

Page 1

xx
TekExpress USB
ZZZ
Automated Solutions
Online Help
*P077035001*
077-0350-01
Page 2

Page 3

TekExpress USB
Automated Solutions
ZZZ
Online Help
www.tektronix.com
077-0350-01
Page 4

Copyright © Tektronix. All rights reserved. Licensed software products are owned by Tektronix or its
subsidiaries or suppliers, and are protected by national copyright laws and international treaty provisions.
Tektronix products are covered by U.S. and foreign patents, issued and pending. Information in this
publication supersedes that in all previously published material. Specifications and price change privileges
reserved.
TEKTRONIX and TEK are registered trademarks of Tektronix, Inc.
TekExpress is a registered trademark of Tektronix, Inc.
TekExpress USB Automated Solutions Online help, 076-0196-01.
Contacting Tektronix
Tektroni
14200 SW Karl Braun Drive
P. O . Box 5 00
Beaverton, OR 97077
USA
x, Inc.
For pro
duct information, sales, service, and technical support:
In North America, call 1-800-833-9200.
Worldwide, visit www.tektronix.com to find contacts in your area.
Page 5

Table of Contents
General Safety Summary ......................................................................................... iii
Introduction
Using Online Help..................... ................................ ................................ ............. 1
Related Documentation ............. ................................ ................................ ............... 1
Conventions .............................. ................................ .................................. ......... 2
Techn i c a
Getting Started
What is new in this release ........................................................................................ 5
Accessories................... .................................. ................................ ..................... 5
Minimum System Requirements..................... ................................ ............................. 6
Application Directories and Usage .................................... ................................ ........... 6
File Name Extensions.............................................................................................. 8
How To Activate the License......................................... ................................ ............. 8
Before You Click Run............................................................................................. 10
l Support ............................... .................................. ................................ . 3
Table of Contents
Operating Basics
TekExpress Application Overview .............................................................................. 13
Starting the Application..................... .................................. ................................ .... 14
Resizing the Application Window ............... .................................. .............................. 14
Exiting the Application . . .. . .. .. . .. .. . .. .. ... ... .. . .. . .. . .. . .. .. . .. . .. . .. . .. ... ... .. . .. . .. . .. . .. .. . .. . .. . .. . .. ... . 15
Global Controls ............ ................................ .................................. ...................... 15
Menus
File Menu.................... ................................ .................................. ................ 16
View Menu ............ ................................ ................................ ........................ 17
Tools Menu .................................................................................................... 17
Help Menu..................................................................................................... 19
How To
Deskew Real Time Oscilloscopes .. . .. . .. . .. ... .. . .. . .. . .. . .. . .. ... ... .. . .. . .. . .. . .. ... ... .. . .. . .. . .. . .. ... ... .. 21
Select the Test(s)................... ................................ .................................. .............. 22
Configure and Run the Test(s)........................................ ................................ ............ 24
View and Select Connected Instruments ...................... ................................ .................. 28
Use the Prerecorded Waveform for Analysis................................................................... 30
View the Progress of Analysis ..... ................................ ................................ .............. 32
View the Report.................................................................................................... 34
View Test Related Files................... ................................ ................................ ........ 35
Use Filters . . .. .. . .. . .. . .. ... .. . .. . .. ... .. . .. . .. . .. .. . .. . .. . .. . .. .. . .. . .. . .. . .. .. . .. . .. . .. ... .. . .. . .. ... .. . .. . .. . .. .. 36
TekExpress USB Automated Solutions Help i
Page 6

Table of Contents
Using the Nonstandard Filter .. . .. . .. .. . .. . .. ... .. . .. . .. . .. .. . .. . .. . .. . .. .. . .. . .. ... .. . .. . .. . .. .. . .. . .. . .. . .. 36
Using the Nonstandard Waveform Mask........................................... ........................ 37
Application Examples
Testing a Device Transmitter Using DPOJET Application
Set Up the Equipment ........................................................................................ 39
Testing Deterministic Jitter on a Device Front Panel . .. . .. . .. ... ... .. . .. . .. . .. . .. .. . .. . .. . .. . .. ... ... .. . . 40
TekExpress Programmatic Interface
About the Programmatic Interface............................................................................... 45
Server and Client Proxy Objects ................................................................................. 47
Remote Proxy Object............................. ................................ ............................ 47
Client Proxy Object..... .................................. ................................ .................... 48
Programmatic Interface APIs
Connect() ...................................................................................................... 49
Disconnect()................................................................................................... 51
LockSession() ..... .................................. ................................ .......................... 52
UnlockSession() .............................................................................................. 53
SetTimeOut()................................ ................................ ................................ .. 54
GetTimeOut() ................................................................................................. 55
GetDutId() ..................................................................................................... 56
ChangeDutId() ................................................................................................ 57
SaveSession() ................................................................................................. 58
SaveSessionAs() ........ ................................ .................................. .................... 59
RecallSession()................................................................................................ 60
Run() ..... .................................. ................................ ................................ .... 61
Stop()........................................................................................................... 62
QueryStatus().................................................................................................. 63
TransferReport() .............................................................................................. 64
CheckSessionSaved() .............................. ................................ .......................... 65
ApplicationStatus() ......... .................................. ................................ ................ 66
ErrorCodes ......................................................................................................... 67
Example ............................................................................................................ 67
Troubleshooting
Instrument Connectivity .......................................................................................... 69
TestStand Run time Engine Installation....................................... .................................. 69
Reference
Shortcut Keys .................. .................................. ................................ .................. 71
Index
ii TekExpress USB Automated Solutions Help
Page 7

General Safety Summary
Review the following safety precautions to avoid injury and prevent damage to this product or any
products connected to it.
To avoid potential hazards, use this product only as specified.
Only qualified personnel should perform service procedures.
While using this product, you may need t o access other parts of a larger system. Read the safety sections
of the other component manuals for warnings and cautions related to operating the system.
To Avoid Fire or Personal Injury
Connect and disconnect properly. Connect the probe output to the measurement instrument before
connecting the probe to the circuit under test. Connect the probe reference lead to the circuit under test
before c
under test before disconnecting the probe from the measurement instrument.
onnecting the probe input. Disconnect the probe input and the probe reference lead from the circuit
General Safety Summary
Observ
Consult the product manual for further ratings information before making connections to the product.
Do not
Do not operate with sus p ected failures. If you suspect that there is damage to this product, have it inspected
by qu
Avoid exposed circuitry. Do not touch exposed connections and components when power is present.
e all terminal ratings. To av o i d fire or shock hazard, observe all ratings and markings on the product.
operate without covers. Do not operate this product with covers or panels removed.
alified service personnel.
Terms in This Manual
ese terms may appear in this manual:
Th
WARNING. Warning statements identify conditions or practices that could result in injury or loss of life.
CAUTION. Caution statements identify conditions or practices that could result in damage to this product
or other
property.
TekExpress USB Automated Solutions Help iii
Page 8

General Safety Summary
iv TekExpress USB Automated Solutions Help
Page 9

Introduction Using Online Help
Using Online Help
Select Help from the menu to open the help file. You can also find an electronic copy of the help file in the
Documents directory on the 063-4068-XX DVD.
Tables of Contents (TOC) tab — Organizes the Help into book-like sections. Select a book icon to open
a section; select any of the topics listed under the book.
Index tab — Enables you to scroll a list of alphabetical keywords. Select the topic of interest to bring
up the appropriate help page.
Search tab — Allows a text-based search.
Follow these steps:
1. Type the word or phrase you want to find in the search box. If the word or phrase is not found, try the
Index tab.
2. Choose a topic in the lower box, and then select the Display button.
General Help Functions
Select the Print button from the Help topics menu bar to print a topic.
To return to the previous window, select the Back button.
Use hyperlinks to jump from one topic to another.
ebackbuttonisgrayedoutorajumpisnotavailable,choosetheHelpTopicsbuttontoreturnto
If th
the originating help folder.
ated Documentation
Rel
addition to TekExpress USB Online Help, the following documentation is included with the software:
In
DPOJET SuperSpeed (USB 3.0) Setup Library Methods of Implementation (MOI) for Verification,
ebug and Characterization, Tektronix part number 077-0266-xx.
D
TekExpress USB Online Help (PDF version), Tektronix part number 077-0350-xx.
TekExpress USB Automated Solutions Help 1
Page 10
Introduction Conventions
Conventions
The online help uses the following conventions:
The term “DUT” is an abbreviation for Device Under Test.
The term “select” is a generic term that applies to the two mechanical methods of choosing an option:
using a mouse or using the touch screen.
Table 1: Ico
Icon Meaning
xxx
n descriptions
This icon i
This icon identifies conditions or practices that could result in loss of data.
This icon identifies additional information that will help you use the
application more efficiently.
dentifies important information.
2 TekExpress USB Automated Solutions Help
Page 11

Introduction Technical Support
Technical Support
Tektronix values your feedback on our products. To help us serve you better, please send us your
suggestions, ideas, or comments on your application or oscilloscope.
When you contact Tektronix Technical Support, please include the following information (be as specificas
possible):
General Information
All instru
Hardware options, if any.
Probes used.
Your name, company, mailing address, phone number, FAX number.
Please indicate if you would like to be contacted by Tektronix about your suggestion or comments.
ment model numbers.
Application Specific Information
Software version number.
Description of the problem such that technical support can duplicate the problem.
If possible, save the setup files for all the instruments used and the application.
ssible, save the application setup files, log.xml and status messages text file.
If po
If possible, save the waveform on which you are performing the measurement as a .wfm file.
Forward the information to technical support using one of these methods:
E-mail – techsupport@tektronix.com
FAX – (503) 627-5695
TekExpress USB Automated Solutions Help 3
Page 12

Introduction Technical Support
4 TekExpress USB Automated Solutions Help
Page 13

Getting Started What is new in this release
What is new in this release
This version of TekExpress USB provides the following feature enhancements:
The USB transmitter solution support test automation in the TekExpress framework providing
customers with a complete solution for USB 3.0 verification, characterization, debug, and compliance.
Accessories
About the Test Fixture
For Host Testing. TF-USB3-A-P (for best signal quality) or for more mechanical flexibility use
TF-USB-B-R (with included 13 cm USB 3.0 Cable - Part n umber 174-5772-00). For precision De-Embed
of TF-USB3-A plug fixture, order TF-USB3-AB-KIT (includes Cal Kit).
For Device Testing. TF-USB3-A-R (includes short USB 3.0 Cable).
Supported Probes
llowing probes support TekExpress USB application:
The fo
P7313 SMA differential probe
P7500 Tri-Mode probe
TekExpress USB Automated Solutions Help 5
Page 14

Getting Started Minimum System Requirements
Minimum System Requirements
The minimum system requirements for a PC to run the application are as follows:
Table 2: System requirements
Processor
Pentium 4/M or equivalent processor.
Operating System Windows XP Service Pack 2.
Memory
Hard Disk
512 MB of memory.
Approximately 2 GB of available hard-disk space for the recommended
installation, which includes full TekExpress installation and distributed
components.
Drive DVD drive
Display
Super VGA resolution or higher video adapter (800x600 minimum video
resolution for small fonts or 1024x768 minimum video resolution for large fonts).
The application is best viewed at 96 dpi display settings
1
.
Software TekExpress Framework (v1.3.4 or later) installed.
DPOJET Jitter and Eye Analysis Tool (v2.5.0.7 or later) with Advanced Jitter
and Eye analysis (DJA option) installed.
SDLA software for Channel De-Embed for custom filter development
(optional).
Microsoft Internet Explorer 6.0 SP1 or later.
Adobe Reader 6.0 or equivalent software for viewing portable document
format (PDF) files.
Other Devices Microsoft compatible mouse or compatible pointing device.
Four USB ports (2 USB ports minimum).
PCI-GPIB or equivalent interface for instrument connectivity2.
xxx
1
If TekExpress is running o n an instrument that has a video resolution lower than 800x600 (for example, sampling oscilloscope), it is recommended
to connect a secondary monitor and this has to be enabled before launching the application.
2
If TekExpress is installed on a Tektronix oscilloscope, the virtual GPIB port cannot be used by Tek
applications.
If external devices like USB-GPIB or equivalent are used for instrument connectivity, ensure that the Talker Listener utility is enabled in the
DPO/DSA oscilloscope’s GPIB menu.
Application Directories and Usage
Express for communicating with oscilloscope
Related Topics
File Name Extensions
How To Activate the License
View Test Related Files
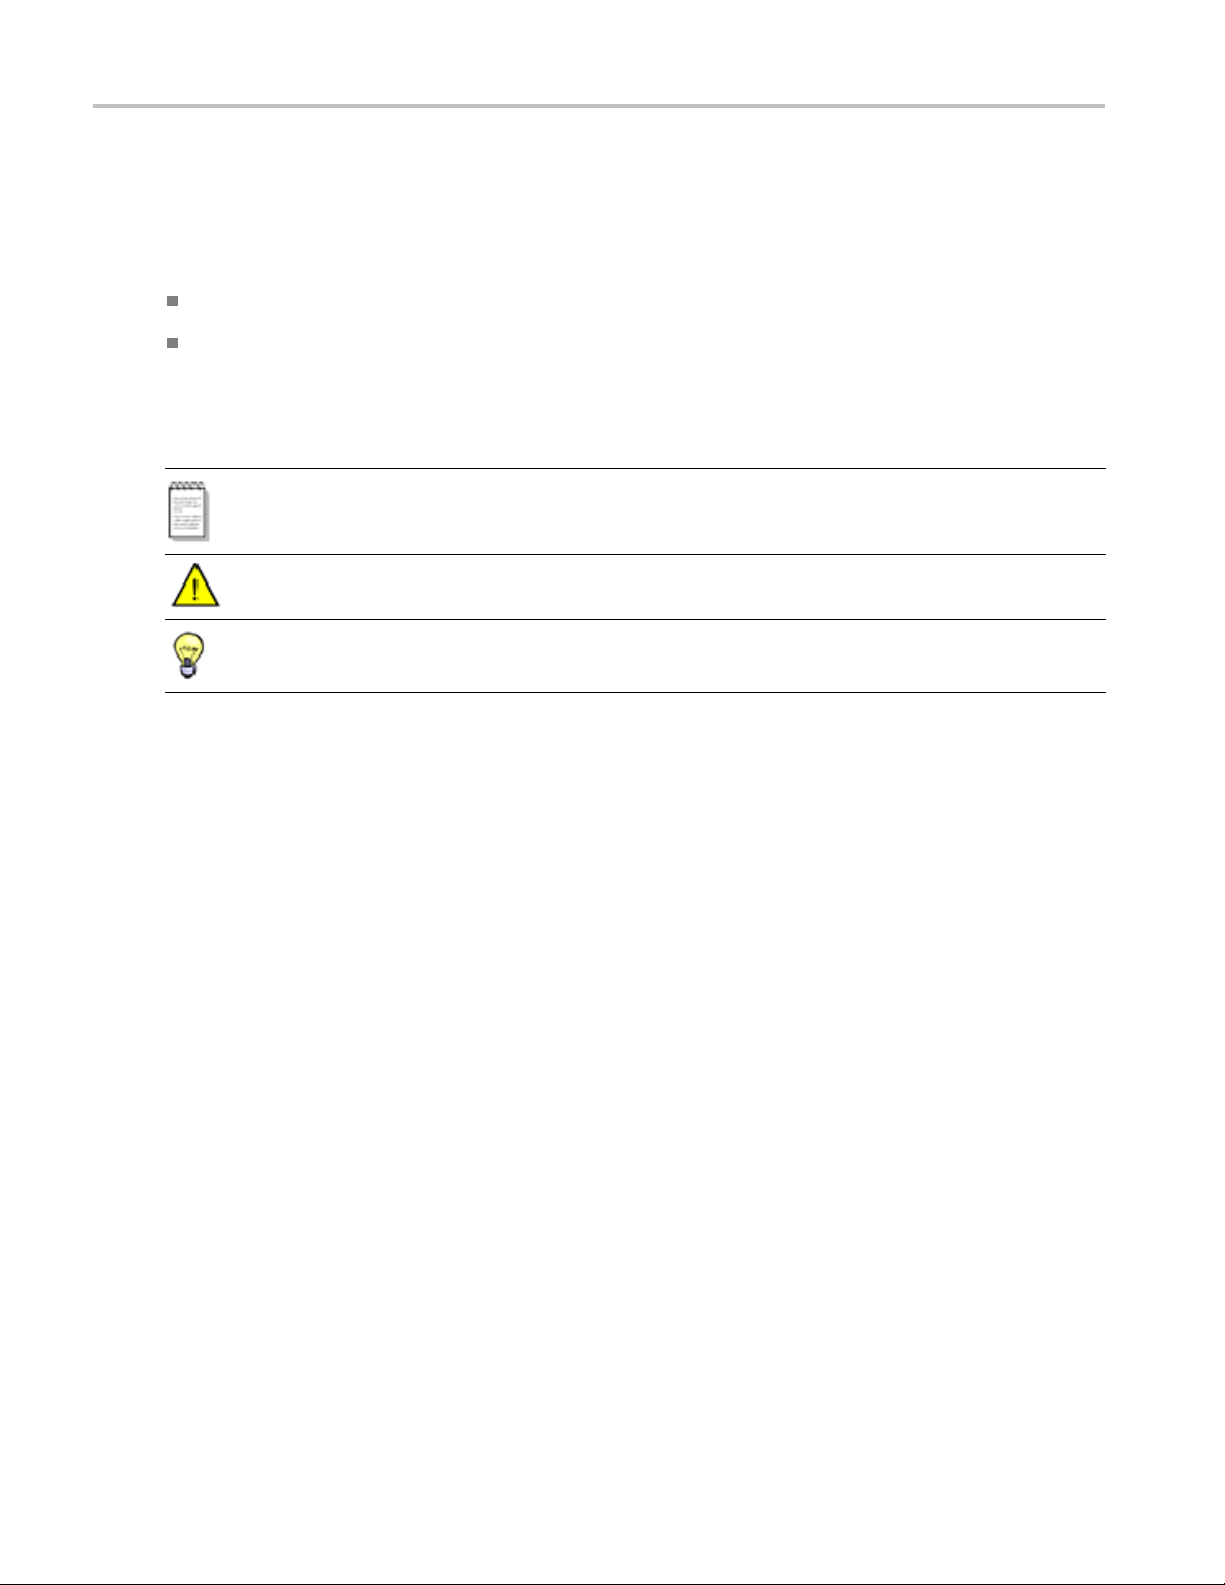
The complete path of the directory structure is C:\Program Files\Tektronix\TekExpress\Tek-
Express USB
.
6 TekExpress USB Automated Solutions Help
Page 15
Getting Started Application Directories and Usage
The application directory and associated files are organized as follows:
The following table lists the default directory names and their usage:
Table 3: Default directory names and their usage
Directory names Usage
InstallDir\TekExpress Contains the TekExpress application and associated
files.
\TekExpress\TekExpress USB Contains files specific to TekExpress USB.
\TekExpress USB\Compliance Suites Contains compliance specific sequence files. The
folders under this directory represent the devices
to be tested.
\TekExpress USB\Compliance Suites\USB Includes the Device and Host Transmitter folders.
\TekExpress USB\Compliance Suites\USB\Device Includes the “Device Connector” folder.
\TekExpress USB\Compliance Suites\USB\Device\Device
Connector
\TekExpress USB\Compliance Suites\USB\Host Includes the “Host Connector” folder.
Contains application specific files for Device.
TekExpress USB Automated Solutions Help 7
Page 16

Getting Started File Name Extensions
Table 3: Default directory names and their usage (cont.)
Directory names Usage
\TekExpress USB\Compliance Suites\USB\Host\Host Connector Contains application specific files for Host.
\TekExpress USB\ACP
\TekExpress USB\SCP
\TekExpress USB\ICP
\TekExpress USB \Data Manager
\TekExpress USB \Data Storage
\TekExpress USB\Report Generator
\TekExpress USB\Documents Includes the Method of Implementation documents
\TekExpress USB\Bin
\TekExpress USB\Lib
\TekExpress USB\Tools
xxx
File Name Extensions
Includes instrument and application specific
interface libraries of TekExpress.
Includes the result management specific libraries of
TekExpress are present in these folders.
and technical documentation for the application.
Includes the miscellaneous libraries of TekExpress.
Related Topics
Application Directories and Usage
How To Activate the License
The software uses the following file name extensions:
File name extension Description
.TekX
.seq
.xml
The session file will be saved in this format.
The test sequence file.
The encrypted XML file that contains the test specificconfiguration information. The
log file extension is also xml.
.mht
.PDF
.msk
This file details the test report.
The PDF file that details the method of implementation for the test.
The mas k file.
.fltThefilter file.
.html
xxx
The htm l file.
How To Activate the License
Follow the steps below to activate the license:
NOTE. Ensure that your TekExpress USB dongle is installed on your host system.
Related Topics
Application Directories and Usage
File Name Extensions
1. Click Help > About to view the license information.
8 TekExpress USB Automated Solutions Help
Page 17

Getting Started How To Activate the License
2. Click the View Version Details link to check the version numbers of the installed test suites.
3. Click the View End-User License Agreement link to open the following Tektronix Software License
Agreement window. Click Print to print the License Agreement.
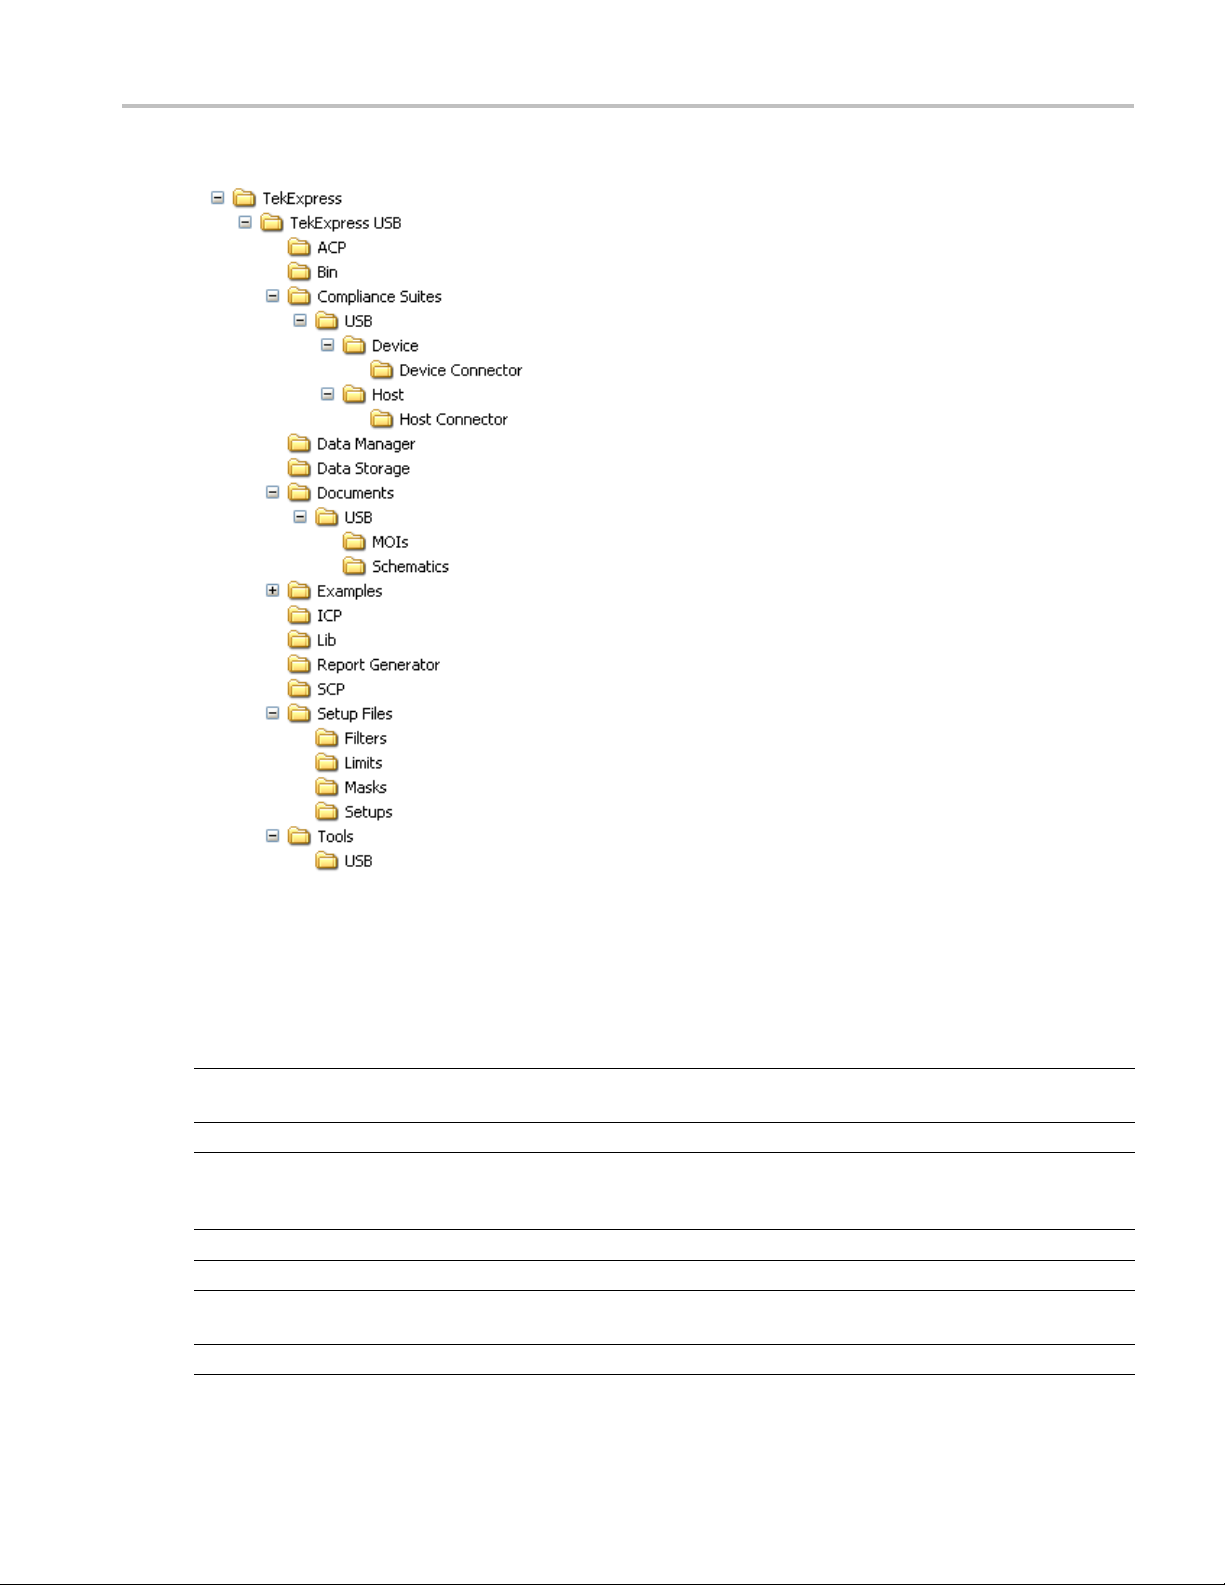
4. Click License Info to view the available s oftware options. This window shows the license key and the
various options with their status (active or inactive) with the current license key.
TekExpress USB Automated Solutions Help 9
Page 18
Getting Started Before You Click Run
5. If you are activating the license for the first time, the license key field will be empty. To activate the
license, connect the USB dongle to your computer, enter the license key provided in the license
key certificate, and click Activate. If the activation is successful, a
the license key field.
6. If you ar
e reactivating the license, click Reactivate, enter the new license key and click Activate.
Before You Click Run
sign is displayed next to
After you first launch TekExpress, it creates the following folders on your computer:
\My Documents\My TekExpress
NOTE. Ensure that the “My TekExpress” folder has read and write access.
NOTE. If a user with a different Windows login ID launches TekExpress, a new
created under that user’s
\My Documents\My TekExpress\USB.
\My Documents\My TekExpress\USB\Untitled Sessio n. Every time the USB.exe is
launched an
is deleted when you exit TekExpress.
AUTION. Each session has multiple files associated with it. Do not modify any of the session files and/or
C
folders as this may result in loss of data or corrupted session files.
Untitled Session folder is created under USB folder. The Untitled Session folder
My Documents
folder
My TekExpress
folder is
10 TekExpress USB Automated Solutions Help
Page 19

Getting Started Before You Click Run
The My TekExpress folder is created as a shared folder with share name as <domain><user
ID> My TekExpress
name><user ID
(or if the PC is not connected to domain then share name is <Computer
> My TekExpress
).
The above shared folder is mapped as X: (X drive) on to the PC where TekExpress is running.
NOTE. If X dri
ve is mapped to any other shared folder, TekExpress will display a warning message window
asking you to disconnect the X: drive manually.
Do the foll
owing before you click Run:
NOTE. Ensure that the network connectivity is enabled on the PC running the TekExpress.
ared
1. Map the sh
My TekExpress folder as X: (X drive) on all the instruments used in test setup
running Microsoft Windows Operating System. This share folder is used to save the waveform files
or any other file transfer operations.
2. Rightclickonthe
My TekExpress folderandopentheProperties dialog box. Select General tab
and then Advanced.IntheAdvanced Attributes window, ensure that the option Encrypt contents
to secure data is NOT selected. Click h
3. Ensure that all the required instruments are properly warmed up, and that S
ere to view the picture.
ignal Path Compen satio n
(SPC) is performed.
Mapping My TekExpress folder
To map the My TekExpress folder on the instruments, follow the steps below:
1. Open Windows Explorer.
2. From the Windows Explorer menu, select To o ls > Ma p N e tw o rk d r ive .
3. Select the Drive letter as X: (if there is any previous connection on X:, disconnect it first through
Tools > Disconnect Network drive menu of Windows Explorer).
4. In the Folder field, enter remote
My TekExpress folder path (for example, \\192.158.97.65\My
TekExpress)
5. You can determine the IP address of the PC where “My TekExpress” folder exists by doing
the following:
Select Start > Run menu on the PC where My TekExpress folder exists.
Enter cmd and click Enter.
At command prompt, type ipconfig.
TekExpress USB Automated Solutions Help 11
Page 20

Getting Started Before You Click Run
You c a n
1. On the oscilloscope main menu, click Utilities menu.
2. Click Instrument Calibration option.
find SPC by following the steps below:
12 TekExpress USB Automated Solutions Help
Page 21

Operating Basics TekExpress Application Overview
TekExpress Application Overview
TekExpress is the Tektronix Compliance Test Automation Framework, developed to support current and
future test automation needs of customers. Developed using National Instruments’ TestStand, TekExpress
leverages on
deploying automated test solutions for various serial standards in a relatively short time.
the capabilities of Microsoft .NET framework. It is a highly modular architecture that enables
The TekExpr
DPOJET Timing and Analysis tool. With TekExpress USB, Tektronix provides Fully-Automated Tx
solution for verification, characterization, and debug.
ess U SB application (Opt. USB-TX) is the automated version of USB3.0 measurements from
Key Features
The following are the key features of TekExpress USB application:
Comprehensive test coverage
Precise debugging and troubleshooting
Accura
te and reliable results
TekExpress USB Automated Solutions Help 13
Page 22

Operating Basics Starting the Application
Related Topics
Starting the Application
Resizing the Application Window
Exiting the Application
To start the application, you can do one of the following:
Click Start > Programs > Tektronix > TekExpress > TekExpress USB. Other applications follow
similar pattern.
Double click the icon on the desktop.
If you have previously save d a session, you can double-click the session file stored under My
TekExpress\USB
.
When the application is launched it displays the splash screen providing launch information. The
application also checks for the presence and validity of the USB dongle.
NOTE. If the application was not terminated properly during the last use, a dialog box prompts to recall
the previously unsaved session.
Related Topics
Resizing the Application Window
Starting the Application
Exiting the Application
To minimize the application, click on the application title bar. To restore the application to its
previous size, select
in the Windows task bar.
To maximize the application, click . To restore it to previous size, click on the application
title bar.
14 TekExpress USB Automated Solutions Help
Page 23

Operating Basics Exiting the Application
Related Topics
Exiting the Application
Starting the Application
Resizing the Application Window
To exit the application, do one of the following:
Click File > Exit.
Click on the application title bar.
Global Controls
The menus and controls that appear outside the individual tabs are called “Global Controls”. These are
used to specify the devices to be tested.
Table 4: Contro
Control name Function
DUT ID
xxx
ls and Functions
The device ID is specified at the global level and the
information is stored in the default location for all data
files. This fie
special characters (.,..,...,\,/:?”<>|*). The maximum length
of characters allowed is 32.
You will be able to run, pause, resume and stop the tests.
ld cannot be empty and does not allow these
TekExpress USB Automated Solutions Help 15
Page 24
Operating Basics File Menu
Related Topics
File Menu
View Menu
Tools Menu
Help Menu
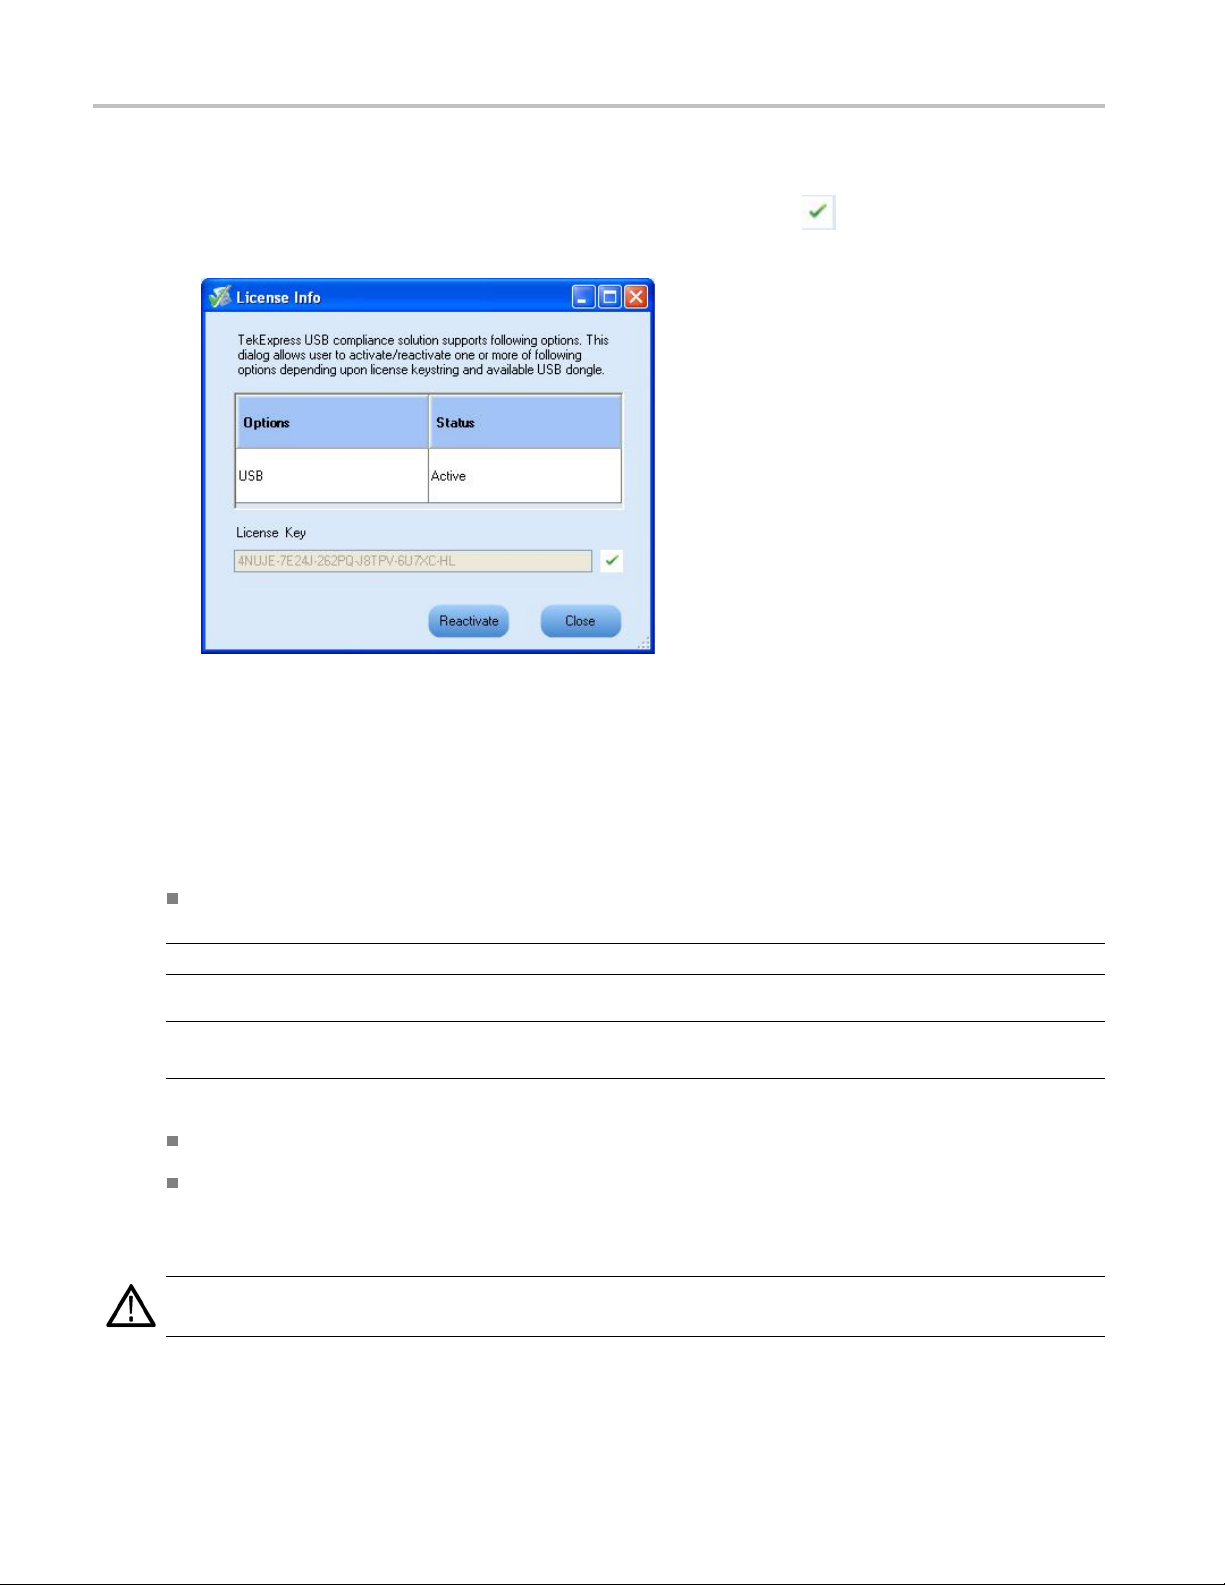
Click File on the application menu bar.
The File menu has the following selections:
Menu Function
New Session Starts a default session of TekExpress.
Open Session Opens a saved session.
Save Session Saves the session.
Save Session As Saves a session in a different name.
Recently Recalled Setup Lists all the recent and previously recalled setup files.
Save Report As Saves the report in user specified location.
Print Preview Report
Print Report
Exit
Previews the report before printing.
Opens the Windows “Print” dialog box.
Closes the application.
16 TekExpress USB Automated Solutions Help
Page 25
Operating Basics View Menu
xxx
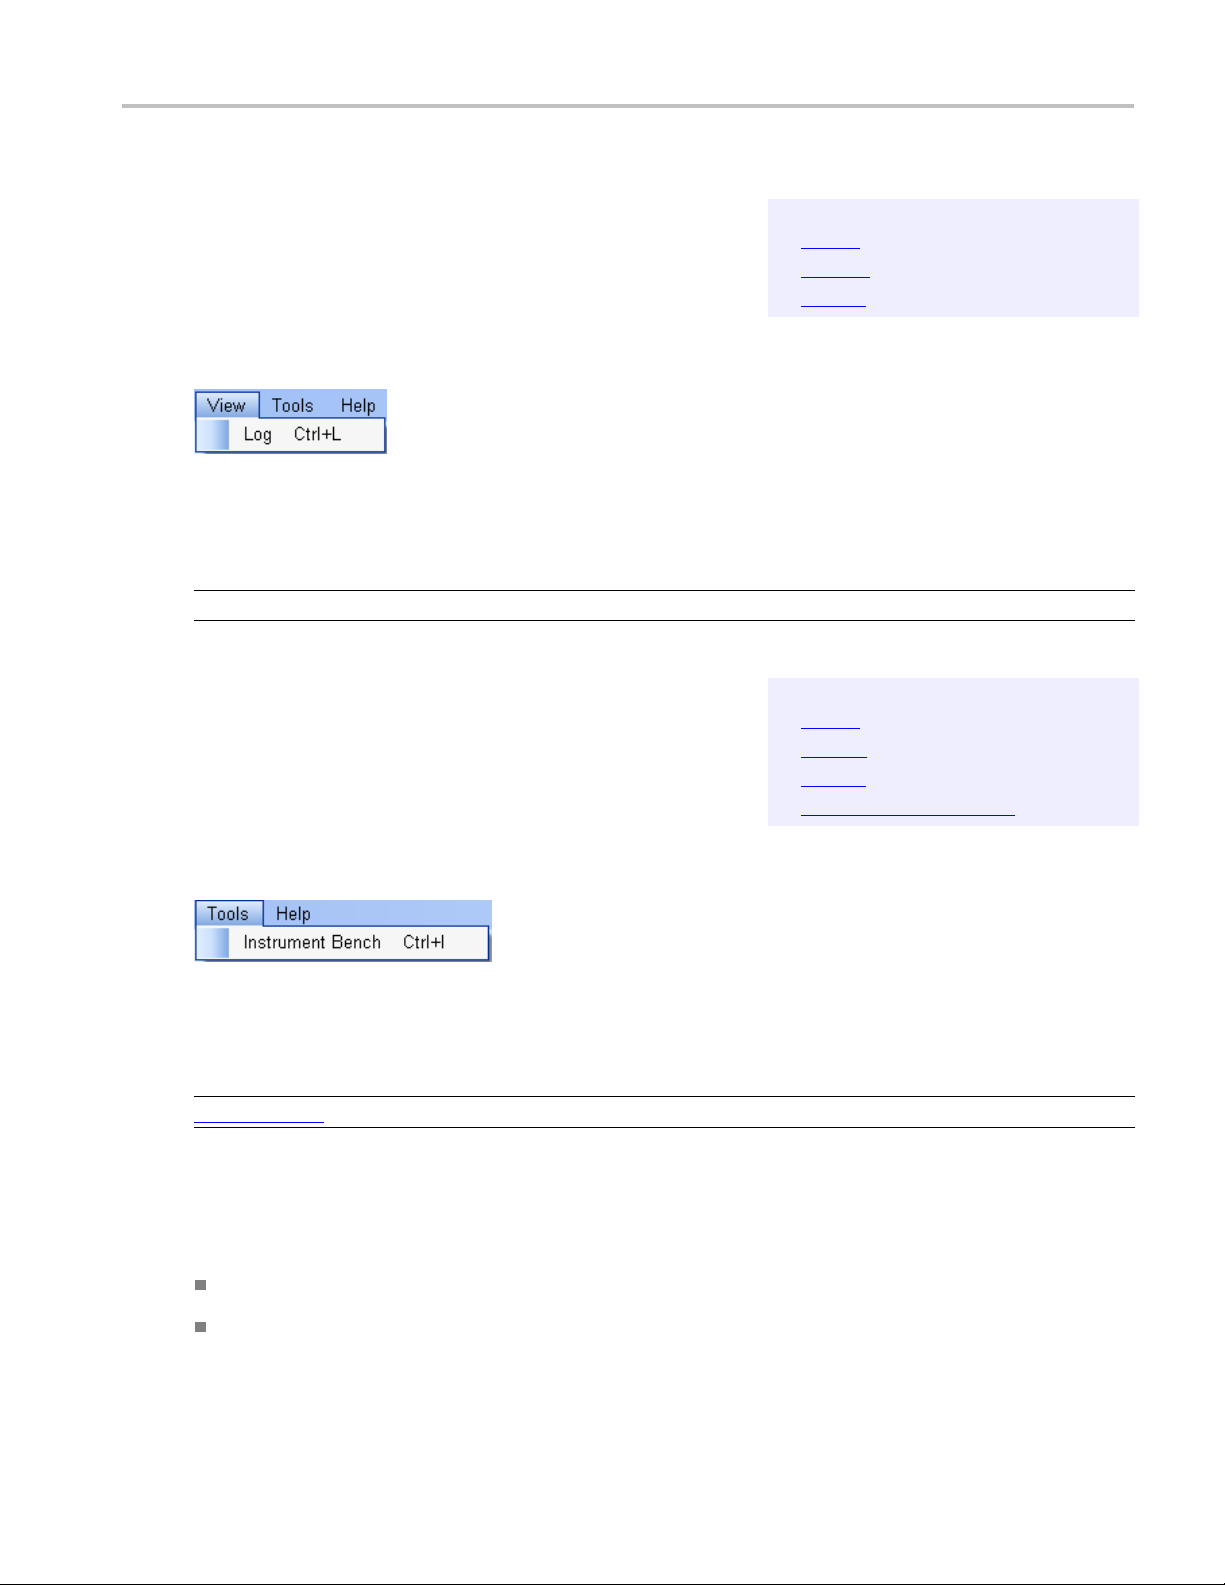
View Menu
Click View on the application menu bar.
The View menu has the following selections:
Menu Function
Log
xxx
Tools Menu
Related Topic
File Menu
Tools Menu
Help Menu
s
Opens the log (log.xml) file in the default viewer.
Related Topics
File Menu
View Menu
Help Menu
Deskewing Real Time Oscilloscopes
Click Tools on the application menu bar.
The Tools menu has the below selection:
Menu Function
Instrument Bench
xxx
Opens a dialog box showing the list of instruments attached to the test setup.
Tools > Instrument Bench
The Instrument Bench window shows the list of VISA and Non-VISA resources found on d ifferent
interfaces/connections. It serves two purposes at the launch of TekExpress:
Discovers the connected instruments.
Confirms the instrument connection setup.
When you click Tools > Instrument Bench, the following dialog box is displayed:
TekExpress USB Automated Solutions Help 17
Page 26

Operating Basics Tool s Menu
Search Criteria: The various connections on which you can search. Non-VISA Resources are the
instruments that cannot be searched using TekVISA.
Retrieved Instruments: Displays the count and details of instruments that were discovered.
Last Updated: Displays the time when the last time search was performed.
Tek V IS
A Refresh Timeout (Seconds): This time out specifies the maximum time that TekExpress
can wait for TekVISA update.
NOTE. TekExpress uses TekVISA for instrument search. Ensure that TekVISA is running on your system
before you refresh the instrument bench window.
Table 5: Retrieved Resources properties in the Instrument Bench window
Title Description
Connection Shows the type of connection with the instrument.
ource
Res
Serial Number Shows the serial number of the resource.
Options Shows the options available on the instrument.
esource Address
R
xxx
1
he options column displays the options that fitinthefield. To view complete options on the instrument, move the mouse cursor over the option.
T
Shows the name of the resource.
1
Shows IP Address/Port number of the resource.
18 TekExpress USB Automated Solutions Help
Page 27

Operating Basics Help Menu
Table 6: Button controls on Instrument Bench dialog box
Button Function
Refresh The application searches on the selected connection for resources. While searching
resources it s
window shows the connection currently being scanned and the percentage of task
completed.
Close Closes the dialog box.
xxx
Help Menu
hows the Instrument Bench discovery window. The Instrument Discovery
Related Topics
File Menu
View Menu
Tools Menu
Click Help on the application menu bar.
The Help menu has the following selections:
Selection Function
TekExpress Help
A
bout TekExpress
Activate License
xxx
Displays TekExpress Help (F1).
Displays application details such as software name, version
number and copyright.
Displays available software options and also about license
activation.
TekExpress USB Automated Solutions Help 19
Page 28

Operating Basics Help Menu
20 TekExpress USB Automated Solutions Help
Page 29

How To Deskew Real Time Oscilloscopes
Deskew Real Time Oscilloscopes
The following procedure is used for deskewing d irect input SMA channels on a real time oscilloscope.
NOTE. If you are using DPOJET, it has an automatic deskew option under Analyze > Jitter And Eye
Analysis > De
1. Run Signal Path Compensation (SPC) on the oscilloscope.
2. Connect a SMA Power Splitter (preferred) or SMA 50 ohm coaxial “T” connector to the Fast Edge
output of the oscilloscope.
3. Connect SMA cables from each of the two channels to be deskewed to the power splitter (or SMA
coaxial “T” connector). It is best to use matched cables when making high speed serial measurements.
It is impo
4. Select Default Setup, and then select Autoset on the oscilloscope front panel.
5. Set the oscilloscope for 70% to 90% full screen amplitude on both channels. Center both traces
so that they overlap.
skew. Refer to your DPOJET online help on how to deskew the channels.
rtant to use the same cables that will be used for subsequent measurements.
6. Make sure that volts/div, position, and offset are identical for the two channels being deskewed.
7. Set the time/div to approximately 100 ps/div or less, with sample rate at 1 ps/pt. These settings
are not critical, but should be close.
8. Set the horizontal acquisition mode to average, which provides a more stable display.
9. Select Deskew from the Vertical menu.
10. Verify that the reference channel (typically CH1 or CH2) is set to 0 ps deskew.
11. In t
NOTE. Typical values are in the 10’s of p s or less with cables connected directly from Fast Edge to SMA
inputs. If you are using a switch box (for example, Keithley), deskew the complete path from where the
test fixture connects, through the switch, and into the oscilloscope. Deskew values in these cases may
be as much as 30 ps or more.
he deskew control window, select the channel to deskew (typically CH3 or CH4). Adjust the
deskew to overlay the rising edge as best as possible.
TekExpress USB Automated Solutions Help 21
Page 30

How To Select the Test(s)
There are sometimes significant differences in the skew between two TCA-SMA adapters. If you find
that a system requires a very large correction, it might be better to findapairofTCA-SMAadapters
that match eac
Select the Test(s)
h other better.
Related Topics
View and Selec t Conn ected Instruments
Configure and Run the Tests
View the Progress of Analysis
View the Report
View Test Related Files
The application tests USB transmitter devices for compliance. The Select panel allows you to select tests
to configure and run.
This panel provides the following functions:
Version
USB 3.0 SuperSpeed is the default version selected.
Electrical Test Spe c
0.9 is the default value for electrical test specification.
22 TekExpress USB Automated Solutions Help
Page 31

How To Select the Test(s)
Test Method
By default, DPOJET is selected for running the selected measurements.
Select DUT type
Select the Device or Host as the device to be tested.
Test Point S
You can select the appropriate test point location. For example, Compliance[TP1] with CTLE, Connector
andsoon.
election
Probing Location
You can select the appropriate probing location from where the DUT is tested. In the example screen
shown above, the device DUT is being tested with a test fixture at the Device Connector (Near End
connection) and the Channel Configuration being emulated is the Host’s Back Panel or Front Panel.
Channel Definition
Select Hardware or Software option.
Chann
Select the filter file from the drop-down menu. Use can also choose your own filter file when Custom
Filt
The table has the following two columns:
el Filter File Type
er File is selected.
Select: You can include or exclude any test for analysis.
Test N am e : Displays the name of the test.
NOTE. If any of the check boxes in the Select column is grayed, you cannot make any changes. It implies
that the test is mandatory.
Once you select a row, the following options are available:
Table 7: Button controls on the Select panel
Button Description
Opens the configuration panel for the selected test.
Opens the PDF of method of implementation (MOI) for the selected test.
TekExpress USB Automated Solutions Help 23
Page 32

How To Configure and Run the Test(s)
Table 7: Button controls on the Select panel (cont.)
Button Description
Opens the schematic for the selected test. This is useful if you want to
verify the test setup before running the test.
xxx
Configure and Run the Test(s)
The configuration panel is used to create, view, and edit the parameters associated with the acquisition and
the analysis of the selected test. In the Select panel, click Con figure.
Selects all
tests in the table.
Selects all the required tests in the grid and deselects all informative
tests in the table.
Deselects all tests in the table.
Indicates system on low disk space.
Related Topics
Select the Tests
View and Selec t Conn ected Instruments
View the Progress of Analysis
View the Report
View Test Related Files
24 TekExpress USB Automated Solutions Help
Page 33

How To Configure and Run the Test(s)
In the Configure panel, you have the following options:
To change the parameters associated with the configuration of acquisition.
To change the parameters associated with analysis configuration.
NOTE. You can select different filter files under Filter Selection option for different test suites.
The upper part of the Configure panel has general parameters that are common for all the tests under
the selected test suite that are editable.
Select the appropriate instrument.
ect the P
Sel
The lower part of the Configure panel has test specific parameters.
TE. If any of the test parameters are grayed, it means that these parameters cannot be modified in the
NO
compliance mode. When you switch to the user defined mode, these parameters are editable.
robing Configuration.
TekExpress USB Automated Solutions Help 25
Page 34

How To Configure and Run the Test(s)
Table 8: Test parameters
Parameters to c
Acquire
Analyze
Limits
onfigure
Description
Shows the vari
related to acquisition of a selected
test. These parameters can vary
from one test
Shows the various parameters
related to analysis of a selected
test. The Analyze parameters
shows the default analysis
parameters for the s elected test.
Refer to:
U
sing NonStandard Waveform
Mask
stoaspecific test. It shows
Applie
the measurement limits using
different types of comparisons.
ous parameters
to another.
Comments You can specify a comment up to
256 characters long for the selected
t.
tes
Compliance settings
Restores the default settings.
Accepts all changes that you made.
Dismisses the dialog box and does
not apply changes.
26 TekExpress USB Automated Solutions Help
Page 35

How To Configure and Run the Test(s)
Table 8: Test parameters (cont.)
xxx
Click Run in t
he Select panel to run the selected tests.
Refer to the following table for different test limit comparisons:
Table 9: Different test limit comparisons
Comparison string Description
EQ(==)
NE(!=)
GT(>) Greater than
LT(<)
GE(>=) Greater than or Equal to
LE(<=)
GTLT(><) Greater than and Less than
GELT(>=<) Greater than or equal to and Less than
GTLE(><=) Greater than and Less or equal to
LTGT(<>) Less than and Greater than
LEGE(<= >=) Less than or equal to and Greater than or equal to
LEGT(<= >) Less than or equal to and Greater than
LTGE(< >=) Less than and Greater than or equal to
GELE(>= =<) Greater than or equal to and Less than or equal to
xxx
Equal to
Not equal to
Less than
Less than or Equal to
TekExpress USB Automated Solutions Help 27
Page 36

How To View and Select Connected Instruments
Using Reference Waveforms
If you want to use an existing reference waveform from your storage location for analysis and run,
kProbingConfiguration field to select the different waveforms for example, ref1, or ref1-ref2
clic
and so on from the drop-down list.
Related Topics
View and Select Connected Instruments
Select the Tests
Configure and Run the Tests
View Test Related Files
View the Progress of Analysis
View the Report
Viewing Connected Instruments
The Tools > Instrument Bench menu item is used to discover connected instruments required for the
tests. The application uses TekVISA to discover the connected instruments. Once the search is done, the
Instrument Bench dialog box resumes operation and lists the instrument-related details based on the
selected search criteria.
NOTE. When the TekVISA Instr
dialog box does not respond.
28 TekExpress USB Automated Solutions Help
ument Manager checks for connected instruments, the Instrument Bench
Page 37

How To View and Select Connected Instruments
For example, if you select LAN and GPIB as the search criteria in the Instrument Be nch dialog box and
click Refresh, the TekVISA Instrument Manager checks for the instruments available over LAN and GPIB
and the detail
s of the instrument are displayed in the Retrieved Instruments table.
You can provide the time in the TekVISA Timeout (Seconds) field, within which if the TekVISA
Instrument Manager does not find the instruments, the TekExpress application resumes operation.
If you choose Non-VISA resources, all the instruments supported by TekExpress but not communicating
over the VISA layer can be searched.
Selecting Connected Instruments
an view the instruments connected in the Configuration panel. The upper part of the panel displays
You c
the general parameters for the tests under the selected test suite.
TekExpress USB Automated Solutions Help 29
Page 38

How To Use the Prerecorded Waveform for Analysis
NOTE. The list of instruments displayed is specific to the selected test suite. It does not show all the
connected instruments.
Use the Prerecorded Waveform for Analysis
From the Acquire tab, you can see unique acquisitions, acquisition parameters, acquisition status, and
prerecorded waveform files of the selected test suite. The Acquire panel is specific to a suite and gets
updated every time the selected test suite is changed. This panel shows the acquisition details for the tests
in the currently selected suite. The tests with the common acquisition parameters are grouped together and
shown as a single acquisition.
Column name Function
Status Test acquisition status of the running test passed at intervals.
Test
Acquisition Acquisition name
Waveform File(s) Prerecorded waveform files of unique acquisitions. You can select waveform
Name of the tests performing acquisitions. One or more test can perform the
same acquisitions.
files by selecting browse on individual cells. This allows you to select any
waveform file using the standard file open window.
30 TekExpress USB Automated Solutions Help
Page 39

How To Use the Prerecorded Waveform for Analysis
xxx
The following Acquire source options are available:
Use Pre-Recorded Waveform files : Enabling or disabling the option shows or hides the waveform
file column in the acquisition table. When you save a session and then select this option, the DUT
ID text box changes to a drop-down list, in which you can select the DUT ID up to the point where
the session was saved. A drop-down box appears above the Waveform file column, showing the run
details, including the date and time of each run. If you select a run, corresponding data for that run will
pulated (such as the selected test, the test configuration settings, and the test summary status).
be po
Acquire Step by Step: Selecting this option prompts you at the end of each acquisition before
ceeding to the next one.
pro
Show Acquire Parameters: On enabling this option, the acquisition parameters for each unique
uisition are displayed in the acquisition table.
acq
When you select “Use Pre-Recorded Waveform Files”, the first column shows the waveform type and the
cond column shows the tests that use that waveform type for analysis.
se
TekExpress USB Automated Solutions Help 31
Page 40

How To View the Progress of Analysis
Related Topics
View the Progress of Analysis
Select the Tests
View and Selec t Conn ected Instruments
Configure and Run the Tests
View the Report
View Test Related Files
You can view the progress of the analysis in the Analyze panel. As the analysis of each test is complete,
the result value is updated.
Analysis Table
The table contains the following:
The test name.
The status of the tests that are being run.
The measured, limit and margin values of the tests.
The tests that are not yet started are shown with a “To be Started” status. A summarized status of the
currently running test is shown on the Status Messages panel.
32 TekExpress USB Automated Solutions Help
Page 41

How To View the Progress of Analysis
The Status Messages window timestamps all runtime messages and displays them. You can do the
following:
Display Status: Enable/Disable status messages.
Auto Scroll: Scrolls status messages automatically.
Clear All: Clear all status messages in Status Window.
Save Status: Save all status messages in text file. Displays a standard save file window and saves the
status messages in the user specified file.
NOTE. TheStatusMessageswindowisdockableandcanberesized.
TekExpress USB Automated Solutions Help 33
Page 42

How To View the Report
Related Topics
View the Report
Select the Tests
View and Selec t Conn ected Instruments
Configure and Run the Tests
View the Progress of Analysis
View Test Related Files
After the analysis, a report is automatically generated and displayed in the report panel. The report shows
the results of the tests, including device information and pass/fail status of each test. The following screen
is an example report
of a test run using only DPOJET software.
The Report View Area contains an mht report. You can select any area of the report and copy it to the
clipboard to make i
t available to other application.
34 TekExpress USB Automated Solutions Help
Page 43

How To View Test Related Files
Related Topics
View Test Related Files
Application Directories and Usage
All the test related files for currently selected tests are always save d under My Docum ents\My
TekExpress\USB\Untitled Session
.
When you save a session, it is saved with the session name under the path
TekExpress\USB\SessionName
for future references.
My Documents\My
The session that is currently running will be stored in the same path as “Untitled Session” until you save it.
WARNING. Do not save a session named “Untitled Session” or “Backup” because there are
application-spe
cific files and are deleted when you exit the application.
A session folder can contain results for more than one DUT, and a DUT folder can contain more than one
run data folder m
arked by date-time stamp as folder name.
Here is an example image of data storage:
TekExpress USB Automated Solutions Help 35
Page 44

How To Use Filters
Use Filters
Using the Nons
The following procedure explains how to select and enter any fi lter file in the configuration panel.
1. Click the Channel Filter File Type option in the Select panel and select Custom Filter File option
from the drop-down menu.
2. Click Browse to view the location of filter files from where you can choose from. Select the file
and click Open.
tandard Filter
36 TekExpress USB Automated Solutions Help
Page 45

How To Use Filters
Using the Nons
If you want to use a nonstandard mask file, follow this procedure:
1. Enter the limits file name in the Analyze tab of the Configuration panel as shown. Click Apply
and Close.
tandard Waveform Mask
2. Brows
etothefolder,
USB\Setupfiles\Masks
mask file is ready to use.
C:\Program Files\Tektronix\TekExpress\TekExpress
and copy us erdefinedmaskfile.msk to this folder. The user defined
TekExpress USB Automated Solutions Help 37
Page 46

How To Use Filters
38 TekExpress USB Automated Solutions Help
Page 47

Application Examples Set Up the Equipment
Set Up the Equipment
You need the following equipment:
Table 10: Required equipment
Resource Model supported
Real-time o scilloscope
Probes
Test Fixture
AWG (optional) AWG7122B with options 1,6,8 (v3.0.136.60.2 or later).
xxx
Connect the equipment as shown in the following diagram:
Tektronix DPO/DSA71254/B and above. Also
DPO/DSA70804/B (8 GHz) model is suitable for Normative
measurements.
Two TCS-SMA or one P7300SMA/P7500 differential probe.
TF-USB3-A-R (includes short USB 3.0 cable)
TekExpress USB Automated Solutions Help 39
Page 48

Application Examples Testing Deterministic Jitter on a Device Front Panel
Testing Deterministic Jitter on a D evice Front
Panel
The following procedure discusses how to use TekExpress to test the Device back panel.
1. Selec
2. Select TP1 (Through Front Panel) as the probing location.
3. Select Compliance[TP1] with CTLE as the test point.
4. Select DJ-Tx deterministic Jitter-Dual Dirac asthetesttoberun.
t Device as the DUT type.
40 TekExpress USB Automated Solutions Help
Page 49

Application Examples Testing Deterministic Jitter on a Device Front Panel
5. Click Configure to configure the test parameters.
6. You c a n c
SuperSpeed (USB 3.0) Setup Library Methods of Implementation (MOI) document for information on
how to configure the Deterministic Jitter test, click Show MOI in the Select panel.
7. Once you change the parameters, click Apply to apply the new settings for the selected test. If you
want to restore the default settings, click Restore.
Click Close to close the dialog box.
onfigure any test to help you analyze measurement results. To refer to the DPOJET
TekExpress USB Automated Solutions Help 41
Page 50

Application Examples Testing Deterministic Jitter on a Device Front Panel
8. Click Run in the Select panel to run the selected test.
9. The Acquire panel shows the status of the waveform acquisition. To know more about the Acquire
panel, click h
10. Click Ok in the following dialog box to continue.
ere.
42 TekExpress USB Automated Solutions Help
Page 51

Application Examples Testing Deterministic Jitter on a Device Front Panel
11. The Analyze
12. After the tests complete, a report is generated and displayed in the Report panel.
tab displays the Measured, High, and Low limit values.
TekExpress USB Automated Solutions Help 43
Page 52

Application Examples Testing Deterministic Jitter on a Device Front Panel
You can save the report using the File > Save R eport As option. The following dialog box is displayed.
44 TekExpress USB Automated Solutions Help
Page 53

TekExpress Programmatic Interface About the Programmatic Interface
Related Topics
About the Programmatic Interface
The Programmatic interface allows you to seamlessly integrate the TekExpress test automation application
with the high-level automation layer. This also allows you to control the state of TekExpress application
running on a l
interface exposed by TekExpress:
Query DUT ID
Set DUT ID
SaveSession
RecallSession
Run the TekExpress execution
Stop the TekExpress execution
ocal or a remote PC. The following operations can be performed using the programmatic
Server and Client Proxy Objects
Query ex
Transfer result files
Check the application status
For simplifying the descriptions, the following terminologies are used in this section:
TekExpress Client: A high level automation application that communicates with TekExpress using
TekExpress Programmatic Interface.
TekExpress Server: The TekExpress application when being controlled by TekExpress Client.
TekExpress leverages .Net Marshalling to enable the Programmatic Interface for TekExpress Client.
TekExpress provides a client library for TekExpress clients to use the programmatic interface. The
TekExpress client library is inherited from .Net MarshalByRef class to provide the proxy object for the
ients. The TekExpress client library maintains a reference to the TekExpress Server and this reference
cl
allows the client to control the server state.
ecution status
TekExpress USB Automated Solutions Help 45
Page 54

TekExpress Programmatic Interface About the Programmatic Interface
Click the following links to get details on them:
What does one need to have to develop TekExpress Client ?
While developing TekExpress Client one needs to use the TekExpressClient.dll. The client can be a VB
.Net, C# .Net, TestStand, or a web application. The examples for interfaces in each of these applications
Samples folder.
are in
References
required
TekExpressClient.dll has internal reference to IIdlglib.dll and IRemoteInterface.dll IIdlglib.dll has a
reference
to TekDotNetLib.dll. IRemoteInterface.dll provides the interfaces required to perform the remote
automations. It is an interface that forms the communication line between the server and the client.
IIdlglib.dll provides the methods to generate and direct the secondary dialog messages at the client-end.
NOTE. The end-user client application does not need any reference to above mentioned DLL files. It is
essential to have these DLLs (IRemoteInterface.dll, IIdlglib.dll and TekDotNetLib.dll) in same folder
location as that of TekExpressClient.dll.
What steps does a client need to follow ?
The following are the steps that a client needs to follow to use the TekExpressClient.dll to programmatically
control the server:
A client UI has to be developed to access the interfaces exposed through the server. This client needs to
TekExpressClient.dll to access the interfaces. Once the TekExpressClient.dll is loaded, the
load
client UI can call the specific functions to run the operations requested by the client. Once the client is up
running, it has to do the following to run a remote operation:
and
1. The client needs to provide the IP address of the PC at which the server is running in order to connect
the server.
to
2. The client needs to lock the server application to avoid conflict with any other Client that may try to
ntrol the server simultaneously. “Lock” would also disable all user controls on server so that server
co
state cannot be changed by manual operation.
f any other client tries to access a server which is locked, it will get a notification that the server
3.I
is locked by another client.
4. When the client has connected to and locked the server, the client can access any of the programmatic
controls to run the remote automations.
46 TekExpress USB Automated Solutions Help
Page 55

TekExpress Programmatic Interface Server and Client Proxy Objects
5. Once the client operations are completed, the server needs to be “unlocked” by the client.
Server and Client Proxy Objects
Remote Proxy Object
The server exposes a remote object to let the remote client access and perform the server side operations
remotely. The proxy object is instantiated and exposed at the server-end through marshalling.
The following is an example:
RemotingConfiguration.RegisterWellKnownServiceType (typeof (TekExpressRemoteInterface), “TekExpress Remote interface”, WellKnownObjectMode.Singleton);
This object lets the remote client access the interfaces exposed at the server side. The client gets the
reference to this object when the client gets connected to the server.
For example,
//Get a reference to the remote object
remoteObject = (IRemoteInterface)Activator.GetObject(typeof(IRemoteInterface),
URL.ToString());
TekExpress USB Automated Solutions Help 47
Page 56

TekExpress Programmatic Interface Server and Client Proxy Objects
Client Proxy O
Client exposes a proxy object to receive certain information.
For examp
//Register the client proxy object
WellKnownServiceTypeEntry[] e = RemotingConfiguration.GetRegisteredWellKnownServiceTypes();
clientInterface = new ClientInterface();
RemotingConfiguration.RegisterWellKnownServiceType(typeof(ClientInterface),
“Remote Client Interface”, WellKnownObjectMode.Singleton);
bject
le,
//Expose the client proxy object through marshalling
RemotingServices.Marshal(clientInterface, "Remote Client Interface");
The client proxy object is used for the following:
1. To g
et the secondary dialog messages from the server.
2. To get the file transfer commands from the server while transferring the report.
Click here to see examples.
clientObject.clientIntf.DisplayDialog(caption, msg,iconType, btnType);
clientObject.clientIntf.TransferBytes(buffer, read, fileLength);
48 TekExpress USB Automated Solutions Help
Page 57

TekExpress Programmatic Interface Connect()
To know more on the topics below, click the links.
Secondary Dialog Message Handling
The secondary dialog messages from the Secondary Dialog library are redirected to the client-end when a
client is performing the automations at the remote end.
In the secondary dialog library, the assembly that is calling for the dialog box to be displayed is checked
and if a remote connection is detected, the messages are directed to the remote end.
File Transfer Events
When the client requests the transfer of the report, the server reads the report and transfers the file by
calling the file transfer methods at the client-end.
Connect()
Connect(string ipAddress, out string clientID)
This method connects the client to the server. The client provides the ip address of the server to connect to
the server. The server provides a unique clientId when the client is connected to it.
Parameters
Name Type Direction Description
ipAdress string IN
clientid
xxx
The ip address of the server to which the client is
trying to connect to. This is required to establish
the connection between the server and the client.
String OUT Identifier of the client that is connected to the
server.
clientId = unique number + ipaddress of the
client. For example, 1065–192.157.98.70
TekExpress USB Automated Solutions Help 49
Page 58

TekExpress Programmatic Interface Connect()
Return Value
Value that suggests the status if the connection was established or an error occurred. The return value is an
object that can be a boolean value, returning true or a string, returning the error message.
Example
try {
IPAddress[] hostIPAddr = Dns.GetHostAddresses(Dns.GetHostName());
// Connect to the remoter Server
remoteObject.Connect(hostIPAddress, clientInterface, out clientID);
return true;
}
catch (Exception error)
{
return error;
}
50 TekExpress USB Automated Solutions Help
Page 59

TekExpress Programmatic Interface Disconnect()
Comments
The server has to be active and running for the client to connect to the server. Any number of clients can
be connected to the server at a time. Each client will get a unique id.
Disconnect()
Disconnect(string id)
This method disconnects the client from the server it is connected to.
Paramete
Name Type Direction Description
id
xxx
rs
String
IN
Identifier of the client that is performing
the remo
te function.
Return Value
Integer value that suggests the status of the operation after it has been performed.
1–Success
–1 – Failure
Example
try
{
string returnVal = UnlockServer (clientId);
moteObject.Disconnect (clientId);
re
return 1;
}
omments
C
When the client is disconnected, it is unlocked from the server and then disconnected. The id is reused.
TekExpress USB Automated Solutions Help 51
Page 60

TekExpress Programmatic Interface LockSession()
LockSession()
LockSession(
string id)
This method locks the server. The client has to call this method before running any of the remote
automations
. The server can be locked by only one client.
Parameters
Name Type Direction Descriptio
id
xxx
String
IN
Identifier
the remote function.
n
of the client that is performing
Return Value
String v
alue that suggests the status of the operation after it has been performed.
Example
if (locked)
n “Session has already been locked!”;
retur
returnVal = remoteObject.LockSession(clientId);
if ((OP_STATUS)returnVal == OP_STATUS.SUCCESS)
{
locked = true;
return “Session Locked...”;
}
Comments
When the client tries to lock a server that is locked by another client, the client gets a notification that the
server is already locked and it has to wait until the server is unlocked.
Iftheclientlockstheserverandisidleforacertain amount of time then the server is unlocked
automatically from that client.
52 TekExpress USB Automated Solutions Help
Page 61

TekExpress Programmatic Interface UnlockSession()
UnlockSession()
UnlockSessio
n(string id)
This method unlocks the server from the client. The client id of the client to be unlocked has to be provided.
Parameters
Name Type Direction Description
id string IN
xxx
Return Va
lue
Identifier of the client that is performing
the remote function.
String that suggests the status of the operation after it has been performed.
Example
return
if ((OP_STATUS)returnVal == OP_STATUS.SUCCESS)
{
Val = remoteObject.UnlockSession(clientId);
locked = false;
return “Session Un-Locked...”;
}
Comments
When the client is disconnected, it is automatically unlocked.
TekExpress USB Automated Solutions Help 53
Page 62

TekExpress Programmatic Interface SetTimeOut()
SetTimeOut()
SetTimeOut (s
tring id, string time)
Parameters
Name Type Direction Description
id string IN
time string IN The time in seconds which
xxx
Identifier o
is performing the remote
function.
refers to the timeout period.
f the client that
Return Value
String that suggests the status of the operation after it has been performed.
Example
if (ClientId == ClientID)
{
if (locked == true)
{
tempTime = Int32.Parse(time);
}
if (tempTime < 0)
return “Enter a valid Timeout Period”;
else
{
timeout = tempTime;
return “Timeout Period Changed”;
}
}
54 TekExpress USB Automated Solutions Help
Page 63

TekExpress Programmatic Interface GetTimeOut()
Comments
The time parameter gives the timeout period, that is the time the client is allowed to be locked and idle.
After the timeout period if the client is still idle, it gets unlocked.
The time parameter should be a positive integer. Else, the client is prompted to provide a valid timeout
period.
GetTimeOut()
GetTimeOut (string id)
Parameters
Name Type Direction D escription
id string IN
xxx
Return Value
Identifier of the client that
is performing the remote
function.
String that suggests the status of the operation after it has been performed.
Example
if (ClientId == ClientID)
{
etTimer();
Res
return timeOut.ToString();
}
omments
C
The timeout period is a positive integer.
TekExpress USB Automated Solutions Help 55
Page 64

TekExpress Programmatic Interface GetDutId()
GetDutId()
GetDutId(str
ing id, string dutId)
This method gives the DUT id of the current set-up.
Parameters
Name Type Direction Description
id string IN
dutId string
xxx
Return Va
lue
OUT The DUT id of the set-up.
Identifier of the client that is performing
the remote function.
String that gives the timeout period (in seconds) of the client.
Example
return
if ((OP_STATUS)returnVal == OP_STATUS.SUCCESS)
{
Val = remoteObject.GetDutId(clientId, out id);
return id;
}
else
urn CommandFailed(returnVal);
ret
Comments
The dutId is an OUT parameter whose value is set after the server processes the request.
56 TekExpress USB Automated Solutions Help
Page 65

TekExpress Programmatic Interface ChangeDutId()
ChangeDutId()
ChangeDutId(
string id, string dutName)
This method changes the DUT id of the set-up. The client has to provide a valid DUT id.
Parameters
Name Type Direction Description
id string IN
dutName string IN
xxx
Return Va
lue
Identifier of the c lient that is performing
the remote function.
The new DUT id of the set-up.
String that suggests the status of the operation after it has been performed.
Example
If (dut
return “Enter a valid DUT-ID”;
returnVal = remoteObject.ChangeDutId(clientId, dutId);
Id.Length <=0 && locked == true)
if ((OP_STATUS)returnVal == OP_STATUS.SUCCESS)
return “DUT Id Changed...”;
else
urn CommandFailed(returnVal);
ret
Comments
If the dutName parameter is null, the client is prompted to provide a valid DUT id.
TekExpress USB Automated Solutions Help 57
Page 66

TekExpress Programmatic Interface SaveSession()
SaveSession()
SaveSession(
string id, string name)
Saves the current session. The name of the session is provided by the client.
Parameters
Name Type Direction Description
id string IN
name
xxx
Return Va
lue
string IN
Identifier of the client that is performing
the remote function.
The name of the session being saved.
String that suggests the status of the operation after it has been performed.
Example
return
if ((OP_STATUS)returnVal == OP_STATUS.SUCCESS)
Val = remoteObject.SaveSession(clientId,sessionName);
return “Session Saved...”;
else
return CommandFailed(returnVal);
Comments
The name parameter cannot be empty. If it is empty, the client is prompted to provide a valid name.
Once the session is saved under ‘name’ you cannot use this method to save the session in a different name.
Instead SaveSessionAs can be used.
58 TekExpress USB Automated Solutions Help
Page 67

TekExpress Programmatic Interface SaveSessionAs()
SaveSessionAs()
SaveSessionA
s(string id, string name)
Saves the current session in a different name every time this method is called. The name of the session is
provided by t
he client.
Parameters
Name Type Direction Descriptio
id string IN
name
xxx
string IN
Identifier
the remote function.
The name of the session being saved.
n
of the client that is performing
Return Value
String t
hat suggests the status of the operation after it has been performed.
Example
returnVal = remoteObject.SaveSessionAs(clientId,sessionName);
if ((O
P_STATUS)returnVal == OP_STATUS.SUCCESS)
return “Session Saved...”;
else
return CommandFailed(returnVal);
Comments
The same session is saved under different names using this method. The name parameter cannot be empty.
If it is empty, the client is prompted to provide a valid name.
TekExpress USB Automated Solutions Help 59
Page 68

TekExpress Programmatic Interface RecallSession()
RecallSession()
RecallSessio
n(string id, string name)
Recalls a saved session. The name of the session is provided by the client.
Parameters
Name Type Direction Description
id string IN
name
xxx
Return Va
lue
string IN
Identifier of the client that is performing
the remote function.
The name of the session being recalled.
String that suggests the status of the operation after it has been performed.
Example
return
if ((OP_STATUS)returnVal == OP_STATUS.SUCCESS)
Val = remoteObject.RecallSession(clientId,sessionName);
return “Session Recalled...”;
else
return CommandFailed(returnVal);
Comments
The name parameter cannot be empty. If it is empty, the client is prompted to provide a valid name.
60 TekExpress USB Automated Solutions Help
Page 69

TekExpress Programmatic Interface Run()
Run()
Run(string id
)
Runs the setup. Once the server is set up and is configured, it can be run remotely using this function.
Parameters
Name Type Direction Description
id string IN
xxx
Return Va
lue
Identifier of the client that is performing
the remote function.
String that suggests the status of the operation after it has been performed.
Example
return
if ((OP_STATUS)returnVal == OP_STATUS.SUCCESS)
else
Val = remoteObject.Run(clientId);
return “Run started...”;
return CommandFailed(returnVal);
Comments
When the run is performed the status of the run is updated periodically using a timer.
TekExpress USB Automated Solutions Help 61
Page 70

TekExpress Programmatic Interface Stop()
Stop()
Stop(string i
d)
Stops the run operation.
Parameters
Name Type Direction Description
id string IN
xxx
Return Va
lue
Identifier of the client that is performing
the remote function.
String that suggests the status of the operation after it has been performed.
Example
return
if ((OP_STATUS)returnVal == OP_STATUS.SUCCESS)
else
Val = remoteObject.Stop(clientId);
return “Stopped...”;
return CommandFailed(returnVal);
Comments
When the session is stopped the client is prompted to stop the session and is stopped at the consent.
62 TekExpress USB Automated Solutions Help
Page 71

TekExpress Programmatic Interface QueryStatus()
QueryStatus()
QueryStatus(
string id, out string[] status)
This method gives the status of the run as messages. The status messages are generated once the run
is started.
Parameters
Name Type Direction Descriptio
id string IN
status
xxx
string ar
ray
OUT The list of status messages generated
Identifier
the remote function.
during run.
n
of the client that is performing
Return Value
String that suggests the status of the operation after it has been performed.
Example
returnVal = remoteObject.QueryStatus(clientId, out statusMessages);
if ((OP_STATUS)returnVal == OP_STATUS.SUCCESS)
return “Status updated...”;
else
return CommandFailed(returnVal);
Comments
estatusmessagesareupdatedperiodically after the run begins. The status is an out parameter which is
Th
set when the server processes the request.
TekExpress USB Automated Solutions Help 63
Page 72

TekExpress Programmatic Interface TransferReport()
TransferReport()
TransferRepo
rt(string id, string filePath)
This method transfers the report generated after the run. The report contains the summary of the run. The
client has to
provide the location where the report is to be saved at the client-e nd.
Parameters
Name Type Direction Descriptio
id string IN
filePath
xxx
string IN The locat
Identifier
the remote function.
saved in the client.
n
of the client that is performing
ion where the report has to be
Return Value
String t
hat suggests the status of the operation after it has been performed.
Example
returnVal = remoteObject.TransferReport(clientId);
if ((O
P_STATUS)returnVal == OP_STATUS.SUCCESS)
return “Transferred...”;
else
return CommandFailed(returnVal);
Comments
If the client does not provide the location to save the report, the report is saved at C:\ProgramFiles.
64 TekExpress USB Automated Solutions Help
Page 73

TekExpress Programmatic Interface CheckSessionSaved()
CheckSessionSaved()
CheckSession
Saved(string id, out bool saved)
This function is called when a check is to be made to know if the current session is saved.
Parameters
Name Type Direction Description
id string IN
saved bool
xxx
OUT Boolean which represents if the current
Identifier of the client that is performing
the remote function.
session is saved.
Return Value
Vo i d
Example
if (clientId == ClientID)
{
nVal = remoteObject.IsSessionSaved(id,out saved);
retur
}
Comments
saved parameter gives the boolean value suggesting if the current session is saved or not. This is used
The
as a check in SaveSession() and SaveSessionAs() Functions.
TekExpress USB Automated Solutions Help 65
Page 74

TekExpress Programmatic Interface ApplicationStatus()
ApplicationStatus()
ApplicationS
tatus(string id)
This method gets the status (ready, running, paused) of the server application.
Parameters
Name Type Direction Description
Id string IN
xxx
Return Va
lue
Identifier of the client that is performing
the remote function.
String value that gives the status of the server application.
Example
return
return returnVal;
Val = remoteObject.ApplicationStatus(clientId);
Comments
The ap
plication can be in one of the following states at a given time:
Ready – Test configured and ready to start
Running – Test running
Paused – Test paused
66 TekExpress USB Automated Solutions Help
Page 75

TekExpress Programmatic Interface ErrorCodes
ErrorCodes
The return value of the remote automations at the server-end is OP_STATUS which is changed to a string
value depending on its code and returned to the client.
The values of OP_STATUS are as follows:
Value Code Description
FAIL −1
SUCCESS
NOTFOUND
LOCKED
UNLOCK
NULL 0 Nothing
xxx
1 The operation succeeded.
2
3 The server is locked by another client, so operation cannot
4
The operation failed.
Server not found
be performed.
The server is not locked. Lock the server before performing
the oper
ation.
Exampl
The fo
Files\Tektronix\TekExpress\TekExpress USB\Examples\Programmatic
Interface\TestStand
e
llowing is an example for NI TestStand Client available in the path,
.
C:\Program
TekExpress USB Automated Solutions Help 67
Page 76

TekExpress Programmatic Interface Example
68 TekExpress USB Automated Solutions Help
Page 77

Troubleshooting Instrument Connectivity
Related Topics
Instrument Connectivity
If the instrument(s) are displayed in TekVISA Instrument Manager but not in the TekExpress Instrument
Bench, check the following:
Only those instruments that respond to *idn? and *opt? queries successfully, are displayed in
Instrument Bench.
Ensure that VXI-11 Server is running on the instruments.
If Instrument initialization fails during test sequence execution, do the following:
It is observed that GPIB communication with instrument over Tek-VISA layer is not initialized if in
TekVISA Instrument manager the search criteria is turned-off, even if a valid instrument is connected in
the network. It is necessary to turn ON the respective search criteria by opening the TekVISA Instrument
manager.
TestStand Runti me Engine Installation
TestStand Run time Engine Installation
Managing multiple versions of TestStand installed on the system.
TekExpress installs TestStand version 3.5 runtime engine. If you have versions other than 3.5, while
ng with TekExpress, ensure that the version shipped with TekExpress is active. You can do so by
worki
clicking Start > Programs > National Instruments > TestStand 3.5 > TestStand Version Selector.
TekExpress USB Automated Solutions Help 69
Page 78

Troubleshooting TestStand Run time Engine Installation
70 TekExpress USB Automated Solutions Help
Page 79

Reference Shortcut Keys
Shortcut Keys
The following table lists the short cut keys to access the application:
Table 11: Keyboard shortcut keys
Menu Shortcut keys
File Alt + F
New Session Ctrl + N
Open Session... Ctrl + O
Save Session... Ctrl + S
Save Session As
Save Report As...
Print Preview Report Alt + F + V
Print R eport...
Exit
View Alt + V
Log
Tools Alt + T
Instrument Bench
Help Alt + H
TekExpress Help (F1)
About TekExpress Alt + H + A
Activate License Alt + H + L
xxx
Alt + F + A
Alt + F + R
Ctrl + P
Ctrl + X
Ctrl + L
Ctrl + I
Alt + H + H
TekExpress USB Automated Solutions Help 71
Page 80

Reference Shortcut Keys
72 TekExpress USB Automated Solutions Help
Page 81

Index
Index
A
About menu, 19
About TekExp
Acquire options, 31
Acquire parameters, 26
Acquire Parameters, 31
Acquire tab, 30
acquisition table, 31
acquisit
Activating license, 8
Analyze parameters, 26
Application
Application overview, 13
Application summary, 13
ions, 30
exiting, 15
resizing, 14
starti
ress, 13
ng, 14
B
Before clicking Run, 10
C
Client, 45
Compliance mode, 25
figure button, 23
Con
Controlling the Server, 46
D
Data storage, 35
Default directory usage, 6
Deskew
real time oscilloscopes, 21
Deterministic Jitter test, 40
Directory structure, 6
Dongle, 8
DPOJET, 6
DUT type, 23
E
Exit, 16
Exiting the application, 15
F
File name extensions, 8
Filter selection, 36
Filters, 36
G
General p
Global Controls, 15
arameters, 25
I
Instrument bench, 17
Instrument Bench menu, 28
Instrument discovery, 29
Instrument initialization, 69
face, 45
Inter
Interface commands
ChangeDutId, 57
Connect, 49
Disconnect, 51
GetDutId, 56
TimeOut, 55
Get
LockSession, 52
Recall Session, 60
Run, 61
SaveSession, 58
SaveSessionAs, 59
etTimeOut, 54
S
Status, 63
Stop, 62
Transfer report, 64
UnlockSession, 53
Interface error codes, 67
K
Key features, 13
L
Log file, 17
M
Mapping My TekExpress
folder, 11
Menus
File, 16
Help, 19
Tool s , 17
View, 17
Minimum S
ments, 6
My TekExpress, 35
My TekExpress folder, 10
ystem Require-
N
Non VISA resources, 18
Nonstandard waveform mask, 37
P
eters to configure, 24
Param
Prerecorded Waveform, 30
Probes, 5
Programmatic interface, 45
Progress of analysis, 32
Proxy object
ent, 48
cli
remote, 47
R
Report
preview, 16
print, 16
save, 16
Report panel overview, 34
Required equipment, 39
Resizing the application, 14
Retrieved instruments, 18
Run, 10
Run button, 15
Run button, 15
TekExpress USB Automated Solutions Help 73
Page 82

Index
S
Safety Summary, iii
Save
report, 16
session, 16
SDLA software, 6
Selecting connected
instruments, 29
Server, 45
Session
new, 16
open, 16
save, 16
Session folder, 35
Set up diagram, 39
Shortcut keys, 71
Show MO
Show schematic button, 24
Signal Path Compensation
I button, 23
(SPC), 11
SMA Breakout Fixture, 5
Software version, 19
Starting the a
Supported Probes, 5
System requirements, 6
pplication, 14
T
Technical support, 3
TekVISA instrument manager, 28
Test
configure,
report, 34
select, 22
Test limits, 27
Test Method, 23
Test parameters, 26
Test po
Test point selection, 23
Test related files, 35
int, 23
24
TestStand client example, 67
Troubleshooting
instrument co
TestStand Run-time Engine
installation, 69
nnectivity, 69
U
Untitled session, 10
USB devices, 22
User defined filter file, 36
User define
Using filters, 36
d mode, 25
V
View scorecard, 34
Viewing connected
instruments, 28
74 TekExpress USB Automated Solutions Help
 Loading...