

Page 1

xx
TekExpress®40G-CR4
ZZZ
40GBase-CR4 Compliance and Debug Solution Software
Printable Ap plication Help
*P077093801*
077-0938-01
Page 2

Page 3

TekExpress®40G-CR4
40GBase-CR4 Compliance and Debug Solution Software
ZZZ
Printable Application Help
w.tek.com
ww
077-0938-01
Page 4

Copyright © Tektronix. All rights reserved. Licensed software products are owned by Tektronix or its
subsidiaries or suppliers, and are protected by national copyright laws and international treaty provisions.
Tektronix products are covered b y U.S. and foreign patents, issued and pending. Information in this
publication supersedes that in all previously published material. Specifications and price change privileges
reserved.
TEKTRONIX and TEK are registered trademarks of Tektronix, Inc.
TekExpress is a registered trademark of Tektronix, Inc.
TekExpress 40G-CR4 Compiled Application Help 076-0346-01.
Contacting Tektronix
Tekt roni
14150 SW Karl Braun Drive
P.O . B o x 500
Beaverton, OR 97077
USA
x, Inc.
For pro
duct information, sales, service, and technical support:
In North America, call 1-800-833-9200.
Worldwide, visit www.tektronix.com to find contacts in your area.
Page 5

Table of Contents
Getting help and support
Related documentation............................................................................................. 1
Conventions used in help .......................................................................................... 2
Technical support ................................................................................................... 3
Table of Contents
Getting s
tarted
Installing the software
Minimum system requirements ............. .................................. ............................... 6
Required Windows 7 user account setting ... . . . . . . . . ...... . . . . . . . ....... . . . . . . ........ . . . . . . ........ . . . . . . . 7
Supported instruments......................................................................................... 8
Install the software.................................... .................................. ....................... 9
Verify application installation ............... .................................. .............................. 10
Activate the license........................................................................................... 11
View software version and license information ............... .................................. .......... 12
Required \My TekExpress folder settings .... . . . . . . ....... . . . . . . ....... . . . . . . ...... . . . . . . ...... . . . . . . ...... 13
Map the My TekExpress folder to drive X ................................. ................................ 14
Set the \My TekExpress folder permissions ....... ................................ ........................ 15
Application file directories and their contents ............... ................................ .............. 16
File name extensions ......................................................................................... 17
Where test session files are stored ................ .................................. ........................ 18
TekExpress
®
and DPOJET 40GBase-CR4 features.......................................... .................. 19
Operating basics
Start the application ......... .................................. .................................. .................. 21
Exit the application................................................................................................ 23
Application user interface overview............. .................................. .............................. 24
Application controls and menus
Application controls............................................................................................... 26
Options menu overview........................................................................................... 27
Application test panels
Setup tabs
Setup controls overview............... .................................. ................................ 29
Set DUT parameters ..................................................................................... 30
Select tests ................................................................................................ 32
Acquisitions tab
Set acquisition p arameters . . . . . . . ...... . . . . . . ...... . . . . . ...... . . . . . . ...... . . . . . ...... . . . . . . ...... . . 33
Acquire Step By Step example waveform screens .............................................. 35
TekExpress 40GBase-CR4 Printable Help i
Page 6

Table of Contents
Status panel.................................................................................................... 45
Results panel
Plots panel
Reports panel
Running tests on prerecorded (saved) waveforms............................................... 38
Configure test parameters
Configuration tab parameters ...................... .................................. .............. 39
Configuration: Global Settings parameters........... . . . . . . ........ . . . . . . ........ . . . . . . ........ . . 40
Configuration: Measurements parameters................................ ........................ 42
Preferences tab .......... .................................. .................................. ........ 44
Results panel overview.................................................................................. 47
Preferences menu (Results panel).. ................................ .................................. .. 48
View test result files ............... ................................ .................................. .... 49
Plots panel overview..................................................................................... 50
Plot cursors ..... ................................ .................................. ........................ 51
Reports panel overview ................................................................................. 52
Select report options ..................................................................................... 53
View a report . ................................ .................................. .......................... 55
Report contents........................................................................................... 56
Running tests
Test process flow................................................................................................... 58
Deskew real-time
Instrument and DUT connection setup............................ .................................. ............ 60
Running tests....................................................................................................... 61
Prerun checklist .................................................................................................... 62
oscilloscopes.......... . . . . . . ...... . . . . . . ...... . . . . . . ....... . . . . . . . ...... . . . . . . ...... . . . . . . .... 58
Saving and recalling test setup files
Test set up files overview.......................................................................................... 64
Save a tes t setup file............................................................................................... 65
Open (load) a saved test setup file............................................................................... 66
Run a saved test in prerecorded mode........................................................................... 67
Create a new test setup file based on an existing one.......... .................................. .............. 68
TekExpress programmatic interface
About the programmatic interface ............................................................................... 69
To enable remote access .......................................................................................... 70
Requirements for developing TekExpress client ............................................................... 72
Remote proxy object .. .................................. ................................ .......................... 73
Client proxy object ............ .................................. ................................ .................. 74
Client programmatic interface example... ................................ .................................. .... 76
Program remote access code example..................... ................................ ...................... 80
ii TekExpress 40GBase-CR4 Printable Help
Page 7

Table of Contents
40GBase-CR4 application commands
The 40GBase-CR4 application commands ................................................................ 82
Connect through an IP address........ .................................. .................................. .. 88
Lock the server................................................................................................ 89
Disable the popups........................................ ................................ .................... 90
Set or get the DUT ID.................. ................................ .................................. .... 91
Set the configuration parameters for a suite or measurement ............................................ 92
Query the configuration parameters for a suite or measurement ........................................ 94
Select a measurement ............ ................................ .................................. .......... 96
Select a suite................................................................................................... 97
Select a channel ......................... .................................. ................................ .... 98
Configure the selected measurement ........... ................................ .......................... 100
Run with set configurations or stop the run operation .................. ................................ 101
Handle error codes.......................................................................................... 102
Get or set the timeout value................................................................................ 103
Wait for the test to complete............................................................................... 104
After the test is complete................................................................................... 106
Save, recall, or check if a session is saved ............................................................... 109
Unlock the server ................. ................................ .................................. ........ 110
Disconnect from the server .............. .................................. ................................ 111
Reference
TekExpress instrument control settings
Instrument control settings. . . . . ....... . . . . . . ....... . . . . . . ...... . . . . . . ....... . . . . . . ....... . . . . . . ...... . . . . . . 114
View connected instruments............................................................................... 115
Email settings
Email settings . . . . ...... . . . . . ...... . . . . . . ...... . . . . . ...... . . . . . ...... . . . . . . ...... . . . . ...... . . . . . . ...... . . . . . . 117
Configure email settings ... . . . . . . ....... . . . . . . ....... . . . . . . ...... . . . . . . ...... . . . . . . . ....... . . . . . . ...... . . . . 118
Handle error codes............. .................................. .................................. .............. 120
Limits Editor: compare string d efinitions . . . ...... . . . . . . ...... . . . . . . ...... . . . . . . ...... . . . . . . ...... . . . . . . ...... 121
Error messages............................... .................................. ................................ .. 122
DPOJET setup details
DPOJET: Test point TP2 measurements and setup files................................................ 124
DPOJET: Test point TP0 measurements and setup files................................................ 125
DPOJET: Oscilloscope horizontal settings............................................................... 126
DPOJET: Oscilloscope trigger settings..... . . . . . . ........ . . . . . . ...... . . . . . . . . ...... . . . . . . ........ . . . . . . .. 127
DPOJET: Oscilloscope vertical settings.. . . . . . . . ....... . . . . . . ........ . . . . . . ...... . . . . . . . ....... . . . . . . .... 128
DPOJET: Accessing 40GBase-CR4 measurements..................................................... 130
DPOJET: Inputs to measurements ........................................................................ 131
DPOJET: 40GBase-CR4 transmitter m easurement procedure....... . . . . . . . ....... . . . . . . ........ . . . . . . 132
Measurement details
Measurements and supported patterns.................................................................... 141
TekExpress 40GBase-CR4 Printable Help iii
Page 8

Table of Contents
Differential peak to peak output voltage (max) with Tx disabled: TP2 and TP0........ ............ 142
Amplitude peak to peak: TP2 ............................................................................. 143
Duty Cycle Dis
Signaling Rate: TP2 and TP0 ........... ................................ .................................. 145
Random Jitter: TP0 and TP2 .. . . . . . . . ....... . . . . . . ...... . . . . . . ........ . . . . . . ...... . . . . . . ....... . . . . . . . .... 146
Total Jitter excluding DD J (UTJ): TP2 . . . . ....... . . . . . . ...... . . . . . . ...... . . . . . . . ....... . . . . . . ...... . . . . . . 147
J2 (Informative): TP2 ........ .................................. ................................ ............ 148
J9 (Informative): TP2 ........ .................................. ................................ ............ 149
Common mod
Common mode AC output voltage: TP0 and TP2 ............ .................................. ........ 151
Differential Output Return Loss: TP0 and TP2 ... ................................ ...................... 152
Common Mode Output Return Loss: TP0 ............................................................... 154
Total Jitter: TP0... . . . . . . ....... . . . . . . . ...... . . . . . . ....... . . . . . . ....... . . . . . . ....... . . . . . . ....... . . . . . . ...... 156
Deterministic Jitter: TP0..... . . . . . . ....... . . . . . . ....... . . . . . . ...... . . . . . . ...... . . . . . . ...... . . . . . . ....... . . . 157
Transm
Transition Time (20% - 80%): TP0 and TP2 .. . . . . . . ....... . . . . . . ....... . . . . . . ...... . . . . . . ...... . . . . . . .. 162
tortion: TP0 and TP2..................... .................................. .............. 144
e voltage limits: TP0 and TP2............................................................ 150
itter Output Waveform Requirements: TP2 . . . . . ........ . . . . . . ........ . . . . . . ...... . . . . . . . . ...... 158
Index
iv TekExpress 40GBase-CR4 Printable Help
Page 9
Getting help and support Related documentation
Related documentation
The following documents are available for the TekExpress®40GBase-CR4 (Opt. 40G-CR4) Compliance
and Debug Solution Software.
Table 1: Product documentation
Item Purpose Location
Help Applicatio
Interface help
PDF of the help Printable version of the compiled help
DPOJET 40GBase-CR4 setup
library Methods of Implementation
(MOI) fo
characterization.
xxx
rverification, debug and
Detailed information on test setup and
execution
See also
n operation and User
In the application: Options > Help.
C:\Program Files\Tek-
ekExpress\TekExpress
tronix\T
40GBase-CR4\Documents\
C:\Program Files\TekApplications\DPOJET
Techni
cal support
TekExpress 40GBase-CR4 Printable Help 1
Page 10

Getting help and support Conventions used in help
Conventions used in help
Online H elp uses the following conventions:
The term “DUT” is an abbreviation for Device Under Test.
Theterm“select”isagenerictermthatappliesto the two methods of choosing a screen item (button,
control, list item): using a mouse or using the touch screen.
Table 2: Ico
Icon Meaning
xxx
n descr iptions
This icon i
This icon identifies conditions or practices that could result in loss of data.
This icon identifies additional information that will help you use the
application more efficiently.
dentifies important information.
2 TekExpress 40GBase-CR4 Printable Help
Page 11

Getting help and support Technical support
Technical support
Tektronix values your feedback on our products. To help us serve you better, please send us your
suggestions, ideas, or comments on your a pplication or oscilloscope. Contact Tektronix through mail,
telephone, o
When you contact Tektronix Technical Support, please include the following information (be as specificas
possible):
r the Web site. See Contacting Tektronix
General information
All instrument model numbers
for more information.
Hardware
Your name, company, mailing address, phone number, FAX number
Please indicate if you w ould like to be contacted by Tektronix about your suggestion or comments.
ation specific information
Applic
Software version number
Description of the problem such that technical support can duplicate the problem
If possible, save the setup files for all the instruments used and the application
If possible, save the TekExpress setup files, log.xml, *.TekX (session files and folders), and status
messages text file
If possible, save the waveform on which you are performing the measurement a s a .wfm file
options, if any
TekExpress 40GBase-CR4 Printable Help 3
Page 12

Getting help and support Technical support
4 TekExpress 40GBase-CR4 Printable Help
Page 13

Getting started Technical support
TekExpress 40GBase-CR4 Printable Help 5
Page 14

Getting started Minimum system requirements
Minimum system requirements
The following table shows the minimu m system r equirements needed for an oscilloscope to run this
application.
Table 3: Syst
Oscilloscope See Supported instruments
Processor
Operating System Same as the oscilloscope:
Memory
Hard Disk
Display
Firmware
are
Softw
em requirements
Same as the oscilloscope
Windows 7 (64-bit only) SP1 Windows 7 user account settings
Same as the oscilloscope
Same as the oscilloscope
Same as the oscilloscope. Super VGA resolution or higher video adapter (800 x
600 minimum video resolution for small fonts or 1024 x 768 minimum video resolution
e fonts). The application is best viewed at 96 dpi display settings
for larg
pe 10.3.3 for non-SX series digital oscilloscopes
TekSco
pe 10.3.0 for SX series digital oscilloscopes
TekSco
T, Jitter and Eye Diagram Analysis Tool, version 10.0.0.35 or later (64-bit)
DPOJE
ython 2.7.3
IronP
a 1.0.0.25
PyVis
osoft .NET 4.0 Framework
Micr
osoft Internet Explorer 7.0 SP1 or later, or other Web browser for viewing
Micr
reports
Microsoft Photo Editor 3.0 or equivalent software for viewing image files
Adobe Reader software 7.0 or later for viewing portable document format (PDF)
files
Other Devices Microsoft compatible mouse or compatible pointing device.
Two USB ports minimum; four USB ports recommended.
PCI-GPIB or equivalent interface for instrument connectivity.
xxx
6 TekExpress 40GBase-CR4 Printable Help
Page 15
Getting started Required Windows 7 user account setting
Required Windows 7 user account setting
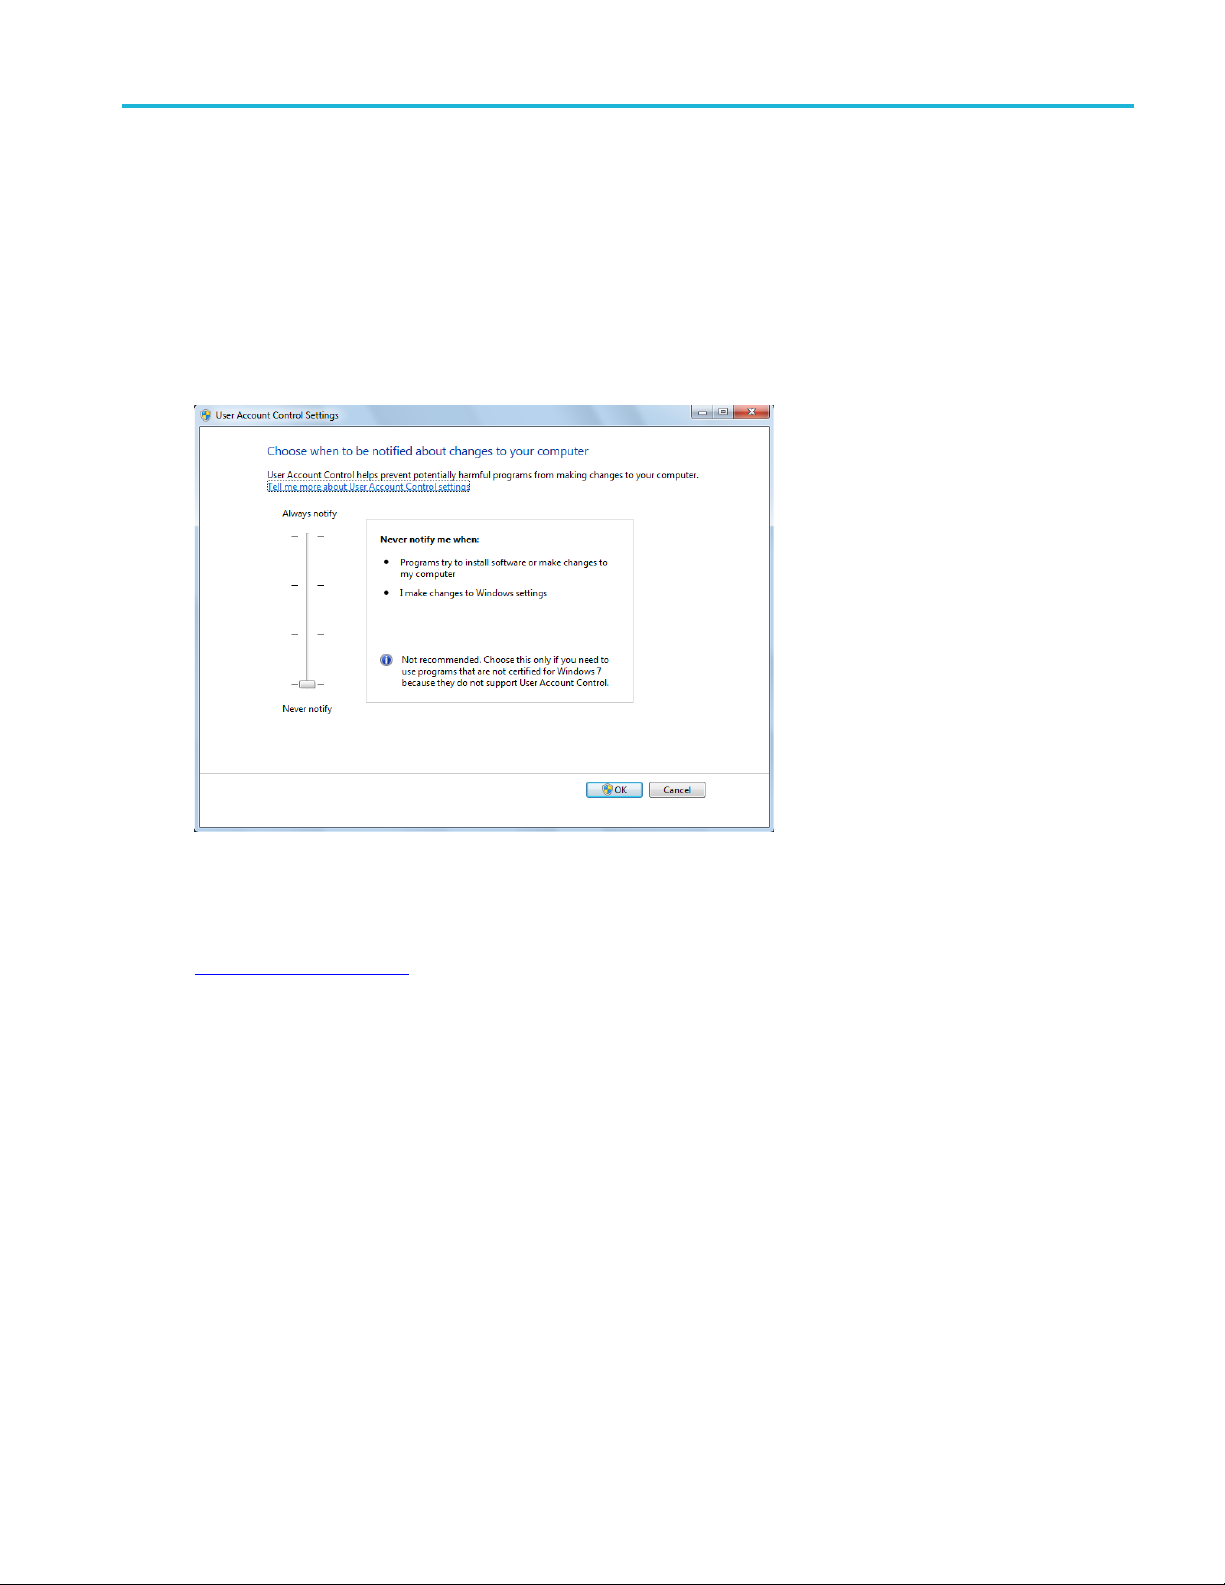
Windows 7 instruments need to have the User Account Control Settings set to Never Notify.Toset
User Account Control Settings:
1. Go to Control Panel > User A ccounts > Change User Account Control settings.
2. Set the sliding control to Never Notify as shown in the image, and click OK.
so
See al
Supported oscilloscopes
TekExpress 40GBase-CR4 Printable Help 7
Page 16

Getting started Supported instruments
Supported instruments
Table 4: Required equipment
Resource Description
Real-time oscilloscope
Test fixtures and accessories TF-QSFP-TPA-HCB-P: QSFP+ Host Compliance Board Plug
xxx
See also
Tektronix DPO71604C, DPO72004C, DPO72304DX, DPO72504D,
DPO72504DX, DPO73304D, DPO73304DX
Tektronix DSA71604C, DSA72004C, DSA72504D, DSA73304D
Tektronix MSO71604C, MSO72004C, M SO 72304DX , MSO72504DX,
MSO73304DX
Tektronix DPO72304SX, DPO73304SX, DPO75002SX, D PO 75902SX,
DPO77002SX
TF-DC-BLOCK-KIT: DC Block Kit (quantity 4)
For C series oscilloscopes: T CA-292MM adapters (quantity 4)
For D series oscilloscopes: 12 dB attenuators (quantity 4)
For D, DX, or SX series oscilloscopes: TCA-292D adapters (quantity 4)
Minimum system require ments
8 TekExpress 40GBase-CR4 Printable Help
Page 17

Getting started Install the software
Install the software
Do the following steps to download the latest TekExpress 40GBase-CR4 software from the Tektronix
Web s ite and install on any compatible instrume nt running Microsoft Windows 7 (64-bit). See Minimum
System Requi
1. Close all applications (including the TekScope application).
2. Go to the www.tek.com Web site and locate the Downloads fie lds.
3. Enter tekexpress 40gbase-cr4 in the Model o r Keyword field, select Software from the Select
Download Type list, and click GO.
4. Select the latest version of software. Follow instructions to download the software file.
5. Copy or download the installer executable file to the oscilloscope.
6. Double-click the installer .exe file to extract the installation files and launch the InstallShield Wizard.
Follow the on-screen instructions.
rements
for details.
Software is installed at
40GBase-CR4
7. Verify application installation
C:\Program Files\Tektronix\TekExpress\TekEx pre ss
See also
Minimum system requirements
Supported instruments
Required \My TekExpress folder settings
TekExpress 40GBase-CR4 Printable Help 9
Page 18

Getting started Verify application installation
Verify application installation
To verify the installation was successful:
1. Open the TekScope application.
2. Click the Analyze menu.
3. Verify that TekExpress 40GBase-CR4 (for TekExpress application) and 40GBase-CR4 (for DPOJET
plug-in) is listed in the Analyze menu.
4. Click TekExpress 40 GBase-CR4 in the menu to open the application. Verify that the application
opens successfully.
5. Activate the license
NOTE. Contact Tektronix for information about floating or fixed licenses for theTekExpress 40GBASE-CR4.
.
See also
Required \My TekExpress folder settings
10 TekExpress 40GBase-CR4 Printable Help
Page 19

Getting started Activate the license
Activate the license
Do the following to activate the TekExpress license:
1. In the TekScope application menu bar, click Utilities > O ption Installation to open the TekScope
Option Installation wizard.
2. Push the F1 key on the oscilloscope keyboard to open the Option Installation help topic.
3. Follow the directions in the Option Installation help topic to activate the license.
See also
View version and license information
Required \My TekExpress folder settings
TekExpress 40GBase-CR4 Printable Help 11
Page 20

Getting started View software version and license information
View software version and license
information
To view version information for the TekExpress application (application and TekExpress Framework
versions),
1. Open the TekExpress application
2. Select Options > About TekExpress to display the version information.
3. Click OK to close the dialog box.
To view license and option key information in the TekScope application:
1. In the Tek
2. Scroll through the Options list to locate 40GBase-CR4 Compliance and Debug Solution.
3. The Option installation key value is shown below the Options list.
Scope application, select Help > About TekScope.
See also
Activate the license
Option
smenu
12 TekExpress 40GBase-CR4 Printable Help
Page 21

Getting started Required \My TekExpress folder settings
Required \My TekExpress folder settings
Before you run tests for the first time, do the following:
1. Map the \My TekExpress folder to Drive X
2. Set the \My TekExpress folder permissions
See also
Application directories and usage
File name extensions
TekExpress 40GBase-CR4 Printable Help 13
Page 22

Getting started Map the My TekExpress folder to drive X
Map the My TekExpress folder to drive X
The first time you run the application, it creates the following folders on the oscilloscope:
\My Documents\My TekExpress\TekExpress 40GBase-CR4
\My Documents\My TekExpress\TekExpress 40GBase-CR4\Untitle d Session
Youneedtomap(assign)thesharedMy TekExpress folder as drive X: on the instrument running the
application. The application uses this shared folder to save session waveform files a nd for other application
file transfer operations.
To map the My TekExpress folder on the instrument to be drive X:
1. Open Microsoft Windows Explorer.
2. From the W
3. Select the Drive letter as X: (if there is any previous connection on X:, disconnect it first through
Tools > D
press the Alt key).
4. In the F
\\192.158.97.65\My TekExpress).
ermine the IP address of the instrument where the ‘My TekExpress’ folder exists, do the following:
To det
1. On the instrument where the ‘My TekExpress’ folder exists, click Start and select Run.
2. Enter cmd and press Enter.
3. At the command prompt, enter ipconfig and press Enter to list the instrument IP configuration
information.
NOTE. TheMyTekExpressfolderhasthesharenameformat
If the instrument is not connected to a domain, the share name format is
ID>My TekExpress
NOTE. If the X: drive is mapped to any other shared folder, the application displays a warning message
asking you to d isconnect the X: drive manually.
indows Explorer menu, select Computer > Map network drive.
isconnect Network drive menu of Windows Explorer. If you do not see the Tools menu,
older field, enter the remote ‘My TekExpress’ folder path (for example,
<domain><user ID>My TekExpress
<instrument name><user
.
.
See also
Set the \My TekExpress folder permissions
Application directories and usage
File name extensions
14 TekExpress 40GBase-CR4 Printable Help
Page 23

Getting started Set the \My TekExpress folder permissions
Set the \My TekExpress folder permissions
Make sure that the My TekExpress folder has read and write access. Also verify that the folder is not set
to be encrypted:
1. Right-click the folder and select Properties.
2. Select the General tab and then click Advanced.
3. In the Advanced Attributes dialog box, make sure that the option Encrypt contents to secure data
is NOT selected.
4. Click the Security tab a nd verify that the correct read and write permissions are set.
See also
the \My TekExpress folder to Drive X
Map
Application directories and usage
File name extensions
TekExpress 40GBase-CR4 Printable Help 15
Page 24

Getting started Application file directories and their contents
Application file directories and their contents
The application files are installed at the following location:
C:\Program Files\Tektronix\TekExpress\TekEx pre ss 40GBase -CR 4
The following table lists the application directory names and their purpose.
Table 5: Application directories and usage
Directory names Usage
Bin
Compliance Suites Contains compliance-specific files
Documents
Examples
ICP Contains instrument and application-specific interface
Images
Lib
Mask Files
Report Generator Contains style sheets for report generation
Tools
xxx
Contains application binary libraries
Contains application technical documentation
Contains various example support files
libraries
Contains the Tektronix logo graphic
Contains application utility files
Contains return loss measurement related mask files.
Contains instrument and application-specifictoolfiles
See also
File name extensions
Where test session files are stored
View test-results files
16 TekExpress 40GBase-CR4 Printable Help
Page 25

Getting started File name extensions
File name extensions
The application uses the f ollowing file name extensions:
File name extension Description
.flt Filter files
.mht
.py
.s16p
.TekX
.wfm Test wave
.xml
.xslt
xxx
See also
Test result reports (default)
Test reports can also be savedinHTMLformat
Python sequence file
S-Parameter input files for return loss measurement
Application session files (the extensions may not be
displaye
Test-s p
Application log files
Style sheet used to generate reports
d)
form files
ecificconfiguration information (encrypted) files
est-related files
View t
Application directories and their contents
TekExpress 40GBase-CR4 Printable Help 17
Page 26
Getting started Where test session files are stored
Where test session files are stored
When you launch TekExpress 40GBase-CR4 for the first time, it creates the following folders on the
oscilloscope:
\My Documents\My TekExpress\TekExpress 40GBase-CR4
\My Documents\My TekExpress\TekExpress 40GBase-CR4\Untitle d Session
Every time you start the application, the application creates an Untitled Session folder in the
TekExpress 40GBase-CR4 folder. The application automatically deletes the Untitled Session
folder when you exit the application. To preserve your test session files, save your session information
(setup, reports, and so on) before exiting the TekExpress application. When you save a session, the
applicat
oscilloscope X: drive.
CAUTION. Do not edit or modify any of the session folders or their files. Modifying these files or their
contents may result in loss of data or corrupted session files. Each session has multiple files associated
with it.
ion creates a .TekX file, and a folder named for the session that contains associated files, on the
See also
Map the \My TekExpress folder to Drive X
Set the \My TekExpress folder permissions
Application directories and usage
File name extensions
18 TekExpress 40GBase-CR4 Printable Help
Page 27
Getting started TekExpress®and DPOJET 40GBase-CR4 features
TekExpress®and DPOJET 40GBase-CR4
features
Welcome to the TekExpress®40GBase-CR4 Compliance and Debug Solution Software application and
DPOJET 40GB ase-CR 4 plug-in. These applications provide an automated, simple, and efficient way to
test interfaces and devices to the requirements of the IEEE 802.3-2012 section 85 and Annex 85A standard.
Key features and benefits include:
An intuitive user interface and framework decreases testing time and learning curve
Provides measurements for electrical characterization of 40GBase-CR4 signal at TP2 and TP0
Provides both an automation solution (for compliance) and DPOJET option (for debug), saving up to
80% on testing time as com p ared to manual testing
Has flexible parameter control for characterization and margin analysis (in user-defined mode)
Supports N1N0 (4 <= N <= 12), PRBS7, PRBS11, PRBS15, PRBS20, PRBS23, and PRBS31 patterns
in advanced/us er-defined mode, and supports PRBS9, 8180, and 1010 patterns in compliance mode
Complete programm atic interface enables users to call 40G-CR4 functions using c ustom automation
scripts
Performs autom atic signal validation before performing tests and displays an error message if the
signal does not meet acceptable limits
Includes DPOJET setup files for 8180, 1010, and PRBS9 patterns to help set oscilloscope and load
measurements (in DPOJET).
Creates detailed reports (.MHT or .PDF) for compliance record keeping, with flexible reporting
features such as appending t he report, auto-incrementing the report, and including user comments
1
TekExpress 40GBase-CR4 Printable Help 19
Page 28

Getting started TekExpress®and DPOJET 40GBase-CR4 features
20 TekExpress 40GBase-CR4 Printable Help
Page 29

Operating basics Start the application
Start the application
To start the TekExpress 40G-CR4 application, do either of the following:
Select Analyze > TekExpress 40GBase-CR4 from the TekScope menu.
Double-click any saved TekExpress 40GBase-CR4 session file (<file name>.TekX).
The oscilloscope opens the TekExpress 40GBase-CR4 application:
When you first run the application after installation, the application checks for a file called Resources.xml
located in the C:\Users\<usern ame >\M y TekExpr ess \Te kEx pre ss 40GBase -CR 4 folder.
The Resources.xml file contains information about available network-connected instruments. The
urces.xml file gets mapped to the
Reso
inside the
he application cannot find the Resources.xml file, the application runs an instrument discovery program
If t
to detect connected instruments before launching.
NOTE. Do the steps in the Required \My TekExpress folder settings
application for the first time.
To keep the 40GBase-CR4 application window on top, select Keep On Top from the 40GBase-CR4
Options menu
40GBase-CR4 to move the application to be in front.
X:\TekExpress 40GBase-CR4 folder.
. If the application goes behind the oscilloscope application, click Analyze > TekExpress
X: drive when the application launches. Session files are then stored
topic before running tests with the
TekExpress 40GBase-CR4 Printable Help 21
Page 30

Operating basics Start the application
See also
Required My TekExpress folder settings
Activate the license
Exit the application
Application
Application panel overview
controls
22 TekExpress 40GBase-CR4 Printable Help
Page 31

Operating basics Exit the application
Exit the application
To exit the application, click on the application title bar. Follow on-screen prompts to save any
unsaved session, save test setup files, or exit the application.
NOTE. Using other methods to exit the application can result in abnormal termination of the application.
TekExpress 40GBase-CR4 Printable Help 23
Page 32

Operating basics Application user interface overview
Application user interface overview
TekExpress 40GBase-CR4 uses panels to group related configuration, test, and results settings. Click on
a button to open the associated panel. A panel can have one or more tabs that list further parameters
available in
panel or another panel.
that panel. Displayed controls in a panel can change depending on settings made in that
Table 6: Application panels overview
Panel Name Purpose
Setup The Setup panel shows the test setup controls. Click the Setup button to open
this panel.
Use this panel to:
Select DUTparameters.
Select the tes t(s ).
Set acquisitions parameters for selected tests.
Select test notification preferences.
Status View the progress and analysis status of the selected tests, and view test logs.
Results
Plots
Reports
xxx
View a summary of test results and select result viewing preferences.
View plots generated for tests
Browse for reports, save reports as specific file types, specify report naming
conventions, select report content to include (such as summary information, detailed
information, user comments, setup configuration, application configuration), and
select report viewing options.
See also
Application controls
24 TekExpress 40GBase-CR4 Printable Help
Page 33

Application controls and menus Application user interface overview
TekExpress 40GBase-CR4 Printable Help 25
Page 34

Application controls and menus Application controls
Application controls
Application controls are accessible at all times, and provide the interface tools to the application functions.
Table 7: Application controls descriptions
Item Description
Options menu
Menu to display global application controls.
Test Panel buttons
Start / Stop button Use the Start button to start the test run of the measurements in the selected order.
Pause / Continue button
Clear button Use the Clear button to clear all existing measurement results. Adding or deleting a
Application window move icon
Buttons that open panels to configure, monitor, and report test sessions.
If prior acquired measurements have not been cleared, the new measurements
are added to the existing set.
The button toggles to the Stop mode while tests are running. Use the Stop button to
abort the test.
Use the Pause button to temporarily interrupt the current acquisition. When a test is
paused, the button name changes to “Continue.”
surement, or changing a configuration parameter of an existing measurement,
mea
also clears measurements. This is to prevent the accumulation of measurement
statistics or sets of statistics that are not coherent. This button is available only on
e Results panel
th
sition the cursor over the three-dot pattern in the upper left corner of the application
Po
window. When the cursor changes to a hand, drag the window to the desired location.
.
xxx
See also
Application panel overview
26 TekExpress 40GBase-CR4 Printable Help
Page 35

Application controls and menus Options menu overview
Options menu overview
The Options menu is located in the upper right corner of the application.
The Options menu has the following selections:
Menu Function
Default Test Setup Opens an untitled test setup with defaults selected
Open Test Setup Opens a saved test setup
Save Test Setup Saves the current test setup selections
Save Test Setup As Creates a new test setup based on an existing one
Open Recent Displays a menu of recently opened test setups to select
from
Instrument Control Settings Detects, lists, and refreshes the connected instruments
found on specified connections (LAN, GPIB, USB, and so
on)
Keep On Top Keeps the application on top of other open windows on
the desktop
Email Settings Usetoconfigure email options for test run and results
notifications
Deskew Use to set deskew parameter and read instrument
deskew/attenuation values.
Help Displays the application help
About TekExpress
Displays application details such as software name,
version number, and copyright
Provides access to license information
Provides a link to the Tektronix Web site
xxx
TekExpress 40GBase-CR4 Printable Help 27
Page 36

Application controls and menus Options menu overview
See also
Application controls
28 TekExpress 40GBase-CR4 Printable Help
Page 37

Application controls and menus Setup controls overview
Setup controls overview
The Setup panel contains sequentially ordered tabs that help guide you through a typical test setup and
execution proc es s. Click on a tab to open the associated panel and controls.
The tabs on this panel are:
DUT: Set the DUT param eters
Test Selection: Select test(s)
Acquisitions: Select acquisition parameters
Preferences: Select test fail notification preferences
TekExpress 40GBase-CR4 Printable Help 29
Page 38

Application controls and menus Set DUT parameters
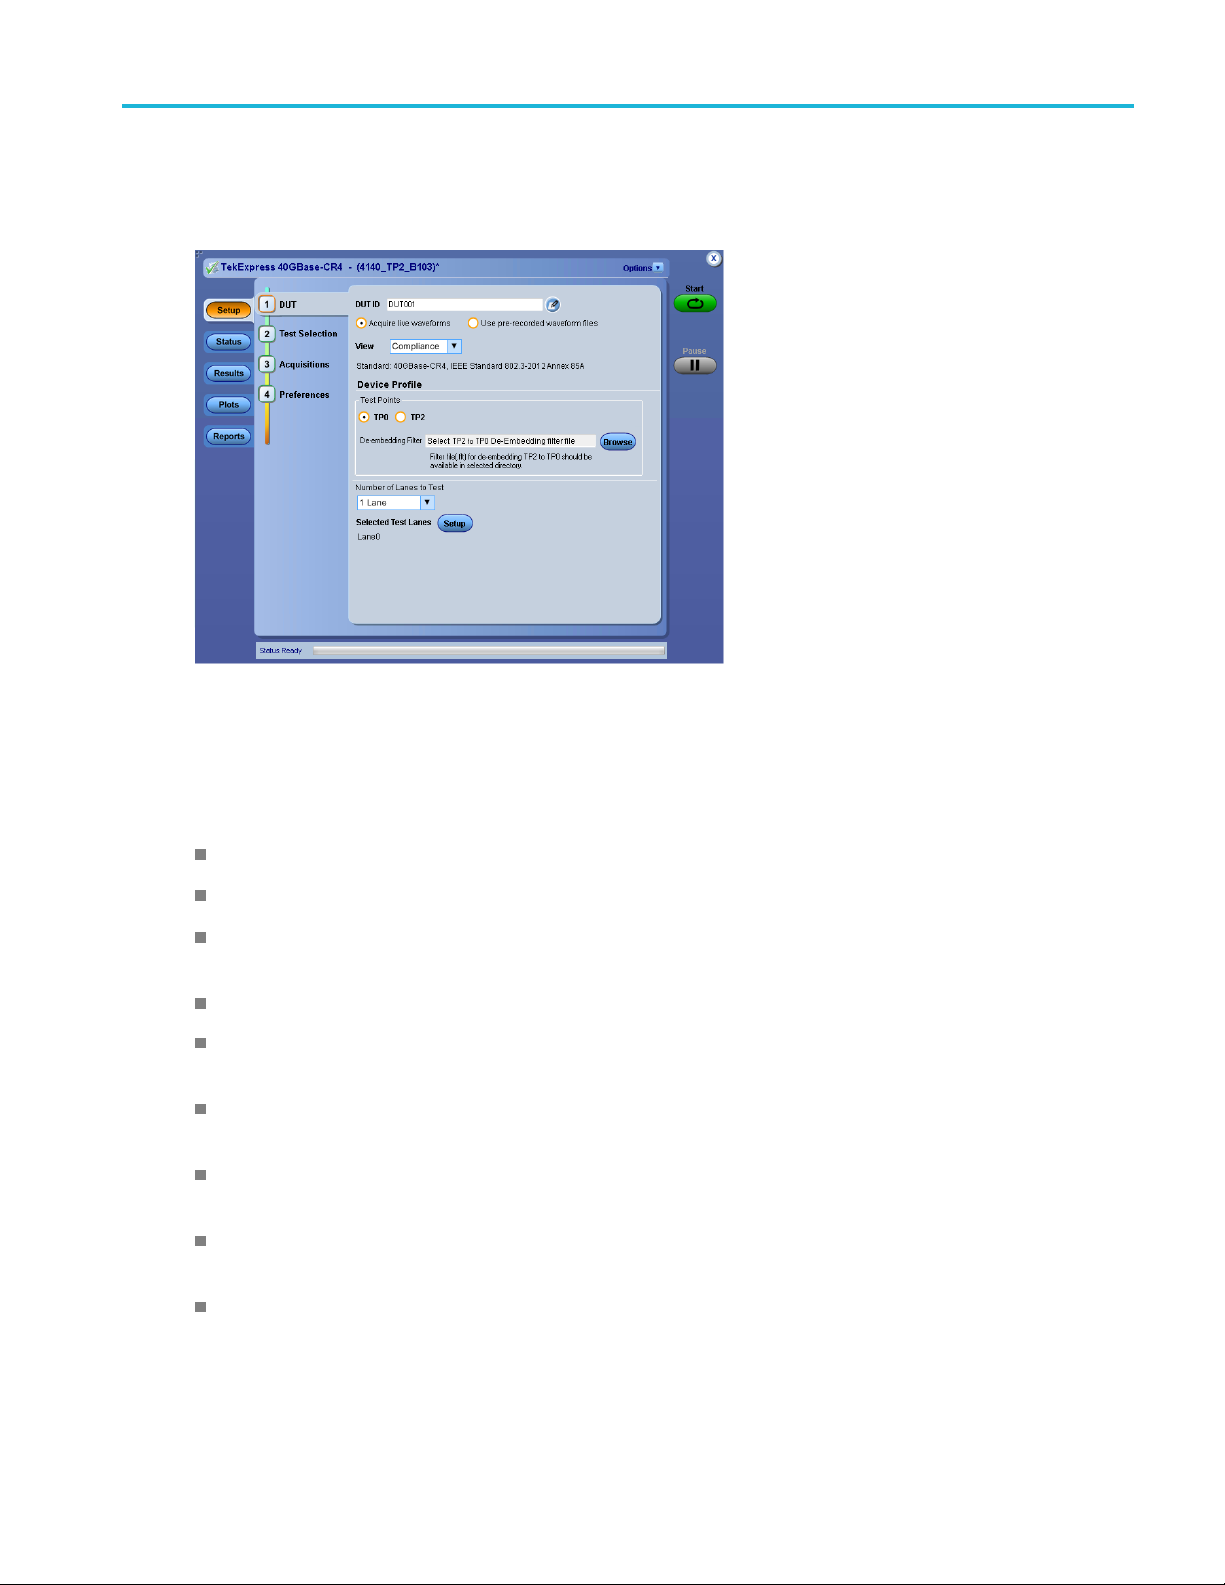
Set DUT parameters
Use the DUT tab to select parameters for the device under test. The settings are global and apply to all
tests for the current session. DUT settings also affect the list of available tests in the Test Selection tab.
Click Setup > DUT to access the DUT parameters:
Table 8: DUT tab settings
Setting Description
DUT ID
Comments
of the DUT ID field)
Acquire live waveforms Acquire active signals from the DUT for measurement and analysis.
Use prerecorded waveform files Run tests on a saved waveform. Open (load) a saved test setup
View
icon (to the right
Adds an optional text label for the DUT to reports. The default value is DUT001. The
maximum number of characters is 32.
You cannot use the following characters in an ID name: (.,..,...,\,/:?”<>|*)
Opens a Comments dialog box in which to enter optional text to add to a report.
Maximum size is 256 characters. To enable or disable comments appearing on the
test report, see Select report options
Compliance: Preselects tests and parameters needed to meet compliance
specifications. Disables the compliance filter controls.
.)
Advanced: Enables selecting o f specific tests and setting custom parameters for
Selecting Advanced adds a Configuration tab to the Setup panel. Advanced
tests.
(User-defined) tests are not considered to meet compliance testing requirements.
Device Profile
oint
Test p
De-embedding Filter (TP0 only) Lists de-embed filter file to use for TP0. Use this filter to de-embed the signal path
mber of Lanes to Test
Nu
tup
Se
xxx
Select a test point location from those listed.
between TP0 and TP2.
ck the ... button to navigate to and select filter files. The default location is My
Cli
Documents.
Filter files are device specific; contact the device manufacture to obtain filter files.
s control is not available when Test Point is set to TP2.
Thi
lects the number of lanes to test.
Se
ens the Test Lane Setup
Op
dialog box to select which lanes to test.
30 TekExpress 40GBase-CR4 Printable Help
Page 39

Application controls and menus Set DUT parameters
Test Lane Setup dialog
Use this dialog box to select which lanes to test. Link width field must match the value in the Number
of Lanes to Test fieldintheDUTpanel.
See also
Select a test
TekExpress 40GBase-CR4 Printable Help 31
Page 40

Application controls and menus Select tests
Select tests
Use the Test Selection tab to select tests. Listed tests depend on the test point selected in the DUT panel
(TP0 or TP2).
Table 9: Test Selection tab settings
Setting Description
Deselect All, Select All buttons
Select Required button Selects all tests required for compliance certification.
Tests
Schematic button Shows an equipment and test fixture setup schematic (connection diagram) for the
Configure Opens the Test Selection Configuration panel.
xxx
Deselect or select all tests in the list.
Click on a test to select or unselect. Selecting a test also show details about that
test in the Test Description pane.
All required tests are selected when in Compliance test mode.
selected test. Use to set up the equipment and fixtures or to verify the setup before
running the test.
NOTE. Select Required is the default test selection mode.
See also
Set acquisition parameters
32 TekExpress 40GBase-CR4 Printable Help
Page 41

Application controls and menus Set acquisition parameters
Set acquisition parameters
Use the Acquisition tab in the Setup panel to view test acquisition parameters. You also use this tab to
load prerecorded (saved) test session waveform files on which to run tests.
Contents displayed on this tab depend on the DUT type and selected tests.
Table 10: Acquisitions tab settings
Setting Description
Device Lists the signal type and input channel assigned to a lane.
Click in a Source field to assign a channel source to that lane.
Deskew
Test name/Acquisitions list Lists each test name and its associated acquisition lane/group type.
Show Acquire Parameters
Use to set deskew parameter and read instrument deskew/attenuation values.
When selected, lists the acquisition parameters associated with each test. Parameters
are shown in a separate column.
TekExpress 40GBase-CR4 Printable Help 33
Page 42

Application controls and menus Set acquisition parameters
Table 10: Acquisitions tab settings (cont.)
Setting Description
Acquire Step By Step When selected, the application displays equipment/signal setup and configuration
information, and examples of input signal waveform images
measurement acquisitions. Us the example waveform images to verify that the live
signal is correct. Click OK to continue the acquisition process.
When not selected, the application displays just equipment or signal
setup/configuration information during execution of the measurement acquisitions, as
required by selected tests. No input signal waveform images are shown.
If the live signal waveform does not match the displayed example waveform, or if an
acquisition fails, exit the screen and click Stop to halt the test session,
Signal Validation Sets the signal validation actions. Select from the available list items. S ignal
validation only applies to l ive signals; signal validation is not done on saved
(pre-recorded) waveform.
Select Prompt me if signal fails to display a dialog box when the application fails to
acquire a valid signal after a specified number of retries (as set in the Configuration
tab or fields). Select one of the following options in the dialog box:
Re-Acquire: The application attempts to re-acquire the signal.
Use Anyway: Use the acquired signal for all applicable tests. The test results
may not be as expected.
, during execution of the
Skip Test: Skip (ignore) any test(s) that depend on this acquisition. Skipped tests
are listed in the status panel and in the report.
Select Skip test if signal fails to skip all tests that depend on an acquired signal that
fails signal validation. The comments section in the report file will show the details as
"User skipped acquisitions for this pattern."
Select Use signal as is - Don’t Check to skip signal validation and use the signal
as-is for testing. The test results may not be as expected.
xxx
The a pplication saves all acquisition waveforms to files by default. Waveforms are saved to a folder
that is unique to each session (a session starts when you click the Start button). The folder path is
X:\40GBase-CR4\Untitled Session\<dutid_fold er> \<da te> _<t ime>. Images created for each
lysis, CSV files with result values, reports, and other information specific to that particular execution
ana
are also saved in this folder.
en the session is saved, content is moved to that session folder and the “Untitled Session” name is
Wh
replaced by the session name.
See also
Running tests on prerecorded saved waveforms
Acquire Ste p By Step exa mple w aveform screens
34 TekExpress 40GBase-CR4 Printable Help
Page 43

Application controls and menus Acquire Step By Step example waveform screens
Acquire Step By Step example waveform
screens
The Acquire Step By Step option is available in the Acquisitions panel. When selected, this function
displays the reference input waveform required for the selected me asurem ent. Compare the example
waveform to t
verify the c orrect signal is present. If the signal d oes not match, you can change the setup before acquiring
the waveforms.
This is a global function that is applied to all tests(exceptGroup6inTP2andGroup5inTP0)when
selected. By default, this option is deselected.
NOTE. The Acquire Step By Step function is not available when using prerecorded waveform files.
All PRBS data patterns except PRB S9
The following screen shot is shown for all PRBS(n) data patterns except PR B S9. Positive edge trigger
with level as 50% is used. This image shows that the signal to be acquired should have a random pattern.
he input waveform coming from DUT with the typical reference waveform (snap shot) to
BS9datapattern
PR
The following screen shot is shown for PRBS9 data patterns. Width trigger with positive width as equal 9
I will be used, cursors will be placed to show that the positive pulse is representing 9 UI.
U
TekExpress 40GBase-CR4 Printable Help 35
Page 44

Application controls and menus Acquire Step By Step example waveform screens
8010 data pattern
Following screen shot will be shown
Positive edge trigger with level as 50% is used. This image shows that the signal to be acquired should
have an 8180 pattern. Cursors are placed to show that the positive width is approximately 8 UI.
1010 data pattern
Following screen shot will be shown Positive edge trigger with level as 50% is used. This image shows
that the signal to be acquired should have an 1010 pattern. Cursors are placed to show that the positive
idth is approximately 1UI.
w
36 TekExpress 40GBase-CR4 Printable Help
Page 45

Application controls and menus Acquire Step By Step example waveform screens
Differential p eak to peak volta ge with tx disabled test
If differential peak to peak voltage with tx disabled test is selected, the applicatin shows the following
screen. This image shows that signal which is expected with DUT tx disabled.
TekExpress 40GBase-CR4 Printable Help 37
Page 46

Application controls and menus Running tests on prerecorded (saved) waveforms
Running tests on prerecorded (saved)
waveforms
To load a saved waveform file:
1. Click DUT.
2. Click Use pre-recorded waveform files.
3. Click Acquisitions. The Waveform Filename column now shows browse buttons.
4. Click the browse button ( ) for each test acquisition type.
5. Navigate to and select the appropriate waveform file(s). You will need to select all waveforms required
for the acquisition type.
6. To change , remove, or add a file to the list, click the browse button next to the file name to change, and
use the menu items to replace, remove (delete) or add a file in the list.
7. Click Start.
38 TekExpress 40GBase-CR4 Printable Help
Page 47

Application controls and menus Configuration tab parameters
Configuration tab parameters
Use the Configuration tab to set and view g loba l instrument parameters for the selected tests. Whic h
fields are a vailable to edit depends on the selected test mode (Compliance or User Defined) a s set i n
this tab or the DUT tab.
NOTE. The Configuration tab is only displayed when the View (test mode) field is set to Advanced
(user-defin
DUT View mode is set to Compliance), open the Test Selection tab and click the Configure button.
ed) in the DUT tab. To access configuration settings while in Compliance testing mode (the
NOTE. Yo u
cannot change test parameters that are grayed out.
See also
Configuration: Global Settings parameters
Configuration: Measurements settings
TekExpress 40GBase-CR4 Printable Help 39
Page 48

Application controls and menus Configuration: Global Settings parameters
Configuration: Global Settings parameters
The following table lists the Configuration tab settings and parameters. This is the same panel as the one
displayed when clicking the Configure button in the Test Selection tab (when DUT panel View field is set
to Compliance). Fields shown on this tab can change depending on selected items.
Table 11:
Control Description
Mode
Test S
Configuration: Global Settings tab
Sets the test measurement mode.
election button
Displ
for Compliance mode on the DUT panel, and you clicked the Configure button in
the Test Selection panel.
Compliance: Most test parameter values cannot be edited. Select this for
compliance mode testing.
User Defined Mode: Enables editing of measurement parameters for selected
in the Measurements tab or with the Limits Editor).
tests (
ays the main Test Selection panel. This button is only shown when View is set
40 TekExpress 40GBase-CR4 Printable Help
Page 49

Application controls and menus Configuration: Global Settings parameters
Table 11: Configuration: Global Settings tab (cont.)
Control Description
Limits Editor button
Opens the Limits Editor dialog box.
In User Defined Mode, use the Limits Editor to edit individual test limit settings.
To edit a v alue, click that field and either select from the displayed list or enter a new
value. Use scroll bars to view all available fields.
Editor: compare string definitions
Limits
In Compliance Mode, use the Limits Editor to view the measurement high and low
limits used for selected tests. You cannot edit values while i n Compliance mode.
Instruments Detected
Displays a list of the connected instruments found during the instrument discovery.
ument types include equipment such as oscilloscopes and signal sources (AFG,
Instr
AWG). Select Options > Instrument Control Settings to refresh the connected
instrument list.
Record Length
Sets the waveform record length to acquire. Valid range is 2M to 20M.
Use Filter File for De-embedding All tests except Group 4: When selected, provides a way to select and apply a
embed filter for sampling rate of 100 Gs/sec.
deGroup 4 tests only: When selected, provides a way to select and appy a
de-embedding filter for sampling rate of 3.3 Ts/sec.
xxx
See also
Configuration: Measurements parameters
About acquisitions
Limits Editor: compare string definitions
TekExpress 40GBase-CR4 Printable Help 41
Page 50

Application controls and menus Configuration: Measurements parameters
Configuration: Measurements parameters
Use the Measurements tab to view or edit individual test parameters. Select a test for which to view the
parameters; the parameters are s hown if that measurement has editable parameters.
To edit measurement parameters, select User-Defined M ode, select a measurement, and m ake changes to
the tab fields (if any) listed below the measurement selection list.
NOTE. Not al
l m easurements have editable settings.
Click the Test Selection button (if present) to return to the main Test Selection panel. Otherwise select
another S
etup tab to exit this panel.
Table 12: Configuration: Measurements tab
Control Description
Mode
Test Selection button Displays the main Test Selection panel. This button is only shown when View is set
Sets the test measurement mode.
Compliance: Most test parameter values cannot be edited. Select this for
compliance mode testing.
User Defined Mode: Enables editing of measurement parameters for selected
tests (in the Measurements tab or with the Limits Editor).
for Compliance mode on the DUT panel, and you clicked the Configure button in
the Test Selection panel.
42 TekExpress 40GBase-CR4 Printable Help
Page 51

Application controls and menus Configuration: Measurements parameters
Table 12: Configuration: Measurements tab (cont.)
Control Description
Limits Editor button
Opens the Limits Editor dialog box.
In User Defined Mode, use the Limits Editor to edit individual test limit settings
of all listed tests.
To edit a
value, click that field and either select from the displayed list or enter a new
value. Use scroll bars to view all available fields.
Limits Editor: compare string definitions
In Comp
liance Mode, use the Limits Editor to view the measurement high and low
limits used for selected tests. You cannot edit values while i n Compliance mode.
uments Detected
Instr
Displays a list of the connected oscilloscopes and other instruments found during
the instrument discovery. Select Options > Instrument Control Settings to refresh
nnected instrument list
the co
Measurement list
s test measurements as selected in the Test Selection tab. Select a test in this list
List
to view/edit any associated parameters.
ire tab
Acqu
Displays the available acquisition settings of the selected measurement. Not all
measurements have editable settings.
xxx
See also
Configuration tab: Global Settings parameters
.
TekExpress 40GBase-CR4 Printable Help 43
Page 52

Application controls and menus Preferences tab
Preferences tab
Use the Preferences tab to s et the application action when a test is completed.
Table 13: Preferences tab settings
Setting Descripti
On test co
Email
xxx
mpletion, send me an
Sends an e
on
mail when a test finishes.
44 TekExpress 40GBase-CR4 Printable Help
Page 53
Application controls and menus Status panel
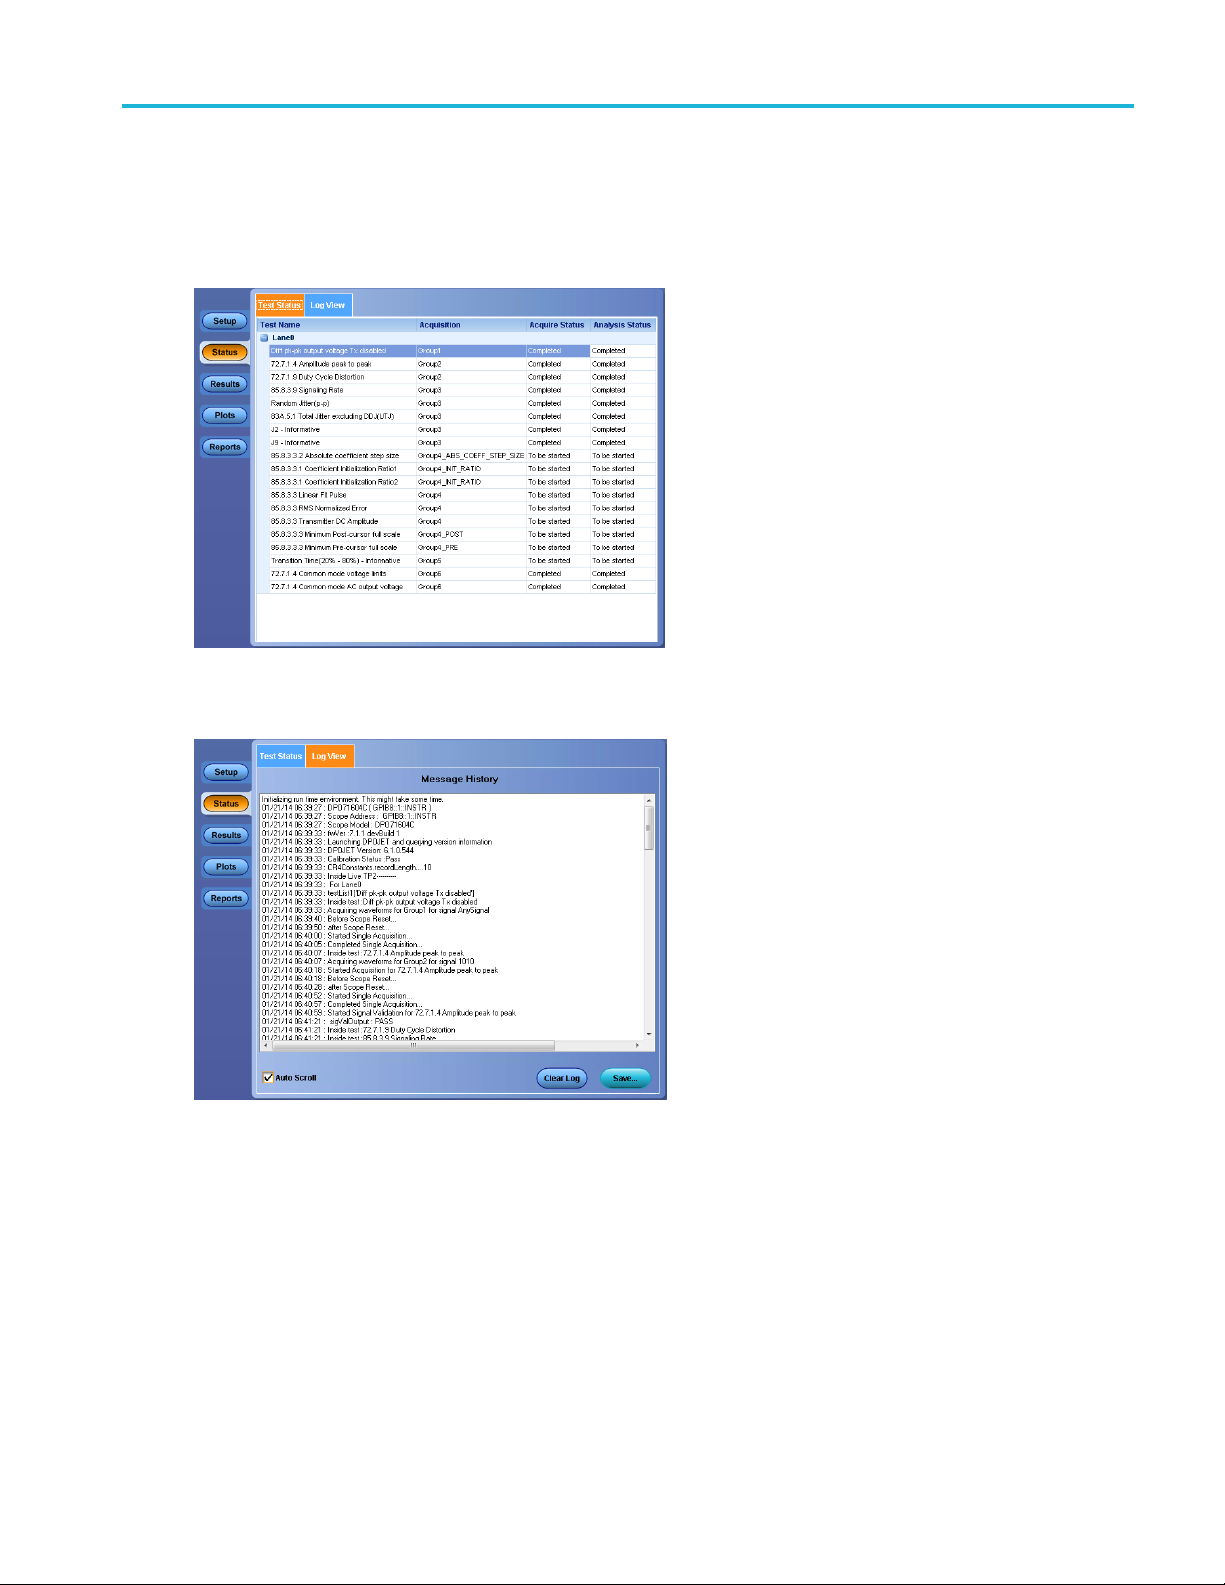
Status panel
The Status button displays the Test Status and Log View tabs, which provide status on test acquisition and
analysis (Test Status tab) and a listing of test tasks performed (Log View tab).
Test Status tab
Log View tab
The application opens the Test Status tab when you start a test run. You can select the Test Status or the
Log View tab to view these items while tests are running. Use standard Windows procedur es for changing
the width of a column.
TekExpress 40GBase-CR4 Printable Help 45
Page 54

Application controls and menus Status panel
Table 14: Log View tab: fields and controls
Control Description
Message History
Window that li
Auto Scroll Enables auto
the test.
Clear Log button Clears all messages from the log view.
Save button Saves the log filetoatextfile. Use the standard Save File dialog box to navigate to
and specify the folder and file name to which to save the log text.
xxx
sts all executed test operations with timestamp information.
matic scrolling of the log view as information is added to the log during
46 TekExpress 40GBase-CR4 Printable Help
Page 55

Application controls and menus Results panel overview
Results panel overview
When a test finishes, the application automatically opens the Results panel to display a summary of
signal and preset test results.
The Overall Test Result is displayed at the top left of the Results table. If all of the tests for the session
pass, the overall test result is Pass. If one or more tests fail, the overall test result is Fail.
By default, results are displayed in summary format with the measurement details collapsed and with the
Pass/Fail column visible. Set viewing preferences for this panel from the Preferences menu
in the upper right corner of this panel).
NOTE. NA (Not Available) is displayed in the test results when invalid signals cause measurement errors.
eport provides details related to the cause of the error.
The r
(menu item is
See also
View a report
TekExpress 40GBase-CR4 Printable Help 47
Page 56

Application controls and menus Preferences menu (Results pa nel)
Preferences menu (Results panel)
The Preferences menu is part of the Results panel d isplay (in the upper-right area of the screen). Use the
Preferences menu to change how some items display in the Results panel.
Item Description
Show Pass/Fail Show or hide the Pass/Fail column
View Results Summary Collapse all expanded test results
View Re
Enable Wordwrap Enable or disable wordwrap in columns
Group By Lane Groups test results by lane number
Group By Test Groups test results by test number
xxx
sults Details
Expand
all tests listed
See also
Results panel overview
48 TekExpress 40GBase-CR4 Printable Help
Page 57

Application controls and menus View test result files
View test result files
Files related to tests are stored in the My TekExpress\40GB ase -CR 4 f older. Each test setup in this folder
has a test setup file and a test setup folder, both with the test setup name.
The test setup file is preceded by the TekExpress icon and usually has no visible file name extension.
Inside the test setup folder is another folder named for the DUT ID used in the test sessions. The default
is DUT001.
Inside the DUT001 folder are the session folders and files. Each session also has a folder and file pair, both
named for the test session using the naming convention (date)_(time). Each session file is stored outside
its matching session folder:
Each session folder contains image files of any plots generated from running the test session. If you
selected to save all waveforms or ran tests using prerecorded waveform files, these are included here.
The first time you run a new, unsaved session, the session files are stored in the
folder located at ..\My TekExpress\4 0GB ase- CR4. When you name and save the session, the files are
placed in a folder with the name that you specify. A copy of the test files stay in the Untitled Session folder
until you run a new test or until you close the 40G-CR4 application.
also
See
File name extensions
quired \My TekExpress folder settings
Re
Untitled Session
TekExpress 40GBase-CR4 Printable Help 49
Page 58

Application controls and menus Plots panel overview
Plots panel overview
Use the Plots panel to view waveform plots associated with test measurements, and use cursors to take
measurements on the plotted waveforms.
The toolbar at the to edge of the plot contains the plot UI controls. Position the cursor over a control to
see a pop
for a specific measurement.
-up description of that control. Use the Lane and Select Test controls to select and view a plot
See also
Plot cursors
50 TekExpress 40GBase-CR4 Printable Help
Page 59

Application controls and menus Plot cursors
Plot cursors
The plot panel provides a pair of cursors for each plot axis (X axis and Yaxis). The readout in the upper
right corner of the plot shows the difference (delta) between the cursors.
Each pair of cursors is positioned together by default. To move a cursor:
1. position the mouse pointer over the plot cursor icon until the pointer changes to a vertical or horizontal
move icon.
2. Press and hold the left mouse button, then move the cursor to a new position.
3. Release the mouse button.
TekExpress 40GBase-CR4 Printable Help 51
Page 60

Application controls and menus Reports panel overview
Reports panel overview
Use the Reports panel to append new results to a report, name and save reports from the curr ent session,
select test content to include in reports, view saved reports, and select report conent options.
For information on setting up reports, see Select report options. For information on viewing reports,
see View a Report
.
See also
About
panels
52 TekExpress 40GBase-CR4 Printable Help
Page 61

Application controls and menus Select report options
Select report options
Click the Reports button and use the Reports panel controls to select which test result information to
include in the report, and the naming conventions to use for the report. For example, always give the report
a unique name
Select report options before running a test or when creating and saving test setups. Report settings are
included in
In the Reports panel, select from the following repo r t optio ns:
Table 15: Report options
Setting Description
Report Generation
Generate new report Creates a new report.
Append to previous run session
Replace current test in previous
run session
Report name
or select to have the same name increment each time you run a particular test.
saved test setups.
Appends the latest test results to the end of the current session’s test results report.
Replaces the previous test results with the latest test results. Results from newly
added tests are appended to the end of the report.
Displays the name and location from which to open a report. The default location is
at \My TekExpress\40GBase-CR4\<session_name>\<dutid_folder>\<date>_<time>\.
The report file in this folder gets overwritten each time you run a test unless you
specify a unique name or select to auto increment the report name.
Change the report name or location.
Do one of the following:
In the Report Path field, type over the current folder path and
name.
Double-click in the Report Path field and then make selections
from the popup keyboard and click the Enter button.
Be sure to include the entire folder path, the file name, and the
file extension. For example: C:\<user_name>\My Documents\My
TekExpress\40GBase-CR4\DUT001_Test_72.7.1.3.mht.
NOTE. You cannot set the file location using the Browse button.
Open an existing report.
Click Browse, locate and select the report file and then click View at the bottom
of the panel.
Save as type Saves a report in the specified output format (Web archive or PDF).
NOTE. If you select a file type different from the default, be sure to change the
report file name extension in the Report Name field to match.
Auto increment report name if
duplicate
Sets the application to automatically increment the name of the report file if the
application finds a file with the same name as the one being generated. For example:
DUT001, DUT002, DUT003. This option is enabled by default.
TekExpress 40GBase-CR4 Printable Help 53
Page 62

Application controls and menus Select report options
Table 15: Report options (cont.)
Setting Description
Add logo to report
Contents To Save
Include pass/fail results summary Sets the application to include the color block labeled Test Result (indicating whether
Include detailed results
Include plot images
Include setup configuration Sets the application to include hardware and software information in the summary
Include user comments
Group test Results by Groups report test results by test name or Lanes.
View Report After Generating
View button
Generate Report Generates a new report based on the current (most-recent) analysis results.
Save As Specify a name for the report.
xxx
Adds the specified graphic file to the top-right area of the report title. Click the browse
button and navigate to and select the graphic file to load (.PNG or .JPG format;
maximum size = 200 pixels wide x 100 pixels high).
the test passed or failed) in the report. For details, see Report C ontents in View
a report.
Sets the application to include parameters measured, such as Margin, Low Limit,
High Limit, Compliance Mode Yes/No, Execution Time, and test-specific Comments
generated by the software.
Sets the application to save waveform and measurement data screen shots that are
captured from the oscilloscope during test execution.
box at the top of the report. Information includes: the oscilloscope model and
serial number, probe model and serial number, the oscilloscope firmware version,
SPC and factory calibration status, and software versions for applications used in
the measurements.
Select to include any comments about the test that you or another user added in the
DUT tab of the Setup panel. Comments appear in the Comments section, under the
summary box at the beginning of each report.
Automatically opens the report in a Web browser when the test completes. This
option is selected by default.
Click to view the most current report.
54 TekExpress 40GBase-CR4 Printable Help
Page 63

Application controls and menus View a report
View a report
The application automatically generates a report when test analysis is completed and displays the report
in your default Web browser (unless you cleared the View Report After Generating check box in the
Reports pane
do the following:
l before running the test). If you cleared this check box, or to view a different test report,
1. Click the Re
2. Click the Browse button and locate and select the report file to view.
3. In the Reports panel, click View.
For information on changing the file type, file name, and other report options, see Select report options
ports button.
.
TekExpress 40GBase-CR4 Printable Help 55
Page 64

Application controls and menus Report contents
Report contents
A report shows specified test details, such as detailed results and plots, as set in the Reports panel.
Setup configuration information is listed in the summary box at the b eginning of the report. This
informat
information from a report, clear the Include Setup Configuration check box in the Reports panel before
running the test.
ion includes the oscilloscope model and serial number, and software versions. To e xclude this
If you selected to include comments in the test report, any comments you added in the DUT tab are
shown at the top of the report.
The Test Result column indicates whether a test passed or failed. If the test p assed, the cell text is green.
If the test failed, the text is red. To exclude this information from a report, clear the Include Pass/Fail
Results Summary check box in the Reports panel before running the test.
NOTE. NA (Not Applicable) is displayed in the report contents if an invalid waveform was supplied
for the test.
See also
ults panel overview
Res
View test-related files
56 TekExpress 40GBase-CR4 Printable Help
Page 65

Running tests Report contents
TekExpress 40GBase-CR4 Printable Help 57
Page 66

Running tests Test process flow
Test process flow
Use the following steps to set up and run tests.
1. Allow test instruments to warm up (~20 minutes).
2. Deskew the real-time oscilloscope
3. Set up test equipment
4. Verify that required instruments are connected to 4
5. Set DUT parameters
6. Select tests
7. View acquisition settings
8. Set global signal-related parameters
9. Select test notification preferences
10. Select report options
11. Check the prerun checklis t
12. Click Start to Run tests.
.
.
.
.
.
.
.
.
See also
Abouttestsetups
About running tests
0G-CR4
.
Deskew real-time oscilloscopes
Use the following procedure to deskew d irect input SMA channels on a real time oscilloscope.
NOTE. DPOJET has an automatic deskew option under Analyze > Jitter A nd Eye Analysis > Deskew.
RefertoyourDPOJET
1. Run Signal Path Compensation (SPC) on the oscilloscope.
2. Connect a SMA Power Splitte
output of the oscilloscope.
3. Connect SMA cables from each of the two channels to be deskewed to the power splitter (or SMA
coaxial “T” connector). It is best to use matched cable s when making high speed seria l measurements.
It is important to use the same cables that will be used for subsequent measurements.
4. Select Default Setup, and then select Autoset on the oscilloscope front panel.
58 TekExpress 40GBase-CR4 Printable Help
online help for information on how to deskew the channels.
r (preferred) or SMA 50 Ω coaxial “T” connector to the Fast Edge
Page 67

Running tests Deskew real-time oscilloscopes
5. Set the oscilloscope for 70% to 90% full screen amplitude on both channels. Center both traces
so that they overlap.
6. Make sure that volts/div, position, and offset are identical for the two channels being deskewed.
7. Set the time/div to approximately 100 p s/div or less, with sample rate at 1ps/pt. These settings
are not critical, but should be close.
8. Set the horizontal acquisition mode to average, which provides a more stable display.
9. Select Deskew from the Vertical menu.
10. Verify that the reference channel (typically CH1 o r CH2) is set to 0psdeskew.
11. In the desk
deskew to overlay the rising edge as best as possible.
NOTE. Typicalvaluesareinthe10’sofpsorlesswithcables connected directly from Fast Edge to SMA
inputs. If you are using a switch box (for example, Keithley), deskew the com plete path from where the
test fi xture connects, through the switch, and into the oscilloscope. Deskew values in these cases may
be as much as 30 ps or more.
NOTE. There can be significant differences in the skew between two TCA-SMA adapters. If you find
that a system requires a very large correction, obtain a pair of TCA-SMA adapters that closely match
each other to reduce the amount of correction.
NOTE. TekExpress retains the user configured Deskew values, and does not override the values during test
runs.
ew control window, select the channel to deskew (typically CH3 or CH4). Adjust the
TekExpress 40GBase-CR4 Printable Help 59
Page 68

Running tests Instrument and DUT connection setup
Instrument and DUT connection setup
Click the Setup > Test Selection > Schematic button to open a PDF file that shows the compliance test
setup diagrams (instrument, DUT, and cabling) for supported testing configurations.
See also
Minimum sys
View connected instruments
tem requirements
60 TekExpress 40GBase-CR4 Printable Help
Page 69

Running tests Running tests
Running tests
After selecting and configuring tests, review the prerun checklist andthenclickStart to run the tests. To
monitor the test progress, switch between viewing the Status panel and the Results panel. You cannot edit
any fields on t
The application displays a report when the tests are complete. While the tests are running, other
applicatio
other applications, but you can switch to other applications by using the Alt + Tab key combination. To
keep the a pplication screen on top (in front of other application screens), select Keep On Top from
the TekExpress Options menu.
See also
Configuration tab parameters
hese panels while tests are running.
ns may display windows in the background. The TekScope application takes precedence over
TekExpress 40GBase-CR4 Printable Help 61
Page 70

Running tests Prerun checklist
Prerun checklist
Do the following before you click Start to run a test:
NOTE. If this is the fi rst time you are running a test on the application, make sure that you have done the
steps in Requ
1. Make sure that all the required instruments are properly warmed up (approximately 20 minutes).
2. Perform Signal Path Compensation (SPC)
a. On the oscilloscope main menu, select the Utilities menu.
b. Select Instrument Calibration.
c. Follow the on-screen instructions.
ired \My TekExpress folder settings
before continuing.
3. Deskew r
4. Verify that the application detects that the correct instruments are connected (oscilloscope and signal
source
a. In 40GBase-C R4, click Setup > Test Selection > Configure.
b. Click Global Settings.
c. In the Instruments Det ected list, verify that the test setup instruments are shown. If they are not,
ealtime oscilloscope channels
s):
click on an instrument and click the arrow button to list and select from all detected instruments. If
the required instrument is still not listed, use the TekExpress Instrument Control Settings dialog
o scan for and detect instruments (see View connected instruments
box t
).
See also
Instrument and DUT connection setup
62 TekExpress 40GBase-CR4 Printable Help
Page 71

Saving and recalling test setup files Prerun checklist
TekExpress 40GBase-CR4 Printable Help 63
Page 72

Saving and recalling test setup files Test setup files overview
Test setup files overview
Saved test setup information (such as the selected oscilloscope, general parameters, acquisition param eters,
measurement lim its, waveforms (if applicable), and other configuration settings) are all saved under
the setup name at X:\40GBase-CR4.
Use test setups to:
Run a new session, acquiring live waveforms, using a saved test configuration.
Create a new test setup based on an existing one.
Vie w all th
status as it executed, and the results summary.
Run a save
e informa tion associated with a saved test, including the log file, the history of the test
d test using saved waveforms.
See also
Save a test setup
Recall a saved test setup
64 TekExpress 40GBase-CR4 Printable Help
Page 73

Saving and recalling test setup files Save a test setup file
Save a test setup file
Save a test setup before or after running a test to save the test settings. Create a new test setup from any
open setup or from the default setup. When you select the default test setup, all parameters are returned to
the applicat
To immediately save the current setup session to the same setup name, select Options > Save Test Setup.
To immediately save the c urrent setup session to a new setup name, select Options > Save Test Setup As.
To create and save a new setup from the default test setup:
1. Select Options > Default Test Setup to return the application to default test settings.
2. Click the application Setup button and use the setup tabs to set required options and parameters (DUT,
Test Selection, and so on).
ion’s default values.
3. Click the application Reports button and set your report options
4. Optiona
information and reports. If it does not, edit the parameters and repeat this step u ntil the test runs to
your satisfaction.
Running the test helps verify that all parameters are set correctly, but it is not a necessary step.
5. Selec
the file to
l: Click Start to run the test and verify that it runs correctly and captures the specified test
t Options > Save Test Setup.Enterthefile name for the new setup file. The application saves
X:\40GBase-CR4\<session_name>.
.
See also
Test pr ocess flow
View test-related files
Configuration tab parameters
TekExpress 40GBase-CR4 Printable Help 65
Page 74

Saving and recalling test setup files Open (load) a saved test setup file
Open (load) a saved test setup file
These instructions are for recalling saved test setups.
1. Select Options > Open Test Setup.
2. Select the setup from the list and click Open.Setupfiles must be located at X:\40GBase-CR4.
See also
Abouttestsetups
Create a n ew test setup based on an existing one
Test setups overview
66 TekExpress 40GBase-CR4 Printable Help
Page 75

Saving and recalling test setup files Run a saved test in prerecorded mode
Run a saved test in prerecorded mode
Use this option to rerun a complete test using just the oscilloscope and the saved test setup files, provided
that you selected to save the captured waveforms when you originally ran the saved test.
NOTE. When yo
results are saved in a new session folder named for the date and time of the session. Any test settings that
you changed for the session will be saved as a new test session fileandbepairedwithafolderofthesame
name. Example. When you open a test setup that has multiple sessions and you select a session from the
Run session list in the DUT tab, the settings associated with that test session are restored.
Each test session folder h as a matching test session file that stores the individual test settings for that
session.
1. Use the Options menu to Open a saved test setup file
2. Select Setup > DUT andthenselectUse pre-recorded waveform files. A Run session drop-do wn
list appears that displays the previous saved sessions for this test.
3. Select the session to run. NOTE. If you select a session for which no waveform files were saved, you
will receive an error message. Either select another te st session or select waveform files to use.
4. Click Start.
5. To save the test results, session settings, and related files, save the test setup before selecting another
test setup or exiting the application.
u run a saved test in prerecorded mode and then save it under the same name, the test
TekExpress 40GBase-CR4 Printable Help 67
Page 76

Saving and recalling test setup files Create a new test setup file based on an existing one
Create a new test setup file based on an
existing one
Use this method to create a variation on a test setup without having to create the setup from the beginning.
1. Select Options > Open Test Setup.
2. Select a setup from the list and then click Open.
3. Use the Setup and Reports panels to modify the parameters to meet your testing requirements.
4. Select Opt
5. Enter a test setup name and click Save.
ions > Save Test Setup As.
See also
About te
Set DUT parameters
Select acquisitions
st setups
68 TekExpress 40GBase-CR4 Printable Help
Page 77

TekExpress programm atic interface About the p rogramm atic interface
About the programmatic interface
The Programm atic interface seamlessly integrates the TekExpress test automation application with the
high-level automation layer. This also lets you control the state of the TekExpress application running on a
local or a rem
ote computer.
The follo
TekExpress leverages .Net Marshalling to enable the Programmatic Interface for TekExpress Client.
TekExpress provides a client library for TekExpress clients to use the programmatic interface. The
TekEx
clients. The TekExpress client library maintains a reference to the TekExpress Server and this reference
allows the client to control the server state.
wing term inology is used in this section to simplify description text:
TekExpress Client: A high-level automation application that communicates with TekExpress using
TekExpr
TekExpress Server: The TekExpress application when being controlled by TekExpress Client.
ess Programmatic Interface.
press client library is inherited from .Net MarshalByRef class to provide the proxy object for the
See also
Requirements for Developing TekExpress Client
TekExpress 40GBase-CR4 Printable Help 69
Page 78

TekExpress programmatic interface To enable remote access
To enable remote access
To access and remotely control an ins trument using the TekExpress programmatic interface, you need to
change specific firewall settings as follows:
1. Access the Windows C ontrol Panel and open the Windows Firewall tool (Start > Control Panel > All
Control Panel Items > Windows Firewall).
2. Click Advance Settings > Inbound Rules.
3. Scroll through the Inbound Rules list to see if the following item(s) (or with a similar n ame) are
shown:
TekExpress 40GBase-CR4
4. If items are shown, you do not need to set up any rules. Exit the Windows Firewall tool.
5. If items are missing, use the following procedure to run the New Inbound Rule Wizard and add these
executables to the rules to enable remote access to the TekExpress application.
Run the New Inbound Rule wizard
1. Click on New Rule (in Actions column) to start the New Inbound Rule wizard.
2. Verify that Program is selected in the Rule Type panel and click Next.
3. Click Browse in the Program panel and navigate to and select one of the following TekExpress
applications (depending on the one for which you need to create a rule):
4. TekExpress 4 0GBase-CR4
5. TekExpress.exe
70 TekExpress 40GBase-CR4 Printable Help
Page 79

TekExpress programm atic interface To enable remote access
NOTE. See Application directories and content for the path to the application files.
6. Click Next.
7. Verify that Allow the connection is selected in the Action panel and click Next.
8. Verify that all fields are selected (Domain, Private,andPublic)intheProfile panel and click Next.
9. Use the field
s in the Name panel to enter a name and optional description for the rule. For example, a
name for the TekExpress 40G-CR4 application could be TekExpress 40G-CR4 Application.Add
description text to further identify the rule.
10. Click Finish to return to the main Windows Firewall screen.
11. Scroll th
rough the Inbound Rules list and verify that the list shows the rule that you just entered.
12. Repeat steps 1 through 11 to enter the other TekExpress executable if it is missing from the list.
Enter TekExpress PI as the name.
13. Scroll through the Inbound Rules list and verify that the list shows the rule that you just entered.
14. Exit the Windows Firewall tool.
To use the remote access:
1. Obtain the IP address of the instrum ent on which you are running TekExpress 40GBase-CR4. For
example, 134.64.235.198.
2. On the PC from which you are accessing the remote instrument, use the instrument IP address as part
of the PI code to access that instrum ent. For example:
object obj = pi Cli ent .Co nne ct( “134 .64 .23 5.1 98” ,ou t clienti d);
TekExpress 40GBase-CR4 Printable Help 71
Page 80

TekExpress programmatic interface Requirements for developing TekExpress client
Requirements for developing TekExpress
client
While developing TekExpress Client, use the TekExpressClient.dll. The client can be a VB .Net, C#
.Net, Python, or Web application. The examples for interfaces in each of these applications are in the
Samples fold
References required
TekExpressClient.dll has an internal reference to IIdlglib.dll and IRemot eIn ter face.dll
IIdlglib.dll has a reference to TekDotNetLi b.d ll.
er.
.
IRemoteI
interface that forms the communication line between the server and the client.
IIdlgli
client-end.
NOTE. The end-user c lient application does not need any reference to the above mentioned DLL files.
It is essential to have these DLLs (IRemoteInterface.dll, IIdlglib.dll and TekDotNetLib.dll) in the same
folder as that of TekExpressClient.dll.
ired steps for a client
Requ
The client uses the following steps to use TekExpressClient.dll to programmatically control the
er:
serv
Develop a client UI to access the interfaces exposed through the server. This client loads
ExpressClient.dll
Tek
UI can call the specific functions to run the operations requested by the client. When the client is up and
running, it does the following to run a remote operation:
1. To connect to the server, the client provides the IP address of the PC where the server is running.
he client locks the server application to avoid conflict with any other Client that may try to control
2.T
the server simultaneously. “Lock” would also disable all user controls on the server so that server
state cannot be changed by manual operation.
nterface.dll
b.dll
provides the methods to generate and direct the secondary dialog messages at the
provides the interfaces required to perform the remote automations. It is an
to access the interfaces. After TekExpres sCl ient .dl l is loaded, the client
If any other client tries to access a server that is locked, it will receive a notification that the server
is locked by another client.
3. When the client has connected to and locked the server, the client can access any of the programmatic
controls needed to run the remote automations.
4. After the client operations finish, the client unlocks the server.
72 TekExpress 40GBase-CR4 Printable Help
Page 81

TekExpress programm atic interface Remote proxy object
Remote proxy object
The server exposes a remote object to let the remote client access and perform the server-side operations
remotely. The proxy object is instantiated and exposed at the server-end through marshalling.
The following is an example:
RemotingConfiguration.RegisterWe llK now nSe rvi ceT ype (type of (TekExpres sRe moteInterface), “TekExpress Remote interface”, WellKnownObject Mod e.S ing let on) ;
This object lets the remote client access the interfaces exposed at the server side. The client gets the
reference to this object when the client gets connected to the server.
For example,
//Get a reference to the remote object
remoteObject = (IRemoteInterface)Activator.GetO bje ct( typ eof (IR emo teIn ter fac e),
URL.ToString());
TekExpress 40GBase-CR4 Printable Help 73
Page 82

TekExpress programmatic interface Client proxy object
Client proxy object
Client exposes a proxy object to receive certain information.
For example,
//Register the client proxy object
WellKnownServiceTypeEntry[] e = RemotingConfiguration.GetR egisteredWellKnownServiceTypes();
clientInterface = new ClientInterface();
RemotingConfiguration.RegisterWell Kno wnS ervi ceT ype (ty peo f(C lie ntI nte rfac e),
“Remote Client Interface”, WellKnownObjectMode.Singleton);
//Expose the client proxy object through marshalling
RemotingServices.Marshal(clientInt erf ace , "Remote Client Inteface ");
lient proxy object is used for the following:
The c
To get the secondary dialog messages from the server.
To get the file transfer commands from the server while transferring the report.
Examples
clientObject.clientIntf.DisplayDia log (ca ptio n, msg,iconT ype, btnType);
clientObject.clientIntf.TransferBy tes (bu ffer , read, fileLength );
or more information, click the following links:
F
Secondary Dialog Message Handling
74 TekExpress 40GBase-CR4 Printable Help
Page 83

TekExpress programm atic interface Client proxy object
The secondary dialog messages from the Secondary Dialog library are redirected to the client-end when a
client is performing the automations at the remote end.
In the secondary dialog library, the assembly that is calling for the dialog box to be displayed is checked
and if a remote connection is detected, the messages are directed to the remote end.
File Transfer Events
When the client requests the transfer of the report, the server reads the report and transfers the file by
calling the file transfer methods at the client-end.
TekExpress 40GBase-CR4 Printable Help 75
Page 84

TekExpress programmatic interface Client programmatic interface example
Client programmatic interface example
An example of the client programmatic interface is described and shown as follows:
Process flowchart
76 TekExpress 40GBase-CR4 Printable Help
Page 85

TekExpress programm atic interface Client programmatic interface example
TekExpress 40GBase-CR4 Printable Help 77
Page 86

TekExpress programmatic interface Client programmatic interface example
1. Connect to a server or remote object using the programmatic interface provided.
2. Get the client ID that is created when connecting to the remote object. This client ID is one of the
required pa rameters to communicate with the server.
NOTE. The server identifies the client with this ID only and rejects any request if the ID is invalid.
3. Lock the server for further operations. This disables the application interface.
NOTE. You can get values from the server or set values from the server to the client only if the application
is locked.
4. Register for receiving notifications on status change events on the server. To register you need to
give a handler as a parameter.
NOTE. Whenever there is a change in the status of the server, all the clients registered with the server
receive a notification from the server.
5. Select the tests that you want to run through the programmatic interface.
6. Set the necessary parameters for each test.
7. Run the tests.
8. Poll for the status of the application.
NOTE. Skip step 8 if you are registered for the status change notification and the status is Ready.
9. After completing the tests, get the results.
eate a report or display the results and verify or process the results.
10.Cr
11. Unlock the server after you complete all the tasks.
12. Disconnect from the remote object.
andler of status change notification
H
1. Get the status. If the status is Wait or Error, get the information that contains the title, message
description, and the expected responses for the status.
2. Perform the actions based on the status information.
3. Set the response as expecte d.
78 TekExpress 40GBase-CR4 Printable Help
Page 87

TekExpress programm atic interface Client programmatic interface example
See also
Program remote access code example
TekExpress 40GBase-CR4 Printable Help 79
Page 88

TekExpress programmatic interface Program remote access code example
Program remote access code example
This code example shows how to communicate between a remote P C and TekExpress 40GBase-CR4.
Table 16: Remote access code example
Task Code
Start the
application
Connect through
an IP address.
Lock the server
Disable the
Popups
Set the DUT ID
Select a
measurement.
Select a channel
Configure
the selected
measurement
Runwithset
configurations
Wait for the test to
complete.
Get the current
state information
Send the
response
After the test is completed:
Save results 'Save all results values from folder for current run
m_Client.Connect("localho st" ) 'True or Fal se
clientID = m_Cli ent .g et Cl ien tI D
m_Client.LockServer(clien tID )
m_Client.SetVerboseMode(c lie nt ID , false)
m_Client.SetDutId(clientI D, "DUT_Name")
mclient.SelectTest(client ID, "4 0G Ba se -CR 4" ," TP 2", "7 2. 7.1.4 Common
mode voltage lim its ", Tr ue )
mclient.setGeneralParamet er( cl ie nt ID ,"4 0G Ba se -CR 4" ," TP2","","De-Embedding filter" & "$" & "C:\\Pro gr am Files\\Tektronix\\TekExpress\\xyz.flt") 'Mea su re men t selected
mclient.SetAcquireParamet er( Cl ie nt ID ,"4 0G Ba se -CR 4" ," TP2","85.8.3.9
Signaling Rate","Grou p4 " & "$" & "Da ta Pattern" & "$" & "PRBS7")
m_Client.Run(clientID)
Do
Thread.Sleep(500)
m_Client.Application_Statu s( cl ie ntI D)
Select Case status
Case "Wait"
mClient.GetCurrentStateIn fo( cl ie nt ID , WaitingMsbBxCaption,
WaitingMsbBxMessage, WaitingMsbBxButtontexts)
mClient.SendResponse(clie ntI D, WaitingMsbBxCaption, WaitingMsbBxMessage, WaitingMsb Bx Re spo ns e)
End Select
Loop Until statu s = "Ready"
m_Client.TransferResult(c lie nt ID , logDirname)
'Save all waveforms from folder for current run
m_Client.TransferWaveform s(c li en tI D, logDirname)
'Save all images from folder for current run
m_Client.TransferImages(c lie nt ID , logDirname)
80 TekExpress 40GBase-CR4 Printable Help
Page 89

TekExpress programmatic interface Program remote access code example
Table 16: Remote access code example (cont.)
Task Code
Unlock the server
Disconnect from
server
Exit the
application
xxx
m_Client.UnlockServer(clie nt ID )
m_Client.Disconnect()
TekExpress 40GBase-CR4 Printable Help 81
Page 90

TekExpress programmatic interface The 40GBase-CR4 application commands
The 40GBase-CR4 application commands
Click a client action below to see the command name, description, parameters, return value, and an
example, associated with the action.
Connect through an IP address
Lock the server
Disable the popups
Set or get the DUT ID
Set the configuration parameters for a suite or measurement
Query the configuration parameters for a suite or measurement
Select a measurement
Select a suite
Select a channel
Configure the selected measurement
Run with set configurations or stop the run operation
Handle Error Codes
Get or set the timeout value
Wait for the test to complete
After the test is complete
Save, recall, or check if a session is saved
Unlock the server
Disconnect from server
string id
Name Type Direction Description
id string IN
xxx
Ready: Test configured and ready to start
Running: Test running
Identifier of the client performing the
remote function.
Paused: Test paused
Wait: A popup that needs your inputs
Error: An error is occurred
82 TekExpress 40GBase-CR4 Printable Help
Page 91

TekExpress programm atic interface The 40GBase-CR4 application commands
string dutName
Name Type Direction Description
dutName string IN
xxx
The new DUT ID of the setup
out bool saved
Name Type Direction Description
saved bool
xxx
OUT
This parameter is used as a check in SaveSession() and SaveSessionAs() functions.
Boolean representing whether the
current session is saved
string ip
Address
Name Type Direction Description
ipAddress string IN
The ip address of the server to which the client
g to connect to. This is required to
is tryin
establish the connection between the server
and the client.
xxx
out string clientID
Name Type Direction Description
clientid string
xxx
NOTE. If the dutName parameter is null, the client is prompted to provide a valid DUT ID.
NOTE. The server must be active and running for the client to connect to the server. Any number of
clients can be connected to the server at a time.
OUT Identifier of the client that is connected to the
server
clientId = unique number + IP address of the
client. For example, 1065–192.157.98.70
NOTE. When the client is disconnected, it is unlocked from the server and then disconnected. The id
is reused.
TekExpress 40GBase-CR4 Printable Help 83
Page 92

TekExpress programmatic interface The 40GBase-CR4 application commands
string dutId
Name Type Direction Description
dutId string
xxx
OUT The DUT ID of the setup
The dutId parameter is set after the server processes the request.
string device
Name Type Direction Description
device string IN
xxx
Specifies the name of the device
string suite
Name Type Direction Description
suite string IN
xxx
Specifies the name of the suite
string test
Name Type Direction Description
test
string IN
Specifies the name of the test to
obtain the pass or fail status
xxx
string parameterString
Name Type Direction Description
parameterString
xxx
string IN
Selects or deselects a test
int rowNr
Name Type Direction Description
rowNr int IN
xxx
NOTE. When the client tries to lock a server that is locked by another client, the client gets a
notification that the server is already locked and it must wait until the server is unlocked. If the client
locks the server and is idle for a certain a mount of time, then the server is unlocked automatically
from that client.
Specifies the zero based row index of
the sub-measurement for obtaining
the result value
84 TekExpress 40GBase-CR4 Printable Help
Page 93

TekExpress programm atic interface The 40GBase-CR4 application commands
out string[ ] status
Name Type Direction Description
status
string array
OUT The list of status messages generated
during run
xxx
string name
Name Type Direction Description
name
string IN
The name of the session being
recalled
xxx
The name parameter cannot be empty. If it is empty, the client is prompted to provide a valid name.
NOTE. When the run is performed, the status of the run is updated periodically using a timer.
string name
Name Type Direction Description
name
xxx
string IN
The name of the session being saved
The name parameter cannot be empty. If it is empty, the client is prompted to provide a valid name.
Once the session is saved under ‘name’ you cannot use this method to save the session in a different
name. Use SaveSessionAs instead.
string name
Name Type Direction Description
name
string IN
The name of the session being
recalled
xxx
The same session is saved under different names using this method. The name parameter cannot be
empty. If it is empty, the client is prompted to provide a valid name.
bool isSelected
Name Type Direction Description
isSelected
xxx
bool IN
Selects or deselects a test
TekExpress 40GBase-CR4 Printable Help 85
Page 94

TekExpress programmatic interface The 40GBase-CR4 application commands
string time
Name Type Direction Description
time string IN The time in seconds
which refers to the timeout
period
xxx
The time parameter gives the timeout period, that is the time the client is allowed to be locked and
idle. After the timeout period, if the client is still idle, it gets unlocked.
The tim e parameter should be a positive integer. Else, the client is prompted to provide a valid
timeout period.
bool_verbose
Name Type Direction Description
_verbose bool IN
xxx
Specifies whether the verbose mode
should be turned ON or OFF
NOTE. When the session is stopped, the client is prompted to stop the session and is stopped at
the consent.
string filePath
Name Type Direction Description
filePath
string IN The location where the report must
be saved in the client
xxx
NOTE. If the c lient does not provide the location to save the report, the report is saved at
C:\ProgramFiles.
NOTE. When the client is disconnected, the client is unlocked automatically.
out string caption
Name Type Direction Description
caption string
xxx
OUT
The wait state or error state m es sage sent to
you
86 TekExpress 40GBase-CR4 Printable Help
Page 95

TekExpress programm atic interface The 40GBase-CR4 application commands
out string message
Name Type Direction Description
message
xxx
string
OUT The wait state/error state message to you
out string[] buttonTexts
Name Type Direction Description
buttonTexts string array
OUT An array of strings containing the
possible response types that you can
send
xxx
string response
Name Type Direction Descripti
response
string IN A string containing the response
type that
one of the strings in the string array
buttonTexts)
xxx
out string clientID
Name Type Direction Description
clientID string
xxx
OUT Identifier of the client that is connected to the
server
clientID = unique number + IP address of the
client. For example, 1065–192.157.98.70
on
can be selected (it must be
TekExpress 40GBase-CR4 Printable Help 87
Page 96

TekExpress programmatic interface Connect through an IP address
Connect through an IP address
Command name Parameters Description Return Value Example
Connect()
xxx
string
ipAddress
out string
clientID
This method
connects the client
to the server
Note
The client provides
the IP addres
to connect to the
server.
The server
provides a unique
client identification
number whe
connected to it.
.
s
n
Return value is
either True or
False.
m_Client = new Client()
//m_Client i
Client class in the Client DLL.
returnval as boolean
returnval =
nect(ipaddress,m_clientID)
sareferencetothe
m_Client.Con-
NOTE. The
Fail condition for PI commands occurs in any of the following cases:
The server is LOCKED and the message displayed is "Server is locked by another client".
The session is UNLOCKED and the message displayed is "Lock Session to execute the command".
The server is NOTFOUND and the message displayed is "Server not found.Disconnect!".
When none of these fail conditions occur, then the message displayed is "Failed.".
88 TekExpress 40GBase-CR4 Printable Help
Page 97

TekExpress programm atic interface Lock the server
Lock the server
Command name Parameters Description Return Value Example
LockSession()
xxx
string clientID
NOTE. The Fail condition for PI commands occurs in any of the following cases:
TheserverisLOCKEDandthemessagedisplayed is "Server is locked by another client".
This method locks
the server.
Note
The client must
call this method
before runni
any of the remote
automations. The
server can b
locked by only one
client.
ng
e
String value
that gives th
status of the
operation after
it is perform
The return value
is "Session
Locked.” on
success.
e
ed.
m_Client = new Client()
//m_Client i
Client class in the Client DLL.
returnval as string
returnval =
m_Client.LockServer(clientID)
s a reference to the
The sess
ion is UNLOCKED and the message displayed is "Lock Session to execute the command".
The server is NOTFOUND and the message displayed is "Server not found.Disconnect!".
When none of these fail conditions occur, then the message displayed is "Failed.".
TekExpress 40GBase-CR4 Printable Help 89
Page 98

TekExpress programmatic interface Disable the popups
Disable the popups
Command name Parameters Description Return Value Example
SetVerboseMode()
xxx
string clientID
bool _verbose
This method sets
the verbose mode
to either tru
false.
When the value
is set to true
message boxes
appearing during
the applica
will be routed to
the client machine
that is con
TekExpress.
When the value is
set to fals
message boxes
are shown on the
server ma
eor
, any
tion
trolling
e, all the
chine.
String that gives
the status of
operation after it
is performed
When Verbos
mode is set to
true, the return
value is “Ve
mode turned on.
All dialog boxes
will be sho
client”.
When Verbose
mode is set
false, the return
value is “Verbose
mode turn
All dialog boxes
will be shown to
server”
the
e
rbose
wn to
to
ed off.
.
m_Client = new Client()
//m_Client i
Client class in the Client DLL.
returnval as string
Verbose mod
return=m_Client.SetVerboseMode(clientID, true)
Verbose mod
returnval=m_Client.SetVerboseMode(clientID, false)
s a reference to the
e is turned on
eisturnedoff
NOTE. The Fail condition for PI commands occurs in any of the following cases:
The server is LOCKED and the message displayed is "Server is locked by another client".
The session is UNLOCKED and the message displayed is "Lock Session to execute the command".
The server is NOTFOUND and the message displayed is "Server not found.Disconnect!".
none of these fail conditions occur, then the message displayed is "Failed.".
When
90 TekExpress 40GBase-CR4 Printable Help
Page 99

TekExpress programm atic interface Set or get the DUT ID
Set or get the DUT ID
Command name Parameters Description Return Value Example
SetDutId()
GetDutId(
xxx
string clientID
string dutName
)
string clientID
string dut
Id
This method
changes the DUT
ID of the set u
The client must
provide a valid
DUT ID.
This method gets
the DUT ID o
current set up.
p.
fthe
String that gives
the status of
operation after it
is performed
Return valu
is “DUT Id
Changed” on
success
String tha
the status of the
operation after it
is perform
the
e
tgives
ed
m_Client = new Client()
//m_Client i
Client class in the Client DLL.
returnval as string
return=m_C
tID,desiredDutId)
Note
m_Client =
//m_Client is a reference to the
Client class in the Client DLL.
returnva
return=m_Client.GetDutid(clien-
tID, out DutId)
s a reference to the
lient.SetDutId(clien-
new Client()
lasstring
NOTE. The Fail condition for PI commands occurs in any of the following cases:
TheserverisLOCKEDandthemessagedisplayed is "Server is locked by another client".
The ses
sion is UNLOCKED and the message displayed is "Lock Session to execute the command".
The server is NOTFOUND and the message displayed is "Server not found.Disconnect!".
When none of these fail conditions occur, then the message displayed is "Failed.".
TekExpress 40GBase-CR4 Printable Help 91
Page 100

TekExpress programmatic interface Set the configuration parameters for a suite or measurement
Set the configuration parameters for a suite
or measurement
Command name Parameters Description Return Value Example
SetGeneralParameter
SetAnalyzeParameter()
SetAcquireParameter()
xxx
string clientID
string device
string suite
string test
string
parameterS
string cli
string device
string suite
string te
string
parameterString
string c
string device
string suite
string
string
parameterString
tring
entID
st
lientID
test
This method sets
the number of video
lanes for the
measurement.
selected
NOTE. Use this
command to s
a lane, channel, or
source type.
This metho
the configuration
parameters in the
Analyze p
the C onfi guration
Panel dialog box
for a give
measurement.
This met
the configuration
parameters in the
Acquir
the C onfi guration
Panel dialog box
for a gi
measurement.
elect
dsets
anel of
nsuiteor
hod sets
e panel of
ven suite or
String that gives
the status of
operation after it is
performed
The return v
(an empty String) on
success.
The return
(an empty String) on
success.
returnV
teObject.SetAcquireParameter(id,
device
parameterString)
if ((OP_STATUS)
return
OP_STATUS.SUCCESS)
n Command-
retur
Failed(returnVal)
the
alue is ""
value is ""
al = remo-
,suite,test,
Val ! =
m_Client = new
Client() //m
is a reference to the
Client class in the
Client DLL.
returnval as string
Select Channel
Select M ea
Method
m_Client = new
Client() //m_Client
is a refer
Client class in the
Client DLL
returnv
_Client
surement
ence to the
al as string
. The Fail condition for PI com mands occurs in any of the following cases:
NOTE
The server is LOCKED and the message displayed is "Server is locked by another client".
The session is UNLOCKED and the message displayed is "Lock Session to execute the command".
The server is NOTFOUND and the message displayed is "Server not found.Disconnect!".
When none of these fail conditions occur, then the message displayed is "Failed.".
92 TekExpress 40GBase-CR4 Printable Help
 Loading...