

Page 1

www.keithley.com
Series 2200
Multichannel Programmable DC Power Supplies
Specifications and Performance Verification
Technical Reference
2220S-905-01 Rev. B
/ Dec 2013
ECNEDIFNOCFOERUSAEMRETAERGA
Page 2

Page 3

Multichannel Programmable DC Power Supplies
Series 2200
Specifications and Performance Verification
Technical Reference
© 2013, Keithley Instruments, Inc.
Cleveland, Ohio, U.S.A.
All rights reserved.
Any unauthorized reproduction, photocopy, or use the information herein, in whole or in part,
without the prior written approval of Keithley Instruments, Inc. is strictly prohibited.
All Keithley Instruments product names are trademarks or registered trademarks of Keithley
Instruments, Inc. Other brand names are trademarks or registered trademarks of their respective
holders.
Document number: 2220S-905-01 Rev. B / Dec 2013
Page 4

Page 5

Safety precautions
The following safety precautions should be observed before using this product and an y associated instrumentation. Although
some instruments and accessories would normally be used with nonhazardous voltages, there are situations where hazardous
conditions may be present.
This product is intended for use by qualified personnel who recognize shock hazards and are familiar with the safety precautions
required to avoid possible injury. Read and follow all install a tion, operation, and maintenance information carefully before using
the product. Refer to the user documentation for complete product specifications.
If the product is used in a manner not specified, the protection provided by the product warranty may be impaired.
The types of product users are:
Responsible body is the individual or group responsible for the use and maintenance of equipment, for ensuring that the
equipment is operated within its specifications and operating limits, and for ensuring that operators are adequately trained.
Operators use the product for its intended function. They must be trained in electrical safety procedures and proper use of the
instrument. They must be protected from electric shock and contact with hazardous live circuits.
Maintenance personnel perform routine procedures on the product to keep it operating properly, for example, setting the line
voltage or replacing consumable materials. Maintenance procedures are described in the user documentation. The procedures
explicitly state if the operator may perform them. Otherwise, they should be performed only by service personnel.
Service personnel are trained to work on live circuits, perform safe installations, and repair products. Only properly trained
service personnel may perform installation and service procedures.
Keithley Instruments products are designed for use with electrical signals that are measurement, control, and data I/O
connections, with low transient overvoltages, and must not be directly connected to mains voltage or to voltage sources with high
transient overvoltages. Measurement Category II (as referenced in IEC 60664) connections require protection for high transient
overvoltages often associated with local AC mains connections. Certain Keithley measuring inst ruments may be connected to
mains. These instruments will be marked as category II or higher.
Unless explicitly allowed in the specifications, operating manual, and instrument labels, do not connect any instrument to mains.
Exercise extreme caution when a shock hazard is present. Lethal voltage may be present on cable connector jacks or test
fixtures. The American National Standards Institute (ANSI) states that a shock hazard exists when voltage levels greater than
30 V RMS, 42.4 V peak, or 60 VDC are present. A good safety practice is to expect that hazardous voltage is present in any
unknown circuit before measuring.
Operators of this product must be protected from electric shock at all times. The responsible body must ensure that operators
are prevented access and/or insulated from every connection point. In some cases, connections must be exposed to potential
human contact. Product operators in these circumstances must be trained to protect themselves from the risk of electric shock. If
the circuit is capable of operating at or above 1000 V, no conductive part of the circuit may be exposed.
Do not connect switching cards directly to unlimited power circuits. They are intended to be used with impedance-limited
sources. NEVER connect switching cards directly to AC mains. When connecting sources to switching cards, install protective
devices to limit fault current and voltage to the card.
Before operating an instrument, ensure that the line cord is connected to a properly-grounded power receptacle. Inspect the
connecting cables, test leads, and jumpers for possible wear, cracks, or breaks before each use.
When installing equipment where access to the main power cord is restricted, such as rack mounting, a separate main input
power disconnect device must be provided in close proximity to the equipment and within easy reach of the operator.
For maximum safety, do not touch the product, test cables, or any other instruments while power is applied to the circuit under
test. ALWAYS remove power from the entire test system and discharge any capacitors before: connecting or disconnecting
cables or jumpers, installing or removing switching cards, or making internal changes, such as installing or removing jumpers.
Do not touch any object that could provide a current path to the common side of the circuit under test or power line (earth)
ground. Always make measurements with dry hands while standing on a dry, insulated surface capable of withstanding the
voltage being measured.
Page 6

For safety, instruments and accessories must be used in accordance with the operating instructions. If the instruments or
accessories are used in a manner not specified in the operating instructions, the protection provided by the equipment may be
impaired.
Do not exceed the maximum signal levels of the instruments and accessories, as defined in the specifications and operating
information, and as shown on the instrument or test fixture panels, or switching card.
When fuses are used in a product, replace with the same type and rating for continued protection against fire hazard.
Chassis connections must only be used as shield connections for measuring circuits, NOT as protective earth (safety ground)
connections.
If you are using a test fixture, keep the lid closed while power is applied to the device under test. Safe operation requires the use
of a lid interlock.
screw is present, connect it to protective earth (safety ground) using the wire recommended in the user documentation.
If a
The
user documentation in all cases where the symbol is marked on the instrument.
The
contact with these voltages.
The symbol on an instrument shows that the surface may be hot. Avoid personal contact to prevent burns.
The
If this symbol is on a product, it indicates that mercury is present in the display lamp. Please note that the lamp must be
properly disposed of according to federal, state, and local laws.
The WARNING heading in the user documentation explains dangers that might result in personal injury or death. Always read
the associated information very carefully before performing the indicated procedure.
The CAUTION heading in the user documentation explains hazards that could damage the instrument. Such damage may
invalidate the warranty.
Instrumentation and accessories shall not be connected to humans.
Before performing any maintenance, disconnect the line cord and all test cables.
To maintain protection from electric shock and fire, replacement components in mains circuits — including the power
transformer, test leads, and input jacks — must be purchased from Keithley Instruments. Standard fuses with applicable national
safety approvals may be used if the rating and type are the same. Other components that are not safety-related may be
purchased from other suppliers as long as they are equivalent to the original component (note that selected parts should be
purchased only through Keithley Instruments to maintain accuracy and functionality of the product). If yo u are unsure about the
applicability of a replacement component, call a Keithley Instruments office for information.
symbol on an instrument means caution, risk of danger. The user must refer to the operating instructions located in the
symbol on an instrument means caution, risk of electric shock. Use standard safety precautions to avoid personal
symbol indicates a connection terminal to the equipment frame.
To clean an instrument, use a damp cloth or mild, water-based cleaner. Clean the exterior of the instrument only. Do n ot app ly
cleaner directly to the instrument or allow liquids to enter or spill on the instrument. Products that consist of a circuit board with
no case or chassis (e.g., a data acquisition board for installation into a computer) should never require cleaning if handled
according to instructions. If the board becomes contaminated and operation is affected, the board should be returned to the
factory for proper cleaning/servicing.
Safety precaution revision of January 2013.
ii 2220S-900-01 Rev. C/December 2013
Page 7

Table of Contents
Preface .............................................................................................................. iii
Welcome ........................... ................................ .................................. .......... iii
Products.............................. .................................. ................................ ........ iii
Extended Wa
Contact Information .......................................................................................... iv
Specifications .............................. ................................ .................................. ....... 1
Performance Verification ................. ................................ .................................. ...... 13
Test Record ................ ................................ .................................. .................. 15
Performance Verification Procedures ....................... ................................ ................ 23
rranty ......................... .................................. ................................ iv
Series 2200 Multichannel Programmable DC Power Supplies Technical Reference i
Page 8

Table of Contents
List of Tables
Table 1: Series 2220 Dual Channel specifications.............................................................. 1
Table 2: Ser
Table 3: Series 2230 Triple Channel specifications for Channel 3........................... ................. 5
Table 4: Combined channel characteristics............................... ................................ ....... 7
Table 5: Series 2230 Triple Channel unit characteristics....................................................... 7
Table 6: Mains power characteristics ................. ................................ ........................... 8
Table 7: Common characteristics................................................................................. 8
Table 8: T
Table 9: Interfaces and output ports ......... ................................ ................................ ..... 9
Table 10: Mechanical characteristics............................................................................ 10
Table 11: Environment performance .... ................................ .................................. ...... 10
Table 12: Keypad special operations................ ................................ ............................ 10
Table 13: Safety characteristics.................................................................................. 11
Table
family .......................... ................................ .................................. .............. 12
Table 15: DC voltage accuracy with remote sense .................... ................................ ........ 16
Table 16: DC voltage accuracy without remote sense......................................................... 17
Table 17: DC voltage readback accuracy ....................................................................... 18
Table 18: DC voltage line regulation............................................................................ 19
le 19: DC voltage load regulation ......... .................................. ................................ 19
Tab
Table 20: DC current accuracy................................................................................... 20
Table 21: DC current readback accuracy ....................................................................... 21
Table 22: DC current line regulation ............................................................................ 22
Table 23: DC current load regulation ..... .................................. ................................ .... 22
Table 24: Voltage noise at 7 MHz ....... ................................ ................................ ........ 22
Table 25: Voltage noise at 20 MHz.............................. .................................. .............. 22
Table 26: Current noise at 20 MHz.......... ................................ ................................ .... 22
Table 27: Test equipment ........... ................................ ................................ .............. 24
ies 2230 Triple Channel specifications for Channels 1 and 2 .............. ..................... 3
erminal strip ................................ ................................ ............................. 9
14: Electromagnetic Compatibility (EMC) — Measurement, laboratory, and control product
ii Series 2200 Multichannel Programmable DC Power Supplies Technical Reference
Page 9

Preface
Welcome
Preface
Products
Thank you fo
Multichannel Programmable DC Power Supplies are flexible DC sources designed
to power a wide range of applications. The model 2230-30-1 and its variants
offer three power channels and the model 2220-30-1 and its variants provide two
channels. The output channels on both models are independent and isolated,
allowing you to power circuits with different references or polarities. Each
channel c
feature remote sense capability which can be used to reduce the effect of lead
resistance, delivering 0.03% basic voltage accuracy even when using long leads.
Basic current ac curacy is 0.1% for all channels and linear regulation delivers
low noise – less than 3 mVp-p. Flexible display modes make it easy to use the
two 30 V outputs in combination, and the USB interface makes it easy to build
PC-bas
model include a GPIB interface in combination with the USB interface.
compact power supplies cover a wide range of applications without
These
covering a lot of bench space. Versions of these power supplies are available for
use at 100 VAC nominal line voltage which is common in Japan. These versions
are indicated by the "J" suffix.
This manual contains information about the following products:
r using a Keithley Instruments product. The Series 2200
an be enabled or disabled as your application requires. All outputs
ed systems without converters or special cables. The G vers ions of each
Model Description
2220-30-1 Programmable Dual Channel DC Power Supply
2220G-30-1 Programmable Dual Channel DC Power Supply with GPIB Interface
2220J-30-1 Programmable Dual Channel DC Power Supply for Japan
2220GJ-30-1 Programmable Dual Channel DC Power Supply with GPIB Interface for Japan
2230-30-1 Programmable
2230G-30-1 Programmable Triple Channel DC Power Supply with GPIB Interface
2230J-30-1 Triple Channel Programmable DC Power Supply for Japan
2230GJ-30-1 Programmable Triple Channel DC Power Supply with GPIB Interface for Japan
Series 2200 Multichannel Programmable DC Power Supplies Technical Reference iii
Triple Channel DC Power Supply
Page 10

Preface
Extended Warranty
Contact Information
Additional years of warranty coverage are available on many products. These
valuable contracts protect you from unbudgeted service expenses and provide
additional years of protection at a fraction of the price of a repair. Extended
warranties are available on new and existing products. Contact your local Keithley
Instrument
s representative for details.
If you have
following sources:
1. Keithley
2. Keithley web forum (http://forum.keithley.com)
3. Call Keithley Instruments corporate headquarters (toll-free inside the U.S. and
Canada only) at 1-888-KEITHLEY (1-888-534-8453), or from outside the
U.S. at
Instruments website (http://www.keithley.com).
any questions after reviewing this information, please use the
Instruments website (http://www.keithley.com)
+1-440-248-0400. For worldwide contact numbers, visit the Keithley
iv Series 2200 Multichannel Programmable DC Power Supplies Technical Reference
Page 11

Specifications
This section contains specifications for the Series 2200 Multichannel
Programmable DC Power Supplies. All specifications are guaranteed unless noted
as "typical.
not guaranteed. Specifications that are marked with the
in Performance Verification.
Table 1: Series 2220 Dual Channel specifications
Parameter Description
Channel 1 and 2,
nominal
Constant voltage
operation, nominal
Voltage range
This is the range
over which the
output voltage is
adjustable
Remote sense
voltage range
Voltage resolution,
nominal
age setting
Volt
accuracy with
remote sense
Voltage setting
accuracy without
remote sense
Current limit,
nominal
Voltage
temperature
coefficient, typical
Constant current
operation, nominal
Current range
This is the range
over which the
output current is
adjustable
Channels 1 and 2 are symmetrical and isolated. They are primarily targeted at powering analog circuits
operating around ground.
The unit may be set to a constant voltage over a range of currents
0to30V
The total voltage from the – terminal to the + terminal may not exceed the rated full scale (FS) voltage + 0.2 V,
allowing a minimum of 0.1 V/line for remote sense.
The maximum voltage difference between a terminal and its associated sense line may not exceed 1 V.
The available overhead above full scale voltage to support remote sense is limited to 0.1 V/line. However,
this widens as the output voltage decreases to the ultimate limit of 1 V/line. Thus, the maximum difference
specification controls operation except for the 2 V of output below full scale output.
1mV
±(0.03% of settling + 10 mV) at 25 °C ±5 °C with remote sense.
±(0.05% of settling + 10 mV) at 25 °C ±5 °C without remote sense.
Defined by the c onstant current setting. The changeover is automatic.
±(0.03% + 10 m V) per °C outside the 25 °C ±5 °C standard range
The unit may be set to a constant current over a range of voltages.
0Ato1.5A
" Typical specifications are provided for your convenience but are
symbol are checked
Series 2200 Multichannel Programmable DC Power Supplies Technical Reference 1
Page 12

Specifications
Table1:Series2220DualChannelspecifications (cont.)
Parameter Description
Current resolution,
nominal
Current set
ting
accuracy
Voltage li
mit,
nominal
Current
temperature
nt, typical
coefficie
Meter, nominal Internal readback capability. Voltage and current can be measured internally.
Current readback
ion, nominal
resolut
Current
readback accuracy
Current readback
temperature
coefficient, typical
Voltage
readback accuracy
Voltage readback
resolution, nominal
Voltage readback
temperature
ficient, typical
coef
Line regulation
– voltage
Line regulation
rent
–cur
Load regulation
– voltage
Load regulation
rrent
–cu
Voltage ripple,
20 MHz bandwidth
Voltage ripple,
Hz bandwidth
7M
Current ripple,
20 MHz bandwidth
Common Mode
Current Noise
1mA
±(0.1% + 5 mA) at 25 °C ±5 °C
0to30V
±(0.1% + 5 mA) per °C outside the 25 °C ±5 °C standard range
1mA
of reading + 5 mA) at 25 °C ±5 °C
±(0.1%
±(0.1% + 5 mA) per °C outside of the 25 °C ±5 °C standard range
±(0.03% of reading + 10 mV) at 25 °C ±5 °C standard range
1mV
±(0.03% of reading + 10 mV) per °C outside the 25 °C ±5 °C standard range
ge over the full rated line voltage range: ±(0.01% + 3 mV)
Chan
Change over full rated line voltage range: ±(0.1% + 3 mA)
nge from 0 to 100% of full scale current: ±(0.01% + 3 mV)
Cha
Change from 10 to 90% of full scale voltage: ±(0.01% + 3 mA)
<3mV
<1.
<1mV
<5mA
<1.5μA
and 20 mV
RMS
5mV
and 12 mV
RMS
and 3 mV
RMS
RMS
, 700 Hz bandwidth.
RMS
p-p
p-p
,typical
p-p
2 Series 2200 Multichannel Programmable DC Power Supplies Technical Reference
Page 13

Table 1: Series 2220 Dual Channel specifications (cont.)
Parameter Description
Voltage transient
response settling
time, load change,
typical
Voltage transient
response settling
time, setting
change, rising,
typical
Voltage transient
response settling
time, setting
change, falling,
typical
Unit SpecificMains
Requirements
<150 ms to within 75 mV following a change from 0.1 A to 1 A.
<150 ms from beginning of excursion to within 75 mV of terminal value following a change from 1 V to 11 V
intoa10Ω resistor.
<150 ms from beginning of excursion to within 75 mV of terminal value following a change from 11 V to
1Vintoa10Ω resistor.
2220-30-1 and 2220G-30–1
Line Selection
Switch
110V
220V
Voltage Frequency Fuse Rating Max VA +
110/115/120 50/60 Hz
220/230/240 50/60 Hz
Specifications
6.3A TH 250V 350
3.15A TH 250V 350
2220J-30-1 and 2220GJ-30–1
Voltage Frequency Fuse Rating Max VA +
50/60 Hz
50/60 Hz
6.3A TH 250V 350
3.15A TH 250V 350
Maximum Input VA,
typical
Line Selection
Switch
110V 100
220V 200
350 VA
Table2:Series2230TripleChannelspecifications for Channels 1 and 2
Parameter Description
Channel 1 and 2, nominal Channels 1 and 2 are symmetrical and isolated. They are primarily targeted at powering analog
circuits operating around ground.
Constant Voltage Operation,
nominal
Voltage Range
The unit may be set to be a constant voltage over a range of currents.
The output voltage may be adjusted from 0V to 30V.
Series 2200 Multichannel Programmable DC Power Supplies Technical Reference 3
Page 14

Specifications
Table2:Series2230TripleChannelspecifications for Channels 1 and 2 (cont.)
Parameter Description
Remote Sense Voltage Range The total voltage from - terminal to + terminal may not exceed the rated full scale voltage +0.2V,
allowing a minimum of 0.1V/line for remote sense.
The Maximum voltage difference between a terminal and its associated sense line m ay not
exceed 1V.
The available overhead above full scale voltage to support remote sense is limited to 0.1
V/line. However, this widens as the output voltage decreases to the ultimate l imit of 1 V/line.
Thus, the maximum difference specification controls operation except for the 2 V of output
below full scale output.
Voltage Resolution, nominal 1 mV
√ Voltage Setting Accuracy with
Remote Sense
√ VoltageSetting Accuracy without
Remote Sense
Current Limit, nominal Defined by Constant Current setting. Changeover is automatic.
Voltage Temperature Coefficient,
typical
Constant Current Operation,
nominal
Current Range The output voltage may be adjusted from 0 A to 1.5 A.
Current Resolution, nominal
√ Current Setting Accuracy
Voltage Limit, nominal 0 to 30 V.
Current Temperature Coefficient,
typical
Meter, nominal Internal readback capability. Voltage and current are measured internally.
Current Readback Resolution,
nominal
urrent Readback Accuracy
C
Current Readback Temperature
Coefficient, typical
Voltage Readback Accuracy
Voltage Readback Resolution,
nominal
Voltage Readback Temperature
Coefficient, typical
Line regulation – Voltage
Line regulation – Current
Load regulation – Voltage
+/-(0.03% of setting + 10 mV) at 25 °C ±5 °C with Remote Sense
+/-(0.05% of setting + 10 mV) at 25 °C ±5 °C without Remote Sense
+/-(0.03% of setting + 10 mV) per °C outside of the 25 °C ±5 °C standard range
The unit may be set to be a constant current over a range of voltages.
1mA
+/-(0.1% + 5 mA) at 25 °C ±5 °C.
+/-(0.1% + 5 mA) per °C outside of the 25 °C ±5 °C standard range
1mA
±(0.01% of reading + 5 mA) at 25 °C ±5 °C
±(0.01% + 5 mA) per °C outside the 25 °C ±5 °C standard range
±(0.03% of reading + 1 0 mV) at 25 °C ±5 °C
1mV
±(0.03% of reading + 10 mV) per °C outside the 25 °C ±5 °C standard range
Change over the full rated line voltage range: ±(0.01% + 3 mV)
Change over full rated line voltage range: ±(0.1% + 3 mA)
Change from 0 to 100% of full scale. Voltage: ±(0.01% + 3 mV)
4 Series 2200 Multichannel Programmable DC Power Supplies Technical Reference
Page 15

Table 2: Series 2 230 Triple Channel specifications for Channels 1 and 2 (cont.)
Specifications
Load regulat
ion – Current
Change from 10 to 90% of full scale. Current: ±(0.01% + 3 mA)
While not readily testable, similar performance is expected over the 0% to 100% of full scale
range of the product.
Voltage Ripple, 20 MHz
bandwidth
h
<3mV
<1.5mV
Voltage Ripple, 7 MHz bandwidth < 1 mV
Current Ripple, 20 MHz
<5mA
and 20 mV
RMS
RMS
and3mV
RMS
RMS
and 12 mV
p-p
p-p
p-p
,typical
bandwidth
Common Mode Current Noise
Voltage Transient Response
<1.5μA
<150 ms to within 75 mV following a change from 0.1 A to 1 A.
. 700 Hz bandwidth.
RMS
Settling Time, Load Change,
typical
Voltage Transient Response
Settling Time, Setting Change,
<150 ms from beginning of excursion to within 75 mV of terminal value following a change
from1Vto11Vintoa10Ω resistor.
Rising, typical
Voltage Transient Response
Settling time, Setting Change,
<150 ms from beginning of excursion to within 75 mV of terminal value following a change
from11Vto1Vintoa10Ω resistor.
Falling, typical
Table 3: Series 2230 Triple Channel specifications for Channel 3
Parameter Description
Channel 3, nominal
Constant Voltage Operation,
nal
nomi
Voltage Range
ote Sense Voltage Range
Rem
ltage Resolution, nominal
Vo
Voltage Setting Accuracy with
√
Remote Sense
√ VoltageSetting Accuracy without
Remote Sense
Current Limit, nominal Defined by Constant Current setting. Chageover is automatic.
Voltage Temperature Coefficient,
typical
A third channel is provided. It is primarily targeted at logic power.
The unit may be set to be a constant voltage over a range of currents.
utput voltage may be adjusted from 0 V to 6 V.
The o
total voltage from - terminal to + terminal may not exceed the rated full scale voltage +0.2V,
The
allowing a minimum of 0.1V/line for remote sense.
The maximum voltage difference between a terminal and its associated sense line may not
eed 1V.
exc
The available overhead above full scale voltage to support remote sense is limited to 0.1
V/line. However, this widens as the output voltage decreases to the ultimate limit of 1 V/line.
us, the maximum difference specification controls operations except for the 2 V of output
Th
below full scale output.
V
1m
/-(0.03% of setting + 10 mV) at 25 °C ±5 °C with Remote Sense
+
+/-(0.05% of setting + 10 mV) at 25 °C ±5 °C without Remote Sense
+/-(0.03% of setting + 10 mV) per °C outside of the 25 °C ± 5 °C standard range
Series 2200 Multichannel Programmable DC Power Supplies Technical Reference 5
Page 16

Specifications
Table 3: Series 2230 Triple Channel specifications for Channel 3 (cont.)
Constant Current Operation,
The unit may be set to be a constant current over a range of voltages.
nominal
Current Range The output voltage m ay be adjusted from 0 A to 5 A.
Current Resolution, nominal
√ Current Setting Accuracy
1mA
+/-(0.1% + 5 mA) at 25 °C ±5 °C.
Voltage Limit, nominal 0 to 6 V.
Current Temperature Coefficient,
+/-(0.1% + 5 mA) per °C outside of the 25 °C ±5 °C standard range
typical
Meter, nominal Internal readback capability. Voltage and current can be measured internally. DVM connections
exist to allow measuring external voltages.
Current Readback Resolution,
1mA
nominal
Current Readback Accuracy
Current Readback Temperature
cient, typical
Coeffi
Voltage Readback Accuracy
Voltage Readback Resolution,
±(0.1% of reading + 5 mA) at 25 °C ±5 °C
±(0.1% +5mA) per °C outside of the 25 °C ± 5 °C standard range
3% of reading + 1 0 mV) at 25 °C ±5 °C
±(0.0
0.1 mV
nominal
Voltage Readback Temperature
±(0.03% of reading + 10 mV) per °C outside of the 25 °C ±5 °C standard range
Coefficient, typical
Line Regulation – Voltage
Line Regulation – Current
Load Regulation – Voltage
Load Regulation – Current
ge Ripple, 20 MHz
Volta
Bandwidthh
Voltage Ripple, 7 MHz
Change over the full rated line voltage range: ±(0.01% + 3 mV)
Change over full rated line voltage range: ±(0.1% + 3 mA)
Change from 0 to 100% of full scale. Voltage: ±(0.01% + 3 mV)
Change from 10 to 90% of full scale. C urrent: ±(0.01% + 3 mA)
<3mV
<1.5mV
<1mV
and 20 mV
RMS
RMS
and3mV
RMS
and 12 mV
p-p
.
p-p
p-p
,typical
bandwidth
nt Ripple, 20 MHz
Curre
Less than 6 mA
RMS
Bandwidth
μA
Common Mode Current Noise
age Transient Response
Volt
<1.5
<150 ms to within 75 mV following a change from 0.1 A to 1 A.
. 700 Hz bandwidth.
RMS
Settling Time, Load Change,
typical
Voltage Transient Response
Settling Time, Setting Change,
ing, typical
Ris
Voltage Transient Response
ttling Time, Setting Change,
Se
Falling, typical
<150 ms from beginning of excursion to within 75 mV of terminal value following a change
m0.4Vto4Vintoa4Ω resistor.
fro
50 ms from beginning of excursion to within 75 mV of terminal value following a change
<1
from0.4Vto4Vintoa4Ω resistor.
The specification does not include Command Decode Time.
6 Series 2200 Multichannel Programmable DC Power Supplies Technical Reference
Page 17

Specifications
Table 4: Combin
Characteristic Description
Combined Channel
Characteristics, nominal
Series Combinations, nominal Deliver up to 60 V when CH1 and CH2 are wired in series. Voltage Readback is the combined
Available Series Configurations,
nominal
Series Co
Accuracy, typical
Series Combination Current
Accuracy, typical
Paralle
Available Parallel Configurations,
nominal
Parallel Combination Voltage
Accur
Para
Accuracy, typical
mbination Voltage
l Combination, nominal
acy (typical)
llel Combination Current
ed channel characteristics
The unit can be configured to provide functionality on Channel 1 and Channel 2 together.
voltage. Se
only. If the currents in the two channels are significantly different there is no indication of
CC/CV status for Channel 2.
Channels 1 and 2 are connected in series. Either channel 1 or channel 2 m ay be the most
positive s
±(0.10% o
±(0.1% + 5 mA) at 25 °C ±5 °C for Channel 1's current.
The current is only measured for Channel 1. The error is the same as for the Current
Measure
Deliver
combined current.
CH1 and CH2 are connected in parallel (+ to + and – to –)
±(0.05% of setting + 10 mV) at 25 °C ±5 °C
±(0.
ment Accuracy.
s up to 3 A when CH1 and CH2 are wired in parallel. The meter reads back the
2% +10 mA) at 25 °C ±5 °C
ttings changes are to the combined voltage. Current Readback is for Channel 1
ource.
f the setting + 50 mV) at 25 °C ±5 °C
Table 5: Series 2230 Triple Channel unit characteristics
Characteristic Description
Unit Characteristics, nominal Characteristics and specifications of features unique to this product, but unrelated to a
particular channel.
Unit SpecificMains
Requirements
Maximum Input VA, typical 450 VA
2230-30-1 and 2230G-30–1
Line Selection
Switch
110V
220V
2230J-30-1 and 2230GJ-30–1
Line Selection
Switch
110V 100
220V 200
Voltage Frequency Fuse Rating Max VA
110/115/120 50/60 Hz
220/230/240 50/60 Hz
Voltage Frequency Fuse Rating Max VA
50/60 Hz
50/60 Hz
6.3A TH 250V 450
3.15A TH 250V 450
6.3A TH 250V 450
3.15A TH 250V 450
Series 2200 Multichannel Programmable DC Power Supplies Technical Reference 7
Page 18

Specifications
Table 6: Mains p
ower characteristics
Characteristic Description
Source Voltage
The 2220-30-1, 2220G-30-1, 2230-30-1, and 2230G-30-1 each have two ranges, selectable
with a bottom panel switch. Each range is capable of ±10% excursions.
Marked Allowed nominal voltages
110
220
The 2220J-30-1, 2220G J-30-1, 2230J-30-1, and 2230GJ-30-1 each have two ranges,
selectable with a bottom panel switch. Each range is capable of ±10% excursions.
Marked Allowed nominal voltage
110
220
Source Frequency 50/60 Hz
Fuse Ra
ting, nominal
Model
2230, 2230G and 2220,
2220G
Table 7: Common characteristics
110/115/120 VAC
220/230/240 VAC
100 VAC
200 VAC
RMS
RMS
110 VAC setting 220 VAC setting
250V
6.3A T
159-0399-00
T 250V
3.15A
159-0493-00
RMS
RMS
Item Description
Setup Memory, nominal
30 setup memory locations
Output Timer, nominal The product includes a timer that can be used to disable the output after a predetermined
period of time.
Timer Set Time, nominal
The Timer may be set to any value between 1 and 999,999 seconds.
Timer Accuracy ±100 ppm
Software Voltage Limit, nominal The product offers the opportunity to change the maximum settable voltage on a temporary
basis. The MAX VOLT menu entry, when set below hardware maximum limit, disallows
adjusting the product to voltages in excess of the MAX VOLT limit.
Cleaning Requirements, nominal Inspect the power supply as often as operating conditions require. To clear the exterior
surface, perform the following steps:
1. Remove loose dust on the outside of the power supply with a lint free cloth. Use care to
avoid scratching the display.
2. Use a soft cloth dampened with water to clear the power supply. Use an aqueous solution of
75% isopropyl alcohol for more efficient cleaning.
Caution: To avoid damage to the surface of the power supply, do not use any abrasive or
chemical cleaning agents.
Caution: Avoid getting moisture inside the unit during external cleaning. Use only enough
cleaning solution to dampen the cloth or swab.
8 Series 2200 Multichannel Programmable DC Power Supplies Technical Reference
Page 19

Specifications
Table 7: Common characteristics (cont.)
Item Description
Isolation Voltage, Output to
Chassis
Any output can be floated up to 240 V (DC + peak AC with AC limited to a maximum 3 V
maximum of 60 Hz) relative to the Earth Ground terminal. Note that remote sense terminals
should remain within 1 V of their respective outputs to avoid possible damage.
Isolation Voltage, Output to Output Any output can be floated up to 240 V (DC + pk AC with AC limited to a maximum of 3 V
and a maximum of 60 Hz) relative to any other output terminal. Remote sense terminals should
remain within 1 V of their respective outputs to avoid possible damage.
Table 8: Terminal strip
Item Description
The rear panel has a customer accessible terminal strip. This strip is comprised of a board-mounted section and a
technician-removeable section. The technician-removeable section offers the customer a safe set of screw terminals to connect
us instrument functions detailed below.
to vario
pk-pk
and
pk-pk
Table 9: Interfaces and output ports
Parameter
(instrument
model) Description
USB device,
nominal
(All models)
GPIB interface
(G models only)
Command
processing time,
typical
(All models)
USB 2.0 Full Speed device. 12 Mb/sec maximum.
IEEE-488.2 compliant
About 400 ms per command.
Series 2200 Multichannel Programmable DC Power Supplies Technical Reference 9
Page 20

Specifications
Table 10: Mecha
Parameter
Weight,
instrument,
nominal
Dimensions,
nominal
Cooling method,
nominal
Required cooling
clearance
Construction
materials, nominal
nical characteristics
9kg
(19.8 lbs)
Model
2230
Fan
Rear of instrument must be separated by at least 5 cm (2 in) from any airflow restrictions to assure adequate
cooling.
Bottom of instrument must have 1 cm (0.4 in) from any airflow restrictions. The protective boot maintains
the proper bottom clearance.
For rackm
instructions.
Chassis – Aluminum
Front Panel Plastics – PC/ABS blend
ount configuration, follow the clearance requirements provided with the rackmount installation
Table 11: Environment performance
Parameter All models
Temperature
Humidity
Altitude
Operating: +0 °C to +40 °C
Nonoperating: -20 °C to 70 °C
Operating:
5% to 95% relative humidity (% RH) at up to 40 °C, noncondensing
Nonoperating:
5% to 95% RH (relative humidity) at up to +40 °C,
5% to 60% RH above +40 °C up to +70 C, noncondensing
Operating: 100% capability up to 2,000 meters.
Nonoperating: Up to 4,000 meters
Dimensions (Width * Height * Depth
214 mm * 88 mm * 355 mm (8.45” * 3.47” * 13.9”)
Table 12: Keypad special operations
aracteristic
Ch
Display the heat sink temperature Enter + Esc + 1
Reset the unit to the factory default
ettings
s
scription
De
Enter+Esc+2
10 Series 2200 Multichannel Programmable DC Power Supplies Technical Reference
Page 21

Specifications
Tabl e 13: Safet
y characteristics
Item Description
Safety Certifi
cations
U.S. National
UL61010-1–2004 Safety Requirements for Electrical Equipment for Measurement, Control,
and Laboratory Use
Canadian Certification
CAN/CSA C22
Measurement, Control, and Laboratory Use
European Union Compliance
Low Voltage Directive 2006/95/EC
EN61010-1
and Laboratory Use
Additional Compliance
IEC61010-1 2001 Safety Requirements for Electrical Equipment for Measurement, Control,
atory U se
ut can be floated up to 240 V (DC + peak AC with AC limited to a maximum 3V
Channel
Voltage
to Channel Isolation
and Labor
Any outp
maximum of 60 Hz) relative to any other channel terminal. Remote sense terminals should
remain within 1 V of their respective outputs to avoid possible damage.
Channel to Ground Isolation
e
Voltag
Any output can be floated up to 240 V (DC + peak AC with AC limited to a maximum 3V
m of 60 H z) relative to the Earth Ground terminal. Remote sense terminals should
maximu
remain within 1 V of their respective outputs to avoid possible damage.
ly Recognized Testing Laboratory (NRTL) Listing
.2 No. 61010-1-2004 Safety Requirements for E lectrical Equipment for
2001 Safety Requirements for Electrical Equipment for Measurement, Control,
pk-pk
pk-pk
and
and
Series 2200 Multichannel Programmable DC Power Supplies Technical Reference 11
Page 22

Specifications
Table 14: Elect
romagnetic Compatibility (EMC) — Measurement, laboratory, and control product family
Item Description
Regional Cert
ifications,
Classifications, and Standards List
European Uni
on
EC Council EMC Directive 2004/108/EC
Demonstrated using:
EN 61326-1:
Emissions
CISPR 11, Class A
Immunity
IEC 61000-4-2
IEC 61000-4-3
IEC 61000-
IEC 61000-4-5
IEC 61000-4-6
IEC 61000
IEC 61000-4-11
EN 61000-3-2
EN 61000
1
Emissions that exceed the levels by this standard may occur when this equipment is
-3–3
connected to a test object.
Australia
2
EMC Fra
igh quality shielded cables to maintain compliance
.Useh
mework, demonstrated per Emission Standard CISPR11 in accordance w ith EN
61326-1
2006 Electrical Equipment for Measurement, Control, and Laboratory
4-4
-4-8
1
1,2
ity
Immun
Immunity, Electrostatic Discharge
, Enclosure Port
(ESD)
Immunity, Conducted Radio
Frequency
000-4-2
IEC 61
EN 61326-1, Performance Criterion “B”
IEC 61000-4-6
EN 61326-1, Performance Criterion “A”
12 Series 2200 Multichannel Programmable DC Power Supplies Technical Reference
Page 23

Performance Verification
This section contains performance verification procedures for the specifications
marked with the
verification
These procedures cover all models of theSeries2200ProgrammableDCPower
Supplies. I
Print the test record on the following pages, and use it to record the performance
test resul
NOTE. Each individual performance test must be done for each channel. This
means two times for the 2220-30-1, 2220G-30-1, 2220J-30-1, and 2220GJ-30-1. It
means three times for the 2230-30-1, 2230G-30-1, 2230J-30-1, and 2230GJ-30-1.
NOTE. Completion of the performance verification procedure does not update the
stored time and date of the latest successful adjustment. The date and time are
updated only when the factory adjustment procedures are successfully completed.
procedures. (See Table 27 on page 24.)
gnore checks that do not apply to the specific model you are testing.
ts for your power supply.
symbol. Additional test equipment is required to complete the
Series 2200 Multichannel Programmable DC Power Supplies Technical Reference 13
Page 24

Performance Verification
The performanc
instrument. They do not adjust your instrument. If your instrument fails any of
the performance verification tests, you should contact Keithley service.
WARNING. Observe all safety precautions listed in this manual before using
this product and any associated instrumentation. Although some instruments
and accessories are used with nonhazardous voltages, there are situations
where hazar
qualified personnel who recognize shock hazards and are familiar with the safety
precautions required to avoid possible injury. Before using the product, carefully
read and follow all installation, operation, and maintenance information. Refer
to this manual for complete product specifications. Before performing any
maintenance, disconnect the line cord and all test cables. Operators of this
instrum
body must make sure that operators are prevented access and/or insulated from
every connection point. In some cases, connections must be exposed to potential
human contact. Product operators in these circumstances must be trained to
protect themselves from the risk of electric shock. If the circuit can operate at or
above 1000 volts, no conductive part of the circuit may be exposed.
WARNING. Do not loosen any screw on this product. There are no user
serviceable components inside.
ent must be protected from electric shock at all times. The responsible
everification procedures verify the performance of your
dous conditions may be present. This product is intended for use by
CAUTION. Use properly rated load wires. All load wires must be heavy enough not
to overheat when carrying the maximum short-circuit output current of the power
supply. If there is more than one load, then any pair of load wires must be capable
safely carrying the full-rated short-circuit output current of the power supply.
of
14 Series 2200 Multichannel Programmable DC Power Supplies Technical Reference
Page 25

Performance Verification
Test Record
Model Serial Procedure performed by Date
Test Passed Failed
Self test
DC voltage accuracy with remote sense
DC voltage accuracy without remote sense
DC voltage readback accuracy
DC voltage line regulation
DC voltage load regulation
DC c urrent accuracy
DC current readback accuracy
DC current line regulation
DC current load regulation
Voltage noise at 7 MHz
Voltage noise at 20 MHz
Current noise at 20 MHz
Series 2200 Multichannel Programmable DC Power Supplies Technical Reference 15
Page 26

Performance Verification
Table 15: DC vol
Instrument te
voltage DUT voltage Test current Min Measured Max
Channel 1
0%
25%
50%
75%
100%
Channel 2
0%
25%
50%
75%
100%
Channel 3
0%
25%
50%
75%
100%
tage accuracy with remote sense
st
0.00000 V 0.5 A -0.01000 V
7.5000 V 0.5 A 7.48775 V
15.00000 V 0.5 A 14.98550 V
0.00000 V 2.5 A -0.01000 V
30.0000 V 0.5 A 29.98100 V
00 V
00 V
000 V
000 V
000 V
0000 V
50000 V
00000 V
V
0.5 A -0.0100
0.5 A 14.985
0.5 A 22.483
0.5 A 29.98
2.5 A -0.0
0.5
2.5
2.
2.
0.00000
7.5000 V 0.5 A 7.48775
15.000
22.500
30.00
0.00
1.5
3.0
4.
6.
A
A
5A
5A
1000 V
98550 V
14.
8910 V
2.9
48865 V
4.
98820 V
5.
0V
V
50 V
25 V
100 V
__________
__________
__________
_________
_________
_______
_______
______
_____
_____
____
___
___
__
_
___
___
____
_____
_____
______
_______
_______
________
_________
0.01000 V
7.51225 V
15.01450 V
_
_
0.01000 V
30.01900 V
0.01000
7.51225
15.014
22.516
30.01
0.01
15.
3.0
51135 V
4.
01180 V
6.
V
V
50 V
75 V
900 V
000 V
01450 V
1090 V
16 Series 2200 Multichannel Programmable DC Power Supplies Technical Reference
Page 27

Performance Verification
Tabl e 16: DC vol
Instrument te
voltage DUT voltage Test current Min Measured Max
Channel 1
0%
25%
50%
75%
100%
Channel 2
0%
25%
50%
75%
100%
Channel 3
0%
25%
50%
75%
100%
tage accuracy without remote sense
st
0.00000 V 0.5 A -0.01000 V
7.50000 V 0.5 A 7.48625 V
15.00000 V 0.5 A 14.98250 V
22.50000 V 0.5 A 22.47875 V
30.00000 V 0.5 A 29.975000
00 V
00 V
000 V
000 V
0000 V
0000 V
50000 V
00000 V
V
0V
0.5 A -0.0100
0.5 A 7.48625
0.5 A 14.982
0.5 A 22.478
0.5 A 29.97
2.5 A -0.0
A
2.5
A
2.5
5A
2.
5A
2.
0.00000
7.50000
15.000
22.500
30.00
0.00
1.5
3.0
4.
6.
1000 V
8925 V
1.4
8850 V
2.9
48775 V
4.
98700 V
5.
0V
V
50 V
75 V
500 V
__________
__________
__________
_________
V
_________
_______
_______
______
_____
_____
____
___
___
________
__
_________
_
_
_
___
___
____
_____
_____
______
_______
_______
0.01000 V
7.51375 V
15.01750 V
22.52125 V
30.02500 V
0.01000
7.51375
15.017
22.521
30.02
0.01
1.5
3.0
51225 V
4.
01300 V
6.
V
V
50 V
25 V
500 V
000 V
1075 V
1150 V
Series 2200 Multichannel Programmable DC Power Supplies Technical Reference 17
Page 28

Performance Verification
Table 17: DC vol
Instrument
test voltage DUT voltage Test current
Channel 1
0%
25%
50%
75%
100%
Channel 2
0%
25%
50%
75%
100%
Channel 3
0%
25%
50%
75%
100%
tage readback accuracy
0.00000 V 0.5 A
7.50000 V 0.5 A
15.00000 V 0.5 A
22.50000 V 0.5 A
30.00000 V 0.5 A
00 V
00 V
000 V
000 V
0000 V
0000 V
50000 V
00000 V
V
V
0.5 A
0.5 A
0.5 A
0.5 A
0.5 A
2.5 A
2.5
2.5
5A
2.
5A
2.
A
A
0.00000
7.50000
15.000
22.500
30.00
0.00
1.5
3.0
4.
6.
Measured
voltage
________ ________ ________
________ ________ ________
________ ________ ________
________ ________ ________
________ ________ ________
_______
_______
______
_____
_____
____
___
___
__
_
_
_
__
___
___
____
_____
_____
______
_______
Vol tage
readout
_______
_______
______
___
_____
___
_____
____
____
_____
___
_____
___
______
__
_______
_
__
Absolute
difference
_
_
_______
_______
______
___
_____
___
_____
____
____
_____
___
_____
___
______
__
_______
_
__
Maximum
difference
0.01000 V
0.01225 V
0.01450 V
0.01675 V
0.01900 V
_
_
0.01000
0.01225
0.0145
0.0167
0.019
0.01
0.0
0.0
0.
0.
V
V
0V
5V
00 V
000 V
10375 V
10750 V
011125 V
01150 V
18 Series 2200 Multichannel Programmable DC Power Supplies Technical Reference
Page 29

Performance Verification
Table 18: DC vol
Instrument Min line Max line Nom line Nom – Min Max – Nom Largest Max value
Channel 1
Channel 2
Channel 3
tage line regulation
_________ _________ _________ _________ _________ _________
_________ _________ _________ _________ _________ _________
_________ _________ _________ _________ _________ _________
0.0120000 V
0.0120000 V
0.0072000 V
Table 19: DC voltage load regulation
Instrument Min load Ref load Max load Ref – Min
Channel 1
Channel 2
Channel 3
_______ _______ _______ ________ ________ ________ _______
_______ _______ _______ ________ ________ ________ _______
_______ _______ _______ ________ ________ ________ _______
Max –
Ref
(Max–Ref)
/ 0.98 Largest
Max
value
0.0120000 V
0.0120000 V
0.0072000 V
Series 2200 Multichannel Programmable DC Power Supplies Technical Reference 19
Page 30

Performance Verification
Table 20: DC cur
Instrument test
current Test voltage DUT current Min Measured current Max
Channel 1
0%
25%
50%
75%
100%
Channel 2
0%
25%
50%
75%
100%
Channel 3
0%
25%
50%
5%
7
100%
rent accuracy
15 V 0.00000000 A -0.00500000 A
15 V 0.3750 A 0.36963 A
15 V 0.75000 A 0.74425 A
15 V 1.1250 A 1.11888 A
15 V 1.5000 A 1.49350 A
15 V 0.00000000 A -0.00500000 A
15 V 0.3750 A 0.36963 A
15 V 0.7500
15 V 1.1250 A 1.11888 A
15 V 1.5000 A 1.49350 A
3 V 0.00000000 A -0.00500000 A
3 V 1.25000000 A 1.24375000 A
3V 2.
3 V 3.75000000 A 3.74125000 A
3 V 5.00000 A 4.99000 A
0A
50000000 A
0.7442
49250000 A
2.
5A
__________
__________
__________
__________
__________
__________
__________
____
______
__________
__________
__________
__________
________
__
__________
__________
0.00500000 A
0.38037 A
0.75575 A
1.13113 A
1.50650 A
0.00500000 A
0.38037 A
5A
0.7557
1.13113 A
1.50650 A
0.00500000 A
1.25625000 A
50750000 A
2.
3.75875000 A
5.01000 A
20 Series 2200 Multichannel Programmable DC Power Supplies Technical Reference
Page 31

Performance Verification
Tabl e 21: D C cur
Instrument te
current Test current
Channel 1
0%
25%
50%
75%
100%
Channel 2
0%
25%
50%
75%
100%
Channel 3
0%
25%
50%
75%
100%
rent readback accuracy
st
0A
0.375 A
0.75 A
1.125 A
1.5 A
0A
0.375 A
0.75 A
1.125 A
1.5 A
0A
5A
1.2
A
2.5
75 A
3.
5A
Measured
current Current readout
________ ________ ________
________ ________ ________
________ ________ ________
________ ________ ________
________ ________ ________
_______
_______
______
___
_____
___
_____
____
____
_____
___
_____
___
______
__
_______
_
__
_
_
_______
_______
______
_____
_____
____
___
___
__
_
_
_
__
___
___
____
_____
_____
______
_______
Absolute
difference
_______
_______
__
______
___
_____
___
_____
____
____
_____
___
_____
___
______
__
_______
_
Maximum
difference
0.00500000 A
0.0053750 A
0.00575000
0.0061250
0.0065000
_
_
0.00500
0.00537
0.0057
0.0061
0.006
0.00
0625000 A
0.0
0550000 A
0.0
00875000 A
0.
01000000 A
0.
A
0A
0A
000 A
50 A
5000 A
2500 A
50000 A
500000 A
Series 2200 Multichannel Programmable DC Power Supplies Technical Reference 21
Page 32

Performance Verification
Table 22: DC cur
rent line regulation
Test
Instrument
Channel 1
Channel 2
Channel 3
voltage Min line Max line Nom line
15 V
15 V
3V
______ ______ ______ ______ ______ ______
______ ______ ______ ______ ______ ______
______ ______ ______ ______ ______ ______
Table 23: DC current load regulation
Instrument
Channel 1
Channel 2
Channel 3
Meas @
min volts
_________ _________ _________ _________ _________ _________
_________ _________ _________ _________ _________ _________
_________ _________ _________ _________ _________ _________
Meas @
ref volts
Table 24: Voltage noise at 7 MHz
Voltage test
ment
Instru
el 1
Chann
el 2
Chann
nel 3
Chan
1
Load R must be rated at 100 W minimum.
load R
40 Ω
40 Ω
2.5 Ω
Nom –
Min
Max –
Nom Largest Max value
0.004500A
0.004500A
A
Meas @
maxvolts Ref-Min Max-Ref Largest
Maximum
difference
0.003120 A
0.003120 A
0.003400 A
1
rms
________
________
________
Measured
Maximum
rms
1mV
1mV
1mV
Measured
pk - pk
________
________
________
Maximum
pk - pk
3mV
3mV
3mV
Table 25: Voltage noise at 20 MHz
Voltage test
1
trument
Ins
nnel 1
Cha
annel 2
Ch
annel 3
Ch
1
Load R must be rated at 100 W minimum.
loa
40 Ω
40
5 Ω
2.
dR
Ω
Table 26: Current noise at 20 MHz
urrent test
C
Instrument
Channel 1 1 Ω
Channel 2 1 Ω
Channel 3 1 Ω
1
Load R must be rated at 100 W minimum.
load R
Measured
rms
________
________
________
1
Maximum
rms
3mV
3mV
3mV
easured
M
rms
________
________
________
Measured
pk
pk -
________
________
________
aximum
M
rms
3mVA
3mA
3mA
Maximum
pk
pk -
20 mV
20 mV
20 mV
22 Series 2200 Multichannel Programmable DC Power Supplies Technical Reference
Page 33

Performance Verification
Performance V
erification Procedures
Performance Verification
Conditions
The following conditions must be met before performing these procedures:
1. The Device Under Test (DUT) and all test equipment must have been
operating continuously for 20 minutes in an environment that meets the
operating range specifications for temperature and humidity.
Test setup changes affecting the remote sense require an additional 20 minute
warm-up period.
2. The procedures are intended to be used in sequence. If it is necessary to
partially test the DUT using an individual test, a 20 minute warm-up period is
required
3. You must connect the DUT and the test equipment to the same AC power
circuit
you are unsure of the AC power circuit distribution. Connecting the DUT and
test instruments into separate AC power circuits can result in offset voltages
between the equipment, which can invalidate this performance verification
procedure.
4. The AC Power Source for the DUT must match the Voltage Selector switch
setting located on the bottom of the DUT.
for the individual test.
. Connect the DUT and test instruments into a common power strip if
Equipment Required
DUT voltage selector
switch AC source voltage
110 115 V 100 V
220 230
ese procedures use external equipment to directly check warranted
Th
characteristics. The following table lists the required equipment.
V
AC source voltage for
Japan products
V
200
Series 2200 Multichannel Programmable DC Power Supplies Technical Reference 23
Page 34

Performance Verification
Table 27: Test e
Item Minimum requi
1. Connectors Connectors fo
2. AC power source Variable AC output from 90 to 265 VA C with at least
3. Electronic load
4. DC voltmeter
5. High current hook up wire
urrent connections are
(High c
indicated with bold lines in the
setup illustrations)
quipment
rements
r hook up wire assemblies and test
resistors, item numbers 5, 6, 9, 10, and 11.
(Qty. 6) #10 fork lugs similar to Tyco part number
52951
(Qty, 14) Stackable, gold plated, banana plugs/jacks
similar to P
current connections, and connection to the load
resistors (items 10 and 11) used for noise testing.
(Qty. 4) Sheathed Banana Jacks similar to Pomona
model 4834
(item 9).
750 VA capacity
Variable DC Load capable of 6 ADC and 40 VDC B&K Precision 8510
Voltage measurement at 12 mV through 40 V to better
than 100 ppm accuracy with the ability to multiply the
result b
18 AWG (
To perform all tests, the following wire assemblies need
to be created:
#10 fork lug to #10 fork lug, Qty 2, (included in
Guild
omona model 4897-0. Used for lower
to put connectors on the Resistors
y a scalar.
minimum) hookup wire assemblies.
line 92301 if used)
Example
Kikusui PCR2000M
Keithley 2000 DMM
able Banana to #10 fork lug, Qty 2
Stack
able Banana to Bare Wire Qty 2.
Stack
Wire lengths are not critical.
6. Low c
(Low current connections are
indicated with light lines in the
setu
7. 50 mΩ precisionshunt resistor 0.050 Ω ±100 ppm at 25 W ±4 ppm/°C temperature
8. Current sense resistor cabling Kelvin 4 terminal measuring cables for shunt resistor to
urrent hook u p wire
p illustrations)
22 AWG (minimum) hookup wires
To perform all tests, the following wire assemblies need
created:
to be
ana plug to Banana plug, Qty 2
Ban
e Wire to stackable Banana, Qty 2
Bar
e Wire to Banana, Qty 2
Bar
Wire lengths are not critical.
coefficient
oltmeter
v
Guildline 9230A-50
Guildline 92301 cable set
24 Series 2200 Multichannel Programmable DC Power Supplies Technical Reference
Page 35

Performance Verification
Table 27: Test equipment (cont.)
Item Minimum requirements Example
9. 50 mΩ resistor for Remote
Sense testing
(2 required)
Oneofthese50mΩ resistors
may be substituted with
item 7.
10. Load resistor for Voltage
Noise testing
Channel 1 12 Ω Vishay/Dale RH05012R00FE02
Channel 2 12 Ω Vishay/Dale RH05012R00FE02
Channel 3 ( 2230-30-1 and
2230J-30-1 only)
11. Load Resistor for Current
Noise testing
12. Oscilloscope 20 MHz bandwidth limited oscilloscope at 1 mV/division Tektronix DPO3012
13. Oscilloscope probe Low capacitance 1 MΩ/10 MΩ 1X/10X 6 MHz/200 MHz
14. Oscilloscope probe Low capacitance 10 MΩ 500 MHz probe
15. Coaxial cable 50 Ω BNC, male-to-male
16. BNC adapter BNC female to banana breakout
0.050 Ω,5W.
To perform the tests as illustrated, both leads of each
resistor require a Banana Jack connector (e.g. Pomona
model 4834).
Loading resistors for high current in voltage mode, and
high voltage in current mode
All resistors should be rated for at least 50 W. Ohms
tolerance within 5% . Resistor composition is not critical.
To perform the tests as illustrated, both leads of the load
resistor require a Banana plug/jack (or equivalent) to
connect to the power supply.
2.5 Ω Vishay/Dale RH0502R500FE02
1 Ω, 100 W, 5%
To perform the tests as illustrated, both leads of the load
resistor require a Banana plug/jack (or equivalent) to
connect to the power supply.
probe
OHMITE 15FR050E
Vishay/Dale HL10006Z1R000JJ
Tektronix P2220, 1X probe
Tektronix P6139A, 10X probe
Tektronix part number:
012-0482-00
Pomona Electronics 3073
Series 2200 Multichannel Programmable DC Power Supplies Technical Reference 25
Page 36

Performance Verification
Self Test
This procedure
its internal self tests. No test equipment or hookups are required.
1. Disconnect al
2. Power on the DUT. The front-panel display will light up briefly while the
DUT perform
up at once.
3. Review the d
strokes lost on any annunciator.
4. If the EEPROM is damaged or the latest operation data in the EEPROM is
missing, the display appears as follows:
uses internal routines to verify that the DUT functions and passes
l cables from the DUT outputs.
s its power-on self test. All the display annunciators will light
isplay with all the annunciators. Visually check if there are any
5. If the calibration data in the EEPROM is missing, the display appears as
follows:
6. If the latest operating state of the power supply in the EEPROM is missing,
the display appears as follows:
7. If there is no response when you power on the DUT, verify that there is AC
power to the power supply, verify the power-line voltage settings, and verify
hat the correct power-line fuse is installed. If you need more help, contact
t
Keithley.
8. Power off the DUT.
26 Series 2200 Multichannel Programmable DC Power Supplies Technical Reference
Page 37

Performance Verification
Check DC Volta
ge
Accuracy with Remote
Sense
Equipment required
(Item 2) AC Power Source (Item 5) High current hook up wire (bold line
connections)
(Item 3) Electronic Load (Item 6) Low current hook up wire (fine line
)
50 Ω,5WResistor(Qty2)
(Item 4) DC V
oltmeter
connections
(Item 9) 0.0
For each of the channels sequentially.
1. Power off the DUT.
2. Remove the shorting clip from the Remote Sense connector on the rear panel
for the channel being tested. Be sure to retain the clip or clips for the channels
not bein
gtested.
Figure 1: Configuring the shorting clips on a Remote Sense connector to test
channel 1 on a 2230-30-1
Figure 2: Configuring the shorting clips on a Remote Sense connector to test
channel 2 on a 2230-30-1
Series 2200 Multichannel Programmable DC Power Supplies Technical Reference 27
Page 38

Performance Verification
Figure 3: Configuring the shorting clips on a Remote Sense connector to test
channel 3 on a 2230-30-1
3. Set up the equipment a s shown. (See Figure 4.)
NOTE. To assure accurate measurements, it is important that a significant amount
of current does not flow through the sense leads. For this reason, we recommend
that the wiring of the remote sense and the voltmeter be away from the high
t connections between the electronic load and the DUT.
curren
A solution is a pair fork lugs with all three wires crimped in. Another alternative
rk lug between the DUT and the load, and separate connections (probably
is a fo
also fork lugs) holding the wiring for one or both of the voltmeter and remote
sense. A third alternative is to stack banana jacks at the voltmeter, with the remote
sense toward the voltmeter, and the two high current connections on the outside.
28 Series 2200 Multichannel Programmable DC Power Supplies Technical Reference
Page 39

Performance Verification
Figure 4: DC voltage accuracy with remote sense test setup. The channel 1 test
setup is shown.
Series 2200 Multichannel Programmable DC Power Supplies Technical Reference 29
Page 40

Performance Verification
4. Power on the DUT
NOTE. Ensure the warm-up criteria has been met as described in the Performance
Ver ification Conditions.
5. Set the voltmeter as follows:
a. Set to measu
b. Set to auto range.
c. Verify that the Math mx+b function is disabled (shift DCV), assuring that
volts are being read.
6. Set the electronic load as follows:
a. Set to Constant Current.
b. Set the to draw a constant current at the test current specified for the DUT
in the table for checking DC Voltage Accuracy With Remote Sense. (See
Table 15 on page 16.)
7. Set the channel under test (CUT) to the full scale (FS) output current.
8. Set the CUT to 0% of the FS output voltage (0 V).
.
re DC volts.
9. Turn the DUT output on.
10. Ente
11. Inc
12. Repeat steps 10 and 11 until you complete testing at 100% of the FS.
13. Power off the DUT.
14. Disconnect the hook up wires from the Remote Sense connector and reinstall
15. Power on the DUT.
This completes the check for one channel. If needed, return to step 1 to run
through the check for the next channel.
r the voltmeter reading into the table for checking DC voltage accuracy
with remote sense. (See Table 15 on page 16.)
rease the CUT output voltage by 25% of the FS output voltage.
the shorting clip on the channel you just tested.
30 Series 2200 Multichannel Programmable DC Power Supplies Technical Reference
Page 41

Performance Verification
Check DC Volta
ge Setting
Accuracy Without Remote
Sense and Voltage
Readback Accu
racy
Equipment required
(Item 2) AC Power Source (Item 5) High current hook up wire (bold line
connections)
(Item 3) Electronic Load (Item 6) Low current hook up wire (fine line
)
(Item 4) DC V
connections
oltmeter
For each channel sequentially.
1. Set up the equipment as shown. (See Figure 5.)
NOTE. Ens
ure the warm-up criteria has been met as described in the Performance
Ver ification Conditions.
NOTE. To
assure accurate measurements, the voltmeter must connect as close as
possible to the front panel of the DUT. A solution is to use fork lugs between the
electronic load and the DUT, and banana plugs between the DUT and voltmeter.
An alternative solution is to use fork lugs for both connections at the DUT.
Series 2200 Multichannel Programmable DC Power Supplies Technical Reference 31
Page 42

Performance Verification
Figure 5: Voltage accuracy, regulation, and protection test setup. The channel
1 test setup is shown.
2. Set the voltmeter as follows:
a. Set to measure DC volts.
b. Set to auto range.
c. Verify that the Math mx+b function is disabled (shift DCV), assuring that
volts are being read.
3. Set the electronic load as follows:
a. Set to Constant Current.
b. Set to draw a constant current at the test current specified for the channel
under test (CUT) in the table for checking DC Voltage Accuracy without
Remote Sense. (See Table 16 on page 17.)
4. Set the CUT to the full scale (FS) output current.
5. Set the CUT to 0% of the FS output voltage (0 V).
6. Turn the DUT output on.
32 Series 2200 Multichannel Programmable DC Power Supplies Technical Reference
Page 43

Performance Verification
7. Enter the voltm
without remote sense. (See Table 16 on page 17.)
8. Enter the volt
accuracy. (See Table 17 on page 18.)
9. Enter the CU
accuracy. (See Table 17 on page 18.)
10. Calculate t
enter the absolute value into the difference column of the table. (See Table 17
on page 18.)
11. Increase the CUT output voltage by 25% of the FS output voltage.
12. Repeat st
This completes the check for one channel. If needed, return to step 1 to run
through
the check for the next channel.
eter reading into the table for checking DC voltage accuracy
meter reading into the table for checking DC voltage readback
T Readback Voltage into the table for DC voltage readback
he difference of the two measurements taken in steps 8 and 9 and
eps 7 through 11 until you complete testing at 100% of FS.
Series 2200 Multichannel Programmable DC Power Supplies Technical Reference 33
Page 44
Performance Verification
Check DC Voltage Line
Regulation
This check proc
edure uses the same test setup as the previous procedure. (See
Figure 5.)
For each channel sequentially.
1. Change the AC
Power Source output to the minimum voltage specified in the
following table.
NOTE. Ensure the warm-up criteria has been met as described in the Performance
Ver ification Conditions.
DUT voltage selector
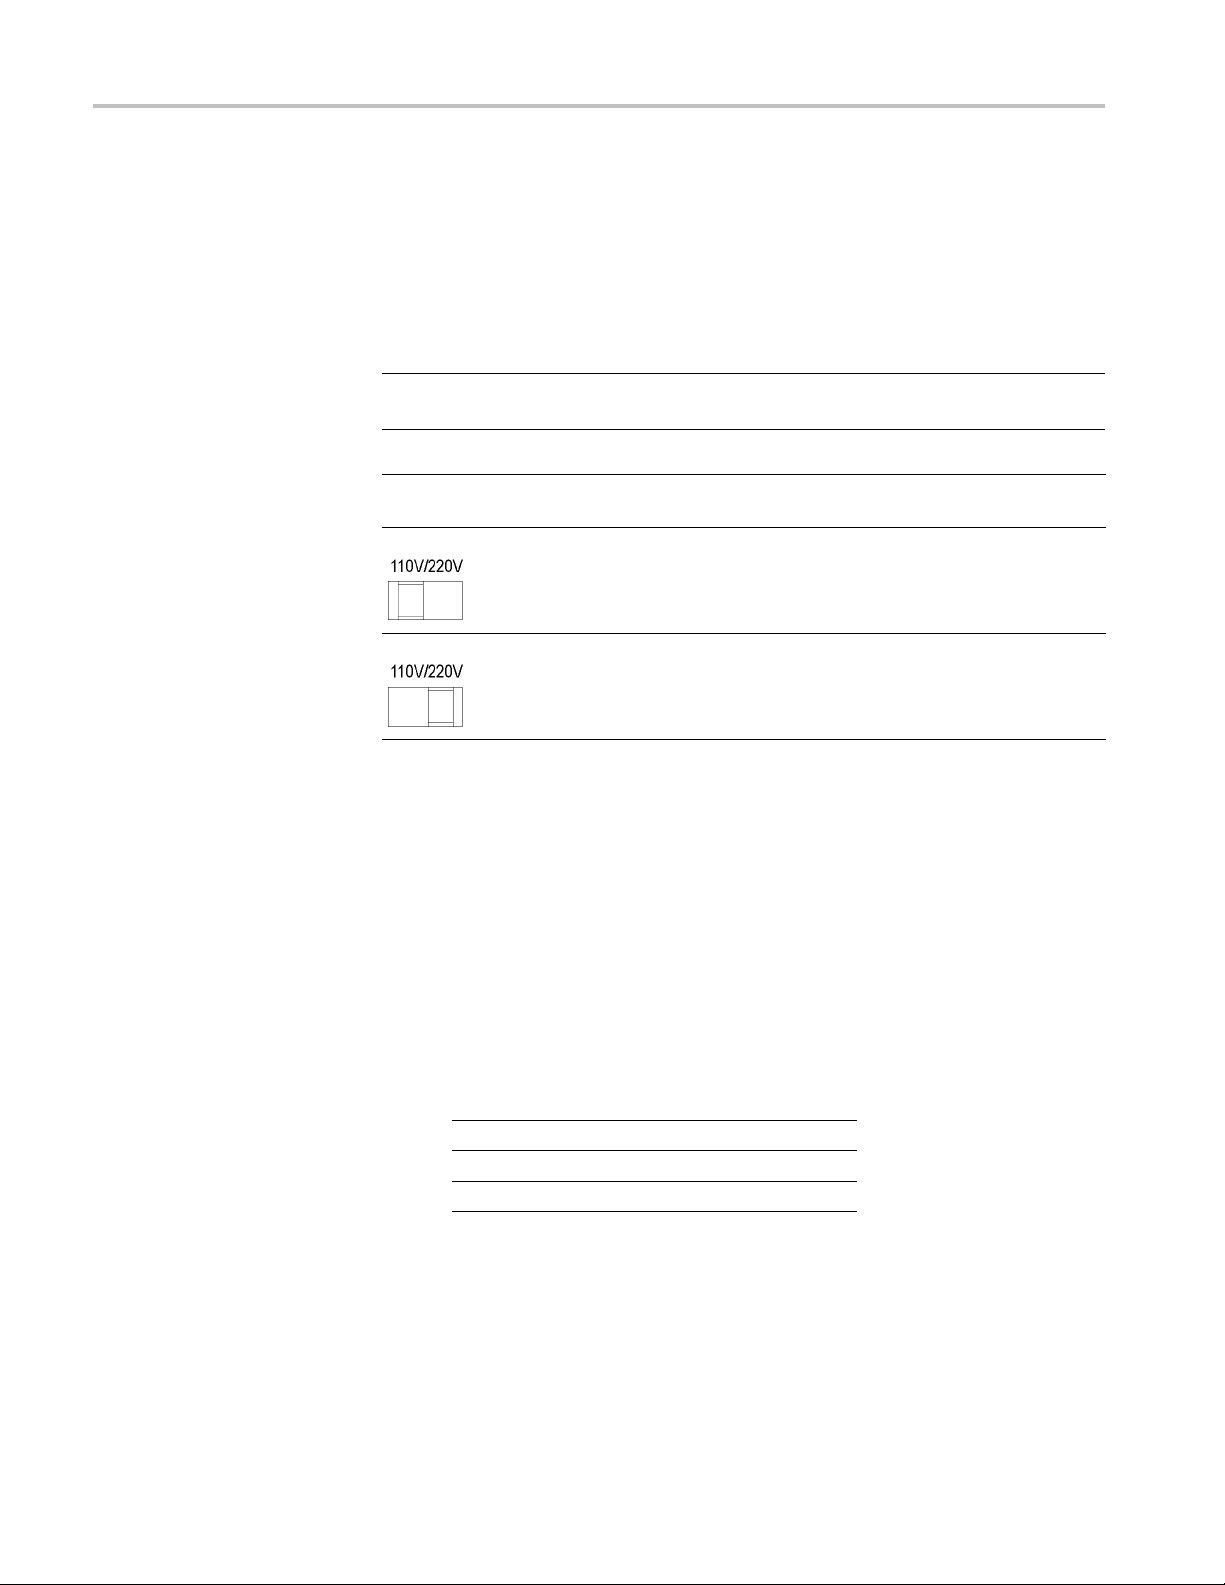
switch AC Power Source voltage Japan configured units
110 99 V 90
220 198 V 180
2. Set the voltmeter as follows:
a. Set to measure DC volts.
b. Set t
o auto range.
c. Verify that the Math mx+b function is disabled (shift DCV), assuring that
s are being read.
volt
3. Set the electronic load as follows:
a. Set to Constant Current.
b. Set to draw the specified test current.
Instrument Test current
Channel 1
Channel 2
Channel 3
0.5 A
0.5 A
2.5 A
4. Set the channel under test (CUT) to 100% of the full scale (FS) output current.
5. Set the CUT to 100% of the FS output voltage.
6. Turn the DUT output on.
34 Series 2200 Multichannel Programmable DC Power Supplies Technical Reference
Page 45

Performance Verification
7. Enter the voltm
Regulation under the min column for the CUT. (See Table 18 on page 19.)
eter reading into the table for checking DC Voltage Line
Series 2200 Multichannel Programmable DC Power Supplies Technical Reference 35
Page 46

Performance Verification
8. Change the AC Po
wer Source output to the maximum voltage specified in the
following table.
DUT voltage selector
switch AC Power Source voltage Japan configured units
110 132 V 110 V
220 264 V 220 V
9. Enter the voltmeter reading into table for checking DC Voltage Line
Regulation under the Max column for the CUT. (See Table 18 on page 19.)
10. Change the AC Power Source output to match the Voltage Selector switch
setting of the DUT.
DUT voltage selector
switch AC Power Source voltage Japan configured units
110 115 V 100 V
220 230 V 200 V
11. Enter the voltmeter reading into table for checking DC Voltage Line
Regulation under the Nom column for the CUT. (See Table 18 on page 19.)
12. Calculate the two values: Nom – Min and Max – Nom. Enter the values into
the appropriate columns. (See Table 18 on page 19.)
13. Enter the largest of the two values calculated in step 12 into the Largest
column. (See Table 18 on page 19.)
This completes the check for one channel. If needed, return to step 1 to run
through the check for the next channel.
36 Series 2200 Multichannel Programmable DC Power Supplies Technical Reference
Page 47

Performance Verification
Check DC Voltage Load
Regulation
This check proc
edure uses the same test setup as the previous procedure. (See
Figure 5.)
For each channel sequentially.
NOTE. Ensure the warm-up criteria has been met as described in the Performance
Ver ification Conditions.
1. Set the voltmeter as follows:
a. Set to measure DC volts.
b. Set to auto range.
c. Verify th
at the Math mx+b function is disabled (shift DCV), assuring that
volts are being read.
2. Set the e
lectronic load as follows:
a. SettoConstantCurrent.
b. Set to draw 0 Amps.
3. Set the channel under test (CUT) to 100% of the full scale (FS) output current.
4. Set the CUT to 100% of the FS output voltage.
5. Turn the DUT output on.
6. Ente
r the voltmeter reading into the table for checking DC Voltage Load
Regulation under the minimum load column for the CUT. (See Table 19 on
page 19.)
7. Increase the electronic load to the reference load test current value.
Instrument Reference load test current
Channel 1
Channel 2
Channel 3
0.75 A
0.75 A
2.5 A
8. Enter the voltmeter reading into the table for checking DC Voltage Load
Regulation under the reference load column for the CUT. (See Table 19 on
page 19.)
Series 2200 Multichannel Programmable DC Power Supplies Technical Reference 37
Page 48

Performance Verification
9. Increase the el
Channel Maximum load test current
Channel 1
Channel 2
Channel 3
ectronic load to the maximum load test current value.
1.47 A
1.47 A
4.9 A
10. Enter the voltmeter reading into the table for checking DC Voltage Load
Regulatio
n under the maximum load column for the channel. (See Table 19
on page 19.)
11. Calculat
e the three values: Ref – Min, Max – Ref, and (Max – Ref)/0.98.
Enter the values into the appropriate columns. (See Table 19 on page 19.)
12. Enter th
e largest of the three values calculated in step 11 into the Largest
column.
This co
mpletes the check for one channel. If needed, return to step 1 to run
through the check for the next channel.
38 Series 2200 Multichannel Programmable DC Power Supplies Technical Reference
Page 49

Performance Verification
Check DC Cu rre
nt and
DC Current Readback
Accuracy
Equipment required
(Item 2) AC Power Source (Item 5) High current hook up wire (bold line
connections)
(Item 3) Electronic Load (Item 7) High Accuracy 0.05 Ω Resistor
(Item 4) DC Voltmeter (Item 8) Current Shunt Resistor Cabling
For each channel sequentially.
1. Set up the equipment as shown. (See Figure 6.)
NOTE. Ensure the warm-up criteria has been met as described in the Performance
Ver ification Conditions.
Figure 6: DC current accuracy and regulation test setup. The channel 1 test setup is shown.
Series 2200 Multichannel Programmable DC Power Supplies Technical Reference 39
Page 50

Performance Verification
2. Set the voltmet
a. Set to measure DC volts.
b. Set to auto range.
c. Set to show amps (instead of volts) by multiplying the voltmeter result
by 20.
Press Shift DC V (mX+B).
Use the arrow key to move the cursor to the far right until it is
positioned on the ^.
Press the up range button once so that M=10.00000.
Press the arrow key to move the cursor to the 1’s digit and then press
the up range button once so that M=20.00000.
Press the Enter button and check that the display shows B=0.
Press the Enter button and check that the display shows UNITS.
Use the arrow keys to modify the display to show AMP.
Adjust each letter individually.
3. Set the electronic load as follows:
er as follows:
a. Set to Constant Voltage.
b. Set to the specified voltage for your channel under test (CUT). (See
Table 20 on page 20.)
4. Set the channel under test (CUT) to 0% of the full scale (FS) output current.
5. Set the CUT to 100% of the FS output voltage.
6. Turn the DUT output on.
7. Enter the voltmeter reading into the table for checking DC current accuracy.
(SeeTable20onpage20.)
8. Enter the voltmeter reading into the table for checking DC current readback
accuracy. (See Table 21 on page 21.)
9. Enter the CUT readback current readout into the table for checking current
readback accuracy under the current readout column. (See Table 21 on
page 21.)
10. Calculate the difference of the two measurements taken in steps 8 and 9.
Enter the absolute value of the calculated value into the difference column of
the table. (See Table 21 on page 21.)
11. Increase the CUT output current by 25% of the FS output current.
12. Repeat steps 7 through 11 until you complete testing at 100% of the FS output
current.
40 Series 2200 Multichannel Programmable DC Power Supplies Technical Reference
Page 51

Performance Verification
This completes
through the check for the next channel.
the check for one channel. If needed, return to step 1 to run
Series 2200 Multichannel Programmable DC Power Supplies Technical Reference 41
Page 52

Performance Verification
Check DC Current Line
Regulation
This check proc
edure uses the same test setup as the previous procedure.(See
Figure 6.)
For each channel sequentially.
1. Change the AC Power Source output to the voltage specified in the following
table.
DUT voltage selector
switch AC power source voltage Japan configured units
110 99 V 90 V
220 198 V 180 V
NOTE. Ensure the warm-up criteria has been met as described in the Performance
Ver ification Conditions.
2. Set the voltmeter as follows:
a. Set to measure DC volts.
b. Set to auto range.
c. Set to show amps (instead of volts) by multiplying the voltmeter result
y20.
b
Press Shift DC V (mX+B).
Use the arrow key to move the cursor to the far right until it is
positioned on the ^.
Press the up range button once so that M=10.00000.
Press the arrow key to move the cursor to the 1’s digit and then press
the up range button once so that M=20.00000.
Press the Enter button and check that the display shows B=0.
Press the Enter button and check that the display shows UNITS.
Use the arrow keys to modify the display to show AMP.
Adjust each letter individually.
3. Set the electronic load as follows:
a. Set to Constant Voltage.
b. Set to the specified voltage for your channel under test (CUT). (See
Table 22 on page 22.)
4. Set the channel under test (CUT) to 100% of the full scale (FS) output voltage.
5. Set the CUT to 100% of the full scale (FS) output current.
42 Series 2200 Multichannel Programmable DC Power Supplies Technical Reference
Page 53

Performance Verification
6. Turn the DUT out
put on.
7. Enter the voltmeter reading into the table for checking current line regulation
under the mini
mum line for the CUT. (See Table 22 on page 22.)
8. Change the AC Power Source output to the voltage specified in the following
table.
DUT voltage selector
switch AC power source voltage Japan configured units
110 132 V 110
220 264 V 220
9. Enter the voltmeter reading into the Max line for the CUT. (See Table 22
on page 22.)
10. Change the AC Power Source output to the voltage specified in the following
table.
DUT voltage selector
switch AC power
110 115 V 100 V
220 230 V 200 V
source voltage
Japan co
nfigured units
11. Enter the voltmeter reading into the Nom line for the CUT. (See Table 22
on page 22.)
12. Calculate the two values: Nom – Min and Max – Nom. Enter the values into
the appropriate columns. (See Table 22 on page 22.)
13. Select the largest of the two calculations from step 12 and enter the value into
the Largest column. (See Table 22 on page 22.)
14. Turn the DUT output off.
This completes the check for one channel. If needed, return to step 1 to run
through the check for the next channel.
Series 2200 Multichannel Programmable DC Power Supplies Technical Reference 43
Page 54

Performance Verification
Check DC Current Load
Regulation
This check proc
edure uses the same test setup as the previous procedure. (See
Figure 6.)
NOTE. Ensure the warm-up criteria has been met as described in the Performance
Ver ification Conditions.
For each channel sequentially.
1. Set the voltmeter as follows:
a. Set to measure DC volts.
b. Set to auto range.
c. Set to show amps (instead of v
olts) by multiplying the voltmeter result
by 20.
Press Shift DC V (mX+B).
Use the arrow key to move the cursor to the far right until it is
positioned on the ^.
Press the up range button once so that M=10.0
0000.
Press the arrow key to move the cursor to the 1’s digit and then press
the up range button once so that M=20.00000.
Press the Enter button and check that the display shows B=0.
Press the Enter button and check that the display shows UNITS.
Use the arrow keys to modify the display to show AMP.
Adjust each letter individually.
2. Set the electronic load as follows:
a. Set to Constant Voltage.
b. Set to output the minimum test voltage level.
Channel Minimum test voltage
Channel 1
Channel 2
Channel 3
3.0 V
3.0 V
0.6 V
3. Set the channel under test (CUT) to 100% of the FS output current for your
product.
4. Set the CUT to 100% of the FS output voltage for your product.
5. Turn the DUT output on.
44 Series 2200 Multichannel Programmable DC Power Supplies Technical Reference
Page 55

Performance Verification
6. Enter the voltm
at the minimum voltage for your product. (See Table 23 on page 22.)
eter reading into the table for checking current load regulation
Series 2200 Multichannel Programmable DC Power Supplies Technical Reference 45
Page 56

Performance Verification
7. Increase the el
Channel
under test Reference tes
Channel 1
Channel 2
Channel 3
ectronic load to the Reference test voltage level.
t voltage
15.0 V
15.0 V
3.0 V
8. Enter the voltmeter reading into the table for checking current load regulation
at the reference test voltage the CUT. (See Table 23 on page 22.)
9. Increase the electronic load to the Maximum test voltage level.
Channel
under test Maximum test voltage
Channel 1
Channel 2
Channel 3
29.4 V
29.4 V
5.88 V
10. Enter the voltmeter reading into the table for checking current load regulation
at the maximum voltage for the CUT. (See Table 23 on page 22.)
11. Calculate the two values: REF – Min and Max – REF. Enter the values into
the appropriate columns. (See Table 23 on page 22.)
12. Select the larger of the two calculated values from step 11 and enter the value
into the Largest column. (See Table 23 on page 22.)
13. Power off the DUT and test equipment.
This completes the check for one channel. If needed, return to step 1 to run
through the check for the next channel.
46 Series 2200 Multichannel Programmable DC Power Supplies Technical Reference
Page 57

Performance Verification
Check Voltage
Noise
(7 MHz)
Equipment required
(Item 5) High current hook up wire
(bold line connections)
(Item 10) Load Resistor (Item 13) Oscilloscope 1X probe
(Item 12) Oscilloscope
For each channel sequentially.
1. Plug the DUT into your local line power from the mains.
2. Plug the test oscilloscope into the same mains outlet as the DUT.
NOTE. Some AC Power Sources create large amounts of high frequency noise on
the power line that the instrument may not fully reject. N oise directly on the mains
is typically better controlled.
Use the same mains outlet for both the DUT and test oscilloscope to avoid ground
loops which may cause noise.
3. Power on the DUT and test oscilloscope.
NOTE. Ensure the warm-up criteria has been met as described in the Performance
cation Conditions.
Ver ifi
4. Set up the equipment as shown. (See Figure 7.)
Use the appropriate load resistor depending on the channel being tested. (See
Table 24 on page 22.)
Series 2200 Multichannel Programmable DC Power Supplies Technical Reference 47
Page 58

Performance Verification
Figure 7:
7 MHz test setup. The channel 1 test setup is shown.
48 Series 2200 Multichannel Programmable DC Power Supplies Technical Reference
Page 59

Performance Verification
5. Set the oscillo
scope as follows:
a. 1 mV/division
b. 1MΩ input resistance
c. 20 MHz bandwidth (BW) limit
d. AC Coupled
e. Line trigger
f. 2ms/div
g. Set to measure V
p-p
and V
RMS
6. Set the oscilloscope probe to 1X mode.
7. Set the channel under test (CUT) to the 100% FS output voltage.
8. Set the CUT to the 100% FS output current.
9. Turn the DUT output on.
WAR N I NG. Do not touch the load resistor. The load resistor may become hot
enough to cause burns.
10. Enter the oscilloscope measurements into the table for checking Noise at
7 MHz. (See Table 24 on page 22.)
This completes the check for one channel. If needed, return to step 1 to run
through the check for the next channel.
Series 2200 Multichannel Programmable DC Power Supplies Technical Reference 49
Page 60

Performance Verification
Check Voltage
(20 MHz)
Noise
Equipment required
(Item 5) High current hook up wire
(bold line connections)
(Item 10) Load Resistor (Item 16) BNC F-to-Banana
(Item 12) Oscilloscope
(Item 15) Coaxial cable (BNC M-M)
For each channel sequentially.
1. Plug the DUT into your local line power from the mains.
2. Plug the test oscilloscope into the same mains outlet as the DUT.
NOTE. Some AC Power Sources create large amounts of high frequency noise on
the power line that the instrument may not fully reject. Noise directly on the mains
is typically better controlled.
Use the same mains outlet for both the DUT and test oscilloscope to avoid ground
loops which may cause noise.
3. Power on the DUT and test oscilloscope.
NOTE. Ensure the warm-up criteria has been met as described in the Performance
fication Conditions.
Ver i
4. Set up the equipment a s shown. (See Figure 8.)
Use the appropriate load resistor depending on the channel under test. (See
Table 25 on page 22.)
50 Series 2200 Multichannel Programmable DC Power Supplies Technical Reference
Page 61

Performance Verification
Figure 8: 20 MHz voltage noise test setup. The channel 1 test setup is shown.
Series 2200 Multichannel Programmable DC Power Supplies Technical Reference 51
Page 62

Performance Verification
5. Set the oscillo
scope as follows:
a. 1 mV/division
b. 1MΩ input resistance
c. 20 MHz bandwidth (BW) limit
d. AC Coupled
e. Line trigger
f. 2ms/div
g. Set to measure V
p-p
and V
RMS
6. Set the channel under test (CUT) to the 100% FS output voltage.
7. Set the channel under test (CUT) to the 100% FS output current.
8. Turn the DUT output on.
WARNING. Do not touch the load resistor. The load resistor may become hot
enough to cause burns.
9. Enter the oscilloscope measurements into the table for checking voltage noise
at 20 MHz. (See Table 25 on page 22.)
This completes the check for one channel. If needed, return to step 1 to run
through the check for the next channel.
52 Series 2200 Multichannel Programmable DC Power Supplies Technical Reference
Page 63

Performance Verification
Check Current
Noise
Equipment required
(Item 5) High current hook up wire
(bold line connections)
(Item 11) 1 Ω Load Resistor (Item 14) Oscilloscope 10X probe
(Item 12) Oscilloscope
For each channel sequentially.
1. Plug the DUT into your local line power from the mains.
2. Plug the test oscilloscope into the same mains outlet as the DUT.
NOTE. Some AC Power Sources create large amounts of high frequency noise on
the power line that the instrument may not fully reject. N oise directly on the mains
is typically better controlled.
Use the same mains outlet for both the DUT and test oscilloscope to avoid ground
loops which may cause noise.
3. Power on the DUT and test oscilloscope.
NOTE. Ensure the warm-up criteria has been met as described in the Performance
cation Conditions.
Ver ifi
4. Set up the equipment as shown. (See Figure 9.)
Figure 9: 20 MHz current noise test setup. The c hannel 1 test setup is shown.
Series 2200 Multichannel Programmable DC Power Supplies Technical Reference 53
Page 64

Performance Verification
5. Set the oscillo
scope as follows:
a. 1 mV/division
b. 1MΩ input resistance
c. 20 MHz bandwidth (BW) limit
d. AC Coupled
e. Line trigger
f. 2ms/div
g. Set to measure V
p-p
and V
RMS
6. Set the channel under test (CUT) to the 100% FS output voltage.
7. Set the CUT to the 100% FS output current.
8. Turn the DUT output on.
WARNING. Do not touch the load resistor. The load resistor may become hot
enough to cause burns.
9. Enter the oscilloscope measurements into the table for checking current noise.
(SeeTable25onpage22.)
10. Power off the DUT and test equipment.
This completes the check for one channel. If needed, return to step 1 to run
through the check for the next channel.
54 Series 2200 Multichannel Programmable DC Power Supplies Technical Reference
Page 65

Page 66

All Keithley trademarks and trade names are the property of Keithley Instruments, Inc.
All other trademarks and trade names are the property of their respective companies.
Specifications are subject to change without notice.
Corporate Headquarters • 28775 Aurora Road • Cleveland, Ohio 44139 • 440-248-0400 • Fax: 440-248-6168 • 1-888-KEITHLEY • www.keithley.com
Keithley Instruments, Inc.
A Greater Measure of Confidence
6/13
 Loading...