

Page 1
P H A S E R® 7 4 0 a n d 7 4 0 L
LASER PRINTERS
User Guide
www.tek.com/Color_Printers/
®
Page 2
Contents
0
Tektronix Supplies
Getting The Most From Your Printer
Printing
All About Media
Loading Media Trays
Using the Multi-Purpose Tray
Duplex Printing
Front Panel Messages
Troubleshooting Print Quality
Media Jams
Occasional Cleaning
Printing Help Pages from the Front Panel
Consumables
Controlling Color Density
Getting More Information
Getting Help
1
2
3
4
7
8
16
20
21
26
32
33
37
38
41
42
Symbols
Note
General information
Caution
Use caution or damage to the printer may result.
Hot
Hot surface on or in the printer. Use caution to avoid
personal injury.
Copyright © 1998 by Tektronix, Inc. All rights reserved.
®
Tektronix
and Phaser® are registered trademarks of Tektronix, Inc.
Page 3
Tektronix Supplies
Supplies Order number Description
Toner Cartridges Hi-Capacity Standard Color
016-1656-00 016-1684-00 Black
016-1657-00 016-1685-00 Cyan
016-1658-00 016-1686-00 Magenta
016-1659-00 016-1687-00 Yellow
Fuser
Fuser Roll
Imaging Unit
Transfer Kit
Main Charge Grid
Laser paper
A/Letter (U.S.) 016-1368-00 500 sheets
A4 (Metric Letter) 016-1369-00 500 sheets
Glossy Coated paper
A/Letter (U.S.) 016-1704-00 100 sheets
A4 (Metric Letter) 016-1705-00 100 sheets
Transparencies
A/Letter (U.S.) 016-1654-00 50 sheets
A4 (Metric Letter) 016-1655-00 50 sheets
016-1660-00
016-1661-00
016-1663-00
016-1662-00
016-1664-00
016-1665-00
110 volt
220 volt
Ordering Information
Accessories Order number Description
Paper T rays
Transparency T rays
Automatic Duplex /
Lower Tra y Assembly
Printer Cart
Cleaning Kit
Alcohol Cleaning Wipes
Printer CD-ROM
Printer Diskettes
436-0282-02 A/Letter (U.S.)
436-0283-02 A4 (Metric Letter)
436-0314-02 Legal
436-0284-02 A/Letter (U.S.)
436-0285-02 A4 (Metric Letter)
ZDPLX Includes one each: Duplex Unit,
ZCARTA
016-1710-00
006-7824-01 Pack of 10
063-3079-00 -00 English
063-3078-00
Paper tray, and Transparency tray;
order option 01 for Metric.
-10 French
-20 Italian
-30 German
-40 Spanish
-70 Chinese,
-80 Chinese,
-90 Korean
To order supplies and accessories, contact your local dealer or visit
the Tektronix web site:
www.tek.com/Color_Printers/supplies
Simplified
Traditional
1
Page 4

Ordering Information
Getting The Most From Your Printer
Supplies Startup Kit
Z740SS
Option 01 for Metric
Color Kit
Z740LCS
Automatic Duplex/
Lower T ray Assembly
ZDPLX
Option 01 for Metric
Plus Feature Set
Z740FP*
* Includes installation
Scanner support
Requires Plus Features
■
4 Standard color Toner Cartridges (CMYK)
■
Glossy Coated Paper (100 sheets)
Tektronix Transparencies (50 sheets)
■
Converts a Phaser 740L color-capable printer to a
full-color printer:
■
Adds three color toners.
■
Converts the Phaser 740L product warranty from
a 1-year return-to-depot
the
remainder of the warranty period
■
Automatic
Lower Tray Assembly
■
■
Increased paper-printing capacity
■
Increased printing versatility and convenience
■
1200 dpi
■
Premium print-quality mode
Adds SCSI card for connecting an external hard
■
duplex with the Duplex Unit
to a 1-year on-site
drive or a copy unit
Check Print and Quick Collate functionality
■
■
Requires a minimum of 64 Mbytes of memory
(must be purchased separately)
■
Use your printer as a color copier.
For a list of supported scanners, contact your
■
local Tektronix reseller, or visit the Tektronix web
site.
2
External Hard Disk
ZDISK
PhaserShare®
Network Card
for
.
ZNBFE
ZNBTR
ZNBLT
PhaserLink™
Software
Requires network
connection via TCP/IP
■
Required for collation
■
Extends font capacity
Requires Plus Feature set
■
■
Easy to install
Increases speed and shareability
■
■
High-performance network connectivity
100Base-T Ethernet
Token Ring
LocalTalk
View printer status using any web browser.
■
■
Control printer settings.
■
Link to online documentation via the World
Wide Web.
■
Receive electronic mail when consumables are
low or other printer maintenance is required.
Additional memory
ZMB32
ZMB64
ZMB128
Improved performance
■
32 Mbytes
64 Mbytes
128 Mbytes
Page 5
Print Quality Modes
Standard
Premium Monochrome
Premium
Requires Plus Features
Fast Monochrome
Fast Color
Presentation
General-purpose mode for full-color
■
Highest-quality monochrome (gray scale)
■
Highest-quality color prints.
■
■
Near-photographic detail.
■
Fastest gray scale printing.
Recommended for documents with lots of
■
Fastest full-color output.
■
■
Excellent output using CMY toners for
■
Smoothest and brightest large-area fills.
■
Useful for printing paper copies of
printing.
prints.
black text.
raster image data or color graphics.
overhead presentations.
TekColor™ Color Corrections
Automatic
SWOP
Euroscale
Commercial
Toyo
DIC
None
Vivid Color
sRGB Display
Automatically applies the best color correction mode to
■
each element on the page.
■
Specification for Web Offset Publications. Used to
match U.S. press standards.
■
Used to match equivalent Imation Matchprint® proofs.
■
Used to match commercial Imation Matchprint® proofs.
Used to match commercial Toyo printing inks on
■
coated paper.
■
Used to match Dai Nippon printing inks on coated
paper.
■
No color correction made to colors.
Used with the PANTONE® Color Chart for PANTONE®
■
Color matching.
■
Produces the brightest possible colors.
Adjusts color to closely approximate the colors on a
■
standard display screen.
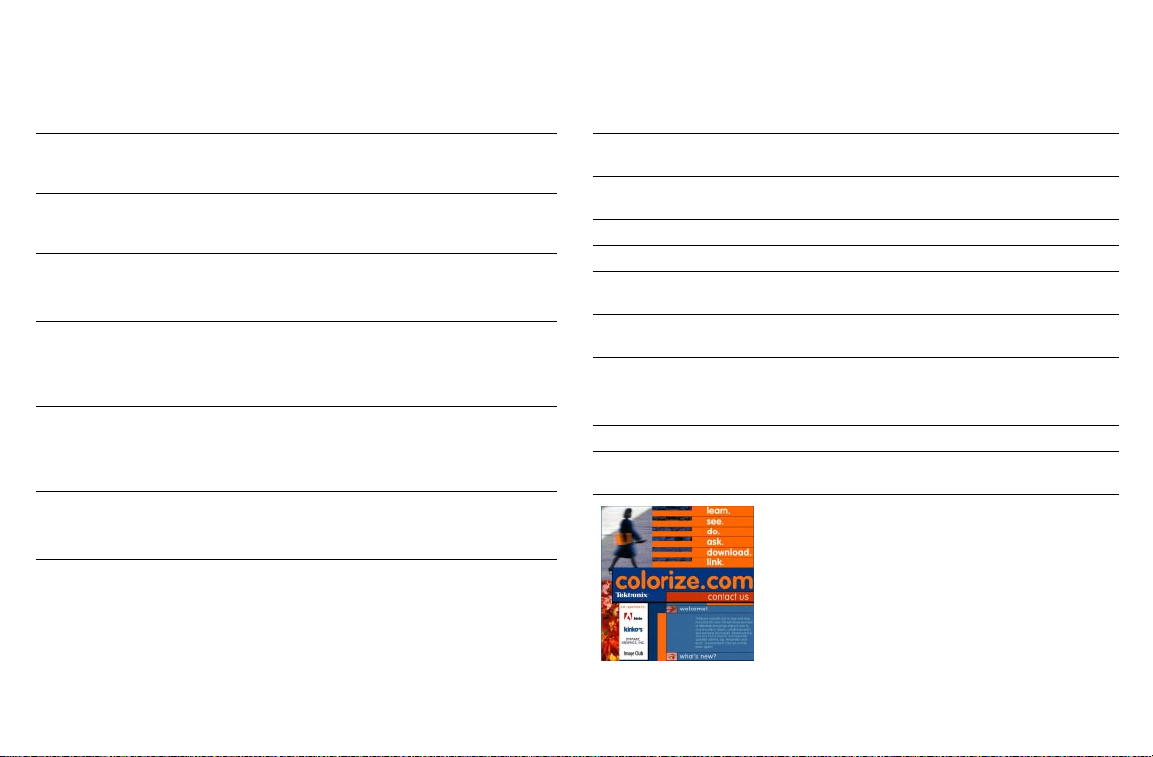
To learn more about using color,
visit our color web site:
www.colorize.com
Printing
3
Page 6
Media
All About Media
Paper T ra ys
Laser paper only
Tray sizes:
■
A/Letter A4 Legal
■
60 - 90 g/m2, 16 - 24 lb.
■
250-sheet capacity
■
Use Tektronix media for
best results
Load only laser paper in the paper trays; specialty media (such as
glossy paper, card stock, en velopes , and labels) must be loaded in
the Multi-Purpose Tray.
4
T ransparency Tray
Tektronix
transparencies only
■
Tray sizes:
A/Letter A4
100-sheet capacity
■
Always use Tektronix
PAPER
A4
33100-38
■
transparencies for best
results
A4
TRANSPARENCY
33100-20
Page 7
Multi-Purpose T ray
33100-21
Laser paper
A/Letter A4 Legal
■
■
75 - 150 g/m2, 20 - 40 lb.
Tektronix transparencies
■
A/Letter A4
Tektronix Glossy Coated paper
■
A/Letter A4
Laser labels
■
A/Letter A4
■
Recommended Avery™ labels
(U.S.: 5160, 5164; Metric: L7162, L7165)
Tektronix Fabric Transfer media
A/Letter A4
■
Envelopes
■
#10
Other media
■
Cover stock up to 163 g/m2, 60 lb.
■
Card stock up to 163 g/m2, 40 lb.
Index up to 163 g/m2, 90 lb.
■
Media sizes supported in the Multi-Purpose Tray
88.9 x 254 mm – 216 x 355.6 mm
Metric:
U.S.:
3.5 x 10 in. – 8.5 x 14 in.
5
Page 8

Supported page sizes and image area
2
34
1
33100-22
6
The printer supports four media sizes, which you select in the
supported printer driver).
Media Page size Print area Top /
1 Letter
2 A4
3 Legal
4 #10 Envelope
8.5 x 11 in. 8.2 x 10.6 in. .2 in. .15 in.
210 x 297 mm 200 x 287 mm 5 mm 5 mm
8.5 x 14 in. 8.2 x 13.6 in. .2 in. .15 in.
4.13 x 9.5 in.
(104.8 x 241.3 mm)
3.8 x 9.2 in.
(96.5 x 233.7 mm)
Print
screen (using a
Margins
Bottom
.16 in.
(4.1 mm)
Sides
.14 in.
(3.6 mm)
Page 9
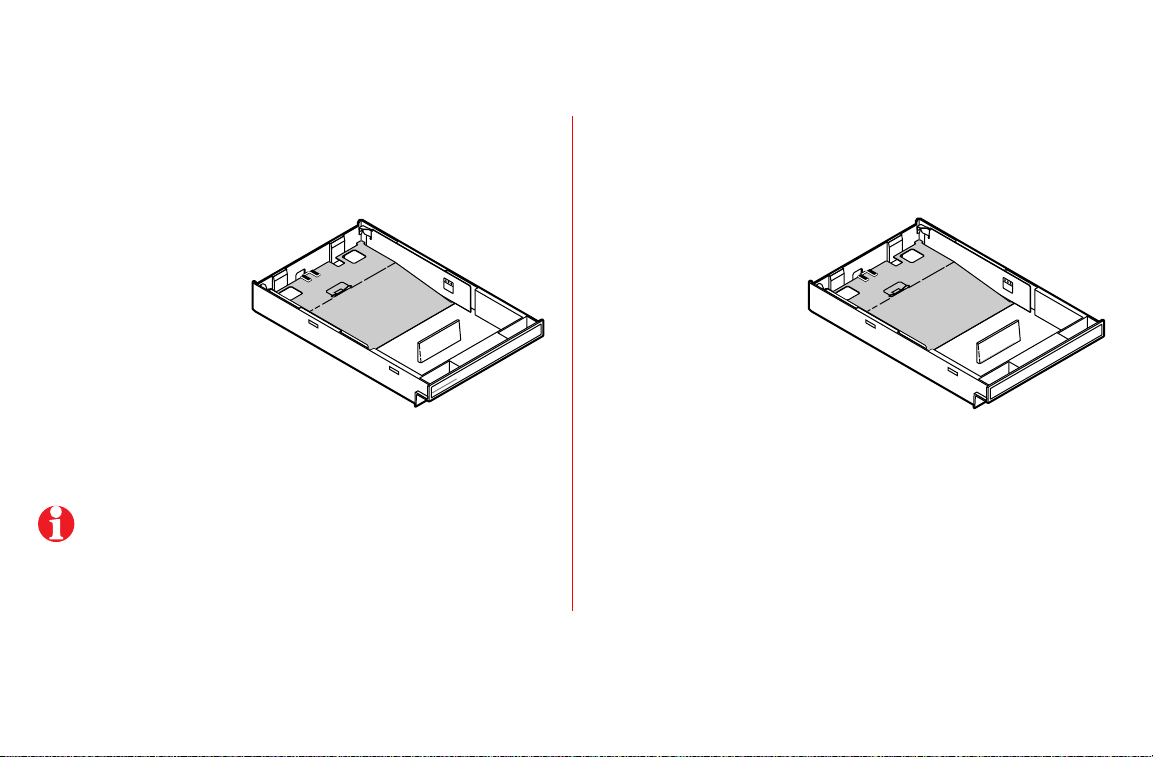
Loading Media Trays
1
Push down on the tray’s metal plate until it clicks, locking it
in place.
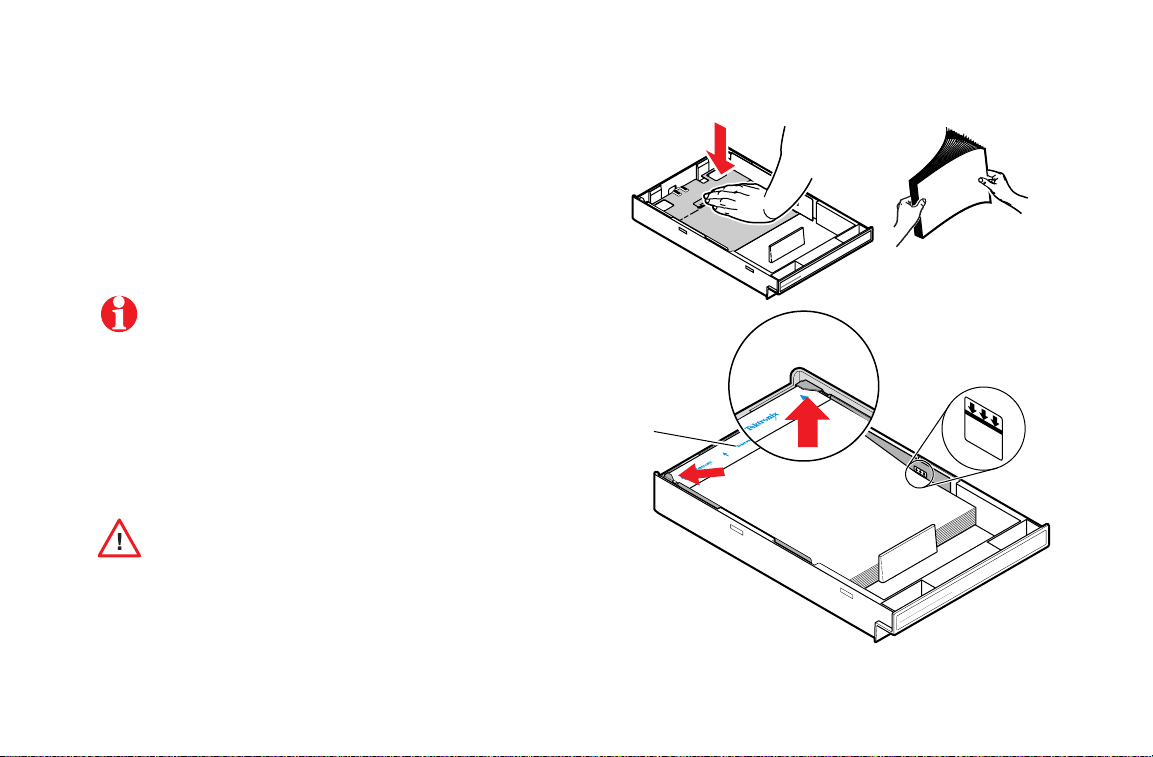
2
Fan the media to release sheets that are stuck together.
3
Place the media in the tray under the hooks.
Place the side to be printed (for example, letterhead
paper)
face-down
4 Transparencies:
face-up
5
Tray capacity:
under the hooks.
Paper: 250 sheets
■
■ Tektronix Transparencies: 100 sheets
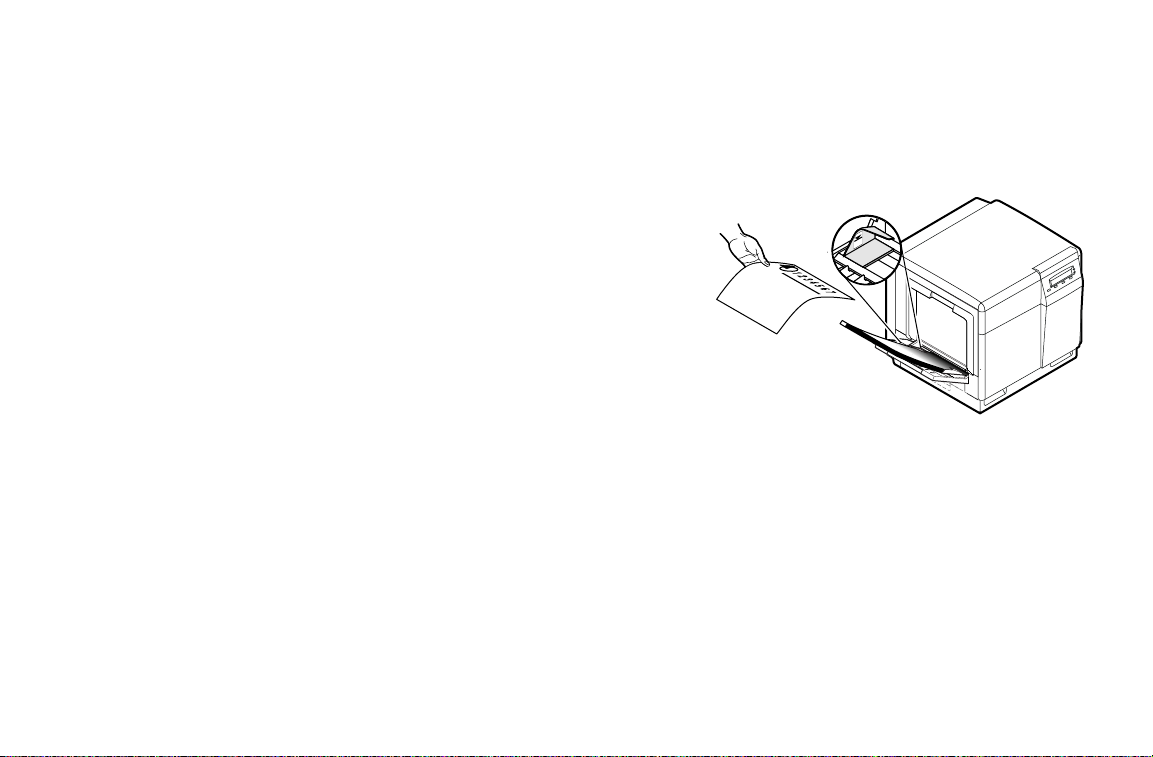
Keep the media level below the indicator on the tray’s
label; otherwise, the printer may jam.
under the hooks.
Place the Tektronix logo strip
1
PAPER
A4
2
3
5
4
A4
TRANSPARENCY
33100-48
Loading Media Trays
7
Page 10
3
2
1
33100-23
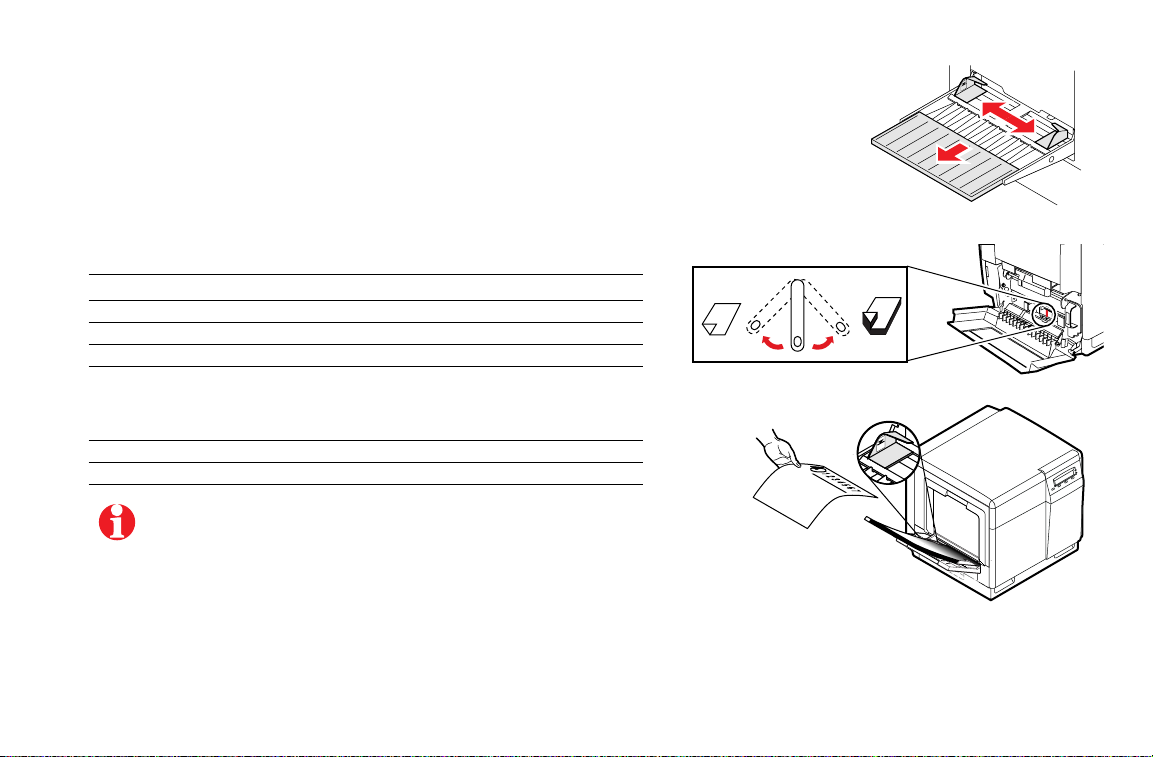
Multi-Purpose Tray
Using the Multi-Purpose Tray
1 Adjust the guides for the width of the media.
2 Adjust the Media Thickness switch for the media you are using (see
page 9).
3 Insert the media, printing side
logo strip is
4 Select the media type at the front panel:
Paper
Paper 2nd Side
Transparency
Coated Paper
Card or Envelope
Label
Fabric Transfer
5 In the Print screen (using a supported driver), select Multi-Purpose T ray .
face-down
■ Standard paper and letterhead 75 - 105 g/m
■ Duplex laser paper
■ Tektronix transparencies
■ Tektronix Glossy Coated paper
■ Heavy paper 109 - 150 g/m
■ Card stock / Index
■ Cover stock
■ Envelope
■ Laser labels
■ Tektronix Fabric Transfer media
The printer waits a minute for you to select the media type. After
a minute, the job prints, using the previously selected media type.
Send the job to the printer.
face-up
(for Tektronix transparencies, the
).
2
, 20 - 28 lb.
2
, 29 - 40 lb.
8
Page 11
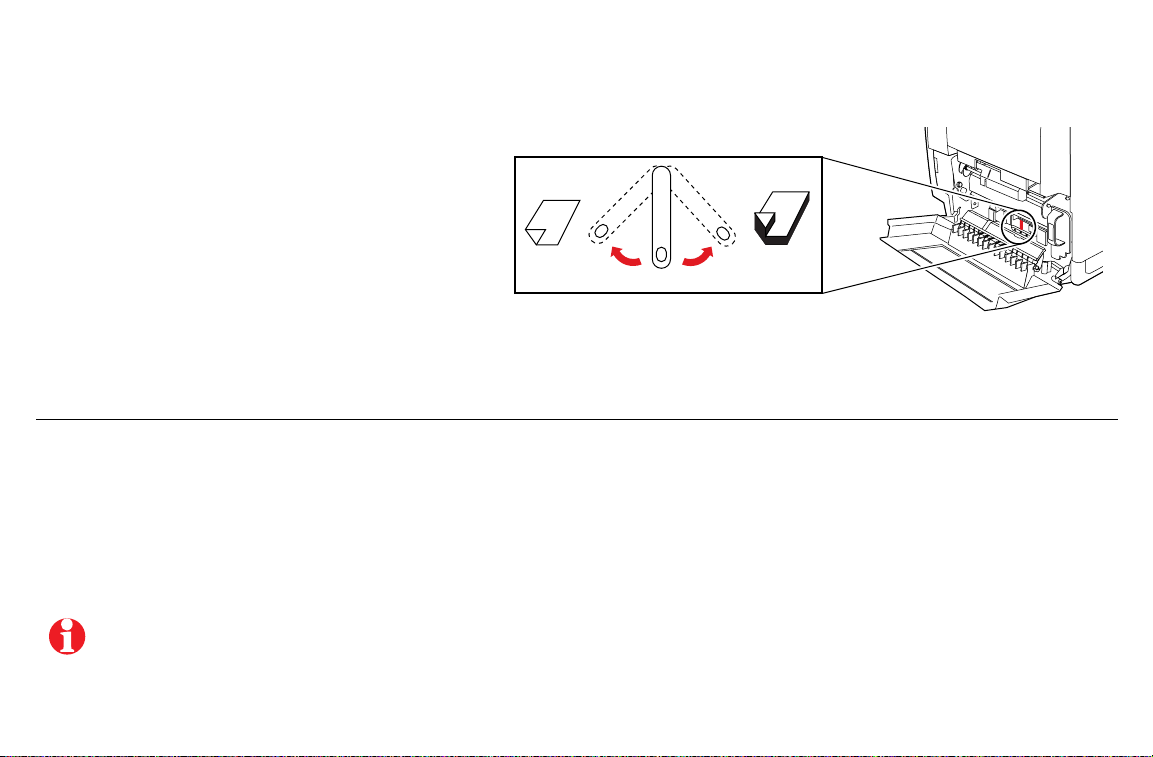
Setting Media Thickness
Manually select a media thickness for the most reliable
paper-picking from the Multi-Purpose Tray.
1 Open the left side door. The blue media
thickness switch has three settings and is
located on the paper feeder.
2 Move the switch to the desired setting:
Thin Medium Thick
Standard laser paper 75 - 105 g/m
(20 - 28 lb.)
For the best coverage when using laser paper heavier than 105 g/m2 (28 lb.) in the Multi-Purpose Tray,
select Card as the media type.
2
Heavy laser paper 109 - 150 g/m2 (29 - 40 lb.)
Tektronix Glossy Coated paper
Tektronix transparencies
Thin Thick
Medium
Cover stock up to 163 g/m2(60 lb.)
Card stock up to 163 g/m
Index up to 163 g/m
Tektronix Fabric Transfer media
Laser labels
#10 Envelopes
2
2
(40 lb.)
(90 lb.)
33100-24
9
Page 12
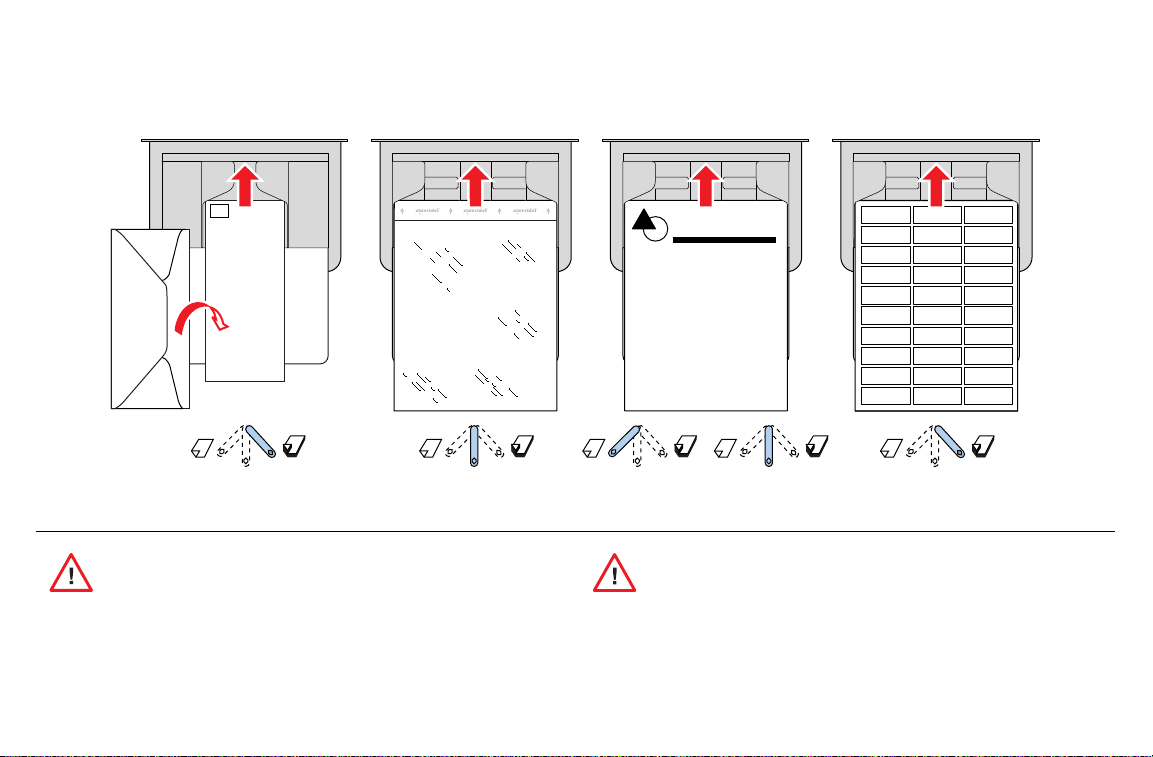
Loading specialty media
Envelopes Tektronix T ransparencies Letterhead Laser Labels
Here
Place
Stamp
10
1234567
Never use envelopes with windows or metal clasps;
they will damage the printer. Use envelopes that are at
least #10-size.
<105 g/m
28 lb.
2
>105 g/m
28 lb.
2
33100-25
Never use media for inkjet printers; inkjet media may damage
the Fuser. Tektronix laser media are specially designed for
this printer.
Page 13
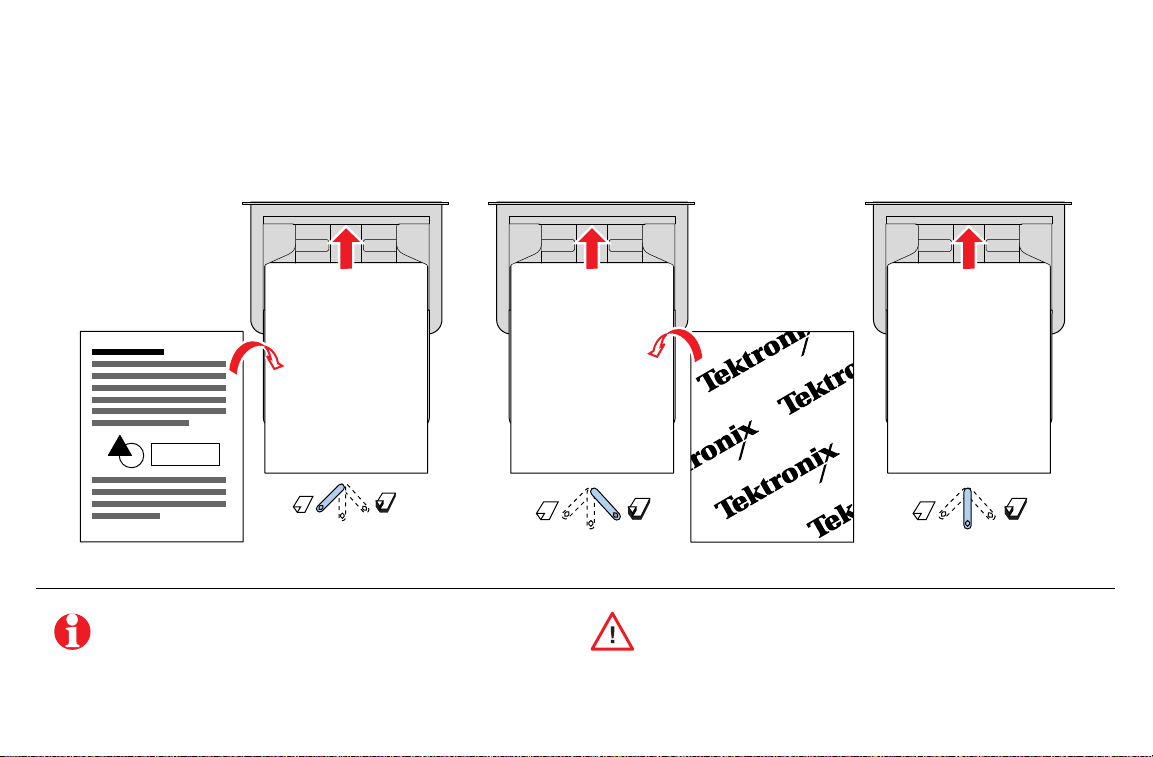
Paper 2nd Side Tektronix Fabric Transfer Tektronix
Glossy Coated Paper
33100-26
For best results on double-sided printing, use 90 g/m2
(24 lb. bond) laser paper.
Feed Fabric Transfer Media one sheet at a time; otherwise the
media may jam.
11
Page 14
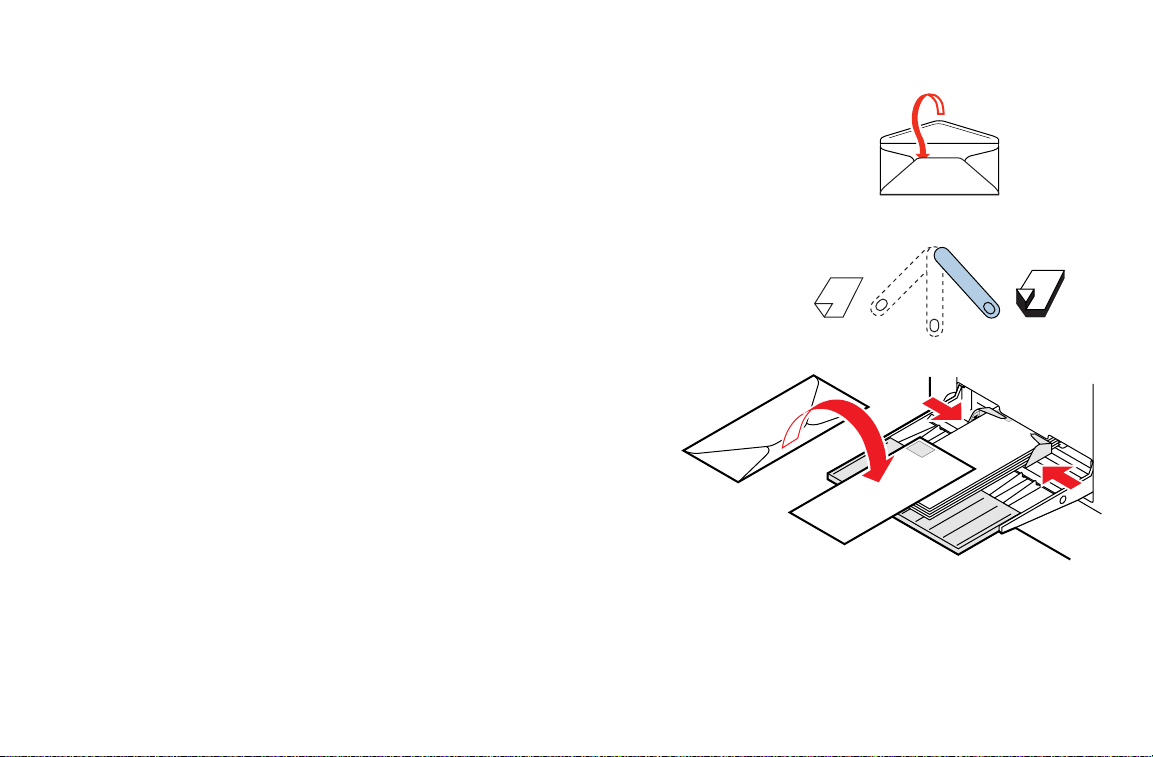
Printing Envelopes
33100-47
Place
Stamp
Here
Place
Stamp
Here
3
2
4
1
1 Prepare each envelope: tuck in the envelope flap.
2 Adjust the printer’s media thickness switch to Thick.
3 Adjust the printer’s media guides for the width of your envelopes.
4 Insert the envelopes (maximum capacity is 10-15, depending on
thickness):
■ Short end enters
■ Side to be printed is
■ The edge where you place the stamp enters the printer
some applications; make a test print before proceeding.
first
.
face-up
.
first
in
5 At the front panel prompt, scroll to Card or Envelope and press OK.
6 In the front panel’s Printer Defaults menu, scroll to Multi-Purpose
Media and select #10 Envelope under Media Size.
12
Page 15

7 In your application:
■ Create a document with these measurements:
■ Width: 4.13 in. (104.1 mm)
■ Length: 9.5 in. (241.3 mm)
■ Margins: .2 in. (5 mm)
Guidelines for envelope printing
■ Use envelopes that are at least #10-size
(4.13 x 9.5 in. / 104.1 x 241.3 mm).
■ No plastic windows or metal clips.
■ Access the Page Setup menu and make these
selections:
■ Paper Size: #10 Envelope
■ Orientation: Landscape
8 In the Print screen (using a supported printer driver),
make this selection and send the job to the printer.
■ Paper Source: Multi-Purpose Tray
■ No exposed gummed surfaces.
■ Tuck the gummed flap into the envelope.
■ Single-sided printing only.
■ Keep unused envelopes in their original packaging.
This printer is not made to handle high-capacity production
envelope printing. Envelopes may wrinkle depending on weight
and stiffness of envelope media.
13
Page 16

Printing on labels
1
2
33100-46
Recommended Avery™ labels:
14
A/Letter: 5160
5164
A4: L7162
L7165
At the printer
1 Adjust the printer’s media thickness switch to Thick.
2 Insert the label sheets (maximum capacity is 30 sheets):
■ Side to be printed is
■ The top of the sheet enters the printer
3 At the front panel prompt, scroll to Label and press OK.
face-up
.
first
.
Page 17

In the application
1 If your application has a setting for Avery
™
a template. Otherwise, refer to the instructions included
with the labels for margin settings.
Avery labels
■ A/Letter: 5160
■ A4: L7162
5164
L7165
labels, use it as
Guidelines for printing on labels
■ Recommended labels: Use Avery labels.
■ Each label is at least 25.4 x 66.7 mm (1 x 2.625 in.) in size.
Smaller labels may peel off and damage printer
components.
■ If any of the labels on a sheet are missing, do not use that
sheet; it may damage printer components.
2 In the Print screen, select the Multi-Purpose T ray . Send
the job to the printer.
■ When selecting Label as the media type, the printer
requires that room temperature be cooler than 27˚ C
(81˚ F). If the temperature is above this, the printer reports
an error and stops printing.
15
Page 18

Automatic Duplex Printing
PAPER
A4
1234567
Duplex
Paper
33100-37
1
2
16
Automatic duplex printing requires that the Lower Tray Assembly
be installed.
1 Make sure that the Duplex Unit is inserted in the printer’s
upper (a) slot.
Never put media in the Duplex Unit; the printer will report a
media jam.
2 Load 75 - 90 g/m2 (20 - 24 lb.) paper in the paper tray.
If you are using pre-printed paper, such as letterhead:
■ Place the first side to be printed
■ Place the top of the page under the paper tray’s hooks.
face-down
This example shows letterhead paper.
3 Insert the paper tray in the printer’s middle (b) or lower (c)
tray slots.
a
b
A/Letter
Paper
.
For best results with duplex printing,
use 90 g/m2 (24 lb.) laser paper.
c
Legal
Paper
Page 19

4 Decide on a binding preference (how the page
turns) for Step 5:
Landscape Portrait
Long
edge
5 In the Print screen, select the Duplex option
preference:
Macintosh Drivers:
LaserWriter 8.5.1
■ From the pull-down menu, choose Layout.
■ Select Print on Both Sides.
■ Select a binding preference.
and
a binding
Short
edge
9102-50
LaserWriter 8.3.4
PC Drivers:
Windows 95/
Windows 98
Windows NT4
■ Click Options.
■ Select 2-Sided Printing.
■ Select Short-Edge Binding or Long-Edge Binding.
■ Click Properties.
■ Click Paper.
■ Click More Options and select your binding
preference.
■ Click Properties.
■ Click Advanced.
■ Under Paper/Output, select your option for
Print on Both Sides.
17
Duplex Printing
Page 20

Duplex Printing
Manual Duplex Printing: Multi-Purpose Tray
Side 1
For a multi-page document, print odd-numbered pages for Side 1.
(This selection is application-specific).
1 Insert paper with the side to be printed
letterhead paper.
2 In the printer’s front panel, select the media type at the prompt.
Front panel selection Media type
Paper:
Coated Paper:
Card or Envelope:
Standard laser paper 90 - 105 g/m2, 24 - 28 lb.
Tektronix Glossy Coated paper
Card stock
Heavy laser paper 109 - 150 g/m
3 In the Print screen (using a supported driver), select Multi-Purpose
Tray as the Paper Source or Tray Selection. Send the job to the
printer.
4 Remove the printed paper from the output tray.
face-up
. This example shows
2
, 29 - 40 lb.
Two-sided printing on specialty media can
shorten component life.
1234567
32564-06
For best results with duplex printing, use 90
(24 lb.) laser paper.
g/m2
18
Page 21

Side 2
For a multi-page document, print even-numbered pages for Side 2.
(This selection is application-specific).
1 Insert the paper with the blank side
face-up
.
2 In the printer’s front panel, select the media type at the prompt.
Front panel selection Media type
Paper 2nd Side:
Coated Paper:
Card or Envelope:
Standard laser paper 90 - 105 g/m2, 24 - 28 lb.
Tektronix Glossy Coated paper
Card stock
Heavy laser paper 109 - 150 g/m
2
, 29 - 40 lb.
3 In the Print screen (using a supported driver), select Multi-Purpose
Tray as the Paper Source or Tray Selection. Send the job to the printer.
4 Remove the printed paper from the output tray.
1234567
32564-07
19
Page 22

Front Panel Messages
Message Action Page
<color>:low
Energy Star Mode
Wake Up Menu
Error XX
Fuser:replace
Fuser Roll:replace
Imaging Unit:replace
Jam at <Location>
Open <door>
Main Charge Grid:replace
Media Tray:empty
MPT:<media type>
<--- ---> OK
Stopped:
Fuser Roll:replace
Stopped: replace <color>
Transfer Kit:replace
The displayed color Toner Cartridge is running out; replace it soon.
The printer is in energy conservation mode. Press the Wake Up button on the front panel or send a print job
to bring the printer to Ready.
1 Press the Info button for problem information. Follow any steps listed.
2 If the failure persists, note the display’s error number.
3 Look up the error number in the online topic “Error Codes” on the printer’s CD-ROM or the web site at
www2.tek.com/merlin/tko.
Replace the Fuser soon.
Replace the Fuser Roll soon.
Replace the Imaging Unit soon.
A media jam has occurred at the indicated location. The second line of the message indicates the location
of the jam.
Replace the Main Charge Grid soon.
Refill the media tray. If your printer has a Lower Tray Assembly, the choices include Upper, Middle, or Lower. 7
Media has been loaded in the Multi-Purpose Tray; select that media type in the front panel. Press the arrows
to scroll to the appropriate media type; press OK. The printer waits a minute for you to select a media type at
the front panel prompt. After a minute, the job prints, using the previously selected media type.
Replace the Fuser Roll now.
The displayed color Toner Cartridge is empty; replace it now.
Replace the Transfer Kit (transfer roller and waste bin) soon.
20
26
8
Page 23

Troubleshooting Print Quality
If you notice a problem with the quality of your prints, the
probable solution is replacing one of the consumables.
Keep in mind this basic guideline:
■ If the symptom appears in a single color:
Replace the Toner Cartridge
■ If the symptom appears in all colors:
Replace the Imaging Unit, or Fuser, or Fuser Roll, or
Main Charge Grid, or Transfer Kit
To diagnose the problem, check these items:
1 Check the front panel for a message on replacing a
consumable.
2 From the Help Pages menu, print the Consumables
Page; use it to diagnose and correct problems; it
contains useful information, such as the remaining life
for consumables.
3 From the front panel Help Pages menu, print Service
Print 1. Examine prints for symptoms.
.
.
For detailed troubleshooting information, refer to the Advanced Features
and Tr oubleshooting Manual on the printer’s CD-ROM or web site.
1
<color>:replace
2
Consumables Page
<--- ---> Print
Power
Error
Power
Error
Toner
Black
Page Remaining: >500 @ 5% coverage
OK
Your average coverage/page: TBD%
Magenta
Page Remaining: >500 @ 5% coverage
Your average coverage/page: TBD%
OK
Cyan
Page Remaining: >500 @ 5% coverage
Your average coverage/page: TBD%
OK
Yellow
=
Page Remaining: >500 @ 5% coverage
Your average coverage/page: TBD%
OK
Life Remaining
Life Remaining
%
Imaging Unit
0% 50% 100%
Count (Pages)
Serial #
Avg. Toner Coverage/Color
Date Installed
Life Remaining
Fuser
0% 50% 100%
Count (Pages)
Serial #
Avg. Toner Coverage/Color
Date Installed
Transfer Kit
Life Remaining
0% 50% 100%
Count (Pages)
%
Main Charge Grid
0% 50% 100%
Count (images)
Life Remaining
%
%
Fuser Roll
0% 50% 100%
Count (Pages)
%
3
Service Print 1
<--- ---> Print
Power
Error
=
Black
Cyan
Magenta
Yellow
Test Print
33100-01
Troubleshooting
21
Page 24

Troubleshooting
Symptom: In one color only? Solution: Replace that color Toner Cartridge.
1 color has many vertical streaks.
1 color has a light vertical streak.
1 color is light or faded.
22
Replace the Toner Cartridge.
1 Adjust the color density (see
page 38).
2 Replace the Toner Cartridge.
Page 25

Symptom: In all four colors? Solution: 1) Choice of media or 2) Replace Imaging Unit, or Fuser, or Fuser Roll.
Streak through all 4 colors.
Spot in the same place on the
page in all 4 colors.
Random spots appear on every
page.
1 Use Tektronix media.
2 Use the correct media tray for
the media you are using.
3 When using the Multi-Purpose
Tray, select the correct media in
the front panel.
4 Print about 25 blank pages until
the problem disappears.
5 Replace the Imaging Unit.
23
Page 26

Symptom: In all four colors? Solution: 1) Choice of media or
2) Replace Imaging Unit, or Fuser, or Fuser Roll or Main Charge Grid.
Prints are black (edge to edge).
All 4 colors are extremely faded.
or
Each page has a chipped
corner.
24
1 Remove, then re-insert the Main
Charge Grid.
2 Replace the Main Charge Grid.
33100-34
Hints
■ Use Tektronix media.
■ Use the correct media tray for
the media you are using.
■ When using the Multi-Purpose
Tray, select the correct media in
the front panel.
■ Relative humidity may be too low
(below 30% relative humidity).
Page 27

Symptom: In all four colors? Solution: 1) Choice of media or
2) Replace Imaging Unit, or Fuser, or Fuser Roll or Main Charge Grid.
Pieces of the printed image are
missing and reappear out of place,
approximately 129 mm (5 in.) down
the page.
If
Jam at C, clear the media jam.
Print 10-20 blank pages to clean
the roller.
■ If you still see the problem,
replace the Fuser Roll.
or
Media frequently wraps around
the Fuser (
Jam at C).
Hints
■ Use Tektronix media.
■ Print 10-20 blank pages of plain paper.
■ To avoid jams with Tektronix transparencies, make sure that the logo strip is
loaded
face-down
for the Multi-Purpose Tray and
face-up
for the transparency
tray.
■ If you still see the problem,
replace the Fuser.
25
Page 28

Media Jams
7
26
Preventing media jams
■ To reduce the frequency of media jams, use Tektronix
media and occasionally clean the rollers. See
page 32.
■ When using the Multi-Purpose Tray, always set the
media thickness switch for the media you are using.
See page 9.
■ If the printer frequently reports Jam at Multi-
Purpose, move the media thickness switch to a
thicker setting.
Locating a jam
The front panel reports Jam at <Location>.
The <Locations> are the sensors listed as A through E.
Line 2 of the front panel message directs you to the location
of the jam. For example:
Jam at A
Open left side door
A
D
Multi-Purpose
B
Duplex Unit
C
E
33100-0
Page 29

Jam at A
Jam at B
Solution 1
Open the left side door;
remove the jammed media.
33100-08
Solution 2
Remove the media tray;
remove the jammed media
from inside the printer.
33100-09
Media Jams
Solution 1
Open the lower left side door
and remove the jammed
media.
33100-10
Solution 2
Remove the selected media
tray (middle or lower tray) and
remove the jammed media
from inside the printer.
A/Letter
Paper
A/Letter
Paper
33100-11
27
Page 30

Media Jams
Jam at C
1 Remove the Fuser:
a Open the printer’s front door.
b Turn the small blue thumbscrew
to unlock the Fuser.
c Press the safety catch and slide the Fuser out of
the printer.
2 Remove the Fuser Roll:
out
a Press
b Lift the Fuser Roll out of the Fuser and set it aside.
3 Turn the Fuser’s large blue knob
counterclockwise
4 Remove the jammed media from the Fuser.
on the two tabs to unlock the Fuser Roll.
to release the jammed media.
counterclockwise
clockwise
or
28
The Fuser is hot. To avoid personal injury, use caution or
wait for it to cool before touching it.
1
a
b
c
2
a
b
3
4
33100-12
5 Re-insert the Fuser Roll into the Fuser; re-install the Fuser.
Page 31

Jam at D
The Fuser is hot. To avoid personal injury, use caution or
wait for it to cool before touching it.
Solution 1
1 Open the front door.
2 Pull open the access door; the media is visible.
3 Turn the Fuser’s large blue knob
counterclockwise
4 Remove the media.
3
A/Letter
Paper
33100-13
If the Fuser knob will not turn, do not force it or you may
damage the Fuser. Instead, remove the Fuser and Fuser Roll;
then turn the Fuser knob to release the jammed media.
Solution 2
1 Open the front door
2 Turn the Fuser’s large blue knob
.
3 Remove the jammed media.
1
and
the right side door.
counterclockwise
.
3
4
2
2
33100-14
29
Page 32

Jam at E
33100-17
Jam at Multi-Purpose Tray
30
Solution 1
Remove the jammed media
from the output tray.
Solution 2
Pull open the access door
(above the plastic output tray)
and remove the media.
A/Letter
Paper
33100-15
Open and close the printer’s front door to clear the error
message.
1 Remove all media in the
Multi-Purpose Tray.
2 Remove the jammed media
from the Multi-Purpose Tray.
3 Set the Media Thickness
switch for the media you are
using (page 9).
4 Re-insert the media in the
Multi-Purpose Tray.
A/Letter
Paper
33100-16
Open and close the printer’s front door to clear the error
message.
Page 33

Jam at Duplex Unit
1 Remove the Duplex Unit (it is in the printer’s
upper
slot).
2 Open the Duplex Unit.
3 Remove the jammed media.
If paper is not in the Duplex Unit, open the right side
door; paper may be jammed there.
4 Close the Duplex Unit; press down to make
sure that it snaps shut.
5 Re-insert the Duplex Unit into the printer’s
upper
slot.
13
4
2
5
33100-18
31
Page 34

Occasional Cleaning
L
e
g
a
l
P
a
p
e
r
A
/L
e
tte
r
P
a
p
e
r
If your printer experiences frequent media jams, clean the rollers.
Instructions are included in these locations:
■ Cleaning menu in the front panel
■ Video clips on the printer’s CD-ROM
Replacement cleaning kit 016-1710-00
32
Print the cleaning instructions
1 On the printer’s front panel, press Menu.
2 Press the arrow buttons; scroll to Cleaning. Press Menu;
this message displays:
Print instructions
<--- ---> Print
3 Press Print.
4 Follow the instructions on the cleaning page.
33100-49
Cleaning
<--- ---> Menu
Print Instructions
<--- ---> Print
Clean Pick Rollers
12
6
Select Tray
<-- -->
Middle
<-- -->
Clean Duplex Unit
123 4
34
Iso
90%
alco
p
ro
p
h
yl
o
l
Select Tray
Menu
<-- -->
Lower
Menu
Clean
90%
Isopropyl
alcohol
Clean
<-- -->
Use isopropyl alcohol (at least 90% pure) with a lint-free cloth.
Do not use alcohol that has any additives; it can damage the
printer.
®
Phaser
740 Color Printer
5
8
Clean 4 Feed Rollers
12
Menu
Menu
Menu
Clean
9
90%
Isopropyl
alcohol
33100-65
Menu
Clean
Page 35

Printing Help Pages from the Front Panel
3
The front panel contains pages to help you use the printer and
diagnose print quality.
1 On the printer’s front panel, press Menu; you see this
message:
Help Pages
<--- ---> Menu
2 Press Menu; you see this message:
Consumables Page
<--- ---> Print
3 Press <--- or ---> to scroll to any of these help pages:
Consumables Page (1)
Configuration Page (2)
Startup Page
Usage Profile (3)
Demonstration Page
Service Print 1 and 2 (4)
RGB Sampler Prints
CMYK Sampler Prints
Menu Map (5)
12
Toner
Black
Page Remaining: >500 @ 5% coverage
OK
Your average coverage/page: TBD%
Magenta
Page Remaining: >500 @ 5% coverage
Your average coverage/page: TBD%
OK
Cyan
Page Remaining: >500 @ 5% coverage
Your average coverage/page: TBD%
OK
Yellow
Page Remaining: >500 @ 5% coverage
Your average coverage/page: TBD%
OK
Imaging Unit
Fuser
Transfer Kit
Usage Profile
Life Remaining
0% 50% 100%
Count (Pages)
Serial #
Avg. Toner Coverage/Color
Date Installed
Life Remaining
0% 50% 100%
Count (Pages)
Serial #
Avg. Toner Coverage/Color
Date Installed
Life Remaining
0% 50% 100%
Count (Pages)
%
Main Charge Grid
%
Fuser Roll
%
Phaser® 740 Color Printer
Life Remaining
0% 50% 100%
Count (images)
Life Remaining
0% 50% 100%
Count (Pages)
%
%
4 5
Black
Cyan
Magenta
Yellow
Configuration
Phaser® 740 Color Printer
Test Print
Exit
Exit
Exit
Exit
Exit
Exit
Exit
Exit
Exit
Exit
Optional configuration
Print the menu map from the front panel; keep it by the printer for
easy reference.
Calibrate Colors
Calibrate Margins
Consumables Report
TekColor Correction
Printer Defaults
Network Settings
MenuPress
Help Pages
Print Quality
Cleaning
Language
Consumables Page
Configuration Page
Menu
Startup Page
Usage Profile
Adjust Light / Dark Adjust Each Color
Menu
Print Page Adjust Left Margin Adjust Top Margin
Menu
Page Count
Imaging Unit
Menu
Automatic
SWOP
Euroscale
Menu
Standard
Premium Monochrome
Menu
Default Tray
Multi-Purpose Media
Duplex
Print Mode
Menu
Startup Page
Print Instructions
Menu
Token Ring
TCP / IP
EtherTalk
Menu
English (default)
Español
Menu
Menu
scrolls backward
scrolls forward
enters the sub-menu
Demonstration Page
Service Print 1
Service Print 2
RGB Sampler Prints
Transfer Kit
Fuser
Commercial
Toyo
DIC
Premium
Fast Monochrome
Startup Mode
Output Order
Error Handler
Image Smoothing
Energy Star Timeout
Select Tray
Token Talk
NetWare
HTTP
Français
Deutsch
Exit
exits without a change
OK
OK
accepts the new setting
CMYK Sampler Prints
Menu Map
Fuser Roll
Main Charge Grid
None
Vivid Color
sRGB Display
Fast Color
Presentation
Check Print
Check Print Timeout
Authorization Codes
DNS
Usage Profile e-mail
Italiano
Japanese
33100-66
4 Press Print.
33
Help Pages
Page 36

Page Remaining: >500 @ 5% coverage
Your average coverage/page: 7.3%
4
050
g
Count (Pages): 341
S/N: 00:00:00:00:00:00:00:00:00:00
Avg. Toner Coverage/Color: 12.25%
Date Installed: 8/1/98
Count (Images): 214
S/N: 00:00:00:00:00:00:00:00:00:00
Avg. Toner Coverage/Color: 12.25%
0 50 100
91
Life Remaining
Consumables Information
Consumables Information
Using the Consumables Page
■ Toner life remaining:
OK More than 500 pages remaining
at 5% coverage
LOW Less than 500 pages remaining
at 5% coverage
■ % Remaining gauge for all other consumables
■ Count
■ Average Toner Coverage per Color
■ Date of installation
34
Toner
Black
Page Remaining: >500 @ 5% coverage
OK
Your average coverage/page: 7.3%
Magenta
Page Remaining: >500 @ 5% coverage
Your average coverage/page: 11.5%
OK
Cyan
Page Remaining: >500 @ 5% coverage
Your average coverage/page: 9.1%
OK
Yellow
Page Remaining: >500 @ 5% coverage
Your average coverage/page: 2.9%
OK
Life Remaining
0% 50% 100%
Count (Pages): 214
Serial #00:00:00:00:00:00:00:00:00:00
Avg. Toner Coverage/Color 5.49%
Date Installed: 10/1/98
Life Remaining
0% 50% 100%
Count (Pages): 341
Serial #00:00:00:00:00:00:00:00:00:00:00
Avg. Toner Coverage/Color: 12.25%
Date Installed: 8/1/98
Life Remaining
0% 50% 100%
Count (Pages):1903
91 %
98 %
96 %
Imaging Unit
Fuser
Transfer Kit
Main Charge Grid
Fuser Roll
Life Remaining
0% 50% 100%
Count (images): 105
Date installed: 12/17/98
Life Remaining
0% 50% 100%
Count (Pages):4977
Date installed: 01/13/99
33100-4
98%
98%
Page 37

Using the Usage Profile Report
Phaser® 740 Color Printer
Usage Profile
Provides in-depth information on printer usage:
■ Consumables used
■ Tray and media selections
■ Printer interventions
■ Analysis of usage rates
For detailed information on the Usage Profile report, refer to “Printer Management” on
the printer’s CD-ROM or web site.
35
Page 38

Using PhaserLink™ software
PhaserLink software, using World Wide Web technology, provides these printer
management tools:
■ Print job status
■ Printer usage
■ Routine troubleshooting
■ Configuration of printer settings
PhaserLink requires a TCP/IP connection. To access PhaserLink information, enter
your printer’s Internet address in a web browser.
For detailed information on PhaserLink, refer to “Printer Management” on the printer’s
CD-ROM or web site. Or enter this address in your web browser:
www.tek.com/Color_Printers/products/phaserlink.html
36
Page 39

Replacing Consumables
0236-41
3
Detailed, illustrated replacement instructions are shipped with each replaceable component.
Component Average Life*
Toner Hi-capacity cartridges
10,000 pages (CMY)
12,000 pages (Black)
Standard cartridges
5,000 pages (CMY)
6,000 pages (Black)
Imaging Unit 60,000 images
or
15,000 color pages
or
60,000 monochrome pages
Transfer Roller 80,000 pages
Component Average Life*
Fuser Roll 15,000 pages
33100-
Fuser 60,000 pages
Main Charge
30,000 images
Grid
*
Based on an average of 5% coverage of the printable area (at 600 dpi) for any one
color on laser paper. The replacement frequency varies with the complexity of the
prints, the percentage of coverage, and media type. Printing on specialty media
may reduce consumable life. Refer to “User-replaceable components” on the
printer’s CD-ROM or web site for more details.
37
Page 40

Controlling Color Density
When colors look faded, adjust the toner color density to extend the
life of the components.
Print and use the Color Reference Page
1 In the printer’s front panel, scroll to Calibrate Colors,
press Menu and print the Color Reference Page.
2 Compare the Color Reference Page to the Color Density
Samples on page 39. Make a note of the value (–10 to +10)
for each color that most closely matches the samples.
3 Adjust the density for each color: Enter the value noted in
Step 2 in the Calibrate Colors menu, under Adjust
Each Color.
■
■
Decrease
Increase
color density: Press <---.
color density: Press --->.
38
1
Color Reference Page
Cyan Magenta Yellow Black
-10
-10
-10
-8
-8
-6
-6
-4
-4
-2
-2
0
0
+2
+2
+4
+4
+6
+6
+8
+8
+10
+10
-10
-8
-8
-6
-6
-4
-4
-2
-2
0
0
+2
+2
+4
+4
+6
+6
+8
+8
+10
+10
0
+2
+4
+2
+6
+4
+8
+10
+6
+8
+6
+10
+8
+10
+10
-8
-6
-4
-2
-4
-2
0
0
+2
+4
+4
+6
+8
2
Color Density Samples
Color Reference Page
-10
Cyan Magenta Yellow Black
-10
-8
-10
-6
-8
-10
-6
-8
-4
-6
-2
-4
-2
0
+2
4 Reprint the Color Reference Page; check your adjustments.
Calibrate Colors
3
Exit
Menu
Adjust Light/Dark Adjust Each Color
33100-30
Page 41

Color Density Samples
Color Density Samples
Phaser® 740 Color Laser Printer
Phaser® 740 Color Laser Printer
Page 42

40
Page 43

Getting More Information
Find detailed printer information in any of these locations.
Printer CD-ROM
■ Advanced Features and
Troubleshooting
■ Consumables instructions
■ Cleaning instructions
■ Setup Guide
■ Network manuals
■ Repacking instructions
■ Printer drivers
■ Material Safety Data Sheets
(MSDS)
■ Direct link to World Wide
Web
Tektr onix Web Site
■ Product and supplies information
■ Downloading printer drivers
■ Finding your local dealer
■ Online documentation
www.tek.com/Color_Printers
TekSMART™ Knowledge Base
■ Application issues
■ Networking issues
■ Printer errors
■ Print quality issues
■ Troubleshooting
■ Latest tips from technical support
Online Color Resource
■ Step-by-step lessons
■ Using clip art
■ Articles and product reviews
■ Tips and techniques
■ Templates and tools
■ Questions and answers
www2.tek.com/merlin/tko
www.colorize.com
41
Getting Information
Page 44

Getting Help
42
Online Services
World Wide W eb:
www.tek.com/Color_Printers/
TekSMART™
Knowledge Base:
Technical support:
Current software:
Anonymous ftp server:
www2.tek.com/merlin/tko
www.tek.com/Color_Printers/support/colcare.html
www.tek.com/Color_Printers/support/software.html
ftp.tek.com/Color_Printers
Subscribe to email
update notices:
www.tek.com/Color_Printers/support/subscribe.html
Supplies
Information on local Tektronix dealers
www.tek.com/Color_Printers/contacts
U. S.
1-800-835-6100
Canada
1-800-563-1289
Customer Support Centers
Australia
1-800-811-177
Austria
0660 5804
Belgium
02 720 9602
Brazil
0800 16 0220
Canada
1-800-835-6100
China
10-6235-1230
:
Denmark
(44) 533 444
Eastern Europe and
the Middle East
Outside U.S. and Canada
Contact your local Tektronix
office for a list of local
resellers
+44 1908 68187
Finland
0203 206 30
France
01 69 86 8137
Germany
0180 525 3535
Hong Kong
2585-6655
India (South Asia)
(91) 80-227-5577
Italy
02 45 287 000
Japan
81 3 3448 4872
Korea
2-528-5299
Luxembourg
400 847
Netherlands
(040) 267 0440
New Zealand
+61 2 9888 0100
Norway
(22) 723 801
Singapore (ASEAN)
1-800-356-5565
Spain
902 239 272
Sweden
(08) 299 071
Switzerland
155 9493
Taiwan
(02) 2757-1571
Thailand
2-645-4407
U.K.
(01) 908 681 707
U.S.
1-800-835-6100
V3
063-3100-00
 Loading...