

Page 1

Cleaning Instructions
Phaser
ª
200 Series
Color Printers
First Printing February 1995
063-1450-02
Page 2

Copyright
©
1995 by Tektronix, Inc., Wilsonville, Oregon. Printed in the United States of America.
All rights reserved. Contents of this publication may not be reproduced in any form without permission of
Tektronix, Inc.
This instrument, in whole or in part, may be protected by one or more U.S. or foreign patents or patent
applications. Information provided upon request from Tektronix, Inc., P.O. Box 1000, Wilsonville, Oregon
97070-1000.
If acquired subject to FAR or DFARS, the following shall apply:
■
Unpublished Ñ rights reserved under the copyright laws of the United States.
■
Restricted Rights Legend Ñ Use, duplication, or disclosures by the U.S. government is subject to restrictions as
set forth in subparagraph (c)(1)(ii) of the Rights in Technical Data and Computer Software clause at DFARS
252.227-7013, or in subparagraph (c) (2) of the Commercial Computer Software Ð Restricted Rights clause at
FAR 52.227-19, as applicable. Tektronix, Inc., P.O. Box 1000, Wilsonville, Oregon 97070-1000.
Tektronix
¨
is a registered trademark of Tektronix, Inc. Phaserª is a trademark of Tektronix, Inc. for color printers
and related products.
Other marks are trademarks or registered trademarks of the companies with which they are associated.
Page 3

Users safety summary
Terms in manual:
CAUTION Conditions that can result in damage to the product.
WARNING Conditions that can result in personal injury or loss of life.
Power source:
Do not apply more than 250 volts RMS between the supply conductors or between either supply
conductor and ground. Use only the speciÞed power cord and connector. Refer to a qualiÞed service technician
for changes to the cord or connector.
Operation of product:
Avoid electric shock by contacting a qualiÞed service technician to replace fuses inside the
product. Do not operate without the covers and panels properly installed. Do not operate in an atmosphere of
explosive gases.
WARNING Turning the power off using the On/Off switch does not de-energize the
printer. You must remove the power cord to disconnect the printer from the
mains. Keep the power cord accessible for removal in case of an emergency.
Safety instructions:
Read all installation instructions carefully before you plug the product into a power source.
Terms on product:
CAUTION A personal injury hazard exists that may not be apparent. For example, a
panel may cover the hazardous area. Also applies to a hazard to property
including the product itself.
DANGER A personal injury hazard exists in the area where you see the sign.
Care of product:
Disconnect the power plug by pulling the plug, not the cord. Disconnect the power plug if the
power cord or plug is frayed or otherwise damaged, if you spill anything into the case, if product is exposed to
any excess moisture, if product is dropped or damaged, if you suspect that the product needs servicing or repair,
and whenever you clean the product.
Ground the product:
Plug the three-wire power cord (with grounding prong) into grounded AC outlets only. If
necessary, contact a licensed electrician to install a properly grounded outlet.
Symbols as marked on product:
DANGER high voltage:
Protective ground (earth) terminal:
Use caution. Refer to the manual(s) for information:
WARNING:
If the product loses the ground connection, usage of knobs and controls (and other conductive parts)
can cause an electrical shock. Electrical product may be hazardous if misused.
!
Page 4

Cleaning Instructions
iii
Contents
Introduction
..................1
Thermal Head
..................3
Paper-feed Rollers
................5
Paper-pick Rollers
................6
Transfer Roll Sensor Pad
............10
Drum
....................11
Exit Rollers
..................12
Page 5

Cleaning Instructions
1
Keeping your printer a top performer
Introduction
By performing regular cleaning, you ensure that your printer produces the highest quality prints.
Regular cleaning also helps prevent paper jams, smudged or streaked prints and misregistration.
Cleaning the printer is easy; just follow the procedures given in the next few pages.
When to clean
Every time you replace the transfer roll, and whenever printing appears streaked, or media feeds
improperly, clean these parts:
1.
Thermal head
2.
Paper-feed rollers
3.
Paper-pick rollers
Clean these printer parts every 5,000 prints:
1.
Transfer roll sensor pad
2.
Drum
3.
Exit rollers
Troubleshooting
Problem Possible Solution
Vertical streaks on prints. Clean the thermal head.
Missing areas of primary colors (cyan,
magenta, yellow, black).
Clean the thermal head.
Smudges on one end of prints. Clean the paper-pick rollers.
Smudges throughout prints. Clean the paper-feed rollers and exit
rollers.
Page 6

2
Phaser 200 Series
Important notes about cleaning
❑
Use isopropyl alcohol to clean your printer. It can be purchased at your local pharmacy. You
can also use cleaning wipes that are pre-saturated with isopropyl alcohol (Tektronix order
number 006-7824-00).
❑
90% isopropyl alcohol is recommended. If you use alcohol that is less than 90% pure, allow
extra time for the paper-feed, paper-pick and exit rollers to dry.
❑
Before cleaning any part except the paper-pick rollers: Dampen a lint-free wipe with isopropyl
alcohol.
Cleaning kit
A cleaning kit is shipped with the printer (Tektronix order number 016-1233-00). You will need the
contents of the cleaning kit to perform the cleaning procedures on the next few pages:
1.
Lint-free cleaning wipes
2.
A plastic bottle for isopropyl alcohol
3.
A cleaning tray for cleaning paper-pick rollers
4.
Cleaning Instructions (this book)
Cleaning
Instructions
1
3
2
Isopropyl
4
Page 7

Cleaning Instructions
3
Thermal Head Ð
Clean every transfer roll change.
123
Isoprop
OR
Pre-saturated
isopropyl
alcohol
cleaning
wipe
❑
Turn off the printer using the
switch on the side.
❑
Open the top cover.
❑
Open a pre-saturated
cleaning wipe packet and
remove the wipe
or
dampen
a lint-free wipe with
isopropyl alcohol.
Page 8

4
Phaser 200 Series
45
ON
Caution
The thermal head may be hot.
To avoid possible injury, let it
cool before cleaning it.
❑
Use the wipe to gently clean
the entire surface of the
thermal head. Cleaning in
one direction only prevents
dirt from being re-introduced
to the thermal head.
❑
Close the top cover. Turn on
the printer using the switch
at the side.
Page 9

Cleaning Instructions
5
23
Paper-feed Rollers Ð Clean every transfer roll change.
1
❑
Remove the front cover by
pulling forward, using the
Þngergrips at each side.
❑
Clean the three paper-feed
rollers; rotate them as you
wipe so that all surfaces are
cleaned.
❑
Replace the front cover,
tilting it slightly toward you
to align the guide-tabs in the
top slot.
Page 10

6
Phaser 200 Series
23
a
b
aper-pick Rollers Ð Clean every transfer roll change.
1
For A4-size (metric) trays
❑
Turn off the printer.
❑
Remove the paper tray.
Remove the paper or
transparencies from the tray.
If your printer has two paper
trays, be sure to remove both
trays.
❑
When removing paper or
transparencies, do
not push
the paper trayÕs metal plate
down. If the metal plate is
down, put the paper tray in
the printer and pull it out
again; this returns the metal
plate to the
up
position.
❑
Remove the cleaning tray
from your cleaning kit.
Note
If you are using an A-size
(U.S.) paper tray:
do not
break the endtabs off the
cleaning tray. Proceed to
S
tep 4 on the following page.
❑
If you are using an A4-size
(
metric ) paper tray: break
both endtabs (
a
and b ) off
the cleaning tray.
Page 11

Cleaning Instructions
7
56
Isopropyl
ON
4
ab
❑
Turn on the printer. Wait
30 seconds until the
READY
light is on.
❑
Open the cleaning tray.
Dampen the pad on the
cleaning tray with isopropyl
alcohol. Dampen the entire
surface but do not saturate it.
❑
Slide the cleaning tray into
the paper tray. Position the
cleaning tray gently, so that
the paper trayÕs metal plate
presses up, against the
cleaning tray. Be sure that
the corners or endtabs of the
cleaning tray are secured
under the hooks on the paper
tray (
a
and b ).
❑
Insert the paper tray
containing the cleaning tray
into the printer. If your
printer uses two paper trays,
load the
lowest tray
opening
Þrst .
Page 12

8
Phaser 200 Series
8
7
SECOND
FEEDER
TEST
SWITCH
SECOND
FEEDER
TEST
SWITCH
OFF
a
b
3 SEC.
❑
Press and hold the TEST
switch for 3 seconds; the
switch is at the back of the
printer.
Note
When the JAM light blinks you
have completed cleaning this set
of paper-pick rollers.
❑
If your printer has only one
paper tray:
remove the
paper tray from the printer
and the cleaning tray from
the paper tray. Reload the
paper tray with paper or
transparencies and replace it
in the printer.
❑
If your printer has two
paper trays:
proceed to
Step 8 to clean your printerÕs
second set of paper-pick
rollers.
❑
Turn off the printer ( a ).
Remove the paper tray
containing the cleaning
tray (
b
).
Page 13

Cleaning Instructions
9
10 11
ON
b
9
SECOND
FEEDER
TEST
SWITCH
SECOND
FEEDER
TEST
SWITCH
3 SEC.
a
❑
Insert the paper tray
containing the cleaning tray
into the upper opening (
a
).
Turn on the printer (
b
).
(Turning your printer off and
on resets the printer default
to the upper tray and lets you
clean this set of paper-pick
rollers.)
❑
Press and hold the TEST
switch for 3 seconds; the
switch is at the back of the
printer.
❑
When the JAM light blinks
you have completed cleaning
the second set of paper-pick
rollers.
❑
Remove the paper tray
containing the cleaning tray.
Reload both paper trays with
paper or transparencies and
replace them in the printer.
Page 14
10
Phaser 200 Series
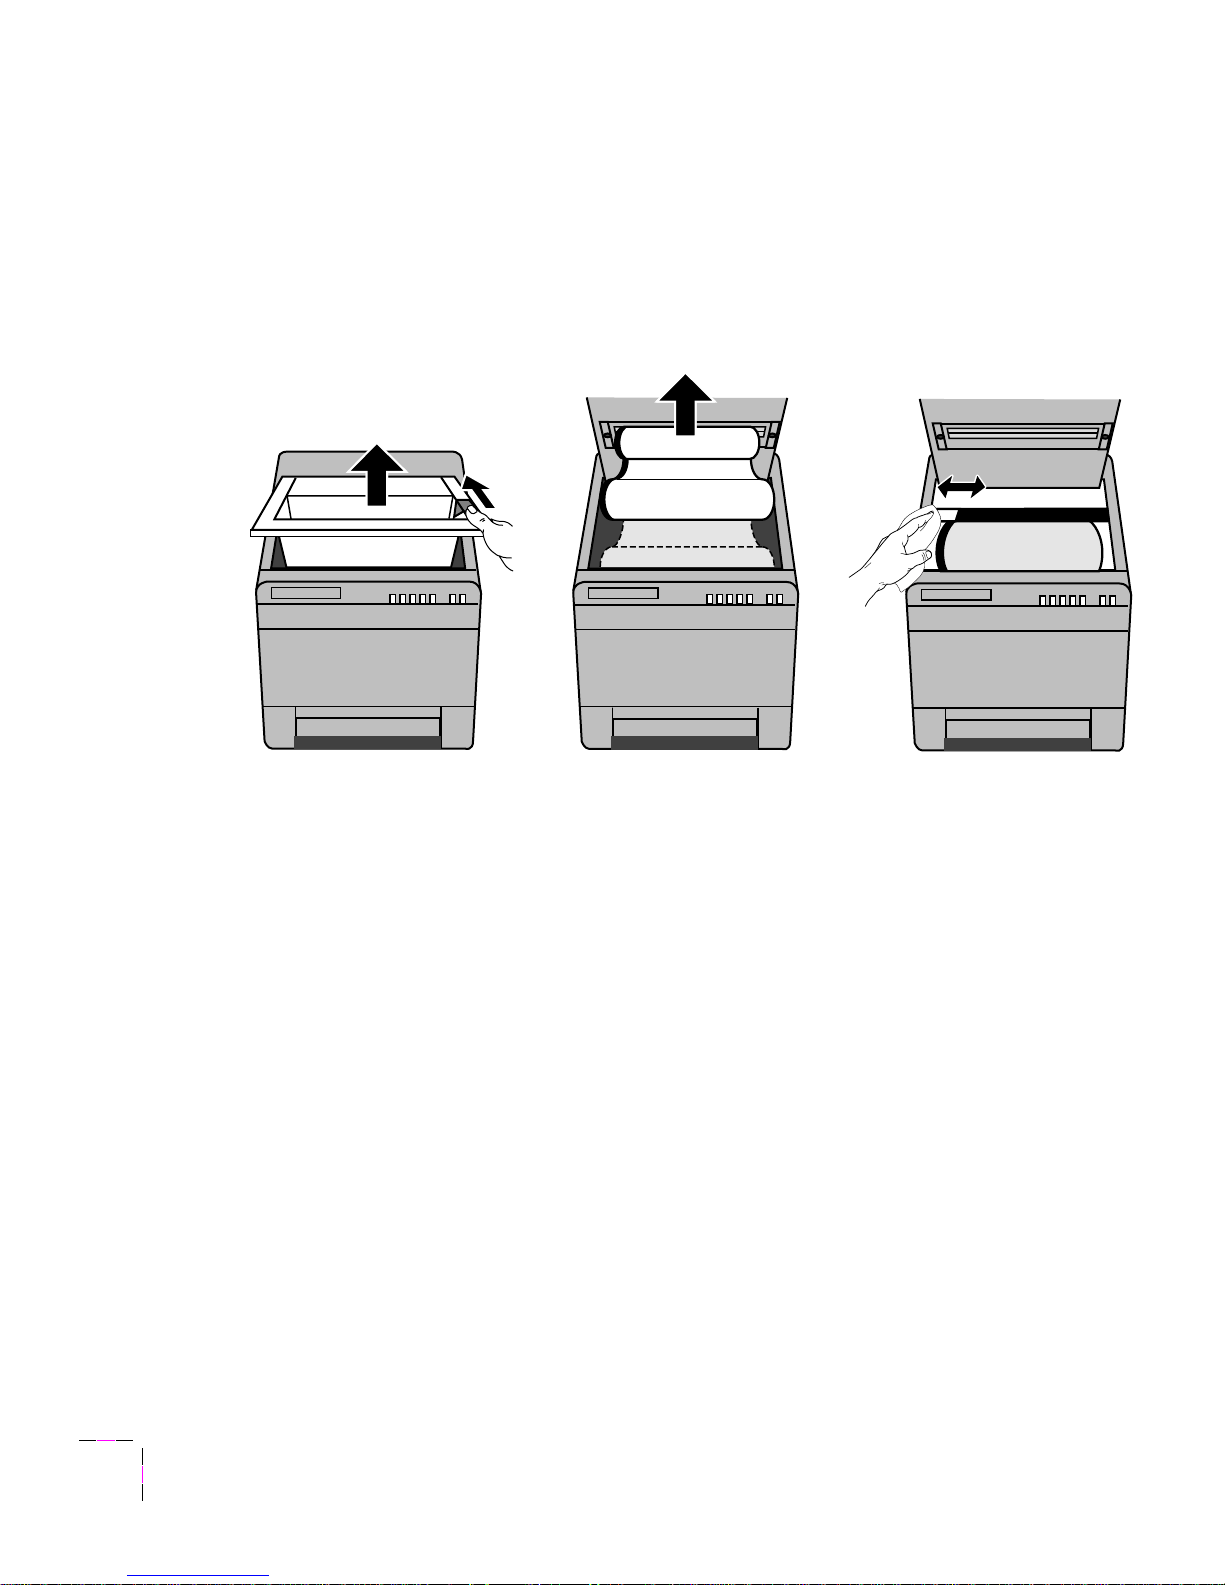
Transfer Roll Sensor Pad Ð Clean every 5,000 prints.
123
❑
Open the top cover.
❑
Remove the transfer roll from
the printer.
❑
Open a pre-saturated
cleaning wipe packet and
remove the wipe
or
dampen
a lint-free wipe with
isopropyl alcohol.
❑
Use the wipe to clean the
transfer roll sensor pad.
Page 15

Cleaning Instructions
11
3
Drum Ð Clean every 5,000 prints.
12
❑
Clean the drum. Rotate the
drum as you wipe so that the
entire surface is cleaned.
❑
Replace the transfer roll in
the printer.
❑
Close the top cover.
Page 16

12
Phaser 200 Series
Exit Rollers Ð Clean every 5,000 prints.
1
23
❑
Remove the front cover.
❑
Clean the exit rollers; rotate
them as you wipe, so that all
surfaces are cleaned.
❑
Replace the front cover,
tilting it slightly toward you
as you align the guide-tabs in
the top slot.
Page 17

February 1995 063-1450-02
 Loading...