

Page 1

Installation and Service
Grass Valley Model 2200
Digital Video Switcher
Software Release 5.3
071-0157-00
Revised Printing: February, 1998
Page 2

Telephone Numbers
North America
(800) 547-8949
Fax: (530) 478-3181
Elsewhere
Distributor or sales office from
which equipment was purchased.
Web Addresses
Grass Valley Email Support
GVGSERVICE@tek.com
Grass Valley W eb Page
http://www.tek.com/Grass_V alley
Tektronix W eb Site
http://www.tek.com
Customer Support
Tektronix Grass Valley Products is committed to providing the most
responsive and professional product support available. We have a fully
staffed, highly trained support team ready to respond to anything from a
simple question to an emergency repair . Support is available via telephone
or email. For new and updated customer support documents, as well as
new product information, check the Tektronix web site and Grass Valley’s
web page.
Related Publications:
Manual Set TP0759-nn
User’s Guide TP0815-nn
Operation Reference TP0732 -nn
Postal Addresses
Mail
Tektronix Grass Valley Products
P.O. Box 1114
Grass Valley, CA 95945
Shipping
Tektronix Grass Valley Products
400 Providence Mine Rd.,
Nevada City, CA 95959
Copyright © Tektronix, Inc. All rights reserved. Printed in U.S.A.
Tektronix products are covered by U.S. and foreign patents, issued and pending. Information in this publication supersedes that in all previously published material. Specifications
and price change privileges reserved. TEKTRONIX, TEK, Grass Valley Group, Borderline,
E-MEM, TEN-X, Wavelink, and are registered trademarks, and Air Link, Auto Match,
Doubletake, E-Disk, Eagle V, Emphasys, EZ-Link, 409, Grass Valley, Horizon, Jogger, Kadenza, Kaleidoscope, K-Mask, Key-Layer, Key-Link, Krystal, MASTER System, Master 21,
MAX, Omni-Key, Performer, Programmed Motion, Silhouette, Softset, SqueezeBack,
Streamline, Super Edit, TEN-20, 20-TEN, Trace, TrailBlazer, VideoDesktop, Flex-Time, and
XEDL are trademarks of Tektronix, Inc. P.O. Box 1000 Wilsonville, OR 97070-1000 U.S.A.
The information in this manual is furnished for informational use only, is subject to change
without notice, and should not be construed as a commitment by Tektronix, Inc. Tektronix
assumes no responsibility or liability for any errors or inaccuracies that may appear in this
publication.
Tektronix, Inc., Video and Networking Division, P.O. Box 1114 Grass Valley, California
95945 U.S.A.
Page 3

Tektronix—Grass Valley Products
P.O. Box 1114
Grass Valley, CA 95945
916-478-3800
iii
Page 4

iv
Page 5

Contents
Important Safety Notices
Symbols and Their Meaning . . . . . . . . . . . . . . . . . . . . . . . . . . . . . . . . . . . . . . . . . . . . . . . . . . . xi
Warnings . . . . . . . . . . . . . . . . . . . . . . . . . . . . . . . . . . . . . . . . . . . . . . . . . . . . . . . . . . . . . . . . . . . xii
Cautions . . . . . . . . . . . . . . . . . . . . . . . . . . . . . . . . . . . . . . . . . . . . . . . . . . . . . . . . . . . . . . . . . . . xiii
Federal Communications Commission (FCC) Part 15 Information . . . . . . . . . . . . . . xiii
Power Cord Notices . . . . . . . . . . . . . . . . . . . . . . . . . . . . . . . . . . . . . . . . . . . . . . . . . . . . . . . . . xiv
North American Power Supply Cords . . . . . . . . . . . . . . . . . . . . . . . . . . . . . . . . . . . . . . xiv
International Power Supply Cord . . . . . . . . . . . . . . . . . . . . . . . . . . . . . . . . . . . . . . . . . . xiv
Section 1 — System Overview
Introduction . . . . . . . . . . . . . . . . . . . . . . . . . . . . . . . . . . . . . . . . . . . . . . . . . . . . . . . . . . . . . . . . 1-1
System Description . . . . . . . . . . . . . . . . . . . . . . . . . . . . . . . . . . . . . . . . . . . . . . . . . . . . . . . . . . 1-1
Optional Features for Switcher . . . . . . . . . . . . . . . . . . . . . . . . . . . . . . . . . . . . . . . . . . . . . . . . 1-4
Input Modules . . . . . . . . . . . . . . . . . . . . . . . . . . . . . . . . . . . . . . . . . . . . . . . . . . . . . . . . . . 1-4
Serial Input Modules . . . . . . . . . . . . . . . . . . . . . . . . . . . . . . . . . . . . . . . . . . . . . . . . . 1-4
Chroma Key Input Module . . . . . . . . . . . . . . . . . . . . . . . . . . . . . . . . . . . . . . . . . . . . 1-4
Output Modules . . . . . . . . . . . . . . . . . . . . . . . . . . . . . . . . . . . . . . . . . . . . . . . . . . . . . . . . . 1-5
Analog Output (Cell C15) . . . . . . . . . . . . . . . . . . . . . . . . . . . . . . . . . . . . . . . . . . . . . 1-5
Serial Output 1 (Cell C3) (Standard) . . . . . . . . . . . . . . . . . . . . . . . . . . . . . . . . . . . . 1-5
Serial Output 2 (Cell C11) (Standard) . . . . . . . . . . . . . . . . . . . . . . . . . . . . . . . . . . . 1-5
Aux Output (Cell C16) . . . . . . . . . . . . . . . . . . . . . . . . . . . . . . . . . . . . . . . . . . . . . . . . 1-6
Effects Send Matrix (Cell A11) . . . . . . . . . . . . . . . . . . . . . . . . . . . . . . . . . . . . . . . . . . . . . 1-6
Secondary Wipe Generators . . . . . . . . . . . . . . . . . . . . . . . . . . . . . . . . . . . . . . . . . . . . . . . 1-6
Dual Chromatte Advanced Chroma Keyer (Cells A3, A16, C8) . . . . . . . . . . . . . . . . . 1-7
BORDERLINE Key Edge Generation . . . . . . . . . . . . . . . . . . . . . . . . . . . . . . . . . . . . . . . 1-7
Tally Output . . . . . . . . . . . . . . . . . . . . . . . . . . . . . . . . . . . . . . . . . . . . . . . . . . . . . . . . . . . . 1-7
Look-Ahead Preview . . . . . . . . . . . . . . . . . . . . . . . . . . . . . . . . . . . . . . . . . . . . . . . . . . . . . 1-8
Timed Aux Output (Cell B16) . . . . . . . . . . . . . . . . . . . . . . . . . . . . . . . . . . . . . . . . . . . . . 1-8
Extender Modules . . . . . . . . . . . . . . . . . . . . . . . . . . . . . . . . . . . . . . . . . . . . . . . . . . . . . . . 1-8
Power Supplies . . . . . . . . . . . . . . . . . . . . . . . . . . . . . . . . . . . . . . . . . . . . . . . . . . . . . . . . . . 1-8
Control Panel Power Supplies . . . . . . . . . . . . . . . . . . . . . . . . . . . . . . . . . . . . . . . . . 1-8
Switcher Frame Power Supplies . . . . . . . . . . . . . . . . . . . . . . . . . . . . . . . . . . . . . . . . 1-8
Physical Description . . . . . . . . . . . . . . . . . . . . . . . . . . . . . . . . . . . . . . . . . . . . . . . . . . . . . . . . . 1-9
Control Panel . . . . . . . . . . . . . . . . . . . . . . . . . . . . . . . . . . . . . . . . . . . . . . . . . . . . . . . . . . . 1-9
Switcher Frame . . . . . . . . . . . . . . . . . . . . . . . . . . . . . . . . . . . . . . . . . . . . . . . . . . . . . . . . . . 1-9
System Specifications . . . . . . . . . . . . . . . . . . . . . . . . . . . . . . . . . . . . . . . . . . . . . . . . . . . . . . . 1-11
v
Page 6

Contents
Section 2 — Installation
Introduction . . . . . . . . . . . . . . . . . . . . . . . . . . . . . . . . . . . . . . . . . . . . . . . . . . . . . . . . . . . . . . . . 2-1
Unpacking . . . . . . . . . . . . . . . . . . . . . . . . . . . . . . . . . . . . . . . . . . . . . . . . . . . . . . . . . . . . . . . . . 2-2
Pre-installation Procedures . . . . . . . . . . . . . . . . . . . . . . . . . . . . . . . . . . . . . . . . . . . . . . . . . . . 2-2
Items Required but not Supplied . . . . . . . . . . . . . . . . . . . . . . . . . . . . . . . . . . . . . . . . . . . 2-2
Physical Specifications and Installation Requirements . . . . . . . . . . . . . . . . . . . . . . . . 2-3
Power Requirements . . . . . . . . . . . . . . . . . . . . . . . . . . . . . . . . . . . . . . . . . . . . . . . . . 2-3
Environmental Requirements . . . . . . . . . . . . . . . . . . . . . . . . . . . . . . . . . . . . . . . . . . 2-3
Safety Requirements . . . . . . . . . . . . . . . . . . . . . . . . . . . . . . . . . . . . . . . . . . . . . . . . . . 2-3
Installation . . . . . . . . . . . . . . . . . . . . . . . . . . . . . . . . . . . . . . . . . . . . . . . . . . . . . . . . . . . . . . . . . 2-5
Control Panel Installation . . . . . . . . . . . . . . . . . . . . . . . . . . . . . . . . . . . . . . . . . . . . . . . . . 2-5
Control Panel Cutout Dimensions . . . . . . . . . . . . . . . . . . . . . . . . . . . . . . . . . . . . . . 2-6
Control Panel Rear Cable Clearance . . . . . . . . . . . . . . . . . . . . . . . . . . . . . . . . . . . . 2-7
Inserting the Panel . . . . . . . . . . . . . . . . . . . . . . . . . . . . . . . . . . . . . . . . . . . . . . . . . . . 2-7
Control Panel Redundant Power Supply Option Installation . . . . . . . . . . . . . . . . . . . 2-8
Switcher Frame Installation . . . . . . . . . . . . . . . . . . . . . . . . . . . . . . . . . . . . . . . . . . . . . . 2-10
Switcher Frame Power Supply Installation . . . . . . . . . . . . . . . . . . . . . . . . . . . . . . . . . 2-12
Switcher Frame Redundant Power Supply Installation . . . . . . . . . . . . . . . . . . . . . . . 2-16
Switcher Frame Modules . . . . . . . . . . . . . . . . . . . . . . . . . . . . . . . . . . . . . . . . . . . . . . . . 2-18
Installing and Removing Modules . . . . . . . . . . . . . . . . . . . . . . . . . . . . . . . . . . . . . 2-19
Mask Draw Tablet Installation . . . . . . . . . . . . . . . . . . . . . . . . . . . . . . . . . . . . . . . . . . . . 2-23
Installing the Mask Draw Tablet . . . . . . . . . . . . . . . . . . . . . . . . . . . . . . . . . . . . . . . . . . 2-23
Installing UD and KT Series Tablets . . . . . . . . . . . . . . . . . . . . . . . . . . . . . . . . . . . 2-23
Installing SD Series Tablet . . . . . . . . . . . . . . . . . . . . . . . . . . . . . . . . . . . . . . . . . . . . 2-24
Switcher Option Module Installation . . . . . . . . . . . . . . . . . . . . . . . . . . . . . . . . . . . . . . . . . . 2-25
Input Modules . . . . . . . . . . . . . . . . . . . . . . . . . . . . . . . . . . . . . . . . . . . . . . . . . . . . . . . . . 2-26
Serial Digital Input Module Options . . . . . . . . . . . . . . . . . . . . . . . . . . . . . . . . . . . 2-26
Digital Output Module Options . . . . . . . . . . . . . . . . . . . . . . . . . . . . . . . . . . . . . . . . . . 2-27
Serial Output 1 (Slot C3) . . . . . . . . . . . . . . . . . . . . . . . . . . . . . . . . . . . . . . . . . . . . . 2-27
Serial Output 2 (Slot C11) . . . . . . . . . . . . . . . . . . . . . . . . . . . . . . . . . . . . . . . . . . . . 2-27
Timed Aux Output (Slot C17) . . . . . . . . . . . . . . . . . . . . . . . . . . . . . . . . . . . . . . . . . 2-27
Analog Output . . . . . . . . . . . . . . . . . . . . . . . . . . . . . . . . . . . . . . . . . . . . . . . . . . . . . . . . . 2-28
Effects Send Option . . . . . . . . . . . . . . . . . . . . . . . . . . . . . . . . . . . . . . . . . . . . . . . . . . . . . 2-30
Chroma Keyer Option . . . . . . . . . . . . . . . . . . . . . . . . . . . . . . . . . . . . . . . . . . . . . . . . . . . 2-31
BORDERLINE Key Edge Generator Option . . . . . . . . . . . . . . . . . . . . . . . . . . . . . . . . 2-31
Secondary Wipe Pattern Generator Options . . . . . . . . . . . . . . . . . . . . . . . . . . . . . . . . 2-32
Look Ahead Preview Option . . . . . . . . . . . . . . . . . . . . . . . . . . . . . . . . . . . . . . . . . . . . . 2-34
Timed Aux Output Option . . . . . . . . . . . . . . . . . . . . . . . . . . . . . . . . . . . . . . . . . . . . . . . 2-34
Framestore Option . . . . . . . . . . . . . . . . . . . . . . . . . . . . . . . . . . . . . . . . . . . . . . . . . . . . . . 2-35
Remote Aux Panel Option . . . . . . . . . . . . . . . . . . . . . . . . . . . . . . . . . . . . . . . . . . . . . . . 2-35
Setting Rear Panel Switches . . . . . . . . . . . . . . . . . . . . . . . . . . . . . . . . . . . . . . . . . . . 2-37
Tally Expansion Option . . . . . . . . . . . . . . . . . . . . . . . . . . . . . . . . . . . . . . . . . . . . . . . . . . 2-39
Chassis Installation . . . . . . . . . . . . . . . . . . . . . . . . . . . . . . . . . . . . . . . . . . . . . . . . . . 2-39
Setting Tally Module Switches . . . . . . . . . . . . . . . . . . . . . . . . . . . . . . . . . . . . . . . . 2-41
Cable Connections . . . . . . . . . . . . . . . . . . . . . . . . . . . . . . . . . . . . . . . . . . . . . . . . . . . . . . . . . . 2-45
Model 2200-2s Control Panel Connections . . . . . . . . . . . . . . . . . . . . . . . . . . . . . . . . . . 2-46
Model 2200-2i Control Panel Connections . . . . . . . . . . . . . . . . . . . . . . . . . . . . . . . . . . 2-47
Status Terminal Connections . . . . . . . . . . . . . . . . . . . . . . . . . . . . . . . . . . . . . . . . . . . . . 2-48
Analog Reference Connection . . . . . . . . . . . . . . . . . . . . . . . . . . . . . . . . . . . . . . . . . . . . 2-48
Input Signal Connections (Video and Key) . . . . . . . . . . . . . . . . . . . . . . . . . . . . . . . . . 2-49
Serial Digital Video Connections . . . . . . . . . . . . . . . . . . . . . . . . . . . . . . . . . . . . . . 2-49
Output Signal Connections . . . . . . . . . . . . . . . . . . . . . . . . . . . . . . . . . . . . . . . . . . . . . . . 2-50
Timed Aux Output Connections . . . . . . . . . . . . . . . . . . . . . . . . . . . . . . . . . . . . . . 2-50
Serial Output Connections . . . . . . . . . . . . . . . . . . . . . . . . . . . . . . . . . . . . . . . . . . . . 2-51
vi
Page 7

Contents
Switcher Communications Connections . . . . . . . . . . . . . . . . . . . . . . . . . . . . . . . . . . . . 2-52
DPM Configurations . . . . . . . . . . . . . . . . . . . . . . . . . . . . . . . . . . . . . . . . . . . . . . . . . . . . 2-53
The Video Connection (Aux Buses and Return Inputs) . . . . . . . . . . . . . . . . . . . 2-53
DPM Capabilities (Fixed and Pooled) . . . . . . . . . . . . . . . . . . . . . . . . . . . . . . . . . . 2-54
Control Connection . . . . . . . . . . . . . . . . . . . . . . . . . . . . . . . . . . . . . . . . . . . . . . . . . . 2-57
Connecting to Kaleidoscope . . . . . . . . . . . . . . . . . . . . . . . . . . . . . . . . . . . . . . . . . . 2-58
Connecting to a DPM–700 . . . . . . . . . . . . . . . . . . . . . . . . . . . . . . . . . . . . . . . . . . . . 2-60
Video Production Editor Connections . . . . . . . . . . . . . . . . . . . . . . . . . . . . . . . . . . 2-61
GPI Connections . . . . . . . . . . . . . . . . . . . . . . . . . . . . . . . . . . . . . . . . . . . . . . . . . . . . 2-62
Remote Aux Connections . . . . . . . . . . . . . . . . . . . . . . . . . . . . . . . . . . . . . . . . . . . . . . . . 2-64
Cable Installation . . . . . . . . . . . . . . . . . . . . . . . . . . . . . . . . . . . . . . . . . . . . . . . . . . . 2-64
Connector Installation . . . . . . . . . . . . . . . . . . . . . . . . . . . . . . . . . . . . . . . . . . . . . . . 2-65
JSO Cable connection . . . . . . . . . . . . . . . . . . . . . . . . . . . . . . . . . . . . . . . . . . . . . . . . 2-65
Power Supply Installation . . . . . . . . . . . . . . . . . . . . . . . . . . . . . . . . . . . . . . . . . . . . 2-66
Remote Aux Panel Lens Chip Installation . . . . . . . . . . . . . . . . . . . . . . . . . . . . . . 2-67
Remote Aux Panel Power Up . . . . . . . . . . . . . . . . . . . . . . . . . . . . . . . . . . . . . . . . . 2-67
Tally Expansion Option . . . . . . . . . . . . . . . . . . . . . . . . . . . . . . . . . . . . . . . . . . . . . . . . . . 2-68
Tally Output Cable Installation . . . . . . . . . . . . . . . . . . . . . . . . . . . . . . . . . . . . . . . 2-69
Turning Tally Expansion Option On . . . . . . . . . . . . . . . . . . . . . . . . . . . . . . . . . . . 2-70
Maintenance Terminal Connections . . . . . . . . . . . . . . . . . . . . . . . . . . . . . . . . . . . . . . . 2-70
Connecting the Control Panel to Source Power . . . . . . . . . . . . . . . . . . . . . . . . . . . . . 2-71
Switcher Power Supply Connections . . . . . . . . . . . . . . . . . . . . . . . . . . . . . . . . . . . . . . 2-71
Redundant Power Supply Voltage Adjustments . . . . . . . . . . . . . . . . . . . . . . . . . . . . 2-72
System Setup . . . . . . . . . . . . . . . . . . . . . . . . . . . . . . . . . . . . . . . . . . . . . . . . . . . . . . . . . . . . . . 2-74
Preliminary Checks . . . . . . . . . . . . . . . . . . . . . . . . . . . . . . . . . . . . . . . . . . . . . . . . . . . . . . . . . 2-74
Power-On . . . . . . . . . . . . . . . . . . . . . . . . . . . . . . . . . . . . . . . . . . . . . . . . . . . . . . . . . . . . . 2-75
System Timing (13.5 MHz, Serial I/O only) . . . . . . . . . . . . . . . . . . . . . . . . . . . . . . . . . . . . 2-76
Equipment Required . . . . . . . . . . . . . . . . . . . . . . . . . . . . . . . . . . . . . . . . . . . . . . . . . . . . 2-76
Timing Procedures . . . . . . . . . . . . . . . . . . . . . . . . . . . . . . . . . . . . . . . . . . . . . . . . . . . . . . 2-77
Switcher Delay = 70 µS . . . . . . . . . . . . . . . . . . . . . . . . . . . . . . . . . . . . . . . . . . . . . . . 2-77
Switcher Delay = 50 µS . . . . . . . . . . . . . . . . . . . . . . . . . . . . . . . . . . . . . . . . . . . . . . . 2-77
Switcher Delay for Between 50 µS and 90 µS . . . . . . . . . . . . . . . . . . . . . . . . . . . . 2-78
Output Timing Adjustment . . . . . . . . . . . . . . . . . . . . . . . . . . . . . . . . . . . . . . . . . . . 2-79
System Configuration . . . . . . . . . . . . . . . . . . . . . . . . . . . . . . . . . . . . . . . . . . . . . . . . . . . . . . . 2-79
Section 3 — Functional Description
Introduction . . . . . . . . . . . . . . . . . . . . . . . . . . . . . . . . . . . . . . . . . . . . . . . . . . . . . . . . . . . . . . . . 3-1
Signal Paths . . . . . . . . . . . . . . . . . . . . . . . . . . . . . . . . . . . . . . . . . . . . . . . . . . . . . . . . . . . . . . . . 3-4
System Overview . . . . . . . . . . . . . . . . . . . . . . . . . . . . . . . . . . . . . . . . . . . . . . . . . . . . . . . . . . . . 3-5
Power Distribution . . . . . . . . . . . . . . . . . . . . . . . . . . . . . . . . . . . . . . . . . . . . . . . . . . . . . . . . . . 3-5
Input Voltage: . . . . . . . . . . . . . . . . . . . . . . . . . . . . . . . . . . . . . . . . . . . . . . . . . . . . . . . . . . . 3-5
Output Voltages: . . . . . . . . . . . . . . . . . . . . . . . . . . . . . . . . . . . . . . . . . . . . . . . . . . . . . . . . 3-5
Switcher Module Description . . . . . . . . . . . . . . . . . . . . . . . . . . . . . . . . . . . . . . . . . . . . . . . . . 3-6
Input Modules . . . . . . . . . . . . . . . . . . . . . . . . . . . . . . . . . . . . . . . . . . . . . . . . . . . . . . . . . . 3-8
Serial Digital Input Module (064820) . . . . . . . . . . . . . . . . . . . . . . . . . . . . . . . . . . . . 3-8
Chroma Key Input Module (064817) . . . . . . . . . . . . . . . . . . . . . . . . . . . . . . . . . . . . 3-8
Serial Reentry Module (064822) . . . . . . . . . . . . . . . . . . . . . . . . . . . . . . . . . . . . . . . . . . . . 3-9
Output Modules . . . . . . . . . . . . . . . . . . . . . . . . . . . . . . . . . . . . . . . . . . . . . . . . . . . . . . . . 3-10
Serial (Digital) Output Modules (064821) . . . . . . . . . . . . . . . . . . . . . . . . . . . . . . . 3-10
Analog Output Module (064819) . . . . . . . . . . . . . . . . . . . . . . . . . . . . . . . . . . . . . . 3-10
Timed Aux Output Module (064852) (Slot C16 and 17) . . . . . . . . . . . . . . . . . . . 3-10
vii
Page 8

Contents
Crosspoint Module (064800) . . . . . . . . . . . . . . . . . . . . . . . . . . . . . . . . . . . . . . . . . . . . . . 3-11
M/E 1 Crosspoint Module (Slot A4) . . . . . . . . . . . . . . . . . . . . . . . . . . . . . . . . . . . 3-11
M/E 2 Crosspoint Module (Slot A9) . . . . . . . . . . . . . . . . . . . . . . . . . . . . . . . . . . . 3-12
Keyer Carrier Module (064804) . . . . . . . . . . . . . . . . . . . . . . . . . . . . . . . . . . . . . . . . . . . 3-13
Keyer Mezzanine (064826) . . . . . . . . . . . . . . . . . . . . . . . . . . . . . . . . . . . . . . . . . . . . . . . 3-14
M/E 1 Key 1 Keyer Carrier Module and Mezzanines (Slot A5) . . . . . . . . . . . . 3-16
M/E 1 Key 2 Keyer Carrier Module and Mezzanines (Slot A6) . . . . . . . . . . . . 3-16
M/E 2 Key 1 Keyer Carrier Module and Mezzanines (Slot A13) . . . . . . . . . . . 3-17
M/E 2 Key 2 Keyer Carrier Module and Mezzanines (Slot A14) . . . . . . . . . . . 3-17
BORDERLINE Mezzanine (067909) . . . . . . . . . . . . . . . . . . . . . . . . . . . . . . . . . . . . . . . . 3-18
M/E 1 Key 1 Borderline (Slot A5) . . . . . . . . . . . . . . . . . . . . . . . . . . . . . . . . . . . . . . 3-18
M/E 1 Key 2 Borderline (Slot A6) . . . . . . . . . . . . . . . . . . . . . . . . . . . . . . . . . . . . . . 3-18
M/E 2 Key 1 Borderline (Slot A12) . . . . . . . . . . . . . . . . . . . . . . . . . . . . . . . . . . . . . 3-19
M/E 2 Key 2 Borderline (Slot A14) . . . . . . . . . . . . . . . . . . . . . . . . . . . . . . . . . . . . . 3-19
Mixer Interface Module (064813) (Slot A8) . . . . . . . . . . . . . . . . . . . . . . . . . . . . . . . . . . 3-20
Effects Send Module (064809) (Slot A11) . . . . . . . . . . . . . . . . . . . . . . . . . . . . . . . . . . . 3-22
Chroma Keyer Carrier Module (064807) . . . . . . . . . . . . . . . . . . . . . . . . . . . . . . . . . . . 3-23
Chroma Key Mezzanine Module (064831) . . . . . . . . . . . . . . . . . . . . . . . . . . . . . . . . . . 3-24
M/E 1 Chroma Keyer Module Set (Slot A3) . . . . . . . . . . . . . . . . . . . . . . . . . . . . . 3-24
M/E 2 Chroma Keyer Module Set (Slot A16) . . . . . . . . . . . . . . . . . . . . . . . . . . . . 3-24
Analog Chroma Key Input Module (064817) (Slot C8) . . . . . . . . . . . . . . . . . . . . . . . . 3-25
Mix/Wipe Module (064803) . . . . . . . . . . . . . . . . . . . . . . . . . . . . . . . . . . . . . . . . . . . . . . 3-25
Wipe Mezzanine (064828) . . . . . . . . . . . . . . . . . . . . . . . . . . . . . . . . . . . . . . . . . . . . . . . . 3-26
Preview Mezzanine Module (064829) . . . . . . . . . . . . . . . . . . . . . . . . . . . . . . . . . . . . . . 3-26
M/E 1 Mix/Wipe Module Set (Slot A7) . . . . . . . . . . . . . . . . . . . . . . . . . . . . . . . . 3-27
M/E 2 Mix/Wipe Module Set (Slot A12) . . . . . . . . . . . . . . . . . . . . . . . . . . . . . . . 3-27
Preview Module (064802) (Slot A15) . . . . . . . . . . . . . . . . . . . . . . . . . . . . . . . . . . . . . . . 3-28
Mask Mezzanine Board (064830) . . . . . . . . . . . . . . . . . . . . . . . . . . . . . . . . . . . . . . . . . . 3-28
Sync Generator Module (064801) (Slot A10) . . . . . . . . . . . . . . . . . . . . . . . . . . . . . . . . 3-29
Frame Store (064814) . . . . . . . . . . . . . . . . . . . . . . . . . . . . . . . . . . . . . . . . . . . . . . . . . . . . 3-30
Overall System Control . . . . . . . . . . . . . . . . . . . . . . . . . . . . . . . . . . . . . . . . . . . . . . . . . . . . . 3-31
Control Processor 1 Module (064805) (Slot A1) . . . . . . . . . . . . . . . . . . . . . . . . . . . . . . 3-31
Control Processor 2 Module (064806) (Slot A2) . . . . . . . . . . . . . . . . . . . . . . . . . . . . . . 3-33
Communications Processor 2: . . . . . . . . . . . . . . . . . . . . . . . . . . . . . . . . . . . . . . . . . 3-33
M/E 2 Processor Mezzanine . . . . . . . . . . . . . . . . . . . . . . . . . . . . . . . . . . . . . . . . . . 3-33
Communications I/O Module (064823) (Slot C10) . . . . . . . . . . . . . . . . . . . . . . . . . . . 3-34
GPI Module (064825) (Slot C4) . . . . . . . . . . . . . . . . . . . . . . . . . . . . . . . . . . . . . . . . . . . . 3-34
Expanded Communications Carrier Module (064824) . . . . . . . . . . . . . . . . . . . . . . . . 3-34
Serial Communications Mezzanine (068918) . . . . . . . . . . . . . . . . . . . . . . . . . . . . . . . . 3-34
Control Panel Modules Overview . . . . . . . . . . . . . . . . . . . . . . . . . . . . . . . . . . . . . . . . . . . . 3-35
Main Panel CPU Module (066262) . . . . . . . . . . . . . . . . . . . . . . . . . . . . . . . . . . . . . . . . . 3-36
Upper Panel Microprocessor (PUP) Module (066271) . . . . . . . . . . . . . . . . . . . . . . . . 3-36
Lower Panel Microprocessor (PUP) Module (066267) . . . . . . . . . . . . . . . . . . . . . . . . 3-36
Display Module (066262) . . . . . . . . . . . . . . . . . . . . . . . . . . . . . . . . . . . . . . . . . . . . . . . . 3-36
Lower Left Switch Module (066263) . . . . . . . . . . . . . . . . . . . . . . . . . . . . . . . . . . . . . . . 3-36
Lower Center Switch Module (066264) . . . . . . . . . . . . . . . . . . . . . . . . . . . . . . . . . . . . . 3-37
Lower Right Switch Module (066265) . . . . . . . . . . . . . . . . . . . . . . . . . . . . . . . . . . . . . . 3-37
Upper Left Switch Module (066268) . . . . . . . . . . . . . . . . . . . . . . . . . . . . . . . . . . . . . . . 3-37
Upper Center Switch Module (066269) . . . . . . . . . . . . . . . . . . . . . . . . . . . . . . . . . . . . . 3-37
Upper Right Switch Module (066270) . . . . . . . . . . . . . . . . . . . . . . . . . . . . . . . . . . . . . . 3-37
Control Panel IO Module (066266) . . . . . . . . . . . . . . . . . . . . . . . . . . . . . . . . . . . . . . . . 3-37
Remote Aux Panel . . . . . . . . . . . . . . . . . . . . . . . . . . . . . . . . . . . . . . . . . . . . . . . . . . . . . . . . . . 3-38
Tally Expansion . . . . . . . . . . . . . . . . . . . . . . . . . . . . . . . . . . . . . . . . . . . . . . . . . . . . . . . . . . . . 3-38
viii
Page 9

Contents
Section 4 — Maintenance
Introduction . . . . . . . . . . . . . . . . . . . . . . . . . . . . . . . . . . . . . . . . . . . . . . . . . . . . . . . . . . . . . . . . 4-1
Servicing Precautions . . . . . . . . . . . . . . . . . . . . . . . . . . . . . . . . . . . . . . . . . . . . . . . . . . . . . . . . 4-2
Powering Down . . . . . . . . . . . . . . . . . . . . . . . . . . . . . . . . . . . . . . . . . . . . . . . . . . . . . . . . . 4-2
Removing Circuit Modules . . . . . . . . . . . . . . . . . . . . . . . . . . . . . . . . . . . . . . . . . . . . . . . . 4-2
Repairing Circuit Modules . . . . . . . . . . . . . . . . . . . . . . . . . . . . . . . . . . . . . . . . . . . . . . . . 4-3
Repairing Power Supplies . . . . . . . . . . . . . . . . . . . . . . . . . . . . . . . . . . . . . . . . . . . . . . . . . 4-3
Model 2200 Power Supply Configurations . . . . . . . . . . . . . . . . . . . . . . . . . . . . . . . . . . 4-4
Frame Power Supply Assemblies . . . . . . . . . . . . . . . . . . . . . . . . . . . . . . . . . . . . . . . 4-4
Frame Power Supply Replacement . . . . . . . . . . . . . . . . . . . . . . . . . . . . . . . . . . . . . . . . . 4-6
Replacement of Individual Power Supply Assemblies . . . . . . . . . . . . . . . . . . . . . . . . 4-9
Configurations . . . . . . . . . . . . . . . . . . . . . . . . . . . . . . . . . . . . . . . . . . . . . . . . . . . . . . . 4-9
Procedures . . . . . . . . . . . . . . . . . . . . . . . . . . . . . . . . . . . . . . . . . . . . . . . . . . . . . . . . . 4-10
Replacement of Multi-Output Power Supply Assembly . . . . . . . . . . . . . . . . . . 4-10
Removal of Pioneer Multi-Output Supply . . . . . . . . . . . . . . . . . . . . . . . . . . . . . . 4-11
Installation of Todd Multi-Output Supply . . . . . . . . . . . . . . . . . . . . . . . . . . . . . . 4-12
Mount Terminal Block . . . . . . . . . . . . . . . . . . . . . . . . . . . . . . . . . . . . . . . . . . . . . . . 4-13
Install Assembly in Frame . . . . . . . . . . . . . . . . . . . . . . . . . . . . . . . . . . . . . . . . . . . . 4-14
Replacement of +5 Volt Power Supply Assembly . . . . . . . . . . . . . . . . . . . . . . . . . . . . 4-15
Removal of Pioneer +5 Volt Supply . . . . . . . . . . . . . . . . . . . . . . . . . . . . . . . . . . . . 4-16
Installation of Todd +5 Volt Supply . . . . . . . . . . . . . . . . . . . . . . . . . . . . . . . . . . . . 4-18
Fan Jumper Setting . . . . . . . . . . . . . . . . . . . . . . . . . . . . . . . . . . . . . . . . . . . . . . . . . . . . . . . . . 4-21
Replacing Either Control Panel Power Supply . . . . . . . . . . . . . . . . . . . . . . . . . . . . . . . . . . 4-22
Control Panel Servicing . . . . . . . . . . . . . . . . . . . . . . . . . . . . . . . . . . . . . . . . . . . . . . . . . . . . . 4-24
Replacing Control Panel Modules . . . . . . . . . . . . . . . . . . . . . . . . . . . . . . . . . . . . . . . . . 4-25
Pushbutton Lamp Replacement . . . . . . . . . . . . . . . . . . . . . . . . . . . . . . . . . . . . . . . . . . . 4-27
Air Filter Cleaning . . . . . . . . . . . . . . . . . . . . . . . . . . . . . . . . . . . . . . . . . . . . . . . . . . . . . . . . . . 4-28
Switcher Frame Air Filter Cleaning . . . . . . . . . . . . . . . . . . . . . . . . . . . . . . . . . . . . . . . . 4-28
Switcher Power Supply Air Filter Cleaning . . . . . . . . . . . . . . . . . . . . . . . . . . . . . . . . . 4-30
Switcher Frame Module Precautions . . . . . . . . . . . . . . . . . . . . . . . . . . . . . . . . . . . . . . . . . . 4-31
Replacing Frame Modules . . . . . . . . . . . . . . . . . . . . . . . . . . . . . . . . . . . . . . . . . . . . . . . . . . . 4-32
Draining the Control Processor RAM . . . . . . . . . . . . . . . . . . . . . . . . . . . . . . . . . . . . . . . . . 4-36
Index
ix
Page 10

Contents
x
Page 11
Important Safeguards and Regulatory Notices
Information on the following pages provides important safety guidelines for both
Operator and Service Personnel. Specific warnings and cautions will be found
throughout the manual where they apply, but may not appear here. Please read
and follow the important safety information, noting especially those instructions
related to risk of fire, electric shock or injury to persons.
WARNING
Any instructions in this manual that require opening the equipment cover or
enclosure are for use by qualified service personnel only. T o reduce the risk
of electric shock, do not perform any servicing other than that contained in
the operating instructions unless you are qualified to do so.
Symbols and Their Meaning
The lightning flash with arrowhead symbol, within an equilateral triangle, alerts
the user to the presence of “dangerous voltage” within the product’s enclosure that
may be of sufficient magnitude to constitute a risk of electric shock to persons.
The exclamation point within an equilateral triangle alerts the user to the presence
of important operating and maintenance (servicing) instructions in the literature
accompanying the appliance.
The fuse symbol indicates that the fuse referenced in text must be replaced with
one having the ratings indicated.
This symbol represents an internal protective grounding terminal. Such a terminal
must be connected to earth ground prior to making any other connections to the
equipment.
This symbol represents an external protective grounding terminal. Such a terminal
may be connected to earth ground as a supplement to an internal grounding
terminal.
xi
Page 12

Safeguards and Notices
Warnings
CAUTION
This equipment contains static sensitive components. Use anti-static grounding
equipment whenever handling or servicing modules and components. When circuit
modules are removed from the frame, place them on a flat static controlled surface.
Failure to follow this precaution can result in component damage due to
electrostatic discharge.
■
Heed all warnings on the unit and in the operating instructions.
■
Do not use this product in or near water.
Disconnect ac power before installing any options.
■
■
The attachment plug receptacles in the vicinity of the equipment are all to be
of a grounding type, and the equipment grounding conductors serving these
are to be connected to earth ground at the service equipment.
Route power cords and other cables so that they are not likely to be damaged.
■
■
Disconnect power before cleaning. Do not use liquid or aerosol cleaners; use
only a damp cloth.
Dangerous voltages exist at several points in this product. To avoid personal
■
injury, refer all servicing to qualified personnel.
■
Do not wear hand jewelry or watches when troubleshooting high current
circuits, such as the power supplies.
■
During installation, do not use the door handles or front panels to lift the
equipment as they may open abruptly and injure you.
To avoid fire hazard, use only the specified correct type, voltage and current
■
rating as referenced in this service manual. Always refer fuse replacement to
qualified service personnel.
■
To avoid explosion, do not operate this product in an explosive atmosphere.
Have qualified personnel perform safety checks after any completed service.
■
■
Turn off power supplies and disconnect power cords before servicing the
control panel.
■
To reduce the risk of electric shock, ensure that the two power supply cords
are each plugged into a separate branch circuit.
If equipped with redundant power, this unit has two power cords. To reduce
■
the risk of electric shock disconnect both power supply cords before servicing.
■
High leakage current! Earth ground connection is essential before connecting
power supply.
xii
Page 13

Cautions
Safeguards and Notices
To prevent damage to equipment when replacing fuses, locate and correct the
■
trouble that caused the fuse to blow before applying power.
■
Verify that all power supply lights are off and that the power supply cords are
unplugged before removing power supply or servicing equipment.
Use only specified replacement parts.
■
■
Follow static precautions at all times when handling this equipment.
■
Leave the back of the frame clear for air exhaust cooling and to allow room for
cabling. Slots and openings in the cabinet are provided for ventilation. Do not
block them.
Front door is part of fire enclosure and should be kept closed during normal
■
operation.
Circuit boards in this product are densely populated with surface mount and
■
ASIC components. Special tools and techniques are required to safely and
effectively troubleshoot and repair modules that use SMT or ASIC
components. For this reason, service and repair of GVG products
incorporating surface mount technology are supported only on a module
exchange basis. Customers should not attempt to troubleshoot or repair
modules that contain SMT components. GVG assumes no liability for damage
caused by unauthorized repairs. This applies to both in- and out-of-warranty
products.EMC Regulatory Notices
Federal Communications Commission (FCC) Part 15 Information
This device complies with Part 15 of the FCC Rules. Operation is subject to the
following two conditions:
(1) This device may not cause harmful interference.
(2) This device must accept any interference received including interference
that may cause undesireable operations.
xiii
Page 14

Safeguards and Notices
Power Cord Notices
North American Power Supply Cords
This equipment is supplied with a molded grounding plug (NEMA X-XXX) at one
end and a molded grounding receptacle (IEC 320-C13) at the other end.
Conductors are color coded white (neutral), black (line) and green or green/yellow
(ground).
Operation of this equipment at voltages exceeding 130 Vac will require power
supply cords which comply with NEMA configurations.
Black
Line
White
Neutral
International Power Supply Cord
This equipment is supplied with a molded grounding receptacle (IEC 320-C13) at
one end and stripped conductors (50/5 mm) at the other end. Conductors are CEE
color coded, light blue (neutral), brown (line) and green/yellow (ground). Other
IEC 320 C-13 type power supply cords can be used if they comply with the safety
regulations of the country in which they are installed.
Green or Green
with Yellow stripe
Brown
Blue
Green with
Yellow stripe
Ground
(Earth)
Line
Neutral
Ground
(Earth)
xiv
Page 15

1
Introduction
System Overview
This section presents a general description of the Grass Valley Group
Model 2200 Digital Production Switcher, its basic architecture, and a list of
video specifications.
System Description
The Model 2200 Production Switcher manipulates CCIR 601 4:2:2
component digital video and key signals. Outputs from the system are
serial digital. Analog component program and preview monitor outputs
are available.
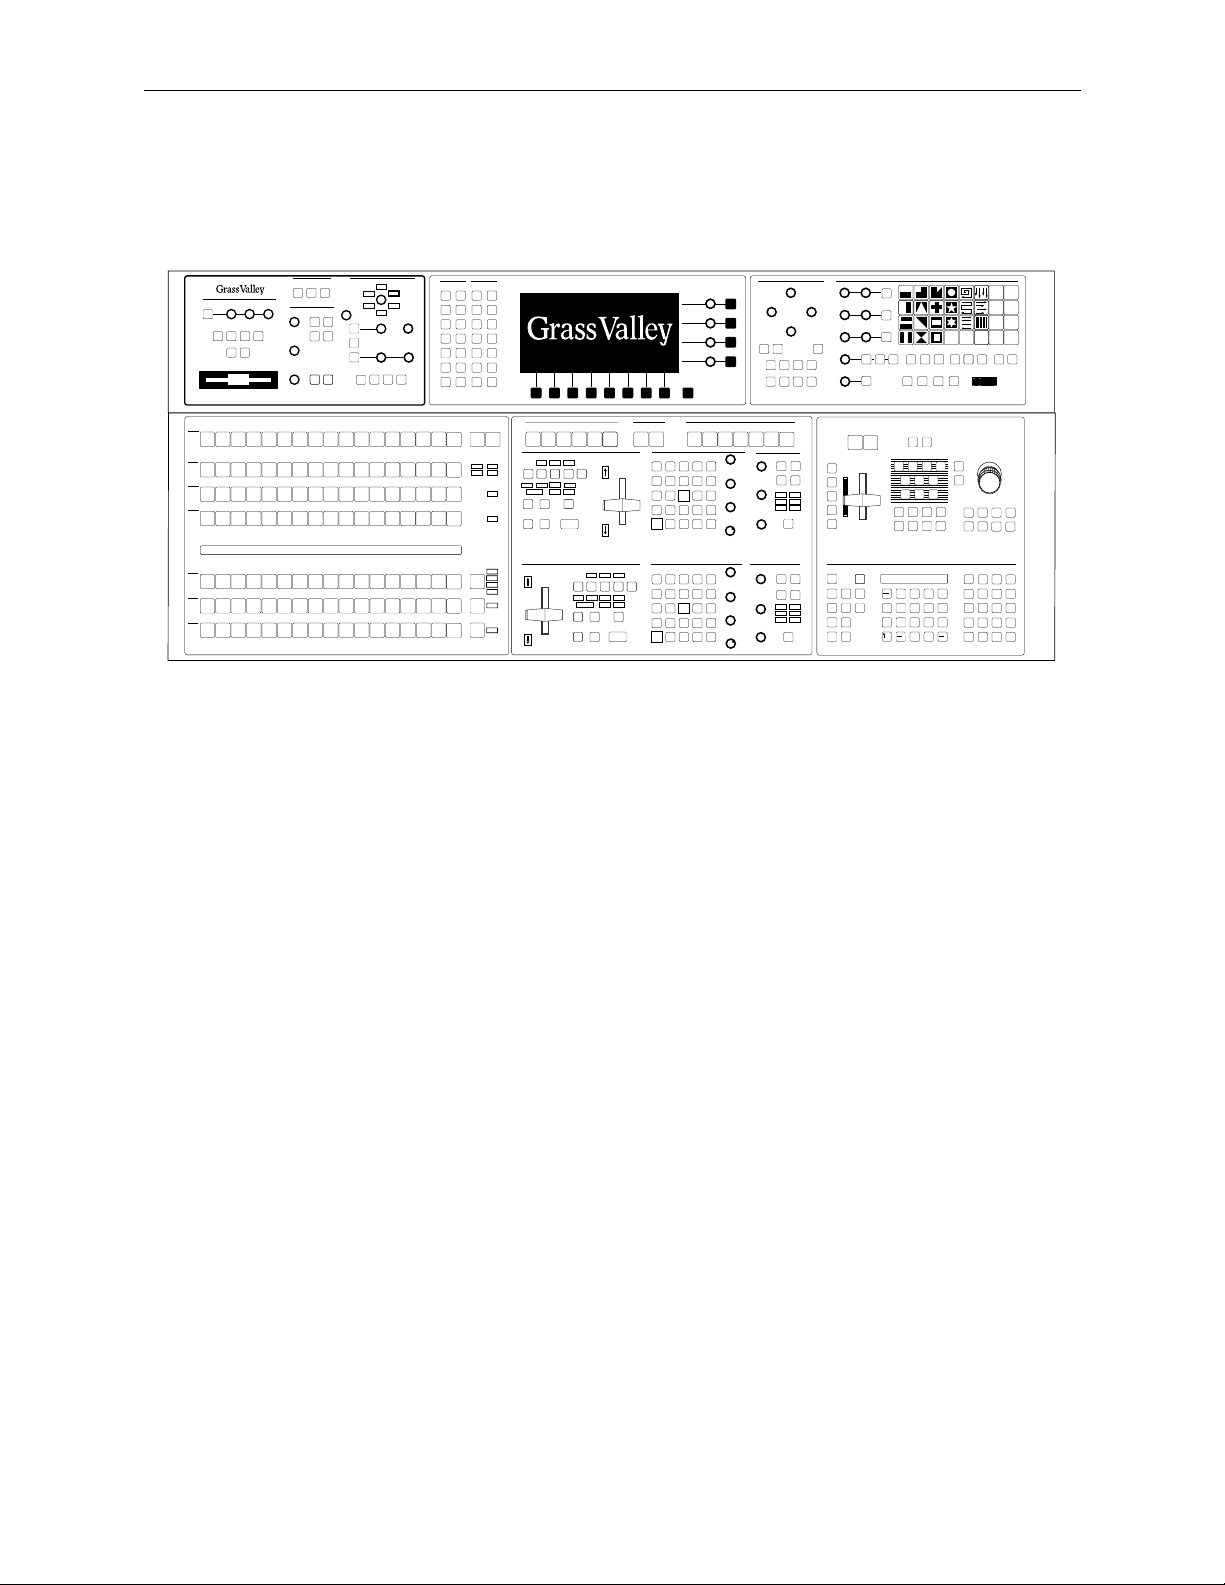
The Model 2200 control panel shown in
systems. Up to 32 video and key sources can be mapped to crosspoint
buttons and accessed directly from the control panel. In addition, the full
range of digital effects can be done directly form the same control panel.
Figure 1-1
provides two mix/effects
1-1
Page 16
Section 1 — System Overview
This manual covers the installation, functional description, maintenance,
and troubleshooting of the control panel and switcher electronics frame.
Chroma Keyer
Frame Store
Frame Store
Shadow
On
External Interface
Editor
GPI
Enable
Enable
Background
M/E 1
Vertical
Position
Position
Field 1
Grab
Freeze
Video
Key
Store
Store
Sec
Opacity Horizontal
Wash
Hue/
Field 2
Softness
Matte
Saturation/
Offset
Bk
Bkgd 1
Brightness
R
Periph
Enable
M/E 2
Sec
Wash
Matte 2 Flat
Bkgd 2
Shadow
On
Auto
Setup
Bkgd
Supr
M/E 1
Key 1
M
Y
B
G
C
Shadow
Opacity
Chroma Lum
M/E 1
M/E 2
Key 2
Key 1
Selectivity
M/E 2
Key 2
Effect Switcher
Picture
Effect
Config
Picture
Panel
Frame
Setup
Effect
Key/
Oper
Stencil
View
Input/
Run
Output
Control
Graphic
Path Aux
Display
Clear
Menu
Mixer
Config
Keyer
Status
E-MEM Key
Mask Matte
Bus
Disk Misc
Wipe Mask
M/E
Mode
Chroma
Key
Wipe
Frame
Frame
Store
Exit
Top/Gain
Left Right
Bottom/Clip
Force
Inhibit
Mask
Mask
Box
Pri
Wipe
M/E 1
M/E 1
Key 1
Key 2
Mask
Invert
Sec
Mask
Wipe
Bus
M/E 2
M/E 2
Key 1
Key 2
Symmetry
Opacity
Preset Size Aspect
Pattern Mix
Soft
Softness
Border
Width
Aspect
Rotate
Rotate
Reverse
Rotate
Normal
Mag
Speed
Pos
Rotation TypeRotate
Wipe Direction
Pattern
M/E 1
M/E 1
Sec
Pri
Mix
Delegate
RandomMenu Texture User
Flip
Split
Flop
Pattern Modifiers Positioner
M/E 2
M/E 2
Pri
Sec
H
Multi
V
Multi
Model
User 1
User 3
User 5 User 6
Wipe
Undo
Pos
Norm
2200
User 2
User 4
Learn
User
Wipe
Pos
Auto
Pvw
Aux
Key
A
B
VTR3VTR2VTR1Cam3Cam2Cam1Black DPM2DPM
VTR3VTR2VTR1Cam3Cam2Cam1Black DPM2DPM
VTR3VTR2VTR1Cam3Cam2Cam1Black DPM2DPM
VTR3VTR2VTR1Cam3Cam2Cam1Black DPM2DPM
1
1
1
1
Routr4Routr3Routr2Routr
1
Routr4Routr3Routr2Routr
1
Routr4Routr3Routr2Routr
1
Routr4Routr3Routr2Routr
1
Shift
Color
Routr3Routr
M/E 1
Bkgd
2
2
2
2
Pgm
Key 1
Routr3Routr
Color
Shift
Bkgd
Key 2
Shift
Color
Routr3Routr
Bkgd
Shift
Color
Routr3Routr
Bkgd
RTD1TK 1GF 2GF 1 GF 2
Key
A
B
VTR3VTR2VTR1Cam3Cam2Cam1Black DPM2DPM
VTR3VTR2VTR1Cam3Cam2Cam1Black DPM2DPM
VTR3VTR2VTR1Cam3Cam2Cam1Black DPM2DPM
1
1
1
1
1
1
Color
Routr4Routr3Routr2Routr
Routr3Routr
Shift
M/E 1
Bkgd
2
Color
Routr4Routr3Routr2Routr
Routr3Routr
Shift
M/E 1
Bkgd
2
Color
Routr4Routr3Routr2Routr
Routr3Routr
Shift
M/E 1
Bkgd
2
Figure 1-1. Model 2200 Control Panel
Modularity extends throughout the system, providing simple
configuration and expansion to meet your present and future needs. The
basic system consists of a switcher frame and a control panel. The switcher
frame and the control panel each have separate power supplies.
The switcher frame houses the serial and analog I/O modules, the signal
processing modules and the system controller.
M/E 2AM/E 2
Key
Priority
Bkgd
B
On
Layered
Mix
Cut
Key 1
Effect
Effect Effect
BkgdAKey
1
On On
Over
Wipe
Auto
Tran
Preview Only
M/E 2
Key 2
Key
2
On
Over
Preset
Black
60
Bus Delegate
Pvw
M/E 2
M/E 1
Pvw
Key
Priority
Pvw
Keyer
Normal Border
Key
Over
Video
Fill
Linear
Key
Key
On
Keyer
Normal Border
Key
Over
Video
Fill
Linear
Key
Key
On
Inhibit
Mask
Matte
Fill
Lum
Key
BkgdBBkgd
Inhibit
Mask
Matte
Fill
Lum
Key
BkgdBBkgd
Shadow
Force
Mask
Split
Key
Chroma
Key
A
Shadow
Force
Mask
Split
Key
Chroma
Key
A
Mask Aux1Aux2Aux
OutlineExtrude
Invert
Show
Key
Video
Auto
Key
Select
Key
Pri
Sec
Preset
Preset
Pattern
Pattern
Key
Key
2
1
OutlineExtrude
Invert
Show
Key
Video
Auto
Key
Select
Key
Sec
Pri
Preset
Preset
Pattern
Pattern
Key
Key
2
1
Borderline
Size/Position
Borderline
Opacity
Borderline
Size/Position
Borderline
Opacity
Aux
Aux
5
4
3
Matte
Pri
Sec
Stop
Wipe
Wipe
Next
Wash
Wash
Hue/
Softness
Saturation/
Offset
Gain
Brightness
Clip
Matte
Hue/
Softness
Saturation/
Offset
Gain
Brightness
Clip
KF
Matte 2
Flat
Hold
Matte
Input
Reverse
K1 Border
K1 Fill
K2 Border
K2 Fill
Rewind
Sec Wipe
Pri Wipe
Matte
Run
Select
Run Control
E-MEM
Auto
Pri
Sec
Wipe
Wipe
Recall
Wash
Wash
Chan 1
Enable
Matte 2
Flat
Matte
K1 Fill
K2 Fill
Pri Wipe
All
Chan 2
Misc
K1 Border
K2 Border
Bkgd
Global
Sec Wipe
Camera
Matte
Select
Enables Edit
Near
Side
Auto
Run
M/E 1
M/E 2
Far
Side
1345804-42224438
Lock
Learn
Seq
Effect
Dis
Bank
Freeze
Video
Source
Target
Locate
Size/
3D
Locate
Locate
Axis
Skew
Persp
XY
8
7
56
4
123
Undo
0
.
Freeze
Key
Camera
World
Axis
Lock
Rotate
Knob
Control
Spin
Aspect
Post
Xform
Center
Z
+/---
9
Bank
0
Bank
1
Trim
Tran
Rate
Enter
CameraGlobalChan 1
Chan 2
M/E 2
M/E 1
M/E 2
M/E 1
Pri
Pri
Sec
Sec
Clear
Const
Prev Next
Work
Dur
Buffer
Get
Cut
Go To
Go To
Time
KF
Put
Copy
Effect
DurKFDur
Time
Mark
Paste
Insert
Cursor
Cursor
Before
Insert
Mark
Modify
Mark
After
Block
Aux 1-4 Effects Send Only
M/E 1AM/E 1
Transition
Transition
B
Mix
Cut
Bkgd
On
Layered
Key 1
Effect
Effect Effect
Key
Bkgd
1
A
On
Wipe
Auto
Tran
M/E 1
Key 2
Key
2
On
On
Over
Over
Preset
Black
60
M/E 2
Pgm
Uncal
Uncal
Uncal
Uncal
Uncal
Key 1
Key 2
Uncal
Uncal
Uncal
1-2
Page 17

System Description
Power supplies for the system can be made fault tolerant with the optional
redundant supplies. See Section 2, Installation, for further information.
EFFECTS SEND
MATRIX
MIX EFFECTS
Video/Key
Signals In
PROCESSOR
Video/Key
Signals Out
MIX EFFECTS
PROCESSOR
CONTROL
PROCESSOR
Status
Terminal
SERIAL INPUT MODULES
SERIAL CROSSPOINT MATRIX
CONTROL
PANEL
LOGIC
CONTROL PANEL
POWER SUPPLY
Control Panel
Figure 1-2. Model 2200 Simplified Block Diagram
ANALOG AND SERIALOUTPUT MODULES
Switcher
Frame
Switcher Frame
Power Supply
1-3
Page 18

Section 1 — System Overview
Optional Features for Switcher
This section provides brief descriptions of options for the Model 2200
Digital Production Switcher.
Input Modules
The input format is component serial digital. Two Serial Digital Input
Modules are standard, this will provide 16 inputs. Up to two additional
Serial Digital Input Modules may be added for a total of 32 primary inputs.
Component Serial Digital Input Modules are installed in the rear bay of the
switcher frame. There is also a provision for installing one optional Analog
Chroma Key Input Module. This module provides two inputs for
component analog chroma keys. The following module types are available:
Serial Input Modules
Two modules standard, up to two additional modules optional. Eight
■
looping inputs on each module
Chroma Key Input Module
The Analog Input Module allows full bandwidth chroma keys. There is a
separate gain adjustment near each input BNC connector.
One module optional. provides two inputs–RGB, SIMPTE, EBU, Beta
■
or MII
1-4
Page 19

Output Modules
The switcher has two standard Serial Output Modules and can have one
optional Analog Preview Output, and one optional Aux Serial Output
Module. Each Serial Output Module option has eight different output
signals (two BNCs per output for a total of 16 BNCs on each module). The
Aux Output Module has eight outputs of which six are used. This provides
three independent output pairs (video/key) from aux buses 3A through
5B. The Analog Output Module has two component analog outputs, M/E 2
program and switched preview.
Analog Output (Cell C15)
■
M/E 2 Program Video
■
Switched Preview
Optional Features for Switcher
Serial Output 1 (Cell C3) (Standard)
■
Mask
■
Switched Preview
M/E 1 Preview
■
M/E 2 Preview
■
M/E 1 Program Video
■
■
M/E 1 Program Key
■
M/E 2 Program Video
■
M/E 2 Program Key
Serial Output 2 (Cell C11) (Standard)
■
M/E 1 Clean Feed
■
M/E 2 Clean Feed
Aux Bus 1A (Video)
■
Aux Bus 1B (Key)
■
Aux Bus 2A (Video)
■
Aux Bus 2B (Key)
■
■
Frame Store Video
■
Frame Store Key
1-5
Page 20

Section 1 — System Overview
Aux Output (Cell C16)
■
Aux Bus 3A (Video)
■
Aux Bus 3B (Key)
■
Aux Bus 4A (Video)
■
Aux Bus 4B (Key)
Aux Bus 5A (Video/Key)
■
Aux Bus 5B (Video/Key)
■
Effects Send Matrix (Cell A11)
The Effects Send Matrix option provides a method of integrating digital
effects devices into the switcher mix/effects system. Up to two send
channels can be used to route the A video, key 1, or key 2 from an M/E to
and from an external digital effects system.
This option comes in the form of an Effects Send Matrix Module which
installs in the front switcher frame bay.
Secondary Wipe Generators
An optional Secondary Wipe Generator for both Mix/Effects provides a
second wipe pattern for each of the M/E systems. With this option
installed, two independent wipe patterns are allowed within each M/E.
The output from the Secondary Wipe Generator can be mixed or non-
additively mixed with the output from the primary wipe generator to
create novel wipe patterns.
This option also allows the Preset wipe pattern to differ from the transition
wipe pattern. It can also be used as an additional mask source and a matte
generator modulator within each M/E.
The Secondary Wipe Generator Modules are sub-modules which mount
onto the Mix/Wipe Modules in each M/E.
1-6
Page 21

Optional Features for Switcher
Dual Chromatte Advanced Chroma Keyer (Cells A3, A16, C8)
Optional Chromatte™ Advanced Chroma Keyer Modules are available for
component chroma keying. Each module provides chroma keying for both
foreground keyers in an M/E. Dual Chromatte™ Chroma Keyer Modules
are installed in the front bay of the switcher frame. Any internal 4:2:2
component signal may be used to chroma key.
To use external analog component inputs for chroma keying, the optional
Dual Analog Component Chroma Key Input Modules must be installed.
The input module provides two analog component chroma key inputs
direct to both Chroma Keyer Modules. The input module is installed in the
rear bay of the switcher frame. This module provides the key only, the key
fill must come from the Serial Input Modules.
The following analog component formats are supported:
■
Betacam®
1
■
MII
SMPTE
■
EBU
■
BORDERLINE Key Edge Generation
BORDERLINE® Key Edge Generators are optional for each keyer in the
switcher. The BORDERLINE option is added by plugging a small sub-
module onto the Keyer module of an M/E. One sub-module can be
installed for each of the two keyers in each M/E.
Each BORDERLINE Key Edge Generator supports 1, 2, or 3 line wide
borders or outlines. Video fill is provided within the borders. Shadow and
extrude modes create 1 to 6 line wide edges, positioned either below left or
below right. Separate mattes are provided by the generators for edge and
fill. Key Edge opacity is adjustable.
Tally Output
The Tally Expansion Option provides 64 tally relay closures for on-air
source indicators. This option is a separate frame with the tally module and
support modules installed.
1. Betacam is the registered trademark of Sony Corporation.
1-7
Page 22

Section 1 — System Overview
Look-Ahead Preview
The Look-Ahead Preview option provides look-ahead preview processing
for the M/Es. This option is a mezzanine module which mounts on the
Mix/Wipe Module for that M/E. Without the Look-Ahead Preview
installed, only the switched preview is available for that M/E.
Timed Aux Output (Cell B16)
The Timed Aux Output Module provides three independent output pairs
(video/key) from aux buses 3A through 5B.
Extender Modules
A set of two Extender Modules is available.
Power Supplies
The switcher electronics frame and the control panel each have a single
standard power supply. The control panel power supply is located inside
the control panel tub. The switcher frames is powered by a power supply
that is mounted in the rack below the frame.
An optional redundant power supply assembly is available for the control
panel and the switcher frame.
Control Panel Power Supplies
Power is provided to the control panel by an assembly containing two
individual power supplies which is mounted inside the control panel tub.
The redundant power supply option provides a second, backup power
supply assembly. The optional assembly also mounts inside the panel.
1-8
Switcher Frame Power Supplies
Power for the switcher frame is provided by a single 19” rack mounted
assembly containing two individual power supplies. The assembly is rack
mounted directly below and wired directly to the switcher frame. When
the optional redundant supply is installed, it is rack mounted below the
standard supply and interconnected by a wiring harness. The frame power
supply assembly is air cooled by integral fans.
Page 23

Physical Description
Model 2200 Series electronic circuitry is contained on circuit modules in the
switcher frame, effects frame, and control panel.
In this manual and in other related documents, the circuit modules will be
referred to by the names and assembly numbers printed on them.
Control Panel
The control panel is the operator interface for the Model 2200 system and
provides all operator controls for the switcher and effects systems.
Through the control panel, the operator performs all actions via
mechanical buttons and controls, or through software controlled menus
and soft button adjustments. The control panel provides the data links to
both Frames.
Physical Description
Switcher Frame
The switcher frame is a large rack-mounted unit, see
all of the signal processing modules along with some control processor
modules.
The Head-of-State (HOS) processor and all M/E processors reside on two
Control Processor modules in Bay A (front bay) of the frame. Control
Processor 1 contains the HOS processor which supervises the state of the
switcher, handles communication with the control panel and controls the
video hardware. The M/E 1 processor also resides on this module.
The Control Processor 2 contains the circuitry for communication with the
editor, tally expansion and other remote control. The M/E 2 processor is on
this module.
Since each M/E has its own processor, failure of the HOS processor does
not shut down the entire switcher. Individual M/Es can continue to
operate independently, although in a degraded capacity (cuts, mixes and
fade- to-black continue to operate).
The control panel communicates with the switcher frame over two RS-422
data links, one per M/E. Both of the links is contained within a single cable
that may be up to 1000 feet long.
Figure 1-3
, that houses
1-9
Page 24

Section 1 — System Overview
Front Door
Impeller Fan —
Air flows up through the frame
Air
Outlets
(Both sides & rear)
Control and Signal
Processing Modules
Front Bay (A)
Air Filter
Figure 1-3. Signal Frame and Power Supply.
Input and Output Modules
and Options
Rear Bay (B)
Standard Power Supply
Assembly Slide Mounted directly
under the Signal Processing
1
0
1
0
Frame in the Equipment Rack
Optional Redundant Power Supply
Assembly Slide Mounted directly
under the Standard Power Supply
Assembly in the Equipment Rack
1-10
Page 25

System Specifications
Specifications for the Model 2200 System are listed on the following pages.
Refer to Section 2, Installation and Configuration, for information on the
mechanical characteristics of the system.
Specifications
1
are provided for the following:
System Specifications
Table 1-1
■
Table 1-2
■
Table 1-3
■
■
Table 1-4
■
Table 1-5
■
Table 1-6—Video System Characteristics (Analog and Digital)
■ Table 1-7—Environmental Characteristics
—Power Specifications
—Analog Input Video Characteristics
—Serial Digital Input Video Characteristics
—Analog Output Characteristics
—Serial Digital Output Characteristics
Table 1-1. Model 2200 Power Specifications.
Component Power Voltage Frequency
Control Panel 300 Watts 90–130 or 176–264 VAC – Autoranging 50-60 Hz – Nominal
Frame Power Supply 1600 Watts 176–264 VAC 50-60 Hz – Nominal
1. All specifications subject to change without notice.
1-11
Page 26

Section 1 — System Overview
Characteristic Requirement
Table 1-2. Analog Input Video Requirements.
Video Amplitude (Luminance channel) for
Chroma Key Inputs
Maximum luminance Excursion
Relative To Black level
(before clipping)
Video Amplitude For Color
Difference Chroma Key Inputs
(100% saturated bars)
Video Amplitude For RGB Chroma Key inputs 0.714mV with or without setup or
DC Offset Of Blanking Level
Common Mode Hum
Random Noise < –54 dB RMS relative to 1V p-p
Analog Reference Input Black (Burst is not required)
1
2
0.714 mV with/without setup or
0.700 mV without setup (with or without sync)
+108 IRE peak positive
– 6 IRE peak negative
Betacam ±467 mV
MII 60 Hz ±324 mV
MII 50 Hz ±350 mV
SMPTE ±350 mV
EBU ±350 mV
(Format for each input is individually
selectable)
700mV without setup (with or without sync)
Format for each input is individually selectable
±1 V olt DC
1.0 V p-p Max
Impedance (Chroma key and reference inputs) 75 Ω Terminating (Chroma Key/Analog Inputs)
Return Loss >40 dB to 5 MHz
Manual Timing steps 18 nS
Manual Timing range ±1 µS (Chroma Key inputs)
Common Mode Hum Attenuation >34 dB
1. Exclusive of Common Mode Hum
2. With DC Offset at 0.0 volts
75 Ω loop-through (Reference input)
1-12
Page 27

System Specifications
Table 1-3. Serial Digital Input Video Requirements.
Characteristic Requirement
Channel Coding Conforms to SMPTE RP–259M
Connector BNC
Input Impedance 75 Ω
Return Loss >15 dB 5 MHz to 270 MHz
Autotiming Range ±18 µS
Maximum Cable Length Equalized
(Belden 8281 type cable)
Number of Bits 8 or 10
225 meters (738 feet)
Table 1-4. Analog Output Specifications.
Characteristic Specifications
Output Amplitude 1.0 Volt p-p nominal
DC On Output Blanking Level <50 mV
Output Return Loss >34 dB to 5 MHz
Output Isolation >54 dB to 5 MHz
Output Y/C Timing error <10 nS
Number of Outputs 2 (RGB, SMPTE/EBU, MII or Betacam)
Table 1-5. Serial Digital Output Specifications.
Characteristic Specifications
Rise and Fall Times
(Between 20% and 80% amplitude points)
Channel Coding Conforms to SMPTE RP-259M
Aux Data Blanked
Between 400 pSec and 1.5 nSec
across 75 Ω termination
1-13
Page 28

Section 1 — System Overview
Characteristic Specifications
Connector BNC
Output Impedance 75 Ω
Return Loss >15 dB 5MHz to 270 MHz
Output Amplitude 800 mV p-p across 75 Ω ±10%
DC Offset on Output <50 mV across 75 Ω termination
Number of Bits 10 bits or 8 bits
Number of Outputs 2 (Timed Aux Output has 1)
Table 1-5. Serial Digital Output Specifications. - (continued)
Table 1-6. Video System Specifications (Analog or Digital).
Characteristic Specifications
Blanking Width 10.222 µS (525 line)
Number Of Quantization Bits 10 Minimum
Mix T r acking Error 0
Linearity During Mix Linearity Is Not Affected By Mix
Frequency Response During Mix Response Is Not Affected By Mix
Path Length 70 µS
Rounding Method (digital only) Adaptive Bit Reduction™ (Patent Pending)
10.666 µS (625 line)
Table 1-7. Environmental Specifications.
1-14
Characteristic Specifications
Operating Ambient Temperature Range 0° – 40° C (32° – 104° F)
Ambient Temperature for Specifications 20° – 30° C (68° – 86° F)
Relative Humidity (Operating) 95% Maximum (Non-Condensing)
Page 29

2
Introduction
Installation
This section describes the installation and setup of the Model 2200 Digital
Switcher. Installing the Model 2200 is done in the following order:
■ Unpacking
■ Installing the Control Panel
■ Installing the switcher frame in the rack
■ Option Installation
■ Cabling the equipment
■ Power connections
■ Configuring, testing and timing the installed system
Also included in this section are procedures to connect peripheral
equipment such as Grass Valley Editors, KALEIDOSCOPE, DPM-700,
Tally Control and GPI connections to the Model 2200.
2-1
Page 30

Section 2 — Installation
Unpacking
The Model 2200 is packaged in several boxes, which contain the following:
■ Switcher Frame
■ Control Panel
■ Cables and Power Cords
■ Power Supplies
■ Instruction Manuals
■ Options
Carefully check the contents of each box against the packing slip to ensure
that everything shipped to you was received. If any items are missing or
damaged, contact the shipping company or your supplier or sales
representative immediately.
Pre-installation Procedures
Before you install the Model 2200, there are certain considerations such as
tools required, physical specifications, safety and power requirements you
should be aware of. These considerations are covered in the following
sections.
Items Required but not Supplied
The following is a list of items required for installation:
■ Medium flat bladed screwdriver
■ Medium Phillips head screwdriver
■ #10, #15, & #20 Torx screwdrivers
■ 3/8” deep well socket
■ Torque Wrench (100 inch pound range)
■ 1/8” (3mm) drill
■ six #6 (M4) screws
2-2
Page 31

Pre-installation Procedures
Physical Specifications and Installation Requirements
Physical dimensions for the Model 2200, shown in Table 2-1, are provided
to assist you in the installation.
Table 2-1. Model 2200 Component Size Summary
Component Depth Width Height
2200 Control Panel 23.5 inches
(578 mm)
Switcher Frame 22.5 inches
(571.5 mm)
Power Supply 22.5 inches
(571.5 mm)
* Allow 14 rack units total under switcher frame if installing redundant Power Supply.
47.0 inches
(1.194 M)
Std (19 inches)
(483 mm)
Std (19 inches)
(483 mm)
13.8 inches
(350 mm)
26.25 inches
(666.7 mm)
12.25 inches
(311.1 mm)
Power Requirements
Power requirements for the Model 2200 control panel and switcher frame
are listed in Table 1-1 on page 1-11. The frame operates on 220 VAC only,
the control panel power supply is autoranging between 110 and 220 VAC.
Environmental Requirements
# of Rack
Units
n/a 150 lbs
15 175 lbs
7* 143 lbs
Weight
(67 kgs)
(78 kgs)
(65 kgs)
The Model 2200 has been designed to operate properly in environments
outlined in Table 1-7 on page 1-14.
Safety Requirements
The following precautions are provided to ensure that safety
considerations for both equipment and personnel are presented before
installation procedures are begun. To prevent injury or equipment
damage, read, understand, and follow all installation safety precautions.
any
2-3
Page 32

Section 2 — Installation
WARNING
Electrical potential is still applied to some internal components even when
the power switch/breaker is in the off position. To prevent electrical shock
when working on this equipment, disconnect the AC line cord from the AC
source before working on any internal components. A residual voltage may
be present immediately after unplugging the system due to large power
supply capacitors discharging. Wait thirty seconds to allow capacitors to
discharge before working on the system.
WARNING
The switcher frame weighs approximately 175lbs. (67 Kg.) when fully
configured. Provide appropriate equipment to support the frame during
installation.
Do not lift the control panel by the lid. The lid could open causing the unit to
fall creating a hazard to personnel and/or damage to the equipment.
WARNING
The Switcher Frame Power Supply assembly exhibits high leakage (fault)
currents due to the EMI suppression filter system. This power supply chassis
must be connected to earth ground via the ground wire provided in the AC
input cord. An additional ground lug is provided on the rear of the power
supply chassis for supplementary grounding purposes.
CAUTION
To avoid static damage to sensitive electronic devices, protect the Model 2200
Digital Switcher from static discharge. Avoid handling switcher modules in a high
static environment. Touch the switcher frame before you remove any modules.
This helps ensure that any potential difference between your body and the frame
is dissipated. If you handle the modules or make any repairs to them use a
grounding strap and grounded equipment.
2-4
Page 33

Installation
Control Panel Installation
Installation
The following procedures contain the instructions necessary to install the
control panel, switcher frame, and frame power supply. Procedures are
also included for optional circuit modules and cable installation. Before
proceeding, read and understand all precautions and notes.
This installation does not require countersunk or beveled edges. The tub
slips into the cutout from the top and is held in place by an overhanging lip
secured by six screws. To install the control panel in the console, proceed
with the following steps.
NOTE:
The control panel should be installed on as flat a surface as possible. It is
not recommended to have more than a 10 degree tilt, as this would add excessive
weight on the gas shocks supporting the control panel top.
Be sure to leave a minimum of 6.0” (153 mm) of clear space inside the console
behind the control panel for control, signal, and power cables and connectors.
Also, be sure to leave a minimum of 5.2” (152 mm) of clear space behind the
control panel so the lid can be fully opened, as shown in Figure 2-1.
23.5"
(597 mm)
1"
(25 mm)
2.2"
(56 mm)
(596 mm)
Figure 2-1. Model 2200 Control Panel Profile
23.5"
5.2"
(152 mm)
5.8"
(146 mm)
8.0"
(203 mm)
13.8"
(350 mm)
2-5
Page 34

Section 2 — Installation
Control Panel Cutout Dimensions
Using the dimensions shown in Figure 2-2, make cutouts in the console to
accommodate the control panel.
WARNING
Do not lift the control panel by the lid or the transition lever arms. Be careful
when opening or closing the panel lid. The gas shock supports may cause
the lid to open or close abruptly, causing possible injury or damage to the
equipment. Always lift the control panel by holding onto the tub.
Pilot Holes
Rear
21.8"
(554 mm)
0.2"
(5 mm)
1.8"
(46 mm)
22.16"
(563 mm)
21.2"
(538 mm)
Front
42.4"
(1077 mm)
46"
(1168 mm)
Figure 2-2. Model 2200 Control Panel Console Cutout Dimensions
Limits of
Cutout
Area
2-6
Page 35

Mounting
Surface
6.25"
(159 mm)
4.0"
(102 mm)
3.75"
(95 mm)
Installation
Control Panel Rear Cable Clearance
Using the dimensions shown in Figure 2-3, make cutouts in the rear of the
console platform.
Connectors and Ventilation.
Leave These Areas Clear.
5.3"
Vent
43.2" (1.097 M)
Cables
38.2" (970 mm)
24.4" (620 mm)
30.4" (772 mm)
47" (1.194 M)
REAR VIEW
Vent
Power
11.1"
(282 mm)
12.2"
(241 cm)
17.2" (436 mm)
(135 mm)
5.9"
(150 mm)
7.5"
(191 mm)
Figure 2-3. Required Cable Clearance
Inserting the Panel
1. Carefully place the control panel into the cutout in the console and
open the control panel.
2. Drill six pilot holes in the console through the holes in the control panel
flange using a 1/8” (3 mm) drill and secure the control panel to the
console with six #6 (M4) screws (not included) into these holes.
3. Do not connect power to the control panel until all cable connections
have been completed and verified.
2-7
Page 36

Section 2 — Installation
Control Panel Redundant Power Supply Option Installation
To install the control panel redundant power supply proceed as follows:
1. Open the control panel and turn the AC power switch(s) on the left
front of the enclosure to the OFF position. See Figure 2-4. At the rear of
the control panel, disconnect the power cord from the AC source.
Power Supply
(Standard)
Optional
Redundant
Power Switch
& Fuse
Power
ON/OFF
Switch
Fuse
Control Panel
Power Supply
Cover
Figure 2-4. Control Panel AC Power Switch Location.
2. Remove the enclosure covering the power supplies by removing the
screws securing it to the control panel tub.
NOTE:
Removing some control panel internal ribbon cables may make removing
the power supply enclosure easier.
Fan
Power Supply
(Redundant)
Control Panel
CPU Board
2-8
Page 37

Installation
Power
Supply
Access
Cover
(secured
by 6 screws)
Control Panel
I/O Board
(068949)
Power
ON/OFF
Switch
(Redundant)
(Redundant)
Fuse
EMI
Filter
Power
ON/OFF
Switch
Fuse
Standard
Supply
Figure 2-5. Removing Control Panel Power Standard Supply.
Fan
Redundant
Supply
Control Panel
CPU Board
3. Remove the ten screws securing the flat mounting plate supporting the
supply.
4. Attach the redundant power supply to the flat mounting plate.
5. Remove the U shaped plate which covers the redundant power supply
fuse, switch, and power connector holes.
6. Using the same screws, mount the power supply fuse, switch, and
power connector bracket.
7. Route the long cable behind the standard power supply and over the
standard AC filter.
8. Plug the short cable into the control panel I/O board.
9. Reattach the flat mounting plate, replace the power supply enclosure,
and reconnect any cables that were disconnected.
2-9
Page 38

Section 2 — Installation
Switcher Frame Installation
NOTE:
The switcher frame must be installed before either of the power supplies.
When planning your installation, ensure that the frame will be installed high
enough in the equipment rack to allow 7 rack units for the installation of the Frame
Primary Power Supply (and another 7 rack units for the optional redundant Power
Supply, if purchased) below it.
To allow the use of extender modules and access for other maintenance, sufficient
room should be allowed in front of the equipment rack (
≥
41 inches, 1.05 0 M.).
Sufficient room should also be allowed in the rear of the rack for access to cables and
the exhausting of cooling air.
The switcher frame mounts in a standard 19-inch (48.3 mm) wide
equipment rack. It is installed in the rack from the front and secured at the
front edges of the frame with screws (not provided by GVG). Its Power
Supply mounts below it in the rack on slide rails. The procedure for
installing the Power Supply follows the frame installation procedure.
To install the frame in the equipment rack, read the following precautions,
then refer to Figure 2-6 and complete the following steps:
WARNING
The Model 2200 switcher frame weighs appro ximately 175 lbs (67 Kg.) when
fully configured. Pr ovide appr opriate equipment to support the frame during
installation.
When the switcher frame and Po wer Supply are installed, the equipment rack
is top heavy and could topple. Ensure that the equipment rack is attached
solidly to the floor/building to prevent tipping when the frame and Power
Supply are installed.
When lifting the frame into place in the equipment rack, it is recommended
that a mechanical lifting device be used.
Ensure that the bottom plate of the frame is protected from damage while the
frame is being lifted into the equipment rack.
NOTE:
The switcher frame is shipped with a protective metal plate on the bottom.
Leave the plate in place to protect the power cables until the frame is mounted in
the rack.
2-10
Page 39

Installation
1. Ensure that all packing foam, strapping, and tape is removed from the
frame before installing the frame in the rack.
2. Carefully, with the aid of a mechanical lifting device, lift the frame and
place it in position in the equipment rack.
3. Align the frame so that its screw holes match up with those in the rack
and secure the 10 rack screws (not supplied) required by the rack
manufacturer.
4. Install all screws and tighten to the rack manufacturer’s specifications.
5. Remove the protective plate from the bottom of the switcher frame.
Switcher
Frame
Front
Note: Front Door Not
Shown For Clarity
Secure
Bolts
through
Frame
(5 each
side)
into
Rack
Install Standard Power
Supply Assembly and
Optional Redundant Power
Supply After Switcher is
Installed in Rack
(ensure shipping
plate has been removed
from bottom of Signal
Processor Frame)
1
0
1
0
Figure 2-6. Switcher Frame Installation
2-11
Page 40

Section 2 — Installation
Switcher Frame Power Supply Installation
The Primary Power Supply must be mounted immediately below the
switcher frame in the rack. If you are installing an optional Redundant
Power Supply, it must be located immediately below the Primary Power
Supply. Verify that you have allowed enough rack space (7 rack units per
Supply) before proceeding.
WARNING
T o reduce the risk of electric shoc k, do not perf orm an y servicing other than
that contained in the operating instructions unless you are qualified to do so.
To install the Switcher Frame Power Supply in the equipment rack, refer to
Figure 2-7 and proceed as follows:
1. Ensure that the Primary and Redundant Power Supplies are
disconnected from all power sources.
2. Locate the installation kit containing the power supply assembly slide
mounts and hardware. The installation kit consists of the following:
a. Slide Mounts
b. Mounting Hardware
3. Measure the location of the slide sections mounted on the power
supply chassis to determine the height at which the stationary sections
of the slides are to be mounted in the rack.
NOTE:
frame by eight captive screws. It must be installed so that it is touching the bottom
of the frame.
4. Verify that the screws holding the chassis sections of the slides to the
5. Mount the rack sections of the slides to the front and back of the rack
The Primary Power Supply will be attached to the bottom of the switcher
power supply chassis are securely tightened.
and secure them in place with the appropriate screws as illustrated in
Figure 2-7. The mounting ears at the front of the slides should mount to
the inside of the rack rail. On threaded rails, run short pan head screws
from the inside. On unthreaded rails, run flat head screws (with nuts)
from the outside. This results in the power supply being flush with the
frame; plus allowing for the proper mating of the electrical connectors
in back. It may be necessary to adjust the length of the rear brackets,
depending upon the depth of the rack assembly.
2-12
Page 41

I
O
Front view of Power Supply
- completely installed-
Installation
Adjustable
Rear Brackets
Slide Rack Mount
Attachment
Figure 2-7. Switcher Frame Power Supply Installation (frame not shown)
CAUTION
The Frame Power Supply is very heavy and should be supported in the rack by
both the front and rear rack slide mounting.
NOTE:
locations of components as viewed from the rear of the power supply.
6. Remove the right and left covers from the rear of the Power Supply
7. Extend the intermediate sections of the slides and while fully
In the following descriptions, the terms “right” and “left” refer to the
assembly to expose the wiring connections.
supporting the weight of the power supply, insert the chassis sections
(mounted on the power supply chassis) into the intermediate sections.
8. Still supporting the full weight of the power supply, slide the power
supply assembly into the rack, making sure that the power cables from
the switcher frame pass through the slot in the top rear of the Power
Supply.
9. Secure the front of the Power Supply assembly to the rails by installing
the appropriate 1/4” (6.4 mm) length rack screws. The finished power
supply installation will appear as illustrated in Figure 2-6.
2-13
Page 42

Section 2 — Installation
Fasten Captive
Screws into
Chassis Mounting
Holes (8 Places)
at Bottom of
Switcher Frame
Power Supply
Chassis
Figure 2-8. Captive Screw Locations, Switcher Frame Power Supply (rear view)
10. At the rear of the unit, install the 8 captive screws (see Figure 2-8)
through the top of the power supply chassis into the bottom of the
switcher frame. Tighten the 8 screws securely.
11. Remove the nuts and lock washers from the two large electrical posts
in the right compartment of the power supply. Do not discard.
NOTE:
If you will be installing a Redundant Power Supply at this time, skip to
Step 15.
12. Refer to Figure 2-9. Connect the two large black cables running down
from the right rear of the switcher frame to the right post and secure
with the nut and lock-washer removed previously. Torque nut to
80 inch pounds (6.7 foot pounds) (9 Newton meters).
13. Connect the two large red cables running down from the right rear of
the frame to the left post and secure with the nut and lock washers
removed previously. Torque nut to 80 inch pounds (6.7 foot pounds)
(9 Newton meters).
2-14
14. Ensure that the power cables are properly positioned in the slot cut out
of the Power Supply and reinstall the right rear cover.
Page 43

Installation
15. At the left rear of the Power Supply, thread the two connectors through
the rectangular cutouts in the power supply and connect them to the
jacks that are installed in the bottom rear channel of the frame. The
connectors are keyed for proper alignment.
16. Ensure that the cables are properly positioned and reinstall the left rear
cover of the Power Supply.
Fasten Captive
Screws into
Chassis Mounting
Holes (8 Places)
at Bottom of
Signal Processor
Frame
0347-02-03
Figure 2-9. Switcher Frame Power Supply Connections.
Power Supply
Chassis
2-15
Page 44

Section 2 — Installation
Switcher Frame Redundant Power Supply Installation
The Redundant Power Supply Option consists of the following
components:
■ Power Supply Chassis (identical to the Frame Power Supply)
■ Pair of Red cables
■ Pair of Black cables
■ 2 Threaded Standoffs
■ 4 Lock Washers
■ 2 Nuts
WARNING
T o reduce the risk of electric shoc k, do not perf orm an y servicing other than
that contained in the operating instructions unless you are qualified to do so.
Perform the following procedure to install the redundant Power Supply.
1. Ensure that the Primary and Redundant Power Supplies are
disconnected from all power sources.
2. Remove the rear panel access covers (right and left sides) of the
Redundant and (if necessary) the Primary Power Supply.
3. Remove the hex nuts and lock washers that secure the red and black
power cables on the Primary power supply. Do not discard. (Leave the
cables positioned over their respective studs.)
4. Install the new lock washers and posts over the threaded ends of the
existing studs. Using a deep well 3/8 in (10mm) socket and torque
wrench, torque the posts to 80 inch pounds (6.7 foot pounds)
(9 Newton Meters).
5. Remove the connector and cable slot covers from the bottom of the
Primary Power Supply (see Figure 2-10).
6. Mount the Redundant Power Supply chassis underneath the Primary
Power supply in the same manner as the Primary Power Supply was
installed (see Step 3 through Step 9 of the previous section).
2-16
7. Tighten the 8 captive screws that secure the Redundant chassis to the
Primary chassis
Page 45

Installation
8. Place the pair of new black cables over the proper studs in the Primary
and Redundant Power Supplies, routing the cables through the slot in
the bottom of the Primary supply and the top of the Redundant supply.
(The colors must match those of the existing cables.)
Switcher
Frame
Red Cables
from Switcher
Primary
Hex
Nuts
Lock
Washers
Black Cables
from Switcher
Power Supply
If Present,
Remove
Connector
Cover Plate
From Primary
Power Supply
Connector Cover Plate
Should Remain on Bottom of
Redundant Power Supply
Lock Washers
Hex Nuts
Red Cables
from Primary
Power Supply
Route Cables
Down Through
Slot in Top of
Lower Chassis
Lock Washers
Studs
If Present,
Remove Slot
Cover Plate
From Primary
Power Supply
NOTE:
Always Insert Black Cables
In Slots Before Red Cables
Tighten Captive
Screws to Upper
Chassis
(8 Places)
Redundant
Power Supply
Black Cables
from Primary
Power Supply
Figure 2-10. Switcher Redundant Power Supply Installation
Slot Cover Plate Should Remain on
Bottom of Redundant Power Supply
2-17
Page 46

Section 2 — Installation
NOTE:
are shorter than the red.
9. Secure the cables by placing a lock-washer and hex nut (removed
10. Similarly, place the pair of new red cables over the proper studs in the
11. Torque all four hex nuts to 80 inch pounds (6.7 foot pounds) (9 Newton
12. Route the loose cable harness connectors on the left side of the chassis
13. Check your work to ensure all connections are secure and safe.
14. Replace the rear panel access covers (left and right) on both the Primary
The black cables must go in the slot before the red cables; the black cables
earlier) over each end of the cables.
Primary and Redundant Power Supplies and secure the cables with
lock washers and hex nuts.
meters).
up through the two holes at the top, and securely insert them into the
connector sockets in the bottom of the primary power supply chassis.
(The connectors are keyed for proper alignment.)
and Redundant Power Supplies.
Switcher Frame Modules
The Model 2200 switcher is shipped fully configured with all the standard
and ordered optional modules already installed in the switcher frame.
The frame is divided into two “bays,” one in front (A) and one in the rear
(C). The modules slide into the frame bays, plugging into connectors
attached to the main motherboard at the center of the frame. The correct
location of each module is indicated on a location strip above the top of the
bays. Refer to Figure 2-13 and 2-14 for the location of the modules.
2-18
Page 47

Installation
Installing and Removing Modules
To insert a module, slide it slowly into the correct location, avoiding
contact with the modules on either side. Be sure to match the rear
connectors before applying pressure to seat the module.
To remove a module from the front bay, pull up on the upper and lower
plastic ejector tabs and pull the module out slowly avoiding contact with
the modules on either side. See Figure 2-11.
Figure 2-11. Removing a Module From the Switcher Front Bay
2-19
Page 48

Section 2 — Installation
The modules in the rear bay are removed by first removing the screws at
the top and bottom of the module, then pulling up on the upper and lower
metal ejectors to release the module. Pull the module out slowly. Refer to
Figure 2-12.
CAUTION
The EMI fingers may interfere with components located on adjoining boards.
Caution must be used when replacing the boards in the switcher frame to prevent
damage to the EMI shield and modules.
2-20
Figure 2-12. Removing a Module From the Switcher Rear Bay
Page 49

Installation
Look Ahead Preview
M/E1 Processor
Mezzanine (068916)
Module (064831)
Chroma Key Mezzanine
M/E2 Processor
HOS Processor
Control Processor 1
Mezzanine (068916)
Mezzanine (068919)
Module (064805)
Chroma Key Carrier
Module (064806)
Control Processor 2
M/E 1 Module (064807)
A1 A2 A3 A4
Module Option (064909)
BORDERLINE™ Mezzanine
BORDERLINE™ Mezzanine
Modules (064826)
2 Keyer Mezzanine
2 Keyer Mezzanine
Keyer Carrier M/E 1
Crosspoint 1 Module (064800)
Keyer Carrier M/E 1
Key 1 Module (064804)
A5
A6 A7 A8 A9
Mezzanine Option (064829)
Module Option (064909)
Modules (064826)
Mezzanine Modules (064828)
Primary and Secondary (Option) Wipe
Mix/Wipe M/E 1
Key 2 Module (064804)
Mixer Interface Module (Video) (064813)
Module (064803)
Figure 2-13. Switcher Front Module Locations.
Look Ahead Preview
Mezzanine Option (064829)
Module Option (064909)
BORDERLINE™ Mezzanine
Modules (064826)
2 Keyer Mezzanine
2 Keyer Mezzanine
Mezzanine Modules (064828)
Primary and Secondary (Option) Wipe
Keyer Carrier M/E 2
Keyer Carrier M/E 2
Mix/Wipe M/E 2
Crosspoint 2 Module (064800)
Sync Generator Module (064801)
Module (064803)
Effects Send Module (064809)
Key 1 Module (064804)
A10 A11 A12 A13 A14 A15
Module Option (064909)
BORDERLINE™ Mezzanine
Mask Mezzanine
Module (064830)
Aux Control (064855)
Module (064831)
Chroma Key Mezzanine
Modules (064826)
Chroma Key Carrier
Preview Module (064802)
Key 2 Module (064804)
OR
M/E 2 Module (064807)
Framestore (064814)
A16 A17
2-21
Page 50

Section 2 — Installation
C17 C16 C15 C14 C13 C12 C11 C10 C9 C8 C7 C6 C5 C4 C3 C2 C1
TIMED
AUX
OUTPUT
J1
J3
J5
J7
J9
J11
J13
J15
ANALOG
OUTPUT
J1
J2
J3
PROGRAM
J4
J5
J6
PREVIEW
R/V
R/V
B/U
G/Y
B/U
G/Y
SERIAL
INPUT
SERIAL
COM
SERIAL
INPUT
OUTPUT
I/O
PANEL
J1
J1
J2
J2
J3
J3
J4
J5
J6
J7
J7
J8
J9
J9
J10
J10
J11
J11
J12
J12
J13
J13
J14
J14
J4
J5
J6
J8
EDITOR
AUX BUS
CTL
ANALOG
REF IN
J1
J2
J3
J4
J5
J15
J15
J6
J16
J16
GAIN
J1
GAIN
J2
GAIN
J3
CHROMA
KEY
INPUT
J4
GAIN
J5
GAIN
J6
GAIN
G/Y
B/U
R/V
G/Y
B/U
R/V
SERIAL
INPUT
SERIAL
J1
REENTRY
J2
J3
J4
J5
J6
J7
J8
J9
J10
J11
J12
J13
J14
J15
J16
SERIAL
INPUT
J1
J1
J2
J2
J3
J3
J4
J4
J5
J5
J6
J6
J7
J7
J8
J8
J9
J9
J10
J10
J11
J11
J12
J12
J13
J13
J14
J14
J15
J15
J16
J16
SERIAL
REENTRY
GPI
MAINTENANCE
TALLY EXP
GPI INPUTS
TB1
TB2
GPI OUTPUTS
TB3
TB4
J1
J2
+5
1
2
3
4
G
+5
1
2
3
4
G
G
1
2
3
4
G
G
1
2
3
4
G
SERIAL
OUTPUT
J1
J2
J3
J4
J5
J6
J7
J8
J9
J10
J11
J12
J13
J14
J15
J16
EXPANDED
COM
PORT A1
PORT B1
PORT A2
PORT B2
PORT A3
PORT B3
J1
J2
J3
J4
J5
J6
Figure 2-14. Switcher Rear Bay Module Locations
2-22
Page 51

Mask Draw Tablet Installation
The Mask Draw feature (requiring version 5.2 software and new Frame Store and
Mask Store hardware) allows you to use a graphics tablet (connected to the
switcher Control Panel) to customize existing masks or to create new ones.
Using the Force Mask mode, you can add to a key, or using the Inhibit Mask mode,
you can subtract from a key.
For example, one use of Mask Draw is the ability to draw an irregularly shaped
“garbage mask.” Draw a custom-shaped mask around an object using Force Mask,
and turn “foreground” on. Use this tool instead of keying the object out.
Installation
NOTE:
04). The Mask Draw feature works with the Model 2200 by feeding the mask into the key
channel.
For the Model 4000, mask draw requires the new Mask Store Option for full functionality,
or the new Frame Store module for Mask Store using the key channel.
For the Model 2200, mask draw requires the new Frame Store module (064814-
Installing the Mask Draw Tablet
The following WACOM graphics tablet models are supported (Grass
Valley does not supply the tablet):
■ KT-0405-R “ART PAD” (PC compatible version)
■ UD—XXXX—R (Any PC-compatible UD-series tablet)
■ UD-608-R “ART Z” (PC compatible version)
■ SD series (these tablets are now obsolete; however, they may be used if
a pressure sensitive pen is used with the tablet)
Installing UD and KT Series Tablets
The following connector pin-out information applies to the UD and KT
series tablets.
The KT and UD tablets include a 9-pin male to 25-pin female adapter. You
will need a 25-pin male-to-male gender adapter to connect the tablet to the
POINTING DEVICE input port on the back of the switcher Control Panel.
The 9-pin male to 25-pin female adapter must be wired as follows: (All
other pin wiring is unchanged.)
25-Pin 9-Pin
Pin 2 Pin 3
Pin 3 Pin 2
2-23
Page 52

Section 2 — Installation
1. Connect the graphics tablet to the POINTING DEVICE input port on the
2. The Control Panel CPU Board RS-232 jumper blocks must be set to the
back of the switcher Control Panel.
“DCE” position. Refer to the following text for Model-specific jumper
locations.
On a Model 2200-2s:
■ Open the Control Panel lid and locate the Control Panel CPU
Board. Locate the two RS232 jumper blocks (2 pins each) labeled J3
at the top, middle, of the board. Set the blocks to the “DCE” setting
(horizontal as you view the board from the front of the panel).
On a Model 2200-2i:
■ Open the Control Panel lid and locate the Control Panel CPU
Board. Locate the two RS232 jumper blocks (2 pins each) labeled J10
near the board’s top edge (above the Lower PuP cable-connector).
Set the blocks to the “DCE” setting by jumpering pins 1 and 3
together, and pins 2 and 4 together (horizontally as you view the
board from the front of the panel).
Installing SD Series Tablet
1. Connect the graphics tablet to the POINTING DEVICE input port on the
back of the switcher Control Panel.
2. The Control Panel CPU Board RS-232 jumper blocks must be set to the
“DTE” position.
On a Model 2200-2s:
■ Open the Control Panel lid and locate the Control Panel CPU
Board. Locate the two RS232 jumper blocks (2 pins each) labeled J3
at the top, middle, of the board. Set the blocks to the “DTE” setting
(vertical as you view the board from the front of the panel).
On a Model 2200-2i:
■ Open the Control Panel lid and locate the Control Panel CPU
Board. Locate the two RS232 jumper blocks (2 pins each) labeled J10
near the board’s top edge (above the Lower PuP cable-connector).
Set the blocks to the “DTE” setting by jumpering pins 1 and 2
together, and pins 3 and 4 together (vertically as you view the board
from the front of the panel).
2-24
Page 53

Switcher Option Module Installation
There are two types of modules. The first type is a full sized circuit board
that slides into the frame bays like a standard module. The second module
type is a smaller “mezzanine” which mounts on a standard circuit board in
the frame.
The installation for each of the Model 2200 options is described below.
Options ordered with the system may already be installed. Most options
also require configuration and/or setup using the soft panel menus. The
menus are given at the end of this section along with explanations for using
each menu.
Empty module cells in the rear bay have blank metal strips screwed in
place to maintain proper air flow inside the switcher and to prevent
electromagnetic interference. These must be removed before the options
can be installed.
CAUTION
Special EMI fingers are installed on each module connector and blank strip in rear
bays. Use extreme care when removing or installing the modules and blank strips
so that the EMI fingers do not break off.
Switcher Option Module Installation
2-25
Page 54

Section 2 — Installation
Input Modules
The input formats must be component serial digital. A total of 32 inputs
may be installed in any combination of video and key. Two analog
component chroma key inputs may be used when both the optional
Chroma Keyer and optional Analog Chroma Key Input Modules are
installed.
Serial Digital Input Module Options
Each optional Serial Digital Input Module can accommodate 8 serial digital
component inputs. There are two standard modules and up to two optional
modules may be installed. Input modules can be installed in C7, C12, C13,
and C14.
J # C14 C13 C12 C7
J1 1 9 17 25
J2 2 10 18 26
J3 3 11 19 27
J4 4 12 20 28
J5 5 13 21 29
J6 6 14 22 30
J7 7 15 23 31
J8 8 16 24 32
2-26
Page 55

Digital Output Module Options
Two Serial Digital Output Modules are standard. Each of these has eight
different output signals (2 BNCs per output for a total of 16 BNCs on each
module). The third serial output module is the Timed Aux Output Module
which has eight outputs. Only six of these outputs are used.
Serial Output 1 (Slot C3)
■ Mask
■ Switched Preview
■ Look Ahead Preview
■ Look Ahead Preview
■ M/E 1 Program Video
■ M/E 1 Program Key
Switcher Option Module Installation
1
1
■ M/E 2 Program Video
■ M/E 2 Program Key
Serial Output 2 (Slot C11)
■ M/E 1 Clean Feed Video
■ M/E 2 Clean Feed Video
■ Aux/Effects Send Bus 1A (Video)
■ Aux/Effects Send Bus 1B (Key)
■ Aux/Effects Send Bus 2A (Video)
■ Aux/Effects Send Bus 2B (Key)
■ Framestore Video
■ Framestore Key
2
2
Timed Aux Output (Slot C17)
■ Aux Bus 3A (Video)
■ Aux Bus 3B (Key)
2
2
■ Aux Bus 4A (Video)
■ Aux Bus 4B (Key)
■ Aux Bus 5A (Video)
■ Aux Bus 5B (Key)
1. Preview video is available only of optional Lookahead Preview Module is installed.
2. Available only if the optional Effects Send is installed.
2-27
Page 56

Section 2 — Installation
Analog Output
The optional Analog Output Module (slot C15) provides component
analog monitor outputs for M/E 2 program and switched preview. These
outputs are designed for monitor use only and should not be used as on air
outputs.
There are two DAC Mezzanine boards on the Analog Output Module; one
providing the Program analog output and the other, the Preview analog
output. There are ten Color Difference or RGB formats to choose from as
the analog output. Output format is determined by the customer by setting
jumpers on the Analog Output Module and the mezzanine boards. Gain
adjustments must also be made for accurate output levels.
Analog Output Modules leave the factory set at RGB .700V, No Setup, and
narrow RP125 blanking. To change to a different standard, perform the
following steps:
1. Remove the Analog Output Module from the rear Signal Processor
Frame, and place it on a flat, static-free surface.
2. Locate jumper J17, on the right hand side of the Analog Output Module
immediately below TP7. Set the jumper setting to the desired blanking
width of the converted video output. When set to RS-170 (wide
blanking), blanking edges are placed as in the RS-170 specifications for
60 Hz systems or for the CCIR 470-2 recommendation for 50 Hz
systems. When it is set to RP-125, blanking is active from end of active
video (EAV) to start of active video (SAV) data words, inclusive, as
described in SMPTE recommended practice RP-125.
3. Locate jumper J16 on the Analog Output Module, and select the
appropriate Setup (54 mV) or No Setup setting for your system’s
desired analog outputs. Note that this setting is common to both
program and preview outputs. Whatever is chosen for one applies to
both.
2-28
Page 57

Switcher Option Module Installation
Table 2-2. Analog Output Module Setting
Format
Selection
EBU/SMPTE No Setup a a b c
RGB .714 Volts No Setup b b b & d b & d
RGB .714 Volts Setup b c d a & b
RGB .700 Volts No Setup b a a & d b & d
MII 50 Hz No Setup a a c c
MII 60 Hz No Setup a a c e
MII 60 Hz Setup a c c e
Beta 50 Hz No Setup a a d d
Beta 60 Hz No Setup a b d d
Beta 60 Hz Setup a c d d
J16
Analog Module
J5, J6, J9, J11
DAC Mezz.
Color Diff.
J4 (Y)
DAC Mezz.
J8 (R-Y)
DAC Mezz.
J10 (B-Y)
DAC Mezz.
4. Remove the Program DAC Mezzanine board from the Analog Output
Module, and turn the module to the component side. Locate jumpers
J5, J6, J9, and J11; set all four jumpers to either “a” for Color Difference
format, or “b” for RGB format.
5. Locate jumpers J4, J8, and J10 on the Program DAC Mezzanine.
Referring to Table 2-2, set each jumper to the desired format selection
for your analog output format. Note that some formats require
installing two jumpers on J8 and J10. Extra jumpers are stored in an
inactive socket, J7. If you are changing to a format that uses one jumper
at J8 and J10, store the extra jumpers at J7. If you lose a jumper, a
suitable substitute can be made of a short piece of 24 gauge solid tinned
copper wire.
6. Carefully replace the Program DAC Mezzanine on the Analog Output
Module, making sure all connector pins are in the sockets correctly.
7. Remove the Preview DAC Mezzanine board from the Analog Output
Module, and repeat Steps 4, and 5.
8. Carefully replace the Preview DAC Mezzanine on the Analog Output
Module, making sure all connector pins are in the sockets correctly.
Coarse adjustment of the format voltage levels are set by jumper selection;
however , you may need to fine tune these levels using the gain adjustments
on the DAC Mezzanines.
2-29
Page 58

Section 2 — Installation
1. Place the Analog Output Module on the I/O Module Extender
2. The gain adjustment trimpots are accessible with the DAC mezzanines
3. Adjust the gain controls to match the waveform for the desired format
NOTE: In RGB formats, the gain controls are somewhat interactive. For best
results, adjust Y gain while observing green output such that the white color bar
is at specified level. Then observe red output and adjust R-Y gain for equal level
bars having red content; similarly, observe blue output and adjust B-Y gain for
equal level bars.
(064834), and select 100% Color Bars as the Program and Preview
switcher output. (You may use the internal signal for this adjustment
which is accessible through the Configuration [INPUTS] menu.)
installed on the Analog Output Module. Connect a waveform monitor
or oscilloscope to the Analog Output(s). Terminate the scope or
monitor’s inputs in 75 Ohms. A component waveform monitor is
convenient in that all three output channels can be observed
simultaneously, but it is only necessary to observe one at a time.
shown in Figure 2-26 for color difference or Figure 2-27 for RGB.
Effects Send Option
The Effects Send option consists of the Effects Send Module which resides
in slot A11. When the effects send is used, the Aux Bus outputs of Serial
Output Module 2 (slot B11) become the outputs of the Effects Send option.
This allows A video and key signals (any two signals) in an M/E to be
routed outside of the switcher for processing by external devices and then
brought back into the same M/E for mixing and output. The Effects Send
functions require software set ups in the Configuration menus (See
Section 3 of the Reference Manual).
2-30
Page 59

Chroma Keyer Option
Chromatte™ Advanced Chroma Keyer
You may install one Chromatte™ Chroma Keyer to each M/E to add
internal 4:2:2 chroma keying functions to Keyer 1 and Keyer 2. Each option
includes a Chroma Key Carrier Module with a mezzanine module. The
Chroma Keyer for M/E 1 slides into slot A3 and the M/E 2 Chroma Keyer
slides into slot A16. To configure your Keyer option refer to the menus for
the Chroma Keyer in Section Three of the Operators Manual. Any serial
digital input may be used for 4:2:2 chroma keying from the key bus. Analog
component video may be used for 4:4:4 chroma keying with the Analog
Component Chroma Keyer Input Modules option. There is a separate front
panel gain control for each of the input BNC connectors.
BORDERLINE Key Edge Generator Option
Switcher Option Module Installation
The Borderline® option consists of one mezzanine module for one keyer.
This option module mounts on the Keyer Carrier where the Borderline is
desired. Up to four Borderline options may be installed on the Keyer
Carriers; one for M/E 1 Keyer 1 (Slot A5), M/E 1 Keyer 2 (Slot A6), M/E 2
Keyer 1 (Slot A13), M/E 2 Keyer 2 (Slot A14).
To install a Borderline Module, remove the designated Keyer Carrier
carefully, and place it on a static free surface. The Borderline Mezzanine
installs in the top location of the module above the Keyer Mezzanines as
illustrated in Figure 2-15.
1. Line up the four 50-pin connectors on the Borderline mezzanine with
the matching connectors on the Keyer Carrier. Be sure the pins are lined
up properly before seating the mezzanine (look between the mezzanine
and the Carrier). Push down firmly to seat the mezzanine to the Carrier.
Check that no pins are bent or outside of the connectors.
2. From the solder side of the Carrier, attach the mezzanine to the module;
install the four screws into the metal spacers on the mezzanine, and
carefully reinstall the Keyer Carrier into the frame in its proper slot
location.
NOTE:
unscrewing from the solder side of the Carrier, not from the component side of the
Mezzanine.
For best mechanical fit, Mezzanine modules should always be removed by
2-31
Page 60

Section 2 — Installation
BORDERLINE MEZZANINE
KEYER MEZZANINE
KEYER MEZZANINE
Figure 2-15. Borderline Option Mezzanine Installation
Secondary Wipe Pattern Generator Options
The Secondary Wipe Pattern Generator option for the Model 2200 provides
a second wipe for each Mix/Effects. It consists of two mezzanine modules
which mount on the Mix/Wipe Modules for M/E 1 (Slot A8) and M/E 2
(Slot A12). Refer to Figure 2-15 for the Mix/Wipe module locations.
The Secondary Wipe Pattern Generator Mezzanines mount next to the
Primary Wipe Generator Mezzanines already present on each Mix/Wipe
Module. The Look Ahead Preview Option Mezzanines described later also
mount on each Mix/Wipe Module. Refer to Figure 2-15.
To install the Secondary Wipe Pattern Generator Mezzanine modules,
carefully remove the correct Mix/Wipe Modules from the front bay of the
switcher frame. Place them on a static free surface.
1. Line up the Mezzanine Module so that Connector J1 on the Mezzanine
aligns with J10 of the Mix/Wipe Module. Note that the keying plug on
J1 will mate with the missing pin on J10. Line up the two 50-pin
connectors on the Secondary Wipe Pattern Generator mezzanine with
the matching connectors on the Mix/Wipe Module. Be sure the pins are
lined up properly before seating the mezzanine (look between the
mezzanine and the main module). Check that no pins are bent or
outside of the connectors. Push down firmly to seat the mezzanine to
the module.
2-32
Page 61

Switcher Option Module Installation
NOTE:
Be sure the mezzanine modules are oriented the same on each Mix/Wipe
Module.
2. From the solder side of the Mix/Wipe Module, attach the mezzanine to
the module, and install the screws into the metal spacers on the
mezzanine.
NOTE:
For best mechanical fit, Mezzanine modules should always be removed by
unscrewing from the solder side of the Carrier, not from the component side of the
Mezzanine.
SECONDARY WIPE MEZZANINE
PRIMARY WIPE MEZZANINE
LOOK-AHEAD
PREVIEW
MEZZANINE
Figure 2-16. Secondary Wipe and Look Ahead Preview Option Installation
2-33
Page 62

Section 2 — Installation
Look Ahead Preview Option
The Look Ahead Preview option consists of two identical mezzanine
modules which mount on the two Mix/Wipe Modules: M/E 1 (Slot A7)
and the M/E 2 (Slot A12) next to the Primary Wipe Mezzanines as shown
in Figure 2-15.
To install the modules, carefully remove the Mix/Wipe Modules from the
frame. Place them on a static free surface.
1. Line up the six 50-pin connectors on the Look-ahead Preview
2. From the solder side of the Mix/Wipe Module, attach the mezzanine to
mezzanine with the matching connectors on the Mix/Wipe Module. Be
sure the pins are lined up properly before seating the mezzanine (look
between the mezzanine and the main module). Check that no pins are
bent or outside of the connectors. Push down firmly to seat the
mezzanine to the module.
the module, and install the screws into the metal spacers on the
mezzanine.
3. Carefully reinstall the Mix/Wipe Module in its proper location. Refer
to the Menu Setup information at the end of this section for
configuration details.
Timed Aux Output Option
The Timed Aux Output option provides three timed aux output pairs
(video or key) from Aux Buses 3A through 5B. The outputs are autotimed
on the module to match the Program output. If the optional Framestore is
installed, the Timed Aux Output option consists of the Timed Aux Output
Module with the Timed Aux Mezzanine mounted on it. If the optional
Framestore is not installed, the Timed Aux Control Module must also be
installed.
Install the Timed Aux Output Module in Slots C16 and 17. To install the
Timed Aux Output Module follow the steps below:
1. Remove the blank plates, if installed, in locations C16 and 17. Install the
Aux Output Module into Slot C17. Pull the metal ejectors towards each
other to seat the module. Screw in the two screws at either end of the
front metal plate with a screwdriver.
2. Either the Optional Framestore or the Timed Aux Control Module must
be installed in slot A17. The Framestore Module contains the control
circuitry for the Aux Output Module so if it is installed, the installation
is now complete. If the Framestore Module is not installed, install the
Timed Aux Control Module in slot A17.
2-34
3. Refer to the Cable Connections portion next in this section for Aux bus
connection instructions.
Page 63

Framestore Option
The Framestore stores up to eight fields of video which can be reentered
into the switcher or sent to the output of the switcher. several special effects
can be done to the stored video. The Framestore installs in slot A17. If the
Aux Control Module is installed in A17, that module must be removed and
the Framestore installed. The Framestore has all of the circuits required to
operate the Timed Aux Output Modules.
Remote Aux Panel Option
The Remote Aux Control Panel Option allows you to control the Model
2200’s Aux Buses from a remote location. As many as 32 Remote Aux
Panels can be daisy-chained to the switcher (see Cabling Information later
in this section). There are three Remote Aux Panel configurations available,
identified by the number of rack units (RUs) each occupies in the
equipment rack. See Figure 2-17 below. Refer to the Remote Aux Control
Panel Options stand-alone documentation (TP 0699-01) for operating,
testing, and troubleshooting information.
Switcher Option Module Installation
The panels are designed to control 48 external inputs (24 unshifted and 24
shifted). On the Model 2200, input s 17 through 24, aux 6A through aux 9B,
the M/E 3 and Pgm buttons are disabled (inputs 1 through 16, and shift 1
through shift 16 are the active crosspoints).
Each crosspoint lamp on the Remote Aux panel will high tally when that
input is on the air. There is an ON AIR lamp on the 1-RU Remote Aux panel
(P/N 088901) which will illuminate to indicate that the selected input is on
the air. The on-air tally can be permanently enabled on all three Remote
Aux Panels.
2-35
Page 64

Section 2 — Installation
1 2 3 4 5 6 7 8 9 10 11 12 13 14 15 16 17 18 19 20 21 22 23 24 SHIFT
1-RU Panel
1
2435678910 11
18 19 20 21
17
22 23
24
SHIFT
12
13
M/E
1
2-RU Panel
SOURCE
1
2435678910 11
18 19 20 21
17
DELEGATE
AUX
1A
AUX
1B
22 23
AUX
2A
AUX
2B
AUX
3A
AUX
3B
AUX
4A
AUX
4B
24
AUX
5A
AUX
5B
SHIFT
AUX
6A
AUX
6B
AUX
7A
AUX
7B
AUX
8A
AUX
8B
12
AUX
9A
AUX
9B
13
M/E
1
M/E M/E M/E
1 2 3 PGM
Grass Valley
14 15 16
M/E2M/E
PGM
3
Grass Valley
14 15 16
M/E
M/E
2
PGM
3
Grass Valley
ON
AIR
Figure 2-17. Remote Aux Control Panels
All three panels have a joystick override and chop capability.
Joystick Override — Each panel has inputs for up to eight user supplied
switch closures each enabling an override function. When one of these
switches is closed, the Aux Bus changes to a user defined crosspoint. The
crosspoint returns to the previous selection when the switch is opened.
To program Joystick override:
1. Set TEST MODE Switches to 12 (0011).
2. Press and hold the JSO switch to be programmed.
3. On the Remote Aux Control Panel, press and release the source button
that is to be associated with that JSO button.
4. Release the JSO button.
5. Repeat steps 2 through 4 for other JSO switches.
3-RU Panel
2-36
6. Set TEST MODE switches to 0 (0000).
Page 65

Switcher Option Module Installation
Chop — Chop alternates between two selections at approximately a frame
rate. This function is intended for system calibration and is not an artistic
feature.
Chop is started by pressing one source select button on the Remote Aux
Panel, then double pressing the second source select button. Chop is
stopped by pressing any source select button on any aux panel. Chop must
be enabled using the switches on the rear panel of the Remote Aux Panel
(see next section).
Setting Rear Panel Switches
The rear panel includes a number of switches that control operating modes,
such as address, bus enable, delegate enable, and test mode. Settings of
these switches are explained below.
ON
OFF
1A1B2A2B3A3B4A
BUS TO BE CONTROLLED
4B
COMMUNICATIONS
COMMUNICATIONS
COMMUNICATIONS
5A5B6A6B7A7B8A
+
–
SHIELD
+
–
SHIELD
+
–
SHIELD
DC POWER
DC POWER
DC POWER
BUS
BUS
BUS
FORCE HIGH TALLY
124
8
MODE
JOYSTICK
OVERRIDE
JOYSTICK
OVERRIDE
JOYSTICK
OVERRIDE
124816
PANEL ADDRESSES
* Panel Addresses 32 and
64 Must be Set To Off
3
2
1
5
4
7
6
9
8
3
2
1
5
4
7
6
9
8
3
2
1
5
4
7
6
9
8
*32
*64
8B
9A
9B
TEST
CHOP ENABLE
TEST
8
MODE
FORCE HIGH TALLY
124816
PANEL ADDRESSES
* Panel Addresses 32 and
64 Must be Set To Off
*32
*64
ON
OFF
1A1B2A2B3A3B4A
BUS ENABLES
4B
5A5B6A6B7A7B8A
9A
9B
124
CHOP ENABLE
DELEGATE LOCK
8B
Figure 2-18. Rear View of Remote Aux Panels Showing DIP Switches
2-37
Page 66

Section 2 — Installation
Address Switches — Set the address of the Remote Aux Panel (0 through 31)
using the switches marked PANEL ADDRESS on the right rear of the panel
(see Figure 2-18). Only the first five switches are used (1, 2, 4, 8, and 16).
Switches 32 and 64 must be in the OFF position. It may be useful to
maintain a record of each Remote Aux panel address.
NOTE:
Each panel must have a unique address. Setting the same address for two
or more panels will cause the entire Remote Aux system to malfunction.
Bus to be Controlled (Bus Enable) Switches — The 1-RU and 2-RU panels have
eighteen switches labeled BUS TO BE CONTROLLED. These set which
Aux Bus is controlled by the panel. Only one of these switches may be ON.
The 3-RU panel has eighteen switches labeled BUS ENABLE. These set
which Aux Buses can be controlled by the panel. Turn the switch ON for
each Aux Bus to be controlled. Any combination of the eighteen switches
can be turned ON. The functioning of the buses that have the switches
turned OFF depends on the position of the DEL LOCK switch (see below).
The last eight switches (6A through 9B) must be set to OFF.
NOTE:
Two or more panels can control the same Aux Bus; however, if the same
bus is selected on more than one panel, the panel with the highest address will
control the bus.
Delegate Lock Switch — On the 3-RU panel, the DEL LOGIC switch controls
the functioning of the Aux Buses that are not selected:
DEL LOCK Switch OFF: If a BUS ENABLE switch is OFF, the associated
Delegate button on the panel can be selected and the source button
selected for that bus will light but cannot be changed.
2-38
DEL LOCK Switch ON: The Delegate button on the panel cannot be
selected if its BUS ENABLE switch is OFF.
NOTE:
The DEL LOGIC switch is not used on the 1-RU and 2-RU panels.
Force High Tally Switch — On the 1-RU panel, the FORCE HIGH TALLY
switch forces the ON AIR lamp on at all times.
On the 2-RU and 3-RU panels, the FORCE HIGH TALLY switch disables
the low tally condition. The lamps will be on bright whether the bus is on
air or not.
Test Mode Switches — These switches run diagnostics and program the
joystick override. For normal operation set all four TEST MODE switches
to OFF. Information on the test mode switches can be found in the Remote
Aux Panel Manual TP0699-01.
Chop Enable Switch — Enables and disables the chop mode
Page 67

Tally Expansion Option
The Tally Expansion Option provides tally relay closures which allows you
to control remote devices from your Model 2200 Switcher. An unlimited
number of Tally Expansion frames, each with up to three tally modules,
can be added to a switcher.
The Tally Expansion Option consists of the following items:
■ Two Rack Unit (RU) chassis which has two (redundant) power supplies
mounted on a single sled and three slots for optional Tally Output
modules (068932)
■ One, two, or three Tally Output modules installed in the chassis
■ Control cable (16 Meters standard up to 300 meters optional)
Chassis Installation
Switcher Option Module Installation
1. Install the rear supports on the chassis.
2. Install the rear support brackets into the rack.
3. Mount the chassis in a rack as shown in Figure 2-19 on page 2-40.
4. Attach ground wire between ground lug on rear of chassis and station
ground.
Do not apply power to the Tally Expansion Chassis at this time.
Repeat the above instructions for each of the chassis.
2-39
Page 68

Section 2 — Installation
Figure 2-19. Chassis Installation
WARNING
Tighten door latches before moving chassis.
Do not lift chassis by the door or door handles. Door may open unexpectedly
causing damage or injury.
2-40
Page 69

Switcher Option Module Installation
Setting Tally Module Switches
Seven banks of eight DIP switches on each of the Tally Modules determine
how that module will act on the data sent to it. See Table 2-20.
CAUTION
To avoid static damage to sensitive electronic devices, protect the Model 2200
Modules from static discharge. Avoid handling switcher modules in a high static
environment. Touch the switcher frame before you remove any modules. This
helps ensure that any potential difference between your body and the frame is
dissipated. If you handle the modules or make any repairs to them, use a grounding
strap and grounded equipment.
OFF ON
S2
1
2
RESET
RUN
INCOMING
DATA
1
2
3
4
5
6
7
8
OFF
ON
NORMAL ON-AIR TALLY=
ALL SWITCHES OFF.
REFER TO MANUAL FOR
OTHER MODES.
Figure 2-20. Tally Output Module Switch and Jumper Locations
3
4
5
6
7
8
S3
9
10
11
12
13
14
15
16
S4
17
INDIVIDUAL BUS ENABLES
18
19
20
21
22
23
24
S5
25
26
27
28
29
30
31
32
S6
33
34
35
36
37
38
39
40
S7
41
42
43
44
45
46
47
48
F1
F2
F3
REMOVE JUMPER TO
ISOLATE TALLY COMMON A
AND TALLY COMMON B
2-41
Page 70

Section 2 — Installation
The first bank of 8 switches, labeled on the module as MODE (S1), selects
one of several specialized tally functions.
ON AIR Tally is the normal, most commonly-used tally system (all DIP
switches OFF). When Mode 0 is selected, any input whose signal reaches
the Program Video or Program Key output is tallied. Table 2-3 shows the
switch settings for the mode switch.
Table 2-3. Tally Mode Switch S1 Settings
A
Preset
(LookAhead)
Tally
Mode 5
DIP
Switch
Segment
1 OFF ON OFF OFF ON
2 OFF OFF ON OFF OFF
3 OFF OFF OFF ON ON
4 OFF OFF OFF OFF OFF
5 OFF OFF OFF OFF OFF
6 OFF OFF OFF OFF OFF
7 OFF OFF OFF OFF OFF
8 OFF OFF OFF OFF OFF
A. Iso tally for every bus having its associated DIP switch closed. Select the individual bus-
es as listed in Table 2-6.
ON AIR
Tally
Mode 0
M/E 1
Iso T ally
Mode 1
M/E 2
Iso T ally
Mode 2
Individual
Bus
Iso T ally
Mode 4
2-42
When Mode 1, 2, or 3 (Iso Tally) is selected, the switcher tallies only the
inputs that contribute to the output of the corresponding M/E.
When Mode 4 (Individual Bus Iso Tally) is selected, the remaining six
banks of switches on the board (INDIVIDUAL BUS ENABLES 1—48) select
the switcher’s internal buses to be used as tally sources (see Table 2-4). For
example, with the Bus Enable switches set for buses 35 and 36 ON, if an
input were selected on bus 35 or 36, its corresponding relay would close.
The same input chosen on other buses would cause no relay closures. It is
possible to tally as many buses as desired simultaneously. Table 2-4 shows
the switch settings for each of the buses in Mode 4.
Page 71

Switcher Option Module Installation
Table 2-4. Tally Individual Bus Enables Swtich Setting
DIP Switch
ON
1 25
2 26
3 27
4 28
5 29
6 30
7 31
8 32
9 M/E 1 Key 1 Video Bus 33 PVW Video Bus
10 M/E 1 Key 1 Key Bus 34 Mask Bus
11 M/E 1 Key 2 Video Bus 35 Aux 1 Video Bus
Function
DIP Switch
ON
Function
12 M/E 1 Key 2 Key Bus 36 Aux 1 Key Bus
13 M/E 1 BKGD A Video Bus 37 Aux 2 Video Bus
14 M/E 1 BKGD A Key Bus 38 Aux 2 Key Bus
15 M/E 1 BKGD B Video Bus 39 Aux 3 Video Bus
16 M/E 1 BKGD B Key Bus 40 Aux 3 Key Bus
17 M/E 2 Key 1 Video Bus 41 Aux 4 Video Bus
18 M/E 2 Key 1 Key Bus 42 Aux 4 Key Bus
19 M/E 2 Key 2 Video Bus 43 Aux 5 Video Bus
20 M/E 2 Key 2 Key Bus 44 Aux 5 Key Bus
21 M/E 2 BKGD A Video Bus 45
22 M/E 2 BKGD A Key Bus 46
23 M/E 2 BKGD B Video Bus 47
24 M/E 2 BKGD B Key Bus 48
2-43
Page 72

Section 2 — Installation
When Mode 5 (Look-Ahead Tally) is selected, the switcher tallies the
source(s) that will be on air after one of the following transitions:
■ M/E 2 Cut
■ M/E 2 Auto Transition
■ M/E 2 Lever Arm Transition
2-44
Page 73

Cable Connections
This section describes the cabling of the switcher system components. You
need not follow the specific sequence of steps presented here; however the
procedures do provide a reference for ensuring that all connections are
properly made.
Cabling is described in the following sequence:
■ Connection of the control cable from the control panel to the frame
■ Connection of a Status Terminal to the control panel
■ Connection of an analog reference signal to the frame
■ Connection of Video and Key signals to the inputs
■ Connection of analog and serial output signals
■ Frame communications connections which include the following:
KALEIDOSCOPE, Editor, Maintenance Terminal, GPI inputs and
outputs, and Remote Aux Panels
Cable Connections
■ Tally Expansion Connections
■ Source power connection to the Control Panel and frame
■ Maintenance Terminal Connection
2-45
Page 74

Section 2 — Installation
Model 2200-2s Control Panel Connections
1. Connect the interconnect control cable to the connector marked J1 on
2. Connect the other end of the interconnect control cable to J1 (PANEL)
the rear of the Control Panel as shown in Figure 2-21.
on the COM I/O Module in the rear bay (Slot B10) of the switcher frame
illustrated in Figure 2-21. The RP125 parallel digital cable is available in
15, 50, 100 and 300 (maximum) meter lengths.
Frame
DB-25
Connector
For
Future
AC
Power
Connector
Use
Serial Link between
Control Panel and
Signal Processor
Status Terminal
DB-25
Connector
Frame.
C17 C16 C15 C14 C13 C12 C11 C10 C9 C8 C7 C6 C5 C4 C3 C2 C1
OUTPUT
J1
J9
J11
J13
J15
TIMED
AUX
J3
J5
J7
ANALOG
OUTPUT
J1
J2
J3
PROGRAM
J4
J5
J6
PREVIEW
SERIAL
SERIAL
INPUT
INPUT
J1
G/Y
J2
R/V
J3
B/U
J4
J5
J6
J7
J8
J9
J10
J11
J12
J13
J14
G/Y
J15
R/V
J16
B/U
SERIAL
COM
OUTPUT
SERIAL
INPUT
J1
J2
J3
J4
J5
J6
J7
J8
J9
J10
J11
J12
J13
J14
J15
J16
I/O
PANEL
J1
J1
J2
J2
J3
J3
J4
J5
J6
J7
J8
J9
J10
J11
J12
J13
J14
J15
J16
J1
J4
J5
J6
J2
J7
EDITOR
J8
J3
J9
AUX BUS
CTL
J10
J11
J4
J12
J13
ANALOG
REF IN
J14
J5
J15
J6
J16
J1
J2
J3
CHROMA
J4
J5
J6
GAIN
GAIN
GAIN
INPUT
GAIN
GAIN
GAIN
SERIAL
INPUT
SERIAL
REENTRY
J1
G/Y
J2
J3
B/U
J4
J5
R/V
J6
J7
J8
KEY
J9
J10
J11
G/Y
J12
J13
B/U
J14
J15
R/V
J16
SERIAL
REENTRY
GPI
MAINTENANCE
TALLY EXP
GPI INPUTS
GPI OUTPUTS
TB3
EXPANDED
SERIAL
OUTPUT
COM
J1
PORT A1
J2
J1
PORT B1
J3
J4
PORT A2
J5
J2
TB1
J6
PORT B2
+5
1
2
J7
3
PORT A3
4
J8
G
+5
1
PORT B3
2
J9
3
4
J10
G
TB2
J11
G
1
J12
2
3
4
J13
G
G
1
J14
2
3
4
J15
G
TB4
J16
AC
Power
Connector
(Redundant)
J1
J2
J3
J4
J5
J6
J7
J8
Figure 2-21. Model 2200-2s Switcher to Control Panel Connections
2-46
Page 75

Model 2200-2i Control Panel Connections
1. Connect the interconnect control cable to the connector marked J1 on
the rear of the Control Panel as shown in Figure 2-22.
2. Connect the other end of the interconnect control cable to J1 (FRAME
COMM) on the COM I/O Module in the rear bay (Slot B10) of the
switcher frame illustrated in Figure 2-22. The RP125 parallel digital
cable is available in 15, 50, 100 and 300 (maximum) meter lengths.
Cable Connections
J1
FRAME COMM
Port
DB-25
Connector
C17 C16 C15 C14 C13 C12 C11 C10 C9 C8 C7 C6 C5 C4 C3 C2 C1
TIMED
AUX
OUTPUT
J1
J3
J5
J7
J9
J11
J13
J15
POINTING
DEVICE
DB-25
Connector
Serial Link between
Control Panel and
Signal Processor
Frame.
ANALOG
OUTPUT
J1
J2
J3
PROGRAM
J4
J5
J6
PREVIEW
SERIAL
INPUT
J1
G/Y
J2
R/V
J3
B/U
J4
J5
J6
J7
J8
J9
J10
J11
J12
J13
J14
G/Y
J15
R/V
J16
B/U
OUTPUT
SERIAL
SERIAL
INPUT
INPUT
J1
J1
J2
J2
J3
J3
J4
J4
J5
J5
J6
J6
J7
J7
J8
J8
J9
J9
J10
J10
J11
J11
J12
J12
J13
J13
J14
J14
J15
J15
J16
J16
J2
J3
STATUS/
DIAGNOSTIC
TERMINAL
J6
ETHERNET
50-Ohm BNC
Connector
DB-25
Connector
J4
DPM
RS232
PORT
DB-25
Connector
J5
KEYBOARD
Connector
J1
AC
Power
Connector
(Redundant)
AC
Power
Connector
Com I/O
PANEL Port
DB-25
Connector
GPI INPUTS
TB1
TB2
TB3
EXPANDED
SERIAL
OUTPUT
COM
J1
PORT A1
J2
J1
J2
+5
1
2
3
4
G
+5
1
2
3
4
J10
G
J11
G
1
J12
2
3
4
J13
G
G
1
J14
2
3
4
J15
G
TB4
J16
J1
PORT B1
J3
J2
J4
PORT A2
J5
J3
J6
PORT B2
PORT A3
PORT B3
J4
J5
J6
J7
J8
J7
J8
J9
SERIAL
COM
I/O
PANEL
J1
J2
J3
J1
J4
J5
J6
J2
J7
EDITOR
J8
J3
J9
AUX BUS
CTL
J10
J11
J4
J12
J13
ANALOG
REF IN
J14
J5
J15
J6
J16
J1
J2
J3
J4
J5
J6
GAIN
GAIN
GAIN
CHROMA
INPUT
GAIN
GAIN
GAIN
SERIAL
INPUT
J1
G/Y
J2
J3
B/U
J4
J5
R/V
J6
J7
J8
KEY
J9
J10
J11
G/Y
J12
J13
B/U
J14
J15
R/V
J16
SERIAL
REENTRY
SERIAL
REENTRY
GPI
MAINTENANCE
TALLY EXP
GPI OUTPUTS
Figure 2-22. Switcher to Control Panel Connections
2-47
Page 76

Section 2 — Installation
Status Terminal Connections
The Status Terminal connector on the rear of the control panel allows the
connection of a VT-100 (type) terminal to be connected to the Model 2200.
The terminal is used to monitor system status and for maintenance
purposes.
1. Connect a cable between the input of a VT-100 (type) terminal and J3
2. Ensure that the baud rate and other parameters of the Model 2200 given
(Status Terminal connector) on the rear of the control panel. The
connector (J3) on the rear of the control panel is a standard RS-232
configuration via a DB-25 connector with the following pin-outs:
■ Pin 1 — Protective Ground
■ Pin 2 — TxD (From the Terminal)
■ Pin 3 — RxD (To the Terminal)
■ Pin 7 — Signal Ground
below match the baud rate of the terminal. See the Owner’s Manual of
the terminal in use to determine or set the baud rate of the terminal.
Also be sure the terminal is set to “Newline Off” or “No Newline”.
■ 9600 baud
■ 8 data bits
■ 1 stop bit
■ No parity
Analog Reference Connection
Connect an analog signal such as color black or any other stable analog
signal to either J5 or J6, ANALOG REF IN, on the Com I/O Module in Slot
C10. Terminate any unused BNC connectors.
2-48
Page 77

Input Signal Connections (Video and Key)
The Model 2200 allows up to 32 video/key inputs to be connected. These
inputs are connected to a Serial Digital Module at the rear of the frame.
Inputs are configured in the soft menus.
Component analog inputs can be connected to the optional Chroma Key
Input Module.
Cable Connections
NOTE:
be obtained from other suppliers.
Grass Valley Products does not supply cables or terminators. These must
Serial Digital Video Connections
The serial digital inputs require the use of 75Ω coaxial cables. The use of
75Ω BNC connectors is recommended but not required. Facilities with
existing cables with 50Ω connectors on 75Ω cables need not change their
connectors. However, with the use of 50Ω connectors there is the
possibility of some errors occurring in the serial data stream.
The maximum length of serial digital cables should not exceed 225 meters
(738 feet). Fiber optic distribution and transmission is recommended for
runs longer than 225 meters.
Connect serial digital video sources to the Serial Input Modules in Slots C7,
C12-C14 as required for your facility. Inputs are loopthrough; be sure to
terminate each input with a 75Ω termination.
2-49
Page 78

Section 2 — Installation
Output Signal Connections
Timed Aux Output Connections
The Timed Aux Output module allows six output connections from the
switcher to external devices. (See Figure 2-23 below.)
The following outputs are assigned:
TIMED
AUX
OUTPUT
J1
J3
C16C17
Aux 3A (Video)
Aux 3B (Key)
Aux 4A (Video)
J5
Aux 4B (Key)
J7
Aux 5A (Video)
J9
J11
J13
J15
Aux 5B (Video/ Key)
Figure 2-23. Timed Aux Output Connections
2-50
Page 79

Cable Connections
Serial Output Connections
The two Serial Digital Output Modules provide serial digital outputs from
the switcher. The signal type of each output is hard-wired according to the
slot ID (as shown in Figure 2-24) and is listed on the designation strip on
the back of the frame (above the rear bay).
SERIAL OUT 2
CELL C11
J1
M/E 1 CLEAN FEED
J2
J3
M/E 2 CLEAN FEED
J4
J5
AUX 1A
J6
J7
AUX 1B
J8
J9
AUX 2A
J10
J11
AUX 2B
J12
SERIAL OUT 1
CELL C3
J1
MASK
J2
J3
SW PVW
J4
J5
M/E 1 PVW
J6
M/E 2 PVW
J7
J8
J9
ME1 PGM
J10
J11
ME1 KEY
J12
J13
FRAMESTORE VIDEO
J14
J15
FRAMESTORE KEY
J16
Figure 2-24. Output Signal Connections
J13
ME2 PGM
J14
J15
ME2 KEY
J16
2-51
Page 80

Section 2 — Installation
Switcher Communications Connections
You can connect external devices such as Kaleidoscope, DPM-700, Video
Production Editors, GPI connections, Tally Expansion, and a maintenance
terminal to the switcher. These are connected to the switcher via the
Communications I/O Module, GPI Module and the Expanded
Communications Module, located at the rear bay of the switcher frame as
shown in Figure 2-14. (The Tally Module is located in the Tally Expansion
option and is not shown here).
COM
I/O
PANEL
EDITOR
AUX BUS
CTL
ANALOG
REF IN
J5
C1C2
GPI
C4C10
EXPANDED
COM
MAINTENANCE
PORT A1
J1
J1
J1
J2
J3
J4
J6
TALLY EXP
GPI INPUTS
TB1
TB2
GPI OUTPUTS
TB3
TB4
J2
+5
1
2
3
4
G
+5
1
2
3
4
G
G
1
2
3
4
G
G
1
2
3
4
G
PORT B1
J2
PORT A2
J3
PORT B2
J4
PORT A3
J5
PORT B3
J6
2-52
Figure 2-25. Switcher Frame Communications Connections (Control Section)
Page 81

DPM Configurations
Digital Picture Manipulators (DPMs) are external video devices connected
to the switcher. In this discussion, reference is also made to DPM levels,
which are E-MEM levels into which DPM-associated information is
learned. The combined system capabilities of the switcher and DPMs
depend on:
■ The video connection
■ The capabilities of the DPM
■ The control connection
It is not necessary to have a control connection from the switcher to a DPM;
however, the highest level of system integration is achieved where there is
a control connection.
The Video Connection (Aux Buses and Return Inputs)
Cable Connections
A normal video signal path consists of an Aux Bus output from the
switcher feeding a DPM input and the DPM output returned to a switcher
input which is mapped to a switcher source select button.
The video path through a DPM introduces a video delay into the system.
For example, Kaleidoscope introduces a 2-field video delay. It is most
important that this delay be set correctly in the DPM Setup menu if Effects
Send is to be used.
NOTE:
If the video delay is not set correctly, there will be a glitch in the video upon
entering Effects Send mode.
There are four steps in configuring the video path:
■ Aux buses are assigned to DPMs using the DPM Map Aux Bus menu
■ Return input connections are configured using the DPM Map Inputs
menu
■ The mapping of a return connection to a crosspoint is done using the
Configuration/Map Inputs menu
■ The video delay is set using the DPM Setup menu
2-53
Page 82

Section 2 — Installation
The system defaults to all Aux Buses being part of the [MISC] E-MEM level.
When an Aux Bus is configured for use with an external DPM, its settings
are no longer saved in the [MISC] level but are saved in the relevant [DPM]
level when an E-MEM register is learned. Information (such as Aux Bus
crosspoint selection) is learned for each DPM on separate E-MEM levels.
In cases where it is not desirable to have an Aux Bus selection learned or
recalled on the [MISC] level, it is possible to configure the Aux Bus to a
[DPM] level (such as [DPM 4]) and never enable that level. An example
would be if the Aux Bus were controlled by a Remote Aux panel.
DPM Capabilities (Fixed and Pooled)
The characteristics of the DPM are configured in the DPM Setup menu. The
first choice to be made is selection of
or
The
for the particular DPM level. However, it can also be used for cases where
Aux Buses are assigned to a DPM level, but there is no physical device, no
return signal, and no control connection (for example, an Aux Bus
dedicated to feeding a video monitor).
[DPM TYPE] from NONE, KSCOPE, KRYSTAL,
OTHER FIXED.
[DPM TYPE] of NONE indicates that there is no external DPM device used
Both
KSCOPE and KRYSTAL are selections for pooled devices.
A pooled device is one which provides acquisition of logical channels from
a pool of physical channels.
Kaleidoscope is a pooled device. As an example, consider a Kaleidoscope
having 5 physical channels named A, B, C, D, and E. The pooled channels
are shared by different users. A user may build a Kaleidoscope effect using
3 channels. On one day he may acquire physical channels C, D, and E as
logical channels 1, 2, and 3; on another day he may acquire physical
channels B, C, and D as logical channels 1, 2, and 3. The same effect will
perform identically on both configurations since the operator’s view of the
system is the logical arrangement of channels (1, 2, and 3), not the physical
channels used.
In systems with multiple DPM channels, it is desirable to have a
predictable relationship between Aux Buses and DPM channels (for
example, Aux Bus 1 feeding DPM channel 1, Aux Bus 2 feeding channel 2,
and so on) and to have a particular switcher crosspoint button always
select the same DPM channel return input. For a fixed device (such as the
DPM-700) this relationship is achieved by cabling alone. For a pooled
device, such as Kaleidoscope, the Model 2200 achieves predictable DPM
channel routing by maintaining an extra level of mapping between
physical and logical DPM channels. This mapping, termed Switcher Input
Routing and Switcher Output Routing, is discussed on the following page.
2-54
Page 83

Cable Connections
For [DPM TYPE] of OTHER FIXED or NONE (DPMs which are not pooled and do
not have Input and Output Routing), the
should be
OFF.
Kaleidoscope changes its logical-to-physical channel mapping, depending
on the order in which channels are acquired from its pool. Switcher outputrouting maps a physical Aux Bus to a logical Aux Bus so that the logical
Aux Bus number corresponds with the DPM’s logical channel.
The Aux bus button selection made on the switcher control panel is always
a logical Aux Bus; however, unless Kaleidoscope is connected, Logical Aux
Bus 1 always corresponds to Physical Aux Bus 1, etc. (The current mapping
of physical-to-logical DPM channels is displayed in the DPM Map Inputs
menu.)
It should be noted that the switcher supports only one pooled device. Also,
the pooled device must be cabled so that the first physical Aux Bus is
connected to the first physical channel. In the example in Figure 2-26,
Physical Aux Bus 1 is connected to Kaleidoscope Physical Channel A, Bus
2 to Channel B, and so on.
[CHANNEL ROUTING] selection
Model 2200
Switcher
Input
Routing
Logical Aux 1
Logical Aux 2
Logical Aux 3
Logical Aux 4
Logical Aux 5
Logical Aux 6
Logical Aux 7
Kaleidoscope
Physical
Channels
Logical
Channel
1
Logical
Channel
EDCBA
Logical
Channel
2
Kaleidoscope
Logical Channels
Channel
3
Logical
Channel
Logical
4
Kaleidoscope
Switcher
Output
Routing
5
Phys Aux 1
Phys Aux 2
Phys Aux 3
Phys Aux 4
Phys Aux 5
Channel Pool
A
B
C
D
E
Figure 2-26. Example of Connections for a Pooled DPM
2-55
Page 84

Section 2 — Installation
For a particular studio session, three Kaleidoscope channels could be
acquired from the pool in the order D, E, A, which would be logical
channels 1, 2, 3. This mapping information is passed from the DPM to the
switcher via the control connection. Switcher output routing ensures that
the logical channels 1, 2, 3 appear to the user on logical Aux Buses 1, 2, 3
and switcher input routing ensures that DPM logical channels 1, 2, 3
appear on the crosspoints configured for these logical channels. For the
above configuration, the selection of
menu should be set to
There are circumstances where output routing is not desirable. For
example, the DPM may have more than 5 channels. In that case, a router or
patch panel may be inserted between the switcher and Kaleidoscope
(Figure 2-27). In this example, switcher output routing is turned off, so the
menu selection for
to
consistent crosspoint.
[CHANNEL ROUTING] in the DPM Setup
BOTH.
[CHANNEL ROUTING] in the DPM Setup menu should be set
SWR IN. This still provides the return video from the switcher being on a
16 Inputs
Model 2200
HGFEDCBA
Router/
Patch Panel
Switcher
Input
Routing
Aux 1
Aux 2
Aux 3
Aux 4
Aux 5
Logical
Channel
1
Logical
Channel
2
Kaleidoscope
Logical Channels
Logical
Channel
3
Logical
Channel
Logical
Channel
4
5
Aux Bus Outputs
From Other Suites
Figure 2-27. Example of Connections Using an External Router.
Kaleidoscope
Channel Pool
A
B
C
D
E
F
G
H
To Other Suites
2-56
Page 85

Cable Connections
Control Connection
Three forms of control connection to the DPMs are supported. These are
■ CPL (Control Point Language)
■ PBusII (Peripheral Bus II)
■ GPIs
Control Point Language — CPL is the communication protocol used to
couple the switcher and Kaleidoscope. One of its uses is to convey the
physical-to-logical channel mapping information described previously. It
is also used for run control of effects, Aux Bus selection (including front/
back switching) and tally.
When
[DPM TYPE] is set to KSCOPE in the DPM Setup menu, CPL is
automatically invoked.
[AUX BUS CONTROL] selection has a choice of DPM or SWITCHER. In normal
The
use with Kaleidoscope, this should be set to
source button is selected on the Kaleidoscope panel, that source button is
also selected on the switcher for that Aux Bus, and vice versa. So an effect
running on Kaleidoscope can cause the switcher to select different
crosspoints. This is the mechanism used to achieve front/back switching.
If
[AUX BUS CONTROL] is set to SWITCHER, any CPL requests to change
crosspoints on an Aux Bus are ignored and Kaleidoscope is unable to
change sources when running an effect.
[PORT ASSIGN] must be set to PORT A1.
DPM. With this setting, when a
All control connections have an associated control delay. For Kaleidoscope
using CPL, this delay is 6 fields which is selected automatically.
Peripheral Bus II (Port A3 Only) — PBusII is used for run control of effects
using triggers. With current software, PBusII triggers are learned into the
[MISC] E-MEM level. For example, when using PBusII as the control
connection for a DPM-700, the following should be set in the DPM Setup
menu:
[PORT ASSIGN] = NONE
[CHANNEL ROUTING] = OFF
GPIs — Both input and output GPIs may be used as triggers as part of the
control interface between the DPM and switcher. Depending on the nature
of the DPM, GPIs can be used for effect recall and run control, source
selection, and tally information.
2-57
Page 86

Section 2 — Installation
Connecting to Kaleidoscope
The Kaleidoscope Controller connects to the Model 2200 through an
adapter cable (151022-00) and the Model 2200 RS-422 control cable
(054602-16). See Figure 2-28.
The Model 2200’s Aux Bus video and key outputs (numbered 1 and 2) are
connected to the Kaleidoscope Channel video and key inputs. Note that the
Model 2200’s physical Aux Bus 1 output must be cabled to Kaleidoscope’s
physical Channel A and the Model 2200’s physical Aux Bus 2 to
Kaleidoscope’s physical Channel B.
Model 2200 Switcher
Frame
Exp. Comm.
Module
Cell C1
(rear)
(Effects Send Aux Buses
Key Inputs In Any Order
are pairs 1-4 only)
Any Video &
(Port A1) J1
Aux Bus
Outputs
1
2
3
4
5
Control Cable
RS-422
(054602-16)
VIDEO
VIDEO
VIDEO
VIDEO
VIDEO
KEY
KEY
KEY
KEY
KEY
VIDEO
VIDEO
VIDEO
VIDEO
VIDEO
Figure 2-28. Model 2200 to Kaleidoscope Cabling
Adapter
Cable
(151022-00)
KEY
KEY
KEY
KEY
KEY
Kaleidoscope
Controller
J17 (IPL)
Channel (A)
Channel (B)
Channel (C)
Channel (D)
Channel (E)
Parallel I/O
Module
(068604)
From 1 to 5
Kaleidoscope
Channels
2-58
The Kaleidoscope Channel outputs can be connected to any of the Model
2200 physical inputs (1 to 32), in any order. It is important to note which
physical inputs are connected from which Kaleidoscope Channel outputs,
for both video and key. This information must be entered later into a setup
menu in the Model 2200 (DPM Map Inputs Menu under the External
Interfaces Menu).
When the Kaleidoscope’s outputs are sent to an Output Router, the
Primary Video and Key, and Secondary Video and Key outputs may be
connected to any four inputs on the switcher. The switcher’s inputs are
assigned via menus to any crosspoints (Map Inputs Menu under the Inputs
Menu). This assignment is described later in this section.
Page 87

Cable Connections
NOTE:
Standard length of the RS-422 cable is 16 meters (The cable length is
indicated by the dash number on the end of the part number.) The maximum
combined length of the adapter and RS-422 cables should not exceed 300 meters.
The adapter cable connects between J17 at the rear of the Kaleidoscope
Controller chassis, and the 9-pin D-type connector on the end of the RS-422
control cable. The control cable connects to J1 (Port A1) or J3 (Port A2) on
the optional Expanded Communications Module at the rear of the switcher
frame (B1 and B2). See Figure 2-14.
NOTE:
This interface requires that the Serial Communications mezzanine board
(068918) be installed on the switcher Expanded Communications Carrier Module
(064824). The Expanded Communications Carrier Module is located in slot B1
and B2 in the switcher frame.
Additional Kaleidoscope requirements are as follows: The Parallel I/O module in
the Kaleidoscope Controller must be a 068604 module (not a 068537), and the
software version installed in Kaleidoscope must be 6.0 or later.
2-59
Page 88

Section 2 — Installation
Connecting to a DPM–700
The Model 2200 can initiate E-MEM Effects Memory Learn and Recall
operations in a DPM-700 using Peripheral Bus II protocol. In addition, the
Model 2200 can trigger specific functions in the DPM.
Communication is controlled from the Model 2200 to the DPM; the DPM
will not control or communicate with the Model 2200. (Direct DPM control
of the Model 2200 Aux buses is not provided.)
Model 2200 Switcher
Frame
Comm.
Panel
Any Video &
Key Inputs
Port A3
Any
Aux Bus
Outputs
NOTE:
This interface requires that the Serial Communications mezzanine board
(068918) be installed on the switcher Expanded Communication Module
(068824). The Expanded Communications Module is located in slot B1 and B2 in
the rear bay of the switcher frame.
Control and video/key connections between the Model 2200 and the DPM
are illustrated in Figure 2-29. The switcher’s Aux Bus video and key
outputs are connected to the DPM’s video and key inputs. The DPM’s
outputs can be connected to any of the Model 2200’s physical inputs. The
inputs are then assigned via menus to any crosspoints, as described later in
this section (Map Inputs Menu under Inputs Menu).
DPM-700
Peripheral
Port
J5
Channel 1
Channel 2
J5
Control Cable
RS-422
(054602-XX)
B
A
B
VIDEO 1
KEY 1
VIDEO 2
KEY 2
VIDEO
Figure 2-29. Model 2200 to DPM-700 Cabling
2-60
KEY
Page 89

Cable Connections
The Control cable is connected between the Peripheral Port (J5) at the rear
of the DPM frame, and Port A3 (J5) on the Expanded Communications
Panel at the rear of the switcher frame. See Figure 2-14.
The DPM-700 connects to the switcher frame through a control cable
available from GVG. Available cable length is 16 meters (054602-16).
Alternatively, you may make your own cable, as illustrated in Figure 2-30.
Maximum length of the control cable is 300 meters.
Male
Connects to
PORT A3
on Model 2000
1
2
3
4
5
6
7
8
9
Wiring
Side
Chassis Ground
Rx A
Rx B
Tx A
Tx B
Ground
(Twisted Pairs)
Figure 2-30. Peripheral Bus II Cable Design
Video Production Editor Connections
The Model 2200 may be connected to video editors such as GVP’s VPEseries of editors. Refer to Figure 2-14 while making this connection.
1. Attach the signal cable from the editor to the EDITOR port (J3) located
on the Communications I/O Module in slot B10.
Male
Wiring
Side
1
6
2
7
3
8
4
9
5
Connects to
J5 on
DPM 100/700
2. The EDITOR INTERFACE menu for assigning baud rate and parity is
found under the EXTERNAL I/F section of the CONFG menus. Refer
to System Setup later in this section.
2-61
Page 90

Section 2 — Installation
GPI Connections
The four GPI connectors on the rear panel of the switcher frame provide
eight input and eight output GPI connections. See Table 2-14 These
connections provide a variety of user-assignable GPI applications such as
remote control of Auto Transitions, DSK mix, Fade-to-Black Transitions
and other selected functions. Refer to “External Interface Setup” later in
this section for defining GPI inputs.
NOTE:
lugs as shown in Figure 2-31.
It is important that the shields of the GPI cables be attached to the ground
GPI Inputs
GPI inputs are opto-isolators. These pairs of input connectors are
numbered 1 through 8 with a chassis ground connection on the bottom
and +5V connection on the top end of each connector module. To
trigger the GPI input, a DC voltage must be applied across the pair of
terminals for that input. Voltage must be between 4V and 24V, either
polarity. When the device used to trigger this input has a pair of relay
contacts available, the following wiring connection is recommended
(Input 6 shown in the following example).
Connect the appropriate GPI DC input signals to the GPI INPUTS
connectors TB1 and TB2. See Table 2-31
GPI Outputs
Each GPI output consists of pairs of connections on the rear of the
frame, which are connected to an isolated pair of relay contacts (SPST;
normally open). These pairs of output connectors TB 3 and TB 4 are
numbered 1 through 8 with a chassis ground connection on both ends
of each connector module. These relay connections are rated at 500mA
(peak) for voltages not to exceed 30 volts peak (AC or DC) with respect
to chassis ground.
2-62
Connect the appropriate GPI output connections to GPI OUTPUTS
connectors TB3 and TB4. Record these output connections for use by
the operator when attaching the triggers to E-MEM recalls.
Page 91

Fold cable shield over
the insulation before
Inserting cable into clamp.
Clamp MUST make good
electrical contact with shield.
Clamp is not supplied by GVG.
Use C2980 Style Tinnerman Clamp
From Eaton Corp or equivalent.
EXTERNAL
CONTACT
CLOSURE
TO BE
CONTROLLED
Twisted Pair from remote
switch or relay contacts
TB1
GPI INPUTS
+5
+5
TB2
Cable Connections
1
2
3
4
G
5
6
7
8
G
Insert stripped end of wires in connector slot
and tighten screws on side of connector as
shown to ensure good connection
Figure 2-31. GPI Connections
GPI OUTPUTS
TB3
G
1
2
3
4
G
G
5
6
7
8
G
TB4
2-63
Page 92

Section 2 — Installation
Remote Aux Connections
The Remote Aux Control Panel consists of three parts:
■ Remote Aux Panel Assembly
■ Power supply with power cord
■ Communications bus cable connector
NOTE: Due to limited access at the rear of the Remote Aux Panel after it is
installed in the rack, it is recommended that the communications cable and power
supply cord be connected and the DIP switches on the rear of the panel be set before
the panel assembly is installed in the rack.
Cable Installation
A Remote Aux cable connector is provided with each panel. See Figure 2-32
for connector illustration. This connector must be applied to a shielded
twisted-pair control cable with a D connector on the opposite end. The D
connector of the cable will later be plugged into the rear of the switcher
frame.
CAUTION
Do not plug the D connector in at this time. If power is applied to the switcher, the
cable line drivers in the switcher may be damaged.
The other end of the cable will be plugged into the Communications Bus
connector on the rear of the Remote Aux Panel using the supplied
connector. Any additional panel(s) will be connected to the previous panel.
Keep in mind that the total length of the cable must not exceed 1000 feet
(320 M).
Place the D-connector end of the cable so that it will reach J4 (AUX BUS
CTL) on the Communication I/O Module Slot C10.
Lay the cable from the switcher frame to where the first Remote Aux Panel
will be. Allow enough cable to reach the control panel connector, and about
3 feet (1 meter) extra, then cut the cable and strip the wires.
2-64
Page 93

Cable Connections
Connector Installation
The connector that plugs into the Remote Aux Panel has screw clamps to
hold the wires. Paying attention to polarity (see Table 2-5), insert the wires
into the appropriate holes and screw down the clamps. If there is another
control panel, the cable to the next panel must also be inserted into this
connector. The D connector on that cable must be cut off, and the wires for
the next panel must be stripped and inserted into the same holes before the
screws are tightened. Make sure the polarity is correct. Refer to Figure 2-18
on page 2-37and plug the cable into the Communications Bus connector.
KEEP SHIELD CONNECTION AS SHORT AS POSSIBLE
Figure 2-32. Remote Aux Panels Connection
If you are building your own cable, use a shielded twisted-pair such as
Belden 8451 and refer to Table 2-5.
To Pin 9 of
D Connector
(SHIELD)
To Next Panel
(if any)
To Pins 3 and 7 of
D Connector (+)
To Pins 2 and 8 of
D Connector (–)
From Switcher or
Previous Panel
Table 2-5. Cable Polarity
Panel Connector D-Connector Factory Supplied Cable
+ (Plus) 3 and 7 Red
– (Minus) 2 and 8 Black
Shield 9 Shield
2-65
Page 94

Section 2 — Installation
JSO Cable connection
The JSO cable is an optional cable that is installed if you want to use the
joystick override function of the Remote Aux Panel. The JSO cable is not
supplied by GVP. Refer to Figure 2-33.
Male 9 PIn
D Connector
1
2
3
4
5
6
7
8
9
Momentary
Pushbuttonsr
1
2
3
4
5
6
7
8
The Joy Stick Override Cable is customer supplied.
The cable is connected to a male 9 pin D connector
which has 4-40 jack screws. For EMI supression,
the cable shield should be connected to the metal
connector cover.
Figure 2-33. JSO Cable Connection
Power Supply Installation
The Remote Aux Panel Power Supply should be securely fastened either on
a horizontal surface where it will not be disturbed, or attached to a support
inside the equipment rack. Verify that the power supply cord will reach the
Remote Aux Control Panel and the AC source. The power supply requires
100–120 VAC or 200–240 VAC and automatically switches to select one of
these two line voltages.
2-66
Figure 2-34. Remote Aux Panel Power Supply
Page 95

Cable Connections
Remote Aux Panel Lens Chip Installation
The primary crosspoint push-buttons on the 2-RU and 3-RU control panels
can be labeled as desired. An envelope containing a set of printed lens
chips is shipped with the control panel.
To change a lens chip, grasp the lens firmly with your fingers and pull it
straight out. The push-button may come off with the lens. You can then
pull apart the push-button, lens, and lens chip (refer to Figure 2-35). When
re-inserting the push-button and lens into the panel, make sure to align the
keys on the legs of the push-button base with the larger key slots on the
base of the switch (not the smaller slots at the top of the switch, near the
lamp). When properly installed, the push-button should lock in place and
not rotate around the lamp and switch.
Clear Overcap
Lens Designation Chip
Lens
Figure 2-35. Lens Chip Installation
Remote Aux Panel Power Up
1. Turn OFF the power to the switcher frame.
2. Attach the Communications Bus Cable(s) and the Power Supply cable
to the connectors on the rear of the Remote Aux Panel.
3. Using standard rack-mounting screws and washers (not supplied),
install the Remote Aux Panel in the equipment rack.
4. Plug the Remote Aux Panel power supply into the AC power source
(100–120 VAC or 200–240 VAC).
5. After all panels have been connected, plug the D connector on the
Communications Cable into connector J4 on the Communications I/O
module at the rear of the switcher.
6. Turn the switcher frame’s power on.
2-67
Page 96

Section 2 — Installation
Tally Expansion Option
The Tally Expansion Control Cable installation information follows. Each
chassis comes with a 16 meter (50 foot) cable. This cable has a 9 pin D
connector on each end. The cables are standard RS422 and can be replaced
with a custom-built cable if desired.
Connects to
J2 on GPI Module
Male
1
6
2
7
3
8
4
9
5
Wiring
Side
Cable Shield and
Chassis Ground
Rx A
Rx B
Tx A
Tx B
Ground
(Twisted Pairs)
Connects to
J3 on
Tally Expansion
Frame
Male
1
2
3
4
Wiring
5
Side
6
7
8
9
Figure 2-36. Tally Expansion Control Cable Wiring
NOTE:
Maximum total length of the tally expansion cables is 300 meters
(1000 feet)
1. Locate J2 on the GPI Module at the rear of the switcher. Tie cable so the
connector on the cable will reach the connector on the switcher.
2-68
CAUTION
Do not plug the cable into the switcher at this time. Doing so may damage the line
drivers in the switcher.
2. Lay the cable from the switcher chassis to the first Tally Expansion
option.
3. Plug this cable into J3 on the rear of the Tally Expansion unit.
If there is more than one Tally Expansion chassis, do the following steps:
1. Connect the second cable to J4 on the rear of the first chassis.
2. Run that cable to the next Tally Expansion chassis.
3. Connect cable to J3 on the rear of the second chassis.
Repeat the above three instructions for each additional chassis. There are
no terminations for the cable.
Page 97

Cable Connections
Tally Output Cable Installation
There are six tally output connectors on the rear of each Tally Expansion
chassis. These connectors are 37 pin D connectors and have the following
assignments:
■ 1A and 2A: upper Tally Relay module (Slot A).
■ 1B and 2B: center Tally Relay module (Slot B).
■ 1C and 2C: lower Tally Relay module (Slot C).
The tally output connectors are active only if their associated Tally Relay
module is installed. Pinouts for the two connectors are shown in
Figure 2-37.
Pins 1 through 35 are Relay Closures
to Tally Common A (Pin 36)
Input 1 Tally
Input 2 Tally
Input 3 Tally
Input 4 Tally
Input 5 Tally
Input 6 Tally
Input 7 Tally
Input 8 Tally
Input 9 Tally
Input 10 Tally
Input 11 Tally
Input 12 Tally
Input 13 Tally
Input 14 Tally
Input 15 Tally
Input 16 Tally
Input 17 Tally
Input 18 Tally
Input 19 Tally
1
20
2
21
3
22
4
23
5
24
6
25
7
26
8
27
9
28
10
29
11
30
12
31
13
32
14
33
15
34
16
35
17
36
18
37
19
Input 20 Tally
Input 21 Tally
Input 22 Tally
Input 23 Tally
Input 24 Tally
Input 25 Tally
Input 26 Tally
Input 27 Tally
Input 28 Tally
Input 29 Tally
Input 30 Tally
Input 31 Tally
Input 32 Tally
M/E 1 Tally
M/E 2 Tally
Tally Common A
Chassis Ground
Pins 1 through 32are Relay Closures
to Tally Common B (Pin 36)
1
20
2
21
3
22
4
23
5
24
6
25
7
26
8
27
9
28
10
29
11
30
12
31
13
32
14
33
15
34
16
35
17
36
18
37
19
M/E 1 ON AIR
M/E 2 ON AIR
Tally Common B
Chassis Ground
J1
J2
NOTE: Tally Common A is tied to Tally Common B on the module.
Either A or B or both can be connected.
Maximum Relay Current is 1 Amp at 32 Volts
As Viewed from the Rear of the Frame
Figure 2-37. Tally Output Connector Pinouts
2-69
Page 98

Section 2 — Installation
Turning Tally Expansion Option On
When all the Tally Expansion Chassis are installed and set up:
1. Turn the power off to the switcher frame and plug the control cable into
2. Turn the switcher power back on.
3. At the rear of each Tally Expansion chassis plug both power cords into
4. At the front of each Tally Expansion chassis, open the door, turn on
J2 on the GPI Module (C4 on the back of the switcher frame).
the chassis and a source of power (90 to 132 VAC or 180 to 264 VAC).
The power supplies automatically selects either 115 or 220 volt source,
depending on the input.
both power switches, and verify that both power supply lamps are lit.
Maintenance Terminal Connections
C4
GPI
MAINTENANCE
TALLY EXP
GPI INPUTS
TB1
TB2
GPI OUTPUTS
TB3
TB4
J1
J2
+5
1
2
3
4
G
+5
1
2
3
4
G
G
1
2
3
4
G
G
1
2
3
4
G
The Maintenance port allows a text-only monitor to be connected to the
switcher frame. The monitor is normally used for maintenance purposes
only. Refer to Figure 2-38.
1. Connect a cable from the input port of a RS-232 terminal to J1
(MAINTENANCE port) on the GPI Module in Slot B4.
The Data cable must be wired in a standard RS-232 configuration with pin
assignments as follows:
■ Pin 1 — Protective Ground
■ Pin 2 — TxD (From the Terminal)
■ Pin 3 — RxD (To the Terminal)
■ Pin 7 — Signal Ground
2. Ensure that the settings of the terminal matches the parameters of the
Model 2200 given below:
■ 9600 baud
■ 8 data bits
■ 1 stop bit
■ No parity
See the monitor’s manual for its settings.
2-70
Figure 2-38. Maintenance Terminal Connectors
Page 99

Connecting the Control Panel to Source Power
1. Open the control panel lid and check to see that the power switch
(located on the left side of the tub) is in the OFF position.
2. Connect the power cable from the back of the control panel to source
power. Do NOT turn control panel power on at this time.
3. Verify you have received the correct power cable. For use in Europe,
the power cables must be TUV approved. The control panel power
cable should be a molded grounding connector (IEC 320-C13) on one
end with pigtails on the other.
4. For use in the United States, Canada, South America and Southeast
Asia, a standard 110VAC power cable is supplied for the control panel.
It has a molded grounding plug (NEMA 5-15P) at one end and a
molded grounding connector (IEC 320-C13) at the other end.
Cable Connections
Switcher Power Supply Connections
1. Ensure that the power switch located on the front of the switcher power
supply is in the OFF position.
2. Connect the power cable from the rear of the switcher power supply to
an appropriate source of 220VAC power. Refer to Table 1-1 on
page 1-11 for power requirements.
3. Make sure you have the correct power cable. For use in Europe you
should have received a power cable with pigtails on the free end. For
use in the U.S., Canada, South America and Southeast Asia the power
cable should have a 20 Amp Twist-Lock 240 VAC NEMA Type l6-20P
plug attached.
4. If a redundant switcher power supply is installed, connect it to a
separate 220 VAC power source (branch circuit).
2-71
Page 100

Section 2 — Installation
Redundant Power Supply Voltage Adjustments
If you ordered a redundant Frame Power Supply with the Model 2200, it
was tested and adjusted with the system before leaving the factory. In this
case, it is not necessary to perform the following procedure.
If a redundant Frame Power Supply is ordered after the Model 2200, the
following procedure should be performed to ensure that the Primary and
Redundant supplies are working properly together.
NOTE:
supplies using power units manufactured by Todd Products Corporation (the
present supplier). For information on older power supplies manufactured by
Pioneer Magnetics, refer to the Maintenance section of this manual.
This procedure describes the adjustment of output voltages in power
WARNING
Dangerous voltages are present inside the Signal Processor Frame Power
Supply. Do not perform any servicing of this equipment unless you are
qualified to do so. Remove all rings, wrist watches, etc., before working
inside the equipment.
1. Remove the rear access panels of both power supplies if they have not
already been removed.
2. With power to the Redundant Frame Power Supply turned off, turn on
the power switch on the front of the Primary Frame Power Supply.
3. Record the following measurements on paper. Measure the MultiOutput supply voltages (–5.2, +13, –13, and +48 Vdc, referenced to the
COM test point) at the test points inside the left rear compartment of
the power supply frame. See Table 2-39. Measure the +5 Vdc supply
voltage between the power lugs in the right rear compartment.
2-72
 Loading...