


Special Edition
PROFESSIONAL
METAL
DETECTOR
COMPREHENSIVE
OPERATING MANUAL
& GUIDE TO
METAL DETECTING

TEKNETICS Comprehensive Operating Manual & Guide to Metal Detecting
The Teknetics® T 2 is a new high-performance multi-purpose professional grade metal detector. It utilizes the latest advances in electronic technology, and its functional design represents the leading edge of the metal detector engineering art. The T 2 is easier to learn to use properly than other comparable metal detectors. Its combination of light weight and balance provides comfort unmatched by any other detector in its price range. Its most popular uses include coinshooting, relic hunting, and gold prospecting.
PRODUCT FEATURES
•Simple, easy-to-use controls
•Large LCD screen with Target Identification and operating control displays
•Straightforward menu-driven user interface
•Bar graph readout of ground mineral concentration
•Trigger-actuated FASTGRAB™ ground canceling with manual override
•11”DD Elliptical, Open Waterproof Searchcoil
•Single-Filter All Metal Mode for maximum detection depth
•Double-Filter Discrimination Modes for searching in trashy areas
•Trigger-actuated target pinpointing with variable audio pitch
If you have any questions, or need assistance with your metal detector, Call 1-800-413-4131, and ask for Teknetics® Customer Service.
2

Comprehensive Operating Manual & Guide to Metal Detecting TEKNETICS
TABLE OF CONTENTS
Quick-Start . . . . . . . . . . . . . . . . . . . . . . . . . . . . . . . . . . . . . . . . . . . . . . . . . . . . . . . . . .4
Mechanicals
Assembly . . . . . . . . . . . . . . . . . . . . . . . . . . . . . . . . . . . . . . . . . . . . . . . . . . . . . . . . .5
Batteries . . . . . . . . . . . . . . . . . . . . . . . . . . . . . . . . . . . . . . . . . . . . . . . . . . . . . . . . . .6
Armrest . . . . . . . . . . . . . . . . . . . . . . . . . . . . . . . . . . . . . . . . . . . . . . . . . . . . . . . . .6-7
Headphones (not included) . . . . . . . . . . . . . . . . . . . . . . . . . . . . . . . . . . . . . . . . . . . .7
Introduction to the Teknetics® T 2
General information . . . . . . . . . . . . . . . . . . . . . . . . . . . . . . . . . . . . . . . . . . . . . . . . . .8 Specifications . . . . . . . . . . . . . . . . . . . . . . . . . . . . . . . . . . . . . . . . . . . . . . . . . . . . . .9 Controls . . . . . . . . . . . . . . . . . . . . . . . . . . . . . . . . . . . . . . . . . . . . . . . . . . . . . . . . . .10 Menu System . . . . . . . . . . . . . . . . . . . . . . . . . . . . . . . . . . . . . . . . . . . . . . . . . . . . . .11 Ground Cancellation . . . . . . . . . . . . . . . . . . . . . . . . . . . . . . . . . . . . . . . . . . . . .12-14 All Metal Mode . . . . . . . . . . . . . . . . . . . . . . . . . . . . . . . . . . . . . . . . . . . . . . . . . . . .15 Discrimination Mode . . . . . . . . . . . . . . . . . . . . . . . . . . . . . . . . . . . . . . . . . . . . . .15-17 PinPoint Feature . . . . . . . . . . . . . . . . . . . . . . . . . . . . . . . . . . . . . . . . . . . . . . . . . . .18 LCD Visual Display . . . . . . . . . . . . . . . . . . . . . . . . . . . . . . . . . . . . . . . . . . . . . .19-21
Numeric Target Identification . . . . . . . . . . . . . . . . . . . . . . . . . . . . . . . . . . . . . .19 Probable Target Identification . . . . . . . . . . . . . . . . . . . . . . . . . . . . . . . . . . . . . .19 Target Depth . . . . . . . . . . . . . . . . . . . . . . . . . . . . . . . . . . . . . . . . . . . . . . . . . . .20 G.C. Phase . . . . . . . . . . . . . . . . . . . . . . . . . . . . . . . . . . . . . . . . . . . . . . . . . . . .20 Settings . . . . . . . . . . . . . . . . . . . . . . . . . . . . . . . . . . . . . . . . . . . . . . . . . . . . . . .20 Messages . . . . . . . . . . . . . . . . . . . . . . . . . . . . . . . . . . . . . . . . . . . . . . . . . . . . .20 Bar Graph . . . . . . . . . . . . . . . . . . . . . . . . . . . . . . . . . . . . . . . . . . . . . . . . . . . . .21 Battery Indicator . . . . . . . . . . . . . . . . . . . . . . . . . . . . . . . . . . . . . . . . . . . . . . . .21
Frequency Shifting . . . . . . . . . . . . . . . . . . . . . . . . . . . . . . . . . . . . . . . . . . . . . . . . .21 Capabilities & Limitations . . . . . . . . . . . . . . . . . . . . . . . . . . . . . . . . . . . . . . . . . .22-24
Tips & Techniques
Search Techniques
Sweep Searchcoil . . . . . . . . . . . . . . . . . . . . . . . . . . . . . . . . . . . . . . . . . . . . . .25 Pinpointing targets . . . . . . . . . . . . . . . . . . . . . . . . . . . . . . . . . . . . . . . . . . .26-27 Estimating Target Size, Depth and Shape . . . . . . . . . . . . . . . . . . . . . . . . .27-28 False signals and chatter . . . . . . . . . . . . . . . . . . . . . . . . . . . . . . . . . . . . . .28-30 Adjusting Sensitivity using the Sensitivity Control . . . . . . . . . . . . . . . . . . . . . .30 Tips On Ground Canceling . . . . . . . . . . . . . . . . . . . . . . . . . . . . . . . . . . . . . . . .31
Detecting Activities
Coinshooting . . . . . . . . . . . . . . . . . . . . . . . . . . . . . . . . . . . . . . . . . . . . . . . . . .32 Relic Hunting . . . . . . . . . . . . . . . . . . . . . . . . . . . . . . . . . . . . . . . . . . . . . . . .32-33 Gold Prospecting . . . . . . . . . . . . . . . . . . . . . . . . . . . . . . . . . . . . . . . . . . . .33-36 Cache Hunting . . . . . . . . . . . . . . . . . . . . . . . . . . . . . . . . . . . . . . . . . . . . . .36-37 Shallow Water Hunting . . . . . . . . . . . . . . . . . . . . . . . . . . . . . . . . . . . . . . . . . . .37
How metal detectors work . . . . . . . . . . . . . . . . . . . . . . . . . . . . . . . . . . . . . . . . . . .38 Treasure Hunter’s Code of Ethics . . . . . . . . . . . . . . . . . . . . . . . . . . . . . . . . . . . . . .38 Warranty . . . . . . . . . . . . . . . . . . . . . . . . . . . . . . . . . . . . . . . . . . . . . . . . . . . . . . . . .39
3

TEKNETICS Comprehensive Operating Manual & Guide to Metal Detecting
QUICK START
Start using your T2 right out of the box
1.Assemble the detector (see instructions beginning page 5-6).
2 Install four AA alkaline batteries. All positive terminals point up.
3.Turn the knob, located under the armrest, fully clockwise.
This turns the machine on and sets audio volume to maximum.
4.When first turned on, the T 2 starts out in the Discrimination Mode, with: Sensitivity preset to 60
Discrimination Level preset to 10
Number of Tones preset to method-1
Sweep the searchcoil from side to side, parallel to the ground. Keep the searchcoil moving over the ground. If you stop moving the search coil, the sound will also stop. Probable target type will be indicated at the top of the LCD screen.
5.If the searchcoil is not in motion and not close to metal, the detector should be silent.
6.If you experience false signals from electrical interference, from the soil itself, or from lots of trash metal, press the Menu button.
Sensitivity will be highlighted.
Rotate the Settings knob to the left (counterclockwise), Reduce the sensitivity setting until the false signals go away.
After 5 seconds, the machine will exit the menu and return to normal operation.
7.Toss a coin on the ground and sweep back and forth over it a few times to get a feel for how the machine responds.
8.You are now ready to search.
9.Pull the trigger switch with your index finger to pinpoint the exact location of targets, making them easier to unearth.
When the trigger is pulled, PinPoint is engaged ….
The searchcoil need not be in motion to detect an object.
The 2-digit numeric display indicates approximate target depth, in inches.
4
Comprehensive Operating Manual & Guide to Metal Detecting TEKNETICS
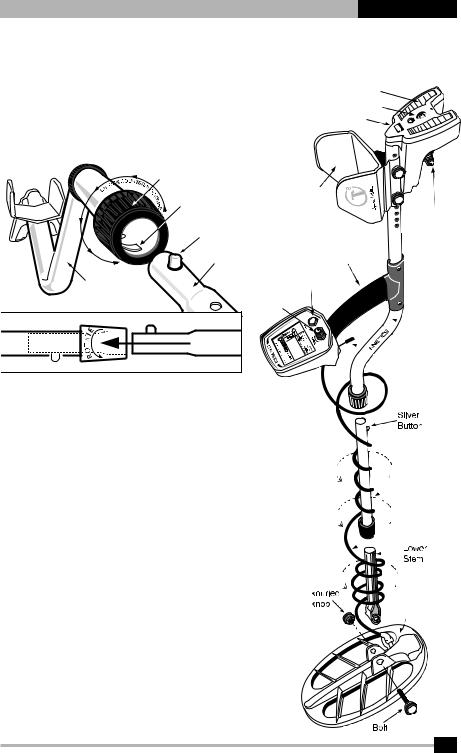
MECHANICALS |
Caution: Forcing in MIDDLE STEM with CAM LOCK raised may form a burr on |
camlock. If this happens, remove burr with knife to allow insertion. |
Assembly
1Position S-Rod upright.
2Rotate the LOCKING COLLAR fully in the counterclockwise direction.
Battery Compartment
Headphone Jack
Release Clip
3 Insert your finger inside the tube and make sure the INTERNAL CAM LOCK is flush with the inside of the tube.
LOCKING |
2 |
|
|
|
COLLAR |
● |
|
2-way |
|
|
|
|
|
|
INTERNAL |
|
adjustable |
|
|
3 |
armrest |
|
||
|
|
On/Off & |
||
CAM LOCK ● |
|
|||
SILVER BUTTON |
|
Volume |
||
|
Switch |
|||
|
|
|
|
|
MIDDLE |
4 |
|
|
|
|
STEM |
● |
Hand-grip |
|
S-ROD |
|
|
Menu |
|
|
|
Settings Botton |
|
|
|
|
|
Switch |
|
S-ROD |
MIDDLE STEM |
5 |
4 |
● |
● |
 S-Rod
S-Rod
 Dual-function
Trigger switch
4Insert the MIDDLE STEM into the S-ROD, with the SILVER BUTTON pointed upward
5Rotate the MIDDLE STEM until the SILVER BUTTON locates in the hole.
6Twist the LOCKING COLLAR fully in the clockwise direction until it locks.
7Repeat this process on the LOWER STEM.
8Using the BOLT and KNURLED KNOB, attach the SEARCHCOIL to the LOWER STEM.
9Adjust the LOWER STEM to a length that lets you maintain a comfortable upright posture, with your arm relaxed at your side, and the SEARCHCOIL parallel to the ground in front of you.
10Wind the CABLE securely around the STEMS.
11Connect CABLE PLUG to housing.
Do not twist the Cable or Plug. Turn Locking Ring only. Use minimal finger pressure to start the threads. Do not crossthread. When the Locking Ring is fully engaged over the threaded connector, give it a firm turn to make sure that it is very tight. When the Locking Ring is fully engaged over the threaded connector, it may not cover all of the threads.
12Tighten both LOCKING COLLARS.
Upper
 Stem
Stem
Search
Coil
 Cable
Cable
Biaxial
Searchoil
* Note: Very tall users can purchase the optional Extended Lower Stem (TUBE5X), for extended reach.
5

TEKNETICS Comprehensive Operating Manual & Guide to Metal Detecting
MECHANICALS (continued)
BATTERIES
The T 2 uses four AA batteries. Use ALKALINE batteries for best performance. Rechargeable batteries may be used. Expect 40 hours of service in the field with one set of ALKALINE batteries.
If you use rechargeable batteries, good-quality NiMH (nickel-metal–hydride) batteries are recommended. They will usually deliver over 25 hours of service without recharging, but when they start running low, they die suddenly with little warning.
Always install batteries which are of the same type and the same state of charge. Otherwise battery life will be determined by the weakest battery, as the good batteries cannot deliver their power with a dead battery blocking the current.
All 4 batteries are installed with the positive terminals facing upward.
DO NOT MIX OLD AND NEW BATTERIES
The LCD screen shows battery condition on the right.
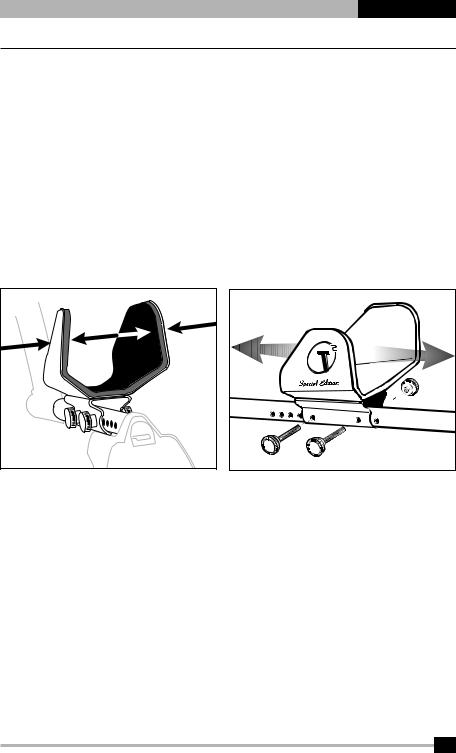
ARMREST
The armrest WIDTH and POSITION are both adjustable.
Armrest Width: The sides of the armrest can be bent inward and outward.
To best stabilize the detector to your arm and body movement, squeeze the sides of the armrest around your forearm. For a very secure fit, some users prefer to bend the armrest in tightly against the forearm such that you pry the sides loose each time you place your arm into the armrest.
6
Comprehensive Operating Manual & Guide to Metal Detecting TEKNETICS
MECHANICALS (continued)
Armrest Position on Pole: Remove the two bolts to position the armrest farther forward or back, to adapt to your arm’s length.
—To reinsert the bolts, spin and twist them into place. Be careful not to damage the power cable that runs through the aluminum tube.
—Insert both bolts completely through both sides of the bracket before attaching the nut to the opposite side.
—For maximum stability, the bolts fit very tightly into the holes; you may have to wiggle each one a bit to push it through the holes.
—After reinserting the bolts, tighten them very securely. As you swing the detector from side-to-side, you want the bolts tight enough so that you do not feel any movement between the pole and armrest mounting bracket.
If you notice unwanted movement while swinging detector, check the tightness of the locking collars. The locking collars must be rotated a full 270° to reach the locking position.
Adjust the armrest in or out accordingly |
Adjust the armrest forward or back, to adapt to |
|
your arm’s length. |
HEADPHONES (not included)
The T 2 is equipped with a standard 1/4-inch stereo headphone jack at the rear of the unit, located under the elbow as you hold the detector for use. Any headphone with a 1/4” stereo jack should work. Mono headphones will not work.
Using headphones improves battery life, and prevents the sounds from annoying bystanders. It also allows you to hear subtle changes in the sound more clearly, particularly if searching in a noisy location.
For safety reasons, do not use headphones near traffic or where other dangers, like rattlesnakes, are present.
This device is to be used with interconnecting cables/headphone cables shorter than three meters.
7

TEKNETICS Comprehensive Operating Manual & Guide to Metal Detecting
Introduction to the Teknetics® T 2
General Information
HIGH PERFORMANCE The Teknetics® T2 is a multi-purpose high-performance computerized metal detector. It has the high sensitivity and ground cancellation features needed for professional gold prospecting, the discrimination responsiveness needed for serious relic hunting under difficult conditions, and visual Target-ID considered essential in searching for coins. The ground cancellation system can be adjusted to allow searching salt water beaches. The T2 operates at 13 kHz for good sensitivity to gold nuggets and jewelry as well as to coins. The T2 comes with an 11-inch elliptical Bi-Axial searchcoil for maximum detection depth in mineralized soils.
USER COMFORT The T2 is light weight and the best balanced of any high-performance metal detectors, so you can hold and swing it almost effortlessly. The armrest position is adjustable to fit your arm. The grip is durable high-friction foam elastomer, comfortable in any kind of weather. The controls are conveniently located and easy to learn how to use. Locking collars on the tubes eliminate rattling.
EASY-TO-USE & INFORMATIVE INTERFACE The entire menu is always visible on the LCD display. The LCD display indicates the electrical signature (Target-ID) of the detected metal object. The display provides continuous information on battery condition and on ground mineralization, which affects detection depth. Help messages are automatically displayed on the lower right corner of the display when necessary.
LOW OPERATING COST The T2 is powered by four AA alkaline batteries, which will typically last for more than 40 hours of use before needing replacement.
DESIGNED BY EXPERIENCED ENGINEERS The lead engineers on the T2 design team were John Gardiner, firmware engineer, and David Johnson, whose expertise is behind many of the best-known high-performance metal detectors offered by major U.S. manufacturers for the last 26 years.
8

Comprehensive Operating Manual & Guide to Metal Detecting TEKNETICS
SPECIFICATIONS
Mechanical: S-rod with electronics housing mounted on handgrip, 3-piece breakdown, batteries under elbow, 2-way armrest adjustment — forward/backward & around forearm.
Searchcoil: 11” (28 cm) open-frame elliptical double-D, waterproof.
Batteries: 4 AA, alkaline or NiMH (not included).
Weight: 3.5 pounds (1.6 kg) with alkaline batteries installed.
Static Balance: force in vertical plane normal to elbow 0.47 pounds (0.22 kg).Varies with adjustment and user’s stance and arm/hand physiology.
Dynamic Balance: axial moment, 0.29 foot-pounds (0.39 newton-meters). Varies with adjustment and user’s stance and arm/hand physiology.
Sweep Effort: lateral moment 5.2 foot-pounds (7.1 newton-meters).
Operating Principle: VLF induction balance
Operating Frequency: nominal 13 kHz, quartz crystal timing reference
Basic Sensitivity: |
5 x 10⁹ root Hertz (detectivity) |
Lag Coefficient: |
70 milliseconds |
Reactive Overload: approximately 10,000 micro-cgs units (volume susceptibility) |
|
Resitive Overload: approximately 1,200 micro-cgs units (volume susceptibility) |
|
Ground Cancellation Range: From ferrite to salt, inclusive |
|
Discrimination Ground Suppression: combination of second and third order methods |
|
ID Ground Suppression: third order
Battery Life: typically 40 hours with good quality alkaline, somewhat less with NiMH rechargeable.
Operating Temp Range: -4 to +122 degrees F (-20 to +50 degrees C)
Operating Humidity Range: 0-90% non-condensing
9
TEKNETICS Comprehensive Operating Manual & Guide to Metal Detecting
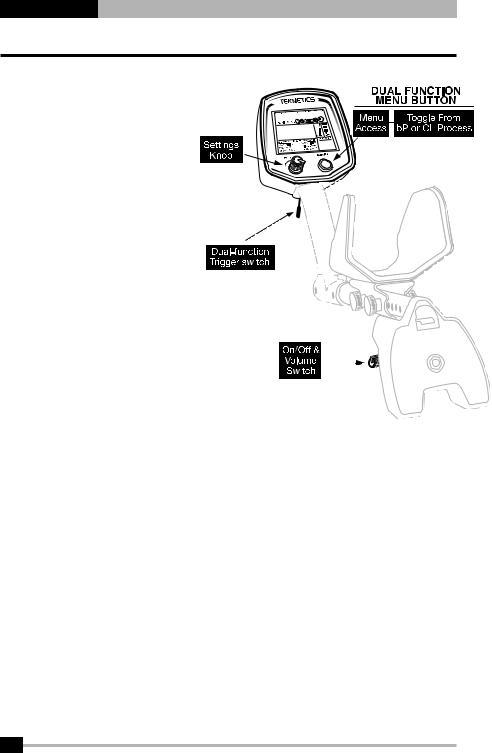
CONTROLS
ON-OFF & VOLUME Knob (Under the elbow) This knob turns the machine on or off, and controls speaker volume and headphone volume. Knob position has no effect on detector’s
sensitivity or susceptibility to noise from electrical interference
The T2 has two controls on the front panel, MENU and SETTINGS.
MENU Pushbutton (On right of the front panel)
Push the MENU button to:
1. Step through the menu selections on the display.
With each push of the button, the next menu selection will be highlighted.
The SETTINGS knob allows you to change the values of the highlighted selection.
2. Recall the last setting which you adjusted. After you have adjusted a setting, an arrow will
remain highlighted next to this menu selection. One push of the menu button will recall that selection and display the stored value.
This recall function is useful for a value you want to adjust frequently, such as the ground cancellation value.
3.Press-and-Hold the Menu button to temporarily deactivate the bP or CL settings.
The standard function of the 2+ # of TONES selection will be activated while the button is depressed.
Releasing the button will return you to the bP or CL setting which you were operating in.
When using any # OF TONES setting other than bP or CL, pressing-and-holding the button will have no effect.
SETTINGS Knob (On the left of the front panel)
Rotate the SETTINGS knob to:
1.Change the setting (or value) of the highlighted menu selection you have chosen.
2.Select operating MODE when the top line of the menu is highlighted.
When used to switch back and forth between the All Metal Mode and Discrimination Mode, the detector changes modes as soon as the corresponding selection is highlighted. The All Metal Mode is used to detect all metal objects, including small or deep objects. Use the Discrimination Mode to ignore trash metal such as nails, foil, or pull-tabs.
3. Recall the last setting which you adjusted.
10
Comprehensive Operating Manual & Guide to Metal Detecting TEKNETICS
CONTROLS (continued)
When you rotate the settings knob, you are also changing the value. If using this knob to recall a setting, it is best to rotate just one indent.
TRIGGER SWITCH (Under the control housing in front of your hand)
While the trigger is pulled back, metal objects are temporarily detected without the need for searchcoil motion. This aids in pinpointing the exact location of objects which were found while searching in the All Metal or Discrimination Mode.
When the trigger is pushed forward, FASTGRAB™ automatic ground cancellation is activated. The internal computer measures the magnetic properties of the soil in order to cancel interference from naturally-occurring minerals in the ground. After the detector measures the soil in this manner, the detector then uses this information to control operation in both the All Metal and Discrimination search modes.
THE MENU SYSTEM
The entire menu is printed on the LCD display. The display highlights the mode and settings which are in use.
There are two search modes, All Metal and Discrimination. To change between search modes, the top line of the menu system must be highlighted. Press the MENU button until the top line of the menu is highlighted. When either ALL METAL or DISCRIM is highlighted, rotate the SETTINGS knob to change between the two modes.
Each search mode has three adjustable function settings:
ALL METAL: Sensitivity, Hum Level, and Manual Ground Cancellation. See page 15.
DISCRIMINATION: Sensitivity, Discrimination Level, and Number of Tones. See page 15-16.
To select a function, push the MENU button and continue pushing to move to the function you want. The word SETTING will pop up on the display above the menu, and the present setting of that function will be displayed as a number.
To change a setting, rotate the knob.
To increase a value, rotate to the right (clockwise)
To decrease a value, rotate to the left (counterclockwise)
If you select a function and do not make a change to that function after 5 seconds, the detector will exit the menu system automatically, and resume normal operation.
11

TEKNETICS Comprehensive Operating Manual & Guide to Metal Detecting
THE MENU SYSTEM (continued)
If you press the MENU button or rotate the SETTINGS knob while the machine is in normal operation, the user interface will return to the last menu feature setting. This feature allows you to have quick access to a function that you want to adjust frequently.
GROUND CANCELLATION
What is Ground Cancellation?
All soils contain minerals. Signals from ground minerals are often tens or hundreds of times as strong as the signal from a buried metal object. The magnetism of iron minerals, found in nearly all soils, causes one type of interfering signal. Dissolved mineral salts, found in some soils, are electrically conductive, causing another type of interfering signal.
Ground Cancellation is the process by which the metal detector cancels the unwanted ground signals while leaving signals from buried metal objects intact. This is accomplished by establishing the detector’s internal Ground Phase setting; this setting is calibrated to the soil and eliminates the ground minerals’ signal.
When the detector is calibrated to the actual soil condition, the result will deeper target detection, quieter operation, and more accurate Target Identification. This calibration, or Ground Cancellation, can be accomplished automatically with the detector’s internal computer, by pushing the Trigger Switch forward, or manually in the All Metal menu.
The ground cancellation setting carries through into both All Metal and Discrimination Modes. In Discrimination Mode, the ground signal is generally inaudible unless the discrimination setting is 0.
AUTOMATIC GROUND CANCELLATION PROCEDURE (FASTGRAB™)
1. Find a spot of ground where there is no metal present. 2. Hold the detector with the searchcoil about one foot 
 above the ground.


3. Push the TRIGGER SWITCH forward with your index
finger. 4. Physically pump the searchcoil and detector up and down over
the ground. Lift it about 6 inches above the ground and lower it to within 1 inch of the ground, about once or twice a second.
5. A 2-digit value will appear on the display. This is the  Ground Phase setting.
If the detector’s internal computer is unable to cancel the ground signal, the
message CAN’T GC will appear; find another spot of ground and try again.
12
 Loading...