

Page 1
Page 2

Introduction
Thank you for purchasing this product. For your mobile phone works properly.
Please follow the instructions in this manual. To prevent any possible incidents
or malfunction, please follow all safety warnings. If function described in the
manual does not match with actual products, please refer to our company
subsequent information. This user guide specially used to guide you
understand the phone functions and characteristic.
Please read the instruction first
Before you use this phone, please read all the safety cautions in the
instructions in detail, to ensure safety and correct use.
--The descriptions are based on the default settings.
--The pictures and screen shots may different from the actual product.
--Receive and send message, upload and download, automatic synchronism
or GPRS service may cause other kinds of fee. If you want to avoid the extra
charge, choose the probable charging plan. Any relevant information, please
contact the service provider.
--For unknown applications, be careful when install, the strange website pop
up when browsing the internet, you can click but better to avoid the operation
or the phone will be infected by malicious applications or virus. Please properly
keep this instruction book for the future reference.
Contects
1、Phone Layout.........................................................................................................5
1.1 Keys and Parts.................................................................................................. 5
1.2 Functions and Buttons..................................................................................... 6
1.3 Insert the SIM Card
1.4 Insert the microSD card................................................................................... 7
1.5 Battery charging
2、Basic Operations
2.1 Power on/off devices........................................................................................ 7
2.2 Unlock the phone
2.3 Make a call
2.4 Call settings
3、Call logs.................................................................................................................. 8
.........................................................................................................
.......................................................................................................
...........................................................................................
................................................................................................
...................................................................................................
..............................................................................................
7
7
7
8
8
8
4、Contacts
..................................................................................................................
1
9
Page 3

4.1 Add a contact.....................................................................................................9
4.2 Search contacts.................................................................................................9
4.3 Import/Export contacts..................................................................................... 9
4.4 Batch delete
.......................................................................................................
4.5 SIM capacity...................................................................................................... 9
4.6 Contacts to display........................................................................................... 9
4.7 Add to Blacklist..................................................................................................9
4.8 Send vcard......................................................................................................... 9
5、Message................................................................................................................. 9
5.1 New message
..................................................................................................
10
5.2 Templates........................................................................................................ 10
5.3 Delete message
..............................................................................................
10
5.4 Message settings............................................................................................10
6、Phone....................................................................................................................10
6.1 VoLTE
...............................................................................................................
10
6.2 Answer an incoming call................................................................................10
9
6.3 Reject an incoming call
..................................................................................
10
6.4 During a call.....................................................................................................10
6.5 Emergency calls..............................................................................................11
6.6 Make International Calls................................................................................ 11
7、Multimedia
7.1 Camera
7.2 Video recorder
............................................................................................................
.............................................................................................................
.................................................................................................
11
11
11
7.3 Gallery.............................................................................................................. 12
7.4 Music.................................................................................................................12
7.5 FM Radio..........................................................................................................13
8、Tools..................................................................................................................... 13
8.1 SOS
8.2 Call Fire Wall
...................................................................................................................
...................................................................................................
13
14
8.3 Sound Recorder..............................................................................................14
2
Page 4

8.4 Backup And Restore...................................................................................... 14
8.5 File Explorer.....................................................................................................14
8.6 Calculator.........................................................................................................14
9、Settings.................................................................................................................14
9.1 WIFI...................................................................................................................14
9.2 Bluetooth.......................................................................................................... 15
9.3 Audio Profiles.................................................................................................. 15
9.4 Display..............................................................................................................15
9.5 Voice Broadcast
9.6 Data usage
..............................................................................................
.......................................................................................................
15
15
9.7 Airplane mode................................................................................................. 15
9.8 Internet Tethering
...........................................................................................
15
9.9 Data Connection............................................................................................. 15
9.10 GPS................................................................................................................ 15
9.11 Security Settings
...........................................................................................
16
9.12 Data & time....................................................................................................16
9.13 Language & input
.........................................................................................
16
9.14 Timer Switch Machine................................................................................. 16
9.15 Storage...........................................................................................................16
9.16 Battery............................................................................................................ 16
9.17 Mouse control................................................................................................16
9.18 Apps
9.19 Reset
................................................................................................................
..............................................................................................................
16
16
9.20 About phone.................................................................................................. 16
10、App Folder
.........................................................................................................
17
10.1 Downloads..................................................................................................... 17
10.2SIM Toolkit......................................................................................................17
11、Other Functions................................................................................................ 17
11.1 Alarm
..............................................................................................................
17
11.2 Stopwatch...................................................................................................... 17
3
Page 5

11.3 Calendar.........................................................................................................17
11.4 Browser.......................................................................................................... 17
11.5 Cleaner...........................................................................................................17
11.6 Profile
12、Software update
13、Safety Warning
14、Battery maintainance and cautions
15、Trouble shooting
15.1 My phone cannot be switched on or is frozen
15.2 My phone has not responded for several minutes
.............................................................................................................
................................................................................................
..................................................................................................
................................................................
...............................................................................................
.........................................
..................................
17
17
18
19
19
19
20
15.3My phone turns off by itself.......................................................................... 20
15.4 My phone cannot charge properly
.............................................................
20
15.5 My phone cannot connect to a network or “No service” is displayed...20
15.6 My phone cannot connect to the Internet................................................. 20
16、Certification Information (SAR).......................................................................20
17、Product warranty and our service centers.................................................... 21
18、Our Service centers..........................................................................................21
19、F Warning
...................................................................................................
22CC
4
Page 6
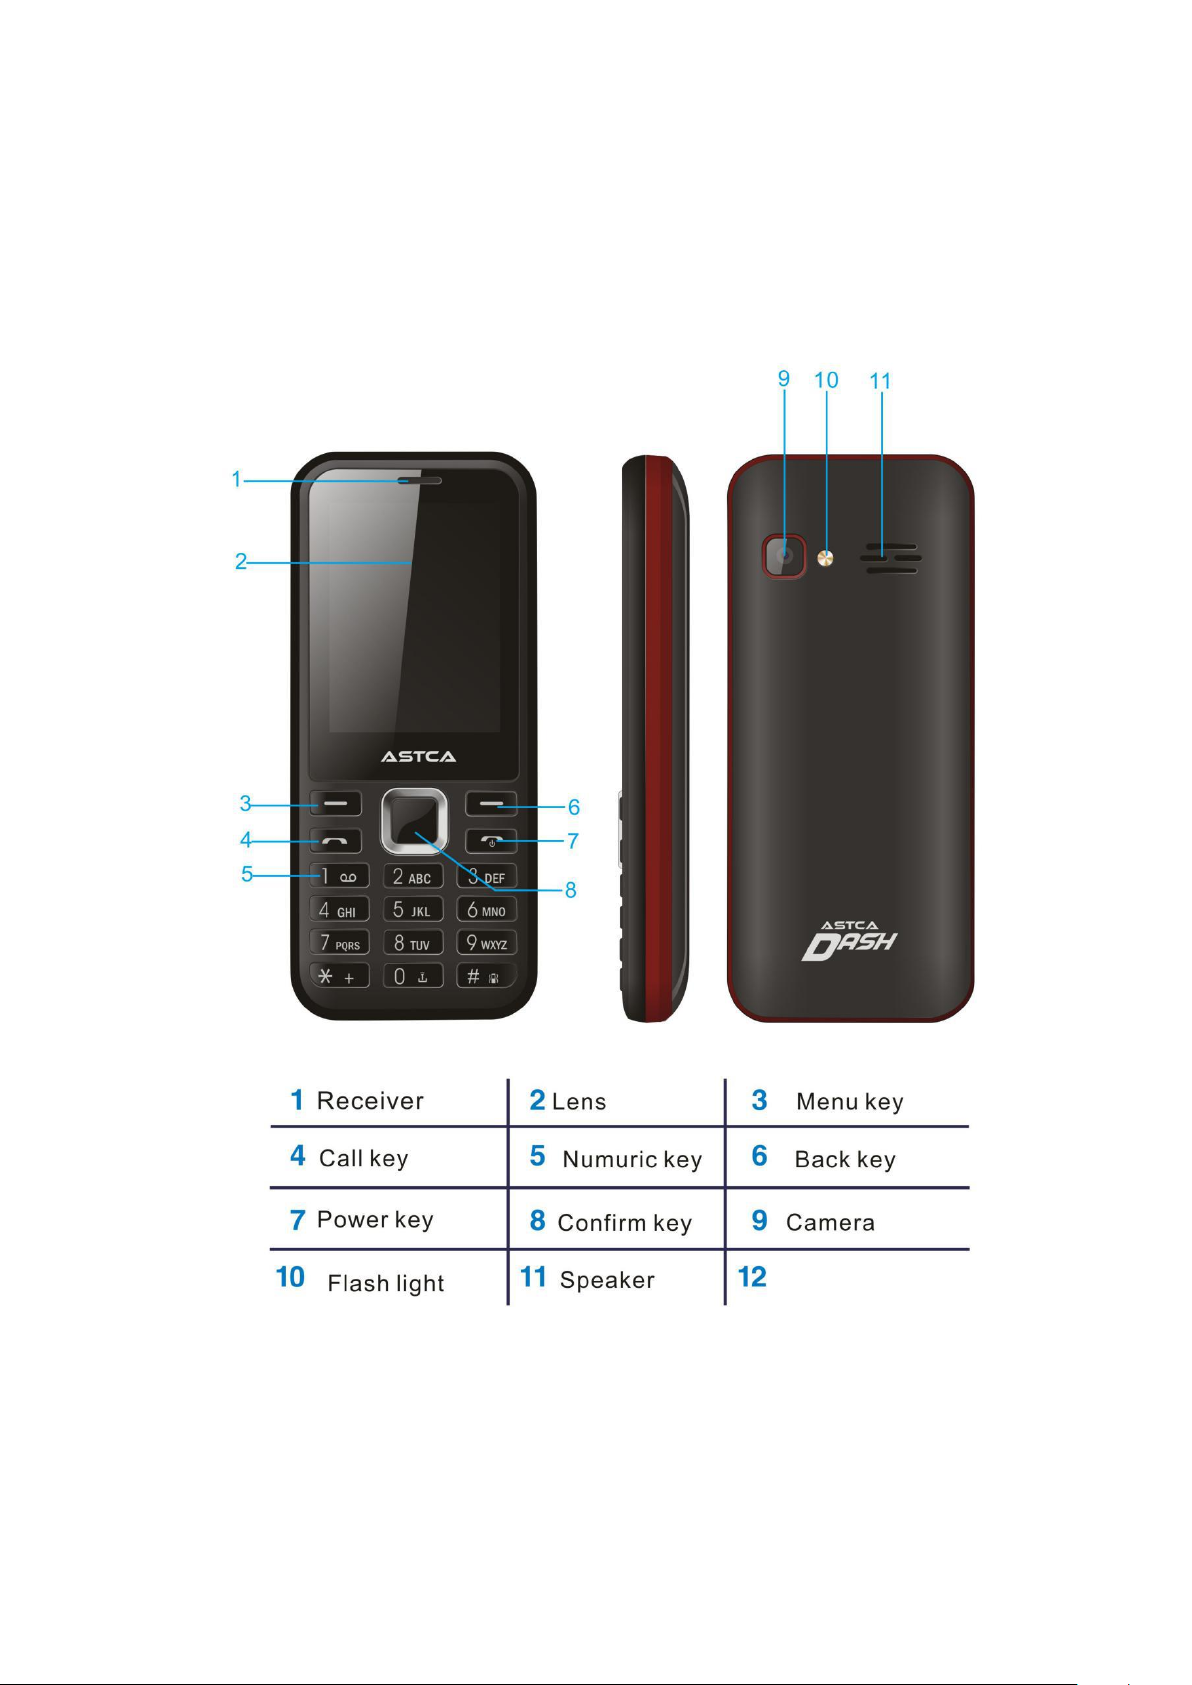
5
Phone Layout
1.1
1.1
Keys
Keys
and
and
Parts
Parts
Page 7
6
1.2
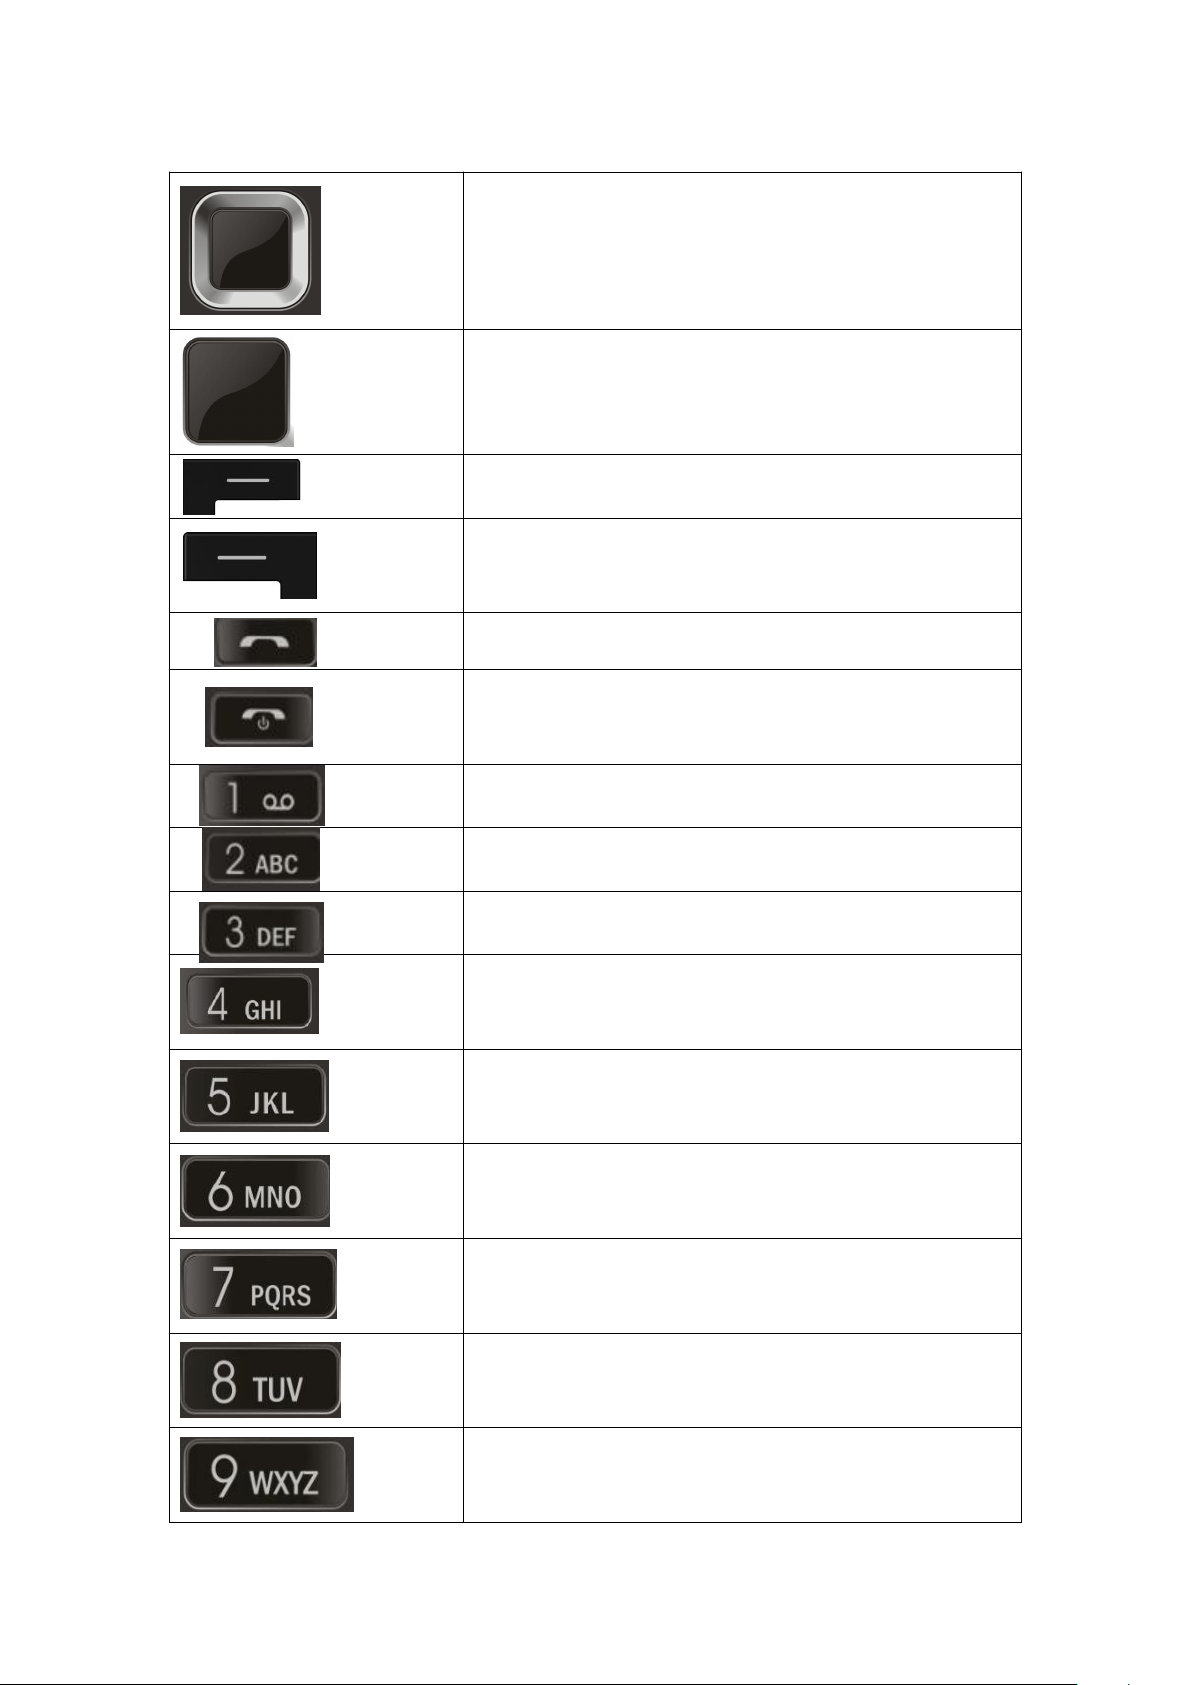
--4 ways nagination to move the selector
--Select item on screen
--Long press to active SOS
--Press for Menu
--Press for back to previou screen,
--Delete charecters in input mode
--press for make a call
--Awake screen
--Long press to turn off the phone
--Press for back to home screen
--Press for input special symbol , number 1 ,
entering voice mail or work on assignment
--Press for input A,B,C, number 2, or work on
assignment
--Press for input D,E,F, number 3, or work on
assignment.
--Press for input G,,I, number 4, or work on
assignment.
--Press for input J,K,L, number 5, or work on
assignment.
--Press for input M,N,O, number 6, or work on
assignment.
--Press for input P,,R,S 7, or work on
assignment.
--Press for input T,U,V number 8, or work on
assignment.
--Press for input - W,X,Y,Z Number 9, or work on
assignment.
Functions
1.2
Functions
and
and
Buttons
Buttons
Page 8
7
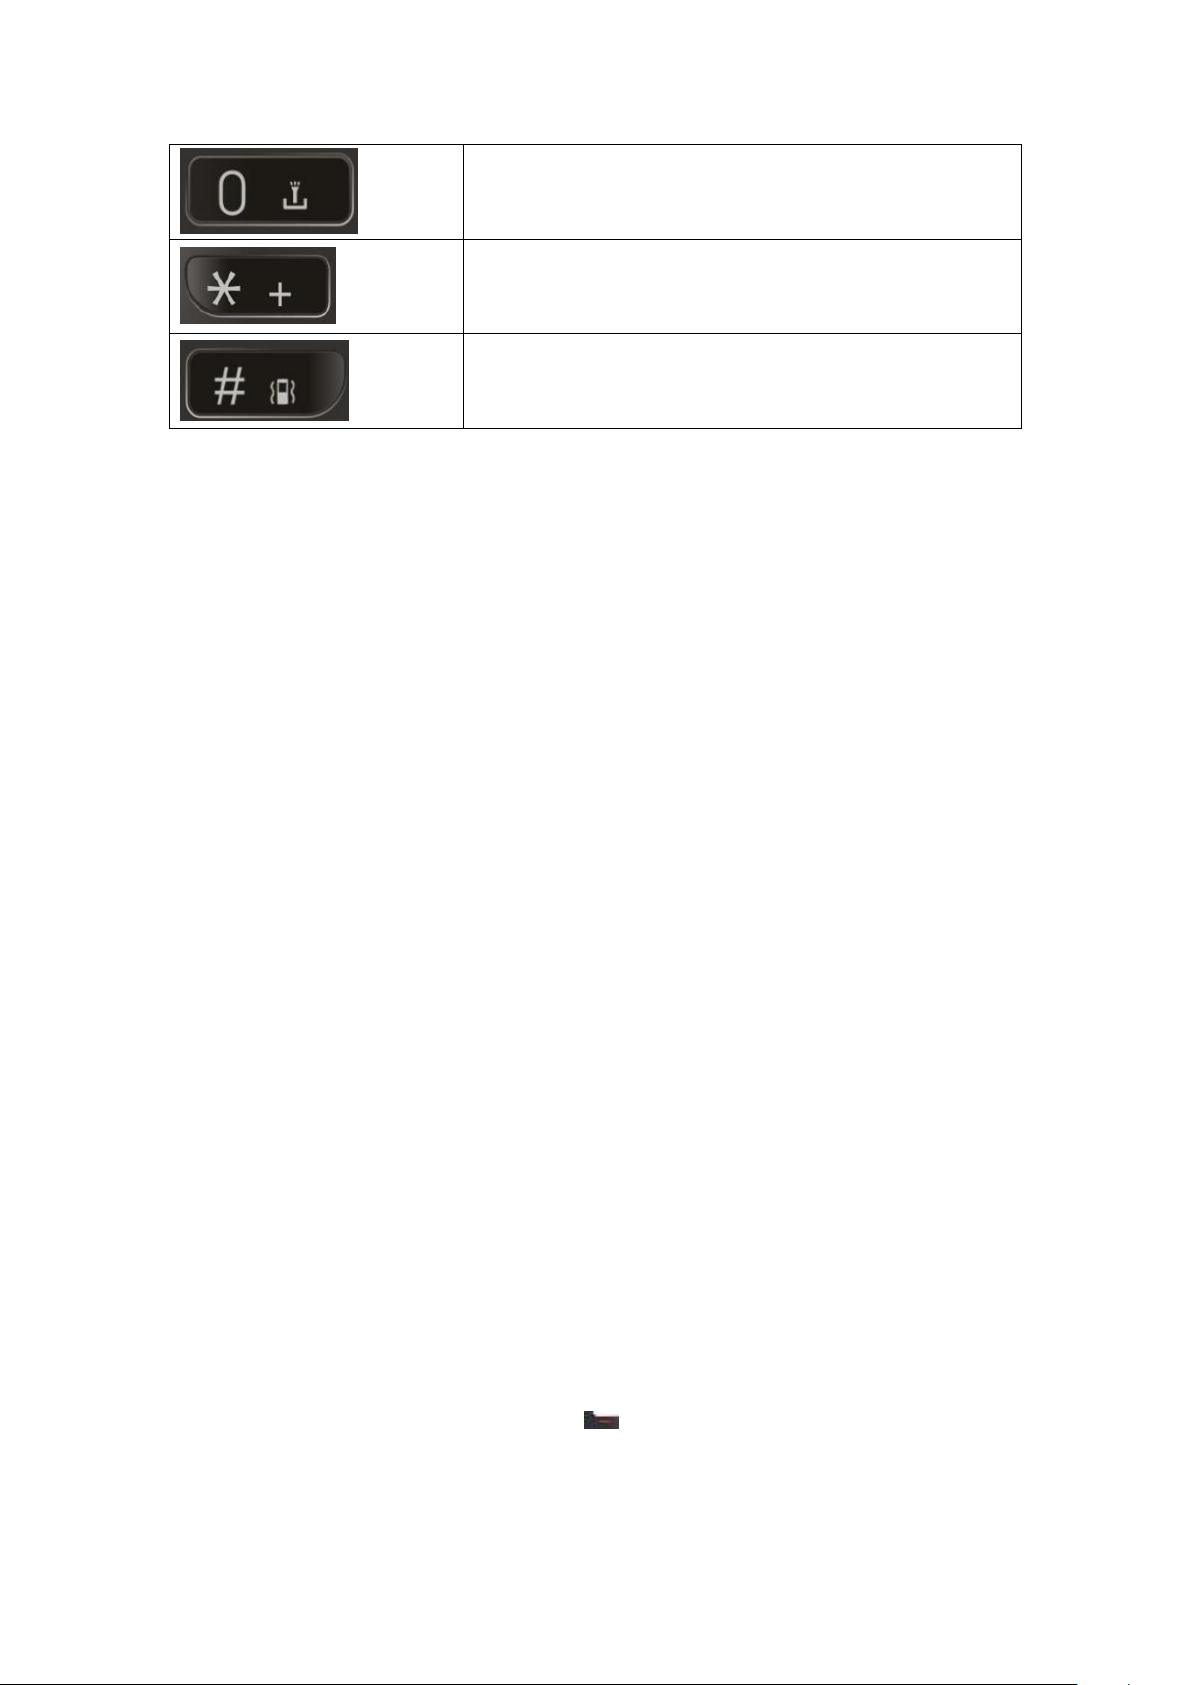
--Press for input - number 0, or long press
switch light
--unlock the Long press /Press for input special
alphabet
--long press Mute mode/Press for input special
alphabet
1.3
Insert
1.3
Insert
Please according to the label on the phone. Make sure that the clipped corner
of the SIM card is facing the correct direction and the metallic contacts are
facing the correct direction. Slide the SIM card into the card slot until it stop.
1.4
Insert
1.4
Insert
Slide the SD card into the SD card slot with the metallic pins facing downwards.
Push the card until it locks into place.
Warning : Use only compatible memory cards for use with this device.
Incompatible memory cards may damage the card or the device and corrupt
the data stored in the card.
1.5
Battery
1.5
Battery
When using the phone at the first time, need to charge for the phone, can use
charger or connect the phone with the computer via data cable.
The phone will issue warning tone and display electricity shortage information
when low battery, the battery icon will turn red, moreover, the phone will turn off
automatically when electricity is too low. Need to re-charge then you can use
the phone.
If the handset is power off, can’t turn on the phone immediately even connect
to the charger, before you turn on the phone, please charge for several
minutes.
When charging with the charger, Please put the micro USB (smaller) the
charger into the phone in the multi-function socket, put other side into the
standard power socket, be attention the improper charger connection will lead
to serious damage to the phone, to the damage caused by miss operation, will
not guarantee to repair.
the
SIM
the
SIM
the
microSD
the
microSD
charging
charging
Card
Card
card
card
2、Basic Operations
2.1
Power
2.1
Power
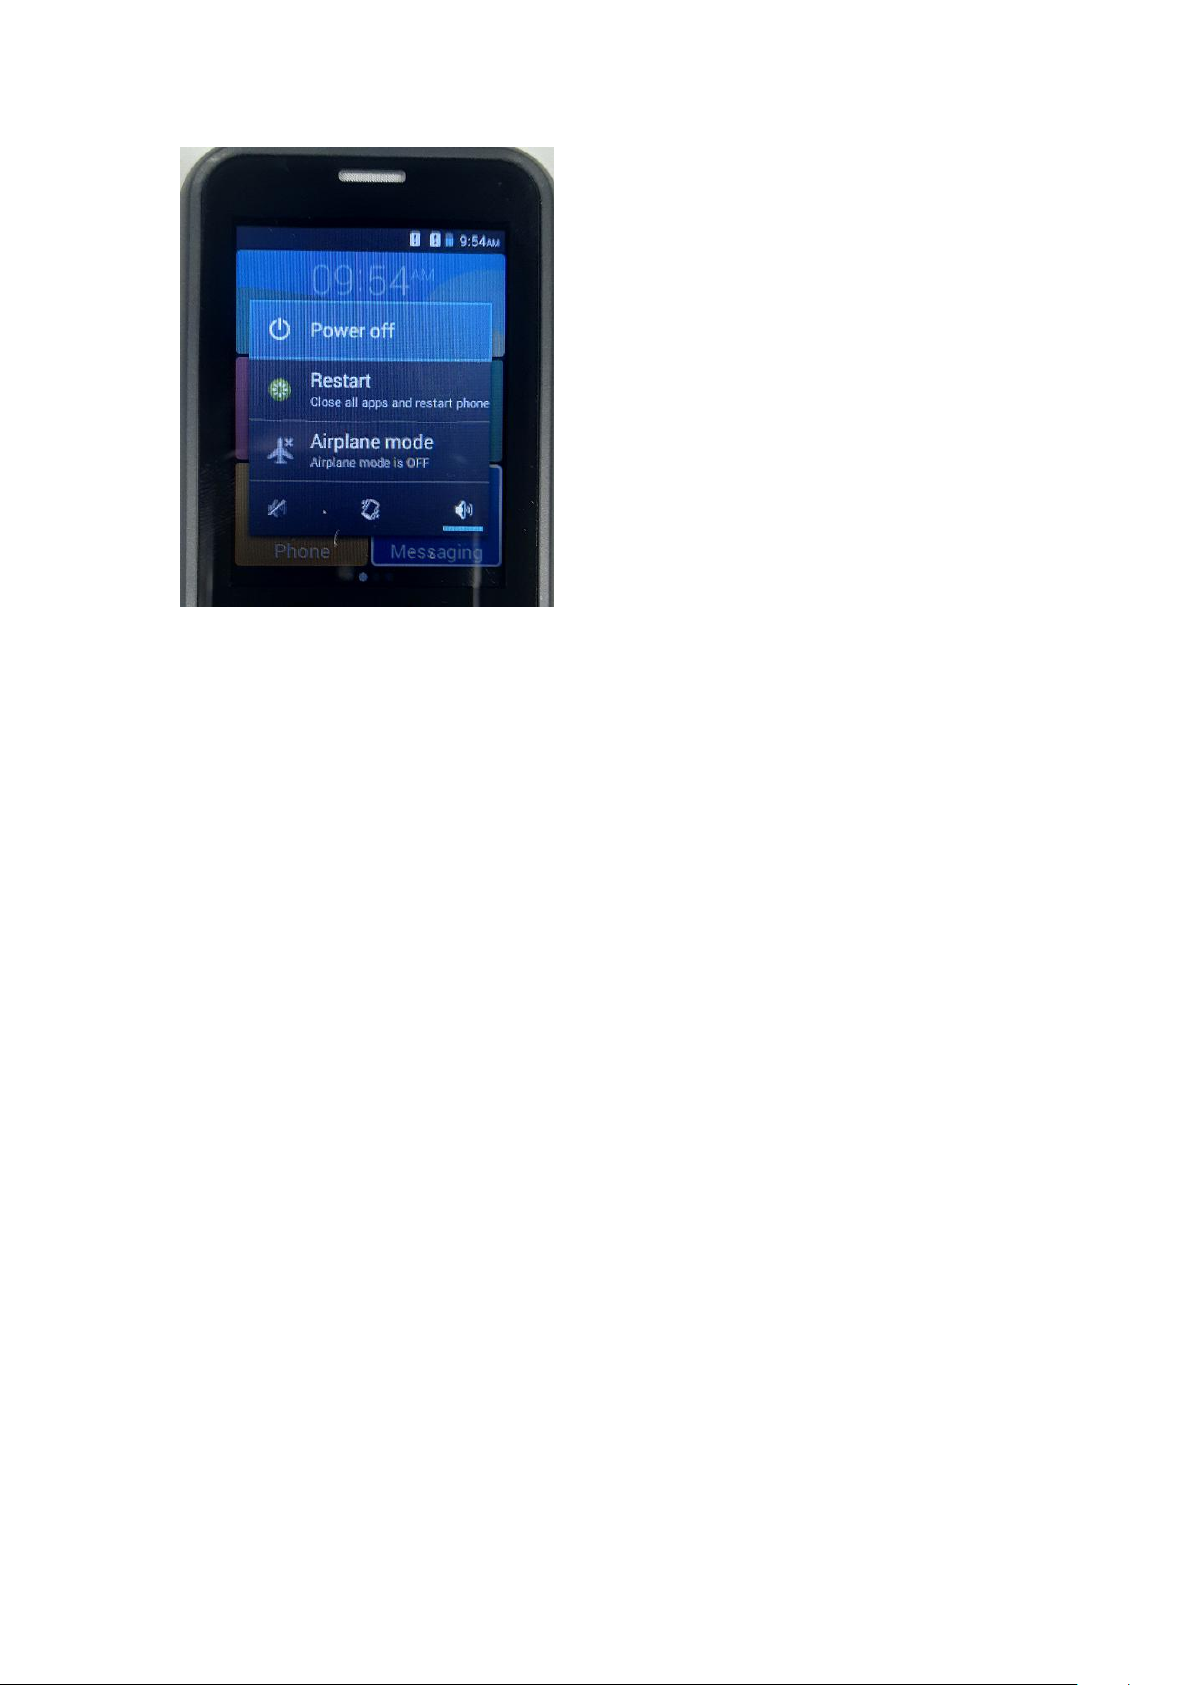
Do a long press the Switch power key to switch on the phone.
Press the power key for a while and comes out the dialogue(See picture),
select Power off and press ok to turn off
on/off
on/off
devices
devices
Page 9
8
2.2
(1) Enter the desired number while on home screen and press the Call
(2) Go to Contacts and then select a number and dial the desired number
(3) Just press the Call key to dial the contacts listed in Call logs.
Unlock
2.2
Unlock
If you do not use the phone for a while, the screen is locked .
(1) Press the power key to activate the screen.
(2)Press LSK then * key to unlock
2.3
Makeaa
2.3
Make
You can make a call in the following ways:
key to make the call.
from contact.
(4)You can also dial a contact from the messages.
2.4
Call
2.4
Call
Phone> Option>Call settings
To perform the IP dial setting, quick responses, call recording, voice mail, call
waiting, call barring, etc.
the
the
call
call
settings
settings
phone
phone
3、Call logs
Menu > istory
The history lists the calls you have recently dialed, received, missed.
Press the Left/right navigation keys to access various call logs and work on the
call logs.
Page 10

9
4、Contacts
The contacts application offers you to store and manage all your contacts.
Your phonebook data can be stored in your SIM card or your phone memory.
4.1
Addaa
4.1
Add
Menu>contacts>Menu key>option>Add Contact
Then select a location to save, enter the information for the contact. After you
finish, select to save.
4.2
Search
4.2
Search
Move the selector to Contacts icon, select to and Input to keyword
search contacts. The matched contacts listed phone automatically.
4.3
Import/Export
4.3
Import/Export
Menu>Contacts>Option>Import/Export
You can copy, Import or Export contacts entries stored in the SIM card to the
phone memory and SD card.
4.4
Batch
4.4
Batch
Menu>Contacts>Option>Batch delete
To select single or multiple contacts to delete in the contacts list.
contact
contact
contacts
contacts
delete
delete
contacts
contacts
4.5
SIM
4.5
Menu>Contacts>Option>SIM capacity
Check the memory status of SIM.
4.6
4.6
To select which contacts to display in the contacts list.
4.7
4.7
Menu > Contacts > Select a contact>Option > Add to blacklist
Allow you to black list selected numbers. In this case the contact will be
blocked from calling you up.
4.8
4.8
Menu > Contacts >Option >Import/Export>Share visible
Allow you to send vCard to other numbers via SMS or Bluetooth.
capacity
SIM
capacity
Contactstoto
Contacts
Addtoto
Add
Send
Send
Blacklist
Blacklist
vcard
vcard
display
display
5、Message
You can compose, send and receive text messages from your phone, and also
can compose, send and receive multimedia messages, which contain media
files such as pictures, videos and audios. When you view your messages, they
appear as conversations, which means that all messages to and from a
particular person are grouped together.
Page 11

10
5.1
New
5.1
Menu>Messaging>Options>New message
You can compose and send SMS/MMS, after input recipient and the content of
the SMS/MMS.
5.2
5.2
Menu>Messaging> Settings>General>Common Phrase
Enter into preset message templates and use them. These preset templates
can save you time if the theme of your message is the same as those existing
in the template
5.3
5.3
Menu>Messaging>Options>Delete thread
You can choose all messages in the Inbox or others to delete.
5.4
5.4
Menu>Messaging>Options>settings
The messages settings allow you to set notifications, signature, and many
others.
message
New
message
Templates
Templates
Delete
Delete
Message
Message
message
message
settings
settings
6、Phone
6.1
VoLTE
6.1
VoLTE
Make a call via VoLTE (Voice over LTE). You can make a call via VoLTE which
make a better experience in calling please contact service provider for enable
VoLTE function. Please check available coverage with your service provider
for more information. To setting please go to Settings > More > Mobile
networks > VoLTE>VoLTE Call Availability and then turn on for use.
6.2
Answeranan
6.2
Answer
To answer an incoming call, press
6.3
Rejectanan
6.3
Reject
To reject an incoming call, press
6.4
Duringaa
6.4
During
During a call, there are some call options available to you. These call options
can be seen only during a call. When a call is in progress, you can put it on
hold, mute your microphone etc.
--Select Speaker to turn on/off the speaker.
--Select Mute mute your voice so that the other party cannot hear
--Select old to place a call on hold.
--Select Add call open dial pad to dial the second call.
--Select Record record the dialog of the call.
incoming
incoming
incoming
incoming
call
call
call
call
call
call
you.
Page 12

11
--Select Send message Message can be sent to each other during the call.
6.5
Emergency
6.5
Emergency
You can call for emergency service as long as you are in the network coverage
(check the signal strength indication bar on the upper right side of the handset
screen). If your network provider doesn’t provide roaming service in this area,
there will be “Emergency Calls “on the lock screen. If you are in the network
coverage, you can have emergency calls even without a SIM card.
6.6
Make
6.6
Make
If you need to make an international call, do a long press on the 0 key on the
numuric keypad until there appears the sign “+” for international call prefix,
which helps you call from any country (For example, in China that is 86) even if
you don’t know the international call prefix of that country.
You can make an international call according to the following typing order: + >
country code > complete phone number > dialing icon (type in the prefix code,
and then continue to enter the country code and complete phone number).
Country code usually follows conventional practice: German is 49, Britain 44,
Sweden 46 and so on.
International
International
calls
calls
Calls
Calls
7、Multimedia
7.1
Camera
7.1
Camera
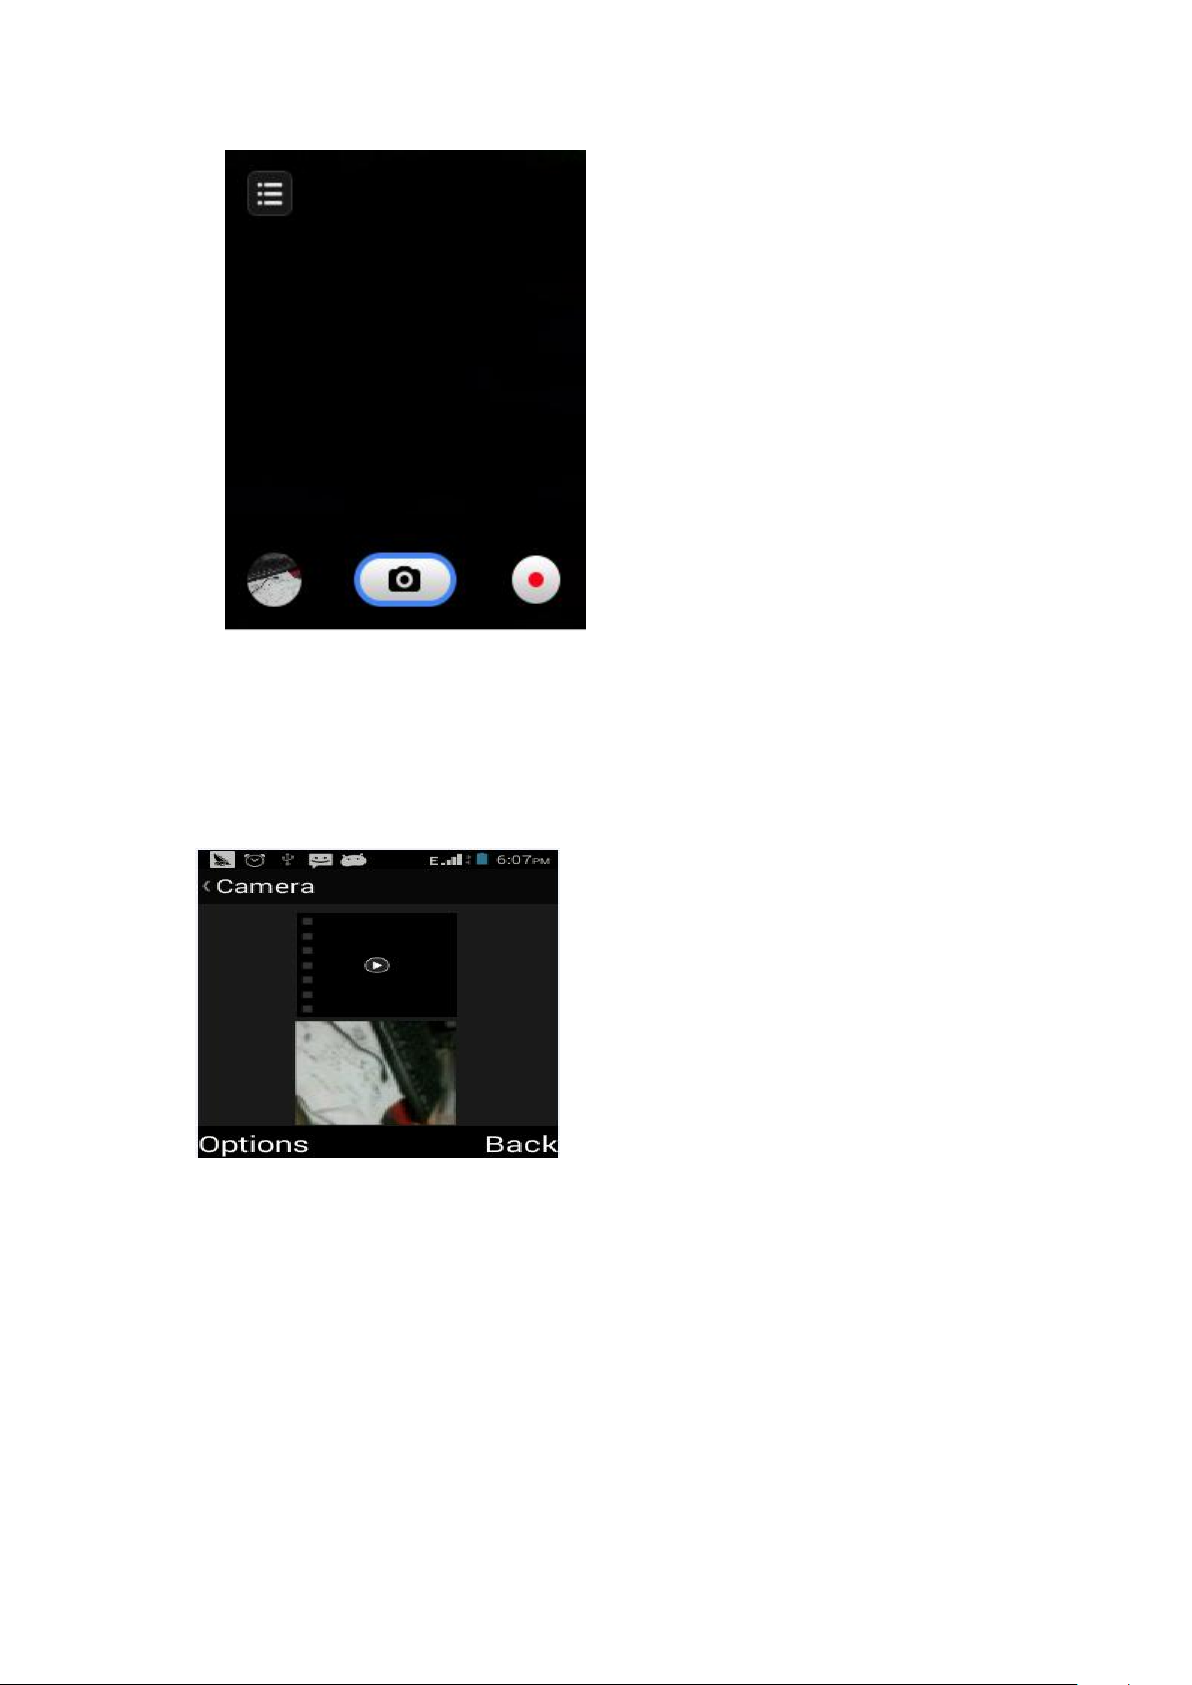
Menu > Camera > Navigation Key > Select camera button in the below
Press the OK Key to capture picture.
--You can press Navigation Key to choose Camera and Video
--You can also press Options key to choose Storage Path (Internal /
External)
7.2
Video
7.2
Video
Menu >Camera > Navigation Key > Select Video button in the lower right
corner. Press the OK Key to start recording.
recorder
recorder
Page 13
12
7.3
Gallery
7.3
Gallery
Menu > Gallery
You can use the Gallery to view pictures and play videos and share files.
--Press option key >Switch to Camera
--Select an album to open and view its contents.
--Touch a picture or a video in an album to view it.
7.4
Music
7.4
Music
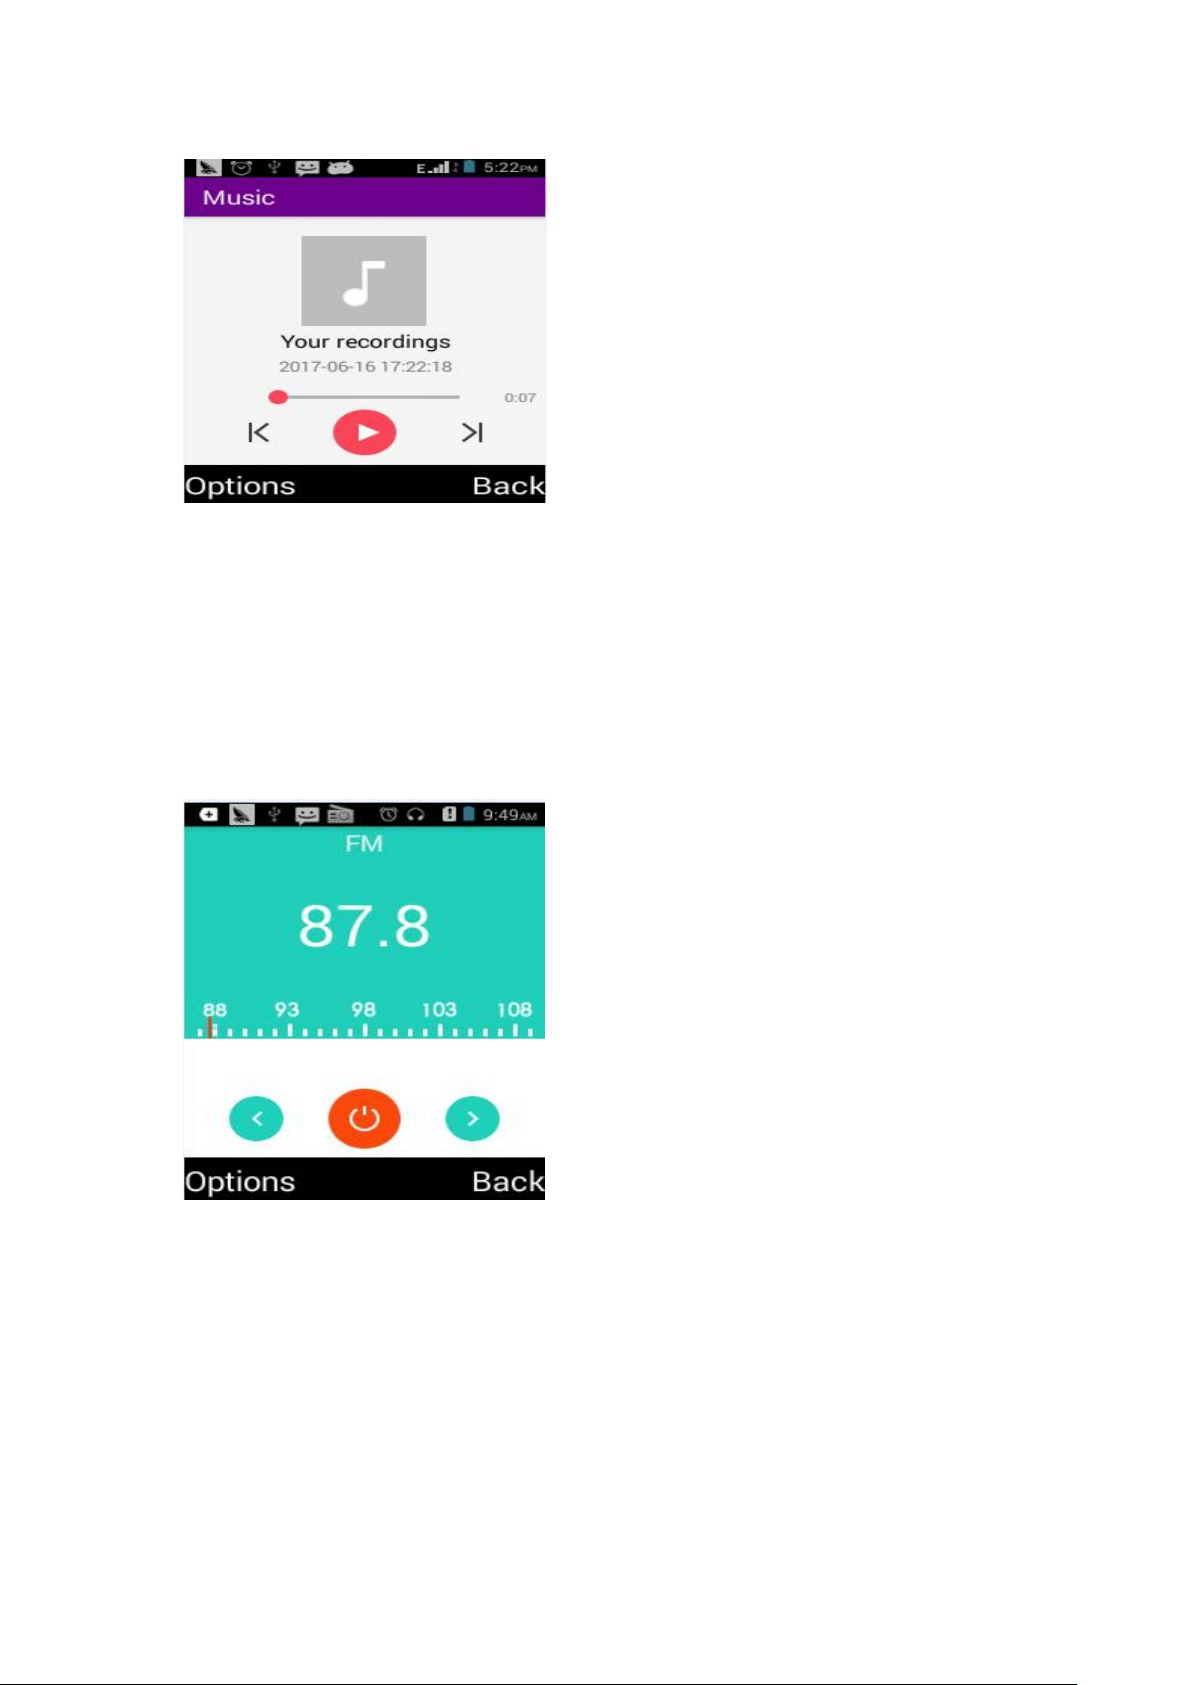
Menu>music
The phone comes with a Music player that plays all your favorite songs stored
in the phone or memory card.
--While in music mode, press the Navigation key to choose various music
options
--Adjust Volume: Press Up and Down keys to adjust volume only while it is
playing.
Page 14
13
7.5FMFM
long press the OK key to make a SOS call when the code is available. If the
7.5
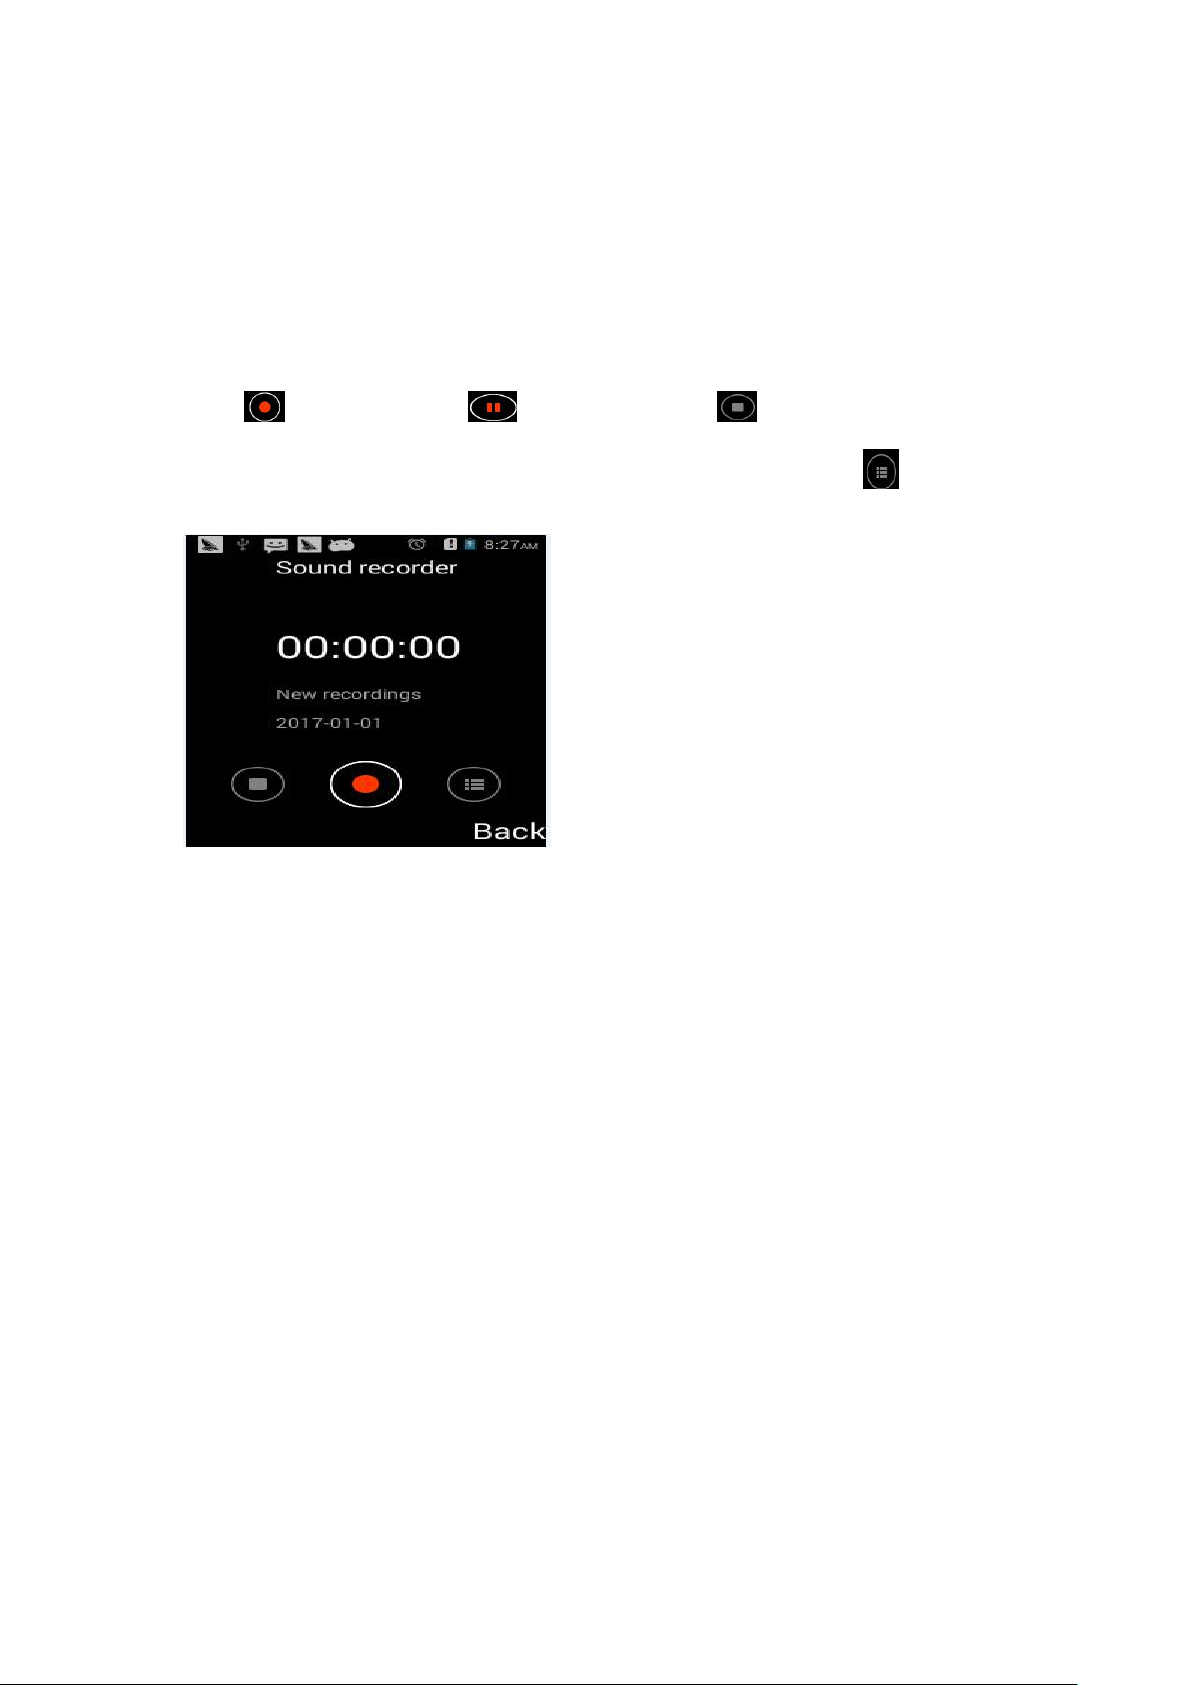
Menu>FM radio
Your phone comes with an FM radio to let you listen to FM channels.
-- Go to Options> Auto Search to fill up the channels.
-- Go to Options> Speaker > Switch to Speaker mode
-- Press OK key to start/stop the radio.
--Press the Up or Down key to increase/decrease the volume.
--Press the Left & Right Navigation key for preview & next Radio stations.
Radio
Radio
8、Tools
8.1
SOS
8.1
SOS
Menu > Tools > SOS
When you activated the function of SOS and set the SOS code, enter the
following procedure:
call of the first code failed, background will sent a message to note.
Page 15
14
Call automatically the next S0S number which has been set.
8.2
Call
Fire
8.2
Call
Menu>Tools>Call Fire Wall
Blacklist undesired SMS senders and caller so that you do not receive SMS
and call from them.
8.3
Sound
8.3
Sound
Menu>Tools>Sound Recorder
Press to record, press for pause. Press for stop, and remind to
save or abandon the record file. Choose OK to save and select to play
the file.
Wall
Fire
Wall
Recorder
Recorder
8.4
Backup
8.4
Backup
Backup & Restore your application data & SMS /MMS /Gallery/ Contacts to SD
card.
8.5
File
8.5
File
You can view files by category such as audio/images/video, etc.
8.6
Calculator
8.6
Calculator
To provide a calculator with 4 basic functions to facilitate simple calculations.
And
And
Explorer
Explorer
Restore
Restore
9、Settings
Choose various preferences to customize your handset according to your
requirements. You can set:
9.1
WIFI
9.1
WIFI
Menu > Settings> Wi-Fi
Check Wi-Fi to turn it on. The phone scans for available. Wi-Fi networks and
displays the names of those it finds. Secured networks are indicated with a
Lock icon. Select a network to connect to it.
If the network is secured, you are prompted to enter a password or other
credentials (Ask your network administrator for details).
Page 16

15
TIP: Turn off Wi-Fi when you are not using it, to extend the life of your battery.
9.2
Bluetooth
9.2
Bluetooth
Menu > Settings> Bluetooth
You manage Bluetooth to communicate with other Bluetooth devices
9.3
9.3
Audio
Audio
Profiles
Profiles
Menu > Settings> Audio Profiles
Configure how and at what volume the phone rings, vibrates etc.
9.4
Display
9.4
Display
Menu > Settings>Display
To perform changes in Brightness level, Sleep time, Font size.
9.5
9.5
Voice
Voice
Broadcast
Broadcast
Menu > Settings > Voice broadcast
If you enable this function then device will announce the application name .
9.6
Data
Data
usage
usage
9.6
Menu > Settings >Date usage
Data usage set up mobile data traffic limit, flow more than limit will be close
mobile data services.
9.7
Airplane
9.7
Airplane
mode
mode
Menu>Settings>More>Airplane mode
Some locations like airplanes may require you to turn off your mobile. You
chose the Airplane mode to turn on.
9.8
9.8
Internet
Internet
Tethering
Tethering
Menu>Settings>More> Tethering & portable hotspot
Turn on Internet tehering, you can configs some parameter base on your
required. You can share your phone’s mobile data connection with a single
computer via a USB cable (USB tethering) or with up to eight devices at once
by turning your phone into a portable Wi-Fi hotspot.
Note: The functions may incur additional network charges from your network
operator. Extra fees may also be charged in roaming areas.
9.9
Data
9.9
Connection
Data
Connection
Menu>Settings>More> Mobile networks>select Data roaming or turn off
The first time you turn on your phone with your SIM card inserted, it will
automatically configure your network service: GPRS, EDGE, 3G or 4G
To check the network connection you are using.
9.10
GPS
9.10
GPS
Menu>Settings>Location
Select the switch beside Location access to turn on. You can then open Maps
to find your location. Use your phone’s GPS satellite receiver to pinpoint your
location within an accuracy as close as several meters (“street level”). You will
need to stand in a place with a clear view of the sky and avoid moving.
Page 17

16
9.11
9.11
Security
Security
Settings
Settings
Menu>Settings> Security
To perform changes in SIM security, protect personal information.
9.12
9.12
Data&&
Data
time
time
Menu>Settings> Data & time
Automatic date and time provided by Network, If closed automatic updates,
you need to manually set the time.
9.13
Language&&
9.13
Language
input
input
Menu > Settings>Language & input
You select the language for the text on your phone and for configuring the
onscreen keyboard.
9.14
9.14
Timer
Timer
Switch
Switch
Machine
Machine
Menu>Settings>Scheduled power on/off
You power on or power off your mobile phone on your scheduled time.
9.15
Storage
9.15
Storage
Menu>Settings>Storage
Can view the SD card and cell phone memory usage.
9.16
Battery
9.16
Battery
Menu>Settings> Battery
You check the battery level and status and enable battery saver.
Battery saver turns off automatically when your device is charging.
9.17
9.17
Mouse
Mouse
control
control
Menu>Settings>Mouse control
You can enable mouse control feature to access application using
navigation keys and to select some option press by center key.
9.18
Apps
9.18
Apps
Menu>Settings>Apps
Management application and delete installed applications. The running
services Click on the 'stop' running services, confirmed the service disappear
from the list of "running" service.
9.19
Reset
9.19
Reset
Menu>Settings> Factory data reset
It will reset all network settings including: system and app data and settings
9.20
9.20
About
About
phone
phone
Menu>Settings>About phone
View information about your phone, such as signal strength, status, phone
information and battery use.
Page 18

17
10、App Folder
10.1
Downloads
10.1
Downloads
Menu > App Folder> Downloads
View the files downloaded from the browser.
10.2SIM
10.2SIM
Menu > App Folder> SIM tool kit
Your phone supports STK (SIM TOOL KIT) function for SIM
Toolkit
Toolkit
11、Other Functions
11.1
Alarm
11.1
Alarm
Menu>clock>Alarm
To use the alarm service available with your mobile phone.
11.2
Stopwatch
11.2
Stopwatch
Menu>clock>stopwatch
Use the stopwatch function records at different times, for example: running
11.3
Calendar
11.3
Calendar
To arrange your journey according to calendar
11.4
Browser
11.4
Browser
Open a browser and enter the URL to browse the web.
11.5
Cleaner
11.5
Cleaner
Clean up background applications and optimize phone performance.
11.6
Profile
11.6
Profile
Long press # key to switch user profile directly.
12、Software update
Menu>Settings> About phone > System software update
To make sure that your mobile phone work more efficiency and update any
performance in future. In order to make sure that you will got the lastest
software this mobile phone was build in with wireless update function .
Page 19

18
13、Safety Warning
WARNING: Please pay attention to these guidelines, it’s dangerous and may
break the law, even the manufacturer will not undertake any responsibility to
the user who does not follow with the following recommendations or improper
to use the Smart Phone.
--If the phone supports the “Flight mode” function, please set the mode as
“Flight mode” on the plane. If not support, please turn off the phone before
boarding, because the phone may cause interference in aircraft. Please follow
any restrictions on the airplane.
--Switch the device off near the fuel, chemicals, or blasting areas. Keep the
device away from the children.
--While driving please obey local laws and regulations with regard to Smart
Phone use. When talking on the phone while driving, please obey the following
rules: Concentrate on driving and be aware of traffic conditions; if your Phone
has a hands-free function, please use it in this mode. Under poor driving
conditions, please stop the car before you dial or pick up the phone.
--Switch off the Phones in the hospital or other forbidden using Smart Phone
place. The Phones will affect the normal work of electronic equipment and
medical devices, such as pacemakers, hearing aids and other medical
electronics equipment.
--Non-original accessories and components are not provided with repair
warranty qualification.
--Please do not disassemble your phone by yourself, if your phone is out of
order, please contact your supplier.
--Please do not charge the Phone before battery is installed. Do not
short-circuit the battery.
--Phone must be charged in the good ventilated and cooling environment, and
away from flammable and explosive materials.
--In order to demagnetization, please keep Phone away from the magnetic
material, such as disks, credit card etc.
--Keep the device dry. Precipitation, humidity, and all types of liquids or
moisture can contain minerals that will corrode electronic circuits. If your
device does get wet, remove the battery, and contact with the supplier.
--Do not use the Phone in too high or too low temperature environment, and do
not expose the Smart Phone to strong sunlight or high humidity.
--Do not use liquid or wet cloth with strong detergent to clean the device.
--This Phone is provided photograph, video recording and sound recording
functions; please follow the relevant laws and regulations to use those
functions. Photograph, video recording and sound recording without
authorization may violate laws and regulations.
--While using the network functions, please do not download the files which
have virus, do not install any photos and ringtones which have been damaged.
Page 20

19
If it results the phone abnormally, our company will not undertake any
responsibility.
--Please dispose of batteries according to local regulations, please recycle
when possible. Please do not dispose as household waste.
STATEMENT: Our Company reserves the right to revise this manual content
without prior notice.
14、Battery maintainance and cautions
--Remove the battery from the device and check if it swells or there is any
liquid leaks out.
--Notice if the battery runs out so quickly after being charged.
--Try spinning it on a flat surface. It it spins, it might have gone bad. A good
battery should not spin.
--Keep your battery away from heat or fire and store out of direct sunlight at
temperature no higher than 60 degreed Celsius or 140 degreed Fahrenheit.
--Batteries should be stored at a room temperature of 20-25 degrees Celsius.
--Charge batteries in a well-ventilated area.
--To prevent fast degradation, do not charge when battery drop less than 30%.
--To prevent a power surge, plug the mobile phone charger into the outlet first,
then plug the charging head into the device.
--Always use a certified standard and genuine device and product.
--To keep it safe, plug your mobile charger into a standard extension socket
instead of plugging directly into the wall outlet.
--Try to avoid dropping your battery or mobile phone that may cause the
battery to leak or its pole to remove. If not using your mobile phone for a long
period, remove the battery from the phone when it has around 40% of charge
and keep it away from humidity.
、
15
Before contacting the service centre, you are advised to follow the instructions
below:
You are advised to fully charge the battery for optimal operation. Avoid storing
large amounts of data in your phone as this may affect its performance. Use
Factory data reset. All user phone data: contacts, photos, messages and files,
downloaded applications will be lost permanently. It is strongly advised to fully
backup the phone data before doing formatting and upgrading. and carry out
the following checks:
15.1MyMy
15.1
When the phone cannot be switched on, charge for at least 20 minutes to
Trouble shooting
phone
phone
cannotbebe
cannot
switchedononororisis
switched
frozen
frozen
Page 21

ensure the minimum battery power needed, then try to switch on again.
15.2MyMy
15.2
Restart your phone by pressing and holding the Power key more than 10s.
15.3My
15.3My
Check that your screen is locked when you are not using your phone, and
make sure the Power key is not mis-contacted due to unlocked screen. Check
the battery charge level.
15.4MyMy
15.4
Make sure that your battery is not completely discharged; if the battery power
is empty for a long time, it may take around 20 minutes to display the battery
charger indicator on the screen.
Make sure charging is carried out under normal conditions (0°C to +45°C).
When abroad, check that the voltage input is compatible.
15.5MyMy
15.5
--Try connecting in another location.
--Verify the network coverag with your operator.
--Check with your operator that your SIM card is valid.
--Try selecting the available network(s) manually.
--Try connecting at a later time if the network is overloaded.
phone
phone
phone
phone
phone
phone
phone
phone
has
not
has
not
turns
turns
cannot
cannot
cannot
cannot
responded
responded
offbyby
off
itself
itself
charge
charge
connecttotoaa
connect
for
for
properly
properly
networkoror““NoNo
network
several
several
minutes
minutes
service””isis
service
displayed
displayed
15.6MyMy
15.6
--Make sure that the internet access service of your SIM card is available.
--Check your phone’s Internet connecting settings.
--Make sure you are in a place with network coverage.
--Try connecting at a later time or another location.
phone
phone
cannot
cannot
connecttoto
connect
the
the
Internet
Internet
16、Certification Information (SAR)
This device meets guidelines for exposure to radio waves, Your device is a low
power radio transmitter and receiver, As recommended by international
guidelines, the device is designed not to exceed the limits for exposure to radio
waves, These guid lines were developed by the International Commission on
Non Ionizing Radiation Protection (IONIRP). an independent scientific
organization, and include safety measures designed to ensure the safety of all
users, regardless of age and health.
The Specific Absorption Rate (SAR) is the unit of measurement for the amount
of radio frequency energy absorbed by the body when using a device. The
SAR value is determined at the highest certified power level in laboratory
conditions, but the actual SAR level ‘during operation can be well below the
value. This is because the device is designed to use the minimum power
required to reach the network.
The highest SAR value reported for this device typee when tested is
1.52
20
Page 22

W/Kg (Body) W/Kg (ead)
1.49
17、Product warranty and our service centers
――andset will be warrant for 15 months after date of purchase
――Accessories ( Battery , Earphone , USB cable , Power Adaptor) will be
warrant for 7 months after date of purchase
――This warranty covered only andset that brought from True shop or any
authorize dealer
――Under warranty period repair, replacement, consult will be free of charge.
This warranty will apply on andset and Accessories exclude the following
--Commerce
--Customer satisfaction
--Any personal violation
--Out of warranty service will charge a service fees and customer need to pay
for any charge on actual cost
--Void need to in complete stated , no damage , lost , tear apart.
Warranty will not apply under these conditions
--andset and Accessories are damaged according to abuse intent eg. Put
andset or Accessories on fire .
--andset and Accessories are damaged by natural disaster .
--andset and Accessories are being repaired , modified by unauthorized
service center.
--Any damaged that cause by using with other device than True ,
--Any different of brightness of LCD on screen that cause of malfunction of
LCD that least than 2 spot will count as acceptable and not count as product
defect
--Any Modify handset Identity (IMEI) will void Warranty
--Any other application that download by end user and cannot work well will not
count as defect
--Warranty will not include in personal data , Banking data or any violate by
virus , intent to violate to software by modify software of hand set .
--Warranty will not include any lost of personal data while using handset.
--Warranty will not include any intent to use handset with other product and
cause damage.
--Warranty will not include any charge that will cause during verify problem and
repairing
18、Our Service centers
Should you encounter a problem while using the device, please contact our
21
Page 23

Customer Care at 1331 or any of the True Shops throughout Thailand.
Please check http://www3.truecorp.co.th/cm/shop for our service location.
、
19
Specific Absorption Rate (SAR) information SAR tests are conducted using
standard operating positions accepted by the FCC with the phone transmitting
at its highest certified power level in all tested frequency bands, although the
SAR is determined at the highest certified power level, the actual SAR level of
the phone while operating can be well below the maximum value, in general,
the closer you are to a wireless base station antenna, the lower the power
output.
Before a new model phone is a available for sale to the public, it must be
FCC Warning
tested and certified to the FCC that it does not exceed the exposure limit
established by the FCC, Tests for each phone are performed in positions and
locations (e.g. at the ear and worn on the body)as required by the FCC.
For body worn operation, this mobile phone has been tested and meets the
FCC RF exposure guidelines when used with an accessory designated for this
product or when used with an accessory that contains no metal and that
positions the handset a minimum of 1.0cm from the body.
This device complies with part 15 of the FCC Rules. Operation is subject to the
following two conditions: (1) This device may not cause harmful interference,
and (2) this device must accept any interference received, including
interference that may cause undesired operation. Any Changes or
modifications not expressly approved by the party responsible for compliance
could void the user’s authority to operate the equipment.
Note: This equipment has been tested and found to comply with the limits for a
Class B digital device, pursuant to part 15 of the FCC Rules. These limits are
22
Page 24

designed to provide reasonable protection against harmful interference in a
residential installation. This equipment generates uses and can radiate radio
frequency energy and, if not installed and used in accordance with the
instructions, may cause harmful interference to radio communications.
owever, there is no guarantee that interference will not occur in a particular
installation. If this equipment does cause harmful interference to radio or
television reception, which can be determined by turning the equipment off and
on, the user is encouraged to try to correct the interference by one or more of
the following measures:
--Reorient or relocate the receiving antenna.
--Increase the separation between the equipment and receiver.
--Connect the equipment into an outlet on a circuit different from that to which
the receiver is connected.
--Consult the dealer or an experienced radio/TV technician for help.
23
 Loading...