

Page 1

MANUAL DE INSTRUCCIONES
REFRIGERADOR
TNF 450 INOX
Page 2
Por favor, lea atentamente este manual antes de usar el aparato.
Gracias por comprar nuestros productos.
atención:
*Porfavor, lea las instrucciones de seguridad antes de su uso.
*Conserve este manual después de leerlo.
*Aviso no nos hacemosr caciones en el producto posteriores a
la edición de est
ADVERTENCIAS DE SEGURIDAD:
la estructura en la que esté integrado.
descongelación que no sean los recomendados por elfabricante.
3).ATENCIÓN: Asegúrese de no dañar el circuito del líquido refrigerante.
e manual.
que sea bajo supervisión o siguiendo indicaciones sobre su uso por parte de la persona
responsable de su seguridad. Los niños deberán estar bajo supervisión para asegurarse de
que no jueguencon el horno.
su serviciotécnico autorizado paraevitar cualquier riesgo.
niños puedan quedarseatrapados en él.
11)No almacene en este aparato sustanciase vastalescomo aerosoles ya que corren
riesgo de in rse.
ESPELIGROSOQUEPERSONALNOAUTORIZADOREALICEREPARACIONESENESTE
APARATO.
PARAEVITARACCIDENTESCONRIESGODEDESCARGAELECTRICAPORFAVORNOHACER
REPARACIONESUSTEDMISMO.
1
Page 3
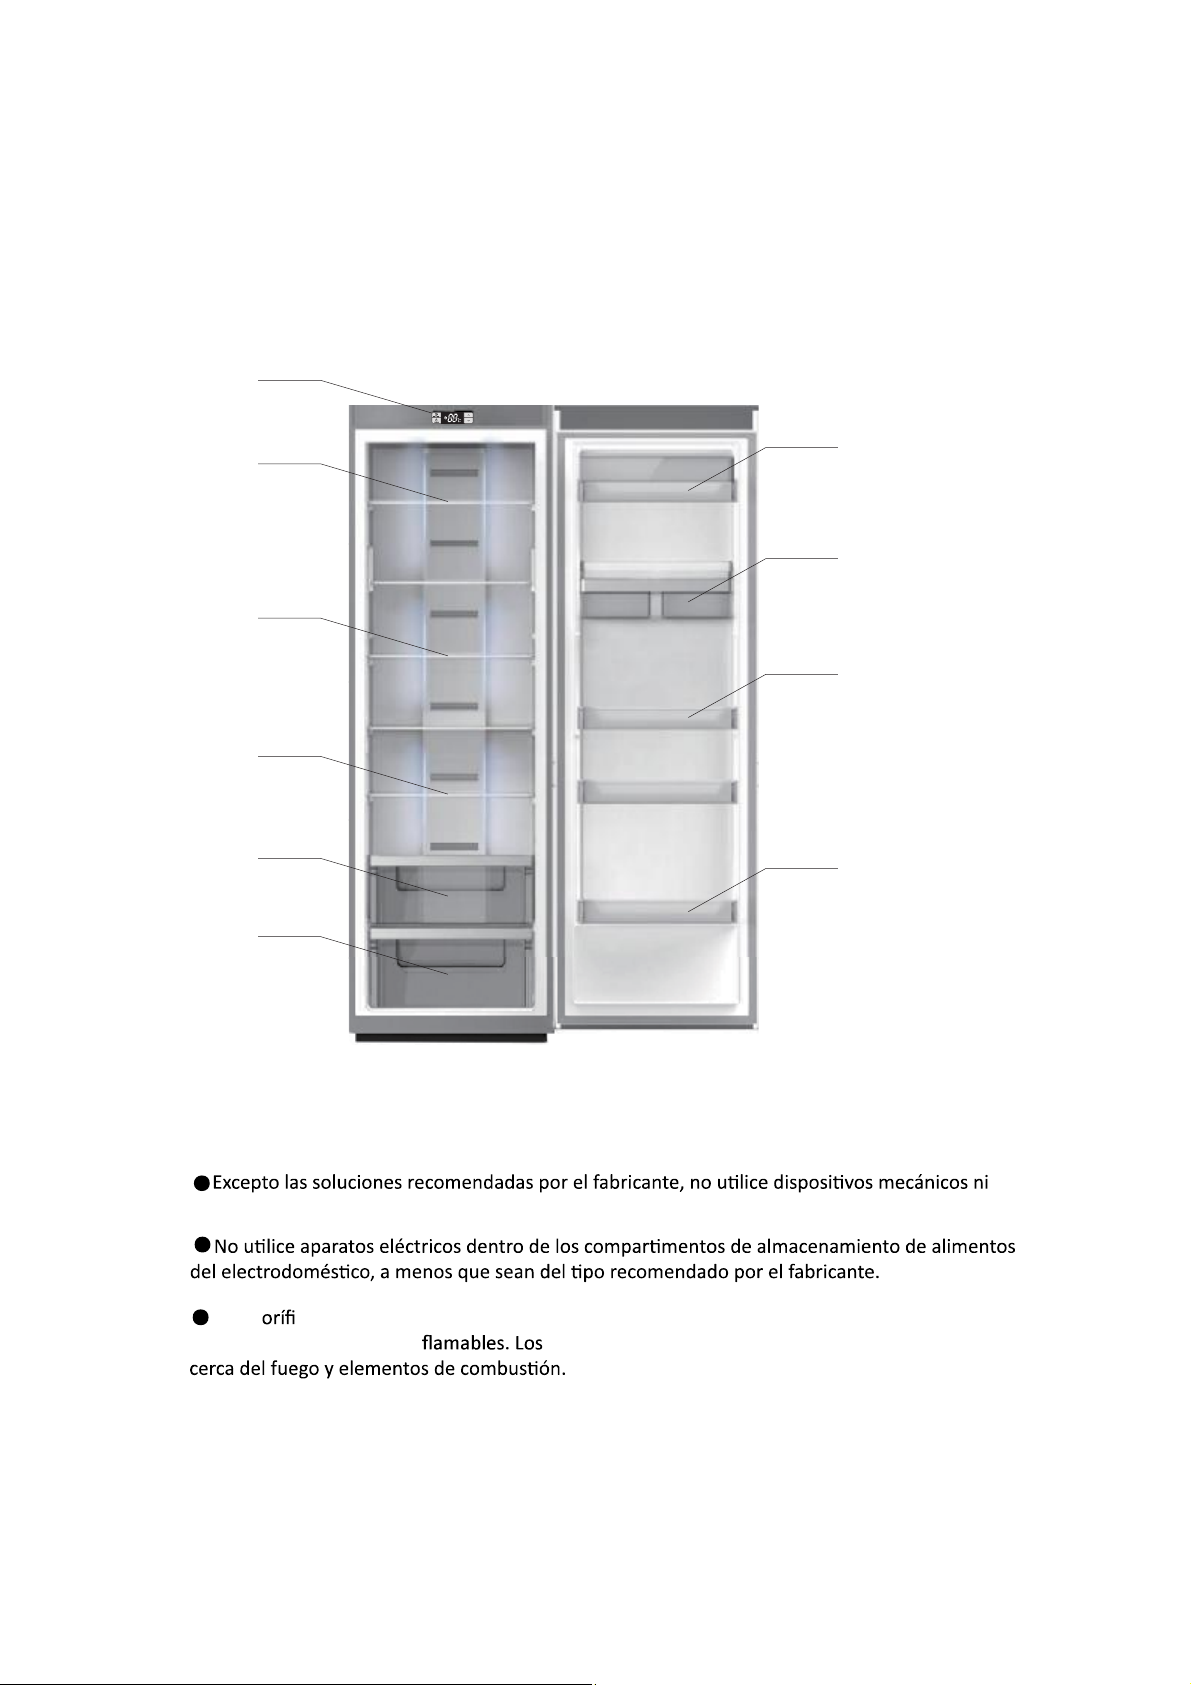
Configuración principal:
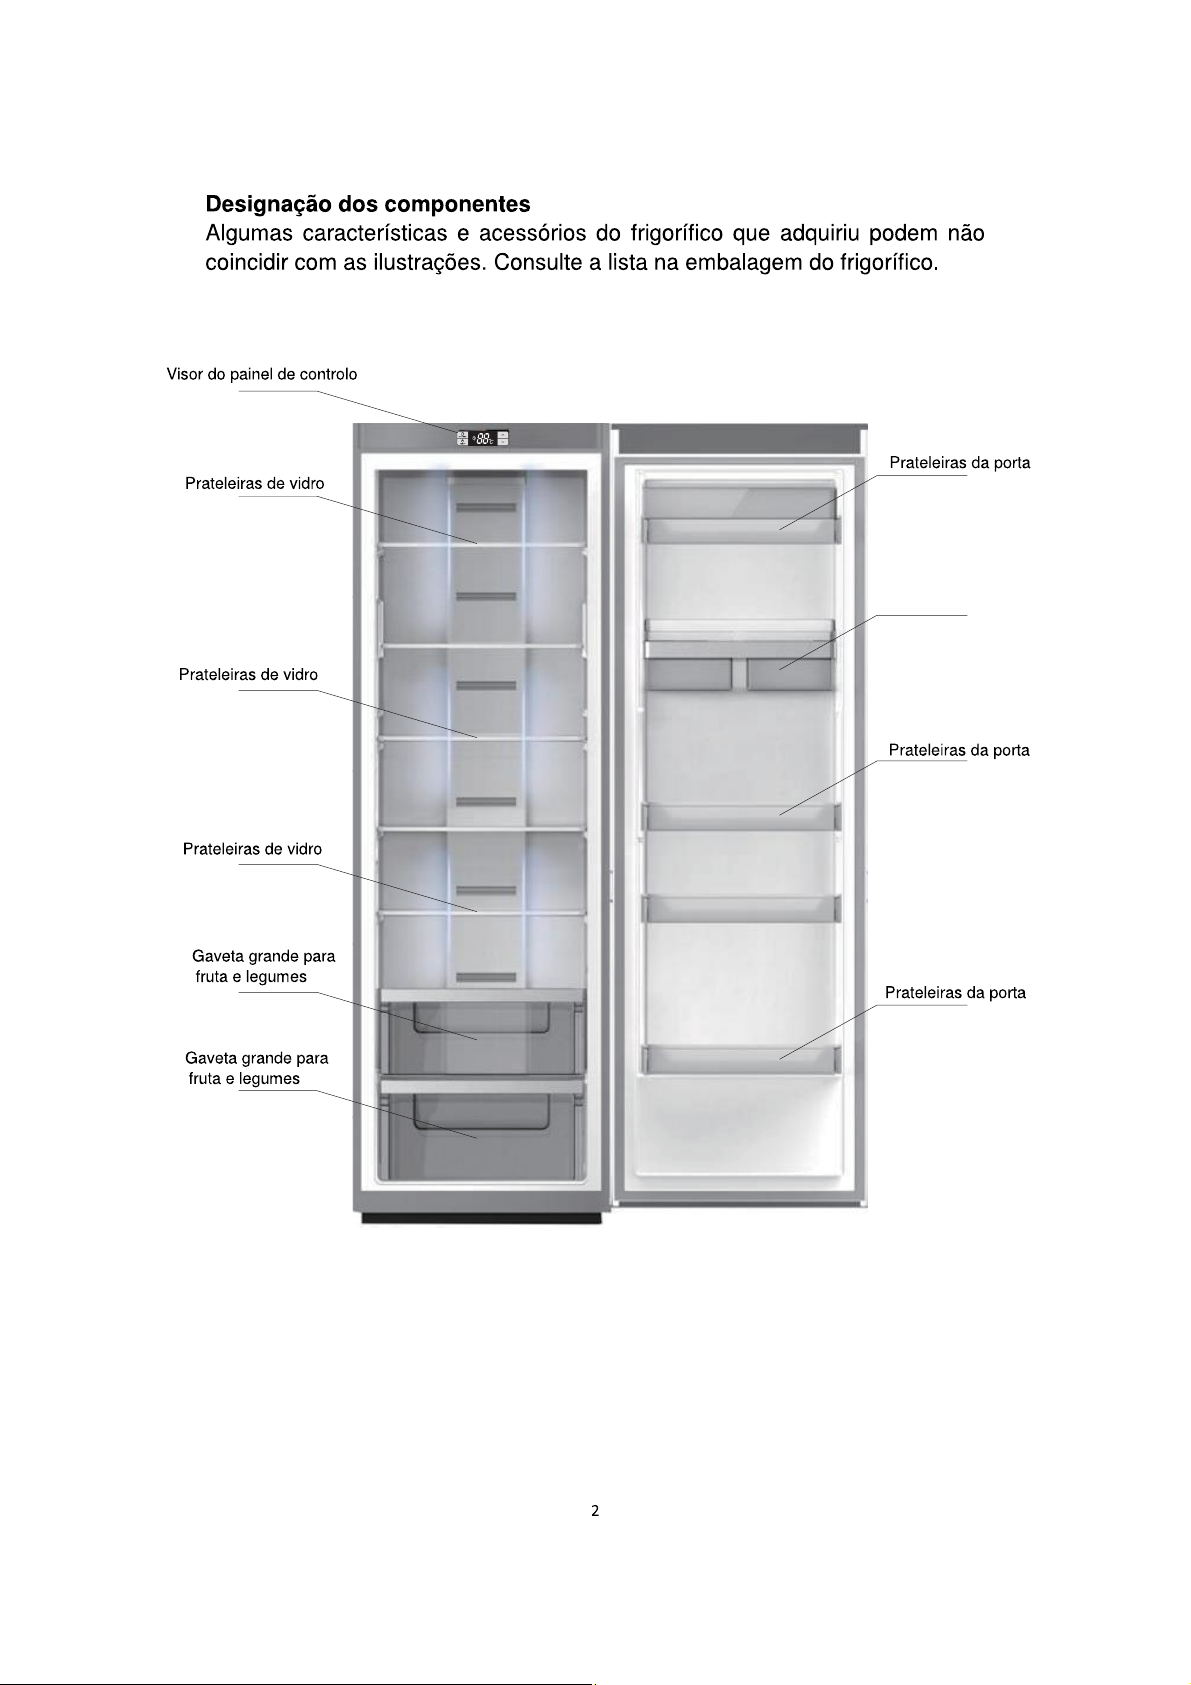
Todas las imágenes del Manual de Instrucciones son solo indicaciones, puede que algunos
de los elementos que componen el refrigerador no correspondan con las ilustraciones, para
el equipamiento de este debe consultarcon el listado de componentes del equipo.
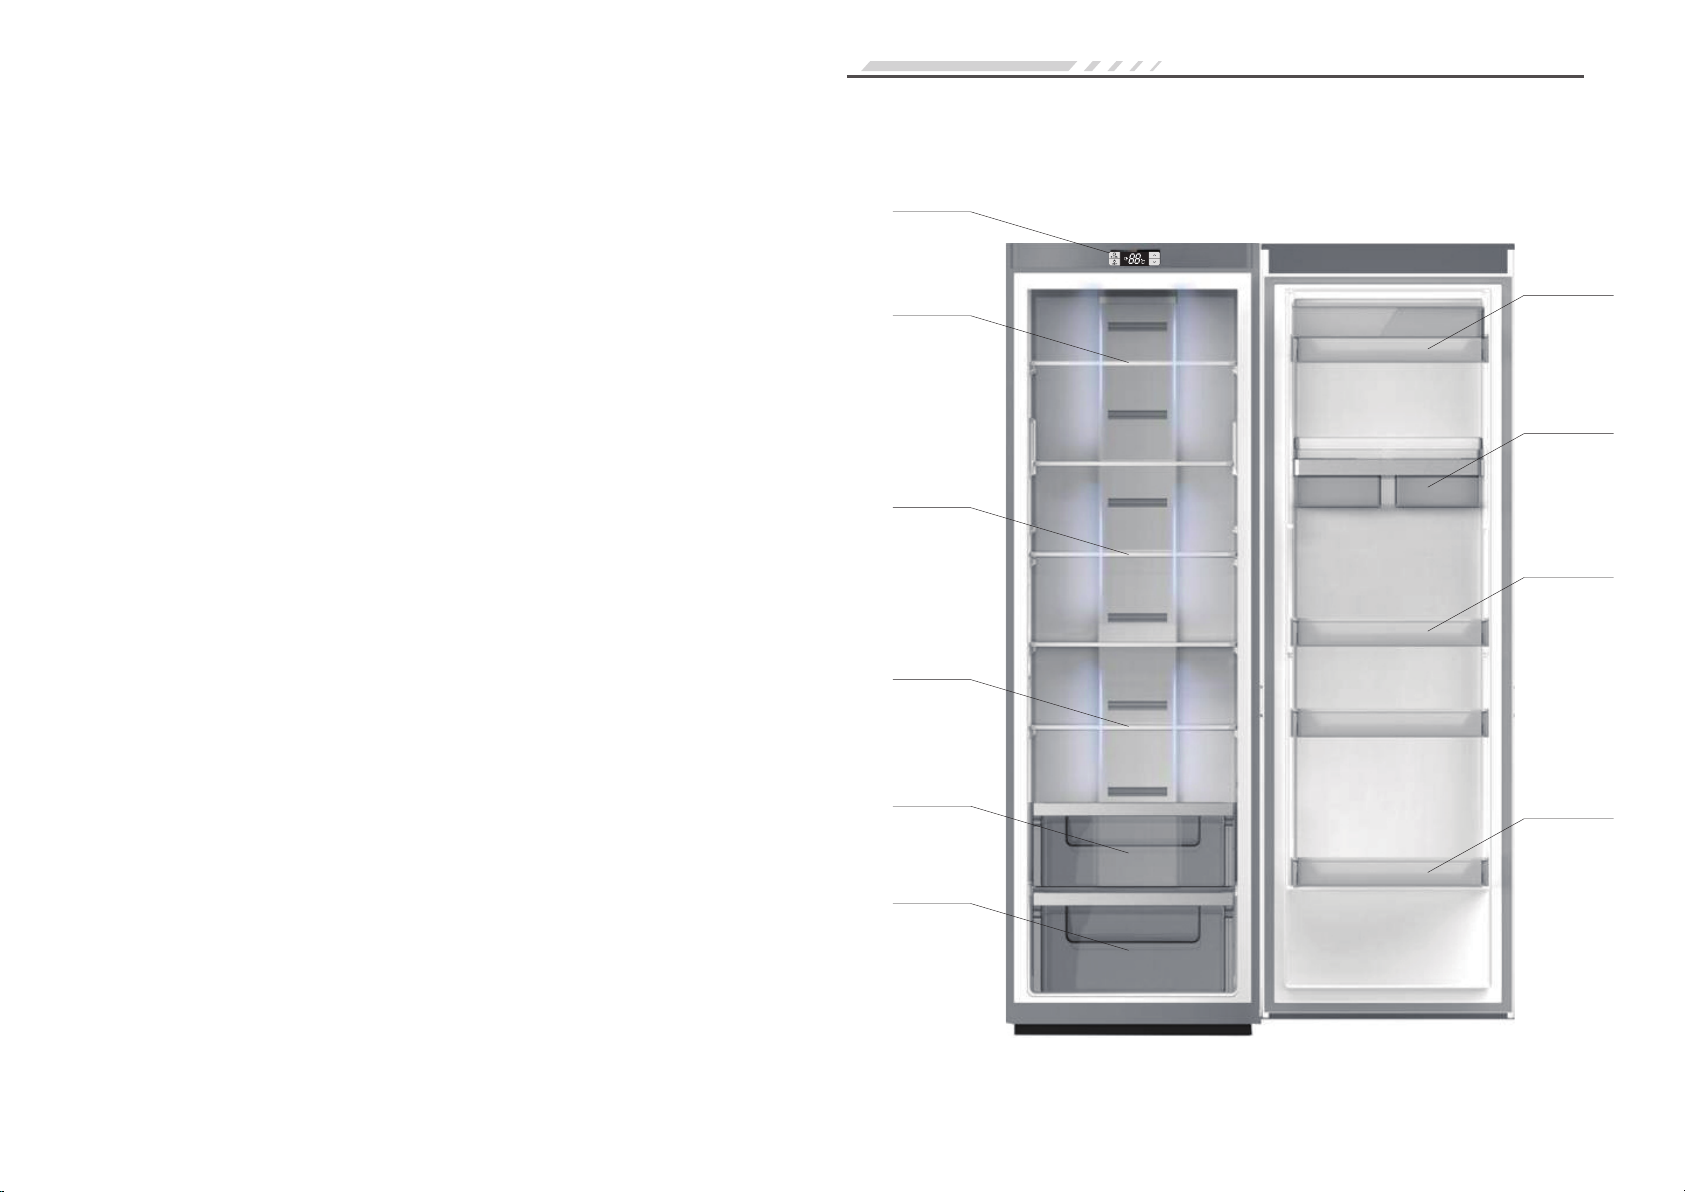
Panelde
control
display
bandeja
bandeja
bandeja
Cajónverdulero
Cajónverdulero
botellero
rizador de sellado
botellero
botellero
п®¿ «² ½±®®»½¬± «-± ¼»´ ¿°¿®¿¬±
advertencia
otros medios pararealizar la descongelación
El frig co está provisto de refrigerante R600 y materiales de ciclopentano
, y ambos son materiales in refrigeradores sin uso no se pueden poner
2
Page 4
Refrigerador nuevo
solución suave de bicarbonato sódico. Aclarecon agua templada y con un paño. Lave
las estanterías y cajonescon jabón y agua caliente y séquelos completamente. Lave el
exteriorcon un trapo húmedo.
U liceunenchufede3tomasdecorrienteyquelatomadealimentaciónnocompartacon
otroaparato.Elcabledealimentacióndebeestarbienencontactoconlatomaopuede
provocarunincendio.Asegúresedequeelelectrodo erraolatomadealimentació nestá
equipadoconunatoma erracon able.
Transporte y ubicación del refrigerador.
transporte.
Noinvierta,presioneoagiteelrefrigerador.Almoverelrefrigerador,el ángulode
inclinaciónnodeberá sermayorde45 °.
Cuandosemueve,nohagademasiadapresiónsobrelapuertaolacubiertasuperior,delo
contrarioseproducirádeformación.
Ligeramenteinclineelrefrigeradorsobrelaspatastraserasmenosde20º,paradesplazarlo
endistanciascortas.
Ubicación.
Coloqueelrefrigeradorenunlugarven lado,lejosdefuentesdecalorydirectode
laluzdelsol.Conel ndeevitarqueseoxidenoreducirelefectoaislante,porfavor,nolo
coloqueenlugarhúmedoyregado.
elespaciosuperiorparaelrefrigeradornodeberáserinferiora30cm.Distanciacontrados
ladosnopodrá serinferiora10cm,ladistanciafrentealaparednodeberáexcederde75mm,
proporcionandomayorcomodidadparaabrirycerrarlapuertaydispersarelcalor.
Coloqueelrefrigeradorenunpisoplanoysólido.(sinoesestable,sepuedenregularlas
patas)
Atención.
Asegúrese de que la línea eléctrica no está siendo presionada por el refrigerador u otros
tensión es el adecuado con el de la fuente de alimentación del refrigerador.
Uso correcto del refrigerador.
Asegúrese de que el refrigerador esté colocado correctamente y de forma estable. Esté al
tanto de todos los asuntos de seguridad que requierenatención.
1. Conéctelo a la electricidad
Después de conectarlo a la electricidad, estecomenzará a funcionar hasta obtener la
2.Colocar los alimentos en el refrigerador
alimentos en el refrigerador, para mantener la frescura de estos.
3
Page 5
Nota: si la temperatura es alterada o un alimento nuevo se pone en el refrigerador,
se determina por el grado de alteración de la temperatura, la temperatura del entorno
FUNCIONAMIENTO
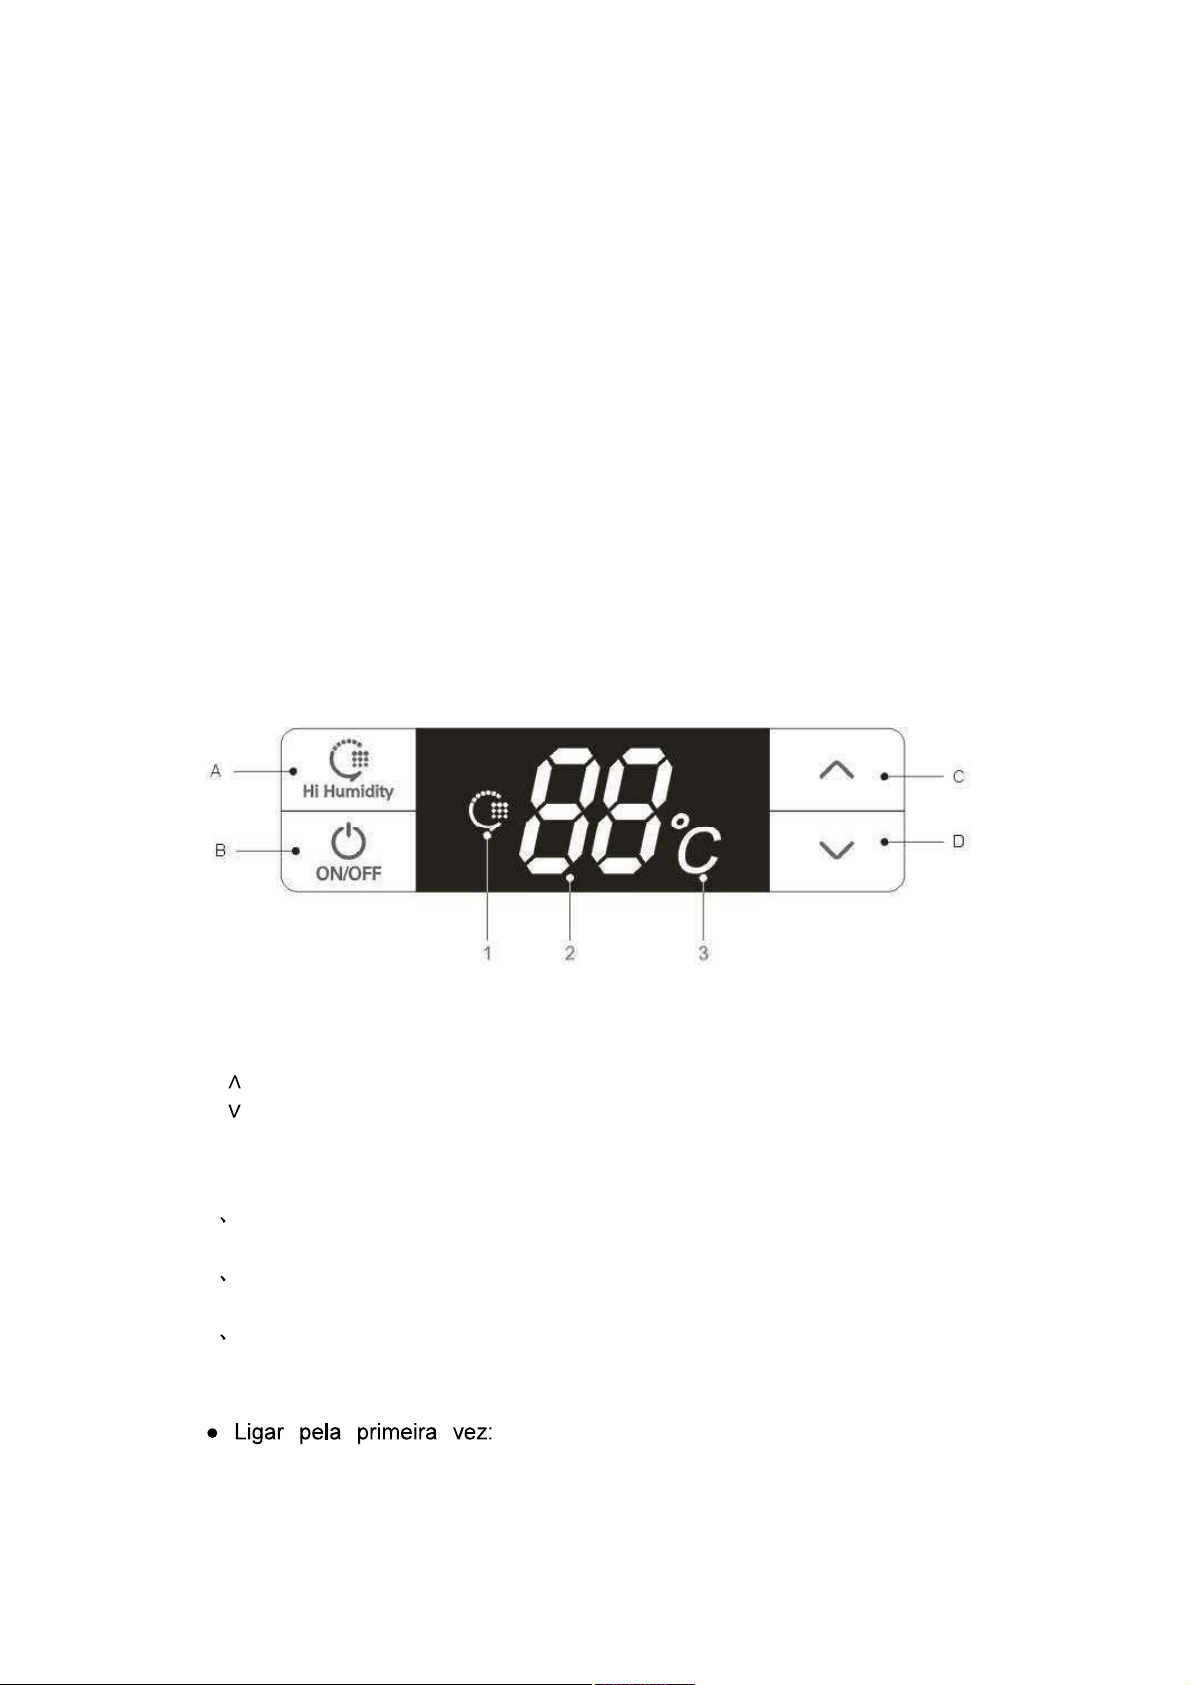
1 2 3
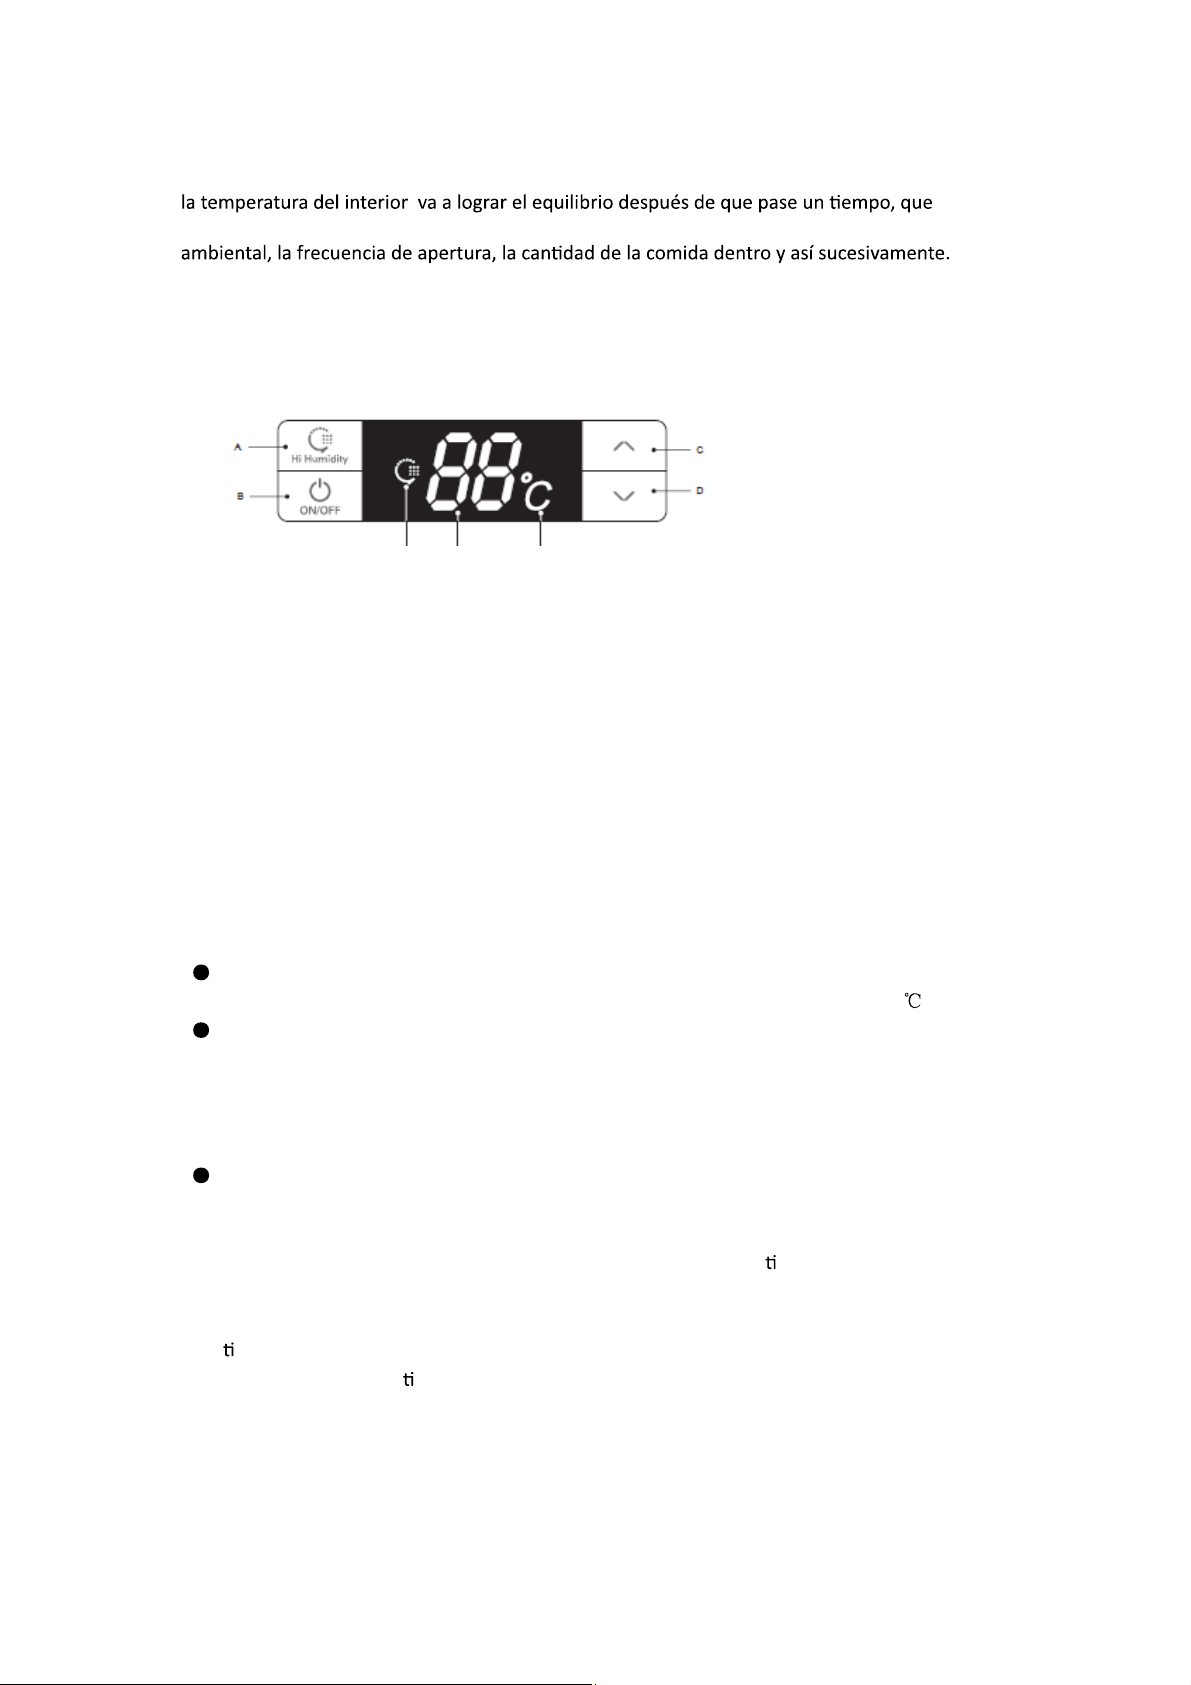
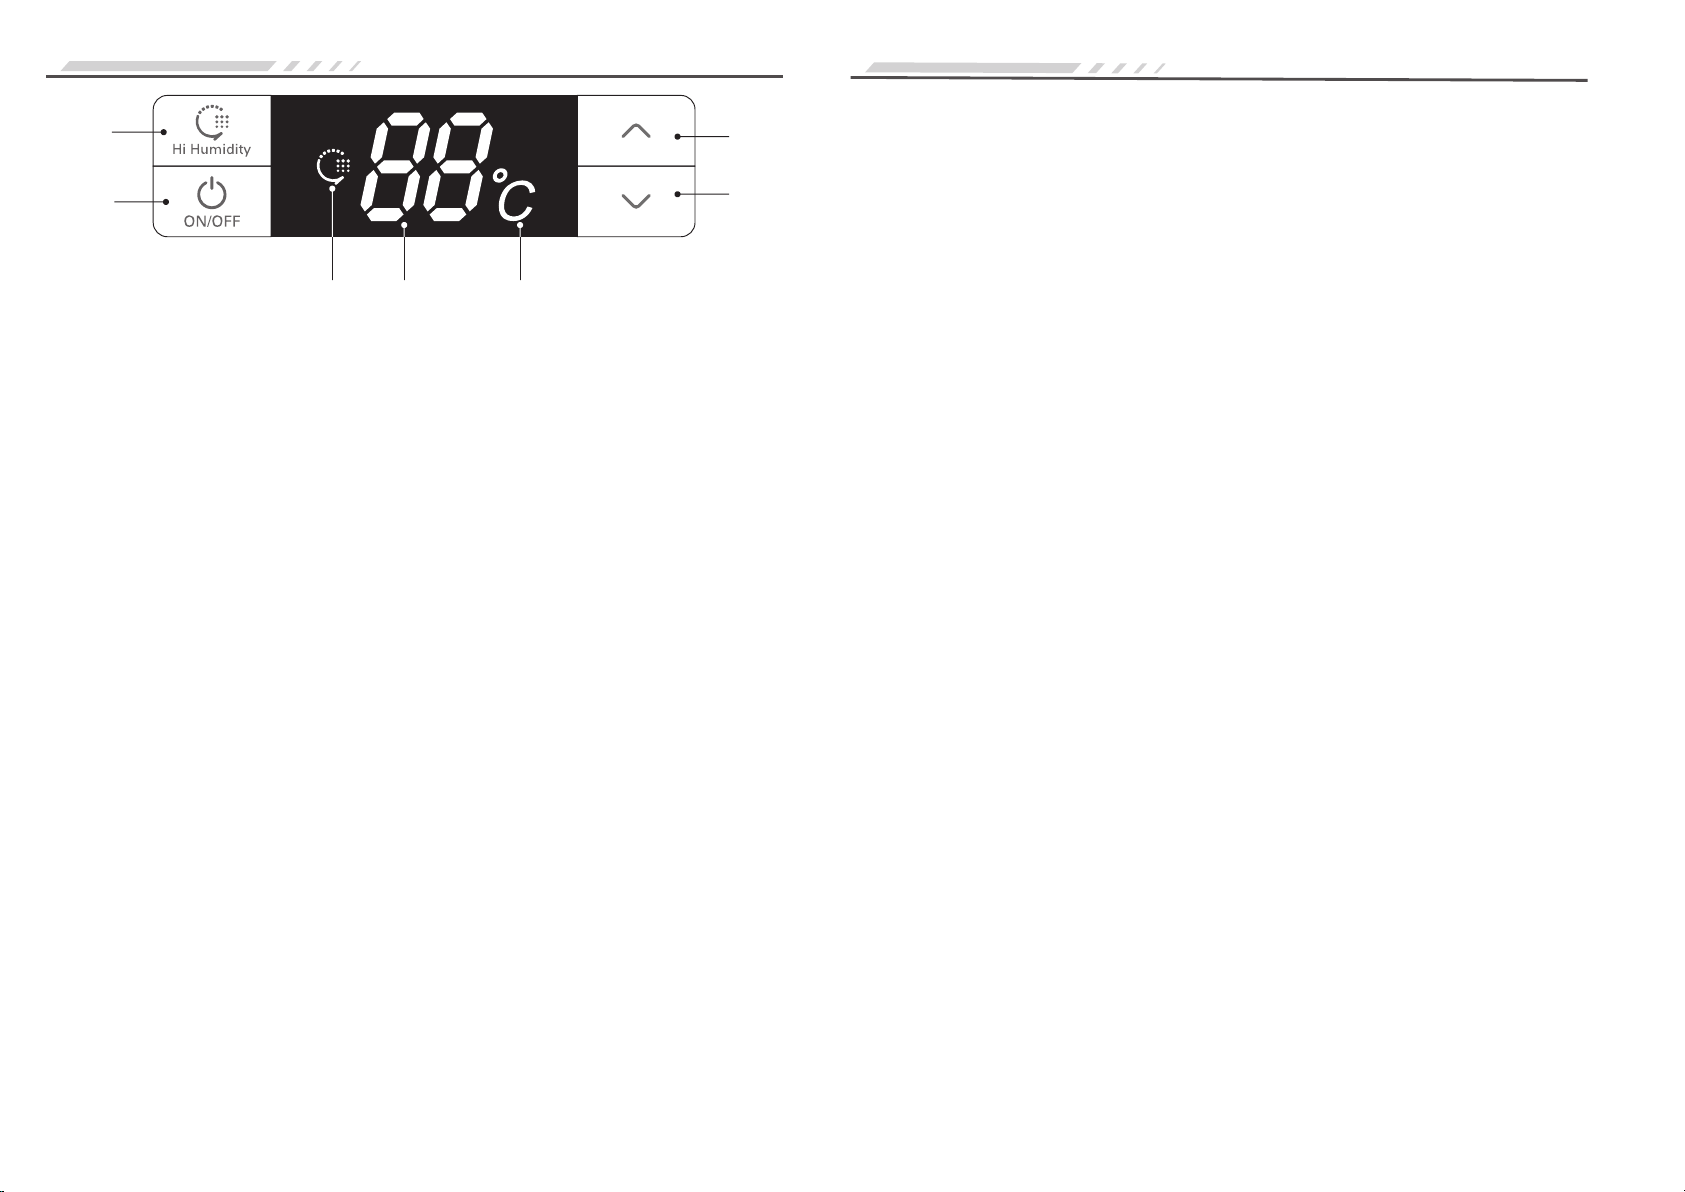
1.Teclas
A. Alto nivel de humedad: Modo de humedad alto
B. Encendido / Apagado: poner en marcha o apagar el sistema
C. /\: incremento de temperatura en la cámara de enfriamiento
D. \/:descenso de temperatura en la cámara de enfriamiento.
2.Descripción de las funciones del display de la pantalla.
1.Figura del modo de humedad alta.
2.Grados de temperatura
3.Medición de la temperatura.
3.Control del display
Encendidoporprimeravez:todobrilladurantetressegundosconrepiquedela
campanadeinicio.Pordefectolatemperaturadelacámaradeenfriamientoesde5 .
Indicadordefuncionamientonormal:
Regióndevisualizacióndetemperatura:cuandoseproduceunfallo,semostrará
códigosdefalloporturnoenunordendeprioridad; sinfallo,semostrará la
temperaturaestablecida.
FiguraaltaHumedad:brillacuandoelsistemaestá enelMododealtahumedad.
ControldePantalla:
1,bajoelpatrónnormal,novaabrillarmásquedespuésdetreintasegundossinabrir
yoperació ndetecla.
2,cuandolapuertaestá enestadoabierto,lapantallabrillatodoel empoydejará de
brillartreintasegundosdespuésdequelapuertasecierre.
3,cuandoocurreunfalloyesdentrode"códigodeerror",lapantallabrillará durante
un empoyparará debrillardespuésdetreintaminutos(sielsonidodelacampana
persistedurantemucho empo,pulsecualquierteclaparacancelarelsonido).
4
Page 6
4.Funcionamiento.
Puesta en marcha y apagado
Enelmododepuestaenmarcha,mantengapulsadalateclaON/OFF(teclaB)durantetres
segundos,lacampanadeiniciosonará yelsistemasecerrará inmediatamente;
Enelmododeapagado,presioneysostengalateclaON/OFF(teclaB)durantetressegundos,
lacampanadeiniciosonará yelsistemaseiniciará inmediatamente.
PulselateclaON/OFFdurantetressegundosparaapagarelsistemayla
más.ExceptolateclaON/OFF(teclaB),otrasteclasdejará deresponder,yelcompresor,
lámparadelapuertayotrascargassecerraráninmediatamente;
PulselateclaON/OFFdurantetressegundosparaponerenmarchaelsistema.Antesde
comenzar,sielsistemaestá enmododealtahumedad,la guraaltahumedadbrillará,delo
contrarioelsistemasólobrillará latemperaturaprogramadaytodaslascargasseejecutarán
enelmodoquesehayaajustadoantesdelaparada.
pantallanomostrará
Todas las funciones siguientes se deben trabajar bajo estado de inicio
Modo alta humedad.
Cuandoelsistemanoestá enmododealtahumedad,mantengapulsadalatecladealta
humedad(teclaA)durantetressegundosparainiciarestemodoyla guradealta
humedadseiluminará.ParasalirdeestemodovuelvaapulsarlatecladealtaHumedad
(teclaA)durantetressegundosynobrillará más.
Aliniciarelmododealtahumedad,lacámaraderefrigeraciónfuncionará enestadode
altahumedadparamejorarlahumedadrela vadelairededentrodelacámarade
refrigeració n.
Ajuste la temperatura de la cámara de refrigeración.
Pulse las teclas de regulación de la temperatura (tecla c) y (tecla D)
para ajustar la temperatura dentro de la cámara y la temperatura programada
brillará. El rango de ajuste está entre 2 a 8 (no regulación de la temperatura
periódica); le sacará del sistema en cinco segundos y la con ración tendrá
efecto. (dentro de los cinco segundos después de terminar el ajuste, pulse una
tecla A o B paraa stado de ajuste de forma manual y realizar el ajusteválido.)
5.Control de luz de alumbrado
Cuandoestáabiertalapuertadelacámaradeenfriamiento,lalámparaqueiluminala
cámaradeenfriamientobrillará.Cuandocierrelapuertadelacámaradeenfriamiento,
lalámparaqueiluminalacámaradeenfriamientoseapagará.
6.Apertura de puerta y alarma de apertura de puerta.
Silapuertadelrefrigeradorhaestadoabiertadurante120segundos,sonará una
alarmayestasonará cadadossegundoshastaquelapuertanoesté cerrada.Presione
cualquierteclaparacancelarelavisodepuertaabierta.
5
Page 7
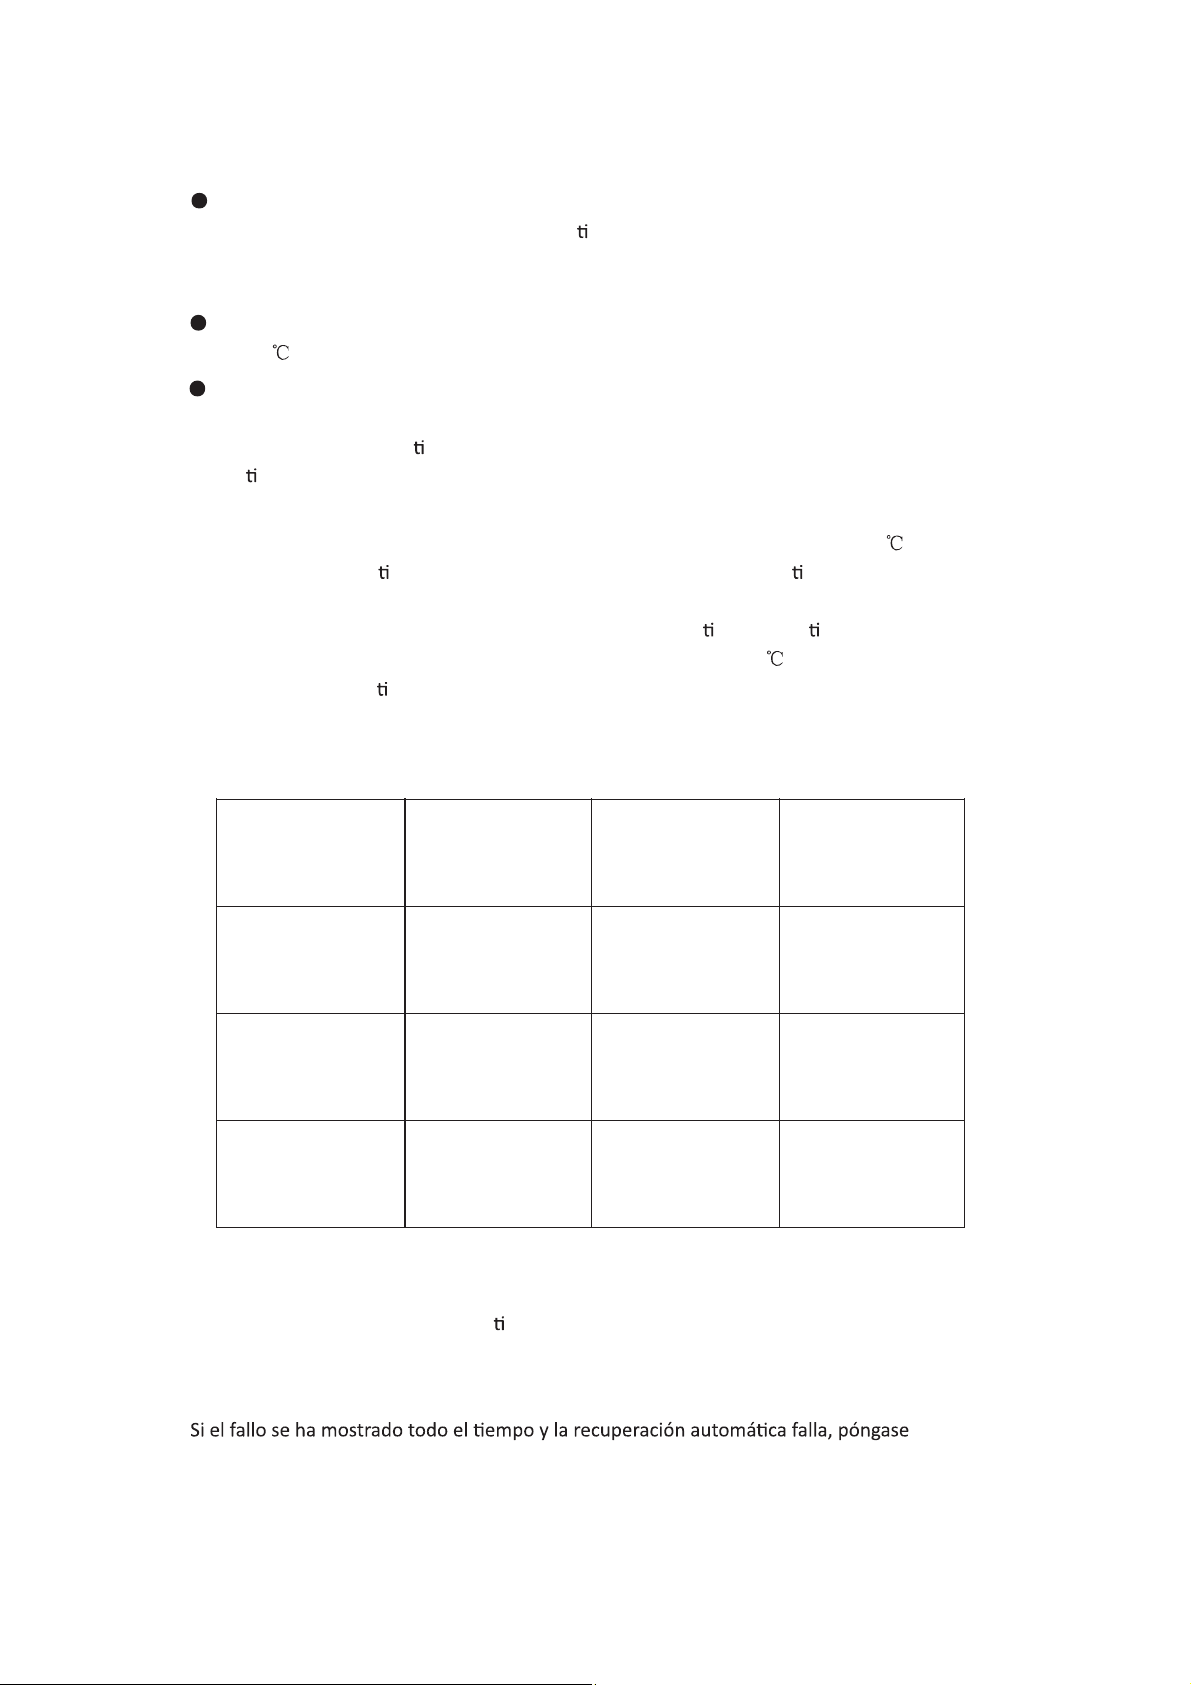
CódigosdeerrorFalloCódigosdeerrorFalloE1Falloenelsensor
E6Falloenla
E4Falloenelsensor
E9Temperaturaalta
E7Falloenelsensor
ECEEPROMfalloenel
7.Memoria interrupción de suministro eléctrico y el estado de encendido inicial
Cuandoapareceuncortedelsuministro,elrefrigeradorseponeenmodode
memoriaydelestadoantesdeformaautomá ca;Cuandosevuelveaencender,se
recuperará alestadoantesdelainterrupciónyejecutaelmodoquesehayaajustado
antesdelainterrupción.
Estadodelencendidoinicial:latemperaturaestablecidadecámaradeenfriamiento
esde+5 yelsistemanoestá enmododealtahumedad.
Memoria:incluyeajustedelatemperaturadelacámaraderefrigeración,elmodo
"AltaHumedad"ylashorasdetrabajoacumuladasdecompresor.
Porejemplo,sielsistema eneunafalladeenergíabajoelestadodealtahumedad,
secon nuará trabajandoenelmodode"altahumedad"despuésdelarecuperación.
8.Advertencia de alta temperatura de la cámara de enfriamiento
Cuandolatemperaturadelacámaradeenfriamientohaestadoporencimade15
duranteseishoras,el mbredeadvertenciadetemperaturasonará.El mbresonará
diezvecesporsegundoyluegodiezvecescadatreintaminutosyenlapantallael
indicadordetemperaturamostraráncódigodeerror(E9);el mbresede enecuando
latemperaturadelacámaradeenfriamientoestá pordebajode10 .Pulsecualquier
teclaparacancelarel mbredeaviso(paraelsonidodespu ésde30minutos).El
estadodevisualizacióndecódigodeerrornosecancela,hastaquesesolucioneel
fallo.
9.Códigos de error.
deenfriamiento
dedescongelació n
detemperatura
ambiente
Nota:cuandoseproduceunfallo,elsistemamostrará loscódigosdetodoslosfallos
delamáquina'porturno.
Laadvertenciasecancelará automá camentedespuésdelarecuperacióndelfalloo
pulsecualquierteclaparacancelarlaalerta.Cuandoelfalloocurre,semuestraenla
pantalla el código de error, desapareciendo la temperatura de ajuste y el estado de
alta humedad hasta que el estado de error se recupere.
comunicación
enelrefrigerador
circuito
encontactocon el personal de postventa o con el serviciotécnico.
6
Page 8
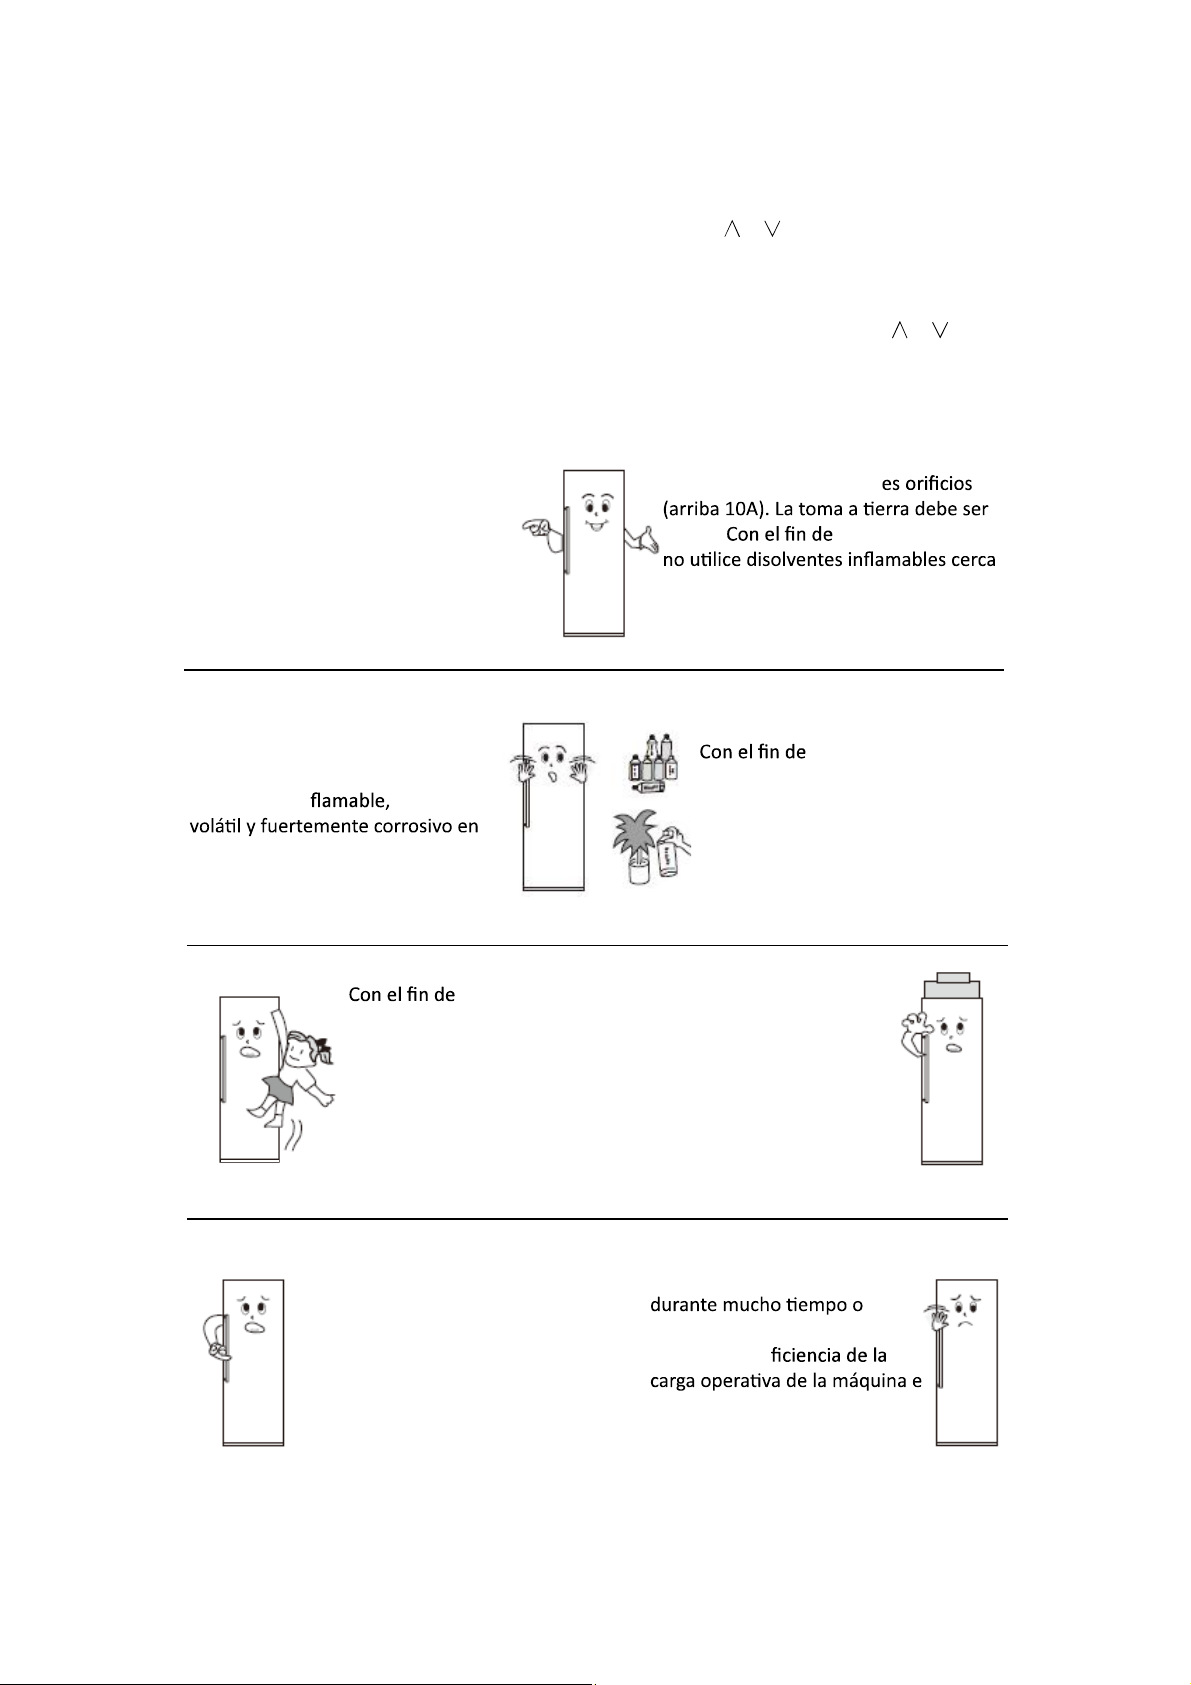
10. Modo descongelación
Mantenga pulsado teclas "regulación de la temperatura"tecla y durante tres segundos
para entrar en modo descongelación. En la alta posición de la región de la temperatura
del LED muestra siempre "3" sin mostrar la posición baja. Al entrar en el modo de descongelación,
elcompresor se detendrá inmediatamente. Cuando se trabaja en Modo de descongelación o se
realiza esta acción, presione y mantenga las teclas "regulación de la temperatura" y durante
tres segundos para salir del modo de descongelación.
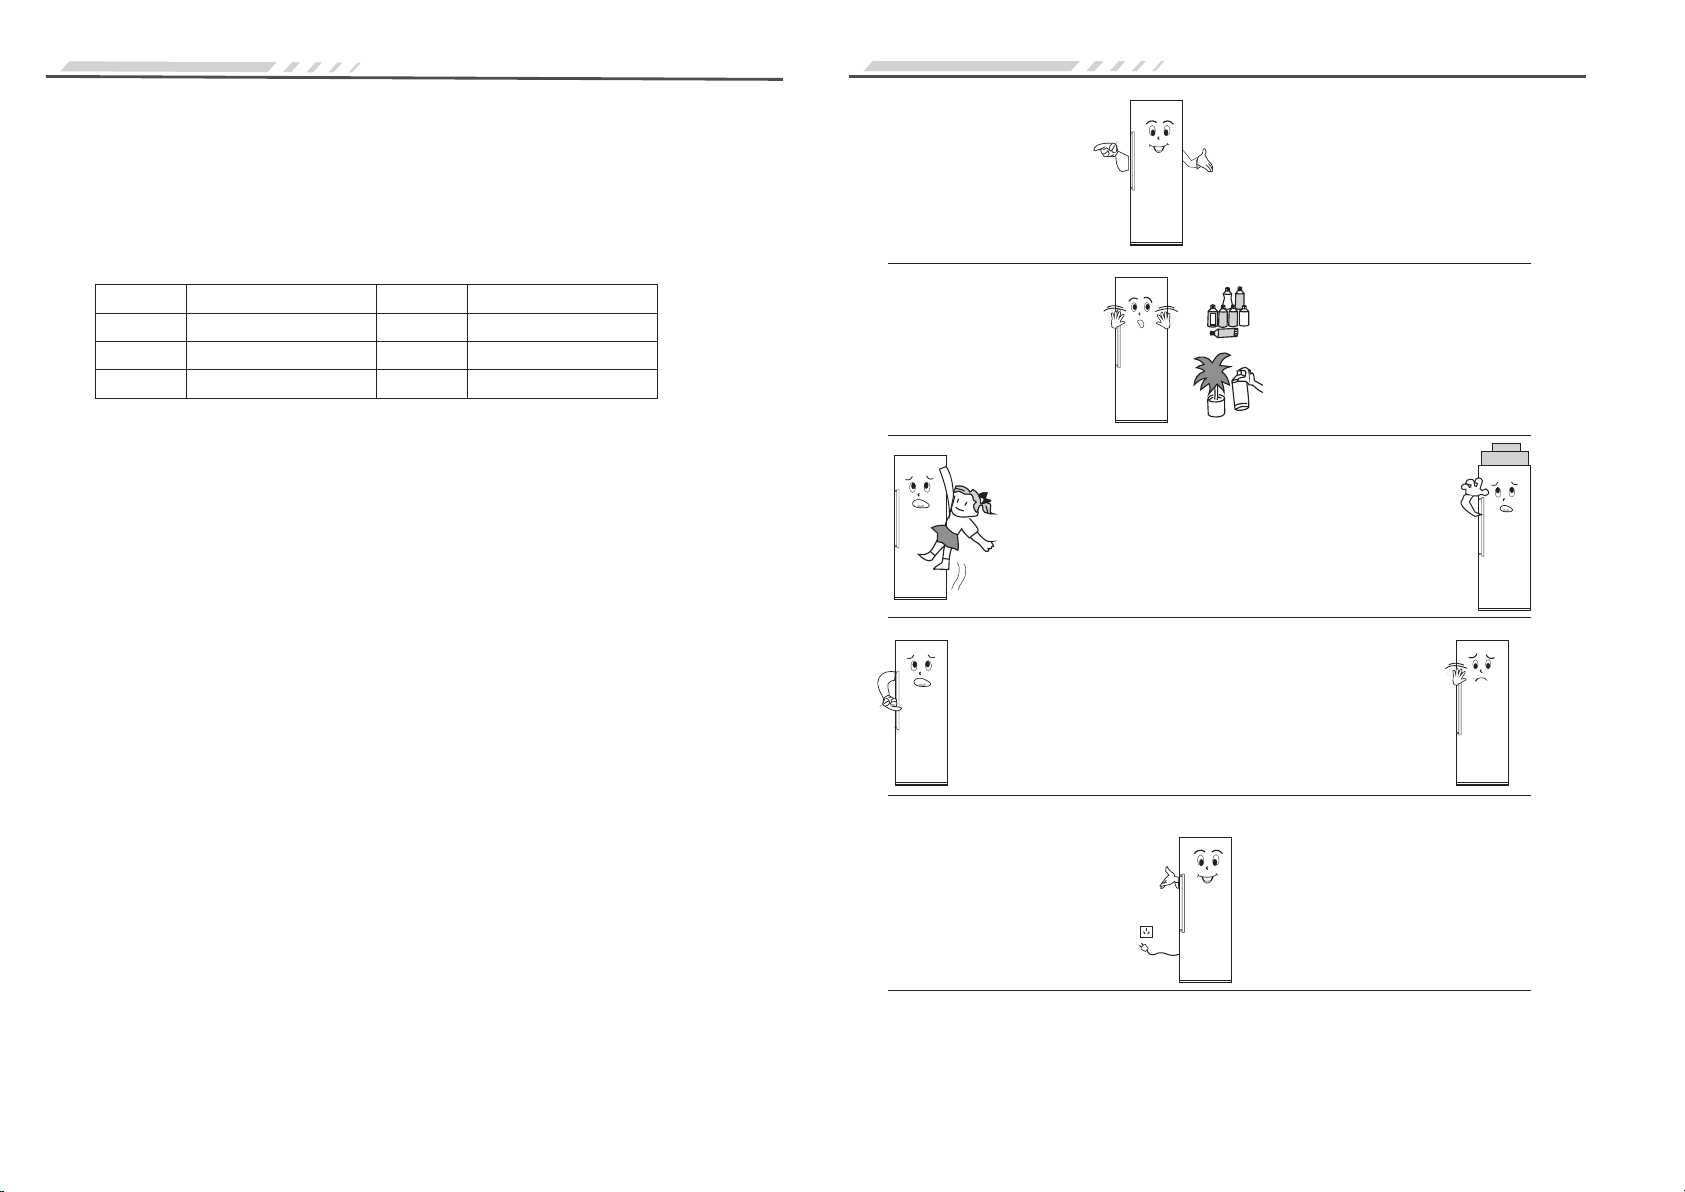
Hechos que necesitan atención
No desmonte o repare usted mismo
el aparato. Elija los talleres de reparación
designados por el fabricante para
reemplazar los accesorios.
Paraevitar provocar incendios y
otrosaccidentes, por favor no
ponga nada in explosivo,
elrefrigerador.
evitar un daño
accidentalcausado porque
un niño se quede encerrado
en el interior o que el
refrigerador se pueda volcar,
no permita que los niños
entren o se suban en el
refrigerador.
Use un enchufecon en tr
buena. evitar un incendio,
del refrigerador
evitar la congelación,
larotura y otras pérdidas, por favor,
no ponga las botellascon líquidos o
precintar envases en la caja de
refrigeración.
No pongacosas pesadas
en el refrigerador, si no
será fácil que se puedan
caer y producir lesiones.
No introduzca demasiados
alimentos en el refrigerador.
No abra la puerta y cajones
frecuentemente, de lo contrario
debilitará la e
incrementará el funcionamiento
delcompresor.
7
Page 9
atención:
talescomo guardar la sangre, drogas, productos biológicos, etc.
Mantenimiento del refrigerador
Limpieza
Las huellas digitalesfácilmente se quedan marcadas en su exterior. Use una
toalla seca para limpiar el aparato. Periódicamente limpiar el polvotanto en la
parte posterior de y bajo el refrigerador.
Frig co interior debe limpiarsecon frecuencia paraevitar olores extraños.
Después de desenchufar el refrigerador, use una toalla suave y un detergente
neutro para limpiar con agua limpia.
No utilice los siguientes productos para limpiar el interior del refrigerador:
Jabón en polvo, bencina, acetato de amilo, el alcohol, etc .; (puede destruirlos
Si el aceite o condimentos paracocinar mancha en el exterior del refrigerador
componentes se agrieten).
Cambio de lámpara
Si la luz de alumbrado origina fallos, por favor póngase en contactocon el servicio técnico.
atención:
No utilizar el refrigerador durante un largo período de tiempo:Porfavor, desconecte
la alimentación paraevitar una descarga eléctrica o fuego debido al envejecimiento de la línea
de alimentación; limpiar interior del refrigerador; abrir la puerta a la vez y cerrarla después de
que el interior estecompletamente seco.
Corte de energía :Reducir las horas de apertura al mayor número posible; intente no poner
los alimentos frescos en el interior, si ocurre esto.
Deshacerse: Cuando deseche el refrigerador sin usar, la junta de la puerta debe ser
desmontada, de modo que los niños no se puedan quedar encerrados en el refrigerador
por accidente.
Cambio de puertas
(abrir la puerta hacia la derecha)
8
Page 10
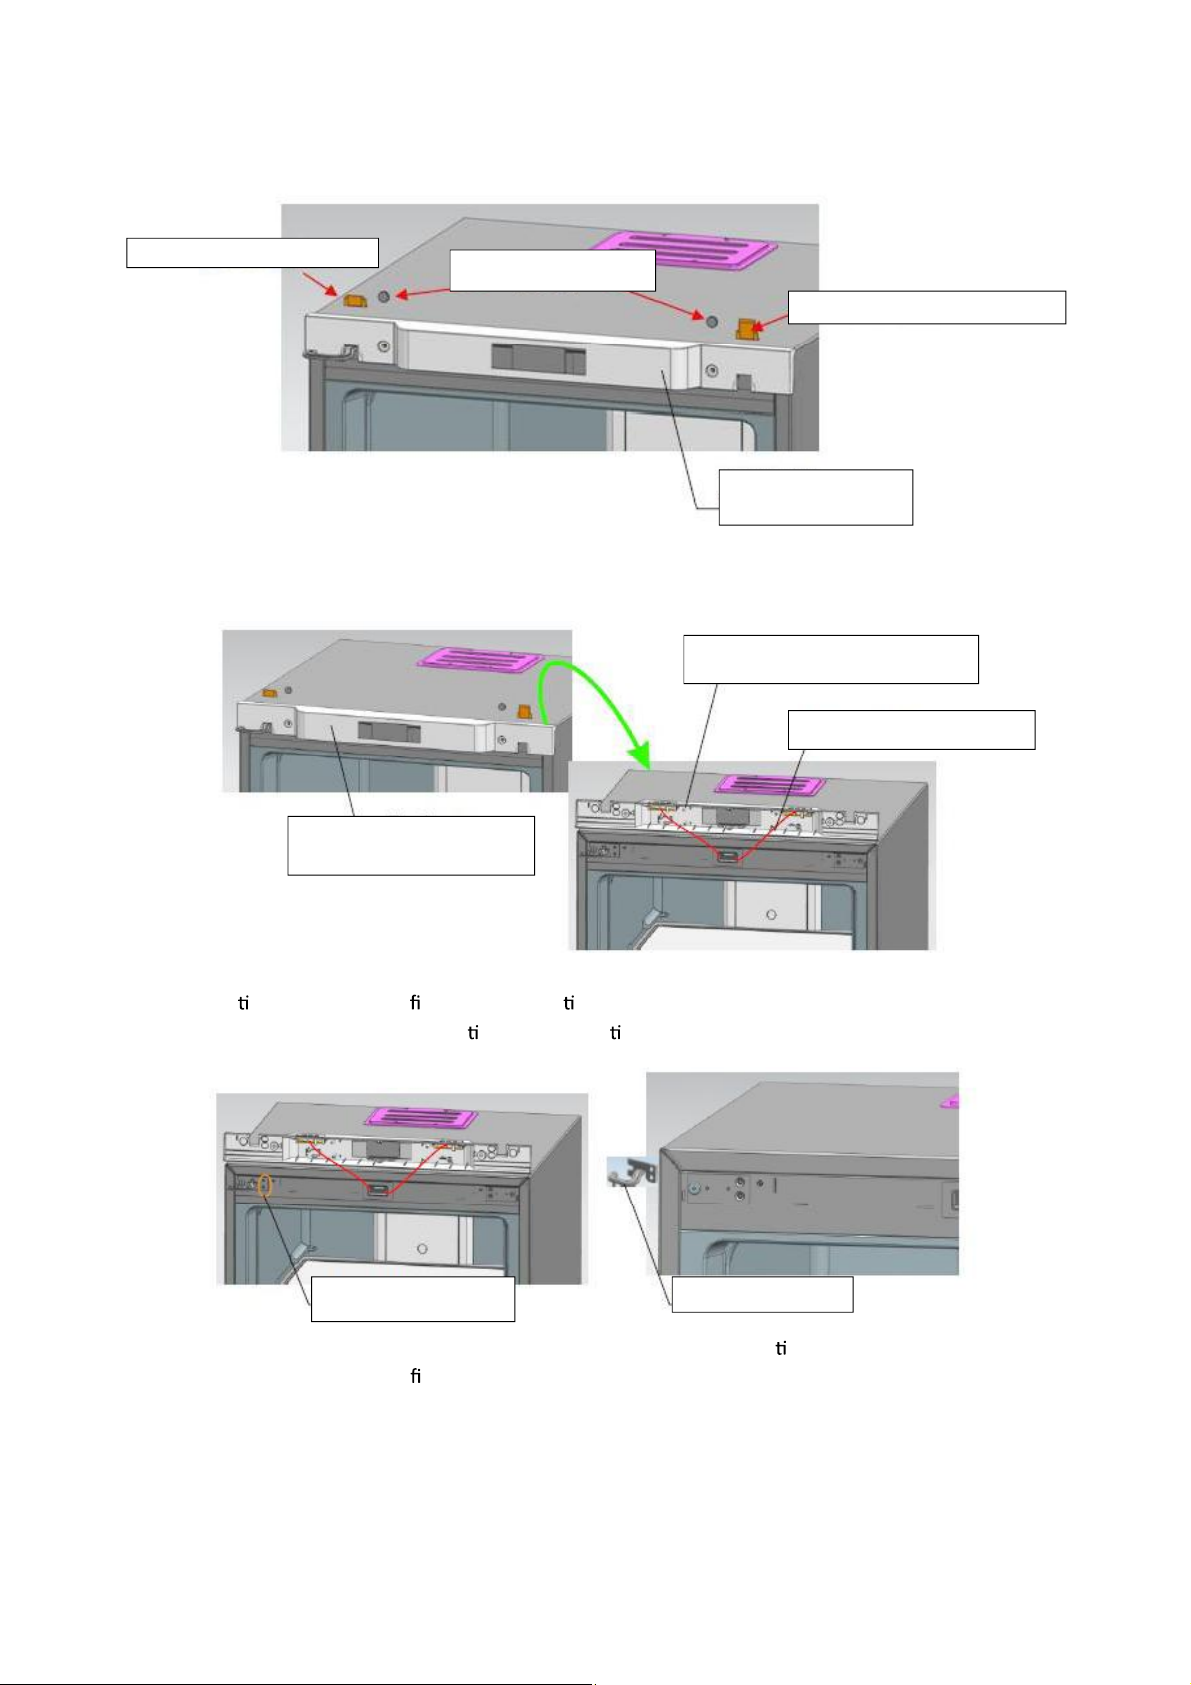
2.Quitarcomponentesdedecoració ndelzócalo.
Placadelacubiertaizquierda
T
apade tuercaPlacadelacubiertaderechaZocalos
uperiorZocalosuperior
cabl
eadoDospernosbisagra
Zocalosuperior
3.Re relosdostornillos josconbisagras, redelasbisagrasfueradeunladoy
desmantelarlapuertaalmismo empo.Como úl mo,tomelasbisagrasfueradelapuerta.
4.Volveramontarelejedelabisagrainferior:desmontarelejedear culaciónoriginaley
montarenlaposicióngrá ca.
9
Page 11
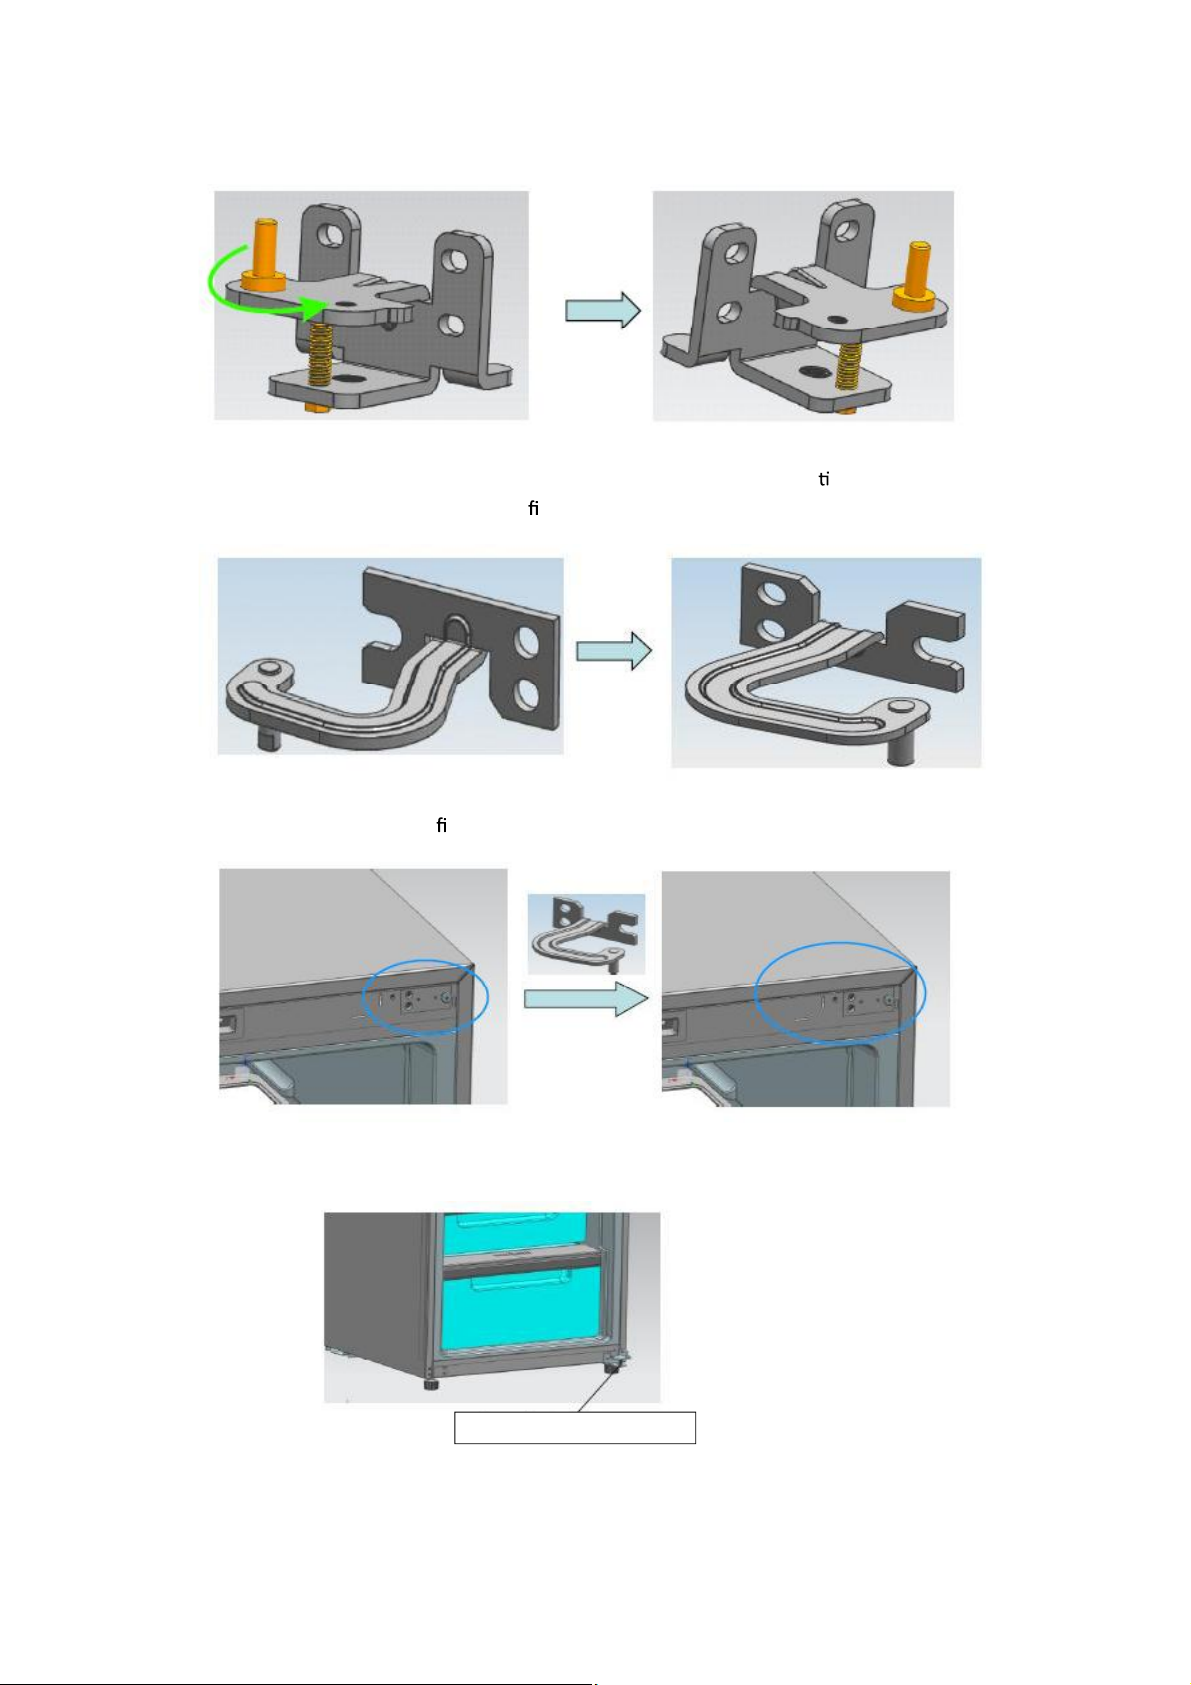
5.Volveramontarelejedelasbisagrassuperiores: desmontarelejedear culaciónymontar
Bisagrainferio
r
girándolodesdeelotroextremodelori ciodeltornillo.
6.Instalelabisagrasuperior ja(delaizquierda)enelladoderecho.
7.Instalarlabisagrainferiorenelladoderechodelanevera.
10
Page 12
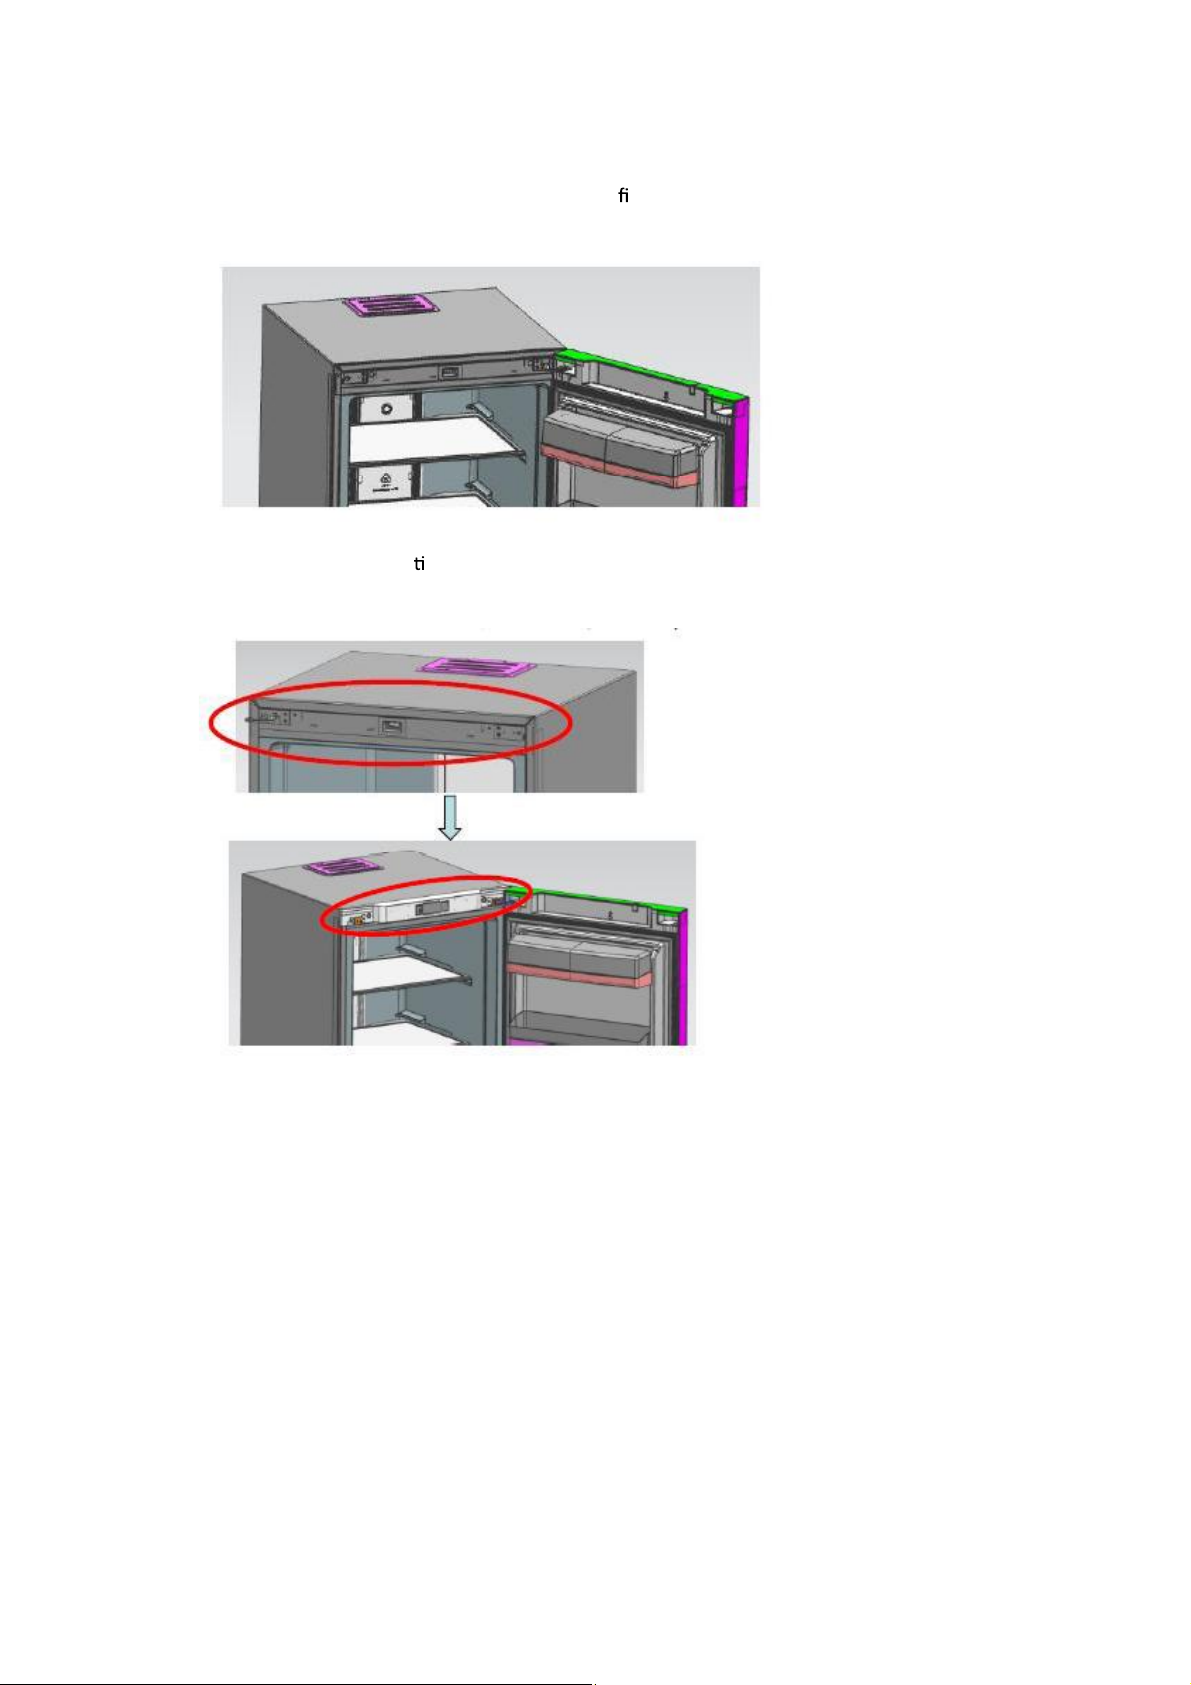
8.Primeroinstalelasbisagrassuperioresenlosori ciosdelejedeladerecha(enlapuerta),
luegocoloquelapuertaenlasbisagrasinferiores,introduzcalasbisagras
9.Instaleelzócalodecora vo,así comolostaponesytuercasdelasplacasdelacubiertadelas
bisagras.
GUIAPARAUNIRELCONGELADORYELREFRIGERADOR.
11
Page 13
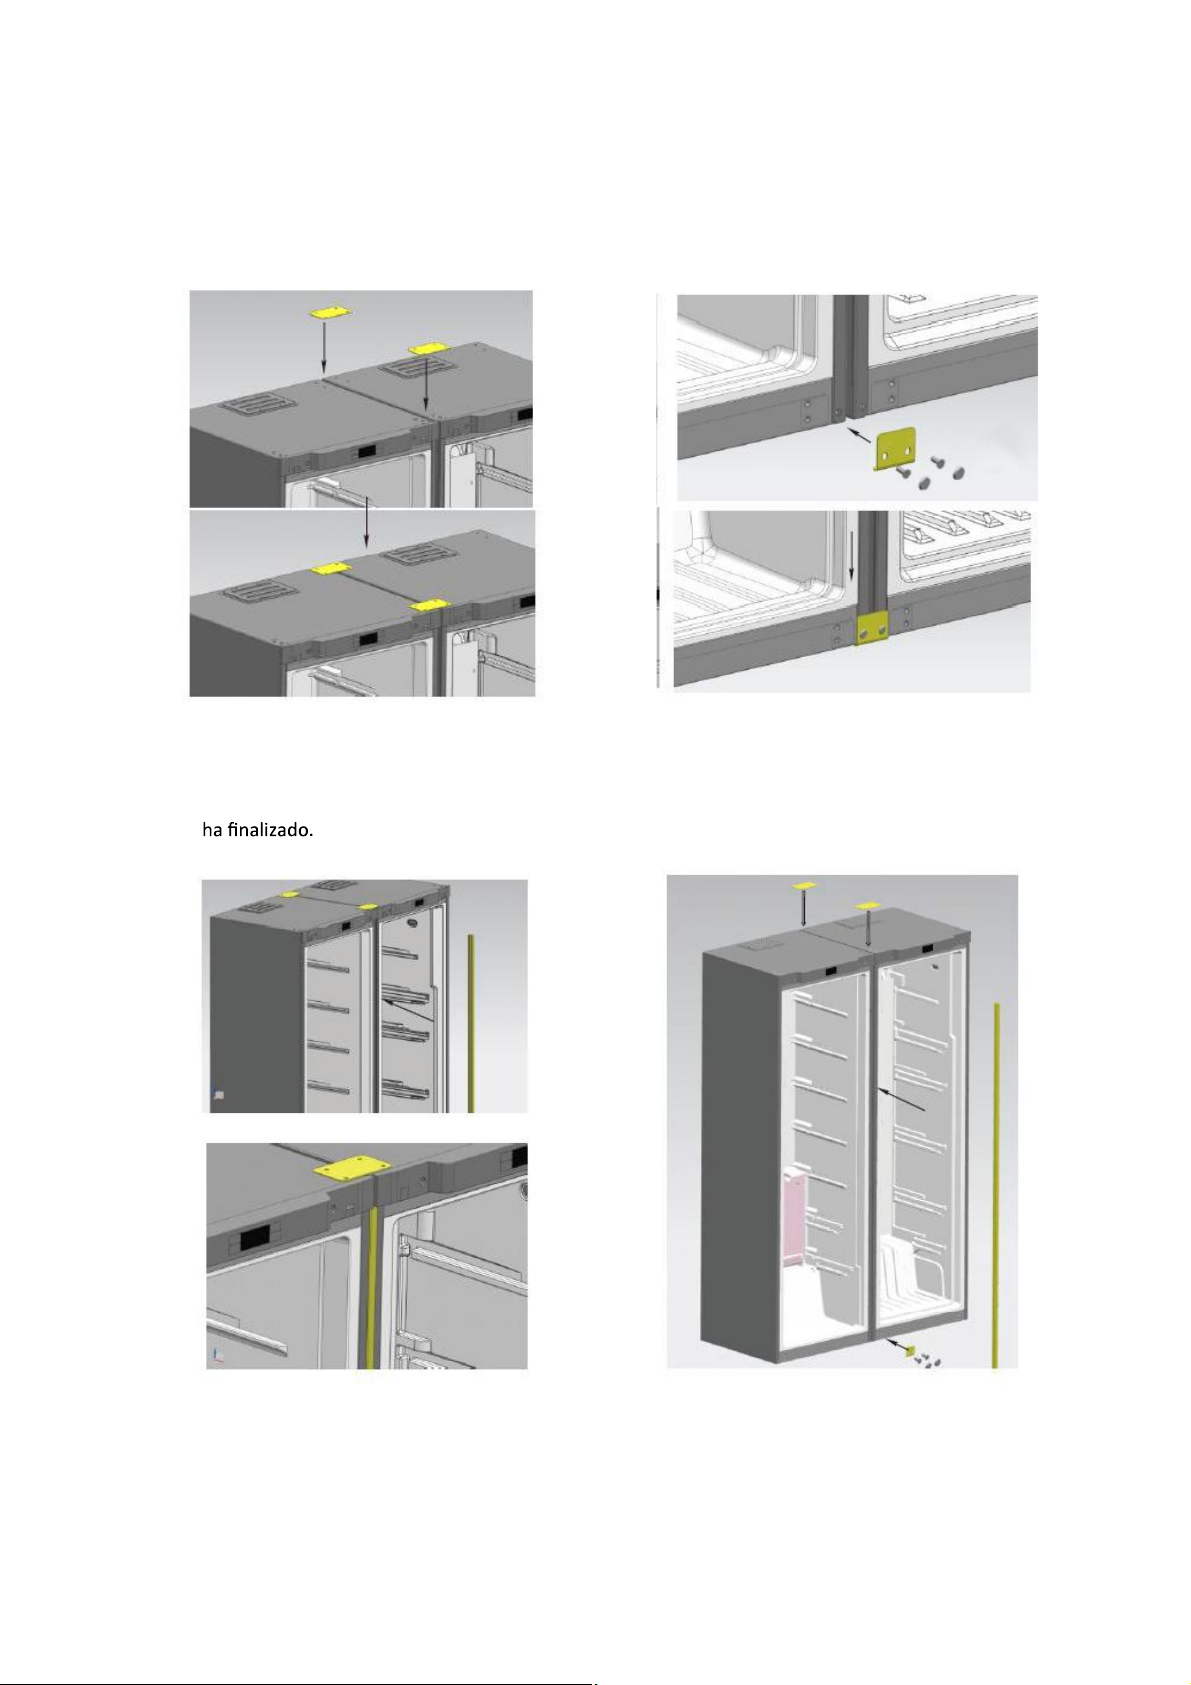
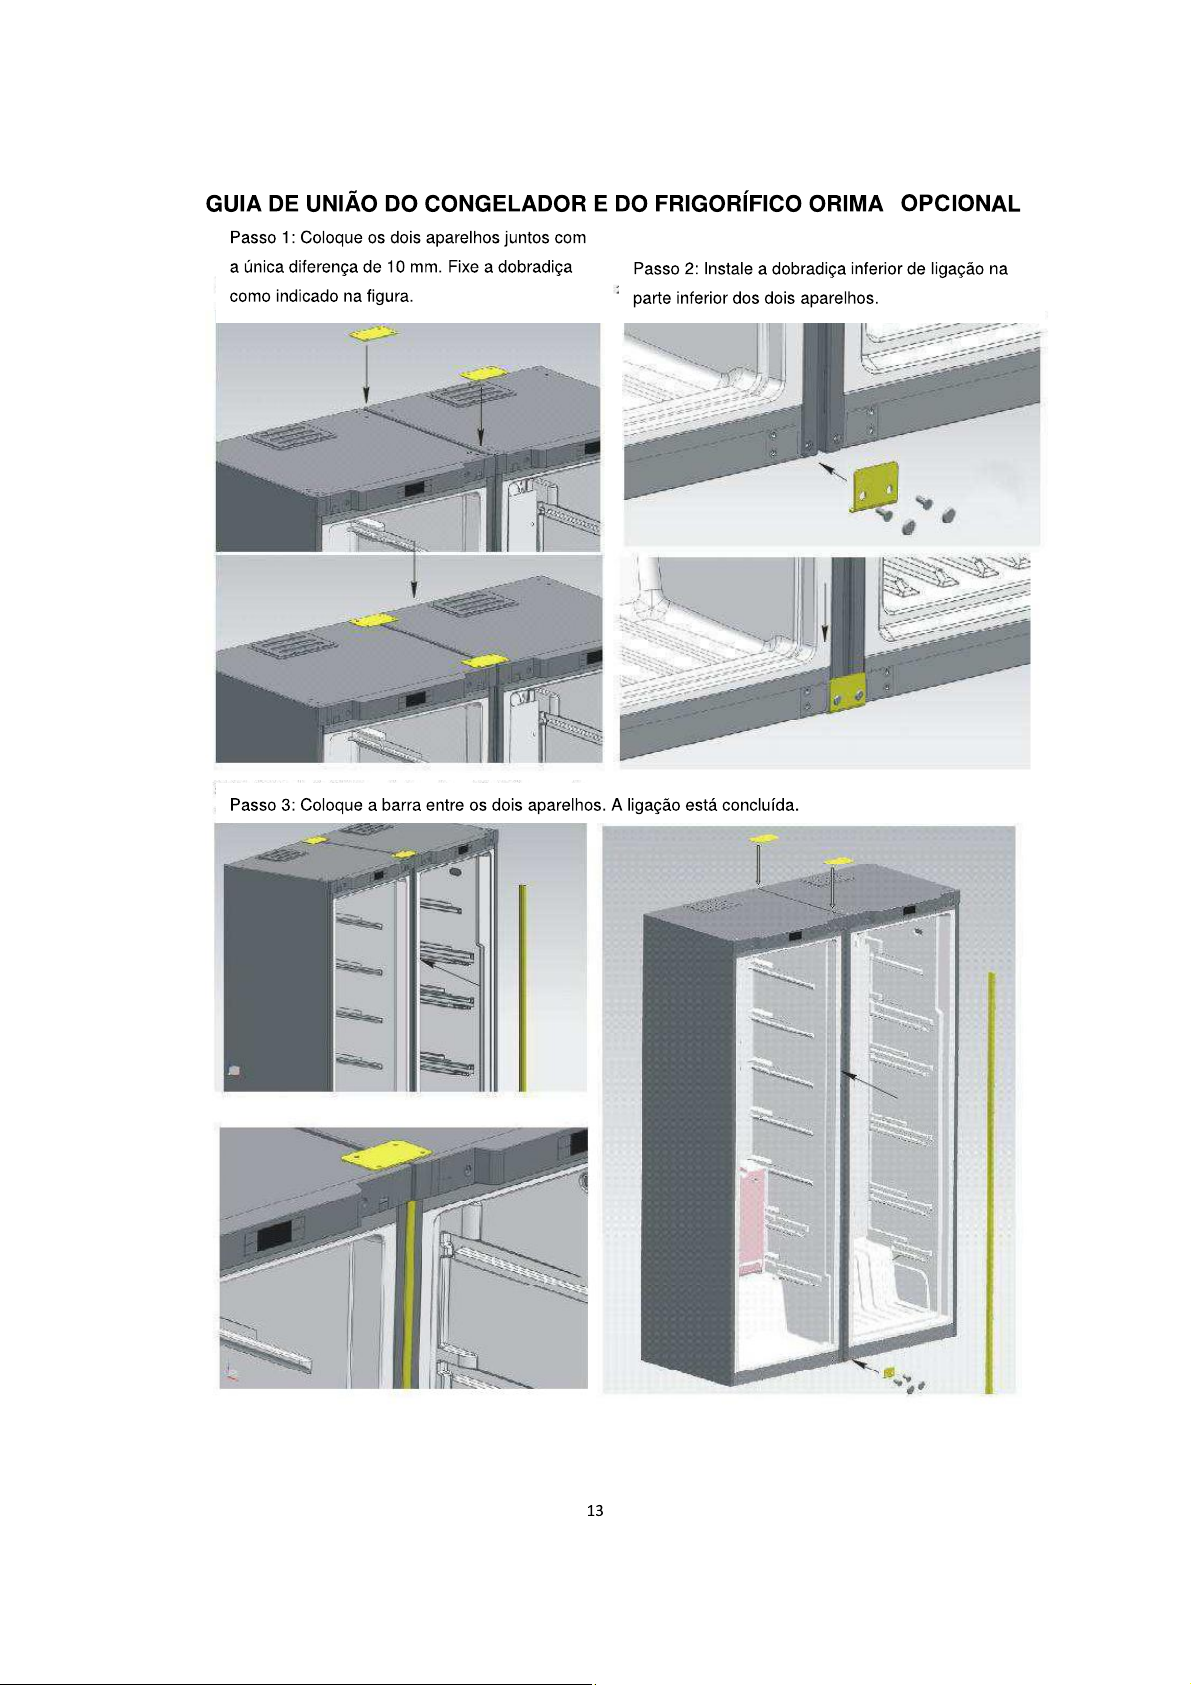
PASO 1: Ponga los dos aparatos juntoscon
sólo 10mm de hueco.Fije la bisagra que
conecta al lugarcomo se muestra en la imagen.
PASO 2: Coloque la bisagra inferior de
conexión en la parte inferior de los dos
aparatos.
Paso 3: Coloque la barra dentro de la
brecha entre los dos aparatos .La conexión
12
Page 14
Noestaenchufadooelcablenohaceconexiónbien
Sueloirregularcolocacióninestable
Envolturadelosalimentosnoestabiensellad
a
Solución de problemas.
Antes de la revisión por favor, lea cuidadosamente el siguiente contenido
causa
Posibles razones y motivos que necesitan revisarse
No funciona
Potenciabaja
Alimentos no se
conservan bien
Temperaturademasiadoalta
Demasiadacomida
Comidacaliente
Aperturaconstantedelaspuertas
Puertanoestá biencerrada
Proximidadaunafuentedecalor
Ruido alto
Colocació nincorrectadelosaccesorios
Malos olores
Alimentos ácidos
Suciedadenelinterior
Silasituaciónsigueexis endodespuésdecomprobartodaslascues onesanteriores,por
favorpóngaseencontactoconnuestroserviciotécnico.
Elcabledealimentació ndañadodebeserreemplazadoporelpersonaldemantenimiento
nombradospornuestraempresaparaelbiendesuseguridad.
No son fallos:
Dentrodelostuboscapilaresel uidorefrigerante uyemuyrápidoavecesllevaalgunas
burbujasdeairelascualespodríancausarruidosirregularesenlaentrada.
Cuandolahumedaddelaireesrela vamentealtalaszonasdealrededordelapuertapueden
generarhumedadestassepuedenlimpiarconunpañoseco.
Eliminacióncorrectadeesteproducto
Estesímboloindicaqueesteproductonodebedesecharsejuntoconotrosresiduosdomés cosentoda
laUE.Paraevitarcualquierposibledañoalmedioambienteoalasaluddelaspersonasporuna
eliminaciónincontrolada,recíclelodeformaresponsableparafomentarlareu lizaciónsosteniblede
lasmateriasprimas.Sideseadevolveresteproducto,u licelossistemasdedevoluciónyrecogidao
póngaseencontactoconelcomerciodondeloadquirió.Ellospodrá nllevaresteproductoaunas
instalacionesadecuadasparaunreciclajeseguro.
13
Page 15

Manual de Instruções
FRIGORIFICO
TNF 450 INOX
Page 16
Page 17
nítidas selagem
Page 18
Ю»°¿®¿9=± ¿²¬»- ¼» «-¿®
ߪ·-±
±« ±«¬®±- ³»·±- °¿®¿ ¿½»´»®¿® ±
°®±½»--± ¼» ¼»-½±²¹»´¿9=±ô »¨½»°¬± ¿- -±´«9+»- ®»½±³»²¼¿¼¿- °»´±
º¿¾®·½¿²¬»ò
®»½±³»²¼¿¼±- °»´± º¿¾®·½¿²¬»ò
Ñ- ¹¿-»- Îêðð » ± ½·½´±°»²¬¿²± «¬·´·¦¿¼±-ô ¿--·³ ½±³± ±- ³¿¬»®·¿·- ¯«»
½±³°+»³ ± º®·¹±®3º·½± -=± ·²º´¿³?ª»·-ò Ñ- ¿°¿®»´¸±- ª»´¸±- ¼»ª»³ -»®
·-±´¿¼±- ¼± º±¹± » ²=± °±¼»³ -»® ¯«»·³¿¼±-ò
Ú®·¹±®3º·½± ²±ª±
·²º»®·±® ¼±- -«°±®¬»- ¼» »-º»®±ª·¬» » ½¿®¬=± ¼± ·²¬»®·±® ¼± ¿°¿®»´¸±å
«³ °¿²±³¿½·± » ¸&³·¼± °¿®¿ ´·³°¿® ± ·²¬»®·±® » »¨¬»®·±® ¼± º®·¹±®3º·½±
ø¿¼·½·±²» «³ °±«½± ¼» ¼»¬»®¹»²¬» ²¿ ?¹«¿ ³±®²¿ » ¼»°±·- «¬·´·¦» ?¹«¿ ´·³°¿
°¿®¿ ´·³°¿®÷å
ß ¬±³¿¼¿ ¼»ª» -»® ½±³ ´·¹¿9=± @ ¬»®®¿ò Ñ º·± ¬»®®¿ » ± º·± ²»«¬®± ¼»ª»³ -»®
¼·-¬·²¹«·¼±- » ²=± ¼»ª»³ -»® ´·¹¿¼±- »²¬®» -·ò Ò=± «¬·´·¦» ¬±³¿¼¿- ³&´¬·°´¿½±³ ±«¬®±- ¿°¿®»´¸±- »´7½¬®·½±-ò
Ì®¿²-°±®¬» » ·²-¬¿´¿9=± ¼± º®·¹±®3º·½±
Ì®¿²-°±®¬»
ò ß± ³±ª»®ô ± >²¹«´± ¼» ·²½´·²¿9=± ²=±
¼»ª» »¨½»¼»® ±- ìëpò
½±²¬®?®·± °±¼» ¼»º±®³¿®ò
ߺ¿-¬» ´·¹»·®¿³»²¬» ¿ °¿®¬» ¼» ¬®?- ¼± º®·¹±®3º·½± ø³»²±- ¼» îðp÷ °¿®¿
³¿²¬»® «³¿ ½«®¬¿ ¼·-¬>²½·¿ ¼¿ °¿®»¼»ò
ײ-¬¿´¿9=±
± º®·¹±®3º·½± Ñ®·³¿ ²«³ ´±½¿´ ª»²¬·´¿¼±ô º±®¿ ¼± ¿´½¿²½» ¼» º±²¬»-
¼» ½¿´±® » ¼¿ ´«¦ -±´¿® ¼·®»½¬¿ò п®¿ »ª·¬¿® ¿ ±¨·¼¿9=± ±« ¿ ¼¿²·º·½¿9=± ¼±
·-±´¿³»²¬±ô ²=± ± ½±´±¯«» »³ ´±½¿·- ¸&³·¼±- » ³±´¸¿¼±-ò
º®·¹±®3º·½± ²=± ¼»ª» »-¬¿® ¿ ³»²±- ¼» íð½³ ¼± ¿®³?®·±ò ß
¼·-¬>²½·¿ »²¬®» ±- ´¿¼±- ²=± ¼»ª» -»® ·²º»®·±® ¿ ïð½³ô » ¿ ¼·-¬>²½·¿ ½±²¬®¿ ¿
°¿®»¼» ²=± ¼»ª» »¨½»¼»® ±- éôë½³ô °®±°±®½·±²¿²¼± ½±³±¼·¼¿¼» °¿®¿ ¿¾®·® »
º»½¸¿® ¿ °±®¬¿ » ¼·-°»®-¿® ± ½¿´±®ò
³ -±´± ´·-± » º·®³» ø-» ²=± º±® »-¬?ª»´ô °±¼» ®»¹«´¿®
±- °7-÷ò
߬»²9=±
Ý»®¬·º·¯«»ó-» ¼» ¯«» ± ½¿¾± ²=± »-¬? ¼»¾¿·¨± ¼± º®·¹±®3º·½± ±« ¼»±«¬®±¿®¬·¹±-ò
ß²¬»- ¼» ´·¹¿® ± ½¿¾±ô ª»®·º·¯«» -» ¿ ª±´¬¿¹»³ ½±®®»-°±²¼» @ ¼± ¿°¿®»´¸±ò
í
Page 19
ˬ·´·¦¿9=± ½±®®»¬¿ ¼± º®·¹±®3º·½±
Ý»®¬·º·¯«»ó-» ¼» ¯«» ± º®·¹±®3º·½± »-¬? ·²-¬¿´¿¼± ½±®®»½¬¿³»²¬» » ¼» º±®³¿
»-¬?ª»´ò
Û-¬»¶¿ ¿¬»²¬± ¿ ¬±¼¿- ¿- ¯«»-¬+»- ¼» -»¹«®¿²9¿ò
ïò Ô·¹«» @ ¬±³¿¼¿ò
Ü»°±·- ¼» ´·¹¿® @ »´»½¬®·½·¼¿¼»ô »²¬®¿ »³ º«²½·±²¿³»²¬±ò
îò ݱ´±¯«» ±- ¿´·³»²¬±- ²± º®·¹±®3º·½±
Í«¹»-¬=±æ ¼»°±·- ¼» º«²½·±²¿® ¼«®¿²¬» ¿´¹«³ ¬»³°±ô ± º®·¹±®3º·½± ¿¬·²¹» ¿
¬»³°»®¿¬«®¿ ¼» ¿®³¿¦»²¿³»²¬± ±« ¿°-- ¿ °®·³»·®¿ °¿®¿¹»³ ¼± ½±³°®»--±®ô
½±´±¯«» ¿ ½±³·¼¿ °¿®¿ ³¿²¬»® ¿ º®»-½«®¿ ¼±- ¿´·³»²¬±-ò
Ò±¬¿æ -» ¿´¬»®¿® ¿ ¬»³°»®¿¬«®¿ ±« ½±´±½¿® ²±ª±- ¿´·³»²¬±-ô ¿
¬»³°»®¿¬«®¿ ²± ·²¬»®·±® ¼¿- ¹¿ª»¬¿- ¿´½¿²9¿ ± »¯«·´3¾®·± ¿°-- ¿´¹«³
¬»³°±ô ¼»¬»®³·²¿¼± °»´± ¹®¿« ¼» ¿´¬»®¿9=± ¼» ¬»³°»®¿¬«®¿ô °»´¿
¬»³°»®¿¬«®¿ ¿³¾·»²¬»ô ¿ º®»¯«6²½·¿ ¼» ¿¾»®¬«®¿ ¼¿ °±®¬¿ô ¿ ¯«¿²¬·¼¿¼»
¼» ¿´·³»²¬± »²¬®» ±«¬®±- º¿½¬±®»-ò
ײ¬®±¼«9=± ¼» º«²9+»-
ïò Þ±¬+»-
ßò Ø«³·¼¿¼» ß´¬¿æ Ó±¼± ¼» Ø«³·¼¿¼» ß´¬¿
Þò Ô·¹¿®ñÜ»-´·¹¿®æ ´·¹¿® ±« ¼»-´·¹¿® ± º®·¹±®3º·½±
Ýò æ¿«³»²¬¿® ¿ ¬»³°»®¿¬«®¿
Üò æ ¼·³·²«·® ¿ ¬»³°»®¿¬«®¿
îò Ü»-·¹²¿9=± ¼¿- º«²9+»- ¼± ª·-±®
ï ײ¼·½¿¼±® ¼» ¸«³·¼¿¼» ¿´¬¿
î Ü3¹·¬±- ·²¼·½¿¼±®»- ¼¿ ¬»³°»®¿¬«®¿
í Ì»³°»®¿¬«®¿ øfÝ÷
íò Ê·-±®
¬±¼±- ±- ·²¼·½¿¼±®»- ¿½»²¼»³ ¼«®¿²¬» ¬®6-
-»¹«²¼±-ô » -±¿ ± ¿´¿®³» ¼» ·²3½·±ò ß ¬»³°»®¿¬«®¿ °¿¼®=± °®7󼻺·²·¼¿ 7 ¼»
ì
Page 20
ëfÝò
Ô±½¿´ ¼± ·²¼·½¿¼±® ¼» ¬»³°»®¿¬«®¿æ ¯«¿²¼± ¸? «³¿ º¿´¸¿ô ³±-¬®¿ ±- ½-¼·¹±¼» »®®± °±® ¬«®²± ²«³¿ ±®¼»³ ¼» °®·±®·¼¿¼»å -» ²=± ¸±«ª»® »®®±-ô ³±-¬®¿ ¿
¬»³°»®¿¬«®¿ ¿¶«-¬¿¼¿ò
ײ¼·½¿¼±® ¼» Ø«³·¼¿¼» ß´¬¿æ ¿½»²¼» ¯«¿²¼± ± -·-¬»³¿ »-¬? ²± Ó±¼±
Ø«³·¼¿¼» ß´¬¿ò
ïò Ò«³¿ -·¬«¿9=± ²±®³¿´ô ²=± ¿½»²¼» ³¿·- ¿°-- ¬®·²¬¿ -»¹«²¼±- -»³
¿¾»®¬«®¿ ¼¿ °±®¬¿ ±« -»³ ¿½½·±²¿® ±- ¾±¬+»- ¼» º«²½·±²¿³»²¬±å
î Ï«¿²¼± ¿ °±®¬¿ »-¬? ¿¾»®¬¿ô ± ª·-±® »-¬? -»³°®» ´·¹¿¼± » ¼»-´·¹¿ ¬®·²¬¿
-»¹«²¼±- ¼»°±·- ¼» º»½¸¿® ¿ °±®¬¿ò
í Ï«¿²¼± ¸? «³¿ º¿´¸¿ » ¿°¿®»½» þÝ-¼·¹± ¼» º¿´¸¿þô ± ª·-±® ¿½»²¼» °±® «³
¬»³°± » ¼»°±·- ¼»-´·¹¿ ¿°-- ¬®·²¬¿ -»¹«²¼±- ø-» ± ¿´¿®³» ¬±½¿® °±® «³ ´±²¹±
°»®3±¼± ¼» ¬»³°±ô °®»--·±²» ¯«¿´¯«»® ¬»½´¿ °¿®¿ ½¿²½»´¿® ± ¿´¿®³»÷å
ìò Ú«²½·±²¿³»²¬±
ͱ¾ ± ³±¼± ·²·½·¿®ô °®»--·±²» » -»¹«®» ± ¾±¬=± ´·¹¿®ñ¼»-´·¹¿® ø¾±¬=± Þ÷
¼«®¿²¬» ¬®6- -»¹«²¼±-ô ¬±½¿ ± ¿´¿®³» ¼» ·²3½·± » ± -·-¬»³¿ ¼»-´·¹¿
·³»¼·¿¬¿³»²¬»å
ͱ¾ ± ³±¼± ¼»-´·¹¿®ô °®»--·±²» » -»¹«®» ± ¾±¬=± ´·¹¿®ñ¼»-´·¹¿® ø¾±¬=± Þ÷
¼«®¿²¬» ¬®6- -»¹«²¼±-ô ¬±½¿ ± ¿´¿®³» ¼» ·²3½·± » ± -·-¬»³¿ ´·¹¿
·³»¼·¿¬¿³»²¬»å
Ю»--·±²» ± ¾±¬=± ´·¹¿®ñ¼»-´·¹¿® ¼«®¿²¬» ¬®6- -»¹«²¼±- °¿®¿ ¼»-´·¹¿® ±
-·-¬»³¿ » ± ª·-±® ¼»-´·¹¿ò Í¿´ª± ± ¾±¬=± ´·¹¿®ñ¼»-´·¹¿® ø¾±¬=± Þ÷ô ¿- ±«¬®¿¬»½´¿- ²=± ®»-°±²¼»³ô » ± ½±³°®»--±®ô ¿¯«»½»¼±® ¼» ¼»-½±²¹»´¿9=±ô ¿ ´«¦
¼¿ °±®¬¿ » ±«¬®¿- ½¿®¹¿- °¿®¿³ ·³»¼·¿¬¿³»²¬»å Ю»--·±²» ¿ ¬»½´¿
´·¹¿®ñ¼»-´·¹¿® ¼«®¿²¬» ¬®6- -»¹«²¼±- °¿®¿ ·²·½·¿® ± -·-¬»³¿ò ß²¬»- ¼» ½±³»9¿®ô
-» ± -·-¬»³¿ »-¬·ª»® ²± ³±¼± ¼» Ø«³·¼¿¼» ß´¬¿ô ± ·²¼·½¿¼±® ¼» Ø«³·¼¿¼»
ß´¬¿ ¿½»²¼»ô ±«ô ½¿-± ½±²¬®?®·±ô ±ª·-±® ·²¼·½¿ ¿ ¬»³°»®¿¬«®¿ ²± ·²¬»®·±® ¼±
º®·¹±®3º·½± ø³¿®½¿¼¿ ¼¿ &´¬·³¿ ª»¦÷ » ¬±¼¿- ¿- ½¿®¹¿- -»®=± »¨»½«¬¿¼¿- ¼»
¿½±®¼± ½±³ ¿- ¼»º·²·9+»- ¿²¬»- ¼» ¼»-´·¹¿®ò
̱¼¿- ¿- º«²9+»- ¿ -»¹«·® ¼»ª»³ -»® »¨»½«¬¿¼¿- ²± »-¬¿¼± ´·¹¿¼±ò
Ó±¼±Ø«³·¼¿¼» ß´¬¿
Ï«¿²¼± ± -·-¬»³¿ ²=± »-¬·ª»® ²± ³±¼± Ø«³·¼¿¼» ß´¬¿ô °®»--·±²» » -»¹«®» ±
¾±¬=± Ø«³·¼¿¼» ß´¬¿ ø¾±¬=± ß÷ ¼«®¿²¬» ¬®6- -»¹«²¼±- °¿®¿ ·²·½·¿® »-¬¿ º«²9=±
» ¿½»²¼» ± ·²¼·½¿¼±® ´«³·²±-±ò
Ï«¿²¼± ± -·-¬»³¿ »-¬·ª»® ²± ³±¼± Ø«³·¼¿¼» ß´¬¿ô °®»--·±²» » -»¹«®» ±
¾±¬=± Ø«³·¼¿¼» ß´¬¿ ø¾±¬=± ß÷ ¼«®¿²¬» ¬®6- -»¹«²¼±- °¿®¿ -¿·® ¼»-¬¿ º«²9=±
»¼»-´·¹¿ ± ·²¼·½¿¼±® ´«³·²±-±ò
ß± ·²·½·¿® ± ³±¼± ¼» Ø«³·¼¿¼» ß´¬¿ô± º®·¹±®3º·½± º«²½·±²¿ -±¾ »-¬» »-¬¿¼±
°¿®¿ ³»´¸±®¿® ¿ ¸«³·¼¿¼» ®»´¿¬·ª¿ ¼± ¿® ²± ·²¬»®·±® ¼± ³»-³±ò
ë
Page 21
Page 22
Page 23
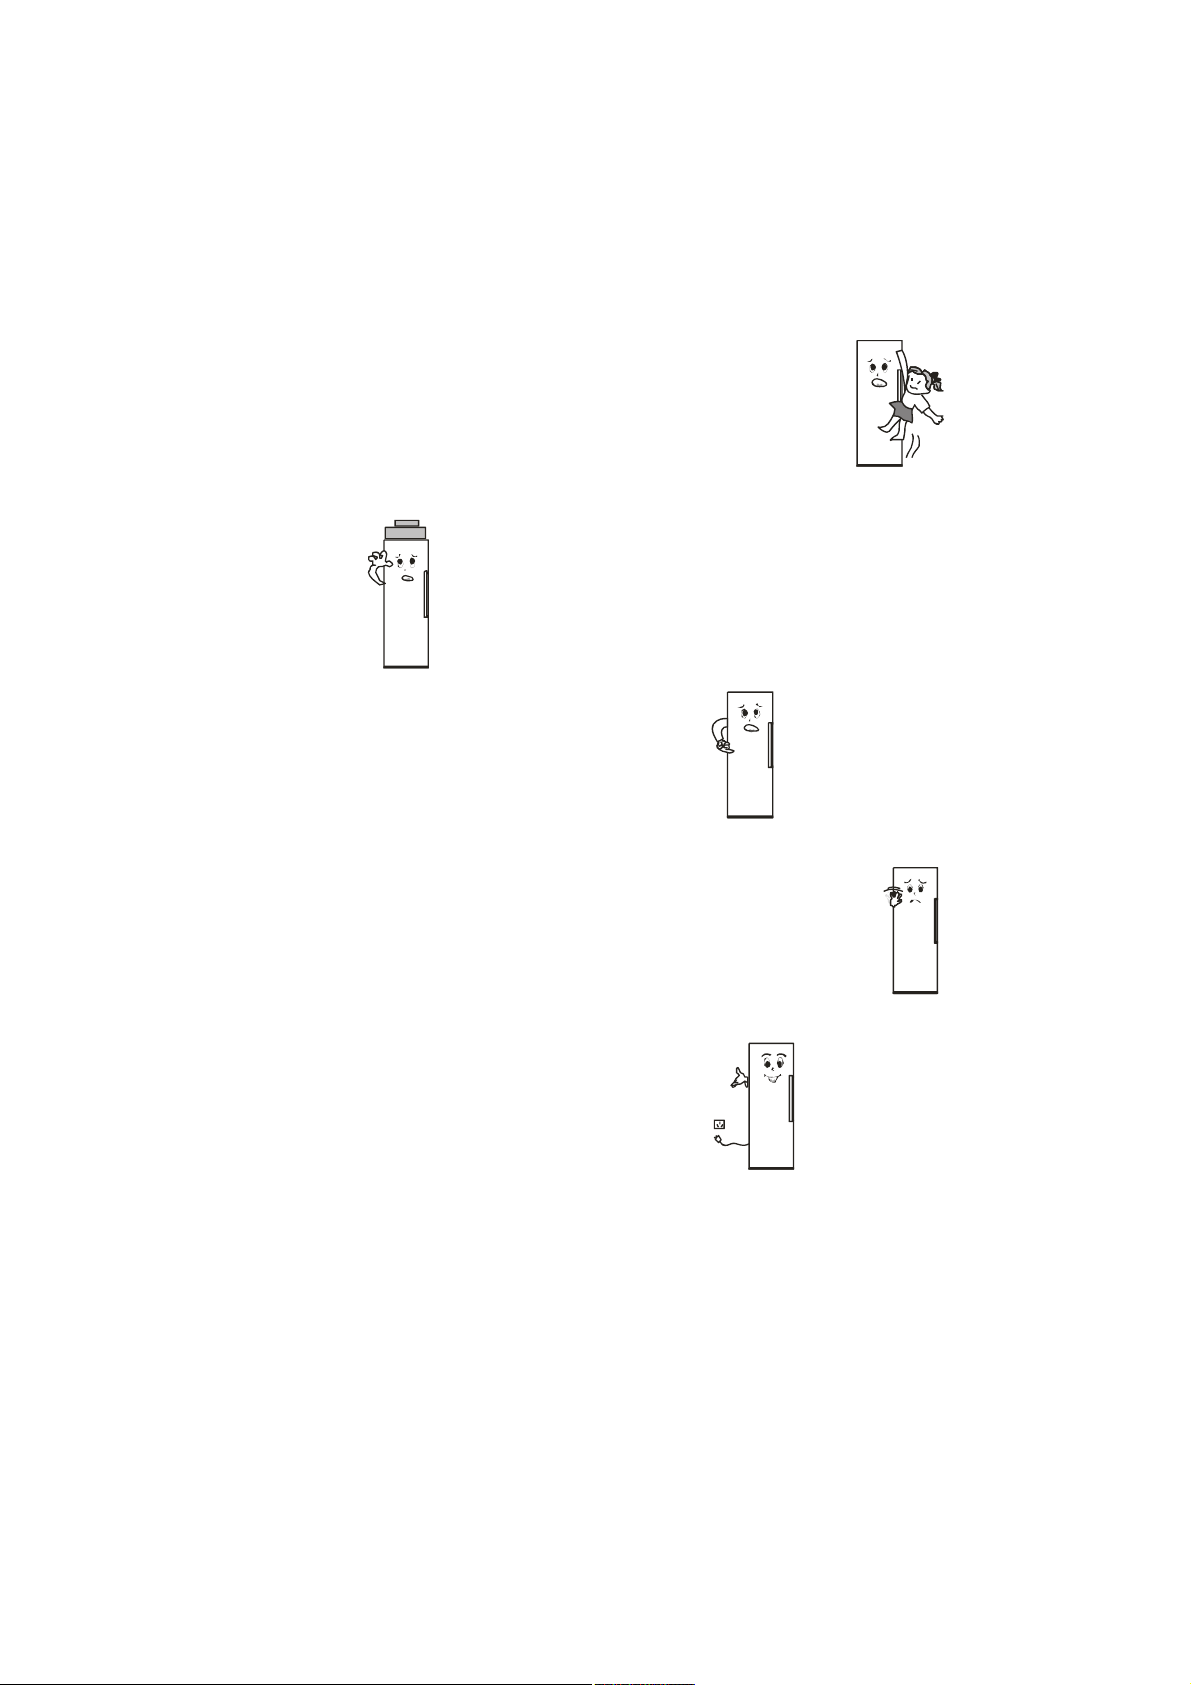
п®¿ »ª·¬¿® ¼¿²±-ô ·²½6²¼·± » ±«¬®±- ¿½·¼»²¬»-ô ²=± ½±´±¯«» °®±¼«¬±-
·²º´¿³?ª»·-ô »¨°´±-·ª±-ô ª±´?¬»·- » º±®¬»³»²¬» ½±®®±-·ª± ²± º®·¹±®3º·½±ò п®¿
»ª·¬¿® ¿ ½±²¹»´¿9=±ô ¯«»¾®¿ » ±«¬®¿- °»®¼¿-ô ²=± ½±´±¯«» ¹¿®®¿º¿- ½±³
´3¯«·¼±- ±« ®»½·°·»²¬»- ¼» ª·¼®± ²¿- ¹¿ª»¬¿- ¼» ½±²¹»´¿9=±ò
п®¿ »ª·¬¿® ¯«» ½®·¿²9¿- º·¯«»³ º»®·¼¿- °±® º·½¿®»³ °®»-¿- ²± ·²¬»®·±® ±« ±
º®·¹±®3º·½± ½¿·®ô ²=± °»®³·¬¿ ¯«» »²¬®»³ ±« -«¾¿³ °¿®¿ ± ³»-³±ò
Ò=± ½±´±¯«» °»-±- -±¾®» ± º®·¹±®3º·½±ô ½¿-± ½±²¬®?®·± °±¼» ¬±³¾¿® º¿½·´³»²¬»
» ½¿«-¿® ¼¿²±-ò
Ò=± ½±´±¯«» ¿´·³»²¬±- »³ »¨½»--± ²± º®·¹±®3º·½±ò
Ò=± ¿¾®¿ ¿ °±®¬¿ » ¹¿ª»¬¿- °±® ³«·¬± ¬»³°± ±« º®»¯«»²¬»³»²¬»ô ½¿-±
½±²¬®?®·± ¼·³·²«· ¿ »º·½·6²½·¿ » ¿«³»²¬¿ ¿ ½¿®¹¿ ¼» º«²½·±²¿³»²¬±ò
Ï«¿²¼± ± º®·¹±®3º·½± ²=± »-¬? ¿ º«²½·±²¿® ²±®³¿´³»²¬» ±« 7 °¿®¿ »´·³·²¿®ô
½±®¬» ¿ »²»®¹·¿ » ·²º±®³» ± ½»²¬®± ¼» -»®ª·9± ´±½¿´ò
Ò=± -¿´°·¯«» ?¹«¿ ²¿ °¿®¬» -«°»®·±® ±« ²¿ °¿®¬» ¼» ¬®?- ¼± º®·¹±®3º·½±ô ½¿-±
½±²¬®?®·± ¼¿²·º·½¿ ± ·-±´¿³»²¬±ò
߬»²9=±æ
Ѻ®·¹±®3º·½± 7 °¿®¿ «-± ¼±³7-¬·½±ò Ü» ¿½±®¼± ½±³ ¿- ²±®³¿- ²¿½·±²¿·-ô ±
º®·¹±®3º·½± 7 °¿®¿ ¿®³¿¦»²¿® ¿´·³»²¬±- » ²=± °±¼» -»® «-¿¼± °¿®¿ ±«¬®±- º·²¬¿·- ½±³± ¿®³¿¦»²¿® -¿²¹«»ô ³»¼·½¿³»²¬±-ô °®±¼«¬±- ¾·±´-¹·½±-ô »¬½ò
Ó¿²«¬»²9=±
Ô·³°»¦¿
è
Page 24
ß- ·³°®»--+»- ¼·¹·¬¿·- º·½¿³ º¿½·´³»²¬» ³¿®½¿¼¿- ²± »¨¬»®·±® ¼± º®·¹±®3º·½±ò
Ë-» «³ °¿²± -»½± °¿®¿ ´·³°¿®ò
Ô·³°» °»®·±¼·½¿³»²¬» ¿ -«¶·¼¿¼» ²¿ °¿®¬» ¼» ¬®?- » -±¾ ± º®·¹±®3º·½±ò
Ñ ·²¬»®·±® ¼»ª» -»® ´·³°± º®»¯«»²¬»³»²¬» °¿®¿ »ª·¬¿® ³¿«- ±¼±®»-ò Ü»°±·- ¼»
¼»-´·¹¿® ¿ »²»®¹·¿ô «-» «³ °¿²± ³¿½·± » ¼»¬»®¹»²¬» ²»«¬®± °¿®¿ ´·³°¿® » ²±
º·³ ´·³°» ½±³ ?¹«¿ ´·³°¿ò
Ò=± «-» ±- -»¹«·²¬»-°®±¼«¬±- °¿®¿ ´·³°¿® ± ·²¬»®·±® ¼± º®·¹±®3º·½±æ
®»ª»-¬·³»²¬± ·²¬»®²± » ±- ½±³°±²»²¬»- ¼» °´?-¬·½±÷
°´?-¬·½±÷
®»º®·¹»®¿¼±®ô ´·³°» ·³»¼·¿¬¿³»²¬» ø°±¼»³ ¼¿²·º·½¿® ¿- °»9¿- ¼» °´?-¬·½±÷
Ô>³°¿¼¿- » -«¾-¬·¬«·9=±
Í» ¿ ´>³°¿¼¿ º«²¼·®ô »²¬®» »³ ½±²¬¿½¬± ½±³ °®±º·--·±²¿·- °¿®¿ ¿ -«¿
-«¾-¬·¬«·9=±ò
Ò=± «¬·´·¦¿9=±
Ò=± «¬·´·¦¿9=± ¼«®¿²¬» «³ ´±²¹± °»®3±¼± ¼» ¬»³°±æ Ü»-´·¹«» ¿ º·½¸¿ ¼¿
¬±³¿¼¿ °¿®¿ »ª·¬¿® ½¸±¯«» »´7½¬®·½± ±« ·²½6²¼·±ô ¼»ª·¼± ¿± »²ª»´¸»½·³»²¬±
¼± ½¿¾± ¼» ¿´·³»²¬¿9=±å ´·³°» ± ·²¬»®·±® ¼± º®·¹±®3º·½±å ß¾®¿ ¿ °±®¬¿ °±® «³
¬»³°± » º»½¸»ó¿ ¼»°±·- ¼± ·²¬»®·±® »-¬¿® ½±³°´»¬¿³»²¬» -»½±ò
Ú¿´¸¿ ¼» »²»®¹·¿æ ®»¼«¦¿ ± ²&³»®± ¼» ¿¾»®¬«®¿- ± ³?¨·³± °±--3ª»´å 7
³»´¸±® ²=± ½±´±½¿® ¿´·³»²¬±- º®»-½±-ò
Û´·³·²¿9=±æ Û´·³·²» ± ¿°¿®»´¸± ¯«¿²¼± ¶? ²=± ±«-¿®ô ¿ °±®¬¿ ¼»ª» -»®
®»¬·®¿¼¿ °¿®¿ ¯«» ¿- ½®·¿²9¿- ²=± º·¯«»³ º»½¸¿¼¿- °±® ¿½·¼»²¬»ò
ç
Page 25
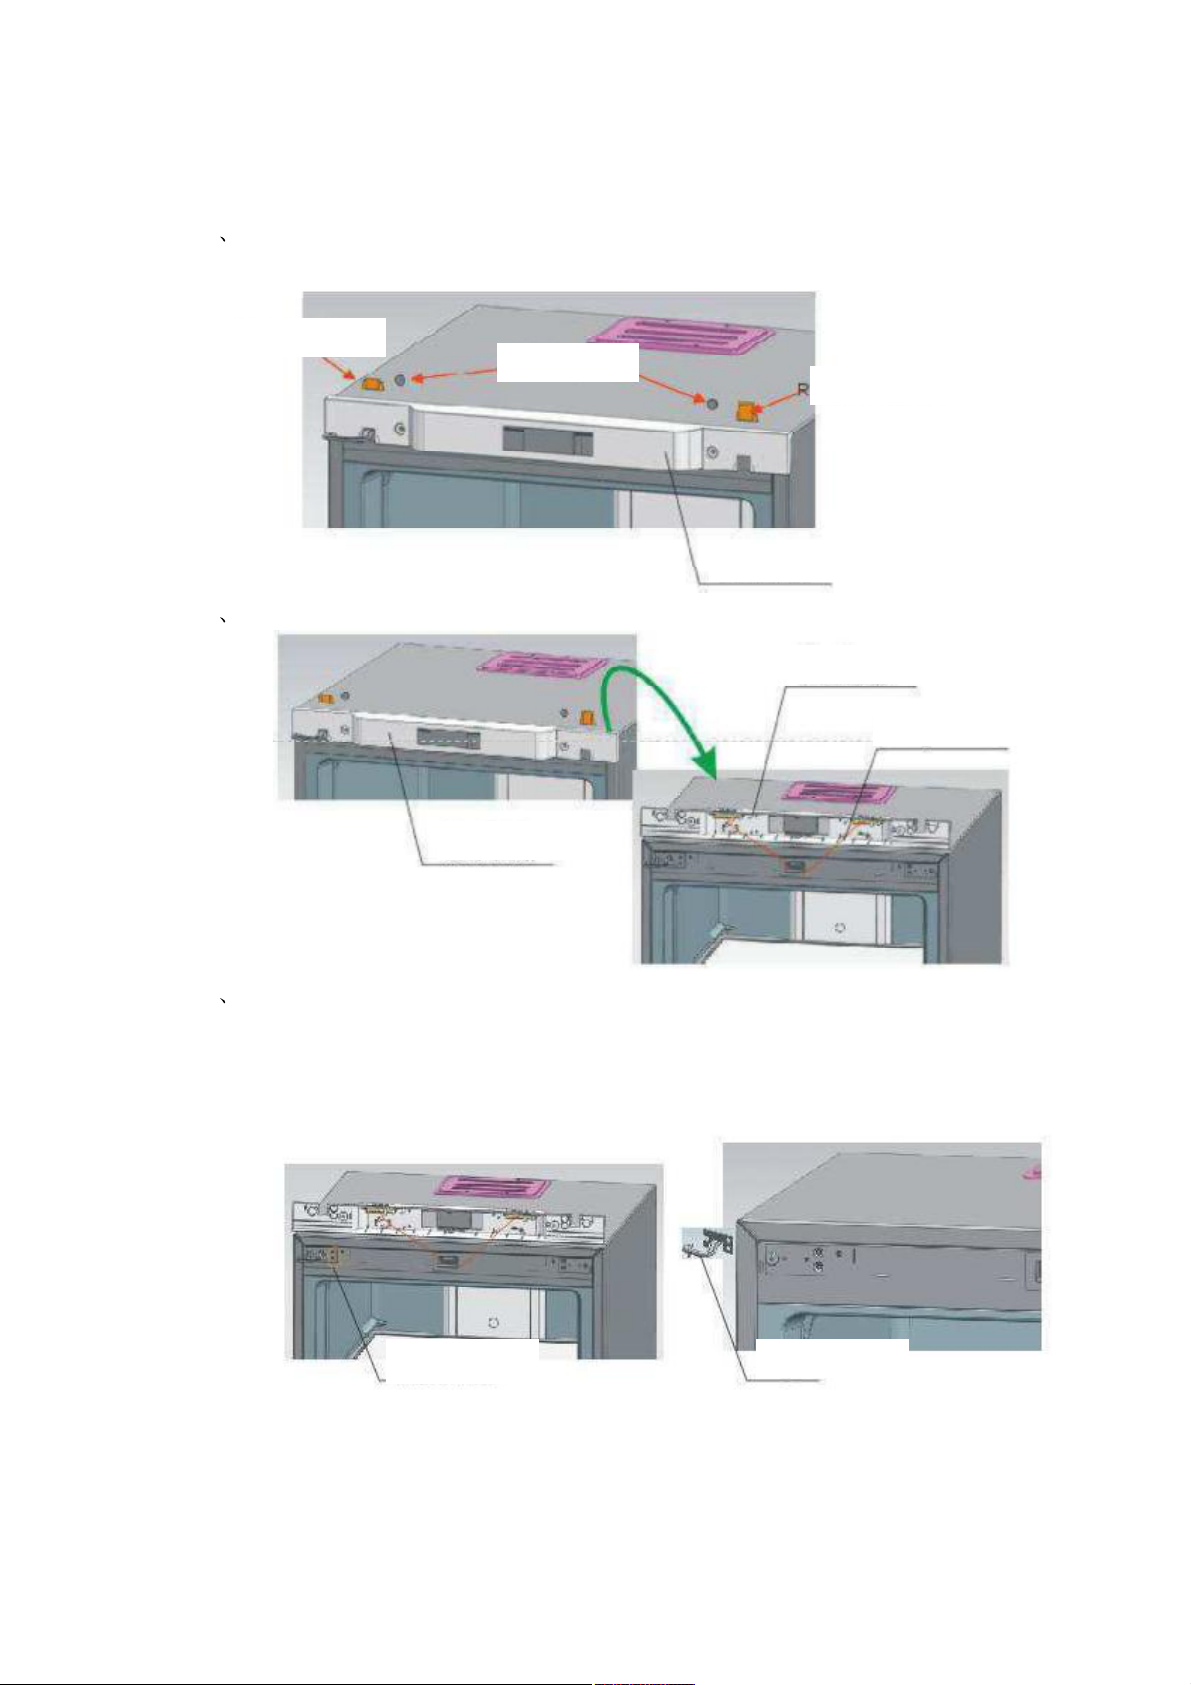
Ó«¼¿® ¿ °±®¬¿ ®»ª»®-3ª»´
ï λ¬·®» ¿- ¼«¿- ¬¿³°¿- ¼¿- °±®½¿- » ¿- ¼«¿- °´¿½¿- ¼¿ ½±¾»®¬«®¿ ¼¿-
¼±¾®¿¼·9¿- ¼± ¬±°± ø¿¾®·® ¿ °±®¬¿ °¿®¿ ¿ ¼·®»·¬¿÷
д¿½¿ ¼» ½±¾»®¬«®¿ »-¯«»®¼¿
Ì¿³°¿ ¼¿ °±®½¿
д¿½¿ ¼» ½±¾»®¬«®¿ ¼·®»·¬¿
Ü»½±®¿9=± ¼» ¬±°±
î λ¬·®» ±- ½±³°±²»²¬»- ¼»½±®¿¬·ª±- ¼± ¬±°±ò
Ü»½±®¿9=± ¼» ¬±°±
Û·¨± ¼¿ ¼±¾®¿¼·9¿
Ü»½±®¿9=± ¼» ¬±°±
í λ³±ª¿ ±- ¼±·- °¿®¿º«-±- º·¨±- ½±³ ¿- ¼±¾®¿¼·9¿-ô ®»¬·®» ¿- ¼±¾®¿¼·9¿-
¼» «³ ´¿¼± » ¼»-³±²¬» ¿ °±®¬¿ ¿± ³»-³± ¬»³°±ò Ì·®» ¿- ¼±¾®¿¼·9¿¼¿ °±®¬¿ò
ܱ·- °¿®¿º«-±- ܱ¾®¿¼·9¿
ïð
Page 26
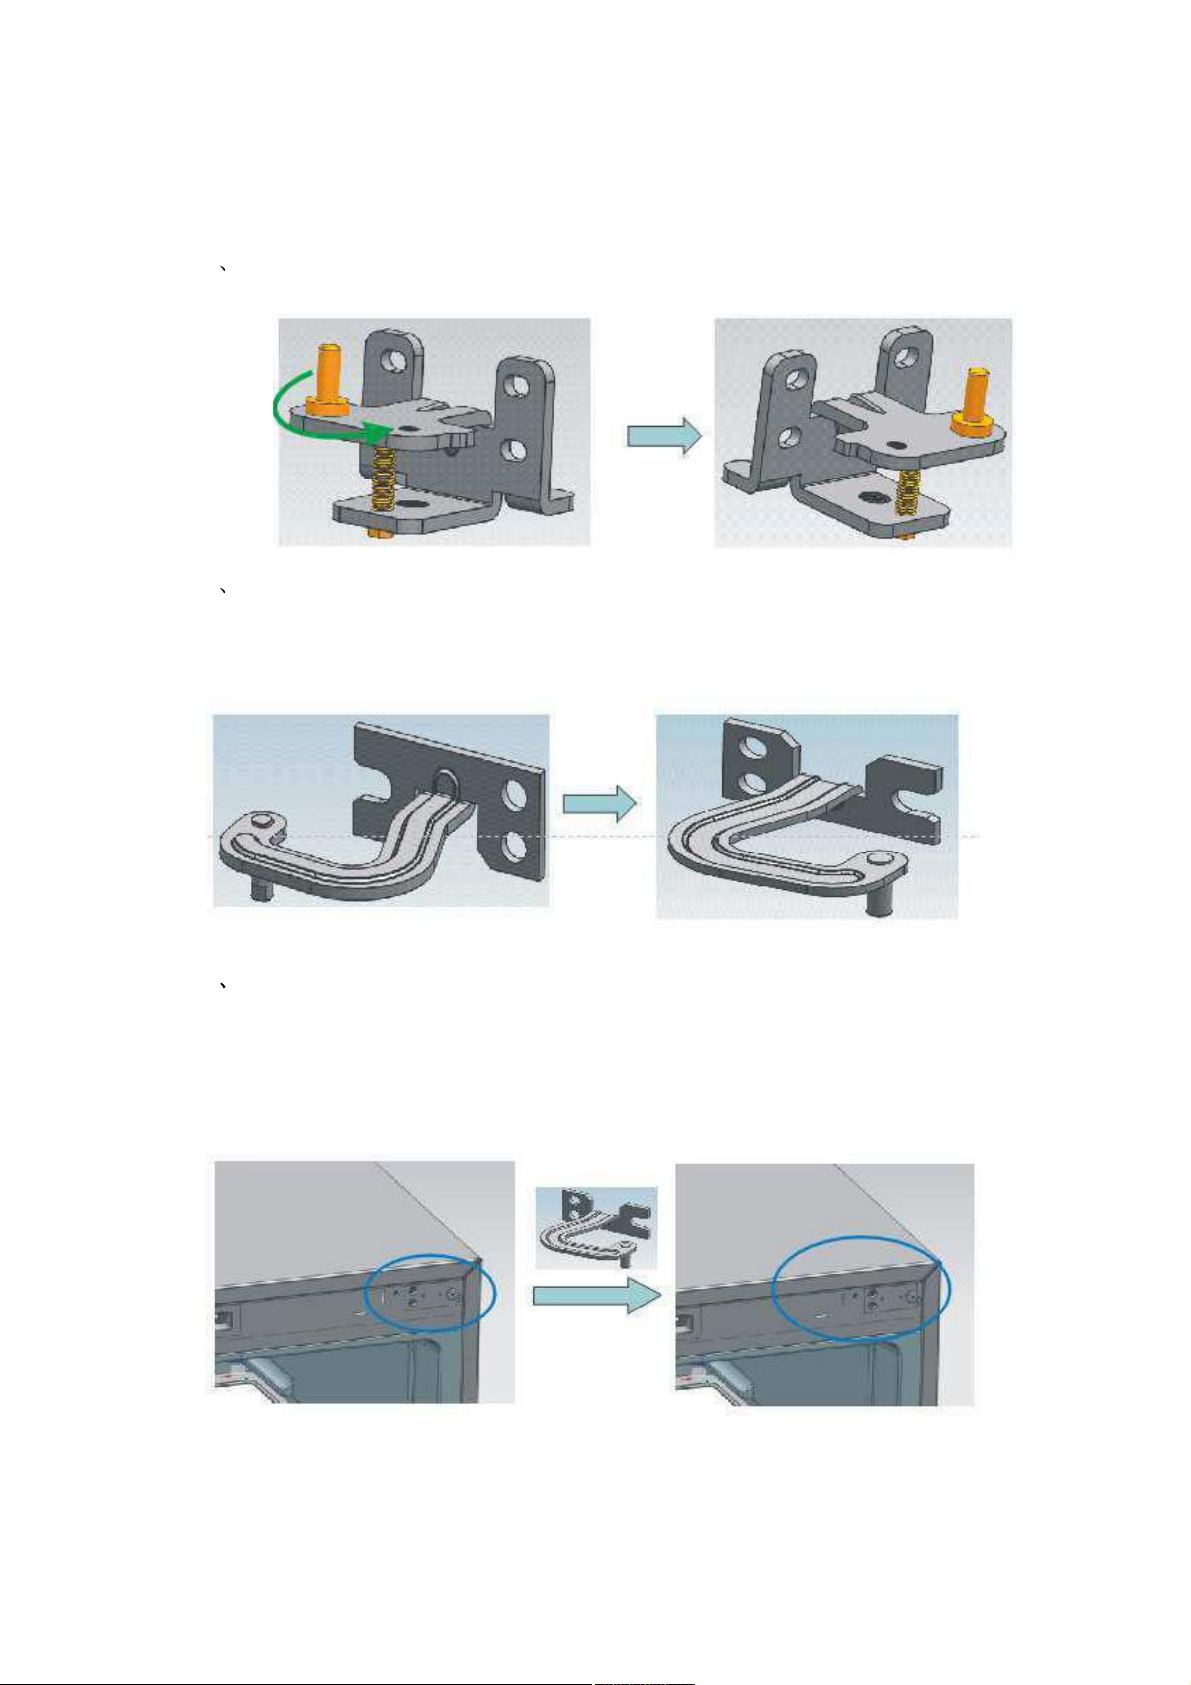
ì Ó±²¬» ± »·¨± ¼¿ ¼±¾®¿¼·9¿ ·²º»®·±®æ ¼»-³±²¬» ± »·¨± ±®·¹·²¿´ ¼¿ ¼±¾®¿¼·9¿
» ³±²¬»ó± ¼» ¿½±®¼± ½±³ ¿ °±-·9=± ¼± ¹®?º·½±ò
ë Ó±²¬» ± »·¨± -«°»®·±® ¼¿- ¼±¾®¿¼·9¿-æ ¼»-³±²¬» ± »·¨± ¼¿ ¼±¾®¿¼·9¿ »
³±²¬» ¹·®¿²¼±ó¿ ¼¿ ±«¬®¿ »¨¬®»³·¼¿¼» ¼± º«®± ¼± °¿®¿º«-±ò
ê ײ-¬¿´» ¿- ¼±¾®¿¼·9¿- -«°»®·±®»- º·¨¿- ¿± °7 ø@ »-¯«»®¼¿÷ ²± ´¿¼± ¼·®»·¬±ò
ïï
Page 27
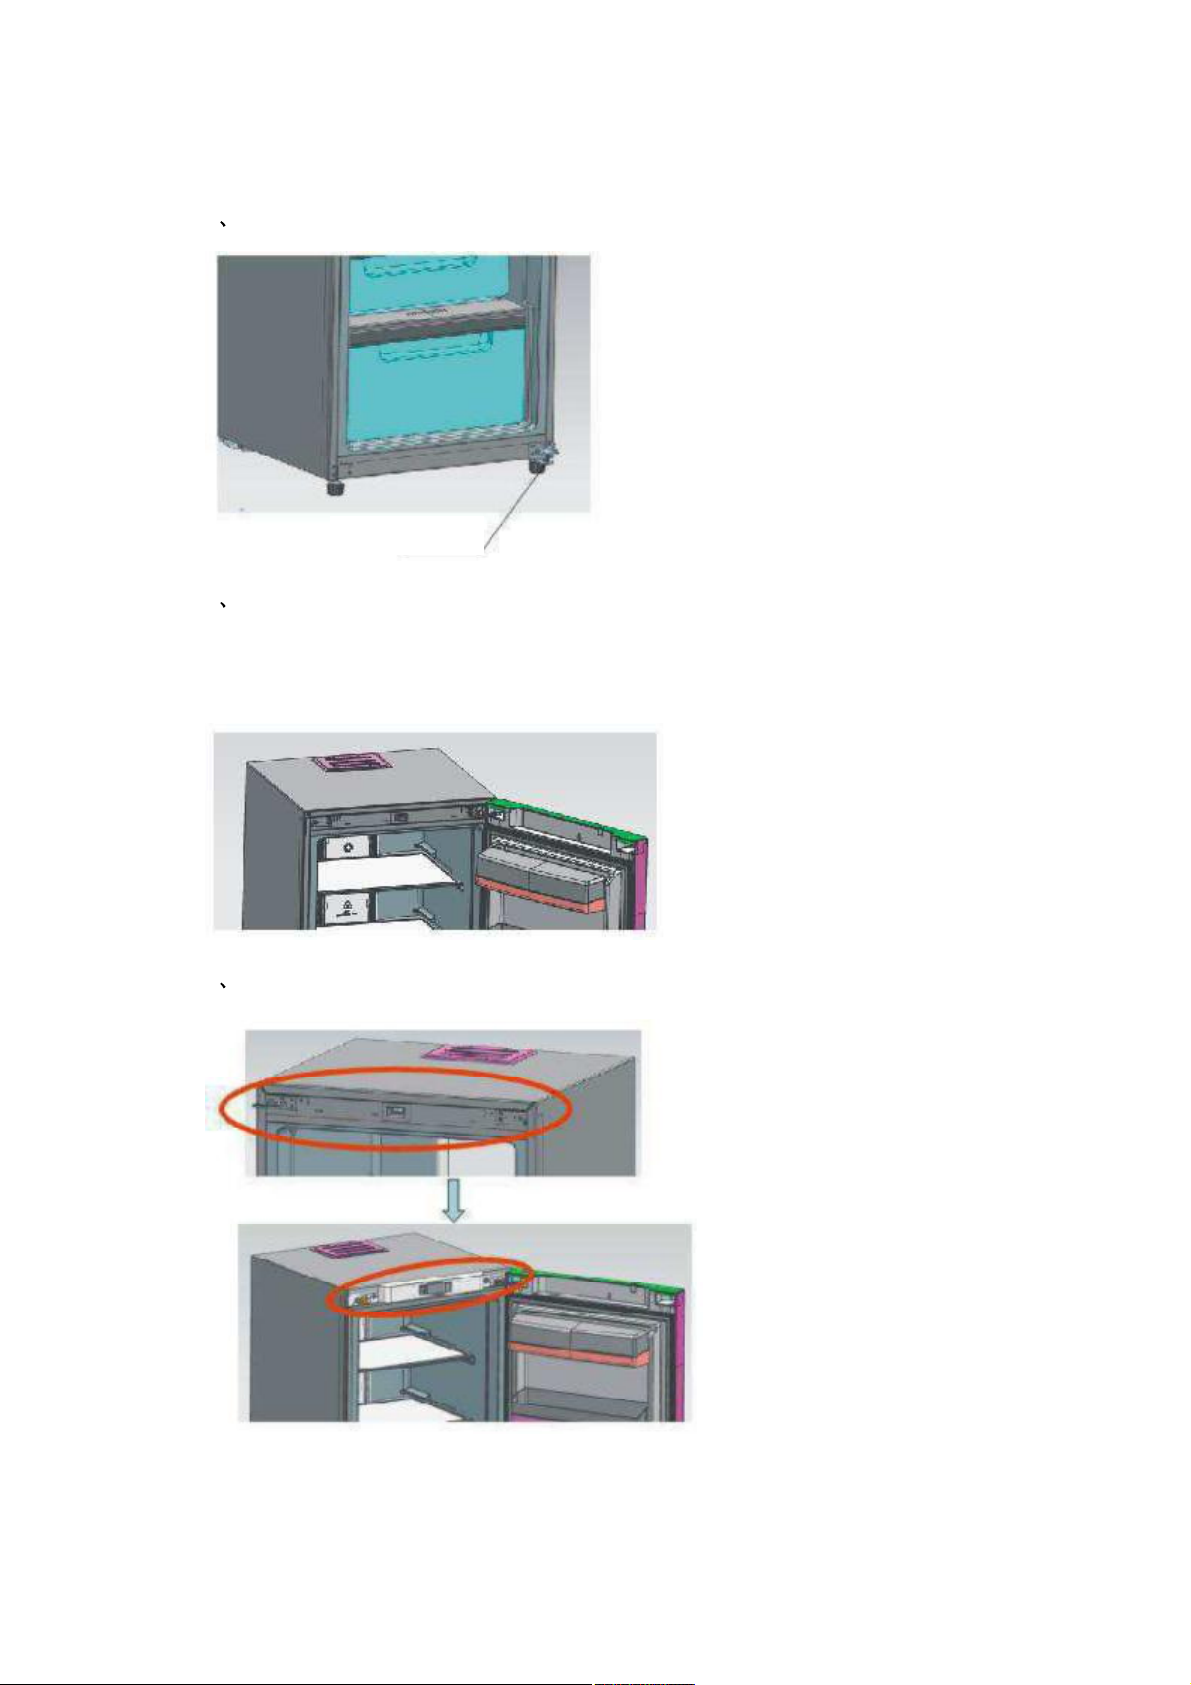
é ײ-¬¿´» ¿ ¼±¾®¿¼·9¿ ·²º»®·±® ²± ´¿¼± ¼·®»·¬± ¼± º®·¹±®3º·½±ò
ܱ¾®¿¼·9¿ ·²º»®·±®
è ײ-¬¿´» ¿- ¼±¾®¿¼·9¿- -«°»®·±®»- ²±- º«®±- ®»´¿¬·ª±- @ ¼·®»·¬¿ ø»³ ½·³¿ ¼¿
°±®¬¿÷ò Û³ -»¹«·¼¿ô ½±´±¯«» ¿ °±®¬¿ ²¿- ¼±¾®¿¼·9¿- ·²º»®·±®»-ô °®»--·±²» ¿¼±¾®¿¼·9¿- -«°»®·±®»- ²¿- °»®²¿- ¼¿- ¼±¾®¿¼·9¿- º·¨¿- » º·¨» ¿- ¼±¾®¿¼·9¿-
-«°»®·±®»-ò
ç ײ-¬¿´» ¿ ¼»½±®¿9=± ¼» ¬±°±ô ½±¾»®¬«®¿- ¼» °±®½¿- » ¼» ¼±¾®¿¼·9¿-ò
ïî
Page 28
ó
Page 29
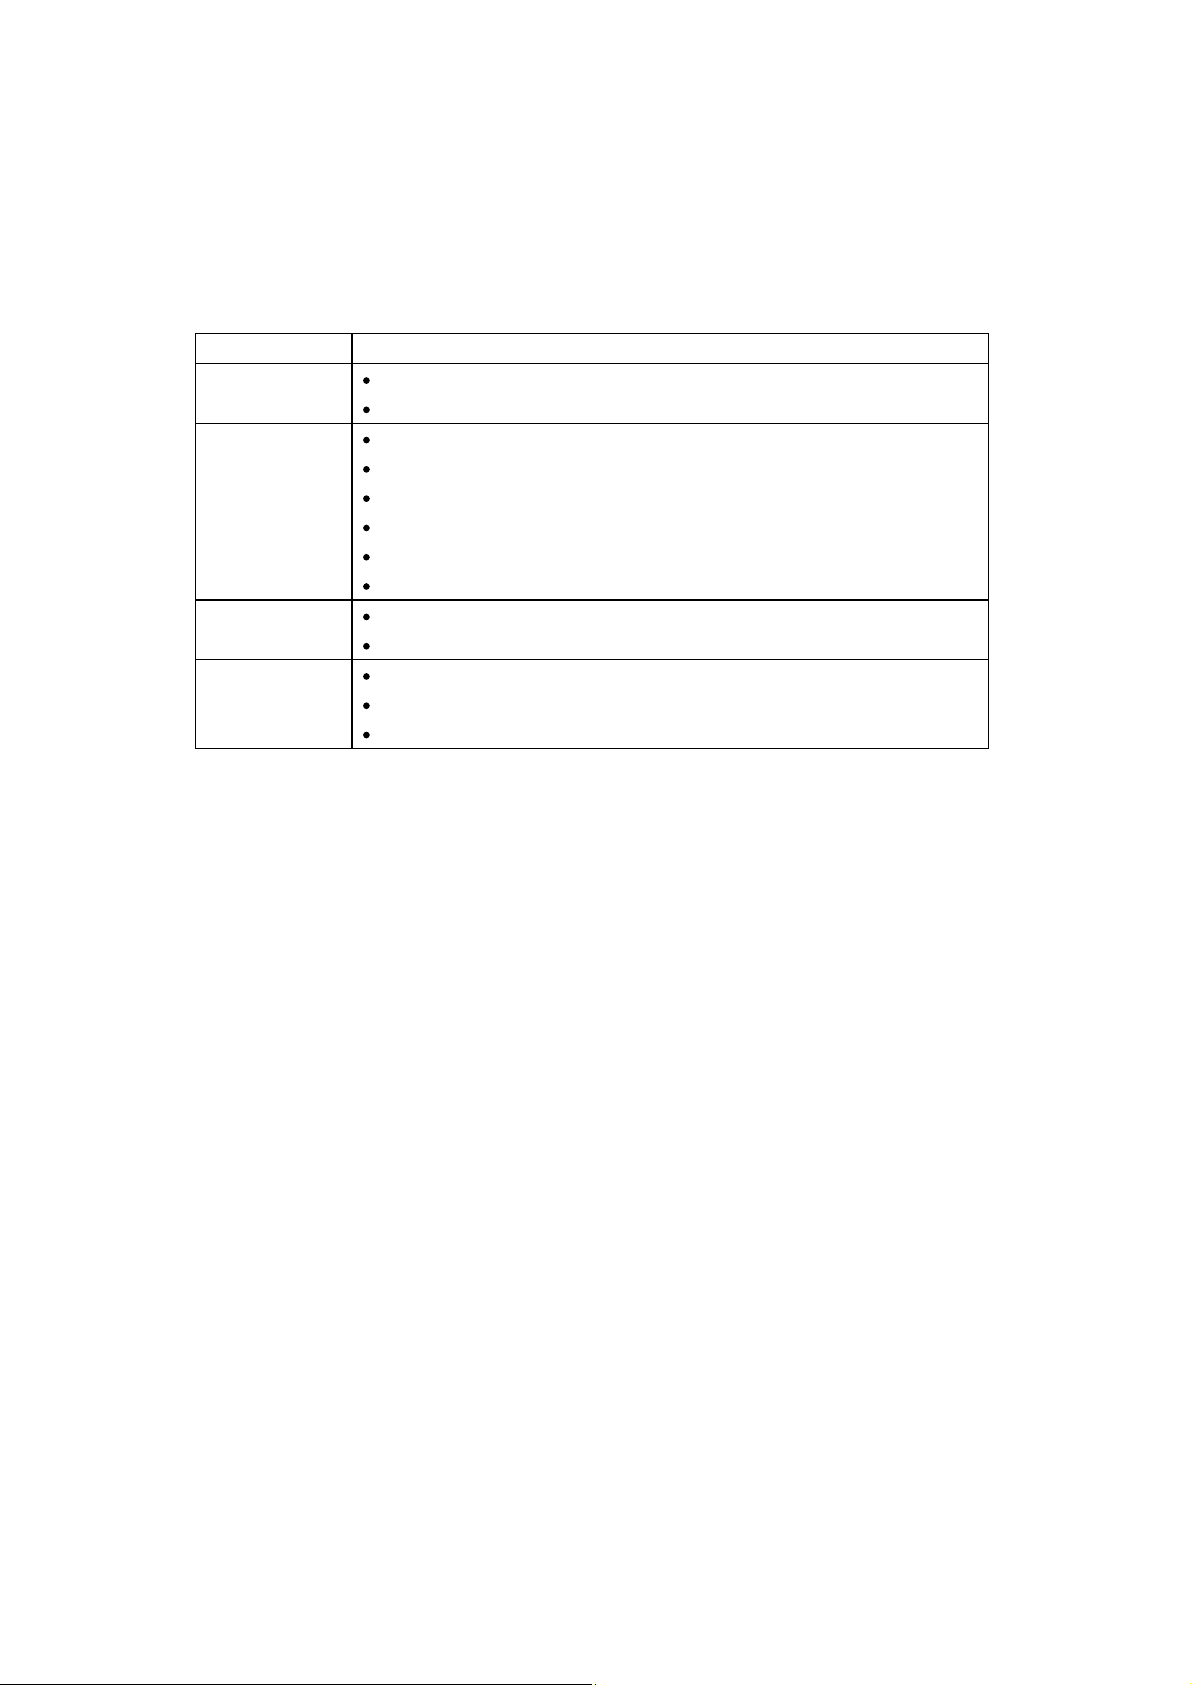
λ-±´«9=± ¼» °®±¾´»³¿ß²¬»- ¼» -±´·½·¬¿® ¿--·-¬6²½·¿ ¬7½²·½¿ô ´»·¿ ± -»¹«·²¬» ¯«¿¼®±æ
ѽ±®®6²½·¿ Ý¿«-¿- » ª»®·º·½¿®
Ò=± º«²½·±²¿
λº®·¹»®¿9=±
º®¿½¿
Ó«·¬±- ®«3¼±-
Ѽ±®»-
»-¬®¿²¸±-
Ò=± »-¬? ´·¹¿¼± @ »²»®¹·¿ »´7½¬®·½¿ ±« »-¬? ¼»-´·¹¿¼± ¼¿ ¬±³¿¼¿
ʱ´¬¿¹»³ ³«·¬± º®¿½¿
λ¹«´¿9=± ¼¿ ¬»³°»®¿¬«®¿ 7 »´»ª¿¼¿
Ó«·¬±- ¿´·³»²¬±- ¿®³¿¦»²¿¼±-
ݱ³·¼¿ ¯«»²¬»
ß¾»®¬«®¿ º®»¯«»²¬» ¼¿ °±®¬¿
ᮬ¿ ³¿´ º»½¸¿¼¿
Ú±²¬» ¼» ½¿´±® °®-¨·³¿
ݸ=± ¼»-²·ª»´¿¼± » ·²-¬?ª»´
ײ-¬¿´¿9=± ½±®®»½¬¿ ¼±- ¿½»---®·±-ò
Ò=± »³¾¿´¿³»²¬± ¼» ¿´·³»²¬±- ±¼±®3º»®±-
ß´·³»²¬±- »-¬®¿¹¿¼±-
Ú¿´¬¿ ¼» ´·³°»¦¿ ¼± ·²¬»®·±®
Í» ¿ -·¬«¿9=± °»®-·-¬·® ¼»°±·- ¼» ª»®·º·½¿® ¬±¼¿- ¿- ¯«»-¬+»- ¿½·³¿ô
»²¬®» »³ ½±²¬¿½¬± ½±³ ± ¼»°¿®¬¿³»²¬± ¼» °--󪻲¼¿ ¼¿ ²±--¿
»³°®»-¿ò
Í» ± ½¿¾± ¼» ¿´·³»²¬¿9=± »-¬·ª»® ¼¿²·º·½¿¼± ¼»ª» -»® -«¾-¬·¬«3¼± °±®
°»--±¿´ ¼» ³¿²«¬»²9=±ô ²±³»¿¼± °»´¿ ²±--¿ »³°®»-¿ °±® ®¿¦+»- ¼»
-»¹«®¿²9¿ò
Ú»²-³»²± ¼» ²=±óº¿´¸¿
Ü»²¬®± ¼±- ¬«¾±- ½¿°·´¿®»-ô ± ®»º®·¹»®¿²¬» º´«· ³«·¬± ®?°·¼± »ô °±® ª»¦»-ô ´»ª¿
¿´¹«³¿- ¾±´¸¿- ¼» ¿® ¯«» °±¼»³ ½¿«-¿® ®«3¼±- ·®®»¹«´¿®»- ²¿ »²¬®¿¼¿ò Í» ±
º®·¹±®3º·½± »-¬? -±¾ ± »-¬¿¼± ¼» ®»º®·¹»®¿9=±ó®?°·¼¿ô ¿± ¿¾®·® °®±¼«¦ ± -±³ ¼±
ª»²¬±ô ¯«» 7 ± -±³ ¼» ®±¬¿9=± ¼» ¿´¬¿ ª»´±½·¼¿¼» ¼± ª»²¬·´¿¼±®ò
Ï«¿²¼± ¿ ¸«³·¼¿¼» ¼± ¿® 7 ®»´¿¬·ª¿³»²¬» ¿´¬¿ô ¿- ?®»¿- »³ ¬±®²± ¼¿ °±®¬¿
°±¼»³ º·½¿® ¸&³·¼¿- » °±¼» ´·³°?ó´¿- ½±³ «³ °¿²± -»½±ò
ïì
Page 30
Page 31

INSTRUCTION MANUAL
REFRIGERATOR
TNF 450 INOX
Page 32
Please go through this manual bef ore use.
Thank you for purchasi ng our products .
Attention:
* Please unde rstand the safety instru ctions before use.
* Please keep this manua l well after read ing it for fu rther referen ce.
* Noti ce will not be giv en if thi s manual is alter ed due to product
improveme nt.
Names of the components
Apologizing for some features and accessor ies of the refrigerator you
brought mi ght not acc ord with th e illustrat ion s, refer to the pac kin g list i n
the refriger ato r ple ase .
Display cont ro l
panel
Glass shelf
Tray upon
the door
Warning
1. WA RNING Kee p ventilation openings , in the appl iance enclosu re or in
the built-in structu re
, clear of obstruction .
2. WARNIN G D o not use mech anical devices or other means to
accelerat e the defros ting process, other than those recommended by the
manufacturer.
3. WARNIN G Do not damage the refriger ant circuit.
4. WARNIN G Do n ot us e ele ctrical a ppliances inside the foo d sto rage
compartme nts of th e applianc e, unless they are of the type recommended b y
the manufacturer.
5. The applian ce has to be unplu gged after use an d before carrying out
user maintenance on th e applian
ce.
6. This appliance is no t in tended f or use by persons (including child ren)
with reduce d physical, sen sory or mental capabi lities, or lack of experie nce
and knowledge, unless they have been g iven s upervision or i nstruction
concernin g use of the appliance by a person responsible for their safety.
7. Chi ldren should be supe rvised to ensure that they do not play with the
appliance .
8. If the supply cord is da maged, it m ust be replaced by the man ufacturer,
its service agent or sim i
larly quali fied persons in order to avo id a hazard.
9. P lease abandon the refrige rator-freez er acc ording to local regulator s for it
use flammab le blowing gas and refrige rant.
10. Disconn ect the power supply befor e replacing the l amp.
11. P lease according to lo cal regulations regarding dispos al of the
appliance for its fla mmable refrig erant and blowing gas. Before you scrap
the applian ce, please take off the doo rs to prevent chi ldren trapped .
Glass shelf
Glass shelf
Small fruit an d
vegetable bo x
Big fruit and
vegetable bo x
sealing cr is pe r
Tray upon
the door
Tra y be lo w
the door
1
Page 33
Preparation before u sing
Correct application of the refr igerator
War nin g
● Exce pt the solu tions r ec ommen ded by the ma nufac tu rer, do no t use mecha nical
equi pment o r ot her mea ns t o accel erate d ef rosti ng .
● Exce pt the type s recom me nded by t he manufa cture r, do n ot use el ectrica l appli an ce
insi de food c lo set.
● The refr ig erato r is prov id ed with R 60 0a refr igera nt a nd cycl opentan e foami ng
mate rial, and b oth are c om busti ble mat er ials. O bs olete r efriger ator sh ou ld be
isol ated from f ire and c om busti on trea tm ent is fo rb idden .
New refriger ato r
● Remo ve all pa ck ing mat erials be fore us in g, includ ing bot to m seati ng washer a nd
foam p ads and g um med pap er inside ;
● Use wa rm and we t cl eanin g cloth to wi pe the re fr igera to r's int erior a nd e xteri or ( add a
litt le deterg ent in th e wa rm wate r an d use cle an wate r to c lean up );
● Prep are a sep ar ating g ro undin g recep ta cle wit h bo th pola ritie s. D o not sha re m ulti-
purp ose soc ke t with ot he r elect rical a pp lianc es;
● Conn ect ear th w ire. Ea rt h elect rode of the s ocket m us t be equi pped wi th a r eliab le
grou nding w ir e.
Transportat ion a nd placement of the re fri ger ator
Trans portati on
● Do not i nvert, tr avers e, p ress an d shake the r efrig er ator. Wh en moving t he
refr igera to r, angle o f in clina tion sh al l not be la rg er than 4 5
● When m oving , do n ot make e xc essiv e press ur e to the do or or top cov er, othe rw ise
defo rmation w ill occ ur.
● Slig htly remo ve the re fr igera tor backw ard(less th an 20°
dist ance.
Plac ement
● Plac e the refri gerat or a t a venti lative pl ace, fa r aw ay from h eat sourc e and dir ec t
sunl ight. In or der to av oi d rust or r educe i ns ulati on r e
damp a nd wate re d place .
● Top space fo r the refri gerat or s hall no t be l ess tha n 30cm. D is tance a ga inst tw o sides
shal l not be less t han 10c m, D istan ce agains t to the wa ll s hall no t exceed 75 mm,
prov iding c on venie nce to open a nd clos e th e door an d dispe rs e the hea t.
● Plac e the refri gerat or o n a flat an d solid flo or. (if it i s no t stabl e, y ou can re gulat e th e
regu latin g le gs)
°.
)
to r ea r t ru ckle roll a s hort
sult , please do n ot plac e it a t
Ensure that th e ref rig erator is place d cor rec tly and stably.
Be aware of all sa fet y mat ter s needing atten tio n.
1.Connect the electricity
Afte r connect ing ele ct ricit y, it w il l enter i nto ex-fa ctory s ta te.
2.Put food into the refrigerator
Sugg estion: a fter work ing a tim e, t he refr ig erato r will arri ve store te mpera tu re
or aft er the firs t stop of t he c ompre ss or, put fo od into it, w hich is ben efici al t o
reta in freshn ess.
Note : if the set temperat ure is alter ed or new food is put in, temperat ure
insi de the box will a chiev e the b alanc e afte r a t ime, w hich is de termine d by
the te mpera ture al terat io n degre e, te mp eratu re of amb ie nt en vi ronme nt,
open in g frequ ency, quanti ty of the foo d inside an d so on.
Attention
Make s ure the pow er line is no t press ed b y the ref rigerat or or other a rticl es .
Befo re connec t the power l ine, ma ke s ure the v ol tage ra nge of the re frigera tor
acco rd with tha t of the powe r supply.
2
3
Page 34
Function introduction
A
B
1. Keys
A. Hi Hu midity: H igh Hum id ity Mod e
B. ON/ OF F: star t up or shut do wn the sy st em
C.∧: inc rease tem perat ur e of the co oling cha mber
D.∨: dec rease tem perat ur e of the co oling cha mber
2. Names of func tio ns of display screen
2 31
Function introduction
All follo win g functions must be wo rke d under start state.
C
D
● High Humidit y Mod e
When t he system i s not at Hi gh H umidi ty Mode, pr ess and h ol d Hi Humi dity key (A ke y) for
thre e secon ds t o start t he H igh Hum idity Mod e and Hig h Hu midit y figur e wi ll be lit u p.
When t he system i s at High H u
seco nds to exit f rom the H ig h Humid ity Mode an d High Hu mi dity fi gure wi ll n ot shin e an y
more .
When s tarting H igh Hum id ity Mod e, coolin g chamb er w ill wor k under H ig h Humid ity state t o
impr ove rel at ive hum idity of th e air ins id e the coo ling cham ber.
● Set the temper atu re of the cooling cham ber
Pres s tempera ture re gu latio n keys ∧ (C key ) and ∨ (D ke y) t o set the t emperat ure ins id e the
cham ber and t he s et temp er ature w ill shi ne . Th e setti ng r ange is b etween 2℃ to 8℃ ( nonperi odic te mp eratu re r egula tion) ; it w ill exi t fr om the sy stem in fiv e secon ds a nd the se tting
will t ake effect. ( within fi ve seco nd s after f inishin g the set ti ng, pre ss A k ey or B key t o affi rm
the se tting sta te manu al ly and ma ke the se tt ing val id .)
midi ty Mode, pr ess and h ol d Hi Humi dity ke y (A ke y) for th re e
1、High H umidi ty f igure
2、Temper ature r eg ion dig itron
3、Temper ature (℃) f ig ure
3. Display con tro l
● Powe r on for the fi rst tim e: a ll shin es for thre e secon ds w ith rin ging of sta rt bell .
Defa ulting te mpera tu re of the c oolin g ch amber i s 5
● Norm al operat ion dis pl ay:
Temper ature d is play re gi on: whe n there i s a fa il
prio rity or de r; with ou t failu re, it will s how the s et t emper ature.
High H umidi ty f igure : sh ine whe n the sys te m is unde r High Humi dity Mo de .
● Disp la y co ntrol:
1、Unde r th e no rmal patt er n, i t wi ll not shin e an y mo re after th ir ty s ec onds with ou t op ening and
key op er at ion;
2、When t he d oo r is under op en s ta te , the displ ay w il l shine all t he t im e and it will s to p sh ining
thir ty s ec onds after th e do or i s closed.
3、When a f ai lu re happen s an d it i s within "Fai lu re C ode", the s cr ee n will shin e fo r on e time and
stop t o sh in e after thirt y se co nds (if the b uz ze r h
to can ce l th e failure b el l) ;
℃.
ure, i t will show f ailur e co des by tu rn at a
as bee n ri ng ing for a lon g ti me , press any key
4. User Mode ope rat ion
● Start-up and s hut down
Unde r st ar t-up mode , pr es s an d hold ON/O FF k ey ( B ke y) for thre e se co nds, the st ar t be ll will rin g
and th e sy st em will be sh ut d ow n immediate ly ;
Unde r sh ut down mode , pr es s an d hold ON/O FF k ey ( B key) for thre e se co nds, the st ar t be ll will
ring a nd t he s ystem wil l be s ta rt ed immedi at el y.
Pres s ON /O FF k ey for thre e se co nds to shut d ow n th e sy stem and th e di sp lay scree n wi ll n ot show
any mo re . Ex cept ON/OFF k ey ( B ke y), other key s wi ll s top respo nd in g, and comp re ss or, door
lamp a nd o th er loads wi ll b e sh ut down immed ia te ly;
Pres s O
N/OF F ke y fo r th ree secon ds t o st art up the sy st em . Be fore star ti ng , if the syst em i s at
High H um id ity Mode, t he H ig h Humidity fi gu re w ill shine , ot he rwise the s ys te m will only shi ne t he
set te mp er ature and a ll l oa ds will run the m od e ha ving been s et b ef ore shutd ow n.
5. Illuminat ing l amp control
When o pen coo li ng cham be r's doo r, cooli ng c hambe r's illum inati ng l amp wil l shine . Wh en
clos e cooli ng c hambe r's doo
r, cool ing cha mb er's il luminat ing lam p wi ll not sh ine any mor e.
6. Door-open ing h int and door-op eni ng alarming contro l
I f ref rigerat or cham be r door ha s
nd the b ell wil l ri ng per 2 se co nds til l
a
door-o penin g wa rning .
been o pen for 1 20 s econd s, it will ri ng warn in g bell
the do or is close d. Pres s an y key to ca ncel the
,
7. Power-int err upt ion memory and in iti al power-up state
● When m eet power i nterr up tion, t he refrig erato r ca n memor y operati ng mode a nd s tate
befo re automa tical ly ; When po wer up, it wi ll reco ve r to the st ate befor e inter ru ption a nd run
the mo de havi ng b een set b ef ore int errup ti on.
● Init ial power -up sta te : the set t emperat ure of co ol ing cha mber is +5℃ a nd t he syst em i s
not at H igh Humid ity Mod e.
● Memo ry: inclu de set te mp eratu re of cooli ng cham be r, "High H umidi ty " Mode an d
cumu lativ e wo rking h ours of com press or.
For ex ample , if t he syst em h as a powe r failu re u n
work a t "High Hum idity " mo de afte r recover y.
der Hi gh Humi di ty stat e, i t will co ntinue to
4
5
Page 35
Fu
nc
t
io
n in
tr
o
du
ctio
n
8. High temper atu re wa rning of the cool ing c ham ber
When t he temper ature o f th e cooli ng c hambe r has been ab ove 15℃ fo r si x hours , hi gh
temp erature w arnin g wi ll ring . Th e bu zzer wi ll r ing per s econd for t en time s an d then te n
time s every thi rty min ut es, and t em perat ure displ ay regi on w ill sho w fa ilure c ode (E9); t he
ring ing will st op when t he t emper at ure of th e cooling c hambe r is b elow 10℃. P re ss any
key to c ancel the w arnin g bu zzer (i f it d oes not b uzz after t hirty m in utes) . Bu t the fai lure
code d isplay st ate is no t ca ncele d, u ntil th e failure i s solve d.
9. Failure hin t
Failure c od e
Hint Hint
Cooling s en so r fa il ure
E1
Cooling d ef ro st in g
E4
sensor fa il ur e
Ambient t em pe ra tu re
E7
sensor fa il ur e
Note : when ther e is a fail ur e, the sy st em will d isplay al l machi ne f ailur es ' codes b y turn.
The wa rning wil l be auto ma tical ly c ancel ed after re cover y of t he fail ur e or pres s any key to
canc el the warn ing. Wh en f ailur e ha ppens , it is a prior ity to sh ow f ailur e co de till f ailure
reco very, otherw ise the set t emper at ure and H ig h Humid ity state c annot b e di splay ed .
If a fai lure has be en disp la yed all t he t ime and a utomati c recov er y fails , pl ease co ntact
Afte r-sale De partm en t or prof es siona l mainten ance pe rs onnel .
Failure c od e
E6
E9
EC
Communi ca ti on f ai lure
High temp er at ur e wa rning
of the cool in g ch am be r
EEPROM ci rc ui t fa il ure
10. Force defr ost ing
Pres s and hold "t emper at ure reg ul ation " keys ∧ and ∨ fo r three s ec onds to e nt er into
Forc e Defrost ing Mod e. H igh pos it ion of LE D tempera ture re gi on alwa ys s hows "3 " with no
disp lay in the lo w posit io n. When e nt ering i nto Force D efros ti ng Mode , th e compr essor wil l
be sto pped imme diate ly. Whe n worki ng u nder Fo rc e Defro sting Mod e or the ex it ing
cond ition is sa tisfi ed , press a nd h old "te mperatu re regu la tion" k ey s ∧ and ∨ for t hree
seco nds to exit f orm the F or ce Defr os ting Mo de.
Matters needing atte ntion
Do n ot arbitrarily d ismantl e
or repa ir. Ch oo se the repair
shop s de signa te d by the
manu fa ct urer to repl ac e the
acce ss or ies.
In ord er t o av oid fire,
plea se d o no t use
comb us ti ble solvent s
near by t he r efrigerat or.
In orde r to avo id accidenta l
harm ca us ed by c lo si ng a ch il d
insi de or refrig er at or fa lling, do
not a ll ow t he chi ld ren to e nt er
into o r cl im b the refrige ra to r.
Do not p ut t oo m uch food into
the re fr ig erator.
Use st an da rd professi on al t hreehole p ow er s ocket (abov e 10 A) .
Sock et g ro unding must b e go od .
In order to a void destroy, fir e and
Cosmetics
othe r a cc id ents, please do not put
Alcohol
accetate
Amyl
anyt hi ng comb us tible, ex plosive ,
r
nde
Bi
vola ti le and str on gl y cor ro si ve in to
the re fr igerator. In o rder to a vo id
free zi ng , rupture a nd o ther loss es ,
P
plea se do not put the bottles with
es
ticid
e
flui ds or se al in g c on tainers into the
refr ig er ating box.
Do no t p u t t h e h eav y
thin gs on th e refrig er at or,
othe rw is e i t w il l e as ily f all
and ca us e ha rm.
Do n ot open the door an d
draw er s fo r a lo ng t im e or
freq ue nt ly open t he d oor
and d rawers, oth er wi se i t
w o u l d w e a k e n t h e
efficien cy o f the compl et e
mac h i n e and i n cr e a s e
oper at in g load.
When the r ef ri gerator is not at
n o r m a l o p e r a t i o n o r i s
dest ro ye d, plea se cut o ff the
Do not splash the water on the t op or
back of th e ref ri ge rator, othe rwise it
woul d re du ce insulati on e ff ec t.
powe r and info rm lo ca l s er vi ce
cent er.
Atte ntion:
The prod uc t is a hous ehold ref riger at or. Accor di ng to the n ational s tanda rd s,
hous ehold ref riger at or is onl y ap plica ble to stor e food an d ca nnot be u se d for oth er
purp ose such as s torin g bl ood, dr ug s, biol ogical pr oduct s, e tc.
6
7
Page 36
R
e
f
r
i
g
e
r
a
t
o
r m
a
i
n
t
e
n
a
n
c
e
C
lean
ing
Fing erprint s are eas il y left on i ts e xteri or. Use a dry to wel to wi pe u p.
Peri odicall y clean t he d ust bot h at t he back o f and under t he
refr igerato r.
Refr igerato r inter io r shoul d be c leane d frequen tly so as t o av oid
fore ign odor. Aft er the po we r is cut off, u se s oft tow el a nd neut ral
dete rgent to cl ean and w ip e with th e cl ean wat er.
Do not u se the foll owing pro ducts t o cl ean ref ri gerat or interi or:
● Alka line or alk alesc en t deter ge nts; (m ay cause th e inner l in er
and pl astic com ponen ts t o crack )
● Soap p owder, ben zine, a my l aceta te , alcoh ol, etc.; ( may des tr oy
the pl astic com ponen ts )
● If coo king oil or s eason in gs blot o n th e refri gerator 's exte rn al
surf ace, plea se clea n it i mmedi at ely. (may ca us e the pla stic
comp onents to c rack)
L
am
p
s a
nd r
ep
l
ac
e
me
nt
I
f th
e i
l
lumi na
t
i
ng l
amp oc
cu
r f
ail
u
r
e, p
le
ase c
o
nta
c
p
ro
f
e
s
s
io
n
al p
erso n
n
el f
o
r h
ome se rvi
H
a
lt
No
n
-
u
s
e with
i
n
a l
ong ti
me
Plea se plug off the p ower to avo id elec tr ic shoc k or f ire due
to pow er line agi ng; cle an u p refri ge rator i nterior ; open th e
door f or a time and c lose it a ft er the in te rior be come
comp letely dr y.
c
e.
t
D
o
o
r R
1
、R
em
(op
2
、R
ov
en t
Left c over plat e
em
ove d
i
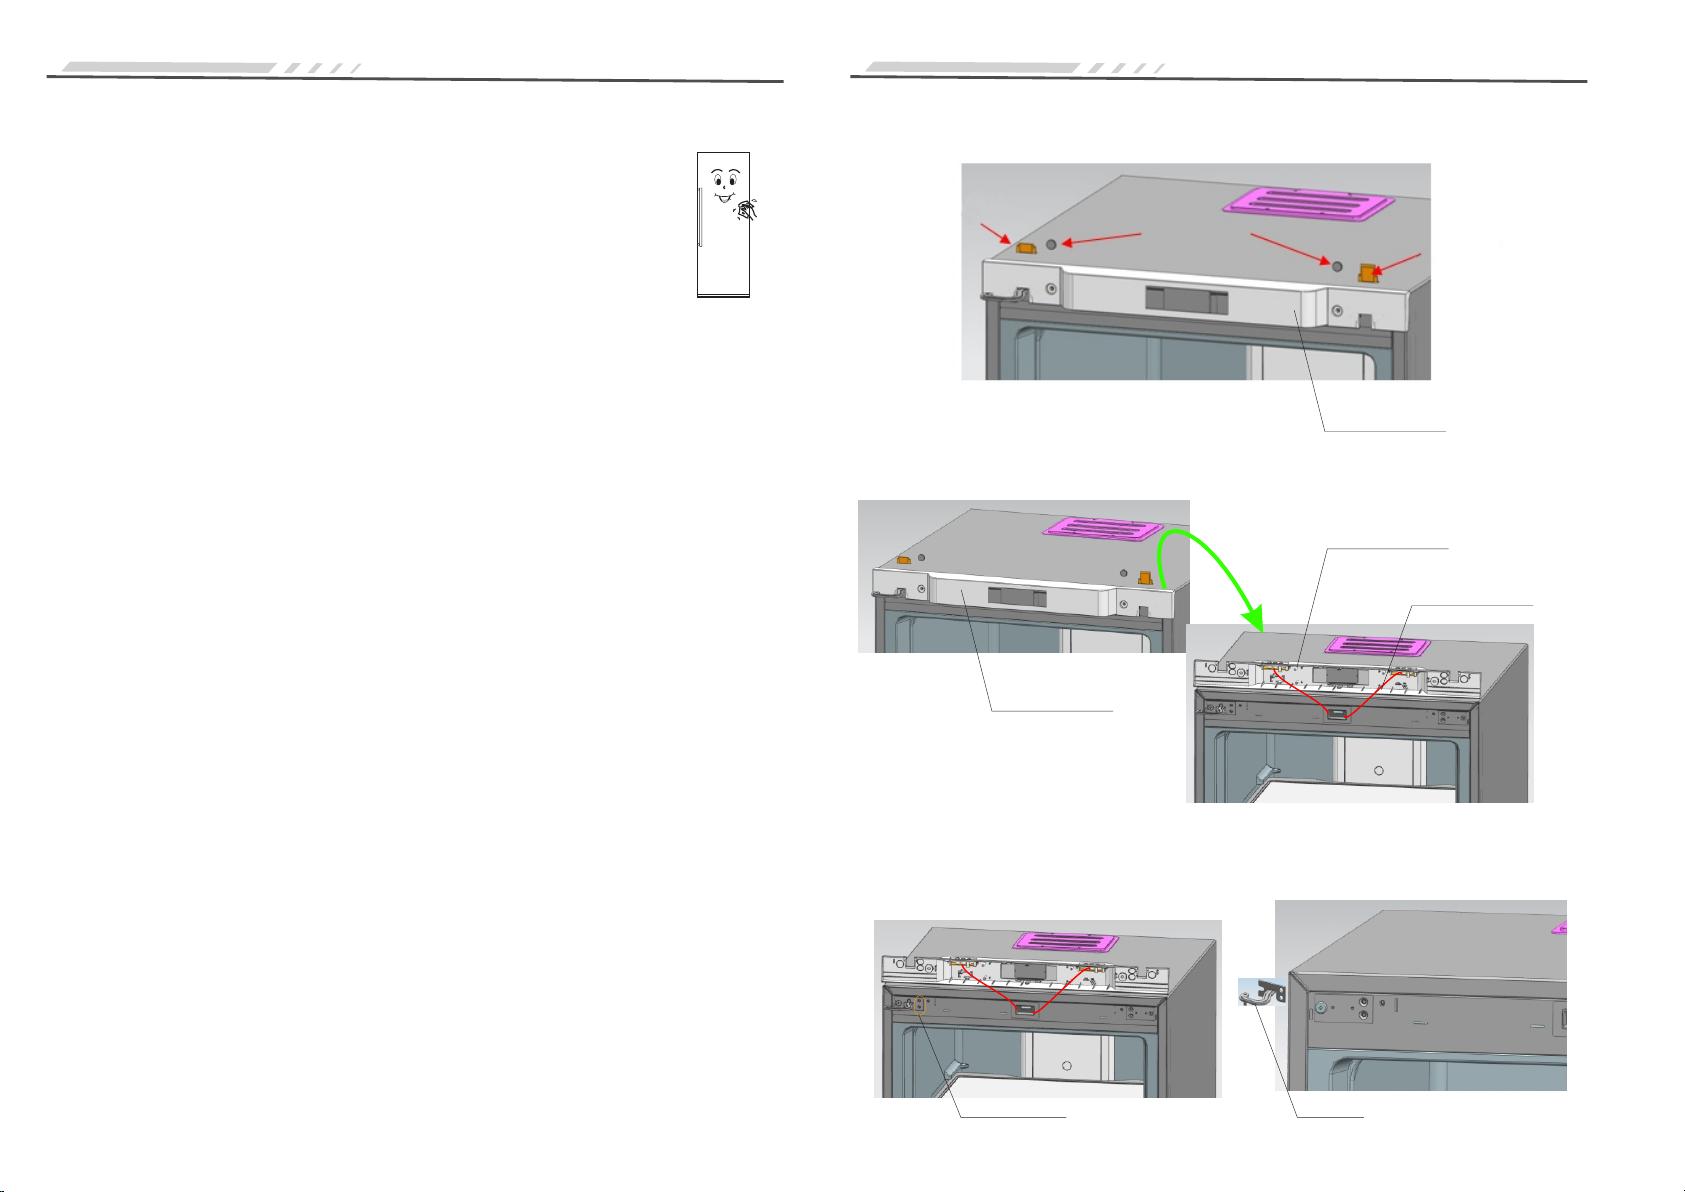
g
e t
he d
h
t-L
e
f
t C
h
a
n
g
e
h
e t
w
o n
u
t c
a
p
s a
nd tw
o h
in
g
e co
ve
r p
la
tes f
ro
m th
e t
o
p b
e
am
ir
in
g b
u
ndle s
ec
oo
r t
ora
o
w
t
ing c
ar
d r
i
g
ht
)
Nut ca p
Righ t cover pla te
T
o
p
-
b
eam
deco
r
ati
on
o
m
po
nen
t
s fr
om th
e t
op b
ea
m
T
o
p
-
b
eam
dec
o
r
ati
on
W
Po
D
isc
w
er fa
a
r
d: ...
ilu
r
e
: .
..
Redu ce openin g times a s ma ny as pos si ble; yo u'd bette r not
to put f resh food i n it.
When d iscard un used re fr igera to r, door se al must be
dism antled off, s o that the ch ildre n wo uld not b e cl osed in i t
by acc ident.
8
3
d
、R
is
ma
em
Top
-b
e
am
d
eco
r
a
ti
o
n
ov
e t
h
e t
w
o b
o
lt
s fi
xe
d w
it
h hi
n
ge
r at the s
Two bol ts
ame ti
m
e.
As last
n
s, pull t
t
le t
he d
oo
h
e h
i
ng
, t
es out fr
ak
e th
e h
inge
Hing e
s ou
o
m one s
t fr
om t
id
e a
n
he door.
d
9
Page 37
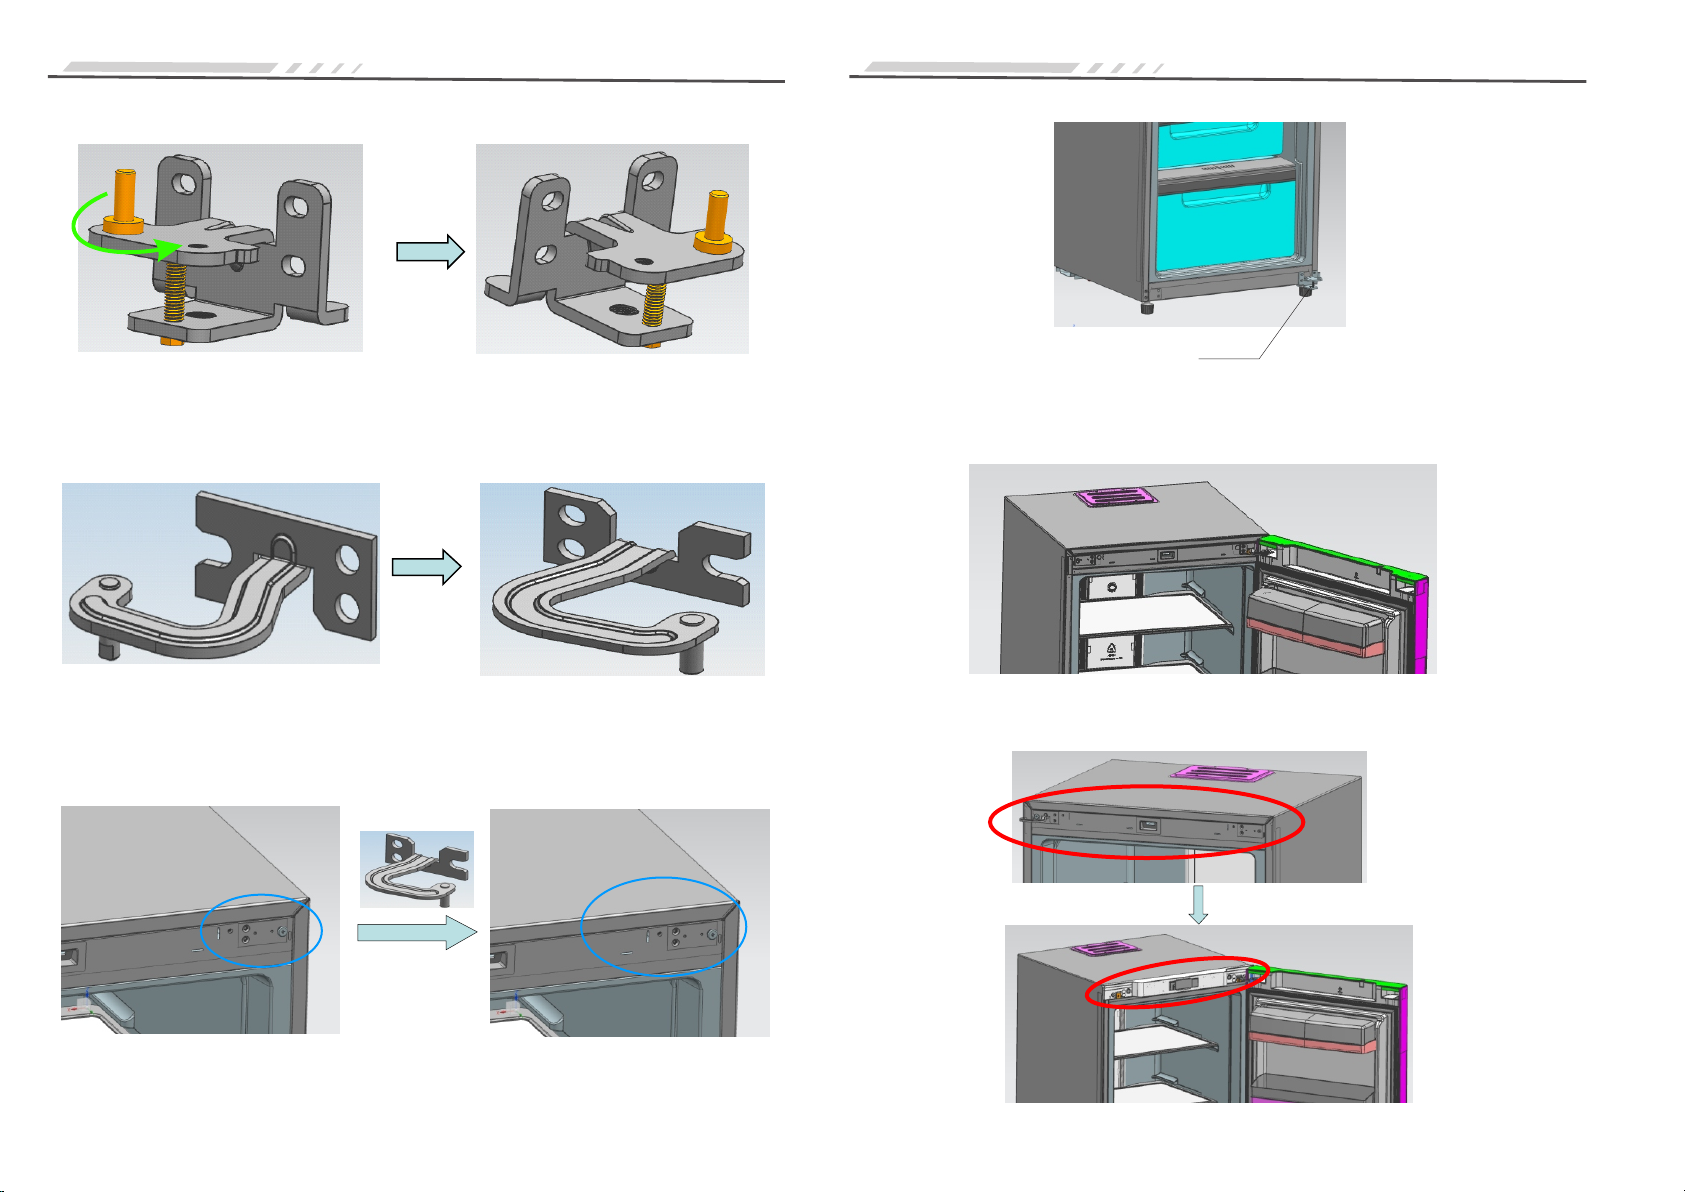
4、
as
5、
by r
D
o
o
r R
i
g
h
t
-
L
e
f
t C
h
a
n
g
e
Re
a
ss
e
mb
l
e th
e lo
we
r h
i
n
ge a
xi
s
: dis
ma
nt
l
e t
he o
r
ig
in
a
l h
i
n
ge a
xi
s a
n
s
em
Re
ot
ble i
ass
embl
at
i
n
g it from th
t at the g
e the upp
ra
e o
phi
th
c p
e
er e
r hi
o
siti
nge
nd o
o
n.
s ax
f t
h
is: d
e sc
i
re
sm
w h
an
t
o
le the hi
l
e.
ng
e a
x
i
s a
nd asse
d
m
b
l
e
D
7
8
do
i
o
o
、
I
n
、In
or) a
nto h
r R
s
sta
ta
in
i
g
ll t
l
t first
g
h
t
-
L
he l
ow
l t
h
e up
, the
e fixed l
e
f
per h
t C
er h
n p
eg
h
ing
in
l
a
s an
a
n
ges i
ce t
g
e at t
he d
d fi
e
x t
h
e r
i
g
h
t sid
e o
f t
h
e r
e
f
rig
e
ra
to
r
L
o
w
er h
i
n
g
e
n
t
o t
he r
el
a
tiv
e ax
l
e h
ol
es o
n t
he r
igh
t (u
po
n t
oo
r on t
he l
ow
h
e u
p
per h
in
er hing
g
e
s a
t la
es, p
st.
r
es
s u
p
pe
r hin
he
ges
6
、In
sta
9、
I
ns
t
al
l t
op-
bea
m dec
o
r
at
io
n, n
ut c
ap
s a
n
d h
in
ge c
ov
e
r pl
ate
s
l
l t
h
e up
per h
in
ges f
i
xe
d le
g (o
n th
e le
f
t) at t
h
e r
ig
ht si
de
.
1
0
1
1
Page 38
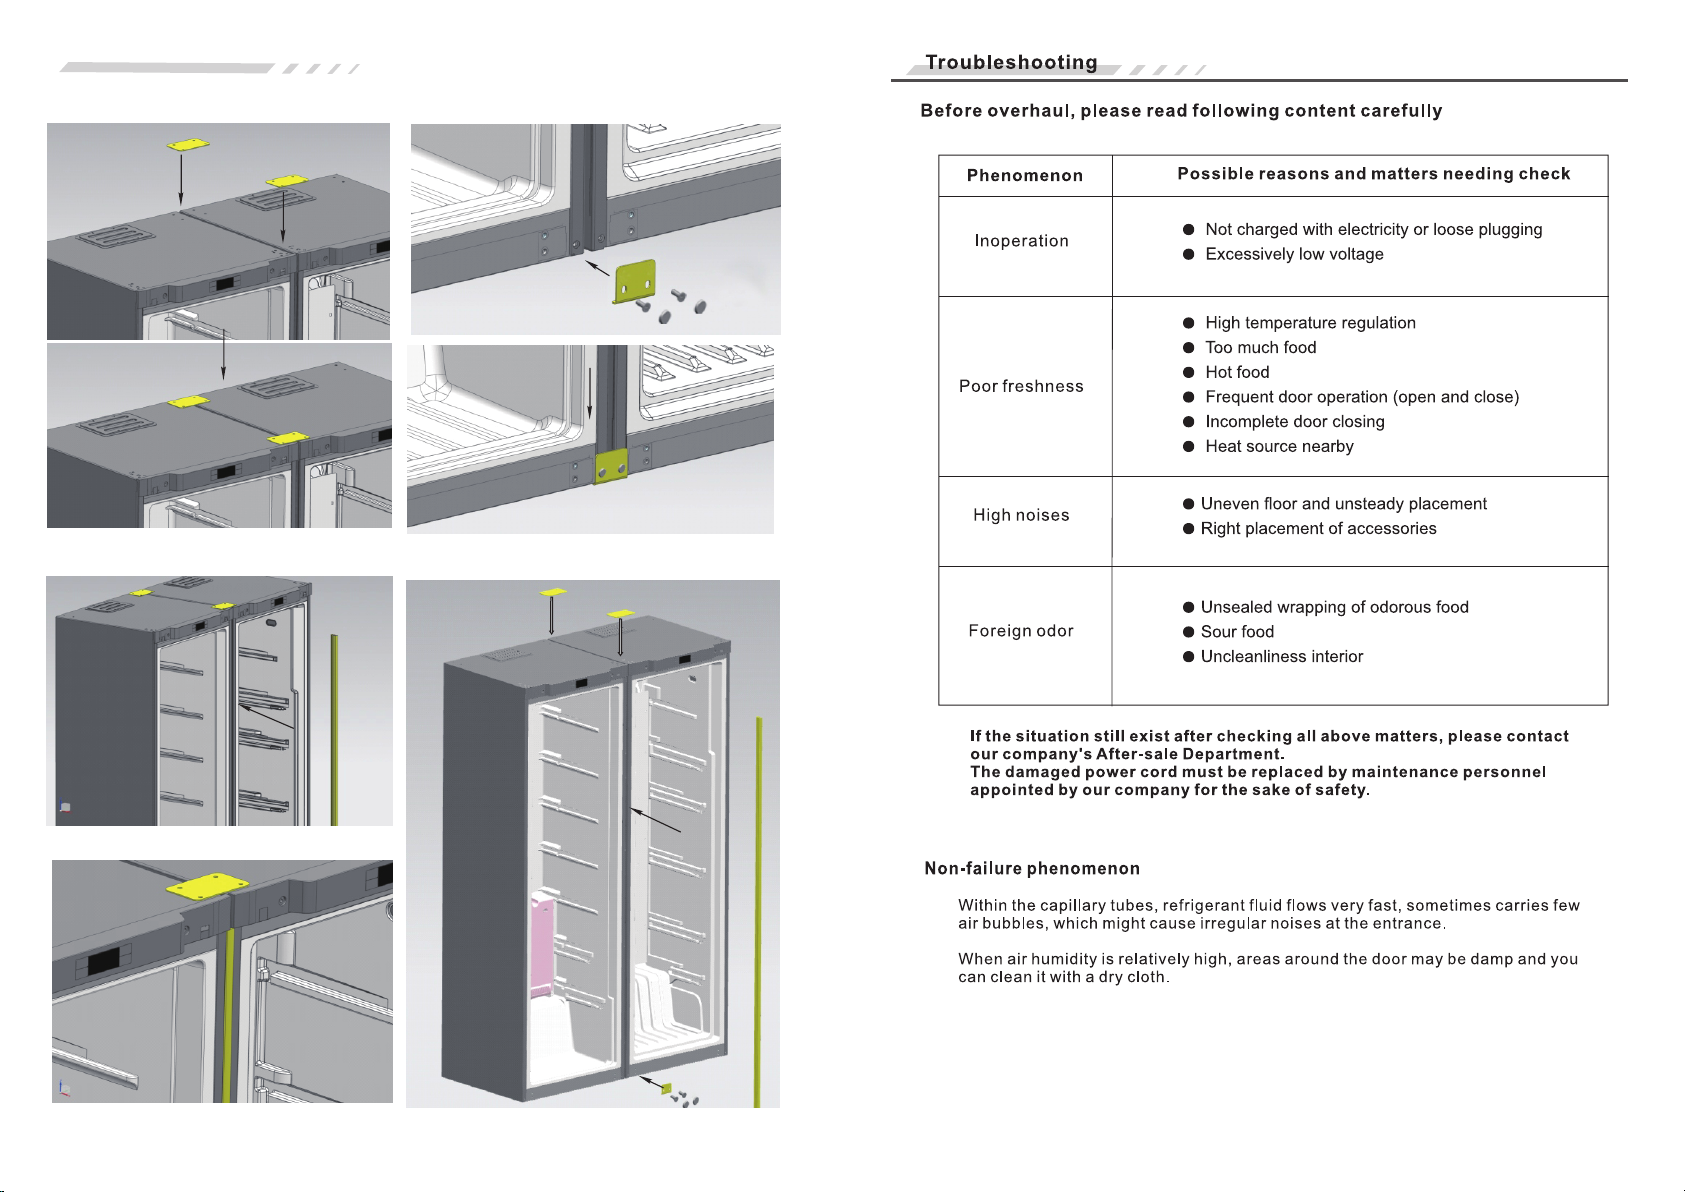
CONNECTING GUIDE for R EFRIGER ATO R
AND FREEZER CABINETS
ST
1 S tep:P ut two ca binet s toget her wit h only 10 mm gap.
Fix t he conn ectin g hinge t o the pla ce as sho wn in the p ictur e.
rd
3 Step: Put the b ar ins ide t he gap be tween t wo cabi nets.
Ste p finis hed.
The c onnec ting
nd
2 Ste p: Fit th e lower c onne cti ng hing e at the bo ttom of t wo cabi nets.
12
13
Page 39
Safety contents
1) This appliance is not intended for use by persons (including children) with reduced
physical, sensory or mental capabilities, or lack of experience and knowledge, unless they
have been given supervision or instruction concerning use of the appliance by a person
responsible for their safety. Children should be supervised to ensure that they do not play
with the appliance.
2) Do not store explosive substances such as aerosol cans with a flammable propellant
in this appliance.
3) This appliance is intended to be used in household and similar applications such as:Staff kitchen areas, in shops, offices.
4) If the supply cord is damaged, it must be replaced by the manufacturer or its service
agent or a similarly qualified person in order to avoid a hazard.
 Loading...