

Teka NFL 320 BLANCO, NFL 320 INOX, NFL 340 BLANCO, NFL 340 INOX, NFL 430 INOX User guide [en, es, pt, pl]
Page 1
MODEL: NFL 320 BLANCO
NFL 320 INOX
NFL 340 BLANCO
NFL 340 INOX
NFL 430 INOX
Page 2

Índice
1. ADVERTENCIAS DE SEGURIDAD ......................................................................................... 1
2. INSTALACIÓN ..................................................................................................................... 2
2.1 Ubicación .................................................................................................................... 2
2.2 Instalación del tirador de la puerta (opcional) ........................................................... 2
2.3 Invertir el sentido de apertura de la puerta ............................................................... 3
2.4 Requisitos de espacio para la puerta ......................................................................... 3
2.5 Nivelación del electrodoméstico ................................................................................ 3
2.6 Limpieza antes de su uso ........................................................................................... 3
2.7 Antes de utilizar el electrodoméstico ........................................................................ 4
2.8 Accesorios interiores .................................................................................................. 4
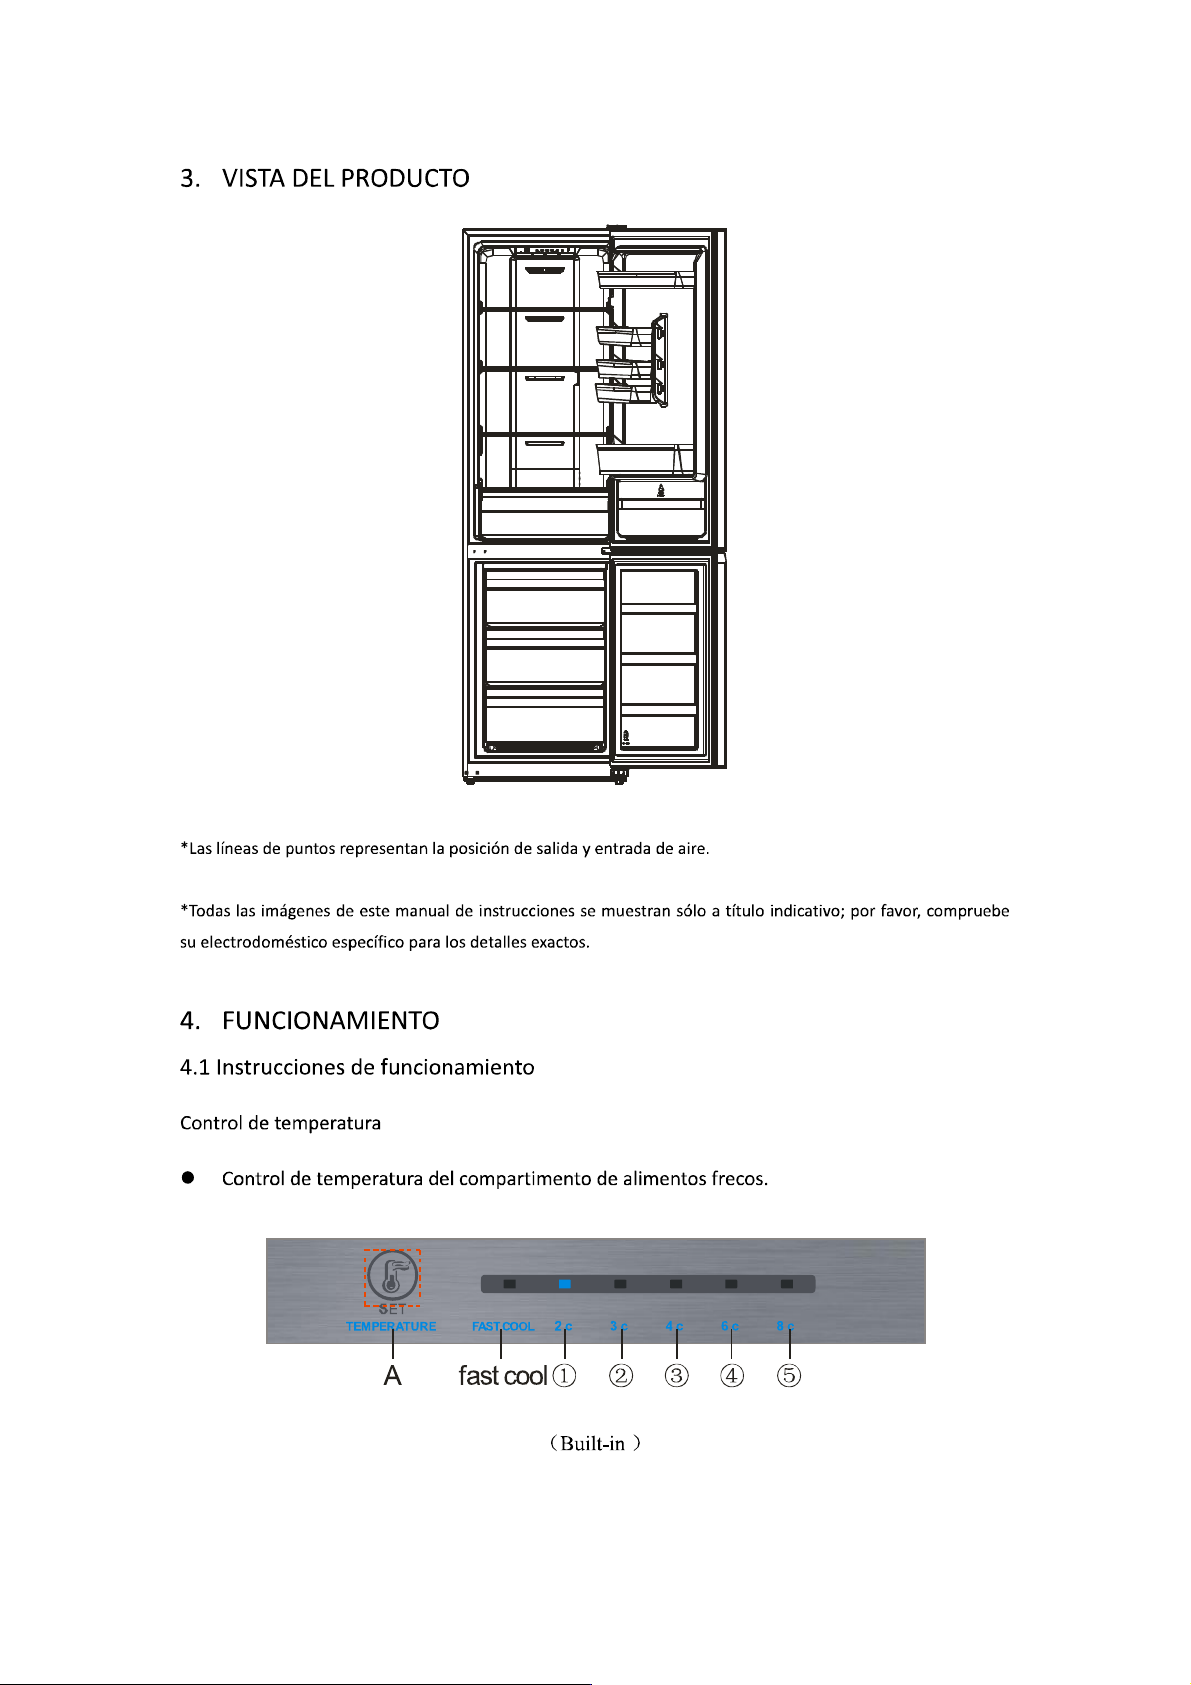
3. VISTA DEL PRODUCTO ....................................................................................................... 6
4. FUNCIONAMIENTO ............................................................................................................ 6
4.1 Instrucciones de funcionamiento ............................................................................... 6
4.2 Ruido en el interior del frigorífico .............................................................................. 8
4.3 Consejos para conservar los alimentos en el frigorífico ............................................ 8
4.4 Sustitución de la bombilla interior ............................................................................. 9
5. LIMPIEZA ............................................................................................................................ 9
5.1 Descongelación .......................................................................................................... 9
5.2 Limpieza del interior y del exterior del frigorífico ...................................................... 9
5.3 Consejos de limpieza .................................................................................................. 9
6. MANTENIMIENTO .............................................................................................................. 9
6.1 Sustitución de la bombilla interior ............................................................................. 9
6.2 Precauciones a la hora de transportar o mover el frigorífico .................................... 9
6.3 Mantenimiento y reparación ..................................................................................... 9
6.4 Largos periodos de no utilización ............................................................................. 10
6.5 No obstruya la salida ni la entrada de aire del frigorífico. ....................................... 10
7. Resolución de problemas ................................................................................................ 10
7.1 Consideraciones sobre el calor emitido: .................................................................. 10
8. CONSEJOS PARA EL AHORRO DE ENERGÍA ...................................................................... 11
9. ELIMINACIÓN ................................................................................................................... 11
Page 3
1. ADVERTENCIAS DE SEGURIDAD
1) ATENCIÓN: Mantenga sin obstrucciones las aberturas de ventilación del aparato o de la
estructura en la que esté integrado.
2) ATENCIÓN: No utilice dispositivos mecánicos u otros medios para acelerar el proceso de
descongelación que no sean los recomendados por el fabricante.
3) ATENCIÓN: Asegúrese de no dañar el circuito del líquido refrigerante.
4) ATENCIÓN: No utilice aparatos eléctricos dentro de los compartimentos de almacenamiento
de alimentos del electrodoméstico, a menos que sean del tipo recomendado por el fabricante.
5) Desenchufe el aparato después de su uso y antes de realizar en él cualquier tipo de
mantenimiento.
6) Este electrodoméstico puede ser utilizado por niños a partir de 8 años y personas con
facultades físicas, sensoriales o mentales reducidas, o con falta de experiencia y conocimientos,
siempre que cuenten con la supervisión y hayan recibido instrucciones en relación con el uso del
mismo de forma segura y entiendan los peligros asociados al mismo. Los niños no deben jugar
con el electrodoméstico. Las tareas de limpieza y mantenimiento del electrodoméstico no
deberán ser realizados por niños sin supervisión.
7) Si el cable de alimentación resulta dañado, deberá ser sustituido por el fabricante o por su
servicio técnico autorizado para evitar cualquier riesgo.
8) Lleve el frigorífico a un punto autorizado de recogida de acuerdo con la normativa local, ya que
este utiliza gases y refrigerante inflamables.
9) Proceda de acuerdo con la normativa local relativa a la eliminación de los electrodomésticos,
ya que este utiliza gases y refrigerante inflamables. Antes de desechar el electrodoméstico,
desmonte sus puertas para evitar la posibilidad de que niños puedan quedarse atrapados en él.
10) Este electrodoméstico ha sido diseñado para ser utilizado exclusivamente en uso doméstico
11) No almacene sustancias explosivas como aerosoles con propelentes inflamables en este
electrodoméstico.
ES PELIGROSO QUE PERSONAS QUE NO SEAN TÉCNICOS ESPECIALIZADOS REALICEN
TAREAS DE REPARACIÓN QUE IMPLIQUEN RETIRAR ALGUNA CUBIERTA PROTECTORA.
PARA EVITAR EL RIESGO DE ELECTROCUCIÓN, NO INTENTE REALIZAR REPARACIONES
USTED MISMO.
1
Page 4
2. INSTALACIÓN
2.1 Ubicación
A la hora de instalar el electrodoméstico, seleccione una ubicación bien ventilada y donde el
suelo sea llano y firme. No instale el electrodoméstico cerca de una fuente de calor, como por
ejemplo una cocina, una caldera o un radiador. Evite también ubicarlo a la luz solar directa, ya
que ello podría hacer aumentar el consumo eléctrico. Situarlo en un lugar con temperaturas
demasiado bajas también podría hacer que el electrodoméstico no funcionase correctamente.
Este electrodoméstico no ha sido diseñado para ser utilizado en garajes o en el exterior. No cubra
el electrodoméstico con ningún tipo de funda.
Al instalar el electrodoméstico, asegúrese de dejar un espacio libre de 10 cm a cada lado y por
detrás y de 30 cm por la parte superior. Ello ayudará a que el aire circule alrededor del frigorífico
y mejorará el proceso de enfriamiento.
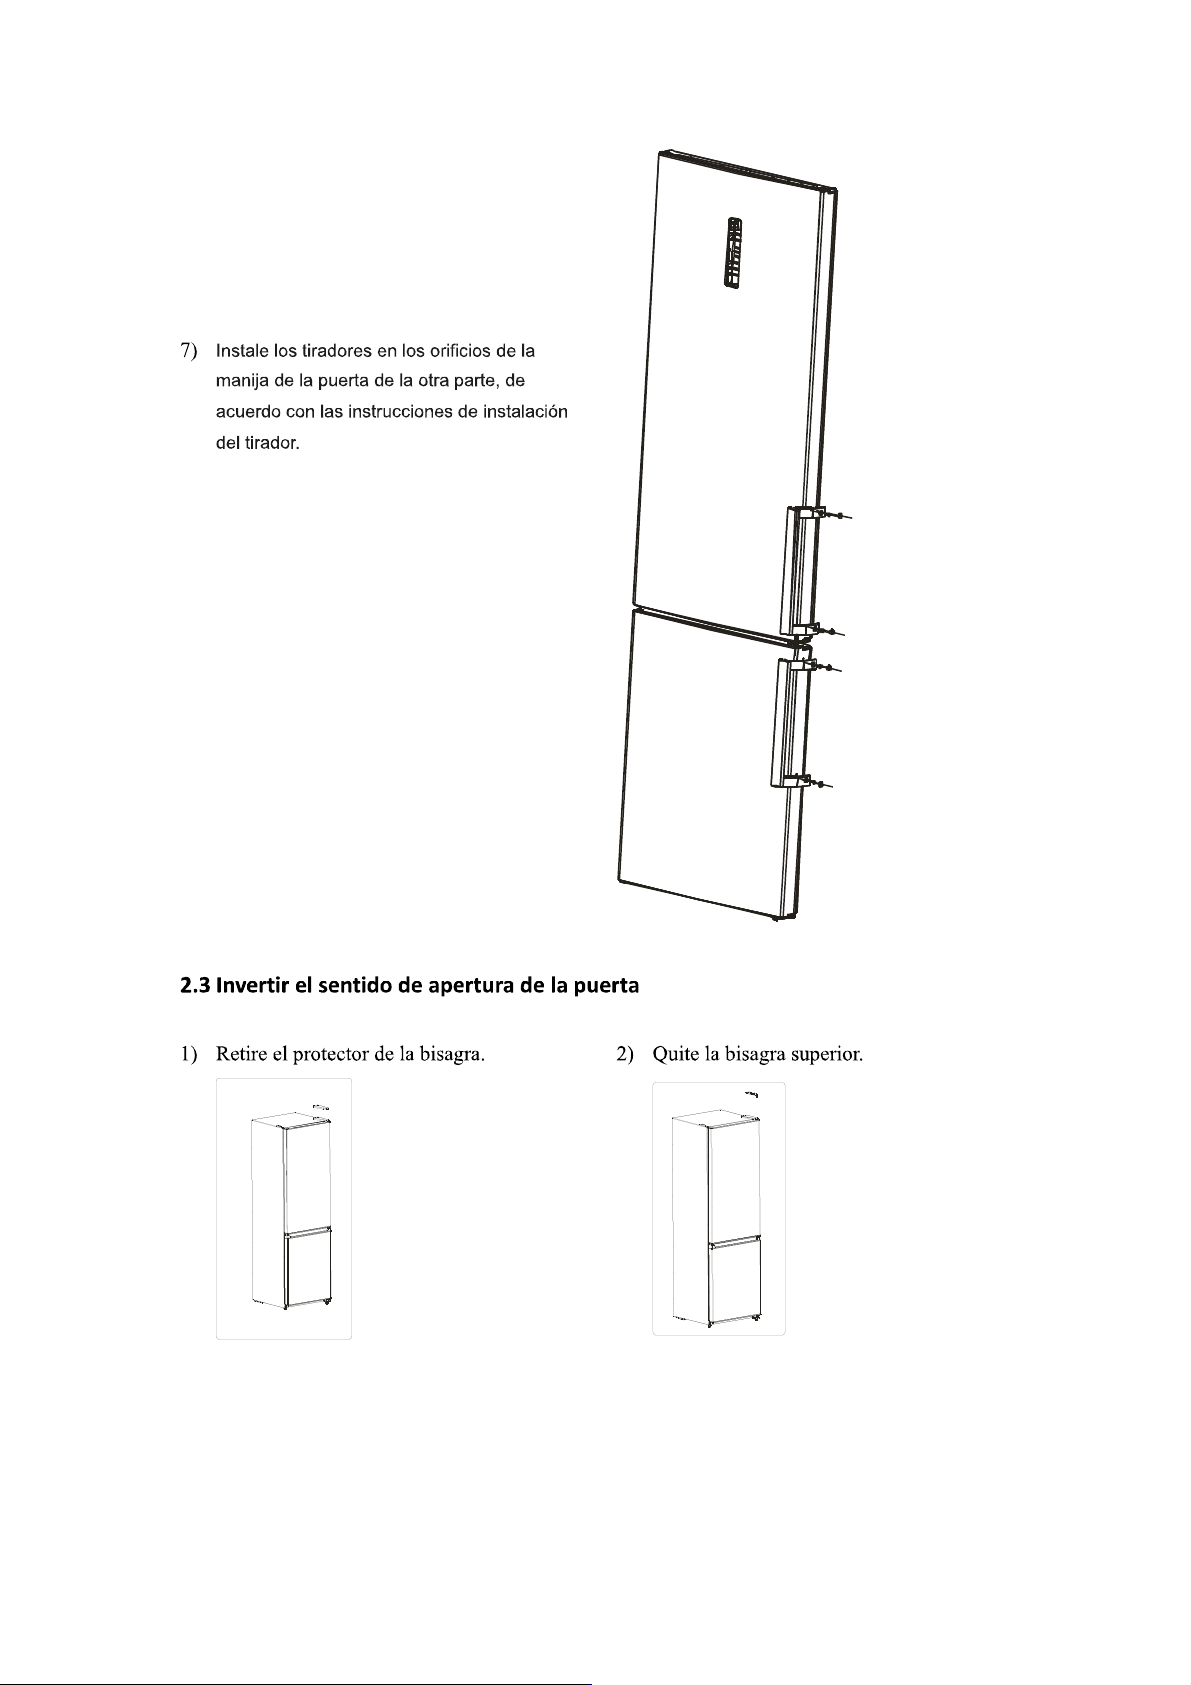
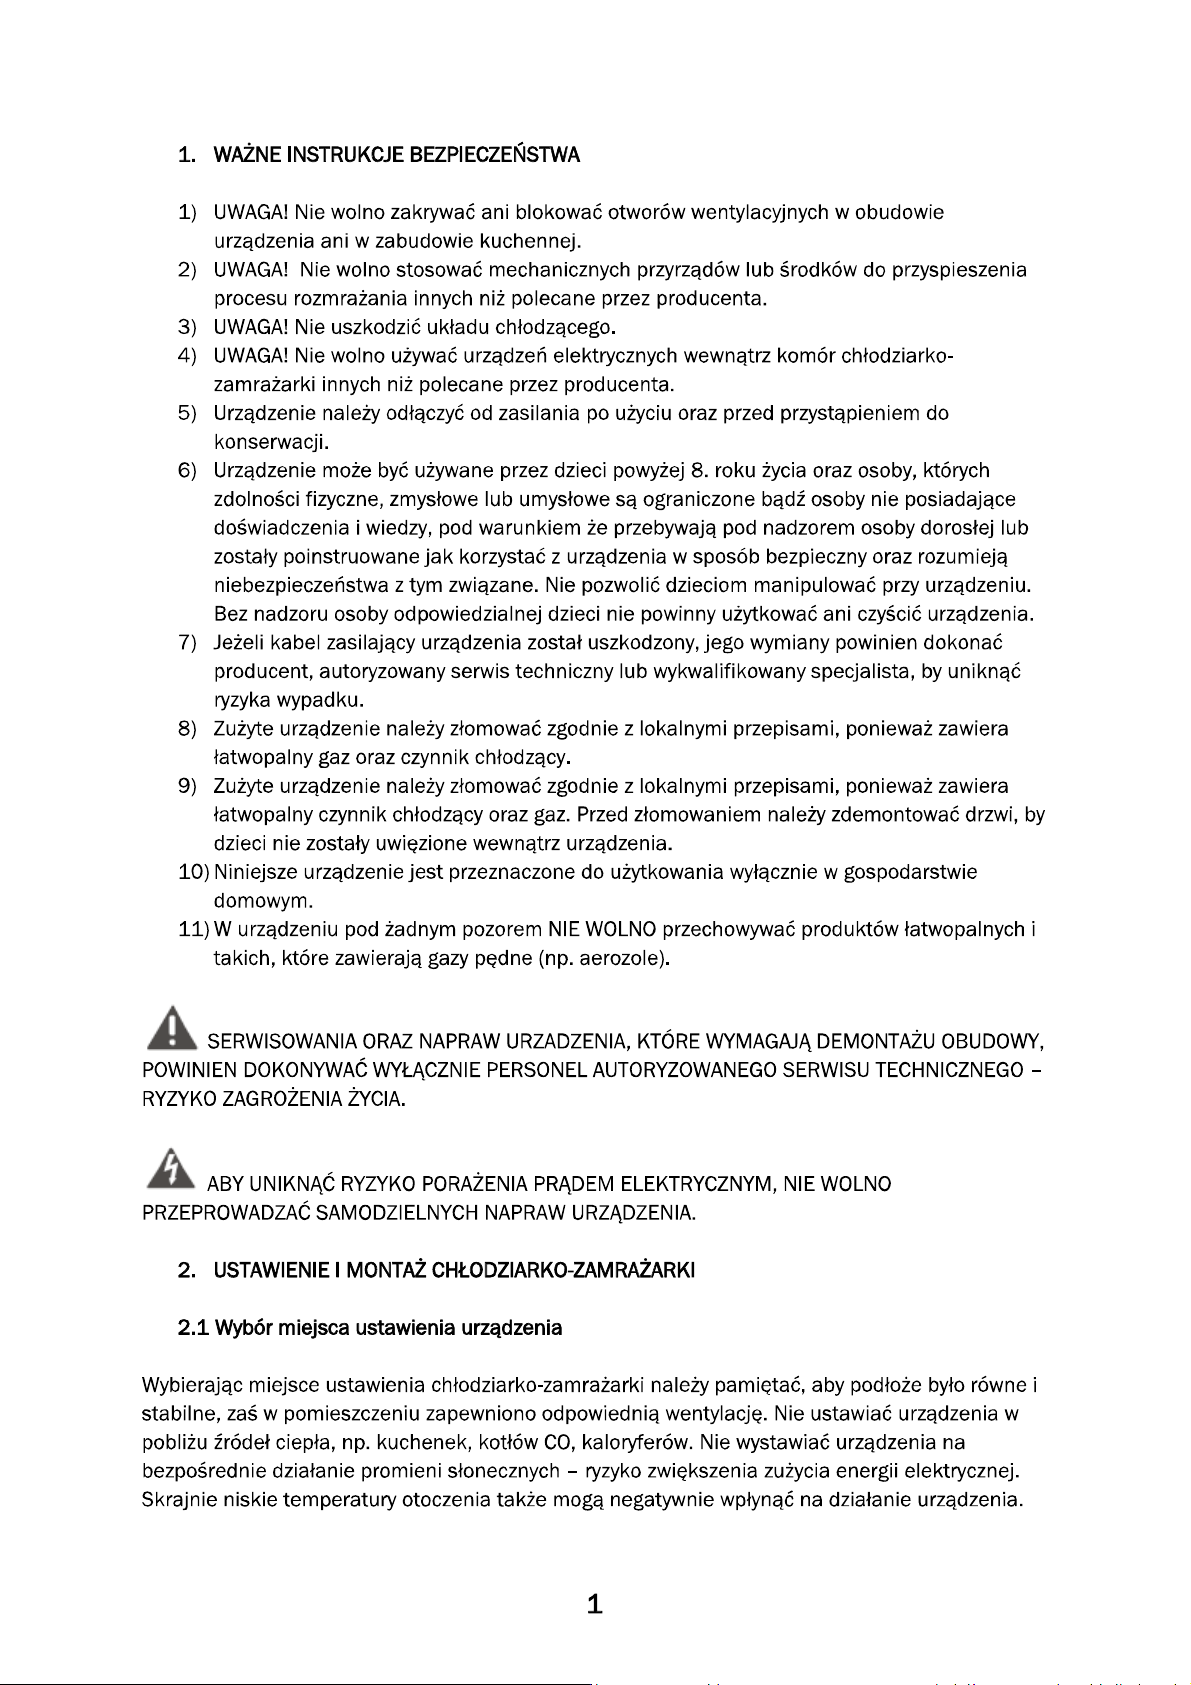
2.2 Instalación del tirador de la puerta (opcional)
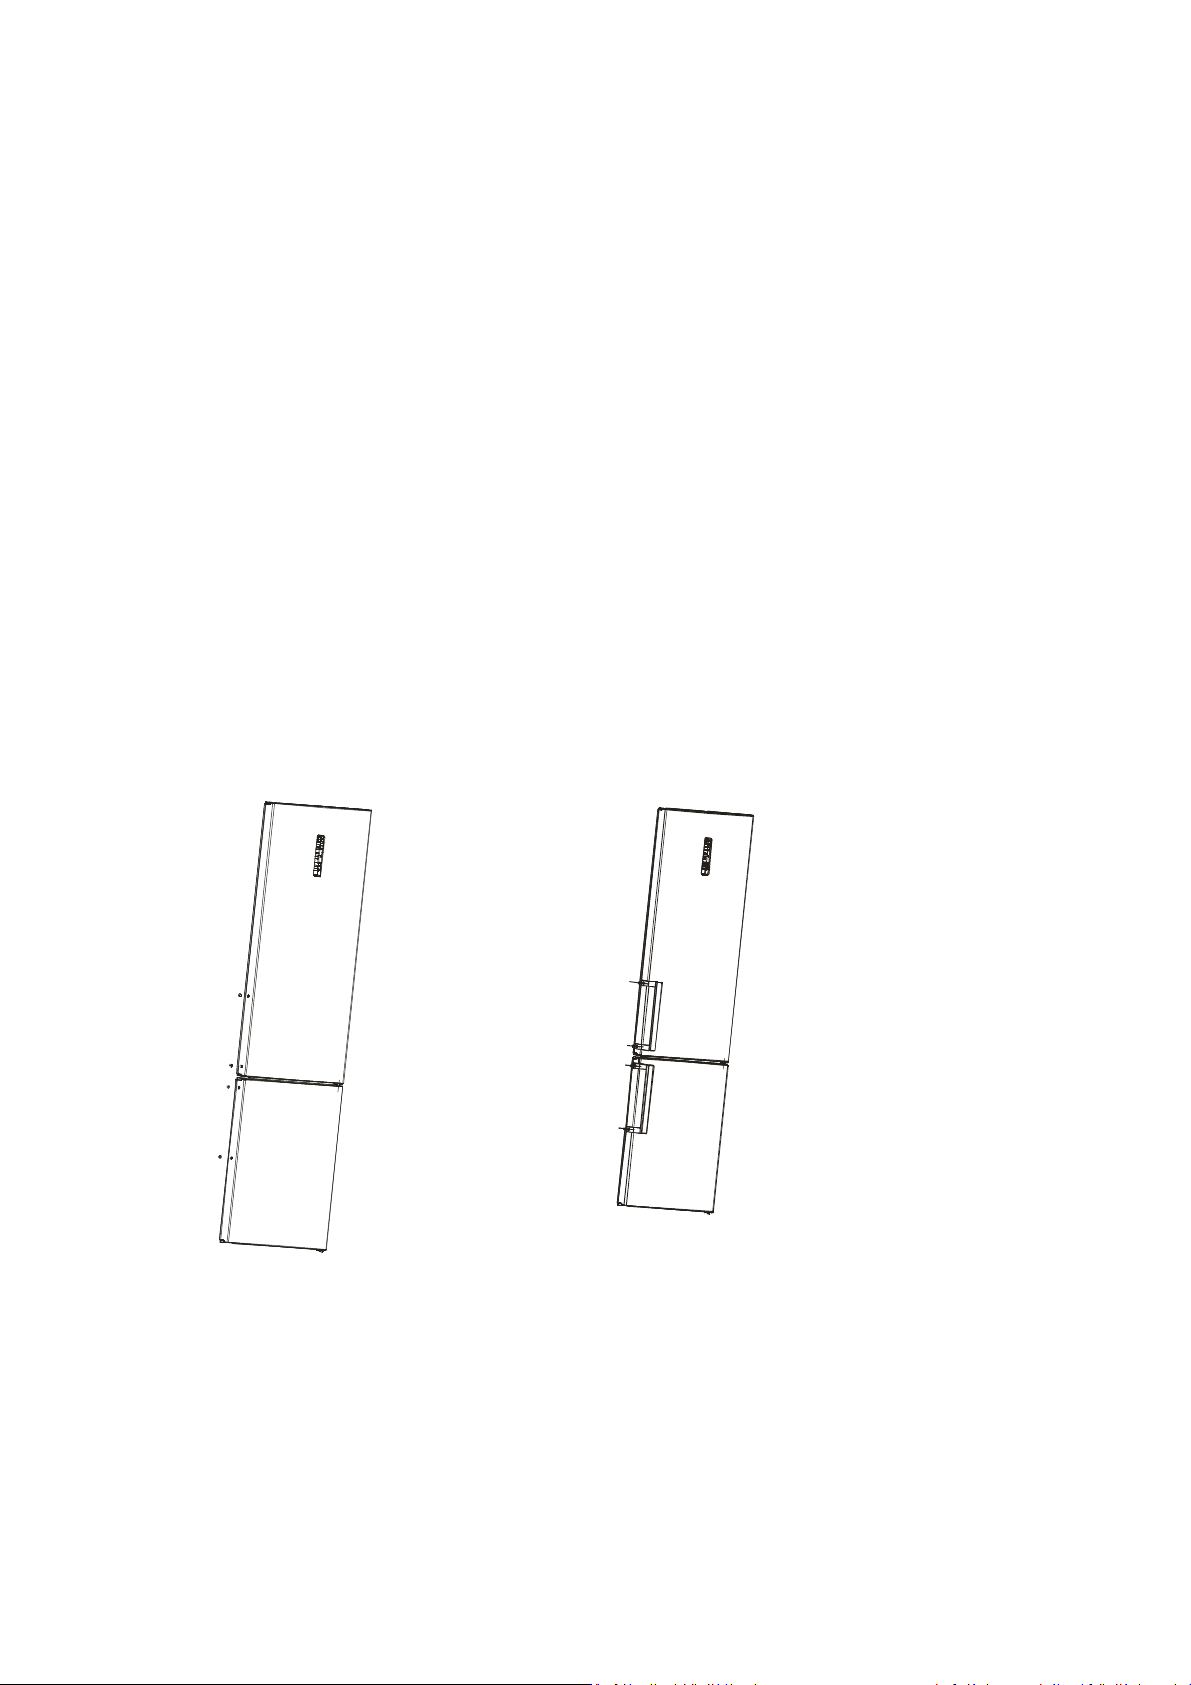
1) Saque los tapones de la rosca de los
agujeros del tirador de la puerta.
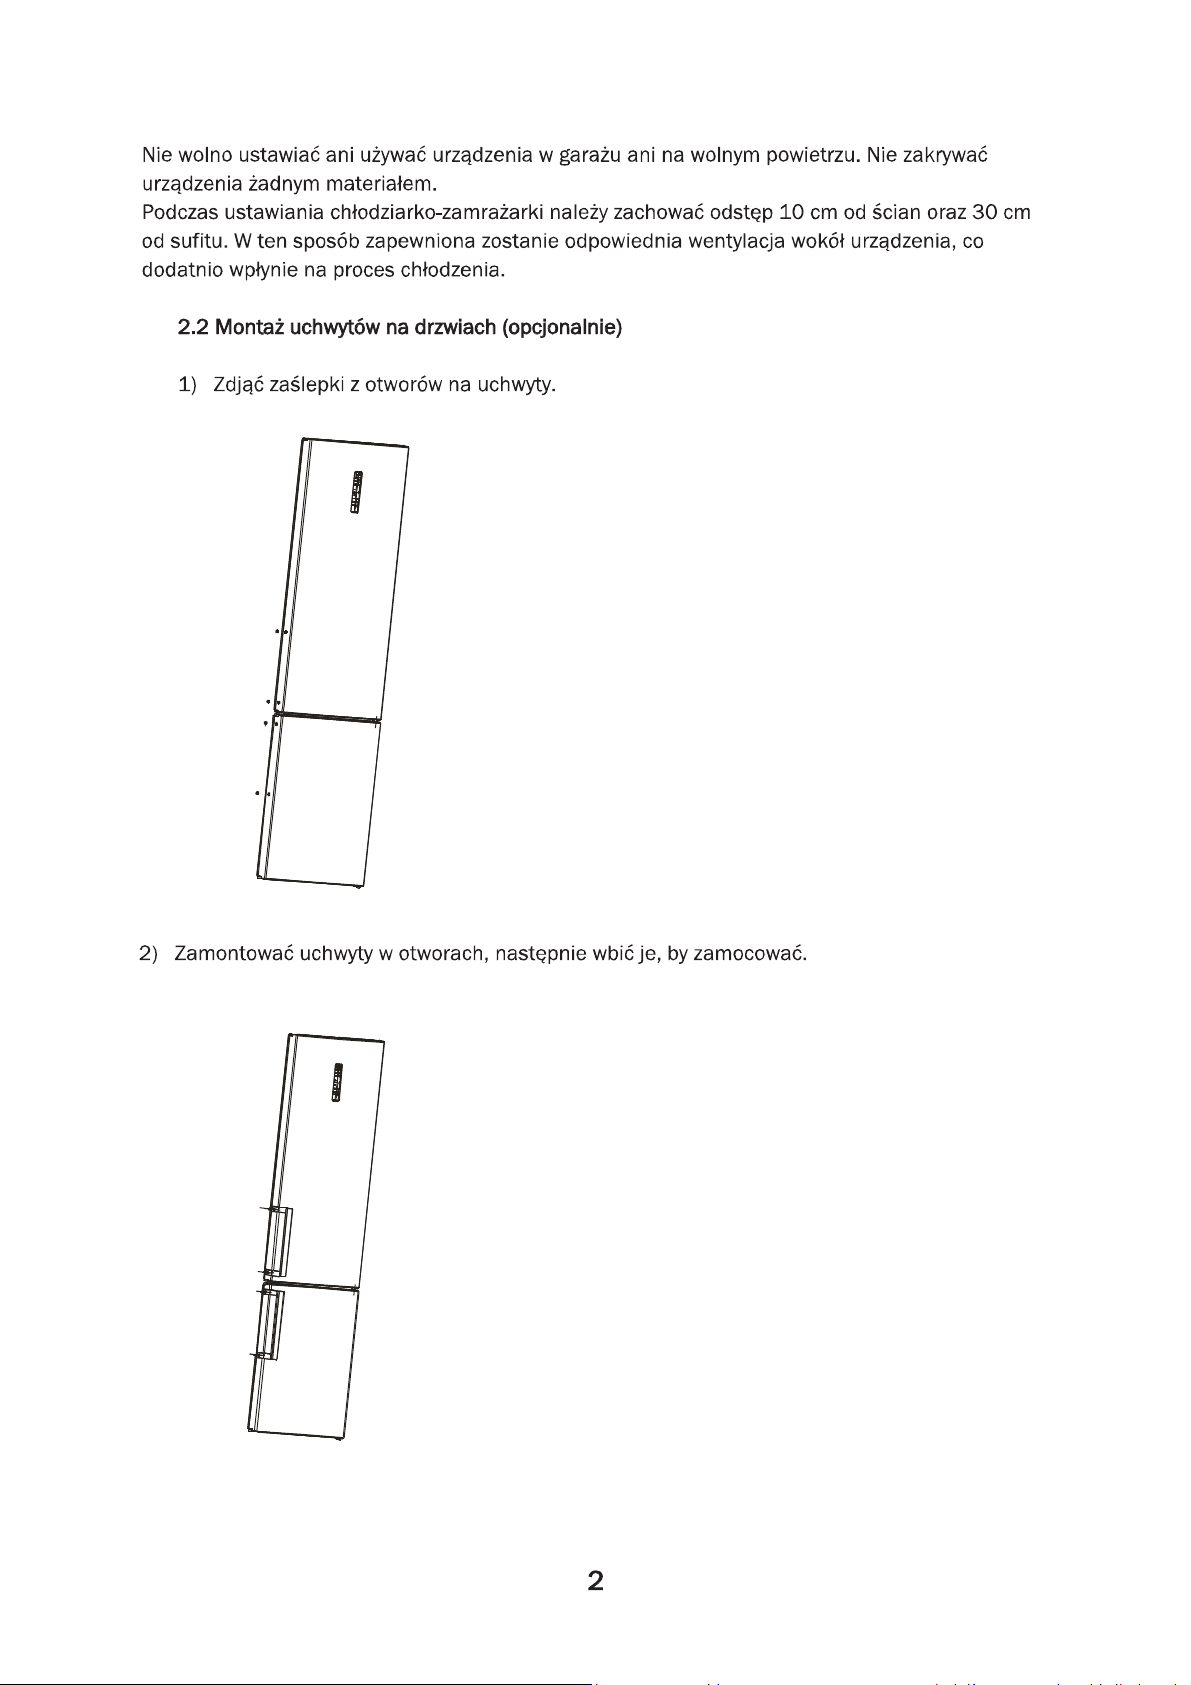
2) Ponga las asas en los orificios de los
tornillos y luego presione hasta que encajen.
2
Page 5
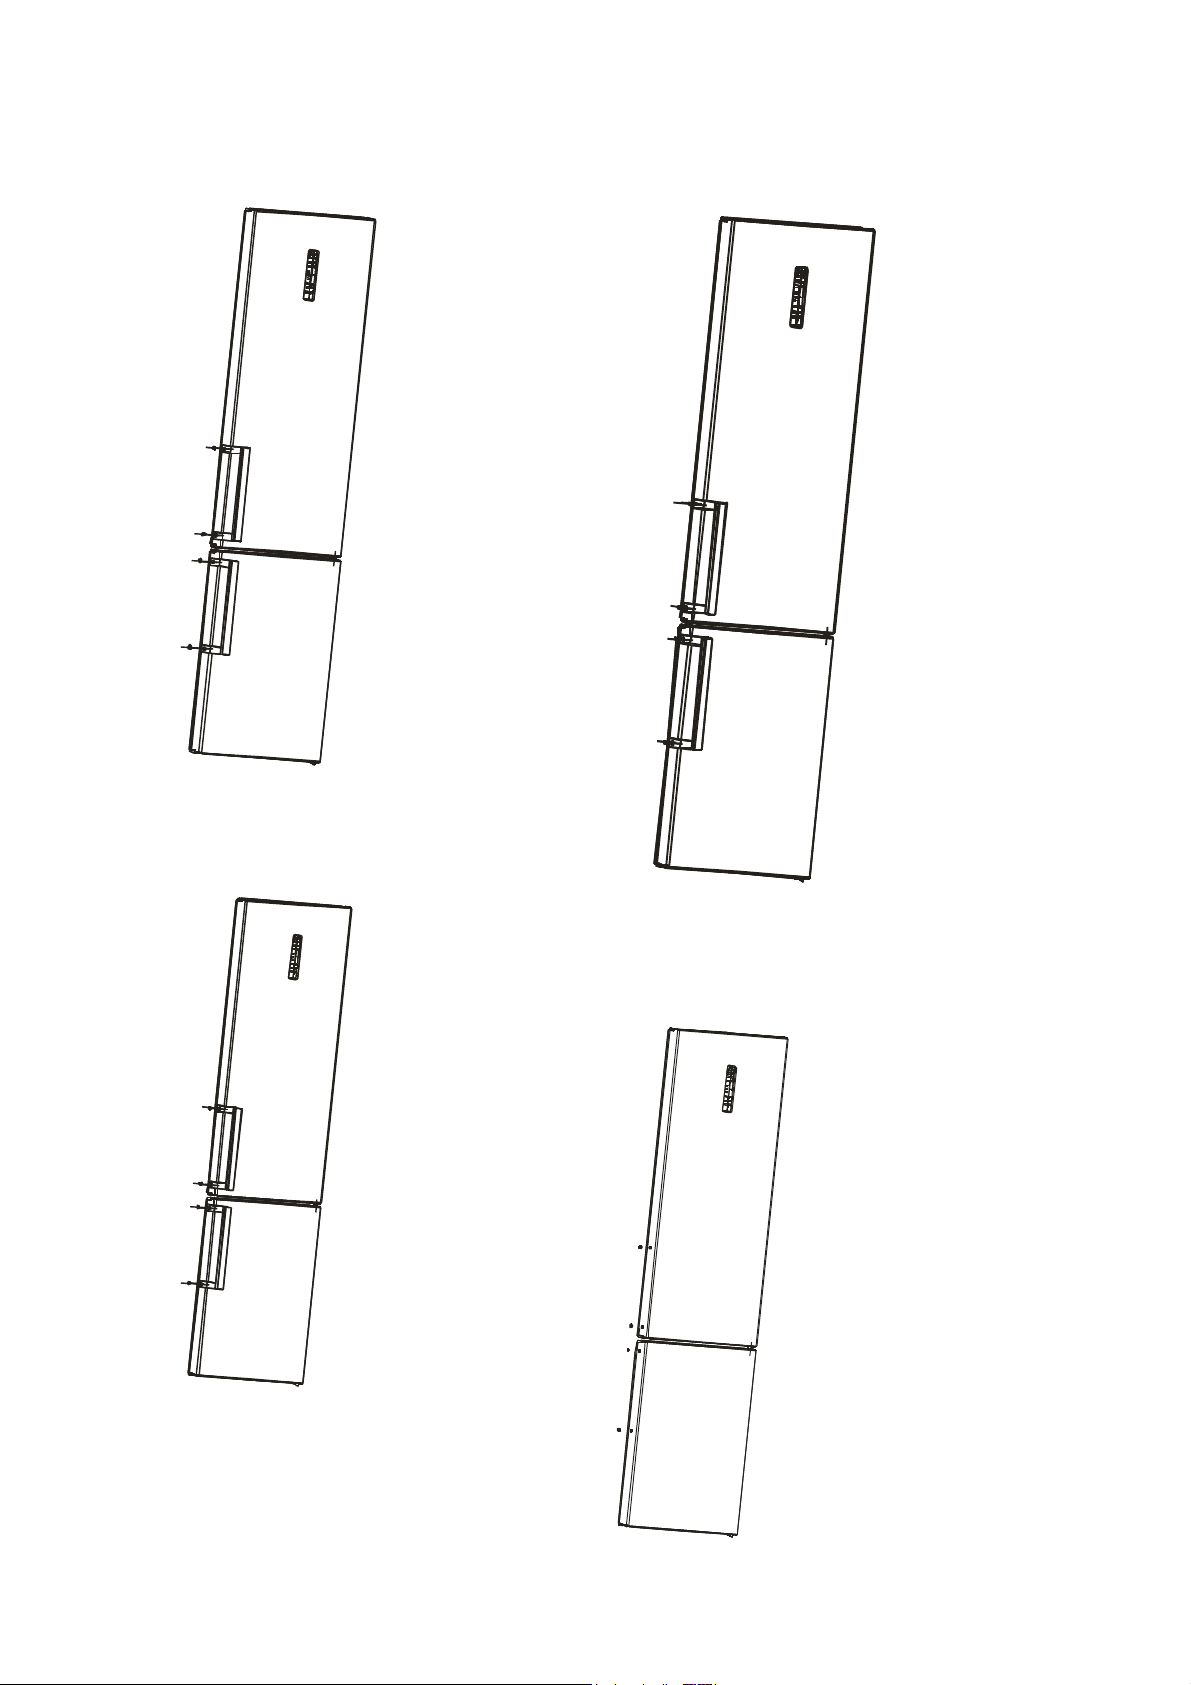
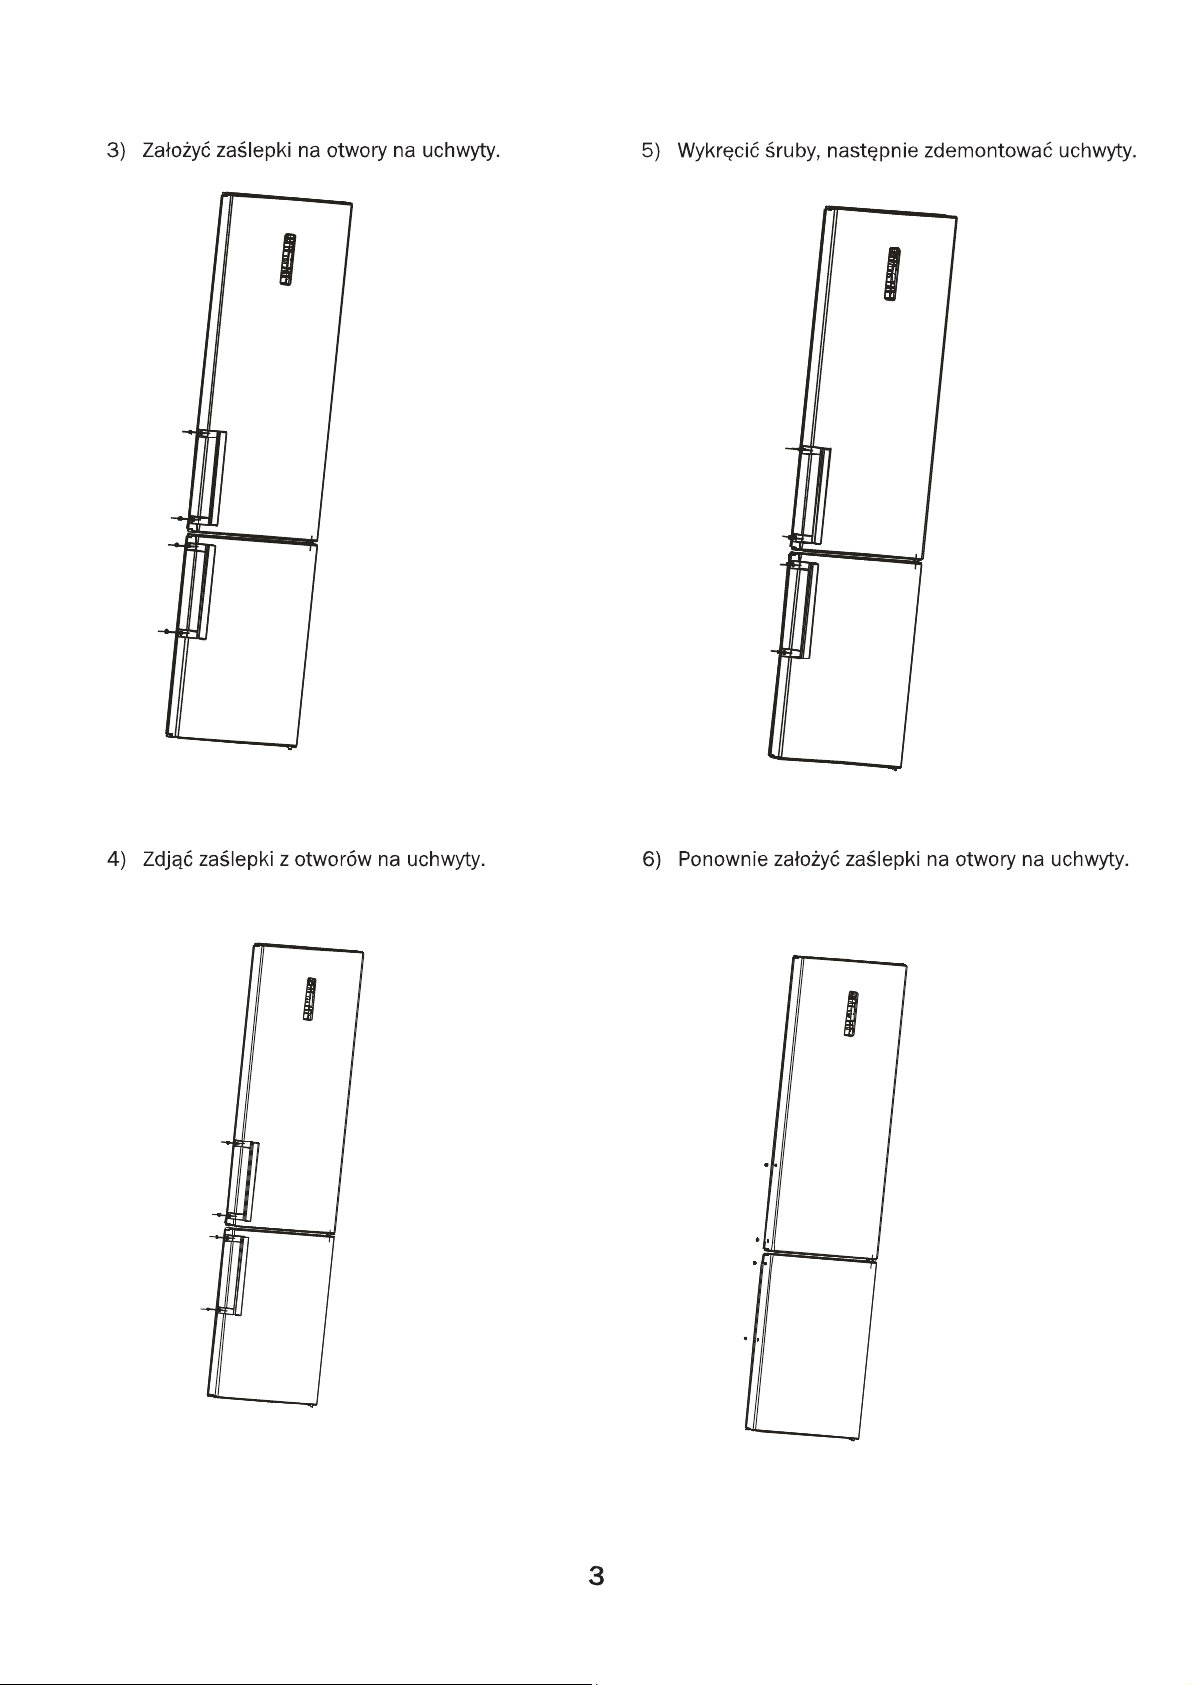
3) Coloque los tapones de la rosca de los
tornillos encima del tirador.
5) Retire los tornillos y baje los tiradores hacia
abajo.
4) Remueva los tapones de la rosca de los
orificios de los tornillos del tirador.
6) Tapar las tapas de los tornillos en los
agujeros del tirador de la puerta de nuevo.
3
Page 6
4
Page 7
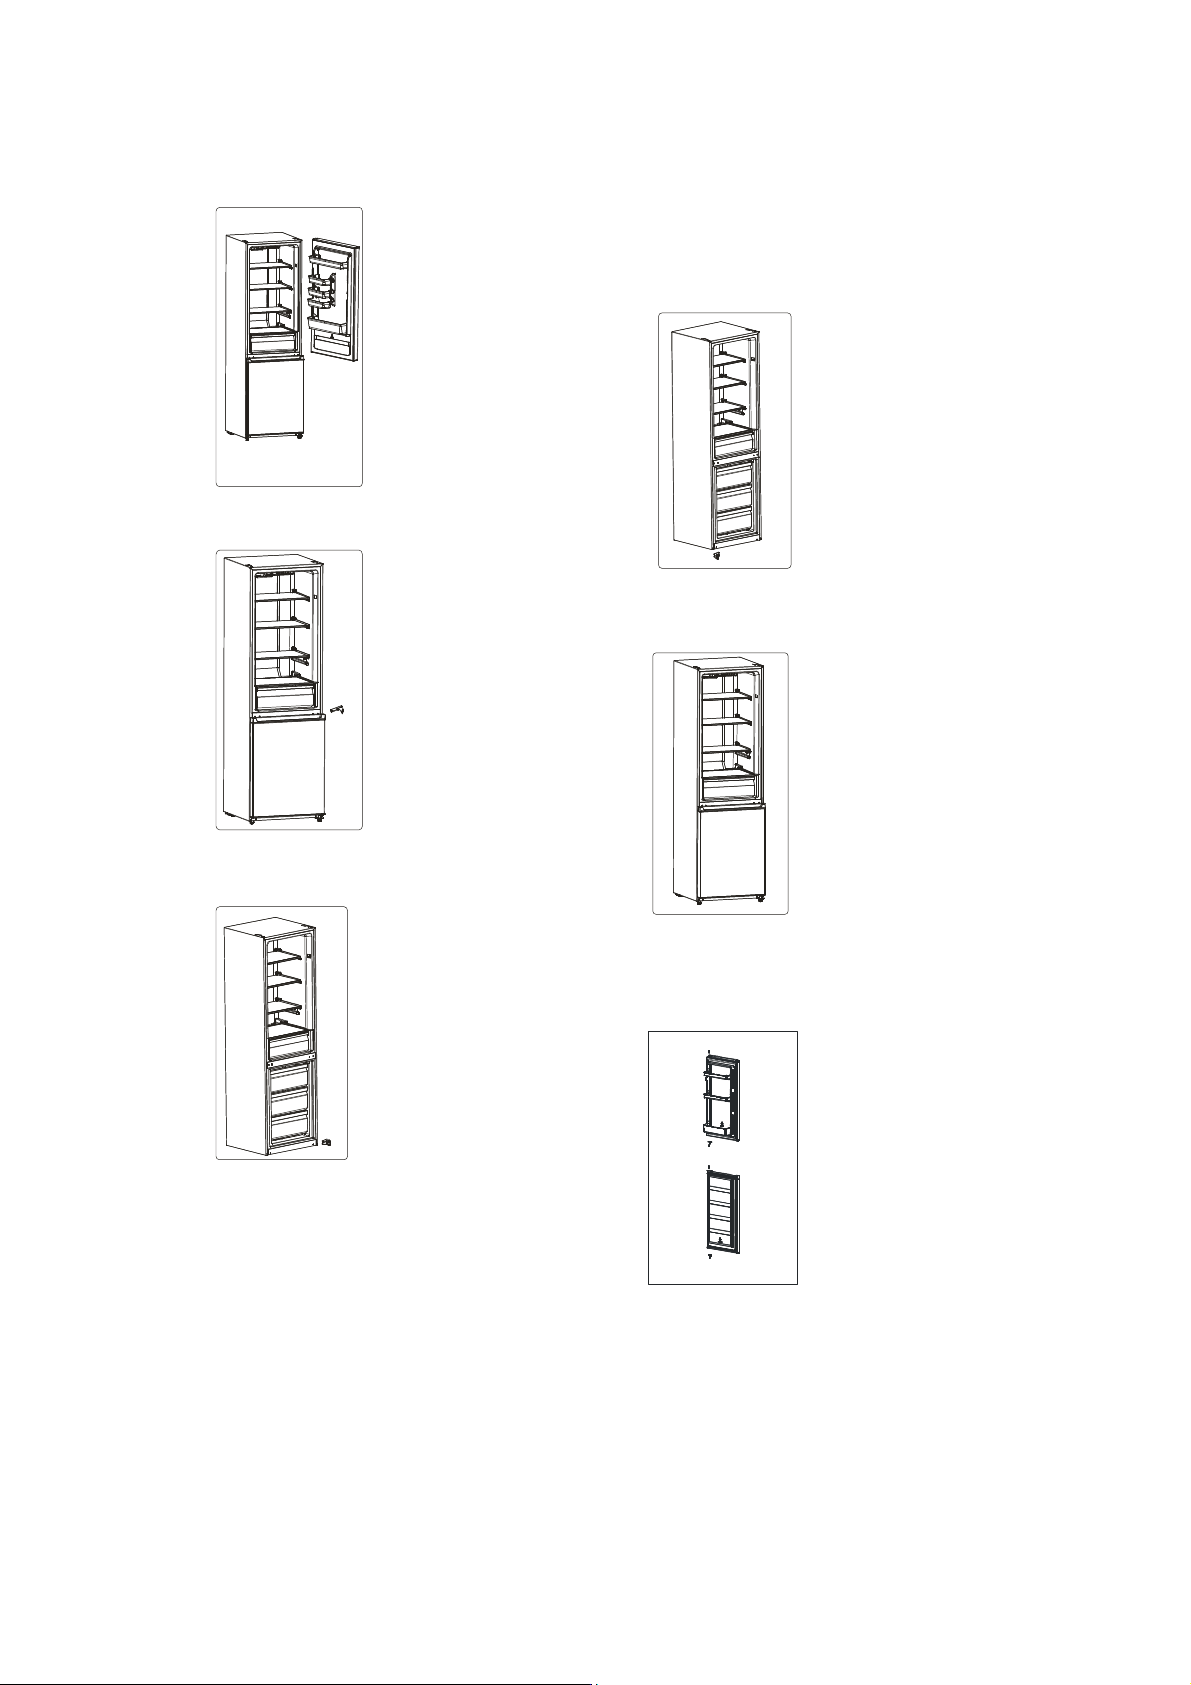
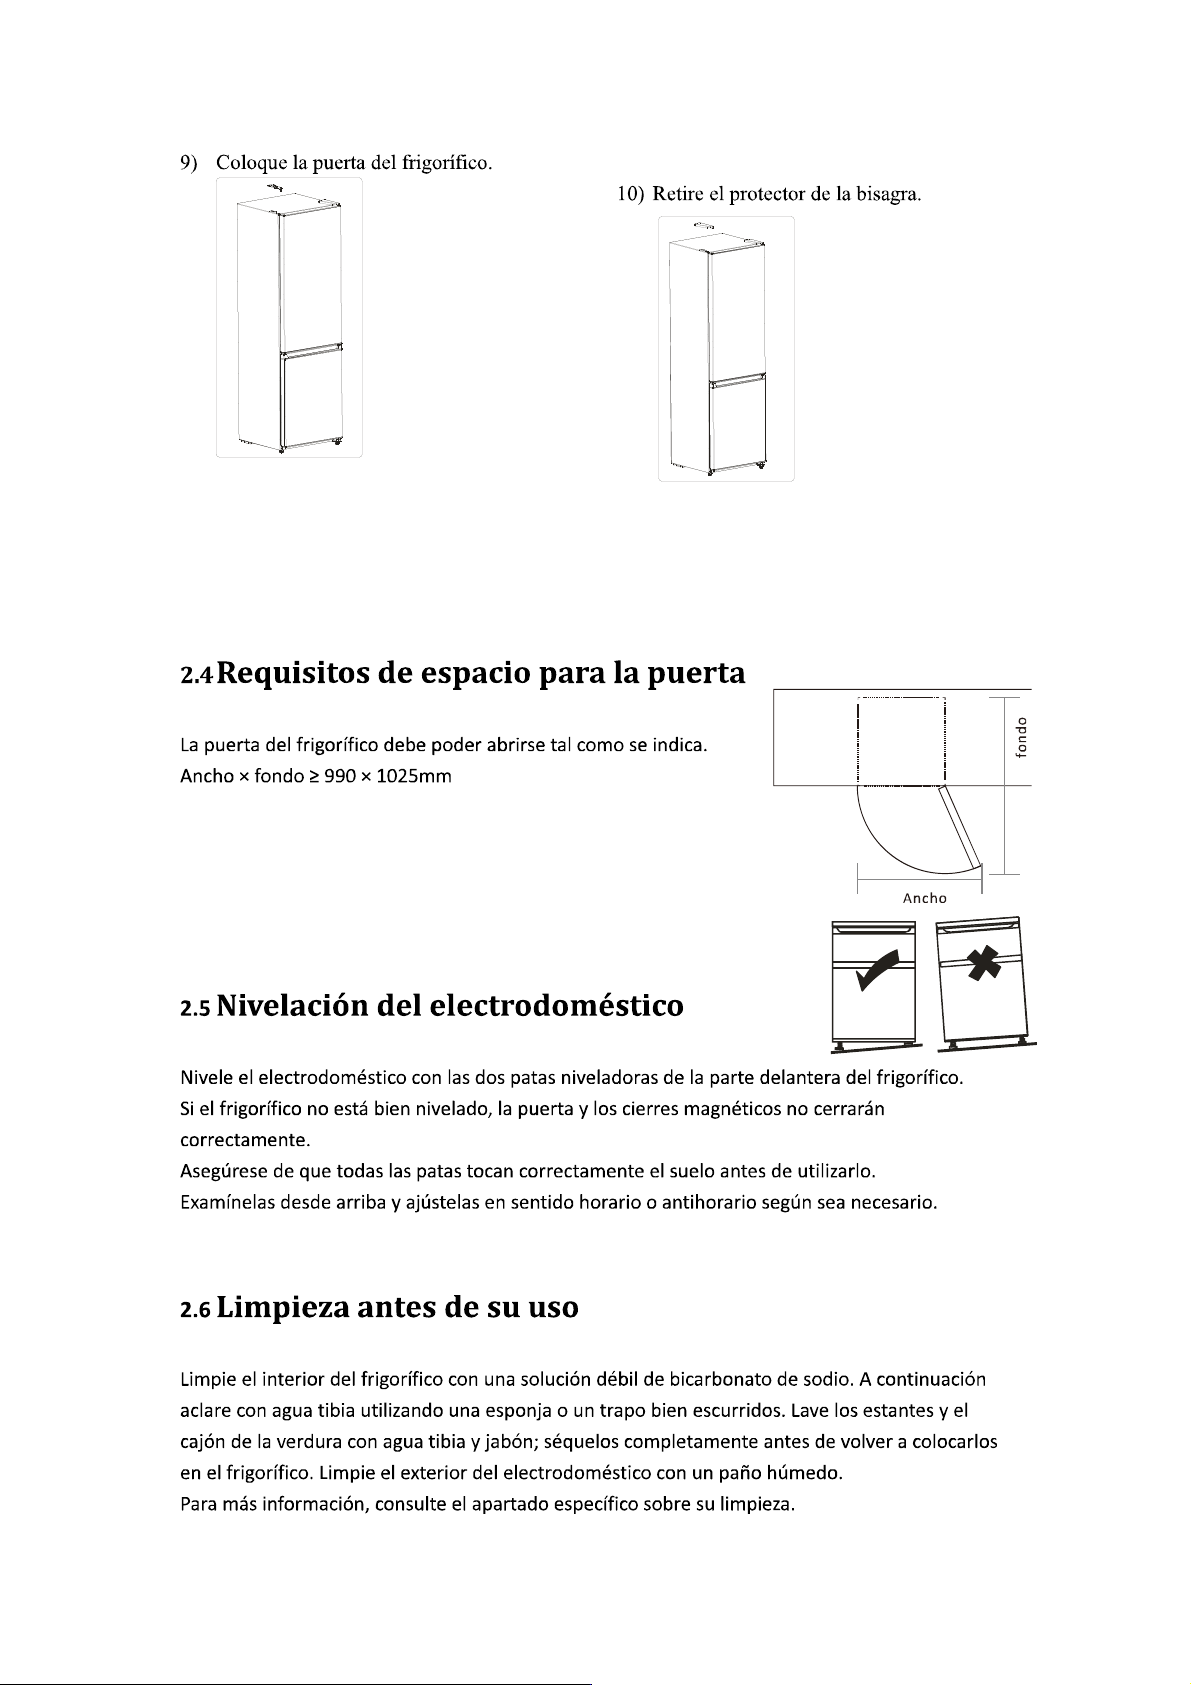
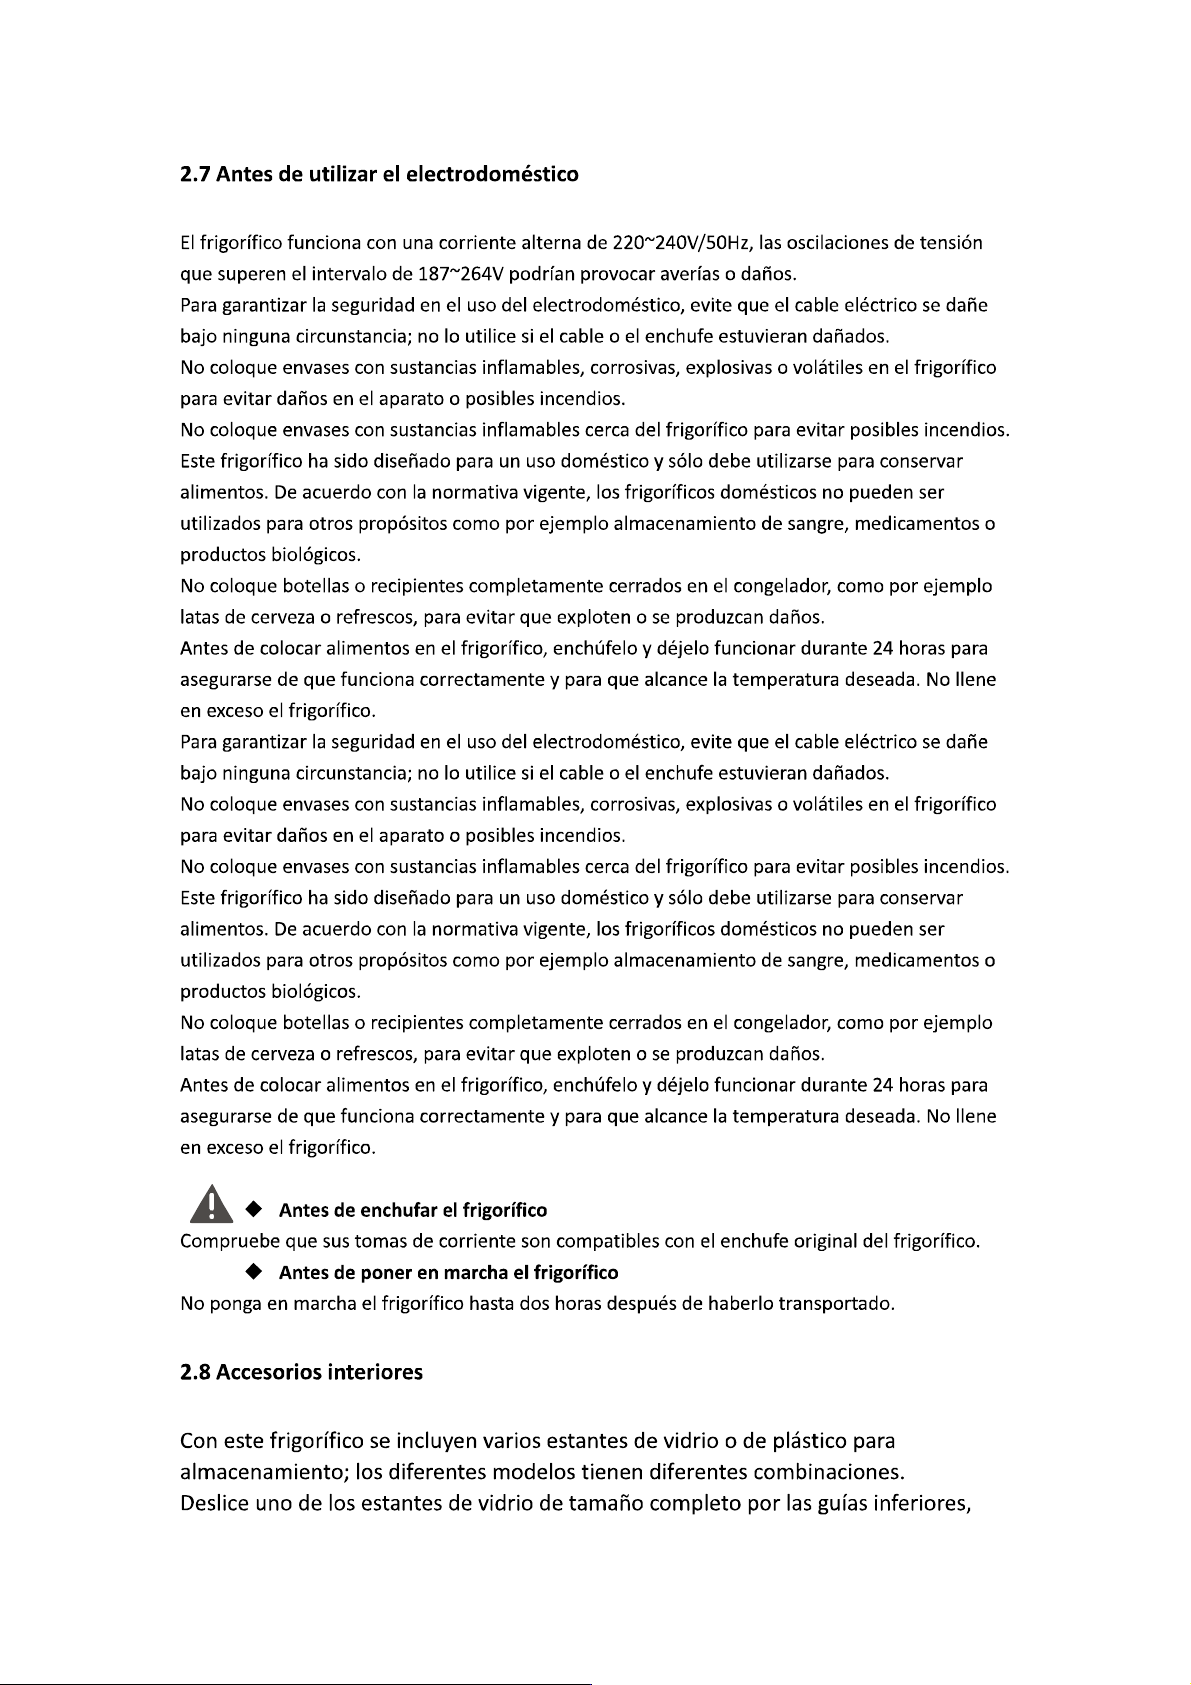
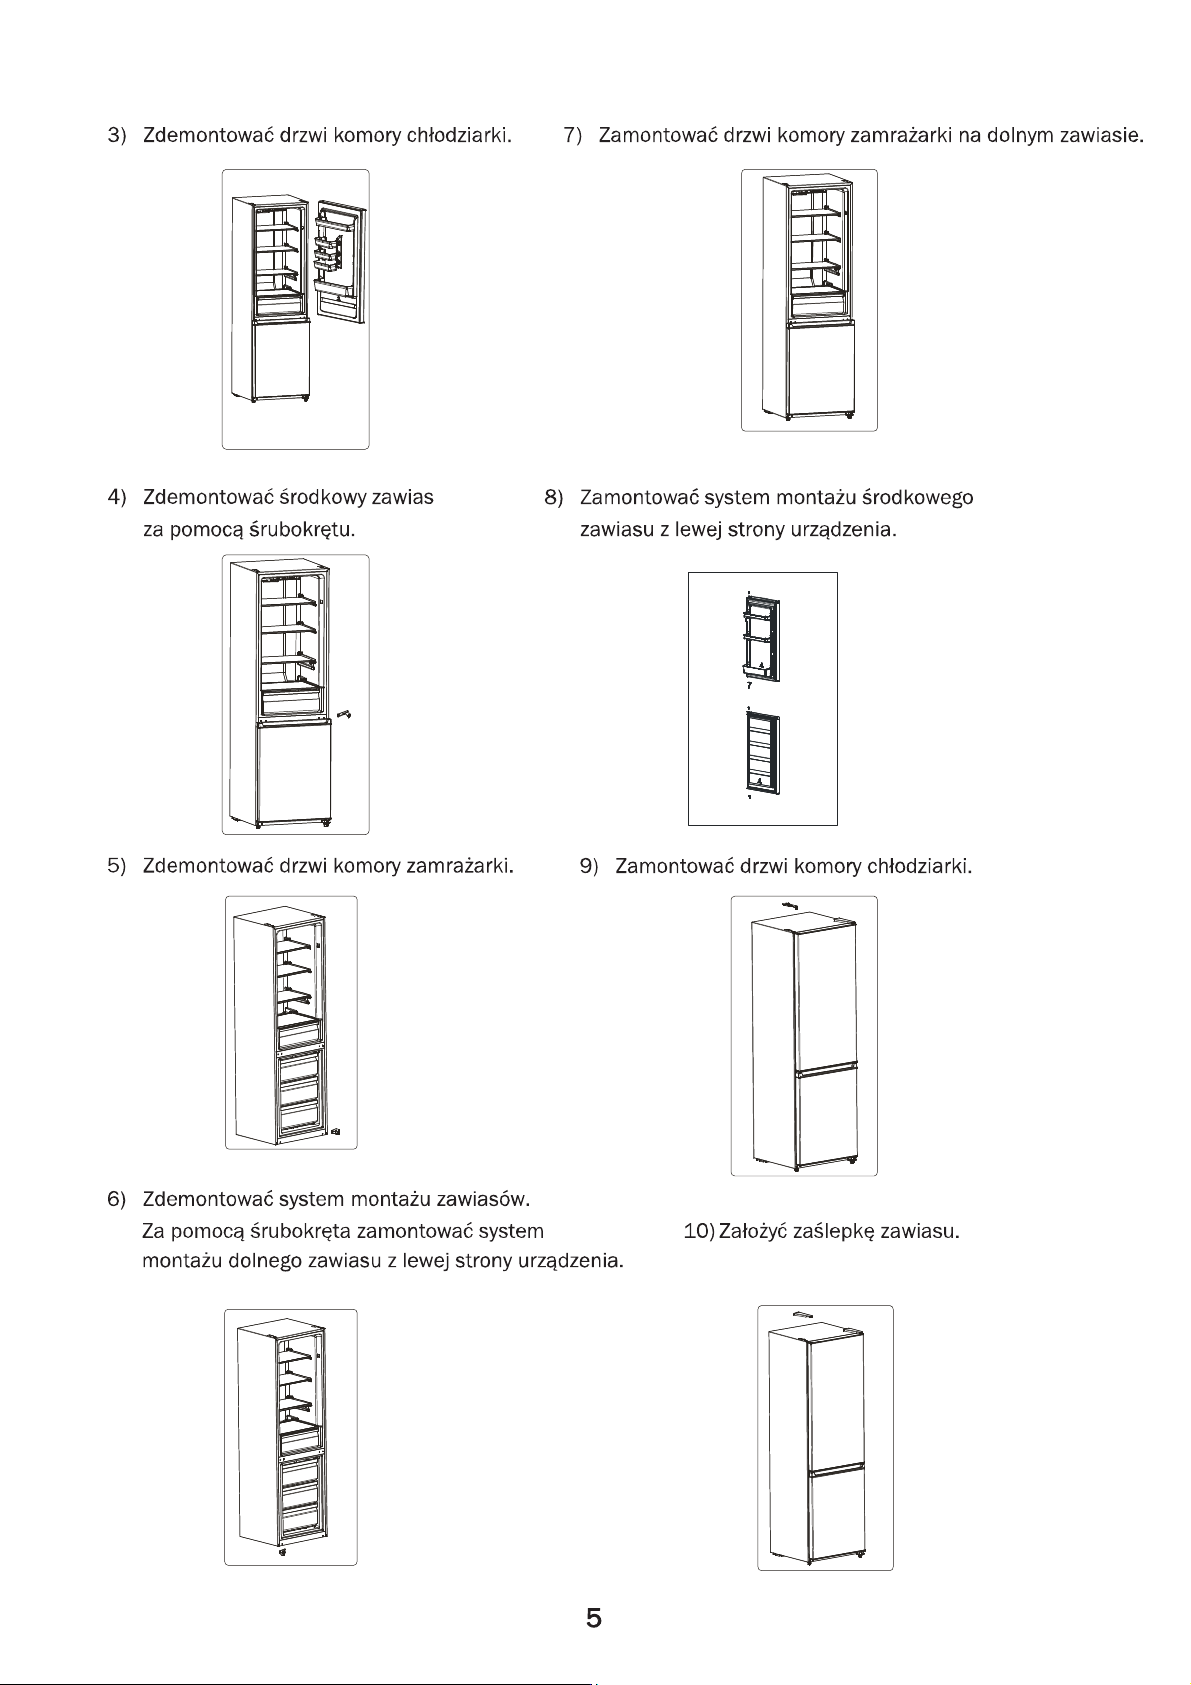
3) Remueva la puerta de la cámara de
refrigeración.
4) Quite la bisagra central con un
destornillador.
6) Coloque el conjunto de bisagras con un
destornillador. Coloque el conjunto de
bisagra inferior en el lado izquierdo del
electrodoméstico con un destornillador.
7) Coloque la puerta del frigorífico sobre la
bisagra inferior.
5) Retire la puerta del congelador.
8) Monte el conjunto de la bisagra central
hacia el lado izquierdo del gabinete.
5
Page 8
6
Page 9
7
Page 10
por encima de los cajones de frutas y verduras y manténgalo en esta posición. Para
quitarlo, re de él hacia adelante hasta que se pueda girar hacia arriba o hacia abajo
y re rarse.
Haga lo mismo a la inversa para insertar el estante a una altura diferente.
Para aprovechar al máximo el espacio del compar mento de almacenamiento de alimentos
frescos y el de almacenamiento de alimentos congelados, el usuario puede re rar uno o varios
estantes o cajones del electrodomés co, según con el uso diario que realice de los mismos.
8
Page 11
9
Page 12
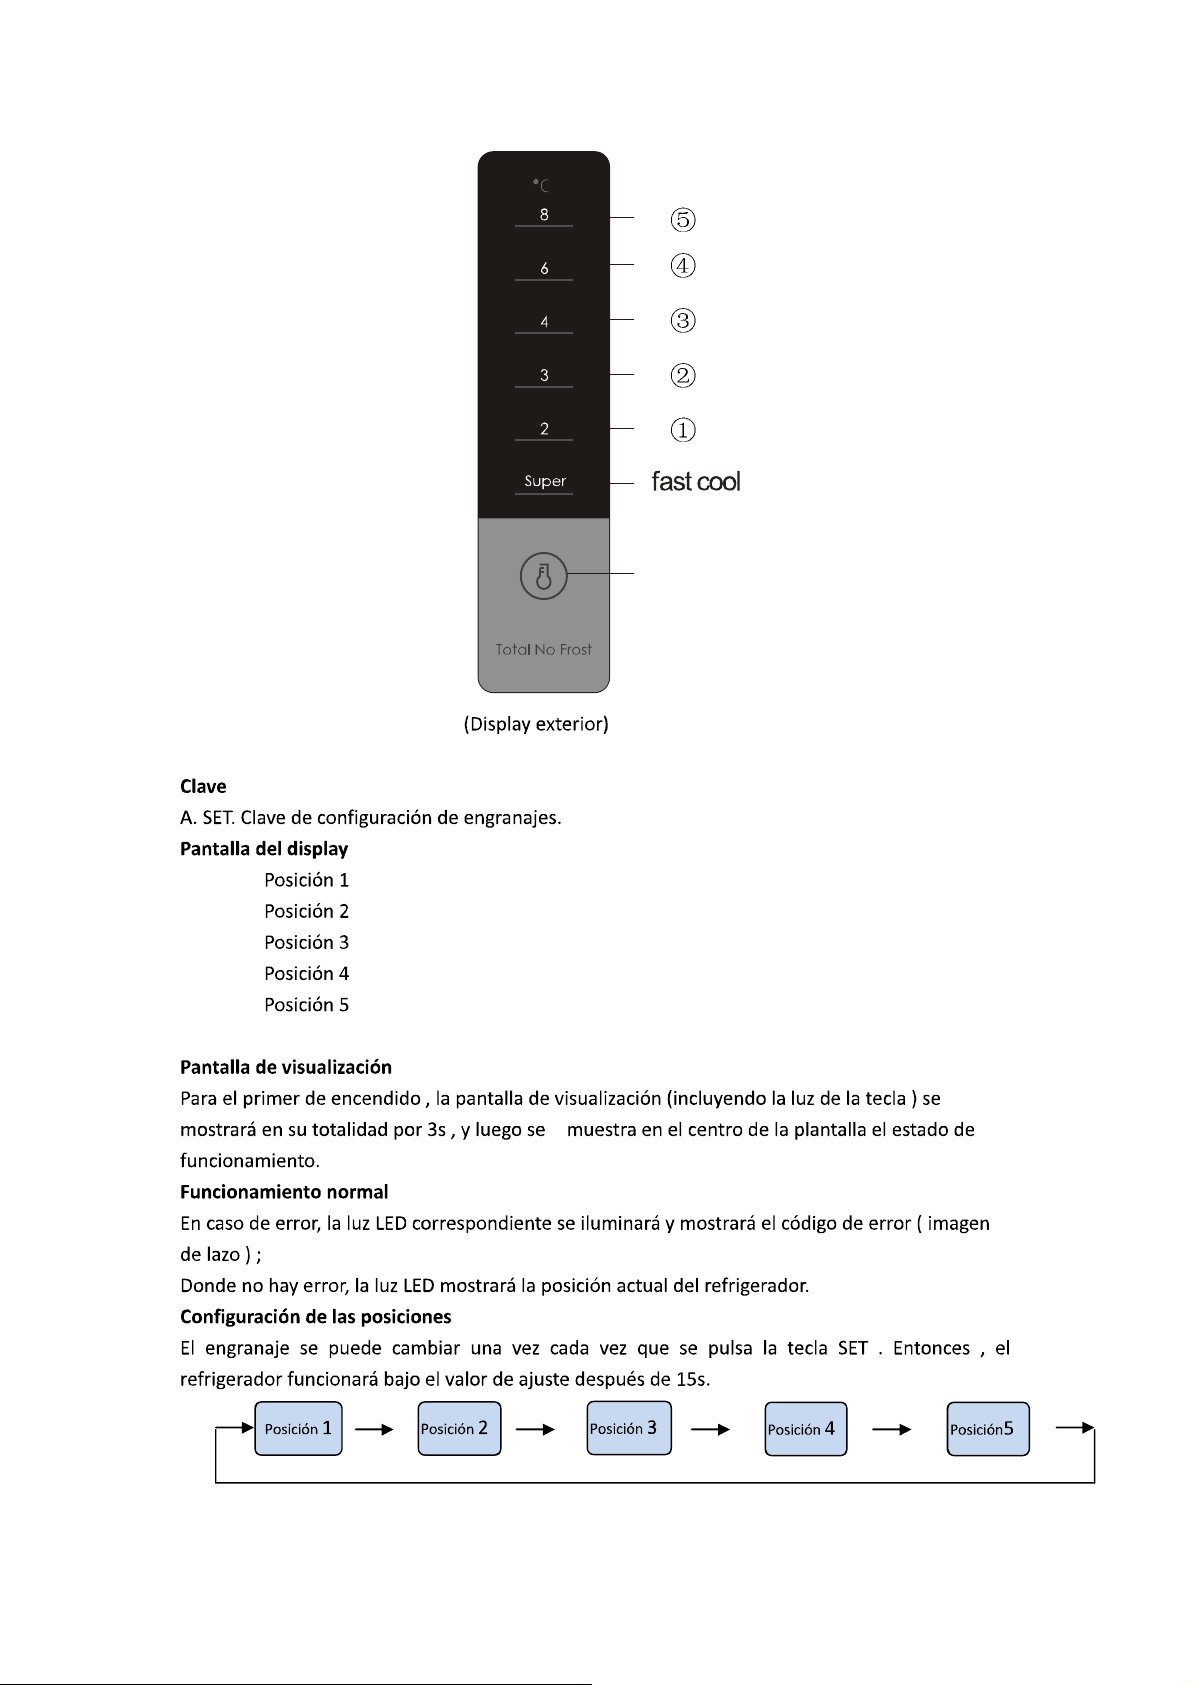
A
10
Page 13
11
Page 14
12
Page 15
13
Page 16
14
Page 17
contacto con su ayuntamiento.
Cuando deseche un refrigerador an guo, re re cualquier po de cierre y las puertas como
medida de seguridad.
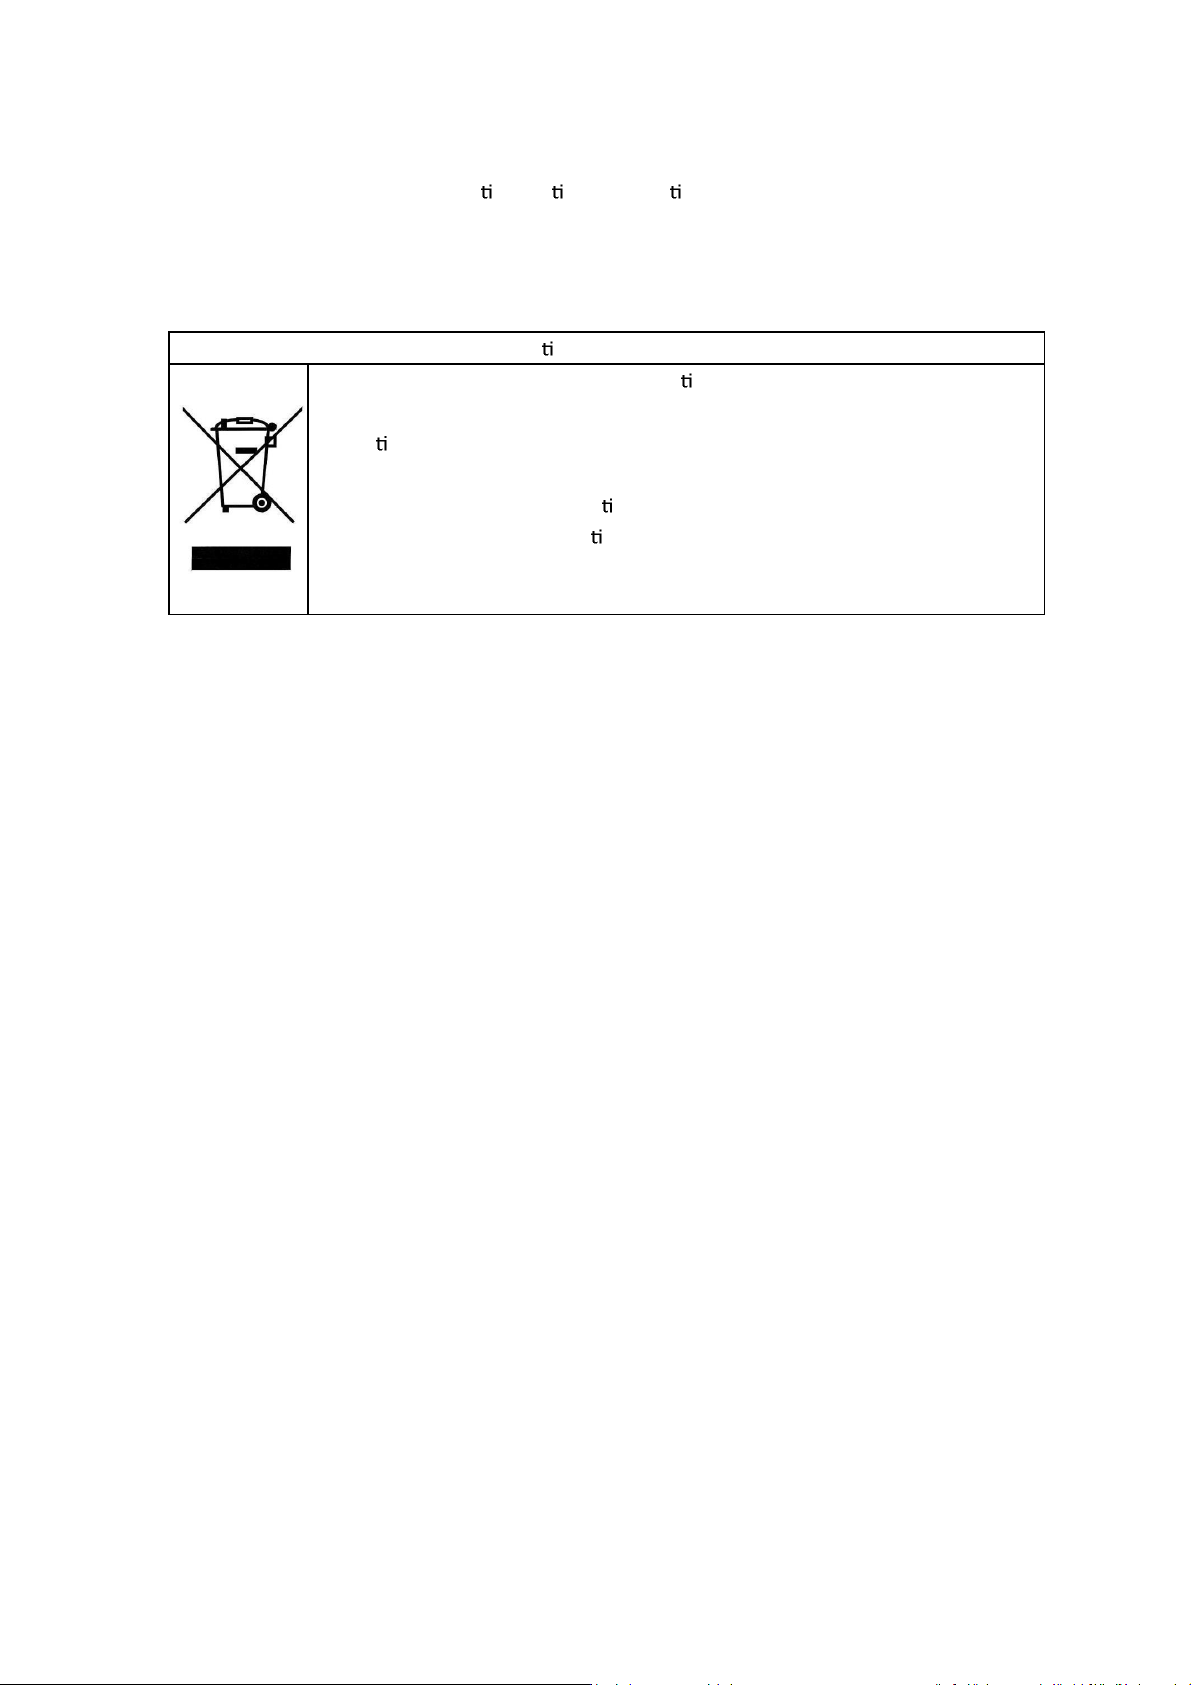
Eliminación correcta de este electrodomés co
Eliminación correcta de este electrodomés co
Este símbolo indica que este producto no debe desecharse junto con otros residuos
domés cos en toda la UE. Para evitar cualquier posible daño al medio ambiente o a
la salud de las personas por una eliminación incontrolada, recíclelo de forma
responsable para fomentar la reu lización sostenible de las materias primas. Si
desea devolver este producto, u lice los sistemas de devolución y recogida o
póngase en contacto con el comercio donde lo adquirió. Ellos podrán llevar este
producto a unas instalaciones adecuadas para un reciclaje seguro.
Para más información, póngase en contacto con el ayuntamiento o con el comercio en el que
adquirió el producto.
15
Page 18
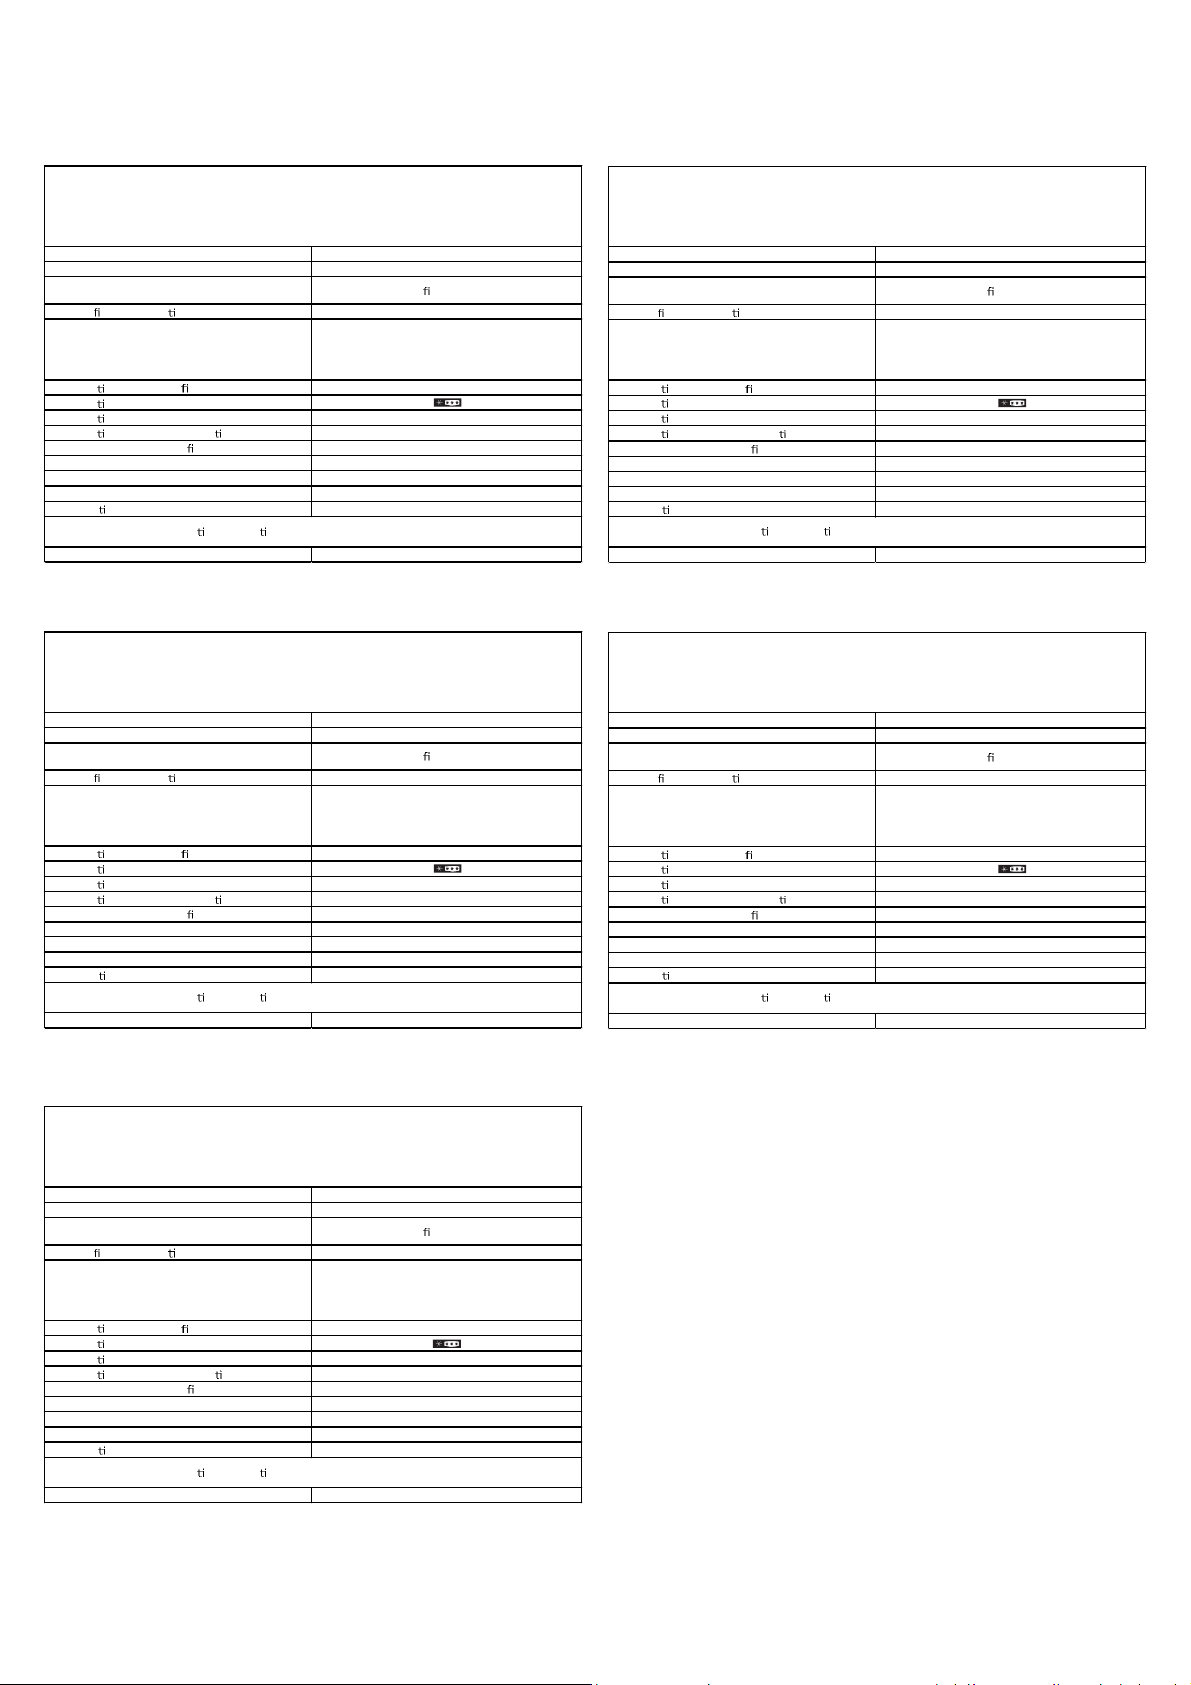
Ficha de Producto
Ficha de Producto
Marca comercial TEKA
Modelo NFL 320 BLANCO
Categoría Frigorí co- congelador
Clase de e ciencia energé ca A+
Consumo de energía en kWh/año, según los resultados
obtenidos en la prueba estándar de 24 horas; el
consumo de energía real depende de l as condiciones de
uso del aparato y de su localización
Volumen ú l en litros, frigorí co 219L
Volumen ú l en litros, estrella
Volumen ú l en litros, congelador 76L
Volumen ú l en litros, otros compar mentos /
Libre de escarcha (S/N), frigorí co S
Libre de escarcha (S/N), congelador N
Tiempo de subida de temperatura, h 15h
Capacidad de congelación en kg/24 h 4kg/24h
Clase climá ca N/T
Este aparato está des n ado a ser u lizado en una temperatura ambiente entre 10 °C y 38 ° C
Nível de ruído db(A) 40db(A)
286kWh/año
Ficha de Producto
Marca comercial TEKA
Modelo NFL 340 BLANCO
Categoría Frigorí co- congelador
Clase de e ciencia energé ca A+
Consumo de energía en kWh/año, según los resultados
obtenidos en la prueba estándar de 24 horas; el
consumo de energía real depende de l as condiciones de
uso del aparato y de su localización
Volumen ú l en litros, frigorí co 219L
Volumen ú l en litros, estrella
Volumen ú l en litros, congelador 76L
Volumen ú l en litros, otros compar mentos /
Libre de escarcha (S/N), frigorí co S
Libre de escarcha (S/N), congelador N
Tiempo de subida de temperatura, h 15h
Capacidad de congelación en kg/24 h 4kg/24h
Clase climá ca N/T
Este aparato está des n ado a ser u lizado en una temperatura ambiente entre 10 °C y 38 ° C
Nível de ruído db(A) 40db(A)
286kWh/año
Marca comercial TEKA
Modelo NFL 320 INOX
Categoría Frigorí co- congelador
Clase de e ciencia energé ca A+
Consumo de energía en kWh/año, según los resultados
obtenidos en la prueba estándar de 24 horas; el
consumo de energía real depende de l as condiciones de
uso del aparato y de su localización
Volumen ú l en litros, frigorí co 219L
Volumen ú l en litros, estrella
Volumen ú l en l itros, congelador 76L
Volumen ú l en li tros, otros compar mentos /
Libre de escarcha (S/N), fri gorí co S
Libre de escarcha (S/N), congelador N
Tiempo de subida de temperatura, h 15h
Capacidad de congelación en kg/24 h 4kg/24h
Clase climá ca N/T
Este aparato está des n ado a ser u lizado en una temperatura ambiente entre 10 °C y 38 ° C
Nível de ruído db(A) 40db(A)
286kWh/año
Ficha de Producto
Marca comercial TEKA
Modelo NFL 340 INOX
Categoría Frigorí co- congelador
Clase de e ciencia energé ca A+
Consumo de energía en kWh/año, según los resultados
obtenidos en la prueba estándar de 24 horas; el
consumo de energía real depende de l as condiciones de
uso del aparato y de su localización
Volumen ú l en litros, frigorí co 219L
Volumen ú l en litros, estrella
Volumen ú l en l itros, congelador 76L
Volumen ú l en li tros, otros compar mentos /
Libre de escarcha (S/N), fri gorí co S
Libre de escarcha (S/N), congelador N
Tiempo de subida de temperatura, h 15h
Capacidad de congelación en kg/24 h 4kg/24h
Clase climá ca N/T
Este aparato está des n ado a ser u lizado en una temperatura ambiente entre 10 °C y 38 ° C
Nível de ruído db(A) 40db(A)
286kWh/año
Ficha de Producto
Marca comercial TEKA
Modelo NFL 430 INOX
Categoría Frigorí co- congelador
Clase de e ciencia energé ca A++
Consumo de energía en kWh/año, según los resultados
obtenidos en la prueba estándar de 24 horas; el
consumo de energía real depende de l as condiciones de
uso del aparato y de su localización
Volumen ú l en litros, frigorí co 250L
Volumen ú l en l itros, estrella
Volumen ú l en li tros, congelador 76L
Volumen ú l en litros, otros compar mentos /
Libre de escarcha (S/N), fri gorí co S
Libre de escarcha (S/N), congelador N
Tiempo de subida de temperatura, h 15h
Capacidad de congelación en kg/24 h 4kg/24h
Clase climá ca N/T
Este aparato está des n ado a ser u lizado en una temperatura ambiente entre 10 °C y 38 ° C
Nível de ruído db(A) 40db(A)
234kWh/año
Page 19

Manual de Instruções
Frigorífico
MODEL: NFL 320 BLANCO
NFL 320 INOX
NFL 340 BLANCO
NFL 340 INOX
NFL 430 INOX
Page 20

Contents
1. Avisos de segurança .......................................................................................................... 1
2. Instalação ................................................................ ................................................................................... 2
2.1 Localização ...................................................................................................................... 2
2.2 Instalação da pega da porta (opcional) ................................................................ 2
2.3 Reverter lado de abertura da porta .......................................................................................... 4
2.4 Requesitos de espaço para abertura da porta .......................................................... 6
2.5 Nivelamento do aparelho ................................................................ ....................................... 6
2.6 Cleaning Before Use ................................................................ ................................... 6
2.7 Antes de usar o aparelho ................................................................ ............................... 6
2.8 IAntes de usar o aparelho ................................................................ .................................... 7
3. Descrição geral do produto ................................................................ ........................................ 8
4. Funcionamento ................................................................ ........................................................ 8
4.1 Instruções de funcionamento ................................................................ ............................... 8
4.2 Ruídos no interior do aparelho ................................................................ ............................... 10
4.3 Dicas para a manutenção dos alimentos no interior do aparelho ............................ 10
4.4 Mudar a lampada ................................................................ .............................................................. 11
5. Limpeza ................................................................ ........................................................................................ 11
5.1 Descongelação ................................................................ ................................................. 11
5.2 Limpeza do interior e exterior do aparelho ................................................................ ................... 11
5.3 Dicas para a limpeza ................................................................ ............................................ 11
6. Manutenção ................................................................ ................................................................................ 11
6.1 Mudar a luz interior ................................................................ ...................................................... 11
6.2 Cuidados a ter na movimentação do seu aparelho ................................................................ . 11
6.3 Reparação ................................................................ ...................................................
11
6.4 Aparelho desligado durante longos periodos de tempo ................................................................ .... 11
6.5 Não mudar as posições de entrada e saída de ar do aparelho ........... 12
.....................
7. Possíveis problemas ................................................................ ............................................. 12
7.1 Cuidados a ter com o calor ................................................................ ................................................ 12
8. Dicas para poupança de energia ................................................................ ............................... 12
9. Eliminação do aparelho quando deixar de funcionar ........................................................................... 13
Page 21
1. RECOMENDAÇÕES de SEGURANÇA
1) Aviso
Aviso
2)
3)
Aviso
Aviso
4)
5)
6)
7)
)
9)
-
10)
11)
1
Page 22
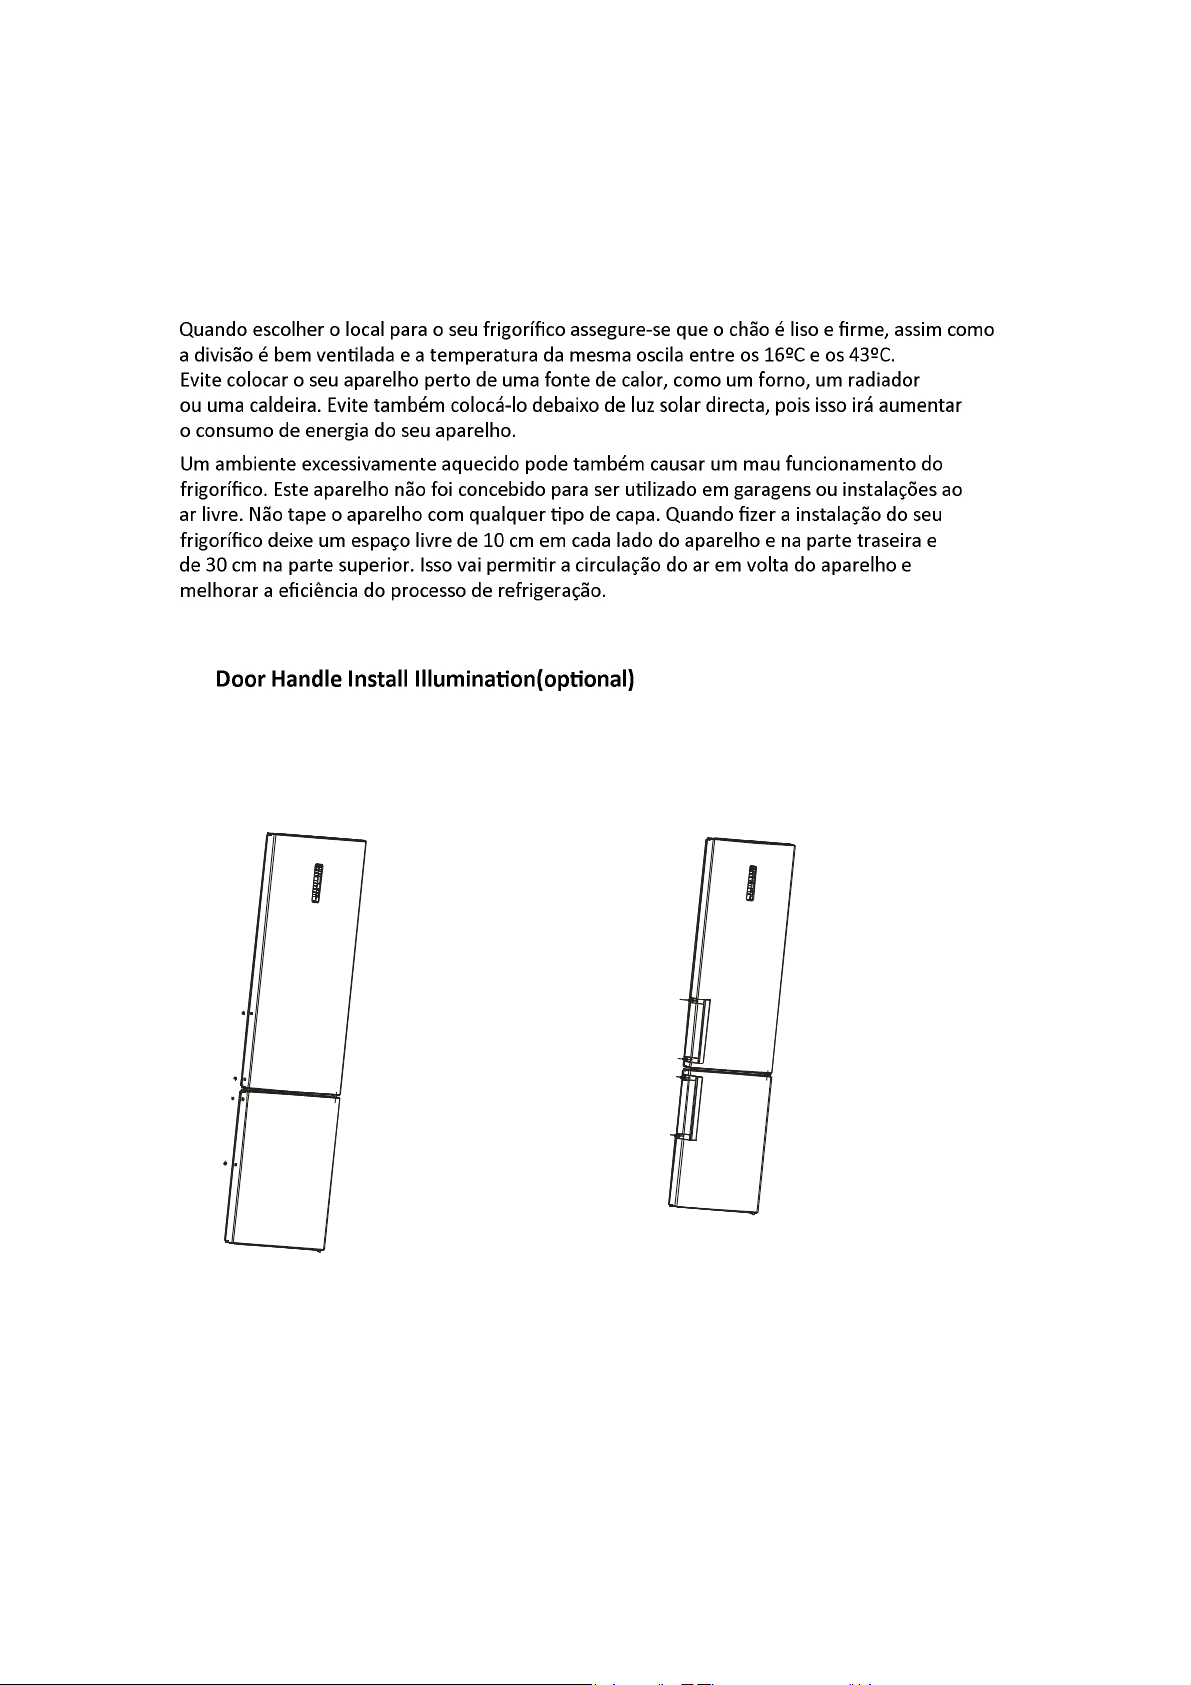
2. INSTALAÇÃO
2.1 Localização
2.2
1) Retire as protecções das dobradiças e
as tampas dos parafusos dos orifícios
da pega da porta.
Ponha as pegas nos respectivos orifícios
2)
e enrosque os parafusos até estarem
fixos.
2
Page 23
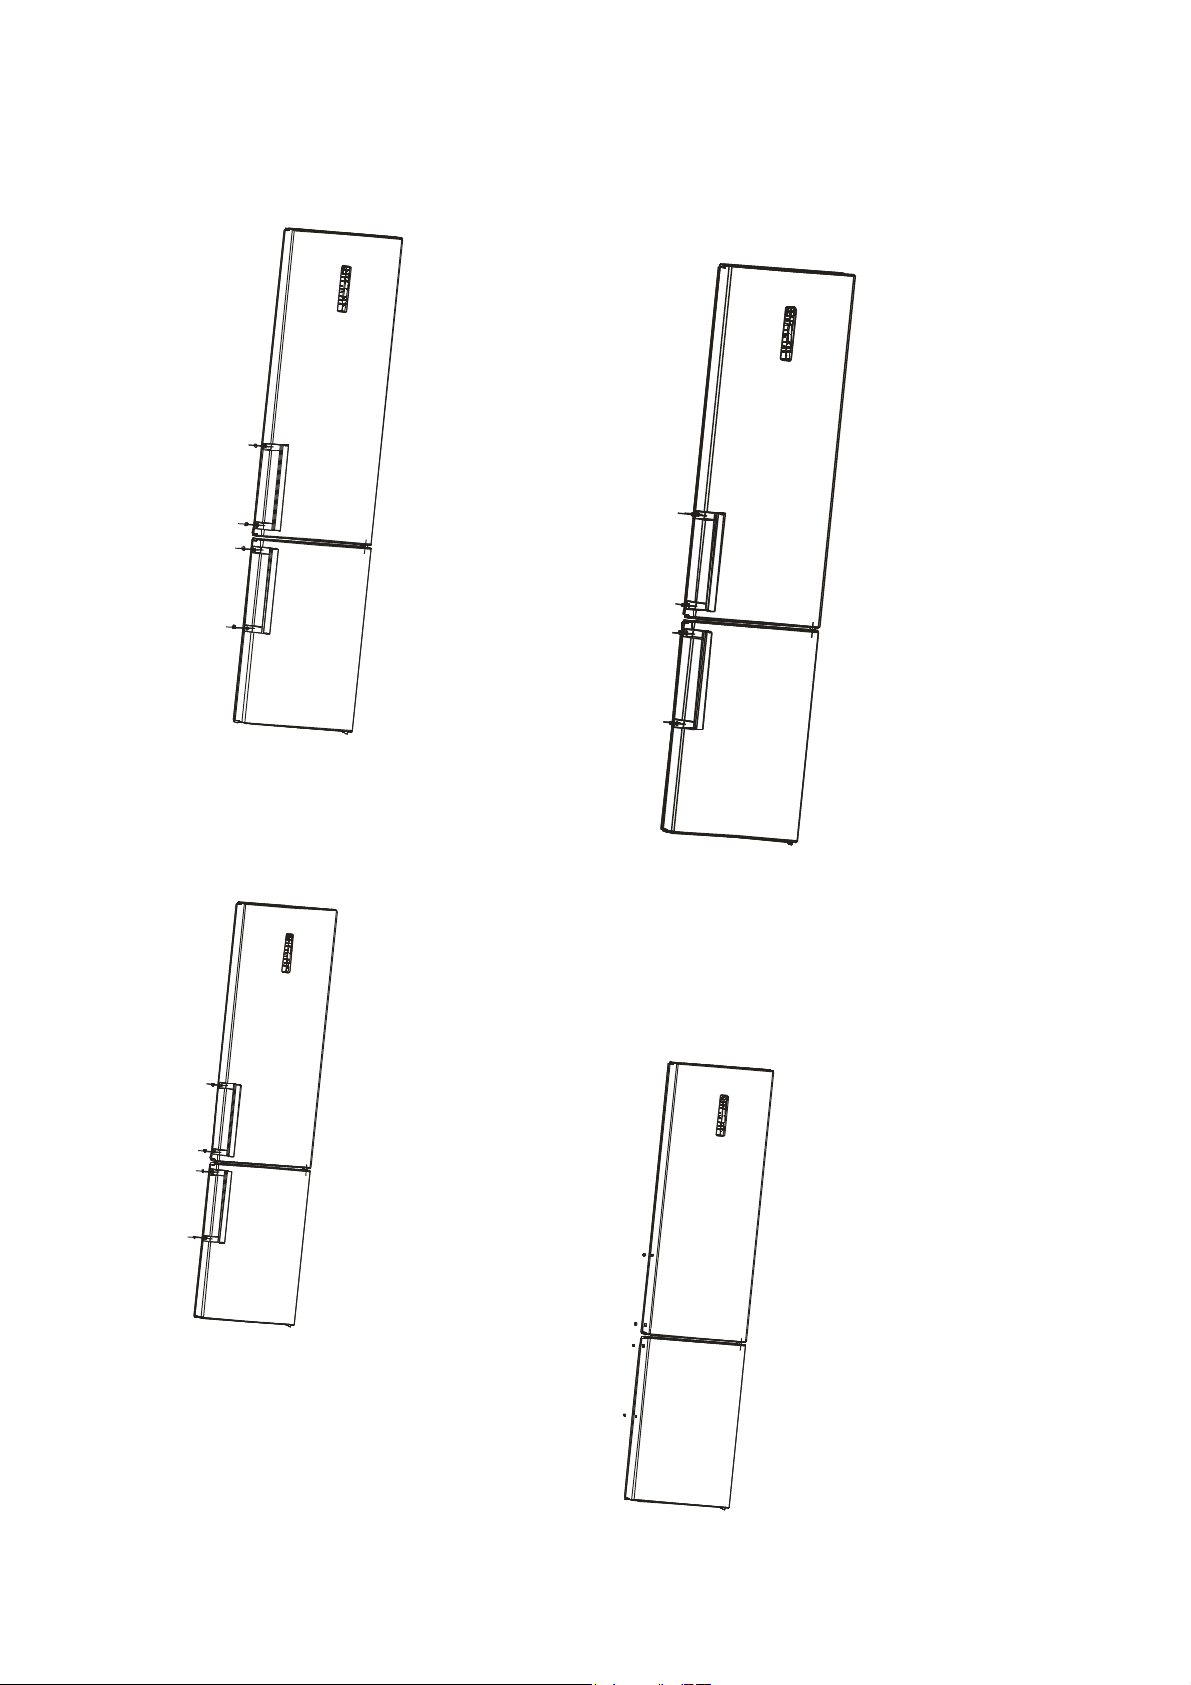
3)
Ponha as capas nos parafusos da pega
da porta.
4)
Retire as capas dos parafusos dos furos
para os mesmos na pega da porta.
5)
Retire os parafusos e retire a pega da porta.
Ponha as respectivas capas nos parafusos
6)
que colocou na pega da porta.
3
Page 24
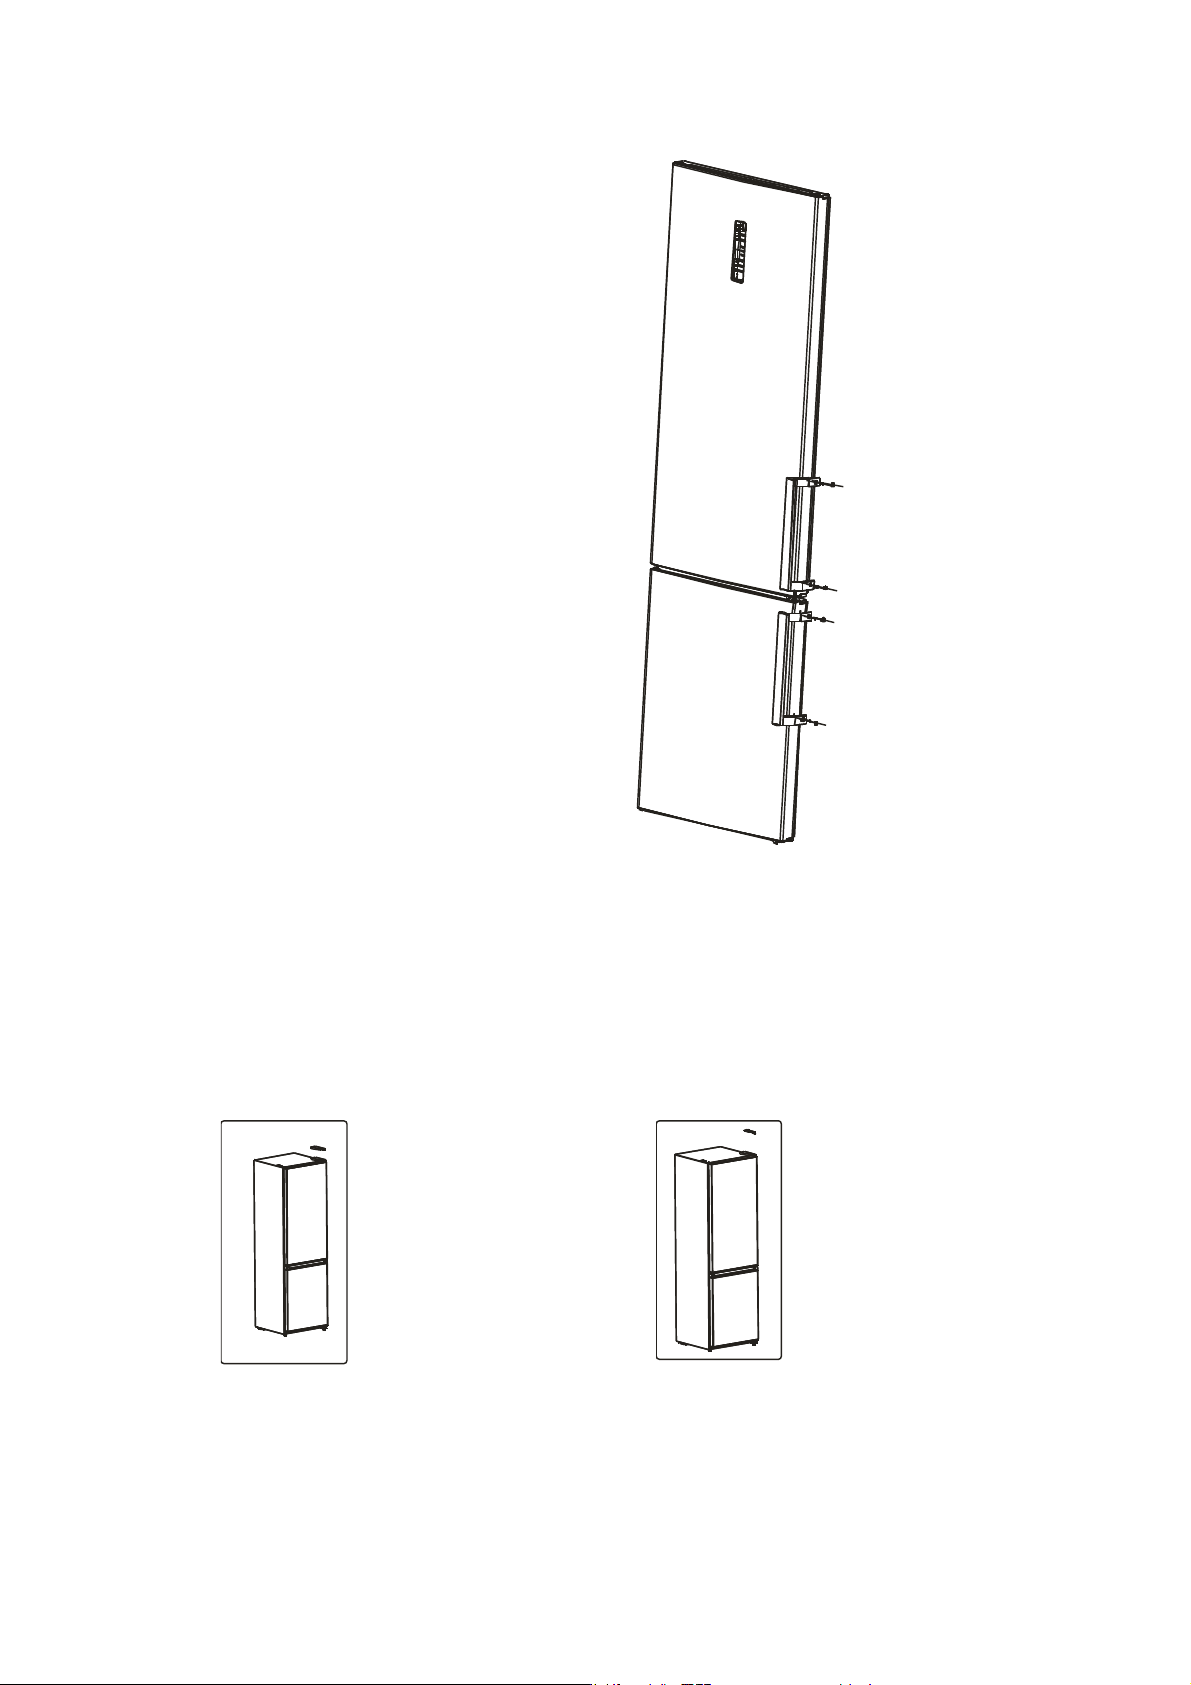
7)
Instale as pegas nos furos respectivos e
ponha os parafusos de acordo com as
instruções de instalação.
2.3 Reversing the Door Swing
1) Retire as protecções das dobradiças. 2) Tire dobradiça superior.
4
Page 25
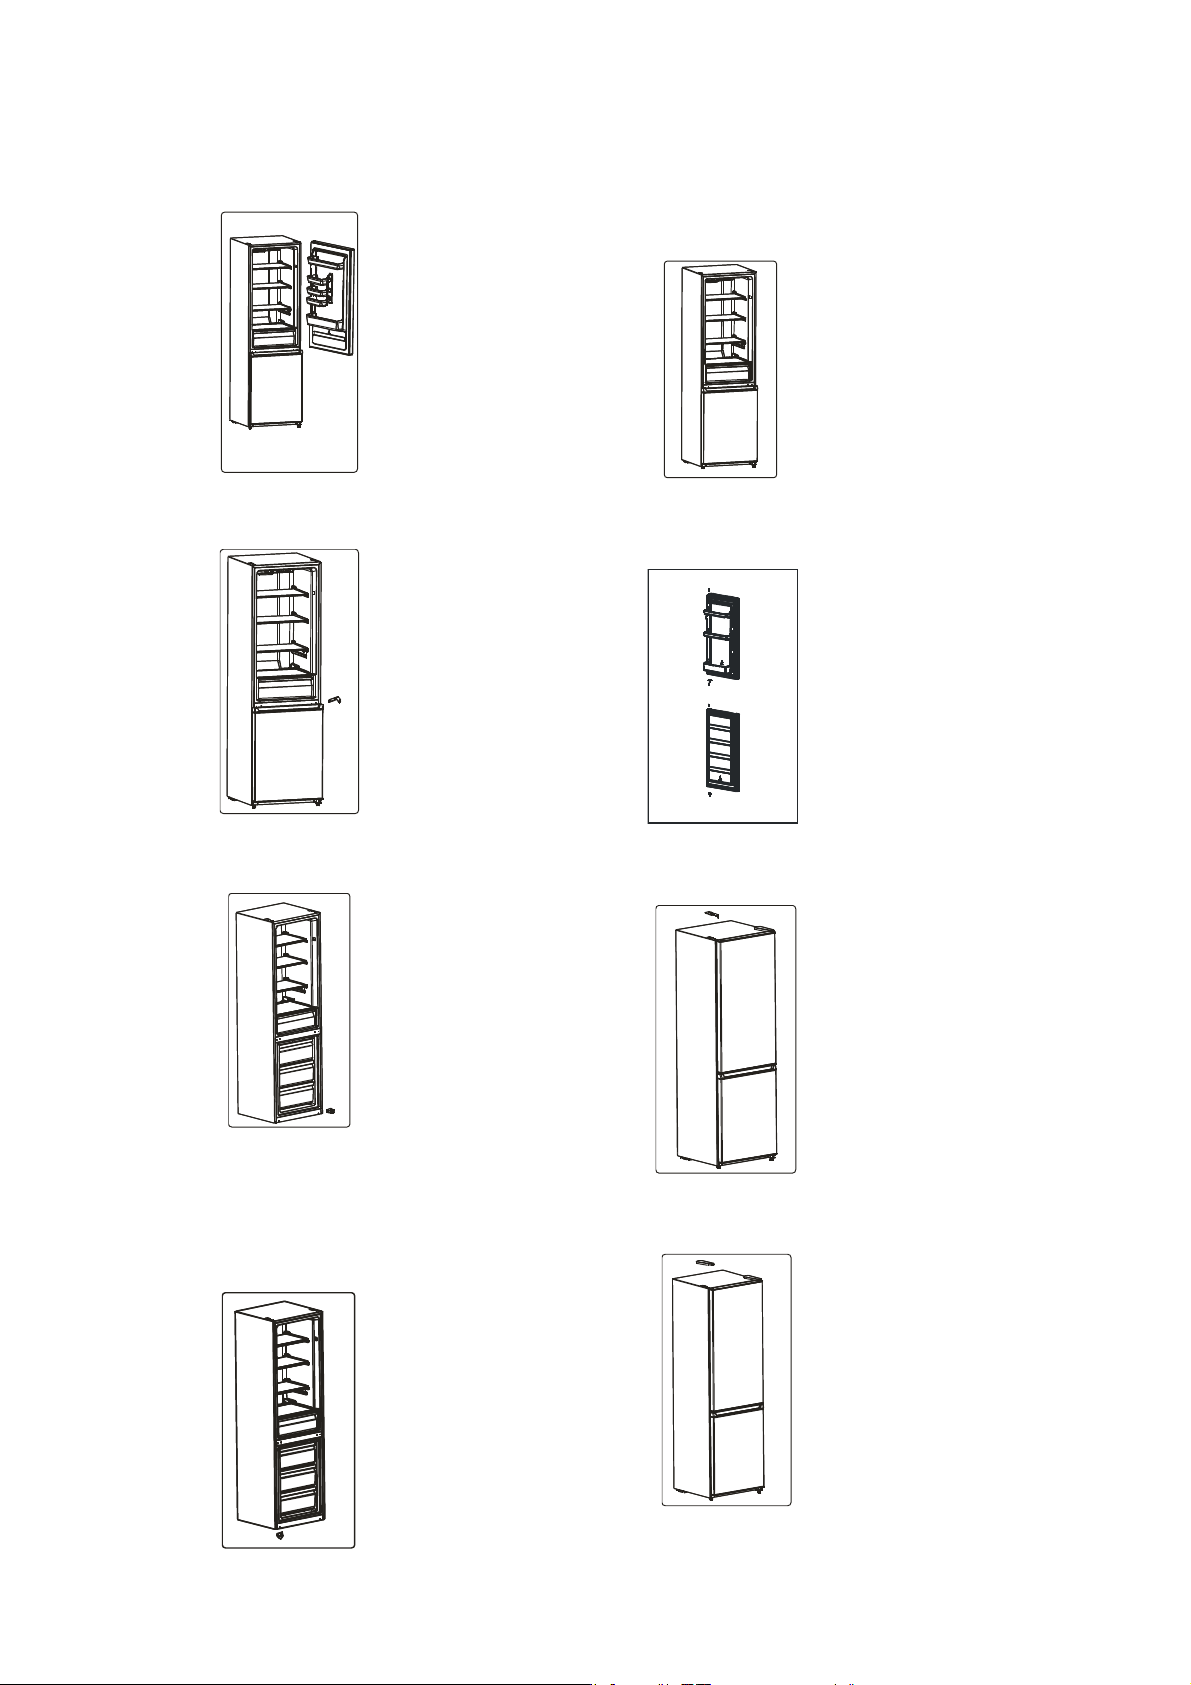
Retire a porta da parte superior, tal
3)
como na imagem.
Retire as partes finais, como na imagem e comece
7)
o processo inverso do outro lado do aparelho.
Vá montando as peças que retirou, do lado
oposto da porta.
4)
Retire a dobradiça do meio com
uma chave de parafusos.
5)
Retire a porta do congelador.
8) Ponha a dobradiça da parte central do lado oposto.
9) Ponha novamente as partes
interiores das portas.
Retire as partes finais com uma
6)
chave de parafusos, como na
imagem e comece o processo
inverso do outro lado do aparelho.
Vá montando, as peças que retirou,
do lado oposto da porta, colocando-as
da mesma forma que estavam no outro lado.
10) Reponha os bloqueadores das portas
no lado oposto também.
5
Page 26
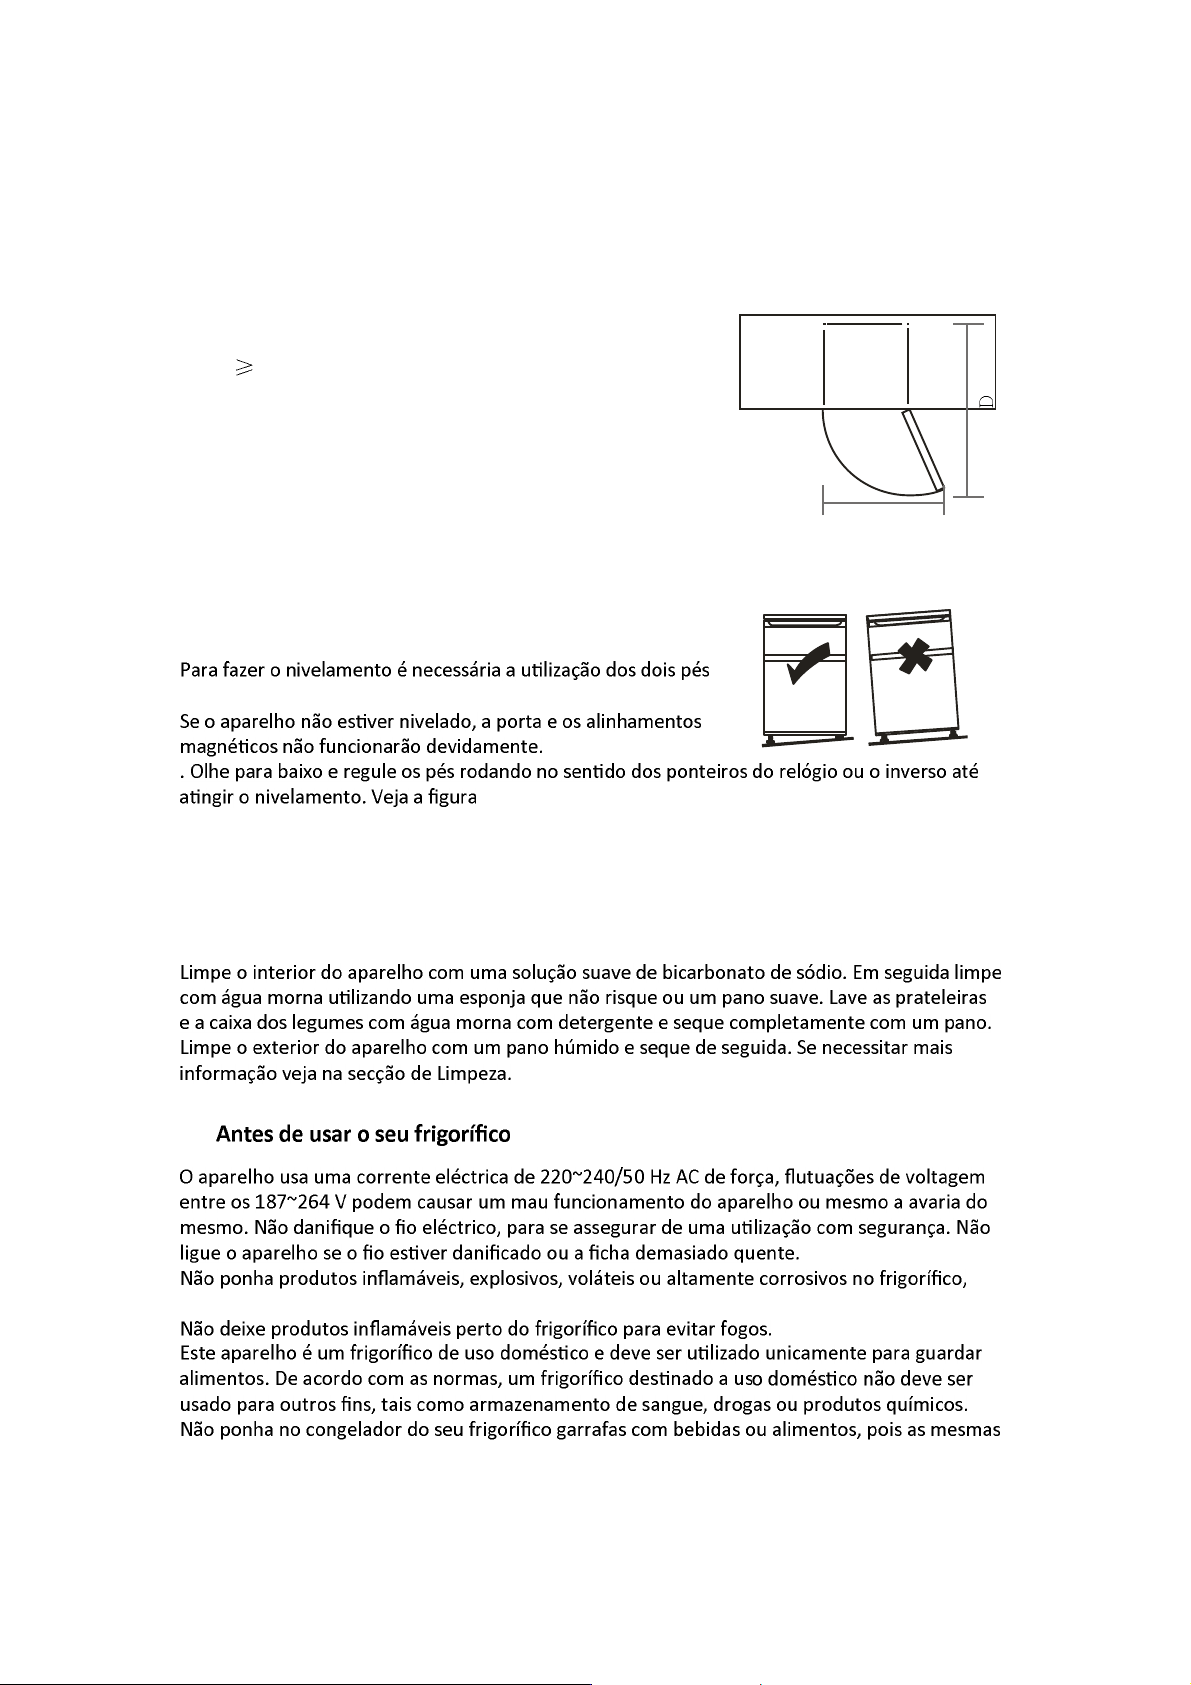
2.4 Requisitos de espaço, para a porta abrir
A porta do aparelho deve abrir na totalidade.
W×D 990×1025mm
2.5 Nivelamento
W
na parte frontal do aparelho.
2.6 Limpar antes de usar
2.7
para evitar danos ou acidentes.
podem rebentar e causar danos ou acidentes.
6
Page 27
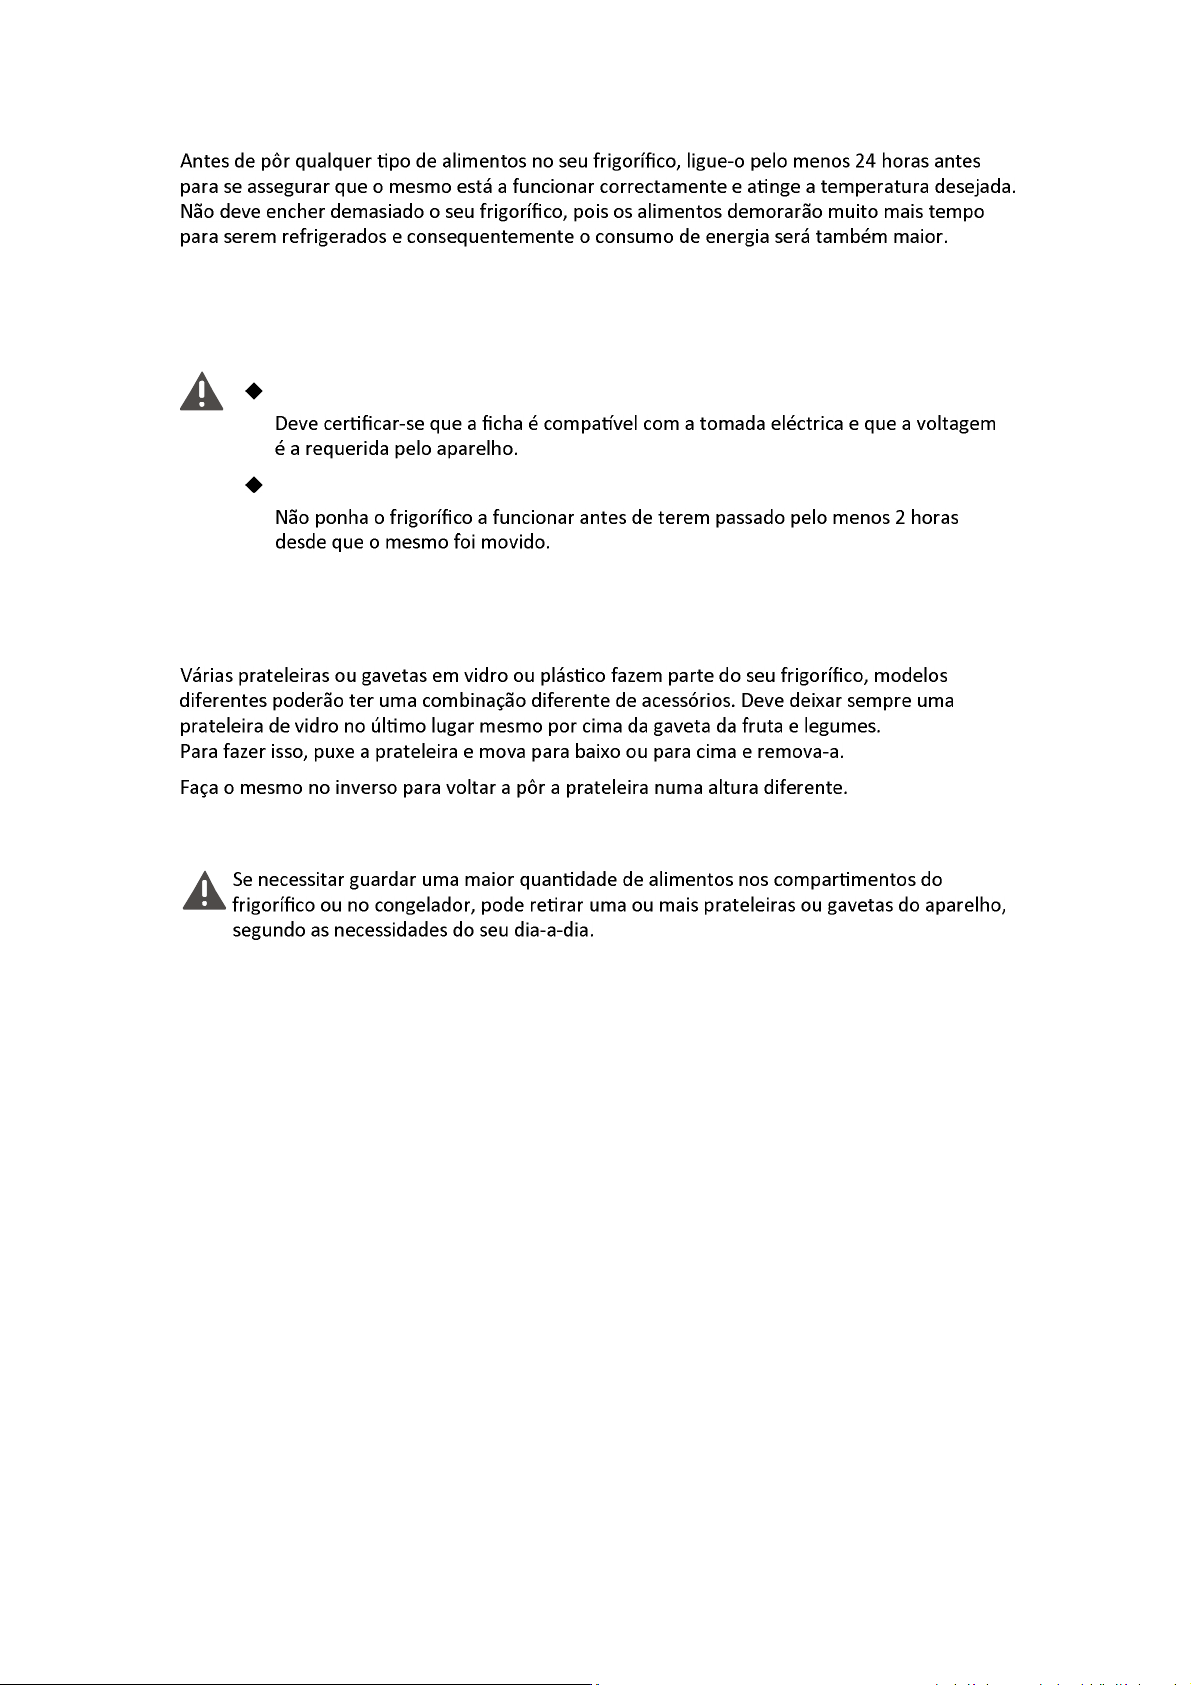
Antes de ligar á corrente eléctrica!
Antes de pôr a funcionar!
2.8 Acessórios interiores
7
Page 28
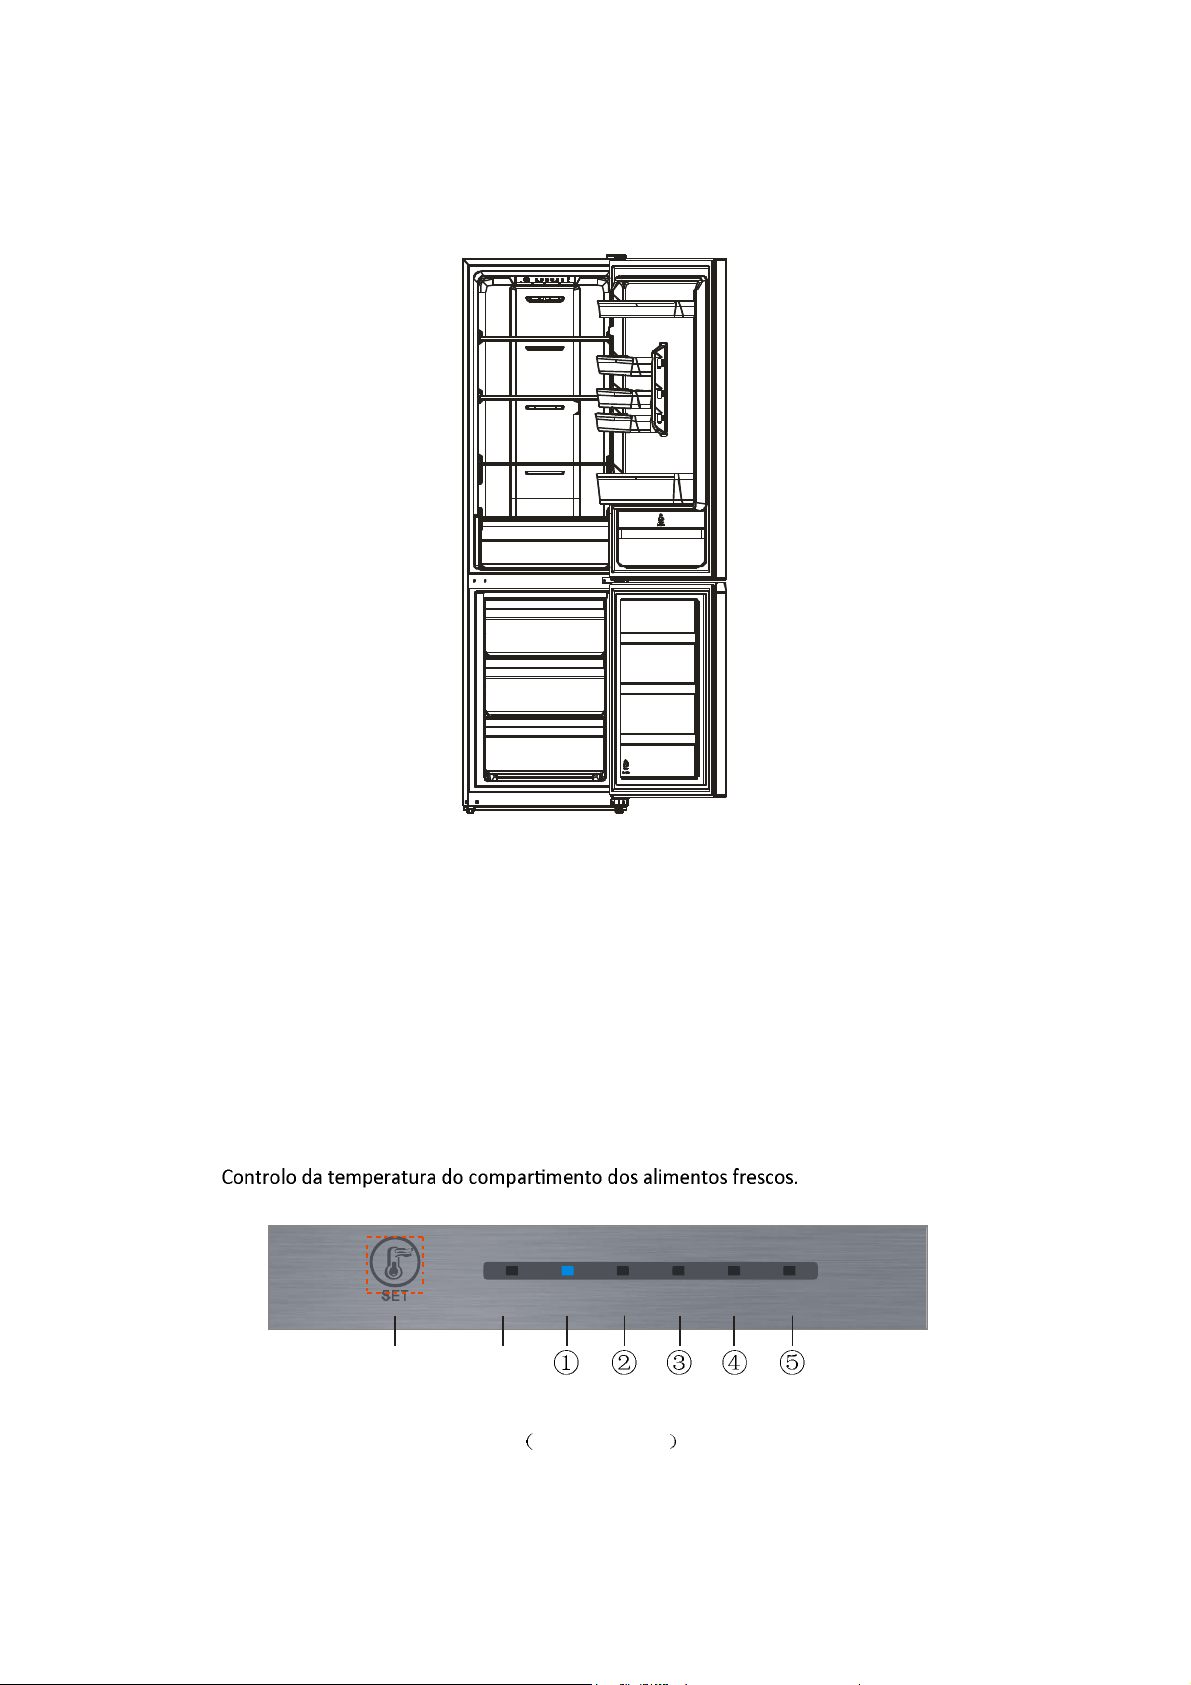
3. Descrição do produto
*As linhas ponteadas representam o local das saídas de ar do aparelho e entradas de retorno do ar.
*Todas estas imagens são unicamente de referência, veja o seu aparelho para detalhes, uma vez que a disposição
interior de prateleiras e gavetas pode variar de um modelo para outro.
4. Funcionamento
4.1 Instruções de Funcionamento
Controlo de temperatura
TEMPERATURE
A
FAST COOL
FRESCO RÁPIDO
3 c 4 c 6 c
2c
Construídas em
c
8
8
Page 29
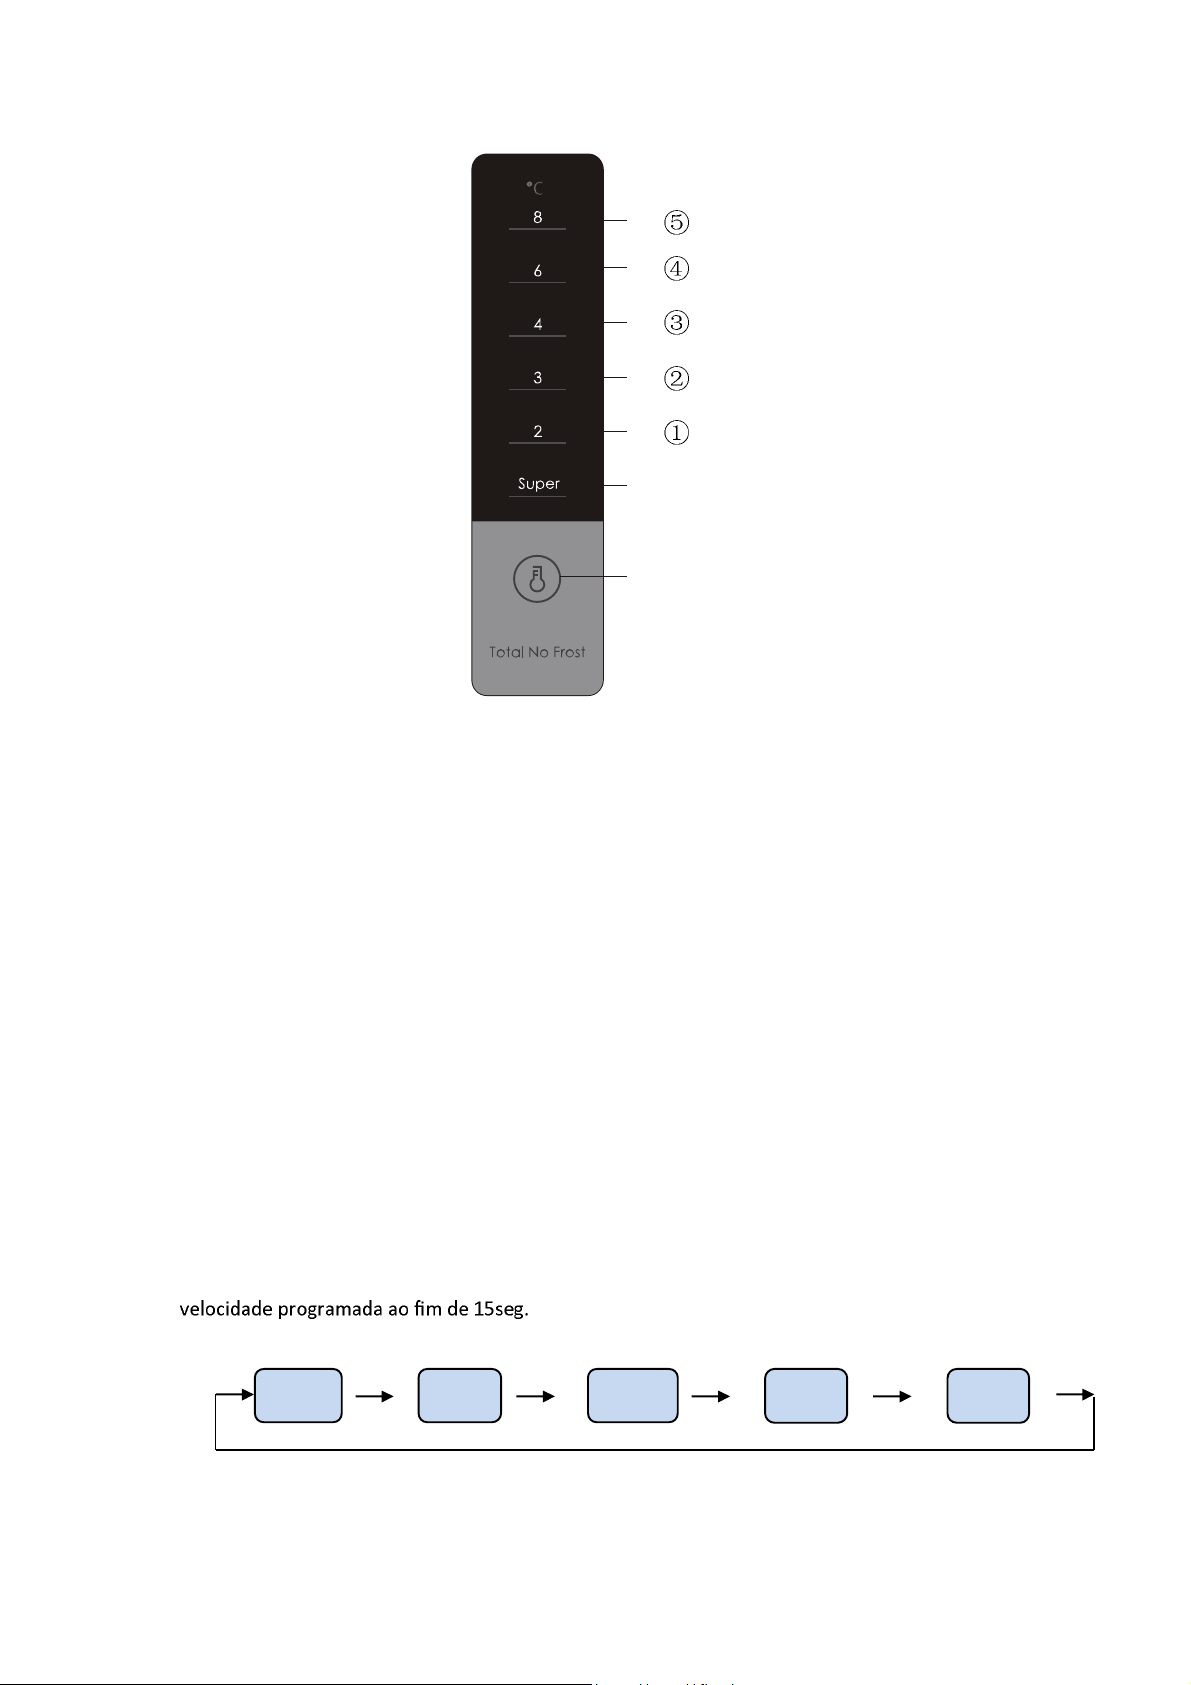
Frio rápido
A
(Ecrã exterior )
Chave
A.SET:
Ecrã luminoso
1 Velocidade 1
2 Velocidade 2
3 Velocidade 3
4 Velocidade 4
5 Velocidade 5
Ecrã
Na primeira vez que ligar o aparelho, o ecrã luminoso (incluindo a luz da chave) irão iluminar-se
por 3 seg e o aparelho começará a trabalhar na velocidade do meio.
Ecrã em modo de funcionamento normal.
Se ocorrer uma avaria, o ecrã iluminar-se-á e a luz LED mostrará um código de avaria ou falha.
Quando não houver qualquer avaria ou falha, o ecrã iluminar-se-á na velocidade de
funcionamento normal do aparelho.
Programar velocidade
A velocidade será alterada sempre que premir a chave, então o aparelho trabalhará na
Velocidade 1 Velocidade 2 Velocidade 3 Velocidade 4 Velocidade 5
9
Page 30
Função de frio rápido
Programe a função e começará a funcionar o modo de arrefecimento rápido.
Aparelho mostrará no ecrã as luzes acesas dessa função e o aparelho começará a
arrefecer até aos 2ºC.
Funcionamento no modo frio rápido durante 150mn.
2. Um ajustamento da temperatura fará o aparelho sair do modo frio rápido.
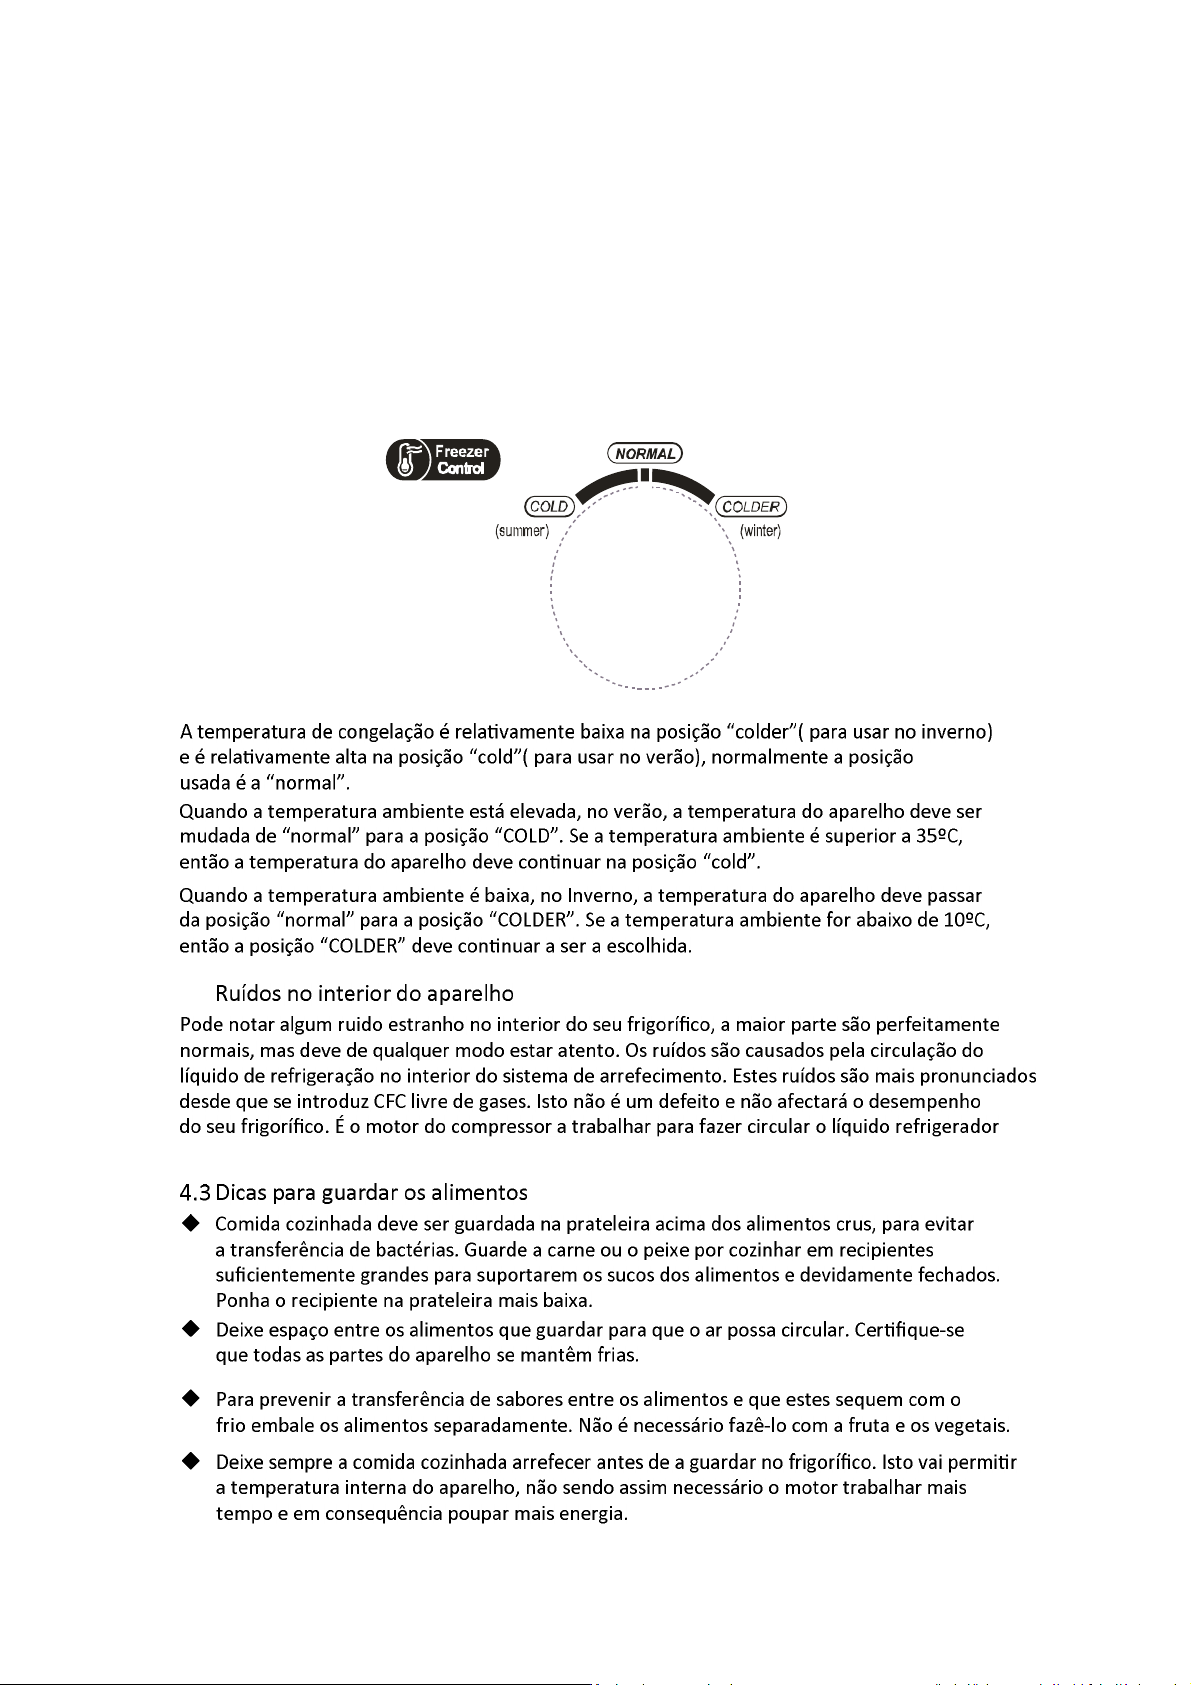
Controlo da temperatura no congelador
4.2
pelo sistema.
10
Page 31
4.4
5.
5.1
5.2
5.3
6. MANUTENÇÃO
6.1
6.2
6.3
6.4
11
Page 32
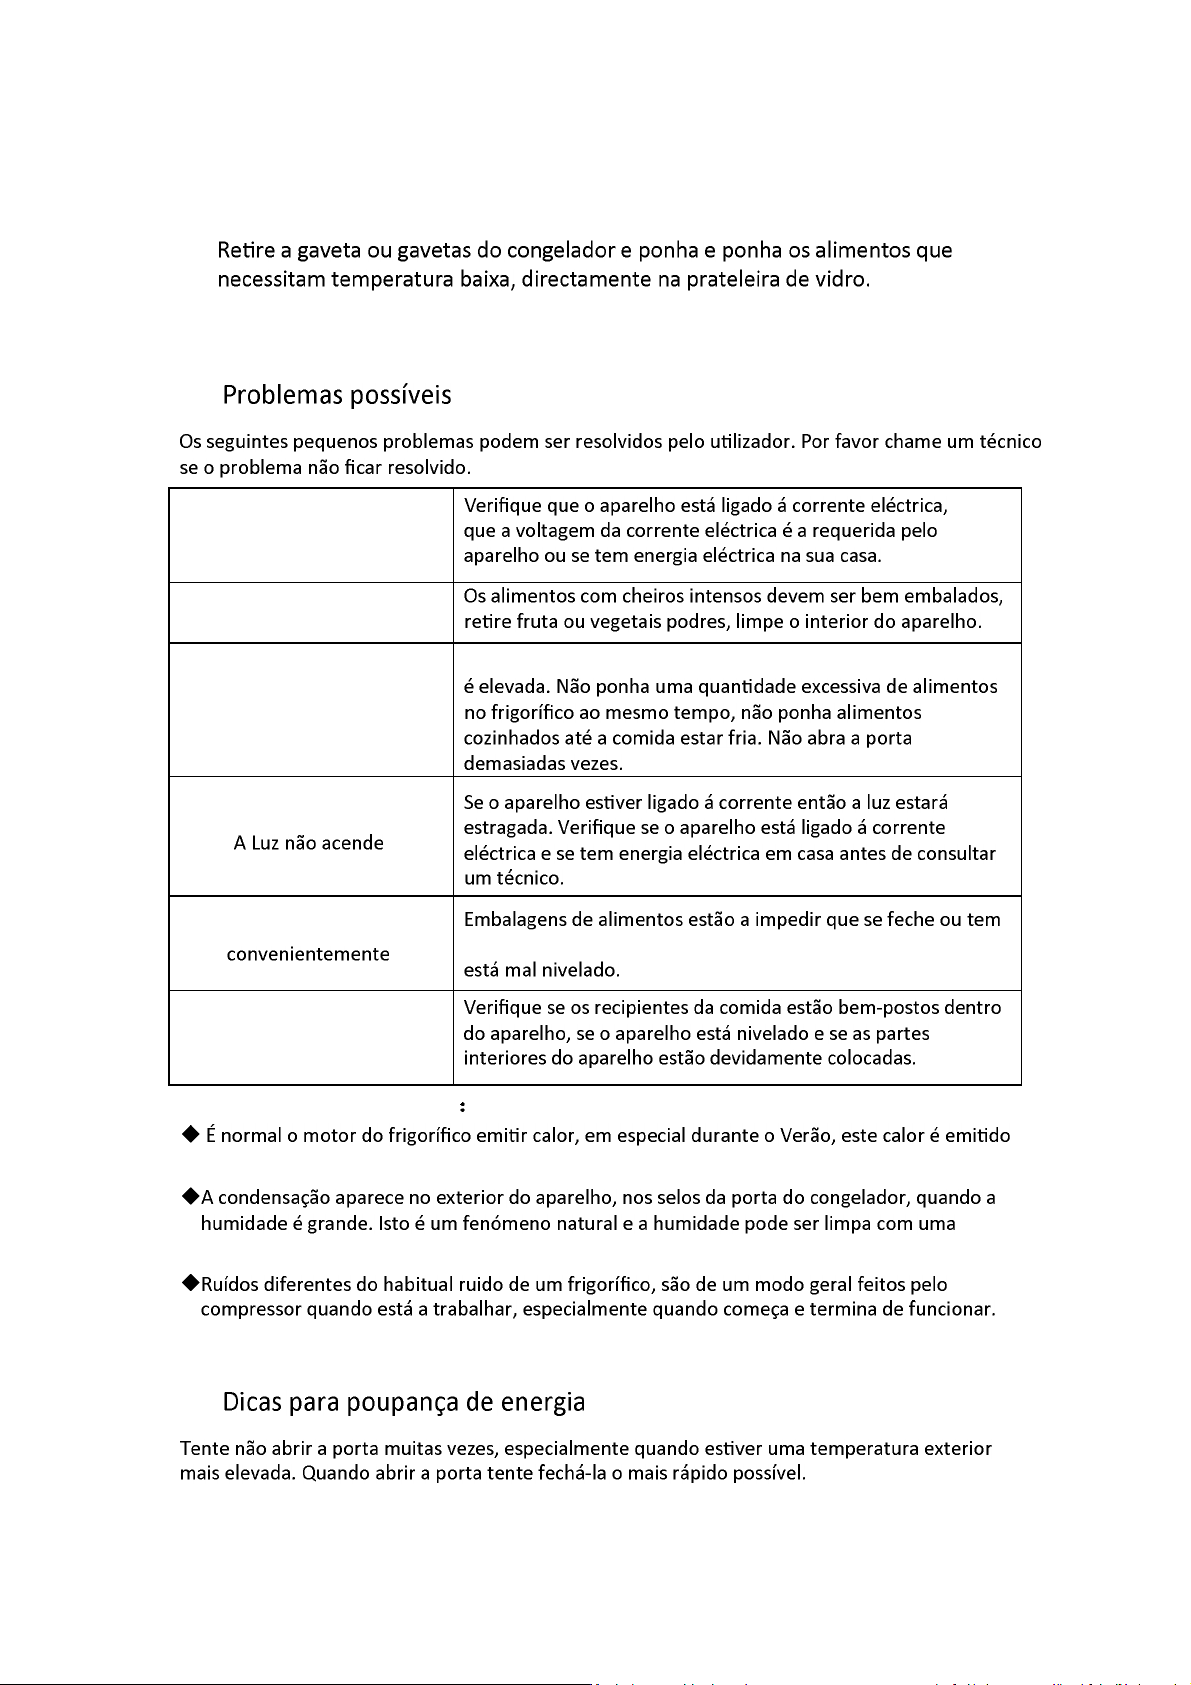
6.5 Não tape as saídas e entradas de ar do seu aparelho.
6.6 Não deixe alimentos que necessitem uma temperatura bastante fria, perto do sensor
da temperatura.
6.7
7.
Não funciona
Odores
O compressor
trabalha sem parar
É normal acontecer no Verão quando a temperatura ambiente
A porta não fecha
Ruídos altos
7.1 Cuidados a ter com o calor
pelas radiações do condensador.
toalha seca.
demasiados alimentos no interior do aparelho; ou o aparelho
8.
12
Page 33
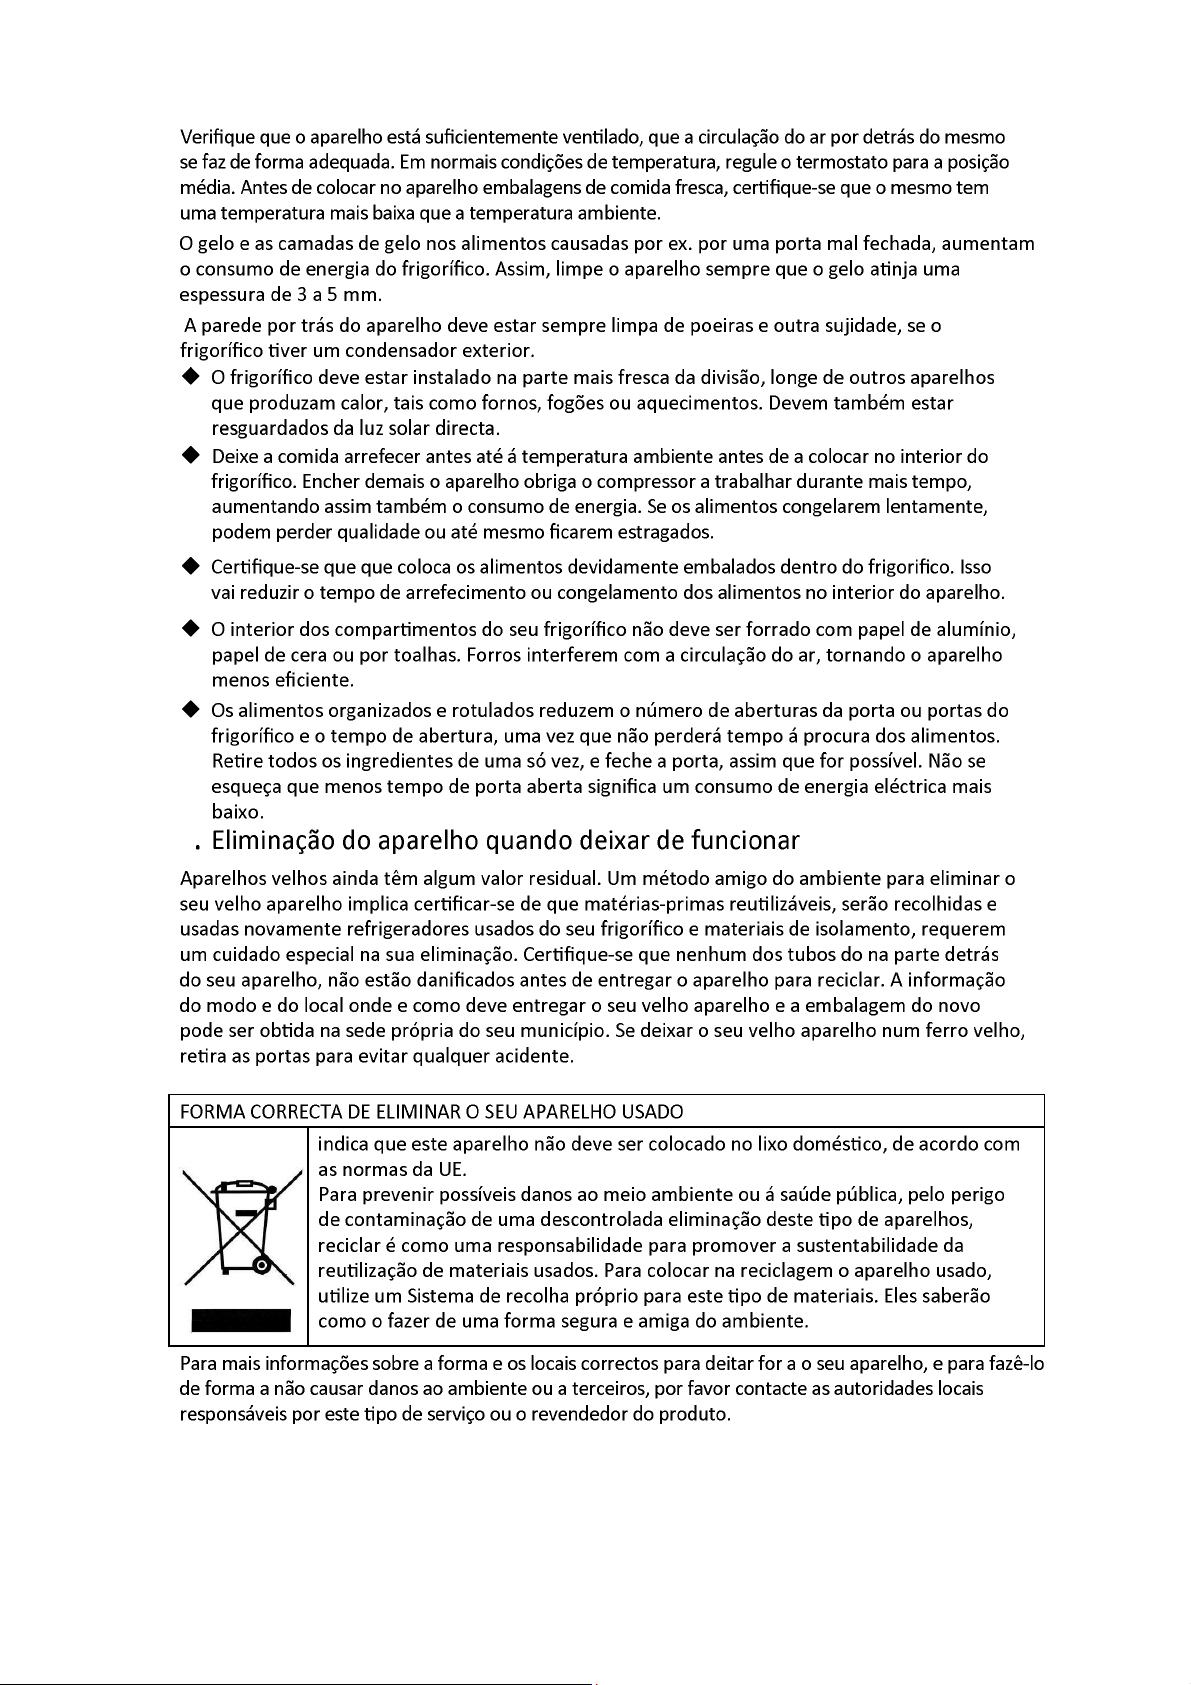
9
13
Page 34
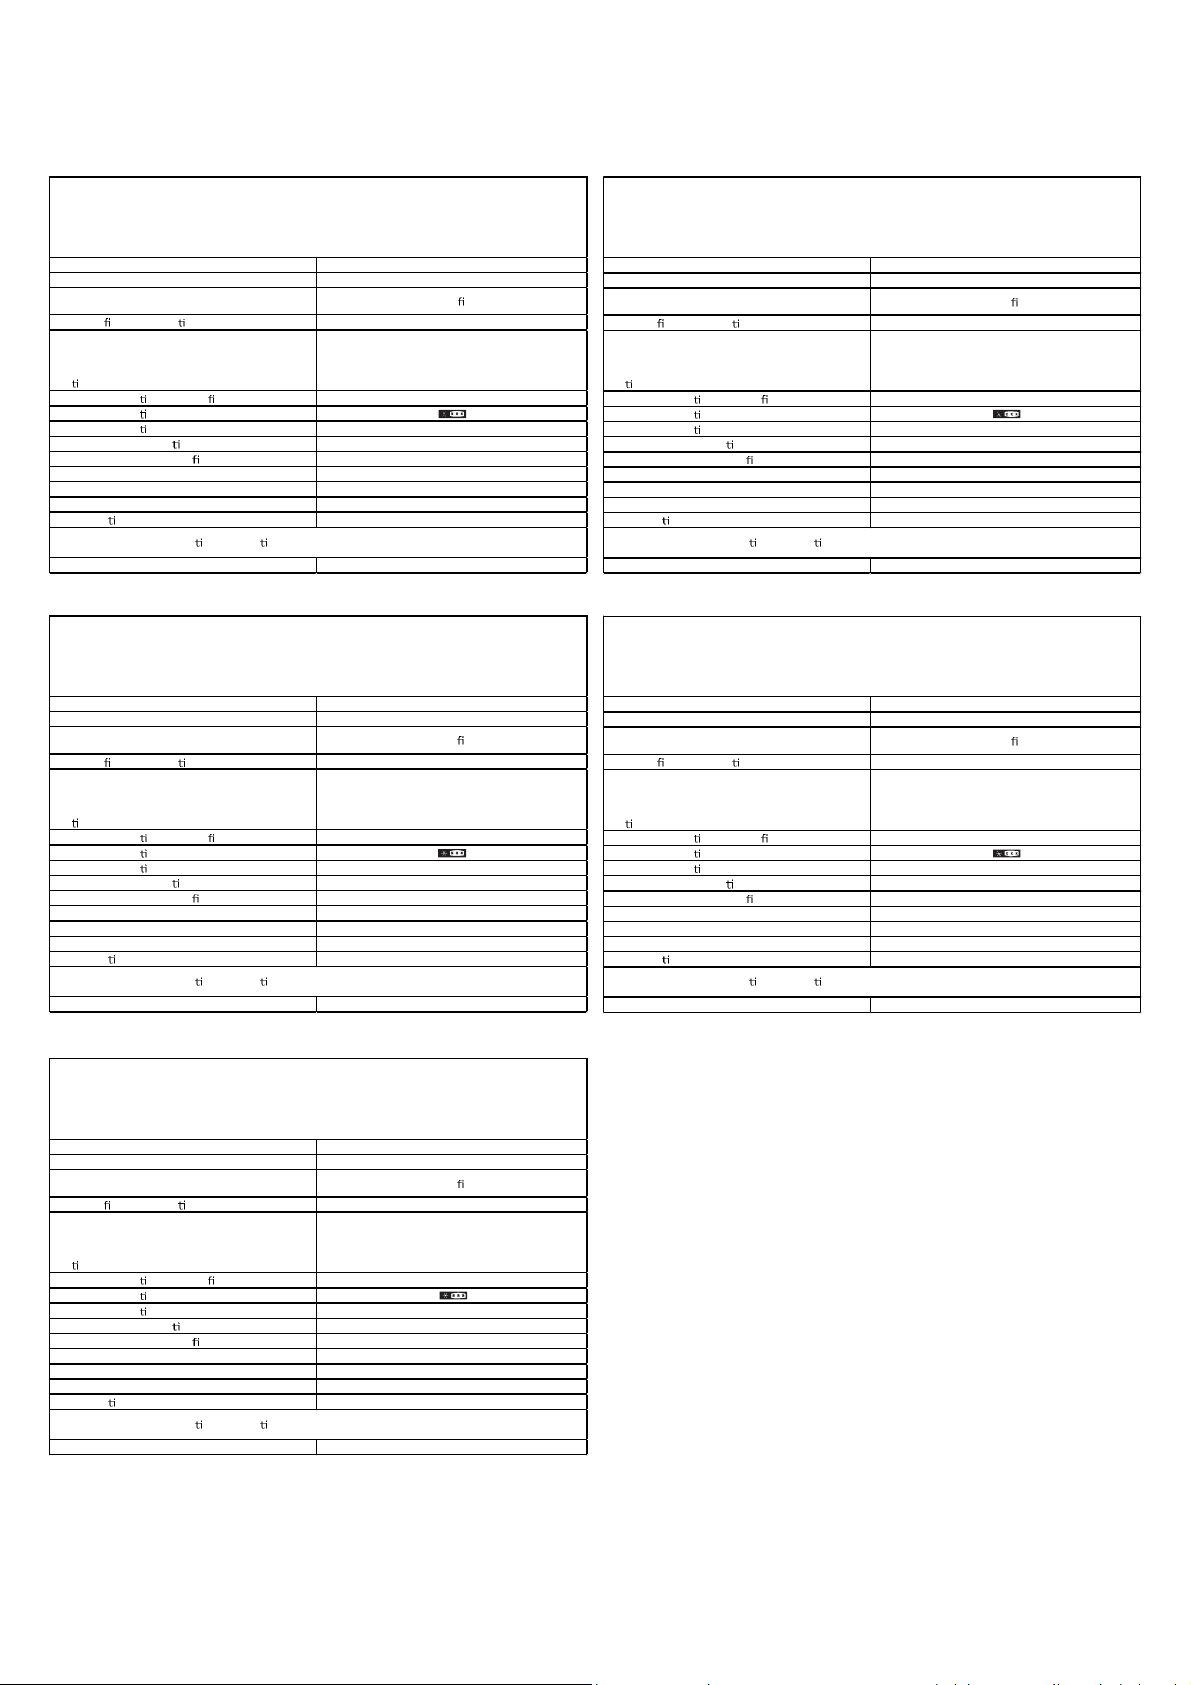
Ficha do Produto
Ficha do Produto
Marca comercial TEKA
Modelo NFL 320 BLANCO
Categoria
Classe de e ciência energé ca A+
Consumo de energia de kWh/ano, com base nos
resultados do ensaio normalizado durante 24 horas. O
valor real do consumo de energia dependerá do modo
de u l ização do aparelho e da sua localização
Volume do compar mento frigorí co (L) 219L
Volume do compar mento de Estrela (L)
Volume do compar mento congelador(L) 76L
Volume do outros compar mentos(L) /
Libre de escarcha (S/N), frigorí co S
Libre de escarcha (S/N), congelador N
Tempo de subida de temperatura (h) 15h
Capacidade de congelação (kg/24h) 4kg/24h
Classe climá ca N/T
Este aparelho des na-se a ser u l izado a uma temperatura ambiente entre 10 °C e 38 °C
Nível de ruído db(A) 40db(A)
Frigorí co
286kWh/ano
Ficha do Produto
Marca comercial TEKA
Modelo NFL 340 BLANCO
Categoria
Classe de e ciência energé ca A+
Consumo de energia de kWh/ano, com base nos
resultados do ensaio normalizado durante 24 horas. O
valor real do consumo de energia dependerá do modo
de u l ização do aparelho e da sua localização
Volume do compar mento frigorí co (L) 219L
Volume do compar mento de Estrela ( L)
Volume do compar mento congelador(L) 76L
Volume do outros compar me ntos(L) /
Libre de escarcha (S/N), frigorí co S
Libre de escarcha (S/N), congelador N
Tempo de subida de temperatura (h) 15h
Capacidade de congelação (kg/24h) 4kg/24h
Classe climá ca N/T
Este aparelho des na-se a ser u l izado a uma temperatura ambiente entre 10 °C e 38 °C
Nível de ruído db(A) 40db(A)
Frigorí co
286kWh/ano
Marca comercial TEKA
Modelo NFL 320 INOX
Categoria
Classe de e ciência energé ca A+
Consumo de energia de kWh/ano, com base nos
resultados do ensaio normalizado durante 24 horas. O
valor real do consumo de energia dependerá do modo
de u li zação do aparelho e da sua localização
Volume do compar mento frigorí co (L) 219L
Volume do compar mento de Estrela (L)
Volume do compar mento congelador(L) 76L
Volume do outros compar me ntos(L) /
Libre de escarcha (S/N), frigorí co S
Libre de escarcha (S/N), congelador N
Tempo de subida de temperatura (h) 15h
Capacidade de congelação (kg/24h) 4kg/24h
Classe climá ca N/T
Este aparelho des na- se a ser u li zado a uma temperatura ambiente entre 10 °C e 38 °C
Nível de ruído db(A) 40db(A)
Frigorí co
286kWh/ano
Ficha do Produto
Marca comercial TEKA
Modelo NFL 340 INOX
Categoria
Classe de e ciência energé ca A+
Consumo de energia de kWh/ano, com base nos
resultados do ensaio normalizado durante 24 horas. O
valor real do consumo de energia dependerá do modo
de u li zação do aparelho e da sua localização
Volume do compar mento frigorí co (L) 219L
Volume do compar mento de Estrela (L)
Volume do compar mento congelador(L) 76L
Volume do outros compar me ntos(L) /
Libre de escarcha (S/N), frigorí co S
Libre de escarcha (S/N), congelador N
Tempo de subida de temperatura (h) 15h
Capacidade de congelação (kg/24h) 4kg/24h
Classe climá ca N/T
Este aparelho des na- se a ser u li zado a uma temperatura ambiente entre 10 °C e 38 °C
Nível de ruído db(A) 40db(A)
Frigorí co
286kWh/ano
Ficha do Produto
Marca comercial TEKA
Modelo NFL 430 INOX
Categoria
Classe de e ciência energé ca A++
Consumo de energia de kWh/ano, com base nos
resultados do ensaio normalizado durante 24 horas. O
valor real do consumo de energia dependerá do modo
de u li zação do aparelho e da sua localização
Volume do compar mento frigorí co (L) 250L
Volume do compar mento de Estrela (L)
Volume do compar mento congelador(L) 76L
Volume do outros compar mentos(L) /
Libre de escarcha (S/N), frigorí co S
Libre de escarcha (S/N), congelador N
Tempo de subida de temperatura (h) 15h
Capacidade de congelação (kg/24h) 4kg/24h
Classe climá ca N/T
Este aparelho des na-se a ser u l izado a uma temperatura ambiente entre 10 °C e 38 °C
Nível de ruído db(A) 40db(A)
Frigorí co
234kWh/ano
Page 35
MODEL: NFL 320 BLANCO
NFL 320 INOX
NFL 340 BLANCO
NFL 340 INOX
NFL 430 INOX
Page 36

Contents
1. SAFETY WARNINGS ............................................................................................................ 1
2. INSTALLATION ................................................................................................................... 2
2.1 Location ...................................................................................................................... 2
2.2 Door Handle Install Illumination(optional) ................................................................ 2
2.3 Reversing the Door Swing .......................................................................................... 4
2.4 Door Space Requirements .......................................................................................... 6
2.5 Levelling the Unit ....................................................................................................... 6
2.6 Cleaning Before Use ................................................................................................... 6
2.7 Before Using Your Unit ............................................................................................... 6
2.8 Interior Accessories .................................................................................................... 7
3. PRODUCT OVERVIEW ........................................................................................................ 8
4. OPERATION ........................................................................................................................ 8
4.1 Operation Instructions ............................................................................................... 8
4.2 Noise Inside the Unit! ............................................................................................... 10
4.3 Tips for Keeping Food in the Unit ............................................................................. 10
4.4 Change the Light Bulb .............................................................................................. 11
5. CLEANING ........................................................................................................................ 11
5.1 Defrosting ................................................................................................................. 11
5.2 Cleaning the Interior and the Exterior of the Unit ................................................... 11
5.3 Cleaning Tips ............................................................................................................ 11
6. MAINTENANCE ................................................................................................................ 11
6.1 Changing the Internal Light ...................................................................................... 11
6.2 Care When Handling / Moving Your Unit ................................................................. 11
6.3 Servicing ................................................................................................................... 11
6.4 Switching Off for Long Periods of Time .................................................................... 11
6.5 Do not shield positions of air outlet and return air inlet of the refrigerator ........... 12
7. Trouble shooting ............................................................................................................. 12
7.1 Warm tips: ................................................................................................................ 12
8. TIPS FOR ENERGY SAVING ............................................................................................... 12
9. DISPOSAL ......................................................................................................................... 13
Page 37
1. SAFETY WARNINGS
1) Keep ventilation openings, in the appliance enclosure or in the built-in
structure, clear of obstruction.
2) Do not use mechanical devices or other means to accelerate the defrosting
process, other than those recommended by the manufacturer.
3) Do not damage the refrigerant circuit.
4) Do not use electrical appliances inside the food storage compartments of the
appliance, unless they are of the type recommended by the manufacturer.
5) The appliance has to be unplugged after use and before carrying out user maintenance on the
appliance.
6) This appliance can be used by children aged from 8 years and above and persons with reduce
physical sensory or mental capabilities or lack of experience and knowledge if they have been
given supervision or instruction concerning use of the appliance in a safe way and understand the
hazards involved. Children shall not play with the appliance. Cleaning and user maintenance shall
not be made by children without supervision.
7) If the supply cord is damaged, it must be replaced by the manufacturer, its service agent or
similarly qualified persons in order to avoid a hazard.
8) Please abandon the refrigerator according to local regulators for it use flammable blowing gas
and refrigerant.
9) Please according to local regulations regarding disposal of the appliance for its flammable
refrigerant and blowing gas. Before you scrap the appliance, please take off the doors to prevent
children trapped.
10) This appliance is intended to be used in household and similar applications such as
staff kitchen areas in shops, offices and other working environments;
farm houses and by clients in hotels, motels and other residential type environments;
bed and breakfast type environments;
catering and similar non-retail applications.
11) Do not store explosive substances such as aerosol cans with a flammable propellant in this
appliance.
IT IS HAZARDOUS FOR ANYONE OTHER THAN AUTHORISED SERVICE PERSONNEL TO
CARRY OUT SERVICING OF REPAIRS WHICH INVOLVE THE REMOVAL OF COVERS.
TO AVOID THE RISK OF AN ELECTRICAL SHOCK DO NOT ATTEMPT REPAIRS YOURSELF.
1
Page 38
2. INSTALLATION
2.1 Location
When selecting a position for your unit you should make sure the floor is flat and firm, and the
room is well ventilated. Avoid locating your unit near a heat source, e.g. cooker, boiler or radiator.
Also avoid direct sunlight as it may increase the electrical consumption. Extreme cold ambient
temperatures may also cause the unit not to perform properly. This unit is not designed for use in
a garage or outdoor installation. Do not drape the unit with any covering.
When installing the unit, ensure that 10 cm of free space is left at both sides, 10 cm at the rear
and 30 cm at the top of the unit. This will allow cold air to circulate around the wine cooler and
improve the efficiency of the cooling process.
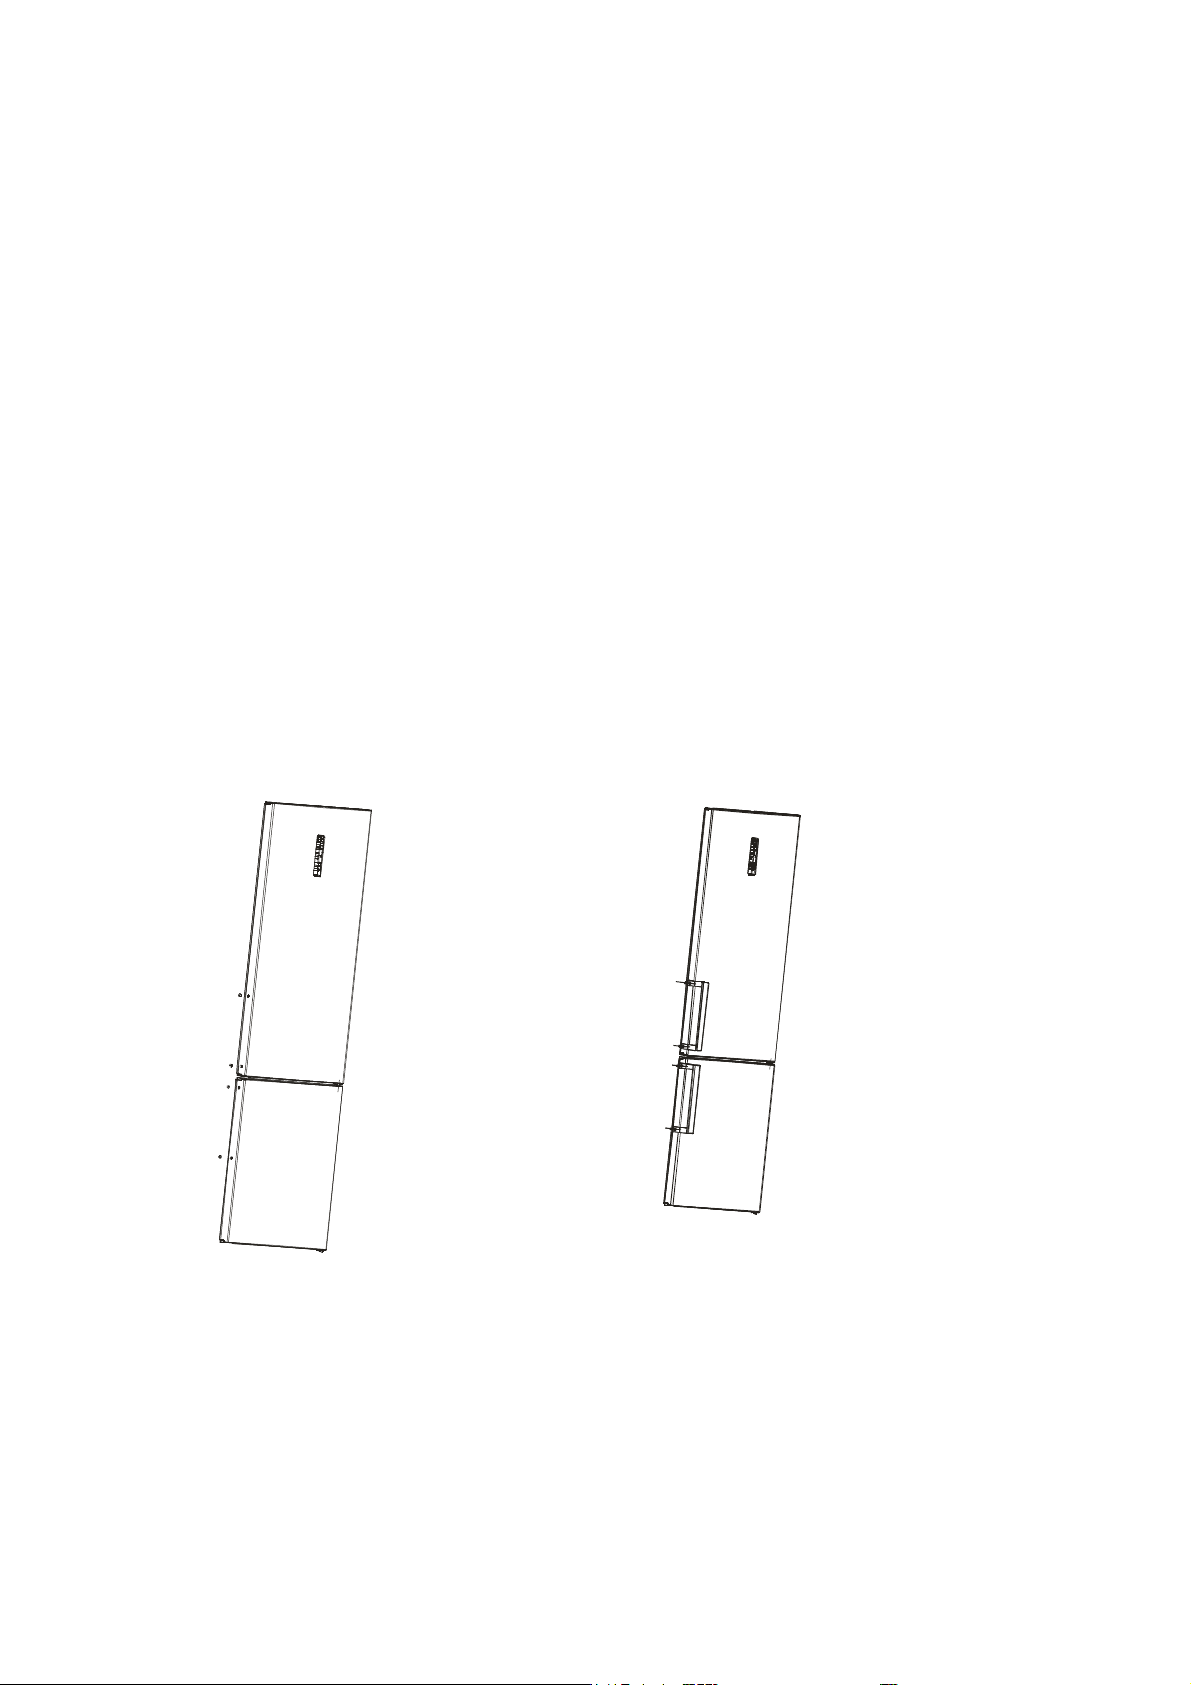
2.2 Door Handle Install Illumination(optional)
1) Take out the screw caps from the door
handle holes.
2) Put the handles into the screw holes and
then hit them to fix .
2
Page 39
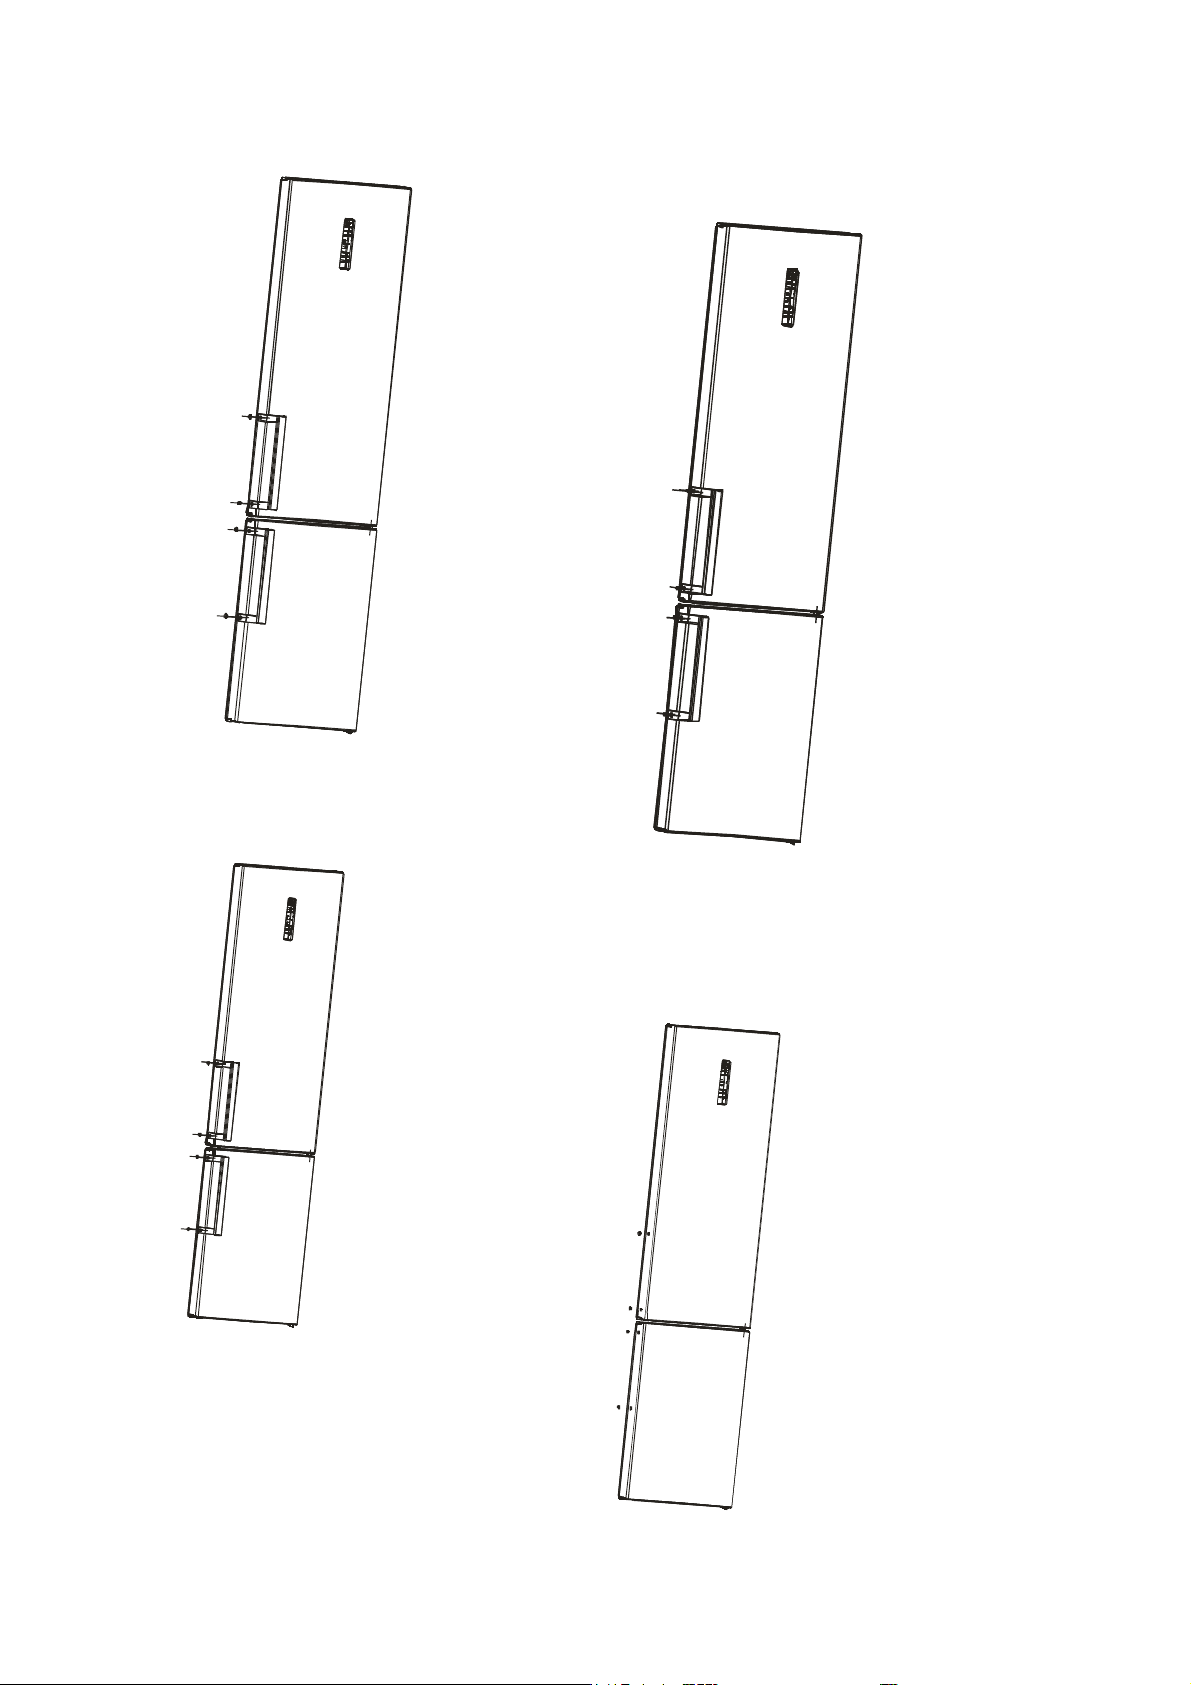
3) Cap the screw caps on the handle screws.
4) Take out the screw caps from the handle
screw holes.
5) Remove the screws and take the handles
down.
6) Cap the screw caps on the door handle
holes again.
3
Page 40
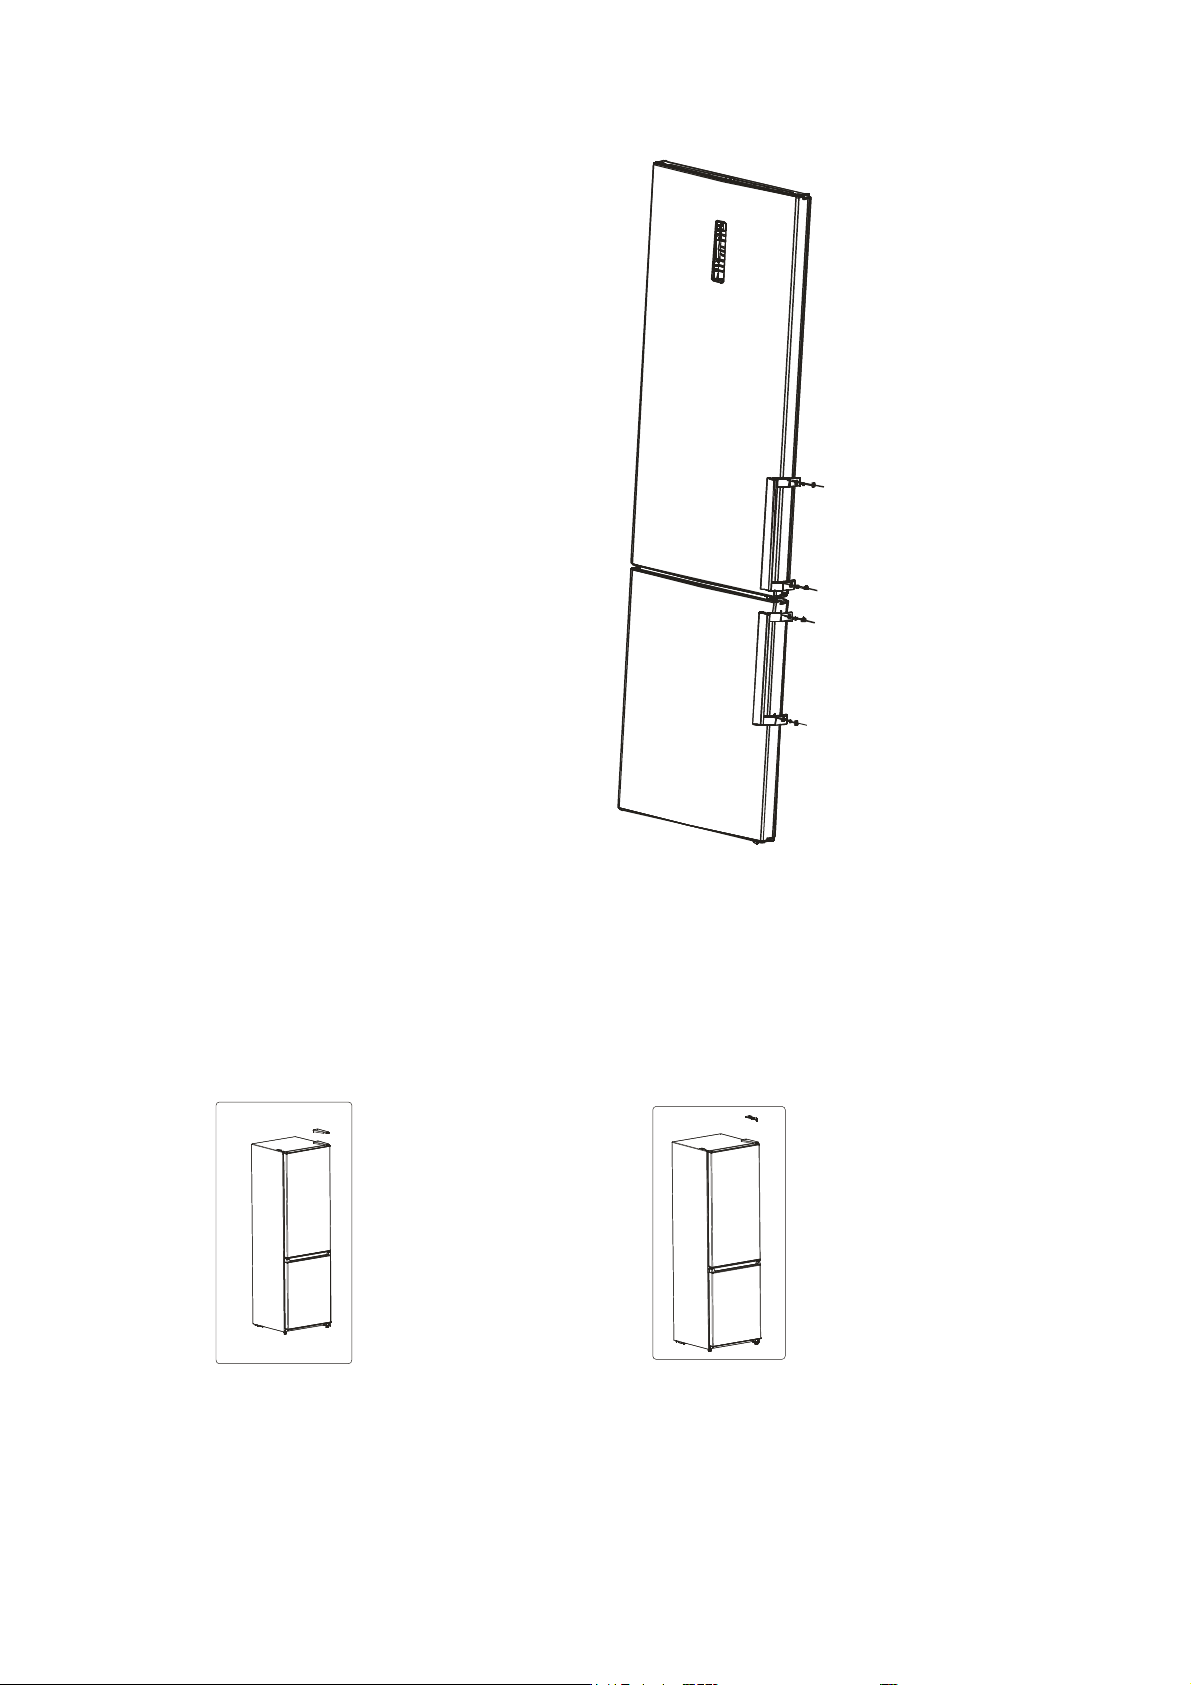
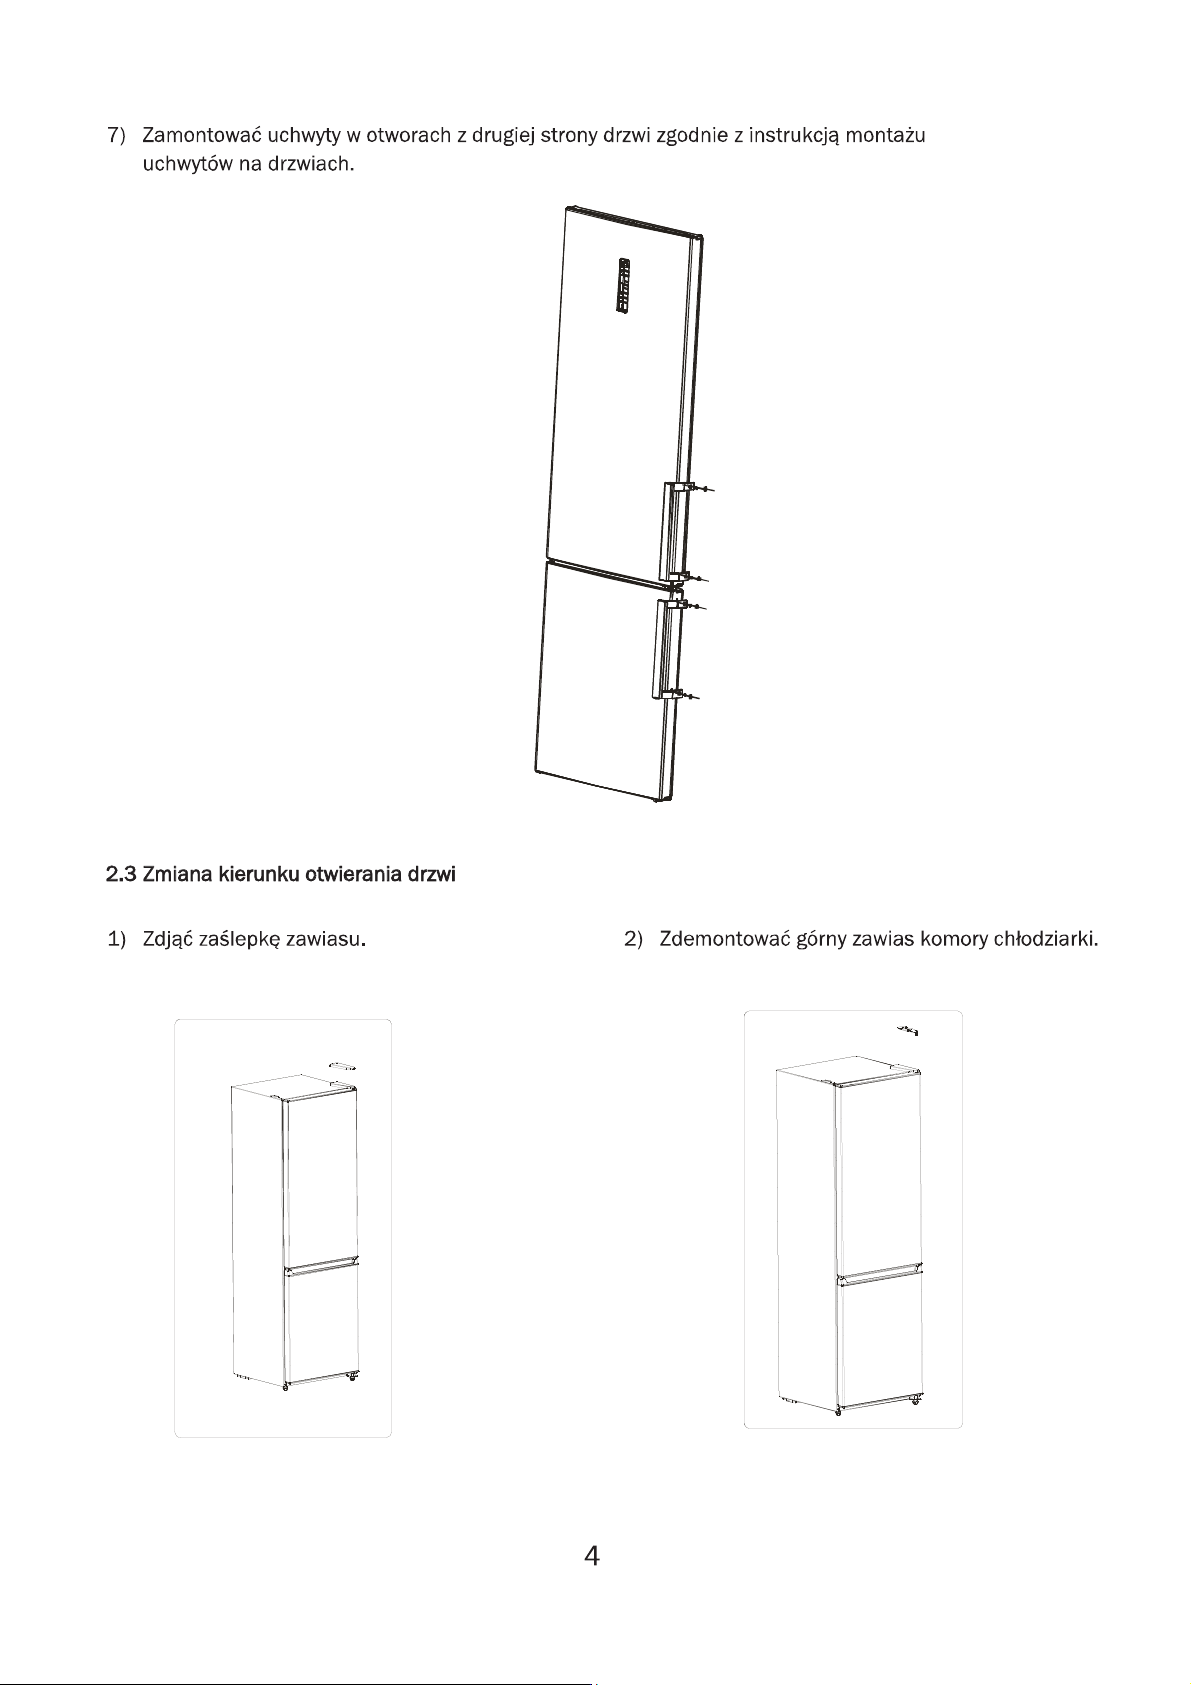
7) Install the handles into the door handle
holes of the other side in accordance with
the handle installation instructions.
2.3 Reversing the Door Swing
1) Take off knuckle guard.
2) Take off top hinge.
4
Page 41
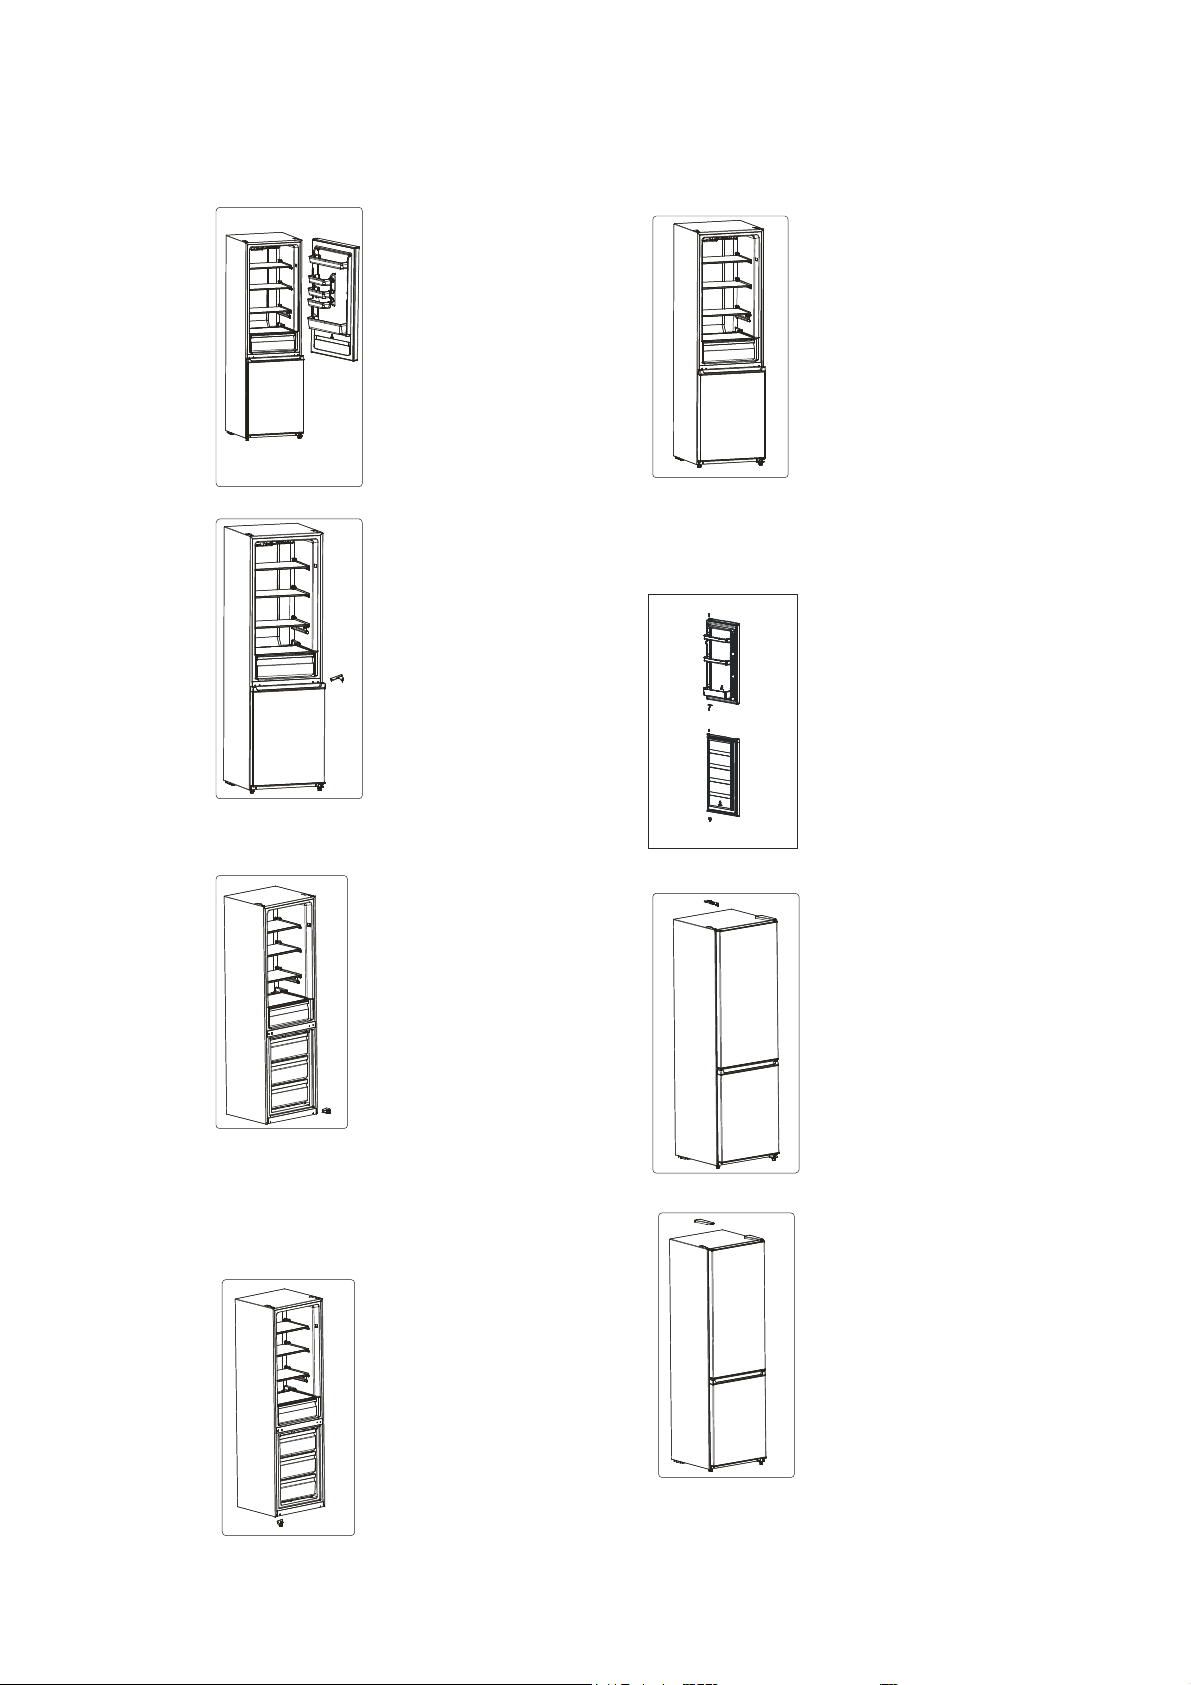
3) Take off the door of refrigerating
chamber.
7) Assemble the door of freezer chamber on
the lower hinge.
4) Take off middle hinge with a screw driver.
5) Take off the door of freezing chamber.
8) Assemble middle hinge assembly to left
side of the cabinet .
9) Assemble the door of refrigerating.
6) Take off hinge assembly with a screw
driver , Assemble lower hinge assembly to
left side of the cabinet with a screw driver.
10) Take on knuckle guard.
5
Page 42
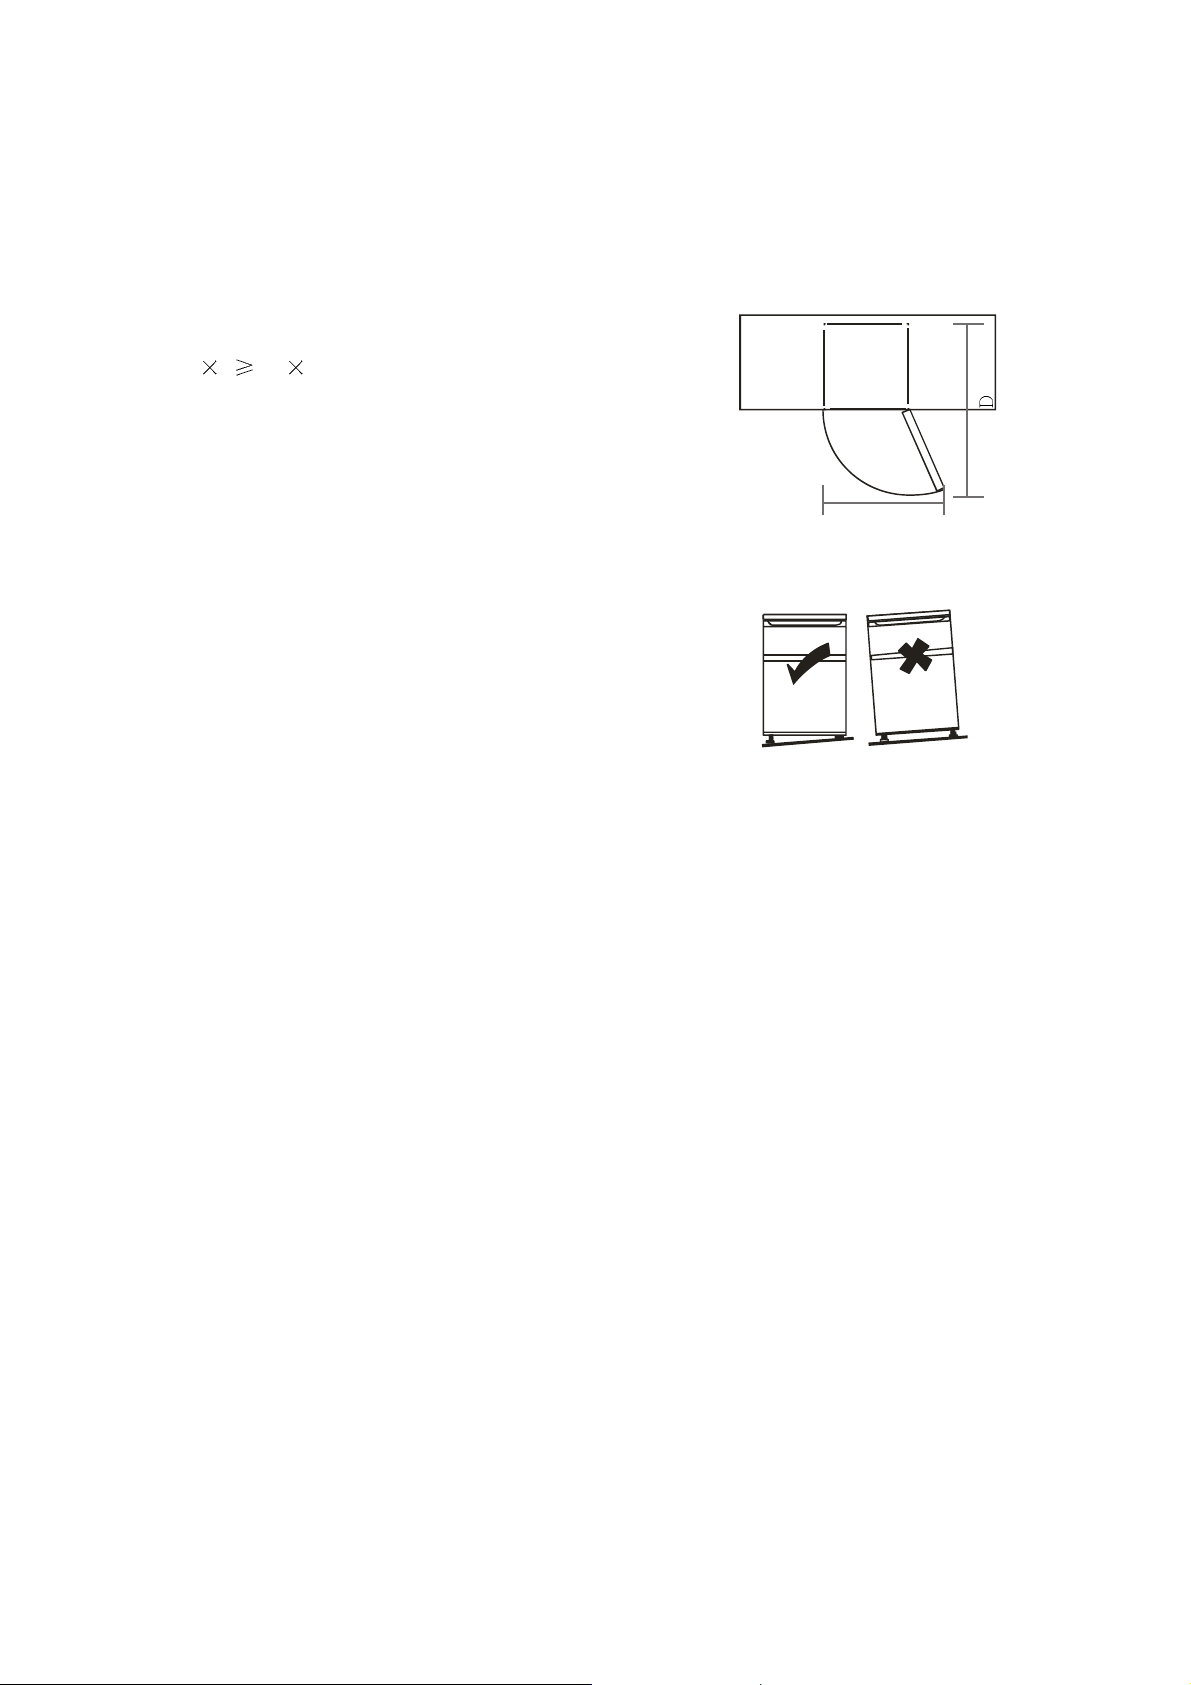
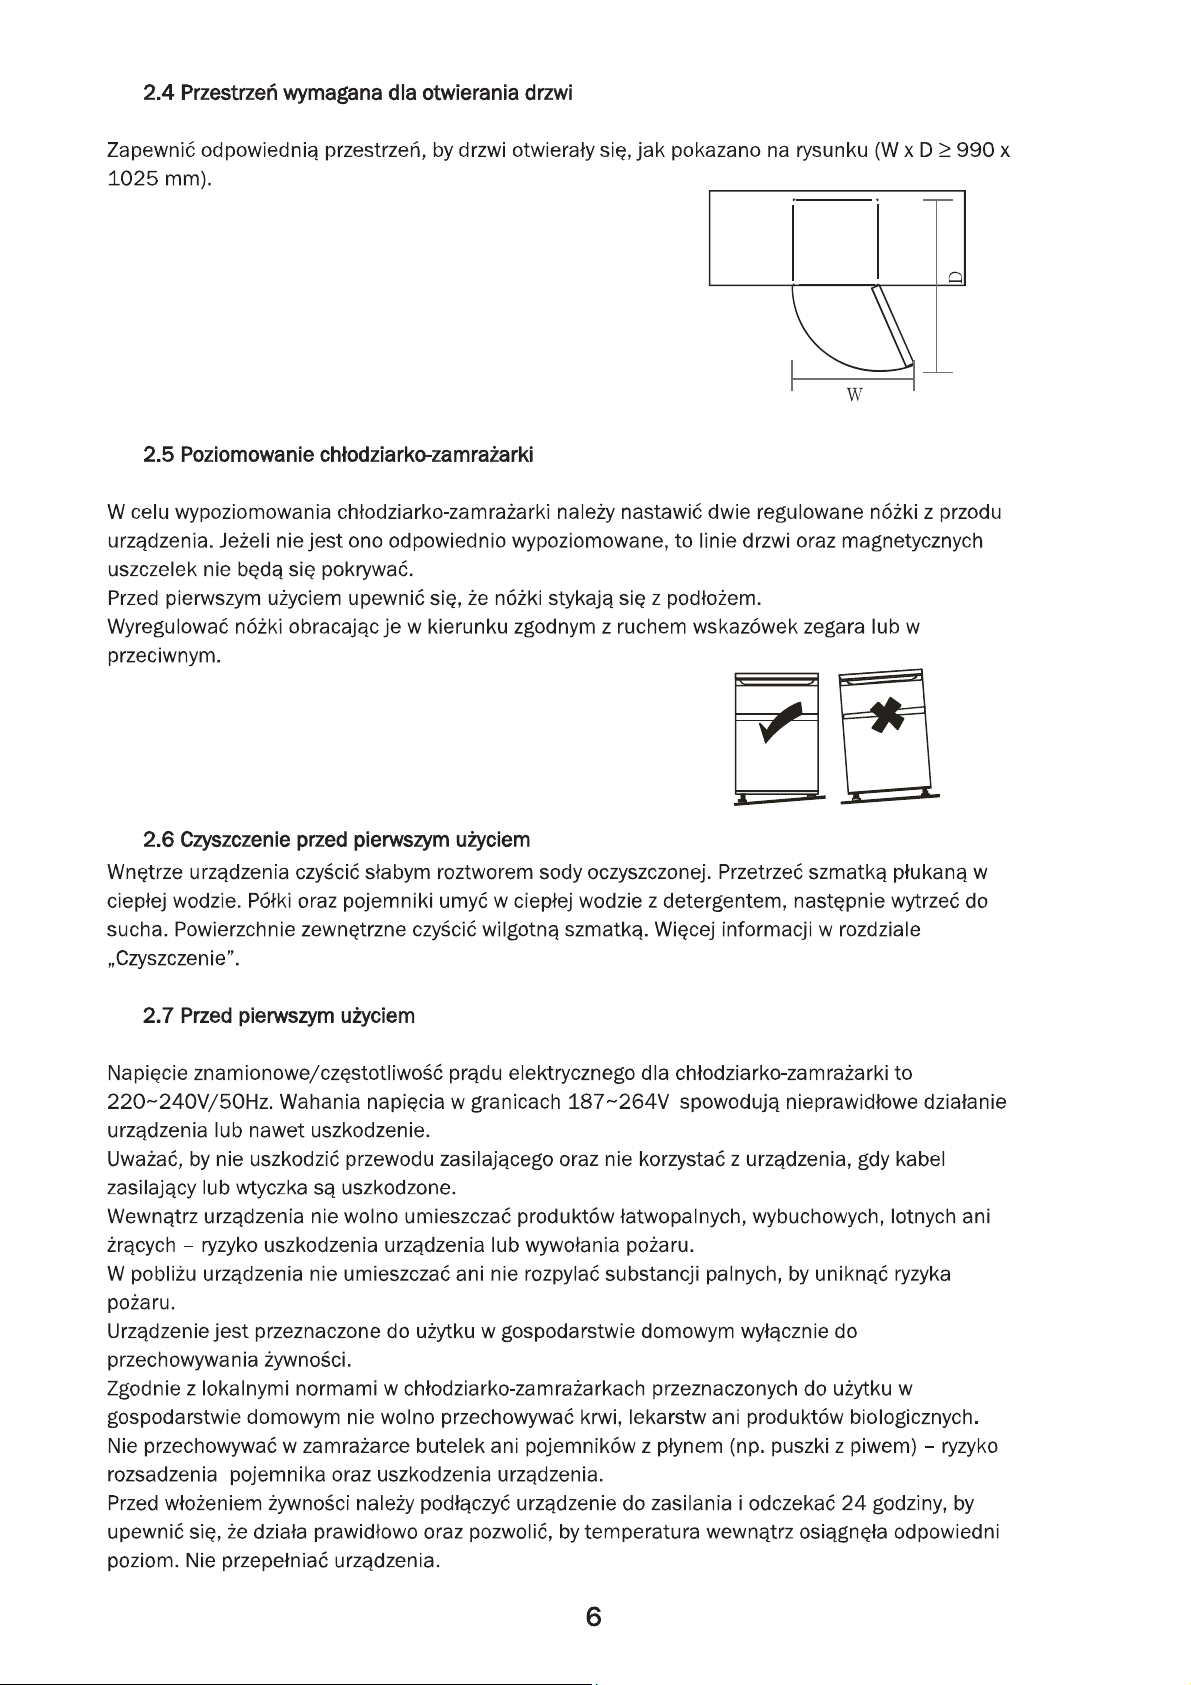
2.4 DoorSpaceRequirements
The unit's door must be able to open fully as shown.
W D 990 1025mm
2.5 Levelling the Unit
To do this adjust the two levelling feet at the front of the unit.
If the unit is not level, the door and magnetic seal alignments
will not be covered properly.
Make sure that the foot touches the ground before use.
Look down from the top, clockwise and counterclockwise loosening, tightening.
W
2.6 Cleaning Before Use
Wipe the inside of the unit with a weak solution of bicarbonate soda. Then rinse with warm
water using a 'Wrung-out' sponge or cloth. Wash the shelves and salad bin in warm soapy water
and dry completely before replacing in the unit. Clean the exterior of the unit with a damp cloth.
If you require more information refer to the Cleaning section.
2.7 Before Using Your Unit
The refrigerator adopts 220~240V/50Hz AC power, voltage fluctuations over the range of 187 ~
264V will cause malfunction or even damage.
Do not damage the power cord under any condition so as to ensure safety use, do not use when
the power cord is damaged or the plug is worn.
Do not put flammable, explosive, volatile and highly corrosive items in the refrigerator to prevent
damages to the product or fire accidents.
Do not place flammable items near the refrigerator to avoid fires.
This product is household refrigerators and shall be only suitable for the storage of foods.
According to national standards, household refrigerators shall not be used for other purposes,
such as storage of blood, drugs or biological products.
Do not place items such as bottled or sealed container of fluid such as bottled beers and
6
Page 43
beverages in the freezer to prevent bursts and other losses.
Before placing any food in your unit, turn it on and wait for 24 hours, to make sure it is working
properly and to allow it time to fall to the correct temperature. Your unit should not be overfilled.
Do not damage the power cord under any condition so as to ensure safety use, do not use when
the power cord is damaged or the plug is worn.
Do not put flammable, explosive, volatile and highly corrosive items in the refrigerator to prevent
damages to the product or fire accidents.
Do not place flammable items near the refrigerator to avoid fires.
This product is household refrigerators and shall be only suitable for the storage of foods.
According to national standards, household refrigerators shall not be used for other purposes,
such as storage of blood, drugs or biological products.
Do ot place items such as bottled or sealed container of fluid such as bottled beers and beverages
in the freezer to prevent bursts and other losses.
Before placing any food in your unit, turn it on and wait for 24 hours, to make sure it is working
properly and to allow it time to fall to the correct temperature. Your unit should not be overfilled.
Before Plugging in
You must check that you have a socket which is compatible with the plug supplied
with the unit.
Before Turning On!
Do not turn on until two hours after moving the unit.
2.8 Interior Accessories
Various glass or plastic storage shelves are included with your appliance - different
models have different combinations.
You should always slide one of the full size glass storage shelves into the lowest set of
guides, above the fruit and vegetable containers, and keep it in this position. To do
this, pull the storage shelf forward until it can be swivelled upwards or downwards
and removed.
Please do the same in reverse to insert the shelf at a different height.
In order to make the most of the volume of the fresh food storage compartment and
frozen-food storage compartment, the user can remove one or more shelves, drawers, out
of the appliance, according to your daily use.
7
Page 44
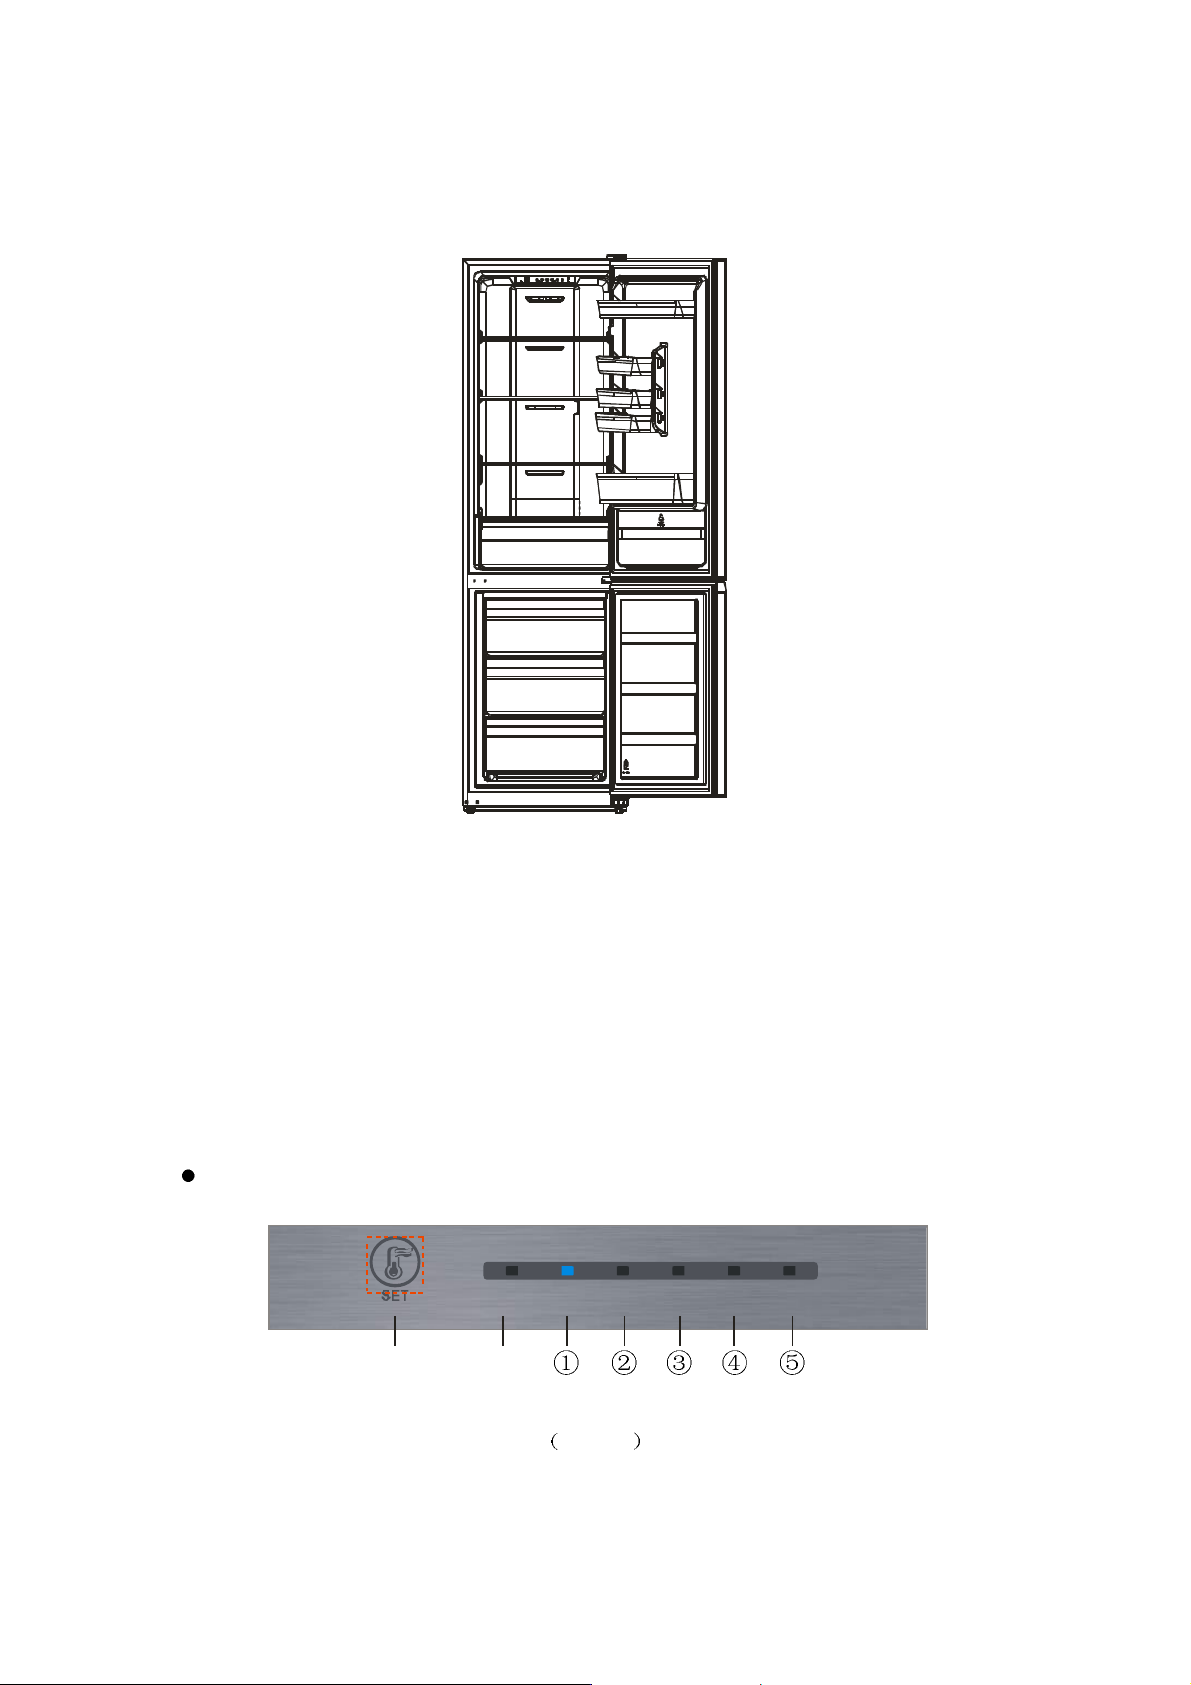
3. PRODUCT OVERVIEW
*Dotted line represents the position of air outlet and return air inlet.
*All images in this instruction manual are for indication only; please refer to your individual unit for details.
4. OPERATION
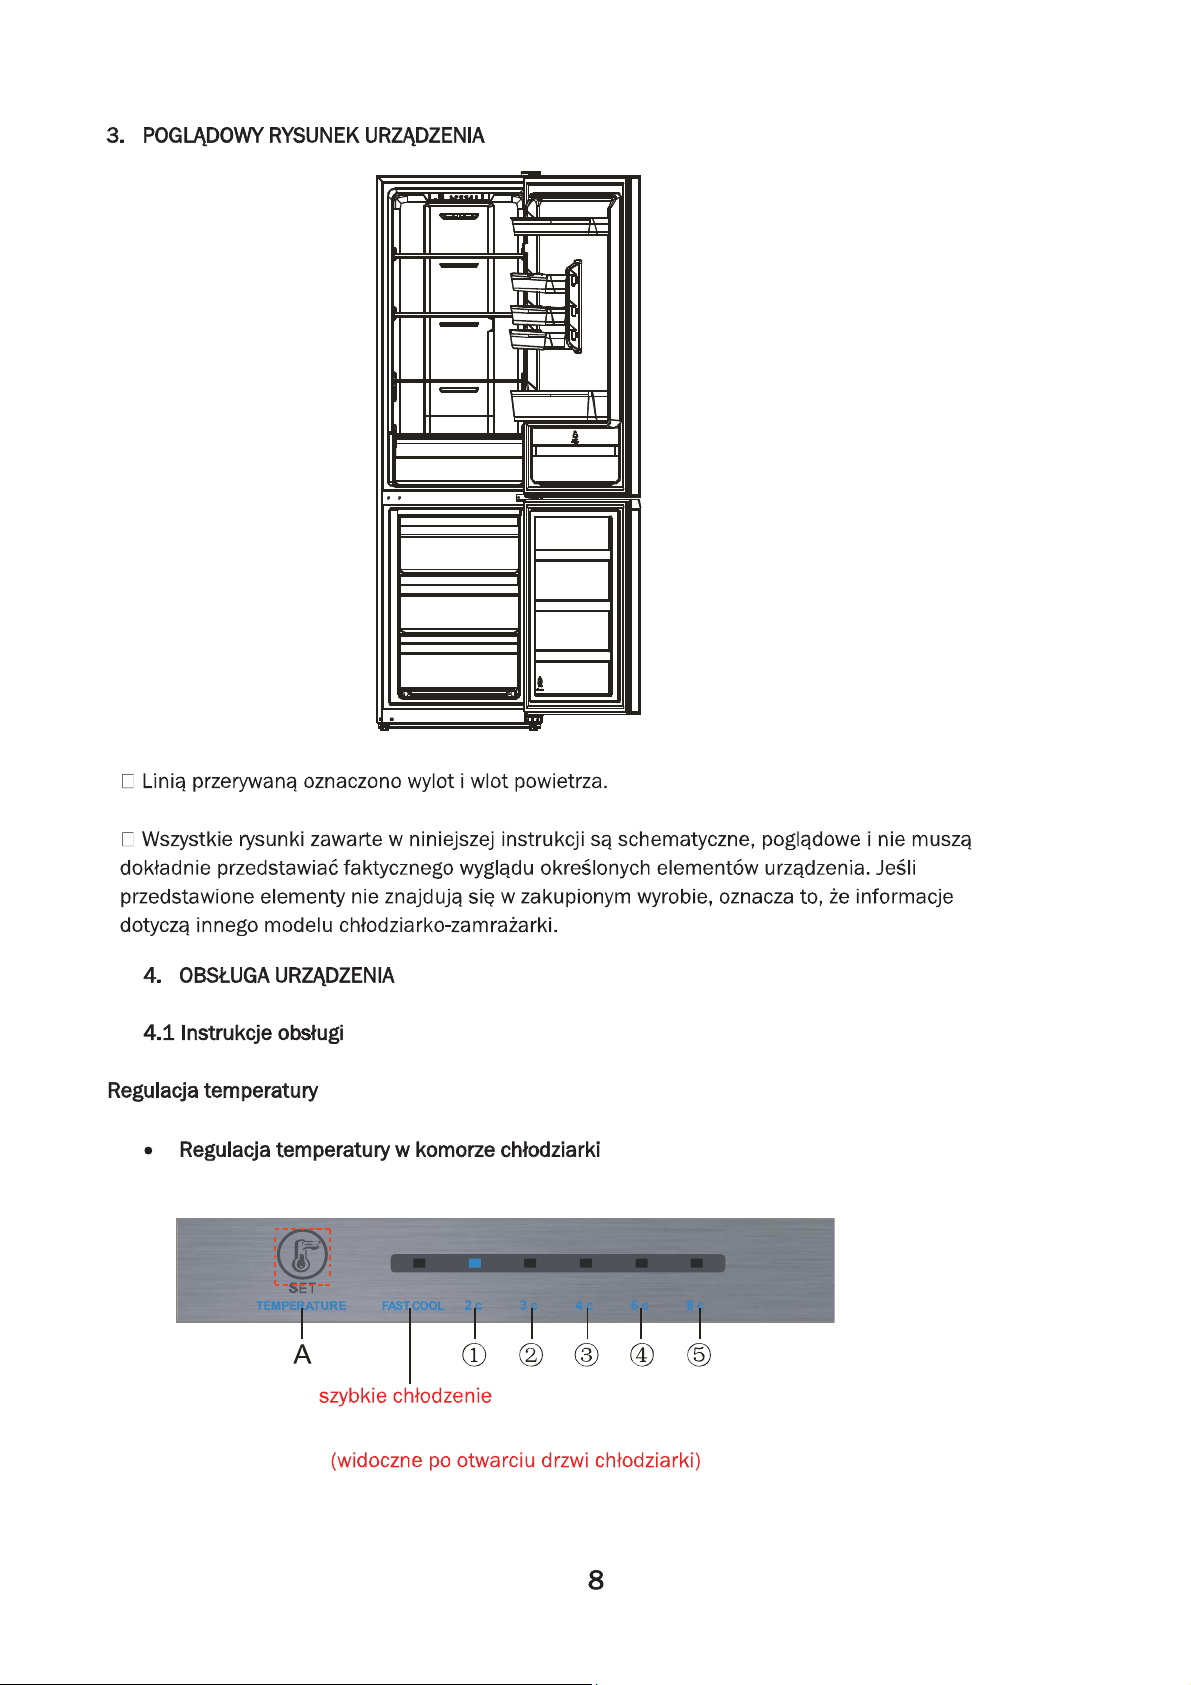
4.1 Operation Instructions
Temperature control
Temperature control of fresh food storage compartment.
A fast cool
2 c 3 c 4 c 6 c 8 cTEMPERATURE FAST COOL
Built-in
8
Page 45
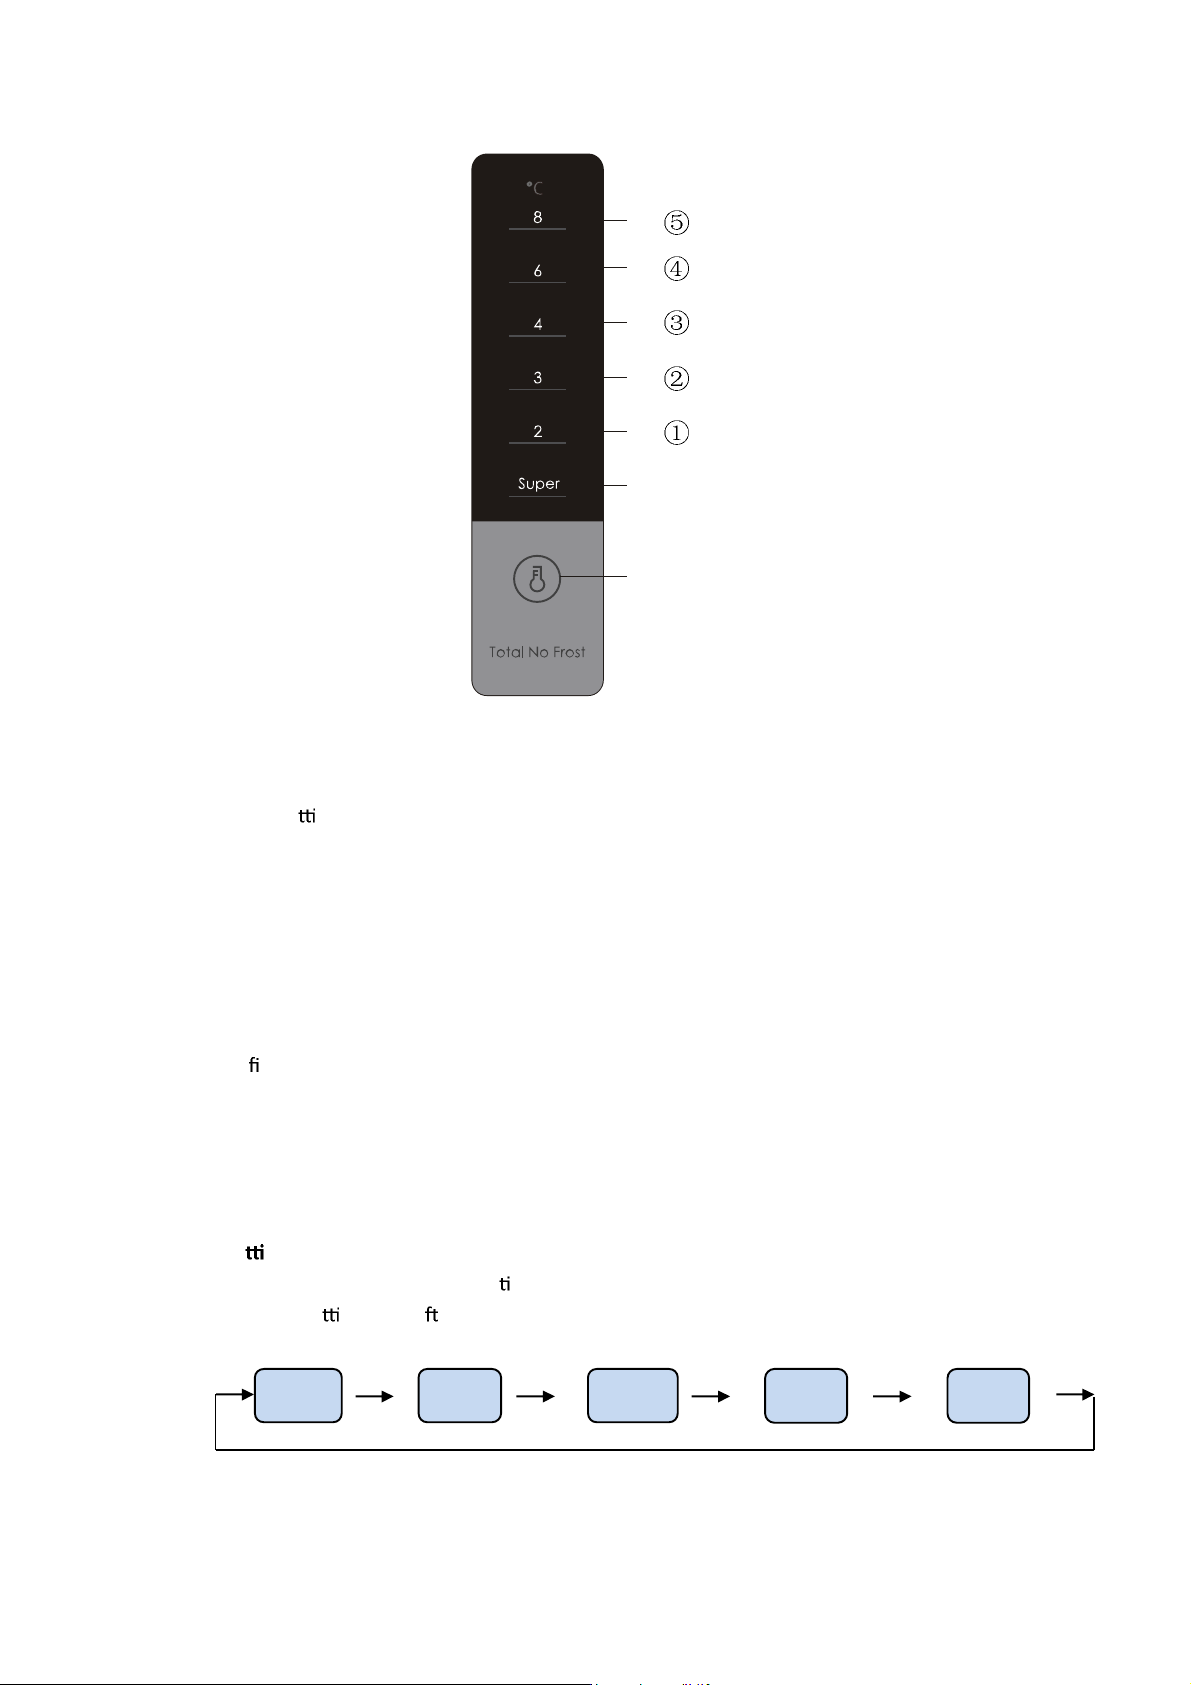
fast cool
A
(External display)
Key
A.SET: gear se ng key.
Display screen
1 Gear 1
2 Gear 2
3 Gear 3
4 Gear 4
5 Gear 5
Display
For the rst power-on, the display screen (including the key light) will be displayed in full for 3s,
and then the gear in the middle displays the state of running.
Display of normal running
On the occurrence of a failure, the corresponding LED light will give a combined display of failure
code (loop display);
Where there is no failure, the LED light will display the current running gear of the refrigerator.
Gear se ng
The gear will be changed once every me when you press the key SET. Then, the refrigerator will
run under the se ng value a er 15s.
Gear 1 Gear 2 Gear 3
9
Gear 4 Gear 5
Page 46
Fast cool function
Enter: Circulating modulation rapid cooling mode.
Operate: Indicator of rapid cooling lights up, and the refrigerator operates at 2 .
Exit: 1. Operate 150min under the rapid cooling mode.
2. Temperature adjustment can exit from the rapid cooling mode.
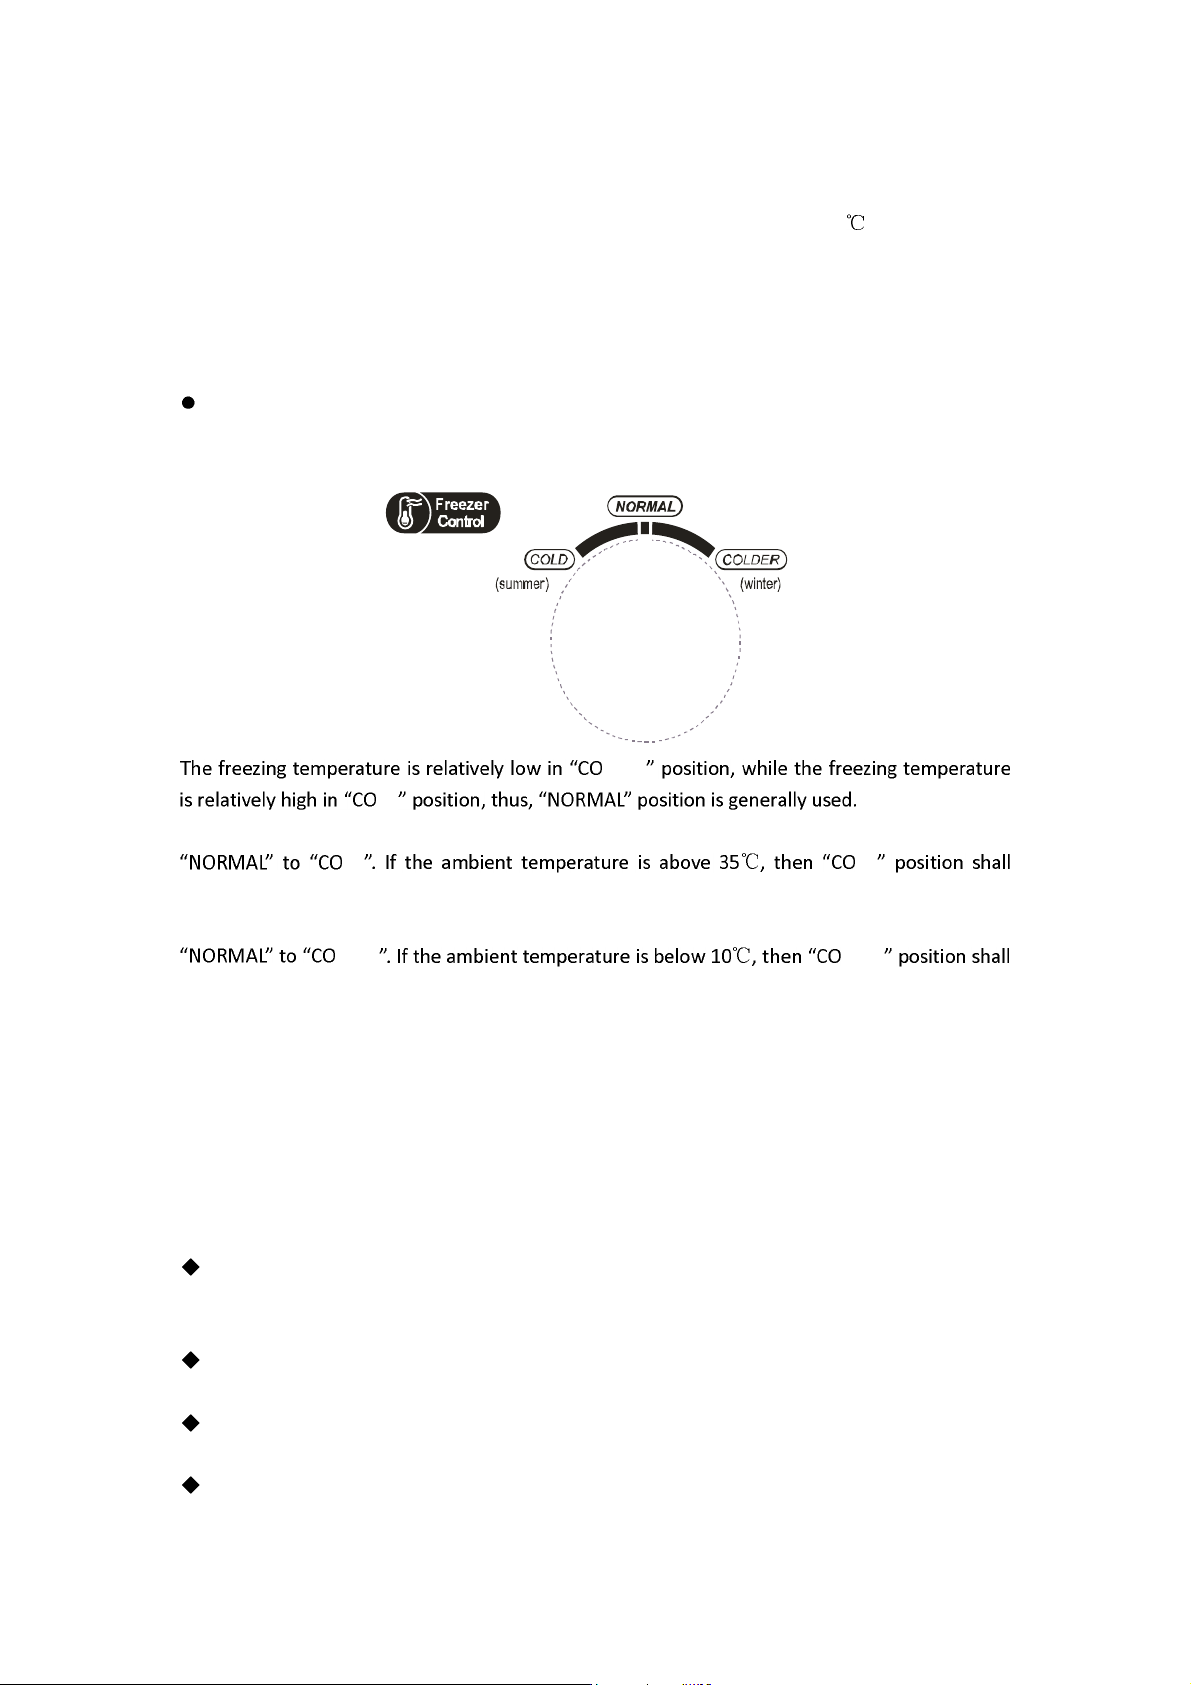
Temperature control of freezing chamber
LDER
LD
When ambient temperature is high in summer, the temperature shall be in the range from
LD LD
prevail.
When ambient temperature is low in winter, the temperature shall be in the range from
LDER LDER
prevail.
4.2 Noise Inside the Unit!
You may notice that your unit makes some unusual noises. Most of these are perfectly normal,
but you should be aware of them!
These noises are caused by the circulation of the refrigerant liquid in the cooling system. It has
become more pronounced since the introduction of CFC free gases. This is not a fault and will not
affect the performance of your unit. This is the compressor motor working, as it pumps the
refrigerant around the system.
4.3 Tips for Keeping Food in the Unit
Cooked meats/fishes should always be stored on a shelf above raw meats/fishes to avoid
bacterial transfer. Keep raw meats/fishes in a container which is large enough to collect juices
and cover it properly. Place the container on the lowest shelf.
Leave space around your food, to allow air to circulate inside the unit. Ensure all parts of the
unit are kept cool.
To prevent transfer of favours and drying out, pack or cover the food separately. Fruit and
vegetables do not need to be wrapped.
Always let pre-cooked food cool down before you put in the unit. This will help to maintain
the internal temperature of the unit.
10
Page 47
To prevent cold air escaping from the unit, try to limit the number of times you open the
door. We recommend that you only open the door when you need to put food in or take food
out.
4.4 Change the Light Bulb
Lamp replacement by professionals
5. CLEANING
5.1 Defrosting
Auto-defrost for Frost-free Refrigerator
5.2 Cleaning the Interior and the Exterior of the Unit
Remove all the shelves and the salad bin. To remove the salad bin first remove the lower
door shelf.
Wipe the inside of the unit with a weak solution of bicarbonate soda and then rinse with
warm water using a wrung-out sponge or cloth. Wipe completely dry before replacing the
shelves and salad bin.
Use a damp cloth to clean the exterior, and then wipe with a standard furniture polish. Make
sure that the door is closed to avoid the polish getting on the magnetic door seal or inside
the unit.
The grille of the condenser at the back of the unit and the adjacent components can be
vacuumed using a soft brush attachment.
5.3 Cleaning Tips
Condensation may appear on the outside of the unit. This may be due to a change in room
temperature. Wipe of any moisture residue. If the problem continues, please contact a qualified
technician for assistance.
6. MAINTENANCE
6.1 Changing the Internal Light
Lamp replacement by professionals.
6.2 Care When Handling / Moving Your Unit
Hold the unit around its sides or base when moving it. Under no circumstances should it be lifted
by holding the edges of the top surface.
6.3 Servicing
The unit should be serviced by an authorized engineer and only genuine spare parts should be
used. Under no circumstances should you attempt to repair the unit yourself. Repairs carried out
by inexperienced persons may cause injury or serious malfunction. Contact a qualitatively
technician.
6.4 Switching Off for Long Periods of Time
When the unit is not in use for a long period of time, disconnect it from the mains supply, empty
all food and clean the appliance, leaving the door ajar to prevent unpleasant smells.
11
Page 48
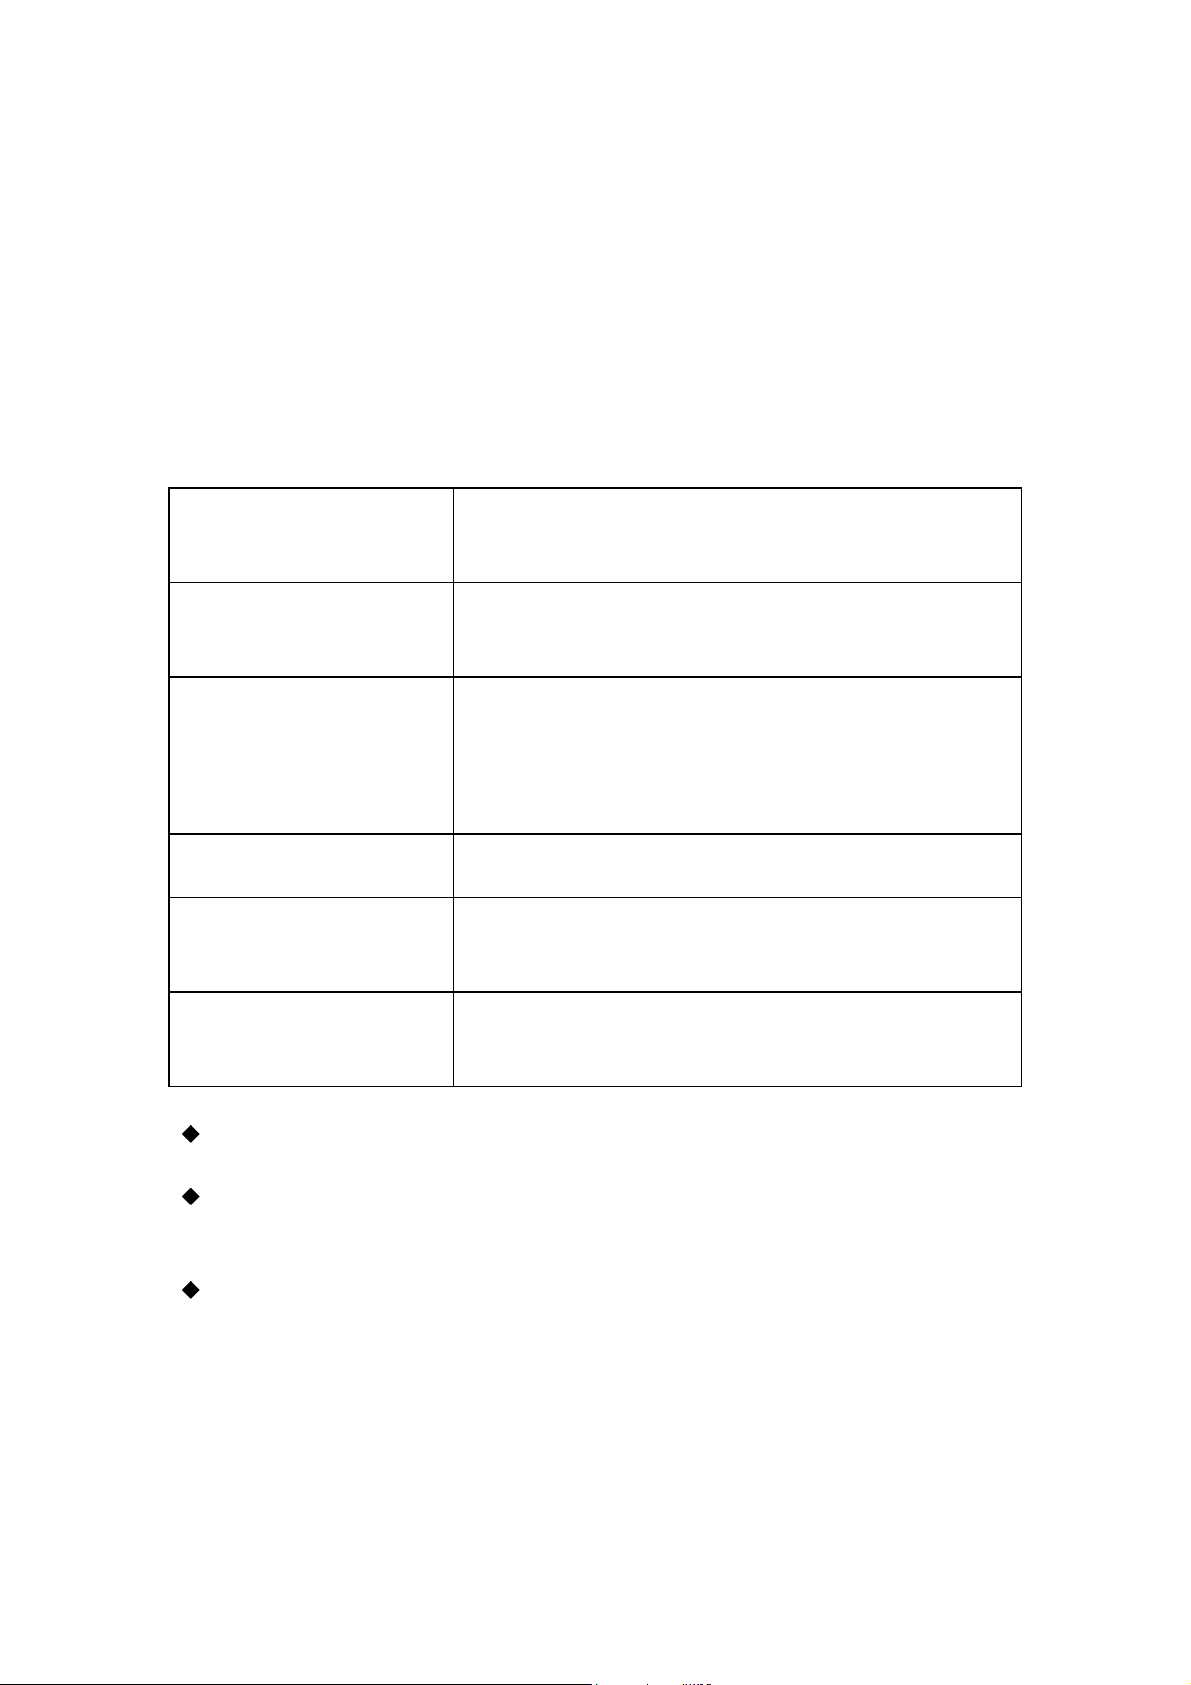
6.5 Do not shield positions of air outlet and return air inlet of the refrigerator
The refrigerator door can not
6.6 Do not keep foods of higher temperature close to temperature sensor
6.7Take out drawer of freezing chamber of refrigerator and put foods directly on the
glass partition
7. Trouble shooting
The following simple issues can be handled by the user. Please call the after-sale service
department if the issues are not settled.
Whether the freezer is plugged and connected to power;
Inoperation
Odor
Long-term operation of
compressor
Illuminating light does not
shine
be properly closed.
Loud noises
7.1 Warm tips:
The refrigerator enclosure may emit heat during operation specially in summer, this is caused
by the radiation of the condenser, and it is a normal phenomenon.
Condensation: condensation phenomenon will be detected on the exterior surface and door
seals of the freezer when the ambient humidity is large, this is a normal phenomenon, and the
condensation can be wiped away with a dry towel.
Buzz: Buzz will be generated by running compressor specially when starting up or shutting
down.
Low voltage;
Failure power or tripping circuit
Odorous foods should closely wrapped;
Whether foods are rotten;
Whether the interior shall be cleaned.
It is normal that refrigerator operates for longer time in
summer when the ambient temperature is higher;
Do not put too much food in the freezer at one time;
Do not put foods until they are cooled;
Frequent opening of refrigerator door.
Whether the refrigerator is connected to power,
whether the illuminating light is damaged.
The freezer door is stuck by food packages;
Too much food;
Tilt refrigerator.
Whether the food is leveled, whether the refrigerator is
balanced;
Whether the refrigerator parts are properly placed.
8. TIPS FOR ENERGY SAVING
Try not to open the door too often, especially when the weather is wet and hot. Once you open
the door, close it as soon as possible.
12
Page 49
Every now and then check if the appliance is sufficiently ventilated (adequate air circulation
harm to the environment
product was purchased. They can take this product for environmental safe recycling.
behind the appliance).
In normal temperature conditions, please arrange the thermostat at the middle setting.
Before loading the appliance with packages of fresh food, make sure they are cooled to ambient
temperature.
Ice and frost layer increase energy consumption, so clean the appliance as soon as the layer is 3-5
mm thick.
If it is the outer condenser, the rear wall should be always clean free of dust or any impurities.
The appliance should be located in the coolest area of the room, away from heat producing
appliances or heating ducts, and out of the direct sunlight.
Let hot foods cool to room temperature before placing in the appliance. Overloading the
appliance forces the compressor to run longer. Foods that freeze too slowly may lose quality, or
spoil.
Be sure to wrap foods properly, and wipe containers dry before placing them in the appliance.
This cuts down on frost build-up inside the appliance.
Appliance storage bin should not be lined with aluminum foil, wax paper, or paper toweling.
Liners interfere with cold air circulation, making the appliance less efficient.
Organize and label food to reduce door openings and extended searches. Remove as many
items as needed at one time, and close the door as soon as possible.
9. DISPOSAL
Old units still have some residual value. An environmentally friendly method of disposal will
ensure that valuable raw materials can be recovered and used again. The refrigerant used in your
unit and insulation materials require special disposal procedures. Ensure that none of the pipes
on the back of the unit are damaged prior to disposal. Up to date information concerning options
of disposing of your old unit and packaging from the new one can be obtained from your local
council office.
When disposing of an old unit break of any old locks or latches and remove the door as a
safeguard.
Correct Disposal of this product
For more information, please contact the local authority or your retailer where you purchased
the product.
Correct Disposal of this product
This marking indicates that this product should not be disposed with other
household wastes throughout the EU. To prevent possible
or human health from uncontrolled waste disposal, recycle it responsibly to
promote the sustainable reuse of material resources. To return your used device,
please use the return and collection systems or contact the retailer where the
13
Page 50
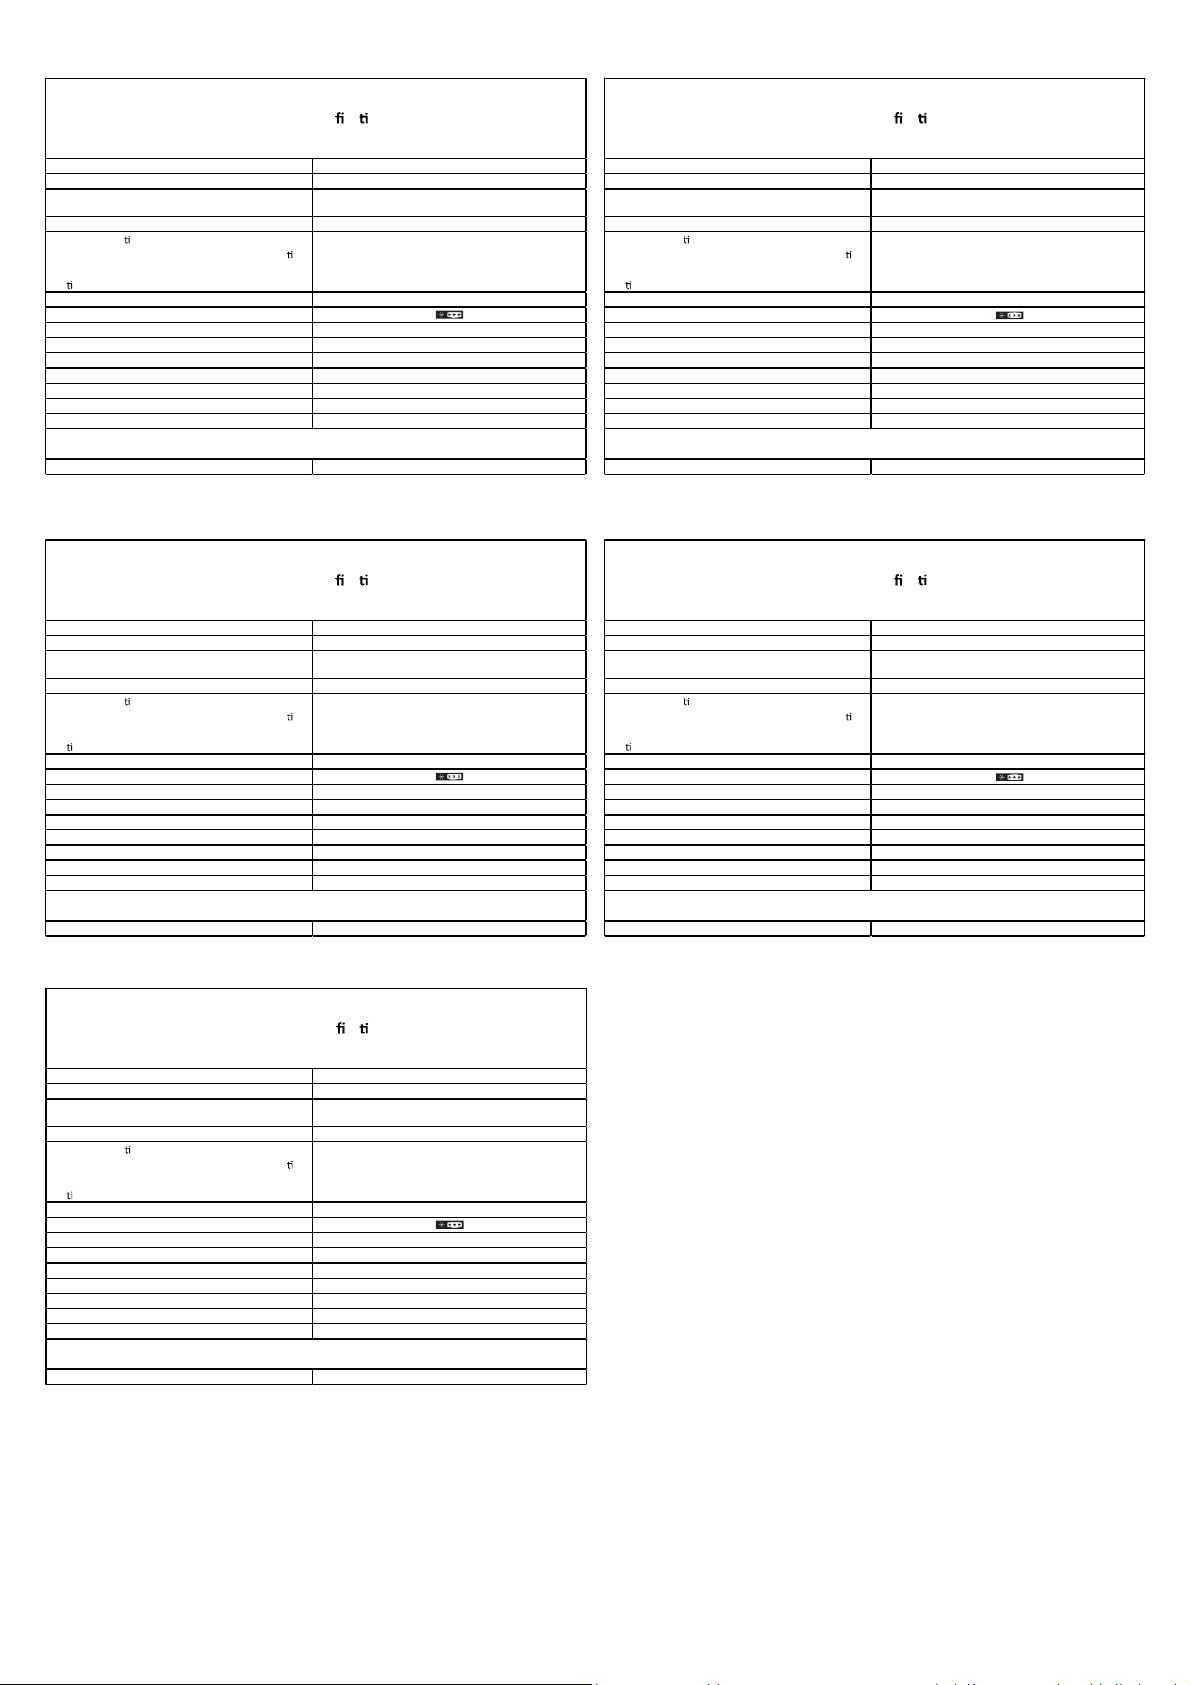
Product Speci ca on
Product Speci ca on
Brand TEKA
Model NFL 320 BLANCO
Category
Energy Class A+
Energy consump on of kwh per year, based on standard
test results of 24 hours. The actual energy consump on
will depe nd on the mode of use of the apparatus and
loca on.
Volume of fridge ( L) 219L
Volume of star compartment (L)
Volume of free zer (L) 76L
Volume of other compartments (L) /
Frost Free, fridge compartment (YES/NO)
Frost Free, freezer compartment (YES/NO)
Temperature rise value(h) 15h
Freezing Capacity(kg/24h) 4kg/24h
Climate Class N/T
This appliance is intended to be used at an ambient temperature between 10°C and 38 °C.
Noise db(A) 40db(A)
Refrigerator-freeze r
286kWh/ year
YES
NO
Product Speci ca on
Brand TEKA
Model NFL 340 BLANCO
Category
Energy Class A+
Energy consump on of kwh per year, based on standard
test results of 24 hours. The actual energy consump on
will depe nd on the mode of use of the apparatus and
loca on.
Volume of fridge ( L) 219L
Volume of star compartment (L)
Volume of free zer (L) 76L
Volume of other compartments (L) /
Frost Free, fridge compartment (YES/NO) YES
Frost Free, freezer compartment (YES/NO)
Temperature rise value(h) 15h
Freezing Capacity(kg/24h) 4kg/24h
Climate Class N/T
This appliance is intended to be used at an ambient temperature between 10°C and 38 °C.
Noise db(A) 40db(A)
Refrigerator-freeze r
286kWh/ year
NO
Brand TEKA
Model NFL 320 INOX
Category
Energy Class A+
Energy consump on of kwh per year, based on standard
test results of 24 hours. The actual energy consump on
will depend on the mode of use of the apparatus and
loca on.
Volume of frid ge (L) 219L
Volume of star compartment (L)
Volume of free zer (L) 76L
Volume of other compartments (L) /
Frost Free, fridge compartment (YES/NO) YES
Frost Free, freezer compartment (YES/NO) NO
Temperature rise value(h) 15h
Freezing Capacity(kg/24h) 4kg/24h
Climate Class N/T
This appliance is intended to be used at an ambient temperature between 10°C and 38 °C.
Noise db(A) 40db(A)
Refrigerator-freeze r
286kWh/ year
Product Speci ca on
Brand TEKA
Model NFL 340 INOX
Category
Energy Class A+
Energy consump on of kwh per year, based on standard
test results of 24 hours. The actual energy consump on
will depend on the mode of use of the apparatus and
loca on.
Volume of frid ge (L) 219L
Volume of star compartment (L)
Volume of free zer (L) 76L
Volume of other compartments (L) /
Frost Free, fridge compartment (YES/NO) YES
Frost Free, freezer compartment (YES/NO)
Temperature rise value(h) 15h
Freezing Capacity(kg/24h) 4kg/24h
Climate Class N/T
This appliance is intended to be used at an ambient temperature between 10°C and 38 °C.
Noise db(A) 40db(A)
Refrigerator-freeze r
286kWh/ year
NO
Product Speci ca on
Brand TEKA
Model NFL 430 INOX
Category
Energy Class A++
Energy consump on of kwh per year, based on standard
test results of 24 hours. The actual energy consump on
will depen d on the mode of use of the apparatus and
loca on.
Volume of frid ge (L) 250L
Volume of star compartment (L)
Volume of free zer (L) 76L
Volume of other compartments (L) /
Frost Free, fridge compartment (YES/NO) YES
Frost Free, freezer compartment (YES/NO)
Temperature rise value(h) 15h
Freezing Capacity(kg/24h) 4kg/24h
Climate Class N/T
This appliance is intended to be used at an ambient temperature between 10°C and 38 °C.
Noise db(A) 40db(A)
Refrigerator-freez er
234kWh/ year
NO
Page 51
Page 52
Page 53
Page 54
Page 55
Page 56
Page 57
Page 58
Page 59
Page 60
Page 61
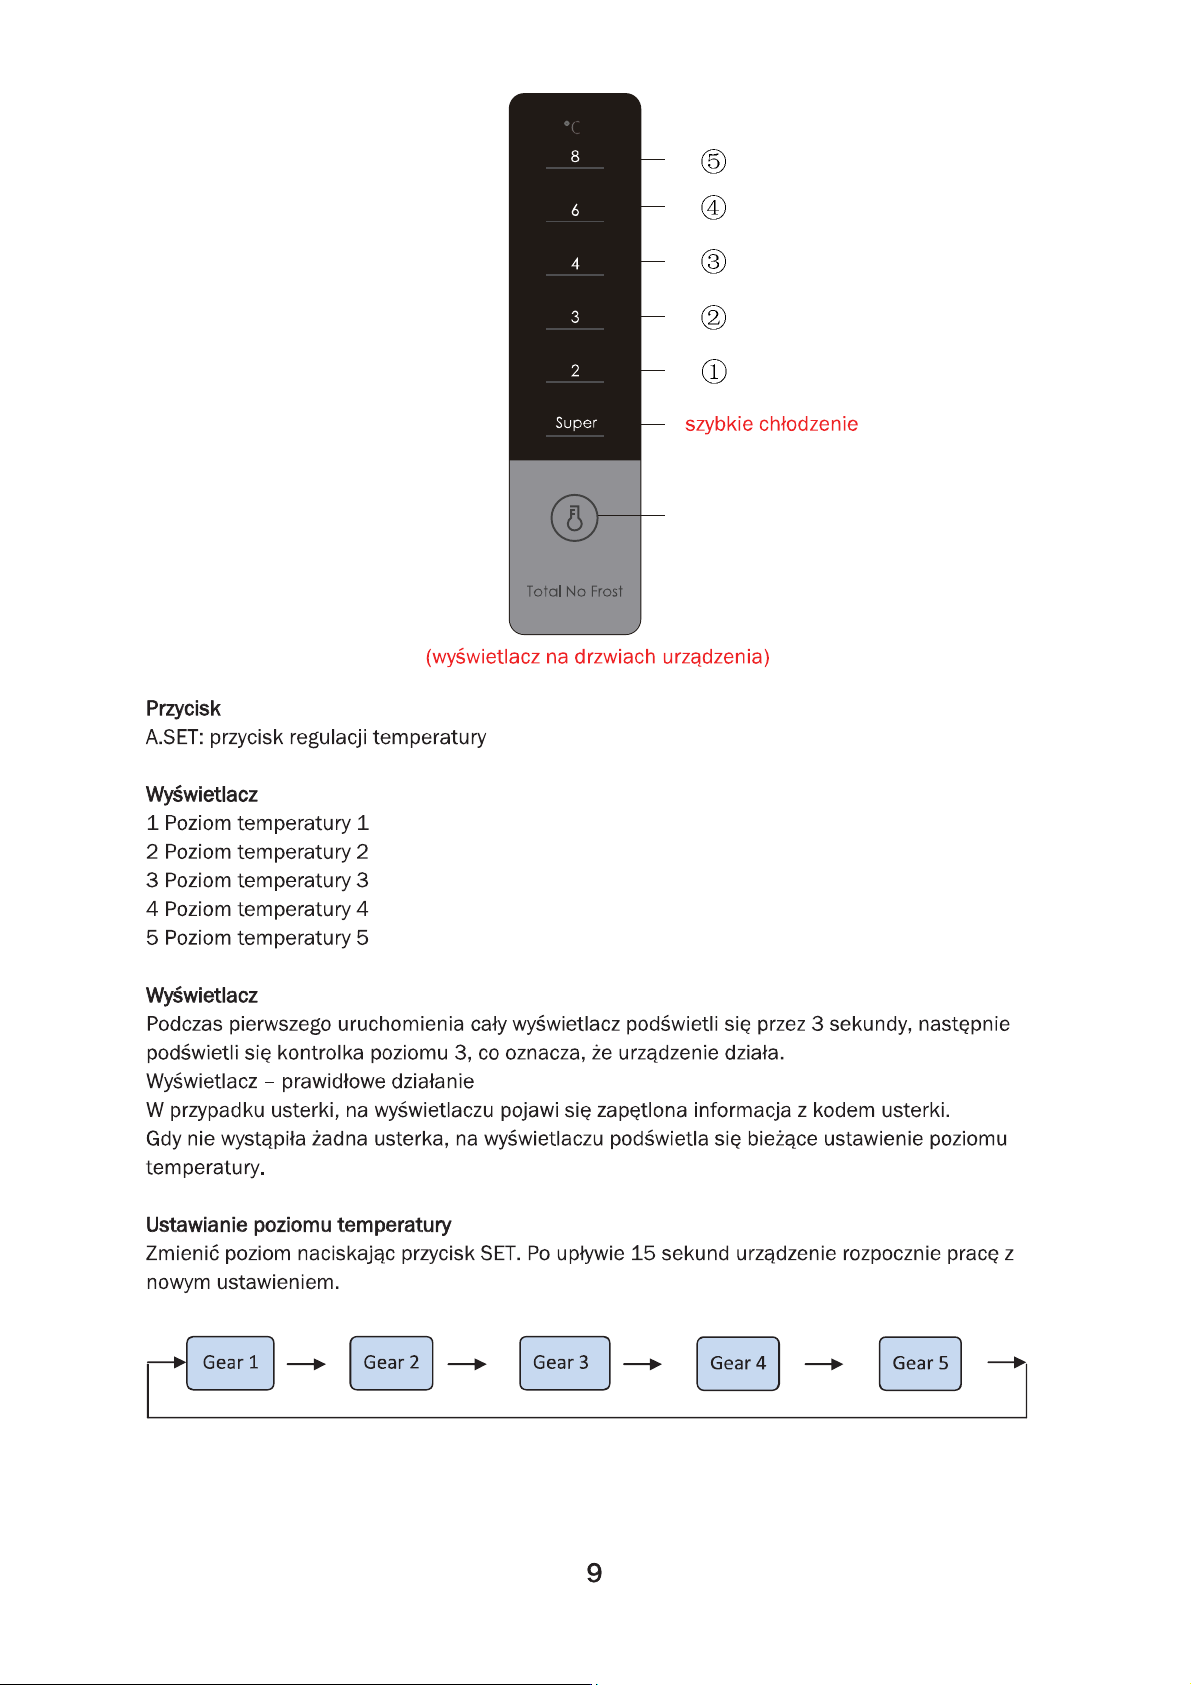
A
Page 62
Page 63
Page 64
Page 65
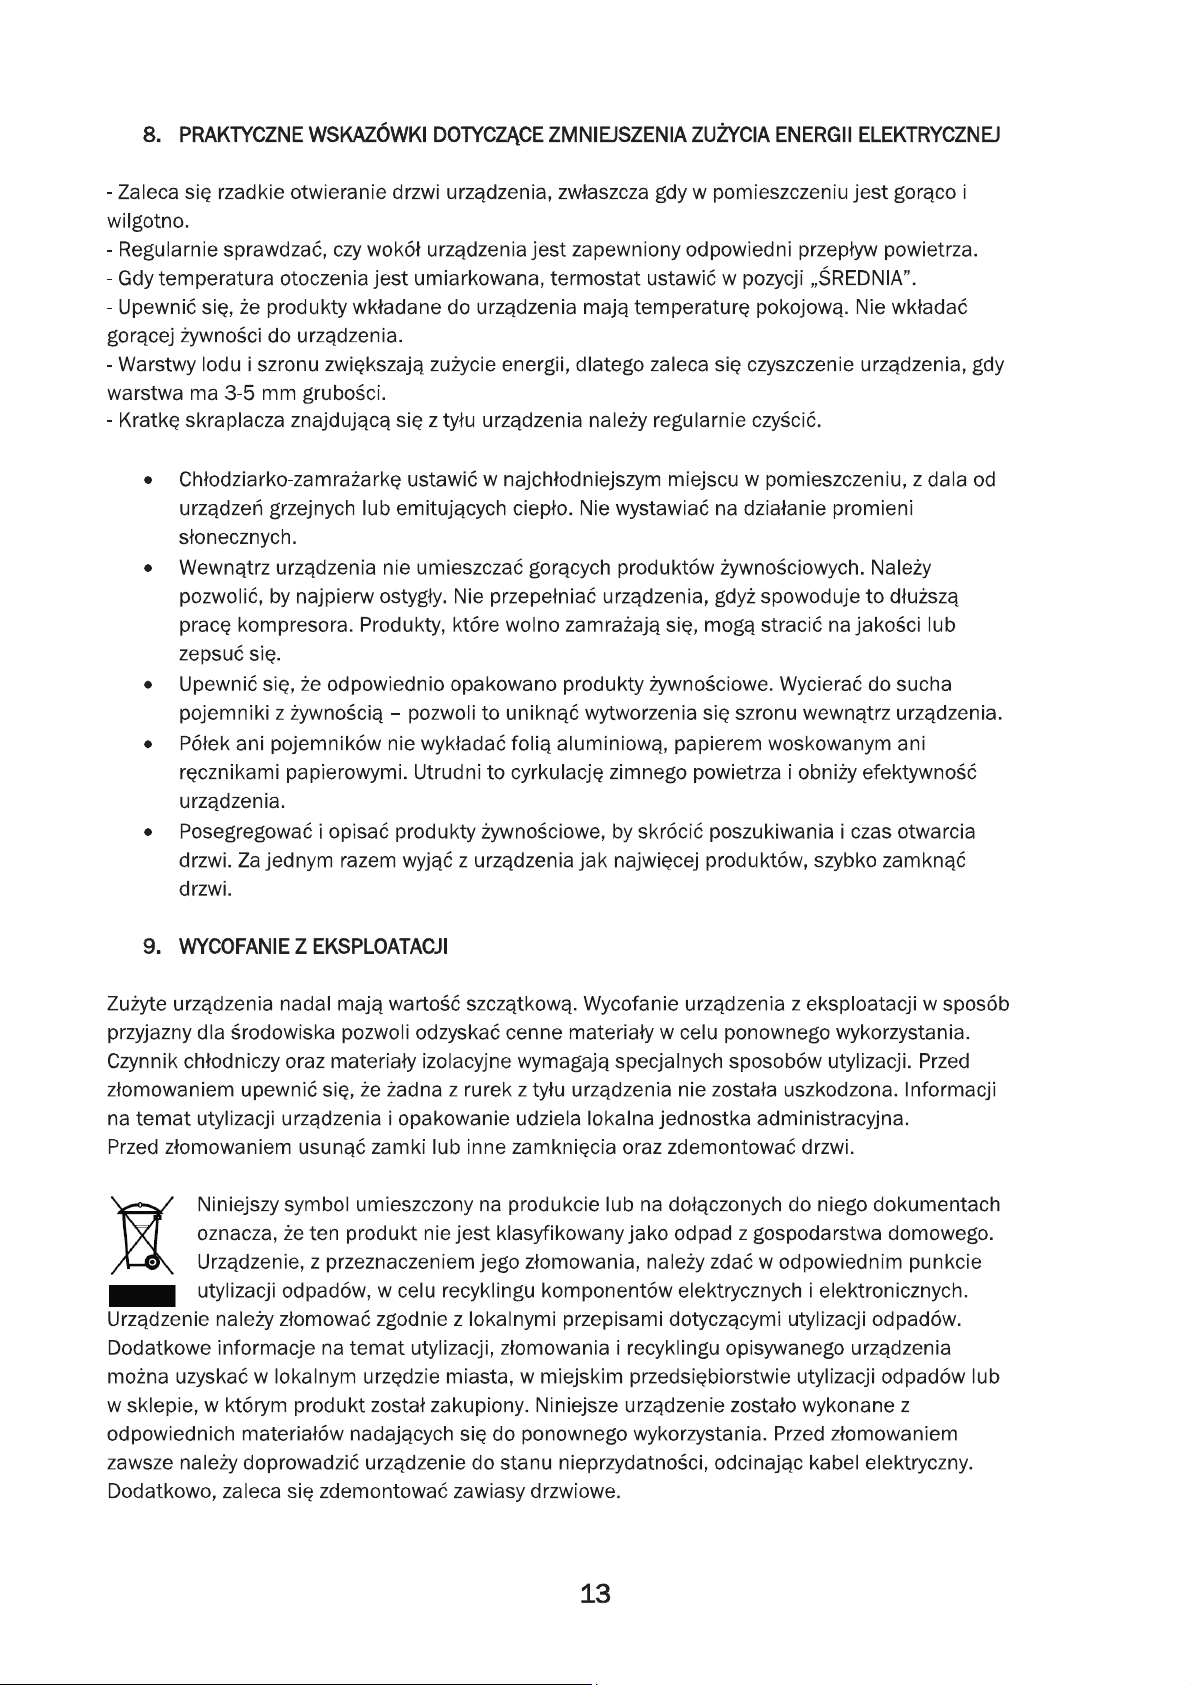
Page 66
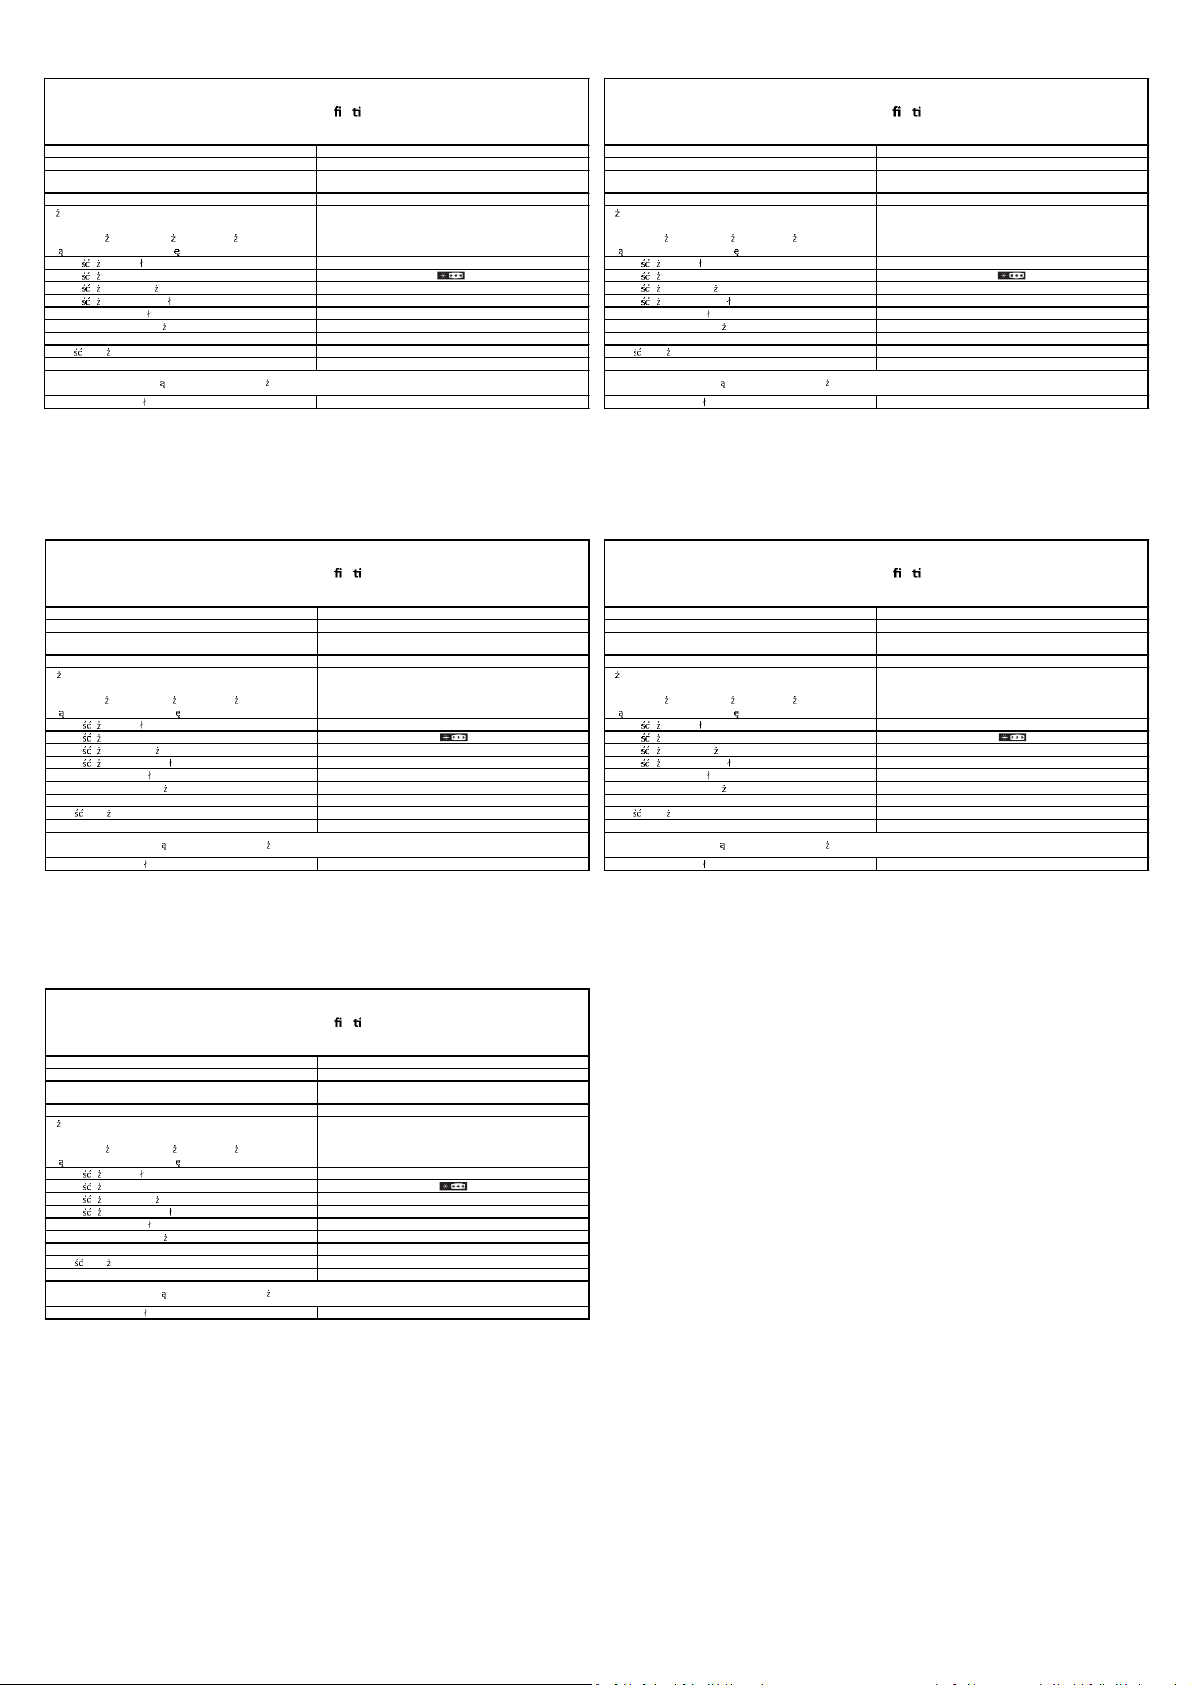
Product Speci ca on
Product Speci ca on
Marka
Model
Kategoria
Klasa energetyczna
Zu yci e energii w kWh rocznie na podstawie wyników testu
przeprowadzonego w normalnych warunkach w cyklu 24 godzinnym.
Rzeczywiste zu ycie energii zale y od sposobu u ytkowania
urz dzenia i miejsca, w którym si ono znajduje.
Pojemno u ytkowa ch odziarki (w l itrach)
Pojemno u ytkowa, oznaczenie gwiazdkowe (w litrach)
Pojemno u ytkowa zamra arki (w litrach)
Pojemno u ytwkowa pozostaych komór (w litrach)
System bezszronowy w ch odziarce (TAK/NIE)
System bezszronowy w zamra arce (TAK/NIE)
Bezpieczny czas przechowywania bez zasilania (w godzinach)
Zdolno zamra ani a (kg/24 h)
Klasa klimatyczna
Poziom emitowanego ha asu db(A) re1 pW 40db(A)
Urz d zenie przeznaczone do u ytkow ania w temperaturze otoczenia od +10°C do +38°C
TEKA
NFL 3 20 BLANCO
REFRIGERADOR
A+
286kWh/ year
219L
76L
/
TAK
NIE
15h
4kg/24 h
N/T
Product Speci ca on
Marka
Model
Kategoria
Klasa energetyczna
Zu ycie energii w kWh rocznie na podstawie wyników testu
przeprowadzonego w normalnych warunkach w cyklu 24 godzinnym.
Rzeczywiste zu ycie energii zale y od sposobu u ytkowania
urz dzenia i miej sca, w którym si ono znajduje.
Pojemno u y tkowa chodzi arki (w litrach)
Pojemno u y tkowa, oznaczenie gwiazdkowe (w l itrach)
Pojemno u y tkowa zamra a rki (w litrach)
Pojemno u y twkowa pozosta ych komór (w litrach)
System bezszronowy w ch odziarce (TAK/NIE)
System bezszronowy w zamra arce (TAK/NI E)
Bezpieczny czas przechowywania bez zasilania (w godzinach)
Zdolno zamra ania (kg/24 h)
Klasa klimatyczna
Poziom emitowanego ha asu db(A) re1 pW 40db(A)
Urz dzenie przeznaczone do u y tkowania w temperaturze otoczenia od +10°C do +38°C
TEKA
NFL 340 BLANC O
REFRIGE RADOR
A+
286kWh/ year
219L
76L
/
TAK
NIE
15h
4kg/2 4h
N/T
Marka
Model
Kategoria
Klasa energetyczna
Zu yci e energii w kWh rocznie na podstawie wyników testu
przeprowadzonego w normalnych warunkach w cyklu 24 godzinnym.
Rzeczywiste zu ycie energii zale y od sposobu u ytkowania
urz dzenia i miejsca, w którym si ono znajduje.
Pojemno u ytkowa ch odziarki (w litrach)
Pojemno u ytkowa, oznaczenie gwiazdkowe (w litrach)
Pojemno u ytkowa zamra arki ( w litrach)
Pojemno u ytwkowa pozosta ych komór (w litrach)
System bezszronowy w ch odziarce (TAK/NIE)
System bezszronowy w zamra arce (TAK/NIE)
Bezpieczny czas przechowywania bez zasilania (w godzinach)
Zdolno zamra ania (kg/24 h)
Klasa klimatyczna
Poziom emitowanego ha asu db(A) re1 pW 40db(A)
Urz d zenie przeznaczone do u ytkow ania w temperaturze otoczenia od +10°C do +38°C
TEKA
NFL 3 20 INOX
REFRI GERADOR
A+
286kWh/ year
219L
76L
/
TAK
NIE
15h
4kg/24 h
N/T
Product Speci ca on
Marka
Model
Kategoria
Klasa energetyczna
Zu yci e energii w kWh rocznie na podstawie wyników testu
przeprowadzonego w normalnych warunkach w cyklu 24 godzinnym.
Rzeczywiste zu ycie energii zale y od sposobu u ytkowania
urz dzenia i miejsca, w którym si ono znajduje.
Pojemno u ytkowa ch odziarki (w litrach)
Pojemno u ytkowa, oznaczenie gwiazdkowe (w litrach)
Pojemno u ytkowa zamra arki (w litrach)
Pojemno u ytwkowa pozostaych komór (w litrach)
System bezszronowy w ch odziarce (TAK/NIE)
System bezszronowy w zamra arce (TAK/NIE)
Bezpieczny czas przechowywania bez zasilania (w godzinach)
Zdolno zamra ani a (kg/24 h)
Klasa klimatyczna
Poziom emitowanego ha asu db(A) re1 pW 40db(A)
Urz d zenie przeznaczone do u ytkow ania w temperaturze otoczenia od +10°C do +38°C
TEKA
NFL 3 40 INOX
REFRI GERADOR
A+
286kWh/ year
219L
76L
/
TAK
NIE
15h
4kg/24 h
N/T
Product Speci ca on
Marka
Model
Kategoria
Klasa energetyczna
Zu ycie energii w kWh rocznie na podstawie wyników testu
przeprowadzonego w normalnych warunkach w cyklu 24 godzinnym.
Rzeczywiste zu ycie energii zal e y od sposobu u ytkowania
urz dzenia i mie jsca, w którym si ono znajduje.
Pojemno u ytkowa ch odziarki (w l itrach)
Pojemno u ytkowa, oznaczenie gwi azdkowe (w litrach)
Pojemno u ytkowa zamra arki (w litrach)
Pojemno u ytwkowa pozosta ych komór (w litrach)
System bezszronowy w ch odziarce (TAK/NIE)
System bezszronowy w zamra arce (TAK/NIE)
Bezpieczny czas przechowywania bez zasilania (w godzinach)
Zdolno zamra ania (kg/24 h)
Klasa klimatyczna
Poziom emitowanego ha asu db(A) re1 pW 40db(A)
Urz d zenie przeznaczone do u ytkow ania w temperaturze otoczenia od +10°C do +38°C
TEKA
NFL 4 30 INOX
REFRIG ERADOR
A++
234kWh/ year
250L
76L
/
TAK
NIE
15h
4kg/2 4h
N/T
Page 67
Take Industrial SA
C/ CAJO, 17 – 39011 SANTANDER (SPAIN)
 Loading...