


User Manual
TBBQ 4100 G SS
EN ES PT FR
teka.com

4 BURNER GAS BBQ GRILL
Should you have any questions, please contact us. Contact information can be found on our website teka.com.
MANUAL MUST BE READ BEFORE OPERATING!

WARNINGS
Improper installation, adjustment, alteration, use, or maintenance can cause bodily injury and/or property damage.
Read this instruction manual thoroughly before installing or using this appliance.
1. Do not store or use gasoline or other flammable liquids or vapors in the vicinity of this or any other appliance.
2. A propane/butane gas tank not connected for use should not be stored in the vicinity of this or any other appliance.
DANGER
If you smell gas:
1. Immediately shut off gas to the appliance.
2. Extinguish any open flame.
3. Open the lid.
4. If the odour continues, keep away from the appliance and immediately call your gas supplier or fire department.
Before using your appliance for the first time, please carefully read the installation and maintenance
instructions included.
Depending on the model, the accessories and features included in your appliance may vary from those
shown in the pictures.
CONTACT US
Should you have any questions, please contact us. Contact information can be found on our website teka.com.
Our address:
TEKA Industrial S.A.
C/Cajo 17, 39011 Santander

TABLE OF CONTENTS
INTENDED USE ...................................................................................................................................EN-5
SAFETY INFORMATION ......................................................................................................................EN-5
UNPACKING THE GRILL
PARTS LIST ............................................................................................................................................................... EN-11
PREPARATION .......................................................................................................................................................... EN-12
ASSEMBLY INSTRUCTIONS
CONNECTING TO GAS SUPPLY
GAS TANK CONNECTION .......................................................................................................................................... EN-19
GAS REQUIREMENTS ............................................................................................................................................... EN-20
SAFE GRILLING ENVIRONMENT ............................................................................................................................... EN-20
OPERATING INSTRUCTIONS
FIRST USE – PRIMING THE GRILL ............................................................................................................................. EN-21
PREHEATING ............................................................................................................................................................ EN-21
COOKING TIPS ......................................................................................................................................................... EN-21
ELECTRONIC LIGHTING INSTRUCTIONS ................................................................................................................... EN-21
REPLACING THE BATTERY ........................................................................................................................................ EN-22
LID POSITIONING – OPEN OR CLOSE ....................................................................................................................... EN-22
TESTING FOR GAS LEAKS ......................................................................................................................................... EN-22
MAINTENANCE AND CLEANING
CLEANING THE BURNERS ........................................................................................................................................ EN-23
CLEANING THE IGNITION HEAD ............................................................................................................................... EN-24
CLEANING THE DRIP TRAY ....................................................................................................................................... EN-24
MAINTAINING BARBECUE SURFACES AND LIDS ...................................................................................................... EN-24
GAS SAFETY ............................................................................................................................................................. EN-25
CARE AND MAINTENANCE TIME TABLE ................................................................................................................... EN-26
REPLACING THE MAIN BURNER .......................................................................................................EN-27
TROUBLESHOOTING ........................................................................................................................EN-28
REPLACEMENT PARTS ......................................................................................................................EN-29
WASTE DISPOSAL ............................................................................................................................. EN-31
DECLARATION OF CONFORMITY ......................................................................................................EN-31
EN-4

INTENDED USE
This gas grill is intended for heating up, cooking and grilling different kinds of foodstuff in well-ventilated outdoor areas.
The appliance must be operated with low pressure butane or propane gas. It may not be supplied with natural gas.
This product is intended for private use only and may not be used for any commercial or industrial purposes.
This appliance must only be used as described in this user manual. Any other use will be considered improper and may
cause property damage and personal injury.
The manufacturer is not liable for any damage resulting from improper use.
SAFETY INFORMATION
SAFETY SYMBOLS
Danger! (High risk)
Failure to observe this precaution can result in fatal injuries.
Warning! (Medium risk)
Failure to observe this precaution can result in property damage.
Caution! (Low risk)
Precaution that should be taken into account when handling the appliance.
General safety information
GENERAL SAFETY INSTRUCTIONS
These safety instructions must be observed during every use.
– Use outdoors only!
– Read the instructions before using the appliance.
– WARNING! Accessible parts may be very hot. Keep young children away.
– This appliance must be kept away from flammable materials during use.
– Do not move the appliance during use!
– Turn off the gas supply at the gas cylinder after use.
– Do not modify the appliance.
GENERAL BARBECUE WARNINGS
1. WARNING! Danger of carbon monoxide poisoning! Never operate the appliance in enclosed areas such as garages or sheds, as
this leads to a carbon monoxide build-up resulting in personal injury or death.
2. WARNING! Danger of explosion! Never operate the appliance in enclosed areas such as garages or sheds, as this leads to gas
accumulation in case of a leakage which may result in an explosion.
3. Always lock the wheels with their brakes (if available) prior to use.
4. Do not attempt to move the appliance while it is in use.
5. Do not attempt to modify the appliance in any way. Only use attachments and accessories recommended by the manufacturer.
Any alterations made to the appliance, improper use, or non-compliance with the instructions lead to danger.
6. Do not use the appliance in the immediate presence of aerosol cans, flammable liquids, volatile gases, or other flammable
substances. Keep open flames such as candles or torches away from the appliance.
7. Do not store any flammable liquids or volatile gases near the appliance.
EN-5

8. Do not leave the appliance unattended during use.
9. Do not use liquid fuels with this appliance.
10. Never lean over the cooking surface while igniting the appliance or during cooking.
GAS BARBECUE WARNINGS
1. This appliance is configured to work with low-pressure butane or propane gas. Do not use natural gas supply.
2. Open the cover before igniting the appliance.
3. Use caution when opening the cover when the appliance is being used. Hot steam could collect inside the cover and may be
ejected quickly when opened. Do not open the cover too quickly.
4. Do not touch hot surfaces. Use the handle only for lifting the cover.
5. Cover the appliance only when it has completely cooled down completely.
6. Never use charcoal or other solid fuels in this appliance.
7. It is recommended minimum clearances of the grill to any combustible materials must be 1 m.
8. Do not place anything on the top for the cover while the appliance is in use!
9. Minimum and maximum dimentions of pot or pan to use on the side burner: 203.2 mm - 254 mm.
GAS CONNECTIONS / GAS CYLINDER / PRESSURE REGULATOR WARNINGS
1. Check the appliance and all connections regularly and each time the gas cylinder is replaced for possible gas leaks.
2. Never check for gas leaks using a match or any other open flame.
3. Never alter or modify the pressure regulator or gas supply assembly.
4. Always turn the gas supply off on the gas cylinder or the pressure regulator and disconnect the gas hose after use.
5. Never store gas cylinders indoors or close to heat sources.
6. Always store gas cylinders in the upright position, never in a horizontal position which could cause the gas cylinder to leak or
the gas to leak into the gas hose.
7. Never use the appliance without the pressure regulator.
8. Only use pressure regulators approved for liquid petroleum gas (LPG) and complying with national regulations.
GAS HOSE WARNINGS
1. Inspect the gas hose(s) prior to and after each use: look for any cuts, cracks, excessive wear, or other damage. The gas hose(s)
shall be replaced every one to two years by a qualified technician or the retailer only. Replace brittle gas hoses and their
connections. If in doubt, ask a local specialist.
2. Protect the gas hose(s) against damages. Do not let it / them hang over sharp edges. Do not twist, squeeze or bend it / them.
Keep the gas hose(s) away from hot surfaces and ensure that nobody can trip over it / them.
3. Only use gas hoses approved for liquid petroleum gas (LPG) and complying with national regulations.
4. Every kind of work or replacement of the hoses is to be conducted according to the manufacturer’s instructions by qualified
personnel or specialists.
5. The LP Gas hose must be replaced if damaged and when national conditions require it.
6. Make sure there is no debris, spiders, small insects, or webs inside the hose before any connection is made. They can obstruct
the gas flow, which could result in a fire in and around the burner tube.
The maximum length of the hose shall not exceed 1.5 m.
IF YOU SMELL GAS
1. Never light the appliance if you smell gas.
2. Immediately turn the gas supply off on the appliance as well as on the gas cylinder and / or the pressure regulator.
3. Extinguish all open flames near the appliance such as candles and torches. Switch off all electrical appliances in the
surroundings.
4. Make sure the area is well ventilated with fresh air.
5. Open the cover of the appliance in order to let the gas escape. Should you still smell gas, do not use the appliance any longer
and have it repaired by an authorized professional only.
EN-6

SAFETY INSTRUCTIONS
Danger! Risk of fire!
The grill parts become very hot during use and can cause fire.
- Always have a ready-to-use fire extinguisher and a first aid kit at hand in the event of an accident or fire.
- Place the grill on a secure, non-flammable, flat, level, stable, heat-resistant and clean surface away from any heat source prior
to use.
- Ensure that the grill is set up at least 1 m away from highly combustible materials such as awnings, wooden terraces or
furniture.
- Do not move the grill during use.
- Some foods produce flammable fats and juices. Clean the grill on a regular basis, preferably after each use.
- Do not leave the operating grill unattended.
Danger! Risk of fire!
Never attempt to switch on/light the grill with the lid closed.
- Only operate the gas grill with the lid closed at a low flame.
Danger! Risk of burns and accidents!
This appliance is not intended for use by persons (including children) with reduced physical, sensory or mental
capabilities, or lack of experience and/or knowledge.
- This group of people must be informed about the dangers associated with the use of the appliance and must be supervised by
a person responsible for their safety.
- Supervise children at all times to ensure that they do not play with the appliance.
- Any modifications to the product may be extremely hazardous and are therefore prohibited. Do not attempt to make
unauthorized modifications to the appliance. In the event of damage, repairs or other problems with the grill, please contact
our service center or a local dealer.
- Keep the appliance away from children and pets.
Do not touch the grill, flame burner and food being grilled during use as they become extremely hot and can cause severe burns.
- Keep sufficient distance from hot parts since any contact can cause severe burns.
- Always wear grill or oven gloves (e.g. Category II heat-resistant gloves rated according to DIN-EN 407) when grilling.
- Use only long-handled grill utensils with heat-resistant grips.
- Do not wear clothing with wide sleeves.
- Allow the grill to cool down completely before cleaning it or stowing it away.
Danger! Risk of deflagration!
When poured into the flames, flammable liquids create flashes or deflagrations.
- Never use flammable fluids such as gasoline or spirit.
Danger! Risk of poisoning!
Gas is odorless and can be deadly in enclosed spaces!
- The grill is intended for outdoor use only.
Danger! Health risk!
Do not use paint solvents or thinners to remove stains. These substances are hazardous to health and must not come
into contact with food.:
Danger! Risks to children!
Children playing with the packaging film can get caught in it, which can result in suffocation.
- Do not let children play with the packaging film.
- Do not let children put small assembly parts into their mouths as these present a choking hazard. The parts can cause choking
if swallowed.
EN-7

Danger! Risk of injury!
Both the grill and individual parts have some sharp edges.
- Individual parts of the grill must be handled with care to prevent accidents or injuries during assembly and use. Wear safety
gloves where necessary.
- Do not set up the grill near entryways or high-traffic zones.
- Utmost care must be exercised when grilling. You may lose control of the appliance if distracted.
- Always be attentive to and aware of what you are doing. Do not use this product if you are unfocused or tired, or if you are
under the influence of drugs, alcohol, or medicines. Just one moment of carelessness during use of the product can cause
serious injuries.
Warning! Risk of damage!
During use, the screws can loosen slowly and impair the grill's stability.
- Check the tightness of screws before each use. If necessary, re-tighten all screws to ensure the grill stands stable at all times.
Warning! Risk of damage!
Do not use any strong or abrasive solvents or scouring pads as these can damage the surfaces and leave scuff marks.
Danger! Risk of burns and accidents!
Caution! If you smell gas:
- Immediately shut off gas to the appliance.
- Extinguish any open flame.
- Open the lid.
- If odour continues, keep away from the appliance and immediately call your gas supplier or fire department.
Danger! Risk of burns and accidents!
The grill must be stored away from fuels (e.g. gasoline) or other flammable liquids or gases.
- Gas cylinders must be stored separately from the gas grill.
- Gas cylinders must be stored away from the gas grill.
- Do not place gas cylinders directly under the gas grill.
Danger! Risk of fire!
This appliance must be kept away from flammable materials during use.
- Changing the gas cylinder must be carried out away from any source of ignition.
- Gas cylinders must never be stored at temperatures exceeding 50 °C. On extremely hot days, efforts should be made to keep
the cylinders in the shade.
EN-8

BATTERY SAFETY INFORMATION
1. WARNING: KEEP BATTERY OUT OF REACH OF CHILDREN. Swallowing can lead to chemical burns, perforation of soft
tissue, and death. Severe burns can occur within two hours of ingestion. Seek medical attention immediately.
2. If you think the battery might have been swallowed or placed inside any part of the body, seek immediate medical
attention.
3. Do not allow children to replace the battery without adult supervision.
4. Exhausted batteries should be immediately removed from the equipment and properly disposed of.
5. Do not dispose of the batteries in fire. Do not expose batteries to heat or fire. Avoid storage in direct sunlight.
6. If the battery should leak, remove it with a cloth from the battery compartment. Dispose of battery according to
regulations. If battery acid has leaked, avoid contact to skin, eyes, and mucous membranes. Rinse affected areas
immediately after contact with the acid and wash with plenty of clean water. Visit a physician.
7. Do not encapsulate and/or modify batteries.
8. Before you discard the appliance, dispose of batteries in an environmentally safe manner.
9. Always insert batteries correctly with regard to polarity (+ and –) marked on the battery and in the battery
compartment. When batteries are inserted in reverse they might be short-circuited or charged. This can cause
overheating, leakage, venting, rupture, explosion, fire, and personal injury.
10. Only use the battery type indicated in this manual.
11. Do not short-circuit batteries. When the positive (+) and negative (–) terminals of a battery are in electrical contact
with each other, the battery becomes short-circuited. For example, loose batteries in a pocket with keys or coins can be
short-circuited. This can result in venting, leakage, explosion, fire, and personal injury.
12. Do not charge alkaline batteries. Attempting to charge a non-rechargeable (primary) battery can cause internal gas
and/or heat generation resulting in leakage, venting, explosion, fire, and personal injury.
13. Do not subject batteries to mechanical shock.
14. Do not dismantle, open or shred batteries.
15. WARNING: Used batteries must not be disposed of in the household rubbish. Take them to a designated disposal/
collection site.
EN-9

UNPACKING THE GRILL
(
$
'
%
<
&
(
)
*
'
9
8
7
-
/
0
4
$
;
&
%
=
:
6
5
+
,
.
1
3
2
EN-10

PARTS LIST
PART DESCRIPTION QTY PART DESCRIPTION QTY
A Firebox Assembly 1 S Grease Tray 1
B Left Side Shelf 1 T Cart Side Panel, Right 1
C Left Side Shelf Facia 1 U Knob 1
D Bracket D 1 V Side Burner Knob Bezel 1
E Cart Side Panel, Left 1 W Side Burner 1
F Left Door 1 X Bracket X 1
G Door Hanle Bezel 4 Y Right Side Shelf Facia 1
H Door Handle 2 Z Right Side Shelf 1
I Door Handle Grommet 4 A1 Flame Tamer 4
J Bracket J 1 B1 Cooking Grid 2
K Locking Caster 2 C1 Warming Rack 1
L Cart Front Brace 1 D1 Cart Rear Panel 1
M Bracket M 1 E1 Firebox Rear Cover 1
N Cart Bottom Panel 1 AA 5/32"x10mm Screw 10
O Door Stopper 1 BB 1/4"x8mm Screw 6
P Straight Caster 2 CC 1/4"x10mm Screw 23
Q Right Door 1 DD 1/4"x12mm Screw 26
R Grease Box 1 EE 1/4" Flat Washer 22
EN-11

PREPARATION
N
Before beginning assembly of product, make sure all parts are present. Compare parts with package contents list and
hardware contents list. If any part is missing or damaged, do not attempt to assemble the product.
Contact the dealer from whom you purchased the appliance if you find that parts are missing or show damage.
Do not use the appliance unless missing parts have been delivered or defective parts have been replaced. Using an
incomplete or damaged appliance leads to personal injury and property damage.
Remove and safely discard any packaging material or promotional labels attached to the set.
Tools required for assembly: Phillips screwdriver (not included).
ASSEMBLY INSTRUCTIONS
Danger! Risk of injury!
Follow all assembly instructions listed here. Failure to follow these instructions can lead to problems and
risks while using the grill.
1. Assemble the appliance completely and make all required adjustments prior to operation.
2. Follow the assembly and operation instructions closely. Use the figures as a visual guide.
3. Pay attention to small parts such as screws and nuts that are loosened or removed for assembly or during
adjustments. Keep them safe in order to avoid losing them.
4. The appliance is large. It is recommended to assemble by two people.
WARNING!
Use the appliance only after it has been completely assembled and adjusted!
IMPORTANT: Parts sealed by the manufacturer or the manufacturer's agent shall not be manipulated by the user.
NOTE: For all of the following steps, do not tighten any screws completely until all screws for that step have been
installed. Once all screws have been installed, then tighten them securely.
Step 1 Installing the casters
DD
EE
K
P
Step 2 Installing the door stopper
AA
N
O
Use 16pcs of screw DD and 16pcs of flat washer EE to
install the casters P and K onto the bottom panel N.
Use 2pcs of screw AA to install the door stopper O onto
the bottom panel.
EN-12

Step 3 Installing the side panels
J
Step 4 Installing the rear panel
E
CC
T
N
Use 6pcs of screw CC to install the side panels E and T
onto the bottom panel.
CC
D1
E
T
N
Use 7pcs of screw CC to install the rear panel D1 onto the
bottom panel.
Step 5 Installing the front brace
CC
T
L
Use 4pcs of screw CC to install the front brace L onto the
side panels.
Step 6 Installing the brackets
AA
E
T
E
M
Use 4pcs of screw AA to install the bracket J and bracket
M onto the front brace and side panel.
EN-13

Step 7 Mounting the firebox
A
A
S
Step 8 Securing the firebox to the cart
DD
E
T
Put the firebox assembly A on the cart as shown above.
Step 9 Installing the grease tray
S
Remove the pre-assembled screw on grease tray S, then
Use 4cps of screw DD to secure the firebox assembly.
Step 10 Installing the grease box
R
Install the grease box R as shown above.
install the grease tray to the firebox and tighten the
screw.
EN-14

Step 11 Installing the rear cover
A
I
C
T
Step 12 Assembling the door handles
F
CC
E1
G
E
D1
Use 6pcs of screw CC to fasten the firebox rear cover E1.
Step 13 Installing the cart doors
A
F
Q
H
Remove the pre-assembled screw on the door handle H,
and install the handle and bezel G to the door as shown
above. Then install the handle grommet I.
Apply the same installation method for the other door.
Step 14 Assembling the side shelf
BB
AA
B
D
N
Install the 2pcs of doors to the cart as shown above.
Use 3pcs of screw BB to install the left side shelf facia C
onto the left side shelf B.
Use 2pcs of screw AA to install the bracket D onto the left
side shelf B.
EN-15

Step 15 Assembling the side burner shelf
AA
BB
X
Y
Z
a
b
a
Step 16 Loosening the right side screws
c
Use 3pcs of screw BB to install the left side shelf facia Y
onto the side burner shelf Z.
Use 2pcs of screw AA to install the bracket X onto the
side burner shelf Z.
Step 17 Attaching the right side shelf
b
c
Loosen screws a and c, and remove screw b on the right
side of the firebox.
Step 18 Securing the right side shelf
DD EE
Attach the right side shelf to screws a and c, then tighten
screw b.
EN-16
Use 3pcs of screw DD and 3pcs of flat washer EE to
fasten the side burner shelf from inside of the firebox.
Then tighten screws a and c.
Apply the same installation method for left side shelf.

Step 19 Loosening the left side screws
V
Step 20 Attaching the left side shelf
a
b
c
Loosen screws a and c, and remove screw b on the left
side of the firebox.
Step 21 Securing the left side shelf
a
b
c
Attach the left side shelf to screws a and c, then tighten
screw b.
Step 22 Connecting the side burner valve
W
DD
EE
Use 3pcs of screw DD and 3pcs of flat washer EE to
fasten the left side shelf from inside of the firebox. Then
tighten screws a and c.
Remove the pre-assembled screws (2pcs) on the side
valve, then attach the bezel V to the valve with the holes
aligned. Tighten the screws.
EN-17

Step 23 Installing the side burner
Step 24 Installing the side burner knob
W
U
Remove the nut on the side burner W, and align the end
of side burner to the nozzle as shown in step 22. Install
the side burner by tightening the nut.
Step 25 Connecting electrode wire
Install the side burner knob U.
Step 26 Installing the cooking components
C1
B1
A1
Connect the side burner electrode wire.
Attach the flame tamer A1, cooking grid B1 and warming
rack C1 onto the grill.
EN-18

CONNECTING TO GAS SUPPLY
WARNING! Be aware of flashbacks!
Make sure there is no debris, spiders, small insects, or webs inside the head of the gas cylinder, pressure regulator,
burner(s), burner tube(s), or hose before any connection is made. They can obstruct the gas flow, which could result in
a fire in and around the burner tube. This kind of fire is known as “flashback” and can cause serious damages. Check
and clean (refer to "MAINTENANCE AND CLEANING" on page EN-23.) all the parts of the appliance before assembling it,
to reduce the chance of its occurrence.
GAS TANK CONNECTION
Warning! Risk of damage!
Do not use any strong or abrasive solvents or scouring pads as these can damage the surfaces and leave
scuff marks.
SAFEGUARD 1 - HAND ASSEMBLY
1. Make certain the tank valve and all the appliance valves are in the “OFF” position.
2. When connecting the regulator/burner valve assembly to the tank valve, turn the large plastic nut clockwise
until it stops.
3. Gas will not flow unless the plastic nut is completely connected.
4. HAND TIGHTEN ONLY.
SAFEGUARD 2 - HAND DISASSEMBLY
1. Make certain the tank valve and all the appliance valves are in the “OFF” position.
2. Turn the large plastic nut counterclockwise until it is disassembled.
3. HAND TIGHTEN ONLY.
SAFEGUARD 3 - EXCESS FLOW CONTROL
The regulator assembly incorporates an excess flow device designed to supply the grill with sufficient gas flow under
normal conditions yet control excess gas flow. Rapid changes in pressure can trigger the excess flow device providing
a low flame and low temperature. If the tank valve is turned open to allow gas flow while a burner valve is open, the
surge of pressure will cause the device to activate. The device will remain closed until the pressure is equalized. This
should occur within 5 seconds.
To ensure this does not cause difficulty in lighting the grill, follow these instructions:
1. Make sure all burner valves are ”OFF.”
2. Open the tank valve and wait 5 seconds.
IMPORTANT: Before using a fresh tank of gas, please check leakage around the connection system to make sure there
is no leakage or vapor accumulation in the cabinet. Make sure all openings around side walls are not blocked.
IMPORTANT: Place dust cap on cylinder valve outlet whenever the cylinder is not in use. Only use the type of dust
cap on the cylinder valve outlet that is provided with the cylinder valve. Other types of caps or plugs may result in
leakage.
EN-19

GAS REQUIREMENTS
CAUTION: It is important to inspect the full length of the gas hose. If it is evident there is excessive abrasion or wear,
or the hose is cut, the hose must be replaced before using this appliance.
NEVER use an unregulated gas supply.
Refer to the following table for supported gas type:
Cat
Nozzle Size
Country code
Gas Type and Pressure
Nominal heat input Qn= 3.22 kW
Total Heat Input ∑Qn=16.39 (1193g/h) kW
I3+(28-30/37)
Main Burner: 0.88mm
Side Burner: 0.92mm
BE, CH, CY, CZ, ES, FR,
GB, GR, IE, IT, LT, LU, LV,
PT, SK and SI.
G30 Butane at 28-
30mbar and G31
Propane at 37mbar
I3B/P(30)
Main Burner: 0.88mm
Side Burner: 0.92mm
AL, CY, DK, EE, FR, FI,
HU, IT, LT, NL, NO, SE,
SI, SK, RO, HR, TR, BG,
IS, LU, MT and CZ.
G30 Butane and G31
Propane at 30mbar
I3B/P(37)
Main Burner: 0.85mm
Side Burner: 0.89mm
PL AT, CH, CZ, DE and SK
G30 Butane and G31
Propane at 37mbar
I3B/P(50)
Main Burner: 0.76mm
Side Burner: 0.81mm
G30 Butane and G31
Propane at 50mbar
SAFE GRILLING ENVIRONMENT
This gas appliance is designed and certified for outdoor use only. Do not operate the grill inside a building, garage,
recreation vehicle, screened porch or any enclosed area. Keep the grill away from windy areas but keep the grill in a
well-ventilated area. Do not obstruct the flow of the combustion and ventilation air around the grill.
• CLEARANCE TO COMBUSTIBLE CONSTRUCTION
A minimum clearance of 1 m from the sides of the grill and a minimum clearance of 1 m from the back of the grill
to adjacent vertical combustible constructions must be maintained. We strongly recommend a 1 m clearance of the
grill to any combustible constructions.
• CLEARANCE TO NON-COMBUSTIBLE CONSTRUCTION
A minimum clearance of 1 m from the back of the grill above the cooking surface to noncombustible constructions
is required to allow the grill hood to open completely. A minimum of 1 m clearance to the sides of the grill above
the cooking surface to noncombustible constructions is recommended. The grill can be installed directly next to
noncombustible construction below the cooking surface.
Warning: Do not place the grill under overhead, unprotected combustible surfaces.
EN-20

OPERATING INSTRUCTIONS
FIRST USE – PRIMING THE GRILL
When firing your grill for the first time, it is advisable to run the main burner(s) on “HIGH” for 20 minutes with the hood
down and then turn the main burners off. This tempers the grill.
IMPORTANT: Ensure the hood is completely open each time you attempt to light the grill. Failure to open the hood
could lead to delayed ignition resulting in bodily harm. Use the flame observation hole in the side panel.
PREHEATING
It is extremely important that your grill be up to temperature before you begin using it. After lighting, close the hood
and preheat the grill on “HIGH” for 15 minutes. This preheating will ensure that the cooking grid and grate are hot
enough for proper grilling.
COOKING TIPS
1. Brush the grill grates with cooking or vegetable oil prior to using the appliance.
2. Use a brush with a long handle. Juices from the food drip onto the heater during cooking and vaporize. The steam
arising from this process contributes to the taste of the food.
3. Adjust the control knob(s) between “High” to “Low” position in order to achieve your desired cooking results.
4. Keep the lid closed at a low flame in order to achieve a more consistent result and to cook larger pieces of meat or
whole chickens.
5. Avoid opening the lid too often as accumulated heat escapes each time, increasing the grilling duration as a result.
ELECTRONIC LIGHTING INSTRUCTIONS
To Light the Main Burners and the Side Burner
1. Make sure the control knobs are in the “OFF” position.
2. Open the grill hood.
3. Check the ignition pin position and distance between the pin and the
burner.
4. Make sure the drip tray is installed.
5. Open the LP tank or natural gas valve.
6. Light each burner separately. Turning on two burner valves together could
trip the flow limiting device in the tank connection (LP grills only).
7. Push the control knob in and turn the knob to the left to “HIGH” position.
8. Push and turn burner control knob to “HIGH” and immediately press and hold electronic igniter.
9. If the burner still does not ignite, TURN OFF THE GAS. WAIT 5 MINUTES for excess gas to dissipate.
10. If the burner still can’t be lit, refer to the troubleshooting section.
EN-21

REPLACING THE BATTERY
Unscrew the electrical ignition button and remove the old battery. Replace with new AA battery.
Note: The negative (-) side of the battery goes in first. Please refer to the mark on the side of the cap.
LID POSITIONING – OPEN OR CLOSE
Cooking with the lid open or closed is a matter of personal preference.
• LID OPEN
Cooking with the lid-open is recommended if you enjoy cooking at maximum searing temperatures. This method
will also produce more flare-ups, speed the cooking procedure and will give you a more robust, smoky, outdoor
flavor. Lid-open when grilling meats, especially chicken.
• LID CLOSED
If you prefer cooking slower with less flare-up, we suggest the lid-closed method. Perfect for indirect or rotisserie
cooking. We recommend always cooking with the lid CLOSED if you are in a windy area or colder climate.
Your grill has been designed and constructed to give you maximum flexibility and cooking performance. Be creative.
Try different cooking methods on your grill to determine which suits your needs best. There is no right or wrong way to
cook, just alternative cooking styles. Get creative and enjoy!
CAUTION: Always protect your hand with a pot mitten or cooking glove when coming into contact with a hot surface.
TESTING FOR GAS LEAKS
Warning! Risk of explosion!
Never use a match or open flame for leak detection. Use of an open flame could result in fire, explosion and
bodily harm.
Test all connections, fittings and all gas hoses for gas leaks every time prior to use of the appliance, or each time the gas
cylinder is changed. Make sure this procedure is carried out in a well-ventilated area away from flames, sparks or any
heat sources. Do not attempt to light the appliance, if you smell gas.
1. Make sure that all control knobs on the appliance are in the off positions (OFF).
2. Open the gas valve of the gas cylinder and / or the pressure regulator.
3. Apply leak detector spray or half water / half soap solution with a brush to all the connection points.
4. If you spot gas bubbles forming, there is a leak. Turn the gas supply and/or the pressure regulator off immediately.
Tighten all connections again and repeat the test.
5. Do not use the appliance but contact your retailer, if gas bubbles keep forming.
IMPORTANT: When connecting or replacing any gas pipe or fittings, all joints must be sealed with approved leakproof sealing compound or plumber’s tape.
EN-22

MAINTENANCE AND CLEANING
Your barbecue is made of high-quality materials.
Clean the barbecue after each use. To clean and maintain the surfaces, please observe the following instructions:
Danger! Risk of burns!
Allow the barbecue to cool down completely before cleaning.
Danger! Health risk!
Do not use paint solvents or thinners to remove stains. These substances are hazardous to health and must
not come into contact with food.
Warning! Risk of damage!
Do not use any strong or abrasive solvents or scouring pads as these can damage the surfaces and leave scuff
marks.
• After each use, allow the barbecue to burn for approx. 5 more minutes without any grillables. This minimizes the food
residues.
• Set the regulator on the gas hose to Off before cleaning the barbecue.
• Remove the grill grate and clean it thoroughly with soapy water. Rinse it with clean water and then dry it off
thoroughly.
• Use a wet sponge to remove loose residues from the barbecue.
• Any grease layer that may have built up on the internal surface of the lid can be cleaned off using a hot strong soapy
solution. Then rinse with clean water and dry completely before using the barbecue again.
Warning! Never use commercially available oven cleaners!
• Food residues on the barbecue base can be removed with a brush, spatula or cleaning sponge. Then wash again with
soapy water. Rinse with clean water and dry.
• Clean the inner and outer surfaces with warm soapy water as a general practice.
• Clean wooden surfaces with a soft cloth and hot soapy water. Then rinse with clean water. Never clean wooden
surfaces with barbecue cleaner concentrates.
• Use a soft, clean cloth for drying. Do not scratch the surfaces when wiping them dry.
• Tighten all screws before every use to ensure that the barbecue stands stable at all times.
• When the gas barbecue is not in use, it should be covered with a protective cover.
CLEANING THE BURNERS
• Set the regulator on the gas cylinder to Off. Then set the temperature controller on the barbecue to Off and
disconnect the gas hose from the gas cylinder.
• Remove the grill grates.
• Clean the burners with a soft brush or with compressed air. Then wipe them dry with a cloth.
• Clean blocked openings with a sturdy pipe cleaner, a wire or with the opened end of a paper clip.
EN-23

CLEANING THE IGNITION HEAD
• Soiling of the ignition head tip may make it difficult to build up fire. In this case, it must be cleaned. The ignition head
tip is located next to the burner opening.
• To ensure perfect functioning, food residues between the ignition head tip and the burner must be removed. Use fine
sandpaper/emery paper to clean the ignition head tip and the burner edge.
• The ignition head tip should be approx. 4 - 6 mm away from the burner edge. This is the optimal distance for reliable
ignition.
CLEANING THE DRIP TRAY
This drip tray collects excessive grease runoff and fallen food particles. Allow the tray and its contents to cool before
cleaning. Loosen the back grill head cover (J) and slide out the drip tray and then wipe it clean.
Make sure the tray is installed properly before using the grill. It is highly recommended that you check the tray regularly
to avoid any possibility of a grease fire; however, most of the drippings will vaporize back into the cooked item giving
you an outdoor grilled flavor.
MAINTAINING BARBECUE SURFACES AND LIDS
IMPORTANT INFORMATION
Maintaining and protecting stainless steel surfaces
Your barbecue was manufactured with stainless steel components. All stainless steel parts require a certain protection
and care effort in order to keep their original appearance. Contrary to general perception, stainless steel is not
hundred percent resistant to flash rust and corrosion; therefore, it does require certain maintenance. Even the highestquality stainless steel parts need to be cleaned on a regular basis with fresh water so that oxidation and corrosion are
prevented.
Modern aesthetics requires that your barbecue be equipped with stainless steel components and a brushed finish. This
brushed finish is achieved by running stainless steel sheets through a process in which the mirror finish of the steel is
removed and thus the sheets leave the processing plant in a brushed condition.
Brushed stainless steel requires regular cleaning and maintenance in order to preserve its appearance. Without proper
care, signs of rust or corrosion are sure to appear on the steel surface over time.
Stainless steel does require maintenance. Cleanliness and stainless steel are closely interrelated.
Once you have assembled the barbecue, it is recommended that you use a clean cloth to apply a thin film of olive oil
on all accessible stainless steel surfaces.
EN-24

Then rub in the olive oil and subsequently wipe the surface with a clean cloth so that the finish is not oily. This way you
will ensure that the material is protected from dirt and other aggressive harmful substances because the surface will be
covered with a temporary food-safe protective layer.
The olive oil film also makes subsequent polishing and removal of fingerprints and the like much easier. Repeat this
procedure from time to time when you clean your barbecue.
IMPORTANT INFORMATION
You may have purchased a protective cover for your barbecue. To protect your investment, we recommend that you
cover the barbecue with the protective cover whenever it is not in use. However, make sure to put on the protective
cover only when your barbecue has cooled down and is clean and dry. It may be necessary to use a protective cover.
Caution! Putting a protective cover on your barbecue while it is warm, wet or dirty may lead to heavy rusting.
For this reason, your barbecue must always be cool, clean and thoroughly dried before you put on the protective
cover. This is especially important before long periods of disuse, e.g. during winter storage.
Follow these maintenance and care tips thoroughly in order to preserve the quality of your barbecue for a long time.
Take good care of your investment and it will serve you well for years to come.
GAS SAFETY
For LP gas grills, the LP gas supply tank to be used must be: manufactured in accordance with an established European
Directive relating to gas cylinders.
• The tank should be 35.3 cm in diameter and 45.72 cm tall and be equipped with a Type-I fitting.
• The tank supply system must be arranged for vapor withdrawal.
• The tank used must include a collar to protect the cylinder valve.
Do not operate the gas grill indoors or in any enclosed area. If the gas grill is not in use, the gas must be turned off at
the supply tank and store the tank in an upright position in a cool, well-ventilated outdoor location away from your grill
or any other heat source.
When checking for gas leaks, do not use an open flame. Use a soapy water solution and apply it to the pipe joints and
fittings with a brush and check for bubbles. Check flexible hoses for cuts and wear that may affect the safe operation
of the grill. Only the factory supplied hose and regulator must be used. Use only replacement regulator and hose
assemblies specified by the manufacturer.
LP tank should be securely locked by the patented safety tank ring at all times. An unlocked tank may fall or tilt which
can cause injury or property damage. It is recommended to lock the tank all the time.
After positioning the tank in the opening, lower the safety tank ring to lock the tank. Use only 20lb (9.07 kg) gas tank.
WARNING: The pressure regulator and hose assembly supplied with the outdoor cooking gas appliance must be
used. Replacement pressure regulators and hose assemblies must be those specified by the outdoor cooking gas
appliance manufacturer.
EN-25

• HANDLING GAS TANKS
Remember to handle your portable liquid butane or propane tank carefully when you take it to your dealer for a
refill. Avoid dropping it or bumping it against sharp objects. Liquid butane or propane tanks are sturdily constructed,
but a series of hard jolts could damage the container.
When transporting the tank to your local butane or propane gas dealer, make sure the valve is closed tightly and the
protective cover is in place. Position the tank securely in an upright position so it will not roll around your vehicle.
If you plan to make stops for shopping or errands, have your liquid butane or propane tank filled at the last stop
before going home. Again, make certain the refilled tank is secure and in an upright position. When you return
home, remove the refilled tank from your vehicle. Never leave a portable liquid butane or propane tank inside a
vehicle that may become overheated by the sun.
• SAFE STORAGE
Do not store portable liquid butane or propane tanks (whether full or empty) inside your home, the living area of
an R.V., a garage, basement or workshop. It is unlikely that liquid butane or propane will leak from the tanks. If it
should leak, the fuel could be exposed to sparks from automobiles, power tools or other appliances. When storing
or transporting your LP tank, it must remain in an upright position. Never lay your LP tank down on its side whether
it is full or empty. Never store a spare tank under or near your grill.
CAUTION: Never transport or move your grill or grill tank without first closing the manual valve on your liquid butane
or propane gas tank.
The best place to store a liquid butane or propane tank is in a shady or protected spot outdoors, behind your home or
garage, or on a screened porch but where it is out of reach of children. Liquid butane or propane will not evaporate. It is
in a strong, closed container. It will not lose any of its clean-burning heat content, even if left outside year-round.
WARNING: When not connected to your grill, the LP gas tank must be stored in an upright position in a cool, shady,
well-ventilated, outdoor location away from your grill or any other heat source. Failure to follow his warning could
lead to tank valve damage, fire hazard and personal injury.
IMPORTANT: When connecting or replacing gas pipe or fittings, all joints must be sealed with approved leak-proof
sealing compound or plumber’s tape. After making connections, check all joints for leaks using a soapy water
solution and a brush.
WARNING: Never use an open flame to test for gas leaks. Use of an open flame could result in a fire, explosion and
bodily harm.
CARE AND MAINTENANCE TIME TABLE
Item Cleaning Frequency (Normal Use) Cleaning Method
Stainless Steel Surfaces Twice Per Year Stainless Steel Cleaner
Cooking Grates After Each Use Burn Off Excess, Wire Brush
Stainless Steel Grates 15 Days Scrub Pad & Soapy Water/Dishwasher Safe
Grease Cup 15 Days Scrub Pad & Soapy Water/Dishwasher Safe
Grease Tray 15 Days Scrub Pad & Soapy Water
Flame Tamers 30 Days Scrub Pad & Soapy Water/Dishwasher Safe
Burners 90 Days Scrub Pad & Soapy Water
Firebox 120 Days Interior Grill Cleaning Products
EN-26

REPLACING THE MAIN BURNER
HOW TO REPLACE THE MAIN BURNER
1. Open the grill hood and remove the warming rack (A), cooking
grates (B) and flame tamers (C).
2. Remove the cotter pin from the main burner. (Fig. 1)
3. Remove the two screws that attach the main burner electrode and
wire to the main burner.
4. Remove and discard the old main burner. Replace with new one.
Note: When reinstalling the main burner make sure the main valve
stem is inserted into main burner tube opening.
5. Reinstall the cotter pin and the two screws that attach the main
burner electrode and wire.
6. Replace the flame tamers, cooking grates and warming rack.
HOW TO REPLACE THE ELECTRONIC IGNITION AND MAIN
BURNER ELECTRODE WIRE
1. Open the grill hood and remove the warming rack (A), cooking
grates (B) and flame tamers (C).
2. Remove the two screws that attach the main burner electrode and
wire to the main burner. (Fig. 1)
3. From underneath the grill just above the left side cart door,
remove the two screws holding the ignition heat shield in place.
Remove the heat shield through the opening just above the door.
(Fig. 2)
4. Unscrew the push button igniter button and lock nut, then remove
the push button igniter through the same opening. Unplug the
main burner electrode wire that you are replacing from the back
of the push button igniter, then remove the electrode and wire
from the grill. (Fig. 2)
5. Feed the new main burner electrode wire through the hole on the
inside of the grill, then reinstall the main burner electrode with
the two screws previously removed. (Fig. 3)
6. Plug the wire into the back of the push button igniter where the
previous wire was removed. (Fig. 4)
7. Reinstall the push button, then reinstall the ignition heat shield
with the two screws previously removed.
8. Replace the flame tamers, cooking grates and warming rack.
FIG. 1
FIG. 2
Fixed Screws
Ignition heat shield
FIG. 3
Push button igniter
lock nut and push
button
Ignition heat shield
FIG. 4
Ignition wire
“Cotter” Pin
Fixed Screws
EN-27
igniter

TROUBLESHOOTING
PROBLEM CAUSE CORRECTIVE ACTION
Grill or side cooker will
not light.
Excessive flare-up. Grilling fatty meats. Grill fatty meats when the grids are cold, and
The ignition wire came off the electrical
igniter/valve.
The distance between the ignition pin and
the burner is greater than 3.96 mm to 4.75
mm (side burner).
The ignition wire is broken. Call Customer Service for replacement.
The battery has died. Install a new battery.
The new battery does not work. Check the battery polarity. The negative (-) side
The electrode tip does not produce sparks
at the burner port.
No gas supplied. Check the regulator valve. Check connection for
Controls are on “HIGH”. Before you are ready to grill, turn the knobs to
Water sprayed on gas flames. Do not spray water on gas flames.
Hood closed when grilling. Hood up when grilling.
Reconnect the ignition wire to the electrical
igniter/valve.
Loosen the ignition pin, adjust the distance,
then tighten.
of the battery goes in first.
Reinstall the electrode.
leak.
the knobs are on the “LOW” setting. Move the
meats to the warming rack if flare-up continues.
the “OFF”.
Burner blows out. LP tank is empty. Refill the LP tank.
Burner is not aligned with the control
valve.
Gas supply is not sufficient. Check the gas supply hose and make sure there
Low heat when on
“HIGH”
Low Heat, LP gas. The regulator assembly incorporates an
Ports are blocked. Clear ports of any obstructions.
LP tank has run out. Refill the LP tank.
excess flow device designed to supply the
grill with sufficient gas flow. Rapid changes
in pressure can trigger the excess flow
device, providing a low flame and low
temperature.
Install the burner correctly.
are no leaks and no knots.
1. Make sure all burners are “OFF.”
2. Open the tank valve and wait 5 minutes.
3. Light each burner, one at a time, following
the lighting instructions.
EN-28

REPLACEMENT PARTS
EN-29

PART DESCRIPTION PART DESCRIPTION
1 Main Lid 36 Bracket J
2 Hing Screw 37 Bracket M
3 Heat Insulating Spacer, for Thermometer 38 Door Magnet
4 Thermometer Bezel 39 Door Pivot
5 Thermometer 40 Door Handle Grommet
6 Name Plate 41 Door Handle
7 Lid Bumper 42 Door Handle Bezel
8 Lid Handle Bezel 43 Left Door
9 Heat Insulating Spacer, for Lid Handle 44 Right Door
10 Lid Handle 45 Locking Caster
11 Lid Bracket, Left 46 Door Stopper
12 Lid Bracket, Right 47 Straight Caster
13 Firebox 48 Cart Bottom Panel
14 Door Pivot Bracket 49 Cart Side Panel, Right
15 Control Panel Bracket, Left 50 Side Burner
16 Control Panel Bracket, Right 51 Side Burner Fixture
17 Main Burner Valve 52 Bracket X
18 Gas Manifold, for Main Burner 53 Side Burner Knob Bezel
19 Ignitor 54 Right Side Shelf Facia
20 Control Panel 55 Right Side Shelf
21 Knob 56 Right Side Shelf Bottom Panel
22 Knob Bezel 57 Side Burner Electrode & Wire
23 Gas Hose 58 Side Burner Cooking Grid
24 Side Burner Valve 59 Right Side Shelf Cover
25 Gas Manifold, for Side Burner 60 Right Side Shelf Cover Hinge
26 Regulator 61 Main Burner
27 Grease Tray 62 Main Burner Electrode & Wire A
28 Grease Box 63 Main Burner Electrode & Wire B
29 Firebox Rear Cover 64 Main Burner Electrode & Wire C
30 Cart Rear Panel 65 Main Burner Electrode & Wire D
31 Bracket D 66 Cotter Pin
32 Left Side Shelf 67 Flame Tamer
33 Left Side Shelf Facia 68 Cooking Grid
34 Cart Side Panel, Left 69 Warming Rack
35 Cart Brace 70 Igniting Tube
EN-30

WASTE DISPOSAL
The packaging is made from environmentally friendly materials, which you can dispose of at your local
recycling points.
Do not under any circumstances dispose of the grill in normal household waste! Either bring to an approved
waste management firm or dispose of it at your municipal waste disposal facility. Observe the current
regulations in force. If in doubt, get in touch with your disposal facility.
Batteries and rechargeable batteries
Batteries must not be disposed of with normal household waste. Recycle them at the collection points
provided for this purpose. Contact the local authorities or your dealer for recycling advice. Correct disposal
of old batteries helps protect the environment and human health.
DECLARATION OF CONFORMITY
This product complies with the applicable European and national directives. This is confirmed by the CE marking
(respective declarations can be requested from the manufacturer).
EN-31

BARBACOA DE GAS CON 4
QUEMADORES
Si tiene alguna pregunta, contacte con nosotros. Puede encontrar nuestros datos de contacto en la página web
teka.com.
¡LEA ESTE MANUAL ANTES DE USAR EL APARATO!

ADVERTENCIA
Instalar, manipular, utilizar o cuidar de forma incorrecta este aparato puede provocar lesiones personales y/o daños en
la propiedad. Lea este manual de instrucciones detalladamente antes de instalar o usar este aparato.
1. No almacene ni use gasolina u otros líquidos o vapores inflamables cerca de este aparato ni de ningún otro.
2. No se debe almacenarse tanques de gas propano/butano que no estén conectados para usar cerca de este o
cualquier otro aparato.
PELIGRO
Si huele a gas:
1. Cierre inmediatamente
2. Apague cualquier llama encendida.
3. Abra la tapa.
4. Si el olor persiste, manténgase alejado del aparato y llame inmediatamente a su proveedor de gas o al cuerpo de
bomberos.
Antes de usar el aparato por primera vez, lea detalladamente las instrucciones de instalación y
mantenimiento incluidas.
Dependiendo del modelo, los accesorios y las funciones que incluye el aparato pueden variar con respecto
a lo que se muestran en las imágenes.
la llave de gas del aparato.
CONTACTO
Si tiene alguna pregunta, contacte con nosotros. Puede encontrar nuestros datos de contacto en la página web
teka.com.
Nuestra dirección:
TEKA Industrial S.A.
C/Cajo 17, 39011 Santander

ÍNDICE
USO PREVISTO ................................................................................................................................... ES-4
INFORMACIÓN DE SEGURIDAD ......................................................................................................... ES-4
DESEMPAQUETAR LA BARBACOA
LISTA DE PIEZAS ........................................................................................................................................................ ES-10
PREPARACIÓN ........................................................................................................................................................... ES-10
INSTRUCCIONES DE MONTAJE
CONEXIÓN A UNA FUENTE DE SUMINISTRO DE GAS
CONEXIÓN A LA BOMBONA DE GAS......................................................................................................................... ES-18
REQUISITOS DE GAS ................................................................................................................................................. ES-19
ENTORNO SEGURO DE COCINADO ........................................................................................................................... ES-19
INSTRUCCIONES DE FUNCIONAMIENTO
PRIMERO USO – PREPARACIÓN DE LA BARBACOA ................................................................................................... ES-20
PRECALENTAMIENTO ................................................................................................................................................ ES-20
CONSEJOS PARA COCINAR ........................................................................................................................................ ES-20
INSTRUCCIONES DE ENCENDIDO ELECTRÓNICO ...................................................................................................... ES-20
SUSTITUCIÓN DE LA PILA .......................................................................................................................................... ES-21
POSICIÓN DE LA CAMPANA – ABIERTA O CERRADA ................................................................................................. ES-21
COMPROBACIÓN DE FUGAS DE GAS ........................................................................................................................ ES-21
MANTENIMIENTO Y LIMPIEZA
LIMPIEZA DE LOS QUEMADORES ............................................................................................................................. ES-22
LIMPIEZA DEL CABEZAL DE ENCENDIDO .................................................................................................................. ES-23
LIMPIEZA DE LA BANDEJA DE RECOGIDA ................................................................................................................. ES-23
MANTENIMIENTO DE LAS SUPERFICIES Y TAPAS DE LA BARBACOA ......................................................................... ES-23
SEGURIDAD DEL GAS ................................................................................................................................................ ES-24
CALENDARIO DE CUIDADOS Y MANTENIMIENTO ....................................................................................................ES-25
SUSTITUCIÓN DEL QUEMADOR PRINCIPAL ..................................................................................... ES-26
RESOLUCIÓN DE PROBLEMAS ......................................................................................................... ES-27
PIEZAS DE RECAMBIO ...................................................................................................................... ES-28
ELIMINACIÓN DE RESIDUOS ............................................................................................................ ES-30
DECLARACIÓN DE CONFORMIDAD .................................................................................................. ES-30
ES-3

USO PREVISTO
Esta barbacoa de gas está diseñada para calentar, cocinar y asar distintos tipos de alimentos en zonas al aire libre bien
ventiladas. Se debe utilizar el aparato con gas butano o propano a baja presión. No se debe usar con gas natural.
Este producto está diseñado para usos personales y no se puede usar con fines comerciales o industriales.
Este aparato solo se puede usar según se describe en este manual de usuario. Cualquier otro uso se considerará
inadecuado y puede causar daños en la propiedad y lesiones personales.
El fabricante no es responsable de los daños que resulten de un uso inadecuado.
INFORMACIÓN DE SEGURIDAD
SÍMBOLOS DE SEGURIDAD
¡Peligro! (Riesgo alto)
Incumplir estas precauciones puede provocar lesiones letales.
¡Advertencia! (Riesgo medio)
Incumplir estas precauciones puede provocar daños en la propiedad.
¡Precaución! (Riesgo bajo)
Precauciones que se deben tener en cuenta a la hora de manejar el aparato.
Información general de seguridad
INSTRUCCIONES GENERALES DE SEGURIDAD
Estas instrucciones de seguridad se deben cumplir en cada uso.
– ¡Use el aparato únicamente al aire libre!
– Lea las instrucciones antes de usar el aparato.
– ¡ADVERTENCIA! Las piezas disponibles se pueden calentar mucho. Mantenga lejos a los niños pequeños.
– Este aparato se debe mantener lejos de materiales inflamable durante su uso.
– ¡No mueva el aparato mientras lo utiliza!
– Cierre la llave de la bombona de gas después de su uso.
– No manipule el aparato.
ADVERTENCIAS GENERALES DE LAS BARBACOAS
1. ¡ADVERTENCIA! ¡Peligro de envenenamiento por monóxido de carbono! Nunca use el aparato en espacios cerrados como
garajes o cobertizos. Esto provoca que se acumule monóxido de carbono, lo que causa lesiones personales o la muerte.
2. ¡ADVERTENCIA! ¡Riesgo de explosión! Nunca use el aparato en espacios cerrados como garajes o cobertizos. Esto provoca que
se acumule gas si hay alguna fuga, lo que puede provocar una explosión.
3. Bloquee siempre las ruedas con los frenos (si hay) antes de usar el aparato.
4. No intente mover el aparato mientras lo utiliza.
5. No intente manipular el aparato de ninguna manera. Use solo complementos y accesorios recomendados por el fabricante. Es
muy peligroso manipular el aparato, usarlo de manera inadecuada o no seguir las instrucciones.
6. No use el aparato cerca de botes de aerosoles, líquidos inflamables, gases volátiles u otras sustancias inflamables. Mantenga las
llamas directas, como las velas o las antorchas, lejos del aparato.
7. No use líquidos inflamables ni gases volátiles cerca del aparato.
8. No deje el aparato desatendido durante su uso.
ES-4

9. No use combustibles líquidos con este aparato.
10. Nunca incline la superficie de cocinado cuando encienda el aparato o mientras esté cocinando.
ADVERTENCIAS DE LAS BARBACOAS A GAS
1. Este aparato está configurado para funcionar con gas butano o propano a baja presión. No lo use con gas natural.
2. Abra la cubierta antes de encender el aparato.
3. Tenga cuidado al abrir la cubierta cuando use el aparato. Se podría acumular vapor caliente dentro de la cubierta y salir
despedido rápidamente al abrirla. No abra la cubierta muy rápido.
4. No toque las superficies calientes. Use el tirador solo para levantar la cubierta.
5. Cubra el aparato solo cuando se haya enfriado completamente.
6. Nunca use carbón ni otros combustibles sólidos en este aparato.
7. Se recomienda que las distancias mínimas de la parrilla a cualquier material combustible sean de 1 m.
8. ¡No coloque nada sobre la cubierta mientras use el aparato!
9. Dimensiones mínimas y máximas de la olla o sartén para usar en el quemador lateral: 203,2 mm - 254 mm.
ADVERTENCIAS SOBRE CONEXIONES DE GAS / BOMBONAS DE GAS / REGULADORES DE PRESIÓN
1. Revise el aparato y todas las conexiones con regularidad y siempre que remplace la bombona para comprobar que no haya
fugas de gas.
2. Nunca compruebe si hay fugas de gas usando una cerilla o una llama directamente.
3. Nunca manipule ni modifique el regulador de presión o el conjunto de suministro de gas.
4. Cierre siempre el suministro de gas de la bombona o el regulador de presión y desconecte la manguera de gas después de usar
el aparato.
5. Nunca guarde las bombonas de gas en interiores o cerca de fuentes de calor.
6. Guarde siempre las bombonas de gas en posición vertical, nunca en posición horizontal, ya que podrían producirse fugas o
filtraciones en la manguera de gas.
7. Nunca use el aparato sin el regulador de presión.
8. Use únicamente reguladores de presión aprobados para gas licuado del petróleo (GLP) y sigas las normativas nacionales.
ADVERTENCIAS DE LOS TUBOS DE GAS
1. Revise las mangueras de gas antes y después de cada uso: busque cortes, grietas, zonas excesivamente desgastadas u otros
daños. Las mangueras de gas se deben remplazar cada uno o dos años y solo debe hacerlo un técnico cualificado o el vendedor.
Sustituya las mangueras de gas quebradizas y sus conexiones. En caso de duda, pregunte a un especialista de su zona.
2. Evite que se dañen las mangueras de gas. No deje que cuelgue(n) sobre bordes afilados. No las retuerza, apriete ni doble.
Mantenga las mangueras de gas lejos de superficies calientes y asegúrese de que nadie se tropiece con ellas.
3. Use únicamente mangueras aprobadas para gas licuado del petróleo (GLP) y sigas las normativas nacionales.
4. Cualquier tipo de trabajo o recambio de las mangueras debe ser llevado a cabo según las instrucciones del fabricante por parte
de especialistas o personal cualificado.
5. El tubo de gas PL debe reemplazarse si se daña y cuando las normativas nacionales lo exijan.
6. Asegúrese de que no haya escombros, arañas, insectos pequeños o telarañas dentro de la manguera antes de realizar cualquier
conexión. Pueden obstruir el flujo de gas, lo que podría provocar fuego dentro y alrededor del tubo del quemador.
La longitud máxima de la manguera no debe ser mayor de 1,5 m.
SI HUELE A GAS
1. Nunca encienda el aparato si huele a gas.
2. Cierre inmediatamente la llave de gas del aparato y de la bombona de gas y/o el regulador de presión.
3. Apague las llamas que haya cerca del aparato, como velas y antorchas. Apague todos los aparatos eléctricos de los alrededores.
4. Asegúrese de que la zona esté bien ventilada con aire fresco.
5. Abra la cubierta del aparato para dejar que salga el gas. Si sigue oliendo a gas, no use el aparato más tiempo y contacte con un
profesional autorizado para que lo repare.
ES-5

INSTRUCCIONES DE SEGURIDAD
¡Peligro! ¡Riesgo de incendio!
Al utilizar la barbacoa, las piezas se calientan mucho y pueden provocar un incendio.
- Tenga siempre un extintor listo para usar y un kit de primeros auxilios a mano en caso de accidente o incendio.
- Coloque la barbacoa en una superficie segura, no inflamable, plana, nivelada, estable, resistente al calor y limpia que esté
alejada de cualquier fuente de calor antes de utilizarla.
- Asegúrese de que la barbacoa esté a al menos 1 m de materiales altamente combustibles como toldos, terrazas de madera o
muebles.
- No mueva la barbacoa mientras la utiliza.
- Algunos alimentos producen grasas y jugos inflamables. Limpie la barbacoa de forma regular, preferiblemente después de
cada uso.
- No deje la barbacoa encendida sin supervisión.
¡Peligro! ¡Riesgo de incendio!
No intente nunca encender o prender la barbacoa con la tapa cerrada.
- Use la barbacoa de gas con la tapa cerrada únicamente con una llama baja.
¡Peligro! ¡Riesgo de quemaduras y accidentes!
Este aparato no está diseñado para que lo usen personas (incluidos niños) con capacidades físicas, sensitivas o
mentales reducidas, o que no tengan la experiencia y/o conocimientos suficientes.
- A este grupo de personas se le debe informar de los peligros asociados con el uso de este aparato y una persona responsable
debe supervisarlos por su seguridad.
- Supervise a los niños en todo momento para asegurarse de que no jueguen con el aparato.
- Hacer modificaciones al producto puede ser extremadamente peligroso y, por tanto, está prohibido. No intente hace
modificaciones no autorizadas al aparato. En caso de daños, reparaciones y otros problemas con la barbacoa, póngase en
contacto con nuestro centro de servicio o un proveedor local.
- Mantenga el aparato lejos de niños y mascotas.
No toque la barbacoa, los quemadores ni la comida que esté cocinando mientras use el aparato, ya que podrían estar
extremadamente calientes y provocar quemaduras graves.
- Mantenga una distancia suficiente con las partes que se calientan, ya que cualquier contacto podría provocar quemaduras
graves.
- Use siempre guantes para horno o barbacoa (p., ej., guantes resistentes al calor de categoría II según el estándar DIN-EN 407)
al cocinar.
- Use solo utensilios para barbacoa con mangos largos y resistentes al calor.
- No lleve prendas con mangas anchas.
- Espere hasta que la barbacoa se enfríe completamente antes de limpiarla o guardarla.
¡Peligro! ¡Riesgo de deflagración!
Al echar líquidos inflamables en las llamas se producen fogonazos o deflagraciones.
- Nunca use fluidos inflamables como gasolina o bebidas alcohólicas.
¡Peligro! ¡Riesgo de intoxicación!
¡El gas es inodoro y puede ser letal en espacios cerrados!
- La barbacoa solo se puede usar en exteriores.
¡Peligro! ¡Riesgo para la salud!
No use diluyentes o disolventes de pintura para eliminar las manchas. Estas sustancias son peligrosas para la salud y
no deben entrar en contacto con la comida.
ES-6

¡Peligro! ¡Riesgo para los niños!
Al jugar con el plástico del embalaje, los niños pueden quedarse atrapados y asfixiarse.
- No deje que los niños jueguen con el plástico del embalaje.
- No deje que los niños se lleven piezas de montaje pequeñas a la boca, ya que corren el riesgo de asfixiarse. Se podrían asfixiar
al tragarse las piezas.
¡Peligro! ¡Riesgo de lesiones!
Tanto la barbacoa como sus piezas tienen bordes afilados.
- Cada pieza de la barbacoa se debe usar con cuidado para evitar accidentes o lesiones durante su uso y montaje. Lleve guantes
de seguridad siempre que sea necesario.
- No instale la barbacoa cerca de entradas o zonas con mucho tránsito de personas.
- Tenga mucho cuidado al cocinar con la barbacoa. Puede perder el control del aparato si se distrae.
- Preste atención y sea consciente de lo que está haciendo. No use este producto si está cansado o le cuesta mantenerse
centrado, o si está bajo el efecto de drogas, alcohol o medicamentos. Solo un momento de descuido durante su uso puede
provocar lesiones graves.
¡Advertencia! ¡Riesgo de daños!
Con el uso, los tornillos se pueden aflojar poco a poco y afectar a la estabilidad de la barbacoa.
- Compruebe que los tornillos estén bien apretados antes de cada uso. En caso de que sea necesario, vuelva a apretar todos los
tornillos para asegurarse de que la barbacoa se mantiene estable en todo momento.
¡Advertencia! ¡Riesgo de daños!
No use disolventes abrasivos o estropajos fuertes, ya que podrían dañar y rayar las superficies.
¡Peligro! ¡Riesgo de quemaduras y accidentes!
¡Precaución! Si huele a gas:
- Cierre inmediatamente la llave de gas del aparato.
- Apague cualquier llama encendida.
- Abra la tapa.
- Si el olor persiste, manténgase alejado del aparato y llame inmediatamente a su proveedor de gas o al cuerpo de bomberos.
¡Peligro! ¡Riesgo de quemaduras y accidentes!
La barbacoa se debe guardar lejos de combustibles (p. ej., gasolina) y de otros líquidos o gases inflamables.
- Las bombonas de gas se deben guardar separados de la barbacoa de gas.
- Las bombonas de gas se deben guardar lejos de la barbacoa de gas.
- No coloque bombonas de gas directamente bajo la barbacoa de gas.
¡Peligro! ¡Riesgo de incendio!
Este aparato se debe mantener lejos de materiales inflamable durante su uso.
- El cambio de bombona de gas se debe hacer lejos de cualquier fuente de ignición.
- Las bombonas de gas nunca se deben almacenar en lugares donde la temperatura supere los 50 °C. En los días que haga
mucho calor, debe esforzase por mantener las bombonas en la sombra.
ES-7

INFORMACIÓN DE SEGURIDAD SOBRE LA BATERÍA
1. ADVERTENCIA: MANTENGA LA PILA LEJOS DEL ALCANCE DE LOS NIÑOS. Tragarse la pila puede provocar quemaduras
químicas, perforaciones de tejido blando o la muerte. Se pueden producir quemaduras graves en un plazo de dos horas
desde la ingesta. Busque asistencia médica de inmediato.
2. Si piensa que alguien puede haberse tragado la pila o que la ha colocado dentro de una parte del cuerpo, busque
asistencia médica de inmediato.
3. No deje que los niños remplacen la pila sin la supervisión de un adulto.
4. Las pilas agotadas se deben retirar y desechar inmediatamente del equipo.
5. No se deshaga de las pilas en el fuego. No exponga las pilas al calor o el fuego. Evite guardarlas directamente bajo el
sol.
6. Si la pila gotea, retírela del compartimento de la pila con un trapo. Deseche la pila según la normativa
correspondiente. Si la pila ha goteado, evite que entre en contacto con la piel, los ojos y las membranas mucosas.
Enjuague las zonas afectadas inmediatamente después del contacto con el ácido y límpielas con abundante agua limpia.
Visite a un médico.
7. No encapsule ni modifique las pilas.
8. Antes de desechar el aparato, deseche las pilas de una forma respetuosa con el medio ambiente.
9. Introduzca las pilas de forma correcta según la polaridad (+ y –) que se indica en la pila y en el compartido de la pila.
Al introducir las pilas del revés, se pueden cargar o cortocircuitar. Esto puede provocar sobrecalentamientos, fugas,
descargar, roturas, explosiones, incendios y lesiones personales.
10. Use únicamente el tipo de pila que se indica en este manual.
11. No cortocircuite las pilas. Cuando los extremos positivo (+) y negativo (–) de una pila entran en contacto entre sí, la
pila se cortocircuita. Por ejemplo, se puede producir un cortocircuito si lleva las pilas sueltas en el bolsillo con llaves o
monedas. Esto puede provocar descargas, fugas, explosiones, incendios y lesiones personales.
12. No cargue las pilas alcalinas. Intentar cargar pilas no recargables (primarias) puede generar gases y/o calor en su
interior, lo que a su vez provoca fugas, descargas, explosiones, incendios y lesiones personales.
13. No exponga las pilas a impactos mecánicos.
14. No desmonte, abra ni triture las pilas.
15. ADVERTENCIA: Las pilas usadas no se deben desechar en la basura de residuos domésticos. Llévelas a un punto de
recogida o un lugar de eliminación adecuado.
ES-8

DESEMPAQUETAR LA BARBACOA
(
$
'
%
<
&
(
)
*
'
9
8
7
-
/
0
4
$
;
&
%
=
:
6
5
+
,
.
1
3
2
ES-9

LISTA DE PIEZAS
PIEZA DESCRIPCIÓN CANT. PIEZA DESCRIPCIÓN CANT.
A Conjunto del armazón superior 1 S Bandeja para la grasa 1
B Estante izquierdo 1 T Panel lateral del carro, derecho 1
C Cara de estante lateral izquierdo 1 U Controlador 1
D Soporte D 1 V Bisel de la perilla del quemador
lateral
E Panel lateral del carro, izquierdo 1 W Quemador lateral 1
F Puerta izquierda 1 X Soporte X 1
G Bisel de tirador de puerta 4 Y Estante lateral derecho 1
H Tirador de la puerta 2 Z Estante lateral derecho 1
I Ojal del tirador de la puerta 4 A1 Difusor del calor 4
J Soporte J 1 B1 Parrilla de cocinado 2
K Rueda de bloqueo 2 C1 Rejilla de calentamiento 1
L Soporte frontal del carro 1 D1 Panel trasero de carro 1
M Soporte M 1 E1 Cubierta trasera del fogón 1
N Panel inferior del carro 1 AA Tornillo de 4 mm x 10 mm 10
O Tope de la puerta 1 BB Tornillo de 1/4" x 8 mm 6
P Rueda recta 2 CC Tornillo de 1/4" x 10 mm 23
Q Puerta derecha 1 DD Tornillo de 6,35 mm x 12 mm 26
R Caja de grasa 1 EE Arandela plana de 6,35 mm 22
1
ES-10

PREPARACIÓN
N
Antes de empezar a montar el producto, asegúrese de contar con todas las piezas. Compare las piezas con la lista de
contenidos del paquete y la lista de herramientas. Si alguna pieza falta o está dañada, no intente montar el producto.
Contacte con el distribuidor al que compró el aparato si descubre que alguna pieza falta o si está dañada.
No utilice el aparato si no se han entregado las piezas faltantes o se han sustituido las piezas defectuosas. Usar aparatos
incompletos o dañados provoca lesiones personales y daños en la propiedad.
Reitre y deseche con cuidado los materiales de embalaje y las etiquetas promocionales adjuntas al producto.
Herramientas necesarias para el montaje: Destornillador Phillips (no incluido).
INSTRUCCIONES DE MONTAJE
¡Peligro! ¡Riesgo de lesiones!
Siga todas las instrucciones de montaje que se indican aquí. El incumplimiento de estas instrucciones
puede provocar problemas y suponer un riesgo a la hora de usar la barbacoa.
1. Monte el aparato completamente y haga los ajustes necesarios antes de usarlo.
2. Siga las instrucciones de montaje y uso detalladamente. Use las imágenes como guía visual.
3. Preste atención a las piezas pequeñas como tornillos y tuercas cuando las afloje o las retire al montar o ajustar el
aparato. Póngalas a buen recaudo para evitar perderlas.
4. Este aparato es grande. Se recomienda que lo monten dos personas.
¡ADVERTENCIA!
¡Use el aparato solo después de haberlo montado y ajustado!
IMPORTANTE: Los usuarios no deben manipular las piezas selladas por el fabricante o los representantes del
fabricante.
NOTA: En los siguientes pasos, no apriete completamente los tornillos hasta que haya colocado todos los tornillos de
ese paso. Una vez colocados todos los tornillos, apriételos firmemente.
Paso 1 Instalar las ruedas
DD
EE
K
P
Paso 2 Instale el tope de la puerta
AA
N
O
Utilice 16 tornillos DD y 16 arandelas planas EE para
instalar las ruedas P y K en el panel inferior N.
Utilice 2 tornillos AA para instalar el tope de la puerta O
en el panel inferior.
ES-11

Paso 3 Instalar los paneles laterales
J
Paso 4 Instalar el panel trasero
E
CC
T
N
Utilice 6 tornillos CC para instalar los paneles laterales E
y T en el panel inferior.
CC
D1
E
T
N
Utilice 7 tornillos CC para instalar el panel trasero D1 en
el panel inferior.
Paso 5 Instalar la riostra delantera
T
CC
L
Paso 6 Instalar los soportes
AA
E
T
E
M
Utilice 4 tornillos CC para instalar la riostra frontal L en
los paneles laterales.
Utilice 4 tornillos AA para instalar el soporte J y el soporte
M en la riostra frontal y el panel lateral.
ES-12

Paso 7 Montar el fogón
A
A
S
Paso 8 Fijar el fogón en el carro
DD
E
T
Coloque el conjunto del fogón A en el carro como se
Utilice 4 tornillos DD para asegurar el conjunto del fogón.
muestra arriba.
Paso 9 Instalar la bandeja de grasa
S
Retire el tornillo premontado en la bandeja de grasa
Paso 10 Instalar la caja de grasa
R
Instale la caja de grasa R como se muestra arriba.
S, luego instale la bandeja de grasa en la cámara de
combustión y apriete el tornillo.
ES-13
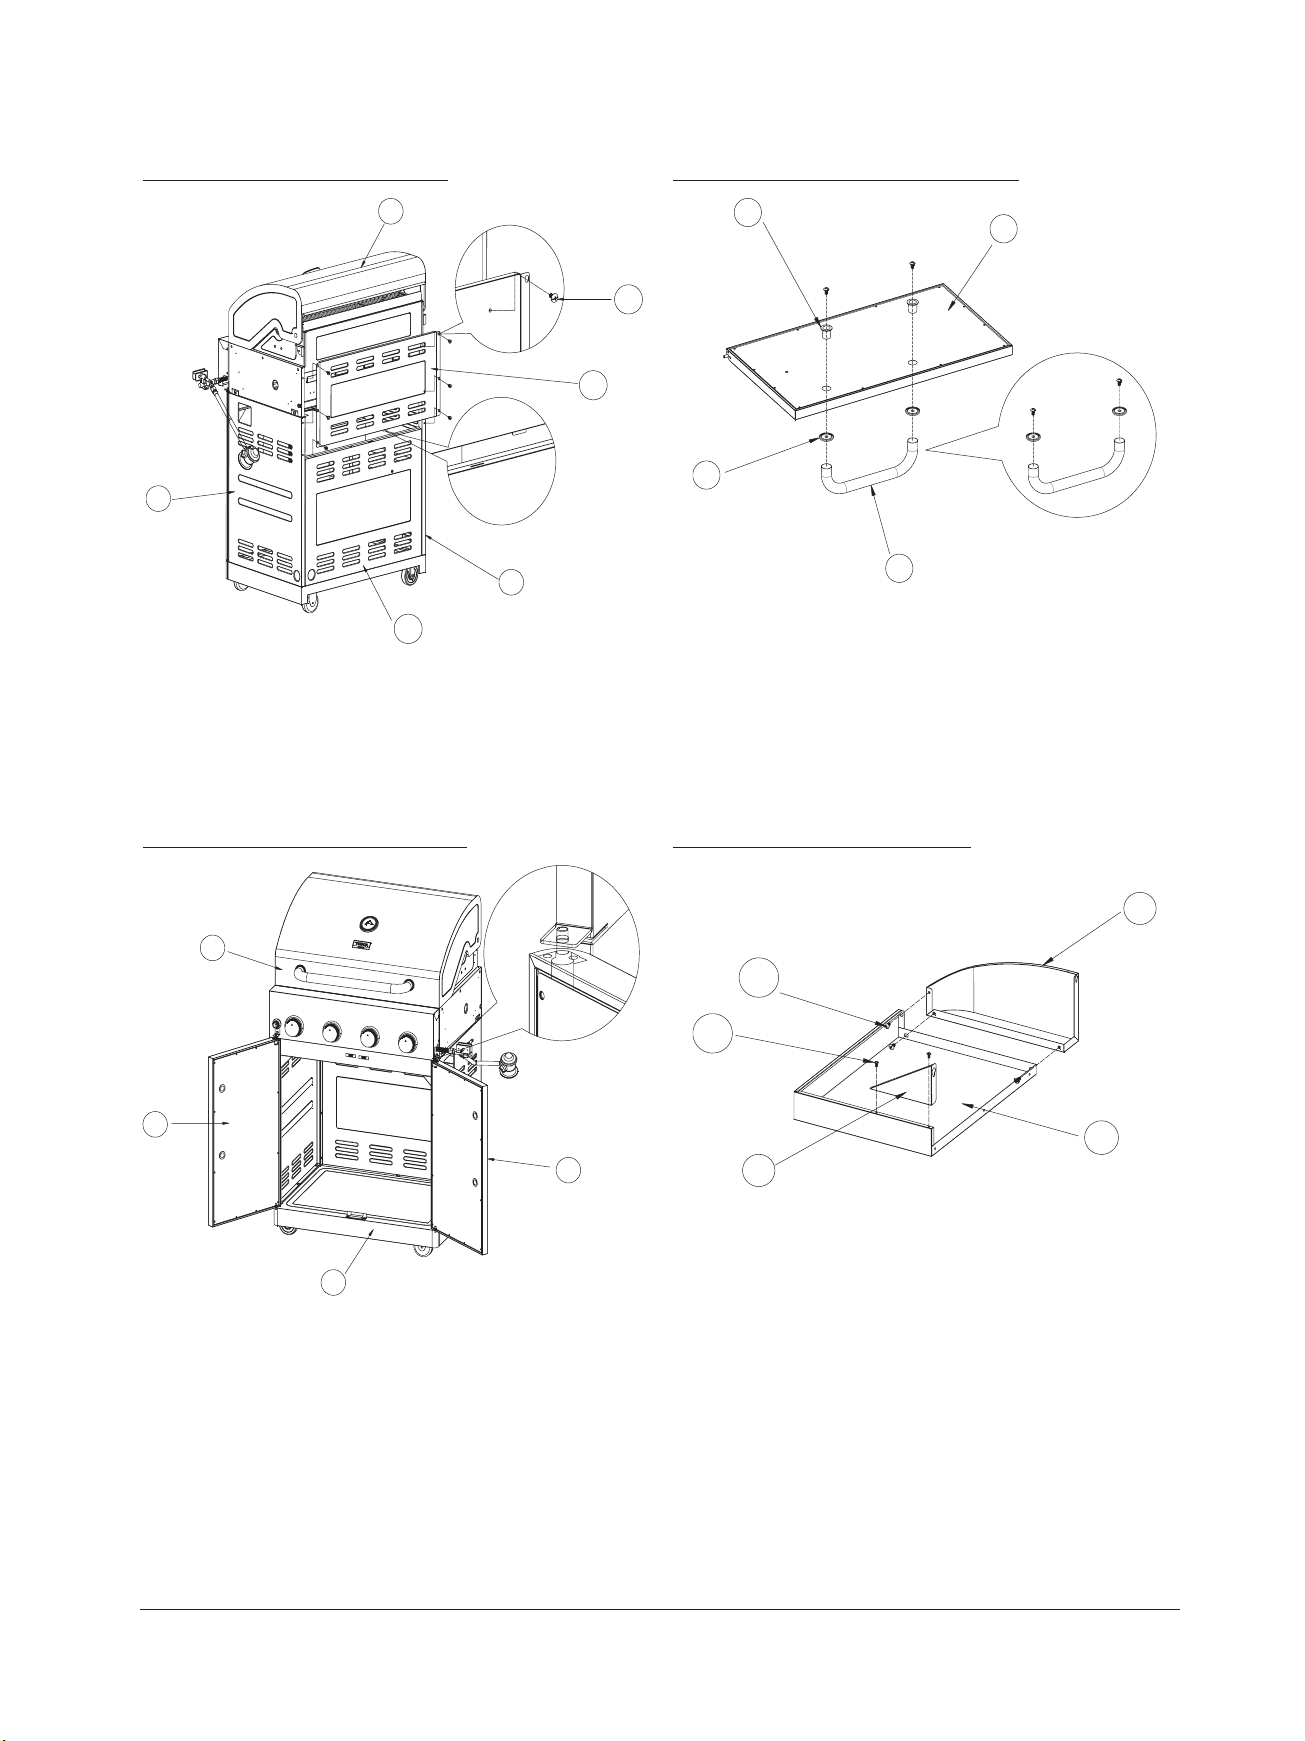
Paso 11 Instalar la cubierta trasera
A
I
C
T
Paso 12 Montar los tiradores de puerta
F
CC
E1
G
E
D1
Utilice 6 tornillos CC para sujetar la cubierta trasera E1 de
la cámara de combustión.
Paso 13 Instalar las puertas del carro
A
F
Q
H
Quite el tornillo preensamblado en el tirador de la puerta
H e instale el tirador y el bisel G en la puerta como se
muestra arriba. Instale el ojal del tirador I.
Aplique el mismo método de instalación para la otra
puerta.
Paso 14 Montar el estante lateral
BB
AA
B
D
Instale las 2 puertas en el carro como se muestra arriba.
N
Utilice 3 tornillos BB para instalar el panel frontal del
estante lateral izquierdo C en el estante lateral izquierdo B.
Utilice 2 tornillos AA para instalar el soporte D en el
estante lateral izquierdo B.
ES-14

Paso 15 Montar el estante del quemador lateral
AA
BB
X
Y
Z
b
a
Paso 16 Aflojar los tornillos del lado derecho
a
c
Utilice 3 tornillos BB para instalar el panel frontal Y del
estante lateral izquierdo en el estante Z del quemador
lateral.
Utilice 2 tornillos AA para instalar el soporte X en el
estante del quemador lateral Z.
Paso 17 Acoplar el estante lateral derecho
b
c
Afloje los tornillos a y c, y retire el tornillo b del lado
derecho de la cámara de combustión.
Paso 18 Fijar el estante lateral derecho
DD EE
Fije el estante del lado derecho a los tornillos a y c, luego
apriete el tornillo b.
ES-15
Utilice 3 tornillos DD y 3 arandelas planas EE para sujetar
el estante del estante del quemador lateral desde el
interior del fogón. A continuación apriete los tornillos a
y c.
Aplique el mismo método de instalación para el estante
lateral izquierdo.

Paso 19 Aflojar los tornillos laterales izquierdos
V
Paso 20 Acoplar el estante lateral izquierdo
a
b
c
Afloje los tornillos a y c, y retire el tornillo b del lado
izquierdo de la cámara de combustión.
Paso 21 Fijar el estante lateral izquierdo
a
b
c
Fije el estante del lado izquierdo a los tornillos a y c, luego
apriete el tornillo b.
Paso 22 Conectar la válvula del quemador lateral
W
DD
EE
Utilice 3 tornillos DD y 3 arandelas planas EE para sujetar
el estante lateral izquierdo desde el interior del fogón. A
continuación apriete los tornillos a y c.
Retire los tornillos preensamblados (2 piezas) en la válvula
lateral y después fije el bisel V a la válvula con los orificios
alineados. Apriete los tornillos.
ES-16

Paso 23 Instalar el quemador lateral
Paso 24 Instalar la perilla del quemador lateral
W
U
Quite la tuerca del quemador lateral W y alinee el
extremo del quemador lateral con la boquilla como se
muestra en el paso 22. Apriete la tuerca para instalar el
quemador lateral
Paso 25 Conectar el cable del electrodo
Instale la perilla del quemador lateral U.
Paso 26 Instalar los componentes de cocción
C1
B1
A1
Conecte el cable del electrodo del quemador lateral.
Acople el difusor de calor A1, la rejilla de cocción B1 y la
rejilla de calentamiento C1 en la parrilla.
ES-17

CONEXIÓN A UNA FUENTE DE SUMINISTRO DE GAS
¡ADVERTENCIA! ¡Tenga cuidado con los retrocesos de las llamas!
Asegúrese de que no haya suciedad, arañas, pequeños insectos o telarañas en el cabezal de la bombona de gas, el
regulador de presión, los quemadores, los tubos de los quemadores o la manguera antes de hacer las conexiones.
Pueden obstruir el flujo de gas, lo que podría provocar fuego dentro y alrededor del tubo del quemador. A este tipo
de fuego se le denomina “retroceso de llama” y puede causar daños graves. Revise y limpie (consulte la sección
"MANTENIMIENTO Y LIMPIEZA" en la página ES-22.) todas las piezas del aparato antes de montarlo para reducir el riesgo
de incidencias.
CONEXIÓN A LA BOMBONA DE GAS
¡Advertencia! ¡Riesgo de daños!
No use disolventes abrasivos o estropajos fuertes, ya que podrían dañar y rayar las superficies.
MECANISMO DE PROTECCIÓN 1 - MONTAJE MANUAL
1. Asegúrese de que la válvula de la bombona y todas las válvulas del aparato estén en la posición de “APAGADO”.
2. Al conectar el conjunto de la válvula del quemador/regulador a la válvula de la bombona, gire la tuerca de
plástico en el sentido de las agujas del reloj hasta que se detenga.
3. El gas no circulará gasta que la tuerca de plástico esté completamente conectada.
4. APRIÉTELA ÚNICAMENTE CON LA MANO.
MECANISMO DE PROTECCIÓN 2 - DESMONTAJE MANUAL
1. Asegúrese de que la válvula de la bombona y todas las válvulas del aparato estén en la posición de “APAGADO”.
2. Gire la tuerca de plástico en sentido contrario a las agujas del reloj hasta que se desmonte.
3. APRIÉTELA ÚNICAMENTE CON LA MANO.
MECANISMO DE PROTECCIÓN 3 - LIMITACIÓN DEL FLUJO
El conjunto del regulador incorpora un dispositivo de exceso de flujo diseñado para suministrar a la parrilla flujo de gas
suficiente en condiciones normales y controlar el exceso de flujo de gas. Los cambios rápidos de presión pueden activar
el dispositivo de limitación del flujo, lo que produce que la llama y la temperatura bajen. Si se abre la válvula de la
bombona para para permitir que circule el gas mientras se abre la válvula de un quemador, el aumento de presión hará
que se active este dispositivo. El dispositivo permanecerá cerrado hasta que la presión se equilibre. Esto debería ocurrir
en unos 5 segundos.
Para asegurase de que esto no suponga un problema para encender la barbacoa, siga estas instrucciones.
1. Asegúrese de que todas las válvulas de los quemadores estén en la posición de “APAGADO”.
2. Abra la válvula de la bombona y espere 5 segundos.
IMPORTANTE: Antes de usar una bombona de gas nueva, compruebe si hay alguna fuga en el sistema de conexión
para asegurarse de que en el armario no se acumule vapor ni pérdidas. Asegúrese de que todas las aperturas de los
paneles laterales no estén bloqueadas.
IMPORTANTE: Coloque la tapa antipolvo en la bombona cuando no la vaya a usar. Use únicamente la tapa antipolvo
que se suministra con la válvula de la bombona. Otros tipos de tapas o tapones pueden provocar fugas.
ES-18

REQUISITOS DE GAS
PRECAUCIÓN: Es importante que inspeccione el tubo de gas en su totalidad. Si hay señales de que el tubo está
demasiado desgastado o quemado, o si tiene algún corte, se debe reemplazar antes de usar el aparato.
NUNCA use un suministro de gas sin regulador.
Consulte la tabla siguiente para el tipo de gas compatible:
Cat
Lado de la boquilla
Código de país
Tipo de gas y presión
Entrada de calor
nominal
Entrada de calor total ∑Qn=16,39 (1193 g/h) kW
I3+ (28-30/37)
Quemador principal:
0,88 mm
Quemador lateral:
0,92 mm
BE, CH, CY, CZ, ES, FR,
GB, GR, IE, IT, LT, LU, LV,
PT, SK y SI.
Butano G30 a 28-30
mbar y propano G31 a
37 mbar
I3B/P (30)
Quemador principal:
0,88 mm
Quemador lateral:
0,92 mm
AL, CY, DK, EE, FR, FI,
HU, IT, LT, NL, NO, SE,
SI, SK, RO, HR, TR, BG,
IS, LU, MT y CZ.
Butano G30 y propano
G31 a 30 mbar
Qn=3,22 kW
I3B/P (37)
Quemador principal:
0,85 mm
Quemador lateral:
0,89 mm
PL AT, CH, CZ, DE y SK
Butano G30 y propano
G31 a 37 mbar
I3B/P (50)
Quemador principal:
0,76 mm
Quemador lateral:
0,81 mm
Butano G30 y propano
G31 a 50 mbar
ENTORNO SEGURO DE COCINADO
Este aparato de gas está diseñado y certificado para su uso al aire libre. No use la barbacoa dentro de edificios, garajes,
vehículos recreativos, porches cubiertos o cualquier zona cerrada. Mantenga la barbacoa lejos de zonas con mucho
viento, pero siempre en zona bien ventiladas. No bloquee el flujo de combustión y ventilación del aire alrededor de la
barbacoa.
• DISTANCIA CON MATERIALES COMBUSTIBLES
Se debe mantener un espacio libre mínimo de 1 m desde los lados de la parrilla y un espacio mínimo de 1 m
desde la parte posterior de la parrilla hasta las construcciones combustibles verticales adyacentes. Se recomienda
encarecidamente dejar un espacio libre de 1 m entre la parrilla y cualquier construcción combustible.
• DISTANCIA CON MATERIALES NO COMBUSTIBLES
Se debe mantener una distancia mínima de 1 m desde la parte trasera de la barbacoa sobre la superficie de
cocinado con cualquier material no combustible para permitir que la campana de la barbacoa pueda abrirse
completamente. Se recomienda mantener una distancia mínima de 1 cm desde los lados de la barbacoa sobre la
superficie de cocinado con cualquier material no combustible. La barbacoa se puede instalar directamente junto a
materiales no combustibles bajo la superficie de cocinado.
Advertencia: No coloque la barbacoa debajo de superficies suspendidas, desprotegidas o combustibles.
ES-19

INSTRUCCIONES DE FUNCIONAMIENTO
PRIMERO USO – PREPARACIÓN DE LA BARBACOA
Al encender la barbacoa por primera vez, se recomienda abrir los quemadores principales en posición “ALTO” durante
20 minutos con la campana bajada y luego apague los quemadores principales. Así se atemperará la barbacoa.
IMPORTANTE: Asegúrese de abrir completamente la campana siempre que intente encender la barbacoa. No abrir
la campana podría retrasar el encendido y provocar lesiones corporales. Use el agujero para observar la llama en
el panel lateral.
PRECALENTAMIENTO
Es extremadamente importante que la barbacoa esté a la temperatura adecuada antes de empezar a usar. Después de
encenderla, cierre la campana y precaliente la barbacoa en posición “ALTO” durante 15 minutos. Este precalentamiento
hará que las rejillas y parrillas de cocinado estén lo suficientemente calientes para asar correctamente los alimentos.
CONSEJOS PARA COCINAR
1. Pincele las parrillas de cocinado con aceite de cocina o vegetal antes de usar el aparato.
2. Use un pincel con un mango largo. Los jugos de la comida caen sobre el fuego y se evaporan. El vapor que se genera
con este proceso aporta sabor a la comida.
3. Ajuste los mandos reguladores entre las posiciones “Alta” y “Baja” para conseguir los resultados deseados.
4. Mantenga la cubierta cerrada con la llama baja para conseguir un resultado más uniforme y cocinar piezas más
grandes de carne o pollos enteros.
5. Evite abrir la cubierta a menudo. Cada vez que lo hace, se escapa el calor acumulado, lo que prolonga el tiempo de
cocinado.
INSTRUCCIONES DE ENCENDIDO ELECTRÓNICO
Para encender los quemadores principales y el quemador lateral
1. Asegúrese de que los mandos reguladores estén en posición “APAGADO”.
2. Abra la campana de la barbacoa.
3. Compruebe la posición del botón de encendido y la distancia entre el botón
y el quemador.
4. Asegúrese de que la bandeja recogedora esté colocada.
5. Abra la bombona de gas PL o la válvula de gas natural.
6. Encienda cada quemador por separado. Encender las válvulas de dos
quemadores a la vez podría accionar el dispositivo de limitación del flujo en
la conexión de la bombona (solo barbacoas de gas PL).
7. Presione el mando regulador y gírelo a la izquierda hasta la posición “ALTO”.
8. Presione y gire el mando regulador del quemador hasta la posición “ALTO”, e inmediatamente después, presione
y mantenga presionado el encendedor electrónico.
9. Si el quemador no prende, CIERRE LA LLAVE DEL GAS. ESPERE 5 MINUTOS para que se disipe el exceso de gas.
10. Si el quemador sigue sin prenderse, consulte la sección de resolución de problemas.
ES-20

SUSTITUCIÓN DE LA PILA
Desenrosque el botón de encendido eléctrico y retire la pila gastada. Sustitúyala por una nueva pila AA.
Nota: El lado negativo (-) de la pila va hacia dentro. Fíjese en la marca a cada lado de la tapa.
POSICIÓN DE LA CAMPANA – ABIERTA O CERRADA
Cocina con la campana abierta o cerrada depende de sus preferencias personales.
• CAMPANA ABIERTA
Se recomienda cocinar con la campana abierta para disfrutar de una temperatura de sellado máxima. Este método
también produce más llamas, acelera el proceso de cocinado y le aporta a los alimentos un sabor más intenso,
ahumado y de cocina al aire libre. Deje la campana abierta para cocinar carne, sobre todo pollo.
• CAMPANA CERRADA
Si prefiere cocinar más despacio con menos llamas, le recomendamos cerrar la campana. Es método es perfecto
para asar o cocinar de forma indirecta. Recomendamos cocinar con la campana CERRADA siempre si está en una
zona con mucho viento o con un clima frío.
La barbacoa se ha diseñado y fabricado para ofrecerle la máxima flexibilidad y el mejor rendimiento a la hora de cocinar.
Dé rienda suelta a su creatividad. Pruebe distintos métodos de cocinado en la barbacoa para determinar cuál se ajusta
mejor a sus necesidades. No hay una manera correcta o incorrecta de cocinar, solo estilos de cocinado distintos. ¡Use su
imaginación y disfrute!
PRECAUCIÓN: Protéjase siempre las manos con unas manoplas o guantes para cocinar cuando entre en contacto con
una superficie caliente.
COMPROBACIÓN DE FUGAS DE GAS
¡Advertencia! ¡Riesgo de explosión!
Nunca use cerillas ni llamas para detectar fugas. Usar llamas directamente podría provocar incendios,
explosiones y lesiones corporales.
Revise siempre todas las conexiones, uniones y tubos de gas para comprobar que no haya fugas antes de usar el
aparato, o cada vez que cambie la bombona de gas. Asegúrese de realizar este procedimiento en una zona bien
ventilada y alejada de llamas, chispas o fuentes de calor. No intente encender el aparato si huele a gas.
1. Asegúrese de que todos los mandos reguladores del aparato estén en la posición de “APAGADO”.
2. Abra la válvula de la bombona de gas y/o el regulador de presión.
3. Aplique un aerosol de detección de fugas o una solución con una mezcla a partes iguales de agua y jabón en todos
los puntos de unión.
4. Si se forman burbujas de gas, significa que hay una fuga. Cierre la llave del gas y/o el regulador de presión
inmediatamente. Apriete todas las conexiones de nuevo y repita el proceso de comprobación.
5. No use el aparato y póngase en contacto con su proveedor si se siguen formando burbujas de gas.
IMPORTANTE: Al conectar o reemplazar las uniones o tubos de gas, todas las juntas se deben sellar con un producto
antifugas aprobado o con cinta de fontanería.
ES-21

MANTENIMIENTO Y LIMPIEZA
La barbacoa está hecha de materiales de alta calidad.
Limpie la barbacoa después de cada uso. Para limpiar y cuidar las superficies, sigas estas instrucciones:
¡Peligro! ¡Riesgo de quemaduras!
Espere hasta que la barbacoa se enfríe completamente antes de limpiarla.
¡Peligro! ¡Riesgo para la salud!
No use diluyentes o disolventes de pintura para eliminar las manchas. Estas sustancias son peligrosas para la
salud y no deben entrar en contacto con la comida.
¡Advertencia! ¡Riesgo de daños!
No use disolventes abrasivos o estropajos fuertes, ya que podrían dañar y rayar las superficies.
• Después de usar la barbacoa, déjela encendida durante aproximadamente 5 minutos sin comida. Esto reduce los
restos de comida.
• Ponga el regulador de la manguera de gas en la posición de Apagado antes de limpiar la barbacoa.
• Retire la parrilla de cocinado y límpiela minuciosamente con agua con jabón. Aclárela con agua limpia y séquela bien.
• Puede usar una esponja humedecida para despegar los restos de la barbacoa.
• Si se acumula una capa de grasa en la parte interior de la cubierta, se puede limpiar con una solución jabonosa fuerte
y caliente. Luego, aclárela con agua limpia y séquela bien antes de volver a usar la barbacoa.
¡Advertencia! ¡Nunca use limpiadores de horno comerciales!
• Los restos de comida en la barbacoa se pueden retirar con un cepillo, una espátula o un estropajo. A continuación,
vuelva a lavarla con agua con jabón. Aclárela con agua limpia y séquela.
• Limpie las superficies interiores y exteriores con agua caliente con jabón como práctica habitual.
• Limpie las superficies de madera con un paño suave y agua caliente con jabón. Luego, aclárelas con agua limpia.
Nunca limpie las superficies de madera con limpiadores de barbacoa concentrados.
• Use un paño suave y limpio para secarlas. No raye las superficies al secarlas.
• Apriete todos los tornillos antes de cada uso para asegurarse de que la barbacoa se mantiene estable en todo
momento.
• Cuando no use la barbacoa de gas, debe cubrirla con una funda protectora.
LIMPIEZA DE LOS QUEMADORES
• Ponga el regulador de la bombona de gas en la posición Apagado. A continuación, ponga el controlador de
temperatura de la barbacoa en las posición Apagado y desconecte la manguera de la bombona de gas.
• Retire las parrillas de cocinado.
• Limpie los quemadores con un cepillo suave o con aire comprimido. Luego, séquelos con un paño.
• Limpie los orificios bloqueados con un limpiapipas resistente, un alambre o con uno de los extremos de un clip
abierto.
ES-22

LIMPIEZA DEL CABEZAL DE ENCENDIDO
• La acumulación de suciedad en el extremo del cabezal de encendido puede dificultar que se prenda la llama. En este
caso, se debe limpiar. El extremo del cabeza de encendido está situado junto a la abertura del quemador.
• Para conseguir un funcionamiento perfecto, se deben retirar los restos de comida entre el extremo del cabezal de
encendido y el quemador. Use una lija fina o papel de esmeril para limpiar el extremo del cabezal de encendido y el
borde del quemador.
• El extremo del cabezal de encendido debe estar a unos 4 o 6 mm de distancia con el borde del quemador. Esta es la
distancia óptima para que encienda correctamente.
LIMPIEZA DE LA BANDEJA DE RECOGIDA
Esta bandeja recoge el excedente de grasa y las partículas de comida que caen al cocinar. Espere a que la bandeja y
su contenido se enfríe antes de limpiarla. Afloje la cubierta trasera del armazón superior (J) para sacar la bandeja de
recogida y limpiarla.
Asegúrese de que la bandeja esté correctamente instalada antes de usar la barbacoa. Se recomienda encarecidamente
comprobar la bandeja con regularidad para evitar que la grasa salga ardiendo. Sin embargo, las gotas que van cayendo
se evaporarán y aportarán a la comida un sabor más intenso a barbacoa.
MANTENIMIENTO DE LAS SUPERFICIES Y TAPAS DE LA BARBACOA
INFORMACIÓN IMPORTANTE
Mantenimiento y cuidado de las superficies de acero inoxidable
La barbacoa está fabricada con piezas de acero inoxidable. Todas las piezas de acero inoxidable necesitan un poco de
esfuerzo para protegerlas y cuidarlas a fin de mantener su apariencia original. Al contrario de lo que se cree, el acero
inoxidable no es totalmente resistente a la oxidación rápida y a la corrosión; por tanto, requiere algunos cuidados.
Incluso las piezas de acero inoxidable de la mejor calidad necesitan limpiarse regularmente con agua dulce para evitar la
oxidación y corrosión.
Los componentes de acero inoxidable y su acabado pulido aportan a la barbacoa una estética moderna. Este acabado
pulido se consigue tratando las hojas de acero inoxidable con un proceso en el que el acabado de espejo del acero se
retira y las hojas salen de la planta de procesado pulidas.
El acero inoxidable pulido requiere una limpieza y mantenimiento regular para conservar su apariencia. Sin los cuidados
adecuados, con el tiempo pueden aparecer marcas de óxido y corrosión en la superficie del acero.
El acero inoxidable necesita mantenimiento. La limpieza y el acero inoxidable guardan una relación estrecha.
Cuando haya montado la barbacoa, le recomendamos usar un paño limpio para aplicar una fina capa de aceite de
oliva en todas las superficies accesibles de acero inoxidable.
ES-23

A continuación, frote el aceite de oliva y, luego, limpie la superficie con un paño limpio para que no se quede aceitosa.
De esta manera, se asegurará de que el material queda protegido de la suciedad y otras sustancias agresivas dañinas, ya
que la superficie quedará cubierta temporalmente con una capa protectora segura para los alimentos.
El aceite de oliva también facilita el pulido posterior y la limpieza de huellas y similares. Repita este proceso de vez en
cuando limpie la barbacoa.
INFORMACIÓN IMPORTANTE
Puede que haya comprado una funda protectora para la barbacoa. Para proteger su inversión, le recomendamos
que cubra la barbacoa con la funda protectora cuando no la vaya a usar. Sin embargo, asegúrese de poner la funda
protectora solo cuando la barbacoa se haya enfriado y esté limpia y seca. Puede ser necesario usar una funda
protectora. ¡Precaución! Poner la funda protectora en la barbacoa mientras está caliente, mojada o sucia puede
provocar una gran oxidación.
Por este motivo, la barbacoa siempre tiene que estar fría, limpia y perfectamente seca antes de colocar la funda
protectora. Esto es especialmente importante si no la va a usar durante periodos de tiempo prolongados, como el invierno.
Siga estas instrucciones de mantenimiento y cuidado detalladamente para conservar la calidad de la barbacoa durante
mucho tiempo.
Cuide de su inversión y le prestará un buen servicio durante muchos años.
SEGURIDAD DEL GAS
Para las barbacoas de gas PL, la bombona de suministro de gas PL debe estar fabricada de acuerdo a una directiva
europea implantada en relación a las bombonas de gas.
• La bombona debe medir 35,3 cm de diámetro y 45,72 cm de altura y debe estar equipada con un acoplamiento de
Tipo I.
• El sistema de suministro de la bombona debe contar un mecanismo de extracción del vapor.
• La bombona debe incluir un anillo que proteja la válvula del cilindro.
No use la barbacoa de gas en interiores o zonas cerradas. Si no va a usar la barbacoa de gas, cierre la llave de suministro
de la bombona de gas y guárdela en posición vertical en un lugar fresco, bien ventilado al aire libre y que esté lejos de
cualquier otra fuente de calor.
Al comprobar si hay fugas de gas, no use llamas directamente. Use una solución de agua con jabón y aplíquela a las
juntas y conexiones de los tubos con un cepillo y mire si se forman burbujas. Compruebe que los tubos no estén
desgastados ni tengan cortes que puedan impedir un uso seguro de la barbacoa. Solo se deben usar los tubos y
reguladores suministrados de fábrica. Sustituya los conjuntos de tubos y reguladores únicamente por otros que haya
especificado el fabricante.
La bombona de PL debe estar cerrada de forma segura por el anillo de seguridad en todo momento. Si una bombona
abierta se cae o se inclina puede provocar lesiones o daños en la propiedad. Se recomienda cerrar la bombona en todo
momento.
Después de coloca la bombona en la apertura, baje el anillo de seguridad para cerrar la bombona. Use solo bombonas
de gas de 9,07 kg.
ADVERTENCIA: Se deben usar los conjuntos de tubos y reguladores de presión suministrados con el aparato de gas
para cocinar al aire libre. Sustituya los conjuntos de tubos y reguladores únicamente por otros que haya especificado
el fabricante del aparato de gas para cocinar al aire libre.
ES-24

• MANIPULACIÓN DE LOS TANQUES DE GAS
Recuerde manipular con cuidado su tanque de butano o propano líquido portátil cuando lo lleve a su distribuidor
para que lo recargue. Intente que no se caiga ni se choque con objetos afilados. Los tanques de butano líquido o
propano están construidos de manera robusta, pero varias sacudidas fuertes podrían dañar el recipiente.
Cuando transporte el tanque a su distribuidor local de gas butano o propano, compruebe que la válvula esté bien
cerrada y que la cubierta protectora esté en su lugar. Coloque la bombona de forma segura en posición vertical para
que no ruede en el vehículo.
Si planea hacer paradas para hacer compras o hacer recados, llene su tanque de butano líquido o propano en la
última parada antes de volver a casa. De nuevo, asegúrese de transportar la bombona rellena de forma segura y en
posición vertical. Al volver a casa, saque la bombona rellena del vehículo. Nunca deje un tanque líquido portátil de
butano o propano dentro de un vehículo que pueda sobrecalentarse por el sol.
• ALMACENAMIENTO SEGURO
No almacene tanques portátiles de butano o propano líquido (llenos o vacíos) dentro de su casa, la sala de estar de
una autocaravana, un garaje, un sótano o un taller. Es poco probable que se filtre butano o propano líquido de los
tanques. Si hay alguna fuga, el combustible podría exponerse a chispas procedentes de automóviles, herramientas
eléctricas u otros aparatos. Al almacenar o transportar la bombona de PL, debe permanecer en posición vertical.
Nunca tumbe la bombona de PL de lado, tanto si está llena como vacía. Nunca almacene bombonas de reserva
debajo de la barbacoa ni cerca.
PRECAUCIÓN: Nunca transporte ni mueva la parrilla o tanque de parrilla sin cerrar antes la válvula manual en su
tanque de gas butano líquido o propano.
El mejor lugar para almacenar un tanque de butano o propano líquido es en un lugar con sombra o protegido al aire
libre, detrás de su casa o garaje, o en un porche con mosquitero, pero donde esté fuera del alcance de los niños. El
butano líquido o el propano no se evaporan. Está en recipiente cerrado y resistente. No perderá su contenido de
combustión limpia incluso si deja fuera todo el año.
ADVERTENCIA: Cuando no esté conectada a la barbacoa, la bombona de gas de PL se debe guardar en posición vertical
en un lugar al aire libre fresco, con sombra y bien ventilado lejos de la barbacoa o de cualquier otra fuente de calor. No
respetar esta advertencia podría dañar la válvula de la bombona y provocar incendios y lesiones personales.
IMPORTANTE: Al conectar o reemplazar las uniones o tubos de gas, todas las juntas se deben sellar con un producto
antifugas aprobado o con cinta de fontanería. Después de unir las conexiones, compruebe que no haya fugas usando
una solución de agua con jabón y un cepillo.
ADVERTENCIA: Nunca compruebe si hay fugas de gas con una llama directa. Usar llamas directamente podría
provocar incendios, explosiones y lesiones corporales.
CALENDARIO DE CUIDADOS Y MANTENIMIENTO
Componente Frecuencia de limpieza (uso
normal)
Superficies de acero inoxidable Dos veces al año Limpiador de acero inoxidable
Parrillas de cocinado Después de cada uso Restos quemados, Cepillo metálico
Parrillas de acero inoxidable 15 días Estropajo y agua con jabón/Apto para lavavajillas
Recipiente para la grasa 15 días Estropajo y agua con jabón/Apto para lavavajillas
Bandeja para la grasa 15 días Estropajo y agua con jabón
Difusores del calor 30 días Estropajo y agua con jabón/Apto para lavavajillas
Quemadores 90 días Estropajo y agua con jabón
Interior del armazón superior 120 días Productos de limpieza para interiores de parrillas
Método de limpieza
ES-25

SUSTITUCIÓN DEL QUEMADOR PRINCIPAL
CÓMO SUSTITUIR EL QUEMADOR PRINCIPAL
1. Abra la campana de la barbacoa y retire la rejilla de calentamiento
(A), las parrillas de cocinado (B) y los difusores del calor (C).
2. Retire el pasador de chaveta del quemador principal. (Fig. 1)
3. Retire los dos tornillos que fijan el cable y el electrodo del
quemador principal al quemador principal.
4. Retire y deseche el quemador principal antiguo. Sustitúyalo por
uno nuevo.
Nota: Al volver a instalar el quemador principal, asegúrese de que
el eje de la válvula principal se inserta en la abertura del tubo del
quemado principal.
5. Vuelva a instalar el pasador de chaveta y los dos tornillos que fijan
el cable y el electrodo del quemador principal.
6. Vuelva colocar los difusores del calor, las parrillas de cocinado y la
rejilla de calentamiento.
CÓMO SUSTITUIR EL CABLE DE ENCENDIDO AUTOMÁTICO Y
DEL ELECTRODO DEL QUEMADOR PRINCIPAL
FIG. 1
FIG. 2
Tornillos fijos
Pasador de chaveta
Tornillos fijos
1. Abra la campana de la barbacoa y retire la rejilla de calentamiento
(A), las parrillas de cocinado (B) y los difusores del calor (C).
2. Retire los dos tornillos que fijan el cable y el electrodo del
quemador principal al quemador principal. (Fig. 1)
3. Desde debajo de la barbacoa, justo encima de la puerta izquierda
del carro, retire los dos tornillos que mantienen fijado el escudo
térmico. Retire el escudo térmico a través de la abertura que hay
justo encima de la puerta. (Fig. 2)
4. Desenrosque el botón del encendedor y la tuerca de bloqueo,
y luego retire el botón del encendedor a través de la misma
abertura. Desconecte el cable del electrodo del quemador
principal que va a reemplazar desde la parte trasera del botón
del encendedor, y luego sustituya el electrodo y el cable de la
barbacoa. (Fig. 2)
5. Pase el nuevo cable del electrodo del quemador principal por el
agujero del interior de la barbacoa, y luego vuelva a instalar el
electrodo del quemador principal con los dos tornillos que retiró
anteriormente. (Fig. 3)
6. Conecte el cable en la parte trasera del botón del encendedor
donde retiró el cable anterior. (Fig. 4)
7. Vuelva a colocar el botón y el escudo térmico con los dos tornillos
que retiró anteriormente.
8. Vuelva colocar los difusores del calor, las parrillas de cocinado y la
rejilla de calentamiento.
Escudo térmico de encendido
FIG. 3
Tuerca de bloqueo del
botón de encendido y
botón
Escudo térmico de encendido
FIG. 4
Cable de encendido
ES-26
Encendedor
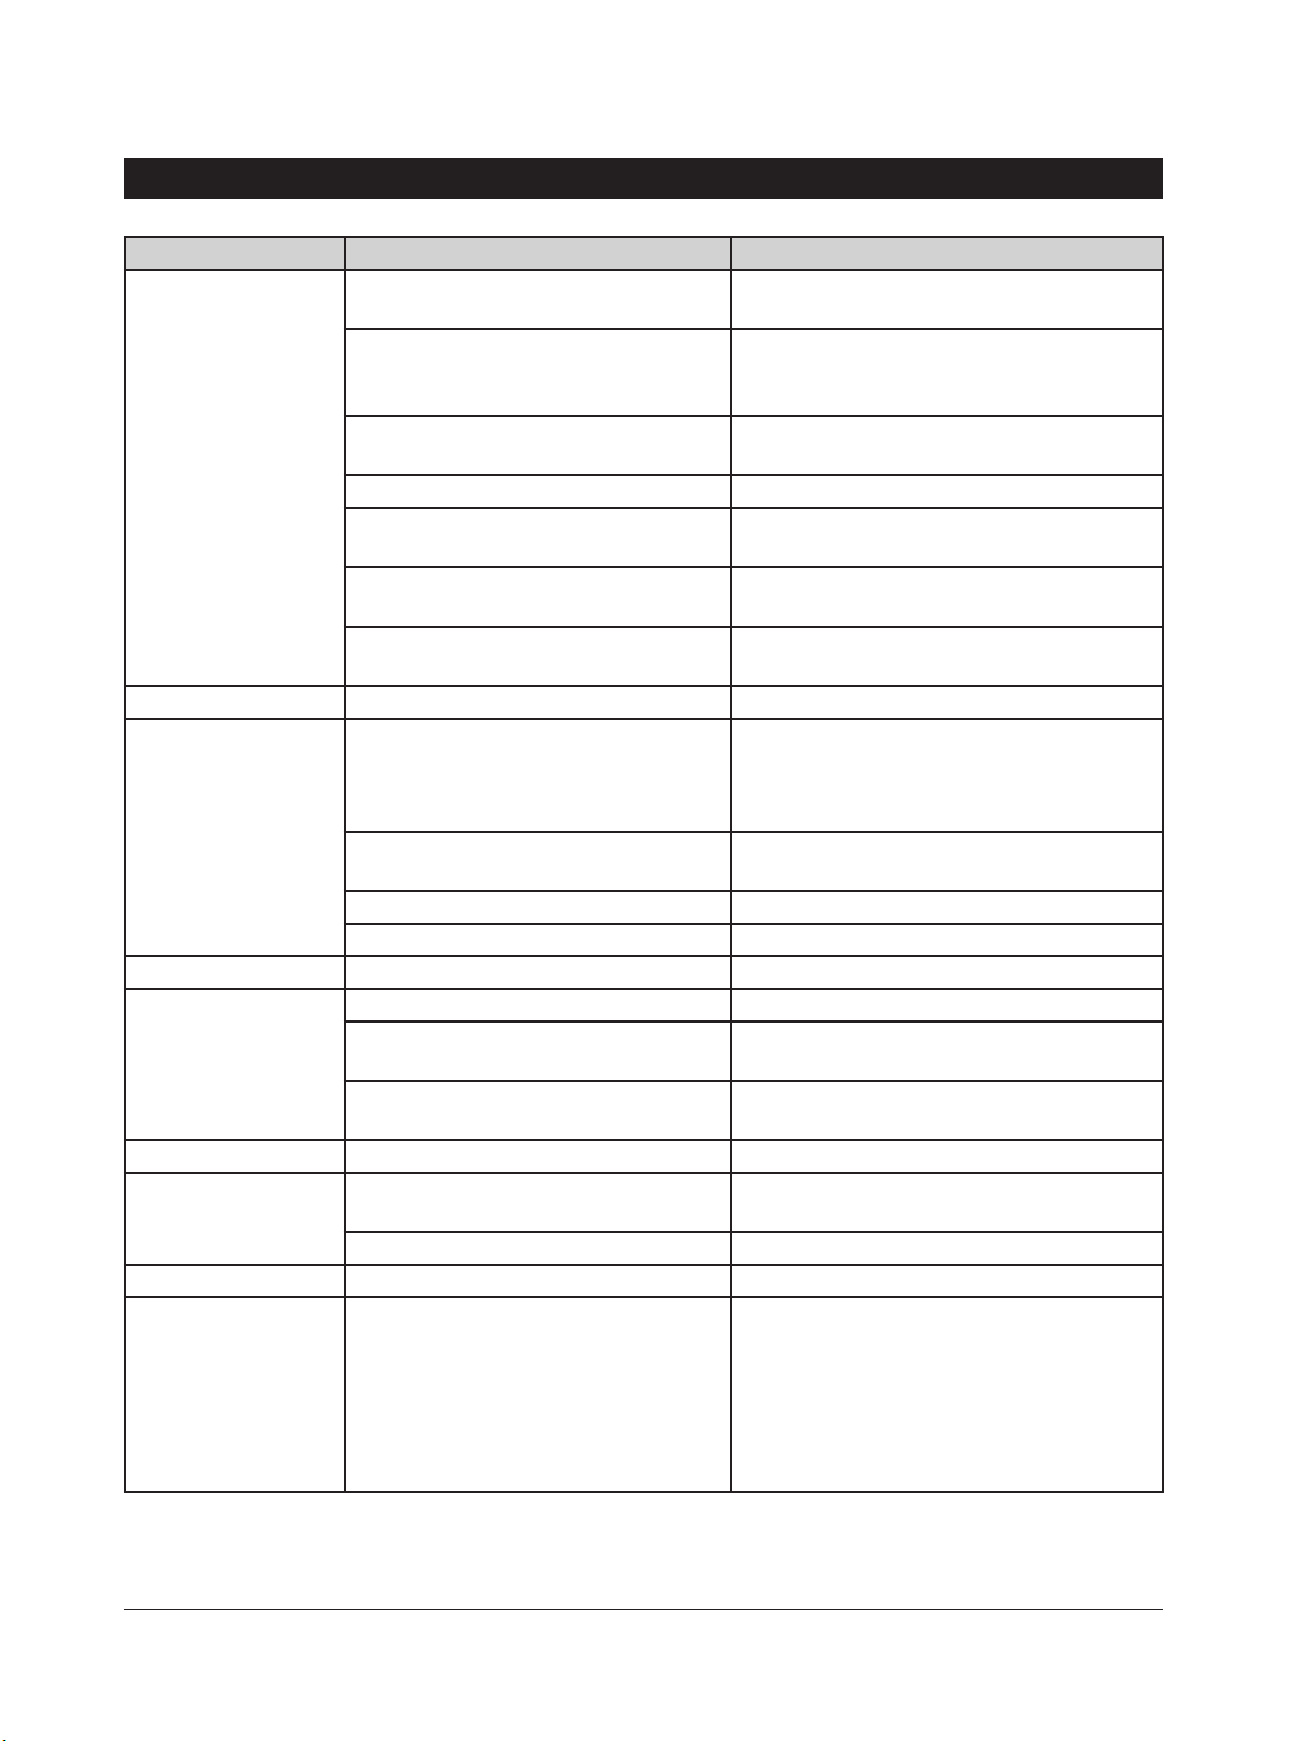
RESOLUCIÓN DE PROBLEMAS
PROBLEMA CAUSA ACCIÓN CORRECTIVA
La barbacoa o los
fogones laterales no se
encienden.
El cable de encendido se ha desconectado
del encendedor eléctrico o la válvula.
La distancia entre el botón de encendido
y el quemador es superior a 3,96 mm 4,75 mm (quemador lateral).
El cable de encendido está roto. Llame al servicio de atención al cliente para
La pila se ha agotado. Ponga una nueva pila.
La nueva pila no funciona. Compruebe la polaridad de la pila. El lado
La punta del electrodo no produce chispas
en el puerto del quemador.
No hay suministro de gas. Compruebe la válvula reguladora. Compruebe la
Vuelva a conectar el cable de encendido al
encendedor eléctrico o la válvula.
Afloje el botón de encendido, ajuste la distancia
y luego vuelva apretarlo.
pedir un recambio.
negativo (-) de la pila va hacia dentro.
Vuelva a instalar el electrodo.
conexión para ver si hay fugas.
Las llamas son
demasiado fuertes.
El quemador se apaga. La bombona de PL está vacía. Rellene la bombona de PL.
La posición “ALTO”
calienta poco
Poca temperatura, gas
PL.
Se está cocinando carne con mucha grasa. Cocine carnes grasas cuando las rejillas estén
frías y ajuste los mandos a la posición “BAJO”.
Mueva la carne a la rejilla de calentamiento si
las llaman persisten.
Los mandos están en posición “ALTO”. Antes de cocinar, gire los mandos a la posición
de “APAGADO”.
Se ha rociado agua en las llamas de gas. No rocíe agua en las llamas de gas.
Se ha cerrado la campana para cocinar. Suba la campana para cocinar.
El quemador no está alineado con la
válvula de control.
El suministro de gas no es suficiente. Compruebe el tubo del suministro de gas y
Los puertos están bloqueados. Retire cualquier elemento que obstruya los
La bombona de PL se ha acabado. Rellene la bombona de PL.
El conjunto del regulador incorpora un
dispositivo de exceso de flujo diseñado
para suministrar a la parrilla flujo de gas
suficiente. Los cambios rápidos de presión
pueden activar el dispositivo de limitación
del flujo, lo que produce que la llama y la
temperatura bajen.
Instale el quemador correctamente.
asegúrese de que no haya fugas ni nudos.
puertos.
1. Asegúrese de que todos los quemadores
estén en la posición de “APAGADO”.
2. Abra la válvula de la bombona y espere
5 minutos.
3. Encienda los quemadores uno por uno
siguiendo las instrucciones de encendido.
ES-27

PIEZAS DE RECAMBIO
ES-28
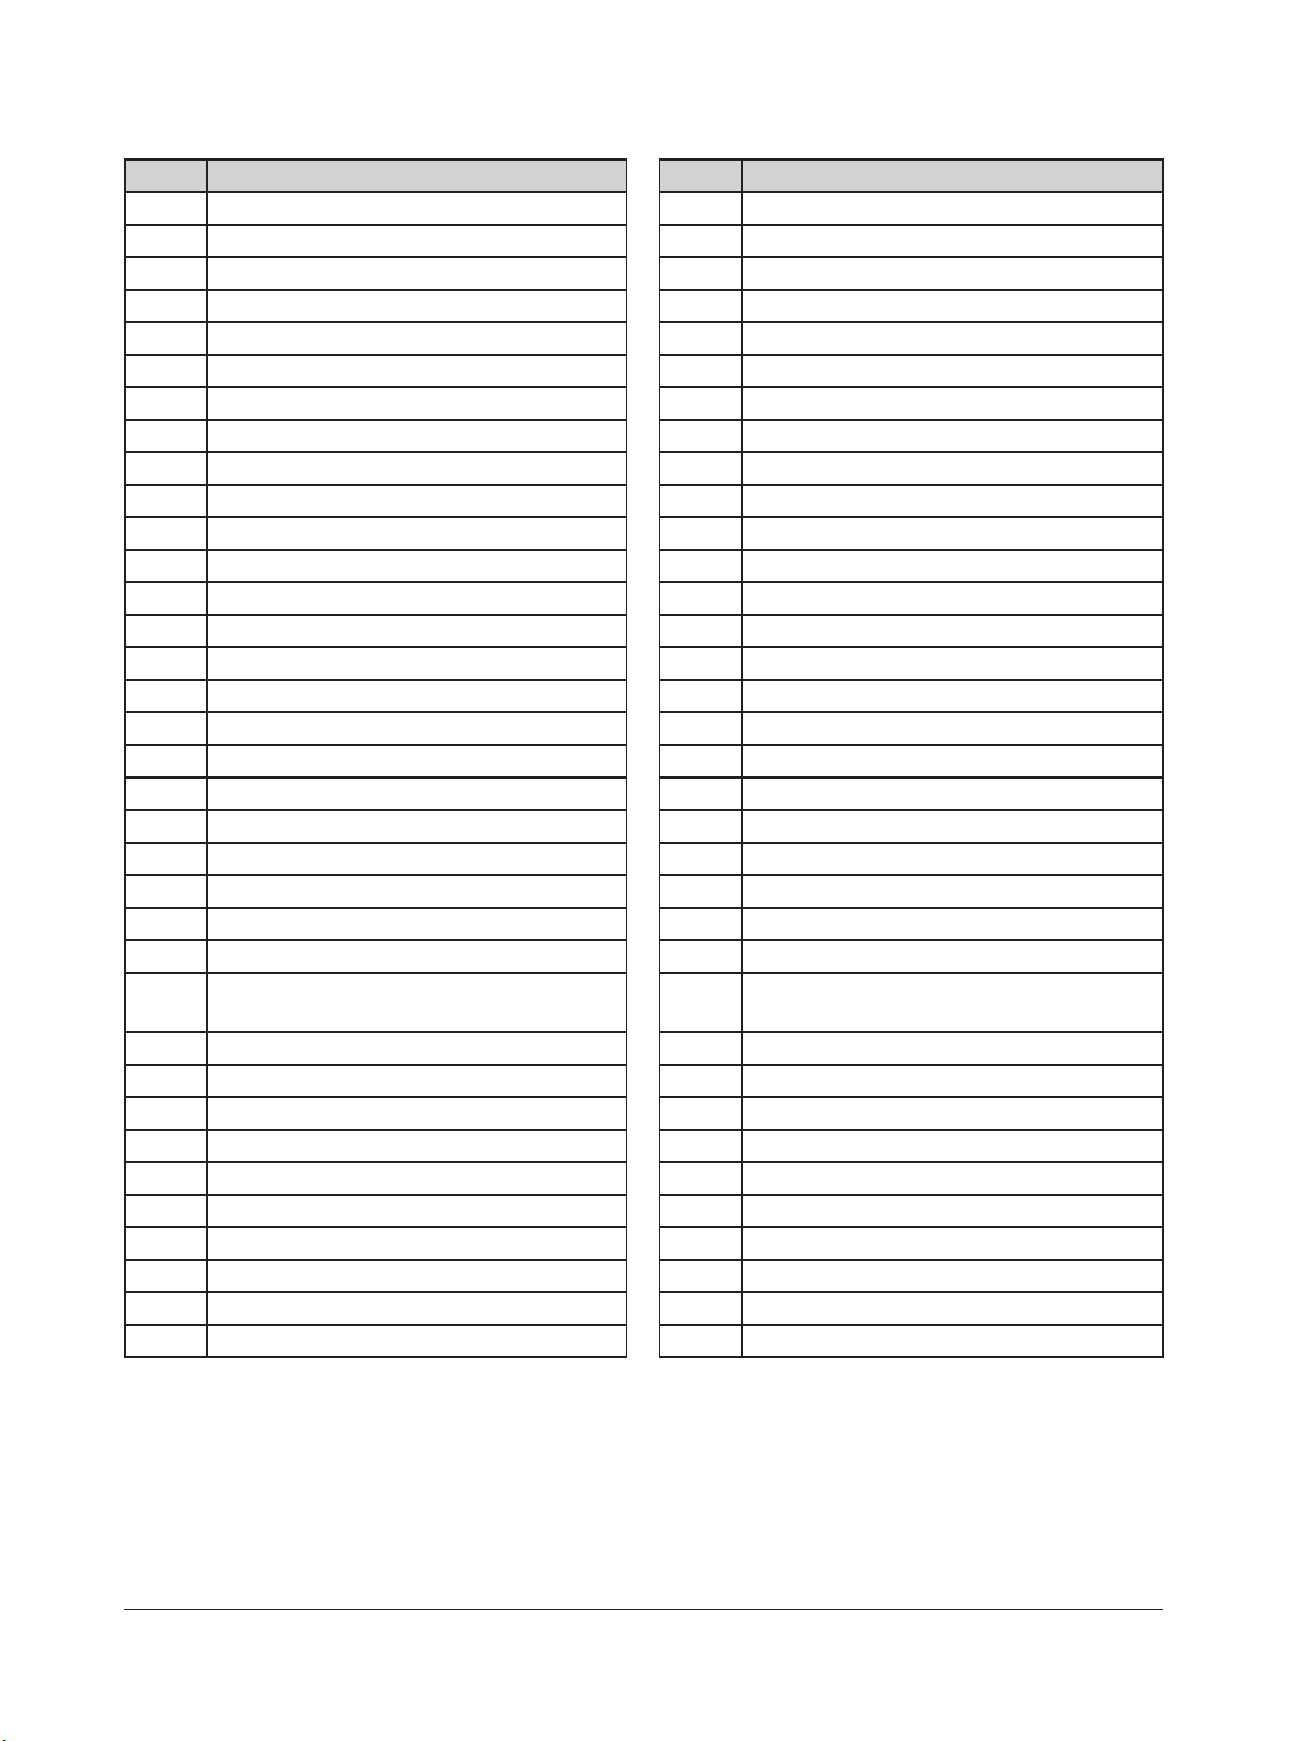
PIEZA DESCRIPCIÓN PIEZA DESCRIPCIÓN
1 Tapa principal 36 Soporte J
2 Tornillo de la bisagra 37 Soporte M
3 Aislante del calor para el termómetro 38 Imán de la puerta
4 Embellecedor del termómetro 39 Pivote de puerta
5 Termómetro 40 Ojal del tirador de la puerta
6 Placa del nombre 41 Tirador de la puerta
7 Tope de la tapa 42 Embellecedor del tirador de la puerta
8 Embellecedor del tirador de la tapa 43 Puerta izquierda
9 Aislante del calor para el tirador de la tapa 44 Puerta derecha
10 Tirador de la tapa 45 Rueda de bloqueo
11 Soporte de tapa, izquierdo 46 Tope de la puerta
12 Soporte de tapa, derecho 47 Rueda recta
13 Interior del armazón superior 48 Panel inferior del carro
14 Soporte de pivote de puerta 49 Panel lateral del carro, derecho
15 Escuadra izquierda del panel de control 50 Quemador lateral
16 Escuadra derecha del panel de control 51 Accesorio de quemador lateral
17 Válvula de quemador principal 52 Soporte X
18 Distribuidor de gas para el quemador principal 53 Bisel de la perilla del quemador lateral
19 Encendedor 54 Estante lateral derecho
20 Panel de control 55 Estante lateral derecho
21 Controlador 56 Panel inferior del estante derecho
22 Embellecedor del controlador 57 Cable y electrodo del quemador lateral
23 Tubo de gas 58 Parilla de cocción con quemador lateral
24 Válvula de quemador lateral 59 Cubierta del estante derecho
25 Colector de gas, para quemador lateral 60 Bisagra de la cubierta del estante del lado
derecho
26 Regulador 61 Quemador principal
27 Bandeja para la grasa 62 Electrodo del quemador principal y cable A
28 Caja de grasa 63 Electrodo del quemador principal y cable B
29 Cubierta trasera del fogón 64 Electrodo del quemador principal y cable C
30 Panel trasero de carro 65 Electrodo del quemador principal y cable D
31 Soporte D 66 Pasador de chaveta
32 Estante izquierdo 67 Difusor del calor
33 Cara de estante lateral izquierdo 68 Parrilla de cocinado
34 Panel lateral del carro, izquierdo 69 Rejilla de calentamiento
35 Soporte de carro 70 Tubo de encendido
ES-29
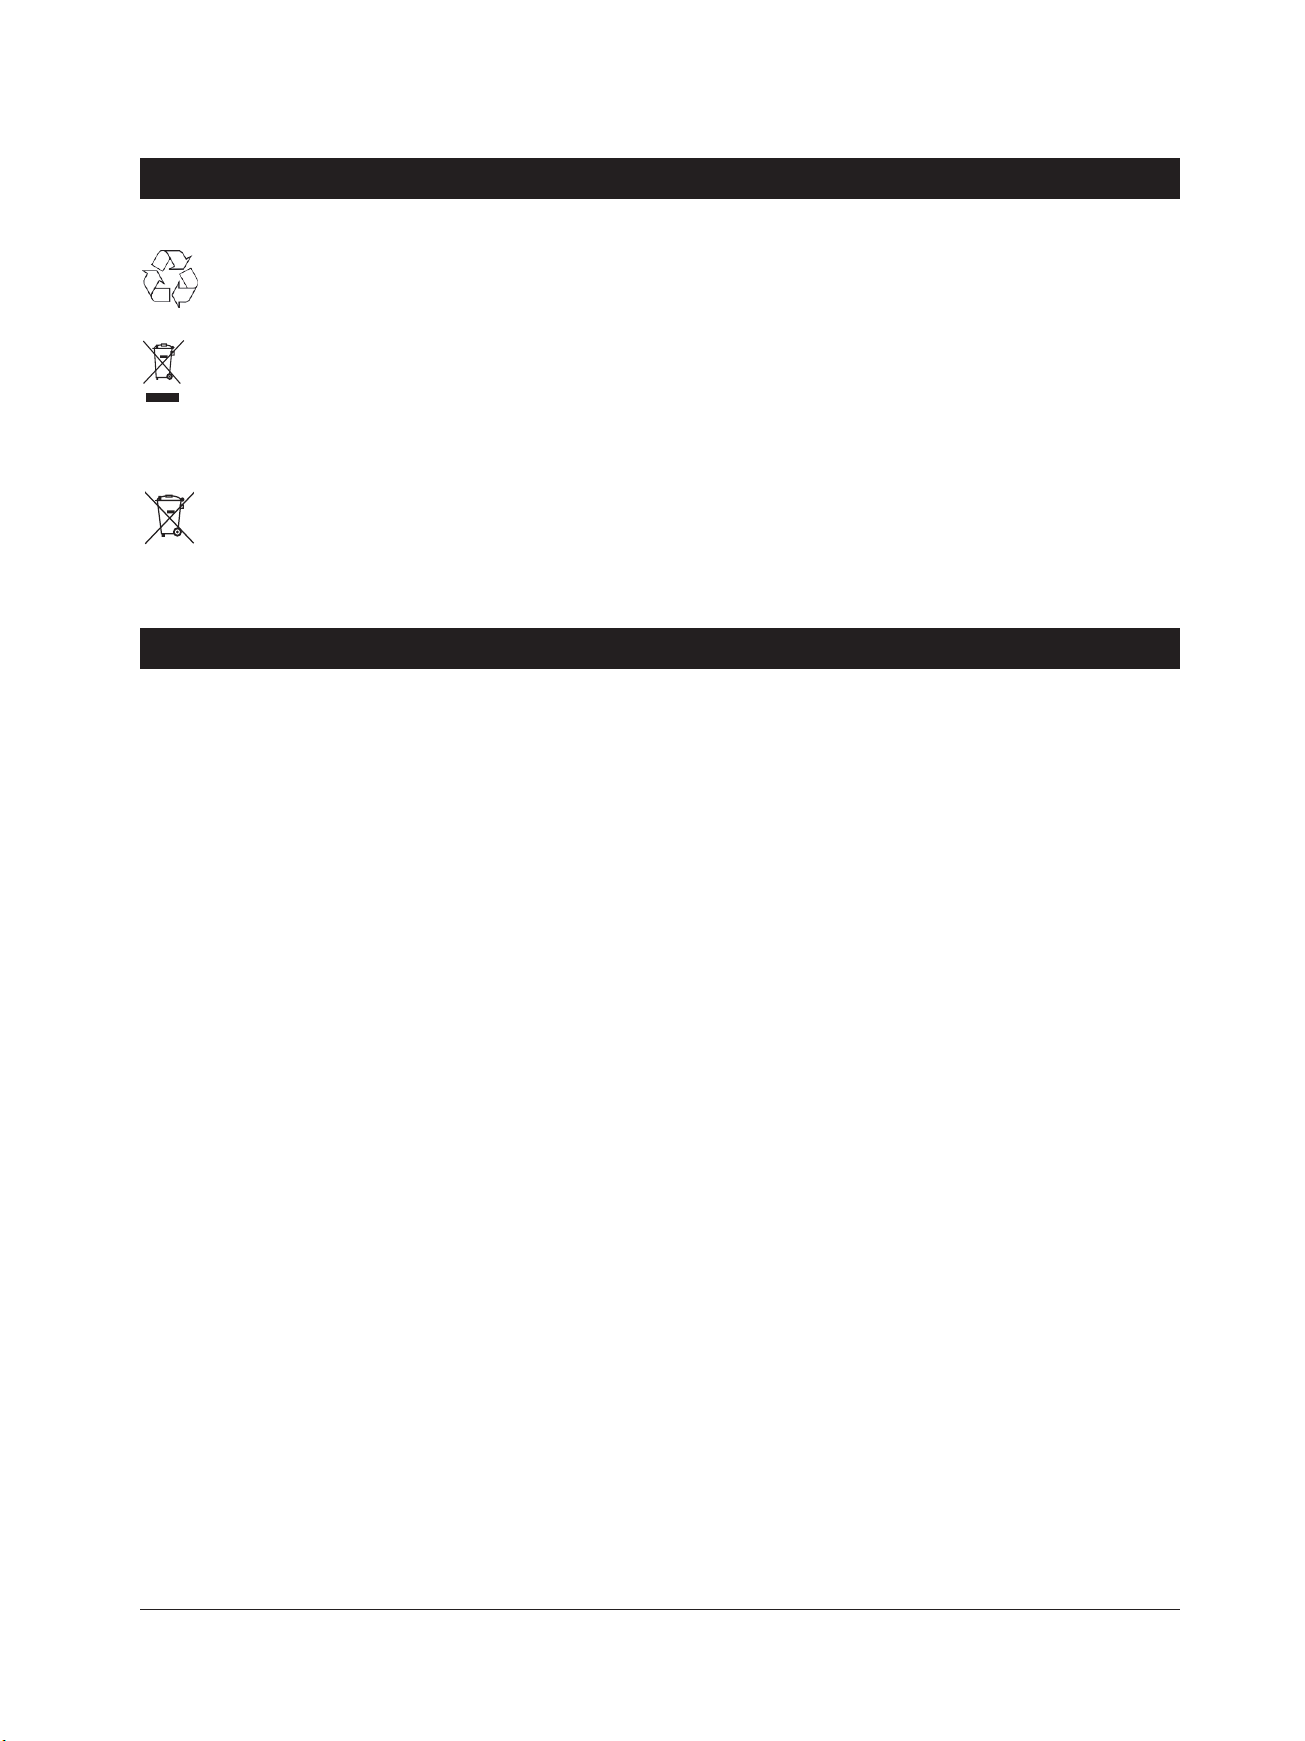
ELIMINACIÓN DE RESIDUOS
El embalaje está hecho de materiales respetuosos con el medio ambiente, que puede desechar en los
puntos de reciclaje que tenga más cerca.
¡No tire bajo ninguna circunstancia la barbacoa en el contenedor de residuos domésticos normales! Llévelo
a una empresa de tratamiento de residuos o al centro de eliminación de residuos de su municipio. Cumpla
con las normativas vigentes. En caso de duda, contacte con su centro de eliminación de residuos.
Pilas y pilas recargables
Las pilas usadas no se deben desechar en la basura de residuos domésticos. Recíclelas en los puntos de
recogida previstos para este fin. Contacte con las autoridades locales o su distribuidor para recibir asistencia
con el reciclado. Desechar correctamente las pilas usadas ayuda a proteger el planeta y la salud de las
personas.
DECLARACIÓN DE CONFORMIDAD
Este producto cumple con las directivas europeas y nacionales aplicables. Así lo confirma la marca CE (se pueden
solicitar las declaraciones correspondientes al fabricante).
ES-30

GRELHADOR CHURRASCO COM
4 QUEIMADORES
Caso tenha alguma questão, não hesite em contactar-nos. As informações de contacto podem ser encontradas no
nosso website teka.com.
O MANUAL DEVERÁ SER LIDO ANTES DA UTILIZAÇÃO!

AVISOS
Uma instalação, ajuste, alteração ou manutenção imprópria pode causar lesões corporais e/ou materiais. Leia este
manual de instruções atentamente antes de instalar ou usar este aparelho.
1. Não armazene nem use gasolina ou outros líquidos ou vapores inflamáveis na proximidade deste ou de qualquer
outro aparelho.
2. Uma botija de gás propano/butano não ligada para utilização não deve ser armazenada nas imediações deste ou de
qualquer outro eletrodoméstico.
PERIGO
Se sentir cheiro a gás:
1. Imediatamente, corte o fornecimento de gás ao aparelho.
2. Apague qualquer chama aberta.
3. Abra a tampa.
4. Se o odor persistir, mantenha-se afastado do aparelho e contacte imediatamente o seu fornecedor de gás ou os
bombeiros.
Antes de usar o seu aparelho pela primeira vez, leia atentamente as instruções de instalação e manutenção
incluídas.
Dependendo do modelo, os acessórios e recursos incluídos no seu aparelho podem ser diferentes dos que
são mostrados nas fotos.
CONTACTE-NOS
Caso tenha alguma questão, não hesite em contactar-nos. As informações de contacto podem ser encontradas no nosso
website teka.com.
O nosso endereço:
TEKA Industrial S.A.
C/Cajo 17, 39011 Santander

ÍNDICE
UTILIZAÇÃO PREVISTA ....................................................................................................................... PT-4
INFORMAÇÃO DE SEGURANÇA ......................................................................................................... PT-4
DESEMPACOTAR O GRELHADOR
LISTA DE PEÇAS ......................................................................................................................................................... PT-10
PREPARAÇÃO ............................................................................................................................................................ PT-11
INSTRUÇÕES DE MONTAGEM
LIGAÇÃO AO ABASTECIMENTO DE GÁS
LIGAÇÃO A BOTIJA DE GÁS ....................................................................................................................................... PT-18
REQUISITOS DE GÁS ................................................................................................................................................. PT-19
AMBIENTE DE CHURRASCO SEGURO ....................................................................................................................... PT-19
INSTRUÇÕES DE USO
PRIMEIRA UTILIZAÇÃO - PREPARAÇÃO DO GRELHADOR ..........................................................................................PT-20
PREAQUECIMENTO ................................................................................................................................................... PT-20
SUGESTÕES DE COCÇÃO ........................................................................................................................................... PT-20
INSTRUÇÕES DE ACENDIMENTO ELETRÓNICO ......................................................................................................... PT-20
SUBSTITUIÇÃO DA PILHA .......................................................................................................................................... PT-21
POSICIONAMENTO DA TAMPA - ABERTA OU FECHADA ............................................................................................ PT-21
TESTE PARA FUGAS DE GÁS ...................................................................................................................................... PT-21
MANUTENÇÃO E LIMPEZA
LIMPEZA DOS QUEIMADORES .................................................................................................................................. PT-22
LIMPEZA DA CABEÇA DE IGNIÇÃO ............................................................................................................................ PT-22
LIMPEZA DA BANDEJA DE GOTEJAMENTO ............................................................................................................... PT-23
MANUTENÇÃO DAS TAMPAS E SUPERFÍCIES DO GRELHADOR ................................................................................. PT-23
SEGURANÇA RELACIONADA COM GÁS ..................................................................................................................... PT-24
CALENDÁRIO DE CUIDADOS E MANUTENÇÃO ......................................................................................................... PT-25
SUBSTITUIÇÃO DO QUEIMADOR PRINCIPAL ................................................................................... PT-26
RESOLUÇÃO DE PROBLEMAS ........................................................................................................... PT-27
PEÇAS DE SUBSTITUIÇÃO................................................................................................................. PT-28
ELIMINAÇÃO DE RESÍDUOS ............................................................................................................. PT-30
DECLARAÇÃO DE CONFORMIDADE ................................................................................................. PT-30
PT-3

UTILIZAÇÃO PREVISTA
Este grelhador a gás destina-se a aquecer, cozinhar e grelhar diversos tipos de alimentos em espaços exteriores
bem ventilados. O eletrodoméstico deve ser utilizado com gás butano ou propano de baixa pressão. Não pode ser
alimentado com gás natural.
Este produto destina-se apenas a uso privado e não pode ser usado para quaisquer fins comerciais ou industriais.
Este aparelho deve ser usado apenas conforme descrito neste manual do usuário. Qualquer outro uso será considerado
impróprio e pode causar danos materiais e lesões corporais.
O fabricante não se responsabiliza por quaisquer danos resultantes de uso impróprio.
INFORMAÇÃO DE SEGURANÇA
SÍMBOLOS DE SEGURANÇA
Perigo! (Risco elevado)
A não observância desta precaução pode resultar em lesões fatais.
Aviso! (Risco médio)
A não observância desta precaução pode resultar em lesões fatais.
Cuidado! (Risco reduzido)
Precauções que devem ser levadas em consideração ao manusear o aparelho.
Informação geral de segurança
INSTRUÇÕES GERAIS DE SEGURANÇA
Estas instruções de segurança devem ser observadas durante cada utilização.
– Utilizar apenas em espaços exteriores!
– Leia as instruções antes de usar o aparelho.
– AVISO! As peças acessíveis podem estar muito quentes. Mantenha as crianças afastadas.
– Este aparelho deve ser mantido longe de materiais inflamáveis durante a utilização.
– Não mova o aparelho durante a utilização!
– Desligue o abastecimento de gás na botija de gás após a utilização.
– Não modifique o aparelho.
AVISOS GERAIS DE GRELHADORES
1. AVISO! Perigo de intoxicação com monóxido de carbono! Nunca utilize o aparelho em áreas fechadas, como garagens ou
arrecadações, pois tal pode causar uma acumulação de monóxido de carbono, resultando em lesões pessoais ou morte.
2. AVISO! Perigo de explosão! Nunca utilize o aparelho em áreas fechadas, como garagens ou arrecadações, pois tal pode causar
uma acumulação de gás em caso de fuga que pode resultar numa explosão.
3. Trave sempre as rodas com os respetivos travões (caso existam) antes da utilização.
4. Não tente mover o aparelho enquanto o mesmo estiver em funcionamento.
5. Não tente modificar o aparelho de modo algum. Use apenas conexões e acessórios recomendados pelo fabricante. Quaisquer
alterações no aparelho, uso indevido ou incumprimento das instruções podem originar perigo.
6. Não use o aparelho na presença imediata de latas de aerossol, líquidos inflamáveis, gases voláteis ou outras substâncias
inflamáveis. Mantenha chamas abertas, tais como velas ou tochas, afastadas do aparelho.
7. Não armazene quaisquer líquidos inflamáveis ou gases voláteis perto do aparelho.
PT-4

8. Não deixe o aparelho sem vigilância durante a utilização.
9. Não use combustíveis líquidos com este aparelho.
10. Nunca se incline sobre a superfície de cocção enquanto acende o aparelho ou durante a cocção.
AVISOS DO GRELHADOR A GÁS
1. Este eletrodoméstico está configurado para trabalhar com gás butano ou propano de baixa pressão. Não use o abastecimento
de gás natural.
2. Abra a tampa antes de ligar o aparelho.
3. Tenha cuidado ao abrir a tampa quando o aparelho estiver em utilização. O vapor quente pode ficar acumular-se dentro da
tampa e pode ser ejetado rapidamente quando esta é aberta. Não abra a tampa muito rapidamente.
4. Não toque nas superfícies quentes. Use o puxador apenas para levantar a tampa.
5. Cubra o aparelho apenas quando este estiver completamente arrefecido.
6. Nunca use carvão ou outros combustíveis sólidos neste aparelho.
7. Recomenda-se uma distância mínima de 1 m entre o grelhador e quaisquer materiais combustíveis.
8. Não coloque nada em cima da tampa enquanto o aparelho estiver a funcionar!
9. Dimensões mínimas e máximas de panelas ou frigideiras a utilizar no queimador lateral: 203,2 mm - 254 mm.
CONEXÕES DE GÁS / BOTIJA DE GÁS / AVISOS DO REGULADOR DE PRESSÃO
1. Verifique o aparelho e todas as ligações regularmente e sempre que a botija de gás for substituída quanto a possíveis fugas de
gás.
2. Nunca verifique se há fugas de gás usando um fósforo ou qualquer outra chama aberta.
3. Nunca altere ou modifique o regulador de pressão ou o conjunto de abastecimento de gás.
4. Desligue sempre o abastecimento de gás na botija de gás ou no regulador de pressão e desconecte o tubo de gás após a
utilização.
5. Nunca armazene botijas de gás dentro de casa ou perto de fontes de calor.
6. Armazene sempre as botijas de gás em posição vertical, nunca na horizontal, o que poderia fazer com que a botija de gás tenha
fugas ou que o gás passe para o tubo de gás.
7. Nunca use o aparelho sem o regulador de pressão.
8. Use apenas reguladores de pressão aprovados para gás de petróleo liquefeito (GPL) e em conformidade com as
regulamentações nacionais.
AVISOS DO TUBO DE GÁS
1. Inspecione o(s) tubo(s) de gás antes e depois de cada uso: verifique se há cortes, fissuras, desgaste excessivo ou outros danos.
O(s) tubo(s) de gás devem ser substituídos com uma frequência de um a dois anos apenas por um técnico qualificado ou
pelo revendedor. Substitua as mangueiras de gás quebradiças e as respetivas conexões. Em caso de dúvida, pergunte a um
especialista local.
2. Proteja o(s) tubo(s) de gás contra danos. Não o/os deixe apoiados sobre extremidades afiadas. Não o/os torça, aperte ou dobre.
Mantenha os tubos de gás afastados de superfícies quentes e certifique-se de que ninguém pode tropeçar neles.
3. Use apenas tubos de gás aprovados para gás de petróleo liquefeito (GPL) e em conformidade com as regulamentações
nacionais.
4. Qualquer tipo de manutenção ou substituição dos tubos deve ser realizado de acordo com as instruções do fabricante por
pessoal qualificado ou especialistas.
5. O tubo de Gás PL deve ser substituído caso esteja danificado e quando os regulamentos nacionais assim o exijam.
6. Certifique-se de que não existem resíduos, aranhas, pequenos insetos ou teias no interior do tubo antes de realizar qualquer
ligação. Estes podem obstruir o fluxo de gás, o que poderia resultar numa deflagração dentro e em redor do tubo do queimador.
O comprimento máximo do tubo não deve exceder os 1,5 m.
SE SENTIR CHEIRO A GÁS
1. Nunca acenda o aparelho se sentir cheiro a gás.
2. Desligue imediatamente o fornecimento de gás no aparelho, bem como na botija de gás e / ou no regulador de pressão.
PT-5

3. Extinga todas as chamas abertas perto do aparelho, tais como velas e tochas. Desligue todos os aparelhos elétricos na
proximidade.
4. Certifique-se de que a área está bem ventilada com ar fresco.
5. Abra a tampa do aparelho para deixar escapar o gás. Se ainda sentir cheiro a gás, não volte a usar o aparelho e mande consertálo apenas por um profissional autorizado.
INSTRUÇÕES DE SEGURANÇA
Perigo! Risco de incêndio!
As peças do grelhador ficam muito quentes durante a utilização e podem causar um incêndio.
- Tenha sempre à mão um extintor de incêndio pronto a usar e um kit de primeiros socorros em caso de acidente ou incêndio.
- Coloque o grelhador numa superfície segura, não inflamável, plana, nivelada, estável, resistente ao calor e limpa, afastada de
qualquer fonte de calor, antes de utilizá-lo.
- Assegure-se de que o grelhador é instalado pelo menos 1 m afastado de materiais altamente combustíveis, tais como toldos,
alpendres de madeira ou móveis.
- Não mova o grelhador durante a utilização.
- Alguns alimentos produzem gorduras e sucos inflamáveis. Limpe o grelhador com regularidade, de preferência após cada
utilização.
- Não deixe o grelhador a funcionar sem vigilância.
Perigo! Risco de incêndio!
Nunca tente ligar/acender o grelhador com a tampa fechada.
- Só deverá utilizar o grelhador a gás com a tampa fechada caso a chama seja baixa.
Perigo! Risco de queimaduras e acidentes!
Este aparelho não se destina a ser utilizado por pessoas (incluindo crianças) com capacidades físicas, sensoriais ou
mentais reduzidas ou com falta de experiência e/ou conhecimento.
- Este grupo de pessoas deve ser informado sobre os perigos associados à utilização do aparelho e deve ser supervisionado por
uma pessoa responsável pela sua segurança.
- Supervisione as crianças constantemente para garantir que não brincam com o aparelho.
- Quaisquer modificações do produto podem ser extremamente perigosas e, portanto, são proibidas. Não tente fazer
modificações não autorizadas no aparelho. Em caso de danos, reparações ou outros problemas com o grelhador, contacte o
nosso centro de manutenção ou um representante local.
- Mantenha o aparelho longe de crianças e animais de estimação.
Não toque na grelha, no queimador e nos alimentos em preparação, pois ficam extremamente quentes e podem causar
queimaduras graves.
- Mantenha uma distância suficiente em relação a peças quentes, pois qualquer contacto pode causar queimaduras graves.
- Use sempre luvas de grelhador ou forno (p. ex. luvas resistentes ao calor em conformidade com a norma DIN-EN 407) quando
fizer grelhados.
- Use sempre utensílios de grelhador de cabo comprido, com pegas resistentes ao calor.
- Não use roupas com mangas largas.
- Deixe que o grelhador arrefeça completamente antes de o limpar ou armazenar.
Perigo! Risco de deflagração!
Quando vertidos sobre as chamas, os líquidos inflamáveis criam flashes ou deflagrações.
- Nunca use fluidos inflamáveis como gasolina ou álcool.
Perigo! Risco de intoxicação!
O gás é inodoro e pode ser mortal em espaços fechados!
- O grelhador destina-se a ser utilizado exclusivamente em espaços exteriores.
PT-6

Perigo! Risco para a saúde!
Não use solventes de tinta ou diluentes para remover manchas. Essas substâncias são perigosas para a saúde e não
devem entrar em contacto com os alimentos.
Perigo! Riscos para crianças!
As crianças que brinquem com a película de embalagem podem ficar presas na mesma, o que pode resultar em
asfixia.
- Não deixe que as crianças brinquem com a película de embalagem.
- Não deixe que as crianças ponham pequenas peças de montagem na boca, pois podem apresentar risco de asfixia. As peças
podem causar asfixia se forem ingeridas.
Perigo! Risco de lesão!
Tanto o grelhador como as peças individuais têm extremidades afiadas.
- As peças individuais do grelhador devem ser manuseadas com cuidado para evitar acidentes ou lesões durante a montagem e
a utilização. Use luvas de segurança quando necessário.
- Não instale o grelhador perto de entradas ou zonas de muito movimento.
- Ao grelhar, devemos ter o máximo de cuidado. Poderá perder o controlo do aparelho caso se distraia.
- Esteja sempre atento e consciente daquilo que está a fazer. Não use este produto se estiver distraído ou cansado, ou se estiver
sob a influência de drogas, álcool ou medicamentos. Basta um momento de descuido durante o uso do produto para causar
ferimentos graves.
Aviso! Risco de danos!
Com o uso, os parafusos podem soltar-se lentamente e prejudicar a estabilidade do grelhador.
- Verifique se os parafusos estão bem apertados antes de cada utilização. Caso seja necessário, volte a apertar todos os
parafusos para assegurar que o grelhador se mantém sempre estável.
Aviso! Risco de danos!
Não use quaisquer solventes fortes ou abrasivos ou esfregões, pois estes podem danificar as superfícies e deixar
marcas de arranhões.
Perigo! Risco de queimaduras e acidentes!
Cuidado! Se sentir cheiro a gás:
- Imediatamente, corte o fornecimento de gás ao aparelho.
- Apague qualquer chama aberta.
- Abra a tampa.
- Se o odor persistir, mantenha-se afastado do aparelho e contacte imediatamente o seu fornecedor de gás ou os bombeiros.
Perigo! Risco de queimaduras e acidentes!
O grelhador deve ser armazenado afastado de combustíveis (p. ex. gasolina) ou outros líquidos ou gases inflamáveis.
- As botijas de gás devem ser armazenadas separadamente do grelhador a gás.
- As botijas de gás devem ser armazenadas longe do grelhador a gás.
- Não coloque botijas de gás diretamente debaixo do grelhador a gás.
Perigo! Risco de incêndio!
Este aparelho deve ser mantido longe de materiais inflamáveis durante a utilização.
- A troca da botija de gás deve ser realizada longe de qualquer fonte de ignição.
- As botijas de gás nunca devem ser armazenadas em temperaturas superiores a 50 °C. Em dias extremamente quentes, deverá
ter o cuidado de manter as botijas à sombra.
PT-7

INFORMAÇÃO DE SEGURANÇA DA PILHA
1. AVISO: MANTENHA A PILHA FORA DO ALCANCE DAS CRIANÇAS. Caso esta seja engolida, pode originar queimaduras
químicas, perfuração de tecidos moles e a morte. Podem ocorrer queimaduras graves num prazo de duas horas após a
ingestão. Procure atendimento médico imediatamente.
2. Se achar que a pilha pode ter sido engolida ou introduzida no organismo, procure atendimento médico
imediatamente.
3. Não permita que crianças substituam a pilha sem a supervisão de um adulto.
4. As pilhas gastas devem ser removidas imediatamente do aparelho e descartadas de maneira adequada.
5. Não descarte as pilhas no fogo. Não exponha as pilhas ao calor ou fogo. Evite armazenar sob luz solar direta.
6. Se a pilha tiver fugas, remova-a com um pano do compartimento da pilha. Descarte a pilha de acordo com os
regulamentos. Se o ácido da pilha foi derramado, evite o contacto com a pele, os olhos e as membranas mucosas.
Enxague as áreas afetadas imediatamente após o contacto com o ácido e lave com água limpa em abundância. Consulte
um médico.
7. Não encapsule e/ou modifique as pilhas.
8. Antes de descartar o aparelho, elimine as pilhas de forma segura para o ambiente.
9. Introduza sempre as pilhas corretamente no que diz respeito à polaridade (+ e -) marcada na pilha e no
compartimento. Quando as pilhas são inseridas ao contrário, podem entrar em curto-circuito ou em carga. Isso pode
causar superaquecimento, derrames, libertação de gases, rutura, explosão, fogo ou lesões pessoais.
10. Use apenas o tipo de pilha indicado neste manual.
11. Não provoque curto-circuito nas pilhas. Quando os terminais positivo (+) e negativo (-) de uma pilha estão em
contacto elétrico, a pilha entra em curto-circuito. Por exemplo, as pilhas soltas num bolso com chaves ou moedas
podem entrar em curto-circuito. Isso pode resultar em libertação de gases, derrames, explosão, fogo e lesões pessoais.
12. Não carregue pilhas alcalinas. A tentativa de carregar uma pilha não recarregável (primária) pode causar a geração
de gás interno e/ou de calor, resultando em derrame, libertação de gases, explosão, incêndio e ferimentos pessoais.
13. Não submeta as pilhas a choques mecânicos.
14. Não desmonte, abra ou fragmente as pilhas.
15. AVISO: As pilhas usadas não devem ser eliminadas juntamente com o lixo doméstico. Leve-as a um local indicado
para eliminação/recolha.
PT-8

DESEMPACOTAR O GRELHADOR
(
$
'
%
<
&
(
)
*
'
9
8
7
-
/
0
4
$
;
&
%
=
:
6
5
+
,
.
1
3
2
PT-9

LISTA DE PEÇAS
PEÇA DESCRIÇÃO QUANT PEÇA DESCRIÇÃO QUANT
A Conjunto de fornalha 1 S Bandeja de gordura 1
B Prateleira do lado esquerdo 1 T Painel lateral do carrinho, direita 1
C Painel da prateleira do lado esquerdo 1 U Botão 1
D Suporte D 1 V Luneta do botão do queimador lateral 1
E Painel lateral do carrinho, esquerda 1 W Queimador lateral 1
F Porta esquerda 1 X Suporte X 1
G Luneta do puxador da porta 4 Y Painel da prateleira do lado direito 1
H Puxador da porta 2 Z Prateleira do lado direito 1
I Ilhó do puxador da porta 4 A1 Controlador da chama 4
J Suporte J 1 B1 Grade de cozedura 2
K Roda com bloqueio 2 C1 Grelha de aquecimento 1
L Suporte frontal do carrinho 1 D1 Painel traseiro do carrinho 1
M Suporte M 1 E1 Tampa traseira da fornalha 1
N Painel inferior do carrinho 1 AA Parafuso 5/32” x 10 mm 10
O Batente da porta 1 BB Parafuso de 1/4"x8 mm 6
P Rodízio reto 2 CC Parafuso de 1/4"x10 mm 23
Q Porta direita 1 DD Parafuso 1/4” x 12 mm 26
R Caixa de gordura 1 EE Anilha plana 1/4" 22
PT-10

PREPARAÇÃO
N
Antes de iniciar a montagem do produto, certifique-se de que todas as peças estão presentes. Compare as peças com
a lista de conteúdo do pacote e a lista de conteúdo das ferragens. Se alguma peça estiver em falta ou danificada, não
tente montar o produto.
Contacte o revendedor onde adquiriu o aparelho se verificar que há peças em falta ou que apresentam danos.
Não utilize o eletrodoméstico se não tiver recebido as peças em falta ou se não tiver substituído as peças danificadas. O
uso de um aparelho incompleto ou danificado pode causar ferimentos e danos materiais.
Retire e elimine em segurança quaisquer materiais de embalagem ou etiquetas promocionais afixadas ao conjunto.
Ferramentas necessárias para a montagem: Chave Phillips (não incluída).
INSTRUÇÕES DE MONTAGEM
Perigo! Risco de lesão!
Siga todas as instruções de montagem aqui indicadas. Caso não siga estas instruções poderá causar
problemas e riscos durante o uso do grelhador.
1. Monte o aparelho completamente e faça todos os ajustes necessários antes da utilização.
2. Siga atentamente as instruções de montagem e utilização. Use as figuras como um guia visual.
3. Preste atenção às peças pequenas, como parafusos e porcas, que são afrouxadas ou removidas para montagem ou
durante os ajustes. Mantenha-os seguros para evitar perdê-los.
4. O aparelho é grande. É recomendável que seja montado por duas pessoas.
AVISO!
Use o aparelho apenas depois de estar completamente montado e ajustado!
IMPORTANTE: As peças seladas pelo fabricante ou pelo agente do fabricante não poderão ser manuseadas pelo
utilizador.
NOTA: Para todos os passos seguintes, não aperte quaisquer parafusos completamente até que todos os parafusos para
esse passo estejam instalados. Assim que todos os parafusos estiverem instalados, poderá então apertá-los com segurança.
Passo 1 Instalação dos rodízios
DD
EE
K
P
Passo 2 Instalação do batente da porta
AA
N
O
Utilize 16 unidades de parafusos DD e 16 unidades de
anilhas planas EE para instalar os rodízios P e K no painel
inferior N.
Utilize 2 unidades de parafusos AA para instalar o batente
da porta O no painel inferior.
PT-11

Passo 3 Instalação dos painéis laterais
J
Passo 4 Instalação do painel traseiro
E
CC
T
N
Utilize 6 unidades de parafusos CC para instalar os
painéis laterais E e T no painel inferior.
CC
D1
E
T
N
Utilize 7 unidades de parafusos CC para instalar o painel
traseiro D1 no painel inferior.
Passo 5 Instalação do suporte frontal
T
CC
L
Passo 6 Instalação dos suportes
AA
E
T
E
M
Utilize 4 unidades de parafusos CC para instalar o
suporte frontal L nos painéis laterais.
Utilize 4 unidades de parafusos AA para instalar o suporte
J e o suporte M no suporte frontal e no painel lateral.
PT-12

Passo 7 Montagem da fornalha
A
A
S
Passo 8 Fixação da fornalha no carrinho
DD
E
T
Coloque o conjunto da fornalha A no carrinho, conforme
indicado acima.
Passo 9 Instalação da bandeja de gordura
S
Utilize 4 unidades de parafusos DD para fixar o conjunto
da fornalha.
Passo 10 Instalação da caixa de gordura
R
Remova o parafuso pré-montado na bandeja de gordura
S e, em seguida, instale a bandeja de gordura na fornalha
e aperte o parafuso.
Instale a caixa de gordura R conforme indicado acima.
PT-13

Passo 11 Instalação da tampa traseira
A
I
C
T
Passo 12 Montagem dos puxadores da porta
F
CC
E1
G
E
D1
Utilize 6 unidades de parafusos CC para apertar a tampa
traseira da fornalha E1.
Passo 13 Instalação das portas do carrinho
A
F
Q
H
Remova o parafuso pré-montado no puxador da porta
H, e instale o puxador e a luneta G na porta, conforme
indicado acima. Em seguida, instale a anilha do puxador I.
Aplique o mesmo método de instalação para a outra
porta.
Passo 14 Montagem da prateleira lateral
BB
AA
B
D
Instale 2 unidades das portas no carrinho, conforme
indicado acima.
N
Utilize 3 unidades de parafusos BB para instalar o painel
da prateleira do lado esquerdo na prateleira do lado
esquerdo B.
Utilize 2 unidades do parafuso AA para instalar o suporte
D na prateleira do lado esquerdo B.
PT-14

Passo 15 Montagem da prateleira do queimador lateral
AA
BB
X
Y
Z
b
a
Passo 16 Desapertar os parafusos do lado direito
a
c
Utilize 3 unidades de parafusos BB para instalar o
painel da prateleira do lado esquerdo Y na prateleira do
queimador lateral Z.
Utilize 2 unidades do parafuso AA para instalar o suporte
X na prateleira do queimador lateral Z.
Passo 17 Fixação da prateleira do lado direito
b
c
Desaperte os parafusos a e c, e remova o parafuso b no
lado direito da fornalha.
Passo 18 Retenção da prateleira do lado direito
DD EE
Fixe a prateleira do lado direito com os parafusos a e c, e
em seguida aperte o parafuso b.
PT-15
Utilize 3 unidades de parafusos DD e 3 unidades de
anilhas planas EE para apertar a prateleira do queimador
lateral a partir do interior da fornalha. Em seguida,
aperte os parafusos a e c.
Aplique o mesmo método de instalação para a prateleira
do lado esquerdo.
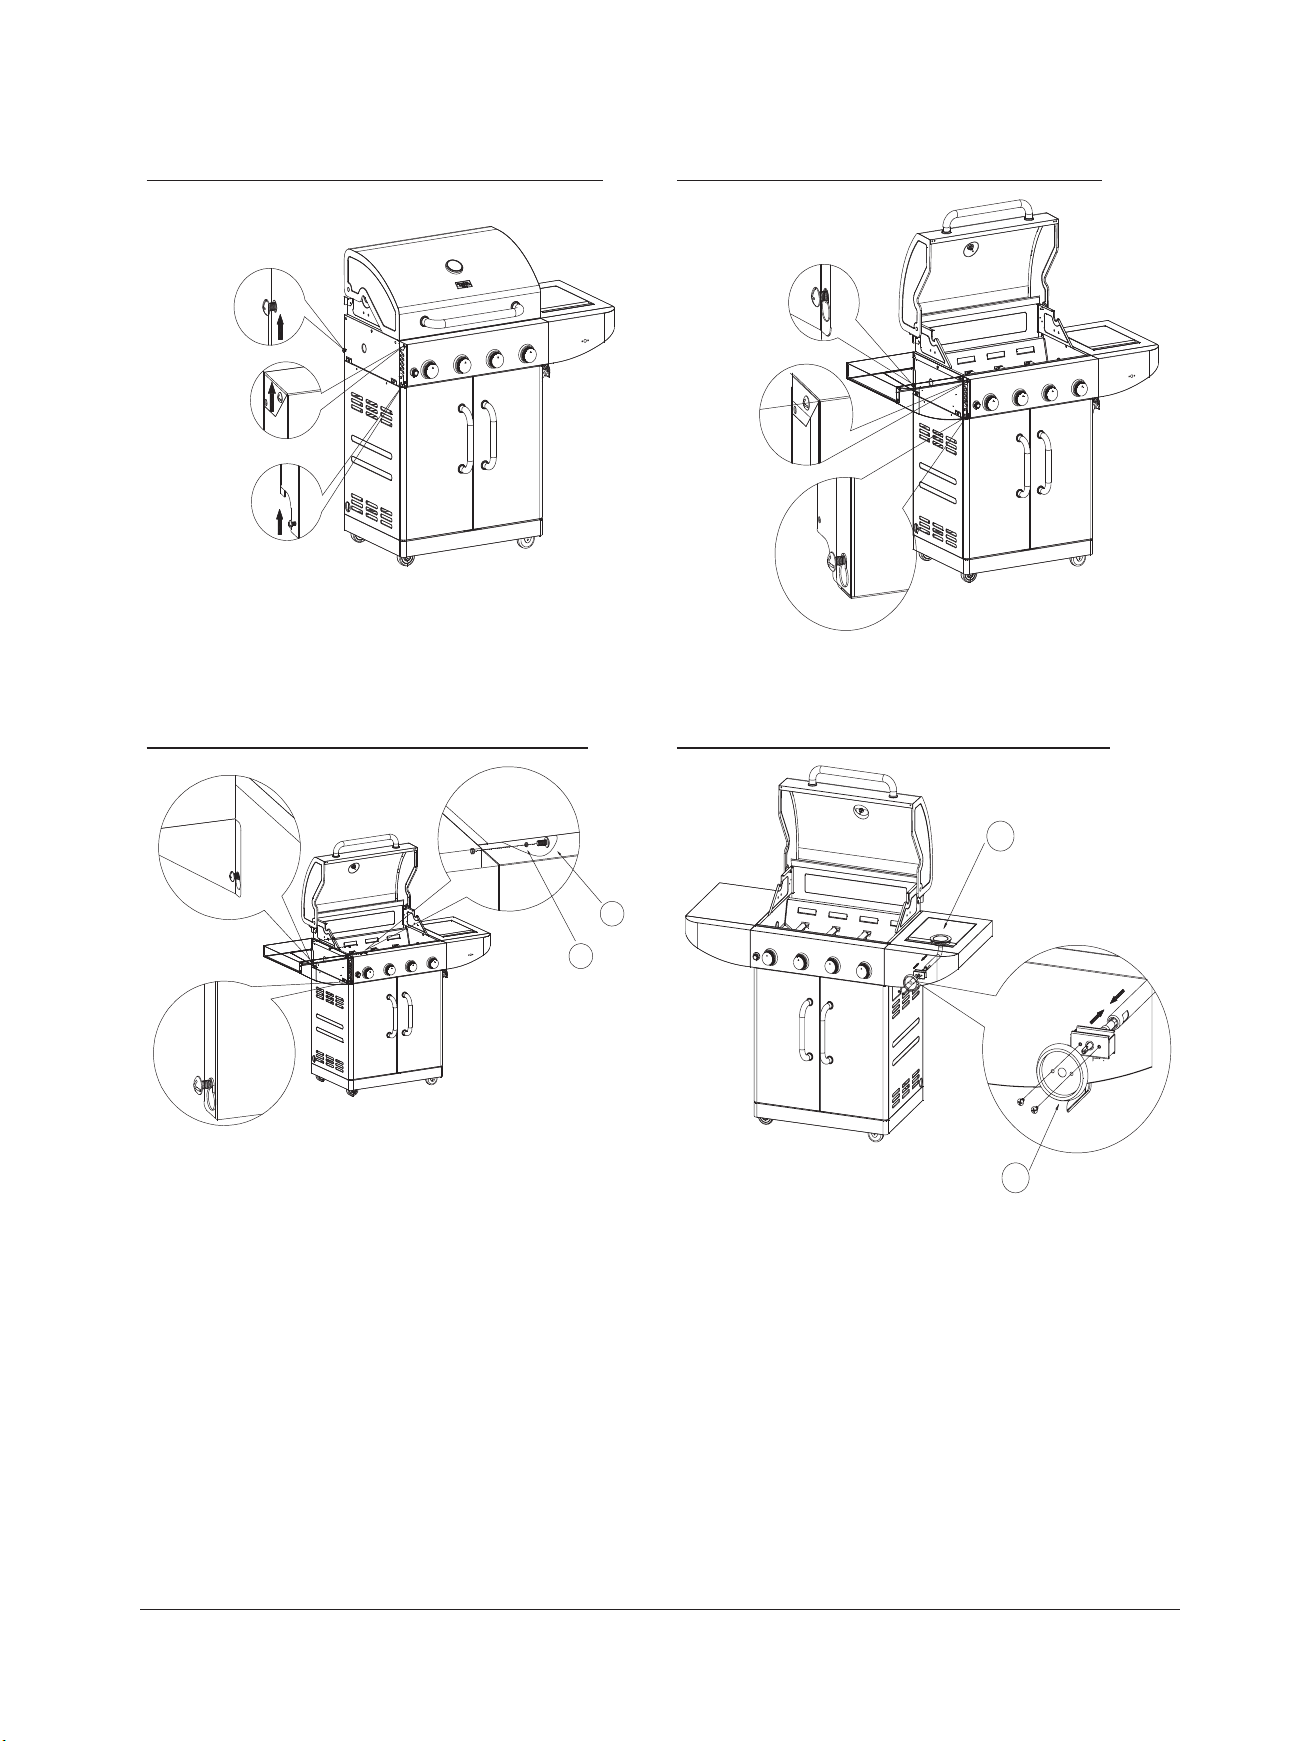
Passo 19 Desapertar os parafusos do lado esquerdo
V
Passo 20 Fixação da prateleira do lado esquerdo
a
b
c
Desaperte os parafusos a e c, e remova o parafuso b no
lado esquerdo da fornalha.
Passo 21 Retenção da prateleira do lado esquerdo
a
b
c
Fixe a prateleira do lado esquerdo com os parafusos a e c,
e em seguida aperte o parafuso b.
Passo 22 Ligação da válvula do queimador lateral
W
DD
EE
Utilize 3 unidades de parafusos DD e 3 unidades de
anilhas planas EE para apertar a prateleira do lado
esquerdo a partir do interior da fornalha. Em seguida,
aperte os parafusos a e c.
Remova os parafusos pré-montados (2 unidades) na
válvula lateral e, em seguida, fixe a luneta V na válvula
com os orifícios alinhados. Aperte os parafusos.
PT-16

Passo 23 Instalação do queimador lateral
Passo 24 Instalação do botão do queimador lateral
W
U
Remova a porca no queimador lateral W e alinhe a
extremidade do queimador lateral com o bico, conforme
indicado no passo 22. Instale o queimador lateral
apertando a porca.
Passo 25 Ligação do fio do elétrodo
Instale o botão U do queimador lateral.
Passo 26 Instalação dos componentes de cozedura
C1
B1
A1
Ligue o fio do elétrodo do queimador lateral.
Fixe o controlador de chama A1, a grade de cozedura B1 e
a grelha de aquecimento C1 no grelhador.
PT-17

LIGAÇÃO AO ABASTECIMENTO DE GÁS
AVISO! Esteja atento aos retornos de chama!
Certifique-se de que não há detritos, aranhas, pequenos insetos ou teias dentro da cabeça da botija de gás,
regulador de pressão, queimador(es), tubo(s) do queimador ou tubo do gás antes de fazer qualquer conexão. Estes
podem obstruir o fluxo de gás, o que poderia resultar numa deflagração dentro e em redor do tubo do queimador.
Este tipo de deflagração é conhecido como “retorno de chama” e pode causar danos graves. Verifique e limpe
(consulte “MANUTENÇÃO E LIMPEZA” na página PT-22.) todas as peças do aparelho antes de montá-lo, para reduzir a
probabilidade de que isso ocorra.
LIGAÇÃO A BOTIJA DE GÁS
Aviso! Risco de danos!
Não use quaisquer solventes fortes ou abrasivos ou esfregões, pois estes podem danificar as superfícies e
deixar marcas de arranhões.
SALVAGUARDA 1 - MONTAGEM MANUAL
1. Certifique-se de que a válvula da botija e todas as válvulas do aparelho estão na posição “DESLIGADO”.
2. Ao conectar o conjunto da válvula do regulador/queimador à válvula da botija, gire a porca de plástico grande
no sentido dos ponteiros do relógio até que esta pare.
3. O gás não fluirá a menos que a porca de plástico esteja completamente conectada.
4. APERTAR APENAS À MÃO.
SALVAGUARDA 2 - DESMONTAGEM MANUAL
1. Certifique-se de que a válvula da botija e todas as válvulas do aparelho estão na posição “DESLIGADO”.
2. Rode a porca de plástico grande no sentido dos ponteiros do relógio até que esteja desmontada.
3. APERTAR APENAS À MÃO.
SALVAGUARDA 3 - CONTROLO DE EXCESSO DE FLUXO
O conjunto do regulador incorpora um dispositivo de excesso de fluxo concebido para fornecer ao grelhador um fluxo
de gás suficiente sob condições normais, ainda que controlando o fluxo de gás em excesso. Mudanças rápidas de
pressão podem acionar o dispositivo de excesso de fluxo, o que resulta numa chama baixa e temperatura baixa. Se a
válvula da botija for aberta para permitir o fluxo de gás enquanto a válvula do queimador estiver aberta, o aumento da
pressão fará com que o dispositivo seja ativado. O dispositivo permanecerá fechado até que a pressão seja equalizada.
Esse processo deverá concluir em 5 segundos.
Para garantir que isso não causa dificuldade ao acender o grelhador, siga estas instruções:
1. Certifique-se de que todas as válvulas do queimador estão em posição “DESLIGADO”.
2. Abra a válvula da botija e aguarde 5 segundos.
IMPORTANTE: Antes de usar uma botija nova de gás, verifique se há fugas em torno do sistema de conexão para
garantir que não haja fuga ou acumulação de vapor no armário. Assegure-se de que nenhuma das aberturas em
redor das paredes laterais está bloqueada.
IMPORTANTE: Coloque a cobertura contra poeira na saída da válvula da botija sempre que a botija não estiver a ser
usada. Use apenas o tipo de cobertura contra poeira na saída da válvula da botija que é fornecida com a válvula da
botija. Outros tipos de coberturas ou tampas pode resultar em fugas.
PT-18

REQUISITOS DE GÁS
CUIDADO: É importante inspecionar o tubo de gás em toda a sua extensão. Se for evidente que há abrasão ou
desgaste excessivo, ou se o tubo estiver cortado, o tubo deve ser substituído antes de usar este aparelho.
NUNCA use um fornecimento de gás não regulamentado.
Consulte a seguinte tabela para obter o tipo de gás suportado:
Cat.
Tamanho do bico
Código do país
Tipo e pressão do gás
Entrada de calor
nominal
Entrada de calor total ∑Qn=16,39 (1193 g/h) kW
I3+(28-30/37)
Queimador principal:
0,88 mm
Queimador lateral:
0,92 mm
BE, CH, CY, CZ, ES, FR,
GB, GR, IE, IT, LT, LU, LV,
PT, SK e SI.
Butano G30 a 28-30
mbar e Propano G31 a
37 mbar
I3B/P(30)
Queimador principal:
0,88 mm
Queimador lateral:
0,92 mm
AL, CY, DK, EE, FR, FI,
HU, IT, LT, NL, NO, SE,
SI, SK, RO, HR, TR, BG,
IS, LU, MT e CZ.
Butano G30 e Propano
G31 a 30 mbar
Qn= 3,22 kW
I3B/P(37)
Queimador principal:
0,85 mm
Queimador lateral:
0,89 mm
PL AT, CH, CZ, DE e SK
Butano G30 e Propano
G31 a 37 mbar
I3B/P(50)
Queimador principal:
0,76 mm
Queimador lateral:
0,81 mm
Butano G30 e Propano
G31 a 50 mbar
AMBIENTE DE CHURRASCO SEGURO
Este aparelho a gás foi concebido e homologado apenas para uso externo. Não use o grelhador dentro de um prédio,
garagem, autocaravana, alpendre com toldo ou qualquer área fechada. Mantenha o grelhador longe de áreas com
vento, mas numa zona bem ventilada. Não obstrua o fluxo do ar de combustão e ventilação em redor da churrasqueira.
• DISTÂNCIA DE CONSTRUÇÃO COM MATERIAIS COMBUSTÍVEIS
Deve manter-se uma distância mínima de 1 m entre os lados do grelhador e uma distância mínima de 1 m entre
a parte traseira do grelhador e construções verticais com materiais combustíveis adjacentes. Recomendamos
fortemente uma distância de 1 m entre o grelhador e quaisquer construções com materiais combustíveis.
• DISTÂNCIA DE CONSTRUÇÃO COM MATERIAIS NÃO COMBUSTÍVEIS
É necessária uma distância mínima de 1 m da parte de trás do grelhador acima da superfície de cocção em relação
a construções com materiais não combustíveis para permitir que a tampa do grelhador abra completamente.
Recomenda-se uma distância mínima de 1 m das laterais do grelhador acima da superfície de cozimento em
relação a construções com materiais não combustíveis. O grelhador pode ser instalada diretamente ao lado de uma
construção com materiais não combustíveis abaixo da superfície de cocção.
Aviso: Não coloque o grelhador sob superfícies combustíveis desprotegidas e acima da cabeça.
PT-19

INSTRUÇÕES DE USO
PRIMEIRA UTILIZAÇÃO - PREPARAÇÃO DO GRELHADOR
Ao acender o grelhador pela primeira vez é aconselhável colocar o queimador ou queimadores principais em “ALTO”
durante 20 minutos com a tampa baixada e depois desligar os queimadores principais. Isso tempera o grelhador.
IMPORTANTE: Assegure-se de que a tampa está completamente aberta de cada vez que tentar acender o
grelhador. Caso a tampa não seja aberta, pode ocorrer uma ignição retardada, resultando em lesões corporais. Use
o orifício de observação da chama no painel lateral.
PREAQUECIMENTO
É extremamente importante que o seu grelhador esteja à temperatura adequada antes de começar a usá-lo. Após o
acendimento, feche a tampa e preaqueça o grelhador em “ALTO” durante 15 minutos. Este preaquecimento vai garantir
que a grelha de cocção e a grade estejam suficientemente quentes para grelhar adequadamente.
SUGESTÕES DE COCÇÃO
1. Pincele as grelhas com óleo de cozinha ou vegetal antes de usar o aparelho.
2. Use um pincel de cabo longo. Os sucos dos alimentos pingam sobre o aquecedor durante o cozimento e evaporam.
O vapor resultante desse processo contribui para o sabor dos alimentos.
3. Ajuste o botão ou botões reguladores entre a posição “Alto” e “Baixo” para obter os resultados de cocção desejados.
4. Mantenha a tampa fechada em chama baixa para obter um resultado mais consistente e para cozinhar pedaços
maiores de carne ou frangos inteiros.
5. Evite abrir a tampa com muita frequência, pois o calor acumulado escapa de cada vez, aumentando a duração da
cocção como resultado.
INSTRUÇÕES DE ACENDIMENTO ELETRÓNICO
Para acender os queimadores principais e o queimador lateral
1. Certifique-se de que os botões reguladores estão na posição “DESLIGADO”.
2. Abra a tampa do grelhador.
3. Verifique a posição do pino de ignição e a distância entre o pino e o
queimador.
4. Certifique-se de que a bandeja de gotejamento está instalada.
5. Abra a válvula da botija de PL ou gás natural.
6. Acenda cada queimador separadamente. Ligar as duas válvulas do
queimador juntamente pode despoletar o dispositivo de limitação de fluxo
na conexão da botija (apenas em grelhadores de PL).
7. Pressione o botão regulador para dentro e rode-o para a esquerda, até à
posição “ALTO”.
8. Pressione e gire o botão regulador do queimador para “ALTO” e imediatamente prima e segure o acendedor
eletrónico.
9. Se o queimador não acender assim, DESLIGUE O GÁS. ESPERE 5 MINUTOS para que o excesso de gás se dissipe.
10. Se ainda assim o queimador não acender, consulte a secção de resolução de problemas.
PT-20

SUBSTITUIÇÃO DA PILHA
Desaparafuse o botão de ignição elétrica e remova a pilha antiga. Substitua por uma nova pilha AA.
Nota: O lado negativo (-) da pilha deve entrar primeiro. Consulte a marca no lado da cobertura.
POSICIONAMENTO DA TAMPA - ABERTA OU FECHADA
Cozinhar com a tampa aberta ou fechada é uma questão de preferência pessoal.
• TAMPA ABERTA
Cozinhar com a tampa aberta é recomendado caso goste de grelhar a temperaturas máximas abrasadoras. Este
método também produzirá mais chamejar, acelera o processo de cocção e resultará num sabor mais robusto e
defumado ao ar livre. Tampa aberta para grelhar carnes, em particular frango.
• TAMPA FECHADA
Caso prefira cozinhar mais devagar com menos chamejar, sugerimos o método de tampa fechada. Perfeito para uma
cocção indireta ou assado. Recomendamos cozinhar sempre com a tampa FECHADA caso esteja numa zona ventosa
ou num clima mais frio.
O seu grelhador foi concebido e construído para lhe dar o máximo de flexibilidade e desempenho de cocção. Seja
criativo. Experimente diferentes métodos de cocção no seu grelhador para determinar qual se adapta melhor às suas
necessidades. Não existe uma forma certa ou errada de preparar os alimentos, apenas estilos de cocção alternativos.
Seja criativo e divirta-se!
CUIDADO: Proteja sempre a sua mão com uma luva de cozinha ou pega ao entrar em contacto com uma superfície
quente.
TESTE PARA FUGAS DE GÁS
Aviso! Risco de explosão!
Nunca use um fósforo ou uma chama aberta para detetar fugas. O uso de uma chama aberta pode resultar
em incêndio, explosão e lesões corporais.
Verifique todas as conexões, encaixes e todos os tubos de gás quanto a fugas de gás sempre que for usar o aparelho
ou de cada vez que a botija de gás for trocada. Certifique-se de que este procedimento é realizado numa área bem
ventilada, longe de chamas, faíscas ou quaisquer fontes de calor. Não tente acender o aparelho se sentir cheiro a gás.
1. Assegure-se de que todos os botões reguladores do aparelho estão na posição desligada (DESLIGADO).
2. Abra a válvula de gás da botija de gás e / ou o regulador de pressão.
3. Aplique spray detetor de fugas ou uma solução metade água / metade sabão com um pincel em todos os pontos de
conexão.
4. Caso identifique a formação de bolhas de gás, há uma fuga. Desligue o abastecimento de gás e/ou o regulador de
pressão imediatamente. Aperte todas as conexões novamente e repita o teste.
5. Não utilize o aparelho, mas contacte o seu revendedor, se continuarem a formar-se bolhas de gás.
IMPORTANTE: Ao conectar ou substituir qualquer tubo de gás ou acessórios, todas as juntas devem ser seladas com
um composto vedante à prova de fugas aprovado ou fita adesiva de canalizador.
PT-21

MANUTENÇÃO E LIMPEZA
O seu grelhador é feito de materiais de alta qualidade.
Limpe o grelhador após cada utilização. Para limpar e cuidar as superfícies, siga as instruções abaixo:
Perigo! Risco de queimaduras!
Deixe que o grelhador arrefeça completamente antes de o limpar.
Perigo! Risco para a saúde!
Não use solventes de tinta ou diluentes para remover manchas. Essas substâncias são perigosas para a saúde
e não devem entrar em contacto com os alimentos.
Aviso! Risco de danos!
Não use quaisquer solventes fortes ou abrasivos ou esfregões, pois estes podem danificar as superfícies e
deixar marcas de arranhões.
• Após cada utilização, deixe o grelhador queimar por aprox. mais 5 minutos sem alimentos. Isso minimiza os resíduos
de alimentos.
• Coloque o regulador no tubo de gás na posição Desligado antes de limpar o grelhador.
• Retire a grelha do grelhador e limpe-a cuidadosamente com água e sabão. Enxague com água limpa e seque-a bem.
• Use uma esponja húmida para remover os resíduos soltos do grelhador.
• Qualquer camada de gordura que se possa ter acumulado na superfície interna da tampa pode ser limpa com uma
solução forte e quente de sabão. Em seguida, enxague com água limpa e seque completamente antes de usar o
grelhador novamente.
Aviso! Nunca use produtos de limpeza de forno disponíveis no mercado!
• Os resíduos de alimentos na base do grelhador podem ser retirados com uma escova, espátula ou esponja de limpeza.
Em seguida, lave novamente com água e sabão. Enxague com água limpa e seque.
• Como prática geral, limpe as superfícies interna e externa com água morna e sabão.
• Limpe as superfícies de madeira com um pano macio e água quente com sabão. Em seguida, enxague com água
limpa. Nunca limpe superfícies de madeira com produtos concentrados para limpeza de grelhadores.
• Use um pano limpo e macio para secar. Não risque as superfícies ao enxugá-las.
• Aperte todos os parafusos antes de cada utilização para assegurar que o grelhador se mantém sempre estável.
• Quando o grelhador a gás não estiver a ser usado, deve ser tapado com uma capa protetora.
LIMPEZA DOS QUEIMADORES
• Coloque o regulador da botija de gás em Desligado. Em seguida, coloque o controlador de temperatura do grelhador
na posição Desligado e desconecte o tubo de gás da botija de gás.
• Retire as grelhas de cocção.
• Limpe os queimadores com uma escova macia ou com ar comprimido. Em seguida, seque-os com um pano.
• Limpe as aberturas bloqueadas com um escovilhão de cachimbo resistente, um fio ou com a extremidade aberta de
um clipe de papel.
LIMPEZA DA CABEÇA DE IGNIÇÃO
• A sujidade na cabeça de ignição pode dificultar a formação de fogo. Nesse caso, deve ser limpa. A ponta da cabeça de
ignição está localizada junto da abertura do queimador.
• Para garantir um funcionamento perfeito, devem ser removidos os resíduos de alimentos entre a ponta da cabeça de
ignição e o queimador. Use lixa/lixa fina para limpar a ponta da cabeça de ignição e o rebordo do queimador.
PT-22

• A ponta da cabeça de ignição deve estar aprox. 4 - 6 mm afastada do rebordo do queimador. Esta é a distância ideal
para um ignição fiável.
LIMPEZA DA BANDEJA DE GOTEJAMENTO
Esta bandeja de gotejamento recolhe o escoamento excessivo de gordura e partículas de comida caídas. Deixe que
a bandeja e o seu conteúdo arrefeçam antes de limpar. Solte a cobertura traseira da cabeça do grelhador (J) e faça
deslizar a bandeja de gotejamento para fora, limpe-a em seguida com um pano.
Assegure-se de que a bandeja é instalada corretamente antes de usar o grelhador. É altamente recomendável que
verifique a bandeja regularmente para evitar qualquer possibilidade de incêndio de gordura; no entanto, a maioria das
gotas vai evaporar-se de volta no alimento grelhado, conferindo um sabor de grelhados ao ar livre.
MANUTENÇÃO DAS TAMPAS E SUPERFÍCIES DO GRELHADOR
INFORMAÇÃO IMPORTANTE
Manutenção e proteção de superfícies de aço inoxidável
O seu grelhador foi fabricado com componentes de aço inoxidável. Todas as peças de aço inoxidável requerem uma
certa proteção e cuidado para manter a sua aparência original. Ao contrário do que geralmente se pensa, o aço
inoxidável não é cem por cento resistente à flor de ferrugem e corrosão; portanto, requer certa manutenção. Até as
peças de aço inoxidável da mais alta qualidade precisam de ser limpas regularmente com água doce para evitar a
oxidação e a corrosão.
A estética moderna exige que o seu grelhador esteja equipado com componentes de aço inoxidável e um acabamento
escovado. Este acabamento escovado é obtido fazendo passar as folhas de aço inoxidável por um processo no qual
o acabamento espelhado do aço é removido e, assim, as folhas saem da unidade de processamento numa condição
escovada.
O aço inoxidável escovado requer limpeza e manutenção regulares para preservar a sua aparência. Sem os devidos
cuidados, os sinais de ferrugem ou corrosão irão certamente aparecer na superfície do aço com o tempo.
O aço inoxidável requer manutenção. A limpeza e o aço inoxidável estão intimamente ligados.
Depois de montar o grelhador, é recomendável usar um pano limpo para aplicar uma fina camada de azeite em todas
as superfícies de aço inoxidável acessíveis.
Em seguida, passe o azeite e depois, passe um pano limpo na superfície para que o acabamento não fique oleoso. Desta
forma, garantirá que o material está protegido contra sujidade e outras substâncias nocivas perigosas, pois a superfície
será coberta com uma camada protetora temporária e segura para os alimentos.
A película de azeite também facilita o polimento e a remoção subsequentes de impressões digitais e semelhantes.
Repita este procedimento de vez em quando ao limpar o seu grelhador.
PT-23

INFORMAÇÃO IMPORTANTE
Talvez tenha comprado uma capa protetora para o seu grelhador. Para proteger o seu investimento, recomendamos
que cubra o grelhador com a capa protetora sempre que esta não esteja a ser usada. No entanto, tenha o cuidado de
colocar a capa protetora apenas quando o grelhador tiver arrefecido e estiver limpo e seco. Pode ser necessário usar
uma capa protetora. Cuidado! Colocar uma capa protetora no seu grelhador enquanto este está quente, húmido ou
sujo pode causar ferrugem intensa.
Por este motivo, o seu grelhador deve estar sempre frio, limpo e bem seco antes de colocar a tampa protetora. Isso
é particularmente importante antes de longos períodos sem utilização, por exemplo, durante o armazenamento no
inverno.
Siga atentamente estas sugestões de manutenção e cuidados para preservar por muito tempo a qualidade do seu
grelhador.
Cuide bem do seu investimento, e o seu investimento retribuirá com longos anos de bom serviço.
SEGURANÇA RELACIONADA COM GÁS
Para os grelhadores a gás PL, a botija de abastecimento de gás usada deve ser fabricada de acordo com uma diretiva
europeia estabelecida relativa a botijas de gás.
• A botija deve ter 35,3 cm de diâmetro e 45,72 cm de altura e estar equipada com uma conexão Tipo I.
• O sistema de abastecimento da botija deve estar preparado para a retirada do vapor.
• A botija usada deve incluir um anel para proteger a válvula da botija.
Não use o grelhador a gás em interiores ou em qualquer área fechada. Se o grelhador a gás não estiver a ser usado, o
gás deve ser desligado na botija de abastecimento e guarde a botija na posição vertical em local fresco e bem ventilado,
longe do seu grelhador ou de qualquer outra fonte de calor.
Ao verificar se há fugas de gás, não use uma chama aberta. Use uma solução de água com sabão e aplique-a nas juntas
dos tubos e conexões com um pincel e verifique se há bolhas. Verifique os tubos flexíveis quanto a cortes e desgastes
que possam afetar a operação segura do grelhador. Apenas o tubo e o regulador fornecidos de origem devem ser
usados. Use apenas conjuntos de regulador e tubo de substituição especificados pelo fabricante.
A botija de PL deverá ficar sempre bem bloqueada pelo anel patenteado de segurança da botija. Uma botija
desbloqueada pode cair ou inclinar-se, o que pode causar lesões ou danos materiais. É recomendável ter a botija
permanentemente bloqueada.
Após posicionar a botija na abertura, baixe o anel de segurança da botija para travar a botija. Use apenas uma botija de
gás de 9,07 kg (20 lb).
AVISO: O conjunto de regulador de pressão e tubo fornecidos com o aparelho de cocção a gás ao ar livre deverá ser
usado. Os conjuntos de reguladores de pressão e tubos de substituição devem ser os especificados pelo fabricante
do aparelho de cocção a gás ao ar livre.
• MANUSEAMENTO DE BOTIJAS DE GÁS
Lembre-se de manusear as suas botijas de butano ou propano líquido com cuidado sempre que as levar ao seu
revendedor para substituição. Evite deixá-la cair ou bater em objetos pontiagudos. As botijas de butano ou propano
líquido são resistentes, mas uma série de choques fortes pode danificar o recipiente.
Quando transportar a botija até ao seu revendedor local de gás butano ou propano, certifique-se de que a válvula
se encontra fechada e que a tampa de proteção se encontra na sua posição. Coloque a botija bem fixa na posição
vertical para que não fique a rolar no seu veículo.
PT-24

Se planeia parar para fazer compras ou recados, substitua a botija de butano ou propano líquido por outra cheia na
última paragem antes de ir para casa. Repetimos, assegure-se de que a botija atestada fica bem fixa e em posição
vertical. Ao chegar a casa, retire a botija atestada do veículo. Nunca deixe uma botija de butano ou propano líquido
no interior de um veículo que pode aquecer em demasia devido ao sol.
• ARMAZENAMENTO SEGURO
Não armazene botijas de butano ou propano líquido (cheias ou vazias) no interior de casa, na área de estar de uma
caravana, em garagens, caves ou oficinas. É pouco provável que o butano ou propano líquido verta das botijas. Em
caso de fuga, o combustível poderia ser exposto a faíscas de automóveis, ferramentas elétricas ou outros aparelhos.
Ao armazenar ou transportar a sua botija de PL, esta deve permanecer na posição vertical. Nunca coloque a botija
de PL de lado, quer esteja cheia ou vazia. Nunca armazene uma botija suplente por baixo de ou perto do seu
grelhador.
CUIDADO: nunca transporte ou movimente o seu grelhador ou depósito do grelhador sem primeiro fechar a válvula
manual na sua botija de butano ou propano.
O melhor local para armazenar uma botija de butano ou propano líquido é um local com sombra ou protegido no
exterior, na parte traseira da sua casa ou garagem, ou num alpendre coberto onde esteja fora do alcance de crianças. O
butano ou propano líquido não evapora. Está dentro de um contentor forte e fechado. Não vai perder qualquer do seu
conteúdo calorífero de queima limpa, mesmo se deixado no exterior durante todo o ano.
AVISO: Quando não estiver conectada ao seu grelhador, a botija de gás PL deve ser armazenada na posição vertical
em local fresco, sombreado, bem ventilado, exterior, afastada do seu grelhador ou de qualquer outra fonte de calor.
O não cumprimento deste aviso pode levar a danos na válvula da botija, risco de incêndio e lesões pessoais.
IMPORTANTE: Ao conectar ou substituir o tubo de gás ou acessórios, todas as juntas devem ser vedadas com um
composto de vedação à prova de fugas aprovado ou fita adesiva para canalizador. Depois de fazer as conexões,
verifique todas as juntas quanto a fugas usando uma solução de água com sabão e um pincel.
AVISO: Nunca use uma chama aberta para testar se há fugas de gás. O uso de uma chama aberta pode resultar em
incêndio, explosão e lesões corporais.
CALENDÁRIO DE CUIDADOS E MANUTENÇÃO
Item Frequência de limpeza (uso normal) Método de limpeza
Superfícies de aço
inoxidável
Grelhas de cocção Após cada uso Queimar o excesso, escova metálica
Grelhas de aço inoxidável 15 dias Esfregão e água com sabão/pode ir à máquina de
Recipiente de gordura 15 dias Esfregão e água com sabão/pode ir à máquina de
Bandeja de gordura 15 dias Esfregão e água com sabão
Controladores da chama 30 dias Esfregão e água com sabão/pode ir à máquina de
Queimadores 90 dias Esfregão e água com sabão
Fornalha 120 dias Produtos de limpeza para grelhadores de interior
Duas vezes por ano Produto de limpeza de aço inoxidável
lavar loiça
lavar loiça
lavar loiça
PT-25

SUBSTITUIÇÃO DO QUEIMADOR PRINCIPAL
COMO SUBSTITUIR O QUEIMADOR PRINCIPAL
1. Abra a tampa do grelhador e retire a grelha de aquecimento (A),
as grelhas de cocção (B) e os controladores da chama (C).
2. Retire o contrapino do queimador principal. (Fig. 1)
3. Remova os dois parafusos que prendem o elétrodo do queimador
principal e o fio ao queimador principal.
4. Remova e descarte o queimador principal antigo. Substitua pelo
novo.
Nota: Ao reinstalar o queimador principal, certifique-se de que a
haste da válvula principal está introduzida na abertura do tubo do
queimador principal.
5. Reinstale o contrapino e os dois parafusos que prendem o
elétrodo e o fio do queimador principal.
6. Substitua os controladores de chamas, grelhas de cocção e grelha
de aquecimento.
COMO SUBSTITUIR A IGNIÇÃO ELETRÓNICA E O FIO DO
ELÉTRODO DO QUEIMADOR PRINCIPAL
FIG. 1
FIG. 2
Parafusos fixos
Contrapino
Parafusos fixos
1. Abra a tampa do grelhador e retire a grelha de aquecimento (A),
as grelhas de cocção (B) e os controladores da chama (C).
2. Remova os dois parafusos que prendem o elétrodo do queimador
principal e o fio ao queimador principal. (Fig. 1)
3. Abaixo da grelha, logo acima da porta do lado esquerdo do
carrinho, remova os dois parafusos que prendem a proteção
térmica da ignição. Remova a proteção térmica pela abertura logo
acima da porta. (Fig. 2)
4. Desaparafuse o botão de ignição e a porca de travamento e,
em seguida, remova o botão de ignição pela mesma abertura.
Desconecte o fio do elétrodo do queimador principal a substituir
da parte traseira do botão de ignição e, em seguida, remova o
elétrodo e o fio da grelha. (Fig. 2)
5. Passe o novo fio do elétrodo do queimador principal através
do orifício na parte interna da grelha e, em seguida, reinstale o
elétrodo do queimador principal com os dois parafusos removidos
anteriormente. (Fig. 3)
6. Conecte o fio na parte de trás do botão de pressão de ignição
onde o fio anterior foi removido. (Fig. 4)
7. Reinstale o botão de pressão e, em seguida, reinstale a
proteção térmica da ignição com os dois parafusos removidos
anteriormente.
8. Substitua os controladores de chamas, grelhas de cocção e grelha
de aquecimento.
Proteção térmica da ignição
FIG. 3
Porca de travamento
da ignição de botão de
pressão e botão de pressão
Proteção térmica da ignição
FIG. 4
Fio de ignição
PT-26
ignição

RESOLUÇÃO DE PROBLEMAS
PROBLEMA CAUSA AÇÃO CORRETIVA
O grelhador ou o
queimador lateral não
acendem.
Chamejar excessivo. Grelhar carnes gordurosas. Grelhe carnes gordurosas quando as grelhas
O fio de ignição soltou-se da ignição/
válvula elétrica.
A distância entre o pino de ignição e
o queimador é superior a 3,96 mm a
4,75 mm (queimador lateral).
O fio de ignição está partido. Ligue ao Atendimento ao Cliente para
A pilha está gasta. Instale uma nova pilha.
A pilha nova não funciona. Verifique a polaridade da pilha. O lado negativo
A ponta do elétrodo não produz faíscas à
entrada do queimador.
Não há fornecimento de gás. Verifique a válvula reguladora. Verifique se a
Os controlos estão em “ALTO”. Antes de estar pronto para grelhar, gire os
Água borrifada em chamas de gás. Não borrife água nas chamas de gás.
Tampa fechada ao grelhar. Levantar a tampa ao grelhar.
Ligue novamente o fio de ignição à ignição/
válvula elétrica.
Afrouxe o pino de ignição, ajuste a distância e
aperte.
substituição.
(-) da pilha deve entrar primeiro.
Reinstale o elétrodo.
conexão tem fuga.
estão frias e os botões na posição “BAIXO”.
Mova as carnes para a grelha de aquecimento se
o chamejar continuar.
botões para “DESLIGADO”.
O queimador apaga-se. A botija de PL está vazia. Ateste a botija de PL.
O queimador não está alinhado com a
válvula de controlo.
O abastecimento de gás não é suficiente. Verifique o tubo de abastecimento de gás e
Calor reduzido estando
em “ALTO”
Calor reduzido, gás PL. O conjunto do regulador incorpora um
As entradas estão bloqueadas. Limpe as entradas de quaisquer obstruções.
A botija de PL acabou. Ateste a botija de PL.
dispositivo de excesso de fluxo concebido
para fornecer ao grelhador um fluxo de gás
suficiente. Mudanças rápidas de pressão
podem acionar o dispositivo de excesso de
fluxo, o que resulta numa chama baixa e
temperatura baixa.
Instale o queimador corretamente.
certifique-se de que não há fugas e nós.
1. Assegure-se de que todos os queimadores
estão em “DESLIGADO”.
2. Abra a válvula da botija e espere 5 minutos.
3. Acenda cada queimador, um de cada vez, a
seguir as instruções de acendimento.
PT-27

PEÇAS DE SUBSTITUIÇÃO
PT-28

PEÇA DESCRIÇÃO PEÇA DESCRIÇÃO
1 Tampa principal 36 Suporte J
2 Parafuso de dobradiça 37 Suporte M
3 Espaçador isolante térmico, para termómetros 38 Íman da porta
4 Luneta do termómetro 39 Pivô da porta
5 Termómetro 40 Ilhó do puxador da porta
6 Placa de identificação 41 Puxador da porta
7 Para-choques da tampa 42 Luneta do puxador da porta
8 Luneta do puxador da tampa 43 Porta esquerda
9 Espaçador isolante térmico, para puxador da
tampa
10 Puxador da tampa 45 Roda com bloqueio
11 Suporte da tampa, esquerda 46 Batente da porta
12 Suporte da tampa, direita 47 Rodízio reto
13 Fornalha 48 Painel inferior do carrinho
14 Suporte do pivô da porta 49 Painel lateral do carrinho, direita
15 Suporte do painel de controlo, esquerdo 50 Queimador lateral
16 Suporte do painel de controlo, direito 51 Fixação do queimador lateral
17 Válvula do queimador principal 52 Suporte X
18 Coletor de gás, para queimador principal 53 Luneta do botão do queimador lateral
19 Arrancador 54 Painel da prateleira do lado direito
20 Painel de controlo 55 Prateleira do lado direito
21 Botão 56 Painel inferior da prateleira do lado direito
22 Luneta do botão 57 Elétrodo e fio de queimador lateral
23 Tubo de gás 58 Grade de cozedura do queimador lateral
24 Válvula do queimador lateral 59 Cobertura da prateleira do lado direito
25 Coletor de gás, para queimador lateral 60 Dobradiça da cobertura da prateleira do lado
26 Regulador 61 Queimador principal
27 Bandeja de gordura 62 Elétrodo do queimador principal e fio A
28 Caixa de gordura 63 Elétrodo do queimador principal e fio B
29 Tampa traseira da fornalha 64 Elétrodo do queimador principal e fio C
30 Painel traseiro do carrinho 65 Elétrodo do queimador principal e fio D
31 Suporte D 66 Contrapino
32 Prateleira do lado esquerdo 67 Controlador da chama
33 Painel da prateleira do lado esquerdo 68 Grade de cozedura
34 Painel lateral do carrinho, esquerda 69 Grelha de aquecimento
35 Suporte do carrinho 70 Tubo de ignição
44 Porta direita
direito
PT-29

ELIMINAÇÃO DE RESÍDUOS
A embalagem é feita de materiais ecológicos, que poderá descartar nos pontos de reciclagem da sua zona.
Em circunstância alguma deverá descartar o seu grelhador juntamente com resíduos domésticos normais!
Leve-o a uma empresa de gestão de resíduos aprovada ou descarte-o nas instalações adequadas do seu
município. Cumpra as normas vigentes. Em caso de dúvida, entre em contacto com o seu serviço de gestão
de resíduos.
Pilhas e pilhas recarregáveis
As pilhas não devem ser eliminadas com o lixo doméstico normal. Recicle-as nos pontos de recolha
previstos para esse fim. Contacte as autoridades locais ou o seu revendedor para obter conselhos sobre
reciclagem. A eliminação correta de pilhas usadas ajuda a proteger o meio ambiente e a saúde humana.
DECLARAÇÃO DE CONFORMIDADE
Este produto está em conformidade com as diretivas europeias e nacionais vigentes. Isso é confirmado pela marcação
CE (as respetivas declarações podem ser solicitadas ao fabricante).
PT-30

BARBECUE GAZ 4 BRÛLEURS ET
GRILL
Contactez-nous en cas de questions. Nos coordonnées figurent sur notre site Internet teka.com.
CE MANUEL DOIT ÊTRE LU AVANT TOUTE UTILISATION !

AVERTISSEMENTS
Une installation, un ajustement, une altération, une utilisation ou un entretien incorrect de ce produit peut entraîner
des blessures graves et/ou des dommages matériels. Lisez attentivement ce mode d’emploi avant l’installation et
l’utilisation de cet appareil.
1. Ne stockez et n’utilisez pas d’essence ou d’autres liquides ou vapeurs inflammables à proximité de cet appareil ou
de tout autre appareil.
2. Un réservoir de gaz propane/butane non utilisé ne doit pas être stocké à proximité de cet appareil ou de tout autre
appareil.
DANGER
En cas d’odeur de gaz :
1. Coupez immédiatement l’arrivée de gaz de l’appareil.
2. Éteignez toute flamme nue.
3. Ouvrez le couvercle.
4. Si l’odeur persiste, tenez-vous à l’écart de l’appareil, puis appelez immédiatement votre fournisseur de gaz ou les
pompiers.
Avant la première utilisation de l’appareil, veuillez lire attentivement les consignes d’installation et
d’entretien.
Selon le modèle de votre appareil, ses accessoires et fonctions peuvent être différents de ceux figurant sur
les photos.
CONTACTEZ-NOUS
Contactez-nous en cas de questions. Nos coordonnées figurent sur notre site Internet teka.com.
Notre adresse :
TEKA Industrial S.A.
C/Cajo 17, 39011 Santander

TABLE DES MATIÈRES
UTILISATION PRÉVUE ......................................................................................................................... FR-4
INFORMATIONS RELATIVES À LA SÉCURITÉ ....................................................................................... FR-4
DÉBALLAGE DU GRILL
LISTE DES PIECES ......................................................................................................................................................FR-10
PRÉPARATION ........................................................................................................................................................... FR-11
CONSIGNES D’ASSEMBLAGE
RACCORDEMENT À L’ALIMENTATION EN GAZ
CONNEXION DE LA BOUTEILLE DE GAZ ....................................................................................................................FR-18
PRÉREQUIS GAZ ........................................................................................................................................................FR-19
ENVIRONNEMENT D’UTILISATION SÉCURISÉE DU GRILL ..........................................................................................FR-19
MODE D’EMPLOI
PREMIÈRE UTILISATION : PRÉPARATION DU GRILL ............................................................................................ .......FR-20
PRÉCHAUFFAGE ........................................................................................................................................................ FR-20
CONSEILS DE CUISSON .............................................................................................................................................FR-20
CONSIGNES D’ALLUMAGE ÉLECTRONIQUE ............................................................................................................... FR-20
REMPLACEMENT DE LA PILE ....................................................................................................................................FR-21
POSITIONS DU COUVERCLE : OUVERT OU FERMÉ ....................................................................................................FR-21
VÉRIFICATION DE LA PRÉSENCE DE FUITES DE GAZ .................................................................................................. FR-21
ENTRETIEN ET NETTOYAGE
NETTOYAGE DES BRÛLEURS ..................................................................................................................................... FR-22
NETTOYAGE DE LA CHEVILLE D’ALLUMAGE ..............................................................................................................FR-22
NETTOYAGE DU BAC RÉCUPÉRATEUR DE GRAISSES .................................................................................................FR-23
ENTRETIEN DES SURFACES ET COUVERCLES DU BARBECUE ..................................................................................... FR-23
SÉCURITÉ RELATIVE AU GAZ .....................................................................................................................................FR-24
PLANNING D’ENTRETIEN .......................................................................................................................................... FR-25
REMPLACEMENT DU BRÛLEUR PRINCIPAL ...................................................................................... FR-26
DÉPANNAGE .................................................................................................................................... FR-27
PIÈCES DE REMPLACEMENT ............................................................................................................ FR-28
MISE AU REBUT ............................................................................................................................... FR-30
DÉCLARATION DE CONFORMITÉ ...................................................................................................... FR-30
FR-3

UTILISATION PRÉVUE
Ce grill au gaz est prévu pour le réchauffage, la cuisson et la grillade de différentes sortes d’aliments dans des espaces
extérieurs bien ventilés. L’appareil doit fonctionner avec du gaz butane ou propane basse pression. Il ne peut pas être
alimenté par du gaz naturel.
Ce produit est prévu pour une utilisation privée uniquement et ne peut pas être utilisé pour une quelconque finalité
commerciale ou industrielle.
Cet appareil doit uniquement être utilisé de la façon décrite dans ce mode d’emploi. Toute autre utilisation sera
considérée comme incorrecte et peut causer des dommages matériels ou des blessures graves.
Le fabricant n’est pas responsable de tout dommage découlant d’une utilisation incorrecte.
INFORMATIONS RELATIVES À LA SÉCURITÉ
SYMBOLES DE SÉCURITÉ
Danger ! (Risque élevé)
Ignorer cette précaution peut entraîner des blessures mortelles.
Avertissement ! (Risque moyen)
Ignorer cette précaution peut entraîner des dommages matériels.
Attention ! (Risque faible)
Précaution à prendre compte lors de la manipulation de l’appareil.
Instructions générales de sécurité
CONSIGNES GÉNÉRALES DE SÉCURITÉ
Ces consignes de sécurité doivent être respectées à chaque utilisation.
– Utilisez l’appareil uniquement en extérieur !
– Lisez les consignes avant d’utiliser l’appareil.
– AVERTISSEMENT ! Les pièces accessibles peuvent être très chaudes. Tenez les jeunes enfants à l’écart de l’appareil.
– Cet appareil doit être placé à l’écart des matériaux inflammables pendant son utilisation.
– Ne déplacez pas l’appareil en cours d’utilisation !
– Coupez l’arrivée de gaz à la bouteille après chaque utilisation.
– Ne modifiez pas l’appareil.
AVERTISSEMENTS GÉNÉRAUX RELATIFS AU BARBECUE
1. AVERTISSEMENT ! Danger d’intoxication au monoxyde de carbone ! N’utilisez jamais l’appareil dans des lieux clos, comme des
garages ou des abris de jardin, car le monoxyde de carbone s’accumulera, ce qui entraînera des blessures graves ou la mort.
2. AVERTISSEMENT ! Danger d’explosion ! N’utilisez jamais l’appareil dans des lieux clos, comme des garages ou des abris de
jardin, car le gaz risque de s’accumuler en cas de fuite, ce qui risque d’engendrer une explosion.
3. Verrouillez toujours les roues à l’aide de leur frein (le cas échéant) avant utilisation.
4. N’essayez pas de déplacer l’appareil en cours d’utilisation.
5. N’essayez pas de modifier l’appareil d’une quelconque façon. N’utilisez que les accessoires recommandés par le fabricant. Toute
altération apportée à l’appareil, toute utilisation incorrecte ou non-conformité aux consignes est dangereuse.
6. N’utilisez pas l’appareil à proximité immédiate de bombes aérosol, liquides inflammables, gaz volatiles ou d’autres substances
inflammables. Tenez les flammes nues, comme les bougies ou torches, à l’écart de l’appareil.
FR-4

7. Ne stockez aucun liquide inflammable ou gaz volatile à proximité de l’appareil.
8. Ne laissez jamais l’appareil en cours d’utilisation sans surveillance.
9. N’utilisez pas de combustibles liquides avec cet appareil.
10. Ne vous penchez jamais au-dessus de la surface de cuisson lorsque vous allumez l’appareil ou pendant la cuisson.
AVERTISSEMENTS RELATIFS AU BARBECUE AU GAZ
1. Cet appareil est configuré pour fonctionner avec du gaz butane ou propane basse pression. N’utilisez pas d’alimentation en gaz
naturel.
2. Ouvrez le couvercle avant d’allumer l’appareil.
3. Soyez prudent lors de l’ouverture du couvercle quand l’appareil est en cours d’utilisation. De la vapeur chaude peut s’accumuler
à l’intérieur et être rapidement éjectée lors de l’ouverture. N’ouvrez pas le couvercle trop rapidement.
4. Ne touchez pas les surfaces chaudes. Utilisez la poignée uniquement pour soulever le couvercle.
5. Ne recouvrez l’appareil qu’une fois qu’il a complètement refroidi.
6. N’utilisez jamais de charbon ou d’autres combustibles solides dans cet appareil.
7. Il est recommandé de laisser au moins 1 m entre le gril et tout matériau combustible.
8. Ne placez rien sur le couvercle quand l’appareil fonctionne !
9. Dimensions minimales et maximales de toute casserole ou poêle utilisée sur le brûleur latéral : 203,2 mm - 254 mm.
RACCORDEMENTS AU GAZ/BOUTEILLE DE GAZ/AVERTISSEMENT RELATIF AU RÉGULATEUR DE PRESSION
1. Vérifiez régulièrement l’état de l’appareil et de tous ses raccordements, et à chaque remplacement de bouteille, pour vous
assurer qu’il n’y a pas de fuites de gaz.
2. Ne recherchez jamais de fuites de gaz en utilisant une allumette ou toute autre flamme nue.
3. Ne modifiez jamais le régulateur de pression ou l’assemblage de l’arrivée de gaz.
4. Coupez toujours l’arrivée de gaz sur la bouteille de gaz ou le régulateur de pression avant de débrancher le détendeur après
utilisation.
5. Ne stockez jamais de bouteilles de gaz en intérieur ou près de sources de chaleur.
6. Stockez toujours les bouteilles de gaz droites, jamais couchées, car cela pourrait entraîner des fuites de gaz au niveau de la
bouteille ou dans le détendeur.
7. N’utilisez jamais l’appareil sans le régulateur de pression.
8. N’utilisez que des régulateurs de pression approuvés pour le gaz de pétrole liquéfié (GPL) et conformes aux réglementations
nationales.
AVERTISSEMENTS RELATIFS AU DÉTENDEUR
1. Vérifiez l’état du détendeur avant et après chaque utilisation pour vous assurer qu’il n’est pas sectionné, qu’il n’y a pas de trace
d’usure excessive ou d’autres dommages. Le détendeur doit être remplacé tous les ans ou tous les deux ans uniquement par un
technicien qualifié ou le détaillant. Remplacez les détendeurs fragiles et leur raccordement. En cas de doute, demandez conseil
à un spécialiste proche de chez vous.
2. Protégez le détendeur des dommages. Ne le/les laissez pas pendre au-dessus de bords saillants. Ne le tordez pas, ne le pressez
pas et ne le pliez pas. Tenez le détendeur à l’écart des surfaces chaudes et assurez-vous que personne ne se prenne les pieds
dedans.
3. N’utilisez que des détendeurs approuvés pour le gaz de pétrole liquéfié (GPL) et conformes aux réglementations nationales.
4. Tout type de réparation ou de remplacement du détendeur doit être effectué conformément aux consignes du fabricant par du
personnel ou des spécialistes qualifié(s).
5. Le détendeur de gaz LP doit être remplacé en cas de dommage et si les conditions nationales le demandent.
6. Assurez-vous qu’il n’y a pas de débris, araignées, petits insectes ou toile d'araignée à l’intérieur du tuyau avant d’effectuer tout
raccordement. Ils pourraient obstruer le débit de gaz, ce qui pourrait provoquer un départ de feu dans le détendeur et autour.
La longueur maximale du tuyau ne doit pas dépasser 1,5 m.
FR-5

EN CAS D’ODEUR DE GAZ
1. N’allumez jamais l’appareil si vous sentez une odeur de gaz.
2. Coupez immédiatement l’arrivée de gaz sur l’appareil et sur la bouteille de gaz et/ou le régulateur de pression.
3. Éteignez toutes les flammes nues à proximité de l’appareil, comme les bougies ou torches. Éteignez tous les appareils
électriques à proximité.
4. Assurez-vous que la zone soit bien ventilée par de l’air frais.
5. Ouvrez le couvercle de l’appareil afin de laisser le gaz s’échapper. Si l’odeur de gaz persiste, arrêtez d’utiliser l’appareil et
déposez-le pour réparation uniquement chez un professionnel certifié.
CONSIGNES DE SÉCURITÉ
Danger ! Risque d’incendie !
Les pièces du grill deviennent très chaudes lors de l’utilisation et peuvent provoquer des départs de feu.
- Ayez toujours un extincteur et un kit de premiers secours à disposition en cas d’accident ou d’incendie.
- Placez le grill sur une surface sécurisée, non inflammable, plate, stable, résistante à la chaleur et propre, à l’écart de toute
source de chaleur avant utilisation.
- Assurez-vous que le grill soit placé à au moins1 mètre de distance des matériaux fortement combustibles, comme les vélums,
les terrasses ou les meubles en bois.
- Ne déplacez pas le grill en cours d’utilisation.
- Certains aliments dégagent des graisses et jus inflammables. Nettoyez régulièrement le grill, de préférence après chaque
utilisation.
- Ne laissez pas le grill sans surveillance durant son fonctionnement.
Danger ! Risque d’incendie !
N’essayez jamais de mettre en route/d’allumer le grill quand le couvercle est fermé.
- N’utilisez le grill couvercle fermé qu’à feux doux.
Danger ! Risque de brûlure et d’accident !
Cet appareil n’est pas conçu pour être utilisé par des personnes (y compris des enfants) aux capacités physiques,
sensorielles ou mentales réduites, ou qui manquent d’expérience et/ou de connaissances.
- Ces personnes doivent être informées des dangers associés à l’utilisation de cet appareil et doivent être supervisées par une
personne responsable de leur sécurité.
- Surveillez en permanence les enfants pour vous assurer qu’ils ne jouent pas avec l’appareil.
- Toute modification apportée au produit peut être extrêmement dangereuse et est donc interdite. N’essayez pas d’apporter des
modifications non autorisées à l’appareil. En cas de dommage, réparations ou d’autres problèmes avec le grill, prenez contact
avec notre centre de réparation ou un distributeur local.
- Maintenez l’appareil à l’écart des enfants et des animaux.
Ne touchez pas le grill, le brûleur ou la nourriture en cours de cuisson, car ils deviennent extrêmement chauds et peuvent
occasionner de graves brûlures.
- Gardez suffisamment de distance avec les pièces chaudes, car tout contact peut entraîner de graves brûlures.
- Portez toujours des gants pour barbecue ou four (c.-à-d., des gants isolants de catégorie II, classés selon la norme DIN-EN 407)
lorsque vous vous servez du grill.
- N’utilisez que des ustensiles pour grill à longs manches, dotés de poignées résistantes à la chaleur.
- Ne portez pas d’habits aux manches larges.
- Attendez que le grill soit complètement froid avant de le nettoyer ou de le ranger.
Danger ! Risque de déflagration !
Quand ils sont versés sur les flammes, les liquides inflammables peuvent entraîner des flashs ou des déflagrations.
- N’utilisez jamais de fluides inflammables, comme l’essence ou l’alcool.
FR-6

Danger ! Risque d’intoxication !
Le gaz n’a pas d’odeur et peut s’avérer mortel dans les lieux clos !
- Le grill est seulement prévu pour une utilisation en extérieur.
Danger ! Risque pour la santé !
N’utilisez pas de diluants à peinture pour enlever les taches. Ces substances sont dangereuses et ne doivent pas
entrer en contact avec de la nourriture.
Danger ! Risque pour les enfants !
Si les enfants jouent avec le film d’emballage, ils peuvent rester coincés dedans et s’étouffer.
- Ne laissez pas les enfants jouer avec le film d’emballage.
- Ne laissez pas les enfants porter des petites pièces du barbecue à leur bouche, car il y a un risque d’étouffement. Ces pièces
présentent un risque d’étouffement si elles sont avalées.
Danger ! Risque de blessure !
Le grill et ses pièces sont dotés de bords saillants.
- Les pièces du grill doivent être manipulées avec précaution pour éviter tout accident ou blessure au cours de l’assemblage ou
de l’utilisation. Portez des gants de protection si nécessaire.
- Ne placez pas le grill près d’une entrée ou dans une zone de forts passages.
- La grillade doit s’effectuer avec le plus grand soin. Vous pouvez perdre le contrôle de l’appareil si vous êtes distrait.
- Soyez toujours attentif à ce que vous faites et conscient de vos actions. N’utilisez pas ce produit si vous manquez de
concentration ou si vous êtes fatigué, ou si vous êtes sous l’influence de stupéfiants, d’alcool ou de médicaments. Un seul
moment d’inattention au cours de l’utilisation du produit suffit à causer de graves blessures.
Avertissement ! Risque de dommage !
Pendant l’utilisation, les vis peuvent se desserrer petit à petit et remettre en cause la stabilité du grill.
- Vérifiez que les vis sont bien serrées avant chaque utilisation. Si nécessaire, resserrez les vis pour préserver la stabilité des
pieds du grill.
Avertissement ! Risque de dommage !
N’utilisez pas de solvants abrasifs ou forts ou d’éponges grattantes, car ils peuvent endommager les surfaces et laisser
des éraflures.
Danger ! Risque de brûlure et d’accident !
Attention ! En cas d’odeur de gaz :
- Coupez immédiatement l’arrivée de gaz de l’appareil.
- Éteignez toute flamme nue.
- Ouvrez le couvercle.
- Si l’odeur persiste, écartez-vous de l’appareil et appelez immédiatement votre fournisseur de gaz ou les pompiers.
Danger ! Risque de brûlure et d’accident !
Le grill doit être stocké à l’écart des carburants (p. ex., essence) et d’autres liquides ou gaz inflammables.
- Les bouteilles de gaz ne doivent pas être stockées au même endroit que le grill.
- Les bouteilles de gaz doivent être stockées à l’écart du grill.
- Ne placez pas de bouteille de gaz directement en dessous du grill.
Danger ! Risque d’incendie !
Cet appareil doit être placé à l’écart des matériaux inflammables pendant son utilisation.
- Le changement de bouteille de gaz doit être effectué à l’écart des sources de départ de feu.
- Les bouteilles de gaz ne doivent jamais être stockées à des températures dépassant 50 °C. Les jours de forte chaleur, efforcez-
vous de placer les bouteilles à l’ombre.
FR-7

INFORMATIONS DE SÉCURITÉ RELATIVES À LA PILE
1. AVERTISSEMENT : TENIR LA PILE HORS DE PORTÉE DES ENFANTS. Toute ingestion peut entraîner des brûlures
chimiques, la perforation de tissus mous et la mort. Des brûlures graves peuvent survenir dans les deux heures suivant
l’ingestion. Consultez immédiatement un médecin.
2. Si vous pensez que la pile a pu être avalée ou placée dans une partie du corps, consultez immédiatement un médecin.
3. Ne laissez pas un enfant remplacer la pile sans être surveillé par un adulte.
4. Les piles usagées doivent être immédiatement enlevées de l’équipement et jetées de manière adéquate.
5. Ne jetez pas les piles au feu. N’exposez pas les piles à la chaleur ou au feu. Évitez de les stocker à la lumière directe.
6. En cas de fuite de la pile, sortez-la du compartiment à l’aide d’un tissu. Jetez la pile conformément aux
réglementations. Si l’acide de la pile fuit, évitez tout contact avec la peau, les yeux et vos muqueuses. Rincez
immédiatement les parties touchées après le contact avec l’acide et rincez abondamment à l’eau claire. Consultez un
médecin.
7. Ne placez pas les piles dans un contenant et/ou ne les modifiez pas.
8. Avant de jeter l’appareil, jetez les piles d’une manière respectueuse de l’environnement.
9. Insérez toujours les piles en respectant la polarité (+ et -) indiquée sur la pile et dans le compartiment de la pile. Si les
piles sont insérées dans le mauvais sens, des courts-circuits peuvent se produire ou elles peuvent être chargées. Cela
peut entraîner une surchauffe, une fuite, une évacuation, un éclatement, un départ de feu et des blessures graves.
10. Utilisez seulement le type de pile indiqué dans ce manuel.
11. Ne court-circuitez pas les piles. Quand les bornes positive (+) et négative (-) de la pile entrent en contact, cela
entraîne un court-circuit. Par exemple, des piles qui se baladent dans une poche avec des clés ou des pièces peuvent
subir un court-circuit. Cela peut entraîner une évacuation, une fuite, une explosion, un départ de feu et des blessures
graves.
12. Ne rechargez pas des piles alcalines. Le fait d’essayer de recharger une pile (primaire) non rechargeable peut
entraîner la fuite du gaz interne et/ou une production de chaleur entraînant une fuite, une évacuation, une explosion,
un départ de feu et des blessures graves.
13. Ne faites pas subir de chocs mécaniques aux piles.
14. Ne démontez pas, n’ouvrez pas et ne déchiquetez pas les piles.
15. AVERTISSEMENT : Les piles usagées ne doivent pas être jetées avec les déchets ménagers. Apportez-les aux points
de collectes appropriés.
FR-8

DÉBALLAGE DU GRILL
(
$
'
%
<
&
(
)
*
'
9
8
7
-
/
0
4
$
;
&
%
=
:
6
5
+
,
.
1
3
2
FR-9
 Loading...