

Teka GKST 85 Operating Instructions Manual

12 223693
You now own a glass ceramic hob with Touch-Control switches.
Chapters 2 and 3 of these Operating Instructions contain information on how you can make sure that your hob
gives many years of service.
These Operating Instructions are for use with several types of hobs. The rating label on the front of these
Instructions will show you which type you have bought.
Contents
1. Operations
1.1 Your new hob
1.2 Touch-Control switches
1.3 Touch-Control operations
2. Things to watch out for
2.1 Notes on the right types of saucepans
2.2 Important
3. Cleaning and maintenance
4. Fitting
4.1 Working surface cut-out
4.2 Installation
4.3 Electrical connection
4.4 Service work
223693 13
1. Operations
1.1 Your new hob with Touch-Control operation
This manual covers the models: . GKST 85..
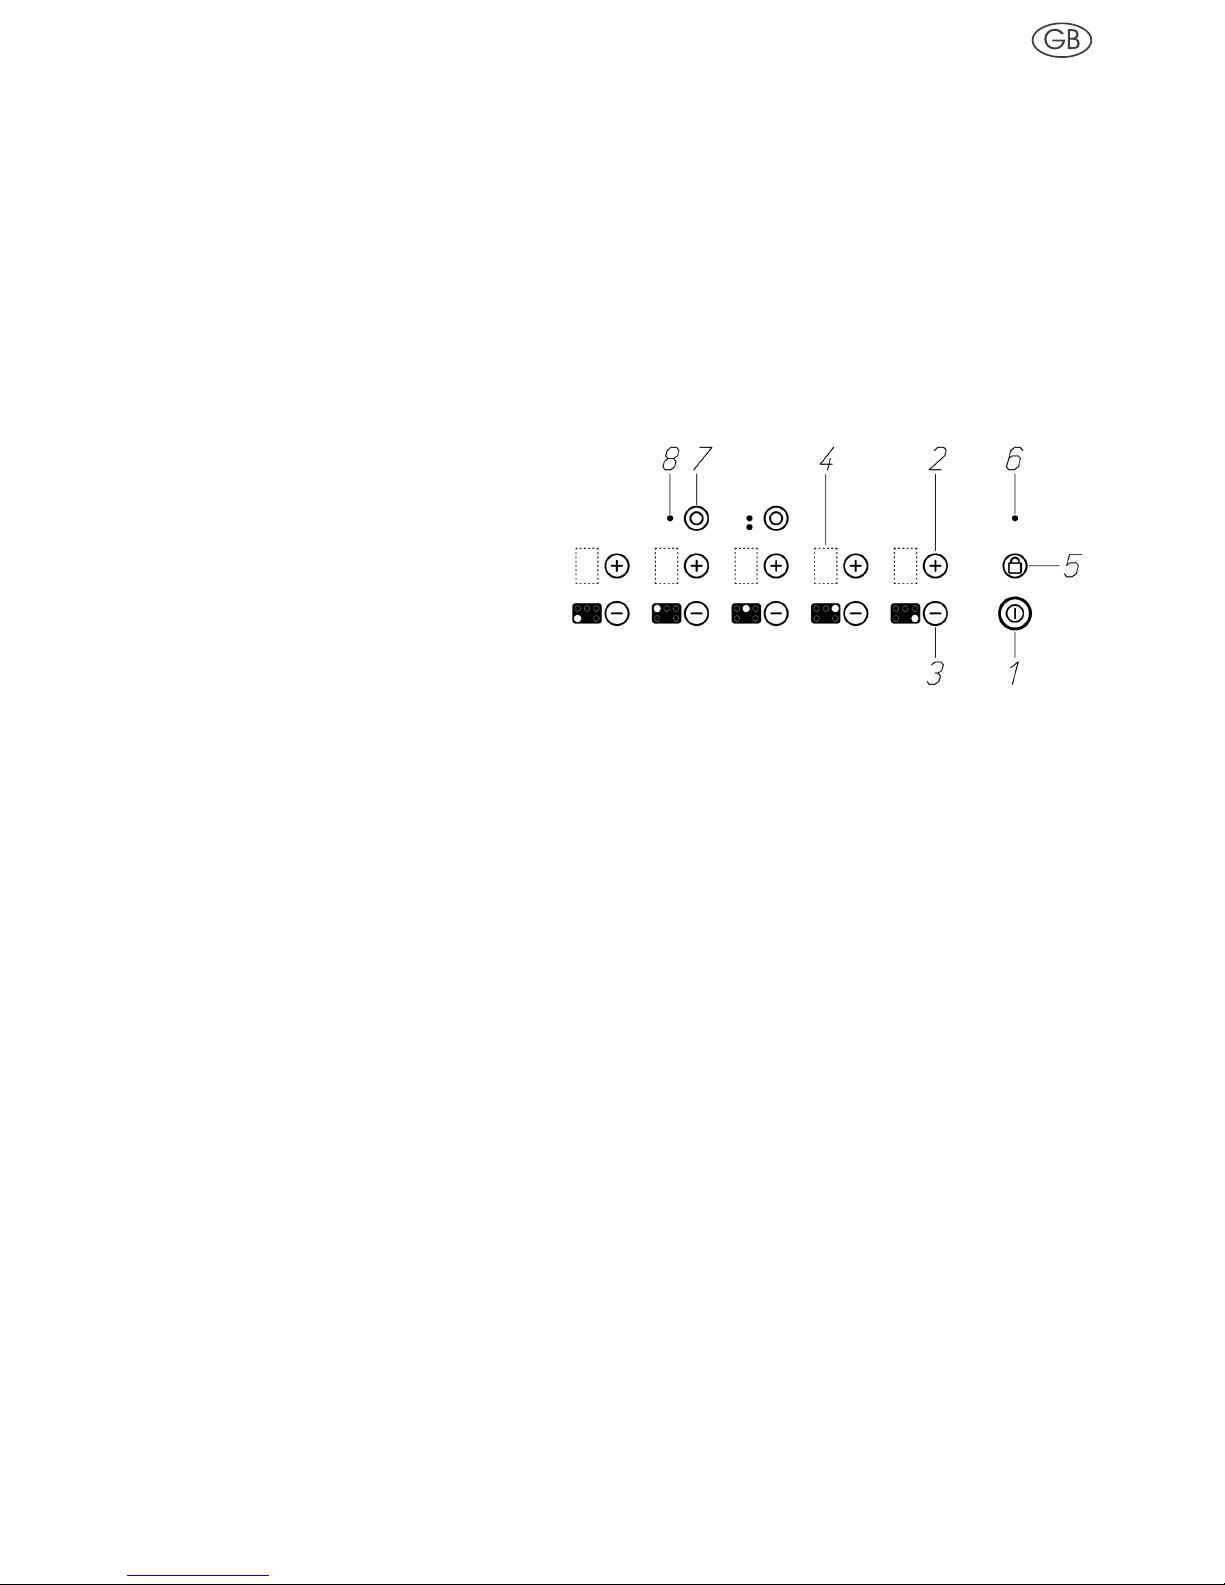
1.2 Touch-Control operating panel
After the supply voltage has been applied (mains connection), a self-test of the control unit (calibration adjustment)
is then carried out. Afterwards, the control unit is in standby mode.
During calibration adjustment a minus sign is lit in the cooking level display (4). It goes out if calibration is
successfully executed.
The touch keys may not be covered by objects or anything else during calibration.
1. On/off switch (emergency shutdown)
2. Plus key
3. Minus key
4. Cooking level display
5. Locking key
6. Lock indicator
7. Multi-circuit key
8. Additional multi-circuit control lamp
1.3 Touch-Control operations
Each key operation is always confirmed by an acoustic signal.
Pressing the on/off switch key (1) switches on the control system. A “0” is lit for the cooking level indicators (4).
The next action must be carried out within ten seconds, otherwise the control system will automatically switch off
again.
If the minus key (3) is pressed, cooking level 4 is indicated.
Then, a cooking level between 0 and 9 can be selected with the plus or minus key.
The minus key (3) can be used to turn the cooling level down to “0”; if the minus and plus keys (2+3) are pressed
at the same time, the cooking level can be switched off directly.
A “0” appears that goes out after 10 seconds.
As a rule, the complete control system can be switched off at any time by pressing the
on/off key (1).

14 223693
Parboiling boost
This function makes cooking easier. The cooking zone is
automatically heated at full power and at a specified time (see
table) its is switched back to the cooking level which you preselect.
If a cooking zone is switched on with the plus key (2) then
cooking level 9 is indicated. The parboiling boost is now
activated and the decimal point is lit. Any additional keys now
have to be pressed within 10 seconds, otherwise the decimal
point goes out and the parboiling boost is no longer activated.
Select a cooking level between 9 and 0 with the minus key.
The parboil impulse remains activated and the decimal
point is lit. If a key is pressed after the decimal point is no
longer lit then the parboiling boost is no longer activated.
If the cooking level is changed during the parboiling boost then
the parboiling time is automatically (see table) calculated.
Two-circuit- / three-circuit connection
Two-circuit- / three-circuit connection of the respective cooking zone can only be effected after the corresponding
cooking zone has been switched on.
Select the desired cooking level 1-9. Switch on the second heating element by means of the Multi-circuit key (7).
The control lamp (8) of the selected cooking zone lights up. Connect the third heating circuit by pressing the Multicircuit key (7) once again. The second control lamp (8) lights up. The corresponding cooking zone must also be
activated in order to switch off the two-circuit / three-circuit connection. The outer heating circuits are switched off
by pressing the Multi-circuit key (7) once again. The control lamps (8) are then no longer lit.
Locking
By pressing the locking key (5) for approx. 2 seconds (lock indicator (6) lights up) all of the buttons, except for the
ON/OFF button, are then locked against accidental use.
The lock indicator then goes out after approx. 2 seconds, the lock is, however, still on. If any key will be pressed
the lock indicator (6) lights up again for approx. 2 seconds.
The following keys can still be used:
• Switch off with ON/OFF key (emergency shutdown)
• Switch off by pressing the plus and minus key simultaneously.
• Unlock
The lock is released by pressing the locking key (5) again.
The lock indicator lights up for approx. 2 seconds and then goes out again.
The lock is now no longer activated.
Residual heat display
The residual heat display is indicated by an illuminated “H” on the corresponding cooking level display (4).
Tabl
e of times
PB = Parboiling boost,
in seconds
Cooking level PB (s)
182
2164
3264
4328
5410
682
7164
8164
9—
 Loading...