

Page 1
Model:
TM32/TM42/TM52
TM32G/TM42G/TM52G
Absorption Minibar
Instruction manual
UK
4
Bedienungsanleitung
DE
10
Mode d’emploi
F
16
Manual de Instrucciones
ES
20
Manual de Instruções
PT
26
Pokyny k obsluze
CZ
32
Kezelői kézikönyv
HU
38
1
Page 2

UK Contents
Introduc tion 4
Important Safety Precautions 4
Installation 5
Product Parts a nd Features 6
How to Operate 6
Reversing The Door 7
Proper Absorptio n Minibar Care and Cleaning 7
Warranty 8
Disposal 8
Circuit Diagram 9
DE Inhalt
Introduktion 10
Wichtige Sicherheitsmaßnahmen 10
Installation 11
Produktt ei le und Funkt io ne n 12
Betrieb 12
Türanschlag wechseln 13
Pflege und Reinigung 13
Garantie 14
Beseitigung 14
Schaltkreisdiagramm 15
F Sommaire
Description 16
Déballage 17
Installation 17
Nettoyage 17
Équipement électrique 17
Dégivrage 18
Changeme nt des charni ère s 18
En cas de pa nne 18
Élimination 18
Diagramme électrique 19
ES Índice
Introduc ción 20
Precauciones de seguridad importantes 20
Instalación 21
Partes y características del producto 22
Funcionamiento 22
Cambio del senti do de a pertura de la puerta 23
Limpieza y cuidados del mini bar de absorción 23
Garantía 24
Eliminación 24
Diag rama de circuitos 25
2
Page 3

PT Índice
Introdução 26
Importantes precauções de seg ura nça 26
Instalação 27
Peças e funcionalid a de s do pr o duto 28
Como utilizar 28
Inverter a porta 29
Cuidados e limpeza adequados do Minib ar d e A bsorção 2 9
Garantia 30
Eliminação 30
Diagrama de circuitos 31
CZ Obsah
Úvod 32
Důležité bezpečnostní pokyny 32
Instalace 33
Díly a funkce produktu 34
Používání přístroje 34
Otočení otevírání dvířek 35
Správná péče o absorpční minibar a jeho čištění 35
Záruka 36
Likvidace 36
Schéma zapoje ní 37
HU Tartalomjegyzék
Bevezetés 38
Fontos biztonsági t udnivaló k 38
Elhelyezés 39
A termék részei és jellemzői 40
A termék használat a 40
Az ajtó nyílásirányának megfordítása 41
Az abszorpc iós mi ni b ár ka rb a nt ar t ás a és tis ztí t ása 41
Jótállás 42
Hulladékkezelés 42
Villamos kapcsolási rajz 43
3
Page 4

INTRODUCTION
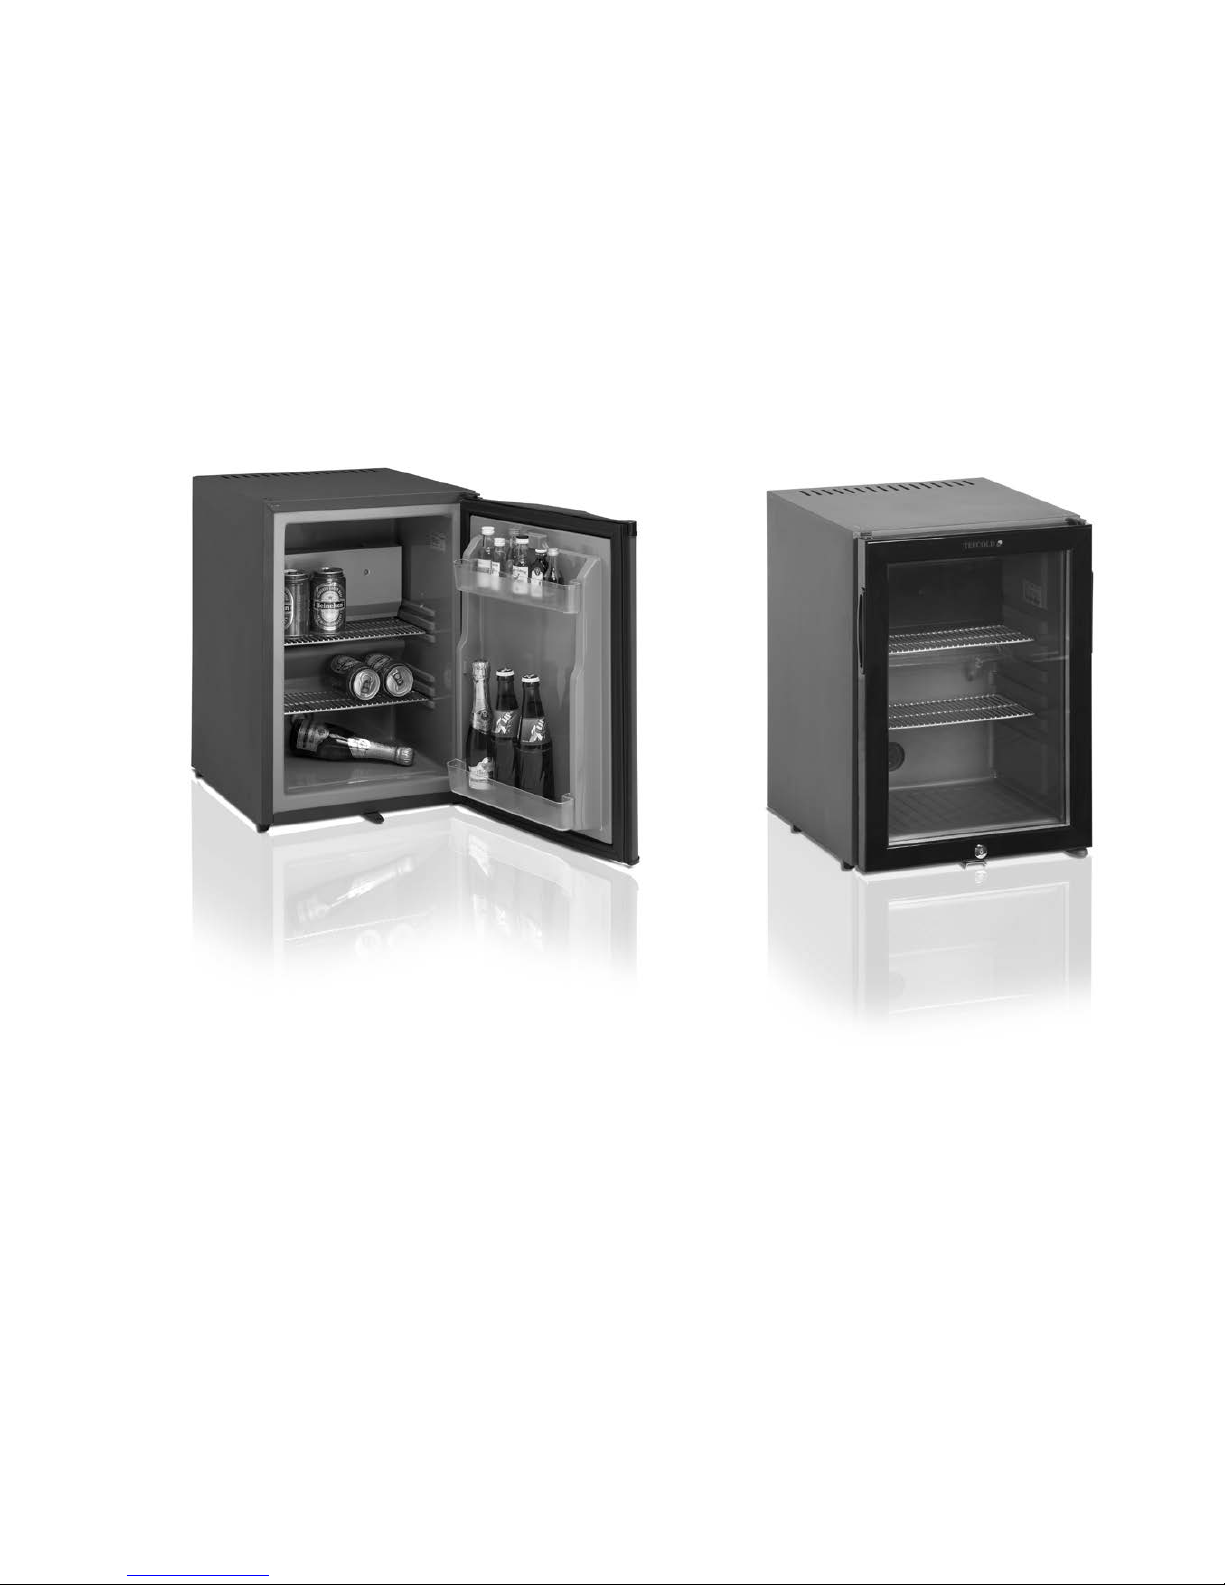
Thank you for purchasing our absorption minibar. This unit is designed to improve your living and
entertaining comfort. The absorption system minibar is a compact, totally silent refrigerator that
uses no compressors or fans. Originally developed for use in hotel rooms, this kind of little
refrigerato r is available to use in many ot her locations, such as cruise line, caravan, depar tment
dormitory, office, etc. With its silent o per at ion and attract ive des ign, you will enjoy the co nven ience
and comfort for years to co me.
Please read these instructions carefully before operat ing this app liance. Whe n using this appliance,
always exercise basic safety precautions.
This easy-to-use manual will guide you to getting the best use of your absorption minibar.
IMPORTANT SAFETY PRECAUTIONS
Before you use your absorption refrigerator, please read this instruction manual carefully.
Use this appliance only for its intended purpose as described in this owner’s manual.
This absorpt ion refrigerat or must be properly installed in accordance w ith t he insta llation
instruc tions before it is used .
Never unplug you absorption refrigerator by pulling on the power cord. Always grasp the plug
firm ly and pull straight out from the wall outle t.
1) Repair or replace immediat ely, all electric service cords that have become frayed or otherwise
damaged. Do not use a cord that shows cracks or abrasion damage along its length, the plug or the
connector end .
2) Unplug your absorption refrigerator before cleaning or before making any repairs.
NOTE: If for any reason this product requires service, we strongly recommend that a certified
technician perfo rm th e service.
3) Do not operate your absorption refrigerator in the presence of explosive fumes.
4) The power supply must be properly grounded.
5) Do not use an adapter plug or extension co r d.
6) Do not use the unit in the immediate surroundings of a bath, shower or swimming pool.
7) Before discarding or storing, we recommend that you remove the door and leave the shelves in
place. This will reduce the possibility of danger to children.
8) Do not store food in absorption refrigerator as the interior temperature ma y not be coo l enough to
prevent spoilage.
UK
4
Page 5
INSTALLATION
It is advisable to clean the inside of the absorption refrigerator with lukewarm water using a
mild detergent, and then to dry it thoroughly prior to use.
The temperature in the appliance will depend on:
The temperature in the room
The frequency and duration of periods when the door is open.
How many items are in the fridge
It may therefore be necessar y to adjust the t hermostat from time to time.
The refrigeration system of the cabinet is designed to operate with the cabinet located on a
flat surface. Avoid tilting the cabinet side.
If the cab inet mu st be t ilted on an angle fo r handling or mo ving purpos es, a llow it to sit in an
upright position 20 to 30 minutes prior to plugging it in and starting the cooling of the storage
compartment.
Grounding plug and socket sho uld be provided in accordance with local regulat ions. The cable-size
should meet the refrigerator’s requirements. The unit must be connected to proper electrical
networ k, which is shown on the nam e plate, thr ough a n omnipop lar cir cuit-break er . To assure the
proper function of the refrigerator, please observe the following recommended.
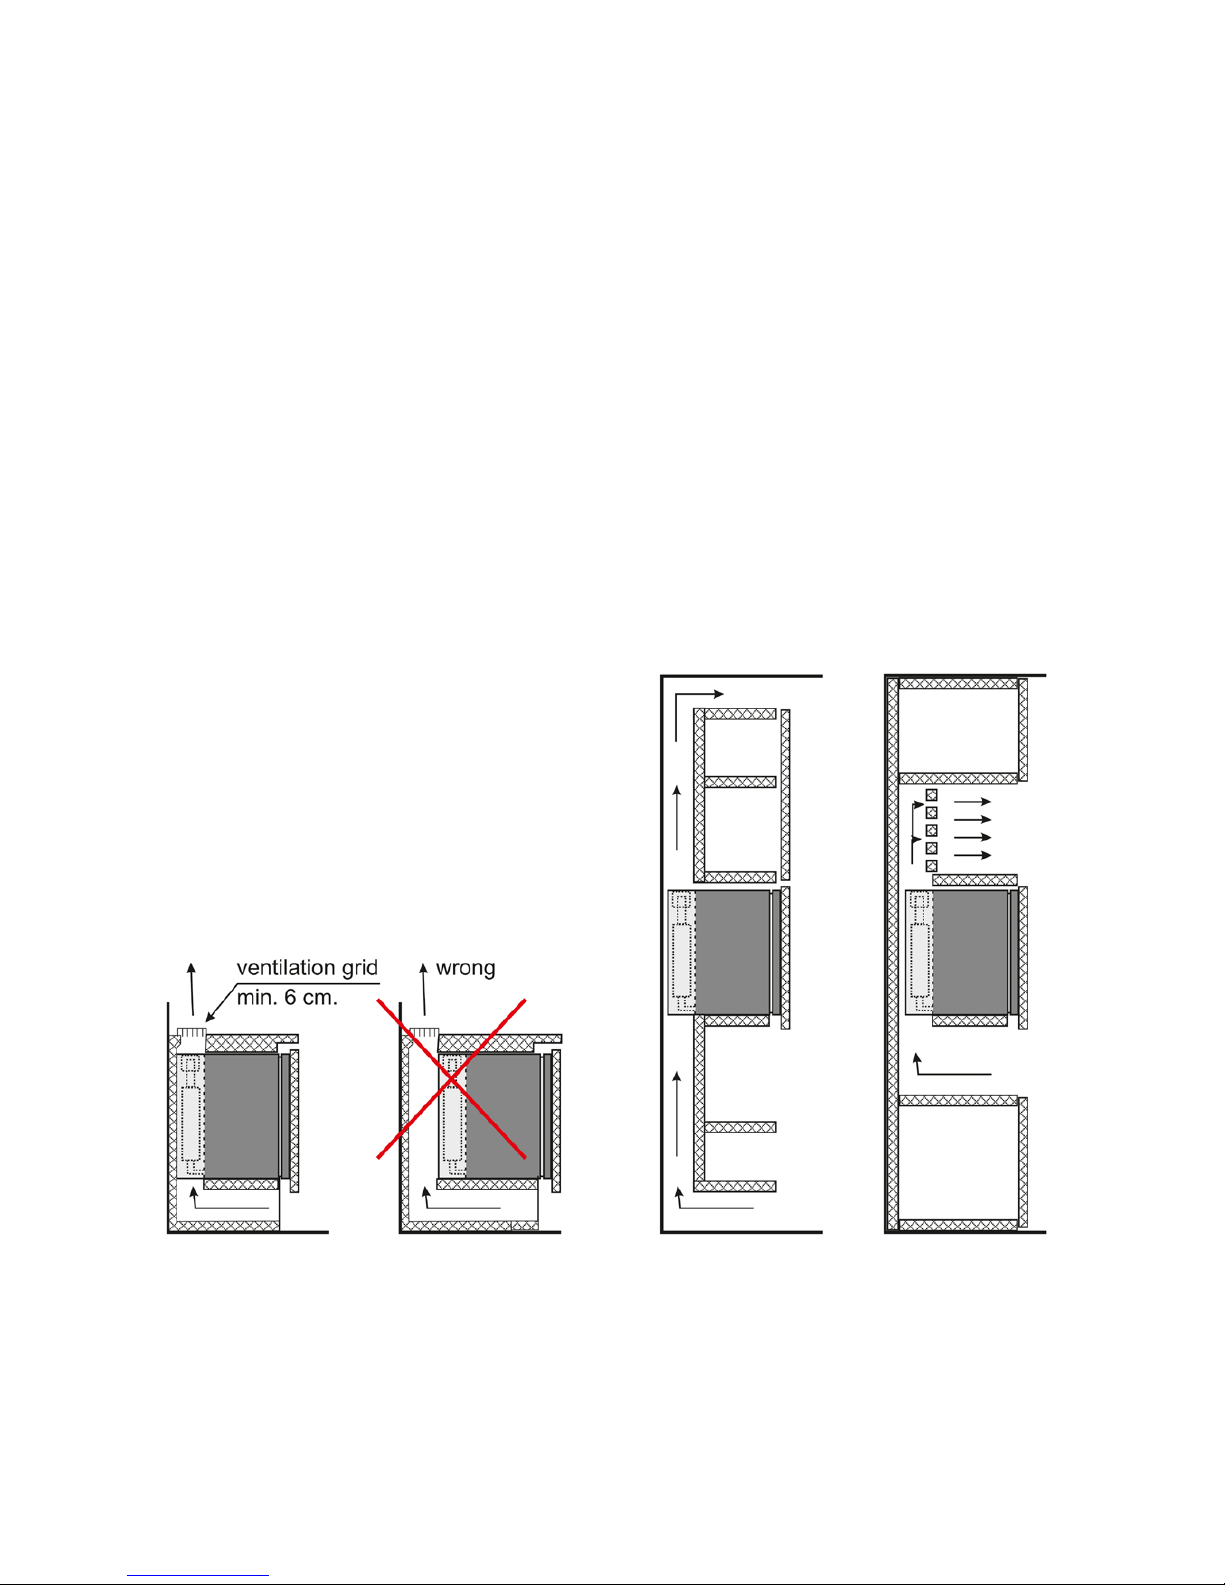
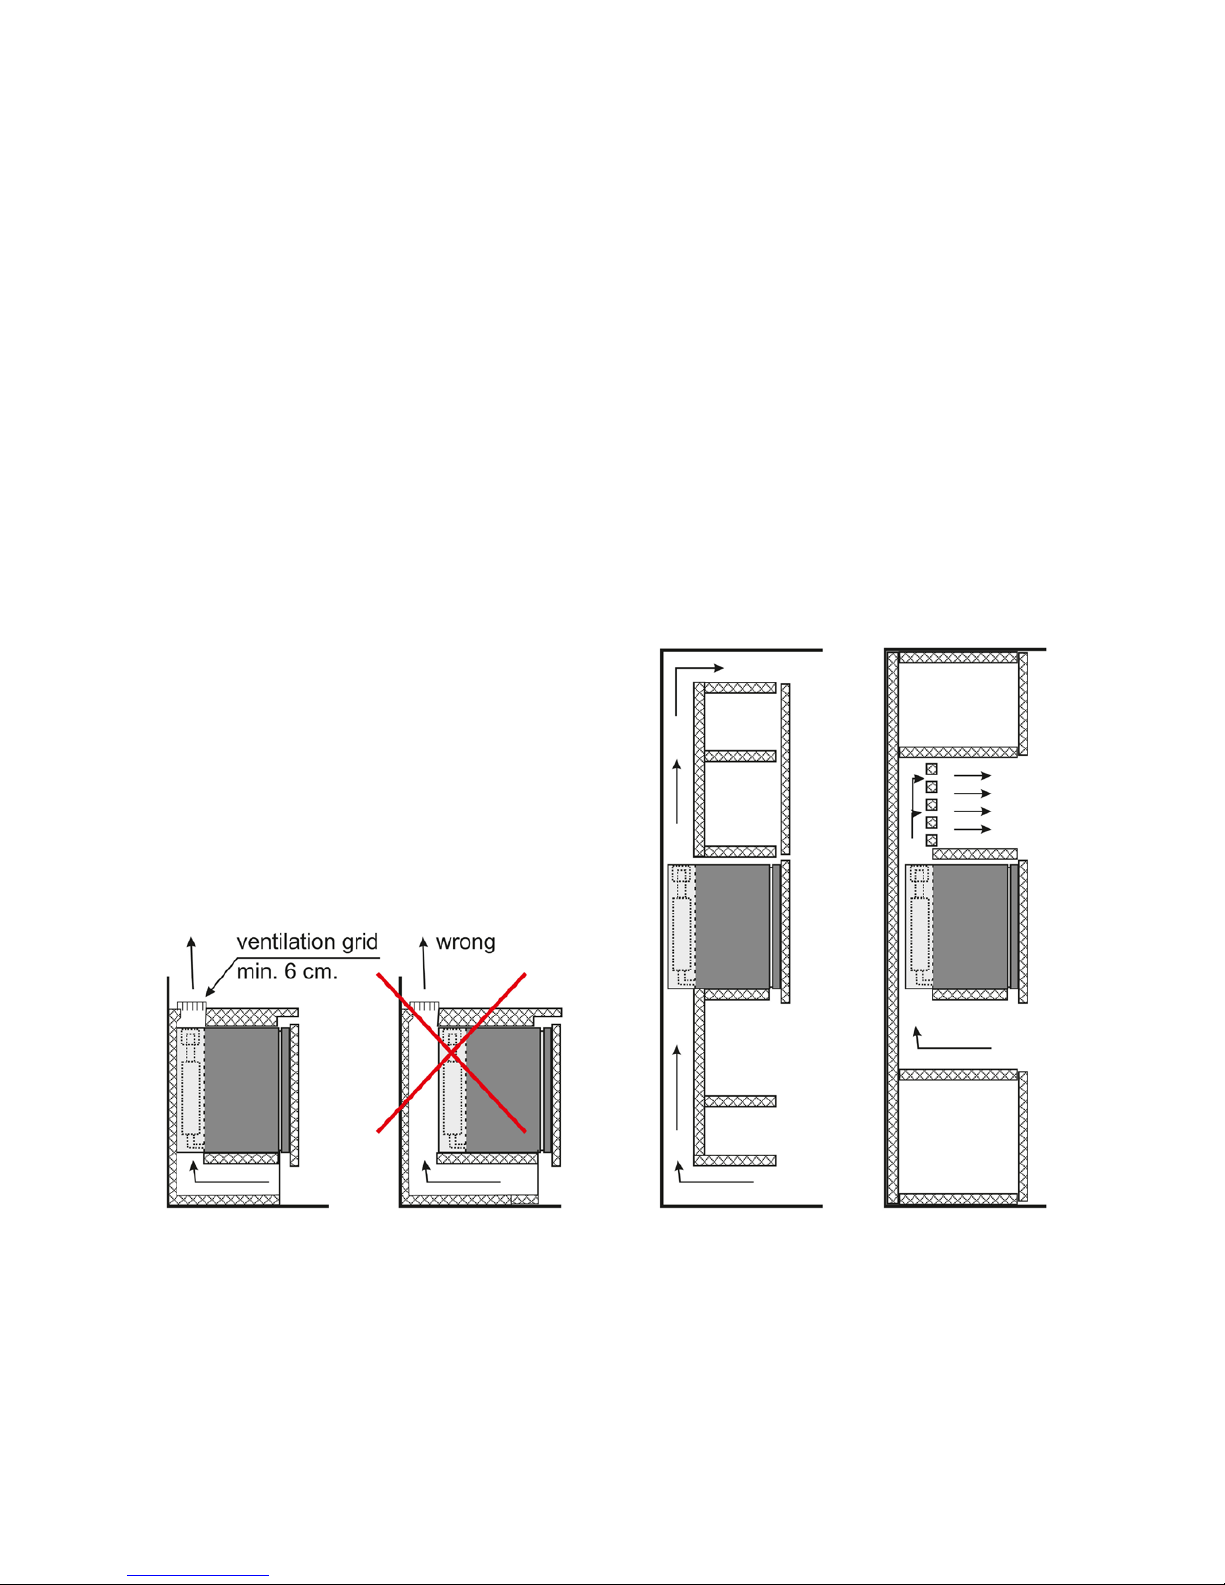
1. To ensure the circulation, the unit should be kept at 2 cm, away from the wall.
2. Locate the unit away from direct sunlight. This will enable you to obtain the best performance
and save energy.
3. Under no circumstances shou ld the to p grid be covered by any objest. It will preclude the warm
air fr om circ ulating.
Installa tio n Figure
5
Page 6
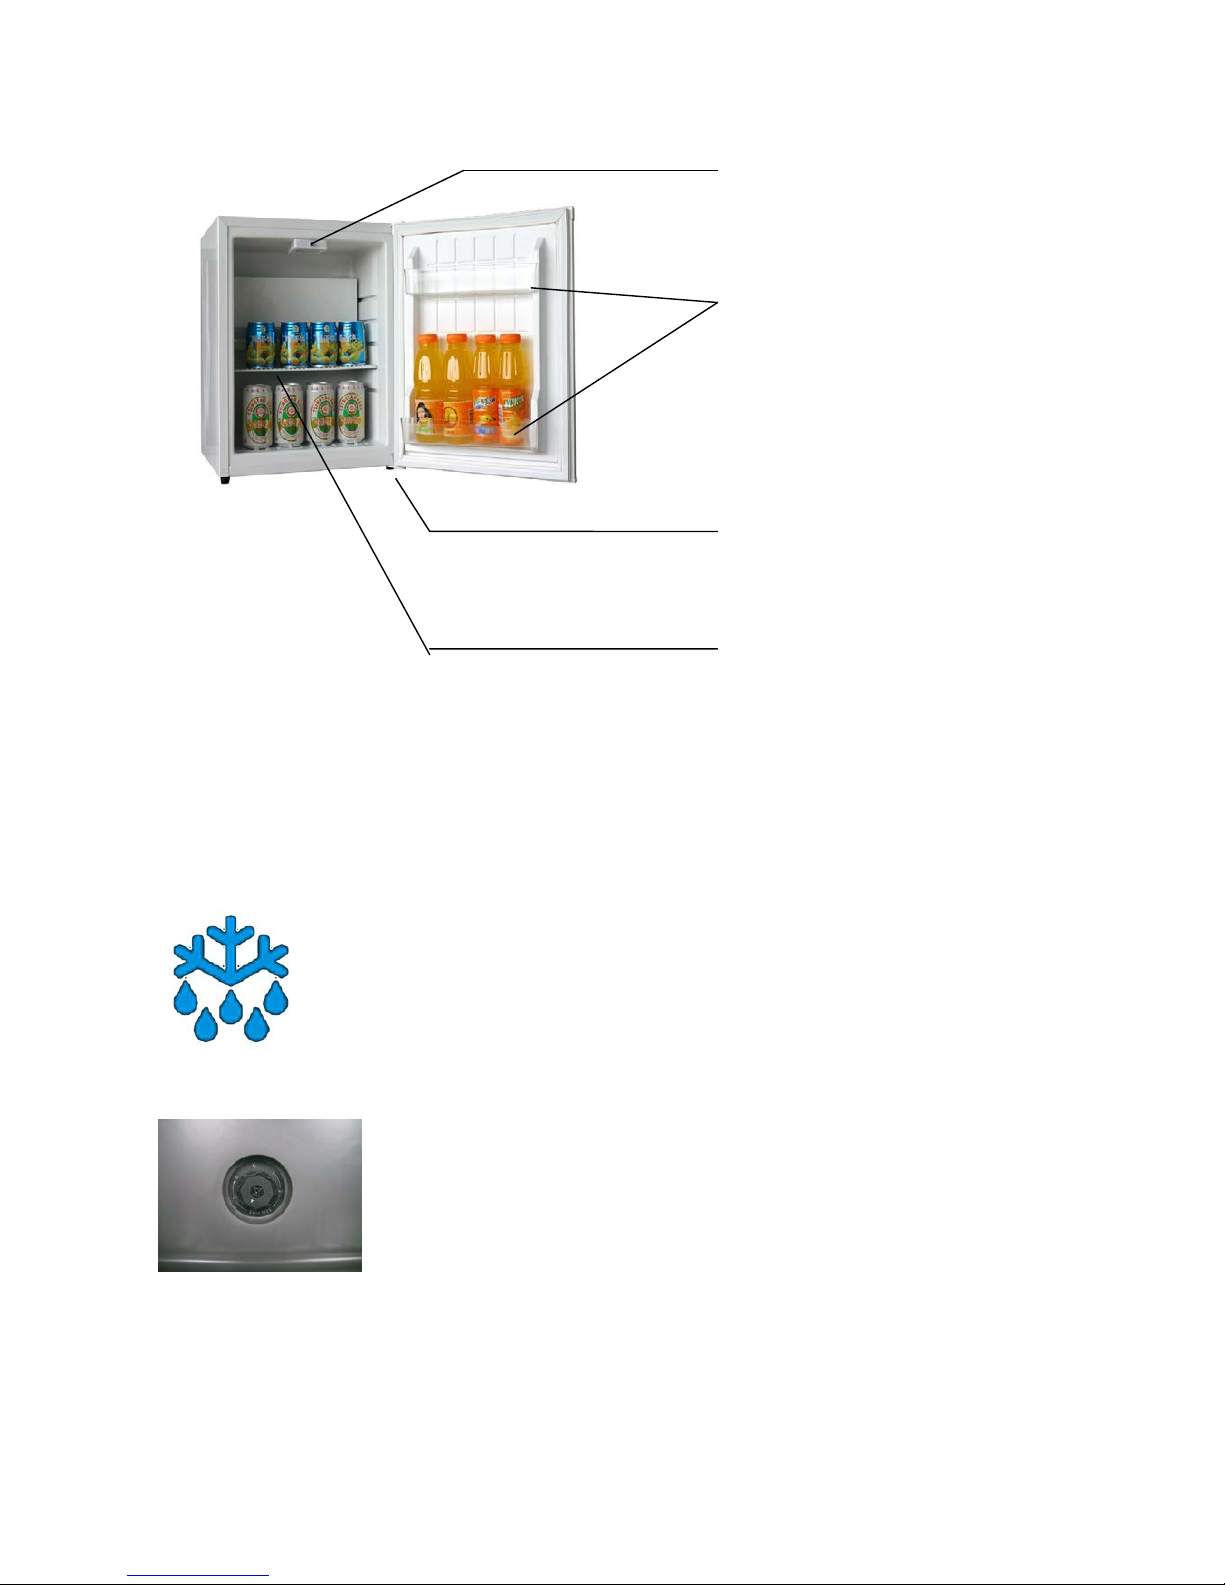
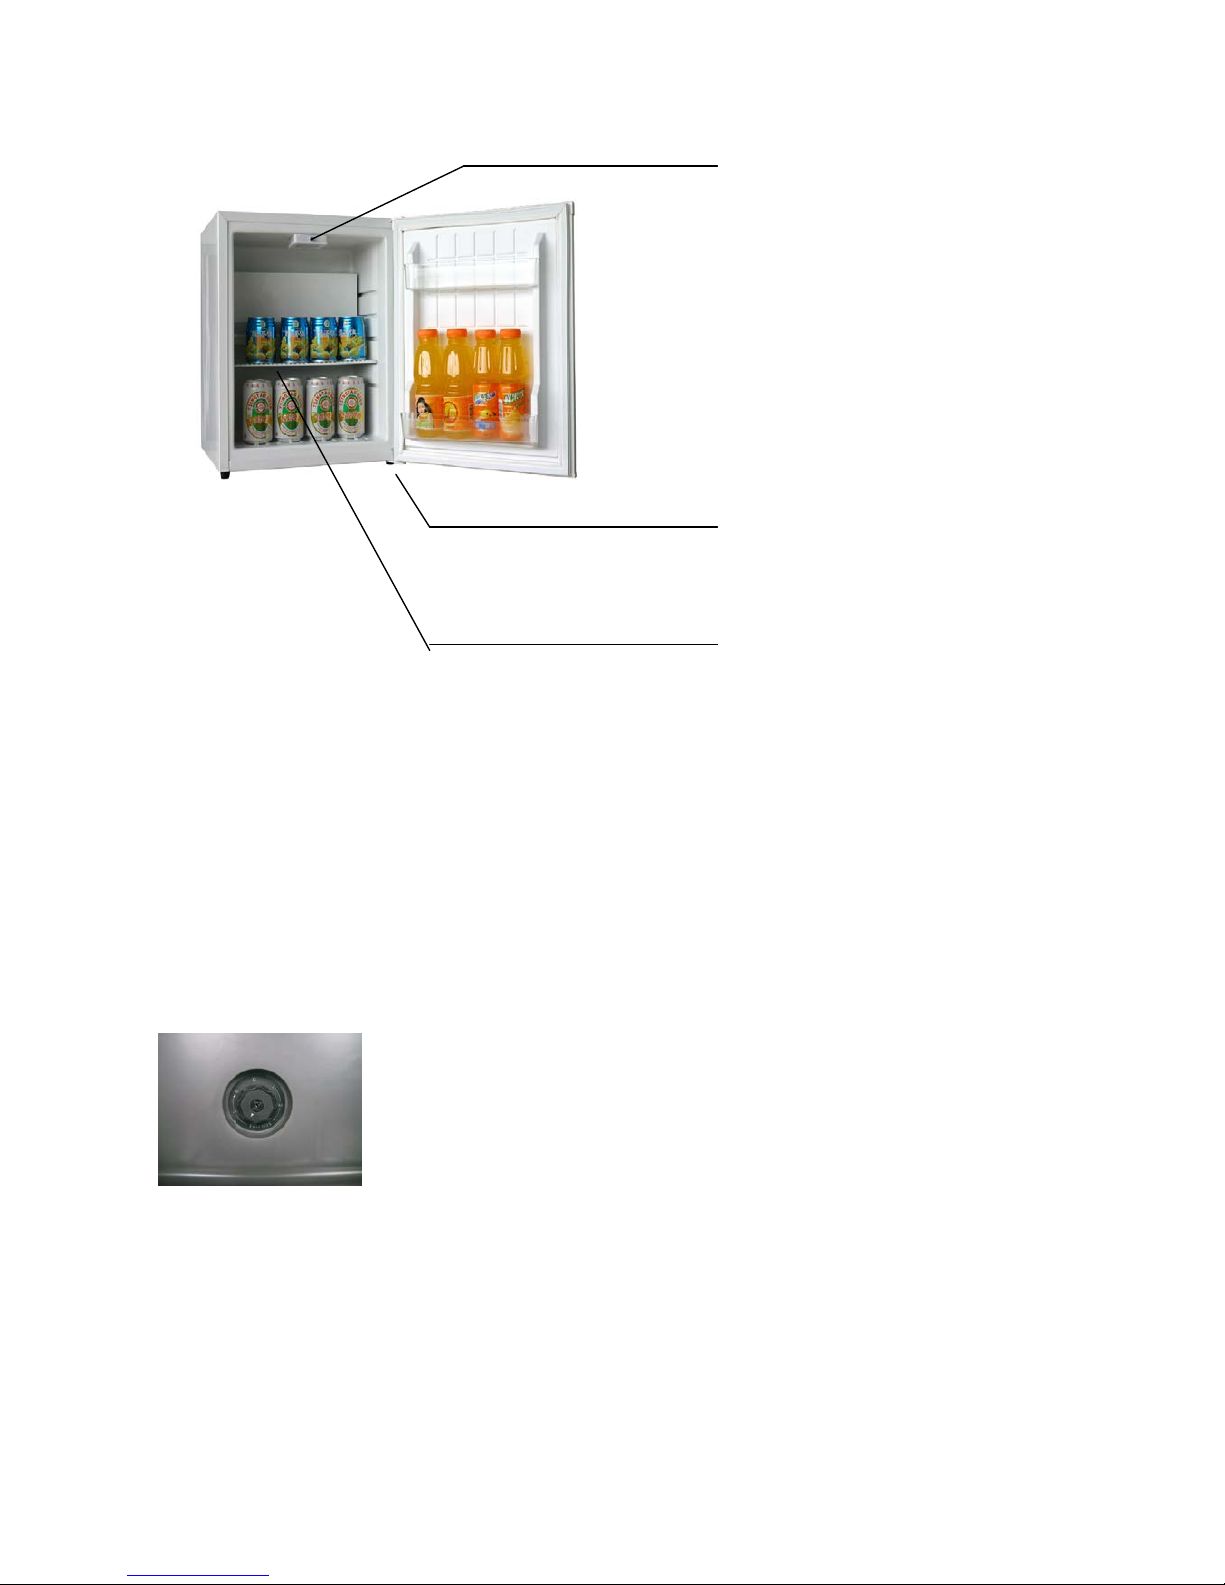
PRODUCT PARTS AND FEATURES
HOW TO OPERATE ABSORPTION MINIBAR
1. Insert the power plug into wall out let.
2. To adjust the temperatur e t urn thermost at kno b inside the cabinet.
Automatic Defrosting
These models are with auto mat ic defrosting system.
It defrosts automat ically every 24 hours.
Temperature Con trol
shelf
feet
Lamp
Balcony
The control ranges from 0 to 6. Turn t he thermostat knob till you
have the des ired temperature. Turn the knob clockw ise, from 1 to
6, and you can get a lower temperature.
6
Page 7

REVERSING THE DOOR
How to reverse the door
Remove t he lower h inge by loose ning and re movin g t he screws w ith scredriver.
Carefully lower the door and re move it.
Remove t he t wo screws fro m the left to p hinge po sition, take the metal part off the hinge
position.
Remove t he t wo screws fro m the right top hinge and take off the hinge, insert the metal part,
rivet the two screws thereafter .
Take off the lower hinge and fix it to the op posite s ide.
Take the doo r. Insert t he lower hinge axle into t he r ight bottom hole of the door.
Fix the spare hinge to t he left top po sit ion of the cabinet. Ad just t he door, make it st r aight and
in alignment wit h the cabinet.
Note: As the door gasket g ets pressed-in during shipment, after reversing the door the gasket might
have to be reset. This will be goo d for seal to avo id any air escaping. If there is a gap between the
cabinet and the door gasket, set t he gasket by gently pulling it o ut to seal the gap. I f necessar y, you
are recommended also to use t he hair drier to warm the gasket to get rid of the gap.
PROPER ABSORPTION MINIBAR CARE AND CLEANING
Warning:To avoid electric shock always unplug you absorption refrigerator before cleaning.
Ignoring this warning may result in injury.
General:Do not use harsh chemicals, abrasives, ammonia, chlor ine bleach,
concentrated detergents, solvents or metal scouring pads. SOME of
thes e c hemic als ma y dissolve, damage a nd/or discolor your absorption refrigerator.
1) Remove the content s of the appliance
2) Wipe the inside and outside surfaces with a damp cloth. The addition of vinegar to the
water is good for the prevention of mold and fungus.
3) Wipe all parts thoroughly after the cleaning.
IMPORTANT:
When the absorpt ion refrigerat or is not in use it must be co mpletely dry inside to avo id mold
growth (if possible have the door open).
7
Page 8
LIMITED WARRANTY
As a condition to any warrant y service o bligation, the consumer must present this Warranty
Certificate a long with a copy of the or iginal purch ase invoice.
THIS WARRANTY DOES NOT COVER:
1) Damage, accidenta l or ot herw ise, to t he absorptio n refrigerat or while in the possession of a
consumer not caused by a defect in material or workmanship.
2) Damage caused by consumer misuse, tampering, or failure to follow the care and special
handling provisions in the instructions.
3) Damage to the finish of the case, or other appear ance parts caused by wear
4) Damage caused by repairs or alterations of the absorption refrigerator by anyone other than those
authorized by the manufact u r er..
5) Freight and Insurance cost for the warranty service
ALL WARRANTIES, INCLUDING ANY IMPLIED WARRANTY OF MERCHANT ABILITY
ARE LIMITED TO CLAIMED DURATION. THE MANUFACTURER DISCLAIMS ANY
LIABILITY FOR CONSEQUENTIAL OR INCIDENTAL DAMAGES.
Disposal
Disposal of the cabinet must take place in an environmentally corr ect way. P lease not e exist ing
regulation on disposal. There may be special requirements and conditions whi ch must be obser ve d.
8
Page 9
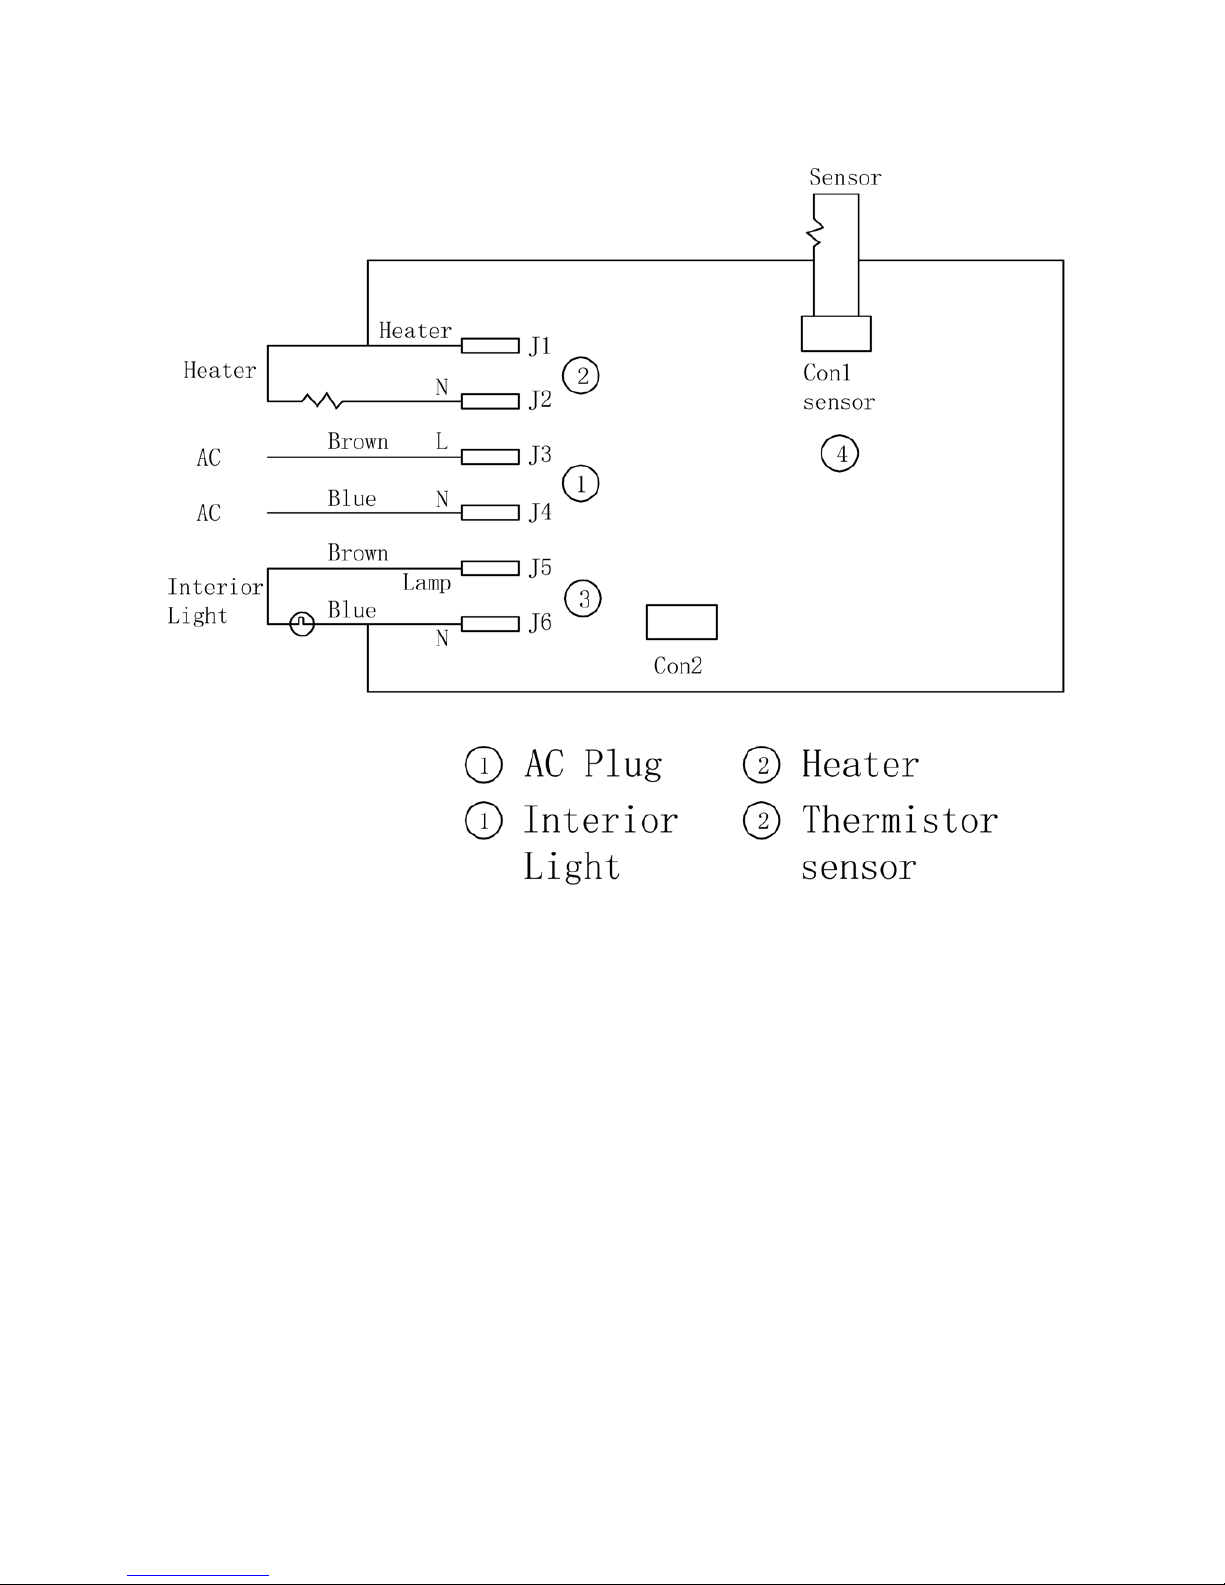
CIRCUIT DIAGRAM
9
Page 10

INTRODUKTION
Vielen Dank, dass Sie unseren Absorptions-Minibar gekauft haben. Dieses Produkt wurde zu Ihrem
Vergnügen und Komf ort geschaf fen.
Die Absorptions-System-Minibar ist ein kompakter, völlig lautloser Kühl schrank ohne K ompressor oder
Ventilator . Sie wurde ursprüngl ich für Hotelzimmer entwickelt, kann aber auch an vielen anderen Stell en
verwendet werden, z.B. Cruise Lines, Camping, Büros usw. Mit dem lautlosen Betr ieb und attraktivem
Design werden Sie di e Bequemlichkeit und Komfort für viele Jahre genießen können.
Lesen Sie bitte di ese Anleitungen vor Inbetriebhanme gründlich durch. Achten Sie beim Gebrauch des
Apparates immer auf grundlegende Sicherheitsmaßnahmen.
Mit dieser leic ht ver wendbaren Anleitung werden Sie Ihre Absorpti ons-Mi nibar am besten nutzen können.
WICHTIGE SICHERHEITSMAßNAHMEN
Lesen Sie vor Inbetri ebnahme des Produktes bitte diese Anweisungen gründlich durch.
Verwenden Sie di eses Gerät nur zum vorgesehenen Zweck, wie in dieser Anleitung beschrieben. Dieser
Absorptions-Kühlschrank muss vor Gebrauch gemäß den Install ations-Anleitungen korrekt installiert werden.
Ziehen Sie den Stecker beim Auslauf nie her aus.
1) Reparieren oder austausc hen S ie gleic h alle elek trischen Kabel, die FLOSSET oder beschädigt sind.
Verwenden Sie keinen Kabel, der Risse oder andere Schaden an der Länge, dem Stec k oder dem
Verbindungsende aufweist.
2) Schalten Sie vor Reinigung oder Repar atur immer das Gerät aus.
NOTIZ: Wenn dieses Produkt Reparatur benötigt, empfehlen wir deutlich, einen zertifizierten Technik er zu
verwenden.
3) Verwenden Sie das Gerät nicht bei der Anwesenheit von explosiven Dampf en.
4) Die Stromversorgung muss gründlich geerdet sein.
5) Verwenden Sie keinen A dapterstecker oder Verlängerungskabel.
6) Verwenden Sie das Gerät nicht in der direkten Umgebung von Bad, Dusche oder Pool.
7) Vor dem Verwerfen oder Aufbewahrung empfehlen wir, die Tür zu entfernen und die Rosten auf ihrer
Stelle zu lassen, um di e Gef ahr für Ki nder z u reduzieren.
8) Bewahren Sie keine Lebensmittel im Kühlschrank, weil der innere Temperatur nicht ausreichend kühl sein
könnte, um Verderbung zu vermeiden.
DE
10
Page 11
INSTALLATION
Reinigen Sie die I nnensei te des Kühlschrankes mit lauwarmem Wasser und einem milden Reinigungsmittel
und trocknen Sie vor Betr eib gründlich ab.
Die Temperatur im Gerät ist abhängig von:
− Raumtemperatur
− Wie oft und wie lange die Tür offen steht
− Wieviele Sachen im Kühlschrank aufbewahrt werden
Eine laufende Justierung des Thermostates könnte deshalb notwendi g sei n.
Das Kühlsystem des Ger ätes ist für Betrieb auf einer waagerechten Fläc he gem ac ht. V ermeiden Sie das
Kippen des Gerätes.
Falls das Gerät wegen Umzug oder Reinigung gekippt werden muss, sind vor der erneuten Einschaltung
und Kühlung 20-30 Minuten in aufrechter Position notwendig.
Erdungsstecker und St ec k dose müssen den lokalen Regeln entsprechen. Die Kabelgröße muss mit den
Anforderungen des Kühlschrankes übereinstimmen. Das Gerät muss mit einem ri c htigen Netzwerk, wie auf
dem Namenschild gezeigt, durch einen allpoligen Leistungsschalt er . Um den richtig Betreib des Gerätes
sicherzustellen, achten Sie bitte auf die folgenden Empf ehlungen:
1. Zwischen Gerät und Wand minium 2 cm, um die Zirkulation zu ermöglichen.
2. Das Gerät nicht in direk tem Sonnenlicht anbringen, dadurch wird di e Leistung besser und der
Energiev erbrauch ger inger.
3. Das Topgitter darf unter keinen Umständen zugedeckt werden, da di e warme Luft dabei nicht zirkulieren
kann.
Installationsfigur
11
Page 12
PRODUKTTEILE UND FUNKTIONEN
BETRIEB
1. Stecken Sie den Stecker in die Wandsteckdose.
2. Drehen Sie den Thermostatknopf im Kabinet, um die Temperatur zu regulieren.
Automatische Abtauung
Alle Modell e sind mit automatischer Abtauung.
Temperaturkontrolle
Die Kontrolle kann v on 0 bis 6 eingestel lt warden. Drehen Sie den Thermostatknopf, bis sie die erwünschte
Temperatur err eic hen. 1 ist die höchste Temperatur, und 6 ist die niedrigste.
Roste
Füße
Lampe
12
Page 13

TÜRANSCHLAG WECHSELN (OPTION)
Wie man den Türanschlag wechselt
Das untere Scharnier mit einem Schraubenzieher entfernen.
Die Tür vorsichtig senken und entfernen.
Die zwei Schrauben und das Metall-Teil v om oberen Scharnier links entfernen.
Die zwei Schrauben vom oberen Scharnier recht s entfernen, das Scharnier entfernen, das Metallteil
einsetzen und die zwei S c hr auben einschrauben.
Das untere Scharnier entfernen und auf die gegenüberliegende Seite montier en.
Die Tür nehmen und die untere Scharnierachse in das untere Loc h r ec hts auf der Tür einsetzen.
Das übrige Scharnier oben links monti er en. Die Tür gerade und in Angleichung mit dem Kabinett
montieren.
Notiz: Weil die Türdichtung im Transport eingedruckt wird, kann nac h dem Wechsel des Türanschlags eine
neue Montierung der Dic htung notwendig sein. Wenn es eine Öffnung zwischen dem K abinett und der
Dicthung gibt, kann diese durch das leichte Ausdehnen der Dic htung geschl os sen warden. Wenn notwendig
kann auch ein Haartr oc k ner verwendet warden, um die Dichtung zu erweiteren, dami t die Öffnung
geschlossen wird.
PFLEGE UND REINIGUNG
Achtung: Um elektrischen Stoß zu vermeiden das Gerät vor Reinigung immer ausschalten.
Generell: Verwenden Sie k eine starken Chemikalien, Schleifmi tt el, Ammoniak, Chlor-Bleichmittel,
konzentrier te Waschmittel, Lösungsmittel oder Sc heuerschwämme. Diese können das Gerät auflösen,
beschädigen oder verfärben.
1) Entfernen Sie die Inhalte aus dem Schrank.
2) Wischen Sie die inneren und auß er en Oberflächen mit einem feuchten Tuch ab. Der Zusatz von Essig
zum Wasser kann zur Vorbeugung von Schimmel und Fungus beitragen.
3) Trocknen Sie alle T eile nac h der Reinigung gründlich ab.
WICHTIG:
Wenn das Gerät außer Gebrauc h ist, muss die Innenseite völlig trocken sein, um Schimmelbildung zu
vermeiden. Wenn m öglic h die Tür offen halten.
13
Page 14

GARANTIE
Dieses Warranty Certificate und die originale Rechnung i st eine B edingung dafür, dass unter Garantie
Wartung geleistet werden kann.
DIESE GARANTIE UMFASST NICHT:
1) Schäden, die dem Gerät im Besitz vom Verbraucher zugekommen sind, die nicht auf defekt es Mat erial
oder falsche Verarbeitung zurückzuführen sind.
2) Schäden, die durch f alschen G ebr auc h, Manipulation oder die fehlende Einhaltung der Pflege- und
Gebrauchsanweisungen entstanden sind.
3) Schäden auf der Oberfläc he oder ander en Teilen durch Verschleiß.
4) Schäden, die durch W artung oder Ä nder ungen des Ger ätes durch Personen, die nicht vom Produzent en
autorisiert sind.
5) Fracht und Versicher ungskosten für die Garantie-Wartung.
DER PRODUZENT HAFTET NICHT FÜR FOLGESCHÄDEN UND ZUFÄLLIGE SCHÄDEN.
Beseitigung
Das Gerät muss umweltfr eundlich beseitigt werden. Bitte achten Sie auf die gegebenen Regelungen von
Beseitigung, da es besondere Anforderungen und Konditionen geben könnt e.
14
Page 15

SCHALTKREISDIAGRAMM
15
Page 16

DESCRIPTION
Le Minibar est une petite armoire d’absorption pour hôt e ls, collectivités, bateaux et camping.
Le Minibar est pour 220-240V/50Hz.
Le Minibar consiste des piéces détachés suivant e s:
1. Exterieur 6. Charnière inferieur
2. Absorption, Aggregat 7. Char nière superieur
3. Bac d'évaporateur 8. Serrure
4. Clayette, réglable 9. Porte
5. Thermostat 10. Joint
clayette
pieds
F
Lampe
Balcon
16
Page 17

DÉBALLAGE
Contrôler lors du déballage du minibar q ue rien ne manque et que tout est en bon état. En cas de
dommages c onsta tés, en avertir immédiatement le tr anspo rt eu r.
INSTALLATION
Po ur obt e nir un maxium d e réfr i gération moyen nant u n minimum de co nsommation, il convient
d'éviter de placer le minibar à proximité d'une source de chaleur ou de l'exposer directement au
soleil. Il doit être parfaitement de niveau pour garantir de bon fonctionnement du groupe
frigorifique. La gr ille de vent ilation arrière ne doit pas être recouverte et l’arrière d u miniba r doit
être distante d'au moins 2 cm d'un mur éventu el.
Attention: Si le minib ar ne fait pas l'objet d'u ne in st a lla tion indépendante, mais et encastré
dans un quelconque élément d'aménagement, il faut prévoir une ventilation
suffisante du gr oup frigorifique, par l' inter médiaire d'orific es d'admission et
d'evacuation d'air d'une surface d'au moins 200 cm2.
NETTOYAGE
Il est recommandé de nettoyer le minibar intérieurement et extér ieureme nt avec de l'eau tiède
(additionnée d'un déter gent doux et no n abrasif) avant d e le mettr e en service. Le rincer ensuite à
l'eau et le sécher. Le joint en PVC de la porte ne do it pas êtr e en co nt act avec l'huile ou la graisse.
Pour lui conserver sa souplesse et en prolonger la durée, le frotter de temps à autre avec du talc, en
particulier du côté des charnières.
Un fois par an nettoyer le groupe frigorifique, au dos de l'appareil avec une brosse ou un chiffon
souple. Ne pas utiliser de lubrifiants conventionnels pour les barillets de serrures, car cela po urrait
nuire à leur bon fonctionnement. S'il est absolument nécessaire de les huile r, recourir à un lubri fi ant
spécial pour serrur es à bar illet.
EQUIPEMENT ÉLECTRIQUE
Le Minibar est pour 230V AC/50Hz. Avant de mettre le minibar en service, co nt rôler que la tension
indiquée sur la plaque signalétique cor r espond à celle du secteur, puis brancher le cable
d'alimentat ion sur une prise reliée à la terre.
Cet appareil est équ ipé d'une contr ôle de temperature. Le thermostat est à régler sur une position
moyenne. Pour abaisser la température dans le compart iment r éfrigérateur, tourner le bouton du
thermostat vers la droite.
Il dure environ 4 heures pour obtenir la température.
17
Page 18

DÉGIVRAGE - automatique
CHANGEMENT DES CHARNIERES
La porte peut être montée avec ou verture aussi bien à droite qu'à gauche. Pour cela il faut dév isser
les trourillons de charn ières et les reviser du côte opposé.
EN CAS DE PANNE
1.Contrôler que le minibar est parfaitement de niveau.
2.Contrôler que l'air circule co mme il faut autour du groupe frigorifique.
3.Si le minibar ne fonct ionne pas, contrôler le branchement et le fusible.
Attention: Ne pas stocker de produits explosifs (gaz p our briquets, essence, éther et c) dans le
minibar. Le groupe frigorifique au dos de l'appareil dégage de la chaleur lorsqu'il
fonctionne, aussi convient-il de placer le minibar de telle sorte q ue l'on ne puisse
pas toucher ce gro upe, par accident.
Élimination
Quand l’armoire usée doit être éliminée, il doit se passer d’une manière que ne co mpromet pas
l’environnement. Veuillez prendre note des règles d’éliminat ion et exa miner s’ i l existe des
demandes et conditions spécifiques qu’il faut respecter.
18
Page 19

CIRCUIT DIAGRAM - DIAGRAMME ÉLECTRIQUE
19
Page 20

INTRODUCCIÓN
Gracias por adquirir nuest ro minibar de absorción. Esta unidad está diseñada para p r oporcionarle un
mayor confort en sus momentos de ocio. El minibar con sistema de absorción es un refrigerador
compacto y totalmente silencioso qu e no usa co mpresores ni ventiladores. Desarro llado
inicialmente para su u so en habitacio nes de ho teles, este pequeño refrigerador est á disponib le para
su uso en muchos otros lugares, como por ejemplo cruceros, caravanas, dormitorios de
departamento s, oficinas, etc. Su funcionamiento silencioso y su atractivo diseño le permitirán
disfrutarlo durant e muchos años.
Lea detenidamente estas instrucciones antes de poner en funcionamie nt o el aparat o. Tome siempre
las precauciones básicas de seguridad siempre que use el aparato.
Este manual de fácil uso le ayudará a sacar el máxi mo partido de su minibar de absorción.
PRECAUCIONES DE SEGURIDAD IMPORTANTES
Antes de utilizar su refrigerador de absorción, lea detenidamente este manual de
instrucciones.
Utilice este disposit ivo única me nt e par a su uso p r evisto segú n lo descrito en este manual del
propietario.
Asegúrese de que el refrigerador de absorción esté correct amente inst alado de acuerdo con las
instrucciones de instalación antes de utilizarlo.
Nunca desenchufe su re frigerado r de abso r ción tirando del cable de alimentación eléctr ica. Agarr e
firmemente el enchufe y tire de él para ext r aer lo de la to ma de pared.
1) Repare o sustituya inmediat amente todos los cables eléctricos que se hayan deshilachado o
presenten otro s daño s. No ut ilice un cable que pres ent e grietas o daños por abrasión en algún punto
de su longitud, en el enchufe o en el extre mo del conector.
2) Desenchufe el refrigerado r d e absor ción antes de limpiarlo o realizar cualquier repar ación.
NOTA: Si por algún motivo este producto debiera repararse, le recomendamos encarecidamente
que confíe la tarea a un técnico certificado.
3) No utilice su refrigerador de absor ción en prese nc ia de humos exp lo s ivos.
4) La alimentación eléct r ica debe estar co r r ect ament e p uesta a tierra.
5) No utilice un enchufe adaptador o un cable de prolongación.
6) No utilice la unidad cerca de un baño, d ucha o piscina.
7) Antes de desechar o almacenar la unidad, le recomendamos que retire la puert a y que deje las
bandejas en su sitio, con el fin de reducir la posibilidad de peligro para niños.
8) No deposite alimentos en el refrigerador d e absor ción, ya que es pos ible que la temperatura
interior no sea lo suficientemente baja como para impedir su deterioro.
ES
20
Page 21

INSTALACIÓN
Se recomienda limpiar el interior del refrigerador de absorción con agua tibia y detergente
suave y a continuación secarlo bien antes del uso.
La temperatura en el dispositivo dependerá de:
La temperatura ambiental
La frecuencia y la duración de los periodos en los que la puerta esté abierta
El número de artículos depositados en su interior
Por tanto, puede resultar necesar io a just ar ocasionalmente el termostato.
El sistema de refrigeración del armario está diseñado para funcionar con el armario colocado
sobre una superficie plana. Evi t e in clina r el lado del armario.
Si el armario debe inclinarse para su manipulación o traslado, deje que permanezca e n po s ición
vertical entre 20 y 30 minuto s antes de enchufarlo e iniciar la refrigeración del compartimento de
almacenamiento.
La toma de corriente y la toma de tierra deben ser co nfor mes a las normas locales. La longitud d el
cable debe satisfacer los requisitos de l refrigerad or. La unidad debe estar conectada a una red
eléctrica adecuada, la cual se indica en la placa identificadora, a través de un disyu nto r omnipo lar.
Para garantizar e l corr ecto funcionam ient o del refrigerador, observe las siguient es
recomendaciones.
4. Para garantizar la circulación, la unidad de be manteners e a una d ist ancia de 2 c m respect o a la
pared.
5. Coloque la unidad de forma que quede prot eg ida de la luz solar directa. Obt endrá así el mejor
rendimiento y ahorr ar á energía.
6. La rejilla superior no debe cubrirse bajo ningu na ci r cunst ancia con ningún objeto, ya que se
obstaculizaría la circulac ió n de l aire caliente.
Ilustración de inst alació n
21
Page 22

PARTES Y CARACTERÍSTICAS DEL PRODUCTO
USO DEL REFRIGERADOR DE ABSORCIÓN
1. Inserte el enchufe de alimentac ió n e léct r ica en la to ma de pared.
2. Para ajustar la temperatu r a, gire el mando del termostato situado en el interior del armario.
Descongelación manual
En los modelos que disponen de un sistema de descongelación manual, que son la mayoría, basta
con girar el mando del termost ato hasta la pos ición cer o y esperar a que la escarcha acumu lada se
fund a. A continuación, vuelva a poner el mando en s u pos ic ión normal.
Descongelación automática
Algunos modelos disponen de un sistema de descongelación
automática, cuyo t emporizador se encuentra en la parte posterior d e
la unidad. La descongelació n aut omática se lleva a cabo cada 24
horas.
Para ajustar el periodo de desconge lac ió n, gire el mando azul hacia
la derecha hasta que se o iga un clic. El ciclo de descongelación se
iniciará a continuación.
Contro l de te m peratura
g
a
Lámpara
Estantes
El control va de la posición 0 a la 6. Gir e e l ma n do del termostato
hasta alcanzar la temperat ura deseada. Cuanto más hacia la
derecha entre las pos iciones 1 a 6 gire el mando, más baja será la
temperatura que obtenga.
22
Page 23

Cambio del sentido de apertura de la puerta
Cómo cambiar el sentido de apert u r a de la puerta
Retire la bisagra inferior aflojando y retirando los tor nillos c on un de sto rnillad or.
Mueva hacia aba jo la puert a con cu idado y retírela.
Retire los dos to r nillos de la pos ición de la bisagra en la parte superior izquierda y retire la
pieza metálica de dicha po s ición.
Retire los dos to r nillos de la bisagra superior derecha y retire la bisagra; co loque la pieza
metálica y a continuación apr iet e firmement e los dos tornillos.
Retire la bisagra inferior y fíjela en el lado opuesto.
To me la puerta. Intro d uzca el eje de la bisagra inferior en el orificio inferior derecho de la
puerta.
Fije la bisagra libre en la po sición superior izquierda del armario. Ajuste la puerta de forma que
quede recta y alineada con el armario.
Nota: Dado que la junta de la puerta se comprime dur ant e el envío, es posible que deba reajustarla
después de cambiar el sentido de apert ur a de la puerta con el fin de que el sellado evite cualquier
escape de aire. Si existe un espacio de separación entre el armario y la junta de la puerta, a juste la
junta tirando ligera mente de ella hacia afuera para que selle el espacio de separación. En caso
necesario también se puede emp lear un secador de pelo para calentar la junta y eliminar el espac io
de separación.
LIMPIEZA Y CUIDADOS DEL MINIBAR DE ABSORCIÓN
Advertencia: desenc hu fe s iempre su re friger ador de absorción antes de limpiarlo para evitar
descargar eléctr icas. I gno r ar est a ad vertencia puede tener como consecuencia lesione s.
Generalidades: no utilice sustancias químicas fuertes, abras ivos, amoniaco, blanqueador clorado,
detergentes conce ntrados, disolventes o estropajos metálicos. ALGUNAS de
estas sustancias quím icas puede n d isolver, dañar y/o decolorar su refrigerado r .
1) Extraiga los contenidos del aparato
2) Pase un paño húmedo por las superficies interiores. Es bueno echar un poco de vinagre al agua
para evitar la aparición de moho y hongos.
3) Seque bien todas las partes después de la limpieza.
23
Page 24

IMPORTANTE:
Cuando el refrigerado r no se utilice, asegúres e d e que su interior esté completamente seco par a
evitar la proliferación de moho ( a ser po sible, de je la puerta abierta).
GARANTÍA LIMITADA
Como condición para cua lquier o b ligación de rep aración en garantía, el consumidor debe presentar
este certificado de gar ant ía junto co n una copia de la fact ura de compra original.
ESTA GARANTÍA NO CUBRE:
1) D años al refrigerado r d e absor ción, acc ide nt ales o de cualquier otro tipo mientras éste se
encuentre en posesión de un co nsum ido r y que no hayan sido causado s por u n defecto de material o
mano de obra.
2) Daños causados por uso incorr ecto, manipulación o no observancia de las disposiciones de
manejo especiales ind icada s en las inst r ucciones por parte el consumidor.
3) Daños al acabado del bastidor u otros eleme nt os ornamentales causados por desgaste.
4) Daños causados por repar aciones o alteraciones del refrigerador rea lizadas por personas distintas
a las autorizadas por el fabricante.
5) Costes del transport e y seguro para el servicio de garantía.
TODAS LAS GARANTÍAS, INCLUIDA CUALQUIER GARANTÍA IMPLÍCITA DE
COMERCIABILIDAD, ESTÁN LIMITADAS A LA DURACIÓN INDICADA. EL
FABRICANTE DECLINA TODA RESPONSABILIDAD POR DAÑOS INDIRECTOS O
INCIDENTALES.
Eliminación
El armario se debe eliminar de for ma respet uosa con el medio ambiente. T enga en cuent a la
normativa existent e en cuanto a residuos. Es posible que haya requisitos y condiciones especiales
que deban cumplirse.
24
Page 25

CIRCUIT DIAGRAM
25
Page 26

INTRODUÇÃO
Obrigado por adqu irir o no sso minibar de absor ção. Esta unidade foi concebida com o intuíto de
melhorar o seu conforto. O minibar com sistema de absorção é um frigorífico compacto totalmente
silencioso que não recor r e a compressor es ou ventoinhas. Originalmente dese n vo lvido par a
utilização em quarto s de hotel, este tipo de pequeno frigorífico está disponível para utilização em
muitos outros locais, tais como lihas de cruzeiros, caravanas, do r mitór ios, escritórios, etc. Graças ao
funcionamento s ilencioso e ao d es ign atr act ivo, defrutará d a comodidade e do conforto durante
muitos anos.
Por favor leia atenta mente est e manual de instruçõ es antes de colocar este aparelho em operação.
Na utilização de este dispos it ivo obser ve sempre as pr ecau ções de segurança elementares
Este manual, de fácil consulta, permitir-lhe-á t irar par tido de todas as vantagens que o seu minibar
de absorção proporciona.
PRECAUÇÕES DE SEGURANÇA IMPORTANTES
Leia atentamente este manual antes de proceder à operação do minibar de absorção.
Utilize este apare lho apenas para o fim a que se destina, tal co mo descrito neste manual.
Antes de ser colocado em funcioname nt o, este frigorífico de absorção deverá ser devidament e
instalado de acor do com as instruções de instalação.
Nunca desligue o seu frigorífico d e absor ção d a aliment ação puxando o cabo de alimentação.
Agarre com firmeza a ficha eléct r ica, puxa ndo-a da tomada de alimentação.
1) Repare ou substitua qua lquer ca bo eléctrico que apresente estrias ou outro s sinais de danos. Não
utilize cabos que apresentem fissuras ou sinais de abrasão em toda a sua extensão, na ficha o u nos
conectores.
2) Desligue o frigo rífico d e absor ção da alimentação antes de proceder a trabalhos de limpeza o u
reparação.
NOTA: No caso de, por um qualquer motivo, este produto necessitar de uma intervenção de
manutenção, recomenda-se que tal seja realizado por um técnico qualificado.
3) Não utilize o frigorífico de absorção na presença de gases explosivos.
4) A alimentação eléctrica deverá incluir uma ligação de terra adequada.
5) Não utilize um adaptado r de ficha eléctrica ou cabo de extensão eléctrica.
6) Não utilize a unidade nas imediações de uma casa de banho, chuveiro ou piscina.
7) Antes de proceder à eliminação ou armazenamento do aparelho, r ecomenda-se a r emoção da
porta e a manutenção das prateleiras nas suas posições. Tal reduzirá o risco d e lesão em cria nças.
8) Não guarde alimentos no frigorífico de absorção, uma vez que a sua temperatura interior poderá
ser insuficiente par a a conservação da mesma.
PT
26
Page 27

INSTALAÇÃO
Na limpeza do interior do frigorífico de absorção, recomenda-se a utilização de água morna
com um detergente suave e uma secagem cuidadosa antes da colocação em utilização.
A temperatura no interior do dispositivo dependerá de:
A temperatura no local de operação
A frequência e duração dos períodos em que a porta se encontra aberta
A quantidade de artigos inseridos no frigorífico
Poderá ser necessário pro ced er à regulação esporádica do termóstato.
O sistema de refrigeração do compartimento foi concebido para operação em superfície
plana. Evite inclinar o lado do compartimento.
No caso de ser necessário inclinar o compartimento para a sua movimentação, agu ar de cer ca e 20 a
30 minutos com este na sua posição vertical antes de proceder à sua reconexão à alimentação
eléctrica e reinício de oper ação de r efr igeração.
No local de instalação deverá existir uma tomada eléctrica com ligação de terra que esteja conforme
com os regulamentos locais. O comprimento do cabo deverá ser adequado às necessidades de
instalação do frigorífico. A unidade deverá estar ligada a uma rede eléctrica com características
adequadas, a quais se encontram descritas na placa de identificação, e p rotegida por um disjuntor
omnipolar. Para g ar ant ir o corr ecto funcionament o do frigorífico, por favor observe as seguintes
recomendações.
7. Para assegurar uma circulação d e ar adequad a, mantenha a unidad e a uma distância de 2 cm da
parede.
8. Coloque a unidade em local isento de expos ição solar d irect a. T al permitirá a obtenção de uma
economia de energia e desempe nho máximos.
9. Em circunstância alguma se deverá tapar a grade sup erior com um qualquer objecto. Tal
impedirá a circulação de ar .
Figura Instalação
27
Page 28

PEÇAS DO PRODUTO E FUNCIONALIDADES
COMO UTILIZAR O MINIBAR DE ABSORÇÃO
1. Insira a ficha na tomada eléctrica da parede.
2. Para proceder à regulação da t emperatu r a, rode o manípulo do ter móst ato sito no interior do
compartimento.
Descongelação manual
Na maioria dos modelos que integram o sistema de descongelação manual, basta rodar o botão do
termostáto p ara a posição zero até o gelo acumulado derreter. Depois, coloque na posição normal.
Descongelação automática
Alguns modelos integra m um sistema de descongelação automát ica.
O temporizador está instalado na traseira. Descongela
automaticamente a cada 24 horas.
Para regular o período de d esco nge lação, ro d e o botão azul no
sentidos dos ponteiros do relógio até ouvir um estalido, e então será
iniciado um ciclo de descongelação.
Controlo de Temperatura
h
l
Lâmpada
Bandeja
O controlo varia entre 0 e 6. Rode o botão do tremostáto até
atingir a temperatur a pretendida. Se rodar o botão no sentido dos
ponteiros do relógio, de 1 a 6, obterá uma temperatura inferior.
28
Page 29

INVERTER A PORTA
Procedimento de inversão da po rta
Remova o supo rte inferior desapertando e removendo os parafusos com uma chave de fendas.
Baixe lenta mente a po rt a e remova-a.
Retire os dois parafusos do suporte superior esquerdo, e retire a parte de metal do suporte.
Retire os dois parafusos do suporte superior direito e retire o suport e, insira a part e de metal, e
depois ape r te os dois para fusos.
Retire o suporte inferior e fixe-o do lado oposto.
Pegue na porta. Insira o eixo do suporte inferior no orifício inferior direito da porta.
Instale o suporte sobressalente na posição superior esquerda do compartimento. Ajust e a po rt a,
colocando-a na pos ição vert ical e devida ment e alinhada com o compartimento.
Nota: A selagem da port a será sujeita a compressã o du r ant e o transporte do equipamento, pelo que
poderá ser necessár io proceder à reinicialização da mesma após a inversão da sua po sição. Tal será
necessário para gar ant ir uma selage m efic ient e e, assim, evitar a fuga de ar. Caso exista uma folga
entre o compartimento e a selagem da porta, ajuste a selagem, puxando-a delicadament e par a a zo na
da folga. Caso necessár io, r eco menda-se a inda que , com recurso a um secador de cabelo, se aqueça
a selagem por forma a eliminar a folga.
CUIDADOS E LIMPEZA ADEQUADOS DO MINIBAR DE ABSORÇÃO
Aviso: Para evitar e lectro cussõ es, d es ligue sempre o frigorífico de absorção antes de proced er à sua
limpeza. O incumprimento desta regra poderá resultar em ferimentos.
Geral: Não utilize químicos agress ivos, abrasivos, amoníaco, so luções de bra nquea me nt o à base de
cloro,
detergentes concent r ado s, d issolventes ou peças de raspagem metálicas. ALGUNS dest es
químicos poder ão disso lver, dani ficar e/ou descolorar o frigorífico de absorção.
1) R emova o conteúdo do aparelho
2) Limpe as superfícies interior e exterior com um pano húmido. A adição de vinagre na água é
óptima para a prevenção de bo lor e fungos.
3) Limpe cuidadosamente t odas as peças após a sua limpeza.
29
Page 30

IMPORTANTE:
Quando o frigorífico d e absor ção não se encont rar em utilização, o seu interior deverá encontrar -se
completamente seco , por for ma a evitar a acu mulação de humidade (manter a porta aberta, se
possível).
GARANTIA LIMITADA
A apresentação do Cert ificado d e Gar ant ia e de uma có pia original da factur a d e compra é requisito
estritamente necessário ao usufruto dos direitos previstos na garant ia.
ESTA GAR ANTI A NÃO AB RANGE:
1) Danos, acidentais ou não, do frigorífico de absorção que não originem num defeito material ou
de fabrico.
2) Danos causados por uma ut ilização indevida, alterações realizadas no apar elho ou
incumprimento das instruções de utilização do mesmo.
3) Danos nos acabamento s das super fícies ou outras peças expostas, causadas por d esgaste.
4) Danos causados por intervençõ es de r epar ação ou de introdução de alterações no frigorífico de
absorção realizadas po r p esso al não auto r izado pelo fabricante.
5) Custos de transporte e de Seguro pelo serviço de garantia
TODAS AS GARANTIAS, INCLUINDO QUALQUER GARANTIA IMPLÍCITA DE
EXPLOR AB ILIDADE, EST ÃO LIMITAD AS À DURAÇÃO PREV IST A. O FAB R ICANTE
NÃO ASSUME QUALQUER RESPONSABILIDADE POR DANOS DIRECTOS OU
INDIRECTOS.
Eliminação
A eliminação da arca deverá efect uar-se de modo ambientalmente correcto. Aquando da eliminação,
tenha em consideração a legislação ex ist ent e. Po d erá haver requisitos e condições especiais a serem
observados.
30
Page 31

CIRCUIT DIAGRAM
31
Page 32

ÚVOD
Děkujeme, že jste si zakoupili náš absorpční minibar. Toto zařízení bylo navrženo pro zvýšení
vašeho pohodlí. Absorpční minibar je kompaktní, naprosto tichá chladnička, která nepoužívá
kompresor ani ventilátory. Tento druh malých chladniček, původně vyvinutý pro použití v
hotelových pokojích, je možné používat na mnoha dalších místech, jako jsou výletní lodě,
karavany, ubytovny, kanceláře atd. Díky tichému provozu a atraktivnímu designu se budete z
pohodlí a komfortu tohoto zařízení těšit mnoho let.
Před používáním tohoto zařízení si pozorně přečtěte tyto pokyn. Při používání tohoto zařízení vždy
dodržujte základní bezpečnostní opatření.
Tento přehledný návod obsahuje informace o nejlepším možném využití absorpčního minibaru.
DŮLEŽITÉ BEZPEČNOSTNÍ POKYNY
Před používáním absorpční chladničky si pozorně přečtěte tento návod k obsluze.
Toto zařízení smí být používáno pouze k účelům, pro které bylo určeno, dle popisu v této příručce.
Tato absorpční chladnička musí být před používáním řádně nainstalována v souladu s instalačními
pokyny.
Nikdy absorpční chladničku neodpojujte z elektrické sítě tažením za napájecí šňůru. Vždy zástrčku
pevně uchopte a vytáhněte ji přímo ze zásuvky ve zdi.
1) Všechny elektrické kabely, které jsou opotřebeny nebo jinak poškozeny vždy neprodleně opravte
nebo vyměňte. Nepoužívejte kabely, zástrčky nebo koncovky, které jsou popraskané nebo prodřené.
2) Před čištěním nebo prováděním oprav absorpční chladničku odpojte ze sítě.
POZNÁMKA: Pokud tento produkt z nějakého důvodu vyžaduje opravu, důrazně doporučujeme,
aby byla provedena autorizovaným servisním technikem.
3) Absorpční chladničku nepoužívejte v přítomnosti výbušných výparů.
4) Přívod proudu musí být řádně uzemněn.
5) Nepoužívejte zástrčku s adaptérem nebo prodlužovací šňůru.
6) Nepoužívejte zařízení v těsné blízkosti vany, sprchy nebo bazénu.
7) Před likvidací nebo skladováním zařízení doporučujeme, abyste demontovali dvířka a ponechali
na místě police. Snížíte tak možné riziko úrazu dětí.
8) V absorpční chladničce neuchovávejte potraviny, vnitřní teplota nemusí být dostatečně nízká,
aby zabránila jejich zkáze.
CZ
32
Page 33

INSTALACE
Vnitřní prostor absorpční chladničky je vhodné čistit vlažnou vodou se slabým čisticím
prostředkem a poté ji před použitím důkladně vysušit.
Teplota v zařízení je závislá na následujících faktorech:
Teplota místnosti
Frekvence a délka doby kdy jsou otevřená dvířka.
Množství položek umístěných v chladničce.
Občas může být nutné nastavit termostat.
Chladicí systém je navržen pro práci zařízení na rovném povrchu. Nenaklánějte zařízení na
stranu.
Pokud je zařízení nutné naklonit kvůli manipulaci nebo transportu, je nutné ho 20 až 30 minut před
zapojením a vychlazením vnitřního prostoru nechat stát ve vzpřímené poloze.
V souladu s místními nařízeními musí být zásuvka a zástrčka uzemněny. Rozměry kabelu musí
splňovat požadavky chladničky. Zařízení musí být zapojeno do řádné elektrické sítě, dle štítku se
jmenovitými údaji, prostřednictvím vícepólového jističe. Aby bylo zajištěno řádné fungování
chladničky, dodržujte prosím následující doporučené podmínky.
10. Aby byla zajištěna cirkulace vzduchu, zařízení by mělo být umístěno alespoň 2 cm daleko od
stěny.
11. Umístěte zařízení mimo dosah slunečních paprsků. Dosáhnete tak nejlepšího výkonu a ušetříte
energii.
12. Vrchní mřížka nesmí být za žádných okolností něčím zakryta. Zabránilo by se tak v cirkulaci
teplého vzduchu.
Obrázek instalace
33
Page 34

DÍLY A FUNKCE PRODUKTU
POUŽÍVÁNÍ ABSORPČNÍHO MINIBARU
1. Zasuňte napájecí zástrčku do elektrické zásuvky.
2. K nastavování teploty slouží knoflík termostatu uvnitř chladničky.
Automatické odmrazování
Některé modely jsou vybaveny systémem automatického odmrazování. U většiny modelů se
systémem ručního odmrazování jednoduše otočíte knoflíkem termostatu do nulové pozice a
vyčkáte, dokud nahromaděná námraza neroztaje. Poté termostat vrátíte do původní polohy.
Ovládání teploty
Přihrádka
Nožičky
Světlo
Dveřní přihrádky
Ovládání teploty se provádí v rozsahu od 0 do 6. Otáčejte
knoflíkem a nastavte požadovanou teplotu. Otáčením knoflíku po
směru hodinových ručiček, od 1 do 6, nastavíte nižší teplotu.
34
Page 35

OTOČENÍ OTEVÍRÁNÍ DVÍŘEK
Postup otočení otevírání dvířek
Uvolněním a demontáží šroubů pomocí šroubováku odstraňte spodní pant.
Dvířka opatrně spusťte dolů a odstraňte je.
V yš roubujte dva šrouby z pozice levé ho horního pantu a odstraňte zde umístěný kovový díl.
Vyšroubujte dva šrouby z pozice pravého horního pantu, odstraňte pant, zasuňte na jeho místo
kovový díl a dva šrouby zašroubujte zpět.
Odstraňte spodní pant a připevněte ho na opačnou stranu.
Vezměte dvířka. Zasuňte osu spodního pantu do pravého spodního otvoru dvířek.
Upevněte zbývající pant do levé horní pozice na skříni zařízení. Dvířka seřiďte a vyrovnejte je
se skříní zařízení.
Poznámka: Protože těsnění dveří je při přepravě stlačeno, po obrácení dvířek může být nutné ho
vyrovnat. Zabráníte tak úniku vzduchu okolo těsnění. Pokud se mezi skříní zařízení a dveřním
těsněním nachází mezera, usaďte těsnění jeho tažením tak, aby došlo k utěsnění mezery. V případě
potřeby je možné použít vysoušeč vlasů, těsnění nahřát a mezeru tak odstranit.
SPRÁVNÁ PÉČE O ABSORPČNÍ MINIBAR A JEHO ČIŠTĚNÍ
Výstraha: Abyste zabránili úrazu elektrickým proudem, vždy před čištěním absorpční chladničku
odpojte od elektrické sítě. V opačném případě může dojít ke zranění.
Obecné: Nepoužíve jte agresivní chemikálie, abrazivní prostředky, čpavek, bělicí prostředky na bázi
chlóru,
koncentrovaná rozpouštědla, ředidla nebo kovové drátěnky. NĚKTERÉ z
těchto chemikálií mohou rozpustit, poškodit nebo odbarvit části chladničky.
1) Zařízení vyprázdněte
2) Vnitřní a vnější povrchy otřete vlhkým hadříkem. Pro ochranu před plísní a houbami
je vhodné do vody přidat trochu octa.
3) Po čištění všechny části důkladně otřete.
DŮLEŽITÉ:
Pokud není absorpční chladnička používána, je třeba ji uvnitř důkladně vysušit, aby nedocházelo k
hromadění plísní (pokud je to možné, nechte otevřená dvířka).
35
Page 36

OMEZENÁ ZÁRUKA
Podmínkou při jakoukoliv žádost o provedení servisního záručního zásahu je předložení tohoto
záručního listu spolu s kopií originální kupní faktury.
TATO ZÁRUKA NEPOKRÝVÁ NÁSLEDUJÍCÍ PŘÍPADY:
1) Poškození, nechtěné nebo jiné, absorpční chladničky vlastněné spotřebitelem, které není
způsobeno vadou materiálu nebo zpracování.
2) Poškození způsobené nesprávným používáním spotřebitelem, upravováním zařízení nebo
nedodržením správné péče a manipulace uvedené v těchto pokynech.
3) Poškození povrchové úpravy zařízení nebo dalších viditelných částí způsobené opotřebením.
4) Poškození způsobené opravami nebo úpravami absorpční chladničky jinou osobou nežli osobou
pověřenou výrobcem.
5) Náklady na dopravu a pojištění v souvislosti se záručním servisem.
VŠECHNY ZÁRUKY, VČETNĚ JAKÉKOLIV NEVYJÁDŘENÉ ZÁRUKY PRODEJNOSTI
JSOU OMEZENY NA UVEDENOU DOBU. VÝROBCE SE ZŘÍKÁ VEŠKERÉ
ODPOVĚDNOSTI ZA NÁSLEDNÉ NEBO NÁHODNÉ ŠKODY.
Likvidace
Likvidace zařízení musí být provedena v souladu s požadavky na ochranu životního prostředí.
Vezměte v potaz stávající směrnice týkající se likvidace. Mohou obsahovat zvláštní požadavky a
podmínky, které je třeba dodržet.
36
Page 37

SCHÉMA ZAPOJENÍ
37
Page 38

BEVEZETÉS
Köszönjük, hogy az általunk gyártott mini bárt választott a. A termék javítan i fogja kényel mét és
életérzését. Az abszorpciós rendszernek köszönhetően a hűtőgép teljesen zajmentes, kompresszor és
ventilátor nélkül működő kompakt egység. A berendezést eredetileg szállodai szobákban való
használatra fejlesztették ki, de előnyösen használható más helyeken is, többek között luxushajókon,
lakókocsikban, kollégi umi há lóhelyisé gekben, irodákban stb. Csendes működésének és vo nz ó
kialakításának, az általa nyújtott kényelemnek köszönhetően éveken át sok örömet fog szerezni
Önnek.
A berendezés használata előtt olvassa el figyelmesen az útmutatót. A berendezés használatakor
mindig tartsa be az alapvető biztonsági előírásokat.
A könnyen érthető kézikönyv segítségével a lehető leghatékonyabb módon tudja használni a
berendezést.
FONTOS BIZTONSÁGI TUDNIVALÓK
Az abszorpciós hűtőberendezés használata előtt gondosan olvassa el a jelen kezelői
kézikönyvet.
A készüléket kizáró lag a jelen kézikö nyvbe n ismer tett célokra használja.
A készüléket az erre vonat kozó út mutatásokat követve gondosan kell elhelyezn i.
A bere nd ezés csatlakozóját sose húzza ki a kábelnél fogva. Mindig a dugaszt fogja meg erősen, és
húzza ki a fali csatlakozó ból.
1) A kopott vagy más módon megrongálódott kábeleket haladéktalanul jav ítsa vag y cseré l je k i. Ne
használjon olyan csat lako zást, amelynek kábelén vagy dugaszolóa ljzatán repedések vagy kopások
vannak.
2) Tisztítás vagy bármi fajta javítás előtt mindig húzza ki a csatlakozózsinórt a konnektorból.
MEGJEGYZÉS: Ha a termék bármely okból javításra szorul, a munkát mindig szakképzett
szerelővel végeztesse.
3) Ne működtesse a berendezést robbanásveszélyes gázok közelében.
4) A tápfeszültséget szolgáltató vezetéket földelni ke ll.
5) A villamos csatlakozásho z ne haszná ljo n hossza b bítózsínórt vagy csatlakozó adapt ert.
6) Ne használja a berendezést fürdőkád, zuhanyozó vagy úszómedence közvetlen közelében.
7) Mielőtt kiselejtezné, vagy üzemen kívül t áro lná a bere ndezést, távolítsa el az ajtót, a polcokat
pedig hagyja a helyükön. Ennek e lmulasztása veszélyes lehet a gyerekekre.
8) Az abszorpciós hűtőberendezésben ne tároljon ételt, mert előfordulhat, hogy a nem elegendően
alacsony belső hőmérséklet miatt megromlanak.
HU
38
Page 39

ELHELYEZÉS
Használat előtt célszerű a berendezés belső részeit nem agress zív tisztí tószert tart almazó
langyos vízzel tisztítani, majd alaposan megszárítani.
A berendezés belső hőmérséklete az alábbi tényezőktől függ:
A helyiség hőmérséklete.
Az ajtó nyitásának gyakorisága, nyitva tartásának ideje.
A berendezésben tárolt t ermék menn yi sége.
Célszerű ezért a hőfokszabályozót az igények alakulása szer int állít an i.
A szekrény hűtőrendszere akkor működik megfelelően, ha a szekrény sima, vízszintes
felületen áll. A szekrény nem állhat ferdén, dőlve.
Ha kezelés vagy mozgatás miatt a szekrényt meg kell dönteni, a csatlakozó k ábel újbóli
csatlakozt atása és a hűtés beindítása előtt hagyja a szekrényt 20–30 peren át ü zemen kívül, eg yenes
helyzetb en állni.
Használjon a helyi előírásoknak megfelelő földelt dugaszolóaljzatot és konnektort. A
csatlakozókábel méretének ki kell elégítenie a hűtőberendezés követelményeit. Az egységet
többpólusú kapcso lón keresztül az adattáblán megadott villamo s hálóz athoz kell csatlakoztat ni. A
hűtőberendezés megfelelő működése érdekében tartsa be az alábbi ajánlásokat:
13. A megfelelő légáramlás biztosítása érdekében a szekrény és a fal közö tt mind ig legyen egy
legalább 2 cm-es rés.
14. A berendezést ne tegye ki a nap sugarainak. Így érhető el a legjobb hatékonyság és az
energiatakarékos üzemmód.
15. Semmi esetre se helyezzen semmilyen tárgyat a felső rácsra, mert az akadályozná a meleg
levegő áramlását.
A berendezés elhelyezésének lehetőségei
39
Page 40

A TERMÉK RÉSZEI ÉS JELLEMZŐI
AZ ABSZORPCIÓS MINI BÁR MŰKÖDTETÉSE
1. Csatlakoztassa a hálózati kábelt a fali konnektorba.
2. A szekrényben található hőfokszabályozóval állítsa be a kívánt hőmérsékletet.
Automatikus jégtelenítés
Egyes típusok automatikus jégtelenítő rendszert tartalmaznak. A kézi jégtelenítéssel működő
típusok többségében a jégtelenítés úgy történik, hogy a hőfokszabályzót nullára kell állítani, amíg
az összegyűlt jég leolvad. Azt követően a hőfokszabályzót vissza kell állítani a szokásos helyzetbe.
Hőfokszabályzás
polc
lábak
világítótest
tárolórekeszek az
A hőfokszabályzó szabályozási tartománya a gombon 0-tól 6-ig
terjed. A kívánt hőmérséklet a hőfokszabályzó gombjának
forgatásával állít hat ó be. Az go mbot ó r amutató járásának
megfelelő irányban 1 és 6 között forgatva csökkenhető a
hőmérséklet.
40
Page 41

AZ AJTÓ NYÍLÁSIRÁNYÍNAK MEGFORDÍTÁSA
Az ajtó nyílásirányát az a lábbiak szerint lehet megfordítani:
Csavarhúzó val lazítsa k i és t ávo lítsa e l az alsó forgópánt csavarjait, majd távo lítsa el a
forgópántot.
Óvatosan engedje le és távolítsa el az ajtót.
Távolítsa el a bal felső pánt helyén lévő két csavart, majd vegye le a fém alkatrészt.
Távolítsa el a jobb felső forgópánt két csavarját, vegye le a forgópántot, helyezze be a fém
alkatrészt, majd hajtsa be a két csavart .
Vegye le az alsó forgópántot és erősítse fel az ellenkező oldalon.
Fogja meg az ajtót. Az alsó sarokpánt tengelyét helyezze be az ajtó jobb alsó részén található
lyukba.
Rögzítse a tartalék pántot a szekrény bal felső részéhez. Állítsa be az a jtót eg yenesen, a
szekrényhez igazítva.
Megjegyzés: Az ajtó tömítése a szállítás alatt összepréselődhet. Ha ez történt, az ajtó megfordítása
után állítsa helyre a tömítést . Erre a légmentes zárás érdekében van szükség. Ha a szekrény és az
ajtó tömítése között rés van, ennek megszü nt etése érdekében finoman húzza k i a tömítést.
Előfordulhat, hogy a rés megszüntetéséhez fel kell melegíteni a tömítést (pl. hajszárítóval).
AZ ABSZORPCIÓS MINIBÁR KARBANTARTÁSA ÉS TISZTÍTÁSA
Figyelem: Az áramütés elkerülésére tisztítás előtt mindig húzza ki a készülék csatlakozóját a
konnektor ból. Sérü lésekhez vezet het , ha ezt elmulasztja.
Általános tanács: A t iszt ítás ho z ne használ jo n agressz ív vegyszereket, koptató anyagokat, ammóniát
vagy klórtartalmú fehérítőt, nagy koncentrátumú tisztítószert, oldószert vagy fémes
dörzsölőanyagot. Ezen vegyszerek EGY RÉSZE feloldhatja és károsíthatja a hűtőberendezést,
illetve elvehet i annak színét .
1) Távolítsa el a berendezésben lévő termékeket.
2) A belső és külső felületeket törölje le egy nedves textíliával. Elősegítheti a gombásodás és
penészedés megelőzését, ha kevés ecetet is tesz a vízbe.
3) A tisztítás után alaposan törö lje meg a berende zés összes részét.
41
Page 42

FONTOS:
Ha nem használja a hűtőberendezést, a penészedés megelőzése érdekében teljesen szárítsa ki a belső
részeket, és ha lehet, hag yja nyitva az ajtó t .
KORLÁTOZOTT JÓTÁLLÁS
A jó tállásból adódó bármely javítás i kötelezettség érvényesítéséhez a fogyasztónak be kell mutatnia
a jelen Jótállási igazo lást és a vásárláskor kapott eredeti számlát.
A JÓTÁLL ÁS NEM VONATKOZIK
1) A fogyasztó birtokában lévő abszorpciós hűtőberendezés véletlenszerű vagy egyéb károsodására,
ha azt nem anyag vagy gyártás i hiba oko zt a.
2) A helytelen használatból, szakszerűtlen beavatkozásból vagy az útmutatóban a gondos és
speciális kezelésre vonatkozó előírások be nem tartásából adódó károkra.
3) A burkolat vagy más látható rész kopás miatti károsodására.
4) Az abszorpciós hűtőberendezés javítása vagy módosítása miatti károkra, ha a javítást vagy
módosítást nem a gyártó álta l felhatalmazott személy végezte.
5) A jótállá s keretébe tartozó javítás szállítási és biztosítási k öltségeire.
MINDEN FAJTA JÓTÁLLÁS, ÍGY AZ ELADHATÓSÁGRA VONATKOZÓ BELEÉRTETT
JÓTÁLLÁS IS CSAK A MEGADOTT IDŐTARTAMRA VONATKOZIK. A GYÁRTÓ NEM
VÁLLAL SEMMI FAJTA FELELŐSSÉGET A KÖVETKEZMÉNYSZERŰ VAGY
VÉLETLENSZERŰ KÁROKÉRT
Hulladékelhelyezés
A kiselejtezett hűtőszekrényt környezetkímélő módon kell eltávolítani. Ennek érdekében vegye
figyelembe a hulladékelhelyezést szabályozó előírásokat. Előfordulhat, hogy ezzel kapcsolatban
különleges követ elményeket vagy feltételeket kell figye lembe vennie.
42
Page 43

VILLAMOS KAPCSOLÁSI RAJZ
43
 Loading...