

Page 1
Instruction Manual-
Bottle Cooler and Wine Cooler
Manual de instrucões-
refrigerador para bebidas e vinho
Bedienungsanleitung-
Flaschenkühlschrank und Weinschrank
Brugsanvisning-
Flaskekøler og vinkøler
Manual de instrucción-
armarios frigoríficos y armarios del vino
Mode d´emploi-
vitrine et cave à vin
Οδηγιες λειτουργιας-
για ορθιο ψυγειο συντηρησης και ψυγειο κρασιων
instructie boekje-
glasdeurkoelkasten wijn kast
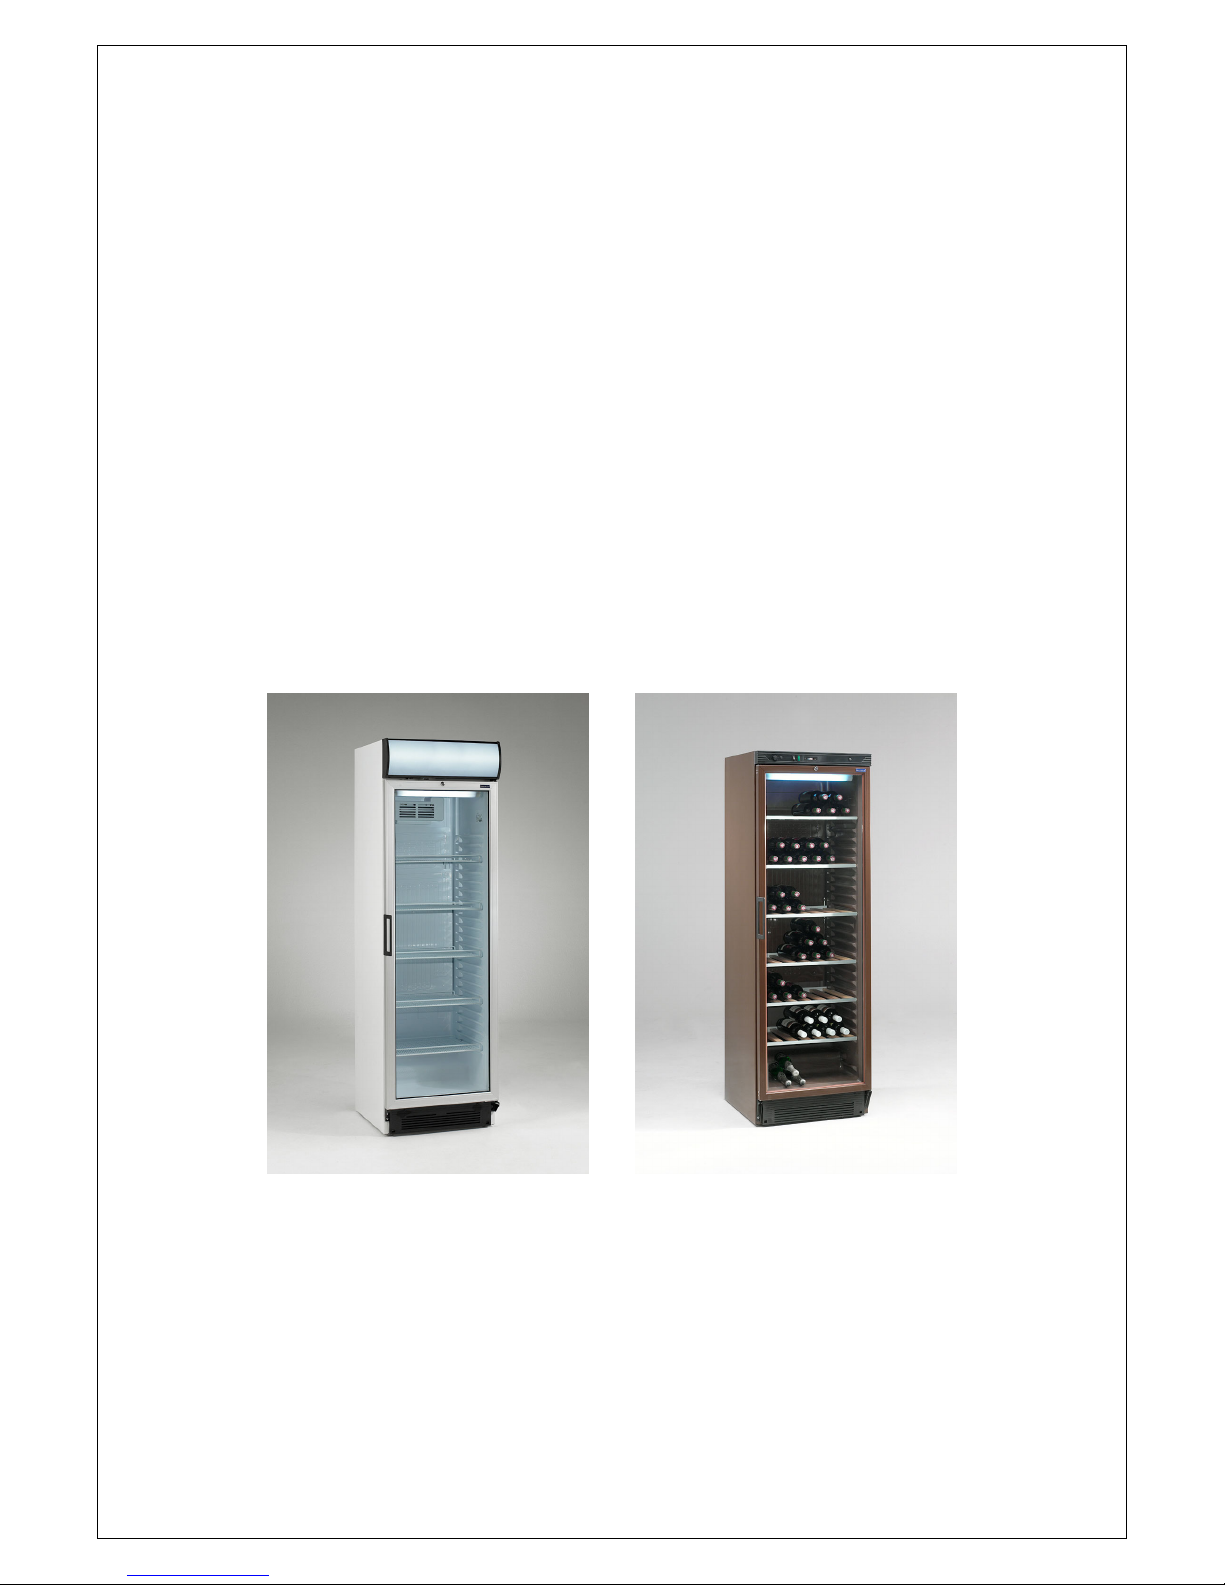
FS80CP
FS1220, FS1280, FS1380, FS2380, FSC1220, FSC1280, FSC1380, FSC2380, FSC1450
SCU12220, SCU1280, SCU1375, SCU2375, SCU1220CP, SCU1280CP, SCU1375CP, SCU2375CP, SCU1450CP
SD1220, SDU1220, SD1280, SDU1280, SD1380, SDU1375
CPV1380M, CPV1380BX
CPP1380M, CPP1380BX
Page 2
Important Safety Instructions
1. Please read the instructions carefully and keep it in your records.
2. It is the user's responsibility to operate this appliance in accordance with the
instructions given.
3. Contact your dealer immediately in case of any malfunctions.
4. Keep the cooler away from strongly heat-emitting sources i.e. oven, cooker and +
5. Do not expose it to direct sunlight.
6. Place the cooler in a dry place.
7. Plug the mains cable into a socket with a supply voltage as indicated on the rating
label.
8. Always keep in mind that all electrical devices are sources of potential danger.
9. Do not use inflammable material such as thinner, gasoline etc. Only use materials
which have no odour and no poisonous effect.
10. This appliance must be earthed. The main electrical connections must be done by
skilled electricians.
11. Start your cooler one hour after installation and cleaning.
12. We declare that no asbestos nor any CFC are used in the construction.
13. The oil in the compressor does not contain PCB.
If the cooler is not used any longer, remove the door before scrapping in order to
prevent children entering the cabinet and thereby risking danger to their life.
Installation
The cooler is supplied with a wooden pallet for safe transportation. Remove the pallet and
place the cabinet in upright position and level it by means of the adjustable screws at the
base. Check with a spirit level.
Place the cabinet as described in the safety instructions.
When the cabinet is placed on carpet or on a wooden floor it may require re-adjustment.
If you want to install your cooler into a gap between walls, take care of the following:
UK
Page 3

1. There must be at least 15 cm free space above the cooler in order for the cooling
system to work satisfactorily.
2. Since the cooler takes up more room width wise when the door is opened, the door
must either be placed free of the wall or there should be enough space of at least
1.5 cm at the hinge side.
3. There must be sufficient room at the hinge side to clean and replace the wire
shelves or wooden shelves
Electrical Connections
Your cooler operates on 230V/50Hz.
The plug must be earthed. Use a 10A fuse. The socket must be out of reach of children. If
the plug does not fit to the socket, use an adaptor.
If you need to replace the plugged cord, use earthed plug. This installation of a new
suitable plug may proceed by appointed service agent or skilled electrician.
The main electrical connections must be done by skilled electricians.
If the supply cord is damaged it should be replaced by the manufacturer or appointed
service agent in order to avoid hazard.
Control Panel
The control panel is located at the top of the cooler. The control panel has a green lamp
and a light switch. The green lamp is on, when the cooler is plugged in. The light switch
controls on/off function of the fluorescent lamp.
The thermostat adjustment button controls the temperature in the cooler. Turn the button
to clockwise to decrease the temperature and if turned to anti-clockwise it stops. For wine
coolers turn the button to anti-clockwise to decrease the temperature and if turned to
clockwise it stops. However, the cooler is still connected and the green light is still on.
Temperature adjustment of wine cooler – see separate section.
Lighting
The models without canopy are equipped with interior light and the models with canopy
are equipped with interior light and canopy light.
If any problem occurs at the fluorescent tubes please call the service men.
Page 4
Defrosting
The evaporator defrosts automatically reducing the thermal conductivity. Defrosted water
runs to a container by means of a dropper in compressor area and evaporates.
Maintenance and Cleaning
Switch the cooler off and take the plug out. Clean the interior of the cooler with a solution
of one tea spoon sodium bicarbonate to 0.5 litres warm water. Use a soft sponge. Do not
use chemical cleaners. Dry the inside of the cooler after cleaning.
It is recommended that the condenser at the back of the cooler is cleaned by using a soft
brush or a vacuum cleaner at least every 6 months. The reject water system should also
be cleaned.
Door reversal
As standard the door of the cooler opens to the right side (the door handle is on the left).
The door can be mounted to open to the left side. Instructions are as follows:
* Remove the screws fixing the top hinge on the cabinet
* Lift the door free of the bottom hinge.
* Remove the bottom hinge.
* Drill holes for the handle on the right side and move the handle from left to right.
Fault finding
Incorrect installation and improper use may cause problems with your cooler.
If the compressor operates continiously check the following:
* that room temperature is not above 32°C
* that the door is not opened frequently
* that the goods are placed in a suitable manner
* that the air circulation is not restricted by large items on the shelves
If the green lamp is off and the cooler is not working check the following:
* that the power supply is on
* that the plug is connected
* that no fuse is blown and the relay has not cut out
If the green lamp is off but the compressor is operating
* replace the green lamp
Page 5

If the cooler makes a loud noise
* check that the cooler is not touching the wall
All checks done correctly?
* switch off the cooler for 15 minutes (you can do it at the thermostat). Switch it
on again and check that the evaporator is cooling.
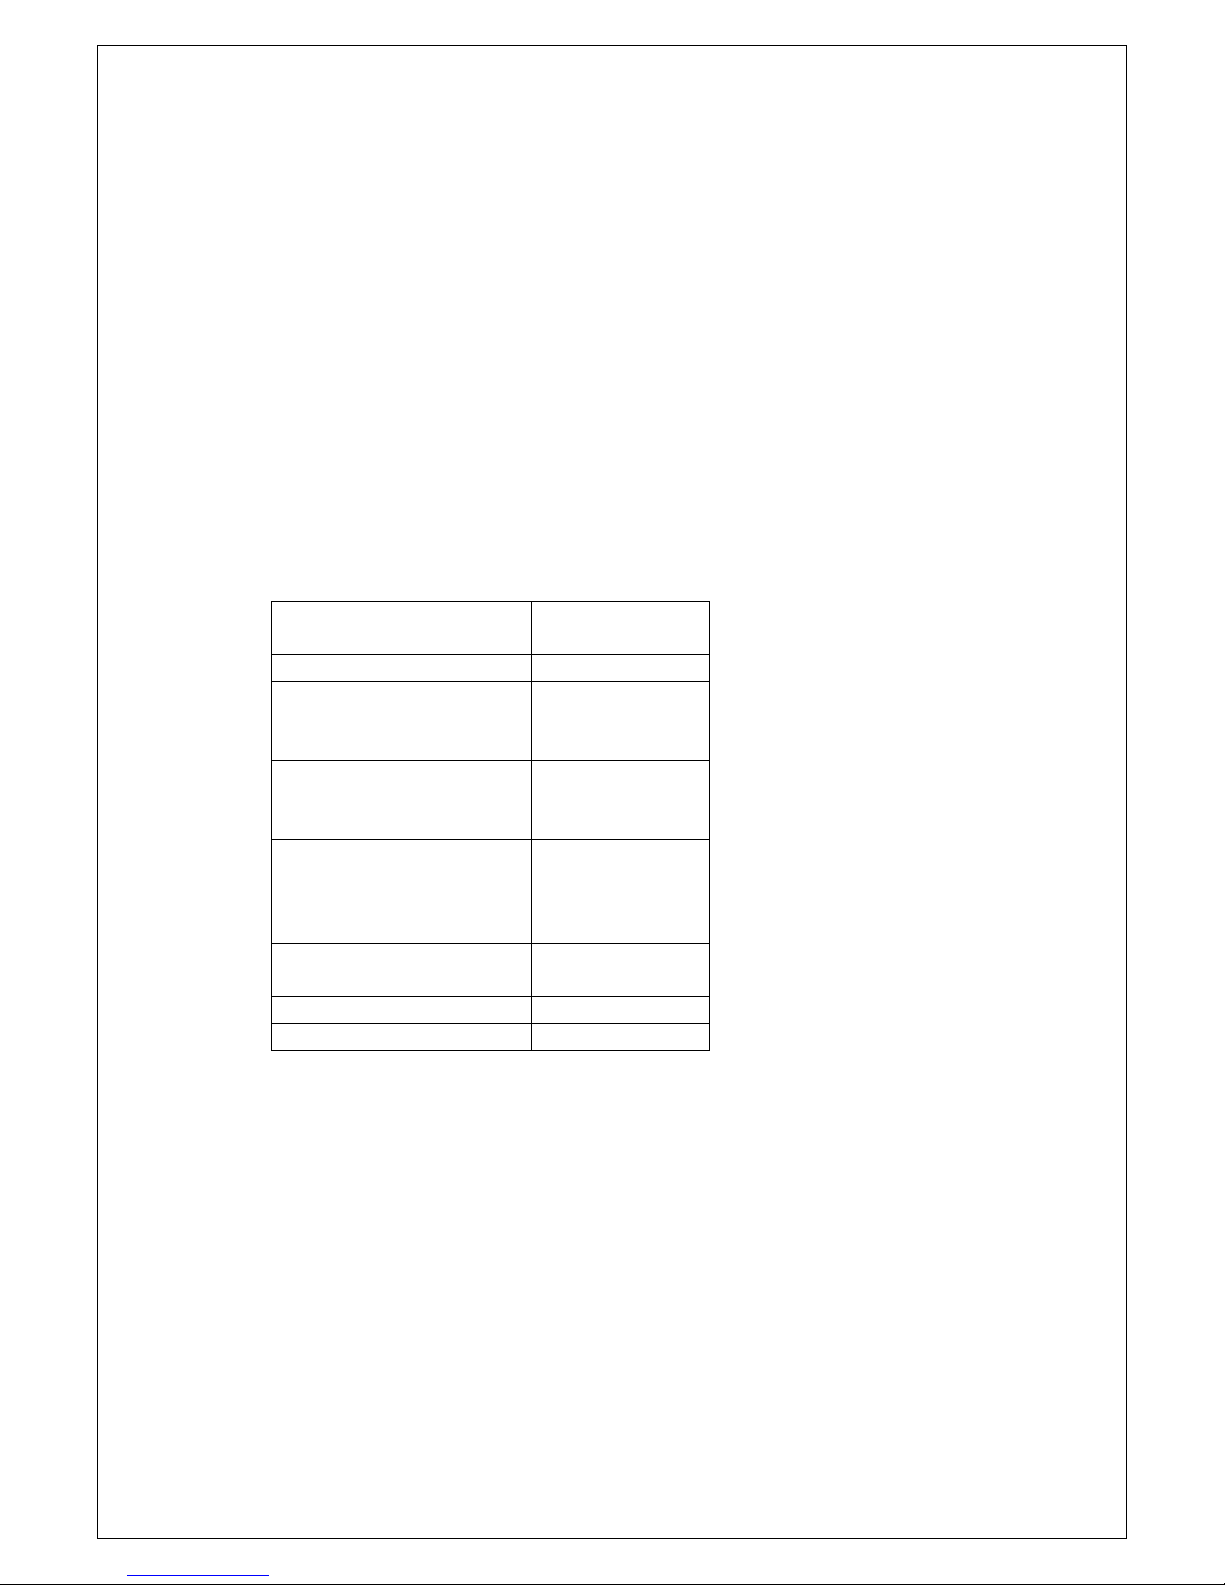
Loading Of Shelves
We recommend loading the shelves as equal as possible all over
MODEL
CAPACITY
(kg)
FS80CP 15
FSC1220/ FS1220/
SD1220
55
FSC1280/ FS1280/
SD1280
55
FSC1380/ FS1380/
SD1380
55
FSC2380/ FS2380/
SD2380
55
BC 2000 55
FSC 1450 55
Page 6
Avisos importantes de segurança
1. Favor ler essas instruções atentamente e guardá-las em lugar adequado.
2. O usador é responsável em usar o produto de acordo com as instruções
fornecidas.
3. Contacte seu fornecedor imediatamente em caso de mau funcionamento.
4. O refrigerador não deve ser instalado próximo a fontes de calor, por exemplo
fogão, forno ou diretamente à luz do sol.
5. Instale o refrigerador em lugar seco.
6. Coloque o plugue do cordão de alimentação em uma tomada com voltagem
apropriada a indicação da tabela.
7. Lembre-se sempre que todas as fontes elétricas são riscos em potencial.
8. Não use produtos inflamáveis como thinner, gasolina etc. Somente use produtos
que não sejam tóxicos ou que não tenham odor.
9. Esse aparelho deve ser aterrado. As instalações elétricas importantes devem ser
feitas por um eletricista de sua confiança.
10. Ligue seu refrigerador uma hora após instalação e limpeza.
11. Segure-se de que os alimentos guardados no refrigerador estejam embalados
corretamente.
12. A porta do refrigerador se fecha com uma borracha magnética. Não se usam
travas. A porta pode ser aberta facilmente.
13. Nós declaramos que nenhum asbesto nem todos os CFC estão usados na
construção.
14. O óleo no compressor não contem o PWB.
Se o refrigerador não esteja em uso, remova a porta antes de jogar-lo fora para
prevenir que criancas entrem no cabinete e coloquem sua vida em risco.
Instalação
O refrigerador vem numa embalagem com uma base de madeira para garantir o
transporte seguro. Remova a embalagem e coloque o refrigrador em posição vertical e
gire os pés ajustáveis da base para o nivelamento. Cheque com um nível de mão.
PT
Page 7

Coloque o cabinete como descrito nas instrucões de segurança.
Quando o cabinete é colocado num chão de madeira ou carpete pode ser necessário
fazer um reajuste.
Se voce quiser instalar seu refrigerador de forma embutida, leve em consideração o
seguinte:
1. Deve haver no mínimo 15 centímetros de espaço livre no topo do refrigerador para
garantir o bom desempenho do sistema de refrigeramento
2. O refrigerador necessita espaço nas laterais quando se abre a porta, na instalação,
a porta deve ser colocada livre da parede ou com um distanciamento de ao menos
1,5 cm no lado da dobradiça.
3. Deve- se haver espaço suficiente no lado da dobradica para a limpeza e troca das
prateleiras e fios.
Conexões Elétricas
Seu refrigerador opera com 230V/50HZ.
O plugue do cordão de alimentação deve ser aterrado. Use um fuso 10A. A tomada deve
estar fora do alcance de crianças. Se o plugue não serve na tomada use um adaptador.
Caso voce necessite trocar o plugue de alimentação use um plugue aterrado. A instalação
de uma nova tomada apropriada ao produto deve ser feita por um técnico de serviço ou
eletricista autorizado.
As instalações elétricas importantes devem ser feitas por um eletricista de sua confiança.
Para evitar acidentes em caso que o cordão de alimentação esteja defeituoso, esse deve
ser trocado pela fábrica ou técnico autorizado.
Painel de Controle
O painel de controle está localizado no topo de seu refrigerador. O painel de controle tem
uma lâmpada verde e um interruptor para luz. A lâmpada verde acende quando se
conecta o refrigerador. O interruptor de controle tem a funcão liga/desiga da luz
fluorescente.
O botão de ajuste do termostato controla a temperatura do refrigerador. Gire o botão para
a esquerda para aumentar a temperatura e girando o botão para a direita o refrigerador
desliga. Para refrigeradores de vinho gire o botão no sentido anti-horário para diminuir a
temperatura e no sentido horário para desligar. No entanto o refrigerador ainda está ligado
se a lâmpada verde estiver acesa.
Ajuste da temperatura do refrigerador de vinhos. Veja na seção em separado.
Page 8

Iluminação
Os modelos sem cúpula estão equipados com luz interior e lúz de cúpula.
Em caso de problemas nos tubos fluorecentes contacte um técnico de serviços.
Degelo
O evaporador degela automaticamente reduzindo a conductividade térmica. A água
descongelada se acumula em um aparador d´água na área do compressor e evapora.
Manuntenção e limpeza
Desligue o refrigerador e desconecte o plugue da tomada. Limpe o interior de seu
refrigerador usando uma solução de uma colher de chá de detergente dissolvida em 0,5
litro de água quente. Use uma esponja macia. Não use produtos químicos. Seque o
interior de seu refrigerador após a limpeza.
Se recomenda a fazer a limpeza do condensador atrás do refrigerador usando uma
escova macia ou o aspirador de pó a cada 6 meses. Também se deve fazer a limpeza do
sistema de água rejeitada.
Reversão da porta
Como padrão, a porta do refrigerador abre para a direita (a alça da porta está a
esquerda). A porta pode ser montada para abrir do lado esquerdo. A instruções são as
seguintes.
* Remova os parafusos que fixam a dobradiça no topo do cabinete.
* Levante a porta livre da dobradiça de baixo.
* Remova a dobradiça de baixo.
* Faça buracos para alca no lado direito e remova a alça da esquerda para a direita.
Problemas e soluções
Instalação incorreta e uso desapropriado pode causar problemas ao refrigerador.
Se o compressor está funcionando em demasia verifique o seguinte
* que a temperatura ambiente não esteja acima de 32°C
* que a porta esteja sendo aberta com muita frequência
* que os alimentos estejam distribuídos no refrigerador de maneira uniforme
* que a circulação de ar não esteja sendo obstruída por iténs muito grandes sobre
a prateleira.
Se a lâmpada verde não acende e o refrigerador não esteja funcionando verifique o
seguinte:
* que o fornecimento de energia elétrica esteja em ordem
* que o cabo de alimentacão esteja conectado
* que o fusível ou disjuntor esteja queimado ou desarmado
Page 9
Se a lãmpada verde não acende mas o compressor esteja funcionando
* subistitua a lâmpada verde
Se o refrigerador estiver fazendo um ruído alto
* verifique se o refrigerador não esteja em contacto com a parede
Todos os ítens acima seguidos corretamente?
* Desligue o refrigerador por 15 minutos (pode-se desligar usando o termostato).
Ligue o refrigerador novamente e cheque se o evaporador está refrigerando.
Capacidade das prateleiras
Recomendamos que se distribua o peso nas prateleiras de forma uniforme
Modelo
Capacidade
(kg)
FS80CP 15
FSC1220/ FS1220/
SD1220/SCU1220/
SCU1220CP/SDU1220
55
FSC1280/ FS1280/
SCU1280/SCU1280CP/
SD1280/SDU1280
55
FSC1380/
FS1380/SCU1375/
SCU1375CP
SD1380/SDU1375
55
FSC2380/ FS2380/
SCU2375/SCU2375CP
55
BC 2000 55
FSC 1450/SCU1450CP 55
Page 10

Wichtige Sicherheitsvorschriften
1. Vor Inbetriebnahme des Gerätes machen Sie sich bitte mit der
Gebrauchsanweisung insbesondere der Sicherheitsvorschriften vertraut. Bewahren
Sie diese stets gut auf.
2. Bei Zuwiderhandlung gegen diese oder fahrlässigem Gebrauch übernimmt der
Anwender des Produktes die Haftung für eventuell dadurch entstehende Sachsowie Personschäden (Produktschäden).
3. Im Falle einer Störung kontaktieren Sie bitte daher umgehend Ihren Fachhändler.
4. Der Schrank darf nicht in der Nähe von Hitzeabstrahlenden Geräten (z.B.
Küchenherd/-ofen) platziert werden. Vermeiden Sie Standorte mit direkter
Sonneneinstrahlung.
5. Platzieren Sie den Schrank an einem trockenen Standort und setzen Sie Ihm
keinerlei Feuchtigkeit aus. Den Schrank in einen trockenen Platz platzieren.
6. Stecken Sie das Gerät ausschließlich an eine Netzsteckdose, welche der
Spannung des am Gerät angebrachten Aufklebers entspricht!
7. Bitte denken Sie daran, dass alle elektronischen Geräte gefährlich sein können.
8. Bewahren Sie keine explosiven Stoffe wie z.B. chemische Verdünnungsmittel und
Benzin in diesem Gerät auf. Lagern Sie keine Geruchsbildenen sowie in irgendeiner
Form giftige Produkte/Stoffe in diesem Gerät ein.
9. Dieses Gerät muss geerdet sein und darf lediglich durch einen erfahrenen
Elektriker angeschlossen sowie in Betrieb genommen werden.
10. Nach abschließender Reinigung des Gerätes sowie geeigneter Standortwahl ist das
Gerät nicht vor Ablauf einer Stunde in Betrieb zu nehmen
11. Achten Sie stets auf Dichtigkeit der im Schrank untergebrachten Produkte/Waren.
Immer sicher sein dass die Ware im Schrank gut eingepackt sind.
12. Die Tür schließt magnetisch ab und kann durch einfaches ziehen geöffnet werden.
Es wird kein Schloss verwendet
13. Wir erklären, dass kein Asbest noch CFC im Aufbau verwendet worden ist.
14. Das Öl im Kompressor enthält nicht PWB.
Entfernen Sie vor Entsorgung bzw. bei nicht benutzen des Gerätes die magnetische
Verschlusstür so dass ggf. spielende Kinder nicht in diesem Gerät eingeschlossen werden
können
DE
Page 11

Aufstellung
Der Schrank wird auf einer Holzpalette für den sicheren Transport geliefert. Entfernen Sie
diese und stellen Sie den Schrank in einer geraden/waagrechten Position auf. Ist die
Aufstellfläche uneben, richten Sie bitte den Kühlschrank mit Hilfe der Stellfüße aus.
Überprüfen Sie dies mit einer Wasserwaage.
Platzieren Sie das Gerät ausschließlich wie in den Sicherheitsvorschriften vorgegeben!
Auf Teppich- sowie Holzböden kann es sein, dass das Gerät mit Hilfe der Standfüße
nachreguliert werden muss.
Bitte beachten Sie unbedingt folgende Einbauhinweise: Wenn Sie Ihr Schrank in einen
Einschnitt zwischen 2 Wände, bitte notieren Sie sich folgendes:
1. Es müssen mindestens 15 cm oberhalb des Gerätes frei gehalten werden damit
das Kühlsystem ordnungsgemäß funktioniert.
2. Da der Schrank mit geöffneter Türe mehr Platz benötigt muss die Tür ausreichend
frei von der Wand platziert werden, mindestens jedoch 1,5 cm von der Scharnier/Türanschlagsseite.
3. Achten Sie auf genügend Freiraum an der Seite des Scharnier-/Türanschlages um
das Gerät reinigen und die Roste/Einlegeböden ersetzen bzw. entnehmen zu
können.
Elektrischer Anschluss
Das Gerät hat eine Spannung von 230V/50Hz.
Der Stecker muss geerdet sein. Benutzen Sie eine 10A Sicherung. Die Netzsteckdose darf
nicht in der Reichweite von Kinder sein. Sollte der Stecker nicht in die vorhandene
Netzsteckdose passen, verwenden Sie bitte einen Adapter.
Sollten Sie das Kabel ersetzen müssen benutzen Sie unbedingt ein entsprechendes
geerdetes Kabel.
Bitte beachten Sie, dass der Anschluss lediglich durch einen erfahrenen Elektriker
erfolgen darf.
Wenn der Kabel beschädigt ist sollte es bei entweder der Hersteller oder ein Service
Vertreter ersetzt werden um Gefahr zu vermeiden.
Kontrollpanel
Das Kontrollpanel befindet sich oben am Schrank. Dort befindet sich eine grüne
Kontrollleuchte sowie ein Lichtschalter. Die grüne Kontrollleuchte zeigt an sobald sich das
Page 12

Gerät in Betrieb befindet. Der Lichtschalter steuert die Funktion der Leuchtstoffröhre und
setzt das Gerät in Betrieb bzw. schaltet dieses ab (On = An / Off = Aus).
Mit Hilfe des Thermostatdrehknopfes kann die Temperatur im inneren des Gerätes
gesteuert werden. Um die Temperatur zu erhöhen drehen Sie bitte den Knopf nach links.
Zum senken der Temperatur drehen Sie bitte den Knopf nach rechts. Für
Weinkühlschränke bitte drehen Sie den Knopf nach rechts um den Temperatur zu erhöhen
und nach links um den Temperatur zu senken.
Beleuchtung
Geräte ohne Leuchtaufsatz besitzen ein Innenlicht. Bei Geräten mit Leuchtaufsatz befindet
sich neben dem Innenlicht eine weitere Lichtquelle im Leuchtaufsatz.
Wenn ein Problem entsteht mit der Leuchtstoffrohr bitte rufen Sie einen Service Vertreter
an.
Abtauen des Gerätes
Der Verdampfer abtaut automatisch. Abgetautes Wasser läuft in einen Behälter mit Hilfe
einer Tropfenzählerpfropfen bei der Kompressor und verdampft.
Reinigung und Pflege Ihres Gerätes
Schalten Sie das Gerät am Kontrollpanel aus. Stellen Sie dazu den Schalter auf die
Stellung Off (=Aus). Ziehen Sie im Anschluss den Netzstecker aus der Steckdose.
Versichern Sie sich dabei, dass die grüne Kontrollleuchte erloschen ist. Beginnen Sie erst
dann mit der Reinigung des Gerätes.
Reinigungsmittel:
Verwenden Sie eine Mischung in der Konzentration 1 Teelöffel Natrium Bicarbonat auf 0,5
Liter Wasser. Verwenden Sie keine chemischen Reinigungsmittel.
Verwenden Sie bitte stets einen weichen Schwamm um das Gerät nicht zu
verkratzen/beschädigen. Trocknen Sie im Anschluss das Gerät nach und achten Sie
darauf, dass keine Feuchtigkeit im inneren zurückbleibt.
Der Kondensor auf der Rückseite des Gerätes ist mindestens alle 6 Monate zu reinigen.
Empfehlenswert ist die Reinigung mit einer weichen Bürste oder ggf. mit dem
Staubsauger.
Wechseln des Türanschlages
Als Standard öffnet die Tür zur rechten Seite hin. Der Türgriff ist in diesem Fall links
montiert. Der Türanschlag kann verändert werden sodass er zur linken Seite hin öffnet:
* Entfernen Sie dazu bitte die Schrauben des oberen Scharniers am Gerät.
Page 13

* Heben Sie die Tür im Anschluss aus dem unteren Scharnier heraus.
* Entfernen Sie dann das obere Scharnier.
* Bohren Sie danach Löcher für den Griff an der rechten Seite und wechseln Sie den
Griff von der linken Seite zur rechten Seite.
Störungen
Falscher Anschluss sowie Gebrauch kann zu Störungen und somit zu schwerwiegenden
Problemen mit Ihrem Gerät führen.
Fehlerbehebung
Wenn der Kompressor immer noch läuft bitte überprüfen Sie folgendes:
* Liegt die Raumtemperatur über 32°C.
* Wird der Tür zu häufig geöffnet.
* Sind die Waren ordnungsgemäß platziert.
* Ist die Luftzirkulation verhindert z.B. bei größeren Sachen auf den
Rosten/Einlegeboden.
Wenn die grüne Lampe nicht leuchtet und der Schrank nicht funktioniert bitte
überprüfen Sie folgendes:
* Steht die Steckdose unter Spannung
* Ist der Stecker richtig in der Netzsteckdose
* Ist der Sicherung durchgebrannt und das Relais ist
nicht abgeschaltet.
Wenn die grüne Lampe nicht leuchtet aber der Kompressor läuft:
* Die grüne Lampe wechseln.
Wenn der Schrank eine hohe Geräusch macht:
* Bitte überprüfen Sie das der Schrank nicht der Wand berührt.
Alles richtig überprüft?
* Den Schrank für 15 Minuten abschalten (Sie können es am Thermostat machen).
Bitte wieder anmachen und überprüfen dass der Verdampfer kühlt.
Page 14

Roste laden
Wir empfehlen dass Sie das Gewicht so gleich wie möglich verteilen auf die
Roste.
Modell Kapazität (kg)
FS80CP 15
FSC1220/ FS1220/
SD1220/SCU1220/
SCU1220CP/SDU1220
55
FSC1280/ FS1280/
SCU1280/SCU1280CP/
SD1280/SDU1280
55
FSC1380/
FS1380/SCU1375/
SCU1375CP
SD1380/SDU1375
55
FSC2380/ FS2380/
SCU2375/SCU2375CP
55
BC 2000 55
FSC 1450/SCU1450CP 55
Page 15

Vigtige sikkerhedsforanstaltninger
1. Før apparatet tages i brug, bør De læse hele denne brugsanvisning igennem. Den
er kort og omfatter kun det, som De skal vide for at få det fulde udbytte af skabet.
2. Det er brugers ansvar at anvende skabet i henhold til instruktionerne.
3. Kontakt omgående forhandleren, såfremt der opstår fejl ved skabet.
4. Skabet bør ikke placeres i nærheden af varmekilder f.eks. ovn, komfur eller direkte
sollys.
5. Skabet bør stilles på et tørt sted.
6. Sæt stikket i kontakten.
7. Bemærk at alle elektriske apparater kan medføre farer.
8. Opbevar ikke eksplosionsfarlige stoffer, f.eks. gas, cigartændere, benzin æter og
lignende.
9. Skabet skal have jordforbindelse. De elektriske installationer skal foretages af en
elektriker.
10. Tænd for apparatet en time efter installation og rengøring.
11. Sørg for at alle varer i skabet er omhyggeligt indpakket.
12. Døren lukker automatisk.
13. Der er ikke brugt asbest eller CFC i konstruktionen.
14. Olien i kompressoren indeholder ikke PCB.
Kasserede apparater kan være farlige ved børns leg. Fjern derfor dørene eller
anbring det kasserede skab, så børn ikke kan komme ind i det.
Beskrivelse af flaskekøleskabet
Apparatet kan anvendes af restauranter, grønthandlere, supermarkeder,
bagerforretninger, kiosker og tankstationer. Velegnet til opbevaring af mælk,
mælkeprodukter, brød, grøntsager, juice, sodavand.
Indebeholderen er fremstillet af aluminium, isoleringen af polyurethan. Glasdøren er med
opvarmet dobbelt lag glas og aluminiumsramme. Døren lukker automatisk. Kontrolpanelet
er forsynet med lås.
DK
Page 16

Installation
Skabet leveres på en træpalle af hensyn til transporten. Fjern træpallen og anbring skabet
på et tørt sted og således, at det ikke udsættes for direkte sol eller anden varmekilde.
Det er vigtigt, at skabet står lige ved opstillingen, hvilket let sker ved hjælp af de stilbare
fødder. Skabet må ikke hvile mod mur i hængselsiden.
Hvis skabet anbringes på et tæppe eller trægulv, bør det justeres igen efter et stykke tid,
da der er mulighed for sætning i blødt underlag.
Hvis skabet bygges ind i skab eller lignende, er man nødt til at tage hensyn til
følgende:
1. Der skal være en passende luftsprække over flaskekøleskabet for at kølesystemet
kan fungere tilfredsstillende.
2. Når døren åbnes fylder flaskekøleskabet mere i bredden, således at døren enten
skal være placeret fri af væggen, eller skabet sal have mindst 1½ cm luft til den
side, hvor døren er hængslet.
3. Afstand til vægge o.lign. i hængselsiden skal være af passende størrelse, så man
kan udskifte hylder og rengøre ved hængslet.
Elektriske forbindelser
Køleskabet kører ved 220-240V/50Hz.
Stikket skal have jordforbindelse. Der anvendes en 10A sikring. Såfremt stikket ikke
passer, anvendes en omformer. Såfremt man udskifter ledningen, skal der anvendes en
ledning med jord. Installationen af et nyt stik skal foretages af en servicemontør eller en
autoriseret el-installatør.
De elektriske installationer skal foretages af autoriseret el-installatør.
Hvis ledningen er beskadiget skal den udskiftes af producenten eller en servicemontør for
at undgå farlige situationer.
Ekstra beskyttelse
Dette apparat skal ekstra beskyttes ifølge stærkstrømsreglementet. Dette gælder også,
selvom der er tale om udskiftning af et eksisterende apparat, der ikke har været ekstra
beskyttet. Formålet med ekstra beskyttelse er at beskytte brugeren mod farlige elektriske
stød i tilfælde af fejl.
I boliger opført efter 1. april 1975 vil alle stikkontakter i køkken og eventuelt bryggers være
omfattet af en ekstra beskyttelse. I boliger opført før 1975 er ekstra beskyttelsen i orden,
hvis der er installeret HFI-afbryder, som omfatter den stikkontakt, apparatet skal forbindes
til. I begge disse tilfælde skal der, hvis stikkontakten er for trebenet stikprop, benyttes en
Page 17

trebenet stikprop, og lederen med grøn/gul isolation skal tilsluttes jordklemmen (mærket),
hvis stikkontakten kun er for tobenet stikprop. Hvis brugeren selv monterer denne, skal
lederen med grøn/gul isolation klippes af så tæt som muligt på det sted, hvor ledningen
går ind i stikproppen. I alle andre tilfælde bør De lade en autoriseret el-installatør
undersøge, hvordan De nemmest får ekstra beskyttet apparatet. Elektricitetsrådet
anbefaler, at den krævede ekstra beskyttelse udføres med HFI-afbryder.
Kontrolpanel
Kontrolpanelet er placeret i toppen af skabet. Panelet er forsynet med grøn kontrollampe
og lyskontakt. Den grønne lampe er tændt, når skabet er tilsluttet. Lyskontakten tænder og
slukker lyset i skabet.
Termostatknappen regulerer temperaturen i skabet. Termostatknappen drejes til venstre
for at øge temperaturen og til højre for at reducere temperaturen. I vinkøleskabene drejes
termostatknappen til højre for at øge temperaturen og til venstre for at reducere
temperaturen.
Lysarmatur
Skabet med canopy (lysskilt i toppen) er forsynet med lys i canopyen og indvendigt i
skabet. Lysstofrøret kan udskiftet ved at fjerne afdækningen.
Hvis der opstår problemer med lysstofrøret, ring da venligst til en servicemontør.
Afrimning
Fordamperen afrimes automatisk. Tøvandet ledes ud til fordampning i en plastbeholder,
der er placeret oven på kompressoren.
Vedligeholdelse og rengøring
Afbryd skabet og tag stikket ud. Indvendig rengøring bør foretages med uparfumeret
opvaskemiddel, brug en blød svamp. Tør skabet af indvendigt.
For at køleskabet kan fungere optimalt må trådkondensator og kompressor på skabets
bagside 1 gang hvert halve år rengøres med børste eller støvsuger. Husk også at rengøre
afløbsrenden.
Ændrig af hængselside
Skabet er hængslet i højre side (dørhåndtaget sider til venstre). Døren kan vendes
således at skabet hængsles i venstre side. Følgende foretages:
* Fjern skruerne der fæstner tophængslet
* Løft døren af bundhængslet
* Fjern bundhængslet
* Vend døren og anbring den i hængslerne
Page 18

Fejlfinding
Såfremt skabet ikke er korrekt installeret eller ikke bruges korrekt, kan der opstå
problemer.
Såfremt kompressoren kører hele tiden undersøg følgende:
* at rumtemperaturen ikke er over 32°C
* at døren ikke åbnes for hyppigt
* at varerne er placeret hensigtsmæssigt så der sker en luftcirkulation
Såfremt den grønne lampe er slukket og køleskabet ikke kører undersøg følgende:
* at der er tændt ved kontakten
* at stikket er i kontakten
* at sikringen ikke er sprunget eller HFI-relæet slået fra
Såfremt den grønne lampe er slukket men kompressoren kører
* udskift den grønne lampe
Såfremt køleskabet giver høje lyde
* undersøg at skabet ikke berører væggen
Såfremt døren ikke kan åbnes
* døren kan ikke åbnes umiddelbart efter den er blevet lukket, idet gummilisten laver
vakuum. Vent et par minutter med at åbne døren. Når trykket er udlignet, kan
døren åbnes.
Sluk for skabet evt. på termostaten i 15 min. Tænd igen og efter yderligere 5 min. se da
efter om der er rimdannelser på fordamperen.
Page 19

Hyldekapacitet
Vi anbefaler at man fordeler vægten så ligeligt som muligt på hylderne.
Model Kapacitet (kg)
FS80CP 15
FSC1220/ FS1220/
SD1220/SCU1220/
SCU1220CP/SDU1220
55
FSC1280/ FS1280/
SCU1280/SCU1280CP/
SD1280/SDU1280
55
FSC1380/
FS1380/SCU1375/
SCU1375CP
SD1380/SDU1375
55
FSC2380/ FS2380/
SCU2375/SCU2375CP
55
BC 2000 55
FSC 1450/SCU1450CP 55
Page 20

Precauciones importantes de seguridad
1. Lea cuidadosamente las instrucciones y manténgalas guardadas.
2. Es responsabilidad del usuario utilizar el armario de acuerdo con estas
instrucciones.
3. Contacte con su distribuidor inmediatamente ante cualquier fallo en el
funcionamiento del armario.
4. No debe situar el armario próximo a fuentes de calor, por ejemplo, horno, cocina o
luz solar directa.
5. Debe situar el armario en un lugar seco.
6. Ponga el cable principal en un enchufe con el voltaje indicado.
7. Tenga en cuenta que todos los aparatos eléctricos pueden originar algún peligro.
8. No guardar productos combinados con agentes o gases propelentes
(expendedores de nata, sprays) ni con materias explosivas en el aparato. Existe
peligro de explosión!
9. Conecte la unidad a una red eléctrica de corriente alterna de 230 V/50 Hz a través
de una toma de corriente instalada reglamentariamente. Necesita conexión de
toma de tierra. La conexión principal debe ser hecha por profesionales electricistas.
10. Tras instalar y limpiar el aparato espere aprox. 1 hora antes de conectarlo.
11. Asegúrese de que todas las mercancías almacenadas en el armario estén
empaquetadas minuciosamente.
12. La puerta se cierra automáticamente. No tiene cerradura. Puede ser abierta
fácilmente.
13. Declaramos que no se utiliza ningún asbesto ni ningunos CFC en la construcción.
14. El aceite en el compresor no contiene el PWB.
Si el armario no se usa por un período de tiempo prolongado, quite la puerta antes
de desechar con el fin de prevenir que los niños entren en el armario y cualquier
riesgo para sus vidas.
Instalación
El armario se entrega con pallet de madera para asegurar el transporte. Retire el pallet
y sitúe el armario en posición vertical. Es muy importante que el armario esté nivelado
a la hora del montaje. Esto se hace fácilmente con ayuda del los pies ajustables.
E
Page 21

Coloque el armario tal y como se ha descrito siguiendo las instrucciones de seguridad.
Cuando el armario está situado en una alfombra o suelo de madera, se necesita
nivelar otra vez después de algún tiempo, ya que hay posibilidad de asentarse en base
flexible.
Si se instala el armario en un hueco entre paredes o algo parecida, necesita
considerar lo siguiente:
1. Debe haber al menos 15 cm. De espacio libre sobre el armario con el fin de que el
sistema de refrigeración pueda funcionar satisfactoriamente.
2. Cuando se abre la puerta, la anchura del armario se extiende, por eso la puerta
debe estar situada libre de la pared o el armario debe tener min. 1 ½ cm. de aire
en el lado de la bisagra.
3. Debe haber suficiente espacio en la parte de la bisagra para limpiar y recolocar los
estantes de varilla.
Conexiones eléctricas
El armario funciona con voltaje 230V/50Hz.
La clavija necesita conexión de toma de tierra. Se usa un fusible de 10A. El enchufe debe
estar fuera del alcance de los niños. En caso de que la clavija no vaya bien emplee un
transformador. La instalación de una clavija nueva debe ser hecha por un agente servicio
ó un instalador de electricidad autorizado.
En caso de cambio de cable debe usar uno que tenga conexión de toma de tierra.
La instalación eléctrica principal debe ser hecha por un instalador de electricidad
autorizado.
Sí el conductor está dañado debe ser cambiado por el productor ó en agente servicio para
evitar peligro.
Panel de control
El panel de control está situado en la parte de arriba del armario. El panel de control tiene
un piloto verde y un interruptor. El piloto verde se ilumina cuando el armario está en
funcionamiento. El interruptor enciende y apaga la luz en el armario.
El botón de termostato regulariza la temperatura en el armario. Gire el botón a la izquierda
para aumentar la temperatura y a la derecha para reducirla. Para el armario del vino gire
el botón a la derecha para aumentar la temperature y a la izquierda para reducirla.
Iluminación interior
El armario con canopy (muestra de luz arriba) está equipado con luz en el canopy y en el
interior del armario.
Page 22

Si hay alguno problema con el tubo fluorescente pro favor llamar un agente servicio.
Descongelación.
El evaporador descongela automáticamente. El agua derivada del proceso de
descongelación va a un recipiente de plástico, que está situado arriba del compresor y se
evapora.
Mantenimiento y limpieza.
Desconecte el armario y quite la manija del enchufe. Limpie el interior del armario con una
solución de una cucharadita de bicarbonato por medio litro de agua templada. Utilice una
esponja suave. No use productos químicos. Seque el interior después de la limpieza.
Se recomienda limpiar el condensador de la parte trasera del armario con un cepillo suave
o aspirador de polvo al menos cada seis meses. Recuerde limpiar también el sistema de
desagüe.
Cambio de lado de las bisagras.
De forma standard la puerta del armario abre hacia la derecha (el mango de la puerta está
a la izquierda). La puerta puede montarse para abrirse a la izquierda. Las instrucciones
son las siguientes:
* Desenrosque los tornillos que fijan la bisagra superior al armario.
* Libere la puerta de la bisagra inferior.
* Quite la bisagra de abajo.
* Haga agujeros para el mango en la parte derecha y trasládelo de la parte izquierda a
la derecha.
Encontrar errores
Una instalación incorrecta y un uso inadecuado pueden causar problemas.
En caso de que el compresor no funcione investigar lo siguiente:
* La temperatura de la habitación no es superior a 32 ºC.
* La puerta no está abierta con frecuencia.
* Las mercancías están situadas de forma apropiada.
* La circulación del aire no está obstaculizada por bultos grandes en los estantes.
En caso de que el piloto verde esté apagado y el armario no funcione, compruebe lo
siguiente:
* El interruptor está encendido.
* La manija esté en el enchufe.
* El fusible no se ha fundido o el disyuntor de alta sensibilidad no está desconectado.
Page 23

En caso de que el piloto verde esté pagado, pero el compresor funcione:
* Cambie el piloto verde
En caso de que el armario haga ruido alto:
* Tener en cuenta que el armario no toque la pared.
En caso de que no pueda abrir la puerta:
* La puerta no se abre inmediatamente después de cerrar ya que la faja de goma
produce un vacío. Espere unos minutos e inténtelo de nuevo. La puerta se abrirá
cuando la presión interna esté igualada.
¿Todas las comprobaciones están hechas?
* Apague el armario durante 15 minutos (pude hacerlo con el termostato). Encienda
otra vez y compruebe que el evaporador está enfriando.
Capacidad de los estantes
Recomendamos que se distribuye el peso de los estantes en una forma
uniforme
Modelo Capacidad (kg)
FS80CP 15
FSC1220/ FS1220/
SD1220/SCU1220/
SCU1220CP/SDU1220
55
FSC1280/ FS1280/
SCU1280/SCU1280CP/
SD1280/SDU1280
55
FSC1380/
FS1380/SCU1375/
SCU1375CP
SD1380/SDU1375
55
FSC2380/ FS2380/
SCU2375/SCU2375CP
55
BC 2000 55
FSC 1450/SCU1450CP 55
Page 24

Instructions de sécurité importantes
1. Avant d'utiliser votre armoire, nous vous recommandons de lire ce mode
d'emploi dans son entier. Il est bref et porte ce que vous avez besoin de savoir
pour tirer le meilleur parti de votre armoire.
2. C’est la responsabilité de l’utilisateur de manier l’appareil selon les instructions
données.
3. Contacter votre revendeur immédiatement en cas de défauts de
fonctionnement.
4. L'armoire doit être placée dans un endroit sec et de manière à ne pas être
exposée aux rayons du soleil ou à tout autre source de chaleur.
5. Brancher l’armoire par une prise avec la tension indiquée sur la plaque
signalétique à l’intérieur de l’armoire.
6. N’oublier pas que tous les appareils électriques sont des sources de danger
potentiel
7. Ne conserver pas et n’utilisez pas des produits qui pourraient provoquer des
explosions ou qui sont inflammables, tels que gaz, briquets, essence, éther
etc. dans l’armoire.
8. N’utiliser que des produits non-toxiques et non-polluants dans l’armoire.
9. L’armoire doit avoir une prise de terre. Les installations électriques doivent être
effectués par un électricien spécialisé.
10. Démarrer l’appareil une heure après l’installation et le nettoyage.
11. Aucune asbeste ou CFC est utilisée dans la construction de l’armoire.
12. L’huile dans le compresseur ne contient pas de PCB
Les armoires mises au rebut peuvent être dangereuses pour les enfants ; il convient donc
d'en ôter les portes ou de placer l'armoire au rebut de telle manières, que les enfants ne
puissent pas y pénétrer.
Installation
L’armoire est livrée avec une palette en bois afin de l’assurer pendant le transport. Enlever
la palette et placer l’armoire d’une position verticale. Lors de la mise en place, l'armoire
doit être de niveau, ce qui s'obtient aisément grâce aux pieds réglables à l'avent du socle.
S'il est installé sur un tapis ou un plancher en bois, il convient de s'assurer au bout de
quelque temps qu'il est toujours de niveau, car il y a risque de tassement sur une assise
molle.
Si vous voulez installer l’armoire dans un placard ou similaire, il faut tenir compte des
points suivants :
1. Il faut au minimum 15 cm d’espace au-dessus de l’armoire afin que le système
frigorifique peut functionner de façon satisfaisante.
2. L'armoire ne doit pas être appuyé contre un mur du côté charnières. Il faut au
minimum 1½ cm d’espace.
3. Il faut assez d’espace autour de l’armoire pour pouvoir nettoyer et remplacer les
clayettes.
F
Page 25

Branchement èlectrique
L'armoire est branchée par une prise qui doit avoir la tension de 230-240V/50Hz.
L’armoire doit être branché sur une prise reliée à la terre. Utiliser un plomb 10A. Si la fiche
ne convient pas, utiliser un transformateur. Le montage d’une fiche propre doit être
effectué par un monteur ou un technicien instruit.
La plaque signalétique placée à l'interieur comporte divers renseignements techniques
ainsi que le numéro de modèles et de série.
Si vous avez besoin de remplacer le cable d’alimentation, utiliser une prise reliée à la
terre.
Les installations électriques doivent être effectués par un électricien spécialisé.
Dans le cas où le cable serait endommagé il serait à remplacer par le vendeur ou un
monteur afin d’éviter des accidents.
Panneau de contrôle
Le panneau de contrôle est plaçé en haut de l’armoire. Il est équipé d’une lampe de
contrôle verte et d’un commutateur. La lampe verte est allumée quand l’armoire est
branchée. Le commutateur contrôle la lumière dans l’armoire.
Le bouton de thermostat régle la température à l’intérieur de l’armoire. Le bouton est
tourné à gauche pour augmenter la température et à droit pour la reduire. Concernant les
caves à vin, tourner le bouton anti-montre pour reduire la témpérature et par montre pour
l’arrêter.
Top lumineux
L’armoire avec canopy (top lumineux) est équipée de lumière dans le canopy et à
l’intérieur de l’armoire. On peut remplacer le tube au néon par enlever le dévoilement.
En cas des problèmes avec la lumière fluorescente veuillez appeler le monteur.
Dégivrage
L'évaporateur de l'armoire se dégivre automatiquement. L'eau de dégivrage est évacuée
et s'évapore dans un récipient placé au-dessus du compresseur.
Entretien
Le nettoyage des parois intérieures doit être effectué à l'aide d'un produit à vaisselle non
parfumé.
Page 26

Retirer éventuellement le panneau supérieur et le laver en même temps que les parois
intérieures. Mettre l'armoire hors circuit pendant le nettoyage et la débrancher. Le
panneau intérieur peut s'enlever, ce qui permet de passer l'aspirateur en-dessous.
Pour un fonctionnement optimal du système refrigération le fil condensateur et le
compresseur situés à l'arrière de l'armoire devront être nettoyés avec brosse ou aspirateur
de temps en temps. Ne pas oublier de nettoyer le bac d'écoulement.
Changement de côte des charnières
Si les charnières de porte doivent être changées de droite à gauche, il faut proceder
comme suit:
* demonter les vis pour le charnière en haut
* relever la porte de charnière de la porte
* relever la porte de charnière inférieure
* relever la charnière inférieure
* inverser la porte et mettre en position
En cas de panne
Si le compresseur ne s’arrête jamais, vérifier :
* Que la température environnante ne dépasse pas 32°C
* Que la porte n’est pas ouverte plus que nécessaire
* Que la circulation d’air n’est pas entravée par des articles trop grands sur les
clayettes.
Si la lampe verte est éteint et l’armoire ne marche pas, vérifier :
* Que la fiche est bien enfoncée
* Que la fusible est intact
* Qu'il n'y a pas de coupure de courant
Si la lampe verte est éteint, mais le compresseur marche :
* Remplacer la lampe verte.
Si l’armoire fait du bruit :
* Verifier que l’armoire ne touche pas le mur.
Mettez l'armoire hors circuit, éventuellement au thermostat pendant 15 min. Remettre en
circuit et au bout de 5 min. vérifier s'il y a formation de givre sur l'évaporateur.
Page 27

Chargement des clayettes :
Nous recommandons de charger regulièrement les clayettes
Modelo Capacite(kg)
FS80CP 15
FSC1220/ FS1220/
SD1220/SCU1220/
SCU1220CP/SDU1220
55
FSC1280/ FS1280/
SCU1280/SCU1280CP/
SD1280/SDU1280
55
FSC1380/
FS1380/SCU1375/
SCU1375CP
SD1380/SDU1375
55
FSC2380/ FS2380/
SCU2375/SCU2375CP
55
BC 2000 55
FSC 1450/SCU1450CP 55
Page 28

Σηµαντικες οδηγιες ασφαλειας
1. Παρακαλώ διαβάστε και φυλάξτε προσεκτικά αυτές τις οδηγίες.
2. 2)Ο χρήστης είναι υπεύθυνος να χειριστεί αυτή την συσκευή σύµφωνα µε τις
δοθείσες οδηγίες.
3. 3)Επικοινωνήστε µε τον προµηθευτή σας σε περίπτωση κακοτεχνιών.
4. 4)Κρατείστε το ψυγείο µακριά από πηγές έκκλησης δυνατής θερµότητας π.χ.
φούρνοι, µαγειρία και αποφύγετε µε κάθε τρόπο την απευθείας έκθεσή του στον
ήλιο.
5. 5)Τοποθετείστε το ψυγείο σε ξηρό µέρος.
6. 6)Συνδέστε τα κεντρικά καλώδια σε µια πρίζα τάσης ίδιας µε αυτή που
υποδεικνύεται στην ετικέτα των χαρακτηριστικών του ψυγείου.
7. 7)Να έχετε πάντα υπόψη σας ότι όλες οι ηλεκτρικές συσκευές αποτελούν πηγές
πιθανού κινδύνου.
8. 8)Μην χρησιµοποιείτε εύφλεκτα υλικά όπως διαλυτικό, βενζίνη κλπ..
Χρησιµοποιείστε µόνο υλικά που δεν έχουν δηλητηριώδη ή δύσοσµα
αποτελέσµατα.
9. 9)Αυτή η συσκευή θα πρέπει να είναι γειωµένη. Οι κύριες ηλεκτρικές συνδέσεις θα
πρέπει να γίνουν από ειδικευµένους ηλεκτρολόγους.
10. 10)Θέσετε σε λειτουργία το ψυγείο µια ώρα µετά την εγκατάσταση και τον
καθαρισµό.
11. 11)Πάντα να βεβαιώνεστε ότι τα προϊόντα που φυλάσσετε στο ψυγείο είναι
συσκευασµένα προσεκτικά.
12. 12)Η πόρτα κλείνει µαγνητικά. ∆εν χρησιµοποιείται κλειδαριά. Μπορεί εύκολα να
ανοιχτεί.
13. ∆ηλώνουµε ότι κανένας αµίαντος ούτε οποιοδήποτε CFC δεν χρησιµοποιείται στην
κατασκευή.
14. Το πετρέλαιο στο συµπιεστή δεν περιέχει το PCB.
Αν το ψυγείο δεν χρησιµοποιείται πλέον, αφαιρέστε την πόρτα πριν το πετάξετε, ώστε να
µην καταστεί δυνατόν να κλειστούν παιδιά µέσα στην καµπίνα, διακυνδινεύοντας την ζωή
τους.
ελληνικα
Page 29

Εγκατασταση
Το ψυγείο είναι εφοδιασµένο µε µια ξύλινη παλέτα για ασφαλή µεταφορά. Αφαιρέστε την
παλέτα και τοποθετείστε το σε ορθή θέση, ευθυγραµµίζοντάς το µέσω των ρυθµιζόµενων
βιδών στην βάση . Ελέγξτε µε ένα αλφάδι.
Τοποθετείστε το ψυγείο όπως περιγράφεται στις οδηγίες ασφαλείας.
Όταν το ψυγείο τοποθετηθεί πάνω σε χαλί ή σε ξύλινο πάτωµα πιθανόν να απαιτηθεί
επαναρρύθµιση.
Εάν θέλετε να εγκαταστήσετε το ψυγείο σε κάποιο κενό µεταξύ τοίχων, λάβετε υπόψη σας
τα εξής :
1. Θα πρέπει να υπάρχει τουλάχιστον 15 εκατοστά ελεύθερος χώρος πάνω από το
ψυγείο, έτσι ώστε το ψυκτικό σύστηµα να δουλεύει ικανοποιητικά.
2. Από τη στιγµή που το ψυγείο καταλαµβάνει περισσότερο χώρο σε φάρδος όταν η
πόρτα είναι ανοιχτή, η πόρτα θα πρέπει είτε να είναι µακριά από τοίχο, είτε -εάν
υπάρχει τοίχος- θα πρέπει να υπάρχει απόσταση ελεύθερη από τον µεντεσέ της
πόρτας τουλάχιστον 1,5 εκ.
3. Θα πρέπει να υπάρχει αρκετός ελεύθερος χώρος στην πλευρά των µεντεσέδων
για να καθαρίζονται και να αντικαθίστανται τα ράφια
Ηλεκτρικες συνδεσεις
Το ψυγείο σας λειτουργεί σε 230V/50Hz.
Η πρίζα θα πρέπει να είναι γειωµένη . Χρησιµοποιήστε µια ασφάλεια 10 Α . Η πρίζα θα
πρέπει να βρίσκεται µακριά από παιδιά. Εάν η υποδοχή τοίχου δεν ταιριάζει µε την πρίζα,
χρησιµοποιήστε µία σωστή προέκταση.
Εάν χρειαστεί να αντικαταστήσετε το καλώδιο, χρησιµοποιήστε γειωµένο. Οι κύριες
ηλεκτρικές συνδέσεις θα πρέπει να γίνουν από ειδικευµένους ηλεκτρολόγους.
Εάν το καλώδιο τροφοδοσίας καταστραφεί θα πρέπει να αντικατασταθεί από το service
της αντιπροσωπίας ή από εξειδικευµένο τεχνικό, προς αποφυγή ζηµιών.
Πινακας ελεγχου
Ο πίνακας ελέγχου βρίσκεται στην οροφή του ψυγείου. Ο πίνακας ελέγχου έχει ένα
πράσινο λαµπάκι και ένα διακόπτη φωτός. Το πράσινο λαµπάκι είναι αναµµένο όταν ο
καταψύκτης είναι συνδεδεµένος µε το ρεύµα. Ο διακόπτης φωτός ελέγχει την on/of
λειτουργία της λάµπας φθορίου.
Ο θερµοστάτης ελέγχει την θερµοκρασία στο ψυγείο. Γυρίστε τον διακόπτη προς τα δεξιά
για να για να µειώσετε τη θερµοκρασία και προς τα αριστερά για να αυξήσετε την
θερµοκρασία, ή να διακόψετε τελείως τη λειτουργία του ψυγείου. Παρόλα αυτά ο
καταψύκτης είναι ακόµα συνδεδεµένος µε το ρεύµα και το πράσινο φως είναι ακόµα
αναµµένο.
Για τη ρύθµιση της θερµοκρασίας του ψυγείου κρασιού – βλέπε ξεχωριστό παράρτηµα.
Page 30

Εάν παρουσιαστεί κάποιο πρόβληµα στις λάµπες φθορισµού παρακαλώ καλέστε τεχνικό.
Φωτισµος
Τα µοντέλα χωρίς µετώπη είναι εξοπλισµένα µε εσωτερικό φωτισµό και τα µοντέλα µε
µετώπη είναι εξοπλισµένα µε εσωτερικό φωτισµό και φωτισµό µετώπης.
Για να αλλάξετε την εσωτερική λάµπα φθορίου, µετακινείστε το διαφανές προστατευτικό
κάλυµµα.
Αποψυξη
Το στοιχείο ψύξης αποψύχεται αυτόµατα διαλύοντας τη συσσώρευση πάγου. Το νερό της
απόψυξης ρέει µέσω µίας διόδου προς ένα δοχείο στο χώρο του συµπιεστή και
εξατµίζεται.
Συντηρηση και καθαρισµος
Σβήστε το ψυγείο και βγάλτε την πρίζα . Καθαρίστε το εσωτερικό του ψυγείου µε ένα
διάλυµα αποτελούµενο από µια κουταλιά σόδα και µισό λίτρο χλιαρό νερό.
Χρησιµοποιήστε ένα µαλακό σφουγγάρι . Μην χρησιµοποιείτε χηµικά καθαριστικά.
Στεγνώστε το εσωτερικό του ψυγείου αφού το καθαρίσετε.
Προτείνεται να καθαρίζετε το κοντεσερ στο πίσω µέρος του ψυγείου χρησιµοποιώντας µια
µαλακή βούρτσα ή µια ηλεκτρική σκούπα, τουλάχιστον κάθε 6 µήνες. Επίσης θα πρέπει να
καθαρίζετε το σύστηµα αποβολής του νερού της απόψυξης.
Αναστροφη ανοιγµατος της πορτας
Η πόρτα του ψυγείου ανοίγει προς την δεξιά πλευρά (το χερούλι της πόρτας βρίσκεται στα
αριστερά). Η πόρτα µπορεί να γυρίσει έτσι ώστε να ανοίγει προς την αριστερή πλευρά. Οι
οδηγίες δίνονται παρακάτω :
* Αφαιρέστε τις βίδες απελευθερώνοντας τον επάνω µεντεσέ της πόρτας
* Σηκώστε την πόρτα απελευθερώνοντας τον κάτω µεντεσέ
* Αφαιρέστε τον κάτω µεντεσέ
* Τοποθετήστε κατα σειρά τον κάτω µεντεσέ, την πόρτα και τέλος τον επάνω µεντεσέ
στην αριστερή πλευρά της κάσας της πόρτας.
* Με ένα τρυπάνι ανοίξτε τρύπες για το χερούλι της πόρτας στην δεξιά µεριά της
πόρτας και τοποθετήστε εκεί το χερούλι
Αντιµετωπιση προβληµατων
Η λανθασµένη εγκατάσταση και η µη ορθή χρήση µπορεί να προκαλέσει προβλήµατα στο
ψυγείο σας.
Εαν ο συµπιεστης λειτουργει συνεχοµενα, ελεγξτε τα ακολουθα :
* Ότι η θερµοκρασία δωµατίου δεν είναι πάνω από 32ο C.
* Ότι η πόρτα δεν ανοίγει συχνά.
Page 31

* Ότι τα προϊόντα είναι τοποθετηµένα µε κατάλληλο τρόπο.
* Ότι η κυκλοφορία του αέρα δεν περιορίζεται από µεγάλα αντικείµενα στα ράφια.
Εαν το πρασινο λαµπακι ειναι σβηστο και το ψυγειο δεν δουλευει, ελεγξτε τα
ακολουθα :
* Ότι το ηλεκτρικό ρεύµα τροφοδοτεί την πρίζα.
* Ότι η πρίζα είναι συνδεδεµένη.
* Ότι δεν έχει καεί κάποια ασφάλεια και ότι το ρελέ προστασίας είναι εντός
Εαν το πρασινο λαµπακι ειναι σβηστο αλλα ο συµπιεστης λειτουργει :
* Αντικαταστήστε το πράσινο λαµπάκι.
Εαν το ψυγειο κανει ενα δυνατο θορυβο
* Ελέγξτε ότι το ψυγείο δεν ακουµπάει στον τοίχο.
Ολοι οι ελεγχοι εχουν γινει σωστα:
* Σβήστε το ψυγείο για 15 λεπτά (µπορείτε να το κάνετε κλείνοντας τον θερµοστάτη).
Βάλτε το σε λειτουργία πάλι και ελέγξτε εάν το στοιχείο ψύξης ψύχεται.
Γέµισµα των ραφιών
Προτείνουµε το γέµισµα των ραφιών να γίνεται όσο το δυνατόν πιο
ισοκατανεµηµένα.
Τυπος
Χωρητικοτητα
(kg)
FS80CP 15
FSC1220/ FS1220/
SD1220/SCU1220/
SCU1220CP/SDU1220
55
FSC1280/ FS1280/
SCU1280/SCU1280CP/
SD1280/SDU1280
55
FSC1380/
FS1380/SCU1375/
SCU1375CP
SD1380/SDU1375
55
FSC2380/ FS2380/
SCU2375/SCU2375CP
55
BC 2000 55
FSC 1450/SCU1450CP 55
Page 32

Belangrijke veiligheidsinstructie
1. Lees deze instructie zorgvuldig en bewaar ze.
2. Het is gebruiker zijn verantwoordelijkheid om dit meubel te gebruiken volgens deze
instructies.
3. Neem direct contact op met uw dealer in het geval van storingen.
4. Houd het koelmeubel uit de buurt van warmte bronnen als ovens en verwarmingen
en stel het meubel niet bloot aan direct zonlicht.
5. Plaats het meubel in een droge omgeving.
6. Gebruik voor de stekker alleen in een stopcontact met de aangegeven voltage.
7. Houd er altijd rekening mee dat alle elektrische apparaten bronnen kunnen zijn van
eventueel gevaar.
8. Gebruik geen brandbare stoffen als bijv. thinner en benzine. Gebruik alleen stoffen
die niet sterk ruiken en/of giftig zijn.
9. Dit meubel moet geaard zijn. De primaire voeding dient door een geschoolde
elektricien aangelegd te zijn.
10. Zet het koelmeubel pas aan, een uur na de installatie en reiniging.
11. Zorg er altijd voor dat de goederen die in het meubel bewaard worden goed verpakt
zijn.
12. De deuren sluiten magnetisch. Ze zitten niet op slot zodat de deuren eenvoudig te
openen zijn.
13. Wij verklaren dat geen asbest noch om het even welke CFC in de bouw wordt
gebruikt.
14. De olie in de compressor bevat geen PCB
Als de koelkast niet langer gebruikt kan worden, verwijder dan de deur voor
dat de kast gesloopt gaat worden zodat kinderen zich er niet in kunnen
opsluiten en zo hun leven in gevaar kunnen brengen.
Installatie
De koelkast wordt op een pallet geleverd om veilig te kunnen transporteren. Verwijder
deze pallet en zet de kast recht op, met de verstelbare poten dient u de kast waterpas te
zetten.
NL
Page 33

Plaats het meubel volgens de veiligheidsinstructie.
Als het meubel wordt geplaatst op tapijt of een houten vloer is het mogelijk dat u het
meubel nogmaals waterpas moet stellen.
Als u het meubel in een sparing plaatst, dient u op het volgende te letten:
1. Er dient ten minste 15 cm vrije ruimte boven de kast te zijn, zodat het koelsysteem
naar behoren kan werken.
2. Omdat de kast meer ruimte in de breedte inneemt indien de deur geopend wordt,
dient de deur buiten de sparing te vallen of tenminste 1,5 cm vrije ruimte te hebben
aan de scharnier zijde.
3. Er dient voldoende ruimte te zijn om de draadschappen uit te kunnen wisselen en/of
schoon te kunnen maken. (zie figuur 6).
Elektrische verbindingen
Uw koelkast werkt op 230V/50Hz.
De stekker dient geaard te zijn (10A zekering). Het stopcontact dient buiten bereik van
kinderen te zijn. Als de stekker niet in het stopcontact past dient u een verloopstekker te
gebruiken.
Als het aansluitsnoer vervangen dient te worden gebruik dan een geaarde stekker.
De primaire voeding dient door een geschoolde elektricien aangelegd te zijn.
Indien het aansluitsnoer is beschadigd, dient dit door de leverancier of aangeweze
service agent vervangen te worden. Dit om problemen te voorkomen
Controle paneel
Het controle paneel bevindt zich aan de bovenzijde van de koelkast. Op het paneel zit een
groen lampje en een lichtschakelaar. Het groene lampje brand als de stekker in het
stopcontact zit. De lichtschakelaar dient om de TL buis aan en uit te doen.
De thermostaat knop bevindt zich op de kap van de ventilator, aan de binnenzijde van de
koelkast en regelt de temperatuur. Draai de knop naar links om de temperatuur te
verlagen en indien naar rechts gedraaid, stopt de koeling. Echter de koelkast is nog steeds
aangesloten zodat het groene lampje wel blijft branden. Voor wijnkoelkasten, draai de
thermostaatknop tegen de klok in om de temperatuur te verlagen. Indien u met de klok
mee draait stopt het.
Page 34

Verlichting
De modellen zonder lichtkoof hebben binnenverlichting en de modellen met lichtkoof
hebben binnenverlichting en koofverlichting.
Om de TL buis te vervangen dient de transparante plastic beschermkap verwijderd te
worden.
Als er problemen ontstaan bij de TL verlichting dient u een service dienst te bellen
Ontdooiing
De verdamper ontdooit automatisch. Lekwater druppelt in een container in de compressor
ruimte en verdampt automatisch.
Onderhoud en reinigen
Zet de koelkast uit en haal de stekker uit het stopcontact. Reinig het interieur met een
oplossing van een theelepel sodium bicarbonate op ½ liter warm water. Gebruik een
zachte spons. Gebruik geen chemische reinigingsmiddelen. Droog de binnenkant van de
koelkast na het reinigen.et is aan te raden om de condensor aan de achterzijde van de
kast, elke 6 maanden met een zachte borstel of stofzuiger schoon te maken. Het
lekwatersysteem dient ook schoongehouden te worden.
Deur draairichting
Standaard is de deur rechts afgehangen (de deurgreep zit dus links) De deur kan
omgebouwd worden naar linksdraaiend. De instructie daarvoor is als volgt:
* Draai de schroeven los, die het topscharnier vasthouden.
* Til de deur vrij van het onderste scharnier.
* Demonteer het onderste scharnier.
* Boor gaten voor de deurgreep aan de rechterzijde van de deur.
* Monteer de scharnieren weer op dezelfde manier aan de rechterzijde.
Storingen
Incorrecte installatie en gebruik kunnen storingen van uw koelkast tot gevolg hebben.
Als de compressor continue blijft lopen controleer het volgende:
* Is de omgevingstemperatuur niet hoger dan 32°C
* Wordt de deur niet al te vaak geopend
* Zijn de producten op de juiste manier geplaatst
* Wordt de luchtcirculatie niet gehinderd door grote items op de schappen.
Page 35

Als het groene lampje uit is en de koelkast werkt niet. Controleer het volgende:
* Staat de stroom aan
* Zit de stekker in het stopcontact
* Is er geen zekering kapot
Als het groendelampje uit is maar de compressor draait wel.
* vervang het groene lampje
Als de koelkast een luid geluid maakt
* controleer of de koelkast niet tegen de muur staat
Als de deur niet open wil
* De deur wil niet direct open na het sluiten. Het deurrubber creëert nl. een onderdruk.
Wacht even een paar minuten en probeer het dan nogmaals. De deur wil weer open
als de luchtdruk weer gelijk is.
Alle checks correct uitgevoerd?
* Zet de koelkast uit voor 15 minuten (kunt u doen d.m.v. de thermostaatknop) zet
dekoelkast weer aan en check of de verdamper weer koud wordt.
Belading van de schappen
Wij raden u aan om de schappen zo gelijkmatig mogelijk te beladen
Modelo Capaciteit (kg)
FS80CP 15
FSC1220/ FS1220/
SD1220/SCU1220/
SCU1220CP/SDU1220
55
FSC1280/ FS1280/
SCU1280/SCU1280CP/
SD1280/SDU1280
55
FSC1380/
FS1380/SCU1375/
SCU1375CP
SD1380/SDU1375
55
FSC2380/ FS2380/
SCU2375/SCU2375CP
55
BC 2000 55
FSC 1450/SCU1450CP 55
Page 36

 Loading...