

Page 1

Important
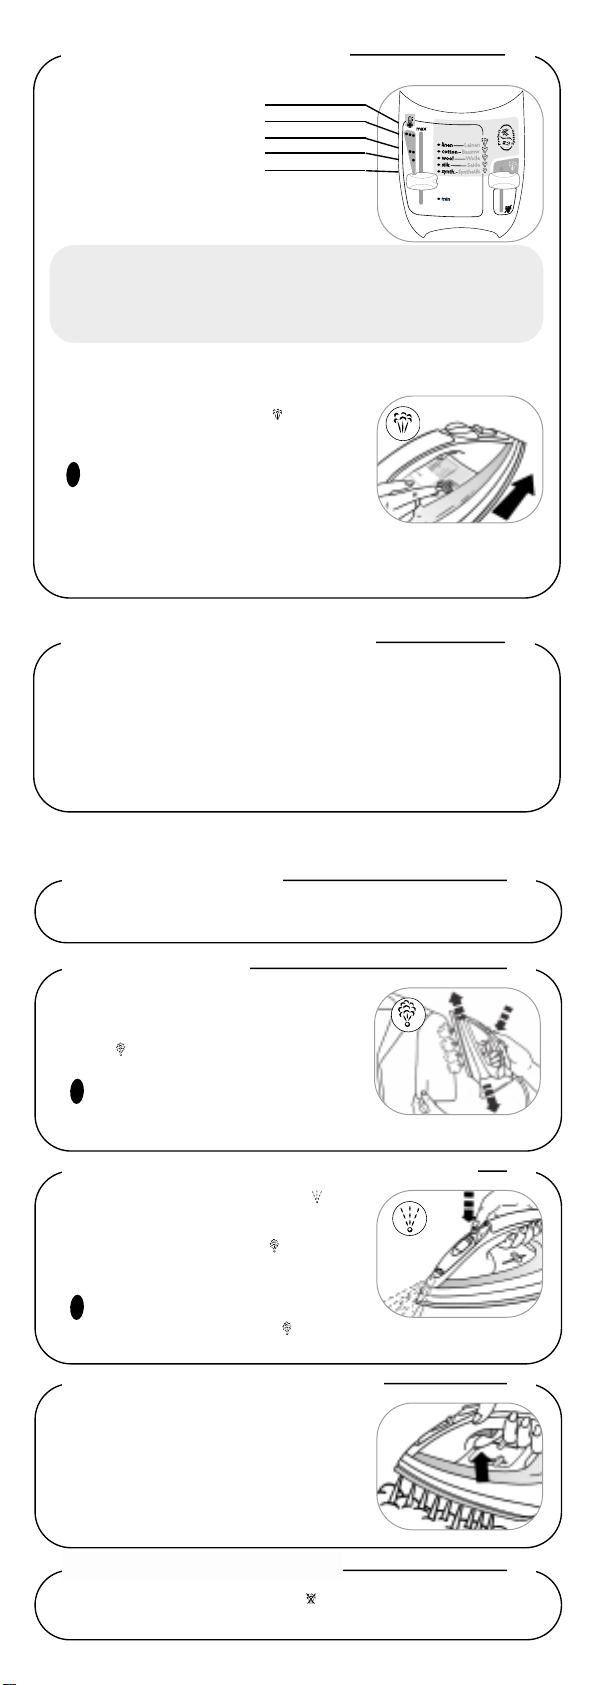
When the appliance is used for the first time, a harmless odour and smoke may be
given off.This has no effect on the use of the appliance and will disappear quickly.
Before using your iron with the steam function for the first time , w e recommend
that you operate it in a horizontal position for a f e w moments , a w ay from your linen,
i.e.press several times on the Burst of Steam button .
STEAM IRONING
Virtuose
Read these instructions carefully and make sure you keep them.
HELPLINE : FOR ANY PROBLEMS OR
QUERIES, PLEASE TELEPHONE
0845 602 1454 (UK - calls charged at local rate)
or (01) 47 51947 (Ireland)
1
YOUR STEAM IRON
English
Instructions for use
B.
Spray button
D.
Spray
C.
Water tank
filler cover
E.
Anti-calc valve
and lock
F.
Maximum tank filling point
K.
“Jeans” trigger
(depending on the model)
G.
Dry / Steam control
H.
Thermostat control
A.
Burst of steam
button
J.
Cord
clip
I.
Thermostat light
L.
Auto stop safety warning light
(depending on the model)
Your iron is equipped with an integrated system that protects
against the effects of lime-scale.
Filling the tank
1. Place the steam control (G) on .
2. Open the cover of the water tank filler hole (
C
),
place the iron on a table (not when iron is hot),
as shown in the diagram, and then fill it.
Important
You should not fill the tank beyond the MAX level (iron
standing vertically on the heel).
The water to use in your iron
Your iron has been designed to operate using tap water.However , if y our w ater is
very hard, mix it 50% tap water with 50% distilled water.
Types of water to be avoided
Do not add anything to the contents of the water tank, and do not use pure
demineralised water, w ater from clothes dryers, scented or softened w ater, water
from refrigerators, batteries or air conditioners, pure distilled water or rainwater .
These contain organic waste or mineral elements that become concentrated when
heated and cause spitting, brown staining or premature wear to your iron.Never
use additives (perfumed water , starch, perfumed oils…)
!
!
!
Important! (depending on the model).
Take off the soleplate protection before heating the iron.
032409 - 37/03
Page 2
2. Place the Steam Control (G) on.
The production of steam automatically adjusts
to the temperature selected.
4
Prevents drips whilst ironing.
ANTI-DRIP FUNCTION
1. Place the ther mostat control
(
H
) to match the type of fabric
to be ironed.
The light comes on (
I
). Wait for
the light to go off and come on
again before you start ironing
Our advice
Start with the fabrics to be ironed on a low temperature (•) and finish with those
which respond best to higher temperatures (••• or MAX)
If you iron a fabric made of a blend of fibres:set the temperature for the most
delicate fibre.
2
3
The electronic system cuts the power off and the auto-stop warning light
(
L
) flashes if the iron is left vertically on its heel for more than 8 minutes
or for more than 30 seconds if left horizontal.
To restart the iron, shake it gently until the warning light stops flashing.
NB.When the auto-stop safety switch operates, the thermostat light will
remain off.
AUTO-STOP SAFETY FEATURE
(depending on the model)
8
Place the Steam control (G) on DRY .You can start ironing when the
indicator light (
I
) comes on for the second time.
IRONING WITHOUT STEAM
SETTING THE TEMPERATURE
AND THE STEAM LEVEL
Linen
Cotton
Wool
Silk
(Viscose)
Synthetics
(Acetate, Acrylic,
Polyamide,
Polyester)
To improve ironing efficiency, this iron produces steam on the “synthetics” position,
thanks to a new sole plate design which allows you to iron delicate fabrics with
steam on a low setting.
Important
• Your iron will only produce steam when the thermostat
control is in the steam zone.When first switching on
the iron wait for 5 minutes after the iron is switched on for
steam to be produced.
• If you lower the thermostat, wait until the light goes out and comes on again before
ironing.
!
TO IRON LINEN OR COTTON
WITH A HIGH FLOW OF STEAM
7
1. Set the ther mostat control to Linen or Cotton.
2. Press the “Jeans” (K)
(depending on the
model)
trigger while ironing.This increases the
flow of steam.
3. Do not press the tr igger
(depending on the
model)
for more than 30 seconds.Wait a
minute before using it again.
Press repeatedly on the Spray button to
dampen the fabric.
or
Use the Burst of Steam button pressing two
or three times in quick succession to obtain a
more powerful burst of steam.
Important
Never use the Burst of Steam button on silk and
synthetics.
REMOVING THE STUBBORN CREASES
6
1. Hang the gar ment up and hold the fabric taut
2. Place the ther mostat control (
H
) on MAX,
press repeatedly on the Burst of Steam
button and move the iron from top to
bottom.
Important
Hold the iron a few centimetres from the garment to
avoid burning delicate fabrics.
VERTICAL STEAM
!
5
!
Page 3

Self-cleaning (twice a month)
1. Fill the tank to the MAX mar k (see our
recommendations on the type of water to use).
2. Put the ther mostat control (
H
) on MAX and the
steam control (
G
) on and switch on.
3. Place the iron on its heel and wait around 5
minutes.
4. Unplug the iron and place over the sink
horizontally. Push the lock (
E
) backwards to
free the anti-calc valve, then remove it
completely.
5. Shake the iron gently until most water (and any
impurities) has drained from the soleplate.
N.B. Once you have done this, it is normal for a little
water to remain in the water tank because the iron’s
anti-drip system may prevent the tank being
completely emptied.This will not effect its ironing
performance.
6. Replace the anti-calc valve (E).
7. When the soleplate is just war m, wipe the iron
with a soft cloth.
8. To keep the anti-calc valve working, once a month leave it to soak in
white vinegar or pure lemon juice for around 2 hours.Rinse the stem
with water before inserting back in the iron.
9
CARING FOR YOUR IRON
!
Note!
Your iron will only operate when the anti-calc valve is
in place.
2
1
11
PUTTING YOUR IRON AWAY
1. Set the steam control (G) on .
2. Unplug the iron.
3. Empty the tank over the sink.
4. Wind the cord loosely around the heel and fix
the clip (
J
) onto the cord.
5. Store the iron upr ight on its heel. Never place it
on a metallic support.
Note
Wait until the iron has cooled down before storing it.
Never place it on a metallic support.
10
CLEANING THE SOLEPLATE
!
Important
Unplug your iron and let it cool down before cleaning.
When the soleplate is cool, clean with a soft damp cloth or non-metallic
washing up pad. Do not use detergent or descaling products. Never put
the iron under the tap.
We recommend that when using starch, it should be spray ed onto the reverse
side of the fabric and the soleplate cleaned more frequently.Try to avoid ironing
over zips which may ha v e rough edges .
!
This appliance is designed for domestic use only.
In the case of professional use, inappropriate use or failure to
comply with the instructions, the manufacturer accepts no
responsibility and the guarantee does not apply.
Page 4

If you have any other problems or queries with your product,
please consult your Approved Service Centre (see separate leaflet)
or call the Helpline (see front page).
SAFETY PRECAUTIONS
WIRING INSTRUCTIONS (FOR U.K. ONLY)
• Important! Your electrical installation must correspond to that of your iron (220240V). Connecting to the wrong voltage may cause irreparable damage to the
iron and this will invalidate the guarantee.
• This iron must be plugged into an earthed socket. If you are using an
extension lead, ensure that it is bipolar (10A-or 13A for UK only) with an earth.
• If the cord is damaged, it must be replaced immediately by an Approved
Service Centre as this is dangerous.
• Never immerse the iron in water!
• The appliance must be unplugged before filling or emptying the tank
• If the iron is dropped, have it checked by a professional before reuse: invisible
damage may be dangerous.
• Your appliance gives off steam which can cause burns.
• The soleplate of the iron may be very hot:
- never touch it
- always leave it to cool before you put it away
-
never leave your iron unattended when plugged in or when the soleplate is still hot.
- keep your iron away from children.
Never take your iron apart: call the Helpline or consult your Approved
Service Centre (see separate leaflet).
12
Warning: this appliance must be
earthed.
Important: the wires in this lead are
coloured in accordance with
the following codes :
- Green and yellow : earth
- Brown : live
- Blue : neutral.
• Connect the green/yellow wire to the terminal in the plug marked ”E”
or by the earth symbol or coloured green and yellow.
• Connect the brown wire to the terminal in the plug marked ”L” or coloured
red.
• Connect the blue wire to the terminal in the plug marked ”N” or
coloured black.A 13 amp fuse should be fitted when the appliance is
connected to a BS 1363A plug.
Seek professional advice if unsure of the correct procedure for the above.
Important : If the electrical cord of this appliance is damaged or shows
signs of wear, it must only be replaced by an authorised Tefal Service
Centre (see section After Sales Service - see separate leaflet).
Green and
yellow
or green
E
Blue or
black
Brown
or red
Fit correct
fuse
Use cable
gripper
N
L
• You are using chemical de-scaling products or
additives in the water.
• Fabric fibres have accumulated in the
soleplate holes or between the iron body and
the soleplate and are singeing.
• You are using the Burst of Steam button or the
“Jeans” trigger
(depending on the model)
too much.
• You are using the “Jeans”trigger
(depending
on the model)
on wool, silk or synthetics.
• The thermostat is not functioning correctly.
• Steam used before the iron is hot enough.
Solutions
T
ROUBLESHOOTING
13
The iron does not heat up
Water is dripping from the holes in the soleplate
Brownish water is dripping from the soleplate and is staining the laundry
The soleplate is scratched or damaged
• The auto-stop safety switch has operated.
• Thermostat control not correctly positioned.
• Restart the iron by lightly shaking it.
• Set thermostat control to required fabric to be
ironed.
• Your iron is new.
• The steam control is on .
• Your iron is clogged with scale or has been
used dry for too long.
Your iron produces little or no steam
• On first use, wait 5 minutes until steam is
produced.
• Put the Steam control on .
• Clean the anti-calc valve and follow the steps
for selfcleaning the iron.
• Wait a minute between each use.
• Set the thermostat to ••• or Max before using the
“Jeans” trigger
(depending on the model)
. Do not
use the “Jeans”trigger on wool, silk or synthetics.
• Take the iron to an approved service centre.
• After switching on wait until the thermostat
indicator light goes out before using the steam.
Problems and possible causes
The soleplate is dirty or brown and is soiling the laundry
• You are using a temperature that is too high.
• Your laundry has not been sufficiently r insed
or you are using starch.
• Clean the soleplate. See the
paragraph "Setting the temperature".
• Clean the soleplate. Spray starch on the other
side of the fabric to the side being ironed.
• Operate the self-clean function and follow our
recommendations on "The water to use" (see
section 1).
• Clean the soleplate with a non-metal, washing up
pad.Vacuum the soleplate holes from time to
time. Operate the self-clean function.
• You have placed your iron horizontally on a
metal support.
• You have ironed over a zip.
• Always place your iron on its heel.
• Try to avoid ironing over zips which may have
rough edges.
• Consult an Approved Service dealer.
 Loading...