

Page 1
EN
ULTRA COMPACT
www.tefal.com
Page 2
1
1 2 3A
3B 4 5
6 7 8
9 10 11
2
3*
5
4
6
7*
8
9
* depending on the model
10
11
12
13
14
15
16
17
Page 3

1 2 3A
3B 4 5
6 7 8
9 10 11
Page 4

12 13
14
15
21
12h
16 17
Vinegar
water
19 2018
Page 5

EN
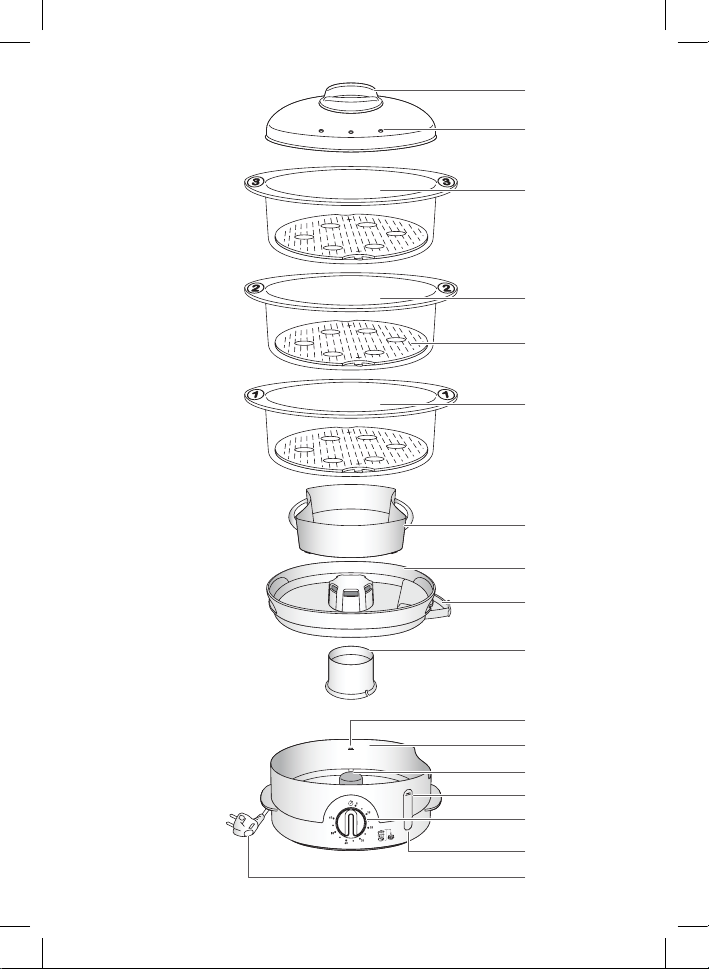
DESCRIPTION
1 Lid handle
2 Lid
3 Steam basket n° 3
(depending on the model)
4 Removable base with clips and
built-in egg holder
5 Steam basket n° 2
6 Steam basket n° 1
7 1 L capacity rice bowl
(depending on model)
8 Juice collector
9 Water-fill drawer
10 Removable turbo ring
11 Inside Maximum water level
12 Water tank (1.5L capacity and
1 hour continuous use)
13 Heating element
14 Exterior water level indicator
15 60-minute timer
16 On indicator light
17 Mains cord
PROTECT THE ENVIRONMENT
Environment protection first!
Your appliance contains valuable materials which can be
recovered or recycled.
Leave it at a local civic waste collection point.
Please follow the instructions for use carefully. This appliance
produces boiling hot steam.
SAFETY INSTRUCTIONS
• For your safety, this appliance complies with the
applicable standards and regulations
– Low voltage directive
– Electromagnetic compatibility
– The environment
– Materials in contact with food.
• Check that the power supply voltage corresponds to
that shown on the appliance (alternating current).
5
Page 6

• Given the diverse standards in effect, if the
appliance is used in a country other than that
in which it is purchased, have it checked by an
approved service centre.
• Do not place the appliance near a heat source or
in a hot oven, as serious damage could result.
• Use a flat, stable, heat resistant work surface,
away from any water splashes.
• Never place the appliance in a tray or other
container which would allow water to accumulate
around the base.
• Never leave the appliance unattended whilst
connected to the power supply, even if for a few
moments, especially where children are present.
Keep away from children.
• Do not leave the power cord close to or in contact
with sources of heat or sharp edges.
• Do not leave the cord hanging.
• Always plug the appliance into an earthed socket.
• Do not unplug the appliance by pulling on the cord.
• Do not use the appliance if:
– the appliance or the cord is damaged.
– the appliance has fallen or shows visible damage
or does not work properly.
In the event of the above, the appliance must be
sent to an approved Service Centre.
6
Page 7

EN
• If the power supply cable is damaged, it must
be replaced by the manufacturer, the aftersales
service or a similarly qualified person in order to
avoid any risk.
• Burns can occur by touching the hot surface of
the appliance, the hot water, the steam or the
food.
• Always unplug the appliance:
– immediately after use,
– when moving it,
– prior to any cleaning or maintenance.
• Never immerse the appliance in water!
• Do not place the appliance near a wall or a
cupboard: the steam produced by the appliance
can cause damage.
• Do not move the appliance when it is full of
liquids or hot foods.
• This appliance is designed for domestic use only.
In case of professional use, inappropriate use
or failure to comply with the instructions, the
manufacturer accepts no responsibility and the
guarantee does not apply.
• It is not intended to be used in the following
applications, and the guarantee will not apply for:
– staff kitchen areas in shops, offices and other
working environments;
7
Page 8

– farm houses;
– by clients in hotels, motels and other residential
type environments;
– bed and breakfast type environments.
• Do not touch the appliance when it is steaming
and use oven gloves to remove the lid, rice bowl
and steam baskets.
• This appliance is not intended for use by persons
(including children) with reduced physical, sensory
or mental capabilities, or lack of experience
and knowledge, unless they have been given
supervision or instruction concerning use of the
appliance by a person responsible for their safety.
• Children should be supervised to ensure that they
do not play with the appliance.
PREPARATION
Prior to use
• Using warm water and washing up liquid, wash all the removable parts
and the inside of the water tank.
• Rinse and dry.
Do not immerse the base unit or water tank when cleaning in water.
Preparing the steamer
• Place the base unit on a flat, stable, heat resistant work surface away
from water splashes and other sources of heat.
• Place the turbo ring around the heating element ensuring it is the right
way round (the largest part on the bottom).
8
Page 9

EN
Filling the water tank
• There are two ways to fill the water tank:
A. Pour the water directly into the water tank, up to the maximum level.
B. Open the water-fill drawer on the right-hand side of the base and
pour in water up to the maximum level. Close the drawer.
• Check that the turbo ring is positioned correctly.
• Place the juice collector on the tank until firmly in place.
• Use fresh water with each use.
Keep away from any objects which could be damaged by the steam.
Do not use seasoning or any other liquid other than water in the water
tank.
Make sure there is water in the tank prior to use.
Positioning the removable bases
• The baskets have bases which can be removed to obtain a larger cooking
space or to cook larger foods.
• To position the bases:
– Place the basket on the table.
– Hold the base right side up (clips toward the bottom).
– Centre the base inside the basket.
– Press on the clips until the base is locked into place.
• To remove the bases, push up from underneath.
Positioning the baskets
• Place the food in the baskets.
• Place the baskets on top of the juice collector.
• The baskets are numbered: 1, 2 and 3 (depending on the model).
– Always put basket n°1 on the juice collector.
– Then place basket n°2.
– Then basket n°3 (depending on the model).
• Put the lid on. (The lid fits on all the baskets).
You can use the product with 1, 2 or 3 baskets
depending on your needs.
Always place the baskets in the right order.
For best results, do not put too much food in the
baskets.
9
Page 10

To cook rice (depending on model)
• Put the rice and the water in the rice bowl (see the table of cooking
times).
• Place the rice bowl in the steam basket, cover with the lid to cook.
To cook eggs
• Place the eggs in the built-in egg holders, cover with the lid to cook.
STEAM COOKING
Choose the cooking time
• Plug the appliance in.
• Set the timer for the recommended cooking times (see table of cooking
times).
• The orange indicator light comes on.
• The steam cooking has begun.
In order to set the timer, the appliance must be plugged in.
During cooking
• Check the water level by looking at the exterior water level indicator.
• Filling to the MAX level lasts about 60 minutes steaming.
• If necessary, add more water through the water-fill drawer.
If there is no more water, the appliance will not produce any more
steam and will no longer continue to cook the food.
At the end of cooking
• The appliance switches off automatically.
• The timer rings and the indicator light goes out.
• To stop the appliance ahead of time, turn the timer to the 0 position.
Re-heating
• You can reheat food (see the table of cooking times).
Removing the food from the steam baskets
• Remove the lid by the handle.
• Remove the steam basket(s).
• Place the steam basket(s) on a plate.
Always use oven gloves to handle the baskets and the lid.
10
Page 11

EN
Afterwards
• Unplug the appliance.
• Let it cool completely before cleaning.
Check that the juice collector has cooled sufficiently before remo ving it.
TABLE OF COOKING TIMES
Cooking times are approximate and are for a single layer of food in
the lower basket, unless stated otherwise. Times may vary depending on
the amount of food, size of the food, the space between the food, using
a different basket level and individual preferences. For larger or smaller
quantities, adjust the cooking time accordingly. Cooking times may need
to be increased when using more than one basket to steam food.
Check food near the end of cooking, especially vegetables and fruit, as an
extra few minutes can result in over cooked food.
Use oven gloves when handling the baskets during cooking.
Fish • Shellfish
Food Type Amount
Thin fillet of fish (cod,
plaice, sole, salmon,
haddock...)
Thick fillets or steaks Fresh 400 g 15 - 20 min.
Whole fish (trout,
salmon trout...)
Mussels Fresh 1 kg 15 - 20 min.
Prawns (raw) Fresh 200 g 3 - 7 min. According to your taste.
Scallops Fresh 100 g 5 - 10 min. According to your taste.
Fresh 450 g 8 - 10 min.
Frozen 450 g 10 - 15 min.
Fresh 600 g 25 - 30 min.
Cooking
Time
Recommendations
Don’t pile up the fish
fillets.
Discard any unopened
mussels.
11
Page 12

Meat • Poultry
Food Type Amount
Chicken breast
(boneless)
Chicken
drumsticks or
thigh joints
Turkey steaks
and escalope
Pork fillet Fresh 450 g 12 - 15 min. Cut into 1 cm slices.
Lamb steaks Fresh 500 g 10 - 15 min.
Sausages (precooked)
Strips 500 g 12 - 15 min.
Whole 450 g 15 - 20 min.
Fresh 4 30 - 35 min.
Fresh 600 g 25 - 30 min.
Knackwurst 10 8 - 12 min.
Frankfurter 10 10 - 12 min. Pierce before cooking.
Cooking
Time
Recommendations
Remove skin.
After steaming, brown
the skin under the grill if
desired.
Vegetables
Food Type Amount
Artichokes (globe) Fresh 3 average 30 - 35 min. Cut the base.
Asparagus Fresh 600 g 15 - 20 min.
Broccoli
Cabbage (green
pointed spring)
Cabbage (red) Fresh 600 g 15 - 18 min.
Carrots Fresh 500 g 10 - 15 min. Cut into 3 mm thin slices.
Cauliflower florets Fresh 1 average 25 - 30 min.
Celeriac Fresh 350 g 20 - 25 min. In cubes or slices.
Corn on the cob Fresh 2 35 - 45 min.
Fresh 400 g 20 - 25 min.
Frozen 400 g 15 - 20 min.
Fresh 400 g 15 - 18 min.
Cooking
Time
Recommendations
Cut the base. Exact time
depends on thickness.
Cut into small florets and
trim off thick stems.
Sliced or shredded. Cut
off thick stems. Toss
halfway through cooking.
Sliced or shredded. Cut
off thick stems. Toss
halfway through cooking.
Cut into small florets and
trim off thick stems.
12
Page 13

EN
Food Type Amount
Courgettes
Fine whole green
beans
Leeks (baby whole) Fresh 500 g 15 - 20 min.
Leeks (sliced) Fresh 500 g 8 - 12 min. Cut into thin slices.
Mange tout Fresh 500 g 10 - 15 min.
Mushrooms Fresh 500 g 10 - 15 min.
Peas
Peppers Fresh 300 g 10 - 15 min. Cut into wide strips.
Potatoes (new) Fresh
Potatoes (old) Fresh 600 g 25 min.
Onions (sliced) Fresh 400 g 10 - 15 min. Thin slices.
Onions (small whole) Fresh 400 g 10 - 15 min.
Spinach
Fresh 600 g 12 - 15 min. Thinly sliced.
Fresh 600 g 12 - 17 min. Cut into 5 cm chunks.
Fresh 500 g 20 - 25 min.
Frozen 500 g 15 - 20 min.
Fresh 400 g 20 - 25 min.
Frozen 400 g 20 - 25 min.
600 g
small
whole
Fresh 300 g 10 - 12 min.
Frozen 500 g 15 - 20 min.
Cooking
Time
40 - 45 min.
Recommendations
Cooking time depends on
thickness and size.
Cut the base and wash
well.
Cooking time depends on
size and variety.
Sliced (1 cm thick) or cut
into cubes.
Cooking time depends
on size.
13
Page 14

Rice • Grains • Pasta
Food
Bulgar Wheat 150 g 300 ml 15 min.
Couscous 200 g 350 ml 10 min.
White Rice American
Long Grain
Basmati Rice 150 g 300 ml 25 - 30 min.
Easy Cook White Rice 150 g 300 ml 20 - 23 min.
Brown Rice 150 g 300 ml 40 - 45 min.
Pasta (spaghetti - not
quick cook type)
Riz
amount
150 g 300 ml 25 - 30 min.
200 g 400 ml 20 - 25 min.
Water
Amount
Cooking
Time
Recommendations
Use boiling water in rice
bowl.
Soak the couscous 5 min.
in boiling water or hot
stock before cooking.
Wash the rice before
cooking. Use boiling
water in the rice bowl.
Add salt if desired.
Use boiling water in rice
bowl.
Other Foods
Food Type Amount
Hard boiled eggs Yolk set 6 15 min.
“Poached” eggs in
ramekins
Firm set 6 12 - 15 min.
Soft set 6 8 - 10 min.
Cooking
Time
Recommendations
Grease the ramekins well.
Fruits
Food Type Amount
Apples (Bramley)
Apricots Halved 4 10 - 15 min.
Bananas Whole 4 10 - 15 min.
Peaches or Nectarines Halved 4 10 - 15 min.
Pears
Rhubarb Fresh 400 g 20 - 25 min. Cut into 2.5 cm chunks.
Quartered
Sliced
Whole or
halved
450 g 15 - 20 min.
14
Cooking
Time
4 15 min.
4 20 - 25 min.
Recommendations
Cook in rice bowl with
40 g sugar.
Time depends on
ripeness of fruit.
Time depends on
ripeness of fruit.
Page 15

EN
Re-heating
Place food in the rice bowl and cover food with cling film. Check the food
is piping hot before serving. Do not reheat cooked rice in the steamer.
Food Amount
Meat (sliced) 2 - 3 portions 15 - 20 min. Turn slices halfway through re-heating.
Pasta 2 portions 10 - 20 min.
Vegetables 3 - 4 portions 15 - 20 min. Stir halfway through re-heating.
Cooking
Time
Recommendations
Stir halfway through re-heating. Time
depends on size of pasta.
STEAMING TIPS AND TECHNIQES
• Do not pack food too tightly in the steam baskets. Leave some space for
steam to circulate as much as possible.
• For best results, use pieces of food of approximately the same size (such
as potatoes, vegetables and chicken breasts) so that they cook at the
same time. The size and thickness of the food will alter the cooking time.
• Avoid lifting the lid to check on the cooking progress too often, as this
allows loss of steam and can lengthen the cooking time.
• If recipes require the use of cling film, always use the all purpose type
suitable for use in microwave ovens. Cling film is often used to prevent
condensation forming and spoiling delicates foods such as egg custards.
Avoid using foil as this tends to increase the steaming time.
• When choosing food for steaming, select suitable size food to fit the
steaming basket, especially if it is cooked whole such as fish.
• Subtle flavour can be given to steamed food with the addition of fresh
herbs, slices of lemon or orange, garlic and onion. These may be placed
either directly underneath or on top of the food in the steaming basket.
• To give meat, poultry and fish a delicious flavour plus make then moist
and tender, marinade for a few hours before steaming. The marinade
can be as simple as a blend of wine and fresh herbs, or it can be a spicy
barbecue or tandoori mix.
• Frozen vegetables can be steamed from frozen. All shellfish, poultry and
meat must be completely thawed before steaming.
• For some recipes with a long cooking time, such as steamed sponge
pudding, you will need to top up with more cold water during steaming.
15
Page 16

• Always use oven gloves when handling the baskets during or after
cooking.
• When cooking different foods in two or three steaming baskets, juices or
condensation will drip from the upper baskets so check that the flavours
complement one another.
When cooking fish, meat or poultry, place them in steam basket no. 1
so that the juices from raw or partially cooked meat cannot drip onto
other foods such as potatoes, rice or vegetables steaming in the baskets
no. 2 or 3.
• A single basket of food steams faster than when using two or three
baskets. Steaming times are usually slightly longer if using two or three
baskets, due to the large volume of food being cooked, so allow an extra
3-5 minutes steaming time.
• If foods have different cooking times, place foods with the longest
cooking time in the lowest steaming basket.
CLEANING AND MAINTENANCE
Cleaning the appliance
• Empty the water tank and clean it with a damp cloth.
• Wash all the removable parts using a sponge, warm water and washing
up liquid, rinse and dry carefully.
• Clean the turbo ring after each use.
Do not use abrasive cleaning products.
Do not immerse the water tank in water.
Note:
some natural strong coloured juices f rom food such as carr ots, beetroot
etc… may cause staining in the juice collector and the water tank.
This is normal and will not effect cooking.
T o try and avoid st aining, wash these two parts immediately after each
use. Y ou ma y also use a mild bleach if necessary and rinse thor oughly.
Removing scale build-up from the appliance
• Position the turbo ring upside down around the heating element (the
largest part uppermost).
• Fill the water tank with cold water up to “max.” level.
• Fill the inside of the turbo ring with white vinegar up to the same level.
16
Page 17

EN
• Do not heat up (to avoid any descaling odour). Leave overnight to
descale.
• Rinse out the inside of the water tank with warm water several times.
Descale the appliance every 8 uses.
Do not use other scale-removing products.
Storing the baskets
• Put the rice bowl (depending on model) upside
down in the juice collector.
• Stack the baskets one inside the other following
the order shown.
• Turn all parts over on the base unit. Put the lid
over them all.
TROUBLESHOOTING GUIDE
Do not dismantle the appliance, if your appliance stops working, take it to
one of our approved service centres for repair.
Fault Reason Solution
Plug in the appliance and
turn the timer.
At the end of the cooking
time, the light goes off
automatically.
Contact our after-sales
service.
Contact our after-sales
service.
For cooking times lower
than 15 min, turn the
button until at least 30 min
and return to the cooking
time needed.
Contact our after-sales
service.
The orange indicator light
does not come on.
The orange indicator light
comes on but the appliance
does not heat up.
The timer gets stuck.
Water is leaking from the
base.
The timer has not been set.
Cooking has ended.
The parts are damaged.
Fault in the heating
element.
Cooking time set to a low
value.
Leak coming from the
heating element.
17
Page 18

Fault Reason Solution
The food takes longer to
cook than usual.
Steam escapes along the
sides of the appliance.
Heating element has scale
build-up.
Baskets/grids not fitted
together properly.
Water-fill drawer located
under juice collector is open.
Remove scale build-up
from the heating element.
See section “Cleaning and
Maintance”.
Check that the baskets/
grids are fitted together
properly and in the right
order.
Check its position.
Voltage
This appliance is designed to run on 230 - 240 volts AC only. Check that
the mains supply corresponds to that shown on the rating plate of the
appliance. If the appliance is to be used in any country other than that of
purchase, it should be checked by an approved Service Dealer. Standards
can vary from country to country.
Helpline:
For any problems or queries please telephone our Customer Relations
Team first for expert help and advice on:
0345 602 1454 (UK - CALLS CHARGED AT LOCAL RATE)
(01) 4751947 (IRELAND)
Or consult our web site: www.tefal.co.uk.
18
Page 19

Page 20

Page 21

Page 22

Page 23

Page 24

NC00139551
 Loading...