

Page 1
EN
10-in-1 Rice & Multi-Cooker
www.tefal.com
Page 2
15
4 5 6 7
12 13 14 15
16
a
b
17
a
b
18 19
1 2 3b3a
MAX.
10 cups
8 9 1110
10 cups
MAX.
2
6
3
7
4
8
9
13
14
17
10
11
12
15
16
Page 3
a
b
a
b
1 2 3b3a
MAX.
10 cups
4 5 6 7
10 cups
MAX.
8 9 1110
12 13 14 15
16
17
18 19
Page 4

CONTROL PANEL
13a
13b
13c
14a
14b
14c
14d
13d
13e
13f
13g
14e
14f
14g
14h
1
Page 5

EN
IMPORTANT SAFEGUARDS
SAFETY INSTRUCTIONS
Read and follow the instructions for use. Keep
them safe.
• This appliance is not intended to be operated by
means of an external timer or a separate remotecontrol system.*
• This appliance shall not be used by children from
0 year to 8 years.*
• This appliance can be used by children aged
from 8 years and above if they have been
given supervision or instruction concerning
use of the appliance in a safe way and if they
understand the hazards involved. Cleaning and
user maintenance shall not be made by children
unless they are older than 8 years and supervised.
Keep the appliance and its cord out of reach of
children aged less than 8 years.
• Appliances can be used by persons with reduced
physical, sensory or mental capabilities or lack
of experience and knowledge if they have been
given supervision or instruction concerning use of
the appliance in a safe way and understand the
hazards involved.
• Children shall not play with the appliance.
• This appliance is not intended for use by persons
(including children) with reduced physical, sensory
or mental capabilities, or lack of experience
* model with the FRY (frying) function
2
Page 6
and knowledge, unless they have been given
supervision or instruction concerning use of the
appliance by a person responsible for their safety.
• Children should be supervised to ensure that they
do not play with the appliance.
• As this appliance is for household use only, it is
not intended for use in the following applications
and the guarantee will not apply for:
– Staff kitchen areas in shops, offices and other
working environments
– Farm houses
– By clients in hotels, motels and other residential
type environments
– Bed and breakfast type environments
• If your appliance is fitted with a removable
power cord: if the power cord is damaged, it must
be replaced by a special cord or unit available
from a authorised service centre.
• If your appliance is fitted with fixed power cord:
a if the power supply cord is damage, it must be
replaced by the manufacturer, the manufacturer’s
after-sales service department or similarly qualified
person in order to avoid any danger.
• The appliance must not be immersed in water or
any other liquid.
• Use a damp cloth or sponge with diswashing
liquid to clean the accessories and parts in
contact with the aliments. Rince with a damp
3
Page 7
EN
cloth or sponge. Drying accessories and parts in
contact with food with a dry cloth.
• If the symbol is marked on the appliance, this
symbol means “Caution: surfaces may become
hot during use”.
• Caution: the surface of heating element is subject
to residual heat after use.
• Caution: risk of injury due to improper use of the
appliance.
• Caution: if your appliance has a removable power
cord, do not spill liquid on the connector.
• Always unplug the appliance:
– immediately after use
– when moving it
– prior to any cleaning or maintenance
– if it fails to function correctly
• Burns can occur by touching the hot surface of
the appliance, the hot water, steam or the food.
• During cooking, the appliance gives out heat and
steam. Keep face and hands away.
• Cooking appliances should be positioned in
a stable situation with the handles (if any)
positioned to avoid spillage of the hot liquids.*
• Do not get face and hands close to the steam
outlet. Do not obstruct the steam outlet.
• For any problems or queries please contact our
Customer Relations Team or consult our web site.
• The appliance can be used up to an altitude of
4000 m.
4
Page 8

• For your safety, this appliance complies with the safety regulations and
directives in effect at the time of manufacture (Low-voltage Directive,
Electromagnetic Compatibility, Food Contact Materials Regulations,
Environment…).
• Check that the power supply voltage corresponds to that shown on the
appliance (alternating current).
• Given the diverse standards in effect, if the appliance is used in a country
other than that in which it is purchased, have it checked by an approved
service centre.
Connecting to the power supply
• Do not use the appliance if:
− the appliance or the cord is damaged
− the appliance has fallen or shows visible damage or does not work
properly
− In the event of the above, the appliance must be sent to an approved
Service Centre. Do not take the appliance apart yourself.
• Do not leave the cord hanging.
• Always plug the appliance into an earthed socket.
• Do not use an extension lead. If you accept liability for doing so, only
use an extension lead which is in good condition, has an earthed plug
and is suited to the power of the appliance.
• Do not unplug the appliance by pulling on the cord.
Using
• Use a flat, stable, heat-resistant work surface away from any water
splashes.
• Do not allow the base of the appliance to come into contact with water.
• Never try to operate the appliance when the bowl is empty or without
the bowl.
• The cooking function/knob must be allowed to operate freely. Do not
prevent or obstruct the function from automatically changing to the
keep warm function.
• Do not remove the bowl while the appliance is working.
• Do not put the appliance directly onto a hot surface, or any other source
of heat or flame, as it will cause a failure or danger.
• The bowl and the heating plate should be in direct contact. Any object or
food inserted between these two parts would with the correct operation.
• Do not place the appliance near a heat source or in a hot oven, as
serious damage could result.
5
Page 9
EN
• Do not put any food or water into the appliance until the bowl is in
place.
• Respect the levels indicated in the recipes.
• Should any part of your appliance catch fire, do not attempt to put it
out with water. To smother the flames use a damp teatowel.
• Any intervention should only be made by a service centre with original
spare parts.
Protect the environment
• Your appliance has been designed to run for many years. However,
when you decide to replace it, remember to think about how you can
contribute to protecting the environment.
• Before discarding your appliance you should remove the battery from
the timer and dispose of it at a local civic waste collection centre
(according to model).
Environment protection first!
Your appliance contains valuable materials which can be
recovered or recycled.
Leave it at a local civic waste collection point.
6
Page 10

DESCRIPTION
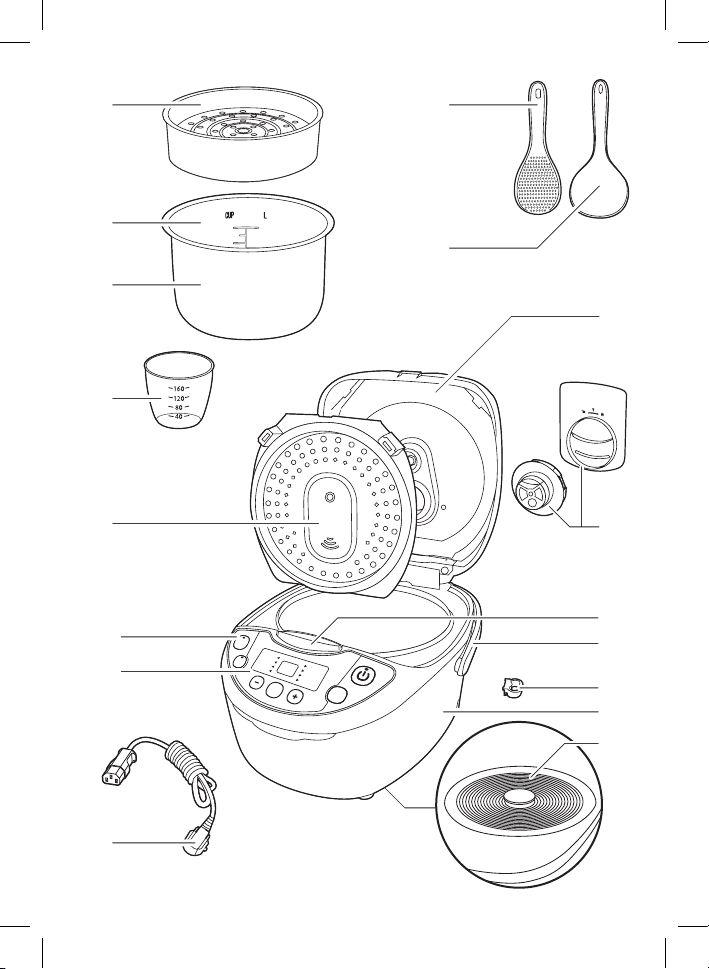
1 Steam basket
2 Measurements for water and rice
3 Removable ceramic bowl
4 Measuring cup
5 Rice spoon
6 Soup spoon
7 Lid
8 Removable inner steam shield
9 Micro pressure valve
10 Lid opening button
11 Handle
12 Rice spoon holder
13 Control panel
a “KEEP WARM/CANCEL” key
b “BROWNING” key
c “–” key - time decrease
d “START” key
e “MENU” key
f “+” key - time increase
g “DELAYED START” key
14 Function indicators
a “RICE” function
b “RISOTTO” function
c “REHEAT” function
d “OATMEAL” function
e “SLOW COOK” function
f “STEAM/SOUP” function
g “YOGURT” function
h “BAKING” function
15 Housing
16 Heating element
17 Power cord
BEFORE THE FIRST USE
Unpack the appliance
• Remove the appliance from the packaging and unpack all the accessories
and printed documents.
• Open the lid by pushing the opening button located on the housing –
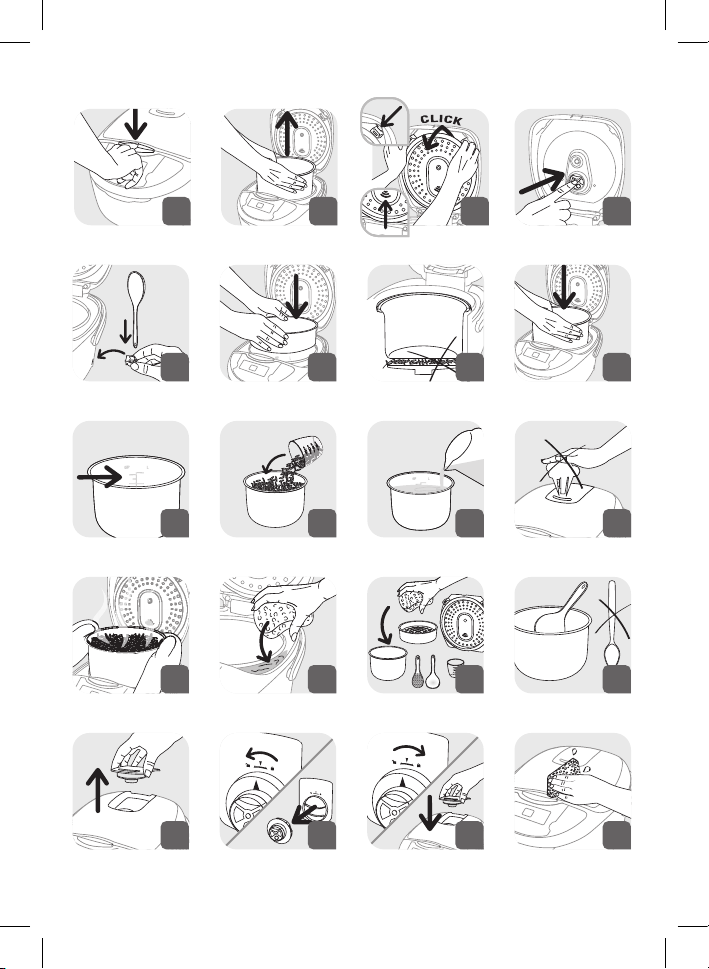
fig.1.
Read the instructions and carefully follow the operating method.
Clean the appliance
• Remove the ceramic bowl – fig.2, the steam shield and the pressure
valve – fig.3a and 3b.
• Clean the bowl, the valve and the steam shield with a sponge and
dishwashing liquid.
• Wipe the outside of the appliance and the lid with a damp cloth.
• Dry off carefully.
• Put all the elements back in their original position. Install the steam
shield in the right positions on the top lid of machine. Then, put the
steam shield behind the 2 ribs and push it on the top until it’s fixed.
Install the detachable cord into the socket on the cooker base.
• Insert the spoon holder on the base of the appliance – fig.4.
7
Page 11

EN
THE APPLIANCE
• This multicooker is equipped with 10 cooking programs: Rice, Risotto,
Reheat, Oatmeal, Slow Cook, Steam/Soup, Yogurt, Baking/Dessert,
Browning, Keep Warm. The multicooker also features an adjustable
timer and delayed start.
• When the power cord is installed into the power outlet and into the socket
on the cooker base, the appliance will ring a long sound “Beep”, all the
indicators on the control panel will light up for an instant. Then the screen
display will show “--”, all the indicators will switch off. The appliance enters
into standby mode, you can select the menu functions as you wish.
• At the end of the cooking period, the appliance will automatically switch
over to keep warm which will last up to 24h.
• Do not touch the heating element when the product is connected or
after cooking.
• Do not carry the product in use or just after cooking.
• This appliance is only intended for indoor use.
• On/Off button function. Press the button once for a short time to stop
the cooking process but leave the machine on for additional cooking or
Keep Warm. Hold the button down to completely turn off the appliance
if all cooking is complete.
PREPARATION BEFORE COOKING
Measuring the ingredients - Max capacity of the bowl
• The measurement markings on the inside of the bowl are given in liters and
cups, these are used for measuring the amount of water when cooking rice.
• The plastic measuring cup provided with your appliance is for measuring
rice and not water. 1 level measuring cup of rice weighs about 160 g.
• Users may reduce or increase water according to types of rice and their
preference of taste.
• As the voltage varies in different areas, slight spillover of rice and water
is a normal phenomenon.
• The maximum quantity of water + rice should not exceed the highest
mark inside the bowl.
Never add ingredients or water higher than the highest level mark.
When cooking rice
• Before cooking, measure the rice with measuring cup and rinse the rice.
• Put the rinsed rice into the bowl and fill it with water to the corresponding
water level (The measurements in cups).
• The water quantity can be adjusted depending on your taste.
8
Page 12
When steam cooking
• The quantity of water must be appropriate and always be lower than
the steam basket bottom.
• Exceeding this level may cause overflows during use.
• Place the steam basket onto the bowl – fig.5.
• Add the ingredients in the basket.
FOR ALL FUNCTIONS
• Carefully wipe the outside of the bowl (especially the bottom). Make
sure that there are no foreign residues or liquid underneath the bowl
and on the heating element – fig.6.
• Place the bowl into the appliance, making sure that it is correctly
positioned – fig.7.
• Make sure that the steam shield is correctly in position.
• Close the lid in place with a “click” sound.
• Plug the power cord into the socket on the base and then plug the other
end of the power cord into the power outlet.
• Do not switch on the appliance until all the above stages have been
completed.
Never place your hand on the steam vent during cooking, as there is a
danger of burns – fig.11.
If you wish to change the selected cooking menu because of an error,
press “KEEP WARM/CANCEL” key and re-choose the menu you want.
Only use the inner bowl provided with the appliance.
Do not pour water or put ingredients in the appliance without the
bowl inside.
Never use reheat or keep warm menu to defrost food.
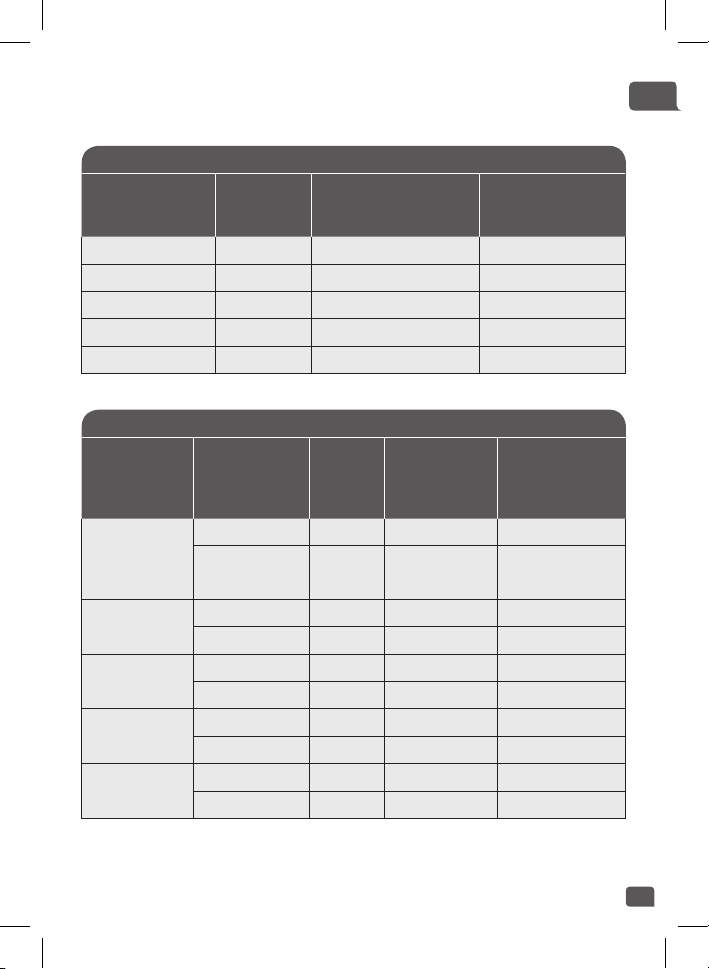
COOKING RICE TABLES
• The table below gives a guide to cook different types of rice. For best
results, we recommend using ordinary rice rather than ‘easy cook’ type
of rice which tends to give a stickier rice and may adhere to the base.
With other types of rice, such as brown or wild rice, the quantities of
water need adjustment, check the tables below.
• To cook 1 cup of white rice (serves 2 small or 1 large portion), use 1
measuring cup of white rice and then add one and a half measuring cup
of water. With some types of rice it is normal for a little rice to stick on
the base when cooking 1 cup of rice. To cook other quantities of white
rice, refer to cooking guide below.
9
Page 13
EN
• The maximum quantity of water + rice should not exceed the highest
mark inside the bowl – fig.8. Depending on the type of rice, quantities
of water may need adjustment. See the table below.
COOKING GUIDE FOR WHITE RICE - 10 cups
Rice
measurement in
cups
2 300 g 2 cup mark 3pers.-4pers.
4 600 g 4 cup mark 5pers.-6pers.
6 900 g 6 cup mark 8pers.-10pers.
8 1200 g 8 cup mark 13pers.-14pers.
10 1500 g 10 cup mark 16pers.-18pers.
Weight of
rice
Water measurement
in the bowl (+ rice)
Serves
• Rinse the rice thoroughly before cooking except for risotto rice.
COOKING GUIDE FOR DIFFERENT KINDS OF RICE OR OTHER RICES
Water
measurement
in the bowl
(+ rice)
Serves
Type of rice
Round white
rice (Italian
rice - often a
stickier rice)
Whole grain
Brown rice
Risotto rice
(Arborio type)
Glutinous rice
(Sticky rice)
Brown rice
Rice
measurement
in cups
6 870 g 6 cup mark 7pers.-8pers.
10 1450 g 10 cup mark 10pers.-12pers.
6 887 g 6 cup mark 7pers.-8pers.
10 1480 g 10 cup mark 10pers.-12pers.
6 870 g 6 cup mark 7pers.-8pers.
10 1450 g 10 cup mark 10pers.-12pers.
6 736 g 5 cup mark 7pers.-8pers.
10 1227 g 9 cup mark 10pers.-12pers.
6 840 g 6 cup mark 7pers.-8pers.
10 1400 g 10 cup mark 10pers.-12pers.
Weight
of rice
10
Page 14
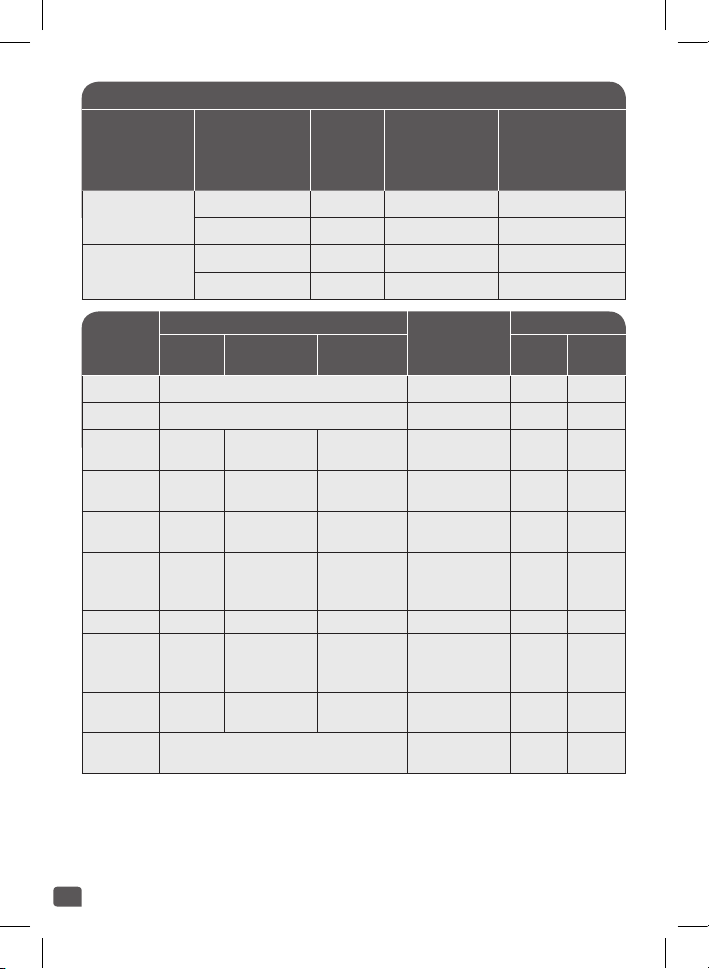
COOKING GUIDE FOR DIFFERENT KINDS OF RICE OR OTHER RICES
Water
measurement
in the bowl
(+ rice)
Type of rice
Japanese rice
Jasmine rice
Rice
measurement
in cups
6 900 g 6 cup mark 7pers.-8pers.
10 1500 g 10 cup mark 10pers.-12pers.
6 870 g 6 cup mark 7pers.-8pers.
10 1450 g 10 cup mark 10pers.-12pers.
Weight
of rice
Serves
Time set
Function
Risotto Automatic •
Reheat 25 min
Oatmeal 10 min
Slow
Cook
Steam/
soup
Yogurt 8 hours 6 h - 12 h 1 hour 42° •
Baking 35 min
Browning 15 min
Keep
warm
Default Range Every
Rice Automatic •
8 min -
45 min
5 min -
90 min
4 hours 2 h - 9 h 1 hour 100° •
30 min
15 min -
2 h
20 min -
4 h
5 min -
60 min
Up to 24 h 75° •
1 min 100° •
1 min 100° •
1 min, after
90 min - 1
hour
1 min, after
90 min - 1
hour
1 min 160° • •
Max
Temperature
(°C)
100° •
135° •
11
Lid position
Lid
closed
Lid
open
Page 15
EN
SOME RECOMMENDATIONS FOR BEST RESULTS WHEN
COOKING RICE
• Measure the rice and rinse it thoroughly under running water in a sieve for
2 minutes (except for risotto rice which should not be rinsed). Then place
the rice in the bowl together with the corresponding quantity of water.
• Make sure that the rice is well distributed around the whole surface of
the bowl, in order to allow even cooking.
• Add salt to your personal taste if required.
• Water may be substituted for stock. If using stock, there is the risk of rice
browning a bit on the bottom of the pan.
• Do not open the lid during cooking as steam will escape and this will
affect the cooking time and the taste.
• When the rice is ready, the “Keep Warm” indicator light will turn on, stir
the rice and then leave it in the multicooker for a few minutes longer in
order to get perfect rice with separate grains.
“RICE” FUNCTION
• Place the appliance on a flat, stable, heat-resistant work surface away
from water splashes and any other sources of heat.
• Pour the required quantity of rice into the bowl using the measuring cup
provided – fig.9. Then fill with cold water up to the corresponding “CUP”
mark printed in the bowl – fig.10.
• Close the lid.
Note: Always add the rice first otherwise you will have too much water.
• Press “Menu” key to select function “Rice”. The screen displays “--”, the light
of “Start” flickers, then press “Start” key. The multicooker enters into “Rice”
cooking status, the light of “Start” lights up, the LED screen displays “-”.
• At the end of cooking, the buzzer will ring twice “beep beep”, the
multicooker will start to simmer and the screen will count down the
simmering time: 14 minutes.
• After simmering, the buzzer will ring several times, the multicooker will enter
keep warm status with the “Keep Warm” indicator turning on and the screen
will display “b” signaling that the appliance is now in keep warm mode.
“RISOTTO” FUNCTION
• Press “Menu” key to select function “Risotto”. The screen displays “--”,
the light of “Start” flickers, then press “Start” key. The multicooker enters
into “Risotto” cooking status. The light of “Start” lights up, and the LED
screen displays “-”.
12
Page 16

• At the end of cooking, the buzzer will ring twice “beep beep”, the
multicooker will start to simmer and the screen will count down the
simmering time: 10 minutes.
• After simmering, the buzzer will ring several times, the multicooker will
enter keep warm status with the “Keep Warm” key turning on and the
screen will display “b”.
“REHEAT” FUNCTION
• Press “Menu” key to select function “Reheat”. The screen displays “--”,
the light of “Start” flickers, then press “Start” key. The multicooker enters
into “Reheat” cooking status. The light of “Start” lights up and the LED
screen displays the remaining time.
• The default cooking time is 25 minutes adjustable from minimum 8
minutes to 45 minutes. Pressing down on the +/- key will allow you to
increase or decrease the time.
• At the end of reheating process, the buzzer will ring several times, the
multicooker will enter keep warm status with the “Keep Warm” key
turning on and the screen will display “b”.
Repeat use of “reheating” in case of excessive rice or too little rice
during cooking will result in burnt rice at the bottom.
Reheating cold rice may cause a burnt smell.
Never use reheat function to defrost food.
“OATMEAL” FUNCTION
• Press “Menu” key to select function “Oatmeal”. The screen displays “--”,
the light of “Start” flickers, then press “Start” key. The multicooker enters
into “Oatmeal” cooking status. The light of “Start” lights up and the LED
screen displays the remaining time.
• The default cooking time is 10 minutes adjustable from minimum 5
minutes to 90 minutes. Pressing down on the +/- key will allow you to
increase or decrease the time.
• At the end of cooking, the buzzer will ring several times, the multicooker
will enter keep warm status with the “Keep Warm” key turning on and
the screen will display “b”.
• Once the oatmeal is cooked, it should be consumed within 1 hour.
13
Page 17
EN
“SLOW COOK” FUNCTION
• Press “Menu” key to select function “Slow Cook”. The screen displays “--”,
the light of “Start” flickers, then press “Start” key. The multicooker enters
into “Slow Cook” cooking status. The light of “Start” lights up and the
LED screen displays the remaining time.
• The default cooking time is 4 hours adjustable from minimum 2 hours
to 9 hours. Pressing down on the +/- key will allow you to increase or
decrease the time.
• At the end of cooking, the buzzer will ring several times, the multicooker
will enter keep warm status with the “Keep Warm” key turning on and
the screen will display “b”.
“STEAM/SOUP” FUNCTION
• Press “Menu” key to select function “Steam/Soup”. The screen displays
“--”, the light of “Start” flickers, then press “Start” key. The multicooker
enters into “Steam/Soup” cooking status. The light of “Start” lights up
and the LED screen displays the remaining time.
• The default cooking time is 30 minutes adjustable from minimum
15 minutes to 2 hours. Pressing down on the +/- key will allow you to
increase or decrease the time.
• At the end of cooking, the buzzer will ring several times, the multicooker
will enter keep warm status with the “Keep Warm” key turning on and
the screen will display “b”.
“YOGURT” FUNCTION
• Press “Menu” key to select function “Yogurt”. The screen displays “--”,
the light of “Start” flickers, then press “Start” key. The multicooker enters
into “Yogurt” cooking status. The light of “Start” lights up and the LED
screen displays the remaining time.
• The default cooking time is 8 hours adjustable from minimum 6 hours
to 12 hours. Pressing down on the +/- key will allow you to increase or
decrease the time.
• The delayed start function is not available for the “Yogurt” function.
• At the end of cooking, the buzzer will ring several times.
• There is no keep warm at the end of the cooking program.
• Oven-proof glass containers can be used in the multicooker when
making yogurt.
14
Page 18

CHOICE OF INGREDIENTS FOR YOGURT
Milk
What milk should you use?
• All our recipes (unless otherwise stated) are prepared using cow’s milk.
You can use plant milk such as soy milk for example as well as sheep
or goat’s milk but, in this case, the firmness of the yogurt may vary
depending on the milk used. Raw milk or long-life milks and all the milks
described below are suitable for your appliance:
• Long-life sterilized milk: UHT whole milk results in firmer yogurt. Using
semi-skimmed milk will result in less firm yogurt. However, you can use
semi-skimmed milk and add one or two tablespoons of powdered milk.
• Pasteurized milk: this milk gives a more creamy yogurt with a little bit
of skin on the top.
• Raw milk (farm milk): this must be boiled. It is also recommended to
let it boil for a long time. It would be dangerous to use this milk without
boiling it. You must then leave it to cool before using it in your appliance.
Culturing using yogurt prepared with raw milk is not recommended.
• Powdered milk: using powdered milk will result in very creamy yogurt.
Follow the instructions on the manufacturer’s box.
Choose a whole milk, preferably long-life UHT.
Raw (fresh) or unpasteurized milk must be boiled then cooled and
needs the skin removing.
The ferment
For yogurt
This is made either from:
• One shop-bought natural yogurt with the longest expiration date
possible; your yogurt will therefore contain more active ferment for a
firmer yogurt.
• From a freeze-dried ferment. In this case, follow the activation time
specified on the ferment instructions. You can find these ferments in
supermarkets, pharmacies and in certain health product stores.
• From one of your recently prepared yogurt – this must be natural and
recently prepared. This is called culturing. After five culturing processes,
the used yogurt loses active ferments and therefore risks giving a less
firm consistency. You then need to start again using a store bought
yogurt or freeze-dried ferment.
If you have boiled the milk, wait until it has reached room temperature
before adding the ferment.
Too high a heat may destroy the properties of your ferment.
15
Page 19
EN
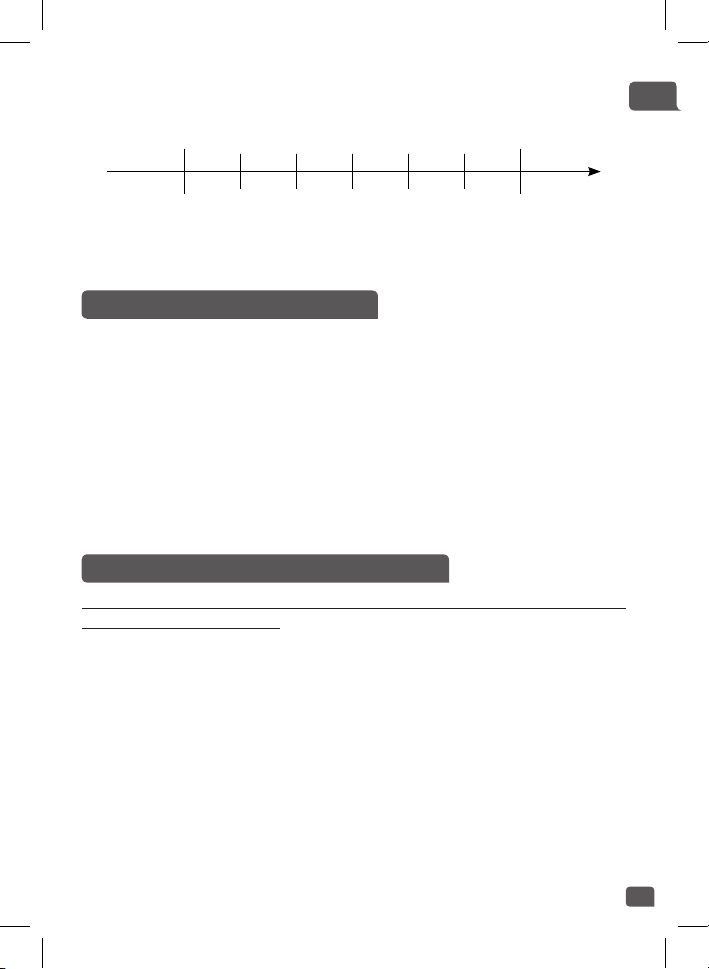
Fermentation time
• Your yogurt will need between 6 and 12 hours of fermentation,
depending on the basic ingredients and the result you want to achieve.
Liquidity
Sweet Acidic
6h 7h 8h 9h 10h 11h 12h
• Once the yogurt cooking process is finished, the yogurt should be placed
in a refrigerator for at least 4 hours and it can be kept max 7 days in
refrigerator.
Firm
“BAKING” FUNCTION
• Press “Menu” key to select function “Baking”. The screen displays “--”,
the light of “Start” flickers, then press “Start” key. The multicooker enters
into “Baking” cooking status. The light of “Start” lights up and the LED
screen displays the remaining time.
• The default cooking time is 35 minutes adjustable from minimum
20 minutes to 4 hours. Pressing down on the +/- key will allow you to
increase or decrease the time.
• The delayed start function is not available for “Baking” function.
• At the end of cooking, the buzzer will ring several times, the multicooker
will enter keep warm status with the “Keep Warm” key turning on and
the screen display “b”.
“BROWNING” FUNCTION
Note: Always use this function with oil and food. With oil only, it may
cause a failure or danger.
• Press “Menu” key to select function “Browning”. The screen displays “--”,
the light of “Start” flickers, then press “Start” key. The multicooker enters
into “Browning” cooking status. The light of “Start” lights up and the
LED screen displays the remaining time.
• The default cooking time is 15 minutes adjustable from minimum 5
minutes to 60 minutes.
• At the end of cooking, the buzzer will ring several times, the multicooker
will enter keep warm status with the “Keep Warm” key turning on and
the screen display “b”.
• Always use this function with oil and food. With oil only, an error
message of “E3” may appear on the display.
16
Page 20
“KEEP WARM” FUNCTION
• Press the “Keep Warm” key, the appliance will enter into “Keep Warm”
status.
• At the end of the keep warm process, please stop the machine manually
by pressing “Keep Warm/Cancel” key.
Recommendation: In order to keep the rice tasting fresh, please limit
the holding time within 6 hours.
Never use keep warm function to defrost food.
“DELAYED START” FUNCTION
• To use the delayed start function, choose a cooking program and the
cooking time first. Then, press the key Delayed Start and choose the
delayed start time. Each “+” or “-” key can increase or decrease one hour.
The default delayed start time will change depending on the selected
cooking time. The Range is from 1 up to 24 hours. When you have
chosen the required delayed start time, press the “START” key to enter
cooking status, the “START” indicator will remain on and LED screen will
display the number of hours you have chosen.
ON COMPLETION OF COOKING
• Open the lid – fig.1.
• Use a pot holder or oven mitt to remove the cooking bowl and steam
tray - fig.12.
• Serve food using the plastic spoon provided with your appliance.
• Food will keep warm for up to 24 hours.
• Press “Keep Warm/Cancel” key to finish the keep warm status.
• Unplug the appliance.
MISCELLANEOUS INFORMATION
• The appliance has a memory function. In case of power failure, the
multicooker will memorize the cooking state right before the failure,
and it will continue the cooking process if the power is resumed within
2 seconds. If the power failure lasts for more than 2 seconds, the
multicooker will cancel previous cooking and return to standby status.
• Please do not open the lid during cooking in order to ensure the cooking
efficiency.
17
Page 21

EN
CLEANING AND MAINTENANCE
• Always make sure the multicooker is unplugged and completely cooled
down before cleaning and maintenance.
• It is strongly advised to clean the appliance after each use with a
sponge – fig.13.
Bowl, steam basket (fig.14)
• Use hot water and dishwashing soap and a sponge to clean the bowl
and the steam basket. Scouring powders and metal sponges are not
recommended.
• If food is stuck to the bottom, you may put water in the bowl to soak for
a while before washing.
• Dry the bowl carefully.
Taking care of the bowl
• For the bowl, carefully follow the instructions below:
• To ensure the maintenance of bowl quality, it is recommended not to
cut food in it.
• Make sure you put the bowl back into the multicooker.
• Use the plastic spoon provided or a wooden spoon and not a metal type
so as to avoid damaging the bowl surface – fig.15.
• To avoid any risk of corrosion, do not pour vinegar into the bowl.
• The color of the bowl surface may change after using for the first time or
after longer use. This change in color is due to the action of steam and
water and does not have any effect on the use of the multicooker, nor is it
dangerous for your health. It is perfectly safe to continue using it.
Cleaning the micro pressure valve
• When cleaning the micro-pressure valve, remove it from the lid – fig.16
and open it by rotating in the direction of “open” – fig.17a and 17b.
After cleaning it, wipe it dry and meet the two triangle in the two parts
together and rotate it in the direction of “close”, then put it back on the
lid of the multicooker – fig.18a and 18b.
Cleaning and care of the other parts of the appliance
• Unplug the appliance before cleaning.
• Clean the outside of the multicooker – fig.19, the inside of the lid –
fig.14 and the cord with a damp cloth and wipe dry. Do not use abrasive
products.
• Do not use water to clean the interior of the appliance body as it could
damage the heat sensor.
18
Page 22
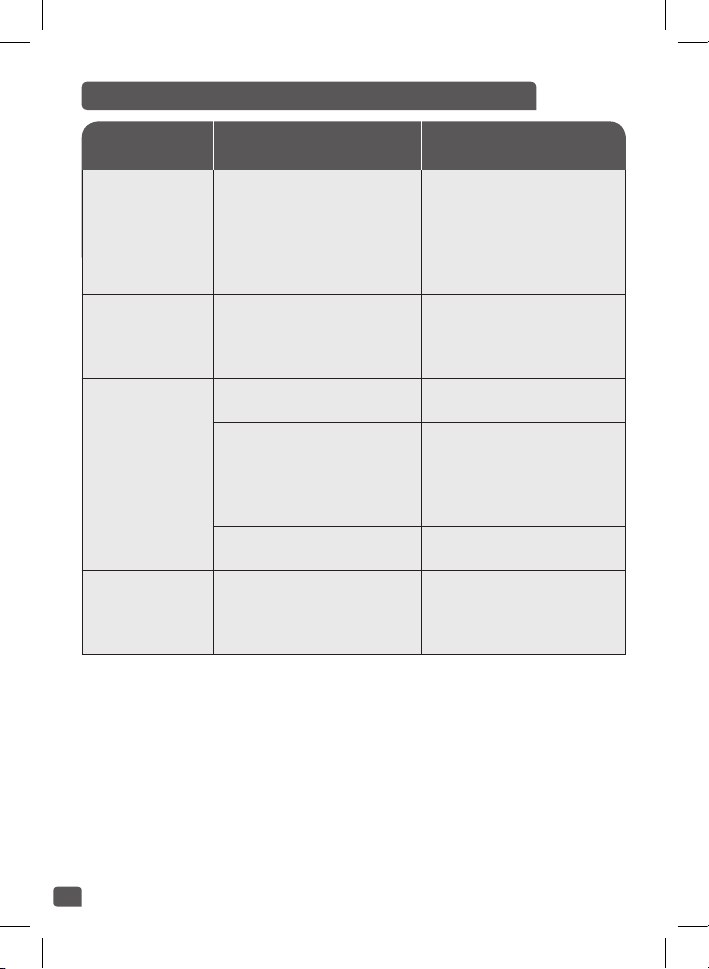
TECHNICAL TROUBLESHOOTING GUIDE
Malfunction
description
Any indicator
light is off and
no heat.
An indicator
light is off but
the appliance is
heating.
Abnormal
steam leakage
during use.
Rice is half
cooked or takes
too long to
cook.
Causes Solutions
Appliance is not plugged
in.
Indicator light damaged.
Lid is not closed well.
Micro pressure valve not
well positioned.
Lid or micro pressure valve
gasket is damaged.
Too much or not enough
water compared to rice
quantity.
Plug in appliance. If the
lights still don’t come on
and there is no heat then
send the appliance to an
authorized service center
for repair.
Send to authorized
service center for repair.
Open and close again the
lid.
Stop cooking (unplug
the product) and check
that the valve is secure
(2 parts locked together)
and well positioned.
Send to authorized
service center for repair.
Refer to table for water
quantity.
19
Page 23
EN
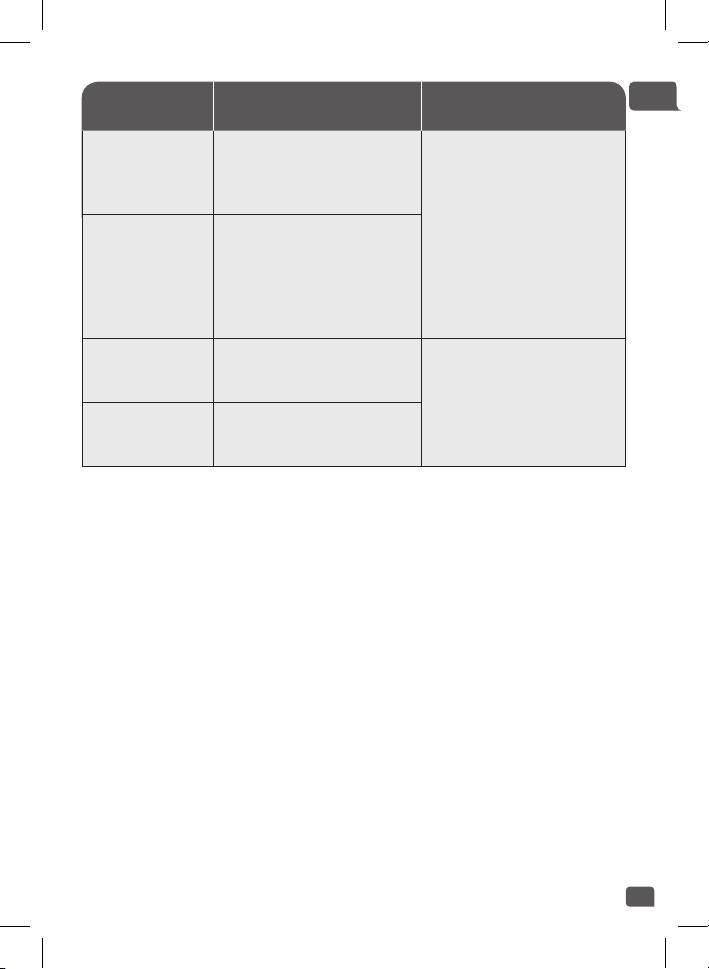
Malfunction
description
Rice half
cooked or takes
too long too
cook.
Automatic
keep warm
fails (product
stays in cooking
program, or no
heating).
E0
E1
Remark: if inner bowl is deformed, do not use it anymore and get a
replacement from the authorized service center.
Not sufficiently simmered.
The sensor on the top
circuit is open or there is a
short circuit
The sensor on the bottom
circuit is open or there is a
short circuit.
Causes Solutions
Send to the authorized
service center for repair.
Stop the appliance and
restart the program. If the
problem repeats, please
send to the authorized
service center for repair.
20
Page 24
TEFAL/T-FAL* INTERNATIONAL LIMITED GUARANTEE
: www.tefal.com
This product is repairable by TEFAL/T-FAL*, during and after the
guarantee period.
TEFAL/T-FAL endeavours to keep most of the stock of the spare parts
available for the repair of your product for up to 5 to 7 years on average,
from the last date of production.
Accessories, consumables and end-user replaceable parts can be
purchased, if locally available, as described on the TEFAL/T-FAL internet
site www.tefal.com
The Guarantee
TEFAL/T-FAL guarantees this product against any manufacturing defect
in materials or workmanship during the guarantee period within those
countries*** as stated in the attached country list, starting from the initial
date of purchase or delivery date.
The international manufacturer’s guarantee covers all costs related to
restoring the proven defective product so that it conforms to its original
specifications, through the repair or replacement of any defective part
and the necessary labour. At TEFAL/T-FAL’s choice, a replacement product
may be provided instead of repairing a defective product. TEFAL/T-FAL’s
sole obligation and your exclusive resolution under this guarantee are
limited to such repair or replacement.
Conditions & Exclusions
TEFAL/T-FAL shall not be obliged to repair or replace any product which is not
accompanied by a valid proof of purchase. The product can be taken directly
in person or must be adequately packaged and returned, by recorded delivery
(or equivalent method of postage), to a TEFAL/T-FAL authorised service centre.
Full address details for each country’s authorised service centers are listed on
TEFAL/T-FAL website (www.tefal.com) or by calling the appropriate consumer
Service centre set out in the attached country list. In order to offer the best
possible after-sales service and constantly improve customer satisfaction,
TEFAL/T-FAL may send a satisfaction survey to all customers who have had
their product repaired or exchanged in a TEFAL/T-FAL authorised service centre.
This guarantee applies only for products purchased and used for domestic
purposes and will not cover any damage which occurs as a result of misuse,
negligence, failure to follow TEFAL/T-FAL instructions, or a modification
or unauthorised repair of the product, faulty packaging by the owner or
mishandling by any carrier. It also does not cover normal wear and tear,
maintenance or replacement of consumable parts, or the following:
21
Page 25

EN
- using the wrong type of water or consumable
- mechanical damages, overloading
- damages or poor results specifically due to wrong voltage or
frequency as stamped on the product ID or specification
- ingress of water, dust or insects into the product
- scaling (any de-scaling must be carried out according to the
instructions for use)
- damage as a result of lightning or power surges
- damage to any glass or porcelain ware in the product
- accidents including fire, flood, etc
- professional or commercial use
Consumer Statutory Rights
This international TEFAL/T-FAL guarantee does not affect the Statutory
Rights a consumer may have or those rights that cannot be excluded or
limited, nor rights against the retailer from which the consumer purchased
the product. This guarantee gives a consumer specific legal rights, and
the consumer may also have other legal rights which vary from State to
State or Country to Country. The consumer may assert any such rights at
his sole discretion.
***Where a product purchased in a listed country and then used in
another listed country, the international TEFAL/T-FAL guarantee duration
is the a in the country of usage, even if the product was purchased in a
listed country with different guarantee duration. The repair process may
require a longer time if the product is not locally sold by TEFAL/T-FAL. If
the product is not repairable in the new country, the international TEFAL/
T-FAL guarantee is limited to a replacement by a similar or alternative
product at similar cost, where possible.
*TEFAL household appliances appear under the T-FAL brand in some
territories like America and Japan. TEFAL/T-FAL are registered trademarks
of Groupe SEB.
Please keep this document for your reference should you wish to make a
claim under the guarantee.
For Australia only:
Our goods come with guarantees that cannot be excluded under the
Australian Consumer Law. You are entitled to a replacement or refund for
a major failure and compensation for any other reasonably foreseeable
loss or damage. You are also entitled to have the goods repaired or
replaced if the goods fail to be of acceptable quality and the failure does
not amount to a major failure.
22
Page 26
ﻥﻳﺭﺣﺑﻟﺍ
BAHRAIN
Paulo/SP
GROUPE SEB CANADA
Groupe SEB ČR s.r.o.
186 00 Praha 8
ﺕﺑﻳﺟﻳﺇ ﺏﺳ ﺏﻭﺭﺟ
ﺔﺣﻭﻣﺳ ، ﻭﻳﺎﻣ١٤ﻕﻳﺭﻁ :ﺔﻳﺭﺩﻧﻛﺳﻹﺍ
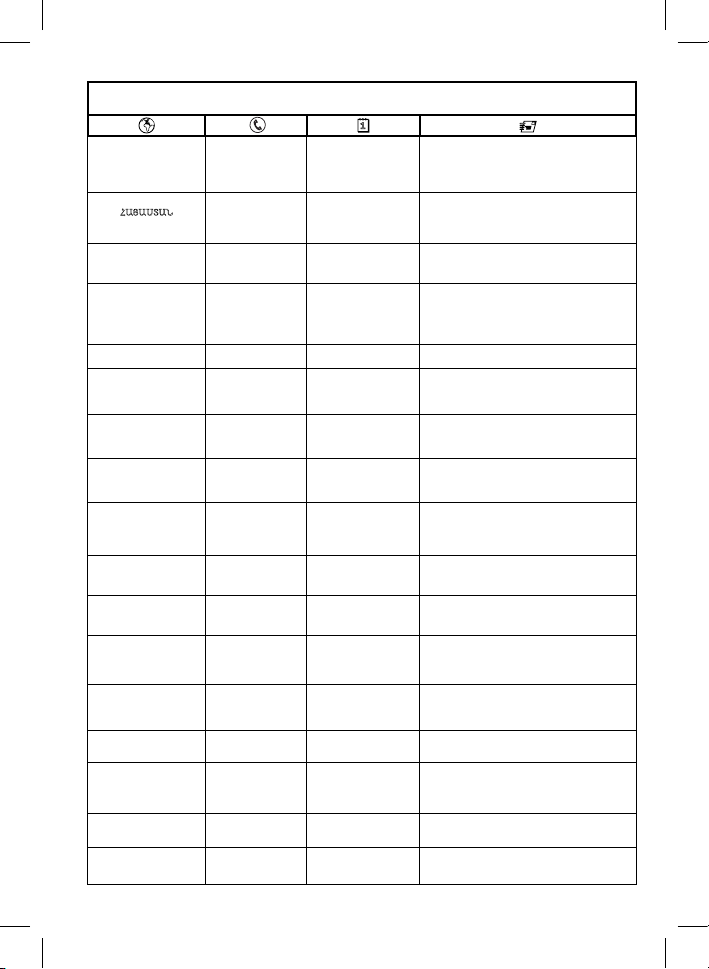
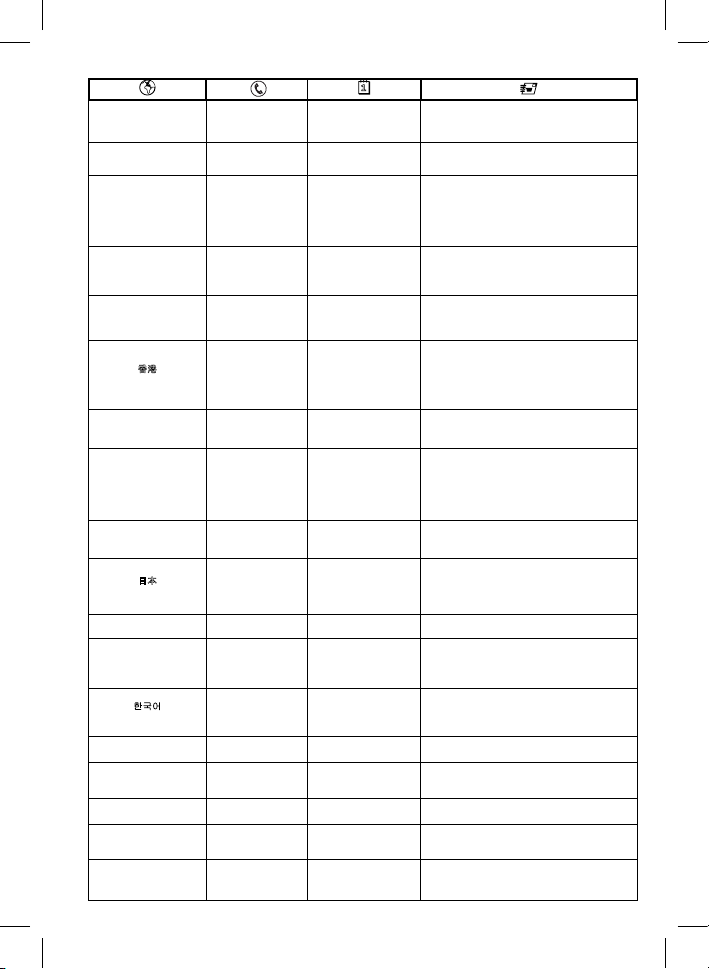
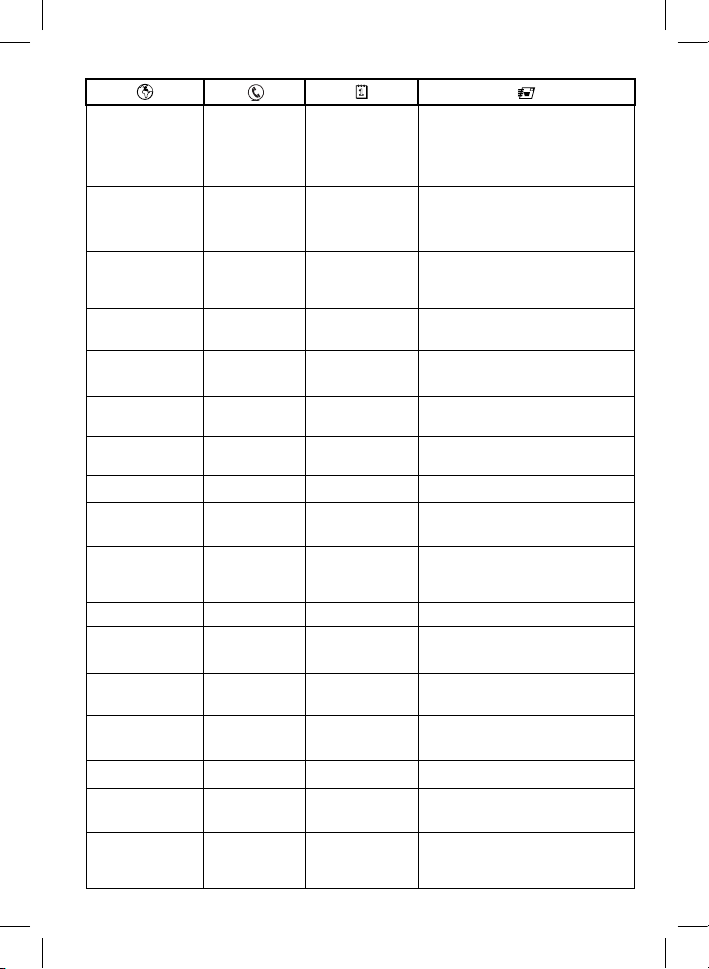
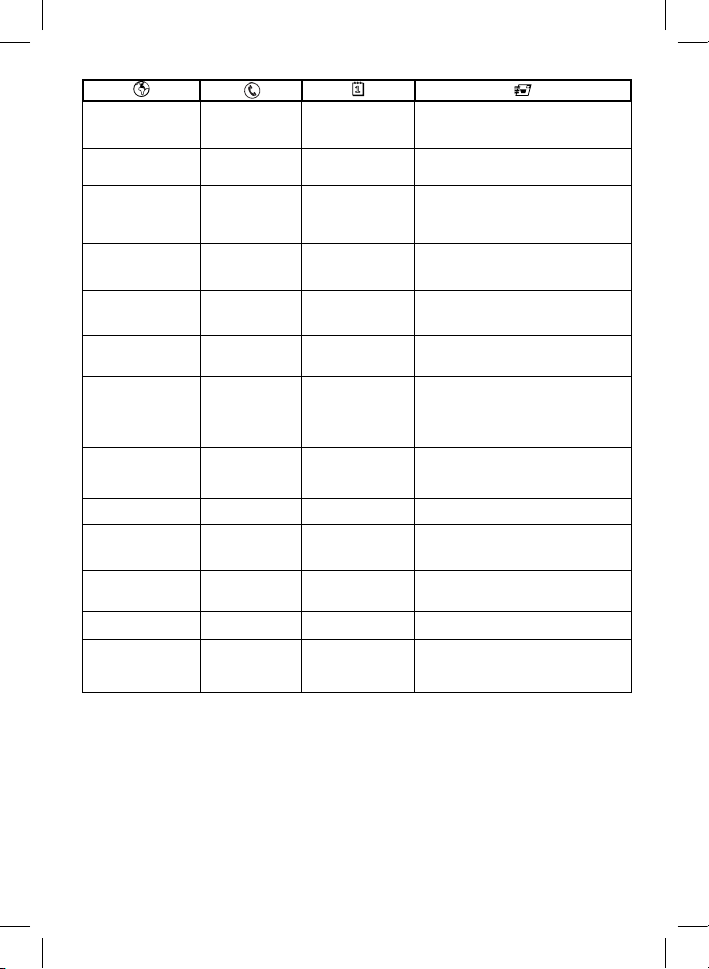
TEFAL/T-FAL INTERNATIONAL GUARANTEE: COUNTRY LIST
www.tefal.com
ARGENTINA
ՀԱՅԱՍՏԱՆ
ARMENIA
AUSTRALIA
ÖSTERREICH
AUSTRIA
БЕЛАРУСЬ
BELARUS
BELGIQUE BELGIE
BELGIUM
BOSNA I HERCEGOVINA
BRASIL
BRAZIL
БЪЛГАРИЯ
BULGARIA
CANADA
CHILE
COLOMBIA
HRVATSKA
CROATIA
ČESKÁ REPUBLIKA
CZECH REPUBLIC
DANMARK
DENMARK
ﺭﺻﻣ
EGYPT
0800-122-2732
010 55-76-07 2 տարի 2 years
1300307824 1 year
01 890 3476
17716666 1 year www.tefal-me.com
017 2239290
070 23 31 59
Info-linija za
potrošače
033 551 220
11 2915-4400
0700 10 330
1-800-418-3325
12300 209207
018000520022
01 30 15 294
731 010 111
44 663 155
16622
2 años
2 years
2 Jahre
2 years
2 года
2 years
2 ans
2 jaar
2 years
2 godine
2 years
1 ano
1 year
2 години
2 years
1 an
1 year
2 años
2 years
2 años
2 years
2 godine
2 years
2 roky
2 years
2 år
2 years
ﺓﺩﺣﺍﻭ ﺔﻧﺳ
1year
GROUPE SEB ARGENTINA S.A.
Billinghurst 1833 3°
C1425DTK
Capital Federal Buenos Aires
ՓԲԸ <<ԳՐՈՒՊՊԱ ՍԵԲ>>
125171,ՄՈՍԿՎԱ, ԼԵՆԻՆԳՐԱԴՅԱՆ
ԽՃՈՒՂԻ, 16A, ՇԻՆ.3
GROUPE SEB AUSTRALIA
PO Box 7535,
Silverwater NSW 2128
SEB ÖSTERREICH GmbH
Campus 21 - Businesspark W ien Süd,
Liebermannstr. A02 702
2345 Brunn am Gebirge
ЗАО «Группа СЕБ-Восток»,
125171, Москва, Ленинградское шоссе, д.
Rua Venâncio Aires, 433, Pompéia, São
GROUPE SEB CHILE Comercial Ltda Av.
Providencia, 2331, piso 5, oficina 501
Via Zipaquira Cajica Cundinamarca
16А, стр. 3
GROUPE SEB BELGIUM SA NV
25 avenue de l'Espérance - ZI
6220 Fleurus
SEB Developpement
Predstavništvo u BiH
Vrazova 8/II 71000 Sarajevo
SEB COMERCIAL DE PRODUTOS
DOMÉSTICOS LTDA
ГРУП СЕБ БЪЛГАРИЯ ЕООД
бул. България 81 В, ет. 5
1404 София
345 Passmore Avenue
Toronto, ON M1V 3N8
Santiago
GROUPE SEB COLOMBIA
Apartado Aereo 172, Kilometro 1
SEB mku & p d.o.o.
Vodnjanska 26, 10000 Zagreb
Futurama Business Park (budova A)
Sokolovská 651/136a
GROUPE SEB NORDIC AS
Tempovej 27 2750 Ballerup
ﺓﺩﻳﺩﺟﻟﺍ ﺭﺻﻣ ،ﺯﺎﺟﺣﻟﺍ ﻉﺭﺎﺷ ١٢١ :ﺓﺭﻫﺎﻘﻟﺍ
Page 27
EESTI
GROUPE SEB DEUTSCHLAND GmbH /
3 Sham Mong Road, Tai Kok Tsui, Kowloon
GROUPE SEB ITALIA S.p.A.
20156 Milano
JORDAN
KUWAIT
ESTONIA
SUOMI
FINLAND
France Continentale +
Guadeloupe, Martinique,
Réunion, Saint-Martin
668 1286
09 622 94 20
09 74 50 47 74
2 aastat
2 years
2 Vuotta
2 years
1 an
1 year
GROUPE SEB POLSKA Sp. z o.o.
ul. Bukowińska 22b
02-703 Warszawa
Groupe SEB Finland
Kutojantie 7 02630 Espoo
GROUPE SEB France
Service Consommateur Tefal
112 Ch. Moulin Carron, TSA 92002
69134 ECULLY Cedex
DEUTSCHLAND
GERMANY
ELLADA
GREECE
香港
HONG KONG
MAGYARORSZÁG
HUNGARY
INDONESIA
ITALIA
ITALY
日本
JAPAN
ﻥﺩﺭﻷﺍ
ҚАЗАҚСТАН
KAZAKHSTAN
한국어
KOREA
ﺕﻳﻭﻛﻟﺍ
LATVJA
LATVIA
ﻥﺎﻧﺑﻟ
LEBANON
LIETUVA
LITHUANIA
LUXEMBOURG
0212 387 400
2106371251
8130 8998 1 year
06 1 801 8434
+62 21 5793 7007 1 year
1 99 207 354
0570-077772 1 year
5665505 1 year www.tefal-me.com
727 378 39 39
1588-1588 1 year
24831000 1 year www.tefal-me.com
6 616 3403
4414727 1 year www.tefal-me.com
5 214 0057
0032 70 23 31 59
2 Jahre
2 years
2 χρόνια
2 years
2 év
2 years
2 anni
2 years
2 жыл
2 years
2 gadi
2 years
2 metai
2 years
2 ans
2 years
KRUPS GmbH
Theodor-Stern-Kai 1
SEB GROUPE ΕΛΛΑΔΟΣ Α.Ε.
Οδός Καβαλιεράτου 7
Τ.Κ. 145 64 K. Κηφισιά
Room 903, 9/F, South Block, Skyway House
SEB ASIA Ltd.
Hong-Kong
GROUPE SEB CENTRAL-EUROPE Kft.
Távíró köz 4 2040 Budaörs
GROUPE SEB INDONESIA (Representative
Sudirman Plaza, Plaza Marein 8th Floor
JL Jendral Sudirman Kav 76-78,
office)
Jakarta 12910, Indonesia
Via Montefeltro, 4
株式会社グループセブジャパン
〒144-0042
東京都大田区羽田旭町11-1
羽田クロノゲート事務棟5F
ЖАҚ «Группа СЕБ- Восток»
125171, Мәскеу, Ленинградское
шоссесі,16А, 3 үйі
(유)그룹 세브 코리아
서울시 종로구 청계천로 35 관정빌딩 2층 110-
GROUPE SEB POLSKA Sp. z o.o.
ul. Bukowińska 22b, 02-703 Warszawa
GROUPE SEB POLSKA Sp. z o.o.
ul. Bukowińska 22b, 02-703 Warszawa
GROUPE SEB BELGIUM SA NV
25 avenue de l'Espérance - ZI
790
6220 Fleurus
Page 28
GROUPE SEB MALAYSIA SDN. BHD
GROUPE SEB NEW ZEALAND
New Zealand
ﺭﻁﻗ
QATAR
МАКЕДОНИЈА
MACEDONIA
MALAYSIA
MEXICO
MOLDOVA
NEDERLAND
The Netherlands
NEW ZEALAND
NORGE
NORWAY
ﺔﻧﻁﻠﺳ ﻥﺎﻣُﻋ
OMAN
POLSKA
POLAND
PORTUGAL
REPUBLIC OF IRELAND
ROMANIA
РОССИЯ
RUSSIA
ﺔﻛﻠﻣﻣﻟﺍ ﺔﻳﺑﺭﻌﻟﺍ ﺔﻳﺩﻭﻌﺳﻟﺍ
SAUDI ARABIA
SRBIJA
SERBIA
SINGAPORE
Groupe SEB Bulgaria EOOD
(02) 20 50 319
2 години
2 years
603 7802 3000 1 year
(01800) 112 8325
22 929249
0318 58 24 24
1 year
2 роки
2 years
2 years
0800 700 711 1 year
815 09 567
2 years
1 año
2 jaar
2 år
Office 1, floor 1, 52G Borovo St.,
1680 Sofia - Bulgaria
ГРУП СЕБ БЪЛГАРИЯ ДООЕЛ
Ул. Борово 52 Г, сп. 1, офис 1, 1680
София, България
Unit No. 402-403, Level 4, Uptown 2,
No. 2, Jalan SS21/37, Damansara Uptown,
47400, Petaling Jaya, Selangor D.E Malaysia
Groupe.S.E.B. México, S.A. DE C.V.
Goldsmith 38 Desp. 401, Col. Polanco
Delegación Miguel Hildalgo
11 560 México D.F.
ТОВ «Груп СЕБ Україна»
02121, Харьківське шосе, 201-203, 3
поверх, Київ, Україна
GROUPE SEB NEDERLAND B.V.
De Schutterij 27
3905 PK Veenendaal
PO Box 17 – 298, Greenlane, 1546 Auckland
GROUPE SEB NORDIC AS
Tempovej 27
2750 Ballerup
24703471 1 year www.tefal-me.com
801 300 420
koszt jak za
połączenie lokalne
808 284 735
2 lata
2 years
2 anos
2 years
GROUPE SEB POLSKA Sp. z o.o.
ul. Bukowińska 22b
02-703 Warszawa
GROUPE SEB IBÉRICA SA
Urb. da Matinha
Rua Projectada à Rua 3
Bloco1 - 3° B/D 1950 - 327 Lisboa
44485555 1 year www.tefal-me.com
01 677 4003 1 year
0 21 316 87 84
495 213 32 30
2 years
2 года
2 years
2 ani
GROUPE SEB IRELAND
Unit B3 Aerodrome Business Park, College
Road, Rathcoole, Co. Dublin
GROUPE SEB ROMÂNIA
Str. Daniel Constantin nr. 8
010632 București
ЗАО «Группа СЕБ-Восток»,
125171, Москва, Ленинградское шоссе, д.
16А, стр. 3
920023701 1 year www.tefal-me.com
060 0 732 000
2 godine
6550 8900 1 year
2 years
SEB Developpement
Đorđa Stanojevića 11b
11070 Novi Beograd
GROUPE SEB SINGAPORE Pty Ltd.
59 Jalan Pemipin,
#04-01/02 L&Y Building
Singapore 577218
Page 29
SLOVENSKO
2000 MARIBOR
UAE
GROUPE SEB VENEZUELA
Urb. La Castellana, Caracas
SLOVAKIA
SLOVENIJA
SLOVENIA
SOUTH AFRICA
ESPAÑA
SPAIN
SVERIGE
SWEDEN
SUISSE SCHWEIZ
SWITZERLAND
ประเทศไทย
THAILAND
TÜRKIYE
TURKEY
ﺕﺍﺭﺎﻣﻻﺍ ﺔﻳﺑﺭﻌﻟﺍ ﺓﺩﺣﺗﻣﻟﺍ
Україна
UKRAINE
UNITED KINGDOM
U.S.A.
VENEZUELA
232 199 930
02 234 94 90
2 roky
2 years
2 leti
2 years
0100202222 1 year
902 31 24 00
08 594 213 30
044 837 18 40
2 años
2 years
2 years
2 ans
2 Jahre
2 years
02 769 7477 2 years
444 40 50
2 YIL
2 years
2 år
GROUPE SEB Slovensko, spol. s r.o.
Cesta na Senec 2/A
821 04 Bratislava
SEB d.o.o.
Gregorčičeva ulica 6
GS South Africa
Building 17, PO BOX 107
The Woodlands Office Park ,
20 Woodlands Drive, Woodm ead 2080
GROUPE SEB IBÉRICA S.A.
C/ Almogàvers, 119-123, Complejo
Ecourban 08018 Barcelona
TEFAL SVERIGE SUBSIDIARY OF
GROUPE SEB NORDIC
Truckvägen 14 A, 194 52 Upplands Väsby
GROUPE SEB SCHWEIZ Gm bH
Thurgauerstrasse 105
8152 Glattbrugg
GROUPE SEB THAILAND
2034/66 Italthai Tower, 14th Floor, n° 14-02,
New Phetchburi Road,
Bangkapi, Huaykwang, Bangkok, 10320
GROUPE SEB ISTANBUL AS
Dereboyu Cd. Bilim Sk. Sun Plaza No:5 K:2
Maslak/IST
8002272 1 year www.tefal-me.com
044 300 13 04
2 роки
2 years
0345 602 1454 1 year
800-395-8325 1 year
0800-7268724
2 años
2 years
ТОВ «Груп СЕБ Україна»
02121, Харківське шосе, 201-203, 3 поверх,
Av Eugenio Mendoza, Centro Letonia, Torre
Київ, Україна
GROUPE SEB UK LTD
Riverside House, Riverside Walk
Windsor, Berkshire, SL4 1NA
GROUPE SEB USA
2121 Eden Road Millville, NJ 08332
ING Bank, Piso 15, Ofc 155
www.tefal.com 25/03/2015
Page 30
Date of purchase: . . . . . . . . . . . . . . . . . . . . . . . . . / Date d'achat / Fecha de compra / Data da compra /Data d'acquisto / Kaufdatum / Aankoopdatum / Købsdato / Inköpsdatum /
TEFAL/T-FAL INTERNATIONAL GUARANTEE
Kjøpsdato / Ostopäivä / Data zakupu / Data vânzării /Įsigijimo data/ Ostukuupäev / D atum nakupa / Sorozatszám / Dátum nákupu / Pirk uma datums / D atum Kupovine / Datum kupnje /
Data cumpărării /Dat um nákupu / Tarikh pembelian / Tanggal pembelian /Ngày mua hàng / Sat ın alma tarihi / Дата продажи / Дата на закупуване / Датум на купување / Сатылған
мерзімі / Ημερομηνία αγο ράς /Վաճառքի օրը / /購買日期 /購入日/구입일자/ ﻱﺮﺧ ﺦﻳﺭﺎﺗ /ءﺍﺮﺸﻟﺍ ﺦﻳﺭﺎﺗr
Product reference: . . . . . . . . . . . . . . . . . . . . . . . . . . . . . . . . . / Référence du produit / Referencia del producto /Nome do produto / Tipo de prodotto / Typnummer des Gerätes /
Artikelnummer van het apparaat / Referencenummer / Produktreferens / Artikk elnummer / Tuot enumero / referencja produktu /Model / Gaminio nume ris / Toote viitenumber / Tip aparata /
Vásárlás kelte / Typ výrobku / Produkta at sauces numurs / Model proizvoda / Oznaka proizvoda / Cod produs / Produk rujukan / Referensi produk / Mã sản phẩm/ Ürün kodu / Модель /
Модель / Модел на уреда / Моделi / Κωδικός προιόντος / Մոդել / /產品模型 /製品番号/제품명/ ﻝﻮﺼﺤﻣ ﻞﻣﺎﻛ ﻊﺟﺮﻣ / ﻞﻣﺎﻜﻟﺍ ﺞﺘﻨﻤﻟﺍ ﻊﺟﺮﻣ
Retailer name & address: . . . . . . . . . . . . . . . . . . . . . . . . . . . . . . . . . . . . . . . . . / Nom et adresse du vendeur / Nombre y dirección del minorista / Nome e endereço do revendedor /
Nome e indirizzo del negozzio / Name und Anschrift des Händlers / Naam en adres van de dealer / Forhandler navn & adresse / Återförsäljarens namn och adress / Forhandler navn og
adresse / Jälleenmyyjän nimi ja osoite / nazwa i adres sprzedawcy /Numele şi adresa vânzătorului /Parduotuvės pavadinimas ir adresas /Müüja kauplus ja aadress / Naziv in naslov
trgovine / Tipusszám / Názov a adresa predajcu /Veikala nosaukums un adrese / Naziv i adresa maloprodaje / Naziv i adresa prodavca / Naziv i adresa prodajnog mjesta / Nume şi adresă
vânzător / Název a adresa prodejce /Nama dan alamat peruncit /Nama Toko Penjual dan alamat / Tên và địa chỉ cửa hàng bán/ Satıcı firmanın adı ve adresi / Название и адрес продавца /
Назва і адреса продавця / Търговки обект / Назив и адреса на продавницата / Сатушының аты және мекен-жайы /Επωνυ μία και διεύθυνση καταστήματος / Վաճառողի
անվանումը և հասցեն // /零售商的店名和地址/販売店名、住所/소매점 이름과 주소/ ﺵﻭﺮﻓ ﻩﺩﺮﺧ ﺱﺭﺩ ﻡﺎﻧ / ﻪﻧﺍﻮﻨﻋ ﻭ ﺔﺋﺰﺠﺘﻟﺍ ﻊﺋﺎﺑ ﻢﺳﺍ
Distributor stamp . . . . . . . . . . . . . . . . . . . . . . . . . . . . ./ Cachet distributeur /Sello del distribuidor / Carimbo do revendedor / Timbro del negozzio /Händlerstempel / Stempel van de
dealer / Forhandler stempel / Återförsäljarens stämpel /Forhandler stempel /Jälleenmyyjän leima /pieczęć sprzedawcy / Ştampila vânzătorului /Antsp audas / Tempel / Žig trgovine / Eladó
neve, címe/ Razítko predajcu / Zīmog s / Pečat maloprodaje/Pečat prodavca / Pečat prodajnog mjesta / Ştampila vânzătorului/ Razítko prodejce/ Cap peruncit / Cap dari Toko Penjual /
Cửa hàng bán đóng d ấu/ Satıcı Firmanın Kaşes i / Печать продавца /Печатка продавця / Печат на търговския обект / Печат на продавницата / Сатушының мөрі / Σφραγίδα
καταστήματος / Վաճառողի կնիքը / / / 零售商的蓋印 /販売店印/販売店印/소매점 직인/ﻭﺮﻓ ﻩﺩﺮﺧ ﺮﻬﻣ / ﺔﺋﺰﺠﺘﻟﺍ ﻊﺋﺎﺑ ﻢﺘﺧ
Page 31

Page 32

EN p. 1 – 22
EN
NC00131790
 Loading...