

TEFAL RK 700 User Manual
ENGLISH
Read the instructions and carefully follow the operating method.
Unpack the appliance
• Remove the appliance from the packaging and unpack all the accessories.
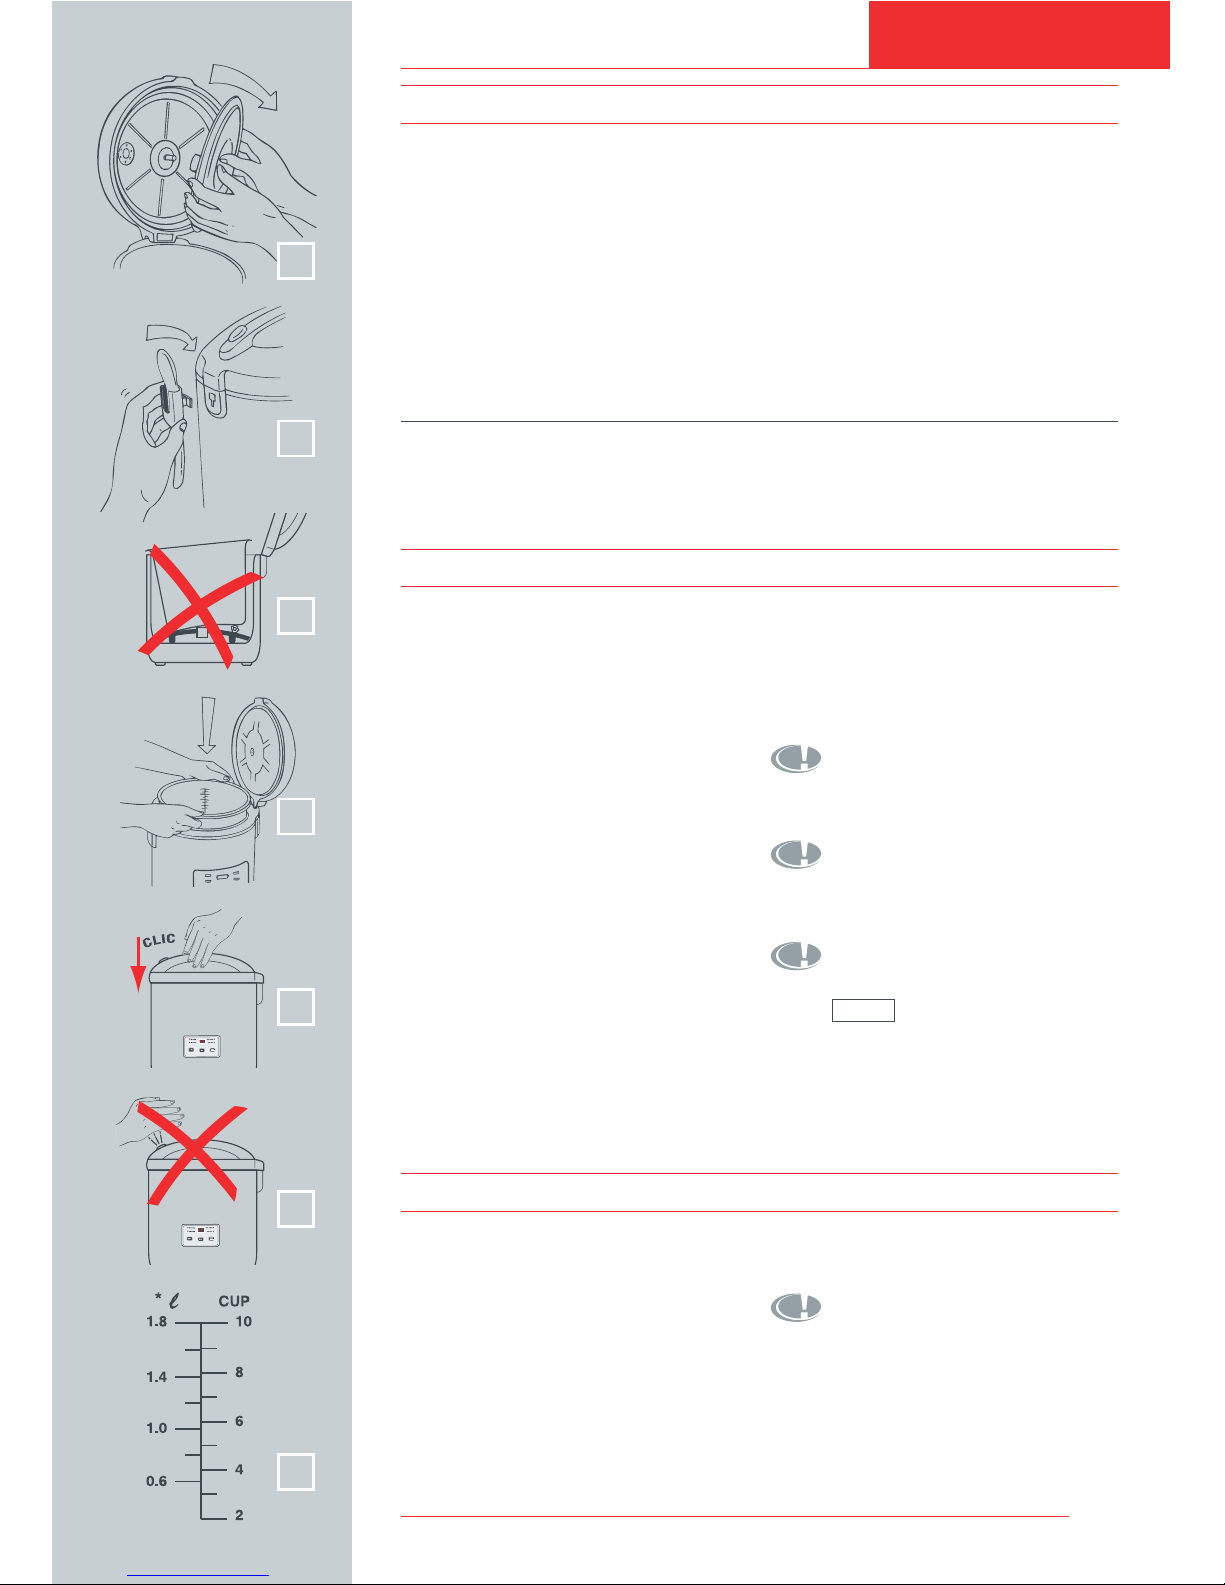
• Open the lid by pressing the opening
button located on the handle.
• Remove all the printed documents and
the accessories.
• Remove the non-stick bowl.
• Clean the metal parts of the lid and the
bowl with a sponge and washing-up
liquid. Fit the steam shield onto its
fixing axis - Fig. 1. Wipe the outside of
the appliance with a damp cloth.
• Dry off carefully.
Before the first use
Measuring the ingredients - Max capacity of the container
• The graduated markings on the inside
of the bowl are given in litres and cups
Fig. 7, these are used for measuring
the amount of water when cooking rice.
If cooking other foods, such as pasta,
follow the quantities in the recipes.
• The plastic cup provided with your
appliance is for measuring rice and the
table states the quantity of rice required
for the number of servings. 1 level
measuring cup of rice weighs 150 g.
The plastic cup is only used for
measuring rice and not the water
(except when cooking 1 cup of rice).
• The table on page 6 gives a guide to
cooking white rice. For best results, we
recommend using ordinary rice rather
than 'easy cook' type rice which tends
2
1
7
Install the spoon support - Fig. 2
• Insert the plastic hook of the support in
the hole located under the lid lock of the
lid, and slide it downwards.
This appliance has three cooking
functions: rice cooking, slow cooking,
and steam cooking.
For all 3 functions:
• Carefully wipe the outside of the bowl
(especially the bottom). Make sure
that there are no foreign residues
underneath the bowl and on the hotplate - Fig. 3
• Place the bowl into the appliance,
making sure that it is correctly positioned - Fig. 4
• Slightly rotate the bowl in both directions, so as to ensure good contact
between the bottom of the bowl and the
hotplate.
• Make sure that the steam shield is correctly in position.
• Close and lock the lid - Fig. 5
• Check that the condensation collector
is correctly in position.
• Plug in the appliance.
• Do not switch on the appliance until all
of the above stages have been completed.
Never place you hand on the
steam vent during cooking, as there is a
danger of burns. - Fig. 6
If the bowl is not properly in place
in the appliance, cooking cannot commence.
If you wish to change the selected
cooking time in the event of an error,
press cancel . Select the cooking mode
again and then the cooking time.
Press Start to begin the cooking process.
PREPARATION
USING YOUR 3 IN 1 RICE COOKER
RICE COOKING
4
K
5
5
6
3

6
to give a stickier rice and may adhere to
the base. With other types of rice, such
as brown or wild rice, see the 2 nd table
below.
• To cook 1 cup of white rice (serves
2 small or 1 large portion), use 1 measuring cup of white rice and then add
13/4 measuring cups of water. It is normal for a little rice to stick on the base
when cooking small quantities.
• The maximum quantity of water + rice
should not exceed the 10 cup mark
inside the bowl.
To cook rice:
The cooking times given in the tables
and recipes are only approximate and
for your guidance.
• Pour the required quantity of rice into
the bowl using the measuring cup provided. Then fill with cold water up to
the corresponding “CUP” mark printed
in the bowl. (See cooking guide).
Note: Always add the rice first otherwise you will have too much water.
• Close the lid.
• Check that the appliance is plugged in.
Briefly press on the mode key. The
first red “Rice cooking” light flashes.
• Press start to begin cooking, (you do
not have to select the cooking time).
The corresponding indicator light
remains steady. - Fig. 8
The rice cooker itself determines
the exact cooking time depending on the
quantity of water and ingredients placed
in the bowl (see cooking table for a
guide to times).
When the volume of water has been
absorbed by the rice, the appliance
stops the cooking process automatically
and passes into the “Keep warm” mode
(the orange “Keep warm” light comes
on).
• After each use empty the condensation
collector.
8
Measuring cups
of white rice
Weight
of white rice
Water level in
the bowl
(+ the rice)
Serves Approximate
cooking time*
2 300 g 2 cup mark 3 - 4 14 - 17 min.
4 600 g 4 cup mark 5 - 6 20 - 25 min.
6 900 g 6 cup mark 8 - 10 23 - 27 min.
8 1200 g 8 cup mark 11 - 14 25 - 30 min.
10 1500 g 10 cup mark 13 - 17 30 - 35 min.
Cooking guide for white rice in 3 in 1 Rice Cooker
(American long grain, Basmati, Thai)
Cooking guide for other types of rice
Wash the rice before cooking except for risotto rice.
* The rice cooker will automatically determine the exact cooking time depending on the quantity of
water and rice placed in the bowl.
* The rice cooker will automatically determine the exact cooking time depending on the quantity of
water and rice placed in the bowl.
Type of rice Measuring
Cup of rice
Weight of
white rice
Water level
in the bowl
(+ the rice)
Serves Approximate
cooking
time*
Round white rice
(Italian rice - often
a stickier rice)
4 600 g 4 cup mark 5 - 6 20 - 23 min.
Wholegrain
Brown rice
4 600 g 4.5 cup mark 5 - 6 35 - 40 min.
Wild rice
4 400 g 3.5 cup mark 4 - 5 about 40 min.
Risotto rice
(Arborrio type)
4 600 g 4 cup mark 4 - 5 17 - 23 min.
ENGLISH
7
• It is possible to delay the time the rice
starts cooking.
This is the only cooking mode
for which programming of a delayed
start-up is possible.
• Press the time key to program the
time which must elapse before cooking
completes. For instance : it is 1 p.m,
I would like my rice cooked at 8 p.m,
I have to set « 7H » on the time key
and press start to set.
• You can delay cooking for 9 hours
maximum.
• Measure out the rice into a sieve, rinse
it thoroughly under cold running water.
Then place the rice in the container
together with the corresponding quantity of water.
• Make sure that the rice is well distributed around the whole surface of the
container, in order to allow even
cooking.
• Add salt if required. Allow about half a
teaspoon of salt for 4 cups of rice, but
you can adjust this to your personal
taste. Remember your Rice Cooker
uses less water than when boiling rice
so take care not to add too much salt.
• Stock may be substituted for water if
desired. If using stock cubes, take care
not to season with too much salt as
they have salt included.
• Do not open the lid during cooking as
steam will escape and this will affect
the cooking time.
• On completion of cooking, when the
“Keep warm” function is selected, stir
the rice and then leave it in the rice
cooker for a few minutes longer in
order to get perfect rice with separate
grains.
• The quantity of ingredients (see recipes
for the amounts) should not exceed the
10 CUP mark in the bowl when slow
cooking.
Some recommendations for best results when cooking
of rice:
Cooking of rice with delayed start-up:
SLOW COOKING
Measuring the ingredients
If you are preparing a slow cooker recipe
which contains dried beans or dried peas,
for example red kidney beans or chick
peas, they must be soaked in plenty of
cold water overnight before cooking them.
Drain and rinse them thoroughly, then
place in a large saucepan and cover with
fresh cold water.
Bring to the boil and continue to boil rapidly for 10 minutes, uncovered, then drain
before using in Slow Cooker recipes.
Important instructions when slow cooking dried beans and
dried peas
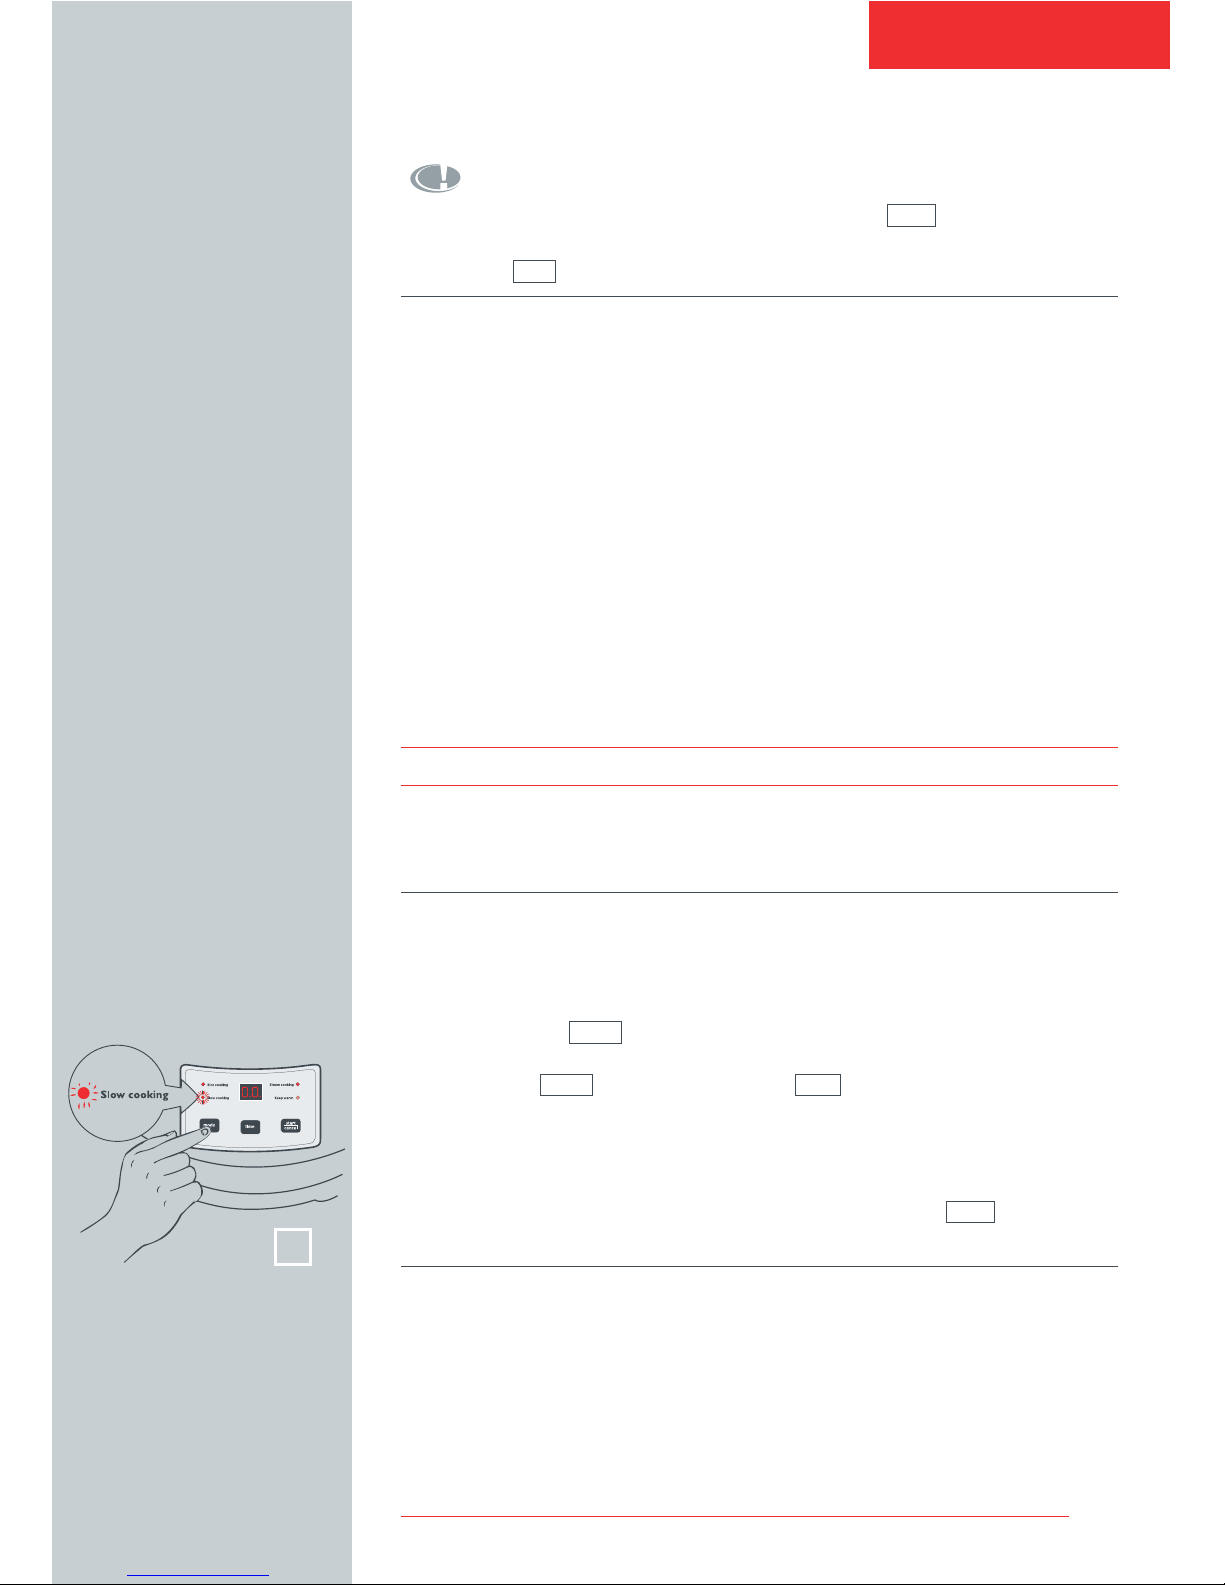
• Select the Slow cooking mode. When
the ingredients have been placed in the
container and the appliance plugged in,
briefly press the mode key. The first
red “Rice cooking” light flashes. Press
again on the mode key to sequence
through the lights corresponding to the
different cooking modes . Stop pressing when the “Slow cooking” light
flashes. - Fig. 9
• Select the cooking time: For cooking to
start, you must select a cooking time.
The appliance allows you to program
between 60 minutes minimum and 9
hours maximum for this cooking mode.
Choose the time so as to suit the chosen recipe. Press repeatedly on the
time key to increase the cooking time.
You can also press continuously in
order to speed up the process. The time
increases in hourly increments from 60
minutes up to 9 hours maximum.
• Press once on start to begin the
cooking process.
To slow cook:
9

8
This destroys any natural toxins in the
beans or peas.
Do not eat uncooked beans, peas
or lentils. Never add pulses to slow
cooker recipes without boiling them
first.
Season pulses after cooking as the salt
can toughen them during cooking.
• Soaking is not necessary for lentils, but
they must still be boiled rapidly for 10
minutes.
• Canned beans and pulses can simply
be drained and rinsed, and added 30
minutes before the end of the cooking
time. They do not need to be boiled
first.
• The maximum quantity of water in the
bowl should not exceed the 6 CUP
mark (representing 1.2 litres of water)
shown in “cups” on the bowl.
Exceeding this level may cause overflows during use.
STEAM COOKING
Measuring the ingredients
• Pour water into the container as stated
in the recipe. However, never exceed
the 6 mark CUP.
• Place the steam basket on top of the
bowl.
• Add the ingredients.
Preparation
• Select the steam mode. Briefly press
the mode key. The first red “Rice
cooking” light flashes. Press again on
the mode key to sequence through the
lights corresponding to the different
cooking modes. Stop pressing as soon
as the “Steam cooking” light flashes.
- Fig. 10.
• Select the cooking time. In order for
cooking to start, you have to select a
cooking time. The appliance allows you
to program from 1 minute minimum to
60 minutes maximum for this cooking
mode. You choose the time so as to
suit the chosen recipe. Press repeatedly on the time key to increase the
cooking time. You can also press continuously in order to speed up the process.
• Press once on start to begin cooking.
To steam cook
• On completion of cooking, irrespective
of the cooking mode chosen, the rice
cooker passes automatically to the
“Keep warm” function. The orange
“Keep warm” light comes on.
• The food is thus kept warm and ready
to serve. To switch off this function,
press cancel .
• You also have the option of manually
engaging the “Keep warm” mode. Just
press the mode key to sequence
through the lights until the orange light
is selected. Press directly on start to
begin the warming process. - Fig. 11.
• You cannot program a time for this
function. To switch it off, press cancel .
• Open the lid.
The escaping steam is very hot.
• Serve the food using the plastic spoon
supplied with the appliance and reclose the lid.
• The food remaining in the container will
keep warm for any second servings.
You can also re-start the “Keep warm”
mode manually (see preceding paragraph).
• Press cancel .
• Unplug the appliance.
11
10
AUTOMATIC KEEP WARM FUNCTION
ON COMPLETION OF COOKING

ENGLISH
9
Cleaning and care of the other parts of
the appliance
• Clean the outside of the Automatic Rice
Cooker, the inside of the lid and the
cord with a damp cloth and wipe dry.
Do not use abrasive products.
• Do not use water to clean the interior of
the appliance body as it could damage
the heat sensor.
• Before putting the appliance away, wind
the cord underneath the appliance.
• Wind up the cord - Fig. 14
The condensation collector should be
emptied and cleaned after each use
- Fig. 12 and 13
• To remove the collector, press on each
side of the plastic cover and remove.
• To put the plastic cover back, push
firmly into the groove.
Taking care of the bowl
• Use a plastic or wooden spoon and not
a metal one so as to avoid damaging
the bowl surface.
• To avoid any risk of corrosion, do not
pour vinegar into the bowl.
• The colour of the bowl surface may
change after using for the first time or
after longer use. This change in colour
is due to the action of steam and water
and does not have any effect on the use
of the Automatic Rice Cooker, nor is it
dangerous for your health. It is perfectly safe to continue using it.
You can also wash the bowl, the steam
bowl and the steam shield in the bottom
shelf of the dishwasher.
For the bowl, carefully follow the
instructions below:
• When putting into the machine, be
careful not to damage the inside
coating on the dishwasher racks.
• After being washed several times in the
dishwasher and to renew the surface, it
is recommended to wipe the whole of the
inner surface of the bowl with a little oil.
• So as to keep the non-stick quality for
as long as possible, it is recommended
not to cut food in it.
• Make sure you put the bowl back into
the rice Cooker.
Cleaning the bowl, the steam bowl and
the steam shield
• Use hot water, washing up liquid and a
sponge to clean the bowl and the steam
plate. Scouring powders and metal
sponges are not recommended.
• If food has stuck to the bottom, allow
the bowl to soak for a while before
washing it.
• Dry the bowl carefully.
• Do not immerse the appliance in water,
nor pour water into it.
Important:
Any brown marks and scratches that
may appear after many hours use are
not a problem. We guarantee that the
non stick coating COMPLIES WITH THE
RULES on materials suitable for contact
with food.
CLEANING AND MAINTENANCE
12
13
14

10
EXAMPLES
HOW TO PREPARE SEVERAL DIFFERENT FOODS AT THE SAME TIME
Two different types of food can be cooked at the same time. For exam-
ple, you could choose to cook the rice at the bottom and the fish at the
top.
For the quantity of water to put into the main bowl, refer to the guide
given in the rice recipes, except when cooking brussel sprouts, potatoes
and broccoli. In this case, you must add 500 ml of water.
Suggestions for combining dishes:
• rice “à la Greque” with frankfurters and cumin,
• rice “à la Turque” with scallops cooked in foil,
• pilau rice with haddock and spinach,
• risotto with chicken breasts,
• plain rice with crunchy broccoli,
• pilau rice with honey spiced apples or pears.
For best results, we advise you to select two recipes for which the
cooking times are approximately the same.
Pilau Rice with Fish fillets
Prepare the Pilau Rice in the bowl (see recipe in the booklet), place the
thin fish fillets in the steam basket. Close the lid. Set to rice cooking and
switch on. The appliance will automatically switch over to keep warm
after about 15 minutes cooking.
Pilau rice with honey spiced apples or pears
Prepare the pilau rice in the bowl (see recipe in the booklet). Place the
3 peeled apples or pears in the steam basket. Brush the fruit over with
the honey spices (mix a tablespoon of honey with a teaspoonful of
powdered cinnamon, 3 ground peppercorns and a clove). Close the lid
set to rice cooking and switch on. The appliance will automatically
switch over to keep warm after about 15 minutes cooking.
English
Please note : The cooking times for all functions stated are only appro-
ximate and vary depending on quantities and personal taste.
 Loading...