

Page 1
E
F
F7
F8
F5
F1
F6
F4
H
H1
H2
H3
H4
H6
H5
F3 F2
G
G4
G6
G2
G1
G5
G3
3
max
B2
B
D
D3
D2
D1
A
C
A4
A3
A2
A1
A5
C2
C1
C3
A6
A7
B1
2
FR
FR
FR
FR
FR
FR
FR
FR
FR
FR
FR
max
masterchef gourmet
Ref. 8080013263
EN
NL
SV
NO
DA
FI
TR
ES
LV
LT
PL
EN
NL
SV
NO
DA
FI
TR
ES
LV
LT
PL
p. 9
p.20
p.31
p.42
p.53
p.64
p.75
p.87
p.98
p.109
p.120
12/2013 - réalisation : Espace Graphique
SM_KITCHEN-MACHINE-MC-GOURMET_MOUFAL_8080013263_OK_EST 06/12/13 14:20 PageC1
Page 2
2.1c
3.1a
3.1b
3.2a
3.2b
3.3a
3
4
1
2
1
2
3
4
5
1
2
44
3
1
2
2
1
1.1a
1.1b
1.1c
1.1d
2.1a
2.1b
1
1
1
22
1
2
2
2
4
3
1
2
3.3b
4.1a
4.1b
4.1c
5.1a
5.1b
5.1b
1
2
2
1
5
1
2
3
4
1
2
3
5.1c
44
3
1
2
3
2
4
654
SM_KITCHEN-MACHINE-MC-GOURMET_MOUFAL_8080013263_OK_EST 06/12/13 14:20 PageC5
Page 3
7
5.1c
5.2a
5.2b 5.2c
6
1
2
2
1
3
1
2
5
SM_KITCHEN-MACHINE-MC-GOURMET_MOUFAL_8080013263_OK_EST 06/12/13 14:21 Page7
Page 4

SM_KITCHEN-MACHINE-MC-GOURMET_MOUFAL_8080013263_OK_EST 06/12/13 14:21 Page8
Page 5
9
EN
Thank you for choosing this appliance, which is intended exclusively for the preparation of food and is
for indoor, domestic use only.
• Please read the instructions for use carefully before using your appliance for the
first time and retain them for future reference: the manufacturer shall accept
no liability in the event of any use that does not comply with the instructions.
• This appliance is not intended for use by persons (including children) with
reduced physical, sensory or mental capacities, or lack of experience and
knowledge, unless they have been given supervision or instruction concerning
use of the appliance by a person responsible for their safety. Children should
be supervised to ensure that they do not play with the appliance.
• Check that the power rating of your appliance corresponds to your electrical
supply. Any connection fault invalidates the warranty.
• Your appliance is intended only for domestic culinary use, in an indoor setting
and under supervision, at an altitude below 2000m.
• Refer to « before first use » section to clean all accessories in contact with
foodstuff, and refer to « cleaning » section to clean them after each use. Also
refer to the “cleaning”section for maintenance and cleaning of your appliance.
• Always disconnect the appliance from the supply if it is left unattended and
before assembling, disassembling or cleaning.
• Do not use the appliance if it is not working properly or if it has been damaged.
Contact an authorised service centre (see list in the service booklet).
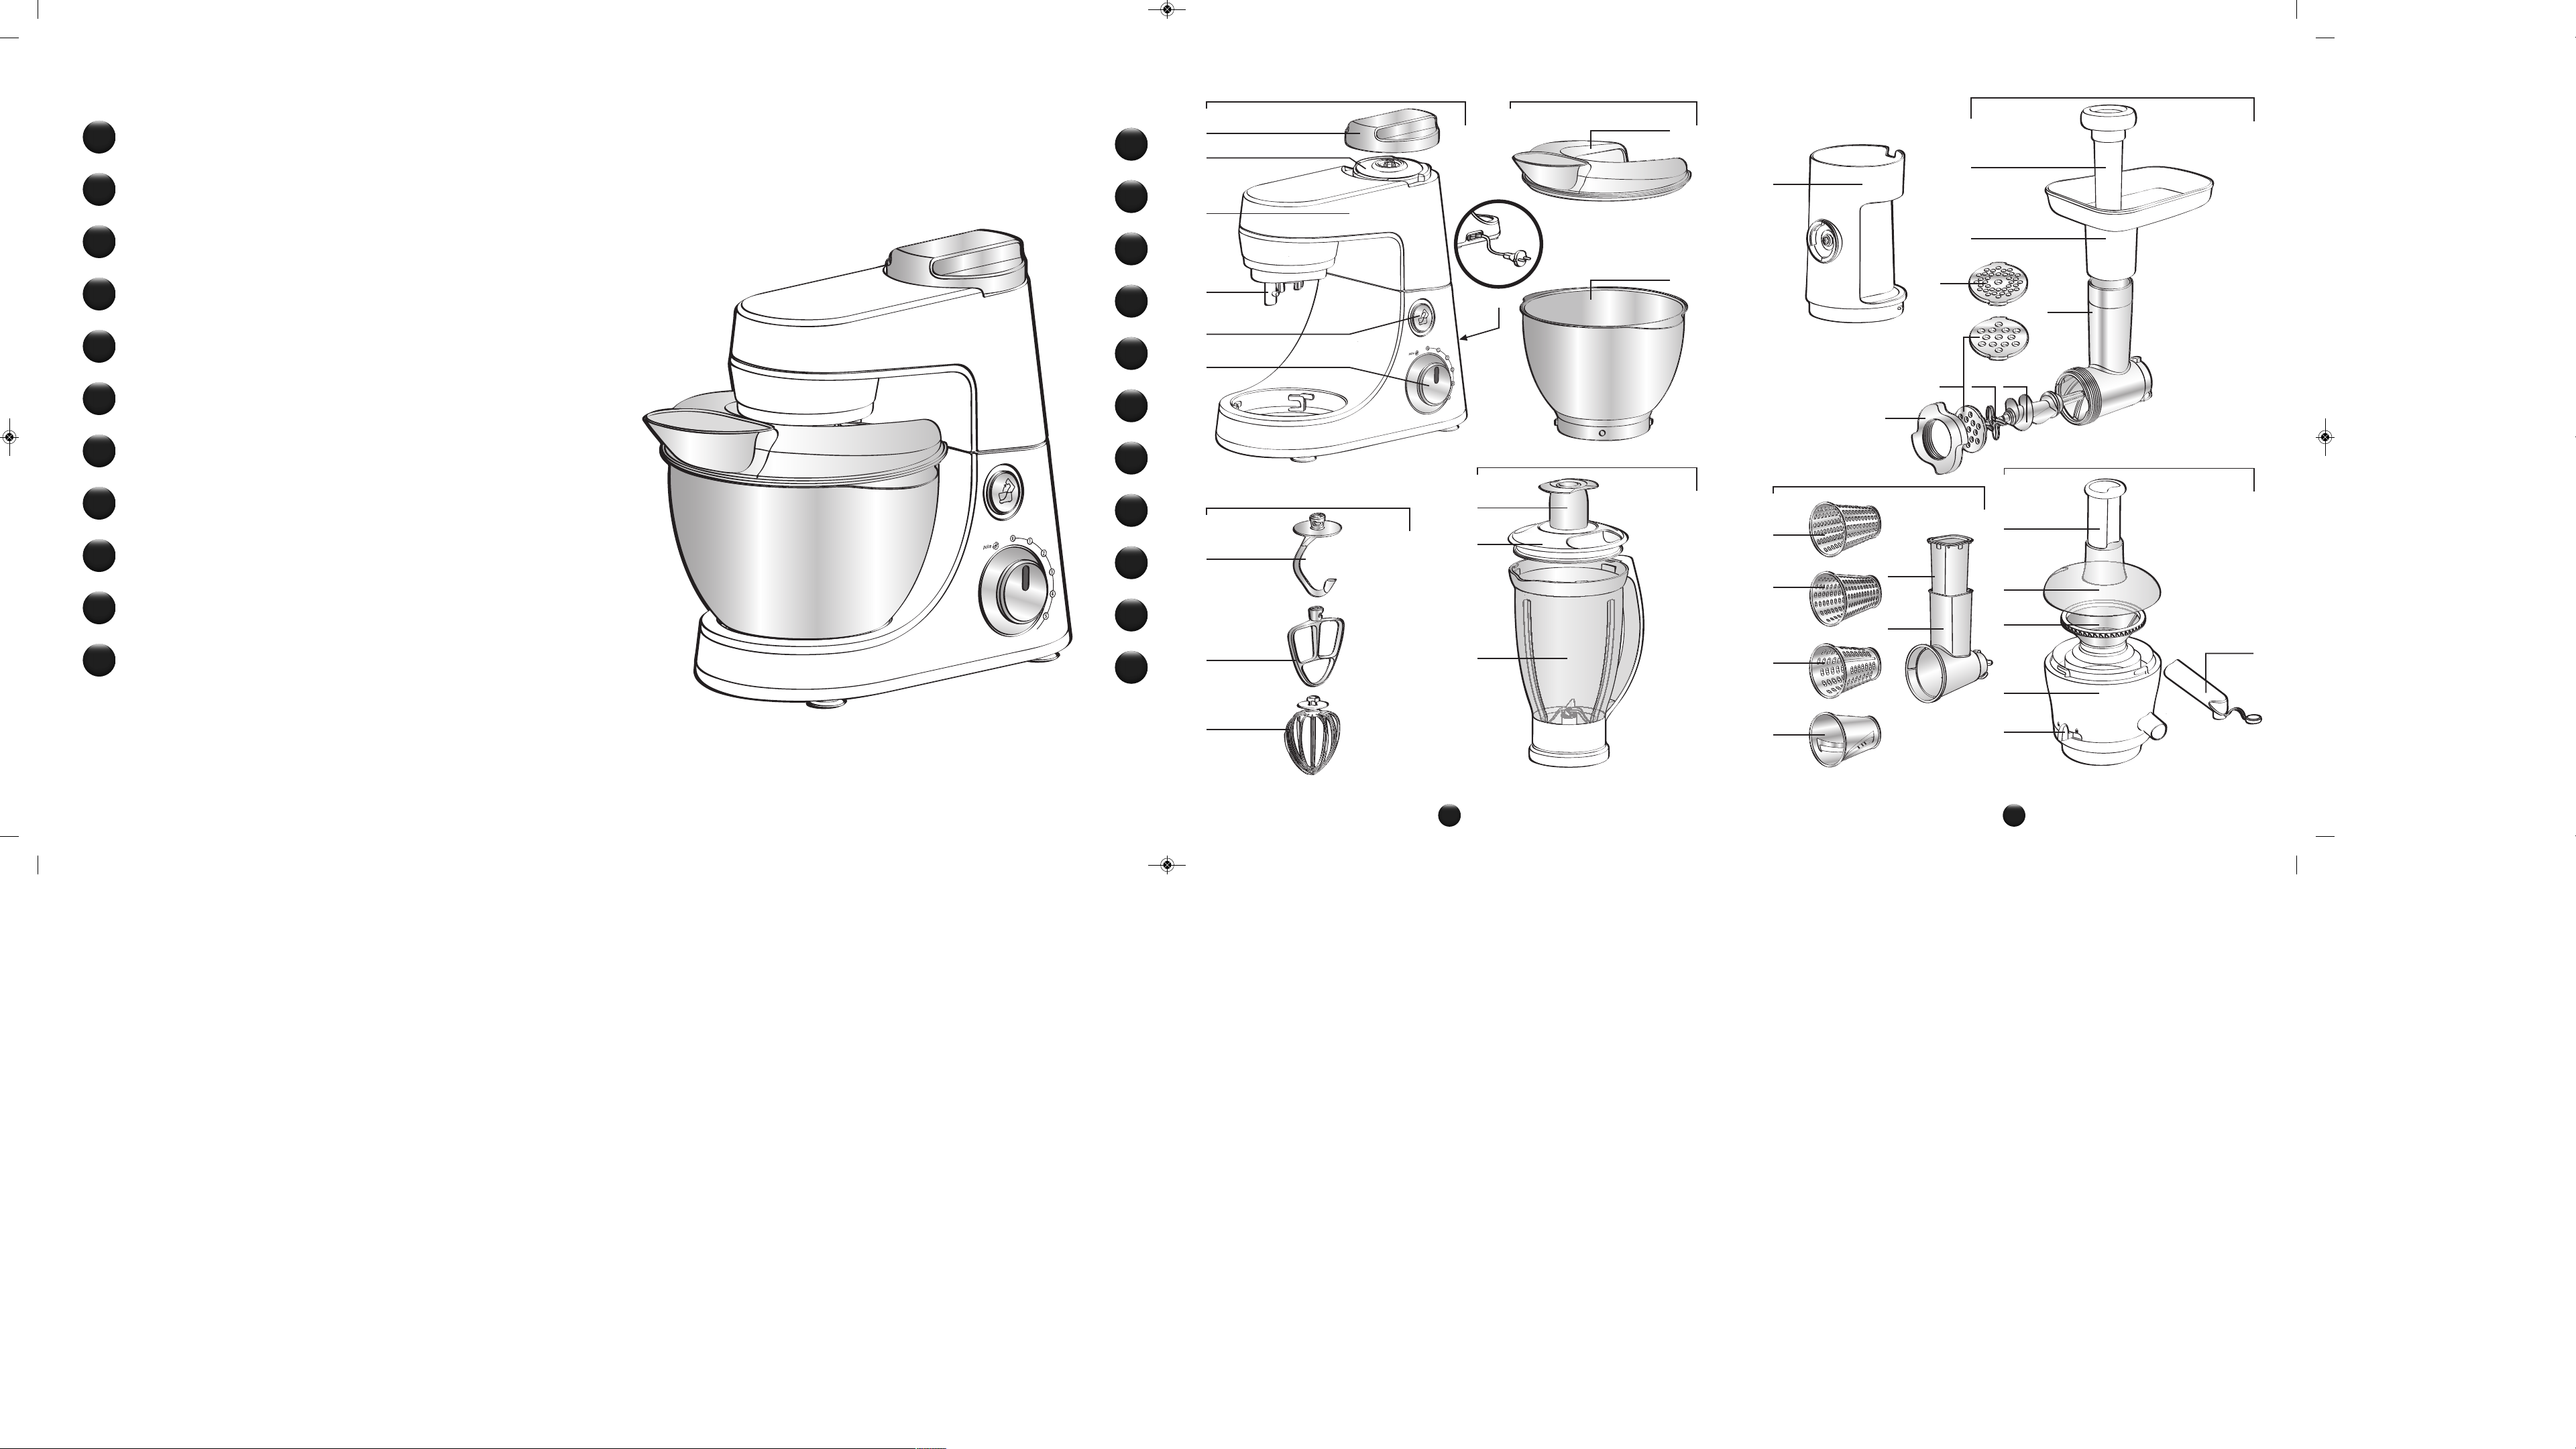
DESCRIPTION
a - Motor unit
a1 Electronic speed selector
a2 Multi-function head (a3) release button
a3 Multi-function head
a4 High speed outlet (blender jug / juice
extractor / grinder)
a5 Safety cover
a6 Mixer accessories outlet (kneader, balloon
whisk, mixer)
a7 Power cord storage
b - Bowl assembly
b1 Stainless steel bowl
b2 Lid
c - Mixer accessories
c1 Kneader
c2 Mixer
c3 Balloon whisk
d - Blender jug (depending on model)
d1 Jug
d2 Lid
d3 Measuring cup
e - Attachment holder (depending on model)
f - Mincer head (depending on model)
f1 Metal body
f2 Feed screw
f3 Blade
f4 Large-hole screen
f5 Small-hole screen
f6 Nut
f7 Pusher
f8 Tray
g - Vegetable slicer (depending on model)
g1 Drum body
g2 Pusher
g3 Slicer drum A
g4 Coarse grater drum C
g5 Fine grater drum D
g6 Reibekuchen drum E
h - Juice extractor (depending on model)
h1 Pusher
h2 Lid
h3 Rotary filter
h4 Juice collector
h5 Pouring spout
h6 Locking lever
SAFETY INSTRUCTIONS
SM_KITCHEN-MACHINE-MC-GOURMET_MOUFAL_8080013263_OK_EST 06/12/13 14:21 Page9
Page 6

10
EN
• Any maintenance other than routine cleaning and upkeep by customers must
be carried out by an approved service centre (see list in the service booklet).
• Do not place the appliance, the supply cable or the plug in water or any other
liquid.
• The power cord must be kept out of the reach of children and must not be
placed near or come into contact with the hot parts of the appliance, sources
of heat or sharp corners.
• Do not use the appliance if the power cord or plug is damaged. The power cord
must be replaced by an approved service centre (see list in the service booklet)
in order to avoid danger.
• Do not place the accessories in a microwave oven.
• For your own safety, use only accessories and spare parts designed for your
appliance and sold in an authorised service centre (see list in the service
booklet).
• Remember: you may injure yourself if you use the appliance incorrectly
• To prevent injuries, handle the blades (d, f, g) with care when emptying the
bowls, assembling and dissassembling the accessories and when cleaning: they
are extremely sharp.
• Always remove the blender (d) or the juice extractor (h) before pressing the
multi-function head (a3) release button (a2).
• Always use the pusher (f7) with the mincer head accessory (f), to guide food
in the feed tube. Never use your fingers, a fork, a spoon, a knife or any other
object.
• Never touch any moving parts. Wait for the appliance to come to a complete
stop before removing accessories.
• Do not touch the whisks or the kneader (c)when the appliance is running.
• Do not allow long hair, scarves, ties etc. to dangle over the appliance during
operation.
• Never insert utensils (spoon, spatula, etc.) through the feed tube in the lids
(b2), (d2) or (h2) in the drum body (g1).
• Do not run the blender jug (d1) without its lid (d2).
• Never fill the blender jug with boiling liquid. Only use liquids at temperature
below 80°C (176°F)
• Never run the blender jug empty.
• Never remove the lid before the blades have stopped completely.
• Always pour liquid ingredients into the blender jug first before adding solid
ingredients.
• Use only one accessory at a time.
• Do not use the bowls (b1, d1) as containers for freezing, cooking or
sterilisation.
• Do not use the juice extractor if the rotary filter (h3)or the protecting cover
(h2) or has visible cracks.
• Switch off the appliance and disconnect from supply before changing
accessories or approaching parts that move in use.
• Be careful if hot liquid is poured into the food processor or blender as it can
SM_KITCHEN-MACHINE-MC-GOURMET_MOUFAL_8080013263_OK_EST 06/12/13 14:21 Page10
Page 7

11
EN
be ejected out of the appliance due to a sudden steaming..
• It is not intended to be used in the following applications, and the guarantee
will not apply for:
- staff kitchen areas in shops, offices and other working environments;
- farm houses;
- by clients in hotels, motels and other residential type environments;
- bed and breakfast type environments.
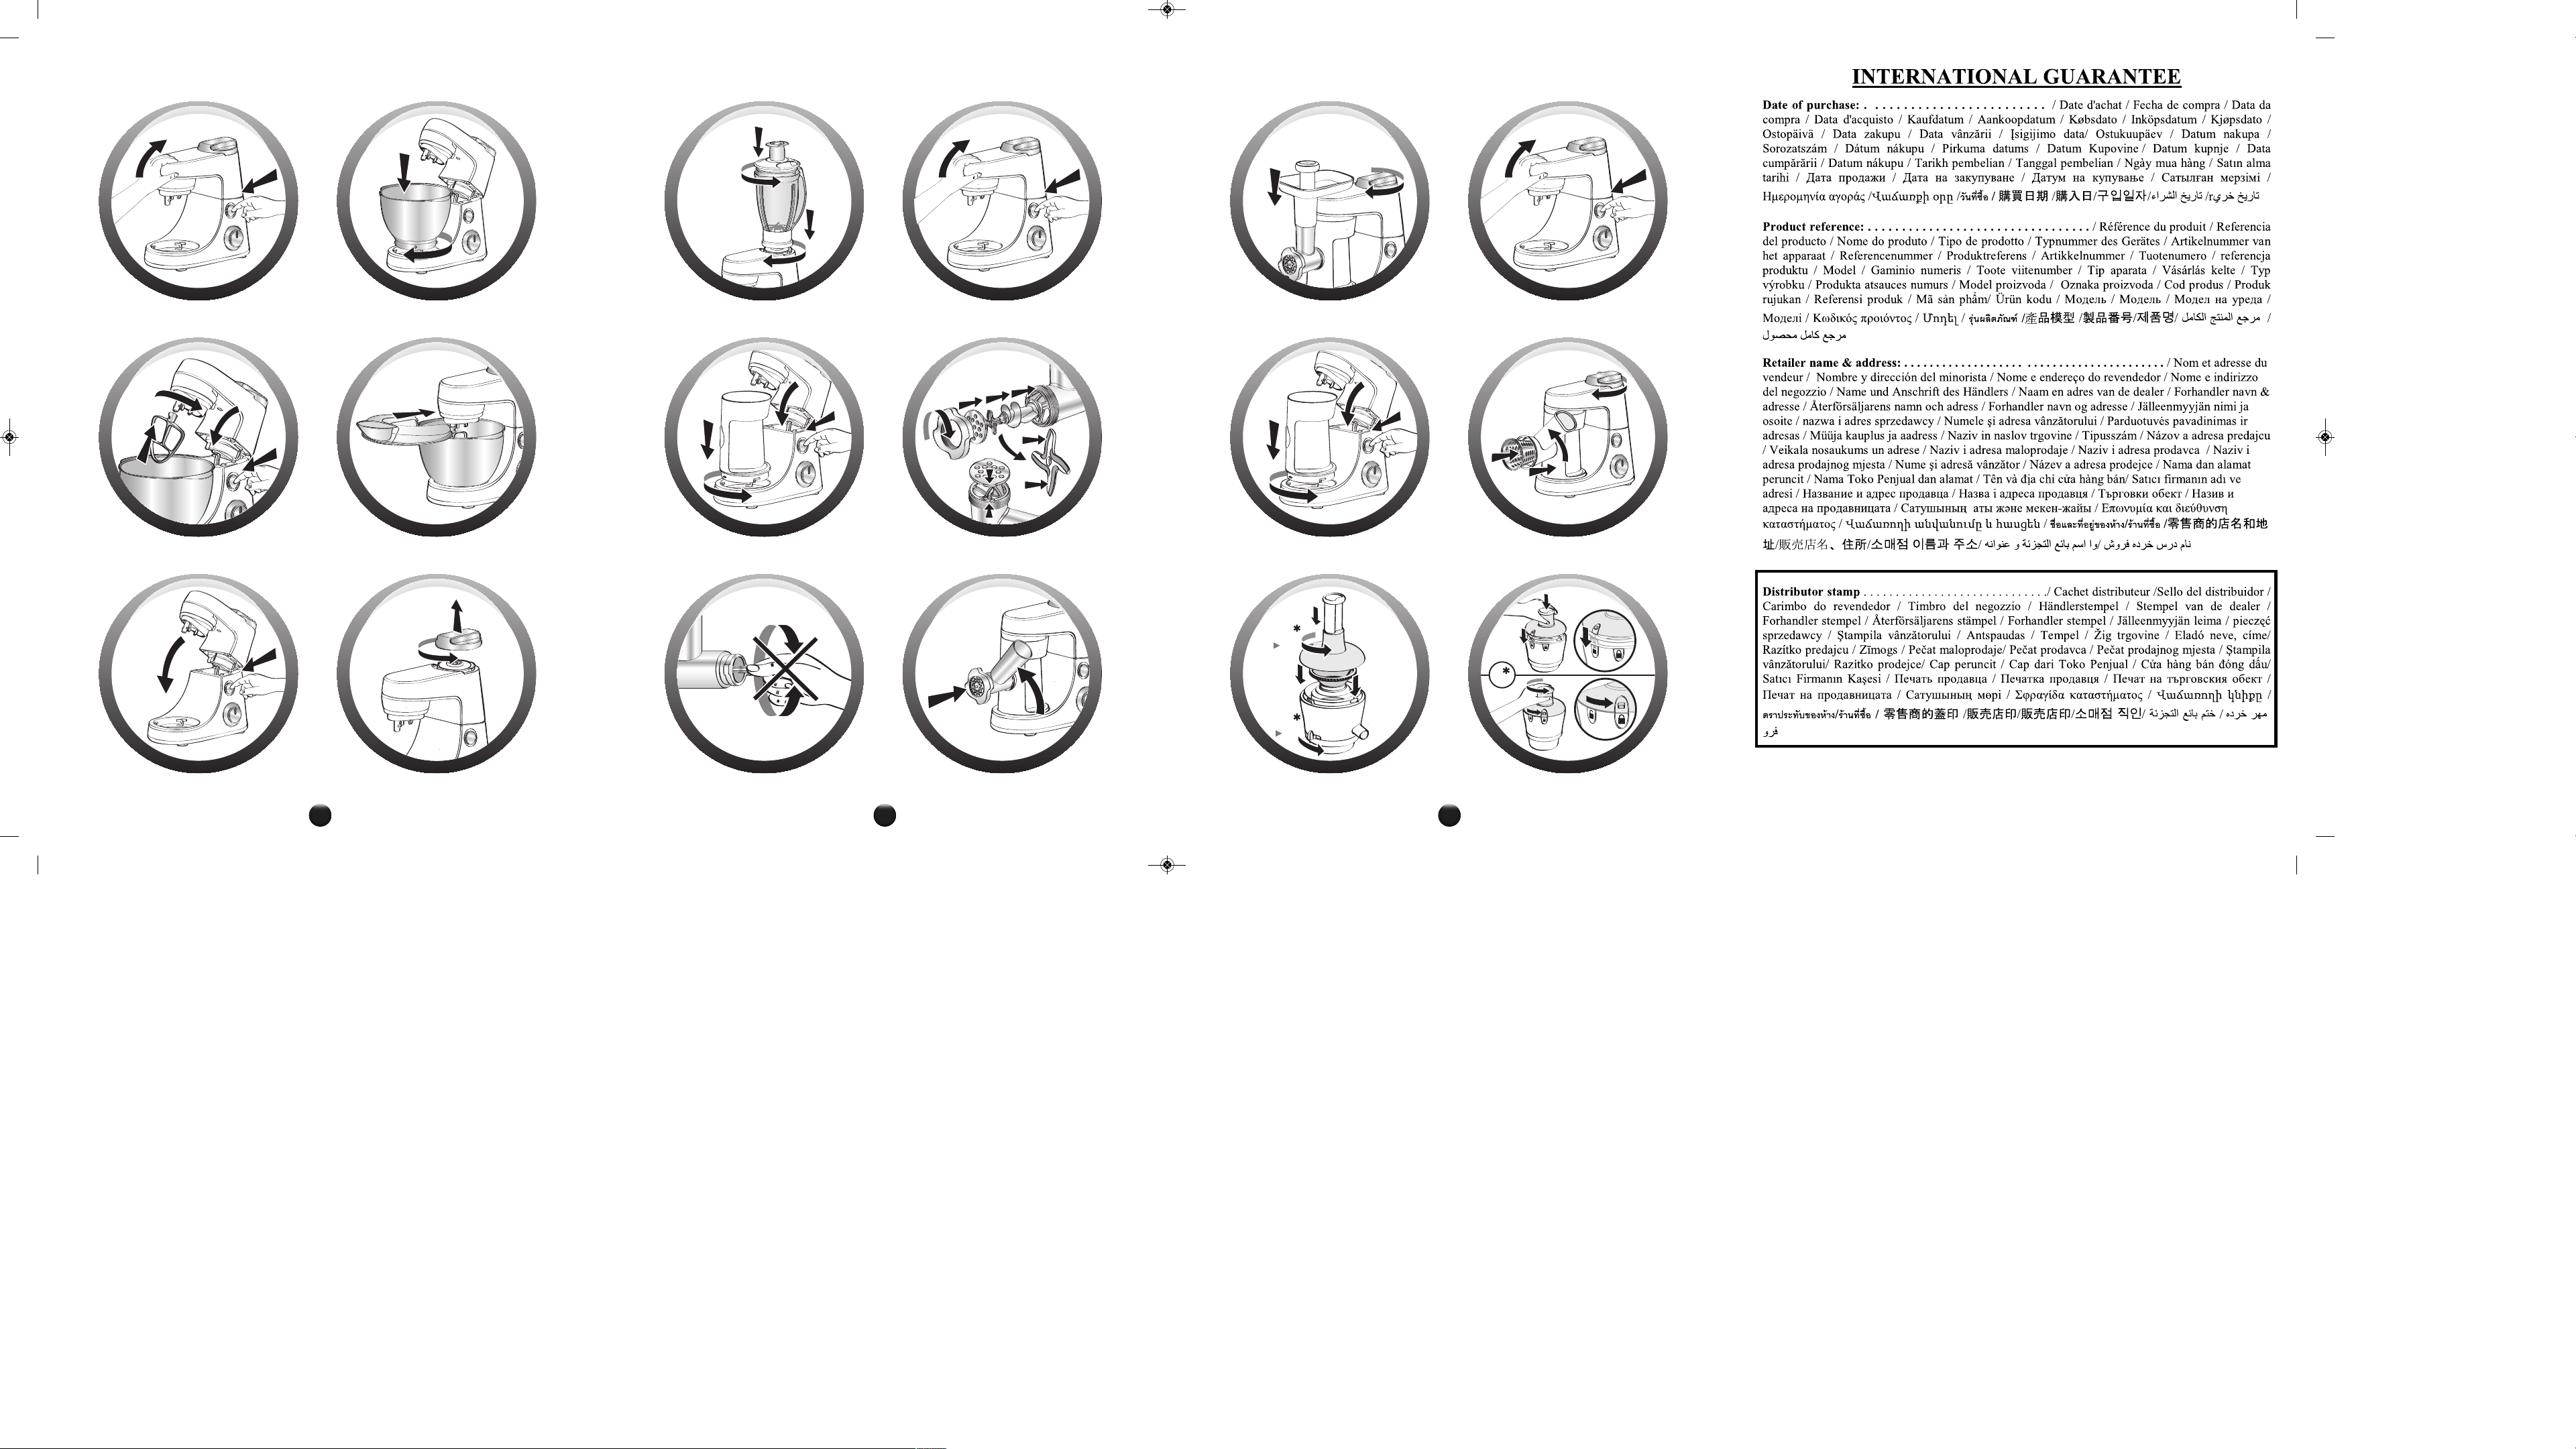
• Refer to the diagrams, « assembling the accessories » and « dismantling the
accessories » sections for correct assembly and dismantling of the accessories.
• Refer to the instructions to obtain the operating time and speed settings for
each accessory.
• This appliance should not be used by children. Keep the appliance and its
cord out of reach of children.
• Children shall not play with the appliance.
• This appliance may be used by persons with reduced physical, sensory or
mental capabilities, or whose experience or knowledge is not sufficient,
provided they are supervised or have received instruction to use the
appliance safely and understand the dangers.
• The multiwire whisk (c3), the coarse grater drum (g4) and fine grater
drum (g5) can be used by children aged from 8 years and above if they
have been given supervision or instruction concerning use of the appliance
in a safe way and if they understand the hazards involved. Cleaning and
user maintenance shall not be made by children unless they are aged from
8 years and above and supervised. Keep the appliance and its cord out of
reach of children aged less than 8 years.
• Before using for the first time, wash all accessory parts in soapy water (except for the attachment (e):
see § Cleaning) Rinse and dry.
• Place the appliance on a flat, clean and dry surface. Make sure that the selector button (a1) is in "0"
position and plug in your appliance.
• You have several options for starting your appliance:
- Intermittent operation (pulse): Turn the selector button (a1) to the "pulse" position. Using a
succession of pulses can give you better control when preparing certain foods.
- Continuous operation: Turn the selector button (a1) to the desired position from "1" to "max"
depending on the food you are preparing.
You can change it as required during preparation.
• To stop the appliance, turn the button (a1) to "0".
Important
: The appliance will start only if the cover (a5) and the head (a3) are locked. The
appliance will stop immediately if you unlock the cover (a5) and/or the head (a3) during
operation. Lock the cover and/or the head, turn the control button (a1) to the "0" position, and
then start the appliance normally by selecting the desired speed.
Your appliance comes with a microprocessor that controls and analyses the operating power. If the load
becomes too high, your appliance will stop automatically. To restart your appliance, turn the rotary
button (a1) to the "0" position and remove some of your ingredients. Allow your appliance to cool down
for a few minutes. You can then select the desired speed to complete your preparation.
BEFORE FIRST USE
The paragraph numbering corresponds to the numbers in the diagrams.
SM_KITCHEN-MACHINE-MC-GOURMET_MOUFAL_8080013263_OK_EST 06/12/13 14:22 Page11
Page 8

12
EN
1 - MIXING / KNEADING / BEATING / EMULSIFYING / WHISKING
You can prepare up to 1,8 kg of dough using the stainless steel bowl (b1) and its lid (b2) depending on
the food.
ACCESSORIES USED:
- Stainless steel bowl (b1).
- Lid (b2)
- Kneader (c1) or mixer (c2) or balloon whisk (c3)
1.1 - ASSEMBLING THE ACCESSORIES
• Press the button (a2) to release the multi-function head (a3) and raise it until it locks in place.
• Lock the stainless steel bowl (b1) (clockwise) on the appliance and put in the ingredients.
• Insert the desired accessory (c1, c2 or c3) on the outlet (a6), push and rotate it anti-clockwise a
quarter turn to lock the accessory in its housing.
• Place the multi-function head (a3) to the horizontal position: press the button (a2) and manually lower
the multi-function head (a3) until it locks (the button (a2) returns to its initial position).
• Slide the lid (b2) over the stainless steel bowl (b1).
Note: It is not essential to use the lid but it prevents splashing.
• Make sure that the cover (a5) is locked correctly (clockwise) on the high-speed outlet (a4).
1.2 - USAGE
Start by turning the selector button (a1) to the desired position according to the recipe.
• The appliance starts running immediately.
You can add food through the hole in the lid (b2) during preparation.
• To stop the appliance, turn the button (a1) to "0".
Tips:
- Kneading
- Use the kneader accessory (c1) at speed "1".
You can knead up to 500 g of flour (e.g. white bread, grain bread, short crust pastry, etc.).
- Mixing
- Use the mixer (c2) at speed "1" to "max".
You can mix up to 1,8 kg of light dough (light cake mixture, sponge cake, biscuit or cookie dough).
- Never use the mixer (c2) to knead heavy dough.
- Beating / emulsifying / whisking
- Use the balloon whisk (c3) at speed "1" to "max".
- You can prepare: mayonnaise, aioli, sauces, whisked egg whites (up to 8 egg whites), whipped cream
(up to 500 ml), meringues etc.
- Never use the balloon whisk (c3) to knead heavy dough or mix light dough.
1.3 - DISMANTLING THE ACCESSORIES
• Wait for the appliance to come to a complete stop.
• Remove the lid (b2).
• Using the button (a2), release the multi-function head (a3) and raise it to the upper position.
• Release the accessory (c1), (c2) or (c3) from the multi-function head by pushing the accessory into
the head and rotating it clockwise a quarter turn.
• Remove the stainless steel bowl.
2 - BLENDING/MIXING (DEPENDING ON MODEL)
Depending on the nature of the food, you can use the blender (d) to prepare up to 1.5 L of thick mixtures
and 1.25 L of liquid mixtures.
SM_KITCHEN-MACHINE-MC-GOURMET_MOUFAL_8080013263_OK_EST 06/12/13 14:22 Page12
Page 9

13
EN
ACCESSORIES USED :
- Blender jug (d)
2.1 - ASSEMBLING THE ACCESSORIES
• Place the multi-function head (a3) in the horizontal position: press the button (a2) and manually
lower the multi-function head (a3) until it locks (the button (a2) returns to its initial position).
• Unlock the safety cover (a5) from the high-speed outlet (a4) by rotating it anti-clockwise and then
remove it.
• Make sure that the appliance is switched off before locking the blender (d).
• Lock the blender jug (d) on the outlet (a4) by rotating it clockwise.
• Place the food in the blender jug, and lock the lid (d2) fitted with the measuring cap (d3), by rotating
it anti-clockwise.
2.2 - USAGE
• Start by turning the selector button (a1) to the desired position according to the recipe.
Use the "Pulse" position for better mixing control and for a better blending of your preparation.
You can add food through the hole in the measuring cap (d3) during preparation.
• To stop the appliance, turn the button (a1) to "0".
Tips :
You can prepare:
- finely blended soups, cream soups, stewed fruit, milkshakes and cocktails.
- liquid batter (pancake, fritters, Yorkshire pudding, waffles, clafoutis and custard flans).
If ingredients stick to the sides of the bowl when mixing, stop the appliance. Remove the blender, and
push the food down onto the blades and put your blender back to continue your preparation.
• Never fill the blender jug with boiling liquid. Only use liquids or foods at simmering temperatures or
below.
• Never run the blender jug empty.
• Always use the blender jug with its lid.
• Never remove the lid before the blades have stopped completely.
• Always pour liquid ingredients into the blender jug first before adding solid ingredients.
2.3 - DISMANTLING THE ACCESSORY
• Wait for the appliance to come to a complete stop before removing the blender by unlocking it in the
anti-clockwise direction and put back the cover (a5) by locking it on the outlet (a4) (clockwise).
3 - MINCING (DEPENDING ON MODEL)
ACCESSORIES USED :
- Attachment holder (e)
- Assembled mincer head (f)
3.1 - FITTING THE MINCER ATTACHMENT
• Press the button (a2) to release the multi-function head (a3) and raise it until it locks in place.
• Place the attachment (e) and lock it in the anti-clockwise direction such that the outlet is in alignment
with the appliance.
• Place the multi-function head (a3) in the horizontal position by pressing the button (a2) once again.
3.2 - ASSEMBLING THE MINCER HEAD
• Hold the body (f1) by the feed tube, with the wider opening uppermost.
• Insert the feed screw (f2) (long shaft first) into the body (f1).
• Fit the blade (f3) onto the short shaft protruding from the feed screw (f2) with the cutting edges facing
outwards.
• Fit the chosen screen (f4 or f5) on the blade (f3), aligning the two lugs with the two notches in the
body (f1).
• Screw the nut (f6) home on the body (f1) in the clockwise direction, without locking it.
SM_KITCHEN-MACHINE-MC-GOURMET_MOUFAL_8080013263_OK_EST 06/12/13 14:22 Page13
Page 10

14
EN
• Check the assembly. The shaft should have no play, neither should it be able to turn on its own.
Otherwise, repeat the assembly procedure.
3.3 - FITTING THE MINCER HEAD ON THE APPLIANCE
• Facing the attachment outlet (e), insert the assembled mincer head (f) inclined to the right, aligning
the two bayonets in the mincer head with the two notches in the attachment. Push the mincer head
home into the attachment and turn the mincer head anti-clockwise until it latches with the feed tube
in the vertical position.
• Place the removable tray (f8) on the feed tube.
3.4 - USAGE, TIPS AND DISMANTLING
• Make sure that the safety cover (a5) is locked correctly (clockwise) on the high-speed outlet (a4).
• Place a container to collect the preparation in front of the appliance.
• Run the appliance by turning the selector (a1) to speed "3" or "4".
• Push the meat, piece by piece, down the feed tube, using the pusher (f7). Never push the ingredients
down the feed tube with your fingers or any other utensil.
• To stop the appliance, turn the selector to "0" speed and wait for the appliance to come to a complete
stop.
• Unlock the mincer head in the reverse order of the assembly.
Tips :
- Prepare all of the foodstuffs to be minced (for meat, remove the bones, gristle and tendons and cut
it into pieces of approximately 2 x 2 cm).
- Make sure that frozen meat is thoroughly thawed.
- At the end of the operation, you can feed a few small pieces of bread into the feed tube to clear any
meat remaining in the machine.
4 - GRATING / SLICING (DEPENDING ON MODEL)
ACCESSORIES USED :
- Attachment holder (e)
- Assembled vegetable slicer (g)
- Drums (depending on model)
4.1 - ASSEMBLING THE ACCESSORIES
• Press the button (a2) to release the multi-function head (a3) and raise it until it locks in place.
• Place the attachment (e) and lock it in the anti-clockwise direction such that the outlet is in alignment
with the appliance.
• Place the multi-function head (a3) in the horizontal position by pressing the button (a2) once again.
• Make sure that the safety cover (a5) is locked correctly (clockwise) on the high-speed outlet (a4).
• Facing the attachment (e) outlet, insert the drum body (g1) inclined to the right, aligning the two
bayonets in the drum body with the two notches in the attachment. Push the drum body home and
turn the drum body anti-clockwise until it latches with the feed tube in the vertical position.
• Insert the chosen drum into the body, and make sure that it is fully engaged in the body.
4.2 - USAGE AND TIPS
• Place a container to collect the preparation in front of the appliance.
• Run the appliance by turning the selector (a1) to speed "3" to slice and to speed "4" to grate.
• Place the food in the feed tube on the body and press down with the pusher (g2). Never push the
ingredients with your fingers or any other utensil.
• To stop the appliance, turn the selector to "0" speed and wait for the appliance to come to a complete
stop.
• Unlock the drum body in the reverse order of the assembly.
• Use the drums to :
- Grate coarsely C (g4) / grate finely D (g5): carrots, celery, potatoes, cheese, etc.
- Slice thickly A (g3): potatoes, carrots, cucumbers, apples, beetroot, etc.
- Reibekuchen E (g6): potatoes, parmesan, etc.
SM_KITCHEN-MACHINE-MC-GOURMET_MOUFAL_8080013263_OK_EST 06/12/13 14:22 Page14
Page 11

15
EN
5 - EXTRACTING JUICE FROM FRUITS AND VEGETABLES (DEPENDING ON MODEL)
ACCESSORIES USED :
- Assembled juice extractor (h).
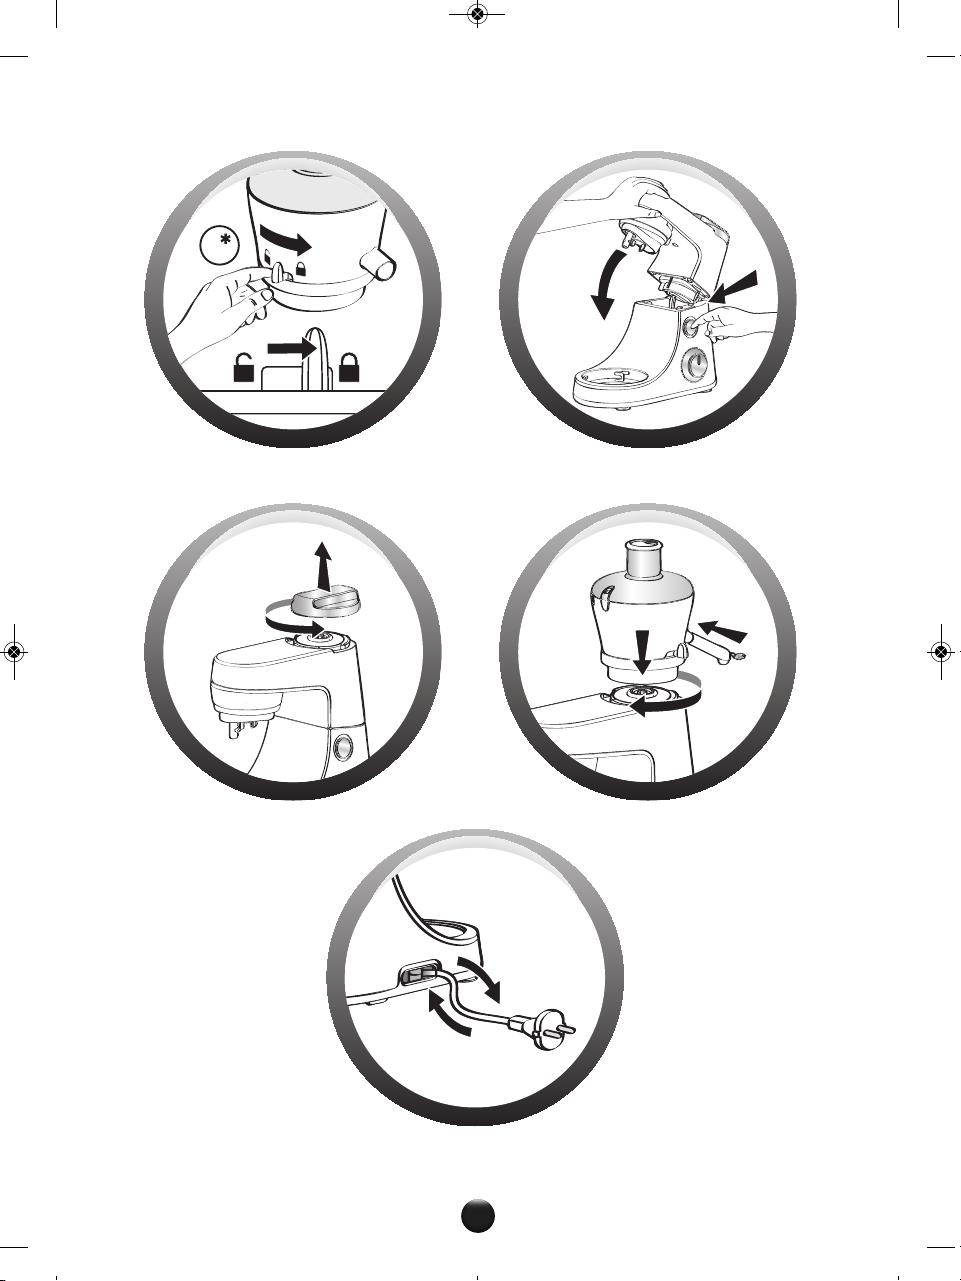
5.1 - ASSEMBLING THE JUICE EXTRACTOR
• Place the filter (h3) in the middle of the juice collector (h4).
• Lock the lid: turn it anti-clockwise and lock the lid (h2) on the juice collector (h4) (closed padlock
position).
• General locking: push the locking lever (h6) to closed padlock position.
5.2 - FITTING THE JUICE EXTRACTOR ON THE APPLIANCE
• Place the multi-function head (a3) in the horizontal position: press the button (a2) and manually
lower the multi-function head (a3) until it locks (the button (a2) returns to its initial position).
• Unlock and remove the cover (a5) from the outlet (a4) by turning it anti-clockwise.
• Make sure that the appliance is switched off before locking the juice extractor (h).
• Lock the assembled juice extractor on the outlet (a4) by turning it clockwise, so as to have the outlet
for the pouring spout aligned with the appliance.
• Fit the pouring spout (h5) on the collector (h4).
5.3 - USAGE AND TIPS
• Place a large glass under the pouring spout (h5).
• Run the appliance by turning the selector (a1) to speed "3".
• Cut the fruits and/or vegetables into pieces.
• Insert them down the feed tube in the lid (h2) push them slowly using the pusher (h1). Never push
the ingredients with your fingers or any other utensil.
• Do not process 500 g of food more than 5 times continuously, without allowing your appliance to cool
down completely.
• For best results, clean the filter after every 300 g of ingredients.
• Important: When the pulp collector is full, stop the appliance and empty the collector.
• To stop the appliance, turn the selector to "0" speed and wait for the appliance to come to a complete
stop.
• Wait until the rotary filter comes to a complete stop before removing the assembly from the
appliance.
• To remove the juice extractor, unlock it by turning it anti-clockwise.
• Place the locking lever (h6) in the open padlock position. Open the lid (open padlock position). You
can then remove the filter (h3) to clean it and empty the collector (h4).
Tips :
• You can make juice from: carrots, tomatoes, apples, grapes, raspberries, etc.
• Peel fruits with thick skins; remove stones and the core of pineapples.
• It is not possible to extract juice from certain fruits and vegetables: bananas, avocado pears,
blackberries, etc.
• You can prepare juices with different fruits and vegetables without having to clean the juice extractor
every time, the flavours will not be mixed. Just run the extractor with a little water to rinse it between
two different juices.
• Drink the juices immediately after preparation, and add lemon juice to keep them in the fridge for a
few hours.
6 - ADJUSTING THE CORD LENGTH
For more comfortable use or for storage, you can reduce the cord length by pushing it inside the motor
unit (a) via the opening on the rear (a7).
SM_KITCHEN-MACHINE-MC-GOURMET_MOUFAL_8080013263_OK_EST 06/12/13 14:22 Page15
Page 12

16
EN
7 - FINELY CHOPPING SMALL QUANTITIES (DEPENDING MODEL)
ACCESSORY USED :
- Assembled grinder.
You can use the grinder to :
- Chop in a few seconds by pulsing: dried figs, dried apricots, etc.
Quantity / max time: 100g / 5s
This grinder is not designed for hard products like coffee beans or hard spices.
• Unplug the appliance.
• Do not immerse the motor unit (a) or the attachment (e) in water or under running water. Wipe them
with a dry or slightly damp cloth.
• For easier cleaning, rinse the accessories quickly after use. Dismantle the mincer head assembly fully.
Handle the blades with care to prevent injury.
• Wash, rinse and dry the accessories: they are dishwasher-safe, except for all the metal components in
the mincer head: body (f1), feed screw (f2), blade (f3), screens (f4 and f5), nut (f6).
• The screens (f4) and (f5) as well as the blade (f3) must remain greased. Coat them with cooking oil.
Tips :
• In the event any of your accessories are coloured by food (carrots, oranges, etc.), rub with a cloth
soaked in cooking oil and then clean them as usual.
• Blender jug (d): pour some hot water containing a few drops of washing up liquid into the blender.
Close the lid. Place it on the appliance and pulse a few times. After removing it, rinse the bowl in
running water and allow to dry (bowl upside down).
Do not store your appliance in a humid environment.
If your appliance does not work, check:
- that it is plugged in correctly.
- that the accessories are correctly locked.
- that the safety cover (a5) is present and locked when the high-speed outlet (a4) is not used.
- that the multi-function head (a3) is locked horizontally.
Your appliance comes with a microprocessor that controls and analyses the operating power. If the load
becomes too high, your appliance will stop automatically. To restart your appliance, turn the rotary
button (a1) to the "0" position and remove some of your ingredients. Allow your appliance to cool down
for a few minutes. You can then select the desired speed to complete your preparation.
Your appliance still does not work? Contact an authorised service centre (see the list in the service
booklet).
HELPLINE:
If you have any product problems or queries, please contact our Customer Relations Team first for expert
help and advice:
0845 602 1454 – UK
(01) 677 4003 – Ireland
CLEANING
STORAGE
WHAT TO DO IF YOUR APPLIANCE DOES NOT WORK
SM_KITCHEN-MACHINE-MC-GOURMET_MOUFAL_8080013263_OK_EST 06/12/13 14:22 Page16
Page 13
17
EN
You can customise your appliance and obtain the following accessories from your usual retailer or an
authorised service centre:
Caution: This booklet contains instructions for additional accessories. Please keep safe for future
reference. You can purchase new or replacement items directly from Tefal Customer Relations.
CHANTILLY CREAM
Ingredients (for 6/8 people): 250 ml very cold liquid crème fraîche - 50g icing sugar.
Put the crème fraîche and the icing sugar in the stainless steel bowl fitted with the kneader and the
lid. Run the appliance on speed 4 for two minutes, then on maximum speed for three and a half minutes.
MAYONNAISE
Ingredients: 1 egg yolk - 1 tablespoon mild mustard - 1 teaspoon wine vinegar - 250 ml olive or sunflower
oil - salt and pepper.
Put the egg yolk, mustard, vinegar, salt and pepper in the stainless steel bowl fitted with the balloon
whisk and the lid. Select speed 1. Run the whisk and begin to add the oil in a thin trickle. After 10
seconds, increase to maximum speed. Once the oil is incorporated into the mixture, run the whisk for a
further 30 seconds.
Tip: Add a grated clove of garlic, if suitable for your recipe. For best results, all the ingredients should
be at room temperature.
DISPOSAL OF PACKAGING AND THE APPLIANCE
The packaging is comprised exclusively of materials that present no danger for the
environment and which may therefore be disposed of in accordance with the recycling
measures in force in your area.
For disposing of the appliance itself, please contact the appropriate service of your local
authority.
END-OF-LIFE ELECTRICAL OR ELECTRONIC PRODUCTS
Think of the environment!
Your appliance contains valuable materials which can be recovered or recycled.
Leave it at a local civic waste collection point.
ACCESSORIES
Stainless steel bowl
Stainless steel bowl lid
Kneader
Mixer
Balloon whisk
Blender jug
Juice extractor
Grinder
Attachment holder
Mincer head
Vegetable slicer:
- A: Slicer
- C: Coarse grating
- D: fine grating
- E: reibekuchen
Kit pasta
Coulis attachment
Pasta rolling mill
RECIPES
SM_KITCHEN-MACHINE-MC-GOURMET_MOUFAL_8080013263_OK_EST 06/12/13 14:22 Page17
Page 14

18
EN
WHITE BREAD
Ingredients (for one round loaf of 800 g): 500 g white bread flour - 300 ml lukewarm water - 10 g dried
yeast (the type which does not need dissolving in water first)* - 10 g salt.
Put the flour, salt and dried yeast into the stainless steel bowl. Fit the kneader and the lid and run for
a few seconds on speed 1. Add the lukewarm water through the opening in the lid. Knead for eight
minutes. Allow the dough to rest at room temperature for around half an hour. Then work the dough by
hand into a ball. Place the ball of dough on a buttered, floured baking sheet. Allow to rise for a second
time at room temperature for about an hour. Preheat the oven to 240 °C. Make cuts on the top of the
loaf with a sharp blade, and brush with lukewarm water. Put a small container full of water into the oven:
this helps the bread to form a golden crust. Bake for 40 minutes at 240 °C.
Tip: Dried yeast should never come into direct contact with either sugar or salt as they prevent the yeast
from acting.
SHORTCRUST PASTRY
Ingredients (for a tart base of 350 g): 200 g plain flour - 100 g softened butter - 50 ml water - one pinch
salt.
Put the flour, butter and salt into the stainless steel bowl. Fit the kneader and the lid and run for a few
seconds on speed 1. Add the lukewarm water while the appliance is running. Allow the appliance to run
until the pastry forms a ball. Allow the pastry to rest in a cool place, covered with cling film, for at least
an hour before rolling out and cooking.
BRIOCHE
Ingredients (for 6 people): 250 g white bread flour - 5 g salt - 25 g sugar - 100 g butter (left to soften at
room temperature 1 hour before using) - 2 whole eggs and 1 egg yolk - 3 tablespoons lukewarm milk - 2
tablespoons water - 5 g dried yeast (type which does not need dissolving in liquid first).
Put the flour into the stainless steel bowl, and create two hollows: put the salt and the sugar in one,
and the yeast, lukewarm milk and water in the other. The salt and yeast should not be added together
because the yeast reacts badly to contact with salt. Add the eggs and egg yolk, and fit the kneader and
lid. Select speed 1 and knead for 15 seconds, then on speed 2 for two minutes 45 seconds. Without
stopping the appliance, incorporate the butter within one minute, which should not be too soft (leave
it at room temperature for half an hour before using). Continue kneading for five minutes on speed 2,
then five minutes on speed 3. Cover the dough and leave it to rise for two hours at room temperature,
then work the dough vigorously by slapping it against the sides of the bowl. Cover the dough and leave
to rise for a further two hours in the refrigerator; work the dough by hand again by slapping it against
the sides of the bowl. Then cover with cling film and leave the dough to rise overnight in the refrigerator.
The next day, butter and flour a brioche tin. Shape the dough into a ball. Place it into the tin and leave
to rise in a warm place until the dough has filled the tin (takes two to three hours). Put it into the oven
at 180 °C and leave to cook for 25 minutes.
Tip: Add chocolate chips or glacé fruit.
SAVOURY LOAF
Ingredients (for 6 people): 200 g plain flour - 4 eggs – 11g baking powder - 100 ml milk – 50 ml olive oil
- 12 sun-dried tomatoes 200 g feta cheese - 15 pitted green olives - a touch of curry powder (optional) salt and pepper.
Preheat the oven to 180 °C. Butter and flour a loaf tin. In the stainless steel bowl fitted with the mixer
and the lid, mix together the flour, eggs and baking powder, starting on speed 1 then increasing to speed
3. Add the olive oil and the milk and mix for one and a half minutes. Reduce to speed 1 and add the
dried tomatoes (cut into pieces), cubed feta, green olives (cut into pieces) and curry powder. Season.
Pour the mixture into the tin and put into the oven for 30 to 40 minutes, depending on the oven. Pierce
with a knife to check that the loaf is cooked.
SM_KITCHEN-MACHINE-MC-GOURMET_MOUFAL_8080013263_OK_EST 06/12/13 14:22 Page18
Page 15

19
EN
Tip: Replace the feta with mozzarella and add a few chopped basil leaves.
MOIST RICH CHOCOLATE CAKE
Ingredients (for 8 people): 200 g good quality plain chocolate - 150 g caster sugar - 125 g plain flour 125 g softened butter - 4 eggs – 200 ml liquid cream (whipping cream) - 100 g ground almonds (optional) - 1 sachet vanilla sugar or 1 teaspoon vanilla extract (optional) - 11g baking powder - 1 pinch salt 24cm loose bottom non-stick cake tin.
Preheat the oven to 180 °C. In a bain marie or in the microwave oven, melt the chocolate cut into pieces
with 3 tablespoons of water. While stirring, add a tablespoon of the butter to give a smooth chocolate
mixture. Allow to cool. Separate the egg yolks from the whites. Set the egg whites aside. Put the egg
yolks, melted chocolate, cream, sugar, vanilla sugar, ground almonds and the rest of the butter in the
stainless steel bowl fitted with the mixer and the lid. Run on speed 1 for 20 seconds to mix. Increase
to speed 2 and incorporate the flour mixed with baking powder through the opening in the lid. Allow
the appliance to run for around two minutes until a smooth dough is obtained. Set aside in a large
bowl. Put the egg whites and the pinch of salt in the cleaned stainless steel bowl fitted with the balloon
whisk. Whisk the whites on speed 5 for one and three-quarter minutes, then on maximum speed for 30
seconds. Using a spatula, carefully incorporate the beaten egg whites into the chocolate mixture. Pour
into a buttered, floured cake tin. Cook in the oven at 180 °C for 25 minutes.
Tip: This cake is delicious served with crème anglaise or scoops of vanilla ice cream.
For more recipe ideas, please visit www.tefal.com
SM_KITCHEN-MACHINE-MC-GOURMET_MOUFAL_8080013263_OK_EST 06/12/13 14:22 Page19
Page 16
20
NL
Wij danken u voor uw keuze van dit apparaat dat uitsluitend bestemd is voor de bereiding van voedsel,
voor huishoudelijk gebruik.
• Lees deze gebruiksaanwijzing zorgvuldig voordat u het apparaat in gebruik
neemt: indien het apparaat niet in overeenstemming met de gebruiksaanwijzing
wordt gebruikt, vervalt de aansprakelijkheid van de fabrikant.
• Dit apparaat is niet bedoeld om zonder hulp of toezicht te worden gebruikt door
kinderen of andere personen indien hun fysieke, zintuiglijke of mentale
vermogen hen niet in staat stelt dit apparaat op een veilige wijze te gebruiken,
tenzij zij van tevoren instructies hebben ontvangen betreffende het gebruik van
dit apparaat van een verantwoordelijke persoon. U dient toezicht te houden op
kinderen om te voorkomen dat zij met het apparaat spelen.
• Controleer of de netspanning van uw apparaat overeenkomt met die van het
elektriciteitsnet. Bij aansluitingsfouten vervalt de garantie.
• Uw apparaat is uitsluitend bestemd voor het bereiden van voedsel en voor
huishoudelijk gebruik binnenshuis onder toezicht en op een hoogte van minder
dan 2000m.
• Reinig de oppervlakken die in contact komen met het voedsel vóór het eerste
gebruik (zie hoofdstuk „Gebruiksklaar maken” van deze gebruiksaanwijzing) en
na elk gebruik (zie hoofdstuk „Reinigen”). Zie hoofdstuk „Reinigen” voor het
OMSCHRIJVING
a - Motorblok
a1 Elektronische Snelheidskeuzeschakelaar
a2 Ontgrendelknop van de multifunctionele
arm (a3)
a3 Multifunctionele arm
a4 Aansluiting voor hoge snelheid
(blender/sapcentrifuge/maler)
a5 Veiligheidskap
a6 Aansluiting voor mixeraccessoires
(kneedhaak, garde, klopper)
a7 Snoerhaspel
b - Assemblage van de mengkom
b1 Roestvrijstalen mengkom
b2 Deksel
c - Mixeraccessoires
c1 Kneedhaak
c2 Klopper
c3 Garde
d - Mengbeker (afhankelijk van het model)
d1 Kan
d2 Deksel
d3 Maatdop
e - Hulpstuk voor het gebruik van diverse
accessoires (afhankelijk van het model)
f - Kop gehaktmolen (afhankelijk van het
model)
f1 Metalen behuizing
f2 Aanvoerschroef
f3 Mes
f4 Schijf met grote gaten
f5 Schijf met kleine gaten
f6 Moer
f7 Stamper
f8 Verwijderbaar blad
g - Groentemolen (afhankelijk van het model)
g1 Trommelbehuizing
g2 Stamper
g3 Accessoire voor plakken snijden A
g4 Accessoire voor grof raspen C
g5 Accessoire voor fijn raspen D
g6 Accessoire voor reibekuchen
(aardappelpannekoeken/soort rösti)
h - Sapcentrifuge (afhankelijk van het model)
h1 Stamper
h2 Deksel
h3 Roterende filter
h4 Sapreservoir
h5 Schenktuit
h6 Vergrendeling
VEILIGHEIDSVOORSCHRIFTEN
SM_KITCHEN-MACHINE-MC-GOURMET_MOUFAL_8080013263_OK_EST 06/12/13 14:22 Page20
Page 17

21
NL
onderhoud en de reiniging van uw apparaat.
• Trek altijd de stekker van het apparaat uit het stopcontact indien het
onbewaakt wordt achtergelaten en vóór montage, demontage of reiniging.
• Gebruik het apparaat niet als het niet goed werkt of beschadigd is. Neem
contact op met een erkend servicecentrum (zie de lijst in het serviceboekje).
• Elk ander onderhoud dan reiniging en het normale onderhoud door de klant
moet door een erkend servicecentrum worden uitgevoerd (zie de lijst in het
serviceboekje).
• Plaats het apparaat, het netsnoer of de stekker niet in water of enige andere
vloeistof.
• Laat het netsnoer niet binnen handbereik van kinderen hangen en laat het niet
in de buurt liggen van of in aanraking komen met warme onderdelen van het
apparaat, warmtebronnen of scherpe hoeken.
• Gebruik het apparaat niet als het netsnoer of de stekker is beschadigd. Laat
deze onderdelen vervangen door een erkend servicecentrum (zie de lijst in het
serviceboekje) om zeker te zijn van een veilige werking.
• Gebruik de accessoires niet in de magnetron.
• Gebruik omwille van uw eigen veiligheid alleen de voor uw apparaat bedoelde
accessoires en onderdelen die verkrijgbaar zijn bij een erkend servicecentrum.
Wees voorzichtig om het risico op verwondingen bij foutief gebruik van het
apparaat te voorkomen.
• De messen (d, f, g) zijn vlijmscherp: wees voorzichtig dat u zich niet snijdt
wanneer u de kom leegt, bij het monteren/demonteren van de messen op het
accessoire, en tijdens het reinigen.
• Verwijder de mengbeker (d) of de sapcentrifuge (h) altijd voordat u op de
ontgrendelknop (a2) van de multifunctionele arm (a3) drukt.
• Gebruik altijd de stamper (f7) met het accessoire van de kop van de
gehaktmolen (f) om voedsel in de aanvoerbuis naar beneden te drukken.
Gebruik hiervoor nooit uw vingers, vorken, lepels, messen of enig ander
voorwerp.
• Raak nooit bewegende onderdelen aan. Wacht totdat het apparaat volledig tot
stilstand is gekomen voordat u accessoires verwijdert.
• Raak de garde of deeghaak niet aan wanneer het apparaat in werking is.
• Zorg ervoor dat er geen lang haar, sjaals, stropdassen, enz. boven het apparaat
hangen wanneer het apparaat in werking is.
• Steek nooit keukengerei (lepels, spatels, enz.) door de aanvoerbuis in de
deksels (b2), (d2) en (h2) of in de trommelbehuizing (g1).
• Gebruik de kan (d1) nooit zonder het bijbehorende deksel (d2).
• Gebruik slechts één accessoire tegelijk.
• Vul de mengbeker nooit met een kokende vloeistof.
• Gebruik de mengbeker nooit leeg.
• Gebruik de mengbeker altijd met het bijbehorende deksel.
• Verwijder het deksel nooit voordat het mes volledig tot stilstand is gekomen.
• Giet altijd eerst de vloeibare ingrediënten in de mengbeker en voeg dan pas de
vaste ingrediënten toe.
SM_KITCHEN-MACHINE-MC-GOURMET_MOUFAL_8080013263_OK_EST 06/12/13 14:22 Page21
Page 18

22
NL
• Gebruik de mengkom (b1) en de mengbeker (d1) niet om eten in te vriezen,
te koken of te steriliseren.
• Gebruik de sapcentrifuge niet als de roterende filter (h3) of het deksel (h2) zijn
beschadigd of zichtbare barsten vertonen.
• Zet het apparaat UIT en trek de stekker uit het stopcontact voordat u de
accessoires verwisselt of onderdelen aanraakt die bewegen tijdens het gebruik
van het apparaat.
• Let goed op als u een warme vloeistof in de keukenmachine of de mixer giet:
door een plotseline opborreling kan de vloeistof uit het apparaat spatten.
• Dit apparaat is niet bestemd voor huishoudelijk of vergelijkbaar gebruik (dit
gebruik valt niet onder de garantie) in de volgende gevallen:
- In keukens van winkels, kantoren en andere werkomgevingen;
- Door klanten in hotels, motels en andere residentiële omgevingen.
• Zie de verschillende afbeeldingen en de paragrafen „monteren van de
accessoires” en „demonteren van de accessoires” voor de montage en
demontage van accessoires op het apparaat.
• Zie de gebruiksaanwijzing voor het instellen van de werkingssnelheid en
-tijd voor elk accessoire.
• Dit apparaat mag niet worden gebruikt door kinderen. Bewaar het apparaat en
netsnoer buiten het bereik van kinderen.
• Kinderen mogen het apparaat niet gebruiken als speelgoed.
• Dit apparaat mag worden gebruikt door personen met een beperkt lichamelijk,
zintuiglijk of geestelijk vermogen of zonder ervaring en kennis, op voorwaarde
dat zij worden begeleid of instructies hebben ontvangen inzake het veilige
gebruik van het apparaat en op de hoogte zijn van de risico's waaraan zij zijn
blootgesteld.
• De garde (c3) en de accessoires voor „fijn raspen” en „grof raspen” (g5 en g4)
mogen worden gebruikt door kinderen vanaf 8 jaar, op voorwaarde dat zij
worden begeleid of instructies hebben ontvangen inzake het veilige gebruik
van het apparaat en op de hoogte zijn van de risico's waaraan zij zijn
blootgesteld. De reiniging en het onderhoud door de gebruiker mogen niet
worden uitgevoerd door kinderen, tenzij ze minstens 8 jaar oud zijn en worden
begeleid door een volwassene. Bewaar het apparaat en netsnoer buiten het
bereik van kinderen jonger dan 8.
• Was voor het eerste gebruik alle accessoires in water met afwasmiddel (behalve onderdeel (e): zie §
Reinigen.) Afspoelen en afdrogen.
• Zet het apparaat op een vlakke, schone en droge ondergrond. Zorg ervoor dat de
snelheidskeuzeschakelaar (a1) op "0" staat en steek de stekker in het stopcontact.
• Het apparaat kan op verschillende manieren worden opgestart:
- Onderbroken werking (impulsen): zet de snelheidskeuzeschakelaar (a1) op "pulse". Door het
gebruik van achtereenvolgende impulsen hebt u een betere controle bij het bereiden van bepaalde
gerechten.
- Continuwerking: zet de snelheidskeuzeschakelaar (a1) op de gewenste stand, van "1" tot "max.",
afhankelijk van de voeding die u bereidt.
U kunt de stand van de snelheidskeuzeschakelaar tijdens de bereiding naar wens wijzigen.
VÓÓR HET EERSTE GEBRUIK
SM_KITCHEN-MACHINE-MC-GOURMET_MOUFAL_8080013263_OK_EST 06/12/13 14:22 Page22
Page 19
23
NL
• Zet de schakelaar (a1) op "0" om het apparaat stop te zetten.
Belangrijk: Het apparaat start alleen als de kap (a5) en de arm (a3) zijn vergrendeld. Het apparaat
stopt onmiddellijk als u tijdens het gebruik de kap (a5) en/of de arm (a3) ontgrendelt. Vergrendel
de kap en/of de arm, zet de snelheidskeuzeschakelaar (a1) op "0", en start het apparaat daarna
op de gebruikelijke manier door de gewenste snelheid in te stellen.
Het apparaat bevat een microprocessor die de werking ervan regelt en analyseert. Als het apparaat te
zwaar wordt beladen, zal het automatisch worden stopgezet. Om het apparaat opnieuw te starten,
zet u de schakelaar (a1) op "0" en verwijdert u een gedeelte van de ingrediënten. Laat het apparaat
enkele minuten afkoelen. Daarna kunt u de gewenste snelheid selecteren om de bereiding te voltooien.
1 - MENGEN/KNEDEN/KLOPPEN/EMULGEREN/KLUTSEN
U kunt max. 1,8 kg deeg bereiden met de roestvrijstalen mengkom (b1) en het deksel (b2), afhankelijk
van de voeding.
GEBRUIKTE ACCESSOIRES:
- roestvrijstalen mengkom (b1).
- Deksel (b2)
- Deeghaak (c1) of klopper (c2) of garde (c3)
1.1 - MONTEREN VAN DE ACCESSOIRES
• Druk op de ontgrendelknop (a2) om de multifunctionele arm (a3) te ontgrendelen en til de arm op
totdat hij vastklikt.
• Plaats de roestvrijstalen mengkom (b1) en draai deze rechtsom tot de aanslag. Doe alle ingrediënten
in de kom.
• Plaats de gewenste accessoire (c1, c2 of c3) in de aansluiting (a6) en draai hem een kwartslag linksom
om hem te vergrendelen in de arm.
• Zet de multifunctionele arm (a3) in de horizontale stand: druk op de ontgrendelknop (a2) en druk de
multifunctionele arm (a3) handmatig omlaag tot de aanslag (de ontgrendelknop (a2) staat dan weer
in de oorspronkelijke stand).
• Schuif het deksel (b2) op de roestvrijstalen mengkom (b1).
Opmerking: Het gebruik van het deksel is niet noodzakelijk. Het deksel voorkomt spatten.
• Zorg ervoor dat het deksel (a5) goed wordt vergrendeld (rechtsom) op de aansluiting voor hoge
snelheid (a4).
1.2 - GEBRUIK
Begin door de snelheidskeuzeschakelaar (a1) in de gewenste stand te zetten, afhankelijk van het recept.
• Het apparaat begint direct te werken.
Tijdens de bereiding kunt u voedsel door het gat in het deksel (b2) toevoegen.
• Zet de schakelaar (a1) op "0" om het apparaat stop te zetten.
Tips:
- Kneden
- Gebruik de kneedhaak (c1) op snelheid "1".
U kunt max. 500 g bloem kneden (bijv. witbrood, granenbrood, korstdeeg, kruimeldeeg, enz.)
- Mengen
- Gebruik de klopper (c2) op snelheid "1" tot "max".
U kunt max. 1,8 kg licht deeg mengen (roombotercake, koekjes, enz.)
- Gebruik de klopper (c2) nooit voor het kneden van zwaar deeg.
- Kloppen/emulgeren/klutsen
- Gebruik de garde (c3) op snelheid "1" tot "max".
- U kunt het volgende bereiden: mayonaise, aioli, sauzen, opgeklopt eiwit (max. 8 eiwitten), slagroom
(max. 500 ml), enz.
- Gebruik de garde (c3) nooit voor het kneden van zwaar deeg of het mengen van licht deeg.
De paragraafnummers komen overeen met de nummers in de diagrammen.
SM_KITCHEN-MACHINE-MC-GOURMET_MOUFAL_8080013263_OK_EST 06/12/13 14:22 Page23
Page 20

24
NL
1.3 - DEMONTEREN VAN DE ACCESSOIRES
• Wacht totdat het apparaat volledig tot stilstand is gekomen.
• Verwijder het deksel (b2).
• Druk op de ontgrendelknop (a2) om de multifunctionele arm (a3) te ontgrendelen en til de arm op
totdat hij vastklikt.
• Haal de accessoire (c1), (c2) of (c3) uit de multifunctionele arm door de accessoire in de arm te
drukken en een kwartslag rechtsom te draaien.
• Verwijder de roestvrijstalen mengkom.
2 - MIXEN/MENGEN (AFHANKELIJK VAN HET MODEL)
Afhankelijk van de aard van het voedsel, kunt u de blender (d) gebruiken voor het bereiden van max.
1,5 L dikke mengsels en 1,25 L vloeibare mengsels.
GEBRUIKTE ACCESSOIRES:
- Mengbeker (d)
2.1 - MONTEREN VAN DE ACCESSOIRES
• Zet de multifunctionele arm (a3) in de horizontale stand: druk op de ontgrendelknop (a2) en druk de
multifunctionele arm (a3) handmatig omlaag tot de aanslag (de ontgrendelknop (a2) staat dan weer
in de oorspronkelijke stand).
• Verwijder de veiligheidskap (a5) van de aansluiting voor hoge snelheid (a4) door hem linksom te
draaien en van het apparaat te tillen.
• Zorg ervoor dat het apparaat is uitgeschakeld voordat u de blender (d) op het apparaat plaatst.
• Plaats de mengbeker (d) op de aansluiting (a4) door hem rechtsom te draaien.
• Doe de ingrediënten in de mengbeker en plaats het deksel (d2) met de doseerdop (d3) erop door hem
linksom te draaien.
2.2 - GEBRUIK
• Begin door de snelheidskeuzeschakelaar (a1) in de gewenste stand te zetten, afhankelijk van het
recept.
Gebruik de "pulse" stand voor een betere controle over het mengen en voor een fijner resultaat. Tijdens
de bereiding kunt u voedsel toevoegen door het gat in de maatdop (d3).
• Zet de schakelaar (a1) op "0" om het apparaat stop te zetten.
Tips:
U kunt het volgende bereiden.
- fijn gepureerde soepen, veloutés, vruchtenmoes, milkshakes en cocktails.
- Vloeibaar beslag (pannenkoeken, beignets, clafoutis en puddingtaart)
- Als de ingrediënten aan de wand van de mengkom blijven plakken tijdens het mengen, zet het apparaat
dan stop. Verwijder de blender en duw het voedsel naar beneden. Plaats de blender terug op het
apparaat en ga verder met de bereiding.
2.3 - DEMONTEREN VAN DE ACCESSOIRES
• Wacht totdat het apparaat volledig tot stilstand is gekomen voordat u de blender verwijdert door hem
linksom te draaien, en plaats vervolgens de veiligheidskap (a5) op het contact (a4) (rechtsom).
3 - MALEN (AFHANKELIJK VAN HET MODEL)
GEBRUIKTE ACCESSOIRES:
- Hulpstuk voor het gebruik van diverse accessoires (e)
- Geassembleerde kop van de gehaktmolen (f)
SM_KITCHEN-MACHINE-MC-GOURMET_MOUFAL_8080013263_OK_EST 06/12/13 14:22 Page24
Page 21

25
NL
3.1 - AANBRENGEN VAN DE GEHAKTMOLEN
• Druk op de ontgrendelknop (a2) om de multifunctionele arm (a3) te ontgrendelen en til de arm op
totdat hij vastklikt.
• Plaats de accessoire (e) en draai deze linksom zodat de aansluiting op een lijn staat met het apparaat.
• Plaats de multifunctionele arm (a3) in de horizontale stand door nogmaals op de knop (a2) te drukken.
3.2 - MONTEREN VAN DE KOP VAN DE GEHAKTMOLEN
• Houd de behuizing (f1) vast aan de aanvoerbuis, met de brede kant van de opening naar boven gericht.
• Plaats de aanvoerschroef (f2) (met de lange as naar beneden) in de behuizing (f1).
• Plaats het mes (f3) op de korte as die uit de aanvoerschroef (f2) steekt met het snijgedeelte naar
buiten gericht.
• Plaats de gewenste schijf (f4 of f5) op het mes (f3), door de twee uitsteeksels op een lijn te brengen
met de ribbels op de behuizing (f1).
• Draai de moer (f6) rechtsom in de behuizing (f1) zonder deze te vergrendelen.
Controleer de assemblage. Er mag geen speling op de as zitten, en de as moet niet zelfstandig kunnen
ronddraaien. Is dit wel het geval, herhaal dan de procedure voor de assemblage.
3.3 - KOP VAN DE GEHAKTMOLEN OP HET APPARAAT PLAATSEN
• Als u voor de aansluiting (e) van de accessoire staat, houd dan de geassembleerde kop van de
gehaktmolen (f) iets naar rechts gericht zodat de twee bajonetaansluitingen op de gehaktmolen op
een lijn staan met de twee ribbels in de accessoire. Duw de kop van de gehaktmolen op de accessoire
en draai de kop naar links tot de aanslag met de aanvoerbuis in de verticale stand.
• Plaats het verwijderbare blad (f8) op de aanvoerbuis.
3.4 - GEBRUIK, TIPS EN DEMONTEREN
• Zorg ervoor dat de veiligheidskap (a5) goed wordt vergrendeld (rechtsom) op de aansluiting voor hoge
snelheid (a4).
• Zet een bak voor het apparaat om de bereiding in op te vangen.
• Zet het apparaat aan door de snelheidskeuzeschakelaar (a1) op snelheid "3" of "4" in te stellen.
• Duw de stukken vlees een voor een in de aanvoerbuis naar beneden met de stamper (f7). Duw de
ingrediënten nooit met uw vingers of enig ander voorwerp naar beneden in de aanvoerbuis.
• Om het apparaat stop te zetten draait u de snelheidskeuzeschakelaar naar "0" en wacht totdat het
apparaat volledig tot stilstand is gekomen.
• Ontgrendel de kop van de gehaktmolen in de tegengestelde volgorde van de montage.
Tips:
- Bereid alle ingrediënten voor die in de gehaktmolen worden geplaatst (botten, kraakbeen en zenuwen
van het vlees verwijderen en het vlees in stukken snijden van ongeveer 2 x 2 cm).
- Zorg ervoor dat het vlees helemaal is ontdooid.
- Aan het einde van de bereiding kunt u enkele stukjes brood toevoegen via de aanvoerbuis om het al
het vlees uit het apparaat te verwijderen.
4 - RASPEN/SNIJDEN (AFHANKELIJK VAN HET MODEL)
GEBRUIKTE ACCESSOIRES:
- Hulpstuk voor het gebruik van diverse accessoires (e)
- Geassembleerde groentemolen (g)
- Accessoires (Afhankelijk van het model)
4.1 - MONTEREN VAN DE ACCESSOIRES
• Druk op de ontgrendelknop (a2) om de multifunctionele arm (a3) te ontgrendelen en til de arm op
totdat hij vastklikt.
• Plaats de accessoire (e) en draai deze linksom zodat de aansluiting op een lijn staat met het apparaat.
• Plaats de multifunctionele arm (a3) in de horizontale stand door nogmaals op de knop (a2) te drukken.
• Zorg ervoor dat de veiligheidskap (a5) goed wordt vergrendeld (rechtsom) op de aansluiting voor hoge
snelheid (a4).
• Als u voor de aansluiting (e) van de accessoire staat, houd dan de accessoire (gl) iets naar rechts
SM_KITCHEN-MACHINE-MC-GOURMET_MOUFAL_8080013263_OK_EST 06/12/13 14:22 Page25
Page 22

26
NL
gericht en zodat de twee bajonetaansluitingen op de trommelbehuizing op een lijn staan met de twee
ribbels in de accessoire. Duw de accessoire in de accessoire en draai de accessoire naar links tot de
aanslag met de aanvoerbuis in de verticale stand.
• Plaats de gewenste accessoire in de behuizing en zorg ervoor dat deze goed stevig in de behuizing
vast zit.
4.2 - GEBRUIK EN TIPS
• Zet een bak voor het apparaat om de bereiding in op te vangen.
• Zet het apparaat aan door de snelheidskeuzeschakelaar (a1) op snelheid "3" om plakken te snijden en
op "4" om te raspen.
• Duw het voedsel in de aanvoerbuis naar beneden met de stamper (g2). Duw de ingrediënten nooit
met uw vingers of enig ander voorwerp naar beneden.
• Om het apparaat stop te zetten draait u de snelheidskeuzeschakelaar naar "0" en wacht u totdat het
apparaat volledig tot stilstand is gekomen.
• Ontgrendel de trommelbehuizing in de tegengestelde volgorde van de montage.
• Gebruik de accessoires voor het volgende:
- Grof raspen C (g4) / fijn raspen D (g5): wortels, selderij, aardappel, kaas, enz.
- Dikke plakken snijden A (g3): aardappel, wortel, komkommer, appel, rode biet, enz.
- Reibekuchen E (g6): aardappels, Parmezaan, enz.
5 - SAP PERSEN UIT VRUCHTEN EN GROENTEN (AFHANKELIJK VAN HET MODEL)
GEBRUIKTE ACCESSOIRES:
- Geassembleerde sapcentrifuge (h).
5.1 - MONTEREN VAN DE SAPCENTRIFUGE
• Plaats het filter (h3) op het sapreservoir (h4).
• Vergrendel het deksel: draai hem linksom en vergrendel het deksel (h2) op het sapreservoir (h4)
(vergrendelde positie).
• Algemene vergrendeling: duw de hendel (h6) naar de vergrendelde positie.
5.2 - SAPCENTRIFUGE OP HET APPARAAT PLAATSEN
• Zet de multifunctionele arm (a3) in de horizontale stand: druk op de ontgrendelknop (a2) en druk de
multifunctionele arm (a3) handmatig omlaag tot de aanslag (de ontgrendelknop (a2) staat dan weer
in de oorspronkelijke stand).
• Ontgrendel de veiligheidskap (a5) en verwijder hem van de aansluiting (a4) door hem linksom te
draaien.
• Zorg ervoor dat het apparaat is uitgeschakeld voordat u de sapcentrifuge (h) plaatst.
• Vergrendel de geassembleerde sapcentrifuge op de aansluiting (a4) door hem rechtsom te draaien,
zodat de schenktuit op een lijn staat met het apparaat.
• Plaats de schenktuit (h5) op het sapreservoir (h4).
5.3 - GEBRUIK EN TIPS
• Zet een groot glas onder de schenktuit (h5).
• Zet het apparaat aan door de snelheidskeuzeschakelaar (a1) op snelheid "3" in te stellen.
• Snijd de vruchten en/of groente in stukken.
• Plaats de vruchten en/of groente in de aanvoerbuis in het deksel (h2) en duw ze langzaam naar
beneden met de stamper (h1). Duw de ingrediënten nooit met uw vingers of enig ander voorwerp
naar beneden.
• Verwerk 500 g voedsel niet meer dan 5 keer continue, zonder het apparaat volledig te laten afkoelen.
U verkrijgt het beste resultaat als u het filter na elke 300 g ingrediënten reinigt.
• Belangrijk: Wanneer het pulpreservoir vol is, dient u het apparaat stop te zetten en het reservoir te
legen.
• Om het apparaat stop te zetten, draait u de snelheidskeuzeschakelaar naar "0" en wacht u totdat het
apparaat volledig tot stilstand is gekomen.
• Wacht totdat de roterende filter volledig tot stilstand is gekomen voordat u de assemblage van
het apparaat haalt.
SM_KITCHEN-MACHINE-MC-GOURMET_MOUFAL_8080013263_OK_EST 06/12/13 14:22 Page26
Page 23

27
NL
• Verwijder de sapcentrifuge door hem linksom te draaien.
• Zet de vergrendeling (h6) in de ontgrendelde positie. Open het deksel (ontgrendelde positie). U kunt
dan het filter (h3) verwijderen om hem te reinigen en het reservoir te legen (h4).
Tips:
• U kunt sap maken van: wortels, tomaten, appels, druiven, frambozen, enz.
• Schil fruit met een dikke schil; verwijder pitten, klokhuizen en het hart van ananas.
• Het is niet mogelijk om sap te persen uit bepaalde vruchten en groenten zoals bananen, avocado's,
bramen, enz.
• U kunt sap maken met diverse vruchten en groenten zonder dat u de sapcentrifuge telkens hoeft te
reinigen; de smaken zullen zich niet vermengen. U hoeft enkel een beetje water in het apparaat te
gieten om het apparaat schoon te spoelen tussen het maken van twee verschillende soorten sap in.
• Drink het sap direct na de bereiding, en voeg citroensap toe om het sap enkele uren in de koelkast te
kunnen bewaren.
6 - AANPASSEN VAN DE SNOERLENGTE
Voor een comfortabeler gebruik van het apparaat of het opbergen ervan, kunt u de lengte van het snoer
verlagen door het snoer in de motorblok (a) te duwen door de opening aan de achterkant (a7).
7 - FIJN HAKKEN VAN KLEINE HOEVEELHEDEN (AFHANKELIJK VAN HET MODEL)
GEBRUIKTE ACCESSOIRES:
- Geassembleerde maler.
U kunt de maler gebruiken om:
- enkele seconden te hakken met impulsen: gedroogde vijgen, gedroogde abrikozen, enz.
Hoeveelheid/max. duur: 100 g / 5 s
Deze maler is niet geschikt voor harde producten zoals koffiebonen.
• Haal de stekker van het apparaat uit het stopcontact:
• Dompel het motorblok (a) of de accessoire (e) nooit onder in water en houd ze niet onder de kraan.
Droog ze af met een droge of licht bevochtigde doek.
• Spoel de accessoires meteen na gebruik af om ze makkelijker te kunnen reinigen. Demonteer de kop
van de gehaktmolen helemaal. Wees voorzichtig met het mes om letsel te voorkomen.
• Was de accessoires af, spoel ze af en droog ze af. Ze kunnen ook in de vaatwasser, behalve alle metalen
onderdelen van de kop van de gehaktmolen: behuizing (f1), aanvoerschroef (f2), mes (f3), schijven
(f4 en f5), moer (f6).
• De schijven (f4) en (f5) en het mes (f3) moeten worden ingevet. Vet ze in met slaolie.
Tips:
• Mochten uw accessoires door contact met voedingsmiddelen (wortelen, sinaasappelen, enz.)
verkleuren, wrijf de verkleurde delen dan in met een stukje keukenpapier met slaolie en maak het
onderdeel vervolgens op de gebruikelijke manier schoon.
• Mengbeker (d): giet warm water met een paar druppels afwasmiddel in de blender. Sluit het deksel.
Plaats het deksel op het apparaat en geef een paar impulsen. Verwijder de mengbeker van het apparaat,
spoel hem af en laat hem drogen (op zijn kop).
Berg het apparaat niet op in een vochtige omgeving.
Als het apparaat niet werkt, controleer dan:
- of het apparaat goed is aangesloten.
REINIGING
OPBERGEN
WAT TE DOEN ALS UW APPARAAT NIET WERKT?
SM_KITCHEN-MACHINE-MC-GOURMET_MOUFAL_8080013263_OK_EST 06/12/13 14:22 Page27
Page 24
28
NL
- of de accessoires juist zijn aangebracht.
- of de veiligheidskap (a5) is aangebracht en vergrendeld wanneer de aansluiting voor hoge snelheid
(a4) niet in gebruik is.
- of de multifunctionele arm (a3) horizontaal is vergrendeld.
Het apparaat bevat een microprocessor die de werking ervan regelt en analyseert. Als het apparaat te
zwaar wordt beladen, zal het automatisch worden stopgezet. Om het apparaat opnieuw te starten, zet
u de schakelaar (a1) op "0" en verwijdert u een gedeelte van de ingrediënten. Laat het apparaat enkele
minuten afkoelen. Daarna kunt u de gewenste snelheid selecteren om de bereiding te voltooien.
Werkt het apparaat nog steeds niet? Neem contact op met een erkend servicecentrum (zie de lijst in
het serviceboekje).
U kunt uw apparaat aanpassen en bij uw winkelier of een erkend servicecentrum de volgende accessoires
kopen.
Let op
: u kunt uitsluitend accessoires aanschaffen op vertoon van de gebruiksaanwijzing van uw
apparaat.
SLAGROOM
Ingrediënten (voor 6/8 personen): 25 cl koude vloeibare room - 50 g poedersuiker.
Doe de room en de poedersuiker in de roestvrijstalen kom, voorzien van de garde en het deksel. Laat 2
minuten draaien op snelheid 4 en dan 3 minuten en 30 seconden op maximale snelheid.
WEGGOOIEN VAN HET APPARAAT EN HET VERPAKKINGSMATERIAAL
De verpakking bestaat uitsluitend uit voor het milieu ongevaarlijke materialen. U kunt ze
dus conform de geldende recyclingvoorschriften weggooien.
Win voor het weggooien van het apparaat zelf inlichtingen in bij de betreffende
gemeentelijke dienst in uw woonplaats.
ELEKTRISCHE OF ELEKTRONISCHE PRODUCTEN AAN HET EINDE VAN DE LEVENSDUUR
Wees zuinig op het milieu!
Uw apparaat bevat veel materialen die geschikt zijn voor hergebruik of recycling.
Breng het naar een verzamelpunt voor de juiste verwerking ervan.
ACCESSOIRES
Roestvrijstalen mengkom
Deksel roestvrijstalen mengkom
Deeghaak
Klopper
Garde
Mengbeker
Sapcentrifuge
Maler
Hulpstuk voor het gebruik van diverse
accessoires
Kop gehaktmolen
Groentemolen
- A: plakken snijden
- C: grof raspen
- D: fijn raspen
- E: reibekuchen (aardappelpannekoeken/
soort rösti)
Accesoires voor diverse soorten pasta
Accesoire voor het maken van pastasaus
Wals voor het maken van diverse soorten pasta
RECEPTEN
SM_KITCHEN-MACHINE-MC-GOURMET_MOUFAL_8080013263_OK_EST 06/12/13 14:22 Page28
Page 25

29
NL
MAYONAISE
Ingrediënten: 1 eidooier - 1 eetlepel mosterd - 1 theelepel azijn - 25 cl olie - peper en zout.
Doe de eidooier, de mosterd, de azijn, het zout en de peper in de roestvrijstalen kom, voorzien van de
garde en het deksel. Kies snelheid 1. Laat de garde werken en voeg de olie in een klein straaltje toe. Ga
na 10 seconden over op maximale snelheid. Laat de garde nog 30 seconden werken nadat de olie in het
mengsel is opgenomen.
Tip: Breng eventueel op smaak met een geraspt teentje knoflook, afhankelijk van het gebruik.
WIT BROOD
Ingrediënten (voor een brood van 800 g): 500 g meel - 300 ml lauw water - 10 g bakkersgist - 10 g zout.
Doe het meel, het zout en de bakkersgist in de roestvrijstalen kom. Plaats de kneedarm en het deksel
en laat enkele seconden draaien op snelheid 1. Giet het lauwe water door de opening in het deksel. Kneed
8 minuten. Laat het deeg ongeveer een half uur rusten bij kamertemperatuur. Kneed het deeg vervolgens
met de hand en maak er een bal van die u op de met boter ingevette en met bloem bestrooide ovenplaat
legt. Laat ongeveer 1 uur rijzen op een warme plaats. Verwarm de oven voor op 240° C. Maak inkepingen
in de bovenkant van het brood met een scheermesje en bestrijk met een penseel met lauw water. Zet
ook een kommetje met water in de oven. Zo krijgt u een mooie, goudkleurige korst. Zet 40 minuten in
een oven van 240° C.
Tip: De bakkersgist mag nooit rechtstreeks in contact komen met de suiker of het zout, want dit
verhindert de werking van de gist.
KRUIMELDEEG
Ingrediënten (voor een taartbodem van 350 g): 200 g bloem - 100 g boter - 5 cl water - een snufje zout.
Doe de bloem, de boter en het zout in de roestvrijstalen kom. Plaats de kneedarm en het deksel en laat
het apparaat enkele seconden draaien op snelheid 1. Voeg dan het water toe zonder het apparaat uit te
schakelen. Laat draaien totdat het deeg een mooie bal wordt. Laat minimaal 1 uur rusten in de koelkast,
omwikkeld in huishoudfolie, voordat u het uitrolt en bakt.
BRIOCHE
Ingrediënten (voor 6 personen): 250 g bloem - 5 g zout - 25 g suiker - 100 g boter - 2 hele eieren en 1
eidooier - 3 eetlepels lauwe melk - 2 eetlepels water - 5 g bakkersgist.
Doe de bloem in de roestvrijstalen kom en maak twee kuiltjes: doe in het ene het zout en giet in het
andere de gist, de suiker, de lauwe melk en het water. Houd zout en gist gescheiden, want gist reageert
slecht in contact met zout. Doe de eieren erbij en zet de kneedarm en het deksel op hun plaats. Kies
snelheid 1 en kneed 15 seconden. Laat dan 2 minuten 45 seconden kneden op snelheid 2. Voeg tijdens
het kneden de niet te zachte boter toe (laat de boter een halfuur op kamertemperatuur komen) en laat
nog 5 minuten kneden op snelheid 2 en vervolgens 5 minuten op snelheid 3. Dek het deeg af en laat
het twee uur rijzen bij kamertemperatuur. Kneed het dan krachtig met de hand en sla het tegen de kom.
Dek af en laat nogmaals twee uur rijzen in de koelkast. Kneed het deeg met de hand en sla het tegen
de kom. Dek het af met huishoudfolie en laat het een nacht rijzen in de koelkast. Vet de volgende dag
een briochevorm in met boter en bestrooi met bloem. Maak een bol van het deeg. Leg de bol in de vorm
en laat deze op een warme plaats rijzen tot hij de vorm heeft gevuld (2 tot 3 uur). Zet in een oven van
180° C en laat 25 minuten bakken.
Tip: Voeg stukjes chocolade of gekonfijte vruchten toe.
HARTIGE CAKE
Ingrediënten (voor 6 personen): 200 g bloem - 4 eieren - 11 g gist 10 cl melk - 5 cl olijfolie - 12 zongedroogde tomaten - 200 g feta 15 ontpitte groene olijven - 1 mespuntje curry (optie) - peper, zout.
Verwarm de oven voor op 180° C. Beboter een cakevorm en bestrooi met bloem. Meng de bloem, de
eieren en de gist in de roestvrijstalen kom, voorzien van de kneder en het deksel. Begin op snelheid 1
SM_KITCHEN-MACHINE-MC-GOURMET_MOUFAL_8080013263_OK_EST 06/12/13 14:22 Page29
Page 26

30
NL
en verhoog tot snelheid 3. Giet er de olijfolie en de koude melk bij en meng 1 minuut en 30 seconden.
Ga naar snelheid 1 en voeg de gedroogde tomaten, de feta, de groene olijven (in stukjes gesneden),
curry, zout en peper toe. Giet het mengsel in de cakevorm en bak 30 tot 40 minuten in de oven,
afhankelijk van het type oven. Prik in de cake om te controleren of deze klaar is.
Tip: Vervang de feta door mozzarella en doe er enkele fijngehakte blaadjes basilicum bij.
MOELLEUX VAN CHOCOLADE
Ingrediënten (voor 8 personen): 200 g pure bakchocolade - 150 g poedersuiker - 125 g bloem - 125 g zachte
boter - 4 eieren - 20 cl vloeibare room - 100 g amandelpoeder (optie) - 1 zakje vanillesuiker - 1 zakje gist
- 1 snufje zout.
Verwarm de oven voor op 180° C. Laat de in stukken gesneden chocolade au bain-marie of in de
magnetron smelten met 3 eetlepels water. Voeg er langzaam en al roerend een beetje boter bij om de
chocolade glad te maken. Laat een beetje afkoelen. Scheid de eidooiers van de eiwitten. Zet het eiwit
opzij. Doe de eidooiers, de gesmolten chocolade, de room, de rest van de boter, de suiker, de vanillesuiker
en het amandelpoeder in de roestvrijstalen kom, voorzien van de kneder en het deksel. Laat 20 seconden
draaien op snelheid 1 om alles te mengen. Ga naar snelheid 2 en voeg de met gist gemengde bloem toe
via de opening in het deksel. Laat ongeveer 2 minuten draaien totdat het deeg mooi glad is. Schep over
in een grote kom. Giet het eiwit met een snufje zout in de afgewassen roestvrijstalen kom, voorzien van
de garde. Klop het eiwit gedurende 1 minuut en 45 seconden stevig op snelheid 5 en laat vervolgens 30
seconden werken op maximale snelheid. Schep het opgeklopte eiwit voorzichtig met een spatel door het
chocolademengsel. Giet in een met boter ingevette en met bloem bestrooide springvorm. Zet 25 minuten
in een oven van 180° C.
Tip: Deze taart is heerlijk met crème anglaise of bolletjes vanille-ijs.
SM_KITCHEN-MACHINE-MC-GOURMET_MOUFAL_8080013263_OK_EST 06/12/13 14:22 Page30
Page 27
Tack för att du har valt denna apparat som endast är avsedd för tillredning av livsmedel inomhus, och
är för hushållsbruk.
• Läs bruksanvisningen noga innan du använder apparaten första gången och
behåll den: Tillverkaren frånsäger sig alltansvar för användning som inte
överensstämmer med bruksanvisningen.
• Apparaten är inte avsedd att användas av personer (inklusive barn) med
funktionsnedsättningar(fysiska, intellektuella eller sensoriska), eller av
personer som inte har kunskap om eller erfarenhet avhur apparaten används.
Undantag kan göras om personerna övervakas eller om de får
instruktionergällande apparatens användning av någon som är ansvarig för
deras säkerhet. Barn ska hållas underuppsikt så att de inte leker med
apparaten.
• Kontrollera att den spänning som anges på apparaten överensstämmer med
den lokala nätspänningen. Samtliga inkopplingsfel upphäver garantin.
• Apparaten är endast avsedd för hemmabruk för matlagning under uppsikt
inomhus och vid en höjd över havet på under 2 000 m.
• Rengör de ytor som kommer i kontakt med livsmedel före den första
användningen, enligt kapitlet Igångsättning i detta dokument, och efter
varje användning, enligt kapitlet Rengöring. Se kapitlet Rengöring för
information om underhåll och rengöring av apparaten.
BESKRIVNING
a - Motorenhet
a1 Elektroniskt motorhastighetsreglage
a2 Upplåsningsknapp för
multifunktionsenheten (a3)
a3 Multifunktionsenhet
a4 Snabbfäste
(mixerbägare/centrifug/hackare)
a5 Säkerhetslucka
a6 Fäste för blandningstillbehör (degkrok,
ballongvisp, blandare)
a7 Sladdhållare
b - Skål
b1 Rostfri skål
b2 Lock
c - Blandningstillbehör
c1 Degkrok
c2 Blandare
c3 Ballongvisp
d - Mixerbägare (beror på modellen)
d1 Mixerbägare
d2 Lock
d3 Plugg
e - Tillbehörshållare (beroende på modell)
f - Kvarn (beror på modellen)
f1 Metallkropp
f2 Skruv
f3 Kniv
f4 Hålskiva med stora hål
f5 Hålskiva med små hål
f6 Skruvring
f7 Matare
f8 Bricka
g - Grönsaksskärare (beror på modellen)
g1 Trummagasin
g2 Matare
g3 Trumma A för skivor
g4 Trumma C för grov rivning
g5 Trumma D för fin rivning
g6 Trumma E för potatispannkakor
h - Centrifug (beror på modellen)
h1 Matare
h2 Lock
h3 Roterande filter
h4 Uppsamlingskärl
h5 Hällpip
h6 Låsspak
SÄKERHETSANVISNINGAR
31
SV
SM_KITCHEN-MACHINE-MC-GOURMET_MOUFAL_8080013263_OK_EST 06/12/13 14:22 Page31
Page 28

• Koppla alltid bort apparaten från strömkällan om den ska lämnas obevakad
och före montering, demontering eller rengöring.
• Använd inte apparaten om den inte fungerar korrekt eller om den är skadad.
Vänd dig i så fall till ett auktoriserat servicecenter (se listan i servicehäftet).
• Alla åtgärder, med undantag för rengöring och sedvanligt underhåll av
apparaten, måste utföras av ett auktoriserat servicecenter (se listan i
servicehäftet).
• Sänk aldrig ned apparaten, sladden eller kontakten i vatten eller annan
vätska.
• Se till att sladden är utom räckhåll för barn, samt att den inte är i närheten
av eller i kontakt med apparatens varma delar, annan värmekälla eller vass
kant.
• Använd inte apparaten om sladden eller kontakten är skadade. För att
undvika alla risker, låt ett auktoriserat servicecenter (se listan i servicehäftet)
byta ut delarna.
• Placera inte tillbehören i en mikrovågsugn.
• Av säkerhetsskäl ska endast tillbehör och reservdelar avsedda för den här
apparaten användas (sålda av ett auktoriserat servicecenter).
• Var uppmärksam på riskerna för kroppsskada vid felaktig användning av
apparaten.
• Knivarna (d, f, g) är mycket vassa: Var försiktig när du hanterar dem för att
undvika att skada dig när du tömmer skålen, monterar/demonterar knivarna
på/från tillbehöret samt rengör apparaten.
• Ta alltid loss mixerbägaren (d) eller centrifugen (h) innan du trycker på
upplåsningsknappen (a2) till multifunktionsenheten (a3).
• Använd alltid mataren (f7) för att föra ner livsmedlen i röret till kvarnen (f),
använd aldrig fingrarna, en gaffel, sked, kniv eller något annat föremål.
• Rör aldrig vid apparatens rörliga delar och vänta tills den har stannat helt
innan du tar loss tillbehören.
• Vidrör inte visparna eller degkrokarna (c) när apparaten är igång.
• Se till att inte långt hår, scarfar, slipsar osv. hänger över apparaten när den
är igång.
• För aldrig in köksredskap (t.ex. skedar, spatlar) i röret i locket (b2), (d2)
eller (h2) eller itrummagasinet (g1).
• Kör aldrig mixerbägaren (d1) utan lock (d2).
• Använd endast ett tillbehör i sänder.
• Fyll aldrig mixerbägaren med kokande vätska.
• Kör inte apparaten med mixerbägaren tom.
• Använd alltid mixerbägaren tillsammans med locket.
• Ta aldrig loss locket innan apparaten har stannat helt.
• Tillsätt alltid ingredienser i vätskeform före ingredienser i fast form i
mixerbägaren.
• Använd inte skålarna (b1, d1) som allmänna köksredskap (för infrysning,
tillagning, sterilisering).
• Använd inte centrifugtillbehöret om det roterande filtret (h3) eller
32
SV
SM_KITCHEN-MACHINE-MC-GOURMET_MOUFAL_8080013263_OK_EST 06/12/13 14:22 Page32
Page 29

skyddslocket (h2) uppvisar skador eller synliga sprickor.
• Stäng av apparaten och dra ur kontakten innan du byter tillbehör eller
hanterar rörliga delar.
• Var försiktig om het vätska hälls in i matberedaren eller blandaren eftersom
det finns en risk för att stänker ut ur apparaten om den plötsligt kokar.
• Den här apparaten är inte avsedd att användas vid följande typer av
hushållstillämpningar och liknande tillämpningar (sådan användning
omfattas inte av garantin):
- I köksområdet i butiker, kontor eller andra arbetsmiljöer.
- På bondgårdar.
- Av kunderna på hotell, motell och i andra liknande boendemiljöer.
- I miljöer av typen Bed and Breakfast.
• Se de olika figurerna och avsnitten Montera tillbehören och Ta loss
tillbehören för information om hur du monterar och demonterar
tillbehören på/från apparaten.
• Se bruksanvisningen för information om hur du ställer in hastigheten
och funktionstiden för varje tillbehör.
• Apparaten får inte användas av barn. Förvara apparaten och tillhörande sladd
utom räckhåll för barn.
• Barn får inte använda apparaten som leksak.
• Apparaten får användas av personer med funktionsnedsättningar(fysiska,
intellektuella eller sensoriska), eller av personer som inte har tillräcklig
kunskap om eller erfarenhet avhur apparaten används, förutsatt att
personerna övervakas eller får instruktionergällande apparatens användning
under säkra förhållanden och förstår de möjliga riskerna ordentligt.
• Visptillbehöret (c3) och trummorna Riva fint och Riva grovt (g5 och g4) får
användas av barn som är minst 8 år gamla, förutsatt att de övervakas eller
får instruktioner gällande apparatens användning under säkra förhållanden
och förstår de möjliga riskerna ordentligt. Rengöring och underhåll utfört av
användaren får inte utföras av barn, annat än om de är minst 8 år gamla och
övervakas av en vuxen. Förvara apparaten och tillhörande sladd utom räckhåll
för barn som är under 8 år gamla.
• Diska alla tillbehör noggrant med vatten och handdiskmedel innan du använder apparaten första
gången (utom adaptern (e): se avsnittet Rengöring). Skölj och torka dem.
• Placera apparaten på en plan, ren och torr yta, kontrollera att motorreglaget (a1) är i position ”0” och
sätt sedan i kontakten.
• Det finns flera alternativ för att starta apparaten:
– Oregelbunden körning (pulse): Vrid motorreglaget (a1) till positionen ”pulse” stegvis för att få
bättre kontroll över tillredningen.
– Kontinuerlig körning: Vrid motorreglaget (a1) till önskad position från ”1” till ”max”, efter önskad
tillredning.
Du kan ändra inställningen under tillredningen.
• Vrid tillbaka reglaget (a1) till ”0” för att stanna apparaten.
Viktigt
: Apparaten kan bara startas om säkerhetsluckan (a5) och multifunktionsenheten (a3) är
låsta. Om du öppnar säkerhetsluckan (a5) och/eller multifunktionsenheten (a3) när apparaten är
FÖRSTA ANVÄNDNINGEN
33
SV
SM_KITCHEN-MACHINE-MC-GOURMET_MOUFAL_8080013263_OK_EST 06/12/13 14:22 Page33
Page 30
igång, stannar den direkt. Lås säkerhetsluckan och/eller multifunktionsenheten igen, för tillbaka
motorreglaget (a1) till position ”0” och fortsätt sedan på normalt sätt för att starta apparaten
genom att välja önskad hastighet.
Denna apparat är utrustad med en mikroprocessor som styr och analyserar köreffekten. Vid alltför stor
belastning stängs apparaten av automatiskt. För att starta apparaten igen för du tillbaka
motorreglaget (a1) till position ”0” och avlägsnar en del av ingredienserna. Låt apparaten vila några
minuter. Du kan sedan välja önskad hastighet för att slutföra tillredningen.
1 - BLANDA/KNÅDA/VISPA
Beroende på livsmedlens egenskaper kan du bereda upp till 1,8 kg deg med hjälp av den rostfria skålen
(b1) och locket (b2).
TILLBEHÖR SOM ANVÄNDS:
- Rostfri skål (b1).
- Lock (b2)
- Degkrok (c1) eller blandare (c2) eller ballongvisp (c3)
1.1 - MONTERA TILLBEHÖREN
• Tryck på knappen (a2) för att låsa upp multifunktionsenheten (a3) och vicka upp den tills det tar stopp.
• Sätt fast den rostfria skålen (b1) (medurs) på apparaten och tillsätt ingredienserna.
• För in önskat tillbehör (c1, c2 eller c3) i fästet (a6), tryck fast det och vrid ett kvarts varv moturs för
att låsa fast tillbehöret på plats.
• För tillbaka multifunktionsenheten (a3) i horisontalläge: tryck på knappen (a2) och sänk
multifunktionsenheten (a3) manuellt tills den låses på plats (knappen (a2) ska återgå till
ursprungspositionen).
• Skjut in locket (b2) över den rostfria skålen (b1).
OBS! Du måste inte använda locket. Det förhindrar att livsmedel stänker eller slungas över kanten.
• Kontrollera att säkerhetsluckan (a5) har låsts fast (medurs) på snabbfästet (a4).
1.2 - STARTA APPARATEN
Starta apparaten genom att vrida motorreglaget (a1) till önskad position enligt det recept du följer.
• Apparaten startar direkt.
Du kan tillsätta livsmedel genom öppningen i locket (c2) under tillredningen.
• Vrid tillbaka reglaget (a1) till ”0” för att stanna apparaten.
Tips:
- Knåda
- Använd degkroken (c1) med hastigheten ”1”.
Du kan knåda upp till 500 g mjöl (t.ex: bröd, fullkornsbröd, mördeg).
- Blanda
- Använd blandaren (c2) med hastigheten ”1” till ”max”.
Du kan blanda upp till 1,8 kg lätt deg eller smet (sockerkaka, kakor...).
- Använd aldrig blandaren (c2) för att knåda tunga degar.
- Vispa
- Använd ballongvispen (c3) med hastigheten ”1” till ”max”.
- Du kan göra: majonnäs, aioli, såser, uppvispad äggvita (upp till 8 äggvitor), vispad grädde (upp till
500 ml)…
- Använd aldrig ballongvispen (c3) för att knåda tunga degar eller blanda lätta degar eller smet.
Numren på avsnitten överensstämmer med numren på bilderna.
34
SV
SM_KITCHEN-MACHINE-MC-GOURMET_MOUFAL_8080013263_OK_EST 06/12/13 14:22 Page34
Page 31

1.3 - TA LOSS TILLBEHÖREN
• Vänta tills apparaten har stannat helt.
• Ta loss locket (b2).
• Lås upp multifunktionsenheten (a3) genom att trycka på knappen (a2) och vicka upp den.
• Ta loss tillbehöret (c1), (c2) eller (c3) från multifunktionsenheten genom att trycka tillbehöret mot
enheten och vrida det ett kvarts varv medurs.
• Ta loss den rostfria skålen.
2 - RÖRA/BLANDA/MIXA (BEROR PÅ MODELLEN)
Beroende på livsmedlet kan du tillreda upp till 1,5 l tjock blandning och 1,25 l vätska i mixerbägaren
(d).
TILLBEHÖR SOM ANVÄNDS:
- Mixerbägare (d).
2.1 - MONTERA TILLBEHÖREN
• För multifunktionsenheten (a3) till horisontell position: tryck på knappen (a2) och sänk
multifunktionsenheten (a3) manuellt tills den låses på plats (knappen (a2) ska återgå till
ursprungspositionen).
• Lås upp säkerhetsluckan (a5) på snabbfästet (a4) genom att vrida den moturs och sedan avlägsna
den.
• Kontrollera att apparaten står helt stilla innan du sätter fast mixerbägaren (d).
• Sätt fast mixerbägaren (d) på snabbfästet (a4) genom att vrida den medurs.
• Tillsätt livsmedlen i mixerbägaren och sätt på locket (d2) med pluggen (d3) genom att vrida det
moturs.
2.2 - STARTA APPARATEN
• Starta apparaten genom att vrida motorreglaget (a1) till önskad position enligt det recept du följer.
För att få bättre kontroll över mixningen och en bättre blandning under tillredningen kan du använda
positionen ”Pulse”.
Du kan tillsätta livsmedel genom öppningen i pluggen (d3) under tillredningen.
• Vrid tillbaka reglaget (a1) till ”0” för att stanna apparaten.
Tips:
Du kan göra:
- fint mixade soppor, krämer, mos, mjölkdrinkar och cocktails.
- lätt smet (pannkakor, munkar, sockerkakor osv...).
- Om ingredienserna fastnar på sidorna av mixerbägaren under mixningen stannar du apparaten, tar loss
mixerbägaren, för ner ingredienserna mot knivbladen och sätter sedan tillbaka mixerbägaren för att
fortsätta tillredningen.
• Fyll aldrig mixerbägaren med kokande vätska.
• Kör inte apparaten med mixerbägaren tom.
• Använd alltid mixerbägaren tillsammans med locket.
• Ta aldrig loss locket innan apparaten har stannat helt.
• Tillsätt alltid ingredienser i vätskeform före ingredienser i fast form i mixerbägaren.
2.3 - TA LOSS TILLBEHÖRET
• Vänta tills apparaten har stannat helt innan du tar loss mixerbägaren genom att vrida den moturs och
sätt tillbaka säkerhetsluckan (a5) på snabbfästet (a4) (vrid medurs).
35
SV
SM_KITCHEN-MACHINE-MC-GOURMET_MOUFAL_8080013263_OK_EST 06/12/13 14:22 Page35
Page 32

3 - MALA (BEROR PÅ MODELLEN)
TILLBEHÖR SOM ANVÄNDS:
- Tillbehörshållare (e)
- Kvarnenhet (f)
3.1 - MONTERA HACKADAPTERN
• Tryck på knappen (a2) för att låsa upp multifunktionsenheten (a3) och vicka upp den tills det tar stopp.
• Sätt fast adaptern (e) och vrid den moturs så att fästet blir en förlängning av apparaten.
• För tillbaka multifunktionsenheten (a3) i horisontalläge genom att trycka på knappen (a2) igen.
3.2 - MONTERA KVARNEN
• Håll enheten (f1) i röret och sätt den största öppningen uppåt.
• Sätt i skruven (f2) (den långa axeln först) i enheten (f1).
• Sätt fast kniven (f3) på den korta axeln som sticker ut från skruven (f2) och rikta de vassa kanterna
utåt.
• Sätt fast önskad hålskiva (f4 eller f5) på kniven (f3) genom att passa in de två stiften mot de två
spåren i enheten (f1).
• Vrid på skruvringen (f6) kraftigt på enheten (f1) medurs, utan att låsa den helt.
• Kontrollera att du har monterat kvarnen rätt. Axeln får varken ha något spelrum eller kunna snurra själv.
Om så är fallet ska du börja om med anvisningarna ovan.
3.3 - MONTERA KVARNEN PÅ APPARATEN
• För in kvarnenheten (f) genom att luta den åt höger, mot adapterns framsida (e), passa in de två
stiften i kvarnen mot de två spåren i adaptern. Sätt i kvarnen helt i adaptern och vrid sedan kvarnens
rör moturs och uppåt till vertikal position tills det tar stopp.
• Sätt fast den löstagbara brickan (f8) på röret.
3.4 - STARTA APPARATEN, TIPS OCH NEDMONTERING
• Kontrollera att säkerhetsluckan (a5) har låsts fast (medurs) på snabbfästet (a4).
• Placera en behållare för att samla upp de tillredda livsmedlen framför apparaten.
• Starta apparaten genom att vrida på motorreglaget (a1) till hastighet ”3” eller ”4”.
• För in köttet i röret bit för bit med hjälp av mataren (f7). Tryck aldrig ner ingredienser med fingrarna
eller med några köksredskap i röret.
• Vrid motorreglaget till hastigheten ”0” för att stanna apparaten och vänta tills den har stannat helt.
• Ta loss kvarnen genom att vrida den åt motsatt håll jämfört med monteringen.
Tips:
- Förbered allt du ska hacka (för kött ska du ta bort ben, brosk och senor och skära det i bitar på ca. 2
x 2 cm).
- Kontrollera att köttet är helt tinat.
- När du är klar kan du köra igenom några små brödbitar för att få ut all köttfärs.
4 - RIVA/SKIVA (BEROR PÅ MODELLEN)
TILLBEHÖR SOM ANVÄNDS:
- Tillbehörshållare (e)
- Grönsaksskärare (g)
- Trummor (beror på modellen)
4.1 - MONTERA TILLBEHÖREN
• Tryck på knappen (a2) för att låsa upp multifunktionsenheten (a3) och vicka upp den tills det tar stopp.
36
SV
SM_KITCHEN-MACHINE-MC-GOURMET_MOUFAL_8080013263_OK_EST 06/12/13 14:22 Page36
Page 33

• Sätt fast adaptern (e) och vrid den moturs så att fästet blir en förlängning av apparaten.
• För tillbaka multifunktionsenheten (a3) i horisontalläge genom att trycka på knappen (a2) igen.
• Kontrollera att säkerhetsluckan (a5) har låsts fast (medurs) på snabbfästet (a4).
• För in trummagasinet (g1) genom att luta det åt höger, mot adapterns framsida (e), passa in de två
stiften i kvarnen mot de två spåren i adaptern. Sätt i magasinet helt och vrid sedan magasinets rör
moturs och uppåt till vertikal position tills det tar stopp.
• Sätt i önskad trumma i magasinet och kontrollera att den är korrekt insatt i magasinet.
4.2 - STARTA APPARATEN OCH TIPS
• Placera en behållare för att samla upp de tillredda livsmedlen framför apparaten.
• Starta apparaten genom att vrida på motorreglaget (a1) till hastighet ”3” för att skiva eller ”4” för
att riva.
• Tillsätt livsmedlen i magasinets rör med hjälp av mataren (g2). Tryck aldrig ner ingredienser med
fingrarna eller med några köksredskap.
• Vrid motorreglaget till hastigheten ”0” för att stanna apparaten och vänta tills den har stannat helt.
• Ta loss trummagasinet genom att vrida det åt motsatt håll jämfört med monteringen.
• Detta kan du göra med trummorna:
- Riva grovt C (g4)/riva fint D (g5): morötter, rotselleri, potatis, ost
- Skiva grovt A (g3): potatis, morötter, gurka, äpplen, betor
- Potatispannkakor E (g6): potatis, parmesanost
5 - CENTRIFUGERA FRUKT OCH GRÖNSAKER (BEROR PÅ MODELLEN)
TILLBEHÖR SOM ANVÄNDS:
- Centrifugenhet (h).
5.1 - MONTERA CENTRIFUGEN
• Placera filtret (h3) i mitten av uppsamlingskärlet (h4).
• Stäng locket: vrid moturs och sätt fast locket (h2) på uppsamlingskärlet (h4) (position stängt hänglås).
• Stäng hela centrifugen: för låsspaken (h6) till positionen med ett stängt hänglås.
5.2 - MONTERA CENTRIFUGEN PÅ APPARATEN
• För multifunktionsenheten (a3) till horisontell position: tryck på knappen (a2) och sänk
multifunktionsenheten (a3) manuellt tills den låses på plats (knappen (a2) ska återgå till
ursprungspositionen).
• Lås upp och avlägsna säkerhetsluckan (a5) på snabbfästet (a4) genom att vrida det moturs.
• Kontrollera att apparaten står helt stilla innan du sätter fast centrifugen (h).
• Sätt fast centrifugenheten på snabbfästet (a4) genom att vrida den medurs, så att fästet för hällpipen
är i linje med apparaten.
• Rikta hällpipen (h5) mot uppsamlingskärlet (h4).
5.3 - STARTA APPARATEN OCH TIPS
• Ställ ett stort glas under hällpipen (h5).
• Starta apparaten genom att vrida på motorreglaget (a1) till hastighet ”3”.
• Skär frukt och/eller grönsaker i bitar.
• Tillsätt livsmedlen i röret till locket (h2) och tryck långsamt ner dem med hjälp av mataren (h1).
Tryck aldrig med fingrarna eller med några köksredskap.
• Tillred aldrig mer än 5 gånger 500 g livsmedel efter varandra utan att låta apparaten vila helt.
• För att få ett bättre resultat, rengör filtret efter 300 g ingredienser.
• Viktigt: När uppsamlingskärlet för fruktkött är fullt ska du stänga av apparaten och tömma
uppsamlingskärlet.
• Vrid motorreglaget till hastigheten ”0” för att stanna apparaten och vänta tills den har stannat helt.
37
SV
SM_KITCHEN-MACHINE-MC-GOURMET_MOUFAL_8080013263_OK_EST 06/12/13 14:22 Page37
Page 34

• Vänta tills det roterande filtret har stannat helt innan du tar loss enheten från apparaten.
• För att avlägsna centrifugen tar du loss den genom att vrida den moturs.
• För låsspaken (h6) till positionen med ett öppet hänglås. Öppna locket (position öppet hänglås). Du
kan sedan ta loss filtret (h3) för att rengöra det och tömma uppsamlingskärlet (h4).
Tips:
• Du kan pressa juicer från frukt och grönsaker som: morötter, tomater, äpplen, vindruvor, hallon.
• Skala frukter med tjockt skal, ta bort kärnorna och mitten på ananasfrukter.
• Man kan inte utvinna juice ur vissa frukter och grönsaker: bananer, avocado, björnbär, etc.
• Du kan göra juice av olika frukter och grönsaker utan att rengöra centrifugen varje gång, smakerna
blandas inte. Det räcker med att tillsätta lite vatten i centrifugen för att skölja den mellan varje
juicesort.
• Drick juicen omedelbart efter den har pressats eller tillsätt litet citronjuice och förvara den kallt i
några timmar.
6 - JUSTERING AV SLADDLÄNGD
För att förenkla användning eller förvaring kan du minska sladdlängden genom att trycka in sladden i
motorenheten (a) genom öppningen på baksidan (a7).
7 - HACKA MYCKET FINT I SMÅ MÄNGDER (BEROR PÅ MODELLEN)
TILLBEHÖR SOM ANVÄNDS:
- hackenhet.
Med hackaren kan du:
- Hacka på några sekunder i pulsläget: torkade fikon, torkade aprikoser.
maximal mängd/tid: 100 g/5 sekunder
Hackaren är inte avsedd för hårda livsmedel som kaffe.
• Dra ut kontakten ur eluttaget.
• Nedsänk aldrig motorenheten (a) eller adaptern (e) i vatten eller under rinnande vatten. Torka av dem
med en torr eller lätt fuktad trasa.
• Om du sköljer av tillbehören direkt efter användning blir de lättare att rengöra. Ta isär kvarnenheten
helt. Hantera kniven med försiktighet, du kan göra dig illa på den.
• Rengör, skölj och torka tillbehören: de går att diska i diskmaskin förutom metalldelarna till kvarnen:
enheten (f1), skruven (f2), kniven (f3), hålskivorna (f4 och f5) och skruvringen (f6).
• Hålskivorna (f4) och (f5) och kniven (f3) måste smörjas. Smörj dem med matolja för att skydda dem.
Tips:
• Om tillbehören har missfärgats av livsmedel (morötter, apelsiner) kan du torka av dem med en trasa
indränkt i matolja och sedan rengöra dem på vanligt sätt.
• Mixerbägare (d): häll varmt vatten med några droppar diskmedel i mixerbägaren. Stäng locket. Sätt
bägaren på apparaten och kör den några korta gånger. Ta loss bägaren och skölj den med rinnande
vatten och låt den lufttorka (upp och ner).
Förvara inte apparaten på en fuktig plats.
RENGÖRING
FÖRVARING
38
SV
SM_KITCHEN-MACHINE-MC-GOURMET_MOUFAL_8080013263_OK_EST 06/12/13 14:22 Page38
Page 35

Kontrollera följande om apparaten inte fungerar:
- Att apparaten är elansluten.
- Att alla tillbehör sitter fast ordentligt.
- Att säkerhetsluckan (a5) sitter på snabbfästet (a4) när den inte används.
- Att multifunktionsenheten (a3) är låst i horisontellt läge.
Denna apparat är utrustad med en mikroprocessor som styr och analyserar köreffekten. Vid alltför stor
belastning stängs apparaten av automatiskt. För att starta apparaten igen för du tillbaka motorreglaget
(a1) till position ”0” och avlägsnar en del av ingredienserna. Låt apparaten vila några minuter. Du kan
sedan välja önskad hastighet för att slutföra tillredningen.
Vad gör jag om apparaten inte fungerar? Vänd dig i så fall till ett auktoriserat servicecenter (se listan
i servicehäftet).
Du kan köpa följande tillbehör hos återförsäljaren eller hos ett auktoriserat servicecenter:
Varning
: Inget tillbehör får säljas till dig utan att du visat upp bruksanvisningen eller apparaten.
VISPAD GRÄDDE
Ingredienser (6 till 8 personer) : 2,5 dl kall vispgrädde - 50 g fl orsocker.
Häll vispgrädde och fl orsocker i den rostfria skålen och sätt ballongvispen och locket på plats. Vispa
på hastighet 4 i 2 minuter, och sedan på maxhastighet i 3 minuter och 30 sekunder.
VAD GÖR JAG OM APPARATEN INTE FUNGERAR?
KASSERING AV EMBALLAGE OCH APPARAT
Emballaget består enbart av material som inte är skadliga för miljön och de kan kastas i
enlighet med gällande bestämmelser för återvinning.
Hör dig för med berörd lokal myndighet om du har frågor gällande kasseringen av
apparaten.
UTTJÄNTA ELEKTRISKA/ELEKTRONISKA PRODUKTER
Tänk på miljön!
Apparaten innehåller material som kan återanvändas eller återvinnas.
Lämna den på en återvinningsstation.
TILLBEHÖR
Rostfri skål
Lock till den rostfria skålen
Degkrok
Blandare
Ballongvisp
Mixerbägare
Centrifug
Hackare
Tillbehörshållare
Kvarn
Grönsaksskärare:
- A: skiva
- C: riva grovt
- D: riva fint
- E: potatispannkakor
Pasta kit
Fruktkompottstillbehör
Valsverk för pasta
RECEPT
39
SV
SM_KITCHEN-MACHINE-MC-GOURMET_MOUFAL_8080013263_OK_EST 06/12/13 14:22 Page39
Page 36

MAJONNÄS
Ingredienser: 1 äggula - 1 msk senap - 1 tsk vinäger - 2,5 dl olja - salt och peppar.
Blanda äggula, senap, vinäger, salt och peppar i den rostfria skålen med ballongvispen och locket på
plats. Starta på hastighet 1. Häll i oljan i en tunn stråle utan att stanna vispen. Öka till maxhastighet
efter 10 sekunder. När blandningen jämn och slät, vispa i ytterligare 30 sekunder.
Tips: Smaksätt majonnäsen med en pressad vitlöksklyfta."
VITT BRÖD
Ingredienser (för ett runt bröd på ca 800 g): 8,3 dl mjöl - 3 dl ljummet vatten - 10 g torrjäst - 2 tsk salt.
Blanda mjöl, salt och torrjäst i den rostfria skålen. Sätt degkroken och locket på plats och kör maskinen
i några sekunder på hastighet 1. Tillsätt det ljumma vattnet genom lockets öppning och knåda i 8
minuter. Låt jäsa i rumstemperatur i ungefär en halv timme. Knåda sedan degen för hand och rulla den
till en rund bulle. Placera brödbullen på en smord och mjölad bakplåt. Låt jäsa ytterligare 1 timme på
ett ljummet ställe. Värm ugnen till 240°C. Skär små snitt på brödets yta med en vass kniv och pensla
det med ljummet vatten. Ställ även in en liten vattenbehållare i ugnen, eftersom det gör att brödet får
en gyllenbrun skorpa. Grädda i 40 minuter i 240°C.
Tips: Jäst bör aldrig komma i direkt kontakt med socker eller salt, eftersom socker och salt hindrar
jästen från att reagera.
PAJDEG
Ingredienser (för en pajdeg på ca 350 g): 3,3 dl mjöl - 100 g smör - 0,5 dl vatten - 1 nypa salt.
Lägg mjöl, smör och salt i den rostfria skålen. Sätt i degkroken och lägg på locket. Kör maskinen på
hastighet 1 i några sekunder, och häll sedan i vattnet utan att stanna maskinen. Fortsätt bearbeta degen
tills den är en jämn, rund bulle. Låt degen vila minst 1 timme i kylskåp täckt med plastfolie innan du
bakar ut och gräddar den.
BRIOCHE
Ingredienser (6 personer): 4,2 dl mjöl - 1 tsk salt - 2 msk socker - 100 g smör - 2 hela ägg och en 1
äggula - 3 msk ljummen mjölk - 2 msk vatten - 5 g torrjäst.
Häll mjölet i den rostfria skålen och forma två fördjupningar: I den ena fördjupningen lägger du saltet
och sockret, och i den andra jäst, ljummen mjölk och vatten. Saltet och jästen ska inte tillsättas
tillsammans eftersom jästen reagerar negativt i kontakt med salt. Tillsätt äggen och sätt degkroken och
locket på plats. Starta på hastighet 1 och knåda i 15 sekunder, öka sedan till hastighet 2 i 2 minuter
45 sekunder. Arbeta in smöret, som inte ska vara för mjukt (låt stå i rumstemperatur i en halv timme),
utan att stanna maskinen och fortsätt knåda i 5 minuter på hastighet 2, sedan i 5 minuter på hastighet
3. Täck degen och låt jäsa i två timmar i rumstemperatur. Knåda sedan degen ordentligt för hand i
skålen. Täck degen igen och låt den jäsa ytterligare två timmar i kylskåp, knåda sedan degen för hand
i skålen ännu en gång. Täck sedan degen med plastfolie och låt den jäsa i kylskåp över natten. Smörj
och mjöla en brödform. Forma degen till en boll. Lägg degen i formen och låt jäsa på ett varmt ställe
tills degen fyller hela formen (2 till 3 timmar). Värm ugnen till 180°C och grädda i 25 minuter.
Tips: Tillsätt chokladbitar eller kanderade frukter i degen.
SALT KAKA
Ingredienser (6 personer): 3,3 dl mjöl - 4 ägg - 11 g bakpulver 1 dl mjölk - 0,5 dl olivolja - 12 soltorkade
tomater - 200 g fetaost - 15 gröna oliver utan kärnor - 1 knivsudd curry (kan utelämnas) - salt och peppar.
Värm ugnen till 180°C. Smörj och mjöla en kakform. Blanda mjöl, ägg och bakpulver i den rostfria skålen
med blandaren och locket på plats. Starta på hastighet 1 och öka sedan till hastighet 3. Tillsätt olivoljan
och den kalla mjölken och blanda i en och en halv minut. Sänk till hastighet 1 och tillsätt soltorkade
40
SV
SM_KITCHEN-MACHINE-MC-GOURMET_MOUFAL_8080013263_OK_EST 06/12/13 14:22 Page40
Page 37

tomater, fetaost, gröna oliver (hackade i bitar) och curry. Salta och peppra. Häll över blandningen i
kakformen och grädda i 30 till 40 minuter, beroende på ugnen. Känn med en sticka att kakan är torr.
Tips: Byt ut fetaosten mot mozzarella och tillsätt några hackade basilikablad.
FYLLIG CHOKLADKAKA
Ingredienser (8 personer): 200 g mörk blockchoklad - 1,7 dl socker - 2 dl mjöl - 125 g rumstempererat smör
- 4 ägg - 2 dl grädde - 100 g mald mandel (kan uteslutas) - 2 tsk vaniljsocker - 11g bakpulver - 1 nypa
salt.
Värm ugnen till 180°C. Smält chokladen i vattenbad eller i mikrovågsugn tillsammans med 3 matskedar
vatten. Tillsätt smöret lite i taget under omrörning så att chokladen blir jämn och slät. Låt svalna.
Separera äggulorna och äggvitorna. Ställ äggvitorna åt sidan. Lägg äggulor, smält choklad, grädde,
resten av smöret, socker, vaniljsocker och malda mandlar i den rostfria skålen och sätt blandaren och
locket på plats. Blanda på hastighet 1 i 20 sekunder. Växla till hastighet 2 och tillsätt mjölet blandat
med bakpulvret genom lockets öppning. Kör maskinen i ungefär 2 minuter tills smeten är jämn. Häll över
smeten i en stor skål. Diska den rostfria skålen och sätt i ballongvispen. Lägg i äggvitorna och en nypa
salt, vispa äggvitorna styva på hastighet 5 i 1 minut och 45 sekunder, och öka sedan till maxhastighet
i 30 sekunder. Blanda försiktigt ned äggvitorna i chokladsmeten med hjälp av en slickepott. Häll över i
en smord och mjölad form med höga kanter. Grädda i 180°C i 25 minuter.
Tips: Servera kakan med vaniljsås eller vaniljglass.
För fler receptförslag gå in på www.tefal.com
41
SV
SM_KITCHEN-MACHINE-MC-GOURMET_MOUFAL_8080013263_OK_EST 06/12/13 14:22 Page41
Page 38

Takk for at du valgte dette apparatet, som kun er beregnet på tilberedning av mat i private husholdninger
innendørs.
•
Les bruksanvisningen nøye før du tar i bruk apparatet første gang, og
oppbevar den for senere bruk. Bruk i strid med bruksanvisningen fritar
produsenten for ethvert ansvar.
•
Dette apparatet er ikke ment brukt av personer (inkludert barn) med
nedsatte fysiske, sensoriske eller mentale evner, eller mangel på
erfaring og kunnskap, med mindre disse personene overvåkes eller får
nødvendige instruksjoner i bruken av apparatet av en person som er
ansvarlig for deres sikkerhet.
•
Barn bør overvåkes for å sikre at de ikke leker med apparatet.
•
Kontroller at nettspenningen som står på apparatets merkeskilt,
samsvarer med ditt elektriske anlegg. Garantien faller bort ved
koblingsfeil.
•
Dette apparatet er kun beregnet på privat husholdningsbruk og til
matlaging innendørs, i høyde over havet på under 2000 m.
•
Delene av apparatet som er i kontakt med matvarer skal rengjøres før
BESKRIVELSE
a - Motorenhet
a1 Hastighetsbryter
a2 Åpneknapp for flerfunksjonshodet (a3)
a3 Flerfunksjonshode
a4 Hurtigutgang
(blenderkanne/saftpresse/kvern)
a5 Sikkerhetsdeksel
a6 Utgang for blandetilbehøret (eltekrok,
ballongvisp, blandekniv)
a7 Ledningsrom
b - Bolleenhet
b1 Stålbolle
b2 Lokk
c - Blandetilbehør
c1 Eltekrok
c2 Blandekniv
c3 Ballongvisp
d - Blenderkanne (avhengig av modell)
d1 Kanne
d2 Lokk
d3 Doseringskork
e - tilbehørsholder (avhengig av modell)
f - Kvernehode (avhengig av modell)
f1 Metallrør
f2 Skrue
f3 Kniv
f4 Skive med store hull
f5 Skive med små hull
f6 Mutter
f7 Stapper
f8 Brett
g - Grønnsakskutter (avhengig av modell)
g1 Trommelhus
g2 Stapper
g3 Trommel A skiver
g4 Trommel C grovriving
g5 Trommel D finriving
g6 Trommel E ekstra fin riving
h - Saftpresse (avhengig av modell)
h1 Stapper
h2 Lokk
h3 Roterende filter
h4 Beholder
h5 skjenketut
h6 låsetapp
SIKKERHETSINSTRUKSJONER
42
NO
SM_KITCHEN-MACHINE-MC-GOURMET_MOUFAL_8080013263_OK_EST 06/12/13 14:22 Page42
Page 39

første gangs bruk, i overensstemmelse med instruksjonene som gis i
avsnittet "Igangsetting" i denne bruksanvisningen, og etter hver bruk,
som oppgitt i avsnittet "Rengjøring". Se avsnittet "Rengjøring" for
vedlikehold og rengjøring av apparatet.
•
Koble alltid fra strømmen hvis apparatet skal stå uten tilsyn og før
montering, demontering eller rengjøring.
•
Ikke bruk apparatet hvis det har blitt skadet eller ikke fungerer som det
skal. Ta det med til et autorisert servicesenter (se listen i
servicehåndboken).
•
Alt annet arbeid enn vanlig rengjøring og vedlikehold utført av
kunden, skal gjøres av et autorisert servicesenter (se listen i
servicehåndboken).
•
Ikke ha apparatet, ledningen eller støpselet i vann eller annen væske.
•
Ikke la strømledningen henge innenfor barns rekkevidde, være i
kontakt med apparatets varme deler, nær en varmekilde eller på en
skarp kant.
•
Ikke bruk apparatet hvis strømledningen eller støpselet er skadet. Av
sikkerhetsmessige årsaker må disse delene byttes ut av et autorisert
servicesenter (se listen i servicehåndboken).
•
Ikke sett tilbehørsdelene i mikrobølgeovnen.
•
Av sikkerhetsgrunner må du utelukkende bruke tilbehørsdeler og
reservedeler som passer til apparatet, og som kan fås fra et godkjent
servicesenter.
•
Det er risiko for skader ved feil bruk av apparatet.
•
Knivene (d,f,g) er veldig skarpe: For å unngå å skade deg, vær forsiktig
ved håndtering av disse når bollen tømmes, ved
montering/demontering av knivene og ved rengjøring.
•
Ta alltid ut blenderkannen (d) eller saftpressen (h) før du trykker på
åpneknappen (a2) for flerfunksjonshodet (a3).
•
Ved bruk av kvernehodet (f), må alltid stapperen (f7) brukes til å skyve
matvarene ned i sjakten, bruk aldri fingrene, en gaffel, kniv eller andre
gjenstander.
•
Berør aldri delene i bevegelse, vent alltid til apparatet har stanset helt
før tilbehørsdelene tas av.
•
Ikke berør vispen eller eltekroken mens apparatet er i gang.
•
Ikke la langt hår, skjerf, slips osv. henge over apparatet mens det er i
gang.
•
Stikk aldri redskaper (skje, sleiv ...) ned i sjakten i lokkene (b2), (d2)
eller (h2) eller i trommelhuset (g1).
•
Ikke start opp blenderkannen (d1) uten lokket (d2).
•
Bruk kun én tilbehørsdel om gangen.
•
Blenderkannen må aldri fylles med kokende væske.
43
NO
SM_KITCHEN-MACHINE-MC-GOURMET_MOUFAL_8080013263_OK_EST 06/12/13 14:22 Page43
Page 40

•
Blenderkannen må ikke brukes tom.
•
Blenderkannen må alltid brukes med lokket.
•
Løft aldri av lokket før apparatet har stanset helt.
•
Ha alltid flytende ingredienser i blenderkannen før du tilsetter faste
ingredienser.
•
Bruk aldri bollen eller kannen (b1, d1) som beholder (til frysing,
steking, sterilisering …).
•
Bruk ikke saftpressen dersom det roterende filteret (h3) eller
beskyttelseslokket (h2) er skadet eller har synlige sprekker.
•
Slå av apparatet og koble det fra før du skifter ut tilbehørsdelene eller
kommer i nærheten av deler som er i bevegelse mens apparatet er i
gang.
•
Vær forsiktig dersom varm væske helles inn i matkvernen eller
blanderen. Rask oppkoking kan nemlig gjøre at den spruter ut av
apparatet.
•
Apparatet er ikke ment for (garantien dekker ikke) følgende bruk i
hjemmet eller lignende steder, som f.eks.:
- Kjøkkensoner i butikker, kontorer eller på andre arbeidsplasser;
- På gårder,
- Av kunder på hotell, motell og andre overnattingssteder
- På steder av typen bed & breakfast.
•
Se de forskjellige tegningene og avsnittene "montering av
tilbehør" og "demontering av tilbehør" for demontering og
montering av apparatets tilbehør.
•
Se bruksanvisningen for regulering av hastigheter og funksjonstid
for hvert tilbehør.
•
Dette apparatet skal ikke brukes av barn. Apparatet og strømledningen
skal oppbevares utilgjengelig for barn.
•
Påse at ingen barn leker med apparatet.
•
Dette apparatet kan brukes av personer med nedsatte fysiske,
sensoriske eller mentale evner, eller mangel på erfaring og kunnskap,
på den betingelse at de er under overvåking eller har fått
sikkerhetsinstruksjoner når det gjelder bruken av apparatet og at de
har full forståelse for eventuelle faremomenter.
•
Ballongvispen (c3) og tromlene som «rasper fint» og «rasper grovt»
(g5 og g4) kan brukes av barn som er fylt 8 år på den betingelse at de
er under overvåking eller har fått sikkerhetsinstruksjoner når det
gjelder bruken av apparatet og at de har full forståelse for eventuelle
faremomenter. Rengjøring og vedlikehold skal ikke gjøres av barn under
8 år. Barn over 8 år som utfører rengjøring eller vedlikehold, skal være
under overvåking av en voksen. Apparatet og ledningen skal holdes
utenfor rekkevidde for barn under 8 år.
44
NO
SM_KITCHEN-MACHINE-MC-GOURMET_MOUFAL_8080013263_OK_EST 06/12/13 14:22 Page44
Page 41

• Alle tilbehørsdelene må vaskes med såpevann før de brukes for første gang (unntatt adapteren (e): se
avsnittet om rengjøring). Skyll og tørk.
• Sett apparatet på en jevn, ren og tørr overflate, og sørg for at hastighetsbryteren (a1) står på posisjon
"0" før apparatet kobles til.
• Apparatet har flere kjøremoduser:
- Intervall (puls): Vri hastighetsbryteren (a1) til posisjon "pulse" i flere korte omganger for å ha
bedre kontroll over blandingen.
- Kontinuerlig: Vri hastighetsbryteren (a1) til en posisjon fra "1" til "max" avhengig av oppskriften.
Du kan endre hastigheten mens apparatet går.
• Vri bryteren (a1) tilbake til "0" for å slå av apparatet.
Viktig
: Apparatet starter ikke opp hvis dekselet (a5) og hodet (a3) ikke er låst. Hvis du låser opp
dekselet (a5) og/eller hodet (a3) mens apparatet går, stopper apparatet med en gang. Lås fast
dekselet og/eller hodet, sett hastighetsbryteren (a1) tilbake på "0", og start opp apparatet som
vanlig ved å velge en hastighet.
Kjøkkenapparatet er utstyrt med en mikroprosessor som kontrollerer og analyserer funksjonseffekten.
Hvis apparatet overbelastes, stanser det automatisk. For å starte apparatet opp igjen, må du sette
hastighetsbryteren (a1) tilbake til posisjon "0" og ta ut en del av ingrediensene. La apparatet hvile i
noen minutter. Deretter kan du velge ønsket hastighet for å avslutte tilberedningen.
1 - BLANDE/ELTE/VISPE/EMULGERE/PISKE
Avhengig av typen matvare, er bollen (b1) og lokket (b2) beregnet på å tilberede 1,8 kg deig.
TILBEHØR:
- Stålbolle (b1).
- Lokk (b2)
- Eltekrok (c1) eller blandekniv (c2) eller ballongvisp (c3)
1.1 - MONTERE TILBEHØRSDELENE
• Trykk på knappen (a2) for å åpne flerfunksjonshodet (a3), og løft det inntil det stopper.
• Lås fast stålbollen (b1) til apparatet (med klokka), og tilsett ingrediensene.
• Sett ønsket tilbehørsdel (c1, c2 eller c3) på utgangen (a6), trykk den ned og vri den en kvart omgang
mot klokken for å feste den på utgangen.
• Senk flerfunksjonshodet (a3) til vannrett posisjon: trykk på knappen (a2) og senk flerfunksjonshodet
(a3) manuelt inntil det låser seg (knappen (a2) går tilbake til utgangsposisjon).
• Sett lokket (b2) på stålbollen (b1).
Merk: Det er ikke nødvendig å bruke lokket. Bruk av lokket hindrer søl og sprut.
• Sørg for at dekselet (a5) er låst (med klokken) på hurtigutgangen (a4).
1.2 - IGANGSETTING
Start apparatet ved å sette hastighetsbryteren (a1) på ønsket posisjon avhengig av oppskriften.
• Apparatet setter straks i gang.
Du kan tilføye ingredienser gjennom sjakten i lokket (b2) mens apparatet er i gang.
• Vri bryteren (a1) tilbake til "0" for å slå av apparatet.
Råd:
- Elte
- Bruk eltekroken (c1) på hastighet "1".
Nummeret på hvert avsnitt tilsvarer nummeret på hver figur.
IGANGSETTING
45
NO
SM_KITCHEN-MACHINE-MC-GOURMET_MOUFAL_8080013263_OK_EST 06/12/13 14:22 Page45
Page 42

Du kan elte inntil 500 g mel (f.eks.: hvetebrød, grovbrød, mørdeig, paideig ...).
- Blande
- Bruk blandekniven (c2) på hastighet "1" til "max".
Du kan blande inntil 1,8 kg lett deig (formkake, sukkerbrød …).
- Bruk aldri blandekniven (c2) til å elte tunge deiger.
- Vispe/emulgere/piske
- Bruk ballongvispen (c3) på hastighet "1" til "max".
- Du kan tilberede: majones, aioli, sauser, piskede eggehviter (inntil åtte eggehviter), pisket krem (inntil
5 dl) …
- Bruk aldri ballongvispen (c3) til å elte tunge deiger eller blande lette deiger.
1.3 - DEMONTERE TILBEHØRSDELENE
• Vent til apparatet har stanset helt.
• Ta av lokket (b2).
• Trykk på knappen (a2) for å åpne flerfunksjonshodet (a3), og løft det til oppreist posisjon.
• Utløs tilbehørsdelen (c1), (c2) eller (c3) fra flerfunksjonshodet ved å skyve tilbehøret oppover og
dreie det en kvart omgang med klokken.
• Ta ut stålbollen.
2 - MIKSE/BLANDE/BLENDE (AVHENGIG AV MODELL)
Avhengig av typen matvare er blenderkannen (d) beregnet på å tilberede 1,5 l tykke blandinger og 1,25
l flytende blandinger.
TILBEHØR:
- Blenderkanne (d).
2.1 - MONTERE TILBEHØRSDELENE
• Senk flerfunksjonshodet (a3) til vannrett posisjon: trykk på knappen (a2) og senk flerfunksjonshodet
(a3) manuelt inntil det låser seg (knappen (a2) går tilbake til utgangsposisjon).
• Åpne og ta av sikkerhetsdekselet (a5) fra hurtigutgangen (a4) ved å vri det mot klokken.
• Sørg for at apparatet har stanset helt før du setter på blenderkannen (d).
• Fest blenderkannen (d) på utgangen (a4) ved å vri den med klokken.
• Ha matvarene i blenderkannen, og fest lokket (d2) med doseringskorken (d3) ved å vri det mot klokken.
2.2 - IGANGSETTING
• Start apparatet ved å sette hastighetsbryteren (a1) på ønsket posisjon avhengig av oppskriften.
Med "Pulse"-funksjonen kontrollerer du blandingen bedre, og blandingen blir jevnere.
Du kan tilsette ingredienser gjennom sjakten i doseringskorken (d3) mens apparatet går.
• Vri bryteren (a1) tilbake til "0" for å slå av apparatet.
Råd:
Du kan tilberede:
- Finmikset suppe, saus, kompott, milkshake, cocktail.
- Flytende rører (pannekaker, vafler, frityrbakverk ...).
- Hvis ingredienser kleber seg til sidene i kannen mens de blandes, må du slå av apparatet, ta av
blenderkannen og få ingrediensene ned på bladene. Sett blenderkannen tilbake på plass og fortsett
blandingen.
2.3 - DEMONTERE TILBEHØRSDELEN
• Vent til apparatet har stanset helt før du tar av blenderkannen ved å dreie den mot klokken. Sett
tilbake dekselet (a5) og fest den på utgangen (a4) (med klokken).
46
NO
SM_KITCHEN-MACHINE-MC-GOURMET_MOUFAL_8080013263_OK_EST 06/12/13 14:22 Page46
Page 43

3 - KVERNE (AVHENGIG AV MODELL)
TILBEHØR:
- Tilbehørsholder (e)
- Montert kvernehode (f)
3.1 - MONTERE KVERNEADAPTEREN
• Trykk på knappen (a2) for å åpne flerfunksjonshodet (a3), og løft det inntil det stopper.
• Sett adapteren (e) på plass, og drei den fast mot klokken slik at utgangen er på linje med apparatets
lengderetning.
• Trykk på knappen (a2) på nytt for å senke flerfunksjonshodet (a3) til vannrett posisjon.
3.2 - SETTE SAMMEN KVERNEHODET
• Hold metallrøret (f1) i sjakten, og sett den bredeste åpningen slik at den peker oppover.
• Stikk skruen (f2) (lang akse først) i røret (f1).
• Sett kniven (f3) på den korte aksen som stikker ut av skruen (f2) med de skarpe kantene pekende
utover.
• Sett hullskiven (f4 eller f5) på kniven (f3) slik at de to stopperne passer inn i de to rillene på røret
(f1).
• Skru mutteren (f6) hardt på røret (f1) med klokken, men den må ikke sitte helt fast.
• Sjekk at alt er montert som det skal. Aksen må ikke være løs eller kunne dreie rundt alene. Hvis dette
ikke er tilfellet, må du starte monteringen på nytt.
3.3 - MONTERE KVERNEHODET PÅ APPARATET
• Hold det monterte kvernehodet (f) på skrå til høyre foran adapterutgangen (e) slik at de to tappene
på kvernehodet passer inn i de to rillene på adapteren. Skyv kvernehodet så langt det går inn i
adapteren, og vri så sjakten på kvernehodet oppover mot klokken inntil hodet låser seg.
• Sett det avtakbare brettet (f8) på sjakten.
3.4 - IGANGSETTING, RÅD OG DEMONTERING
• Sørg for at sikkerhetsdekselet (a5) er festet (med klokken) på hurtigutgangen (a4).
• Sett en beholder til grønnsakene foran apparatet.
• Slå på apparatet ved å sette hastighetsbryteren (a1) på hastighet "3" eller "4".
• Ha kjøttet ned i sjakten bit for bit, og skyv det ned med stapperen (f7). Bruk aldri fingrene eller
redskaper til å skyve ingrediensene ned i sjakten.
• For å slå av apparatet, setter du hastighetsbryteren på hastighet "0". Vent til apparatet har stanset helt.
• Skru løs kvernehodet i motsatt retning av monteringen.
Råd:
- Tilbered på forhånd hele mengden som skal kvernes (kjøtt: ta ut ben, brusk, nerver, og skjær det i biter
på ca. 2 x 2 cm).
- Sørg for at kjøttet er fullstendig opptint.
- Når du har kvernet alt kjøttet, kan du kverne noen brødbiter for å få ut alt kjøttet.
4 - RIVE/SKJÆRE (AVHENGIG AV MODELL)
TILBEHØR:
- Tilbehørsholder (e)
- Montert grønnsakskutter (g)
- Tromler (avhengig av modell)
47
NO
SM_KITCHEN-MACHINE-MC-GOURMET_MOUFAL_8080013263_OK_EST 06/12/13 14:22 Page47
Page 44

4.1 - MONTERE TILBEHØRSDELENE
• Trykk på knappen (a2) for å åpne flerfunksjonshodet (a3), og løft det inntil det stopper.
• Sett adapteren (e) på plass, og drei den fast mot klokken slik at utgangen er på linje med apparatets
lengderetning.
• Trykk på knappen (a2) på nytt for å senke flerfunksjonshodet (a3) til vannrett posisjon.
• Sørg for at sikkerhetsdekselet (a5) er festet (med klokken) på hurtigutgangen (a4).
• Hold trommelhuset (g1) på skrå til høyre foran adapterutgangen (e) slik at de to tappene på
trommelhuset passer inn i de to rillene på adapteren. Skyv trommelhuset helt inn, og vri sjakten
oppover mot klokken inntil det låser seg.
• Sett en trommel i trommelhuset, og sørg for at den er satt helt inn i huset.
4.2 - IGANGSETTING OG RÅD
• Sett en beholder til grønnsakene foran apparatet.
• Slå på apparatet ved å sette hastighetsbryteren (a1) på hastighet "3" for å skjære, eller "4" for å rive.
• Ha ingrediensene ned i sjakten på trommelhuset, og skyv dem ned med stapperen (g2). Bruk aldri
fingrene eller redskaper til å skyve ned ingrediensene.
• For å slå av apparatet setter du hastighetsbryteren på hastighet "0". Vent til apparatet har stanset
helt.
• Skru løs trommelhuset i motsatt retning av monteringen.
• Tromlene kan brukes til:
- Grovriving C (g4) / finriving D (g5): gulrøtter, sellerirot, poteter, ost ...
- Tykke skiver A (g3): poteter, gulrøtter, agurk, epler, rødbeter ...
- Ekstra fin riving E (g6): poteter, parmesan ...
5 - SAFTPRESSE TIL FRUKT OG GRØNNSAKER (AVHENGIG AV MODELL)
TILBEHØR:
- Montert saftpresse (h).
5.1 - SETTE SAMMEN SAFTPRESSEN
• Sett filteret (h3) midt i beholderen (h4).
• Feste lokket: vri mot klokken og fest lokket (h2) på beholderen (h4) (posisjon med lukket hengelås).
• Feste hele enheten: skyv låsetappen (h6) til posisjonen med lukket hengelås.
5.2 - MONTERE SAFTPRESSEN PÅ APPARATET
• Senk flerfunksjonshodet (a3) til vannrett posisjon: trykk på knappen (a2) og senk flerfunksjonshodet
(a3) manuelt inntil det låser seg (knappen (a2) går tilbake til utgangsposisjon).
• Åpne og ta av sikkerhetsdekselet (a5) fra hurtigutgangen (a4) ved å vri det mot klokken.
• Sørg for at apparatet har stanset helt før du setter på saftpressen (h).
• Fest den monterte saftpressen på utgangen (a4) ved å vri den med klokken slik at røret til skjenketuten
peker fremover.
• Sett skjenketuten (h5) på beholderen (h4).
5.3 - IGANGSETTING OG RÅD
• Sett et stort glass under skjenketuten (h5).
• Slå på apparatet ved å sette hastighetsbryteren (a1) på hastighet "3".
• Skjær frukten og/eller grønnsakene i biter.
• Ha bitene ned i sjakten i lokket (h2), og skyv dem langsomt ned med stapperen (h1). Bruk aldri
48
NO
SM_KITCHEN-MACHINE-MC-GOURMET_MOUFAL_8080013263_OK_EST 06/12/13 14:22 Page48
Page 45

fingrene eller redskaper til å skyve.
• Ikke press mer enn 5 ganger 500 g frukt/grønnsaker sammenhengende uten å la apparatet hvile
fullstendig.
• Du oppnår best resultat når filteret renses etter å ha presset 300 g frukt/grønnsaker.
• Viktig: Når restbeholderen er full, må du stanse apparatet og tømme beholderen.
• For å slå av apparatet setter du hastighetsbryteren på hastighet "0". Vent til apparatet har stanset helt.
• Vent til det roterende filteret har stanset helt før du løfter enheten av apparatet.
• Løsne saftpressen ved å vri den mot klokken.
• Sett låsetappen (h6) i posisjonen med åpen hengelås. Åpne lokket (åpen hengelås). Ta ut filteret (h3)
for å rense det, og tøm beholderen (h4).
Råd:
• Du kan lage saft av: gulrøtter, tomater, epler, druer, bringebær …
• Skrell frukt med tykt skall, fjern steinene og ta ut midten av ananas.
• Det er ikke mulig å lage saft av visse typer frukt og grønnsaker: bananer, avokado, bjørnebær …
• Du kan lage saft av ulike frukt og grønnsaker uten å rengjøre saftpressen hver gang, smakene blandes
ikke. Mellom ulike typer frukt og grønnsaker, er det er nok å helle litt vann ned i saftpressen mens den
er i gang slik at den skylles.
• Bruk saften innen kort tid etter den er presset, og tilsett sitronsaft hvis du vil oppbevare den kjølig
i noen timer.
6 - LENGDEINNSTILLING AV LEDNINGEN
For å gjøre det enklere å bruke apparatet eller rydde det bort, kan du forkorte strømledningen ved å skyve
den inn i motorenheten (a) gjennom åpningen på baksiden (a7).
7 - FINKVERNE SMÅ MENGDER (AVHENGIG AV MODELL)
TILBEHØRSDEL:
- montert kvern.
Kvernen kan brukes til å:
- Kverne på noen sekunder med pulse-funksjonen: tørket fiken, tørket aprikos ...
mengde/maks tid: 100 g / 5 s
Denne kvernen er ikke beregnet på harde produkter slik som kaffe.
• Trekk ut kontakten.
• Ikke dypp motorenheten (a) eller adapteren (e) ned i vann eller hold dem under rennende vann. Tørk
dem av med en tørr eller lett fuktet klut.
• Det er enklere å rengjøre tilbehørsdelene hvis du skyller dem rett etter bruk. Demonter alle delene i
kvernehodet. Håndter alle knivene forsiktig slik at du ikke skader deg.
• Vask, skyll og tørk tilbehørsdelene: de kan vaskes i oppvaskmaskin med unntak av alle metalldelene i
kvernehodet: røret (f1), skruen (f2), kniven (f3), hullskivene (f4 og f5), mutteren (f6).
• Hullskivene (f4) og (f5), samt kniven (f3), skal ha litt fett på utsiden. Smør dem med matolje før
oppbevaring.
Tips:
• Hvis tilbehørsdelene har blitt farget av matvarene (gulrøtter, appelsin …), gnir du dem med en klut
dynket med matolje før du vasker dem som vanlig.
• Blenderkanne (d): ha varmt vann og noen dråper oppvasksåpe i blenderkannen. Lukk lokket. Sett
kannen på apparatet og kjør noen korte omganger. Ta av kannen, skyll den i rennende vann og la den
tørke (opp ned).
RENGJØRING
49
NO
SM_KITCHEN-MACHINE-MC-GOURMET_MOUFAL_8080013263_OK_EST 06/12/13 14:22 Page49
Page 46

Apparatet skal ikke oppbevares på et fuktig sted.
Hvis apparatet ikke fungerer, må du sjekke:
- at støpselet sitter i stikkontakten.
- at hver tilbehørsdel er riktig montert og festet.
- at sikkerhetsdekselet (a5) er på plass og låst når hurtigutgangen (a4) ikke er i bruk.
- at flerfunksjonshodet (a3) er låst i vannrett posisjon.
Kjøkkenapparatet er utstyrt med en mikroprosessor som kontrollerer og analyserer funksjonseffekten. Hvis
apparatet overbelastes, stanser det automatisk. For å starte apparatet opp igjen, må du sette
hastighetsbryteren (a1) tilbake til posisjon "0" og ta ut en del av ingrediensene. La apparatet hvile i
noen minutter. Deretter kan du velge ønsket hastighet for å avslutte tilberedningen.
Fungerer apparatet fortsatt ikke? Kontakt et godkjent servicesenter (se listen i servicehåndboken).
Du kan anskaffe følgende tilbehørsdeler fra din forhandler eller et godkjent servicesenter:
Merk
: Bruksanvisningen eller apparatet må vises frem for å kunne kjøpe tilbehør.
OPPBEVARING
HVA GJØR JEG HVIS APPARATET IKKE FUNGERER?
GJENVINNING AV EMBALLASJEN OG APPARATET
Emballasjen omfatter utelukkende miljøvennlige materialer som kan kastes i henhold til
gjeldende bestemmelser om resirkulering.
Når du skal kassere apparatet, må du henvende deg til riktig avdeling i din kommune.
RESIRKULERING AV ELEKTRISKE ELLER ELEKTRONISKE PRODUKTER
Tenk grønt!
Apparatet inneholder mange materialer som kan gjenvinnes eller resirkuleres.
Lever apparatet til en miljøstasjon når det ikke skal brukes mer.
TILBEHØRSDELER
Stålbolle
Lokk til stålbollen
Eltekrok
Blandekniv
Ballongvisp
Blenderkanne
Saftpresse
Kvern
Tilbehørsholder
Grønnsakskutter:
- A: skiver
- C: grovriving
- D: finriving
- E: ekstra fin riving
Pastasett
Saustilbehør
Pastarulle
50
NO
SM_KITCHEN-MACHINE-MC-GOURMET_MOUFAL_8080013263_OK_EST 06/12/13 14:22 Page50
Page 47

PISKET KREM
Ingredienser (til 6/8 personer): 2,5 dl svært kald kremfløte - 50 g melis.
Ha krem og melis i stålbollen med ballongvispen og lokket. Kjør på hastighet 4 i to minutter, kjør så på
maksimal hastighet i 3½ minutt.
MAJONES
Ingredienser: 1 eggeplomme - 1 ss sennep - 1 ss eddik - 2,5 dl olje - salt og pepper.
Ha eggeplomme, sennep, eddik, salt og pepper i stålbollen med ballongvispen og lokket. Velg hastighet
1. Tilsett oljen i en tynn stråle mens maskinen visper. Sett maskinen på maksimal hastighet etter
10 sekunder. La maskinen fortsette å gå i 30 sekunder med vispen etter at all oljen er iblandet.
Tips: Tilsett gjerne et fedd revet hvitløk.
HVETEBRØD
Ingredienser (til et brød på 800 g): 500 g mel - 3 dl lunkent vann - 10 g tørrgjær - 10 g salt.
Ha mel, salt og gjær i stålbollen. Sett på plass eltekroken og lokket, og kjør på hastighet 1 i noen
sekunder. Tilsett lunkent vann gjennom åpningen i lokket. Elt i åtte minutter. La deigen heve i
romtemperatur i ca. 30 minutter. Kna deigen for hånd til en form, og legg den på en smurt og melet
stekeplate. La den etterheve på et lunt sted i ca. én time. Forvarm ovnen til 240 °C. Lag flere snitt på
toppen av brødet med et barberblad, og pensle brødet med lunkent vann. Sett også en liten form fylt
med vann i ovnen slik at brødet får en gyllen skorpe. Stek brødet i 40 minutter på 240 °C.
Tips: Gjær skal aldri være i direkte kontakt med sukker eller salt da dette hindrer gjæren i å virke.
MØRDEIG
Ingredienser (til en paibunn på 350 g): 200 g mel - 100 g smør - 0,5 dl vann - en klype salt.
Ha mel, smør i biter og salt i stålbollen. Sett på plass eltekroken og lokket, og kjør maskinen på hastighet
1 i noen sekunder. Tilsett vannet mens maskinen er i gang. La maskinen kjøre inntil ingrediensene har
blitt til en fin, rund deig. La deigen stå kjølig i minst én time før du kjevler den ut og steker den.
BRIOCHE
Ingredienser (til 6 personer): 250 g mel - 5 g salt - 25 g sukker - 100 g smør - 2 hele egg og 1 eggeplomme
- 3 ss lunken melk - 2 ss vann - 5 g tørrgjær.
Ha melet i stålbollen, og lag to groper. I den ene has salt og sukker, og i den sandre gjær, lunken melk
og vann. Salt og gjær må ikke blandes fordi gjær reagerer dårlig på salt. Tilsett egg, sett på plass
eltekroken og lokket. Velg hastighet 1 og elt i 15 sekunder, gå så over til hastighet 2 i 2 minutter og
45 sekunder. Mens maskinen går, tilsett fast, romtemperert smør (det må ikke være for mykt - la det stå
en halvtime i romtemperatur). Fortsett å elte i 5 minutter på hastighet 2, så 5 minutter på hastighet
3. Dekk til deigen og la den heve i to timer ved romtemperatur, kna så deigen godt for hånd ved å slå
den lett mot kantene i bollen. Dekk til deigen og la den heve på nytt i to timer i kjøleskapet. Kna deigen
godt på nytt ved å slå den lett mot kantene i bollen. Dekk til med plastfolie, og la den heve natten over
i kjøleskapet. Smør og mel en brødform neste dag. Del deigen i tre, og kna hver del til en bolle. Sett
bollene ved siden av hverandre i formen, og la dem heve på et varmt sted inntil de fyller formen (2-3
timer). Stekes på 180 °C i 25 minutter.
Tips: Tilsett gjerne sjokoladebiter eller kandisert frukt.
OLIVENBRØD
Ingredienser (til 6 personer): 200 g mel - 4 egg - 11 g bakepulver - 1 dl melk - 0,5 dl olivenolje - 12 tørkede tomater - 200 g fetaost - 15 steinfrie grønne oliven - 1 klype karri (valgfritt) - salt, pepper.
Forvarm ovnen til 180 °C. Smør og mel en brødform. Ha mel, egg og bakepulver i stålbollen med
OPPSKRIFTER
51
NO
SM_KITCHEN-MACHINE-MC-GOURMET_MOUFAL_8080013263_OK_EST 06/12/13 14:22 Page51
Page 48

blandekniven og lokket, og bland først på hastighet 1. Øk så hastigheten til 3. Tilsett olivenolje og
kald melk, og bland i 1½ minutt. Sett ned hastigheten til 1, og tilsett tørkede tomater, fetaost, grønne
oliven (i biter) og karri. Tilsett salt og pepper. Hell blandingen over i brødformen, og stek 30-40
minutter, avhengig av ovnen. Stikk med kniv for å se om det er ferdig.
Tips: Du kan bruke mozzarella istedenfor fetaost, og tilføye noen blader hakket basilikum.
SJOKOLADEFONDANT
Ingredienser (til 8 personer): 200 g mørk kokesjokolade - 150 g sukker - 125 g mel - 125 g mykt smør - 4
egg - 2 dl kremfløte - 100 g malte mandler (valgfritt) - 1 ts vaniljesukker – 11 g bakepulver - 1 klype salt.
Forvarm ovnen til 180 °C. Brekk sjokoladen i biter, og smelt den i vannbad eller mikrobølgeovn med 3
ss vann. Tilsett smør litt etter litt og rør sjokoladen jevn. La blandingen avkjøle. Skill eggene. Legg til
side hvitene. Ha eggeplommer, smeltet sjokolade, krem, resten av smøret, sukker, vaniljesukker og malte
mandler i stålbollen med blandekniven og lokket. Kjør på hastighet 1 i 20 sekunder for å blande
ingrediensene. Kjør videre på hastighet 2, og ha melet blandet med bakepulveret gjennom åpningen i
lokket. La maskinen kjøre i ca. to minutter inntil blandingen er jevn. Legg dette til side i en stor bolle.
Vask stålbollen, ha eggehviter og en klype salt i stålbollen med ballongvispen, og visp hvitene stive på
hastighet 5 i 1 min og 45 sek. Sett så maskinen på maksimal hastighet i 30 sekunder. Bruk en slikkepott
til å vende eggehvitene forsiktig inn i sjokoladeblandingen. Hell over i en smurt og melet kakeform. Stek
i ovn på 180 °C i 25 minutter.
Tips: Denne kaken er deilig servert med vaniljekrem eller vaniljeis.
Du kan finne flere ideer til oppskrifter på www.tefal.com
52
NO
SM_KITCHEN-MACHINE-MC-GOURMET_MOUFAL_8080013263_OK_EST 06/12/13 14:22 Page52
Page 49

Tak, fordi du har valgt dette apparat, som udelukkende er beregnet til tilberedning af madvarer i
hjemmet.
• Læs brugsanvisningen omhyggeligt igennem, inden apparatet tages i
brug første gang og gem den: Producenten påtager sig intet ansvar for
skader, der opstår ved forkert brug.
• Dette apparat er ikke beregnet til at blive brugt af personer (herunder
børn), hvis fysiske, sensoriske eller mentale evner er svækkede, eller
af personer uden erfaring eller kendskab til apparatet, medmindre de
er under opsyn eller har modtaget forudgående instruktioner om
brugen af apparatet af en person, der er ansvarlig for deres sikkerhed.
Børn må ikke lege med apparatet.
• Kontroller, at el-nettets spænding svarer til det, der er anført på
apparatet. Alle fejl i tilslutningen medfører bortfald af garantien.
• Apparatet er udelukkende beregnet til indendørs brug, og til
madlavning under opsyn i hjemmet i en højde over havet på højst
2000 m.
• Vask alle flader i kontakt med fødevarer inden første ibrugtagning ved
at følge beskrivelsen i afsnittet "Ibrugtagning" i denne
brugsanvisning. Rengør alt tilbehør efter hver brug som beskrevet i
afsnittet "Rengøring". Se også afsnittet "Rengøring" med hensyn til
BESKRIVELSE
a - Motorblok
a1 Elektronisk hastighedsvælger
a2 Udløserknap til multifunktionsarm (a3)
a3 Multifunktionsarm
a4 Udtag (til blenderskål / saftcentrifuge /
kværn)
a5 Sikkerhedsklap
a6 Udtag til blandetilbehør (dejkrog,
ballonpiskeris, omrører)
a7 Ledningsspor
b - Skåludstyr
b1 Skål i rustfrit stål
b2 Låg
c - Blandetilbehør
c1 Dejkrog
c2 Omrører
c3 Ballonpiskeris
d - Blenderskål (afhængig af model)
d1 Skål
d2 Låg
d3 Doseringsprop
e - Adapter til tilbehør (afhængig af model)
f - Hakkeudstyr (afhængig af model)
f1 Hus i metal
f2 Snegl
f3 Kniv
f4 Grov hulskive
f5 Fin hulskive
f6 Møtrik
f7 Nedstopper
f8 Påfyldningsbakke
g - Grøntsagsjern (afhængig af model)
g1 Cylinderholder
g2 Nedstopper
g3 Snittecylinder A
g4 Grov rivecylinder C
g5 Fin rivecylinder D
g6 Kartoffelrivejern E
h - Saftcentrifuge (afhænger af model)
h1 Nedstopper
h2 Låg
h3 Roterende filter
h4 Beholder
h5 Hældetud
h6 Låsearm
SIKKERHEDSANVISNINGER
53
DA
SM_KITCHEN-MACHINE-MC-GOURMET_MOUFAL_8080013263_OK_EST 06/12/13 14:22 Page53
Page 50

vedligeholdelse og rengøring af apparatet.
• Afbryd altid strømmen til apparatet, og tag stikket ud, hvis det
efterlades uden opsyn, og inden montering, demontering eller
rengøring.
• Brug ikke apparatet, hvis det ikke fungerer korrekt, eller hvis det er
beskadiget. Kontakt i så fald et autoriseret serviceværksted (se listen
i servicehæftet).
• Anden vedligeholdelse end den regelmæssige rengøring og
vedligeholdelse, som brugeren selv kan foretage, skal udføres af et
autoriseret serviceværksted (se listen i servicehæftet).
• Dyp ikke apparatet, el-ledningen eller stikket ned i vand eller anden
væske.
• Lad ikke ledningen hænge ned inden for børns rækkevidde, komme i
nærheden af, eller i kontakt med apparatets varme dele eller en
varmekilde, og anbring den aldrig, så den hænger ud over en skarp
kant.
• Brug ikke apparatet, hvis el-ledningen eller stikket er beskadiget. For
at undgå at der opstår farlige situationer, må de kun udskiftes af et
autoriseret serviceværksted (se listen i servicehæftet).
• Stil ikke tilbehørsdele, der indeholder metal, i mikrobølgeovn.
• For at der ikke skal ske uheld eller skader, må der kun bruges
tilbehørsdele og reservedele, der passer til modellen, og som sælges
af et autoriseret serviceværksted.
• Vær opmærksom på, at der er risiko for at komme til skade, hvis
apparatet bruges forkert.
• Vær forsigtig ved håndtering af knivene (d, f, g), for ikke at komme
til skade, når du tømmer skålen, når knivene monteres/demonteres på
tilbehøret, og når delene rengøres. Knivene er nemlig meget skarpe.
• Tag altid blenderskålen (d) eller saftcentrifugen (h) ud, inden du
trykker på udløserknappen (a2) på multifunktionsarmen (a3).
• Brug altid nedstopperen (f7) sammen med hakkeudstyret (f) til at
skubbe ingredienserne ned i påfyldningstragten. Brug aldrig fingrene,
en gaffel, en ske, en kniv eller enhver anden genstand.
• Rør aldrig ved delene, når de er i bevægelse, og tag ikke
tilbehørsdelene af, før apparatet er helt standset.
• Rør ikke ved piskeriset eller dejkrogen (c), når apparatet kører.
• Lad ikke langt hår, halstørklæder, slips, osv. hænge ned over
tilbehørsudstyret, mens apparatet arbejder.
• Før aldrig redskaber (ske, skraber osv.) ned gennem lågenes åbning
(b2), (d2) eller (h2) eller gennem cylinderholderen (g1).
• Brug ikke blenderskålen (d1) uden låg (d2).
• Brug kun ét tilbehør ad gangen.
• Hæld aldrig kogende væske ned i blenderskålen.
• Brug aldrig blenderskålen uden ingredienser.
• Brug altid blenderskålen med låget.
54
DA
SM_KITCHEN-MACHINE-MC-GOURMET_MOUFAL_8080013263_OK_EST 06/12/13 14:22 Page54
Page 51

• Tag aldrig låget af, før apparatet er helt standset.
• Kom altid de faste ingredienser i blenderskålen før de flydende
ingredienser.
• Brug ikke skålene (b1, d1) som beholdere (til dybfrysning, stegning,
sterilisation).
• Saftcentrifugen må ikke bruges, hvis det roterende filter (h3) eller
låget (h2) er beskadiget eller har synlige revner.
• Sluk for apparatet, og tag stikket ud, før du skifter tilbehør eller
nærmer dig bevægelige dele.
• Vær forsigtig, hvis der hældes varm væske i foodprocessoren eller
blenderen, eftersom væsken kan sprøjte ud af apparatet, hvis den
pludselig koger op.
• Denne maskine er ikke beregnet til følgende og lignende anvendelser
(som ikke er dækket af garantien):
- I tekøkkener i butikker, på kontorer og andre arbejds- og
erhvervsomgivelser.
- På gårde.
- Af kunder på hoteller, moteller, lejlighedshoteller og andre former
for indkvartering.
- I omgivelser af typen Bed and Breakfast.
• Se de forskellige figurer og afsnittene "Montering af tilbehøret"
og "Afmontering af tilbehøret" med hensyn til montering og
afmontering af tilbehør på apparatet.
• Se brugsanvisningen vedrørende indstilling af hastighed og
driftstid for det enkelte tilbehør.
• Dette apparat må ikke anvendes af børn. Opbevar apparatet og
ledningen utilgængeligt for børn.
• Børn må ikke bruge apparatet som legetøj.
• Dette apparat kan benyttes af personer, hvis fysiske, sensoriske eller
mentale evner er svækkede, eller af personer uden tilstrækkelig
erfaring eller indsigt, såfremt de er under opsyn eller har fået
forudgående instruktion i sikker brug af apparatet og har forstået de
mulige farer forbundet med det.
• Ballonpiskeriset (c3) og den fine og grove rivecylinder (g5 og g4) kan
anvendes af børn på mindst 8 år, såfremt de er under opsyn eller har
fået forudgående instruktion i sikker brug af apparatet og har forstået
de farer, der er forbundet med det. Rengøring og vedligeholdelse, som
brugeren selv kan foretage, må ikke overlades til børn, medmindre de
er mindst 8 år og under opsyn af en voksen. Opbevar apparatet og
ledningen utilgængeligt for børn under 8 år.
• Vask alle tilbehørsdelene (undtaget adapteren (e): Se afsnittet Rengøring) i varmt sæbevand før første
ibrugtagning. Skyl dem, og tør dem af.
IBRUGTAGNING
55
DA
SM_KITCHEN-MACHINE-MC-GOURMET_MOUFAL_8080013263_OK_EST 06/12/13 14:22 Page55
Page 52

• Anbring apparatet på en plan, ren og tør flade. Kontroller, at hastighedsvælgeren (a1) står på position
“0”, og sæt derefter stikket i.
• Der findes flere muligheder for at starte apparatet:
- Diskontinuerlig funktion (pulse): Stil hastighedsvælgeren (a1) på “pulse” position, som fungerer
med intervaller for at have en bedre kontrol over tilberedningen.
- Konstant funktion: Stil hastighedsvælgeren (a1) på den ønskede position fra “1” til “max”
afhængig af tilberedningen.
Man kan skifte hastighed under tilberedningen.
• Stil knappen (a1) tilbage på “0” for at standse apparatet.
Vigtigt
: Apparatet kan kun starte, hvis klappen (a5) og multifunktionsarmen (a3) er blokeret. Hvis
klappen (a5) og/eller multifunktionsarmen (a3) åbnes, mens apparatet kører, vil det straks
standse. Lås klappen og/eller multifunktionsarmen fast, stil hastighedsvælgeren (a1) tilbage på
position “0”, og start apparatet igen på normal vis ved at vælge den ønskede hastighed.
Denne køkkenmaskine er udstyret med en mikroprocessor, som kontrollerer og analyserer effekten, mens
den kører. Hvis belastningen er for stor, standser apparatet automatisk. Tag nogle af ingredienserne
ud for at starte apparatet igen, og sæt hastighedsvælgeren (a1) tilbage på position “0”. Lad apparatet
hvile i nogle minutter. Nu kan du vælge den ønskede hastighed for at gøre tilberedningen færdig.
1 - BLANDE / ÆLTE / PISKE / EMULGERE
Afhængig af hvilke ingredienser, der bruges, giver skålen i rustfrit stål (b1) med låget (b2) mulighed for
at tilberede op til 1,8 kg dej.
ANVENDT TILBEHØR:
- Skål i rustfrit stål (b1)
- Låg (b2)
- Dejkrog (c1) eller omrører (c2) eller ballonpiskeris (c3)
1.1 - MONTERING AF TILBEHØRET
• Tryk på knappen (a2) for at åbne multifunktionsarmen (a3) op, og løft den helt op.
• Sæt skålen i rustfrit stål (b1) fast (med uret) på apparatet, og kom ingredienserne i.
• Sæt det ønskede tilbehør (c1, c2 eller c3) på udtaget (a6), tryk det i bund, og drej en kvart omgang
mod uret for at blokere tilbehøret i sit leje.
• Indstil multifunktionsarmen (a3) i vandret position. Tryk på knappen (a2), og sænk
multifunktionsarmen (a3) manuelt, indtil den sidder fast (drej knappen (a2) tilbage til den oprindelige
position).
• Sæt låget (b2) på skålen i rustfrit stål (b1).
Bemærk: Det er ikke obligatorisk at bruge låget. Det kan anvendes for at undgå risiko for stænk og
sprøjt.
• Kontroller, at klappen (a5) er blokeret (med uret) på udtaget (a4).
1.2 - OPSTART
Start apparatet ved at dreje hastighedsvælgeren (a1) hen på den ønskede position afhængig af
opskriften.
• Apparatet starter med det samme.
Man kan tilsætte ingredienser gennem lågets åbning (b2) under tilberedningen.
• Stil knappen (a1) tilbage på “0” for at standse apparatet.
Gode råd:
- Ælte
- Brug dejkrogen (c1) ved hastighed “1”.
Man kan ælte op til 500 g mel (f.eks.: til franskbrød, grovbrød, mørdej osv.).
Numrene på afsnittene svarer til numrene på de indrammede skemaer.
56
DA
SM_KITCHEN-MACHINE-MC-GOURMET_MOUFAL_8080013263_OK_EST 06/12/13 14:22 Page56
Page 53

- Blande
- Brug omrøreren (c2) ved hastighed “1” til “max”.
Man kan blande op til 1,8 kg tynd dej (sandkagedej, småkagedej osv.).
- Brug aldrig omrøreren (c2) til at ælte tyk dej.
- Piske /emulgere
- Brug ballonpiskeriset (c3) ved hastighed “1” til “max”.
- Man kan tilberede: Mayonnaise, aïoli, saucer, æggehvider (op til 8 æggehvider), flødeskum (op til 500
ml) osv.
- Brug aldrig ballonpiskeriset (c3) til at ælte tyk dej eller til at blande tynd dej.
1.3 - AFMONTERING AF TILBEHØRET
• Vent til apparatet er helt standset.
• Tag låget (b2) af.
• Tryk på knappen (a2) for at åbne multifunktionsarmen (a3), og løft den helt op.
• Tag tilbehøret (c1), (c2) eller (c3) ud af multifunktionsarmen ved at skubbe tilbehøret mod armen og
dreje en kvart omgang med uret.
• Tag skålen i rustfrit stål af.
2 - BLENDE / BLANDE / RØRE (AFHÆNGIG AF MODELLEN)
Afhængig af de anvendte ingredienser kan man tilberede op til 1,25 l tynd dej med blenderskålen (d).
ANVENDT TILBEHØR:
- Blenderskål (d).
2.1 - MONTERING AF TILBEHØRET
• Sæt multifunktionsarmen (a3) i vandret position. Tryk på knappen (a2), og sænk multifunktionsarmen
(a3) manuelt, indtil den sidder fast (drej knappen (a2) tilbage til den oprindelige position).
• Åbn klappen (a5) på udtaget (a4) ved at dreje den mod uret, og tag den af.
• Kontroller, at apparatet er standset, inden blenderskålen sættes fast (d).
• Sæt blenderskålen (d) fast på udtaget (a4) ved at dreje den med uret.
• Kom ingredienserne ned i blenderskålen, og sæt låget (d2) med doseringsproppen (d3) fast ved at dreje
det mod uret.
2.2 - OPSTART
• Start apparatet ved at dreje hastighedsvælgeren (a1) på den ønskede position afhængig af opskriften.
Brug “pulse” positionen for at have en bedre kontrol over tilberedningen.
Man kan tilsætte ingredienser gennem doseringsproppens åbning (d3) under tilberedningen.
• Stil knappen (a1) tilbage på “0” for at standse apparatet.
Gode råd:
Man kan tilberede:
- Fint blendede supper, saucer, cremer, frugtmos, milkshakes og cocktails.
- Tynd dej (til pandekager, beigneter, clafoutis, buddinger osv.).
- Hvis ingredienserne sidder fast på siderne af skålen under tilberedningen, stands apparatet, tag
blenderskålen af, skub ingredienserne ned på klingen, og sæt derefter blenderskålen tilbage i apparatet
for at genoptage tilberedningen.
2.3 - AFMONTERING AF TILBEHØRET
• Vent til apparatet er helt standset, før end du tager blenderskålen af ved at dreje den mod uret og
sætte klappen (a5) på plads på udtaget (a4) (med uret).
57
DA
SM_KITCHEN-MACHINE-MC-GOURMET_MOUFAL_8080013263_OK_EST 06/12/13 14:22 Page57
Page 54

3 - HAKKE (AFHÆNGIG AF MODELLEN)
ANVENDT TILBEHØR:
- Adapter til tilbehør (e)
- Hakkeudstyr (f)
3.1 - MONTERING AF ADAPTEREN TIL HAKKEUDSTYRET
• Tryk på knappen (a2) for at åbne multifunktionsarmen (a3), og løft den helt op.
• Anbring adapteren (e), og sæt den fast ved at dreje den mod uret, således at udtaget sidder i
forlængelse af apparatet.
• Sæt multifunktionsarmen (a3) i vandret position ved at trykke en gang til på knappen (a2).
3.2 - MONTERING AF HAKKEUDSTYRET
• Tag fat i metalhuset (f1) ved påfyldningstragten, og placer det sådan, at den største åbning vender
opad.
• Før sneglen (f2) (med den lange akse først) ind i huset (f1).
• Sæt kniven (f3) på den korte akse, som går ud over sneglen (f2) således, at de skarpe kanter vender
ud af.
• Sæt den valgte hulskive (f4 eller f5) på kniven (f3) således, at de to fremspring passer ind i husets
to indhak (f1).
• Skru møtrikken (f6) godt fast på huset (f1) med uret uden at blokere det.
• Kontroller monteringen. Aksen må ikke have noget spil, og den må ikke kunne dreje rundt. I så fald
skal forrige fremgangsmåde gentages.
3.3 - MONTERING AF HAKKEUDSTYRET PÅ APPARATET
• Hold hakkeudstyret (f) skråt til højre foran adapterens udtag (e) og før de to tilslutninger på
hakkeudstyret ind i adapterens to indhak. Skub hakkeudstyret helt i bund i adapteren, og skub
hakkeudstyrets påfyldningstragt lodret op, og drej den mod uret, indtil den sidder fast.
• Placer den aftagelige påfyldningsbakke (f8) på påfyldningstragten.
3.4 - OPSTART, GODE RÅD OG AFMONTERING
• Kontroller, at klappen (a5) sidder ordentligt fast (med uret) på udtaget (a4).
• Stil en skål foran apparatet, som tilberedningen kan falde ned i.
• Start apparatet ved at sætte hastighedsvælgeren (a1) på “3” eller “4”.
• Kom kødet ned gennem påfyldningstragten et stykke ad gangen ved hjælp af nedstopperen (f7). Skub
aldrig ingredienserne ned med fingrene eller køkkenredskaber.
• Drej hastighedsvælgeren tilbage på “0” for at standse apparatet, og vent til det er helt standset.
• Tag hakkeudstyret af ved at gå frem i modsat rækkefølge som for monteringen.
Gode råd:
- Forbered den mængde ingredienser, der skal hakkes (hvis det er kød, skal det udbenes, befris for sener
og nerver og skæres i terninger på ca. 2x2 cm).
- Kontroller, at kødet er optøet.
- I slutningen af forarbejdningen kan man køre nogle små stykker brød igennem for at få alt det hakkede
kød ud.
4 - RIVE / SNITTE (AFHÆNGIG AF MODELLEN)
ANVENDT TILBEHØR:
- Adapter til tilbehør (e)
- Grøntsagsjern (g)
- Cylindere (afhængig af model)
58
DA
SM_KITCHEN-MACHINE-MC-GOURMET_MOUFAL_8080013263_OK_EST 06/12/13 14:22 Page58
Page 55

4.1 - MONTERING AF TILBEHØR
• Tryk på knappen (a2) for at åbne multifunktionsarmen (a3), og løft den helt op.
• Anbring adapteren (e), og sæt den fast ved at dreje den mod uret, således at udtaget sidder i
forlængelse af apparatet.
• Sæt multifunktionsarmen (a3) i vandret position ved at trykke en gang til på knappen (a2).
• Kontroller, at klappen (a5) sidder ordentligt fast (med uret) på udtaget (a4).
• Hold cylinderholderen (g1) skråt til højre foran adapterens udtag (e), og før de to tilslutninger på
cylinderholderen ind i adapterens to indhak. Skub den helt i bund, og skub holderens påfyldningstragt
lodret op, og drej den mod uret, indtil den sidder fast.
• Sæt den ønskede cylinder ind i holderen, og kontroller, at den sidder helt inde i holderen.
4.2 - OPSTART OG GODE RÅD
• Stil en skål foran apparatet, som tilberedningen kan falde ned i.
• Start apparatet ved at sætte hastighedsvælgeren (a1) på “3” for at skære og på “4” for at rive.
• Kom ingredienserne ned gennem påfyldningstragten på holderen ved hjælp af nedstopperen (g2).
Skub aldrig ingredienserne ned med fingrene eller køkkenredskaber.
• Drej hastighedsvælgeren tilbage på “0” for at standse apparatet, og vent til det er helt standset.
• Tag cylinderholderen af ved at gå frem i modsat rækkefølge som for monteringen.
• Med cylinderne kan man:
- Rive groft C (g4) / rive fint D (g5): Gulerødder, knoldselleri, kartofler, ost,m.m.
- Snitte i tykke skiver A (g3): Kartofler, gulerødder, agurker, æbler, rødbeder, m.m.
- Kartoffelrivejern E (g6): Kartofler, parmesan, m.m.
5 - PRESSE SAFT FRA FRUGTER OG GRØNTSAFER (AFHÆNGIG AF MODEL)
ANVENDT TILBEHØR:
- Samlet saftcentrifuge (h)
5.1 - MONTERING AF SAFTCENTRIFUGEN
• Anbring filteret (h3) midt i beholderen (h4).
• Sæt låget fast: Drej det mod uret, og sæt låget (h2) fast på beholderen (h4) (position lukket hængelås).
• Lås hele systemet: Skub låsearmen (h6) hen til position lukket hængelås.
5.2 - MONTERING AF SAFTCENTRIFUGEN PÅ APPARATET
• Sæt multifunktionsarmen (a3) i vandret position. Tryk på knappen (a2), og sænk multifunktionsarmen
(a3) manuelt, indtil den sidder fast (drej knappen (a2) tilbage til den oprindelige position).
• Åbn klappen (a5) på udtaget (a4), og tag den af ved at dreje den mod uret.
• Kontroller, at apparatet er standset, inden saftcentrifugen (d) sættes fast.
• Sæt den samlede saftcentrifuge fast på udtaget (a4) ved at dreje den med uret, således at udtaget på
hældetuden sidder i forlængelse af apparatet.
• Sæt hældetuden (h5) på beholderen (h4).
5.3 - OPSTART OG GODE RÅD
• Stil et stort glas under hældetuden (h5).
• Start apparatet ved at sætte hastighedsvælgeren (a1) på “3”.
• Skær frugterne og/eller grøntsager i stykker.
• Kom ingredienserne ned gennem åbningen i låget (h2), og skub dem forsigtigt ned med nedstopperen
(h1). Skub aldrig med fingrene eller køkkenredskaber.
• Tilbered aldrig mere end 5 gange 500 g ingredienser ad gangen, uden at lade apparatet hvile et godt
stykke tid.
• For at opnå et bedre resultat, anbefales det at rengøre filteret efter hver 300 g ingredienser.
59
DA
SM_KITCHEN-MACHINE-MC-GOURMET_MOUFAL_8080013263_OK_EST 06/12/13 14:22 Page59
Page 56

• Vigtigt: Når beholderen med frugtkød er fuld, stands apparatet, og tøm beholderen.
• Drej hastighedsvælgeren tilbage på “0” for at standse apparatet, og vent til det er helt standset.
• Vent indtil det roterende filter er helt standset, inden du tager saftcentrifugen ud.
• Tag centrifugen ud ved at dreje den mod uret.
• Skub låsearmen (h6) hen til position åben hængelås. Åbn låget (position åben hængelås). Nu kan du
tage filteret (h3) ud for at rengøre det og tømme beholderen (h4).
Gode råd:
• Du kan lave saft af: Gulerødder, tomater, æbler, vindruer, hindbær, m.m.
• Skræl de frugter, der har tykke skræller, tag stenene ud, fjern den midterste del af ananas.
• Det er ikke muligt at presse saft fra visse frugter og grøntsager: Bananer, avocadoer, brombær osv.
• Man kan tilberede saft af forskellige frugter og grøntsager uden nødvendigvis at skulle rengøre
saftcentrifugen hver gang. De forskellige smagsemner blandes ikke, og det er nok bare at hælde en
smule vand ned i centrifugen og lade den køre lidt for at rense den, inden man kommer næste frugt
eller grøntsag i.
• Den tilberedte saft skal hurtigt drikkes efter tilberedningen. Man kan eventuelt komme til citronsaft
i for at gemme den et par timer i køleskabet.
6 - INDSTILLING AF LEDNINGENS LÆNGDE
For større brugervenlighed eller under opbevaring kan ledningens længde tilpasses ved at skubbe den
ind i motorblokken (a) gennem åbningen bag på apparatet (a7).
7 - HAKKE SMÅ MÆNGDER MEGET FINT (AFHÆNGIG AF MODEL)
ANVENDT TILBEHØR:
- Samlet kværn
Kværnen kan bruges til at:
- Hakke følgende ingredienser på nogle få sekunder med pulsfunktionen: Tørrede figner, tørrede abrikoser
osv.
Maks. mængde/tid: 100g / 5s
Denne kværn er ikke beregnet til at hakke hårde varer, såsom kaffe.
• Tag stikket ud.
• Nedsænk aldrig motorblokken (a) eller adapteren (e) i vand, og hold dem aldrig under rindende vand.
Tør dem af med en tør eller let fugtig klud.
• Det er lettere at rengøre tilbehøret, hvis det skylles hurtigt efter brug. Afmonter hele hakkeudstyret.
Vær altid forsigtig, når du håndterer klingerne, da de kan være meget skarpe.
• Vask, skyl og tør tilbehøret af. Det kan vaskes i opvaskemaskinen undtaget metaldelene: Hus (f1), snegl
(f2), kniv (f3), hulskiver (f4 og f5), møtrik (f6).
• Smør hulskiverne (f4) og (f5) og kniven (f3). Brug madolie til at smøre dem med.
Gode råd:
• Hvis tilbehøret er blevet misfarvet af fødevarer (gulerødder, appelsiner, m.m.), gnub dem med en klud
med lidt madolie, og rengør dem derefter på sædvanlig vis.
• Blenderskål (d): Hæld varmt vand tilsat et par dråber opvaskemiddel ned i blenderskålen. Luk låget.
Stil blenderskålen i apparatet, og tryk et par gange på pulse-knappen. Tag skålen ud, skyld den under
rindende vand, og lad den tørre (med bunden i vejret).
Opbevar ikke apparatet på et fugtigt sted.
OPBEVARING
RENGØRING
60
DA
SM_KITCHEN-MACHINE-MC-GOURMET_MOUFAL_8080013263_OK_EST 06/12/13 14:22 Page60
Page 57

Hvis apparatet ikke virker, kontroller:
- Om stikket er sat i.
- Om tilbehøret er sat ordentligt fast.
- Om klappen (a5) er låst, når udtaget (a4) ikke er i brug.
- Om multifunktionsarmen (a3) er låst fast i vandret position.
Denne køkkenmaskine er udstyret med en mikroprocessor, som kontrollerer og analyserer effekten, mens
den kører. Hvis belastningen er for stor, standser apparatet automatisk. Tag nogle af ingredienserne ud
for at starte apparatet igen, og sæt hastighedsvælgeren (a1) tilbage på position “0”. Lad apparatet
hvile i nogle minutter. Nu kan du vælge den ønskede hastighed for at gøre tilberedningen færdig.
Fungerer apparatet stadigvæk ikke? Kontakt et autoriseret serviceværksted (se listen i servicehæftet).
Du kan udbygge dit apparat med følgende tilbehør, som kan købes hos forhandleren eller på et autoriseret
serviceværksted:
Vigtigt
: Du kan ikke købe tilbehør uden at vise denne brugervejledning eller dit apparat.
FLØDESKUM
Ingredienser (til 6-8 personer): 25 cl meget kold fløde - 50 g flormelis.
Kom fløde og flormelis i den rustri stålskål med ballonpiskeriset og låget. Lad apparatet køre i 2 minutter
på hastighed 4 og derefter i 3 minutter og 30 sekunder på maksimal hastighed.
Skål i rustfrit stål
Låg til skål i rustfrit stål
Dejkrog
Omrører
Ballonpiskeris
Blenderskål
Saftcentrifuge
Kværn
Adapter til tilbehør
Hakkeudstyr
Grøntsagsjern:
- A: Snitte
- C: Rive groft
- D: Rive fint
- E: Rive kartofler
Pastatilbehør
Purépresse
Pastarulle
OPSKRIFTER
HVIS APPARATET IKKE VIRKER?
BORTSKAFFELSE AF EMBALLAGEN OG APPARATET
Emballagen består udelukkende af materialer, der er ufarlige for miljøet, og som kan
bortskaffes i overensstemmelse med gældende regler for genbrug.
Kontakt det lokale kommunekontor for at få at vide, hvordan du bortskaffer apparatet.
BRUGTE ELEKTRONISKE ELLER ELEKTRISKE APPARATER
Tænk på miljøet!
Apparatet indeholder mange materialer, som kan genvindes eller genbruges.
Bring det til et specialiseret indsamlingscenter for genbrug, når det ikke skal bruges mere.
TILBEHØR
61
DA
SM_KITCHEN-MACHINE-MC-GOURMET_MOUFAL_8080013263_OK_EST 06/12/13 14:22 Page61
Page 58

MAYONNAISE
Ingredienser: 1 æggeblomme - 1 spsk. sennep - 1 tsk. vineddike - 25 cl olie - salt og peber.
Kom æg, sennep, vineddike, salt og peber i skålen i rustfrist stål med ballonpiskeriset og låget. Vælg
hastighed 1. Lad piskeriset køre, og tilsæt langsomt olien i en tynd stråle. Skift til maksimal hastighed
efter 10 sekunder. Lad piskeriset køre i endnu 30 sekunder, efter at olien er optaget i blandingen.
Godt råd: Tilsæt eventuel et knust fed hvidløg.
HVIDT BRØD
Ingredienser (til et brød på 800 g): 500 g mel - 300 ml lunkent vand - 10 g tørgær - 10 g salt.
Kom mel, salt og gær i den rustri stålskål. Sæt dejkrogen og låget på, og lad apparatet køre i nogle
sekunder på hastighed 1. Tilsæt vand gennem åbningen på låget. Ælt i 8 minutter. Lad dejen hvile i ca.
1/2 time ved stuetemperatur. Ælt derefter dejen med hænderne, og form den til en kugle, som stilles
på en smurt melet bageplade. Lad dejen hæve igen ca. 1 time på et lunt sted. Forvarm ovnen til 240
°C. Snit dejen med en kniv, og pensl den med lunkent vand. Stil en lille skål vand i ovnen: Dette gør
skorpen mere gylden. Bag brødet i 40 minutter ved 240 °C.
Godt råd: Gæren må aldrig komme i direkte kontakt med salt eller sukker, da dette forhindrer gæren i
at virke
MØRDEJ
Ingredienser (til en tærtebund på 350 g): 200 g mel - 100 g smør - 5 cl vand – knsp salt.
Kom mel, smør og salt i den rustri stålskål. Sæt dejkrogen og låget på, og kør apparatet på hastighed
1 i nogle sekunder. Tilsæt derefter vandet, samtidig med at apparatet kører. Lad apparatet køre, indtil
dejen er fast. Dæk dejen til med husholdningsfilm, og lad den hvile køligt i mindst 1 time, inden den
rulles ud og bages.
BRIOCHE
Ingredienser (til 6 personer): 250 g mel - 5 g salt - 25 g sukker 100 g smør - 2 hele æg og 1 æggeblomme
- 3 spsk. lunken mælk - 2 spsk. vand - 5 g tørgær.
Kom mel i den rustfri stålskål, og form to fordybninger: Kom salt og sukker i den ene og gær, lunken
mælk og vand i den anden. Salt og gær må ikke tilsættes sammen, da gæren reagerer i forbindelse med
kontakt med salt. Tilsæt æggene, sæt dejkrogen og låget på. Vælg hastighed 1, og ælt i 15 sekunder.
Skift derefter til hastighed 2 i 2 minutter 45 sekunder. Tilsæt smørret, der ikke må være for blødt (tag
det ud af køleskabet en halv time før), uden at stoppe apparatet, og fortsæt med at ælte i 5 minutter
på hastighed 2 og derefter på hastighed 3 i 5 minutter. Tildæk dejen, og lad den hæve i to timer ved
stuetemperatur, slå derefter dejen ned i skålen med hånden. Dæk dejen til, og lad den efterhæve i to
timer i køleskabet. Ælt den derefter igen i skålen. Dæk dejen til med husholdningsfilm, og lad den hvile
i køleskabet natten over. Smør og mel en brødform dagen efter. Form dejen til en kugle. Læg dejen ned
i brødformen, og lad den hæve på et lunt sted, indtil formen er fyldt op (ca. 2 til 3 timer). Stil formen
i ovnen, og bag brødet ved 180 °C i 25 minutter.
Godt råd: Tilsæt chokoladestykker eller kandiserede frugter.
GRØNTSAGSKAGE
Ingredienser (til 6 personer): 200 g mel - 4 æg - 11 g tørgær - 10 cl mælk - 5 cl olivenolie - 12 tørrede tomater - 200 g feta - 15 udstenede grønne oliven - 1 knsp. karry (valgfrit) - salt og peber.
Forvarm ovnen til 180 °C. Smør og mel en sandkageform. Bland mel, æg og gær sammen i den rustri
stålskål med omrøreren og låget ved hastighed 1, og øg derefter hastigheden til position 3. Tilsæt
olivenolie og kold mælk, og bland i 1 minut og 30 sekunder. Skift til hastighed 1, og tilsæt de tørrede
tomater, feta, de grønne oliven (skåret i mindre stykker), karry, salt og peber. Hæld dejen over i
sandkageformen, og bag kagen i 30 til 40 minutter, afhængig af ovnen. Stik i kagen under bagningen
for at kontrollere, om den er færdig.
62
DA
SM_KITCHEN-MACHINE-MC-GOURMET_MOUFAL_8080013263_OK_EST 06/12/13 14:22 Page62
Page 59

Gode råd: Man kan erstatte feta med mozzarella og tilsætte nogle hakkede basilikumblade.
CHOKOLADEKAGE
Ingredienser (til 8 personer): 200 g kogechokolade - 150 g sukker - 125 g mel - 125 g blødt smør - 4 æg
- 20 cl fløde - 100 g mandelpulver (valgfrit) - 1 brev vanillesukker - 11 g bagepulver – 1 knsp. salt.
Forvarm ovnen til 180 °C. Smelt chokoladestykkerne over vandbad eller i mikrobølgeovnen med 3 spsk.
vand. Tilsæt gradvist lidt smør under omrøring for at gøre chokoladen mere lind. Lad chokoladen køle
lidt af. Adskil hviderne fra æggeblommerne. Læg æggehviderne til side. Kom æggeblommer, den smeltede
chokolade, fløde, resten af smørret, sukker, vanillesukker og mandelpulver i den rustri stålskål med
omrøreren og låget. Lad apparatet køre på hastighed 1 i 20 sekunder. Skift til hastighed 2, og tilsæt
melet og bagepulveret gennem åbningen i låget. Lad apparatet køre i ca. 2 minutter, indtil dejen er lind.
Hæld dejen over i en stor skål. Kom æggehviderne med en knsp. salt i den rengjorte skål i rustfrit stål
med ballonpiskeriset, pisk hviderne på hastighed 5 i 1 minut og 45 sekunder, og skift derefter til
maksimal hastighed i 30 sekunder. Vend forsigtigt de stive hvider i chokoladeblandingen med en skraber.
Hæld dejen op i en smurt og melet kageform. Bag kagen i 25 minutter ved 180 °C.
Godt råd: Kagen kan serveres med creme anglaise eller vaniljeis.
Du kan finde flere ideer til opskrifter på www.tefal.com
63
DA
SM_KITCHEN-MACHINE-MC-GOURMET_MOUFAL_8080013263_OK_EST 06/12/13 14:22 Page63
Page 60

Kiitos, että olet valinnut tämän laitteen, joka on tarkoitettu käytettäväksi ruoanvalmistukseen
kotitalouksissa.
• Lue käyttöohjeet huolella ennen laitteen ensimmäistä käyttökertaa ja
säilytä ne. Valmistaja ei ole vastuussa virheellisestä käytöstä.
• Tätä laitetta ei ole tarkoitettu sellaisten henkilöiden (mukaan lukien
lapset) käytettäväksi, joiden ruumiilliset tai henkiset kyvyt ovat
rajalliset, tai kokemattomille käyttäjille, jos he eivät saa apua
turvallisuudestaan huolehtivilta henkilöiltä, jotka valvovat ja antavat
heille laitteen käyttöä koskevia ohjeita. Älä anna lasten leikkiä
laitteella.
• Tarkista, että laitteen jännite vastaa sähköverkkosi jännitettä.
Virheellinen sähköliitäntä kumoaa takuun.
• Laite on tarkoitettu ruoanvalmistukseen kotitalouksissa ja sisätiloissa
alle 2000 m:n korkeudessa. Laitetta tulee valvoa käytön aikana.
• Puhdista ennen ensimmäistä käyttökertaa ne osat, jotka tulevat
kosketuksiin ruokien kanssa. Katso ohjeet Käyttöönotto-osiosta.
Puhdista osat myös jokaisen käytön jälkeen (katso Puhdistus-osio).
Laitteen huoltoa ja puhdistusta koskevat ohjeet ovat Puhdistusosiossa.
KUVAUS
a - Moottoriyksikkö
a1 Elektroninen nopeussäädin
a2 Monitoimipään avauspainike (a3)
a3 Monitoimipää
a4 Pikaliitäntä (sekoituskulho/mehulinko/
survin)
a5 Suojaluukku
a6 Sekoitusosien liitäntä (taikinakoukku,
tiheä lankavispilä, sekoitusmela)
a7 Tila johdon säilytystä varten
b - Kulhon osat
b1 Ruostumattomasta teräksestä
valmistettu kulho
b2 Kansi
c - Sekoituslisätarvikkeet
c1 Taikinakoukku
c2 Sekoitusmela
c3 Tiheä lankavispilä
d - Sekoituskulho (mallikohtainen)
d1 Kulho
d2 Kansi
d3 Annostelukorkki
e - Kiinnityskappale (mallikohtainen)
f - Pilkkomispää (mallikohtainen)
f1 Metallirunko
f2 Ruuvi
f3 Leikkuri
f4 Isoaukkoinen levy
f5 Pieniaukkoinen levy
f6 Mutteri
f7 Syöttöpainin
f8 Taso
g - Raastinosa (mallikohtainen)
g1 Rumpukotelo
g2 Syöttöpainin
g3 Viipalointirumpu A
g4 Karkean raasteen rumpu C
g5 Hienon raasteen rumpu D
g6 Perunaraastin E
h - Mehulinko (mallikohtainen)
h1 Syöttöpainin
h2 Kansi
h3 Pyörivä suodatin
h4 Astian runko
h5 Kaatonokka
h6 Lukitusvipu
TURVAOHJEET
64
FI
SM_KITCHEN-MACHINE-MC-GOURMET_MOUFAL_8080013263_OK_EST 06/12/13 14:22 Page64
Page 61

• Irrota laite sähköverkosta, kun et enää käytä sitä sekä kokoamisen,
purkamisen ja puhdistuksen ajaksi.
• Älä käytä laitetta, jos se ei toimi kunnolla tai on vahingoittunut. Ota
yhteys valtuutettuun huoltokeskukseen (luettelo mukana toimitetussa
kirjasessa).
• Kaikki muut toimenpiteet puhdistusta ja tavallista huoltoa lukuun
ottamatta tulee jättää valtuutetun huoltokeskuksen tehtäväksi
(luettelo huoltokeskuksista on mukana toimitetussa kirjasessa).
• Älä laita laitetta, sähköjohtoa tai pistoketta veteen tai muuhun
nesteeseen.
• Sähköjohtoa ei saa koskaan jättää lasten ulottuville, laitteen kuumien
osien lähelle tai kosketuksiin niiden kanssa, lähelle lämmönlähdettä
tai terävälle kulmalle.
• Älä käytä laitetta, jos sähköjohto tai pistoke on vahingoittunut.
Vaaratilanteen välttämiseksi vahingoittuneet osat tulee ehdottomasti
toimittaa valtuutetun huoltokeskuksen vaihdettavaksi (luettelo
mukana toimitetussa kirjasessa).
• Älä laita lisätarvikkeita mikroaaltouuniin.
• Älä käytä muita kuin valtuutetun myyjän toimittamia lisätarvikkeita ja
alkuperäisvaraosia oman turvallisuutesi vuoksi.
• Laitteen virheellisestä käytöstä voi seurata vammoja.
• Leikkuuosat (d, f, g) ovat erittäin teräviä ja voivat aiheuttaa vammoja.
Käsittele niitä varovasti kulhon tyhjennyksen, leikkuuosien
kiinnittämisen tai irrottamisen ja laitteen puhdistuksen yhteydessä.
• Irrota aina sekoituskulho (d) ja mehulinko (h), ennen kuin käytät
monitoimipään (a3) avauspainiketta (a2).
• Kun käytät pilkkomispäätä (f), ohjaa ruoat täyttöaukkoon aina
syöttöpainimella (f7). Älä koskaan käytä sormia, haarukkaa, lusikkaa,
veistä äläkä mitään muuta esinettä.
• Älä koske liikkuvia osia. Anna aina osien pysähtyä kokonaan ennen
lisätarvikkeiden irrotusta.
• Älä koske vispilöitä äläkä taikinakoukkua laitteen ollessa toiminnassa.
• Varo, etteivät pitkät hiukset, huivit, solmiot tms. joudu laitteeseen
sen ollessa toiminnassa.
• Älä koskaan työnnä keittiövälineitä (esim. lusikkaa tai paistinlastaa)
kansien (b2), (d2) tai (h2) syöttöaukkoon äläkä rumpukoteloon (g1).
• Älä käytä sekoituskulhoa (d1) ilman kantta (d2).
• Käytä vain yhtä lisätarviketta kerrallaan.
• Älä kaada sekoituskulhoon kiehuvaa nestettä.
• Älä käytä sekoituskulhoa tyhjänä.
• Älä käytä sekoituskulhoa ilman kantta.
• Älä poista kantta, ennen kuin laite on pysähtynyt kokonaan.
65
FI
SM_KITCHEN-MACHINE-MC-GOURMET_MOUFAL_8080013263_OK_EST 06/12/13 14:22 Page65
Page 62

• Aseta sekoituskulhoon aina nestemäiset ainekset ennen kiinteitä
aineita.
• Älä käytä kulhoja (b1, d1) astioina (pakastukseen, keittämiseen tai
sterilisointiin).
• Älä käytä mehulinkoa, jos pyörivä suodatin (h3) tai kansi (h2) on
vaurioitunut tai siinä näkyy halkeamia.
• Katkaise laitteen virta ja irrota laite virtalähteestä, ennen kuin vaihdat
lisälaitteita tai lähestyt käytön aikana liikkuvia osia.
• Ole varovainen, kun kaadat kuumaa nestettä laitteen kulhoon, sillä se
voi kiehahtaa nopeasti ja roiskua ulos laitteesta.
• Laitetta ei ole tarkoitettu seuraaviin kotitalousmaisiin käyttökohteisiin
(takuu ei koske tällaista käyttöä):
- kauppojen, toimistojen ja muiden työpaikkojen keittiötilat
- maatilat
- hotellien, motellien ja muiden majoituspalvelujen asiakkaat
- aamiaismajoitustyyppiset palvelut.
• Katso ohjeita kuvista ja osioista Lisätarvikkeiden asennus ja
Lisätarvikkeiden irrotus, kun asennat lisätarvikkeita laitteeseen ja
irrotat niitä.
• Katso käyttöohjeesta kullekin lisätarvikkeelle sopivat nopeudet
ja käyttöaika.
• Lapset eivät saa käyttää laitetta. Älä jätä laitetta tai sen sähköjohtoa
lasten ulottuville.
• Älä anna lasten leikkiä laitteella.
• Sellaiset henkilöt, joiden ruumiilliset tai henkiset kyvyt ovat rajalliset,
tai joilla ei ole riittävästi kokemusta tai tietoa, voivat käyttää tätä
laitetta, jos käyttöä valvotaan tai heille on annettu laitteen turvallista
käyttöä koskevia ohjeita ja he ymmärtävät hyvin siihen liittyvät
vaarat.
• Vähintään 8-vuotiaat lapset voivat käyttää tiheää lankavispilää (c3)
sekä hienoa ja karkeaa raastinosaa (g5 et g4), jos käyttöä valvotaan
tai heille on annettu laitteen turvallista käyttöä koskevia ohjeita ja he
ymmärtävät hyvin siihen liittyvät vaarat. Lapset eivät saa puhdistaa
tai huoltaa laitetta, paitsi jos lapsi on vähintään 8-vuotias ja aikuisen
valvonnassa. Säilytä laite ja sähköjohto poissa alle 8-vuotiaiden lasten
ulottuvilta.
• ese ennen ensimmäistä käyttökertaa kaikki osat paitsi sovitin (e) saippuavedellä. (Katso Puhdistus-
osio.) Huuhtele ja kuivaa.
• Aseta laite tasaiselle, puhtaalle ja kuivalle pinnalle ja varmista, että nopeudensäädin (a1) on 0-
asennossa. Kytke laite sähköverkkoon.
KÄYTTÖÖNOTTO
66
FI
SM_KITCHEN-MACHINE-MC-GOURMET_MOUFAL_8080013263_OK_EST 06/12/13 14:22 Page66
Page 63

• Voit käynnistää laitteen usealla tavalla:
– Ajoittainen käyttö (sykäystoiminto): Käännä nopeudensäädin (a1) sykäysasentoon. Lyhyillä
sykäyksillä hallitset parhaiten ruoanvalmistusta.
– Jatkuva käyttö: Käännä nopeudensäädin (a1) haluamaasi asentoon 1-asetuksen ja
enimmäisasetuksen välillä valmistettavan ruoan mukaan.
Voit vaihtaa nopeutta käytön aikana.
• Sammuta laite siirtämällä säädin (a1) takaisin 0-asentoon.
Tärkeää
: Laitetta ei voi käynnistää, elleivät kansi (a5) ja pää (a3) ole lukittuina. Jos avaat kannen
(a5) ja/tai pään (a3) käytön aikana, laite pysähtyy. Sulje kansi ja/tai pää uudestaan, siirrä säädin
(a1) takaisin 0-asentoon ja jatka laitteen käyttöönottoa normaalisti valitsemalla haluamasi
nopeus.
Keittiövälineessäsi on mikroprosessori, joka ohjaa ja analysoi toiminnan tehoa. Jos teho on liikaa,
laite pysähtyy itsekseen. Voit käynnistää laitteen uudestaan siirtämällä säätimen (a1) 0-asentoon ja
poistamalla osan ruoista. Anna laitteen levätä hetken. Sitten voit valita haluamasi nopeuden ja jatkaa
käyttöä.
1 - SEKOITUS / TAIKINAN ALUSTUS / VATKAUS / EMULGOINTI / VAAHDOTUS
Ainesosien ominaisuuksista riippuen voit valmistaa enintään 1,8 kg taikinaa käyttämällä
ruostumattomasta teräksestä valmistettua kulhoa (b1) ja sen kantta (b2).
KÄYTETYT LISÄTARVIKKEET:
- Ruostumattomasta teräksestä valmistettu kulho (b1)
- Kansi (b2)
- Taikinakoukku (c1) tai sekoitusmela (c2) tai tiheä lankavispilä (c3)
1.1 - LISÄTARVIKKEIDEN ASENNUS
• Paina painiketta (a2), jolloin monitoimipään (a3) lukitus avautuu, ja nosta päätä pysäyttimeen saakka.
• Lukitse teräskulho (b1) (kääntämällä myötäpäivään) laitteeseen ja lisää sinne ainekset.
• Asenna haluamasi lisätarvike (c1, c2 tai c3) liitäntään (a6), paina ja kierrä neljänneskierroksen verran
vastapäivään lisätarvikkeen lukitsemiseksi paikalleen.
• Laske monitoimipää (a3) taas vaaka-asentoon painamalla painiketta (a2) ja laskemalla monitoimipäätä
(a3) käsin, kunnes se lukittuu. Palauta painike (a2) takaisin alkuasentoonsa.
• Liu’uta kansi (b2) teräskulhon (b1) päälle.
Huomio: Kannen käyttö ei ole pakollista. Se estää kuitenkin ainesten roiskumisen.
• Varmista, että luukku (a5) on kunnolla paikallaan (lukittuna myötäpäivään kääntämällä)
pikaliitännässä (a4).
1.2 - KÄYNNISTYS
Käynnistä kääntämällä nopeudensäädinpainiketta (a1) reseptin mukaiseen asentoon.
• Laite käynnistyy heti.
Voit lisätä aineksia kannen (b2) aukosta valmistuksen aikana.
• Sammuta laite siirtämällä säädin (a1) takaisin 0-asentoon.
Ohjeita:
- Taikinan sekoittaminen
- Käytä taikinakoukkua (c1) ja nopeutta 1.
Voit sekoittaa enintään 500 g jauhoja (esim.: vaaleaa leipää, moniviljaleipää, murotaikinaa tai makeaa
murotaikinaa).
- Sekoitus
- Käytä sekoitusmelaa (c2) 1-nopeuden ja enimmäisnopeuden välillä.
Kappaleiden numerointi vastaa kuvien numerointia.
67
FI
SM_KITCHEN-MACHINE-MC-GOURMET_MOUFAL_8080013263_OK_EST 06/12/13 14:22 Page67
Page 64

Voit sekoittaa enintään 1,8 kg kevyttä taikinaa (esim. sokerikakku- tai keksitaikina).
- Älä käytä sekoitusmelaa (c2) raskaiden taikinoiden vaivaamiseen.
- Vatkaus/emulgointi/vaahdotus
- Käytä tiheää lankavispilää (c3) 1-nopeuden ja enimmäisnopeuden välillä.
- Voit valmistaa esim. majoneesia, valkosipulimajoneesia, kastikkeita, munanvalkuaisvaahtoa (enintään
8 valkuaisesta) tai kermavaahtoa (enintään 500 ml).
- Älä käytä tiheää lankavispilää (c3) raskaiden taikinoiden vaivaamiseen äläkä kevyiden
taikinoiden sekoittamiseen.
1.3 - LISÄTARVIKKEIDEN IRROTUS
• Odota, että laite pysähtyy kokonaan.
• Poista kansi (b2).
• Avaa monitoimipää (a3) painikkeella (a2) ja nosta pää yläasentoon.
• Irrota lisätarvike (c1), (c2) tai (c3) monitoimipäästä painamalla lisätarviketta päätä kohden ja
kääntämällä sitä neljänneskierroksen verran myötäpäivään.
• Irrota teräskulho.
2 - HOMOGENOINTI/SEKOITUS/VATKAUS (MALLIKOHTAINEN)
Ruoka-aineiden tyypistä riippuen voit valmistaa sekoituskulhossa (d) enintään 1,5 l paksuja sekoituksia
ja 1,25 l nestemäisiä sekoituksia.
KÄYTETYT LISÄTARVIKKEET:
- Sekoituskulho (d).
2.1 - LISÄTARVIKKEIDEN ASENNUS
• Aseta monitoimipää (a3) vaaka-asentoon painamalla painiketta (a2) ja laskemalla monitoimipäätä
(a3) käsin, kunnes se lukittuu. Palauta painike (a2) takaisin alkuasentoonsa.
• Irrota suojaluukku (a5) pikaliitännästä (a4) kääntämällä sitä vastapäivään. Irrota luukku.
• Varmistu, että laite on pysähtynyt, ennen kuin irrotat sekoituskulhon (d).
• Lukitse sekoituskulho (d) liitäntään (a4) kääntämällä sitä myötäpäivään.
• Aseta ainekset sekoituskulhoon ja lukitse annostelutulpalla (d3) varustettu kansi (d2) kääntämällä sitä
vastapäivään.
2.2 - KÄYNNISTYS
• Käynnistä kääntämällä nopeudensäädinpainiketta (a1) reseptin mukaiseen asentoon.
Sykäystoiminnolla voit hallita sekoitusta paremmin ja lopputuloksesta tulee tasaisempi.
Voit lisätä aineksia annostelutulpan (d3) aukosta valmistuksen aikana.
• Sammuta laite siirtämällä säädin (a1) takaisin 0-asentoon.
Ohjeita:
Voit valmistaa seuraavia ruokia:
- hienoksi sekoitettuja keittoja, kastikkeita, kompotteja, pirtelöitä tai cocktaileja
- kevyitä taikinoita (lettuja, munkkeja, hedelmäkakkuja tai luumupannukakkua).
- Jos ainekset tarrautuvat sekoituskulhon seinämiin sekoituksen aikana, pysäytä laite, irrota
sekoituskulho ja pudota ainekset terille. Aseta sitten sekoituskulho takaisin ja jatka valmistusta.
2.3 - LISÄTARVIKKEEN IRROTUS
• Odota, että laite on pysähtynyt kokonaan, ja irrota sitten sekoituskulho lukituksesta kääntämällä sitä
vastapäivään. Laita sitten luukku (a5) takaisin paikoilleen lukitsemalla se liitäntään (a4)
(myötäpäivään).
68
FI
SM_KITCHEN-MACHINE-MC-GOURMET_MOUFAL_8080013263_OK_EST 06/12/13 14:22 Page68
Page 65

3 - PILKKOMINEN (MALLIKOHTAINEN)
KÄYTETYT LISÄTARVIKKEET:
- Kiinnityskappale (e)
- Pilkkomispää koottuna (f)
3.1 - PILKKOMISSOVITTIMEN ASENNUS
• Paina painiketta (a2), jolloin monitoimipään (a3) lukitus avautuu, ja nosta päätä pysäyttimeen saakka.
• Aseta sovitin (e) paikalleen ja lukitse se kiertämällä vastapäivään siten, että liitäntä on laitteen
pitkässä osassa.
• Palauta monitoimipää (a3) vaaka-asentoon painamalla uudestaan painikkeesta (a2).
3.2 - PILKKOMISPÄÄN KOKOAMINEN
• Tartu runkoon (f1) täyttöaukosta ja sijoita suurin aukko ylöspäin.
• Vie ruuvi (f2) (pitkä akseli edellä) runkoon (f1).
• Aseta leikkuri (f3) ruuvin (f2) yli ulottuvalle lyhyelle akselille ohjaamalla terävät reunat ulospäin.
• Aseta valitsemasi levy (f4 tai f5) leikkurille (f3) ohjaamalla kaksi hakasta rungon (f1) kahteen loveen.
• Kierrä voimakkaasti mutteria (f6) runkoon (f1) myötäpäivään lukitsematta sitä kuitenkaan täysin.
• Tarkista asennus. Akselissa ei saa olla välystä eikä se saa päästä kääntymään itsensä ympäri. Jos niin
on, suorita edellä mainitut vaiheet uudestaan.
3.3 - PILKKOMISPÄÄN ASENNUS LAITTEESEEN
• Vie koottu pilkkomispää (f) oikealle kallistettuna sovittimen (e) liitäntään ja varmista, että
pilkkomispään kaksi uloketta osuvat kohdakkain sovittimen kahden loven kanssa. Kiinnitä
pilkkomispään pohja sovittimeen ja nosta paloittelupään täyttöaukkoa vastapäivään pystysuoraan
asentoon, kunnes se lukittuu paikalleen.
• Aseta irrotettava taso (f8) täyttöaukkoon.
3.4 - KÄYNNISTYS, NEUVOT JA PURKU
• Varmista, että suojaluukku (a5) on lukittuna (myötäpäivään) pikaliitännässä (a4).
• Aseta laitteen eteen astia, johon voit kerätä valmiin ruoan.
• Käynnistä laite kääntämällä säädintä (a1) nopeuteen 3 tai 4.
• Laita liha täyttöaukkoon pala palalta syöttöpainimen (f7) avulla. Älä koskaan työnnä aineksia
täyttöaukkoon sormin tai keittiövälineillä.
• Sammuta laite kääntämällä säädin nopeudelle 0 ja odota, että laite pysähtyy kokonaan.
• Avaa pilkkomispää kääntämällä vastakkaiseen suuntaan kuin asennettaessa.
Ohjeita:
- Valmistele kaikki pilkottavat ainekset (poista lihasta luut, rustot ja jänteet ja leikkaa n. 2 x 2 cm:n
paloiksi).
- Varmista, että liha on sulaa.
- Kun lopetat käytön, voit työntää syöttöaukkoon pieniä leipäpaloja, jotta kaikki paloittelutähteet
poistuvat.
4 - RAASTO/VIIPALOINTI (MALLIKOHTAINEN)
KÄYTETYT LISÄTARVIKKEET:
- Kiinnityskappale (e)
- Koottu raastinosa (g)
- Rummut (mallikohtainen)
4.1 - LISÄTARVIKKEIDEN ASENNUS
• Paina painiketta (a2), jolloin monitoimipään (a3) lukitus avautuu, ja nosta päätä pysäyttimeen saakka.
• Aseta sovitin (e) paikalleen ja lukitse se kiertämällä vastapäivään siten, että liitäntä on laitteen
pitkässä osassa.
69
FI
SM_KITCHEN-MACHINE-MC-GOURMET_MOUFAL_8080013263_OK_EST 06/12/13 14:22 Page69
Page 66

• Palauta monitoimipää (a3) vaaka-asentoon painamalla uudestaan painikkeesta (a2).
• Varmista, että suojaluukku (a5) on lukittuna (myötäpäivään) pikaliitännässä (a4).
• Vie rumpukotelo (g1) oikealle kallistettuna kohti sovittimen (e) liitäntää ja varmista, että
rumpukotelon kaksi uloketta osuvat kohdakkain sovittimen kahden loven kanssa. Kiinnitä rumpuosa
pohjasta ja nosta kotelon syöttöaukkoa vastapäivään pystyasentoon, kunnes se lukittuu.
• Työnnä rumpusäiliöön valitsemasi rumpu ja varmista, että se on kokonaan kotelossa.
4.2 - KÄYNNISTYS JA NEUVOJA
• Aseta laitteen eteen astia, johon voit kerätä valmiin ruoan.
• Käynnistä laite kääntämällä säädintä (a1) nopeuteen 3, jos haluat viipaleita tai nopeuteen 4, jos
haluat raastetta.
• Vie ainekset kotelon syöttöaukosta ja ohjaa ne syöttöpainimen (g2) avulla. Älä koskaan paina
aineksia sormin äläkä keittiövälineillä.
• Sammuta laite kääntämällä säädin nopeudelle 0 ja odota, että laite pysähtyy kokonaan.
• Avaa rumpukotelo kääntämällä vastakkaiseen suuntaan kuin asennettaessa.
• Voit käyttää rumpuja seuraavasti:
- Karkea raastinosa C (g4) ja hieno raastinosa D (g5) soveltuvat esim. porkkanoiden, juurisellerin,
perunoiden tai juuston raastamiseen.
- Viipalointiosalla A (g3) saat paksuja viipaleita esim. perunoista, porkkanoista, kurkusta, omenoista
tai punajuurista.
- Perunaraastimella E (g6) voit raastaa esim. perunoita ja parmesaania.
5 - HEDELMÄ- JA VIHANNESMEHULINKO (MALLIKOHTAINEN)
KÄYTETYT LISÄTARVIKKEET:
- koottu mehulinko (h).
5.1 - MEHULINGON KOKOAMINEN
• Aseta suodatin (h3) astian rungon (h4) keskelle.
• Lukitse kansi kääntämällä vastapäivään ja lukitsemalla kansi (h2) astian runkoon (h4) (suljetun
riippulukon kuva).
• Yleislukitus: paina lukitusvipu (h6) suljetun riippulukon kuvaan.
5.2 - MEHULINGON ASETUS LAITTEESEEN
• Aseta monitoimipää (a3) vaaka-asentoon painamalla painiketta (a2) ja laskemalla monitoimipäätä
(a3) käsin, kunnes se lukittuu. Palauta painike (a2) takaisin alkuasentoonsa.
• Avaa luukku (a5) liitännästä (a4) kääntämällä sitä vastapäivään ja irrota se.
• Varmistu, että laite on pysähtynyt, ennen kuin lukitset lingon (h).
• Lukitse mehulinko liitäntään (a4) kääntämällä sitä myötäpäivään siten, että kaatonokan liitäntä on
kohdistettuna laitteen kanssa.
• Liitä kaatonokka (h5) astian runkoon (h4).
5.3 - KÄYNNISTYS JA NEUVOJA
• Aseta suuri lasi kaatonokan (h5) alle.
• Käynnistä laite kääntämällä säädintä (a1) nopeuteen 3.
• Paloittele hedelmät ja/tai vihannekset.
• Vie ainekset kannen (h2) syöttöaukosta ja paina niitä hitaasti syöttöpainimella (h1). Älä koskaan
paina aineksia sormin äläkä keittiövälineillä.
• Käsittele enintään 5 kertaa 500 g aineksia antamatta laitteen levätä kunnolla välillä.
• Saat parhaat tulokset, kun puhdistat suodattimen aina 300 gramman välein.
• Tärkeää: Kun jätesäiliö on täynnä, pysäytä laite ja tyhjennä astian runko.
• Sammuta laite kääntämällä säädin nopeudelle 0 ja odota, että laite pysähtyy kokonaan.
• Odota, että pyörivä suodatin pysähtyy kokonaan, ennen kuin irrotat kokonaisuuden laitteesta.
70
FI
SM_KITCHEN-MACHINE-MC-GOURMET_MOUFAL_8080013263_OK_EST 06/12/13 14:22 Page70
Page 67

• Avaa lingon lukitus poistoa varten kääntämällä linkoa vastapäivään.
• Siirrä lukitusvipu (h6) suljetun riippulukon kuvan kohdalle. Avaa kansi (avatun riippulukon kuva). Voit
irrottaa suodattimen (h3) puhdistusta varten ja tyhjentää astian rungon (h4).
Ohjeita:
• Voit valmistaa mehuja esimerkiksi porkkanoista, tomaateista, omenoista, viinirypäleistä ja mansikoista.
• Kuori paksukuoriset hedelmät, poista siemenet ja irrota ananaksen keskiosa.
• Joistakin hedelmistä ja kasviksista ei saa mehua. Tällaisia ovat esimerkiksi banaanit ja avokadot.
• Voit valmistaa mehua eri hedelmistä ja kasviksista puhdistamatta linkoa aina välillä, sillä maut eivät
sekoitu. Riittää, että huuhtelet lingon eri mehujen välillä käyttämällä siellä hieman vettä.
• Juo mehut nopeasti valmistuksen jälkeen. Sitruunamehulla saat mehun säilymään tuoreena muutaman
tunnin.
6 - JOHDON PITUUDEN SÄÄTÄMINEN
Jotta laitteen käyttö ja säilytys olisi käytännöllistä, voit lyhentää johdon pituutta työntämällä sitä
moottoriyksikön (a) sisään takaosassa olevan aukon kautta (a7).
7 - PIENTEN MÄÄRIEN PALOITTELU HYVIN HIENOKSI (MALLIKOHTAINEN)
KÄYTETTY LISÄTARVIKE:
- survin koottuna.
Survimella voit:
- Paloitella sykäystoiminnolla muutaman sekunnin kerrallaan esim. kuivia viikunoita ja aprikooseja.
Määrä/enimmäisaika: 100 g / 5 s
Survinta ei ole tarkoitettu koville tuotteille, kuten kahvipavuille.
• Katkaise sähkövirta.
• Älä upota moottoriyksikköä (a) äläkä sovitinta (e) veteen äläkä juoksevan veden alle. Pyyhi ne kuivalla
tai hieman kostealla liinalla.
• Jotta puhdistaminen kävisi helpommin, huuhtele lisätarvikkeet joka käytön jälkeen. Pura pilkkomispää
kokonaan. Käsittele teriä varovasti, jotta et loukkaa itseäsi.
• Pese, huuhtele ja kuivaa lisätarvikkeet. Ne voi pestä astianpesukoneessa pilkkomispään metalliosia
runkoa (f1), ruuvia (f2), leikkuria (f3), levyjä (f4 ja f5) ja mutteria (f6) lukuun ottamatta.
• Levyjen (f4) ja (f5) ja leikkurin (f3) on oltava voideltuja. Huolla niitä ruokaöljyllä.
Vihjeitä:
• Jos jotkut ruoka-aineet (esim. porkkana tai appelsiini) värjäävät lisätarvikkeita, hankaa lisätarviketta
ruokaöljyssä kostutetulla kankaalla ja puhdista sen jälkeen tavalliseen tapaan.
• Sekoituskulho (d): Kaada kuumaa saippuavettä sekoituskulhoon. Sulje kansi. Aseta kulho laitteeseen
ja käytä sykäystoimintoa muutaman kerran. Poista kulho, huuhtele se juoksevalla vedellä ja anna
kuivua (alassuin).
Älä säilytä laitetta kosteassa tilassa.
Jos laite ei toimi, tarkista seuraavat asiat:
- Sähkövirta on kytketty päälle.
- Kaikki osat on kiinnitetty oikein.
- Suojaluukku (a5) on paikoillaan ja lukittu, kun pikaliitäntää (a4) ei käytetä.
- Monitoimipään vaakalukitus (a3).
PUHDISTUS
SÄILYTYS
MITÄ TEHDÄ, JOS LAITE EI TOIMI?
71
FI
SM_KITCHEN-MACHINE-MC-GOURMET_MOUFAL_8080013263_OK_EST 06/12/13 14:22 Page71
Page 68

Keittiövälineessäsi on mikroprosessori, joka ohjaa ja analysoi toiminnan tehoa. Jos teho on liikaa, laite
pysähtyy itsekseen. Voit käynnistää laitteen uudestaan siirtämällä säätimen (a1) 0-asentoon ja
poistamalla osan ruoista. Anna laitteen levätä hetken. Sitten voit valita haluamasi nopeuden ja jatkaa
käyttöä.
Eikö laitteesi vieläkään toimi? Ota yhteys valtuutettuun huoltokeskukseen (luettelo huoltokeskuksista
on mukana toimitetussa kirjasessa).
Voit hankkia seuraavia lisätarvikkeita myyjältä ja valtuutetuista huoltokeskuksista:
Huomio
: Mitään lisätarviketta ei voida myydä ilman käyttöohjeen tai laitteen esittämistä.
KERMAVAAHTO
Ainekset (6/8 annosta): 2,5 dl kylmää ranskankermaa - 50 g tomusokeria.
Kiinnitä teräskulhoon tiheä lankavispilä ja kansi ja laita kulhoon ranskankerma ja tomusokeri. Sekoita
4-nopeudella 2 minuuttia ja sitten suurimmalla nopeudella 3 minuuttia 30 sekuntia.
MAJONEESI
Ainekset: 1 munankeltuainen - 1 rkl sinappia - 1 tl viinietikkaa - 2,5 dl öljyä - suolaa ja pippuria.
Kiinnitä teräskulhoon tiheä lankavispilä ja kansi ja lisää kananmunankeltuainen, sinappi, viinietikka,
suola ja pippuri. Valitse nopeus 1. Käytä vispilää ja ala kaataa öljyä ohuena nauhana. Vaihda suurimmalle
nopeudelle 10 sekunnin kuluttua. Kun öljy on sekoittunut, sekoita vispilällä vielä 30 sekuntia.
LAITTEEN PAKKAUSMATERIAALIN HÄVITTÄMINEN
Pakkausmateriaali ei ole ympäristölle haitallinen, ja se voidaan kierrättää tai hävittää
tavallisten jätteiden mukana.
Ota selvää paikallisista määräyksistä itse laitteen hävittämistä varten.
SÄHKÖLAITE TAI ELEKTRONINEN LAITE KÄYTTÖIKÄNSÄ LOPUSSA
Suojele ympäristöä!
Laitteessa on lukuisia materiaaleja, jotka voidaan kerätä talteen tai kierrättää.
Toimita laite kierrätyskeskukseen.
LISÄTARVIKKEET
Ruostumattomasta teräksestä valmistettu kulho
Ruostumattomasta teräksestä valmistetun kulhon
kansi
Taikinakoukku
Sekoitusmela
Tiheä lankavispilä
Sekoituskulho
Mehulinko
Survin
Kiinnityskappale
Pilkkomispää
Raastimet:
- A: viipalointiosa
- C: karkea raastin
- D: hieno raastin
- E: perunaraastin
Pasta Kit
Soseutukseen erikoistunut lisälaite
Lisälaite pastalle
RESEPTEJÄ
72
FI
SM_KITCHEN-MACHINE-MC-GOURMET_MOUFAL_8080013263_OK_EST 06/12/13 14:23 Page72
Page 69

Vihje: halutessasi voit lisätä raastetun valkosipulinkynnen.
VAALEA LEIPÄ
Ainekset (800 g:n leipä): 500 g jauhoja - 3 dl lämmintä vettä - 10 g kuivahiivaa - 10 g suolaa.
Kaada jauhot, suola ja hiiva teräskulhoon. Kiinnitä taikinakoukku ja kansi ja sekoita muutama sekunti
1-nopeudella. Lisää lämmintä vettä kannen aukosta. Sekoita taikinaa 8 minuuttia. Anna taikinan nousta
lämpimässä tilassa noin ½ tunnin ajan. Vaivaa taikinasta käsin pyöreä leipä ja aseta se voidellulle ja
jauhotetulle uunipellille. Kohota vielä 1 tunnin ajan lämpimässä paikassa. Lämmitä uuni 240 asteeseen.
Tee leipään viiltoja terävällä veitsellä ja sivele pinnalle lämmintä vettä leivontasudilla. Aseta uuniin myös
pieni astia täynnä vettä. Se tekee pinnasta rapean. Paista 40 minuuttia 240 asteessa.
Vihje: hiiva ei saa osua suoraan sokeriin tai suolaan, sillä ne estävät hiivan toiminnan.
MUROTAIKINA
Ainekset (350 g:n piirakkapohja): 200 g jauhoja - 100 g voita - 0,5 dl vettä - hyppysellinen suolaa.
Kaada teräskulhoon jauhot, voi ja suola. Kiinnitä taikinakoukku ja kansi ja käytä laitetta 1-nopeudella
muutaman sekunnin ajan. Kaada sitten sekaan vesi sekoittaen koko ajan. Sekoita taikinaa, kunnes se
on pyöreänmuotoinen. Anna taikinan levätä vähintään 1 tunnin ajan kelmun peitossa ennen leipomista
ja paistamista.
BRIOSSI
Ainekset (6 annosta): 250 g jauhoja - 5 g suolaa - 25 g sokeria - 100 g voita - 2 kokonaista kananmunaa
ja 1 munankeltuainen - 3 rkl lämmintä maitoa - 2 rkl vettä - 5 g kuivahiivaa.
Kaada jauho teräskulhoon ja tee siihen kaksi koloa: laita toiseen suola ja sokeri ja toiseen hiiva, lämmin
maito sekä vesi. Suolaa ja hiivaa ei pidä yhdistää, koska suola estää hiivaa toimimasta. Lisää kananmunat
ja aseta paikoilleen taikinakoukku ja kansi. Valitse nopeus 1 ja sekoita taikinaa 15 sekuntia. Siirry sitten
2-nopeudelle 2 minuuttia ja 45 sekuntia. Pysäyttämättä laitetta lisää voi, joka ei saa olla liian pehmeää
(puolisen tuntia huoneenlämpötilassa). Jatka vaivaamista noin viisi minuuttia 2-nopeudella ja sitten viisi
minuuttia nopeudella 3. Peitä taikina ja anna sen nousta kaksi tuntia huoneenlämmössä. Vaivaa sitten
taikinaa voimakkaasti käsin ja läiskytä sitä kulhoa vasten. Peitä taikina ja anna sen nousta taas kaksi
tuntia jääkaapissa. Vaivaa taas taikinaa käsin ja taputtele sitä kulhoa vasten. Peitä sitten taikina
kelmuun ja anna sen kohota yön yli jääkaapissa. Seuraavana päivänä voitele ja jauhota leipävuoka.
Muovaa taikina palloksi. Aseta taikinapallo vuokaan ja anna turvota kuumassa paikassa, kunnes vuoka
on täyttynyt (2–3 tuntia). Paista 180 asteessa 25 minuutin ajan.
Vihje: lisää suklaanpaloja tai liemeen säilöttyjä hedelmiä.
SUOLAINEN KAKKU
Ainekset (6 annosta): 200 g jauhoja - 4 kananmunaa - 11g leivinjauhetta - 0,1 dl maitoa - 0,5 dl oliiviöljyä - 12 kuivattua tomaattia - 200 g fetajuustoa - 15 vihreää kivetöntä oliivia - 1 hyppysellinen currya (ei pakollinen) - suolaa ja pippuria.
Lämmitä uuni 180 asteeseen. Voitele ja jauhota kakkuvuoka. Kiinnitä sekoitusmela ja kansi teräskulhoon
ja lisää kulhoon jauhot, kananmunat ja leivinjauhe. Aloita nopeudella 1 ja nosta sitten 3-nopeuteen.
Lisää oliiviöljy ja kylmä maito ja sekoita 1 minuutin 30 sekunnin ajan. Vaihda 1-nopeudelle ja lisää
kuivatut tomaatit, feta, vihreät oliivit (paloiteltuina) ja curry. Mausta suolalla ja pippurilla. Kaada
sekoitus vuokaan ja paista 30–40 minuuttia uunista riippuen. Varmista kypsyys esimerkiksi tulitikulla.
Vihjeitä: käytä fetan tilalla mozzarellaa ja lisää silputtuja basilikanlehtiä.
SUKLAAHERKKU
Ainekset (8 annosta): 200 g tummaa taloussuklaata - 150 g sokeria - 125 g jauhoja - 125 g pehmeää voita
- 4 kananmunaa - 2 dl kermaa - 100 g mantelijauhetta (ei pakollinen) - 1 rkl vaniljasokeria - 11g leivin-
jauhetta - 1 hyppysellinen suolaa.
73
FI
SM_KITCHEN-MACHINE-MC-GOURMET_MOUFAL_8080013263_OK_EST 06/12/13 14:23 Page73
Page 70

Lämmitä uuni 180 asteeseen. Sulata paloiteltu suklaa ja 3 rkl vettä joko vesihauteessa tai
mikroaaltouunissa. Lisää vähitellen voita samalla sekoittaen, kunnes suklaa tuntuu notkealta. Anna
jäähtyä. Erota kananmunanvalkuaiset ja -keltuaiset toisistaan. Siirrä syrjään kananmunanvalkuaiset.
Kiinnitä sekoitusmela ja kansi teräskulhoon, lisää kananmunankeltuaiset, sulatettu suklaa, kerma, loput
voista, sokeri, vaniljasokeri ja mantelijauhe. Sekoita 1-nopeudella 20 sekuntia. Vaihda nopeuteen 2 ja
lisää keskenään sekoitetut jauhot ja leivinjauhe kannen aukon kautta. Sekoita vielä noin 2 minuutin ajan,
kunnes taikina tuntuu notkealta. Kaada taikina suureen kulhoon. Kiinnitä pestyyn teräskulhoon tiheä
lankavispilä, lisää kulhoon munanvalkuaiset ja hyppysellinen suolaa, sekoita munanvalkuaiset kiinteäksi
5-nopeudella 1 minuutin 45 sekunnin ajan ja käytä sitten suurinta nopeutta 30 sekunnin ajan. Sekoita
lastalla valkuaisvaahto ja suklaaseos keskenään. Kaada voideltuun ja jauhotettuun uunivuokaan. Paista
180 asteessa 25 minuuttia.
Vihje: tarjoile kakku yhdessä vaniljakastikkeen tai vaniljajäätelön kanssa.
Katso lisää resepti-ideoita osoitteesta www.tefal.com
74
FI
SM_KITCHEN-MACHINE-MC-GOURMET_MOUFAL_8080013263_OK_EST 06/12/13 14:23 Page74
Page 71

TÜRKÇE KULLANMA ve TANITMA KILAVUZU
QB404H38 - QB404D38 - QB413H38
Sadece evde kullanılmak üzere gıda hazırlamak için tasarlanmış olan bu cihazı seçtiğiniz için
teşekkür ederiz.
• Bu cihazı ilk defa kullanmadan önce kullanma kılavuzunu dikkatle okuyun ve
saklayın: Cihazın talimatlara uyulmadan kullanılması durumunda üretici
sorumluluk kabul etmez.
• Cihaz bedensel, duyusal veya zihinsel engeli olan kişiler (ve çocuklar)
tarafından ya da daha önce cihaz hakkında bilgisi veya deneyimi olmayan
kişiler tarafından kullanılmak üzere de tasarlanmamıştır. Kişinin güvenliğinden
sorumlu birinin gözetimi altında veya cihazın kullanımına ilişkin talimatlar
sağlandıktan sonra kullanılabilir. Cihazla oynamadıklarından emin olmak için,
çocukların gözetim altında tutulması tavsiye edilir.
• Cihazın çalışma voltajının elektrik tesisatınıza uygun olduğundan emin olun.
Hatalı elektrik bağlantısından kaynaklanan tüm arızalar garanti
kapsamı dışındadır.
• Cihazınız yalnızca evde, mutfakta, iç mekanlarda ve en fazla 2.000 m rakımda
gözetim altında kullanılmak üzere tasarlanmıştır.
AÇIKLAMA
a - Motor ünitesi
a1 Elektronik hız seçici
a2 Çıkarma düğmesi
a3 Çok fonksiyonlu başlık
a4 Yüksek hız çıkış alanı (mikser haznesi /
katı meyve sıkacağı / öğütücü)
a5 Güvenlik kapağı
a6 Mikser aksesuarları çıkışı (yoğurucu,
balon çırpıcı, karıştırıcı uçlar)
a7 Güç kordonu saklama bölümü
b - Hazne grubu
b1 Paslanmaz çelik hazne
b2 Kapak
c - Mikser aksesuarları
c1 Yoğurucu
c2 Mikser
c3 Balon çırpıcı
d - Blender haznesi (modele göre değişir)
d1 Hazne
d2 Kapak
d3 Ölçme kabı
e - Aksesuar tutucu (modele gore)
f - Kıyma başlığı (modele göre değişir)
f1 Metal gövde
f2 Besleme vidası
f3 Bıçak
f4 Büyük delikli kıyma diski
f5 Küçük delikli kıyma diski
f6 Somun
f7 İtici
f8 Tepsi
g -Sebze dilimleyici (modele göre değişir)
g1 Silindir gövde
g2 İtici
g3 Dilimleme silindiri A
g4 Kalın rendeleme silindiri C
g5 İnce rendeleme silindiri D
g6 Reibekuchen (patates rendeleme)
silindiri E
h - Katı meyve sıkacağı (modele göre değişir)
h1 İtici
h2 Kapak
h3 Döner ltre
h4 Meyve suyu haznesi
h5 Hazne ağzı
h6 Kilit kolu
GÜVENLİK ÖNERİLERİ
75
TR
SM_KITCHEN-MACHINE-MC-GOURMET_MOUFAL_8080013263_OK_EST 06/12/13 14:23 Page75
Page 72

• İlk kullanımdan önce, yiyeceklerle temasta olan tüm yüzeyleri bu tanıtma
yazısındaki "İlk Kullanım" bölümünde tarif edildiği gibi temizleyin ve aletin
her kullanımdan sonraki bakımı ve temizliği için "Temizleme" bölümüne
bakın.
• Cihazınızın elektrik şini, gözetim altında bulunmadığı zamanlar, parça takma
ve sökme işlemleri öncesinde ve temizlik sırasında daima prizden çıkarın.
• Düzgün çalışmıyorsa veya hasar görmüşse cihazı kullanmayın. Yetkili servis ile
iletişim kurun (servis kitapçığındaki listeye bakın).
• Müşteriler tarafından gerçekleştirilen rutin temizleme ve bakım dışındaki tüm
işlemler yetkili bir servis tarafından yapılmalıdır (servis kitapçığındaki listeye
bakın).
• Cihazı, kabloyu veya şi suyla veya herhangi başka bir sıvıyla temas ettirmeyin.
• Elektrik kablosunu çocukların erişiminden, cihazın ısınan parçalarından,
herhangi bir ısı kaynağından ve sivri köşelerden uzak tutulması gerekir.
• Elektrik kablosu veya şi hasarlıysa cihazı kullanmayın. Güvenliği sağlamak
için bu parçaların yetkiliservis tarafından değiştirilmesi gerekir (servis
kitapçığındaki listeye bakın).
• Aksesuarları mikrodalga fırında kullanmayın..
• Güvenliğiniz için yalnızca cihazınıza uygun ve yetkili servis merkezinde satılan
yedek parça ve aksesuarları kullanın.
• Dikkat ! Cihazın yanlış kullanılması yaralanmalara sebep olabilir.
• Bıçaklar ve rendeler (d,f,g) çok keskindir: Haznenin boşaltılması, bıçakların ve
rendelerin aksesuarlara takılması / sökülmesi ve temizlik sırasında
yaralanmamak için dikkatli olun.
• Çok fonksiyonlu başlığı (a3) çıkarma düğmesine (a2) basmadan önce blenderi
(d) veya katı meyve sıkacağını (h) her zaman çıkarın.
• Kıyma başlığı aksesuarıyla (f) besleme borusundaki yiyeceği yönlendirmek
için daima iticiyi (f7) kullanın, asla parmaklarınızı, çatal, kaşık, bıçak veya başka
bir nesne kullanmayın.
• Cihazın hareket eden parçalarına asla dokunmayın aksesuarları çıkarmadan
önce cihazın tamamen durmasını bekleyin.
• Cihaz çalışırken çırpıcı veya yoğurucu uçlara dokunmayın.
• Çalışırken saç, eşarp, kravat veya herhangi başka bir şeyin blender ile temas
etmesinden kaçının.
• Silindir gövdede (g1) bulunan (b2), (d2) veya (h2) kapaklarındaki besleme
borusundan içeri hiçbir nesne (kaşık, spatula, vs.) sokmayın.
• Blender haznesini (d1) kapaksız (d2) çalıştırmayın.
• Her seferde sadece bir aksesuar kullanın.
• Blender haznesini asla kaynar sıvıyla doldurmayın.
• Blender haznesini asla boşken çalıştırmayın.
• Blender haznesini her zaman kapağıyla kullanın.
• Bıçaklar tamamen durmadan asla kapağı açmayın.
76
TR
SM_KITCHEN-MACHINE-MC-GOURMET_MOUFAL_8080013263_OK_EST 06/12/13 14:23 Page76
Page 73

• Katı malzemeleri eklemeden önce her zaman ilk olarak sıvı malzemeleri
blender haznesine koyun.
• Hazneleri (b1, d1) dondurma, pişirme veya sterilizasyon işlemlerinde kap
olarak kullanmayın.
• Eğer döner ltre (h3) veya koruma kapağı (h2) hasarlıysa veya üzerlerinde
görülebilir çatlaklar varsa katı meyve sıkacağını kullanmayın.
• Aksesuarları değiştirmeden veya kullanım sırasında hareket eden parçaları
tutmadan önce cihazı kapatın ve prizden çekin.
• Mutfak aletinin veya mikserin içine sıcak su dökülürse dikkat edin. Kaynama
sebebiyle ani taşmalar meydana gelebilir.
• Bu cihazın garantisi, ev içinde ve benzeri yerlerde kullanılsa dahi, aşağıdaki
ortamlarda geçersiz olur:
- Mağazaların, büroların ve başka işyerlerinin mutfaklarında;
- Çiftliklerde;
- Otel, motel ve ikamet edilen başka yerlerde;
- Otel odası tarzındaki yerlerde.
• Cihazın aksesuarlarını takmak ve sökmek için yukarıdaki resimlere ve
"Aksesuarların monte edilmesi" ile "Aksesuarları sökme" paragraarına
bakın.
• Aksesuarların hız ayarları ve işleme süreleri için kullanma kılavuzuna
bakın.
• Bu cihaz çocuklar tarafından kullanılmamalıdır. Cihazı ve kablosunu
kullanmadığınız zaman çocukların ulaşamayacağı bir yere kaldırın.
• Bu cihaz çocuk oyuncağı değildir.
• Bu cihaz ziksel, duyusal veya zihinsel engelleri olan veya cihaz ile deneyimi
olmayan veya cihazı tanımayan kişiler tarafından sadece gözetim altında veya
cihazın güvenli kullanımına dair bilgilendirilmişler ve olası tehlikeleri
anlamışlar ise kullanılabilir.
• Balon çırpıcı (c3) ile kalın ve ince rendeleme silindirleri (g5 ve g4), sadece
gözetim altında veya cihazın güvenli kullanımına dair bilgilendirilmişler ve
olası tehlikeleri anlamışlar ise 8 yaşın üzerindeki çocuklar tarafından
kullanılabilir. Cihazın bakımı ve temizliği, en az 8 yaşındaki çocuklar tarafından
sadece bir yetişkinin gözetimi altında gerçekleştirilebilir. Cihazı ve kablosunu
8 yaşın altındaki çocoukların ulaşamayacağı bir yere kaldırın.
• İlk kez kullanmadan önce tüm aksesuar parçalarını ılık ve sabunlu suyla yıkayın ((e) takma ünitesi
dışında: bkz. Temizleme) durulayın ve kurutun.
• Cihazınızı düz, temiz ve kuru bir yüzeye yerleştirin. Seçme düğmesinin (a1) "0" konumunda
olduğundan emin olun ve cihazınızı fişe takın.
• Cihazınızı çalıştırmak için birçok seçeneğe sahipsiniz:
- Aralıklı çalıştırma (anlık çalıştırma): Seçme düğmesini (a1) "pulse" konumuna getirin. Bazı
yiyecekleri hazırlarken art arda anlık çalıştırma daha iyi bir kontrol sağlayabilir.
- Sürekli çalıştırma: Hazırladığınız yiyeceğe göre seçme düğmesini (a1) "1" konumundan "max"
İLK KULLANIMDAN ÖNCE
77
TR
SM_KITCHEN-MACHINE-MC-GOURMET_MOUFAL_8080013263_OK_EST 06/12/13 14:23 Page77
Page 74

konumu arasında istenilen bir pozisyona getirin.
Hazırlama sırasında istediğiniz gibi değiştirebilirsiniz.
• Cihazı durdurmak için düğmeyi (a1) "0" konumuna getirin.
Önemli
: Kapağın (a5) ve başlığın (a3) kilitlenmesi koşuluyla cihaz çalışmaya başlar. Çalışırken
kapağın (a5) ve/veya başlığın (a3) kilidini açarsanız cihaz hemen duracaktır. Başlığı ve/veya
kapağı kilitleyin, kontrol düğmesini (a1) "0" konumuna getirin ve istediğiniz hızı seçerek
cihazı normal olarak çalıştırın.
Mutfak cihazınız çalıştırma gücünü denetleyen ve analiz eden bir mikro işlemciye sahiptir. Yük çok
artarsa, cihazınız otomatik olarak durur. Cihazınızı tekrar başlatmak için hız seçme düğmesini
(a1) "0" konumuna getirin ve malzemelerin bir kısmını çıkarın. Birkaç dakika cihazınızın soğumasını
bekleyin. Sonra yiyecek hazırlamaya devam etmek için istenilen hızı seçebilirsiniz.
1 - KARIŞTIRMA / YOĞURMA / ÇIRPMA / AKICI HALE GETİRME
Yiyeceğin türüne uygun paslanmaz çelik hazneyi (b1) ve kapağını (b2) kullanarak 1,8 kg hamur
hazırlayabilirsiniz.
KULLANILAN AKSESUARLAR:
- Paslanmaz çelik hazne (b1).
- Kapak (b2)
- Yoğurucu (c1), mikser (c2) veya balon çırpıcı (c3)
1.1 - AKSESUARLARIN MONTE EDİLMESİ
• Çok fonksiyonlu başlığı (a3) çıkarmak için düğmeye (a2) basın ve yerine kilitlenene kadar kaldırın.
• Paslanmaz çelik hazneyi (b1) çevirerek (saat yönünde) cihazın üzerine kilitleyin ve malzemeleri
içine koyun.
• İstenilen aksesuarı (c1, c2 or c3) çıkışa (a6) takın, itin ve saat yönünün tersine çeyrek tur çevirerek
aksesuarı yerine kilitleyin.
• Çok fonksiyonlu başlığı (a3) yataykonumda yerleştirin: düğmeye (a2) basın ve manuel olarak çok
fonksiyonlu başlık (a3) yerine kilitleninceye kadar bastırın (düğme (a2) önceki durumuna döner).
• Kapağı (b2) paslanmaz çelik haznenin (b1) üzerinden kaydırın.
Not: Kapağı kullanmak zorunlu değildir. Sıçramayı önler.
•Yüksek hız çıkışındaki (a4) kapağın (a5) doğru bir şekilde kilitlendiğinden emin olun (saat
yönünde).
1.2 - KULLANIM
Tarife göre hız seçme düğmesini (a1) istenilen konuma getirerek başlayın.
• Cihaz hemen çalışmaya başlar.
Hazırlama işlemi boyunca kapaktaki (b2) delikten yiyecek ekleyebilirsiniz.
• Cihazı durdurmak için düğmeyi (a1) "0" konumuna getirin.
İpuçları:
- Yoğurma
- Yoğurma aksesuarını (c1) "1" hızında kullanın.
500 gr unu yoğurabilirsiniz (örn. beyaz ekmek, tahıllı ekmek, tart hamuru, turta hamuru, vs.).
- Karıştırma
- Mikser aparatını (c2) "1" ile "max" konumu arasında kullanın.
En fazla 1,8 kg ağırlığında yumuşak hamur (kek, kurabiye, vs.) karıştırabilirsiniz.
- Sert hamur yoğurmak için asla mikser aparatını (c2) kullanmayın.
- Çırpma / akıcı hale getirme
- Balon çırpıcıyı (c3) "1" ile "max" konumu arasında kullanın.
- Şunları hazırlayabilirsiniz: mayonez, soslar, çırpılmış yumurta beyazı (en fazla 8 yumurta beyazı),
kremşanti, (en fazla 500 ml), vs.
Paragraf numaraları şemalardaki numaralara karşılık gelir.
78
TR
SM_KITCHEN-MACHINE-MC-GOURMET_MOUFAL_8080013263_OK_EST 06/12/13 14:23 Page78
Page 75

- Balon çırpıcıyı (c3) asla sert hamur yoğurmak veya yumuşak hamur karıştırmak için
kullanmayın.
1.3 - AKSESUARLARI SÖKME
• Cihazın tamamen durmasını bekleyin.
• Kapağı çıkarın (b2).
• Düğmeyi (a2) kullanarak çok fonksiyonlu başlığı (a3) çıkarın ve yukarıya kaldırın.
• (c1), (c2) veya (c3) aksesuarlarını başlığın içine itip saat yönünde çeyrek tur döndürerek çok
fonksiyonlu başlıktan çıkarın.
• Paslanmaz çelik hazneyi çıkarın.
2 - BLENDER/KARIŞTIRMA (MODELE GÖRE DEĞİŞİR)
Yiyeceğin yapısına göre 1,5 L yoğun ve 1,25 L akıcı karışım hazırlamak için blender (d) aparatını
kullanabilirsiniz.
KULLANILAN AKSESUARLAR:
- Blender haznesi (d).
2.1 - AKSESUARLARIN MONTE EDİLMESİ
• Çok fonksiyonlu başlığı (a3) yataykonumda yerleştirin: düğmeye (a2) basın ve manuel olarak çok
fonksiyonlu başlık (a3) yerine kilitleninceye kadar bastırın (düğme (a2) önceki durumuna döner).
•Yüksek hız çıkışındaki (a4) güvenlik kapağının (a5) kilidini saat yönünün tersine çevirerek açın ve
çıkarın.
• Blender (d) aparatını yerine kilitlemeden önce cihazın kapalı olduğundan emin olun.
• Blender haznesini (d) saat yönünde döndürerek hız çıkış alanı (a4) üzerine kilitleyin.
•Yiyeceği blender haznesine koyun ve ölçekli kapağın (d3) takıldığı kapağı (d2) yerleştirip saat
yönünün tersine döndürerek kilitleyin.
2.2 - KULLANIM
•Tarife göre hız seçme düğmesini (a1) istenilen konuma getirerek başlayın.
Karışımı daha iyi kontrol edebilmek ve daha iyi karıştırmak için "Pulse" kademesini kullanın.
Hazırlık sırasında ölçekli kapaktaki (d3) delikten malzeme ekleyebilirsiniz.
• Cihazı durdurmak için düğmeyi (a1) "0" konumuna getirin.
İpuçları:
Şunları hazırlayabilirsiniz:
- blender'dan geçirilmiş çorbalar, soslar, kompostolar, milkshake ve kokteyller.
- sıvı hamur (pancake, kızartma hamuru, clafoutis ve krem karameller).
- Karıştırma sırasında malzemeler haznenin kenarlarına yapışırsa cihazı durdurun. Blender haznesini
çıkarın, yiyeceği bıçaklara doğru itin, blender haznesini yerine takın ve hazırlık işlemine devam
edin.
2.3 - AKSESUARI SÖKME
• Blender haznesinin kilidini saat yönünün tersine döndürerek açmadan önce cihazın tamamen
durmasını bekleyin ve kapağı (a5) hız çıkış alanına (a4) kilitleyerek yerine takın (saat yönünde).
3 - KIYMA (MODELE GÖRE DEĞİŞİR)
KULLANILAN AKSESUARLAR:
- Aksesuar tutucu (e)
- Monte edilmiş kıyma başlığı (f )
3.1 - ADAPTÖRÜ TAKMA
• Çok fonksiyonlu başlığı (a3) çıkarmak için düğmeye (a2) basın ve yerine kilitlenene kadar kaldırın.
79
TR
SM_KITCHEN-MACHINE-MC-GOURMET_MOUFAL_8080013263_OK_EST 06/12/13 14:23 Page79
Page 76

•Takma ünitesini (e) yerleştirin ve cihaz ile çıkış aynı hizaya gelecek şekilde saat yönünün tersine
kilitleyin.
• Çok fonksiyonlu başlığı (a3) düğmeye (a2) bir kez daha basarak yatay konumda yerleştirin.
3.2 - ET KIYMA BAŞLIĞININ MONTE EDİLMESİ
• Gövdeyi (f1) besleme tüpünden, geniş ağız kısmı yukarı gelecek şekilde tutun.
• Besleme vidasını (f2) (uzun kısmı önce gelecek şekilde) gövdeye (f1) takın.
• Bıçağı (f3) besleme vidasının uzantısı olan kısa kola (f2) kesici kenarları dışarı gelecek şekilde
takın.
• Seçilen diski (f4 veya f5) bıçağın üstüne (f3), iki kulbunu gövdedeki (f1) uygun girintilere
hizalayarak takın.
• Somunu (f6) gövdedeki (f1) yerine saat yönünde kilitlemeden yerleştirin.
• Grubu kontrol edin. Mil kendi başına dönmemeli ve hareket etmemelidir. Aksi halde monte etme
işlemini tekrarlayın.
3.3 - KIYMA BAŞLIĞININ CİHAZ ÜZERİNE YERLEŞTİRİLMESİ
•Takma ünitesi çıkışına (e) dönük, monte edilmiş kıyma başlığını(f) başlıktaki iki kesiciyle aparat
üzerindeki girintileri aynı hizaya getirerek sağa doğru eğimli olacak şekilde yerleştirin. Kıyma
başlığını aparattaki yerine doğru itin ve besleme borusuyla yatay konumda birbirlerini
kavrayıncaya kadar başlığı saat yönünün tersine döndürün.
• Çıkarılabilir tepsiyi (f8) besleme borusuna yerleştirin.
3.4 - KULLANIM, İPUÇLARI VE SÖKME
•Yüksek hız çıkışındaki (a4) güvenlik kapağının (a5) doğru bir şekilde kilitlendiğinden emin olun
(saat yönünde).
• Karışım için kullanacağınız kabı cihazın önüne yerleştirin.
• Seçicinin (a1) hızını "3" veya "4" kademesine getirerek cihazı çalıştırın.
• İticiyi (f7) kullanarak parçalara ayırdığınız eti besleme borusundan itin. Malzemeleri besleme
borusundan iterken asla parmaklarınızı veya herhangi başka bir nesne kullanmayın.
• Cihazı durdurmak için hız seçim düğmesini "0" konumuna getirin ve tamamen durmasını
bekleyin.
• Kıyma başlığını birleştirirken takip ettiğiniz adımları, tersinden izleyerek kilidi açın.
İpuçları:
- Kıyılacak tüm yiyecekleri hazırlayın (etin kemiklerini, kıkırdaklarını ve sinirlerini ayırın ve yaklaşık
2 x 2 cm boyunda kesin).
- Etin tamamen çözüldüğünden emin olun.
- Uygulama sonunda makinenin içinde kalan kıyma parçalarını çıkarmak amacıyla birkaç dilim
ekmeği makinede çekebilirsiniz.
4 - RENDELEME/DİLİMLEME (MODELE GÖRE DEĞİŞİR)
KULLANILAN AKSESUARLAR:
- Aksesuar tutucu (e)
- Monte edilmiş sebze dilimleyici (g)
- Silindirler (modele göre değişir)
4.1 - AKSESUARLARIN MONTE EDİLMESİ
• Çok fonksiyonlu başlığı (a3) çıkarmak için düğmeye (a2) basın ve yerine kilitlenene kadar kaldırın.
•Takma ünitesini (e) yerleştirin ve cihaz ile çıkış aynı hizaya gelecek şekilde saat yönünün tersine
kilitleyin.
• Çok fonksiyonlu başlığı (a3) düğmeye (a2) bir kez daha basarak yatay konumda yerleştirin.
•Yüksek hız çıkışındaki (a4) güvenlik kapağının (a5) doğru bir şekilde kilitlendiğinden emin olun
(saat yönünde).
•Takma ünitesi (e) çıkışına dönük, silindir gövdeyi (g1), üzerindeki iki kesiciyle aparattaki girintiler
aynı hizaya gelecek şekilde yerleştirin. Silindir gövdeyi cihazdaki yerine itin ve besleme borusuyla
80
TR
SM_KITCHEN-MACHINE-MC-GOURMET_MOUFAL_8080013263_OK_EST 06/12/13 14:23 Page80
Page 77

yatay konumda birbirlerini kavrayıncaya kadar gövdeyi saat yönünün tersine döndürün.
• Seçilen silindiri gövdeye takın ve tamamen kavrandığından emin olun.
4.2 - KULLANIM VE İPUÇLARI
• Karışım için kullanacağınız kabı cihazın önüne yerleştirin.
• Hız seçim düğmesini (a1) dilimlemek için "3" ve rendelemek için "4" konumuna getirerek cihazı
çalıştırın.
• Gövdedeki besleme borusuna yiyeceği koyun ve iticiyle (g2) aşağı itin. Malzemeleri kesinlikle
parmaklarınızı veya başka bir aleti kullanarak itmeyin.
• Cihazı durdurmak için hız seçim düğmesini "0" konumuna getirin ve tamamen durmasını
bekleyin.
• Silindir gövdeyi birleştirirken takip ettiğiniz adımları, tersinden izleyerek kilidi açın.
• Silindirleri şu işlemler için kullanabilirsiniz:
- Kalın rendeleme C (g4) / ince rendeleme D (g5): havuç, kereviz, patates, peynir, vs.
- Kalın dilimleme A (g3): patates, havuç, salatalık, elma, pancar, vs.
- ReibekuchenE (patates rendeleme) (g6): patates, parmesan, vs.
5 - MEYVE VE SEBZE SUYU SIKMA (MODELE GÖRE DEĞİŞİR)
KULLANILAN AKSESUARLAR:
- Monte edilmiş katı meyve sıkacağı (h).
5.1 - KATI MEYVE SIKACAĞINI MONTE ETME
• Filtreyi (h3) meyve suyu haznesinin (h4) ortasına yerleştirin.
• Kapağı kilitleyin: saat yönünün tersine döndürün ve kapağı (h2) meyve suyu haznesinin (h4)
üzerine kilitleyin (kapalı kilit konumu).
• Genel kilitleme: kilit kolunu (h6) kilit konumu kapalıya gelecek şekilde itin.
5.2 - KATI MEYVE SIKACAĞININ CIHAZA MONTE EDİLMESİ
• Çok fonksiyonlu başlığı (a3) yataykonumda yerleştirin: düğmeye (a2) basın ve manuel olarak çok
fonksiyonlu başlık (a3) yerine kilitleninceye kadar bastırın (düğme (a2) önceki durumuna döner).
• Kilidi açın ve saatin tersi yönünde döndürerek kapağı (a5) çıkış alanından (a4) çıkarın.
• Katı meyve sıkacağını (h) yerine kilitlemeden önce cihazın kapalı olduğundan emin olun.
• Monte edilen katı meyve sıkacağını saat yönünde döndürerek çıkış (a4) üzerine kilitleyin, böylece
hazne ağzı ve cihaz aynı hizaya gelir.
• Hazne ağzını (h5) hazneye (h4) takın.
5.3 - Kullanım ve ipuçları
• Hazne ağzının (h5) altına büyük bir bardak yerleştirin.
• Seçicinin (a1) hızını "3" konumuna getirerek cihazı çalıştırın.
• Meyveleri ve/veya sebzeleri parçalara ayırın.
• Parçaları kapaktaki (h2) besleme borusundan içeri atın ve iticiyi (h1) kullanarak yavaşça itin.
Malzemeleri kesinlikle parmaklarınızı veya başka bir aleti kullanarak itmeyin.
• 500gr. yiyeceği 5 defadan fazla cihazınızın tamamen soğumasına izin vermeden, durmaksızın
işlemeyin.
• En iyi sonuçları almak için filtreyi her 300 gr. yiyecek hazırladıktan sonra temizleyin.
• Önemli: Posa haznesi dolduğunda cihazı durdurun ve hazneyi boşaltın.
• Cihazı durdurmak için hız seçiciyi "0"konumuna getirin ve tamamen durmasını bekleyin.
• Grubu cihazdan çıkarmadan önce döner ltrenin tamamen durmasını bekleyin.
• Katı meyve sıkacağını çıkarmadan önce saat yönünün tersine döndürerek kilidi açın.
• Kilit kolunu (h6) açık kilit konumunda yerleştirin. Kapağı açın (açık kilit konumu) Şimdi filtreyi
(h3) temizlemek için çıkarabilirsiniz ve hazneyi (h4) boşaltabilirsiniz.
İpuçları:
• Şunların suyunu sıkabilirsiniz: havuç, domates, elma, üzüm, frambuaz, vs.
81
TR
SM_KITCHEN-MACHINE-MC-GOURMET_MOUFAL_8080013263_OK_EST 06/12/13 14:23 Page81
Page 78

• Kalın kabuklu meyvelerin kabuğunu soyun ve çekirdeklerini çıkarın.
• Belirli meyvelerin ve sebzelerin suyunu sıkmak mümkün değildir: muz, avokado, böğürtlen, vs.
• Her defasında katı meyve sıkacağını temizlemeden farklı meyvelerin ve sebzelerin sularını
hazırlayabilirsiniz, lezzetler birbirine karışmaz. Sadece katı meyve sıkacağını farklı iki malzeme
arasında besleme borusundan biraz su akıtarak çalıştırın.
• Suyu sıkar sıkmaz için veya birkaç saat buzdolabında bekletecekseniz içine biraz limon suyu
ekleyin.
6 - KABLO BOYUNU AYARLAMA
Kolay kullanım veya saklama için motor ünitesindeki (a) açık bölmenin (a7) içine iterek kabloyu
kısaltabilirsiniz.
7 - KÜÇÜK MİKTARLARDA KESME (MODELE GÖRE DEĞİŞİR)
KULLANILAN AKSESUAR:
- Monte edilmiş öğütücü.
Öğütücüyü şu işlemler için kullanabilirsiniz:
- Anlık çalıştırarak birkaç saniyede şunları kıyabilirsiniz: kuru incir ve kuru kayısı, vs.
Miktar / maks. süre: 100gr. / 5s
Bu öğütücü, kahve gibi sert ürünler için tasarlanmamıştır.
• Cihazı fişten çekin.
• Motor ünitesini (a) veya takma ünitesini (e) suyun içinde yıkamayın veya akan suya tutmayın.
Bunları kuru veya nemli bir bezle silin.
• Daha kolay temizlemek için kullandıktan sonra aksesuarları yıkayın. Kıyma başlığı grubunu
tamamen sökün. Yaralanmayı engellemek için bıçakları tutarken dikkatli olun.
• Aksesuarları yıkayın, durulayın ve kurulayın: kıyma başlığındaki tüm metal aksamlar dışındaki
aksesuarlar bulaşık makinesinde yıkanabilir: gövde (f1), besleme vidası (f2), bıçak (f3), diskler (f4
ve f5), somun (f6).
• (f4) ve (f5) disklerinin yanı sıra bıçak (f3) yağlı kalmalıdır. Bu parçaları yemeklerde kullandığınız sıvı
yağ ile yağlayın.
İpuçları:
• Aksesuarlar yiyeceklerle boyanırsa (havuç, portakal vb.) sıvı yağ damlattığınız bir bezle ovun ve
her zamanki gibi temizleyin.
• Blender haznesi (d): birkaç damla bulaşık deterjanı damlattığınız sıcak suyu blender haznesinin
içine dökün. Kapağı kapatın. Cihaz üzerine yerleştirin ve birkaç defa anlık çalıştırın. Yerinden
çıkardıktan sonra, hazneyi akan suyla durulayın ve kurumaya bırakın (hazneyi başı aşağı kurutun).
Cihazınızı nemli bir ortamda saklamayın.
Cihazınız çalışmıyorsa:
- fişe doğru takılıp takılmadığından
- aksesuarların doğru kilitlendiğinden
- güvenlik kapağının (a5) takılı olduğundan ve yüksek hız çıkışı (a4) kullanılmadığında kilitli
olduğundan
TEMİZLEME
SAKLAMA
CİHAZINIZ ÇALIŞMIYORSA NE YAPMANIZ GEREKİR?
82
TR
SM_KITCHEN-MACHINE-MC-GOURMET_MOUFAL_8080013263_OK_EST 06/12/13 14:23 Page82
Page 79

- çok fonksiyonlu başlığın (a3) yatay konumda kilitli olduğundan emin olun.
Mutfak cihazınız çalıştırma gücünü denetleyen ve analiz eden bir mikro işlemciye sahiptir. Yük çok
artarsa, cihazınız otomatik olarak durur. Cihazınızı tekrar başlatmak için döner düğmeyi (a1) "0"
konumuna getirin ve malzemelerin bir kısmını çıkarın. Birkaç dakika cihazınızın soğumasını
bekleyin. Sonra yiyecek hazırlamaya devam etmek için istenilen hızı seçebilirsiniz.
Cihazınız hâlâ çalışmıyor mu? Yetkili servisle iletişim kurun (servis kitapçığındaki listeye bakın).
Cihazınızı ihtiyacınıza göre özelleştirebilir ve satıcınızdan veya yetkili servisten şu aksesuarları
tedarik edebilirsiniz:
Dikkat:
Bir aksesuar satın alırken talimat kitapçığınızı veya cihazınızı göstermeniz gerekir.
KREM ŞANTİ
İçindekiler (6/8 kişi için): 250 ml çok soğuk sıvı krema - 50 gr pudra şekeri
Çırpma teli ve kapak takılı metal kabın içine, krema ve pudra şekeri koyun. Dördüncü hızda 2 dakika,
ardından maksimum hızda 3 dakika 30 saniye çalıştırın.
CİHAZIN VE AMBALAJIN ATILMASI
Ambalaj, çevre için tehlike barındırmayan malzemelerden üretilmiştir ve yaşadığınız
yerde geçerli olan geri dönüşüm tedbirleri doğrultusunda atılabilir.
Cihazın atılması ile ilgili olarak, bulunduğunuz bölgedeki yetkili servisten bilgi alınız.
KULLANIM ÖMRÜ SONA EREN ELEKTRİKLİ VE ELEKTRONİK ÜRÜNLER
Çevreyi koruyun!
Cihazınız çok sayıda yeniden üretilebilen veya geri dönüştürülebilen parça içerir.
Lütfen atık geri dönüştürme merkezlerine götürün.
AKSESUARLAR
Paslanmaz çelik hazne
Paslanmaz çelik hazne kapağı
Yoğurucu
Mikser
Balon çırpıcı
Blender haznesi
Katı meyve sıkacağı
Öğütücü
Aksesuar tutucu
Kıyma başlığı
Sebze dilimleyici:
- A: Dilim
- C: Kalın rende
- D: ince rende
- E: Patates dilimleme
Makarna seti
Sos/püre aksesuarı
Makarna aksesuarı
YEMEK TARİFLERİ
83
TR
SM_KITCHEN-MACHINE-MC-GOURMET_MOUFAL_8080013263_OK_EST 06/12/13 14:23 Page83
Page 80

MAYONEZ
İçindekiler:1 yumurta sarısı-1 yemek kaşığı hardal-1 çay kaşığı sirke-250 ml zeytinyağı veya ayçiçek yağı-tuz
ve kara biber.
Yumurta sarısı,hardal,sirke ve karabiberi çok bıçaklı çırpıcı ve kapaktan oluşan yapışmaz çelik haznenin
içine koyun.1. hızı seçin.Çırpıcıyı çalıştırın ,yavaşça yağı dökün.10 saniyeden sonra, maksimum hıza
çıkartın.Yağ tamamen karışımın içine karıştığında,çırpıcıyı 30 saniye kadar çalıştırın.
Not:Eğer tariniz için uygunsa, bir diş rendelenmiş sarımsak ekleyin.En iyi sonucu almak için,
malzemeler oda sıcaklığında olmalıdır..
BEYAZ EKMEK
İçindekiler (800 gramlık yuvarlak bir ekmek için): 500 gr un - 300 ml ılık su - 10 gr ekmek mayası - 10 gr tuz.
Unu, tuzu ve ekmek mayasını metal bir kabın içine dökün. Yoğurma aparatını ve kapağı yerleştirin ve
birinci hızda birkaç saniye çalıştırın. Kapağın deliğinden ılık su ilave edin. 8 dakika yoğurun. Hamuru
oda sıcaklığında yaklaşık yarım saat dinlenmeye bırakın. Ardından, hamuru tekrar elle yoğurun ve
hamurdan bir top oluşturun; bu topu fırınınızın tereyağı ile yağlanmış ve unlanmış tepsisinin üzerine
koyacaksınız. Yaklaşık 1 saat boyunca ılık bir yerde ikinci kez kabarmaya bırakın. Fırını 240°C sıcaklığa
kadar önceden ısıtın. Bir bıçak ile ekmek hamurunun üstünde yarıklar açın ve bir fırça yardımıyla üstüne
ılık su sürün. Fırının içine su dolu küçük bir kap da koyun. Bu, sarı bir kabuğun oluşmasını
kolaylaştıracaktır. 240°C sıcaklıkta 40 dakika fırınlayın.
Öneri:
Ekmek mayası asla şeker veya tuz ile doğrudan temas etmemelidir, zira bunlar mayanın etkisine
engel olur.
TARTÖLET HAMURU
İçindekiler (350 gramlık bir turta hamuru için): 200 gr un - 100 gr tereyağı - 50 ml su - bir tutam tuz.
Unu, tereyağını ve tuzu metal kabın içine dökün. Yoğurucuyu ve kapağı yerleştirin ve cihazı birinci
hızda birkaç saniye çalıştırın, ardından cihaz çalışırken su akıtın. Hamur güzel bir top şeklini alana kadar,
cihazı çalıştırın. Yayıp pişirmeden önce, üstü streç lm ile örtülü olarak en az bir saat serin bir yerde
dinlenmeye bırakın.
BRİYOŞ
İçindekiler (6 kişi için): 250 gr un - 5 gr tuz - 25 gr şeker - 100 gr tereyağı - 2 tam yumurta ve 1 yumurta akı 3 çorba kaşığı ılık süt - 2 çorba kaşığı su - 5 gr ekmek mayası.
Metal bir kabın içine un koyun ve içine iki çukur açın: Birinin içine tuz koyun, diğerinin içine ekmek
mayası, şeker, ılık süt ve su doldurun.Tuz ve maya bir araya getirilmemelidir, zira maya tuzla temas
ettiğinde kötü tepki verir. Yumurtaları ilave edin, yoğurma aparatını ve kapağı yerleştirin. Birinci hızı
seçin ve 15 saniye boyunca yoğurun; ardından 2 dakika 45 saniye boyunca ikinci hıza geçin. Cihazı
durdurmadan, fazla yumuşak olmaması gereken tereyağını ilave edin (tereyağını yarım saat ortam
sıcaklığında bırakın). 5 dakika boyunca ikinci hızda, ardından 5 dakika boyunca üçüncü hızda yoğurma
işlemine devam edin. Hamurun üstünü örtün ve oda sıcaklığında iki saat kabarmaya bırakın; ardından,
hamuru kabın içine vurarak elle güçlü bir şekilde yoğurun. Üstünü örtün ve yeniden, buzdolabında iki
saat mayalanmaya bırakın; kabın içine vurarak hamuru elle yeniden yoğurun . Ardından, hamurun
üstünü bir streç lm ile örtün ve bir gece buzdolabında kabarmaya bırakın. Ertesi sabah, bir briyoş
kalıbını tereyağı ile yağlayın ve unlayın. Hamura top şeklini verin. Kalıbın için koyun ve kalıp dolana dek
sıcak bir yerde şişmeye bırakın (2 ila 3 saat). 180°C sıcaklıkta fırınlayın ve 25 dakika pişirin.
Öneri:
Çikolata parçacıkları veya meyve şekerlemeleri ilave edilebilir."
BAHARATLI EKMEK
İçindekiler(6 kişilik):200 gr saf un-4 yumur ta-11g kabartma tozu-100 ml süt-50 ml zeytinyağı-12 adet
güneşte kurutulmuş domates-200 gr beyaz peynir-15 adet çekirdekleri çıkartılmış yeşil zeytin-1 tutam
köri(isteğe bağlı)-tuz ve karabiber.
84
TR
SM_KITCHEN-MACHINE-MC-GOURMET_MOUFAL_8080013263_OK_EST 06/12/13 14:23 Page84
Page 81

Fırını 180 °C’ye kadar önceden ısıtın.Fırın tepsisini katı yağ ile yağlayalım ve unlayalım.Mikser ve kapak
takılmış yapışmaz kaplama metal kabın içinde un,yumurta ve kabartma tozunu karıştırın.1. hızda
başlayıp 3. hıza kadar çıkartarak çırpın.Yağ ve sütü ekleyip 1,5 dk kadar karıştırın.Hızı 1. seviyeye
düşürün ve kurutulmuş domatesler(doğranmış),küp küp kesilmis beyaz peynir,yeşil
zeytin(doğranmış)ve köriyi ekleyin.Karışımı fırın tepsisinin içine dökün ve 30-40 dk kadar fırında
bekletin(süre,fırın çeşidine göre değişebilir).Bir bıçakla delerek,ekmeğin pişip pişmediğini kontrol
edebilirsiniz.
Öneri:Beyaz peynir yerine mozzarella peyniri kullanabilirsiniz ve doğranmış fesleğen ekleyebilirsiniz.
ERİMİŞ ÇİKOLATALI KEK
İçindekiler (8 kişi için): 200 gr bitter pastacı çikolatası - 150 gr pudra şekeri - 125 gr un - 125 gr yumuşak
tereyağı - 4 yumurta - 200 ml şekerli krema - 100 gr badem tozu (isteğe bağlı) - 1 paket vanilyalı şeker - 1
paket maya - 1 tutam tuz.
Fırını 180°C sıcaklığa kadar önceden ısıtın. parçalara bölünmüş çikolatayı ben maride veya mikrodalga
fırında 3 çorba kaşığı su ile eritin. Çikolatayı kayganlaştırmak amacıyla karıştırarak, kademeli olarak
biraz tereyağı ekleyin. Soğumaya bırakın. Yumurtaların sarısını akından ayırın. Yumurta aklarını saklayın.
Mikser ve kapak takılmış metal kabın içine, yumurta sarısı, erimiş çikolata, krema, tereyağının kalan
kısmı ve şeker, vanilyalı şeker ile badem tozu koyun. Karıştırmak için 20 saniye birinci hızda çalıştırın.
İkinci hıza geçin ve kapak deliğinden maya ile karıştırılmış unu ilave edin; kaygan bir hamur elde
edinceye dek yaklaşık 2 dakika çalıştırın. Büyük bir salata tabağının içinde saklayın. Çırpma teli ile
donatılmış temizlenmiş paslanmaz çelik kabın içine, yumurta aklarını bir tutam tuz ile birlikte ilave
edin; yumurta aklarını beşinci hızda 1 dakika 45 saniye güçlü bir şekilde çırpın; ardından 30 saniye
boyunca maksimum hızda çalıştırın. Bir spatül yardımıyla yumurta aklarını özenle çikolatalı karışıma
katın Tereyağı ile yağlanmış ve unlanmış bir pasta kalıbına dökün. 180°C sıcaklıkta 25 dakika fırınlayın.
Öneri:
Bu kek İngiliz kreması veya vanilyalı dondurma topları ile servis yapılabilir.
Daha fazla yemek tari için lütfen sitemizi ziyaret edin www.tefal.com
GARANTİ BELGESİ
GARANTİ İLE İLGİLİ OLARAK DİKKAT EDİLMESİ GEREKEN HUSUSLAR
Groupe Seb İstanbul tarafından verilen bu garanti, ürünün kullanma kılavuzunda yer alan hususlara
aykırı kullanılmasından doğacak arızaların giderilmesini kapsamadığı gibi, aşağıdaki durumlar garanti
dışıdır.
1. Kullanma hatalarından meydana gelen hasar ve arızalar,
2. Hatalı elektrik tesisatı kullanılması nedeniyle meydana gelebilecek arıza ve hasarlar,
3. Tüketici ürünü teslim aldıktan sonra, dış etkenler nedeniyle (vurma, çarpma, vs.) meydana gelebilecek
hasarlar,
4. Garantili onarım için yetkili servise başvurulmadan önce Groupe Seb yetkili personeli veya yetkili
servis personeli dışında birinin, cihazı onarım veya tadiline kalkışması durumunda,
5. Üründe kullanılan aksesuar parçalar.
Yukarıda belirtilen arızaların giderilmesi ücret karşılığı yapılır.
GARANTİ ŞARTLARI
Bu ürün ev kullanımı için tasarlanmıştır. Profesyonel kullanım için uygun değildir.
1. Garanti Süresi, ürünün teslim tarihinden itibaren başlar ve 2 yıldır.
2. Ürünün bütün parçaları dahil olmak üzere tamamı firmamızın garantisi kapsamındadır.
3. Ürünün garanti süresi içinde arızalanması durumunda, tamirde geçen süre garanti süresine eklenir.
4. Ürünün tamir süresi en fazla 30 iş günüdür. Bu süre, ürünün servis istasyonuna, servis istasyonunun
olmaması durumunda, ürünün satıcısı, bayii, acentası, temsilciliği, ithalatçısı veya imalatçısından
birine bildirim tarihinden itibaren başlar.
85
TR
SM_KITCHEN-MACHINE-MC-GOURMET_MOUFAL_8080013263_OK_EST 06/12/13 14:23 Page85
Page 82

5. Sanayi ürününün arızasının 15 iş günü içerisinde giderilmemesi halinde, imalatçı veya ithalatçı; ürünün
tamiri tamamlanıncaya kadar, benzer özelliklere sahip başka bir sanayi ürününü tüketicinin kullanımına
tahsis etmek zorundadır.
6. Ürünün garanti süresi içerisinde, gerek malzeme ve işçilik, gerekse montaj hatalarından dolayı
arızalanması halinde, işçilik masrafı, değiştirilen parça bedeli ya da başka herhangi bir ad altında
hiçbir ücret talep etmeksizin, tamiri yapılacaktır.
7. Ürünün:
- Teslim tarihinden itibaren garanti süresi içinde kalmak kaydıyla bir yıl içerisinde, aynı arızayı ikiden
fazla tekrarlaması veya farklı arızaların dörtten fazla veya belirlenen garanti süresi içerisinde farklı
arızaların toplamının altıdan fazla olması unsurlarının yanı sıra, bu arızaların üründen
yararlanmamayı sürekli kılması,
- Tamiri için gereken azami sürenin aşılması,
- Servis istasyonunun mevcut olmaması halinde sırasıyla satıcısı, bayii, acentası, temsilciliği, ithalatçısı
veya imalatçısından birinin düzenleyeceği raporla arızanın tamirinin mümkün bulunmadığının
belirlenmesi durumlarında, ücretsiz olarak değiştirme işlemi yapılacaktır.
8. Ürünün kullanma kılavuzunda yer alan hususlara aykırı kullanılmasından kaynaklanan arızalar garanti
kapsamı dışındadır.
9. Garanti süresi içerisinde, servis istasyonları tarafından yapılmasının zorunlu olduğu, imalatçı veya
ithalatçı tarafından şart koşulan periyodik bakımlarda; verilen hizmet karşılığında tüketiciden işçilik
ücreti veya benzeri bir ücret talep edilemez.
10. Garanti belgesi ile ilgili olarak çıkabilecek sorunlar için T.C. Sanayi ve Ticaret Bakanlığı Tüketicinin
ve Rekabetin Korunması Genel Müdürlüğü’ne başvurulabilir.
Bu Garanti Belgesi’nin kullanılmasına 4077 sayılı Kanun ile bu Kanun’a dayanılarak yürürlüğe konulan
Garanti Belgesi Uygulama Esaslarına Dair Tebliğ uyarınca, T.C. Sanayi ve Ticaret Bakanlığı Tüketicinin
ve Rekabetin Korunması Genel Müdürlüğü tarafından izin verilmiştir.
İMALATÇI VEYA İTHALATÇI FİRMANIN:
Ünvanı : Groupe SEB İstanbul Ev Aletleri Tic. A.Ş.
Adresi : Beybi Giz Plaza Dereboyu Cad. Meydan sok. No:28 Kat:12 34398 Maslak/İstanbul
DANIŞMA HATTI: 444 40 50
Size en yakın servisimizi 444 40 50 numaralı Tüketici Danışma Hattımızdan
öğrenebilirsiniz.
86
TR
İthalatçı Firma;
GROUPE SEB İSTANBUL A.Ş.
Dereboyu Cad. Meydan Sokak
No:1 BEYBİ GİZ PLAZA Kat:12
Maslak / İSTANBUL
0850 222 40 50
444 40 50
TÜKETİCİ HİZMETLERİ DANIŞMA HATTI
0850 222 40 50
444 40 50
KULLANIM ÖMRÜ: 7 YIL
Üretici Firma;
GROUPE SEB INTERNATIONAL
Chemin du Petit Bois Les 4 M-BP 172
69134 ECULLY Cedex – FRANCE
Tel : 00 33 472 18 18 18
Fax: 00 33 472 18 16 15
www.groupeseb.com
SM_KITCHEN-MACHINE-MC-GOURMET_MOUFAL_8080013263_OK_EST 06/12/13 14:23 Page86
Page 83

Le agradecemos que haya seleccionado este aparato diseñado exclusivamente para la preparación de
alimentos y uso doméstico en el interior del hogar.
• Lea detenidamente las instrucciones de uso antes de utilizar el aparato por
primera vez y consérvelas: un uso no conforme con las instrucciones eximirá al
fabricante de cualquier responsabilidad.
• Este aparato no está diseñado para que lo utilicen personas (incluyendo niños)
con alguna discapacidad física, sensorial o mental, o con falta de experiencia
y conocimientos, a no ser que sean supervisadas, o que la persona responsable
de su seguridad les haya proporcionado instrucciones sobre el funcionamiento
del aparato. No permita que los niños jueguen con el aparato.
• Compruebe que la tensión de alimentación del aparato coincida con la tensión
de su red eléctrica. Cualquier conexión incorrecta anula la garantía.
• Este aparato está destinado únicamente al uso doméstico y culinario, bajo
supervisión, siempre en el interior del hogar y a una altitud inferior a 2000m.
• Antes de utilizar el aparato por primera vez, limpie todas las superficies en
contacto con los alimentos como se indica en el capítulo «Puesta en marcha»
de estas instrucciones, y después de cada uso hágalo siguiendo las indicaciones
del apartado «Limpieza». Para realizar la conservación y la limpieza del aparato
consulte también el apartado de «Limpieza».
• Desconecte el aparato de la alimentación siempre que no esté bajo supervisión
DESCRIPCIÓN
a - Bloque motor
a1 Regulador electrónico de la velocidad
a2 Botón de desbloqueo del cabezal
multifunción (a3)
a3 Cabezal multifunción
a4 Salida rápida (vaso mezclador / licuadora
/ molinillo)
a5 Tapa de seguridad
a6 Terminal para los accesorios mezcladores
(amasador, varilla de múltiples aspas,
batidor)
a7 Almacenamiento para el cable
b - Conjunto del vaso
b1 Vaso de acero inoxidable
b2 Tapa
c - Accesorios mezcladores
c1 Amasador
c2 Batidor
c3 Varilla de múltiples aspas
d - Vaso mezclador (según modelo)
d1 Vaso
d2 Tapa
d3 Tapón dosificador
e - Adaptador (segùn modelo)
f - Cabezal picador (según modelo)
f1 Cuerpo metálico
f2 Serpentín
f3 Cuchilla
f4 Disco de picado grueso
f5 Disco de picado fino
f6 Tuerca
f7 Embutidor
f8 Bandeja
g - Corta-verduras (según modelo)
g1 Depósito del tambor
g2 Embutidor
g3 Tambor A para cortar
g4 Tambor C para rallado grueso
g5 Tambor D para rallado fino
g6 Tambor E para reibekuchen (tortas de
patata rallada)
h - Licuadora (según modelo)
h1 Embutidor
h2 Tapa
h3 Filtro giratorio
h4 Recipiente
h5 Vertedor
h6 Palanca de bloqueo
CONSEJOS DE SEGURIDAD
87
ES
SM_KITCHEN-MACHINE-MC-GOURMET_MOUFAL_8080013263_OK_EST 06/12/13 14:23 Page87
Page 84

y antes de montarlo, desmontarlo o limpiarlo.
• No utilice el aparato si no funciona correctamente o si está dañado. En este
caso, diríjase a un centro de servicio oficial (consulte la lista en el folleto de
servicio).
• Cualquier tarea de mantenimiento, salvo las tareas de limpieza y conservación
realizadas por el cliente, debe llevarse a cabo en un centro de servicio oficial
(consulte la lista en el folleto de servicio).
• No sumerja el aparato, el cable de alimentación ni el enchufe en líquidos.
• El cable de alimentación debe mantenerse fuera del alcance de los niños y no
debe colocarse cerca de ni estar en contacto con piezas calientes del aparato,
fuentes de calor o ángulos pronunciados.
• Si el cable de alimentación o el enchufe están dañados, no utilice el aparato.
Para que el aparato sea seguro en todo momento, estas piezas deben ser
sustituidas en un centro de servicio oficial (consulte la lista en el folleto de
servicio).
• No coloque los accesorios en el microondas.
• Para su seguridad, utilice únicamente accesorios y piezas de recambio
adecuadas para el aparato, vendidas en un centro de servicio oficial.
• Existe riesgo de heridas en caso de una mala utilización del aparato.
• Deberá tener cuidado cuando manipule las cuchillas afiladas (d, f, g) al vaciar
los recipientes, al montar o desmontar las cuchillas en el accesorio o durante
la limpieza, ya que pueden provocar cortes graves.
• Retire siempre el vaso mezclador (d) o la licuadora (h) antes de pulsar el botón
de desbloqueo (a2) del cabezal multifunción (a3).
• Con el accesorio picador (f), utilice siempre el embutidor (f7) para guiar los
alimentos por el tubo, nunca los dedos, ni tenedores, cucharas, cuchillos u
otros objetos.
• Nunca toque las piezas en movimiento y espere a que el aparato se detenga
completamente antes de retirar los accesorios.
• No toque ni las varillas ni el amasador cuando el aparato esté en
funcionamiento.
• Mantenga el pelo, bufandas, corbatas, etc. fuera del alcance del aparato en
funcionamiento.
• Nunca introduzca utensilios (cucharas, espátulas, etc.) por el tubo de
alimentación de las tapas (b2), (d2) o (h2) ni por el depósito del tambor (g1).
• No utilice el vaso mezclador (d1) sin la tapa (d2).
• No utilice varios accesorios a la vez.
• Nunca llene el vaso mezclador con un líquido en ebullición.
• No utilice el vaso mezclador vacío.
• Utilice siempre el vaso mezclador con la tapa.
• Nunca retire la tapa antes de que el aparato se detenga completamente.
• En el vaso mezclador, introduzca siempre los ingredientes líquidos antes que los
ingredientes sólidos.
• No utilice los vasos (b1, d1) como recipientes (para congelar, cocinar,
esterilizar, etc.).
88
ES
SM_KITCHEN-MACHINE-MC-GOURMET_MOUFAL_8080013263_OK_EST 06/12/13 14:23 Page88
Page 85

• No utilice la licuadora si el filtro giratorio (h3) o la tapa de protección (h2)
están dañados o agrietados.
• Apague el aparato y desconéctelo de la red antes de cambiar los accesorios o
de tocar las piezas móviles durante su funcionamiento.
• Tenga cuidado al verter líquidos calientes en el preparador culinario o en el
mezclador, ya que pueden salpicar si se produce una ebullición repentina.
• Este aparato no está diseñado para ser utilizado en las siguientes aplicaciones
domésticas y análogas (utilización no cubierta por la garantía):
- Zonas de trabajo de cocina en tiendas, oficinas y otros entornos de
trabajo;
- Granjas;
- Uso por parte de clientes en hoteles, moteles y otros entornos de tipo
residencial;
- Entornos de tipo "bed and breakfast".
• Consulte las ilustraciones y los apartados «Montaje de los accesorios» y
«Desmontaje de los accesorios» para montar y desmontar los accesorios
en el aparato.
• Consulte las instrucciones de uso para ajustar las velocidades y el tiempo
de funcionamiento de cada accesorio.
• Este aparato no está diseñado para ser utilizado por niños. Mantenga el aparato
y su cable fuera del alcance de los niños.
• No permita que los niños jueguen con el aparato.
• Este aparato puede ser utilizado por personas con capacidades físicas,
sensoriales o mentales reducidas o falta de conocimientos y experiencia en el
manejo de este tipo de aparatos, siempre que cuenten con supervisión o hayan
recibido instrucciones sobre el uso seguro del electrodoméstico y entiendan
los riesgos que implica.
• La varilla de múltiples aspas (c3) y los tambores para rallado fino y para rallado
grueso (g5 y g4) pueden ser utilizados por niños de 8 años en adelante, siempre
que cuenten con supervisión o hayan recibido instrucciones sobre el uso seguro
del electrodoméstico y entiendan los riesgos que implica. La limpieza y el
mantenimiento de usuario no deben realizarlas los niños, excepto si son
mayores de 8 años y lo hacen bajo la supervisión de un adulto. Mantenga el
aparato y su cable fuera del alcance de los niños menores de 8 años.
• Antes de utilizar el aparato por primera vez, lave todas las piezas de los accesorios con agua y jabón
(excepto el adaptador (e): consulte § limpieza) Aclárelos y séquelos.
• Coloque el aparato sobre una superficie plana, limpia y seca, compruebe que el botón regulador (a1)
esté en la posición "0" y, a continuación, conéctelo.
• Para la puesta en marcha, dispone de varias posibilidades:
- Marcha intermitente (pulse): Gire el botón regulador (a1) hacia la posición "pulse", impulsos
sucesivos, para conseguir un mejor control de las preparaciones.
- Marcha continua: Gire el botón regulador (a1) hacia la posición deseada de "1" a "máx" según las
preparaciones que realice.
Se puede modificar durante la preparación.
• Para detener el aparato, devuelva el botón (a1) a la posición "0".
PUESTA EN MARCHA
89
ES
SM_KITCHEN-MACHINE-MC-GOURMET_MOUFAL_8080013263_OK_EST 06/12/13 14:23 Page89
Page 86

Importante: el aparato sólo se pondrá en marcha si la tapa de seguridad (a5) y el cabezal (a3)
están acoplados. Si durante el funcionamiento desacopla la tapa (a5) y/o el cabezal (a3), el
aparato se detendrá inmediatamente. Vuelva a acoplar la tapa y/o el cabezal, gire el botón
regulador (a1) hasta la posición "0" y, a continuación, prosiga normalmente con la puesta en
marcha del aparato seleccionando la velocidad deseada.
Este aparato de cocina está equipado con un microprocesador que controla y analiza la potencia durante
el funcionamiento. En caso de sobrecarga, el aparato se detendrá automáticamente. Para volver a
poner el aparato en marcha, devuelva el botón regulador (a1) a la posición "0" y retire una parte de los
ingredientes. Deje reposar el aparato durante unos minutos. A continuación, podrá seleccionar la
velocidad que desee para terminar la preparación.
1 - MEZCLAR / AMASAR / BATIR / EMULSIONAR / BATIR CON LAS VARILLAS
Según la naturaleza de los alimentos, el vaso de acero inoxidable (b1) y la tapa (b2) le permitirán
preparar hasta 1,8 kg de pasta.
ACCESORIOS UTILIZADOS:
- Vaso de acero inoxidable (b1).
- Tapa (b2)
- Amasador (c1), batidor (c2) o varilla de múltiples aspas (c3)
1.1 - MONTAJE DE LOS ACCESORIOS
• Pulse el botón (a2) para desacoplar el cabezal multifunción (a3) y retírelo hasta el tope.
• Acople el vaso de acero inoxidable (b1) (sentido horario) en el aparato y coloque los ingredientes.
• Inserte el accesorio deseado (c1, c2 o c3) en el terminal (a6), presiónelo y gírelo con un cuarto de
vuelta en el sentido contrario a las agujas del reloj para bloquearlo en su cavidad.
• Devuelva el cabezal multifunción (a3) a la posición horizontal: pulse el botón (a2) y baje manualmente
el cabezal multifunción (a3) hasta que se bloquee (devuelva el botón (a2) a la posición inicial).
• Deslice la tapa (b2) sobre el vaso de acero inoxidable (b1).
Nota: el uso de la tapa no es obligatorio. Evita el riesgo de salpicaduras.
• Compruebe que la tapa (a5) esté bien acoplada (sentido horario) a la salida rápida (a4).
1.2 - PUESTA EN MARCHA
Ponga en marcha el aparato girando el botón regulador (a1) hasta la posición deseada según la receta.
• El aparato se pone en funcionamiento inmediatamente.
Puede añadir los alimentos por el orificio de la tapa (b2) durante la preparación.
• Para detener el aparato, devuelva el botón (a1) a la posición "0".
Consejos:
- Amasar
- Utilice el accesorio amasador (c1) a la velocidad "1".
Puede amasar hasta 500 g de harina (por ejemplo: pan blanco, pan de cereales, pasta brisa, pasta
sablée, …).
- Mezclar
- Utilice el mezclador (c2) de la velocidad "1" a "máx".
Puede mezclar hasta 1,8 kg de pasta ligera (bizcocho de cuatro partes, galletas, etc.)
- Nunca utilice el mezclador (c2) para amasar pastas pesadas.
- Batir / emulsionar / batir con varillas
- Utilice la varilla de múltiples aspas (c3) de la velocidad "1" a "máx".
- Puede preparar: mayonesa, alioli, salsas, claras a punto de nieve (hasta 8 claras de huevo), chantillí
(hasta 500 ml)...
- Nunca utilice la varilla de múltiples aspas (c3) para amasar pastas pesadas o mezclar pastas
ligeras.
La numeración de los apartados se corresponde con la numeración de los esquemas encuadrados.
90
ES
SM_KITCHEN-MACHINE-MC-GOURMET_MOUFAL_8080013263_OK_EST 06/12/13 14:23 Page90
Page 87

1.3 - DESMONTAJE DE LOS ACCESORIOS
• Espere a que el aparato se detenga completamente.
• Retire la tapa (b2).
• Utilizando el botón (a2), desacople el cabezal multifunción (a3) y levántelo.
• Desbloquee el accesorio (c1), (c2) o (c3) del cabezal multifunción apretando el accesorio hacia el
cabezal y girándolo un cuarto de vuelta en sentido horario.
• Retire el vaso de acero inoxidable.
2 - HOMOGENEIZAR / MEZCLAR / BATIR (SEGÚN MODELO)
Según la naturaleza de los alimentos, el vaso mezclador (d) permite preparar hasta 1,5 l de mezclas
espesas y 1,25 l de mezclas líquidas.
ACCESORIOS UTILIZADOS:
- Vaso mezclador (d).
2.1 - MONTAJE DE LOS ACCESORIOS
• Sitúe el cabezal multifunción (a3) a la posición horizontal: pulse el botón (a2) y baje manualmente
el cabezal multifunción (a3) hasta que se bloquee (devuelva el botón (a2) a la posición inicial).
• Desacople la tapa de seguridad (a5) de la salida rápida (a4) girándola en sentido contrario a las agujas
del reloj y, a continuación, retírela.
• Compruebe que el aparato se haya detenido completamente antes de acoplar el vaso mezclador (d).
• Acople el vaso mezclador (d) en el terminal (a4) girándolo en sentido horario.
• Introduzca los alimentos en el vaso mezclador y acople la tapa (d2) con el tapón dosificador (d3),
girándola en sentido contrario a las agujas del reloj.
2.2 - PUESTA EN MARCHA
• Ponga en marcha el aparato girando el botón regulador (a1) hasta la posición deseada según la receta.
Para un mejor control de la mezcla y una mejor homogeneización de la preparación, utilice la posición
"Pulse".
Puede añadir los alimentos por el orificio del tapón dosificador (d3) durante la preparación.
• Para detener el aparato, devuelva el botón (a1) a la posición "0".
Consejos:
Puede preparar:
- sopas con una textura muy suave, cremas, compotas, batidos de leche, cócteles.
- pastas ligeras (crepes, buñuelos, clafoutis, flanes, etc.).
- Si, durante la mezcla, los ingredientes se quedan pegados en la pared del vaso, detenga el aparato,
retire el vaso mezclador, haga caer los ingredientes encima de las hojas y vuelva a colocar el vaso
mezclador para continuar con la preparación.
2.3 - DESMONTAJE DEL ACCESORIO
• Espere a que el aparato se detenga completamente para retirar el vaso mezclador desacoplándolo en
el sentido contrario a las agujas del reloj, y vuelva a colocar la tapa (a5) acoplándola en la salida (a4)
(sentido horario).
3 - PICAR (SEGÚN MODELO)
ACCESORIOS UTILIZADOS:
- Adaptador (e)
- Cabezal picador montado (f)
3.1 - COLOCAR EL ADAPTADOR PICADOR
• Pulse el botón (a2) para desacoplar el cabezal multifunción (a3) y retírelo hasta el tope.
• Coloque el adaptador (e) y acóplelo en el sentido contrario a las agujas del reloj de manera que obtenga
la salida en la prolongación del aparato.
• Devuelva el cabezal multifunción (a3) a la posición horizontal pulsando nuevamente el botón (a2).
91
ES
SM_KITCHEN-MACHINE-MC-GOURMET_MOUFAL_8080013263_OK_EST 06/12/13 14:23 Page91
Page 88

3.2 - MONTAJE DEL CABEZAL PICADOR
• Sujete el cuerpo (f1) por el tubo de alimentación, con la apertura más ancha hacia arriba.
• Introduzca el serpentín (f2) (eje largo en primer lugar) en el cuerpo (f1).
• Coloque la cuchilla (f3) en el eje corto que sobresale del serpentín (f2) con las aristas cortantes hacia
el exterior.
• Coloque el disco seleccionado (f4 o f5) en la cuchilla (f3) de manera que las dos pestañas coincidan
con las dos muescas del cuerpo (f1).
• Enrosque la tuerca (f6) en el cuerpo (f1) con fuerza, en sentido horario, pero sin bloquearla.
• Compruebe el montaje. El eje no debe tener juego ni debe girar sobre sí mismo. En caso contrario,
vuelva a realizar las operaciones anteriores.
3.3 - COLOCAR EL CABEZAL PICADOR EN EL APARATO
• Coloque el conjunto del cabezal picador (f) inclinado hacia la derecha, frente a la salida del adaptador
(e) y haga corresponder los dos cierres de bayoneta del cabezal picador con las dos muescas del
adaptador. Acople completamente el cabezal picador en el adaptador y, a continuación, devuelva el
tubo de alimentación del cabezal picador a la posición vertical hasta el punto de bloqueo, girándolo
en el sentido contrario de las agujas del reloj.
• Coloque la bandeja extraíble (f8) en el tubo.
3.4 - PUESTA EN MARCHA, CONSEJOS Y DESMONTAJE
• Compruebe que la tapa de seguridad (a5) esté bien acoplada (sentido horario) a la salida rápida (a4).
• Coloque un recipiente para recoger la preparación delante del aparato.
• Ponga el aparato en marcha girando el botón regulador (a1) a la velocidad "3" o "4".
• Introduzca la carne troceada por el tubo de alimentación con la ayuda del embutidor (f7). Nunca
apriete los ingredientes con los dedos o con otro utensilio por el tubo.
• Para detener el aparato, gire el botón regulador hasta la velocidad "0" y espere a que el aparato se
detenga completamente.
• Desacople el cabezal picador en el sentido contrario del montaje.
Consejos:
- Prepare la cantidad de alimentos que desee picar (para la carne, elimine los huesos, cartílagos y nervios
y córtela en trozos de unos 2 x 2 cm).
- Compruebe que la carne esté bien descongelada.
- Al final de la operación, puede hacer pasar unos pequeños trozos de pan para hacer salir todo el
picadillo.
4 - RALLAR / CORTAR (SEGÚN MODELO)
ACCESORIOS UTILIZADOS:
- Adaptador (e)
- Corta-verduras montado (g)
- Tambores (según modelo)
4.1 - MONTAJE DE LOS ACCESORIOS
• Pulse el botón (a2) para desacoplar el cabezal multifunción (a3) y retírelo hasta el tope.
• Coloque el adaptador (e) y acóplelo en el sentido contrario a las agujas del reloj de manera que obtenga
la salida en la prolongación del aparato.
• Devuelva el cabezal multifunción (a3) en posición horizontal pulsando nuevamente el botón (a2).
• Compruebe que la tapa de seguridad (a5) esté bien acoplada (sentido horario) a la salida rápida (a4).
• Coloque el depósito del tambor (g1) inclinado hacia la derecha, frente a la salida del adaptador (e) y
haga corresponder los dos cierres de bayoneta del depósito del tambor con las dos muescas del
adaptador. Acóplelo completamente y devuelva el tubo del depósito a la posición vertical hasta el
punto de bloqueo, girándolo en el sentido contrario a las agujas del reloj.
• Inserte el tambor seleccionado en el depósito y compruebe que ha entrado completamente en el
depósito.
4.2 - PUESTA EN MARCHA Y CONSEJOS
• Coloque un recipiente para recoger la preparación delante del aparato.
92
ES
SM_KITCHEN-MACHINE-MC-GOURMET_MOUFAL_8080013263_OK_EST 06/12/13 14:23 Page92
Page 89

• Ponga el aparato en marcha girando el botón regulador (a1) a la velocidad "3" para cortar y a la
velocidad "4" para rallar.
• Introduzca los alimentos por el tubo del depósito y guíelos con la ayuda del embutidor (g2). Nunca
apriete los ingredientes con los dedos o con otros utensilios.
• Para detener el aparato, gire el botón regulador hasta la velocidad "0" y espere a que el aparato se
detenga completamente.
• Desacople el depósito del tambor en el sentido contrario del montaje.
• con los tambores puede:
- Rallar ingredientes de forma gruesa C (g4) / rallar ingredientes finos D (g5): zanahorias, apio-
rábano, patatas, queso, etc.
- Cortar ingredientes gruesos A (g3): patatas, zanahorias, pepinos, manzanas, remolacha, etc.
- Reibekuchen E (g6): patatas, parmesano, etc.
5 - CENTRIFUGAR FRUTAS Y VERDURAS (SEGÚN MODELO)
ACCESORIOS UTILIZADOS:
- licuadora montada (h).
5.1 - MONTAJE DE LA LICUADORA
• Coloque el filtro (h3) en el centro del recipiente (h4).
• Bloqueo de la tapa: gírela en sentido contrario a las agujas del reloj y bloquee la tapa (h2) en el
recipiente (h4) (posición cerrada del candado).
• Bloqueo global: coloque la palanca de bloqueo (h6) en la posición cerrada del candado.
5.2 - COLOCAR LA LICUADORA EN EL APARATO
• Sitúe el cabezal multifunción (a3) a la posición horizontal: pulse el botón (a2) y baje manualmente
el cabezal multifunción (a3) hasta que se bloquee (devuelva el botón (a2) a la posición inicial).
• Desacople y retire la tapa (a5) de la salida rápida (a4) girándola en sentido contrario a las agujas del
reloj.
• Compruebe que el aparato se haya detenido completamente antes de acoplar la licuadora (h).
• Bloquee la licuadora montada en la salida (a4) girándola en el sentido horario, para que la salida del
vertedor quede alienada con el aparato.
• Encaje el vertedor (h5) en el recipiente (h4).
5.3 - PUESTA EN MARCHA Y CONSEJOS
• Coloque un vaso grande debajo del vertedor (h5).
• Ponga el aparato en marcha girando el botón regulador (a1) a la velocidad "3".
• Trocee las frutas y/o las verduras.
• Introdúzcalas por el tubo de la tapa (h2) y guíelas con la ayuda del embutidor (h1). Nunca apriete
los ingredientes con los dedos o con otros utensilios.
• No procese más de 5 veces seguidas 500 g de alimentos, sin dejar reposar el aparato completamente.
• Para obtener un mejor rendimiento, limpie el filtro cada 300 g de ingredientes.
• Importante: cuando el recipiente para la pulpa esté lleno, detenga el aparato y vacíelo.
• Para detener el aparato, gire el botón regulador hasta la velocidad "0" y espere a que el aparato se
detenga completamente.
• Espere a que el filtro giratorio se detenga completamente antes de retirar el conjunto del
aparato.
• Para retirar la licuadora, desacóplela girándola en el sentido contrario a las agujas del reloj.
• Coloque la palanca de bloqueo (h6) con el candado en posición cerrada. Abra la tapa (candado en
posición abierta). Ya puede retirar el filtro (h3) para limpiarlo y vaciar el recipiente (h4).
Consejos:
• Puede preparar zumos de: zanahoria, tomate, manzana, uva, frambuesa, etc.
• Pele las frutas con piel gruesa, retire los huesos, retire la parte central de las piñas.
• Es imposible extraer zumo de determinadas frutas y verduras: plátanos, aguacates, moras, etc.
• Puede preparar zumos con diferentes tipos de frutas y verduras sin limpiar cada vez la licuadora; los
sabores no se mezclarán. Sólo debe pasar un poco de agua por la licuadora en funcionamiento para
aclararla antes de cada zumo.
93
ES
SM_KITCHEN-MACHINE-MC-GOURMET_MOUFAL_8080013263_OK_EST 06/12/13 14:23 Page93
Page 90

• Consuma rápidamente los zumos después de su preparación y añada zumo de limón para conservarlos
unas horas en fresco.
6 - ADAPTAR LA LONGITUD DEL CABLE
Para una utilización más cómoda o para el almacenamiento, puede reducir la longitud del cable
colocándolo en el interior del bloque motor (a) mediante la apertura situada en la parte posterior (a7).
7 - PICAR FINAMENTE PEQUEÑAS CANTIDADES (SEGÚN MODELO)
ACCESORIO UTILIZADO:
- molinillo montado.
Con el molinillo puede:
- Picar en pocos segundos por impulsos: higos secos, albaricoques secos, etc.
cantidad / tiempo máximo: 100 g / 5 seg
Este molinillo no se ha diseñado para productos como el café.
• Desconecte el aparato.
• No sumerja el bloque motor (a) ni el adaptador (e) en el agua o debajo de agua corriente. Límpielos
con un trapo seco o un poco húmedo.
• Para una limpieza más fácil, aclare rápidamente los accesorios después de su utilización. Desmonte
completamente el accesorio del cabezal picador. Manipule todas las cuchillas con precaución; puede
cortarse.
• Lave, aclare y seque todos los accesorios: todos son aptos para el lavavajillas excepto el conjunto de
accesorios metálicos del cabezal picador: cuerpo (f1), serpentín (f2), cuchilla (f3), discos (f4 y f5),
tuerca (f6).
• Los discos (f4) y (f5) así como la cuchilla (f3) deben permanecer engrasados. Úntelos con aceite
comestible con el fin de conservarlos.
Trucos:
• En caso de coloración de los accesorios por parte de alimentos (zanahorias, naranjas,...), frótelos con
un trapo empapado en aceite comestible y, a continuación, prosiga con la limpieza habitual.
• Vaso mezclador (d): vierta agua caliente con unas cuantas gotas de jabón líquido en el vaso mezclador.
Cierre la tapa. Colóquela en el aparato y dele unos cuantos impulsos. Una vez retirado, enjuague el vaso
en agua corriente y déjelo secar (vaso invertido).
No guarde el aparato en un entorno húmedo.
Si el aparato no funciona, compruebe:
- La conexión del aparato.
- El bloqueo de cada accesorio.
- La presencia y el bloqueo de la tapa de seguridad (a5) cuando no se utilice la salida rápida (a4).
- El bloqueo horizontal del cabezal multifunción (a3).
Este aparato de cocina está equipado con un microprocesador que controla y analiza la potencia durante
el funcionamiento. En caso de sobrecarga, el aparato se detendrá automáticamente. Para volver a poner
el aparato en marcha, devuelva el botón regulador (a1) a la posición "0" y retire una parte de los
ingredientes. Deje reposar el aparato durante unos minutos. A continuación, podrá seleccionar la
velocidad que desee para terminar la preparación.
¿Su aparato sigue sin funcionar? Diríjase a un centro de servicio oficial (consulte la lista del folleto
de servicio).
LIMPIEZA
ALMACENAMIENTO
¿QUÉ HACER SI EL APARATO NO FUNCIONA?
94
ES
SM_KITCHEN-MACHINE-MC-GOURMET_MOUFAL_8080013263_OK_EST 06/12/13 14:23 Page94
Page 91

Puede personalizar su aparato y adquirir los siguientes accesorios de su proveedor habitual o de un
centro oficial:
Atención: no se le podrá vender ningún accesorio sin presentar las instrucciones de uso o el aparato.
NATA MONTADA
Ingredientes (para 6/8 personas) : 25 cl de nata líquida bien fría - 50 g de azúcar glas.
En el cuenco de acero inoxidable provisto del batidor de varillas y la tapa, ponga la nata líquida y el
azúcar glas. Ponga en marcha a la velocidad 4 durante 2 minutos y luego a velocidad máxima durante
3 minutos y medio.
MAYONESA
Ingredientes : 1 yema de huevo - 1 cucharada sopera de mostaza 1 cucharadita de café de vinagre - 25 cl
de aceite - sal y pimienta.
En el cuenco de acero inoxidable provisto del batidor de varillas y la tapa, ponga la yema de huevo, la
mostaza, el vinagre, la sal y la pimienta. Seleccione la velocidad 1. Deje en marcha el batidor y empiece
a echar el aceite en un chorrito pequeño. Al cabo de 10 segundos, pase a la velocidad máxima. Una vez
incorporado el aceite a la preparación, deje en marcha el batidor durante otros 30 segundos.
Sugerencia: según su uso, añada un diente de ajo rallado.
ACCESORIOS
Vaso de acero inoxidable
Tapa del vaso de acero inoxidable
Amasador
Batidor
Varilla de múltiples aspas
Vaso mezclador
Licuadora
Molinillo
Adaptador
Cabezal picador
Corta-verduras:
- A: cortar
- C: rallado grueso
- D: rallado fino
- E: reibekuchen
Kit para pasta
Accesorio para coulis
Laminador
RECETAS
ELIMINACIÓN DE LOS MATERIALES DE EMBALAJE Y DEL APARATO
El embalaje está exclusivamente compuesto por materiales inocuos para el medio ambiente
que pueden eliminarse con arreglo a la normativa de reciclaje vigente en su localidad.
Para deshacerse del aparato, contacte con el servicio correspondiente de su ayuntamiento.
PRODUCTO ELECTRÓNICO O ELÉCTRICO AL FINAL DE SU VIDA ÚTIL
¡Piense en el medioambiente!
Su aparato contiene numerosos materiales recuperables o reciclables.
Lleve el aparato a un centro de reciclaje de residuos (punto limpio).
95
ES
SM_KITCHEN-MACHINE-MC-GOURMET_MOUFAL_8080013263_OK_EST 06/12/13 14:23 Page95
Page 92

PAN BLANCO
Ingredientes (para una hogaza de pan de 800 g) : 500 g de harina - 300 ml de agua templada - 10 g de
levadura seca de panaderia 10 g de sal.
En el cuenco de acero inoxidable, eche la harina, la sal y la levadura de panadería. Instale la amasadora
de gancho y la tapa y ponga en marcha durante unos segundos a la velocidad 1. Añada el agua templada
por la abertura de la tapa. Amase durante 8 minutos. Deje reposar la masa a temperatura ambiente
durante 1/2 hora aproximadamente. A continuación, vuelva a trabajar la masa a mano y forme con ella
una bola que colocará sobre la bandeja de repostería untada con mantequilla y enharinada de su horno.
Deje crecer por segunda vez en un lugar templado durante aproximadamente 1 hora. Precaliente el horno
a 240 °C. Practique unos cortes en la parte superior de la hogaza con ayuda de una cuchilla de afeitar
y, con una brocha, moje con agua templada. Meta también en el horno un pequeño recipiente lleno de
agua; esto favorecerá la formación de una corteza dorada. Hornee durante 40 minutos a 240 °C.
Sugerencia: la levadura de panadería no debe entrar nunca en contacto directo con el azúcar ni con la
sal, ya que estos impiden que la levadura actúe.
MASA QUEBRADA
Ingredientes (para un fondo de tarta de 350 g) : 200 g de harina - 100 g de mantequilla - 5 cl de agua una pizca de sal.
En el cuenco de acero inoxidable, eche la harina, la mantequilla y la sal. Instale la amasadora de gancho
y la tapa, ponga en marcha el aparato a la velocidad 1 durante unos segundos y luego vierta toda el agua
con el aparato en marcha. Deje el aparato en marcha hasta que la masa forme una gran bola. Déjela
reposar al fresco durante al menos 1 hora, tapada con película transparente, antes de extenderla y
hornearla.
BRIOCHE
Ingredientes (para 6 personas) : 250 g de harina - 5 g de sal - 25 g de azúcar - 100 g de mantequilla - 2
huevos enteros y 1 yema de huevo - 3 cucharadas soperas de leche tibia - 2 cucharadas soperas de agua
- 5 g de levadura seca de panaderia.
En el cuenco de acero inoxidable, ponga la harina y forme dos huecos: en uno de ellos ponga la sal y el
azúcar, y en el segundo la levadura, la leche tibia y el agua. La sal y la levadura no deben ponerse juntas
porque la levadura reacciona mal al contacto con la sal. Añada los huevos e instale la amasadora de
gancho y la tapa. Seleccione la velocidad 1 y amase durante 15 segundos; luego pase a la velocidad 2
durante 2 minutos y 45 segundos. Sin detener el aparato, incorpore la mantequilla, que no deberá estar
demasiado blanda (déjela previamente al uso media hora a temperatura ambiente) durante un minuto.
Continúe amasando durante 5 minutos a la velocidad 2 y luego 5 minutos a la velocidad 3. Tape la masa
y déjela crecer dos horas a temperatura ambiente. A continuación, trabaje vigorosamente la masa a
mano haciéndola chasquear en el cuenco. Tape y deje crecer de nuevo dos horas en el frigorífi co. Vuelva
a trabajar la masa a mano haciéndola chasquear en el cuenco. Luego tape con película transparente y
deje crecer la masa toda la noche en el frigorífi co. Al día siguiente, unte con mantequilla y enharine
un molde para brioche. Modele la masa en forma de bola. Póngala en el molde y déjela crecer en un lugar
cálido hasta que rellene el molde (de 2 a 3 horas). Hornee a 180 °C durante 25 minutos.
Sugerencia: añada pepitas de chocolate o frutas confi tadas.
BIZCOCHO SALADO
Ingredientes (para 6 personas) : 200 g de harina - 4 huevos - 1 sobre de levadura - 10 cl de leche - 5 cl
de aceite de oliva - 12 tomates secos - 200 g de queso feta - 15 aceitunas verdes - deshuesadas - 1 pizca
de curry (opcional) - sal, pimienta.
Precaliente el horno a 180 °C. Unte con mantequilla y enharine un molde para bizcocho. En el cuenco
de acero inoxidable provisto de la amasadora de aspas y la tapa, mezcle la harina, los huevos y la
levadura empezando a la velocidad 1 y subiendo luego hasta la velocidad 3. Añada el aceite de oliva y
96
ES
SM_KITCHEN-MACHINE-MC-GOURMET_MOUFAL_8080013263_OK_EST 06/12/13 14:23 Page96
Page 93

la leche fría y mezcle durante 1 minuto y medio. Pase a la velocidad 1 y añada los tomates secos, el queso
feta, las aceitunas verdes (cortadas en trocitos) y el curry, y salpimente. Vierta la preparación en el
molde y hornee de 30 a 40 minutos, según el horno. Pinche para comprobar el grado de cocción.
Sugerencia: sustituya el queso feta por mozzarella y añada unas hojas de albahaca troceadas.
BIZCOCHO DE CHOCOLATE
Ingredientes (para 8 personas) : 200 g de chocolate negro de pastelería - 150 g de azúcar en polvo - 125
g de harina - 125 g de mantequilla reblandecida - 4 huevos - 20 cl de nata líquida - 100 g de almendras
en polvo (opcional) - 1 sobre de azúcar de vainilla 11 g de levadura quimica - 1 pizca de sal.
Precaliente el horno a 180 °C. Funda al baño maría o en horno microondas el chocolate cortado en
trozos con 3 cucharadas soperas de agua. Añada gradualmente un poco de mantequilla removiendo para
que el chocolate quede homogéneo. Deje enfriar hasta que esté templado. Separe las yemas de huevo
de las claras. Reserve las claras. En el cuenco de acero inoxidable equipado con la amasadora de aspas
y la tapa, ponga las yemas de huevo, el chocolate fundido, la nata, el resto de la mantequilla, el azúcar,
el azúcar de vainilla y las almendras en polvo. Ponga en marcha a la velocidad 1 durante 20 segundos
para mezclar. Pase a la velocidad 2 e incorpore la harina mezclada con la levadura por la abertura de la
tapa, y deje en marcha unos 2 minutos hasta obtener una masa homogénea. Reserve en una ensaladera
grande. En el cuenco de acero inoxidable limpio equipado con el batidor de varillas, ponga las claras de
huevo con la pizca de sal, bata bien las claras a la velocidad 5 durante 1 minuto y 45 segundos y pase
luego a la velocidad máxima durante 30 segundos. Con ayuda de una espátula, incorpore suavemente
las claras a punto de nieve a la preparación de chocolate. Vierta en un molde de bizcocho untado de
mantequilla y enharinado. Hornee a 180 °C durante 25 minutos.
Sugerencia: este pastel está delicioso servido con crema inglesa o bolas de helado de vainilla.
Para más ideas de recetas, visite www.tefal.com
97
ES
SM_KITCHEN-MACHINE-MC-GOURMET_MOUFAL_8080013263_OK_EST 06/12/13 14:23 Page97
Page 94

Paldies, ka izvēlējāties šo ierīci,, kas īpaši paredzēta ēdiena gatavošanai mājās (iekštelpās).
•
Pirms ierīces pirmās izmantošanas rūpīgi iepazīstieties ar lietošanas
norādījumiem un saglabājiet tos: jebkura izmantošana, kas neatbilst
lietošanas norādījumiem, atbrīvo ražotāju no jebkādas atbildības.
•
Šo ierīci aizliegts izmantot personām ar nepietiekamām ziskajām,
maņu vai garīgajām spējām (tostarp bērniem) vai arī personām ar
nepietiekamu pieredzi vai zināšanām, ja persona, kura atbildīga par
to drošību, nav tās iepazīstinājusi ar ierīces lietošanu un nav
iemācījusi šo ierīci lietot. Neļaujiet bērniem rotaļāties ar šo ierīci.
•
Pārliecinieties, vai ierīces spriegums atbilst jūsu elektrotīklam. To
neievērojot, garantija tiek zaudēta.
•
Šī ierīce ir paredzēta vienīgi uzraudzītai lietošanai mājsaimniecības
kulinārijai iekštelpās augstumā, kas nepārsniedz 2000 m.
•
Pirms ierīces pirmās izmantošanas notīriet virsmas, kas nonāk saskarē
ar pārtikas produktiem. Lūdzu, skatiet norādījumus šīs pamācības
nodaļā „Iedarbināšana”, bet pēc katras izmantošanas reizes, kā arī
norādījumus par ierīces apkopi un tīrīšanu skatiet norādījumus
nodaļā „Tīrīšana”.
APRAKSTS
a - Motora bloks
a1 Elektroniskais ātruma regulators
a2 Daudzfunkcionālā uzgaļa atbrīvošanas
taustiņš (a3)
a3 Daudzfunkcionālais uzgalis
a4 Ātrā izeja (blendera trauks/sulu spiede/
dzirnaviņas)
a5 Drošības uzlika
a6 Miksera piederumu izeja (mīcītājs,
daudzzaru slotiņa, maisītājs)
a7 Vada glabātava
b - Trauka komplekts
b1 Nerūsējošā tērauda trauks
b2 Vāks
c - Miksera piederumi
c1 Mīcītājs
c2 Maisītājs
c3 Daudzzaru slotiņa
d - Blendera trauks (atkarībā no modeļa)
d1 Trauks
d2 Vāks
d3 Dozēšanas noslēgs
e - Piederumu turētājs (atkarībā no modeļa)
f - Gaļasmašīnas uzgalis (atkarībā no modeļa)
f1 Metāla korpuss
f2 Vītne
f3 Asmens
f4 Restīte ar lielām atverēm
f5 Restīte ar mazām atverēm
f6 Uzgrieznis
f7 Spiede
f8 Paplāte
g -Dārzeņu griezējs (atkarībā no modeļa)
g1 Cilindru kārba
g2 Spiede
g3 A cilindrs griešanai
g4 C cilindrs rupjai rīvēšanai
g5 D cilindrs smalkai rīvēšanai
g6 E cilindrs saberšanai
h - Sulu spiede (atkarībā no modeļa)
h1 Spiede
h2 Vāks
h3 Rotējošais ltrs
h4 Savākšanas korpuss
h5 Noteces snīpis
h6 Atbrīvošanas svira
DROŠĪBAS NORĀDĪJUMI
98
LV
SM_KITCHEN-MACHINE-MC-GOURMET_MOUFAL_8080013263_OK_EST 06/12/13 14:23 Page98
Page 95

•
Vienmēr atvienojiet ierīci no tīkla, pirms to atstājat bez uzraudzības,
kā arī pirms ierīces salikšanas, izjaukšanas vai tīrīšanas.
•
Nelietojiet ierīci, ja tā nedarbojas pareizi vai ir bojāta. Šādā gadījumā
vērsieties serticētā servisa centrā (to saraksts ir pievienots).
•
Jebkādas darbības, kas nav parastā tīrīšana vai apkope, ko veic
klients, jāveic serticētam servisam (to saraksts ir pievienots).
•
Ne ierīci, ne kontaktdakšu, ne kabeli nelieciet ūdenī vai citā šķidrumā.
•
Neļaujiet elektrības kabelim brīvi karāties bērniem pieejamā vietā,
pieskarties tās karstajām daļām, siltuma avotiem un asām malām vai
atrasties to tuvumā.
•
Ja elektrības kabelis vai kontaktdakša ir bojāta, nelietojiet ierīci. Lai
neietekmētu drošību, detaļu maiņu vai remontu uzticiet serticētam
servisa centram (to saraksts ir pievienots).
•
Neievietojiet piederumus mikroviļņu krāsnī.
•
Jūsu drošības labad, izmantojiet vienīgi tādus piederumus un papildu
detaļas, kas piemērotas jūsu ierīcei un ko pārdod serticētos servisa
centros.
•
Ja ierīci izmantosiet nepareizi, jūs varat savainoties.
•
Asmeņi (d, f, g) ir ļoti asi — iztukšojot trauku, uzstādot asmeņus uz
piederuma vai noņemot asmeņus no tā, kā arī tīrīšanas laikā
rīkojieties ar tiem piesardzīgi, lai nesavainotos.
•
Vienmēr noņemiet blendera trauku (d) vai sulu spiedi (h), pirms
piespiežat daudzfunkcionālā uzgaļa, (a3) atbrīvošanas taustiņu (a2).
•
Strādājot ar gaļasmašīnas uzgaļa piederumu (f ), bīdot produktus
vienmēr izmantojiet spiedi (f7), nekad nedariet to ar pirkstiem, dakšu,
karoti, nazi vai kādu citu priekšmetu.
•
Nekad neaiztieciet kustīgās detaļas un pirms piederumu
noņemšanas sagaidiet pilnīgu ierīces apstāšanos.
•
Iekārtas darbības laikā neaiztieciet ne slotiņas, ne mīcītāju.
•
Kad ierīce darbojas, uzmanieties, lai virs tās nenokarātos mati, šalles,
kaklasaites u. tml.
•
Nekad neievietojiet galda piederumus (karoti, lāpstiņu...) caur vāku
atverēm (b2), (d2) vai (h2), kā arī cilindru kārbā (g1).
•
Nedarbiniet blendera trauku (d1) bez vāka (d2).
•
Vienā reizē lietojiet tikai vienu piederumu.
•
Nekad nelejiet blendera traukā verdošu šķidrumu.
•
Nelietojiet blendera trauku, kad tas ir tukšs.
•
Vienmēr izmantojiet blendera trauku ar vāku.
•
Nekad nenoņemiet vāku, pirms ierīce nav pilnībā apstājusies.
•
Blendera traukā vienmēr vispirms lejiet šķidrās sastāvdaļas un tikai
tad pievienojiet cietās sastāvdaļas.
•
Neizmantojiet tvertnes (b1, d1) kā konteinerus (saldēšanai, vārīšanai,
99
LV
SM_KITCHEN-MACHINE-MC-GOURMET_MOUFAL_8080013263_OK_EST 06/12/13 14:23 Page99
Page 96

sterilizācijai...).
•
Nelietojiet sulas spiedi, ja rotējošais ltrs (h3) vai aizsargvāks (h2) ir
bojāts vai saplaisājis.
•
Pirms piederumu nomaiņas un piekļuves detaļām, kas darbības laikā
ir kustīgas, izslēdziet ierīci un atvienojiet to no tīkla.
•
Esiet piesardzīgi, lejot karstu šķidrumu virtuves kombainā vai mikserī,
jo tas var pēkšņi izvirt no ierīces.
•
Šī ierīce nav paredzēta izmantošanai mājās šādā un tamlīdzīgā veidā
(uz šādu izmantojumu garantija neattiecas):
- virtuves darba zonā veikalos, birojos un citās darba vietās;
- zemnieku saimniecībās;
- to nevar izmantot viesnīcu, moteļu un citu dzīvojamo vietu
apmeklētāji;
- viesu namos un tamlīdzīgās vietās.
•
Informāciju par to, kā uzstādīt un noņemt ierīces piederumus,
var atrast dažādos attēlos un iedaļās „Piederumu uzstādīšana”
un „Piederumu noņemšana”.
•
Informāciju par to, kā iestatīt katra piederuma darbības ātrumu
un laiku, var atrast lietošanas norādījumos.
•
Šo ierīci nedrīkst izmantot bērni. Glabājiet ierīci un tās vadu bērniem
nepieejamā vietā.
• Bērni nedrīkst ar ierīci spēlēties.
•
Personas ar nepietiekamām ziskajām, maņu vai garīgajām spējām
vai arī personas ar nepietiekamu pieredzi vai zināšanām drīkst
izmantot šo ierīci, ja tās tiek uzraudzītas vai ir iepazinušās ar
norādījumiem par to, kā ierīci izmantot droši, un apzinās tās radītos
draudus.
•
Slotiņu (c3) un cilindrus smalkai un rupjai rīvēšanai (g5 un g4) var
izmantot bērni, kuriem ir vismaz 8 gadi, ja viņi tiek uzraudzīti vai ir
saņēmuši norādījumus par to, kā ierīci izmantot droši, un apzinās
ierīces radītos draudus. Bērni drīkst tīrīt un apkopt ierīci tikai tad, ja
viņiem ir vismaz 8 gadi un ja viņus uzrauga pieaugušais. Ierīce un tās
vads jāglabā vietā, kurai nevar piekļūt bērni, kam vēl nav 8 gadi.
•Pirms pirmās izmantošanas visus piederumus nomazgājiet ziepjūdenī (izņemot adapteri (e): skatīt
nodaļu par tīrīšanu). Noskalojiet un noslaukiet.
•Nolieciet iekārtu uz gludas, tīras un sausas virsmas, pārliecinieties, ka regulatora taustiņš (a1) ir
pozīcijā "0", pieslēdziet ierīci strāvai.
•Ir vairāki veidi, kā to iedarbināt:
- Darbība ar pārtraukumiem (pulse): Pagrieziet regulatora taustiņu (a1) pozīcijā "pulse", veicot
secīgas darbības, lai labāk kontrolētu gatavošanas procesu.
- Nepārtraukta darbība: Pagrieziet regulatora taustiņu (a1) vēlamajā pozīcijā no "1" līdz "max",
ņemot vērā veicamo darbību.
IEDARBINĀŠANA
100
LV
SM_KITCHEN-MACHINE-MC-GOURMET_MOUFAL_8080013263_OK_EST 06/12/13 14:23 Page100
Page 97

Gatavošanas laikā jūs to varat mainīt.
• Lai apturētu ierīci, pagrieziet taustiņu (a1) "0" pozīcijā.
Svarīgi: Ierīci var iedarbināt vienīgi tad, ja uzlika (a5) un uzgalis (a3) ir nostiprināti. Ja darbības
laikā noņemat uzliku (a5) un/vai uzgali (a3), ierīce uzreiz apstājas. No jauna nostipriniet uzliku
un/vai uzgali, vadības taustiņu (a1) pagrieziet "0" pozīcijā un veiciet parastās darbības, lai
iedarbinātu ierīci, izvēloties vajadzīgo ātrumu.
Šī virtuves ierīce ir aprīkota ar mikroprocesoru, kas kontrolē un analizē darbības jaudu. Pārāk lielas
noslodzes gadījumā, ierīce pati izslēdzas. Lai atkārtoti iedarbinātu ierīci, pagrieziet regulēšanas
taustiņu (a1) "0" pozīcijā un izņemiet daļu sastāvdaļu. Dažas minūtes ierīci nedarbiniet. Pēc tam jūs
varat izvēlēties vēlamo ātrumu, lai pabeigtu gatavošanu.
1 - MAISĪŠANA/MĪCĪŠANA/PUTOŠANA /EMULSIJAS GATAVOŠANA/KULŠANA
Atkarībā no sastāvdaļām nerūsējošā tērauda traukā (b1) ar vāku (b2) jūs varat sagatavot līdz pat 1,8 kg
mīklas.
IZMANTOTIE PIEDERUMI:
- Nerūsējošā tērauda trauks (b1).
- Vāks (b2)
- Mīcītājs (c1), maisītājs (c2) vai daudzzaru slotiņa (c3)
1.1 - PIEDERUMU UZSTĀDĪŠANA
•Piespiediet taustiņu (a2), lai atbrīvotu daudzfunkcionālo uzgali (a3), un paceliet to līdz galam.
•Nostipriniet nerūsējošā tērauda trauku (b1) uz ierīces (pulksteņrādītāja virzienā) un ielieciet
sastāvdaļas.
•Ievietojiet vēlamo piederumu (c1, c2 vai c3) izejā (a6), piespiediet un pagrieziet par četrdesmit
pieciem grādiem pretēji pulksteņrādītāja virzienam, lai nostiprinātu piederumu.
•Novietojiet daudzfunkcionālo uzgali (a3) horizontālā pozīcijā: piespiediet taustiņu (a2) un manuāli
laidiet lejā daudzfunkcionālo uzgali (a3), līdz tas ir nostiprināts (taustiņš (a2) atgriežas sākotnējā
pozīcijā).
•Novietojiet vāku (b2) uz nerūsējošā tērauda trauka (b1).
Piezīme: Vāka lietošana nav obligāta. Tas ļauj izvairīties no traipiem un izšļakstīšanās.
•Pārliecinieties, ka virs ātrās izejas (a4) ir kārtīgi nostiprināta uzlika (a5) (pulksteņrādītāja virzienā).
1.2 - IEDARBINĀŠANA
Ieslēdziet ierīci, pagriežot regulatora taustiņu (a1) vēlamajā pozīcijā, saskaņā ar recepti.
•Ierīce uzreiz sāk darboties.
Jūs gatavošanas laikā varat pievienot produktus caur vāka (b2) atveri.
•Lai apturētu ierīci, pagrieziet taustiņu (a1) "0" pozīcijā.
Ieteikumi:
- Mīcīšanai
- Izmantojiet mīcīšanas piederumu (c1) ar "1" ātrumu.
Jūs varat samīcīt līdz 500 g miltu (piemēram: baltmaize, graudu maize, drupaču mīkla, smilšu mīkla
u. c.).
- Maisīšanai
- Izmantojiet maisītāju (c2) ar ātrumu "1" līdz "max".
Jūs varat samaisīt līdz 1,8 kg vieglas mīklas (pīrāgiem, cepumiem utt.).
- Nekad neizmantojiet maisītāju (c2) smago mīklu mīcīšanai.
- Putošanai/kulšanai/emulsijas gatavošanai
- Izmantojiet daudzzaru slotiņu (c3) ar ātrumu "1" līdz "max".
Sadaļu numerācija atbilst ierāmēto shēmu numerācijai.
101
LV
SM_KITCHEN-MACHINE-MC-GOURMET_MOUFAL_8080013263_OK_EST 06/12/13 14:23 Page101
Page 98

- Jūs varat sagatavot: majonēzi, ķiploku mērci, citas mērces, saputot olu baltumus (līdz astoņiem olu
baltumiem), putukrējumu (līdz 500 ml)...
- Nekad neizmantojiet daudzzaru slotiņu (c3), lai mīcītu smagās mīklas vai maisītu vieglās
mīklas.
1.3 - PIEDERUMU NONEMSANA
•Pagaidiet, līdz ierīce pilnībā apstājas.
•Noņemiet vāku (b2).
•Piespiežot taustiņu (a2), atbrīvojiet daudzfunkcionālo uzgali (a3) un paceliet to uz augšu.
•Atbloķējiet piederumu (c1), (c2) vai (c3) no daudzfunkcionālā uzgaļa, spiežot piederumu uzgaļa
virzienā un pagriežot to par četrdesmit pieciem grādiem pulksteņrādītāja virzienā.
•Noņemiet nerūsējošā tērauda trauku.
2 - VIENDABĪGAS MASAS VEIDOŠANAI/MAISĪŠANAI/SMALCINĀŠANAI(ATKARĪBĀ
NO MODEĻA)
Atkarībā no produktu veida blendera traukā (d) jūs varat sagatavot līdz 1,5 l bieza maisījuma un 1,25
l šķidra maisījuma.
IZMANTOTIE PIEDERUMI:
- Blendera trauks (d).
2.1 - PIEDERUMU UZSTĀDĪŠANA
•Novietojiet daudzfunkcionālo uzgali (a3) horizontālā pozīcijā: piespiediet taustiņu (a2) un manuāli
laidiet lejā daudzfunkcionālo uzgali (a3) līdz tas ir nostiprināts (taustiņš (a2) atgriežas sākotnējā
pozīcijā).
•No ātrās izejas (a4) ņemiet drošības uzliku (a5), pagriežot to pretēji pulksteņrādītāja virzienam un
paceļot.
•Pirms blendera trauka (d) nostiprināšanas pārliecinieties, ka ierīce ir izslēgta.
•Nostipriniet blendera trauku (d) uz izejas (a4), pagriežot pulksteņrādītāja virzienā.
•Lieciet produktus smalcinātāja traukā un uzlieciet vāku (d2), kas aprīkots ar dozēšanas noslēgu (d3),
pagriežot to pretēji pulksteņrādītāja virzienam.
2.2 - IEDARBINĀŠANA
•Ieslēdziet ierīci, pagriežot regulatora taustiņu (a1) vēlamajā pozīcijā, saskaņā ar recepti.
Labākai smalcināšanas kontrolei un viendabīgas masas veidošanai, izmantojiet pozīciju "Pulse".
Jūs gatavošanas laikā varat pievienot produktus caur dozēšanas noslēga (d3) atveri.
•Lai apturētu ierīci, pagrieziet taustiņu (a1) "0" pozīcijā.
Ieteikumi:
Jūs varat sagatavot:
- Biezzupas, krēmus, kompotus, piena kokteiļus, kokteiļus.
- Vieglas mīklas (pankūkas, plāceņi, augļu pīrāgs, krēms brulē...).
- Ja jaukšanas laikā sastāvdaļas paliek pie trauka sienām, apturiet ierīci, noņemiet blendera trauku,
sabīdiet sastāvdaļas uz asmeņiem, novietojiet blendera trauku atpakaļ un turpiniet gatavošanu.
2.3 - PIEDERUMA NOŅEMŠANA
•Sagaidiet, lai ierīce ir pilnībā apstājusies, noņemiet blendera trauku, pagriežot to pretēji
pulksteņrādītāja virzienam, un uzlieciet uzliku (a5), noslēdzot izeju (a4) (pulksteņrādītāja virzienā).
3 - GAĻAS MALŠANAI (ATKARĪBĀ NO MODEĻA)
IZMANTOTIE PIEDERUMI:
- Piederumu turētājs (e)
- Salikts gaļasmašīnas uzgalis (f)
102
LV
SM_KITCHEN-MACHINE-MC-GOURMET_MOUFAL_8080013263_OK_EST 06/12/13 14:23 Page102
Page 99

3.1 - GAĻASMAŠĪNAS ADAPTERA UZSTĀDĪŠANA
•Piespiediet taustiņu (a2), lai atbrīvotu daudzfunkcionālo uzgali (a3), un paceliet to līdz galam.
•Novietojiet adapteri (e), pagriežot pretēji pulksteņrādītāja virzienam tā, lai izeja būtu ierīces
pagarinātajā daļā.
•Daudzfunkcionālo uzgali (a3) novietojiet horizontālā pozīcijā, vēlreiz nospiežot taustiņu (a2).
3.2 - GAĻASMAŠĪNAS UZGAĻA SALIKŠANA
•Satveriet korpusu (f1) aiz padeves caurules un novietojiet ar lielāko atveri uz augšu.
•Ievietojiet korpusā (f1) vītni (f2) (ar garo asi pa priekšu).
•Novietojiet asmeni (f3) uz vītnes (f2) īsās ass ar asajām malām uz ārpusi.
•Novietojiet izvēlēto restīti (f4 vai f5) uz asmens (f3), saskaņojot abus izciļņus ar abām iedobēm
korpusā (f1).
•Pulksteņrādītāja virzienā stingri uzskrūvējiet uzgriezni (f6) uz korpusa (f1), tomēr to nenobloķējot.
•Pārbaudiet, kā ir salikts. Ass nedrīkst kustēties un griezties ap sevi. Pretējā gadījumā atkārtojiet
iepriekš minētās darbības.
3.3 - GAĻASMAŠĪNAS DARBINĀŠANA UZ IERĪCES
•Pavēršot uz labo pusi, pielieciet salikto gaļasmašīnu (f ) pie adaptera (e) izejas, saskaņojiet abus
gaļasmašīnas izvirzījumus ar abām adaptera iedobēm. Ievietojiet gaļasmašīnas uzgali līdz galam un
tad, griežot pretēji pulksteņrādītāja virzienam, novietojiet gaļasmašīnas uzgali vertikālā pozīcijā, līdz
tas nobloķējas.
•Virs padeves caurules novietojiet noņemamo paplāti (f8).
3.4 - IEDARBINĀŠANA, PADOMI UN NOŅEMŠANA
•Pārliecinieties, ka drošības uzlika (a5) virs ātrās izejas (a4) ir kārtīgi nostiprināta (pulksteņrādītāja
virzienā).
•Ierīces priekšā nolieciet trauku sagatavotās masas savākšanai.
•Iedarbiniet, regulatoru (a1) pagriežot līdz "3" vai "4" ātrumam.
•Ar spiedes (f7) palīdzību caur padeves cauruli vienu pēc otra ievietojiet gaļas gabalus. Nekad
nebīdiet produktus padeves caurulē ar pirkstiem vai galda piederumiem.
•Lai apturētu ierīci, pagrieziet regulatoru "0" pozīcijā un sagaidiet līdz ierīce pilnībā apstājas.
•Noņemiet gaļasmašīnas uzgali, veicot uzstādīšanai pretējas darbības.
Ieteikumi:
- Sagatavojiet visus maļamos produktus (gaļai izņemiet kaulus, skrimšļus un cīpslas un sagrieziet to
aptuveni 2x2 cm lielos gabalos).
- Pārliecinieties, ka gaļa ir kārtīgi atsaldēta.
- Darbības beigās jūs varat ievietot dažus nelielus maizes gabalus, lai dabūtu ārā visu samalto gaļu.
4 - RĪVĒŠANAI/GRIEŠANAI (ATKARĪBĀ NO MODEĻA)
IZMANTOTIE PIEDERUMI:
- Piederumu turētājs (e)
- Salikts dārzeņu griezējs (g)
- Cilindri (atkarībā no modeļa)
4.1 - PIEDERUMU UZSTĀDĪŠANA
•Piespiediet taustiņu (a2), lai atbrīvotu daudzfunkcionālo uzgali (a3), un paceliet to līdz galam.
•Novietojiet adapteri (e), pagriežot pretēji pulksteņrādītāja virzienam tā, lai izeja būtu ierīces
pagarinātajā daļā.
•Daudzfunkcionālo uzgali (a3) novietojiet horizontālā pozīcijā, vēlreiz nospiežot taustiņu (a2).
103
LV
SM_KITCHEN-MACHINE-MC-GOURMET_MOUFAL_8080013263_OK_EST 06/12/13 14:23 Page103
Page 100

•Pārliecinieties, ka drošības uzlika (a5) virs ātrās izejas (a4) ir kārtīgi nostiprināta (pulksteņrādītāja
virzienā).
•Pavēršot uz labo pusi, pielieciet salikto cilindru kārbu (g1) pie adaptera (e) izejas, saskaņojiet abus
cilindru kārbas izvirzījumus ar abām adaptera iedobēm. Ievietojiet cilindru kārbu līdz galam un tad,
griežot pretēji pulksteņrādītāja virzienam, novietojiet to vertikālā pozīcijā, līdz tā nobloķējas.
•Ievietojiet kārbā izvēlēto cilindru un pārliecinieties, ka tas ir ievietots pilnībā.
4.2 - IEDARBINĀŠANA UN PADOMI
•Ierīces priekšā nolieciet trauku sagatavotās masas savākšanai.
•Iedarbiniet, regulatoru (a1) pagriežot līdz "3" ātrumam griešanai un "4" ātrumam rīvēšanai.
•Ievietojiet produktus kārbas padeves caurulē un bīdiet tos ar spiedi (g2). Nekad nebīdiet produktus
ar pirkstiem vai galda piederumiem.
•Lai apturētu ierīci, pagrieziet regulatoru "0" pozīcijā un sagaidiet līdz ierīce pilnībā apstājas.
•Noņemiet cilindru kārbu, veicot uzstādīšanai pretējas darbības.
• izmantojot cilindrus, jūs varat:
- Rupji sarīvēt C (g4)/smalki sarīvēt D (g5): burkānus, selerijas sakni, kartupeļus, sieru...
- Sagriezt biezās šķēlēs A (g3): kartupeļus, burkānus, gurķus, ābolus, bietes,…
- Saberzt E (g6): kartupeļus, parmezānu …
5 - AUGĻU UN DĀRZEŅU SULU SPIEŠANAI (ATKARĪBĀ NO MODEĻA)
IZMANTOTIE PIEDERUMI:
- salikta sulu spiede (h).
5.1 - SULU SPIEDES SALIKŠANA
•Novietojiet ltru (h3) savākšanas korpusa (h4) centrā.
•Vāka nostiprināšana: pagrieziet pretēji pulksteņrādītāja virzienam un nostipriniet vāku (h2) uz
savākšanas korpusa (h4) (pozīcijā "piekaramā atslēga slēgta").
•Pilnīga nostiprināšana: pabīdiet atbrīvošanas sviru (h6) pozīcijā "piekaramā atslēga slēgta".
5.2 - SULU SPIEDES NOVIETOŠANA UZ IERĪCES
•Novietojiet daudzfunkcionālo uzgali (a3) horizontālā pozīcijā: piespiediet taustiņu (a2) un manuāli
laidiet lejā daudzfunkcionālo uzgali (a3) līdz tas ir nostiprināts (taustiņš (a2) atgriežas sākotnējā
pozīcijā).
•No izejas (a4) ņemiet uzliku (a5), pagriežot to pretēji pulksteņrādītāja virzienam un paceļot.
•Pirms sulu spiedes (h) nostiprināšanas pārliecinieties, ka ierīce ir izslēgta.
•Nostipriniet salikto sulu spiedi uz izejas (a4), pagriežot pulksteņrādītāja virzienā tā, lai noteces snīpis
atrastos ierīces taisnajā daļā.
•Pievienojiet noteces snīpi (h5) savākšanas korpusam (h4).
5.3 - IEDARBINĀŠANA UN PADOMI
•Zem noteces snīpja novietojiet lielu glāzi (h5).
•Iedarbiniet, regulatoru (a1) pagriežot līdz "3" ātrumam.
•Augļus un/vai dārzeņus sagrieziet gabaliņos.
•Ievietojiet produktus vāka atverē (h2) un lēnām bīdiet tos ar spiedi (h1). Nekad nebīdiet produktus
ar pirkstiem vai galda piederumiem.
•Vienmēr pēc tam, kad piecas reizes pēc kārtas ir ievietoti 500 g produktu, ļaujiet ierīcei pilnībā atdzist.
•Lai iegūtu vislabāko rezultātu, ik pēc 300 g sastāvdaļu iztīriet ltru.
•Svarīgi: Tiklīdz savākšanas korpuss ir pilns ar mīkstumu, apturiet ierīci un iztukšojiet savākšanas
korpusu.
•Lai apturētu ierīci, pagrieziet regulatoru "0" pozīcijā un sagaidiet līdz ierīce pilnībā apstājas.
•Pirms saliktā piederuma noņemšanas no ierīces sagaidiet, līdz rotējošais ltrs pilnībā apstājas.
104
LV
SM_KITCHEN-MACHINE-MC-GOURMET_MOUFAL_8080013263_OK_EST 06/12/13 14:23 Page104
 Loading...