

Tefal P4624931 Product Manual
EN p. 1
FR p. 27
DE p. 52
NL p. 76
IT p. 100
ES p. 124
PT p. 149
DA p. 173
FI p. 197
NO p. 221
SV p. 245
BG p. 269
BS p. 293
CS p. 317
HR p. 341
HU p. 365
PL p. 389
RO p. 413
RU p. 437
SK p. 461
SL p. 485
SR p. 509
UK p. 533
www.tefal.com
ClipsoMinut'®Perfect
ClipsoMinut'®Duo
ClipsoMinut'®Easy
EN
FR
DE
NL
IT
A
C
B
D
G
F*
H
ES
PT
I
DA
FI
NO
E
SV
BG
J*
BS
CS
HR
K*
L*
HU
User manual - Guide de l'utilisateur -
Bedienungsanleitung - Gebruiksaanwijzing -
Manuale d’uso - Guía del usuario - Manual do
utilizador - Brugervejledning - Käyttöopas -
Bruksanvisning - Bruksanvisning - Ръководство на
потребителя - Vodič za korisnike - Uživatelská
příručka - Upute za korisnika - Használati útmutató -
Instrukcja obsługi - Ghidul utilizatorului -
August 2018 - 1520007351 - Realization : Espace Graphique
Руководство пользователя - Používateľská príručka
- Navodila za uporabnika - Uputstvo za upotrebu Інструкція з експлуатації
www.tefal.com
PL
RO
RU
SK
SL
SR
UK
M
N
O
*depending on model - *selon modèle - *Je nach Modell - *afhankelijk van model - *a seconda del modello - *según
el modelo - *consoante o modelo - *afhængig af modellen - *mallikohtainen - *avhengig av modell - *beroende på
modell - *В зависимост от модела - *ovisno o modelu - *v závislosti na modelu - *ovisno o modelu - *modelltől
függően - *w zależności od modelu - * în funcție de model - *в зависимости от модели - *v závislosti od modelu *odvisno od modela - *u zavisnosti od modela - *залежно від моделі
Min 25cl/ Min 250ml
MAX2
2/3
MAX
22
1
2
IMPORTANT PRECAUTIONS
Before using your pressure cooker, please take the time
to read all the instructions and always refer to the "User guide".
Improper use may result in damage.
fig 1 fig 2 fig 3
fig 5
fig 9 fig 10 fig 11 fig 12
fig 13 fig 14 fig 15 fig 16
fig 6
fig 7 fig 8
fig 4
For your safety, this appliance complies with the applicable standards and
regulations:
- Pressure Equipment Directive
- Materials that come into contact with food products
- Environment
MAKE SURE
the vents are not obstructed (see section “Before
cooking”). - fig 13.
the ball of the safety valve is mobile.- fig 18.
BEFORE USE
the lid gasket is placed under each notch of the lid
- fig 15.
the lid handles are properly fastened. The lid handles are
safety components. Never change them yourself. Never
use any other models of lid handles.
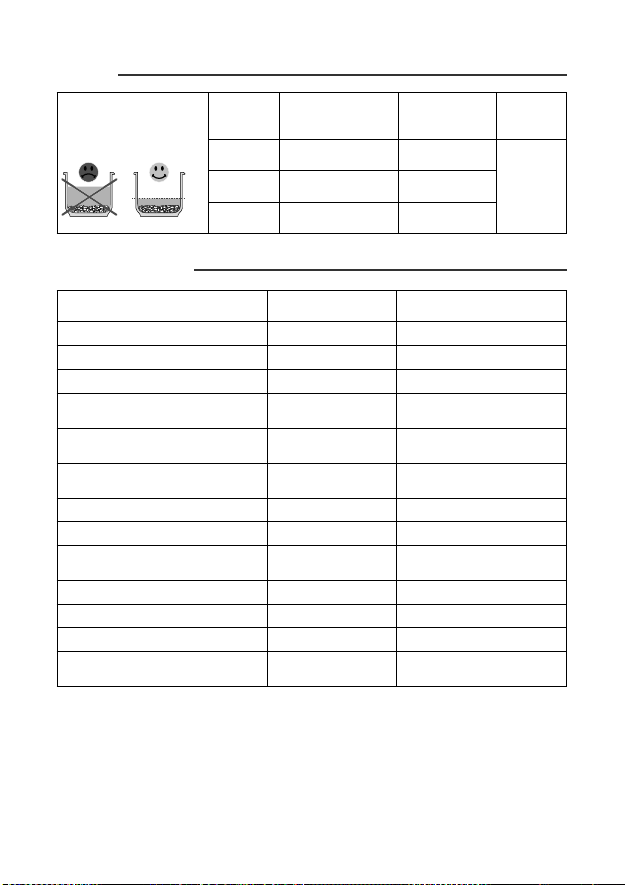
Never use your pressure cooker without liquid, as this
could damage it. Make sure there's always enough
liquid in the device when cooking.
Minimum 250 ml - fig 4.
Maximum 2/3 of the height of the pot, MAX 2 mark.
ALWAYS
RESPECT THE
FOLLOWING
FILLING
QUANTITIES
- fig 5.
When pressure cooking, the food in the steam basket*
should not be in contact with the water or the steam
basket* in contact with the water. - fig 6 and 7.
Maximum 1/3 of the height of the pot, (MAX 1 mark)
for foodstuffs that expand and/or foam during cooking,
such as rice, pulses, dehydrated vegetables, compotes,
pumpkin, courgettes, carrots, potatoes, fish fillets, etc.
Food in the steam basket should not exceed the MAX 2
level of the pot.
fig 17 fig 18 fig 19 fig 20

DURING AND
AFTER
COOKING
EN
Ensure close supervision if you are using the pressure
cooker near children.
Your pressure cooker cooks using pressure. Improper use
may result in scalding injuries. Make sure the pressure
cooker is properly closed before use (see section
"Closing").
During cooking, check that the valve murmurs regularly.
If there is not enough steam being released, increase the
heat source slightly.
Do not cook food that risks blocking the outlets for the
safety devices:
- blueberries
- pearl barley,
- oat flakes,
- split peas,
- noodles,
- macaroni,
- spaghetti,
- rhubarb,
- currants.
Never use your pressure cooker to cook milk-based recipes
(such as rice pudding, semolina pudding...).
For stainless steel pot, never use coarse sea salt in your
pressure cooker, only use fine salt at the end of cooking.
Never use your pressure cooker to fry under pressure using
oil.
Do not use your pressure cooker for any other purpose
than the one it is meant for.
Do not put your pressure cooker in a hot oven.
Never use aluminium foil unsecured on a container in
your pressure cooker. Always secure with string.
Never use cling film in your pressure cooker.
Alcohol vapour is flammable. Bring to a boil about 2
minutes before fitting with the lid. Check your pressure
cooker on a regular basis if you are making alcohol-based
recipes.
Only use the compatible heat source(s) listed in the user
guide.
1
AFTER
COOKING
For models with non-stick coating: do not use whisks or
metal or sharp-edged utensils. Do not drain your utensils
by tapping them on the edge of the pot, as this could
damage it and cause leaks.
Steadily turn the operating valve (A), to adjust the
decompression speed, and finish opposite the pictogram
mark - fig 10. If, when releasing steam, you notice
any food or liquid start to spray out, return the operating
valve (A) to the "Pressure Cooking" position, then carry
out fast decompression in cold water - fig 14.
If the pressure indicator (D) does not go down, carry out
fast decompression in cold water - fig 14.
Never interfere with the pressure indicator.
After cooking meats with an outer skin (e.g. beef tongue,
etc.), where there's a risk of swelling under pressure, don't
stab the meat when swollen to avoid being scalded. Be
sure to pierce the meat before cooking.
For foods that swell during cooking, such as rice, dried
vegetables, stewed fruit, etc., do not fill your pressure
cooker more than 1/3 full. For certain soups made with
pumpkins, courgettes, etc., leave your pressure cooker to
cool for a few minutes, and then cool it under cold water
(see section Fast decompression - fig 14).
Always be very careful when moving your pressure
cooker under pressure. Do not touch hot surfaces. Use the
handles and knobs. Use oven gloves when necessary.
For soups, we recommend you to do a fast release with
cold water (see section “ End of cooking with ‘pressure
cooking’ “).
Make sure operating valve (A) is in the decompression
position before opening the pressure cooker. The pressure
indicator (D) should be in the lowered position.
Never use force to open your pressure cooker. Make sure
the internal pressure has been released. The pressure
indicator (D) should be in the lowered position (see
section "Safety").
2

If you notice that a part of your pressure cooker is broken
or cracked, do not attempt to open it under any
circumstances; wait for it to cool down completely before
moving it. Do not use it again and take it to an TEFAL
Approved Service Centre for repair.
Do not tamper with the safety systems other than when
following the cleaning and maintenance instructions.
Only use the correct TEFAL original parts for your model.
Specifically use a TEFAL lid and pot.
Do not use your pressure cooker for storing acidic or salty
foods before or after cooking as it may damage your
pot.
CLEANING AND
MAINTENANCE
Clean and rinse your pressure cooker immediately after
each use.
Never put the operating valve (A), the gasket (I), the
timer* (F) or the pot with a non stick coating in the
dishwasher.
Never place the timer* (F) in water.
Do not use bleach or chlorine-containing chemicals.
Do not let the lid soak into water.
Change your pressure cooker’s gasket every year, or if
there is a cut.
Make sure you get your pressure cooker checked in a
TEFAL Approved Service Centre after 10 years of use.
To store your pressure cooker, rest the lid upside down on
the pot, to avoid premature wear of the lid gasket.
KEEP THESE INSTRUCTIONS
EN
* depending on model
3
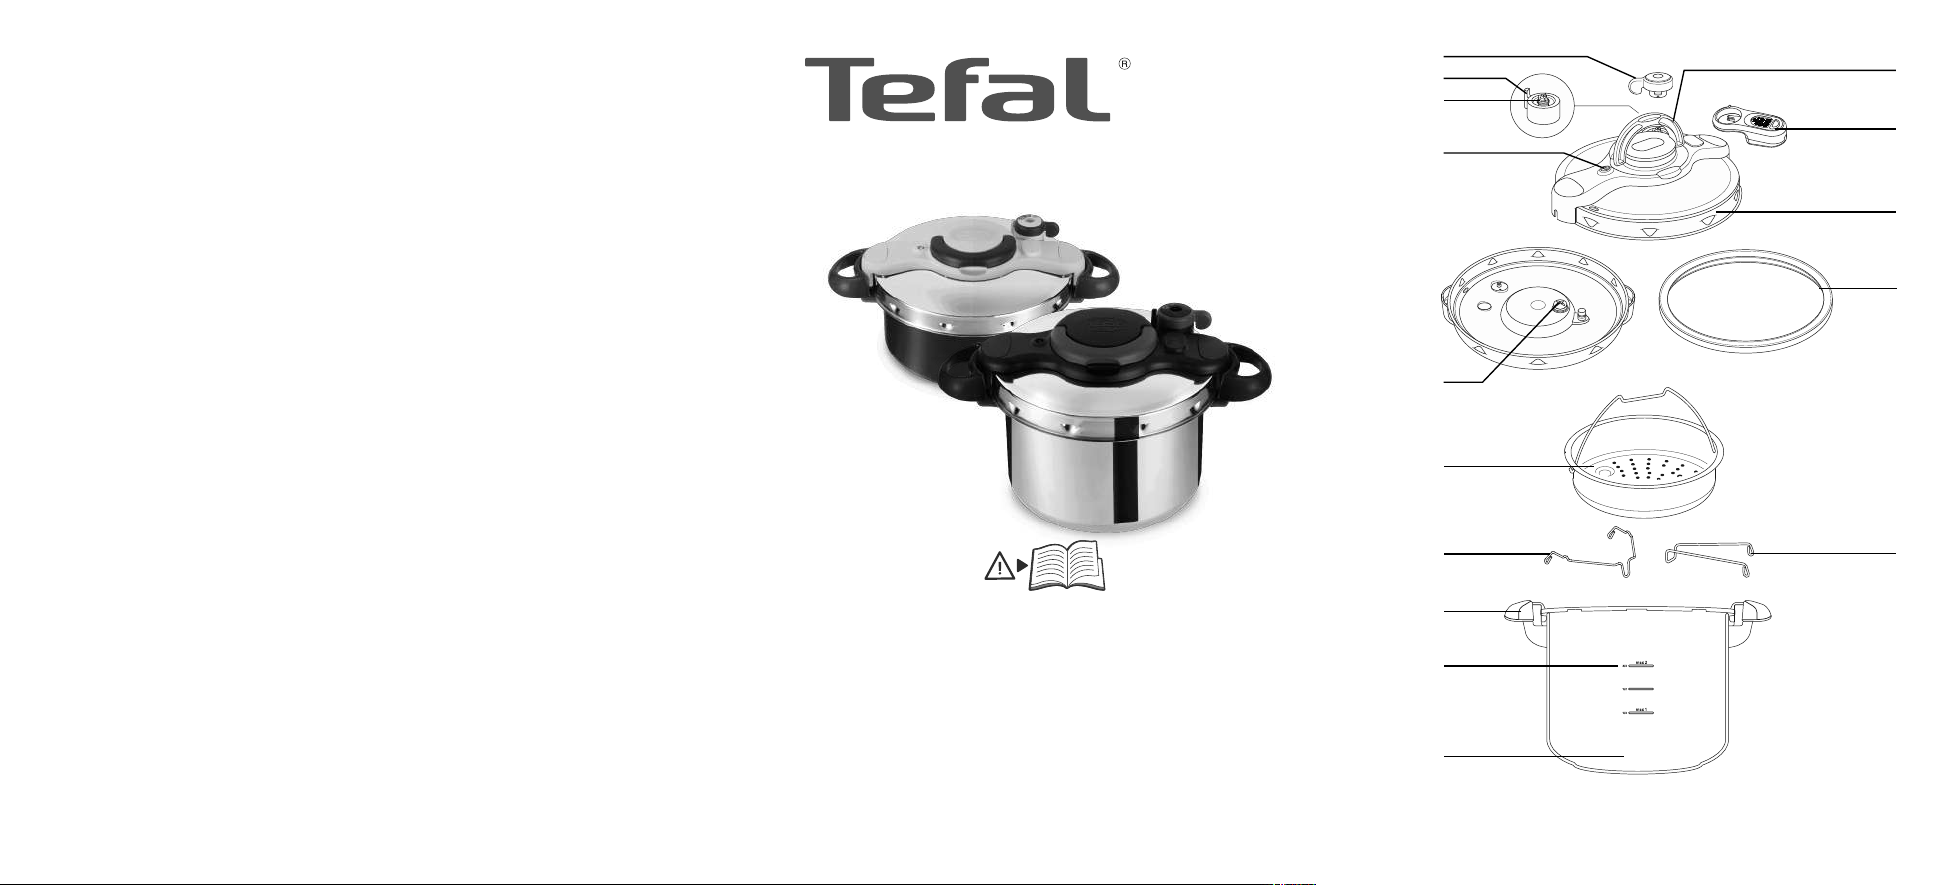
Description of diagram
A. Operating valve
B. Steam release outlet
C. Valve positioning mark
D. Pressure indicator (See
section "Safety")
E. Safety valve
F. Removable timer*
G. Lid handle
H. Lid
I. Gasket
J. Steam basket*
K./ L. Trivet*
M. Pot handle
N. Maximum fill lines
O. Pot
Compulsory checks before each use
Checking the operating valve
Check that the draining hole of the operating valve is not obstructed (see section
"Removal and installation of the operating valve").
Checking the safety valve
Check that the bearing of the safety valve can move (use a stick).
4
*depending on model

GAS ELECTRIC
(Solid plate)
ELECTRIC
(Radiant or halogen ceramic hobs)
ELECTRIC
(Ceramic induction hob)
ELECTRIC
(Spiral resistor)
Features
Your pressure cooker's base diameter - reference
Pot
24 cm
Base
diameter
14 cm
Capacity
Set
diameter
3 L 22 cm 15.5 cm P46205 - 3 L 22 cm 18 cm - - P46605
4 L 22 cm 14 cm - P46042 -
4.5 L 22 cm 15.5 cm P46206 - -
5 L 24 cm 14 cm - P46051 -
5.2 L 24 cm 20 cm - - P46654
7.5 L 24 cm 18 cm P46248 - 9 L 24 cm 18 cm P46249 - -
5 L
7.5 L 18 cm
Clipso
Minut'
Perfect / Easy
Lid material: stainless steel
Technical information:
Maximum operating pressure: 65 kPa/ 9 psi
Maximum safety pressure: 120 kPa/17.4 psi
Compatible heat sources
Clipso
®
Minut'
®
Duo colour
P46353 -
Clipso
®
Minut'
Duo Gourmet
Pot
material
Stainless
steel
Aluminium
coated
Stainless
steel
Aluminium
coated
Stainless
steel
EN
Your pressure cooker can be used on all heat sources including induction but
excluding Aga hobs.
On an electric , ceramic or induction hob, use a plate with a diameter equal
to or less than that of your pressure cooker base.
On ceramic hobs, make sure that the base of the pot is clean and dry.
On gas, the flame should not extend beyond the diameter of the pot.
On all heat sources, make sure that your pressure cooker is well centred.
5
Use
Pressure cooking Cooking with stew pot* Steam release
Opening
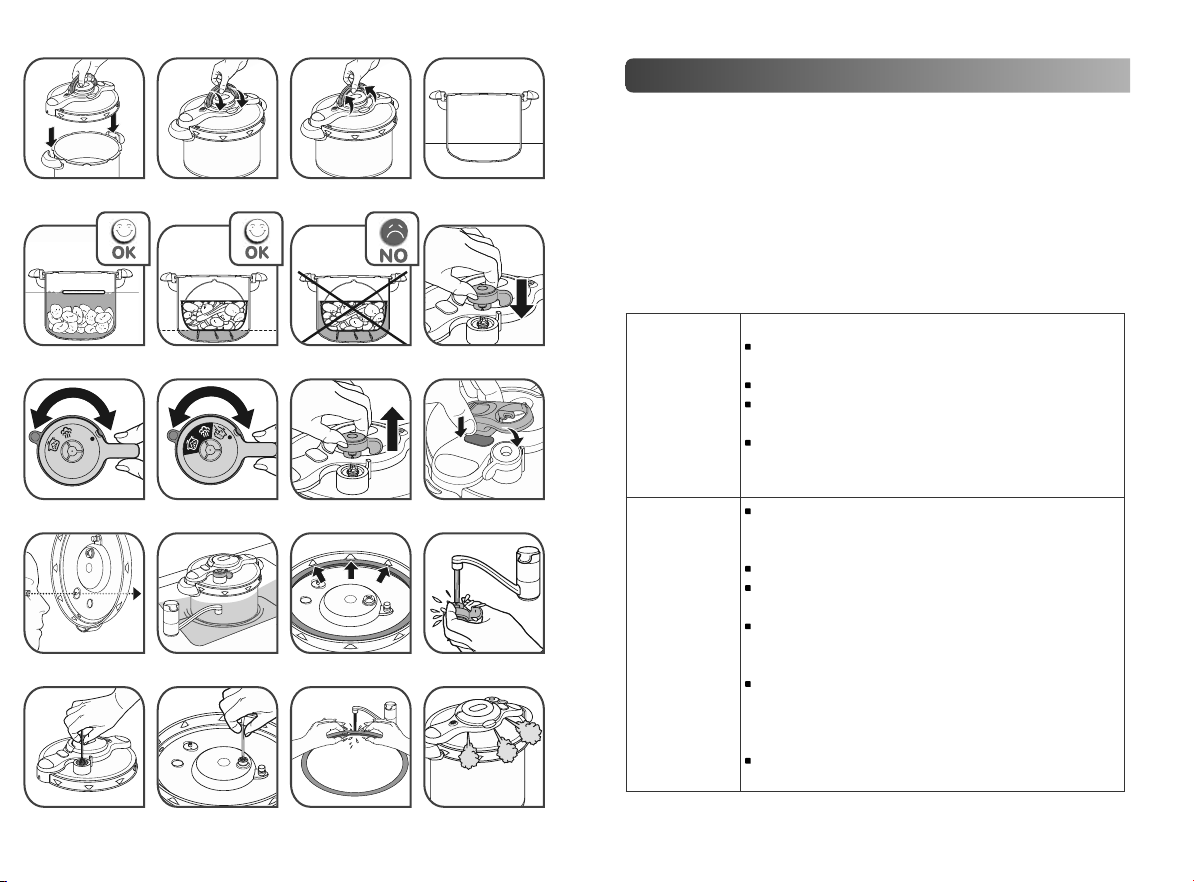
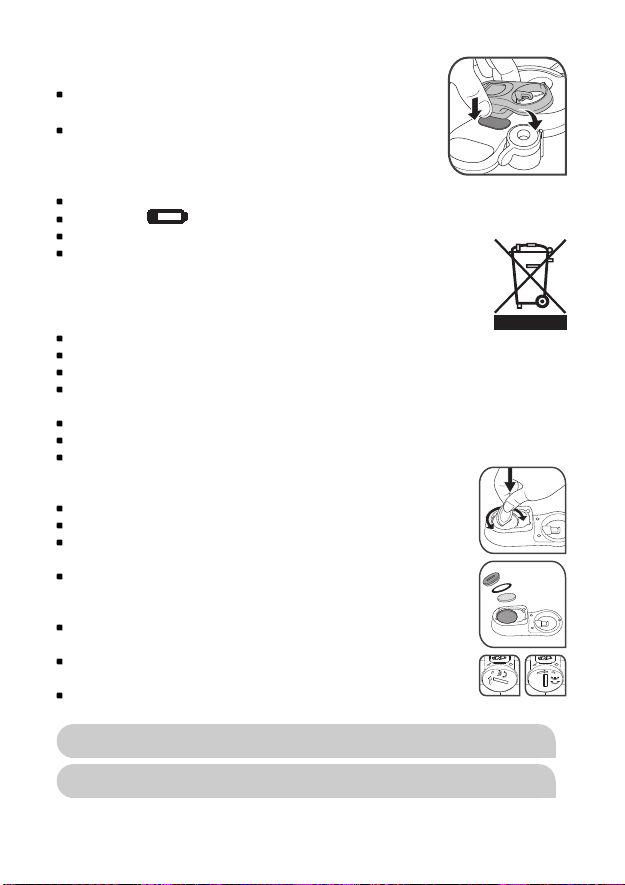
Switch the lid handle from a horizontal position to a vertical position - Fig. 3.
The lid turns.
Lift the lid.
In case of difficulties opening the lid, rinse the gasket under water and
replace it in the lid without drying it - fig 19 and take care to insert it under
each of the grooves on the lid - fig 15.
Closing
Ensure that the lid handle is in a vertical position.
Place the lid on the pot as indicated in - Fig. 1 by lining up the plastic part
with the pot handles.
Lower the lid handle back from a vertical position to a horizontal position -
Fig. 2.
It is normal that the lid turns on the pot. when the pressure cooker is closed
but not in operation. This effect disappears when it is pressurised.
If you are unable to close the lid:
Check the correct positioning of the gasket.
In case of difficulties closing the lid, rinse the gasket under water and replace
it in the lid without drying it - fig 19 and take care to insert it under each of
the grooves on the lid - fig 15.
Using for the first time
For models with a non-stick coating: wash and use cooking oil to lightly oil
the entire interior surface.
Depending on the model:
Place the pot handle * (L) and steam basket * (J) at the
bottom of the pot.
Clip the trivet * (K) to the steam basket * (J), then place it
at the bottom of the pot.
Fill the pot (O) with water up to 2/3 (MAX 2) - fig 5.
Close your pressure cooker.
Align the pictogram for the operating valve (A) with
the valve positioning mark (C) - Fig. 9.
6
*depending on model
Place your pressure cooker on a heat source then set to maximum power.
MAX1
1/3
When steam begins to exit the valve, turn down the heat source and set a
timer to 20 min.
After 20 min., turn off your heat source.
Gradually turn the operating valve (A), adjusting the speed that pressure is
released by how far you open the valve, to align the pictogram for the
operating valve (A) with the valve positioning mark (C).
When the pressure indicator (D) drops down again, your pressure cooker is
no longer under pressure.
Open your pressure cooker - Fig. 3.
Clean with washing-up liquid. Dry thoroughly.
Minimum and maximum fill level
Minimum 25 cl/250 ml (2 glasses) - Fig. 4.
Maximum 2/3 of the height of the pot, MAX 2 mark - Fig. 5.
Never use coarse salt in your pressure cooker, only use fine salt at the end of
cooking.
For some foods:
For foodstuffs that expand or foam during cooking, such
as rice, pulses, dehydrated vegetables, stewed fruit,
pumpkin, courgettes, carrots, potatoes, fish fillets, etc.
do not fill your pressure cooker beyond 1/3 (MAX 1) of
its capacity. Let your pressure cooker cool down for a
few minutes, then cool by standing in a sink half filled
with cold water. After having checked that the pressure
indicator has gone down, gently shake the pressure
before opening to prevent food from spurting out and burning you. This
operation is particularly important when steam is released quickly or after
cooling down in cold water. For soups, we recommend you to do a fast release
standing in cold water (see section “End of cooking with ‘pressure cooker’").
Do not cook foodstuffs that might block the safety components:
- blueberries, cranberries
- pearl barley
- oat flakes
- split peas
- noodles, macaroni, spaghetti
- rhubarb
- blackcurrants, redcurrants
EN
*depending on model
7
Using the steam basket*
MAX
Pour 750ml of water into the bottom of the pot (O).
Depending on the model:
Place the trivet* (L) and steam basket * (J) at the
bottom of the pot.
Clip the trivet * (K) to the steam basket * (J), and then
then place it at the bottom of the pot.
.
When pressure cooking, the food in the steam basket* should not be in
contact with the water - Fig. 6 and 7.
The food in the steam basket* must not touch the lid of the pressure
cooker.
Fitting and removal of the
Operating valve (A)
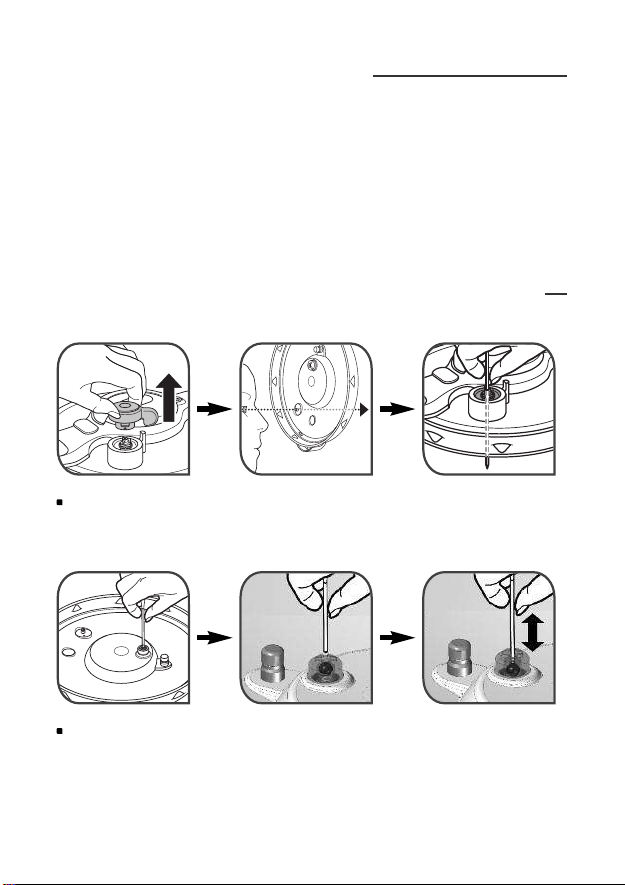
To remove the operating valve (A):
Align the groove with the operating valve positioning
mark (C) pressing down on the ring of the operating
valve (A).
Remove it - Fig. 11.
To fit the operating valve:
Fit the operating valve (A) - fig 8 aligning the dot on
the operating valve with the positioning mark (C); see
opposite.
dot
Press the operating valve (A) so that it engages on the
steam release outlet, then turn it to the pictogram
symbol required.
8
*depending on model
Timer*
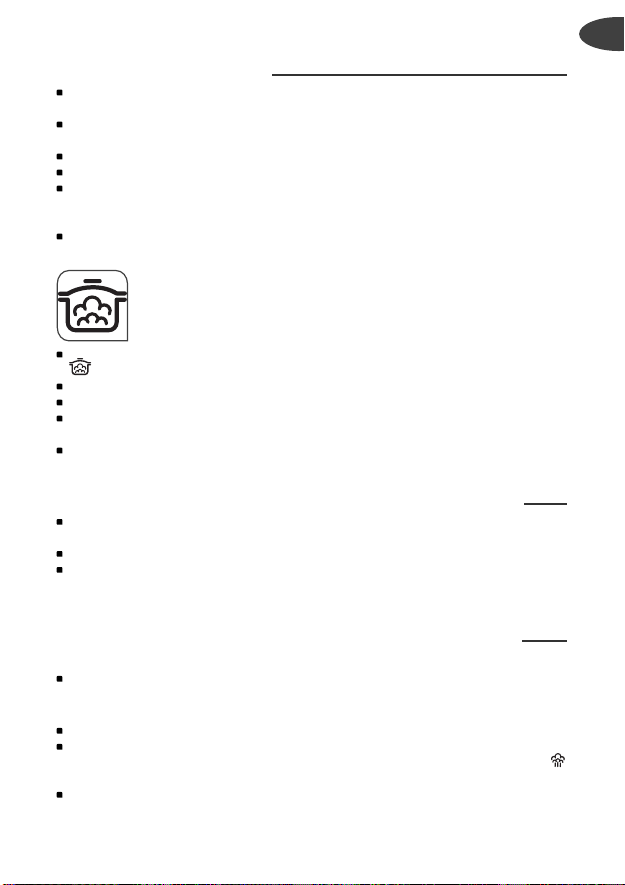
*Only provided for ClipsoMinut' Perfect model.
The timer has been designed to help you obtain the best cooking result by
allowing you to optimise energy consumption. It automatically counts down
the cooking time once the temperature required for cooking with "Pressure
Cooking" is reached .
The timer must be clipped to your pressure cooker in order to work.
During cooking, check that the operating valve (A) murmurs
regularly. If there is not enough steam, increase the heat source
slightly; if there is too much steam, reduce the heat source.
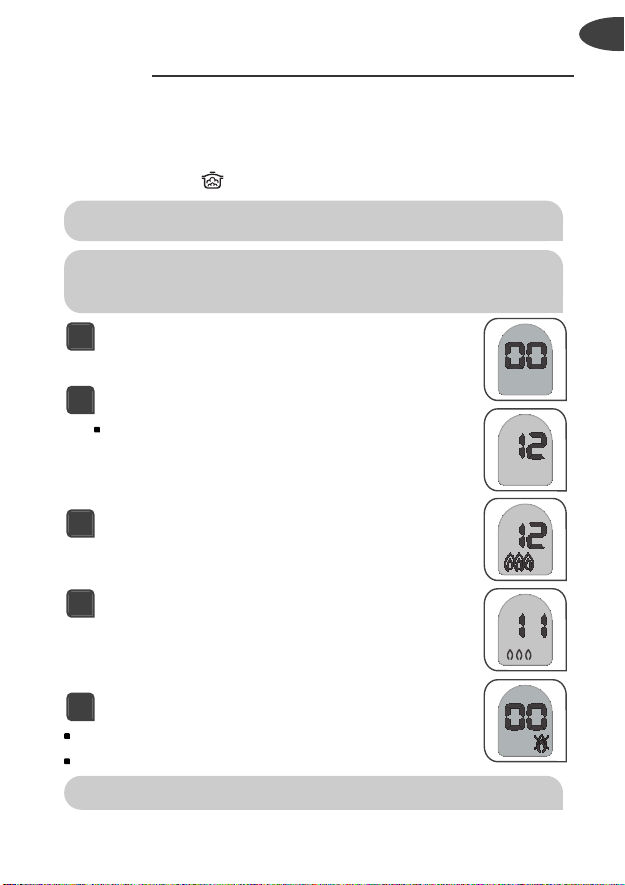
To switch on the timer: press the button.
1
Program the cooking time (in minutes).
2
If you made a mistake with the cooking time, wait for
4 seconds until the flame symbol does not flash any
more, then hold the button down to reset.
Start with the heat source at maximum power.
3
As soon as your pressure cooker has reached the
4
cooking temperature, the timer rings and the
countdown begins (numbers flash).
Reduce the power of the heat source.
EN
At the end of the cooking time, the timer rings.
5
To stop the timer ringing, press the button.
Turn off the heat source.
Holding the button down resets and switches off the timer.
*depending on model
9
Fitting and removing the timer*
22
1
2
+
To fit the timer (F) - Fig. 12, first insert the front part
into the module and then press to clip the rear part.
To remove the timer(F), lift it using the tab and remove
it.
Changing the timer* battery
The timer battery is a CR2032 type.
If the symbol appears, or if you no longer have a display, change the battery.
The battery life depends on how often the timer is used.
The battery contains Dimethoxyethane no. CAS 110-71-4. It is in
accordance with the European regulations. For your safety and the
environmental protection: do not open the battery, do not expose it to
high temperatures, do not throw it with household waste. Dispose of
battery at a battery disposal point.
Non-rechargeable batteries should not be recharged.
The battery must be inserted in the correct polarity.
A dead battery must be removed from the device and disposed of safely.
If the device is to be stored without being used for a long period of time, the battery
should be removed.
The power terminals must not be short-circuited.
Place the timer on a flat work surface.
To remove the battery from your timer, open the battery cover
with a coin (see illustration opposite), and carefully retain the
battery sealing ring.
Replace your battery (see diagram opposite).
Replace the battery sealing ring in it's casing.
Position the "half moon" on the battery cover opposite the
"half moon" on the timer.
◗
Gently turn the battery cover and continue to press lightly as
you align the "half moon" on the battery cover with the
moon on the timer.
●
Work on a flat work surface so that the cover is positioned
correctly horizontally.
Do not force the battery cover when you close it. Do not turn
beyond the stops.
If you lose your timer, you can purchase another from all of
our TEFAL Approved Service Centres.
Never place the timer* in water, nor in the dishwasher.
◗
◗
Never use the timer in "Stewpot" mode.
10
*depending on model
Before cooking
Before each use, remove the operating valve (A) - Fig. 11 and check the
steam release valve (B) is not blocked - Fig. 13.
Check that the safety valve bearing is mobile (see sections “Cleaning” and
“Compulsory checks before each use”) - Fig. 18.
Add your ingredients and the liquid.
Close your pressure cooker - Fig. 2.
In case of difficulties closing the lid, rinse the gasket under water and replace
it in the lid without drying it - fig 19 and 15 and take care to insert it under
each of the grooves on the lid.
Position the operating valve (A) - fig 8.
Cooking with
"Pressure Cooking"
Turn the operating valve (A) to the cooking with "Pressure Cooking" position
- fig 9. The pressure cooker operates at 65kPa / 9 lbs (psi).
Make sure your pressure cooker is properly closed before use - Fig. 2.
Place your pressure cooker on a heat source then set to maximum power.
For models equipped with a timer*: program the cooking time indicated in
the recipe (see section "Using the timer").
A clicking noise and steam emitted from the pressure indicator are normal
when bringing the cooker up to pressure, as the air escapes before cooking.
During cooking with "Pressure Cooking"
When the operating valve (A) is constantly emitting steam and making a
regular sound (PSCHHHT), lower the heat source.
Select the cooking time indicated in the recipe.
During cooking, check that the valve murmurs regularly. If there is not
enough steam being released, increase the heat source slightly; if there is
too much steam, reduce it.
EN
End of cooking with "Pressure Cooking"
To release the steam:
When the heat source has been turned off, you have two options:
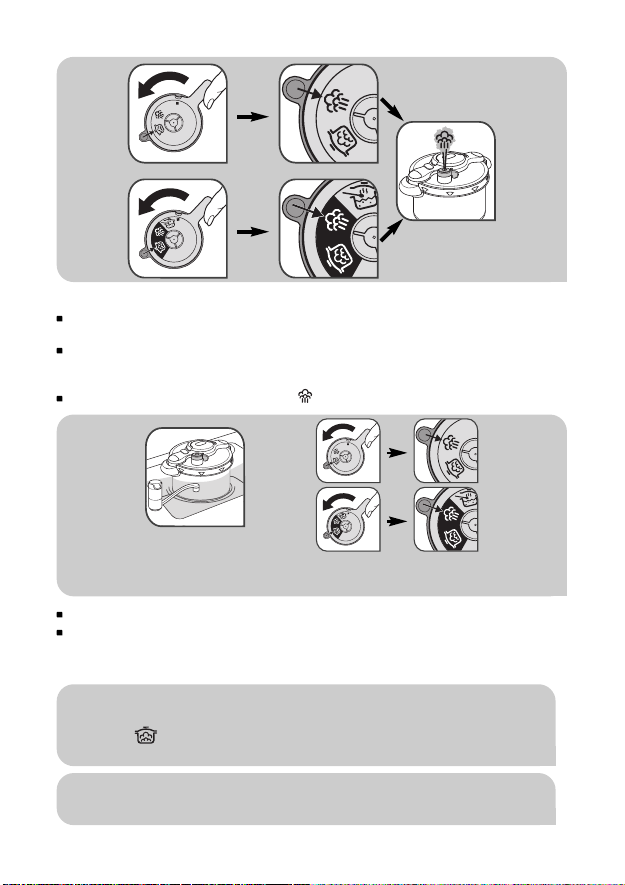
• Gradual pressure release:
This is used for stews, vegetables, meat joints and fish dishes.
Gradually turn the operating valve (A), adjusting the speed that the pressure
is released by how far you open the valve, until the steam release symbol
is is opposite the positioning mark (C) (see diagrams on page 12).
When the pressure indicator (D) drops down, your pressure cooker is no
longer under pressure.
*depending on model
11
•
Fast pressure release with cold water:
This is used for soups, rice, pasta, egg custards, cake and pudding mixes,
recipes containing rice or pasta, and recipes with a high liquid content.
Place your pressure cooker in a sink half-filled with cold tap water (see diagram
below step 1) until the pressure indicator (D) goes down, and your pressure
cooker is no longer under pressure.
Turn the operating valve (A) to the position (see diagram below step 2).
Step 1
{
Step 2
You can open your pressure cooker - fig 3.
In case of difficulties opening the lid, rinse the gasket under water and
replace it in the lid without drying it - fig 19 and take care to insert it under
each of the grooves on the lid - fig 15.
If you notice food or liquid start to spray out from the valve during
steam release, return the operating valve (A) to the "pressure
cooker" position, then wait a few minutes and follow the
instructions above for fast pressure release with cold water.
If the pressure indicator (D) does not come down, follow the instructions
above for fast pressure release with cold water - fig 14
12
.
Never interfere with the pressure indicator.
For foodstuffs that expand or foam during cooking, such as rice, pulses, dried
vegetables, stewed fruit (compotes), pumpkin, courgettes, carrots, potatoes,
fish fillets, etc. do not fill your pressure cooker beyond 1/3 (MAX 1) of its
capacity. Let your pressure cooker cool down for a few minutes, then cool by
standing in a sink half filled with cold water. After having checked that the
pressure indicator has gone down, gently shake the pressure cooker before
opening to prevent food from spurting out and burning you. This operation
is particularly important when steam is released using the fast pressure
method by cooling in cold water.
For soups, we recommend you to do a fast pressure release with cold water
(see section “End of cooking with ‘pressure cooker’").
Cooking with the “Stewpot"*
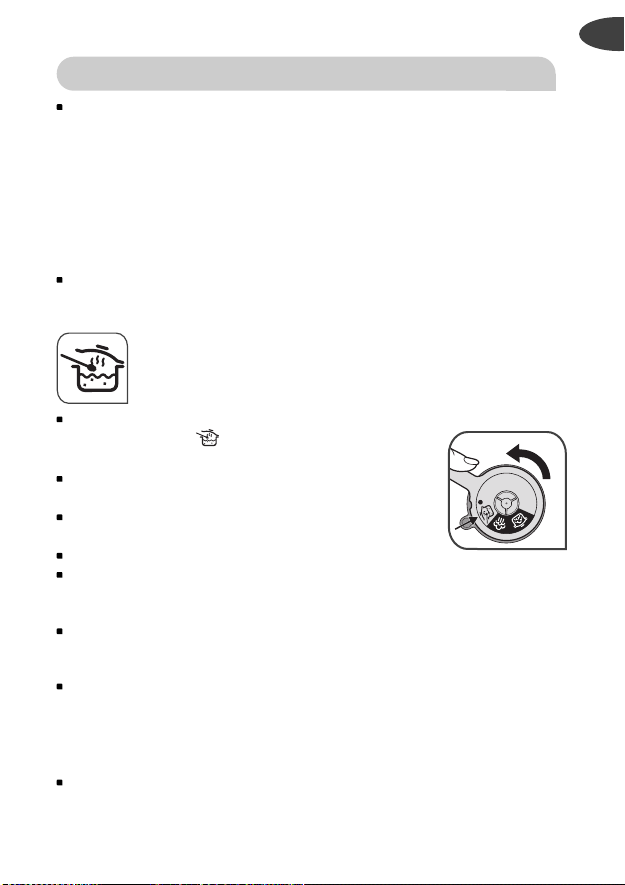
Turn the operating valve (A) to the cooking with
“Stewpot" position . To do this, apply enough force
to go beyond the notch in the decompression position.
Make sure the pressure cooker is properly closed - Fig.
2 before use.
Place your pressure cooker on a heat source set at low
heat.
Select the cooking time indicated in the recipe.
When 'stewpot' cooking, you can open your pressure
cooker at any time to stir, check whether the food is cooked or add
ingredients.
In case of difficulties opening the lid, rinse the gasket under water and
replace it in the lid without drying it - fig 19 and 15 and take care to insert
it under each of the grooves on the lid.
If the heat source is set too high, the pressure cooker may lock (the pressure
indicator (D) rises and blocks the opening) and the lid handle may not work
or may not open the pressure cooker. In this case, reduce the heat or turn
off the heat source. If you are using cast iron heating plates to open the
lid, remove the pressure cooker from the heat source.
For models with non-stick coating: do not use whisks or metal or sharp
utensils. Do not drain your utensils by tapping them on the side of the pot as
this risks damaging it and causing leaks.
*depending on model
EN
13

Never let fat or oil burn in the pot until completely carbonised. The cooking
fumes could be dangerous to animals with a particularly sensitive respiratory
system, such as birds. Bird owners should keep them away from the kitchen.
Safety
Your pressure cooker is fitted with several safety devices:
Closing safety:
- If the lid is not positioned correctly or if you forget to fold down the lid handle,
the steam will seep out on the lid (near the pressure indicator D) of the
pressure cooker and it can not build up pressure.
- If you forget to fold the lid handle to the horizontal position, steam leaks.
Opening safety:
- If your pressure cooker is under pressure, the pressure indicator (D) is up and
the opening/closing lid handle (G) should not be used.
- Never try to forcibly open the pressure cooker.
- Above all do not touch the pressure indicator (D).
- Make sure that the interior pressure has fallen (pressure indicator (D) in
lowered position) before opening the pressure cooker.
- The lid handles are safety components. Never change them yourself. Never
use any other models of lid handles.
- If you attempt to move the opening/closing lid handle (G) to a vertical
position while the pressure cooker is still under pressure, you are not able to
open it. This function is an additional safety measure. In this circumstance,
move the lid handle back to a horizontal position and wait until the pressure
indicator (D) is in the lowered position.
Two safety devices against overpressure:
- First device: the safety valve (E) releases the pressure
- Second device: the gasket allows steam to escape from the lid - fig 20.
If one of the overpressure safety systems is triggered:
Turn off the heat source.
Allow the pressure cooker to cool completely.
Open.
Check and clean the operating valve (A), the steam release outlet (B), the
safety valve (E) and the gasket (I) - Fig. 16 - 17- 18. See section “Compulsory
checks before each use”.
If, after these checks and cleaning, your product leaks or no longer works,
take it to an TEFAL Approved Service Centre.
- fig 20.
14

Recommendations for use
1 - Steam is very hot when it leaves the operating valve. Watch out for
the jet of steam.
2 - While the pressure indicator is high, you cannot open the pressure
cooker.
3 - As with any cooking appliance, ensure close supervision if you are
using your pressure cooker near children.
4 - To move your pressure cooker, use the two pot handles.
5 - Never leave food in your pressure cooker. Never carry your pressure
cooker by the lid handle.
6 - Never use bleach or products containing chlorine, as these will alter
the quality of the steel.
7 - Do not leave the lid soaking in water.
8 - Change the gasket every year or if it is split or damaged.
9 - You should only clean your pressure cooker when it is cold and empty.
10 - Make sure you get your pressure cooker checked in a TEFAL Approved
Service Centre after 10 years of use.
Cleaning
To ensure the correct operation of your pressure cooker, follow these cleaning
and maintenance recommendations after each use.
The browning and marks which may appear following long use do
not affect the operation of the pressure cooker.
Wear of the exterior coating as a result of the contact between
the lid and pot is normal.
For pressure cookers with non stick coating (according to model):
the slight scratches and abrasions that may appear with use do not
affect the coating's non stick performance.
EN
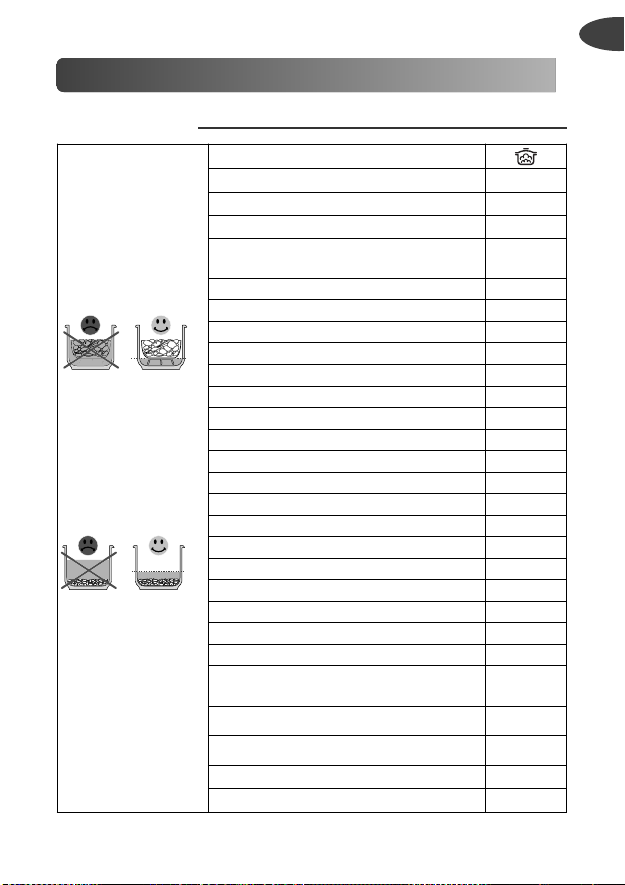
Wash your pressure cooker after each use using warm water with a little
washing-up liquid added. Follow the same procedure for the basket*.
Do not use bleach or chlorine-containing chemicals.
Do not heat your pot when empty.
To clean the inside of the stainless steel pot:
Wash using a sponge and washing-up liquid.
If the interior of the steel pot has an iridescent sheen or white marks (mineral
deposits), clean using a sponge with a little white vinegar.
*depending on model
15

To clean the inside of the aluminium pot with a non stick coating:
To prolong the product's lifespan, we recommend washing by hand only.
Wash with hot water, washing-up liquid and a soft sponge.
Do not use scouring powder or abrasive sponges.
If you have burned some food, fill the pot with hot water and leave to soak.
Then clean with washing-up liquid.
You can wash the stainless steel pot and the basket in the dishwasher.
Do not put the pot with a non stick coating (according to model) in the
dishwasher, because detergents tablets contain substances that are
very aggressive and corrosive for aluminium parts.
Extended use of pots with a non stick coating (according to model)
may slightly alter the colour of the coating (yellowing, staining).
To clean the outside of the pot:
Wash using a sponge and washing-up liquid.
To clean the lid:
Wash the lid using a damp sponge and washing-up liquid.
Drain the lid vertically to remove the remaining water between the
metal and plastic parts of the lid.
To clean the gasket:
After each use, clean the gasket (I) and its housing.
To replace the gasket, refer to - Fig. 15 and ensure that the gasket is properly
inserted beneath each of the grooves on the lid.
To clean the operating valve (A):
Remove the operating valve (A) - Fig. 11
Clean the operating valve (A) under cold tap water
- Fig. 16.
Check its mobility: see figure opposite.
After removing the operating valve (A), the
gasket (I) and the timer* (F), you can put the lid
in the dishwasher.
16
*depending on model

Never put the operating valve (A), the gasket (I), the timer* (F), or
the pot with the non stick coating in the dishwasher.
To clean the steam release outlet (B) located on the lid:
Remove the valve (A) - Fig. 11
Check to make sure the steam release outlet is clear of debris and round -
Fig. 13. If needed, clean it with a tooth pick - Fig. 17 and rinse it.
To clean the safety valve (E):
Clean the part of the safety valve located inside the lid by washing under
water.
Check its proper functioning by pressing firmly using a cotton bud (with the
cotton wool tip removed), and the bearing must be mobile - Fig 18. See
section “Compulsory checks before each use”.
To clean the timer* (F):
Use a clean dry cloth.
Do not use any solvents.
Never place the timer in water, nor in the dishwasher.
Maintenance
To change your pressure cooker's gasket:
Change your pressure cooker's gasket every year or if split or damaged.
Always use an original TEFAL gasket corresponding to your model (see
section "Accessories")
To replace the gasket, refer to - Fig 15 and ensure that the gasket is properly
inserted beneath each of the grooves on the lid.
To store your pressure cooker:
Turn the lid over on the pot.
The pressure cooker's opening and closing system does not require any
specific maintenance apart from cleaning.
Make sure you get your pressure cooker checked in a TEFAL Approved
Service Centre after 10 years of use.
EN
*depending on model
17

TEFAL Accessories
Commercially available pressure cooker accessories are:
Accessories References
Gasket
Steam basket*
To replace other parts or for repairs, contact a TEFAL Approved Service Centre.
Only use the correct TEFAL original parts for your model.
Guarantee
When used as recommended in the manual, the stainless steel pot of your
new TEFAL pressure cooker is guaranteed for 10 years against:
- Any defect linked to the metallic structure of your pot,
- Any premature deterioration of the base metal
All other pot materials and all other parts of your pressure cooker are
guaranteed against defects in workmanship or materials, for the period
of guarantee defined in valid legislation in force in the country where the
product was purchased from the date of purchase.
This contractual guarantee is established upon presentation of the receipt
or invoice showing the date of purchase.
These guarantees exclude:
Scratches and discolouration resulting from ageing for pans with non stick
coating.
Damage resulting from failure to comply with important precautions, or
negligent use, particularly:
- Impacts, falls, use in the oven, etc.
Only TEFAL Approved Service Centres are authorised to provide this
guarantee service.
Please call our local rate number to find out the address of your nearest
TEFAL Approved Service Centre.
18
3/4/4.5/6 L: outer diameter of gasket: 24 cm X1010008
5/7.5/9 L: outer diameter of gasket: 27 cm
3/4.5/4/6 L: for pot with 22 cm diameter
5/7.5/9 L: for pot with 24 cm diameter 792654
Trivet*
Timer*
X1010007
792185
792691
X1060007
Regulatory markings
Labelling Location
Trademark On the lid.
Year and batch manufacture
Reference model
Maximum safety pressure (SP)
Maximum operating pressure (OP)
Capacity On the outer base of the pot.
Manufacturer's postal address On the outer base of the pot.
Think of the environment!
i Your appliance contains valuable materials which can be
recovered or recycled.
‹ Leave it at a local civic waste collection point.
On the lid.
EN
19
Troubleshooting
Problems Recommendations
If it becomes
difficult to open
and/or close it:
If you are unable
to close the lid:
Remove the gasket,
Rinse the gasket under running water then replace it
in the lid without wiping it - fig 19.
Check that the lid handle is in a vertical position.
Check that the gasket is positioned correctly (see
section "Cleaning and maintenance").
Check that the lid is positioned as indicated on
(when pressure cooking)
- Fig 1.
Rinse the gasket under running water then replace it
in the lid without wiping it - fig 19 and ensure that it
is correctly positioned under the grooves on the lid -
fig 15.
If your pressure
cooker has been
heated under
pressure without
liquid inside:
If the pressure
indicator emits a
clicking noise and
steam.
If the pressure
indicator has not
risen and nothing
is escaping
through the vent
during cooking:
Have your pressure cooker checked by a TEFAL Approved Service Centre.
This is normal during the first few minutes : it allows
escape of air before cooking.
This is normal during the first few minutes.
If the phenomenon persists, check that:
- The heat source is sufficiently strong; if not, increase
it.
- The quantity of liquid in the pot is sufficient.
- The operating valve (A) is positioned on .
- Your pressure cooker is properly closed.
- There is no deterioration of the gasket or edge of the
pot.
- The gasket is correctly positioned.
20
EN
Problems
If the pressure
indicator has risen
but nothing is
escaping through the
vent during cooking:
If steam leaks out
around the lid, and
the pressure indicator
is in the lowered
position, check:
If you are unable to
open the lid:
If the food is not cooked or is burned,
check:
If food has burnt in
your pressure cooker:
If one of the
overpressure safety
systems is triggered:
If you notice the
appearance of
oxidation marks
inside the stainless
steel pot:
Recommendations
This is normal for the first few minutes.
If this persists, run cold water into your sink and submerge the bottom of your pressure cooker until the
pressure indicator (D) comes down.
Clean the operating valve (A) - Fig. 16 and the steam
release outlet - Fig. 17 and use a cotton bud to check
that the security valve ball can be pressed without
any problems - Fig. 18.
The correct closure of the lid.
The position of the gasket.
The condition of the gasket; replace if necessary.
The cleanliness of the lid, the gasket and its housing
in the lid.
The condition of the edge of the pot.
Check that the pressure indicator (D) is in the
lowered position.
Otherwise, depressurise, run cold water into your sink
and submerge the bottom of your pressure cooker
until the pressure indicator comes down.
Never interfere with the pressure indicator (D).
Turn the operating valve (A) to the position
The cooking time.
The power of the heat source.
The correct position of the operating valve (A).
The quantity of liquid.
Fill the pot with water and soak for a while before
washing.
Never use bleach or chlorine-containing chemicals.
Turn off the heat source.
Let your pressure cooker cool down without moving
it. Wait for the pressure indicator to fall and open the
pressure cooker.
Check and clean the operating valve (A), the steam
release outlet, the safety valve and the gasket.
If the problem persists, have your pressure cooker
checked by a TEFAL Approved Service Centre.
The use of high performance stainless steel does not
prevent the appearance of oxidation in extreme
cases. If you notice oxidation marks, remove them by
rubbing with an abrasive sponge before using your
pressure cooker again.
21

Golden rules when pressure cooking
(for UK Consumers)
For 5 Litre and 5.2 Litre models only.
• The minimum quantity of liquid required for normal cooking is 250 ml (½
pint) for the first ¼ hour cooking. For each additional ¼ hour, or part of ¼
hour, add a further 150 ml (¼ pint) of liquid. For example, 45 minutes
cooking requires 600 ml (1 pint) of liquid. Note: This is only a general guide.
Certain foods, such as rice, pulses, steamed puddings and Christmas
puddings may require extra water (see details below).
• When steaming foods in the basket use a minimum of 750 ml (1¼ pint)
water in the cooker.
• Always use a liquid that gives off steam when boiled e.g. water stock, wine,
beer, cider. Never use oil or fat. All pressure cooking requires some liquid.
• Whatever the size of pressure cooker, the maximum filling level when all the
ingredients and liquid have been added are:
Solid foods e.g. vegetables, meat joints: no more than two-thirds full
(MAX 2 mark)
Liquids and cereals e.g. soups, stews, cereal and pasta: no more than
half full
Foods that swell during cooking e.g. rice, dried beans, dried peas, dried
vegetables, stewed fruit (compotes), pumpkin, courgette and
potatoes, etc: no more than one-third full (MAX 1 mark).
• When cooking pulses they swell up and tend to froth up. Use 1.2 litres (2
pints) water for every 450 g (1 lb) pre-soaked weight of pulses. Remember
all dried peas and dried beans, must be soaked in boiling water for 1 hour
before cooking. Drain, rinse thoroughly and cook in fresh water. Never eat
uncooked beans or peas. Soaking is not necessary for red lentils. The high
temperatures achieved in the pressure cooker ensure that any natural toxins
in the pulses are destroyed. Canned beans and pulses can simply be drained
and rinsed before adding to the pressure cooker.
• For steamed suet puddings, sponge puddings or Christmas puddings, a short
pre-steaming time is best to enable the raising agent to activate and prevent
a heavy, close texture. Extra liquid is required so use a minimum of 1½
pint/900 ml of boiling water for a combined steaming and cooking time of
up to 1 hour. For each additional ¼ hour of cooking, or part of ¼ hour, add
a further ¼ pint/150 ml of boiling water. Pre-steaming is done with the
operating valve in the steam release position on a low heat for the required
time. Then turn the operating valve to , and increase the heat to bring
to full pressure. Lower the heat and pressure cook for the required time.
22

• Pressure operates at 65 kPa (9psi/9lbs).
• Never cook dumplings with the lid tightly closed, as they could rise up and
block the safety devices. Cook the stew and at the end of cooking, release
the steam and cook gently for about 10 - 15 minutes without the lid on.
• Pressure cooking times vary according to the size of individual pieces or
thickness of the food, not the weight.
• To prevent discolouration of the inside of the stainless steel pot, caused by
mineral deposits in hard water areas, add a tablespoon of lemon juice or
vinegar.
• Cooking containers must withstand temperatures of 130°C (250°F). Any
covering on containers, e.g. foil, greaseproof paper, must be securely tied
otherwise they could block the safety devices. Do not use plastic lids as they
prevent steam from being in contact with the food. Also, they could distort
and come off during cooking which could block the safety outlets.
• Accurate timing is essential when pressure cooking to prevent overcooking,
especially with vegetables, fruit and fish.
• Never make milk-based recipes (such as rice pudding, semolina pudding..)
when pressure cooking.
EN
23

Australian – NZ warranty
COOKWARE, BAKEWARE AND PRESSURE COOKERS
Limited Replacement Guarantee
Our goods come with guarantees that cannot be excluded under the
Australian Consumer Law. You are entitled to a replacement or refund for a
major failure and compensation for any other reasonably foreseeable loss or
damage. You are also entitled to have the goods repaired or replaced if the
goods fail to be of acceptable quality and the failure does not amount to a
major failure. In addition to these statutory rights and any other rights and
remedies you may have under the law, Groupe SEB Australia Pty Ltd (we or
us) guarantees this Jamie Oliver by Tefal/Tefal/All-Clad/Moulinex product will
be free of defects in material and craftsmanship including handles, body,
knobs, lids and fixings for 12 months from the date of purchase.We also
guarantee the non-stick coating of this Jamie Oliver by Tefal/Tefal/AllClad/Moulinex product will be free of blistering or peeling for the life of the
Jamie Oliver by Tefal/Tefal/All-Clad/Moulinex product. Should your Jamie Oliver
by Tefal/Tefal/All-Clad/Moulinex product develop a defect during the
guarantee period or the non-stick coating peel during the life of your Jamie
Oliver by Tefal/Tefal/All-Clad/Moulinex product, you should return it, at your
cost, to the retailer from which you purchased it from, together with your
receipt as proof of purchase. The retailer will then forward your claim directly
to us for processing. Alternatively, if the retailer is unable to help you, you may
contact us directly at:
Groupe SEB Australia Pty Ltd,Customer Service Department,Unit 1, No 10 Hill
Rd, Homebush NSW 2127 T: +61 2 9748 7944
If on receipt your Jamie Oliver by Tefal/Tefal/All-Clad/Moulinex product is
found to be defective or the non-stick coating has peeled, we will, at our cost,
replace or repair the product in our discretion. Only the defective part or
accessory will be repaired or replaced. Packaging, instructions etc. will not be
replaced unless faulty.This guarantee excludes defects caused by the Jamie
Oliver by Tefal/Tefal/All-Clad/Moulinex product not being used in accordance
with instructions , accidental damage (including overheating), misuse or being
tampered with by unauthorised persons. It also does not apply if the Jamie
Oliver by Tefal/Tefal/All-Clad/Moulinex product is used commercially and
excludes consumable items (including accessories such as pressure regulators
and safety devices), dishwasher effects and damages, stains, dents,
discolouration, scratches or scuffs due to normal wear and tear, and your costs
of claiming under the guarantee.
24
COOKING TABLE
750 ml
MAX
1/3
MAX 1
Vegetable
VEGETABLES
(FRESH)
STEAM
Ingredients in the steam
basket and 750 ml water
in the bottom of the
pressure cooker.
IMMERSION
Ingredients in water and
without the basket.
PULSES
IMMERSION
Without the basket.
Artichokes, 2 whole, 600g each (immersion) 30 to 35 mins
Asparagus, white (Steam) 5 to 6 mins
Aubergines, peeled and sliced (3mm), 850g (Steam)
Beetroot, red, cut into quarters (Immersion)
Broccoli florets 600 g (steam) 9 to 11 mins
Brussel sprouts (steam) 10 to 12 mins
Cabbage, sliced and green, 500 g (Immersion) 5 to 6 mins
Carrots cut into round slices (3 mm) 600 g (steam) 17 to 19 mins
Cauliflower florets 600 g (steam) 10 to 12 mins
Celeriac, sliced (immersion) 600 g 7 to 9 mins
Chard, sliced (2cm) 700 g (Steam) 15 to 17 mins
Courgettes in round slices (3 mm) 600 g (steam) 12 to 15 mins
Chicory cut in half (900 g) (steam) 14 to 16 mins
Fennel cut into strips (600 g) (steam) 6 to 9 mins
Fine green beans (600 g) (steam) 10 to 12 mins
Flageolet beans, dried 250 g (Immersion) 35 to 40 mins
Leek, whole and white 650 g (Steam) 9 to 11 mins
Lentils, green 250 g (Immersion) 14 to 16 mins
Mushrooms, sliced 800 g (Immersion) 4 to 5 mins
Peas (steam) 6 to 8 mins
Peppers cut in half (550 g) (steam) 14 to 16 mins
Pickled onions (steam) 7 to 8 mins
Potatoes cut in half (950 g) (steam)
Pumpkin, cut in pieces (3 to 5 cm) 600 g (steam) 13 to 18 mins
Spinach (steam) 3 to 4 mins
Split peas 250 g (immersion) 18 to 20 mins
Turnips, diced (500 g) (steam) 14 to 16 mins
10 to 12 mins
20 to 25 mins
(according to size)
20 to 25 mins
(according to size)
25
EN
Rice
1/3
MAX 1
IMMERSION
Without the basket.
QUANTITY
OF WATER
2 PEOPLE 400 ml / 2 glasses 150 g / 1 glass
500 ml / 2.5 glasses
6 PEOPLE
700 ml / 3.5 glasses
QUANTITY
OF RICE
250 g / 2 glasses
375 g / 3 glasses
COOKING
7 to 8 mins4 PEOPLE
Meat/ fish
FRESH FROZEN
Chicken (1.35 kg) 23 to 25 mins x
Duck (1.8 kg) 45 to 47 mins x
Lamb shanks: 2 (0.95 kg) 40 to 45 mins 1 h05 to 1 h15
Monkfish fillets (1 kg)
in pieces of 75 g
Pork fillet (tenderloin)
2 pieces of 350 g
Pork joint (0.8 kg, 8–10 cm
diameter)
Poussins: 2 (1.3 kg) 23 to 25 mins 40 to 45 mins
Quail: 4 9 to 10 mins 18 to 20 mins
Roast beef (1 kg, 8–11 cm
diameter)
Salmon steaks: 4 (0.8 kg) 5 to 6 mins 7 to 8 mins
Tuna steaks: 4 (0.7 kg) 5 to 6 mins 7 to 9 mins
Veal fillets: 0.7 kg 17 to 21 mins 33 to 38 mins
Veal joint (0.8 kg, 5–7 cm
diameter)
** Cook for an additional 5 minutes for well done meat.
5 to 6 mins 7 to 8 mins
13 to 15 mins 26 to 29 mins
30 to 35 mins 1 h05 to 1h15
30 to 35 mins
(medium) **
45 to 50 mins (medium)**
17 to 19 mins 37 to 40 mins
TIME
Note: For models 5 litres and below ensure that meat joints and poultry do
not exceed the mark on the inside of the pot. Choose meat joints and
poultry 8 cm or less in height.
26

PRÉCAUTIONS IMPORTANTES
Avant d’utiliser votre autocuiseur, prenez le temps de lire toutes les
instructions et reportez-vous toujours au “Guide de l’utilisateur”.
Des dommages peuvent résulter d’une utilisation non conforme.
Pour votre sécurité, cet appareil est conforme aux normes et réglementations
applicables :
- Directive des Équipements sous Pression
- Matériaux en contact avec les aliments
- Environnement
VERIFIER
à l'œil et au jour, que le conduit d'évacuation vapeur ne
soit pas obstrué - fig 13.
VERIFICATIONS
IMPERATIVES
AVANT CHAQUE
UTILISATION
RESPECTER
TOUJOURS LES
QUANTITES DE
REMPLISSAGES
SUIVANTES
que la bille de la soupape de sécurité soit mobile
- fig 18.
que le joint de couvercle soit placé sous chacune des
encoches du couvercle - fig 15.
que les poignées de la cuve soient correctement fixées.
Les poignées de cuve sont des pièces de sécurité. Veillez
à ne jamais les changer vous-même.
N’utilisez jamais votre autocuiseur sans liquide, cela le
détériorerait gravement. Assurez-vous qu’il y ait toujours
suffisamment de liquide pendant la cuisson.
Minimum 25 cl - fig 4.
Maximum 2/3 de la hauteur de la cuve, repère MAX 2
- fig 5.
Lors des cuissons vapeur, les aliments présents dans le
panier vapeur ne doivent pas être en contact avec l’eau
- fig 6 et 7.
Maximum 1/3 (MAX 1) pour les aliments pâteux qui se
dilatent et/ou qui moussent pendant la cuisson, comme
le riz, les légumineuses, les légumes déshydratés, les
compotes, le potiron, les courgettes, les carottes, les
pommes de terre, les filets de poisson...
Les aliments placés dans le panier vapeur ne doivent pas
dépasser le niveau MAX 2 de la cuve.
FR
27

AVANT ET
PENDANT LA
CUISSON
Ne pas laisser les enfants à proximité lorsque l'autocuiseur
est en cours d'utilisation.
Votre autocuiseur cuit sous pression. Des blessures par
ébouillantage peuvent résulter d’une utilisation
inadéquate. Assurez-vous que l’autocuiseur est
convenablement fermé avant de le mettre en service. (Voir
paragraphe “Fermeture”).
Veillez, au cours de la cuisson, à ce que la soupape chuchote
toujours. S’il n’y a pas assez de vapeur qui s’échappe,
décompressez le produit et vérifiez la présence suffisante
de liquide, ainsi que la non obstruction du conduit
d'évacuation vapeur. Après ces vérifications si la vapeur ne
s'échappe toujours pas, augmentez légèrement la source
de chaleur.
Ne pas cuire des aliments risquant d'obstruer les conduits
des organes de sécurité :
- les airelles
- l'orge perlé
- les flocons d'avoine
- les pois cassés
- les nouilles, macaronis, spaghettis
- la rhubarbe
- les groseilles
Ne réalisez jamais de recette à base de lait animal dans
votre autocuiseur.
Dans le cas d'un autocuiseur avec cuve en inox, n’utilisez
pas de gros sel dans votre autocuiseur, ajoutez du sel fin en
fin de cuisson. Vous éviterez ainsi l'apparition de "piqûres"
qui pourraient altérer le fond de votre autocuiseur.
N’utilisez pas votre autocuiseur pour frire sous pression
avec de l’huile.
N’utilisez pas votre autocuiseur dans un autre but que celui
auquel il est destiné.
Ne mettez pas votre autocuiseur dans un four chaud.
Ne jamais mettre de feuille de papier d'aluminium non
maintenue sur un moule dans votre autocuiseur.
Ne jamais mettre de film plastique dans votre autocuiseur
Les vapeurs d’alcool sont inflammables. Portez à ébullition
environ 2 minutes avant de mettre le couvercle. Surveillez
votre appareil dans le cadre des recettes à base d’alcool.
Utilisez la(les) source(s) de chaleur compatible(s),
conformément aux instructions d’utilisation.
28
 Loading...