

Page 1
1
EN
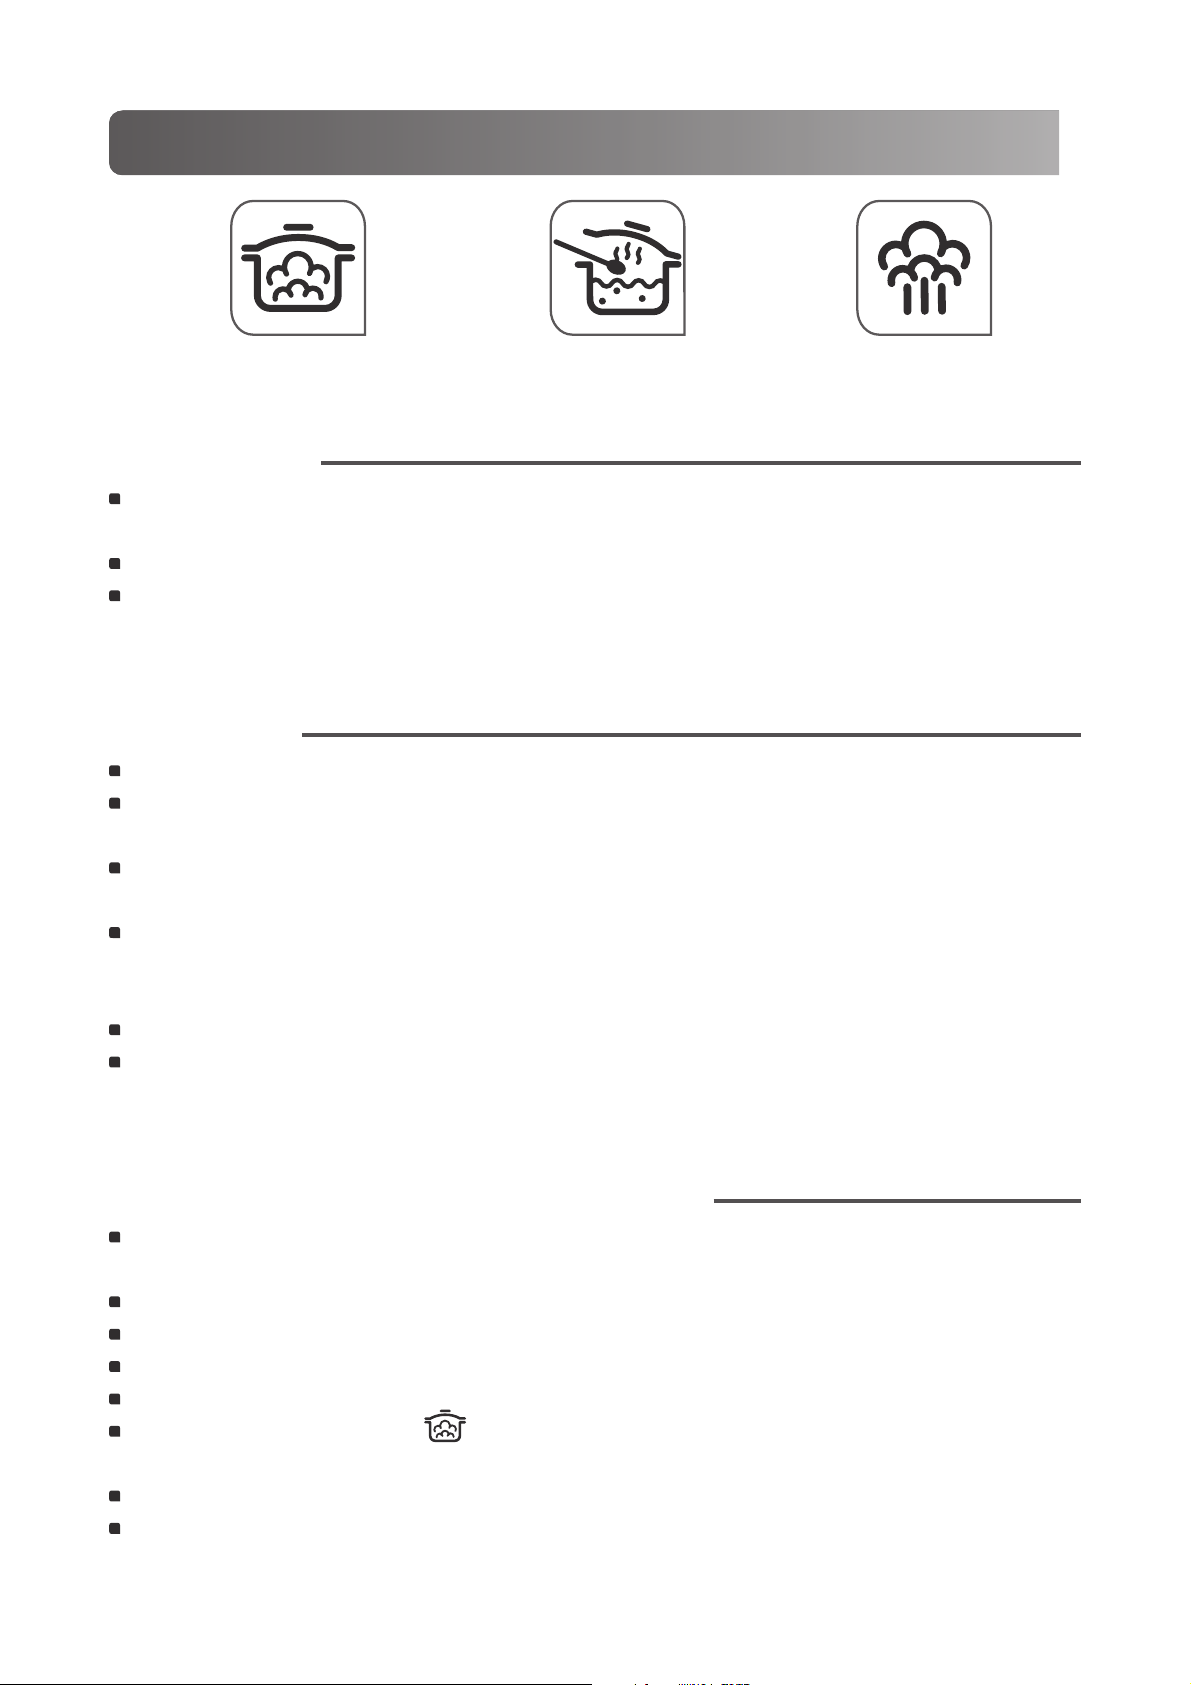
DURING AND
AFTER
COOKING
Ensure close supervision if you are using the pressure
cooker near children.
Your pressure cooker cooks using pressure. Improper use
may result in scalding injuries. Make sure the pressure
cooker is properly closed before use (see section
"Closing").
During cooking, check that the valve murmurs regularly.
If there is not enough steam being released, increase the
heat source slightly.
Do not cook food that risks blocking the outlets for the
safety devices:
- blueberries
- pearl barley,
- oat flakes,
- split peas,
- noodles,
- macaroni,
- spaghetti,
- rhubarb,
- currants.
Never use your pressure cooker to cook milk-based recipes
(such as rice pudding, semolina pudding...).
For stainless steel pot, never use coarse sea salt in your
pressure cooker, only use fine salt at the end of cooking.
Never use your pressure cooker to fry under pressure using
oil.
Do not use your pressure cooker for any other purpose
than the one it is meant for.
Do not put your pressure cooker in a hot oven.
Never use aluminium foil unsecured on a container in
your pressure cooker. Always secure with string.
Never use cling film in your pressure cooker.
Alcohol vapour is flammable. Bring to a boil about 2
minutes before fitting with the lid. Check your appliance
on a regular basis if you are making alcohol-based
recipes.
Only use the compatible heat source(s) listed in the user
guide.
Page 2
2
AFTER
COOKING
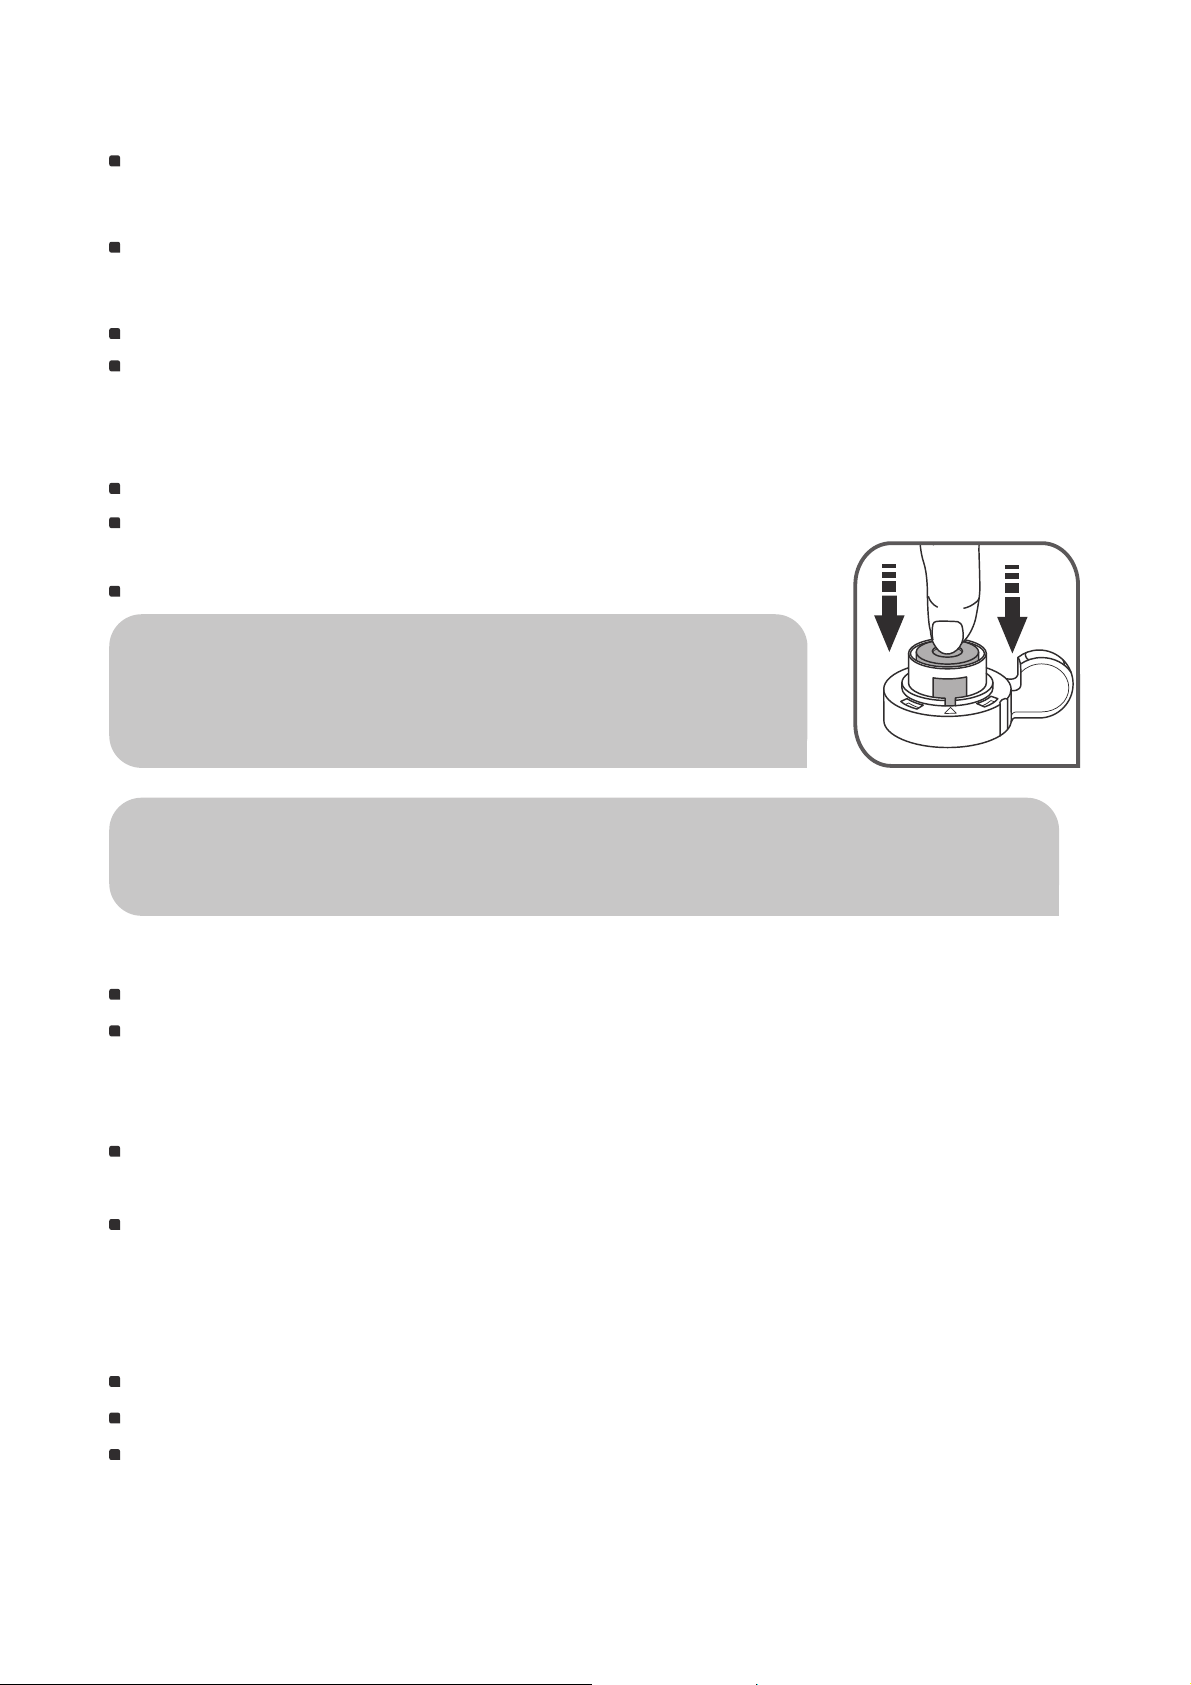
Steadily turn the operating valve (A) selecting your
chosen decompression speed, to finish opposite the
pictogram mark
- fig 10. If, when releasing steam, you
notice unusual pr
ojections, return the operating valve (A)
to the cooking with "Pressure Cooking" position, then
carry out fast decompression under cold water.
If the pressure indicator (D) does not go down, put your
pressure cooker under a cold water tap
- fig 14.
Ne
ver interfere with the pressure indicator.
After cooking meats with an outer skin (e.g. beef tongue,
etc.), where there's a risk of swelling under pressure, don't
stab the meat when swollen to avoid being scalded.
Pierce the meat before cooking.
For foodstuffs that expand during cooking, such as rice,
pulses, dehydrated vegetables or compotes, pumpkin,
potatoes, and courgette, let your pressure cooker cool
down for a few minutes, then cool under cold water.
Methodically shake the pressure cooker each time before
opening to prevent bubbles of steam from overflowing
and burning you. This operation is particularly important
when steam is released quickly or after cooling down
under tap water.
Always be very careful when moving your pressure
cooker under pressure. Do not touch hot surfaces. Use the
handles and knobs. Use oven gloves when necessary.
For soups, we recommend you to do a fast release under
cold water (see section “ End of cooking with ‘pressure
cooking’ “).
Make sure operating valve (A) is in the decompression
position before opening the pressure cooker. The pressure
indicator (D) should be in the lowered position.
Never use force to open your pressure cooker. Make sure
the internal pressure has been released. The pressure
indicator (D) should be in the lowered position (see
section "Safety").
Page 3

KEEP THESE INSTRUCTIONS
* depending on model
3
EN
CLEANING AND
MAINTENANCE
If you notice that a part of your pressure cooker is broken
or cracked, do not attempt to open it under any
circumstances; wait for it to cool down completely before
moving it. Do not use it again and take it to an TEFAL
Approved Service Centre for repair.
Do not tamper with the safety systems other than when
following the cleaning and maintenance instructions.
Only use the correct TEFAL original parts for your model.
Specifically use a TEFAL lid and
pot.
Do not use y
our pressure cooker for storing acidic or salty
foods before or after cooking as it may damage your
pot.
Wash your pressure cooker after each use.
Never put the operating valve (A), the gasket (I), the
timer* (F) or the pot with a non stick coating in the
dishwasher.
Never place the timer in water.
Do not use bleach or chlorine-containing chemicals.
Do not let the lid soak into water.
Change your pressure cooker’s gasket every year, or if
there is a cut.
Make sure you get your pressure cooker checked in a
TEFAL Approved Service Centre after 10 years of use.
To store your pressure cooker, rest the lid upside down on
the pot, to avoid premature wear of the lid gasket.
Page 4
4
*depending on model
Description of diagram
Compulsory checks before each use
Checking the operating valve
Check that the draining hole of the operating valve is not obstructed.
Checking the safety valve
Check that the bearing of the safety valve can move (use a cotton bud with the
cotton wool tip removed).
A. Operating valve
B. Steam release outlet
C. Valve positioning mark
D. Pressure indicator (See section
"Safety")
E. Safety valve
F. Removable timer*
G. Lid handle
H. Lid
I. Gasket
J. Steam basket*
K. Trivet*
L. Pot handle
M. Maximum fill lines
N. Pot
Removable timer: only provided with ClipsoMinut'®Perfect model.
Page 5
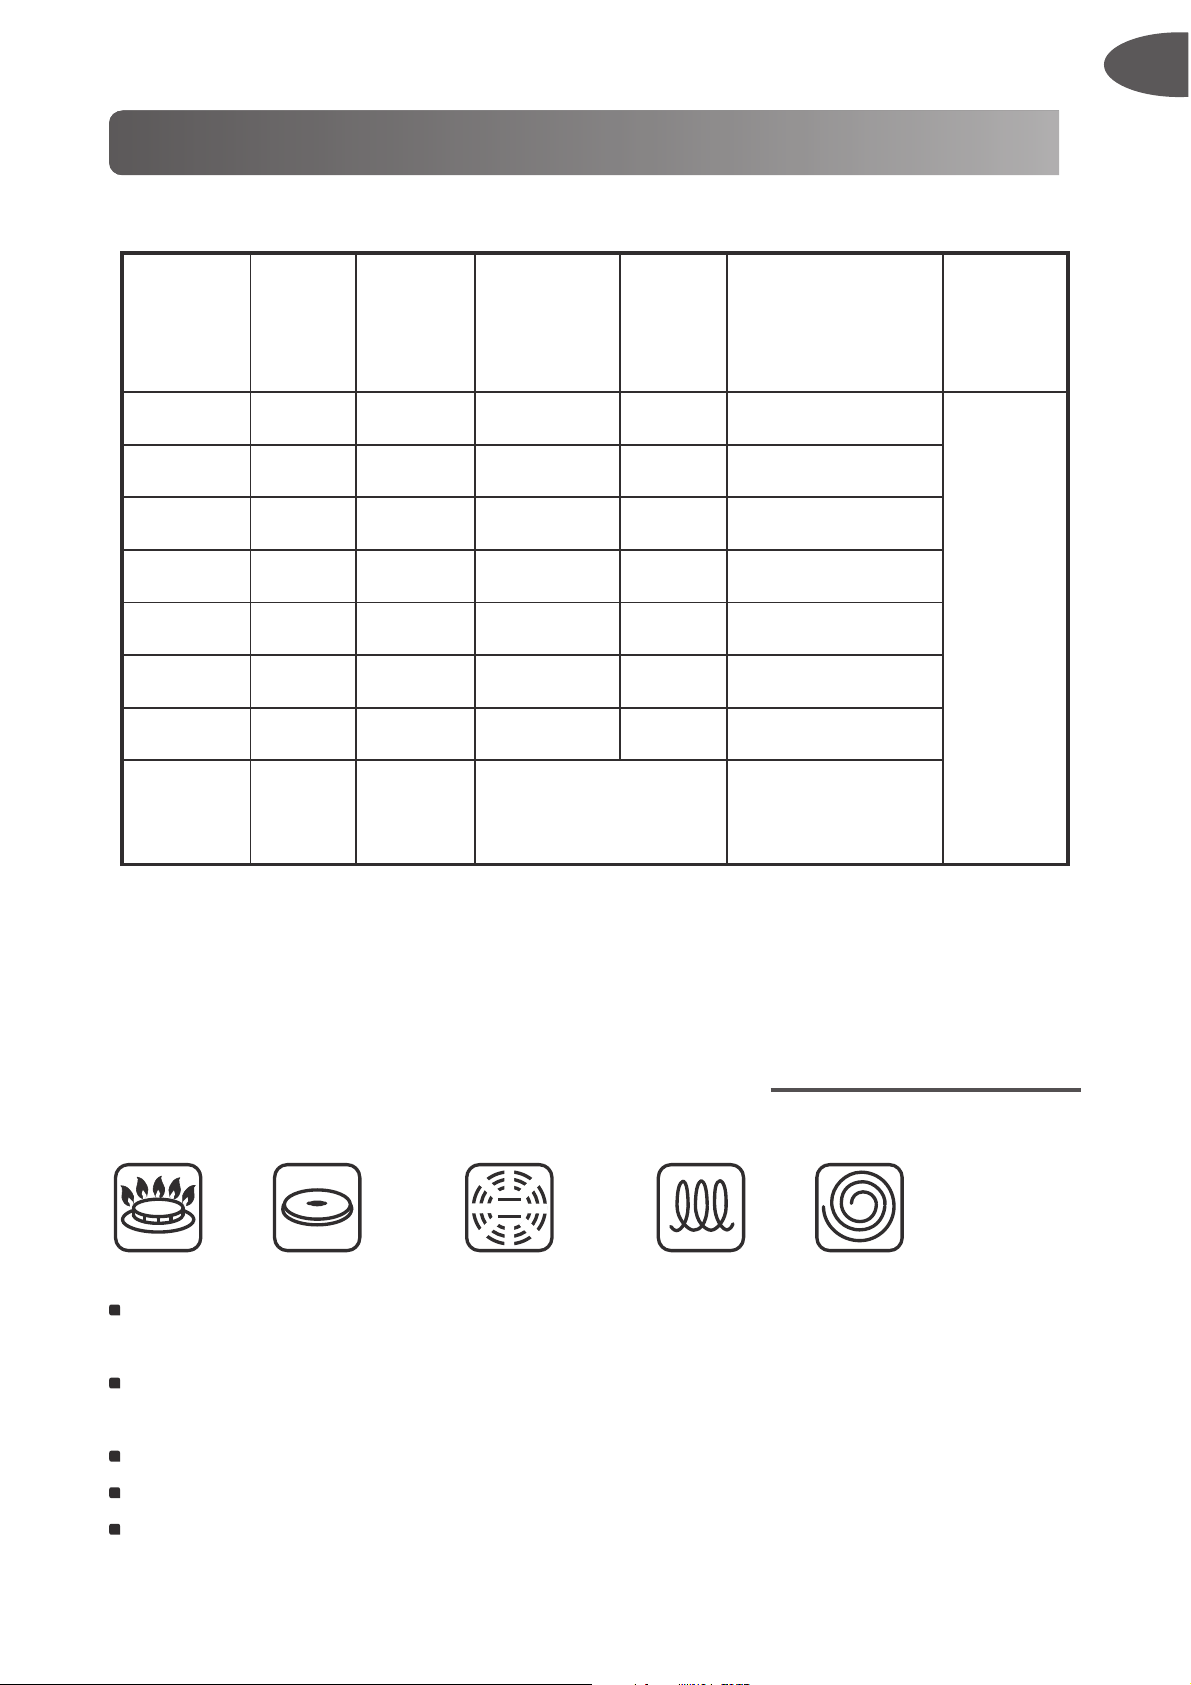
Your pressure cooker's base diameter - reference
Technical information:
Maximum operating pressure: 65 kPa/ 9 psi
Maximum safety pressure: 120 kPa/17.4 psi
Compatible heat sources
Your pressure cooker can be used on all heat sources including induction but
excluding Aga hobs.
On an electric hotplate, use a plate with a diameter equal to or less than that
of your pressure cooker base.
On ceramic hobs, make sure that the base of the pot is clean and dry.
On gas, the flame should not extend beyond the diameter of the pot.
On all heat sources, make sure that your pressure cooker is well centred.
Features
Capacity Ø Pot Ø Base
Clipso
Minut'
®
Perfect /
Easy
Clipso
Minut'
®
Duo
Pot
material
Lid
material
3 L 22 cm 15,5 cm P46205 - Stainless steel
Stainless
steel
4,5 L 22 cm 15,5 cm P46206 - Stainless steel
6 L 22 cm 15,5 cm P46207 - Stainless steel
4 L 22 cm 14 cm - P46042 Aluminium coated
5 L 24 cm 14 cm - P46051 Aluminium coated
7,5 L 24 cm 18 cm P46248 - Stainless steel
9 L 24 cm 18 cm P46249 - Stainless steel
Set
5 L
24 cm
14 cm
P46353
Aluminium coated
7,5 L 18 cm Stainless steel
GAS ELECTRICITY
(Cast iron heating plate)
ELECTRICITY
(Radiant or halogen ceramic hobs)
ELECTRICITY
(Ceramic induction hob)
ELECTRICITY
(Spiral resistor)
5
EN
Page 6
6
*depending on model
Pressure cooking Cooking with stew pot* Steam release
Opening
Switch the lid handle from a horizontal position to a vertical position - Fig. 2.
The lid turns.
Lift the lid.
In case of difficulties opening the product rinse the gasket under water and
r
eplace it in the lid without drying it
- fig 19 and 15 and take care to insert
it under each of the grooves on the lid.
Closing
Ensure that the lid handle is in a vertical position.
Place the lid on the pot as indicated in
- Fig. 1 by lining up the plastic part
with the pot handles.
S
witch the lid handle back from a vertical position to a horizontal position
-
Fig. 3
.
It is normal that the lid turns on the pot.
If y
ou are unable to close the lid:
Check the correct positioning of the gasket.
In case of difficulties closing the product rinse the gasket under water and
r
eplace it in the lid without drying it
- fig 19 and 15 and take care to insert
it under each of the grooves on the lid.
Using for the first time
For models with a non-stick coating: wash and use cooking oil to lightly oil
the entire interior surface.
Put the trivet* (K) in the
pot base.
Fill the
pot (N) with w
ater up to the 2/3 mark (MAX 2)
- Fig. 5.
Position the steam basket* (J) on the trivet* (K).
Close your pressure cooker.
Align the pictogram for the operating valve (A) with the valve
positioning mark (C) - Fig. 9.
Place y
our pressure cooker on a heat source then set to maximum power.
When steam begins to exit the valve, turn down the heat source and set a
timer to 20 min.
Use
Page 7
*depending on model
7
EN
After 20 min., turn off your heat source.
Align the pictogram for the operating valve (A) with the valve positioning
mark (C).
When the pressure indicator (D) drops down again, your pressure cooker is
no longer under pressure.
Open your pressure cooker
- Fig. 2.
Clean with w
ashing-up liquid.
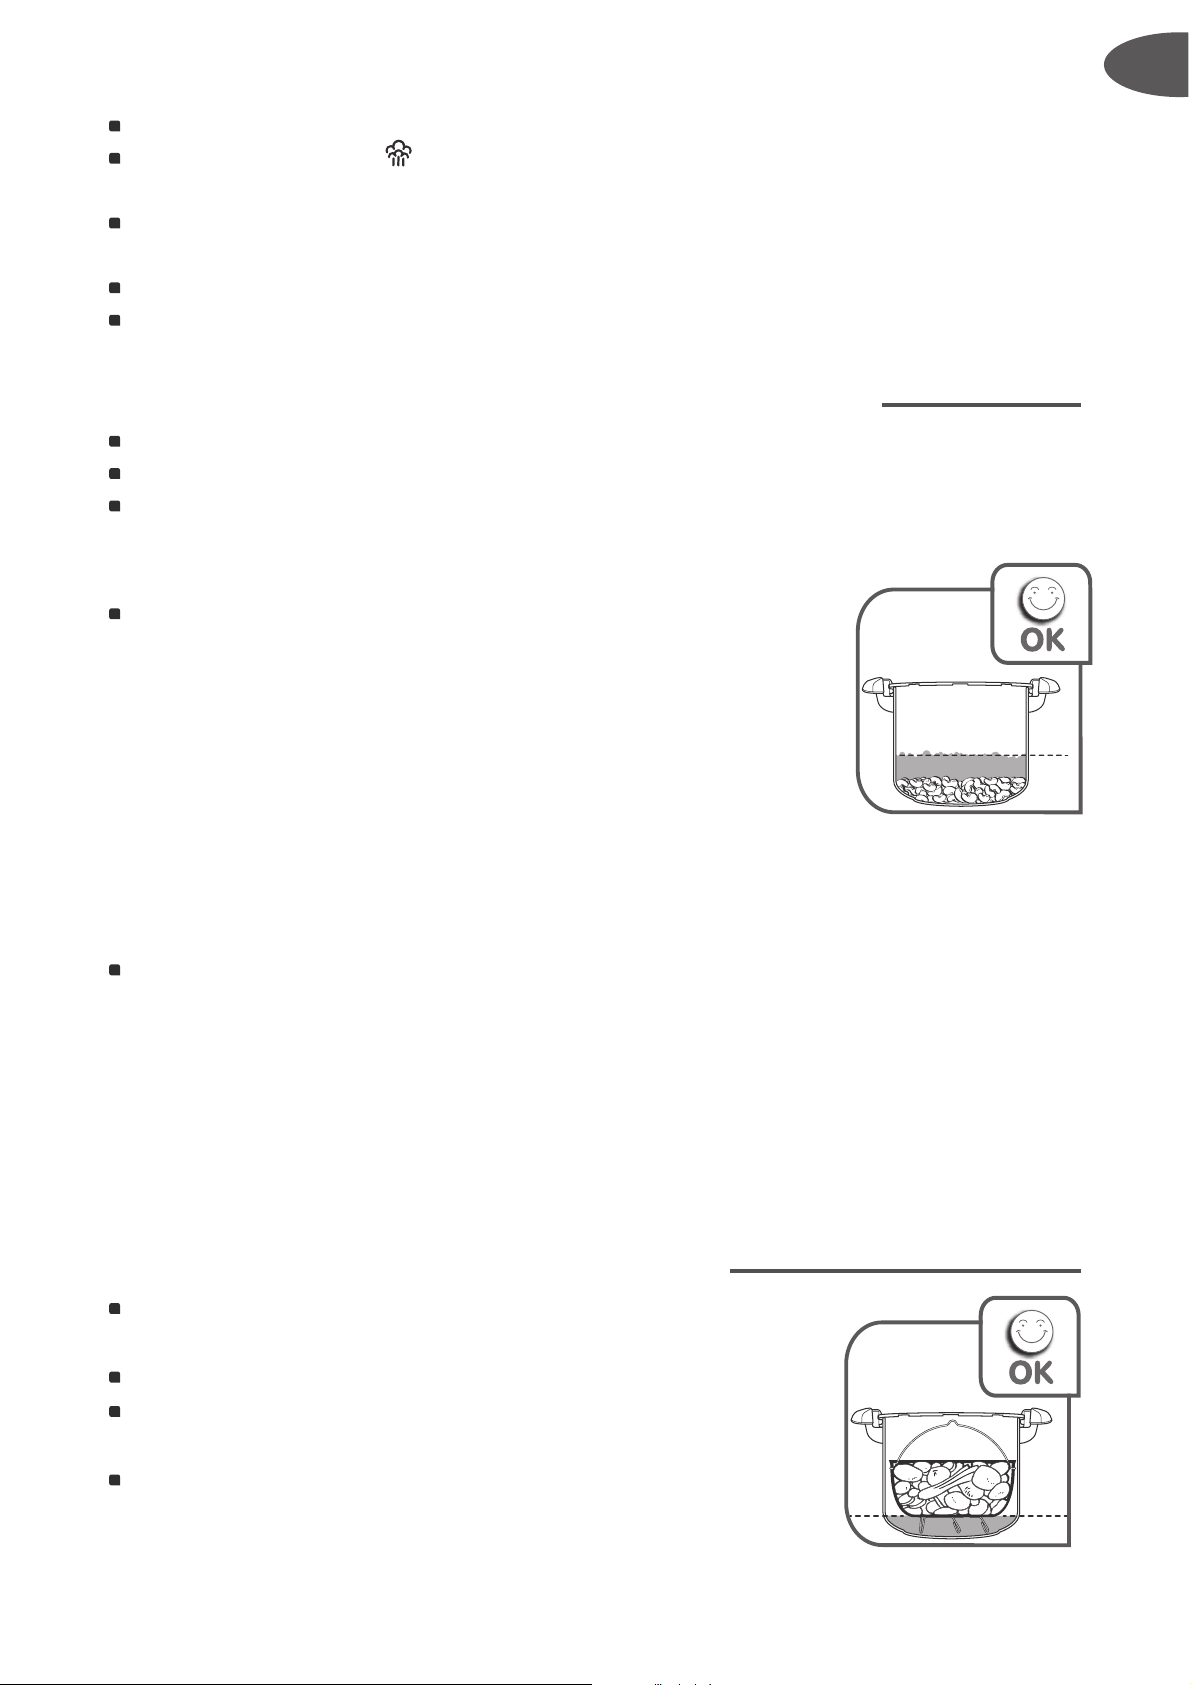
Minimum and maximum fill level
Minimum 25 cl/250 ml (2 glasses) - Fig. 4.
Maximum 2/3 of the height of the pot, MAX 2 mark
- Fig. 5.
Ne
ver use coarse salt in your pressure cooker, only use fine salt at the end of
cooking.
For certain foodstuffs:
For foodstuffs that expand during cooking, such as rice,
pulses, dehydrated vegetables or compotes, pumpkin,
courgette,
potatoes do not fill your pressure cooker
abo
ve 1/3 (MAX 1) of the depth of the
pot. Let your
pr
essure cooker cool down for a few minutes, then cool
under running cold water. Carefully shake the pressure
cooker each time before opening to prevent bubbles of
steam from overflowing and burning you. This operation
is particularly important when steam is released quickly or after cooling down
under tap water. For soups, we recommend rapid decompression under cold
water (see section "End of 'Pressure Cooking'").
Do not cook foodstuffs that might block the safety components:
- blueberries, cranberries
- pearl barley
- oat flakes
- split peas
- noodles, macaroni, spaghetti
- rhubarb
- blackcurrants, redcurrants
Using the steam basket*
Pour 75 cl/750 ml of water into the bottom of the pot
(N).
Put the trivet* (K) in the
pot base.
Position the steam basket* (J) on the trivet* (K)
- Fig. 6.
When pressure cooking, the food in the steam basket*
should not be in contact with the water
- Fig. 6 and 7.
MAX
MAX1
1/3
Page 8
8
*depending on model
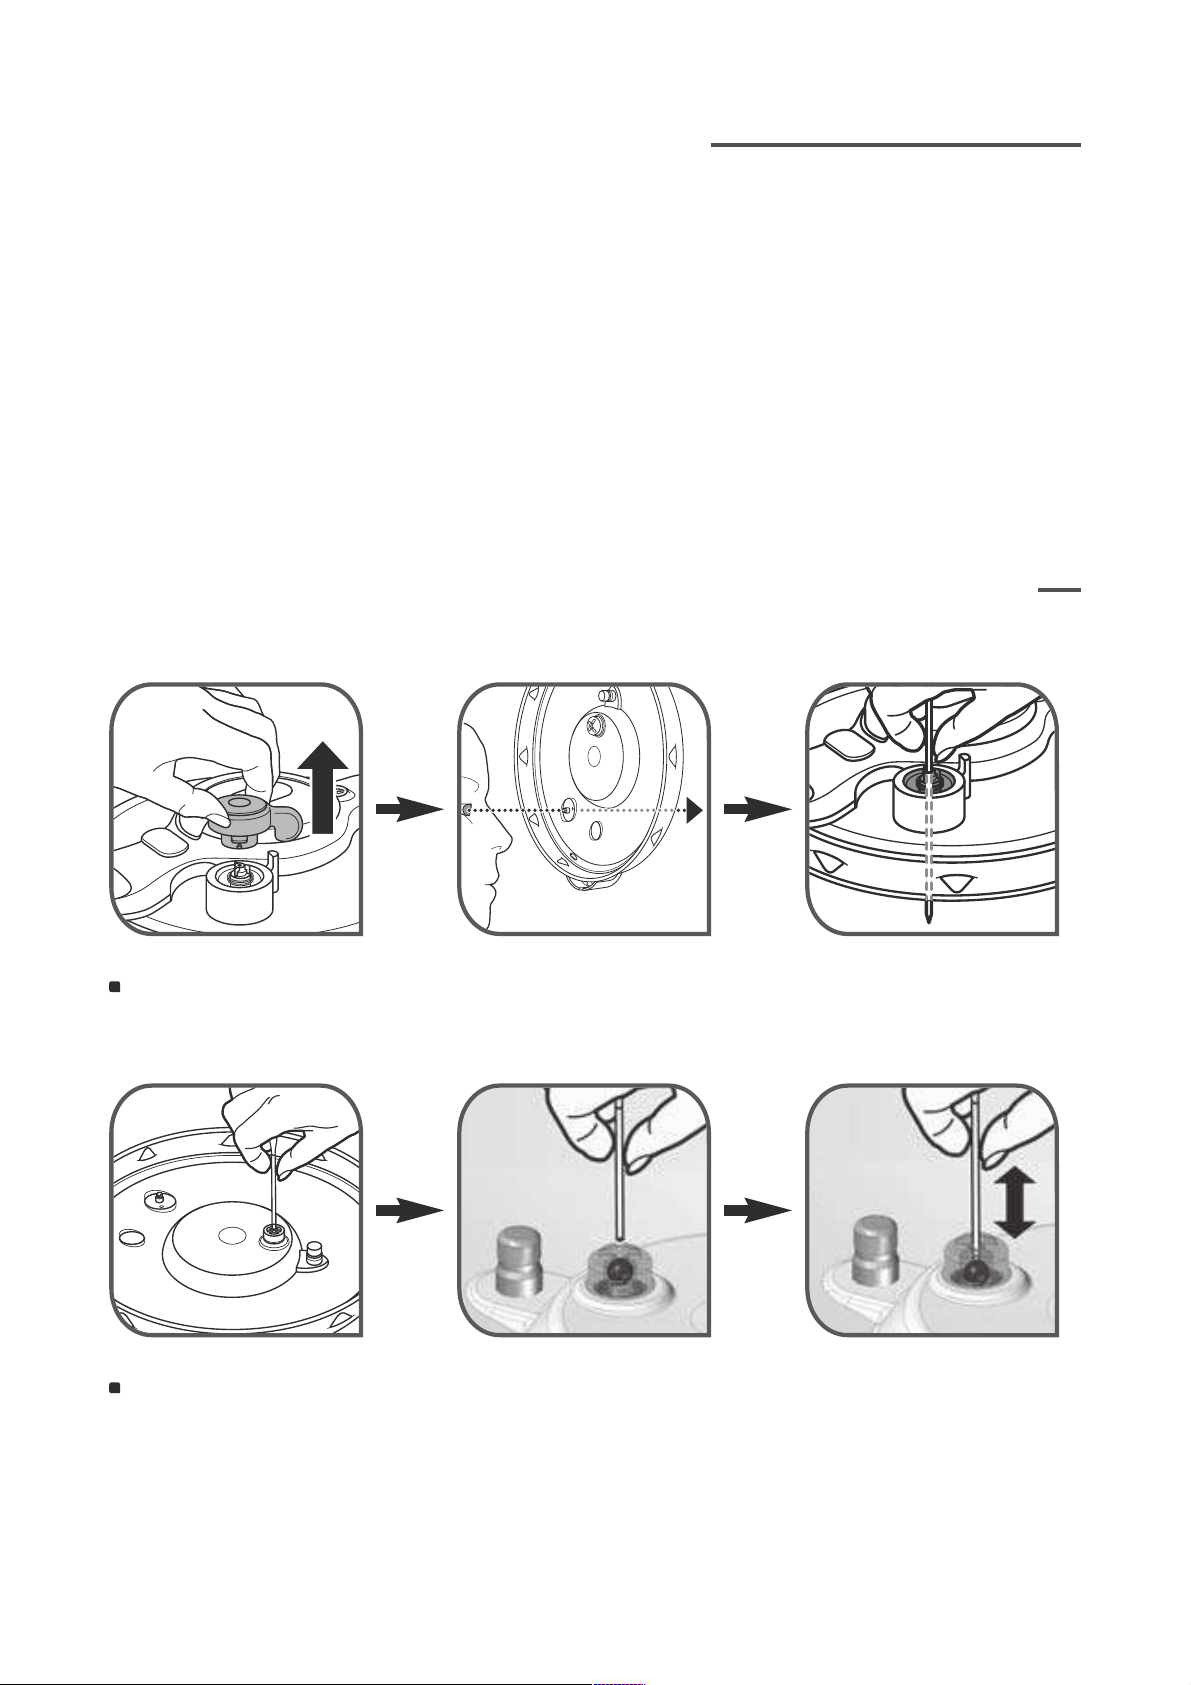
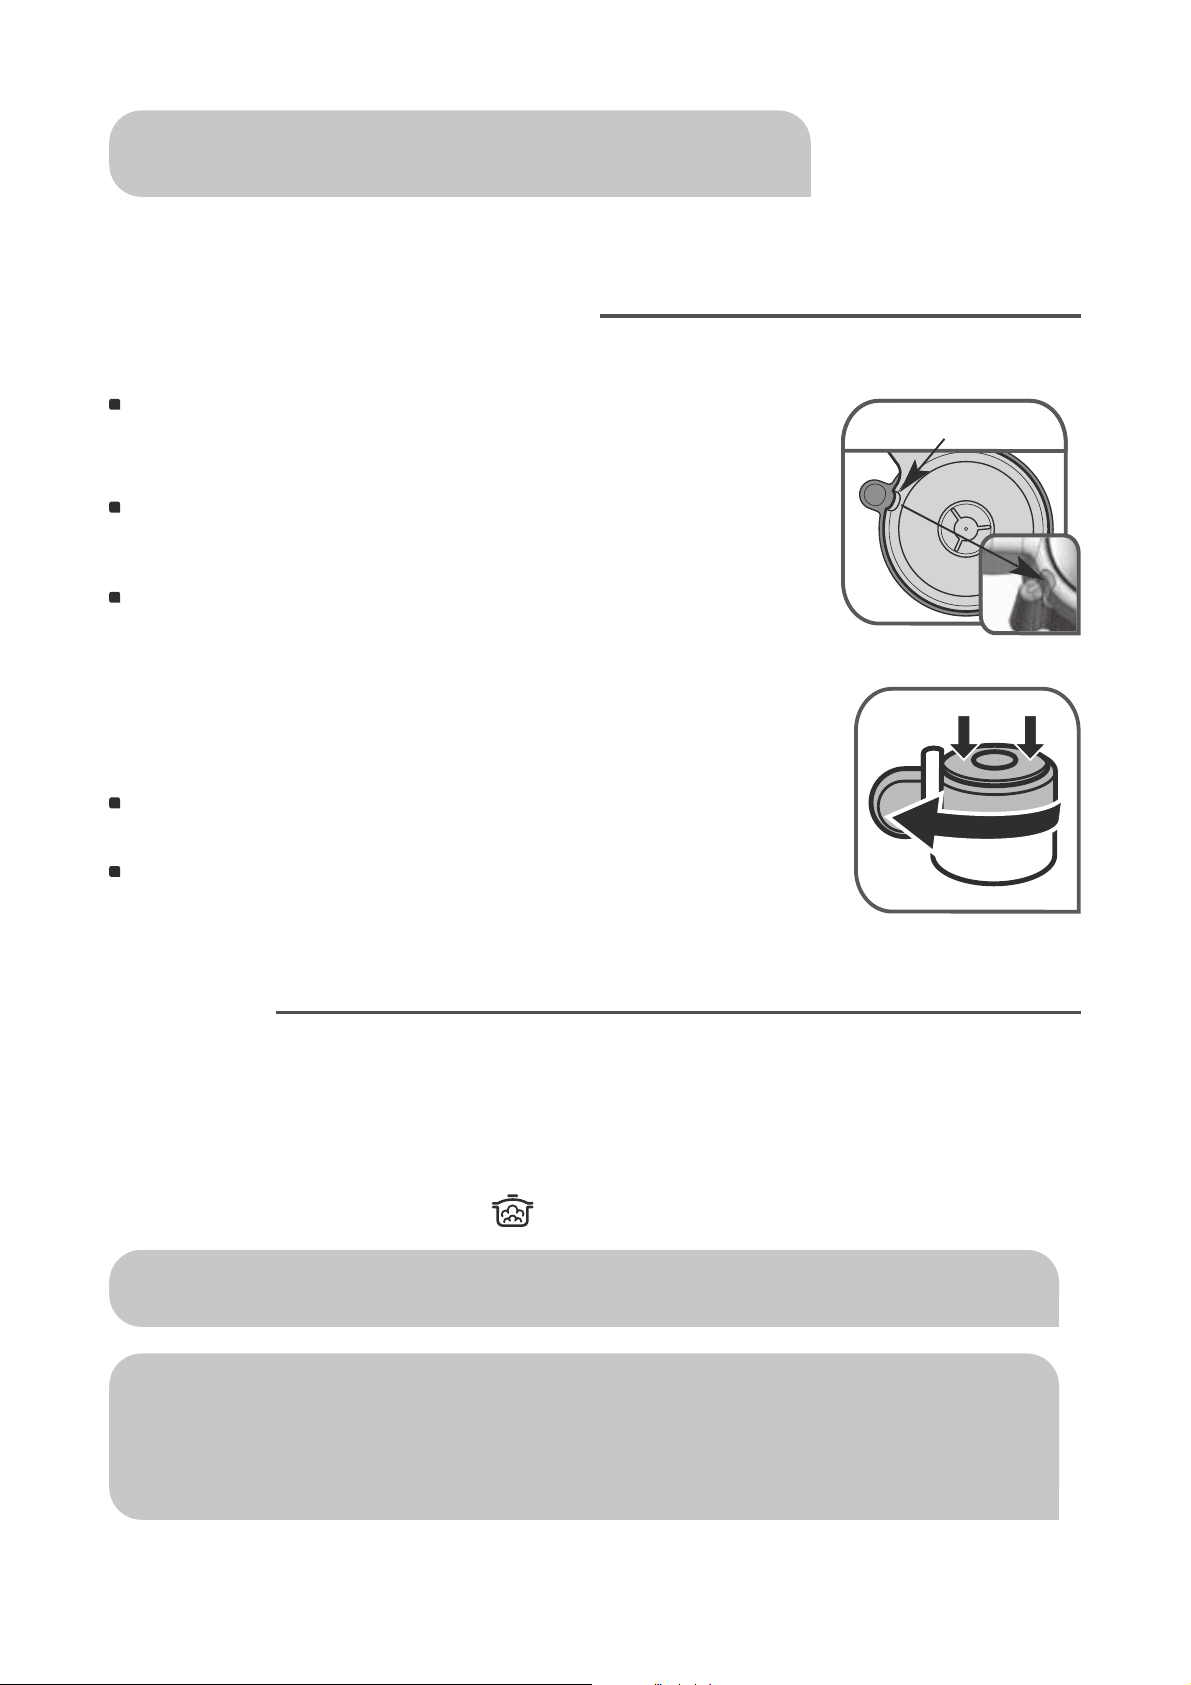
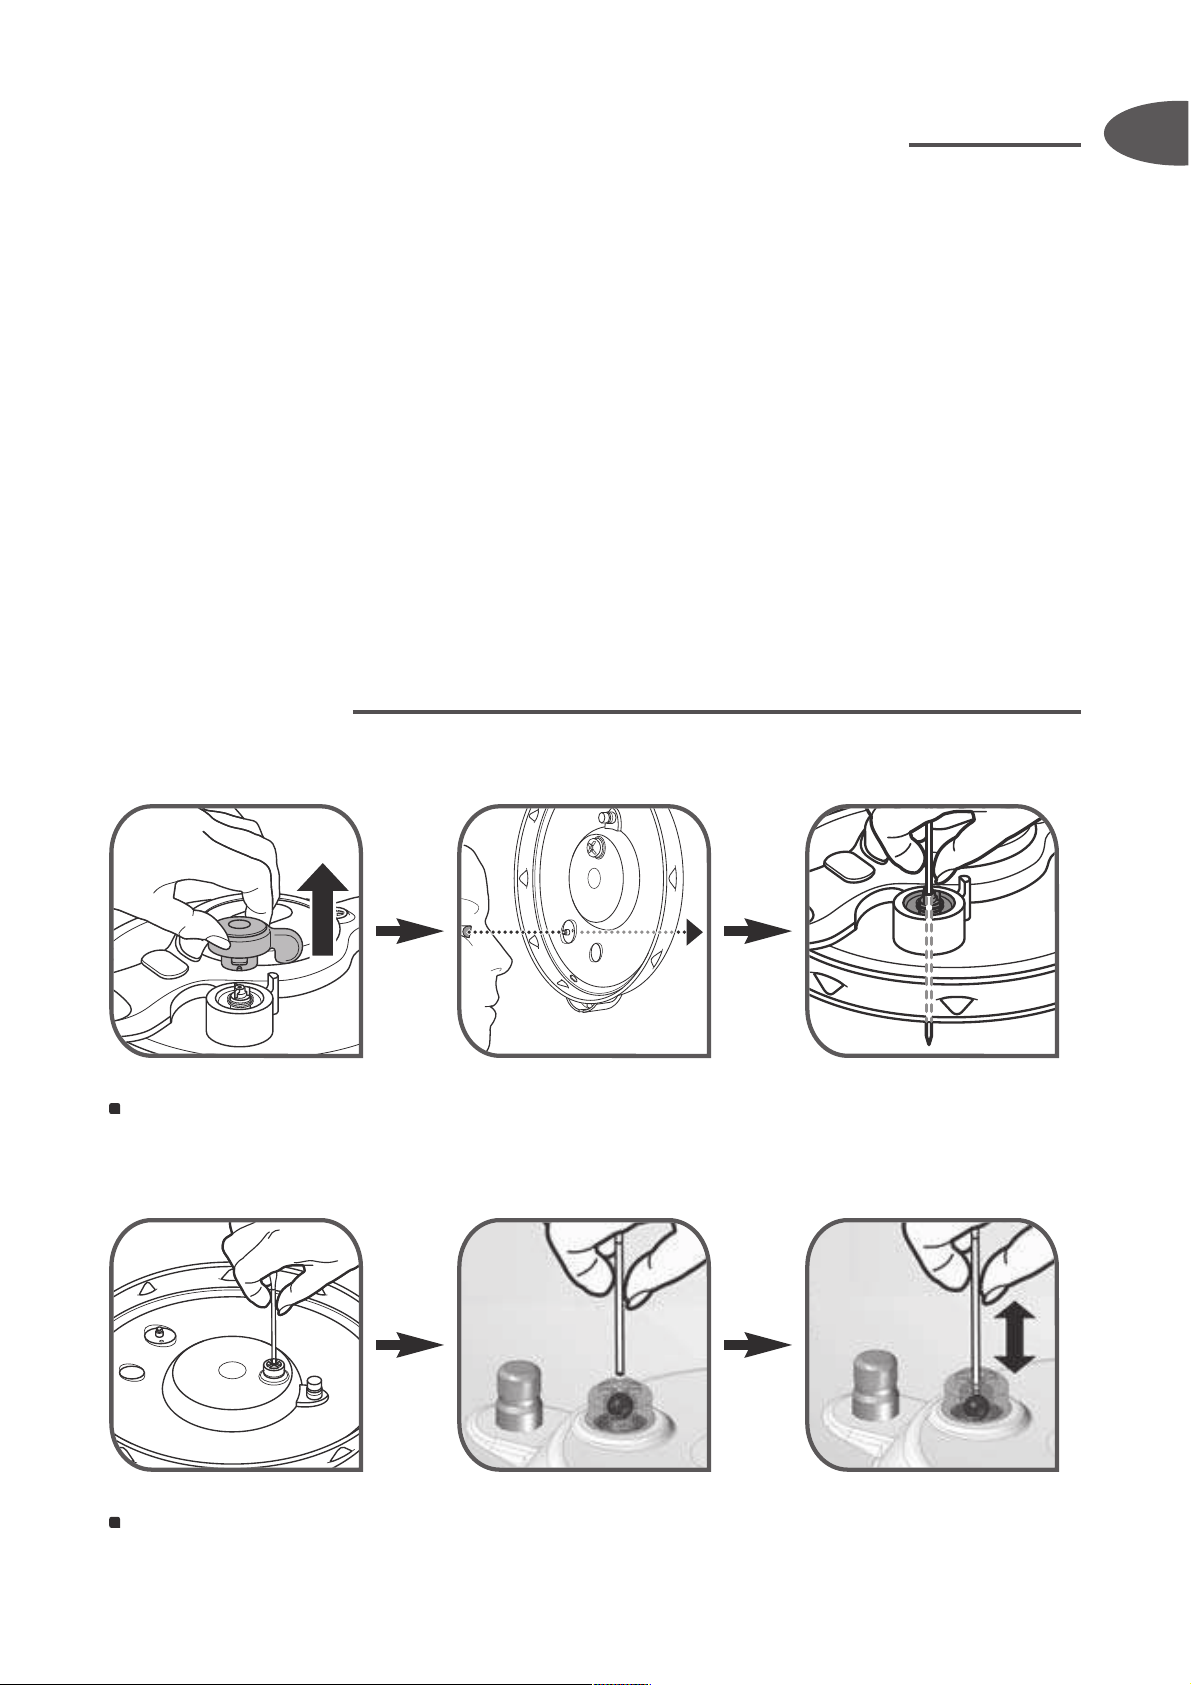
Fitting and removal of the
Operating valve (A)
To remove the operating valve (A):
Align the groove with the operating valve positioning
mark (C) pressing down on the ring of the operating
valve (A).
Remove it
- Fig. 11.
To fit the operating valve:
Position the operating valve (A) by aligning the groove
of the operating valve (A) with the positioning mark (C)
- Fig 8.
P
ress the operating valve (A) so that it engages on the
steam release outlet.
Press on the ring of the operating valve (A) and turn.
Timer*
*Only provided for ClipsoMinut' Perfect model.
The
timer has been designed to help you obtain the best cooking result by
allowing y
ou to optimise energy consumption. It automatically counts down
the cooking time once the temperature corresponding to cooking with
"Pressure Cooking" is reached .
The food in the steam basket* must not touch the
lid of the pressure cooker.
The
timer
must be clipped to your pressure cooker in order to work.
During cooking, check that the operating valve (A) murmurs
regularly. If there is not enough steam, increase the heat source
slightly; if there is too much steam, reduce the heat source.
Groove
Page 9
*depending on model
9
EN
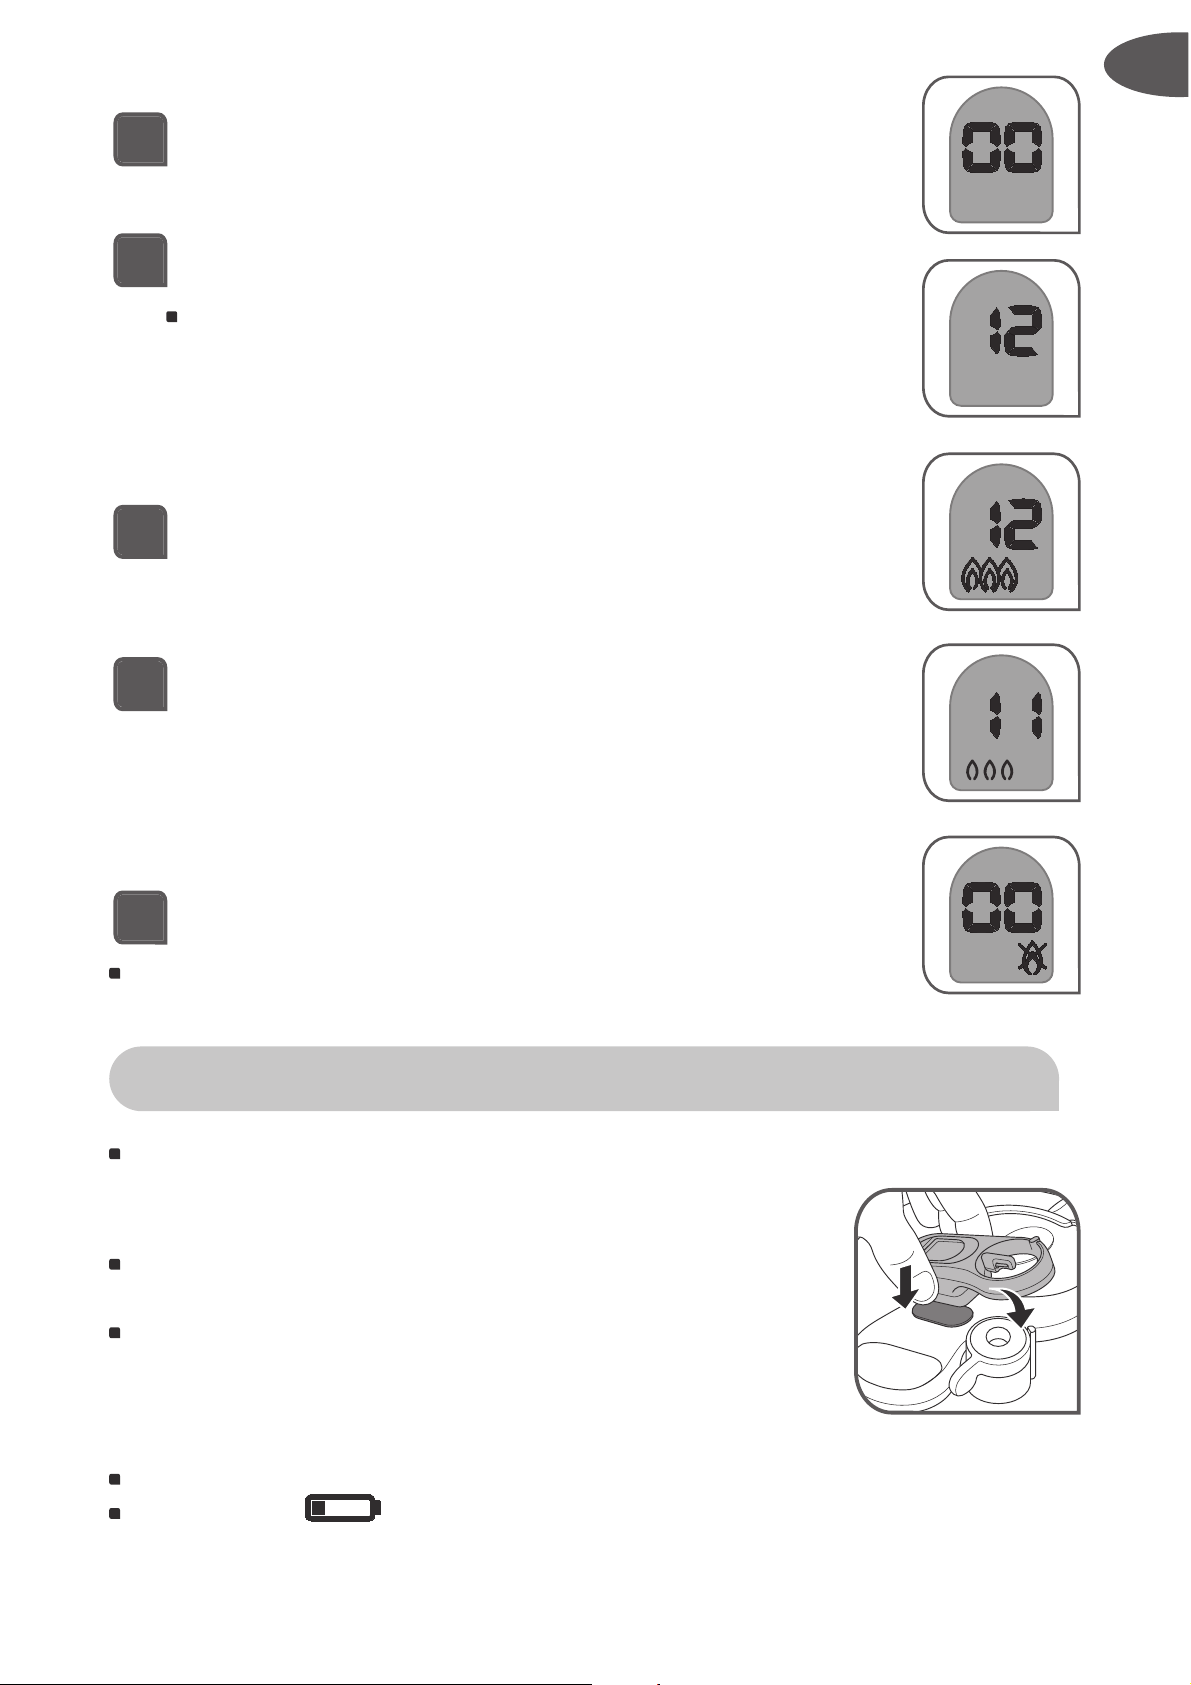
To switch on the timer: press the button.
Programme the cooking time (in minutes).
If you made a mistake with the cooking time, wait for
4 seconds until flames do not flash any more, then hold
the button down to reset.
Start with the heat source at maximum power.
As soon as your pressure cooker has reached the
cooking temperature, the timer rings and the
countdown begins (numbers flash).
Reduce the power of the heat source.
At the end of the cooking time, the timer rings.
To stop the
timer ringing, press the button.
T
urn off the heat source.
Fitting and removing the timer*
To fit the
timer (F) - Fig. 12, first insert the front part
into the module and then press to clip the rear part.
To remove the
timer (F), lift it using the tab and remove
it.
Changing the
timer* battery
The
timer battery is a CR2032 type.
If the symbol appears, or if you no longer have
a display, change the battery.
1
2
3
4
5
Holding the button down resets and switches off the
timer
.
2
1
2
Page 10
10
*depending on model
The battery life depends on how often the
timer is
used.
The battery contains Dimethoxyethane n° CAS 110-71-
4. It is in accordance with the European regulations. For
your safety and the environmental protection: do not
open the battery, do not expose it to high
temperatures, do not throw it with household waste;
bring back it in a center of used battery collection.
To remove the battery from your
timer, open the
battery lid with a coin (see illustration opposite).
Replace your battery.
Replace the gasket in its casing.
Position the "half moon" on the battery cap opposite
the "half moon" on the
timer.
Gently turn the battery cap and continue to press
lightly as you align the "half moon" on the battery
cap with the moon on the
timer.
Work on a flat work surface so that the cap is
positioned correctly horizontally.
Do not force the battery cap when you close it. Do not
turn beyond the stops.
In the case of loss, you can purchase another
timer
from all of our TEFAL Approved Service Centres.
Before cooking
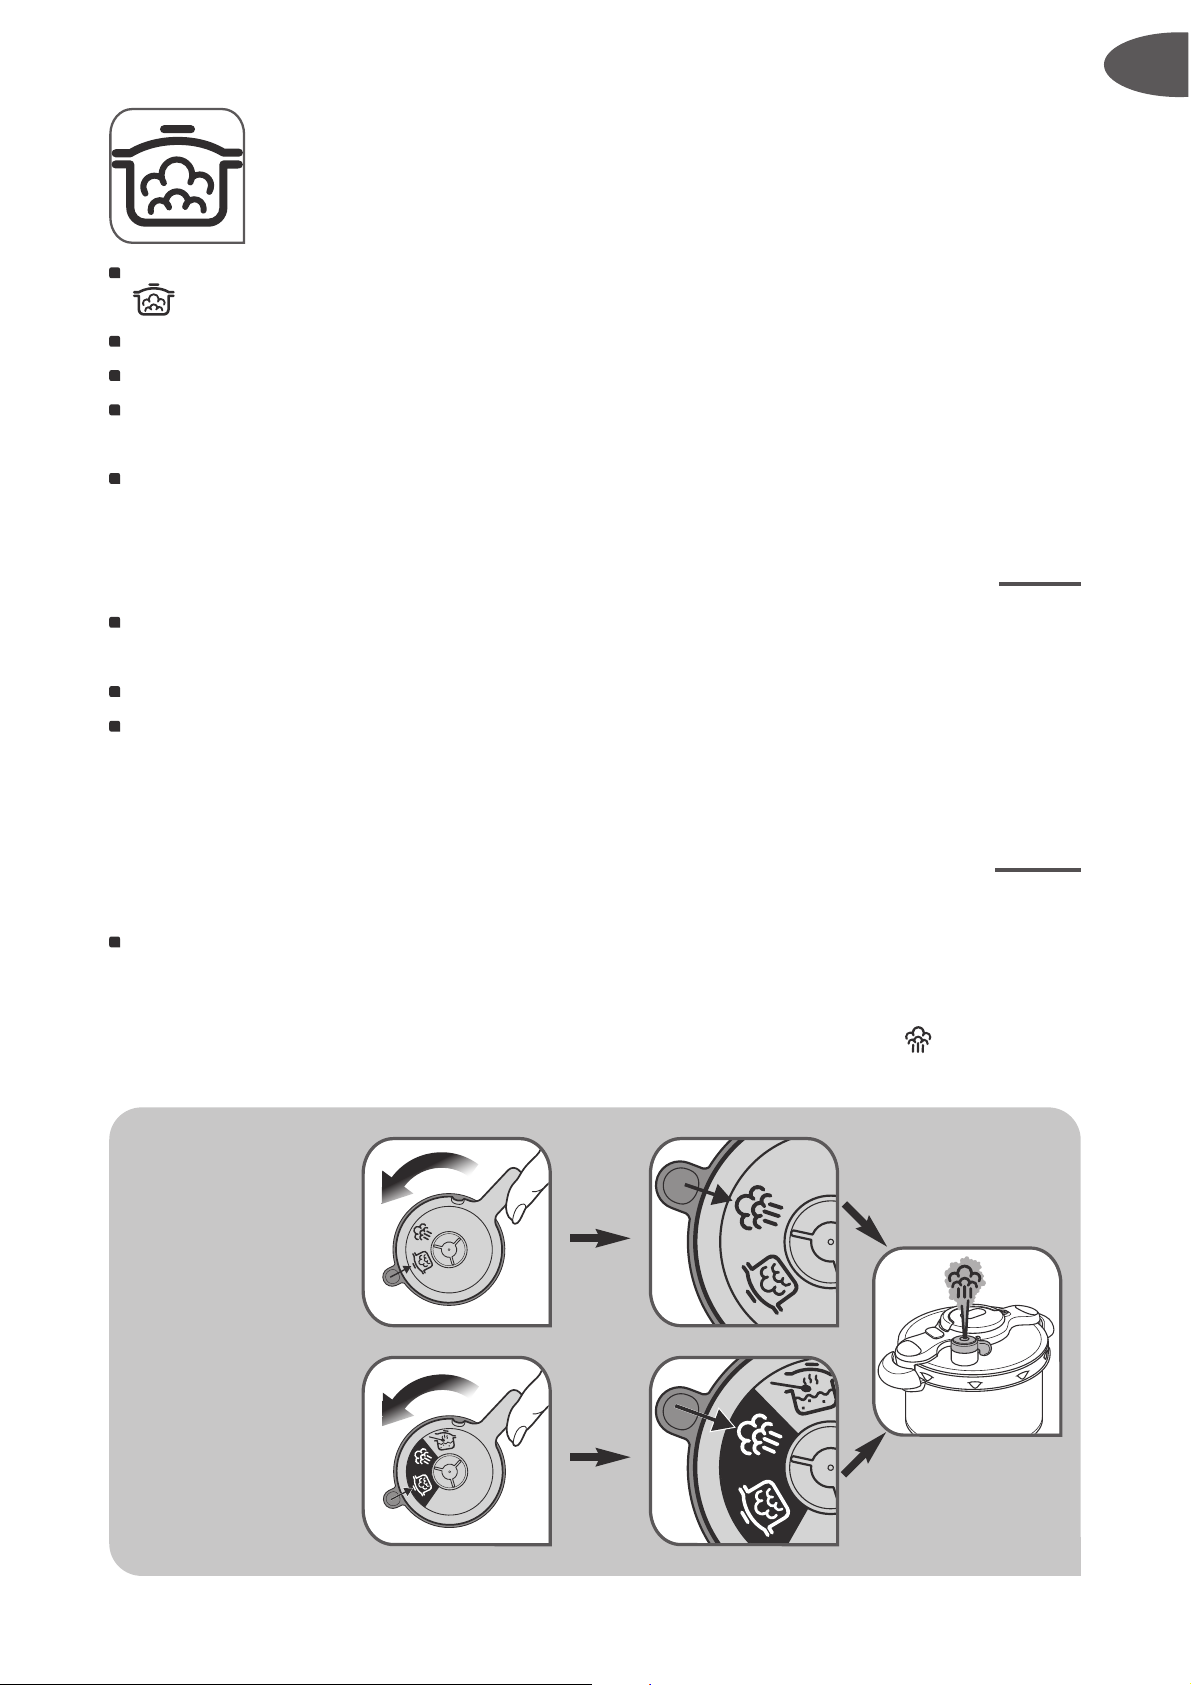
Before each use, remove the operating valve (A) - Fig. 11 and check the
steam release valve (B) is not blocked
- Fig. 13.
Check that the safety valve is mobile
(see sections “Cleaning” and
“Compulsory checks before each use”)
- Fig. 18.
Close your pressure cooker
- Fig. 3.
In case of difficulties closing the product rinse the gasket under water and
replace it in the lid without drying it
- fig 19 and 15 and take care to insert
it under each of the grooves on the lid.
Position the operating valve (A) - fig 8.
◗
◗
◗
●
Never place the
timer
* in water, nor in the dishwasher.
+
Page 11
*depending on model
11
EN
Cooking with
"Pressure Cooking"
Turn the operating valve (A) to the cooking with "Pressure Cooking" position
- fig 9. The pressure cooker operates at 65kPa / 9 lbs (psi).
Make sure your pressure cooker is properly closed before use
- Fig. 3.
Place your pressure cooker on a heat source then set to maximum power.
For models equipped with a
timer*: programme the cooking time indicated
in the recipe (see section "Using the
timer").
A clicking noise and st
eam emitted from the pressure indicator are normal
when bringing the cooker up to pressure, as the air escapes before cooking.
During cooking with "Pressure Cooking"
When the operating valve (A) is constantly emitting steam and making a
regular sound (PSCHHHT), lower the heat source.
Select the cooking time indicated in the recipe.
During cooking, check that the valve murmurs regularly. If there is not
enough steam being released, increase the heat source slightly; if there is
too much steam, reduce it.
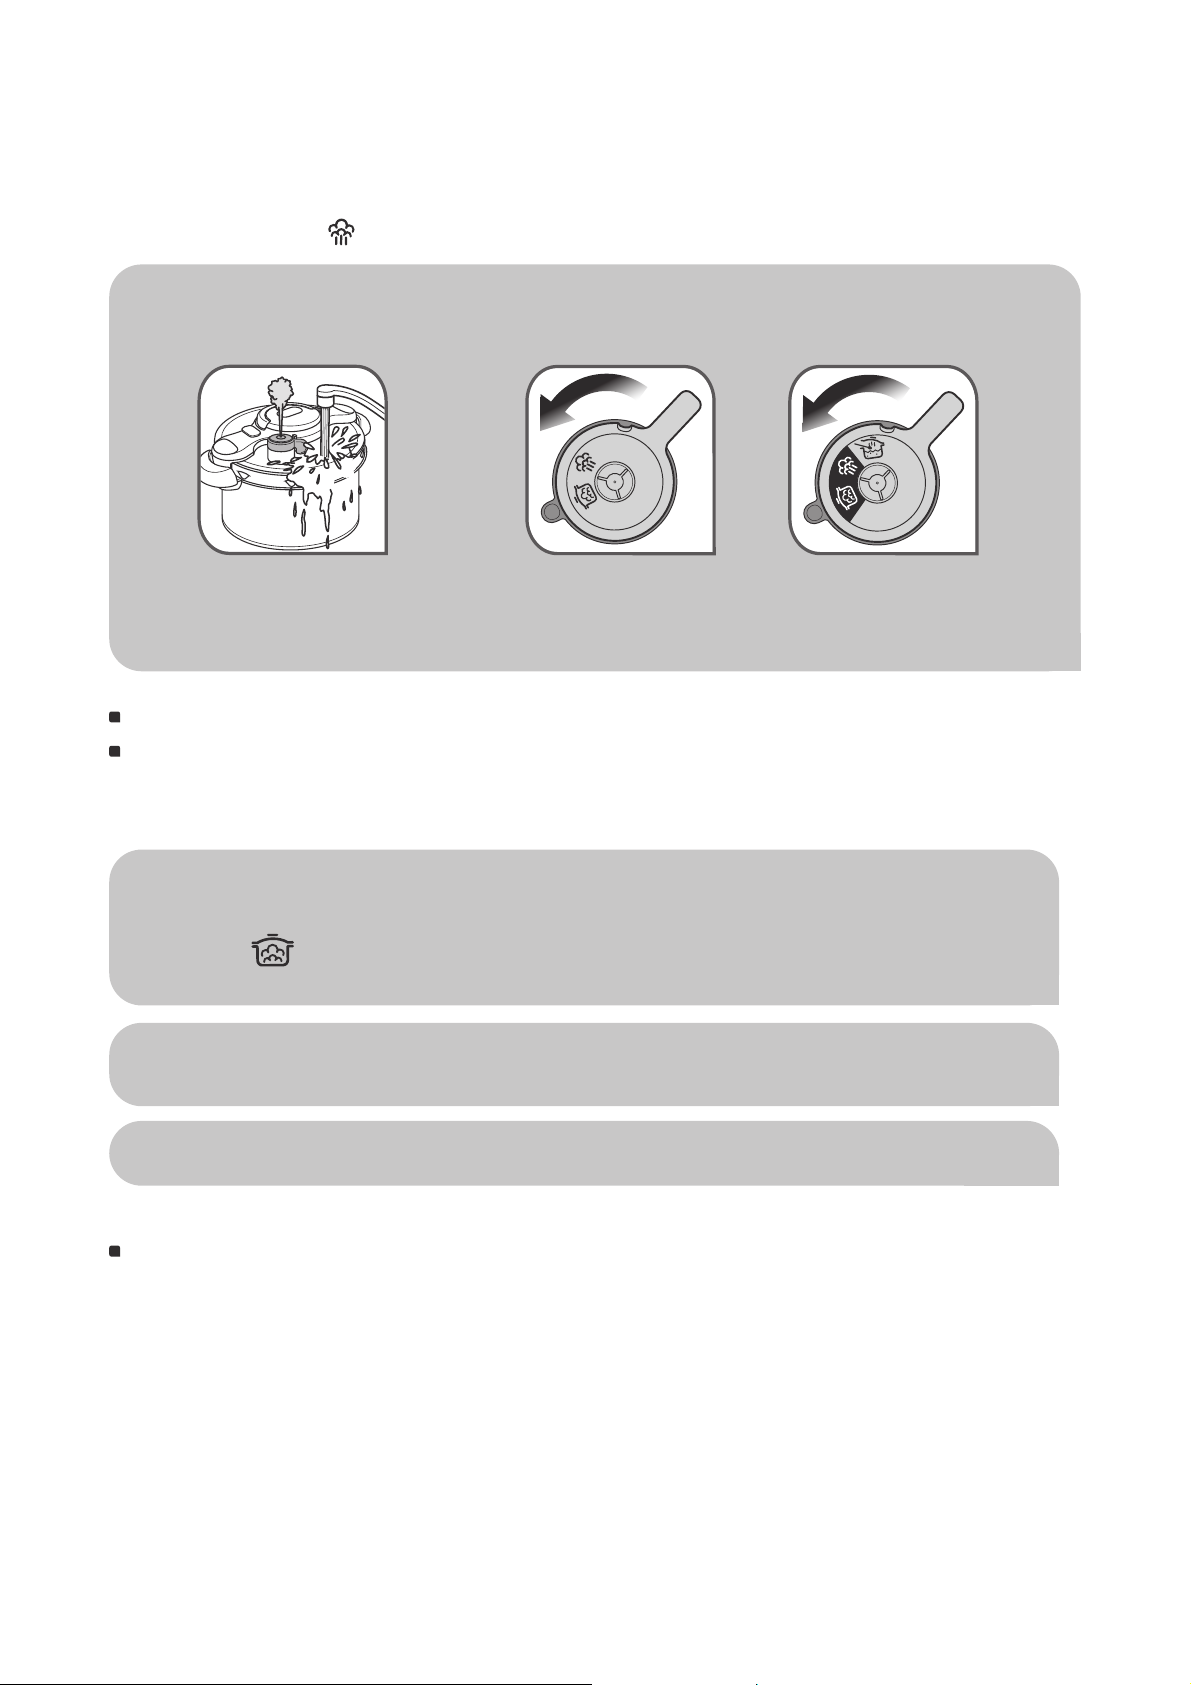
End of cooking with "Pressure Cooking"
To release the steam:
When the heat source has been turned off, you have two options:
• Gradual release: steadily turn the operating valve (A) selecting your chosen
decompression speed to finish opposite the pictogram mark
- fig 10.
ClipsoMinut'
®
Perfect and
Easy models
ClipsoMinut'
®
Duo model
Page 12
12
•
Fast release under cold water: put your pressure cooker under cold running
water from a tap
- Fig. 14. When the pressure indicator (D) drops down again,
your pressure cooker is no longer under pressure. Turn the operating valve (A)
to the position .
You can open your pressure cooker
- fig 2.
In case of difficulties opening the product rinse the gasket under water and
replace it in the lid without drying it
- fig 19 and 15 and take care to insert
it under each of the grooves on the lid.
For foodstuffs that expand during cooking, such as rice, pulses, dehydrated
v
egetables or compotes, pumpkin, courgette,
potatoes do not fill your
pressure cooker above 1/3 (MAX 1) of the depth of the pot. Let your pressure
cooker cool down for a few minutes, then cool under cold water. Carefully
shake the pressure cooker each time before opening to prevent bubbles of
steam from overflowing and burning you. This operation is particularly
important when steam is released quickly or after cooling down under tap
water. We recommend a fast steam release for soups.
If, when releasing steam, you notice unusual projections of food or
liquid, return the operating valve (A) to the "Pressure Cooking"
position , then then carry out fast decompression under cold
water.
If the pressure indicator (D) does not go down, put your pressure
cooker under cold running water from a tap
- fig 14.
Never interfere with the pressure indicator.
Perfect/Easy
models
Duo
model
Step 1
{
Step 2
Page 13
*depending on model
13
EN
Cooking with
“Stewpot"*
Only possible with the non-stick coated pot
Turn the operating valve (A) to the cooking with
“Stewpot" position .
Make sure the pressure cooker is properly closed
- Fig.
3 before use.
Place y
our pressure cooker on a heat source set
at low
heat.
Select the cooking time indicated in the recipe.
When 'st
ewpot' cooking, you can open your pressure
cooker at any time to stir, check whether the food is cooked or add
ingredients.
In case of difficulties opening the product rinse the gasket under water and
replace it in the lid without drying it
- fig 19 and 15 and take care to insert
it under each of the grooves on the lid.
If the heat source is too high, the pressure cooker may lock (the pressure
indicator (D) rises and blocks the opening) and the lid handle may not work
or may not open the pressure cooker. In this case, reduce or turn off the heat
source. If you are using cast iron heating plates, remove the pressure
cooker from the heat source.
For pressure cookers with non stick coating (according to model): do not use
metallic utensils or sharp whisks. Do not drain your utensils by tapping them
on the side of the pot as this risks damaging it and causing leaks.
Never let fats burn until completely carbonised. The cooking fumes could be
dangerous to animals with a particularly sensitive respiratory system, such
as birds. Bird owners should keep them away from the kitchen.
Your pressure cooker is fitted with several safety devices:
Closing safety:
- If the lid is not positioned correctly, or if you forget to fold back the lid handle,
steam will leak from the edge of the pressure cooker and it may not increase
pressure.
- If you forget to fold the lid handle to the horizontal position, steam leaks.
Safety
Page 14

14
Opening safety:
- If your pressure cooker is under pressure, the pressure indicator (D) is up and
the opening/closing lid handle (G) should not be used.
- Never try to forcibly open the pressure cooker.
- Abo
ve all do not touch the pressure indicator (D).
- Make sure that the interior pressure has fallen (pressure indicator (D) in
lowered position).
- The lid handles are safety components. Never change them yourself. Never
use any other models of lid handles.
- If you attempt to move the opening/closing lid handle (G) to a vertical
position while the pressure cooker is still under pressure, you are not able to
open it. This function is an additional safety measure.
- Move the lid handle back to a horizontal position and wait until the pressure
indicator (D) is in the lowered position.
Two safety measures against overpressure:
- First measure: the safety valve (E) releases the pressure
- fig 20.
- Second measure: the gasket allows steam to escape from the lid
- fig 20.
If one of the overpressure safety systems is triggered:
Turn off the heat source.
Allow the pressure cooker to cool completely.
Open.
Check and clean the operating valve (A), the steam release outlet (B), the
safety valve (E) and the gasket (I)
- Fig. 16 - 17- 18. See section “Compulsory
checks bef
ore each use”.
If, after these checks and cleaning, your product leaks or no longer works,
t
ake it to an TEFAL Approved Service Centre.
Recommendations for use
1 - Steam is very hot when it leaves the operating valve. Watch out for
the jet of steam.
2 - While the pressure indicator is high, you cannot open the pressure
cooker.
3 - As with any cooking utensil, ensure close supervision if you are using
your pressure cooker near children.
4 - To move your pressure cooker, use the two pot handles.
5 - Never leave food in your pressure cooker. Never carry your pressure
cooker by the lid handle.
6 - Never use bleach or products containing chlorine, as these will alter
the quality of the steel.
7 - Do not leave the lid soaking in water.
8 - Change the gasket every year or if a cut appears.
9 - You should only clean your pressure cooker when it is cold and empty.
10 - Make sure you get your pressure cooker checked in a TEFAL Approved
Service Centre after 10 years of use.
Page 15

*depending on model
15
EN
To ensure the correct operation of your pressure cooker, follow these cleaning
and maintenance recommendations after each use.
Wash your pressure cooker after each use using warm water with a little
washing-up liquid added. Follow the same procedure for the basket*.
Do not use bleach or chlorine-containing chemicals.
Do not heat your pot when empty.
To clean the inside of the stainless steel pot:
Wash with a scouring pad and washing-up liquid.
If the interior of the steel pot has an iridescent sheen or white marks (mineral
deposit), clean it using white vinegar.
To clean the inside of the aluminium pot with a non stick coating:
To prolong the product's lifespan, we recommend washing by hand.
Wash with hot water, washing-up liquid and a soft sponge.
Do not use scouring powder or abrasive sponges.
If you have burned some food, fill the pot with hot water and leave to soak.
Then clean with washing-up liquid.
The browning and marks which may appear following long use do
not affect the operation of the pressure cooker.
For pressure cookers with non stick coating (according to model):
the slight scratches and abrasions that may appear with use do not
affect the coating's non stick performance.
Cleaning
You can wash the stainless steel pot and the basket in the dishwasher.
Wear of the exterior coating as a result of the contact between
the lid and pot is normal.
Do not put the pot with a non stick coating (according to model) in the
dishwasher, because detergents tablets contain substances that are
very aggressive and corrosive for aluminium parts.
The intensive use of your pot with a non stick coating (according to
model) may slightly alter the colour of the coating (yellowing,
staining).
Page 16
16
*depending on model
To clean the outside of the pot:
Wash using a sponge and washing-up liquid.
To clean the lid:
Wash the lid using a damp sponge and washing-up liquid.
To clean the gasket:
After each use, clean the gasket (I) and its housing.
To reposition the gasket, refer to
- Fig. 15 and ensure that the gasket is
pr
operly inserted beneath each of the grooves on the lid.
To clean the operating valve (A):
Remove the operating valve (A)
- Fig. 11
Clean the operating valve (A) under cold t
ap water
- Fig. 16.
Check its mobility: see figure opposite.
To clean the steam release outlet (B) located on the lid:
Remove the valve (A)
- Fig. 11
Check to make sure the steam release outlet is unblocked and round - Fig.
13. If needed, clean it with a tooth pick - Fig. 17 and rinse it.
T
o clean the safety valve (E):
Clean the part of the safety valve located inside the lid by washing under
water.
Check its proper functioning by pressing firmly using
a cotton bud (with the
cotton wool tip r
emoved), and the bearing must be mobile
- Fig 18. See
section “Compulsory checks before each use”.
To clean the timer* (F):
Use a clean dry cloth.
Do not use an
y solvents.
Never place the
timer in water, nor in the dishwasher.
After removing the operating valve (A), the
gasket (I) and the
timer
* (F), you can put the lid
in the dishwasher.
Never put the operating valve (A), the gasket (I), the
timer
* (F), or
the pot with the non stick coating in the dishwasher.
Page 17
*depending on model
17
EN
To change your pressure cooker's gasket:
Change your pressure cooker's gasket every year or if a cut appears.
Always use an original TEFAL gasket corresponding to your model (see
section "Accessories")
To reposition the gasket, refer to - Fig 15 and ensure that the gasket is
pr
operly inserted beneath each of the grooves on the lid.
To store your pressure cooker:
Turn the lid over on the pot.
The pressure cooker's opening and closing system does not require any
specific maintenance apart from cleaning.
TEFAL Accessories
Commercially available pressure cooker accessories are:
To replace other parts or for repairs, contact a TEFAL Approved Service Centre.
Only use the correct TEFAL original parts for your model.
Maintenance
Make sure you get your pressure cooker checked in a TEFAL Approved
Service Centre after 10 years of use.
Accessories References
Gasket
3/4/4.5/6 L: outer diameter of gasket: 24 cm X1010008
5/7.5/9 L: outer diameter of gasket: 27 cm
X1010007
Steam basket*
3/4.5/4/6 L: for pot with 22 cm diameter
792185
5/7.5/9 L: for pot with 24 cm diameter 792654
Trivet*
792691
Timer*
X1060007
Page 18
When used as recommended in the manual, the stainless steel pot of your
new TEFAL pressure cooker is guaranteed for 10 years against:
- Any defect linked to the metallic structure of your pot,
- Any premature deterioration of the base metal
All other pot materials and all other parts of your pressure cooker are
guaranteed against defects in workmanship or materials, for the period
of guarantee defined in valid legislation in force in the country where the
product was purchased from the date of purchase.
This contractual warranty is established upon presentation of the receipt
or invoice showing the date of purchase.
These warranties exclude:
Scratches and discolouration resulting from ageing for pans with non stick
coating.
Damage resulting from failure to comply with important precautions, or
negligent use, particularly:
- Impacts, falls, use in the oven, etc.
Only TEFAL Approved Service Centres are authorised to provide this
guarantee service.
Please call our local rate number to find out the address of your nearest
TEFAL Approved Service Centre.
Guarantee
Regulatory markings
Labelling Location
Trademark On the lid.
Year and batch manufacture
Reference model
Maximum safety pressure (SP)
Maximum operating pressure (OP)
On the lid.
Capacity On the outer base of the pot.
Manufacturer's postal address On the outer base of the pot.
18
Page 19
Troubleshooting
19
EN
Problems Recommendations
If you are unable
to close the lid:
Check that the lid handle is in a vertical position.
Check that the gasket is positioned correctly (see
section "Cleaning and maintenance").
Check that the lid is positioned as indicated on
- Fig 1.
Rinse the gasket under water and replace it in the lid
without drying it
- fig 19 and 15 and take care to
insert it under each of the grooves on the lid.
If your pressure
cooker has been
heated under
pressure without
liquid inside:
Have your pressure cooker checked by a TEFAL Approved Service Centre.
If the pressure
indicator emits a
clicking noise and
steam.
This is normal during the first few minutes : it allows
escape of air before cooking.
If the pressure
indicator has not
risen and nothing
is escaping
through the vent
during cooking:
This is normal during the first few minutes.
If the phenomenon persists, check that:
- The heat source is sufficiently strong; if not, increase
it.
- The quantity of liquid in the pot is sufficient.
- The operating valve (A) is positioned on .
- Your pressure cooker is properly closed.
- There is no deterioration of the gasket or edge of the
pot.
- The gasket is correctly positioned.
If the pressure
indicator has risen
but nothing is
escaping through
the vent during
cooking:
This is normal during the first few minutes.
If the problem continues, put your pressure cooker
under cold tap water until the pressure indicator (D)
goes down.
Clean the operating valve (A)
- Fig. 16 and the steam
r
elease outlet
- Fig. 17 and use a cotton bud to check
that the security v
alve ball can be pressed without any
problems
- Fig. 18.
Page 20
20
Problems
Recommendations
If steam leaks from
around the lid, check:
The correct closure of the lid.
The position of the gasket.
The condition of the gasket; replace if necessary.
The cleanliness of the lid, the gasket and its
housing in the lid.
The condition of the edge of the pot.
If you are unable to
open the lid:
Check that the pressure indicator (D) is in the
lowered position.
Otherwise, release steam if necessary by cooling
the pressure cooker under running cold water.
Never interfere with the pressure indicator (D).
Rinse the gasket under water and replace it in the
lid without drying it
- fig 19 and 15 and take care
to insert it under each of the grooves on the lid.
If the food is not cooked
or is burned, check:
The cooking time.
The power of the heat source.
The correct position of the operating valve (A).
The quantity of liquid.
If food has burnt in
your pressure cooker:
Fill the pot with water and soak for a while before
washing.
Never use bleach or chlorine-containing chemicals.
If one of the
overpressure safety
systems is triggered:
Turn off the heat source.
Let your pressure cooker cool down without
moving it. Wait for the pressure indicator to fall
and open the pressure cooker.
Check and clean the operating valve (A), the steam
release outlet, the safety valve and the gasket.
If the problem persists, have your pressure cooker
checked by a TEFAL Approved Service Centre.
If you notice the
appearance of
oxidation marks inside
the pot:
The use of high performance stainless steel does
not prevent the appearance of oxidation in
extreme cases. If you notice oxidation marks,
remove them by rubbing with an abrasive sponge
before using your pressure cooker again.
Think of the environment!
! Your appliance contains valuable materials which can be
recovered or recycled.
! Leave it at a local civic waste collection point.
Page 21

Golden rules when pressure cooking
(for UK Consumers)
For 6 Litre models only.
• The minimum quantity of liquid required for normal cooking is 250 ml (½ pint) for the
first ¼ hour cooking. For each additional ¼ hour, or part of ¼ hour, add a further 150 ml
(¼ pint) of liquid. For example, 45 minutes cooking requires 600 ml (1 pint) of liquid.
Note: This is only a general guide. Certain foods, such as rice, pulses, steamed puddings
and Christmas puddings may require extra water (see details below).
• When steaming foods in the basket use a minimum of 750 ml (1¼ pint) water in the
cooker.
• Always use a liquid that gives off steam when boiled e.g. water stock, wine, beer, cider.
Never use oil or fat. All pressure cooking requires some liquid.
• Whatever the size of pressure cooker, the maximum filling level when all the ingredients
and liquid have been added are:
Solid foods e.g. vegetables, meat joints: no more than two-thirds full (MAX 2
mark)
Liquids and cereals e.g. soups, stews, cereal and pasta: no more than half full
Pulses e.g. dried beans and dried peas, rice, stewed fruit (compotes), pumpkin,
courgette and potatoes: no more than on-third full (MAX 1 mark).
• When cooking pulses they swell up and tend to froth up. Use 1.2 litres (2 pints) water for
every 450 g (1 lb) pre-soaked weight of pulses. Remember all dried peas and dried beans,
must be soaked in boiling water for 1 hour before cooking. Drain, rinse thoroughly and
cook in fresh water. Never eat uncooked beans or peas. Soaking is not necessary for red
lentils. The high temperatures achieved in the pressure cooker ensure that any natural
toxins in the pulses are destroyed. Canned beans and pulses can simply be drained and
rinsed before adding to the pressure cooker.
• For steamed suet puddings, sponge puddings or Christmas puddings, a short presteaming time is best to enable the raising agent to activate and prevent a heavy, close
texture. Extra liquid is required so use a minimum of 1½ pint/900 ml of boiling water for
a combined steaming and cooking time of up to 1 hour. For each additional ¼ hour of
cooking, or part of ¼ hour, add a further ¼ pint/150 ml of boiling water. Pre-steaming is
done with the operating valve in the steam release position on a low heat for the required
time. Then turn the operating valve to , and increase the heat to bring to full pressure.
Lower the heat and pressure cook for the required time.
• Pressure operates at 65 kPa (9psi/9lbs).
• Never cook dumplings with the lid tightly closed, as they could rise up and block the safety
devices. Cook the stew and at the end of cooking, release the steam and cook gently for
about 10 - 15 minutes without the lid on.
• Pressure cooking times vary according to the size of individual pieces or thickness of the
food, not the weight.
• To prevent discolouration of the inside of the stainless steel pot, caused by mineral
deposits in hard water areas, add a tablespoon of lemon juice or vinegar.
21
EN
Page 22

• Cooking containers must withstand temperatures of 130°C (250°F). Any covering on
containers, e.g. foil, greaseproof paper, must be securely tied otherwise they could block
the safety devices. Do not use plastic lids as they prevent steam from being in contact
with the food. Also, they could distort and come off during cooking which could block
the safety outlets.
• Accurate timing is essential when pressure cooking to prevent overcooking, especially
with vegetables, fruit and fish.
• Never make milk-based recipes (such as rice pudding, semolina pudding..) in the pressure
cooker.
Australian – NZ warranty
COOKWARE, BAKEWARE AND PRESSURE COOKERS
Limited Replacement Guarantee
Our goods come with guarantees that cannot be excluded under the Australian Consumer
Law. You are entitled to a replacement or refund for a major failure and compensation for
any other reasonably foreseeable loss or damage. You are also entitled to have the goods
repaired or replaced if the goods fail to be of acceptable quality and the failure does not
amount to a major failure. In addition to these statutory rights and any other rights and
remedies you may have under the law, Groupe SEB Australia Pty Ltd (we or us) guarantees
this Jamie Oliver by Tefal/Tefal/All-Clad/Moulinex product will be free of defects in material
and craftsmanship including handles, body, knobs, lids and fixings for 12 months from the
date of purchase.We also guarantee the non-stick coating of this Jamie Oliver by
Tefal/Tefal/All-Clad/Moulinex product will be free of blistering or peeling for the life of the
Jamie Oliver by Tefal/Tefal/All-Clad/Moulinex product. Should your Jamie Oliver by
Tefal/Tefal/All-Clad/Moulinex product develop a defect during the guarantee period or the
non-stick coating peel during the life of your Jamie Oliver by Tefal/Tefal/All-Clad/Moulinex
product, you should return it, at your cost, to the retailer from which you purchased it from,
together with your receipt as proof of purchase. The retailer will then forward your claim
directly to us for processing. Alternatively, if the retailer is unable to help you, you may
contact us directly at:
Groupe SEB Australia Pty Ltd,Customer Service Department,Unit 1, No 10 Hill Rd,
Homebush NSW 2127 T: +61 2 9748 7944
If on receipt your Jamie Oliver by Tefal/Tefal/All-Clad/Moulinex product is found to be
defective or the non-stick coating has peeled, we will, at our cost, replace or repair the
product in our discretion. Only the defective part or accessory will be repaired or replaced.
Packaging, instructions etc. will not be replaced unless faulty.This guarantee excludes
defects caused by the Jamie Oliver by Tefal/Tefal/All-Clad/Moulinex product not being used
in accordance with instructions , accidental damage (including overheating), misuse or
being tampered with by unauthorised persons. It also does not apply if the Jamie Oliver
by Tefal/Tefal/All-Clad/Moulinex product is used commercially and excludes consumable
items (including accessories such as pressure regulators and safety devices), dishwasher
effects and damages, stains, dents, discolouration, scratches or scuffs due to normal wear
and tear, and your costs of claiming under the warranty.
22
Page 23
23
EN
VEGETABLES
(FRESH)
STEAM
Ingredient in the steam
basket and 750 ml water
in the bottom of the
pressure cooker.
IMMERSION
Ingredient in water and
without the basket.
PULSES
IMMERSION
Without the basket.
75 cl
MAX
1/3 MAX 1
Artichokes, 2 whole, 600g each (immersion) 30 to 35 mins
Asparagus, white (Steam) 5 to 6 mins
Aubergines, peeled and sliced (3mm), 850g (Steam)
10 to 12 mins
Beetroot, red, cut into quarters (Immersion)
20 to 25 mins
(according to size)
Bell peppers cut in half (550 g) (steam) 14 to 16 mins
Broccoli florets 600 g (steam) 9 to 11 mins
Brussels sprouts (steam) 10 to 12 mins
Cabbage, sliced and green, 500 g (Immersion) 5 to 6 mins
Carrots cut into round slices (3 mm) 600 g (steam) 17 to 19 mins
Cauliflower florets 600 g (steam) 10 to 12 mins
Celeriac, sliced (immersion) 600 g 7 to 9 mins
Chard, sliced (2cm) 700 g (Steam) 15 to 17 mins
Courgettes in round slices (3 mm) 600 g (steam) 12 to 15 mins
Endives cut in half (900 g) (steam) 14 to 16 mins
Fennel cut into strips (600 g) (steam) 6 to 9 mins
Fine green beans (600 g) (steam) 10 to 12 mins
Flageolet beans, dried 250 g (Immersion) 35 to 40 mins
Leek, whole and white 650 g (Steam) 9 to 11 mins
Lentils, green 250 g (Immersion) 14 to 16 mins
Mushrooms, sliced 800 g (Immersion) 4 to 5 mins
Peas (steam) 6 to 8 mins
Pickling onions (steam) 7 to 8 mins
Potatoes cut in half (950 g) (steam)
20 to 25 mins
(according to size)
Pumpkin, cut in pieces (3 to 5 cm) 600 g (steam) 13 to 18 mins
Spinach (steam) 3 to 4 mins
Split peas 250 g (immersion) 18 to 20 mins
Turnips, diced (500 g) (steam) 14 to 16 mins
Vegetable
COOKING TABLE
Page 24
24
Rice
Meat/ fish
IMMERSION
Without the basket.
1/3 MAX 1
QUANTITY
OF WATER
QUANTITY
OF RICE
COOKING
TIME
2 PEOPLE 400 ml / 2 glasses 150 g / 1 glass
7 to 8 mins4 PEOPLE
500 ml / 2.5 glasses
250 g / 2 glasses
6 PEOPLE
700 ml / 3.5 glasses
375 g / 3 glasses
FRESH FROZEN
Chicken (1.35 kg) 23 to 25 mins 1 h to 1 h10mins
Duckling (1.8 kg) 45 to 47 mins 50 to 55 mins
Lamb shanks: 2 (0.95 kg) 40 to 45 mins 1 h05 to 1 h15
Monkfish fillets (1 kg)
in pieces of 75 g
5 to 6 mins 7 to 8 mins
Pork filet mignon:
2 pieces of 350 g
13 to 15 mins 26 to 29 mins
Pork joint (0.8 kg, 8–10 cm
diameter)
30 to 35 mins 1 h05 to 1h15
Poussins: 2 (1.3 kg) 23 to 25 mins 40 to 45 mins
Quail: 4 9 to 10 mins 18 to 20 mins
Rabbit (1.5 kg in pieces) 8 to 9 mins 20 to 23 mins
Roast beef (1 kg, 8–11 cm
diameter)
30 to 35 mins 45 to 50 mins
Salmon steaks: 4 (0.8 kg) 5 to 6 mins 7 to 8 mins
Tuna steaks: 4 (0.7 kg) 5 to 6 mins 7 to 9 mins
Veal filet mignon: 0.7 kg 17 to 21 mins 33 to 38 mins
Veal joint (0.8 kg, 5–7 cm
diameter)
17 to 19 mins 37 to 40 mins
Veal paupiettes: 4 10 to 12 mins x
Note: For models 5 litres and below ensure that meat joints and poultry do
not exceed the mark on the inside of the pot. Choose meat joints and
poultry 8 cm or less in height.
Page 25
25
FR
Avant d’utiliser votre autocuiseur, prenez le temps de lire toutes les
instructions et reportez-vous toujours au “Guide de l’utilisateur”.
Des dommages peuvent résulter d’une utilisation non conforme.
Pour votre sécurité, cet appareil est conforme aux normes et réglementations
applicables :
- Directive des Équipements sous Pression
- Matériaux en contact avec les aliments
- Environnement
PRÉCAUTIONS IMPORTANTES
VERIFICATIONS
IMPERATIVES
AVANT CHAQUE
UTILISATION
VERIFIER
à l'œil et au jour, que le conduit d'évacuation vapeur ne
soit pas obstrué - fig 13.
que la bille de la soupape de sécurité soit mobile
- fig 18.
que le joint de couv
ercle soit placé sous chacune des
encoches du couvercle
- fig 15.
que les poignées de la cuve soient correctement fixées.
Les poignées de cuve sont des pièces de sécurité. Veillez
à ne jamais les changer vous-même.
RESPECTER
TOUJOURS LES
QUANTITES DE
REMPLISSAGES
SUIVANTES
N’utilisez jamais votre autocuiseur sans liquide, cela le
détériorerait gravement. Assurez-vous qu’il y ait toujours
suffisamment de liquide pendant la cuisson.
Minimum 25 cl
- fig 4.
Maximum 2/3 de la hauteur de la cuve, repère MAX 2
- fig 5.
Lors des cuissons vapeur, les aliments présents dans le
panier vapeur ne doivent pas être en contact avec l’eau
- fig 6 et 7.
Maximum 1/3 (MAX 1) pour les aliments pâteux qui se
dilatent et/ou qui moussent pendant la cuisson, comme
le riz, les légumineuses, les légumes déshydratés, ou les
compotes, le potiron, les courgettes, les carottes, les
pommes de t
erre
...
Les aliments placés dans le panier vapeur ne doivent pas
dépasser le niveau MAX 2 de la cuve.
Page 26
26
AVANT ET
PENDANT LA
CUISSON
Ne pas laisser les enfants à proximité lorsque l'autocuiseur
est en cours d'utilisation.
Votre autocuiseur cuit sous pression. Des blessures par
ébouillantage peuvent résulter d’une utilisation
inadéquate. Assurez-vous que l’autocuiseur est
convenablement fermé avant de le mettre en service. (Voir
paragraphe “Fermeture”).
Veillez, au cours de la cuisson, à ce que la soupape chuchote
toujours. S’il n’y a pas assez de vapeur qui s’échappe,
décompressez le produit et vérifiez la présence suffisante
de liquide, ainsi que la non obstruction du conduit
d'évacuation vapeur. Après ces vérifications si la vapeur ne
s'échappe toujours pas, augmentez légèrement la source
de chaleur.
Ne pas cuire des aliments risquant d'obstruer les conduits
des organes de sécurité :
- les airelles
- l'orge perlé
- les flocons d'avoine
- les pois cassés
- les nouilles, macaronis, spaghettis
- la rhubarbe
- les groseilles
Ne réalisez jamais de recette à base de lait animal dans
votre autocuiseur.
Dans le cas d'un autocuiseur avec cuve en inox, n’utilisez
pas de gros sel dans votre autocuiseur, ajoutez du sel fin en
fin de cuisson. Vous éviterez ainsi l'apparition de "piqûres"
qui pourraient altérer le fond de votre autocuiseur.
N’utilisez pas votre autocuiseur pour frire sous pression
avec de l’huile.
N’utilisez pas votre autocuiseur dans un autre but que celui
auquel il est destiné.
Ne mettez pas votre autocuiseur dans un four chaud.
Ne jamais mettre de feuille de papier d'aluminium non
maintenue sur un moule dans votre autocuiseur.
Ne jamais mettre de film plastique dans votre autocuiseur
Les vapeurs d’alcool sont inflammables. Portez à ébullition
environ 2 minutes avant de mettre le couvercle. Surveillez
votre appareil dans le cadre des recettes à base d’alcool.
Utilisez la(les) source(s) de chaleur compatible(s),
conformément aux instructions d’utilisation.
Page 27
27
FR
APRES LA
CUISSON...
Tournez progressivement la soupape de fonctionnement
(A) en choisissant à votre convenance la vitesse de
décompression, pour terminer face au repère du
pictogramme
- fig 10. Si lors de la libération de la
vapeur, vous observez des projections anormales, remettez
la soupape de fonctionnement (A) en position de cuisson
mode "Autocuiseur", puis effectuez une décompression
rapide sous eau froide
- fig 14.
Si la tige de sécurité (D) ne descend pas, placez votre
autocuiseur sous un robinet d’eau froide
- fig 14.
N’intervenez jamais sur cette tige de sécurité.
Après cuisson de viandes qui comportent une peau
superficielle (ex. langue de bœuf), qui risque de gonfler
sous l’effet de la pression, ne piquez pas la viande tant
que la peau présente un aspect gonflé; vous risqueriez
d’être ébouillanté. Veillez à piquer la viande avant cuisson.
Pour les aliments pâteux qui se dilatent ou qui moussent
pendant la cuisson, comme le riz, les légumineuses, les
légumes déshydratés, ou les compotes, le potiron, les
courgettes, les carottes... Laissez refroidir votre autocuiseur
quelques minutes, puis effectuez un refroidissement sous
eau froide. Secouez systématiquement et légèrement
l’autocuiseur avant chaque ouverture afin d’éviter tout
jaillissement de bulles de vapeur qui risqueraient de vous
brûler. Cette opération est particulièrement importante
lors de l’évacuation rapide de la vapeur ou après
refroidissement sous l’eau du robinet.
Déplacez votre autocuiseur sous pression avec un
maximum de précautions. Ne touchez pas les surfaces
chaudes. Utilisez les poignées et boutons. Utilisez des
gants, si nécessaire.
Dans le cadre des soupes, nous vous conseillons
d'effectuer une décompression rapide sous eau froide (voir
paragraphe " Fin de cuisson en mode 'Autocuiseur' ").
Assurez-vous que la soupape soit en position de
décompression avant d’ouvrir votre autocuiseur. La tige
de sécurité (D) doit être en position basse.
N’ouvrez jamais votre autocuiseur en force. Assurez-vous
que la pression intérieure est retombée. La tige de sécurité
(D) doit être en position basse. (Voir paragraphe
“Sécurités”).
Page 28
28
CONSERVEZ CES INSTRUCTIONS
ENTRETIEN
Si vous constatez qu'une partie de votre autocuiseur est
cassée ou fissurée, n'essayez en aucun cas de l'ouvrir s'il
est fermé, attendez qu'il refroidisse complètement avant
de le déplacer, ne l'utilisez plus et rapportez le à un Centre
de Service Agréé TEFAL pour réparation.
N’intervenez pas sur les systèmes de sécurité au-delà des
consignes de nettoyage et d’entretien.
N’utilisez que des pièces d’origine TEFAL correspondant
à votre modèle. En particulier, utilisez une cuve et un
couvercle TEFAL.
N’utilisez pas votre autocuiseur pour stocker des aliments
acides ou salés avant et après cuisson, au risque de
dégrader votre cuve.
Nettoyer et rincer votre autocuiseur immédiatement après
chaque utilisation.
Ne passez jamais ni la soupape de fonctionnement (A), ni
le joint (I), ni le minuteur* (F), ni la cuve avec revêtement
antiadhésif au lave-vaisselle.
Ne passez jamais le minuteur* (F) sous l'eau.
N’utilisez jamais d’eau de javel ou de produits chlorés, qui
pourraient altérer la qualité de l’acier inoxydable.
Ne laissez pas le couvercle tremper dans l’eau.
Changez le joint tous les ans ou immédiatement si celuici présente une coupure.
Il est impératif de faire vérifier votre autocuiseur dans un
Centre de Service Agréé TEFAL après 10 ans d'utilisation.
Pour ranger votre autocuiseur : Retournez le couvercle sur
la cuve afin d'éviter l'usure prématurée du joint de
couvercle.
* selon modèle
Page 29
29
FR
Composants (voir Schéma descriptif)
Vérifications impératives avant chaque
utilisation
Vérification de la soupape de fonctionnement
Vérifiez que le trou d’évacuation de la soupape de fonctionnement n’est pas
obstrué.
Vérification de la soupape de sécurité
Vérifiez que la bille de la soupape de sécurité est mobile (utilisez un coton tige
sans le coton).
A. Soupape de fonctionnement
B. Conduit d’évacuation de
vapeur
C. Index de positionnement de la
soupape
D. Tige de sécurité (voir
paragraphe "Sécurités")
E. Soupape de sécurité
F. Minuteur*
G. Poignée de couvercle
H. Couvercle
I. Joint
J. Panier vapeur*
K. Trépied*
L. Poignée de cuve
M. Repères maximum de
remplissage
N. Cuve
Minuteur: fourni uniquement avec le modèle ClipsoMinut'®Perfect.
Disponible en accessoire dans le commerce pour les autres modèles ClipsoMinut'®.
* selon modèle
Page 30

30
* selon modèle
Cuisson en mode Cuisson en mode Décompression
Autocuiseur Faitout*
Ouverture
Basculez la poignée de couvercle de la position horizontale à la position
verticale
- fig 2. Le couvercle tourne.
Soulevez le couvercle.
En cas de difficulté pour ouvrir le produit : passer le joint sous l'eau et le
remettre dans le couvercle sans l'essuyer
- fig 19 et 15 et en veillant à bien
le placer sous les encoches du couvercle.
Fermeture
Assurez-vous que la poignée de couvercle est en position verticale.
Posez le couvercle sur la cuve comme indiqué sur la
- fig 1 en alignant la
partie plastique a
vec les poignées de la cuve.
Rabattez la poignée de couvercle de la position verticale à la position
horizontale
- fig 3.
Le couv
ercle tourne.
Si vous ne pouvez pas fermer le couvercle :
Vérifiez la bonne mise en place du joint ainsi que le bon positionnement du
couvercle.
En cas de difficulté pour fermer le produit : passer le joint sous l'eau et le
r
emettre dans le couvercle sans l'essuyer
- fig 19 et 15 et en veillant à bien
le placer sous les encoches du couvercle.
Première utilisation
Pour les modèles avec revêtement antiadhésif : lavez et huilez légèrement,
avec de l’huile de cuisson, toute la surface de revêtement intérieur.
Posez le trépied* (K) au fond de la cuve.
Remplissez la cuve (N) d'eau jusqu'aux 2/3 (MAX 2) - fig 5.
Positionnez le panier* (J) sur le trépied* (K)
.
Fermez votre autocuiseur.
Alignez le pictogramme de la soupape de fonctionnement (A) avec
l’index de positionnement de la soupape (C)
- fig 9.
Posez votre autocuiseur sur une source de chaleur puis réglez-la à sa
puissance maximum.
Utilisation
Page 31

31
FR
Lorsque la vapeur commence à s’échapper par la soupape, réduisez la source
de chaleur et décomptez 20 min.
Lorsque les 20 min. sont écoulées, éteignez votre source de chaleur.
Alignez le pictogramme de la soupape de fonctionnement (A) avec l’index
de positionnement de la soupape (C).
Lorsque la tige de sécurité (D) redescend, votre autocuiseur n’est plus sous
pression.
Ouvrez votre autocuiseur
- fig 2.
Nettoyez-le avec du produit vaisselle.
Remplissage minimum et maximum
Minimum 25 cl (2 verres) - fig 4.
Maximum 2/3 de la hauteur de la cuve, repère MAX 2
- fig 5.
N'utilisez pas de gros sel dans votre autocuiseur, ajoutez du sel fin en fin de
cuisson.
Pour certains aliments :
Pour les aliments pâteux qui se dilatent ou qui
moussent pendant la cuisson,
comme le riz, les
légumineuses, les légumes désh
ydratés, ou les
compotes, le potiron, les courgettes, les carottes, les
pommes de terre...
ne remplissez pas votre autocuiseur
au-delà de 1/3 (MAX 1) de sa capacité. Laissez refroidir
votre autocuiseur quelques minutes, puis effectuez un
refroidissement sous eau froide. Secouez
systématiquement et légèrement l’autocuiseur avant chaque ouverture afin
d’éviter tout jaillissement de bulles de vapeur qui risqueraient de vous brûler.
Cette opération est particulièrement importante lors de l’évacuation rapide
de la vapeur ou après refroidissement sous l’eau du robinet. Dans le cadre
des soupes, nous vous conseillons d'effectuer une décompression rapide sous
eau froide (voir paragraphe 'Fin de cuisson en mode "Autocuiseur"').
Utilisation du panier vapeur*
Versez 75 cl d’eau dans le fond de la cuve (N).
Posez le trépied* (K) au fond de la cuve.
Positionnez le panier* (J) sur le trépied* (K)
- fig 6.
Lors des cuissons vapeur, les aliments présents dans le
panier vapeur* ne doivent pas être en contact avec
l’eau
- fig 6 et 7.
Les aliments placés dans le panier vapeur* ne
doivent pas dépasser le niveau MAX 2.
* selon modèle
MAX
MAX1
1/3
Page 32

32
* selon modèle
Retrait et mise en place de la
soupape de fonctionnement (A)
Pour retirer la soupape de fonctionnement (A) :
Alignez la rainure avec l’index de positionnement de la
soupape (C) en appuyant sur la bague de la soupape
de fonctionnement (A).
Retirez la
- fig 11.
Pour mettre en place la soupape de fonctionnement :
Posez la soupape de fonctionnement (A) en alignant la
rainure de la soupape de fonctionnement (A) avec
l’index de position (C)
- fig 8.
Enf
oncez la soupape de fonctionnement (A) pour
qu’elle s’enclenche sur la tige d’évacuation de vapeur.
Appuyez sur la bague de la soupape de
fonctionnement (A) et tournez.
Minuteur*
*Uniquement fourni avec le modèle ClipsoMinut'
Perfect
Le minuteur a été conçu pour vous aider à garantir le résultat des cuissons, en
vous permettant d’ajuster au mieux la consommation d’énergie. Il décompte
automatiquement le temps de cuisson dès l’atteinte du niveau de température
correspondant à la cuisson en mode “Autocuiseur” .
Le minuteur doit être clipsé sur votre autocuiseur pour fonctionner.
Veillez, au cours de la cuisson, à ce que la soupape de
fonctionnement (A) chuchote régulièrement. S'il n’y a pas assez de
vapeur, augmentez légèrement la source de chaleur, dans le cas
contraire, réduisez la source de chaleur.
Rainure
Page 33

33
Pour allumer le minuteur : appuyez sur le bouton.
Programmez le temps de cuisson (en minutes).
Si vous vous êtes trompés de temps de cuisson,
attendez 4 sec que les flammes ne clignotent plus, puis
appuyez longtemps sur le bouton pour la remise à zéro.
Démarrez la source de chauffe puissance maximum.
Dès que votre autocuiseur a atteint la température de
cuisson, le minuteur sonne et le décompte du temps
commence (les chiffres clignotent).
Réduire la puissance de la source de chauffe.
À la fin du temps de cuisson, le minuteur sonne.
Pour arrêter la sonnerie du minuteur, appuyez sur le bouton.
Coupez la source de chauffe.
Mise en place et retrait du minuteur*
Pour mettre le minuteur (F) en place
- fig 12, insérez
d’abord la partie "côté touche" sur le module puis
appuyez pour clipser la partie opposée.
Pour retirer le minuteur (F), soulevez-le et retirez-le.
Changement de la pile du minuteur*
La pile du minuteur est une pile de type bouton
CR2032.
Si le symbole apparait ou si vous n’avez plus
aucun affichage, changez la pile.
2
3
4
5
Un appui long sur le bouton remet à zéro et éteint le minuteur.
1
2
1
2
FR
* selon modèle
Page 34

34
La durée de vie de la pile dépend de la fréquence
d’utilisation du minuteur.
La pile du minuteur contient du Dimethoxyethane n°
CAS 110-71-4. Elle est conforme à la réglementation
européenne. Pour votre sécurité et la préservation de
l’environnement : n’ouvrez pas la pile, ne l’exposez pas
à des températures élevées, ne la jetez pas avec les
ordures ménagères; rapportez-la dans un centre de
collecte de piles usagées.
Pour retirer la pile de votre minuteur, ouvrez le bouchon
de pile à l'aide d'une pièce de monnaie (voir dessin cicontre).
Remplacez votre pile.
Remettez le joint en place dans son logement.
Positionnez la ½ lune du bouchon de pile en face de
la ½ lune du timer.
Tournez le bouchon de pile, doucement, tout en
appuyant légèrement, en alignant la ½ lune du
bouchon de pile avec la lune du timer.
Procédez à plat sur un plan de travail afin que le
bouchon soit bien positionné horizontalement.
Ne forcez pas sur le bouchon de pile lorsque vous le
refermez. N’allez pas au-delà des butées.
En cas de perte, vous pouvez vous procurer un autre
minuteur dans tous nos Centres de Service Agréés
TEFAL.
Avant la cuisson
Avant chaque utilisation, retirez la soupape de fonctionnement (A) - fig 11
et vérifiez à l’œil et au jour que le conduit d’évacuation de vapeur (B) n’est
pas obstrué
- fig 13.
Vérifiez que la soupape de sécurité est mobile (
voir paragraphes “Nettoyage”
et "Vérifications impératives avant chaque utilisation"
) - fig 18.
Fermez votre autocuiseur
- fig 3.
En cas de difficulté pour fermer le produit : passer le joint sous l'eau et le
remettre dans le couvercle sans l'essuyer
- fig 19 et 15 et en veillant à bien
le placer sous les encoches du couvercle.
Mettez en place la soupape de fonctionnement (A) - fig 8.
◗
◗
◗
●
Ne passez jamais le minuteur* sous l’eau, ni au lave-vaiselle.
+
Page 35

35
FR
Cuisson en mode
“Autocuiseur”
Tournez la soupape de fonctionnement (A) jusqu’à la position de cuisson
mode “Autocuiseur” - fig 9.
Assurez-vous que votre autocuiseur est convenablement fermé avant de le
mettre en service
- fig 3.
Posez votre autocuiseur sur une source de chaleur puis réglez-la à sa
puissance maximum.
Pour les modèles équipés d'un minuteur* : programmez le temps de cuisson
indiqué sur la recette (voir paragraphe "Utilisation du minuteur").
Les cliquetis et les fumerolles émis par la tige de sécurité sont normaux, ils
permettent l'échappement de l'air avant la cuisson.
Pendant la cuisson en mode “Autocuiseur”
Lorsque la soupape de fonctionnement (A) laisse échapper de la vapeur de
façon continue, en émettant un son régulier (PSCHHHT), réduisez la source
de chaleur.
Commencez alors le décompte du temps de cuisson indiqué dans la recette.
Veillez, au cours de la cuisson, à ce que la soupape chuchote régulièrement.
S’il n’y a pas assez de vapeur qui s’échappe, augmentez légèrement la source
de chaleur, dans le cas contraire, réduisez-la.
Fin de cuisson en mode “Autocuiseur”
Pour libérer la vapeur :
Une fois la source de chaleur éteinte, vous avez deux possibilités :
• Décompression progressive : tournez progressivement la soupape de
fonctionnement (A) pour terminer face au repère du pictogramme
- fig 10.
Modèle Clipso
Minut Perfect
et Easy
Modèle
ClipsoMinut
Duo
* selon modèle
Page 36

36
•
Décompression rapide sous eau froide : placez votre autocuiseur sous un
robinet d’eau froide
- fig 14. Lorsque la tige de sécurité (D) redescend, votre
autocuiseur n’est plus sous pression. Tournez la soupape de fonctionnement
(A) jusqu’à la position .
Vous pouvez ouvrir votre autocuiseur
- fig 2.
En cas de difficulté pour ouvrir le produit : passer le joint sous l'eau et le
remettre dans le couvercle sans l'essuyer
- fig 19 et 15 et en veillant à bien
le placer sous les encoches du couvercle.
Pour les aliments pâteux qui se dilatent ou qui moussent pendant la cuisson,
comme le riz, les légumineuses, les légumes déshydratés, ou les compotes, le
potir
on, les courgettes, les carottes, les pommes de terre...
ne remplissez pas
votre autocuiseur au-delà de 1/3 (MAX 1) de sa capacité. Laissez refroidir votre
autocuiseur quelques minutes, puis effectuez un refroidissement sous eau froide.
Secouez systématiquement et légèrement l’autocuiseur avant chaque
ouverture afin d’éviter tout jaillissement de bulles de vapeur qui risqueraient de
vous brûler. Cette opération est particulièrement importante lors de l’évacuation
rapide de la vapeur ou après refroidissement sous l’eau du robinet. Dans le cadre
des soupes, nous vous conseillons d'effectuer une décompression rapide.
Si la tige de sécurité (D) ne descend pas, placez votre autocuiseur
sous un robinet d’eau froide
- fig 14.
N’intervenez jamais sur la tige de sécurité.
Si lors de la libération de la vapeur, vous observez des projections
anormales, remettez la soupape de fonctionnement (A) en position
de cuisson mode "Autocuiseur" , puis effectuez une
décompression rapide sous eau froide.
Modèle
Perfect/Easy
Modèle
Duo
Etape 1
{
Etape 2
Page 37

37
FR
Cuisson en mode
“Faitout”*
Uniquement possible avec le modèle cuve
couleur antiadhésive
Tournez la soupape de fonctionnement (A) jusqu’à la
position de cuisson mode “Faitout” .
Assurez-vous que votre autocuiseur est convenablement
fermé
- fig 3 avant de le mettre en service.
P
osez votre autocuiseur sur une source de chaleur réglée
à puissance réduite.
Commencez alors le décompte du temps de cuisson
indiqué dans la recette.
En mode “Faitout”, vous pouvez ouvrir votre autocuiseur à tout moment pour
remuer, surveiller la cuisson ou rajouter des ingrédients.
En cas de difficulté pour ouvrir le produit : passer le joint sous l'eau et le
remettre dans le couvercle sans l'essuyer - fig 19 et 15 et en veillant à bien
le placer sous les encoches du couvercle.
Si la source de chaleur est trop forte, il peut arriver que l’autocuiseur se
v
errouille (la tige de sécurité (D) monte et bloque l'ouverture) et que la
poignée du couvercle ne puisse être actionnée ou n’ouvre pas l’autocuiseur.
Dans ce cas, réduisez ou éteignez la source de chauffe. Dans le cas de
plaques électriques en fonte, retirez l’autocuiseur de la source de chauffe.
Ne pas utiliser de fouets ou ustensiles métalliques ou tranchants. N'égouttezpas vos ustensiles en tapant sur le rebord de la cuve au risque de l'abîmer et
de provoquer des fuites.
Ne jamais chauffer de matières grasses jusqu’à carbonisation. Les fumées
dégagées par la cuisson peuvent être dangereuses pour les animaux ayant
un système respiratoire sensible, comme les oiseaux. Les propriétaires
d'oiseaux doivent les éloigner de la cuisine.
Votre autocuiseur est équipé de plusieurs dispositifs de sécurité :
Sécurité à la fermeture :
- Si le couvercle est mal positionné ou si vous oubliez de rabattre la poignée
de couvercle, il y a une fuite de vapeur sur le pourtour de l’autocuiseur et il
ne peut pas monter en pression.
Sécurités
* selon modèle
Page 38

38
Sécurité à l’ouverture :
-
Si votre autocuiseur est sous pression, la tige de sécurité (D)est en position haute
et la poignée de couvercle d'ouverture/fermeture (G) ne doit pas être actionnée.
- N'essayez jamais d'ouvrir votre autocuiseur en force.
- N’agissez surtout pas sur la tige de sécurité (D).
- Assurez-vous que la pression intérieure est retombée en vérifiant que la tige
de sécurité (D) est en position basse.
- Les poignées de cuve sont des pièces de sécurité. Veillez à ne jamais les
changer vous-même. N’utilisez jamais d’autres modèles de poignées.
- Si vous avez basculé la poignée de couvercle d'ouverture/fermeture (G) en
position verticale, alors que l'autocuiseur était encore sous pression, vous ne
pouvez pas l'ouvrir. Cette fonction est une sécurité supplémentaire.
- Rebasculez la poignée de couvercle en position horizontale et attendez que
la tige de sécurité (D) soit en position basse.
Deux sécurités à la surpression :
- Premier dispositif : la soupape de sécurité (E) libère la pression
- fig 20.
- Second dispositif : le joint laisse échapper de la vapeur sur le couvercle
- fig 20.
Si l’un des systèmes de sécurité à la surpression se déclenche :
Arrêtez la source de chaleur.
Laissez refroidir complètement votre autocuiseur.
Ouvrez.
Vérifiez et nettoyez la soupape de fonctionnement (A), le conduit
d’évacuation de vapeur (B), la soupape de sécurité (E) et le joint (I)
- fig 16 - 17- 18. Voir paragraphes "Nettoyage" et "Vérifications
impératives avant chaque utilisation".
Si après ces vérifications et nettoyages, votre produit fuit ou ne fonctionne
plus, ramenez-le dans un Centre de Service agréé TEFAL.
Recommandations d’utilisation
1 - La vapeur est très chaude lorsqu’elle sort de la soupape de
fonctionnement. Attention au jet de vapeur.
2 - Dès que la tige de sécurité s’élève, vous ne pouvez plus ouvrir votre
autocuiseur.
3 - Comme pour tout appareil de cuisson, assurez une étroite surveillance
si vous utilisez votre autocuiseur à proximité d’enfants.
4 - Pour déplacer votre autocuiseur, servez-vous des deux poignées de cuve.
5 - Ne laissez pas séjourner d’aliments dans votre autocuiseur. Ne
transportez jamais votre autocuiseur par la poignée de couvercle.
6 - N’utilisez jamais d’eau de javel ou de produits chlorés, qui pourraient
altérer la qualité de l’acier inoxydable.
7 - Ne laissez pas le couvercle tremper dans l’eau.
8 - Changez le joint tous les ans ou si celui-ci présente une coupure.
Page 39

39
FR
9 - Le nettoyage de votre autocuiseur s’effectue impérativement à froid,
l’appareil vide.
10 - Il est impératif de faire vérifier votre autocuiseur dans un Centre de
Service Agréé TEFAL après 10 ans d’utilisation.
Pour le bon fonctionnement de votre autocuiseur, veillez à respecter ces
recommandations de nettoyage et d’entretien après chaque utilisation.
Lavez votre autocuiseur après chaque utilisation avec de l’eau tiède
additionnée de produit vaisselle. Procédez de même pour le panier*.
N’utilisez pas d’eau de javel ou de produits chlorés.
Ne surchauffez pas votre cuve lorsqu’elle est vide.
Pour nettoyer l’intérieur de la cuve en inox :
Lavez avec un tampon à récurer et du produit vaisselle.
Si l’intérieur de la cuve inox présente des reflets irisés ou des traces
blanchâtres (dépôt de minéraux), nettoyez-la avec du vinaigre blanc.
Pour nettoyer l’intérieur de la cuve en aluminium avec revêtement
antiadhésif :
Pour prolonger la durée de vie du produit, nous vous recommandons le lavage
à la main.
Lavez avec de l’eau chaude, du produit vaisselle et une éponge douce.
N’utilisez-pas de poudre à récurer ni d’éponges abrasives.
Si vous avez laissé brûler un aliment, remplissez votre cuve d’eau chaude et
laissez tremper. Ensuite, nettoyez avec du produit vaisselle.
Pour nettoyer l’extérieur de la cuve :
Lavez avec une éponge et du produit vaisselle.
Nettoyage
Le brunissement et les rayures qui peuvent apparaître à la suite d’une
longue utilisation ne présentent pas d’inconvénient.
L'usure du revêtement extérieur
(selon modèle)
liée au contact du
couvercle sur la cuve est normale.
Pour les autocuiseurs avec revêtement antiadhésif
(selon modèle)
:
les légères rayures et abrasions pouvant apparaître à l’usage
n’altèrent pas les performances antiadhésives du revêtement.
Vous pouvez mettre la cuve en inox et le panier au lave-vaisselle.
* selon modèle
Page 40

40
*selon modèle
Pour nettoyer le couvercle :
Lavez le couvercle avec une éponge et du produit vaisselle.
Pour nettoyer le joint du couvercle :
Après chaque cuisson, nettoyez le joint (I) et son logement.
Pour la remise en place du joint, veuillez vous reporter
- fig 15 et veillez à ce
que le joint soit bien passé sous chacune des encoches du couv
ercle.
Pour nettoyer la soupape de fonctionnement (A) :
Retirez la soupape de fonctionnement (A)
- fig 11.
Netto
yez la soupape de fonctionnement (A) sous le
jet d’eau du robinet
- fig 16.
Vérifiez sa mobilité : dessin ci-contre.
Pour nettoyer le conduit d'évacuation de vapeur (B) situé sur le couvercle :
Enlevez la soupape (A)
- fig 11.
C
ontrôlez à l’œil et au jour que le conduit d’évacuation de vapeur est
débouché et rond
- fig 13. Si besoin, nettoyez-le avec un cure-dent - fig 17
et rincez-le.
P
our nettoyer la soupape de sécurité (E) :
Nettoyez la partie de la soupape de sécurité située à l’intérieur du couvercle
en passant celui-ci sous l’eau.
Vérifiez son bon fonctionnement en appuyant fortement sur la bille (
à l'aide
d'un coton tige sans coton)
qui doit être mobile - fig 18. Voir paragraphe
"V
érifications impératives avant chaque utilisation".
Ne mettez pas la cuve avec revêtement antiadhésif (selon modèle) au
lave-vaisselle, car les détergents en tablettes contiennent des
substances très agressives et corrosives pour les parties en aluminium.
L’utilisation intensive de votre cuve revêtement antiadhésif (selon
modèle) peut légèrement altérer la couleur du revêtement
(jaunissement, tâchage).
Après avoir retiré la soupape de
fonctionnement (A), le joint (I) et le minuteur*
(F), vous pouvez passer le couvercle au lavevaisselle.
Ne passez jamais ni la soupape de fonctionnement (A), ni le joint (I),
ni le minuteur* (F), ni la cuve avec revêtement antiadhésif au
lave-vaisselle.
Page 41

41
FR
Pour nettoyer le minuteur* (F) :
Utilisez un chiffon propre et sec.
N’utilisez pas de solvant.
Ne passez jamais le minuteur sous l’eau ou au lave-vaisselle.
Pour changer le joint de votre autocuiseur :
Changez le joint de votre autocuiseur tous les ans ou si celui-ci présente une
coupure.
Prenez toujours un joint d’origine TEFAL, correspondant à votre modèle (voir
paragraphe "Accessoires").
Pour la remise en place du joint, veuillez vous reporter
- fig 15 et veillez à ce
que le joint soit bien passé sous chacune des encoches du couv
ercle.
Pour ranger votre autocuiseur :
Retournez le couvercle sur la cuve.
Le mécanisme d’ouverture/fermeture de l’autocuiseur ne nécessite pas
d’entretien particulier hormis le nettoyage.
Accessoires TEFAL
Les accessoires de votre autocuiseur disponibles dans le commerce sont :
Pour le changement d’autres pièces ou réparations, faites appel aux Centres
de Service Agréés TEFAL.
N’utilisez que des pièces d’origine TEFAL correspondant à votre modèle.
Entretien
Il est impératif de faire vérifier votre autocuiseur dans un Centre de
Service Agréé TEFAL après 10 ans d'utilisation.
Accessoires Références
Joint
3/4/4.5/6 L : diamètre extérieur
du joint : 24 cm
X1010008
5/7.5/9 L : diamètre extérieur
du joint : 27 cm
X1010007
Panier vapeur*
3/4.5/4/6 L : pour cuve diamètre 22 cm
792185
5/7.5/9 L : pour cuve diamètre 24 cm 792654
Trépied*
792691
Minuteur*
X1060007
* selon modèle
Page 42

42
Diamètre du fond de votre autocuiseur - références
Informations normatives :
Pression supérieure de fonctionnement : 65 kPa
Pression maximum de sécurité : 120 kPa
Sources de chaleur compatibles
Votre autocuiseur s’utilise sur tous les modes de chauffage, y compris induction.
Sur plaque électrique, employez une plaque de diamètre égal ou inférieur à celui
du fond de votre autocuiseur.
Sur table vitrocéramique, assurez-vous que le fond de la cuve est propre et net.
Sur gaz, la flamme ne doit pas déborder du diamètre de la cuve.
Sur tous les foyers, veillez à ce que votre autocuiseur soit bien centré.
Dans le cadre de l’utilisation préconisée par le mode d’emploi, la cuve inox
de votre nouvel autocuiseur TEFAL est garantie 10 ans contre :
- Tout défaut lié à la structure métallique de votre cuve,
- Toute dégradation prématurée du métal de base.
Caractéristiques
Capacité Ø Cuve Ø Fond
Clipso
Minut'
®
Perfect / Easy
Clipso
Minut'
®
Duo
Matériau
cuve
Matériau
du
couvercle
3 L 22 cm 15,5 cm P46205 - Inox
Inox
4,5 L 22 cm 15,5 cm P46206 - Inox
6 L 22 cm 15,5 cm P46207 - Inox
4 L 22 cm 14 cm - P46042 Alu revêtu
5 L 24 cm 14 cm - P46051 Alu revêtu
7,5 L 24 cm 18 cm P46248 - Inox
9 L 24 cm 18 cm P46249 - Inox
Set
5L
24 cm
14 cm
P46353
Alu revêtu
7,5L 18 cm Inox
GAZ ELECTRICITÉ
(Plaque fonte)
ELECTRICITÉ
(Plaque radiante ou halogène
en verre céramique)
ELECTRICITÉ
(Plaque à induction en verre
céramique)
ELECTRICITÉ
(Résistance spirale)
Garantie
Page 43

43
FR
Les autres matériaux de cuve ainsi que toutes les autres pièces de votre
autocuiseur sont garanties contre tout défaut de fabrication ou de
matière, pour la période de garantie définie par la loi en vigueur dans le
pays d'achat et à partir de la date d'achat.
Cette garantie contractuelle sera acquise sur présentation du ticket de
caisse ou facture de cette date d’achat.
Ces garanties excluent :
Les rayures et la décoloration dues au vieillissement, pour les cuves avec
revêtement antiadhésif.
Les rayures liées au contact du couvercle sur la cuve avec revêtement
antiadhésif.
Les dégradations consécutives dues au non respect des précautions
importantes ou à des utilisations négligentes, notamment :
- Chocs, chutes, passage au four, …
Seuls les Centres de Service Agréés TEFAL sont habilités à vous faire bénéficier
de cette garantie.
Veuillez appeler le numéro Azur pour l’adresse du Centre Service de Agréé
TEFAL le plus proche de chez vous.
Veuillez noter que, indépendamment de la présente garantie commerciale,
s’appliquent, en tout état de cause, la garantie légale de conformité au
contrat visée par les articles L 211-4, L 211-5 et L 211-12 du Code de la
Consommation ainsi que la garantie des vices cachés visée aux articles 1641
à 1649 du Code Civil.
Marquages réglementaires
Marquage Localisation
Marque commerciale Sur le couvercle
Année et lot de fabrication
Référence modèle
Pression maximum de sécurité (PS)
Pression supérieure de fonctionnement (PF)
Sur le couvercle
Capacité Sur le fond extérieur de la cuve
Adresse postale du fabricant Sur le fond extérieur de la cuve
• Participons à la protection de l’environnement !
! Votre appareil contient de nombreux matériaux valorisables
ou recyclables.
! Confiez celui-ci dans un point de collecte pour que son
traitement soit effectué.
Page 44

44
TEFAL répond à vos questions
Problèmes
Recommandations
Si vous ne pouvez
pas fermer le
couvercle :
Vérifiez que la poignée de couvercle est bien en
position verticale.
Vérifiez le bon positionnement du joint (voir
paragraphe "Nettoyage et entretien").
Vérifiez que le couvercle est bien positionné comme
indiqué sur la
- fig 1.
Passez le joint sous l'eau et le remettre dans le
couvercle sans l'essuyer
- fig 19 et 15 et en veillant à
bien le placer sous les encoches du couvercle.
Si votre autocuiseur
a chauffé sous
pression sans
liquide à l’intérieur :
Faites vérifier votre autocuiseur par un Centre de
Service Agréé TEFAL.
Si la tige de
sécurité émet des
cliquetis et des
fumerolles :
Ceci est normal pendant les premières minutes : cela
permet l'échappement de l'air avant la cuisson.
Si la tige de
sécurité n’est pas
monté et que rien
ne s’échappe par la
soupape pendant
la cuisson :
Ceci est normal pendant les premières minutes.
Si le phénomène persiste, vérifiez que :
- La source de chaleur est assez forte, sinon augmentez-la.
- La quantité de liquide dans la cuve est suffisante.
- La soupape de fonctionnement (A) est positionnée
sur .
- Votre autocuiseur est bien fermé.
- Le joint ou le bord de la cuve ne sont pas détériorés.
- Le joint est bien positionné.
Si la tige de
sécurité est montée
et que rien ne
s’échappe par la
soupape pendant
la cuisson :
Ceci est normal pendant les premières minutes.
Si le phénomène persiste, passez votre appareil sous
l’eau froide jusqu'à ce que la tige de sécurité (D) descende.
Nettoyez la soupape de fonctionnement (A)
- fig 16
et le conduit d’évacuation de vapeur - fig 17 et vérifiez que la bille de la soupape de sécurité s’enfonce
sans difficulté
- fig 18.
Page 45

45
FR
Problèmes
Recommandations
Si la vapeur fuit autour
du couvercle, vérifiez :
La bonne fermeture du couvercle.
Le positionnement du joint dans le couvercle.
Le bon état du joint, au besoin changez-le.
La propreté du couvercle, du joint et de son logement dans le couvercle.
Le bon état du bord de la cuve.
Si vous ne pouvez pas
ouvrir le couvercle :
Vérifiez que la tige de sécurité (D) est en position
basse.
Sinon, décompressez, au besoin, refroidissez votre
autocuiseur sous un jet d’eau froide.
N’intervenez jamais sur la tige de sécurité (D).
Passez le joint sous l'eau et le remettre dans le
couvercle sans l'essuyer
- fig 19 et 15 et en veillant
à bien le placer sous les encoches du couvercle.
Si les aliments ne sont
pas cuits ou s’ils sont
brûlés, vérifiez :
Le temps de cuisson.
La puissance de la source de chaleur.
Le bon positionnement de la soupape de fonctionnement (A).
La quantité de liquide.
Si des aliments ont
brûlé dans votre
autocuiseur :
Laissez tremper votre cuve quelque temps avant
de la laver.
N’utilisez jamais d’eau de javel ou de produits
chlorés.
Si l’un des systèmes
de sécurité se
déclenche :
Arrêtez la source de chaleur.
Laissez refroidir votre autocuiseur sans le déplacer.
Attendez que la tige de sécurité soit descendue et
ouvrez.
Vérifiez et nettoyez la soupape de fonctionnement
(A), le conduit d’évacuation de vapeur, la soupape
de sécurité et le joint.
Assurez-vous que les conditions de remplissage
sont bien respectées.
Si le défaut persiste, faites vérifier votre appareil
par un Centre de Service Agréé TEFAL.
Si vous observez
l'apparition de traces
d'oxydation :
L’usage d’acier inoxydable de hautes performances n’empêche pas l’apparition d’oxydation
dans des cas extrêmes. Si vous remarquez des
traces d’oxydation, éliminez-les en frottant avec
une éponge abrasive avant d’utiliser à nouveau
votre autocuiseur.
Page 46

46
Légumes
TABLEAUX DE CUISSON
LÉGUMES
(FRAIS)
VAPEUR
Ingrédient dans le
panier vapeur et 75 cl
d’eau au fond de
l’autocuiseur.
IMMERSION
Ingrédient dans l’eau et
sans panier.
LÉGUMES SECS
IMMERSION
Sans panier.
75 cl
MAX
1/3 MAX 1
Artichauts entiers 2 pièces soit 600 g (immersion) 30 à 35 min
Asperges blanches (vapeur) 5 à 6 min
Aubergines pelées émincées (3 mm) 850 g (vapeur)
10 à 12 min
Betteraves rouges coupées en 4 (immersion)
20 à 25 min
(suivant grosseur)
Bettes en tronçons (2 cm) 700 g (vapeur) 15 à 17 min
Blancs de poireaux entiers 650 g (vapeur) 9 à 11 min
Brocolis en bouquets 600 g (vapeur) 9 à 11 min
Carottes en rondelles (3 mm) 600 g (vapeur) 17 à 19 min
Céleri rave émincé (immersion) 600 g 7 à 9 min
Champignons émincés (immersion) 800 g 4 à 5 min
Chou vert émincé (immersion) 500 g 5 à 6 min
Choux Bruxelles (vapeur) 10 à 12 min
Chou fleur en bouquets 600 g (vapeur) 10 à 12 min
Courgettes en rondelles (3 mm) 600 g (vapeur) 12 à 15 min
Endives coupées en 2 soit 900 g (vapeur) 14 à 16 min
Épinards (vapeur) 3 à 4 min
Fenouil en lamelles 600 g (vapeur) 6 à 9 min
Haricots verts fins 600 g (vapeur) 10 à 12 min
Navets en cubes 500 g (vapeur) 14 à 16 min
Petits oignons grelots (vapeur) 7 à 8 min
Petits pois (vapeur) 6 à 8 min
Poivrons coupés en 2 soit 550 g (vapeur) 14 à 16 mm
Pommes de terre moyennes coupées en 2
soit 950 g (vapeur)
20 à 25 mm
(suivant grosseur)
Potiron en morceaux (3 à 5 cm) 600 g (vapeur) 13 à 18 min
Flageolets (secs) 250 g (immersion) 35 à 40 min
Lentilles vertes 250 g (immersion) 14 à 16 min
Pois cassés 250 g (immersion) 18 à 20 min
Page 47

47
FR
Riz
Viandes / poissons
IMMERSION
Sans panier.
1/3 MAX 1
QUANTITÉ
D’EAU
QUANTITÉ DE
RIZ
TEMPS DE
CUISSON
2 PERSONNES 400 ml / 2 verres 150 g / 1 verre
7-8 min4 PERSONNES
500 ml / 2,5 verres
250 g / 2 verres
6 PERSONNES
700 ml / 3,5 verres
375 g / 3 verres
FRAIS SURGELÉS
Cailles : 4 9 à 10 min 18 à 20 min
Canette (1,8 kg) 45 à 47 min 50 to 55 mins
Coquelets : 2 (1,3 kg) 23 à 25 min 40 à 45 min
Darnes de saumon : 4 (0,8 kg) 5 à 6 min 7 à 8 min
Filet mignon de porc : 2 morceaux
de 350 g
13 à 15 min 26 à 29 min
Filet mignon de veau : 0,7 kg 17 à 21 min 33 à 38 min
Filets de lotte 1 kg
en morceaux de 75 g
5 à 6 min 7 à 8 min
Lapin (1,5 kg en morceaux) 8 à 9 min 20 à 23 min
Paupiettes de veau : 4 10 à 12 min x
Poulet (1,35 kg) 23 à 25 min 1 h à 1 h10
Rôti de bœuf (1 kg Ø 8-11 cm) 30 à 35 min 45 à 50 min
Rôti de porc (0,8 kg Ø 8-10 cm) 30 à 35 min 1 h05 à 1 h15
Rôti de veau (0,8 kg Ø 5-7 cm) 17 à 19 min 37 à 40 min
Souris d’agneau : 2 (soit 0,95 kg) 40 à 45 min 1 h05 à 1 h15
Steaks de thon : 4 (soit 0,7 kg) 5 à 6 min 7 à 9 min
Note: Pour les autocuiseurs d’une capacité inférieure à 5 litres, assurez-vous
que les morceaux de viande ou le poulet ne dépassent pas le repère
MAX 2 de la cuve. Choisissez des morceaux de viande ou un poulet de
8cm ou moins de hauteur.
Page 48

48
Lesen Sie bitte vor dem Gebrauch Ihres Schnellkochtopfes
die nachstehenden Hinweise sorgfältig durch und lesen Sie im
Zweifelsfall in der „Bedienungsanleitung“ nach.
Bei unsachgemäßem Gebrauch können Schäden entstehen.
Um Ihre Sicherheit zu gewährleisten, entspricht dieses Gerät den gültigen
Normen und Vorschriften hinsichtlich:
- Richtlinien für Geräte, die unter Druck stehen
- Materialien, die in Kontakt mit Lebensmitteln kommen
- Umweltschutz
WICHTIGE SICHERHEITSHINWEISE
VOR JEDEM
GEBRAUCH
UNBEDINGT
ÜBERPRÜFEN
ÜBERPRÜFEN SIE
bei Tageslicht, ob der Dampfaustritt nicht verstopft ist
-
Abb. 13
;
ob der Stift des Sicherheitsventils frei beweglich ist
-
Abb. 18
;
ob der Dichtungsring des Deckels unter jeder der
Aussparungen des Deckels verläuft
- Abb. 15.
dass die Handgriffe des Behälters richtig befestigt sind.
Die Handgriffe des Behälters sind Sicherheitsteile.
Tauschen Sie sie niemals selbst aus.
DIE
FOLGENDEN
FÜLLHÖHEN
SIND IMMER
EINZUHALTEN
Verwenden Sie Ihren Schnellkochtopf niemals ohne
Flüssigkeit. Bei Nichtbeachtung kann es zu schweren
Beschädigungen kommen. Stellen Sie sicher, dass
während des Garvorgangs jederzeit ausreichend
Flüssigkeit im Schnellkochtopf vorhanden ist.
Minimale Füllhöhe 250 ml
- Abb. 4.
Maximale Füllhöhe 2/3 der Topfhöhe, Markierung Max
2
- Abb. 5.
Beim Dampfgaren dürfen die in den Dampfkorb
gefüllten Nahrungsmittel nicht mit dem Wasser in
Berührung kommen - Abb. 6 und 7.
Maximale Füllhöhe 1/3 (Max 1) bei der Zubereitung von
Lebensmitteln, die sich während des Garens ausdehnen
oder schäumen, wie zum Beispiel Reis, Hülsenfrüchte,
trockenes Gemüse oder Kompott, Kürbis, Zucchini,
Möhren, Kartoffeln usw.
Die Füllhöhe der in den Dampfkorb gefüllten
Nahrungsmittel darf die Markierung Max 2 des Topfes
nicht überschreiten.
Page 49

49
DE
VOR UND
WÄHREND DES
GARENS
Lassen Sie Kinder nicht in die Nähe des Schnellkochtopfs, wenn
dieser in Gebrauch ist.
Ihr Schnellkochtopf gart unter Druck. Bei unsachgemäßer
Verwendung kann es zu Verbrühungen kommen. Vergewissern
Sie sich, dass der Schnellkochtopf richtig verschlossen ist, bevor
Sie ihn in Betrieb nehmen. (Siehe Kapitel „Schließen“)
Achten Sie während des Garens darauf, dass der Garregler
immer zischt. Wenn nicht ausreichend Dampf entweicht, lassen
Sie den Druck des Gerätes ab und überprüfen Sie, dass sich
genug Flüssigkeit im Topf befindet und dass der Dampfaustritt
nicht verstopft ist. Wenn nach den oben genannten
Überprüfungen immer noch kein Dampf entweicht, erhöhen Sie
die Leistung der Hitzequelle etwas.
Garen Sie keine Nahrungsmittel, die die
Sicherheitseinrichtungen verstopfen können:
- Preiselbeeren
- Graupen
- Haferflocken
- Palerbsen
- Nudeln, Makkaroni, Spaghetti
- Rhabarber
- Rote Johannisbeeren
Bereiten Sie in dem Schnellkochtopf niemals Rezepte auf
Tiermilchbasis zu.
Wenn Ihr Schnellkochtopf mit einem Edelstahltopf ausgestattet
ist, verwenden Sie in ihm kein grobes Salz. Fügen Sie stattdessen
nach dem Garen feines Salz hinzu. So vermeiden Sie das
Auftreten von sog. Lochfraß, der den Boden des Schnellkochtopfs
beschädigen könnte.
Verwenden Sie Ihren Schnellkochtopf nicht zum Frittieren von
Lebensmitteln in Öl unter Druck.
Verwenden Sie den Schnellkochtopf nur für den vorgesehenen
Verwendungszweck.
Stellen Sie Ihren Schnellkochtopf nie in einen heißen Ofen.
Legen Sie niemals lose Aluminiumfolie auf eine Form im
Schnellkochtopf.
Verwenden Sie niemals Kunststofffolie im Schnellkochtopf.
Alkoholdämpfe sind entflammbar. Bringen Sie die Speisen etwa
2 Minuten vor dem Aufsetzen des Deckels zum Kochen. Bei der
Zubereitung von Rezepten mit Alkohol muss der Schnellkochtopf
überwacht werden.
• Verwenden Sie ausschließlich die geeignete(-n) Herdplatte(-n)
und Kochfeld(-er), gemäß den Benutzerhinweisen.
Page 50

50
NACH DEM
GAREN
Drehen Sie langsam den Garregler (A) und wählen Sie die von
Ihnen gewünschte Druckablassgeschwindigkeit, bis sie der
Piktogrammanzeige gegenüberliegt
- Abb. 10. Sollten
Lebensmitt
el oder Flüssigkeit herausspritzen, während Sie den
Dampf entweichen lassen, bringen Sie den Garregler (A)
wieder in die Garposition „Schnellkochtopf“, und führen Sie
dann eine schnelle Druckminderung unter fließendem kalten
Wasser durch
- Abb. 14.
W
enn die Druckanzeige
(D)
nicht fällt, stellen Sie den
Schnellkochtopf unter fließendes kaltes Wasser
- Abb. 14
.
Manipulieren Sie niemals diese Druckanzeige.
Nach der Zubereitung von Fleisch, das mit einer Haut
überzogen ist, die sich unter Druckeinwirkung aufbläht (z. B.
Kalbszunge), darf das Fleisch nicht eingestochen werden,
solange die Haut aufgebläht ist, sie könnten sich verbrühen.
Stechen Sie das Fleisch deshalb vor der Zubereitung ein.
Bei der Zubereitung von Lebensmitteln, die sich während des
Garens ausdehnen oder schäumen, wie zum Beispiel Reis,
Hülsenfrüchte, trockenes Gemüse oder Kompott, Kürbis,
Zucchini, Karotten usw.: Lassen Sie den Schnellkochtopf einige
Minuten abkühlen, und stellen Sie ihn dann unter fließendes
kaltes Wasser, damit er weiter abkühlt. Rütteln Sie den
Schnellkochtopf vor dem Öffnen immer leicht, damit keine
Dampfblasen herausspritzen können; Sie könnten sich
verbrennen. Dieser Vorgang ist besonders wichtig beim
schnellen Ablassen des Dampfes oder nach dem Abkühlen
unter fließendem Wasser.
Bewegen Sie den unter Druck stehenden Schnellkochtopf mit
höchster Vorsicht. Berühren Sie die heißen Flächen nicht.
Verwenden Sie die Topfgriffe und Knöpfe. Verwenden Sie
gegebenenfalls Topfhandschuhe. Heben Sie ihren
Schnellkochtopf niemals am Deckelverschluss hoch.
Bei Suppen sollten Sie eine schnelle Druckminderung unter
kaltem Wasser durchführen (siehe Abschnitt „Ende des
Garvorgangs im Modus 'Schnellkochtopf'“).
Vergewissern Sie sich, dass der Garregler auf der Position
„Abdampfen“ steht, bevor Sie den Schnellkochtopf öffnen. Die
Druckanzeige
(D)
muss sich in der unteren Position befinden.
Öffnen Sie den Schnellkochtopf niemals mit Gewalt.
Vergewissern Sie sich, dass er nicht mehr unter Druck steht. Die
Druckanzeige
(D)
muss sich in der unteren Position befinden.
(Siehe Kapitel „Sicherheit“)
Page 51

BEWAHREN SIE DIESE
BEDIENUNGSANLEITUNG AUF!
* Je nach Modell
51
DE
PFLEGE
Sollten Sie feststellen, dass Ihr Schnellkochtopf Brüche oder
Risse aufweist, versuchen Sie keinesfalls ihn zu öffnen, wenn er
verschlossen ist. Warten Sie ab, bis er vollständig abgekühlt ist,
bevor Sie ihn bewegen. Verwenden Sie ihn nicht mehr und
bringen Sie ihn zur Reparatur in eine autorisierte TefalKundendienstwerkstatt.
Beschränken Sie sich bei der Handhabung der
Sicherheitssysteme auf Maßnahmen zur Reinigung und
Instandhaltung.
Verwenden Sie ausschließlich Original-Zubehör von TEFAL, das
für Ihr Modell geeignet ist. Verwenden Sie vor allem einen Topf
und einen Deckel von TEFAL.
Verwenden Sie den Schnellkochtopf nicht dazu, vor oder nach
dem Kochvorgang säurehaltige oder salzhaltige
Nahrungsmittel aufzubewahren, da die Gefahr besteht, dass
der Topf beschädigt wird.
Reinigen Sie den Schnellkochtopf unverzüglich nach jedem
Gebrauch und spülen Sie ihn ab.
Geben Sie niemals den Garregler
(A)
, den Dichtungsring
(I)
,
den Timer*
(F)
oder den Topf mit Antihaftversiegelung in die
Spülmaschine.
Halten Sie den Timer*
(F)
niemals unter Wasser.
Verwenden Sie niemals Bleichmittel oder chlorhaltige Produkte,
da diese die Qualität des Edelstahls beeinträchtigen können.
Lassen Sie den Deckel nicht im Wasser liegen.
Wechseln Sie den Dichtungsring jedes Jahr oder dann
unverzüglich aus, wenn er einen Riss aufweist.
Nach 10 Jahren Gebrauch muss der Schnellkochtopf von einer
autorisierten Tefal-Kundendienstwerkstatt überprüft werden.
Aufbewahrung des Schnellkochtopfes: Legen Sie den Deckel
umgedreht auf den Topf, damit sich der Dichtungsring des
Deckels nicht vorzeitig abnutzt.
Page 52

* Je nach Modell
52
Komponenten (siehe Beschreibung)
Vor jedem Gebrauch unbedingt überprüfen
Überprüfung des Garreglers
Überprüfen Sie, dass der Austritt des Garreglers nicht verstopft ist.
Überprüfen Sie das Sicherheitsventil.
Überprüfen Sie, dass der Stift des Sicherheitsventils frei beweglich ist
(verwenden Sie dazu ein Wattestäbchen).
A. Garregler
B. Dampfaustritt
C. Positionsmarkierung
D. Druckanzeige (siehe Kapitel
„Sicherheit“)
E. Sicherheitsventil
F. Timer*
G. Deckelgriff
H. Deckel
I. Dichtungsring
J. Dampfkorb*
K. Dreifuß*
L. Topfgriff
M. Markierungen der maximalen
Füllhöhe
N. Garbehälter
Timer : nur im Lieferumfang des Modells ClipsoMinut'®Perfect enthalten.
Für die anderen Modelle ClipsoMinut'®als Zubehör im Handel erhältlich.
Page 53

Garen im Modus Garen im Modus Abdampfen
‚Schnellkochtopf‘ ‚Kochtopf‘*
Öffnen
Bewegen Sie den Deckelgriff aus der horizontalen in die vertikale Stellung
- Abb. 2
.
Der Deckel dreht sich.
Nehmen Sie den Deckel ab.
Bei Schwierigkeiten mit dem Öffnen des Geräts: Den Dichtungsring unter Wasser
halten und ohne Abtrocknen wieder in den Deckel einsetzen
- Abb. 19 und 15
.
Dabei darauf achten, dass er richtig unter den Aussparungen des Deckels verläuft.
Schließen
Vergewissern Sie sich, dass sich der Deckelgriff in der vertikalen Stellung befindet.
Setzen Sie den Deckel auf den Topf wie es in
- Abb. 1
dargestellt ist, indem Sie den
Kunststoffteil zu den Topfgriffen ausrichten.
Klappen Sie den Deckelgriff aus der vertikalen in die horizontale Stellung
- Abb. 3
.
Der Deckel dreht sich.
Wenn Sie den Deckel nicht schließen können:
Überprüfen Sie den richtigen Sitz des Dichtungsrings sowie des Deckels.
Bei Schwierigkeiten mit dem Schließen des Geräts: Den Dichtungsring unter Wasser
halten und ohne Abtrocknen wieder in den Deckel einsetzen
- Abb. 19 und 15
.
Dabei darauf achten, dass er richtig unter den Aussparungen des Deckels verläuft.
Erstgebrauch
Bei Modellen mit Antihaftversiegelung: Waschen Sie die gesamte Fläche der
Innenversiegelung ab und ölen Sie sie leicht mit Speiseöl.
Stellen Sie den Dreifuß*
(K)
in den Garbehälter.
Füllen Sie den Garbehälter
(N)
zu 2/3 (Max 2) mit Wasser
- Abb. 5
.
Stellen Sie den Korb*
(J)
auf den Dreifuß*
(K)
.
Schließen Sie den Schnellkochtopf.
Richten Sie das Piktogramm des Garreglers
(A)
an der Positionsmarkierung
(C)
aus
- Abb. 9
.
Stellen Sie den Schnellkochtopf auf eine Heizquelle und stellen Sie dann die
Maximalleistung ein.
Wenn der Dampf durch den Regler entweicht, reduzieren Sie die Heizleistung und
warten Sie 20 Minuten.
Verwendung
* Je nach Modell
53
DE
Page 54

Wenn die 20 Minuten vorbei sind, schalten Sie die Heizquelle aus.
Richten Sie das Piktogramm des Garreglers
(A)
an der Positionsmarkierung
(C)
aus.
Wenn die Druckanzeige
(D)
abgesunken ist, steht der Schnellkochtopf nicht mehr
unter Druck.
Öffnen Sie den Schnellkochtopf
- Abb. 2
.
Reinigen Sie ihn mit Geschirrspülmittel.
Minimale und maximale Füllhöhe
Minimale Füllhöhe 250 ml (2 Glas)
- Abb. 4
.
Maximale Füllhöhe 2/3 der Topfhöhe, Markierung Max 2
- Abb. 5
.
Verwenden Sie kein grobes Salz in Ihrem Schnellkochtopf. Fügen Sie stattdessen
nach dem Garen feines Salz hinzu.
Für einige Lebensmittel gilt Folgendes:
Bei der Zubereitung von Lebensmitteln, die sich während des
Garens ausdehnen oder schäumen, wie zum Beispiel Reis,
Hülsenfrüchte, trockenes Gemüse oder Kompott, Kürbis,
Zucchini, Karotten, Kartoffeln usw. darf der Schnellkochtopf
nur zu 1/3 (Max 1) seines Fassungsvermögens gefüllt
werden. Lassen Sie den Schnellkochtopf einige Minuten
abkühlen, und stellen Sie ihn dann unter fließendes kaltes
Wasser, damit er weiter abkühlt. Rütteln Sie den
Schnellkochtopf vor dem Öffnen immer leicht, damit keine Dampfblasen
herausspritzen können; Sie könnten sich verbrennen. Dieser Vorgang ist besonders
wichtig beim schnellen Ablassen des Dampfes oder nach dem Abkühlen unter
fließendem Wasser. Bei Suppen sollten Sie eine schnelle Druckminderung unter
kaltem Wasser durchführen (siehe Abschnitt „Ende des Garvorgangs im Modus
'Schnellkochtopf'“).
Verwendung des Dampfkorbs*
Gießen Sie 750 ml Wasser in den Topf
(N)
.
Stellen Sie den Dreifuß*
(K)
in den Topf.
Stellen Sie den Einsatz*
(J)
auf den Dreifuß*
(K) - Abb. 6
.
Beim Dampfgaren dürfen die in den Dampfkorb gefüllten
Nahrungsmittel nicht mit dem Wasser in Berührung
kommen
- Abb. 6 und 7
.
Die Füllhöhe der in den Dampfkorb* gefüllten
Nahrungsmittel darf die Markierung Max 2 nicht
überschreiten.
54
* Je nach Modell
MAX
MAX1
1/3
Page 55

DE
Entfernen und Anbringen des Garreglers (A)
Entfernen des Garreglers (A):
Richten Sie die Nut an der Positionsmarkierung
(C)
des
Garreglers aus, indem Sie auf den Ring des Garreglers
(A)
drücken.
Entfernen Sie ihn
- Abb. 11
.
Anbringen des Garreglers:
Setzen Sie den Garregler
(A)
ein, und richten Sie die Nut des
Garreglers
(A)
an der Positionsmarkierung
(C)
aus
- Abb. 8
.
Drücken Sie den Garregler
(A)
nach unten, bis er auf dem
Dampfaustrittsstift einrastet.
Drücken Sie auf den Ring des Garreglers
(A)
und drehen Sie
ihn.
Timer*
*nur im Lieferumfang des Modells ClipsoMinut' Perfect enthalten.
Der Timer soll Ihnen helfen, ein gutes Garergebnis zu gewährleisten, da Sie mit ihm
den Energieverbrauch optimal anpassen können. Er zählt automatisch die Garzeit
herunter, sobald die Temperatur erreicht ist, die für den Garvorgang im Modus
‚Schnellkochtopf‘ vorgesehen ist.
Für seinen Betrieb muss der Timer auf den Schnellkochtopf
geklemmt werden.
Achten Sie während des Kochens darauf, dass der Garregler (A)
gleichmäßig zischt. Wenn nicht genug Dampf vorhanden ist, erhöhen
Sie die Leistung der Heizquelle etwas; wenn zu viel Dampf vorhanden
ist, verringern Sie die Leistung.
55
* Je nach Modell
Nut
Page 56

Einschalten des Timers: Betätigen Sie die Taste.
Programmieren Sie die Garzeit (in Minuten).
Wenn Sie sich in der Garzeit geirrt haben, warten Sie 4
Sekunden, bis die Flammensymbole nicht mehr blinken, und
setzen Sie sie anschließend durch langen Druck auf die Taste
auf Null zurück.
Schalten Sie die Hitzequelle auf maximaler Leistung ein.
Sobald der Schnellkochtopf die Gartemperatur erreicht hat,
ertönt der Timer und der Countdown beginnt (die Ziffern
blinken).
Rerringern Sie die Leistung der Heizquelle.
Am Ende der Garzeit ertönt der Timer.
Stoppen des Timersignals: Betätigen Sie die Taste.
Schalten Sie die Heizquelle aus.
Einsetzen und Abnehmen des Timers*
Zum Einsetzen des Timers
(F) - Abb. 12
schieben Sie den
Timer mit der Taste voran auf das Modul und drücken
anschließend den entgegengesetzten Teil zum Festklemmen
nach unten.
Zum Abnehmen des Timers
(F)
heben Sie ihn an und
nehmen ihn ab.
Wechseln der Batterie des Timers*
Bei der Batterie des Timers handelt es sich um eine
Knopfzelle CR2032.
Wenn das Symbol oder keine Anzeige mehr erscheint,
wechseln Sie die Batterie.
4
5
Mit einem langen Druck auf die Taste wird der Timer auf Null gesetzt und
ausgeschaltet.
1
2
3
56
* Je nach Modell
2
1
2
Page 57

Die Lebensdauer der Batterie hängt davon ab, wie häufig
Sie den Timer nutzen.
Die Batterie des Timers enthält Dimethoxyethan, CAS-Nr.
110-71-4. Sie entspricht den europäischen Vorschriften. Zu
Ihrer Sicherheit und zum Schutz der Umwelt: diese Batterie
nicht öffnen, keinen erhöhten Temperaturen aussetzen,
nicht mit dem Hausmüll entsorgen, sondern bei einer
Altbatterie-Sammelstelle abgeben.
Zum Herausnehmen der Batterie aus dem Timer öffnen Sie
den Batteriedeckel mithilfe einer Münze (siehe
nebenstehende Abbildung).
Ersetzen Sie die Batterie.
Setzen Sie die Dichtung wieder ein.
Positionieren Sie den Halbmond des Batteriedeckels
gegenüber dem Halbmond des Timers.
Drehen Sie den Batteriedeckel vorsichtig unter leichtem
Druck, bis der Halbmond des Batteriedeckels dem
Vollmond des Timers gegenüberliegt.
Führen Sie den Vorgang auf einer ebenen Arbeitsfläche
durch um sicherzustellen, dass der Batteriedeckel richtig
horizontal eingesetzt wird.
Drücken Sie beim Schließen nicht zu stark auf den
Batteriedeckel. Drehen Sie nicht weiter als bis zum Anschlag.
Sollte Ihnen der Timer abhanden kommen, können Sie in
allen unseren autorisierten TEFAL-Kundendienstwerkstätten
Ersatz erhalten.
Vor dem Garen
Entnehmen Sie vor jedem Gebrauch den Garregler
(A) - Abb. 11
, und vergewissern
Sie sich, dass der Dampfaustritt
(B)
nicht blockiert ist
- Abb. 13
.
Überprüfen Sie, dass das Sicherheitsventil frei beweglich ist (siehe Abschnitte
„Reinigung“ und „Vor jedem Gebrauch unbedingt überprüfen“)
- Abb. 18
.
Schließen Sie den Schnellkochtopf
- Abb. 3
.
Bei Schwierigkeiten mit dem Schließen des Geräts: Den Dichtungsring unter Wasser
halten und ohne Abtrocknen wieder in den Deckel einsetzen
- Abb. 19 und 15
.
Dabei darauf achten, dass er richtig unter den Aussparungen des Deckels verläuft.
Bringen Sie den Garregler an
(A) - Abb. 8
.
◗
◗
●
◗
Halten Sie den Timer* niemals unter Wasser und geben Sie ihn niemals in
die Spülmaschine.
57
DE
* Je nach Modell
+
Page 58

Garen im Modus
‚Schnellkochtopf‘
Drehen Sie den Garregler
(A)
bis zur Garposition „Schnellkochtopf“
- Abb. 9
.
Vergewissern Sie sich, dass der Schnellkochtopf richtig verschlossen ist, bevor Sie ihn
in Betrieb nehmen
- Abb. 3
.
Stellen Sie den Schnellkochtopf auf eine Hitzequelle und stellen Sie dann die
Maximalleistung ein.
Bei den Modellen mit Timer : Programmieren Sie die in dem Rezept angegebene
Garzeit (siehe Kapitel „Verwendung des Timers“).
Die von der Druckanzeige abgegebenen Klickgeräusche und Dämpfe sind normal.
Dabei wird vor dem Garen Luft abgelassen.
Während des Garens im Modus ‚Schnellkochtopf‘
Sobald ständig Dampf aus dem Garregler
(A)
entweicht und ein gleichmäßiges
Geräusch (PSCHHHT) zu hören ist, verringern Sie die Leistung der Heizquelle.
Warten Sie nun die im Rezept angegebene Garzeit ab.
Achten Sie während des Kochens darauf, dass der Garregler gleichmäßig zischt.
Wenn nicht genug Dampf entweicht, erhöhen Sie die Leistung der Heizquelle etwas;
wenn zu viel Dampf vorhanden ist, verringern Sie die Leistung.
Ende des Garvorgangs im Modus ‚Schnellkochtopf‘
Ablassen des Dampfs:
Nach Abschalten der Wärmequelle haben Sie zwei Möglichkeiten:
•
Langsame Druckminderung:
Drehen Sie langsam den Garregler
(A)
, bis die
gewünschte Druckablassgeschwindigkeit der Piktogrammanzeige
gegenüberliegt
- Abb. 10
.
* Je nach Modell
58
Modell Clipso-
Minut'Perfect /
Easy
Modell
ClipsoMinut
Duo
Page 59

•
Schnelle Druckminderung unter kaltem Wasser:
Stellen Sie den
Schnellkochtopf unter fließendes kaltes Wasser
- Abb. 14
. Wenn die Druckanzeige
(D)
abgesunken ist, steht der Schnellkochtopf nicht mehr unter Druck. Drehen Sie
den Garregler
(A)
bis zur Position .
Sie können Schnellkochtopf nun öffnen
- Abb. 2
.
Bei Schwierigkeiten mit dem Öffnen des Geräts: Den Dichtungsring unter Wasser
halten und ohne Abtrocknen wieder in den Deckel einsetzen
- Abb. 19 und 15
.
Dabei darauf achten, dass er richtig unter den Aussparungen des Deckels verläuft.
Bei der Zubereitung von Lebensmitteln, die sich während des Garens ausdehnen
oder schäumen, wie zum Beispiel Reis, Hülsenfrüchte, trockenes Gemüse oder
Kompott, Kürbis, Zucchini, Karotten, Kartoffeln usw. darf der Schnellkochtopf nur zu
1/3 (Max 1) seines Fassungsvermögens gefüllt werden. Lassen Sie den
Schnellkochtopf einige Minuten abkühlen, und stellen Sie ihn dann unter fließendes
kaltes Wasser, damit er weiter abkühlt. Rütteln Sie den Schnellkochtopf vor dem
Öffnen immer leicht, damit keine Dampfblasen herausspritzen können; Sie könnten
sich verbrennen. Dieser Vorgang ist besonders wichtig beim schnellen Ablassen des
Dampfes oder nach dem Abkühlen unter fließendem Wasser. Bei Suppen sollten Sie
eine schnelle Druckminderung durchführen.
Sollten Lebensmittel oder Flüssigkeit herausspritzen, während Sie den
Dampf entweichen lassen, bringen Sie den Garregler (A) wieder in die
Garposition „Schnellkochtopf“ , und führen Sie dann eine schnelle
Druckminderung unter fließendem kalten Wasser durch.
Wenn die Druckanzeige (D) nicht fällt, stellen Sie den Schnellkochtopf
unter fließendes kaltes Wasser
- Abb. 14
.
Manipulieren Sie niemals die Druckanzeige.
* Je nach Modell
59
DE
Modell
Perfect/Easy
Modell
Duo
Schritt 1
{
Schritt 2
Page 60

Garen im Modus „Kochtopf“**
Nur bei dem Topfmodell mit Antihaftversiegelung möglich
Drehen Sie den Garregler
(A)
bis zur Garposition „Kochtopf“
.
Vergewissern Sie sich, dass der Schnellkochtopf richtig
verschlossen ist, bevor sie ihn in Betrieb nehmen
- Abb. 3
.
Stellen Sie den Schnellkochtopf auf eine Hitzequelle und
stellen Sie diese auf kleine Leistung.
Warten Sie nun die im Rezept angegebene Garzeit ab.
Im Modus „Kochtopf“ können Sie den Schnellkochtopf
jederzeit zum Umrühren, Überwachen des Garvorgangs oder
Hinzufügen von Zutaten öffnen.
Bei Schwierigkeiten mit dem Öffnen des Geräts: Den Dichtungsring unter Wasser
halten und ohne Abtrocknen wieder in den Deckel einsetzen
- Abb. 19 und 15
.
Dabei darauf achten, dass er richtig unter den Aussparungen des Deckels verläuft.
Wenn die Leistung der Hitzequelle zu hoch ist, kann es vorkommen, dass sich der
Schnellkochtopf verriegelt (die Druckanzeige
(D)
steigt und verhindert das Öffnen)
und der Deckelgriff nicht bewegt werden kann oder den Schnellkochtopf nicht
öffnet. In diesem Fall verringern Sie die Leistung der Heizquelle oder schalten Sie
sie ab. I
m Fall von elektrischen Herdplatten aus Gusseisen ziehen Sie den
Schnellkochtopf von der Hitzequelle.
Keine Rührbesen oder Schneidwerkzeuge aus Metall verwenden. Klopfen Sie Ihre
Utensilien nicht auf dem Rand des Topfes ab; Sie könnten ihn beschädigen und
undichte Stellen verursachen.
Erhitzen Sie niemals Fette bis zur Verkohlung. Für Tiere mit einem sensiblen
Atmungssystem, wie beispielsweise Vögel, können die beim Garen entstehenden
Dämpfe gefährlich sein. Besitzer von Vögeln müssen die Tiere von der Küche
fernhalten.
Ihr Schnellkochtopf verfügt über mehrere Sicherheitsvorrichtungen:
Sicherheit beim Schließen:
- Wenn der Deckel nicht richtig sitzt oder Sie vergessen haben, den Deckelgriff
herunterzuklappen, entweicht Dampf zwischen Deckel und Schnellkochtopf, und es
kann kein Druck aufgebaut werden.
Sicherheit beim Öffnen:
-
Wenn der Schnellkochtopf unter Druck steht, befindet sich die Druckanzeige
(D)
in
der oberen Position und der Deckelgriff zum Öffnen bzw. Schließen
(G)
darf nicht
betätigt werden.
- Versuchen Sie nie, den Schnellkochtopf mit Gewalt zu öffnen.
Sicherheit
60
* Je nach Modell
Page 61

-
Manipulieren Sie niemals die Druckanzeige (D).
- Vergewissern Sie sich, dass der Innendruck abgefallen ist, indem Sie überprüfen, ob
sich die Druckanzeige
(D)
in der unteren Position befindet.
- Die Griffe des Behälters sind Sicherheitsteile. Tauschen Sie sie niemals selbst aus.
V
erwenden Sie niemals andere Modelle von Handgriffen.
- Wenn Sie den Deckelgriff zum Öffnen bzw. Schließen
(G)
in die vertikale Stellung
bewegt haben, während der Schnellkochtopf noch unter Druck steht, können Sie ihn
nicht öffnen. Diese Funktion bietet zusätzliche Sicherheit.
- Bringen Sie den Deckelgriff wieder in die horizontale Stellung und warten Sie, bis die
Druck
anzeige
(D)
nach unten gesunken ist.
Doppelte Sicherheit gegen Überdruck:
-
Erste Sicherheitsvorrichtung: Das Sicherheitsventil
(E)
lässt den Druck ab
- Abb. 20
.
- Zweite Sicherheitsvorrichtung: Die Dichtung lässt Dampf am Deckel entweichen
-
Abb. 20
.
Falls eine der Sicherungen gegen Überdruck ausgelöst wird:
Schalten Sie die Hitzequelle aus.
Lassen Sie den Schnellkochtopf vollständig abkühlen.
Öffnen Sie ihn.
Überprüfen und reinigen Sie den Garregler
(A)
, den Dampfaustritt
(B)
, das
Sicherheitsventil
(E)
und den Dichtungsring
(I)-Abb. 16 - 17 - 1
8. Siehe Abschnitte
„Reinigung“ und „Vor jedem Gebrauch unbedingt überprüfen“.
Falls nach all diesen Prüfungen und der Reinigung das Produkt undicht ist oder nicht
mehr funktioniert, bringen Sie es zu einer autorisierten TEFAL-Kundendienstwerkstatt.
Tipps zum Gebrauch
1 - Der aus dem Garregler austretende Dampf ist sehr heiß. Vorsicht vor dem
Dampfstrahl.
2 - Sobald die Druckanzeige steigt, können Sie den Schnellkochtopf nicht mehr
öffnen.
3 - Überwachen Sie den Schnellkochtopf, wie alle Kochgeräte, aufmerksam, vor
allem wenn Sie ihn in der Nähe von Kindern verwenden.
4 - Zum Umsetzen des Schnellkochtopfs nutzen Sie die beiden Griffe des
Behälters.
5 - Lassen Sie keine Lebensmittel im Schnellkochtopf zurück. Tragen Sie den
Schnellkochtopf niemals am Deckelgriff.
6 - Verwenden Sie niemals Bleichmittel oder chlorhaltige Produkte, da diese
die Qualität des Edelstahls beeinträchtigen können.
7 - Lassen Sie den Deckel nicht im Wasser liegen.
8 - Wechseln Sie den Dichtungsring jedes Jahr aus oder dann, wenn er einen
Riss aufweist.
9 - Die Reinigung Ihres Schnellkochtopfs muss unbedingt unter kaltem Wasser
erfolgen und wenn das Gerät leer ist.
10 - Nach 10 Jahren Gebrauch muss der Schnellkochtopf von einer autorisierten
Tefal-Kundendienstwerkstatt überprüft werden.
61
DE
Page 62

Bitte beachten Sie diese Hinweise zur Reinigung und Pflege des Schnellkochtopfes
nach jedem Gebrauch, um seine Funktionsfähigkeit zu erhalten.
Reinigen Sie den Schnellkochtopf nach jedem Gebrauch mit warmem Wasser und
flüssigem Geschirrspülmittel. Gehen Sie beim Dampfkorb* gleichermaßen vor.
Verwenden Sie kein Bleichmittel und keine chlorhaltigen Produkte.
Überhitzen Sie den Topf nicht im leeren Zustand.
Reinigung der Topfinnenseite aus Edelstahl:
Reinigen Sie sie mit einem Scheuerschwamm und Geschirrspülmittel.
Wenn die Innenseite des Edelstahltopfes einen schimmernden Glanz oder weiße
Streifen (mineralische Ablagerungen) aufweist, reinigen Sie sie mit Essig.
Reinigung der Topfinnenseite aus Aluminium mit Antihaftversiegelung:
Um die Lebensdauer des Produktes zu verlängern, empfehlen wir das Spülen von
Hand.
Reinigen Sie sie mit heißem Wasser, Geschirrspülmittel und einem weichen
Schwamm.
Verwenden Sie weder Scheuerpulver noch Scheuerschwämme.
Falls Ihre Zubereitung angebrannt ist, füllen Sie den Topf mit heißem Wasser und
lassen ihn einweichen. Danach reinigen Sie ihn mit Geschirrspülmittel.
Reinigung der Topfaußenseite:
Reinigen Sie die Topfaußenseite mit einem Schwamm und Spülmittel.
Sie können den Edelstahltopf und den Korb in die Spülmaschine geben.
Geben Sie den Topf mit Antihaftversiegelung (je nach Modell) nicht in die
Spülmaschine, da Geschirrspültabs Substanzen enthalten, die sehr
aggressiv und korrosiv auf die Aluminiumteile wirken.
Reinigung
Nach längerem Gebrauch auftretende bräunliche Verfärbungen und
Streifen stellen keine Beeinträchtigung der Funktionstüchtigkeit dar.
Die Abnutzung der Außenbeschichtung
(je nach Modell)
durch den Kontakt
zwischen Deckel und Topf ist normal.
Bei Schnellkochtöpfen mit Antihaftversiegelung (je nach Modell): Mit
zunehmendem Gebrauch möglicherweise entstehende leichte Kratzer und
abgescheuerte Stellen beeinträchtigen die Antihafteigenschaften der
Beschichtung nicht.
* Je nach Modell
62
Page 63

Reinigung des Deckels:
Reinigen Sie den Deckel mit einem Schwamm und flüssigem Geschirrspülmittel.
Reinigung des Dichtungsrings:
Reinigen Sie nach jedem Garvorgang den Dichtungsring
(l)
und die für den
Dichtungsring vorgesehene Vertiefung im Deckel.
Wie Sie den Dichtungsring wieder richtig einlegen, wird in
- Abb. 15
gezeigt. Achten
Sie darauf, dass der Dichtungsring unter jeder der Aussparungen des Deckels
verläuft.
Reinigung des Garreglers (A):
Entfernen Sie den Garregler
(A) - Abb. 11
.
Reinigen Sie den Garregler
(A)
unter fließendem Wasser
- Abb. 16
.
Überprüfen Sie seine Beweglichkeit: siehe nebenstehende
Abbildung.
Reinigung des Dampfaustritts (B) am Deckel:
Entfernen Sie den Garregler
(A) - Abb. 11
.
Überprüfen Sie bei Tageslicht, dass der Dampfaustritt nicht verstopft und kreisförmig
ist
- Abb. 13
. Falls erforderlich, reinigen Sie ihn mit einem Zahnstocher
- Abb. 17
und spülen ihn ab.
Reinigung des Sicherheitsventils (E):
Reinigen Sie den Teil des Sicherheitsventils, der sich im Inneren des Deckels befindet,
indem Sie ihn unter Wasser halten.
Prüfen Sie den korrekten Betrieb, indem Sie mit einem Wattestäbchen fest auf den
Stift drücken, der sich frei bewegen sollte
- Abb. 18
. Siehe Abschnitt „Vor jedem
Gebrauch unbedingt überprüfen“.
Reinigung des Timers* (F):
Verwenden Sie ein sauberes und trockenes Tuch.
Verwenden Sie kein Lösungsmittel.
Halten Sie den Timer* niemals unter Wasser und geben Sie ihn niemals in die
Spülmaschine.
Ein häufiger Gebrauch des Topfes mit Antihaftversiegelung
(je nach
Modell)
kann zu einer leichten Verfärbung der Beschichtung führen
(Gelbfärbung, Flecken).
Nach dem Abnehmen des Garreglers (A), des
Dichtungsrings (I) und des Timers* (F) können Sie
den Deckel in die Spülmaschine geben.
Geben Sie niemals den Garregler (A), den Dichtungsring (I), den Timer* (F)
oder den Topf mit Antihaftversiegelung in die Spülmaschine.
63
DE
* Je nach Modell
Page 64

* Je nach Modell
Auswechseln des Dichtungsrings Ihres Schnellkochtopfs:
Wechseln Sie den Dichtungsring Ihres Schnellkochtopfs jedes Jahr aus oder dann,
wenn er einen Riss aufweist.
• Verwenden Sie ausschließlich einen Original-Dichtungsring von TEFAL, der für Ihr
Modell geeignet ist (siehe Kapitel „Zubehörteile“).
• Wie Sie den Dichtungsring wieder richtig einlegen, wird in
- Abb. 15
gezeigt. Achten
Sie darauf, dass der Dichtungsring unter jeder der Aussparungen des Deckels verläuft.
Aufbewahrung Ihres Schnellkochtopfs:
Legen Sie den Deckel umgekehrt auf den Topf.
Der Öffnungs- und Schließmechanismus des Schnellkochtopfs erfordert außer
der Reinigung keine besondere Wartung.
TEFAL-Zubehörteile
Im Handel sind folgende Zubehörteile für den Schnellkochtopf Clipso erhältlich:
Wenn Teile ersetzt werden müssen oder das Produkt repariert werden muss, wenden
Sie sich an eine autorisierte Tefal-Kundendienstwerkstatt oder den Tefal
Kundendienst.
Verwenden Sie ausschließlich Original-Zubehör von TEFAL, das für Ihr Modell
geeignet ist.
Pflege
Nach 10 Jahren Gebrauch muss der Schnellkochtopf von einer autorisierten
TEFAL-Kundendienstwerkstatt überprüft werden.
Zubehörteile Artikelnummern
Dichtungsring
3/4/4,5/6 B: Außendurchmesser des
Dichtungsrings: 24 cm
X1010008
5/7,5/9 B: Außendurchmesser des
Dichtungsrings: 27 cm
X1010007
Dampfkorb*
3/4,5/4/6 B: für Topfdurchmesser 22 cm
792185
5/7,5/9 B: für Topfdurchmesser 24 cm 792654
Dreifuß*
792691
Timer*
X1060007
64
• Helfen Sie, unsere Umwelt zu schützen!
! Ihr Gerät enthält wertvolle Rohstoffe, die wiederverwertet oder
recycelt werden können.
! Geben Sie es deshalb bitte bei einer Sammelstelle ab, damit es
wiederverwertet werden kann.
Page 65

Bodendurchmesser des Schnellkochtopfs - Referenzwerte
Informationen bzgl. der Normen:
Maximaler Betriebsdruck: 65 kPa
Maximaler Sicherheitsdruck: 120 kPa
Geeignete Herdarten
Der Schnellkochtopf ist für alle Herdarten einschließlich Induktion geeignet.
Bei Elektroherdplatten muss darauf geachtet werden, dass deren Durchmesser
maximal so groß ist wie der Bodendurchmesser des Schnellkochtopfs.
Bei Glaskeramik-Kochfeldern muss darauf geachtet werden, dass der Topfboden
sauber und trocken ist.
Bei Gasherden ist zu vermeiden, dass die Gasflamme über den Rand des
Schnellkochtopfes hinaus schlägt.
Bitte stellen Sie bei allen Herdarten sicher, dass Ihr Schnellkochtopf in der Mitte der
Platte steht.
Technische Daten
Kapazität
Topf-
durchmes-
ser oben
Topfdurch-
messer
Boden
Clipso
Minut'
®
Perfect / Easy
Clipso
Minut'
®
Duo
Material Boden
Material
Deckel
3 l 22 cm 15,5 cm P46205 - Edelstahl
Edelstahl
4,5 l 22 cm 15,5 cm P46206 - Edelstahl
6 l 22 cm 15,5 cm P46207 - Edelstahl
4 l 22 cm 14 cm - P46042
Aluminium,
antihaftbeschichtet
5 l 24 cm 14 cm - P46051
Aluminium,
antihaftbeschichtet
7,5 l 24 cm 18 cm P46248 - Edelstahl
9 l 24 cm 18 cm P46249 - Edelstahl
Set
5 l
24 cm
14 cm
P46353
Aluminium,
antihaftbeschichtet
7,5 l 18 cm Edelstahl
GAS ELEKTRO
(Gusseiserne Kochplatte)
ELEKTRO
(Wärmestrahler- oder Halogenplatte aus
Glaskeramik)
ELEKTRO
(Induktionsplatte aus
Glaskeramik)
ELEKTRO
(Spiralförmige Heizleiter)
65
DE
Page 66

Für den
Edelstahltopf
Ihres neuen Tefal Schnellkochtopfes gilt eine
10-Jahres-
Garantie
, sofern der Schnellkochtopf gemäß der Bedienungsanleitung genutzt
wurde, bei:
- allen Mängeln an der Metallstruktur des Topfes,
- vorzeitiger Abnutzung des Grundmetalls.
Für die übrigen Materialien des Topfes sowie die übrigen Teile Ihres
Schnellkochtopfes besteht für den im Land des Erwerbs gültigen gesetzlichen
Garantiezeitraum und ab dem Kaufdatum eine Garantie hinsichtlich sämtlicher
Herstellungs- oder Materialfehler.
Die vertragliche Garantie gilt nur bei Vorlage eines gültigen Kaufnachweises,
auf dem das Kaufdatum angegeben ist.
Die Garantie gilt nicht für:
Alterungsbedingte Kratzer und Verfärbungen bei Töpfen mit Antihaftversiegelung.
Kratzer, die durch den Kontakt zwischen Deckel und Topf mit Antihaftversiegelung
entstehen.
Schäden, die auf die Nichteinhaltung von wichtigen Hinweisen oder auf
unsachgemäßen Gebrauch zurückzuführen sind, insbesondere:
- Stöße, Herunterfallen, in den heißen Ofen stellen usw.
Die Garantie kann nur in autorisierten Tefal-Kundendienstwerkstätten geltend
gemacht werden.
Die Adresse Ihrer nächstliegenden autorisierten Tefal-Kundendienstwerkstatt
erfahren Sie unter der kostenlosen Service-Rufnummer.
Gesetzlich vorgeschriebene Kennzeichnungen
Garantie
Kennzeichnung Stelle
Handelsmarke Am Deckel
Herstellungsjahr und -los
Artikelnummer des Modells
Maximaler Sicherheitsdruck (SD)
Maximaler Betriebsdruck (BD)
Am Deckel
Kapazität
An der Außenseite des Topfbodens
Postanschrift des Herstellers
An der Außenseite des Topfbodens
66
Page 67

TEFAL beantwortet Ihre Fragen
67
DE
Problem Empfehlungen
Wenn Sie den
Deckel nicht
schließen können:
Überprüfen Sie, ob sich der Deckelgriff in der vertikalen
Stellung befindet.
Überprüfen Sie, ob der Dichtungsring richtig sitzt (siehe
Kapitel „Reinigung und Wartung“).
Überprüfen Sie, ob der Deckel richtig sitzt, wie in
- Abb.
1
dargestellt.
Halten Sie den Dichtungsring unter Wasser und setzen
Sie ihn ohne Abtrocknen wieder in den Deckel ein
- Abb.
19 und 15
. Achten Sie darauf, dass er richtig unter den
Aussparungen des Deckels verläuft.
Wenn der
Schnellkochtopf
unter Druck erhitzt
wurde, ohne dass
sich Flüssigkeit darin
befindet:
Lassen Sie Ihren Schnellkochtopf durch eine autorisierte
TEFAL-Kundendienstwerkstatt überprüfen.
Wenn die
Druckanzeige
Klickgeräusche und
Dämpfe abgibt:
Das ist in den ersten Minuten normal: So kann vor dem Garen
Luft entweichen.
Wenn die
Druckanzeige nicht
gestiegen ist und
während des Garens
kein Dampf aus
dem Ventil
entweicht:
Dies ist während der ersten Minuten normal.
Wenn dieses Phänomen anhält, prüfen Sie Folgendes:
- Die Leistung der Hitzequelle ist ausreichend hoch; falls nicht,
erhöhen Sie sie.
- Befindet sich ausreichend Flüssigkeit im Topf.
- Der Garregler
(A)
steht auf .
- Der Schnellkochtopf ist richtig geschlossen.
- Der Dichtungsring und der Rand des Topfes sind nicht beschädigt.
- Der Dichtungsring sitzt richtig.
Wenn die
Druckanzeige
gestiegen ist und
während des Garens
kein Dampf aus dem
Garregler entweicht:
Dies ist während der ersten Minuten normal.
Wenn dieses Phänomen anhält, halten Sie den Schnellkochtopf unter fließendes kaltes Wasser, bis die Druckanzeige
(D)
fällt.
Reinigen Sie den Garregler
(A) - Abb. 16
und den Damp-
faustritt
- Abb. 17
und prüfen Sie, ob der Stift des Sicher-
heitsventils problemlos sinkt
- Abb. 18
.
Page 68

68
Problem
Empfehlungen
Wenn Dampf rund
um den Deckel
entweicht, prüfen
Sie Folgendes:
Ist der Deckel richtig geschlossen?
Sitzt der Dichtungsring richtig im Deckel?
Befindet sich der Dichtungsring in einem einwandfreien
Zustand? Falls nötig, tauschen Sie ihn aus.
Sind Deckel, Dichtungsring und die für den Dichtungsring
vorgesehene Vertiefung sauber?
Der Rand des Topfes befindet sich in einwandfreiem Zustand.
Wenn Sie den Deckel
nicht öffnen können:
Überprüfen Sie, ob sich die Druckanzeige
(D)
in der unteren
Position befindet.
Andernfalls lassen Sie bei Bedarf den Druck ab und kühlen Sie
den Schnellkochtopf unter fließendem kaltem Wasser ab.
Manipulieren Sie niemals die Druckanzeige
(D)
. Halten Sie den
Dichtungsring unter Wasser und setzen Sie ihn ohne
Abtrocknen wieder in den Deckel ein
- Abb. 19 und 15
.
Achten Sie darauf, dass er richtig unter den Aussparungen des
Deckels verläuft.
Wenn Lebensmittel
im Schnellkochtopf
nicht gar oder angebrannt sind, überprüfen Sie Folgendes:
War die Garzeit zu lang oder zu kurz?
die Leistung der Hitzequelle
Ist der Garregler in der korrekten Position? (A)
die Flüssigkeitsmenge
Wenn Lebensmittel
im Schnellkochtopf
angebrannt sind:
Lassen Sie den Topf vor dem Reinigen einweichen.
Verwenden Sie niemals Chlorwasser oder chlorhaltige Reinigungsmittel.
Wenn eines der
Sicherheitssysteme
ausgelöst wird:
Schalten Sie die Heizquelle aus.
Lassen Sie den Schnellkochtopf abkühlen, ohne ihn zu
bewegen. Warten Sie, bis die Druckanzeige gefallen ist, und
öffnen Sie ihn.
Überprüfen und reinigen Sie den Garregler (A), den
Dampfaustritt, das Sicherheitsventil und den Dichtungsring.
Achten Sie auf die Einhaltung der Vorgaben für die Befüllung.
Sollte das Problem weiterhin bestehen, lassen Sie den
Schnellkochtopf von einer autorisierten TEFALKundendienstwerkstatt prüfen.
Wenn Sie
Rostbildung
feststellen:
Der Einsatz von Hochleistungsedelstahl verhindert in
Extremfällen nicht das Auftreten von Rost. Sollten Sie
Rostbildung feststellen, entfernen Sie den Rost durch Reiben
mit einem Scheuerschwamm, bevor Sie den Schnellkochtopf
erneut verwenden.
Page 69

69
DE
Gemüse
ÜBERSICHT ZUBEREITUNGEN
GEMÜSE
(FRISCH)
DAMPF
Zutat im GarkorbEinsatz und darunter
750 ml Wasser im
Schnellkochtopf.
IM WASSER
Zutat ohne Einsatz im
Wasser.
HÜLSENFRÜCHTE
IM WASSER
Ohne Einsatz.
75 cl
MAX
1/3 MAX 1
2 ganze Artischocken, je 600 g (im Wasser) 30 bis 35 min
Blumenkohlröschen 600 g (Dampf) 10 bis 12 min
Brokkoli-Röschen 600 g (Dampf) 9 bis 11 min
Eingelegte Zwiebeln (Dampf) 7 bis 8 min
Erbsen (Dampf) 6 bis 8 min
Feine grüne Bohnen (600 g) (Dampf) 10 bis 12 min
Ganzer weißer Lauch 650 g (Dampf) 9 bis 11 min
Geschälte und geschnittene Auberginen (3 mm),
850 g (Dampf)
10 bis 12 min
Geschnittene Pilze 800 g (im Wasser) 4 bis 5 min
Geschnittener Grünkohl, 500 g (im Wasser) 5 bis 6 min
Geschnittener Mangold (2 cm) 700 g (Dampf) 15 bis 17 min
Geschnittener Sellerie (im Wasser) 600 g 7 bis 9 min
Getrocknete Flageolet-Bohnen, 250 g (im Wasser) 35 bis 40 min
Gewürfelte rote Beete (im Wasser)
20 bis 25 min
(je nach Größe)
Gewürfelte Rüben (500 g) (Dampf) 14 bis 16 min
Grüne Linsen, 250 g (im Wasser) 14 bis 16 min
Halbierte Kartoffeln (950 g) (Dampf)
20 bis 25 min
(je nach Größe)
Halbierte Paprika (550 g) (Dampf) 14 bis 16 min
Halbierter Chicorée (900 g) (Dampf) 14 bis 16 min
In Scheibchen geschnittene Karotten (3 mm) 600 g
(Dampf)
17 bis 19 min
In Scheibchen geschnittene Zucchini (3 mm) 600 g
(Dampf)
12 bis 15 min
In Streifen geschnittener Fenchel (600 g) (Dampf) 6 bis 9 min
In Stückchen geschnittener Kürbis (3 bis 5 cm), 600 g
(Dampf)
13 bis 18 min
Rosenkohl (Dampf) 10 bis 12 min
Spalterbsen 250 g (im Wasser) 18 bis 20 min
Spinat (Dampf) 3 bis 4 min
Weißer Spargel (Dampf) 5 bis 6 min
Page 70

Riz
Fleisch/Fisch
70
IM WASSER
Ohne Einsatz.
1/3 MAX 1
WASSERMENGE REISMENGE GARZEIT
2 PERSONEN 400 ml/2 Gläser 150 g/1 Glas
7 bis 8 min4 PERSONEN
500 ml/2,5 Gläser
250 g/2 Gläser
6 PERSONEN
700 ml/3,5 Gläser
375 g/3 Gläser
FRISCH GEFROREN
Ente (1,8 kg) 45 bis 47 min 50 bis 55 min
Filet Mignon vom Kalb: 0,7 kg 17 bis 21 min 33 bis 38 min
Filet Mignon vom Schwein: 2 Stücke zu je 350 g 13 bis 15 min 26 bis 29 min
Hühnchen (1,35 kg) 23 bis 25 min 1 h bis 1 h 10 min
Kalbsbraten (0,8 kg, 5–7 cm Durchmesser) 17 bis 19 min 37 bis 40 min
Kalbsrouladen: 4 10 bis 12 min x
Kaninchen (1,5 kg in Stücken) 8 bis 9 min 20 bis 23 min
Lachssteak: 4 (0,8 kg) 5 bis 6 min 7 bis 8 min
Lammkeule: 2 (0,95 kg) 40 bis 45 min 1 h 5 min bis 1 h 15 min
Rinderbraten (1 kg, 8–11 cm Durchmesser) 30 bis 35 min 45 bis 50 min
Schweinebraten (0,8 kg, 8–10 cm Durchmesser) 30 bis 35 min 1 h 5 min bis 1 h 15 min
Seefisch-Filet (1 kg) in 75-Gramm-Stücken 5 bis 6 min 7 bis 8 min
Stubenküken: 2 (1,3 kg) 23 bis 25 min 40 bis 45 min
Thunfischsteak: 4 (0,7 kg) 5 bis 6 min 7 bis 9 min
Wachtel: 4 9 bis 10 min 18 bis 20 min
Hinweis: Bei Modellen von 5 Litern und weniger sicherstellen, dass Braten
und Geflügel nicht höher als die Markierung im Inneren des Topfes
sind. Braten und Geflügel dürfen max. 8 cm dick sein.
Page 71

71
NL
Neem voordat u uw snelkookpan gebruikt, de tijd om alle
instructies te lezen en raadpleeg steeds de "Gebruiksaanwijzing".
Ondeskundig gebruik kan leiden tot schade.
Met het oog op uw veiligheid, voldoet dit apparaat aan de toepasselijke
normen en regelgevingen:
- Richtlijn Drukapparatuur
- Materialen die met levensmiddelen in contact komen
- Omgeving
BELANGRIJKE VOORZORGSMAATREGELEN
VERPLICHTE
CONTROLES
VOOR ELK
GEBRUIK
CONTROLEER
visueel en dagelijks of de stoomuitlaat niet geblokkeerd
is - afb. 13.
of het kogeltje van het veiligheidsventiel zich kan
bewegen - afb. 18.
of de afdichtingsring van het deksel onder elke
uitsparing van het deksel is geplaatst - afb. 15.
of de handgrepen van de pan goed vastzitten. De
handgrepen van de pan zijn veiligheidsbestanddelen. U
mag deze nooit zelf vervangen.
RESPECTEER
ALTIJD DE
HIER
VERMELDE
VULHOEVEELHEDEN
Gebruik uw snelkookpan nooit zonder vloeistof, want dit
kan de pan ernstig beschadigen. Zorg ervoor dat er altijd
voldoende vloeistof aanwezig is tijdens het koken.
Minimum 25 cl - afb. 4.
Maximum 2/3 van de hoogte van de pan, markering
MAX 2 - afb. 5.
Tijdens het stoomk
oken mogen de voedingswaren in het
stoommandje niet in contact komen met het water
-
afb. 6 en 7.
Maximum 1/3 (MAX 1) voor pasteuze voedingsmiddelen
die tijdens het koken uitzetten en/of schuimen, zoals
rijst, peulvruchten, gedroogde groenten, moes,
pompoen, courgette, wortelen, aardappelen, e.d.
Voedingsmiddelen die in het stoommandje liggen,
mogen niet boven de markering MAX 2 van de pan
komen.
Page 72

72
VOOR EN
TIJDENS HET
KOKEN
Houd kinderen tijdens het gebruik buiten het bereik van de
snelkookpan.
Uw snelkookpan kookt onder druk. Ondeskundig gebruik
kan leiden tot ernstige brandwonden door heet water.
Verzeker u ervan dat de snelkookpan goed is gesloten
voordat u hem in werking stelt. (Zie paragraaf "Sluiten").
Let erop tijdens het koken dat het ventiel steeds fluistert.
Als er geen stoom ontsnapt, open dan de snelkookpan en
controleer of er nog voldoende vloeistof is en of de
stoomuitlaat niet geblokkeerd is. Als na deze controle nog
steeds geen stoom ontsnapt, verhoog dan zachtjes de
warmtebron.
Kook geen voedingsmiddelen die veiligheidsvoorzieningen
kunnen blokkeren:
- veenbessen
- parelgerst
- havervlokken
- spliterwten
- noedels, macaroni, spaghetti
- rabarber
- aalbessen
Bereid nooit een recept op basis van dierlijke melk in uw
snelkookpan.
Als u een snelkookpan met een roestvrijstalen pan heeft,
gebruik dan nooit grof zout in uw snelkookpan, maar voeg
fijn zout toe aan het einde van het koken. Zo vermijdt u dat
er putjes worden gevormd op de bodem van de
snelkookpan.
Gebruik uw snelkookpan niet om onder druk te braden met
olie.
Gebruik uw snelkookpan niet voor een ander doel dan
waarvoor deze is bestemd.
Plaats uw snelkookpan niet in een warme oven.
Doe nooit aluminiumfolie die niet goed vastzit in uw
snelkookpan.
Doe nooit huishoudfolie in uw snelkookpan.
Alcoholdampen zijn ontvlambaar. Breng deze aan de kook
gedurende ongeveer 2 minuten voordat u het deksel sluit.
Houd toezicht op de snelkookpan bij het bereiden van
recepten die alcohol bevatten.
Gebruik de geschikte warmtebron(nen) overeenkomstig de
gebruiksaanwijzingen.
Page 73

NA HET
KOKEN...
Verdraai geleidelijk het drukventiel (A) door naar eigen
wens de drukverlaging te kiezen, tot tegenover de
markering van het pictogram
- afb. 10. Indien u bij het
vrijkomen van de stoom ongewone spatten vaststelt,
plaats het drukventiel (A) terug in de modus
"Snelkookpan" en voer een snelle drukverlaging onder
koud water uit
- afb. 14.
Indien de veiligheidsindicator (D) niet daalt, plaats uw
snelkookpan onder de koudwaterkraan
- afb. 14.
Manipuleer nooit de veiligheidsindicator.
Na het koken van vlees met een oppervlakkige huid (zoals
ossentong) die onder invloed van de druk kan zwellen, het
vlees niet doorprikken zolang de huid opgezwollen is; u
loopt het risico te worden verbrand. Prik het vlees door
voordat u gaat koken.
Voor pasteuze voedingsmiddelen die tijdens het koken
uitzetten of schuimen, zoals rijst, peulvruchten, gedroogde
groenten, moes, pompoen, courgette, wortelen... Laat uw
snelkookpan enkele minuten afkoelen, en voer dan een
afkoeling onder koud water uit. Schud de snelkookpan
lichtjes en systematisch voor elke opening, om het
ontsnappen van stoombellen die u zouden kunnen
verbranden te voorkomen. Deze handeling is vooral
belangrijk bij het snel laten ontsnappen van de stoom of
na het koelen met kraanwater.
Verplaats uw snelkookpan onder druk met uiterste
voorzichtigheid. Raak de warme oppervlakken niet aan.
Gebruik de handgrepen en knoppen. Draag zo nodig
ovenhandschoenen.
Bij het bereiden van soepen, raden wij aan een snelle
drukverlaging onder koud water uit te voeren (zie "Einde
van het koken in de modus 'Snelkookpan' ").
Let erop dat het ventiel in de drukverlagingsstand staat
voordat u uw snelkookpan opent. De veiligheidsindicator
(D) moet op de laagste stand staan.
Open nooit uw snelkookpan met geweld. Verzeker u ervan
dat de interne druk is gedaald. De veiligheidsindicator (D)
moet op de laagste stand staan. (Zie paragraaf
"Beveiliging").
73
NL
Page 74

BEWAAR DEZE INSTRUCTIES
74
*afhankelijk van model
ONDERHOUD
Als u vaststelt dat een onderdeel van uw snelkookpan
gebroken of gebarsten is, probeer deze dan in geen geval
te openen indien de snelkookpan gesloten is. Wacht tot
de pan volledig is afgekoeld voordat u hem verplaatst,
gebruik hem niet meer en breng de snelkookpan naar een
erkend TEFAL- of TEFAL-servicecentrum voor reparatie.
Voer, afgezien van reiniging en onderhoud, geen andere
werkzaamheden uit op de veiligheidssystemen.
Gebruik uitsluitend originele TEFAL onderdelen die voor
uw model zijn bestemd. Gebruik in het bijzonder een
TEFAL pan en deksel.
Gebruik uw snelkookpan niet voor het bewaren van zure
of zoute voedingsmiddelen voor en na het koken, omdat
dit uw pan kan beschadigen.
Reinig en spoel uw snelkookpan meteen na elk gebruik af.
Het drukventiel (A), de afdichtingsring, (I), de timer* (F) of
de snelkookpan met anti-aanbaklaag nooit in de
vaatwasser plaatsen.
Dompel de timer* (F) nooit onder water.
Gebruik nooit bleekwater of chloorhoudende producten,
die de kwaliteit van het roestvrij staal zouden kunnen
aantasten.
Laat het deksel niet in water liggen.
Vervang de afdichtingsring om het jaar of wanneer deze
een scheurtje vertoont.
Het is absoluut noodzakelijk uw snelkookpan na 10 jaar
gebruik te laten nakijken in een erkend TEFAL
servicecenter.
Om uw snelkookpan op te bergen: draai het deksel op de
pan om, om voortijdige slijtage van de afdichtingsring van
het deksel te vermijden.
Page 75

* afhankelijk van model
Onderdelen (zie Productbeschrijving)
Verplichte controles voor elk gebruik
Controle van het drukventiel
Controleer of de uitlaat van het drukventiel niet geblokkeerd is.
Controle van het veiligheidsventiel
Controleer of het kogeltje van het veiligheidsventiel beweegbaar is (gebruik een
wattenstaafje zonder watten).
A. Drukventiel
B. Stoomuitlaat
C. Aanwijzing ventielstand
D. Veiligheidsindicator (zie
paragraaf "Beveiliging")
E. Veiligheidsventiel
F. Timer*
G. Handgreep deksel
H. Deksel
I. Afdichtingsring
J. Stoommandje*
K. Drievoetje*
L. Handgreep pan
M. Markeringen maximumvulling
N. Pan
Timer: wordt uitsluitend geleverd bij het model ClipsoMinut'®Perfect.
In de handel verkrijgbaar als accessoire voor andere modellen van ClipsoMinut'®.
75
NL
Page 76

* afhankelijk van model
Koken in de modus Koken in de modus Drukverlaging
Snelkookpan Kookpan*
Opening
Kantel de handgreep van het deksel van horizontale in verticale stand - afb.
2
. Het deksel draait.
Til het deksel op.
Indien u de snelkookpan moeilijk open krijgt: plaats de afdichtingsring onder
water en plaats deze opnieuw op het deksel zonder het te drogen
- afb. 19
en 15
en let er hierbij op dat de afdichtingsring goed onder de uitsparingen
van het deksel komen te zitten.
Sluiten
Verzeker u ervan dat de handgreep van het deksel in verticale stand is.
Plaats het deksel op de pan zoals aangegeven op
- afb. 1 door het kunststof
gedeelte op de handgrepen van de pan uit te lijnen.
Klap de handgreep van het deksel van verticale in horizontale stand
- afb. 3
Het deksel draait.
Als u het deksel niet kunt sluiten:
Controleer of de afdichtingsring goed op zijn plaats zit en of het deksel goed
is geplaatst.
Indien u de snelkookpan moeilijk kan sluiten: plaats de afdichtingsring onder
water en plaats deze opnieuw op het deksel zonder het te drogen
- afb. 19
en 15
en let er hierbij op dat de afdichtingsring goed onder de uitsparingen
v
an het deksel komen te zitten.
Eerste gebruik
Voor de modellen met anti-aanbaklaag: het volledige binnenoppervlak
afwassen en lichtjes met bakolie invetten.
Plaats het drievoetje* (K) op de bodem van de pan.
Vul de pan (N) met water tot de markering 2/3 (MAX 2) - afb. 5.
Plaats het mandje* (J) op het drievoetje* (K).
Sluit uw snelkookpan.
Lijn het pictogram van het drukventiel (A) uit op de aanwijzing van de
ventielstand (C)
- afb. 9.
Gebruik
76
Page 77

Plaats uw snelkookpan op een warmtebron en stel deze in op maximaal
vermogen.
Wanneer de stoom via het ventiel begint te ontsnappen, zet dan de
warmtebron lager en tel 20 min. af.
Wanneer de 20 min. zijn verstreken, zet uw warmtebron uit.
Lijn het pictogram van het drukventiel (A) uit op de aanwijzing van de
ventielstand (C).
Wanneer de veiligheidsindicator (D) daalt, dan is uw snelkookpan niet meer
onder druk.
Open uw snelkookpan
- afb. 2
Reinig hem met afwasmiddel.
Minimum en maximum vulling
Minimum 25 cl (2 glazen) - afb. 4.
Maximum 2/3 van de hoogte van de pan, markering MAX 2
- afb. 5.
Gebruik nooit grof zout in uw snelkookpan, maar voeg fijn zout toe aan het
einde van het koken.
Voor bepaalde voedingswaren:
Voor pasteuze voedingsmiddelen, die tijdens het koken
uitzetten of schuimen, zoals rijst, peulvruchten,
gedroogde groenten of moes, pompoen, courgette,
wortelen, aardappelen... mag u uw snelkookpan nooit
boven 1/3 (MAX 1) van haar capaciteit vullen. Laat uw
snelkookpan enkele minuten afkoelen, en voer dan een
afkoeling onder koud water uit. Schud de snelkookpan
lichtjes en systematisch voor elke opening, om het
ontsnappen van stoombellen die u zouden kunnen
verbranden te voorkomen. Deze handeling is vooral belangrijk bij het snel
laten ontsnappen van de stoom of na het koelen met kraanwater. Bij het
bereiden van soepen, raden wij aan een snelle drukverlaging onder koud
water uit te voeren (zie "Einde van het koken in modus 'Snelkookpan' ").
Gebruik van het stoommandje*
Giet 75 cl water op de bodem van de pan (N).
Plaats het drievoetje* (K) op de bodem van de pan.
Plaats het mandje* (J) op het drievoetje* (K)
- afb. 6.
Tijdens het stoomkoken mogen de voedingswaren in
het stoommandje niet in contact komen met het water
- afb. 6 en 7.
Voedingsmiddelen die in het stoommandje* liggen,
mogen niet boven de markering MAX 2 komen.
MAX
MAX1
1/3
77
NL
* afhankelijk van model
Page 78

78
Verwijderen en plaatsen van het
drukventiel (A)
Om het drukventiel te verwijderen (A):
Lijn de groef uit met de aanwijzing van de ventielstand
(C) door op de ring van het drukventiel (A) te drukken.
• Verwijder het ventiel - afb. 11
Om het drukventiel te plaatsen:
Plaats het drukv
entiel (A) door de groef van het
drukventiel (A) uit te lijnen met de aanwijzing van de
ventielstand (C)
- afb. 8.
Duw op het drukventiel (A) om het te vergrendelen op
de stoomuitlaat.
Druk op de ring van het drukventiel (A) en draai.
Timer*
*Wordt uitsluitend geleverd bij het model
ClipsoMinut' Perfect.
De timer is ontworpen om u te helpen het beste kookresultaat te bereiken,
zodat u het energieverbruik beter kunt aanpassen. Hij telt automatisch de
kooktijd af zodra het temperatuurniveau wordt bereikt dat overeenkomt met
het koken in de modus "Snelkookpan" .
De timer moet op uw snelkookpan worden geklikt om te werken.
Let erop tijdens het koken dat het drukventiel (A) regelmatig
fluistert. Als er onvoldoende stoom is, zet uw warmtebron iets hoger,
en in het tegenovergestelde geval, zet uw warmtebron iets lager.
Groef
* afhankelijk van model
Page 79

79
NL
Om de timer in te schakelen: druk op de knop.
Stel de kooktijd in (in minuten).
Als u zich heeft vergist in de kooktijd, wacht 4 seconden,
en druk vervolgens lang op de knop om te resetten.
Zet uw warmtebron aan op maximaal vermogen.
Zodra uw snelkookpan de kooktemperatuur heeft
bereikt, piept de timer en begint het aftellen van de tijd
(de cijfers knipperen).
Zet de warmtebron lager.
Aan het einde van de kooktijd piept de timer.
Druk op de knop om de waarschuwingstoon van de timer
stil te zetten.
Zet de warmtebron uit.
Plaatsen en verwijderen van de timer*
Om de timer (F) te plaatsen
- afb. 12 moet u eerst het
voorste gedeelte op de module plaatsen en dan
drukken om het achterste gedeelte vast te klikken.
Om de timer (F) te verwijderen, moet u deze optillen en
eruit trekken.
Vervangen van de batterij van de timer*
De batterij van de timer is een knoopcel type CR2032.
Als het symbool verschijnt of als u geen
weergave meer heeft, vervang dan de batterij.
1
2
3
4
5
Een lange druk op de knop reset de tijd en schakelt de timer uit.
2
1
2
* afhankelijk van model
Page 80

De levensduur van de batterij is afhankelijk van de
gebruiksfrequentie van de timer.
De batterij van de timer bevat dimethoxyethaan CAS
110-71-4. Zij voldoet aan de Europese regelgeving. De
volgende maatregelen gelden voor uw veiligheid en de
bescherming van het milieu: open de batterij niet, stel
deze niet bloot aan hoge temperaturen en gooi de
batterij niet bij het huisvuil, maar breng deze naar een
inzamelpunt voor gebruikte batterijen.
Open het batterijdeksel met behulp van een muntstuk
(zie afbeelding hiernaast) om de batterij van uw timer
te verwijderen.
Vervang uw batterij.
Plaats de ring terug in de behuizing
Plaats de halve maan op het deksel van de batterij
tegenover de halve maan van de timer.
Draai het batterijdeksel langzaam rond, oefen hierbij
een beetje druk uit, om de halve maan van het
batterijdeksel uit te lijnen met de maan van de
timer.
Voer dit op een effen ondergrond uit, zodat het
batterijdeksel netjes horizontaal is geplaatst.
Forceer het batterijdeksel niet bij het sluiten ervan. Ga
niet verder dan de aanslagen.
In geval van verlies kunt u een nieuwe timer kopen bij
alle erkende TEFAL-servicecentra.
Voor het koken
Verwijder voor elk gebruik het drukventiel (A) - afb. 11 en controleer visueel
tegen het licht of de stoomuitlaat (B) niet verstopt is
- afb. 13.
Controleer of het veiligheidsventiel beweegbaar is (zie hiervoor de paragrafen
"Reiniging" en "Verplichte controles voor elk gebruik")
- afb. 18.
Sluit uw snelkookpan
- afb. 3
Indien u de snelkookpan moeilijk kan sluiten: plaats de afdichtingsring onder
water en plaats deze opnieuw op het deksel zonder het te drogen
- afb. 19
en 15
en let er hierbij op dat de afdichtingsring goed onder de uitsparingen
van het deksel komen te zitten.
Plaats het drukventiel (A)
- afb. 8.
◗
◗
◗
●
De timer* niet onder kraan houden of in de vaatwasser plaatsen.
80
+
* afhankelijk van model
Page 81

Koken in de modus
"Snelkookpan"”
Draai het drukventiel (A) tot de stand van de kookmodus "Snelkookpan"
- afb. 9.
Verzeker u ervan dat uw snelkookpan goed is gesloten voordat u hem in
werking stelt
- afb. 3.
Plaats uw snelkookpan op een warmtebron en stel deze in op maximaal
vermogen.
Voor de modellen uitgerust met een timer : programmeer de in het recept
aangegeven kooktijd (zie paragraaf "Gebruik van de timer").
Het tikkende geluid en de damp die bij de veiligheidsindicator ontstaan, zijn
normaal. Hierdoor kan er voor het koken lucht ontsnappen.
Tijdens het koken in de modus "Snelkookpan"
Zet de warmtebron lager wanneer het drukventiel (A) continu en met een
aanhoudend (sissend) geluid stoom laat ontsnappen.
Begin vanaf dat moment de in het recept aangegeven kooktijd af te tellen.
Let erop tijdens het koken dat het ventiel regelmatig fluistert. Als er
onvoldoende stoom vrijkomt, zet dan uw warmtebron iets hoger, en zet hem
iets lager in het tegenovergestelde geval.
Einde van het koken in modus "Snelkookpan"
Om de stoom te laten ontsnappen :
Zodra de warmtebron is uitgezet, heeft u twee opties:
• Snelle drukverlaging: draai geleidelijk het drukventiel (A) tot tegenover de
markering van het pictogram
- afb. 10.
Model Clipso
Minut Perfect
en Easy
Model Clipso
Minut Duo
81
NL
Page 82

• Snelle drukverlaging onder koud water: plaats uw snelkookpan onder de
koudwaterkraan
- afb. 14. Wanneer de veiligheidsindicator (D) daalt, is uw
snelkookpan niet meer onder druk. Draai het drukventiel (A) tot op stand .
U kunt nu uw snelkookpan openen
- afb. 2.
Indien u de snelkookpan moeilijk open krijgt: plaats de afdichtingsring onder
water en plaats deze opnieuw op het deksel zonder het te drogen
- afb. 19
en 15
en let er hierbij op dat de afdichtingsring goed onder de uitsparingen
van het deksel komen te zitten.
Voor pasteuze voedingsmiddelen, die tijdens het koken uitzetten of schuimen,
zoals rijst, peulvruchten, gedroogde groenten of moes, pompoen, courgette,
wortelen, aardappelen... mag u uw snelkookpan nooit boven 1/3 (MAX 1) van
haar capaciteit vullen. Laat uw snelkookpan enkele minuten afkoelen, en voer
dan een afkoeling onder koud water uit. Schud de snelkookpan lichtjes en
systematisch voor elke opening, om het ontsnappen van stoombellen die u
zouden kunnen verbranden te voorkomen. Deze handeling is vooral belangrijk
bij het snel laten ontsnappen van de stoom of na het koelen met kraanwater.
Bij het bereiden van soepen, raden wij aan een snelle drukverlaging onder koud
water uit te voeren.
Indien u bij het laten ontsnappen van de stoom ongewone spatten
vaststelt, plaats het drukventiel (A) terug in de modus
"Snelkookpan" en voer een snelle drukverlaging onder koud
water uit.
Indien de veiligheidsindicator (D) niet daalt, plaats uw snelkookpan
onder de koudwaterkraan
- afb. 14.
Manipuleer nooit de veiligheidsindicator.
82
Model
Perfect/Easy
Model Duo
Stap 1
{
Stap 2
* afhankelijk van model
Page 83

Koken in de modus
"Kookpan"*
Enkel mogelijk met het model met pan met
gekleurde anti-aanbaklaag.
Draai het drukventiel (A) tot de stand voor de kookmodus
"Kookpan" .
Verzeker u ervan dat uw snelkookpan goed is gesloten
- afb.
3
voordat u hem in werking stelt.
Plaats uw snelk
ookpan op een warmtebron waarbij het
vermogen lager is ingesteld.
Begin de in het recept aangegeven kooktijd af te tellen zodra
het water kookt.
In de modus "Kookpan" kunt u uw snelkookpan altijd openen om te roeren, de
bereiding te controleren of ingrediënten toe te voegen.
Indien u de snelkookpan moeilijk open krijgt: plaats de afdichtingsring onder water
en plaats deze opnieuw op het deksel zonder het te drogen
- afb. 19 en 15 en let
er hierbij op dat de af
dichtingsring goed onder de uitsparingen van het deksel
komen te zitten.
Als de warmtebron te hoog staat, kan het gebeuren dat de snelkookpan zich
vergrendelt (de veiligheidsindicator (D) gaat omhoog en blokkeert de opening) en
dat de handgreep van de deksel niet werkt of de snelkookpan niet opent. Zet in
dergelijk geval de warmtebron lager of uit. Haal bij elektrische kookplaten van
gietijzer de snelkookpan van de warmtebron.
Gebruik geen gardes of metalen of scherp keukengerei. Klop uw keukengerei niet af
op de rand van de pan; dit kan de snelkookpan beschadigen en lekken veroorzaken.
Laat vetten, zoals boter of olie, nooit verbranden of verkolen. De tijdens het koken
vrijgegeven dampen kunnen gevaarlijk zijn voor dieren met een gevoelig
ademhalingsstelsel, zoals vogels. Eigenaars van vogels moeten deze uit de keuken
verwijderen.
Uw snelkookpan is uitgerust met verschillende beveiligingen:
Beveiliging bij het sluiten:
- Wanneer het deksel verkeerd is geplaatst of als u vergeet de handgreep van
de deksel omlaag te klappen, ontstaat er een stoomlek aan de buitenrand
van de snelkookpan en kan deze geen druk opbouwen.
Beveiliging
83
NL
* afhankelijk van model
Page 84

Beveiliging bij het openen:
- Terwijl uw snelkookpan onder druk staat, staat de veiligheidsindicator (D) in de
hoogste stand en mag de handgreep van de deksel voor het openen/sluiten (G)
niet worden gebruikt.
- Probeer nooit uw snelkookpan met geweld te openen.
- Manipuleer in het bijzonder nooit de veiligheidsindicator (D).
- Verzeker u ervan dat de interne druk is gedaald door na te gaan of de
veiligheidsindicator (D) in de laagste stand staat.
- De handgrepen van de pan zijn veiligheidsbestanddelen. U mag deze nooit zelf
vervangen. Gebruik nooit andere handgreepmodellen.
- Indien u de handgreep van de deksel voor het openen/sluiten (G) in verticale
stand heeft gezet terwijl de snelkookpan nog onder druk stond, kunt u deze niet
openen. Deze functie is een extra beveiliging.
- Klap de handgreep van de deksel terug in horizontale stand en wacht tot de
veiligheidsindicator (D) naar de laagste stand is gedaald.
Twee overdrukbeveiligingen:
- Eerste voorziening: het veiligheidsventiel (E) ontlast de druk
- afb. 20.
-
Tweede voorziening: de afdichtingsring laat de stoom ontsnappen via het
deksel
- afb. 20.
Wanneer één van deze overdrukbeveiligingen in werking treedt:
Zet de warmtebron uit.
Laat uw snelkookpan volledig afkoelen.
Open de snelkookpan.
Controleer en reinig het drukventiel (A), de stoomuitlaat (B), het
veiligheidsventiel (E) en de afdichtingsring (I)
- afb. 16 - 17- 18. Zie hiervoor
de par
agrafen "Reiniging" en "Verplichte controles voor elk gebruik".
Indien na deze controles en reinigingen uw snelkookpan lekt of niet meer
werkt, breng hem dan naar een erkend TEFAL-servicecentrum.
Gebruiksaanbevelingen
1 - De stoom is zeer warm wanneer deze uit het drukventiel ontsnapt.
Pas op voor een stoomstraal.
2 - Zodra de veiligheidsindicator omhoog komt, mag u uw snelkookpan
niet meer openen.
3 - Zoals bij elk kookapparaat moet u voor nauwlettend toezicht zorgen
als u uw snelkookpan in de nabijheid van kinderen gebruikt.
4 - Om uw snelkookpan te verplaatsen, gebruikt u de twee handgrepen
van de pan.
5 - Laat geen voedingswaren in uw snelkookpan staan. Draag uw
snelkookpan nooit bij de handgreep van de deksel.
6 - Gebruik nooit bleekwater of chloorhoudende producten, die de
kwaliteit van het roestvrije staal zouden kunnen aantasten.
7 - Laat het deksel niet in water liggen.
84
* afhankelijk van model
Page 85

8 - Vervang de afdichtingsring om het jaar of wanneer deze een
scheurtje vertoont.
9 - De reiniging van uw snelkookpan mag alleen uitgevoerd worden als
deze koud en leeg is.
10 - Het is absoluut noodzakelijk uw snelkookpan na 10 jaar gebruik te
laten nakijken in een erkend TEFAL-servicecenter.
Voor de goede werking van uw snelkookpan moeten deze reinigings- en
onderhoudsaanbevelingen na elk gebruik worden nageleefd.
Was uw snelkookpan na elk gebruik met warm water en afwasmiddel. Doe
hetzelfde met het mandje*.
Gebruik geen bleekwater of chloorhoudende producten.
Oververhit uw pan niet wanneer deze leeg is.
Om de binnenzijde van de roestvrijstalen pan te reinigen:
Wassen met een schuursponsje en afwasmiddel.
Als de binnenzijde van de roestvrijstalen pan iriserende plekken of witte
neerslag (minerale afzettingen) vertoont, reinig deze dan met witte azijn.
Om de binnenzijde van de aluminium pan met anti-aanbaklaag te reinigen:
Om de levensduur van het product te verlengen, raden wij aan het met de
hand te wassen.
Wassen met warm water, afwasmiddel en een zachte spons.
Gebruik geen schuurpoeder of schuursponsjes.
Indien u voedingswaren heeft laten aanbakken, vul uw snelkookpan dan met
warm water en laat hem weken. Reinig hem vervolgens met afwasmiddel.
Om de buitenzijde van de pan te reinigen:
Wassen met een spons en afwasmiddel.
Reiniging
De bruine kleuring en de krassen die kunnen optreden als gevolg van een
langdurig gebruik hebben geen invloed op het goed functioneren van de
snelkookpan.
Slijtage van de buitenste coating
(afhankelijk van het model)
die ontstaat
doordat het deksel over de pan komt, is normaal.
Voor de snelkookpannen met anti-aanbaklaag
(afhankelijk van het model)
: de
lichte krassen en schaafplekken die bij het gebruik optreden hebben geen
nadelige invloed op de anti-aanbakprestaties van de coating.
De roestvrijstalen pan en het mandje mogen in de vaatwasser.
85
NL
* afhankelijk van model
Page 86

Om het deksel te reinigen:
Was het deksel met een spons en afwasmiddel.
Om de afdichtingsring van het deksel te reinigen:
Reinig na elk gebruik de afdichtingsring (I) en haar behuizing.
Om de afdichtingsring terug te plaatsen, raadpleeg - afb. 15 en zorg ervoor
dat de ring corr
ect onder elke uitsparing van het deksel zit.
Om het drukventiel (A) te reinigen:
Verwijder het drukventiel (A)
- afb. 11.
R
einig het drukventiel (A) onder stromend
kraanwater
- afb. 16.
Controleer of het vrij beweegt: zie de afbeelding
hiernaast.
Om de stoomuitlaat (B) op het deksel te reinigen:
Verwijder het ventiel (A)
- afb. 11.
C
ontroleer visueel tegen het licht of de stoomuitlaat vrij en rond is
- afb. 13.
R
einig de opening indien nodig met een tandenstoker
- afb. 17 en spoel hem
af.
Om het v
eiligheidsventiel (E) te reinigen:
Reinig het gedeelte dat zich aan de binnenzijde van het deksel bevindt door
het onder stromend water te houden.
Controleer of het ventiel goed functioneert door hard op het kogeltje te
drukken (met een wattenstaafje zonder watten). Het kogeltje moet zich vrij
kunnen bewegen
- afb. 18. Zie hiervoor de paragraaf "Verplichte controles
v
oor elk gebruik".
Plaats de pan met anti-aanbaklaag
(afhankelijk van model)
niet in de
vaatwasser, omdat vaatwasmachinetabletten zeer agressieve en
bijtende stoffen voor de aluminium onderdelen van de pan bevatten.
Het intensieve gebruik van de pan met anti-aanbaklaag
(afhankelijk
van model )
kan de kleur van de coating licht aantasten (vergeling,
vlekken).
Nadat het drukventiel (A), de afdichtingsring (I)
en de timer* (F) zijn verwijderd, kunt u het
deksel in de vaatwasser plaatsen.
Het drukventiel (A), de afdichtingsring (I), de timer* (F), of de pan
met anti-aanbaklaag mogen niet in de vaatwasser.
86
* afhankelijk van model
Page 87

Om de timer* (F) te reinigen:
Gebruik een schone en droge doek.
Gebruik geen oplosmiddel.
De timer niet onder de kraan houden, noch in de vaatwasser plaatsen.
Om de afdichtingsring van uw snelkookpan te vervangen:
Vervang de afdichtingsring van uw snelkookpan om het jaar of wanneer deze
een scheurtje vertoont.
Gebruik steeds een originele TEFAL-afdichtingsring die voor uw model is
bestemd (zie paragraaf "Accessoires").
Om de afdichtingsring terug te plaatsen, raadpleeg
- afb. 15 en zorg ervoor
dat de af
dichtingsring correct onder elke uitsparing van het deksel zit.
Om uw snelkookpan op te bergen:
Plaats het deksel omgekeerd op de pan.
Het mechanisme voor het openen/sluiten van de snelkookpan heeft,
afgezien van de reiniging, geen onderhoud nodig .
TEFAL-accessoires
De in de handel beschikbare accessoires voor uw snelkookpan zijn:
Neem voor het vervangen van andere onderdelen of een reparatie, contact
op met een erkend servicecentrum.
Gebruik uitsluitend originele TEFAL-onderdelen die voor uw model
snelkookpan zijn bestemd.
Onderhoud
Het is absoluut noodzakelijk om uw snelkookpan na 10 jaar gebruik
te laten nakijken in een erkend TEFAL-servicecentrum.
Accessoires Referenties
Afdichtingsring
3/4/4,5/6 L: buitendiameter van de
afdichtingsring: 24 cm
X1010008
5/7,5/9 L: buitendiameter van de
afdichtingsring: 27 cm
X1010007
Stoommandje*
3/4,5/4/6 L: voor pan met diameter 22 cm
792185
5/7,5/9 L: voor pan met diameter 24 cm 792654
Drievoetje*
792691
Timer*
X1060007
87
NL
* afhankelijk van model
Page 88

Diameter van de bodem van uw snelkookpan - referenties
Normatieve informatie:
Hoogste werkdruk: 65 kPa
Maximale veiligheidsdruk: 120 kPa
Geschikt voor de warmtebronnen
Uw snelkookpan kan worden gebruikt op alle soorten warmtebronnen,
inclusief inductie.
Op een elektrische kookplaat gebruikt u een plaat waarvan de diameter gelijk
aan of kleiner is dan deze van de bodem van uw snelkookpan.
Op een keramische kookplaat dient u te controleren of de bodem van de pan
schoon en netjes is.
Op gas mag de vlam niet buiten de diameter van de pan reiken.
Zorg ervoor dat op alle fornuizen uw snelkookpan correct gecentreerd is.
Kenmerken
Inhoud
(L)
Ø pan
Ø
bodem
Clipso
Minut'
®
Perfect / Easy
Clipso
Minut'
®
Duo
Materiaal
van de pan
Materiaal
van het
deksel
3 L 22 cm 15,5 cm P46205 - Roestvrij staal
Roestvrij
staal
4,5 L 22 cm 15,5 cm P46206 - Roestvrij staal
6 L 22 cm 15,5 cm P46207 - Roestvrij staal
4 L 22 cm 14 cm - P46042
Aluminium met
coating
5 L 24 cm 14 cm - P46051
Aluminium met
coating
7,5 L 24 cm 18 cm P46248 - Roestvrij staal
9 L 24 cm 18 cm P46249 - Roestvrij staal
Set
5L
24 cm
14 cm
P46353
Aluminium met
coating
7,5L 18 cm Roestvrij staal
GAS ELEKTRICITEIT
(Gietijzeren kookplaat)
ELEKTRICITEIT
(Keramische of
halogeen kookplaat)
ELEKTRICITEIT
(Inductie-kookplaat)
ELEKTRICITEIT
(Gloeispiraal)
88
Page 89

In het kader van het in de gebruiksaanwijzing aanbevolen gebruik, heeft de
roestvrijstalen pan van uw nieuwe TEFAL-snelkookpan 10 jaar garantie voor:
- Elk defect in verband met de metalen structuur van uw pan;
- Elke vroegtijdige aantasting van het basismetaal.
De andere materialen van de pan en alle andere onderdelen van uw
snelkookpan worden gegarandeerd tegen fabricage- of materiaalfouten,
gedurende de garantieperiode die wordt bepaald door de wet die van kracht
is in het land van aankoop, te rekenen vanaf de datum van aankoop.
Deze contractuele garantie zal worden verleend op vertoon van de kassabon
of factuur van deze datum van aankoop.
Het volgende is uit deze garanties uitgesloten:
Krassen en verkleuring als gevolg van veroudering, voor pannen met een antiaanbaklaag.
Krassen die ontstaan doordat het deksel in contact komt met de pan met antiaanbaklaag.
Verslechtering als gevolg van het niet naleven van de belangrijke
voorzorgsmaatregelen of onzorgvuldig gebruik, waaronder:
- Schokken, vallen, gebruik in de oven...
Alleen de erkende TEFAL-servicecentra zijn gemachtigd u deze garantie te
verlenen.
Neem contact op met onze klantenservice voor de adresgegevens van het
dichtstbijzijnde erkende TEFAL-servicecentrum.
Verplichte markeringen
Markering Plaats
Handelsmerk Op het deksel
Productiejaar en productiepartij
Modelreferentie
Maximale veiligheidsdruk (PS)
Hoogste werkdruk (PF)
Op het deksel
Inhoud (L) Op de buitenzijde van de bodem van de pan
Postadres van de fabrikant Op de buitenzijde van de bodem van de pan
Garantie
• Help mee het milieu te beschermen!
! Uw apparaat bevat veel materialen die geschikt zijn voor
hergebruik of recycling.
! Breng het apparaat naar een verzamelpunt zodat het correct
kan worden verwerkt.
89
NL
Page 90

TEFAL beantwoordt uw vragen
90
Problemen
Aanbevelingen
Als u het deksel
niet kunt sluiten:
Controleer dat de handgreep van het deksel wel
degelijk in verticale stand is.
Controleer de juiste plaatsing van de afdichtingsring
(zie paragraaf "Reiniging en onderhoud").
Controleer of het deksel correct gepositioneerd is
zoals aangegeven op
- afb. 1.
Plaats de afdichtingsring onder water en plaats deze
opnieuw op het deksel zonder het te drogen
- afb. 19
en 15
en let er hierbij op dat de afdichtingsring goed
onder de uitsparingen van het deksel komen te zitten.
Indien uw
snelkookpan
opgewarmd werd
zonder vloeistof erin:
Laat uw snelkookpan nakijken door een erkend TEFALservicecentrum.
Indien de
veiligheidsindicator
kleppert en
dampen vrijlaat:
Dit is normaal voor de eerste paar minuten. Hierdoor
kan namelijk lucht voor het koken ontsnappen.
Indien de
veiligheidsindicator
niet omhoog is
gegaan en tijdens
het koken niets
door het ventiel
ontsnapt:
Dit is normaal tijdens de eerste minuten.
Indien het fenomeen aanhoudt, controleer of:
- De warmtebron hoog genoeg staat, zo niet, zet hem
hoger.
- De hoeveelheid vloeistof in de pan voldoende is.
- Het drukventiel (A) op staat.
- Uw snelkookpan correct gesloten is.
- De afdichtingsring of de rand van de pan niet beschadigd zijn.
- De afdichtingsring correct geplaatst is.
Indien de
veiligheidsindicator
omhoog is gegaan
en tijdens het
koken niets door
het ventiel
ontsnapt:
Dit is normaal tijdens de eerste minuten.
Indien het fenomeen aanhoudt, houd uw apparaat
onder koud kraanwater tot de veiligheidsindicator (D)
daalt.
Reinig het drukventiel (A)
- afb. 16 en de stoomuitlaat
- afb. 17 en controleer of het kogeltje van het
v
eiligheidsventiel moeiteloos kan worden ingedrukt
-
afb. 18.
Page 91

91
NL
Problemen
Aanbevelingen
Indien stoom rondom
het deksel ontsnapt,
controleer:
De correcte sluiting van het deksel.
De positionering van de afdichtingsring in het deksel.
De staat van de afdichtingsring en vervang deze zo
nodig.
Of het deksel, de afdichtingsring en haar behuizing in
het deksel schoon zijn.
De staat van de rand van de pan.
Als u het deksel niet
kunt openen:
Controleer of de veiligheidsindicator (D) op de
laagste stand staat.
Zo niet, laat stoom ontsnappen en koel zo nodig uw
snelkookpan af onder een straal koud water.
Manipuleer nooit de veiligheidsindicator (D). Plaats
de afdichtingsring onder water en plaats deze opnieuw op het deksel zonder de ring te drogen
- afb.
19 en 15
en let er hierbij op dat de afdichtingsring
goed onder de uitsparingen van het deksel komen te
zitten.
Indien de voedingswaren niet gaar of verbrand zijn, controleer:
De kooktijd.
De kracht van de warmtebron.
De correcte positionering van het drukventiel (A).
De hoeveelheid vloeistof.
Indien de
voedingswaren in uw
snelkookpan zijn
aangebrand:
Laat uw pan een tijdje weken alvorens hem te wassen.
Gebruik nooit bleekwater of chloorhoudende producten.
Wanneer één van de
beveiligingen in
werking treedt:
Zet de warmtebron uit.
Laat uw snelkookpan afkoelen zonder hem te
verplaatsen. Wacht tot de veiligheidsindicator is
gedaald en open de snelkookpan.
Controleer en reinig het drukventiel (A), de
stoomuitlaat, het veiligheidsventiel en de
afdichtingsring.
Zorg ervoor dat de voorwaarden voor de
vulhoeveelheden worden gerespecteerd.
Laat uw snelkookpan nakijken door een erkend
TEFAL-servicecentrum wanneer u het probleem zelf
niet kunt verhelpen.
Indien u corrosie
vaststelt:
Het gebruik van hoogwaardig roestvrij staal
voorkomt in extreme gevallen niet het ontstaan van
corrosie. Verwijder sporen van corrosie door erop te
wrijven met een schuursponsje voordat u uw
snelkookpan opnieuw gebruikt.
Page 92

92
Groente
KOOKTABEL
GROENTEN
(VERS)
STOMEN
Ingrediënt in het
stoommandje en
750 ml water op de
bodem van de
snelkookpan.
ONDERDOMPELEN
Ingrediënt in water
zonder stoommandje.
IMPULSEN
ONDERDOMPELEN
Zonder het
stoommandje.
75 cl
MAX
1/3 MAX 1
Aardappels gehalveerd (950 g) (stomen)
20 tot 25 min.
(afhankelijk van grootte)
Andijvie gehalveerd (900 g) (stomen)
14 tot 16 min.
Artisjokken, 2 heel, elk 600 g (onderdompelen)
30 tot 35 min.
Asperges, wit (stomen)
5 tot 6 min.
Aubergines, geschild en gesneden (3 mm), 850 g
(stomen)
10 tot 12 min.
Bieten, rood, in vieren gedeeld (onderdompelen)
20 tot 25 min.
(afhankelijk van grootte)
Bloemkoolroosjes 600 g (stomen)
10 tot 12 min.
Broccoliroosjes 600 g (stomen)
9 tot 11 min.
Champignons, gesneden 800 g (onderdompelen)
4 tot 5 min.
Courgettes in plakjes (3 mm) 600 g (stomen)
12 tot 15 min.
Erwten (stomen)
6 tot 8 min.
Fijne sperziebonen (600 g) (stomen)
10 tot 12 min.
Flageoletbonen, gedroogd 250 g (onderdompelen)
35 tot 40 min.
Groene kool, gesneden, 500 g (onderdompelen)
5 tot 6 min.
Groene linzen, 250 g (onderdompelen)
14 tot 16 min.
Ingelegde uien (stomen)
7 tot 8 min.
Knolrapen, in blokjes (500 g) (stomen)
14 tot 16 min.
Knolselderij, gesneden (onderdompelen) 600 g
7 tot 9 min.
Paprika's gehalveerd (550 g) (stomen)
14 tot 16 min.
Pompoen, in stukjes (3 tot 5 cm) 600 g (stomen)
13 tot 18 min.
Prei, heel en wit 650 g (stomen)
9 tot 11 min.
Snijbiet, gesneden (2 cm) 700 g (stomen)
15 tot 17 min.
Spinazie (stomen)
3 tot 4 min.
Spliterwten 250 g (onderdompelen)
18 tot 20 min.
Spruitjes (stomen)
10 tot 12 min.
Venkel in reepjes (600 g) (stomen)
6 tot 9 min.
Wortels in plakjes (3 mm) 600 g (stomen)
17 tot 19 min.
Page 93

93
NL
Rijst
Vlees / vis
ONDERDOMPELEN
Zonder het stoommandje.
1/3 MAX 1
HOEVEELHEID
WATER
HOEVEEL-
HEID RIJST
KOOK-
TIJD
2 PERSONEN 400 ml / 2 glazen 150 g / 1 glas
7 tot 8 min.4 PERSONEN
500 ml / 2,5 glazen
250 g / 2 glazen
6 PERSONEN
700 ml / 3,5 glazen
375 g / 3 glazen
VERS BEVROREN
Eend (1,8 kg) 45 tot 47 min. 50 tot 55 min.
Kalfskarbonade (0,8 kg, diameter 5–7 cm) 17 tot 19 min. 37 tot 40 min.
Kalfsmedaillons: 0,7 kg 17 tot 21 min. 33 tot 38 min.
Kalfsrolletjes: 4 10 tot 12 min. x
Kip (1,35 kg) 23 tot 25 min. 1 u tot 1 u 10 min.
Konijn (1,5 kg in stukken) 8 tot 9 min. 20 tot 23 min.
Kwartels: 4 9 tot 10 min. 18 tot 20 min.
Lamsschenkel: 2 (0,95 kg) 40 tot 45 min. 1 u 05 tot 1 u 15
Piepkuikens: 2 (1,3 kg) 23 tot 25 min. 40 tot 45 min.
Rosbief (1 kg, diameter 8 – 11 cm) 30 tot 35 min. 45 tot 50 min.
Tonijnsteaks: 4 (0,7 kg) 5 tot 6 min. 7 tot 9 min.
Varkenskarbonade (0,8 kg, diameter 8 – 10 cm) 30 tot 35 min. 1 u 05 tot 1 u 15
Varkensmedaillons: 2 stukken van 350 g 13 tot 15 min. 26 tot 29 min.
Zalmsteaks: 4 (0,8 kg) 5 tot 6 min. 7 tot 8 min.
Zeeduivelfilet (1 kg) in stukken van 75 g 5 tot 6 min. 7 tot 8 min.
Opmerking: Bij modellen van 5 liter en kleiner ervoor zorgen dat vlees en
gevogelte de markering aan de binnenkant van de pot niet
overschrijdt. Kies vlees en gevogelte dat in hoogte 8 cm of kleiner
is.
Page 94

94
Prima di utilizzare la vostra pentola a pressione, leggere attentamente
tutte le istruzioni e fare sempre riferimento al "Manuale d'uso".
Un utilizzo non conforme può causare danni.
Al fine di garantire la sicurezza, l'apparecchio è conforme alle norme e ai
regolamenti vigenti:
- direttiva relativa alle attrezzature a pressione
- materiali a contatto con gli alimenti
- ambiente
PRECAUZIONI IMPORTANTI
CONTROLLI
INDISPENSABIL
I PRIMA DI
OGNI UTILIZZO
CONTROLLARE
visivamente e alla luce del giorno che il condotto di
scarico del vapore non sia ostruito - fig. 13
che la sfera della valvola di sicurezza sia mobile - fig. 18
che la guarnizione del coperchio sia posizionata sotto
ogni linguett
a del coperchio
- fig. 15
che i manici della pentola siano ben fissati. I manici
della pentola sono elementi di sicurezza. Non cambiarli
mai direttamente.
RISPETTARE
SEMPRE LE
SEGUENTI
QUANTITÀ DI
RIEMPIMENTO
Non utilizzare mai la pentola a pressione senza liquido,
poiché potrebbe subire gravi danni. Assicurarsi che,
durante la cottura, vi sia sempre una quantità di liquido
sufficiente.
Minimo 25 cl - fig. 4.
Massimo 2/3 dell'altezza della pentola, tacca MAX 2 -
fig. 5.
Durante la cottura a vapore, gli alimenti presenti nel
cestello vapore non devono essere in contatto con
l'acqua -fig. 6 e 7.
Massimo 1/3 (MAX 1 ) per gli alimenti che aumentano
di volume e/o producono schiuma durante la cottura,
come il riso, i legumi, i legumi secchi o le composte, la
zucca, le zucchine, le carote, le patate...
Gli alimenti contenuti nel cestello vapore non devono
superare il livello MAX 2 della pentola.
Page 95

95
IT
PRIMA E
DURANTE LA
COTTURA
Non lasciare i bambini nelle vicinanze della pentola a pressione
quando quest'ultima è in funzione.
La pentola cuoce a pressione. Un utilizzo inadeguato può
causare ustioni da acqua bollente. Prima di ogni utilizzo,
assicurarsi che la pentola a pressione sia adeguatamente
chiusa. (Consultare il paragrafo “Chiusura”.)
Durante la cottura, accertarsi che il sibilo emesso dalla valvola
sia continuo. Se non esce vapore sufficiente, procedere alla
decompressione del prodotto e verificare che il livello del
liquido sia sufficiente e che il condotto di scarico del vapore
non sia ostruito. Se dopo queste operazioni, il vapore continua
a non uscire, aumentare leggermente la fonte di calore.
Prestare particolare attenzione quando si cuociono alimenti
che rischiano di ostruire i condotti degli elementi di sicurezza:
- mirtilli
- orzo perlato
- fiocchi d'avena
- piselli spezzati
- tagliatelle, maccheroni, spaghetti
- rabarbaro
- ribes
L’uso della pentola a pressione con ricette a base di latte
animale è consigliato solo quando si prevede l’impiego dello
scodello: prestare comunque attenzione perché potrebbe
uscire schiuma dalla valvola.
Se la pentola a pressione è con cestello in acciaio, non utilizzare
sale grosso, ma aggiungere sale fino a fine cottura. Si eviterà
così la formazione di puntini che potrebbero alterare il fondo
della pentola stessa.
Non utilizzare la pentola a pressione per friggere a pressione
con l’olio.
Utilizzare la pentola a pressione unicamente allo scopo per cui
è destinata.
Non collocare la pentola a pressione in un forno caldo.
Non coprire mai con un foglio di carta di alluminio uno stampo
nella pentola a pressione.
Non inserire mai della pellicola in plastica nella pentola a
pressione.
I vapori d'alcol sono infiammabili. Portare a ebollizione per 2
minuti circa prima di mettere il coperchio. Tenere sotto
controllo l'apparecchio quando si cucinano ricette a base di
alcol.
Utilizzare fonti di calore compatibili, conformemente alle
istruzioni per l'uso.
Page 96

96
DOPO LA
COTTURA...
Ruotare progressivamente la valvola di funzionamento (A)
scegliendo in base alle proprie esigenze la velocità di
decompressione, fino a fermarsi in corrispondenza del
riferimento del simbolo
- fig 10. Se, durante la fuoriuscita
del vapore, si notano delle proiezioni anomale, rimettere la
valvola di funzionamento (A) in posizione di cottura nella
modalità "Pentola a pressione", quindi effettuare una
decompressione rapida sotto l'acqua fredda
- fig 14.
Se l’indicatore di sicurezza (D) non scende, mettere la
pentola a pressione sotto l'acqua fredda del rubinetto
- fig
14
.
Non intervenire mai su questo indicatore di sicurezza.
Dopo aver cotto carni con pelle superficiale (ad es. lingua
di bue ...) che rischia di gonfiarsi per effetto della pressione,
per non scottarsi evitare di pungere la carne fintantoché la
pelle è gonfia. Prima della cottura, bucare la carne.
Per gli alimenti che aumentano di volume o producono
schiuma durante la cottura, come il riso, i legumi, i legumi
secchi o le composte, la zucca, le zucchine e le carote far
raffreddare la pentola a pressione per qualche minuto,
quindi raffreddarla sotto l'acqua fredda. Scuotere
ripetutamente e leggermente la pentola a pressione prima
di aprirla, al fine di evitare che fuoriescano schizzi di vapore
rischiando bruciature. Questa operazione è particolarmente
importante in caso di fuoriuscita rapida del vapore o dopo
il raffreddamento sotto l'acqua corrente.
Adoperare la massima cautela durante lo spostamento
della pentola quando è in pressione. Non toccare le superfici
calde. Utilizzare i manici e le manopole. Indossare i guanti
se necessario.
Per le zuppe, si consiglia di effettuare una decompressione
rapida sotto l'acqua fredda (consultare il paragrafo "Fine
cottura in modalità 'Pentola a pressione").
Prima di aprire la pentola a pressione assicurarsi che la
valvola sia in posizione di decompressione. L’indicatore di
sicurezza (D) deve essere in basso.
Non forzare mai l’apertura della pentola a pressione.
Assicurarsi che la pressione interna si sia ridotta.
L’indicatore di sicurezza (D) deve essere in basso.
(Consultare il paragrafo "Dispositivi di sicurezza".)
Page 97

97
IT
CONSERVARE QUESTE ISTRUZIONI
* a seconda del modello
MANUTENZIONE
Se si nota che una parte della pentola a pressione è rotta
o presenta fessure, non tentare in alcun modo di aprirla se
è chiusa, attendere che si raffreddi completamente prima
di spostarla, non utilizzarla più e rivolgersi per la
riparazione a un centro assistenza autorizzato TEFAL.
Limitare gli interventi sui sistemi di sicurezza alle azioni di
pulizia e manutenzione.
Utilizzare esclusivamente pezzi di ricambio originali TEFAL
corrispondenti al modello. Specificamente, utilizzare una
pentola e un coperchio TEFAL.
Non utilizzare la pentola a pressione per conservare
alimenti acidi o salati prima o dopo la cottura, altrimenti
si rischia di degradare la pentola.
Lavare e sciacquare la pentola a pressione subito dopo
ogni utilizzo.
Non lavare mai in lavastoviglie la valvola di
funzionamento (A), la guarnizione (I), il timer* (F).
Non lavare mai il timer* (F) sotto l'acqua.
Non usare mai candeggina né prodotti clorati per non
alterare le qualità dell'acciaio inossidabile.
Non immergere il coperchio in acqua.
Cambiare la guarnizione ogni anno o subito in caso di
taglio.
Far verificare la pentola presso un centro assistenza
autorizzato TEFAL ogni 10 anni di utilizzo.
Per riporre la pentola a pressione: Collocare il coperchio
capovolto sulla pentola per evita l'usura prematura della
guarnizione del coperchio.
Page 98

98
* a seconda del modello
Componenti (consultare schema descrittivo)
Controlli indispensabili prima di ogni
utilizzo
Controllo della valvola di funzionamento
Verificare che il foro di scarico della valvola di funzionamento non sia ostruito.
Controllo della valvola di sicurezza
Verificare che la biglia della valvola di sicurezza sia mobile (utilizzare un cotton
fioc senza cotone).
A. Valvola di funzionamento
B. Condotto di scarico del vapore
C. Indicazione di posizionamento
della valvola
D. Indicatore di sicurezza
(consultare il paragrafo
"Dispositivi di sicurezza")
E. Valvola di sicurezza
F. Timer*
G. Manico del coperchio
H. Coperchio
I. Guarnizione
J. Cestello vapore*
K. Treppiede*
L. Manici della pentola
M. Livelli di riempimento massimo
N. Pentola
Timer: in dotazione soltanto con il modello ClipsoMinut'®Perfect.
Disponibile come accessorio in vendita per gli altri modelli ClipsoMinut'®.
Page 99

99
IT
Cottura in modalità Cottura in modalità Decompressione
pentola a pressione casseruola tradizionale*
Apertura
Alzare il manico del coperchio dalla posizione orizzontale alla posizione
verticale
- fig. 2 Il coperchio ruota.
Sollevare il coperchio.
In caso di difficoltà per aprire il prodotto al prossimo utilizzo, passare la
guarnizione sotto l'acqua e rimetterla nel coperchio senza asciugarla
- fig.
19 e 15
facendo attenzione a posizionarla sotto le tacche del coperchio.
Chiusura
Assicurarsi che il manico del coperchio sia in posizione verticale.
Appoggiare il coperchio sulla pentola come indicato nella
- fig. 1
allineando la parte in plastica con i manici della pentola.
P
iegare verso il basso il manico del coperchio dalla posizione verticale alla
posizione orizzontale
- fig. 3
Il coperchio ruota.
Il coper
chio non si chiude:
Verificare il corretto montaggio della guarnizione e il posizionamento
corretto del coperchio.
In caso di difficoltà per chiudere il prodotto: passare la guarnizione sotto
l'acqua e rimetterla nel coperchio senza asciugarla
- fig. 19 e 15 facendo
att
enzione a posizionarla sotto le tacche del coperchio.
Primo utilizzo
Per i modelli con rivestimento antiaderente: lavare e ungere leggermente
passando su tutta la superficie del rivestimento interno un po' di olio da cucina.
Posizionare il treppiede* (K) sul fondo della pentola.
Riempire d'acqua la pentola (N) per 2/3 (MAX 2) - fig. 5.
Posizionare il cestello* (J) sul treppiede* (K).
Chiudere la pentola a pressione.
Allineare il simbolo della valvola di funzionamento (A) con l'indicatore
di posizione della valvola (C)
- fig. 9.
Posizionare la pentola a pressione su una fonte di calore regolata alla
massima potenza.
Utilizzo
*a seconda del modello
Page 100

100
Quando il vapore inizia a fuoriuscire dalla valvola, ridurre la fonte di calore e
lasciar trascorrere 20 minuti.
Trascorsi i 20 minuti, spegnere la fonte di calore.
Allineare il simbolo della valvola di funzionamento (A) con l'indicatore di
posizione della valvola (C).
Quando l’indicatore di sicurezza (D) si abbassa, la pentola a pressione non è
più in pressione.
Aprire la pentola a pressione
- fig. 2
Pulire con del detersivo per stoviglie.
Riempimento minimo e massimo
Minimo 25 cl - fig 4.
Massimo 2/3 dell'altezza della pentola, tacca MAX 2
- fig 5.
Non utilizzare sale grosso nella pentola a pressione per evitare schizzi, ma
aggiungere sale fino a fine cottura.
Per alcuni alimenti:
Per gli alimenti che aumentano di volume e/o
producono schiuma durante la cottura, come il riso, i
legumi, i legumi secchi o le composte, la zucca, le
zucchine, le carote, le patate non riempire la pentola a
pressione oltre 1/3 (MAX 1) della sua capacità. Far
raffreddare la pentola a pressione per qualche minuto,
quindi raffreddarla sotto l'acqua fredda. Scuotere
ripetutamente e leggermente la pentola a pressione
prima di aprirla, al fine di evitare che fuoriescano schizzi di vapore rischiando
bruciature. Questa operazione è particolarmente importante in caso di
fuoriuscita rapida del vapore o dopo il raffreddamento sotto l'acqua corrente.
Per le zuppe, si consiglia di effettuare una decompressione rapida sotto
l'acqua fredda (consultare il paragrafo "Fine cottura in modalità 'Pentola a
pressione'").
Utilizzo del cestello vapore*
Versare 75 cl di acqua sul fondo della pentola (N).
Posizionare il treppiede* (K) sul fondo della pentola.
Posizionare il cestello* (J) sul treppiede* (K)
- fig. 6.
Durante la cottura a vapore, gli alimenti presenti nel
cestello vapore* non devono essere a contatto con
l'acqua
- fig. 6 e 7.
Gli alimenti contenuti nel cestello vapore non
devono superare il livello MAX 2.
*a seconda del modello
MAX
MAX1
1/3
 Loading...