

Page 1

www.tefal.com
December 2011 - Réf. : 4136751 - réalisation : Espace Graphique
EN p. 1 - 21
FR p. 22 - 43
TR p. 44 - 67
EL p. 68 - 89
AR p.111 - 90
FA p. 133 - 112
CLIPSO®Modulo 2
www.tefal.com
EN
FR
TR
EL
AR
FA
A
B
M
J
G
C
L*
E
H
K
N*
O*
I
F
D
*depending on model - *selon modèle
*Modele göre değişir - *ανάλογα με το μοντέλοr
*•ºV «∞Luœ¥q -
* °d ©∂o ±b‰
User's Guide
Guide de l'utilisateur
Kullanma Kılavuzu
Οδηγίες χρήσης
b≠∑d Çë ¸«≥øMLU
b∞¥‰ «ùߢFLU‰
EXE_IFU_TE_MODULO-2_4136751_mise en page 06/12/11 17:29 PageC1
e
F
l
a
c
r
c
e
e
v
c
u
ô
o
t
c
é
Page 2
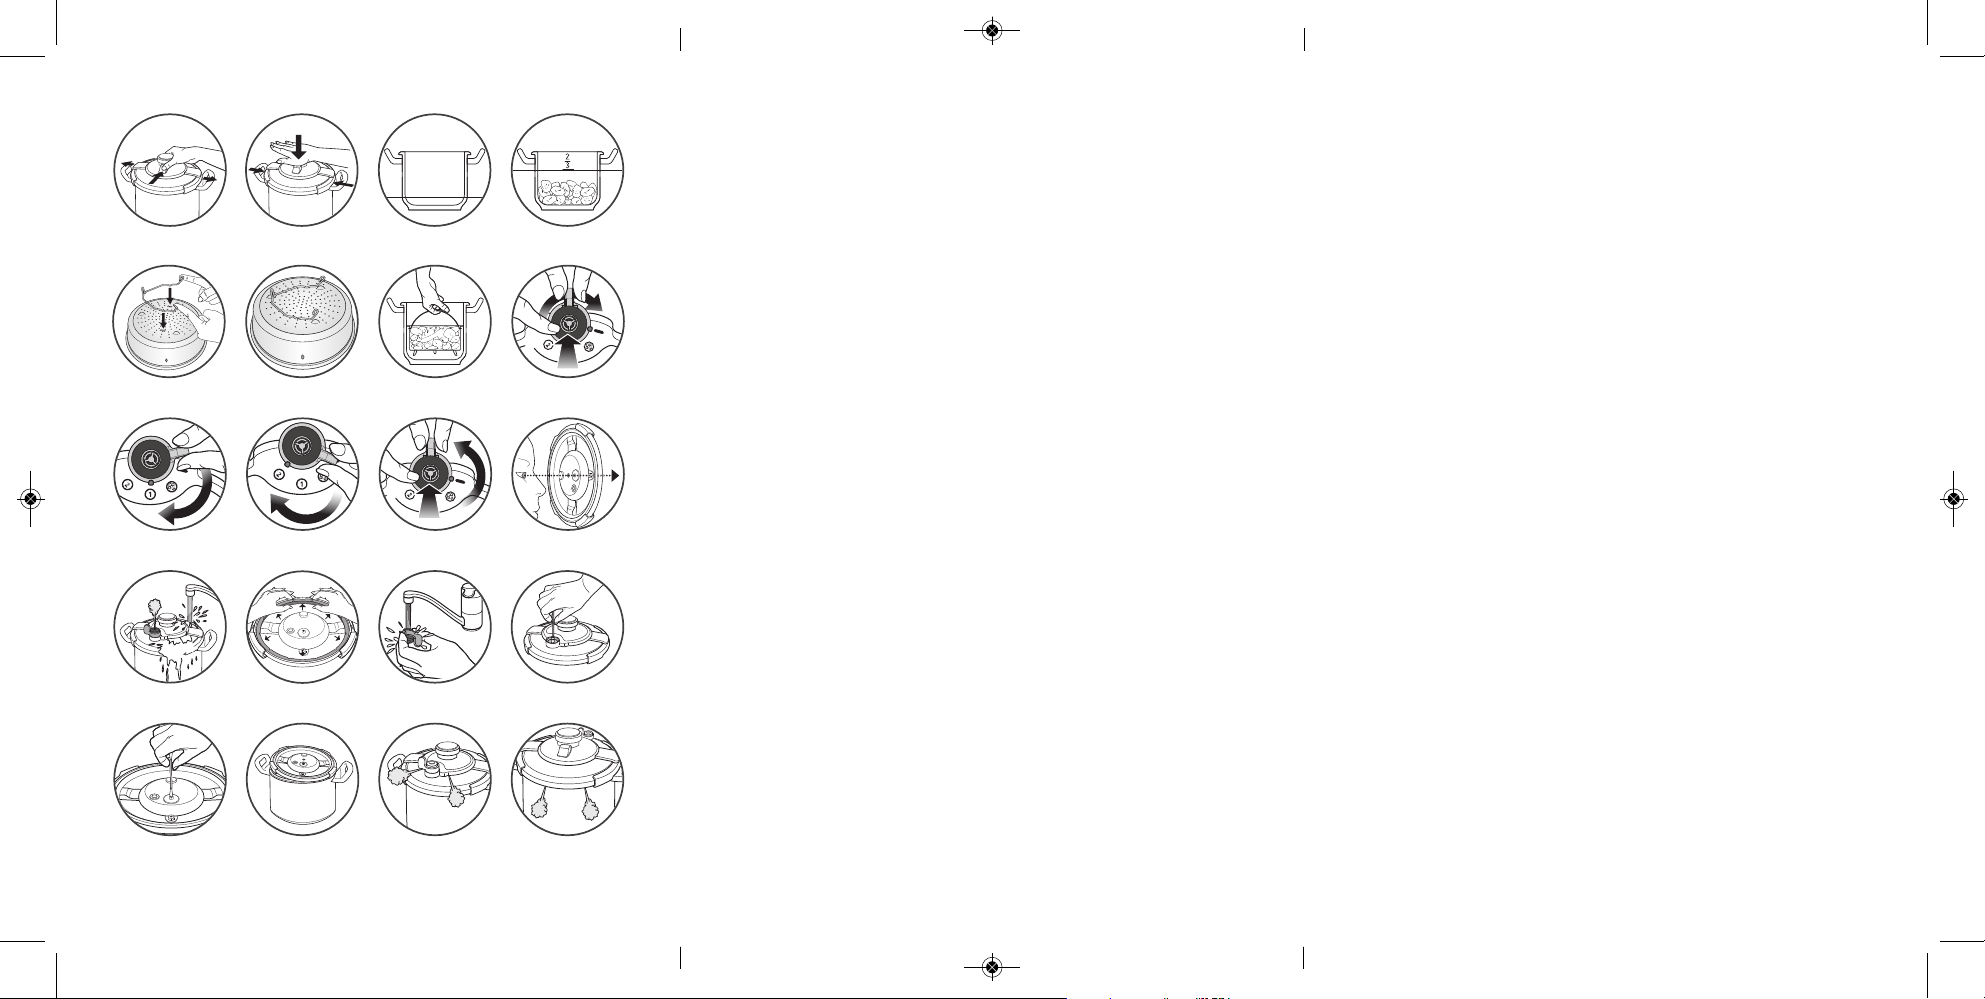
fig. 1 fig. 2 fig. 3 fig. 4
fig. 5 fig. 6 fig. 8
fig. 9
fig. 14
fig. 15 fig. 16
fig. 17 fig. 18 fig. 19 fig. 20
fig. 7
fig. 11fig. 10 fig. 12
fig. 13
mini
Important safety information
For your safety, this appliance complies with applicable standards and regulations:
- Pressure vessel directive
- Materials in contact with food
- Environnement
• This product has been designed for domestic use only. Any commercial use, inappropriate
use or failure to comply with the instructions, the manufacturer accepts no responsibility
and the guarantee will not apply.
• Take time to read all of the instructions and always refer back to the “User's Guide”.
• This appliance is not intended for use by persons (including children) with reduced
physical, sensory or mental capabilities, or lack of experience and knowledge, unless they
have been given supervision or instruction concerning use of the appliance by a person
responsible for their safety.Children should be supervised to ensure that they do not play
with the appliance.
• Never place your pressure cooker in a hot oven.
• Always be very careful when moving your pressure cooker under pressure. Never touch hot
surfaces. Use the handles and knobs. Use gloves where necessary.
• Never use your pressure cooker for any purpose other than the one it was designed for.
• Your pressure cooker cooks under pressure. Scalding injuries may result from unsuitable
use. Always make sure that the pressure cooker is properly closed before starting to use
it. Refer to the “Closing” heading.
• Always make sure that the operating valve is in the open (pressure released) position
before attempting to open your pressure cooker.
• Never force your pressure cooker open. Always make sure that the pressure inside it has
dropped. Refer to the “Safety” heading.
• Never use your pressure cooker without any liquid in it for this will seriously damage it.
Always make sure that there is enough liquid in it during cooking.
• Use heat source(s) that are compatible with your pressure cooker, in line with the
instructions for use.
• Never make a recipe with milk in CLIP SO
®
MODULO 2.
• Do not use rock salt in your pressure cooker, but rather add table salt when the cooking
is nearly finished.
• Never fill your pressure cooker more than two-thirds full (the maximum mark).
• For food that expands during cooking, like rice or dried vegetables or stewed fruit, ... never
fill your pressure cooker more than half full. For certain soups like pumpkin or courgette
…give your pressure cooker a few minutes to cool down, then cool it down fully by placing
it under cold running water.
• For meat with an outer layer of skin (e.g. ox tongue..), which could swell due to the effects
of pressure, pierce the meat before cooking. At the end of cooking, if the skin looks swollen,
wait before taking it out the cooker and never stab the meat as hot juices and steam
may scald you.
• When cooking food with a thick texture (e.g. split peas, rhubard, stewed fruit, etc) the
pressure cooker should be shaken slightly before opening to ensure that the food does not
spurt out.
• Always make sure that the operating and safety valves are not blocked before use. Refer
to the “Before cooking” heading.
• Never use your pressure cooker to deep fry using oil under pressure.
• Never take any action on the safety systems other than that which is described in the
instructions for cleaning and maintenance.
• Only use TEFAL genuine spares designed for your model of appliance. This especially
means only using a model cooker body and lid CLIPSO
®
MODULO 2.
• Alcohol vapour is inflammable. Bring alcohol to the boil two minutes before putting the
lid on. Watch over your appliance when making alcohol based recipes.
• Never place your pressure cooker on a heat source with the handles folded*.
Keep these instructions
* depending on model
EXE_IFU_TE_MODULO-2_4136751_mise en page 06/12/11 17:29 PageC4
Page 3
EN
1
A. Operating valve
B. Closing button
C. Steam release conduit
D. Position valve indicator
E. Opening/Closing knob
F. Safety valve
G. Pressure presence indicator
H. Seal
I. Steam basket
J. Tripod
K. Pressure cooker body
L. Pressure cooker body handle*
M. Maximum filling mark
N.Handle unlocking button*
O. Folding pan handles*
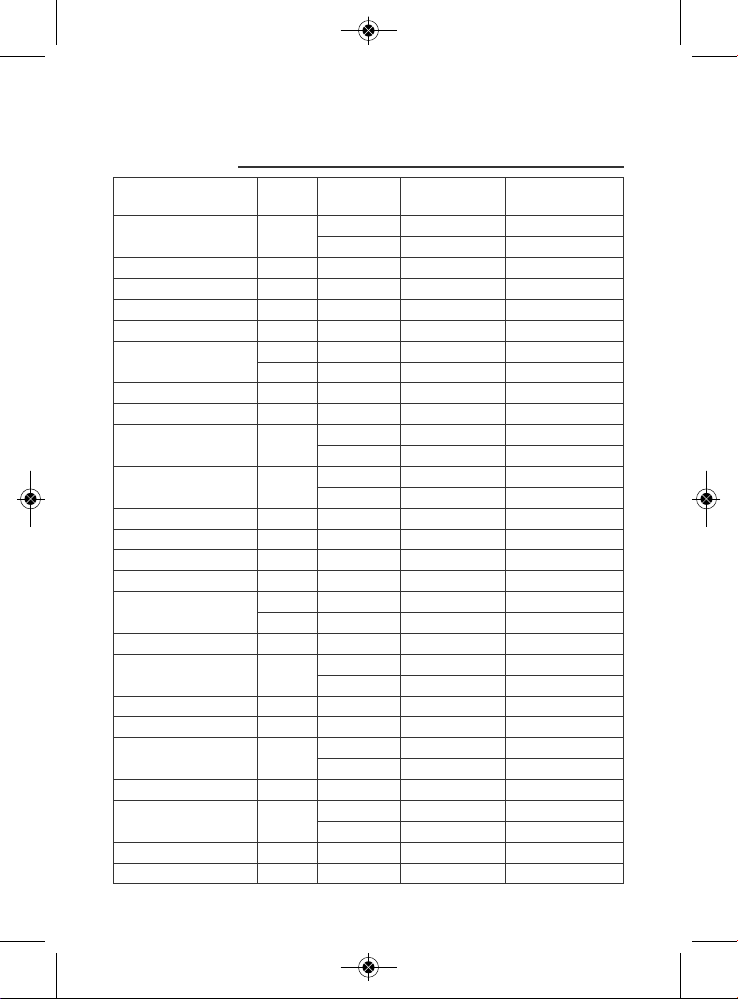
Characteristics
Pressure cooker base diameter – references
Standards information
Upper operating pressure limit: 80 kPa
Maximum safety pressure limit: 120 kPa
Compatible heat sources
•The CLIPSO
®
MODULO 2 pressure cooker can
be used on all heat sources, except on Aga
cookers.
•When using an electric hob or induction, make
sure that the size of the hot plate does not
exceed the size of the pressure cooker base.
Capacity
To ta l
Capacity*
Cooker
diameter
Base
diameter
CLIPSO
®
MODULO 2
Material body
and lid
4,5 L 5,3 L* 22 cm 18 cm
P42706
Stainless steel
6 L 6,8 L* 22 cm 18 cm
P42807
8 L 9,4 L* 25 cm 20 cm
P42814
10 L 11,4 L* 25 cm 20 cm
P42815
Never heat your
pressure cooker
when it is empty or
you may damage it.
Description diagram
* depending on model
* : Product capacity with the lid in position.
EXE_IFU_TE_MODULO-2_4136751_mise en page 06/12/11 17:30 Page1
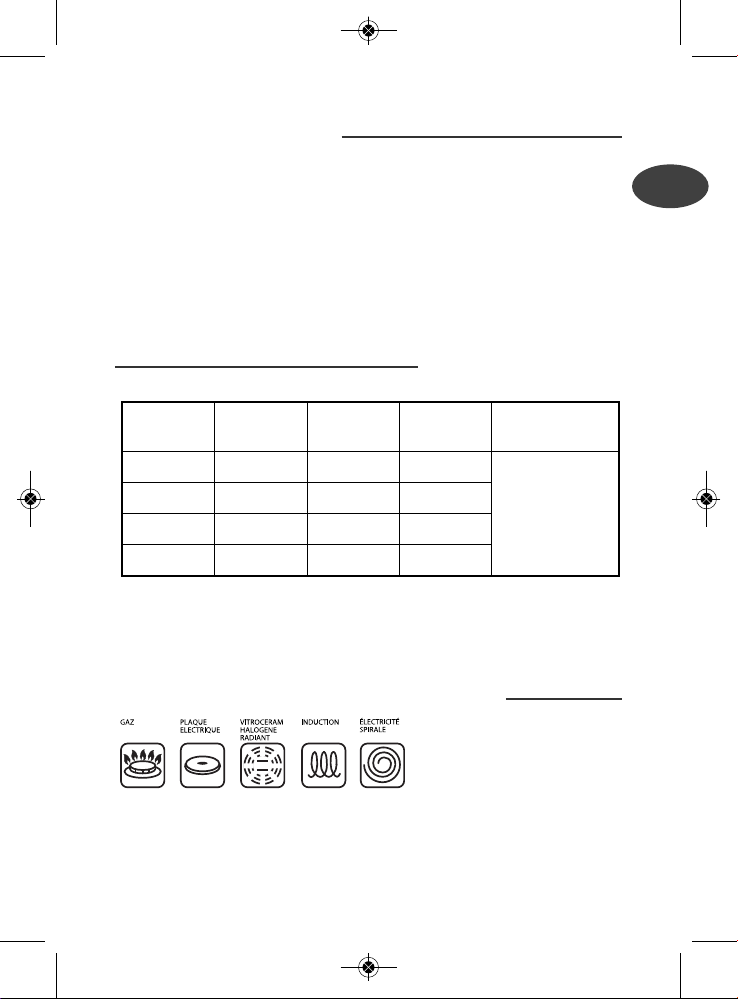
GAS SOLID
HOTPLATE
CERAMIC
or
HALOGEN
ELECTRIC
INDUCTION
HOTPLATE
Page 4
2
•
On a ceramic or halogen hob, always make sure
that the pressure cooker base is clean and dry.
•On a gas hob, the flame should not lick past
the diameter of the pressure cooker base.
•On all burners, make sure that the pressure
cooker is properly centred.
TEFAL accessories
• The following CLIPSO
®
MODULO 2
accessories are available from shops:
•To replace other parts or have repairs
performed, please call on your local TEFAL
Approved Service Centre.
•Only use TEFAL genuine parts designed for
your product model.
Use
Opening
•Press the open button (E) on the lid - fig 1
Closing
•Press the close button (B) on the lid - fig 2
Accessories Reference
Seal
4,5/6L
X1010004
8/10L
X1010003
Steam basket
4,5/6L
792185
8/10L
980513
Tripod
X1030007
The jaws must be in
contact with the
edge of the lid.
EXE_IFU_TE_MODULO-2_4136751_mise en page 06/12/11 17:30 Page2
Page 5

EN
3
Minimum and maximum
filling
•At least 250 ml (2 glasses) - fig 3
•Maximum two-thirds of the pressure cooker height
(M) - fig 4
For some food
•For food that expands during cooking, like rice or
dried vegetables or compotes...never fill your
pressure cooker more than half full. In the case of
soups we recommend you do a fast decompression.
Using the steaming
basket
•Poor 750 ml of water into the pressure cooker.
•Clip the tripod (J) under the steam basket (I)
- fig 5 and 6
•Please the steam basket and its tripod into the
bottom of the pressure cooker - fig 7
Using the operating valve
To fit the operating valve
•Position the operating valve by aligning the
position indicator (D) with the mark on the
lid - Fig. 8.
•Push the operating valve home so that it fits onto
the steam release shaft.
•Press down on the centre of the operating valve
(A) and turn to the desired position - Fig. 8.
To cook delicate foods and vegetables
•Set the position indicator (D) on the operating
valve (A) to 1- Fig. 9.
To cook meat, fish and deep frozen food
•Set the position indicator (D) on the operating
valve to 2 - Fig. 10.
Food placed in the
steam basket must
not touch the
pressure cooker lid.
EXE_IFU_TE_MODULO-2_4136751_mise en page 06/12/11 17:30 Page3
Page 6

4
To remove the operating valve
•Press down the centre of the operating valve
(A) and align the position indicator (D) with
the mark on the lid - Fig. 11.
•Remove the valve.
Folding handles*
Before use, remove the labels on each handle.
Do not attempt to fold the handles without
depressing the unlocking buttons
First use
•Clip the tripod (J) under the steam basket (I)
- figs 5 and 6
•Place the steam basket (I) in the bottom of
the pressure cooker - fig 7
•Fill the pressure cooker with water, up to the
2/3rds mark (M).
•Close the pressure cooker.
•Fit the operating valve (A) and set it to
position 2.
•Place your pressure cooker on a heat source
set to maximum power.
•When steam starts to escape from the valve,
reduce the heat and time off 20 minutes.
•Once the 20 minutes are up, turn off the heat.
To fold the handles:
To put the
handles in
the use position:
"CLICK"
Never place
your pressure cooker
on a heat source
with the handles
folded.
* depending on model
EXE_IFU_TE_MODULO-2_4136751_mise en page 06/12/11 17:30 Page4
Page 7
EN
5
•
Turn the operating valve to the position.
•Once the pressure indicator (G) drops down,
your pressure cooker is no longer under pressure.
•Open the pressure cooker - fig 1
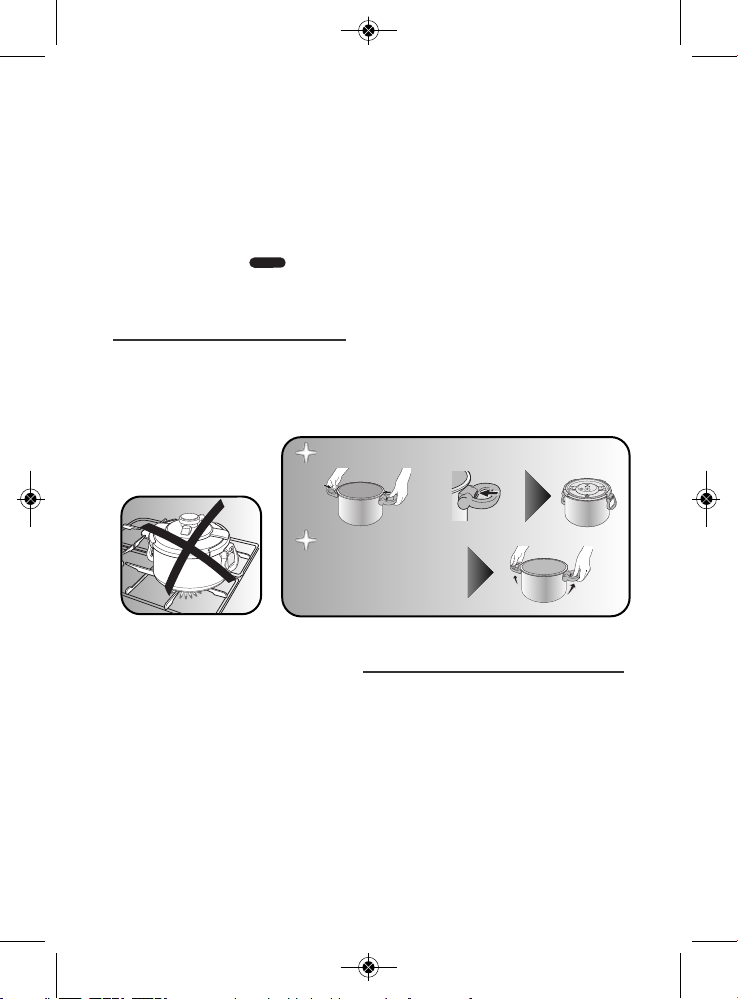
Before cooking
•Before using your pressure cooker, always
visually make sure that the steam release
conduit (C) is clear - fig 12
•Also make sure that the safety valve moves
freely: refer to the “Cleaning and
Maintenance” heading.
•Close your pressure cooker - fig 2
•Fit the valve (A) - fig 8
•Press it all the way down and turn it to the
desired position - fig 9
•Always make sure that the pressure cooker is
properly closed before using it.
•Place your pressure cooker on a heat source
set to maximum power.
During cooking
•Once the operating valve starts to
continuously release steam and a regular
hissing sound can be heard, reduce the heat
level.
•Set a timer for the cooking time stated in your
recipe.
•During cooking, make sure that regular hissing
noises are heard from the valve. If there is not
enough steam released, slightly increase the
heat level, or on the contrary, reduce it a little.
EXE_IFU_TE_MODULO-2_4136751_mise en page 06/12/11 17:30 Page5
Page 8

6
Finishing cooking
To release the steam
•Once the heat is turned off, you have two
options:
•Slow pressure release: turn the operating
valve (A) to the position. Once the pressure
indicator (G) drops down, your pressure cooker
is no longer under pressure.
•Fast pressure release: place your pressure
cooker under a cold water tap - fig 13. Once
the pressure indicator (G) drops down, your
pressure cooker is no longer under pressure.
Turn the operating valve (A) to the
position.
•Now you can open your pressure cooker
- fig 1
Cleaning and maintenance
Cleaning the pressure
cooker
•For best appliance operation, be sure to
follow these cleaning and maintenance
recommendations every time the pressure
cooker is used.
•Always wash the pressure cooker after use
with warm water with a little washing up
liquid added. Do the same for the basket.
•Never use bleach or chlorine products.
•Never overheat the pressure cooker body
when it is empty.
If the pressure indicator
(G) does not drop back,
place your pressure
cooker under a cold
water tap - fig 13
Never tamper with the
pressure indicator.
If you experience any
abnormal discharges
when releasing steam
pressure: return the
pressure control valve
(A) to cooking position
1 or2 and then release
fast.
Browning and
scratching that may
appear following
long periods of use
are normal and will
not affect the
performance of the
pressure cooker.
EXE_IFU_TE_MODULO-2_4136751_mise en page 06/12/11 17:30 Page6
Page 9

EN
7
To clean the inside of the pressure cooker
•Clean it with a scouring pad and washing
up liquid.
•If the inside of the stainless steel cooker
shows iridescent streaks, clean it with
vinegar.
To clean the outside of the pressure cooker
•Clean it with a sponge and washing up
liquid.
To clean the lid
•Wash the lid under a little stream of warm
water using a sponge and washing up
liquid.
To clean the lid seal
•After using the pressure cooker, always
clean the seal (H) and its groove.
•To refit the seal, refer to - fig 14 and
ensure that the words "face côté
couvercle" (Cover side) are placed against
the lid.
To clean the operating valve (A)
•Remove the operating valve (A) - fig 11
•Clean the operating valve (A) under running tap
water - fig 15
•Check that it moves: see drawing opposite
To clean the operating valve conduit located in
the lid
•Remove the valve (A) - fig 11
•Visually make sure that the steam release
conduit is round and clear - fig 12. If necessary,
clean it with a Q-tip - fig 16 and rinse it.
You can wash the
pressure cooker
body and the
basket in a
dishwasher.
After removing the
operating valve (A)
and the seal (H),
you can wash the
lid in a dishwasher.
Never remove the
nut and bolt
located inside the
lid.
EXE_IFU_TE_MODULO-2_4136751_mise en page 06/12/11 17:30 Page7
Page 10

8
To clean the safety valve (F)
•Clean the part of the safety valve located
inside the lid by placing it under running
water.
•Check that it works properly by lightly pressing
on the plunger that should move without
difficulty - fig 17
To replace your pressure cooker seal
•Replace your pressure cooker seal every year.
•Replace your pressure cooker seal if it shows
any signs of splitting or damage.
•Always use a TEFAL genuine seal that
matches your model of pressure cooker.
To store your pressure cooker
•Turn the lid over and place it on the pressure
cooker body.
If your pressure cooker has folding handles* :
• Depress the handle unlocking buttons (N). See
the paragraph "Folding handles".
• Do not attempt to fold the handles* without
depressing the unlocking buttons.
Safety
Your pressure cooker is provided with a number
of safety mechanisms:
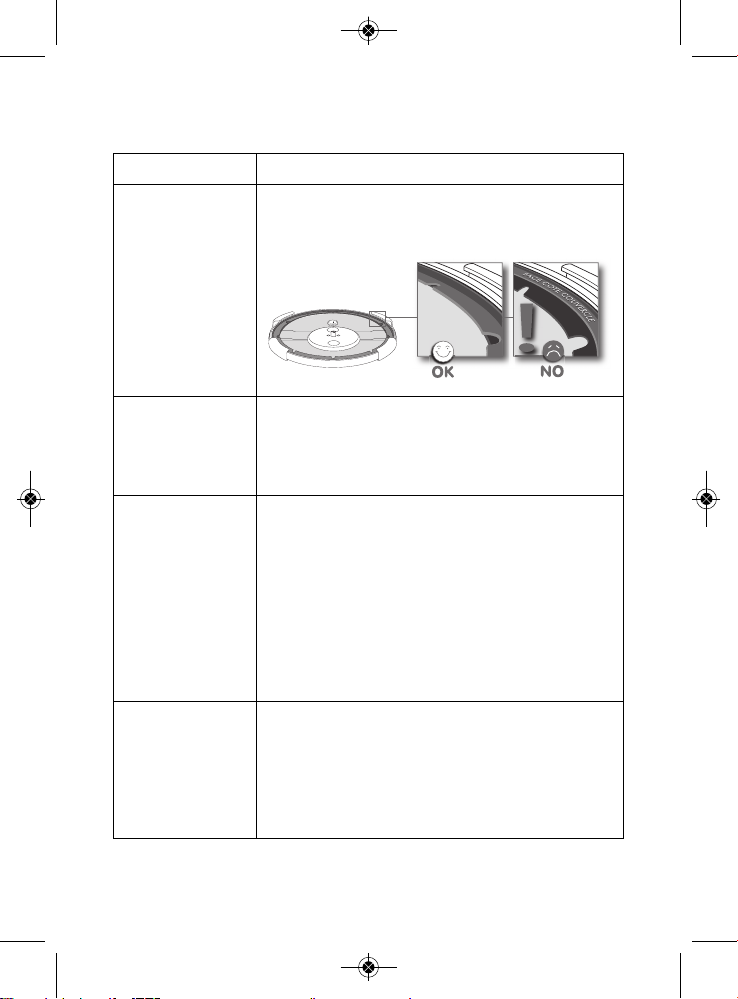
•Closure safety:
- The jaws should be in contact with the lid
edge. If this is not the case, then steam will
escape from the pressure indicator and the
pressure cooker will never come up to
pressure.
•Opening safety:
- While the pressure cooker is under pressure,
the opening knob cannot be actuated.
- Never force the pressure cooker open.
- Never tamper with the pressure indicator.
- Always make sure that the pressure inside
the pressure cooker has been released.
For a longer
pressure cooker life:
do not overheat
your pressure
cooker pan when it
is empty.
Always have your
pressure cooker
checked by a TEFAL
Approved Service
Centre after ten
years of use.
Never use a cutting
or pointed object to
do this, you can use
a cotton bud.
EXE_IFU_TE_MODULO-2_4136751_mise en page 06/12/11 17:30 Page8
Page 11

EN
9
•
Two excess pressure safety features:
- First feature: the safety valve (F) releases
pressure - fig 19
- Second feature: the seal lets steam escape
between the base and the lid - fig 20
If one of the two excess pressure safety
systems is triggered:
•Turn off the heat.
•Allow the pressure cooker to cool down
completely.
•Open it up.
•Check and clean the operating valve (A), the
steam release conduit (C), the safety valve (F)
and the seal (H).
•If after these checks and after cleaning, your
appliance leaks or no longer operates, return it
to a TEFAL Approved Service Center.
Recommendations for use
1 - The steam is very hot when it leaves the
operating valve.
2 - As soon as the pressure indicator rises, you can
no longer open your pressure cooker.
3 - Just as for any other cooking appliance, always
pay close attention to it, especially during use
in the presence of children.
4 - Beware of the steam jet.
5 - To move the pressure cooker, always use both
of the handles.
6 - Never leave food in your pressure cooker.
7 - Never use bleach or chlorine products for they
could affect the quality of the stainless steel.
8 - Never leave the lid to soak in water.
9 - Replace the seal every year.
10 - A pressure cooker may only be cleaned when
cold and when empty.
11 - Always have your pressure cooker checked by
a TEFAL Approved Service Centre after ten
years of use.
EXE_IFU_TE_MODULO-2_4136751_mise en page 06/12/11 17:30 Page9
Page 12

10
Guarantee
•Your new TEFAL pressure cooker comes with a
ten-year guarantee for use under the
conditions set out in these instructions. This
guarantee covers:
- Any defects relating to the metal structure
of the pressure cookebody,
- Any premature deterioration of the metal
base.
•For other parts, a one year parts and labour
guarantee is provided (except where
applicable law in your own country states
otherwise). This guarantee covers any defects
or manufacturing faults.
•The contractual guarantee cover is provided
only on presentation of a valid proof of
purchase which shows the date of purchase.
•The guarantee cover excludes:
•The normal life of the seal, pressure control
valve or locking indicator seal is limited. These
parts are excluded from the guarantee and will
require periodic renewal.
•Any damage consecutive to a failure to follow
the major recommendations made or due to
negligent use, especially:
- Dropping, falls, bangs or knocks, placing in
an oven…
•Only TEFAL Approved Service Centres are
authorised to provide service under guarantee.
•Please call the Helpline number below for the
address of your nearest TEFAL Approved
Service Center.
EXE_IFU_TE_MODULO-2_4136751_mise en page 06/12/11 17:30 Page10
Page 13
EN
11
Regulation markings
Marking Location
Manufacturer's identification or trademark
Closing knob
Year of and batch of manufacture
Model reference
Max. operating pressure
Max. safety pressure
On the top of the lid, when it
is in the "Open" position
Capacity
On the outside of the pressure cooker body
EXE_IFU_TE_MODULO-2_4136751_mise en page 06/12/11 17:30 Page11
Page 14
12
TEFAL answers your questions
Problems
Recommendations
If you cannot close
the lid:
Check that the Open knob (E) is pressed down.
Check the way the seal is fitted, see the "Cleaning and
Maintenance" heading.
If the pressure
cooker has heated
up under pressure
with no liquid
inside:
Have your pressure cooker inspected by a TEFAL Approved Service Centre.
If the pressure
indicator did not
rise and nothing
escapes from the
valve during
cooking:
This is normal for the first few minutes.
If the problem persists, check that:
- The heat source is high enough, if not, increase it.
- The amount of liquid in the pressure cooker is sufficient.
- The operating valve is in position 1or 2.
- Your pressure cooker is properly closed.
- The seal and the pressure cooker edge have not been
damaged.
- The seal is properly fitted, see the "Cleaning and Maintenance" heading.
If the pressure
indicator has risen
but still nothing
escapes from the
valve during
cooking:
This is normal for the first few minutes.
If the phenomena persists, place your appliance under
a stream of cold water until the pressure presence indicator drops down.
Clean the operating valve - fig 15 and the steam release conduit - fig 16 and check that the safety valve
flap moves without difficulty - fig 17.
EXE_IFU_TE_MODULO-2_4136751_mise en page 06/12/11 17:30 Page12
Page 15

EN
13
Problems
Recommendations
If steam escapes from
around the lid, check:
That the lid is properly closed.
The position of the lid seal.
That the seal is in good condition, and if necessary,
replace it.
That the lid, the seal, its housing in the lid are clean.
That the edge of the pressure cooker body is in
good condition.
If you see steam escaping from around the
lid accompanied by an
ear-piercing noise :
Check that the seal is not caught between the pot
and the lid.
If you cannot open the
lid:
Check that the selector is set to .
Check that the pressure indicator is down.
If not: release pressure, if necessary by cooling the
pressure cooker under cold running water.
Never tamper with this pressure indicator.
If food is not cooked or
has burnt, check:
The cooking time.
The heat level.
That the cooking program selector was in the right
position.
The amount of liquid.
If food has burnt in
the pressure cooker:
Leave the pressure cooker to soak for a while before
washing.
Never use bleach or chlorine products.
If one of the safety
systems is triggered:
Turn off the heat.
Leave the pressure cooker to cool down without moving it.
Wait for the pressure indicator to drop down and
open the pressure cooker.
Check and clean the operating valve, the steam release conduit, the safety valve and the seal.
If the fault persists, have your appliance inspected
by a TEFAL Approved Service Center.
If you are unable to put
the folding handles* in
the use position:
Check that:
The unlocking button* can be moved.
If the problem persists, have your pressure cooker
checked by an TEFAL Approved Service Centre.
If you are unable to
fold the folding
handles*:
Do not force them.
Make sure that you are fully depressing the handle
unlocking buttons*.
* depending on model
EXE_IFU_TE_MODULO-2_4136751_mise en page 06/12/11 17:30 Page13
Page 16
14
Ten tasty recipes
to prepare with your pressure cooker
All the recipes are intended for 4 people.
For pressure cookers with a capacity of less than 6 liters,
reduce the proportions by a third.
Starter
Vegetable soup
4 potatoes 1 leek , 4 carrots, 1 turnip, 1liter of water, salt, pepper, 3 table spoons of crème
fraîche (optional).
Peel and wash the vegetables.
Cut the potatoes and the turnip into large dice. Thinly
slice the carrots and the leek.
Pour 1 litre of water into the pressure cooker, and then
add the vegetables, the salt and the pepper.
Seal the pressure cooker. As soon as the valve begins to
whistle, reduce the heat and cook for the recommended amount of time. Decompress under water.
If liked, the crème fraîche can be added before serving.
Fish
Ling fish "Papillote" with citrus fruit
4 ling fish fillets, 150 grams each, 1 grapefruit, 1 orange, the juice of one lime, 2 tomatoes,
1 onion, 2 sliced shallots, 60 grams of butter, 1 glass of dry white wine, a few estragon leaves,
salt, pep per.
Cut the tomatoes into slices. Peel the onion and slice it
very finely.
Skin the grapefruit and oranges and take out the quarters taking care to retain their juice.
Place three tomato slices in the centre of four sheets of
aluminium foil, slightly overlapping them. Cover with
some sliced onions and shallots, add a few estragon
leaves, then place the fish fillets on top. Fold up the
sides of each foil "papillote" so that it will hold one tablespoon of white wine and two tablespoons of grapefruit-orange juice without leaking. Add a few drops
of lime, salt and pepper to taste.
Serves 4
Preparation time: 15 min.
Valve position: 1
Cooking time: 10 min.
Serves 4
Preparation time: 25 min.
Valve position: 2
Cooking time: 8 min.
EXE_IFU_TE_MODULO-2_4136751_mise en page 06/12/11 17:30 Page14
Page 17

EN
15
On top of each fish fillet, place one quarter of grapefruit, two quarters of orange and 15 grams of fresh butter. Close up the foil "papillotes" before delicately
placing them in the steaming basket.
Pour 70 cl of water into the pressure cooker. Place the
steaming basket on its tripod, in the pressure cooker,
taking care to make sure that it is not in contact with
the water.
Close the pressure cooker. As soon as the valve starts to
hiss, lower the heat and leave to cook for the specified
duration. When cooked, open the pressure cooker.
Remove the steaming basket from the pressure cooker
and delicately place one ling fish foil "papillote" on
each plate. Open up the "papillotes" at the table using
scissors. An avocado salad may be served with this dish.
Mutton
Spring Navarin stew
600 grams of mutton collar and 600 grams of breast cut into chunks, a bunch of new
carrots, a bunch of spring onions, a bunch of spring leaks, 4 small new potatoes, 100 grams
of green beans, 2 peeled tomatoes, 2 cloves of garlic, 1 bouquet garni, a tablespoon of
chopped estragon, 30 grams of butter, 15 cl of white wine, 1 tablespoon of green aniseed,
1 tablespoon of olive oil, a tablespoon of flour, salt, pepper.
Peel and wash all of the vegetables. Using the pressure
cooker, sear the pieces of meat and the unpeeled garlic in the oil and butter. Salt and pepper. Sprinkle the
flour over the ingredients and mix well. Pour in the
white wine, add the aniseed, the bouquet garni of
herbs and the crushed tomatoes. Complete with water
to cover the meat. Bring to the boil.
Close the pressure cooker. As soon as the valve starts to
hiss, lower the heat and leave to cook for the first cooking duration specified. After this time, open the pressure cooker. Add the vegetables, salt and pepper them.
Close up the pressure cooker. As soon as the valve
starts to hiss, lower the heat and leave to cook for the
second cooking duration specified. After this time,
open the pressure cooker.
Remove the meat and the vegetables, letting the juice
run off, remove the bouquet garni and the garlic.
Let the cooking juices reduce over high heat until a
thick gravy is obtained. Place the meat and the vegetables in a serving dish and wet with gravy. Add the estragon and serve.
Serves 4
Preparation time: 20 min.
Valve position: 2
Cooking time: 10 min.
+ 7min.
EXE_IFU_TE_MODULO-2_4136751_mise en page 06/12/11 17:30 Page15
Page 18

16
Veal
Three-mustard roast
1 kg rack of veal, tied as a roast, 6 carrots, 3 garlic cloves, 1 onion, 1 bouquet garni,
2 tablespoons of thick crème fraîche, 40 grams of butter, 30 cl of dry white wine, 2 tablespoons of Meaux mustard, 1 tablespoon of strong French mustard and 2 tablespoons of mild
estragon-flavoured mustard, 1 tablespoon of oil, granulated sugar, salt, pepper.
Stud the roast with slivers of garlic. Using the pressure
cooker, brown the roast in the butter and oil. Salt and
pepper to taste. Remove the roast. Now brown the sliced carrots in place of the meat and add 2 tablespoons
of sugar, some salt and pepper. Place the roast back
into the pressure cooker, add the bouquet garni, the
onion and the white wine. Close the pressure cooker.
As soon as the valve starts to hiss, lower the heat and
leave to cook for the stated duration. Once cooked,
open the pressure cooker.
Remove the roast and the carrots. Bring the cooking
juices to the boil and reduce by one third. Add the
crème fraîche and leave to cook for 5 minutes at low
heat, then add the mustard without allowing it to boil.
Sieve the gravy and add a little water if necessary.
Cut the roast. Serve with gravy and carrots.
Beef
Chef's Pot Roast (Pot-au-feu du chef)
1.2 kg of beef (topside or blade roast, ox tail, a little beef rib end), 2 marrow bones, 800 grams
of large potatoes, half a lemon, one onion studded with cloves, 3 carrots, 3 leeks tied up,
3 turnips, 1 celery branch, 1/2 celeriac, 1 garlic clove, 1 bouquet garni, 4 tablespoons of Port
wine, 4 slices of toasted wholewheat bread rubbed with garlic, pickles, whole salt, salt, pepper.
Clean and peel the vegetables, cut them into pieces. Pour
2 litres of water into the pressure cooker, and add the
onion, carrots, leeks, turnips, celeriac, the garlic clove, the
celery branch and the bouquet garni of herbs. Salt and
pepper. Bring to the boil, then drop in the pieces of meat.
Cook for 10 minutes over low heat while regularly skimming off the foam that forms on the surface.
Close the pressure cooker. As soon as the valve starts to
hiss, lower the heat and leave to cook for the stated du-
Serves 4
Preparation time: 25 min.
Valve position: 2
Cooking time: 11 min.
Serves 4
Preparation time: 20 min.
Valve position: 2
Cooking time: 20 min.
+ 20 min.
EXE_IFU_TE_MODULO-2_4136751_mise en page 06/12/11 17:30 Page16
Page 19

EN
17
ration. Once cooked, open the pressure cooker. Remove
the carrots, leeks, turnips and the celeriac and set them
aside. Close the pressure cooker once again. As soon as
the valve starts to hiss, lower the heat and leave to cook
for the second stated duration. Once cooked, open the
pressure cooker.
Wash and peel the potatoes and cook them in a pan of
salted water. While the meat and potatoes are cooking,
cut up the lemon slices and place them on each end of
the marrow bones using kitchen string. Place the marrow
bones in a pan full of slightly salted and lemon flavoured water and leave to cook for 10 minutes over low heat.
Strain the meat. Serve it with a surrounding of vegetables and with whole salt and pickles. Strain the bones and
remove the marrow. Serve the marrow with the slices of
toasted bread lightly rubbed with garlic. Serve the
bouillon separately after first adding 3 or 4 tablespoons
of Port wine.
Poultry
Basque chicken
A 1.5 kg chicken cut up by the poultry butcher, one 400 gram tin of whole peeled tomatoes, one
400 gram tin of red pepper, one 400 gram tin of green pepper, 3 chopped garlic cloves, 3 sliced
onions, 1 bouquet garni, 2 glasses of white wine, 4 tablespoons of olive oil, salt and pepper
Carefully strain the peppers before slicing them. Using
the pressure cooker, heat up the olive oil with half of
the garlic over high heat, then fry the chicken pieces.
Salt and pepper. Pour in one glass of white wine to deglaze the cooking juices stuck to the bottom of the
pressure cooker, then take out the pieces.
Still using the same pressure cooker, brown the onions.
Add the sliced peppers and cook for 5 minutes over
high heat while stirring. Add the tomatoes, the bouquet garni of herbs, the garlic and the remainder of the
wine. Salt and pepper.
Leave to simmer for 3 minutes and put the chicken
pieces back in.
Close the pressure cooker. As soon as the valve starts to
hiss, lower the heat and leave to cook for the stated duration.
Remove the bouquet garni, then put a few pieces of
chicken in each plate along with the Basque-style trimmings. Serve with pilaf rice.
Serves 4
Preparation time: 20 min.
Valve position: 2
Cooking time: 11 min.
EXE_IFU_TE_MODULO-2_4136751_mise en page 06/12/11 17:30 Page17
Page 20

18
Vegetables
Ratatouille
Five courgettes cut into slices, 4 aubergines cubed, 4 large tomatoes quartered, 2 red peppers
diced, 1 green pepper in strips, 2 large chopped onions, 3 peeled garlic cloves puréed, 1 branch
of thyme, 1 laurel leaf, 1 branch of rosemary, 1 small bowl of basil, 1/2 bunch of coriander,
6 tablespoons of olive oil, salt and pepper.
Using the pressure cooker, brown the onions, diced red
pepper and green pepper strips in 3 tablespoons of
olive oil. Once they are brown, add the aubergine
cubes, the courgette slices, the tomatoes and the rest
of the oil. Finish up with the thyme, laurel, rosemary
and garlic. Season with salt and pepper. Stir well.
Close the pressure cooker. Close the pressure cooker.
As soon as the valve starts to hiss, lower the heat and
leave to cook for the stated duration. Once cooked,
open the pressure cooker and replace on low heat to
let the ratatouille cook down for 10 minutes or so, without a lid. Season to taste, if necessary.
Serve the ratatouille hot, garnished with a mixture of
chopped basil and coriander.
Pilaf rice
200 grams of rice, 40 grams of butter, 75 cl of chicken bouillon, 4 tablespoons of peanuts,
salt, pepper.
Rinse the rice in fresh water several times and dry it
well. Using the pressure cooker, fry it over low heat in
the oil and in 20 grams of butter.
Salt and pepper. Stir and add the chicken bouillon.
Close the pressure cooker. As soon as the valve starts to
hiss, lower the heat and leave to cook for the stated duration. Once cooked, open the pressure cooker.
Remove the rice and strain it. Pour it into a large bowl
and add the remaining butter, and stir.
This pilaf rice complements exotic dishes, fish, poultry
and veal.
Serves 6
Preparation time: 15 min.
Valve position: 1
Cooking time: 14 min.
Serves 4
Preparation time: 20 min.
Valve position: 1
Cooking time: 8 min.
EXE_IFU_TE_MODULO-2_4136751_mise en page 06/12/11 17:30 Page18
Page 21
EN
19
Desserts
Three flavour caramel compote
4 Reinette apples, 4 Granny Smith apples, 4 Canada apples, 100 grams of pine nuts,
60 grams of butter, 100 grams of brown sugar, 2 pinches of powdered cinnamon,
1 teaspoon of liquid vanilla, a pinch of ground ginger.
Peel the apples, pit them and cut them into quarters 2
cm thick.
Using the pressure cooker, gently heat them in the butter. Add the cinnamon, vanilla, ginger, brown sugar and
pine nuts. Stir with a wooden spoon.
Close the pressure cooker. As soon as the valve starts to
hiss, lower the heat and leave to cook for the stated duration. Once cooked, open the pressure cooker.
Serve the compote cold or warm with a scoop of vanilla ice cream or a tablespoon of crème fraîche.
Small crème caramels
25 cl of milk, 1/2 vanilla pod cut in two, 3 egg yolks, 100 grams of granulated sugar, a few
drops of vinegar.
Boil the milk with the vanilla. Pour 50 grams of sugar
and the egg yolks into a dish. Beat the eggs well until
a white mixture is obtained. Slowly pour in the boiling
milk (after removing the vanilla pod) over the egg
while continuing to beat them.
Using a thick-based pan, pour in the rest of the sugar
with two tablespoons of water and a few drops of vinegar. Heat over low heat until a pale caramel is obtained. Coat four individual cooking dishes with
caramel. Filter the egg preparation using a strainer and
pour it into the individual cooking dishes. Cover them
with a small piece of aluminium foil. Place the dishes in
the steaming basket.
Pour 75 cl of water into the pressure cooker and place
the steaming basket in it, on its tripod. Close the pressure cooker. As soon as the valve starts to hiss, lower
the heat and leave to cook for the stated duration.
Once cooked, open the pressure cooker.
Leave the crème dishes to cool before placing them in
the fridge.
Turn out onto a plate and serve cold.
Serves 4 to 6
Preparation time: 15 min.
Valve position: 1
Cooking time: 6 min.
Serves 4
Preparation time: 15 min.
Valve position: 1
Cooking time: 7 min.
EXE_IFU_TE_MODULO-2_4136751_mise en page 06/12/11 17:30 Page19
Page 22
20
Table of cooking times
Vegetables
Cooking
FRESH PRODUCE
Valve position 1
FROZEN PRODUCE
Valve position 2
Artichoke
- steam*
18 min.
- immersion**
15 min.
Asparagus - immersion
5 min.
Beetroot, red - steam
20 - 30 min.
Broccoli - steam
3 min. 3 min.
Brussels sprouts - steam
7 min. 5 min. - immersion
Cabbage, green
sliced - steam
6 min.
leaves - steam
7 min.
Carrots sliced - steam
7 min. 5 min.
Cauliflower - immersion
3 min. 4 min.
Celery
- steam
6 min.
- immersion
10 min.
Courgettes
- steam
6:30 min. 9 min
- immersion
2 min.
Endives - steam
12 min.
Green beans - steam
8 min. 9 min.
Green lentils (dried pulses)
- immersion
10 min.
Leek sliced - steam
2:30 min.
Mushrooms
sliced - steam
1 min. 5 min.
whole - immersion
1:30 min.
Peas - steam
1:30 min. 4 min.
Potatoes
quartered
- steam
12 min.
- immersion
6 min.
Pumpkin (mashed) - immersion
8 min.
Rice (dried pulses) - immersion
7 min.
Spinach
- steam
5 min. 8 min.
- immersion
3 min.
Split peas (dried pulses) - immersion
14 min.
Turnips
- steam
7 min.
- immersion
6 min.
Wheat (dried pulses) - immersion
15 min.
White beans semi-dry - steam
20 min.
* In the steam basket
** In water
EXE_IFU_TE_MODULO-2_4136751_mise en page 06/12/11 17:30 Page20
Page 23

EN
21
Meat - Fish
FRESH PRODUCE
Valve position 2
FROZEN PRODUCE
Valve position 2
Beef (roast 1 Kg) 10 min. 28 min.
Chicken (whole 1.2 Kg) 20 min. 45 min.
Lamb (leg 1.3 Kg) 25 min. 35 min.
Monk fish (fillets 0.6 Kg) 4 min 6 min
Pork (roast 1 Kg) 25 min. 45 min.
Salmon (4 steaks 0.6 Kg) 6 min 8 min
Tuna (4 steaks 0.6 Kg) 7 min 9 min
EXE_IFU_TE_MODULO-2_4136751_mise en page 06/12/11 17:30 Page21
Page 24

22
Précautions importantes
Pour votre sécurité, cet appareil est conforme aux normes et réglementations applicables :
- Directive des Équipements sous Pression
- Matériaux en contact avec les aliments
- Environnement
• Cet appareil a été conçu pour un usage domestique.
• Prenez le temps de lire toutes les instructions et reportez-vous toujours au “Guide de
l’utilisateur”.
• Comme pour tout appareil de cuisson, assurez une étroite surveillance surtout si vous
utilisez la cocotte à proximité d’enfants.
• Ne mettez pas votre cocotte dans un four chauffé.
• Déplacez votre cocotte sous pression avec un maximum de précaution. Ne touchez pas
les surfaces chaudes. Utilisez les poignées et boutons. Utilisez des gants, si nécessaire.
• N’utilisez pas votre cocotte dans un autre but que celui auquel elle est destinée.
• Votre cocotte cuit sous pression. Des blessures par ébouillantage peuvent résulter
d’une utilisation inadéquate. Assurez-vous que la cocotte est convenablement fermée
avant de la mettre en service. Voir paragraphe “Fermeture”.
• Assurez-vous que la soupape est en position de décompression avant d’ouvrir votre
cocotte.
• N’ouvrez jamais la cocotte en force. Assurez-vous que la pression intérieure est
retombée. Voir paragraphe “sécurité”.
• N’utilisez jamais votre cocotte sans liquide, cela la détériorerait gravement. Assurezvous qu’il y a toujours suffisamment de liquide pendant la cuisson.
• Utilisez la(les) source(s) de chaleur compatible(s), conformément aux instructions
d’utilisation.
• Ne réalisez jamais de recette à base de lait dans CLIPSO
®
MODULO 2.
• N’utilisez pas de gros sel dans votre cocotte, ajoutez du sel fin en fin de cuisson.
• Ne remplissez pas votre cocotte au-delà des 2/3 (repère maximum de remplissage).
• Pour les aliments qui se dilatent pendant la cuisson, comme le riz, les légumes
déshydratés, ou les compotes, ... ne remplissez pas votre cocotte au-delà de la moitié
de sa capacité. Pour certaines soupes à base de potirons, courgettes …,laissez refroidir
votre cocotte quelques minutes, puis effectuez un refroidissement sous eau froide.
• Après cuisson de viandes qui comportent une peau superficielle ( ex. langue de
bœuf…), qui risque de gonfler sous l’effet de la pression, ne pas piquer la viande tant
que la peau présente un aspect gonflé ; vous risqueriez d’être ébouillanté. Nous vous
conseillons de piquer la viande avant cuisson.
• Dans le cas d’aliments pâteux (pois cassés, rhubarbe…), la cocotte doit être
légèrement secouée avant ouverture pour que ces aliments ne giclent pas à l’extérieur.
• Vérifiez que les soupapes ne sont pas obstruées avant chaque utilisation. Voir
paragraphe “avant la cuisson”.
• N’utilisez pas votre cocotte pour frire sous pression avec de l’huile.
• N’intervenez pas sur les systèmes de sécurité au-delà des consignes de nettoyage et
d’entretien.
• N’utilisez que des pièces d’origine TEFAL correspondant à votre modèle. En particulier,
utilisez une cuve et un couvercle CLIPSO
®
MODULO 2.
• Les vapeurs d’alcool sont inflammables. Portez à ébullition environ 2 minutes avant de
mettre le couvercle. Surveillez votre appareil dans le cadre des recettes à base d’alcool.
• N’utilisez pas votre cocotte pour stocker des aliments acides ou salés avant et après
cuisson au risque de dégrader votre cuve.
• Ne placez jamais votre cocotte poignées rabattues* sur une source de chaleur.
Conservez ces instructions
*selon modèle
EXE_IFU_TE_MODULO-2_4136751_mise en page 06/12/11 17:30 Page22
Page 25
FR
23
A. Soupape de fonctionnement
B. Bouton de fermeture
C. Conduit d’évacuation de vapeur
D. Index de position de soupape
E. Bouton d’ouverture
F. Soupape de sécurité
G. Indicateur de présence de pression
H. Joint
I. Panier vapeur
J. Trépied
K. Cuve
L. Poignée de cuve fixes*
M. Repère maximum de remplissage
N.Bouton de déverrouillage des
poignées*
O. Poignée de cuve rabattable*
Caractéristiques
Diamètre du fond de la cocotte - références
Informations normatives :
Pression supérieure de fonctionnement : 80 kPa.
Pression maximum de sécurité : de 120 kPa.
Sources de chaleur compatibles
•La cocotte CLIPSO
®
MODULO 2 s’utilise sur tous
les modes de chauffage y compris induction.
•Sur plaque électrique, employez une plaque de
diamètre égal ou inférieur à celui du fond de la
cocotte.
Capacité Ø Cuve Ø Fond
CLIPSO
®
MODULO 2
Matériau cuve et
couvercle
4,5 L 22 cm 18 cm P42706
Inox
6 L 22 cm 18 cm P42807
8 L 25 cm 20 cm P42814
10 L 25 cm 20 cm P42815
Ne faites pas
chauffer votre cuve
lorsqu’elle est vide,
au risque de
détériorer votre
produit.
Schéma descriptif
*selon modèle
EXE_IFU_TE_MODULO-2_4136751_mise en page 06/12/11 17:30 Page23
Page 26

24
•
Sur table vitrocéramique, assurez-vous que le fond
de la cuve est propre et net.
•Sur gaz, la flamme ne doit pas déborder du
diamètre de la cuve.
Sur tous les foyers, veillez à ce que votre cocotte soit
bien centrée.
Accessoires TEFAL
• Les accessoires de votre CLIPSO®MODULO 2.
disponibles dans le commerce sont :
•Pour le changement d’autres pièces ou
réparations, faites appel aux Centres Service
Agréés TEFAL.
•N’utilisez que des pièces d’origine TEFAL
correspondant à votre modèle.
Utilisation
Ouverture
•Appuyez sur le bouton d’ouverture (E) du couvercle
- fig 1
Fermeture
•Appuyez sur le bouton de fermeture (B) du
couvercle - fig 2
Accessoires Référence
Joint
4,5/6L
X1010004
8/10L
X1010003
Panier vapeur
4,5/6L
792185
8/10L
980513
Trépied
X1030007
Les machoires
doivent être en
contact avec le bord
du couvercle.
EXE_IFU_TE_MODULO-2_4136751_mise en page 06/12/11 17:30 Page24
Page 27
FR
25
Remplissage minimum
et maximum
•Minimum 25 cl (2 verres) - fig 3
•Maximum 2/3 de la hauteur de la cuve (M) - fig 4
Pour certains aliments
•Pour les aliments qui se dilatent pendant la
cuisson, comme le riz, les légumes déshydratés ou
les compotes, … ne remplissez pas votre cocotte
au-delà de la moitié de la hauteur de la cuve. Dans
le cadre des soupes, nous vous conseillons
d'effectuer une décompression rapide.
Utilisation du panier
vapeur
•Versez 75 cl d’eau dans le fond de la cuve.
•Clipser le trépied (J) sous le panier vapeur (I)
- fig 5 et 6
•Posez l’ensemble dans le fond de la cuve - fig 7
Utilisation de la soupape de
fonctionnement
Pour mettre en place la soupape de
fonctionnement
•Posez la soupape de fonctionnement en alignant
l’index de position (D) avec le repère sur le
couvercle - fig 8
•Enfoncez la soupape pour qu’elle s’enclenche sur
la tige d’évacuation de vapeur.
•Appuyez sur la partie centrale de la soupape de
fonctionnement (A) et tournez jusqu’à la position
souhaitée - fig 8
Pour cuire les aliments délicats et les légumes
•Positionnez l’index de position (D) de la soupape
de fonctionnement (A) sur 1 - fig 9
Les aliments placés
dans le panier
vapeur ne doivent
pas toucher le
couvercle de la
cocotte.
EXE_IFU_TE_MODULO-2_4136751_mise en page 06/12/11 17:30 Page25
Page 28
26
Pour cuire les viandes, les poissons et les aliments
surgelés
•Positionnez l’index de position (D) de la soupape
sur 2 - fig 10
Pour retirer la soupape de fonctionnement
•Appuyez sur la partie centrale de la soupape de
fonctionnement (A) et alignez l’index de position
(D) avec le repère - fig 11
•Retirez-la.
Poignées rabattables*
Avant utilisation, veillez à retirer les étiquettes
présentes sur chacune des poignées.
N'essayez pas de rabattre les poignées sans
appuyer sur les boutons de déverrouillage.
Première utilisation
•Clipsez le trépied (J) sous le panier vapeur (I) - fig
5
et 6
•Posez le panier vapeur (I) au fond de la cuve
- fig 7
•Remplissez d’eau jusqu’aux 2/3 de la cuve (M).
•Fermez la cocotte.
•Placez la soupape de fonctionnement (A) et
positionnez-la sur 2 .
•Posez la cocotte sur une source de chaleur
réglée à sa puissance maximum.
Pour rabattre les poignées :
Pour mettre les
poignées en
position
d’utilisation :
“CLIC”
Ne placez jamais
votre cocotte poignées rabattues
sur une source de
chaleur.
*selon modèle
EXE_IFU_TE_MODULO-2_4136751_mise en page 06/12/11 17:30 Page26
Page 29
FR
27
•
Lorsque la vapeur commence à s’échapper par la
soupape, réduisez la source de chaleur et
décomptez 20 min.
•Lorsque les 20 min. sont écoulées, éteignez votre
source de chaleur.
•Tournez la soupape de fonctionnement jusqu’à la
position .
•Lorsque l’indicateur de présence de pression (G)
redescend : votre cocotte n’est plus sous pression.
•Ouvrez la cocotte - fig 1
Avant la cuisson
•Avant chaque utilisation, vérifiez à l’œil et au jour
que le conduit d’évacuation de vapeur (C) n’est
pas obstrué - fig 12
•Vérifiez que la soupape de sécurité est mobile : voir
le paragraphe “Nettoyage et entretien”
•Fermez la cocotte - fig 2
•Mettez en place la soupape (A) - fig 8
•Appuyez à fond et tournez jusqu’à la position
cuisson choisie - fig 9
•Assurez-vous que la cocotte est convenablement
fermée avant de la mettre en service.
•Posez la cocotte sur une source de chaleur réglée à
sa puissance maximum.
Pendant la cuisson
•Lorsque la soupape de fonctionnement laisse
échapper de la vapeur de façon continue, en
émettant un son régulier (PSCHHHT), réduisez la
source de chaleur.
•Décomptez le temps de cuisson indiqué dans la
recette.
•Veillez, au cours de la cuisson, à ce que la soupape
chuchote régulièrement. S’il n’y a pas assez de
vapeur, augmentez légèrement la source de
chaleur, dans le cas contraire, réduisez la source de
chaleur.
*selon modèle
EXE_IFU_TE_MODULO-2_4136751_mise en page 06/12/11 17:30 Page27
Page 30
28
Fin de cuisson
Pour libérer la vapeur
•Une fois la source de chaleur éteinte, vous
avez deux possibilités :
•Décompression lente : tournez la soupape de
fonctionnement (A) jusqu’à la position .
Lorsque l’indicateur de présence de pression
(G) redescend : votre cocotte n’est plus sous
pression.
•Décompression rapide : placez votre cocotte
sous un robinet d’eau froide - fig 13 . Lorsque
l’indicateur de présence de pression (G)
redescend : votre cocotte n’est plus sous
pression. Tournez la soupape de
fonctionnement (A) jusqu’à la position .
•Vous pouvez ouvrir votre cocotte - fig 1
Nettoyage et entretien
Nettoyage de la cocotte
•Pour le bon fonctionnement de votre appareil,
veillez à respecter ces recommandations de
nettoyage et d’entretien après chaque utilisation.
•Lavez la cocotte après chaque utilisation avec de
l’eau tiède additionnée de produit vaisselle.
Procédez de même pour le panier.
•N’utilisez pas d’eau de javel ou de produits
chlorés.
•Ne surchauffez pas votre cuve lorsqu’elle est vide.
Le brunissement et
les rayures qui
peuvent apparaître
à la suite d’une
longue utilisation
ne présentent pas
d’inconvénient.
Si lors de la libération
de la vapeur vous
observez des projections
anormales : remettez la
soupape de
fonctionnement
(A) en
position de cuisson :
1 ou
2, puis effectuez une
décompression rapide.
Si l’indicateur de
présence de pression
(G) ne descend pas,
placer votre cocotte
sous un robinet d’eau
froide - fig 13
N’intervenez jamais sur
cet indicateur de
présence de pression.
EXE_IFU_TE_MODULO-2_4136751_mise en page 06/12/11 17:30 Page28
Page 31

FR
29
Pour nettoyer l’intérieur de la cuve
•Lavez avec un tampon à récurer et du produit
vaisselle.
•Si l’intérieur de la cuve inox présente des reflets
irisés, la nettoyer avec du vinaigre.
Pour nettoyer l’extérieur de la cuve
•Lavez avec une éponge et du produit vaisselle.
Pour nettoyer le couvercle
•Lavez le couvercle avec une éponge et du produit
vaisselle.
Pour nettoyer le joint du couvercle
•Après chaque cuisson, nettoyez le joint (H) et son
logement.
•Pour la remise en place du joint, veuillez vous
reporter à la - fig 14 et veillez à ce que
l’inscription “face côté couvercle” soit contre le
couvercle.
Pour nettoyer la soupape de fonctionnement (A)
•Retirez la soupape de fonctionnement (A) - fig 11
•Nettoyez la soupape de fonctionnement (A) sous
le jet d’eau du robinet - fig 15
•Vérifiez sa mobilité : dessin ci-contre
Pour nettoyer le conduit de la soupape de
fonctionnement située sur le couvercle
•Enlevez la soupape (A) - fig 11
•Contrôlez à l’œil et au jour que le conduit
d’évacuation de vapeur est débouché et rond
- fig 12. Si besoin, nettoyez-le avec un cure-dents
- fig 16 et rincez-le.
Vous pouvez mettre
la cuve et le panier
au lave-vaisselle.
Après avoir retiré la
soupape de
fonctionnement (A)
et le joint (H), vous
pouvez passer le
couvercle au lavevaisselle.
Ne dévissez jamais
la vis et l'écrou
situés à l’intérieur
du couvercle.
EXE_IFU_TE_MODULO-2_4136751_mise en page 06/12/11 17:30 Page29
Page 32

30
Pour nettoyer la soupape de sécurité (F)
•Nettoyez la partie de la soupape de sécurité située
à l’intérieur du couvercle en passant celui-ci sous
l’eau.
•Vérifiez son bon fonctionnent en appuyant
fortement à l’aide d’un coton-tige sur le clapet qui
doit être mobile - fig 17
Pour changer le joint votre cocotte
•Changez le joint de votre cocotte tous les ans.
•Changez le joint de votre cocotte si celui-ci
présente une coupure.
•Prenez toujours un joint d’origine TEFAL,
correspondant à votre modèle.
Pour ranger votre cocotte
•Retournez le couvercle sur la cuve.
Si votre cocotte possède des poignées rabattables* :
•Appuyez sur les boutons de déverouillage (N) des
poignées. Voir paragraphe “poignées rabattables”.
•N'essayez pas de rabattre les poignées* sans
appuyer sur les boutons de déverrouillage.
Sécurité
Votre autocuiseur est équipé de plusieurs
dispositifs de sécurité :
•Sécurité à la fermeture :
- Les mâchoires doivent être en contact avec le bord
du couvercle. Si ce n’est pas le cas, il y a une fuite
de vapeur au niveau de l’indicateur de présence de
pression et la cocotte ne peut pas monter en
pression.
•Sécurité à l’ouverture :
- Si la cocotte est sous pression, le bouton
d’ouverture ne peut être actionné.
- N’ouvrez jamais la cocotte en force.
- N’agissez surtout pas sur l’indicateur de présence
de pression.
- Assurez-vous que la pression intérieure est
retombée.
Pour conserver plus
longtemps les
qualités de votre
cocotte : ne
surchauffez pas
votre cuve
lorsqu’elle est vide.
Il est impératif de
faire vérifier votre
cocotte dans un
Centre de Service
Agréé TEFAL après
10 ans d’utilisation.
*selon modèle
N’utilisez jamais
d’objet tranchant
ou pointu pour
effectuer cette
opération.
EXE_IFU_TE_MODULO-2_4136751_mise en page 06/12/11 17:30 Page30
Page 33

FR
31
•
Deux sécurités à la surpression :
- Premier dispositif : la soupape de sécurité (F)
libère la pression - fig 19
- Deuxième dispositif : le joint laisse échapper de
la vapeur entre le couvercle et la cuve - fig 20
Si l’un des systèmes de sécurité à la surpression
se déclenche :
•Arrêtez la source de chaleur.
•Laissez refroidir complètement la cocotte.
•Ouvrez.
•Vérifiez et nettoyez la soupape de fonctionnement
(A), le conduit d’évacuation de vapeur (C), la
soupape de sécurité (F) et le joint (H).
•Si après ces vérifications et nettoyages votre
produit fuit ou ne fonctionne plus, ramenez-le dans
un centre Service agréé TEFAL.
Recommandations d’utilisation
1 - La vapeur est très chaude lorsqu’elle sort de la
soupape de fonctionnement.
2 - Dès que l’indicateur de présence de pression
s’élève, vous ne pouvez plus ouvrir votre cocotte.
3 - Comme pour tout appareil de cuisson, assurez une
étroite surveillance si vous utilisez la cocotte à
proximité d’enfants.
4 - Attention au jet de vapeur.
5 - Pour déplacer la cocotte, servez-vous des deux
poignées de cuve.
6 - Ne laissez pas séjourner d’aliments dans votre
cocotte.
7 - N’utilisez jamais d’eau de javel ou de produits
chlorés, qui pourraient altérer la qualité de l’acier
inoxydable.
8 - Ne laissez pas le couvercle tremper dans l’eau.
9 - Changez le joint tous les ans.
10 - Le nettoyage de votre cocotte s’effectue
impérativement à froid, l’appareil vide.
11 - Il est impératif de faire vérifier votre cocotte dans
un Centre de Service Agréé TEFAL après 10 ans
d’utilisation.
EXE_IFU_TE_MODULO-2_4136751_mise en page 06/12/11 17:30 Page31
Page 34

32
Garantie
•Dans le cadre de l’utilisation préconisée par le
mode d’emploi, la cuve de votre nouvel
autocuiseur TEFAL est garantie 10 ans contre :
- Tout défaut lié à la structure métallique de
votre cuve,
- Toute dégradation prématurée du métal de
base.
•Sur les autres pièces, la garantie pièce et main
d’œuvre, est de 1 an (sauf législation spécifique à
votre pays), contre tout défaut ou vice de
fabrication.
•Cette garantie contractuelle sera acquise sur
présentation du ticket de caisse ou facture de
cette date d’achat.
•Ces garanties excluent :
•Les dégradations consécutives au non respect des
précautions importantes ou à des utilisations
négligentes, notamment :
- Chocs, chutes, passage au four, …
•Seuls les Centres Services Agréés TEFAL sont
habilités à vous faire bénéficier de cette garantie.
•Veuillez appeler le numero Azur pour l’adresse du
Centre Service Agréés TEFAL le plus proche de chez
vous.
EXE_IFU_TE_MODULO-2_4136751_mise en page 06/12/11 17:30 Page32
Page 35

FR
33
Marquages réglementaires
Marquage Localisation
Identification du fabricant ou marque commerciale
Bouton de fermeture.
Année et lot de fabrication
Référence modèle
Pression maximum de sécurité (PS)
Pression supérieure de fonctionnement (PF)
Sur le bord supérieur du couvercle, visible lorsque celui-ci
est en position “ouverture”.
Capacité
Sur le fond extérieur de la
cuve.
EXE_IFU_TE_MODULO-2_4136751_mise en page 06/12/11 17:30 Page33
Page 36

34
TEFAL répond à vos questions
Problèmes Recommandations
Si vous ne pouvez
pas fermer le
couvercle :
• Vérifiez que le bouton d’ouverture (E) est bien
enfoncé.
• Vérifiez le bon sens de montage du joint voir paragraphe "Nettoyage et entretien".
Si la cocotte a
chauffé sous pression sans liquide à
l’intérieur :
Faites vérifier votre cocotte par un Centre Service Agréé
TEFAL.
Si l’indicateur de
présence de pression n’est pas
monté et que rien
ne s’échappe par
la soupape pendant la cuisson :
Ceci est normal pendant les premières minutes.
Si le phénomène persiste, vérifiez que :
- La source de chaleur est assez forte, sinon augmentez-la.
- La quantité de liquide dans la cuve est suffisante.
- La soupape de fonctionnement est positionnée sur 1
ou 2.
- La cocotte est bien fermée.
- Le joint ou le bord de la cuve ne sont pas détériorés.
- Le joint est bien positionné dans le couvercle voir pa-
ragraphe "Nettoyage et entretien".
Si l’indicateur de
présence de pression est monté et
que rien ne
s’échappe par la
soupape pendant
la cuisson :
Ceci est normal pendant les premières minutes.
Si le phénomène persiste, passez votre appareil sous
l’eau froide jusqu'à ce que l'indicateur de présence de
pression descende.
Nettoyez la soupape de fonctionnement - fig 15et le
conduit d’évacuation de vapeur
- fig 16 et vérifiez que
le clapet de la soupape de sécurité s’enfonce sans difficulté
- fig 17.
EXE_IFU_TE_MODULO-2_4136751_mise en page 06/12/11 17:30 Page34
Page 37

FR
35
Problèmes
Recommandations
Si la vapeur fuit autour
du couvercle, vérifiez :
La bonne fermeture du couvercle.
Le positionnement du joint du couvercle.
Le bon état du joint, au besoin changez-le.
La propreté du couvercle, du joint et de son
logement dans le couvercle.
Le bon état du bord de la cuve.
Si de la vapeur fuit
autour du couvercle
accompagnée d’un bruit
strident :
Vérifiez que le joint n’est pas pincé entre la cuve
et le couvercle.
Si vous ne pouvez pas
ouvrir le
couvercle :
Vérifiez que l’indicateur de présence de pression
est en position basse.
Sinon : décompressez, au besoin, refroidissez la
cocotte sous un jet d’eau froide.
N’intervenez jamais sur cet indicateur de pression.
Si les aliments ne sont
pas cuits ou s’ils sont
brûlés,
vérifiez :
Le temps de cuisson.
La puissance de la source de chaleur.
Le bon positionnement de la soupape de
fonctionnement.
La quantité de liquide.
Si des aliments ont brûlé
dans la cocotte :
Laissez tremper votre cuve quelque temps avant de
la laver.
N’utilisez jamais d’eau de javel ou de produits
chlorés.
Si l’un des systèmes de
sécurité se
déclenche :
Arrêtez la source de chaleur.
Laissez refroidir la cocotte sans la déplacer.
Attendez que l'indicateur de présence de pression
soit descendu et ouvrez.
Vérifiez et nettoyez la soupape de fonctionnement, la tige d’évacuation de vapeur, la soupape
de sécurité et le joint.
Si le défaut persiste, faites vérifier votre appareil
par un Centre Service Agréé TEFAL.
Si vous n’arrivez pas à
mettre les poignées
rabattables* en position
d’utilisation :
Vérifiez que :
• Le bouton de déverrouillage* est mobile.
• Si le phénomène persiste, faites vérifier votre cocotte par un Centre de Service Agrée TEFAL.
Si vous n’arrivez pas à
rabattre les poignées
rabattables* :
• Ne forcez pas.
• Assurez-vous que vous appuyez à fond sur les
boutons de déverrouillage* des poignées.
*selon modèle
EXE_IFU_TE_MODULO-2_4136751_mise en page 06/12/11 17:30 Page35
Page 38

36
10 recettes savoureuses
à préparer avec votre cocotte
Toutes les recettes sont réalisées pour 4 personnes.
Pour les cocottes d'une capacité inférieure à 6 litres,
diminuer les proportions d'un tiers.
Entrée
Soupe de légumes
4 pommes de terre, 1 poireau, 4 carottes, 1 navet, 1l d’eau, sel, poivre, 3 cuillères à soupe de
crème fraîche (facultatif).
Pelez et lavez les légumes.
Coupez les pommes de terre et le navet en gros cube.
Coupez finement les carottes et le poireau en tranches.
Mettre 1 litre d’eau dans la cocotte-minute, ajouter les
légumes, le sel et le poivre.
Fermer la cocotte-minute. Dès que la soupape se met
à siffler, réduire la source de chaleur et laisser cuire le
temps indiqué. Décompresser sous l’eau.
Ajoutez éventuellement la crème fraîche avant de
servir.
Poisson
Papillotes de julienne aux agrumes
4 pavés de filet de julienne de 150 g chacun, 1 pamplemousse, 1 orange, le jus d’1 citron vert,
2 tomates, 1 oignon, 2 échalotes émincées, 60 g de beurre, 1 verre de vin blanc sec, quelques
feuilles d’estragon, sel, poivre.
Coupez les tomates en rondelles. Epluchez et émincez
très finement l’oignon.
Pelez à vif et prélevez les quartiers du pamplemousse et
de l’orange en prenant soin de conserver le jus.
Disposez au centre de quatre feuilles d’aluminium 3
rondelles de tomates se chevauchant légèrement.
Recouvrez d’un peu d’oignon et d’échalotes émincés,
ajoutez quelques feuilles d’estragon et déposez les
pavés de julienne. Relevez les bords de chaque
papillote afin de pouvoir verser sans crainte 1 cuillerée
4 personnes
Préparation : 15 min.
Position de la soupape :
1
Temps de cuisson : 10 min.
4 personnes
Préparation : 25 min.
Position de la soupape :
2
Temps de cuisson : 8 min.
EXE_IFU_TE_MODULO-2_4136751_mise en page 06/12/11 17:30 Page36
Page 39

FR
37
à soupe de vin blanc et 2 cuillerées à soupe de jus de
pamplemousse-orange. Ajoutez quelques gouttes de
citron vert, salez et poivrez.
Déposez sur chaque poisson 1 quartier de
pamplemousse, 2 quartiers d’orange et 15 g de beurre
frais. Refermez bien les papillotes avant de les déposer
délicatement dans le panier vapeur.
Dans la cocotte, versez 70 cl d’eau. Placez-y le panier
vapeur sur son support en vous assurant qu’il n’est pas
en contact avec l’eau. Fermez la cocotte. Dès le
sifflement de la soupape, baissez le feu et laissez cuire
le temps indiqué. À la fin de la cuisson, ouvrez la
cocotte.
Retirez le panier vapeur de la cocotte et déposez
délicatement 1 papillote de julienne dans chaque
assiette. Ouvrez les papillotes à table à l’aide de
ciseaux et servez éventuellement accompagné d’une
salade d’avocats.
Mouton
Navarin printanier
600 g de collet de mouton et 600 g de haut de côtelette coupés en morceaux, 1 botte de carottes nouvelles, 1 botte d’oignons nouveaux, 1 botte de navets nouveaux, 4 petites pommes
de terre nouvelles, 100 g de haricots verts, 2 tomates pelées, 2 gousses d’ail, 1 bouquet garni,
1 cuillère à soupe d’estragon ciselé, 30 g de beurre, 15 cl de vin blanc, 1 cuillère à café d’anis
vert, 1 cuillère à soupe d’huile d’olive, 1 cuillère à soupe de farine, sel, poivre.
Epluchez et nettoyez tous les légumes. Dans la cocotte,
faitesrevenir vivement les morceaux de viande et l’ail
non pelé dans l’huile et le beurre. Salez et poivrez.
Ajoutez la farine en pluie et mélangez bien. Versez le
vin blanc, ajoutez l’anis, le bouquet garni et les
tomates concassées. Complétez avec de l’eau pour
mouiller la viande à hauteur. Portez à ébullition.
Fermez la cocotte. Dès le sifflement de la soupape,
baissez le feu et laissez cuire selon le premier temps de
cuisson indiqué. À la fin de la cuisson, ouvrez la cocotte.
Ajoutez les légumes, salez et poivrez. Refermez la
cocotte. Dès le sifflement de la soupape, baissez le feu
et laissez cuire selon le second temps de cuisson
indiqué. À la fin de la cuisson, ouvrez la cocotte.
Egouttez la viande et les légumes, ôtez le bouquet
garni et l’ail. Laissez réduire le liquide de cuisson sur
feu vif jusqu’à obtention d’une sauce onctueuse.
Disposez la viande et les légumes dans un plat et
arrosez de jus. Parsemez d’estragon et servez.
4 personnes.
Préparation : 20 min.
Position de la soupape :
2
Temps de cuisson : 10 min.
+ 7min.
EXE_IFU_TE_MODULO-2_4136751_mise en page 06/12/11 17:30 Page37
Page 40

38
Veau
Rôti aux trois moutardes
1 kg de carré de veau ficelé en rôti, 6 carottes, 3 gousses d’ail, 1 oignon, 1 bouquet garni, 2
cuillères à soupe de crème fraîche épaisse, 40 g de beurre, 30 cl de vin blanc sec, 2 cuillères
à soupe de moutarde de Meaux, 1 de moutarde forte et 2 de moutarde douce à l’estragon,
1 cuillère à soupe d’huile, sucre en poudre, sel, poivre.
Piquez le rôti de bâtonnets d’ail. Dans la cocotte,
faites-le revenir dans le beurre et l’huile. Salez et
poivrez. Retirez-le. Faites revenir les carottes coupées
en rondelles à la place, ajoutez 2 cuillerées à soupe de
sucre, du sel et du poivre. Remettez le rôti, ajoutez le
bouquet garni, l’oignon et le vin blanc. Fermez la
cocotte. Dès le sifflement de la soupape, baissez le feu
et laissez cuire le temps indiqué. À la fin de la cuisson,
ouvrez la cocotte.
Retirez le rôti et les carottes. Portez le jus de cuisson à
ébullition sur feu vif pour le faire réduire d’un tiers.
Ajoutez la crème fraîche et laissez cuire 5 min. à feu
doux, puis incorporez les moutardes sans laisser bouillir.
Passez la sauce au chinois et ajoutez un peu d’eau si
nécessaire.
Découpez le rôti. Servez nappé de sauce et
accompagné de carottes.
Bœuf
Pot-au-feu du chef
1,2 kg de bœuf (gîte ou macreuse, queue de bœuf, un peu de plat de côtes), 2 os à moelle, 800
g de grosses pommes de terres, 1/2 citron, 1 oignon piqué de 3 clous de girofle, 3 carottes, 3
poireaux ficelés, 3 navets, 1 branche de céleri, 1/2 céleri-rave, 1 tête d’ail, 1 bouquet garni, 4
cuillères à soupe de Porto, 4 tranches de pain de campagne grillées et aillées, cornichons, gros
sel, sel, poivre.
Nettoyez et épluchez les légumes, coupez-les en
morceaux. Dans la cocotte, versez 2 litres d’eau et mettez
l’oignon, les carottes, les poireaux, les navets, le célerirave, la tête d’ail, la branche de céleri et le bouquet garni.
Salez et poivrez. Portez à ébullition, puis plongez-y les
morceaux de viande. Faites cuire 10 min. à feu doux en
retirant régulièrement l’écume qui se forme à la surface.
Fermez la cocotte. Dès le sifflement de la soupape,
baissez le feu et laissez cuire selon le premier temps de
4 personnes
Préparation : 25 min.
Position de la soupape :
2
Temps de cuisson : 11 min.
4 personnes.
Préparation : 20 min.
Position de la soupape :
2
Temps de cuisson : 20 min.
+ 20 min.
EXE_IFU_TE_MODULO-2_4136751_mise en page 06/12/11 17:30 Page38
Page 41

FR
39
cuisson indiqué. À la fin de la cuisson, ouvrez la cocotte.
Retirez les carottes, les poireaux, le navet et le céleri-rave
et mettez-les de côté. Refermez la cocotte. Dès le
sifflement de la soupape, baissez le feu et laissez cuire
selon le second temps de cuisson indiqué. À la fin de la
cuisson, ouvrez la cocotte.
Lavez et épluchez les pommes de terre et faites-les cuire
dans une casserole d’eau salée. Pendant la cuisson de la
viande et des pommes de terre, coupez des rondelles de
citron et placez-les à l’extrémité de chaque os à moelle
en les fixant avec de la ficelle de cuisine. Mettez les os à
moelle dans une casserole d’eau légèrement salée et
citronnée et laissez cuire 10 min. à feu doux.
Egouttez la viande. Servez-la entourée des légumes et
accompagnée de gros sel et de cornichons. Egouttez les
os et extrayez-en la moelle. Servez celle-ci avec les
tranches de pain grillées légèrement aillées. Présentez le
bouillon à part après y avoir ajouté 3 ou 4 cuillerées à
soupe de Porto.
Volaille
Poulet basquaise
1 poulet de 1,5 kg coupé en morceaux par le volailler, 1 boîte de 400 g de tomates entières pelées, 1 boîte de 400 g de poivrons rouges, 1 boîte de 400 g de poivrons verts, 3 gousses d’ail hachées, 3 oignons émincés, 1 bouquet garni, 2 verres de vin blanc, 4 cuillères à soupe d’huile
d’olive, sel, poivre.
Égouttez soigneusement les poivrons avant de les
émincer. Dans la cocotte, faites chauffer vivement
l’huile d’olive avec la moitié de l’ail, puis faites-y revenir
les morceaux de poulet. Salez et poivrez. Versez 1 verre
de vin blanc pour détacher les sucs de cuisson collés au
fond de la cocotte, puis retirez les morceaux.
Dans la même cocotte, faites colorer les oignons.
Ajoutez les poivrons émincés et faites cuire 5 min. à feu
vif en remuant. Ajoutez les tomates, le bouquet garni,
l’ail et le vin restants. Salez et poivrez. Laissez mijoter
3 min. et remettez les morceaux de poulet.
Fermez la cocotte. Dès le sifflement de la soupape,
baissez le feu et laissez cuire le temps indiqué.
Retirez le bouquet garni, puis disposez dans chaque
assiette quelques morceaux de poulet avec la garniture
basquaise. Servez accompagné d’un riz pilaf.
4 personnes
Préparation : 20 min.
Position de la soupape :
2
Temps de cuisson : 11 min.
EXE_IFU_TE_MODULO-2_4136751_mise en page 06/12/11 17:30 Page39
Page 42

40
Légumes
Ratatouille
5 courgettes coupées en rondelles, 4 aubergines en cubes, 4 grosses tomates en quartiers, 2 poivrons rouges en dés, 1 poivron vert en lanières, 2 gros oignons hachés, 3 gousses d’ail pelées en
purée, 1 branche de thym, 1 feuille de laurier, 1 branche de romarin, 1 petit bol de basilic, 1/2
botte de coriandre, 6 cuillères à soupe d’huile d’olive, sel, poivre.
Dans la cocotte, faites revenir à feu vif les oignons, les
dés de poivrons rouges et les lanières de poivron vert
dans 3 cuillerées à soupe d’huile d’olive. Quand ils sont
dorés, ajoutez les cubes d’aubergines, les rondelles de
courgettes, les tomates et le restant d’huile. Terminez
avec le thym, le laurier, le romarin et l’ail. Salez et
poivrez. Remuez bien.
Fermez la cocotte. Dès le sifflement de la soupape,
baissez le feu et laissez cuire le temps indiqué. À la fin
de la cuisson, ouvrez la cocotte et remettez sur feu
doux et laissez réduire ainsi la ratatouille 10 min.
environ sans couvercle. Rectifiez l’assaisonnement si
nécessaire.
Servez la ratatouille chaude, parsemée d’un mélange
de basilic et de coriandre ciselés.
Riz pilaf
200 g de riz, 40 g de beurre, 75 cl de bouillon de volaille, 4 cuillères à soupe d’arachide, sel,
poivre.
Rincez plusieurs fois le riz à l’eau claire et séchez-le
bien. Dans la cocotte, faites-le revenir à feu doux dans
l’huile et 20 g de beurre. Salez et poivrez. Remuez et
ajoutez le bouillon de volaille. Fermez la cocotte. Dès
le sifflement de la cocotte, baissez le feu et laissez cuire
le temps indiqué. À la fin de la cuisson, ouvrez la
cocotte.
Retirez le riz et égouttez-le. Versez-le dans un grand
saladier, ajoutez le beurre restant et remuez.
Ce riz pilaf accompagne les plats exotiques, les
poissons, les volailles et le veau.
6 personnes
Préparation : 15 min.
Position de la soupape :
1
Temps de cuisson : 14 min.
4 personnes
Préparation : 20 min.
Position de la soupape :
1
Temps de cuisson : 8 min.
EXE_IFU_TE_MODULO-2_4136751_mise en page 06/12/11 17:30 Page40
Page 43

FR
41
Desserts
Compote aux trois pommes caramélisées
4 pommes reinettes, 4 pommes granny smith, 4 pommes Canada, 100 g de pignons de pin,
60 g de beurre, 100 g de cassonade, 2 pincées de cannelle en poudre, 1 cuillère à café de vanille liquide, 1 pincée de gingembre en poudre.
Épluchez les pommes, épépinez-les, puis coupez-les en
quartiers de 2 cm d’épaisseur.
Dans la cocotte, faites-les revenir à feu doux dans le
beurre. Ajoutez la cannelle, la vanille, le gingembre, la
cassonade et les pignons de pin. Remuez à l’aide d’une
cuillère en bois.
Fermez la cocotte. Dès le sifflement de la soupape,
baissez le feu et laissez cuire le temps indiqué. À la fin
de la cuisson, ouvrez la cocotte.
Servez la compote fraîche ou tiède avec 1 boule de
glace à la vanille ou 1 cuillerée à soupe de crème
fraîche.
Petites crèmes caramel
25 cl de lait, 1/2 gousse de vanille coupée en deux, 3 jaunes d’œufs, 100 g de sucre semoule,
quelques gouttes de vinaigre.
Faites bouillir le lait avec la vanille. Dans une terrine, mettez
50 g de sucre et les jaunes d’œufs. Battez énergiquement
jusqu’à obtention d’un mélange bien blanc. Versez
progressivement le lait bouillant (débarrassé de la gousse
de vanille) sur les œufs sans cesser de fouetter.
Dans une casserole à fond épais, mettez le sucre restant
avec 2 cuillerées à soupe d’eau et quelques gouttes de
vinaigre. Faites chauffer sur feu doux jusqu’à obtention
d’un caramel blond. Enduisez quatre ramequins
individuels de caramel. Filtrez la préparation aux œufs à
l’aide d’une écumoire et versez-la dans les ramequins.
Couvrez ceux-ci d’un petit morceau de papier
aluminium. Disposez les ramequins dans le panier
vapeur.
Versez 75 cl d’eau dans la cocotte et installez-y le panier
vapeur sur son support. Fermez la cocotte. Dès le
sifflement de la soupape, baissez le feu et laissez cuire le
temps indiqué. À la fin de la cuisson, ouvrez la cocotte.
Laissez refroidir avant de mettre les crèmes au
réfrigérateur.
Démoulez sur un plat et servez froid.
4 à 6 personnes
Préparation : 15 min.
Position de la soupape :
1
Temps de cuisson : 6 min.
4 personnes
Préparation : 15 min.
Position de la soupape :
1
Temps de cuisson : 7 min.
EXE_IFU_TE_MODULO-2_4136751_mise en page 06/12/11 17:30 Page41
Page 44

42
Table des temps de cuisson
Légumes
* Aliment dans le panier vapeur
** Aliment dans l’eau
Cuisson
FRAIS
Position de la
soupape
1
SURGELÉS
Position de la
soupape
2
Artichauts - vapeur*
18 min.
- immersion**
15 min.
Asperges - immersion
5 min.
Betterave rouge - vapeur
20 - 30 min.
Blé (lég. secs) - immersion
15 min.
Brocolis - vapeur
3 min. 3 min.
Carottes rondelles - vapeur
7 min. 5 min.
Céleri - vapeur
6 min.
- immersion
10 min.
Champignons émincés - vapeur
1 min. 5 min.
entiers - immersion
1 min. 30
Chou vert émincé - vapeur
6 min.
effeuillé - vapeur
7 min.
Chou Bruxelles - vapeur
7 min. 5 min. - immersion
Chou-fleur - immersion
3 min. 4 min.
Courgettes - vapeur
6 min. 30 9 min
- immersion
2 min.
Endives - vapeur
12 min.
Epinards - vapeur
5 min. 8 min.
- immersion
3 min.
Haricots verts - vapeur
8 min. 9 min.
Haricots mi-secs - immersion
20 min.
Lentilles vertes (lég. secs) - immersion
10 min.
Navets - vapeur
7 min.
- immersion
6 min.
Petits pois - vapeur
1 min. 30 4 min
Poireaux rondelles - vapeur
2 min. 30
Potiron (purée) - immersion
8 min.
Pommes de terre en
quartiers
- vapeur
12 min.
- immersion
6 min.
Pois cassés (lég. secs) - immersion
14 min.
Riz (lég. secs) - immersion
7 min.
EXE_IFU_TE_MODULO-2_4136751_mise en page 06/12/11 17:30 Page42
Page 45

FR
43
Viandes - Poissons
FRAIS
Position de la soupape
2
SURGELÉS
position de la soupape
2
Agneau (gigot 1,3 Kg) 25 min 35 min
Bœuf (rôti 1 Kg) 10 min 28 min
Lotte (filets 0,6 Kg) 4 min 6 min.
Porc (rôti 1 Kg) 25 min 45 min
Poulet (entier 1,2 Kg) 20 min 45 min.
Saumon (4 darnes 0,6 Kg) 6 min 8 min.
Thon (4 steaks 0,6 Kg) 7 min 9 min.
EXE_IFU_TE_MODULO-2_4136751_mise en page 06/12/11 17:30 Page43
Page 46

44
Güvenliğiniz için
Güvenliğiniz için bu ürün geçerli kural ve yönetmeliklere uygundur :
- Basınç altındaki Donanımlar Yönergesi
- Besinlerle temas eden malzemeler
- Çevre
• Bu ürün ev içinde kullanılmak üzere tasarlanmıştır.
• Tüm talimatları okumak için zaman ayırınız ve her zaman « Kullanım Kılavuzu »na
başvurunuz.
• Tüm pişirme ürünlerinde olduğu gibi, düdüklü tencerenizi, özellikle çocukların yanında,
sürekli gözlem altında kullanınız.
• Düdüklü tencereyi ısıtılmış fırına koymayınız.
• Basınç altındak i düdüklü tencerenizi bir yerden bir yere dikkatle götürünüz. Sıcak kısımlara
dokunmayınız. Tutacak ve düğmeleri kullanınız. Gerekirse eldiven kullanınız.
• Düdüklü tencerenizi kullanım amacı dışında bir amaçla kullanmayınız.
• Düdüklü tencereniz basınç altında pişirmektedir. Uygunsuz kullanımdan dolayı haşlanma
yaralanmaları meydana gelebilir. Düdüklü tencerenizi kullanmadan önce iyice
kapatıldığından emin olunuz. “Kapatma” paragrafını okuyunuz.
• Düdüklü tencerenizi açmadan önce, supabın basınçsız konumda olduğundan emin
olunuz.
• Düdüklü tencerenizi hiçbir zaman zorla açmayınız. İç basıncın iyice azalmış olduğundan
emin olunuz. Bakınız “güvenlik ” paragrafı.
• Düdüklü tencerenizi hiçbir zaman içinde sıvı olmadan kullanmayınız, bu ciddi zarar verir.
Pişme sırasında yeterince sıvı olduğundan emin olunuz.
• Kullanım talimatlarına uygun ısı kaynakları kullanınız.
•
CLIPSO®MODULO 2
düdüklü tencerenizde asla sütlü tarifler pişirmeyin.
• Düdüklü tencerenizde kaya tuzu kullanmayın, onun yerine pişme neredeyse tamamlanmak
üzere iken sofra tuzu ilave edin.
• Düdüklü tencerenizi 2/3’ den fazla doldurmayınız (azami doldurma işareti).
• Pirinç, kurutulmuş sebzeler, veya kompostolar gibi pişirme sırasında genleşen besinler için,
…düdüklü tencerenizin kapasitesinin yarısından fazlasını doldurmayınız. Balkabağı veya
kabak çorbası gibi çorbalar pişirdikten sonra düdüklü tencerenizin soğuması için birkaç
dakika bekleyin, daha sonra akan soğuk suyun altına koyarak tamamen soğumasını
sağlayın.
• Basıncın etkisi altında şişme riski bulunan derileri olan etleri (örneğin sığır dili) pişirdikten
sonra, deri şişkin göründüğü sürece eti delmeyiniz ; çıkabilecek buharla yanma tehlikesi
vardır. Eti pişirmeden önce delmenizi tavsiye ederiz.
• Hamurumsu gıdalarda (kırık bezelye, ravent...), bu gıdaların içeride saçılmaması için
açmadan evvel düdüklü tencereyi hafifçe sallayınız.
• Her kullanımdan önce supapların tıkalı olmadığını kontrol ediniz. “Pişirmeden önce”
paragrafını okuyunuz.
• Düdüklü tencerenizi basınç altında yağla kızar tmak için kullanmayınız.
• Temizlik ve bakım talimatları dışında güvenlik sistemlerine müdahalede bulunmayınız.
• Sadece modelinize uygun TEFAL parçalarını kullanınız. Özellikle
CLIPSO®MODULO 2.
• e uygun bir tencere ve kapak kullanınız.
• Alkol buharı tutuşur. Kapağı kapatmadan evvel yaklaşık 2 dakik a kaynatınız. Alkollü tarifler
kullanırken düdüklü tencerenizi dikkatle kullanınız.
• Tencerenizin kabını pişirmeden evvel ve sonra düdüklü tencerenizi asitli veya tuzlu besinler
saklamak için kullanmayınız.
• Tencerenizi, asla sapları katlanmış* durumdayken bir ısı kaynağı üzerinde bırakmayın.
Bu talimatları saklayınız
*Modele göre değişir
EXE_IFU_TE_MODULO-2_4136751_mise en page 06/12/11 17:30 Page44
Page 47

TR
45
A. Çalışma supabı
B. Kapatma düğmesi
C. Buhar çıkış kanalı
D. Supap pozisyon göstergesi
E. Açma düğmesi
F. Emniyet supabı
G. Basınç göstergesi
H. Conta (lastik)
I. Buhar sepeti
J. Buhar sepeti ayağı
K. Hazne
L. Hazne kolu*
M. Maksimum doldurma işareti
N. Sap katlama düğmesi*
O. Katlanabilir saplar*
Özellikler
Düdüklü tencere tabanının çapı - referanslar
Standartlarla ilgili bilgiler:
Yüksek çalışma basıncı: 80 kPa.
Maksimum güvenlik basıncı: 120 kPa.
Uyumlu ısı kaynakları
•CLIPSO® MODULO 2 düdüklü tencere,
endüksiyon dahil tüm ısı kaynakları üzerinde
kullanılır.
•Elektrik plakası üzerinde, düdüklü tencerenin
tabanına eşit veya daha küçük çapta bir plaka
kullanın.
Kapasite ØHazne Ø Taban
CLIPSO
®
MODULO 2
Gövde ve kapak
malzemesi
4,5 L 22 cm 18 cm P42706
Paslanmaz çelik
6 L 22 cm 18 cm P42807
8 L 25 cm 20 cm P42814
10 L 25 cm 20 cm P42815
Hazneyi boşken
ısıtmayın,
ürününüze zarar
verebilirsiniz.
GAZ PLAKA
ELEKTRİKLİ
SERAMİKCAM
HALOJEN
INDÜKSIYON
SPİRAL
ELEKTRİK
Tanımlayıcı şema
*Modele göre değişir
EXE_IFU_TE_MODULO-2_4136751_mise en page 06/12/11 17:30 Page45
Page 48

46
•Seramik cam tabla üzerinde haznenin dibinin
temiz ve net olmasından emin olun.
•Gaz üzerinde, alevin haznenin çapını aşmaması
gerekmektir.
•Tüm Ocaklar üzerinde, düdüklü tencerenizin tam
olarak ortalanmasına dikkat edin.
TEFAL aksesuarları
•CLIPSO® MODULO 2 düdüklü tencerenin
piyasadan temin edilebilecek aksesuarları
şunlardır:
•
Başka parçaların değiştirilmesi veya onarımlar
için, Yetkili bir TEFAL Servis Merkezine müracaat
ediniz.
•Sadece modelinize uygun orijinal TEFAL
parçaları kullanın.
Kullanım
Açma
•
Kapağın açma düğmesi (E) üzerine basın - şekil 1
Kapatma
•
Kapağın kapatma düğmesi (B) üzerine basın
- şekil 2
Aksesuarlar Referans
Conta (lastik)
4,5/6L
X1010004
8/10L
X1010003
Buhar sepeti
4,5/6L
792185
8/10L
980513
Sacayak
X1030007
Kıskaçların kapağın
kenarına temas
etmesi
gerekmektedir.
EXE_IFU_TE_MODULO-2_4136751_mise en page 06/12/11 17:30 Page46
Page 49

TR
47
Maksimum ve minimum
doldurma
•
Minimum 25 cl (2 bardak) - şekil 3
•
Maksimum hazne (M) yüksekliğinin 2/3’ü
- şekil 4
Bazı besinler için
•
Pirinç, susuz sebzeler veya kompostolar gibi
pişirme esnasında genleşen besinler için,
düdüklü tencereyi kapasitesinin yarısından fazla
doldurmayın. Çorbalarda, hızlı basınç düşürme
işlemi yapmanızı tavsiye ediyoruz.
Buhar sepetinin kullanılması
•
Haznenin dibine 75 cl su koyun.
•
Buhar sepeti ayağını (J) buhar sepetinin (I)
altına takın - şekil 5 ve 6
•
Hepsini haznenin dibine yerleştirin - şekil 7
Çalışma supabının kullanılması
İşleyiş supabını yerine takmak için
•
İşleyiş supabını, pozisyon göstergesini (D)
kapak üzerindeki şekille bir hizaya
getirerek takın
- şekil 8
•
Buhar tahliye çubuğunun yerine oturması için,
supabı bastırın.
•
İşleyiş supabının orta kısmı üzerine (A) bastırın
ve arzulanan pozisyona dek çevirin
- Şekil 8
Hassas besinleri ve sebzeleri pişirmek için
•
İşleyiş supabının pozisyon göstergesini (D), 1
üzerine getirin – Şekil 9
Et, balık ve donmuş gıdalar pişirmek için
•
İşleyiş supabının pozisyon göstergesini (D), 2
üzerine getirin – Şekil 10
Buhar sepetine
yerleştirilmiş olan
besinlerin düdüklü
tencerenin
kapağına temas etmemesi gerekmektedir.
EXE_IFU_TE_MODULO-2_4136751_mise en page 06/12/11 17:30 Page47
Page 50

48
İşleyiş supabını yerinden çıkarmak için
•
İşleyiş supabının orta kısmı üzerine (A) bastırın
ve pozisyon göstergesini
(D) kapak üzerindeki
şekille bir hizaya
- Şekil 11
•
Supabı yerinden çıkarın
Katlanabilir saplar*
Kullanmadan önce sapların üzerindeki etiketleri
sökün.
Sapları, kilit açma düğmelerine basmadan
katlamayı denemeyin.
İlk kullanım
• Buhar sepeti ayağını (J) buhar sepeti (I) altına
takın
- şekil 5 ve 6
• Buhar sepetini (I) haznenin dibine yerleştirin
- şekil 7
• Haznenin (M) 2/3’üne su doldurun.
• Düdüklü tencereyi kapatın.
• Çalışma supabını (A) yerleştirin ve 2 üzerine
getirin.
• Düdüklü tencereyi maksimum güçte ayarlanmış
olan bir sıcaklık kaynağı üzerine yerleştirin.
• Buhar supaptan çıkmaya başladığında ateşi kısın
ve 20 dakika tutun.
• 20 dakika geçtiğinde, ateşi kapatın.
• Supabı pozisyonuna kadar çevirin.
Clipso modulo 2® ’u,
asla sapları katlanmış* durumdayken bir ısı kaynağı
üzerinde bırakmayın.
Sapları katlamak için:
Sapları kullanım
konumuna
getirmek için:
"KLİK "
*Modele göre değişir
EXE_IFU_TE_MODULO-2_4136751_mise en page 06/12/11 17:30 Page48
Page 51

TR
49
• Basınç göstergesi
(G)
aşağı indiğinde: düdüklü
tencerenizde artık basınç bulunmamaktadır.
• Düdüklü tencereyi açın
- şekil 1
Pişirme öncesi
•Her kullanımdan önce gözle, buhar çıkış kanalının
(C)
tıkalı olmamasını kontrol edin
- şekil 12
•Emniyet supabının hareketli olmasını kontrol
edin:“Temizlik ve bakım” paragrafına bakınız.
•Düdüklü tencereyi kapatın
- şekil 2
•Supabı
(A)
yerine takın
- şekil 8
•Sonuna kadar bastırın ve seçilen pişirme
pozisyonuna kadar çevirin
- şekil 9
•Çalıştırmadan önce düdüklü tencerenin uygun bir
şekilde kapanmış olmasından emin olun.
•Düdüklü tencereyi maksimum güçte ayarlanmış
olan bir sıcaklık kaynağı üzerine yerleştirin.
Pişirme esnasında
•
Çalışma supabı sürekli olarak düzenli bir ses
çıkararak (PSCHHHT) buhar çıkarıyorsa, sıcaklık
kaynağını kısın.
•
Tarifte belirtilmiş olan pişirme süresini tutun.
•
Pişirme esnasında, supaptan sürekli ses geliyor
olmasına dikkat edin. Buhar yoksa, hafifçe
sıcaklık kaynağını açın, aksi durumda sıcaklık
kaynağını kısın.
EXE_IFU_TE_MODULO-2_4136751_mise en page 06/12/11 17:30 Page49
Page 52

50
Pişirme sonu
Buharı serbest bırakmak için
•
Sıcaklık kaynağı kapatıldığında, iki
seçeneğiniz bulunmaktadır:
•
Basıncın yavaş bir şekilde boşaltılması:
çalışma supabını
(A) pozisyonuna kadar
çevirin. Basınç göstergesi
(G) aşağı
indiğinde: düdüklü tencereniz artık basınçlı
değildir.
•
Basıncın hızlı bir şekilde boşaltılması:
düdüklü tencerenizi soğuk su musluğunun
altına koyun
– şekil 13 . Basınç göstergesi (G)
aşağı indiğinde: düdüklü tencereniz artık
basınçlı değildir. çalışma supabını
(A)
pozisyonuna kadar çevirin.
•Düdüklü tencerenizi açabilirsiniz
- şekil 1
Temizlik ve bakım
Düdüklü tencerenin
temizlenmesi
•
Cihazınızın düzgün çalışması için, her
kullanımdan sonra bu temizlik ve bakım
talimatlarına uyunuz.
•
Düdüklü tencereyi her kullanımın ardından
bulaşık deterjanı eklenmiş ılık su ile yıkayın.
Sepeti de aynı şekilde temizleyin.
•
Çamaşır suyu veya klorlu ürünler kullanmayın.
•
Haznenizi boşken ısıtmayınız.
Uzun kullanımlar
sonrasında belirebilecek olan kararma
ve çizikler önemli
değildir.
Eğer basınç göstergesi
(G) aşağıya inmiyorsa,
düdüklü tencerenizi
soğuk su musluğunun
altına koyun – şekil 13
Bu basınç göstergesi
üzerine asla müdahale
etmeyin.
Buhar tahliyesi sırasında
normal olmayan bir
püskürme söz konusu
olması halinde, işleyiş
supabını (A) pişirme
pozisyonuna getirin:
1
veya 2, ardından çabuk
basınç alma işlemini
uygulayın.
EXE_IFU_TE_MODULO-2_4136751_mise en page 06/12/11 17:30 Page50
Page 53

TR
51
Haznenin içini temizlemek için
•
Bir bulaşık süngeri ve bulaşık deterjanı ile
yıkayın.
•
Paslanmaz haznenin içerisinde izler
oluşmuşsa, sirke ile temizleyin.
Haznenin dışını temizlemek için
•
Bir sünger ve bulaşık deterjanı ile yıkayın.
Kapağı temizlemek için
•
Kapağı bir sünger ve bulaşık deterjanı ile
yıkayın.
Kapağın contasını temizlemek için
•
Her pişirme işleminin ardından, contayı (H)
ve conta bölmesini temizleyin.
•
Contanın yeniden yerine takılması için,
şekil 14’e bakınız ve "face côté couvercle"
ibaresinin kapağın karşısında olmasına
dikkat edin.
Çalışma supabını (A) temizlemek için
•
Çalışma supabını (A) çıkarın - şekil 11
•
Çalışma supabını (A) musluktan akan suyun
altında temizleyin
- şekil 15
•
Hareketli olmasını kontrol edin: yandaki
çizim
Kapak üzerinde yer alan çalışma supabı
kanalını temizlemek için
•
Supabı (A) kaldırın - şekil 11
•
Buhar tahliye kanalının tıkanık olmamasını
ve yuvarlak olmasını gözle kontrol edin
-
şekil 12
. Gerekirse bir kürdan yardımıyla
temizleyin
- şekil 16 ve durulayın.
Hazneyi ve sepeti
bulaşık makinesinde yıkayabilirsiniz.
İşleyiş supabını (A)
ve contayı (H)
çıkardıktan sonra,
kapağı bulaşık makinesine koyabilirsiniz.
Kapağın içerisinde
yer alan vidayı ve
somunu asla sökmeyin
EXE_IFU_TE_MODULO-2_4136751_mise en page 06/12/11 17:30 Page51
Page 54

52
Emniyet supabını (F) temizlemek için
•
Kapağın içerisinde yer alan emniyet supabı
kısmını suyun altına tutarak temizleyin.
• Kulak çubuğu yardımıyla hareketli olması
gereken parçası üzerine güçlü bir şekilde
bastırarak düzgün çalışmasını kontrol edin
-
şekil 17
Düdüklü tencerenizin contasını değiştirmek
için
•
Düdüklü tencerenizin contasını her sene
değiştirin.
• Eğer bir kesik bulunuyorsa düdüklü
tencerenizin contasını değiştirin.
• Her zaman modelinize tekabül eden orijinal bir
TEFAL contası alın.
Düdüklü tencerenizi kaldırmak için
•
Kapağı hazne üzerinde ters çevirin.
Clipso® Modulo 2 ürününüzün sapları
katlanabiliyorsa* :
•
Sapların kilit açma düğmelerine (N) basın.
“Katlanabilir saplar” paragrafına bakın.
•
Sapları, kilit açma düğmelerine basmadan
katlamayı* denemeyin.
Emniyet
Otomatik pişiriciniz birçok emniyet tertibatı
donanımlıdır:
•Kapatma işleminde emniyeti
– Kıskaçların kapağın kenarına temas etmesi
gerekmektedir. Temas etmiyorsa basınç
göstergesi seviyesinde bir buhar sızıntısı
olacaktır ve düdüklü tencerenin basıncı
yükselmeyecektir.
•Açma işleminde emniyet:
- Eğer düdüklü tencere basınç altında ise, açma
düğmesi hareket ettirilemez.
- Düdüklü tencereyi asla zorla açmayın.
- Basınç göstergesi ile kesinlikle oynamayınız.
- İçerdeki basıncın düşmüş olmasından emin
olun.
Düdüklü tencerenizin kalitesini uzun
süre korumak için:
hazneyi, boşken
ısıtmayın.
Bu işlemi gerçekleştirmek için asla
kesici veya sivri bir
nesne kullanmayınız.
Her 10 senelik kullanım süresinin
ardından düdüklü
tencerenin Yetk ili bir
TEFAL Servis merkezinde kontrol ettirilmesi
gerekmektedir.
EXE_IFU_TE_MODULO-2_4136751_mise en page 06/12/11 17:30 Page52
Page 55

TR
53
•
Aşırı basınca karşı iki emniyet:
- İlk tertibat: emniyet supabı
(F) basıncı serbest bırakır
- şekil 19
- İkinci tertibat: conta kapak ile hazne arasından
buharın çıkmasını sağlar
- şekil 20
Eğer aşırı basınca karşı emniyet sistemlerinden
biri devreye girerse:
•Sıcaklık kaynağını kapatın.
•Düdük lü tencerenin tamamen soğumasını bekleyin.
•Açın.
•Çalışma supabını (A), buhar tahliye kanalını (C),
emniyet supabını
(F) ve contayı (H) kontrol edin
ve temizleyin.
•Eğer tüm bu kontroller ve temizleme işlemlerinin
ardından ürününüzde sızıntı oluyorsa veya
çalışmıyorsa, yetkili bir TEFAL servis merkezine
götürün.
Kullanım önerileri
1 - Çalışma supabından çıktığında buhar çok
sıcaktır.
2 - Basınç göstergesi işareti yükseldiğinde, düdüklü
tencerenizi artık açamazsınız.
3 - Tüm pişirme cihazları için olduğu gibi, özellikle
düdüklü tencereyi çocukların yakınında
kullanıyorsanız çok dikkatli olun.
4 - Buhar püskürmesine dikkat edin..
5 - Düdüklü tencereyi taşımak için, haznenin iki
sapını kullanın.
6 - Düdüklü tencerenin içerisinde besinleri
bırakmayın.
7 - Paslanmaz çeliğin kalitesini bozabilecek olan
çamaşır suyu veya klorlu ürünleri asla
kullanmayın.
8 - Kapağı suya batırılmış olarak bırakmayın.
9 - Contayı her sene değiştirin.
10 - Düdüklü tencerenin temizliği mutlaka soğukken
ve cihaz boşken yapılmalıdır.
11 - Her 10 senelik kullanım süresinin ardından
düdüklü tencerenin Yetkili bir TEFAL Servis
merkezinde kontrol ettirilmesi gerekmektedir.
EXE_IFU_TE_MODULO-2_4136751_mise en page 06/12/11 17:30 Page53
Page 56

54
Garanti
•Kullanım talimatlarında öngörülen şekilde
kullanıldığı takdirde yeni TEFAL pişiricinizin
gövdesi şunlara karşı 10 yıl garantilidir:
- Gövdenin metal yapısından kaynaklanan tüm
arızalar,
- Metal tabanın erken aşınması.
•Her türlü imalat hatası veya kusuru için tüm
diğer parçalarda bakım ve işçilik garantisi 1
yıldır (ülkenizdeki yasalara göre değişebilir).
•Bu garanti, ürünün kasa fişi veya satın alınma
tarihini içeren faturanın ibraz edilmesi üzerine
geçerlidir.
•Şunlar garanti kapsamında değildir:
•Önemli uyarıların dikkate alınmaması veya yanlış
kullanımdan kaynaklanan arızalar, yani:
- Darbeler, düşürme, fırına koyma…
•Yalnızca Yetkili TEFAL Servis Merkezleri bu
garantiden yararlanmanıza onay verebilir.
•Size en yakın Yetkili TEFAL Servis Merkezinin
adresini öğrenmek için 444 40 50 Müşteri
Hizmetleri Danışma Hattı’nı arayın.
EXE_IFU_TE_MODULO-2_4136751_mise en page 06/12/11 17:30 Page54
Page 57

TR
55
Yönetmeliğe bağlı işaretler
İşaret Yeri
Üretici veya ticari marka adı Kapatma düğmesi
Üretim senesi
Model referansı
Maksimum emniyet basıncı (PS)
Yüksek çalışma basıncı (PF)
Kapak « açık» pozisyonda iken gözle
görülebilir şekilde kapağın üst kenarı üzerinde
Kapasite Haznenin dış tabanı üzerinde
EXE_IFU_TE_MODULO-2_4136751_mise en page 06/12/11 17:30 Page55
Page 58

56
Sorunlar, Öneriler
Kapağı
kapatamıyorsanız:
Açma düğmesinin (E) basılı pozisyonda olmasını kontrol
edin.
Contanın doğru yönde takılmış olmasını kontrol edin "Temizlik ve bakım " paragrafına bakınız.
Eğer düdüklü
tencere içerisinde
sıvı olmadan
basınç altında
ısındı ise:
Düdüklü tencerenizi TEFAL Yetkili Servis Merkezine kontrol ettirin.
Eğer basınç
gösterge işareti
yükselmedi ise ve
pişirme esnasında
supaptan hiçbir
şey çıkmıyorsa:
Bu ilk dakikalarda normaldir.
Eğer aynı şey devam ederse şunları kontrol edin:
- Sıcaklık kaynağının yeterince güçlü olmasını kontrol
edin, değilse yükseltin.
- Hazne içerisindeki sıvı miktarının yeterli olmasını,
- Çalışma supabının
1
veya 2üzerine getirilmiş olmasını,
- Düdüklü tencerenin iyice kapanmış olmasını,
- Contanın veya hazne kenarının hasar görmüş olmamasını,
- Contanın kapak içerisine doğru bir şekilde yerleştirilmiş
olmasını kontrol edin, “Temizlik ve Bakım” paragrafına
bakınız.
Eğer basınç
gösterge işareti
yükseldi ise ve
pişirme esnasında
supaptan hiçbir
şey çıkmıyorsa:
Bu ilk dakikalarda normaldir. Eğer aynı şey devam derse,
basınç göstergesi aşağı inene kadar cihazınızı soğuk
suyun altına tutun.
Çalışma supabını
- şekil 15
ve buhar tahliye kanalını
-
şekil 16
temizleyin ve emniyet supabı başlığına zorlan-
madan basılıyor olmasını kontrol edin
- şekil 17
.
TEFAL sorularınızı cevaplıyor
EXE_IFU_TE_MODULO-2_4136751_mise en page 06/12/11 17:30 Page56
Page 59

TR
57
Sorunlar, Öneriler
Eğer kapağın
etrafından buhar
sızıyorsa, şunları
kontrol edin:
Kapağın iyi kapanmış olmasını.
Kapak contasının yerleştirilmesini.
Contanın iyi durumda olmasını, gerekirse değiştirin.
Kapağın, contanın ve kapak üzerindeki bölmesinin
temiz olmasını.
Hazne kenarının iyi durumda olmasını.
Kapağı
açamıyorsanız:
Basınç gösterge işaretinin düşük pozisyonda olmasını kontrol edin.
Değilse: basıcı giderin, gerekirse düdüklü tencereyi
soğuk suyun altına tutun.
Bu basınç göstergesine asla müdahale etmeyin.
Eğer kapak
etrafından, kulak
tırmalayıcı bir ses ile
birlikte buhar
çıktığını görürseniz:
Contanın tencere ile kapak arasına sıkışıp
sıkışmadığını kontrol edin
Eğer besinler
pişmemiş veya
yanmış ise, şunları
kontrol edin:
Pişirme süresi.
Sıcaklık kaynağı gücü.
Çalışma supabının doğru konumda olması.
Sıvı miktarı.
Eğer besinler düdüklü
tencere içerisinde
yandı ise:
Yıkamadan önce hazneyi suya batırılmış olarak bekletin.
Asla çamaşır suyu veya klorlu ürünler kullanmayın.
Eğer emniyet
sistemlerinden biri
harekete geçerse:
Sıcaklık kaynağını kapatın.
Düdüklü tencereyi hareket ettirmeden önce
soğumasını bekleyin.
Basınç gösterge işaretinin inmesini bekleyin ve açın.
Çalışma supabını, buhar tahliye kanalı çubuğunu,
emniyet supabını ve contayı kontrol edin ve temizleyin.
Arıza devam ederse, cihazınızı TEFAL Yetkili Servis
Merkezine kontrol ettirin.
Kullanım konumunda
katlanabilir sapları*
katlayamıyorsanız:
Şunları kontrol edin:
Kilit açma düğmesi* hareketli mi ?
Durum devam ederse tencerenizin Yetkili bir TEFAL
Servis Merkezi tarafından kontrol edilmesini
sağlayın.
Katlanabilir
sapları* katlayamıyorsanız:
• Zorlamayın.
• Sapların kilit açma düğmelerine* bastığınızdan
emin olun.
*Modele göre değişir
EXE_IFU_TE_MODULO-2_4136751_mise en page 06/12/11 17:30 Page57
Page 60

58
GARANTİ BELGESİ
GARANTİ İLE İLGİLİ OLARAK DİKKAT EDİLMESİ GEREKEN HUSUSLAR
Groupe Seb İstanbul tarafından verilen bu garanti, ürünün kullanma kılavuzunda yer alan
hususlara aykırı kullanılmasından doğacak arızaların giderilmesini kapsamadığı gibi,
aşağıdaki durumlar garanti dışıdır.
1. Kullanma hatalarından meydana gelen hasar ve arızalar,
2. Hatalı elektrik tesisatı kullanılması nedeniyle meydana gelebilecek arıza ve hasarlar,
3. Tüketici ürünü teslim aldıktan sonra, dış etkenler nedeniyle (vurma, çarpma, vs.)
meydana gelebilecek hasarlar,
4. Garantili onarım için yetkili servise başvurulmadan önce Groupe Seb yetkili personeli
veya yetkili servis personeli dışında birinin, cihazı onarım veya tadiline kalkışması
durumunda,
5. Üründe kullanılan aksesuar parçalar.
Yukarıda belirtilen arızaların giderilmesi ücret karşılığı yapılır.
GARANTİ ŞARTLARI
Bu ürün ev kullanımı için tasarlanmıştır. Profesyonel kullanım için uygun değildir.
1. Garanti Süresi, ürünün teslim tarihinden itibaren başlar ve 2 yıldır.
2. Ürünün bütün parçaları dahil olmak üzere tamamı firmamızın garantisi kapsamındadır.
3. Ürünün garanti süresi içinde arızalanması durumunda, tamirde geçen süre garanti süresine
eklenir.
4. Ürünün tamir süresi en fazla 30 iş günüdür. Bu süre, ürünün servis istasyonuna, servis
istasyonunun olmaması durumunda, ürünün satıcısı, bayii, acentası, temsilciliği, ithalatçısı
veya imalatçısından birine bildirim tarihinden itibaren başlar.
5. Sanayi ürününün arızasının 15 iş günü içerisinde giderilmemesi halinde, imalatçı veya
ithalatçı; ürünün tamiri tamamlanıncaya kadar, benzer özelliklere sahip başka bir sanayi
ürününü tüketicinin kullanımına tahsis etmek zorundadır.
6. Ürünün garanti süresi içerisinde, gerek malzeme ve işçilik, gerekse montaj hatalarından
dolayı arızalanması halinde, işçilik masrafı, değiştirilen parça bedeli ya da başka herhangi
bir ad altında hiçbir ücret talep etmeksizin, tamiri yapılacaktır.
7. Ürünün:
-Teslim tarihinden itibaren garanti süresi içinde kalmak kaydıyla bir yıl içerisinde, aynı
arızayı ikiden fazla tekrarlaması veya farklı arızaların dörtten fazla veya belirlenen garanti
süresi içerisinde farklı arızaların toplamının altıdan fazla olması unsurlarının yanı sıra, bu
arızaların üründen yararlanmamayı sürekli kılması,
-Tamiri için gereken azami sürenin aşılması,
-Servis istasyonunun mevcut olmaması halinde sırasıyla satıcısı, bayii, acentası, temsilciliği,
ithalatçısı veya imalatçısından birinin düzenleyeceği raporla arızanın tamirinin mümkün
bulunmadığının belirlenmesi durumlarında, ücretsiz olarak değiştirme işlemi yapılacaktır.
8. Ürünün kullanma kılavuzunda yer alan hususlara aykırı kullanılmasından kaynaklanan
arızalar garanti kapsamı dışındadır.
9. Garanti süresi içerisinde, servis istasyonları tarafından yapılmasının zorunlu olduğu, imalatçı
veya ithalatçı tarafından şart koşulan periyodik bakımlarda; verilen hizmet karşılığında
tüketiciden işçilik ücreti veya benzeri bir ücret talep edilemez.
10. Garanti belgesi ile ilgili olarak çıkabilecek sorunlar için T.C. Sanayi ve Ticaret Bakanlığı
Tüketicinin ve Rekabetin Korunması Genel Müdürlüğü’ne başvurulabilir.
Bu Garanti Belgesi’nin kullanılmasına 4077 sayılı Kanun ile bu Kanun’a dayanılarak yürürlüğe
konulan Garanti Belgesi Uygulama Esaslarına Dair Tebliğ uyarınca, T.C. Sanayi ve Ticaret
Bakanlığı Tüketicinin ve Rekabetin Korunması Genel Müdürlüğü tarafından izin verilmiştir.
EXE_IFU_TE_MODULO-2_4136751_mise en page 06/12/11 17:30 Page58
Page 61

TR
59
İMALATÇI VEYA İTHALATÇI FİRMANIN:
Ünvanı : Groupe SEB İstanbul Ev Aletleri Tic. A.Ş.
Adresi : Beybi Giz Plaza Dereboyu Cad. Meydan
sok. No:28 Kat:12 34398
Maslak/İstanbul
DANIŞMA HATTI: 444 40 50
FİRMA YETKİLİSİNİN:
MALIN:
Markası : TEFAL
Cinsi : DÜDÜKLÜ TENCERE
Modeli : P42706, P42707, P42814, P42815
Belge İzin Tarihi :14.04.2009
Garanti Belge No : 67898
Azami Tamir Süresi : 30 gün
Garanti Süresi : 2 yıl
Kullanım Ömrü : 7 Yıl
SATICI FİRMANIN
Ünvanı :
Adresi :
Tel-Telefax :
Fatura Tarih ve No :
Teslim Tarihi ve Yeri :
TARİH-İMZA-KAŞE :
Size en yakın servisimizi 444 40 50 numaralı Tüketici Danışma
Hattımızdan öğrenebilirsiniz.
EXE_IFU_TE_MODULO-2_4136751_mise en page 06/12/11 17:30 Page59
Page 62

60
Düdüklü tencerenizle
hazırlayabileceğiniz 10 lezzetli tarif
Tüm tarifler 4 kişiliktir. 6 litreden az kapasiteye
sahip tencereler için, 1/3’lik kısmını azaltın.
Giriş
Sebze çorbası
4 patates, 1 pırasa, 4 havuç, 1 şalgam, 1 litre su, tuz, karabiber, 3 çorba kaşığı krema (arzuya
bağlı olarak).
Sebzelerin kabuklarını soyun ve yıkayın.
Patatesleri ve şalgamı küpler halinde kesin. Havuçları ve
pırasayı ince dilimler halinde kesin.
Tencereye 1 litre su koyun, ardından sebzeleri doldurun,
tuz ve karabiber ekleyin.
Tencereyi kapatın. Düdük ötmeye başlar başlamaz, ateşi
kısın ve belirtilen süre boyunca pişmeye bırakın. Su
altında basıncını alın.
Servis yapmadan önce, arzuya göre krema ekleyin.
Balık
Kağıtta narenciyeli jülyen balık
4 adet her biri 150 g jülyen morina balığı fileto, 1 adet greyfurt, 1 adet portakal, 1 yeşil limonun
suyu, 2 domates, 1 soğan, 2 diş kıyılmış sarımsak, 60 g tereyağı, 1 bardak sek beyaz şarap,
birkaç yaprak tarhun otu, tuz, karabiber
Domatesleri halkalar halinde kesin. Soğanı soyun ve
çok ince olarak kıyın.
Sularını korumaya dikkat ederek greyfurt ve portakalı
soyun ve çeyrek dilimlerini ayırın.
Dört adet alüminyum folyo üzerine hafifçe üst üste
gelecek şekilde 3 domates halkasını yerleştirin. Biraz
soğanla ve kıyılmış sarımsakla kaplayın, birkaç yaprak
tarhun otu ekleyin ve jülyen filetolarını yerleştirin. 1
çorba kaşığı beyaz şarabı ve 2 çorba kaşığı greyfurt-
4 kişilik
Hazırlama: 15 dakika
Supap pozisyonu:
1
Pişirme süresi: 10 dakika
4 kişilik
Hazırlama: 25 dakika
Supap pozisyonu:
2
Pişirme süresi: 8 dakika
EXE_IFU_TE_MODULO-2_4136751_mise en page 06/12/11 17:30 Page60
Page 63

TR
61
portakal suyunu dökebilmek amacıyla her folyonun
kenarlarını kaldırın. Birkaç damla yeşil limon suyu, tuz
ve karabiber ekleyin.
Her balık üzerine 1 greyfurt çeyreği, 2 portakal çeyreği
ve 15g soğuk tereyağı koyun. Folyoları güzelce kapatın
ve özenle buhar sepeti içerisine yerleştirin.
Düdüklü tencere içerisine 70 cl su koyun. Su ile temas
etmemesine dikkat ederek buhar sepetini yuvasını
takın.
Düdüklü tencereyi kapatın. Supap ötmeye
başladığında, ateşi kısın ve belirtilen süre boyunca
pişirin. Pişirme sonunda, düdüklü tencereyi açın. Buhar
sepetini düdüklü tencere içerisinden çıkarın ve her
tabağa dikkatlice 1 adet julienne’li folyo koyun.
Folyoları masada makas yardımıyla açın ve isteğe bağlı
olarak avokado salatası ile servis yapın
Kuzu
Buharda kuzu yahni
600 g kuzu boyun gerdanı ve 600 g parçalar halinde kesilmiş kaburga kemiği, 1 demet havuç,
1 demet taze soğan, 1 demet taze şalgam, 4 adet küçük taze patates, 100 g taze fasulye, 2 adet
kabuğu soyulmuş domates, 2 diş sarımsak, 1 demet garnitür, 1 çorba kaşığı kıyılmış tarhun
otu, 30 g tereyağı, 15 cl beyaz şarap, 1 tatlı kaşığı yeşil anason, 1 çorba kaşığı zeytinyağı, 1
çorba kaşığı un, tuz, karabiber
Bütün sebzeleri soyun ve temizleyin. Düdüklü tencere
içerisinde et parçalarını ve sıvıyağ ve tereyağı içerisinde
kıyılmamış sarımsağı çevirin. Karabiber ve tuz ekleyin.
Unu yavaş yavaş ekleyin ve iyice karıştırın. Beyaz şarabı
dökün, anasonu, garnitürü ve domatesleri ekleyin. Etin
ıslanması için etin üzerine geçecek kadar su ekleyin.
Kaynatın. Düdüklü tencereyi kapatın. Supap ötmeye
başladığında, ateşi kısın ve belirtilen ilk süre boyunca
pişirin. Pişirme işlemi sonunda düdüklü tencereyi açın.
Sebzeleri ekleyin, tuz ve karabiber koyun. Düdüklü
tencereyi yeniden kapatın. Supap ötmeye
başladığında, ateşi kısın ve belirtilen ikinci süre
boyunca pişirin. Pişirme işlemi sonunda, düdüklü
tencereyi açın. Eti ve sebzeleri süzün, garnitürü ve
sarımsağı çıkarın. Yoğun bir sos elde edene kadar güçlü
ateşte pişirme sıvısını kaynatın. Eti ve sebzeleri bir
tabağa alın ve yemeğin suyunu üzerinde gezdirin.
Tarhun otu serpin ve servis yapın.
4 kişilik.
Hazırlama : 20 dakika
Supap pozisyonu:
2
Pişirme süresi: 10 dakika
+ 7 dakika
EXE_IFU_TE_MODULO-2_4136751_mise en page 06/12/11 17:30 Page61
Page 64

62
Dana eti
Üç hardallı kızartma et
1 kg rosto olarak sarılmış dana eti, 6 adet havuç, 3 diş sarımsak, 1 soğan, 1 buket garni, 2 çorba
kaşığı katı taze krema, 40 g tereyağı, 30 cl sek beyaz şarap, 2 çorba kaşığı Meaux hardal, 1 acı
hardal ve 2 tarhun otlu tatlı hardal, 1 çorba kaşığı sıvıyağ, pudra şekeri, tuz, karabiber.
Sarımsakları rostoya batırın. Düdüklü tencere
içerisinde rostoyu tereyağı ve sıvıyağ ile çevirin. Tuz ve
karabiber ekleyin. Rostoyu çıkarın. Aynı yağda halka
şeklinde doğranmış havuçları çevirin, 2 çorba kaşığı
şeker, tuz ve karabiber ekleyin. Rostoyu yeniden koyun,
garnitürü, soğanı ve beyaz şarabı ekleyin. Düdüklü
tencereyi kapatın. Supap ötmeye başladığında, ateşi
kısın ve belirtilen süre boyunca pişirin. Pişirme işlemi
sonunda, düdüklü tencereyi açın. Rostoyu ve havuçları
çıkarın. Pişirme suyunu çeyrek oranda azalana kadar
harlı ateşte kaynatın. Taze kremayı ekleyin ve 5 dakika
kısık ateşte pişirin, ardından hardalları ekleyin ve
kaynatın. Sosu bir kaba alın ve gerekirse biraz su
ekleyin. Rostoyu kesin. Üzerine sosu dökerek ve
havuçlarla birlikte servis yapın.
Dana eti
Şefin yemeği
1,2 kg dana eti (but parçası veya kol kemiği üzerindeki ince et, sığır kuyruğu), 2 adet ilikli kemik,
800 g büyük patates, 1/2 limon, 3 adet karanfil batırılmış 1 adet soğan, 3 adet havuç, 3 adet
pırasa, 3 adet şalgam, 1 adet kereviz sapı, 1/2 kereviz, 1 baş sarımsak, 1 garnitür demeti, 4
çorba kaşığı Porto, 4 dilim kızarmış köy ekmeği, kornişon, kaya tuzu, tuz, karabiber.
Sebzeleri temizleyin ve soyun, parçalar halinde kesin.
Düdüklü tencere içerisine 2 litre su koyun ve soğanı,
havuçları, pırasaları, şalgamları, kerevizi, sarımsağı,
kereviz sapını ve garnitürü koyun. Tuz ve karabiber
ekleyin. Kaynatın ve ardından içerisine et parçalarını
daldırın. Yüzeyde oluşan köpüğü düzenli olarak alarak
kısık ateşte 10 dakika pişirin.
Düdüklü tencereyi kapatın. Supap ötmeye başladığında,
ateşi kısın ve belirtilen ilk süre boyunca pişirin. Pişirme
işlemi sonunda, düdüklü tencereyi açın. Havuçları,
4 kişilik
Hazırlama: 25 dakika
Supap pozisyonu:
2
Pişirme süresi: 11 dakika
4 kişilik
Hazırlama: 20dakika
Supap pozisyonu:
2
Pişirme süresi: 20 dakika
+ 20 dakika
EXE_IFU_TE_MODULO-2_4136751_mise en page 06/12/11 17:30 Page62
Page 65

TR
63
pırasaları, şalgamı ve kerevizi çıkarın ve ayrı bir yere
koyun. Düdüklü tencereyi yeniden kapatın. Supap
ötmeye başladığında, ateşi kısın ve belirtilen ikinci süre
boyunca pişirin. Pişirme işlemi sonunda, düdüklü
tencereyi açın.
Patatesleri yıkayın ve soyun, bir tencerede tuzlu su ile
pişirin. Et ve patatesler pişerken limon dilimleri hazırlayın
ve mutfak ipi ile bağlayarak bunları her ilikli kemik ucuna
yerleştirin. İlikli kemikleri hafif tuzlu ve limonlu suya
koyun ve 10 dakika kısık ateşte pişirin.
Eti süzün. Etrafına sebzeleri ve kornişon ve kaya tuzunu
koyarak servis yapın.
Kemikleri süzün ve iliğini çıkarın. Bunları kızarmış ekmek
dilimleri ile servis yapın. 3-4 kaşık Porto ekleyerek et
suyunu ayrıca servis yapın.
Tavuk
Bask usulü tavuk
1,5 kg’luk parçalar halinde 1 adet tavuk, 400 g’lık bir kutu soyulmuş bütün domates, 400 g’lık
bir kutu kırmızıbiber, 400 g’lık bir kutu yeşilbiber, 3 diş kıyılmış sarımsak.
Kesmeden önce biberleri özenle süzün. Düdüklü
tencere içerisinde harlı ateşte sarımsağın yarısı ile
birlikte sıvıyağı ısıtın ve ardından tavuk parçalarını bu
yağda çevirin. Tuz ve karabiber ekleyin. Düdüklü
tencerenin dibine yapışmış olan pişirme kalıntılarını
ayırmak için 1 bardak beyaz şarap dökün ve ardından
tavukları çıkarın.
Aynı düdüklü tencere içerisinde, soğanları kavurun.
Kesilmiş biberleri ekleyin ve 5 dakika harlı ateşte
karıştırarak pişirin. Domatesleri, garnitürü, sarımsağı ve
kalan şarabı ekleyin. Tuz ve karabiber dökün. 3 dakika
pişirin ve tavuk parçalarını yeniden koyun. Düdüklü
tencereyi kapatın. Supap ötmeye başladığında, ateşi
kısın ve belirtilen süre boyunca pişirin. Garnitür
demetini çıkarın ve her tabak içerisine birkaç parça
tavuk ile Bask usulü garnitür koyun. Pirinç pilavı ile
birlikte servis yapın.
4 kişilik
Hazırlama: 20 dakika
Supap pozisyonu:
2
Pişirme süresi: 11 dakika
EXE_IFU_TE_MODULO-2_4136751_mise en page 06/12/11 17:30 Page63
Page 66

64
Sebzeler
Tür lü
5 adet halka halka kesilmiş kabak, 4 adet küp şeklinde kesilmiş patlıcan, 4 adet dörde
bölünmüş büyük domates, 2 adet küp küp doğranmış kırmızıbiber, 1 adet uzun çubuk halinde
kesilmiş yeşilbiber, 2 adet kıyılmış büyük boy soğan, 1 diş püre halinde ezilmiş sarımsak, 1 dal
kekik, 1 adet defneyaprağı, 1 dal biberiye, bir küçük tas fesleğen, 1/2 kap kişniş, 6 çorba kaşığı
zeytinyağı, tuz, karabiber.
Düdüklü tencere içerisinde, harlı ateşte soğanları,
kırmızıbiberleri ve yeşilbiber çubuklarını 3 çorba kaşığı
zeytinyağı ile çevirin. Kızardıklarında, patlıcan küplerini,
kabak halkalarını, domatesleri ve kalan sıvıyağı ekleyin.
En son kekik, defneyaprağı, fesleğeni ekleyin. Tuz ve
karabiber koyun. İyice karıştırın.
Düdüklü tencereyi kapatın. Supap ötmeye
başladığında, ateşi kısın ve belirtilen süre boyunca
pişirin. Pişirme işlemi sonunda, düdüklü tencereyi açın
ve yeniden kısık ateş üzerine koyun ve yaklaşık 10
dakika boyunca kapaksız olarak türlünün suyunu
çekmesini bekleyin. Gerekirse baharatlardan yeniden
ekleyin. Türlüyü sıcak olarak ve üzerine kişniş ve
biberiye ekleyerek servis yapın.
Pirinç pilavı
200 g pirinç, 40 g tereyağı, 75 cl tavuk suyu tableti, 4 çorba kaşığı yer fıstığı, tuz, karabiber.
Pirinci birkaç kere duru su ile yıkayın ve iyice kurutun.
Düdüklü tencere içerisinde sıvıyağ ve 20 g tereyağı ile
pirinci kısık ateşte kavurun. Tuz ve karabiber ekleyin.
Karıştırın ve tavuk bulyonu ekleyin. Düdüklü tencereyi
kapatın. Supap ötmeye başladığında, ateşi kısın ve
belirtilen süre boyunca pişirin. Pişirme işlemi sonunda,
düdüklü tencereyi açın. Pirinci çıkarın ve süzün. Büyük
bir servis tabağına alın, kalan tereyağı ekleyin ve
karıştırın.
Bu pirinç pilavı egzotik yemeklerin, balıkları ve et
yemeklerin yanında servis yapılır
6 kişilik
Hazırlama: 15 dakika
Supap pozisyonu:
1
Pişirme suresi: 14 dakika
4 kişilik
Hazırlama: 20 dakika
Supap pozisyonu: 1
Pişirme süresi: 8 dakika
EXE_IFU_TE_MODULO-2_4136751_mise en page 06/12/11 17:30 Page64
Page 67

TR
65
Tatlılar
Karamelli 3 elma püresi
4 adet kokulu elma, 4 adet granny smith elma, 4 adet Kanada elma, 100 g çam fıstığı, 60 g
tereyağı, 100 g ham şeker, 2 tutam toz tarçın, 1 tatlı kaşığı sıvı vanilya, 1 tutam toz zencefil.
Elmaları soyun, çekirdeklerini çıkarın ve 2 cm
kalınlığında dilimleyin. Düdüklü tencere içerisinde,
tereyağı ile kısık ateşte elmaları çevirin. Tarçını,
vanilyayı, zencefili, ham şekeri ve çam fıstıklarını
ekleyin. Bir tahta kaşık yardımı ile karıştırın. Düdüklü
tencereyi kapatın. Supap ötmeye başladığında, ateşi
kısın ve belirtilen süre boyunca pişirin. Pişirme işlemi
sonunda, düdüklü tencereyi açın. Kompostoyu soğuk
veya ılık olarak bir top vanilyalı dondurma veya 1 çorba
kaşığı krema ile servis yapın.
Küçük krem karameller
25 cl süt, 1/2 ikiye bölünmüş vanilya parçası, 3 yumurta sarısı, 100 g toz şeker, birkaç damla
sirke.
Sütü vanilya ile birlikte kaynatın. Bir toprak kap
içerisine 50 g şeker ve yumurta sarılarını koyun. İyice
beyaz bir karışım elde edene kadar hızlı bir şekilde
çırpın. Kaynar sütü (vanilyayı çıkardıktan sonra) azar
azar karıştırmaya devam ederek yumurtaların üzerine
dökün.
Kalın tabanlı bir tencere içerisine kalan şekeri, 2 çorba
kaşığı su ve birkaç damla sirkeyi koyun. Kısık ateşte sarı
bir karamel elde edene kadar ısıtın. Dört adet küçük
peynirli çöreği karamele bulayın. Yumurtalı karışımı bir
süzgeç yardımı ile süzün ve çöreklerin içerisine dökün.
Çörekleri bir parça alüminyum folyo ile kaplayın.
Çörekleri buhar sepetine koyun.
Düdüklü tencere içerisine 75 cl su koyun ve buhar
sepetini yuvasına takın. Düdüklü tencereyi kapatın.
Supap ötmeye başladığında, ateşi kısın ve belirtilen
süre boyunca pişirin. Pişirme işlemi sonunda, düdüklü
tencereyi açın. Buzdolabına koymadan önce
kremaların soğumasını bekleyin.
Bir tabağa alın ve soğuk servis yapın.
4 - 6 kişilik
Hazırlama: 15 dakika
Supap pozisyonu:
1
Pişirme süresi: 6 dakika
4 kişilik
Hazırlama: 15 dakika
Supap pozisyonu:
1
Pişirme süresi: 7 dakika
EXE_IFU_TE_MODULO-2_4136751_mise en page 06/12/11 17:30 Page65
Page 68

66
Pişirme süreleri tablosu
Sebzeler
* Buhar sepetindeki besin
** Sudaki besin
Pişirme
TAZ E
Supap pozisyonu
1
DONDURULMUŞ
Supap pozisyonu
2
Andiv - buhar 12 dak.
Balkabağı (püre) - sıvı ile 8 dak.
Bezelye - buhar 1 dak. 30' 4 dak.
Brokoli - buhar 3 dak. 3 dak.
Brüksel lahanası - buhar 7 dak.
Buğday (Kuru sebze) - sıvı ile 15 dak.
Enginar
- buhar* 18 dak.
- sıvı ile** 15 dak.
Havuç Halka halinde - buhar 7 dak. 5 dak.
Ispanak
- buhar 3 dak.
- sıvı ile 5 dak. 8 dak.
Kabak
- buhar 6 dak. 30' 9 dak.
- sıvı ile 2 dak.
Karnabahar - sıvı ile 3 dak. 4 dak.
Kereviz
- buhar 6 dak.
- sıvı ile 10 dak.
Kırmızı pancar - buhar 20-30 dak.
Kuşkonmaz - sıvı ile 5 dak. 5 dak. daldırma
Mantar
Kıyılmış - buhar 1 dak. 5 dak.
Bütün - sıvı ile 1 dak. 30'
Nohut (Kuru sebze) - sıvı ile 14 dak.
Patates elma
- buhar 12 dak.
- sıvı ile 6 dak.
Pırasa halka - buhar 2 dak. 30'
Pirinç (Kuru sebze) - sıvı ile 7 dak.
Şalgam
- buhar 7 dak.
- sıvı ile 6 dak.
Taze fasulye - buhar 8 dak. 9 dak.
Yarı kuru fasulye - sıvı ile 20 dak.
Yeşil lahana
Kıyılmış - buhar 6 dak.
Yaprakları ayrılmış - buhar 7 dak .
Yeşil mercimek
(Kuru sebze)
- sıvı ile 10 dak.
EXE_IFU_TE_MODULO-2_4136751_mise en page 06/12/11 17:30 Page66
Page 69

TR
67
Etler - Balıklar
TAZ E
Supap pozisyonu
2
DONDURULMUŞ
Supap pozisyonu
2
Dana (rosto 1 kg) 10 dakika 28 dakika
Kuzu ( 1.3 kg but) 25 dakika 35 dakika
Levrek balığı (0,6 kg fileto) 4 dakika 6 dakika
Somon (0,6 kg 4 dilim) 6 dakika 8 dakika
Tavuk (Bütün 1.2 kg) 20 dakika 45 dakika
Ton balığı (4 dilim 0,6 kg) 7 dakika 9 dakika
EXE_IFU_TE_MODULO-2_4136751_mise en page 06/12/11 17:30 Page67
Page 70

68
Σημαντικές προφυλάξεις
Για την ασφάλειά σας, η παρούσα συσκευή έχει κατασκευαστεί σύμφωνα με τα
εφαρμοστέα πρότυπα και κανονισμούς:
- Οδηγία περί εξοπλισμού υπό πίεση
- Υλικά σε επαφή με τροφές
- Περιβάλλον
• Η παρούσα συσκευή προορίζεται για οικιακή χρήση.
• Αφιερώστε χρόνο για να διαβάσετε όλες τις οδηγίες και να ανατρέχετε πάντα στις
“Οδηγίες χρήσης”.
• Όπως ισχύει για όλες τις συσκευές μαγειρέματος, βεβαιωθείτε ότι υπάρχει στενή
επίβλεψη κατά τη χρήση της χύτρας, ιδίως εάν βρίσκονται στον χώρο παιδιά.
• Μην τοποθετείτε τη χύτρα μέσα σε ζεστό φούρνο.
• Μετακινήστε τη χύτρα υπό πίεση με τη μέγιστη προσοχή. Μην αγγίζετε τις ζεστές
επιφάνειες. Να χρησιμοποιείτε τις λαβές και τα κουμπιά. Χρησιμοποιήστε γάντια κουζίνας
εάν χρειαστεί.
• Να χρησιμοποιείτε τη χύτρα αποκλειστικά για τον σκοπό που προορίζεται.
• Η χύτρα ψήνει υπό πίεση. Η ακατάλληλη χρήση μπορεί να προκαλέσει τραυματισμό από
ζεμάτισμα. Βεβαιωθείτε ότι η χύτρα είναι καλά κλεισμένη πριν τη θέσετε σε λειτουργία.
Δείτε την παράγραφο “Κλείσιμο”.
• Βεβαιωθείτε ότι η βαλβίδα είναι σε θέση αποσυμπίεσης προτού ανοίξετε τη χύτρα.
• Μην ανοίγετε ποτέ τη χύτρα με βία. Βεβαιωθείτε ότι η εσωτερική πίεση έχει υποχωρήσει.
Δείτε την παράγραφο “Ασφάλεια”.
• Ποτέ μη χρησιμοποιείτε τη χύτρα χωρίς υγρό διότι κάτι τέτοιο μπορεί να της προκαλέσει
σοβαρές βλάβες. Να φροντίζετε πάντοτε να υπάρχει αρκετό υγρό κατά το μαγείρεμα.
• Να χρησιμοποιείτε μία ή περισσότερες συμβατές πηγές θερμότητας, σύμφωνα με τις
οδηγίες χρήσης.
• Μη μαγειρεύετε ποτέ συνταγές που περιέχουν γάλα μέσα στη χύτρα
CLIPSO®MODULO 2.
• Μην χρησιμοποιείτε ακατέργαστο αλάτι στην χύτρα ταχύτητος. Καλύτερα να
χρησιμοποιείτε κατεργασμένο αλάτι προς το τελείωμα του μαγειρέματος.
• Μη γεμίζετε τη χύτρα περισσότερο από τα 2/3 της χωρητικότητάς της (ένδειξη μέγιστης
πλήρωσης).
• Για τρόφιμα που διαστέλλονται κατά το μαγείρεμα, όπως το ρύζι, τα αφυδατωμένα
λαχανικά ή οι κομπόστες, ... μη γεμίζετε τη χύτρα πάνω από το ήμισυ της χωρητικότητάς
της. Για συγκεκριμένες σούπες που περιέχουν κολοκύθα ή κολοκυθάκια, αφήστε την
χύτρα σας να κρυώσει για μερικά λεπτά.
• Μετά από το μαγείρεμα κρεάτων που έχουν πέτσα (π.χ. βοδινή γλώσσα…), το οποίο
ενδέχεται να διογκωθεί υπό πίεση, μην τρυπήσετε το κρέας εάν το δέρμα φαίνεται
διογκωμένο. Υπάρχει κίνδυνος πρόκλησης εγκαύματος. Σας συνιστούμε να τρυπάτε το
κρέας πριν από το μαγείρεμα.
• Για πηχτά τρόφιμα (φάβα, ραβέντι...), πρέπει να κουνήσετε ελαφρώς τη χύτρα πριν από
το άνοιγμα για να μην πεταχτεί η τροφή προς τα έξω.
• Πριν από οποιαδήποτε χρήση, βεβαιωθείτε ότι δεν είναι φραγμένες οι βαλβίδες. Δείτε
την παράγραφο “Πριν από το μαγείρεμα”.
• Μη χρησιμοποιείτε τη χύτρα για να τηγανίσετε υπό πίεση με λάδι.
• Μην εκτελείτε παρεμβάσεις στα συστήματα ασφαλείας πέρα από αυτές που
υποδεικνύονται στις οδηγίες καθαρισμού και συντήρησης.
• Να χρησιμοποιείτε αποκλειστικά γνήσια αν ταλλακτικά της TEFAL που είναι κατάλληλα για
το μοντέλο σας. Ειδικότερα, να χρησιμοποιείτε κάδο και καπάκι
CLIPSO®MODULO 2.
• Οι ατμοί οινοπνεύματος είναι εύφλεκτοι. Αφήστε τη χύτρα να φθάσει σε βρασμό για
περίπου 2 λεπτά πριν τοποθετήσετε το καπάκι.
• Να επιβλέπετε τη συσκευή κατά την προετοιμασία συνταγών που περιέχουν αλκοόλ.
• Μη χρησιμοποιείτε τη χύτρα για να αποθηκεύετε όξινα ή αλατισμένα τρόφιμα πριν και
μετά από το μαγείρεμα, υπάρχει κίνδυνος πρόκλησης φθοράς στον κάδο.
• Ποτέ μην τοποθετείτε τη χύτρα με κατεβασμένες* τις λαβές πάνω σε μια πηγή
θερμότητας.
Φυλάξτε τις παρούσες οδηγίες
* ανάλογα με το μοντέλοr
EXE_IFU_TE_MODULO-2_4136751_mise en page 06/12/11 17:30 Page68
Page 71

EL
69
A. Βαλβίδα λειτουργίας
B. Κουμπί κλεισίματος
C. Σωλήνας εκκένωσης ατμού
D. Ένδειξη θέσης βαλβίδας
E. Κουμπί ανοίγματος
F. Βαλβίδα ασφαλείας
G. Δείκτης παρουσίας πίεσης
H. Λάστιχο
I. Καλάθι ατμού
J. Τρίποδο
K. Κάδος
L. Χερούλια*
M. Ένδειξη μέγιστης πλήρωσης
N.Κουμπί απασφάλισης των
λαβών*
O. Πτυσσόμενα χερούλια*
Χαρακτηριστικά
Διάμετρος του πυθμένα της χύτρας κωδικοί
Κανονιστικές πληροφορίες:
Ανώτατη πίεση λειτουργίας: 80 kPa.
Μέγιστη πίεση ασφαλείας: 120 kPa.
Συμβατές πηγές
θερμότητας
•Η χύτρα CLIPSO® MODULO 2 χρησιμοποιείται
για όλους τους τρόπους θέρμανσης
συμπεριλαμβανομένης της επαγωγής.
•Σε ηλεκτρική πλάκα, φροντίστε η διάμετρός
της να είναι ίση ή μικρότερη από αυτήν του
πυθμένα της χύτρας.
Χωρητικό-
τητα
Διάμετρος
κάδου
Διάμετρος
πυθμένα
CLIPSO
®
MODULO 2
Υλικό κάδου
και καπακιού
4,5 λ. 22 εκ. 18 εκ. P42706
Ανοξείδωτο
6 λ. 22 εκ. 18 εκ. P42807
8 λ. 25 εκ. 20 εκ. P42814
10 λ. 25 εκ. 20 εκ. P42815
Μη ζεσταίνετε τη
χύτρα ενώ αυτή
είναι άδεια, διότι
υπάρχει κίνδυνος
πρόκλησης ζημιάς
στη συσκευή.
Περιγραφικό διάγραμμα
* ανάλογα με το μοντέλοr
EXE_IFU_TE_MODULO-2_4136751_mise en page 06/12/11 17:30 Page69
ΑΕΡΙΟ ΗΛΕΚΤΡΙΚΗ
ΕΣΤΙΑ
ΚΕΡΑΜΙΚΗ
Η΄ΑΛΟΓΟΝΟΥ
ΕΠΑΓΩΓΗ
ΗΛΕΚΤΡΙΚΗ
ΕΣΤΙΑ ΣΠΙΡΑΛ
Page 72

70
•Σε κεραμική εστία ή εστία αλογόνου, βεβαιωθείτε ότι
η βάση του κάδου είναι στεγνή και καθαρή.
•Σε εστία γκαζιού, η φλόγα δεν πρέπει να
υπερβαίνει τη διάμετρο του κάδου.
•Σε οποιαδήποτε εστία μαγειρέματος, φροντίστε η
χύτρα να βρίσκεται ακριβώς στο κέντρο της
εστίας.
Εξαρτήματα TEFAL
•Τα εξαρτήματα για τη χύτρα CLIPSO® MODULO 2 που
διατίθενται στα εμπορικά καταστήματα είναι τα εξής:
•Για την αντικατάσταση άλλων εξαρτημάτων ή για
επισκευές, επικοινωνήστε με ένα εξουσιοδοτημένο
κέντρο σέρβις της TEFAL.
•Να χρησιμοποιείτε αποκλειστικά γνήσια
ανταλλακτικά της TEFAL που είναι κατάλληλα για
το μοντέλο σας.
Χρήση
Άνοιγμα
•Πατήστε το κουμπί ανοίγματος
(E)
στο καπάκι
- εικ. 1
.
Κλείσιμο
•Πατήστε το κουμπί κλεισίματος
(B)
στο καπάκι
- εικ. 2
.
Εξαρτήματα Κωδικός
Σύνδεσμος
στεγανοποίησης
4,5/6 λ.
X1010004
8/10 λ.
X1010003
Καλάθι ατμού
4,5/6 λ.
792185
8/10 λ.
980513
Τρίποδο
X1030007
Οι σιαγόνες πρέπει
να βρίσκονται σε
επαφή με το χείλος
του καπακιού.
EXE_IFU_TE_MODULO-2_4136751_mise en page 06/12/11 17:30 Page70
Page 73

EL
71
Μέγιστη και ελάχιστη
πλήρωση
•
Ελάχιστη 25 cl (2 ποτήρια) - εικ. 3.
•
Μέγιστη 2/3 του ύψους του κάδου (M) - εικ. 4.
Για ορισμένες τροφές
•Για τρόφιμα που διαστέλλονται κατά το μαγείρεμα,
όπως το ρύζι, τα αφυδατωμένα λαχανικά ή οι
κομπόστες, ... μη γεμίζετε τη χύτρα πάνω από το
ήμισυ του ύψους του κάδου. Στις περιπτώσεις των
σουπών προτείνουμε να κάνετε γρήγορη
αποσυμπίεση.
Χρήση του καλαθιού
ατμού
•
Προσθέστε 75 cl νερό μέσα στον κάδο.
•
Προσαρτήστε το τρίποδο (J) κάτω από το
καλάθι ατμού
(I) - εικ. 5 και 6.
•
Τοποθετήστε το όλο μαζί στον πυθμένα του
κάδου
- εικ. 7.
Χρήση της βαλβίδας
λειτουργίας
Για να βάλετε στη θέση της τη βαλβίδα
λειτουργίας
•Τοποθετήστε τη βαλβίδα λειτουργίας,
ευθυγραμμίζοντας την ένδειξη τοποθέτησης
(D)
με το σύμβολο επάνω στο καπάκι - εικ. 8.
•Πιέστε τη βαλβίδα μέχρι να εφαρμόσει στο
διακόπτη εκτόνωσης ατμού.
•Πατήστε το κεντρικό μέρος της βαλβίδας
λειτουργίας
(A) και στρέψτε το ως την επιθυμητή
θέση
- εικ. 8.
Για να μαγειρέψετε ευαίσθητα τρόφιμα και
λαχανικά
•Βάλτε την ένδειξη θέσης (D) της βαλβίδας
λειτουργίας
(A) στο 1
- εικ. 9
.
Τα τρόφιμα που τοποθετούνται μέσα
στο καλάθι ατμού
δεν πρέπει να αγγίζουν το καπάκι της
χύτρας.
EXE_IFU_TE_MODULO-2_4136751_mise en page 06/12/11 17:30 Page71
Page 74

72
Για να μαγειρέψετε κρεατικά, ψάρι και
κατεψυγμένα τρόφιμα
•Βάλτε την ένδειξη θέσης (D) της βαλβίδας
λειτουργίας στο 2
- εικ. 10.
Για να αφαιρέσετε τη βαλβίδα λειτουργίας
•Πατήστε το κεντρικό μέρος της βαλβίδας
λειτουργίας
(A) και ευθυγραμμίστε την ένδειξη της
θέσης
(D) με το σύμβολο mark on the lid -
εικ. 11.
•Βγάλτε την.
Πτυσσόμενες χερούλια*
Πριν από τη χρήση, αφαιρέστε τις ετικέτες που
υπάρχουν πάνω σε καθένα χερούλι.
Μην επιχειρήσετε να κατεβάσετε τα χερούλια
χωρίς να έχετε πρώτα πατήσει τα κουμπιά
απασφάλισης.
Πρώτη χρήση
• Προσαρτήστε το τρίποδο (J) κάτω από το καλάθι ατμού
(I) - εικ. 5 και 6.
• Τοποθετήστε το καλάθι ατμού (I) στον πυθμένα του
κάδου
- εικ. 7.
• Γεμίστε με νερό έως τα 2/3 του κάδου (M).
• Κλείστε τη χύτρα.
• Τοποθετήστε τη βαλβίδα λειτουργίας (A) και γυρίστε τη
στη θέση
2.
• Τοποθετήστε τη χύτρα πάνω σε μια εστία την οποία
έχετε ρυθμίσει στη μέγιστη ένταση.
Για να κατεβάσετε τα χερούλια:
Για να τοποθετήσετε τα χερούλια
σε θέση χρήσης:
"ΚΛΙΚ"
Ποτέ μην τοποθετείτε την CLIPSO®
MODULO 2 με κατεβασμένα χερούλια
πάνω σε μια εστία
θερμότητας.
* ανάλογα με το μοντέλοr
EXE_IFU_TE_MODULO-2_4136751_mise en page 06/12/11 17:30 Page72
Page 75

EL
73
• Όταν αρχίσει να διαφεύγει ο ατμός από τη βαλβίδα,
μειώστε την ένταση της εστίας και αφήστε να περάσουν
20 λεπτά.
• Μετά από 20 λεπτά, απενεργοποιήστε την εστία.
• Περιστρέψτε τη βαλβίδα λειτουργίας έως τη θέση .
• Όταν πέσει η ένδειξη παρουσίας πίεσης (G): η
χύτρα
δεν είναι πλέον υπό πίεση.
• Ανοίξτε τη χύτρα - εικ. 1.
Πριν από το μαγείρεμα
•Πριν από κάθε χρήση, να επαληθεύετε οπτικά και
τακτικά ότι ο σωλήνας εκκένωσης ατμού (C) δεν
είναι φραγμένος - εικ. 12.
•Βεβαιωθείτε ότι δεν εμποδίζεται η κίνηση της
βαλβίδας ασφαλείας: ανατρέξτε στην παράγραφο
“Καθαρισμός και συντήρηση”.
•Κλείστε τη χύτρα - εικ. 2.
•Τοποθετήστε τη βαλβίδα στη θέση της (A) - εικ. 8.
•Σπρώξτε ως το τέρμα και περιστρέψτε τη στην
επιλεγμένη θέση μαγειρέματος - εικ. 9.
•Βεβαιωθείτε ότι η χύτρα είναι καλά κλεισμένη πριν
τη θέσετε σε λειτουργία.
•Τοποθετήστε τη χύτρα πάνω σε μια εστία την οποία
έχετε ρυθμίσει στη μέγιστη ένταση.
Κατά το μαγείρεμα
• Όταν η βαλβίδα λειτουργίας επιτρέπει τη διαφυγή
του ατμού με συνεχόμενο τρόπο, εκπέμποντας
έναν συνεχή ήχο (ΠΣΣΣΤ), μειώστε την ένταση της
εστίας.
• Αρχίστε να μετράτε αντίστροφα τον χρόνο
μαγειρέματος που υποδεικνύεται στη συνταγή.
• Βεβαιωθείτε ότι κατά τη διάρκεια του μαγειρέματος
η βαλβίδα εκπέμπει συνεχώς έναν χαμηλό ήχο.
• Αν δεν υπάρχει αρκετός ατμός, αυξήστε ελαφρώς την
ένταση της εστίας. Στην αντίθετη περίπτωση,
μειώστε την ένταση της εστίας.
EXE_IFU_TE_MODULO-2_4136751_mise en page 06/12/11 17:30 Page73
Page 76

74
Λήξη του μαγειρέματος
Για την απελευθέρωση του ατμού
• Μόλις σβήσετε την εστία, έχετε δύο επιλογές:
•
Αργή αποσυμπίεση: περιστρέψτε τη
βαλβίδα λειτουργίας
(A) έως τη θέση .
Όταν πέσει η ένδειξη παρουσίας πίεσης
(G)
: η χύτρα δεν είναι πλέον υπό πίεση.
•
Γρήγορη αποσυμπίεση: βρέξτε τη χύτρα με
κρύο νερό βρύσης
- εικ. 13. Όταν πέσει η
ένδειξη παρουσίας πίεσης
(G) : η χύτρα δεν
είναι πλέον υπό πίεση. Περιστρέψτε τη
βαλβίδα λειτουργίας
(A) έως τη θέση .
•Μπορείτε να ανοίξετε τη χύτρα
- εικ. 1
.
Καθαρισμός και συντήρηση
Καθαρισμός της χύτρας
•Για την καλή λειτουργία της συσκευής σας, πρέπει
να τηρείτε τις παρούσες συστάσεις καθαρισμού και
συντήρησης μετά από κάθε χρήση.
•Πλύνετε τη χύτρα μετά από κάθε χρήση με χλιαρό
νερό και υγρό πιάτων. Κάντε το ίδιο και για το
καλάθι.
•Μη χρησιμοποιείτε χλωρίνη ή χλωριωμένα
προϊόντα.
•Μη υπερθερμαίνετε τον κάδο όταν είναι άδειος.
Το μαύρισμα και οι
χαρακιές που μπορεί να εμφανιστούν
μετά από μακρά
χρήση δεν αποτελούν πρόβλημα.
Εάν η ένδειξη παρουσίας
πίεσης (G) δεν έχει πέσει,
βρέξτε τη χύτρα με κρύο
νερό βρύσης - εικ. 13.
Μην παρεμβαίνετε ποτέ
σε αυτήν την ένδειξη
παρουσίας πίεσης.
Αν, κατά την εκτόνωση
του ατμού,
παρατηρήσετε αφύσικες
εκπομπές: βάλτε ξανά τη
βαλβίδα λειτουργίας (A)
στη θέση μαγειρέματος :
1ή
2
, κατόπιν
πραγματοποιήστε
γρήγορη εκτόνωση της
πίεσης.
EXE_IFU_TE_MODULO-2_4136751_mise en page 06/12/11 17:30 Page74
Page 77

EL
75
Για τον καθαρισμό του εσωτερικού του κάδου
•Πλύνετέ το με σύρμα κουζίνας και υγρό πιάτων.
•Εάν το εσωτερικό του ανοξείδωτου κάδου
παρουσιάζει ιριδίζουσες ανακλάσεις, καθαρίστε το
με ξύδι.
Για τον καθαρισμό του εξωτερικού του κάδου
•Πλύνετέ το με ένα σφουγγαράκι και υγρό
πιάτων.
Για τον καθαρισμό του καπακιού
•
Πλύνετε το καπάκι με ένα σφουγγαράκι και
υγρό πιάτων.
Για τον καθαρισμό του λάστιχου του καπακιού
•
Μετά από κάθε χρήση, να καθαρίζετε λάστιχου
(H) και την υποδοχή του.
•
Για να τοποθετήσετε εκ νέου το λάστιχο
στεγανοποίησης στη θέση του, ανατρέξτε στην
εικόνα
- εικ. 14 και φροντίστε η ένδειξη “πίσω
πλευρά καπακιού” να βρίσκεται στην πίσω
πλευρά του καπακιού.
Για τον καθαρισμό της βαλβίδας λειτουργίας (A)
•
Αφαιρέστε τη βαλβίδα λειτουργίας (A) - εικ. 11.
•
Καθαρίστε τη βαλβίδα λειτουργίας (A) με νερό
βρύσης
- εικ. 15.
•
Επαληθεύστε την κινητικότητά της: δείτε το
διπλανό σχήμα
Για τον καθαρισμό του σωλήνα της βαλβίδας
λειτουργίας που βρίσκεται πάνω στο καπάκι
•Αφαιρέστε τη βαλβίδα
(A) - εικ. 11
.
•Να ελέγχετε οπτικά και τακτικά ότι ο σωλήνας
εκκένωσης ατμού δεν έχει φράξει και ότι είναι
στρογγυλός
- εικ. 12
. Αν χρειαστεί, καθαρίστε τον
με μια οδοντογλυφίδα
- εικ. 16
και ξεπλύνετε.
Μπορείτε να πλύνετε τον κάδο και το
καλάθι στο πλυντήριο πιάτων.
Αφού αφαιρέσετε
τη βαλβίδα λειτουργίας (A) και το
σύνδεσμο (H), μπορείτε να πλύνετε το
καπάκι στο πλυντήριο πιάτων.
Μην ξεβιδώνετε
ποτέ τη βίδα και το
παξιμάδι που βρίσκονται στο εσωτερικό του καπακιού.
EXE_IFU_TE_MODULO-2_4136751_mise en page 06/12/11 17:30 Page75
Page 78

76
Για τον καθαρισμό της βαλβίδας ασφαλείας (F)
•
Καθαρίστε το μέρος της βαλβίδας ασφαλείας
που βρίσκεται στο εσωτερικό του καπακιού με
νερό βρύσης.
•
Επαληθεύστε τη σωστή λειτουργία της πιέζοντας
ελαφρώς με μια μπατονέτα τη βαλβίδα, η οποία
πρέπει να κινείται με ευκολία
- εικ. 17.
Για την αντικατάσταση του λάστιχου της χύτρας
•Αντικαταστήστε το λάστιχο της χύτρας μία φορά
ανά έτος.
•Αντικαταστήστε το λάστιχο της χύτρας αν έχει
κοπεί.
•Να αγοράζετε πάντα γνήσια λάστιχα TEFAL που
είναι κατάλληλα για το μοντέλο σας.
Για την αποθήκευση της χύτρας
•
Αναποδογυρίστε το καπάκι πάνω στον κάδο.
Εάν η CLIPSO® MODULO 2 σας διαθέτει
πτυσσομένα χερούλια*:
•
Πατήστε τα κουμπιά απασφάλισης (N) των
λαβών. Δείτε την παράγραφο ‘’Πτυσσόμενα
χερούλια’’.
•
Μην επιχειρήσετε να κατεβάσετε τα
χερούλια* χωρίς να έχετε πρώτα πατήσει τα
κουμπιά απασφάλισης.
Ασφάλεια
Η χύτρα ταχύτητάς σας διαθέτει πολλαπλές
διατάξεις ασφαλείας:
•
Ασφάλεια στο κλείσιμο:
–
Οι σιαγόνες πρέπει να βρίσκονται σε επαφή με το
χείλος του καπακιού. Εάν δεν ισχύει αυτό, θα
υπάρχει διαρροή ατμού στο επίπεδο της ένδειξης
παρουσίας πίεσης και δεν θα είναι δυνατή η αύξηση
πίεσης στη χύτρα.
•
Ασφάλεια στο άνοιγμα:
-
Εάν η χύτρα βρίσκεται υπό πίεση, το κουμπί
ανοίγματος δεν μπορεί να ενεργοποιηθεί.
- Μην ανοίγετε ποτέ τη χύτρα με βία.
Μη χρησιμοποιείτε
ποτέ αιχμηρό ή κοφτερό αντικείμενο
για αυτήν την επέμβαση.
Για να διατηρήσετε
για μεγαλύτερο χρονικό διάστημα τις
ιδιότητες της χύτρας:
μην υπερθερμαίνετε
τον κάδο όταν είναι
άδειος.
Πρέπει οπωσδήποτε
να προσκομίσετε τη
χύτρα για έλεγχο σε
ένα εξουσιοδοτημένο κέντρο σέρβις
της TEFAL μετά από
10 χρόνια χρήσης.
* ανάλογα με το μοντέλοr
EXE_IFU_TE_MODULO-2_4136751_mise en page 06/12/11 17:30 Page76
Page 79

EL
77
- Μην παρεμβαίνετε σε καμία περίπτωση στην
ένδειξη παρουσίας πίεσης.
- Βεβαιωθείτε ότι η εσωτερική πίεση έχει υποχωρήσει.
•
Δύο ασφάλειες υπερπίεσης:
-
Πρώτη διάταξη: η βαλβίδα ασφαλείας (F) εκτονώνει
την πίεση
- εικ. 19.
- Δεύτερη διάταξη ασφαλείας: το λάστιχο επιτρέπει τη
διαφυγή του ατμού που βρίσκεται ανάμεσα στο
καπάκι και τον κάδο
- εικ. 20.
Εάν ενεργοποιηθεί ένα από τα συστήματα
ασφαλείας υπερπίεσης:
•
Απενεργοποιήστε την πηγή θερμότητας.
•
Αφήστε τη χύτρα να κρυώσει εντελώς.
•
Ανοίξτε τη χύτρα.
•
Ελέγξτε και καθαρίστε τη βαλβίδα λειτουργίας
(A), τον σωλήνα εκκένωσης ατμού (C), τη βαλβίδα
ασφαλείας
(F) και λάστιχο (H).
•
Εάν μετά από τον έλεγχο και τον καθαρισμό, η
χύτρα παρουσιάζει διαρροή ή δεν λειτουργεί η
χύτρα, προσκομίστε τη σε ένα εξουσιοδοτημένο
κέντρο σέρβις της TEFAL.
Συμβουλές χρήσης
1 - Ο ατμός είναι υπερβολικά ζεστός όταν βγαίνει
από τη βαλβίδα λειτουργίας.
2 - Όταν αρχίσει να ανεβαίνει η ένδειξη παρουσίας
πίεσης, δεν μπορείτε πλέον να ανοίξετε τη
χύτρα.
3 - Όπως ισχύει για όλες τις συσκευές
μαγειρέματος, βεβαιωθείτε ότι υπάρχει στενή
επίβλεψη κατά τη χρήση της χύτρας εάν
βρίσκονται στον χώρο παιδιά.
4 - Να είστε προσεκτικοί ως προς τις εκτινάξεις
ατμού.
5 - Για να μετακινήσετε τη χύτρα, κρατήστε την
από τις δύο λαβές του κάδου.
6 - Μην αφήνετε τις τροφές για μεγάλο χρονικό
διάστημα μέσα στη χύτρα.
7 - Ποτέ μη χρησιμοποιείτε χλωρίνη ή
χλωριωμένα προϊόντα, γιατί μπορεί να
αλλοιωθεί η ποιότητα του ανοξείδωτου
* ανάλογα με το μοντέλοr
EXE_IFU_TE_MODULO-2_4136751_mise en page 06/12/11 17:30 Page77
Page 80

78
χάλυβα.
8 - Μην αφήνετε το καπάκι να μουλιάσει σε νερό.
9 - Αντικαταστήστε τον σύνδεσμο
στεγανοποίησης μία φορά ανά έτος.
10 - Ο καθαρισμός της χύτρας γίνεται αποκλειστικά
αφού έχει κρυώσει και είναι άδεια.
11 - Πρέπει οπωσδήποτε να προσκομίσετε τη
χύτρα για έλεγχο σε ένα εξουσιοδοτημένο
κέντρο σέρβις της TEFAL μετά από 10 χρόνια
χρήσης.
Εγγύηση
•
Σύμφωνα με την προοριζόμενη χρήση όπως
αυτή προβλέπεται στο εγχειρίδιο χρήσης, ο
κάδος της νέας σας χύτρας ταχύτητας TEFAL
καλύπτεται με εγγύηση 10 ετών για τα εξής:
- Οποιοδήποτε σφάλμα αφορά τη μεταλλική
δομή του κάδου,
- Οποιαδήποτε πρόωρη φθορά του μετάλλου
της βάσης.
•
Ως προς τα άλλα μέρη, η εγγύηση για τα
ανταλλακτικά και το κόστος εργασίας ισχύει
για 1 έτος (εκτός αν ισχύει ειδική νομοθεσία στη
χώρα σας), σχετικά με κάθε βλάβη ή ελάττωμα
κατασκευής.
•
Η συμβατική αυτή εγγύηση αποκτάται κατόπιν
παρουσίασης της ταμειακής απόδειξης ή
τιμολογίου που αποδεικνύει την ημερομηνία
αγοράς.
•
Αυτές οι εγγυήσεις δεν περιλαμβάνουν:
•
Τις φθορές που έχουν προκληθεί από τη μη
τήρηση σημαντικών προφυλάξεων ή από
ακατάλληλες χρήσεις, όπως:
- Χτυπήματα, πτώσεις, τοποθέτηση στον φούρνο, …
•Μπορείτε να χρησιμοποιήσετε την εγγύηση μόνο
στα εξουσιοδοτημένα κέντρα σέρβις της TEFAL.
•Μπορείτε να καλέσετε τον αριθμό Azur για να
μάθετε τη διεύθυνση του πλησιέστερου
εξουσιοδοτημένου κέντρου σέρβις της TEFAL.
EXE_IFU_TE_MODULO-2_4136751_mise en page 06/12/11 17:30 Page78
Page 81

EL
79
•Μπορείτε να επισκεφθείτε την ηλεκτρονική
διεύθυνση της εταιρείας στο www.tefal.gr και θα
βρείτε πολλές υπέροχες συνταγές
Κανονιστικέ ς σημάνσεις
Σήμανση Θέση
Αναγνωριστικό κατασκευαστή ή
εμπορικής ονομασίας
Κουμπί κλεισίματος.
Έτος και παρτίδα κατασκευής
Κωδικός αναφοράς μοντέλου
Μέγιστη πίεση ασφαλείας (PS)
Ανώτατη πίεση λειτουργίας (PF)
Στο επάνω χείλος του καπακιού,
ορατό όταν το καπάκι βρίσκεται στη
θέση “άνοιγμα”.
Χωρητικότητα Στον εξωτερικό πυθμένα του κάδου.
EXE_IFU_TE_MODULO-2_4136751_mise en page 06/12/11 17:30 Page79
Page 82

80
Προβλήματα Συστάσεις
Εάν δεν μπορείτε
να κλείσετε το καπάκι:
Βεβαιωθείτε ότι το κουμπί ανοίγματος (E) έχει πατηθεί σωστά. Επαληθεύστε τη σωστή φορά συναρμολόγησης του συνδέσμου στεγανοποίησης ανατρέχοντας
στην παράγραφο "Καθαρισμός και συντήρηση".
Αν η χύτρα
ζεσταθεί υπό
πίεση χωρίς υγρό
στο εσωτερικό της:
Προσκομίστε τη χύτρα για έλεγχο σε ένα εξουσιοδοτημένο κέντρο σέρβις της TEFAL.
Εάν δεν
ανεβαίνει η
ένδειξη
παρουσίας
πίεσης και δεν
διαφεύγει τίποτε
από τη βαλβίδα
κατά τη διάρκεια
του
μαγειρέματος:
Αυτό είναι φυσιολογικό κατά τα πρώτα λεπτά.
Εάν το φαινόμενο παραμένει, βεβαιωθείτε ότι:
- Η ένταση της πηγής θερμότητας είναι αρκετά ισχυρή,
εάν όχι αυξήστε την.
- Η ποσότητα υγρού μέσα στον κάδο είναι επαρκής.
- Η βαλβίδα λειτουργίας είναι στη θέση 1ή
2
.
- Η χύτρα είναι καλά κλεισμένη.
- Το λάστιχο ή το χείλος του κάδου δεν έχουν φθαρεί.
- Το λάστιχο είναι σωστά τοποθετημένος μέσα στο καπάκι, ανατρέξτε στην παράγραφο "Καθαρισμός και
συντήρηση".
Εάν ανεβαίνει η
ένδειξη
παρουσίας πίεσης
και δεν διαφεύγει
τίποτε από τη
βαλβίδα κατά τη
διάρκεια του
μαγειρέματος:
Αυτό είναι φυσιολογικό κατά τα πρώτα λεπτά.
Εάν το φαινόμενο παραμένει, βρέξτε τη συσκευή με
κρύο νερό έως ότου να κατέβει η ένδειξη παρουσίας πίεσης. Καθαρίστε τη βαλβίδα λειτουργίας
- εικ. 15 και τον
σωλήνα εκκένωσης ατμού
- εικ. 16 και βεβαιωθείτε ότι
η βαλβίδα ασφαλείας πιέζεται χωρίς δυσκολία
- εικ. 17.
Η TEFAL απαντά στις ερωτήσεις σας
EXE_IFU_TE_MODULO-2_4136751_mise en page 06/12/11 17:30 Page80
Page 83

EL
81
Προβλήματα Συστάσεις
Εάν ο ατμός
διαφεύγει γύρω από
το καπάκι,
επαληθεύστε:
Το σωστό κλείσιμο του καπακιού.
Την τοποθέτηση του συνδέσμου στεγανοποίησης.
Την καλή κατάσταση του λάστιχου.
Εάν χρειαστεί, αντικαταστήστε τον.
Την καθαρότητα του καπακιού, του συνδέσμου στεγανοποίησης και της βάσης του μέσα στο καπάκι.
Την καλή κατάσταση του χείλους του κάδου.
Εάν παρατηρήσετε
ατμό να φεύγει από
τα πλάγια μαζί με
έναν ήχο:
Ελέγξτε ότι το λάστιχο είναι σωστά τοποθετημένο
Εάν δεν μπορείτε να
ανοίξετε το καπάκι:
Βεβαιωθείτε ότι η χύτρα βρίσκεται σε θέση αποσυμπίεσης .
Βεβαιωθείτε ότι η ένδειξη παρουσίας πίεσης είναι στη
χαμηλή θέση.
Αν όχι: αποσυμπιέστε, και αν χρειαστεί, αφήστε τη χύτρα
να κρυώσει
βρέχοντάς την με κρύο νερό. Μην παρεμβαίνετε ποτέ σε
αυτήν την ένδειξη πίεσης.
Εάν οι τροφές δεν
έχουν ψηθεί ή έχουν
καεί, επαληθεύστε:
Τον χρόνο ψησίματος.
Την ένταση της πηγής θερμότητας.
Τη σωστή τοποθέτηση της βαλβίδας λειτουργίας.
Την ποσότητα υγρού.
Εάν οι τροφές
κάηκαν μέσα στη
χύτρα:
Αφήστε τον κάδο να μουλιάσει για λίγη ώρα προτού τον
πλύνετε.
Ποτέ μη χρησιμοποιείτε χλωρίνη ή χλωριωμένα προϊόντα.
Εάν ενεργοποιηθεί
ένα από τα
συστήματα
ασφάλειας:
Απενεργοποιήστε την εστία.
Αφήστε τη χύτρα να κρυώσει χωρίς να τη μετακινήσετε.
Περιμένετε έως ότου η ένδειξη παρουσίας πίεσης είναι
στη χαμηλή θέση και ανοίξτε τη χύτρα. Ελέγξτε και καθαρίστε τη βαλβίδα λειτουργίας, το στέλεχος εκκένωσης
ατμού, τη βαλβίδα ασφαλείας και το λάστιχο. Αν η δυσλειτουργία παραμένει, προσκομίστε τη χύτρα για έλεγχο
σε ένα εξουσιοδοτημένο κέντρο σέρβις της TEFAL.
Εάν δεν μπορείτε να
τοποθετήσετε τα
πτυσσόμενα χερούλια* στη θέση χρήσης:
Βεβαιωθείτε ότι:
Δεν εμποδίζεται η κίνηση του κουμπιού απασφάλισης*.
Εάν το φαινόμενο παραμένει, προσκομίστε τη χύτρα
για έλεγχο σε ένα εξουσιοδοτημένο κέντρο σέρβις
της TEFAL.
Εάν δεν μπορείτε να
κατεβάσετε τα πτυσσόμενα χερούλια*:
Μην ασκήσετε πίεση.
Βεβαιωθείτε ότι πιέζετε στη βάση των κουμπιών
απασφάλισης* των χερουλιών.
* ανάλογα με το μοντέλοr
EXE_IFU_TE_MODULO-2_4136751_mise en page 06/12/11 17:30 Page81
Page 84

82
10 νόστιμες συνταγές
για να τις φτιάξετε με τη χύτρα σας
Όλες οι συνταγές πραγματοποιούνται για 4 άτομα.
Για τις χύτρες με χωρητικότητα μικρότερη από 6 λίτρα,
μειώστε τις αναλογίες κατά το ένα τρίτο.
Ορεκτικά
Σούπα λαχανικών
4 πατάτες, 1 πράσα, 4 καρότα, 1 γογγύλια, 1 λίτρο νερό, αλάτι, πιπέρι, 3 κουταλιές της σούπας
κρέμα γάλακτος (προαιρετικά).
Κόψτε σε μεγάλους κύβους τις πατάτες και τα γογγύλια.
Κόψτε τα καρότα και τα πράσα σε μεγάλες ροδέλες.
Βάλτε νερό μέσα στη χύτρα, προσθέστε τα λαχανικά, το
αλάτι και το πιπέρι.
Κλείστε τη χύτρα και αφήστε να μαγειρευτεί κατά τον
υποδεικνυόμενο χρόνο. Στο τέλος του μαγειρέματος,
ανοίξτε τη χύτρα.
Τέλος, προσθέστε την κρέμα γάλακτος πριν από το
σερβίρισμα. Ξεφλουδίστε και πλύντε τα λαχανικά.
Ψάρι
Πουγκιά μουρούνας με λαχανικά
4 φιλέτα μουρούνας 150 g καθένα, 1 γκρέιπ-φρουτ, 1 πορτοκάλι, χυμός από ένα λάιμ,
2 ντομάτες, 1 κρεμμύδι, 2 τεμαχισμένα γλυκά κρεμμυδάκια για στιφάδο, 60 g βούτυρο, 1 ποτήρι
ξηρό λευκό κρασί, μερικά φύλλα εστραγκόν, αλάτι, πιπέρι.
Κόψτε τις ντομάτες σε φέτες. Ξεφλουδίστε και ψιλοκόψτε
το κρεμμύδι.
Ξεφλουδίστε και κόψτε στα τέσσερα το γκρέιπ-φρουτ και το
πορτοκάλι, προσέχοντας να διατηρήσετε το χυμό. Απλώστε
στο κέντρο των τεσσάρων φύλλων αλουμινόχαρτου 3 φέτες
ντομάτα, με τα άκρα τους να αλληλεπικαλύπτονται. Βάλτε
από πάνω λίγο κρεμμύδι και τα τεμαχισμένα κρεμμυδάκια,
προσθέστε μερικά φύλλα εστραγκόν και τα φιλέτα
μουρούνας. Ανασηκώστε τα άκρα από κάθε πουγκί για να
μπορέσετε να χύσετε μέσα 1 κουταλιά της σούπας λευκό
κρασί και 2 κουταλιές της σούπας χυμό από γκρέιπ-φρουτ και
πορτοκάλι. Προσθέστε μερικές σταγόνες λάιμ, αλάτι και
πιπέρι.
4 άτομα
Προετοιμασία : 14 λεπτά
Θέση βαλβίδας :
1
Χρόνος
μαγειρέματος: 10 λεπτά
4 άτομα
Προετοιμασία : 25 λεπτά
Θέση βαλβίδας :
2
Χρόνος
μαγειρέματος: 8 λεπτά
EXE_IFU_TE_MODULO-2_4136751_mise en page 06/12/11 17:30 Page82
Page 85

EL
83
Τοποθετήστε επάνω σε κάθε ψάρι 1 τέταρτο γκρέιπ/φρουτ, 2
τέταρτα πορτοκάλι και 15 γρ. βούτυρο φρέσκο. Κλείστε καλά
τα πουγκιά προτού τα βάλετε απαλά μέσα στο καλάθι ατμού.
Βάλτε 70 cl νερό μέσα στη χύτρα. Τοποθετήστε το καλάθι
ατμού επάνω στο στήριγμά του, προσέχοντας να μην έρχεται
σε επαφή με το νερό. Κλείστε τη χύτρα. Μόλις η βαλβίδα
αρχίσει να σφυρίζει, χαμηλώστε τη φωτιά και αφήστε να
μαγειρευτεί για τον υποδεικνυόμενο χρόνο. Στο τέλος του
μαγειρέματος, ανοίξτε τη χύτρα,
Βγάλτε το καλάθι ατμού της χύτρας και τοποθετήστε
προσεκτικά
1 πουγκί μουρούνας σε κάθε πιάτο. Ανοίξτε τα πουγκιά στο
τραπέζι χρησιμοποιώντας ένα ψαλίδι και σερβίρετέ τα
ενδεχομένως με συνοδεία σαλάτα αβοκάντο.
Αρνί
Ανοιξιάτικο ραγού
600 g λαιμό αρνιού και 600 g παϊδάκια κομμένα σε κομμάτια, 1 μάτσο φρέσκα καρότα, 1 μάτσο
κρεμμυδάκια, 1 μάτσο ραπανάκια, 4 μικρές φρέσκιες πατάτες, 100 g φασολάκια, 2 ντομάτες
ξεφλουδισμένες, 2 σκελίδες σκόρδο, 1 μάτσο μυρωδικά, 1 κουταλιά της σούπας ψιλοκομμένο εστραγκόν,
30 g βούτυρο, 15 cl λευκό κρασί, 1 κουταλάκι του κρασί πράσινο άνηθο, 1 κουταλιά της σούπας ελαιόλαδο,
1 κουταλιά της σούπας αλεύρι, αλάτι, πιπέρι.
Ξ
εφλουδίστε και πλύντε όλα τα λαχανικά. Μέσα στη χύτρα
σοτάρετε έντονα τα κομμάτια του κρέατος και το σκόρδο,
χωρίς να το ξεφλουδίσετε, στο λάδι και το βούτυρο.
Αλατοπιπερώστε. Προσθέστε το αλεύρι σιγά-σιγά και
ανακατέψτε καλά. Προσθέστε το λευκό κρασί, τον άνηθο,
το μάτσο αρωματικών και τις ντομάτες. Στο τέλος, βάλτε το
νερό για να καλύψετε εντελώς το κρέας. Αφήστε το να πάρει
μία βράση.
Κλείστε τη χύτρα. Μόλις η βαλβίδα αρχίσει να σφυρίζει,
χαμηλώστε τη φωτιά και αφήστε να μαγειρευτεί, σύμφωνα με
τον πρώτο υποδεικνυόμενο χρόνο. Στο τέλος του
μαγειρέματος, ανοίξτε τη χύτρα, Προσθέστε τα λαχανικά, αλάτι
και πιπέρι. Κλείστε ξανά τη χύτρα. Μόλις η βαλβίδα αρχίσει
να σφυρίζει, χαμηλώστε τη φωτιά και αφήστε να
μαγειρευτεί, σύμφωνα με το δεύτερο υποδεικνυόμενο
χρόνο. Στο τέλος του μαγειρέματος, ανοίξτε τη χύτρα.
Στραγγίξτε το κρέας και τα λαχανικά, αφαιρέστε το μάτσο
των μυρωδικών και το σκόρδο. Αφήστε να στίψει το ζουμί
σε δυνατή φωτιά, μέχρι που να μείνει μία πηχτή σάλτσα.
Τοποθετήστε το κρέας και τα λαχανικά σε μία πιατέλα και
χύστε από πάνω τη σάλτσα. Πασπαλίστε με το εστραγκόν
και σερβίρετε.
4 άτομα
Προετοιμασία : 20 λεπτά
Θέση βαλβίδας :
2
Χρόνος
μαγειρέματος: 10 λεπτά
+ 7 λεπτά
EXE_IFU_TE_MODULO-2_4136751_mise en page 06/12/11 17:30 Page83
Page 86

84
Μοσχάρι
Ψητό με τρεις μουστάρδες
1 kg μοσχαρίσιο καρέ, δεμένο σε ρολό, 6 καρότα, 3 σκελίδες σκόρδο, 1 κρεμμύδι, 1 μάτσο
αρωματικά βότανα, 2 κουταλιές της σούπας πλήρη κρέμα γάλακτος, 40 g de βούτυρο, 30 cl λευκό
ξηρό κρασί, 2 κουταλιές της σούπας μουστάρδα τύπου Meaux, 1 κουταλιά της σούπας δυνατή
μουστάρδα και 2 κουταλιές της σούπας απαλή μουστάρδα με εστραγκόν, 1 κουταλιά της σούπας
λάδι, ζάχαρη, αλάτι και πιπέρι.
Τρυπήστε το ρολό και στις τρύπες καρφώστε μπαστουνάκια
σκόρδο. Μέσα στη χύτρα, σοτάρετέ το με το βούτυρο και το
λάδι. Αλατοπιπερώστε. Βγάλτε το από την κατσαρόλα.
Σοτάρετε τα καρότα, αφού τα κόψετε σε ροδέλες, προσθέστε
2 κουταλιές της σούπας ζάχαρη, αλάτι και πιπέρι. Βάλτε ξανά
το ρολό, προσθέστε το μάτσο αρωματικών, το κρεμμύδι και
το λευκό κρασί. Κλείστε τη χύτρα. Μόλις η βαλβίδα αρχίσει
να σφυρίζει, χαμηλώστε τη φωτιά και αφήστε να μαγειρευτεί
για τον υποδεικνυόμενο χρόνο. Στο τέλος του μαγειρέματος,
ανοίξτε τη χύτρα.
Βγάλτε το ρολό και τα καρότα. Βράστε το ζουμί σε δυνατή
φωτιά και αφήστε το να στίψει κατά το ένα τρίτο. Προσθέστε
την κρέμα γάλακτος και αφήστε να μαγειρευτεί επί 5 λεπτά
σε χαμηλή φωτιά, κατόπιν ενώστε τις μουστάρδες, χωρίς να
τις αφήσετε να βράσουν. Περάστε τη σάλτσα από το
σουρωτήρι και προσθέστε λίγο νερό, αν είναι απαραίτητο.
Κόψτε το ρολό. Σερβίρετέ το περιχυμένο με τη σάλτσα και με
τα καρότα ως συνοδευτικό.
Βοδινό
Σούπα του σεφ
1,2 kg βοδινό (κότσι ή σπάλα, ουρά, λίγο πλευρά), 2 κόκκαλο με μεδούλι, 800 g μεγάλες πατάτες, 1/2 λεμόνι,
1 κρεμμύδι τρυπημένο με 3 καρφάκια γαρύφαλλο, 3 καρότα, 3 πράσα, 3 γογγύλια, 1 φύλλο σέλινο, 1/2
σελινόριζα, 1 κεφάλι σκόρδο, 1 μάτσο αρωματικών, 4 κουτάλια σούπας κρασί Porto, 4 φέτες χωριάτικο
ψωμί, ψημένες και γαρνιρισμένες με σκόρδο, αγγουράκια τουρσί, αλάτι χονδρό, αλάτι, πιπέρι.
Πλύντε και καθαρίστε τα λαχανικά, κόψτε τα σε κομμάτια.
Βάλτε μέσα στη χύτρα 2 λίτρα νερό και προσθέστε το
κρεμμύδι, τα καρότα, τα πράσα, τα γογγύλια, τη σελινόριζα, το
σκόρδο, το φύλλο του σέλινου κα τα μυρωδικά.
Αλατοπιπερώστε. Αφήστε το να πάρει βράση, κατόπιν βάλτε
μέσα τα κομμάτια του κρέατος. Αφήστε να βράσουν για 10
4 άτομα
Προετοιμασία : 25 λεπτά
Θέση βαλβίδας : 2
Χρόνος
μαγειρέματος: 11 λεπτά
4 άτομα
Προετοιμασία : 20 λεπτά
Θέση βαλβίδας :
2
Χρόνος
μαγειρέματος: 20 λεπτά
+ 20 λεπτά
EXE_IFU_TE_MODULO-2_4136751_mise en page 06/12/11 17:30 Page84
Page 87

EL
85
λεπτά σε σιγανή φωτιά, αφαιρώντας τακτικά τον αφρό που
σχηματίζεται στην επιφάνεια. Κλείστε τη χύτρα. Μόλις η
βαλβίδα αρχίσει να σφυρίζει,Πουλερικά χαμηλώστε τη φωτιά
και αφήστε να μαγειρευτεί σύμφωνα με τον πρώτο
υποδεικνυόμενο χρόνο μαγειρέματος. Στο τέλος του
μαγειρέματος, ανοίξτε τη χύτρα. Αφαιρέστε τα καρότα, τα
πράσα, το γογγύλι και τη σελινόριζα και βάλτε τα στην άκρη.
Κλείστε ξανά τη χύτρα. Μόλις η βαλβίδα αρχίσει να σφυρίζει,
χαμηλώστε τη φωτιά και αφήστε να μαγειρευτεί, σύμφωνα
με τον δεύτερο υποδεικνυόμενο χρόνο. Στο τέλος του
μαγειρέματος, ανοίξτε τη χύτρα. Πλύντε και ξεφλουδίστε τις
πατάτες και βράστε τις σε μία κατσαρόλα με αλατισμένο νερό.
Ενώ βράζει το κρέας και οι πατάτες, κόψτε φέτες από λεμόνι
και βάλτε τις στα άκρα κάθε κόκκαλου και στερεώστε τις με
μαγειρικό σπάγκο. Βάλτε τα κόκκαλα μέσα σε μία κατσαρόλα
με νερό με λίγο αλάτι και λεμόνι και αφήστε τα να βράσουν
για 10 λεπτά σε σιγανή φωτιά. Στραγγίξτε το κρέας. Σερβίρετέ
το γαρνιρισμένο με τα λαχανικά και με συνοδευτικό
αγγουράκια τουρσί και αλάτι χονδρό. Στραγγίξτε τα κόκκαλα
και βγάλτε τους το μεδούλι. Σερβίρετέ το με ψημένες φέτες
ψωμί, τις οποίες έχετε περάσει ελαφρά με μία σκελίδα
σκόρδο. Σερβίρετε ξεχωριστά τη σούπα, αφού της
προσθέσετε 3 -4 κουταλιές της σούπας κρασί Porto
.
Πουλερικά
Βασκικό κοτόπουλο
1 κοτόπουλο 1,5 kg κομμένο σε κομμάτια από το χασάπη, 1 κονσέρβα 400 g ολόκληρες
αποφλοιωμένες ντομάτες, 1 κονσέρβα 400 g κόκκινες πιπεριές, 1 κονσέρβα 400 g πράσινες
πιπεριές, 3 σκελίδες σκόρδο ψιλοκομμένες, 3 τεμαχισμένα κρεμμύδια, 1 μάτσο αρωματικά
βότανα, 2 ποτήρια λευκό κρασί, 4 κουταλιές της σούπας ελαιόλαδο, αλάτι, πιπέρι.
Στραγγίξτε προσεκτικά τις πιπεριές και μετά κόψτε τις σε
κομμάτια. Μέσα στη χύτρα, ζεστάνετε σε δυνατή φωτιά το
ελαιόλαδο με το μισό σκόρδο, κατόπιν σοτάρετε τα κομμάτια
του κοτόπουλο. Αλατοπιπερώστε. Χύστε 1 ποτήρι λευκό
κρασί για να ξεκολλήσετε τους ζωμούς του μαγειρέματος από
τον πάτο της κατσαρόλας, κατόπιν βγάλτε τα κομμάτια.
Μέσα στην ίδια χύτρα, σοτάρετε τα κρεμμύδια. Προσθέστε
τις κομμένες πιπεριές και μαγειρέψτε για 5 λεπτά σε δυνατή
φωτιά, ανακατεύοντας συνέχεια. Προσθέστε τις ντομάτες, το
μάτσο αρωματικών, το υπόλοιπο σκόρδο και το κρασί.
Αλατοπιπερώστε. Αφήστε να σιγοβράσει για 3 λεπτά και
βάλτε ξανά το κοτόπουλο.
Κλείστε τη χύτρα. Μόλις η βαλβίδα αρχίσει να σφυρίζει,
4 άτομα
Προετοιμασία : 20 λεπτά
Θέση βαλβίδας :
2
Χρόνος
μαγειρέματος: 11 λεπτά
EXE_IFU_TE_MODULO-2_4136751_mise en page 06/12/11 17:30 Page85
Page 88

86
χαμηλώστε τη φωτιά και αφήστε να μαγειρευτεί, σύμφωνα
με τον υποδεικνυόμενο χρόνο.
Βγάλτε τα μυρωδικά, κατόπιν βάλτε σε κάθε πιάτο μερικά
κομμάτια κοτόπουλο με τη βασκική γαρνιτούρα. Σερβίρετε
με συνοδευτικό πιλάφι.
Λαχανικά
Μπριαμ
5 κολοκυθάκια σε φέτες, 4 μελιτζάνες σε κύβους, 4 μεγάλες ντομάτες κομμένες στα τέσσερα,
2 κόκκινες πιπεριές σε κύβους, 1 πράσινη πιπεριά σε λωρίδες, 2 μεγάλα κρεμμύδια
ψιλοκομμένα, 3 σκελίδες σκόρδο ξεφλουδισμένες και λιωμένες, 1 κλωναράκι θυμάρι, 1 φύλλο
δάφνης, 1 κλωναράκι δεντρολίβανο, 1 χούφτα φύλλα βασιλικού, 1/2 πρέζα κόλιαντρο,
6 κουταλιές της σούπας ελαιόλαδο, αλάτι, πιπέρι.
Μέσα στη χύτρα, σοτάρετε σε δυνατή φωτιά τα κρεμμύδια,
τους κύβους της κόκκινης πιπεριάς και τις λωρίδες της
πράσινης μέσα σε 3 κουταλιές της σούπας ελαιόλαδο. Όταν
ροδίσουν, προσθέστε τους κύβους της μελιτζάνας, τις φέτες
τα κολοκυθάκια, τις ντομάτες και το υπόλοιπο λάδι.
Ολοκληρώστε με το θυμάρι, τη δάφνη, το δεντρολίβανο και
το σκόρδο. Αλατοπιπερώστε. Ανακινήστε καλά.
Κλείστε τη χύτρα. Μόλις η βαλβίδα αρχίσει να σφυρίζει,
χαμηλώστε τη φωτιά και αφήστε να μαγειρευτεί, σύμφωνα
με τον υποδεικνυόμενο χρόνο. Μόλις ολοκληρωθεί το
μαγείρεμα, ανοίξτε τη χύτρα και ξαναβάλτε τη σε σιγανή
φωτιά και αφήστε να στίψει το φαγητό για δέκα λεπτά
περίπου, χωρίς το καπάκι. Δοκιμάστε για να δείτε αν τα
μπαχαρικά είναι σωστά.
Το μπριάμ σερβίρεται ζεστό, πασπαλισμένο με μίγμα
ψιλοκομμένου βασιλικού και κόλιαντρου.
Ρύζι πιλάφι
200 g ρύζι, 40 g βούτυρο, 75 cl ζωμό κοτόπουλου, 4 κουταλιές της σούπας φιστίκια κελυφωτά,
αλάτι, πιπέρι.
Ξεπλύντε πολλές φορές το ρύζι με καθαρό νερό και
στεγνώστε το καλά. Μέσα στη χύτρα, σοτάρετέ το με το λάδι
και 20 gr βούτυρο σε σιγανή φωτιά. Αλατοπιπερώστε.
Ανακατέψτε και προσθέστε το ζωμό του κοτόπουλου. Κλείστε
τη χύτρα. Μόλις η βαλβίδα αρχίσει να σφυρίζει, χαμηλώστε
τη φωτιά και αφήστε να μαγειρευτεί, σύμφωνα με τον
υποδεικνυόμενο χρόνο. Στο τέλος του μαγειρέματος, ανοίξτε
τη χύτρα.
Βγάλτε το ρύζι και σουρώστε το. Βάλτε το σε ένα μεγάλο
μπολ, προσθέστε το υπόλοιπο βούτυρο και ανακατέψτε.
Αυτό το πιλάφι συνοδεύει τα εξωτικά πιάτα, τα ψάρια, τα
πουλερικά και το μοσχάρι.
6 άτομα
Προετοιμασία : 15 λεπτά
Θέση βαλβίδας :
1
Χρόνος
μαγειρέματος: 14 λεπτά
4 άτομα
Προετοιμασία : 20 λεπτά
Θέση βαλβίδας :
1
Χρόνος
μαγειρέματος: 8 λεπτά
EXE_IFU_TE_MODULO-2_4136751_mise en page 06/12/11 17:30 Page86
Page 89

EL
87
Επιδόρπια
Κομπόστα με τρία καραμελωμένα μήλα
4 μήλα Russet, 4 μήλα Granny Smith, 4 μήλα Canada, 100 g κουκουνάρια, 60 g βούτυρο,
100 g καστανή ζάχαρη, 2 πρέζες κανέλα σε σκόνη, 1 κουταλάκι του καφέ υγρή βανίλια, 1 πρέζα
τζίντζερ σε σκόνη.
Ξεφλουδίστε τα μήλα, αφαιρέστε τον πυρήνα, κατόπιν
κόψτε τα στα τέσσερα με πάχος 2 cm.
Μέσα στη χύτρα, σοτάρετέ τα με το βούτυρο σε σιγανή
φωτιά. Προσθέστε την κανέλα, τη βανίλια, το τζίντζερ, την
καστανή ζάχαρη και τα κουκουνάρια. Ανακατέψτε με ξύλινη
κουτάλα
Κλείστε τη χύτρα. Μόλις η βαλβίδα αρχίσει να σφυρίζει,
χαμηλώστε τη φωτιά και αφήστε να μαγειρευτεί, σύμφωνα
με τον υποδεικνυόμενο χρόνο. Στο τέλος του μαγειρέματος,
ανοίξτε τη χύτρα.
Σερβίρετε την κομπόστα δροσερή ή χλιαρή με μία μπάλα
παγωτό βανίλια ή 1 κουταλιά της σούπας σαντιγί.
Μικρές κρέμες καραμελέ
25 cl γάλα, 1/2 στέλεχος βανίλιας κομμένο στα δύο, 3 κρόκοι αβγού, 100 g ζάχαρη κρυσταλλική,
μερικές σταγόνες ξύδι.
Βράστε το γάλα με τη βανίλια. Σε μπολ, βάλτε 50 g ζάχαρη
και τους κρόκους. Χτυπήστε δυνατά μέχρι να γίνει ένα λευκό
μίγμα. Προσθέστε σιγά-σιγά το βρασμένο γάλα (με τη
βανίλια) στα αβγά, χωρίς να σταματήσετε το χτύπημα. Σε μία
κατσαρόλα με χοντρό πάτο, βάλτε την υπόλοιπη ζάχαρη με 2
κουταλιές της σούπας νερό και μερικές σταγόνες ξύδι.
Ζεστάνετε σε σιγανή φωτιά μέχρι να πετύχετε μία ξανθή
καραμέλα. Ρίξτε λίγη καραμέλα σε τέσσερις ατομικές φόρμες.
Σουρώστε το μίγμα των αβγών με ένα σουρωτήρι και ρίξτε
το μέσα στις φόρμες. Σκεπάστε τις με λίγο αλουμινόχαρτο.
Βάλτε τις φόρμες μέσα στο καλάθι ατμού.
Βάλτε 75 cl νερό μέσα στη χύτρα και βάλτε το καλάθι ατμού
στο υποστήριγμά του. Κλείστε τη χύτρα. Μόλις η βαλβίδα
αρχίσει να σφυρίζει, χαμηλώστε τη φωτιά και αφήστε να
μαγειρευτεί για τον υποδεικνυόμενο χρόνο. Στο τέλος του
μαγειρέματος, ανοίξτε τη χύτρα. Αφήστε τις κρέμες να
κρυώσουν και μετά βάλτε τις στο ψυγείο.
Ξεφορμάρετε σε ένα πιάτο και σερβίρετέ τις κρύες.
4-6 άτομα
Προετοιμασία : 15 λεπτά
Θέση βαλβίδας :
1
Χρόνος
μαγειρέματος: 6 λεπτά
4 άτομα
Προετοιμασία : 15 λεπτά
Θέση βαλβίδας :
1
Χρόνος
μαγειρέματος: 7 λεπτά
EXE_IFU_TE_MODULO-2_4136751_mise en page 06/12/11 17:30 Page87
Page 90

88
Πίνακας χρόνων μαγειρέματος
Λαχανικά
Μαγείρεμα
ΦΡΕΣΚΑ
Θέση της
βαλβίδας
1
ΚΑΤΕΨΥΓΜΕΝΑ
Θέση της
βαλβίδας
2
* Τροφή στο καλάθι ατμού
** Τροφή στο νερό
Αγκινάρες
- ατμός*
18 λεπτά
- βύθιση**
15 λεπτά
Αντίδια
- ατμός
12 λεπτά
Αρακάς
- ατμός
1½ λεπτό 4 λεπτά
Γογγύλια
- ατμός
7 λεπτά
- βύθιση
6 λεπτά
Καρότα ροδέλες
- ατμός
7 λεπτά 5 λεπτά
Κόκκινα παντζάρια
- ατμός
20 - 30 λεπτά
Κολοκυθάκια
- ατμός
6½ λεπτά 9 λεπτά
- βύθιση
2 λεπτά
Κολοκύθα (πολτός)
- βύθιση
8 λεπτά
Κουνουπίδι
- βύθιση
3 λεπτά 4 λεπτά
Λαχανάκια Βρυξελλών
- ατμός
7 λεπτά 5 λεπτά - βύθιση
Μανιτάρια ψιλοκομμένα
- ατμός
1 λεπτό 5 λεπτά
ολόκληρα
- βύθιση
1½ λεπτό
Μπρόκολα
- ατμός
3 λεπτά 3 λεπτά
Πατάτες σε τέταρτα
- ατμός
12 λεπτά
- βύθιση
6 λεπτά
Πράσα σε ροδέλες
- ατμός
2½ λεπτά
Πράσινα φασολάκια
- ατμός
8 λεπτά 9 λεπτά
Πράσινες φακές (ξηρά όσπρια)
- βύθιση
10 λεπτά
Πράσινο λάχανο ψιλοκομμένο
- ατμός
6 λεπτά
σε φύλλα
- βύθιση
7 λεπτά
Ρύζι (ξηρά όσπρια)
- βύθιση
7 λεπτά
Σέλινο
- ατμός
6 λεπτά
- βύθιση
10 λεπτά
Σιτάρι (ξηρά όσπρια)
- βύθιση
15 λεπτά
Σπανάκι
- ατμός
5 λεπτά 8 λεπτά
- βύθιση
3 λεπτά
Σπαράγγια
- βύθιση
5 λεπτά
Φάβα (ξηρά όσπρια)
- βύθιση
14 λεπτά
Φασόλια ξηρά
- βύθιση
20 λεπτά
EXE_IFU_TE_MODULO-2_4136751_mise en page 06/12/11 17:30 Page88
Page 91

EL
89
Κρέας - Ψάρι
ΦΡΕΣΚΟ
Θέση της βαλβίδας 2
ΚΑΤΕΨΥΓΜΕΝΟ
Θέση της βαλβίδας 2
Αρνί (πόδι 1,3 κιλά) 25 λεπτά
35
λεπτά
Βοδινό (ψητό 1 κιλό) 10 λεπτά
28
λεπτά
Κοτόπουλου (ολόκληρο 1,2 κιλά) 20 λεπτά
45
λεπτά
Παχύχελο (φιλέτα 0,6 κιλά) 4 λεπτά
6
λεπτά
Σολομός (4 φέτες 0,6 κιλά) 6 λεπτά
8
λεπτά
Τόνος (4 φιλέτα 0,6 κιλά) 7 λεπτά
9
λεπτά
Χοιρινό (ψητό 1 κιλό) 25 λεπτά
45
λεπτά
EXE_IFU_TE_MODULO-2_4136751_mise en page 06/12/11 17:30 Page89
Page 92

90
îCU¸ ±Ô∏KÒπW
±uÆl «∞BLUÂ 2
îCU¸ ©U“§W
±uÆl «∞BLUÂ 2
82 œÆOIW01 œÆUzo´πq (¸Ëß∑u 1 ØKZ)
54 œÆOIW02 œÆOIWœ§Uà (œ§U§W ØU±KW 2,1 ØKZ)
53 œÆOIW52 œÆOIW{QÊ (≠ªc 3,1 ØKZ)
6 œÆUzo4 œÆUzoßLp ±u≤p (≠OKOt 6,0 ØKZ)
8 œÆUzo6 œÆUzoßKLuÊ (4 ß∑Op 6,0 ØKZ)
9 œÆUzo7 œÆUzo¢u≤t (4 ß∑Op 6,0 ØKZ)
«∞K∫u - «_ßLU„
EXE_IFU_TE_MODULO-2_4136751_mise en page 06/12/11 17:31 Page90
Page 93

AR
91
îCU¸ ±Ô∏KÒπW
±uÆl «∞BLUÂ 2
îCU¸ ©U“§W
±uÆl «∞BLUÂ 1
«∞DNw
81 ϮOIW
- °ªU¸ *
√¸{w ®uØw
51 ϮOIW
- ¨Ld °U∞LU¡ **
5 œÆUzo- ¨Ld °U∞LU¡ ≥KOuÊ
02 - 03 œÆOIW- °ªU¸ ®LMb¸ (°Mπd) √•Ld
3 œÆUzo3 œÆUzo- °ªU¸°dËØKw
5 œÆUzo - ¨Ld °U∞LU¡7 œÆUzo- °ªU¸Ød≤V ±ºuÒ‚ (±KHu· ÅGOd)
6 œÆUzo- °ªU¸®d•U‹
±KHu· , √îCd
7 œÆUzo- °ªU¸√˸«‚
5 œÆUzo7 œÆUzo- °ªU¸®d•U‹§e¸
4 œÆUzo3 œÆUzo- ¨Ld °U∞LU¡Æd≤∂Oj
6 œÆUzo- °ªU¸
Ød≠f
01 œÆUzo- ¨Ld °U∞LU¡
9 œÆUzo03:6 œÆUzo- °ªU¸
Øußv
2 œÆOIW- ¨Ld °U∞LU¡
21 œÆOIW- °ªU¸≥Mb°U¡
9 œÆUzo8 œÆUzo- °ªU¸≠UÅu∞OU¡ îCd«¡
01 œÆUzo- ¨Ld °U∞LU¡´b” √îCd (±πHn)
03:2 œÆOIW- °ªU¸®d•U‹ØdÒ«À
5 œÆUzo1 œÆOIW- °ªU¸®d•U‹
≠Dd
03:1 œÆOIW- ¨Ld °U∞LU¡ ØU±KW
4 œÆUzo03:1 œÆOIW- °ªU¸°U“ô¡
21 œÆOIW- °ªU¸
±ÔJF∂U‹°DU©f
6 œÆUzo- ¨Ld °U∞LU¡
8 œÆUzo- ¨Ld °U∞LU¡ÆdŸ (±NdË”)
7 œÆUzo- ¨Ld °U∞LU¡√¸“ (±ÔπHn)
8 œÆUzo5 œÆUzo- °ªU¸
ß∂U≤a
3 œÆUzo- ¨Ld °U∞LU¡
41 œÆOIW- ¨Ld °U∞LU¡°U“ô¡ •∂u» (±πHHW)
7 œÆUzo- °ªU¸
∞HX
6 œÆUzo- ¨Ld °U∞LU¡
51 œÆOIW- ¨Ld °U∞LU¡ÆL` (±πHn)
02 œÆOIW- °ªU¸
•∂u» «∞IL` «∞MBn ±πHH
§bˉ √ËÆU‹ «∞DNw
«∞ªÔCU¸
* ≠w ßKÒW «∞∂ªU¸
** ¨Ld °U∞LU¡
EXE_IFU_TE_MODULO-2_4136751_mise en page 06/12/11 17:31 Page91
Page 94

92
¢∫COd «∞∂Oi °Uß∑FLU‰ «∞LBHU…, Ë¥ÔºJV ≠w «_©∂U‚. ¢ÔGDv «_©∂U‚
°dÆUzo «_∞LOMOuÂ, £r ¢u{l ≠w ßKÒW «∞∂ªU¸.
¥ÔºJV 57 ßM∑K∑d ±s «∞LU¡ ≠w ©Mπd… «∞CGj , Ë¢u{l ßKW «∞∂ªU¸ ´Kv
«∞∫U±KW «∞∏ö£OW. ¢ÔGKo ©Mπd… «∞CGj . °LÔπdÒœ √Ê ¥∂b√ ÅLÒU «∞∂ªU¸
°U∞BHOd, ¢ÔªHÒi «∞∫d«¸… , Ë¢Ô∑d„ ∞KDNw •ºV «∞uÆX «∞L∫bœ. °Fb «∞DNw,
¢ÔH∑` ©Mπd… «∞CGj.
¢Ô∑d„ «_©∂U‚ ∞Jw ¢∂dœ ¢LU±UÎ , £r ¢u{l ≠w «∞∏öÒ§W.
¢ÔIbÒ °U¸œ….
EXE_IFU_TE_MODULO-2_4136751_mise en page 06/12/11 17:31 Page92
Page 95

AR
93
√¸“ °Oö·
002 §d«Â ±s «_¸“, 04 §d«Â ±s «∞e°b…, 57 ßM∑K∑d ±s ®u¸°W «∞b§UÃ, 4 ±ö´o Ø∂Od… ±s «∞Hº∑o, ±K` Ë ≠KHq.
¥ÔGºq «_¸“ °U∞LU¡ ´b… ±d«‹ £r ¥πHn ¢LU±UÎ. ¥ÔIKv ≠w ©Mπd… «∞CGj °U∞e¥X
Ë02 §d«Â ±s «∞e°b… ≠u‚ ≤U¸ îHOHW . ¥ÔCU· «∞LK` Ë«∞HKHq. ¥Ô∫d„ §Ob«Î
Ë¢ÔCU· «∞Ot ®u¸°W «∞b§Uà . ¢ÔGKo ©Mπd… «∞CGj . °LÔπdÒœ √Ê ¥∂b√ «∞BLUÂ
°U∞BHOd, ¢ÔªHÒi «∞∫d«¸… Ë ¢Ô∑d„ ∞KDNw •ºV «∞uÆX «∞LÔ∫bœ. °Fb «≤ICU¡
ËÆX «∞DNw , ¢ÔH∑` ©Mπd… «∞CGj .
¥Ôd≠l «_¸“ ±s «∞DMπd… Ë¥ÔBHÒv. Ë¥ÔºJV ≠w Æb¸ Ø∂Od Ë¢ÔCU· «∞Ot «∞e°b…
«∞∂UÆOW, Ë¥Ô∫dÒ„ §Ob«Î.
¥ÔF∑∂d √¸“ °Oö· ±Ô∑LLUÎ ∞KJ∏Od ±s «_©∂U‚, ±∏q √©∂U‚ «∞ºLp, «∞DOu¸ Ë∞∫r
«∞Fπq.
«∞∫Ku¥U‹
3 ØL∂u‹ °U∞Jd«±Oq
4 ¢HU•U‹ (ettennier) , 4 ¢HU•U‹ îCd«¡, 4 ¢HU•U‹ ØMb«, 001 §d«Â ±s «∞BMu°d, 06 §d«Â ±s «∞e°b… . 001
§d«Â ±s «∞ºJd «_ßLd, ¸®∑UÊ ±s «∞Id≠W, ±KFIW ÅGOd… ±s ßUzq «∞HU≤OKOU, ¸®W ±s «∞e≤π∂Oq .
¥ÔIAÒd «∞∑HUÕ, ¢Ôe«‰ ±Mt «∞∂c˸, Ë¥ÔIDl «∞v ±JF∂U‹ ßLUØW Øq ±MNU 2 ßM∑r
. ¢ºªÒs ±l «∞e°b… ≠w ©Mπd… «∞CGj °d≠o , ¢ÔCU· «∞ONU «∞Id≠W , «∞HU≤OKOU,
«∞e≤π∂Oq, «∞ºJd «_ßLd Ë «∞BMu°d. ¢Ô∫dÒ„ °u«ßDW ±KFIW îA∂OW.
¢ÔGKo ©Mπd… «∞CGj . °LÔπdÒœ √Ê ¥∂b√ «∞BLU °U∞BHOd, ¢ÔªHÒi «∞∫d«¸… Ë
¢Ô∑d„ ∞KDNw •ºV «∞uÆX «∞LÔ∫bœ. °Fb «≤ICU¡ ËÆX «∞DNw , ¢ÔH∑` ©Mπd…
«∞CGj .
¥ÔIb «∞JL∂u‹ °U¸œ«Î √Ë ßUîMUÎ ´KOt ±KFIW ¬¥f Ød¥r «∞HU≤OKOU, ˱KFIW ±s Ød¥r
≠d¥g.
Ød¥r Ød«±Oq ÅGOd…
52 ßM∑K∑d ±s «∞∫KOV, ≤Bn ±ÔGKÒn ±s «∞HU≤OKOU ¥ÔIºr «∞v ƺLOs, ÅHU¸ 3 °OCU‹, 001 §d«Â ±s «∞ºJd
«∞MU´r, °Cl ÆDd«‹ ±s «∞ªq.
¥ÔGKv «∞∫KOV ±l «∞HU≤OKOU. ¥ÔºJV 05 §d«Â ±s «∞ºJd Ë ÅHU¸ «∞∂Oi ≠w
«∞D∂o. ¥ÔªHo «∞∂Oi «∞v √Ê ¥∑JuÊ ±Mt ±e¥πUÎ «°OCUÎ. ¥ÔºJV «∞∫KOV «∞LGKw
°∂Dv¡ (°Fb ¢Hd¥m ±EdË· «∞HU≤OKOU) ≠u‚ «∞∂Oi ±l «ùß∑Ld«¸ °U∞ªHo.
¢Ôº∑FLq ±Iö… –«‹ ÆU´b… ßLOJW , ¥ÔºJV ≠ONU °IOW «∞ºJd ±l ±KFI∑Os
Ø∂Od¢Os ±s «∞LU¡ Ë °Cl ÆDd«‹ ±s «∞ªq. ¢ÔºªÒs ´Kv ≤U¸ îHOHW ∞∫Os √Ê
¢∑JuÊ ØU¸±Oq «°∑b«zOW. ¢Ôb≥s 4 √©∂U‚ ©Nw ÅGOd… °U∞Jd«±Oq . ¥ÔBHv
4 √®ªU’
ËÆX «∞∑∫COd 02 œÆOIW
±uÆl «∞BLÒUÂ : 1
ËÆX «∞DNw : 8 œÆUzo
4 - 6 √®ªU’
ËÆX «∞∑∫COd : 51 œÆOIW
±uÆl «∞BLUÂ :
1
ËÆX «∞DNw : 6 œÆUzo
4 - 6 √®ªU’
ËÆX «∞∑∫COd : 51 œÆOIW
±uÆl «∞BLUÂ :
1
ËÆX «∞DNw : 7 œÆUzo
EXE_IFU_TE_MODULO-2_4136751_mise en page 06/12/11 17:31 Page93
Page 96

94
«∞DOu¸
œ§Uà °Ußp
5,1 ØKZ œ§Uà ±ÔIDÒl , ´K∂W ±s «∞DLU©r «∞LÔIAÒd… 004 §d«Â , ´K∂W ±s «∞HKOHKW «∞ªCd«¡ 004 §d«Â , ´K∂W ±s
«∞HKOHKW «∞∫Ld«¡ 004 §d«Â , 3 ≠Bu’ £u ±Hd˱W, °UÆW ±s «_´AU» «∞LÔDO∂W, ±dÆW «∞b§UÃ, 4 ±ö´o Ø∂Od… ±s
“¥X «∞e¥∑uÊ, ±K` Ë≠KHq.
¢ÔFBd «∞HKOKHW °d≠o Æ∂q ¢IDOFNU «∞v ®d«z` . ¥ÔºªÒs «∞e¥X ≠w ©Mπd…
«∞CGj Ë ¢ÔIKv ≠Ot ≤Bn ØLOW «∞∏u ´Kv ≤U¸ ´U∞OW, £r ¢ÔIKv ÆDl «∞b§UÃ.
¥ÔCU· «∞LK` Ë«∞HKHq. ¥ÔºJV ±dÆW «∞b§Uà , £r ¢Ôd≠l ÆDl «∞b§UÃ.
¢Ô∫LÒd «∞∂BKW ≠w ≤Hf ©Mπd… «∞CGj . ¢CU· «∞ONU ®d•U‹ «∞HKOHKW, Ë¢ÔDNv
∞Lb… 5 œÆUzo ≠u‚ ≤U¸ ´U∞OW ±l «∞∑∫d¥p §Ob«Î, £r ¢Ôd≠l «∞IDl ±s «∞DMπd….
¢ÔCU· «∞DLU©r, °UÆW «∞e¥MW ±s «_´AU», «∞∏u ˱U ¢∂Iv ±s ±dÆW «∞b§UÃ,
£r «∞LK` Ë«∞HKHq.
¢∑d„ ∞∑ÔDNv ∞Lb… 3 œÆUzo, £r ¢ÔCU· «∞ONU ÆDl «∞b§UÃ.
¢ÔGKo ©Mπd… «∞CGj . °LÔπdÒœ √Ê ¥∂b√ «∞BLU °U∞BHOd, ¢ÔªHÒi «∞∫d«¸… Ë
¢Ô∑d„ ∞KDNw •ºV «∞uÆX «∞LÔ∫bœ. °Fb «≤ICU¡ ËÆX «∞DNw , ¢ÔH∑` ©Mπd…
«∞CGj .
¢Ôd≠l °UÆW «_´AU» , Ë¢u{l °Fi ÆDl «∞b§Uà ≠w Øq ©∂o °UßKu» «∞∂Ußp
∞K∑IDOl. ¢ÔIb ±l √¸“ °Oö·.
«∞ªÔCU¸
¸«¢U¢uÍ
5 •∂ÒU‹ Øußv ±ÔIDFW «∞v ®d«z`, 4 •∂ÒU‹ °U–≤πUÊ ±ÔIDÒFW «∞v ±JF∂U‹, 2 ≠KOHKW •Ld«¡ ±ÔIDFW , 1 ≠KOHKW îCd«¡
±IDFW, °BK∑UÊ Ø∂Od¢UÊ ±Hd˱∑UÊ , 3 ≠Bu’ £u ±IAd… ˱º∫uÆW, ¨Bs ±s «∞e´∑d, ˸ÆW ¨U¸, ¨Bs ±s «ØKOq
«∞π∂q, ±Ib«¸ Øu» ±s «∞d¥∫UÊ, ≤Bn °UÆW ±s «∞Je°d…, 6 ±ö´o Ø∂Od… ±s “¥X «∞e¥∑uÊ, ±K` Ë ≠KHq.
¢Ô∫LÒd «∞∂BKW ≠w ©Mπd… «∞CGj, ±l ±JF∂U‹ «∞HKOHKW «∞∫Ld«¡ «∞ªCd«¡ ≠w
3 ±ö´o ±s “¥X «∞e¥∑uÊ. °Fb ¢∫LOd≥U, ¢ÔCU· ±JF∂U‹ «∞∂U–≤πUÊ, ®d«z`
«∞Jußv, «∞DLU©r, ˱U ¢∂Iv ±s «∞e¥X. Ë ≠w «∞MNU¥W ¥u{l «∞e´∑d, «∞GU¸,
«ØKOq «∞π∂q Ë«∞∏uÂ. ¢Ô∑∂Òq °U∞LK` Ë«∞HKHq, Ë¢Ô∫dÒ„ §Ob«Î.
¢ÔGKo ©Mπd… «∞CGj . °LÔπdÒœ √Ê ¥∂b√ «∞BLU °U∞BHOd, ¢ÔªHÒi «∞∫d«¸… Ë
¢Ô∑d„ ∞KDNw •ºV «∞uÆX «∞LÔ∫bœ. °Fb «≤ICU¡ ËÆX «∞DNw , ¢ÔH∑` ©Mπd…
«∞CGj , Ë¢u{l ´Kv ≤U¸ îHOHW ∞Jw ¢ÔDNv «∞d«¢U¢uÍ ∞Lb… 01 œÆUzo œËÊ
Ë{l «∞GDU¡ ´Kv «∞DMπd…. ¢Ô∑∂Òq ±s √§q «∞Lc«‚ ≈–« ∞e «_±d.
¢ÔIb «∞d«¢U¢uÍ ßUîMW , ±Ôe¥ÒMW °Le¥Z ±s «∞d¥∫UÊ «∞LHdË ˫∞Je°d….
4 √®ªU’
ËÆX «∞∑∫COd : 02 œÆOIW
±uÆl «∞BLUÂ :
2
ËÆX «∞DNw : 11 œÆOIW
6 √®ªU’
ËÆX «∞∑∫COd : 51 œÆOIW
±uÆl «∞BLUÂ :
1
ËÆX «∞DNw : 41 œÆOIW
EXE_IFU_TE_MODULO-2_4136751_mise en page 06/12/11 17:31 Page94
Page 97

AR
95
«∞LÔDOÒ∂W, «∞∂BKW Ë ±dÆW «∞b§UÃ. ¢ÔGKo ©Mπd… «∞CGj . °LÔπdÒœ √Ê ¥∂b√
«∞BLU °U∞BHOd, ¢ÔªHÒi «∞∫d«¸… Ë ¢Ô∑d„ ∞KDNw •ºV «∞uÆX «∞LÔ∫bœ. °Fb
«≤ICU¡ ≥c« «∞uÆX , ¢ÔH∑` ©Mπd… «∞CGj
¢Ôd≠l «∞dËß∑u Ë«∞πe¸ ±s ©Mπd… «∞CGj, Ë¢∂Iv «∞ºu«zq, •OY ¢ÔGKv •∑v
¥MIh •πLNU °Mº∂W «∞∏KY. ¥ÔCU· «∞Jd¥r ≠d¥g, Ë¢Ô∑d„ ∞∑DNv ±b… 5 œÆUzo
´Kv ≤U¸ ≥UœzW, £r ¥ÔCU· «∞ªdœ‰ œËÊ «∞ºLUÕ ∞NU ≥cÁ «∞Ld… √Ê ¢GKw,. ¢ÔIbÂ
«∞LdÆW ±l ≈{U≠W «∞IKOq ±s «∞LU¡ ≈–« «•∑UÃ «_±d.
¢ÔIDÒl «∞dËß∑u, ¢ÔIb ±l «∞LdÆW Ë «∞πe¸.
∞∫r «∞∂Id
¸Ëß∑u «∞AOn (fehc ud uef-ua-toP)
2,1 ØKZ ±s ∞∫r «∞Fπq («∞J∑n, «´Kv «∞Hªc), 2 ±s ≤ªUŸ «∞FEUÂ, 008 §d«Â ±s «∞∂DU©f «∞J∂Od… «∞∫πr, ≤Bn
∞OLu≤W •U±i, °BKW Ë«•b… , 3 §e¸«‹ ±d°u©W, 3 ØdÒ«À ±d°u©W, 3 •∂U‹ ∞HX, 1 ¨Bs Ød≠f, ≤Bn §c¸
ßOKOd¥U„, ≠h £u ˫•b, °UÆW √´AU» ±ÔDOÒ∂W, ±dÆW «∞b§UÃ, 4 ®d•U‹ î∂e ÆL` ±Ô∫LBW ˱b≥u≤W °U∞∏u , ±ªKq,
°Ku¸«‹ «∞LK`, ±K` , ≠KHq.
¢ÔGºq «∞ªÔCU¸ Ë¢ÔMEÒn , £r ¢ÔIDl . ¥ÔºJV ±Ib«¸ 2 ∞∑d ±U¡ ≠w ©Mπd… «∞CGj
, £r ¢CU· «∞∂BKW , «∞πe¸, «∞Jd«À, «∞KHX, «∞ºOKOd¥U„, ≠h «∞∏uÂ, ¨Bs
«∞Jd≠f, Ë °UÆW «_´AU» «∞LÔDOÒ∂W . «∞LK` Ë«∞HKHq. ¢Ô∑d„ ∞Jw ¢GKw , £r ¢ÔºIj
´KONU ÆDl «∞K∫LW. ¢ÔDNv ∞Lb… 01 œÆUzo ´Kv ≤U¸ îHOHW , °OMLU ¢ÔIAb ´MNU
«∞d¨u… «∞∑w ¢∑JuÊ ´Kv ßD∫NU °Uß∑Ld«¸.
¢ÔGKo ©Mπd… «∞CGj . °LÔπdÒœ √Ê ¥∂b√ «∞BLU °U∞BHOd, ¢ÔªHÒi «∞∫d«¸… Ë
¢Ô∑d„ ∞KDNw •ºV «∞uÆX «∞LÔ∫bœ. °Fb «≤ICU¡ ËÆX «∞DNw , ¢ÔH∑` ©Mπd…
«∞CGj . ¥Ôd≠l ±MNU «∞πe¸, «∞Jd≠f , «∞Jd«À , «∞KHX , Ë¢u{l §U≤∂UÎ. ¢ÔGKo
©Mπd… «∞CGj ±d… £U≤OW. °LÔπdÒœ √Ê ¥∂b√ «∞BLU °U∞BHOd, ¢ÔªHÒi «∞∫d«¸…
Ë ¢Ô∑d„ ∞KDNw •ºV «∞uÆX «∞LÔ∫bœ. °Fb «≤ICU¡ ËÆX «∞DNw , ¢ÔH∑` ©Mπd…
«∞CGj .
¢ÔGºq «∞∂DU©f Ë¢ÔIAÒd, Ë¢ÔDNv ≠w Æb¸ °U∞LU¡ «∞LU∞` . °OMLU ¢JuÊ «∞K∫LW
Ë«∞∂DU©f ÆOb «∞DNw, ¢ÔIDl «∞KOLu≤W «∞v ®d•U‹ Ë¢u{l Øq Ë«•b… ≠w
≤NU¥W ≤ªUŸ «∞FEU °u«ßDW îOj ±D∂a. £r ¥u{l ≤ªUŸ «∞FEU ≠w ±Iö…
≠ONU «∞LU¡ «∞LÔMJÒt °FBOd «∞KOLuÊ ±l «∞IKOq ±s «∞LK`, Ë¢ÔDNv ∞Lb… 01 œÆUzo
´Kv ≤U¸ ≥UœzW.
¢ÔBHv «∞K∫LW , Ë¢ÔIb ±Ô∫U©W °U∞ªÔCU¸ ±s •u∞NU Ë °Ku¸«‹ «∞LK` Ë«∞LªKq.
¢ÔBHv «∞FEUÂ Ë ¥ÔMeŸ ±MNU «∞MªUŸ. ¥ÔIb ≤ªUŸ «∞FEU ±l ®d•U‹ ±s «∞ª∂e
«∞LÔ∫Lh «∞Lb≥uÊ °U∞∏u . ¢ÔIb «∞Au¸°W ±MHdœ… °Fb ≈{U≠W 3 √Ë 4 ±ö´o
Ø∂Od… ±s ±dÆW «∞b§UÃ.
4 √®ªU’
ËÆX «∞∑∫COd : 02 œÆOIW
±uÆl «∞BLUÂ :
2
ËÆX «∞DNw : 02 œÆOIW
+ 02 ϮOIW
EXE_IFU_TE_MODULO-2_4136751_mise en page 06/12/11 17:31 Page95
Page 98

96
¢ÔGKo ©Mπd… «∞CGj . °LÔπdÒœ √Ê ¥∂b√ «∞BLU °U∞BHOd, ¢ÔªHÒi «∞∫d«¸… Ë
¢Ô∑d„ ∞KDNw •ºV «∞uÆX «∞LÔ∫bœ. °Fb «≤ICU¡ ≥c« «∞uÆX , ¢ÔH∑` ©Mπd…
«∞CGj .
¢Ôd≠l ßKÒW «∞∂ªU¸ ±s ©Mπd… «∞CGj °Jq •d’ , Ë¢u{l Øq ∞HÒW ßLp
°U°OKu‹ ≠w ©∂o °LHdœ≥U. ¢ÔH∑` «∞∂U°OKu‹ ´Kv «∞DUË∞W °u«ßDW ±Ih. ¥LJs
√Ê ¢ÔIb ±FNU ßKDW «_≠uØU¢u.
∞∫r «∞ªdË·
¥ªMW ≤U≠U¸¥s «∞d°OFOW
006 §d«Â ∞∫LW {QÊ ±s ¸Æ∂W «∞ªdË·, Ë 006 §d«Â ±s «∞Bb¸, ¢ÔIDl ÆDFUÎ Ø∂Od…, ¸“±W ±s «∞πe¸ «∞πb¥b, ¸“±W
±s «∞∂Bq «_îCd, ¸“±W ±s «∞Jd«À «∞d°OFw, 4 •∂U‹ °DU©f §b¥b… ÅGOd… , 001 §d«Â ±s •∂U‹ «∞HUÅu∞OU
«∞ªCd«¡, 2 ©LU©r ±ÔIAd…, 2 ≠h £uÂ, °UÆW √´AU» ±ÔDOÒ∂W, ±KFIW Ø∂Od… ±s «∞DdîuÊ «∞LHdËÂ, 03 §d«Â “°b… ,
51 ßM∑K∑d ±s ±dÆW «∞b§UÃ, ±KFIW ÅGOd… ±s «∞OMºuÊ, ±KFIW Ø∂Od… ±s “¥X «∞e¥∑uÊ, ±KFIW Ø∂Od… ±s «∞D∫Os,
±K` Ë≠KHq.
¢ÔGºq «∞ªÔCU¸ Ë¢ÔMEÒn . ¢ÔIKv §LOl ÆDl «∞K∫r ≠w ©Mπd… «∞CGj °U∞e¥X
Ë«∞e°b… ±l «∞∏u «∞LÔIAd, «∞LK` Ë«∞HKHq. ¥Ôd‘ «∞D∫Os ´Kv «∞LJu≤U‹ Ë ¢ÔªKj
§Ob«Î, ¢ÔºJV ±dÆW «∞b§UÃ, Ë ¥ÔCU· «∞OMºuÊ, °UÆW «_´AU» «∞LÔDOÒ∂W,
Ë«∞DLU©r «∞Lº∫uÆW. ¢Ô∑LÒr °U∞LU¡ ∞Jw ¢ÔGDw «∞K∫LW, Ë ¢Ô∑d„ ∞∑GKw. ¢ÔCU·
«∞ªÔCU¸, «∞LK` Ë«∞HKHq. ¢ÔGKo ©Mπd… «∞CGj . °LÔπdÒœ √Ê ¥∂b√ «∞BLUÂ
°U∞BHOd, ¢ÔªHÒi «∞∫d«¸… Ë ¢Ô∑d„ ∞KDNw •ºV «∞uÆX «∞LÔ∫bœ «∞∏U≤w. °Fb
«≤ICU¡ ≥c« «∞uÆX , ¢ÔH∑` ©Mπd… «∞CGj .
¢Ôd≠l «∞K∫LW Ë«∞ªÔCU¸ , Ë¢Ô∑d„ «∞FBUzd, Ë¢Ôd≠l °UÆW «_´AU» «∞LÔDOÒ∂W,
Ë«∞∏uÂ.
¢Ï∑d„ «∞FBUzd ∞KGKw ´Kv ≤U¸ Æu¥W •∑v ¢B∂` ±dÆW ßLOJW. ¢u{l «∞K∫LW
Ë«∞ªCU¸ ≠w ©∂o ∞K∑Ib¥r Ë ¢Ôd©ÒV °U∞LdÆW. ¥ÔCU· «∞DdîuÊ , Ë¢ÔIbÂ.
∞∫r «∞Fπq
3 ¸Ëß∑u °U∞ªdœ‰
1 ØKZ ±s ¸¥Óg «∞Fπq, ¢Ôd°j ±∏q «∞dËß∑u, 6 §e¸, 3 ≠Bu’ £uÂ, °BKW Ë«•b…, ±KFI∑UÊ Ø∂Od¢UÊ ±s Ød¥r ≠d¥g,
04 §d«Â “°b…, 03 ßM∑K∑d ±s ±dÆW «∞b§UÃ, ±KFI∑UÊ ÅGOd¢UÊ ±s «∞ªdœ‰, ±KFIW Ø∂Od… ±s ±s «∞ªdœ‰ «∞Hd≤ºw
±KFI∑UÊ ÅGOd¢UÊ ±s «∞DdîuÊ °MJNW «∞ªdœ‰, ±KFIW Ø∂Od… ±s «∞e¥X, ßJd ±Ô∫∂V, ±K` Ë≠KHq.
¢Ôe¥Òs «∞dËß∑u °U∞∏uÂ, ¢Ô∫LÒd «∞dËß∑u °U∞e°b… Ë«∞e¥X œ«îq ©Mπd… «∞CGj .
«∞LK` Ë«∞HKn ∞K∑cË‚. ¢Ôd≠l «∞dËß∑u , £r ¢Ô∫LÒd ®d•U‹ «∞πe¸±JUÊ ÆDl
«∞K∫LW, Ë¥ÔCU· «∞ONU ±KFI∑UÊ ÅGOd¢UÊ ±s «∞ºJd, °Fi «∞LK` Ë«∞HKHq.
¢u{l «∞dËß∑u ±d… £U≤OW ≠w ©Mπd… «∞CGj, ¢CU· «üÊ °UÆW «_´AU»
4 √®ªU’
ËÆX «∞∑∫COd : 52 œÆOIW
±uÆl «∞BLUÂ :
2
ËÆX «∞DNw : 11 œÆOIW
4 √®ªU’
ËÆX «∞∑∫COd : 02 œÆOIW
±uÆl «∞BLUÂ :
2
ËÆX «∞DNw : 01 œÆUzo
+ 7 ϮUzo
EXE_IFU_TE_MODULO-2_4136751_mise en page 06/12/11 17:31 Page96
Page 99

AR
97
ËÅHU‹ «∞DNw «∞ANOÒW
«∞∑w ¢Ô∫CÒd ≠w ©Mπd… «∞CGj
«∞LÔI∂Òö‹
®u¸°W «∞ªÔCU¸
4 •∂U‹ °DU©f, 1 Ød«À, 4 §e¸«‹, 1 •∂W ∞HX, 1 ∞∑d ±U¡, ±K`, ≠KHq, 3 ±ö´o Ø∂Od… Ød¥LU ≠d«≤AOt
(«î∑OU¸¥W).
¢ÔIAÒd Ë¢ÔGºq §LOl «∞ªCU¸.
¢ÔIDÒl «∞∂DU©f Ë«∞KHX «∞v ±JF∂U‹ Ø∂Od… «∞∫πr. ¥ÔIDÒl «∞πe¸ «∞v
®d•U‹ ¸ÆOIW ËØc∞p «∞Jd«À.
¥ÔºJV ∞∑d ±s «∞LU¡ ≠w ©Mπd… «∞CGj, Ë¢ÔCU· «∞ªCU¸, «∞LK`, Ë«∞HKHq.
¢ÔIHq ©Mπd… «∞CGj. °LÔπdœ √Ê ¥∂b¬ «∞BLU °U∞BHOd, ¢ÔªHi «∞∫d«¸…
¢∫X «∞DMπd… Ë¢Ô∑d„ ∞KDNw •ºV «∞uÆX «∞LcØu¸ ≠w «∞uÅHW.
¥LJMp ≈{U≠W «∞Jd¥LU ≠d«≤AOt Æ∂q «∞∑Ib¥r, ≈–« √•∂∂X.
«∞ºÒ‡‡Lp
ßLp «∞KMm "°U°OKu‹" ±l ≠UØNW «∞∫u«±i
4 ≠OKOt ßLp «∞KMm, Øq Ë«•b… 051 §d«Â, Ød¥V ≠dË‹ Ë«•b… , °d¢IU∞W Ë«•b… , ´BOd 3 ∞OLu≤U‹ •U±i, 2 ©LU©r,
°BKW Ë«•b…, ®d•∑UÊ ±s «∞Jd«À, 06 §d«Â “°b…, Øu» Ë«•b ±s ±d‚ «∞b§UÃ, °Cl √˸«‚ ©dîuÊ, ±K` , ≠KHq.
¢ÔIDÒl «∞DLU©r «∞v ®d•U‹ , ¢ÔIAÒd «∞∂BKW Ë ¢ÔIDÒl ¢IDOFUÎ ≤U´LUÎ. ¢ÔIAÒd
«∞Jd¥V ≠dË‹ Ë «∞∂d¢IU∞W, Ë¢ÔRîc √¸°U´NU §U≤∂UÎ, ±l «∞∫d’ ´Kv «∞L∫U≠EW
´Kv ´BUzd≥U.
¢u{l £öÀ ®d•U‹ ±s «∞DLU©r ≠w Ëßj 4 ÆDl ±s ≠u¥q «_∞LOMOuÂ, «∞v
√Ê ¢∑b«îq ÆKOöÎ °∂FCNU.. ¢ÔGDv °U∞IKOq ±s «∞∂BKW «∞LHd˱W Ë «∞Jd«À, £r
¢ÔCU· √˸«‚ «∞DdîuÊ, £r ¢u{l ≠OKOt «∞ºLp ≠uÆNU. ¢ÔDuÈ §u«≤V ≠u¥q
«_∞LOMOu "°U°OKu‹" °∫OY ¢ÔºJV ´Kv Øq Ë«•b… ±KFIW ±s ±d‚ «∞b§UÃ
˱KFI∑UÊ ±s ´BOd «∞Jd¥V ≠dË‹ Ë«∞∂d¢IU‰, œËÊ √Ê ¢∑ºdÒ».. ¢ÔCU· °Cl
ÆDd«‹ ±s «∞KOLuÊ, «∞LK`, Ë«∞HKHq ∞KLc«‚.
≠u‚ Øq ≠OKOt ßLp , ¢u{l Ë«•b… ±s «¸°UŸ «∞Jd¥V ≠dË‹, ˸°FOs ±s
«∞∂d¢IU‰, ±l 51 §d«Â ±s «∞e°b…. ¢ÔGKo ¸ÆUÆU‹ «∞∂U°OKu‹ Æ∂q Ë{FNr °Jq
•d’ ≠w ßKÒW «∞∂ªU¸ . ¥ÔºJV 07 ßM∑K∑d ±s «∞LU¡ ≠w ©Mπd… «∞CGj . £r
¢u{l ßKW «∞∂ªU¸ ´Kv «∞∫U±KW «∞∏ö£OW ≠w ©Mπd… «∞CGj, ±l «∞∑QØb °Q≤NU
ô ¢ö±f «∞LU¡.
4 √®ªU’
ËÆX «∞∑∫COd : 51 œÆOIW
±uÆl «∞BLUÂ :
1
ËÆX «∞DNw : 01 œÆUzo
4 √®ªU’
ËÆX «∞∑∫COd : 52 œÆOIW
±uÆl «∞BLUÂ : 2
ËÆX «∞DNw : 8 œÆUzo
§LOl «∞uÅHU‹ ±MUß∂W ∞∑JHw 4 √®ªU’.
∞πLOl ©MU§d «∞CGj –«‹ ßFW 6 ∞∑d,
¢ÔªHÒi «∞JLOU‹ °Mº∂W «∞∏KY.
EXE_IFU_TE_MODULO-2_4136751_mise en page 06/12/11 17:31 Page97
Page 100

98
«∞∫q«∞LAJKW
- «∞GDU¡ ±ÔIHq °AJq Å∫O`.
- ±uÆl «∞∫KIW «∞LDU©OW ∞KGDU¡.
- «∞∫KIW «∞LDU©OW ≠w •U∞W §Ob… , ƒ≈–« ØUÊ ±s «∞Cd˸Í
«ß∑∂b«∞NU.
- «∞GDU¡ ≤EOn, ˱U•u‰ •KIW «∞GDU¡ «∞LDU©OW ≤EOn √¥CUÎ.
- •U≠W «∞NOJq ≠w ©Mπd… «∞CGj ≠w •U∞W §Ob… .
≈–« ØUÊ «∞∂ªU¸ ¥∑ºdÒ» ±s
•u‰ «∞GDU¡, ¥Ôd§v «∞∑QØb
°QÊ :
¥Ôd§v «∞∑QØb °QÊ «∞∫KIW «∞LU≤FW ∞K∑ºd» °Os «∞GDU¡ Ë«∞DMπd… ≠w
Ë{l Å∫O` :
√–« ô•EX ¢ºd» ∞K∂ªU¸
±s •u‰ «∞GDU¡ ±d≠IUÎ
°Bu‹ √Ë{πOZ :
¢QØb °QÊ ±R®Òd «∞CGj ±ÔMªHCUÓ .
≈–« ∞r Øc∞p : ¥ÔBdÒ· «∞CGj , Ë≈–« ØUÊ {d˸¥UÎ °u«ßDW ¢∂d¥b
©Mπd… «∞CGj ¢∫X «∞LU¡ «∞∂U¸œ.
ô ¢F∂Y °LR®Òd «∞CGj.
≈–« ∞r ¥Js °Uù±JUÊ ≠∑`
«∞GDU¡ :
ËÆX «∞DNw .
±º∑uÈ «∞∫d«¸… .
√Ê ±ÔM∑Iw °d«±Z «∞DNw ≠w «∞LuÆl «∞B∫O` .
ØLOÒW «∞ºu«zq ≠w ©Mπd… «∞CGj .
≈–« ∞r ¥∑r ©Nw «∞DFU √Ë
√Ê «∞DFU Æb «•∑d‚ ,
¥d§v «∞∑QØb ±s :
«¢d„ ©Mπd… «∞CGj ¢ÔMIl ≠w «∞LU¡ Æ∂q ¢MEOHNU.
ô ¢º∑FLq ±u«œ «∞∑∂OOi √Ë ±u«œ «∞∑MEOn «∞∑w ¥bîq «∞JKu¸¥s ≠w
¢dØO∂NU.
≈–« «•∑d‚ «∞DFU œ«îq
©Mπd… «∞CGj :
√ËÆn «∞∫d«¸… .
«¢d„ ©Mπd… «∞CGj ∞∑∂dœ œËÊ √Ê ¢Ô∫dÒØNU .
«≤∑Ed «∞v √Ê ¥MªHi ±R®Òd «∞CGj , £r «≠∑` «∞DMπd….
¢QØb ±s ≤EU≠W ÅLU «∞∑AGOq, ÆMU… ¢Bd¥n «∞∂ªU¸ , ÅLUÂ
«_±UÊ Ë «∞∫KIW «∞LDU©OW.
≈–« «ß∑Ld‹ «∞LAJKW , ¥Ôd§v ´d÷ ©Mπd… «∞CGj ´Kv ±dØe
îb±W ¢OHU‰ «∞LÔF∑Lb.
≈–« «≤DKo √•b √≤ELW
«∞ºö±W :
¢∫Io °QÊ :
“¸ «∞H∑` ¥LJs ¢∫d¥Jt
≠w •U‰ «ß∑Ld‹ «∞LAJKW, ¥Ôd§v ´d÷ ©Mπd… «∞CGj ´Kv ±dØe
îb±W ¢OHU‰ «∞LÔF∑Lb.
≈Ê ∞r ¥Js °Uß∑DU´∑p
Ë{l «∞LIU°i* ≠w ±uÆl
«ùß∑FLU‰
ô ¢Du¥NLU °U∞Iu… .
¢QØb °Q≤p {GDX «∞CGj «∞JU≠w ´Kv «_¸«¸ ∞KH∑`
≈Ê ∞r ¥Js °Uß∑DU´∑p ©w
«∞LIU°i «∞IU°KW ∞KDw* :
*•ºV «∞Luœ¥q
EXE_IFU_TE_MODULO-2_4136751_mise en page 06/12/11 17:31 Page98
 Loading...