

Page 1

February 2004
Ref. : 3305792c
Document subject to modification
Realisation : Espace Graphique
Page 2

Instructions for use, bedienungsanleitung, pуководство по зксплуатации,
instrukcj´ obs∏ugi, cel˘ návod, cel˘ návod, használati útmutatót, celotno
besedilo, proãitajte upute,
modul de utilizare.
Page 3

6
8
3*
2*
1*
7
5
4
* according to model,
je nach Modell,
в зависимости от модели,
w zale˝noÊci od modelu,
podle modelu,
podºa
modelov, modelltŒl függŒen, odvisno od modela, ovisi o modelu, în funcþie de model.
Page 4

1 2 3
4
5
9
10 11
12
6
87
Page 5

SAFETY INSTRUCTIONS
PREVENTION OF DOMESTIC
ACCIDENTS
• This appliance complies with the technical rules and safety standards in force.
• Electromagnetic Compatibility Directive 89/336/CEE as modified by 92/31/CEE
and 93/68/CEE.
• Low-Voltage Directive 73/23/CEE as modified by 93/68/CEE.
• Given the diversity of applicable standards, if this appliance is to be used in a
country other than that in which it was purchased, you should have it checked
by an approved service centre.
• Check that the supply voltage matches that indicated on the appliance (alternating current only).
• Check that the electrical system is able to supply an appliance of this rated
power.
• Always connect the appliance to an earthed socket.
• Do not allow the power cable to hang down or touch the hot parts of the
appliance.
• Do not pull on the power cable to unplug the appliance.
• Only use an extension cable that is in good condition, has an earthed socket
and is suitably rated.
• To avoid electric shock, never immerse the power cable, the socket or the
appliance in water or in any other liquid.
When using electrical appliances, there are certain basic rules that should always be complied
with, especially the following:
• Read the instructions for use in their entirety and follow them carefully.
• Never leave the appliance operating unattended, especially when grilling something for the first time or after a change in the settings.
• Do not leave the appliance within the reach of children.
• The appliance must not be used by young children or by disabled people without
supervision.
• Young children must be supervised to ensure that they do not play with the
appliance.
• Do not carry or move the appliance during use.
• Use a solid heat resistant work surface that is not subject to water splashes.
• Do not place the appliance close to a heat source.
• Disconnect the appliance after each use and before cleaning.
• Before use, always check that the crumb tray is properly secured beneath the
appliance.
• During use, the door and the outer surfaces of the appliance can reach high temperatures. Avoid touching these surfaces during use. Only touch the handles and
buttons provided.
• Never place paper, cardboard or plastic in, on or under the appliance.
• Do not use the toaster function to cook or defrost frozen dishes.
4
Eng
Page 6

• Do not use the appliance if:
- the power cable is defective or damaged.
- the appliance has fallen and shows visible signs of damage or does not function
correctly.
In either case, the appliance must be sent to the nearest approved After-Sales Service Centre to avoid any risk.
• Only use the appliance indoors.
• Do not use the appliance as a source of heating.
• Bread can burn and, thus, the appliance should not be used near combustible
material, such as curtains, shelves, furniture, etc.
• Do not cover the appliance while in operation. Should any part of the appliance
catch fire, do not attempt to extinguish it with water. Disconnect the appliance
and smother the flames with a damp cloth.
• Do not store inflammable substances near the appliance.
• Do not use accessories that are not recommended by the manufacturer or of a
brand other than that of your appliance.
• This appliance is designed solely for domestic use; any professional or inappro-
priate use or use not in compliance with these instructions renders the manufacturer’s liability and guarantee null and void.
• For your own safety, never dismantle the appliance yourself; call on the services
of an Approved Service Centre.
KEEP THESE INSTRUCTIONS
IN A SAFE PLACE
5
Eng
Page 7

6
Eng
Appliance characteristics
1.
Grid*
5.
Timer
2.
Baking tray*
6.
Crumb collector
3.G
riddle*
7.T
hermostat
4.
On/Off Indicator
8.
Hotplate
Advantages of the Toaster Oven
Your Toaster Oven offers the following advantages:
• Interior capacity of 8.5 litres to toast up to 4 slices of bread at a time.
• An integrated hotplate on top to offer you more cooking possibilities. (9).
• Bake function: thermostat settings from 90° to 240°C for all your baking requirements.
• Grill function: to braise and brown all your dishes.
• Shelf slides out automatically: for easier monitoring of cooking and easier handling of dishes. (2).
• Easy-to-remove crumb collector for easy cleaning of your oven and to remove breadcrumbs and other food
fragments. (3).
• A baking tray to cook biscuits, sandwiches, and frozen dishes.
• A griddle* for healthier cooking.
Before first use
• Unpack the appliance and remove all stickers.
• Read the instructions for use and follow them carefully.
• Remove the accessories* (grid, baking tray, griddle) and wash them in hot, soapy water. Rinse and dry
carefully.
• Unwind the power cable completely.
• Wipe over the outside of the appliance with a damp cloth and dry. (1).
To eliminate the “new” smell, run the appliance empty, with the door open, in a well ventilated room:
• Set the thermostat to 240 °C and the timer to 15 minutes.
• After 15 minutes, the button will automatically position itself to "0".
A little smoke will come out of the oven. This is normal and will progressively disappear during this first
operation.
Using the TOAST function (Both heating elements in operation)
• There is no need to turn the bread as both sides will be toasted at the same time.
• Place the slices of bread directly on the grid, with the grid turned upwards.
• Set the thermostat button to "Toast". (6).
• Set the timer button to the desired toasting time. (4).
• The indicator light comes on.
• When the cycle ends, the timer button automatically returns to the "0" position and a sound signal is heard;
the light switches off.
• You can interrupt the operation before the end of the cycle by returning the timer to the "0" position.
• Remove the toast. (5).
Note:
• When using the TOAST function, always keep an eye on the bread during toasting.
• On first use, try out the toasting function on a few slices of bread.
• Keep in mind that the fewer the slices of bread, the shorter the toasting time.
• When doing several batches of thin toast, we recommend that you watch your bread so it doesn't burn.
* according to model
Page 8

7
Eng
• Should this happen, stop the toasting cycle immediately by returning the timer to the "0" position.
• If you want to warm up a slice of bread which is already toasted, watch the toasting carefully.
The oven is hot. When removing bread, be careful not to touch the sides (use bread tongs** or oven
gloves**).
BAKE FUNCTION (Both heating elements in operation)
• Place the food on the shelf using an appropriate dish.
• Set the thermostat button to the desired temperature.
• Set the timer to the desired cooking time (maximum of 60 minutes).
• The indicator light comes on.
• You can interrupt the cycle by returning the timer to the "0" position.
• When the cycle ends, the timer automatically returns to the "0" position and a sound signal is heard. The light
switches off.
• Return the thermostat button to the zero "0" position.
The oven is hot. When removing the dish, be careful not to touch the sides (pull out the shelf using
oven gloves**).
GRILL FUNCTION (Only the top heating element is used)
• Place the griddle* in the baking tray.
• Arrange your food on the unit made up of the griddle* and baking tray.
• Place the unit on the shelf: the minimum distance between the food and the top heating element must be at
least 2cm (0.8 in).
• Leave the door partly open. (8).
• Set the thermostat button to "Grill". (7).
• Set the timer to the desired time (maximum of 60 minutes).
• The indicator light comes on.
• Keep an eye on the food and turn it over half-way through the cooking with a cooking utensil (if necessary).
• You can interrupt the cycle by returning the timer to the "0" position.
• When the cycle ends, the timer automatically returns to the "0" position and a sound signal is heard. The light
switches off.
• Return the thermostat button to the zero "0" position.
The oven is hot. When removing the dish, be careful not to touch the sides (pull out the shelf using oven
gloves**).
During cooking, splashes of fat can flare up if they come into contact with the top heating elements.
Don't worry, they will burn out on their own and will have no effect on the appliance.
Useful advice
• When cooking, food always gives off steam and sometimes smoke.
• To reduce smoke and odours, always keep the sides of the oven clean.
• You can also reduce their amount:
- by putting a little water in the bottom of the tray at the beginning of the cooking process.
- by complying with or lowering cooking temperatures.
• If the food does not cook uniformly at the back of the oven:
- Turn the food around during cooking in order to make the cooking more uniform.
• For times under 5 minutes, turn the knob to 15 minutes and then bring it back to the required time.
* according to model ** not supplied with the appliance
Page 9

8
Eng
USING THE HOTPLATE
(The hotplate can be used on its own or at the same time as one of the other three cooking modes).
Using the hotplate on its own (10).
• Set the thermostat to the Grill function (top heating element in operation).
• Set the timer to the desired cooking time.
• The indicator light comes on.
• The top heating element will heat up the hotplate.
• Pre-heat for 5 minutes, then place your food onto the hotplate.
• You can interrupt the operation before the end of the cycle by returning the timer to the "0" position.
• When the cycle ends, the timer automatically returns to the "0" position and a sound signal is heard. The light
switches off.
Caution, the hotplate remains hot when the timer has stopped!
The plate has a specific direction: the side with a finger tab' is the back of the plate, do not place it in the
front.
(9).
This finger tab' is not a carrying finger tab'. It should only be used to lift the plate to clean it. (12).
Using the hotplate at the same time as another cooking mode (11).
• In this case, you need to first choose the cooking settings (time and temperature) for the food to be cooked
in the oven.
• The top heating element is in operation and heats up the hotplate.
In this case, cooking time is determined according to the food placed in the oven; the oven will stop
heating the hotplate at the end of the cooking time.
You will therefore need to keep an eye on the food being cooked or warmed up on the hotplate.
Caution: the hotplate remains hot after the oven switches off!
The plate has a specific direction: the side with a finger tab' is the back of the plate, do not place it
in the front.
(9).
This finger tab' is not a carrying finger tab'. It should only be used to lift the plate to clean it. (12).
Wait until the appliance has cooled down completely before removing and cleaning the hotplate.
Cleaning
• Before cleaning, always unplug your appliance and let it cool down completely.
• Never immerse the appliance in water.
External surfaces
• Wipe the external surface of the appliance with a damp, soapy sponge. (1).
• Rinse and dry thoroughly.
Internal surfaces
• The internal surfaces are non-stick. Remove any grease splashes with a sponge soaked in hot soapy water.
• Rinse and dry thoroughly.
Page 10
9
Eng
• Do not use any scouring pads, metal pads, scouring powder, or aggressive cleaning products (particularly
caustic cleaning agents).
Accessories*
• The accessories* should be cleaned with hot soapy dishwater.
• Rinse and dry thoroughly.
Crumb collector
• The crumb collector should be cleaned with hot soapy dishwater.
• Rinse and dry thoroughly.
Hotplate
• Wait until the appliance has cooled down completely before removing and cleaning the hotplate.
• To remove the hotplate, grasp the finger tab' located at the back of the plate.
• The hotplate is easy to clean with hot soapy dishwater (do not use a metal pad or scouring powder). Leave
to dry.
• The hotplate is easy to put back in its place above the oven, with the finger tab' facing backwards.
Caution: do not put the accessories or the hotplate in the dishwasher.
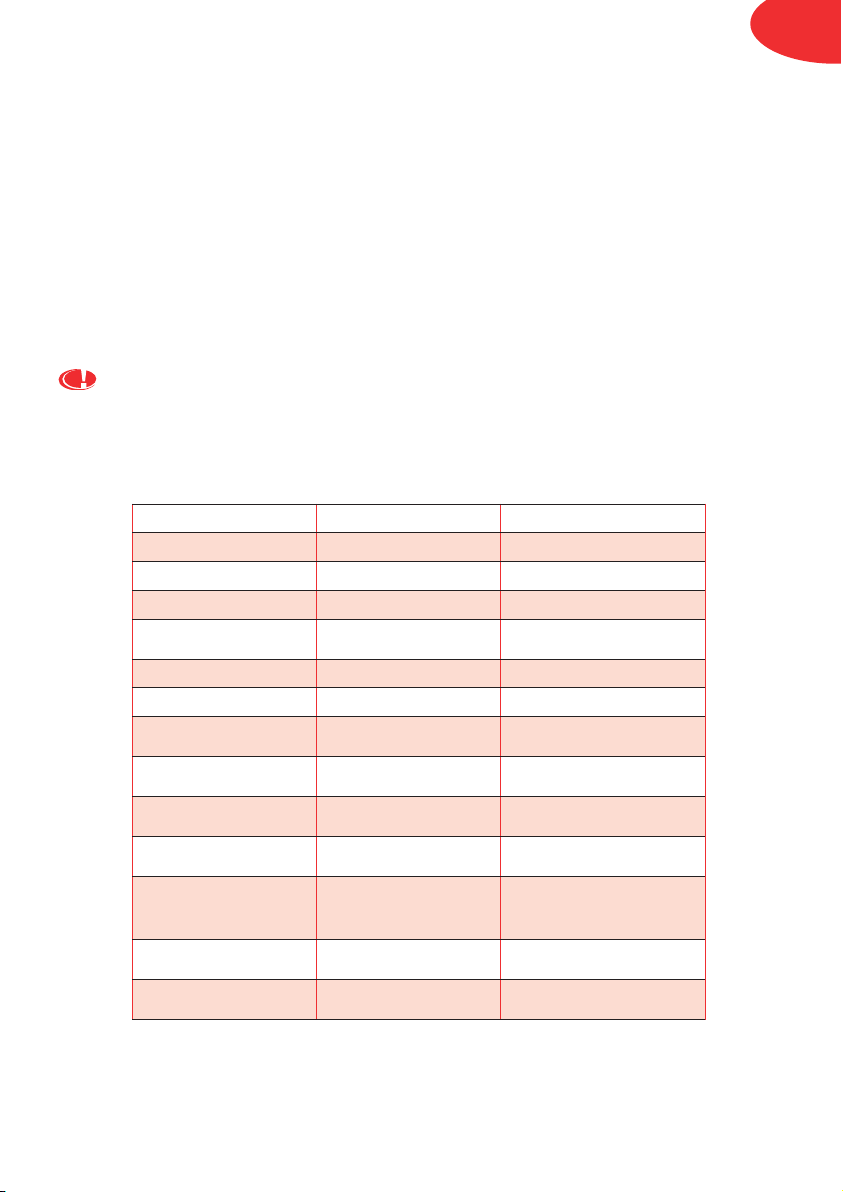
COOKING GUIDE
The temperatures and times stated are given as an indication only. Cooking results vary according to recipes, the
dishes used and the ingredients.
LIMITED WARRANTY PERIOD
Dishes Function - T° Time
Apple pie BAKE 230 °C 25-35 minutes
Cookies BAKE 180 °C 10-15 minutes
Fresh pizza, 200 g BAKE 230 °C 6-8 minutes
Frozen scalloped
potatoes
BAKE 230 °C 40-50 minutes
2 chicken legs BAKE 230 °C 25-35 minutes
Cod fillet BAKE 230 °C 18-22 minutes
Bacon (10 mm )
GRILL
(door partly open)
10 minutes, turn over,
then 4 minutes
Sausages
GRILL
(door partly open)
10 minutes, turn over,
then 4 minutes
Grilled pasta dish
GRILL
(door partly open)
15-20 minutes
Bacon (10 mm)
Hotplate
– in GRILL position
20 minutes
(10 on each side)
Beef burgers
Hotplate
– in GRILL position
10-15 minutes on first side,
5-10 minutes on the other
side
Warming-up potatoes
Hotplate
– in GRILL position
25-30 minutes
Fried eggs
Hotplate
– in GRILL position
4-5 minutes
* according to model
Page 11

SICHERHEITSBESTIMMUNGEN
ZUR VERMEIDUNG VON
HAUSHALTSUNFÄLLEN
• Die Sicherheitseinrichtungen dieses Geräts entsprechen den Regeln der Tech-
nik und den gültigen Normen.
• Richtlinie zur Elektromagnetischen Kompatibilität 89/336/CEE, modifiziert
92/31/CEE und 93/68/CEE.
• Richtlinie zur Niederspannung 73/23/CEE, modifiziert 93/68/CEE.
• Aufgrund der Vielfalt der gültigen Normen muss das Gerät bei Verwendung in
einem Land, in dem es nicht gekauft wurde, dort in einem anerkannten Kundendienstzentrum überprüft werden, um sicher zu gehen, dass es allen in diesem Land gültigen Normen entspricht.
• Versichern Sie sich, dass die Netzspannung der auf dem Gerät angegebenen
Spannung entspricht (nur Wechselspannung).
• Versichern Sie sich, dass Ihre elektrische Installation für die Stromversorgung
eines Geräts dieser Leistungsstärke geeignet ist.
• Das Gerät darf nur an geerdete Steckdosen angeschlossen werden.
• Lassen Sie das Kabel nicht herunterhängen oder mit den heißen Teilen des
Geräts in Berührung geraten.
• Ziehen Sie den Netzstecker nie am Kabel aus der Steckdose.
• Verwenden Sie nur Verlängerungskabel in gutem Zustand, die über einen geer-
deten Stecker verfügen und deren Durchmesser mindestens ebenso groß ist
wie der des mitgelieferten Gerätekabels.
• Zur Vermeidung von Stromschlägen dürfen das Kabel, der Netzstecker und das
Gerät nie in Wasser oder andere Flüssigkeiten getaucht werden.
Bei der Benutzung von elektrischen Geräten sind verschiedene Grundregeln zu beachten. Einige
davon sind nachstehend aufgeführt:
• Lesen Sie die Gebrauchsanweisung vollständig durch und befolgen Sie die
Bedienungsanweisung genau.
• Lassen Sie das Gerät niemals unbeaufsichtigt in Betrieb, besonders bei der ers-
ten Anwendung und nach Veränderung der Einstellungen.
• Lassen Sie das Gerät niemals in Reichweite von Kindern stehen.
• Das Gerät darf von kleinen Kindern und Behinderten nicht ohne Aufsicht benutzt
werden.
• Kleine Kinder müssen beaufsichtigt werden – das Gerät ist kein Kinderspielzeug.
• Das Gerät darf während des Betriebs nicht verstellt oder verschoben werden.
• Das Gerät muss stabil und vor Wasserspritzern geschützt stehen.
• Stellen Sie das Gerät nicht in der Nähe einer Hitzequelle auf.
• Das Gerät muss nach der Benutzung und vor der Reinigung ausgesteckt werden.
• Überprüfen Sie vor jeder Verwendung, ob die Krümelschublade fest unter dem
Gerät sitzt.
• Da die Tür und die Außenhaut des Geräts bei Betrieb sehr heiß werden können,
dürfen diese Teile bei Betrieb des Geräts nicht berührt werden. Bedienen Sie sich
der Griffe und Tasten des Geräts .
10
Deu
Page 12

• In, auf oder unter dem Gerät darf sich niemals Papier, Karton oder Plastik
befinden.
• Der Toaster darf nicht zum Kochen oder Auftauen von Tiefkühlprodukten ver-
wendet werden.
• Das Gerät darf nicht benutzt werden, wenn:
- das Kabel kaputt ist oder Schäden aufweist,
- das Gerät heruntergefallen ist und dabei sichtbare Schäden davongetragen hat
oder Funktionsstörungen auftreten.
In diesen Fällen muss das Gerät zu Ihrer eigenen Sicherheit von einem anerkannten Kundendienstzentrum überprüft werden.
• Das Gerät ist ausschließlich für den Gebrauch in geschlossenen Räumen bes-
timmt.
• Das Gerät darf nicht als Wärmequelle benutzt werden.
• Da das Brot anbrennen kann, darf das Gerät nicht in der Nähe von brennbaren
Materialen wie Vorhängen, Regalen, Möbeln benutzt werden.
• Decken Sie das Gerät nie ab, wenn es in Betrieb ist. Falls Teile des Geräts Feuer
fangen sollten, versuchen Sie auf keinen Fall, dieses mit Wasser zu löschen. Stecken Sie das Gerät aus und ersticken Sie die Flammen mit einem nassen Tuch.
• Das Gerät darf nicht in der Nähe von brennbaren Materialien aufgestellt werden.
• Verwenden Sie aus Sicherheitsgründen ausschließlich vom Hersteller empfoh-
lenes Zubehör. Zubehör anderer Marken darf keinesfalls eingesetzt werden.
• Dieses Gerät ist ausschließlich für den Hausgebrauch bestimmt. Sein Einsatz zu
professionellen, nicht bestimmungsgemäßen oder zu von der Bedienungsanleitung abweichenden Zwecken hat das Erlöschen der Haftung und der Herstellergarantie zur Folge.
• Nehmen Sie das Gerät zu Ihrer eigenen Sicherheit niemals selbst auseinander;
dies ist den anerkannten Kundendienstzentren vorbehalten.
BEWAHREN SIE DIESE ANWEISUNGEN
GUT AUF
11
Deu
Page 13

Eigenschaften des Gerätes
1.
Rost*
5.
Zeitwählschalter
2.
Blech*
6.
Krümelschublade
3.
Grilleinsatz*
7.
Thermostat
4.
Lämpchen
8.
Backblech
Was der Toast-Ofen alles zu bieten hat
Ihr Toast-Ofen besitzt:
• Eine Innenkapazität von 8,5 Litern, mit der bis zu 4 Scheiben Brot auf einmal gegrillt werden können.
• Ein oben integriertes Backblech für zusätzliche Möglichkeiten des Garens. (9).
• Funktion Ofen: ein von 90°C bis 240°C regelbarer Thermostat lässt alle Rezepte gelingen.
• Funktion Grill: zum Anbraten und Bräunen der Lebensmittel.
• Automatische Rostausfuhr zur einfachen Überwachung der Speisen und zum gefahrlosen Herausnehmen
der Schüsseln. (2).
• Reinigungsfreundliche, leicht abnehmbare Krümelschublade zum schnellen Entfernen von Krümeln und
anderen Teilen. (3).
• Eine Form für Plätzchen, Sandwichs und Tiefkühlgerichte.
• Ein Grilleinsatz* für gesünderes Kochen.
Vor der ersten Inbetriebnahme
• Packen Sie das Gerät aus und entfernen Sie alle Aufkleber.
• Lesen Sie die Bedienungsanleitung durch und befolgen Sie die Bedienungsanweisungen genau.
• Nehmen Sie die Zubehörteile ab* (Rost, Blech, Grilleinsatz) und reinigen Sie sie mit heißem Seifenwasser.
Anschließend abspülen und sorgfältig abtrocknen.
• Entrollen Sie das Kabel vollständig.
• Wischen Sie das Gehäuse des Geräts mit einem feuchten Tuch ab und trocknen Sie die Teile anschließend
ab. (1).
Setzen Sie zur Entfernung des „Neugeruchs” das Gerät in einem gut gelüfteten Zimmer mit offener Tür
leer in Betrieb:
• Stellen Sie den Thermostat auf 240°C und die Zeitschaltuhr auf 15 Minuten.
• Nach 15 Minuten stellt sich der Knopf automatisch auf die „0”-Position.
Aus der Gerät kann eventuell ein wenig Rauch entweichen. Dies ist normal und legt sich mit der Zeit von
selbst.
Benutzung der Funktion TOAST (Beide Heizelemente sind in Betrieb)
• Legen Sie die Brotscheiben direkt auf den nach oben gedrehten Rost.
• Stellen Sie den Thermostat auf „Toast”. (6).
• Stellen Sie den Zeitwählschalter auf die gewünschte Toastzeit ein. (4).
• Das Lämpchen geht an.
• Nach Ablauf der eingestellten Toastzeit stellt sich der Zeitwählschalter automatisch auf die „0”-Position, ein
Piepton ertönt und das Lämpchen geht aus.
• Der Grillvorgang kann vor Ablauf der eingestellten Zeit abgebrochen werden. Stellen Sie dazu den
Zeitwählschalter auf die „0”-Position.
• Nehmen Sie die fertigen Toasts aus dem Ofen. (5).
Hinweise:
• Bei Betrieb der Funktion TOAST sollte man das Brot immer im Auge behalten.
• Testen Sie die Toast-Funktionen bei der ersten Inbetriebnahme mit ein paar Scheiben Brot.
• Denken Sie daran: je weniger Brotscheiben getoastet werden, desto kürzer ist die Toastzeit.
• Wenn Sie mehrere Bleche dünner Brotscheiben toasten, sollten Sie besonders gut aufpassen, dass das Brot
nicht anbrennt.
12
Deu
*
je nach Modell
Page 14

• Falls das Brot anzubrennen beginnt, brechen Sie den Toastvorgang sofort ab, indem Sie den
Zeitwählschalter auf die „0”-Position stellen.
• Beim Aufwärmen einer bereits getoasteten Brotscheibe ist besondere Vorsicht geboten.
Der Ofen wird heiß. Vermeiden Sie es deshalb, beim Herausnehmen des Brotes die Ofenwände zu
berühren (Benutzen Sie eine Brotzange** oder Topfhandschuhe**).
FUNKTION OFEN (BAKE) (Beide Heizelemente sind in Betrieb)
• Geben Sie das Gargut in einem geeigneten Gefäß auf den Rost.
• Stellen Sie den Thermostat auf die gewünschte Temperatur.
• Stellen Sie den Zeitwählschalter auf die gewünschte Garzeit (höchstens 60 Minuten).
• Das Lämpchen geht an.
• Der Garvorgang kann vor Ablauf der eingestellten Zeit abgebrochen werden. Stellen Sie dazu den
Zeitwählschalter auf die „0”-Position.
• Nach Ablauf der eingestellten Zeit stellt sich der Zeitwählschalter automatisch auf die „0”-Position und ein
Piepton ertönt. Das Lämpchen geht aus.
• Stellen Sie den Thermostat auf die „0”-Position.
Der Ofen wird heiß. Vermeiden Sie es deshalb, beim Herausnehmen der Schüsseln die Ofenwände zu
berühren (Ziehen Sie den Rost heraus und benutzen Sie Topfhandschuhe**).
FUNKTION GRILL (GRILL) (Nur das obere Heizelement ist in Betrieb)
• Stellen Sie den Grilleinsatz* in die Schüssel.
• Legen Sie das Grillgut auf den Grilleinsatz* in der Schüssel.
• Stellen Sie die Schüssel auf den Rost. Zwischen dem Grillgut und dem oberen Heizelement muss ein
Mindestabstand von 2cm (0.8 in) gewahrt bleiben.
• Lassen Sie die Tür einen Spalt breit offen. (8).
• Stellen Sie den Thermostat auf „Grill”. (7).
• Stellen Sie den Zeitwählschalter auf die gewünschte Garzeit (höchstens 60 Minuten).
• Das Lämpchen geht an.
• Überwachen Sie den Garvorgang und wenden Sie das Grillgut gegebenenfalls (benutzen Sie dazu ein
geeignetes Werkzeug).
• Der Garvorgang kann vor Ablauf der eingestellten Zeit abgebrochen werden. Stellen Sie dazu den
Zeitwählschalter auf die „0”-Position.
• Nach Ablauf der eingestellten Zeit stellt sich der Zeitwählschalter automatisch auf die „0”-Position und ein
Piepton ertönt. Das Lämpchen geht aus.
• Stellen Sie den Thermostat auf die „0”-Position.
Der Ofen wird heiß. Vermeiden Sie es deshalb, beim Herausnehmen der Schüsseln die Ofenwände zu
berühren (Ziehen Sie den Rost heraus und benutzen Sie Topfhandschuhe**).
Während des Garvorgangs kann es vorkommen, dass Fettspritzer beim Auftreffen auf das obere
Heizelement Feuer fangen. Das ist nicht weiter schlimm, sie gehen ganz von selbst aus und beschädigen
das Gerät keinesfalls.
Praktische Ratschläge
• Beim Garen von Lebensmitteln entsteht immer Dampf und manchmal auch etwas Rauch.
• Um die Rauch- und Geruchsentwicklung so niedrig wie möglich zu halten, sollten die Innenwände des Ofens
stets sauber gehalten werden.
• Weitere Tricks zur Senkung der Rauch- und Geruchsentwicklung:
- Geben Sie bei Beginn des Garvorgangs ein wenig Wasser auf den Boden des benutzten Kochgeschirrs.
- Halten Sie die angegebenen Gartemperaturen ein oder senken Sie sie ein wenig.
13
Deu
*
je nach Modell
** nicht mitgeliefert
Page 15

14
Deu
• Sollte das Gargut hinten im Ofen nicht gleichmäßig garen: Wenden Sie das Gargut im Laufe des
Garvorgangs, um es gleichmäßiger zu garen.
• Für Garzeiten unter 5 Minuten muss der Knopf erst auf 15 Minuten gestellt und anschließend auf die
gewünschte Zeitdauer zurückgedreht werden.
EINSATZ DES BRATBLECHS
(Dieser Garmodus kann allein oder parallel zu den drei anderen Garmöglichkeiten eingesetzt werden)
Betrieb des Bratblechs allein (10).
• Stellen Sie den Thermostat auf die Funktion Gril (Betrieb des oberen Heizelements).
• Stellen Sie den Zeitwählschalter auf die gewünschte Garzeit.
• Das Lämpchen geht an.
• Das obere Heizelement heizt das Bratblech auf.
• Heizen Sie 5 Minuten lang vor und legen Sie dann das Bratgut auf das Blech.
• Der Garvorgang kann vor Ablauf der eingestellten Zeit abgebrochen werden. Stellen Sie dazu den
Zeitwählschalter auf die „0”-Position.
• Nach Ablauf der eingestellten Zeit stellt sich der Zeitwählschalter automatisch auf die „0”-Position und ein
Piepton ertönt. Das Lämpchen geht aus.
Achtung, das Bratblech bleibt auch nach Ablauf des Zeitwählschalters noch heiß!
Das Blech muss mit der Seite, an der der Zünglein angebracht ist, nach hinten eingelegt werden. Die
Seiten nicht verwechseln!
(9).
Bei diesem Zünglein handelt es sich nicht um einen Transportzünglein. Er dient zum Anheben des Blechs
bei der Reinigung. (12).
Betrieb des Bratblechs zusammen mit einem anderen Garmodus (11).
• In diesem Fall müssen zuerst je nach Gargut die Gar-Parameter ausgewählt werden (Zeitdauer und
Temperatur).
• Das obere Heizelement ist in Betrieb und heizt das Bratblech auf.
In diesem Fall dauert die Garzeit so lange, wie sie für das Gargut im Ofen eingestellt ist. Am Ende der
Garzeit hört die Beheizung des Bratblechs auf.
Aus diesem Grunde muss der Gar- oder Aufwärmvorgang des Garguts auf dem Bratblech überwacht
werden.
Achtung, das Bratblech bleibt auch nach Ablauf des Zeitwählschalters noch heiß!
Das Blech muss mit der Seite, an der der Zünglein angebracht ist, nach hinten eingelegt werden. Die
Seiten nicht verwechseln!
(9).
Bei diesem Zünglein handelt es sich nicht um einen Transportzünglein. Er dient zum Anheben des Blechs
bei der Reinigung. (12).
Lassen Sie das Gerät vor dem Auseinandernehmen des Geräts und der Reinigung des Bratblechs
vollkommen abkühlen.
Reinigung
• Vor der Reinigung muss das Gerät ausgesteckt werden und völlig abkühlen.
• Tauchen Sie das Gerät nie ins Wasser.
Außenwände
• Wischen Sie die Außenwände des Geräts mit einem mit Seifenwasser angefeuchteten Schwamm ab. (1).
• Anschließend sorgfältig abspülen und trocknen.
Innenwände
• Die Innenwände sind mit einer Anti-Haftbeschichtung versehen. Entfernen Sie Fettspritzer mit einem in
heißes Seifenwasser getauchtem Schwamm.
Page 16
• Anschließend sorgfältig abspülen und trocknen.
• Verwenden Sie keine Pads oder Schwämme aus Metall, weder Scheuerpulver noch aggressive Putzmittel
(besonders keine Scheuermittel auf Natronlauge).
Zubehör*
• Reinigen Sie das Zubehör* mit heißem Wasser und ein wenig Spülmittel.
• Anschließend sorgfältig abspülen und trocknen.
Krümelschublade
• Reinigen Sie die Krümelschublade mit heißem Wasser und ein wenig Spülmittel.
• Anschließend sorgfältig abspülen und trocknen.
Bratblech
• Lassen Sie das Gerät vor dem Auseinandernehmen des Geräts und der Reinigung des Bratblechs
vollkommen abkühlen.
• Nehmen Sie das Bratblech zum Abnehmen an dem hinten am Blech angebrachten Zünglein hoch.
• Das Bratblech lässt sich leicht mit heißem Wasser und Flüssigreiniger sauber machen (verwenden Sie keine
Metallschwämme und Scheuermittel). Anschließend trocknen lassen.
• Das Bratblech kann leicht wieder an seinen Platz auf dem Ofen eingesetzt werden. Achten Sie dabei darauf,
dass der Zünglein nach hinten schaut.
Achtung, die Zubehörteile und das Bratblech sind nicht spülmaschinenfest.
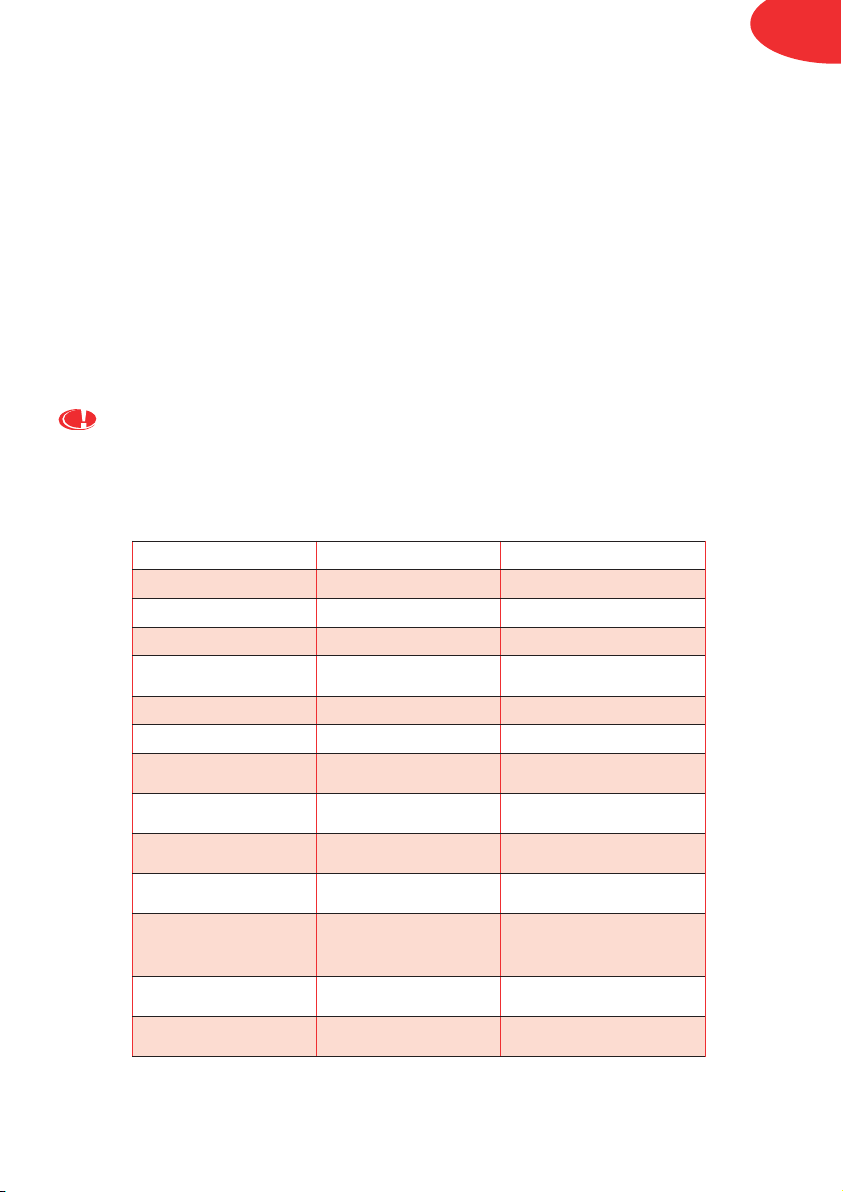
GARZEITENTABELLE
Die angegebenen Temperaturen und Garzeiten sind unverbindliche Angaben, die je nach Rezept, Kochgeschirr und
Zutaten verändert werden können.
BEGRENZTE GARANTIEDAUER
15
Deu
Zutaten Funktionen – T° Zeitdauer
Apfelkuchen BAKE 230 °C 25-35 Minuten
Gebäck BAKE 180 °C 10-15 Minuten
Frische Pizza 200 g BAKE 230 °C 6-8 Minuten
Tiefgefrorenes
Kartoffelgratin
BAKE 230 °C 40-50 Minuten
2 Hühnerschlegel BAKE 230 °C 25-35 Minuten
Schellfischfilet BAKE 230 °C 18-22 Minuten
Speck (10mm)
GRILL (Tür einen Spalt
breit offen)
10 Minuten, wenden,
dann nochmals 4 Minuten
Würstchen
GRILL (Tür einen Spalt
breit offen)
10 Minuten, wenden,
dann nochmals 4 Minuten
Nudelauflauf
GRILL (Tür einen Spalt
breit offen)
15-20 Minuten
Speck (10mm)
Bratblech
– Funktion GRILL
20 Minuten
(10 auf jeder Seite)
Hacksteaks
Bratblech
– Funktion GRILL
10-15 Minuten auf der
einen Seite, dann 5-10
Minuten auf der anderen
Kartoffeln aufwärmen
Bratblech
– Funktion GRILL
25-30 Minuten
Spiegelei
Bratblech
– Funktion GRILL
4-5 Minuten
*
je nach Modell
Page 17

МEPЫ ПPEДOCTOPOЖHOCTИ
ПPEДOTBPAЩEHИE
бЫTOВЫX TPABM
•
Данный прибор соответствует действующим нормам и условиям техники
безопасности, а также следующим директивам:
•
Директива об электромагнитной совместимости 89/336/ЕЭС, измененная
Директивами 92/31/ЕЭС и 93/68/ЕЭС.
•
Директива о низком напряжении 73/23/ЕЭС, измененная Директивой 93/68/ЕЭС.
•
Если вы купили прибор в одной стране, а намерены использовать его в другой, не
забудьте учeсть различия в действующих нормах. Рекомендуем вам проверить
прибор в соответствующем центре обслуживания.
•
Убедитесь, что рабочее напряжение сети соответствует напряжению, указанному
на приборе (только для переменного тока).
•
Убедитесь, что мощность электросети достаточна для питания прибора
подобного типа.
•
Прибор должен включаться только в розетку с заземлением.
•
Следите, чтобы шнур питания не свисал со стола и не касался нагревающихся
частей прибора.
•
Не тяните за шнур, чтобы выключить прибор.
•
Можно использовать только удлинитель в хорошем состоянии, при условии, что
он снабжен заземлением, а сечение его проводника не меньше, чем сечение
проводника шнура, поставляемого вместе с прибором.
•
Во избежание получения электрошока запрещается погружать шнур питания,
штепсель или сам прибор в воду или любую другую жидкость.
Существуют элементарные норм6 которые следует
обязательно соблюдать при пользовании электроприборами, в
частности:
•
Внимательно прочтите инструкцию для пользователя и соблюдайте ее указания.
•
Не оставляйте работающий прибор без присмотра, особенно во время первого
включения и при изменении параметров регулировки.
•
Не оставляйте прибор в местах, доступных для детей.
•
Дети и инвалиды могут пользоваться прибором только под контролем.
•
Следите, чтобы дети не играли с прибором.
•
Запрещается переносить или перемещать работающий прибор.
•
Установите прибор на устойчивый рабочий стол вдали от водяных брызг.
•
Не помещайте прибор вблизи от источников.
•
После использования и перед выполнением чистки обязательно отключайте
прибор.
•
Перед каждым использованием убедитесь, что поддон для сбора крошек
заблокирован на своем месте под прибором.
•
Во время работы прибора дверь и наружные поверхности сильно нагреваются: не
дотрагивайтесь до них руками, пользуйтесь только ручками и кнопками .
16
Rus
Page 18

•
Запрещается класть бумажные, картонные или пластмассовые предметы внутрь
прибора, на него или под него.
•
Запрещается использовать гриль для тостов для приготовления или
размораживания полуфабрикатов.
•
Запрещается использовать прибор, если:
- шнур питания поврежден,
- прибор упал или же имеет заметные повреждения или аномалии в работе.
В этом случае во избежание опасности любого рода прибор следует отнести в
ближайший центр послепродажного обслуживания.
•
Прибор предназначен только для использования в помещении.
•
Запрещается использовать прибор для обогрева.
•
Поскольку хлеб может загореться, следите, чтобы поблизости от прибора не
находились легко воспламеняющиеся предметы (занавески, полки и т. п.).
•
Не закрывайте чем-либо работающий прибор. В случае возгорания продуктов не
заливайте огонь водой. Отключите прибор от сети и погасите пламя влажной
тряпкой.
•
Не храните воспламеняющиеся вещества около прибора.
•
Используйте только принадлежности, рекомендованные изготовителем, той же
марки, что и ваш прибор.
•
Данный прибор был разработан исключительно для бытового использования.
Профессиональное и не соответствующее инструкции использование, также как и
использование прибора не по назначению аннулирует действие гарантии и
освобождает изготовителя от ответственности любого рода.
•
В целях вашей собственной безопасности не разбирайте прибор самостоятельно:
обратитесь в отдел послепродажного обслуживания.
СOXPAHИTE ДAHHYЮ ИHCTPYKЦИЮ
ДЛЯ ДAЛЬHEЙШEГO ИCПOЛЬЗOBAHИЯ
17
Rus
Page 19

18
Rus
Характеристики прибора
1.
Pешетку*
5.
Таймер
2.
Поддон*
6.
Поддон для сбора крошек
3.
Гриль*
7.
Термостат
4.
Световой индикатор
8.
Плитка для приготовления пищи
Характеристики тостера Oven
Ваш тостер Oven обладает следующими преимуществами:
• Объем внутренней камеры составляет 8,5 л и рассчитан на одновременное приготовление 4 тостов.
• Встроенная в верхнюю часть прибора плитка расширяет возможности при приготовлении различных
блюд. (9).
•
Режим «four» («печь»): регулируемый термостат (90°-240°C) поможет успешно приготовить любое блюдо.
•
Режим «Grill» («Гриль») служит для приготовления и поджаривания любых продуктов.
• Автоматическое выдвижение решетки упрощает контроль за прибором и позволяет легко вынуть
блюдо. (2).
• Поддон для сбора крошек легко вынимается с целью удаления крошек или других отходов. Это
упрощает выполнение чистки. (3).
•
Поддон для приготовления печенья, бутербродов, полуфабрикатов.
•
Гриль*для диетического приготовления продуктов.
Перед первым использованием
• Освободите прибор от упаковки и снимите наклейки.
• Внимательно прочтите инструкцию и следуйте ее указаниям.
• Выньте из прибора принадлежности* (решетку, поддон, гриль) и вымойте их горячей мыльной водой.
• Полностью размотайте шнур питания.
• Оботрите наружные поверхности прибора влажной тряпкой и тщательно высушите их. (1).
Для удаления запаха, свойственного новым изделиям, включите в работу пустой прибор с
открытой дверцeй, а затем проветрите помещение:
•
Установите термостат на «240°C» и переключатель таймера на «15 минут».
• Через 15 минут переключатель автоматически вернется в положение «0».
Из печи может выйти небольшое количество дыма. Это нормальное явление, которое
исчезнет в ходе первого использования.
Режим TOAST («Тост»)
(Включаются оба сопротивления)
• Положите ломтики хлеба прямо на решетку, повернув ее вверх.
•
Установите регулятор термостата в положение «Toast» («Тост»).
(6).
• С помощью переключателя таймера установите нужное время. (4).
• Загорится световой индикатор.
• По окончании цикла переключатель таймера автоматически вернется в положение «0». При этом
раздается звуковой сигнал и световой индикатор гаснет.
• По окончании цикла переключатель таймера автоматически вернется в положение «0». При этом
раздается звуковой сигнал и световой индикатор гаснет.
• Достаньте готовые тосты. (5).
Примечания
• При поджаривании хлеба в режиме TOAST не оставляйте тостер без присмотра.
• Поджарьте сначала несколько ломтиков хлеба, чтобы понять, как работает тостер.
• Учитывайте, что небольшое число ломтиков хлеба поджаривается быстрее.
• Если ломтики хлеба тонкие, следите, чтобы они не подгорели.
* в зависимости от модели
Page 20

19
Rus
• Если хлеб начинает подгорать, немедленно прервите рабочий цикл, переведя переключатель таймера
в положение «0».
• При подогревании готового тоста не оставляйте прибор без присмотра.
Тостер сильно нагревается. Вынимая хлеб, не дотрагивайтесь до стенок камеры
(пользуйтесь специальными щипцами для хлеба** или кухонными рукавицами).
РЕЖИМ «FOUR» («ПЕЧЬ») (Включаются оба сопротивления)
•
Поместите продукты в соответствующее блюдо и поставьте его на решетку.
•
С помощью регулятора термостата установите нужную температуру.
•
С помощью переключателя таймера укажите нужное время приготовления (не больше 60 минут)
•
Световой индикатор загорается.
•
Следите за приготовлением продуктов.
•
Рабочий цикл можно прервать в любой момент, переведя переключатель таймера в положение «0».
•
Переведите регулятор термостата в положение «0».
Печь сильно нагревается. Вынимая блюдо, не дотрагивайтесь до стенок камеры (потяните за
решетку, используя кухонные рукавицы**).
РЕЖИМ «GRILL» («ГРИЛЬ») (Включается только верхнее сопротивление)
•
Поместите гриль внутрь блюда*.
•
Поместите продукты внутрь установленного на блюдо гриля*.
•
Поставьте блюдо на решетку: расстояние между продуктами и верхним сопротивлением должно быть не
меньше 2 см (0,8 дюйма).
•
Дверь должна остаться полуоткрытой.
(8).
•
Установите регулятор термостата в положение “ Grill” («Гриль») (пиктограмма).
(7).
•
С помощью переключателя таймера укажите нужное время приготовления (не больше 60 минут).
•
Установите переключатель таймера в положение «on» («вкл.»)
•
Световой индикатор загорается.
•
Следите за приготовлением продуктов и переворачивайте их по мере необходимости с помощью кухонных
принадлежностей.
•
Рабочий цикл можно прервать в любой момент, переведя переключатель таймера в положение «0».
•
Установите регулятор термостата в положение «0».
Печь сильно нагревается. Вынимая блюдо, не дотрагивайтесь до стенок камеры (потяните за
решетку, используя кухонные рукавицы
**
).
В ходе приготовления брызги жира могут загореться при попадании на верхнее сопротивление.
Не волнуйтесь, они погаснут сами и не причинят никаких повреждений прибору.
Практические советы
•
При приготовлении продуктов всегда выделяется пар, и иногда – дым.
• Стенки камеры всегда должны быть чистыми: таким образом вы сможете избежать появления
сильного дыма и неприятных запахов.
•
Можно также уменьшить возникновение дыма и запахов, если:
-
в начале приготовления добавить немного воды на дно блюда.
-
точно соблюдать или снизить температуру приготовления.
•
Если продукты жарятся неравномерно:
-
Переворачивайте их в ходе приготовления.
• Чтобы установить время менее 5 минут, переведите регулятор таймера в положение 15 минут, а затем
поворачивайте его в обратную сторону до нужного показания.
* в зависимости от модели ** не поставляются вместе с прибором
Page 21

20
Rus
ИСПОЛЬЗОВАНИЕ ПЛИТКИ
(Этот режим приготовления может использоваться самостоятельно или в сочетании с тремя
другими режимами)
Независимое использование плитки
(10).
•
Установите регулятор термостата в положение «Grill»/»Гриль» (работает верхнее
сопротивление).
•
С помощью переключателя таймера укажите нужное время.
•
Световой индикатор загорается.
•
Верхнее сопротивление нагревает плитку.
•
Дайте плитке нагреться в течение 5 минут, а затем поставьте на нее продукты.
•
Рабочий цикл можно прервать в любой момент, переведя переключатель таймера в
положение «0».
•
По окончании цикла переключатель таймера автоматически возвращается в положение «0»
и световой индикатор гаснет.
Осторожно! После отключения таймера плитка по-прежнему остается горячей!
Устанавливайте плитку правильно: язычок должна находиться с задней стороны.
(9).
Эта язычок не предназначена для переноски плитки, с ее помощью можно снять
плитку, чтобы вычистить ее.
(12).
Использование плитки вместе с другими режимами приготовления
(11).
•
В этом случае следует сначала установить параметры (время и температуру приготовления)
в зависимости от вида продуктов, которые вы помещаете в печь.
•
Верхнее сопротивление начинает работать, нагревая плитку.
В этом случае время приготовления указано заранее и зависит от вида продуктов,
помещенных в печь. По окончании работы печи плитке тоже перестает нагреваться.
Поэтому следует внимательно следить за процессом приготовления или
подогрева продуктов на плитке.
Осторожно! После отключения таймера плитка по-прежнему остается горячей!
Устанавливайте плитку правильно: язычок должна находиться с задней стороны.
(9).
Эта язычок не предназначена для переноски плитки, с ее помощью можно снять
плитку, чтобы вычистить ее.
(12).
Перед тем, как снимать и чистить плитку, дождитесь, чтобы прибор полностью
остыл.
Чистка
• Перед выполнением чистки отключите прибор от сети и дождитесь, когда он полностью остынет.
• Запрещается погружать прибор в воду.
Наружные стенки
• Протрите наружные поверхности прибора влажной мыльной губкой. (1).
• Сполосните и тщательно высушите их.
Внутренние стенки
•
Внутренние стенки камеры с антипригарным покрытием можно очистить от жирных
подтеков с помощью губки, сильно смоченной горячей мыльной водой.
• Сполосните и тщательно высушите стенки камеры.
• Запрещается использовать металлические щетки и губки, средства для чистки, а также химически
активные средства (в частности, средства на основе соды).
Page 22

21
Rus
Принадлежности*
• Принадлежности можно мыть горячей водой с добавлением средства для мытья посуды.
• Сполосните и тщательно высушите их.
Поддон для сбора крошек
• Поддон для сбора крошек можно мыть горячей водой с добавлением средства для мытья посуды.
• Сполосните и тщательно высушите стенки камеры.
Плитка
•
Перед тем, как снимать и чистить плитку, дождитесь, чтобы прибор полностью остыл.
•
Снимите плитку с помощью расположенной с ее задней стороны язычок.
•
Плитку легко очистить горячей водой с добавлением жидкого моющего средства
(запрещается пользоваться металлической губкой и порошком для чистки). Тщательно
высушите ее.
•
Установите плитку на предназначенное для нее место в верхней части прибора так, чтобы
язычок находилась сзади.
Внимание! Запрещается мыть принадлежности к прибору в посудомоечной машине.
ИНСТРУКЦИИ ПО ПРИГОТОВЛЕНИЮ
Температура и время приготовления указаны только для справки. Полученный результат зависит от
рецепта, используемой посуды и качества продуктов.
ГАРАНТИЯ ИМЕЕТ ОГРАНИЧЕННЫЙ
СРОК ДЕЙСТВИЯ
* в зависимости от модели
Блюдо Блюдо Блюдо
Пирог с яблоками BAKE («ПЕЧЬ»)230 °C 25-35 минут
Печенье BAKE («ПЕЧЬ»)180 °C 10-14 минут
Свежая пицца
200 г
BAKE («ПЕЧЬ»)230 °C 6-8 минут
Замороженная
картофельная
запеканка
BAKE («ПЕЧЬ»)230 °C 40-50 минут
2 куриные ножки BAKE («ПЕЧЬ»)230 °C 25-35 минут
Филе трески
BAKE («ПЕЧЬ»)230 °C 18-22 минут
Бекон
(толщиной 10 мм)
GRILL («ГРИЛЬ»)
(дверь полуоткрыта)
10 минут, перевернуть,
затем 4 минуты
Сосиски
GRILL («ГРИЛЬ»)
(дверь полуоткрыта)
10 минут, перевернуть,
затем 4 минуты
Макаронная
запеканка
GRILL («ГРИЛЬ»)
(дверь полуоткрыта)
15-25 минут, перевернуть,
затем 4 минуты
Бекон
(толщиной 10 мм)
Плитка – в режиме
GRILL («ГРИЛЬ»)
20 минут (10 с каждой
стороны)
Бифштекс
Плитка – в режиме
GRILL («ГРИЛЬ»)
10-15 минут с одной
стороны, 5-10 минут
Подогрев картофеля
Плитка – в режиме
GRILL («ГРИЛЬ»)
25-30 минут
Яичница
Плитка – в режиме
GRILL («ГРИЛЬ»)
4-5 минут
Page 23

ZALECENIA BEZPIECZE¡STWA
ZAPOBIEGANIE WYPADKOM
DOMOWYM
• Bezpieczeƒstwo urzàdzenia jest zgodne z zasadami technicznymi i obowiàzujàcy-
mi normami.
• Dyrektywa zgodnoÊç elektromagnetyczna 89/336/CEE ze zmianami w 92/31/CEE
i 93/68/CEE.
• Dyrektywa niskie napi´cia 73/23/CEE ze zmianami w 93/68/CEE.
• Uwzgl´dniajàc ró˝norodnoÊç obowiàzujàcych norm, je˝eli urzàdzenie jest
u˝ywane w innym kraju ni˝ zosta∏o zakupione, nale˝y je sprawdziç w autoryzowanym serwisie.
• Sprawdziç, czy napi´cie w sieci odpowiada napi´ciu podanemu na urzàdzeniu
(tylko pràd zmienny).
• Upewniç si´, ˝e instalacja elektryczna jest dostosowana do zasilania urzàdzenia o
tej mocy.
• Zawsze pod∏àczaç urzàdzenie do gniazdka wyposa˝onego w uziemienie.
• Zapobiegaç zwisaniu przewodu i jego kontaktowi z goràcymi elementami piekarni-
ka.
• Nie od∏àczaç urzàdzenia ciàgnàc za przewód.
• U˝ywaç tylko przed∏u˝aczy w dobrym stanie technicznym, z wtyczkà z uziemie-
niem i o przekroju równym lub wi´kszym od przewodu dostarczonego z produktem.
• Aby zapobiec pora˝eniu pràdem elektrycznym, nie zanurzaç przewodu zasilania,
wtyczki lub urzàdzenia w wodzie lub innych p∏ynach.
W czasie u˝ywania urzàdzeƒ elektrycznych, nale˝y przestrzegaç podstawowych zasad bezpieczeƒstwa:
• Przeczytaç ca∏à instrukcj´ obs∏ugi i post´powaç zgodnie z jej zaleceniami.
• Nigdy nie pozostawiaç dzia∏ajàcego urzàdzenia bez nadzoru, zw∏aszcza przy
pierwszym pieczeniu lub po zmianie ustawieƒ.
• Nie pozostawiaç urzàdzenia w miejscu dost´pnym dla dzieci.
• Urzàdzenie nie mo˝e byç u˝ytkowane bez nadzoru przez ma∏e dzieci lub osoby
niepe∏nosprawne.
• Ma∏e dzieci muszà byç nadzorowane, aby upewniç si´, ˝e nie mogà bawiç si´
urzàdze-niem.
• Nie nosiç i nie przemieszczaç urzàdzenia w czasie u˝ywania.
• U˝ywaç na stabilnej powierzchni zabezpieczonej przed pryskaniem wody.
• Nie umieszczaç urzàdzenia w pobli˝u êróde∏ ciep∏a
• Od∏àczaç urzàdzenie po ka˝dym u˝yciu lub przed czyszczeniem.
• Przed ka˝dym u˝yciem, sprawdziç, czy szuflada na okruchy jest prawid∏owo zablo-
kowana pod urzàdzeniem.
• Temperatura drzwi i powierzchni zewn´trznej mo˝e byç bardzo wysoka w czasie
dzia∏ania urzàdzenia, nie dotykaç tych powierzchni kiedy urzàdzenie jest w∏àczone,
u˝ywaç uchwytów i przycisków
.
22
Pol
Page 24

• Nie umieszczaç papieru, kartonu lub plastiku w, na lub pod urzàdzeniem.
• Nie u˝ywaç opiekacza do tostów do pieczenia lub rozmra˝ania mro˝onek.
• Nie u˝ywaç urzàdzenia je˝eli:
- przewód zasilania jest uszkodzony.
- urzàdzenie upad∏o i posiada widoczne uszkodzenia lub dzia∏a nieprawid∏owo.
W ka˝dym przypadku, aby zapobiec wszelkiemu niebezpieczeƒstwu, urzàdzenie
nale˝y oddaç do najbli˝szego autoryzowanego serwisu.
• Urzàdzenie nale˝y u˝ywaç tylko w domu.
• Nie u˝ywaç urzàdzenia jako grzejnik.
• Chleb mo˝e si´ zapaliç, z tego powodu urzàdzenia nie nale˝y u˝ywaç w pobli˝u
materia∏ów ∏atwopalnych takich jak firany, pó∏ki, meble...
• Nie przykrywaç urzàdzenia podczas dzia∏ania.
• W przypadku zapalenia si´ produktu, nie gasiç wodà. Od∏àczyç urzàdzenie i st∏umiç
p∏omienie wilgotnà Êcierkà.
• Nie przechowywaç ∏atwopalnych produktów w pobli˝u urzàdzenia.
• Nie u˝ywaç akcesoriów nie zalecanych przez producenta, ani akcesoriów innych
marek ni˝ urzàdzenie.
• Urzàdzenie zosta∏o zaprojektowane wy∏àcznie do u˝ytku domowego, zastosowania
profesjonalne, niew∏aÊciwe lub niezgodne z instrukcjà obs∏ugi zwalniajà producenta
z wszelkiej odpowiedzialnoÊci i powodujà utrat´ gwarancji.
• Dla bezpieczeƒstwa, nie nale˝y nigdy samodzielnie demontowaç urzàdzenia;
nale˝y skorzystaç z pomocy autoryzowanego centrum serwisowego.
NALE˚Y ZACHOWAå INSTRUKCJ¢
23
Pol
Page 25

Opis urzàdzenia
1.
Ruszt*
5.
Minutnik
2.
P∏yta*
6.
Szuflada na okruchy
3.
Opiekacz*
7.
Termostat
4.
Kontrolka
8.
P∏yta grzejna
Zalety piekarnika z tosterem
Piekarnik z tosterem posiada nast´pujàce zalety:
•
PojemnoÊç 8,5 litra do grillowania do 4 kawa∏ków chleba równoczeÊnie.
•
Wbudowana p∏yta do pieczenia w górnej cz´Êci zapewnia wiele mo˝liwoÊci.
(9).
• Funkcja piernika: termostat jest regulowany w zakresie od 90° do 240 °C umo˝liwiajàc przygotowywanie potraw
wed∏ug ró˝nych przepisów.
• Funkcja Grill: do sma˝enia i opiekania produktów.
•
Automatyczne wyjmowanie rusztu: u∏atwia kontrolowanie pieczenia i mocowanie.
(2).
•
Szuflad´ na okruchy mo˝na ∏atwo wyjàç w celu u∏atwienia konserwacji piekarnika i usuni´cia okruchów i
innych zanieczyszczeƒ.
(3).
•
Brytfanna do przygotowywania ciastek, kanapek i mro˝onek.
•
Opiekacz* do zdrowego pieczenia.
Przed pierwszym u˝yciem
•
Odpakowaç urzàdzenie i usunàç wszystkie naklejki.
•
Przeczytaç instrukcj´ obs∏ugi i post´powaç zgodnie z jej zaleceniami.
•
Zdjàç akcesoria* (ruszt, p∏yta, opiekacz), umyç je ciep∏à wodà z p∏ynem do mycia.
Op∏ukaç i dok∏adnie wysuszyç.
•
Rozwinàç ca∏kowicie przewód zasilania.
•
Wilgotnà Êcierkà przetrzeç wn´trze urzàdzenia i wysuszyç.
(1).
Aby usunàç zapachy “fabryczne”, uruchomiç urzàdzenie bez produktów, z otwartymi drzwiami, w
wentylowanym pomieszczeniu:
•
Ustawiç termostat na 240 °C i wy∏àcznik czasowy na 15 minut.
•
Po 15 minutach, wy∏àcznik czasowy ustawi si´ automatycznie na “0”.
Niewielkie iloÊci dymu mogà wydostawaç si´ z piekarnika. Jest to normalne zjawisko, które
zanika stopniowo w czasie pierwszego u˝ycia.
U˝ywanie funkcji TOAST (Oba elementy grzejne dzia∏ajà)
•
Po∏o˝yç kawa∏ki chleba na ruszcie, ruszt ustawiona do góry.
•
Ustawiç termostat na "Toast".
(6).
•
Ustawiç wy∏àcznik czasowy na wybrany czas.
(4).
•
Lampka kontrolna zapala si´.
•
Po zakoƒczeniu cyklu, wy∏àcznik czasowy powraca automatycznie do pozycji “0” i w∏àcza si´ sygna∏
dêwi´kowy, lampka kontrolna gaÊnie.
•
Mo˝na przerwaç dzia∏anie przed zakoƒczeniem cyklu ustawiajàc wy∏àcznik czasowy w pozycji “0”.
•
Wyjàç tosty
(5).
Uwagi:
•
Przy u˝ywaniu funkcji TOAST, nale˝y zawsze kontrolowaç chleb w czasie opiekania.
•
Przy pierwszym u˝yciu, nale˝y wykonaç prób´ na kilku kawa∏kach chleba.
•
Nale˝y pami´taç, ˝e im mniej kawa∏ków chleba znajduje si´ w urzàdzeniu tym krótszy jest czas
pieczenia.
•
Przy pieczeniu kilku partii cienkich tostów, zalecamy kontrolowanie chleba, aby go nie przypaliç.
•
Je˝eli chleb zacznie czernieç, nale˝y natychmiast wy∏àczyç urzàdzenie ustawiajàc minutnik w pozycji “0”.
*
w zale˝noÊci od modelu
24
Pol
Page 26

•
Je˝eli konieczne jest podgrzanie upieczonego tosta, nale˝y dok∏adnie kontrolowaç opiekanie.
Piekarnik jest nagrzany. W momencie wyjmowania chleba, nale˝y zwróciç uwag´, aby nie
dotknàç Êcianek (nale˝y u˝yç szczypiec lub r´kawic**).
FUNKCJA PIEKARNIK (BAKE)
(Oba elementy grzejne dzia∏ajà)
•
UmieÊciç produkty na ruszcie w odpowiedniej brytfannie.
•
Ustawiç termostat na wybranà temperatur´
•
Ustawiç wy∏àcznik czasowy sur na wybrany czas pieczenia (maksymalnie 60 minut)
•
Kontrolka zapala si´.
•
Kontrolowaç pieczony produkt
•
Mo˝na przerwaç dzia∏anie przed zakoƒczeniem cyklu ustawiajàc wy∏àcznik czasowy w pozycji "0".
•
Ustawiç termostat w pozycji zero "0".
Piekarnik jest nagrzany. W momencie wyjmowania brytfanny, nale˝y zwróciç uwag´, aby nie dotknàç
Êcianek (nale˝y wyciàgnàç ruszt lub u˝yç r´kawic**)
FUNKCJA GRILL
(Tylko górny element grzeje)
•
UmieÊciç brytfann´ w opiekaczu*.
•
U∏o˝yç produkty na ruszcie opiekacza na w brytfannie*.
•
Ustawiç ca∏oÊç na kracie: odleg∏oÊç mi´dzy potrawà i elementem grzejnym górnym musi wynosiç
minimum 2cm (0.8 in).
•
Pozostawiç drzwi w pozycji uchylonej.
(8).
•
Ustawiç termostat na "Grill" (picto).
(7).
• Ustawiç wy∏àcznik czasowy na wybrany czas (maksymalnie 60 minut).
•
Ustawiç wy∏àcznik czasowy na "on".
•
Lampka kontrolna zapala si´.
•
Kontrolowaç pieczony produkt odwróciç w po∏owie pieczenia za pomocà ∏opatki (je˝eli zachodzi
potrzeba).
•
Mo˝na przerwaç dzia∏anie przed zakoƒczeniem cyklu ustawiajàc wy∏àcznik czasowy w pozycji "0".
•
Ustawiç termostat w pozycji zero "0".
Piekarnik jest nagrzany. W momencie wyjmowania brytfanny, nale˝y zwróciç uwag´, aby nie
dotknàç Êcianek (nale˝y wyciàgnàç ruszt lub u˝yç r´kawic**).
W czasie pieczenia, odpryski t∏uszczu mogà zapalaç si´ w kontakcie z górnym elementem
grzejnym. Nie nale˝y si´ niepokoiç, p∏omieƒ zgaÊnie samoczynnie i nie ma szkodliwego
wp∏ywu na urzàdzenie.
Wskazówki praktyczne
•
Opiekanie produktów powoduje zawsze powstawanie oparów i czasami dymu.
•
Mo˝na ograniczyç wydzielanie si´ dymu i zapachów przez utrzymanie Êcianek piekarnika w czystoÊci.
•
Mo˝na je równie˝ zmniejszyç:
-
dodajàc na poczàtku pieczenia niewielkà iloÊç wody na u˝ywany pó∏misek.
-
przestrzegajàc lub zmniejszajàc temperatury pieczenia.
•
Je˝eli produkty nie piekà si´ równomiernie we wn´trzu piekarnika:
-
Obracaç produkty w czasie pieczenia, aby zapewniç jednolity efekt.
•
Dla czasów poni˝ej 5 minut, przekr´ç pokr´t∏o na 15 minut i nast´pnie ustaw po˝àdany czas.
25
Pol
*
w zale˝noÊci od modelu
**
nie dostarczone z urzàdzeniem.
Page 27

26
Pol
U˚YWANIE P¸YTY DO PIECZENIA
(Tego trybu pieczenia u˝ywa si´ w sposób niezale˝ny lub w czasie u˝ywania jednego z trzech pozosta∏ych trybów
pieczenia).
Niezale˝ne u˝ywanie p∏yty do pieczenia
(10).
•
Ustawiç termostat na funkcj´ Gril (u˝ywanie górnego elementu grzejnego).
•
Ustawiç wy∏àcznik czasowy na wybrany czas pieczenia.
•
Kontrolka zapala si´.
•
Górny element grzejny podgrzewa p∏yt´ do pieczenia.
•
Pozostawiç do rozgrzania na 5 minut, nast´pnie po∏o˝yç produkty na p∏ycie.
•
Mo˝na przerwaç dzia∏anie przed zakoƒczeniem cyklu ustawiajàc wy∏àcznik czasowy w pozycji "0".
•
Po zakoƒczeniu cyklu, wy∏àcznik czasowy powraca automatycznie do pozycji " 0 " i w∏àcza si´ sygna∏
dêwi´kowy. Lampka kontrolna gaÊnie.
P∏yta do pieczenia pozostaje goràca po wy∏àczeniu minutnika!
P∏yta jednokierunkowa: strona z wyst´ptem odpowiada tylnej cz´Êci p∏yty, nie ustawiaç jej do
przodu.
(9).
Wyst´p nie jest Wyst´ptem do przenoszenia, uchwyt s∏u˝y wy∏àcznie do unoszenia p∏yty w
czasie czyszczenia.
(12).
U˝ywanie p∏yty do pieczenia w czasie dzia∏ania innych trybów
(11).
•
W takim przypadku nale˝y najpierw wybraç parametry pieczenia (czas i temperatura) zale˝nie od
produktów, które zostanà umieszczone w piekarniku.
•
Górny element grzejny jest w∏àczony i umo˝liwia podgrzewanie p∏yty do pieczenia.
W takim przypadku, czas pieczenia jest uzale˝niony od produktu umieszczonego w
piekarniku; piekarnik spowoduje wy∏àczenie podgrzewania p∏yty po up∏ywie czasu pieczenia.
Nale˝y kontrolowaç pieczenie lub podgrzewanie produktów umieszczonych na p∏ycie do
pieczenia.
Uwaga, p∏yta do pieczenia pozostaje goràca po wy∏àczeniu wy∏àcznika czasowego!
P∏yta jest jednokierunkowa: strona z wyst´ptem odpowiada tylnej cz´Êci p∏yty, nie ustawiaç
jej do przodu.
(9).
Wyst´p nie jest wyst´ptem do przenoszenia, uchwyt s∏u˝y wy∏àcznie do unoszenia p∏yty w
czasie czyszczenia.
(12).
Zaczekaç do ca∏kowitego sch∏odzenia urzàdzenia przed zdemontowaniem i wyczyszczeniem
p∏yty do pieczenia.
Czyszczenie
•
Przed ka˝dym czyszczeniem, od∏àczaç urzàdzenie i pozostawiaç do ca∏kowitego sch∏odzenia.
•
Nigdy nie zanurzaç urzàdzenia w wodzie.
Âcianki zewn´trzne
•
Przetrzeç zewn´trzne elementy wilgotnà gàbkà z p∏ynem do mycia.
(1).
•
Op∏ukaç i dok∏adnie wytrzeç.
Âcianki wewn´trzne
•
Âcianki wewn´trzne sà pokryte materia∏em zapobiegajàcym przywieraniu, usunàç odpryski t∏uszczu za
pomocà wilgotnej gàbki z p∏ynem do mycia.
•
Op∏ukaç i wytrzeç dok∏adnie.
•
Nie u˝ywaç drucianych myjek, proszków do szorowania, ani innych produktów agresywnych (zw∏aszcza
Êrodków czyszczàcych na bazie sody).
Page 28

27
Pol
Akcesoria*
•
Akcesoria nale˝y czyÊciç ciep∏à wodà i p∏ynem do mycia naczyƒ.
•
Op∏ukaç i wytrzeç dok∏adnie.
Szuflada na okruchy
•
Szuflad´ na okruchy nale˝y czyÊciç ciep∏à wodà i p∏ynem do mycia naczyƒ.
•
Op∏ukaç i wytrzeç dok∏adnie.
P∏yta do pieczenia
•
Zaczekaç do ca∏kowitego sch∏odzenia urzàdzenia przed zdemontowaniem i wyczyszczeniem p∏yty do
pieczenia.
•
Aby wyjàç p∏yt´ do pieczenia, z∏apaç wyst´p umieszczony z ty∏u p∏yty.
•
P∏yt´ do pieczenia mo˝na ∏atwo wyczyÊciç ciep∏à wodà i detergentem w p∏ynie (nie u˝ywaç myjek
drucianych lub proszku do szorowania). Pozostawiç do wyschni´cia.
•
P∏yt´ do pieczenia mo˝na ∏atwo za∏o˝yç na miejsce na gór´ piekarnika, z wyst´ptem skierowanym do ty∏u.
Nie wk∏adaç akcesoriów do zmywarki do naczyƒ.
INSTRUKCJE PIECZENIA
Temperatury i czas sà orientacyjne. Wyniki pieczenia sà zale˝ne od przepisu, zastosowanych naczyƒ i
sk∏adników.
OKRES GWARANCYJNY
Sk∏adniki Funkcje – T° Sk∏adniki
Tarta z jab∏kami BAKE 230 °C 25-35 minut
Ciastka BAKE 180 °C 10-14 minut
Pizza 200 g BAKE 230 °C 6-8 minut
Mro˝ona zapiekanka z ziemniaków
BAKE 230 °C 40-50 minut
2 udka kurczaka BAKE 230 °C 25-35 minut
Filet z dorsza BAKE 230 °C 18-22 minut
Boczek (10 mm)
GRILL
(drzwi uchylone)
10 minut, obróciç,
nast´pnie 4 minuty
Kie∏baski
GRILL
(drzwi uchylone)
10 minut, obróciç,
nast´pnie 4 minuty
Zapiekanki z makaronem
GRILL
(drzwi uchylone)
15-20 minut
Boczek (10 mm)
P∏yta do pieczenia –
funkcja GRILL
20 minut (10 z ka˝dej
strony)
Kotlet mielony
P∏yta do pieczenia –
funkcja GRILL
10-15 minut z jednej
strony, 5-10 minut z
drugiej strony
Podgrzewanie ziemniaków
P∏yta do pieczenia –
funkcja GRILL
25-30 minut
Jajka sadzone
P∏yta do pieczenia –
pozycja GRILL
4-5 minut
*
w zale˝noÊci od modelu
Page 29

BEZPEâNOSTNæ POKYNY
PREVENCE ÚRAZÒ
V DOMÁCNOSTI
• Tento spotfiebiã je ve shodû s platn˘mi technick˘mi nafiízeními a bezpeãnostními
normami.
• Smûrnice o elektromagnetické sluãitelnosti 89/336/CEE pozmûnûna 92/31/CEE a
93/68/CEE.
• Slaboproudá smûrnice 73/23/CEE pozmûnûna 93/68/CEE.
• Vzhledem k rozliãnosti platn˘ch norem nechejte spotfiebiã zkontrolovat schválenou
servisní sluÏbou pokud ho pouÏíváte v jiné zemi, neÏ byl zakoupen.
• Zkontrolujte, Ïe napûtí sítû odpovídá napûtí uvedeném na spotfiebiãi (pouze
stfiídav˘ proud).
• Ujistûte se, Ïe va‰e elektrická instalace je dostateãná pro napájení spotfiebiãe o
takovém v˘konu.
• Spotfiebiã zapojte vÏdy do uzemnûné zásuvky.
• Nenechávejte ‰ÀÛru viset nebo se dot˘kat hork˘ch ãástí spotfiebiãe.
• Nevypínejte spotfiebiã taháním za ‰ÀÛru.
• PouÏívejte pouze uzemnûnou prodluÏovací ‰ÀÛru v dobrém stavu a s prÛfiezem
vodiãÛ ne men‰ím jako má ‰ÀÛra dodaná se spotfiebiãem.
• Abyste pfiede‰li elektrickému ‰oku, nikdy neponofiujte elektrickou ‰ÀÛru, elektrickou
zásuvku ani spotfiebiã do vody nebo jiné kapaliny.
Pfii pouÏívání elektrick˘ch spotfiebiãÛ se musí dodrÏovat nûkolik základních
pravidel, zejména následující:
• Pfieãtûte si cel˘ návod k pouÏití a peãlivû dodrÏujte instrukce.
• Nikdy nenechávejte zapnut˘ spotfiebiã bez dohledu, a to zejména pfii prvním pouÏití
grilu nebo zmûnû nastavení.
• Nenechávejte spotfiebiã v dosahu dûtí.
• Spotfiebiã nesmí b˘t pouÏíván mal˘mi dûtmi nebo hendikepovan˘mi osobami bez
dohledu.
• Na malé dûti se musí dohlíÏet, jestli si se spotfiebiãem nehrají.
• Nezvedejte nebo nepfiesunujte zapnut˘ spotfiebiã.
• PouÏívejte pevnou pracovní plochu chránûnou pfied vlhkostí.
• Nikdy nedávejte spotfiebiã do blízkosti zdroje tepla.
• Po kaÏdém pouÏití a pfied kaÏd˘m ãi‰tûním spotfiebiã vypnûte ze zásuvky.
• Pfied kaÏd˘m pouÏitím ovûfite, Ïe je zachytávaã drobkÛ dobfie pfiipevnûn pod
spotfiebiãem.
• Teplota dvífiek a venkovního povrchu mÛÏe b˘t zv˘‰ená, kdyÏ je spotfiebiã v provo-
zu. Nedot˘kejte se spotfiebiãe v provozu, pouÏívejte rukojeti a knoflíky
.
• Nikdy nedávejte papír, lepenku ani umûlou hmotu do, na ani pod spotfiebiã.
• Nikdy nepouÏívejte toustovaã pro peãení nebo rozmrazování zmraÏen˘ch jídel.
28
Cze
Page 30

• NepouÏívejte spotfiebiã v následujících pfiípadech:
- má-li vadnou nebo po‰kozenou ‰ÀÛru,
- spotfiebiã spadnul a je viditelnû po‰kozen˘ nebo nefunguje.
V tûchto pfiípadech odneste spotfiebiã do nejbliωího schváleného servisu, aby se
pfiede‰lo jakémukoliv nebezpeãí.
• Spotfiebiã je urãen pouze k pouÏití v interiéru.
• NepouÏívejte spotfiebiã jako tepeln˘ zdroj.
• Chleba se mÛÏe spálit, proto spotfiebiã nesmí b˘t pouÏíván v blízkosti hofilav˘ch
materiálÛ jako jsou záclony, police, nábytek,...
• Nezakr˘vejte spotfiebiã v provozu. Pokud se stane, Ïe nûkteré jeho ãásti zaãnou
hofiet, nikdy se je nesnaÏte uhasit vodou. Vypnûte spotfiebiã ze zásuvky a uhaste
oheÀ mokrou hadrou.
• Neukládejte hofilavé v˘robky do blízkosti spotfiebiãe.
• NepouÏívejte pfiíslu‰enství nedoporuãené v˘robcem, ani pfiíslu‰enství jiné znaãky
neÏ je vበspotfiebiã.
• Tento spotfiebiã byl vyroben v˘hradnû pro pouÏití v domácnosti, jakékoli profesionální nebo neodpovídající pouÏívání, ani pouÏívání, které není v souladu s návodem, nezavazuje v˘robce k odpovûdnosti a ru‰í záruku.
• Pro va‰i bezpeãnost nikdy nerozebírejte spotfiebiã sami, poÏádejte schválenou servisní sluÏbu.
PEâLIVù TYTO
POKYNY USCHOVEJTE
29
Cze
Page 31

30
Cze
Vlastnosti pfiístroje
1.
MfiíÏku*
5.
âasov˘ spínaã
2.
Plot˘nku*
6.
Zásuvka na zachycení drobkÛ
3.
Gril*
7.
Termostat
4.
Kontrolní svûtlo
8.
Varná deska
V˘hody multifunkãní trouby Toaster Oven
Va‰e multifunkãní trouba Toaster Oven má následující v˘hody:
•
Vnitfiní objem 8,5 litrÛ na opékání aÏ 4 krajícÛ chleba naráz.
•
Plot˘nka zabudovaná na horní ãásti spotfiebiãe vám umoÏní je‰tû více zpÛsobÛ pfiípravy jídel.
(9).
•
Funkce „trouba“(peãení): nastaviteln˘ termostat od 90° do 240° C pro úspû‰né zvládnutí v‰ech va‰ich receptÛ.
•
Funkce „gril“: pro prudké osmahnutí a opeãení dozlatova.
•
Automatické vysunutí mfiíÏky pro snadnou kontrolu peãení a manipulaci s pokrmy.
(2).
•
Vyjímateln˘ zachytávaã drobkÛ pro jejich jednoduché odstraÀování a snadné ãi‰tûní trouby.
(3).
•
Plech na cukroví, sendviãe a zmraÏená jídla.
•
Gril* pro zdravûj‰í peãení.
Pfied prvním pouÏitím
•
Vybalte spotfiebiã a odlepte samolepky
•
Pfieãtûte si návod k pouÏití a peãlivû dodrÏujte instrukce.
•
Vyjmûte pfiíslu‰enství* (mfiíÏku, plot˘nku, gril) a umyjte je teplou jarovou vodou. Opláchnûte a peãlivû vysu‰te.
•
Zcela rozmotejte napájecí ‰ÀÛru.
•
Vlhk˘m hadfiíkem otfiete vnûj‰ek spotfiebiãe a usu‰te.
(1).
Zapnûte prázdn˘ spotfiebiã s otevfien˘mi dvífiky ve vûtrané místnosti, aby zmizel zápach novoty.
•
Nastavte termostat na 240° C a ãasovaã na 15 minut.
•
Po 15 minutách se ãasovaã automaticky vrátí na “0”.
Z trouby mÛÏe vycházet trocha koufie. Je to normální jev, kter˘ vymizí postupnû bûhem prvního pouÏití.
PouÏití funkce TOAST(opékání) (Obû topná tûlesa jsou zapnuta)
•
Krajíce chleba poloÏte pfiímo na mfiíÏku, kterou otoãte smûrem vzhÛru.
•
Nastavte termostat do pozice « Toast ».
(6).
•
Nastavte ãasovaã na poÏadovanou délku opékání.
(4).
•
Kontrolka se rozsvítí.
•
Jakmile se cyklus skonãí, ãasovaã se automaticky vrátí do pozice “0”, rozezní se zvukov˘ signál a kontrolka zhasne.
•
Opékání mÛÏete pfieru‰it pfied skonãením cyklu tím, Ïe ãasovaã vrátíte do pozice “0”.
•
Vyjmûte tousty.
(5).
Poznámky :
•
Pfii pouÏívání funkce TOAST chleba bûhem opékání stále sledujte.
•
Pfii prvním pouÏití spotfiebiã vyzkou‰ejte na nûkolika krajících.
•
Uvûdomte si, Ïe ãím je krajícÛ chleba mûnû, tím je krat‰í ãas opékání.
•
KdyÏ opékáte po sobû nûkolik várek tenk˘ch plátkÛ chleba, doporuãujeme vám dávat pozor na to, aby se chleba
nepfiipálil.
•
Pokud se to stane, zastavte ihned opékaní tím, Ïe vrátíte ãasovaã do pozice “0”.
•
Pokud chcete ohfiát jiÏ opeãen˘ krajíc chleba, pozornû dohlíÏejte na opékání
.
Trouba je horká. KdyÏ chleba vytahujete, dávejte pozor, abyste se nedotkli stûn (pouÏívejte kle‰tiãky na
chleba** nebo rukavice**).
* podle modelu **
nedodávají se spotfiebiãem.
Page 32

31
Cze
FUNKCE TROUBA (PEâENÍ) (Obû topná tûlesa jsou zapnuta)
•
VloÏte potraviny na pfiíslu‰ném plechu na mfiíÏku.
•
Nastavte termostat na poÏadovanou teplotu.
•
Nastavte ãasovaã na poÏadovan˘ ãas (maximálnû na 60 minut).
•
Kontrolka se rozsvítí.
•
Vafiení mÛÏete pfieru‰it pfied jeho koncem tím, Ïe ãasovaã vrátíte do pozice „0“.
•
Po ukonãení vafiení se ãasovaã automaticky vrátí do pozice „0“ a rozezní se zvukov˘ signál. Kontrolka zhasne.
•
VraÈte termostat do pozice „0“.
Trouba je horká. KdyÏ jídlo vytahujete, dávejte pozor, abyste se nedotkli stûn (vytáhnûte mfiíÏku a
pouÏívejte rukavice**).
FUNKCE GRIL (Pouze horní topné tûleso je zapnuto)
•
VloÏte roÏeÀ dovnitfi pekáãe*.
•
Rozmístûte potraviny na takto sestaven˘ gril*.
•
V‰e dejte na mfiíÏku: vzdálenost mezi jídlem a horním topn˘m tûlesem musí b˘t minimálnû 2cm.
•
Dvífika nechejte pootevfiená.
(8).
•
Termostat nastavte na „Grill“ (gril).
(7).
•
Nastavte ãasovaã na poÏadovanou dobu (maximálnû na 60 minut).
•
Kontrolka se rozsvítí.
•
DohlíÏejte na jídlo a obraÈte ho v polovinû grilování za pomocí vhodného náãiní (je-li to nutné).
•
Vafiení mÛÏete pfieru‰it pfied jeho koncem tím, Ïe ãasovaã vrátíte do pozice „0“.
•
Po ukonãení vafiení se ãasovaã automaticky vrátí do pozice „0“ a rozezní se zvukov˘ signál. Kontrolka zhasne.
•
VraÈte termostat do pozice „0“.
Trouba je horká. KdyÏ jídlo vytahujete, dávejte pozor, abyste se nedotkli stûn (vytáhnûte mfiíÏku a
pouÏívejte rukavice**).
Bûhem peãení se mohou kapky mastnoty vznítit pfii kontaktu s horním topn˘m tûlesem. Neznepokojujte se,
samy se uhasí a nebude to mít Ïádn˘ vliv na pfiístroj.
Praktické rady
•
Opékání potravin vÏdy páry a nûkdy i koufie.
•
MnoÏství koufie a pachu zmírníte tím, Ïe troubu i stûny budete udrÏovat v ãistotû.
•
MÛÏete je zmírnit také:
-
pfiidáním trochu vody na spod pouÏitého talífie na zaãátku opékání
-
dodrÏováním nebo sníÏením teplot opékání
•
Pokud se potraviny nepeãou v troubû stejnomûrnû:
-
Otáãejte jídlo bûhem peãení.
•
Pro dobu krat‰í neÏ 5 minut otoãte knoflík na 15 minut a pak vraÈte zpût na Ïádanou délku vafiení.
POUÎITÍ PLOT¯NKY
(Tento zpÛsob vafiení mÛÏete pouÏívat samostatnû nebo souãasnû s jednou ze 3 zb˘vajících funkcí).
Samostatné pouÏití plot˘nky
(10).
•
Nastavte termostat na funkci Gril (vyuÏití horního topného tûlesa).
•
Nastavte ãasovaã na poÏadovanou dobu.
* podle modelu **
nedodávají se spotfiebiãem.
Page 33

32
Cze
•
Kontrolka se rozsvítí.
•
Horní topné tûleso ohfieje plot˘nku.
•
Nechejte plot˘nku 5 minut zahfiívat, potom na ni dejte jídlo.
•
Vafiení mÛÏete pfieru‰it pfied jeho koncem tím, Ïe ãasovaã vrátíte do pozice „0“.
•
Po ukonãení vafiení se ãasovaã automaticky vrátí do pozice „0“ a rozezní se zvukov˘ signál. Kontrolka zhasne.
Pozor, plot˘nka zÛstává horká i po vypnutí ãasovaãe!
Plot˘nku vÏdy správnû natoãte: strana s zvedací jaz˘ãek patfií dozadu, nedávejte ji dopfiedu.
(9).
Tato zvedací jaz˘ãek není sestrojena k pfiená‰ení, mÛÏe b˘t pouÏívána pouze na nadzvednutí plot˘nky
bûhem jejího ãi‰tûní.
(12).
PouÏití plot˘nky souãasnû s jinou funkcí
(11).
•
V tomto pfiípadû musíte nejprve zvolit parametry vafiení (ãas a teplotu) podle jídla, které dáte do trouby.
•
Horní topné tûleso je zapnuto a zahfiívá plot˘nku.
V tomto pfiípadû je ãas na pfiípravu urãen podle jídla, které dáváte do trouby; trouba pfiestane zahfiívat
plot˘nku na konci peãení.
Proto dohlíÏejte na vafiení a ohfiívání jídel na plot˘nce.
Pozor, plot˘nka zÛstává horká i po vypnutí trouby!
Plot˘nku vÏdy správnû natoãte: strana s zvedací jaz˘ãek patfií dozadu, nedávejte ji dopfiedu.
(9).
Tato zvedací jaz˘ãek není sestrojena k pfiená‰ení, mÛÏe b˘t pouÏívána pouze na nadzvednutí plot˘nky
bûhem jejího ãi‰tûní.
(12).
Pfied rozebráním a ãi‰tûním vyãkejte, aÏ pfiístroj zcela vychladne.
âi‰tûní
•
Pfied ãi‰tûním vÏdy vypnûte spotfiebiã ze zásuvky a nechejte zcela vychladnout.
•
Nikdy neponofiujte spotfiebiã do vody.
Vnûj‰í stûny
•
Houbiãkou navlhãenou ve vodû s jarem oãistûte vnûj‰ek spotfiebiãe.
(1).
•
Peãlivû omyjte a osu‰te.
Vnitfiní stûny
•
Vnitfiní stûny jsou nepfiilnavé, mastnotu odstraÀujte mokrou houbiãkou nasáklou teplou jarovou vodou.
•
Peãlivû omyjte a osu‰te.
•
NepouÏívejte drátûnku, ãistící písek ani agresivní ãistící prostfiedky (zejména ty, které obsahují sodu).
Pfiíslu‰enství
*
•
Pfiíslu‰enství* se ãistí horkou vodou a prostfiedkem na mytí nádobí.
•
Peãlivû omyjte a osu‰te.
Zachytávaã drobkÛ
•
âistí se horkou vodou a prostfiedkem na mytí nádobí.
•
Peãlivû omyjte a osu‰te.
Plot˘nka
•
Pfied rozebráním a ãi‰tûním vyãkejte, aÏ pfiístroj zcela vychladne.
•
Abyste pfiemístili plot˘nku, uchopte ji za zvedací jaz˘ãek umístûnou vzadu.
* podle modelu
Page 34

33
Cze
•
Plot˘nka se snadno ãistí v teplé vodû a v tekutém ãistícím prostfiedku (nepouÏívejte drátûnku ani ãistící písek). Nechejte
oschnout.
•
Plot˘nku snadno vrátíte na její místo nad troubou, zvedací jaz˘ãek smûfiuje dozadu.
Pozor! Pfiíslu‰enství ani plot˘nku nedávejte do myãky na nádobí.
NÁVOD K PEâENÍ
Uvedené teploty a ãasy jsou pouze orientaãní. V˘sledek peãení se li‰í podle receptu, jídla a ingrediencí.
OMEZENÁ ZÁRUâNÍ DOBA
Jídlo Funkce – Teplota° âas
Jablkov˘ koláã PEâENÍ 230 °C 25-35 minut
Cukroví PEâENÍ 180 °C 10-14 minut
âerstvá pizza 200 g PEâENÍ 230 °C 6-8 minut
Zapékané brambory
zmraÏené
PEâENÍ 230 °C 40-50 minut
2 kufiecí steh˘nka PEâENÍ 230 °C 25-35 minut
Filé z tresky PEâENÍ 230 °C 18-22 minut
Slanina (10 mm)
GRIL
(pootevfiená dvífika)
10 minut, obrátit, po té
je‰tû 4 minuty
Párky
GRIL
(pootevfiená dvífika)
10 minut, obrátit, po té
je‰tû 4 minuty
Zapékané tûstoviny
(posypané s˘rem)
GRIL
(pootevfiená dvífika)
15-20 minut
Slanina (10 mm)
Plot˘nka– funkce
GRIL
20 minut
(10 z kaÏdé strany)
¤ízek z mletého
masa
Plot˘nka– funkce
GRIL
10-15 minut z jedné
strany, 5-10 minut z
druhé
Ohfiát brambory
Plot˘nka– funkce
GRIL
25-30 minut
Vajíãka „volské oko“
Plot˘nka– funkce
GRIL
4-5 minut
Page 35

BEZPEâNOSTNÉ POKYNY
PREDCHÁDZANIE
DOMÁCIM RIZIKÁM
• BezpeãnosÈ tohto prístroja zodpovedá technick˘m poÏiadavkám a platn˘m
normám.
• Smernica o elektromagnetickej evidencii ã. 89/336/EHS v znení smernice ã.
92/31/EHS a smernice ã. 93/68/EHS.
• Smernica t˘kajúca sa nízkeho napätia ã. 73/23/EHS v znení smernice ã.
93/68/EHS.
• Vzhºadom na rôznorodosÈ platn˘ch noriem platí, Ïe ak sa tento prístroj pouÏíva v
inej krajine, neÏ v akej bol zakúpen˘, treba ho daÈ skontrolovaÈ autorizovanému
servisnému stredisku.
• Skontrolujte, ãi napätie siete skutoãne zodpovedá napätiu oznaãenému na prístroji
(iba striedav˘ prúd).
• Skontrolujte, ãi je elektrické zariadenie schopné napájaÈ prístroj s tak˘mto príko-
nom.
• Prístroj vÏdy zapojte do zástrãky, ktorá je uzemnená.
• Elektrickú ‰núru nenechávajte voºne visieÈ a nedot˘kajte sa horúcich ãastí prístroja.
• Prístroj nevypínajte vytiahnutím elektrickej ‰núry zo zástrãky.
• PouÏívajte iba predlÏovaãku, ktorá je v dobrom stave a zástrãku, ktorá je uzem-
nená a vodiã s prierezom, ktor˘ nie je men‰í neÏ prierez vodiãa dodaného spolu s
prístrojom.
• V záujme zabránenia elektrick˘m ‰okom nikdy neponárajte elektrickú ‰núru do
vody alebo inej kvapaliny.
Pri pouÏívaní elektrick˘ch prístrojov treba dodrÏiavaÈ isté základné pravidlá
a predov‰etk˘m tieto:
• Preãítajte si cel˘ návod na pouÏitie a striktne sa riaìte pokynmi uveden˘mi v návode.
• Zapnut˘ prístroj nikdy nenechávajte bez dohºadu a hlavne nie pri prvom grilovaní
alebo zmene jeho nastavenia.
• Prístroj nenechávajte v dosahu detí.
• Malé deti alebo postihnuté osoby nesmú prístroj pouÏívaÈ bez dozoru.
• Malé deti treba kontrolovaÈ, ãi sa s prístrojom nehrajú.
• Poãas chodu sa prístroj nesmie dvíha È alebo prená‰aÈ.
• Prístroj pouÏívajte na stabilnom mieste mimo dosahu vody.
• Prístroj nedávajte do blízkosti tepelného zdroja.
• Po kaÏdom pouÏití alebo pred kaÏd˘m ãistením prístroj vypojte zo siete.
• Pred kaÏd˘m pouÏitím skontrolujte, ãi je platniãka na zachytávanie omrviniek, ktorá
sa nachádza pod prístrojom, dobre uzavretá.
• Teplota dvierok a vonkaj‰ích plôch môÏe byÈ vysoká, keì je prístroj v chode a
preto sa ich vtedy nedot˘kajte a na manipuláciu pouÏite rukoväte a gombíky
.
• Do prístroja, na prístroj alebo pod prístroj nikdy nedávajte papier, kartón alebo pro-
dukt z plastu.
Slk
34
Page 36

• Na tepelnú úpravu alebo rozmrazovanie pokrmov nikdy nepouÏívajte hriankovaã.
• Prístroj nikdy nepouÏívajte, ak:
- je jeho elektrická ‰núra vadná alebo po‰kodená;
- prístroj spadol a zjavne je po‰koden˘ alebo sa vyznaãuje funkãn˘mi anomáliami.
V kaÏdom z uveden˘ch prípadov musíte prístroj poslaÈ do najbliωieho autorizovaného servisného strediska, aby ste predi‰li akémukoºvek riziku.
• Prístroj pouÏívajte vÏdy iba v domácnosti.
• Prístroj nepouÏívajte ako vyhrievacie teleso.
• Chlieb sa môÏe spáliÈ a preto sa prístroj nesmie pouÏívaÈ v blízkosti horºav˘ch
materiálov ako záclony, poliãky, kusy nábytku...
• Neprikr˘vajte prístroj, keì je v chode. Ak sa stane, Ïe sa vznietia niektoré ãasti pro-
duktu, nikdy sa ich nesnaÏte uhasiÈ vodou. Prístroj vypojte zo siete a plamene
uhaste vlhkou handrou.
• Do blízkosti prístroja nedávajte horºavé produkty.
• NepouÏívajte príslu‰enstvá, ktoré neodporuãil v˘robca a ani príslu‰enstvá inej
znaãky neÏ je znaãka prístroja.
• Tento prístroj bol skon‰truovan˘ v˘luãne na domáce pouÏitie a za po‰kodenia spô-
sobené jeho pouÏitím na profesionálne úãely, nevhodn˘m pouÏitím alebo pouÏitím,
ktoré nezodpovedá pokynom uveden˘m v návode, nenesie v˘robca Ïiadnu zodpovednosÈ a v uveden˘ch prípadoch neposkytuje ani Ïiadnu záruku.
• V záujme vlastnej bezpeãnosti nevykonávajte demontáÏ prístroja sami, ale obráÈte
sa na autorizované servisné stredisko.
STRIKTNE SA RIAD’TE
POKYNMI V NÁVODE
35
Slk
Page 37

Vlastnosti spotrebiãa
1.
Ro‰t*
5.
âasov˘ spínaã
2.
Plech*
6.
Zásuvka na omrvinky
3.
RaÏeÀ*
7.
Termostat
4.
Kontrolné svetlo
8.
PlatÀa na varenie
V˘hody prístroja Toaster Oven
V˘hody vá‰ho prístroja Toaster Oven sú takéto:
•
Vnútorná kapacita 8,5 litrov na opeãenie aÏ 4 krajcov chleba naraz.
•
Plech na peãenie zabudovan˘ v hornej ãasti, ktor˘ vám ponúka viac moÏností tepelnej úpravy.
(9).
•
Funkcia rúry: termostat nastaviteºn˘ na teplotu od 90° do 240 °C, ktor˘ vám umoÏní prípravu jedál
podºa v‰etk˘ch va‰ich receptov.
•
Funkcia opeãenia na raÏni: na prudké opeãenie a upeãenie va‰ich jedál do zlatista.
•
Automatické vysúvanie ro‰tu, ão uºahãuje kontrolu procesu tepelného spracovávania a vyberanie
pokrmov.
(2).
•
Zásuvka na zachytávanie omrviniek sa ºahko vyberá, ão zjednodu‰uje údrÏbu a vyberanie omrviniek
a in˘ch neãistôt.
(3).
•
Plech na peãenie koláãikov, tepelnú úpravu sendviãov a mrazen˘ch pokrmov.
•
Ro‰t* na zdrav‰iu tepelnú úpravu pokrmov.
Pred prv˘m pouÏitím
•
Prístroj vybaºte a odstráÀte lepiace pásky.
•
Preãítajte si návod na pouÏitie a striktne sa riaìte pokynmi uveden˘mi v návode.
•
Vyberte príslu‰enstvá * (ro‰t, plech, raÏeÀ) a umyte ich teplou vodou s ãistiacim prípravkom.
Dôkladne ich opláchnite a osu‰te.
•
RozviÀte cel˘ kotúã prívodnej ‰núry.
•
Vlhkou handriãkou oãistite prístroj zvonka a osu‰te ho.
(1).
VôÀu novoty odstránite tak, Ïe prístroj necháte jedenkrát beÏaÈ naprázdno s otvoren˘mi
dvierkami v dobre vetranej miestnosti:
•
Termostat nastavte na 240 °C a gombík ãasového spínaãa na 15 minút.
•
Po 15 minútach sa gombík automaticky vráti do polohy “0”.
Z rúry uniká trocha dymu. Je to normálne - dym sa v priebehu prvého pouÏívania postupne
stratí.
PouÏitie funkcie TOAST (V ãinnosti sú dva odpory)
•
Krajce chleba dajte priamo na ro‰t tak, aby smeroval hore.
•
Gombík termostatu nastavte na funkciu „Toast“.
(6).
•
Nastavte ãasov˘ spínaã na poÏadovanú dobu opekania.
(4).
•
Rozsvieti sa kontrolka.
•
Po skonãení cyklu sa gombík ãasového spínaãa automaticky vráti do polohy “0”, zaznie zvukov˘
signál a kontrolka zhasne.
•
Celú operáciu môÏete preru‰iÈ e‰te pred ukonãením cyklu pootoãením ãasového spínaãa do polohy “0”.
•
Vyberte toasty.
(5).
Poznámky:
•
Pri pouÏití funkcie TOAST musíte chlieb pri opekaní stále kontrolovaÈ.
•
Pri prvom pouÏití opeãte niekoºko krajcov na skú‰ku.
•
Uvedomte si, Ïe men‰í poãet krajcov si vyÏaduje krat‰í ãas opekania.
•
Po opeãení niekoºk˘ch várok dávajte pozor, aby sa vám chlieb nespálil.
*
podºa modelov
36
Slk
Page 38

•
Ak sa spáli, ihneì zastavte cyklus opekania pretoãením ãasového spínaãa do polohy “0”.
•
Ak si chcete zohriaÈ opeãen˘ krajec chleba, kontrolujte proces jeho tepelnej úpravy.
Rúra je horúca. Pri vyberaní chleba sa vyvarujte styku s jej plochami (pouÏite klie‰te na
chlieb** alebo rukavice**).
FUNKCIA RÚRY (BAKE) (V ãinnosti sú dva odpory)
•
Pokrmy uloÏte na ro‰t, priãom pouÏite vhodn˘ plech.
•
Gombík termostatu nastavte na poÏadovanú teplotu.
•
âasov˘ spínaã nastavte na poÏadovanú dobu tepelnej úpravy (najviac 60 minút)
•
Rozsvieti sa kontrolka.
•
Celú operáciu môÏete preru‰iÈ e‰te pred ukonãením cyklu pootoãením ãasového spínaãa do polohy “0”.
•
Po skonãení cyklu sa gombík ãasového spínaãa automaticky vráti do polohy “0”, zaznie zvukov˘
signál a kontrolka zhasne.
•
Gombík termostatu nastavte do polohy nula "0".
Rúra je horúca. Pri vyberaní plechu sa vyvarujte styku s jej plochami (na vybratie ro‰tu
pouÏite rukavice**)
FUNKCIA PEâENIA NA RAÎNI (GRILL)
(V ãinnosti je iba horn˘ odpor)
•
RaÏeÀ vloÏte do vnútra plechu*.
•
Pokrmy uloÏte na zostavu tvorenú raÏÀom a plechom*.
•
Celú zostavu vloÏte na ro‰t: vzdialenosÈ medzi miestom tepelnej úpravy a horn˘m odporom musí byÈ
minimálne 2 cm (0.8 in).
•
Dvierka nechajte pootvorené.
(8).
•
Gombík termostatu nastavte na funkciu " Grill" (piktogram).
(7).
•
âasov˘ spínaã nastavte na poÏadovanú dobu tepelnej úpravy (najviac 60 minút)
•
Rozsvieti sa kontrolka.
•
Pokrmy poãas tepelnej úpravy kontrolujte a v polovici procesu ich obráÈte pomocou kuchynského
náãinia (ak je to nutné).
•
Celú operáciu môÏete preru‰iÈ e‰te pred ukonãením cyklu pootoãením ãasového spínaãa do polohy “0”.
•
Po skonãení cyklu sa gombík ãasového spínaãa automaticky vráti do polohy “0”, zaznie zvukov˘
signál a kontrolka zhasne.
•
Gombík termostatu pretoãte do polohy "0".
Rúra je horúca. Pri vyberaní plechu sa vyvarujte styku s jej plochami (ro‰t vyberajte
pomocou rukavíc**).
Poãas tepelnej úpravy sa môÏe pri kontakte s horn˘mi odpormi vznietiÈ rozprsknut˘ tuk
MôÏete byÈ bez obáv, plameÀ zhasne sám a prístroj nijako nepo‰kodí.
Praktické rady
•
Pri tepelnej úprave pokrmov sa vÏdy tvorí para a niekedy aj dym.
•
V˘skyt dymu a pachov zníÏite t˘m, Ïe budete udrÏiavaÈ vnútorné plochy va‰ej rúry stále ãisté.
•
MôÏete ho zníÏiÈ aj
-
priliatím malého mnoÏstva vody na zaãiatku tepelnej úpravy na spodok pouÏívaného plechu,
-
dodrÏaním alebo zníÏením teplôt tepelnej úpravy.
•
Ak sa pokrmy na dne plechu nezohrievajú rovnomerne:
-
Poãas tepelnej úpravy pokrmy otoãte, ãím dosiahnete rovnomerné prepeãenie.
•
Pre ãasy krat‰ie ako 5 minút otoãte gombík aÏ na 15 minút a vráÈte sa späÈ na ãas Ïelaného ãasu varenia.
*
podºa modelov
**
nie sú súãasÈou dodávky
37
Slk
Page 39

38
Slk
POUèÍVANIE PLECHU NA PEâENIE
(Tento spôsob tepelnej úpravy sa môÏe pouÏívaÈ nezávisle od ostatn˘ch spôsobov tepelnej úpravy
alebo súbeÏne s niektor˘m z nich).
Samostatné pouÏívanie plechu na peãenie
(10).
•
Termostat nastavte na funkciu Gril (pouÏitie horného odporu).
•
âasov˘ spínaã nastavte na poÏadovanú dobu tepelného spracovania.
•
Rozsvieti sa kontrolka.
•
Horn˘ odpor zohreje plech na peãenie.
•
Plech predhrievajte 5 minút a potom naÀ poukladajte pokrmy.
•
Celú operáciu môÏete ukonãiÈ e‰te pred skonãením cyklu pretoãením ãasového spínaãa do polohy "0".
•
Po skonãení cyklu sa ãasov˘ spínaã automaticky vráti do polohy "0" a zaznie zvukov˘ signál.
Kontrolka zhasne.
Upozornenie: plech je po vypnutí ãasového spínaãa horúci!
Plech má svoj smer: strana s jaz˘ãekou zodpovedá zadnému okraju plechu a preto jeho
rukoväÈ nesmie smerovaÈ dopredu.
(9).
Táto jaz˘ãek nie je urãená na prená‰anie plechu, ale iba na vytiahnutie plechu na úãely
jeho ãistenia.
(12).
PouÏívanie plechu na peãenie súbeÏne s in˘m spôsobom tepelnej úpravy
(11).
•
V takomto prípade si najprv treba zvoliÈ parametre tepelnej úpravy (doba a teplota) podºa druhu
potraviny, ktorá sa vloÏí do rúry.
•
Horn˘ odpor je v ãinnosti a umoÏÀuje ohrev plechu na peãenie.
V takomto prípade je doba tepelného spracovávania urãená druhom potraviny, ktorá bola
do rúry vloÏená; po skonãení doby tepelného spracovania rúra prestane hriaÈ.
Jedlá tepelne upravované alebo ohrievané na plechu na peãenie majte poãas tepelnej
úpravy pod dohºadom.
Upozornenie: plech je po vypnutí rúry horúci!
Plech má svoj smer: strana s jaz˘ãekou zodpovedá zadnému okraju plechu a preto jeho
rukoväÈ nesmie smerovaÈ dopredu.
(9).
Táto jaz˘ãek nie je urãená na prená‰anie plechu, ale iba na vytiahnutie plechu pri jeho
ãistení.
(12).
Prístroj demontujte a plech vyãistite aÏ po jeho úplnom vychladnutí.
âistenie
•
Pred kaÏd˘m ãistením prístroj vypojte zo siete a nechajte ho celkom vychladnúÈ.
•
Prístroj nikdy nedávajte do vody.
Vonkaj‰ie plochy
•
Vonkaj‰ie plochy prístroja pretrite vlhkou ‰pongiou, ktorú ste predt˘m namoãili do vody s ãistiacim
prípravkom.
(11).
•
Plochy dôkladne opláchnite a osu‰te.
Vnútorné plochy
•
Vnútorné plochy sú protilepiace; mastnoty sa odstraÀujú pomocou ‰pongie navlhãenej vodou s
ãistiaceho prostriedku.
•
Plochy dôkladne opláchnite a osu‰te.
•
NepouÏívajte Ïiadne drôtené podu‰ky ãi hubky, ani ãistiace prá‰ky alebo agresívne ãistiace
Page 40

Slk
39
Príslu‰enstvá*
•
Príslu‰enstvá sa um˘vajú v teplej vode s ãistiacim prostriedkom na riad.
•
Dôkladne ich opláchnite a osu‰te.
Zásuvka na zachytávanie omrviniek
•
Zásuvka na omrvinky sa ãistí teplou vodou a ãistiacim prípravkom na riad.
•
Dôkladne ju opláchnite a osu‰te.
Plech na peãenie
•
Prístroj demontujte a plech vyãistite aÏ po jeho úplnom vychladnutí.
•
Na vytiahnutie plechu pouÏite jaz˘ãek na zadnom okraji plechu.
•
Plech sa ºahko ãistí teplou vodou a tekut˘m ãistiacim prípravkom (nepouÏívajte drôtenú ‰pongiu alebo
ãistiaci prá‰ok). Nechajte ho vysu‰iÈ.
•
Plech sa dá ºahko zasunúÈ do hornej ãasti rúry, priãom jaz˘ãek musí smerovaÈ dozadu.
Upozornenie: nedávajte ich do um˘vaãky riadu.
PRÍRUâKA TEPELNEJ ÚPRAVY
Teplota a ãas tepelnej úpravy sú v tabuºke uvedené len pre informáciu. V˘sledky tepelnej úpravy sa
rôznia podºa receptov, pouÏit˘ch plechov alebo druhu pokrmov.
LIMITOVANÁ ZÁRUâNÁ DOBA
Ingrediencie Funkce – Teplota° âas
Jablkov˘ koláã BAKE 230 °C 25-35 minút
Cookies BAKE 180 °C 10-14 minút
âerstvá pizza 200 g BAKE 230 °C 6-8 minút
Zapekané zemiaky
pripravené zo zmra-
zeného polotovaru
BAKE 230 °C 40-50 minút
2 kuracie stehná BAKE 230 °C 25-35 minút
Filé z tresky BAKE 230 °C 18-22 minút
Slanina (10 mm )
GRILL
(pootvorené dvere)
10 minút, otoãte ich,
potom opekajte
4 minúty
Klobásy
GRILL
(pootvorené dvere)
10 minút, otoãte ich,
potom opekajte
4 minúty
Zapekané cestoviny
(gratinovanie syra)
GRILL
(pootvorené dvere)
15-20 minút
Slanina (10 mm)
Plech na peãenie –
vo funkcii GRILL
20 minút (10 na kaÏdej
strane)
Steaky z mletého
mäsa
Plech na peãenie –
vo funkcii GRILL
10-15 minút na jednej
strane, 5-10 minút na
druhej strane
Ohriatie zemiakov
Plech na peãenie –
vo funkcii GRILL
25-30 minút
Volské oká
Plech na peãenie –
vo funkcii GRILL
4-5 minút
*
podºa modelov
Page 41

BIZTONSÁGI TANÁCSOK
A HÁZTARTÁSI
BALESETEK MEGELÃZÉSE
• Jelen készülék biztonsági rendszere megfelel az érvényben lévŒ mıszaki szabá-
lyoknak és normáknak.
• Az Elektromágneses ÖsszeférhetŒség Direktívája 89/336/CEE, módosítva
92/31/CEE és 93/68/CEE.
• Az Alacsony Feszültség Direktívája 73/23/CEE, módosítva 93/68/CEE.
• Figyelembe véve az érvényben levŒ normák sokféleségét, ha ezt a készüléket a
vásárlási országtól eltérŒ országban használják, vizsgáltassa meg egy elfogadott
szervizállomáson.
• EllenŒrizze, hogy a hálózati feszültség tökéletesen megfelel-e a készüléken feltün-
tetettel (kizárólag váltóáram).
• Bizonyosodjon meg, hogy az elektromos szerelés elégséges-e egy ilyen teljesítmé-
nyı készülék táplálásához.
• A készüléket mindig földelt dugaszoló aljzathoz csatlakoztassa.
• Ne engedje, hogy a kábel lelógjon vagy, hogy érintkezzen a készülék meleg rés-
zeivel.
• Ne a kábel rángatásával húzza ki a csatlakozó dugaszt.
• Csak jó állapotban levŒ, földelt csatlakozó aljzattal ellátott hosszabbítót használjon,
melynek huzal-keresztmetszete egyenlŒ vagy több kell legyen a termékkel adott
huzal keresztmetszetével.
• Az áramütések elkerülése végett, soha ne merítse vízbe vagy bármilyen más folya-
dékba a kábelt, a csatlakozó aljzatot vagy magát a készüléket.
Elektromos készülékek használatakor, bizonyos számú alapvetŒ szabályt
mindig be kell tartani, kiváltképp a következŒket:
• Olvassa végig a használati útmutatót és kövesse figyelemmel a használati utasítá-
sokat.
• A készüléket soha ne hagyja felügyelet nélkül mıködni, fŒleg az elsŒ grillezésnél
vagy a beállítások megváltoztatásakor.
• Ne hagyja a készüléket a gyerekek kezeügyében.
• A készüléket kisgyerekek vagy mozgássérültek csak felügyelet mellett használhatják.
• A kisgyerekeket figyelni kell, nehogy játszani kezdjenek a készülékkel.
• A használat alatt ne hordozza vagy ne mozdítsa el a készüléket.
• Stabil munkafelületet használjon, és figyeljen, hogy a készüléket ne érje víz..
• Ne tegye a készüléket hŒforrás közelébe.
• Minden egyes használat után és tisztítás elŒtt húzza ki a hálózati csatlakozó
dugaszt.
• Minden egyes használat elŒtt ellenŒrizze, hogy a morzsagyıjtŒ tálca jól le legyen
rögzítve a készülék alatt.
• Az ajtó és a külsŒ felület hŒmérséklete a készülék mıködése alatt magasra emel-
kedhet, ezért a készülék mıködésekor ne érintse meg ezeket a felületeket,
használja a fogantyúkat és a gombokat
.
40
Hun
Page 42

• Ne tegyen soha papírt, kartont vagy mıanyagot a készülékbe, a készülékre vagy a
készülék alá.
• Ne használja a kenyérpirító rácsot a mélyhıtött ételek készítéséhez vagy kiol-
vasztásához.
• Ne használja a készüléket, ha:
- csatlakozó kábele hibás vagy sérült
- a készülék leesett és szemmel látható sérüléseket vagy mıködési rendellenessé-
geket mutat.
Ezekben az esetekben, mindennemı veszély elkerüléséért a készüléket mihamarabb el kell juttatni az ügyfélszolgálat legközelebbi elfogadott szervizközpontjába.
• A készüléket csak a lakáson belül használja.
• Ne használja a készüléket hŒforrásként.
• Mivel a kenyér meggyulladhat, a készüléket nem szabad gyúlékony anyagok, mint
pl.: függönyök, polcok, bútorok közelében használni...
• Ne takarja be a készüléket mıködés közben. Ha megtörténne, hogy a termék bizo-
nyos részei lángba boruljanak, ezeket soha ne próbálja vízzel oltani. Húzza ki a
készülék hálózati csatlakozó dugaszát és fojtsa el a lángokat egy nedves ronggyal.
• Ne helyezzen gyúlékony termékeket a készülék közelébe.
• Ne használja a gyártó által nem ajánlott vagy az ön készülékétŒl eltérŒ márkájú
készülékek tartozékait.
• Ez a készülék kizárólag háztartási használatra készült, a profi vagy a használati
útmutatótól eltérŒ használat a gyártót mentesíti a felelŒsség és a garanciális kötele-
zettségek alól.
• Az ön biztonsága érdekében, soha ne ön szerelje szét készülékét, hanem forduljon
egy elfogadott szervizközponthoz.
GONDOSAN ÃRIZZE MEG
EZEKET AZ UTASæTæSOKAT
41
Hun
Page 43

42
Hun
A készülék mıszaki jellemzŒi
1.
Rostély*
5.
IdŒzítŒ
2.
Tálca*
6.
MorzsagyıjtŒ fiók
3.
Pirító*
7.
Termosztát
4.
JelzŒlámpa
8.
FŒzŒlap
A sütŒ -pirítókemence elŒnyei
Az ön sütŒ -pirítókemencéje a következŒ elŒnyöket nyújtja:
•
8,5 literes ırtartalom, mely alkalmanként egészen 4 szelet kenyér pirítását teszi lehetŒvé.
•
Egy felül beépített fŒzŒlap, azért, hogy önnek több fŒzési lehetŒsége legyen.
(9).
•
Kemence funkció: egy 90° és 240 °C között állítható termosztát, ahhoz, hogy az ön minden receptje
sikerüljön.
•
Grill funkció: élelmiszerei könnyed, aranyszínı megpirításához.
•
A grill automata kibocsátása: a fŒzés felügyeletének és az étkek megfogásának a megkönnyítéséért.
(2).
•
MorzsagyıjtŒ fiók, mely könnyen kihúzható, a kemence karbantartásának és a kenyérmorzsák, valamint
a fröccsenések eltávolításának a megkönnyítéséért.
(3).
•
Egy tál kis sütemények, szendvicsek, mélyhıtött ételek készítésére.
•
Egy rács* az egészségesebb fŒzéshez.
Az elsŒ használat elŒtt
•
Csomagolja ki a készüléket és távolítsa el az öntapadós csíkokat.
•
Olvassa el a használati útmutatót és kövesse figyelemmel a használati utasításokat.
•
Vegye le a tartozékokat* (rostély, tálca, pirító), mossa meg Œket szappanos vízben. Gondosan öblítse
le és szárítsa meg ezeket.
•
Teljesen tekerje le a tápkábelt.
•
Egy nedves ronggyal törölje le, majd szárítsa meg a készülék külsejét.
(1).
Az új termék szagának a kiküszöböléséért, a készüléket elŒször üresen mıködtesse, nyitott
kemenceajtóval, egy szellŒztetett helyiségben:
•
Állítsa be a termosztátot 240 °C-ra és az idŒzítŒ gombját pedig 15 percre.
•
15 perc múlva, a gomb automatikusan a “0”-ra ugrik.
Egy kis füst fog kiszivárogni a kemencébŒl. Ez természetes és ez fokozatosan eltınik az
elsŒ mıködtetés közben.
A TOAST (kenyérpirítás) funkció használata
(A két fıtŒellenállás mıködik)
•
Tegye a kenyérszeleteket közvetlenül a felfele fordított grillre (rostélyra).
•
Állítsa a termosztát gombját a « Toast » funkcióra.
(6).
•
Állítsa az idŒzítŒ gombját a kívánt grillezési idŒtartamra.
(4).
•
A jelzŒlámpa kigyullad.
•
A ciklus végeztével az idŒzítŒ gombja automatikusan visszaugrik a “0” helyzetbe és egy hangjelzés
hangzik fel, a jelzŒlámpa pedig kialszik.
•
Ön még a ciklus végezte elŒtt megállíthatja a mıveletet, az idŒzítŒ “0” helyzetbe való állításával.
•
Vegye ki a pirítósokat.
(5).
Megjegyzések:
•
A TOAST funkció közben, mindig figyelje a piruló kenyeret.
•
Az elsŒ használatkor kísérletezzen néhány szelettel.
•
Vegye figyelembe, hogy minél kevesebb a kenyérszelet, annál rövidebb a pirítási idŒtartam.
•
Amikor több adag vékony szelet pirítását végzi, azt ajánljuk önnek, hogy figyeljen arra, hogy kenyere
nehogy megfeketedjen.
*
modelltŒl függŒen
Page 44

43
Hun
•
Ha ez fennáll, azonnal állítsa meg a pirítási ciklust az idŒzítŒ “0” helyzetbe való visszaállításával.
•
Ha újra fel akar melegíteni egy már megpirult kenyérszeletet, nagyon figyeljen a pirításra.
A kemence meleg. A kenyér kiemelésekor, ügyeljen arra, hogy ne érintse a kemence falait.
(használjon egy tésztafogót** vagy kesztyıt**).
KEMENCE FUNKCIÓ (BAKE - SÜTÉS)
(A két fıtŒellenállás mıködik)
•
Tegye az élelmiszereket a grillre, megfelelŒ tálcát használva.
•
Állítsa a termosztát gombját a kívánt hŒmérsékletre.
•
Állítsa az idŒzítŒt a kívánt fŒzési idŒtartamra (maximum 60 perc).
•
A jelzŒlámpa kigyullad.
•
A ciklus végezte elŒtt is megszakíthatja a mıveletet, ha az idŒzítŒt a "0" helyzetbe állítja vissza.
•
A ciklus végeztével az idŒzítŒ automatikusan visszaugrik a "0" helyzetbe és egy hangjelzés fog
felhangzani. A jelzŒlámpa kialszik.
•
Állítsa vissza a termosztát gombját a "0" helyzetbe.
A kemence meleg. A tálca kiemelésekor, vigyázzon, nehogy megérintse a belsŒ falakat
(húzza ki a grillt és használjon kesztyıt**).
GRILL FUNKCIÓ (GRILL – ROSTON SÜTÉS)
(Csak a felsŒ fıtŒellenállás mıködik)
•
Tegye a rácsot a tálcába*.
•
Helyezze élelmiszereit a rácsból és tálcából létrejött szerkezetre*.
•
Tegye a szerkezetet a rácsra: a készítmény és a fıtŒellenállás közötti távolság minimum 2 cm (0.8
in) kell legyen.
•
A kemenceajtót hagyja kissé nyitva.
(8).
•
A termosztát gombját állítsa a " Grill"-ra (picto).
(7).
•
Állítsa az idŒzítŒt a kívánt idŒtartamra (maximum 60 perc).
•
A jelzŒlámpa kigyullad.
•
Figyelje az élelmiszereket és a sütés felénél fordítsa meg Œket egy fogóeszköz segítségével (ha
szükségesnek látszik).
•
A ciklus végezte elŒtt is megszakíthatja a mıveletet, ha az idŒzítŒt a "0" helyzetbe állítja vissza.
•
A ciklus végeztével az idŒzítŒ automatikusan visszaugrik a "0" helyzetbe és egy hangjelzés fog
felhangzani. A jelzŒlámpa kialszik.
•
Állítsa vissza termosztát gombját a "0" helyzetbe.
A kemence meleg. A tálca kiemelésekor, vigyázzon, nehogy megérintse a belsŒ falakat
(húzza ki a grillt és használjon kesztyıt**)
FŒzés közben a zsírcseppek meggyúlhatnak, ha ráfröccsennek a felsŒ melegítŒ
ellenállásokra. Ne nyugtalankodjon, maguktól eloltódnak és ennek nem lesz semmilyen
következménye a készülékre.
Gyakorlati tanácsok
•
Az ételek készítése mindig gŒzképzŒdéssel és néha füstképzŒdéssel jár.
•
Ön csökkentheti a füst -és szagképzŒdést, ha a kemence falait mindig tisztán tartja.
•
Ezeket a kellemetlenségeket csökkentheti, ha:
-
A fŒzés kezdetekor egy kis vizet tesz a felhasznált tál aljára.
-
betartva vagy csökkentve a fŒzési hŒmérsékleteket.
•
Ha az élelmiszerek nem készülnek egyformán a kemence alján:
-
Készítés közben, a kiegyensúlyozott készítés érdekében, forgassa meg az élelmiszereket.
*
modelltŒl függŒen
**
nem járnak együtt a készülékkel
Page 45

44
Hun
•
Az 5 percig terjedŒ idŒtartamok esetén, forgassa el a gombot egészen a 15 perces jelzésig, majd
csavarja vissza egészen a kívánt sütési idŒtartamig.
A FÃZÃLAP HASZNÁLATA
(Ez a fŒzési mód független módon is használható vagy akár a már említett fŒzési módok valamelyikével párhuzamosan.)
A fŒzŒlap független használata
(10).
•
Állítsa a termosztátot a Gril funkcióra (a felsŒ fıtŒellenállás használata).
•
Állítsa az idŒzítŒt a kívánt fŒzési idŒtartamra.
•
A jelzŒlámpa kigyullad.
•
A felsŒ fıtŒellenállás fıti a fŒzŒlapot.
•
Engedje, hogy 5 percig elŒmelegedjen, ezután élelmiszereit ráteheti a lapra.
•
A ciklus végezte elŒtt is megszakíthatja a mıveletet, ha az idŒzítŒt a "0" helyzetbe állítja vissza.
•
A ciklus végeztével az idŒzítŒ automatikusan visszaugrik a "0" helyzetbe és egy hangjelzés fog
felhangzani. A jelzŒlámpa kialszik.
Vigyázat, a fŒzŒlap még az idŒzítŒ megállítása után is meleg marad!
A lapnak meghatározott helyzete van: a KiemelŒ fül ellátott oldal a lap hátsó részének felel
meg, tehát ne tegye elŒl.
(9).
Ez a KiemelŒ fül nem egy szállítófogantyú, ez csak a lap felemelésére szolgál, amikor
ennek a tisztítására kerül sor.
(12).
A fŒzŒlap használata egy más fŒzési mód használatával párhuzamosan
(11).
•
Ebben az esetben, a kemencébe behelyezett élelmiszertŒl függŒen, elŒször a fŒzési paramétereket
kell kiválasztani (idŒtartam és hŒmérséklet).
•
A felsŒ fıtŒellenállás mıködik, ez lehetŒvé teszi a fŒzŒlap fıtését.
Ebben az esetben a fŒzési idŒt a kemencébe betett élelmiszer határozza meg; a kemence
leállása megállítja a fŒzŒlap fıtését, amikor az ottani fŒzési idŒ lejár.
Ezért tehát ügyeljen a fŒzŒlapra tett élelmiszerek fŒzésére vagy felmelegítésére.
Vigyázat, a fŒzŒlap a kemence megállítása után is meleg marad!
A lapnak meghatározott helyzete van: a KiemelŒ fül ellátott oldal a lap hátsó részének felel
meg, tehát ne tegye elŒl.
(9).
Ez a KiemelŒ fül nem egy szállítófogantyú, ez csak a lap felemelésére szolgál, amikor
ennek a tisztítására kerül sor.
(12).
MielŒtt a fŒzŒlapot leszerelné és megtisztítaná várja meg a készülék teljes lehılését.
Tisztítás
•
Tisztítás elŒtt húzza ki készüléke hálózati csatlakozó dugaszát és hagyja teljesen lehılni.
•
Soha ne merítse vízbe a készüléket.
KülsŒ falak
•
A készülék külsŒ felületeit egy szappanos vízbe mártott szivaccsal törölje végig.
(1).
•
Gondosan öblítse le és szárítsa meg.
BelsΠfalak
•
A belsŒ falak ragadásmentesek, a zsíros ráfröccsenéseket szappanos meleg vízbe mártott szivaccsal
távolítsa el.
•
Gondosan öblítse le és szárítsa meg.
•
Ne használjon tamponokat, se fémszivacsokat, se súrolóporokat, se agresszív tisztítószereket (fŒleg
szóda alapú zsírtalanítókat).
Page 46

45
Hun
Tartozékok*
•
A *-al jelölt tartozékokat meleg vízzel és mosogatószerrel kell tisztítani.
•
Gondosan öblítse le és szárítsa meg.
MorzsagyıjtŒ fiók
•
A morzsagyıjtŒ fiókot langyos vízzel és mosogatószerrel kell tisztítani.
•
Gondosan öblítse le és szárítsa meg.
FŒzŒlap
•
MielŒtt a fŒzŒlapot leszerelné és megtisztítaná várja meg a készülék teljes lehılését.
•
A fŒzŒlap eltávolításáért fogja meg a lap hátsó oldalán található KiemelŒ fül.
•
A fŒzŒlapot könnyen lehet tisztítani meleg vízzel és folyékony mosószerrel (ne használjon
fémszivacsot vagy súrolóport). Hagyja száradni.
•
A fŒzŒlapot könnyedén vissza lehet tenni a kemence tetején kiképzett helyére, de KiemelŒ fül hátul legyen.
Figyelem: ne tegye a tartozékokat az edénymosogató gépbe.
FÃZÉSI KALAUZ
A megadott hŒmérsékletek és idŒtartamok tájékoztató jellegıek. A fŒzési eredmények változnak a
receptektŒl, tálaktól és hozzávalóktól függŒen.
KORLÁTOLT IDÃTARTAMÚ GARANCIA
Hozzávalók Funkce – Teplota° âas
Almásszelet BAKE (SÜTÉS) 230 °C 25-35 perc
Teasütemények BAKE (SÜTÉS) 180 °C 10-14 perc
Friss pizza 200 g BAKE (SÜTÉS) 230 °C 6-8 perc
Mélyhıtött krumpli BAKE (SÜTÉS) 230 °C 40-50 perc
2 csirkecomb BAKE (SÜTÉS) 230 °C 25-35 perc
TŒkehal-filé BAKE (SÜTÉS) 230 °C 18-22 perc
Szalonna (10 mm)
GRILL
(ROSTON SÜTÉS)
(kissé nyitott ajtó)
10 perc, megfordíta-
ni, még 4 perc
Kolbász
GRILL
(ROSTON SÜTÉS)
(kissé nyitott ajtó)
10 perc, megfordíta-
ni, még 4 perc
Száraztészták
(sajttal)
GRILL
(ROSTON SÜTÉS)
(kissé nyitott ajtó)
15-20 perc
Szalonna (10 mm)
FŒzŒlap – GRILL funk-
cióval
20 perc (10 minden
oldalnak)
Ãrölt hús
FŒzŒlap – GRILL funk-
cióval
10-15 perc elsŒ
oldal, 5-10 perc
második oldal
Krumpli felmelegítése
FŒzŒlap – GRILL funk-
cióval
25-30 perc
Tükörtojás
FŒzŒlap – GRILL funk-
cióval
4-5 perc
*
modelltŒl függŒen
Page 47

VARNOSTNA OPOZORILA
PREPREâEVANJE NESREâ
V GOSPODINJSTVU
• Varnost tega aparata zagotavlja njegova izdelava v skladu s tehniãnimi predpisi in
veljavnimi normami.
• Direktiva Elektromagnetna kompatibilnost 89/336/CEE preoblikovana 92/31/CEE in
93/68/CEE.
• Direktiva Nizka napetost 73/23/CEE preoblikovana 93/68/CEE.
• Upo‰tevajte raznolikost veljavnih norm; ãe uporabljate aparat, ki ste ga kupili v
drugi drÏavi, naj ga najprej preveri poobla‰ãeni servis.
• Prepriãajte se, da napetost elektriãnega omreÏja odgovarja napetosti, navedeni na
aparatu (samo izmeniãni tok).
• Preverite, da je elektriãna napeljava primerna za vklop tako moãnega aparata.
• Aparat vedno ozemljite.
• Elektriãni kabel ne sme viseti ali se dotikati vroãih delov aparata.
• Ko aparat izklopite iz elektriãnega omreÏja, ne vlecite za kabel.
• Uporabljajte le nove ali dobro ohranjene podalj‰ke z ozemljitvijo in s prevodno Ïico,
ki je enaka Ïici, s katero je opremljen aparat.
• Elektriãna Ïica, elektriãni prikljuãek in aparat ne smejo priti v stik z vodo niti s kate-
rokoli drugo tekoãino, da ne bo pri‰lo do elektriãnega udara.
Ko uporabljate elektriãne naprave, morate vedno spo‰tovati doloãena
osnovna pravila, predvsem naslednja:
• Preberite celotno besedilo, ki govori o naãinu uporabe aparata in pazljivo sledite
navodilom za uporabo.
• Aparat naj nikoli ne deluje brez va‰ega nadzora, ‰e posebej pazljivi bodite pri prvi
uporabi in vsaki spremembi nastavitev.
• Aparat naj bo izven dosega otrok.
• Otroci in invalidi aparata ne smejo uporabljati brez nadzora.
• Otroci se ne smejo igrati z aparatom.
• Med uporabo aparata ne prena‰ajte in ne prestavljajte.
• Uporabljajte stabilno delovno povr‰ino daleã od vode.
• Aparata ne postavite v bliÏino toplotnih virov.
• Po vsaki uporabi in pred vsakim ãi‰ãenjem aparat izklopite iz elektriãnega omreÏja
• Pred vsako uporabo se prepriãajte, da je predal za drobtine pod aparatom dobro
zaprt.
• Vrata in zunanje povr‰ine se med delovanjem aparata lahko segrejejo, ne dotikajte
se teh povr‰in, uporabljajte roãaje in gumbe
.
• V aparat, nanj ali pod njega nikoli ne poloÏite papirja ali plastike.
• Aparata ne uporabljajte za kuho ali tajanje zamrznjenih jedi.
46
Slo
Page 48

• Aparata ne uporabljajte v naslednjih primerih:
- ko je pokvarjena ali po‰kodovana elektriãna vrvica
- ko je aparat padel in na njem opazite po‰kodbe ali ko nepravilno deluje.
V vsakem primeru morate aparat nesti na najbliÏji poobla‰ãeni servis, da se izognete
nevarnostim.
• Aparat uporabljajte samo doma.
• Aparata ne smete uporabljati kot vir toplote.
• Kruh lahko zagori, aparata ravno tako ne smete uporabljati v bliÏini gorljivih snovi
kot so zavese, police, pohi‰tvo...
• Med obratovanjem ga ne prekrivajte. âe se aparat sluãajno vname, ga nikoli ne
posku‰ajte pogasiti z vodo. Izklopite ga z elektriãnega omreÏja in pogasite ogenj z
vlaÏno krpo.
• Vnetljivi predmeti ne smejo biti v bliÏini aparata.
• Uporabljajte samo tiste rezervne dele, ki jih priporoãa proizvajalec, in samo rezervne dele iste blagovne znamke kot je va‰ aparat.
• Aparat je namenjen izkljuãno domaãi uporabi, za vsako neprimerno profesionalno
uporabo proizvajalec ne garantira niti zanjo ne prevzema odgovornosti.
• Zaradi va‰e varnosti vam priporoãamo, da aparata nikoli ne razstavljate sami; pokliãite poobla‰ãeni servis.
VARNO SHRANITE
TA NAVODILA
47
Slo
Page 49

48
Slo
Znaãilnosti naprave
1.
Re‰etko*
5.
Ura za nastavitev ãasa kuhanja
2.
Plo‰ão*
6.
Predal za metlico in smeti‰nico
3.
Pripravo za peãenje*
7.
Termostat
4.
Kontrolna luãka
8.
Kuhalna plo‰ãa
Prednosti izdelka Toaster Oven
Va‰ Toaster Oven vam nudi naslednje prednosti:
•
Notranjo prostornino 8,5 litrov za praÏenjedo ‰tirih rezin kruha naenkrat.
•
Vgrajena kuhalna plo‰ãa na zgornjem delu vam nudi veã moÏnosti kuhanja.
(9).
•
Funkcija peãice: termostat, ki se nastavi na temperaturo od 90° do 240 °C in omogoãa uspe‰nost
vseh va‰ih receptov.
•
Funkcija Grill: za peãenje in zlato barvo va‰ih jedi.
•
Samodejen izstop re‰etke: olaj‰a nadzor praÏenja in prijemanja jedi.
(2).
•
Predal za drobtine, ki se zlahka odstrani in tako olaj‰a vzdrÏevanje va‰ega opekaãa in odstranjevanje
kru‰nih drobtin ter drugih ostankov hrane.
(3).
•
Posoda za peko ãajnega peciva, toplih sendviãev, pripravo hitro zamrznjene hrane.
•
Naprava za peãenje* za bolj zdrav naãin peãenja.
Pred prvo uporabo
•
Vzemite aparat iz ovoja in odstranite lepilne trakove.
•
Preberite besedilo o naãinu uporabe in pazljivo sledite navodilom za uporabo.
•
Izvlecite sestavne dele aparata* (re‰etko, plo‰ão, pripravo za peãenje), umijte jih v topli milnici.
Splaknite in skrbno osu‰ite.
•
Popolnoma izvlecite elektriãno vrvico.
•
Z vlaÏno krpo obri‰ite zunanjost naprave in osu‰ite.
(1).
Da odstranite vonj po novem aparatu, najprej enkrat vklopite praznega, vratca naj bodo odprta,
aparat naj bo v zraãnem prostoru:
•
Termostat nastavite na 240 °C, ãasovno stikalo pa na 15 minut.
•
Po petnajstih minutah se stikalo samodejno premakne na “0”.
Malo dima uide iz peãice. To je normalno in bo izginilo med prvo uporabo.
Uporaba funkcije TOAST (Obe plo‰ãi delujeta)
•
Rezine kruha postavite direktno na re‰etko, re‰etka je obrnjena navzgor.
•
Gumb termostata nastavite na « Toast ».
(6).
•
âasovno stikalo naravnajte na Ïeleni ãas praÏenja.
(4).
•
PriÏge se kontrolna luãka.
•
Ko mine nastavljeni ãas praÏenja, se ãasovno stikalo samodejno vrne na poloÏaj “ 0 “ in zasli‰ite
glasen zvoãni signal, kontrolna luãka ugasne.
•
Delovanje aparata lahko prekinete predãasno tako, da ãasovno stikalo pomaknete na poloÏaj “0”.
•
Vzemite opeãene kruhke.
(5).
Opombe:
•
V funkciji TOAST vedno nadzorujte praÏenje kruha.
•
Po prvi uporabi poskusno opecite nekaj rezin.
•
Bodite pozorni na dejstvo, da manj ko je rezin kruha, kraj‰i je ãas praÏenja.
•
Ko veãkrat praÏite rezine kruha bodite previdni, da rezine ne poãrnijo.
* odvisno od modela
Page 50

49
Slo
•
âe se to vseeno zgodi, takoj ustavite delovanje opekaãa tako, da ãasovno stikalo obrnete na poloÏaj “0”.
•
âe Ïelite pogreti Ïe opeãeno rezino kruha, dobro nadzorujte praÏenje.
Peãica je vroãa. V trenutku, ko kruhke vzamete iz opekaãa pazite, da se ne dotikate sten
(uporabite posebne kle‰ãe za kruh** ali rokavice**).
FUNKCIJA PEâICE (BAKE) (Obe plo‰ãi delujeta)
•
Jedi postavite na re‰etko in za to uporabite ustrezen pekaã.
•
Gumb termostata obrnite na Ïeleno temperaturo
•
âasovno stikalo nastavite na Ïeleni ãas kuhanja (najveã 60 minut)
•
PriÏge se kontrolna luãka.
•
Kuhanje lahko predãasno prekinete tako, da ãasovno stikalo obrnete na poloÏaj "0".
•
Ko poteãe nastavljen ãas za kuhanje, se bo ãasovno stikalo samodejno postavilo v poloÏaj "0" in
zasli‰ali boste glasen zvoãni signal. Kontrolna luãka se bo ugasnila.
•
Gumb termostata obrnite v zaãetni poloÏaj "0".
Peãica je vroãa. V trenutku ko vzamete jed iz peãice pazite, da se ne dotaknete sten
(potegnite re‰etko in uporabite rokavice**).
FUNKCIJA GRILL (GRILL) (Samo zgornja plo‰ãa deluje)
•
Napravo za peãenje poloÏite v notranjost pekaãa*.
•
Jedi lepo razporedite po povr‰ini naprave za peãenje in pekaãa*.
•
Vse poloÏite na re‰etko: razdalja med pripravo in gornjo plo‰ão mora biti najmanj 2 cm (0.8 in).
•
Vrata naj bodo na pol odprta.
(8).
•
Termostat nastavite na "Grill" (picto).
(7).
•
âasovno stikalo nastavite na Ïeleni ãas (najveã 60 minut).
•
PriÏge se kontrolna luãka.
•
Nadzorujte pripravo jedi in s pomoãjo posebne priprave zniÏajte njeno lego (ãe je to potrebno).
•
Kuhanje lahko predãasno prekinete tako, da ãasovno stikalo obrnete na poloÏaj "0".
•
Ko poteãe nastavljen ãas za kuhanje, se bo ãasovno stikalo samodejno postavilo v poloÏaj "0" in
zasli‰ali boste glasen zvoãni signal. Kontrolna luãka se bo ugasnila.
•
Termostat nastavite na poloÏaj "0".
Peãica je vroãa. V trenutku ko vzamete jed iz peãice pazite, da se ne dotaknete sten
(potegnite re‰etko in uporabite rokavice**).
Med peãenjem se mastni madeÏi lahko v stiku z zgornjo plo‰ão vnamejo. Ne vznemirjajte se,
plamen se bo pogasil sam in ne bo po‰kodoval aparata.
Praktiãni nasveti
•
Peãenje jedi vedno povzroãi uhajanje pare in vãasih tudi dima.
•
Izpuhtevanje dima ter neprijetne vonjave zmanj‰ate tako, da so stene va‰ega opekaãa vedno ãiste.
•
To lahko zmanj‰ate tudi kot sledi:
-
Na zaãetku peke dodate na dno posode malo vode.
-
Spo‰tujete ali zmanj‰ate temperaturo peãenja.
•
âe se jed ne peãe enakomerno na dnu peãice:
-
Med peko jed obrnite.
•
Za ãas peãenja, ki je kraj‰i od 5 minut obrnite gumb najprej na 15 minut, potem pa ga zavrtite nazaj
na Ïeleni ãas peãenja.
* odvisno od modela
**
niso del opreme aparata
Page 51

50
Slo
UPORABA KUHALNE PLO·âE
(Ta naãin kuhanja lahko uporabite neodvisno ali v kombinaciji z enim od treh drugih moÏnih naãinov
kuhanja)
Neodvisna uporaba kuhalne plo‰ãe
(10).
•
Termostat nastavite na poloÏaj Gril (zgornja plo‰ãa).
•
âasovno stikalo nastavite na Ïeleni ãas kuhanja.
•
PriÏge se kontrolna luãka.
•
Zgornja plo‰ãa segreje kuhalno plo‰ão.
•
Pustite, da se segreva 5 minut, ‰ele nato poloÏite hrano na plo‰ão.
•
Kuhanje lahko predãasno prekinete tako, da ãasovno stikalo obrnete na poloÏaj "0".
•
Ko poteãe nastavljen ãas za kuhanje, se bo ãasovno stikalo samodejno postavilo v poloÏaj "0" in
zasli‰ali boste glasen zvoãni signal. Kontrolna luãka se bo ugasnila.
Pozor! Kuhalna plo‰ãa ostane vroãa ‰e nekaj ãasa po samodejnem izklopu!
Plo‰ãa ima sledeã namen: stran, na katero je pritrjen jeziãek, je hkrati zadnji rob plo‰ãe,
ne premikajte je naprej.
(9).
jeziãek ni namenjen prena‰anju aparata, sluÏi samo dvigovanju plo‰ãe med ãi‰ãenjem.
(12).
Uporaba kuhalne plo‰ãe med uporabo drugih naãinov kuhanja
(11).
•
V tem primeru morate najprej izbrati parametre kuhanja (ãas in temperaturo) za hrano, ki jo boste
pekli v peãici.
•
Gornja plo‰ãa deluje in greje kuhalno plo‰ão.
V tem primeru ãas kuhanja doloãa hrana, ki je v peãici; ko bo minil nastavljeni ãas peke,
bo peãica prenehala delovati in greti kuhalno plo‰ão.
Nadzorujte torej kuhanje ali ponovno gretje hrane, ki jo pripravljate na kuhalni plo‰ãi.
Pozor! Kuhalna plo‰ãa ostane vroãa po prenehanju delovanja peãice!
Plo‰ãa ima sledeã namen: stran, na katero je pritrjen jeziãek, je hkrati zadnji rob plo‰ãe,
ne premikajte je naprej.
(9).
jeziãek ni namenjen prena‰anju aparata, sluÏi samo dvigovanju plo‰ãe med ãi‰ãenjem.
(12).
Preden aparat razstavite in priãnete s ãi‰ãenjem poãakajte, da se popolnoma ohladi.
âi‰ãenje
•
pred vsakim ãi‰ãenjem izklopite aparat z elektriãnega omreÏja in ga pustite, da se popolnoma ohladi.
•
Nikoli ga ne potopite v vodo.
Zunanje stene
•
âistite jih z vlaÏno gobico namoãeno v toplo milnico.
(1).
•
Splaknite in skrbno osu‰ite.
Notranje stene
•
Notranje stene so obloÏene tako, da prepreãujejo prijemanje hrane, mastne madeÏe odstranite z
gobo, prepojeno s toplo milnico.
•
Splaknite in skrbno osu‰ite.
•
Ne uporabljajte vate niti kovinskih krpic niti ãistilnega pra‰ka niti ostalih agresivnih ãistilnih sredstev
(posebno ãistilna sredstva na bazi sode).
Page 52

51
Slo
Sestavni deli*
•
Sestavne dele ãistite z vroão vodo in tekoãim ãistilom za pomivanje posode.
•
Splaknite in skrbno osu‰ite.
Predal za drobtine
•
Predal za drobtine ãistite z vroão vodo in tekoãim ãistilom za pomivanje posode.
•
Splaknite in skrbno osu‰ite.
Kuhalna plo‰ãa
•
Preden aparat razstavite in priãnete s ãi‰ãenjem poãakajte, da se popolnoma ohladi.
•
Za dvig kuhalne plo‰ãe uporabite jeziãek na zadnjem delu plo‰ãe.
•
Kuhalno plo‰ão zlahka oãistite z vroão vodo in tekoãim detergentom (ne uporabljajte Ïiãnate gobice
ali ãistilnega pra‰ka). Pustite, da se osu‰i.
•
Kuhalno plo‰ão zlahka namestite nazaj na njeno mesto na vrhu peãice, z jeziãek na zadnji strani.
Pozor! Delov aparata in kuhalne plo‰ãe ne odlagajte v pomivalno korito!
VODIâ KUHANJA
Navedene temperature in ãasi so okvirni. Loãijo se glede na uporabljeni recept, jedi in sestavine.
TRAJANJE OMEJENE GARANCIJE
Sestavine Funkcije – temperatura âas
Jabolãni kolaã BAKE 230 °C 25-35 minut
Cookies BAKE 180 °C 10-14 minut
SveÏa pica 200 g BAKE 230 °C 6-8 minut
Gratiniran hitro
zamrznjen krompir
BAKE 230 °C 40-50 minut
2 pi‰ãanãji bedri BAKE 230 °C 25-35 minut
File polenovke BAKE 230 °C 18-22 minut
Slanina (10 mm )
GRILL
(vratca na pol odprta)
10 minut, obrniti, ‰e
4 minute
Klobasice
GRILL
(vratca na pol odprta)
10 minut, obrniti, ‰e
4 minute
Gratinirane testeni-
ne (gratiniran sir)
GRILL
(vratca na pol odprta)
15-20 minut
Slanina (10 mm)
Kuhalna plo‰ãa –
funkcija GRILL
20 minut
(10 na vsaki strani)
Mleti zrezki
Kuhalna plo‰ãa –
funkcija GRILL
10-15 minut na eni
strani, 5-10 minut na
drugi strani
Pogret krompir
Kuhalna plo‰ãa –
funkcija GRILL
25-30 minut
Jajca na oko
Kuhalna plo‰ãa –
funkcija GRILL
4-5 minut
* odvisno od modela
Page 53

SIGURNOSNA UPOZORENJA
SPREâAVANJE NEZGODA
U DOMAåINSTVU
• Sigurnost aparata jamãi njegova izrada u skladu s tehniãkim propisima i vaÏeçim
normama.
• Upozorenje Elektromagnetska kompatibilnost 89/336/CEE preoblikovana
92/31/CEE i 93/68/CEE.
• Upozorenje Niski napon 73/23/CEE preoblikovan 93/68/CEE.
• Po‰tujte raznolikost vaÏeçih normi; ako koristite aparat kojeg ste kupili u drugoj
drÏavi, neka ga najprije provjeri ovla‰teni servis.
• Provjerite odgovara li napon elektriãne mreÏe naponu aparata (samo izmjeniãna
struja)
• Provjerite je li elektriãna instalacija primjerena za prikljuãak tako jakog aparata.
• Aparat uvijek uzemljite.
• Elektriãni kabel ne smije visjeti niti se doticati vruçih dijelova aparata.
• Prilikom iskljuãivanja aparata iz elektriãne mreÏe ne vucite za kabel.
• Koristite iskljuãivo nove ili dobro oãuvane produÏetke s uzemljenjem i provodnom
Ïicom, koja je jednaka Ïici aparata.
• Elektriãna Ïica, elektriãni prikljuãak i aparat ne smiju doçi u doticaj s vodom niti bilo
kojom drugom tekuçinom, kako ne bi do‰lo do elektriãnog udara.
Prilikom uporabe elektriãnih naprava uvijek morate po‰tivati odre|ena
osnovna pravila, posebno slijedeça:
• U cijelosti proãitajte upute za uporabu i slijedite ih.
• Neka aparat ne djeluje bez va‰eg nadzora; posebno paÏljivi budite prilikom prve
uporabe i svake slijedeçe promjene.
• Aparat drÏati izvan dohvata djece.
• Djeca i invalidi ne smiju koristiti aparat bez nadzora.
• Djeca se ne smiju igrati s aparatom.
• Prilikom kori‰tenja aparat ne nositi i ne pomicati.
• Koristite stabilnu radnu povr‰inu daleko od vode.
• Ne postavljajte aparat u blizinu izvora topline.
• Nakon svake uporabe i prije ãi‰çenja aparata prekinite dovod elektriãne energije
aparatu.
• Prije svake uporabe provjerite je li pretinac za mrvice pod aparatom dobro zatvo-
ren.
• Tijekom djelovanja aparata, vrata i vanjske povr‰ine mogu se zagrijati te ih stoga
ne dirajte, koristite ruãice i gumbe
.
• Papir ili plastiku nikako ne ostavljajte u aparatu, na njemu ili ispod njega.
• Aparat ne koristite za kuhanje ili otapanje zamrznutih jela.
52
Cro
Page 54

• Aparat ne koristite u slijedeçim primjerima:
- ako je elektriãni kabel uni‰ten ili o‰teçen
- ako su na aparatu vidljive nepravilnosti nakon ‰to je pao ili ako je neispravan.
U svakom sluãaju aparat je potrebno odnijeti na najbliÏi ovla‰teni servis, kako bi izbjeli rizik.
• Aparat koristite iskljuãivo u kuçanstvu.
• Aparat ne smijete koristiti kao izvor topline.
• I kruh moÏe izgorjeti stoga aparat ne koristite u blizini lako zapaljivih tvari kao ‰to
su zavjese, police, namje‰taj...
• Ne pokrivajte ga dok radi. Ne gasite ga s vodom ãak i ako se zapali. Iskljuãite ga iz
elektriãne mreÏe i vatru ugasite vlaÏnom krpom.
• Lako zapaljivi predmeti ne smiju biti u blizini aparata.
• Koristite iskljuãivo rezervne dijelove koje preporuãuje proizvo|aã i one koji su iste
firme kao i va‰ aparat.
• Aparat je namijenjen iskljuãivo kuçnoj uporabi, za svaku neprimjerenu profesionalnu uporabu proizvo
|aã ne garantira niti za nju snosi odgovornost.
• Zbog vlastite sigurnosti preporuãamo vam da aparat nikada ne rasklapate sami;
nazovite ovla‰teni servis.
âUVAJTE UPUTE
NA SIGURNOM
53
Cro
Page 55

54
Cro
Svojstva ure|aja
1.
Re‰etku*
5.
Sat za pode‰avanje vremena kuhanja
2.
Ploãu*
6.
Pretinac za metlicu i lopaticu
3.
Pripravu za peãenje*
7.
Termostat
4.
Nadzorna Ïaruljica
8.
Ploãa za kuhanje
Prednosti proizvoda Toaster Oven
Va‰ Toaster Oven vam nudi slijedeçe prednosti:
•
Unutarnju zapreminu 8,5 litara za peãenje do ãetiri kri‰ke kruha istovremeno.
•
Ugra|ena ploãa za kuhanje na gornjem dijelu, nudi vam vi‰e moguçnosti kuhanja.
(9).
•
Funkcija peçnice: termostat se pode‰ava na temperaturu od 90° do 240° C ‰to omoguçuje uspje‰nost
svih va‰ih recepata.
•
Funkcija Grill: za peãenje i zlatnoÏutu boju va‰ih jela.
•
Automatsko osloba|anje re‰etke: olak‰ava nadzor peãenja i zagorijevanja jela.
(2).
•
Pretinac za mrvice: jednostavno se odstranjuje i time olak‰ava odrÏavanje va‰eg pekaãa, otklanjanje
mrvica kruha te drugih ostataka hrane.
(3).
•
Pekaã za peãenje ãajnog peciva, toplih sendviãa, pripravu brzo zamrznute hrane.
•
Naprava za peãenje*, za zdraviji naãin peãenja.
Prije prve uporabe
•
Izvadite aparat iz omota i odstranite ljepljive trake.
•
Proãitajte upute za uporabu i paÏljivo ih slijedite.
•
Izvucite sastavne dijelove aparata* (re‰etku, ploãu, pripravu za peãenje), operite ih u toploj sapunici.
Isperite i paÏljivo posu‰ite.
•
Elektriãni kabel izvucite do kraja.
•
VlaÏnom krpom obri‰ite vanj‰tinu aparata i pustite da se osu‰i.
(1).
Kako biste odstranili miris novog aparata, postavite ga u prozraãnu prostoriju, ukljuãite ga
praznog, vrata‰ca ostavite otvorena:
•
Termostat namjestite na 240 °C, prekidaã za vrijeme na 15 minuta.
•
Nakon 15 minuta prekidaã se automatski pomakne na “0”.
z peçnice çe se malo zadimiti. To je normalno i nestat çe nakon prve uporabe.
Uporaba funkcije TOAST
(Obje ploãe djeluju)
•
Kri‰ke kruha postavite direktno na re‰etku; re‰etka je okrenuta prema gore.
•
Gumb termostata namjestite na « Toast ».
(6).
•
Prekidaã za vrijeme namjestite na Ïeljeno vrijeme peãenja.
(4).
•
Sigurnosna lampica se upali.
•
Kada pro|e vrijeme predvi|eno za peãenje, prekidaã se automatski vrati na poloÏaj “0” uz glasni
zvuãni signal, sigurnosna lampica se gasi.
•
Djelovanje aparata moÏete prijevremeno prekinuti tako da prekidaã za vrijeme pomaknete na poloÏaj “0”.
•
Uzmite prepeãen kruh.
(5).
Napomene:
•
U funkciji TOAST uvijek nadzirite peãenje kruha.
•
Nakon prve uporabe za probu pecite nekoliko kri‰ki.
•
Upamtite! ·to je manje kri‰ki kruha, kraçe je vrijeme peãenja.
*
ovisi o modelu
Page 56

55
Cro
•
Peãete li kri‰ke kruha vi‰e puta, pazite da ne izgore.
•
Ako se to dogodi, smjesta zaustavite djelovanje pekaãa tako da prekidaã za vrijeme okrenete u
poloÏaj “ 0 “.
•
Îelite li zagrijati veç peãenu kri‰ku kruha, nadgledajte peãenje.
Peçnica je vruça. Vadeçi kri‰ke kruha pazite da ne dotaknete stijenke pekaãa (koristite
posebna klije‰ta za kruh* ili rukavice**).
FUNKCIJA PEåNICE (BAKE) (Obje ploãe djeluju)
•
Jela poloÏite na re‰etku i pri tom upotrijebite adekvatan pekaã.
•
Gumb termostata okrenite na Ïeljenu temperaturu.
•
Prekidaã za vrijeme namjestite na Ïeljeno vrijeme djelovanja (najvi‰e 60 minuta).
•
Sigurnosna lampica se upali.
•
Kuhanje moÏete prijevremeno prekinuti tako da prekidaã za vrijeme okrenete u poloÏaj »0«.
•
Kada pro|e vrijeme odre|eno za kuhanje, prekidaã çe se automatski postaviti u poloÏaj »0« i ãut çete
glasni zvuãni signal. Sigurnosna lampica çe se ugasiti.
•
Gumb termostata okrenite u poãetni poloÏaj »0«.
Peçnica je vruça. Vadeçi jelo iz peçnice pazite da ne dodirnete stijenke peçnice (izvucite
re‰etku i upotrijebite rukavice**).
FUNKCIJA GRILL (GRILL) (Djeluje samo gornja ploãa)
•
Napravu za peãenje poloÏite u unutra‰njost peçnice*.
•
Po povr‰ini naprave za peãenje i pekaãa rasporedite jela*.
•
Sve poloÏite na re‰etku: udaljenost izme|u priprave i gornje ploãe mora biti najmanje 2 cm (0.8 in).
•
Vrata neka budu otvorena do polovice.
(8).
•
Termostat namjestite na " Grill" (picto).
(7).
•
Prekidaã za vrijeme namjestite na Ïeljeno vrijeme (najvi‰e 60 minuta).
•
Sigurnosna lampica se upali.
•
Nadgledajte pripravu jela i uz pomoç posebne naprave snizite njezin poloÏaj (ako je to potrebno).
•
Kuhanje moÏete prijevremeno prekinuti tako da prekidaã za vrijeme okrenete u poloÏaj »0«.
•
Kada pro|e vrijeme odre|eno za kuhanje, prekidaã çe se automatski postaviti u poloÏaj »0« i ãut çete
glasni zvuãni signal. Sigurnosna lampica çe se ugasiti.
•
Termostat namjestite u poloÏaj "0".
Peçnica je vruça. Vadeçi jelo iz peçnice pazite da ne dodirnete stijenke peçnice (izvucite
re‰etku i upotrijebite rukavice**).
Tijekom peãenja mogu masni madeÏi u dodiru sa gornjom ploãom planuti. Nema razloga
za uznemirenost; plamen çe se sam ugasiti ne o‰tetiv‰i aparat.
Praktiãni savjeti
•
Peãenje jela uvijek prouzrokuje izlaÏenje pare, a ponekad i ne‰to dima.
•
Dim i neugodne mirise uklonite tako da su stijenke va‰eg pekaãa uvijek ãiste.
•
To moÏete smanjiti na slijedeçi naãin:
-
Na poãetku peãenja dodajte na dno posude malo vode.
-
Po‰tujte ili smanjite temperaturu peãenja.
•
Ako se jelo na dnu peçnice ne peãe jednakomjerno:
-
Tijekom peãenja okrenite jelo.
*
ovisi o modelu**nisu dio opreme aparata
Page 57

56
Cro
•
Za vrijeme peãenja koje je kraçe od 5 minuta dugme okrenite najprije na 15 minuta, a potom ga
zavrtite natrag na Ïeljeno vrijeme peãenja.
UPORABA PLOâE ZA KUHANJE
(Taj naãin kuhanja moÏete upotrijebiti nezavisno ili u kombinaciji s jednim od tri preostala moguça
naãina kuhanja)
Nezavisna uporaba ploãe za kuhanje
(10).
•
Termostat namjestite u poloÏaj Gril (gornja ploãa).
•
Prekidaã za vrijeme namjestite na Ïeljeno vrijeme djelovanja.
•
Sigurnosna lampica se upali.
•
Gornja ploãa zagrije ploãu za kuhanje.
•
Pustite da se grije 5 minuta, potom poloÏite hranu na ploãu.
•
Kuhanje moÏete prijevremeno prekinuti tako da prekidaã za vrijeme okrenete u poloÏaj »0«.
•
Kada pro|e vrijeme odre|eno za kuhanje, prekidaã çe se automatski postaviti u poloÏaj »0« i ãut çete
glasni zvuãni signal. Sigurnosna lampica çe se ugasiti.
Pozor! Ploãa za kuhanje ostaje vruça jo‰ neko vrijeme po automatskom isklapljanju!
Slijedeça svrha ploãe: strana na kojoj je priãvr‰çena jeziãak ujedno je i straÏnji rub ploãe,
stoga je ne pomiãite naprijed.
(9).
jeziãak nije namijenjena za preno‰enje aparata, veç sluÏi samo za podizanje ploãe tijekom
ãi‰ãenja.
(12).
Uporaba ploãe za kuhanje tijekom ostalih naãina kuhanja
(11).
•
Za hranu koju Ïelite peçi u peçnici morate, u tom sluãaju, najprije izabrati parametre peãenja (vrijeme
i temperaturu).
•
Gornja ploãa djeluje i grije ploãu za kuhanje.
U tom sluãaju vrijeme peãenja odre|uje hrana koja je u peçnici; kada bude vrijeme peãenja
isteklo, peçnica çe prestati djelovati i neçe grijati ploãu za kuhanje.
Stoga, nadgledajte kuhanje ili podgrijavanje hrane koju pripremate na ploãi za kuhanje.
Pozor! Ploãa za kuhanje ostaje vruça nakon ‰to peçnica prestaje djelovati.
Slijedeça svrha ploãe: strana na kojoj je priãvr‰çena jeziãak ujedno je i straÏnji rub ploãe,
stoga je ne pomiãite naprijed.
(9).
jeziãak nije namijenjena za preno‰enje aparata, veç sluÏi samo za podizanje ploãe tijekom
ãi‰ãenja.
(12).
Prije rasklapanja i ãi‰ãenja, priãekajte da se aparat potpuno ohladi.
âi‰çenje
•
prije svakog ãi‰çenja iskljuãite aparat iz elektriãne mreÏe i pustite ga da se potpuno ohladi.
•
Nikada ga ne uranjajte u vodu.
Vanjske stijenke
•
âistite ih vlaÏnom spuÏvom namoãenom u toploj sapunici.
(1).
•
Isperite i paÏljivo osu‰ite!
Unutarnje stijenke
•
Unutarnje su stijenke obloÏene te tako sprijeãavaju hvatanje hrane; masne mrlje odstranite sa
spuÏvom natopljenom u toploj sapunici.
Page 58

57
Cro
•
Isperite i paÏljivo osu‰ite!
•
Ne koristite vatu, Ïiãane spuÏve, pra‰ke za ãi‰çenje i ostala agresivna sredstva za ãi‰çenje (posebice
ne ona na osnovi sode).
Sastavni dijelovi*
•
Sastavne dijelove* ãistiti vruçom vodom i tekuçim deterdÏentom za pranje posu|a.
•
Isperite i paÏljivo osu‰ite!
Pretinac za mrvice
•
Pretinac za mrvice ãistite vruçom vodom i tekuçim deterdÏentom za pranje posu|a.
•
Isperite i paÏljivo osu‰ite!
Ploãa za kuhanje
•
Prije rasklapanja i ãi‰ãenja, priãekajte da se aparat potpuno ohladi.
•
Za podizanje ploãe za kuhanje upotrijebite jeziãak na straÏnjem dijelu ploãe.
•
Ploãu za kuhanje efikasno oãistite vruçom vodom i tekuçim deterdÏentom (ne upotrebljavajte Ïiãane
spuÏve ili pra‰ak za ãi‰çenje). Pustite da se osu‰i.
•
Uz pomoç ruãice na straÏnjoj strani, ploãu za kuhanje jednostavno namjestite na njezino mjesto, na
vrhu peçnice.
Pozor! Dijelove aparata i ploãe za kuhanje ne odlagati u sudoper!
VODIå ZA KUHANJE
Navedene temperature i vrijeme okvirni su. Razlikuju se po receptu, jelu i sastojcima.
VRIJEME GARANCIJE OGRANIâENO
Sastojci Funkcije – temperatura Vrijeme
Kolaã od jabuka BAKE 230 °C 25-35 minuta
Kolaãi BAKE 180 °C 10-14 minuta
SvjeÏa pizza 200 g BAKE 230 °C 6-8 minuta
Gratiniran zamrz-
nut krumpir
BAKE 230 °C 40-50 minuta
2 pileça bedra BAKE 230 °C 25-35 minuta
File bakalara BAKE 230 °C 18-22 minuta
Slanina (10 mm )
GRILL (vrata‰ca otvore-
na do pola)
10 minuta, okrenuti,
jo‰ 4 minute
Kobasice
GRILL (vrata‰ca otvore-
na do pola)
10 minuta, okrenuti,
jo‰ 4 minute
Gratinirane tjesteni-
ne (gratiniran sir)
GRILL (vrata‰ca otvore-
na do pola)
15-20 minuta
Slanina (10 mm)
Ploãa za kuhanje –
funkcija GRILL
20 minuta (10 sa
svake strane)
Mljeveni odresci
Ploãa za kuhanje –
funkcija GRILL
10-15 minuta sa
jedne strane,
5-10 minuta sa
druge strane
Podgrijan krumpir
Ploãa za kuhanje –
funkcija GRILL
25-30 minuta
Jaja na oko
Ploãa za kuhanje –
funkcija GRILL
4-5 minuta
*
ovisi o modelu
Page 59

RECOMANDÃRI DE SIGURANÞ
Ã
PREVENIREA ACCIDENTELOR
CASNICE
• Sistemul de siguranþã al acestui aparat este în conformitate cu reglementãrile tehnice ºi
cu normativele în vigoare.
• Directiva cu privire la Compatibilitatea Electromagneticã 89/336/CEE modificatã prin
92/31/CEE ºi 93/68/CEE.
• Directiva cu privire la Aparate de joasã tensiune 73/23/CEE modificatã prin 93/68/CEE.
• Avându-se în vedere diversitatea normelor în vigoare, dacã acest aparat este utilizat într-
o þarã diferitã de cea în care a fost achiziþionat, verificaþi-l la un centru de service agreat.
• Asiguraþi-vã cã tensiunea de reþea corespunde celei indicate pe aparat (numai curent
alternativ).
• Asiguraþi-vã cã instalaþia electricã rezistã la alimentarea unui aparat de asemenea pute-
re.
• Conectaþi întotdeauna aparatul la o prizã cu împãmântare.
• Nu lãsaþi cablul de alimentare sã atârne sau sã atingã pãrþile fierbinþi ale aparatului.
• Nu deconectaþi aparatul prin tragere de cablu.
• Nu utilizaþi decât prelungitoare în stare bunã, cu prizã cu împãmântare ºi cu fir conduc-
tor de secþiune cel puþin egalã cu cea a cablului furnizat împreunã cu produsul.
• Pentru a evita pericolul de electrocutare, nu introduceþi niciodatã cablul, ºtecherul sau
aparatul în apã sau în alte lichide.
Atunci când se utilizeazã aparate electrice, existã un anumit numãr de reguli elementare care trebuie respectate întotdeauna, în special urmãtoarele:
• Citiþi în întregime modul de utilizare ºi respectaþi cu atenþie instrucþiunile.
• Nu lãsaþi niciodatã aparatul sã funcþioneze fãrã supraveghere, în special când începeþi sã
prãjiþi sau când modificaþi reglajele.
• Nu lãsaþi aparatul la îndemâna copiilor.
• Aparatul nu trebuie utilizat de copii sau de persoane infirme fãrã supraveghere.
• Copiii trebuie supravegheaþi, pentru a vã asigura cã nu se joacã cu aparatul.
• Nu ridicaþi ºi nu schimbaþi locul aparatului în timpul utilizãrii.
• Utilizaþi o suprafaþã de lucru stabilã, feritã de stropi de apã.
• Nu puneþi aparatul lângã surse de cãldurã.
• Deconectaþi aparatul de la reþea dupã fiecare utilizare sau înaintea curãþãrii.
• Înainte de fiecare utilizare, asiguraþi-vã cã tava de firimituri este bine fixatã sub aparat.
• Temperatura uºii ºi a suprafeþei exterioare pot fi destul de ridicate în timpul funcþionãrii
aparatului, nu atingeþi aceste suprafeþe atâta timp cât aparatul funcþioneazã, utilizaþi
mânerele ºi butoanele
.
• Nu puneþi niciodatã hârtie, carton sau plastic în, pe sau sub aparat.
• Nu utilizaþi niciodatã grãtarul de pâine pentru prepararea sau decongelarea alimentelor.
58
Rom
Page 60

• Nu utilizaþi aparatul dacã:
- aparatul are cablul de alimentare defect sau deteriorat
- aparatul a cãzut ºi prezintã deteriorãri vizibile sau anomalii în funcþionare.
În oricare din aceste cazuri, aparatul trebuie prezentat la un Centru de service postvânzare agreat cât mai repede posibil, pentru evitarea pericolelor.
• Nu utilizaþi aparatul decât în interiorul locuinþei.
• Nu utilizaþi aparatul ca sursã de cãldurã.
• Pâinea poate lua foc, de aceea aparatul nu trebuie utilizat în apropierea materialelor
inflamabile, cum ar fi perdele, etajere, piesele de mobilier...
• Nu acoperiþi aparatul în timpul funcþionãrii. Dacã unele componente ale aparatului iau
foc, nu încercaþi niciodatã sã le stingeþi cu apã. Deconectaþi aparatul de la reþea ºi stingeþi
flãcãrile cu o lavetã umedã.
• Nu depozitaþi produse inflamabile în apropierea aparatului.
• Utilizaþi numai accesorii recomandate de fabricant; nu utilizaþi accesorii având altã
marcã decât cea a aparatului dvs.
• Acest aparat a fost conceput exclusiv pentru uzul casnic; orice utilizare profesionalã,
necorespunzãtoare sau care nu respectã modul de utilizare nu angajeazã nici responsabilitatea, nici garanþia fabricantului.
• Pentru siguranþa dvs., nu demontaþi niciodatã aparatul dvs. înºivã; aceastã operaþiune tre-
buie efectuatã numai într-un Centru de Service agreat.
PÃSTRAÞI CU GRIJ
Ã
ACESTE INSTRUCÞIUNI
59
Rom
Page 61

60
Rom
Caracteristici
1.
Grãtar*
5.
Temporizator
2.
Tavã*
6.
Tãviþã colectare firimituri
3.
Prãjitor*
7.
Termostat
4.
LED
8.
Placã de coacere
Avantajele cuptorului - prãjitor de pâine
Aparatul dvs. oferã urmãtoarele avantaje:
•
Capacitate interioarã de 8,5 litri, pentru prãjirea a pânã la 4 felii de pâine în acelaºi timp.
•
O plitã integratã deasupra, pentru a vã oferi mai multe posibilitãþi de preparare a alimentelor.
(9).
•
Funcþia cuptor: un termostat reglabil de la 90° la 240 °C pentru reuºita tuturor reþetelor dvs.
•
Funcþia Grill: pentru frigerea uºoarã ºi rumenirea alimentelor dvs.
•
Scootere automatã a grãtarului: pentru facilitarea supravegherii pregãtirii preparatelor ºi pentru prinderea
farfuriilor.
(2).
•
Sertar pentru firimituri uºor de extras, pentru o întreþinere mai uºoarã a cuptorului dvs. ºi pentru colectarea
firimiturilor ºi a altor reziduuri.
(3).
•
O tavã pentru pregãtirea prãjiturilor mici, a sandviºurilor, a alimentelor congelate.
•
Un prãjitor* pentru prepararea mai sãnãtoasã a alimentelor.
Înainte de prima utilizare
•
Despachetaþi aparatul din ambalajul lui ºi desprindeþi banda adezivã.
•
Citiþi modul de utilizare ºi urmaþi cu atenþie instrucþiunile.
•
Scoateþi accesoriile* (grãtar, tavã, prãjitor), spãlaþi-le cu soluþie de apã caldã ºi sãpun.
Clãtiþi-le ºi uscaþi-le cu atenþie.
•
Derulaþi complet cablul de alimentare.
•
Cu o lavetã umedã, ºtergeþi exteriorul aparatului ºi uscaþi-l.
(1).
Pentru a elimina mirosul de nou, utilizaþi o datã aparatul în gol, cu uºa deschisã, într-o încãpere aerisitã:
•
Reglaþi termostatul la 240 °C, iar temporizatorul la 15 minute.
•
Dupã trecerea celor 15 minute, butonul se poziþioneazã automat pe “0“.
Din cuptor va ieºi puþin fum. Acest fenomen este normal ºi va înceta progresiv în cursul acestei prime
utilizãri.
Utilizarea funcþiei TOAST (PRÃJIRE PÂINE)
(Funcþioneazã ambele rezistenþe)
•
Puneþi feliile de pâine direct pe grãtar, cu grãtarul orientat în sus.
•
Poziþionaþi butonul termostatului pe "Toast".
(6).
•
Reglaþi temporizatorul pe perioada de prãjire doritã.
(4).
•
Indicatorul luminos se aprinde.
•
O datã ciclul încheiat, temporizatorul revine automat în poziþia “0“, se aude un semnal sonor ºi indicatorul luminos
se stinge.
•
Puteþi întrerupe operaþiunea înainte de finalul ciclului poziþionând temporizatorul pe “0“.
•
Extrageþi feliile de pâine prãjitã.
(5).
Observaþii:
•
Când aparatul se aflã pe funcþia TOAST, supravegheaþi permanent feliile de pâine în timpul prãjirii.
•
La prima utilizare, faceþi încercãri pe câteva felii.
•
Þineþi cont de faptul cã cu cât sunt mai puþine felii de pâine, cu atât timpul de prãjire este mai scurt.
* în funcþie de model
Page 62

61
Rom
•
Dacã doriþi sã prãjiþi mai multe tranºe de felii subþiri, vã recomandãm sã supravegheaþi aparatul pentru ca pâinea sã
nu se ardã.
•
Dacã se întâmplã acest lucru, opriþi imediat ciclul de prãjire poziþionând temporizatorul pe “0“.
•
Dacã doriþi sã reîncãlziþi o tranºã de pâine deja prãjitã, supravegheaþi cu atenþie grãtarul.
Cuptorul este fierbinte. În momentul scoaterii pâinii, atenþie sã nu atingeþi pereþii interiori (utilizaþi un cleºte
de apucat pâinea** sau mãnuºi**).
FUNCÞIA CUPTOR (BAKE - COACERE)
(Funcþioneazã ambele rezistenþe)
•
Puneþi alimentele pe grãtar utilizând un recipient corespunzãtor.
•
Poziþionaþi butonul termostatului pe temperatura doritã.
•
Poziþionaþi temporizatorul pe timpul de preparare dorit (maximum 60 minute).
•
Indicatorul luminos se aprinde.
•
Puteþi întrerupe operaþiunea înainte de încheierea ciclului aducând din nou temporizatorul pe poziþia "0".
•
O datã ciclul terminat, temporizatorul revine automat în poziþia "0" ºi se aude un semnal sonor. Indicatorul
luminos se stinge.
•
Aduceþi din nou butonul termostatului pe poziþia "0".
Cuptorul este fierbinte. În momentul scoaterii recipientului, fiþi atenþi sã nu atingeþi pereþii interiori (trageþi
grãtarul ºi utilizaþi mãnuºile**)
.
FUNCÞIA GRILL (GRILL - FRIGERE)
(Numai rezistenþa superioarã funcþioneazã)
•
Introduceþi prãjitorul în interiorul recipientului*.
•
Puneþi alimentele pe ansamblul format din prãjitor ºi recipient*.
•
Introduceþi ansamblul pe grãtar: distanþa dintre preparat ºi rezistenþa superioarã trebuie sã fie de cel puþin 2 cm
(0,8 in).
•
Lãsaþi uºa întredeschisã.
(8).
•
Poziþionaþi butonul termostat pe "Grill" (picto).
(7).
•
Reglaþi temporizatorul pe timpul dorit (maximum 60 minute).
•
Indicatorul luminos se aprinde.
•
Supravegheaþi alimentele, iar la jumãtatea frigerii întoarceþi-le cu ajutorul unei ustensile (dacã este necesar).
•
Puteþi întrerupe operaþiunea înainte de încheierea ciclului aducând din nou temporizatorul pe poziþia "0".
•
O datã ciclul terminat, temporizatorul revine automat în poziþia "0" ºi se aude un semnal sonor. Indicatorul
luminos se stinge.
•
Repoziþionaþi butonul termostat pe "0".
Cuptorul este fierbinte. În momentul scoaterii tãvii, fiþi atenþi sã nu atingeþi pereþii interiori (trageþi grãtarul
ºi utilizaþi mãnuºile**).
În cursul pregãtirii alimentelor, picãturi de grãsime se pot aprinde la contactul cu rezistenþele superioare.
Nu vã îngrijoraþi, acestea se sting de la sine ºi nu au nici o consecinþã asupra aparatului.
Sfaturi practice
•
Pregãtirea alimentelor este întotdeauna însoþitã de degajare de vapori ºi câteodatã de fum.
•
Puteþi reduce emisia de fum ºi mirosurile pãstrând întotdeauna curaþi pereþii cuptorului dvs.
•
Le puteþi de asemenea diminua:
-
adãugând, la începutul pregãtirii alimentelor, puþinã apã pe fundul tãvii utilizate.
-
respectând sau reducând temperaturile de pregãtire a alimentelor.
* în funcþie de model ** nu sunt furnizate împreunã cu aparatul
Page 63

•
Dacã alimentele nu se coc uniform în fundul cuptorului:
-
Întoarceþi alimentele în timpul pregãtirii, pentru a se coace uniform.
•
Pentru durate mai mici de 5 minute, rotiþi butonul pânã la 15 minute ºi reveniþi apoi la timpul de coacere dorit.
UTILIZAREA PLITEI
(Acest mod de preparare a alimentelor poate fi utilizat independent sau în timpul utilizãrii unuia din celelalte trei
moduri de preparare)
Utilizarea independentã a plitei
(10).
•
Poziþionaþi termostatul pe funcþia Grill (utilizarea rezistenþei superioare).
•
Poziþionaþi temporizatorul pe timpul de preparare dorit.
•
Indicatorul luminos se aprinde.
•
Rezistenþa superioarã încãlzeºte plita.
•
Acordaþi 5 minute pentru preîncãlzire, apoi puneþi alimentele pe plitã.
•
Puteþi întrerupe operaþiunea înainte de încheierea ciclului aducând din nou temporizatorul pe poziþia "0".
•
O datã ciclul terminat, temporizatorul revine automat în poziþia "0" ºi se aude un semnal sonor. Indicatorul
luminos se stinge.
Atenþie, plita rãmâne fierbinte dupã oprirea temporizatorului!
Plita se poziþioneazã cu latura care are limbã de apucare spre spate, nu o poziþionaþi invers.
(9).
Acest limbã de apucare nu este un limbã de apucare de transport, el nu trebuie utilizat decât pentru
ridicarea plitei în timpul curãþãrii acesteia.
(12).
Utilizarea plitei în timpul funcþionãrii unui alt mod de preparare a alimentelor
(11).
•
În acest caz, trebuie aleºi în prealabil parametrii de preparare (timp ºi temperaturã), în funcþie de alimentul ce
va fi introdus în cuptor.
•
Rezistenþa superioarã funcþioneazã ºi permite încãlzirea plitei.
În acest caz, timpul de preparare este determinat în funcþie de alimentul introdus în cuptor; cuptorul nu va
mai încãlzi plita la capãtul perioadei de timp alocate pentru prepararea alimentelor din cuptor.
Deci, supravegheaþi prepararea sau reîncãlzirea alimentelor puse pe plitã.
Atenþie, plita rãmâne fierbinte dupã oprirea cuptorului!
Plita se poziþioneazã cu latura care are limbã de apucare spre spate, nu o poziþionaþi invers.
(9).
Acest limbã de apucare nu este un limbã de apucare de transport, el nu trebuie utilizat decât pentru
ridicarea plitei în timpul curãþãrii acesteia.
(12).
Aºteptaþi ca aparatul sã se rãceascã complet înainte de a demonta ºi curãþa plita.
Curãþarea
•
Înaintea oricãrei operaþiuni de curãþare, scoateþi aparatul din prizã ºi lãsaþi-l sã se rãceascã complet.
•
Nu introduceþi niciodatã aparatul în apã.
Pereþii exteriori
•
Treceþi un burete umezit în soluþie de apã cu sãpun pe suprafaþa exterioarã a aparatului.
(1).
•
Clãtiþi ºi uscaþi cu atenþie.
Pereþii interiori
•
Pereþii interiori sunt anti-aderenþi; îndepãrtaþi depunerile de grãsime cu un burete îmbibat în soluþie de apã ºi
sãpun.
62
Rom
Page 64

63
Rom
•
Clãtiþi ºi uscaþi cu atenþie.
•
Nu utilizaþi tampoane, bureþi metalici, praf de curãþat, produse de întreþinere agresive (în special decapanþi pe bazã
de sodã).
Accesorii*
•
Accesoriile* se curãþã cu apã caldã ºi un detergent pentru spãlat vase.
•
Clãtiþi ºi uscaþi cu atenþie.
Sertarul pentru firimituri
•
Sertarul pentru firimituri se curãþã cu apã caldã ºi un detergent pentru spãlat vase.
•
Clãtiþi ºi uscaþi cu atenþie.
Plita
•
Aºteptaþi ca aparatul sã se rãceascã complet înainte de a demonta ºi curãþa plita.
•
Pentru a extrage plita, apucaþi de limbã de apucare situat la partea din spate a plitei.
•
Plita se curãþã uºor cu apã caldã ºi detergent lichid (nu utilizaþi bureþi metalici sau praf de curãþat). Lãsaþi sã se
usuce.
•
Plita se introduce uºor înapoi la loc, deasupra cuptorului, cu limbã de apucare spre spate.
Atenþie! Nu spãlaþi accesoriile sau plita cu maºina de spãlat vase.
GHID DE PREGÃTIRE A ALIMENTELOR
Temperaturile ºi timpii indicaþi sunt daþi cu titlu orientativ. Rezultatul variazã în funcþie de reþete, de tãvile utilizate
sau de ingrediente.
DURATÃ LIMITATÃ A GARANÞIEI
Ingrediente Funcþii - T° Timpi
Tarte cu mere BAKE (COACERE) 230 °C 25-35 minute
Fursecuri BAKE (COACERE) 180 °C 10-14 minute
Pizza crudã 200 g BAKE (COACERE) 230 °C 6-8 minute
Cartofi congelaþi gratinaþi BAKE (COACERE) 230 °C 40-50 minute
2 copane de pui BAKE (COACERE) 230 °C 25-35 minute
File de morun BAKE (COACERE) 230 °C 18-22 minute
Costiþã (10 mm)
GRILL (FRIGERE) (uºa între-
deschisã)
10 minute, rotire, apoi 4
minute
Cârnaþi
GRILL (FRIGERE) (uºa între-
deschisã)
10 minute, rotire, apoi 4
minute
Paste gratinate
(gratinare brânzã)
GRILL (FRIGERE) (uºa între-
deschisã)
15-20 minute
Costiþã (10 mm) Plita - în funcþia GRILL
20 minute (10 pe fieca-
re parte)
Biftec tocat Plita - în funcþia GRILL
10-15 minute pe prima
parte, 5-10 minute
pe cealaltã parte
Reîncãlzire cartofi Plita - în funcþia GRILL 25-30 minute
Ouã ochiuri Plita - în funcþia GRILL 4-5 minute
* în funcþie de model
 Loading...