

Page 1
EXPRESS COMPACT
EN
EL
AR
EASY CONTROL
www.tefal.com
Page 2
1
2
3
4
5
6
7
16
8
9
10
11
12
13
14
15
17
e
a
b
c
d
Page 3
Page 4
Page 5

EN
Important recommendations
Safety instructions
• Please read these instructions carefully before rst use.
This appliance is designed for indoor domestic household
use only. Any commercial use, inappropriate use or
failure to comply with the instructions, the manufacturer
accepts no responsibility and the guarantee will not
apply.
• Never unplug the appliance by pulling the power cord.
Always unplug your appliance:
- before lling the water tank or rinsing the boiler,
- before cleaning the appliance,
- after each use,
• The appliance must be used and placed on a at, stable,
heat & water resistant surface. Do not place the base
unit on a soft ironing board cover or any other soft
surface. When you place the iron on the iron rest, make
sure that the surface on which you place it is stable.
• This appliance is not intended to be used by persons
(including children) with reduced or impaired physical,
sensory or mental capacities or persons lacking
appropriate knowledge or experience, unless a person
responsible for their safety provides either supervision or
appropriate instructions concerning use of the appliance
prior to its use.
• Children should be supervised to ensure they do not play
with the appliance.
5
Page 6

• This appliance may be used by children aged 8 or
over and persons lacking appropriate knowledge
or experience or persons with reduced or impaired
physical, sensory or mental capacities provided that
they have been thoroughly instructed regarding use
of the appliance, are supervised, and understand the
risks involved. Children must not be allowed to play with
the appliance. Cleaning and maintenance must not be
carried out by children unless they are aged 8 or over
and are supervised. Keep the appliance and power cord
out of the reach of children under 8 years of age.
• The surfaces of your appliance can reach very high
temperatures when functioning, which may cause
burns. Do not touch the hot surfaces of the appliance
(accessible metal parts and plastic parts adjacent to the
metallic parts).
• Never leave the appliance unattended:
- when it is connected to the mains,
- until it has cooled down (around 1 hour).
• Before rinsing the boiler/rinsing the anti-scale collector
(depending on the model), wait until the appliance is
completely cold and has been unplugged for at least
2 hours before unscrewing the boiler rinse cap/ the scale
collector cover.
• Be careful: if the boiler cap or the boiler rinse cap
(depending on the model), is dropped or severely
knocked, have it replaced by an Approved Service Centre,
as it may be damaged.
• When rinsing the boiler, never ll it directly from the tap.
6
Page 7

• The boiler cap must not be opened during use.
• The appliance must not be used if it has been dropped,
if it has any visible damage, if it leaks, or if it functions
abnormally in any way. Do not attempt to dismantle
your appliance: have it examined at an Approved Service
Centre to avoid any danger.
• Check the electrical power and steam cords for signs of
wear or damage prior to use. If the electrical power cord
or the steam cord is damaged, it must be replaced at an
Approved Service Centre to avoid any danger.
• Accessories, consumables and end user replaceable parts must be only purchased from Tefal or an
Approved Service Centre.
• For your safety, this appliance conforms to all applicable regulations (Low Voltage Directive,
Electromagnetic Compatibility, Environment, etc).
• Your steam generator iron is an electrical appliance: it must be used under normal conditions of use.
It is designed for domestic use only.
• It is equipped with 2 safety systems:
- a pressure release valve designed to avoid excessive pressure. In the event of malfunction, the valve
releases excess steam.
- a thermal fuse to avoid overheating.
• Check that your power supply voltage corresponds to that shown on the appliance (alternating
current only). Any error in plugging in your appliance may cause irreversible damage and invalidate
the guarantee.
• The appliance is to be connected to a socket-outlet having an earthing contact.
• Given the diverse standards in effect, if the appliance is used in a country other than that in which it
is purchased, have it checked by an Approved Service Agent.
• Do not use an extension lead. If you accept liability for doing so, only use an extension lead which is in
good condition, has a plug with an earth connection and is suited to the power rating of the appliance.
• Completely unwind the power cord before plugging into an earthed socket.
• Do not leave the power cord close to or in contact with sources of heat or sharp edges.
• The sole plate of your iron and the iron rest on the base unit can reach extremely high temperatures,
and can cause burns: do not touch them. Never touch the electrical power cords with the sole plate
of the iron.
• Always use a vented/mesh ironing board and be careful of hot steam when ironing close to the
edges of the board.
• Your appliance emits steam, which can cause burns. Always handle the iron with care, especially
when ironing vertically. Never direct the steam towards people or animals.
• Never immerse your steam generator iron in water or any other liquid. Never place it under a running
tap.
PLEASE RETAIN THIS INSTRUCTION
BOOKLET FOR FUTURE REFERENCE
7
Page 8
PLEASE REFER TO SAFETY INSTRUCTIONS AT THE BEGINNING
OF THIS BOOKLET BEFORE USING YOUR APPLIANCE
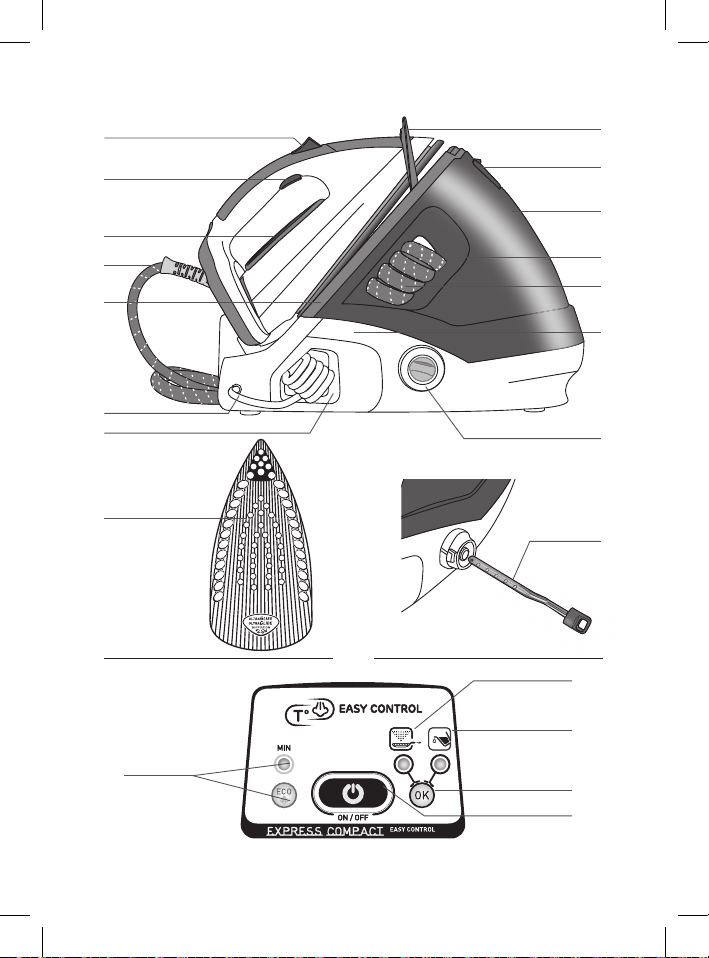
Description
1. Steam Boost button
2. Steam control
3. Thermostat light
4. Easycord power lead outlet
5. Iron rest
6. Power cord
7. Power cord storage space
8. Lock-System hoop
9. Water tank ller cover
10. 1.6 litre water tank
11. Steam cord storage compartment
12. Steam cord
13. Boiler (in the base unit)
14. «Anti-calc» collector cap
15. «Anti-calc» collector
16. Ultra Gliss soleplate
17. Control panel
a. «Anti-calc» light
b. «Water tank empty» light
c. «OK» button
d. «ON-OFF» button with light
e. «ECO MIN» button with light
Locking system for retaining the iron on the base - Lock-system
Your steam generator is tted with a retaining hoop to hold the iron onto the base with a locked position for easy
transport and storage:
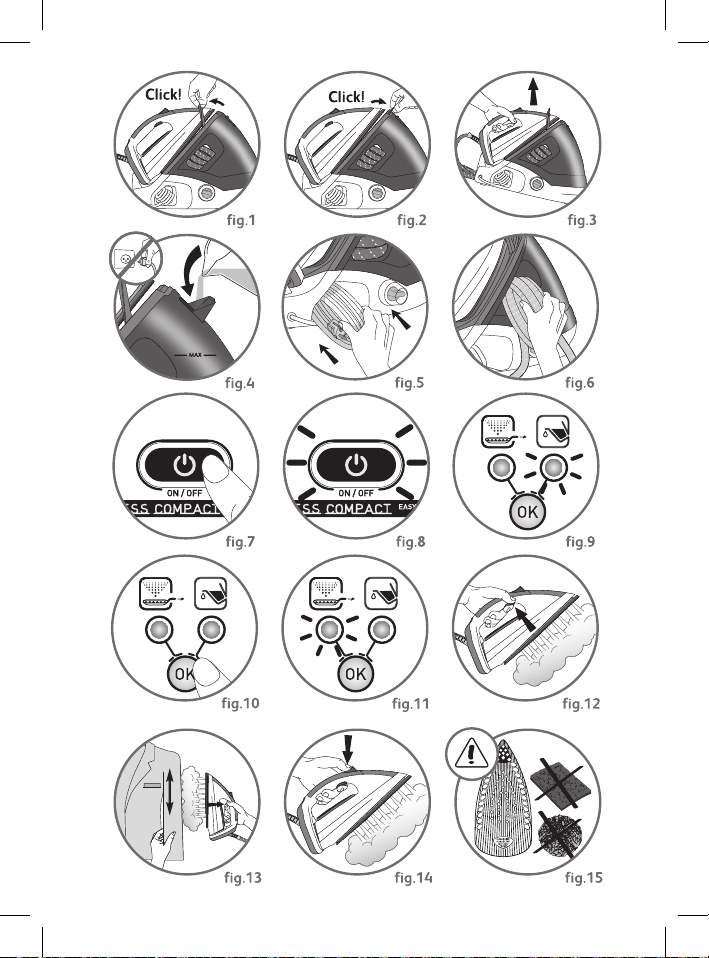
• Locking - fig.1.
• Unlocking - fig.2.
To transport your steam generator using the handle of the iron:
- Put the iron on the steam generator iron rest and raise the retaining hoop over the iron until it locks into place (audible
click) - fig.1.
- Hold the iron by the handle to transport your steam generator - fig.3.
Preparation
What water may be used?
• Tap water:
Your appliance has been designed to function using untreated tap water. If your water is very hard, we recommend you
use a mix of 50% untreated tap water and 50% distilled water available in hardware stores.
• Types of water not to use:
Heat concentrates the elements contained in water during evaporation. The types of water listed below may contain
organic waste, mineral or chemical elements that can cause spitting, brown staining or premature wear of the
appliance: water from clothes dryers, scented or softened water, water from refrigerators, batteries, air conditioners,
rain water, boiled, ltered or bottled water. These types of water should not be used in your TEFAL iron. Also only use
distilled water as advised above.
Always remember:
Never use rainwater or water containing additives (like starch, fragrance or water from domestic appliances). Such
additives can affect the steam properties and at high temperature, form deposits in the steam generator chamber
which are likely to stain your washing.
Filling the water tank
• Place your steam generator on a stable, at heat-resistant surface.
• We recommend that you use a mesh type ironing board to allow steam to pass through the garments for better
ironing results and also to prevent steam venting sideways.
• Check that your appliance is unplugged and open the ap on the tank.
• Pour in untreated tap water up to the max mark - fig.4.
Switch the steam generator on
The first time the
appliance is used, there
may be some fumes
and smell but this is not
harmful.
They will not affect
use and will disappear
rapidly.
• Put the steam generator on a at, stable, horizontal surface that is heatproof.
• Always ensure that the base unit is positioned close enough to the ironing surface to avoid
straining and wear of the steam cord.
• Completely unwind the power cord - fig.5 and take the steam cord out of its storage space
- fig.6.
• Plug your steam generator into an earthed socket.
• Press the «ON-OFF» button - fig.7.
• The «ON-OFF» button light and the iron thermostat light remain ashing while the
appliance is warming up. When the light stops ashing (after approximately 2 minutes) the
steam generator is ready.
8
Page 9
Operating the control panel
• The blue light of the «ON-OFF» button is ashing - fig.8: the boiler is heating up. When the light stops ashing, the
steam generator is ready.
• The red «Water tank empty» button light is ashing - fig.9: the water tank is empty. Fill the tank and press the «OK»
button to switch the light off - fig.10. See paragraph «Filling the water tank during use»
• The orange «Anti-calc» light is ashing - fig.11: maintenance is required, see paragraph «Maintenance and cleaning».
• Your steam generator comes with an automatic shut-off system after approximately 8 minutes without use. The
«ON-OFF» button light is ashing: the steam generator is on standby. Press the «ON-OFF» button or the steam shot
button to start ironing again - fig.7-12. See paragraph «AUTO-OFF» System.
Use
Steam ironing
• To obtain steam, press the steam control button under the iron handle - fig.12. The
steam will stop when you release the button.
• After approximately one minute, and regularly while it is being used, your steam
generator’s electric pump injects water into the boiler. It makes a noise but this is
quite normal.
• If you are using starch, always spray it onto the reverse side of the fabric to be ironed.
Do not iron over zips, studs or
other hard or sharp objects
which may damage the
soleplate. Do not place the
iron on a metal support. When
taking a break from ironing,
always place the iron on the
iron rest plate of the unit. It is
equipped with non-slip pads
and has been designed to
withstand high temperatures.
Smart technology easy control
Your steam generator is tted with SMART TECHNOLOGY EASY CONTROL electronic regulation which offers you the
optimum temperature and steam combination allowing you to iron all your ironable fabrics without risk and without
having to sort them.
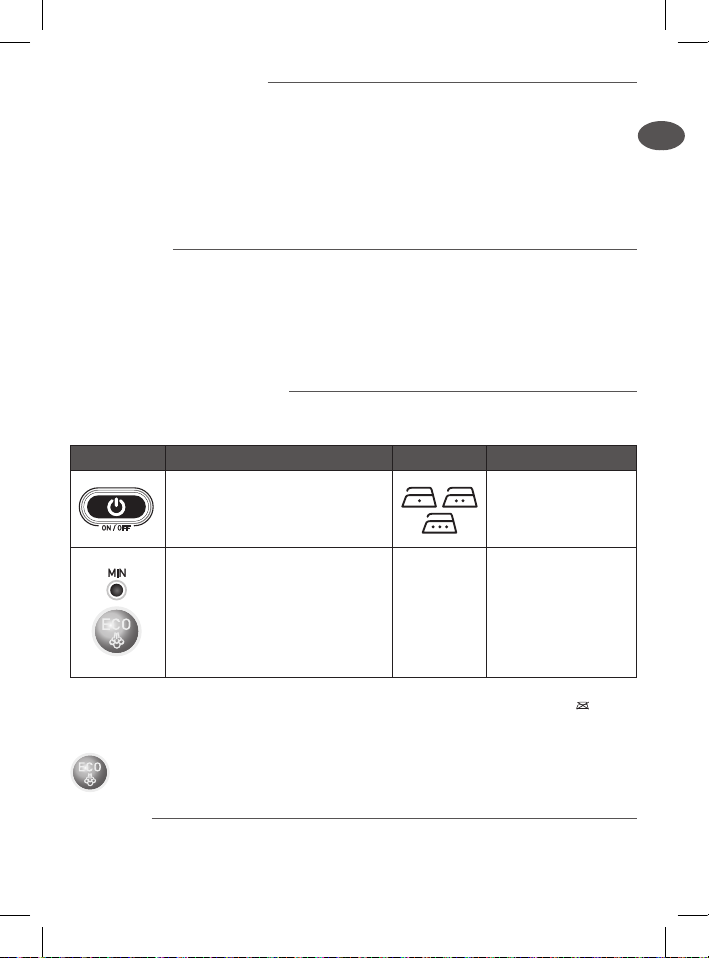
Settings Recommended use Labelling Examples
Cotton, wool*, silk,
Optimum for all types of ironable fabrics
without any risk of burning.
The ECO /Min function allows ironing at
the lowest temperature and low steam
ow suitable for ironing the most delicate
fabrics.
It also reduces energy consumption. Press
the ECO/ Min button to iron in ECO mode
and press the same button again to exit
this mode.
If you are in doubt about the type of fabric an item of clothing is made from, check the label.
*If you are ironing woollen garments, press repeatedly on the steam shot button - fig.12
without placing the iron on the garment. This will avoid it becoming shiny.
ECO MIN MODE: The ECOmin function reduces energy consumption. Press the ECO button to change to
ECO mode and press the same button again to exit this mode.
polyester, cashmere,
mohair, viscose and
synthetic/cotton mixes,
linen and mixed bres.
Acetate, elastane,
polyamide, acrylic and
synthetic mixes.
Note: do not use steam to
iron acrylic fabrics.
Warning, fabrics with
the symbol
suitable for ironing.
are not
Dry ironing
• Do not press the steam control button under the iron handle.
DE
EN
FR
NL
ES
PT
IT
DA
NO
SV
FI
TR
EL
PL
CS
SK
HU
SL
RU
UK
HR
RO
ET
LT
LV
9
Page 10
Vertical steam ironing
Recommendations: for
fabrics other than linen
or cotton, hold the iron a
few centimetres from the
garment to avoid burning
the fabric.
• Hang the garment on a coat hanger and hold the fabric slightly taut with one hand.
• As steam is very hot: never attempt to remove creases from a garment while it is
being worn, always hang garments on a coat hanger.
• Holding the iron in a vertical position - fig.12 tilted slightly forwards, press repeatedly
on the steam control button (underneath the iron handle) moving the iron from top
to bottom - fig.13.
Refilling the tank during use
• When the red «Tank empty» light is ashing - fig.9, there is no more steam. The water tank is empty.
• Open the water tank ller cover.
• Using a jug of water, ll to a maximum of 1.6 litre with untreated tap water and ll the tank, making sure not to
exceed the «Max» level of the tank - fig.4.
• Close the water tank ller cover.
• Press the «OK» restart button - fig.7 under the control panel to continue ironing. When the «ON-OFF» button light
remains on, the steam is ready.
Steam boost function
• Your appliance is tted with a steam boost function: automatic sequential steam for effortless use.
• To use this function, press the steam boost button on the top of the iron - fig.14.
Maintenance and cleaning
Cleaning your steam generator
• Do not use any type of cleaning or descaling product to clean the soleplate or the base unit.
• Never hold the iron or the base unit under a running tap.
• Cleaning the soleplate: we recommend using a soft damp cloth on the soleplate while it is
still warm to avoid damaging the coating.
• We recommend always standing your iron upright or on the iron rest to protect its coating.
• Clean the plastic parts from time to time using a slightly damp soft cloth.
Easy descaling of your steam generator
Do not use any
descaling substances
(industrial descaling
products etc..) when
rinsing the anti-calc
collector or the boiler
tank: they could
damage it.
Before emptying your
steam generator, it
must always be left
to cool for 2 hours
to avoid any risks of
scalding.
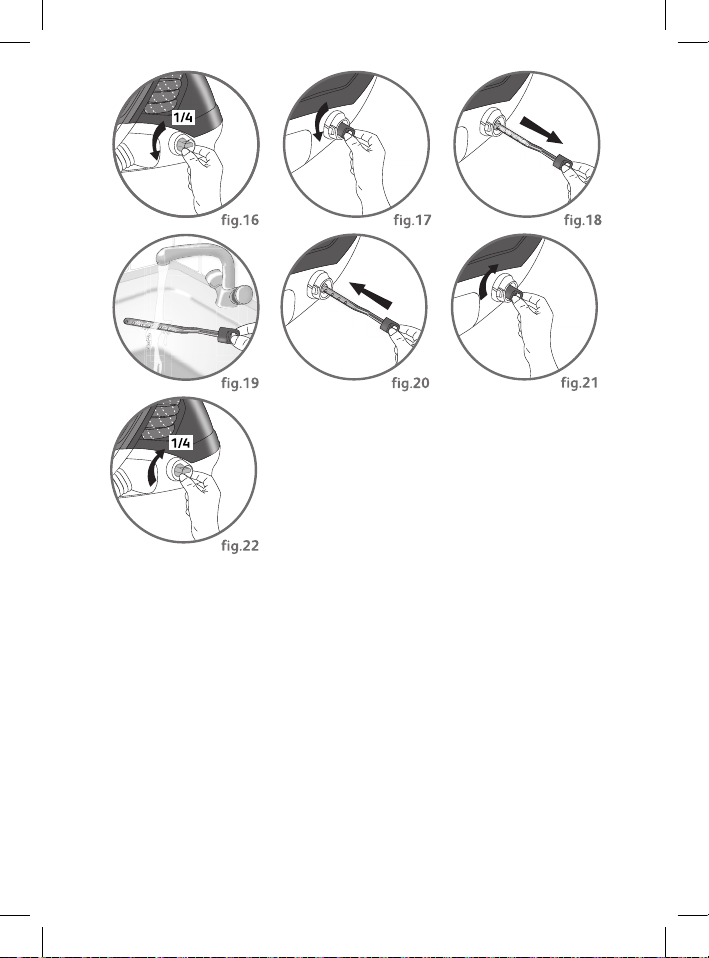
• Once the steam generator has cooled completely unscrew the «Anti-calc» collector.
• Fully unscrew the collector - fig.16 and pull it out of the base unit - fig.17, it contains the scale that has built up in
the tank - fig.18.
• To clean the collector, simply rinse it under running water to remove any scale it contains - fig.19.
• You can soak the collector rod in white vinegar or lemon juice for a few hours to remove any stubborn scale stuck to
the rod.
• Place the collector in its housing by screwing it in completely to ensure it is watertight but do not overtighten it -
fig.20-21.
• Fit the collector cover back in place - fig.22.
Next time you use your appliance, press the «OK» button under the control panel until the orange «Anti-calc»
light goes out - fig.10.
To extend the life of your steam generator and avoid scale on your ironing, your steam
generator is equipped with a built in «Anti-calc» collector. This collector, located in the tank,
automatically removes the scale that forms inside.
Operation:
• An orange «Anti-calc» collector light located on the control panel starts ashing to tell you
that the anti-calc collector needs rinsing - fig.11.
Important: This operation must not be carried out unless the steam generator has
been unplugged for at least two hours and has cooled down completely. To carry out
this operation, the steam generator must be close to a sink as water may come out of
the tank when it is opened.
10
Never use harsh or
abrasive cleaning
products.
Warning! The use of
abrasive pads will
damage the
soleplate coating- fig.15.
Page 11
In addition to this regular maintenance, it is advisable to rinse the tank out completely every 6 months or after
approximately 25 uses.
• Check that the steam generator is cold and has been unplugged for at least 2 hours.
• Place the steam generator on the edge of your sink and stand the iron upright.
• Remove the collector cap and unscrew the scale collector.
• Hold your steam generator in an inclined position. Use a jug to ll the boiler with 1/4 litre of untreated tap water.
Shake the base unit gently for a few seconds and then empty it completely into the sink.
• Place the collector in its housing by screwing it in completely to ensure that it is watertight but do not overtighten it.
• Fit the collector cover back in place.
Next time you use your appliance, press the «OK» button located below the control panel until the orange
«Anti-scale» light goes out - fig.10.
«AUTO-OFF» System
• For your safety, the steam generator is tted with an «AUTO-OFF» monitoring system, which is activated automatically
after approximately 8 minutes without use.
• Only the «ON-OFF» button ashes to indicate that the appliance is on standby - fig.8.
• To reactivate the steam generator:
- Press the «ON-OFF» button.
- Wait for the «ON-OFF» button light to stop ashing before starting your ironing again.
• For your safety, after approximately 30 minutes of non-use, the «AUTO-OFF» system switches off your steam
generator. To start your ironing again, press the «ON-OFF» button.
Storing the steam generator
• Place the iron on the steam generator iron rest.
• Switch your steam generator off by pressing the «ON-OFF» button and unplug the appliance.
• Raise the retaining hoop over the iron until the protection system locks into place (audible click) - fig.1.
• Store the electrical lead in its housing - fig.5.
• Store the steam cord away in its compartment - fig.6.
• Leave the steam generator to cool before putting it away if you are storing it in a cupboard or a conned space.
• If you store your steam generator in a relatively cold place (approximately <10C°), put it in a warm place before
starting your ironing.
• Wait 3 hours for the iron to reach room temperature.
• You can store your steam generator safely by carrying it by the iron handle - fig.3.
Environment protection first!
i Your appliance contains valuable materials which can be recovered or recycled.
Leave it at a local civic waste collection point.
DE
EN
FR
NL
ES
PT
IT
DA
NO
SV
FI
TR
EL
PL
CS
SK
HU
SL
RU
UK
HR
RO
ET
LT
LV
11
Page 12

Problems with your steam generator?
PROBLEMS CAUSES SOLUTIONS
The steam generator does not switch on or
the iron indicator light and the «ON-OFF»
light are not lit up.
Water runs out of the holes in the soleplate.
Water streaks appear on the linen.
White streaks come through the holes in
the soleplate.
Brown streaks come through the holes in
the soleplate and stain the linen.
The soleplate is dirty or brown and may
stain the linen.
The appliance is not switched on.
The «AUTO-OFF» system has activated
after 30 minutes of non-use and has
switched off your steam generator.
The soleplate is not hot enough.
The water has condensed in the pipes
because you are using steam for the rst
time or you have not used it for a few
minutes.
Your ironing board cover is soaked with
water as it is not suited to the power of a
steam generator.
Scale is coming out of the boiler because it
is not being rinsed regularly.
You are using chemical descaling agents or
additives in the water for ironing.
Your linen is not rinsed sufciently or
you have ironed a new garment before
washing it.
You are using starch.
Check that the appliance is plugged in
correctly to a working power socket and
that it is switched on. Press the «ON-OFF»
button.
Press the «ON-OFF» restart button located
under the control panel.
Wait for the thermostat light to stop
ashing before activating the steam
control.
Press the steam button while holding your
iron away from the ironing board until the
steam starts to come out.
Ensure you use a vented/mesh ironing
board.
Rinse the collector (see § descaling your
steam generator).
Never add any products to the water tank
(see § What water can I use?).
Ensure linen is rinsed thoroughly to remove
any soap deposits or chemicals on new
garments which may be sucked up by
the iron.
Always spray starch on the reverse side of
the fabric to be ironed.
There is no steam or there is little steam.
The red «tank empty» button is ashing
even though the tank has been lled.
Steam comes out around the collector.
Steam or water is coming out from under
the appliance.
The «Anti-calc» button is ashing even
though the collector has been rinsed.
The soleplate is scratched or damaged.
The red «tank empty» light is ashing and
the «ON-OFF» button does not work.
If you have any problems or queries please call our Customer Relations team rst for expert help and advice:
0845 602 1454 - UK (01) 677 4003 - Ireland or consult our website - www.tefal.co.uk
The water tank is empty (red warning light
ashing).
You have not pressed the «OK» restart
button.
The collector is not tightened correctly.
The collector seal is damaged.
The appliance is faulty.
You have not pressed the «OK» restart
button.
You have put your iron down on a metal
iron rest or you have ironed over a zip or
metal fastener.
Your have cleaned your soleplate with an
abrasive or metal pad.
The appliance has been stored in a cold
place (approximately <10C°).
Fill the water tank and press the «OK» until
the light goes out.
Press the «OK» restart button on the
control panel.
Tighten the collector but do not overtighten
it.
Contact The Customer Relations
Department - see contact list.
Stop using the steam generator and contact
The Customer Relations Department - see
contact list.
Press the «OK» restart button located under
the control panel.
Always stand the iron upright or on the
iron rest. Do not iron over a zip or metal
fastener.
See chapter «Maintenance & Cleaning».
Unplug the appliance.
Wait 3 hours for the appliance to reach
room temperature.
12
Page 13

EL
Σημαντικές συστάσεις
Οδηγίες ασφαλείας
• Διαβάστε προσεκτικά τις οδηγίες χρήσης πριν από την πρώτη
χρήση της συσκευής σας: η χρήση που δεν συμμορφώνεται
με τις υποδείξεις των οδηγιών χρήσης απαλλάσσει την
εταιρεία από κάθε ευθύνη.
• Μην βγάζετε τη συσκευή από την πρίζα τραβώντας το καλώδιο.
Βγάζετε πάντοτε τη συσκευή σας από την πρίζα:
- πριν να γεμίσετε το δοχείο ή να ξεβγάλετε το λέβητα,
- πριν να την καθαρίσετε,
- μετά από κάθε χρήση.
• Η συσκευή πρέπει να χρησιμοποιείται και να τοποθετείται
επάνω σε σταθερή επιφάνεια, η οποία να αντέχει στη
θερμότητα. Όταν τοποθετείτε το σίδερο στη βάση του,
ελέγξτε αν η επιφάνεια όπου το βάζετε είναι σταθερή.
Μην τοποθετείτε τη θήκη επάνω στο σιδερόπανο της
σιδερώστρας σας ή σε μαλακή επιφάνεια.
• Δεν προβλέπεται η χρήση της συσκευής αυτής από άτομα
(συμπεριλαμβανομένων των παιδιών) με μειωμένες
σωματικές, αντιληπτικές ή πνευματικές ικανότητες, ή από
άτομα χωρίς εμπειρία ή γνώσεις, εκτός αν τα άτομα αυτά
είναι σε θέση να λάβουν, μέσω ενός ατόμου υπεύθυνου
για την ασφάλειά τους, επίβλεψη ή προειδοποιήσεις όσον
αφορά τη χρήση της συσκευής.
• Πρέπει να επιβλέπετε τα παιδιά, για να βεβαιωθείτε ότι δεν
παίζουν με τη συσκευή.
• Αυτή η συσκευή μπορεί να χρησιμοποιηθεί από παιδιά
13
Page 14

ηλικίας 8 ετών και άνω και από άτομα που δεν έχουν εμπειρία
και γνώσεις ή με περιορισμένες σωματικές, αντιληπτικές ή
διανοητικές ικανότητες, αν εκπαιδευτούν και καταρτιστούν
στη χρήση της συσκευής με ασφαλή τρόπο και γνωρίζουν
τους κινδύνους που διατρέχουν. Τα παιδιά δεν πρέπει να
παίζουν με τη συσκευή. Ο καθαρισμός και η συντήρηση από
το χρήστη δεν πρέπει να πραγματοποιείται από παιδιά, παρά
μόνο αν έχουν ηλικία από 8 ετών και άνω και επιβλέπονται.
Διατηρείτε τη συσκευή και το καλώδιό της σε μέρος που να
μην τη φτάνουν παιδιά μικρότερα από 8 ετών.
• Η θερμοκρασία των επιφανειών μπορεί να είναι αυξημένη
κατά τη λειτουργία της συσκευής, πράγμα που μπορεί να
προκαλέσει εγκαύματα. Μην αγγίζετε τις καυτές επιφάνειες
της συσκευής (προσβάσιμα μεταλλικά εξαρτήματα και
πλαστικά εξαρτήματα πλάι σε μεταλλικά εξαρτήματα).
• Μην αφήνετε ποτέ τη συσκευή χωρίς επίβλεψη:
- όταν είναι συνδεδεμένη με την ηλεκτρική παροχή,
- για περίπου 1 ώρα μετά, μέχρι να κρυώσει.
• Πριν να αδειάσετε το μπόιλερ/ να ξεπλύνετε το συλλέκτη
αλάτων (ανάλογα με το μοντέλο), περιμένετε πάντοτε να
κρυώσει η γεννήτρια ατμού και βεβαιωθείτε ότι δεν είναι
στην πρίζα εδώ και πάνω από 2 ώρες πριν να ξεβιδώσετε το
πώμα αδειάσματος/ το συλλέκτη.
• Προσοχή: αν το καπάκι του δοχείου νερού ή το καπάκι
ξεβγάλματος του δοχείου νερού (ανάλογα με το μοντέλο)
πέσει κάτω ή υποστεί σοβαρό χτύπημα, ζητήστε να σας το
αντικαταστήσουν από ένα εξουσιοδοτημένο κέντρο σέρβις,
καθώς ενδέχεται να έχει υποστεί ζημία.
• Όταν ξεπλένετε το δοχείο, μην το γεμίζετε ποτέ απευθείας
14
Page 15

από τη βρύση.
• Το καπάκι του δοχείου νερού δεν πρέπει να ανοίγεται κατά
τη χρήση.
• Η συσκευή δεν πρέπει να χρησιμοποιηθεί αν έχει πέσει,
αν παρουσιάζει εμφανείς ζημίες, διαρροές ή ανωμαλίες
λειτουργίας. Μην λύνετε ποτέ τη συσκευή σας : απευθυνθείτε
σε ένα Εξουσιοδοτημένο Κέντρο Σέρβις για έλεγχο,
προκειμένου να αποφύγετε κάποιον κίνδυνο.
• Αν το ηλεκτρικό καλώδιο τροφοδοσίας ή το καλώδιο ατμού
υποστεί ζημία, πρέπει οπωσδήποτε να αντικατασταθεί
από ένα Εξουσιοδοτημένο Κέντρο Σέρβις, προκειμένου να
αποτραπεί κάθε κίνδυνος.
• Αξεσουάρ, αναλώσιμα και ανταλλακτικά μπορούν να αγοραστούν μόνο από τα εξουσιοδοτημένα κέντρα
της Tefal
• Για την ασφάλειά σας, η συσκευή αυτή είναι σύμφωνη με τα ισχύοντα πρότυπα και τους κανονισμούς
(οδηγία για τη χαμηλή τάση, την ηλεκτρομαγνητική συμβατότητα, το περιβάλλον κ.λπ.).
• Η γεννήτρια ατμού σας είναι μία ηλεκτρική συσκευή : πρέπει να χρησιμοποιείται υπό φυσιολογικές
συνθήκες χρήσης. Προβλέπεται αποκλειστικά για οικιακή χρήση.
• Διαθέτει 2 συστήματα ασφαλείας :
- μία αντλία, για την αποφυγή της υπερβολικής πίεσης, σε περίπτωση προβληματικής λειτουργίας της
συσκευής, αφήνει να διαφύγει ο περισσευούμενος ατμός,
- μία θερμική ασφάλεια για την αποφυγή της υπερθέρμανσης.
• Συνδέετε πάντοτε τη γεννήτρια ατμού σας :
- με μία ηλεκτρική εγκατάσταση με τάση από 220 ως 240 V.
- με ηλεκτρικό ρευματοδότη γειωμένου τύπου.
Οποιοδήποτε σφάλμα σύνδεσης είναι δυνατό να προκαλέσει ανεπανόρθωτες βλάβες και να ακυρώσει την
εγγύηση.
Αν χρησιμοποιείτε καλώδιο επέκτασης, βεβαιωθείτε ότι ο ρευματοδότης είναι διπολικού τύπου 16A με
αγωγό γείωσης.
• Ξετυλίξτε εντελώς το ηλεκτρικό καλώδιο πριν να το συνδέσετε με ρευματοδότη γειωμένου τύπου.
• Η πλάκα του σίδερού σας και η επιφάνεια τοποθέτησής του επάνω στη γεννήτρια είναι δυνατό να
προσλάβουν πολλές υψηλές θερμοκρασίες και είναι δυνατό να προκαλέσουν εγκαύματα: μην τις αγγίζετε.
Μην αγγίζετε ποτέ τα ηλεκτρικά καλώδια με την πλάκα του σίδερου.
• Η συσκευή σας εκπέμπει ατμό, ο οποίος είναι δυνατό να προκαλέσει εγκαύματα. Να μεταχειρίζεστε το
σίδερο με προσοχή, κυρίως στο κάθετο σιδέρωμα. Μην κατευθύνετε ποτέ τον ατμό προς πρόσωπα ή ζώα.
• Μη βυθίζετε ποτέ την κεντρική μονάδα ατμού στο νερό ή σε οποιοδήποτε άλλο υγρό. Μην την βάζετε
ποτέ κάτω από τη βρύση.
ΠΑΡΑΚΑΛΟΥΜΕ, ΦΥΛΑΞΤΕ ΤΟ
ΠΑΡΟΝ ΕΓΧΕΙΡΙΔΙΟ ΧΡΗΣΤΗ
15
Page 16

ΠΡΙΝ ΝΑ ΧΡΗΣΙΜΟΠΟΙΗΣΕΤΕ ΤΗ ΣΥΣΚΕΥΗ ΣΑΣ, ΑΝΑΤΡΕΞΤΕ ΣΤΙΣ
ΟΔΗΓΙΕΣ ΑΣΦΑΛΕΙΑΣ ΣΤΗΝ ΑΡΧΗ ΤΟΥ ΠΑΡΟΝΤΟΣ ΕΓΧΕΙΡΙΔΙΟΥ.
ΠΕΡΙΓΡΑΦΗ
1. Πλήκτρο «Steam Boost»
2. Πλήκτρο ατμού
3. Λυχνία του σίδερου
4. Έξοδος καλωδίου Easycord
5. Πλάκα τοποθέτησης του σίδερου
6. Ηλεκτρικό καλώδιο
7. Θήκη φύλαξης του ηλεκτρικού καλωδίου
8.
Άγκιστρο ασφάλισης της γεννήτριας ατμού Lock-System
9. Θύρα γεμίσματος δοχείου νερού
10. Δοχείο νερού 1,6 l
11.
Διαμέρισμα τακτοποίησης του καλωδίου ατμού
12. Καλώδιο ατμού
13. Λέβητας (εντός της μονάδας)
14. Κάλυμμα συλλέκτη αλάτων
15. Συλλέκτης αλάτων
16. Πλάκας Ultra Gliss
17. Πίνακας λειτουργιών
a. Ενδεικτική λυχνία «Αφαίρεση αλάτων»
b. Ενδεικτική λυχνία «Άδειο δοχείο νερού»
c. Πλήκτρο «OK»
d. Πλήκτρο «ON-OFF» με ενδεικτική λυχνία
e. Πλήκτρο «ECO MIN» με ενδεικτική λυχνία
Σστημα ασφλιση του σδερου στην βση
Το ατμοσίδερό σας διαθέτει έναν δακτύλιο συγκράτησης του σίδερου πάνω στη βάση του με ασφάλιση για να
διευκολύνεται η μεταφορά και η αποθήκευση :
• Ασφάλιση - fig.1.
• Απασφάλιση - fig.2.
Για μεταφορά του ατμοσίδερου από τη λαβή του:
- Tοποθετήστε το σίδερο επάνω στην βάση στήριξης του συστήματος σιδερώματος και ανασηκώστε το τόξο συγκράτησης
επάνω στο σίδερο μέχρι να κλειδώσει (ακούγεται χαρακτηριστικό «κλικ») - fig.1.
- κρατήστε το σίδερο από τη λαβή για να μεταφέρετε το ατμοσίδερο - fig.3.
Προετοιμασία
Τι είδος νερού πρέπει να χρησιμοποιώ?
• Νερό βρύσης:
Η συσκευή σας σχεδιάστηκε για να λειτουργεί με νερό της βρύσης. Αν το νερό σας είναι πολύ σκληρό, αναμίξτε 50% νερό
της βρύσης και 50% απιονισμένο νερό του εμπορίου. Σε κάποιες παραθαλάσσιες περιοχές, η περιεκτικότητα του νερού
σε άλατα μπορεί να είναι υψηλή. Σε αυτή την περίπτωση, χρησιμοποιήστε αποκλειστικά απιονισμένο νερό.
• Αποσκληρυντικό νερού
Υπάρχουν πολλοί τύποι αποσκληρυντικών νερού που μπορεί να χρησιμοποιηθούν στην κεν τρική μονάδα ατμού.
Ωστόσο, ορισμένα αποσκληρυντικά νερού, ιδιαίτερα όσα χρησιμοποιούν χημικά προϊόντα όπως το αλάτι, είναι
δυνατό να προκαλέσουν λ ευκού ή καφετί λεκέδες ιδίως στην περίπτωση των φίλτρων νερού. Αν συναντήσετε αυτό
το πρόβλημα, σας συνιστούμε να χρησιμοποιήσετε ακατέργαστο νερό βρύσης ή εμφιαλωμένο νερό. Μόλις αλλαχτεί
το νερό, θα απαιτούνται πολλές χρήσεις για να λυθεί το πρόβλημα. Συνισ τάται να δοκιμάσετε τη λειτουργία ατμού
για πρώτη φορά σε ένα χρησιμοποιημένο πανί, το οποίο να μπορείτε στη συνέχει να πετάξετε, προκειμένου να μην
προκαλέσετε ζημιές στα ρούχα σας.
Μην ξεχνάτε:
Δεν πρέπει να χρησιμοποιείτε ποτέ νερό βροχής ή νερό που περιέχει πρόσθετα (όμως άμυλο, αρώματα ή νερό
προερχόμενο από οικιακές συσκευές). Τα πρόσθετα αυτά είναι δυνατό να επηρεάσουν τις ιδιότητες του ατμού και, σε
υψηλή θερμοκρασία, να σχηματίσουν, μέσα στο διαμέρισμα δημιουργίας ατμού, εναποθέσεις, οι οποίες ενδέχεται να
λερώσουν τα ρούχα σας.
Γεμίστε το δοχείο νερού
• Τοποθετήστε τη γεννήτρια σε επιφάνεια σταθερή και οριζόντια που δεν είναι ευαίσθητη στη θερμότητα.
• Βεβαιωθείτε ότι η συσκευή σας είναι αποσυνδεμένη από το ρεύμα και ανοίξτε το κάλυμμα του δοχείου.
• Γεμίστε το δοχείο νερού χωρίς να υπερβείτε τη στάθμη Max - fig.4.
Πρώτη χρήση της γεννήτριας ατμού
Κατά την πρώτη χρήση, η
συσκευή μπορεί να παράγει
μια εκπομπή καπνού και μια
αβλαβή μυρωδιά.
Αυτό το φαινόμενο που δεν
επηρεάζει τη χρήση της
συσκευής θα εξαφανιστεί
γρήγορα.
• Ξετυλίξτε εντελώς το ηλεκτρικό καλώδιο - fig.5 και βγάλτε το καλώδιο ατμού από τη θήκη
του - fig.6.
• Συνδέστε το σύστημα σιδερώματος με ηλεκτρικό ρευματοδότη «τύπου δύο ακροδεκτών
με γείωση».
• Πατήστε το πλήκτρο «ON-OFF»
• Η ε νδεικτική λυχνία του πλήκτρου «ON-OFF» και η ενδεικτική λυχνία του σίδερου
αναβοσβήνουν μόλις η συσκ ευή είναι έτοιμη. Μόλις η ενδεικτική λυχνία ανάψει σταθερά
(μετά από περίπου 2 λεπτά), το σύστημα σιδερώματος είναι έτοιμο.
- fig.7.
16
Page 17

Λειτουργία του πίνακα λειτουργιών
• Αναβοσβήνει μόνο η μπλε ενδεικτική λυχνία του πλήκτρου «ON-OFF» - fig.8: το δοχείο νερού ζ εσταίνεται. Μόλις η
ενδεικτική λυχνία ανάψει σταθερά, το σύστημα σιδερώματος είναι έτοιμο.
• Αναβοσβήνει η κόκκινη ενδεικτική λυχνία του πλήκτρου «Άδειο δοχείο νερού» - fig.9 : το δοχείο νερού είναι άδειο.
Γεμίστε το δοχείο νερού και πατήστε το πλήκτρο «OK» για να σβήσει η ενδεικτική λυχνία - fig.10. Ανατρέξτε στην
παράγραφο «Γέμισμα δοχείου νερού κατά τη χρήση»
• Αναβοσβήνει η πορτοκαλί ενδεικτική λυχνία «Αφαίρεση αλάτων» - fig.11 : απαιτείται συν τήρηση, ανατρέξτε στην
παράγραφο «Συντήρηση και καθαρισμός».
• Το σύσ τημα σιδερώματος διαθέτει ένα σύστημα αυτόματης απενεργοποίησης μετά από περίπου 8 λεπτά αδράνειας.
Αναβοσβήνει γρήγορα η ενδεικτική λυχνία του πλήκτρου «ON-OFF»: το σύστημα σιδερώματος περνάει σε κατάσταση
αναμονής. Πατήστε το πλήκτρο «ON-OFF» ή τη σκανδάλη ατμού για να συνεχίσετε το σιδέρωμά σας - fig.7-12.
Ανατρέξτε στην παράγραφο για το Σύστημα «AUTO-OFF».
ΧΡΗΣΗ
Σιδέρωμα με ατμό
• Για να λάβετε ατμό, πατήστε το διακόπτη ατμού που βρίσκεται κάτω από τη λαβή
του σίδερου - fig.12. Ο ατμός σταματά μόλις απελευθερώσετε το διακόπτη.
• Μετά από περίπου ένα λεπτό, και τακτικά κατά τη χρήση, η ηλεκτρική αντλία
που διαθέτει η συσκευή σας τροφοδοτεί το λ έβητα με νερό. Αυτό προκαλεί ένα
θόρυβο, ο οποίος είναι φυσιολογικός.
• Αν χρησιμοποιείτε προϊόν κολλαρίσματος, τοποθετήστε το στην ανάποδη από
την όψη σιδερώματος.
Smart technology Easy Control
Το σύστημα σιδερώματός σας διαθέτει μία ηλεκτρονική ρύθμιση SMART TECHNOLOGY EASY CONTROL, η οποία
εξασφαλίζει το βέλτιστο συνδυασμό ατμού και θερμοκρασίας, επιτρέποντας το σιδέρωμα όλων των υφασμάτων που
σιδερώνονται χωρίς κίνδυνο και χωρίς διαλογή.
Ρύθμιση Συνιστώμενη χρήση Σύμβολα Παραδείγματα
Ενδείκνυται για όλα τα ρούχα που
σιδερώνετε, χωρίς κανέναν κίνδυνο να τα
κάψετε.
Η λειτουργία ECO /Min επιτρέπει σιδέρωμα
με την πιο χαμηλή θερμοκρασία και ροή
ατμού κατάλληλη για το σιδέρωμα των πιο
ευαίσθητων υφασμάτων.
Επιπλέον, μειώνει την ηλεκτρική
κατανάλωση. Πατήστε το πλήκτρο
ECO/ Min για να σιδερώσετε με τη
λειτουργία ECO και πατήστε το ξανά για να
εγκαταλείψετε αυτή τη λειτουργία.
Αν δεν είστε σίγουροι για τη φύση του υφάσματος των ρούχων σας, κοιτάξτε την ετικέτα του.
Αν σιδερώνετε μάλλινα ρούχα, πατήστε το διακόπτη ατμού του σίδερου διακεκομμένα - fig.12, χωρίς
να ακουμπάτε το σίδερο επάνω στο ρούχο. Έτσι, θα αποφύγετε να κάνετε γυαλάδες στα ρούχα σας.
ΛΕΙΤΟΥΡΓΙΑ ECO MIN: Η λειτουργία ECO-ΜΙΝ επιτρέπει τη μείωση της ηλεκτρικής κατανάλωσης. Πατήστε
το πλήκτρο ECO για να σιδερώσετε με τη λ ειτουργία ECO και πατήσ τε το ξανά για να εγκαταλείψετε αυτή τη
λειτουργία.
Μην τοποθετείτε το σίδερο σε
μεταλλική βάση.Κατά τα ενδιάμεσα
χρονικά διαστήματα που δεν
σιδερώνετε, ακουμπήστε το σίδερο
πάνω στην πλάκα της βάσης. Η
πλάκα διαθέτει αντιολισθητικά
πέλματα και έχει σχεδιαστεί ώστε
να είναι ανθεκτική στις υψηλές
θερμοκρασίες.
Βαμβάκι, μαλλί, μετάξι,
πολυεστέρας, κασμίρ,
μοχέρ, βισκόζ και μίγματα
συνθετικού/βαμβακερού,
λινά και ανάμικτες ίνες.
Οξικά, ελαστάνη,
πολυαμίδιο, ακρυλικά και
συνθετικά μίγματα
Σημείωση: Μην σιδερώνετε
με ατμό τα υφάσματα που
περιέχουν ακρυλικές ή
μοντακρυλικές ίνες.
Προσοχή, τα υφάσματα
με το σύμβολο
σιδερώνονται.
δεν
DE
EN
EL
NL
ES
PT
IT
DA
NO
SV
FI
TR
EL
PL
CS
SK
HU
SL
RU
UK
HR
RO
ET
LT
LV
Στεγνό σιδέρωμα
• Μην πιέζετε το διακόπτη ατμού που βρίσκετε πάνω στη λαβή του σίδερου.
17
Page 18

Σιδερώνετε κάθετα
Οι συμβουλές μας: Εκτός από τα
λινά και τα βαμβαΚερά, όλα τα
υπόλοιπα υφάσματα θα πρέπει
να τα σιδερώνετε κρατώντας το
σίδερο σε απόσταση μερικών
εκατοστών από το ρούχο
προκειμένου να αποφύγετε
πιθανά καψίματα.
• Κρεμάστε το ρούχο σε έναν καλόγερο και τραβήξτε ελαφρά το ύφασμα με το ένα χέρι.
• Ο παραγόμενος ατμός είναι πολύ καυτός: μην σιδερώνετε ποτέ κάθετα ένα ρούχο
πάνω σε ένα άτομο, αλλά πάντα πάνω στον καλόγερο.
• Κρατώντας το σίδερο σε κάθετη θέση - fig.12 με μία ελαφρά κλίση προς τα
εμπρός πιέζετε τον διακόπτη ατμού (που βρίσκεται πάνω στην λαβή του σίδερου)
επαναληπτικά σιδερώνοντας το ρούχο με κατεύθυνση από πάνω προς τα κάτω -
fig.14.
Γέμισμα του δοχείου νερού κατά τη διάρκεια της χρήσης
• Όταν η κόκκινη λυχνία «Άδειο δοχείο νερού» αναβοσβήνει - fig.9, δεν έχετε άλλο ατμό Το δοχείο νερού είναι άδειο.
• Βγάλτε το σύστημα σιδερώματος από την πρίζα. Ανοίξτε τη θύρα γεμίσματος του δοχείου νερού.
• Χρησιμοποιήστε μια κανάτα νερό, γεμίστε την το πολύ με 1,6 λίτρα νερό και γεμίστε το δοχείο, προσέχοντας να μην
ξεπεράσετε τη στάθμη «Max» του δοχείου - fig.4.
• Κλείστε ξανά τη θύρα γεμίσματος.
• Βάλτε το σύστημα σιδερώματος ξανά σ την πρίζα. Πατήστε το πλήκτρο «ΟΚ» για ε πανεκκίνηση - fig.7, το οποίο
βρίσκεται στον πίνακα λειτουργιών, για να εξακολουθήσετε το σιδέρωμά σας. Όταν η φωτεινή ένδειξη του πλήκτρου
«ON-OFF» ανάψει σταθερά, ο ατμός είναι έτοιμος.
Λειτουργία steam boost
• Η συσκευή σας διαθέτει λειτουργία έξτρα ατμού «Steam boost». Συνεχόμενος αυτόματος ατμός για άνετη χρήση.
• Για να χρησιμοποιήσετε αυτή τη λειτουργία, πατήστε το πλήκτρο « steam boost » στο επάνω μέρος του σίδερου -
fig.14.
Συντńρηση και καθαρισμóς
Καθαρισμός του συστήματος σιδερώματος
• Μην χρησιμοποιείτε κανένα προϊόν συντήρησης ή αφαλάτωσης για να καθαρίσετε την πλάκα
ή τη μονάδα.
• Μην βάζετε ποτέ το σίδερο ή τη μονάδα κάτω από τη βρύση.
• Καθαρίστε την πλάκα : συνιστούμε να χρησιμοποιήσετε ένα απαλό και υγρό πανί σε χλιαρή
πλάκα, για να μην καταστρέψετε την επένδυση.
• Συνιστάται να τοποθετείτε πάντοτε το σίδερό σας όρθιο σ το πίσω μέρος του ή στη βάση
στήριξής του για να διατηρείται η επένδυσή του.
• Καθαρίζετε τακτικά τα πλαστικά μέρη με ένα απαλό πανί ελαφρώς υγρό.
Εύκολη αφαλάτωση του ατμοσίδερου
Μην βάζετε προϊόντα
αφαίρεσης αλάτων (ξίδι,
βιομηχανικά προϊόντα
αφαίρεσης αλάτων)
για να ξεπλύνετε το
λέβητα: μπορεί να
του κάνουν ζημιά.
Προτού προχωρήσετε
στην εκκένωση του
ατμοσίδερου, πρέπει
οπωσδήποτε να το
αφήσετε να κρυώσει
για δύο ώρες για να
αποφευχθεί κάθε
κίνδυνος εγκαύματος.
• Μόλις το σύστημα σιδερώματος κρυώσει εντελώς, βγάλτε το πώμα του συλλέκτη αλάτων.
• Ξεβιδώστε τελείως το συλλέκτη αλάτων - fig.16 και βγάλτε τον από τη μονάδα - fig.17, περιέχει τα άλατα που είχαν
συσσωρευτεί μέσα στο λέβητα - fig.18.
• Για να καθαρίσετε καλά το συλλέκτη αλάτων, ξεπλύνετέ τον απλά στη βρύση για να βγάλετε τα ά λατα που περιέχει -
fig.19.
• Τοποθετήστε το συλλέκτη αλάτων πίσω στη θέση του και βιδώσ τε τον καλά, ώστε να μην υπάρχει διαρροή νερού -
fig.20-21.
Για να παρατείνετε τη διάρκεια ζωής του ατμοσίδερού σας και να αποφύγετε τις εκκρίσεις των
επικαθίμενων αλάτων, το ατμοσίδερο διαθέτει ενσωματωμένο συλλέκτη αλάτων. Ο συλλέκτης
αυτός ο οποίος βρίσκεται πάνω σ το δοχείο, μαζεύει αυτόματα τα άλατα που σχηματίζονται
στο εσωτερικό.
Αρχή λειτουργίας:
• Μια πορτοκαλί ένδειξη «Anti-calc » αρχίζει να αναβοσβήνει στον πίνακα οργάνων
επισημαίνοντάς σας ότι πρέπει να ξεπλύνετε το συλλέκτη - fig.11.
Προσοχή: αυτή η διαδικασία πρέπει να εκτελεστεί μόνο αφού έχει αποσυνδεθεί το
ατμοσίδερο από το ρεύμα για δύο ώρες και έχει κρυώσει εντελώς. Για να εκτελέσετε τη
διαδικασία αυτή, το ατμοσίδερο πρέπει να βρίσκεται κοντά σε νεροχύτη καθώς το νερό
μπορεί να τρέξει από τον κάδο κατά το άνοιγμα.
18
Μην χρησιμοποιείτε ποτέ
σκληρά ή διαβρωτικά
προϊόντα.
Προσοχή ! Η χρήση
συρμάτινου σφουγγαριού
θα καταστρέψει την
επένδυση της πλάκας
σας - fig.15.
Page 19

• Τοποθετήστε ξανά το καπάκι του συλλέκτη αλάτων στη θέση του - fig.22.
Την επόμενη φορά που θα χρησιμοποιήσετε τη συ σκευή, πιέστε το πλήκτρο «ΟΚ» πάνω στον πίνακα λειτουργιών
για να σβήσετε την πορτοκαλί ενδεικτική λυχνία «Αφαίρεση αλάτων» - fig.10.
Εκτός από αυτή την τακτική συντήρηση, συνιστάται να πραγματοποιείτε πλήρες ξέπλυμα του κάδου κάθε 6 μήνες ή
κάθε 25 χρήσεις.
• Ελέγξτε αν το ατμοσίδερο είναι κρύο και βγαλμένο από την πρίζα επί τουλάχιστον 2 ώρες.
• Τοποθετήστε το σύστημα σιδερώματος στο χείλος του νεροχύτη σας και το σίδερο δίπλα, επάνω στη βάση στήριξής
του.
• Βγάλτε το καπάκι του συλλέκτη και ξεβιδώστε το συλλέκτη αλάτων.
• Κρατήστε το σύστημα σιδερώματός σας σε κεκλιμένη θέση. Με μία κανάτα γεμίστε το λέβητα με 1/4 λίτρο νερό της
βρύσης.
Ανακινήστε τη μονάδα για λίγο, κατόπιν αδειάστε το εντελώς στο νεροχύτη.
• Ξαναβάλτε στη θέση του το συλλέκτη αλάτων και βιδώστε τον καλά για να εξασφαλίσετε τη στεγανότητά του.
• Ξαναβάλτε το πώμα στη θέση του.
• Τοποθετήστε ξανά το καπάκι του συλλέκτη αλάτων στη θέση του.
Κατά την επόμενη χρήση, πατήστε το πλήκτρο «OK», το οποίο βρίσκεται στον πίνακα λειτουργιών, μέχρι να
σβήσει η πορτοκαλί ενδεικτική λυχνία «Αφαίρεση αλάτων» - fig.10.
Σύστημα «AUTO-OFF»
• Για την ασφάλειά σας, το σύστημα σιδερώματος διαθέτει ένα σύστημα αναμονής «AUTO-OFF», το οποίο ενεργοποιείται
αυτομάτως μόλις περάσουν περίπου 8 λεπτά αδράνειας.
• Αναβοσβήνει μόνο η ε νδεικτική λυχνία «ON-OFF» για να δείξει ότι η συσκευή βρίσκεται σε κατάσταση αναμονής - fig.8.
• Για να ενεργοποιήσετε ξανά το σύστημα σιδερώματος :
- Πατήστε το πλήκτρο «ON-OFF» ή πατήστε τη σκανδάλη ατμού.
- Περιμένετε μέχρι η ενδεικτική λυχνία «ON-OFF» να σταματήσει να αναβοσβήνει πριν να συνεχίσετε το σιδέρωμά σας.
• Για την ασφάλειά σας, αφού περάσουν περίπου 30 λεπτά αδράνειας, το σύστημα «AUTO-OFF» απενεργοποιεί το
σύστημα σιδερώματός σας. Για να συνεχίσετε το σιδέρωμά σας, πατήστε το πλήκτρο «ON-OFF».
Αποθήκευση του συστήματος σιδερώματος
• Τοποθετήστε το σίδερο πάνω στη βάση του συστήματος σιδερώματος.
• Απενεργοποιήστε το σύστημα σιδερώματος, πατώντας το πλήκτρο «ON-OFF», και βγάλτε το από την πρίζα.
• Ανασηκώστε το τόξο συγκράτησης του σίδερου μέχρι να ασφαλίσει το σύστημα προστασίας (χαρακτηριστικό «κλικ»)
- fig.1.
• Φυλάξτε το ηλεκτρικό καλώδιο στη θέση του- fig.5.
• Τακτοποιήστε το καλώδιο ατμού στο διαμέρισμα του - fig.6.
• Αφήστε το σύστημα σιδερώματος να κρυώσει προτού το φυλάξετε, σε περίπτωση που επιθυμείτε να το αποθηκεύσετε
σε ντουλάπι ή στενό χώρο.
• Αν αποθηκεύετε το σύστημα σιδερώματος σε σχετικά κρύο χώρο (περίπου <10°C), τοποθετήστε το σε ένα χώρο με
μέτρια θερμοκρασία πριν να αρχίσετε το σιδέρωμα.
• Μπορείτε να φυλάξετε το σύστημα σιδερώματος με απόλυτη ασφάλεια, μεταφέροντάς το από τη λαβή του σίδερου
- fig.3.
Ας συμβάλουμε κι εμείς στην προστασία του περιβάλλοντος!
i Η συσκευή περιέχει πολλά αξιοποιήσιμα ή ανακυκλώσιμα υλικά.
Παραδώστε την παλιά συσκευή σας σε κέντρο διαλογής, το οποίο θα αναλάβει την επεξεργασία της.
DE
EN
EL
NL
ES
PT
IT
DA
NO
SV
FI
TR
EL
PL
CS
SK
HU
SL
RU
UK
HR
RO
ET
LT
LV
19
Page 20

«∞LAUØq
«_ß∂U»
«∞∫Ku‰
≥q ∞b¥p ±AJKW ±l ±u∞b «∞∂ªU¸ ?
¢QØb °QÊ «∞LM∑Z ±uÅu‰ °U∞∑OU¸ «∞JNd°Uzw °LI∂f
ØNd°Uzw ´U±q Ë °AJq Å∫O`, Ë√Ê «∞LM∑Z Æb ¢r
¢AGOKt.«{Gj ´Kv “¸ «∞∑AGOq òFFO-NOå
±uÒ∞b «∞∂ªU¸ ô ¥FLq √Ë √Ê ±R®d
«∞LJu«… «∞Cuzw Ë{u¡ “¸ «∞∑AGOq
òFFO-NOå ô ¥ÔCOµUÊ.
∞r ¥∑r ¢AGOq «∞LM∑Z
≤EUÂ "«∞∑uÆn «_Ë¢u±U¢OJw" òFFO-OTUAå
Ær ¢r ¢HFOKt °Fb 03 œÆOIW ±s ´b «ùß∑FLU‰,
ËÆb ¢r ≈¥IU· ±u∞b «∞∂ªU¸ ´s «∞FLq.
«{Gj ´Kv “¸ «∞∑AGOq òFFO-NOå «∞Lu§uœ
¢∫X ∞u•W «∞∑∫Jr
«∞LU¡ ¥∑ºdÒ» ±s £Iu» ≤Fq «∞LJu«…
≤Fq «∞LJu«… ∞Of ßUîMUÎ °LU ≠Ot «∞JHU¥W
«≤∑Ed «∞v √Ê ¥∑uÆn ±R®d «∞∑d±uß∑U‹ ´s
«∞u±Oi Æ∂q ¢HFOq «∞∑∫Jr °U∞∂ªU¸
¢J∏Òn «∞LU¡ ≠w «_≤U°OV _≤p ¢º∑FLq
«∞∂ªU¸ ∞KLd… «_Ë∞v, √Ë √≤p ∞r ¢º∑FLKt
∞∂Cl œÆUzo
«{Gj ´Kv “¸ «∞∂ªU¸ °OMLU ¢∫Lq «∞LJu«… °FOb«Î
´s ∞uÕ «∞Jw «∞v √Ê ¥∂b√ «∞∂ªU¸ °U∞ªdËÃ
™Nu¸ ®d«zj ±s «∞LU¡ ´Kv «∞ILU‘
≈Ê ¨DU¡ ∞uÕ «∞Jw ∞b¥p Æb «Å∂` ±ÔA∂FUÎ
°
U∞LU¡, _≤t ô ¥ÔMUßV Æu… ±u∞b «∞∂ªU¸
¥Ôd§v «∞∑QØb °Q≤p ¢º∑FLq ∞uÕ Øw ¥∑L∑l °MEUÂ
∞K∑Nu¥W
®d«zj °OCU¡ ¢ªdà ±s £Iu» ≤Fq
«∞LJu«…
«∞∑JKºU‹ ¢ªdà ±s «∞Ld§q _≤t ô ¥ÔMEn
°Uß∑Ld«¸
«¨ºq ±ÔπLÒl «∞∑JKf («≤Ed ≠Id… ≈“«∞W «∞∑JKf ±s
±u∞b «∞∂ªU¸)
®d«zj °MOÒW «∞KuÊ ¢ªdà ±s £Iu» ≤Fq
«∞LJu«… Ë¢ÔKDa «∞∏OU»
«≤X ¢º∑FLq ±u«œ ØOLUË¥W ù“«∞W «∞∑JKf
√Ë ≈{U≠U‹ √îdÈ ∞KLU¡ √£MU¡ «∞Jw
ô ¢ÔCn «∞v îe«Ê «∞LU¡ √Í ≤uŸ ±s «∞Lu«œ ) «≤Ed
≠Id…: «Í ≤uŸ
±s «∞LU¡ ¥LJs «ß∑FLU∞t?)
∞r ¢ÔGºq «∞∏OU» «∞LÔFb… ∞KJw °AJq §Ob,
√Ë «≤p ¢Iu °Jw £OU» §b¥b… Æ∂q ¨ºKNU
¥Ôd§v «∞∑QØb √Ê «∞∏OU» Æb ¢r ¨ºKNU §Ob«Î °U∞LU¡ ËÆb
«Å∂∫X îU∞OW ±s ¬£U¸ «∞BU°uÊ, √Ë ±s ¬£U¸ «∞Lu«œ
«∞JOLUË¥W ≠w «∞∏OU» «∞πb¥b…, Ë«∞∑w Æb ¢L∑BNU «∞LJu«…
≤Fq «∞LJu«… ±∑ºa Ë¥∑º∂V °∑KDOa
«∞∏OU» °∂Il œ«ØMW
«≤X ¢º∑FLq ±Uœ… «∞MAU¡
«ß∑FLq «∞MAU¡ œ«zLUÎ ´Kv «∞πNW «∞ªKHOW ±s
«∞∏OU» ∞JONU
ô ¥u§b °ªU¸ √Ë √Ê ØLOW «∞∂ªU¸
ÆKOKW
§b«Î
îe«Ê «∞LU¡ ≠U¸⁄ (±R®d {uzw √•Ld
¥u±i ∞K∑∫c¥d)
≈±ú îe«Ê «∞LU¡ Ë«{Gj ´Kv “¸ «∞Lu«≠IW òKOå
«∞v √Ê ¥ÔDHQ «∞LR®d «∞Cuzw
«∞LR®d «∞Cuzw «_•Ld òytpme knat retaWå
≠w •U∞W ˱Oi •∑v ≠w •U‰ ¢F∂µW «∞ªe«Ê
∞r ¥∑r «∞CGj ´Kv “¸ òKOå ù´Uœ…
«∞∑AGOq
«{Gj ´Kv “¸ ò
KOå ´Kv ∞u•W «∞∑∫Jr ù´Uœ…
«∞∑AGOq
«∞∂ªU¸ ¥∑BU´b ±s •u‰ ±ÔπLÒl «∞∑JKf
∞r ¥Ô∫Jr ≈ÆHU‰ ±πÔLÒl «∞∑JKf
≈•Jr ≈ÆHU‰ ±ÔπLÒl «∞∑JKf Ë∞Js ô ¢ÔHd◊ °Uù•JUÂ
«∞∫KIW «∞LU≤FW ∞
K∑ºd» ≠w «∞LÔπLÒl ¢U∞HW
«¢Bq °LdØe «∞ªb±W «∞LF∑Lb
«∞∂ªU¸ √Ë «∞LU¡ ¥∑ºd» ±s ¢∫X «∞LM∑Z
«∞LM∑Z ¢U∞n
«ËÆn ¢AGOq ±u∞b «∞∂ªU¸ Ë«¢Bq °LdØe îb±W
±ÔF∑Lb
«∞LR®d «∞Cuzw «∞∂d¢IU∞w ò
elacs-itnAå
≠w •U∞W ˱Oi •∑v °Fb √Ê ¢r ¢MEOn
±ÔπLÒl «∞∑JKf
∞r ¥∑r «∞CGj ´Kv “¸ ò
KOå ù´Uœ…
«∞∑AGOq
«{Gj ´Kv “¸ ò
KOå «∞Lu§uœ ¢∫X ∞u•W «∞∑∫Jr
ù´Uœ… «∞∑AGOq
≤Fq «∞LJu«… ≠Ot ´DV √Ë ≠Ot îbË‘
°KOGW
∞Ib Ë{FX «∞LJu«… ≠u‚ ∞uÕ ±Fb≤w √Ë
±d¸¢NU √£MU¡ «∞Jw ≠u‚ ß∫ÒU» √Ë ÆHq ±Fb≤w
√ËÆn «∞LJu«… œ«zLUÎ ´Kv «∞LMBW «∞LªBBW ∞NU.
ô ¢ÔLd¸ «∞LJu«… ≠u‚ ß∫ÒU» √Ë ÆHq ±Fb≤w
∞Ib ¢r ¢MEOn ≤Fq «∞LJu«… °u«ßDW
«ßHMπW ±Fb≤OW √Ë ØU®DW.
«∞LR®d «∞Cuzw òytpme knatå ¥u±Oi,
Ë “¸ «∞∑AGOq òFFO-NOå ô ¥FLq
¥Ôd§v «∞Fuœ… «∞v ≠Id… ò¢MEOn ≤Fq «∞LJu«…å
∞Ib ¢r ¢ªe¥s ±u∞b «∞∂ªU¸ ≠w °OµW °U¸œ…
(«Æq ±s 01 œ¸§U
‹ ±R¥W)
«≠Bq «∞LM∑Z ´s «∞∑OU¸ «∞JNd°Uzw . «≤∑Ed 3
ßU´U‹ ∞Jw ¥∂Km «∞LM∑Z œ¸§W •d«¸… «∞Gd≠W
GV76 xx Arabic_GV76 xx Arabic.qxd 09/09/13 14:55 Page1
Υπάρχει πρόβλημα με το ατμοσίδερό σας
Προβλήματα Αιτίες Λύσεις
Η συσκευή δεν είναι συνδεδεμένη στο
Το σύστημα σιδερώματος δεν ανάβει ή
η ενδεικτική λυχνία του σίδερου και η
ενδεικτική λυχνία «ON-OFF» δεν ανάβει.
Τρέχει νερό από τις οπές της πλάκας.
Σταγόνες νερού εμφανίζονται πάνω στα
ρούχα.
Βγαίνουν άσπρες σταγόνες από τις οπές
της πλάκας.
Βγαίνουν καφέ σταγόνες από τις οπές της
πλάκας και λερώνουν τα ρούχα.
Η πλάκα είναι βρώμικη ή καφέ και μπορεί να
λερώσει τα ρούχα
Τεν εκπέμπεται πια ατμός. Εκπέμπεται
λίγος ατμός.
Η κόκκινη ενδεικτική λυχνία «Άδειο δοχείο
νερού» αναβοσβήνει παρότι γέμισα το
δοχείο νερού.
Εκπέμπεται ατμός γύρω από τον συλλέκτη.
Ατμός ή νερό βγαίνουν κάτω από τη
συσκευή.
Η ενδεικτική λυχνία «Αφαίρεση αλάτων»
αναβοσβήνει, παρότι ξέπλυνα το συλλέκτη.
Η πλάκα είναι χαραγμένη ή κατεστραμμένη.
Η κόκκινη ενδεικτική λυχνία «Άδειο δοχείο
νερού» αναβοσβήνει και το πλήκτρο «ONOFF» δεν λειτουργεί.
Για οποιοδήποτε άλλο πρόβλημα, επικοινωνήστε με εξουσιοδοτημένο κέντρο σέρβις για να ελέγξου το σίδερό
σας.
ρεύμα.
Το σύστημα «AUTO-OFF» ενεργοποιήθηκε
μετά από 30 λεπτά αδράνειας και
απενεργοποίησε το σύστημα σιδερώματός
σας.
Η πλάκα δεν είναι αρκετά ζεστή.
Συμπυκνωμένη ποσότητα νερού έχει
απομείνει μέσα στους σωλήνες, γιατί η
συσκευή χρησιμοποιείται για πρώτη φορά ή
δεν έχει χρησιμοποιηθεί για αρκετά λεπτά.
Το κάλυμμα επιφάνειας εργασίας είναι
μουσκεμένο με νερό διότι δεν είναι
προσαρμοσμένο στην ένταση του
ατμοσίδερου.
Ο λέβητας έχει γεμίσει άλατα γιατί δεν έχει
γίνει τακτικός καθαρισμός.
Χρησιμοποιείτε πρόσθετα υλικά ή χημικά
προϊόντα αφαλάτωσης στο νερό που
σιδερώνετε.
Τα ρούχα σας δεν έχουν ξεπλυθεί σωστά ή
σιδερώσατε ένα καινούργιο ρούχο προτού
το πλύνετε.
Χρησιμοποιείτε προϊόν κολλαρίσματος.
Το δοχείο νερού είναι άδειο (αναβοσβήνει η
κόκκινη λυχνία).
Δεν πατήσατε το πλήκτρο «ΟΚ» για
επανεκκίνηση.
Ο συλλέκτης δεν είναι σωστά βιδωμένος. Βιδώστε πάλι τον συλλέκτη.
Ο στεγανοποιητικός σύνδεσμος του
συλλέκτη έχει υποστεί βλάβη.
Η συσκευή είναι ελαττωματική.
Δεν πατήσατε το πλήκτρο «ΟΚ» για
επανεκκίνηση.
Τοποθετήσατε το σίδερό σας με την πλάκα
πάνω σε μία μεταλλική επιφάνεια.
Καθαρίσατε την πλάκα σας με ένα σκληρό ή
μεταλλικό σφουγγάρι.
Αποθηκεύσατε τη συσκευή σε κρύο χώρο
(περίπου <10°C)
20
Ελέγξτε αν η συσκευή είναι σωστά
συνδεδεμένη με λειτουργική πρίζα και
αν τροφοδοτείται. Πατήστε το πλήκτρο
«ON-OFF».
Πατήστε το πλήκτρο «ON-OFF», το οποίο
βρίσκεται στον πίνακα λειτουργιών, για
επανεκκίνηση.
Περιμένετε να ανάψει σταθερά η
ενδεικτική λυχνία του σίδερου πριν να
χρησιμοποιήσετε το διακόπτη ατμού.
Επικοινωνήστε με ένα Εξουσιοδοτημένο
Κέντρο Εξυπηρέτησης.
Βεβαιωθείτε ότι η σιδερώστρα σας είναι
κατάλληλη.
Ξεπλύνετε τον συλλέκτη (ανατρέξτε στην
ενότητα Αφαλάτωση του ατμοσίδερου).
Μην προσθέτετε ποτέ κανένα προϊόν
στο δοχείο (δείτε παρ. Τι νερό να
χρησιμοποιήσω).
Βεβαιωθείτε ότι τα ρούχα έχουν ξεπλυθεί
σωστά ώστε να έχουν απομακρυνθεί τα
ενδεχόμενα υπολείμματα απορρυπαντικού
ή τα χημικά προϊόντα από τα καινούργια
ρούχα.
Ψεκάστε πάντα το προϊόν κολλαρίσματος
στην ανάποδη πλευρά του υφάσματος που
σιδερώνετε.
Γεμίστε το δοχείο νερού και πατήστε το
πλήκτρο «OK» μέχρι να σβήσει η ενδεικτική
λυχνία.
Πατήστε το πλήκτρο « ΟΚ » για
επανεκκίνηση, το οποίο βρίσκεται στον
πίνακα λειτουργιών.
Επικοινωνήστε με ένα εξουσιοδοτημένο
κέντρο σέρβις.
Μην χρησιμοποιήσετε άλλο το σύστημα
σιδερώματος και επικοινωνήστε με ένα
Εξουσιοδοτημένο Κέντρο Σέρβις.
Πατήστε το πλήκτρο « ΟΚ » για
επανεκκίνηση, το οποίο βρίσκεται στον
πίνακα λειτουργιών.
Τοποθετείτε το σίδερό σας πάντοτε όρθιο
στο πίσω μέρος του ή επάνω στη βάση
στήριξής του.
Ανατρέξτε στην ενότητα «Καθαρισμός
της πλάκας».
Βγάλτε τη συσκευή από την πρίζα.
Περιμένετε για 3 ώρες μέχρι η συσκευή
να προσαρμοστεί στη θερμοκρασία
περιβάλλοντος
Page 21

GV76 xx Arabic_GV76 xx Arabic.qxd 09/09/13 14:55 Page1
«∞∫Ku‰
¢QØb °QÊ «∞LM∑Z ±uÅu‰ °U∞∑OU¸ «∞JNd°Uzw °LI∂f
ØNd°Uzw ´U±q Ë °AJq Å∫O`, Ë√Ê «∞LM∑Z Æb ¢r
¢AGOKt.«{Gj ´Kv “¸ «∞∑AGOq òFFO-NOå
«{Gj ´Kv “¸ «∞∑AGOq òFFO-NOå «∞Lu§uœ
¢∫X ∞u•W «∞∑∫Jr
«≤∑Ed «∞v √Ê ¥∑uÆn ±R®d «∞∑d±uß∑U‹ ´s
«∞u±Oi Æ∂q ¢HFOq «∞∑∫Jr °U∞∂ªU¸
«{Gj ´Kv “¸ «∞∂ªU¸ °OMLU ¢∫Lq «∞LJu«… °FOb«Î
´s ∞uÕ «∞Jw «∞v √Ê ¥∂b√ «∞∂ªU¸ °U∞ªdËÃ
¥Ôd§v «∞∑QØb °Q≤p ¢º∑FLq ∞uÕ Øw ¥∑L∑l °MEUÂ
∞K∑Nu¥W
«¨ºq ±ÔπLÒl «∞∑JKf («≤Ed ≠Id… ≈“«∞W «∞∑JKf ±s
±u∞b «∞∂ªU¸)
ô ¢ÔCn «∞v îe«Ê «∞LU¡ √Í ≤uŸ ±s «∞Lu«œ ) «≤Ed
≠Id…: «Í ≤uŸ
±s «∞LU¡ ¥LJs «ß∑FLU∞t?)
¥Ôd§v «∞∑QØb √Ê «∞∏OU» Æb ¢r ¨ºKNU §Ob«Î °U∞LU¡ ËÆb
«Å∂∫X îU∞OW ±s ¬£U¸ «∞BU°uÊ, √Ë ±s ¬£U¸ «∞Lu«œ
«∞JOLUË¥W ≠w «∞∏OU» «∞πb¥b…, Ë«∞∑w Æb ¢L∑BNU «∞LJu«…
«ß∑FLq «∞MAU¡ œ«zLUÎ ´Kv «∞πNW «∞ªKHOW ±s
«∞∏OU» ∞JONU
≈±ú îe«Ê «∞LU¡ Ë«{Gj ´Kv “¸ «∞Lu«≠IW òKOå
«∞v √Ê ¥ÔDHQ «∞LR®d «∞Cuzw
KOå ´Kv ∞u•W «∞∑∫Jr ù´Uœ…
KOå «∞Lu§uœ ¢∫X ∞u•W «∞∑∫Jr
«{Gj ´Kv “¸ ò
«∞∑AGOq
≈•Jr ≈ÆHU‰ ±ÔπLÒl «∞∑JKf Ë∞Js ô ¢ÔHd◊ °Uù•JUÂ
«¢Bq °LdØe «∞ªb±W «∞LF∑Lb
«ËÆn ¢AGOq ±u∞b «∞∂ªU¸ Ë«¢Bq °LdØe îb±W
±ÔF∑Lb
«{Gj ´Kv “¸ ò
ù´Uœ… «∞∑AGOq
√ËÆn «∞LJu«… œ«zLUÎ ´Kv «∞LMBW «∞LªBBW ∞NU.
ô ¢ÔLd¸ «∞LJu«… ≠u‚ ß∫ÒU» √Ë ÆHq ±Fb≤w
¥Ôd§v «∞Fuœ… «∞v ≠Id… ò¢MEOn ≤Fq «∞LJu«…å
«≠Bq «∞LM∑Z ´s «∞∑OU¸ «∞JNd°Uzw . «≤∑Ed 3
ßU´U‹ ∞Jw ¥∂Km «∞LM∑Z œ¸§W •d«¸… «∞Gd≠W
«_ß∂U»
K∑ºd» ≠w «∞LÔπLÒl ¢U∞HW
KOå ù´Uœ…
‹ ±R¥W)
≥q ∞b¥p ±AJKW ±l ±u∞b «∞∂ªU¸ ?
«∞LAUØq
∞r ¥∑r ¢AGOq «∞LM∑Z
≤EUÂ "«∞∑uÆn «_Ë¢u±U¢OJw" òFFO-OTUAå
Ær ¢r ¢HFOKt °Fb 03 œÆOIW ±s ´b «ùß∑FLU‰,
ËÆb ¢r ≈¥IU· ±u∞b «∞∂ªU¸ ´s «∞FLq.
≤Fq «∞LJu«… ∞Of ßUîMUÎ °LU ≠Ot «∞JHU¥W
¢J∏Òn «∞LU¡ ≠w «_≤U°OV _≤p ¢º∑FLq
«∞∂ªU¸ ∞KLd… «_Ë∞v, √Ë √≤p ∞r ¢º∑FLKt
∞∂Cl œÆUzo
≈Ê ¨DU¡ ∞uÕ «∞Jw ∞b¥p Æb «Å∂` ±ÔA∂FUÎ
U∞LU¡, _≤t ô ¥ÔMUßV Æu… ±u∞b «∞∂ªU¸
°
«∞∑JKºU‹ ¢ªdà ±s «∞Ld§q _≤t ô ¥ÔMEn
°Uß∑Ld«¸
«≤X ¢º∑FLq ±u«œ ØOLUË¥W ù“«∞W «∞∑JKf
√Ë ≈{U≠U‹ √îdÈ ∞KLU¡ √£MU¡ «∞Jw
∞r ¢ÔGºq «∞∏OU» «∞LÔFb… ∞KJw °AJq §Ob,
√Ë «≤p ¢Iu °Jw £OU» §b¥b… Æ∂q ¨ºKNU
«≤X ¢º∑FLq ±Uœ… «∞MAU¡
îe«Ê «∞LU¡ ≠U¸⁄ (±R®d {uzw √•Ld
ÆKOKW
¥u±i ∞K∑∫c¥d)
∞r ¥∑r «∞CGj ´Kv “¸ òKOå ù´Uœ…
«∞∑AGOq
∞r ¥Ô∫Jr ≈ÆHU‰ ±πÔLÒl «∞∑JKf
«∞∫KIW «∞LU≤FW ∞
«∞LM∑Z ¢U∞n
elacs-itnAå
∞r ¥∑r «∞CGj ´Kv “¸ ò
«∞∑AGOq
∞Ib Ë{FX «∞LJu«… ≠u‚ ∞uÕ ±Fb≤w √Ë
±d¸¢NU √£MU¡ «∞Jw ≠u‚ ß∫ÒU» √Ë ÆHq ±Fb≤w
∞Ib ¢r ¢MEOn ≤Fq «∞LJu«… °u«ßDW
«ßHMπW ±Fb≤OW √Ë ØU®DW.
∞Ib ¢r ¢ªe¥s ±u∞b «∞∂ªU¸ ≠w °OµW °U¸œ…
(«Æq ±s 01 œ¸§U
DE
EN
±uÒ∞b «∞∂ªU¸ ô ¥FLq √Ë √Ê ±R®d
«∞LJu«… «∞Cuzw Ë{u¡ “¸ «∞∑AGOq
EL
òFFO-NOå ô ¥ÔCOµUÊ.
AR
ES
PT
«∞LU¡ ¥∑ºdÒ» ±s £Iu» ≤Fq «∞LJu«…
IT
DA
™Nu¸ ®d«zj ±s «∞LU¡ ´Kv «∞ILU‘
NO
®d«zj °OCU¡ ¢ªdà ±s £Iu» ≤Fq
«∞LJu«…
SV
FI
®d«zj °MOÒW «∞KuÊ ¢ªdà ±s £Iu» ≤Fq
«∞LJu«… Ë¢ÔKDa «∞∏OU»
TR
EL
≤Fq «∞LJu«… ±∑ºa Ë¥∑º∂V °∑KDOa
«∞∏OU» °∂Il œ«ØMW
PL
ô ¥u§b °ªU¸ √Ë √Ê ØLOW «∞∂ªU¸
CS
§b«Î
«∞LR®d «∞Cuzw «_•Ld òytpme knat retaWå
SK
≠w •U∞W ˱Oi •∑v ≠w •U‰ ¢F∂µW «∞ªe«Ê
HU
«∞∂ªU¸ ¥∑BU´b ±s •u‰ ±ÔπLÒl «∞∑JKf
SL
RU
«∞∂ªU¸ √Ë «∞LU¡ ¥∑ºd» ±s ¢∫X «∞LM∑Z
UK
«∞LR®d «∞Cuzw «∞∂d¢IU∞w ò
≠w •U∞W ˱Oi •∑v °Fb √Ê ¢r ¢MEOn
HR
±ÔπLÒl «∞∑JKf
RO
≤Fq «∞LJu«… ≠Ot ´DV √Ë ≠Ot îbË‘
°KOGW
ET
LT
«∞LR®d «∞Cuzw òytpme knatå ¥u±Oi,
Ë “¸ «∞∑AGOq òFFO-NOå ô ¥FLq
LV
21
Page 22

GV76 xx Arabic_GV76 xx Arabic.qxd 09/09/13 14:55 Page2
≈“«∞W «∞∑JKf °ºNu∞W ´s ±u∞b «∞∂ªU¸
> °LÔπdœ √Ê ¥∂dœ ±u∞b «∞∂ªU¸ ¢LU±UÎ, ≠p ±ÔπLÒl «∞∑JKf.
> •d¸ ±ÔπLl «∞∑JKf «∞v «üîd - ®Jq 61Ë«ß∫∂t «∞v «∞ªU¸Ã ±s Ë•b… «∞IU´b… - ®Jq 71, «≤t ¥∫∑uÍ ´Kv
«∞∑d«ØLU‹ «∞JKºOW ≠w îe«Ê «∞LU¡ - ®Jq 81.
> ∞∑MEOn ±ÔπLÒl «∞∑JKf, «¨ºKt °Jq °ºU©W ¢∫X «∞LU¡ «∞πU¸¥W ù“«∞W «∞∑JKºU‹ «∞∑w ¥∫∑u¥NU - ®Jq 91.
> ¥LJs √Ê ¥ÔMIl ´Luœ «∞LÏπLÒl °U∞ªq «_°Oi √Ë °FBOd «∞KOLuÊ ∞∂Cl ßU´U‹ ù“«∞W «∞∑JKºU‹ «∞FMOb…
«∞LK∑BIW °U∞FLuœ.
> ¥u{l ±πLÒl «∞∑JKf ≠w •ÔπOd¢t Ë¥Ôb«¸ ±∏q «∞∂d¨w ±l «∞∫d’ √Ê «∞LU¡ ∞s ¥∑ºdÒ» ±s •u∞t, Ë∞Js «¥CUÎ
¥Ôd§v «∞∫d’ √Ê ô ¢ÔHd◊ °S•JU±t - ®Jq 02-12.
> ¥u{l °Fb –∞p ¨DU¡ ±ÔπLl «∞∑JKf. - ®Jq 22.
≠w «∞Ld… «∞∑U∞OW ´Mb «ß∑FLU‰ ±u∞b «∞∂ªU¸, «{Gj ´Kv “¸ «∞Lu«≠IW òKOå «∞Lu§uœ ¢∫X ∞u•W «∞∑∫Jr «∞v
√Ê ¥ÔDHQ «∞LR®d «∞Cuzw «∞∂d¢IU∞w òelacs-itnAå - ®Jq 01.
°Uù{U≠W «∞v «∞BOU≤W «∞FUœ¥W, ≤MB` °Gºq îe«Ê «∞LU¡ Øq 6 √®Nd, √Ë °Fb 52 ≈ß∑FLUôÎ ¢Id¥∂UÎ.
> ¥Ôd§v «∞∑QØb °QÊ ±u∞b «∞∂ªU¸ °U¸œ, Ë√≤t Æb ≠ÔBq ´s «∞∑OU¸ «∞JNd°Uzw ±Mc ±b… ô ¢Iq ´s «∞ºU´∑Os.
> {l ±u∞b «∞∂ªU¸ ´Kv •U≠W «∞LGºKW Ë{l «∞LJu«… °u{FOW «∞uÆu· ´Luœ¥UÎ.
> «≤eŸ ¨DU¡ ±ÔπLÒl «∞∑JKf Ë≠p «∞LÔπLÒl.
> «•Lq ±u∞b «∞∂ªU¸ °u{l ±Uzq, Ë«ß∑FLq «°d¥o ∞∑F∂µW «∞ªe«Ê °d°l ∞∑d ±s «∞LU¡ «∞GOd ±ÔFU∞Z.
•dÒ„ «∞IU´b… °S≥∑e«“«‹ îHOHW ∞∂Cl £u«Ê £r «≠d⁄ «∞LU¡ ¢LU±UÎ ≠w «∞LGºKW.
> {l ±ÔπLÒl «∞∑JKf ≠w •πOd¢t Ë«œ¸Á ±∏q «∞∂d¨w ±l «∞∫d’ √Ê «∞LU¡ ∞s ¥∑ºdÒ» ±s •u∞t, Ë∞Js «¥CUÎ
¥Ôd§v «∞∫d’ √Ê ô ¢ÔHd◊ °S•JU±t.
> {l ¨DU¡ ±ÔπLl «∞∑JKf ≠w ±JU≤t.
≠w «∞Ld… «∞∑U∞OW ´Mb «ß∑FLU‰ ±u∞b «∞∂ªU¸, «{Gj ´Kv “¸ «∞Lu«≠IW òKOå «∞Lu§uœ ¢∫X ∞u•W «∞∑∫Jr «∞v
√Ê ¥ÔDHQ «∞LR®d «∞Cuzw «∞∂d¢IU∞w òelacs-itnAå - ®Jq 01.
ô ¢º∑FLq «¥W ±u«œ ù“«∞W
«∞∑JKf (±u«œ ≈“«∞W
«∞∑JKf «∞BMU´OW.. «∞a),
´Mb±U ¢Gºq ±ÔπLÒl
«∞∑JKf √Ë îe«Ê «∞Ld§q
°NcÁ «∞Lu«œ:
Æb ¢∑º∂V °S´DU°t.
Æ∂q ¢Hd¥m ±u∞b «∞∂ªU¸
±s «∞LU¡, ¥πV √Ê ¥Ô∑d„
∞O∂dœ œ«zLUÎ ∞Lb… ô ¢Iq
´s ßU´∑Os ∞∑πMÒV «¥W
√îDU¸ ±s «∞∫dË‚.
∞Jw ¢ÔDOq ±s ´Ld ±u∞b «∞∂ªU¸ ´Mb„, Ë∞Jw ¢∑πMÒV ™Nu¸ «∞∑JKf ´Kv «∞∏OU»
«∞LÔFb… ∞KJw, ≠SÊ ±u∞b «∞∂ªU¸ Æb “ÔËÒœ °LÔπLÒl ∞K∑JKf.
≥c« «∞LÔπLÒl ∞K∑JKf , ±u§uœ ≠w îe«Ê «∞LU¡, Ë≥u ¥Ôe¥q §e¥µU‹ «∞∑JKf ±s
«∞ªe«Ê √Ë¢u±U¢OJOUÎ.
«∞FLKOW :
> ¥u§b ±R®d {uzw °d¢IU∞w "±ÔπLÒl «∞∑JKf" òrotcelloc elacs-itnaå
±u§uœ ´Kv ∞u•W «∞∑∫Jr, ¥∂b√ °U∞u±Oi ≈®U¸… «∞v √Ê ≥c« «∞LÔπLÒl °∫U§W
«∞v «∞∑MEOn -
®Jq 11.
≥‡‡‡‡U : ¥πV √Ê ô ¢ÔπdÈ ≥cÁ «∞FLKOW ±U ∞r ¥Js «∞Lu∞b ±HBuôÎ ´s
«∞∑OU¸ «∞JNd°Uzw ∞H∑d… ô ¢Iq ´s ßU´∑Os, Ë√≤t °U¸œ ¢LU±UÎ.
±s √§q «∞IOU °NcÁ «∞FLKOW, ¥πV √Ê ¥∑u«§b ±u∞b «∞∂ªU¸ Æd¥∂UÎ ±s «∞LGºKW
_Ê «∞LU¡ ßu· ¥∑b≠o ±s «∞ªe«Ê ´Mb ≠∑∫t.
GV76 xx Arabic_GV76 xx Arabic.qxd 09/09/13 14:55 Page3
FFO-NOå Æ∂q «∞∂b¡ °U∞Jw ±d… £U≤OW.
22
≤EUÂ «∞∑uÆn «_Ë¢u±U¢OJw òFFO-OTUAå
> ±s √§q ßö±∑p, “ÔËÒœ ±u∞b «∞∂ªU¸ ≥c« °MEU ∞dÅb •dØW «∞LJu«… òFFO-OTUAå, «∞cÍ ¥ÔHFÒq √Ë¢u±U¢OJOUÎ
°Fb 8 œÆUzo ¢Id¥∂UÎ ±s ´b «ß∑FLU‰ «∞LJu«….
> «∞LR®d «∞Cuzw ∞e¸ «∞∑AGOq òFFO-NOå ¥u±i ≠Ij ∞Kbô∞W ´Kv √Ê «∞LM∑Z ≠w Ë{FOW «ùß∑Fb«œ. -
®Jq 8
> ù´Uœ… ¢HFOq ±u∞b «∞∂ªU¸ :
FFO-NOå
- ¥∫∑uÍ ≥c« «∞LM∑Z ´Kv «∞Fb¥b ±s «∞Lu«œ «∞IOÒLW «∞∑w ¥LJs ¢BKO∫NU √Ë ≈´Uœ… ¢BMOFNU.
- √ËœŸ «∞LM∑Z ∞bÈ ±dØe ¢πLOl «∞LNLö‹ «∞L∫Kw .
- «{Gj ´Kv “¸ «∞∑AGOq ò
- «≤∑Ed «∞v √Ê ¥∑uÆn ˱Oi “¸ «∞∑AGOq ò
> ±s √§q ßö±∑p, °Fb •u«∞w 03 œÆOIW ±s ´b «ùß∑FLU‰, ßu· ¥uÆn ≤EU "«∞∑uÆn «_Ë¢u±U¢OJw"
ò
FFO-OTUAå ±u∞b «∞∂ªU¸ ´s «∞FLq. ù´Uœ… ¢AGOKt ±d… £U≤OW, ¥Ôd§v «∞CGj ´Kv “¸ «∞∑AGOq
ò
FFO-NOå.
¢ªe¥s ±u∞Òb «∞∂ªU¸
> {l «∞LJu«… ´Kv ±MBÒW ±u∞b «∞∂ªU¸.
> √ËÆn ¢AGOq ±u∞b «∞∂ªU¸ °U∞CGj ´Kv “¸ «∞∑AGOq òFFO-NOå, £r «≠Bq «∞Lu∞b ´s «∞∑OU¸ «∞JNd°Uzw.
> «¸≠l •e«Â «∞d°j ´Kv «∞LJu«… «∞v √Ê ¥ÔIHq ≠w ±u{Ft «∞L∫bœ (¥d«≠o «ùÆHU‰ Åu‹ "ØKOp") - ®Jq 1.
> îeÒÊ «∞ºKp «∞JNd°Uzw ≠w •ÔπOd¢t - ®Jq 5.
> ¥ÔªeÒÊ ßKp «∞∂ªU¸ ≠w ±ªe≤t - ®Jq 6.
> ¥Ô∑d„ ±u∞b «∞∂ªU¸ «∞v √Ê ¥∂dœ ¢LU±UÎ Æ∂q ¢ªe¥Mt ≈–« ØMX °Bbœ ¢ªe¥Mt ≠w îe«≤W √Ë ±JUÊ ±IHq.
> ≈–« ¢r ¢ªe¥s ±u∞b «∞∂ªU¸ ≠w °OµW °U¸œ… («Æq ±s 01 œ¸§U‹ ±R¥W), ¥Ôd§v Ë{Ft ≠w °OµW œ«≠µW Æ∂q «∞∂b¡
°Uß∑FLU∞t.
> ¥LJMp ¢ªe¥s ±u∞b «∞∂ªU¸ °Q±UÊ ≈–« •ÔLq °u«ßDW ±I∂i «∞LJu«… - ®Jq 3.
•LU¥W «∞∂OµW √ËôÎ !
Page 23

GV76 xx Arabic_GV76 xx Arabic.qxd 09/09/13 14:55 Page3
ô ¢º∑FLq «¥W ±u«œ ù“«∞W
«∞∑JKf (±u«œ ≈“«∞W
«∞∑JKf «∞BMU´OW.. «∞a),
´Mb±U ¢Gºq ±ÔπLÒl
«∞∑JKf √Ë îe«Ê «∞Ld§q
°NcÁ «∞Lu«œ:
Æb ¢∑º∂V °S´DU°t.
Æ∂q ¢Hd¥m ±u∞b «∞∂ªU¸
±s «∞LU¡, ¥πV √Ê ¥Ô∑d„
∞O∂dœ œ«zLUÎ ∞Lb… ô ¢Iq
´s ßU´∑Os ∞∑πMÒV «¥W
√îDU¸ ±s «∞∫dË‚.
≈“«∞W «∞∑JKf °ºNu∞W ´s ±u∞b «∞∂ªU¸
DE
EN
∞Jw ¢ÔDOq ±s ´Ld ±u∞b «∞∂ªU¸ ´Mb„, Ë∞Jw ¢∑πMÒV ™Nu¸ «∞∑JKf ´Kv «∞∏OU»
«∞LÔFb… ∞KJw, ≠SÊ ±u∞b «∞∂ªU¸ Æb “ÔËÒœ °LÔπLÒl ∞K∑JKf.
EL
≥c« «∞LÔπLÒl ∞K∑JKf , ±u§uœ ≠w îe«Ê «∞LU¡, Ë≥u ¥Ôe¥q §e¥µU‹ «∞∑JKf ±s
AR
«∞ªe«Ê √Ë¢u±U¢OJOUÎ.
ES
«∞FLKOW :
PT
> ¥u§b ±R®d {uzw °d¢IU∞w "±ÔπLÒl «∞∑JKf" òrotcelloc elacs-itnaå
±u§uœ ´Kv ∞u•W «∞∑∫Jr, ¥∂b√ °U∞u±Oi ≈®U¸… «∞v √Ê ≥c« «∞LÔπLÒl °∫U§W
IT
®Jq 11.
«∞v «∞∑MEOn -
DA
≥‡‡‡‡U : ¥πV √Ê ô ¢ÔπdÈ ≥cÁ «∞FLKOW ±U ∞r ¥Js «∞Lu∞b ±HBuôÎ ´s
NO
«∞∑OU¸ «∞JNd°Uzw ∞H∑d… ô ¢Iq ´s ßU´∑Os, Ë√≤t °U¸œ ¢LU±UÎ.
SV
±s √§q «∞IOU °NcÁ «∞FLKOW, ¥πV √Ê ¥∑u«§b ±u∞b «∞∂ªU¸ Æd¥∂UÎ ±s «∞LGºKW
_Ê «∞LU¡ ßu· ¥∑b≠o ±s «∞ªe«Ê ´Mb ≠∑∫t.
FI
TR
> °LÔπdœ √Ê ¥∂dœ ±u∞b «∞∂ªU¸ ¢LU±UÎ, ≠p ±ÔπLÒl «∞∑JKf.
> •d¸ ±ÔπLl «∞∑JKf «∞v «üîd - ®Jq 61Ë«ß∫∂t «∞v «∞ªU¸Ã ±s Ë•b… «∞IU´b… - ®Jq 71, «≤t ¥∫∑uÍ ´Kv
EL
«∞∑d«ØLU‹ «∞JKºOW ≠w îe«Ê «∞LU¡ - ®Jq 81.
> ∞∑MEOn ±ÔπLÒl «∞∑JKf, «¨ºKt °Jq °ºU©W ¢∫X «∞LU¡ «∞πU¸¥W ù“«∞W «∞∑JKºU‹ «∞∑w ¥∫∑u¥NU - ®Jq 91.
PL
> ¥LJs √Ê ¥ÔMIl ´Luœ «∞LÏπLÒl °U∞ªq «_°Oi √Ë °FBOd «∞KOLuÊ ∞∂Cl ßU´U‹ ù“«∞W «∞∑JKºU‹ «∞FMOb…
CS
«∞LK∑BIW °U∞FLuœ.
> ¥u{l ±πLÒl «∞∑JKf ≠w •ÔπOd¢t Ë¥Ôb«¸ ±∏q «∞∂d¨w ±l «∞∫d’ √Ê «∞LU¡ ∞s ¥∑ºdÒ» ±s •u∞t, Ë∞Js «¥CUÎ
SK
¥Ôd§v «∞∫d’ √Ê ô ¢ÔHd◊ °S•JU±t - ®Jq 02-12.
> ¥u{l °Fb –∞p ¨DU¡ ±ÔπLl «∞∑JKf. - ®Jq 22.
HU
≠w «∞Ld… «∞∑U∞OW ´Mb «ß∑FLU‰ ±u∞b «∞∂ªU¸, «{Gj ´Kv “¸ «∞Lu«≠IW òKOå «∞Lu§uœ ¢∫X ∞u•W «∞∑∫Jr «∞v
SL
√Ê ¥ÔDHQ «∞LR®d «∞Cuzw «∞∂d¢IU∞w òelacs-itnAå - ®Jq 01.
RU
°Uù{U≠W «∞v «∞BOU≤W «∞FUœ¥W, ≤MB` °Gºq îe«Ê «∞LU¡ Øq 6 √®Nd, √Ë °Fb 52 ≈ß∑FLUôÎ ¢Id¥∂UÎ.
UK
> ¥Ôd§v «∞∑QØb °QÊ ±u∞b «∞∂ªU¸ °U¸œ, Ë√≤t Æb ≠ÔBq ´s «∞∑OU¸ «∞JNd°Uzw ±Mc ±b… ô ¢Iq ´s «∞ºU´∑Os.
> {l ±u∞b «∞∂ªU¸ ´Kv •U≠W «∞LGºKW Ë{l «∞LJu«… °u{FOW «∞uÆu· ´Luœ¥UÎ.
HR
> «≤eŸ ¨DU¡ ±ÔπLÒl «∞∑JKf Ë≠p «∞LÔπLÒl.
RO
> «•Lq ±u∞b «∞∂ªU¸ °u{l ±Uzq, Ë«ß∑FLq «°d¥o ∞∑F∂µW «∞ªe«Ê °d°l ∞∑d ±s «∞LU¡ «∞GOd ±ÔFU∞Z.
•dÒ„ «∞IU´b… °S≥∑e«“«‹ îHOHW ∞∂Cl £u«Ê £r «≠d⁄ «∞LU¡ ¢LU±UÎ ≠w «∞LGºKW.
ET
> {l ±ÔπLÒl «∞∑JKf ≠w •πOd¢t Ë«œ¸Á ±∏q «∞∂d¨w ±l «∞∫d’ √Ê «∞LU¡ ∞s ¥∑ºdÒ» ±s •u∞t, Ë∞Js «¥CUÎ
¥Ôd§v «∞∫d’ √Ê ô ¢ÔHd◊ °S•JU±t.
LT
> {l ¨DU¡ ±ÔπLl «∞∑JKf ≠w ±JU≤t.
LV
≠w «∞Ld… «∞∑U∞OW ´Mb «ß∑FLU‰ ±u∞b «∞∂ªU¸, «{Gj ´Kv “¸ «∞Lu«≠IW òKOå «∞Lu§uœ ¢∫X ∞u•W «∞∑∫Jr «∞v
√Ê ¥ÔDHQ «∞LR®d «∞Cuzw «∞∂d¢IU∞w òelacs-itnAå - ®Jq 01.
23
Page 24

GV76 xx Arabic_GV76 xx Arabic.qxd 09/09/13 14:55 Page4
«ùß∑FLU‰
«∞Jw ´Kv «∞∂ªU¸
¢∫Jr ßNq °U∞∑JMu∞u§OU «∞cØOW
§ÔNÒe ≥c« «∞LuÒ∞b ∞K∂ªU¸ °∑MEOr «∞J∑dË≤w : «∞∑∫Jr «∞ºNq °U∞∑JMu∞u§OU «∞cØOW :
òLORTNOC YSAE YGOLONHCET TRAMSå, «∞cÍ ¥Ôu≠Òd ∞p œ¸§W «∞∫d«¸… «∞L∏U∞OW ±IdË≤W ±l «∞∂ªU¸,
≥c« ¥Ô∑O` ∞p ØwÒ §LOl «∞∏OU» «∞IU°KW ∞KJwÒ œËÊ √Í îDd, ËœËÊ ¢d¢O∂NU °U∞∑ºKºq.
ô ¢ÔLd¸ «∞LJu«… ≠u‚ «∞º∫ÒU°U‹
«∞LFb≤OW, «∞b°U°Of √Ë «¥W
«®OU¡ •Uœ… √Ë ÅK∂W Æb ¢ªb‘
≤Fq «∞LJu«…. ô ¢Cl «∞LJu«…
´Kv ±MBÒW •b¥b¥W √Ë ±Fb≤OW.
√£MU¡ ≠∑d «∞d«•W ±s ´LKOW
«∞Jw, {l «∞LJu«… ´Kv
«∞LMBÒW «∞LFb≤OW «∞ªUÅW °NU.
≠S≤NU ±ÔπNÒe… °ußUœ… ±U≤FW
∞û≤eô‚ Ë«∞IUœ¸… ´Kv ¢∫Lq
œ¸§U‹ ´U∞OW ±s «∞∫d«¸….
> ∞K∫Bu‰ ´Kv «∞∂ªU¸, «{Gj ´Kv “¸ «∞∑∫Jr °U∞∂ªU¸ «∞Lu§uœ ¢∫X
±I∂i «∞LJu«… - ®Jq 21. ßu· ¥∑uÆn ≤HY «∞∂ªU¸ ´Mb±U ¢d≠l
«∞CGj ´s “¸ ≤HY «∞∂ªU¸
> °Fb •u«∞w œÆOIW Ë«•b…, ±s «∞∂b¡ °Uß∑FLU‰ ±u∞b «∞∂ªU¸, ßu· ¢∂b√
±CªW «∞LU¡ «∞JNd°UzOW °Ca «∞LU¡ ≠w «∞Ld§q. ˱s «∞D∂OFw √Ê
¥Bb¸ ´s ≥cÁ «∞LCªW °Fi «∞CπOZ. ≥c« «±d ´UœÍ.
> ≈–« ØMX °Bbœ «ß∑FLU‰ ±Uœ… «∞MAU, ¥Ôd§v √Ê ¢Ôd‘ ±Uœ… «∞MAU œ«zLUÎ
´Kv «∞πU≤V «∞b«îKw ∞K∏OU» ∞JONU.
«∞C∂j «ùß∑FLU‰ «∞LuÅv °t
«∞LKBIU‹
«_±∏KW
±∏U∞OW ∞πLOl √≤u«Ÿ «∞ILU‘ «∞IU°KW ∞KJw
œËÊ √Í îDd ±s «ù•∑d«‚
±∏U∞OW ∞πLOl √≤u«Ÿ
«∞ILU‘ «∞IU°KW ∞KJw œËÊ
√Í îDd ±s «ù•∑d«‚
¢Ô∑O` îUÅOW òniM/OCEå «∞Jw ´Kv
«œ≤v œ¸§W ±s «∞∫d«¸… Ë√Æq ØLOW ±s
«∞∂ªU¸ «∞cÍ ¥MUßV ±ÔFEr «∞ILU‘ «∞MU´r.
ØLU ¢ÔªHn ≥cÁ «∞ªUÅOW «ß∑Nö„ «∞DUÆW
. «{Gj ´Kv “¸ òniM/OCEå ∞∑HFOq
≥cÁ «∞ªUÅOW. Ë«{Gj ´Kv ≤Hf «∞e¸
±d… £U≤OW ∞KªdËÃ ±s ≥cÁ «∞u{FOW.
«ßO∑OX, «¥öß∑Os
,
°u∞OU±Ob, «Ød¥KOp,
Ë«∞ILU‘ «∞BMU´w
«∞LdØV.
±ö•EW : ô ¢º∑FLq
«∞∂ªU¸ ≠w Øw «∞ILU‘
«∞LBMuŸ ±s «_Ød¥KOp.
≈–« ØUÊ ∞b¥p «œ≤v ®p ´s ≤u´OW «∞ILU‘ √Ë ±s ¢dØO∂∑t, ¢QØb ±s
«∞LKBo «∞∑πU¸Í ´Kv «∞ILU‘.
*≠S–« ØMX °Bbœ Øw ÆLU‘ ±s «∞Bu·, «{Gj ´Kv “¸ ≤HY «∞∂ªU¸
°AJq ±∑IDl ±d«‹ ±∑∑U∞OW -
®Jq 21 œËÊ √Ê ¢ö±f «∞LJu«…
«∞ILU‘. –∞p ¥LMl «∞ILU‘ «Ê ¥KLl.
¢∫c¥d, «_ÆLAW –«‹ «∞d±u“
«∞ªUÅW ¨Od ±MUß∂W ∞KJw.
Ë{FOW òNIM/OCEå : ±s îBUzh ≥cÁ «∞u{FOW «≤NU ¢ÔIKq ±s «ß∑Nö„ «∞DUÆW. «{Gj ´Kv “¸
òOCEå ∞K∑∫u‰ «∞v ≥cÁ «∞ªUÅOW, Ë«{Gj ´Kv ≤Hf «∞e¸ ±d… £U≤OW ∞KªdËà ±MNU.
GV76 xx Arabic_GV76 xx Arabic.qxd 09/09/13 14:55 Page5
¢uÅOU‹ : ∞KILU‘
«üîd ¨Od «∞J∑UÊ √Ë
«∞IDs, «•Lq «∞LJu«…
°FOb«Î ´s «∞ILU‘
°CFW ßM∑L∑d«‹,
∞Jw ¢∑πMÒV «•∑d«‚
«∞ILU‘.
ô ¢º∑FLq «∞Hd®U… √Ë
±u«œ «∞∑MEOn «∞∫U¸ÆW
√Ë «∞JU®DW.
¢∫c¥d ! ≈Ê «ß∑FLU‰
«ùßHMπU‹ «∞LFb≤OW
¥Ô∑Kn «∞Dö¡ ´Kv ≤Fq
«∞LJu«… -
®Jq 51.
.
«∞Jw «∞πU·
> ô ¢CGj ´Kv “¸ «∞∑∫Jr °U∞∂ªU¸ «∞Lu§uœ ≠w «ßHq ±I∂i «∞LJu«….
«∞Jw «∞∂ªU¸Í «∞FLuœÍ
> ´KÒo «∞ILU‘ ´Kv ´öÆW «∞∏OU» «∞FUœ¥W Ë«§c» °S•bÈ «∞Ob¥s «∞ILU‘ «∞LÔd«œ
ØOÒt °Jq ´MU¥W Ë•d’.
> •OY √Ê «∞∂ªU¸ •U¸ §b«Î : ô ¢∫Uˉ √Ê ¢Ôe¥q «∞∑πU´Ob «∞FMOb… ´s
«∞∏OU» √£MU¡ «¸¢b«zNU, ´KÒo «∞∏OU» œ«zLUÎ ´Kv ´öÆW ËÆr °JONU.
> «•Lq «∞LJu«… °AJq ´LuœÍ -®Jq 21, ±UzKW ÆKOöÎ «∞v «_±UÂ, «{Gj ´Kv
“¸ «∞∑∫Jr °U∞∂ªU¸ (¢∫X ±I∂i «∞LJu«…) ±d«‹ ±∑∑U∞OW ±l ¢∫d¥p «∞LJu«…
®Jq 31.
®Jq 4.
±s «_´Kv «∞v «_ßHq -
≈´Uœ… ¢F∂µW îe«Ê «∞LU¡ √£MU¡ «ùß∑FLU‰
> ´Mb±U ¥∂b√ «∞LR®d «∞Cuzw «_•Ld òytpme knaTå °U∞u±Oi - ®Jq 9: œ∞Oq ´Kv √Ê îe«Ê «∞LU¡ ≠U¸⁄.
> «≠Bq ±u∞Òb «∞∂ªU¸ ´s «∞∑OU¸ «∞JNd°Uzw. «≠∑` ¨DU¡ ≠uÒ≥W «∞∑F∂µW ∞ªe«Ê «∞LU¡
> °Uß∑FLU‰ «°d¥o, «±ú «∞ªe«Ê °U∞∫b «_ÆBv 6,1 ∞∑d ±s «∞LU¡ «∞GOd ±ÔFU∞Z, ±l «∞∫d’ √Ê ô ¢∑FbÈ ±º∑uÈ
«∞∫b «_ÆBv -
> «¨Ko ¨DU¡ ≠uÒ≥W «∞∑F∂µW ∞ªe«Ê «∞LU¡.
> «ËÅq ±u∞Òb «∞∂ªU¸ °U∞∑OU¸ «∞JNd°Uzw £U≤OW. «{Gj ´Kv “¸ ≈´Uœ… «∞∑AGOq òKOå - ®Jq 7 ¢∫X ∞u•W
«∞∑∫Jr ∞Jw ¢Ô∑U°l «∞Jw. ´Mb±U ¥ÔDHQ «∞LR®d «∞Cuzw, ¥JuÊ «∞∂ªU¸ Æb «Å∂` §U≥e«Î.
îUÅOW ≤DU‚ Æu… «∞∂ªU¸
> “ÔËÒœ ≥c« «∞LM∑Z °ªUÅOW "≤DU‚ «∞Iu…" òenoZ rewoPå : Ë≥w ´∂U¸… ´s ØLOW Ø∂Od… ±s «∞∂ªU¸ «∞LÔdØÒe, ¢ÔDKo
±s ±Ib±W ≤Fq «∞LJu«…, ¢Ôº∑FLq ∞∂Fi «∞∑πU´Ob «∞FMOb….
>
ùß∑FLU‰ ≥cÁ «∞ªUÅOW, «{Gj ´Kv “¸ òenoZ rewoPå ≠w «´Kv «∞LJu«… •ºV «∞∫U§W «∞v –∞p - ®Jq 41
«∞∑MEOn Ë«∞BOU≤W
¢MEOn ±u∞b «∞∂ªU¸
> ô ¢º∑FLq √Í ≤uŸ ±s ±u«œ «∞∑MEOn «∞JU®DW ∞∑MEOn ≤Fq «∞LJu«… √Ë
ÆU´b… «∞u•b….
> ô ¢∫Lq «∞LJu«… √Ë «∞IU´b… ¢∫X «∞LOUÁ «∞πU¸¥W.
> ¢MEOn ≤Fq «∞LJu«… : ≤uÅw °Uß∑FLU‰ ÆDFW ÆLU‘ ≤U´LW ˸©∂W ´Kv ≤Fq
«∞LJu«… °OMLU ô ¥e«‰ «∞MFq œ«≠µUÎ ∞∑πMÒV ≈¢ö· «∞Dö¡ «∞ªU¸§w
> ≤uÅw œ«zLUÎ √Ê ¢uÆn «∞LJu«… ´Kv ´I∂NU √Ë ´Kv «∞LMBÒW «∞∫b¥b¥W
«∞ªUÅW °NU ∞∫LU¥W «∞Dö¡ ±s «∞ªbË‘.
> ¢ÔMEn «_§e«¡ «∞∂öß∑OJOW ±s ËÆX üîd °Uß∑FLU‰ ÆDFW ÆLU‘ ≤U´LW
˸©∂W.
24
Page 25

GV76 xx Arabic_GV76 xx Arabic.qxd 09/09/13 14:55 Page5
ô ¢ÔLd¸ «∞LJu«… ≠u‚ «∞º∫ÒU°U‹
«∞LFb≤OW, «∞b°U°Of √Ë «¥W
«®OU¡ •Uœ… √Ë ÅK∂W Æb ¢ªb‘
≤Fq «∞LJu«…. ô ¢Cl «∞LJu«…
´Kv ±MBÒW •b¥b¥W √Ë ±Fb≤OW.
√£MU¡ ≠∑d «∞d«•W ±s ´LKOW
«∞Jw, {l «∞LJu«… ´Kv
«∞LMBÒW «∞LFb≤OW «∞ªUÅW °NU.
≠S≤NU ±ÔπNÒe… °ußUœ… ±U≤FW
∞û≤eô‚ Ë«∞IUœ¸… ´Kv ¢∫Lq
œ¸§U‹ ´U∞OW ±s «∞∫d«¸….
«_±∏KW
«∞LKBIU‹
±∏U∞OW ∞πLOl √≤u«Ÿ
«∞ILU‘ «∞IU°KW ∞KJw œËÊ
√Í îDd ±s «ù•∑d«‚
,
«ßO∑OX, «¥öß∑Os
°u∞OU±Ob, «Ød¥KOp,
Ë«∞ILU‘ «∞BMU´w
«∞LdØV.
±ö•EW : ô ¢º∑FLq
«∞∂ªU¸ ≠w Øw «∞ILU‘
«∞LBMuŸ ±s «_Ød¥KOp.
¢∫c¥d, «_ÆLAW –«‹ «∞d±u“
«∞ªUÅW ¨Od ±MUß∂W ∞KJw.
«ùß∑FLU‰
DE
«∞Jw ´Kv «∞∂ªU¸
EN
> ∞K∫Bu‰ ´Kv «∞∂ªU¸, «{Gj ´Kv “¸ «∞∑∫Jr °U∞∂ªU¸ «∞Lu§uœ ¢∫X
EL
±I∂i «∞LJu«… - ®Jq 21. ßu· ¥∑uÆn ≤HY «∞∂ªU¸ ´Mb±U ¢d≠l
AR
«∞CGj ´s “¸ ≤HY «∞∂ªU¸
> °Fb •u«∞w œÆOIW Ë«•b…, ±s «∞∂b¡ °Uß∑FLU‰ ±u∞b «∞∂ªU¸, ßu· ¢∂b√
ES
±CªW «∞LU¡ «∞JNd°UzOW °Ca «∞LU¡ ≠w «∞Ld§q. ˱s «∞D∂OFw √Ê
¥Bb¸ ´s ≥cÁ «∞LCªW °Fi «∞CπOZ. ≥c« «±d ´UœÍ.
PT
> ≈–« ØMX °Bbœ «ß∑FLU‰ ±Uœ… «∞MAU, ¥Ôd§v √Ê ¢Ôd‘ ±Uœ… «∞MAU œ«zLUÎ
IT
´Kv «∞πU≤V «∞b«îKw ∞K∏OU» ∞JONU.
DA
NO
¢∫Jr ßNq °U∞∑JMu∞u§OU «∞cØOW
SV
§ÔNÒe ≥c« «∞LuÒ∞b ∞K∂ªU¸ °∑MEOr «∞J∑dË≤w : «∞∑∫Jr «∞ºNq °U∞∑JMu∞u§OU «∞cØOW :
FI
òLORTNOC YSAE YGOLONHCET TRAMSå, «∞cÍ ¥Ôu≠Òd ∞p œ¸§W «∞∫d«¸… «∞L∏U∞OW ±IdË≤W ±l «∞∂ªU¸,
≥c« ¥Ô∑O` ∞p ØwÒ §LOl «∞∏OU» «∞IU°KW ∞KJwÒ œËÊ √Í îDd, ËœËÊ ¢d¢O∂NU °U∞∑ºKºq.
TR
EL
«∞C∂j «ùß∑FLU‰ «∞LuÅv °t
≈–« ØUÊ ∞b¥p «œ≤v ®p ´s ≤u´OW «∞ILU‘ √Ë ±s ¢dØO∂∑t, ¢QØb ±s
«∞LKBo «∞∑πU¸Í ´Kv «∞ILU‘.
*≠S–« ØMX °Bbœ Øw ÆLU‘ ±s «∞Bu·, «{Gj ´Kv “¸ ≤HY «∞∂ªU¸
°AJq ±∑IDl ±d«‹ ±∑∑U∞OW «∞ILU‘. –∞p ¥LMl «∞ILU‘ «Ê ¥KLl.
PL
CS
SK
HU
SL
RU
UK
HR
RO
ET
LT
LV
±∏U∞OW ∞πLOl √≤u«Ÿ «∞ILU‘ «∞IU°KW ∞KJw
œËÊ √Í îDd ±s «ù•∑d«‚
¢Ô∑O` îUÅOW òniM/OCEå «∞Jw ´Kv
«œ≤v œ¸§W ±s «∞∫d«¸… Ë√Æq ØLOW ±s
«∞∂ªU¸ «∞cÍ ¥MUßV ±ÔFEr «∞ILU‘ «∞MU´r.
ØLU ¢ÔªHn ≥cÁ «∞ªUÅOW «ß∑Nö„ «∞DUÆW
. «{Gj ´Kv “¸ òniM/OCEå ∞∑HFOq
≥cÁ «∞ªUÅOW. Ë«{Gj ´Kv ≤Hf «∞e¸
±d… £U≤OW ∞KªdËÃ ±s ≥cÁ «∞u{FOW.
®Jq 21 œËÊ √Ê ¢ö±f «∞LJu«…
Ë{FOW òNIM/OCEå : ±s îBUzh ≥cÁ «∞u{FOW «≤NU ¢ÔIKq ±s «ß∑Nö„ «∞DUÆW. «{Gj ´Kv “¸
òOCEå ∞K∑∫u‰ «∞v ≥cÁ «∞ªUÅOW, Ë«{Gj ´Kv ≤Hf «∞e¸ ±d… £U≤OW ∞KªdËà ±MNU.
25
Page 26

GV76 xx Arabic_GV76 xx Arabic.qxd 09/09/13 14:55 Page6
1 “¸ ≤HY «∞∂ªU¸ «∞IuÍ
2 ¢∫Jr °U∞∂ªU¸
3 {u¡ «∞∑d±uß∑U‹
4 ±ªdà «∞ºKp «∞JNd°Uzw
5 ±MBÒW «∞LJu«…
6 «∞ºKp «∞JNd°Uzw
7 ±ªeÊ «∞ºKp «∞JNd°Uzw
8 ≤EUÂ ÆHq «∞Du‚
9 ¨DU¡ ≠uÒ≥W «∞∑F∂µW ≠w îe«Ê «∞LU¡
01 îe«Ê ±U¡ ßFW 6,1 ∞∑d
11 ±ªeÊ ∞ºKp «∞∂ªU¸
21 ßKp «∞∂ªU¸
31 ±d§q (≠w Ë•b… «∞IU´b…)
41 ¨DU¡ ±ÔπLÒl «∞∑JKf
51 ±ÔπLÒl «∞∑JKf
61 ≤Fq ±Ju«… «∞∑d«§KOf
71 ∞u•W «∞∑∫Jr
a ±R®d {uzw ò{b «∞∑JKfå
b ±R®d {uzw òîe«Ê «∞LU¡ ≠U¸⁄å
c “¸ ò±u«≠oå
d “¸ °LR®d {uzw ò¢AGOq/¢uÆnå
e “¸ °LR®d {uzw ò•b «œ≤v «¥Juå (OCE)
ËÅn √§e«¡ «∞LM∑Z
≤EUÂ ∞KIHq ¥d°j «∞LJu«… °MEUÂ ÆHq «∞IU´b…
§ÔNÒe ≥c« «∞LuÒ∞b ∞K∂ªU¸ °∫e«Â ¸°j ∞∫Lq «∞LJu«… ´Kv ÆU´b¢NU ±l ±uÆl ∞KIHq ∞ºNu∞W «∞∫Lq Ë«∞∑ªe¥s :
> «ùÆHU‰ - ®Jq 1.
> «∞H∑` - ®Jq 2.
∞MIq ±u∞Òb «∞∂ªU¸ °Sß∑FLU‰ ±I∂i «∞LJu«…:
- ¢u{l «∞LJu«… ≠u‚ ±MBÒW ±u∞b «∞∂ªU¸ £r ¥Ôd≠l •e«Â «∞d°j ´Kv «∞LJu«… «∞v √Ê ¥ÔIHq ≠w ±u{Ft «∞L∫bœ
(¥d«≠o «ùÆHU‰ Åu‹ "ØKOp") -
®Jq 1.
- ¢Ô∫Lq «∞LJu«… °u«ßDW «∞LI∂i ∞MIq ±u∞Òb «∞∂ªU¸ -
®Jq 3.
«∞∑∫COd
±U ≥u ≤uŸ «∞LU¡ «∞cÍ ¥LJs «ß∑FLU∞t ?
> ±U¡ «∞BM∂u¸
ÅÔLr ≥c« «∞LM∑Z ∞OFLq °LU¡ «∞BM∂u¸ «∞GOd ±ÔFU∞Z. ≈–« ØUÊ «∞LU¡ ´Mb„ £IOq, ≤MB` °Leà LU¡ «∞BM∂u¸ «∞GOd
±ÔFU∞Z °Mº∂W 05% °U∞LU¡ «∞LÔIDd «∞L∑u≠Òd ≠w «∞L∫ö‹ «∞∑πU¸¥W.
> √≤u«Ÿ «∞LOUÁ «∞∑w ô ¥LJs «ß∑FLU∞NU :
±s ®QÊ «∞∫d«¸… ¢dØOe «∞LFUœÊ «∞∑w ¥∫∑u¥NU «∞LU¡ √£MU¡ «∞∑∂ªOd. √≤u«Ÿ «∞LU¡ «∞u«¸œ… √œ≤UÁ, ¢∫∑uÍ ´Kv ±ªKHU‹
´Cu¥W √Ë ±Fb≤OW ¢º∂V ™Nu¸ ∞DªU‹ °MÒOW «∞K
uÊ ´Kv «∞ILU‘ √Ë ¢ÔIBd ±s ´Ld «∞LM∑Z : «∞LU¡ «∞BUœ¸ ´s
±πHHU‹ «∞∏OU», «∞LU¡ «∞LÔFDÒd, «∞LU¡ «∞LÔªH]n, ±U¡ «∞∏ö§U‹, ±U¡ «∞∂DU¸¥U‹, «∞LU¡ «∞BUœ¸ ´s √§Ne… «∞∑JOOn,
±U¡ «∞LDd, «∞LU¡ «∞LGKw, «∞LU¡ «∞LÔBHÒv √Ë ±U¡ «∞e§U§U‹, «∞a... ≠ö ¢º∑FLq ≥cÁ «_≤u«Ÿ ≠w ±Ju«…
LAFET
.
Ë«ß∑FLq √¥CUÎ «∞LU¡ «∞LÔIDd •ºV «∞MºV «∞Lu{∫W ßU°IUÎ.
¥Ôd§v ±Ôd«§FW ≈¸®Uœ«‹ «∞ºö±W ≠w ±Ib±W ≥c« «∞J∑OÒV
Æ∂q ≈ß∑FLU‰ «∞LM∑Z ∞KLd… «_Ë∞v.
GV76 xx Arabic_GV76 xx Arabic.qxd 09/09/13 14:55 Page7
26
¢cØd œ«zLUÎ :
ô ¢º∑FLq ±U¡ «∞LDd «°b«Î, √Ë «∞LU¡ «∞cÍ ¥∫∑uÍ ´Kv ≈{U≠U‹ (±∏q «∞MAU, «∞FDu¸, √Ë «∞LU¡ «∞BUœ¸ ´s «_§Ne…
«∞JNd°UzOW «∞LMe∞OW). ±s ®QÊ ≥cÁ «ù{U≠U‹ «∞∑Q£Od ßK∂OUÎ ´Kv îu«’ ±u∞Òb «∞∂ªU¸ ´Mb œ¸§U‹ «∞∫d«¸…
«∞FU∞OW, Ë¢∑º∂V °KDªU‹ œ«ØMW ´Kv «∞∏OU».
> ±bœ «∞º‡Kp «∞JNd°Uzw «∞v ¬îdÁ - ®Jq 5 Ë√îdà ßKp «∞∂ªU¸ ±s ±ªe≤t -
®Jq 6.
> √ËÅq ±u∞b «∞∂ªU¸ °LI∂f ØNd°Uzw ±R¸Ò÷.
> «{Gj ´Kv “¸ «∞∑AGOq òFFO-NOå - ®Jq 7
> ¥∂Iv «∞LR®d «∞Cuzw ∞u{FOW «∞∑AGOq òFFO-NOå, Ë «∞LR®Òd «∞Cuzw
∞∑d±uß∑U‹ «∞LJu«… ≠w •U∞W ˱Oi √£MU¡ «∞∑ºªOs «∞∑LNObÍ ∞KLM∑Z. ´Mb±U
¥∑uÆn ˱Oi «∞LR®d«‹ «∞CuzOW (°Fb •u«∞w œÆOI∑Os ¢Id¥∂UÎ) ¥JuÊ ±u∞b
«∞∂ªU¸ Æb «Å∂` §U≥e«Î ∞KFLq.
¢F∂µW îe«Ê «∞LU¡
> ¥u{l ±u∞Òb «∞∂ªU¸ ´Kv ßD` ±M∂ºj £U°X , ±IUË ∞K∫d«¸….
> ≤MB` °Uß∑FLU‰ ∞uÕ Øw ¥∑L∑l °U∞∑Nu¥W ±LU ¥ºL` ∞K∂ªU¸ √Ê ¥Ld ±s îö‰ «∞∏OU» ∞K∫Bu‰ ´Kv ≤∑UzZ
«≠Cq ≠w «∞Jw, Ë°U∞∑U∞w ¥LMl «∞∂ªU¸ ±s «ù≤b≠UŸ ´Kv «∞πu«≤V.
> ¥Ôd§v «∞∑QØb °QÊ «∞LM∑Z ±uÅu‰ °U∞∑OU¸ «∞JNd°Uzw Ë≠w Ë{FOW «∞∑AGOq.
> «ßJV ±U¡ ¨Od ±ÔFU∞Z ∞OBq «∞v ´ö±W «∞∫b «_ÆBv - ®Jq 4
¢AGOq ±u∞b «∞∂ªU¸
´Mb «ß∑FLU‰
«∞LM∑Z ∞KLd… «_Ë∞v,
Æb ¢Bb¸ ´Mt °Fi
«∞d«z∫W Ë∞JMNU ¨Od
{U¸…. Ëô ¢R£d ´Kv
«ß∑FLU‰ «∞LM∑Z.
Ëßu· ¢ª∑Hw ≥cÁ
«∞EU≥d… ßd¥FUÎ.
¢AGOq ∞u•W «∞∑∫Jr
> «∞Cu¡ «_“¸‚ ∞e¸ «∞∑AGOq òFFO-NOå ≠w •U∞W ˱Oi - ®Jq 8: œ∞Oq √Ê «∞Ld§q ≠w Ë{FOW «∞∑ºªOs.
´Mb±U ¥∑uÆn ˱Oi «∞LR®d «∞Cuzw, ¥JuÊ ±u∞b «∞∂ªU¸ Æb «Å∂` §U≥e«Î ∞KFLq.
> «∞LR®d «∞Cuzw «_•Ld òytpme knat retaWå ≠w •U∞W ˱Oi - ®Jq 9: œ∞Oq ´Kv √Ê îe«Ê «∞LU¡ ≠U¸⁄.
LU¡ Ë«{Gj ´Kv “¸ «∞Lu«≠IW òKOå ∞Jw ¥ÔDHQ «∞LR®d «∞Cuzw -®Jq 01. «≤Ed «∞HId… °FMu«Ê
FFO-NOå ¥u±i : œ∞Oq ´Kv √Ê ±u∞b «∞∂ªU¸ ≠w Ë{FOW «ùß∑Fb«œ.
FFO-NOå √Ë ´Kv “¸ ≤HY «∞∂ªU¸ ∞L∑U°FW ´LKOW «∞Jw - ®Jq 7 - 21. «≤Ed ≠Id…
FFO-OTUAå.
≈±ú îe«Ê «∞
: ò¢F∂µW îe«Ê «∞LU¡ √£MU¡ «ùß∑FLU‰å.
> «∞LR®d «∞Cuzw «∞∂d¢IU∞w òelacs-itnAå ≠w •U∞W ˱Oi - ®Jq 11: œ∞Oq ´Kv «Ê «∞LM∑Z °∫U§W «∞v
«∞BOU≤W, «≤Ed «∞HId… °FMu«Ê : ò«∞∑MEOn Ë«∞BOU≤Wå.
> “ÔËÒœ ≥c« «∞Lu∞b ∞K∂ªU¸ °MEU ∞K∑uÆn «_Ë¢u±U¢OJw ´s «∞AGOq °Fb •u«∞w 8 œÆUzo ±s ´b «ùß∑FLU‰.
«∞LR®d «∞Cuzw ∞e¸ «∞∑AGOq ò
«{Gj ´Kv “¸ «∞∑AGOq ò
≤EUÂ "«∞∑uÆn «_Ë¢u±U¢OJw" ò
Page 27

GV76 xx Arabic_GV76 xx Arabic.qxd 09/09/13 14:55 Page7
21 ßKp «∞∂ªU¸
31 ±d§q (≠w Ë•b… «∞IU´b…)
41 ¨DU¡ ±ÔπLÒl «∞∑JKf
51 ±ÔπLÒl «∞∑JKf
61 ≤Fq ±Ju«… «∞∑d«§KOf
71 ∞u•W «∞∑∫Jr
a ±R®d {uzw ò{b «∞∑JKfå
b ±R®d {uzw òîe«Ê «∞LU¡ ≠U¸⁄å
c “¸ ò±u«≠oå
d “¸ °LR®d {uzw ò¢AGOq/¢uÆnå
e “¸ °LR®d {uzw ò•b «œ≤v «¥Juå (OCE)
®Jq 3.
LU¡ «∞BUœ¸ ´s
LAFET
.
Æ∂q ≈ß∑FLU‰ «∞LM∑Z ∞KLd… «_Ë∞v.
®Jq 1.
DE
EN
ËÅn √§e«¡ «∞LM∑Z
EL
1 “¸ ≤HY «∞∂ªU¸ «∞IuÍ
AR
2 ¢∫Jr °U∞∂ªU¸
3 {u¡ «∞∑d±uß∑U‹
ES
4 ±ªdà «∞ºKp «∞JNd°Uzw
5 ±MBÒW «∞LJu«…
PT
6 «∞ºKp «∞JNd°Uzw
IT
7 ±ªeÊ «∞ºKp «∞JNd°Uzw
8 ≤EUÂ ÆHq «∞Du‚
DA
9 ¨DU¡ ≠uÒ≥W «∞∑F∂µW ≠w îe«Ê «∞LU¡
NO
01 îe«Ê ±U¡ ßFW 6,1 ∞∑d
11 ±ªeÊ ∞ºKp «∞∂ªU¸
SV
FI
≤EUÂ ∞KIHq ¥d°j «∞LJu«… °MEUÂ ÆHq «∞IU´b…
TR
§ÔNÒe ≥c« «∞LuÒ∞b ∞K∂ªU¸ °∫e«Â ¸°j ∞∫Lq «∞LJu«… ´Kv ÆU´b¢NU ±l ±uÆl ∞KIHq ∞ºNu∞W «∞∫Lq Ë«∞∑ªe¥s :
EL
> «ùÆHU‰ - ®Jq 1.
PL
> «∞H∑` - ®Jq 2.
∞MIq ±u∞Òb «∞∂ªU¸ °Sß∑FLU‰ ±I∂i «∞LJu«…:
CS
- ¢u{l «∞LJu«… ≠u‚ ±MBÒW ±u∞b «∞∂ªU¸ £r ¥Ôd≠l •e«Â «∞d°j ´Kv «∞LJu«… «∞v √Ê ¥ÔIHq ≠w ±u{Ft «∞L∫bœ
SK
(¥d«≠o «ùÆHU‰ Åu‹ "ØKOp") -
- ¢Ô∫Lq «∞LJu«… °u«ßDW «∞LI∂i ∞MIq ±u∞Òb «∞∂ªU¸ -
HU
«∞∑∫COd
SL
±U ≥u ≤uŸ «∞LU¡ «∞cÍ ¥LJs «ß∑FLU∞t ?
RU
> ±U¡ «∞BM∂u¸
UK
ÅÔLr ≥c« «∞LM∑Z ∞OFLq °LU¡ «∞BM∂u¸ «∞GOd ±ÔFU∞Z. ≈–« ØUÊ «∞LU¡ ´Mb„ £IOq, ≤MB` °Leà LU¡ «∞BM∂u¸ «∞GOd
±ÔFU∞Z °Mº∂W 05% °U∞LU¡ «∞LÔIDd «∞L∑u≠Òd ≠w «∞L∫ö‹ «∞∑πU¸¥W.
HR
RO
> √≤u«Ÿ «∞LOUÁ «∞∑w ô ¥LJs «ß∑FLU∞NU :
±s ®QÊ «∞∫d«¸… ¢dØOe «∞LFUœÊ «∞∑w ¥∫∑u¥NU «∞LU¡ √£MU¡ «∞∑∂ªOd. √≤u«Ÿ «∞LU¡ «∞u«¸œ… √œ≤UÁ, ¢∫∑uÍ ´Kv ±ªKHU‹
ET
´Cu¥W √Ë ±Fb≤OW ¢º∂V ™Nu¸ ∞DªU‹ °MÒOW «∞KuÊ ´Kv «∞ILU‘ √Ë ¢ÔIBd ±s ´Ld «∞LM∑Z : «∞
LT
±πHHU‹ «∞∏OU», «∞LU¡ «∞LÔFDÒd, «∞LU¡ «∞LÔªH]n, ±U¡ «∞∏ö§U‹, ±U¡ «∞∂DU¸¥U‹, «∞LU¡ «∞BUœ¸ ´s √§Ne… «∞∑JOOn,
±U¡ «∞LDd, «∞LU¡ «∞LGKw, «∞LU¡ «∞LÔBHÒv √Ë ±U¡ «∞e§U§U‹, «∞a... ≠ö ¢º∑FLq ≥cÁ «_≤u«Ÿ ≠w ±Ju«…
LV
Ë«ß∑FLq √¥CUÎ «∞LU¡ «∞LÔIDd •ºV «∞MºV «∞Lu{∫W ßU°IUÎ.
¥Ôd§v ±Ôd«§FW ≈¸®Uœ«‹ «∞ºö±W ≠w ±Ib±W ≥c« «∞J∑OÒV
27
Page 28

Safety_Instructions_NEW_801_Safety Instructions NEW.qxd 05/09/13 13:43 Page1
> ¥LJs √Ê ¥Ôº∑FLq ≥c« «∞LM∑Z °u«ßDW «_©HU‰ «∞c¥s ô ¢Iq
√´LU¸≥r ´s «∞∏U±MW (8), √Ë °u«ßDW «_®ªU’ «∞c¥s ô ¥∑L∑FuÊ
°Ib¸«‹ °b≤OW √Ë ´IKOW ØU±KW, √Ë ±Ls ∞b¥Nr ≤Ih ≠w «∞ª∂d…
Ë«∞LFd≠W, ≈ôÒ ≈–« îCFu« ∞KLd«Æ∂W √Ë ≈–« «´DOu« «∞∑FKOLU‹
Ë«ù¸®Uœ«‹ «∞u«{∫W ´s ØOHOW «ß∑FLU‰ «∞LM∑Z °Dd¥IW ¬±MW,
Ë«œ¸Øu« «_îDU¸ «∞∑w Æb ¢M∑Z ´s «ùß∑FLU‰ «∞ªU©v¡. ô ¥ÔºL`
∞û©HU‰ √Ê ¥∑ªcË« ≥c« «∞LM∑Z ∞KFV. ô ¥ÔºL` ∞ú©HU‰ «∞IOUÂ
°Q´LU‰ «∞∑MEOn
Ë«∞BOU≤W ±U ∞r ¥Ju≤u« ≠u‚ ßs «∞∏U±MW (8) ±s
´Ld≥r, Ë√Ê ¥Ju≤u« ¢∫X ±d«Æ∂W ®ªh ±ºRˉ ´s ßö±∑Nr.
> ±s «∞LLJs √Ê ¢d¢Hl •d«¸… «_ßD` «∞LFb≤OW «∞EU≥d… ±s «∞LM∑Z
´Mb ¢AGOKt, Ë≥c« ¥Ôº∂V «∞∫dË‚, ô ¢KLf «_ßD` «∞ºUîMW ±s
«∞LM∑Z («_§e«¡ «∞LFb≤OW Ë «_§e«¡ «∞∂öß∑OJOW «∞LÔJLKW ∞ú§e«¡
«∞LFb≤OW).
> ô ¢∑d„ «∞LM∑Z œËÊ ¸ÆU°W :
- ´Mb±U ¥JuÊ ±uÅuôÎ °U∞∑OU¸ «∞JNd°Uzw,
- «∞v √Ê ¥∂dœ ¢LU±UÎ (•u«∞w ßU´W ±s «∞e±s).
> Æ∂q √Ê ¢∂b√ °∑MEOn ÅLU ±Ml «∞∑JKf (•ºV «∞Luœ¥q), «≤∑Ed
«∞v √Ê ¥∂dœ «∞Lu∞b ¢LU±UÎ, ËÆb ¢r ≠BKt ´s «∞∑OU¸ «∞JNd°Uzw ∞Lb…
ô ¢Iq ´s ßU´∑Os Æ∂q ≠pÒ «∞∂d¨w ∞H∑` ¨DU¡ ÅLU ±Ml «∞∑JKf.
> ¥Ôd§v «∞∫c¸ Ë«ù≤∑∂UÁ : ≈–« ≠ÔIb ¨DU¡ «∞Ld§q √Ë ≈–« ≠Ib ¨DU¡
ÅLU ±ÔπLÒl «∞∑JKf (•ºV «∞Luœ¥q) √Ë ≈–« √ÔÅOV °Cd¸ √Ë
Åb±W Æu¥W, ¥Ôd§v «ß∑∂b«∞t °u«ßDW ±dØe îb±W ±ÔF∑Lb _≤t
¥JuÊ Æb «´DV.
> ´Mb ¢MEOn «∞Ld§q, ô ¢Ô∫Uˉ ¢F∂µ∑t °U∞LU¡ °AJq ±∂U®d ±s
«∞BM∂u¸.
Safety_Instructions_NEW_801_Safety Instructions NEW.qxd 05/09/13 13:43 Page2
¥Ôd§v «ô•∑HUÿ °NcÁ
«ù¸®Uœ«‹ ≠w ±JUÊ ¬±s
28
> ¥πV √Ê ¥ÔH∑` ¨DU¡ «∞Ld§q √£MU¡ «ùß∑FLU‰.
>
¥πV «ù±∑MUŸ ´s «ß∑FLU‰ «∞LM∑Z ≈–« ßIj √¸{UÎ, √Ë ≈–« ™Nd‹
´KOt ´ö±U‹ «∞FDV, ±∏q «∞∑ºd» √Ë ≈–« ∞r ¥Fb ¥RœÍ Ë™UzHt
°U∞JHU¡… «∞LF∑Uœ…. ô ¢∫Uˉ ¢HJOp «∞LM∑Z °MHºp. ¢πMÒ∂UÎ _Í îDd
±∫∑Lq, ¥Ôd§v ≠∫h «∞LM∑Z ≠w √•b ±d«Øe «∞ªb±W «∞LF∑Lb¥s.
> ¥Ôd§v «∞∑QØb ±s Åö•OW «∞ºKp «∞JNd°Uzw ËßKp «∞∂ªU¸
Ë«∞∫d’ ´Kv ´b ˧uœ √¥W √´DU» ±s §d«¡ Ø∏d… «ùß∑FLU‰.
≈–« ØUÊ «∞ºKp «∞JNd°Uzw √Ë ßKp «∞∂ªU¸ ±FDu°UÎ, ¥πV «ß∑∂b«∞t
°u«ßDW ±dØe îb±W ±ÔF∑Lb ∞Jw ¢πMÒV «_îDU¸.
> §LOl «∞LÔK∫IU‹ ËÆDl «∞GOU¸ «∞ö“±W ∞Nc« «∞LM∑Z, ¥πV ®d«ƒ≥U ±s ±dØe LAFET «∞LÔF∑Lb.
> ±s √§q ßö±∑p, ¥ªCl ≥c« «∞LM∑Z ∞πLOl «∞Iu«≤Os Ë«∞LFU¥Od «∞ºU¸¥W «∞LHFu‰ (ÆU≤uÊ «∞∑OU¸
«∞LMªHi, ÆU≤uÊ «∞∑u«≠IOW «∞JNd˱GMU©OºOW, Æu«≤Os «∞∂OµW...).
> ±uÒ∞b «∞∂ªU¸ ≥c«, ≥u §NU“ ØNd°Uzw: Ë¥πV √Ê ¥Ôº∑FLq ≠w ™dË· ´Uœ¥W. ËÆb √Ô´b ∞ûß∑FLU‰
«∞LMe∞w ≠Ij.
> “ÔËÒœ ≥c« «∞LM∑Z °MEU±Os ∞Kºö±W :
- ÅLU ¢Bd¥n «∞CGj, ≠w •U‰ •Bu‰ √Í îDQ, ¥ÔBdÒ· «∞BLU √Í “¥Uœ… ≠w «∞CGj
- ±BNd •d«¸Í, ¥∫Lw «∞LM∑Z ±s √Í ßªu≤W ±Hd©W.
> √ËÅq «∞LM∑Z œ«zLUÎ «∞v ±I∂f ØNd°Uzw ±R¸Ò÷.
>
¥πV «_îc ≠w «∞∫º∂UÊ «ùî∑ö· ≠w «∞LFU¥Od «∞JNd°UzOW, ≈–« «ß∑FLKX «∞LM∑Z ≠w °Kb ¨Od «∞∂Kb
«∞cÍ «®∑d¥∑t ±Mt, ¥d§v ≠∫Bt ≠w ±dØe îb±W ±F∑Lb.
>
ô ¢º∑FLq ËÅKW ØNd°UzOW. Ë≠w •U‰ ¢∫LÒKX ±ºRË∞OW –∞p, «ß∑FLq ≠Ij ËÅKW ØNd°UzOW ≠w •U∞W
§Ob… ˱MUß∂W ∞KIu… «∞∑w ¥∑DK∂NU «∞LM∑Z, Ë√Ê ¢JuÊ ±R¸Ò{W.
>
¥Ôd§v ¢Lb¥b «∞ºKp «∞JNd°Uzw «∞v ¬îdÁ Æ∂q ¢uÅOKt «∞v ±I∂f ØNd°Uzw ±R¸Ò÷.
> ô ¢ºL` ∞KºKp «∞JNd°Uzw √Ê ¥I∑d» ±s √Í ±Bb¸ •d«¸Í, √Ë √Ê ¥Ld ≠u‚ √©d«· •Uœ….
> ≈Ê ≤Fq «∞LJu«… °Uù{U≠W «∞v «∞LMBÒW ´Kv «∞IU´b… ¢Bq «∞v œ¸§U‹ •d«¸… ´U∞OW, ËÆb ¢Ôº∂V
«∞∫dË‚: ô ¢KLºNLU, Ëô ¢bŸ «∞ºKp «∞JNd°Uzw √Ê ¥Ôö±f ≤Fq «∞LJu«… √¥CUÎ.
> «ß∑FLq œ«zLUÎ ∞uÕ Øw –Ë «∞LMU≠c «∞πU≤∂OW, Ë¥Ôd§v «∞∫d’ ±s «∞∂ªU¸ «∞L∑BU´b ´Mb «∞Jw
°U∞Id» ±s √©d«· ∞uÕ «∞Jw.
> ≥c« «∞LM∑Z ¥u∞Òb «∞∂ªU¸, «∞cÍ ¥Ôº∂V «∞∫dË‚. ¥Ôd§v «∞∑FU±q ±Ft °Jq •c¸ Ë´MU¥W, îBuÅUÎ √£MU¡
«∞Jw «∞FLuœÍ. ô ¢u§tÒ «∞∂ªU¸ ≤∫u «_®ªU’ √Ë ≤∫u «∞∫Ou«≤U‹.
> ô ¢GLd ±u∞b «∞∂ªU¸ °U∞LU¡ √Ë ≠w √Í ßUzq ¬îd. ô ¢CFt ¢∫X «∞LOUÁ «∞πU¸¥W ±s «∞BM∂u¸.
Page 29

Safety_Instructions_NEW_801_Safety Instructions NEW.qxd 05/09/13 13:43 Page2
Ë«∞BOU≤W ±U ∞r ¥Ju≤u« ≠u‚ ßs «∞∏U±MW (8) ±s
> ¥LJs √Ê ¥Ôº∑FLq ≥c« «∞LM∑Z °u«ßDW «_©HU‰ «∞c¥s ô ¢Iq
√´LU¸≥r ´s «∞∏U±MW (8), √Ë °u«ßDW «_®ªU’ «∞c¥s ô ¥∑L∑FuÊ
°Ib¸«‹ °b≤OW √Ë ´IKOW ØU±KW, √Ë ±Ls ∞b¥Nr ≤Ih ≠w «∞ª∂d…
Ë«∞LFd≠W, ≈ôÒ ≈–« îCFu« ∞KLd«Æ∂W √Ë ≈–« «´DOu« «∞∑FKOLU‹
Ë«ù¸®Uœ«‹ «∞u«{∫W ´s ØOHOW «ß∑FLU‰ «∞LM∑Z °Dd¥IW ¬±MW,
Ë«œ¸Øu« «_îDU¸ «∞∑w Æb ¢M∑Z ´s «ùß∑FLU‰ «∞ªU©v¡. ô ¥ÔºL`
∞û©HU‰ √Ê ¥∑ªcË« ≥c« «∞LM∑Z ∞KFV. ô ¥ÔºL` ∞ú©HU‰ «∞IOUÂ
°Q´LU‰ «∞∑MEOn
´Ld≥r, Ë√Ê ¥Ju≤u« ¢∫X ±d«Æ∂W ®ªh ±ºRˉ ´s ßö±∑Nr.
> ±s «∞LLJs √Ê ¢d¢Hl •d«¸… «_ßD` «∞LFb≤OW «∞EU≥d… ±s «∞LM∑Z
´Mb ¢AGOKt, Ë≥c« ¥Ôº∂V «∞∫dË‚, ô ¢KLf «_ßD` «∞ºUîMW ±s
«∞LM∑Z («_§e«¡ «∞LFb≤OW Ë «_§e«¡ «∞∂öß∑OJOW «∞LÔJLKW ∞ú§e«¡
«∞LFb≤OW).
> ô ¢∑d„ «∞LM∑Z œËÊ ¸ÆU°W :
- ´Mb±U ¥JuÊ ±uÅuôÎ °U∞∑OU¸ «∞JNd°Uzw,
- «∞v √Ê ¥∂dœ ¢LU±UÎ (•u«∞w ßU´W ±s «∞e±s).
> Æ∂q √Ê ¢∂b√ °∑MEOn ÅLU ±Ml «∞∑JKf (•ºV «∞Luœ¥q), «≤∑Ed
«∞v √Ê ¥∂dœ «∞Lu∞b ¢LU±UÎ, ËÆb ¢r ≠BKt ´s «∞∑OU¸ «∞JNd°Uzw ∞Lb…
ô ¢Iq ´s ßU´∑Os Æ∂q ≠pÒ «∞∂d¨w ∞H∑` ¨DU¡ ÅLU ±Ml «∞∑JKf.
> ¥Ôd§v «∞∫c¸ Ë«ù≤∑∂UÁ : ≈–« ≠ÔIb ¨DU¡ «∞Ld§q √Ë ≈–« ≠Ib ¨DU¡
ÅLU ±ÔπLÒl «∞∑JKf (•ºV «∞Luœ¥q) √Ë ≈–« √ÔÅOV °Cd¸ √Ë
Åb±W Æu¥W, ¥Ôd§v «ß∑∂b«∞t °u«ßDW ±dØe îb±W ±ÔF∑Lb _≤t
¥JuÊ Æb «´DV.
> ´Mb ¢MEOn «∞Ld§q, ô ¢Ô∫Uˉ ¢F∂µ∑t °U∞LU¡ °AJq ±∂U®d ±s
«∞BM∂u¸.
29
Page 30

AR
¢‡‡uŇO‡‡‡U‹ ≥‡‡‡U±Ò‡‡‡‡‡W
≈¸®Uœ«‹ ±s √§q «∞ºö±W
> ¥Ôd§v Æd«¡… ≥cÁ «ù¸®Uœ«‹ °FMU¥W Æ∂q «ùß∑FLU‰ ∞KLd… «_Ë∞v.
ÅÔLr ≥c« «∞LM∑Z ∞ûß∑FLU‰ œ«îq «∞LMU“‰ ≠Ij. ≈Ê √Í «ß∑FLU‰
¢πU¸Í, √Ë √Í «ß∑FLU‰ îU©v¡, √Ë ô ¥∑IOÒb °Uù¸®Uœ«‹ «∞Ld≠IW,
∞s ¢∑∫Lq «∞AdØW «∞LÔBMÒFW ´Mt √¥W ±ºRË∞OW, Ë°U∞∑U∞w ¢ºIj
«∞CLU≤W ´s «∞LM∑Z.
> ô ¢HBq «∞LM∑Z ´s «∞∑OU¸ «∞JNd°Uzw °u«ßDW ®b «∞ºKp «∞∑U°l
∞t °U∞Iu….
«≠Bq «∞LM∑Z ´s «∞∑OU¸ œ«zLUÎ :
- Æ∂q ¢F∂µW îe«Ê «∞LU¡, ËÆ∂q ¨ºq «∞Ld§q.
- Æ∂q ¢MEOn «∞LM∑Z
- °Fb Øq «ß∑FLU‰.
> ¥πV √Ê ¥Ôº∑FLq «∞LM∑Z ≠u‚ ßD` «≠Iw £U°X, ±IUË ∞K∫d«¸…
±ÔCUœ ∞KLU¡. ô ¢Cl Ë•b… «∞IU´b… ´Kv ¨DU¡ ∞uÕ «∞Jw «∞dÆOo,
√Ë ´Kv √Í ßD` ≥gÒ ¬îd. ´Mb±U ¢Cl «∞LJu«… ≠u‚ ÆU´b¢NU,
¥Ôd§v «∞∑QØb °QÊ «∞ºD` «∞cÍ ¢u{l ´KOt «∞IU´b… £U°X ˱Ժ∑Id
¢LU±UÎ.
> ∞r ¥ÔFbÒ ≥c« «∞LM∑Z ∞OÔº∑FLq °u«ßDW √®ªU’ (°Ls ≠ONr
«_©HU‰) ±Ls ô ¥∑L∑FuÊ °Ib¸«‹ °b≤OW √Ë •ºOW √Ë ´IKOW ØU≠OW,
√Ë √®ªU’ ∞OºX ∞b¥Nr «∞ª∂d… √Ë «∞LFd≠W, ±U ∞r ¢∑r ±d«Æ∂∑Nr,
√Ë ≈¸®Uœ≥r ´s ØOHOW «ß∑FLU‰ «∞LM∑Z °u«ßDW ®ªh ±ºRˉ
±s √§q ßö±∑Nr.
> ¥πV ±d«Æ∂W «_©HU‰ ∞K∑QØb °Q≤Nr ô ¥F∂∏uÊ °U∞πNU“.
30
Page 31
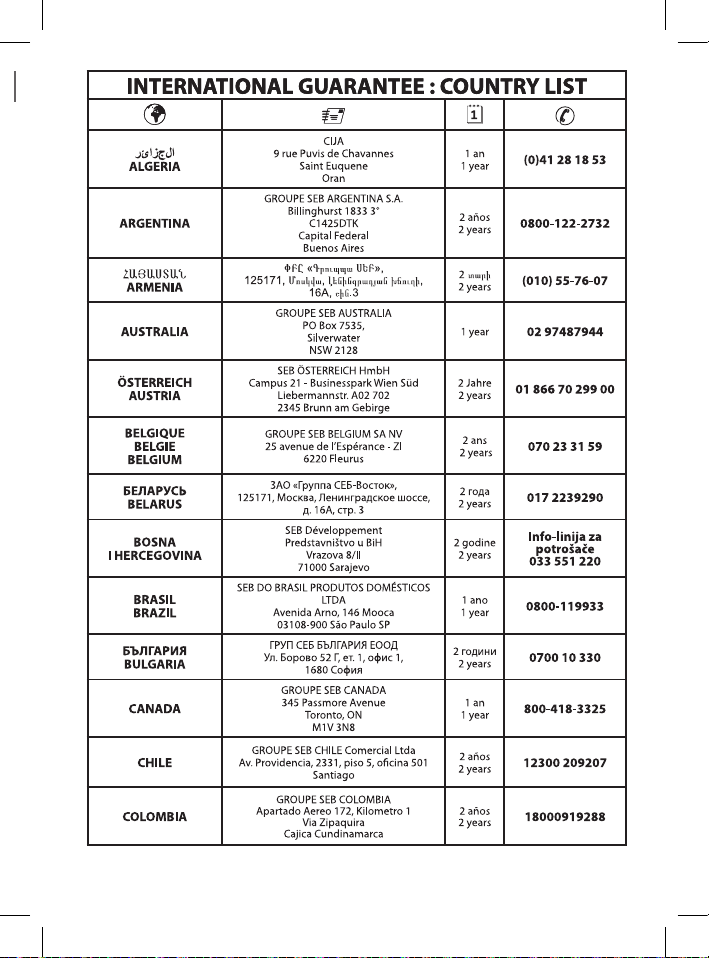
31
Page 32

Seb Groupe Ελλάδος Α.Ε
Καβαλιεράτου 7
Τ.Κ 14564 Κ.Κηφισιά
32
Page 33

33
Page 34

03/21012
34
Page 35

03/21012
Page 36

1800131294 - 35/13 - GTS2
 Loading...