

Page 1
1 kg
1.2 kg
EN
ActiFry Original
www.tefal.com
Page 2
4
1
5
6
2
7
D
I
U
Q
I
L
I
X
A
M
18
3*
8
12
9
10
11
13
14
16
15
2
17
* depending on model
Page 3

2 2
1
2
1
2
1
1
2
1
2
3
4
7
10
13
5 6
8
11
14
9
12
15
3
Page 4

English
Important recommendations
Safety instructions
• This appliance has been designed for internal domestic
use only; any professional use which does not conform
to the instructions will release the manufacturer from all
responsibility and the guarantee will be deemed null and void.
• Read these instructions carefully and keep them in a safe
place.
• This appliance is intended for domestic use only.
• This appliance is not intended to be operated using an
external timer or separate remote control system.
• Do not use the appliance if it or the power cord is damaged
or if it has fallen and has visible damage or appears to be
working abnormally. If this occurs, the appliance must be
sent to an Approved Service Centre.
• If the power cord is damaged, it must be replaced by the
manufacturer, an approved After-Sales Service or a similarly
qualified person, in order to avoid any danger. Never take
the appliance apart yourself.
• This appliance is not designed to be used by people (including
children) with a physical, sensory or mental impairment, or
people without knowledge or experience, unless they are
supervised or given prior instructions concerning the use
of the appliance by someone responsible for their safety.
Children must be supervised to ensure that they do not play
with the appliance.
• This appliance can be used by children aged from 8 years and
above and persons with reduced physical, sensory or mental
4
Page 5

capabilities or lack of experience and knowledge if they have
been given supervision or instruction concerning use of the
appliance in a safe way and understand the hazards involved.
Children shall not play with the appliance. Children under the
age of 8 years should not use this appliance unless continuous
supervision by a responsible adult is given. Cleaning and user
maintenance shall not be made by children unless they are
older than 8 years and supervised.
Keep the appliance and its cord out of reach of children less
than 8 years.
Certain parts of the appliance can become hot when
•
the appliance is operating, which could cause burns. Do not
touch the hot surfaces of the appliance (the lid, visible metal
parts, etc).
• All these removable parts may be cleaned in the dishwasher
or with a non-abrasive sponge and washing up liquid.
• Clean the body of the appliance with a damp sponge and
washing up liquid.
• Dry the parts carefully before reassembling.
• Children should not clean or perform maintenance procedures
on the appliance unless they are supervised by a responsible
adult.
• Do not use the appliance close to inflammable materials
(blinds, curtains, etc), nor close to an external heat source
(gas hob, hotplate, etc).
• This appliance is intended to be used only in the household.
It is not intended to be used in the following applications,
and the guarantee will not apply for:
5
Page 6

- staff kitchen areas in shops, offices and other working
environments;
- farm houses inns,
- clients in hotels, motels and other residential type environments,
- bed and breakfast type environments.
• Do not immerse the product in water.
• Never operate the appliance using the removable cooking
pan only and without the mixing blade or the appropriate
ACTIFRY accessory.
• For your safety, this appliance conforms with applicable standards and regulations
(Directives on Low Voltage, Electromagnetic Compatibility, Materials in contact with
food, Environment, etc.).
• Check that the voltage of your mains network corresponds to the voltage given on the
rating plate on the appliance (alternative current).
• Given that there are so many different standards, if the appliance is to be used in a
country other than that in which it was bought, have it checked by Approved Service
Centre.
• For models with detachable power cords, only use the original power cord.
• Do not use an extension lead. If you nevertheless decide to do so, under your own
responsibility, use an extension lead that is in good condition and compliant with the
power of the appliance.
• Use the appliance on a flat, stable, heat-resistant work surface away from water splashes.
• Do not let the power cord dangle.
• Do not unplug the appliance by pulling on the power cord.
• Always unplug your appliance: after use, to move it, or to clean it.
• In the event of fire, unplug the appliance and smother the flames using a damp tea
towel.
• Never operate the appliance underneath kitchen cupboards.
• Never move the appliance when it still contains hot food.
• Never operate your appliance when empty.
• Never leave the appliance unattended whilst it is plugged in and switched on.
When using the product for the first time, it may release a non-toxic odour. This will not
affect use and will disappear rapidly.
Do not overload the cooking pan; stick to the recommended quantities.
• Your appliance is equipped with an automatic turn-over ring (depending on model). This
turn-over ring should be used to cook chips. We also recommend using it for recipes that
require a large quantity of food. Remove the turn-over ring for liquid recipes, for ease of
pouring at the end of cooking.
6
Page 7

• To avoid damaging your appliance, please ensure that you follow the recipes in
the instructions and recipe book; make sure that you use the right amount of
ingredients.
Protect the environment
• When you decide to replace the appliance, remember to think about how you can
contribute to protecting the environment.
• Before discarding your appliance you should remove the battery from the timer and
dispose of it at a local civic waste collection centre (according to model).
• The Approved Service Centres will take back any old appliances you may have so
that they can be disposed of in accordance with environmental regulations.
7
Page 8

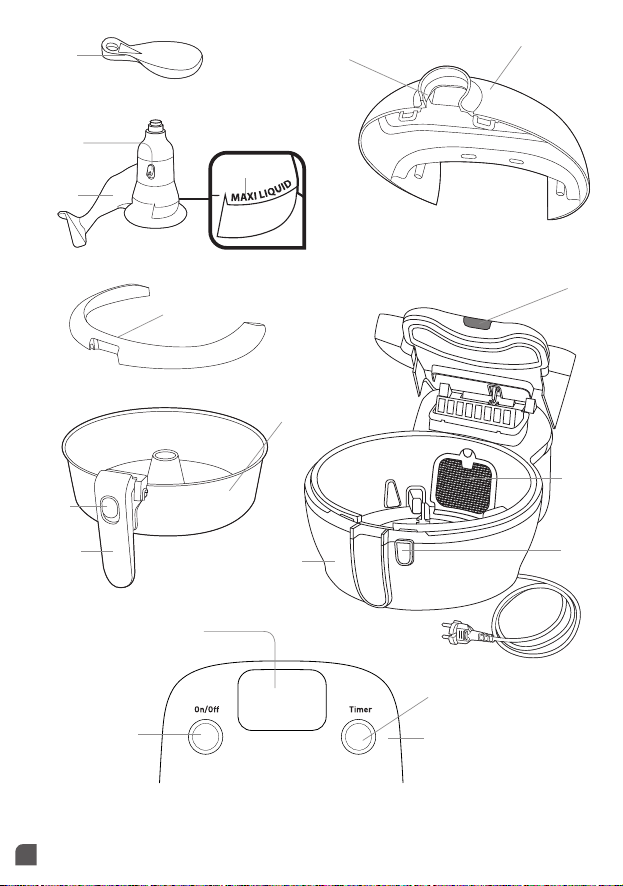
Description
1. Cool touch area of the lid
2. Lid
3. Turn-over ring *
4. Measuring spoon (14 ml)
5. Locking/unlocking paddle lever
6. Maximum level markers (for liquid)
7. Removable mixing paddle
8. Removable cooking pan
9. Cooking pan handle release button
10. Cooking pan handle
Quick introduction for use
11. Base
12. Removable filter
13. Lid opening button
14. Digital timer
15. On/Off switch
16. Timer setting button
17. Removable control panel (for access to the
battery compartment only)
18. Button for removing lid
Before first use
• To remove the lid – fig.1, press the lid opening button (13) and push button for
removing lid (18) to take off the lid – fig. 2 .
• Remove the measuring spoon.
• Lift the handle to a horizontal position until you hear a “click” as it locks.
• Take out the cooking pan – fig. 3.
• Remove the ring by releasing the clips from the edge of the pan and pushing it
upwards*.
• Remove the paddle by pushing the release button – fig. 4.
• All the removable parts are dishwasher safe – fig. 5 or can be washed with a soft
sponge and washing up liquid.
• Wipe the base of the appliance using a damp cloth and washing up liquid.
• Rinse and dry the parts carefully before putting them back together.
• Reposition the paddle until you hear the « CLICK » – fig. 4.
• During its first use, the appliance may give off a slight odour: this is not harmful
and it will disappear quickly. It has no effect on the functioning of your ActiFry.
Remove all the stickers
and any packaging.
Never immerse the base
in water.
On first use, to obtain the
best results from your
new product, we advise
you to prepare a recipe
that cooks for 30 minutes
or more.
Preparing food
Do not leave the
measuring spoon inside
the pan when cooking
food.
• Place the food in the cooking pan, distributing it evenly, making sure that you
respect the maximum quantity (see cooking tables p. 9 to 11) – fig. 6.
• Add the oil to the food with the spoon – fig. 7, distributing it evenly (see cooking
tables p. 9 to 11’for the amount).
(1 spoonful of oil = 14 ml of oil)
• Unlock the handle and fold it completely into its housing – fig. 8.
• Close the lid – fig. 9.
• Never exceed the maximum quantities of ingredients and liquids indicated in the
instruction manual and in the recipe book.
Cooking
• This appliance is not suitable for recipes with a high-liquid content (eg. soups, cook-in sauces...).
• Never turn on the appliance if the cooking pan is empty.
• Do not overfill the cooking pan, never exceed the quantities indicated in the recipes and cooking
tables or maximum food level mark (for liquid).
*Depending on model
8
Page 9

Set the cooking time
• Press the timer setting button to set the time. Hold down the button until desired
time is featured on the display – fig. 10 (see cooking tables p. 9 to 11).
• Now release. The selected time (in minutes) is displayed and the countdown starts.
• If you make a mistake or to delete the selected time, hold down the button for
2 seconds then set the time again.
Starting the cooking
When you open the lid,
the appliance stops
working.
• Press the On/Off switch, the cooking begins thanks to the hot air circulation
inside the cooking enclosure –
direction.
fig.11. The paddle rotates slowly in a clockwise
NOTE: the timer signals
the end of the cooking
but does not switch off
the fryer.
• Once cooking is completed, the timer beeps. To stop the beeping signal, press
the timer setting button –
• Press on On/Off to stop the appliance – fig. 13 and open the lid.
• Lift the handle until you hear a “click” that it locks and take out the cooking pan
–
fig. 14.
• Serve at once.
Table of cooking times
The cooking times below are only a guide and may vary according to the variety and batch of potatoes used.
We recommend using varieties such as King Edward and Maris Piper for chips and potato recipes.
fig.12
To avoid any risk of burns
do not touch the lid or
any part other than the
cool touch area.
Potatoes
Type QuanTiTy Oil COOking Time
Fresh 1200 g** 1 spoonful oil 43 - 46 min
Taking food out
Chips
standard thickness
13 mm x 13 mm
length up to 9 cm
Potatoes (quartered)
Diced potato
Chips
*Weight of unpeeled potatoes
IMPORTANT: To avoid damaging your appliance, never exceed the maximum quantities of ingredients and
liquids indicated in the instruction manual and in the recipe leaflet.
** Only using the turnover ring - Depending on model
Fresh 1000 g* 1 spoonful oil 40 - 45 min
Fresh 750 g* 3/4 spoonful oil 35 - 37 min
Fresh 500 g* 1/2 spoonful oil 28 - 30 min
Fresh 250 g* 1/4 spoonful oil 24 - 26 min
Fresh 1000 g* 1 spoonful oil 40 - 42 min
Frozen 750 g None 14 - 16 min
Fresh 1000 g* 1 spoonful oil 40 - 42 min
Frozen 750 g None 30 - 32 min
Frozen - suitable
for deep frying
only
Frozen - 2 way
or 3 way cook
suitable for oven
and grill (and
deep frying).
750 g
Standard
13 mm x 13 mm
750 g
Thin
10 mm x 10 mm
500 g
American Style
8 mm x 8 mm
None
None
None
35-40 min
30-32 min
25-27 min
9
Page 10

Other vegetables
Type QuanTiTy Oil COOking Time
Courgettes Fresh, in slices 750 g
Sweet peppers Fresh, in slices 650 g
Mushrooms Fresh, in quarters 650 g 1 spoonful oil 12 - 15 min
Tomatoes Fresh, in quarters 650 g
Onions Fresh, in rings 500 g 1 spoonful oil 15 - 25 min
1 spoonful oil
+ 150 ml cold water
1 spoonful oil
+ 150 ml cold water
1 spoonful oil
+ 150 ml cold water
25 - 35 min
20 - 25 min
10 - 15 min
Meat - Poultry
To add flavour to meat and poultry, mix some spices (such as paprika, curry, mixed herbs, thyme…..) with the oil.
Type QuanTiTy Oil COOking Time
Fresh 750 g None 18 - 20 min
Chicken nuggets
Chicken drumsticks Fresh 4 to 6 None 30 - 32 min
Chicken legs Fresh 2 None 30 - 35 min
Chicken breasts
(boneless)
Chinese Spring Rolls Fresh 4 to 8 small 1 spoonful oil 10 - 12 min
Lamb chops
Pork chops
Pork fillet Fresh
Sausages Fresh 4 to 8 (pricked) None 10 - 12 min
Chilli Con Carne
Beef steak
Meatballs Fresh 12 pieces None 18 - 20 min
*Turn halfway through cooking
Frozen 750 g None 18 - 20 min
Frozen
Fresh 6 (about 750 g) None 10 - 15 min
Fresh
(2.5 cm to 3 cm
thick)
Fresh
(2.5 cm thick)
Fresh
(made from
minced beef)
Fresh
(rump or sirloin
cut into 1 cm thick
strips)
12 pieces
(160 g)
2 to 6 None 20 - 25 min*
2 to 3 None 18 - 23 min*
2 to 6 thin slices
or strips
500 g 1 spoonful oil 30 - 40 min
600 g None 8 - 10 min
None
1 spoonful oil 12 - 15 min
12 - 15 min
Fish - Shellfish
Type QuanTiTy Oil COOking Time
Breaded scampi Frozen 18 pieces (280 g) None 10 min
Monkfish Fresh cut in pieces 500 g 1 spoonful oil 20 - 22 min
Prawns Cooked 400 g None 10 - 12 min
Jumbo King prawns Frozen and thawed 300 g (16 pieces) None 12 - 14 min
10
Page 11

Desserts
Type QuanTiTy Oil COOking Time
Bananas
Cherries Whole Up to 1000 g
Strawberries
Apples Cut in wedges 3 1 spoonful oil + 2 spoonful sugar 15 - 18 min
Pears Cut in pieces Up to 1000 g 1 to 2 spoonful sugar 8 - 12 min
Pineapple Cut in pieces 1 1 to 2 spoonful sugar 8 - 12 min
Cut in slices
Wrapped in tinfoil 2 bananas None 20 - 25 min
Cut in quarters
if large or halves
if small
500 g
(5 bananas)
Up to 1000 g 1 to 2 spoonful sugar 5 - 7 min
1 spoonful oil
+ 1 spoonful brown sugar
1 spoonful oil
+ 1 to 2 spoonful sugar
4 - 6 min
12 - 15 min
ActiFry cooking hints and tips
• Do not add salt to chips while the chips are in the pan. Only add salt once the chips are removed from the
appliance at the end of cooking.
• When adding dried herbs and spices to Actifry, mix them with some oil or liquid. If you try sprinkling them
directly into the pan they will just get blown around by the hot air system.
• Please note that strong coloured spices may slightly stain the paddle and parts of the appliance. This is
normal.
• For best results, use finely chopped garlic instead of crushed garlic to avoid it adhering to the central paddle.
• If using onions in ActiFry recipes, they are best thinly sliced instead of chopped as they cook better. Separate
the onion rings before adding them to the pan and give them a quick stir so that they are evenly distributed.
• With meat and poultry dishes, stop the appliance and stir the pan once or twice during cooking so that the
food on top does not dry out and the dish thickens evenly.
• Prepare vegetables in small pieces or stir fry size to ensure they cook through.
• This appliance is not suitable for recipes with a high-liquid content (eg. soups, cook-in sauces...).
• For best results, the best place to store potatoes is in a dark cellar or cool cupboard (between 6 and 8°C),
away from the light.
• Remember that there can be seasonal variations in the quality of potatoes used, even for the varieties of
potato we recommend (Rooster, Maris Piper or King Edwards) these can also be affected by the weather ie
long, wet summers will produce potatoes with a higher water content than normal which may produce less
crisp results. If this happens, try changing the potatoes you are using.
• The way the potatoes are stored in Supermarkets can also affect the cooking result. Try buying potatoes
from a different supermarket or source.
• The chips must be perfectly dry before putting them in the pan otherwise they will not turn crispy. Wipe off
any excess ice from frozen chips.
• With Actifry, you can use a very wide variety of oils:
• Standard oils : olive oil, grape seed oil, corn oil, groundnut (peanut) oil, sunflower oil, soya oil*
• Flavoured oils : oils infused with aromatic herbs, garlic, chilli, lemon…
• Speciality oils : hazelnut*, sesame*…
(*cook according to the manufacturers instructions)
11
Page 12

Easy cleaning
Cleaning the appliance
• Leave it to cool down completely before cleaning.
• Open the lid
• Lift the handle to the horizontal position until you hear a “click” as it locks
• Take out the cooking pan.
• Remove the ring by releasing the clips from the edge of the pan and pushing it
upwards*.
• Remove the paddle by pushing the release button –
• Remove the filter (on parts diagram no. 12) by pulling the top and wash it.
• All the removable parts are dishwasher safe –
sponge and washing up liquid.
• Clean the base of the appliance using a damp cloth and washing up liquid.
• Rinse and dry parts carefully before putting them back together.
• If food gets stuck or burnt on to the pan or paddle, leave them to soak in warm
water before cleaning.
• We guarantee that the coating of the cooking pan complies with regulations
concerning materials in contact with foodstuffs.
– fig. 1 and lift the latch to take off the lid – fig. 2.
fig. 4a.
fig. 5 or can be washed with a soft
– fig. 3.
Timer battery
This appliance uses a button battery – L1154.
• To change the battery remove the control panel with a small flat bladed jewellers
screw driver. Prise the control panel up by inserting the screwdriver into the gap
at the top of the panel. Remove the white battery cover and replace the battery
– fig 15. To protect the environment do not throw the old battery in your regular
waste but take it to a suitable collection point.
• Insert a new battery, put the battery cover back on and clip the control panel
back on.
Never immerse the base
in water.
Do not use harsh or
abrasive cleaning products
or scourers.
The removable filter must
be cleaned regularly.
Do not use metal utensils
in the cooking pan or
when serving food
*Depending on model
12
Page 13

If your fryer is not working correctly
prOblems Causes sOluTiOns
The appliance is not plugged in.
The On-Off switch is not fully pressed down. Press on the On/Off switch.
You have pressed down the On-Off switch
The appliance is not working.
The removable paddle doesn’t stay
in place.
Food is not cooking evenly.
The chips are not crispy enough.
The chips break up during the cooking.
The food stays on the edge of the
cooking pan.
Cooking liquids have flowed into the base
of the appliance.
The timer does not work. The battery is dead. Change the battery (see fig. 15).
The appliance is unusually noisy.
The paddle stops turning during cooking. The paddle is not positioned correctly.
but the appliance is not working.
The motor is running but the appliance
does not heat.
The paddle does not turn.
The mixing paddle is not locked or the
pan has been damaged.
The paddle has not been installed. Fit the paddle.
The food has not been cut in regular size
pieces or the pan has been damaged.
The chips have not been cut in regular
size pieces.
The paddle has been installed correctly
but it does not turn.
The wrong variety of potatoes has
been used.
The potatoes are insufficiently washed
and/or not completely dried.
The chips are too thick.
There is not enough oil for the quantity
of chips.
The filter is obstructed. Clean the removable filter.
The potatoes used are recently harvested
and hence have a high water content.
The potatoes may not have been stored
correctly in the supermarket.
The cooking pan is too full. There is too
much liquid in the cooking pan.
The paddle is not positioned correctly or
the seal of the paddle is defective.
You suspect the motor is not working
correctly.
Check that the appliance is plugged in
correctly.
Close the lid.
Contact the consumer service.
Check that the paddle is correctly
positioned. If the problem continues,
contact the consumer service.
Check that the locking lever has been
pushed down fully or is not damaged.
Check that the cooking pan where the
paddle sits has not been damaged. If so,
contact the consumer service.
Cut food to the same size.
Cut the chips to the same size.
Check that it has been pushed down
and clicked in position. If the problem
continues, contact your point of purchase.
Choose a variety of potato recommended
for chips.
Wash the potatoes for a long time to
remove excess starch, then drain and
dry them before cooking. They must be
completely dry.
Cut the chips thinner. The maximum chips
dimensions are 13mm x 13 mm.
Increase the oil quantity (see cooking
tables p. 9 to 11).
Reduce the quantity of potatoes down to
800 g and adjust the cooking time.
Purchase your potatoes from a different
source.
Respect the maximum quantities
indicated in the cooking tables.
Make sure that the paddle is correctly
positioned. If the problem continues,
contact the consumer service. Do not
use ActiFry for making soups or recipes
with a high liquid content.
Contact the consumer service.
Using an oven glove, push the paddle
downward until it clicks into place. If this
does not work, contact the consumer
service.
13
Page 14

S.A.S. SEB SELONGEY CEDEX • RC. DIJON B 302 412 226 • REF. 1520002481
Félix Création • felix-creation.fr
10/2015
 Loading...