

Page 1
Page 2
Page 3
Page 4
Page 5

Page 6

Recommandations importantes
Cuisson
• Cet appareil n’est pas adapté à la préparation de recettes liquides (soupes...).
• Ne faites jamais fonctionner l’appareil vide.
• Ne surchargez pas le plat, respectez les quantités recommandées.
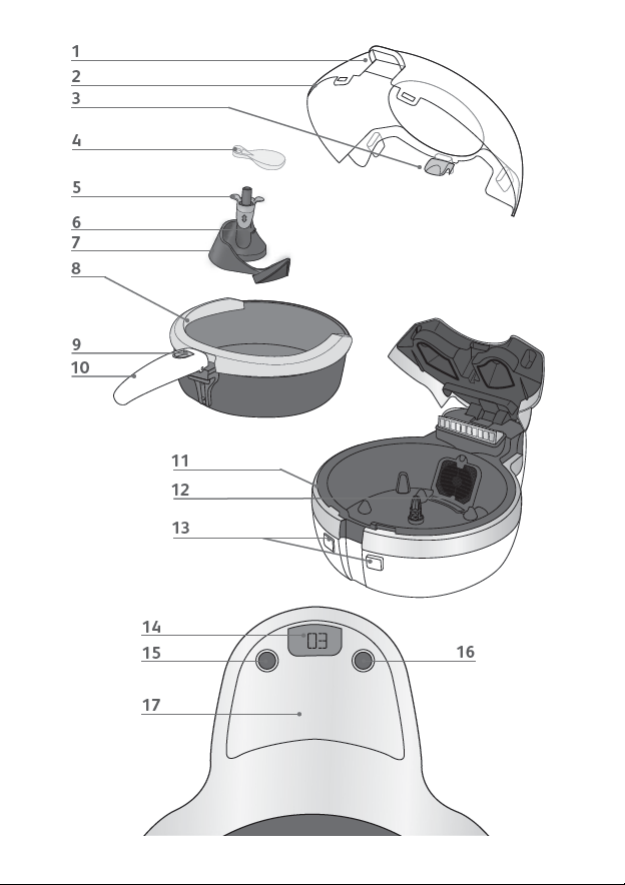
Description
1. Zone de préhension du couvercle
2. Couvercle transparent
3. Verrou du couvercle
4. Cuillère doseuse
5. Manette de verrouillage/déverrouillage
de la pale (de couleur gris clair)
6. Niveau maxi de remplissage (pour les frites)
7. Pale de brassage amovible
8. Plat amovible & anneau
9. Bouton de déverrouillage de la poignée
10. Poignée du plat
11. Base
12. Filtre amovible
13. Commandes d’ouverture du couvercle
14. Minuterie
15. Bouton Marche / Arrêt
(On = marche, Off = Arrêt)
16. Bouton de réglage de la minuterie
17. Panneau de contrôle démontable
(accès au compartiment pile)
Une préparation rapide
Avant la première utilisation
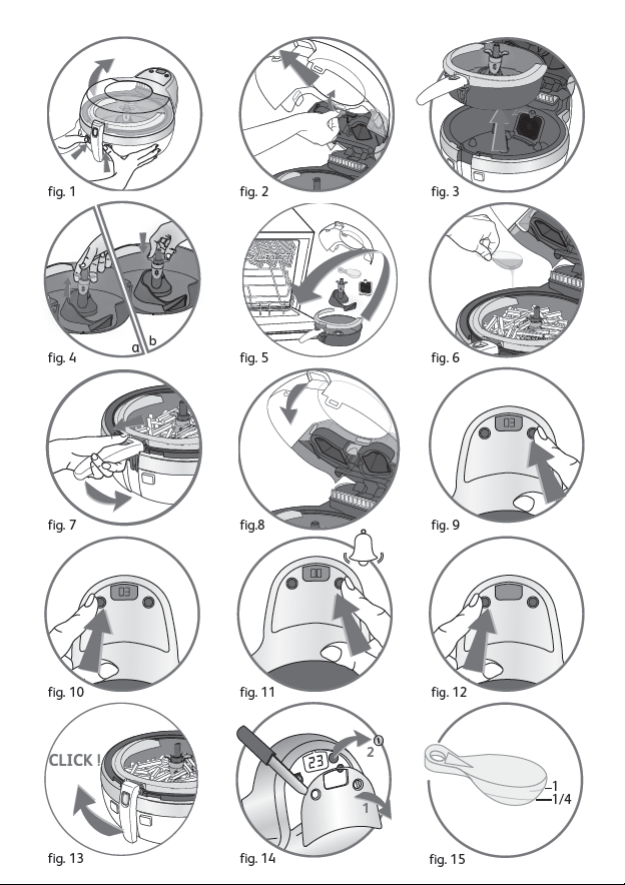
• Ouvrez le couvercle - fig.1 et soulevez le verrou pour retirer le couvercle - fig.2.
• Enlevez la cuillère doseuse.
• Remontez la poignée du plat amovible à l’horizontale jusqu’au “CLIC” pour sortir
le plat - fig.3.
• Démontez l'anneau en écartant les clips du bord de la cuve et poussez -le vers le haut.
• Retirez la pale en soulevant la manette de verrouillage : prenez appui avec le
pouce sur la partie supérieure de la pale et avec l'index et le majeur sous la
manette de verrouillage - fig.4a.
• Toutes les pièces amovibles passent au lave-vaisselle - fig.5 ou peuvent être
nettoyées avec une éponge non-abrasive et du liquide vaisselle.
• Nettoyez la base de l’appareil avec une éponge humide et du liquide vaisselle.
• Séchez soigneusement avant de tout remettre en place.
• Pour recliper la pale, mettez la manette de verrouillage en position haute,
positionnez la pale au centre du plat puis poussez la manette - fig.4b.
• Durant la première utilisation, il peut se produire un dégagement d’odeur sans
nocivité . Ce phénomèn e sans cons équence sur l’utilis ation de l’appar eil
disparaîtra rapidement.
Préparez les aliments
Pour les frites, ne
dépassez jamais le
niveau maxi indiqué sur
la pale amovible - fig.6.
Ne laissez pas la cuillère
doseuse dans le plat.
• Mettez les aliments dans le plat et respectez la quantité maximale ( voir tableau
de cuisson p. 15 à 17).
• Ajoutez la matière grasse - fig.6 (voir tableau de cuisson p. 15 à 17).
• Déverrouillez la poignée et rabattez-la complètement dans son logement - fig.7.
• Fermez le couvercle - fig.8.
• Respectez toujours les quantités maximum d’ingrédients et de liquides indiquées
dans le mode d’emploi et le livre de recettes.
Enlevez tous les
autocollants et éléments
de l’emballage. Ne passez
jamais l’appareil sous
l’eau.
Pour une bonne mise en
route de l'appareil, nous
vous conseillons de faire
une première cuisson d'au
moins 30 minutes. Dès la
seconde cuisson, Actifry
vous donnera entière
satisfaction.
14
14
Page 7

Une cuisson légère
Sélectionnez le temps de cuisson
• Réglez le temps en appuyant sur le bouton du minuteur - fig. 9 (voir tableau de
cuisson p. 15 à 17).
• Relâchez. Le temps sélectionné s’affiche et le décompte commence.
• En cas d’erreur ou pour effacer le temps sélectionné, maintenez le bouton
enfoncé pendant 2 secondes et sélectionnez à nouveau le temps.
Attention : le minuteur
signale la fin du temps de
cuisson mais il n’arrête
pas l’appareil.
Démarrez la cuisson
Lorsque vous ouvrez le
couvercle, l’appareil
s’arrête.
• Appuyez sur le bouton Marche / Arrêt, la cuisson commence grâce à la circulation
de l'air chaud dans l'enceinte de cuisson
- fig.10.
Retirez les aliments
• Lorsque la cuisson est terminée, le minuteur sonne. Arrêtez la sonnerie en
appuyant sur le bouton
• Arrêtez l’appareil en appuyant sur Marche / Arrêt
- fig.1.
• Relevez la poignée et sortez le plat
- fig.11.
- fig.13 et servez sans attendre.
- fig.12 et ouvrez le couvercle
Pour éviter tout risque de
brûlure ne touchez pas le
couvercle en dehors de la
zone de préhension
prévue à cet effet - Fig.8.
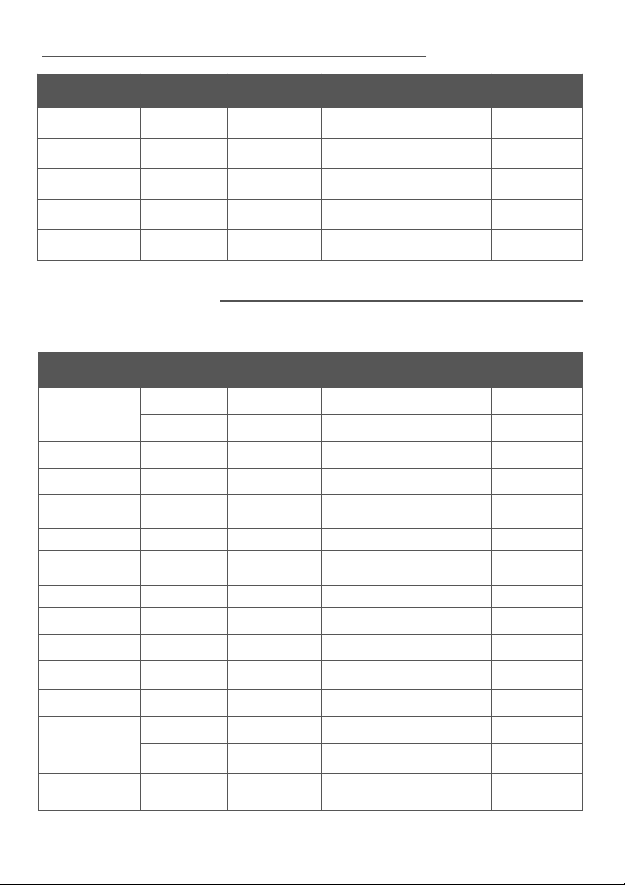
Les temps de cuisson
Les temps de cuisson sont donnés à titre indicatif, ils peuvent varier en fonction de la saisonnalité des aliments, de
leur taille, des quantités, du goût de chacun et de la tension du réseau électrique. La quantité d’huile indiquée peut
être augmentée en fonction de vos goûts et de vos besoins. Si vous souhaitez des frites encore plus croustillantes,
vous pouvez rajouter quelques minutes de cuisson supplémentaires.
Pommes de terre
TYPE QUANTITÉ AJOUT
Fraîches 1200 g 1 cuillère d'huile + 1/4* 43 - 46 min
Frites
taille standard
10mm x10mm
Potatoes
Pommes rissolées
Frites Tradition Surgelées 750 g sans 30 - 32 min
Frites Allumettes Surgelées 750 g sans 25 - 27 min
*fig.15
IMPORTANT : Pour ne pas endommager votre appareil, respectez toujours les quantités maximum d’ingrédients et
de liquide indiquées dans le livre de recettes et mode d’emploi.
Fraîches 1000 g 1 cuillère d'huile 40 - 43 min
Fraîches 750 g 3/4 cuillère d'huile* 35 - 37 min
Fraîches 500 g 1/2 cuillère d'huile* 28 - 30 min
Fraîches 250 g 1/4 cuillère d'huile* 24 - 26 min
Fraîches 1000 g 1 cuillère d'huile 40 - 42 min
Surgelées 750 g sans 14 - 16 min
Fraîches 1000 g 1 cuillère d'huile 40 - 42 min
Surgelées 750 g sans 30 - 32 min
TEMPS DE
CUISSON
FR
15
Page 8
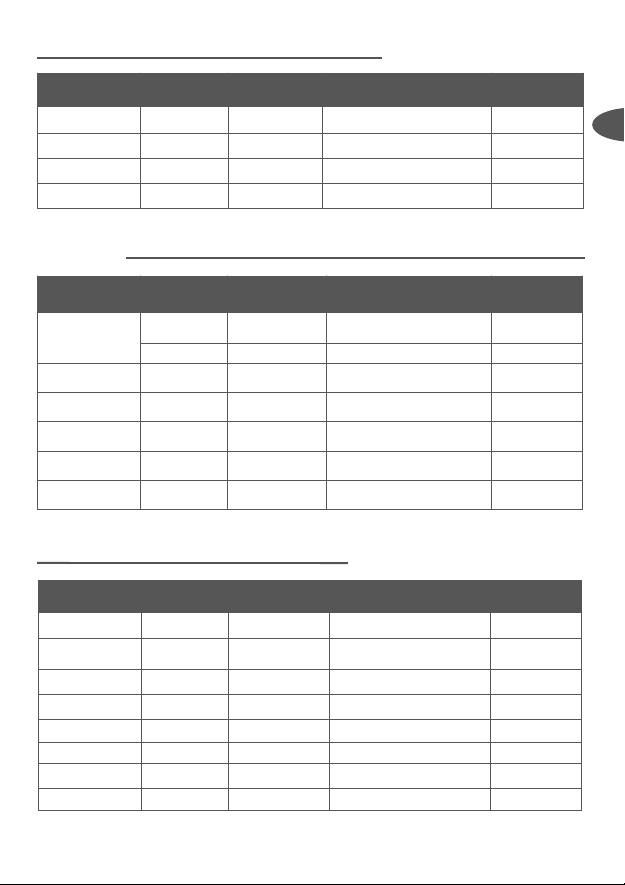
Autres légumes
TEMPS DE
CUISSON
Courgettes
Poivrons
Champignons
Tomates
Oignons
TYPE QUANTITÉ AJOUT
Fraîches
en lamelles
Frais
en lamelles
Frais
en quartiers
Fraîches
en quartiers
Frais
en rondelles
750 g 1 cuillère d’huile + 15 cl d’eau 25 - 35 min
650 g 1 cuillère d’huile + 15 cl d’eau 20 - 25 min
650 g 1 cuillère d'huile 12 - 15 min
650 g 1 cuillère d’huile + 15 cl d’eau 10 - 15 min
500 g 1 cuillère d'huile 15 - 25 min
Viandes - Volailles
Pour donner du goût à vos viandes, n’hésitez pas mélanger des épices dans l’huile (paprika, curry, herbes de
Provence, thym, laurier ….)
TYPE QUANTITÉ AJOUT
Nuggets
de poulet
Pilons de poulet Frais 4 à 6 sans 30 - 32 min
Cuisses de poulet Fraîches 2 sans 30 - 35 min
Blancs de poulet Frais
Nems Frais 4 à 8 petits 1 cuillère d'huile 10 - 12 min
Paupiettes
de veau
Côtelettes d'agneau Fraîches 2 à 6 1 cuillère d'huile 15 - 20 min
Côtes de porc Fraîches 2 à 4 1 cuillère d'huile 15 - 18 min
Filet de porc Frais 2 à 6 tranches 1 cuillère d'huile 12 - 15 min
Saucisses ou merguez Fraîches 4 à 8 (piquées) sans 10 - 12 min
Râbles de lapin Frais 2 à 6 1 cuillère d'huile 15 - 20 min
Viande hachée
Boulettes
de viande
Frais 750 g sans 18 - 20 min
Surgelés 750 g sans 18 - 20 min
6 blancs
(environ 750 g)
Fraîches 2 à 6 1 cuillère d'huile 15 - 20 min
Fraîche 600 g 1 cuillère d'huile 10 - 15 min
Surgelée 400 g
Surgelées 750 g 1 cuillère d'huile 18 - 20 min
sans 10 - 15 min
sans ou avec
1 cuillère d'huile
TEMPS DE
CUISSON
12 - 15 min
16
Page 9
Poissons - Crustacés
TYPE QUANTITÉ AJOUT
Beignets de calamars Surgelés 300 g sans 12 - 14 min
Lotte Fraîche 500 g 1 cuillère d'huile 20 - 22 min
Crevettes Cuites 400 g sans 10 - 12 min
Gambas Surgelées 300 g (16 pièces) sans 12 - 14 min
TEMPS DE
CUISSON
Desserts
TYPE QUANTITÉ AJOUT
Bananes
Cerises entières
Fraises coupées en quatre
Pommes coupées en deux 3
Poires
Ananas
en rondelles
en papillote 2 bananes sans 20 - 25 min
coupées en
morceaux
coupé en
morceaux
500 g
(5 bananes)
jusqu'à
1000 g
jusqu'à
1000 g
jusqu'à
1000 g
1 cuillère d'huile
+ 1cuillère de sucre roux
1 cuillère d'huile
+ 1 à 2 cuillères de sucre
1 à 2 cuillères de sucre 5 - 7 min
1 cuillère d'huile
+ 2 cuillères de sucre
1 à 2 cuillères de sucre 8 - 12 min
1 1 à 2 cuillères de sucre 8 - 12 min
TEMPS DE
CUISSON
4 - 6 min
12 - 15 min
10 - 12 min
Préparations surgelées
TYPE QUANTITÉ AJOUT
Ratatouille Surgelée 750 g sans 20- 22 min
Poêlée pâtes et
poisson
Poêlée paysanne Surgelée 750 g sans 25 - 30 min
Poêlée savoyarde Surgelée 750 g sans 20 - 25 min
Pâtes à la carbonara Surgelées 750 g sans 15 - 20 min
Paëlla Surgelée 650 g sans 15 - 20 min
Riz Cantonnais Surgelé 650 g sans 15 - 20 min
Chili con Carne Surgelé 750 g sans 12 - 15 min
Surgelée 750 g sans 20 - 22 min
TEMPS DE
CUISSON
FR
17
Page 10
Page 11

Quelques conseils en cas de difficulté…
PROBLÈMES CAUSES SOLUTIONS
L’appareil n’est pas bien branché.
Vous n’avez pas encore appuyé sur le
bouton Marche / Arrêt.
Vous avez appuyé sur le bouton
L’appareil ne fonctionne pas.
La pale ne tient pas. La pale n'est pas verrouillée.
La cuisson des préparations n'est pas
homogène.
Les frites ne sont pas assez
croustillantes.
Les frites sont cassées lors de la cuisson.
Les aliments restent sur le bord du plat. Le plat est trop chargé.
Des liquides de cuisson ont coulé dans
la base de l’appareil.
La minuterie ne fonctionne pas. La pile est usagée. Changez la pile (voir fig 14).
L'appareil est anormalement bruyant.
Marche / Arrêt mais l’appareil ne
fonctionne pas.
Les moteurs tournent mais l’appareil
ne chauffe pas.
La pale ne tourne pas.
Vous n’avez pas utilisé la pale. Mettez-la en place.
Les aliments ne sont pas coupés de
façon régulière.
Les frites ne sont pas coupées de façon
régulière.
La pale est bien mise mais elle ne
tourne pas.
Vous n'utilisez pas des pommes de
terre spéciales frites.
Les pommes de terre ne sont pas
suffisamment lavées et séchées.
Les frites sont trop épaisses. Coupez-les plus fines.
Il n’y a pas assez d’huile.
Le filtre est obstrué. Nettoyez le filtre.
Vous avez utilisé des pommes de terre
nouvelles.
La pale est mal positionnée ou le joint
de la pale est défectueux.
Vous soupçonnez une anomalie dans
le fonctionnement des moteurs de
l’appareil.
Vérifiez que l’appareil est correctement
branché.
Appuyez sur le bouton Marche / Arrêt.
Fermez le couvercle.
Rapportez l’appareil à un Centre de
Service Agréé.
Vérifiez qu’elle est bien en place sinon
rapportez l’appareil à un Centre Service
Agréé.
Pour recliper correctement la pale,
mettez la manette de verrouillage en
position haute, positionnez la pale au
centre du plat puis poussez la manette.
Coupez les aliments tous de la même
taille.
Coupez les frites toutes de la même
taille.
Rapportez l’appareil à un Centre de
Service Agréé.
Choisissez des pommes de terre
spéciales frites.
Lavez, égouttez et séchez bien les
pommes de terre avant cuisson.
Augmentez la quantité d’huile (voir
tableau de cuisson p. 15 à 17).
Réduisez la quantité de pommes de
terre à 750 g et adaptez le temps de
cuisson.
Respectez les quantités indiquées sur le
tableau de cuisson.
Vérifiez que la pale est correctement
positionnée. Si le problème persiste,
rapportez l’appareil à un Centre de
Service Agréé.
Rapportez l’appareil à un Centre de
Service Agréé.
FR
19
Page 12
Page 13
Page 14

Wichtige Anweisungen
Garen
• Das G erät ist n icht für Rezep te mit üb erwiegend f lüssigen Be standteilen
(z.B. Suppen) geeignet.
• Nehmen Sie das Gerät nicht leer in Betrieb.
• Geben Sie keine zu großen Mengen in den Gargutbehälter und halten Sie sich an
die empfohlenen Mengen.
Description
1. Griffbereich des Deckels
2. Transparenter Deckel
3. Schloss des Deckels
4. Dosierlöffel
5. Verriegelungshebel: Hebel zum Einsetzen und
Herausnehmen der Rührvorrichtung
6. Maximale Einfüllmenge (für die Pommes Frites)
7. Abnehmbare Rührvorrichtung (Schaufel)
8. Herausnehmbarer Gargutbehälter & Ring
9. Entriegelungsknopf des Griffs
10. Griff des Gargutbehälters
11. Basis
12. Herausnehmbarer Filter
13. Öffnungstaste für den Deckel
14. Timer
15. An / Aus Taste
(On = angeschaltet, Off = ausgeschalten)
16. Einstelltaste des Timers
17. Abnehmbares Bedienfeld
(Zugang zum Batteriefach)
Schnelle Zubereitung
Vor der ersten Inbetriebnahme
• Machen Sie den Deckel auf - Abb. 1 und heben Sie den Verschluss an, um den
Deckel abzunehmen - Abb.2.
• Nehmen Sie den Dosierlöffel ab. Heben Sie den Griff des herausnehmbaren
Gargutbehälters horizontal an, bis ein Klicken ertönt und nehmen Sie den
Gargutbehälter heraus - Abb.3.
• Demontieren Sie den Ring, indem Sie die Clips vom Rand der Schüssel entfernen, und
schieben Sie ihn nach oben.
• Zum Abnehmen der Rührvorrichtung, heben Sie den hellgrauen Verriegelungshebel
an, der sich im oberen Teil der Rührvorrichtung befindet. Positionieren Sie dazu den
Daumen auf der Spitze der Rührvorrichtung und den Zeige- und Mittelfinger unter
den Verriegelungshebel. Heben Sie den Verriegelungshebel mit Ihren Fingern an,
um die Rührvorrichtung abzuheben - Abb.4a.
• Alle abnehmbaren Teile sind spülmaschinenfest - Abb.5 oder können mit einem
nicht scheuernden Schwamm und Spülmittel gereinigt werden.
• Reinigen Sie das Gehäuse des Geräts mit einem feuchten Schwamm und Spülmittel.
• Trocknen Sie alle Teile sorgfältig ab, bevor Sie sie wieder einsetzen.
• Um die Rührvorrichtung einzusetzen, ziehen Sie den hellgrauen Verriegelungshebel
an, setzen die Rührvorrichtung in der Mitte des Gargutbehälters ein und drücken den
Verriegelungshebel herunter - Abb.4b.
• Bei der ersten Inbetriebnahme kann es zu einer harmlosen Rauch- oder
Geruchsentwicklung kommen. Dieses Phänomen hat keinerlei Einfluss auf die
Funktionstüchtigkeit des Geräts und verschwindet schnell von selbst.
Vorbereitung der Lebensmittel
Lassen Sie den
Dosierlöffel nicht im
Gargutbehälter.
• Geben Sie di e Lebe nsmittel unte r Be achtung der Höchst menge in de n
Gargutbehälter (siehe Gartabelle S. 23 bis 25).
• Geben Sie Öl dazu - Abb.6 (siehe Gartabelle S. 23 bis 25).
• Entriegeln Sie den Griff und klappen Sie ihn ganz zuruck in die Horizontale - Abb.7.
• Schließen Sie den Deckel - Abb.8.
• Beachte n Sie stet s die in d er Ge brauchsanweisu ng un d im Rezeptbu ch
angegebenen, maximalen Zutaten- und Flüssigkeitsmengen.
22
Entfernen Sie alle
Aufkleber und
Verpackungselemente.
Halten Sie das Gerät nie
unter laufendes Wasser.
Um optimale Ergebnisse
zu erzielen, empfehlen wir
bei der ersten
Inbetriebnahme ein
Rezept mit einer Garzeit
von mindestens 30
Minuten zu wählen.
Page 15

Garen mit ActiFry
Einstellen der Garzeit
• Drücken Sie die Taste des Timers, um die Garzeit einzustellen - Abb. 9 (siehe
Gartabelle S. 23 bis 25).
• Lassen Sie die Taste los. Die eingestellte Garzeit wird angezeigt und der Countdown
läuft an.
• Sollten Sie sich geirrt haben, lässt sich die eingestellte Garzeit wie folgt löschen:
drücken Sie die Taste 2 Sekunden lang. Anschließend können Sie erneut die Garzeit
einstellen.
Fassen Sie den Deckel nur
an dem entsprechenden
Griffbereich an, um
jedwedes
Verbrennungsrisiko zu
vermeiden. - Abb.8.
Start der Garzeit
Das Gerät schaltet sich
aus, sobald der Deckel
angehoben wird.
• Drücken Sie die An / Aus Taste, der Garvorgang beginnt - Abb.10.
Entnehmen der Lebensmittel
• Wenn die Garzeit abgelaufen ist, ertönt ein Signalton. Beenden Sie den Signalton
mit einem Druck auf die Taste - Abb.11.
• Schalten Sie das Gerät mit einem Druck auf Ein / Aus aus - Abb.12 und öffnen Sie
den Deckel - Abb.1.
• Heben Sie den Griff an (lassen Sie ihn einrasten), nehmen Sie den Gargutbehälter
heraus - Abb.13 und servieren Sie unverzüglich.
Achtung: der Timer zeigt
das Ende der Garzeit an,
schaltet aber nicht das
Gerät aus.
Die Garzeit
Die Garzeiten sind nur Anhaltspunkte und können je nach Jahreszeit, Größe und Menge der Lebensmittel,
entsprechend dem individuellen Geschmack abgeändert werden. Die Ölmenge kann je nach persönlichem
Geschmack und persönlichen Bedurfnissen erhöht oder verringert werden. Wenn die Pommes Frites besonders
knusprig werden sollen, können Sie sie ein paar Minuten länger garen.
Kartoffeln
TYP MENGE ZUGABE GARZEIT
frisch 1200 g 1 Messlöffel Öl + 1/4* 43 - 46 min
Pommes Frites
Standardgröße
10mm x10mm
Country Potatoes
(Kartoffeln geviertlelt)
Bratkartoffeln
(Wurfel oder Scheiben)
Pommes Frites tiefgefroren 750 g keine 30 - 32 Minuten
Dünne Pommes Frites tiefgefroren 750 g keine 25 - 27 Minuten
*Abb.15
WICHTIG: Halten Sie stets die in der Gebrauchsanweisung und im Rezeptbuch angegebenen Zutaten- und
Flüssigkeitsmengen ein, um Ihr Gerät nicht zu beschädigen.
frisch 1000 g 1 Messlöffel Öl 40 - 45 Minuten
frisch 750 g 3/4 Messlöffel Öl* 35 - 37 Minuten
frisch 500 g 1/2 Messlöffel Öl* 28 - 30 Minuten
frisch 250 g 1/4 Messlöffel Öl* 24 - 26 Minuten
frisch 1000 g 1 Messlöffel Öl 40 - 42 Minuten
tiefgefroren 750 g keine 14 - 16 Minuten
frisch 1000 g 1 Messlöffel Öl 40 - 42 Minuten
tiefgefroren 750 g keine 30 - 32 Minuten
DE
23
Page 16

Sonstige Gemüsesorten
TYP MENGE ZUGABE GARZEIT
Zucchini
Paprikaschoten
Champignons frisch, geviertelt 650 g 1 Messlöffel Öl 12 - 15 Minuten
Tomaten frisch, geviertelt 650 g 1 Messlöffel Öl+ 15 cl Wasser 10 - 15 Minuten
Zwiebeln
frisch, in Scheiben
geschnitten
frisch, in Streifen
geschnitten
frisch, in Scheiben
geschnitten
750 g 1 Messlöffel Öl + 15 cl Wasser 25 - 35 Minuten
650 g 1 Messlöffel Öl+ 15 cl Wasser 20 - 25 Minuten
500 g 1 Messlöffel Öl 15 - 25 Minuten
Fleisch – Geflügel
Um dem Fleisch mehr Geschmack zu verleihen, können Sie Gewurze (Paprika, Curry, Kräuter der Provence, Thymian,
Lorbeer…) in das Öl geben.
TYP MENGE ZUGABE GARZEIT
Hähnchennuggets
Hähnchenschenkel frisch 4 bis 6 keine 30 - 32 Minuten
Hähnchenkeulen frisch 2 keine 30 - 35 Minuten
Hähnchenbrust frisch
Frühlingsröllchen frisch 4 bis 8 kleine 1 Messlöffel Öl 10 - 12 Minuten
Kalbsrouladen frisch 2 bis 6 1 Messlöffel Öl 15 - 20 Minuten
Lammkoteletts frisch 2 bis 6 1 Messlöffel Öl 15 - 20 Minuten
Schweinerippchen frisch 2 bis 4 1 Messlöffel Öl 15 - 18 Minuten
Schweinefilet frisch 2 bis 6 Scheiben 1 Messlöffel Öl 12 - 15 Minuten
Würstchen oder
Bratwurst
Kaninchenrücken frisch 2 bis 6 1 Messlöffel Öl 15 - 20 Minuten
Hackfleisch
Hackbällchen tiefgefroren 750 g 1 Messlöffel Öl 18 - 20 Minuten
frisch 750 g keine 18 - 20 Minuten
tiefgefroren 750 g keine 18 - 20 Minuten
6 St.ücke
Hähnchenbrust
(etwa 750 g)
frisch
frisch 600 g 1 Messlöffel Öl 10 - 15 Minuten
tiefgefroren 400 g
4 bis 8
(eingestochen)
keine 10 - 15 Minuten
keine 10 - 12 Minuten
mit oder ohne
1 Messlöffel Öl
12 - 15 Minuten
24
Page 17

Fisch - Schalentiere
TYP MENGE ZUGABE GARZEIT
Tintenfischringe tiefgefroren 300 g keine 12 - 14 Minuten
Seeteufel frisch 500 g 1 Messlöffel Öl 20 - 22 Minuten
Shrimps gekocht 400 g keine 10 - 12 Minuten
Gambas tiefgefroren 300 g (16 Stück) keine 12 - 14 Minuten
Desserts
TYP MENGE ZUGABE GARZEIT
in Scheiben
Bananen
Kirschen ganz bis zu 1000g
Erdbeeren geviertelt bis zu 1000g 1 bis 2 Messlöffel Zucker 5 - 7 Minuten
Äpfel
Birnen
Ananas
geschnitten
in Alufolie 2 Bananen keine 20 - 25 Minuten
in die Hälfte
geschnitten
in Stücke
geschnitten
in Stücke
geschnitten
500 g
(5 Bananen)
3
bis zu 1000g 1 bis 2 Messlöffel Zucker 8 - 12 Minuten
1 1 bis 2 Messlöffel Zucker 8 - 12 Minuten
1 Messlöffel Öl
+ 1 Messlöffel Brauner Zucker
1 Messlöffel Öl
+ 1 bis 2 Messlöffel Zucker
1 Messlöffel Öl
+ 2 Messlöffel Zucker
4 - 6 Minuten
12 - 15 Minuten
10 - 12 Minuten
tiefgefrorene Zubereitungen
TYP MENGE ZUGABE GARZEIT
Ratatouille tiefgefroren 750 g keine 20- 22 Minuten
Nudel- und
Fischpfanne
Bauernpfanne tiefgefroren 750 g keine 25 - 30 Minuten
Pasta à la Carbonara tiefgefroren 750 g keine 15 - 20 Minuten
Paella tiefgefroren 650 g keine 15 - 20 Minuten
Kantonreis-Gericht tiefgefroren 650 g keine 15 - 20 Minuten
Chili con Carne tiefgefroren 750 g keine 12 - 15 Minuten
tiefgefroren 750 g keine 20 - 22 Minuten
DE
25
Page 18

Page 19

Ein paar Tipps für den Problemfall…
PROBLEME MÖGLICHE URSACHEN LÖSUNGEN
Das Gerät funktioniert nicht. Das Gerät ist nicht richtig angeschlossen. Überprüfen Sie, ob das Gerät richtig
Sie haben die An / Aus Taste noch nicht
gedrückt.
Sie haben die An / Aus Taste gedrückt
aber das Gerät funktioniert nicht.
Die Motoren laufen, aber das Gerät heizt
sich nicht auf.
Die Rührvorrichtung dreht sich nicht. Überprüfen Sie, ob sie richtig eingesetzt
Die Rührvorrichtung sitzt nicht fest. Der Verriegelungshebel der
Die Zubereitung ist nicht gleichmäßig
gegart.
Die Pommes Frites sind nicht knusprig
genug.
Die Pommes Frites zerbrechen beim
Garen.
Die Lebensmittel bleiben am Rand des
Gargutbehälters liegen.
Es sind Kochflüssigkeiten in die Basis des
Geräts gelaufen.
Der Timer funktioniert nicht. Die Batterie ist leer. Wechseln Sie die Batterie aus (siehe
Das Gerät läuft ungewöhnlich laut. Sie haben den Verdacht, dass die
Rührvorrichtung ist nicht
eingerastet/verriegelt.
Sie haben die Rührvorrichtung nicht
benutzt.
Die Lebensmittel wurden nicht
gleichmäßig groß geschnitten.
Die Pommes Frites wurden nicht
gleichmäßig groß geschnitten.
Die Rührvorrichtung ist eingesetzt, dreht
sich aber nicht.
Sie haben keine festkochenden
Kartoffeln verwendet.
Die Kartoffeln wurden nicht ausreichend
gewaschen und getrocknet.
Die Pommes Frites Fritten sind zu dick. Schneiden Sie sie dünner.
Sie haben nicht genug Öl hinzugegeben. Geben Sie mehr Öl hinzu (siehe
Der Filter ist verstopft. Reinigen Sie den herausnehmbaren
Sie haben junge Kartoffeln verwendet. Geben Sie nur 750 g Kartoffeln in das
Der Gargutbehälter ist zu voll. Halten Sie sich an die in der Gartabelle
Die Rührvorrichtung wurde nicht richtig
eingesetzt oder die Dichtung der
Rührvorrichtung ist schadhaft.
Motoren des Geräts nicht richtig
funktionieren.
angeschlossen ist.
Drücken Sie die An / Aus Taste.
Schließen Sie den Deckel.
Bringen Sie das Gerät zu einem
zugelassenen Servicezentrum.
ist. Bringen Sie das Gerät andernfalls zu
einem zugelassenen Servicezentrum.
Prüfen Sie, ob der Verriegelungshebel völlig heruntergedrückt wurde.
Setzen Sie sie ein.
Schneiden Sie die Lebensmittel in gleich
große Stücke.
Schneiden Sie die Pommes Frites gleich
groß.
Bringen Sie das Gerät zu einem
zugelassenen Servicezentrum.
Verwenden Sie festkochende Kartoffeln.
Achten Sie darauf, die Kartoffeln vor
dem Garen gut zu waschen, abtropfen
zu lassen und zu trocknen.
Gartabelle S. 23 bis 25).
Filter.
Gerät und passen Sie die Garzeit an.
angegebenen Mengen.
Überprüfen Sie, ob Die Rührvorrichtung
richtig eingesetzt ist. Wenn das Problem
weiterhin besteht, muss das Gerät zu
einem zugelassenen Servicezentrum
gebracht werden.
Abb. 14).
Bringen Sie das Gerät zu einem
zugelassenen Servicezentrum.
DE
27
Page 20

Page 21

Page 22

Raccomandazioni importanti
Cottura
• Questo apparecchio non è adatto a ricette con liquidi (es. zuppe....)
• Non mettete mai in funzione l'apparecchio vuoto.
• Non sovraccaricate il piatto, rispettate le quantità raccomandate.
Descrizione
1. Maniglia di presa del coperchio
2. Coperchio trasparente
3. Blocco del coperchio
4. Cucchiaio dosatore
5. Leva di bloccaggio/sbloccaggio della pala
(colore grigio)
6. Livello massimo di riempimento (per le patate fritte)
7. Miscelatore amovibile
8. Cestello amovibile + Anello
9. Tasto di sblocco dell'impugnatura
10. Impugnatura del piatto contenitore
11. Base
12. Filtro amovibile
13. Comandi di apertura del coperchio
14. Timer
15. Interruttore On / Off
(On = acceso, Off = spento)
16. Manopola di regolazione del timer
17. Pannello di controllo smontabile (accesso allo
scomparto della pila)
Per una rapida preparazione
Primo utilizzo
• Aprite il coperchio - fig.1 e alzate la leva per rimuoverlo - fig.2.
• Rimuovete il cucchiaio dosatore.
• Posizionate l'impugnatura del cestello amovibile in orizzontale fino al "CLIC" per
estrarre il cestello - fig.3.
• Smontare l'anello sganciando le clip dal bordo del cestello e tirarlo verso l'alto.
• Togliete la pala sollevando la leva di bloccaggio: appoggiate il pollice sulla parte
superiore della pala e l'indice sotto la leva di bloccaggio - fig.4a.
• Tutti i pezzi amovibili possono essere lavati in lavastoviglie - fig.5 o con una
spugna non abrasiva e del detersivo per piatti.
• Pulite la base dell'apparecchio con una spugna umida e del detersivo per piatti.
• Asciugate tutti i pezzi con cura prima di riposizionarli nell'apparecchio.
• Per inserire la pala, mettete la leva di bloccaggio in posizione alta e posizionate
la pala al centro del piatto, poi spingete la leva - fig.4b.
• Al primo utilizzo, può verificarsi u n'emissione di odore non pericolosa. Il
fenomeno non pregiudica l'utilizzo dell'apparecchio e scompare rapidamente.
Rimuovete tutti gli adesivi
e gli imballaggi.
Non passate mai
l'apparecchio sotto
l'acqua.
Per una buona messa in
funzione, vi consigliamo di
fare la prima cottura
almeno per 30 minuti. A
partire dalla seconda
cottura, Actifry vi darà
grandi soddisfazioni.
Non lasciate il cucchiaio
dosatore nel piatto
contenitore.
38
Preparare gli alimenti
• Mettete gli alimenti nel cestello e rispettate le dosi massime (vedi tabella di
cottura pp. 39-41).
• Aggiungete l'olio - fig.6 (vedi tabella di cottura pp. 39-41).
• Sbloccate l'impugnatura e introducetela completamente nel suo alloggiamento
- fig.7.
• Chiudete il coperchio - fig.8.
• Rispettare sempre le quantità massime di ingredienti e di liquido indicate nelle
istruzioni e nel libro delle ricette.
Page 23

Una cottura leggera
Selezionate il tempo di cottura
• Regolate il tempo tenendo premuto il tasto del timer - fig.10 (vedi tabella di
cottura pp. 39-41).
• Rilasciate il tasto. Il tempo scelto viene visualizzato e il conteggio del tempo
comincia.
• In caso di errore o per annullare il tempo selezionato, tenere premuto il tasto per
2 secondi e selezionare nuovamente il tempo.
Attenzione: il timer
segnala la fine del tempo
di cottura ma non spegne
l'apparecchio.
Iniziare la cottura
Nel momento in cui
aprite il coperchio,
l'apparecchio si ferma
• Premete il tasto on / off, la cottura ha inizio grazie alla circolazione dell'aria calda
nel vano di cottura
- fig.10.
Estrarre gli alimenti
• Quando la cottura è terminata, il timer suona. Spegnete la suoneria premendo il
tasto
- fig.11.
• Spegnete l'apparecchio premendo il tasto on / off
- fig.1.
• Alzate l'impugnatura, fate uscire il cestello
- fig.12 e aprite il coperchio
- fig.13 e servite subito.
Per evitare ogni rischio di
bruciatura toccate il
coperchio solo con
l'apposita maniglia - Fig. 9.
I tempi di cottura
I tempi di cottura sono indicativi, possono variare a seconda della stagionalità degli alimenti, della loro grandezza,
della quantità, dei gusti personali e della tensione della rete di alimentazione.
La quantità d'olio riportata può essere aumentata in base ai vostri gusti e alle vostre esigenze. Se volete delle
patate fritte ancora più croccanti, potete farle cuocere qualche minuto in più.
Patate
TIPO QUANTITÀ AGGIUNTA TEMPI DI COTTURA
Fresche 1200 g 1 cucchiaio d'olio + 1/4* 43 - 46 min
Patate fritte
misura standard
10 mm x 10 mm
Patate
Patate rosolate
Patate fritte
tradizionali
Patate fritte a
bastoncino
*Fig.15
IMPORTANTE: Per non danneggiare l'apparecchio, rispettare sempre le quantità massime di ingredienti e di
liquido indicate nelle istruzioni e nel libro delle ricette
Fresche 1000 g 1 cucchiaio d'olio 40 - 43 min
Fresche 750 g 3/4 di cucchiaio d'olio* 35 - 37 min
Fresche 500 g 1/2 cucchiaio d'olio* 28 - 30 min
Fresche 250 g 1/4 di cucchiaio d'olio* 24 - 26 min
Fresche 1000 g 1 cucchiaio d'olio 40 - 42 min
Surgelate 750 g senza olio 14 - 16 min
Fresche 1000 g 1 cucchiaio d'olio 40 - 42 min
Surgelate 750 g senza olio 30 - 32 min
Surgelate 750 g senza olio 30 - 32 min
Surgelate 750 g senza olio 25 - 27 min
IT
39
Page 24

Altre verdure
TIPO QUANTITÀ AGGIUNTA TEMPI DI COTTURA
Zucchine Fresche a lamelle 750 g 1 cucchiaio d'olio + 15 cl d'acqua 25 - 35 min
Peperoni Fresche a lamelle 650 g 1 cucchiaio d'olio + 15 cl d'acqua 20 - 25 min
Funghi Freschi a pezzetti 650 g 1 cucchiaio d'olio 12 - 15 min
Pomodori Freschi a pezzetti 650 g 1 cucchiaio d'olio + 15 cl d'acqua 10 - 15 min
Cipolle Fresche a rondelle 500 g 1 cucchiaio d'olio 15 - 25 min
Carne – Pollame
Per dare più gusto alla vostra carne, potrete aggiungere all'olio varie qualità di spezie (paprica, curry, erbe di
Provenza, timo, alloro…)
TIPO QUANTITÀ AGGIUNTA
Crocchette di pollo
Sottocosce di pollo Fresche da 4 a 6 senza olio 30 - 32 min
Cosce di pollo Freschi 2 senza olio 30 - 35 min
Petti di pollo Fresche 6 petti (circa 750 g) senza olio 10 - 15 min
Involtini Fresche da 4 a 8 piccoli 1 cucchiaio d'olio 10 - 12 min
Involtini di vitello Freschi 2 à 6 1 cucchiaio d'olio 15 - 20 min
Costolette di agnello Freschi 2 à 6 1 cucchiaio d'olio 15 - 20 min
Costolette di maiale Freschi 2 à 4 1 cucchiaio d'olio 15 - 18 min
Filetto di maiale Fresche da 2 a 6 pezzi 1 cucchiaio d'olio 12 - 15 min
Salsicce Freschi da 4 a 8 pezzi senza olio 10 - 12 min
Dorso di coniglio Fresche da 2 a 6 1 cucchiaio d'olio 15 - 20 min
Carne macinata
Polpette di carne Surgelate 750 g 1 cucchiaio d'olio 18 - 20 min
Fresche 750 g senza olio 18 - 20 min
Surgelate 750 g senza olio 18 - 20 min
Freschi 600 g 1 cucchiaio d'olio 10 - 15 min
Surgelate 400 g
senza o con
1 cucchiaio d'olio
TEMPI DI
COTTURA
12 - 15 min
40
Page 25

Pesce - Crostacei
TIPO QUANTITÀ AGGIUNTA TEMPI DI COTTURA
Frittelle di calamari Surgelate 300 g senza olio 12 - 14 min
Rana pescatrice Fresca 500 g 1 cucchiaio d'olio 20 - 22 min
Gamberetti Cotti 400 g senza olio 10 - 12 min
Gamberoni Surgelati 300 g (16 pezzi) senza olio 12 - 14 min
Dolci
TIPO QUANTITÀ AGGIUNTA TEMPI DI COTTURA
Banane
Ciliege intere fino a 1.000 g
Fragole tagliate in quattro fino a 1.000 g 1 o 2 cucchiai di zucchero 5 - 7 min
Mele tagliate in due 3
Pere tagliate a pezzetti fino a 1.000 g 1 o 2 cucchiai di zucchero 8 - 12 min
Ananas tagliato a pezzetti 1 1 o 2 cucchiai di zucchero 8 - 12 min
a rondelle
al cartoccio 2 bananes senza olio 20 - 25 min
500 g
(5 banane)
1 cucchiaio d'olio
+ 1 cucchiaio di zucchero grezzo
1 cucchiaio d'olio
+ 1 o 2 cucchiai di zucchero
1 cucchiaio d'olio
+ 2 cucchiai di zucchero
4 - 6 min
12 - 15 min
10 - 12 min
Pietanze surgelate
TIPO QUANTITÀ AGGIUNTA TEMPI DI COTTURA
Ratatouille Surgelata 750 g senza olio 20- 22 min
Pasta e pesce Surgelata 750 g senza olio 20 - 22 min
Piatto campagnolo (a
base di patate)
Piatto savoiardo (a
base di patate e
formaggio)
Pasta alla carbonara Surgelata 750 g senza olio 15 - 20 min
Paella Surgelata 650 g senza olio 15 - 20 min
Riso cantonese Surgelata 650 g senza olio 15 - 20 min
Chili con carne Surgelata 750 g senza olio 12 - 15 min
Surgelata 750 g senza olio 25 - 30 min
Surgelata 750 g senza olio 20 - 25 min
IT
41
Page 26

Page 27

Consigli utili in caso di difficoltà…
PROBLEMI CAUSE SOLUZIONI
L'apparecchio non è collegato.
Non avete ancora premuto il tasto on /
off.
Avete premuto il tasto on / off ma
L'apparecchio non funziona.
La pala non tiene. La pala non è bloccata.
La cottura degli alimenti non è
uniforme.
Le patate fritte non sono abbastanza
croccanti.
Le patate fritte si rompono durante la
cottura.
Gli alimenti superano il bordo del piatto
contenitore.
I liquidi di cottura sono colati nella base
dell'apparecchio.
Il timer non funziona. La pila è esaurita. Cambiate la pila (vedere fig. 14).
L'apparecchio è troppo rumoroso.
l'apparecchio non funziona.
I motori sono in funzione ma
l'apparecchio non scalda.
Il miscelatore non gira.
Non avete utilizzato la pala. Posizionatela.
Gli alimenti non sono tagliati in modo
regolare.
Le patate fritte non sono tagliate in
modo regolare.
Il miscelatore è posizionato
correttamente ma non gira.
Non state utilizzando delle patate
adatte ad essere fritte.
Le patate non sono lavate e asciugate
bene.
Le patate fritte sono troppo spesse. Tagliatele più fini.
L'olio non è sufficiente.
Il filtro è ostruito. Pulite il filtro.
Avete utilizzato delle patate novelle.
Il piatto contenitore è troppo pieno.
Il miscelatore non è posizionato
correttamente o la guarnizione è
difettosa.
Ipotizzate una anomalia nel
funzionamento del motore
dell'apparecchio.
Verificate che l'apparecchio sia
collegato correttamente.
Premere il tasto on / off.
Chiudete il coperchio.
Portate l'apparecchio in un centro di
assistenza autorizzato.
Verificate che il miscelatore sia nella
posizione corretta, altrimenti portate
l'apparecchio in un centro di assistenza
autorizzato.
Per posizionare la pala correttamente,
mettete la leva di bloccaggio in
posizione alta, posizionate la pala al
centro del piatto e poi spingete la leva.
Tagliate gli alimenti della stessa misura.
Tagliate le patate fritte della stessa
misura.
Portate l'apparecchio in un centro di
assistenza autorizzato.
Scegliete delle patate adatte.
Lavate, scolate e asciugate bene le
patate prima della cottura.
Aumentate la quantità di olio (vedere
tabella di cottura pp. 39-41).
Riducete la quantità di patate a 750 g
e impostate il relativo tempo di cottura.
Rispettate le quantità indicate sulla
tabella di cottura.
Verificate che il miscelatore sia
posizionato correttamente. Se il problema
persiste, portate l'apparecchio presso un
centro di assistenza autorizzato.
Portate l'apparecchio in un centro di
assistenza autorizzato.
IT
43
Page 28

Page 29

Page 30

Recomendaciones importantes
Cocción
• Este electrodoméstico no es apto para recetas con base líquida (por ejemplo
sopas).
• Nunca ponga a funcionar el aparato en vacío.
• No sobrecargue la fuente, respete las cantidades recomendadas.
Descripción
1. Zona de prensión de la tapa
2. Tapa transparente
3. Cierre de la tapa
4. Cuchara dosificadora
5. Maneta para cerrar / abrir la pala (color gris
claro)
6. Nivel máximo de llenado (para las patatas
fritas)
7. Pala de braseado extraíble
8. Fuente extraíble + Anillo
9. Botón de desbloqueo del asa
10. Asa de la fuente
11. Base
12. Filtro removible
13. Mandos de desbloqueo de la tapa
14. Minutero
15. Botón On / Off
(On = funcionamiento, Off = parada)
16. Botón de ajuste del reloj
17. Panel de control desmontable (acceso al
compartimento pila)
Una preparación rápida
Antes de la primera utilización
• Abra la tapa - fig.1 y levante el bloqueo para retirar la tapa - fig.2.
• Retire la cuchara dosificadora.
• Lleve el asa de la fuente extraíble a la posición horizontal hasta oír el “CLIC” para
sacar la fuente - fig.3.
• Desmonte el anillo apartando las grapas del borde de la cuba y colóquelo en
posición elevada.
• Para retirar la pala, tire hacia arriba la maneta de color gris claro situada en la
parte superior de la pala. Ponga su dedo pulgar en la parte superior de la pala y
sus dedos índice y el del medio debajo de la maneta, eleve la maneta utilizando
sus dedos para abrir la pala - fig.4a.
• Todas las piezas extraíbles van al lavavajillas - fig.5 o se pueden lavar con una
esponja no abrasiva y detergente para vajillas.
• Limpie la base del aparato con una esponja húmeda y detergente para vajillas.
• Para insertar la pala, tire de la maneta de color gris claro, luego sitúe la pala en
el centro de la fuente de cocción y pulse hacie abajo la maneta - fig.4b.
• Durante la primera utilización, se puede producir un desprendimiento de olor que
no es nocivo. Este fenómeno sin consecuencias derivado de la utilización del
aparato, desaparecerá rápidamente.
Prepare los alimentos
No deje la cuchara
dosificadora en la fuente.
• Introduzca los alimentos en la fuente y respete la cantidad máxima (ver tabla de
cocción p. 47 a 49).
• Añada la materia grasa
• Desbloquee el asa y plegarla completamente en su compartimento
• Cierre la tapa
• Respete siempre las cantidades máximas de los ingredientes y de los líquidos
indicados en el libro de instrucciones y de recetas
- fig.6 (ver tabla de cocción p. 47 a 49).
- fig.8.
46
Retire todos los adhesivos
y elementos del embalaje.
Nunca pase el aparato por
agua.
Para obtener los mejores
resultados de este
producto durante el
primer uso, le
recomendamos una
primera cocción de al
menos 30 minutos.
- fig.7.
Page 31

Una cocción ligera
Seleccione el tiempo de cocción
• Ajuste el tiempo presionando el botón del reloj - fig.9 (ver tabla de cocción p. 47
a 47).
• Suelte. El tiempo seleccionado se visualiza y empieza el descuento.
• En caso de error o para borrar el tiempo seleccionado, mantenga el botón
presionado durante 2 segundos y seleccione de nuevo el tiempo.
Cuando abre la tapa, el
aparato se para.
• Presione el botón On/ Off y la cocción empezará gracias a la circulación del aire
caliente en el recinto de cocción
- fig. 10.
Retire los alimentos
• Cuando la cocción haya terminado, el minutero sonará. Detenga la alarma
presionando el botón
• Pare el aparato presionando en On / Off
• Levante el asa y saque la fuente
- fig.11.
- fig.13 y sirva sin esperar.
- fig.12 y abra la tapa - fig.1.
Atención: el reloj señala
el final del tiempo de
cocción, pero no detiene
el aparato.
Inicie la cocción
Para evitar cualquier
riesgo de quemadura, no
toque la tapa fuera de la
zona de prensión prevista
para este fin - Fig.9.
Los tiempos de cocción
Los tiempos de cocción se proporcionan a título indicativo, pueden variar en función de la estacionalidad de los
alimentos, su tamaño, cantidades, sabor de cada uno y la tensión de la red eléctrica. La cantidad de aceite
indicada puede aumentar en función de su gusto y sus necesidades.
Si desea patatas fritas todavía más crujientes, podrá añadir unos minutos de cocción adicionales.
Patatas
TIPO CANTIDAD AÑADIDO
Frescas 1200 g 1 cuchara de aceite + 1/4* 43 - 46 min
Patatas fritas
Tamaño estándar
10mm x10mm
Patatas
Patatas fritas a dados
Patatas fritas
Tradicionales
Patatas fritas Paja Congeladas 750 g sin 25 - 27 min
*Fig.15
IMPORTANTE: Para no dañar su aparato, respete siempre las cantidades máximas de ingredientes y de líquidos
que se indican en el libro de recetas y de instrucciones
Frescas 1000 g 1 cuchara de aceite 40 - 43 min
Frescas 750 g 3/4 cuchara de aceite* 35 - 37 min
Frescas 500 g 1/2cuchara de aceite* 28 - 30 min
Frescas 250 g 1/4 cuchara de aceite* 24 - 26 min
Frescas 1000 g 1 cuchara de aceite 40 - 42 min
Congeladas 750 g sin 14 - 16 min
Frescas 1000 g 1 cuchara de aceite 40 - 42 min
Congeladas 750 g sin 30 - 32 min
Congeladas 750 g sin 30 - 32 min
TIEMPO DE
COCCIÓN
ES
47
Page 32

Otras verduras
TIPO CANTIDAD AÑADIDO
Calabacines Frescos en laminas 750 g 1 cuchara de aceite + 15 cl de agua
Pimientos Frescos en laminas 650 g 1 cuchara de aceite + 15 cl de agua
Champiñones Frescos en cuartos 650 g 1 cuchara de aceite 12 - 15 min
Tomates Frescos en cuartos 650 g 1 cuchara de aceite + 15 cl de agua 10 - 15 min
Cebollas Frescos en rodajas 500 g 1 cuchara de aceite 15 - 25 min
TIEMPO DE
COCCIÓN
25 - 35 min
20 - 25 min
Carnes – Aves
Para dar más sabor a sus carnes, no dude en mezclar especias en el aceite (paprika, curry, hierbas de Provenza,
tomillo, laurel…)
TIPO CANTIDAD AÑADIDO
Nuggets de pollo
Alitas de Pollo Frescos 4 a 6 Sin 30 - 32 min
Muslos de pollo Frescos 2 Sin 30 - 35 min
Pechugas de pollo Frescas
Rollitos de primavera Frescos 4 a 8 pequeños 1 cuchara de aceite 10 - 12 min
Ternera rellena Fresca 2 a 6 1 cuchara de aceite 15 - 20 min
Chuletas de cordero Frescas 2 a 6 1 cuchara de aceite 15 - 20 min
Chuletas de cerdo Frescas 2 a 4 1 cuchara de aceite 15 - 18 min
Lomo de cerdo Fresco 2 a 6 rodajas 1 cuchara de aceite 12 - 15 min
Salchichas Frescas 4 a 8 (pinchadas) Sin 10 - 12 min
Cuartos traseros
de conejo
Carne picada
Albóndigas de carne Congeladas 750 g 1 cuchara de aceite 18 - 20 min
Frescos 750 g Sin 18 - 20 min
Congelados 750 g Sin 18 - 20 min
6 pechugas
(aprox. 750 g)
Frescos 2 a 6 1 cuchara de aceite 15 - 20 min
Fresca 600 g 1 cuchara de aceite 10 - 15 min
Congelada 400 g Sin o con 1 cuchara de aceite 12 - 15 min
Sin 10 - 15 min
TIEMPO DE
COCCIÓN
48
Page 33

Pescados - Crustáceos
TIPO CANTIDAD AÑADIDO
Calamares Congelados 300 g Sin 12 - 14 min
Rape Fresco 500 g 1 cuchara de aceite 20 - 22 min
Gambas Cocidas 400 g Sin 10 - 12 min
Gambas Congeladas 300 g (16 piezas) Sin 12 - 14 min
TIEMPO DE
COCCIÓN
Postres
TIPO CANTIDAD AÑADIDO
Plátanos
Cerezas Enteras Hasta 1000g
Fresas
Manzanas Cortadas en dos 3
Peras Cortadas en trozos Hasta 1000g 1 a 2 cucharas de azúcar 8 - 12 min
Piñas Cortadas en trozos 1 1 a 2 cucharas de azúcar 8 - 12 min
en rodajas
en papillote 2 plátanos Sin 20 - 25 min
Cortadas en
cuartos
500 g
(5 plátanos)
Hasta 1000g
1 cuchara de aceite
+ 1 cuchara de azúcar moreno
1 cuchara de aceite
+ 1 a 2 cucharas de azúcar
1 a 2 cucharas de azúcar
1 cuchara de aceite
+ 1 a 2 cucharas de azúcar
TIEMPO DE
COCCIÓN
4 - 6 min
12 - 15 min
5 - 7 min
10 - 12 min
Preparaciones congeladas
TIPO CANTIDAD AÑADIDO
Pisto Congelado 750 g Sin 20- 22 min
Salteado pasta y
pescado
Salteado campesino Congelado 750 g Sin 25 - 30 min
Salteado saboyano Congelado 750 g Sin 20 - 25 min
Pastas a la carbonara Congeladas 750 g Sin 15 - 20 min
Paella Congelada 650 g Sin 15 - 20 min
Arroz Cantonés Congelado 650 g Sin 15 - 20 min
Chili con carne Congelado 750 g Sin 12 - 15 min
Congelado 750 g Sin 20 - 22 min
TIEMPO DE
COCCIÓN
ES
49
Page 34

Page 35

Algunos consejos en caso de dificultad…
PROBLEMAS CAUSAS SOLUCIONES
El aparato no está bien conectado.
Todavía no ha presionado el botón
on/off.
Ha presionado el botón on/off pero el
El aparato no funciona.
La pala mezcladora no está en su
posición.
Las patatas fritas no son bastante
crujientes.
La cocción de las preparaciones no es
homogénea.
Las patatas fritas se han roto durante la
cocción.
Los alimentos permanecen en el borde
de la fuente
Líquidos de cocción se han vertido por
la base del aparato
El reloj no funciona. La pila está gastada Cambie la pila (ver
El aparato produce un ruido que no es
normal.
aparato no funciona.
Los motores giran pero el aparato no
calienta.
La pala no gira.
La pala mezcladora no está cerrada.
No ha utilizado la pala. Póngala en su sitio.
Los alimentos no se han cortado de
manera regular.
Las patatas fritas no se han cortado de
manera regular.
La pala está bien puesta pero no gira.
No utiliza patatas especiales para
patatas fritas.
Las patatas no se han lavado y secado
lo suficiente
Las patatas fritas son demasiado
gruesas.
No hay suficiente aceite.
El filtro está obstruido. Limpie el filtro removible.
Ha utilizado patatas recién cosechadas
y con alto contenido de agua.
La fuente está demasiado cargada.
La pala está mal colocada o la junta de
la pala está defectuosa.
Sospecha de una anomalía en el
funcionamiento de los motores del
aparato.
Compruebe que el aparato está
correctamente conectado.
Presione el botón On / Off.
Cierre la tapa.
Lleve el aparato a un Servicio Técnico
Autorizado.
Compruebe que está en su sitio sino
lleve el aparato a un Servicio Técnico
Autorizado.
Cerciórese que ha pulsado hacia abajo
la maneta.
Corte todos los alimentos con el mismo
tamaño.
Corte todas las patatas fritas con el
mismo tamaño.
Lleve el aparato a un Servicio Técnico
autorizado.
Elija patatas especiales para patatas
fritas.
Lave, escurra y seque bien las patatas
antes de la cocción.
Córtelas más finas.
Aumente la cantidad de aceite (ver
tabla de cocción p. 47 a49).
Reduzca la cantidad de patatas a 750
g y adapte el tiempo de cocción.
Respete las cantidades indicadas en la
tabla de cocción.
Compruebe que la pala está
correctamente colocada. Si el problema
persiste, lleve el aparato a un Servicio
Técnico Autorizado.
Lleve el aparato a un Servicio Técnico
Autorizado.
fig 14
ES
).
51
Page 36

Page 37

Page 38

Important recommendations
Cooking
• This appliance is not suitable for recipes with a high-liquid content (eg. soups,
cook-in sauces...).
• Never turn on the appliance if the cooking pan is empty.
• Do not overfill the cooking pan, never exceed the indicated quantities or
maximum food level mark (for chips only).
Description
1. Cool touch area of the lid
2. Transparent lid
3. Latch for removing lid
4. Measuring spoon (14ml)
5. Locking/unlocking paddle lever
6. Maximum food level markers (for chips only)
7. Removable mixing paddle
8. Non-stick removable cooking pan + Ring
9. Cooking pan handle release button
10. Cooking pan handle
11. Base
12. Removable filter
13. Lid opening buttons
14. Digital timer
15. On/Off switch
16. Timer setting button
17. Removable control panel (for access to the
battery compartment only)
Quick introduction for use
Before first use
• To remove the lid – fig.1, press the lid opening buttons (13) at the same time
and lift the latch (3) to take off the lid – fig. 2 .
• Remove the measuring spoon.
• Lift the handle to a horizontal position until you hear a “click” as it locks.
• Take out the cooking pan – fig. 3.
• Remove the ring by releasing the clips from the edge of the pan and pushing it
upwards.
• To remove the paddle, lift up the light grey colour locking lever positioned on part
of the paddle. Position your thumb on the top of the paddle and your index and
middle finger under the locking lever, lift up the locking lever using your fingers
to unlock the paddle – fig. 4a.
• All the removable parts are dishwasher safe – fig. 5or can be washed with a soft
sponge and washing up liquid.
• Wipe the base of the appliance using a damp cloth and washing up liquid.
• Rinse and dry the parts carefully before putting them back together.
• To fit the paddle, pull the light grey colour locking lever up, then place the paddle
in the middle of the cooking pan and push the locking lever down –
• During its first use, the appliance may give off a slight odour: this is not harmful
and it will disappear quickly. It has no effect on the functioning of your + ActiFry.
Do not leave the
measuring spoon inside
the pan when cooking
food.
54
54
• Place the food in the cooking pan, distributing it evenly, making sure that you
respect the maximum quantity (see cooking tables p. 55 to 57).
• Add the oil to the food with the spoon –
tables p. 55 to 57).
(1 spoonful of oil = 14 ml of oil)
• Unlock the handle and fold it completely into its housing –
• Close the lid –
• Never exceed the maximum quantities of ingredients and liquids indicated in the
instruction manual and in the recipe book.
fig. 8.
Remove all the stickers
and any packaging.
Never immerse the base in
water.
On first use, to obtain the
best results from your new
product, we advise you to
prepare a recipe that
cooks for 30 minutes or
more.
fig. 4b.
Preparing food
fig. 6, spreading it evenly (see cooking
fig. 7.
Page 39

Set the cooking time
• Press the timer setting button to set the time. Hold down the button until desired
time is featured on the display – fig. 9 (see cooking tables p. 55 to 57).
• Now release. The selected time (in minutes) is displayed and the countdown
starts.
• If you make a mistake or to delete the selected time, hold down the button for 2
seconds then set the time again.
Starting the cooking
When you open the lid,
the appliance stops
working.
• Press the On/Off switch, the cooking begins thanks to the hot air circulation inside
the cooking enclosure –
fig.10. The paddle rotates slowly in a clockwise direction.
BE CAREFUL: the timer
signals the end of the
cooking but does not
switch off the fryer.
• Once cooking is completed, the timer beeps. To stop the beeping signal, press the
timer setting button –
• Press on On/Off to stop the appliance –
• Lift the handle until you hear a “click” that it locks and take out the cooking pan
–
fig. 13.
• Serve at once.
Table of cooking times
The cooking times below are only a guide and may vary according to the variety and batch of potatoes used.
We recommend using varieties such as King Edward and Maris Piper for chips and potato recipes.
fig.11.
fig. 12 and open the lid.
To avoid any risk of burns
do not touch the lid or
any part other than the
cool touch area.
Potatoes
TYPE QUANTITY OIL COOKING TIME
Fresh 1000 g* 1 spoonful oil + 1/4** 43 - 46 min
Taking food out
Chips
standard
thickness
10mm x 10mm
length up to 9cm
Potatoes (quartered)
Diced potato
Chips
*Weight of unpeeled potatoes / **
IMPORTANT: To avoid damaging your appliance, never exceed the maximum quantities of ingredients and liquids indicated in the instruction manual and in the recipe book
Fresh 1000 g* 1 spoonful oil 40 - 43 min
Fresh 750 g* 3/4 spoonful oil** 35 - 37 min
Fresh 500 g* 1/2 spoonful oil** 28 - 30 min
Fresh 250 g* 1/4 spoonful oil** 24 - 26 min
Fresh 1000 g* 1 spoonful oil 40 - 42 min
Frozen 750 g None 14 - 16 min
Fresh 1000 g* 1 spoonful oil 40 - 42 min
Frozen 750 g None 30 - 32 min
Frozen - suitable
for deep frying
only
Frozen - 2 way or
3 way cook
suitable for oven
and grill (and
deep frying).
fig. 15
750 g
Thick
13mm x 13mm
750 g
Standard
10mm x 10mm
500 g
American Style
8mm x 8mm
None
None
None
35-40 min
30-32 min
25-27 min
EN
55
Page 40

Other vegetables
TYPE QUANTITY OIL COOKING TIME
Courgettes Fresh, in slices 750 g
Sweet peppers Fresh, in slices 650 g
Mushrooms Fresh, in quarters 650 g 1 spoonful oil 12 - 15 min
Tomatoes Fresh, in quarters 650 g
Onions Fresh, in rings 500 g 1 spoonful oil 15 - 25 min
1 spoonful oil
+ 150 ml cold water
1 spoonful oil
+ 150 ml cold water
1 spoonful oil
+ 150 ml cold water
25 - 35 min
20 - 25 min
10 - 15 min
Meat - Poultry
To add flavour to meat and poultry, mix some spices (such as paprika, curry, mixed herbs, thyme…..) with the oil.
TYPE QUANTITY OIL COOKING TIME
Fresh 750 g None 18 - 20 min
Chicken nuggets
Chicken drumsticks Fresh 4 to 6 None 30 - 32 min
Chicken legs Fresh 2 None 30 - 35 min
Chicken breasts
(boneless)
Chinese Spring Rolls Fresh 4 to 8 small 1 spoonful oil 10 - 12 min
Lamb chops
Pork chops
Pork fillet
Sausages Fresh 4 to 8 (pricked) None 10 - 12 min
Chilli Con Carne
Beef steak
Meatballs Fresh 12 pieces None 18 - 20 min
*Turn halfway through cooking
Frozen 750 g None 18 - 20 min
Frozen
Fresh 6 (about 750 g) None 10 - 15 min
Fresh
(2.5 cm to 3 cm
thick)
Fresh
(2.5 cm thick)
Fresh 2 to 6 thin slices
Fresh
(made from
minced beef)
Fresh
(rump or sirloin cut
into 1 cm thick
strips)
12 pieces
(160 g)
2 to 6 None 20 - 25 min*
2 to 3 None 18 - 23 min*
or strips
500 g 1 spoonful oil 30 - 40 min
600 g None 8 - 10 min
None
1 spoonful oil 12 - 15 min
12 - 15 min
Fish - Shellfish
TYPE QUANTITY OIL COOKING TIME
Breaded scampi Frozen
Monkfish Fresh cut in pieces 500 g 1 spoonful oil 20 - 22 min
Prawns Cooked 400 g None 10 - 12 min
Jumbo King prawns Frozen and thawed 300 g (16 pieces) None 12 - 14 min
18 pieces
(280 g)
None 10 min
56
Page 41

Desserts
TYPE QUANTITY OIL COOKING TIME
Bananas
Cherries Whole Up to 1000 g
Strawberries
Apples Cut in wedges 3 1 spoonful oil + 2 spoonful sugar 15 - 18 min
Pears Cut in pieces Up to 1000 g 1 to 2 spoonful sugar 8 - 12 min
Pineapple Cut in pieces 1 1 to 2 spoonful sugar 8 - 12 min
Cut in slices
Wrapped in tinfoil 2 bananas None 20 - 25 min
Cut in quarters if
large or halves if
small
500 g
(5 bananas)
Up to 1000 g 1 to 2 spoonful sugar 5 - 7 min
1 spoonful oil
+ 1 spoonful brown sugar
1 spoonful oil
+ 1 to 2 spoonful sugar
4 - 6 min
12 - 15 min
Frozen products
FOOD TYPE QUANTITY OIL COOKING TIME
Ratatouille Frozen 750 g None 20-22 minutes
Pan-fried fish and
pasta
Pasta carbonara
Paella Frozen
Cantonese rice Frozen 650 g None 15 - 20 minutes
Chilli con carne Frozen 750 g None 112 - 15 minutes
Frozen 750 g None 20-22 minutes
Frozen
750 g None 15 - 20 minutes
650 g
None 15 - 20 minutes
ActiFry cooking hints and tips
• Do not add salt to chips while the chips are in the pan. Only add salt once the
chips are removed from the appliance at the end of cooking.
• When adding dried herbs and spices to Actifry, mix them with some oil or liquid.
If you try sprinkling them directly into the pan they will just get blown around by
the hot air system.
• Please note that strong coloured spices may slightly stain the paddle and parts
of the appliance. This is normal.
• For best results, use finely chopped garlic instead of crushed garlic to avoid it
adhering to the central paddle.
• If using onions in ActiFry recipes, they are best thinly sliced instead of chopped
as they cook better. Separate the onion rings before adding them to the pan and
give them a quick stir so that they are evenly distributed.
• With meat and poultry dishes, stop the appliance and stir the pan once or twice
during cooking so that the food on top does not dry out and the dish thickens
evenly.
• Prepare vegetables in small pieces or stir fry size to ensure they cook through.
• This appliance is not suitable for recipes with a high-liquid content (eg. soups,
cook-in sauces...).
EN
57
Page 42

Page 43

If your fryer is not working correctly
PROBLEMS CAUSES SOLUTIONS
The appliance is not plugged in.
The On-Off switch is not fully pressed
down.
You have pressed down the On-Off switch
The appliance is not working.
The removable paddle doesn't stay in
place.
Food is not cooking evenly.
The chips are not crispy enough.
The chips break up during the cooking.
The food stays on the edge of the
cooking pan.
Cooking liquids have flowed into the base
of the appliance.
The timer does not work. The battery is dead. Change the battery (see
The appliance is unusually noisy.
The paddle stops turning during
cooking.
If you have any product problems or queries please contact our Customer Relations Team
but the appliance is not working.
The motor is running but the appliance
does not heat.
The paddle does not turn.
The mixing paddle is not locked.
The paddle has not been installed. Fit the paddle.
The food has not been cut in regular size
pieces.
The chips have not been cut in regular
size pieces.
The paddle has been installed correctly
but it does not turn.
The wrong variety of potatoes has been
used.
The potatoes are insufficiently washed
and/or not completely dried.
The chips are too thick.
There is not enough oil for the quantity of
chips.
The filter is obstructed. Clean the removable filter.
The potatoes used are recently harvested
and hence have a high water content.
The cooking pan is too full.
The paddle is not positioned correctly or
the seal of the paddle is defective.
You suspect the motor is not working
correctly.
The paddle is not positioned correctly.
0845 602 1454 - UK / (01) 401 8448 - Ireland
or consult our website - www.tefal.co.uk
Helpline:
Check that the appliance is plugged in
correctly.
Press on the On/Off switch.
Close the lid.
Contact your point of purchase.
Check that the paddle is correctly
positioned. If the problem continues,
contact your point of purchase.
Check that the locking lever has been
pushed down fully.
Cut food to the same size.
Cut the chips to the same size.
Check that it has been pushed down and
clicked in position. If the problem
continues, contact your point of purchase.
Choose a variety of potato recommended
for chips.
Wash the potatoes for a long time to
remove excess starch, then drain and dry
them before cooking. They must be
completely dry.
Cut the chips thinner. The maximum
chips dimensions are 13mm x 13 mm.
Increase the oil quantity (see cooking
tables p. 55 to 57).
Reduce the quantity of potatoes down to
800 g and adjust the cooking time.
Respect the maximum quantities
indicated in the cooking tables.
Make sure that the paddle is correctly
positioned. If the problem continues,
contact your point of purchase. Do not
use ActiFry for making soups or recipes
with a high liquid content.
Contact your point of purchase.
Using an oven glove, push the paddle
downward until it clicks into place. If
this does not work, contact your point
of purchase.
fig. 14
EN
).
59
Page 44

Page 45

Page 46

Page 47

TR p. 4 - 11
FR p. 12 - 19
DE p. 20 - 27
NL p. 28 - 35
IT p. 36 - 43
ES p. 44 - 51
EN p. 52 - 59
S.A.S. SEB SELONGEY CEDEX • RC. DIJON B 302 412 226 • REF. 1505087774
 Loading...