

D
F
NL
E
P
I
DK
S
N
FIN
GR
H
CZ
SK
SLO
SR
HR
RO
BG
TR
UA
RU
PL
EST
LV
LT
ENG
1800117037 FVZ E0 10/07/09 10:53 Page 1
6
2
3
11
4
5
9
8
max
7
12
10
1
13
A
B C
D
E H
I J
G
F
LK
M
N
1800117037 FVZ E0 10/07/09 10:53 Page 2
103
Jūsu Drošībai
•
Jūsu drošībai, šis aparāts atbilst piemērojamām normām un noteikumiem (zema sprieguma,
elektromagnētiskās saderības, Vides direktīvām...).
•
Šis aparāts nav paredzēts, lai to lietotu personas (ieskaitot bērnus), kuru fiziskās, sensoriskās vai
garīgās dotības ir aprobežotas, vai personas, kurām nav pieredze vai zināšanas, izņemot, ja, kāda
persona, kas ir atbildīga par to drošību, tās uzmana vai iepriekš ir tām sniegusi visas instrukcijas,
saistītas ar aparāta darbību. Pieklājas uzmanīt bērnus lai nodrošinātos, ka viņi nespēlējās ar aparātu.
•
Uzmanīgi! Jūsu elektriskās instalācijas spriegumam jāatbilst gludekļa spriegumam (220-240V).
Jebkāda pieslēgšanas kļūda var sabojāt gludekli un atcelt garantiju.
•
Šo gludekli obligāti jāpieslēdz iezemētā kontaktligzdā. Ja jūs lietojas pagarinātāju, pārbaudiet, ka
tas ir bipolārs (10A) un ar iezemētu vadītāju.
•
Ja elektrības piegādes vads ir bojāts, to vajag nekavējoties mainīt pret citu Autorizētā Servisa
Centrā lai izvairītos no bīstamas situācijas.
•
Nelietojiet aparātu, ja tas ir kritis, ja tam ir redzami bojājumi, ja tas tek vai ja tā darbībā ir
konstatējami traucējumi. Nekad neizjauciet jūsu aparātu: lieciet lai to izpēta Autorizētā Servisa
Centrā, lai izvairītos no bīstamas situācijas.
•
Nekad neiegremdējiet gludekli ūdenī!
•
Neatvienojiet aparātu, raustot vadu. Vienmēr atvienojiet jūsu aparātu pirms tā piepildīšanas,
rezervuāra izskalošanas, vai pirms tā tīrīšanas, kā arī pēc katras lietošanas reizes.
•
Nekad neatstājiet aparātu bez uzmanības, kamēr tas ir pieslēgts elektrībai, kamēr tas nav aptuveni
stundu atdzisis.
•
Gludekļa pamatne var būt ļoti karsta: nekad to neaiztieciet un ļaujiet gludeklim atdzist pirms jūs to
noliekat vietā. No Jūsu aparāta nāk tvaiki, kas var izraisīt apdegumus, it sevišķi kad jūs gludināt,
kādā no gludināmā dēļa stūriem. Nekad nepavērsiet tvaikus uz personām vai dzīvniekiem.
•
Lietojiet un lieciet gludekli uz stabilas virsmas. Kad jūs liekat gludekli uz tā pamatnes, nodrošinieties,
ka virsma, uz kuras jūs to liekat ir stabila.
•
Šis produkts tika radīts, lai to izmantotu mājas apstākļos. Garantija izbeidzās un firma atsakās
uzņemties atbildību, gadījumos, kad tas tiek neadekvāti lietots, vai kad tā lietošana ir pretēja
instrukcijām.
Vides aizsardzība !
Jūsu aprāts satur daudzus atkārtoti pārstrādājamus materiālus.
Ü
Nododiet to savākšanas centrā vai aprobēto pakalpojumu centrā,lai tas tiktu pārstrādāts.
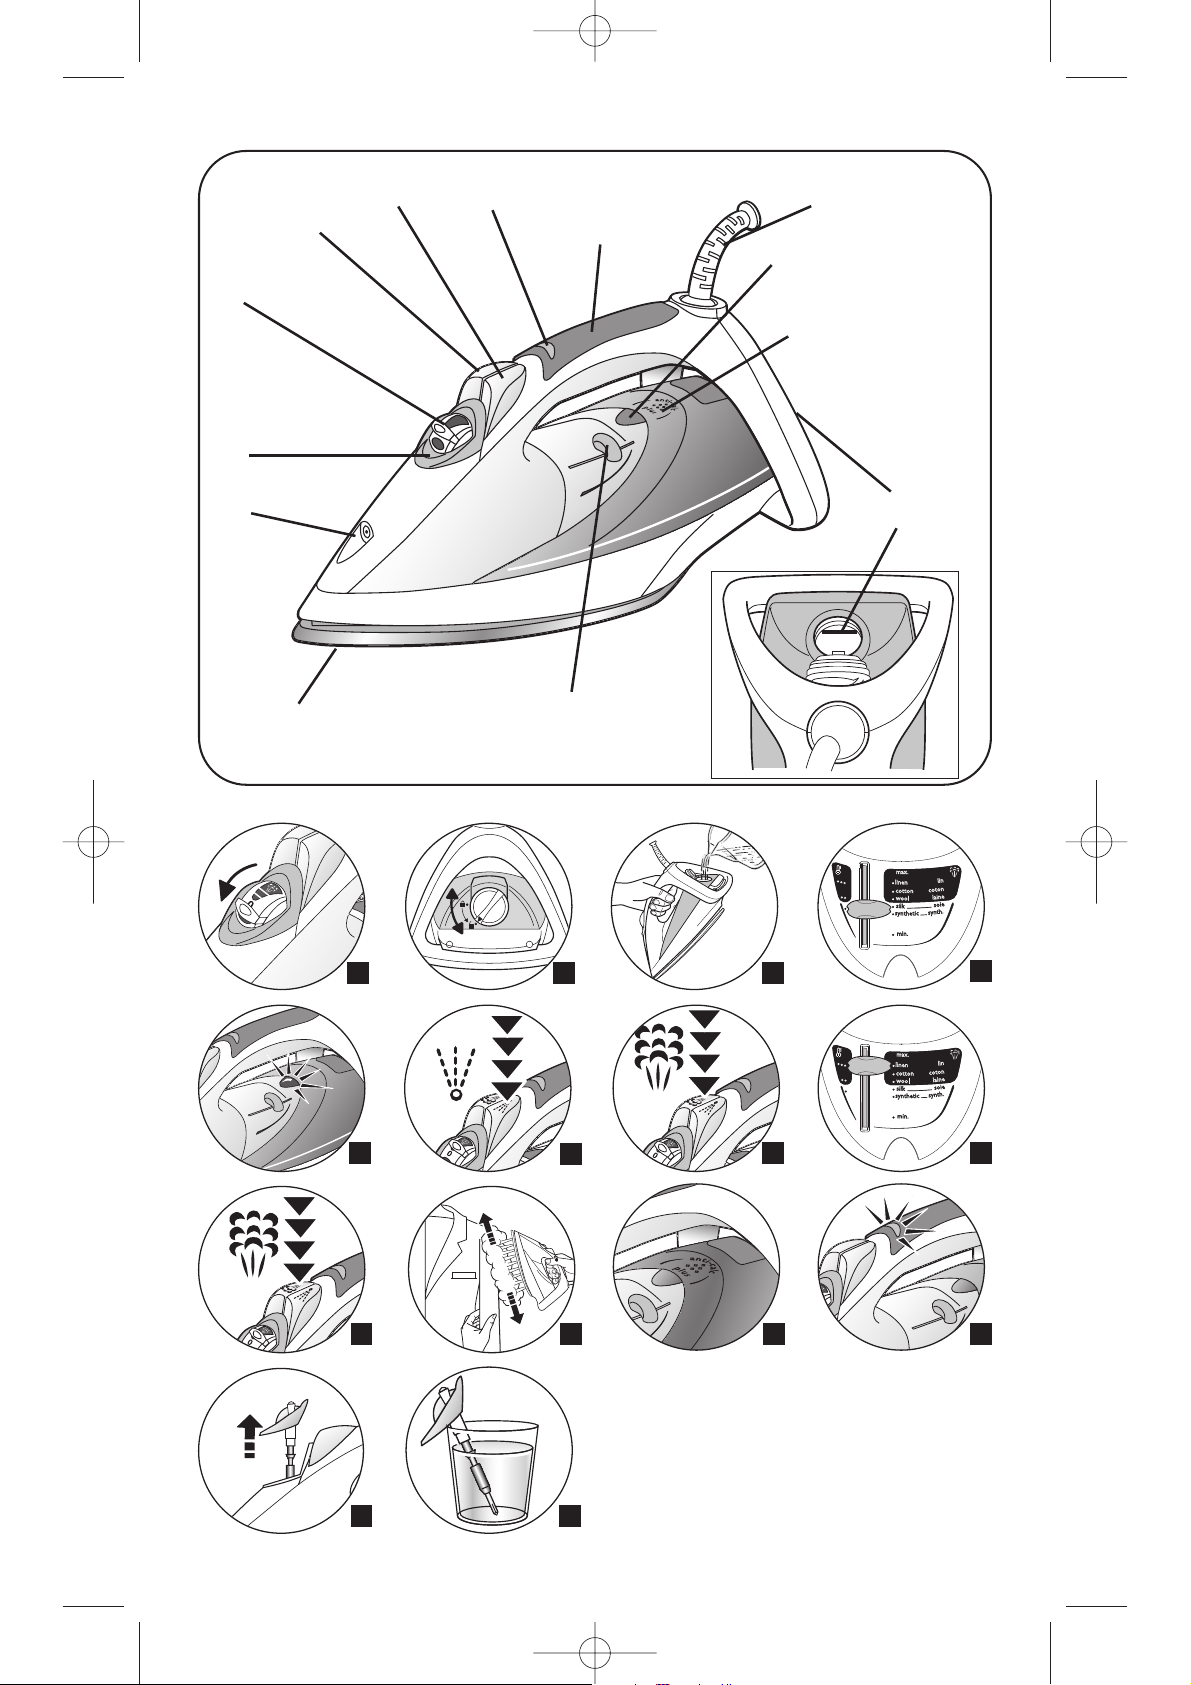
Apraksts
1. Izsmidzinātājs
2. Pret apkaļķošanās vārsts
3. Tvaika kontrole
4. „Superpressing” („Presēšanas”) poga
5. Izsmidzināšanas poga
6. „Auto-Stop” („Automātiskās apturēšanas”)
indikators (atkarībā no modeļa)
7. Ērts rokturis (atkarībā no modeļa)
8. Elektrības vads
9. Termostata indikatora gaisma
Nodziest, kad temperatūra ir sasniegta
10. Sabalansēta pret apkaļķošanās sistēma
(atkarībā no modeļa)
11. Tvertnes pildīšanas atvere
12. Termostata kontrole Lai
izvēlētos gludināšanas temperatūru
13.
Virsma
LV
1800117037 FVZ E0 10/07/09 10:53 Page 103
104
Kādu ūdeni izmantot?
• Jūsu aparāts ir paredzēts lai to varētu lietot izmantojot krāna ūdeni. Ir
nepieciešams 1. reizi mēnesi veikt aparāta auto-attīrīšanu.
• Nekad neizmantojiet apakšā minētos ūdeņus, kuri satur organiskus
atkritumus vai minerālus elementus un var izraisīt krēpošanu, brūnas
krāsas, vai pirms laicīgu aparāta novecošanu: tīru veikalos pērkamu
atmineralizētu ūdeni, veļas žāvējamo mašīnu ūdeni, smaržūdeni, mīkstinātu
ūdeni, ledusskapju ūdeni, bateriju ūdeni, kondicionieru ūdeni, destilētu
ūdeni, uzvārītu, filtrētu ūdeni, ūdeni no pudelēm...
Ja jūsu ūdens ir ļoti
kaļķains, atšķaidiet
krāna ūdeni ar
veikalos pērkamu
atmineralizētu ūdeni,
sekojošos daudzumos:
-50% krāna ūdeni
-50% atmineralizētu
ūdeni.
Noregulējiet temperatūru un tvaiku
• Izvēlieties temperatūru (skatīt apakšā esošo tabulu vai gludekļa aizmuguri) novietojot
termostatu pretī atzīmei (
D).
• Signāllampiņa iedegās (E). Tā izdegsies kad pamatne būs pietiekami karsta.
• Novietojiet tvaika komandu uz vēlamo režīmu, atsaucieties uz apakšā esošo tabulu.
Piepildiet Rezervuāru
• Pirms pildīšanas, atvienojiet gludekli no strāvas.
• Pagrieziet tvaika kontroli uz SEC (A). Paņemiet gludekli ar vienu roku un
pagrieziet to ar virsmas smailo galu uz leju.
• Lai atvērtu tvertnes vāciņu, grieziet to pretēji pulksteņa rādītāja virzienam (kamēr
vāciņa bulta sakrīt ar simbolu „atvērts” (
B). Tas paceļas automātiski. Piepildiet
tvertni līdz norādei „
MAX” („MAKS.”) (C).
• Aizveriet tvertnes vāciņu (lai vāciņa bulta sakrīt ar simbolu « aizvērts » (B)).
Lietošana
Pirms pirmās lietošanas
• Pirms jūs pirmo reizi lietojat gludekļa tvaiku, mēs jums iesākam, to kādu
brīdi lietot horizontāli un ārpus jūsu veļas.
• Tajos pašos apstākļos iedarbiniet vairākas reizes super ķīmiskās tīrītavas
(„Superpressing”) komandu (atkarīgi no modeļiem).
• Pirmajās lietošanas reizēs, jūs iespējams konstatēsiet nekaitīgu dūmu
izplūdi un smaku. Šīs parādības ātri pazudīs un tās neietekmē lietošanu.
Uzmanīgi izlasiet
instrukcijas.
Noņemiet
iespējamās uzlīmes
no pamatnes pirms
uzkarsējiet gludekli.
Sagatavošana
=
TVAIKA ZONA
AUDUMI
TERMOSTATA POGAS
REžīMS
TVAIKA KOMANDAS
REžīMS
Lins
Kokvilna
Vilna
Zīds
Sintētika
(Poliesteris, Acetāts,
Akrils, Poliamīds)
MAX
1800117037 FVZ E0 10/07/09 10:53 Page 104
Samitriniet veļu
• Kad jūs gludiniet ar tvaiku vai sausi, vairākas reizes pēc kārtas nospiediet
aerosola („Spray”) taustiņu lai samitrinātu veļu (
F) un tiktu vaļā no
izturīgām krokām.
• Jūsu gludeklis ātri uzkarst: sāciet ar audumiem, kurus jāgludina zemā temperatūrā, tad
pabeidziet ar tiem, kuriem nepieciešama augstāka temperatūra.
Ir normāli, ka signāllampiņa iedegās un izslēdzās gludināšanas laikā. Lai neriskētu notecināt uz veļas
ūdeni:
-
izslēdziet tvaiku, kad gludiniet zīdu vai sintētisku veļu.
-
Noregulējiet to uz minimālo līmeni lai gludinātu vilnu.
Ja jūs pazeminiet termostatu, pagaidiet līdz signāllampiņa iedegās lai atsāktu gludināt. Ja jūs gludiniet
audumu, kurš sastāv no dažādām šķiedrām: noregulējiet gludināšanas temperatūru balstoties uz
trauslāko šķiedru. Ja jūs vēlaties gludināt ļoti trauslus audumus, mēs jums ieteiktu sākumā
veiktpārbaudi, tādā drēbes vietā, kura būs paslēpta (piemēram, apvīlētā malā). Ja jūs vēlaties gludināt
sausajā režīmā, novietojiet tvaika komandu uz .
105
Iegūstiet vairāk tvaika (atkarīgi no modeļa)
• Ik pa laikam nospiediet Super ķīmiskās tīrītavas taustiņu, lai izgludinātu
izturīgākās krokas (
G
).
Iekļautā atkaļķošanās sistēma (atkarīgi no modeļa)
Jūsu tvaika gludeklī ir iekļauta atkaļķošanās sistēma - (K). šī sistēma dod:
• labāku gludināšanas kvalitāti: tvaika caurplūde ir vienmērīga, visas
gludināšanas laikā.
• jūsu aparāta ilgstošu darbību.
Ievērojiet pāris
sekunžu pauzi pirms
atkārtotas
spiešanas.
Ik pēc 5 minūtēm
novietojiet gludekli
horizontāli. Tvaiki
ir ļoti karsti, nekad
negludiniet drēbes
uz cilvēka, bet
vienmēr uz
pakarināmā.
Auto-Stop drošības sistēma (atkarīgi no modeļa)
• Elektroniskā sistēma pārtrauc elektrības piegādi un auto-stop
signāllampiņa sāk mirgot, ja gludeklis paliek nekustīgs vairāk par 8
minūtēm uz savas aizmugurējās daļas vai vairāk par 30 sekundēm guļus
pozīcijā – (
L).
• Lai atkal iedarbinātu gludekli, to vajag nedaudz pakustināt līdz
signāllampiņa vairs nemirgo.
Kad auto-stop
drošības sistēma
darbojās, ir normāli,
ka termostata
signāllampiņa paliek
izslēgta.
Nogludiniet vertikāli (atkarīgi no modeļa)
Ideāls variants lai tiktu vaļā no uzvalku, žakešu, svārku, aizkaru, krokām.
• Pakariniet drēbes uz pakarināmā un ar vienu roku izstiepiet audumu.
• Novietojiet termostata pogu uz MAX (H).
• Nospiediet Superpressing pogu vairākas reizes (I) un veidojiet kustību no
augšas uz leju (
J).
•
Turiet gludekli pāris centimetru attālumā no auduma, lai nesadedzinātu
trauslus audumus.
LV
1800117037 FVZ E0 10/07/09 10:53 Page 105

Iedarbiniet auto-tīrīšanu (vienreiz mēnesī)
• Atvienojiet jūsu gludekli no strāvas novietojiet tvaika komandu uz (0) un
piepildiet rezervuāru ar ūdeni līdz
MAX līmenim.
• Novietojiet gludekli uz tā aizmugurējās daļas, novietojiet termostata pogu
uz
MAX, pieslēdziet gludekli pie elektrības un pagaidiet līdz signāllampiņa
izslēdzās.
• Atvienojiet gludekli no strāvas un novietojiet to horizontāli virs izlietnes.
• Izņemiet atkaļķošanas stieni (M).
• Viegli pakratiet gludekli virs izlietnes, līdz daļa ūdens (ar netīrumiem)
iztecēs no pamatnes.
• Procedūras beigās, ievietojiet atkaļķošanas stieni atpakaļ gludeklī un atkal
pieslēdziet gludekli pie elektrības. Atstājiet to pieslēgtu pie strāvas
2.minūtes, stāvus uz tā aizmugurējās daļas, lai pamatne nožūtu.
Lai aizkavētu
kaļķakmeņu
nosēdumu
veidošanos un
pagarinātu jūsu
gludekļa kalpošanas
ilgumu, veiciet autotīrīšanu reizi mēnesī.
Tīriet pamatni
• Atvienojiet gludekli no elektrības un kad pamatne ir remdena, berziet to
ar mitru švammi, lai to notīrītu.
Nekad neizmantojiet
kairinošus vai
abrazīvus produktus.
Nolieciet jūsu gludekli vietā
• Novietojiet tvaika komandu uz (0) un atvienojiet gludekli no strāvas.
• Pagaidiet līdz pamatne atdzīst un iztukšojiet rezervuāru. Mazliet ūdens
var palikt rezervuārā.
• Aptiniet vadu ap gludekļa aizmugurējo daļu.
•
Nolieciet auksto gludekli savā vietā, stāvus uz tā aizmugurējās daļas.
Tīriet atkaļķošanas stieni (vienreiz mēnesī)
• Atvienojiet jūsu gludekli no strāvas un iztukšojiet rezervuāru.
• Izņemiet atkaļķošanas stieni (N).
• Iemērciet stieni 4. baltā etiķa vai dabīgas citronu sulas glāzē un atstājiet
to tur 4. stundas. (
M).
• Noskalojiet stieni ar krāna ūdeni un novietojiet to atpakaļ vietā.
Atvienojiet gludekli
no strāvas un ļaujiet
tam atdzist pirms jūs
to tīriet. Gludeklis
nestrādā bez
atkaļķošanas stieņa.
Nekad neaiztieciet
stieņa galu!
Uzglabāšana un tīrīšana
106
Pret-pilienu Funkcija (atkarīgi no modeļa)
• ūdens pieplūde tiek automātiski pārtraukta, lai ūdens nepilētu no
pamatnes, tad, kad gludekļa temperatūra nav pietiekoša, tvaiku
radīšanai.
Pirmās lietošanas
laikā pagaidiet 2.
minūtes lai iegūtu
tvaikus.
Gludināt sausajā režīmā
• Noregulējiet temperatūru atkarīgi no gludināmā auduma
• Novietojiet tvaika komandu uz „0” - (A).
• Jūs varat gludināt, kad signāllampiņa izslēdzās.
1800117037 FVZ E0 10/07/09 10:53 Page 106

Izvēlētā temperatūra neļauj tvaikam
veidoties.
Jūs izmantojat tvaiku, bet gludeklis nav
pietiekami karsts.
Jūs lietojat ātruma komandu pārāk
bieži.
Tvaika caurplūde ir pārāk liela.
Jūs novietojāt gludekli horizontāli
neiztukšojot to un nenovietojot tvaika
komandu uz
“
0
”.
Jūs lietojat ķīmiskus kaļķakmeņu
noņemšanas līdzekļus.
Novietojiet termostatu uz tvaika zonas (no ••
līdz MAX).
Pagaidiet līdz signāllampiņa izslēdzās.
Pagaidiet pāris sekundes starp katru lietošanas
reizi.
Samaziniet tvaika caurplūdi.
Apskatiet sadaļu „Nolieciet jūsu gludekli vietā”.
Nepievienojiet nevienu kaļķakmeņu noņemšanas
līdzekli rezervuāra ūdenim.
Brūnas notekas nāk no
pamatnes un notraipa
veļu.
Jūs neizmantojat labu ūdens veidu. Veiciet auto-tīrīšanu un apskatiet sadaļu „kādu
ūdeni izmantot?”
Veļas šķiedras tika pamatnes caurumos un
tur deg.
Veiciet auto-tīrīšanu un notīriet pamatni ar mitru
švammi. Ik pa laikam izsūciet pamatnes
caurumus.
Veļas šķiedras tika pamatnes caurumos un
tur deg.Jūsu veļa netika pietiekami labi
izskalota vai jūs gludinājāt jaunu drēbi
pirms to izmazgājāt.
Nodrošinieties, ka veļa ir pietiekami labi
izskalota, lai tiktu noņemti iespējamās ziepju vai
ķīmisko produktu nogulsnes uz jaunām drēbēm..
Pamatne ir netīra vai
brūna un var sasmērēt
veļu.
Jūsu veļa netika pietiekami labi izskalota
vai jūs gludinājāt jaunu drēbi pirms to
izmazgājāt.
Notīriet pamatni, kā uzrādīts augšā. Apskatiet
temperatūru tabulu lai noregulētu termostatu.
Jūs izmantojat apģērba cietinātāju. Notīriet pamatni, kā uzrādīts augšā. Izsmidziniet
apģērba otrajā pusē, nevis tajā, kuru gludiniet.
Pamatne ir netīra vai
brūna un var sasmērēt
veļu.
Jūs izmantojat pārāk augstu temperatūru. Notīriet pamatni, kā uzrādīts augšā. Apskatiet
temperatūru tabulu lai noregulētu termostatu.
Jūs izmantojat apģērba cietinātāju. Notīriet pamatni, kā uzrādīts augšā. Izsmidziniet
apģērba otrajā pusē, nevis tajā, kuru gludiniet.
Jūsu gludeklis rada maz
tvaika vai to nerada
vispār.
Rezervuārs ir tukšs. Piepildiet to.
Atkaļķošanas stienis ir netīrs.
Notīriet atkaļķošanas stieni un veiciet autotīrīšanu.
Notīriet atkaļķošanas stieni.
Gludeklī ir kaļķakmens nosēdumi.
Jūsu gludeklis pārāk ilgi tika lietots
sausajā režīmā.
Veiciet auto-tīrīšanu.
Vienmēr novietojiet jūsu gludekli uz tā
aizmugurējās daļas.
Jūs nolikāt jūsu gludekli uz metāla
gludekļu paliktņa.
Pamatne ir saskrāpēta
vai bojāta.
Gludeklis laiž tvaiku,
rezervuāra piepildīšanas
beigās.
Tvaika komandas kursors nav uz “
0”. Pārbaudiet, ka tvaika komanda ir uz “0”.
Ielejiet rezervuārā ūdeni.Rezervuārā nav pietiekami daudz ūdens.Aerosols („Spray”)
nesmidzina ūdeni.
Jebkuras citas problēmas gadījumā, vērsieties Autorizētā Servisa Centrā, lai jūsu gludeklis
tiktu pārbaudīts.
Problēma ar jūsu gludekli
PROBLĒMAS IESPĒJAMIE IEMESLI RISINĀJUMI
Ūdens tek caur
pamatnes caurumiem.
107
LV
1800117037 FVZ E0 10/07/09 10:53 Page 107

108
Jūsų saugumui
•
Js˜ saugumui ‰is prietaisas yra suderintas su taikytinomis normomis ir reglamentavimais (Ïemos
∞tampos, elektromagnetinio suderinamumo, aplinkos ir kitomis direktyvomis)
•
·io prietaiso negali naudoti asmenys (taip pat vaikai) su prastesniais fiziniais, jutiminiais ar psichiniais
gebòjimais, taip pat neturintys pakankamai patirties ir Ïini˜, i‰skyrus atvejus, kai uÏ ‰i˜ asmen˜ saugà
atsakingas asmuo juos tinkamai apmoko saugiai naudotis prietaisu ir leidus jiems naudotis prietaisu
kur∞ laikà stebi, ar kruop‰ãiai laikomasi nurodym˜.
•
Dòmesio! Js˜ elektros instaliacijos ∞tampa turi atitikti lygintuvo ∞tampà (220-240V). Jei prijungdami
lygintuvà suklysite, galite nepataisomai j∞ sugadinti ir garantija nebegalios.
•
Lygintuvas turi bti jungiamas tik ∞ ∞Ïemintà elektros lizdà. Jei Js naudosite elektros ilgintuvà,
patikrinkite ar tai yra dvipolis ilgintuvas 10A su ∞Ïeminimu.
•
Jei maitinimo kabelis yra paÏeistas, vengiant pavojaus, jis turi bti nedelsiant pakeistas ∞galiotoje
gamintojo taisykloje.
•
Negalima naudoti prietaiso, jei jis nukrito, jei yra matomi pakenkimai, jei i‰ jo prateka vanduo arba
prietaisui veikiant pastebòjus kà nors ne∞prasta. Niekada patys neardykite prietaiso: siekiant i‰vengti
pavojaus, patikòkite j∞ patikrint∞ ∞galiotoje gamintojo taisykloje.
•
Niekada nenardinkite lygintuvo ∞ vanden∞.
•
Noròdami atjungti prietaisà nuo maitinimo ‰altinio, jokiu bdu netraukite jo uÏ maitinimo kabelio.
Pripildant arba plaunant vandens rezervuarà, prie‰ valant , baigus lyginti visada i‰junkite lygintuvà.
•
Niekada nepalikite ∞jungto lygintuvo be prieÏiros, taip pat valandos bògyje, kol jis neatvòs.
•
Lygintuvo padas gali bti labai kar‰tas: niekada jo nelieskite ir visada leiskite lygintuvui atvòsti, prie‰ j∞
padòdami ∞ saugojimo vietà. Js˜ prietaisas leidÏia garus, kurie gali tapti nudegimo prieÏastimi, ypaã
lyginant ant lyginimo lentos kampo. Niekada nenukripkite gar˜ srauto ∞ Ïmones arba gyvnus.
•
Lygintuvas turi bti naudojamas ir dedamas tik ant stabilaus pavir‰iaus. Jei Js statote lygintuvà ant
laikiklio, ∞sitikinkite, kad jo pavir‰ius yra stabilus.
•
·is prietaisas yra skirtas naudoti tik buityje. Gamintojas neatsako ir neteikia garantijos uÏ netinkamà
arba prie‰taraujant∞ instrukcijoms nadojimà.
Saugokime aplinką!
·is prietaisas yra pagamintas i‰ perdirbam˜ ar antrini˜ Ïaliav˜.
Ü Atiduokite j∞ buitinòs technikos surinkimo vietoje, jei tokios nòra - palikite
∞galiotame aptarnavimo centre, kad bt˜ uÏtikrintas tinkamas prietaiso perdirbimas.
Apra‰ymas
1.
Purk‰tuvas
2
.
Kalki˜ nuosòdoms susidaryti neleidÏiantis
strypas
3
.
Gar˜ reguliavimo mygtukas
4
.
Auk‰to slògio mygtukas
5
.
Purk‰tuvo mygtukas
6
.
Automatinio sustabdymo lemputò
(priklausomai nuo modelio)
7
.
Patogi rankena (priklausomai nuo modelio)
8
.
Maitinimo laidas
9.
Termostato lemputò UÏg´sta, kai lygintuvas
∞kaista iki reikiamos temperatros
1
0.
Integruota sistema, neleidÏianti susidaryti
kalki˜ nuosòdoms (priklausomai nuo
modelio)
1
1.
Talpyklos pildymo anga
1
2.
Termostato reguliatorius Lyginimo
temperatrai pasirinkti
1
3.
Padas
1800117037 FVZ E0 10/07/09 10:53 Page 108

Prieš pirmąjį naudojimą
•
Prie‰ pirmàji lyginimà su garais, mes Jums rekomenduojame i‰bandyti ‰ià
funkcijà trumpai palaikant lygintuvà horizontalioje padòtyje atokiau nuo
skalbini˜.
•
Tokiomis paãimis sàlygomis keletà kart˜ spustelòkite gar˜ srauto mygtukà.
•
Pirmaisiais lygintuvo naudojimo kartais, lygintuvas gali skleisti ‰iek tiek dm˜
ir nemalon˜ kvapà. ·ie rei‰kiniai greitai i‰nyks naudojimo metu be joki˜
pasekmi˜.
Atidžiai perskaitykite naudojimo instrukciją. Prieš įkaitindami lygintuvą, nuo
pado nuimkite visas
etiketes.
Paruošimas
109
Kokį vandenį naudoti?
• Js˜ prietaisas yra skirtas naudoti vanden∞ i‰ ãiaupo. Btina 1 kartà per
mònes∞ atlikti automatin∞ nukalkinimà.
•
N
iekada nenaudokite
vandens, kurio sudòtyje yra organini˜ atliek˜ arba
mineralini˜ element˜: tai gali tapti prieÏastimi to, kad lyginant i‰ pado
kris ne‰varumai, ir pats prietaisas tarnaus trumpiau. Nenaudokite gryno
distiliuoto vandens; vandens, skirto skalbini˜ dÏiovintuvams, ‰aldytuvams,
kondicionieriams ir pan, kvepenãio vandens, mink‰tinto vandens, lietaus
vandens, virinto vandens, filtruoto, taip pat vandens i‰ buteli˜.
Jei Jūsų naudojamas
vanduo yra labai
kietas, maišykite jį su
distiliuotu vandeniu
šiomis proporcijomis:
- 50% vandens iš
čiaupo,
- 50% distiliuoto
vandens
Nustatykite temperatūrą ir garų reguliatorių
• Pasirinkite temperatrà (Ïiròkite lentel´ apaãioje arba lygintuvo kulnà) ir nustatykite
temperatros reguliatori˜ ties pasirinkta atÏyma (D).
• UÏsidega signalinò lemputò (E). Ji uÏges, kai lygintuvo padas bus pakankamai ∞kait´s.
• Nustatykite gar˜ reguliatori˜ ties pageidaujama padòtimi, pasirink´ jà i‰ apaãioje esanãios
lentelòs.
Rezervuaro užpildymas
• Prie‰ pildami vanden∞, lygintuvà i‰junkite i‰ maitinimo tinklo.
• Gar˜ reguliavimo mygtukà nustatykite ties padòtimi „SEC“ (sausas lyginimas)
(A). Paimkite lygintuvà viena ranka ir palenkite j∞, pasuk´ pado vir‰utin´
dal∞ ∞ apaãià.
• Noròdami atidaryti talpyklos dangtel∞, pasukite j∞ prie‰inga laikrodÏio rodyklòms
kryptimi (kol dangtelio rodyklò sutaps su simboliu „atrakinta spyna“ (B)).
Dangtelis atsidaro automati‰kai. Ø talpyklà pripilkite vandens iki Ïymos
„
MAX“
(C).
• UÏdarykite talpyklos dangtel∞ (dangtelio rodyklò turi sutapti su simboliu
„uÏrakinta spyna“ (B)).
Naudojimas
LT
=
GARŲ ZONA
Audiniai
Temperatūros reguliatoriaus
padėtis
Garų reguliatoriaus
padėtis
Linas
Medvilnė
Vilna
Šilkas
Sintetiniai audiniai
(poliesteris, acetatas,
akrilas, poliamidas)
MAX
1800117037 FVZ E0 10/07/09 10:53 Page 109

110
Garų srautas (priklausomai nuo modelio)
• Laikas nuo laiko nuspauskite gar˜ srauto mygtukà, kad i‰lyginti susigulòjusias
rauk‰les (
G).
Integruota nukalkinimo sistema (priklausomai nuo modelio)
Js˜ garinis lygintuvas turi ∞montuotà nukalkinimo sistemà- (K).
·i sistema suteikia:
• Geriausià lyginimo kokyb´: gar˜ srautas lieka pastovus viso lyginimo
metu.
• Prat´sia lygintuvo naudojimo laikà.
Išlaikykite keletos
sekundžių intervalą
tarp dviejų
nuspaudimų.
Automatinis išsijungimas (priklausomai nuo modelio)
• Elektroninò sistema atjungia maitinimà ir ima blykãioti automatinio
i‰sijungimo lemputò, jei lygintuvas kur∞ laikà buvo nejudinamas: daugiau
nei 8 min pastatytas ant kulno arba daugiau nei 30 sekundÏi˜ pastatytas
horizontaliai. (L)
• Norint, kad lygintuvas vòl pradòt˜ veikti, pakanka lygintuvà lengvai
pajudinti, kol signalinò lemputò nustos blykãioti.
Veikiant automatinio
išsijungimo funkcijai,
yra normalu kai
termostato signalinė
lemputė lieka
užgesusi.
Vertikalus lyginimas (priklausomai nuo modelio)
Idealu lyginant kostiumus, ‰varkus, sijonus, uÏuolaidas...
• Pakabinkite rbà ant pakabos ir viena ranka laikykite audin∞.
• Nustatykite temperatros reguliatori˜ ties
M
AX
atÏyma (H).
• Spauskite gar˜ srauto mygtukà pulsuojanãiai ir lyginkite i‰ vir‰aus ∞
apaãià (
p
av.I
).
•
Lygintuvà laikykite keleto centimetr˜ atstumu nuo audinio, kad
nesudeginti jautri˜ pluo‰t˜.
Po penkių
paspaudimų
pastatykite
lygintuvą
horizontaliai. Garas
yra labai karštas,
niekada nelyginkite
rūbų ant žmogaus,
prieš lygindami
būtinai pakabinkite
ant pakabos.
Skalbinių drėkinimas
• Lygindami su garais arba sausai, keletà kart˜ i‰ eilòs paspauskite
purk‰tuko mygtukà kad sudròkinti skalbinius ir i‰lyginti susigulòjusias
rauk‰les (F).
• Js˜ lygintuvas ∞kaista greitai: pradòkite lyginti nuo audini˜ , kurie reikalauja Ïemiausios lyginimo
temperatros, ir baikite tais, kurie reikalauja auk‰ãiausios temperatros.
Yra normalu, kai signalinė lemputė lyginimo metu laikas nuo laiko užsidegs ir išsijungs. Kad išvengti
vandens lašėjimo ant skalbinių:
- išjunkite garų reguliatorių lygindami šilką ir sintetinius audinius.
- lygindami vilną, nustatykite mini lygį.
Jeigu Jūs sumažinote temperatūrą, prieš pradėdani lyginti palaukite, kol signalinė lemputė vėl
užsidegs. Jei Jūs lyginate audinį, kurio sudėtyje yra skirtingų pluoštų, temperatūrą nustatykite pagal
jautriausią sudedamąjį pluoštą. Švelniems audiniams rekomenduojame pabandyti lyginti per ploną
medžiagos skiautę (pvz. palanką). Jei Jūs norite lyginti be garų, nustatykite garų reguliatorių ties
padėtimi:
1800117037 FVZ E0 10/07/09 10:53 Page 110

Lašėjimo stabdymo funkcija (priklausomai nuo modelio)
• Esant per Ïemai lygintuvo temperatrai, kurios nepakanka susidaryti
garams, vandens tiekimas yra automati‰kai atjungiamas.Tai neleidÏia
vadeniui la‰òti i‰ pado.
Per pirmą naudojimą
palaukite 2 minutes,
kad susidarytų
garai.
Sausas lyginimas
• Nustatykite norimà temperatrà pagal lyginamà audin∞.
• Nustatykite gar˜ reguliatori˜ ties „0“ padòtimi- (A).
• Js galòsite pradòti lyginti, kai signalinò lemputò uÏges.
111
Savaiminis išsivalymas (kartą per mėnesį)
• I‰junkite Js˜ lygintuvà i‰ elektros tinklo, nustatykite gar˜ reguliatori˜ ties
padòtimi ir uÏpildykite vandens rezervuarà iki MAX atÏymos.
• Pastatykite lygintuvà ant kulno, nustatykite temperatros reguliatori˜ ties
MAX atÏyma, ∞junkite lygintuvà ∞ elektros tinklà ir laukite, kol uÏges
signalinò lemputò.
• I‰junkite lygintuvà i‰ elektros tinklo ir laikykite j∞ horizontaliai vir‰
kriauklòs.
• I‰traukite prie‰kalkin∞ strypel∞ (M).
•
Truput∞ pakratykite lygintuvà vir‰ kriauklòs, kad dalis vandens
(su ne‰varumais) i‰tekòt˜ pro lygintuvo padà.
• Operacijos pabaigoje ∞statykite ∞ vietà prie‰kalkin∞ strypel∞, ∞junkite 2
minutòms pastatytà ant kulno lygintuvà ∞ elektros tinklà, kad i‰dÏit˜ jo
padas.
Kad atitolinti
apsinešimą
nuoviromis ir
prailginti lygintuvo
tarnavimo laiką,
atlikite automatinį
valymą vieną kartą
per mėnesį.
Lygintuvo pado valymas
• I‰junkite lygintuvà i‰ elektros tinklo ir kol padas dar neatvòs´s, nuvalykite
j∞ patrindami drògna kempinòle.
Niekada
nenaudokite
agresyvių arba
abrazyvinių
produktų.
Laikymas
• Nustatykite gar˜ reguliatori˜ ties Ïyma ir i‰junkite lygintuvà.
• Palaukite, kol lygintuvo padas atvòs ir i‰tu‰tinkite vandens rezervuarà.
Rezervuare gali likti truputi vandens.
• Apvyniokite laidà apie lygintuvo kulnà.
• Atvòsus∞ lygintuvà laikykite pastatytà ant kulno.
Prieškalkinio strypelio valymas (vieną kartą per mėnesį)
• I‰junkite lygintuvà i‰ maitinimo ir i‰tu‰tinkite rezervuarà.
• I‰imkite prie‰kalkin∞ strypel∞ (M).
• Panardinkite strypel∞ 4 valandoms ∞ stiklin´ su baltuoju actu arba dar
geriau ∞ stiklin´ su natraliomis citrinos sultimis (N).
• Kotel∞ praskalaukite i‰ ãiaupo tekanãiu vandeniu ir ∞statykite ∞ vietà.
Prieš valymą
išjunkite lygintuvą ir
leiskite jam atvėsti.
Lygintuvas neveikia
be atikalkinio
strypelio.Niekada
nelieskite strypelio
galo.
Priežiūra ir valymas
LT
1800117037 FVZ E0 10/07/09 10:53 Page 111

Sumažinkite nuotekį.Garų srautas yra per didelis.
Purkštukas nepurškia
vandens.
SPRENDIMAI
Visų kitų problemų atvejais kreipkitės į gamintojo garantinio aptarnavimo centrą, kad
patikrintų Jūsų lygintuvą.
Galimos problemos
PROBLEMOS GALIMOS PRIEŽASTYS
Iš pado skylių laša
vanduo.
Pasirinkta temperatūra yra per žema, ji
neleidžia susidaryti garui..
Nustatykite temperatūros reguliatorių garų
zonoje (nuo •• iki MAX).
Jūs naudojate garus, kai lygintuvas nėra
pakankamai įkaitęs.
Palaukite, kol signalinė lemputė užges.
Jūs laikėte lygintuvą horizantalioje
padėtyje, neištuštinę jo rezervuaro ir
nenustatę garų reguliatoriaus ties
padėtimi.
Jūs naudojote chemines nuoviras
šalinančias priemones.
Žiūrėkite skyrelį „Laikymas“.
Nedėkite jokio nuoviras šalinančio produkto į
rezervuaro vandenį.
Iš pado varva rudas vanduo ir tepa skalbinius.
Jūs naudojate netinkamą vandenį. Atlikite automatinį valymą ir žiūrėkite skyrelį
„Kokį vandenį naudoti?“
Skalbinių pluošto dalelės susikaupia
lygintuvo pado skylėse ir svyla.
Atlikite automatinį valymą ir nuvalykite lygintuvo
padą drėgna kempinėle. Laikas nuo laiko
išsiurbkite lygintuvo pado skyles.
Jūsų skalbiniai buvo nepakankamai gerai
išskalauti, arba Jūs lyginate naują rūbą
prieš jį išskalbiant.
Įsitikinkite, kad Jūsų skalbiniai yra pakankamai
išskalauti, kad neliktų galimų muilo dalelių, o
išskalbus naują rūbą- kitų cheminių produktų
dalelių.
Padas yra nešvarus
arba parudavęs ir gali
ištepti audinius.
Jūs pasirinkote per aukštą temperatūrą. Išvalykite lygintuvą kaip nurodyta aukščiau.
Pasižiūrėkite temperatūrų lentelę prieš
nustatydami temperatūros reguliatorių.
Jūs naudojate krakmolą. Išvalykite lygintuvą kaip nurodyta aukščiau.
Purškite krakmolą kitoje lyginamo audinio pusėje.
Jūsų lygintuvas gamina
mažai arba negamina
garo.
Rezervuaras yra tuščias. Papildykite jį.
Prieškalkinis strypelis yra užsiteršęs. Notīriet pamatni, kā uzrādīts augšā. Izsmidziniet
cietu apģērba otrajā pusē, nevis tajā, kuru
gludiniet.
Padas yra subraižytas
arba apgadintas.
Jūsų lygintuvas yra apsinešęs nuosėdomis. Nuvalykite prieškalkinį strypelį ir atlikite
automatinį valymą.
Lygintuvas pradeda
leisti garus baigiant
pildyti rezervuarą.
Garų reguliatorius nėra nustatytas ties
padėtimi
.
Patikrinkite, kad garų reguliatorius būtų ties
padėtimi.
Rezervuare nėra pakankamai vandens. Papildykite rezervuarą.
Jūs dėjote lygintuvą horizontaliai ant
metalinio lygintuvo laikyklio.
Visada statykite Jūsų lygintuvą ant kulno.
Jūsų lygintuvas buvo per ilgai naudojamas
sausam lyginimui.
Atlikite automatinį valymą.
1800117037 FVZ E0 10/07/09 10:53 Page 112

ENG
1 • For your safety
• This appliance complies with the technical rules and standards for safety currently in force
(Electromagnetic Compatibility, Low Voltage, Environment).
• This appliance is not designed to be used by children or other persons unassisted or unsupervised if their physical, sensory or mental capacities prevent them from using the appliance
in complete safety. Children should be supervised to ensure that they do not play with the
appliance.
• Warning ! The voltage of your electrical installation must correspond to that of the iron
(220V-240V).
Connecting to the wrong voltage may cause irreversible damage to the iron and will invalidate the guarantee.
• This iron must always be plugged into an earthed socket. If using a mains extension lead,
ensure that it is correctly rated (10A or 13A, depending on model), with an earth connection.
• If the electrical cord becomes damaged, it must be immediately replaced by an Approved
Service Centre to avoid any danger.
• The appliance should not be used if it has fallen, if it has visible signs of damage, if it leaks
or it is operating incorrectly.
Never dismantle your appliance: have it inspected by an Approved Service Centre, so as to
avoid any danger.
• Never immerse your iron in water !
• Do not unplug your appliance by pulling on the cord. Always unplug your appliance: before
filling or rinsing the water tank, before cleaning it, after each use.
• Never leave the appliance unattended when it is connected to a power source; if it has not
cooled down forapproximately 1 hour.
• The soleplate may be very hot : never touch it and always let it cool down before putting it
away.
• Your appliance gives off steam, which may cause burns, especially when you are ironing on a
corner of your ironing board. Never direct the steam towards people or animals.
• Your iron should be used and placed on a stable heat-resistant surface. When you put your
iron onto its iron rest, make sure that the surface on which you put it is stable.
• This product has been designed solely for domestic use. Any commercial use, inappropriate use or failure to comply with the instructions, the manufacturer accepts no responsibility and the guarantee will not apply.
2 • Description
1. Spray nozzle
2. Anti-calc valve
3. Steam control
4. Shot of steam button
5. Spray button
6. Auto-stop safety warning light
(depending on model)
7. Ergonomic grip
(depending on model)
8. Electric power cord
9. Thermostat indicator light
10. Integral anti-scale system
(depending on model)
11. Water tank filler hole
12. Thermostat control
13. Soleplate
1800117037 FVZ E0 10/07/09 10:53 Page 113

3 • Before first use
Warning !
Remove any labels from the soleplate before heating up the iron
(depending on model).
Warning!
Before using your iron with the steam function for the first time,
we recommend that you operate it in a horizontal position for a few moments, away from your linen, i.e. press the Shot of Steam button a few times.
During the first few uses, a harmless odour and smoke may be given off.
This has no effect on the use of the iron and will disappear quickly.
Wh
at water to use ?
• Your a
ppliance has been designed to function with untreated tap water. However, Self-cleaning of the appliance should be carried out once a month in order
to eliminate hard water deposits from the steam chamber.
If you have very hard water, mix untreated tap water with
commercially available demineralised or distilled water in the
following ratio:
50% untreated tap water / 50% demineralised or distilled water.
• Types of water not to use : Heat concentrates the elements contained in
water during evaporation. The types of water listed below may contain organic
waste, mineral or chemical elements that can cause spitting, brown staining or
premature wear of the appliance: water from clothes dryers, scented or softened water, water from refrigerators, batteries, air conditioners, rain water, boiled, filtered or bottled water. These types of water should not be used in your
TEFAL iron. Also only use distilled or demineralised water as advised above.
• The integrated anti-calc system (according to model) gives better quality ironing: a constant flow of steam throughout the ironing
session and longer lasting performance of your appliance.
4 • Steam ironing
Filling the water tank
- Unplug your iron before filling it.
- Set the steam control to DRY (A).
- Take the iron in one hand and hold it with the point of the soleplate tilted
downwards.
- To open the water tank stopper, turn it anticlockwise until the arrow on
the stopper points to the “open padlock” symbol (B). It will lift automatically.
- Fill the tank up to the “MAX” line (C).
- Close the water tank stopper again by pressing it in and turning it
clockwise until the arrow points to the “closed padlock” symbol (B).
Setting the temperature
- Set the thermostat control (D) referring to the table below.
- The thermostat light comes on. It will go out when the soleplate is hot
enough (E).
1800117037 FVZ E0 10/07/09 10:53 Page 114

Setting the steam level
- In order to avoid water dripping from the iron onto the linen:
• Turn off the steam when ironing silk or synthetic fabrics.
• Set it at the minimum position for wool.
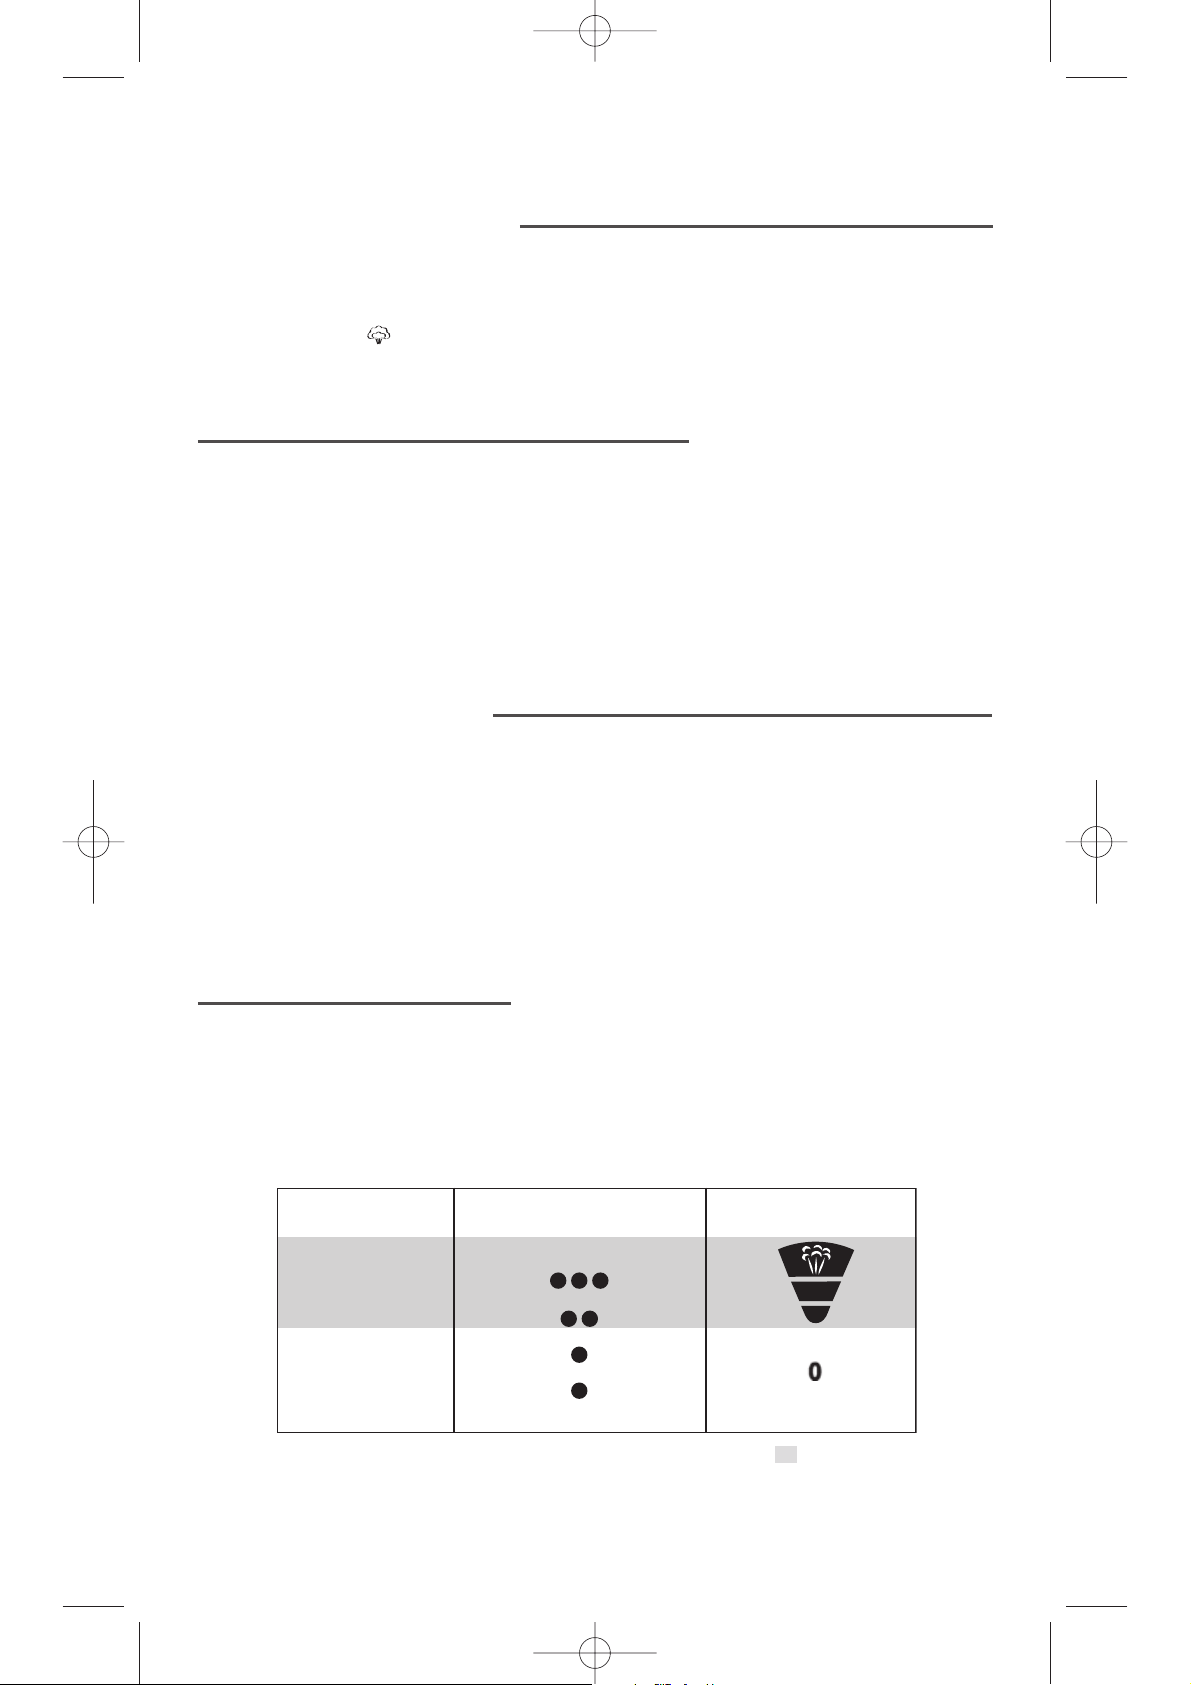
What temperature and which steam setting to use ?
- Set the thermostat control (D) referring to the table below.
- The thermostat light comes on. It will go out when the soleplate is hot
enough (E).
FABRIC
POSITION OF
THERMOSTAT CURSOR
STEAM SETTING
POSITION
COTTON
WOOL
SILK
SYNTHETIC
Polyester, Acetate, Acrylic, Nylon
lll
ll
l
l
= STEAM ZONE
LINEN
MAX
RECOMMANDATIONS:
Fabrics and ironing temperatures:
• Your iron heats up quickly : so begin by ironing fabrics that are ironed at low
temperatures first, then go on to those requiring a higher temperature,
• If you turn down the thermostat, wait until the thermostat light comes back on
before beginning to iron again,
• when ironing fabrics with mixed fibres, set the ironing temperature for the most
delicate fibre. For delicate fabrics we recommend testing the fabric first on an
inconspicious place eg (inside the hem).
Spray function
- Whether steam or dry ironing, you are able to use the spray button (F) to
dampen laundry to remove stubborn creases.
- Make sure that there is water in the tank before using this button.
For more steam
- Press the Shot of Steam button from time to time (G)
- Wait a few seconds between each shot before pressing the button again.
Vertical steam ironing
- Hang the garment on a hanger and hold the fabric slightly taut with one
hand.
The steam is very hot, so you should always do this with the garment on a
hanger – never while someone is wearing it.
- Set the thermostat control to MAX (H).
- Press the Shot of Steam button ( ) repeatedly (I), moving the iron from
top to bottom (See illustration) (J), wait a couple of seconds between each
use of the button.
- Hold the iron a few centimetres from the fabric to avoid burning delicate
fabrics.
ENG
1800117037 FVZ E0 10/07/09 10:53 Page 115

Integral anti-scale system (depending on model)
- Your iron is equipped with an integral anti-scale system (K).
- This system will help to provide:
• a better ironing quality with a constant flow of steam,
• lasting performance from your appliance.
Auto-stop safety feature (depending on model)
- The electronic system cuts off the electric power and the Auto-Stop warning
light flashes if the iron is left vertically on its heel for more than 8 minutes,
or in a horizontal position for more than 30 seconds (L).
- To restart the iron, just move it gently until the warning light stops flashing.
Note : when the Auto-Stop warning light is on, it is normal for the thermostat light to remain off.
Anti-drip function (depending on model)
- If the soleplate temperature is too low, the iron will not produce steam because of the anti-drip technology which prevents droplets of water leaking
from the soleplate.
When using the iron for the first time, allow 2 minutes for steam to be produced.
- Set the temperature for the fabric to be ironed.
- Set the steam control to DRY (see diagram A).
- You may start ironing when the thermostat light goes out.
Self-cleaning
In order to extend the life of your iron, use the Self-Cleaning function once a
month.
- Fill the tank of your iron with untreated tap water. Stand the iron on it’s
heel with the thermostat set to max and heat it up.
- When the thermostat light goes out, unplug the iron and hold it in a
horizontal position, over a sink.
- Remove the anti-calc valve.
- Shake the iron gently, over the sink, until some of the water in the water
tank (with the impurities) has flowed out through the soleplate.
- At the end of the operation, push the anti-calc valve back into position.
- Unplug the iron, and when the soleplate is just warm, wipe it with a soft cloth.
RECOMMENDATIONS : the self-cleaning function helps to slow down the scaling up of your iron.
Cleaning the soleplate
- While the soleplate is still slightly warm, clean it by wiping over it with a
damp non-metallic cloth.
5 • Dry ironing
- Unplug the iron and wait for the soleplate to cool down. Empty the water tank
and set the steam control to DRY. A little water may remain in the tank.
- Wind the cord around the heel at the back of the iron. Store the iron on its heel.
6 • Storing your iron
1800117037 FVZ E0 10/07/09 10:53 Page 116

7 • If there is a problem
PROBLEM POSSIBLE CAUSE SOLUTION
Water drips from the
holes in the soleplate.
The chosen temperature is too
low and does not allow for the
formation of steam.
You are using steam while the
iron is not hot enough.
You are using the Shot of
Steam button too often.
The steam flow is too high
You have stored the iron horizontally, without emptying it
and without setting it to DRY
Position the thermostat in the steam
range (from •• to MAX).
Wait until the thermostat light goes out.
Wait a few seconds between each use of
the button.
Reduce the steam flow
See the section "Storing your iron".
Brown streaks come
through the holes in
the soleplate and
stain the linen.
You are using chemical descaling agents.
You are not using the right
type of water.
Fabric fibres have accumulated
in the holes of the soleplate
and are burning.
Your linen has not been rinsed
sufficiently or you have ironed
a new garment before washing
it.
Do not add any descaling agents to the
water in the water tank.
Perform a self-cleaning operation and
consult the section "What water to use?"
Perform the self-cleaning operation and
clean the soleplate with a damp sponge.
Vacuum the holes of the soleplate from
time to time.
Make sure that your laundry is rinsed
sufficiently so as to remove any deposits
of soap or chemical products on new
clothes.
The soleplate is dirty
or brown and can
stain the linen.
Your are ironing with an inappropriate setting (temperature
too high).
You are using starch.
Clean the soleplate as indicated above.
Select the appropriate setting.
Clean the soleplate as indicated above.
Always spray starch onto the reverse
side of the fabric to be ironed.
There is little or no
steam.
The water tank is empty.
The anti-calc valve is dirty.
Your iron has a build-up of
scale.
Your iron has been used dry for
too long.
Fill it.
Clean the anti-calc valve.
Clean the anti-calc valve and carry out a
self-clean.
Carry out a self-clean.
The soleplate is scratched or damaged.
You have placed your iron flat
on a metallic rest-plate or ironed over a zip.
Always set your iron on its heel.
Do not iron over zips and rivets.
Steam or water come
from the iron as you
finish filling the tank.
The steam control is not set to
the DRY position.
You have not closed the tank
stopper properly
Check that the steam control is set to
the DRY position.
Make sure that the stopper is properly
closed and that the arrow points to the
“closed padlock” symbole
The spray does not
spray
There is not enough water in
the water tank.
Fill up the water tank.
If you have any problem or queries, please contact our Customer Relations team first for expert
help and advice :
0845 602 1454 - UK / (01) 4610390 - Ireland
or consult our website - www.tefal.co.uk
ENG
1800117037 FVZ E0 10/07/09 10:53 Page 117

1800117037 - 27/09
1800117037 FVZ E0 10/07/09 10:53 Page 118
 Loading...