

Page 1

ACCESS PROTECT
EN
www.tefal.com
Page 2

SUMMARY
IMPORTANT SAFETY RECOMMENDATIONS
Important safety recommendations............................................................................................................ p. 5
Before first use
PREPARATION
Which water should I use?
Filling the water tank
USE
Adjusting the temperature and steam
Dry ironing
Getting more steam
Vertical steam ironing
Dampening clothing
While ironing
Auto-Off Function
IRON STORAGE AND MAINTENANCE
Iron storage
Cleaning the anti-calc valve (once per month)
Descaling the steam chamber (once per month)
Cleaning the soleplate
..................................................................................................................................................................................
.
............................................................................................................................................. p. 8
..............................................................................................................................................................
.
...................................................................................................... p. 10
................................................................................................................................................................................................. p. 11
.................................................................................................................................................................. p. 11
............................................................................................................................................................ p. 12
(Spray)........................................................................................................................................... p. 13
....................................................................................................................................................................................... p. 13
......................................................................................................................................................................... p. 13
............................................................................................................................................................................................. p. 14
............................................................................ p. 15
..................................................................................... p. 16
.......................................................................................................................................................... p. 17
p. 8
p. 9
IS THERE A PROBLEM WITH YOUR IRON?
Problems, possible causes, solutions
.................................................................................................... p. 18-19
2
Page 3
SAFE
A
UTO-
3
Page 4
SAFETY
A
UTO-OFF
4
Page 5

IMPORTANT SAFETY INSTRUCTIONS
• Please read these instructions carefully before first
use. This product has been designed for domestic
and indoor use only. Any commercial use,
inappropriate use or failure to comply with the
instructions, the manufacturer accepts no
responsibility and the guarantee will not apply.
• Never unplug the appliance by pulling the power
cord. Always unplug your appliance: before filling
the water tank or rinsing the water tank, before
cleaning the appliance, after each use.
• The appliance must be used and placed on a flat,
stable, heat and water resistant surface. When you
place the iron on the iron rest, make sure that the
surface on which you place it is stable.
• This appliance is not intended to be used by
persons (including children) with reduced or
impaired physical, sensory or mental capabilities or
persons lacking appropriate knowledge or
experience, unless a person responsible for their
safety provides either supervision or appropriate
instructions concerning use of the appliance prior
to its use.
• Children should be supervised to ensure they do
not play with the appliance.
• This appliance may be used by children aged 8 or
over and persons lacking appropriate knowledge
or experience or persons with reduced or impaired
5
Page 6
physical, sensory or mental capabilities provided
that they have been thoroughly instructed
regarding use of the appliance, are supervised, and
understand the risks involved. Children shall not
play with the appliance. Cleaning and user
maintenance shall not be made by children without
supervision. Keep the iron and its cord out of reach
of children less than 8 years of age when it is
energized or cooling down.
• The surfaces of your appliance can reach very
high temperatures when functioning, which
may cause burns. Do not touch the hot
surfaces of the appliance (accessible metal
parts and plastic parts adjacent to the metallic
parts).
• Never leave the appliance unattended when it is
connected to the mains. Before storing the
appliance, once it is unplugged, please wait until it
has cooled down (around 1 hour).
• The appliance must not be used if it has been
dropped, if it has any visible damage, if it leaks, or if
it functions abnormally in any way. Do not attempt
to dismantle your appliance: have it examined at an
Approved Service Centre to avoid any danger.
• The iron should only be used with the base
provided (for cordless irons).
• Check the electrical power cord for sign of wear or
6
Page 7

damage prior to use. If the electrical power cord is
damaged, it must be replaced at an Approved
Service Centre to avoid any danger.
• The iron must always be placed on its base and never on its heel (for cordless irons) .
• Your iron and its base must be used and placed on a stable surface. When you place the iron
on its base, ensure that the surface on which the base is placed is stable.
• For your safety, this appliance conforms to all applicable regulations (Low Voltage Directive,
Electromagnetic Compatibility, Environment, etc).
• Your steam iron is an electrical appliance: it must be used under normal conditions of use. It is
designed for domestic use only.
• Always plug your steam iron:
- into a mains circuit with voltage between 220 V and 240 V,
- into an earthed electrical socket.
Connecting to the wrong voltage may cause irreparable damage to the appliance and will
invalidate your guarantee. If you are using a mains extension lead, ensure that it is correctly
rated (16A) with an earth, and is fully extended.
• Completely unwind the power cord before plugging into an earthed socket.
• The soleplate of your iron can reach extremely high temperatures, and can cause burns: do not
touch them. Never touch the electrical power cords with the soleplate of the iron.
• Your appliance emits steam, which can cause burns. Always handle the iron with care,
especially when ironing vertically. Never direct the steam towards people or animals.
• Never immerse your steam iron in water or any other liquid. Never place it under a running tap.
• The plug must be removed from the socket-outlet before the water tank is filled with water.
PLEASE RETAIN THIS INSTRUCTION
BOOKLET FOR FUTURE REFERENCE
Environment protection first !
i
Your appliance contains valuable materials which can be recovered
or recycled.
‹
Leave it at a local civic waste collection point.
7
Page 8

BEFORE FIRST USE
Remove any labels from the soleplate before heating the iron.
Before using the steam function in your iron for
the rst time, we recommend that you allow the
iron to operate a few moments in a horizontal position without coming into contact with your
laundry. Keeping the iron in this position, push
the turbo steam trigger several times.
During the rst few uses, the appliance may produce smoke, a harmless odour and a light emission of particles. These are simply the engineering
residues from the manufacturing process burning
off. These are harmless and will quickly disappear.
PREPARATION
Which water should I use?
• Your appliance was designed to operate using untreated
tap water. However, it is necessary to periodically clean
the steam chamber to remove any mineral deposits.
• Do not use pure demineralised or pure distilled water,
water from clothes dryers, scented or softened water,
rain water, filtered, bottled or boiled water, water from
refrigerators, batteries or air conditioners, additives
water, condensation water or rain water as these may
damage the iron. These types of water contain organic
waste, mineral elements that become concentrated
when heated and cause spitting, brown staining, leaking
or premature wear on your iron.
If your water is very hard, mix 50% untreated tap water
with 50% distilled water (available in hardware stores).
8
Page 9

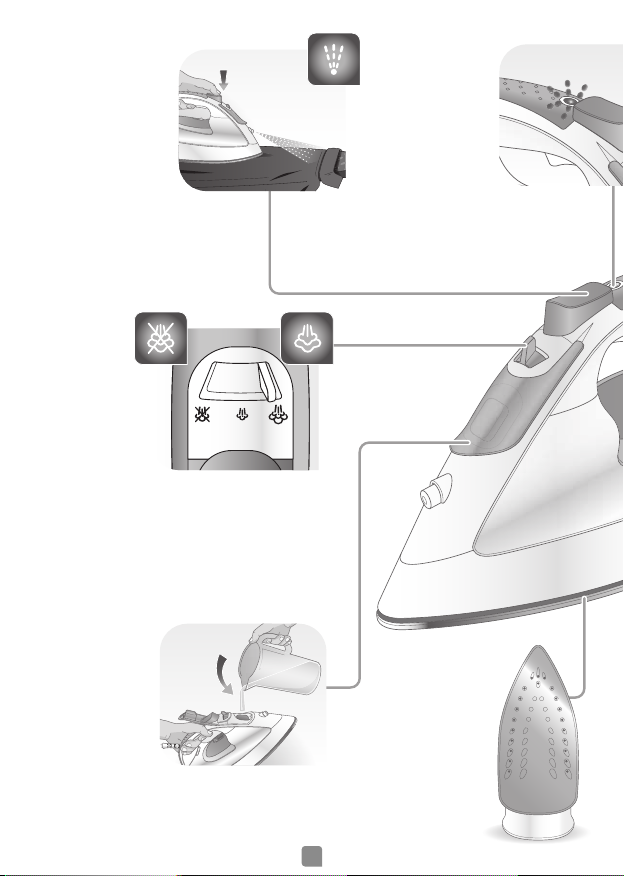
Filling the water tank
Max.
• Unplug the iron before filling it.
• Set the steam control to
• Lift the iron and, holding it at a slight incline, point the
soleplate up.
• Open the water tank cover.
• Fill the water tank to the mark “Max”.
• Close the water tank cover.
9
Page 10

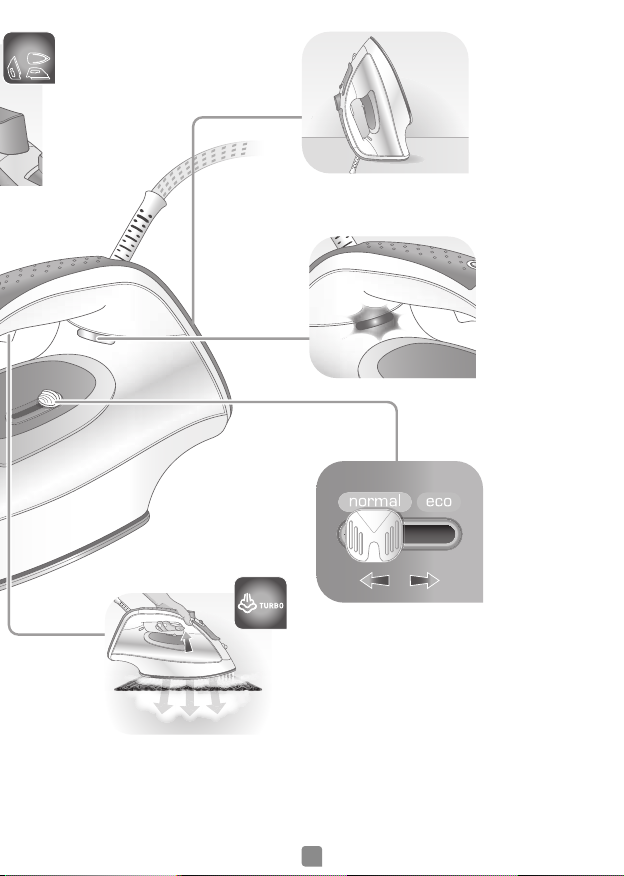
USE
• Plug in the appliance.
Adjusting the temperature and steam
• Set the steam control to or
• Set the slider on the "normal" or "eco" setting.
TEMPERATURE
SLIDER POSITION
In eco setting, you save energy vs the normal
setting.
• The temperature indicator light turns on.
STEAM
CONTROL
POSITION
OK
• It will turn off automatically once the soleplate
achieves the desired temperature.
10
Page 11

1
sec.
Dry ironing
• Set the steam control to
• You may continue to iron when the indicator light
turns off.
Getting more steam
• Press the turbo steam trigger periodically (turbo
steam).
• To avoid water dripping on the laundry, maintain an
interval of a few seconds in between each press.
11
Page 12

1
sec.
Vertical steam ironing
• Set the thermostat control to “Normal”
• Press the turbo steam trigger (turbo steam) in pulses,
moving the iron from top to bottom. Hang the item on
a hanger and keep the fabric taut with one hand.
• Hold the iron at a distance of a few centimetres from
the clothing to avoid burning delicate fabrics.
• Repeat the action if needed.
NO
• The steam is very hot; never steam iron clothing while
it is being worn always use a hanger.
12
Page 13

Dampening clothing (Spray)
• When dry or steam ironing, press repeatedly on the
spray button to moisten clothing and remove stubborn
creases.
• Ensure that there is water in the tank before using the
spray button.
NO
OK
While ironing
• Do not lay the iron down on the soleplate; use the heel
rest for this purpose.
Auto-Off Function
• If the iron remains unused for about 8 minutes on the
heel rest or about 30 second laid flat or on its side, the
electronic system will cut the power, the iron will stop
heating and the temperature indicator light will
begin to flash.
• To restart the iron, move it gently until the indicator
stops flashing.
13
Page 14

1H
IRON STORAGE AND
MAINTENANCE
Storing your iron
• Unplug the iron and wait for the soleplate to cool
(approx. 1 hour).
• Empt y the water tank.
• Set the steam control to .
• Wrap the cord around the bottom of the iron's body.
Store the iron on its heel rest.
14
Page 15

Click
Cleaning the anti-calc valve (once per month)
• Unplug your iron and empty the water tank.
• To remove the anti-calc valve, open the water tank
cover and extract the anti-calc valve vertically.
h
4
• Soak the valve for 4 hours in a glass with lemon juice.
• Rinse the valve under the tap.
• Open the watertank inlet cover.
• Insert the valve in place, pushing it totally until you
hear a click.
• Close the water inlet cover
Beware!
Never touch the end of the valve.
The iron will not function without the anti-calc valve.
15
Page 16

Max.
Click
Descaling the steam chamber (once per month)
• Allow your iron to heat up with a full water tank while
on its heel rest and with the temperature slider set to
normal.
• Once the indicator light turns off, unplug the iron and
place it over a sink.
• Open the watertank inlet cover
• Remove the anti-calc valve.
• Shake the iron gently in a horizontal position over the
sink until some of the water (containing the impurities)
leaks from the soleplate. You may push the turbo
steam trigger to help flush out the minerals.
• Open the watertank inlet cover
• To finish the process, replace the anti-calc valve,
pushing it totally until you hear a click.
• Close the watertank inlet cover.
2
min.
• Plug in your iron for 2 minutes on the heel rest to dry
the soleplate.
16
Page 17

NO
NO
• Unplug your iron and, once cooled (around 1h min.),
wipe it with a soft cloth.
• Never use chemical or abrasive products.
During the next use, turn on your iron in a horizontal
position without putting it into contact with your
laundry in order to eliminate any water containing
mineral residues that remain in the soleplate.
Cleaning the soleplate
• While the soleplate is still warm, clean it with a damp
non-metallic pad.
• Never use chemical or abrasive products.
17
Page 18

IS THERE A PROBLEM WITH YOUR IRON?
PROBLEMS
Water is leaking
from the holes in
the soleplate.
The iron leaks at
the start of
ironing.
A brown
discharge
coming from
the soleplate
is staining the
clothing.
The soleplate is
dirty or brown
and may stain
clothing.
POSSIBLE CAUSES SOLUTIONS
You are using the steam
when the iron is not hot
enough.
You are using the iron on
eco with steam control on
max position
You are using the turbo
steam trigger (turbo steam)
too often.
You have stored the iron
horizontally without
emptying the water tank or
setting the steam control to
.
You have removed the
anti-calc valve to fill up
your iron.
The steam control dial is
not set to when filling
the water tank.
You are using chemical
descaling agents.
You are not using the right
type of water.
Clothing fibres are building
up in the holes of the
soleplate and burning.
You are using starch.. Clean the soleplate as indicated
Your laundry has not been
rinsed sufficiently or you are
ironing a new item of
clothing before washing it.
.
Wait for the indicator light to turn
off.
See the chapter on "Adjusting the
temperature and steam”
Wait a few seconds between each
use.
See the chapter on "Storing your
iron".
Do not remove the anti-calc valve
when filling the iron.
Ensure that the steam control dial is
set to when filling the water tank.
Do not introduce a descaling agent
into the water tank.
Clean the steam chamber and see the
chapter on "What water should I use?"
Clean the steam chamber and the
soleplate with a damp sponge.
Periodically vacuum the holes in the
soleplate.
above. Spray the starch on the reverse
side of the clothing to be ironed.
Ensure that your laundry is
sufficiently rinsed to eliminate
potential soap deposits or chemical
products on new items of clothing.
18
Page 19

IS THERE A PROBLEM WITH YOUR IRON?
PROBLEMS
Your iron
produces little to
no steam.
The soleplate is
scratched or
damaged.
The iron steams
once the water
tank has been
filled.
The spray does
not spray water.
POSSIBLE CAUSES SOLUTIONS
The water tank is empty. Fill it up.
The anti-calc valve is dirty. Clean the anti-calc valve.
Your iron is clogged up with
limescale.
Your iron has been used for
too long in the dry ironing
function.
You have placed your iron
on a metallic iron rest or
ironed over metal zips or
fastners.
The steam control is not set
to
.
The water tank is too full. Do not exceed the max level for
The water tank is not full
enough.
Clean the anti-calc valve and steam
chamber.
Clean the steam chamber.
Always place your iron on its heel
rest when not in use.
Do not iron over metal zips or
fastners.
Ensure that the steam control is set
to .
filling.
Add water to the water tank.
If you have any problems or queries please call our Customer
Relations team first for expert help and advice.
See Helpline number in the separate guarantee
and country list leaflet.
19
Page 20

www.tefal.com
1800141792 - 45/16 - FMO6
 Loading...