

Page 1
EN
SUMMARY
Connection at first use...........................................................................................................................................................................p. 5
Lock system
PREPARATION
What water may be used?
Filling the water tank
Switch the steam generator on
Operating the control panel
USE
.................................................................................................................................................................................................................. p. 5
............................................................................................................................................................
.
................................................................................................................................................................................ p. 6
............................................................................................................................................ p. 7
.......................................................................................................................................................
.
p. 6
p. 8
Steam ironing
Steam boost function
Regulation Effectis Easy and ECO MIN MODE
Regulation Effectis and ECO MODE
Dry ironing
Vertical steam ironing
«AUTO-OFF» System
Refilling the tank during use
.......................................................................................................................................................................................................... p. 9
(depending on model)........................................................................................................ p. 9
..................................................................................... p. 10
............................................................................................................................ p. 11
...................................................................................................................................................................................................................... p. 13
............................................................................................................................................................................. p. 13
.................................................................................................................................................................................. p. 13
...................................................................................................................................................... p. 14
MAINTENANCE AND CLEANING
Cleaning your steam generator
Rinsing the boiler, once a month
Storing the steam generator
........................................................................................................................................... p. 16
...................................................................................................................................... p. 17
..................................................................................................................................................... p.19
PROBLEMS WITH YOUR STEAM GENERATOR?
Problems, possible causes, solutions.......................................................................................................................... p. 20
Page 2
CLICKCLICKCLICK
12
3
4
5
a
b
c
d
e
67
8
9
10
11
12
13
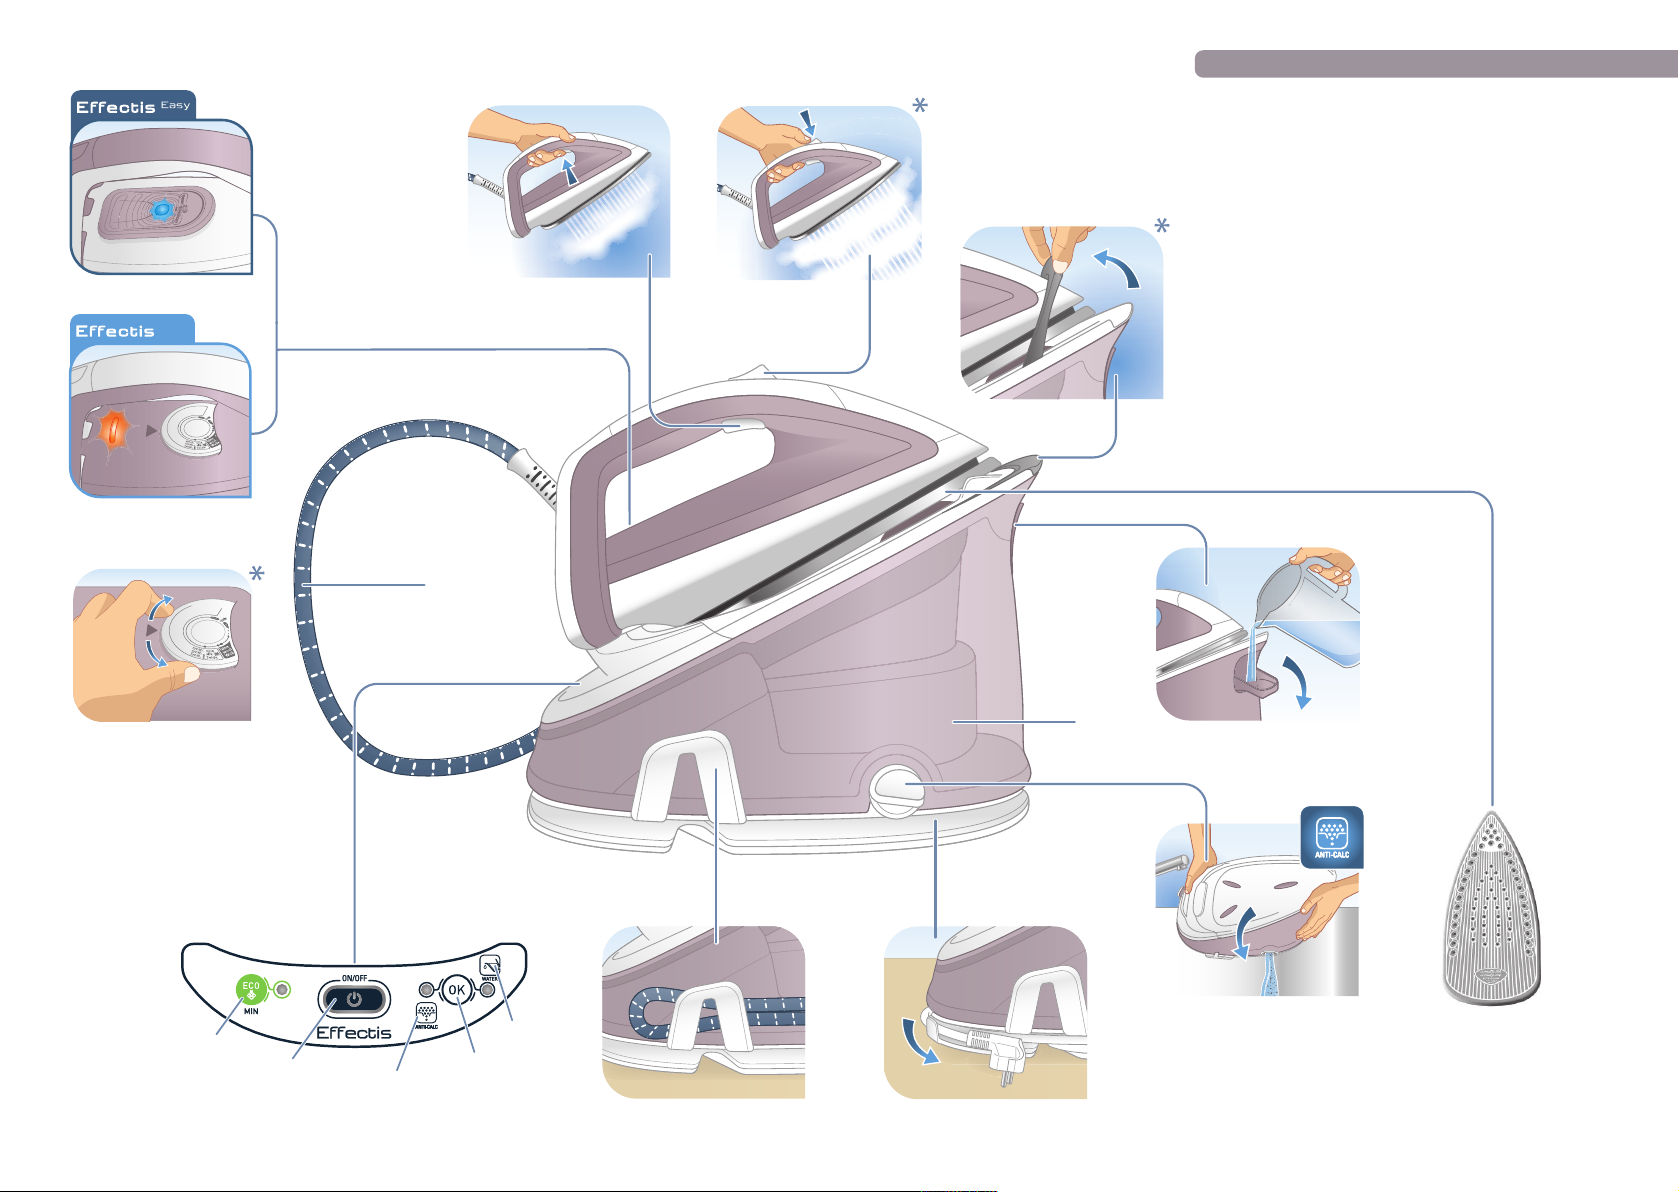
Description
1. Steam Boost button (depending on model)
2. Steam Output button
3. Iron lights EFFECTIS / EFFECTIS
4. Steam cord
5. Control panel
a. «ECO min» button with light
b. «ON-OFF» button with light
c. «Anti Calc» light
d. «OK» button
e. «Water tank empty» light
6. Steam cord storage
7. Power cord storage
8. Anti calc rinsing
9. Boiler (in the base unit)
10. Water tank filler cover
11. Ultraglide Soleplate
12. Locking system
13. Temperature control dial for iron soleplate (depending
on model)
(depending on model)
EASY
EN depending on model
*
Page 3
PREPARATIONCONNECTION AT FIRST USE
Max.
CLICKCLICKCLICK
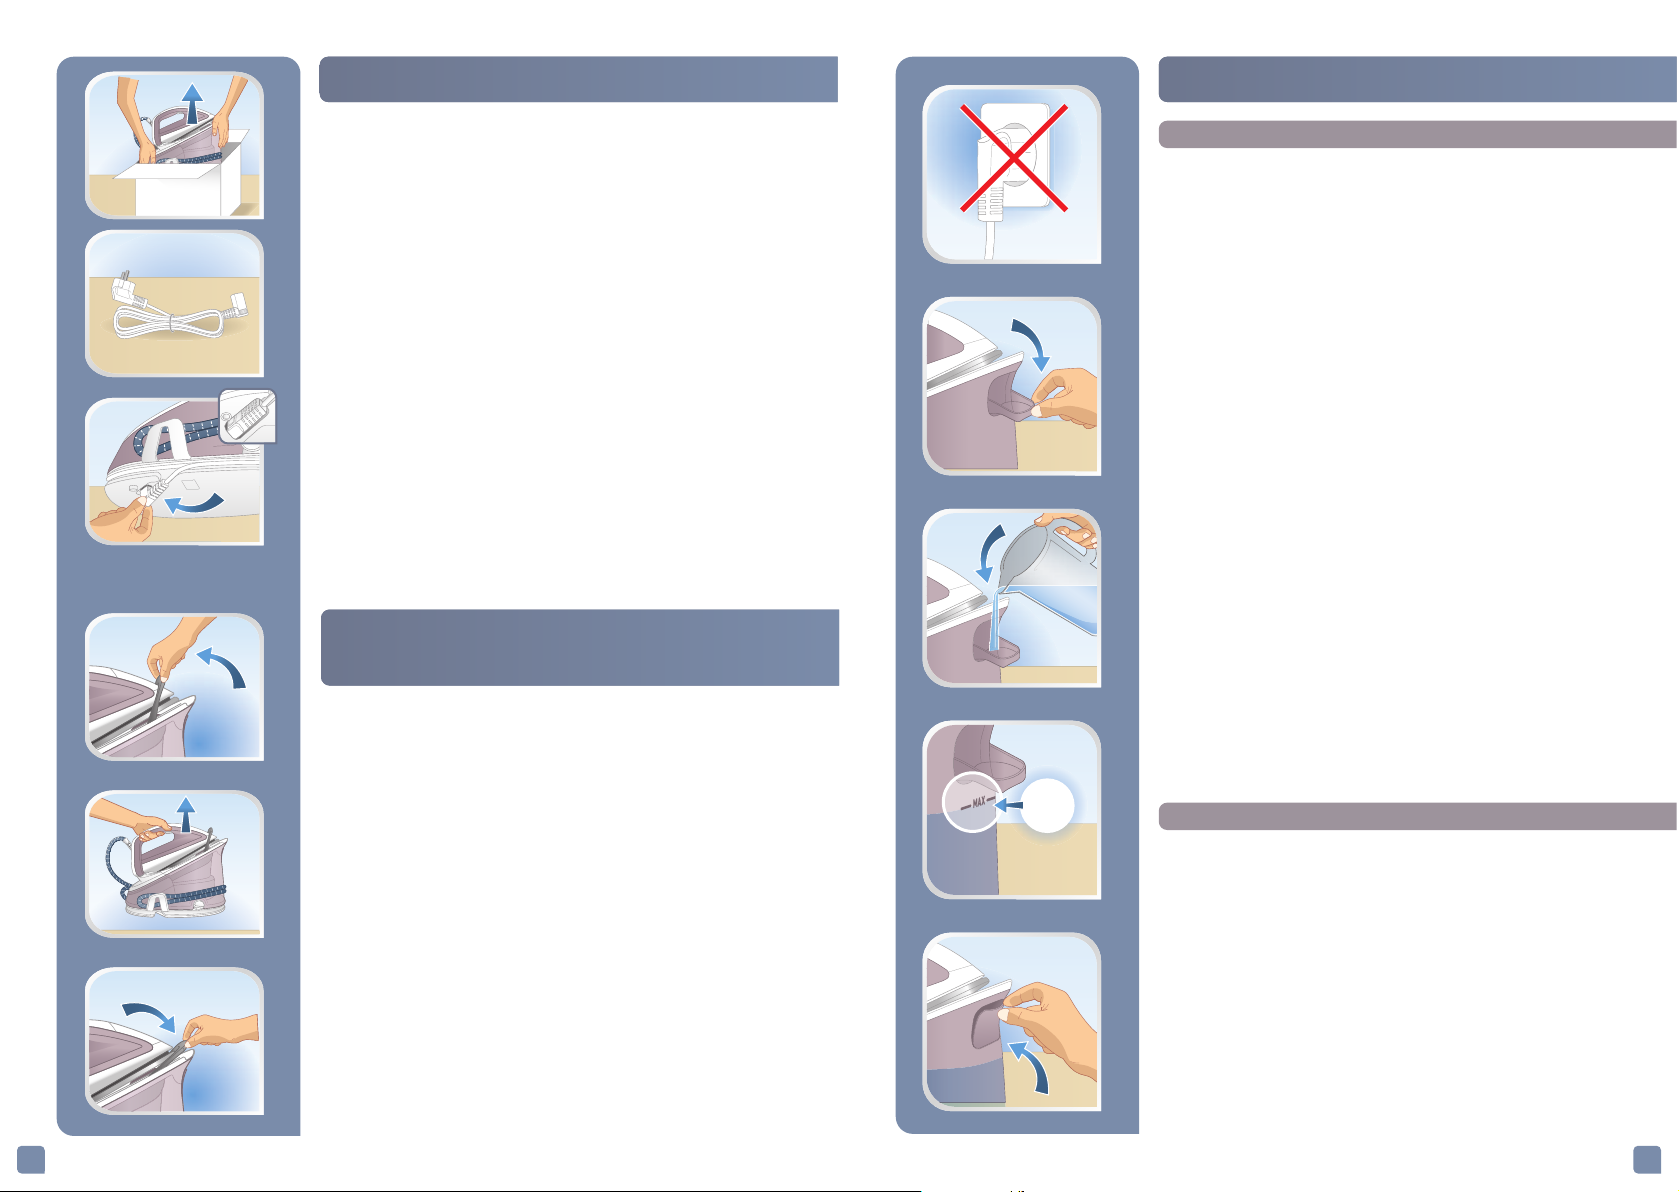
• Remove the product from its packaging
• and recover the cord.
• Tilt the product base and plug the cable into the
connector.
Locking system for retaining
the iron on the base
Your steam generator is fitted with a retaining hoop to
hold the iron onto the base with a locked position for
easy transport and storage:
What water may be used?
• Tap water:
Your appliance has been designed to use tap water. If
your water is very hard, mix 50% tap water and 50%
bottled demineralised water. In some coastal areas, the
salt content of the water may be high. In such cases, use
only demineralised water.
• Water softener: There are several types of water
softeners available and most of them can be used in the
generator.
However, some softeners (especially those that use
chemicals such as salt) may cause white or brown
streaks. This is often the case when using water from
filtering jugs. If you experience this sort of problem, we
suggest you try using untreated tap water or bottled
water.
• NB: Never use rain water or water containing additives
(such as starch, fragrances or water from household
appliances).
These additives may affect the properties of the steam,
and together with high temperatures can cause deposits
to form in the steam chamber which could soil your
laundry.
• Locking
• Unlocking
To transport your steam generator using the handle of
the iron:
- Put the iron on the steam generator iron rest and raise
the retaining hoop over the iron until it locks into place
(audible click).
- Hold the iron by the handle to transport your steam
generator.
Filling the water tank
• Place your steam generator on a stable, flat heatresistant surface.
• We recommend that you use a mesh type ironing
board to allow steam to pass through the garments
for better ironing results and also to prevent steam
venting sideways.
• Check that your appliance is unplugged and open the
flap on the tank.
• Put in untreated tap water up to the max mark.
65
Page 4
Switch the steam generator on
Operating the control panel
The first time the appliance is used, there may be
some fumes and smell but this is not harmful. They
will not affect use and will disappear rapidly.
• Put the steam generator on a flat, stable, horizontal
surface that is heatproof.
• Always ensure that the base unit is positioned close
enough to the ironing surface to avoid straining and
wear of the steam cord.
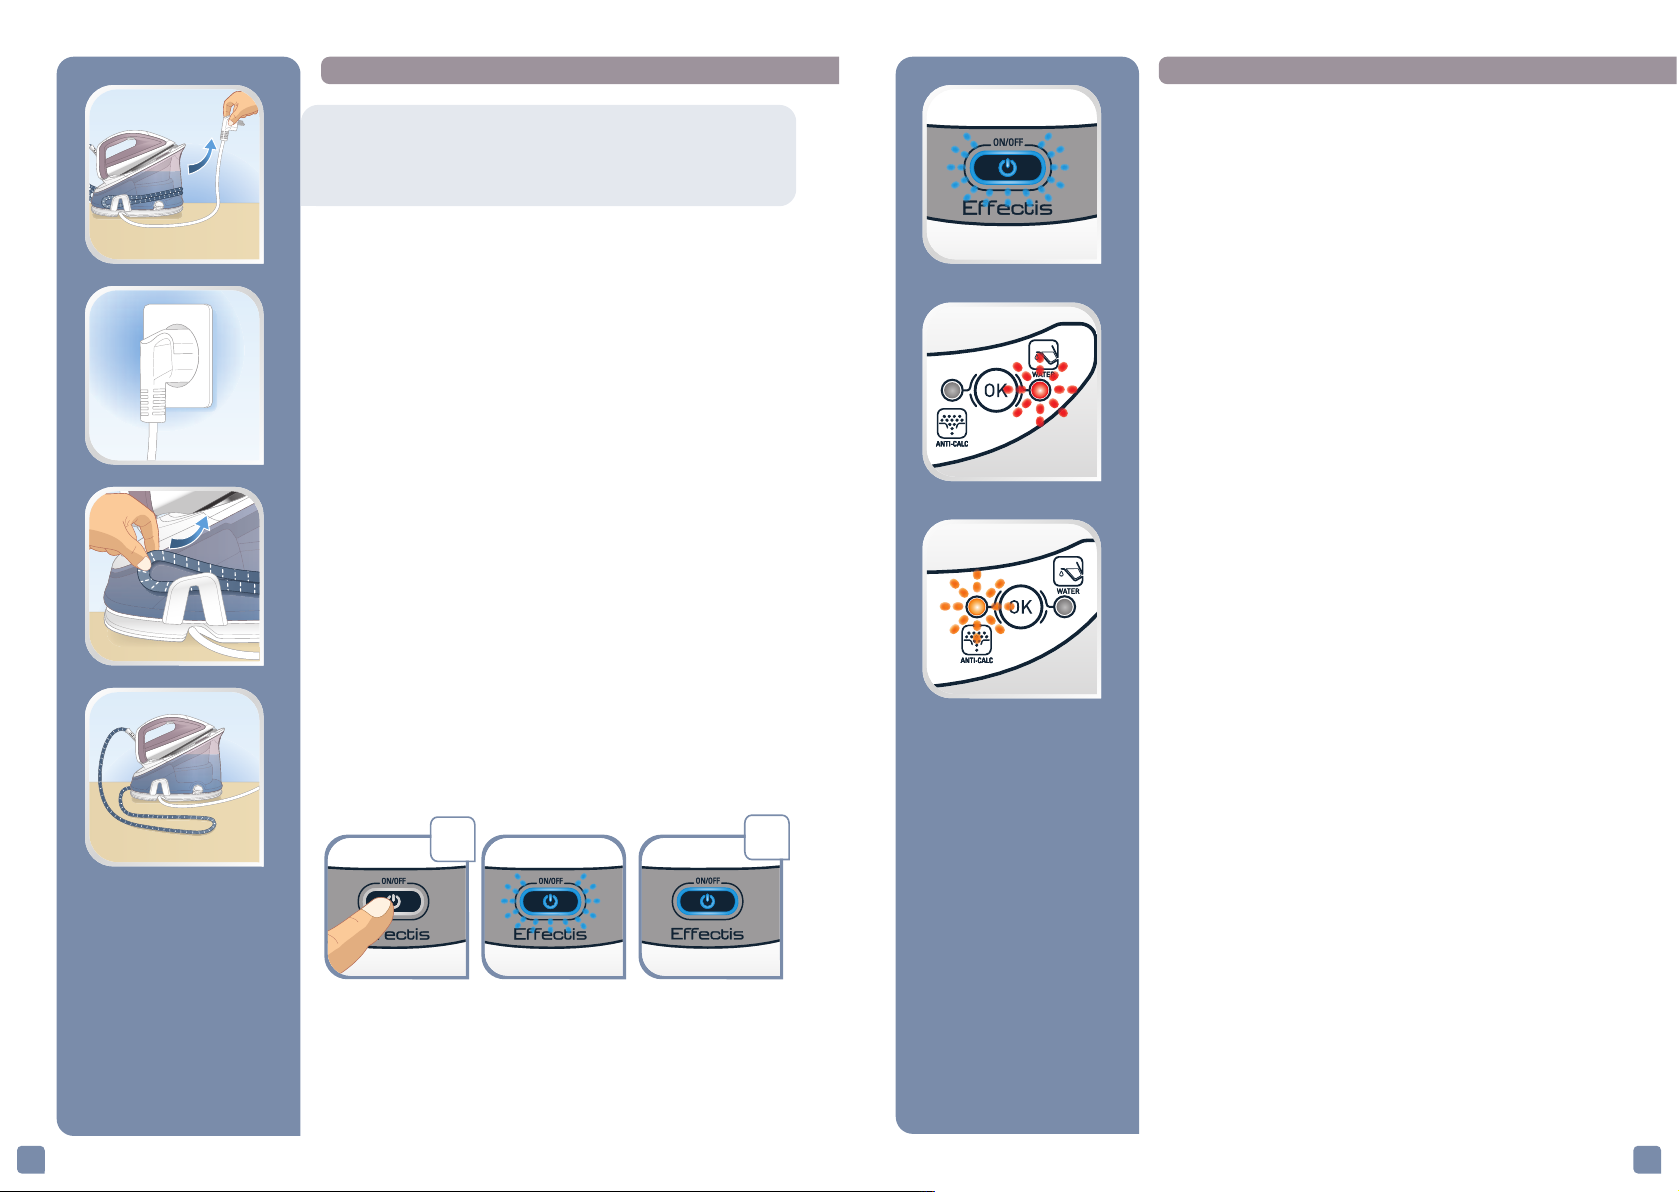
• Completely unwind the power cord and take the steam
cord out of its storage space.
• Plug your steam generator into an earthed socket.
• Press the «ON-OFF» button.
• The «ON-OFF» button light remains flashing while the
appliance is warming up. When the light stops flashing
(after approximately 2 minutes) the steam generator
is ready.
ON
OK
• The blue light of the «ON-OFF» button is flashing : the
boiler is heating up. When the light stops flashing, the
steam generator is ready.
• The red «Water tank empty» button light is flashing :
the water tank is empty. See paragraph «Refilling the
water tank during use»
• The orange «Anti-calc» light is flashing : maintenance
is required, see paragraph «Maintenance and
cleaning».
• Your steam generator comes with an automatic
shut-off system after approximately 8 minutes
without use. The «ON-OFF» button light is flashing: the
steam generator is on standby. Press the «ON-OFF»
button or the steam output button to start ironing
again. See paragraph «AUTO-OFF» System.
87
Page 5
USE
Steam boost function (depending on model)
NO
Steam ironing
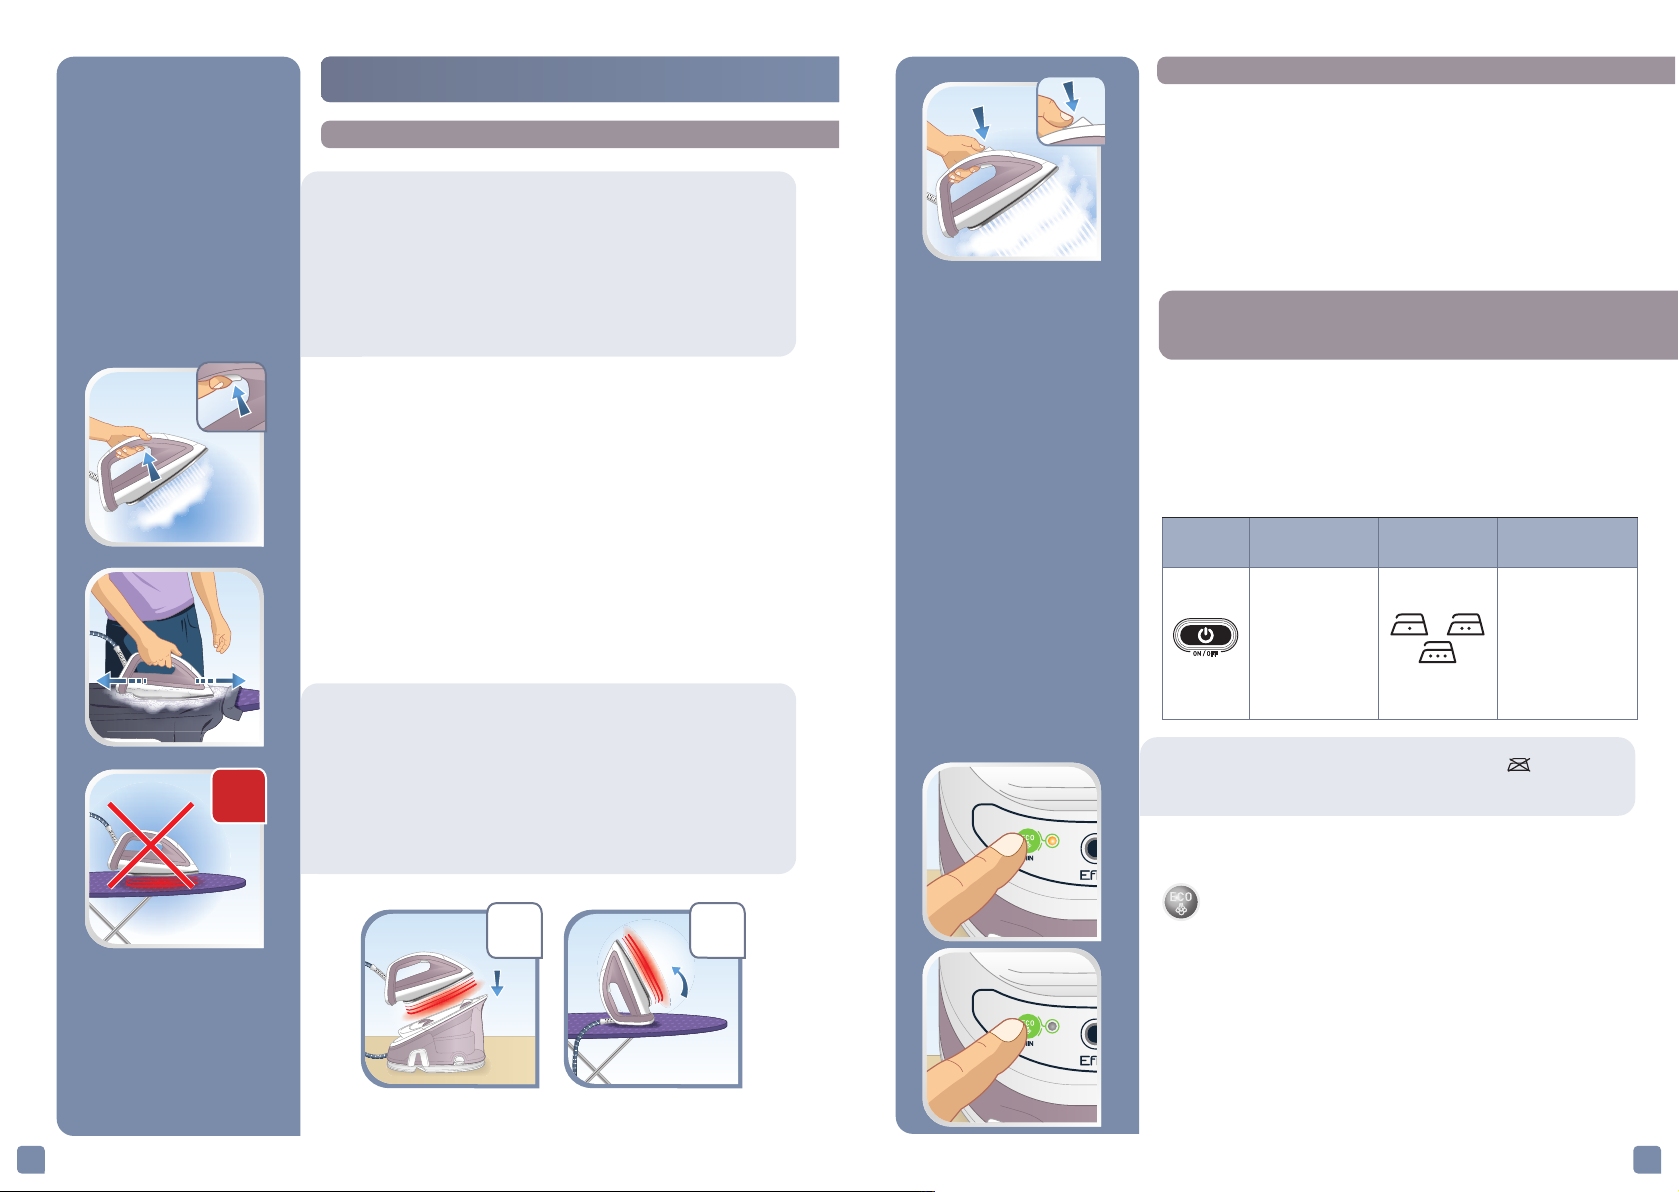
Recommendations: To prime the steam circuit,
either before using the iron for the first time, or if
you have not used the steam function for a few
minutes, press the steam control button several
times in a row, holding the iron away from your
clothes. This will enable any cold water to be
removed from the steam circuit.
• To obtain steam, press the steam output button under
the iron handle. The steam will stop when you release
the button.
• After approximately one minute, and regularly while
it is being used, your steam generator’s electric pump
injects water into the boiler. It makes a noise but this
is quite normal.
• If you are using starch, always spray it onto the reverse
side of the fabric to be ironed.
Do not iron over zips, studs or other hard or sharp
objects which may damage the soleplate. Do not
place the iron on a metal support. When taking a
break from ironing, always place the iron on the
iron rest plate of the unit. It is equipped with nonslip pads and has been designed to withstand high
temperatures.
• Your appliance is fitted with a steam boost function:
automatic sequential steam for effortless use.
• To use this function, press the steam boost button on
the top of the iron.
Regulation
ASY
EFFECTIS
• Your steam generator is fitted with SMART
TECHNOLOGY EASY electronic regulation which offers
you the optimum temperature and steam
combination allowing you to iron all your ironable
fabrics without risk and without having to sort them.
Settings
Warning, fabrics with the symbol are not
suitable for ironing.
E
(depending on model)
Recommended
use
Optimum for all
types of ironable
fabrics without
any risk of
burning.
Labelling Examples
Cotton, wool**, silk,
polyester,
cashmere, mohair,
viscose and
synthetic/cotton
mixes, linen and
mixed fibres.
OK
OK
ECO MIN MODE: The ECOmin function reduces
energy consumption. Press the ECO button to
change to ECO mode and press the same button
again to exit this mode.
The ECO /Min function allows ironing at the lowest
temperature and low steam flow suitable for
ironing the most delicate fabrics.
**If you are ironing woolen garments, press repeatedly on the steam shot button
without placing the iron on the garment. This will avoid it becoming shiny.
109
Page 6
Regulation
EFFECTIS (depending on model)
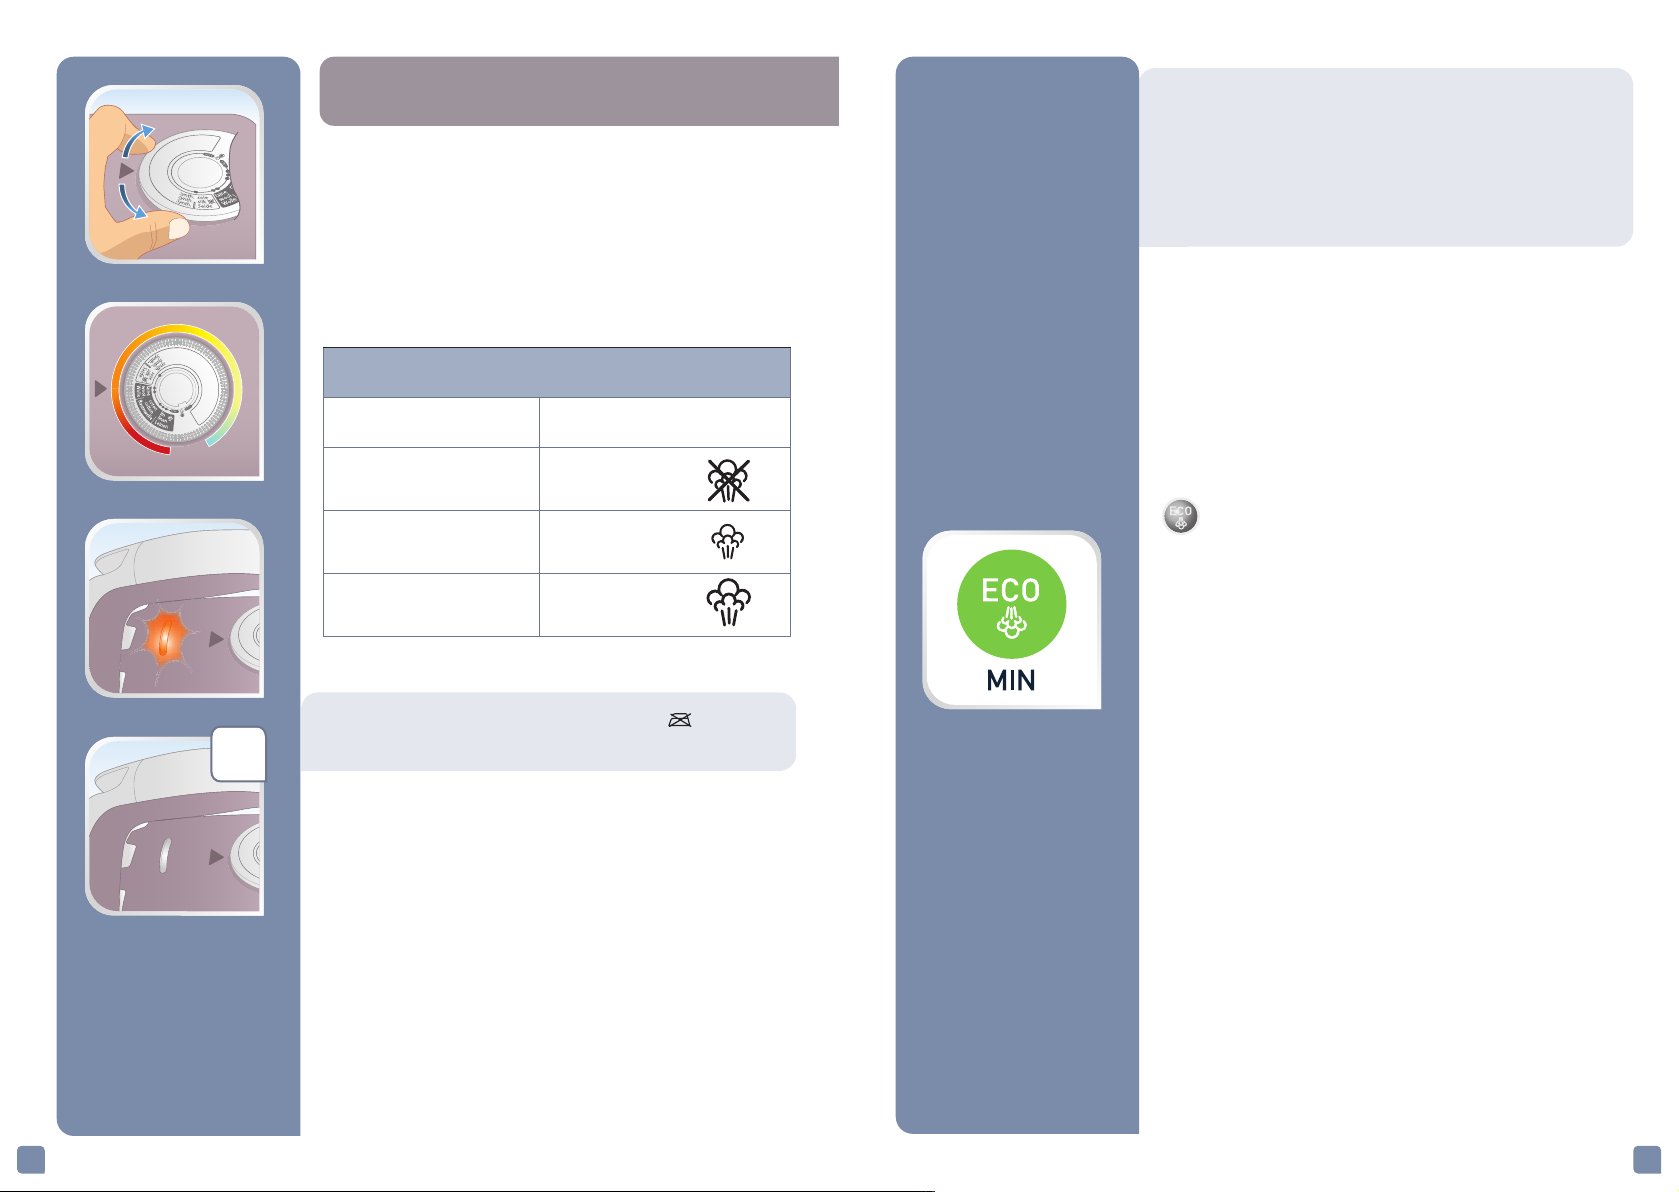
• Your steam generator is fitted with an iron
temperature control dial.
• Place the iron's temperature control dial according to
the type of fabric to be ironed (see table below).
Important: whenever you start using your iron and
whenever you reduce the temperature during use,
the iron is fully ready for use when its iron light goes
out. During use, when you increase the temperature
of the iron, you can start ironing immediately.
• While ironing, the iron light turn on and off, as the
temperature adjusts without interrupting ironing.
OK
SETTING THE TEMPERATURE AND STEAM OUTPUT ACCORDING
TYPE OF FABRICS SETTING TEMPERATURE CONTROL
Synthetics, Silk ( polyester,
acetate, acrylic, polyamide)
Wool**, Viscose
Linen, Cotton
Warning, fabrics with the symbol are not
suitable for ironing.
EFFECTIS Iron temperature setting:
- Start with the fabrics to be ironed at a low temperature
(•) and finish with those which need higher
temperatures (••• or Max).
TO TYPE OF FABRIC TO BE IRONED
•
••
•••
• If you are in doubt about the type of fabric an item of
clothing is made from, check the label.
**If you are ironing woolen garments, press repeatedly
on the steam shot button without placing the iron on
the garment. This will avoid it becoming shiny.
ECO MODE: Your steam generator iron has an ECO
mode function which uses less power whilst still
guaranteeing a sufficient steam flow for you to iron
your garments properly. In order to use this
function, once the Temperature control dial has
been correctly set (see table above), press on the
ECO mode button located on the control panel. The
ECO mode can be used on all types of fabrics,
nevertheless for very thick or very creased fabrics,
we recommend that you use the normal steam
flow for best results.
- Mixed fibre fabric: set the ironing temperature to the
setting for the most delicate fabric.
• If you put the temperature control dial in the “min”
position, the iron does not become hot.
**If you are ironing woolen garments, press repeatedly on the steam shot button
without placing the iron on the garment. This will avoid it becoming shiny.
1211
Page 7
Dry ironing
• Do not press the steam output button under the iron
handle.
Vertical steam ironing
• To reactivate the steam generator:
- Press the «ON-OFF» button.
- Wait for the «ON-OFF» button light to stop flashing
before starting your ironing again.
8
min
NO
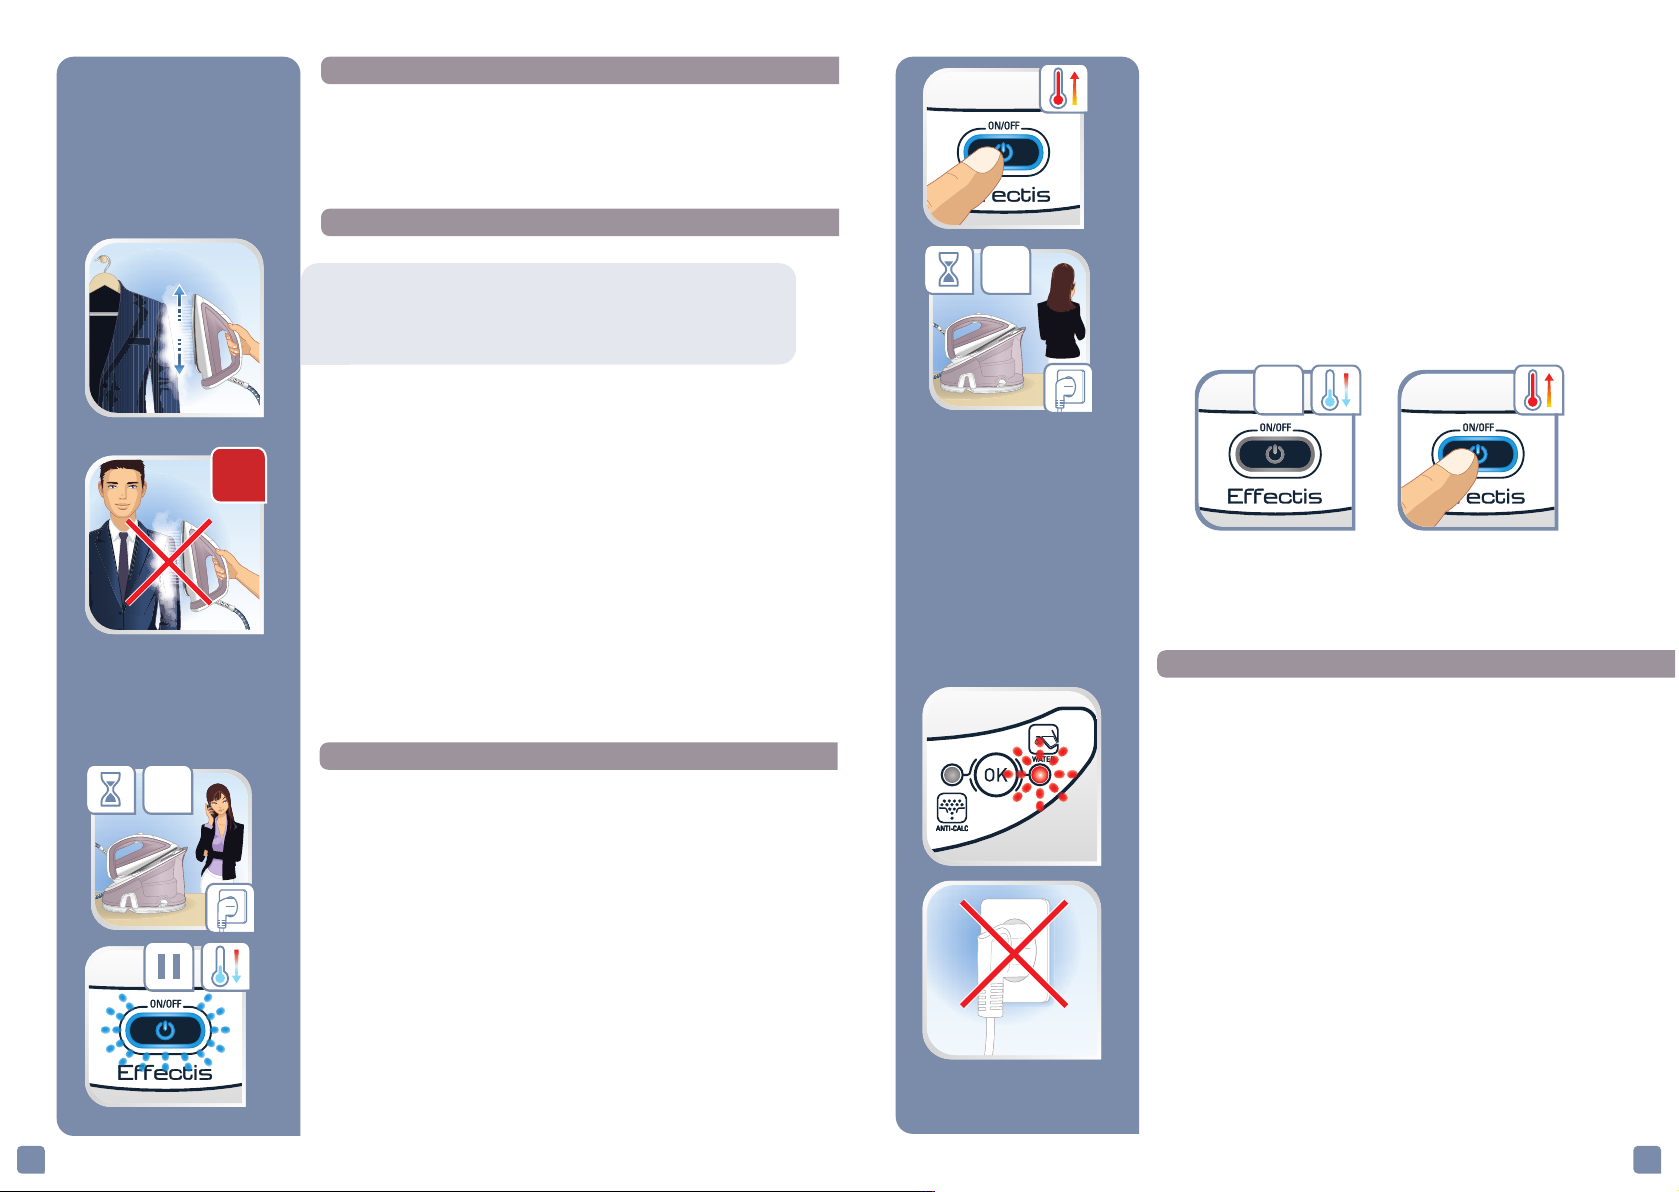
Recommendations: for fabrics other than linen or
cotton, hold the iron a few centimetres from the
garment to avoid burning the fabric.
• Hang the garment on a coat hanger and hold the
fabric slightly taut with one hand.
• As steam is very hot: never attempt to remove creases
from a garment while it is being worn, always hang
garments on a coat hanger.
• Holding the iron in a vertical position tilted slightly
forwards, press repeatedly on the steam control button
(underneath the iron handle) moving the iron from top
to bottom.
«AUTO-OFF» System
• For your safety, the steam generator is fitted with an
«AUTO-OFF» monitoring system, which is activated
automatically after approximately 8 minutes without
use.
30
min
• For your safety, after approximately 30 minutes of
non-use, the «AUTO-OFF» system switches off your
steam generator. To start your ironing again, press the
«ON-OFF» button.
OFF
Relling the tank during use
• When the red «water tank empty» light is flashing,
there is no more steam. The water tank is empty.
• Only the «ON-OFF» button flashes to indicate that the
appliance is on standby.
• Switch off and unplug the product
1413
Page 8
MAINTENANCE AND
Max.
CLEANING
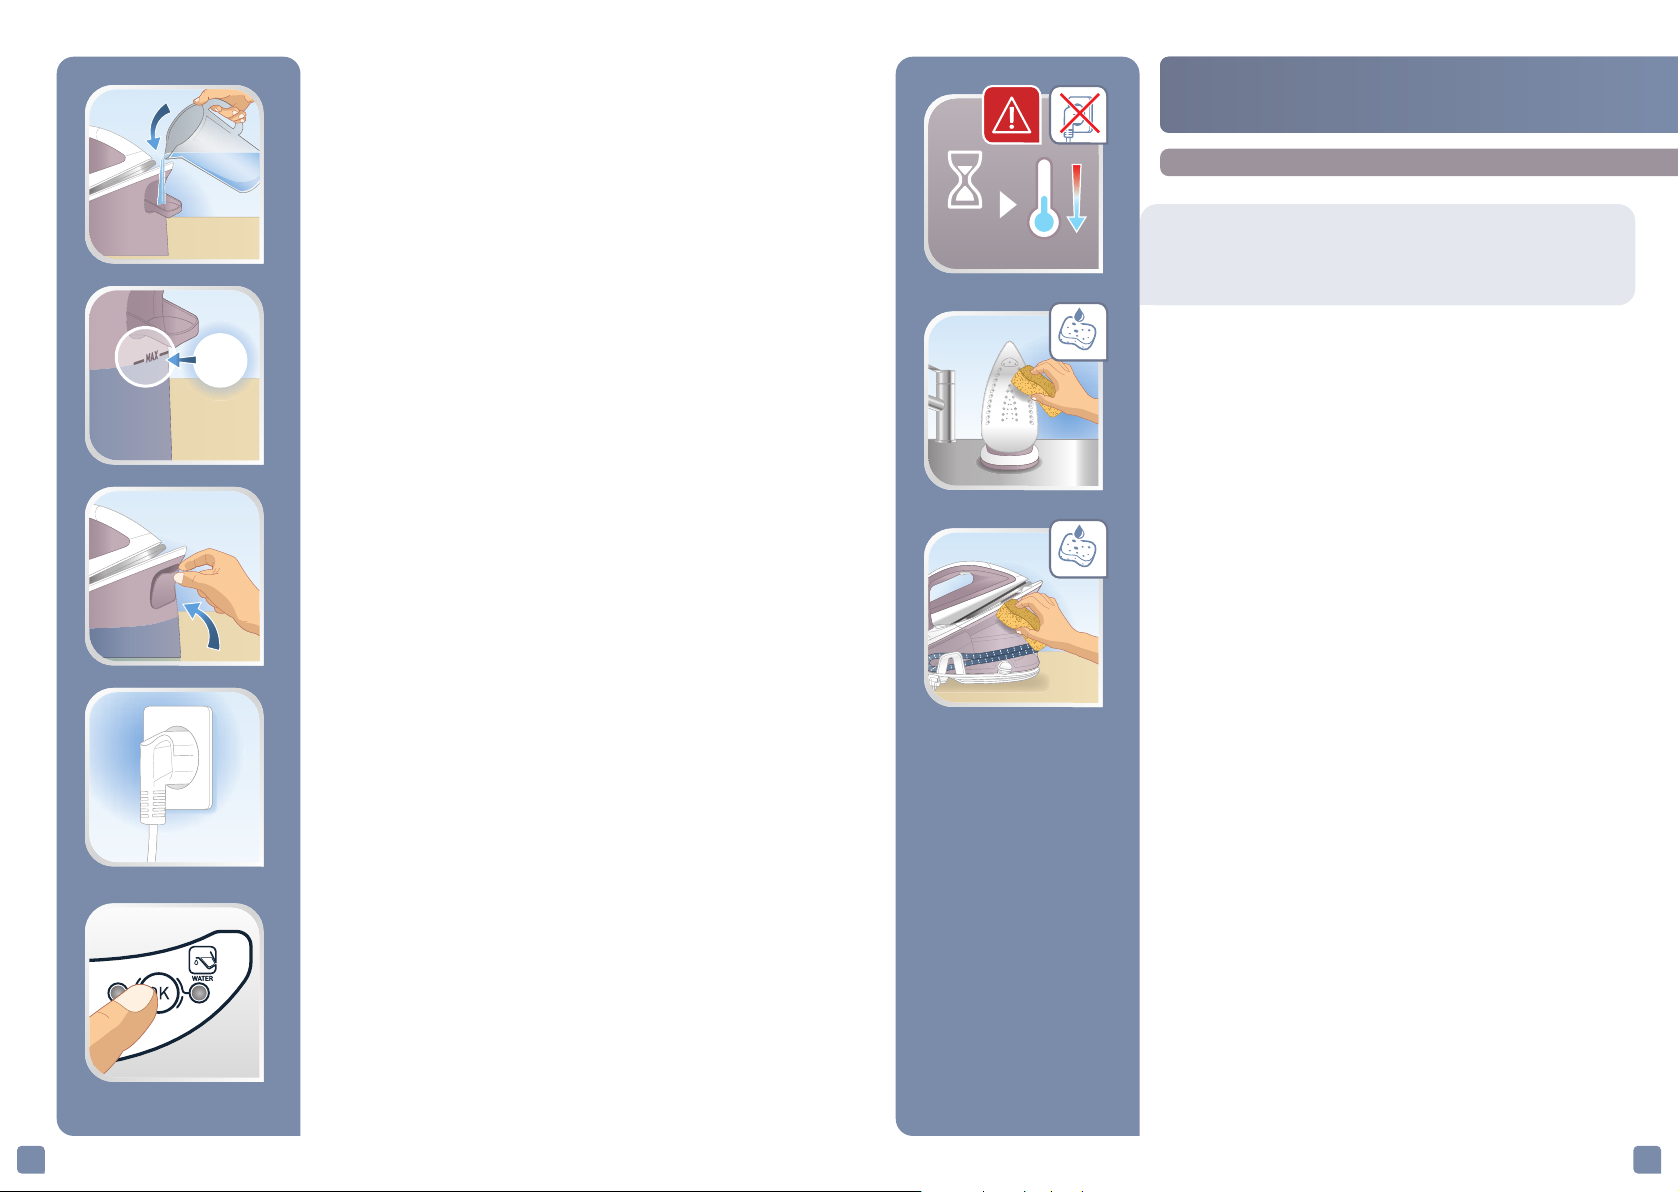
• Open the water tank filler cover.
• Using a jug of water, fill to a maximum of 1.5 litre with
untreated tap water and fill the tank, making sure not
to exceed the «Max» level of the tank.
• Close the water tank filler cover.
2H
Cleaning your steam generator
Before cleaning, ensure your steam generator is
unplugged and that the soleplate and the iron have
cooled down.
• Do not use detergent or descaling products for
cleaning the soleplate base-unit.
• Never hold the iron or the base unit under the tap.
• Regularly clean the soleplate with a damp, nonmetallic
washing up pad.
• Clean the plastic parts of the appliance occasionally
with a soft cloth.
• Plug the appliance and turn it on.
• Press the «OK» restart button under the control panel
to continue ironing. When the «ON-OFF» button light
remains on, the steam is ready.
1615
Page 9
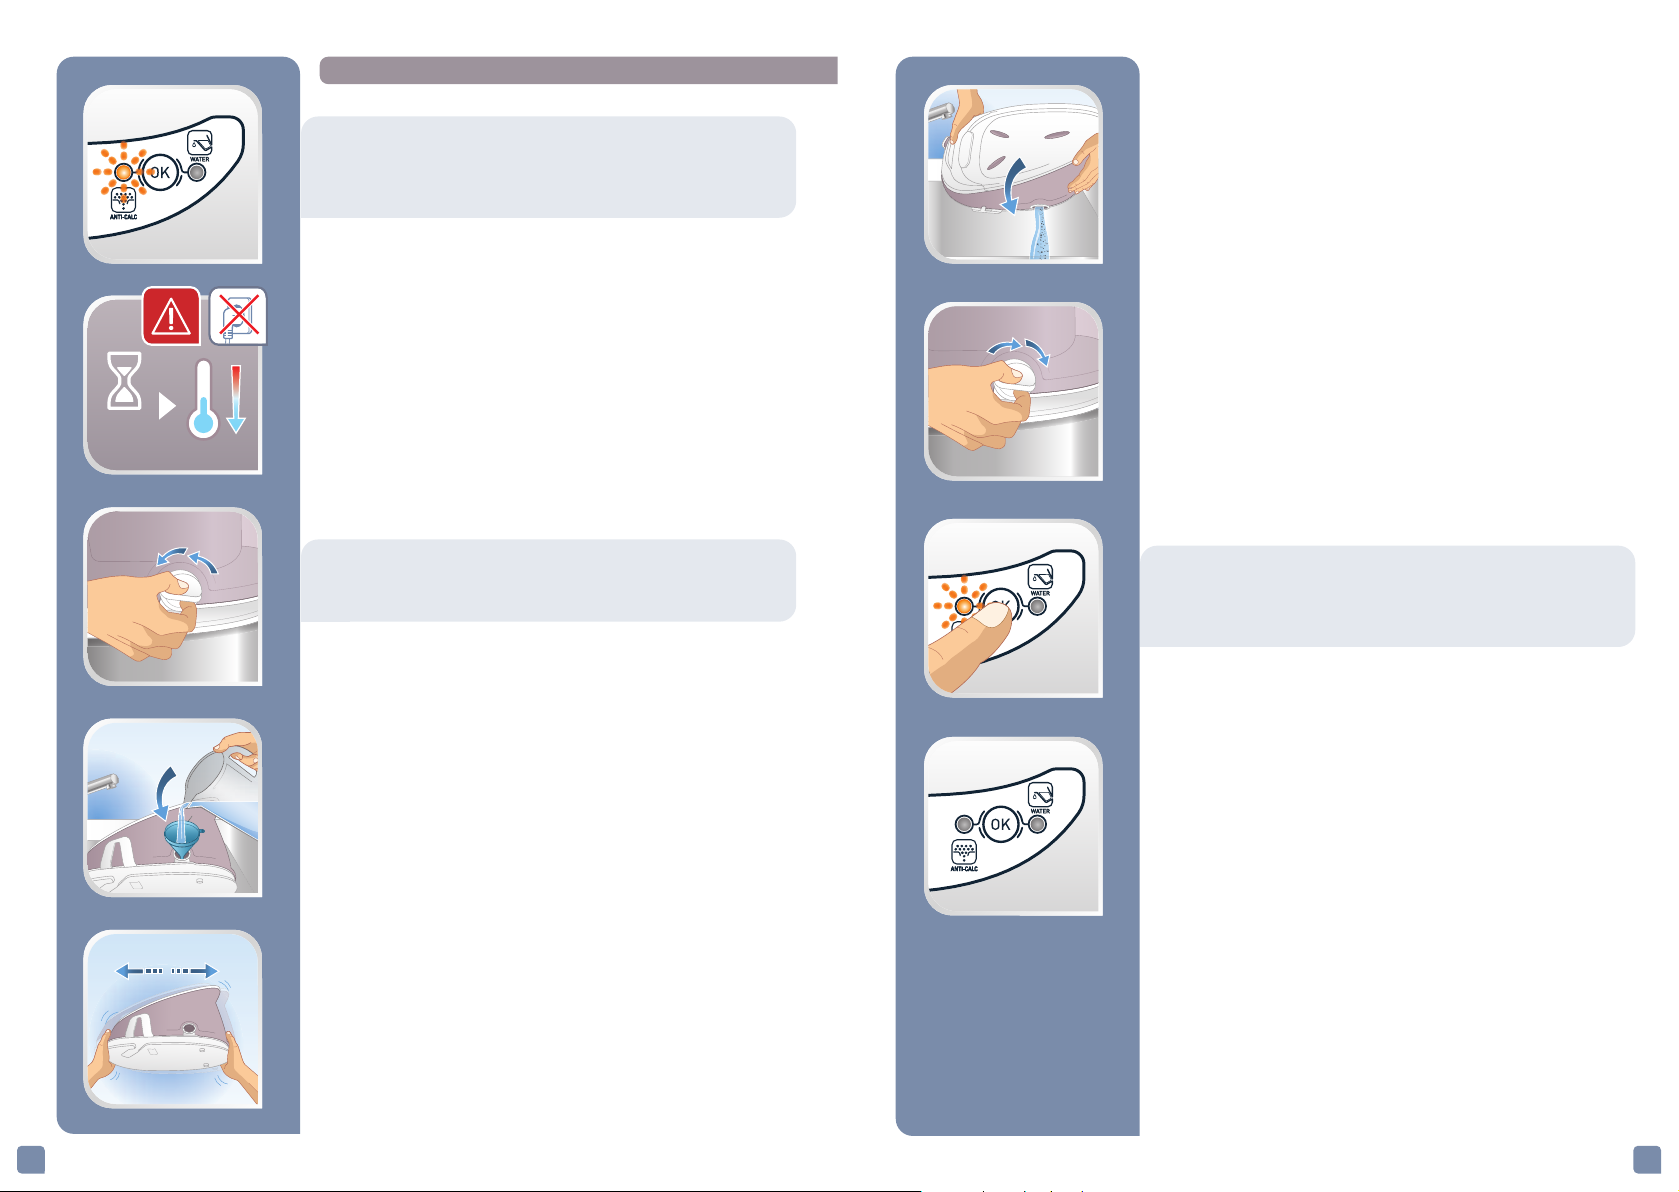
Rinsing the boiler, once a month
2H
Before cleaning, ensure your steam generator is
unplugged and that the soleplate and the iron have
cooled down.
• To extend the efficient operating life of your boiler and
avoid scale particles on your linen, your generator is
equipped with an orange anticalc light that flashes on
the control panel after about 10 uses.
If the orange anticalc light flashes, you can continue
ironing normally but remember to rinse the boiler first
the next time that you use it.
Before proceeding, check that the generator is cool
and unplugged for more than 2 hours.
• Place the steam generator on the edge of your sink,
with the iron placed to one side, standing on its heel.
• To obtain the best results, we recommend that this
operation is done twice.
• Screw back and tighten up the boiler rinse cap.
The next time you use the generator hold down the
“OK” button for a few seconds to turn off the
orange light.
• Gently unscrew the boiler rinse cap.
• Holding the steam generator in a tilted position, using
a jug and a funnel, fill the boiler with ¼ litre of
untreated tap water.
• Shake the base unit for a few moments and then
empty it completely into your sink.
1817
Page 10
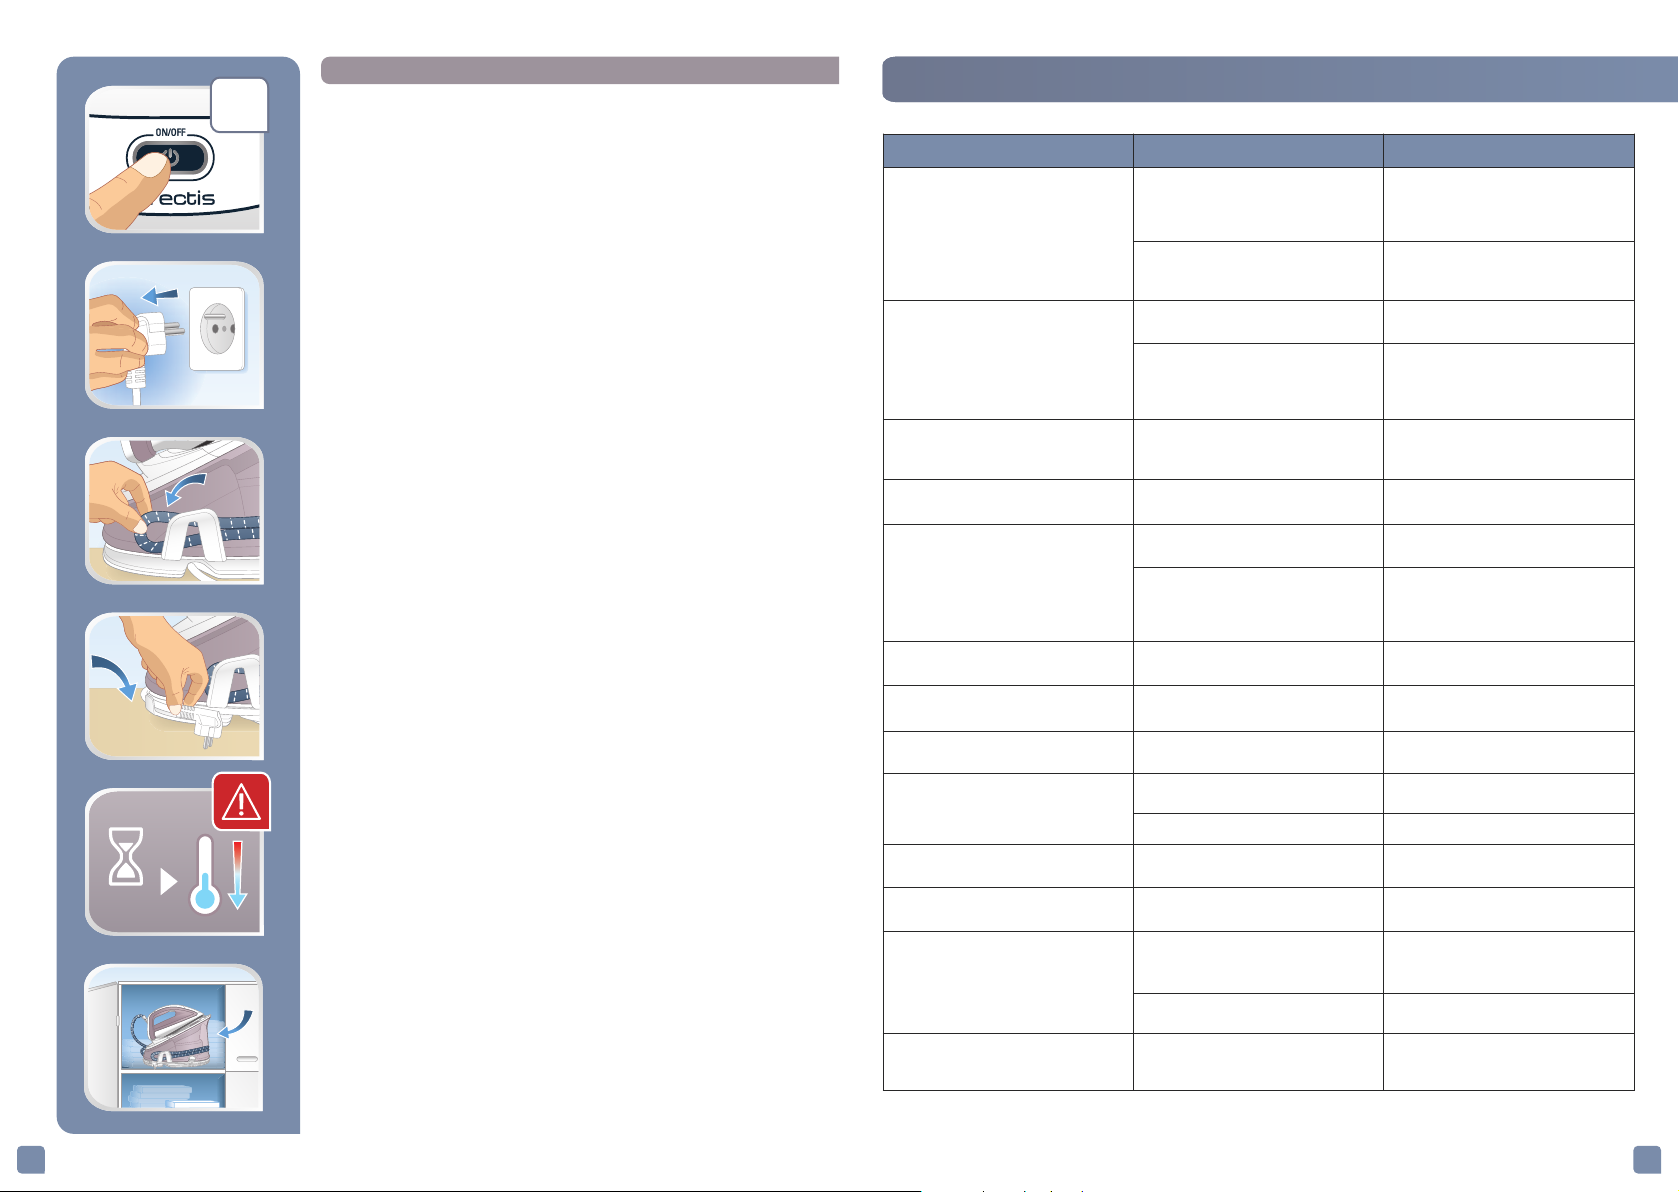
1H
OFF
Storing the steam generator
• Place the iron on the steam generator iron rest.
• Switch your steam generator off by pressing the «ONOFF» button and unplug the appliance.
• Raise the retaining hoop over the iron until the
protection system locks into place (audible click) –
depending on model.
• Store the electrical lead in its housing.
• Store the steam cord away in its compartment.
• Leave the steam generator to cool before putting it
away if you are storing it in a cupboard or a confined
space.
• You can store your steam generator safely by carrying
it by the iron handle.
• If you store your steam generator in a relatively cold
place (approximately <10C°), put it in a warm place
before starting your ironing.
• Wait 3 hours for the iron to reach room temperature.
PROBLEMS WITH YOUR STEAM GENERATOR?
PROBLEMS CAUSES SOLUTIONS
Check that the appliance is plugged in
he appliance is not switched on.
The steam generator does not switch on or
he iron indicator light and the «ON-OFF»
t
ight are not lit up.
l
Water runs out of the holes in the soleplate.
Water streaks appear on the linen.
White streaks come through the holes in
the soleplate.
Brown streaks come through the holes in
the soleplate and stain the linen.
The soleplate is dirty or brown and may
stain the linen.
There is no steam or there is little steam.
The red «tank empty» button is flashing
even though the tank has been filled.
Steam comes out around the boiler rinse
cap.
Steam or water is coming out from under
the appliance.
The «Anti-scale» button is flashing even
though the boiler has been rinsed.
The soleplate is scratched or damaged.
The red «tank empty» light is flashing and
the «ON-OFF» button does not work.
T
The «AUTO-OFF» system has activated
after 30 minutes of non-use and has switched off your steam generator.
The soleplate is not hot enough.
The water has condensed in the pipes
because you are using steam for the first
time or you have not used it for a few
minutes.
Your ironing board cover is soaked with
water as it is not suited to the power of a
steam generator.
Scale is coming out of the boiler because it
is not being rinsed regularly.
You are using chemical descaling agents or
additives in the water for ironing.
Your linen is not rinsed sufficiently or you
have ironed a new garment before washing it.
You are using starch.
The water tank is empty (red warning light
flashing).
You have not pressed the «OK» restart button.
The boiler rinse cap is not tightened
correctly.
The boiler rinse cap seal is damaged. Contact an Approved Service Centre.
The appliance is faulty.
You have not pressed the «OK» restart button.
You have put your iron down on a metal
iron rest or you have ironed over a zip or
metal fastener.
Your have cleaned your soleplate with an
abrasive or metal pad.
The appliance has been stored in a cold
place (approximately <10C°).
If you have any problems or queries please call our Customer Relations team first for expert help and advice:
All the contacts are avalable in the international warranty
correctly to a working power socket and
that it is switched on. Press the «ON-OFF»
utton.
b
Press the «ON-OFF» restart button located
under the control panel.
Wait for the thermostat light to stop flashing before activating the steam control.
Press the steam button while holding your
iron away from the ironing board until the
steam starts to come out.
Ensure that you have a suitable (vented
mesh) ironing board).
Rinse the boiler (see § descaling your
steam generator).
Never add any products to the water tank
(see § What water can I use?).
Ensure linen is rinsed thoroughly to
remove any soap deposits or chemicals on
new garments which may be sucked up by
the iron.
Always spray starch on the reverse side of
the fabric to be ironed.
Fill the water tank and press the «OK» until
the light goes out.
Press the «OK» restart button on the
control panel.
Tighten the boiler rinse cap but do not
overtighten it.
Stop using the steam generator and
contact an Approved Service Centre.
Press the «OK» restart button located on
the control panel.
Always stand the iron upright or on the
iron rest. Do not iron over a zip or metal
fastener.
See chapter «Cleaning the soleplate».
Unplug the appliance.
Wait 3 hours for the appliance to reach
room temperature.
2019
 Loading...