

Page 1

DW1 605 FI
12 placesettings
Page 2

Dear Cus tom er ,
Pleasecarefully rea d this manualbeforeusing the
dishwasher,itwillhelpyou t o use and maintainthe
dishw ash er prope rly.
Keepit tor efertoit at a later date.
Passitontoanysubsequent owner of theappliance.
This manual contains secti ons on safety Instru ct io ns ,
OperatingInstructions,InstallationInstructions and
Troubles hooti ng Tip s, etc.
ControlPanel...................................................3
DishwasherFeatures.......................................3
A WaterSoften er............ ... ...... ....... ..... ..... .....4、
B LoadingtheSaltintotheSoftener.................5、
C Fill theRinse AidDispen ser.... .... ... .. . ..... . .....5、
D Funct i on of Det e rg ent .... ... .. . . ... .. ... . ...... .. . .. .. 6
、
Attenti on b efor e or after loadi ng theDishwas her
Baskets..........................................................9
Loadi n g the upper ...... ... ... . ... ... ... ... ... .. . 10Basket
LoadingtheLower ...............................10Basket
To re view th e sec tion o n tro ubleshooting Tips
willhelpyoutosolve somecommonproblems
byyourself .
Ifyou can notsolve the problemsby yo urself ,
please ask f or the helpof p rofessiona l techn ician s.
The manufac turer,following apolicy of con sta nt
developmentand updating of the product, may
make modificatio ns witho ut gi ving priornotice.
This user ma nualshall alsobegotfrom the
manufacturer or responsiblevendor.
WashCycle Table...........................................11
Turning onthe Appl ianc e. .. ...... . .. .... ... .. .... ... .. ..11
ChangetheProgramme.............. ................12....
At theendof theWashCycle...........................12
Filtering System.............................................13
Carin g for th e Dishwas he r.... . .. ... . ... .. ..... .... .. . ..1 4.
......... ......................... 15Install atio n p repara tion
...16Aest h e tic pane l's dime n sio ns and ins tal l at io n
........ ......18Tension a djus tment ofthe doorspring
............................. . 18Connection of drain hoses
.........................19Dis h washer inst a ll ati on ste ps
AboutElectricity Connecting. ............... ...........20
ColdWater C onnection.... ............... ............... 21
Beforecallingfor service........................... .....23.
Errorcodes.................................... ..............24.
Technical information.............................. .....25..
Page 3

When using your dishwasher,
follow the precautions listed below:
Thisapplianceisintended to be used in household
andsimilarapplicationssuch as:
-staff kitch en areas in shop s, offices an dother
worki ng env ironmen ts;
-farm ho uses;
-byclients in hotels, motelsandother residentialtype
environments;
-bedandbreakfasttypeenvironments.
Thisappliancecanbe usedby childrenagedfrom8
yearsand aboveandpersonswith reducedphysical,
sensory or m ental capa bilities or l ack of experience
andknowledgeiftheyhave beengivensupervision
or instruction concerning use of the applianceina
safe way and understandthe hazardsinvolved.
Children shall not playwiththeappliance. Cleaning
andusermaintenanceshallnotbemadebychildren
withoutsupervision. ForEN6033 5-1
()
This applianc eis no tintend ed for use by p ersons
(including childre n)withreduced physical,sensory
or me nta l c apa bi li ti es , or la ck o f e xp er ie nc e an d
knowled ge ,unles s they h ave be en given s upervisio n
or instruction concerning use of the appliancebya
personresponsiblefortheir safety. ForIEC60335-1
()
Thisapplianceisforindoor use only,forhousehold
useonly.
Toprote ct ag ainst the risk of elect rical sho ck, do no t
immerse theunit,cordorpluginwateror other liquid.
Pleaseunplug before cleaningandmaintenance the
appliance.
Use a soft clothmoistenwith mild soap, and then use
adryclothtowipeitagain.
Page 4

This appliance must be earthed. In the event of a
malfunction or breakdown, earthing will reduce the risk
of anelectric shock by providing apath of least
resistance of electric current. This appliance is equipped
with a cord having an equipment-earthing conductor
and a grounding plug.
The plug must be plugged into an appropriate outlet that
is installed and earthed in accordance with all local
codes and ordinances.
Improper connection of the equipment-earthing
conductor can result in the risk of an electric shock.
Check with a qualified electrician or service
representative if you are in doubt whether the appliance
is properly grounded.
Do not modify the plug provided with the appliance;
If it does not fit the outlet.
Have a proper outlet installed by a qualified electrician.
Do not abuse, sit on, or stand on the door or dish rack of
the dishwasher.
Do not operate your dishwasher unless all enclosure
panels are properly in place.
Open the door very carefully if the dishwasher is
operating, there is a risk of water squirting out.
Do not place any heavy objects on or stand on the door
when it is open. The appliance could tip forward.
When loading items to be washed:
1) Locate sharp items so that they are not likely to
damage the door seal;
Page 5

2) Warning: Knives and other utensils with sharp points
must be loaded in the basket with their points down or
placed in a horizontal position.
Check that the detergent powder is empty after
completion of the wash cycle.
Do not wash plastic items unless they are marked
dishwasher safe or the equivalent.
For plastic items n
ot so marked,
check the manufacturer's
recommendations.
Use only detergent and rinse additives designed for
an automatic dishwasher.
Never use soap, laundry detergent, or hand washing
detergent in your dishwasher.
Children should be supervised to ensure that they do not
play with the appliance.
The door should not be left open, since this could increase
the risk of tripping.
If the supply cord is damaged, it must be replaced by the
manufacturer or its service agent or a similarly qualified
person in order to avoid a hazard.
During installation, the power supply must not be
excessively or dangerously bent or flattened.
Do not tamper with controls.
The appliance is to be connected to the water mains using
new hose sets and that old hose-sets should not be reused.
The maximum number of place settings to be washed
is 12.
The maximum permissible inlet water pressure is 1MPa.
The minimum permissible inlet water pressure is 0.04MPa.
Page 6

Dispose of the dishwasherpackaging material
correctly.
All packagingmaterialscanbe recycled.
Plasticparts are markedwiththestandard
international abbreviations:
PE forpolyethylene,e.g. sheet wrapping material
PS for pol ystyrene, e.g. p adding m aterial
POM polyo xymethylene, e.g . plasti c clips
PP poly propyl ene, e.g. Salt fill er
ABS Acrylonitrile ButadieneStyrene,e.g. Control
Panel.
Packag ing mat erial could be dan gerous fo r childre n!
Fordisposing ofpackage and the applianceplease
go to a recycl ing ce ntre. Th erefo re cut o ffthe power
supply cable a nd m ake the doo r closi ng dev ice
unusab le.
Cardboard packagingismanufactured from recycled
paper a nd should be disposed in the waste pa per
collecti on for re cycling.
Byensuring thisproductis disposed of correctly,you
willhelp prevent potentialnegativeconsequences
fortheenvironment and human health,whichcould
otherw ise be c aused by i nappro priate wa ste handling
of thi s p roduct.
Formoredetailedi nformation aboutrecycling ofthis
produc t, pl ease co ntact y our lo cal city o ffice a nd your
househ old wast edi sposal ser vice.
DISPOSAL:Do not disposethisproductas unsorted
municipal waste. C ollectionof such waste separately
forspecialtreatment is necessary.
Page 7

Fordetailedoperatingmethodread the co rrespondingcontentonthe instruction manual.
Switch on the appliance Open the door,press the On/Off button toswitch on the appliance .
Witheachwashcycle.
Fill the detergent dispenser
Compartment
For programmes with pre-wash only.
(Follow the user instructions!)
C
B
A
Check the rinse aid level
Checkthe regeneration
salt level
Load the baskets
Select a programme
Running the dishwasher
Changing t he programme
Electric indic ator on control panel(ifprovided).
(On models with water softener system only.)
Electric indicator on control panel (if provided).
If there is no salt warning light in the control panel
(for some models), you can estimate when to fill the salt into
the softener by the number of cycles the dishwasher has run.
Scrapeoff any largeamount ofleftover food. Soften remnantsofburnt food in pans,
thenload the baskets. Refer to the dishwasherloading instructions.
Press the Programme Button until the selected programme lights up.
( See the section entitled Operation instruction )“”
Turnonthewatertap,closethedoor.Themachinewillstartworkingafterabout10seconds.
1.A runningcycle can onlybe modified ifit hasbeen runningfora short time.Otherwise the detergent
may have already been released and the water already drained. If this is the case, the detergent
dispenser must be refilled.
2. Press the for more than 3 seconds to cancel the running programme.
3. Select a new programme.
4. Restart thedishwasher.
Programme Button
Add forgottendishes in the
dishwasher.
If the appliance is switched
off during a wash cycle.
Switch off the appliance
Turn off the water tap,
unload the baskets
1.Open the door a littleto sto p the dishwasher.
2.After the spray arms stop working, you can open the door completely.
3.Add the forgotten dishes.
4.Close the door, the dishwasher will start running again after 10 seconds.
If the appliance is switched off during a wash cycle, when switched
on again, please re-select th e washing cycle and operate the dishwasher
according to the original Power-on state ).
When the working cycle has finished, the buzzer of the
dishwasher will sound 8 times, then stop.
Turn off the appliance using the On/Off Button.
Warning: wait a few minutes (about 15 minutes) before unloading the dishwasher to avoid handling
the dishes and utensils while they are still hot and more susceptible to break.
They will alsodry better.Unload the appliance, startingfrom the lowerbasket.
Open the door carefully.
Hotsteam may escape
when the door is opened!
Page 8

To g etthe best performance from y ourdishwasher,read all operatinginstructions
beforeusing itforthe firsttime.
6h
3h
9h
1.Power indicator:To showwhen the p owe r on.
2.Salt and ri nse aid warninglights:To show
whenthesaltconta inerordispenserneedto be
refilled
3.Del ay i n dica tors : t o show the d el ay time
(3h/6h/9h)
4.Haft load indicator: To showwhen you selectthe
haft load fun c tion .
5.Prog ram indicators : to show whi ch program
you have chose;
Front view
1
2
3
4
6.Half l oad functions B utton: Toselect Half load
functions. (W ith thisHalf load functio n you ca n
only use itwhen you haveonly about orless than
6place setting di sh wave, an d you w ill see less
waterand energyconsumption,canonly beused
withIntensive,Normal,ECO, Glassand60min.)
7.Delay B utton :ToPress the button to dela y.
8.Program Button : To Press thebuttonto selecta
wash Progra m.
9.On/OffB utton:To turn on/off thepowersupply.
Back View
6
7
8
5
10
Upper Basket
1
Inner pipe
2
Lower Basket
3
Salt Contai ner
4
Dispenser
5
CupShelf
6
9
Spra y arms
7
Filter assembly
8
Inletpipe connector
9
10
Drai n p i p e
Page 9
Before using y our dishwasher for the first time:
A. Set the wa ter soft ener
B. Add 1.5Kgdishwasher sa lt an d th en ful l fil l the saltcontainer withwater
C. Filltherinseaiddispenser
D. Fill in de t e r gent
The water so ftener must be set m anually, using thewater hard ness dia l.
The water so ftener isdesigned to removeminerals an d sa lts from thewater,which woul d ha ve
a detrimental o r adverseeffect on the operation of the appliance.
The higher t he cont ent o f the se miner als and salts, the har der your wat er is .
The softener s hould beadjusted accordin g to thehardness of thewater in your area. YourlocalWaterAuthority
can advise you onthehardness o fthe waterin yourarea.
AdjustingS altConsumption
The dishwasher isdesigned toallow for adjustmentin the amount of sa lt co nsumed based on the hardness of
the waterused. Thisisintendedtooptimiseand customisethe levelofsalt consumption.
Pleasefollowthestepsbelow foradjustmentin saltconsumption.
1. Open thedoor ,Sw itch on theappliance;
2. Press the Program buttonfor more than 5second s to startthe w ater soft ener
set mod el within 60sec onds af ter t he applia nce wasswitched on( Th e Sal t and
Rinseaidwarninglights willbe on periodicallywhenit g et in the set model );
3. Press the Program buttonto select the proper s et acc ording t o y our loca l envi ronment,
the s ets wil l chang e in thefollowing sequence:H1->H2->H3 ->H4->H5 ->H6;
4. Press the Power b utton toend th e set u p model.
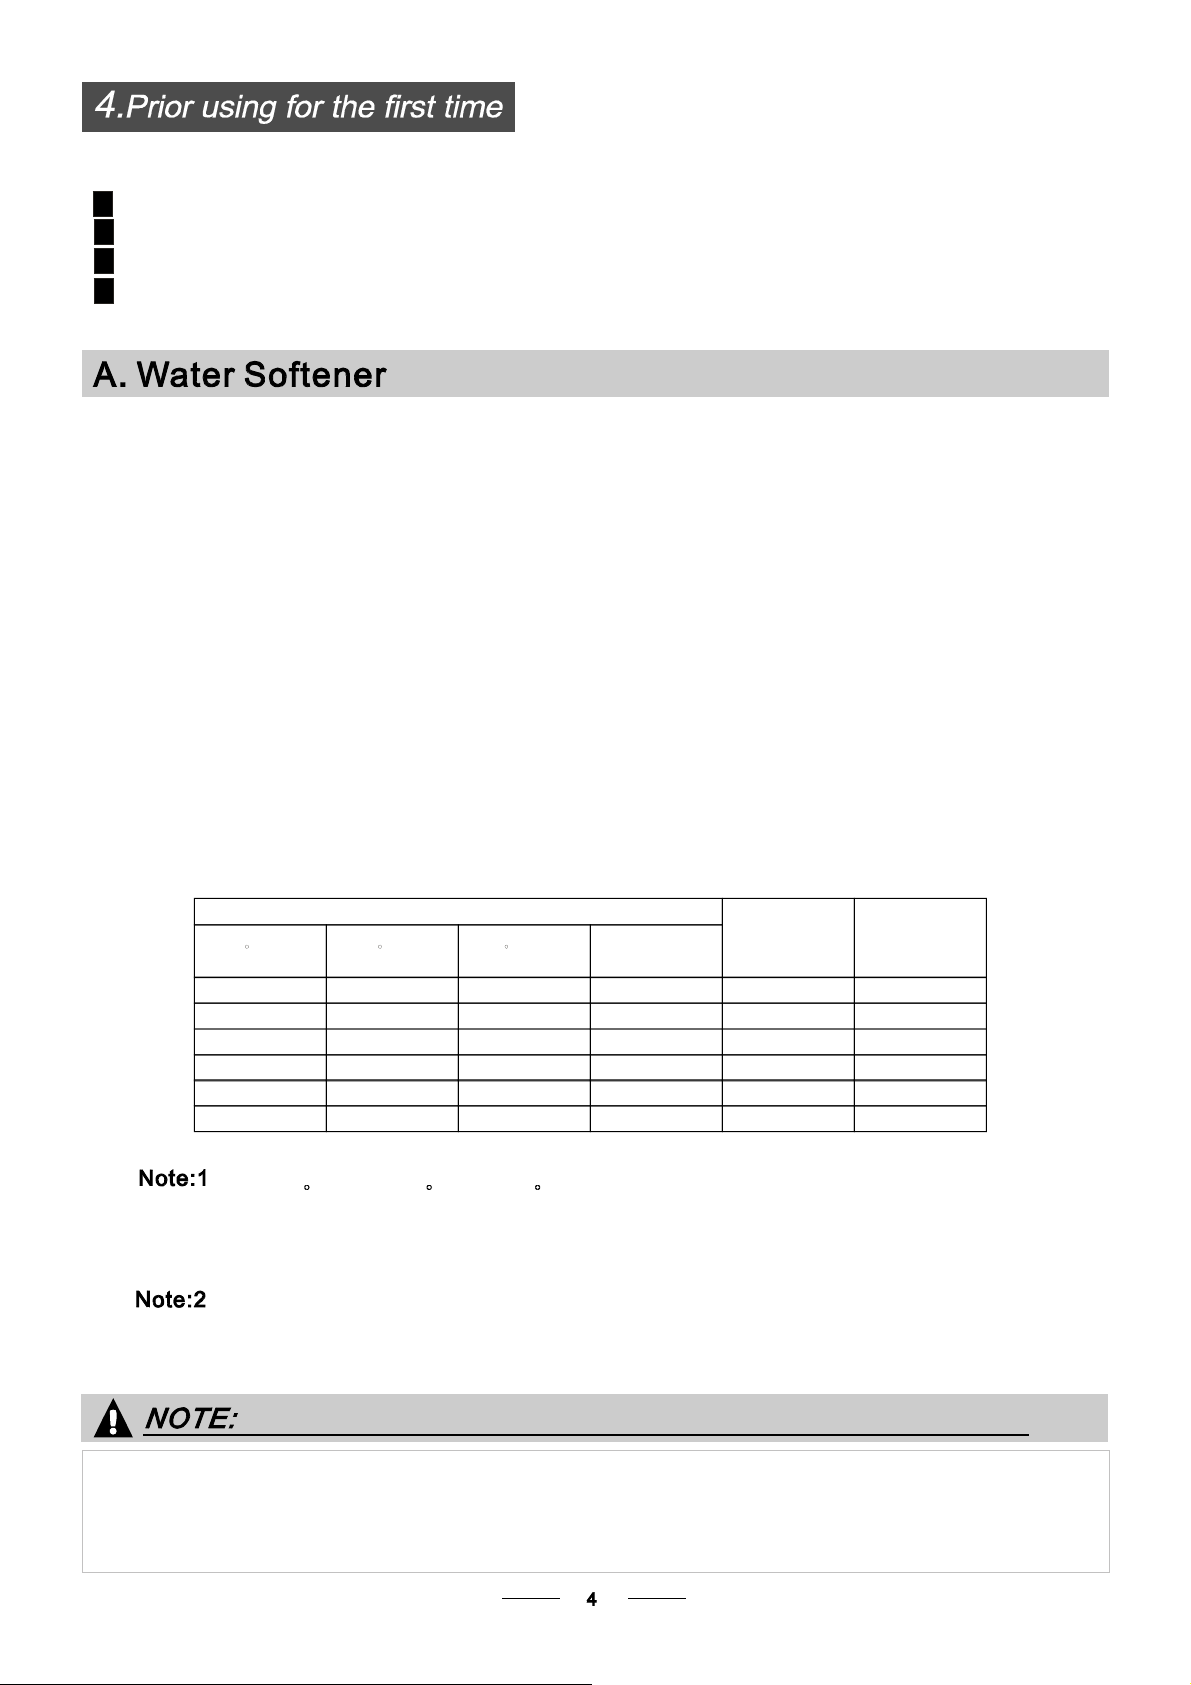
WATER HAR DN E S S
dH
6-11
18-22 31-40 22-28 3.1-4.0
35-55 61-98 43-69 6.1-9.8
fH
0~90~5 0~0.94
10-20
21-3012-17 2.1-3.0
41-6023-34 4.1-6.0
Clarke
0~6
7-14
15-21
29-42
mmol/l
1.0-2.0
Selector Position
H1( Rapid )
H2(1Hour) 9
H3(1Hour Rapid)、
H4(Glass)
H5(Glass Rapid)、
H6(Glass 1Hour)、
Salt consumption
(gram/cycle)
0
12
20
30
60
dH=1.25 Clarke=1.78 FH=0.178 mmo l/l
DH: Germ a n degree
fH: French degree
Clark:Britishdegree
The manufactorysetting: H4(EN 50242)
Contact yo ur local water board for information on thehardness of yourwater su pply.
If yourmodel doesnot have a nyw ater softener, youmays kip this section.
WATER SOFTENER
Thehardness ofthe water v aries fr om place to place. If hardwater i s used inthe dishwasher, de posits will
form on the dish es and utensils.
Theapplian ceis eq uipped withaspecial so ftener thatuses a sal t c ontainer spe cifically designed to elimi nate
lime an d m inera ls from the water.
Page 10
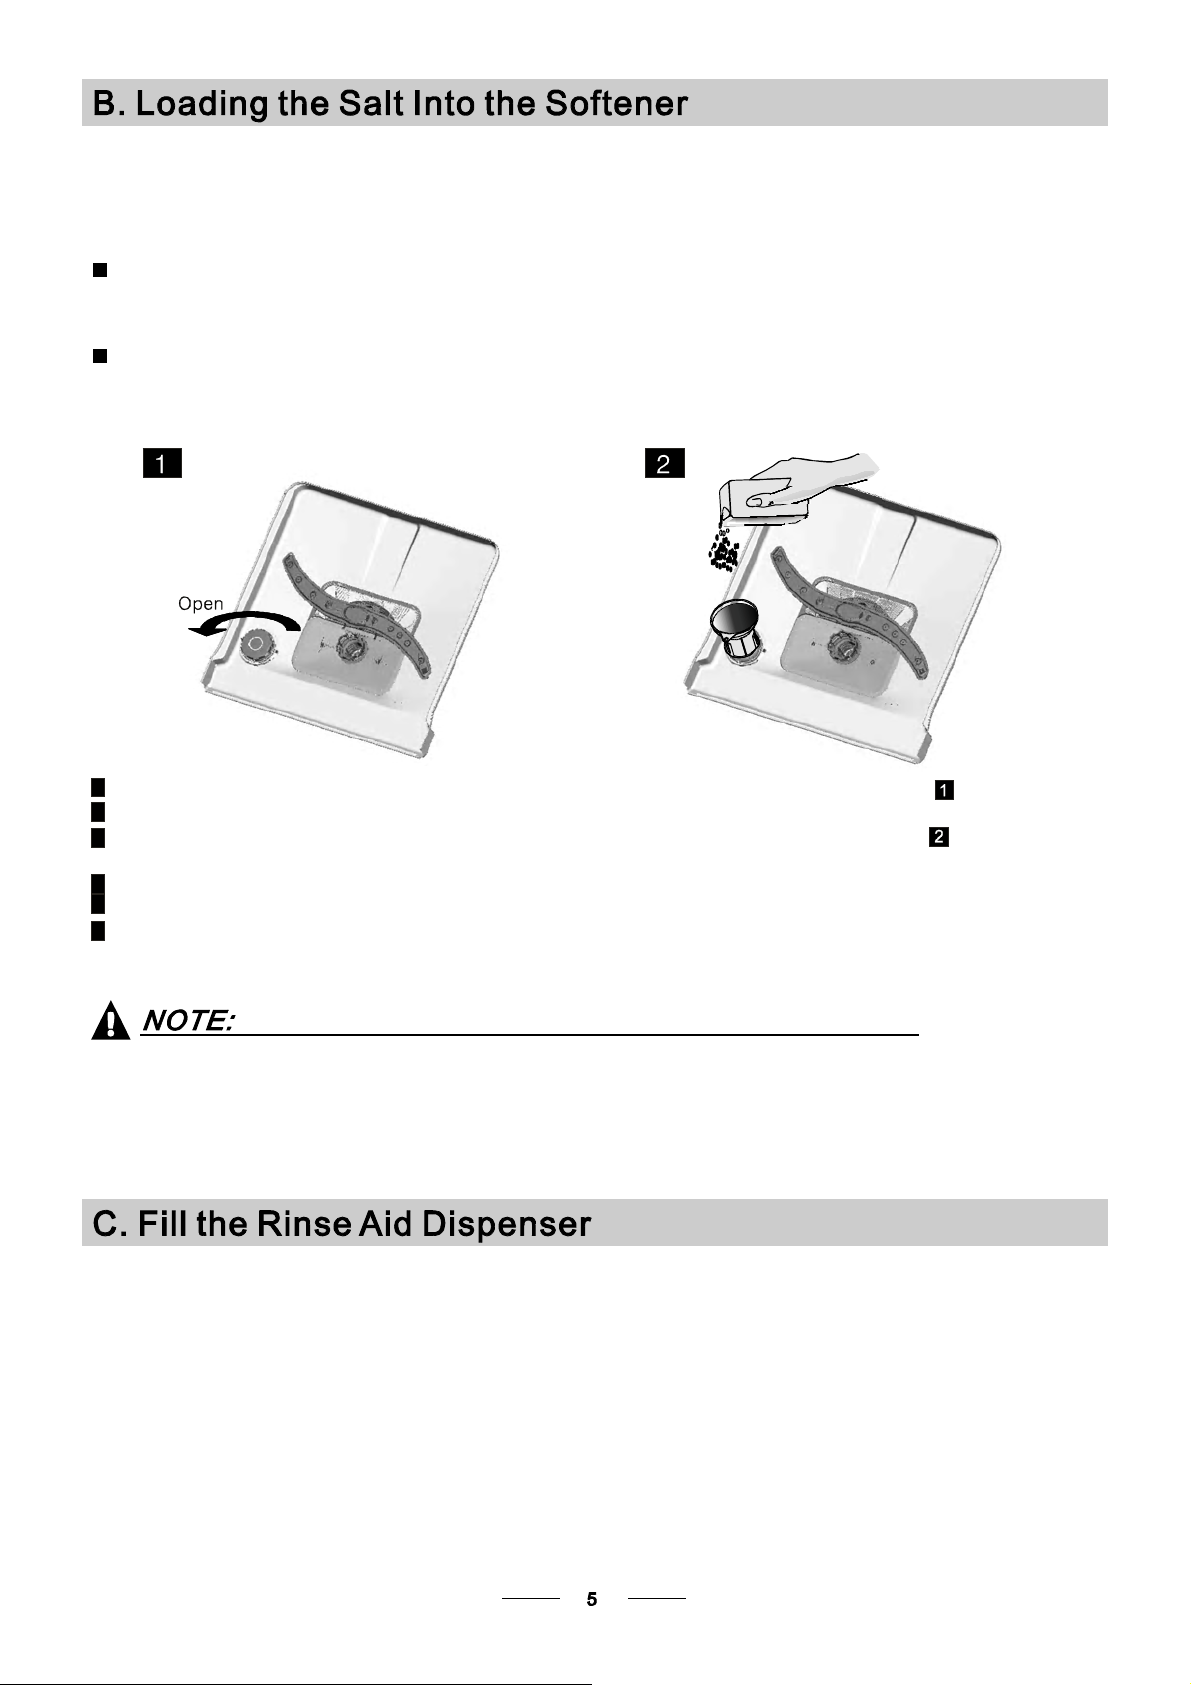
Always use thesalt int ended f or u se wi th di shwasher.
The salt c ont ainer i s l ocated beneath the l ower bas ket andshould be filledas expla ined
inthe following:
Attention!
Only use saltspecifically designed forthe use i n dishwash ers! Every other type of
salt not specificallydesigned for the use inadishwas her, especially tab le salt,will
damage the water softener.In caseofdamages caused by the useof unsuit able
salt the manufacturer does notgive any wa rranty nor is li able forany damages caused.
Only fill wi th s alt ju st b efore star ting one of the co mplete washingprograms.
This will prevent any g rains ofsalt or sa lty water, w hi ch ma y havebeen spi lled,
remaining on the bottom o f the machine for anyperiod of t ime, which may cau se
corrosion.
A After the lower b asket has been removed, unscr ew and remove the cap from the salt conta iner.
B Place theend of thefunnel ( suppli ed) i nto t he ho le andintrodu ce abou t 1. 5kg ofdishwasher salt.
Full fil l t he salt container w ith water,Itis normal fora small amountof water to come out of the
C
saltcontainer.
D After f illi ng thecontainer , screw the c ap t igh tly b ack clockwise.
E The saltwarning lightwillstopbeing afterthesalt containerhas beenfilled wit hsalt .
F Immediately aft er f illing t he salt into thesalt cont ainer, a w ashing program should be started
program O therwise the filter system, pum p or other import ant pa rts ofthe mac hine m ay b e dam aged
bysalty water.This isout of warranty.
).
1.The salt container must onl y be refil led when the salt warn ing ligh t in the control pan el com es on.
Depending on howwell t he salt dissolves, th e sa lt warnin g light maystill be on even tho ugh the
salt container isfilled.
If there i s no saltwarning lightin the con trol panel (forsome Mode ls),you canestimate wh en to fill
the salt i nto thesoftener by thecycles that thedishwasher hasrun.
2. If thereare spills ofthe salt, a soakor a rap id pro gram s hould be runto remove the excessive sa lt.
(Wesuggest to use a short
RinseAid Dispenser
The ri nse aidis relea se d d uring the final rinse to prevent waterfrom forming d roplets onyo ur dis he s, w hich can
leave spots andstreaks. It alsoimproves drying by allowing water tor oll offt he dishes.Your dishwasheris
designed touseliquidrins eaids. The rinse a iddispenser is locatedinside thedoornext tothedetergentdispenser.
To fill the dispenser, open the cap and pour t he rinse ai d i nto the dispens er until t he l ev el i ndi cator turns co mplete ly
black. The vol ume oft he ri nse a id co ntainer is about 110ml.
Function of Rin seAid
Rinse aid isautomat ically a dded d uring thelast r inse, ensuring th orough rinsing, and spot and s treak f ree drying.
Attention!
Only usebrandedrinse aidfordis hwasher.Neverfill the rinseaid dispenserwith any othersubstances
(e.g. Dishwasher cleani ng ag ent, liquid deterge nt). Th is woulddamage the appliance.
Page 11

Whento Refillthe RinseAid Dispenser
Ifthere i s no rinse- aid wa rning light in t he cont rol panel , you can estimate the amount from the col our
ofthe opt ical levelindicator C loc ated ne xt to thecap. Whe n the rinse-aidcontai ner is fu ll, th e wh ole
indicator wil l be d ark . As t he rinse -aid di minishes, thesize of the dark dot de creases. Youshould neve r let
the rins e aid lev el fall 1 / 4 full.
Asthe ri nse aidd imin ishes, th e siz e o f the blackdot
onthe rinse aid levelindicatorchanges, asillustrated b elow.
Full
3/4full
1/2full
1/4full- Should refilltoeliminatespotting
Empty
""
To open t he dispenser, tur n t he cap to the "ope n" (left) arr ow andlift i t out.
1
Pour t he rinse aid into the dispenser, be ing careful n ot tooverfi ll .
2
Replace the capby inserting italigned with "open" arrowand turning i t to t he cl osed (righ t) arrow.
3
Cl ean up a n y ri ns e aid spilled whi le dur in g fi ll i ng wit h an abs o rbe nt cl oth to a v oid exce ssi v e foamin g
during the nextwash.
Don't for get t o replac e the capbefore you closedishwa sher door.
Adjusti ng RinseAid Disp enser
The rins e aid dispenser has six or four settings.Always sta rt withthe dispens er
set on "4".If spots andpoor dr ying are a proble m, increa se t he amo unt o f ri nse
aid disp ensed by removing the d ispe nser l id an d rotat ing t he di al to "5". If t he
dishes st ill ar e not d ryi ng pr operly o r ar e s how sp ots, adj ust th e dialto the next
higher lev er un til y our dishes a re sp ot-free. Therecommended setting is "4".
(Factoryvalueis"4".)
Increasethedose if thereare dropsofwater o rlime spots on thedishes afterwashing.
Reduce it if therearesticky whitish stainsonyour dishesorabluishfilmonglassware o r
knifeblades.
Detergents with its chem ical ingredients a re ne cessary toremove dirt, c rus h dirt and transport itout of thedishwashe r.
Mosto f the commercialquality detergentsaresuitable for thispurpose.
Attention!
Proper Use ofDetergent
Useonly det ergent specifically made forthe use i n dis hwashers. Keep your det ergent fr esh anddry.
Don't putpowdered detergentintothedispenser u ntilyou'rereadytowashdishes.
Page 12

Deterg ents
The re are 3 s orts of detergent s
1.With phosphateandwith chlorine
2.Withphosphate and withoutchlorine
3.Withoutphosphate and with out chlorine
Normally new pulverised detergent is without phos phate. T hus the wate r soften er fu nction of
phosph ate is not given. In this case we rec omme nd to f i l l sal t in the salt con ta i n er even when
the hardness o f wate r is only6 dH. I f detergentswithout ph osphate are usedin the caseof hard water
often white s pots appearon dishe s and glasses.In this caseplease add more detergent toreach
better results. Det erg en ts with o ut chlor ine do only bleach a li ttle. Strongand col o u red s p o ts will not
beremoved completely. In th is c ase p lease ch oose a program with ahigher tempera ture.
°
Concentr ated Deterge nt
Based on their chemical composition, detergents can besplit in twobasictypes:
conventional, alkalinedetergentswithcaustic components
lo w alk aline c onc ent r at ed det erge nt s with natur a l enzy mes
Detergent Tablets
Dete rgent tablets of diffe rent brandsdisso lve atdifferent speeds.For thisreasonsome
detergent tablets cannot dissolve anddevelop the ir full cleaningpower dur ing s hort
programs. There fore plea se use long programs whenusing de tergent t ablets, to
ens ure the complete removal of det erg ent res iduals.
DetergentDispenser
The dispenser m ust b e re filled be fore the star t of eachwash cycle f ollowing theinstructions
provided in t he w ash cycletable . Yourdishwasher usesless detergent andrinse aid than
Conventiona ldishwasher. Generally,onlyone tablespoonofdetergent is neededfor
anormal washload.Moreheavily soileditemsneed moredetergent. Alwaysadd the
detergen t j us t be fore starting the dish was her, othe rwis e it coul d ge t da mp andwill not
dissol v e properly.
AmountofDe tergent toUse
If the l id is closed: press r elease button.T he l id willspring open.
Always add thedetergent just beforestarting ea ch wash cycle.
Only usebranded detergentaid for dishwasher.
Dishwasherdetergent is corrosive!
Take caretokeep it out of reachofchildren.
Page 13

A
B
Fillin Detergent
Fillthe d etergent dispenserwith d etergent.
The mar k ing indi c ates t h e do s i ng le vels , a s
illus t ra ted on the right:
The place o f m ain wash cycledetergent placed.
A
The place o f pr e-wash c ycle det ergent p laced.
B
Pleaseobserve themanufacturers dosingand storage
Recommendationsasstated onthedetergentpac kagi ng.
Closethelidandpress untilit locksinplace.
If the d i sh es are he avil y soi l ed , place an addit i ona l
detergent do se in thepre-wash det ergent chamber.This detergen t will take effect durin g the pre-wash phas e.
Youf ind i nformatio n about the amount o f det ergent forthesingle programme on the last p age.
Please aw are, tha t accordingto the levelsoiling and the specific hardnessof wa ter d ifferences a re po ssible.
Please observethe manufacturer'srecommendationsonthe detergent packaging.
Page 14

Consider buyingutensilswhichareidentified as dishwasher-proof.
Use a mild detergent thatisdescribed as 'kindto dishes'. If necessary, seekfurther
information from the detergent manufacturers.
Forparticular items,select a programwith as lowatemperatureaspossible.
To prev ent damage, d o no t take gla ss a nd c utl ery out of thedishwas he r i mmed iatel y
after theprogr amm e h as e nde d.
Are not suitab le
Cutlerywith wooden, horn china or
mother-of-pearl handles
Plastic i tems t hat ar e not heat resistant
Older cutl ery wit h glue d par ts that arenot
temperatureresistant
Bonded cutl ery i tems or dishes
Pewter or cooper items
Crystal gla ss
Steel item s subj ect t o rusti ng
Wooden platte rs
Items made fromsyntheticfibres
(For best performance of the dishwasher,follow the se loading guidelines.
Features and appearance of baske ts and cutlery ba skets may varyfrom your m odel.)
Scrape off anylarge amounts ofleftover fo od. S often rem nants ofburnt food inpans.
It is no t necess ary torinse t hedishes u nder running water.
Place objects i n the dishwasher in following way:
1.Itemssuch as cups, glasses, pots /pans, etc. a re fa ced dow nwards.
2.Curveditems, or oneswith recess es, shoul d be loadedaslant s o th at water canrun off.
3.Allutensils are stacked securely andcan not tipover.
4.Allutensils a re placed inthe way thatthe spray armscan rotat e freel y d uring wa shing.
Very sm all items s hould n ot b e washe d in the dishwasher as theycould eas ily fall outof the basket.
Are oflimitedsuitability
Some types ofglasses can become
dull after a large number ofwashes
Silver an d aluminum parts have a
tendencytodiscolourduring washing
Glazedpatternsmay fadeif machine
washed freq uently
Load hollow i tems suchas cups, glasses,pans etc. With the opening facing downward sso that
wat e r canno t col lect in the containe r or a deep base.
Dishesanditems of cutlerymust not lieins ide oneanother,orcover eachother.
Toavoid da mage toglasses, th ey mus t not touc h.
Load largeitems which aremost difficult toclean into thelower bask et.
The uppe r bas ket is designed to hold m ore delicate and light er dishw are suc h as glasses, coffee
andtea cups
Long bladedknives sto red in an upright po sition areapotential hazard!
Long and/orsharp item s o f cutle ry such as carving knives must bepositione d
horizon tally in the upper b asket .
Please donot overload your dishwashe r. This is important for g ood resultsand fo r
reasonab le consu mption o f en ergy.
To prevent water dr ipping fromthe uppe r basket intothe lower ba sket, we recommend tha t you
empty the lower basket f irst an d the n the upper basket.
Page 15

The u pper bas ket isdesignedto ho ld m ore delicate
and lighter d ishware s uch as gl asses, coffee and
teacups andsaucers,as wellas plates, smallbowls
andshallowpans (aslongas theyarenot toodirty).
Positionthedishesandco okwaresothattheywill
notget movedby t hesprayof w ater.
Please be r eminded that:
Pots,servingbowls,etc,mustalwaysbeplacedtopdown.
D eep pots sh oul d be slanted to a ll ow water to fl ow out.
The B otto m B ask et f eatu r es fo ldin g sp i kes sothat l arge r or more po ts and pans can be l oade d.
We sug gest that you place l arge items a nd t he most
difficult to cleanitems are to beplaced intothe lower
basket: su ch a s pots, pans, lids, se rving d ishes and
bowls, as shown i n the fi gure below. It i s prefer able to
pla ce ser vi n g dish es and l id s on the s i de of t h e racks
in order toavoidblocking t he ro tation ofthe t op spray
arm.
Adju sting the Upper Bask et
The h eight of t he upp er ba sket can beadjusted inorder to
create mo re space for large utensil s bo th for theupper
/lower basket. Theheight of the upper basketcan b e
adjusted by p lacing the wheelson different heightof the
rails. Long items,serving cut lery,salad ser vers and knives
shouldbe placedon the shelf so thatthey do notobstruct
therotationofthesprayarms..
Foldin g back the cup shelives
For better s tacking ofpots and p ans,
the spi kes canbe fol de d do w n as
show in the picture righ t.
Foldin g Spikes of Lower Bask et
For better stacking of po ts and pans,
the spi kes can b e fol ded do wn a s
show inthe pict ure right.
Cutlery shoul d be placedin the cutlery basket wit h the handlesat the bottom.If the rackhas side baskets, the
spoons shoul d be loadedseparately into theappropriate slot s, especia lly long utensils shoul d be placedin the
horizontal p osition atthefront ofthe upper basketas shown inthe picture.
Do not letanyitemextend through thebottom.
Always load sharp utensils with the sharp
pointdown!
Page 16

()
Means:needtofill rins e into the Rinse-AidDispenser.
Intensive
Normal
ECO
(*EN50242)
Glass
1Hour
Rapid
For heaviest soiled crockery,
and normally soiled pots
pans dishes etc withdried
、
、
onsoiling.
For normally soiled loads,
such as , plates,glasses
pots
and lightly soiled pans.
This is st an dard programme, i t is
suita b le to clea n no rmall y soiled
tablewar e and itis the most
efficien t progr am me i n te rms of
its com bined en e rgy a nd wat e r
consumption forthattype of
tablewar e
.
For lightly s o il ed loads,
suchas glasses ,
crystal and f ine chin a.
For lightly so iled loadsthat
donot n eed excellent drying
efficie ncy.
Asho rter wash for lightly
soiled loadsthat do not
need drying.
Pre -wash( 5 0 )
was h (65 )
℃
℃
Rin se
Rin se
Rinse(65 )
℃
Dry ing
Pre -wash( 4 5 )
Wash (55 )
℃
℃
Rin se
Rinse(65 )
℃
Dry ing
Pre-w ash
Wash (45 )
Rinse(65 )
℃
℃
Drying
Pre-w ash
wash( 40 )
℃
Rins e
Rinse(60 )
℃
Drying
Pre-wash
Wash( 6 0 )
Rinse (55 )
(50 )
℃
℃
℃
Drying
Wash (40 )
℃
Rinse
Rinse (45 )
℃
5/25g
(or )3in1
5/25g
(or )3in1
5/25g
(or )3in1
5/25g
5/25g
20g
160
185
120
60
40
1.3 5
0.91
0.85 15
1
0.6
15
10
11.5
19
11
*EN50242 : Thisprogrammeisthe test cycle. Theinformation for comparabi litytest
in accordance with EN 50242,as follows:
Capacity: 12 setting
Position Upper basket:upper whe els on r ails
Rinse aidsetting: 6
Pl:0.4 9w; Po:0.45 w.
Start ing acycle wash
Draw outthe lower andupper b asket, l oad thed ishe s an d push them back.
1
It i s co mmended toload the lowerbasket fi rst, then theupper one (see the section entitled
Loading the Dishwasher ).
“”
2
Pour inthe deterg ent (see the section entitled Salt, D etergent and Rinse Aid ) .
3
Insert theplug into the socket. The powersupply is 220-240 VAC/50 HZ, thespecification
“”
of thesocket is 10 A 250VAC. Make surethatthe watersupply is turned on to fullpressure.
4
Open thedoor,press the O N/OF F Butt on, an dthe O N/OFF light will t urn o n.
5
Press theprogram Bu tton , the washprogram wi ll be changed as follows direction:
Intensiv e->No rmal-> EC O->G lass- >1 Hour ;->Rapid
Select adesired progr am , willbe l ight. the dis hwasher
begins tostart.
the respons e lig ht Then closethe door,
Page 17

Premise:
Acycle that is underway ca n on ly be modified if it hasonly been running for a s hort tim e. Ot herwis e, the
1
detergent mayhave alr eady be en released,and theappliance m ay have alrea dy dr ained thewash water.
If t his is thecase, the detergent disp enser mustbe refil led (see the sectio n ent itled "Loading the
Detergent " ).
Open the door ,press theProgram button , the machine will bein standb y state,
2
then yo u can change the p rogram t o th e desi red cyc le set ting (seethe section entitled " Starting a
wash cycle. .." ).
more than 3seconds
Ifyou open thedoor ,the machine will pause. The pro gram lightwill
stopblinkingand the bu zzerwill mooing every minuteunless you close the door .After
you c los e t he door ,the m achin e will ke ep o n working after 10sec onds.
Ifyour model has brokenrememb er function,the machine will go ontofinish the selected
progr am .
Aforgotten dish can be added any time before the detergent cup opens.
Open thedoor a little .
1
After the spray arms stop working, you can open the door
2
completely.
Add forgotten dishes.
3
When the wo r ki n g cycle has finished, the buz zer of t he dish w a she r wil l sound for 8 secon d s , then s to p . Turn off
the a ppliance usi ng th e O N/OFF b utton, sh ut o ff the wa ter s upp ly and op en t he door ofthe di shwasher.
Wait for a f ew mi nutes b ef ore unlo ading th e dishwa sher to avoidhandlin g the di shes and utensils whi le th ey
are s till h ot and m ore susceptible to br eakage. The y wil l also d ry be tter.
afterthe power cut
duringawash cycle
Close the door
4
The dishwasher will run after 10 seconds.
5
SwitchOff the Dishwasher
The program light is on butis not bl inking, onlyin this casethe programm e has ended.
1.Switchoff the di shwasher bypressing t he O N/OFF button.
2.Turn off thewatertap!
Openthe doorcarefully.
Hot dishes aresensitive to knocks.The dishes should therefore b e all owed to cooldown arou nd 15 minutes
beforeremovingfrom the appliance.
Open the d ishwas her's door, leave it aj ar and wait a few minutes before r emoving the dishes. In this way they
will be coolerand the dryingwill be i mproved.
Unloadingthe dishwasher
Itis nor mal t hat the dishwasher is we t insid e.
Empty the lowerbasket first and then the upperone. This will avoid wat er dr ipping f rom t he uppe r Bas ket onto
the dishes inthe lower one.
It is danger ous t oopen the door w hen wash ing,
beca use the ho t water may scald y ou.
Page 18

The fil ter pre vents l arger remnants of foodorother objectsfrom getting inside the pu mp.
Theresidues may block thefilter, inthis casetheymus tberemoved .
The filter s ystem c onsists of acoarse filter,a flat (Main f ilter)
An d a mic ro fil t e r( F i ne filter).
1
2
3
2
1
3
Main filter
Foodand soil particlestrappedinthis filterare pulverizedbya
special jet onthe l ower spr ay arm a nd w ashed d own t o drain.
Coarse filter
Larger item s, suc h as pi e c es o f bones or glas s, tha t could blo ck
thedrain aretrapped in thecoarse filter.To remove the i tems
caught by the filter, gently s queeze thetap on th e top ofthis
filterand liftout.
Fine filter
This filterholds soiland foodresiduesinthesump areaand
prevents it frombeing redepositonthedishes duringwash cycle.
Filterassembly
Thefilter efficiently
For best performance and results, the filtermust be cleanedregularly. this r eason, it isa goo d idea to
remove t he la rger food pa rticles tr app ed in thefilter aft er e ach was h cyc le by rin sing thesemicircular filterand
cup unde r runnin g wa ter.To re move th e fil ter de vice, p ull th e cup handle in t he upwar d direct ion.
removes food particles from t he wa sh w ater,allowing it tobe recycle d dur ing the cycle.
For
Th e dish was her must never be us ed without th e filters.
Improper replacementof the f ilter may reduce the performancelevel o f the appliance
anddama gedishes andutensils.
2
1
Step 1 Turn the filterin anti-clo ckwise dir ection,:
Step 2 lift the filter assyup:
When following this procedure from step1 to step 2, the filter system will be removed;
when following it from Step 2 to Step 1, the f ilter system willbe installed.
Page 19

Remarks:
- Inspect thefilters for blockingafter e very tim e the dishwasher has beenused.
- By uns crewing thecoarse fil ter,you can removethe filter system. Remov eany foo d re mnants and
clean the filters underrunni ngwater.
Theentire filterassemblyshould becleanedonce aweek.
Cleaning the Filter
To cle an the coars e filt er and the fin e filter, use ac l eani n g brush . Reas se mbl e the filt er par t s as shown in th e fi gur es
on the last page and reins ert the enti re assembly in the dishwasher, pos itio ning itin i ts s eat and pres sing downwar ds.
Whencleaningthefilters,don'tknock on them. Other wise,the filters could b e
contorted andthe performance of thedishwashercouldbe decreased.
The control panelcan be cleaned by using alightly dam pened c loth.
After cleaning, make sure to dryit thoroug hly.
For the exterior, use agood appliance polis h wax .
Neveruse shar p obj ects, sco uring pa ds o r har sh clean ers on any partofthe dis hwasher.
CleaningThe Door
To cleantheedge aroundthe door, you shoulduse only asoft warm, dampcloth.
To avoidpenetration o f wa ter in to the d oor l ock and electrical componen ts, do not
usea spr ay cle aner ofanykind.
Never use a spray cleaner toclean the door panel as it may damage the door loc k
and electricalcomponents.
Abrasive agent s or somepaper towels shouldnot be u sed b ecause of therisk of
scra tching or leavin g spots on the stai n less steel sur fa ce.
Protec tAgain st Freezing
please takefrost protection measures on the dishwasher in winter.Ev ery fter washi ng cycle s,
please operateas follows
1.Cut offtheelectrical powertothedishwasher.
2.Turnoffthe water supply and disco nnect thewater inl et pipe from the water valve.
3.Drain the w ater f rom the inletpipe an d water valve. (Use apan to gathe r the water)
4.Reconnect the waterinlet pipe tothe wate r valve.
5.Remove the f ilter at the bottom of thetub and usea sponge t o soakup water in the sump.
:
If your dishwasher cannot work because ofthe ice,
please con tact professional service persons.
timea
Cleani ng the SprayArms
It is nece ss ar y to cle an the spray arms re gula rly for h ar d
water chemicalswill clogthespray arm jetsand bearings.
Toremov e the u p per spra y arm, hold the nut, rotat e the arm
clockwiseto remove it.
To remove thelower sprayarm,pull out the sprayarm u pwa rd.
Washthe arms insoapy and w arm w ater an d use asoft brush to
clean the jets.Replace them after rinsing t hem thoroughly.
Page 20

AfterEveryWash
After ever y wa sh, turn offthe water supplyto the
appliance andleave the doorslightly op en so th at
moisture a nd odou rs a re no t tra pped in side.
Removethe Plug
Before cleani ng or performing mainten ance, always
remove the p lug fr om the socket.
No Solve nts orAbrasive Cl eanin g
Toclean the exterior and rubber parts of the dishwasher,
donotusesolventsorabrasivecleaningproducts.
Only use a cloth with warm so a py water.
Tor em ove spots o r st ains from the surface ofthe
interi or, use a cloth dampened withwater ana l ittle
vinegar,or a cleaningproduct mad e sp ecifically f or
dishw ashers.
WhennotinUsefor aLongTime
It isrecommendthat yourun a wash cycle with the
dishwasher empt y an dthen re move th e plu g from t he
socket, turn o ff the water supply and leave the doorof
the appl ian c e sli ght ly ope n. This wil l hel p the doo r
sealsto l ast longerandprevent odours fromforming
withinth e appliance.
Moving t heAp plia nce
If the appliance must be moved,try to keepit in the
vertical position. If absolutely necessary, it canbe
positioned on its back.
Seals
Oneofthefactorsthatcauseodourstoforminthe
dishwasher is foodthat remain s tr apped in theseals.
Periodic cleaning with a damp sponge will prevent this
fro m occ urrin g.
Electrical Shock Hazard
The installation of the pipes
and electrical equipments
should be done by professionals.
Disconnect electrical power before
installing dishwasher.
Failuretodosocanresultindeathor
electrical shock.
●
Installation preparation
The installation position of dishwasher should be near the existing inlet and drain hoses and
power cord.
One side of the cabinet sink should be chosen to facilitate the connection ofdrainhosesof
the dishwasher.
Note: please check the accompanying installation accessories(hook for aesthetic panel
,screw)
Page 21

Please carefully read the installation instruction.
● Illustrationsof cabinet dimensionsand installation position of the dishwasher
Preparations should be made before moving the dishwasher to the installation place.
Choose a place near the sink to facilitate the installation of inlet and drain hoses
1
(see figure 1).
2
If dishwasher is installed at the cor ner of the cabinet, there should be somespace
(illustrated in figure 2) when the door is opened.
【Figur e1】
Cabinet dimensions
Less than 5mm
between the top
of dishwasher and
cabinet and the
outer door aligned
to cabinet.
820mm
580mm
90 °
Electrical, drain and
water supply line
entran ces
Space betweencabinet
bottom an d floor
600 mm
90 °
80
100
【Figure2】
Minimum space when
the door is opened
●
Aesthetic panel's dimensions and installation
1
The aesthetic wooden panel could be processed according to the Figure 3.
【Figure3】
The aesthetic panel should
be processed in accordance
with the illustrated dimensions
Dishwasher
Door of
dishwasher
Minimum space of 50mm
Cabinet
(Unit: mm)
16
Page 22

2
Install the hook on the aesthetic wooden panel and put the hook into the slot of the outer door of
dishwasher(see figure 4a). After positioning of the panel , fix the panel onto the outer door by
screws and bolts(See figure 4b) .
【Figure
Installation of aesthetic panel
4a】
【Figure4b】
Installation of aesthetic
wooden panel
.takeawaythefour
1
short screws
2
. pin up the four long
screws
17
Page 23

●
Tension adjustment of the door spring
The door springs are set at the factory to the proper tension for the outer door. If aesthetic
wooden panel are installed, you will have to adjust the door spring tension. Rotate the adjusting
screw to drive the adjustor to strain or relax the steel cable(see figure 5).
Door spring tension is correct when
the door remains horizontal in the
fully opened position,yet rises
toaclosewiththeslightliftofa
finger.
【Figure
Tension adjustment
of the door spring
●
Connection of drain hoses
Insert the drainhose into adrain pipe witha minimum diameter of 40mm , or letit run into thesink, making sure to
avoidbendingorcrim ping it.Thetopof the ho se must beless than1000mm.
Front
5】
Counter
NOTE
The top of the hose
must be less than
1000mm.
Drain pipe
A
B
φ 40mm
18
Page 24

●
.
Dishwasher installation steps
1
Install the furniture door to the outer door of the dishwasher using the brackets provided. Refer
to the template for positioning of the brackets.
2
Adjust the tension of the door springs by using an Allen key turning in a clockwise motion to
tighten the left and right door springs. Failure to do this could cause damage to your dishwasher
(Illustration 2)
Connect the inlet hose to the cold water supply
3.
4.
Connect the drain hose. Refer to diagram (Figure 6)
5.
Connect the power cord
Affix the condensationstrip under the work surface of cabinet. Please ensure the condensation
6
strip is flush with edge of work surface.
7
Place the dishwasher into position.(Illustration 4)
8
Level the dishwasher. The rear food can be adjusted from the front of the dishwasher by turning
the Allen screw in the middle of the base of dishwasher use an Allen key (Illustration 5A). To adjust
the front feet, use a flat screw driver and turnthe front feet until the dishwasheris level (Illustration 5B).
9 The dishwasher must be secured in place. There are two ways to do this:
A. Normal work surface:Put the right(left) installation hook into the slotoftheright(left)sideplaneand
secure it to the work surface with two woodscrews (Illustration 6).
B. Marble or granite work top:Bend the right(left) installation hook into right-angle,and put it into the
slot of the right(left) side plane and secure it to the work surface with two woodscrews s (Illustration 7)
.
【Figure
19
7】
Page 25

Dishw ash er must be l evel fo r prop er dish ra ck oper ati on and wa sh per form anc e.
Placea spiritlevel ondoor andrack trackinside thetub asshown tocheck thatthe
1
dishwasheris level.
levelthedishwasherbyadjusting thethree levellinglegsindividually.
2
3
Whenlevel thedishwasher, please payattentionnottolet thedishwashertip over.
【】Figu re 8
Illustra tion of feet adjustment
NOTE:
Themaximum adjustment
heightof thefeet is50 mm.
Check leve l Front to Back
Spirit le ve l
Check level side to side
For personal safety:
Do not use an extension cord or an adapter plu g
with this appliance.
Do not, under any circumstances, cut or remove the
earthing
Connection from the power co rd.
Please lookat t he ra ting label to knowthe rat ing v olta ge and c onnect the dishwash er to the app ropriate powersupp ly.
Use the requ ired fuse10 amp, timedelay fuseor circuit breakerrec ommended andprovide sepa rate ci rcuit s erv ing
only thisappliance.
Ensure the voltage andfrequency of thepower being corresponds to
thoseon the rating plate. Only insert the plug into anelectricalsocketwhichisearthed
properly. If th e el ectri cal sock et towhich the appliance m ust be connected is not
appropriatefor the plug,replace thesocket, ratherthanusing a adaptorsorthe likeas
they could ca use overhea ting and burns.
20
Page 26

Th e applia n c e must b e conn ec t e d to the w a ter mai n s using new hos e- se t s .
The old hose-sets shou ld not bereused.
Waterpressure mu st b e between 0,04MPa and 1MPa. If thepressure i s below the
minimum consul t our Service Departmen t for advice.
Pull The safety supply hoses completely out from storage compartment located at rear of dishwasher.
1
Tighter the screws of the safety supply hose to the faucet with thread 3/4inch.
2
Turn water fully on before starting the dishwasher.
3
The saf ety supp ly hose consists of the double walls. T he hose 's sy stem gu arantees i ts intervention by b locking t he
flow of waterin case of the suppl y hose b reaking and when the ai r spacebetween the supplyhose itself and the oute r
corrugated hoseis full o f wa ter.
Ahosethat a ttaches to asink spray canburst if i t is installed on th e sam e w ater line asthedishwasher. If yoursink
has one, it isrecommended t hat thehose be d isconnected andthe hole plugged.
Turn off the water.
1
Release the water pressure by depressing the pressurerelease button. This relieves water pressure and protects you, and the
2
room, from severe splashing.
Unscrew The safety supp ly hose from the faucet..
3
Connect the c old watersupply hose toa threade d 3/4(inc h) c onnector andmake su re that i t is fa stened t ightly in place.
Ifthe wat er p ipes are new orhave not been used for anextended perio d of time, let thewater ru n to makesure that the
water is c lear and free of impur ities. I f this precaution is n ot taken,there is arisk that t he wa ter in let can getblocked
and damage theappliance.
Positioning theA ppliance
Position t he ap pliance inthe desired location. The backshould rest against the wal l behi nd i t, and thesides,
along the adjacent cabinets orwalls. The dishwasheris equippe d wit h water supply and drain h oses thatcan
be positio ned ei ther t o the rightorthe leftsides to facilitate proper i nstalla tion.
HowtoDrainExcess Water From Hoses
If the s ink is 1000higher f rom t he fl oor,the exces s wat er in hoses cannot be drained directly
intothesink.Itwill be necessaryto drainexcess waterfromhoses into a bowl or suitable
conta iner that is held outsi de a nd lower th an t he sink.
Water Outlet
Connect the wate r drain hose.Thedrain h ose must b e correctlyfitted to av oid w ater leaks.
Ensurethatthew aterinlethoseisnotkinked or squashed.
Exte ns ion Ho se
If you n eed a drain hose extension, make sure to u se a similardrain ho se.
It must beno longe r than 4metres; o therw ise t he clean ing effectof the di shwasher couldbe reduced.
Syphon C onnection
Insert the dra in hose into a dra in pipe with aminim um d iam eter of 40mm , or let it run into the sink , ma king sure t o
avoid bendin g or crimping it. The topof the ho se m ust be lessthan 1000 mm.
21
Page 27

Thefollowingthingsshould be checked before startingthe dishwasher.
1 The dishwasher is leveland fixedproperly
2 The inletvalve isopen
3 Thereisa leakageat the connections of theconducts
4 The wiresare tightlyconnected
5 The poweris switchedon
6 The inletand drainhoses areknotted
7 Allpacking materialsandprintingsshould betaken outfrom thedishwasher
Afterinstallation,please makesuretokeep thismanual.
Thecontentof this manualis veryhelpful tothe users.
22
Page 28

Fuse blown, or the
circuit breaker acted
Replace fuse or reset circuitbreaker. Remove any other
appliance s sharing the same circuit with the dishwasher
Power supply is not
turned on
Water pressure i s low
Door of dishwasher
not properly closed.
Kink in drain hose
Filter clogged
Kitchen sink clogged
Improper detergent
Spilled rinse-aid
Make sure the dishwasher is turned on and thedoor is
closed securely.
Make sure the power cord is properly plugged into the
wall socket.
Check that the water supply is connected properly and
the water is turned on.
Make sure to close the door properly and latch it.
Check drain hose.
Check coarse the filter
(see section titled )" Cleani ngThe Filter "
Check the kitchen sink to make sure it is draining well.
If the problem is the kitchen sink not draining ,you may
need a plumber rat herthan a serviceman for dishwashers.
Use only the special dishwasher detergent to avoid suds.
If this occurs,open thedishwasher and let suds evaporate.
Add 1 gallon of cold water to the tub. Close and latch the
dishwasher,then select anycycle.Dishwasher willdrain
outthewater at the first step.Open the doorafter draining
is stop and check if the suds is disappeared.
Repeat if necessary.
Always wipe up rinse-aid spills immediately.
Detergent with
colourant was used
Hard water minerals
The affected items are
notcorrosion resistant.
A programme was not
run after dishwasher
salt wasadded.
Traces of salt have
gotten into the wash cycle.
The lid of the softer
is loose
Aspayarmis
r
knocking against
an itemin a basket
Items of crockery
are loose inthe
wash cabinet
This may be caused
by on-site installation
or the cross-section of
the piping.
Make sure that the detergent is the one without
colourant.
To clean the interior, use a damp sponge with
dishwasher detergent and wear rubber gloves.
Never use any other cleaner than dishwasher
detergent for the risk of foaming or s uds.
Always run the quick wash programme .
without any crockery in the dishwasher and
without selecting the Turbo function (if present),
after adding dishwasher salt.
Check the lip .Ensure the fix is fine.
Interrupt the programme, and rearrange the items
which are obstructing the sp ay arm.r
Interrupt the programme,
and rearrange the items of crockery.
This has no influence on the dishwasher function.
if in doubt, contact a suitably qualified plumber.
Page 29

The dishes were not
loaded correctly.
See notes in " Loading the Dishwasher Baskets ".
Theprogramme was
notpowerful enough.
Not enough detergent
wasdispensed.
Items are blocking
the path of sp ay arms.r
The filter combination
inthebaseofwash
cabinet is not clean or
is not correctly fitted.
This may cause
the sp ay arm jets
r
to get blocked.
Combination of soft
water and too much
detergent.
Aluminum utensils
have rubbed against
dishes.
Dishes block
detergent cups.
Improper loading
Too little rinse-aid
Select a more intensive programme.
See" Wash Cycle Table ."
Use more detergent,or change your det ergent.
Rearrange the items so that the sp ay can rotate freely.r
Clean and/or fit the filter combination correctly.
Clean the sp ay arm jets. See "Cleaning the Spray
Arms".
Use less detergent if you have soft water and select
a shortest cycle to wash the glassware and to get
them clean.
Use a mild abrasive cleaner to eliminate those marks.
Re-loadin g the dishesproperly.
Load the dishwasher as suggested inthe directions.
Increase the amountof rinse-aid/refill the rinse-aid
dispenser.
r
Dishes are removed
too soon
Wrong program
has been selected
Use of cutlery with
a low-quality coating
Do not empt y your dishwasher immediately after
washing. Open the door slightly sothat the steamcan
escape. Begin unloading the dishwasher only once t
he dishes are barely warm to the touch. Empty the low
basket first. This prevents water form dropping off
dishes in the upper basket.
In short program the washing temperature is lower.
This also lowerscleaning performance. Choose
a program with a long washingtime.
Water drainage is more difficult with these items.
Cutlery or dishes of this type are not suitable for
washing in the dishwasher.
When some malfunctions come on, the appliance will display error codes to warn you:
The R ap id light fl icke r fleetly
The Glass l igh t f lic ker fleetly
Longer inlet time.
Overflow.
Faucets is not opened, o r water intake is
restricted,or water pres sure is too low.
Some element of dishwasher leaks .
Page 30

If overflow occurs, turn off the main water supply before calling a service.
If there is water in the base pan because of an overfill or small leak,
the water should be removed before restarting the dishwasher.
Height: 815mm
Width : 598mm
()
Depth: 550mm
with the door closed
Water pr ess ur e: 0.04- 1.0M Pa
Pow er sup p ly: see r a ti ng label
Capacity: 12p lace settings
Page 31

Page 32

TechnicalDataSheet
Sheet o f hous ehold dishwasher accordi ng to EUDirective 1059/2010:
Manufacturer
Type/Description
Standard placesettings
Energy efficiency class
Annual e nergy consumption
Energy consumpt ion ofthe standard cleaningcycle
Power consu mption ofoff-mode
Power consu mption ofleft-on m ode
Annual wat er consumption
Drying efficiency class
Standard cleaningcycle
Program durat ion ofthe standard cleaning cycle
Noise level
Mounting
Couldbebuild-in
TEKA
DW1605 FI
12
A++
258 kWh
0.91 kWh
0.45 W
0.49 W
3080 li tre
A
ECO 45
185 mi n
49dB(A) re1pW
Bu ild- in
Yes
℃
Height
Width
Depth (wi th connect ors)
Power consumption
Rated v oltage / frequency
Waterpressure (flow pressure)
NOTE:
A+ ++ (hig hest efficiency) to D(lowest efficiency)
En e rgy cons ump tio n 2 58 kW h per ye ar, bas ed o n 28 0 sta n d ard cle ani n g cycl es using cold wat e r fil l and
the consump tion of thelow power m odes. Actual energy c onsumption willdepend on howthe appli ance is used.
Waterconsumption 3080 litreperyear, basedon280 standard cleaning cycles. Actual waterconsumption
will depend on h ow the app lianc e is used .
A(highest efficiency) to G(lowest e fficiency)
This progr am is suitable for cl eaning soilednormally soi led tab leware andthat it is the
mostefficient p rogramme interms of itscombined energy and water consu mption for
that ty pe of tab lewa re.
Thedevicemeets theEuropean standardsandthe directives inthe c urre ntversion atdelivery:
-LVD2006/95/EC
-EMC2004/ 108/EC
- ErP 2009/ 125 / EC
“”
“”
81.5 cm
59.8 cm
55 cm
1760-2100 W
AC220-240 V/50Hz
0.4-10bar =0.04-1 Mpa
The above valueshave bee n measur ed in a ccordance withstandards underspecified o perating conditions.
Results may varygreatly ac cording toquantityand p olluti on of thedishes, wat er ha rdness,
amount of detergent, etc.
The manual isbased on theEuropean U nion's s tandar ds and rules.
Page 33

 Loading...