

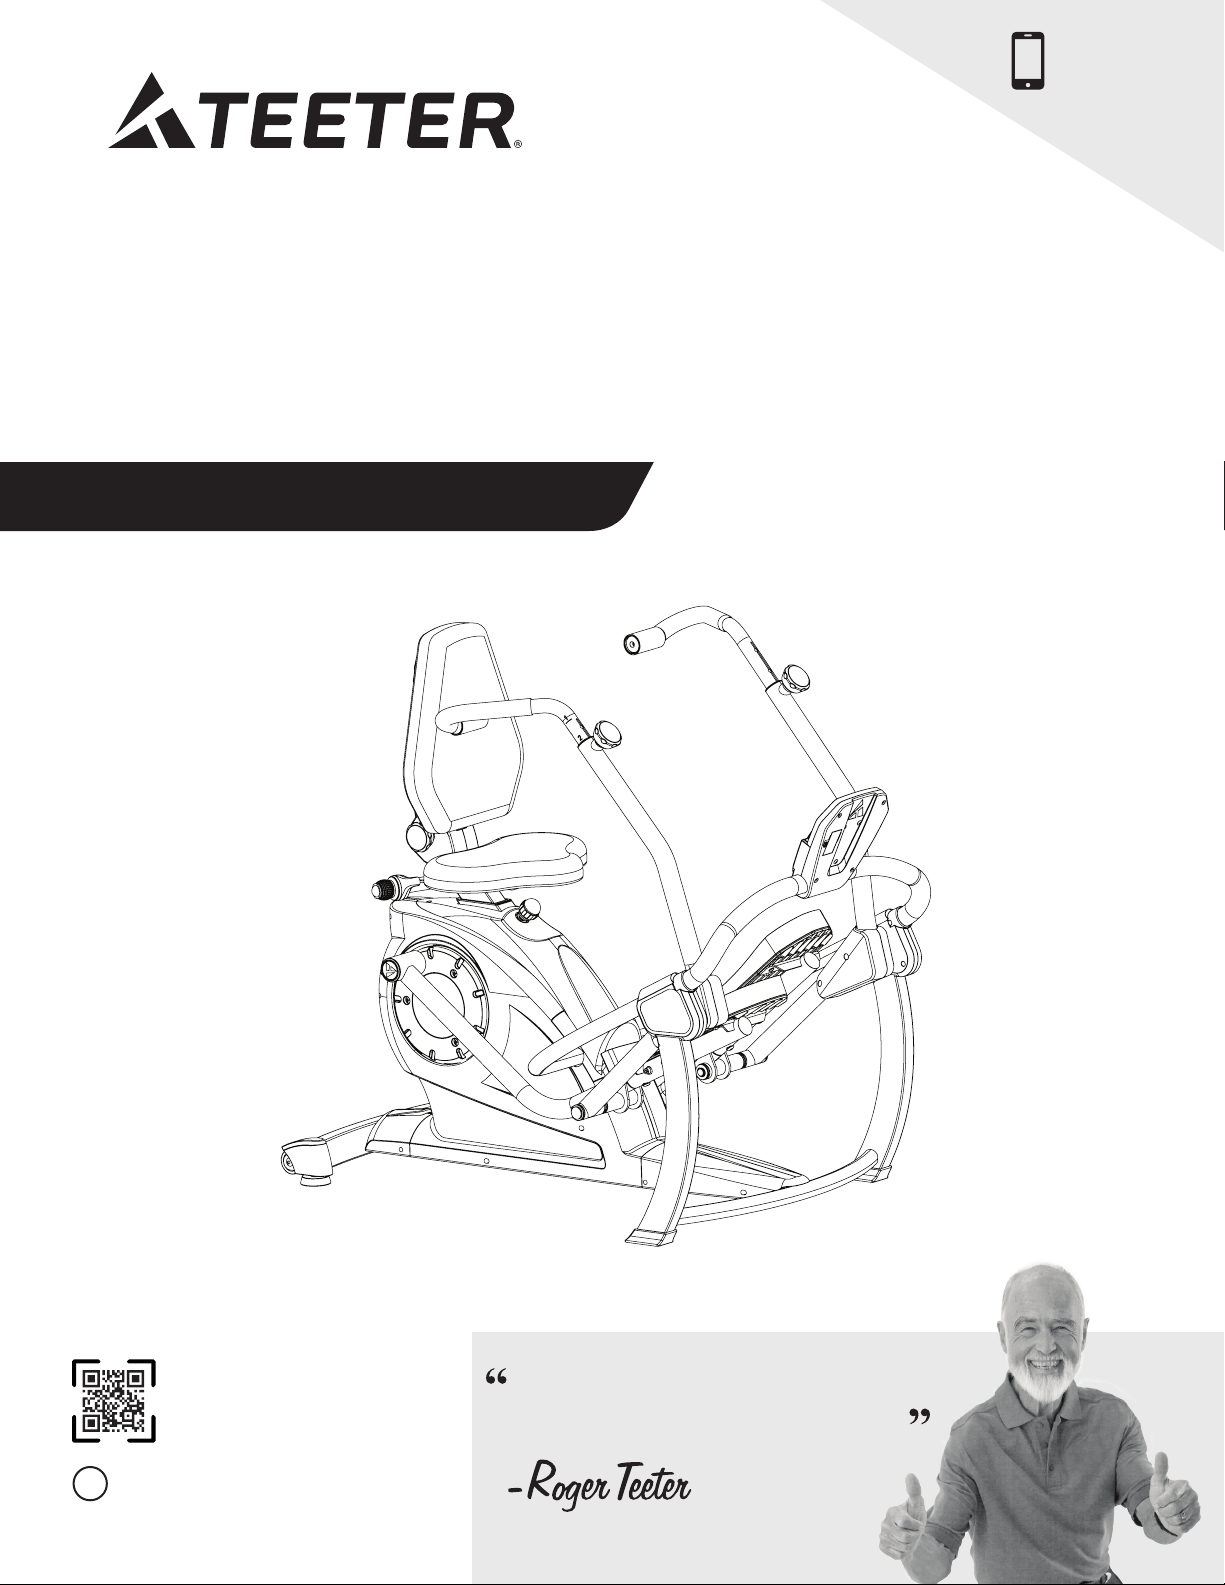
Teeter SE2001 User Manual
™
FreeStep
MODEL SE2001
Recumbent Cross Trainer
Assembly Instructions & User Guide
For Zero-Impact Cardio and Muscle Toning Workouts
NEW!
Follow along with
your smartphone
to make assembly
even easier!
To download and print the Teeter
FreeStep
product support page at teeter.com.
* Specifications may vary from this image and are subject
EN
to change without notice. Your actual model may vary.
™
instructions, visit the
I created Teeter so people could
live healthier, more active lives.
founder & innovator

Congratulations on your purchase of the Teeter FreeStep
follow, read, and fully understand the Assembly Instructions & User Guide. The FreeStep
use, intended to provide a comfortable, zero-impact workout for adults.
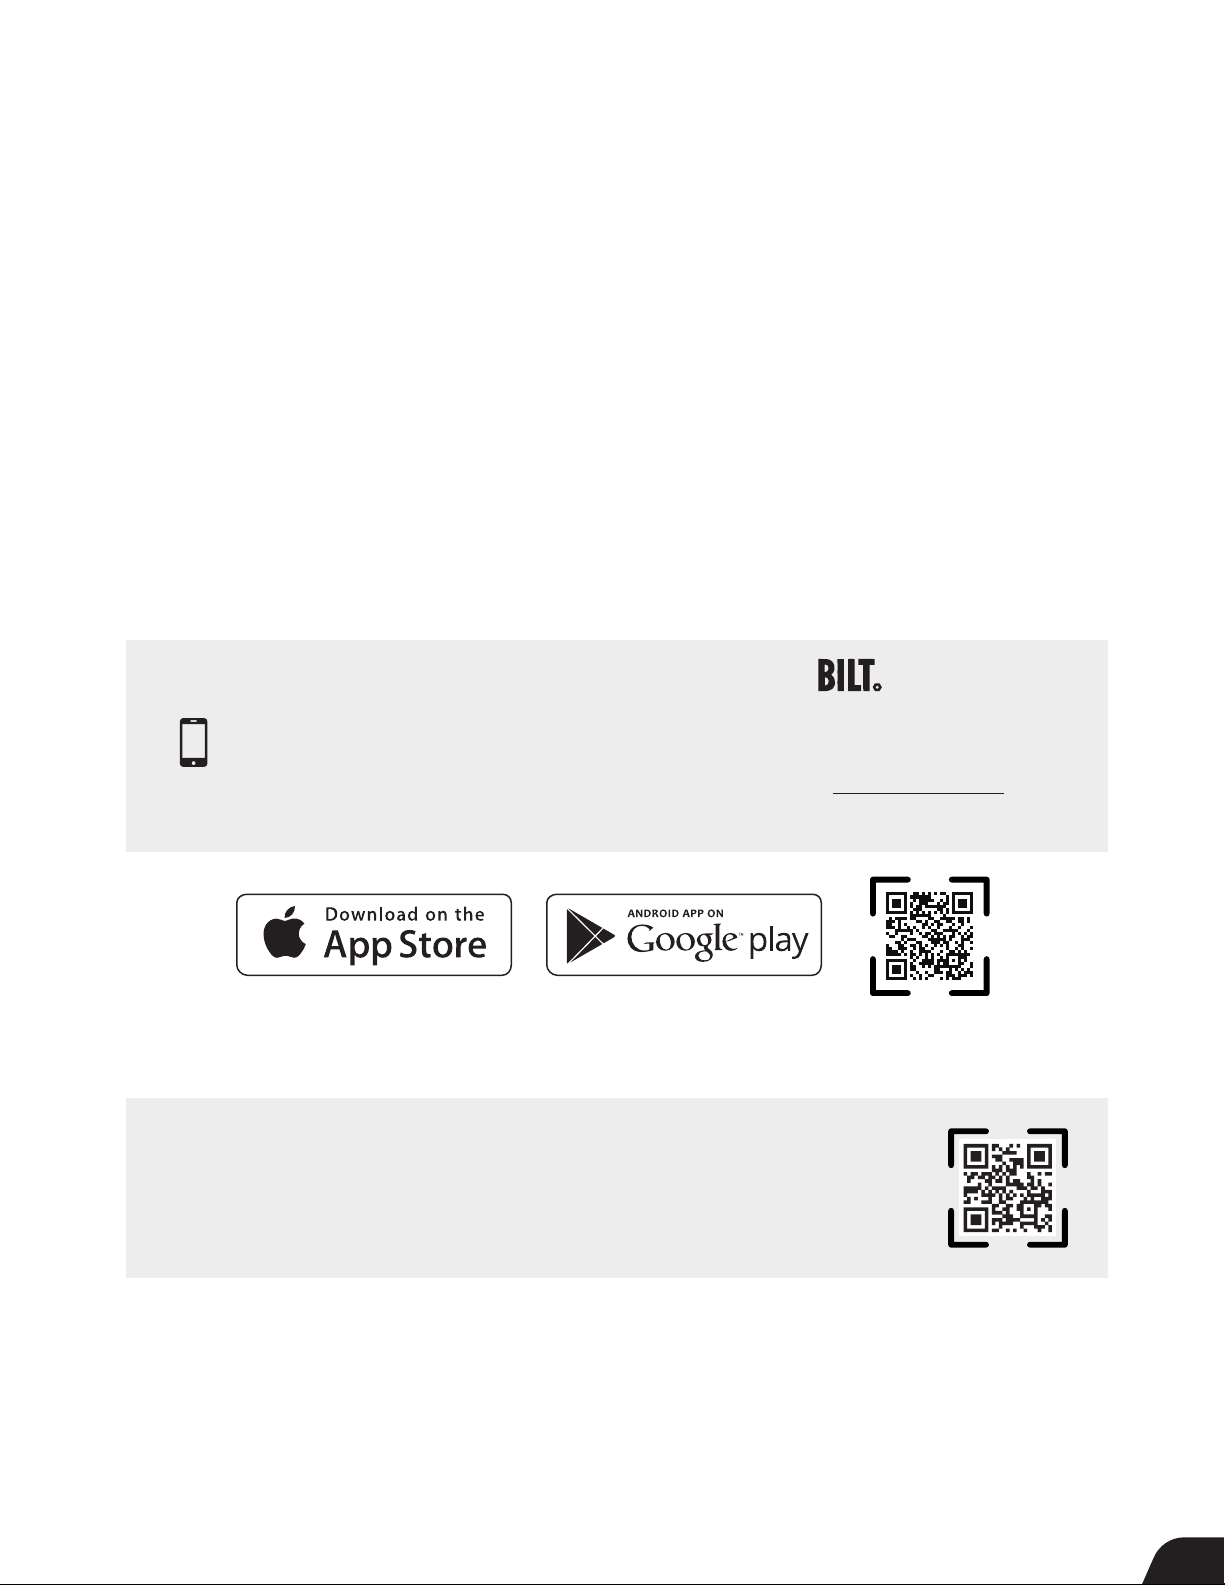
For step-by-step, 3D interactive instructions, download BILT (a FREE mobile app) to your smartphone to follow along.
See Page 5 for instructions on how to download BILT.
To register your product warranty, go to teeter.com/Support/Warranty-Registration
If you have any questions concerning assembly or if any parts are missing, DO NOT RETURN THE ITEM TO THE STORE
OR CONTACT THE RETAILER. Our dedicated customer service experts can help! Contact Teeter Customer Service
at 80 0.847.0143, or via online forms or Live Chat at teeter.com.
™
! In order to utilize this product to its fullest extent, it is critical that you
™
is a multiple user, reusable device for home
Assembly Instructions
Important Safety Instructions .........................1
Items for Assembly ................................... 2
Understanding Your FreeStep
Safety Warning Labels and Product Specifications ..4
Before Beginning Assembly.......................... 5
Assembly Steps....................................6 – 11
™
...................... 3
User Guide
Use Instructions .................................13 – 19
Warranty and Registration ..........................20

BEFORE YOU BEGIN: Review all steps before beginning assembly and read all precautions before using the Teeter FreeStep™.
Carefully adhere to the Assembly Instructions and User Guide to help ensure safety and product integrity.
READ ALL INSTRUCTIONS BEFORE USING THE TEETER FREESTEP
IMPORTANT SAFETY INSTRUCTIONS
!
WARNING
FAILURE TO FOLLOW INSTRUCTIONS AND WARNINGS COULD RESULT IN SERIOUS INJURY OR DEATH.
To reduce the risk of injury:
• Read and understand all the instructions, review all other accompanying documents, and inspect the equipment before use.
It is your responsibility to familiarize yourself with the proper use of this equipment and the inherent risks of exercise equipment
if these instructions are not followed, such as, pinching, entrapment, equipment failure, or aggravating a pre-existing medical
condition. It is the responsibility of the owner to ensure that all users of the product are fully informed about the proper use of
the equipment and all safety precautions.
• ALWAYS consult with your doctor before beginning any exercise or weight-loss program, especially if you are over the age of
35 or have any known pre-existing medical problems. This may include injury or illness, but also the side effects of any drug or
supplement (prescribed or over-the-counter).
• The instructions and advice presented in this User Guide are in no way intended as a substitute for medical advice or counseling.
• DO NOT continue using the equipment if you feel pain, discomfort, shortness of breath, chest tightness, or become
light-headed or dizzy while exercising. STOP and seek medical advice. Call 911 if you are having an emergency health condition.
• DO NOT use if you are over 300 lbs. (136 kg). Structural failure and physical injury could occur.
• ALWAYS ensure that all adjustable features are accurately adjusted to the users’ body proportions and all parts are fully tightened
and secured before use. ALWAYS hold the Handles or Seat Handles when mounting, dismounting, or using equipment.
• DO NOT place hands or feet near linkages while in use. The linkages are flywheel driven and can cause serious injury,
entrapment, or death. DO NOT allow pets or children to approach the linkage while it is moving.
• DO NOT place any objects within a 24” (61 cm) radius of the machine. Do not place any objects or body parts behind the pivot
area of the pedals.
• ALWAYS reduce pedal speed in a controlled manner. Pedals continue to spin when you stop pedaling.
• DO NOT allow children to use this machine. Keep children, bystanders, and pets away from machine at all times and DO NOT
allow children to be left unattended in the same room as the equipment. The FreeStep
with reduced physical, sensory or mental capabilities, unless they are given supervision and instruction concerning use of the
machine by a person responsible for their safety.
• ALWAYS wear appropriate clothing while exercising with the machine. DO NOT wear loose clothing that could get entangled
in the equipment. ALWAYS wear athletic shoes to protect feet while exercising with the machine.
• ALWAYS store indoors and on a level surface. This equipment is not intended for outdoor use.
• DO NOT use in any commercial, rental or institutional setting. This product is intended for home-use only.
• ALWAYS use this equipment only for its intended use as described in this manual. DO NOT use attachments not
recommended by manufacturer.
• DO NOT drop or insert any object into any opening or place any sharp objects near the equipment. Keep body parts, hair, loose
clothing and jewelry clear of all moving parts.
• DO NOT operate equipment while under the influence of drugs, alcohol, or medication that may cause drowsiness or disorientation.
• ALWAYS inspect the equipment prior to use. Make sure all fasteners are secure and adjustable settings are secure.
• ALWAYS replace defective components immediately and/or keep the equipment out of use until repaired.
• ALWAYS position equipment on a level surface and away from water or ledges that could lead to accidental immersion or falls.
• ALWAYS use a damp cloth when cleaning. DO NOT use abrasive soaps or solvents to clean as this could cause damage to the machine.
• Refer to additional warning notices posted on the equipment. If a product label or User Guide should become lost, damaged or
illegible, contact Customer Service for replacement.
™
is not intended for use by persons
™
SAVE THESE INSTRUCTIONS
1
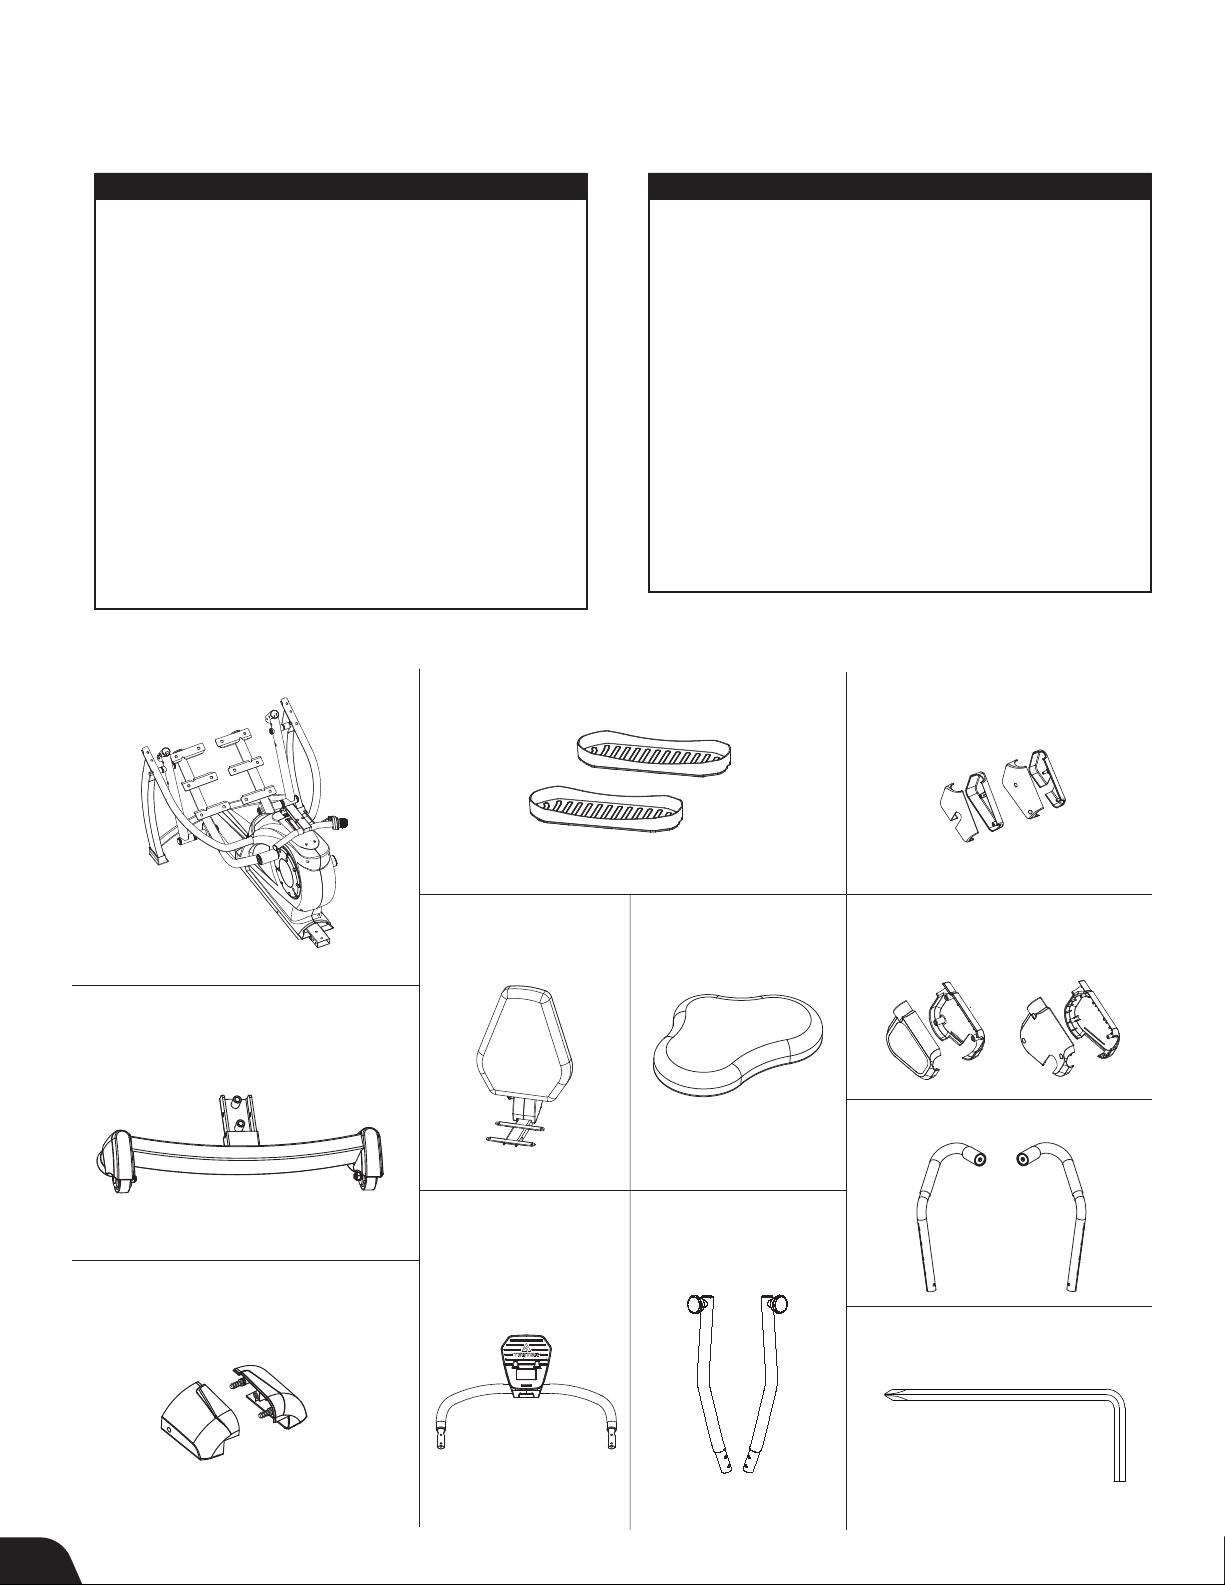
Items for Assembly
Items not shown to scale. Hardware drawings located on the Hardware Kit inserts.
ITEM NO. ITEM NAME
Base
SE2101 Base
Rear Stabilizer
SE1102 Rear Stabilizer
HK1042 Step 1a Hardware Kit
Rear Stabilizer Cover Set
SE1103 Rear Stabilizer Cover (2)
HK1043 Step 1b Hardware Kit
Pedals
SE2104 Pedal (2)
HK2044 Step 2 Hardware Kit
Seat Back Assembly
SE1105 Seat Back Assembly
HK1045 Step 3a Hardware Kit
Lower Seat
SE1106 Lower Seat
HK1046 Step 3b Hardware Kit
Base
ITEM NO. ITEM NAME
Console Front Support Bar
SE1107 Console Front Support Bar
HK1047 Step 4a Hardware Kit
Handle Support Tubes
SE2108 Handle Support Tube (2)
HK1048 Step 4b Hardware Kit
Pedal Arm Joint Cover Sets
SE1109 Pedal Arm Joint Cover (4)
HK1049 Step 5 Hardware Kit
Upper Front Leg Cover Set
SE1110 Upper Front Leg Cover (4)
HK1049 Step 5 Hardware Kit
Handles
SE1111 Handle (2)
Tools
SE1112 Allen Wrench / Screwdriver
Pedals
Use with Step 2 Hardware Kit (HK2044)
Pedal Arm Joint Cover Sets
Use with Step 5 Hardware Kit
(HK1049)
SE2101
Rear Stabilizer
Use with Step 1a Hardware Kit (HK1042)
SE1102
Rear Stabilizer Cover Set
Use with Step 1b Hardware Kit (HK1043)
Seat Back Assembly
Use with Step 3a
Hardware Kit (HK1045)
SE1105
Console Front
Support Bar
Use with Step 4a
Hardware Kit (HK1047)
SE2104
Lower Seat
Use with Step 3b
Hardware Kit (HK1046)
SE1106
Handle Support Tubes
Use with Step 4b
Hardware Kit (HK1048)
SE1109
Upper Front Leg Cover Sets
Use with Step 5 Hardware Kit
(HK1049)
SE1110
Handles
SE1111
Tools Provided for Assembly
Allen Wrench /
Screwdriver
SE1103
SE1107 SE2108
SE1112
2
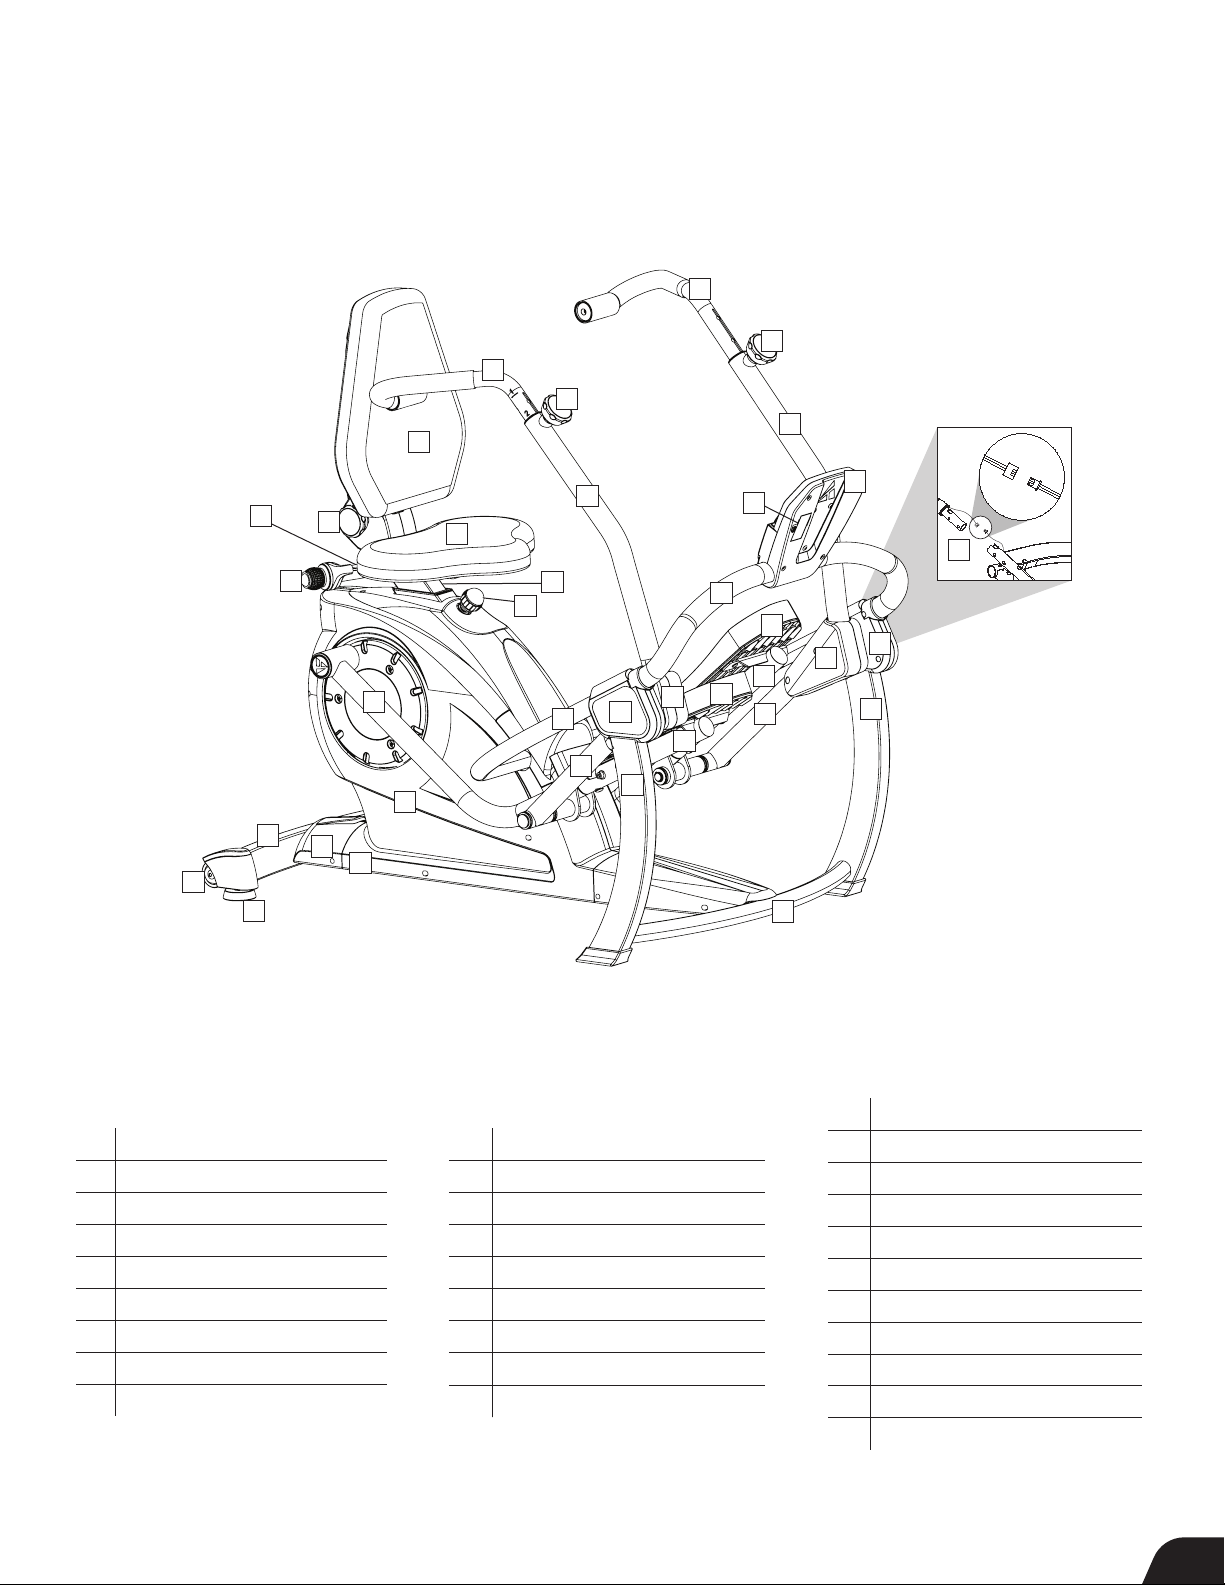
Understanding Your Teeter FreeStep
Before reading further, study the drawing below to familiarize yourself with the
important components of your Teeter FreeStep
™
.
™
24
23
24
23
18
12
25
7
Back
3
27
29
28
4
18
14
13
11
17
5
6
15
9
21
20
10
26
16
21
20
19
22
9
10
19
22
1
Left
2
Right
8
Front
Identifying Parts and Components
1 Base
2 Main Support Tube
3 Rear Stabilizer
4 Rear Stabilizer Cover Set
5 Seat Post
6 Height Adjustment Knob
7 Seat Handle
8 Front Crossbar
9 Pedals
10 Base Pedal Arms
11 Lower Seat
12 Seat Back Assembly
13 Console
14 Battery Compartment
15 Console Front Support Bar
16 Lower Console Support Tube
17 Speed Sensor Wire
18 Handle Support Tubes
19 Upper Pedal Arm
20 Pedal Arm Joint Cover Sets
21 Upper Front Leg Cover Sets
22 Upper Front Leg
23 Handle Adjustment Knobs
24 Handles
25 Transport Wheels
26 Linkage
27 Leveling Feet
28 Seat Back Adjustment Knob
29 Resistance Adjustment Knob
3
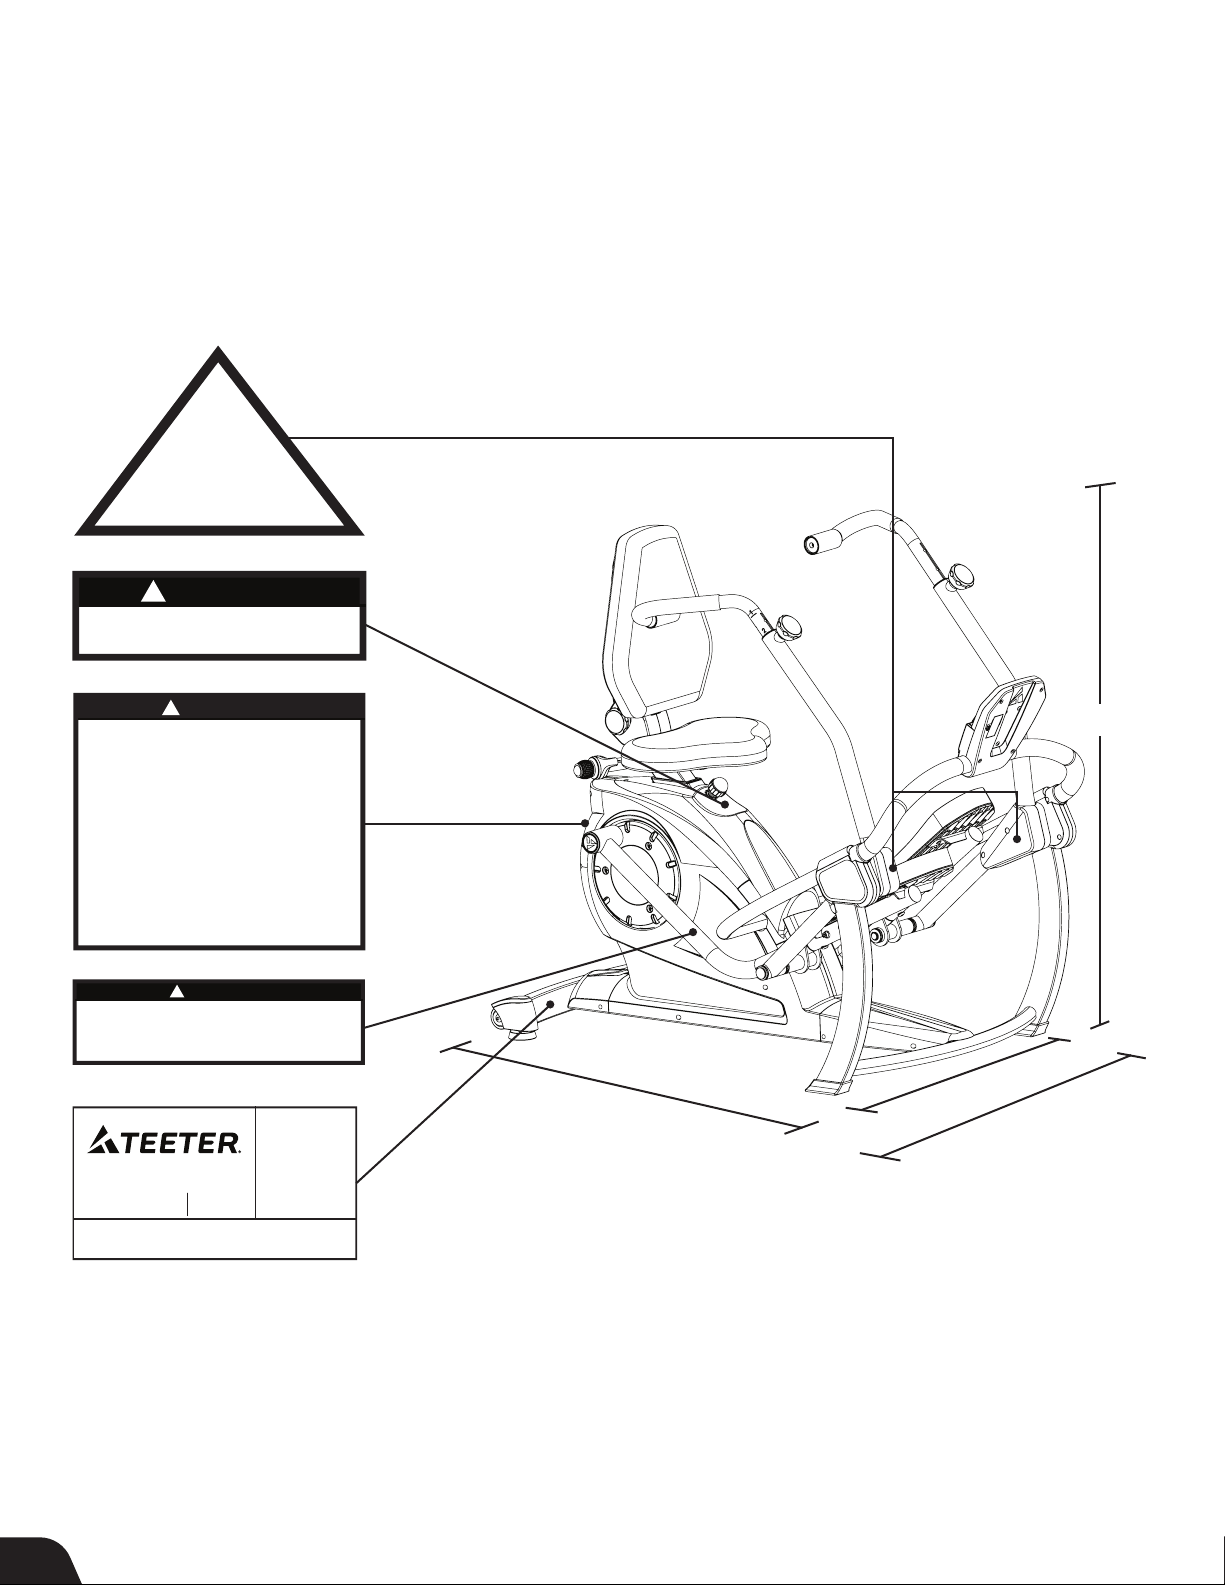
Safety Warning Labels and Product Specifications
SE1053 1017-0
Important: Please review all labels and supporting materials before using your FreeStep™.
This drawing indicates the locations of the warning labels found on your product. If a label is missing, illegible or is removed,
contact Teeter Customer Service to request a complimentary replacement label.
Note: Image and labels below are not shown in actual size.
!
WARNING
PINCH POINT - DO NOT PLACE
HANDS OR FEET HERE
!
Ensure that the knob is fully tightened
WARNING
into a hole setting before use.
Replace labels if damaged, illegible or removed.
!
SERIOUS INJURY OR DEATH MAY OCCUR IF
PRECAUTION IS NOT TAKEN. To reduce this risk:
• READ and understand the Assembly & User Instructions
before attempting to use.
• ALWAYS consult a physician before starting an exercise
regimen. DO NOT continue to use if you feel unusual pain,
dizziness, shortness of breath, chest tightness or discomfort.
• DO NOT allow children to use this machine or leave them
unattended with the product. Keep children, bystanders
and pets away when in use.
• ALWAYS reduce pedal speed in a controlled manner.
Pedals continue to spin when you stop pedaling.
• Keep body parts, hair, loose clothing and jewelry clear of
all moving parts.
• Weight Capacity: 300 lb (136 kg). For consumer,
indoor Home-Use Only.
SERIOUS INJURY OR DEATH MAY OCCUR IF PRECAUTION IS
NOT TAKEN. To reduce this risk:
• DO NOT allow children or pets to approach the equipment while in use.
NEVER place hands or feet near linkages while in use. The linkages are
flywheel driven and can cause serious injury, entrapment or death.
FreeStep
9713 233rd Avenue East
Bonney Lake, WA 98391
SERIAL # / EN SÉRIE / NÚMERO DE SERIE
SSE2-
WARNING
ALWAYS use on a level surface.
Replace labels if damaged, illegible or removed.
!
WARNING
Replace labels if damaged, illegible or removed.
US Pats: 7,815,551,
8,562,491, US Patent Pending:
2013/14048302
Canada: Pats Approved
Application 2696901
(issues 11-2015)
™
SE2001
800.847.0143
teeter.com
Europe: Application 08830164.3
CN (Utility):
ZL 201220191127.2;
ZL 201420589095.0
CN (Design):
ZL 201233139551.8
Int’l PCT/US2008/076264
SE1050 1017-0
SE1054 1017-0
SE2070 1018-0
52.5 in (133.4 cm)
54.0 in (137.2 cm)
29.0 in (73.7 cm) – Base Width
38.0 in (96.5 cm) – Handle Width
Dimensions: 54.0 x 29.0 x 52.5 in (137.2 x 73.7 x 133.4 cm)
54.0 x 38.0 x 52.5 in (137.2 x 96.5 x 133.4 cm)
Weight (approx.): 106.9 lb (48.5 kg)
4
– Base Width
– Handle Width
Before Beginning Assembly
Unpack and Prepare Your Workspace
• Follow the instructions on the outside of the box for the easiest unpacking process.
• If possible, set up the product at or near the space in which you intend to use it to avoid moving it later.
• Unpack all parts and support materials. Set aside packing materials and clear your work area.
• Locate the Hardware Kits inside the box. They are labeled to correspond with the assembly process.
Making Assembly Even Easier with
For step-by-step, 3D interactive instructions, download BILT (a FREE mobile app)
to your smartphone to follow along. Simply download the BILT app by scanning
the QR code below and then search for your product model (FreeStep SE2001)
within the BILT app to get started!
Step-by-Step Assembly & Use Instruction Video
Access the Assembly & Use Instruction video by scanning the QR code
or by entering bit.ly/freestep-video into your web browser.
5
STEP
1
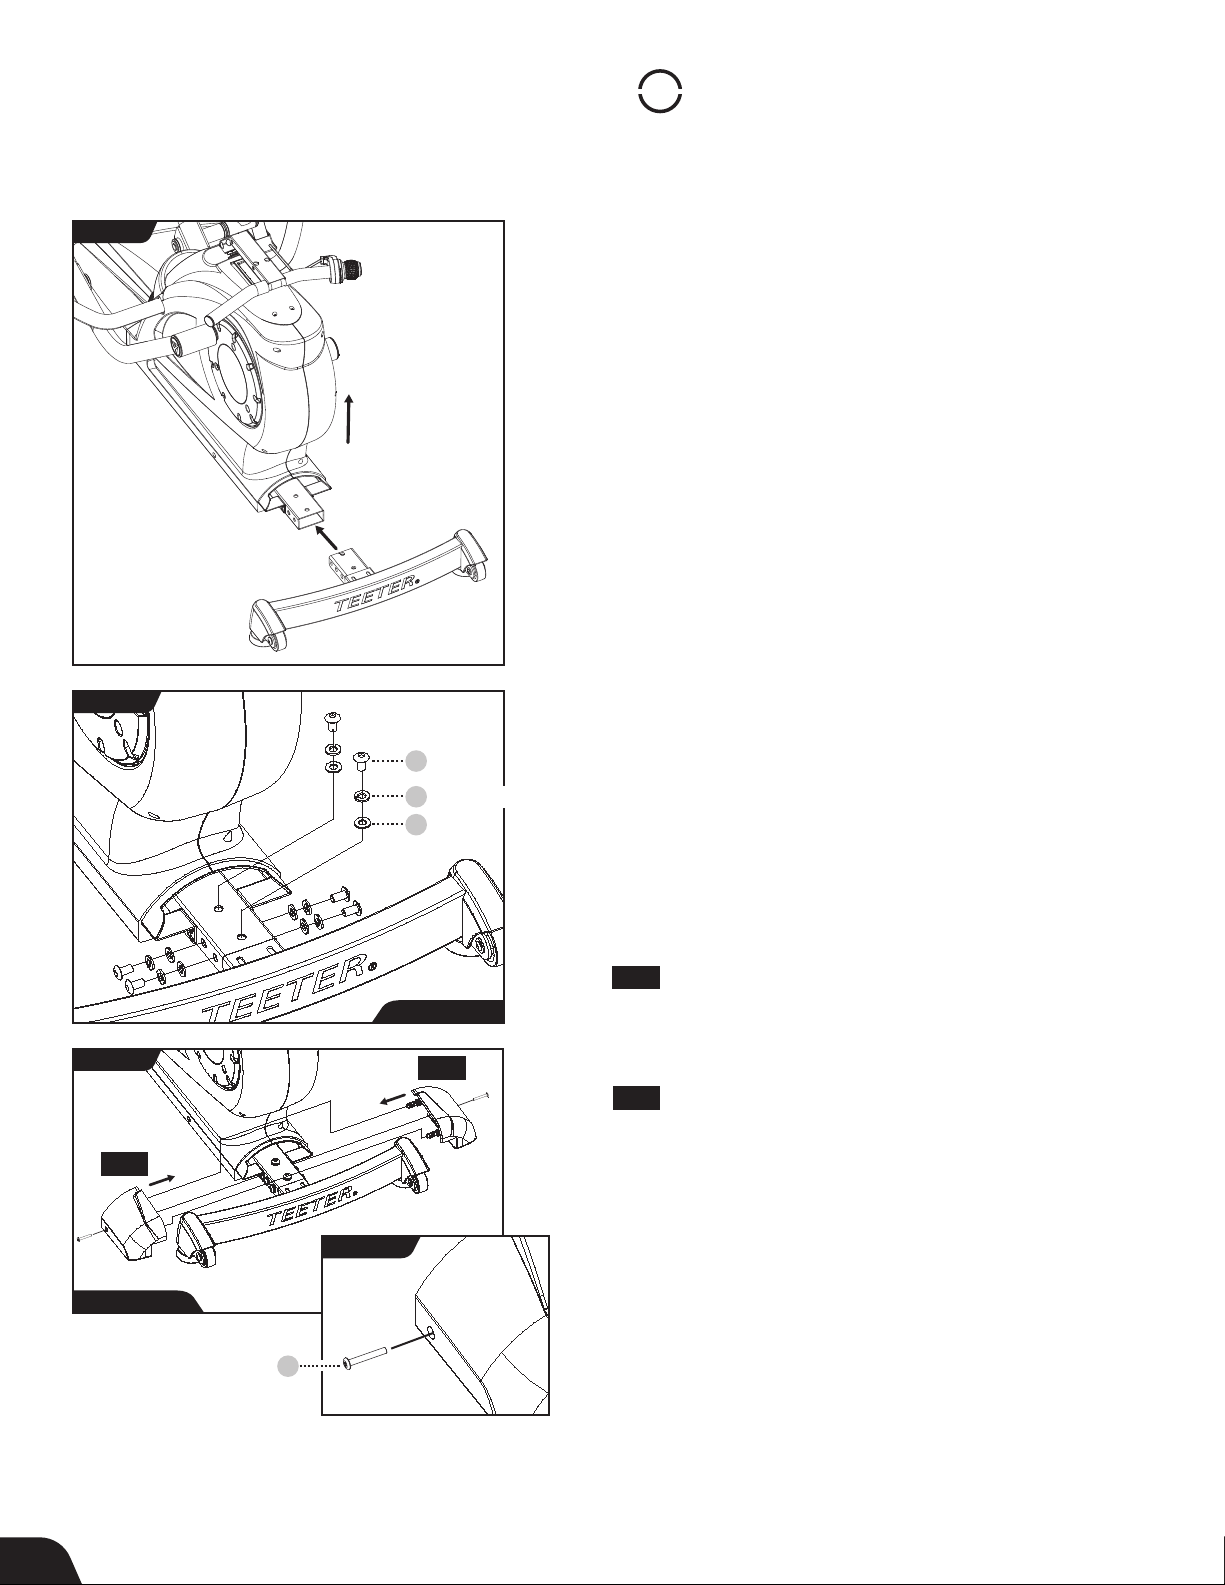
Assemble Rear Stabilizer
FIGURE 1
FIGURE 2
Insert
Lift
Bolt
108
Spring Washer
9
Washer
8
NOTE:
• Always hand tighten all the bolts or screws in each step before
fully tightening with the wrench or screwdriver.
• For reference, the Front, Back, Right and Left of the equipment
™
is labeled on Page 3, Understanding Your FreeStep
.
Attach Rear Stabilizer
• Remove the Base from the packaging and position it on a level
surface on the floor.
• Remove the wooden plug from the Main Support Tube in the
back of the Base and discard it.
• Lift the Base slightly from the back and insert the Rear Stabilizer
into the Main Support Tube at the back of the Base (Figure 1).
• Use the Step 1a Hardware Kit to attach the Rear Stabilizer.
First hand tighten 6 × Bolts with 6 × Spring washers and
6 × Washers on the Rear Stabilizer Joint. The Spring Washers
should always be between the Bolt Head and the Washer.
Use the Allen wrench to fully tighten each bolt (Figure 2).
Attach Rear Stabilizer Cover Set
FIGURE 3
Part 2
Step 1b Hardware
Machine Screw
61
FIGURE 3a
Step 1a Hardware
Part 1
• Locate the Rear Stabilizer Cover Set, noting the Right and Left
markings, and the Step 1b Hardware Kit.
Part 1
Complete this first before Part 2.
• Attach the Right Rear Stabilizer Cover by loosely tightening the
1 x Machine Screw (Figure 3).
Part 2
• Attach the Left Rear Stabilizer Cover to the Right by joining the
alignment pegs and pushing together for a snug fit.
• Insert 1 x Machine Screw to secure the Left Rear Stabilizer, then
finish tightening both Machine Screws with the Screwdriver.
6
 Loading...