

Teenage Engineering PO-28 Robot User manual
PO-28 robot
manual
ユー ザ ーズ マ ニュ アル
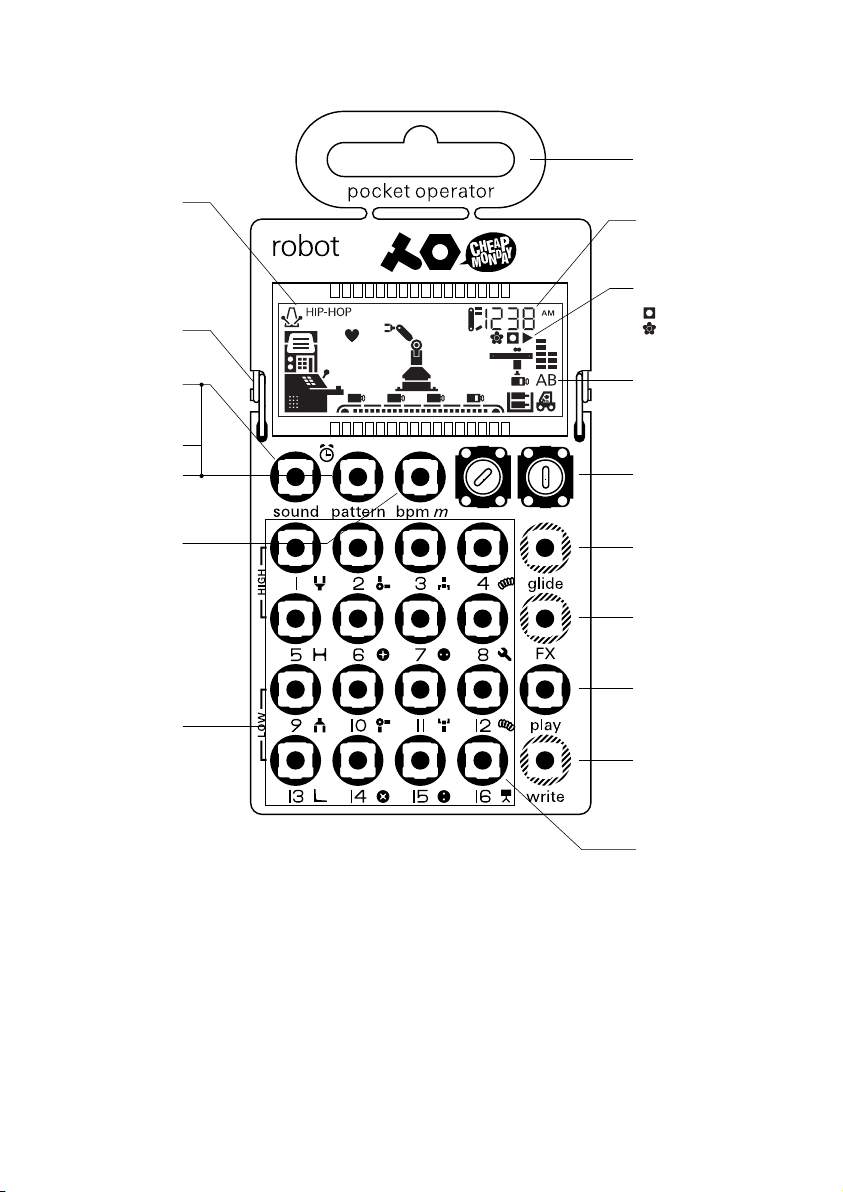
selected
tempo
folding stand
break away
hanger
time / note /
additional info
play / rec mode
indicates write mode is active
indicates micro drum kit is active
sound
to select sound hold
sound and press 1-16
alarm
pattern
to select pattern hold
pattern and press 1-16
bpm
press to select tempo
m
hold to set master volume 1-16
hold step 1-16 + m
to set multiplier
sound 1-16
eect 1-16
the unit auto powers o when no buttons are pressed
for a while, only powering the display to show time.
press sound + bpm to show battery status. press sound + write
to manually power o. this ensures that recent modifications
to pattern data will survive a loss of power.
auto power o (a.p.o.)
sound
parameters A / B
knob A / B
A: timbre B: release
A: depth B: rate
A: swing B: tempo
expression control
eects
to toggle eects hold FX
and press 1-16
play / stop
write
micro drum
sound key 16 is a
micro drum machine
sound 1-16 eect 1-16
1. LFO pulse wave
2. pulse wave
3. mixed wave
4. triangle wave
5. echo
6. arpeggio
7. vibrato
8. 4-bit triangle
9. LFO pulse wave
10. pulse wave
11. mixed wave
12. triangle wave
13. echo
14. arpeggio
15. vibrato
16. micro drum kit
1. distorted filter
2. distorted sweep
3. repeat 4
4. repeat 2
5. lowpass slow sweep
6. lowpass fast sweep
7. hipass filter
8. hipass sweep
9. fill-in
10. fill-in (fast)
11. retrigger
12. retrigger (fast)
13. glitch
14. glitch (fast)
15. blinds
16. noise eect

1. getting started
power-up
insert two fresh AAA batteries.
pay attention to plus and minus
terminals.
set clock
set time by turning knob A for
hours and knob B for minutes.
press any key to confirm and exit.
alarm clock
press sound + pattern. set alarm
clock by turning A for hours and B
for minutes. (disable by turning
knob A all the way down.) press
any key 1-16 to set pattern for the
alarm. to stop alarm press any key.
reset clock
reset the clock by removing the
batteries and start over.
2. live play
select sound
hold sound and press any key 1-8
to select a sound in the high-octave
range. hold sound and press any
key 9-15 to select a sound in the
low-octave range.
play melodies
press keys 1-16 to play notes from
a fixed scale.
tweak the sound
knob A controls the timbre of the
current sound. knob B controls the
release rate.
auto vibrato
hold glide and tweak knobs to
control automatic vibrato. vibrato
is applied a short while after the
onset of every live note. knob A
controls vibrato depth, and knob B
controls the rate. to turn o this
feature, turn knob A all the way to
the left.
add expression
hold glide and press any key 1-16
to glide up to a note.
hold glide while releasing a note
key to activate a falling chromatic
scale eect.
micro drum kit
hold sound and press 16 to select
the micro drum kit.
press keys 1-16 to trigger an
assortment of 8-bit drum sounds.
3. sequencer
the device is equipped with a
16-step, 2-channel sequencer. the
first sequencer channel is for
melodies, and the second is for
drums.
playback
hold pattern and press any key
1-16 to select pattern. blinking led
indicates active pattern. press play
to start and stop playback.
making a beat
press write (rec symbol appears) to
edit the contents of a pattern.
enter notes/sounds in the grid.
active steps will be lit. press play
to listen to your pattern. when
sound 16 is selected, the grid represents the drum channel. when
any other sound is selected, the
grid represents the melody channel.
select sound
while write mode is active, hold
sound and press any key 1-8 (or
9-15) to select a sound for the
melody channel.
parameter locking
during play, hold write while
turning knobs to write sound
parameter changes over time.
set note / drum
while write mode is active, hold a
lit step and turn knob A to set note
value or to select drum sound.
fine-tuning the pattern
while write mode is active, hold a
lit step and turn knob B to modify
the release rate on that step.
hold a lit step and press glide to
toggle the glide-up eect on that
step. hold an unlit step and press
glide to toggle the glide-down
eect on that step.
4. eects
while playing, hold FX and press
any key 1-16 to punch in eects.
hold FX without pressing any key
to clear eects. see reference on
opposite page. the filter eects
also work in live mode when the
sequencer is stopped. hold FX and
press the corresponding key to
activate the eect. press FX briefly
to deactivate it.
5. tempo and swing
press bpm to switch tempo. the
bpm will be displayed in the upper
right corner of the screen.
HIP HOP (80 bpm)
DISCO (120 bpm)
TECHNO (140 bpm)
hold bpm and turn A to adjust
the swing. hold bpm and turn B to
fine-tune tempo from 60 to 240 bpm.
6. volume
hold bpm and press any key 1-16
to adjust master volume.
7. live record
while playing, except in write
mode, hold write and press any
key 1-16 to punch in notes.
notes will be quantized according
to the current swing setting.
8. step multiplier
in write mode, ensure that the
micro drum kit (sound 16) is
selected, so that the grid
represents the drum channel.
hold a lit step, and press bpm
to insert a re-trig on that step.
press bpm multiple times to switch
between 2, 3, 4, 6 or 8 multiplier.
9. making a song
copy pattern
hold write + pattern and press
1-16 to paste the active pattern to
the corresponding new slot.
clear pattern
hold glide and press pattern to
clear the active pattern.
chain pattern
hold pattern and press a sequence
of keys 1-16 to create a chain of
up to 128 patterns. one pattern
can be selected multiple times.
example: 1, 1, 1, 4 plays pattern 1
three times then moves on to pattern
4. the entire sequence then repeats.
11. sync multiple units
connect a standard stereo audio
cable between the units. the
master unit will control the tempo
of the slave unit. hold glide and
press bpm on master unit to
toggle sync modes. press
repeatedly to toggle between
dierent modes displayed in the
upper right corner of the screen.
press play on slave unit to wait for
master clock sync. press play on
master to start.
sync modes
there are 5 sync modes. default
mode is SY0. when sync is used
the signal will be split between
audio (right) and sync (left).
sync scenarios
example A
chain: PO-28 PO-20 PO-12
setting: SY1 SY5 SY4
example B
chain: external PO-28
setting: volca SY2
iphone
computer
synckontrol
example C
chain: ext. PO-28 PO-14
setting: SY3 SY4
example D
chain: PO-28 ext. (split cable)
setting: SY1vv v
disclaimer
although teenage engineering will use all reasonable
endeavours to ensure the accuracy and reliability of
this product, neither teenage engineering nor any
third party supplier will be liable for any loss or
damage in connection with the sale or use of the
product except for: a) personal injury caused by our
negligence or that of our employees or agents when
acting in the course of their employment with
ourselves and; b) any other direct loss or damage
caused by our gross negligence or wilful
misconduct.
ALL EXPRESS OR IMPLIED CONDITIONS,
WARRANTIES OR UNDERTAKINGS (OTHER THAN
CONDITIONS, WARRANTIES OR UNDERTAKINGS
EXPRESSLY STATED, OR IMPLIED BY STATUTE
AND WHICH CANNOT BE EXCLUDED), WHETHER
ORAL OR IN WRITING, INCLUDING WARRANTIES
AS TO SATISFACTORY QUALITY AND FITNESS FOR
A PARTICULAR PURPOSE, ARE EXCLUDED.
©2016 teenage engineering ab.
all rights reserved.
 Loading...