


DIGITAL LED/LCD TELEVISION WITH DIRECT LED LIGHTING
MODEL: LED32CHRDWHBD

Contents
 Safety Information
• About this manual / Safety Information 1
• Product disposal 1
• Safety precautions 1
• Handling the LED/LCD screen 5
 User Guidance Information
• Device Overview 7
• Desktop Mounting / Wall Mounting 9
• Connecting an Antenna 10
• Remote Control 11
 Operation
• First Installation 13
• Picture Menu 15
• Sound Menu 17
• Channel Menu 19
• Feature Menu 24
• Setup Menu 33
• Personal Video Recorder Mode (PVR) 36
• Media Player Mode 37
• Media Player Format 40
• DVD Operation 41
• Disc Care 49
 Maintenance and Service
• Troubleshooting 50
• Specifications 51
1
Safety Precautions
 Preface
 Safety Information
2
Safety Precautions
 Safety Information
3

Safety Precautions
 Safety Information
4
Safety Precautions
 Safety Information
(If the TV set is plugged in, a slight current still flows, even if the power button is in the OFF postion).
5

Safety Precautions
 Important Information
If a television is not positioned in a sufficiently stable location, it can be potentially hazardous due to falling. Many injuries, particularly to children, can be avoided by taking simple precautions such as:
•Using cabinets or stands recommended by the manufacturer of the television.
•Only using furniture that can safely support the television.
•Ensuring the television is not overhanging the edge of the supporting furniture.
•Not placing the television on tall furniture (for example, cupboards or bookcases) without anchoring both the furniture and the television to a suitable support.
•Not standing the televisions on cloth or other materials placed between the television and supporting furniture.
•Educating children about the dangers of climbing on furniture to reach the television or its controls.
6
Use Guidance Information
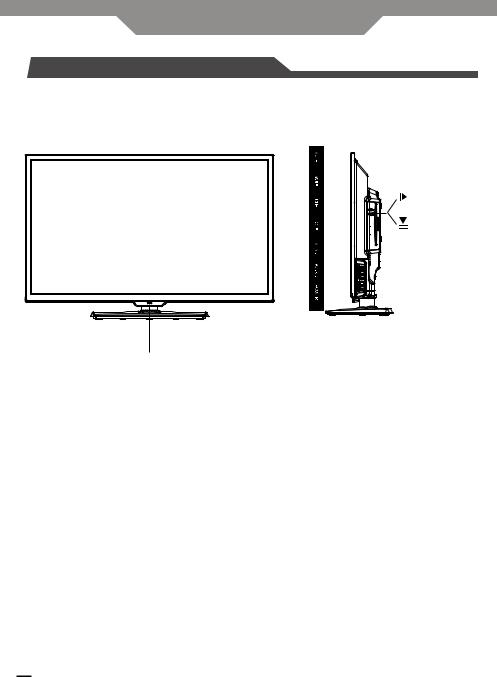
 Device Overview
3 
1,2
1. Remote Sensor
Do not block this sensor or the remote control will not work.
2. Standby Indicator
Indicates whether the unit is ON or in STANDBY (OFF) mode.
3. The functions of the buttons are described as bellows: POWER: Press to turn the unit on or off.
SOURCE: Press to select the input source of the TV.
MENU: Press to display the OSD menu, press again to exit the menu. CH+/-: Press to scan through channels.
VOL+/-: Press to adjust the volume. ►;: Play/Pause the disc playing.
 : Eject the disc.
7

Use Guidance Information
 Device Overview
10
9
8
7
6
|
|
|
|
|
|
|
|
|
|
|
|
|
|
|
|
|
|
|
|
|
|
1 |
2 |
3 |
|
4 |
5 |
|||||
1.Power Cord
2.Headphone Jack
3.HDMI Input Jack
Connecting of HDMI signal
4.AV (Video), R/L (Audio) Input Jack
Connecting for composite signal input in AV mode.
5.Coaxial Output Jack
6.USB
Connecting for USB device.
7. VGA Input Jack
Connecting to the PC output jack a personal computer.
8. PC Audio Input Jack
Connected to the audio output jack on a personal computer.
9. Antenna Input Jack
Connecting to extern antenna to receive the TV.
10. YPbPr Input Jack
Connecting for component signal input in YPbPr mode.
8
Use Guidance Information
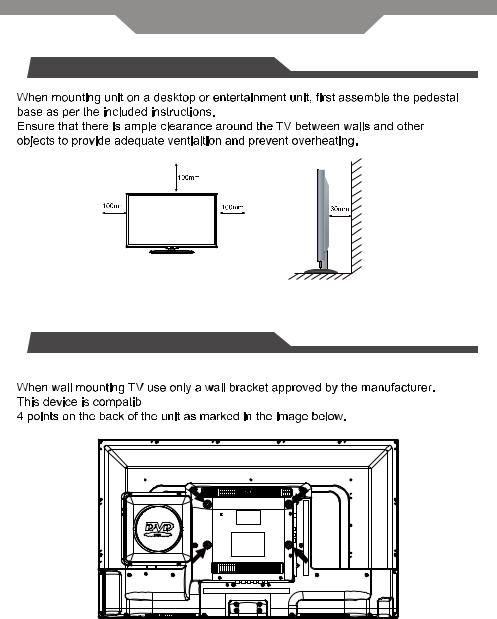
 Desktop Mounting
 Wall Mounting


 200mm x 100mm


9
Use Guidance Information
 Connecting an Antenna
10
Use Guidance Information
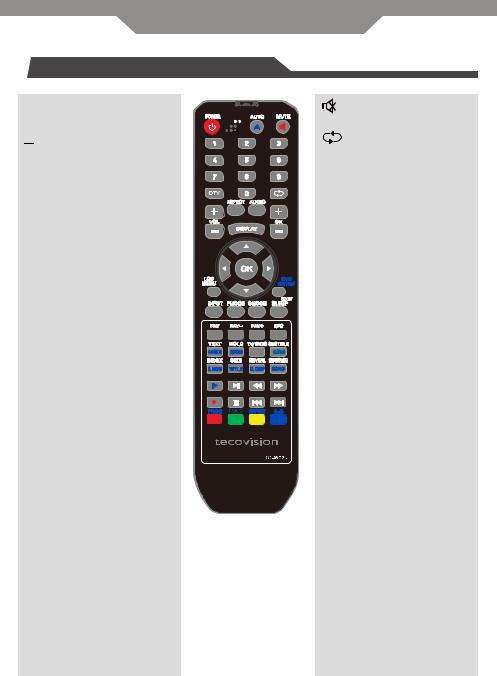
 Remote control
POWER
Turn on/off TV from standby.
 / AUTO
Eject the disc in DVD mode. Auto adjust in PC mode.
0-9
Choose channel directly.
DTV
Switch to DTV source.
ASPECT
Change the picture size.
AUDIO
Change audio language in TV mode.
VOL+/-
Adjust volume.
DISPLAY
Show info bar.
LCD MENU
Open the TV OSD menu.
INPUT
Open the input source menu.
PMODE
Change the picture mode.
SMODE
Change the sound mode. mode.
SLEEP
Set sleep timer to turn off TV.
Mute/Unmute the volume.
Recall previous channel in TV mode.
CH+/-
Adjust channel.
▲▼◄► /OK
Navigation buttons/Confirm selection button.
DVD SETUP / EXIT
Open the DVD Setup menu. Exit from current menu.
FAV
Open the FAV channel list in TV mode.
FAV-/+
Select the channel in FAV channel list.
EPG
Open the electronic program guide.
ANGLE / TEXT
Switch angles in DVD mode.
Open the teletext in TV mode.
ZOOM / HOLD
Zoom function in DVD mode.
Hold function in teletext mode.
11

Use Guidance Information
 Remote control
TV/RADIO
Switch the TV or RADIO mode.
D.SUB / SUBTITLE
Change subtitles in TV and DVD mode.
D.MENU / INDEX
Skip to Root menu in DVD mode.
Index function in teletext mode.
TITLE / SIZE
Skip to title in DVD mode. Size function in teletext mode.
D.DISP / REVEAL
Change language / audio tracks in DVD and TV modes.
Reveal function in teletext mode.
GOTO / SUBPAGE
Open goto function in DVD mode. Subpage function in teletext mode.
Step playback mode in DVD and Media modes. ►;
Play/Pause in DVD and media playback.
◄ ◄
Fast reverse in playback.
►►
Fast forward in playback.
=
Start recording to PVR in DTV mode.
■
Stop in playback modes.
9
Previous file in media playback.
:
Next file in media playback.
PROG / RED
Open the program playback function in DVD mode.
Red button function in on screen menus.
LANG / GREEN
Change the language or audio track in DVD mode. Green button function in on screen menus.
REPEAT / YELLOW
Repeat function in DVD and Media modes. Yellow button function in on screen menus.
A-B / BLUE
A to B repeat function in DVD mode.
Blue button function in on screen menus.
12
Operation
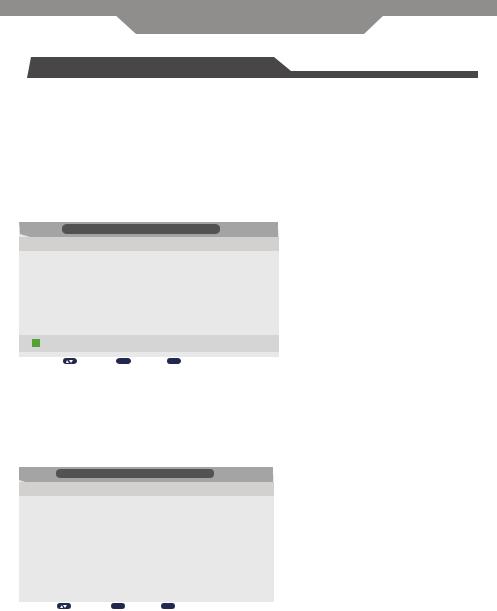
 First Installation
If this is the first time you are turning on the TV and there are no programs in the TV memory, the "Auto Installation" menu will appear on the screen.
These are 5 setups as follow:
Setup 1
Press ▼/▲ button to select inital brightness setting. Press OK button or GREEN button to enter Setup 2 menu. Press EXIT button to exit Auto Installation menu.
Auto Installation
- Setup 1 -
Home Mode: |
Home |
|
|
|
Dynamic |
|
|
|
|
|
|
|
Standard |
|
|
|
|
|
|
|
Mild |
|
|
|
|
|
|
Next Page
Move |
OK Enter |
Exit Exit |
Setup 2
Pres ▼/▲ button to select country.
Press RED button to return to previous menu.
Press OK button or GREEN button to enter Setup 3 menu.
Press EXIT button to exit Auto Installation menu.
Auto Installation
- Setup 2 -
|
|
Country: |
|
|
Ukraine |
|
|
|
|
|
|
|
|
|
|
|
|
|
|
|
|
|
Other |
|
|
|
|
|
|
|
|
|
|
|
|
|
|
|
|
|
Australia |
|
|
|
|
|
|
|
|
New Zealand |
|
|
|
|
|
|
|
|
Singapore |
|
|
|
|
|
Previous Page |
|
Next Page |
|
|
|
|
|
|
|
|
|
|
|||
|
|
|
|
|
|
|
|
|
|
|
Move |
OK Enter |
Exit Exit |
|
|
|
|
Setup 3
Press ▼/▲ button to select Language.
Press RED button to return to previous menu.
Press OK button or GREEN button to enter Setup 4 menu.
Press EXIT button to exit Auto Installation menu.
13

Operation
 First Installation
Auto Installation
- Setup 3 -
|
|
Language: |
|
German |
|
|
|
|
|
|
|
|
|
|
|
|
|
|
|
|
|
|
English |
|
|
|
|
|
|
|
|
French |
|
|
|
|
|
|
|
|
|
|
|
|
|
|
|
|
|
Italian |
|
|
|
|
|
|
|
|
Spanish |
|
|
|
|
|
Previous Page |
|
Next Page |
|
|
|
|
|
|
|
|
|
|
|
||
|
|
|
|
|
|
|
|
|
|
|
Move |
OK |
Enter |
Exit Exit |
|
|
|
Setup 4
Press ▼/▲ button to select preferred Auto Power Off time. Press RED button to return to previous menu.
Press OK button or GREEN button to enter Setup 5 menu. Press EXIT button to exit Auto Installation menu.
Auto Installation
- Setup 4 -
Auto Power Off:
Hours can be chosen for a continuous viewing, and after that the TV will be powered off, “off” means the viewing is timeless.
Off
1 Hour
2 Hours
4 Hours
|
|
Previous Page |
|
|
Next Page |
|
|
|
|
|
|
|
|
|
|
Move |
OK Enter |
Exit Exit |
||
Setup 5
Press ▼/▲ button to select Auto Search type. Press RED button to return to previous menu. Press OK button to Start Search.
Press EXIT button to exit Auto Installation menu.
Auto Installation
- Setup 5 -
Auto Search |
|
|
|
All |
|
|
|
|
|
||
|
ATV |
|
|
|
DTV |
|
|
|
|
|
|
Previous Page
Move |
OK Enter |
Exit Exit |
14

Operation
 Picture Menu
Press MENU button on the TV or on the remote control to display the main menu.
1.Press ▲/▼ button to select PICTURE in the main menu.
2.Press ► or OK button and then press ▲/▼ button to select the option that you want to adjust in the PICTURE menu.
3.Press ► or OK button to enter sub-menu and then press ▲/▼ or ◄/► button to adjust.
4.After finishing your adjustment, press the MENU button to return to the previous menu or press the EXIT button to exit the main menu.
|
Picture Mode |
Picture |
|
||
|
|
|
|
|
|
|
|
|
|
||
|
|
Standard |
|
||
Picture |
Brightness |
|
50 |
|
|
Contrast |
|
|
|
|
|
|
|
50 |
|
||
|
|
||||
Sound |
Sharpness |
|
|
|
|
5 |
|
|
|||
|
Colour |
|
|
|
|
Channel |
|
50 |
|
||
Tint |
|
|
|
|
|
|
|
50 |
|
||
|
Colour Temperature |
|
|
|
|
Feature |
|
Standard |
|
||
|
|
|
|||
|
Aspect Ratio |
|
|
|
|
Setup |
16:9 |
|
|||
|
|
|
|
|
|
 Move
Move
OK Enter |
Exit Exit |
|
|
Menu Return |
|||
Picture Mode
Press ▲/▼ button to select (Dynamic, Standard, Mild, User).
You can adjust the value of Brightness, Contrast, Colour when the Picture Mode is User.
Tips: You can press PMODE button on the remote control to change the Picture Mode directly.
Brightness
Press ◄/► to adjust the brightness of the picture.
Contrast
Press ◄/► button to adjust the contrast of the picture.
Contrast 
15
 Loading...