

Page 1

Model: LED19DHRBJBD
LED19DHRDBJBD
LED22DFRBJBD
LED22DFRDBJBD
LED/LCD Television
Page 2

Page 3

Power Cord Connection
VGA(PC) Connection
AV Connection
YPbPr Connection
Antenna Connection
HDMI Connection
USB PORT Connection
COAX Connection
9
10
10
9
8
8
11
11
Remote control instructions in ANALOGUE TV mode
Remote control setup
Select Input Source
Picture Menu
Sound Menu
Channel Menu
Feature Menu
Setup Menu
Remote control instructions in TELETEXT mode
13
12
20
20
25
23
27
32
14
42
44
45
Movie Menu
Music Menu
E-BOOK Menu
SAFETY
PRECAUTIONS
2
1
PREFACE
FRONT BACK
CONNECTIONS
OF TV
4
5
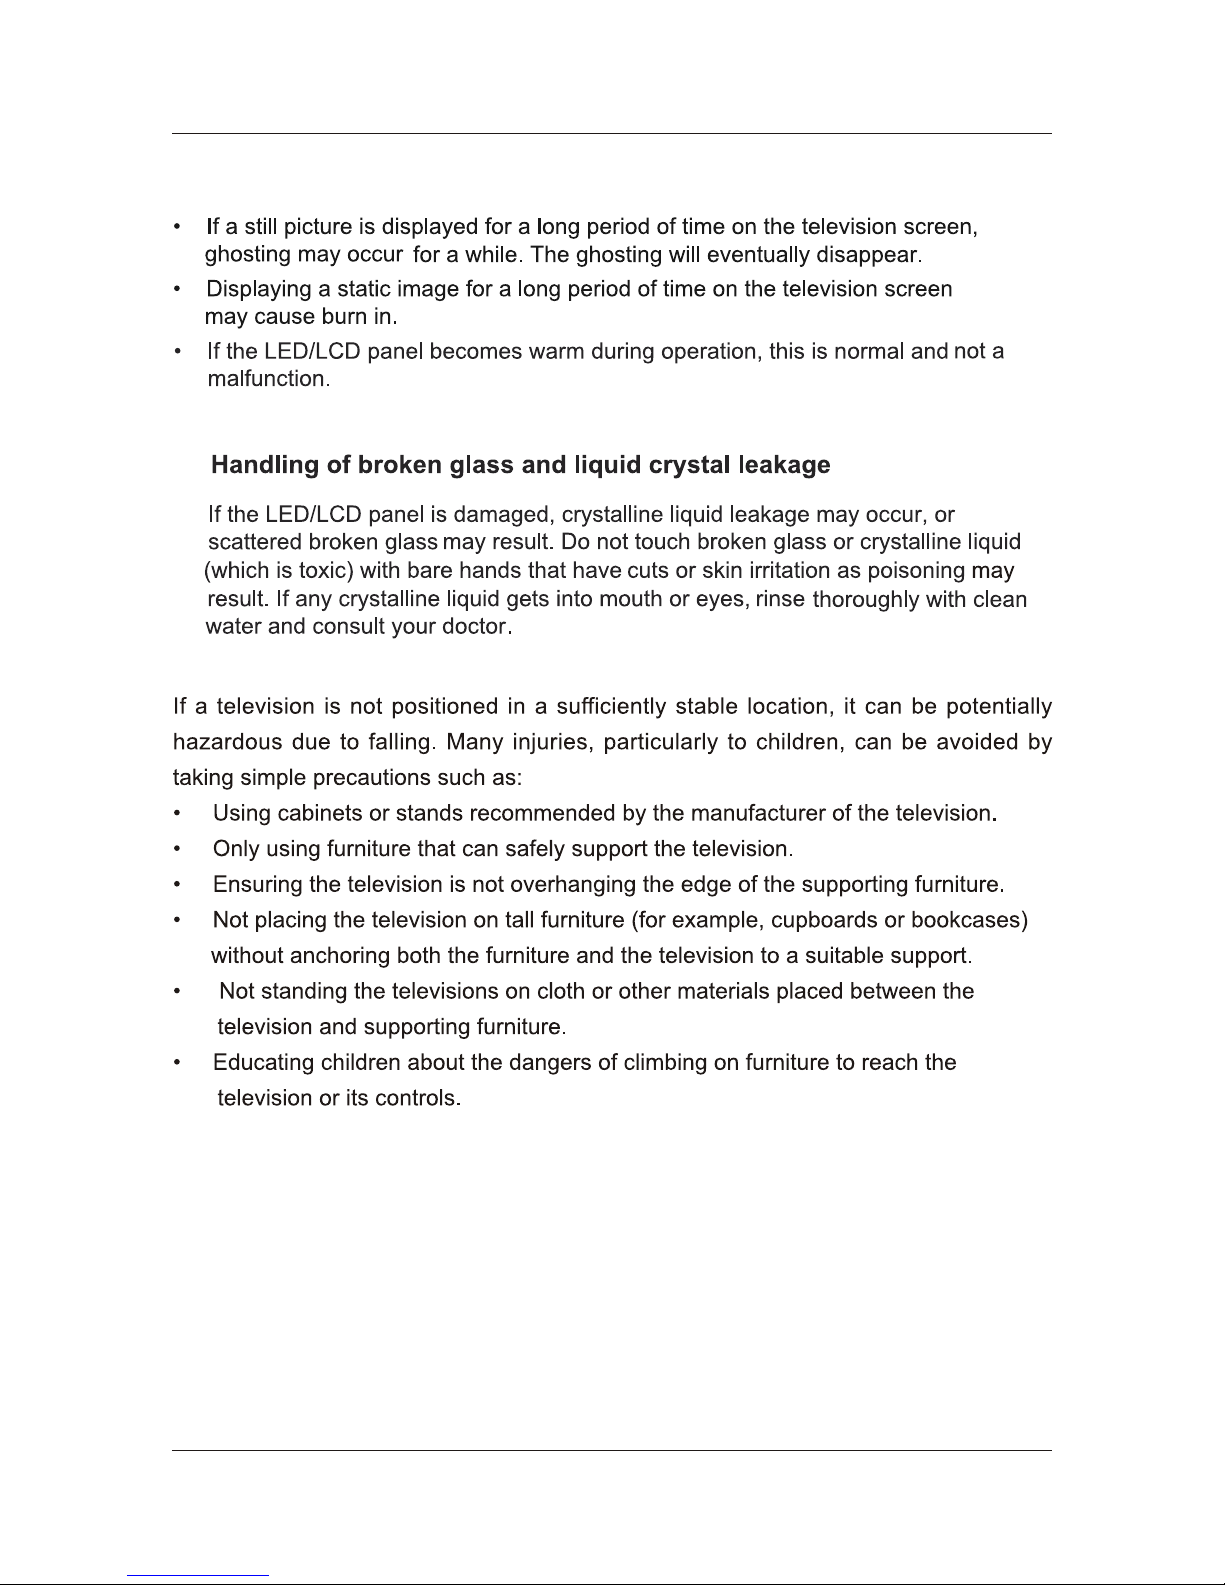
REMOTE CONTROL
6
IN THE CARTON
3
7
TV Operation
2
2
7
6
1
BASIC
A
INSTALL TION
8
USB Operation
53
54
TROUBLESHOOTING
10
SPECIFICATIONS
11
Remote control instructions in USB mode
17
34
35
Photo Menu
41
EPG and Channel List Menu
PVR Menu
Auto Installation
18
Remote control instructions in DIGITAL TV mode
16
15
Remote control instructions in DVD mode
9
DVD Operation
General Setup
Audio Setup
Preference Setup
46
48
49
Page 4

2
1.
2.
Page 5

3
Page 6

4
Page 7
5
Page 8
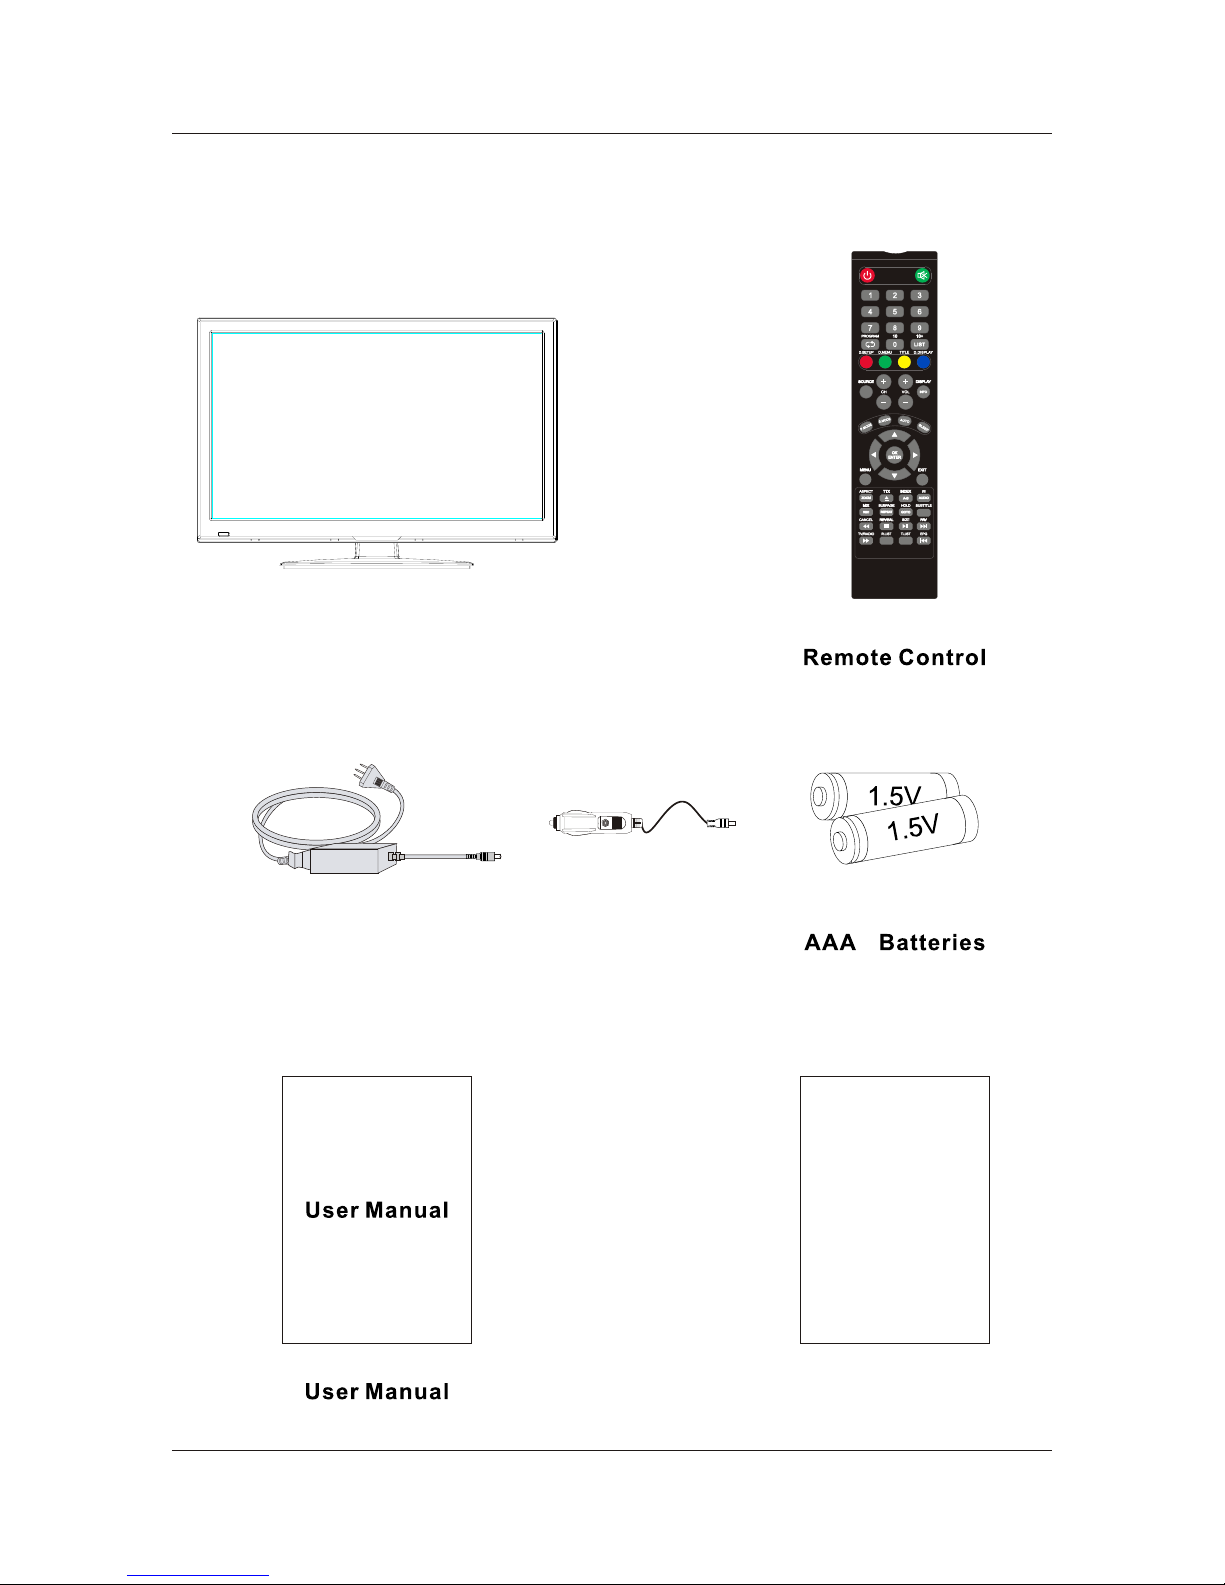
3. IN THE CARTON
6
LED TV SET
Cigar Li ghter
Warranty Card
Warranty Card
Adapter
Page 9
HDM I
7
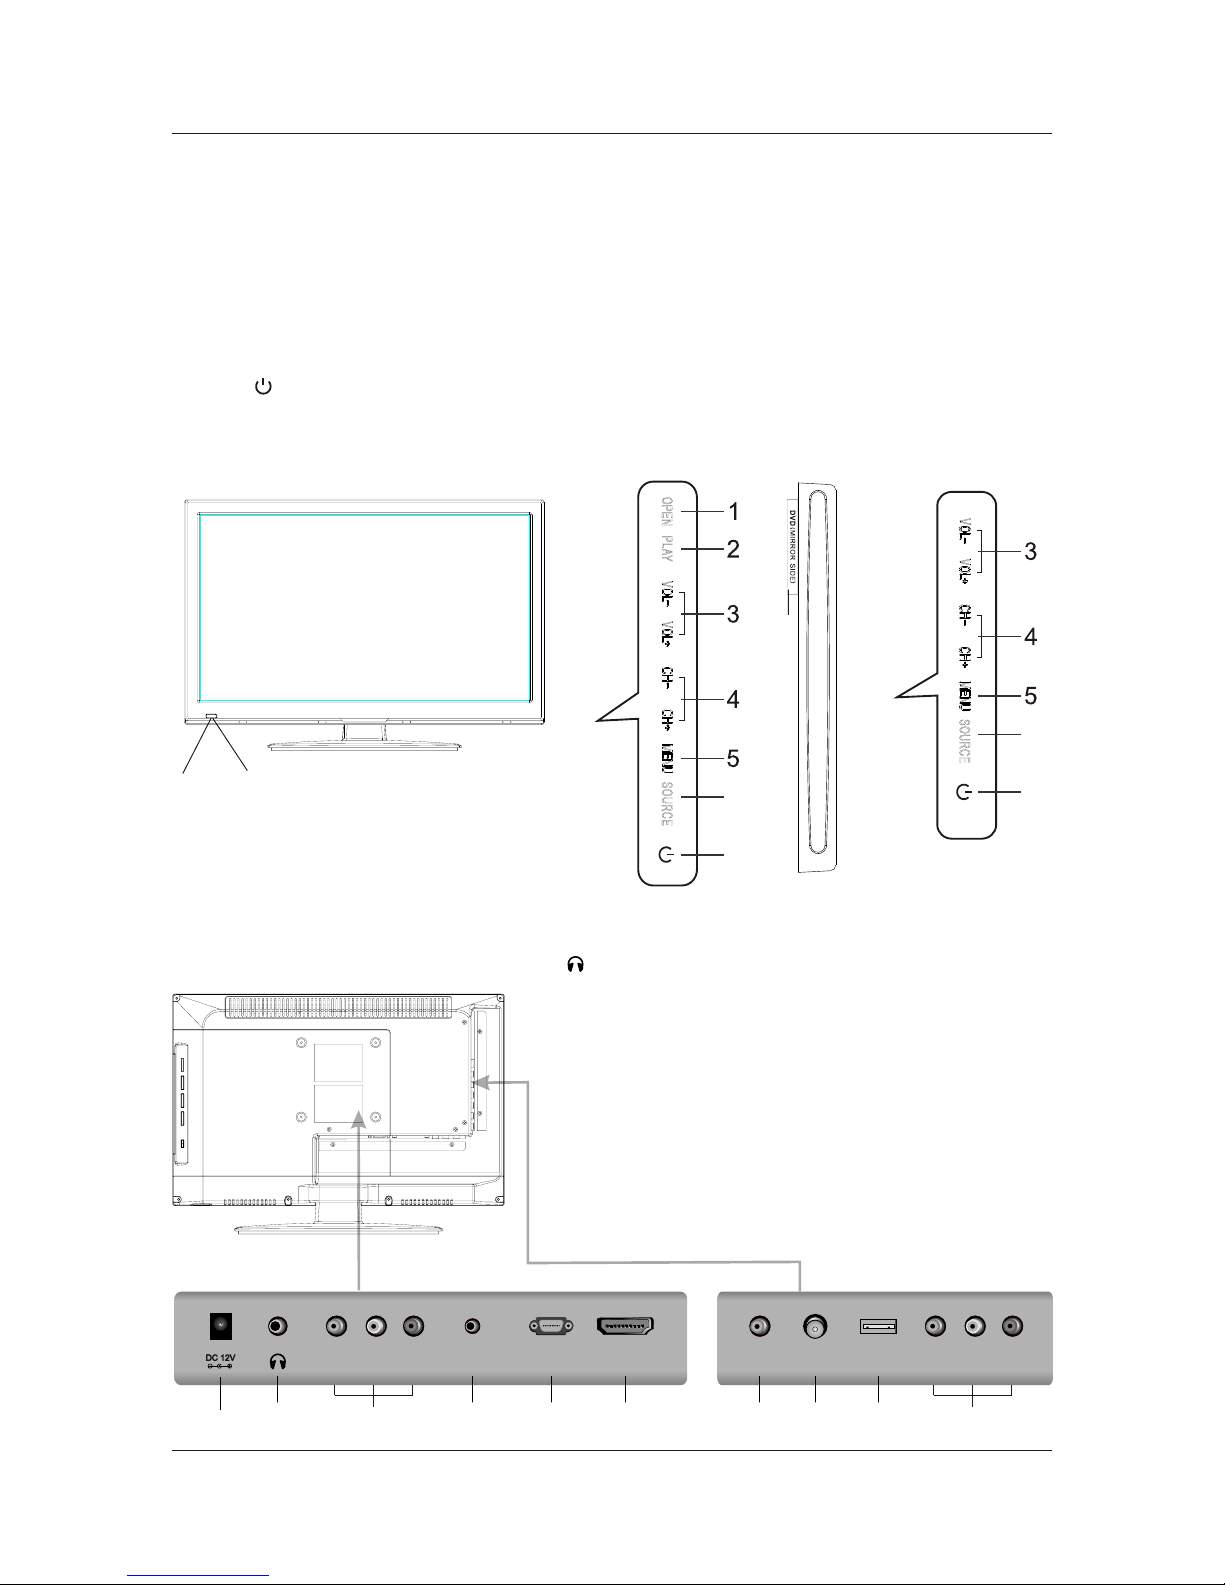
1. DC 12V: DC input socket.
/ ( ) /Audio
2. : Connect the headphone.
3. VIDEO Audio LR : Connect to the Video output
jack of DVD or VCR.
4. PC AUDIO: Connect the Audio output jack of PC.
5. VGA(PC): Connect the PC-RGB output jack of PC.
6. HDMI: Connect the HDMI output jack of DVD.
7. COAX: Connect the SPDIF receiver.
8. RF IN: Connect the antenna.
9. USB: Connect to portable usb device.
10. YPbPr: Connect the YPbPr output jack of DVD or VCR.
4. FRONT BACK CONNECTIONS OF TV
Front View
Back View and Control Connections
2
5
4
VGA(PC)VGA(PC)
PC AU DIO
USB
RF IN RF IN
8
7
COAX
9
1. OPEN/CLOSE in DVD mode.
2. PLAY/PAUSE in DVD mode.
3. Press“VOL+”or “VOL-”to increase or decrease the sound level.
4. Press“CH+”or “CH-”to change channels.
5. Press “MENU”to bring up the main menu on the screen.
6. Press“SOURCE”to select the input source.
7. Press“ ” button to turn standby mode on or off.
8. POWER INDICATOR: show red in standby mode, show blue when your TV is switched on.
9. REMOTE SENSOR: infrared sensor for the remote control.
10.DVD: Insert a 12cm disc to the disc slot according to the label.
8
9
6
7
6
7
LED19DHRBJBD/LED22DFRBJBD
LED19DHRDBJBD/LED22DFRDBJBD
1
3
VID EOVID EO
RRLL
10
YY PrPr
PbPb
6
10
(DVD MODELS ONLY)
Page 10
8
5. BASIC A INSTALL TION
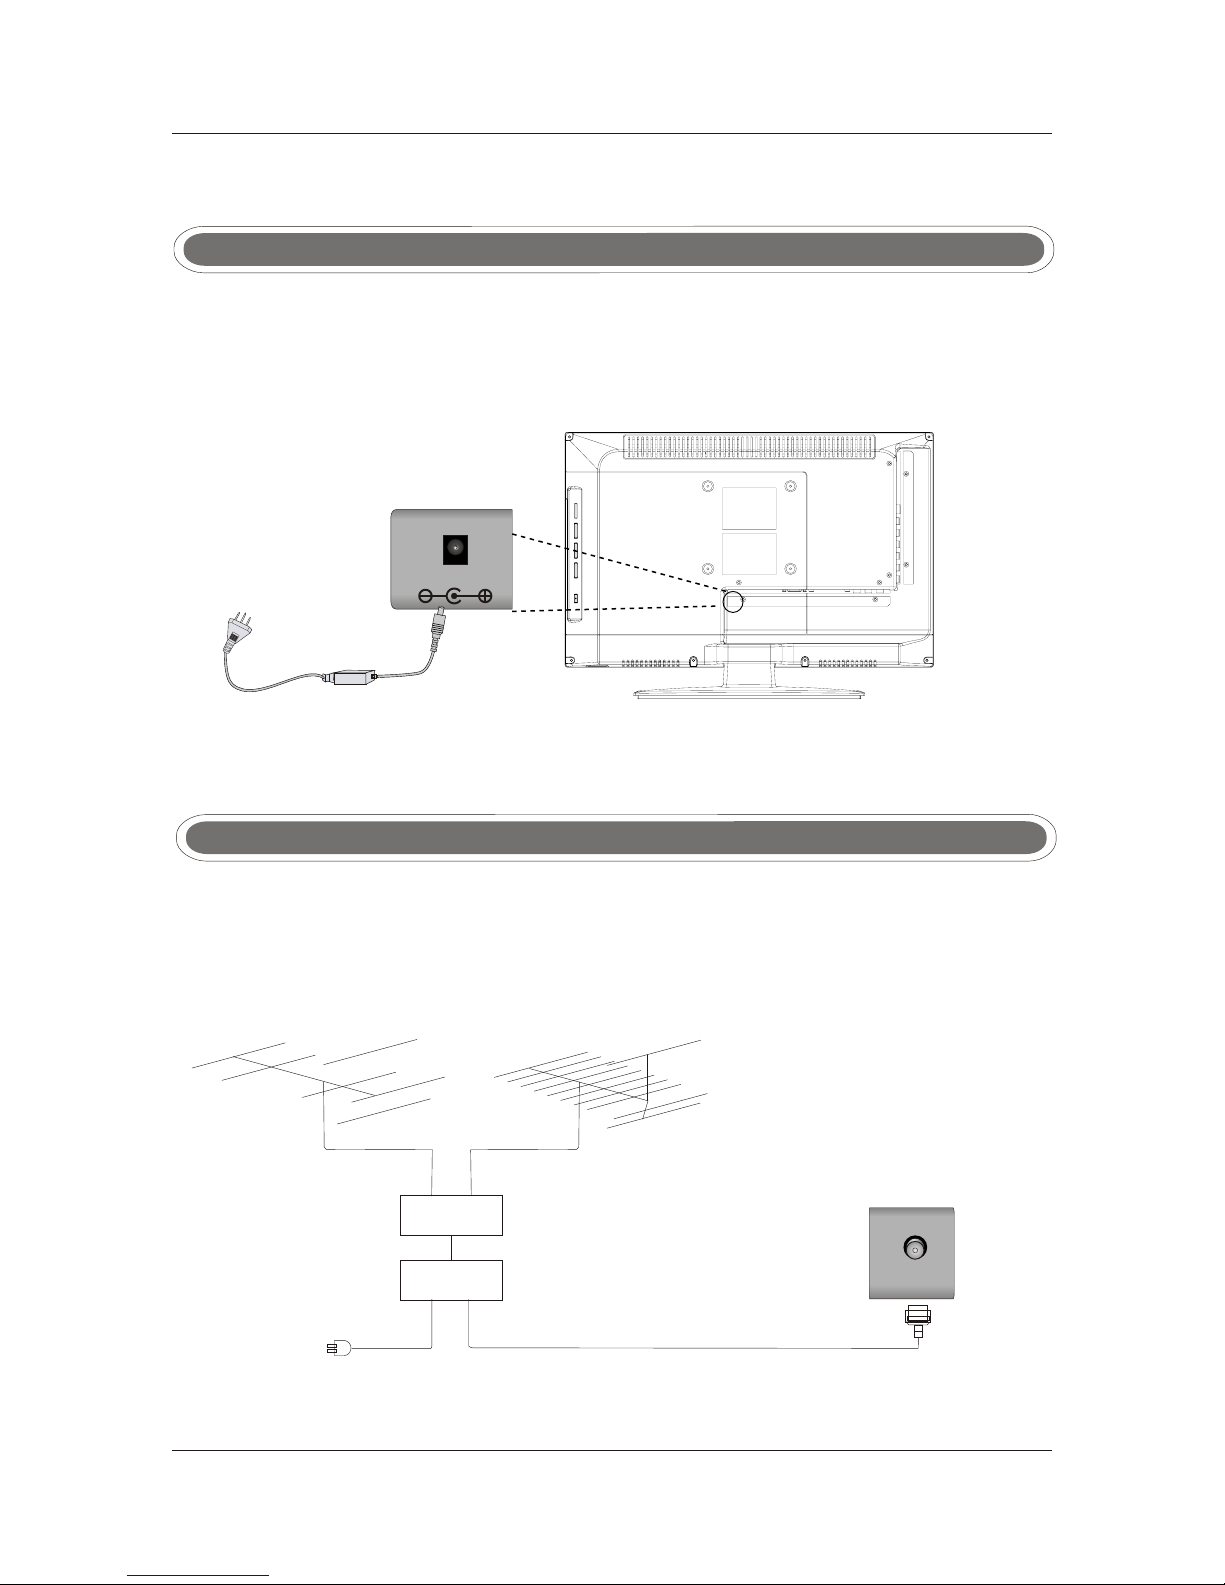
Power Cord Connection
Antennas Connection
To ensure good picture and sound, TV antenna system needs to be installed. The antenna system as
shown can be sourced from TV equipment shops, which will provide service for correct installation
and connection. After installation, insert the 75-ohm antenna plug into the antenna jack as shown.
75 OHM
ANTEN NA
PLUG
POWER P LUG O F
ANTEN NA
AMPLI FIE R
OUTDO OR
ANTEN NA
AMPLI FIE R
VHF ANT ENN A UHF ANT ENN A
INDOO R
ANTEN NA
AMPLI FIE R
RF IN
Connec t the power cord correctly as s hown.
Press the S TANDBY but ton of your TV to s witch on the T V. The power indic ato r o n the fr ont
pan el lights up i n B lue or G reen .
DC DC
12V 1 2V
Page 11

HDM I
VGA(PC)VGA(PC)
PC AU DIO
USB
RF IN RF IN COAX
VID EOVID EO
RRLL YY PrPr
PbPb
Connect the VIDEO and AUDIO output jack of the DVD or VCR to the AV IN jacks on the se t using
the RCA cable (Yellow [video], White an d Red [left & Right audio]).
Select the AV input source using the SOURCE button on the remote control.
AV Connection
YPbPr Connection
TV BackTV Back
9
Connect the YPbPr output of the DVD or VCR to the YPbPr input on the set. The p ic tu re q ua li ty i s
improved compared to connecting a regu la r VC R to t he v id eo i np ut . Co nn ec t th e Aud io o ut pu t of
the DVD or VCR to the Audio input jacks on the set usin g th e RC A cab le .
Match the jacks colors :Y is green,Pb is blue,Pr is red, Au di o le ft i s wh it e an d Au di o ri gh t in r ed .
Select component input source with usi ng t he S OU RC E bu tt on o n th e re mo te c on tr ol .
DVD o r VCR DVD o r VCR
Video C ableVideo C able
V V
R R
LL
TV BackTV Back
DVD o r VCR DVD o r VCR
YPbPr C ableYPbPr C able Auido Ca ble Auido C able
Pr Pr
PbPb
YYLL RR
DVD or VC R BackDVD or VC R Back
HDM I
VGA(PC)VGA(PC)
PC AU DIO
USB
RF IN RF IN COAX
VID EOVID EO
RRLL YY PrPr
PbPb
Page 12
HDM I
VGA(PC)VGA(PC)
PC AU DIO
USB
RF IN RF IN COAX
VID EOVID EO
RRLL YY PrPr
PbPb
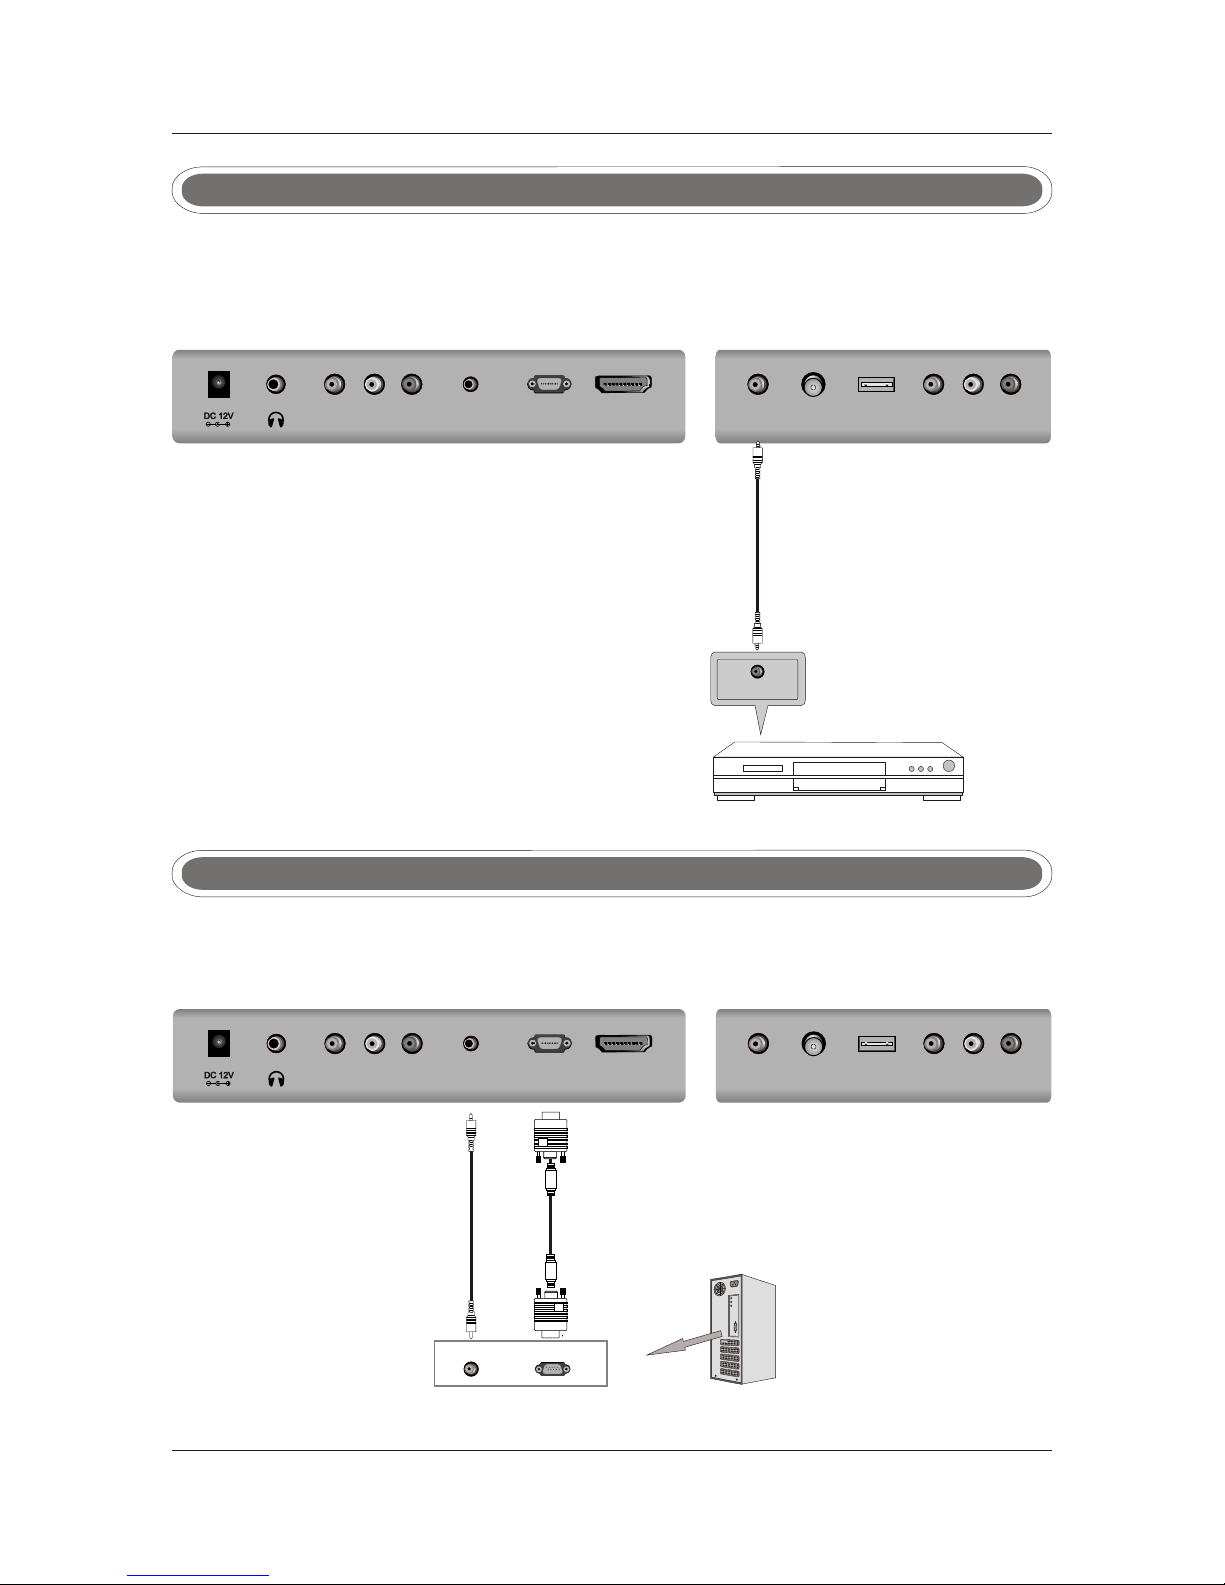
VGA(PC) Connection
Co nne ct the RGB o utput of t he PC t o the V GA( PC) jack on the s et. Connec t the AUDIO outp ut of
th e PC to the PC AUD IO ja ck on the set . S elect the VGA(P C) in put source w ith u sin g SOURCE
bu tto n on th e rem ote c ontro l.
Audio C ableAudio C able
AUD IOAUD IO RGB -PC OUT PUTRGB -PC OUT PUT
Y Y
10
VGA Cabl eVGA Cabl e
TV BackTV Back
COAX Connection
When connected the coaxial output to your audio amplifier,playing back the discs Dolby, MPEG
contents,the coaxial output the original signal to your amplifier. Your Amplifier must have the
corresponding decoding function.
Coax Ca bleCoax Ca ble
SPD IF INPU T
Audio A mpl ifi er
Audio A mpl ifi er Ba ck
TV BackTV Back
HDM I
VGA(PC)VGA(PC)
PC AU DIO
USB
RF IN RF IN COAX
VID EOVID EO
RRLL YY PrPr
PbPb
Page 13
HDM I
VGA(PC)VGA(PC)
PC AU DIO
USB
RF IN RF IN COAX
VID EOVID EO
RRLL YY PrPr
PbPb
11
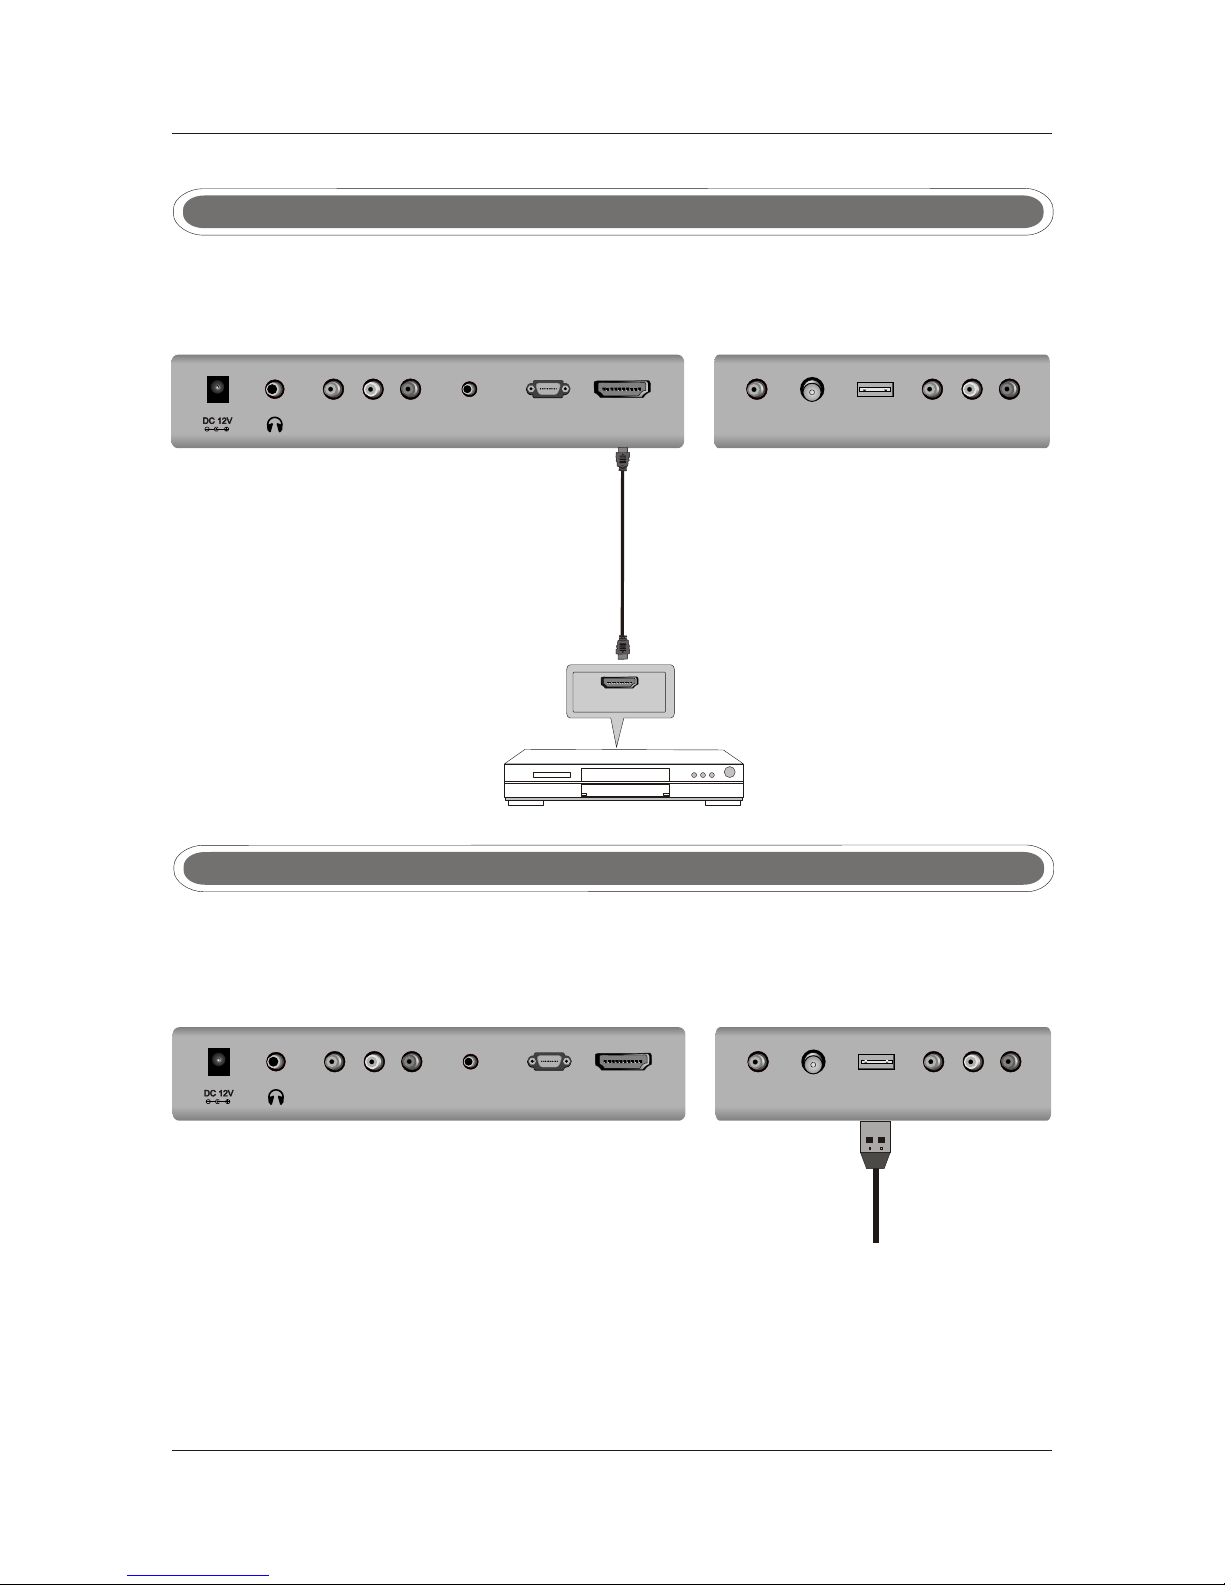
HDMI Connection
HDMI connection allows the user to transfer all audio/video/control signals t hrough one
cable only. These signals are transferred in digital. HDMI cable is not supplie d.
DVD o r VCR DVD o r VCR
DVD or VC R BackDVD or VC R Back
HDM I OUT
HDMI Ca bleHDMI Ca ble
Insert the USB flash drive to the USB port. Select USB channel source via the SOURCE but to n
on the remote control.
USB PORT Connection
R
U
S
B P
O T
TV BackTV Back
TV BackTV Back
HDM I
VGA(PC)VGA(PC)
PC AU DIO
USB
RF IN RF IN COAX
VID EOVID EO
RRLL YY PrPr
PbPb
Page 14
12
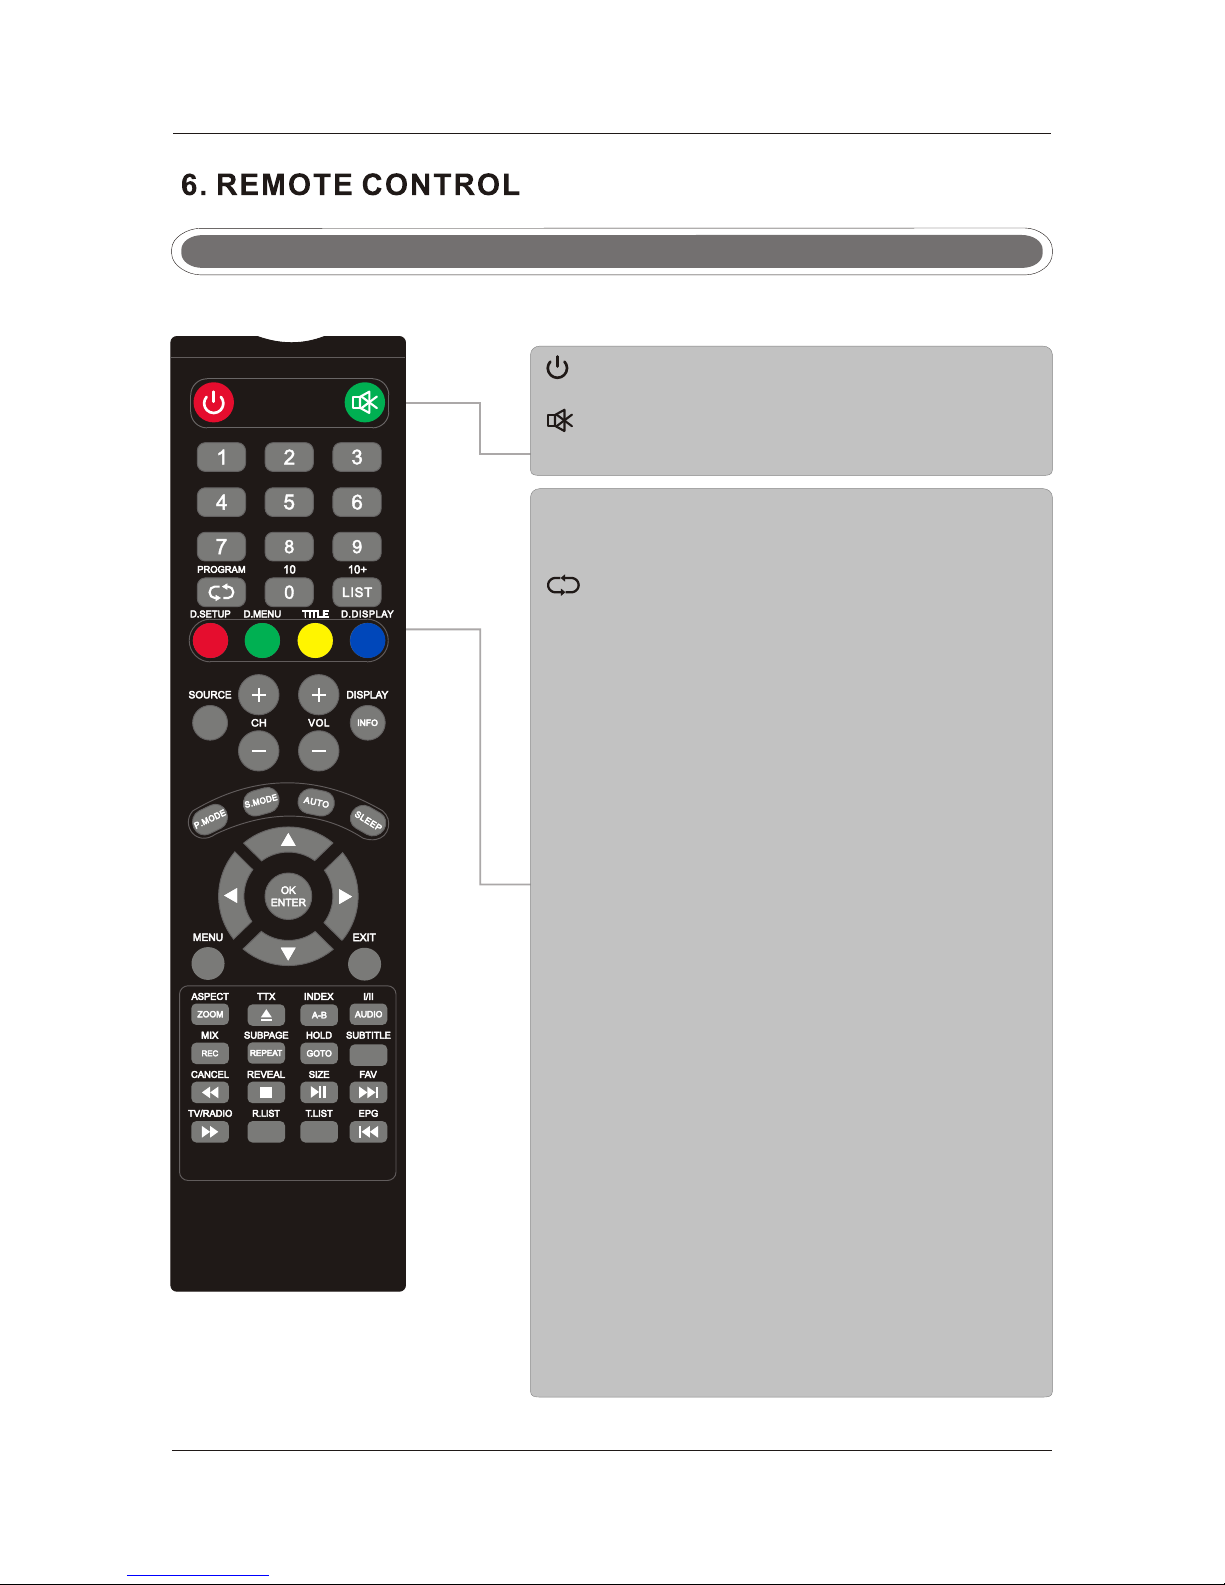
Remote control instructions in Analogue TV mode
Turn the LED TV ON or OFF.
Pres s to m ute the sound. Press agai n or p ress VOL+ to
un-m ut e the TV.
NUMBER BUTTONS
Press 0-9 to select a TV channel directly when you are
watching TV. The channel change after 2 seconds.
MENU
Brings up the main TV menu to the screen.
THUMBSTICK( ▲/ ▼/◄ / ►/ OK ENTER )
Allows you to navigate the on-screen menus and
adjust the system settings to your preference.
EXIT
Exit the main TV menu to the screen.
CH+/CH-
Press to scan through channels.
VOL+/VOL-
Press to increase / decrease the sound level.
Return to the previous channel viewed.
DISPLAY
Press to display the source and channel's information.
SLEEP
Lets you select amount of time before your TV turn itself
off automatically.
SOURCE
Press SOURCE to display the OSD input source,
Press▲▼to select an input spurce, and then press
OK to confirm.
LIST
Press to display the TV program list.
ASPECT
Selects screen display ratio.
PMODE
Press to select preset picture mode.
SMODE
Press to select preset sound mode.
AUTO
Press to do auto configuration directly(PC MODE).
I/II
Press to search the NICAM modes.
Page 15

Remote control instructions in Digital TV mode
13
NUMBER BUTTONS
Press 0-9 to select a channel.
CH+/CH-
When watching a channel, changes the channel.
INFO
Press to display the source and channel's information.
LIST
Display the recorded file list.
COLOR BUTTONS
Color buttons (respectively red, green, yellow and blue)
used in a few sub-menus.
SUBTITLE
To display subtitle in DTV mode.
AUDIO
To display audio menu.
TV/RADIO
When watching a channel,allows you switch between
TV and Radio modes.
FAV
Favorite program list.
REC
Press to record the TV program in DTV mode.
EPG
Launches the EPG(Electronic Program Guide)in DTV
mode.
Stop playing or stop recording.
Fast reverse and Fast forward.
Previous / next chapter in USB mode,or play the Previous
Play or pause.
Press to enter Timeshift, the image paused and it start
record from the paused position.
(Timeshift)
/next scene of the recorded programs, jump by 30 seconds.
T.LIST
Press to display the Record Timer Schedule List.
R.LIST
Display the recorded file list.
Page 16

Remote control instructions in USB mode
14
REPEAT
Press REPEAT button to select the repeat mode.
Jump to previous and next track.
Stop playing or stop.
Press to play or pause the program.
Fast backward and forward key.
Page 17

DVD
TITLE
When DVD is playing,bring up the TITLE MENU.
Note: The DVD function just for LED19DHRDBJBD/LED22DFRDBJBD .
15
Page 18

16
Remote control inst ructions in TELETEXT mode
TTX
Press to switch between TV and Teletext mode.
SUBPAGE
TELETEXT Subpage.
HOLD
Freeze the current page.
SUBTITLE
To display subtitle.
REVEAL
Reveal or hide the hidden words.
COLOR BUTTONS
Select 4 Preferred TELETEXT page.
INDEX
Request index page when index link is valid.
SIZE
Change the picture size.
NUMBER BUTTONS
Press 0-9 to select a teletext page.
Page up and Page down in TELETEXT mode.
CANCEL
TELETEXT cancel.
MIX
TV and TTX picture are mixed together in transparent
background.
Page 19

17
Remote control setup
1. Open the cover.
2. Use two AAA size batteries. When inserting the batteries, make sure correct polarities “+”and “-”
marks
on the batteries line up correctly wi th com pa rt me nt mar ki ng s .
3. Replace the battery cover.
To prevent battery leakage which may result in bodily injury or damage to the remote:
1. Install all batteries correctly, and as marked on the remote control.
2. Do not mix old and new batteries, and do not mix alkaline, standard (carbon-zinc) or rechargeable
(ni-cad, ni-mh, etc.) Batteries.
3. Remove batteries when the remote is not used for a long period of time.
Page 20

18
7. TV Operation
Auto InstallationAuto Installation
If this is the first time you are turning on the TV and there are no programs in the TV memory, the
“Auto Installation” menu will appear on the screen. There are 5 setups as follow:
Setup 1: Set up the TV Location
Setup 2: Set up the Country
Setup 3: Set up the Language
Aut o Insta lltio n
vMo
e
E
nter
E
t
er
n
Exit
E
i
t
x
-Se tup2-
New Z ealan d
Pre vious P age
Cou ntry:
Nex t Page
Aus trali a
Aut o Insta lltio n
M
o
v
e
En
t
e
r
te
En r
iEx
t
Ex
it
-Se tup1-
Hom e
Dyn amic
Sta ndard
Mil d
Nex t Page
Hom e Mode:
Are you s ure ?
MessageMessage
OK
Can celCa ncel
Press ▼ / ▲ button to select Home Mode in the main menu then press OK/ENTER button to enter.,
Press the green button to enter the next page and the EXIT button to exit the entire menu.
Press the green button to enter the next page, the red button to return to the previous page and the
EXIT button to exit the entire menu.
Press ▼ / ▲ button to select Language in the main menu, then press OK/ENTER button to confirm.
Press ▼ / ▲ button to select Country in the main menu then press OK/ENTER button to confirm.,
Aut o Insta lltio n
M v
o e
t
E
n er
E
n
t
e
r
E
xit
E i
t
x
-Se tup3-
Eng lish
Pre vious P age
Lan guage :
Nex t Page
Ita ly
Spa nish
Fra nce
Ger many
Press ◄ / ►button to choose OK or Cancel, press OK/ENTER button to confirm.
Page 21

Setup 4: Set up the Auto Power Off
Aut o Insta lltio n
M v
o
e
E
nt r
e
eE
n
t
r
E
xit
E
xi
t
-Se tup4-
Off
1 Hou r
2 Hou rs
4 Hou rs
Pre vious P age
Aut o Power O ff:
Nex t Page
Hou rs can be c hosen f or a
con tinuo us view ing, an d
aft er that t he TV wil l be
pow ered of f."of f" mean s
the v iewin g is time less.
Press the green button to enter the next page, the red button to return to the previous page and the
EXIT button to exit the entire menu.
Press ▼ / ▲ button to select Auto Power Off in the main menu, then press OK/ENTER button to enter.
Press the green button to enter the next page, the red button to return to the previous page and the
EXIT button to exit the entire menu.
19
Setup 5: Set up the Auto Search
Press ▼ / ▲ button to select Auto Search in the main menu, then press OK/ENTER to confirm.
Press the red button to return to the previous page and the EXIT button to exit the entire menu.
Aut o Insta lltio n
M v
o e
E
nt r
e
eE
n
t
r
i
E
x t
Exi
t
-Se tup5-
All
ATV
DTV
Pre vious P age
Aut o Searc h:
Rad io chan nels fo und:
121 .74MH z
Ex
i
t
E
x
i
t
Cha nnel- Tunin g
Pic ture
Sou nd
Cha nnel
Set up
1
DTV c hanne ls foun d:
ATV c hanne ls foun d:
0
0
34%
Pro cess
Press OK ENTER button to search or EXIT button to exit./
Fea ture
M
e
nu
kS
i
p
Page 22

20
Select Input Source
Press SOURCE button to display the input source list;
Press ▼ / ▲ button to select the input source you want to watch;
Press OK ENTER button or ► button to enter the input source;/
Input
DTV
ATV
YPBPR
HDMI
AV
Media
PC
Press MENU button to display the main menu.
/Press ▼ / ▲ button to select Picture in the main menu, then press OK ENTER button or ► button
to enter.
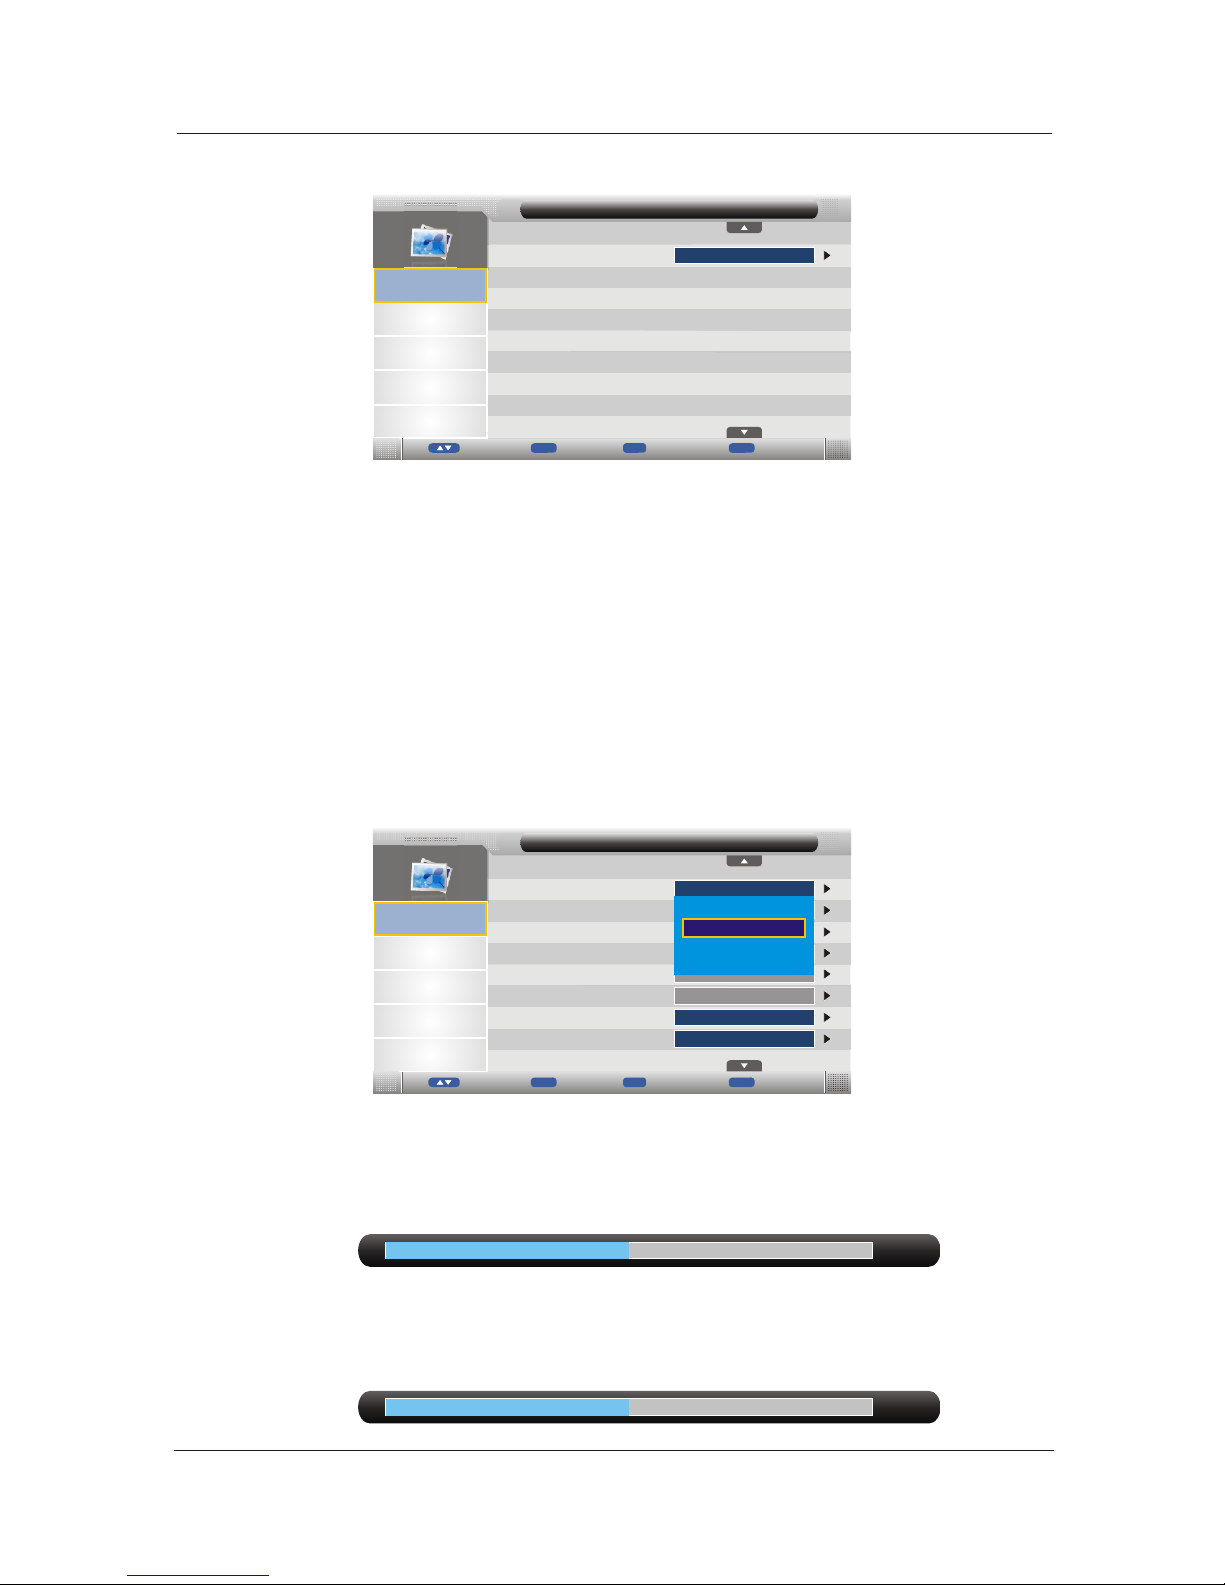
Picture Menu
Pic ture
Sou nd
Cha nnel
Pic ture Mo de
Bri ghtne ss
Con trast
Sha rpnes s
Col our
Tin t
Col our Tempe rat ure
Asp ect Rat io
Pic ture
505 0
505 0
505 0
Sta ndardSta ndard
16: 916: 9
Sta ndardSta ndard
55
5050
505 0
Set up
Fea ture
E
t
e
rn
Mo
ve
Ex
i
t
E
xi
t
M
e
n
u
Re
tur n
t
rEn
e
DVD
Page 23
21
1. Press ▼ / ▲ button to select the option that you want to adjust in the Picture menu, then press
OK ENTER button or ► button to enter.
2. Press ◄ / ► button to adjust or press ▼ / ▲ button to select.
3. After finishing your adjustment, press MENU button to save and return back to the previous
menu, or press EXIT button to exit the entire menu.
/
Press ▼ / ▲ button to select Picture Mode, then press OK ENTER button or ► button to select.
You can change the value of Brightness, Contrast, Sharpness, Colour, when the picture is in User
mode.
Picture Mode
/
Brightness
Press ▼ / ▲ button to select Brightness, press OK ENTER button or ► button to enter, then press
◄ / ► button to adjust.
/
Pic ture
Sou nd
Cha nnel
Noi se Redu ction
Pic ture
Mid dleMidd le
Set up
Fea ture
En
ter
M
o
v
e
E
xit
tEx
i
Menu
uR
e
t
rn
Pic ture
Sou nd
Cha nnel
Pic ture Mo de
Bri ghtne ss
Con trast
Sha rpnes s
Col our
Tin t
Col our Tempe rat ure
Asp ect Rat io
Pic ture
505 0
505 0
Sta ndardSta ndard
16: 916: 9
Sta ndardSta ndard
55
5050
505 0
Set up
Fea ture
Dym anicDym anic
Mil dM ild
Use rUse r
Sta ndardSta ndard
eEnt
r
M
v
o e
i
Ex
t
E
i
t
x
uM
en
tu n
Re
r
-
+
Brigh tness
50
Press ▼ / ▲ button to select Contrast, press OK ENTER button or ► button to enter, then press
◄ / ► button to adjust.
/
-
+
Contr ast
50
Contrast
E
nt r
e
Ent
e
r
Page 24

22
Colour Temperature
Press ▼/▲ button to select Colour Temperature, press OK ENTER button or ► button to enter,
then press ▼/▲ button to select Standard, Warm, Cool.
/
Noise Reduction
Press ▼/▲ button to select Noise Reduction, press OK ENTER button or ► button to enter, then
press ▼/▲ button to select Off, Low, Middle, High.
/
Press ▼/▲ button to select Sharpness, press OK ENTER button or ► button to enter, then press
◄/► button to adjust.
/
Sharpness
Press ▼/▲ button to select Colour, press OK ENTER button or ► button to enter, then press◄/►
button to adjust.
/
Colour
Tint
Press ▼/▲ button to select Tint, press OK ENTER button or ► button to enter, then press◄/►
button to adjust.
/
(Only available in NTSC mode.)
Pic ture
Sou nd
Cha nnel
Pic ture Mo de
Bri ghtne ss
Con trast
Sha rpnes s
Sat urati on
Tin t
Col our Tempe rat ure
Asp ect Rat io
Pic ture
505 0
505 0
Sta ndardSta ndard
16: 916: 9
Sta ndardSta ndard
55
5050
505 0
Set up
Fea ture
Coo lCo ol
War mWar m
Sta ndardSta ndard
505 0
Pic ture
Sou nd
Cha nnel
Pic ture Mo de
Bri ghtne ss
Con trast
Sha rpnes s
Sat urati on
Tin t
Col our Tempe rat ure
Asp ect Rat io
Pic ture
505 0
505 0
Sta ndardSta ndard
16: 916: 9
Sta ndardSta ndard
55
5050
505 0
Set up
Fea ture
Ful lFul l
4:34:3
Zoo m1Zo om1
Zoo m2Zo om2
16: 916: 9
505 0
Press ▼/▲ button to select Aspect Ratio, press OK ENTER button or ► button to enter, then press
▼/▲button to select /4:3,16:9, Full, ZOOM 1, ZOOM 2, Cinema, Just Scan.
Aspect Ratio
e
En
t r
M
v
o
e
i
E
x t
E it
x
u
Men
t
u
nR
e
r
E
nter
te
En
r
M
v
o
e
i
E
x t
E it
x
M nu
e
R
t
u
n
e
r
E
nter
Page 25

Sound Menu
Press MENU button to display the main menu.
/Press ▼ / ▲ button to select Sound in the main menu, then press OK ENTER button or ► button
to enter.
1. Press ▼/▲ button to select the option that you want to adjust in the Sound menu, then press
OK ENTERbutton or ► button to enter.
2. Press ◄ / ► button to adjust or press ▼ / ▲ button to select.
3. After finishing your adjustment, press MENU button to save and return back to the previous
menu, or press EXIT button to exit the entire menu.
/
Sound Mode
Press ▼/▲ button to select Sound Mode, press OK ENTER button or ► button to enter.
You can change the value of Bass, Treble, Balance, when the sound is in User mode.
/
Pic ture
Sou nd
Cha nnel
Noi se Redu ction
Pic ture
Mid dleMidd le
Set up
Fea ture
OffOf f
Hig hHi gh
LowLo w
Mid dleMidd le
Pic ture
Cha nnel
Fea ture
Set up
Sou nd Mode
Bas s
Tre ble
Bal ance
Sou nd
Sta ndardSta ndard
505 0
00
505 0
Sou nd
Sur round
OffOf f
AVL
OffOf f
SPD IF PCMPCM
Pic ture
Cha nnel
Fea ture
Set up
Sou nd Mode
Bas s
Tre ble
Bal ance
Sou nd
Sta ndardSta ndard
505 0
00
505 0
Sou nd
Sur round
OffOf f
AVL
OffOf f
SPD IF PCMPCM
Mov ieMovi e
Mus icMus ic
Spe echSpe ech
Use rUse r
Sta ndardSta ndard
23
E
t
e
r
n
Mo
ve
E
xi
t
E
x
it
M
e
n
u
R
t
u
r
n
e
tEn
e
r
e
En
t r
v
M
o
e
E
xit
E it
x
u
Men
uR
e
t
r
n
E
nter
te
En
r
M
v
o
e
i
E
x t
E it
x
M nu
e
R
t
u
n
e
r
E
nter
Page 26

Pic ture
Cha nnel
Fea ture
Set up
Sou nd Mode
Bas s
Tre ble
Bal ance
Sou nd
Sta ndardSta ndard
505 0
00
505 0
Sou nd
Sur round
OffOf f
AVL
OffOf f
SPD IF PCMPCM
Aut oAu to
OffOf f
PCMPCM
Bass
Press ▼/▲ button to select Bass, press OK ENTER button or ► button to enter, then press ◄/►
button to adjust.
/
-
+
Bass
50
Press ▼/▲ button to select Treble, press OK ENTER button or ► button to enter, then press
◄/►button to adjust.
/
Press ▼/▲ button to select Balance, press OK ENTER button or ► button to enter, then press
◄/►button to adjust.
/
Treble
Balance
Surround
Press ▼/▲ button to select Surround, press OK ENTER button or ► button to enter, then press
▼/▲button to select On or Off.
/
Pic ture
Cha nnel
Fea ture
Set up
Sou nd Mode
Bas s
Tre ble
Bal ance
Sou nd
Sta ndardSta ndard
505 0
00
505 0
Sou nd
Sur round
OffOf f
AVL
OffOf f
SPD IF PCMPCM
OnOn
OffOf f
Press ▼/▲ button to select AVL, press OK ENTER button or ► button to enter, then press ▼/▲
button to select On or Off.
/
AVL
SPDIF
Press ▼/▲ button to select SPDIF, press OK ENTER button or ► button to enter, then press ▼/▲
button to select Off,PCM, Auto.
/
Pic ture
Cha nnel
Fea ture
Set up
Sou nd Mode
Bas s
Tre ble
Bal ance
Sou nd
Sta ndardSta ndard
505 0
00
505 0
Sou nd
Sur round
OffOf f
AVL
OffOf f
SPD IF PCMPCM
OnOn
OffOf f
24
E
n
t
e
r
Mo
ve
Ex
i
t
E
x
i
t
M
e
n
u
R
e
tur
n
t
rEn
e
te
En r
M
v
o e
i
Ex
t
E i
t
x
M
n
ue
R tu n
e
r
E
nte
r
E
n
t
e
r
vMo e
Ex
i
t
t
E
xi
M
e
n
u
u
Re
t rn
En
t
re
Page 27
25
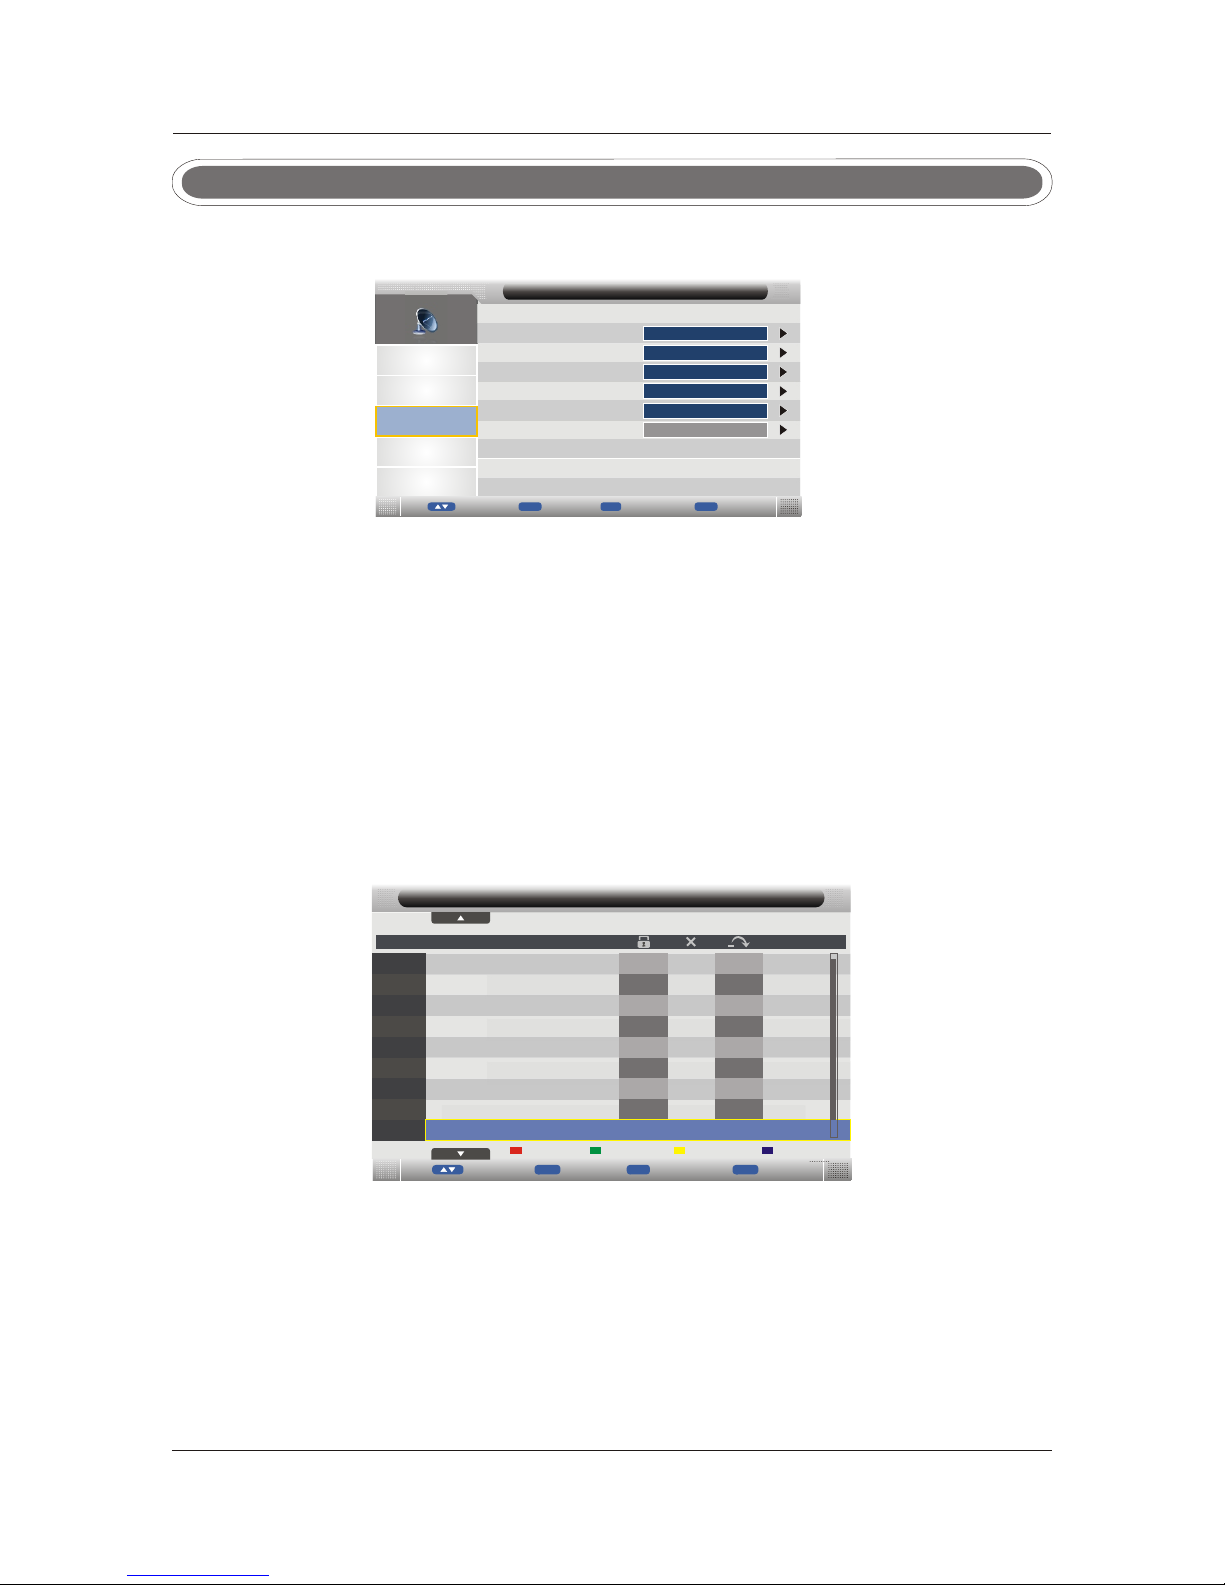
Channel Menu
Press MENU button to display the main menu.
Press ▼/▲ button to select Channel in the main menu, then press OK ENTER button or ► button
to enter.
/
1. Press ▼/▲ button to select the option that you want to adjust in the Channel menu, then press
OK ENTER button or ► button to enter.
2. Press ▼/▲ button to select.
3. After finishing your adjustment, press MENU button to save and return to the previous
menu, or press EXIT button to exit the entire menu.
/
Channel Management
Press ▼/▲ button to select Channel Management, then press OK ENTER button or ► button to enter.
Press ▼/▲ ◄ / ►button to select Program
/
/ .
Favorite Management
Press ▼/▲ button to select Favorite Management, then press OK ENTER button or ► button to enter./
BBC R adio 1
BBC R adio 2
BBC R adio 3
BBC R adio 4
Hea t
-
Pa
ge
+
v
M
o
e
CH+-
Ex
i
t
E it
x
M
e
n
u
u
Re
t rn
Cha nnel- Chann el Mana ger
009 7
070 0
070 2
070 3
071 4
072 1
010 1
010 3
070 4
NO.
Pro gram Na me
Del Loc k Ski p Swa p
MOJ O
Tte xt Holi days
Telev ision
Type
dtv
dtv
dtv
dtv
dtv
dtv
dtv
dtv
Telet ext Gam es
dtv
Pic ture
Sou nd
Cha nnel
Fea ture
Set up
Fav orite M anage ment
Cou ntry
Aut o Searc h
DTV M anual S earch
Cha nnel
Cha nnel Ma nagem ent
ATV Ma nual Se arch
ENT ER
ENT ER
ENT ER
ENT ER
ENT ER
Ent
er
Mo
ve
E
xi
t
E
xi
t
Men
u
Re
ur
nt
En
ter
Aus trali a
Press RED button to Delete the channel. Press RED button again to cancel delete.
Press GREEN button to Lock the channel. Press GREEN button again to Unlock.
Press YELLOW button to Skip the channel. Press YELLOW button again to cancel skip.
Press BLUE button to Swap channel position.
Press ▼/▲ ◄ / ►button to select Program
Press RED button to set to Favorite 1 list.
Press GREEN button to set to Favorite 2 list.
Press YELLOW button to set to Favorite 3 list.
Press BLUE button to set to Favorite 4 list.
Press RED/GREEN/YELLOW/ BLUE button again to unset the program.
Press MENU or EXIT button, the successfully updated message will appear.
/ .
Page 28

26
Press ▼/▲ button to select Auto Search, then press OK ENTER button or ► button to enter.
Press ▼/▲ button to select appropriate ALL,ATV,DTV, then press OK ENTER or ► to enter.
/
/
Auto SearchAuto Search
Pic ture
Sou nd
Cha nnel
Set up
DTV
ATV
All
Cha nnel- Auto Se arch
ENT ER
ENT ER
ENT ER
Press ▼/▲ button to select Country, then press OK ENTER button or ► button to enter.
Press ▼/▲ button to select appropriate Country,and press OK ENTER button or ◄ / ► button to confirm.
/
/
CountryC ou nt ry
Rad io chan nels fo und:
121 .74MH z
E
xit
Exi t
Cha nnel- Tunin g
Pic ture
Sou nd
Cha nnel
Set up
1
DTV c hanne ls foun d:
ATV c hanne ls foun d:
0
0
34%
34%
ATV
Pro cess
Pic ture
Sou nd
Cha nnel
Set up
DTV
ATV
All
Cha nnel- Auto Se arch
ENT ER
ENT ER
ENT ER
Are you su re?
MessageMessage
OK
Can celC ancel
Press ◄ / ► button to choose OK or Cancel
Press OK ENTER button to search or Cancel button to exit.
.
/
nt
e
E
r
o e
M
v
E
x
i
t
x tE
i
M
en
u
R turn
e
teE
n r
E
nt
er
M
ove
E
i
t
x
E
x
i
t
u
M
en
tu n
Re
r
E
n
te
r
Fea ture Fea ture
Fea ture
M
n
ue
k
S ip
Pic ture
Sou nd
Cha nnel
Set up
Fav orite M anage ment
Cou ntry
Aut o Searc h
DTV M anual S earch
Cha nnel Ma nagem ent
ATV Ma nua l Sear ch
ENT ER
ENT ER
ENT ER
ENT ER
Cha nnel- Count ry
Fea ture
e
En
t r
M
v
o
e
i
E
x t
E it
x
u
Men
t
u
nR
e
r
E
nter
Aus trali a
New Z ealan d
BBC R adio 1
BBC R adio 2
BBC R adio 3
BBC R adio 4
Hea t
Cha nnel- Favor ite Man ager
009 7
070 0
070 2
070 3
071 4
072 1
010 1
010 3
070 4
NO.
Pro gram Na me
Fav orite 1 Fav orite 2
MOJ O
Tte xt Holi days
Telev ision
Fav 1 Fav 2
Fav 3
Fav 4
Fav orite 3 Fav orite 4
Type
dtv
dtv
dtv
dtv
dtv
dtv
dtv
dtv
g
+-P
a
e
M v
o e
CH+-
i
E
x t
E
i
t
x
uMen
t
u
nR
e r
Telet ext Gam es
dtv
ENT ER
Page 29

Feature Menu
ATV Manual Search
Press ▼/▲ button to select ATV Manual Search, then press OK ENTER button or ► button to enter.
Note: Press the OK ENTER button to save the channel when the Enter Character turn purple.
/
/
DTV Manual Search
Press ▼/▲ button to select DTV Manual Search, then press OK ENTER button or ► button to enter.
Note: Press the OK ENTER button to save the channel when the Enter Character turn purple.
/
/
Fre quenc y(KHz )
Ban dWidt h(MHz )
Cha nnel
Cha nnel- DTV Man ual Sea rch
27
522 000
8
Sta rt
Str ength
Qua lity
100 %
95%
Pic ture
Sou nd
Cha nnel
PC Se tup
Set up
( Only available in ATV mode).
Press MENU button to display the main menu.
Press ▼/▲ button to select Feature in the main menu, then press OK ENTER button or ► button
to enter.
/
27
Pic ture
Sou nd
Cha nnel
Fea ture
Set up
Lan guage
Fea ture
Loc k
ENT ER
Clo ck
Sle ep Time r
Aut o Power O ff
Hea ring Im paire d
PVR /Time shif t
ENT ER
ENT ER
Off
ENT ER
Off
Off
te
En
r
M
v
o e
OK
i
E
x t
E i
t
x
M nu
e
R t
u n
e
r
Pic ture
Sou nd
Cha nnel
PC Se tup
Set up
Fre quenc y
Sea rch
Fin e Tu ne
Col or Syst em
Cur rent Ch annel
Sou nd Syst em
001 B BC1
217 .25 MHz
ENT ER
PAL
I
Cha nnel- AT V Manu al Sear ch
ENT ER
Sav e
t
eE
n r
M v
o
e
iEx
t
E
it
x
M
n
ue
R
tu
n
e r
En
t
e
r
e
E
n
t
r
v
Mo
e
E
xi
t
t
Ex
i
Me
nu
uR
e
t
r
n
E
n
ter
( Only available in DTV mode).
Page 30

1. Press ▼/▲ button to select the option that you want to adjust in the Feature menu, then press
OK ENTER button or ► button to enter.
2. Press ▼/▲ button to select.
3. After finishing your adjustment, press MENU button to save and return to the previous
menu, or press EXIT button to exit the entire menu.
/
Lock
Press ▼/▲ button to select Lock, then press OK ENTER button or ► button to enter.
A password is required to enter the Lock settings. Enter the default password '0000' to unlock the
menu. The correct numbers will need to be entered to enter the LOCK sub menu. The message
'Wrong Password' will be displayed if the numbers are entered incorrectly.
Press Menu to return to Lock menu.
/
Pic ture
Sou nd
Cha nnel
Fea ture
Set up
Par ental G uidan ce
Fea ture- Lock
Loc k Chann el
Off
Cha nge Pin C ode
Off
ENT ER
28
Press ▼/▲ button to select Lock Channel, press OK ENTER button or ► button to enter, then
press ,
▼/▲ button to select On or Off then press OK/ENTER or ► to confirm .
/
Lock Channel
Press ▼/▲ button to select Parental Guidance, press OK/ENTER button or ► button to enter,
then press Rate ( No Block, Block R and above, Block AV and above, Block
▼/▲ button to select
MA and above, Block M and above, Block PG and above, Block G and above, Block ALL). Then
press OK/ENTER or ► button to confirm.
Parental Guidance
Change Pin Code
Press ▼/▲ button to select Change Pin Code, press OK ENTER button or ► button to enter
.
/
Using the numeric keys enter the old password followed by your new password.
Enter the new password again to confirm.
Pic ture
Sou nd
Cha nnel
Fea ture
Set up
New P asswo rd
Fea ture- Chang e Pin Cod e
Old P asswo rd
Con firm Ne w Passw ord
E ter
n
M
o
v
e
E
xit
Exi
t
Menu
Re
t
urn
t r
E
n e
E
xit
tEx i
Menu
Re
tur n
Hot el Mode
ENT ER
Hotel Mode
Press ▼/▲ button to select Hotel Mode, press OK ENTER button or ► button to enter
/ .
Page 31

Hotel Setting
Hotel Lock
Channel Lock
Picture Lock
Sound Lock
Feature Lock
Setup Lock
Key Lock
Source Lock
Set Source
Channel Number
Max Volume
Default Volume
Next Page
On
Off
Off
Off
Off
Off
Off
-->
Off
0
100
30
-->
Hotel Setting
Clear Lock
DataBase Export
DataBase Import
Previous Page
-->
-->
-->
-->
Hotel Lock/Channel Lock/ Picture Lock/Sound Lock/Feature Lock/Setup Lock/Key Lock/
Source Lock
Press ▼/▲ button to select Hotel Lock/Channel Lock/ Picture Lock/Sound Lock/Feature Lock/
Setup Lock/Key Lock/Source Lock, press OK ENTER button or ► button to select On or Off
/ .
Set Source
Press ▼/▲ button to select Set Source, press OK ENTER button or ► button to confirm
/ .
Channel Number
Press ▼/▲ button to select Channel Number, press OK ENTER button or ► button to set / .
Max Volume
Press ▼/▲ button to select Max Volume, press OK ENTER button or ► button to set / .
Default Volume
Press ▼/▲ button to select Default Volume, press OK ENTER button or ► button to set / .
Clear Lock
Press ▼/▲ button to select Clear Lock, press OK ENTER button or ► button to confirm
/ .
DataBase Export
Press ▼/▲ button to select DataBase Export, press OK ENTER button or ► button to confirm
/ .
DataBase Import
Press ▼/▲ button to select DataBase Import, press OK ENTER button or ► button to confirm
/ .
Previous Page
Press ▼/▲ button to select Previous Page, press OK ENTER button or ► button to confirm
/ .
29
Page 32

30
Pic ture
Sou nd
Cha nnel
Fea ture
Set up
Tim e
Dat e
Tim e Zone
DST
Fea ture- Clock
16: 3
11:1 2/0 1
Aut o
On
Sleep Timer
Press ▼/▲ button to select Sleep Timer, press OK ENTER button or ► button to enter, then press
▼/▲ button to select Off,10minutes, 20minutes, 30minutes, 60minutes, 90minutes, 120minutes,
180minutes, 240 minutes.
/
Pic ture
Sou nd
Cha nnel
Fea ture
Set up
Lan guage
Loc k
Clo ck
Sle ep Time r
Aut o Power O ff
Hea ring Im paire d
PVR /Time shif t
ENT ER
ENT ER
ENT ER
Off
ENT ER
Off
Off
OffOf f
30 Mi ns30 Mins
10 Mi ns10 Mins
20 Mi ns20 Mins
60 Mi ns60 Mins
Fea ture
Pic ture
Sou nd
Cha nnel
Fea ture
Set up
Fea ture- Langu age
Pre ferre d Subti tle
OSD L angua ge
Pre ferre d Audio
DTV Tel etext L angua ge
ATV Tele tex t Lang uage
Eng lish
Wes t
Eng lish
Clock
Press OK ENTER to enter Clock, use ▲▼ to set the Time Zone/DST./
t
eE
n
r
M v
o
e
iEx
t
E
it
x
uM
e
n
t
u
nR
e r
En
t
e
r
E tern
M
o
v
e
Ex
it
Exi
t
Men
u
R tur n
e
E
nter
E
n
t
e
r
Mo
ve
Ex
i
t
E
x
it
M
e
n
u
R
e
t
u
r
n
t
rEn
e
Eng lish
Eng lish
Language
Press OK ENTER to enter Language, use ▲▼ to set OSD language./
Page 33
31
Pic ture
Sou nd
Cha nnel
Fea ture
Set up
Lan guage
Fea ture
Loc k
ENT ER
Clo ck
Sle ep Time r
Aut o Power O ff
Hea ring Im paire d
PVR /Time shif t
ENT ER
ENT ER
Off
ENT ER
Off
Off
OffOf f
OnOn
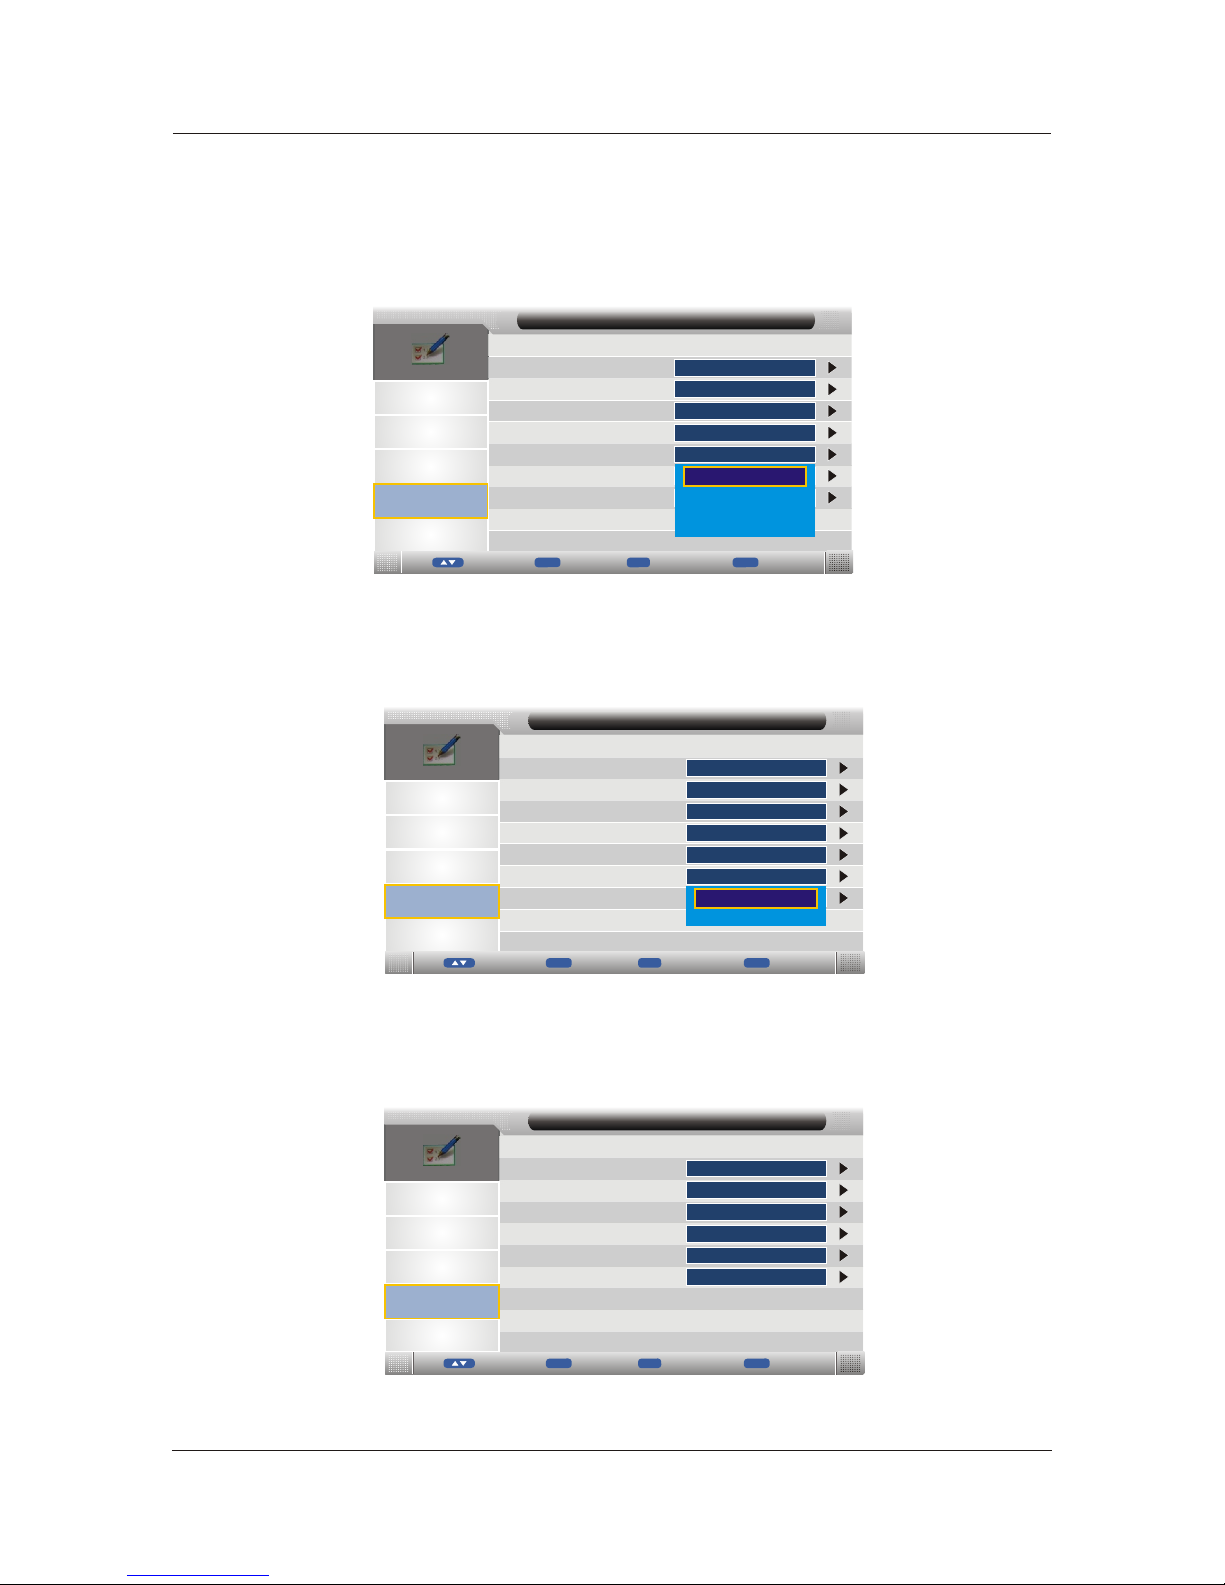
Press ▼/▲ button to select Hearing Impaired, press OK ENTER button or ► button to enter,
then press
▼/▲ button to select On or Off.
/
Hearing Impaired
PVR/Timeshift
Pic ture
Sou nd
Cha nnel
Fea ture
Set up
Fea ture- PVR/T imes hift
Aut o Times hift
Par titio n Selec t
Tim eshi ft Buff er
Tim er
Rec ord Lis t
Rec order S tart
Off
ENT ER
ENT ER
ENT ER
ENT ER
Aut o
Press ▼/▲ button to select PVR/Timeshift, press OK ENTER button or ► button to enter/ .
(Please see PVR Menu for more details)
e
E
n
t
r
M v
o
e
iE
x t
E it
x
u
Me
n
t
u
nR
e r
E
n
ter
En
t
e
r
Mo
ve
Ex
i
t
E
xi
t
M
e
n
u
Re
tur n
t
rEn
e
Pic ture
Sou nd
Cha nnel
Fea ture
Set up
Lan guage
Fea ture
Loc k
ENT ER
Clo ck
Sle ep Time r
Aut o Power O ff
Hea ring Im paire d
PVR /Time shif t
ENT ER
ENT ER
Off
ENT ER
Off
Off
OffOf f
4 Hou rs4 Hours
1 Hou r1 Hou r
2 Hou rs2 Hours
Auto Power Off
Press ▼/▲ button to select Auto Power Off, press OK ENTER button or ► button to enter, then
press ▼/▲ button to select Off, 1Hour, 2 Hours, 4 Hours
/
.
E ter
n
M
o
v
e
E
xit
Ex
it
Menu
R
e
t
u
rn
t r
E
n e
Page 34

32
Setup Menu
Pic ture
Sou nd
Cha nnel
Fea ture
Set up
15 Se conds
Set up
OSD T imer
PC Se tup
Blu e Scree n
Hom e Mode
Res et TV Set ting
ENT ER
Sof tware U pgrad e
Off
Hom e
ENT ER
ENT ER
Press MENU button to display the main menu.
Press ▼/▲ button to select Setup in the main menu, then press OK/ENTER button or ► button
to enter.
OSD Timer
Press ▼/▲ button to select OSD Timer, press OK ENTER button or ► button to enter, then press
▼/▲ button to select 5 Seconds 10 Seconds 15 Seconds 20 Seconds 25 Seconds
30 Seconds Never, press OK/ENTER or ► to confirm
/
, , , , ,
, .
1. Press ▼/▲ button to select the option that you want to adjust in the Setup menu, then press
OK ENTER button or ► button to enter.
2. Press ▼/▲ button to select.
3. After finishing your adjustment, press MENU button to save and return to the previous
menu, or press EXIT button to exit the entire menu.
/
Pic ture
Sou nd
Cha nnel
Fea ture
Set up
15 Se conds15 Se conds
Set up
OSD T imer
PC Se tup
Blu e Scree n
Hom e Mode
Res et TV Set ting
ENT ERENT ER
Sof tware U pgrad e
OffOff
Hom eH ome
ENT ERENT ER
20 Se conds20 Se conds
10 Se conds10 Se conds
25 Se conds25 Se conds
5 Sec onds5 Se con ds
15 Se conds15 Se conds
E
t
e
rn
Mo
ve
Ex
i
t
E
x
it
M
e
n
u
R
t
u
r
n
e
tEn
e
r
e
E
n
t r
v
Mo
e
E
xit
E it
x
Menu
uR
e
t
r
n
E
n
ter
Page 35

33
Pic ture
Sou nd
Cha nnel
Fea ture
Set up
15 Se conds15 Se conds
Set up
OSD T imer
PC Se tup
Blu e Scree n
Hom e Mode
Res et TV Set ting
ENT ERENT ER
Aut o SCART
Sof tware U pgrad e
OnOn
OffOff
Hom eHome
ENT ERENT ER
ENT ERENT ER
OffOf f
OnOn
PC Setup( Only available in PC mode). PC Setup( Only available in PC mode).
Press ▼/▲ button to select PC Setup, press OK ENTER button or ► button to enter./
Pic ture
Sou nd
Cha nnel
Fea ture
Set up-PC S etup
Set up
Aut o Adjus t
V Pos ition
Pha se
Clo ck
H Pos ition
00
ENT ERENT ER
00
00
252 5
Blue Screen
Press ▼/▲ button to select Blue Screen, press OK ENTER button or ► button to enter, then press
, press OK/ENTER or ► to confirm
▼/▲ button to select On or Off .
/
Home Mode
Reset TV Setting
Software Upgrade
Pic ture
Sou nd
Cha nnel
Fea ture
Set up
15 Se conds15 Se conds
Set up
OSD Ti mer
PC Se tup
Blu e Scree n
Hom e Mode
Res et TV Set ting
ENT ERENT ER
Aut o SCART
Sof tware U pgrad e
OnOn
OffOff
Hom eH ome
ENT ERENT ER
ENT ERENT ER
Do yo u want to r eset
Dat abase t o defau lt?
Mes sageMes sage
OK
Can celCa ncel
E
t
e
rn
Mo
ve
Ex
i
t
E
x
it
M
e
n
u
R
tu
r
n
e
tEn
e
r
E
n
t
er
Mo
v
e
E
xi
t
Ex
it
Me
nu
R
e
t
u
r
n
t r
E
n
e
E ter
n
M
v
o e
Exit
Exi
t
M nu
e
R tur n
e
E
nter
Press ▼/▲ button to select Home Mode, press OK ENTER button or ► button to enter, then press
, , ,
▼/▲ button to select Home Dynamic Standard Mild.
/
Press ▼/▲ button to select Reset TV Setting, press OK ENTER button or ► button to enter
.
/
Press ▼/▲ button to select Software Upgrade, press OK ENTER button or ► button to enter
.
/
Page 36

34
EPG MenuEPG Menu
Move
Use ◄►▲▼to select programme.
Exit
Exit EPG.
Abc 1
QVC 2
UK TV G old
bid t v
Hea t
M
ove
EPG W eek ly Mod e
Dai ly
Fiv e
000 5
Fiv e
31/ 05/20 07 14:3 0-31/ 05/20 07 16:3 0
Bat tle of Th e V.1
Wor ld War l l dra ma sta rring M ichae l Renni e and Pat ricia M deina .The P oli sh
res istan ce tack i t upon th emsel ves to sm uggle d etail s of the Na zis' se cret
Thu
Fri S at S un
Mon Tu e Wed ThuThu
31/ 05
Bat tle of Th e V.1
Fiv e News Fo llowe d By Weat her
Hom e and Away
Pay D ay
Fiv e News
12: 30-14 :30
Get ting On T he Prop erty La dder
Bef ore Win ter Com es
14: 30-16 :30
16: 30-17 :00
17: 00-17 :30
17: 30-18 :00
18: 00-18 :15
18: 15-18 :58
Exi t
Pre v Day Next D ay
13: 39:28
31/ 05/20 07
E
xit
UK TV S tyle
Favorite List
Press FAV button to display the Favorite Channel List.
Daily
Change to daily mode.
Prev Day/Next Day
Play the Previous/next day of the programs.
Press ▼/▲ button to select Feature, press OK ENTER button to enter. /
Fav orite L ist
01
Ren ame Fav Ty pe
vMo
e
n r
E te
Ent
er
Fav orite 1
abc
dtv
def
dtv
02
Press EPG get into EPG menu.
Page 37
35
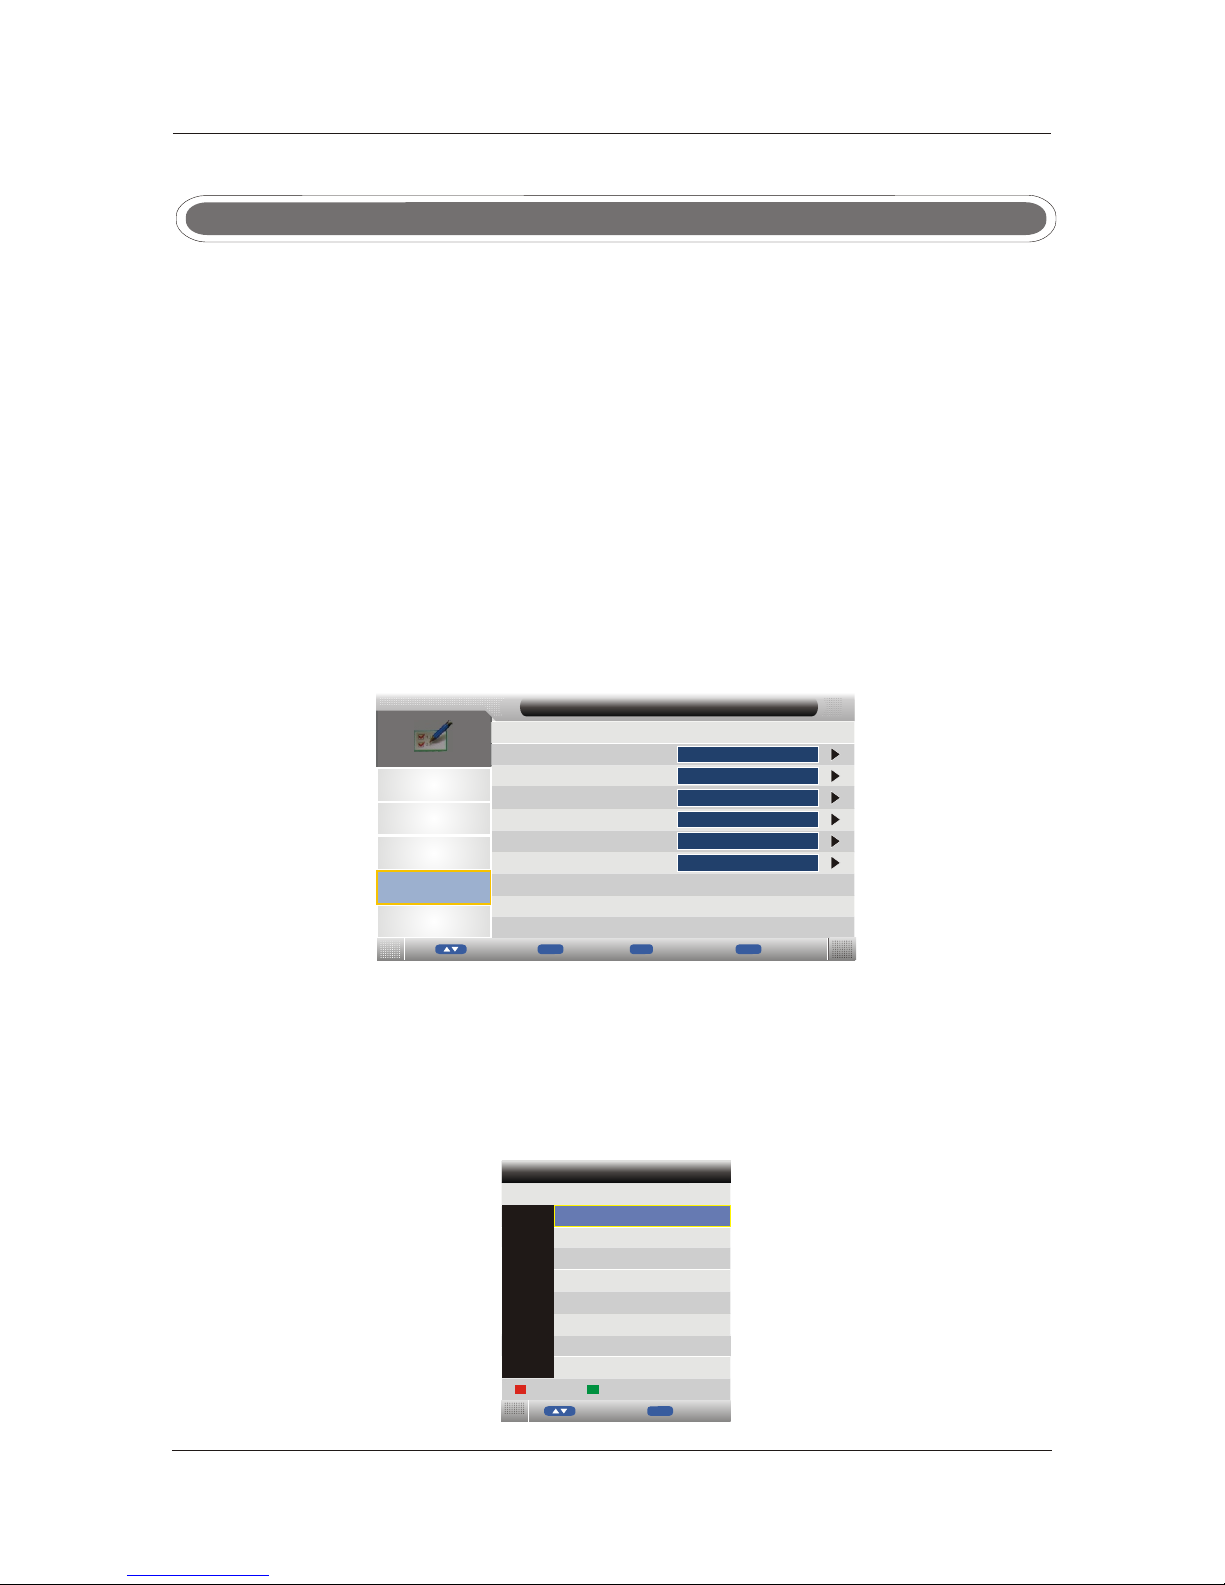
PVR Menu
Pic ture
Sou nd
Cha nnel
Fea ture
Set up
Fea ture- PVR/T imes hift
Aut o Times hift
Par titio n Selec t
Tim eshi ft Buff er
Tim er
Rec ord Lis t
Rec order S tart
Off
ENT ER
ENT ER
ENT ER
ENT ER
Aut o
Press ▼/▲ button to select Feature in the main menu, press OK ENTER button or ► button to enter,
then press ▼/▲ button to select PVR/Timeshift menu.
/
1. Press ▼/▲ button to select.
2. After finishing your adjustment, press MENU button to save and return back to the previous
menu, or press EXIT button to exit the entire menu.
Partition Select
Total S ize:0 001.9 G Free Si ze: 058 3M
Par titio n List
01
/ud ska1
For mat
Set D efaul t Parti tion
M
o
v
e
En
te
r
E
n
t
e
r
Press ▼/▲ button to select Partition Select in the main menu, press OK ENTER button or ►
button to enter.
/
Note
When PVR function is in progress, please don’t unplug the power and the external USB device at will.
When PVR function is active, the power indicator will blink with red and blue consecutively.
Before start recording a program, please make sure the external USB device is connected.
While recording, if the available storage space becomes low, the recording will be automatically
stopped.
PVR function is only available for DTV, includes Record, Timeshift and Playback functions.
Record includes in time record and preserve record. In time record can be worked through REC
key immediately, and preserve record needs to preserve beforehand.
Record and Playback can be done at the same time. Timeshift is another function for both
recording and playing.
The following will explain in details.
E te
n r
M
v
o e
xi
E t
E i
t
x
M nue
R tur n
e
E
nter
Page 38

36
Auto Timeshift
Timeshift Buffer
Timer
Press ▼/▲ button to select Auto Timeshift, press OK ENTER button or ► button to enter, then press
▼/▲ button to select off (Stop auto Timeshift), Auto (Start auto Timeshift).
/Auto Timeshift
Press ▼/▲ button to select Timeshift Buffer, press OK ENTER button or ► button to enter, then press
▼/▲ button to select Auto, 30Mins, 1hr, 2hr, press OK/ENTER button or ► button to confirm..
/Timeshift Buffer
Focus on the previous option on the partition list,Focus on the next option on the partition list.
Format the chosen partition.Red
Green Set the chosen partition as the default partition.
Press ▼/▲ button to select Timer in the main menu, press OK ENTER button or ► button to confirm./
(Press T.LIST button on remote control to get into Timer menu.)
The tot al reco rding t ime
The dat e of star ting re cordi ng
Recor d Mode
009 7
Ch NO .
Cha nnel
Del
Telev ision
01
M
o
ve
Menu
R
t
u
r
n
e
Tim er
Del A ll
Add Ed it
Mod e
Onc e
Sta rt Dura tio n D ate
22: 14:16 10 :16
07/ 02/20 07
21: 39:28
07/ 02/20 07
Chann el numb er
Chann el name
Start r ecord ing tim e
curre nt date a nd time
Red Delete the chosen program.
Green Delete all the programs.
Yellow Add recording program; Enter Timer Edit menu.
Blue Edit the chosen recording program; Enter Timer Edit menu.
Menu
return back to the previous menu.
Timer Edit menuTimer Edit menu
Timer menu KEY_YELLOW for add Timer Edit menu.
Tim er Edi t
Type
Rec order
Cha nnel
Sta rt Time
Dur ation
Dat e
DTV
On
22: 24
10: 10
07/ 02/20 07
YLE T V1
0-
9
vM
o e
0-9
E
n
ter
t
eE
n r
M
en
u
Sa
v
e
21: 39:28
07/ 02/20 07
Mod e
Onc e
t
E
x
i
x
iE t
Page 39

37
Recorder : Off、On .“Off” means to preengage program for watching only, “On” means to
preengage program for watching and recording.
Type: DTV、Radio,DTV means to preengage DTV Channel program and Radio means to
preengage Radio Channel program;
Channel: DTV or Radio Channel programs;Channel:
Start Time: Start recording time; Format is hour / minute;Start Time:
Duration: The total recording time; Format is hour / minute; PS:The status of this option is
disable,only when Recorder is“On”, it can be set;
Date: The date of starting recording, Format is day / month / year;Date:
Mode: Once、Daily、Weekly、Monthly;Mode:
PS:The start recording time must be reasonable (behind current system time); If the timer is repeat
or not reasonable, there will be a message "Set timer fail!" to prompt when return;
The Edit function resemble Add function except that Type and Channel can not changed again.
0-9 Edit Start Time、Duration、Date.
Enter Confirm the choice.(For popList options)
Menu Return to the previous menu (Timer menu) and save the setting.
Record List
PVR/Timeshift menu Recorder Start Recorder Start menu
(Press R.LIST button on remote control to get into Timer menu.)
Record List
0001
Five
Delete
Mo
ve
0002
0003
0004
uM
e
n
t
Re u
r
n
abc1
abc1
abc1
200 7/05/ 31 13:2 7:44- 13:27 :57
200 7/05/ 31 13:3 1:24- 13:32 :36
200 7/05/ 31 13:3 3:18- 13:35 :53
200 7/05/ 31 13:3 6:04- 13:36 :18
Ent
e
r
Ent
er
Enter Play the focus program.
Menu Return to the PVR/Timeshift menu (focus on Record List option).
Focus on the previous option on the partition list,Focus on the next option on the partition list.
Page 40

38
RECREC
Do you wa nt to s tar t
Recor din g?
MessageMessage
OK
Cance lCa ncel
Initi ali zin g Recor der . ..
MessageMessage
Press REC to start recording.
Recorder Start
Menu shows as follows:
REC
PAUSE Start or pause recording.PAUSE
DISPLAY Enter banner info menu.DISPLAY
STOP Stop REC.STOP
Press" "STOP button on remote control to end recording manually;
Do you wa nt to s top
Recor din g?
MessageMessage
OK
Cance lCa ncel
Timer RECTimer REC
There are two methods to set a timer. As follows:
1. In the EPG menu user can preengage programs for watching or recording;
a) Pressing GREEN button once is to preengage the program only for watching(when timeout, it
jumps to the program and only play.
b) Pressing GREEN button twice is to preengage the program for recording (when timeout, it jumps
to the program and starts recording). if TV is in standby mode, it will automatically power on 2 minutes in
advance and start recording under background without powering on the panel. To watch the
program, user need to press POWER button to turn on the TV ;
c) The preengaged programs can be checked in Timer menu.
Page 41
39
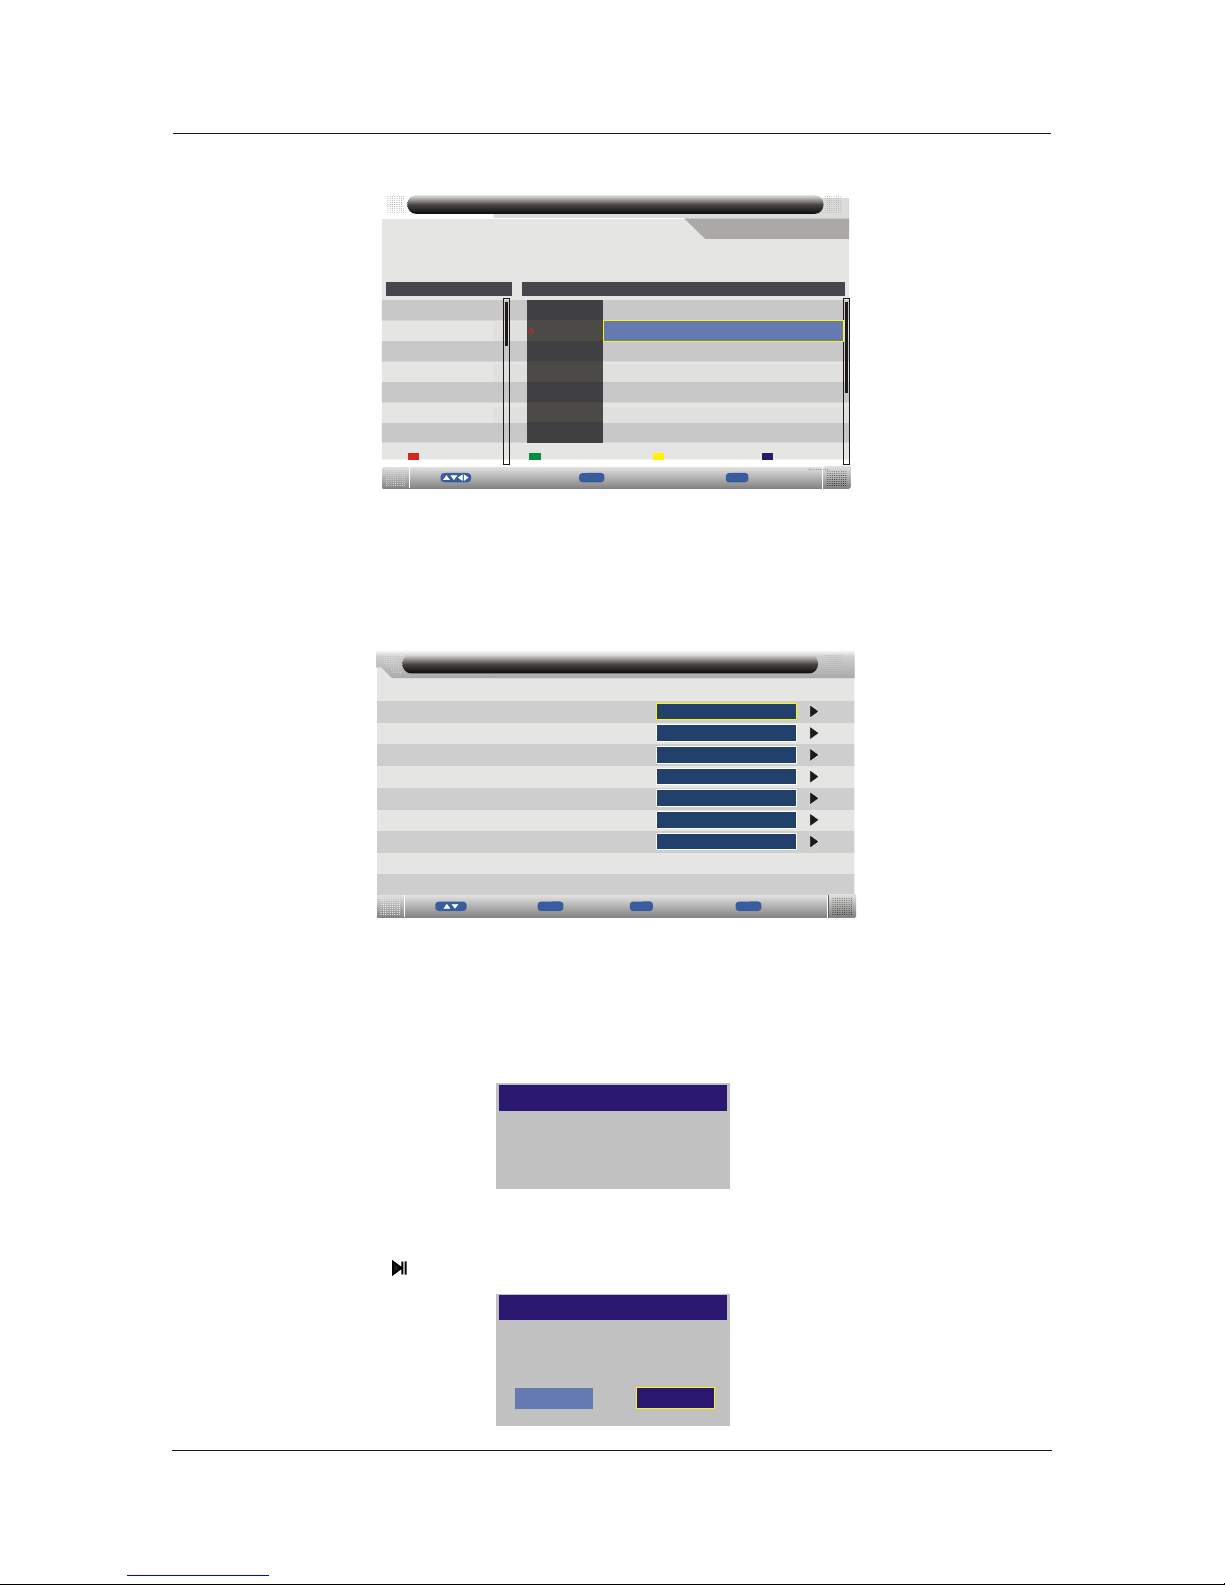
2. In Timer menu, user can increase、delete preengage programs; In Timer Edit menu, user
could set、modify preengaged programs' information;
In Timer menu: press YELLOW button to get into Timer Edit menu to add a timer .Then set timer’s
information in Timer Edit menu.
Tim er Edi t
Type
Rec order
Cha nnel
Sta rt Time
Dur ation
Dat e
DTV
On
22: 24
10: 10
07/ 02/20 07
YLE T V1
0-9
M
v
o e
0-9
tEn
e
r
En
ter
M nu
e
S v
a
e
21: 39:28
07/ 02/20 07
Mod e
Onc e
3. When the timer recorder start, it jumps to the very channel and starts to record the
program automatically.(if a manual recording is under process, it will stop the manual recording
process and starts the timer recorder automatically); A prompted window will pops up,10s before
recording;
4S
Time to start recoderTime to start recoder
TimeshiftTimeshift
Do you wa nt to s tar t
Times hif t?
MessageMessage
OK
Cance lCa ncel
Abc 1
QVC 2
UK TV G old
bid t v
Hea t
M
o
ve
EPG W eek ly Mod e
Dai ly Rem inder
UK TV S tyle
Fiv e
000 5
Fiv e
31/ 05/20 07 14:3 0-31/ 05/20 07 16:3 0
Bat tle of Th e V.1
Wor ld War l l dra ma sta rri ng Mic hael Re nnie an d Patri cia Mde ina. The P olis h
res istan ce tack i t upon th emsel ves to sm uggle d etail s of the Na zis' se cret
Di
s
play
In
f
o
Thu
Fri Sa t Sun
Mon Tu e Wed ThuThu
31/ 05
Fiv e News Fo llowe d By Weat her
Hom e and Away
Pay D ay
Fiv e News
12: 30-14 :30
Get ting On T he Prop erty La dder
Bef ore Win ter Com es
14: 30-16 :30
16: 30-17 :00
17: 00-17 :30
17: 30-18 :00
18: 00-18 :15
18: 15-18 :58
xiE
t
Pre v Day Next D ay
13: 39:28
31/ 05/20 07
Exit
Bat tle of Th e V.1
Timeshift Start conditon
Enter Timeshift to press , and the image paused and it start record from the paused position.
Page 42

40
Menu shows as follows:
abc1( 20070 531_1 33124 )
Playi ng Ti me:12 :31 :30
Start Time :13:3 1:2 4 End Time:1 3:32: 26
PAUSE Start or pause recording and playing.PAUSE
DISPLAY Enter banner info menu and close time menu.DISPLAY
STOP Stop Timeshit.STOP
Do you wa nt to s top
Times hif t?
MessageMessage
OK
Cance lCa ncel
Press " " STOP button on remote control.
REC PlaybackREC Playback
At Playback mode, Playback still.
Enter Playback condition.
Fast reverse and Fast Forward.
Play the Previous/next scene of the recorded programs, jump by 30 seconds.
Pause playing.
Stop playing.
00:00:00
Playing video fast behind with speed “x2”,“x4”,“x8”,“x16”
Playing video fast forward with speed “x2”,“x4”,“x8”,“x16”
Timeshift Play
At Timeshift Play condition, the system record DTV and play it at the same time.
Timeshift Play is start by press , at Timeshift Play condition, it can work Pause, Fast Forward,
Fast Rewind.
Timeshift Record
Timeshift Record condition,similar to Record mode.
Page 43

1. Press ◄ / ► button to select the option that you want to select in the USB menu, then press
OK/ENTER button or ▼ button to enter.
2. Press ◄ / ► button to adjust or press ▼ / ▲ button to select.
Note: Before operating Media menu, Plug in USB device, then press Source button to select Media.
8. Media(USB) MenuMedia(USB) Menu
41
Photo Menu
Press ◄ / ► button to select Photo in the main menu, then press OK/ENTER button to enter,
Press MENU button to return back to the previous menu.
Press ▲/▼ button to select the folder that you want to view, press OK ENTER button or ► button
to select the sub folder and press OK ENTER button to play press Menu button to return back
/
/ , .
Photo
Pho to
Ex
it
E
x
it
Del ete
Add /Del al l to play list
Pag e+/-
Mov e
Ente r
Ent er
001 /004
Ren turn
578 43107 71412 30506 35.jp g
Cdr 57532 2s2de .jpg
161 KB
201 2/12/ 09
800 x910
050 635.j pg
Wed cx. jpg
CH+/ -
Input
DTV
ATV
YPBPR
HDMI
AV
Media
PC
DVD
Page 44

Same as " " key on remote, to start playing pictures in slide show mode.
Same as " " key on remote, to stop sliding show, and return to the file browser.
Same as " " / " " key on remote, to play the previous or next file directly
To rotate the playing picture(0 º、90 º、180 º、270º).
To zoom the playing picture.
Same as "INFO" key on remote, to display the information of the current file.
To enter “Photo Setup” menu, including “Repeat Mode”, “Background Music”, “Music Source”,
”Slide Time”, “Effect”.
To enter the play list menu.
42
Music Menu
Press ◄ / ► button to select Music in the main menu, then press OK/ENTER button to enter,
Press MENU button to return back to the previous menu.
Page 45

43
Press ▲/▼ button to select the folder that you want to view, press OK/ENTER button or ► button
to select the sub folder and press OK ENTER button to play press Menu button to return back / , .
x
iE
t
E i
t
x
Del ete
Add /Del al l to play list
Mov e
Ente r
Ent er
001 /002
Ren turn
Mus ic
64M B
DFG FGW
AEV GGA
578 43107 71412 30506 35.mp 3
050 635.m p3
Mus ic Play er
Clo se Pane l
Exi
t
E
xi
t
Mov e
Ente r
Ent er
A New D ay Has Co me.mp 3
Tit le: S JJDH D
Art ist: Ce line Di on
A lb um : A New Da y Has Co me
Genr e : Ot her
Year s: Unk nowm
00:0 0:21/ 00:04 :19
All
Same as " " key on remote, to pause the playing file.
Same as " " key on remote, to stop the playing file.
All
To switch the repeat mode, including ”Repeat 1”, ”Repeat All”, ”Repeat Dir” and ”Random”
modes.
To switch the window between “Information” and “Play List”.
Same as “BLUE” key on remote, to close the panel only in “MUSIC” mode, and then it can
be opened by every key on remote.
Same as " " / " " key on remote, to play fast backward or forward. The speed can
switch to twice, four times, eight times and sixteen times, and displayed with “X2、
X4、X8、X16” on screen.
Same as " " / " " key on remote, to play the previous or next file directly.
Set freely to fast forward the content and music.
Pag e+/-
CH+/ -
Page 46
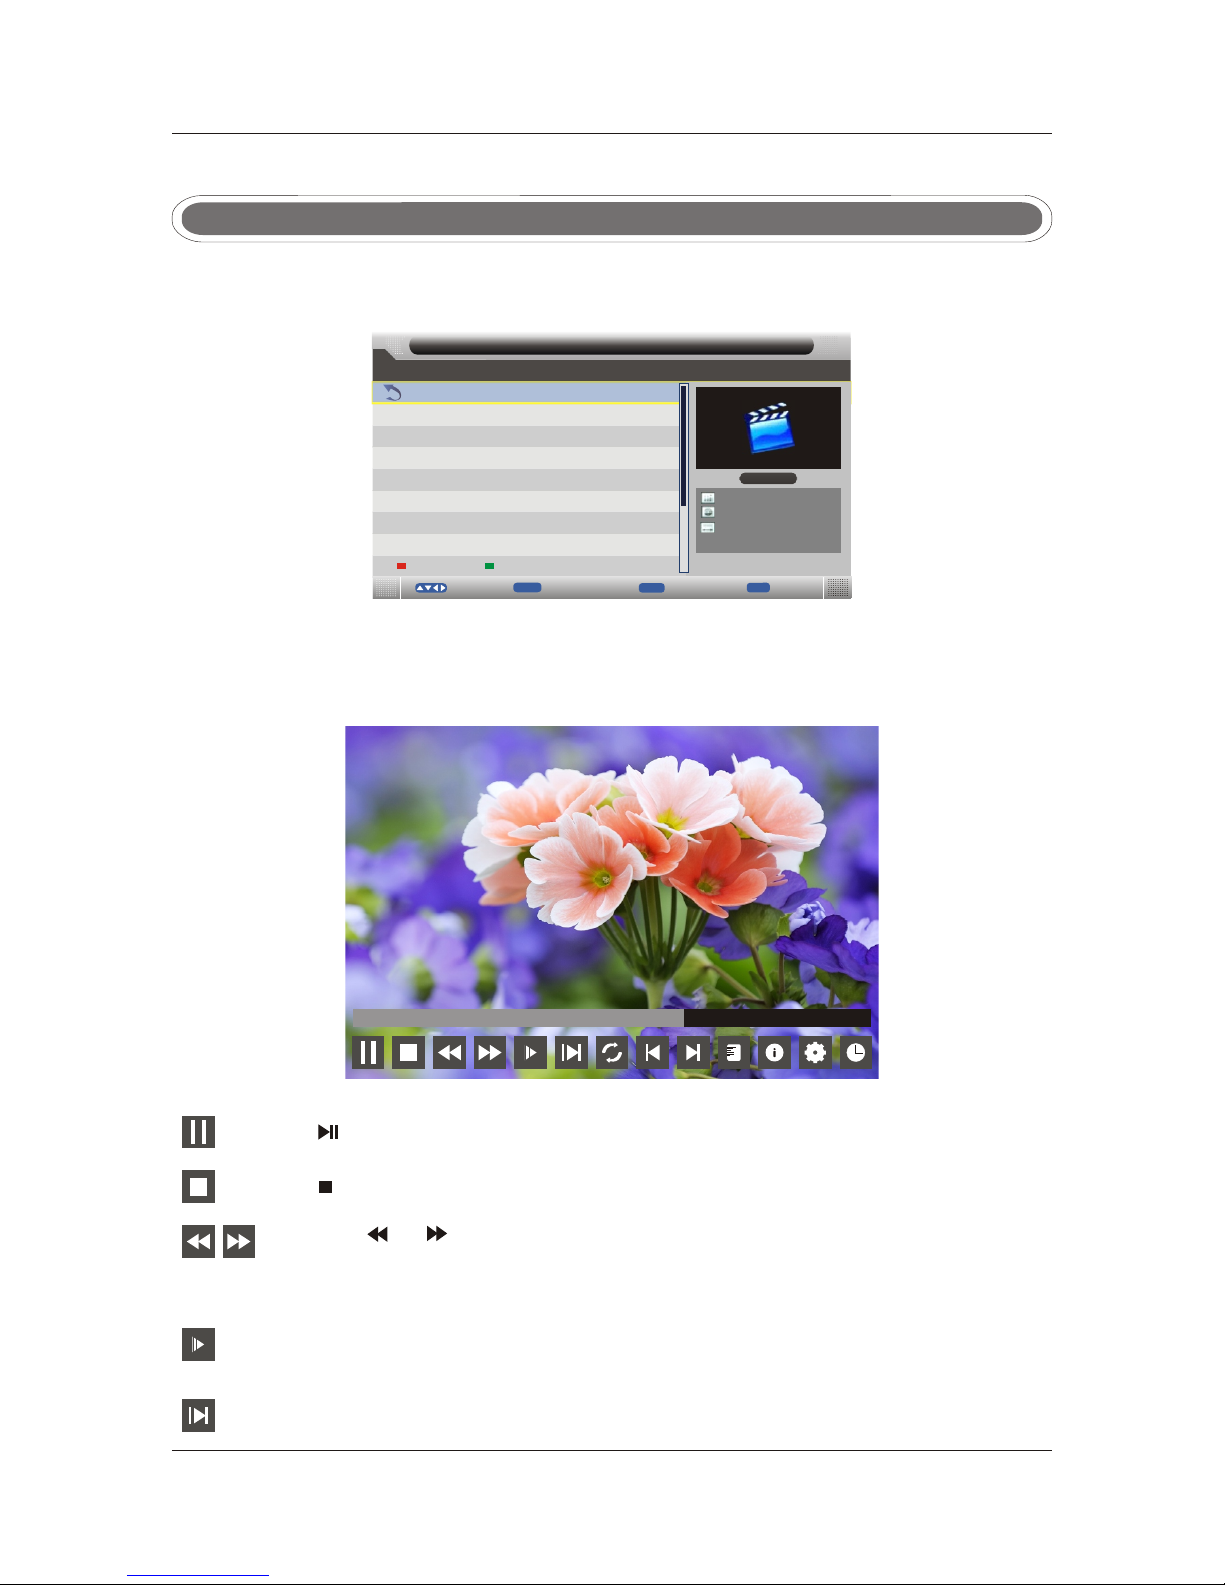
44
Press ◄ / ► button to select Movie in the main menu, then press OK/ENTER button or ▼ button
to enter, press MENU button to return back to the previous menu.
Press ▲/▼ button to select the folder that you want to view, press OK/ENTER button or ► button
to select the sub folder and press OK ENTER button to play press Menu button to return back / , .
Movie Menu
Ex
i
t
Ex
it
Del ete
Add /Del al l to play list
Mov e
Ente r
Ent er
001 /003
Ren turn
Mov ie
264 MB
578 43107 71412 30506 35.rm
050 635.m ov
43d ea006 ef5.r m
AB
00:00 :04/0 1:54: 51
Same as " " key on remote, to pause the playing file
Same as " " key on remote, to stop the playing file, and return to the file browser interface.
Same as " " / " " key on remote, to play fast backward or forward. The speed can
switchto twice, four times, eight times and sixteen times, and displayed with “X2、X4、
X8、X16” on screen
To enter slow mode. The speed can switch to 1/2, 1/4, 1/8, 1/16, and displayed with “X1/2,
X1/4, X1/8,X1/16” on screen.
To enter step mode.
Pag e+/-
CH+/ -
Page 47

Press ◄ / ► button to select e-Book in the main menu, then press OK/ENTER button or ▼ button
to enter, press MENU button to return back to the previous menu.(Must be in .txt format only)
Press ▼/▲ button to select the folder that you want to view, press OK/ENTER button or ► button
to select the sub folder and press OK ENTER button to play press Menu button to return back / , .
E-Book Menu
E
xi
t
E i
t
x
Del ete
Add /Del al l to play list
Mov e
Ente r
Ent er
001 /003
Ren turn
e-B ook
64M B
578 43107 71412 30506 35.tx t
050 635.t xt
123 45.tx t
222 .txt
Pag e +
Exit
Ret urn
e-B ook
Pag e -
Add /Del Bo okmar k
Go to p age
Boo kmark l ist Pla ylist s
Ddh fjhsa uikjx bnjbz ihcis haihd haudd d,dd hsd fms lm8w 49q w4d 6464 d74 cah
sja j21d6 464w6 d,f6 748 451 6q63 dfw edf we5 5s1 as6w d13sa ,5d6 w1d 64d f6w
jdi sw8ss 446a4 d64jh y8741 23454 fr45r 641.
AB
To set AB repeat, the first press sets A point, and the second press sets B point, and then play
between A and B repeatedly.
To enter the play list menu.
Same as "INFO" key on remote, to display the information of the current file.
To enter “Movie Setup” menu, including “Program”, “Subtitle”, “Audio”, ”Repeat Mode”.
To enter “GO TO” function, user can input the time he want to start directly.
45
RED: To add/del bookmark.
GREEN: To input the page number directly.
YELLOW: To enter the “Bookmark list” page.
BLUE: To enter the “Play list” page.
Key OperationKey Operation
Exit: To close the file and return to the file browser.
To page down/page up.
Same as " " / " " key on remote, to play the previous or next file directly.
Pag e+/-
CH+/ -
Page 48

- - General Setup Page - -
TV Display
OSD Lang
Screen Save r
Last Memory
ENG
On
Off
16:9 4: 3Pan Scan
4: 3Letter Box
Wide
1. Press Source button on the remote controller to select DVD input source.
2. Press OPEN / CLOSE button to load from into disc tray.
Hold the disc without touching either or its surfaces, insert the DVD with the label toward the
device’s back panel into the DVD slot on the right side of you TV set.
Only push the DVD slightly until the unit feeds it automatically.
This is used to select the aspect 4:3Pan Scan, 4:3Letter Box, Wide.
Basic Operation
TV Display
9.DVD Operation
General Setup
DVD Setup Mode
·Setup Mode provides the menu for the configuration of General Setup Page, Audio Setup Page,
and Preference Page .
·Item selection in the Setup Menu is done by using the Navigation Arrows, D.SETUP button and the
OK button.
·Press the D.SETUP button first , enter into SETUP men u, t he n pr es s th e DI RE CT ION RIGHT button,
you can enter into the next Sub-menu.
·Press the D.SETUP button again to exit the Setup Menu.
46
(DVD MODELS ONLY)(DVD MODELS ONLY)
Page 49

- - General Setup Page - -
TV Display
OSD Lang
Screen Saver
Last Memory
ENG
On
Off
16:9
On
- - General Setup Page - -
TV Display
OSD Lang
Screen Save r
Last Memory
ENG
On
Off
16:9
Off
OSD Language
This is used to select the OSD language.
·English
·
·
French
Spanish
Screen Saver
Start the screen saver, the screen saver image will appear when the player stops or the picture is
frozen for a few minutes. This saver can keep the screen from being damaged.
·On (Start the screen saver).
·Off (Remove the screen saver).
Last Memory
Can set the items on the last memory, “on”and “off” option.
Select “on”, shutdown the machine before the settings for memory, re-boot the machine setting.
Set near the same time.
Select “off”, every time the machine automatically switched back to the default settings.
·On (Start the last memory).
·Off (Remove the last memory).
English
French
Spanish
47
Page 50
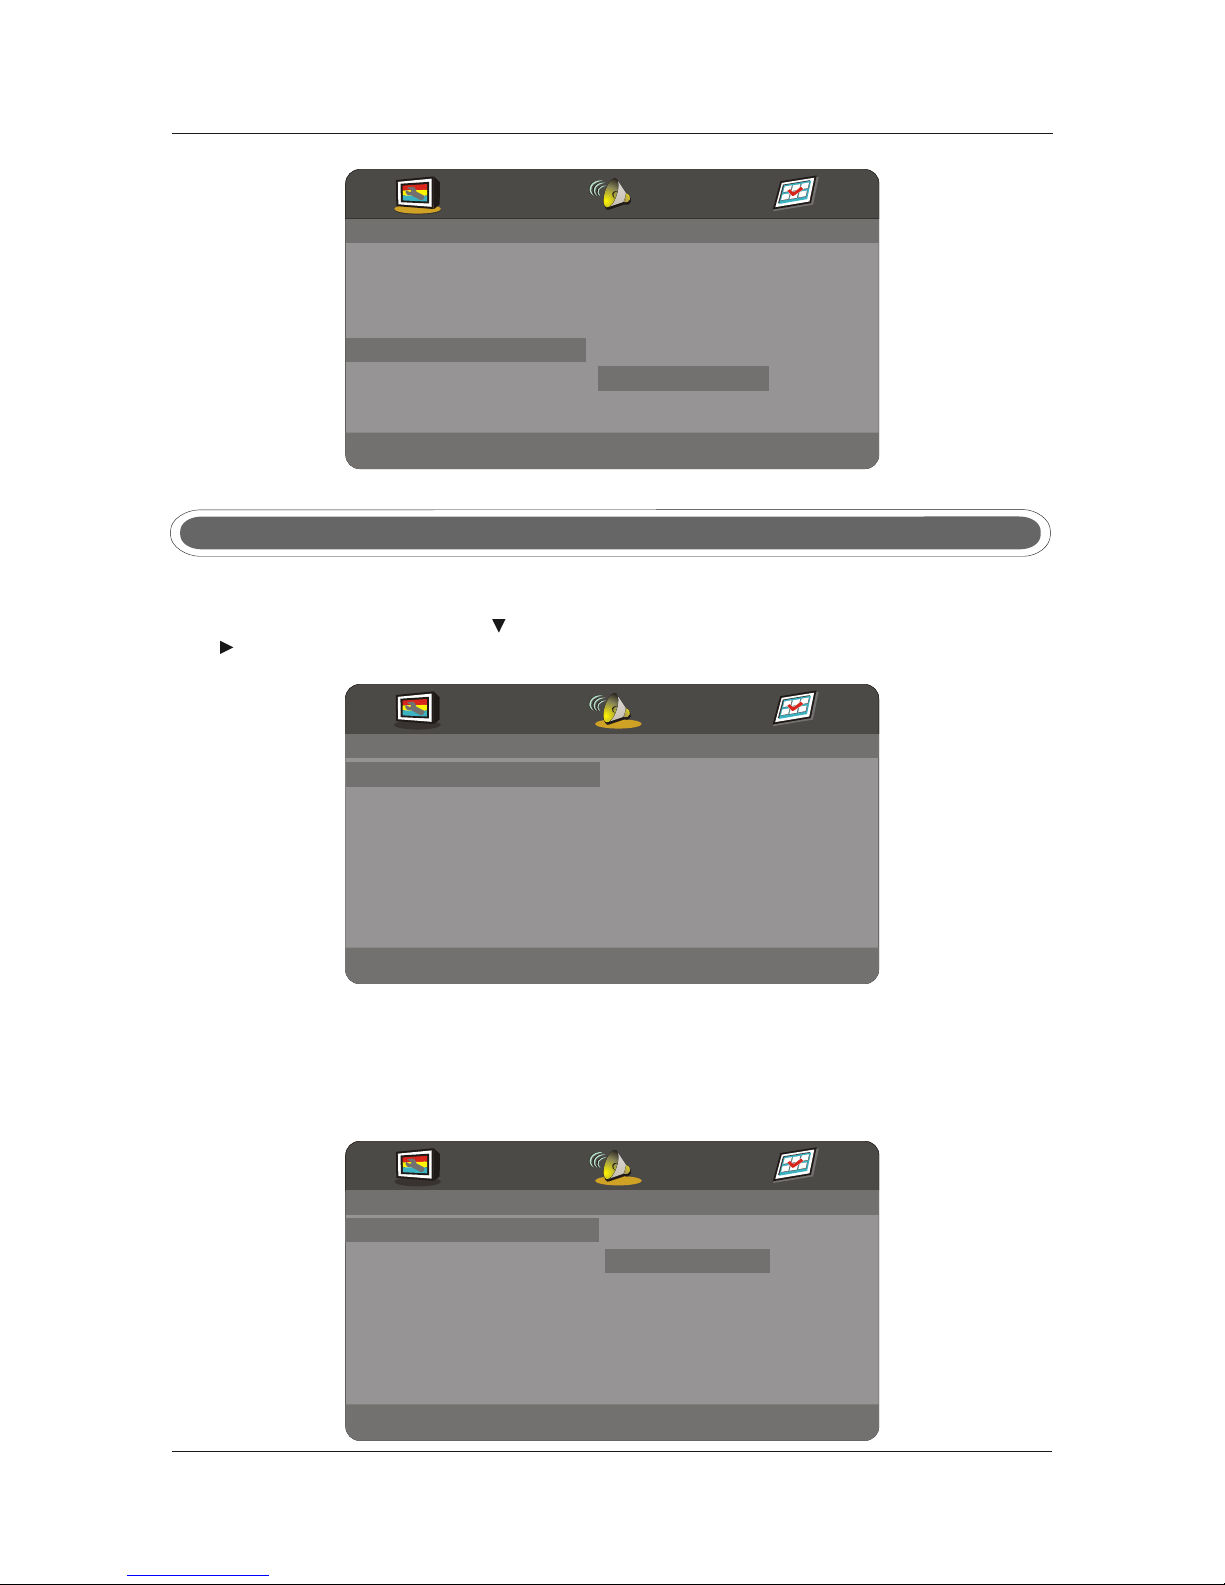
- - General Setup Page - -
TV Display
OSD Lang
Screen Saver
Last Memory
ENG
On
Off
16:9
On
Off
- - Audio Setup Page - -
Downmix
·LT/RT
A disc recorded multi channel soundtrack, the output signal will be incorporated to left and right
channel.
·Stereo
A disc recorded multi channel soundtrack, the output signal will be incorporated to stereo.
·Speaker Setup
In the “Audio Setup page” press “ ” button to select “Speaker Setup” item, press the “OK ENTER”
or “ ” button (play) into the “Speaker Setup Page”.
- - Speaker Setup Page - -
Downmix
STR
LT/RT
Stereo
Audio Setup
Speaker Setup
Dual Mono
48
Dynamic
Page 51

- - Audio Set up P ag e - -
Speaker Set up
Dynamic
FULL
3/4
1/2
1/4
OFF
Dynamic
This option is used to set the compression ratio in order to control the sound (Volume) contrast.
You must sure no disc in the DVD then you can select Preference Page.
TV Type
·PAL
This is selected when the player is connected to an PAL System TV.
·MULTI
The player will set the TV system according to the disc in the tray.
·NTSC
This is selected when the player is connected to a NTSC System TV.
Preference Setup
- - Preference Page - -
TV Type
Audio
Subtitle
Multi
PAL
NTSC
Disc Menu
Password
Parental
Default
Multi
ENG
ENG
ENG
49
- - Audio Set up P ag e - -
Speaker Set up
Dual Mono
Dynamic
Stereo
Mix-Mono
R-Mono
L-Mono
Dual Mono
This is used to select the Stereo, L-MONO, R-MONO and MIX-MONO.
Page 52

- - Preference Page - -
TV Type
Audio
Subtitle
Disc Menu
Password
Parental
Default
Multi
ENG
ENG
ENG
Subtitle
If a language listed below is recorded on the disc, you set the subtitle to be displayed in such language.
If not, the language recorded will be used.
·English
·French
·Spanish
Off·
- - Preference Page - -
TV Type
Audio
Subtitle
Disc Menu
Password
Parental
Default
Multi
ENG
ENG
ENG
English
French
Spanish
English
French
Spanish
Off
Audio
If a language listed below is recorded on the disc, you can play the sound in such language.
If not, the language recorded will be used.
·English
·French
·Spanish
50
Page 53

- - Preference Page - -
TV Type
Audio
Subtitle
Disc Menu
Password
Parental
Default
Multi
ENG
ENG
ENG
Disc Menu
If a language listed below is record on the disc, you can set the Menu to be displayed in such
language. If not, the language recorded will be used.
·English
·French
·Spanish
Parental
When playing disc with parental lock function, you may select an Age Control Grade according to
grade of disc and your own preference. For example, if PG is selected, DVD Video disc rated higher
than the PG grade cannot be played.
·KID SAF
·G
·PG
·PG 13
·P GR
·R
·NC 17
·ADULT
- - Preference Page - -
TV Type
Audio
Subtitle
Disc Menu
Password
Parental
Default
Multi
ENG
ENG
ENG
2 G
3 PG
4 PG 13
5 PGR
6 R
7 NC17
8 ADULT
1 KID SAF
English
French
Spanish
51
Page 54

- - Preference Page - -
TV Type
Audio
Subtitle
Disc Menu
Password
Parental
Default
Multi
ENG
ENG
ENG
Change
Password
User can change the password that is required when the user wants to change the Age Control
Grade in the Parental Lock function.
NOTE:(Default password is 123456 )
- - Preference Page - -
TV Type
Audio
Subtitle
Disc Menu
Password
Parental
Default
Multi
ENG
ENG
ENG
Reset
Default
User can load the original factory setting by choose RESET and press OK button.
52
Page 55

53
10. TROUBLESHOOTING
Page 56

54
11. SPECIFICATIONS
Th is ma nua l is only for your refere nce , any c han ge to t he de sig n and s pec ificatio n wil l not be
ad vis ed.
TFT LED
L / R 2X3W
PAL/SECAM
PAL/SECAM
16:9
YES
DC 12V 3A
DVD Video Output Format
--
Disc Physical Format
Screen Size
Display Type
Resolution(Pixel)
Aspect Ratio
TV System
Video Input Format
Audio Output Power
SUPPORT
EARPHONE - OUT
S-VIDEO - IN
ANTENNA
AV-IN
YPbPr - IN
HDMI - IN
VGA(PC) - IN
SCART - OUT
SCART - IN
Power Consumption
Power Supply
USB
VGA(PC) AUDIO - IN
Inc Stand (LxWxHmm)
DVD
Weight
TV
Dimensions
Net (Kgs)
Gross (Kgs)
AUDIO - OUT
COMMON INTERFACE
COAXIAL - OUT
Exc Stand (LxWxHmm)
YES
YES
YES
YES
YES
YES
YES
YES
YES
YES
YES
--
--
18.5 Inch
1920 X 1080
36W
21.5 Inch
1366 X 768
--
--
--
446X160X323
446X47X285
520X160X362
520X45X325
Model
LED19 DHR DBJ BDLED19 DHR BJB D L ED22DFRD BJB DLED22DF RBJ BD
520X160X362
520X69X325
446X160X323
446X65X285
2.6
3.4
3.6
4.5
3.05
3.85
4.05
4.95
Wall-mount
Wall-mount Screw size
100x100mm
M3x10
Page 57
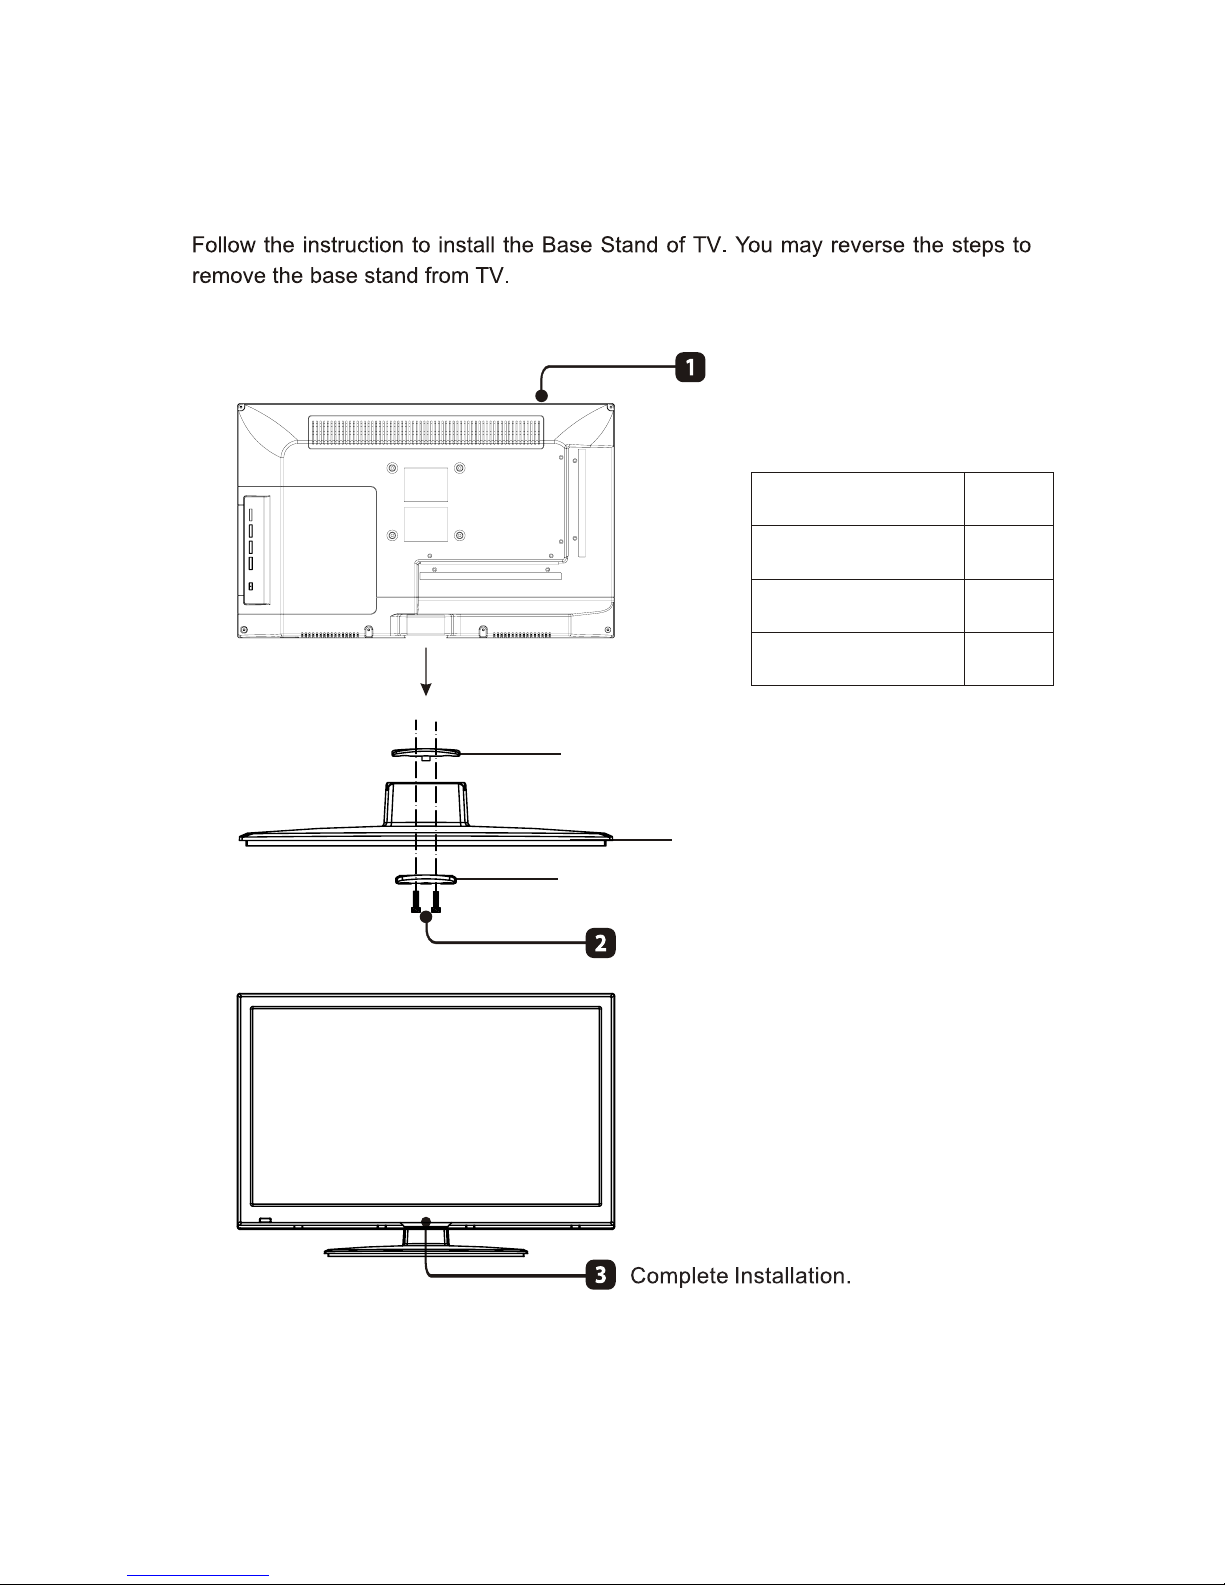
The Base Stand Installation Guide
base plate(down)
Stand base
base plate(up)
Lay the TV face-down in a
flat,cushioned surface to
avoid the screen from
damage or scratches.
Fix the stand base to the TV using
the ST4x12Fx2pcs screws(Black).
PARTS
QTY
BASE PLATE(UP)
BASE PLATE(DOWN)
SCREWS(ST4x12F)
1
1
2
CAUTION: Keepscrewsawayfromchildren.
NOTE: Theproductimagesareforillustrationpurposeonly,appearancemayverybetweenmodels.
 Loading...