

Page 1
TEControl
UNI MIDI Breath Controller
User Guide
Page 2

© TEControl AB
All rights reserved
The information in this document is subject to change without notice and does not represent a commitment on the part of TEControl AB. No part of this publication may be copied,
reproduced or otherwise transmitted or recorded, for any purpose, without prior written
permission by TEControl AB. All product and company names are trademarks of their respective owners.
For up to date information, including documentation and software, please visit the support
pages at
http://www.tecontrol.se/products/uni-midi-breath-controller/support
For general information about products email us at [email protected]
For technical questions and enquiries email us at [email protected]
TEControl AB
Kalladalsv.42
23197 Klagstorp
Sweden
Page 3

Contents
Contents iii
Introduction iv
1 Overview 1
1.1 System requirements . . . . . . . . . . . . . . . . . . . . . . . . . . . . . . . . . 1
2 Getting started 2
2.1 Deliverables . . . . . . . . . . . . . . . . . . . . . . . . . . . . . . . . . . . . . . 2
2.2 Installation . . . . . . . . . . . . . . . . . . . . . . . . . . . . . . . . . . . . . . . 2
2.3 Default settings . . . . . . . . . . . . . . . . . . . . . . . . . . . . . . . . . . . . 2
3 Configuration Utility 3
3.1 Installation . . . . . . . . . . . . . . . . . . . . . . . . . . . . . . . . . . . . . . . 3
3.2 How to configure . . . . . . . . . . . . . . . . . . . . . . . . . . . . . . . . . . . 4
4 Configuring your DAW and VI 6
4.1 DAW . . . . . . . . . . . . . . . . . . . . . . . . . . . . . . . . . . . . . . . . . . 6
4.2 VIs . . . . . . . . . . . . . . . . . . . . . . . . . . . . . . . . . . . . . . . . . . . 6
4.3 Compatibility . . . . . . . . . . . . . . . . . . . . . . . . . . . . . . . . . . . . . 6
5 Declaration of conformity 8
iii
Page 4

Introduction
With sample libraries getting better and better and physical modeling advancing to incredible realism, the need for good controllers is obvious.
Our breath controllers fill the gap left by Yamaha when they discontinued production of
the BC3 breath controller. We like to think that we took over where Yamaha left, providing
the MIDI community with not only a replacement but taking it to a new level.
To quickly get an overview of the past and present world of breath and wind controllers,
we recommend checking out the following page:
http://www.patchmanmusic.com/WindControllerFAQ.html
iv
Page 5

1 Overview
The UNI MIDI Breath Controller is a breath-to-MIDI converter for use with any MIDI device
accepting CC data though a USB port or traditional DIN connector. It has a built-in pressure
sensor and generates continuous MIDI data corresponding to the amount of breath pressure
applied to it. The UNI MIDI Breath Controller can be programmed to send any CC, Pitch
Bend or Aftertouch message on any MIDI channel, including but not limited to:
CC1 Modulation wheel
CC2 Breath control
CC7 Volume
CC11 Expression
Another unique feature of the UNI MIDI Breath Controller is its ability to add a variable
amount of curvature to the response of the applied pressure. In other words it is possible
to reshape the response from breath pressure to MIDI CC to your liking. This allows implementing a nonlinear response, by adding greater response at one end of the breath range
compared to the other. You can therefore optimize the sensitivity to your own style of playing.
The UNI MIDI Breath Controller comes with default factory settings but can be reconfigured by using the Configuration Utility, which runs on Windows or Mac computers and
can store settings in the device non-volatile memory, allowing them to be retained for standalone use with a keyboard/synthesizer. The factory default settings are CC2 (Breath Control) on MIDI channel 1, with linear sensitivity and maximum input/output ranges. The
UNI MIDI Breath Controller sends identical MIDI data on both cables (USB and DIN) but
it is powered exclusively through the USB connector and has no internal batteries. This
means that when using the DIN connector only (for example standalone use with a keyboard/synthesizer), the device still needs to be powered through the USB connector. Power
can be supplied by a universal USB charger, which is not included in the package. The UNI
MIDI Breath Controller is delivered with silicone tubing and a flexible headset with integrated mouthpiece/adjustable bleed valve.
1.1 System requirements
The UNI MIDI Breath Controller does not require installation of drivers or software. It will
work straight out of the box with both Windows (XP or later) and Mac OS (10.5 or later).
If you need to change the default settings (for example the MIDI CC), you can optionally
download the free Configuration Utility from our website.
1
Page 6

2 Getting started
2.1 Deliverables
Your purchase of the UNI MIDI Breath Controller includes:
• Breath controller device with built-in USB and DIN cables
• Silicone tube
• Headset with mouthpiece
• Configuration Utility (download from our website)
2.2 Installation
Cut the silicone tube to convenient length and connect one end to the Breath Controller and
the other to the headset. At the end of the mouthpiece is an adjustable bleed valve which
allows you to set the amount of flow passing though the mouthpiece.
Connect the UNI MIDI Breath Controller to a USB port on your computer (No software
or driver installation is required) and it will show as “Breath Controller X.Y-NNNNNNNN”
in your applications, where X.Y is the firmware version and NNNNNNNN is the unique
serial number of your device.
Alternatively, simply connect the MIDI DIN cable to your synthesizer/keyboard, the
USB cable to a universal USB charger (not supplied) and start playing. Some synthesizers
have a USB port for reading/writing memory sticks. Such a port is also suitable as a power
source instead of the universal USB charger.
2.3 Default settings
The UNI MIDI Breath Controller comes pre-configured with default settings and will work
straight-out-of-the box. The default settings are as follows:
• Linear sensitivity
• Input and output ranges set to maximum
• Attack and decay filters set to minimum
• MIDI Message set to Control Change
• MIDI Channel 1
• MIDI CC 2 (breath control)
2
Page 7
3 Configuration Utility
3.1 Installation
The Configuration Utility is required for changing the settings and is available from our
support webpage:
http://www.tecontrol.se/products/uni-midi-breath-controller/support
Once you have downloaded the software, unzip the file and run the installer (Windows)
or drag and drop the application in your favourite location (Mac). On Windows the installer
will create a shortcut in the Start menu.
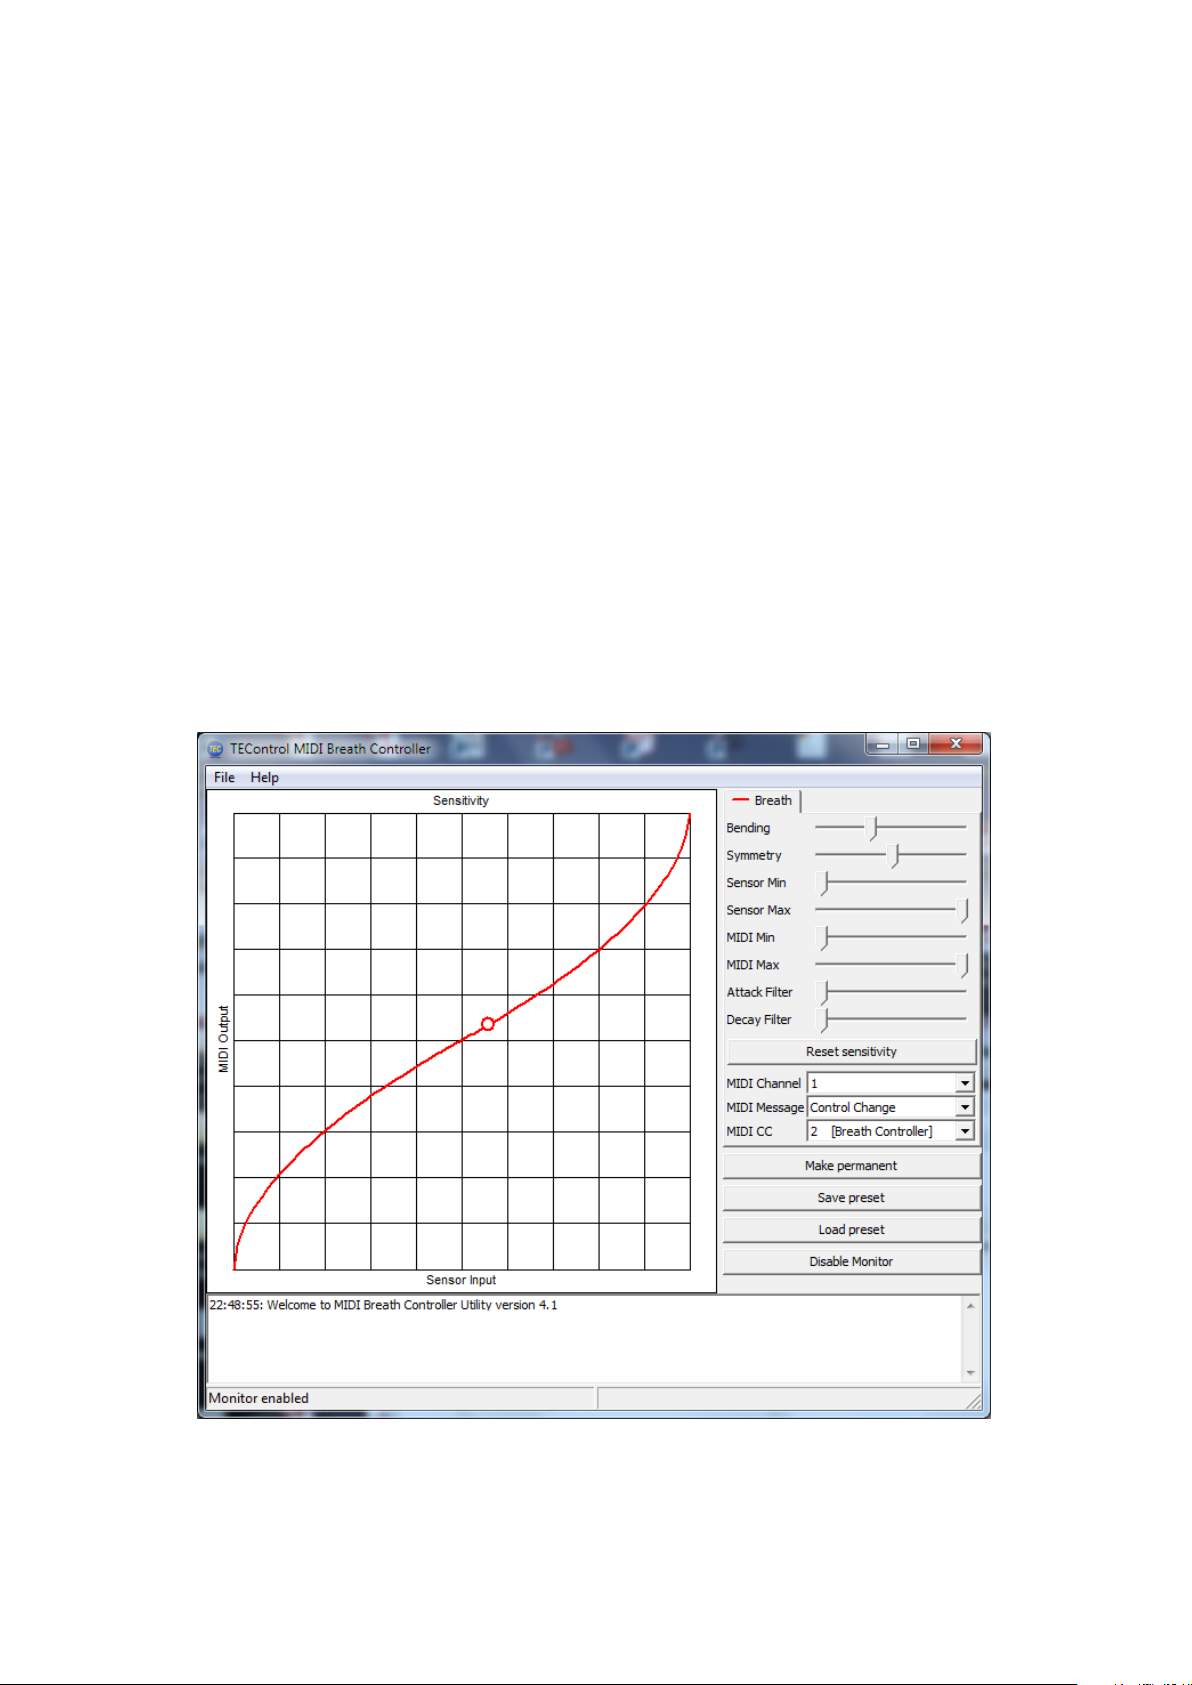
Starting the configuration Utility will show the following window
When started, the Configuration Utility will try to detect the Breath Controller. Upon
first use or if not found, the lower portion of the window will display an error message
“Error - controller not detected” followed by a suggestion to use the “File->Select controller”
menu to select the breath controller.
3
Page 8

It has been reported to us that on some Windows installations, the operating system
may report the Breath Controller as “USB Audio Device” instead of “Breath Controller”.
For those rare instances, we have added an option “Show all MIDI devices” to the “Select
controller” dialog box, which allows listing the correct device.
In your player/sequencer the Breath Controller has to be selected as a MIDI input in
order to work. The Breath Controller also appears in the MIDI output list but this should
not be selected since the output is used by the Configuration Utility to send configuration
messages.
3.2 How to configure
The 8 sliders of the Configuration Utility allow tailoring the response from sensor input to
MIDI value as well as adjusting the attack and decay times:
• The Bending and Symmetry sliders change the shape of the response.
• The Input Min slider sets the lower threshold of the input pressure. Any pressure
below the threshold will not cause any change in the output CC value, which will
remain at the minimum output value.
• The Input Max slider sets the upper threshold of the input pressurs. Any pressure
above the threshold will not cause any change in the output CC value, which will
remain at the maximum output value. In other words, this affects how hard you need
to blow to achieve the maximum output CC value.
• The Output Min slider sets the minimum output CC value, which is output when the
pressure is at or below the lower threshold. This is useful if you don’t want the CC
value to drop to zero.
• The Output Max slider sets the maximum output CC value, which is output when
the pressure is at or above the upper threshold. This is useful if you want to limit the
maximum CC value to less than 127.
• The Attack and Decay Filter sliders set the respective time constants individually. Setting the sliders fully left produce the fastest response (filter disabled); setting them
fully right allows time constants of several seconds. This is very useful for semiautomatic swells.
Below the sliders there are the following additional controls:
• The Reset sensitivity button resets the sensitivity to linear with full input and output
ranges.
• The MIDI Channel drop-down list selects the MIDI channel to be used for the transmission of the MIDI messages.
• The MIDI CC drop-down list selects the actual controller to be used, for example CC1
[Modulation Wheel], CC2 [Breath Control] and so on. The MIDI CC is effective only
when Control Change is selected in the MIDI Message drop-down list.
• The MIDI Message drop-down list offers, in addition to the above mentioned Control
Change, other MIDI message options such as Aftertouch, Pitch Bend Up, Pitch Bend
Down and Pitch Bend Both.
• The Make Permanent button stores the current settings in the Breath Controller’s nonvolatile memory so that they are remembered even when the device is removed from
the computer. You can use this button as often as you wish.
• The Save Preset button allows storing the current settings in a file anywhere on your
computer, for later retrieval.
• The Load Preset button allowsto retrieve a previously saved file and apply the settings
in it to the breath controller. Note, the file name must end in “.tec” otherwise it will
not be possible to select it.
4
Page 9

• The Enable/Disable Monitor button enables a circular marker that is displayed along
the sensitivity curve and indicates the actual sensor input. This is very useful for
tailoring the sensitivity to suit your playing style.
Note that when either Aftertouch or any of the Pitch Bend options are selected the MIDI CC
drop down is grayed out. Aftertouch is what the MIDI specification refers to as “channel
pressure”.
All changes to the settings take immediate effect but are lost when the computer is powered off or the device is removed from the computer. To store you settings permanently
in the device, use the Make permanent button. This means your settings are remembered
when the device is unpowered. You can now move it to another computer or a synthesizer
with your favorite settings intact.
5
Page 10

4 Configuring your DAW and VI
4.1 DAW
In your DAW/player software the breath controller must be selected as a MIDI input device
in order to work. In your DAW you must also configure the MIDI input of the track you are
playing or recording to “MIDI omni”, “All MIDI inputs” or similar function in order to
configure the track to respond to all MIDI controllers. This is necessary to allow controlling
the instrument from both keyboard and breath controller.
Warning! Due to the nature of the breath sensor the MIDI CC will be left at the minimum
(most commonly zero) value when you release the pressure (i.e. stop blowing). Depending
on which CC you are controlling you might then not hear any sound without blowing and it
is possible to get deadlocked. For example suppose you first set the breath controller to CC
7 (volume); when you stop blowing your instrument volume will stay at zero value. If you
now change the breath controller to some other CC, for example 11 (expression) no sound
will be heard even when you blow since CC 7 (volume) is still at zero. Please, keep this in
mind before contacting us. To solve the problem either restart your sample player or try the
following:
• select the CC that might be left at zero
• while applying pressure change the CC to 1 (mod wheel)
• repeat if you have more CCs left at zero.
4.2 VIs
Just as any other MIDI controller, the MIDI CC sent by the breath controller must be matched
to a CC accepted by the VI you want to control.
For example MIDI CC2 (Breath Controller) will have no effect on your instrument if the
instrument does not respond to CC2. In this case you have to configure the breath controller
to send another CC, for instance CC7 (Volume, most instruments respond to this) or CC11
(Expression, also available in most instruments).
Alternatively you can change the controls of your VI to match the default settings of the
breath controller (most VIs allow this, but some don’t - most notably EWQL play engine). If
you want to control the expression of your VI with breath control, change the VI expression
CC control to CC2.
Many VIs have a MIDI learn function for their controls which you can activate and then
blow in the breath controller to make the VI assign whatever CC comes from the breath
controller to the selected parameter.
4.3 Compatibility
Compatibility has been verified with the following sample libraries:
6
Page 11

• Adagio violas
• LA Scoring Strings LASS
• East West Quantum Leap (EWQL)
• Berlin Woodwinds.
• Symphobia 1 & 2 and True Strike 1 & 2
• All instruments, both Kontakt based and SWAM based
• Omnisphere, Trilian and Stylus RMX
• Albion
• Vienna Instrument PRO
• All instruments
We have not yet found any sample player incompatible with our breath controllers.
There are of course many left to be tested and although we cannot guarantee compatibility there is no reason to believe our breath controllers are incompatible with any software
implementing the USB-MIDI standards.
7
Page 12
5 Declaration of conformity
8
 Loading...