

Page 1
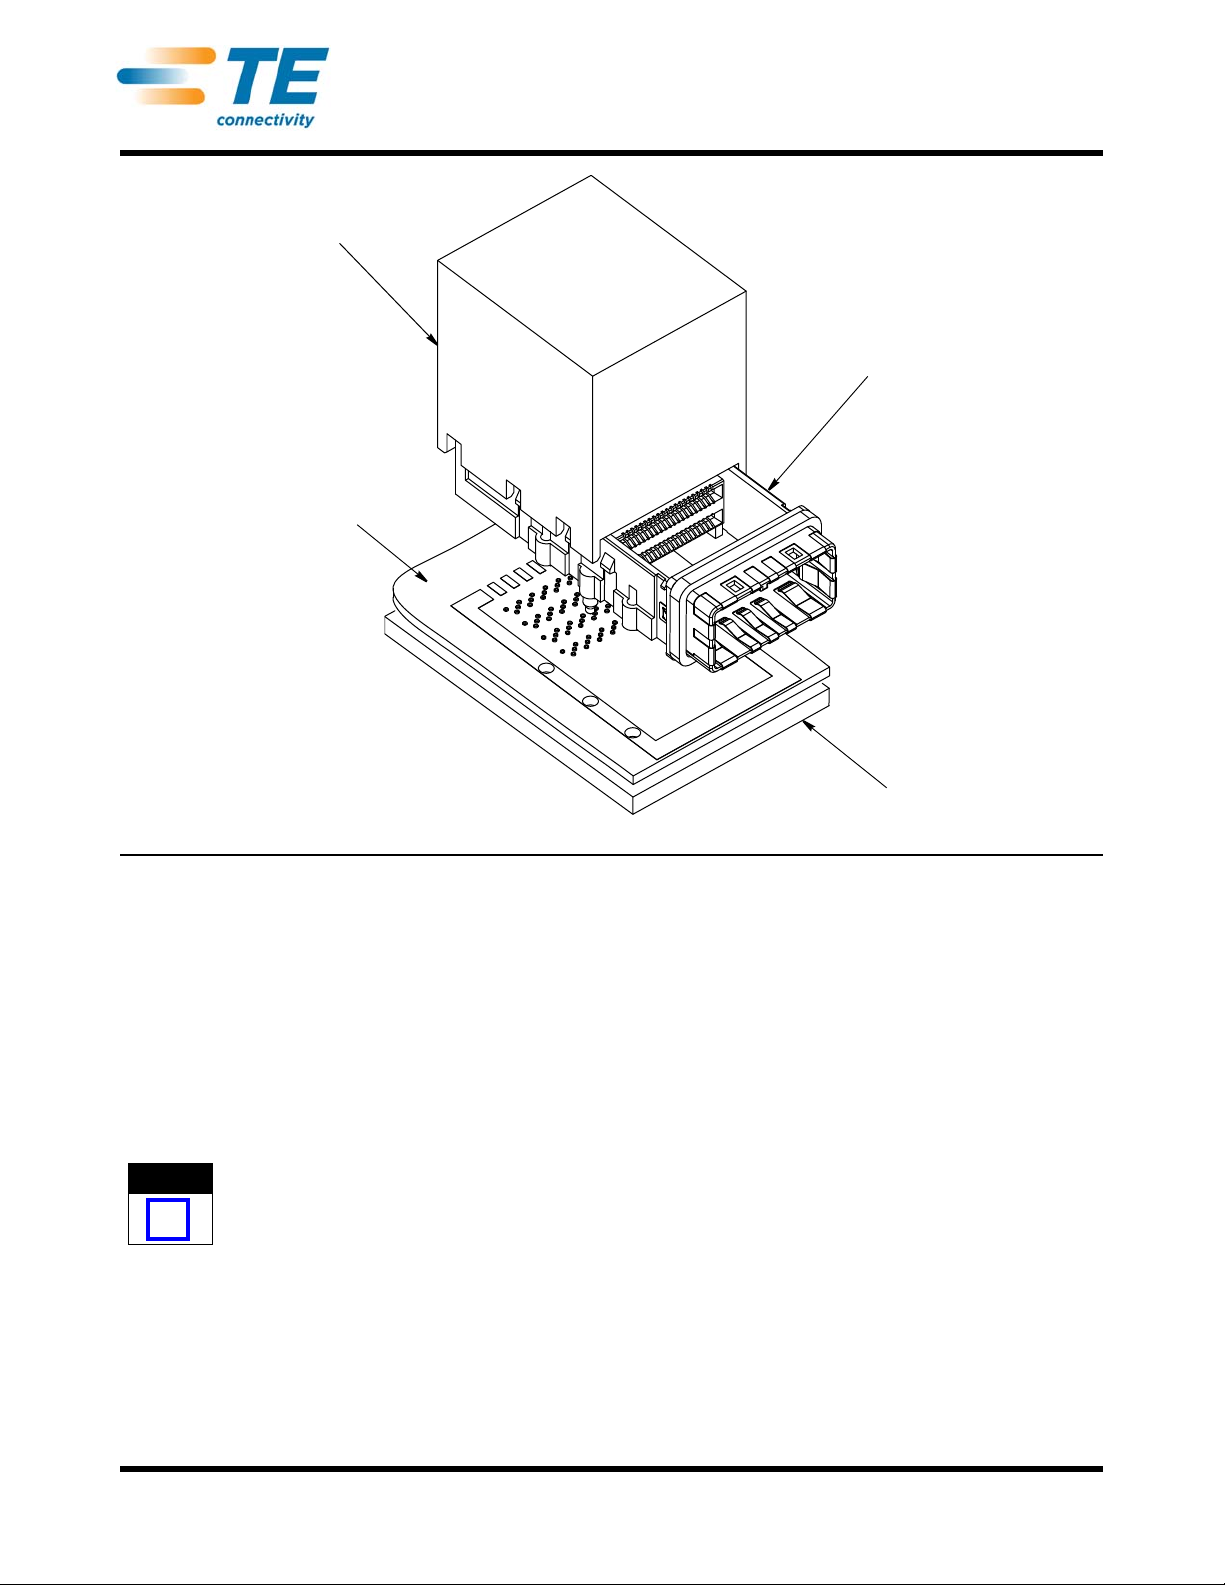
CXP Seating Tool Kit 2018681-1
NOTE
i
Seating Tool 2018681-1
PC Board Support Fixture
(Customer supplied)
Printed Circuit (PC) Board
CXP Cage Assembly
Instruction Sheet
408-10380
14 AUG 13 Rev C
ORIGINAL INSTRUCTIONS
1. INTRODUCTION
CXP Seating Tool Kit 2018681-1 shown in Figure 1 is
used to seat the cage assembly shown in Figure 1
onto the pc board. The cage assembly contains
compliant pin contacts to allow solderless pc board
installation. The seating tool is not designed to seat
the connector. Refer to Application Specification
114-13283 for connector application requirements.
Read these instructions thoroughly before using the
seating tool kit.
2. DESCRIPTION
Each seating tool kit consists of a seating tool and a
wall support. The seating tool and wall support are
also available separately. The seating tool has cutout s
(two located on each side) to accept the protru din g
part of the standoffs of the cage assembly. The wall
Figure 1
Dimensions on this sheet are in metric units.
Figures and illustrations are for reference only and
are not drawn to scale.
support must be installed into the ports of the cage
assembly.
The top of the seating tool provides a surface to
accept the force applied by the application tool to seat
the product onto the pc board. During seating, the
back and sides of the seating tool protect the cage
assembly from damage. The wall support supports the
individual ports of the cage assembly.
3. REQUIREMENTS
3.1. PC Board Support Fixture
A pc board support must be used to provide proper
support for the pc board and to protect the pc board
and the connector and cage assembly from damage.
The support fixture must be designed for specific
needs using the following recommendations:
(Customer Supplied)
•it should be at least 25.4 mm longer and wider
than the pc board
•it should have flat surfaces with holes or a channel
large enough and deep enough to receive any protruding components of the product
©2013 Tyco Electronics Corporation, a TE Connectivity Ltd. Company
All Rights Reserved
*Trademark
TE Connectivity, TE connectivity (logo), and TE (logo) are trademarks. Other logos, product and/or Company names may be trademarks of their respective owners.
TOOLING ASSISTANCE CENTER
PRODUCT INFORMATION
1-800-722-1111
1-800-522-6752
This controlled document is subject to change.
For latest revision and Regional Customer Service,
visit our website at www.te.com
1 of 3
LOC B
Page 2
408-10380
CAUTION
!
CAUTION
!
NOTE
i
NOTE
i
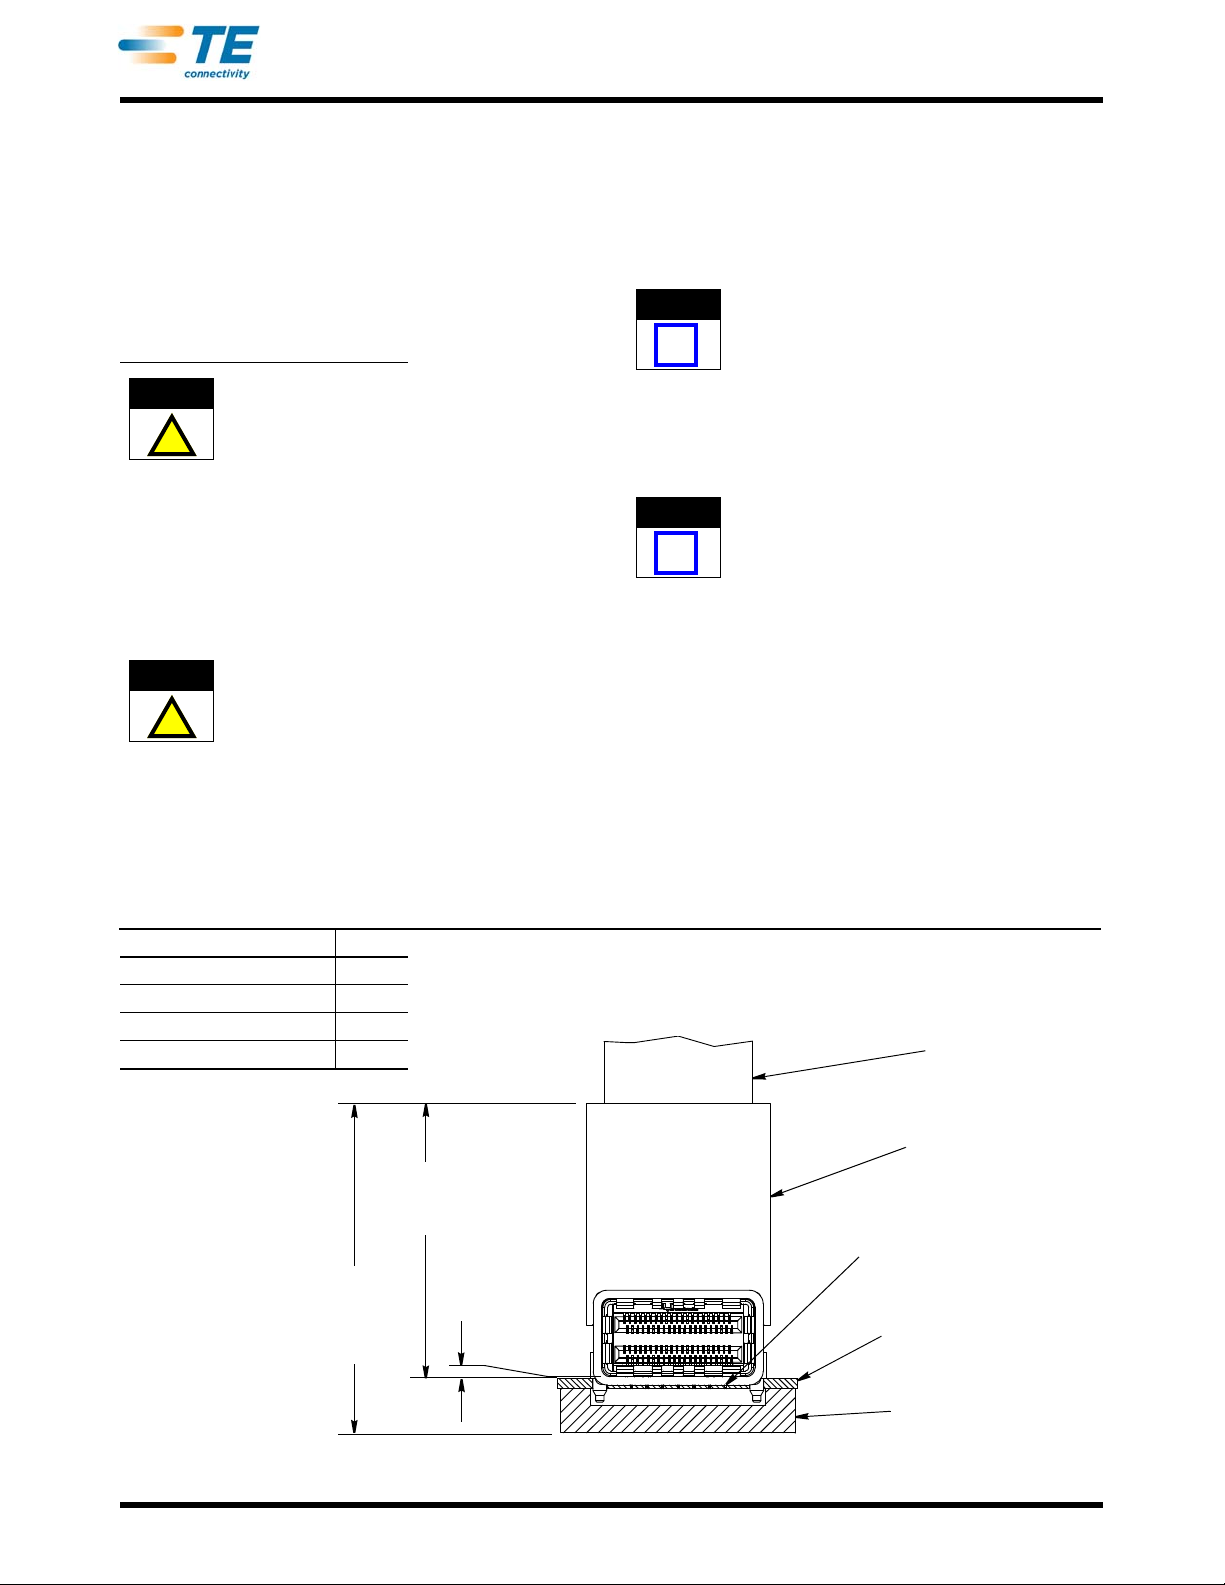
PC Board Support Fixture
Customer Supplied)
Printed Circuit (PC) Board
Ram of Application
Tool (Fully Down)
Seating Tool
Compliant Pin Contacts (and
Any Protruding Components)
Inserted Into Holes in PC Board
and PC Board Support Fixture
Tool Seating Height
“A” (With Cage
Assembly
Seated)
0.10 (Max)
Gap Allowed
Application Tool
Shut Height (Ram
Fully Down) See
Section 4, Step 1
CONNECTOR TYPE “A”
Standard (Without Cover) 42.15
Standard (With Cover) 42.37
Belly-Belly (Without Cover) 41.80
Belly-Belly (With Cover) 42.05
3.2. Application Tool
Power for the seating tool must be provided by
application tools (with a ram) capable of supplying a
downward force of 24.5 N [5.5 lb] per contact.
Manual Electric Servo Press (MEP 6T) 2-1399500-5
and Bench Top Electric Servo Presses (BMEP 3T)
1-1399400-5 and (BMEP 5T) 2-1399401-4 are
available for this seating tool. For press information,
visit the press-fit assembly equipment website at
http://tooling.te.com/pressfit.asp.
Over-driving of the cage assembly will deform
parts critical to the quality of the connection.
Maximum force occurs prior to the cage assembly
bottoming on the pc board.
4. SETUP
When setting up equipment to seat the cage
assembly, pay particular attention to the following:
•the seating tool must be matched to the cage
assembly
If the seating tool and cage assembly are
mismatched or are improperly aligned, damage
could occur to the tooling, cage assembly, or both
•light pipes and/or heatsinks MUST NOT be
assembled onto the cage assembly.
•the wall support must be properly installed, and
the seating tool, cage assembly, and application
tool ram must be properly aligned before cycling
the application tool
1. Set the tool seating height to the dimension
shown in Figure 2 (application tool shut height
will equal the tool seating height PLUS the
combined thicknesses of the pc board and
support fixture). After seating, a gap of no more
than 0.10 mm between the cage assembly
standoffs and the pc board is allowed.
Use the tool seating height as a reference starting
point. This height may need to be adjusted to
obtain the amount allowed (maximum of 0.10 mm)
between the standoffs of the cage assembly and
the pc board.
2. Slide the wall support into the ports of the
cage assembly until the wall support is secure.
5. SEATING (See Figure 2)
The connector must be mounted on the pc board
BEFORE seating the cage assembly.
1. Place the pc board on the support fixture.
2. Orient the seating tool over the cage
assembly so that the back is aligned with the
back of the cage assembly. Then lower the
seating tool onto the cage assembly, making
sure that the cutouts slide over the protruding
components of the cage assembly, until the
seating tool bottoms on the top of the cage
assembly.
3. Place the cage assembly on the pc board so
that the contacts and alignment posts are
aligned and started into the matching holes in
the pc board.
Rev C
Figure 2
2 of 3
Page 3
408-10380
CAUTION
!
NOTE
i
1.375 ±0.013
34 ±0.4
28.15 ±0.4
33 ±0.4
4. Center the seating tool (with the cage
assembly) under the ram of the application tool.
Slowly lower the ram until it just meets the
seating tool. Verify alignment of pc board
support, pc board, cage assembly, and seating
tool.
Damage to the pc board, seating tool, or cage
assembly may occur if the seating tool is not
properly seated on the cage assembly before
cycling the application tool.
5. Cycle the application tool to seat the cage
assembly on the pc board. Then retract the ram,
and carefully remove the seating tool by pulling it
straight from the cage assembly.
6. Check the cage assembly for proper seating
according to the following:
a.the widest section of each compliant pin is
inside its intended pc board hole
b.each alignment post is in its intended pc
board hole
c.if present, the gap between the standoffs
and the pc board is no more than 0.10 mm.
For detailed application requirements of the cage
assembly, refer to the application specification
given in Figure 1.
6. MAINTENANCE AND INSPECTION
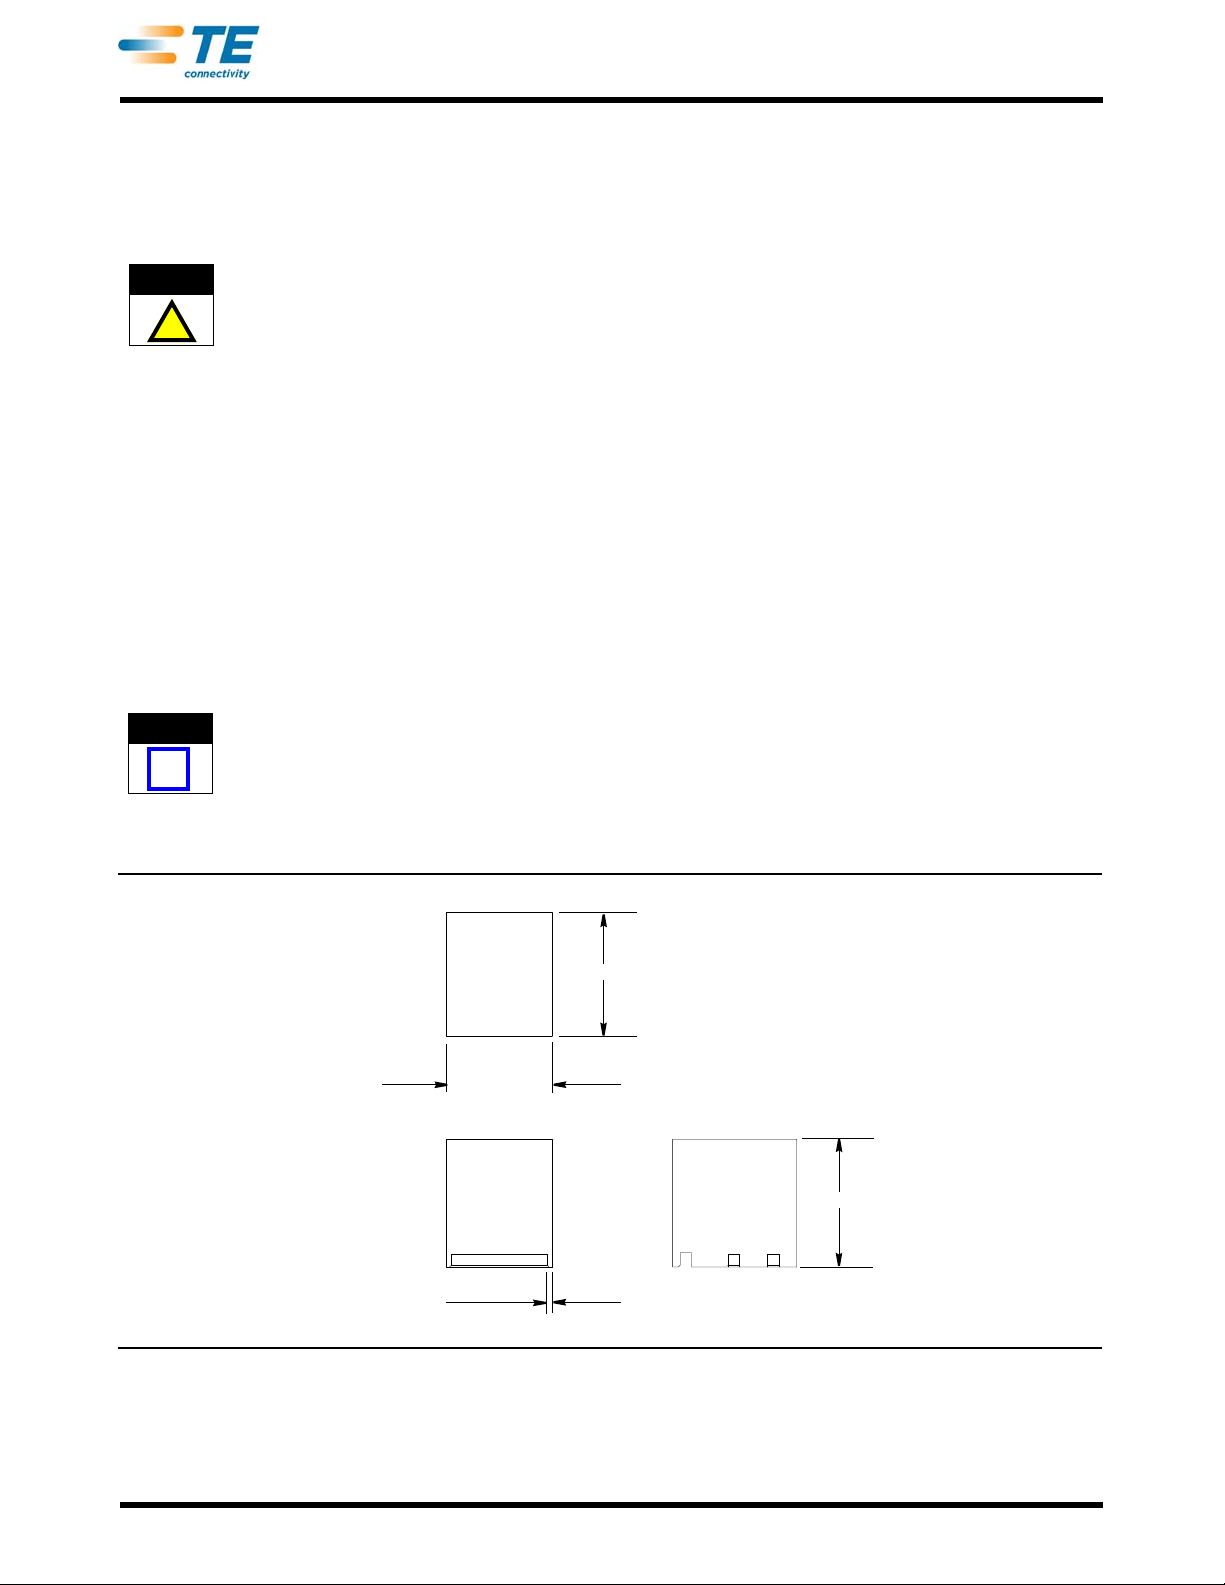
The seating tool kit is assembled and inspected
before shipment. It is recommended that the seating
tool kit be inspected immediately upon arrival at your
facility to ensure that it has not been damaged during
shipment, and that it conforms to the dimensions
provided in Figure 3.
6.1. Daily Maintenance
It is recommended that each operator be made awar e
of, and responsible for, the following steps of daily
maintenance:
1. Remove dust, moisture, and contaminants
with a clean, soft brush or a lint-free cloth. DO
NOT use objects that could damage the
components.
2. When the seating tool and wall support are
not in use, store them in a clean, dry area.
6.2. Periodic Inspection
Regular inspections should be performed by quality
control personnel. A record of scheduled inspections
should remain with the seating tool or be supplied to
personnel responsible for the seating tool kit.
Inspection frequency should be based on amount of
use, working conditions, operator training and skill,
and established standards.
7. REVISION SUMMARY
•Added table to Figure 2
•Changed dimension in Figure 3
Rev C
Figure 3
3 of 3
 Loading...