

Page 1
Error Messages and Corresponding Operation
CHECK CLAMPS
9V INTERNAL BATTERY
IS LOW
LOAD ERROR
is displayed if the connection is poor between the
battery clips and the posts of the battery. Ensure
that the battery posts are free of dirt and grease
before remaking the connection. It is important to
note that each battery clip has a separate isolated
plate on the inside of its jaw. Both the isolated plate
and the other side of the jaw need to be in good
contact with the battery post to ensure a reliable
test result.
is displayed if the internal 9V battery is low or the
connection between instrument and internal battery
terminals is poor.
Exception: If the internal battery is very low, and the
voltage of the battery under test is less than 8V, no
message will be displayed. Replace the internal battery
before proceeding.
is displayed if the clamps are not connected
properly. Please fully charge the battery and retest
after checking clamps. If reading is the same, the
battery tester needs to be fi xed.
Warranty
TecMate (International) S.A./N.V., Ambachtenlaan 6, B-3300 Tienen, Belgium, offers
this limited warranty covering defective parts or manufacture, for a period of 2 years
from the documented date of sale to the user. Wear and tear, damaged or deteriorated
leads or battery clips, damage ensuing from exposure to liquids, acidic or corrosive vapours,
oxidation or other contamination, physical damage of any nature and/or any other defect or
damage resulting from user malfeasance are excluded from warranty cover. In case a 9V dry
cell battery is supplied with the tester, this as well as any damage caused by the discharge of
any 9V battery in the tester, is specifi cally excluded from this warranty. This limited warranty
specifi cally excludes any and all consequential damages that may arise. Your statutory rights
are not affected. To claim on warranty you must return the tester together with the original
dated proof of purchase document direct to the authorized distributor who will repair or
replace the tester at his discretion.
Copyright Warning: this document is a registered copyright of TecMate (International)
and anyone reproducing it in whole or in part without specifi c written authorization will
be prosecuted.
Digital battery tester for 12V
motorcycle/ATV/PWC batteries
Instructions for use
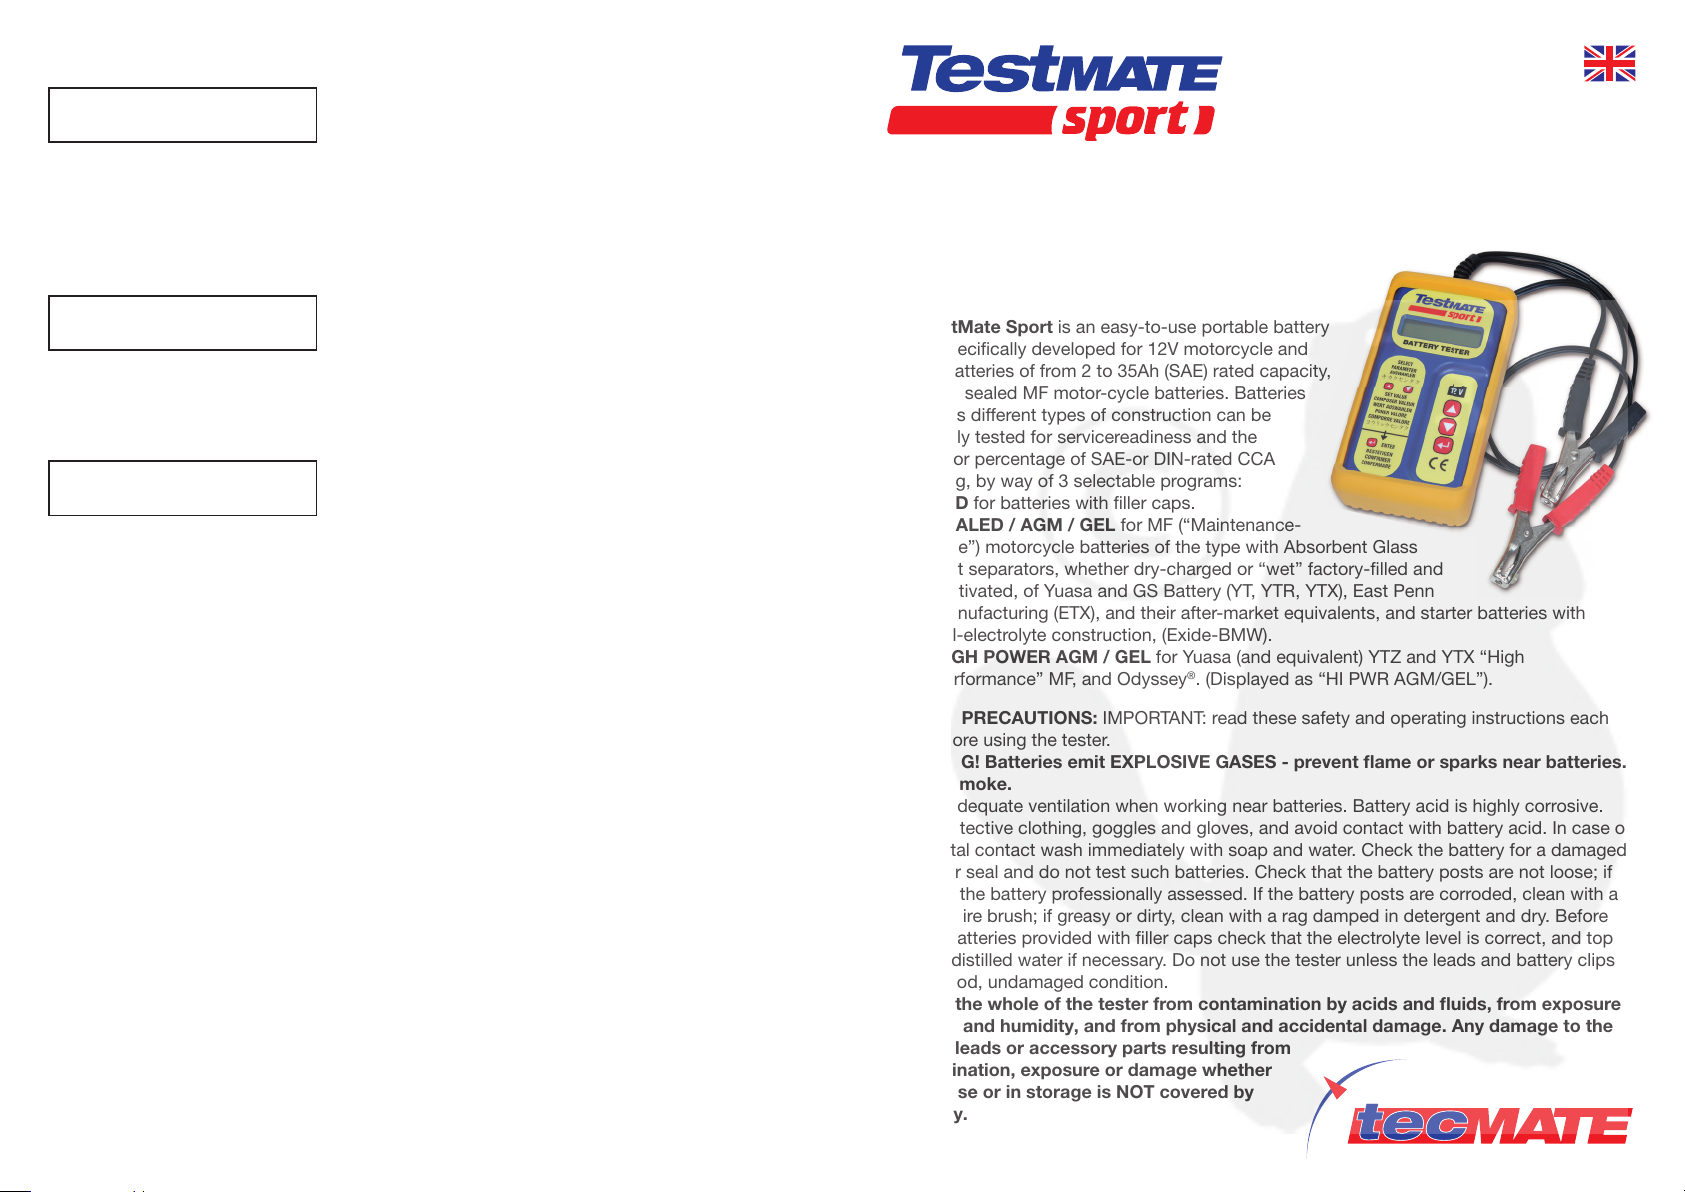
The TestMate Sport is an easy-to-use portable battery
tester specifi cally developed for 12V motorcycle and
similar batteries of from 2 to 35Ah (SAE) rated capacity,
including sealed MF motor-cycle batteries. Batteries
of various different types of construction can be
accurately tested for servicereadiness and the
amount or percentage of SAE-or DIN-rated CCA
remaining, by way of 3 selectable programs:
(1) STD for batteries with fi ller caps.
(2) SEALED / AGM / GEL for MF (“Maintenance-
Free”) motorcycle batteries of the type with Absorbent Glass
Mat separators, whether dry-charged or “wet” factory-fi lled and
-activated, of Yuasa and GS Battery (YT, YTR, YTX), East Penn
Manufacturing (ETX), and their after-market equivalents, and starter batteries with
gel-electrolyte construction, (Exide-BMW).
(3) HIGH POWER AGM / GEL for Yuasa (and equivalent) YTZ and YTX “High
Performance” MF, and Odyssey
SAFETY PRECAUTIONS: IMPORTANT: read these safety and operating instructions each
time before using the tester.
WARNING! Batteries emit EXPLOSIVE GASES - prevent fl ame or sparks near batteries.
Do not smoke.
Ensure adequate ventilation when working near batteries. Battery acid is highly corrosive.
Wear protective clothing, goggles and gloves, and avoid contact with battery acid. In case of
accidental contact wash immediately with soap and water. Check the battery for a damaged
casing or seal and do not test such batteries. Check that the battery posts are not loose; if
so, have the battery professionally assessed. If the battery posts are corroded, clean with a
copper wire brush; if greasy or dirty, clean with a rag damped in detergent and dry. Before
testing batteries provided with fi ller caps check that the electrolyte level is correct, and top
up with distilled water if necessary. Do not use the tester unless the leads and battery clips
are in good, undamaged condition.
Protect the whole of the tester from contamination by acids and fl uids, from exposure
to damp and humidity, and from physical and accidental damage. Any damage to the
unit, its leads or accessory parts resulting from
contamination, exposure or damage whether
during use or in storage is NOT covered by
warranty.
copyright © 2011 TecMate TA017-IN1-110422_EN
TM
®
. (Displayed as “HI PWR AGM/GEL”).
TM
Page 2
Operation
1) It is recommended to disconnect and remove the battery from the vehicle and place on
a hard fl at surface. If the battery is to be tested on the vehicle, fi rst disconnect ALL
accessories and loads to avoid a wrong result.
2) Check that the battery posts are clean (see above) and correct the electrolyte level of
batteries with fi ller caps.
3) If not delivered with its battery already fi tted, insert a standard 9 Volt dry cell battery
into the TestMate Sport, ensuring good connections. This battery is normally supplied
with the tester but may not be in certain countries. NOTE: To avoid risk of damage to
the tester do not leave a discharged battery in it for any length of time. 9V INTERNAL
BATTERY IS LOW is displayed to warn of a discharged battery. Replace the battery
before using the tester again.
4) Connect the black (negative) battery clip to the negative (or black) battery post, and the
red battery clip to the positive (or red) battery post.
IMPORTANT NOTE: Each battery clip has a separate isolated plate on the inside
of its jaw. Both the isolated plate and the other side of the jaw must be in good
contact with the battery terminal to ensure a reliable test result.
5) Once the connection to the battery is made, the
display will show BATTERY TESTER, then the
BATTERY VOLTS.
LANGUAGE CHANGE: the default language is English. If you wish to select another
language (6 availbale), just press one of the
selection keys
pressing the “ENTER” key. The selected language
becomes the new default language but can be changed again afterwards.
NOTE: The battery voltage display is intended to indicate if the battery has suffi cient
charge prior to the test. During the test the battery voltage must remain above 12,4V for
a standard (STD) fi ller cap battery and 12,65V for an AGM /GEL MF battery at a
20°C/68°F ambient to give a GOOD > READY result. Press “ENTER” key to continue.
6) The display now asks you to select the battery type,
STD / FILLER CAP, or SEALED / AGM / GEL, or HI
PWR AGM / GEL. Press the
correct battery type is displayed, e.g. “SEALED / AGM / GEL”, then press ENTER.
7) The display will now ask you to “SELECT THE
PARAMETER” between:
DIN CCA (Cold Cranking Amps according to DIN,
see note below),
SAE CCA (Cold Cranking Amps according to SAE, see note below), and
AH (Storage Capacity in Ampère-hours).
Press the
the “ENTER” key.
NOTE: There are 2 main classifi cation systems for the rated Cold Cranking Amps (CCA)
of starter batteries, DIN Deutsche Industrie-Norm) and SAE (Society of Automotive
Engineers). The SAE standard is mostly used in North America and Asia. Japanese
battery manufacturers such as GS-Yuasa usually provide SAE CCA values. The DIN
standard is mainly used in Europe and by European battery manufacturers.
Confi rm according to which CCA standard the CCA of the battery under test is
stated! It should be stated on the label on the battery, if not check the
manufacturer’s documentation.
. Confi rm your choice by
keys until the
keys to select the preferred parameter. Confi rm your choice by pressing
BATTERY VOLTS
xx,xx V
LANGUAGE; ENGLISH
SELECT
BATTERY TYPE
SEALED/AGM/GEL
SELECT THE
PARAMETER AH
8) The display will now ask you to “SET THE VALUE” of the rated CCA or Ah, depending
on your selection of parameter in the previous step.
If you selected Ah as the parameter, it is important to
enter the correct Amp-hour value between 2 and 35
Ah as this determines the resistive load value and
CCA parameters that will be used during the test. Refer to the battery listings on the
chart in the base of the protective holder to obtain the rated CCA or Ah for the most
popular battery models.
The display reverts to 2Ah if a capacity > 35Ah is entered. The test will start as soon as
you press ENTER to confi rm the CCA or Ah value you have set.
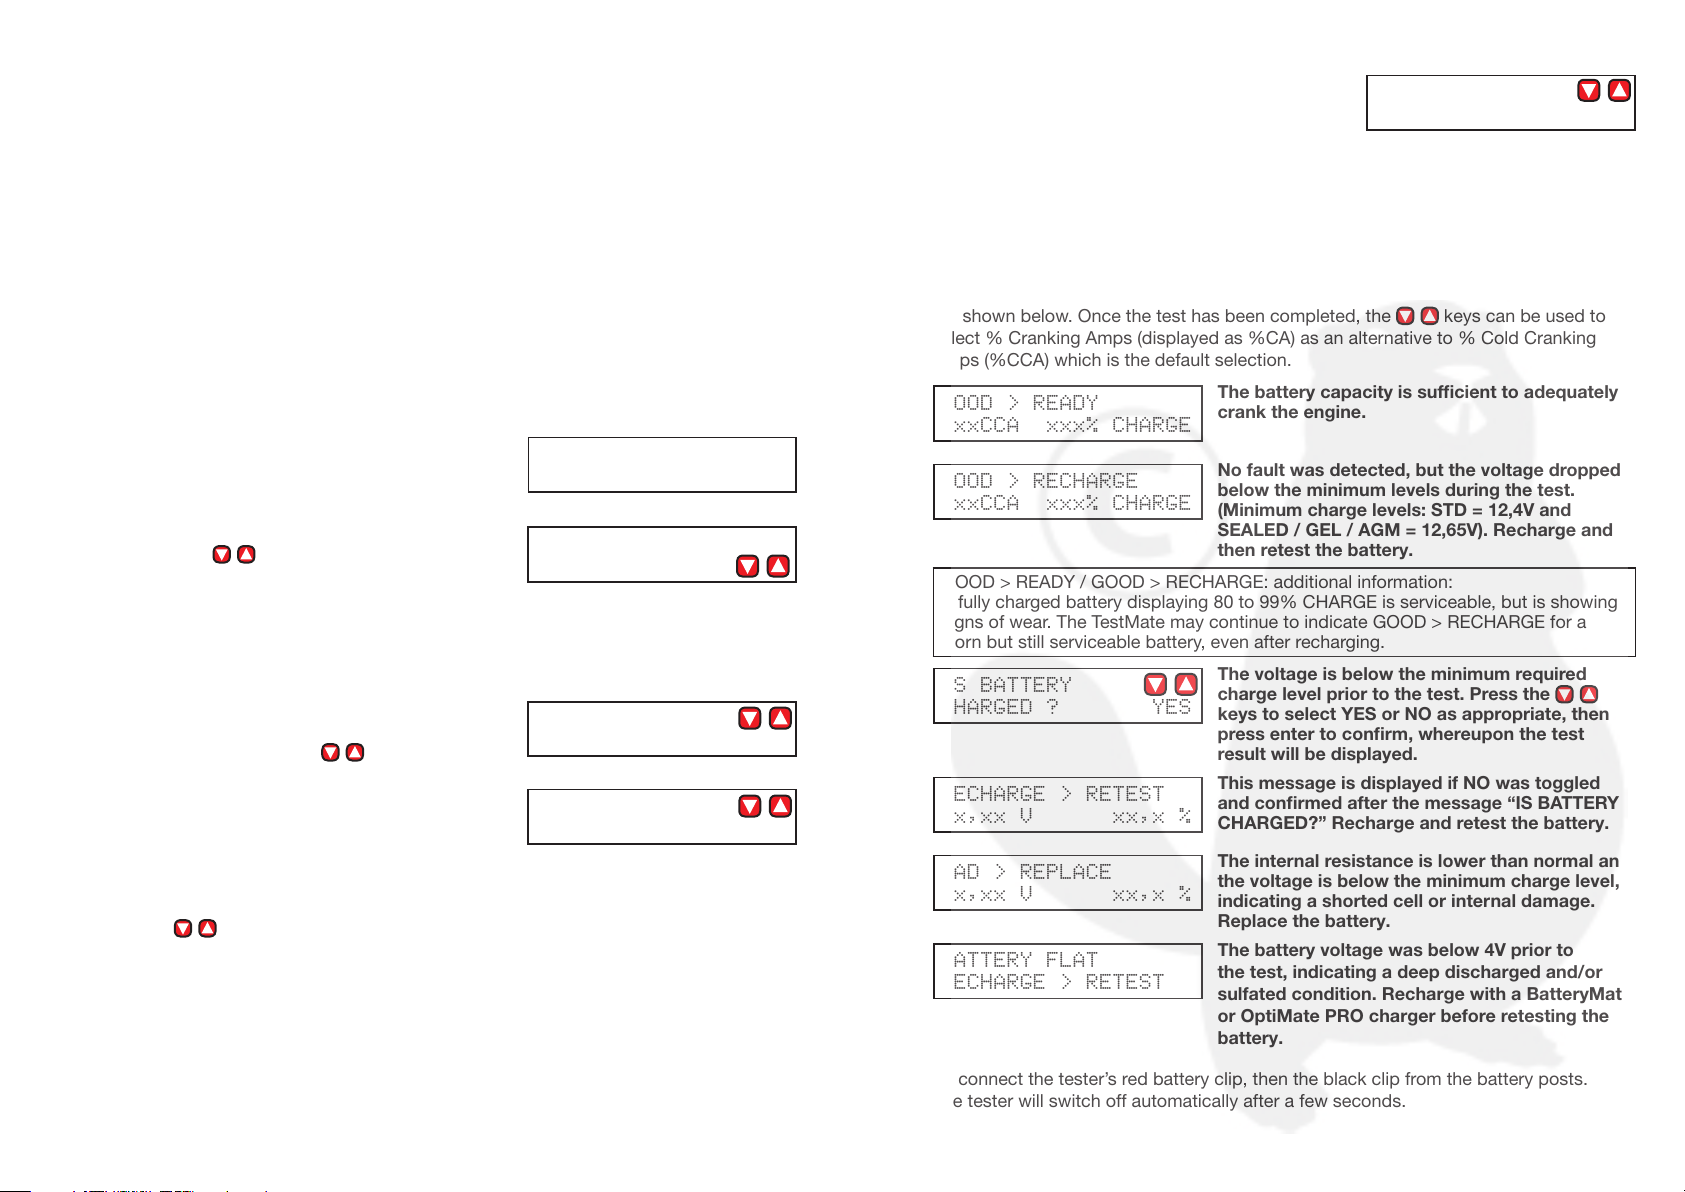
9) TESTING is now displayed for a few seconds followed by both a text summary of the
result, the actual CCA, and % CHARGE. The possible result texts that can be displayed
are shown below. Once the test has been completed, the
select % Cranking Amps (displayed as %CA) as an alternative to % Cold Cranking
Amps (%CCA) which is the default selection.
GOOD > READY
xxxCCA xxx% CHARGE
GOOD > RECHARGE
xxxCCA xxx% CHARGE
GOOD > READY / GOOD > RECHARGE: additional information:
A fully charged battery displaying 80 to 99% CHARGE is serviceable, but is showing
signs of wear. The TestMate may continue to indicate GOOD > RECHARGE for a
worn but still serviceable battery, even after recharging.
IS BATTERY
CHARGED ? YES
RECHARGE > RETEST
xx,xx V xx,x %
BAD > REPLACE
xx,xx V xx,x %
BATTERY FLAT
RECHARGE > RETEST
10) Disconnect the tester’s red battery clip, then the black clip from the battery posts.
The tester will switch off automatically after a few seconds.
The battery capacity is suffi cient to adequately
crank the engine.
No fault was detected, but the voltage dropped
below the minimum levels during the test.
(Minimum charge levels: STD = 12,4V and
SEALED / GEL / AGM = 12,65V). Recharge and
then retest the battery.
The voltage is below the minimum required
charge level prior to the test. Press the
keys to select YES or NO as appropriate, then
press enter to confi rm, whereupon the test
result will be displayed.
This message is displayed if NO was toggled
and confi rmed after the message “IS BATTERY
CHARGED?” Recharge and retest the battery.
The internal resistance is lower than normal and
the voltage is below the minimum charge level,
indicating a shorted cell or internal damage.
Replace the battery.
The battery voltage was below 4V prior to
the test, indicating a deep discharged and/or
sulfated condition. Recharge with a BatteryMate
or OptiMate PRO charger before retesting the
battery.
SET THE VALUE
xx AH
keys can be used to
 Loading...