

Page 1
INSTRUCTIONS FOR USE
IMPORTANT: Read completely
before charging
MODE D’EMPLOI
IMPORTANT: à lire avant
d’utiliser l’appareil
ANWENDUNGSVORSCHRIFTEN
WICHTIG: Vollständig vor der
Benutzung lesen
GEBRUIKSAANWIJZING
BELANGRIJK: Lees volledig
voor gebruik
MODO DE EMPLEO
IMPORTANTE: a leer antes de
utilizar el aparato
INSTRUÇÕES DE UTILIZAÇÃO
IMPORTANTE: Ler antes de
utilizar.
ISTRUZIONI PER L’USO
IMPORTANTE: da leggere prima
di utilizzare l’apparecchio
INSTRUKTIONER
VIKTIGT: läs följande
fullständiga instruktioner
för användningen innan du
använder laddaren
1 x 12.8V 4 series cell
Lithium Iron Phospate / LFP
2.5 - 30Ah
+ -
MODEL: TM470 / TM471 / TM472
AC: 100 – 240VAC 50-60Hz
0.23A @ 100Vac / 0.15A @ 240Vac
DC: 0.8A 12.8V
4 x 12.8V 4 series cell
Lithium Iron Phospate / LFP
2.5 - 30Ah
+ -
MODEL: TM484 / TM485 / 486
AC: 100 – 240VAC 50-60Hz
0.92A @ 100Vac / 0.60A @ 240Vac
DC: 4 x 0.8A 12.8V (independent)
Automatic charger for 12.8V LiFePO4 batteries • Chargeur automatique
pour batteries 12.8V LiFePO4 • Cargador automático para baterías
12.8V LiFePO4 • Carregador automático para baterias de 12.8V LiFePO4
• Automatische Ladegerät für 12.8V LiFePO4 Batterien • Automatische
lader voor 12.8V LiFePO4 accu’s • Caricabatterie automatico per batterie
12.8V LiFePO4 • Automatisk diagnostisk laddare för 12.8V LiFePO4-batterier
Page 2
Multi bank / station model OptiMate Lithium 0.8 x4 : each bank /station /
output operates as an independent OptiMate Lithium 0.8.
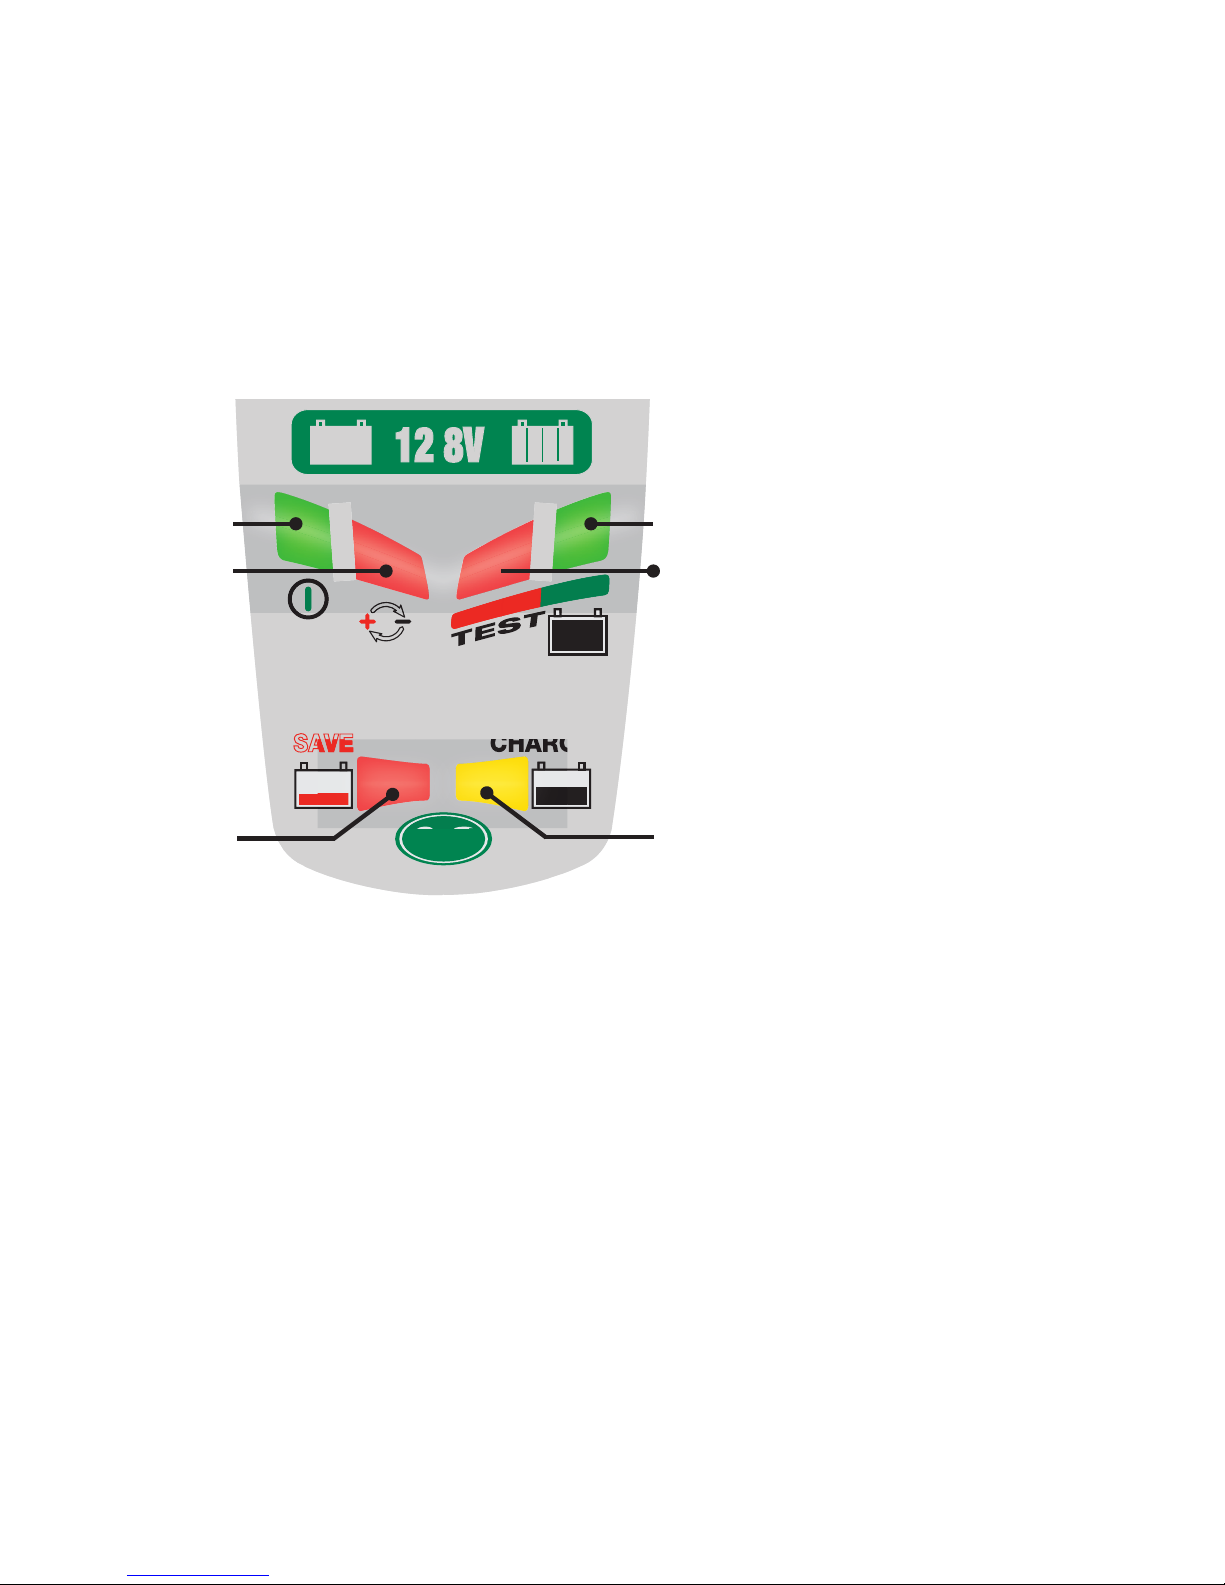
LED #1 - AC POWER (100-240V)
LED #2 - Reverse polarity
LED #3 - SAVE/DESULPHATE
LED #4 - CHARGE
LED #5 - GREEN: TEST & MAINTAIN
LED #6 - RED: TEST & MAINTAIN
#4
#6
#5
CHARGE
SAVESAVE
0.8
BATTERY SAVING
CHARGER + TESTER
FOR/POUR/PARA/FÜR/PER LITHIUM LiFePO4
LFP
12341234
.
READ INSTRUCTIONS & WARNING LABELS
LIRE LES INSTRUCTIONS ET ETIQUETTES
LEER LAS INSTRUCCIONES Y ETIQUETAS
LESEN SIE DIE ANWEISUNGEN UND ETIKETTEN
LEGGERE LE ISTRUZIONI E ETICHETTE
Model: TM470
INPUT/SECTEUR/RED/NETZ/ALIM
100-240V 50-60Hz
0.23A@100Vac / 0.15A@240Vac
OUTPUT/SORTIE/SALIDA/LEISTUNG/USCITA
12.8V 0.8A
CHARGE
LED #1 - AC POWER (100-240V)
LED #2 - Reverse polarity
LED #3 - SAVE
LED #4 - CHARGE
LED #5 - GREEN: TEST & MAINTAIN
LED #6 - RED: TEST & MAINTAIN
#1
#2
#3
#4
#6
#5
Page 3

3
THIS PORTION OF THE MANUAL CONTAINS IMPORTANT SAFETY INSTRUCTIONS FOR
THE OptiMate LITHIUM BATTERY CHARGER. IT IS OF THE UTMOST IMPORTANCE THAT
EACH TIME, BEFORE USING THE CHARGER, YOU READ AND EXACTLY FOLLOW THESE
INSTRUCTIONS. SAVE THESE INSTRUCTIONS.
AUTOMATIC CHARGER FOR 12.8V LIFEPO4 (LITHIUM IRON PHOSPHATE ) BATTERIES.
DO NOT USE FOR NiCd, NiMH, Lead-Acid or any other type of Li-Ion
OR NON-RECHARGEABLE BATTERIES.
1. CAUTION : CLASS II APPLIANCE. DO NOT CONNECT TO GROUND.
2. For indoor use only. Do not expose charger to rain or snow.
3. Use of an attachment not recommended or sold by the battery charger manufacturer may result in a risk of fire, electric shock,or
injury to persons.
4. To reduce risk of damage to electric plug and cord,pull by plug rather than cord when disconnecting charger.
5. An extension cord should not be used unless absolutely necessary. Use of improper extension cord could result in a risk of fire and
electric shock.If extension cord must be used make sure that :
a) pins on plug of extension cord are the same number, size and shape as those of plug on charger.
b) the extension cord is property wired and in good electrical condition,and
c) the conductor wire size is large enough for the AC ampere rating of the charger as specified in the table below.
AC INPUT RATING IN AMPERES
Equal to or greater than But less than
LENGTH OF CORD, FEET
(m)
AWG SIZE OF
CORD
2A 3A 25 (17.6)
50 (15.2)
100 (30.5)
18
18
14
6. Do not operate charger with damaged cord or plug - replace the cord or plug immediately.
7. Do not operate charger if it has received a sharp blow, been dropped,or otherwise damaged in any way; take it to a qualified
serviceman.
8. Do not disassemble charger; take it to a qualified serviceman when service or repair is required.
Incorrect reassembly may result in a risk of electric shock or fire.
9. To reduce risk of electric shock, unplug the charger from outlet before attempting any maintenance or cleaning.
Turning off controls will not reduce this risk.Clean only with slightly moist,not wet, cloth.Do not use solvents.
10. WARNING - RISK OF EXPLOSIVE GASES.
a) WORKING IN VICINITY OF A LEAD-ACID BATTERY IS DANGEROUS. B ATTERIES GENERATE EXPLOSIVE GASES DURING NORMAL
BATTERY OPERATION. FOR THIS REASON, IT IS OF UTMOST IMPORTANCE THAT YOU FOLLOW THE INSTRUCTIONS EACH TIME YOU
USE THE CHARGER.
b) To reduce risk of battery explosion,follow these instructions and those published by the battery manufacturer and manufacturer of
any equipment you intend to use in vicinity of the battery. Review cautionary marking on these products and on engine.
11. PERSONAL PRECAUTIONS.
a) Someone should be within range of your voice OR close enough to come to your aid when you work near a lead-acid battery.
b) Have plenty of fresh water and soap nearby in case battery acid contacts skin, clothing or eyes.
c) Wear complete eye protection and clothing protection. Avoid touching eyes while working near battery.
d) If battery acid contacts or enters eye, flood eye with cold running water for at least 10 minutes and get medical attention
immediately. If battery acid contacts skin or clothing, wash immediately with soap & water. If acid enters an eye , immediately flood
eye with running cold water for at least 10 minutes & get medical attention immediately.
e) NEVER smoke or allow a spark or flame in vicinity of battery or engine.
f) Be extra cautious to reduce risk of dropping a metal tool onto battery. It might spark or short-circuit battery or other electrical part
that may cause explosion.
g) Remove personal metal items such as rings, bracelets ,necklaces , and watches when working with a lead-acid battery. A
lead-acid battery can produce a short-circuit current high enough to weld a ring or the like to metal, causing a severe burn.
i) NEVER charge a frozen battery.
IMPORTANT SAFETY
INSTRUCTIONS FOR CANADA & USA
SAFETY
Page 4

4
12. PREPARING TO CHARGE
a) If necessary to remove battery from vehicle to charge,always remove grounded terminal from battery first.
Make sure all accessories in the vehicle are off, so as not to cause an arc.
b) Be sure area around battery is well ventilated while battery is being charged. Gas can be forcefully blown away by using a piece of
cardboard or other non-metallic material as a fan.
c) Clean battery terminals.Be careful to keep corrosion from coming in contact with eyes.
d) Add distilled water in each cell until battery acid reaches level specified by battery manufacturer. This helps purge excessive gas
from cells. Do not overfill. For a battery without cell caps, such as valve regulated lead acid (VRLA) or absorbed glass mat (AGM)
batteries, carefully follow manufacturer’s recharging instructions.
e) Study all battery manufacturer’s specific precautions such as removing or not removing cell caps while charging and
recommended rates of charge.
f) Determine voltage of battery by referring to vehicle or other user’s manual and BEFORE MAKING THE BATTERY CONNECTIONS,
MAKE SURE TH AT THE VOLTAGE OF THE BATTERY YOU ARE GOING TO CHARGE MATCHES THE OUTPUT VOLTAGE OF THE CHARGER.
13. CHARGER LOCATION.
a) Locate charger as far away from battery as DC cables permit.
b) Never place charger directly above batterv being charged; gases from battery will corrode and damage the charger. c) Never allow battery
acid to drip on charger when reading gravity or filling battery. Do not operate charger in a closed-in area or restrict ventilation in any way.
d) Do not set a battery on top of charger. IMPORTANT : Place charger on a hard flat surface or mount onto a vertical surface. Do not
place on plastic, leather or textile surface.
14. DC CONNECTION PRECAUTIONS
a) Connect and disconnect DC output clips only after setting any charger switches to off position and removing AC cord from electric
outlet. Never allow clips to touch each other, however should this happen no damage will result to the charger circuit & the automatic
charging programme will just reset to «start».
b) Attach clips to battery and chassis as indicated in 15(e), 15(f), and 16(b) through 16(d).
NOTE : This battery charger has an automatic safety feature that will prevent it from operating if the battery has been inversely
connected. Set charger switches to off position and/or remove AC cord from electrical outlet, disconnect the battery clips, then
reconnect correctly according to the instructions below.
15. FOLLOW THESE STEPS WHEN BATTERY IS INSTALLED IN VEHICLE. A SPARK
NEAR A BATTERY MAY CAUSE BATTERY EXPLOSION. TO REDUCE RISK OF A
SPARK NEAR BATTERY :
a) Position AC and DC cords so as to reduce risk of damage by hood, door or moving engine part.
b) Stay clear of fan -blades, belts,pulleys,and other parts that can cause injury to persons.
c) Check polarity of battery posts.POSITIVE (POS, P, +) battery post usually has larger diameter than NEGATIVE (NEG, N,–) post.
d) Determine which post of battery is grounded (connected) to the chassis. If negative post is grounded to chassis (as in most
vehicles),see (e). If positive post is grounded to the chassis,see (f).
e) For negative-grounded vehicle, connect POSITIVE (RED) clip from battery charger to POSITIVE (POS, P, + ) ungrounded post of
battery. Connect NEGATIVE (BLACK) clip to vehicle chassis or engine block away from battery. Do not connect clip to carburetor, fuel
lines, or sheet-metal body parts. Connect to a heavy gage metal part of the frame or engine block.
f) For positive-grounded vehicle, connect NEGATIVE (BLACK) clip from battery charger to NEGATIVE (NEG. N , -) ungrounded post of
battery. Connect POSITIVE (RED) clip to vehicle chassis or engine block away from battery. Do not connect clip to carburetor, fuel
lines, or sheet-metal body parts. Connect to a heavy gage metal part of the frame or engine block.
g) When disconnecting charger, turn switches to off, disconnect AC cord,remove clip from vehicle chassis,and then remove clip from
battery terminal.
h) See operating instructions for length of charge information.
16. FOLLOW THESE STEPS WHEN BATTERY IS OUTSIDE VEHICLE. A SPARK NEAR
THE BATTERY MAY CAUSE BATTERY EXPLOSION. TO REDUCE RISK OF A SPARK
NEAR BATTERY :
a) Check polarity of battery posts. POSITIVE (POS, P, +) battery post usually has a larger diameter than NEGATIVE (NEG,N, -) post.
b) This battery charger has an automatic safety feature that will prevent it from operating if the battery has been inversely connected.
The charger does allow charge current unless a voltage of at least 2V is sensed.
c) Connect POSITIVE (RED) charger clip to POSITIVE (POS, P, +) post of battery.
d) Connect NEGATIVE (BLACK) charger clip to NEGATIVE (NEG, N, -) battery post of the battery.
e) Do not face battery when making final connection.
f) When disconnecting charger, always do so in reverse sequence of connecting procedure & break first connection while as far away
from battery as practical.
g) A marine (boat) battery must be removed & charged on shore. To charge it on board requires equipment specially designed for
marine use.
SAFETY US & CAN
Page 5

5
AUTOMATIC DIAGNOSTIC CHARGER FOR 12.8V LiFePO4 (LITHIUM IRON
PHOSPHATE ) BATTERIES FROM 2.5Ah TO 30Ah:
Input: 100-240V maximum 0,23A. The maximum output current is 0,8A.
SAFETY WARNING AND NOTES: IF YOU HAVE NOT YET DONE SO, READ
THE PRECEDING PAGES LABELLED "IMPORTANT SAFETY
INSTRUCTIONS" BEFORE OPERATING THIS CHARGER.
This appliance is not intended for use by persons (including children) with reduced physical,
sensory or mental capabilities, or lack of experience and knowledge, unless they have been given
supervision or instruction concerning use of the appliance by a person responsible for their
safety. Children should be supervised to ensure that they do not play with the appliance.
USING THE OPTIMATE LITHIUM 0.8A
CORRECT USE:
Use the charger only if the input and output leads and connectors are in good, undamaged condition. If the input cable is
damaged, it is essential to have it replaced without delay by the manufacturer, his authorised service agent or a qualified workshop, to avoid
danger. Protect your charger from damp and humid conditions both during use and in storage. Damage resulting from corrosion, oxidation or
internal electrical short-circuiting is not covered by warranty. Distance the charger from the battery during charging to avoid contamination
by or exposure to acid or acidic vapours. If using it in the horizontal orientation, place the charger on a hard, flat surface, but NOT on plastic,
textile or leather. Use the fixing holes provided in the enclosure base to attach the charger to any convenient, sound vertical surface.
EXPOSURE TO LIQUIDS: This charger is designed to withstand exposure to liquids accidentally spilled or splashed onto the casing
from above, or to light rainfall. Prolonged exposure to falling rain is inadvisable and longer service life will be obtained by minimizing such
exposure.Failure of the charger due to oxidation resulting from the eventual penetration of liquid into the electronic components, connectors
or plugs,is not covered by warranty.
VERY FLAT NEGLECTED BATTERIES: Pay particularly close attention to the following A LiFePO
4
battery left deep-discharged
for an extended period may develop permanent damage in one or more cells. Such batteries may heat up excessively during charging.
During the SAVE mode the program limits charge current if the voltage is below 12.8V and the program should detect obvious cell damage
and will automatically suspend charging, but the higher the cell count in parallel the more difficult it is to detect a bad cell e.g. a 5Ah battery
typically has 4 series connected sets of 2 parallel cells (4S2P configuration - total 8 cells), a 10Ah battery has 4 series connected sets of 4
parallel cells (4S4P configuration - total 16 cells).
ALWAYS monitor the battery temperature during the first hour, then hourly there-after. If at any time the battery is uncomfortably hot to
touch or you notice any unusual signs, DISCONNECT THE CHARGER IMMEDIATELY.
CHARGING TIME
Charge time on a flat but otherwise undamaged battery:
For batteries rated from 2.5Ah to 5Ah: 180 to 360 minutes to progress to the voltage retention test.
For batteries rated above 5Ah: 125% of the battery’s Ah rating, so a 30Ah battery should take no more than about 38 hours to progress to
the voltage retention test.
Deep-discharged batteries may take significantly longer. A full charge may not be achieved within the 24 hour charge safety limit. In this
case follow the reset procedure below.
RESETTING THE CHARGE & TEST CYCLE
Disconnect from the AC mains. Wait for the POWER ON LED #1 to go out. Upon reconnection to AC power LEDs #3, 4, 5 and 6 will flash
twice to confirm micro processor health, irrespective if the charger remains connected to a battery or not.
ECO POWER SAVING MODE WHEN THE CHARGER IS CONNECTED TO AC SUPPLY:
The power converter switches to ECO mode when the charger is not connected to a battery resulting in a very low power draw of less than
0.5W (per charging bank), equivalent to power consumption of 0.012 kWh per day. When a battery is connected to the charger power
consumption depends on the current demand of the battery and its connected vehicle /
electronic circuitry. After the battery has been
charged and the charger is in long term maintenance charge mode (to keep the battery at 100% charge) the total power consumption is
estimated to be 0.024 kWh or less per day.
SAFETY
Page 6

6
PROCEEDING TO CHARGE
The LED indicators below are sequenced as they may come on through the course of the program.
POWER ON: LED #1 - Confirms AC power supply to the charger.
HIGH and LOW intensity indication: The"POWER ON" LED #1 will indicate brightly when current is delivered to the battery.
The "POWER ON" LED #1 will reduce intensity to a low level to indicate low power "ECO" mode. This will occur if there is no battery
connected, or when a battery is connected and the program finds itself in the voltage retention test mode or the 'rest' periods of
Maintenance Charge mode.
REVERSE POLARITY PROTECTION: LED #2 - Lights when the battery connections are incorrect. The charger is electronically protected so
no damage will result, and the output will remain disabled until the connections are corrected.
LED #3 SAVE lights If the battery is extremely flat (deep-discharged),
IMPORTANT: If this mode engages read the section VERY FLAT NEGLECTED BATTERIES .
This mode engages if the battery was more than 90% discharged / voltage is below 12.8V. Charge current is automatically adjusted
according to voltage measured .
VERY LOW VOLTAGE SAVE for batteries between 0.6V and 8.8V: Current starts at 200mA and will increase to 325mA depending on charge
progress. If the voltage did not rise above 8.8V within 2 hours, charging will be suspended and the TEST LED #6 (red) will flash, indicating
the battery may have suffered permanent damage or a professional assessment is required.
LOW VOLTAGE SAVE for batteries between 8.9V and 12.8V: Maximum current is set to 0.8A. The battery's charge acceptance is monitored
for unusual behaviour. A healthy LiFePO4 battery will progress to CHARGE mode within 4 hours, otherwise charging will be suspended and
TEST LED #6 (red) will flash, indicating the battery may have suffered permanent damage or a professional assessment is required.
LED #4 Charge and charge verification
CHARGE: The BULK CHARGE stage delivers a constant current of about 0,8 Amps maximum into the battery, up to a voltage of 14,2 -14,4V.
VERIFICATION: The circuit verifies battery charge level.
If the battery requires further charging the programme reverts to BULK CHARGE for brief periods, delivering a variable current pulse to the
battery. These reversions may occur as many times as is necessary to reduce the battery’s current demand below 200mA at 13,6V (which is
consistent with a battery that has accepted as much charge as its basic condition allows). (see expected Charging time.)
NOTE: For safety reasons there is an overall charge time limit of 48 hours.
VOLTAGE RETENTION TEST: LED #5 flashing
Delivery of current to the battery is interrupted for 12 hours* to allow the program to determine the battery's ability to retain charge. For batteries
with a good state of health LED #5 (green) should continue to flash for the full 12 hours* period. Read the section NOTES ON TEST RESULTS on
reasons for poor test results or how to test a battery that returns a good result but cannot deliver sufficient power once it is returned to service.
MAINTENANCE CHARGE: LED #5 / 6 steady on
For 30 minutes the circuit offers current to the battery within a safe 13,6V voltage limit whilst the result of the voltage retention test is
displayed. If LED #6 (red) indicated the VOLTAGE RETENTION TEST will be repeated. A steady LED #5 (green) indicate the 30 minute float
charge maintenance periods follow and alternate wih the 30 minute REST (no charging) periods until the battery is disconnected. The battery
can draw current as required to support small loads and counter self-discharge.
CHARGE
SAVESAVE
0.8
BATTERY SAVING
CHARGER + TESTER
FOR/POUR/PARA/FÜR/PER LITHIUM LiFePO4
LFP
12 3412 34
.
READ INSTRUCTIONS & WARNING LABELS
LIRE LES INSTRUCTIONS ET ETIQUETTES
LEER LAS INSTRUCCIONES Y ETIQUETAS
LESEN SIE DIE ANWEISUNGEN UND ETIKETTEN
LEGGERE LE ISTRUZIONI E ETICHETTE
Model: TM470
INPUT/SECTEUR/RED/NETZ/ALIM
100-240V 50-60Hz
0.23A@100Vac / 0.15A@240Vac
OUTPUT/SORTIE/SALIDA/LEISTUNG/USCITA
12.8V 0.8A
LED #5 - GREEN: TEST & MAINTAIN
LED #6 - RED: TEST & MAINTAIN
LED #1 - AC POWER (100-240V)
LED #2 - Reverse polarity
LED #3 - SAVE
LED #4 - CHARGE
Page 7

7
NOTES ON TEST RESULTS:
1. For any test result other than green #5, disconnect the battery from the electrical system it supports, and reconnect the OptiMate. If a
better test result is now obtained, this suggests that the power losses are partly due to an electrical problem in the electrical system and not
in the battery itself. If the poor result persists, you are advised to take the battery to a professional service workshop equipped with
professional equipment for a more thorough investigation.
2. If the red LED #6 alone, or the GREEN #5 and red LED #6 indicate together, a significant problem exists. The green + red LEDs mean that
after being charged the battery’s voltage is not being sustained or that despite recovery attempts the battery was irrecoverable. This may be
due to a defect in the battery itself, such as a short-circuited cell or total sulphation, or, in the case of a battery still connected to the
electrical system it supports, the red LED #6 may be signalling a loss of current through deteriorated wiring or a degraded switch or contact,
or in-circuit current-consuming accessories. A sudden load being switched on while the charger is connected can also cause the battery
voltage to dip significantly.
3. GOOD TEST RESULT, but the battery cannot deliver sufficient power: Permanent damage within the battery may be causing excessive
self discharge that is not detected within the test period of 12 hours. Disconnect the battery from the OptiMate.
AUTOMATIC BATTERY MAINTENANCE: The MAINTENANCE CHARGE CYCLE consists of 30 minute charge periods followed by
and alternating with a 30 minute ‘rest’ periods, during which there is no charge current. The circuit offers current to the battery within a safe
13.6V voltage limit (“float charge”), allowing it to draw whatever small current is necessary to sustain it at full charge and compensate for
any small electrical loads imposed by connected circuitry, or the natural gradual self-discharge of the battery itself.
The BATTERY REFRESH CYCLE is performed if the charger detects the battery has lost charge. The program returns to OPTIMIZE mode (LED
#4) and then proceeds to the voltage retention test and maintenance charge cycle.
LIMITED WARRANTY
TecMate (International) SA, Sint-Truidensesteenweg 252, B-3300 Tienen, Belgium, makes this limited warranty to the original purchaser at
retail of this product. This limited warranty is not transferable. TecMate (International) warrants this battery charger for three years from date
of purchase at retail against defective material or workmanship. If such should occur the unit will be repaired or replaced at the option of the
manufacturer. It is the obligation of the purchaser to forward the unit together with proof of purchase (see NOTE), transportation or mailing
costs prepaid, to the manufacturer or its authorized representative. This limited warranty is void if the product is misused, subjected to
careless handling, or repaired by anyone other than the factory or its authorized representative. The manufacturer makes no warranty other
than this limited warranty and expressly excludes any implied warranty including any warranty for consequential damages.
THIS IS THE ONLY EXPRESS LIMITED WARRANTY AND THE MANUFACTURER NEITHER ASSUMES NOR AUTHORIZES ANYONE TO ASSUME OR
MAKE ANY OTHER OBLIGATION TOWARDS THE PRODUCT OTHER THAN THIS EXPRESS LIMITED WARRANTY. YOUR STATUTORY RIGHTS ARE
NOT AFFECTED.
NOTE: Details at www.tecmate.com/warranty.
copyright © 2014 TecMate International
OptiMate, OptiMate Lithium and the names of other battery care products mentioned in these instructions such as BatteryMate,
TestMateand TestMate mini, are registered trademarks of TecMate International NV.
WARRANTY in Canada, USA, Central America & South America:
TecMate North America, Oakville, ON, Canada, as a wholy owned subsidiary of TecMate International, assumes the responsibility for product
warranty in these regions.
More information on TecMate products can be found at www.tecmate.com.
Page 8

8
CETTE SECTION DU MANUEL CONTIENT DES INSTRUCTIONS DE SÉCURITÉ
IMPORTANTES RELATIVES AU CHARGEUR DE BATTERIE OPTIMATE LITHIUM. IL EST
ESSENTIEL QUE VOUS LISIEZ ET SUIVIEZ À LA LETTRE CES INSTRUCTIONS AVANT
CHAQUE UTILISATION DU CHARGEUR. CONSERVEZ CES INSTRUCTIONS.
CHARGEUR AUTOMATIQUE POUR BATTERIES 12,8V LIFEPO4
(LITHIUM FER PHOSPHATE).
NE PAS UTILISER AVEC DES BATTERIES NiCd, NiMH, plomb-acide ou tout autre
type de batterie lithium-ion NI AVEC DES BATTERIES NON-RECHARGEABLES.
AVERTISSEMENT :
N’utiliser l’appareil qu’à l’intérieur. Ne pas exposer à la pluie ou à la neige. Appareil de Classe II.
a) CONSERVER CES INSTRUCTIONS. CE MANUEL CONTIENT DES INSTRUCTIONS IMPORTANTES CONCERNANT LA
SÉCURITÉ ET LE FONCTIONNEMENT.
b) IL EST DANGEREUX DE TRAVAILLER A PROXIMITÉ D’UNE BATTERIE AU PLOMB. LES BATTERIES PRODUISENT DES GAZ
EXPLOSIFS EN SERVICE NORMAL. IL EST AUSSI IMPORTANT DE TOUJOURS RELIRE LES INSTRUCTIONS AVANT
D’UTILISER LE CHARGEUR ET DE LES SUIVRE À LA LETTRE.
c) POUR RÉDUIRE LE RISQUE D’EXPLOSION, LIRE CES INSTRUCTIONS ET CELLES QUI FIGURENT SUR LA BATTERIE.
d) NE JAMAIS FUMER PRÈS DE LA BATTERIE OU DU MOTEUR ET ÉVITER TOUTE ÉTINCELLE OU FLAMME NUE À
PROXIMITÉ DE CES DERNIERS.
e) UTILISER LE CHARGEUR POUR CHARGER UNE BATTERIE AU PLOMB UNIQUEMENT. CE CHARGEUR N’EST PAS CONÇU
POUR ALIMENTER UN RÉSEAU ÉLECTRIQUE TRÈS BASSE TENSION NI POUR CHARGER DES PILES SÈCHES. LE FAIT
D’UTILISER LE CHARGEUR POUR CHARGER DES PILES SÈCHES POURRAIT ENTRAÎNER L’ÉCLATEMENT DES PILES ET
CAUSER DES BLESSURES OU DES DOMMAGES.
f) NE JAMAIS CHARGER UNE BATTERIE GELÉE.
g) S’IL EST NÉCESSAIRE DE RETIRER LA BATTERIE DU VÉHICULE POUR LA CHARGER, TOUJOURS DÉBRANCHER LA
BORNE DE MISE À LA MASSE EN PREMIER. S’ASSURER QUE LE COURANT AUX ACCESSOIRES DU VÉHICULE EST COUPÉ
AFIN D’ÉVITER LA FORMATION D’UN ARC.
h) PRENDRE CONNAISSANCE DES MESURES DE PRÉCAUTION SPÉCIFIÉES PAR LE FABRICANT DE LA BATTERIE, P. EX.,
VÉRIFIER S‘IL FAUT ENLEVER LES BOUCHONS DES CELLULES LORS DU CHARGEMENT DE LA BATTERIE, ET LES TAUX DE
CHARGEMENT RECOMMANDÉS.
i) SI LE CHARGEUR COMPORTE UN SÉLECTEUR DE TENSION DE SORTIE, CONSULTER LE MANUEL DE L’USAGER DE LA
VOITURE POUR DÉTERMINER LA TENSION DE LA BATTERIE ET POUR S’ASSURER QUE LA TENSION DE SORTIE EST
APPROPRIÉE. SI LE CHARGEUR N’EST PAS MUNI D’UN SÉLECTEUR, NE PAS UTILISER LE CHARGEUR À MOINS QUE LA
TENSION DE LA BATTERIE NE SOIT IDENTIQUE À LA TENSION DE SORTIE NOMINALE DU CHARGEUR.
j) NE JAMAIS PLACER LE CHARGEUR DIRECTEMENT SOUS LA BATTERIE À CHARGER OU AU-DESSUS DE CETTE DERNIÈRE.
LES GAZ OU LES FLUIDES QUI S’ÉCHAPPENT DE LA BATTERIE PEUVENT ENTRAÎNER LA CORROSION DU CHARGEUR OU
L’ENDOMMAGER. PLACER LE CHARGEUR AUSSI LOIN DE LA BATTERIE QUE LES CABLES C.C. LE PERMETTENT.
k) NE PAS FAIRE FONCTIONNER LE CHARGEUR DANS UN ESPACE CLOS ET/OU NE PAS GÊNER LA VENTILATION.
l) METTRE LES INTERRUPTEURS DU CHARGEUR HORS CIRCUIT ET RETIRER LE CORDON C.A. DE LA PRISE AVANT DE
METTRE ET D’ENLEVER LES PINCES DU CORDON C.C. S’ASSURER QUE LES PINCES NE SE TOUCHENT PAS.
m) SUIVRE LES ÉTAPES SUIVANTES LORSQUE LA BATTERIE SE TROUVE DANS LE VÉHICULE.
UNE ÉTINCELLE PRÈS DE LA BATTERIE POURRAIT PROVOQUER L’EXPLOSION DE CETTE DERNIÈRE. POUR RÉDUIRE LE RISQUE
D’ÉTINCELLE À PROXIMITÉ DE LA BATTERIE :
(i) PLACER LES CORDONS C.A. ET C.C. DE MANIÈRE À ÉVITER QU’ILS SOIENT ENDOMMAGÉS PAR LE CAPOT, UNE PORTIÈRE
OU LES PIÈCES EN MOUVEMENT DU MOTEUR ;
(ii) FAIRE ATTENTION AUX PALES, AUX COURROIES ET AUX POULIES DU VENTILATEUR AINSI QU’À TOUTE AUTRE PIÈCE
SUSCEPTIBLE DE CAUSER DES BLESSURES ;
(iii) VÉRIFIER LA POLARITÉ DES BORNES DE LA BATTERIE. LE DIAMÈTRE DE LA BORNE POSITIVE (POS, P, +) EST
GÉNÉRALEMENT SUPÉRIEUR À CELUI DE LA BORNE NÉGATIVE (NÉG, N, –) ;
(iv) DÉTERMINER QUELLE BORNE EST MISE À LA MASSE (RACCORDÉE AU CHÂSSIS). SI LA BORNE NÉGATIVE EST RACCORDÉE
AU CHÂSSIS (COMME DANS LA PLUPART DES CAS), VOIR LE POINT (v). SI LA BORNE POSITIVE EST RACCORDÉE AU CHÂSSIS,
VOIR LE POINT (vi) ;
SÉCURITÉ US & CAN
Page 9

9
(v) SI LA BORNE NÉGATIVE EST MISE À LA MASSE, RACCORDER LA PINCE POSITIVE (ROUGE) DU CHARGEUR À LA BORNE
POSITIVE (POS, P, +) NON MISE À LA MASSE DE LA BATTERIE. RACCORDER LA PINCE NÉGATIVE (NOIRE) AU CHÂSSIS DU
VÉHICULE OU AU MOTEUR, LOIN DE LA BATTERIE. NE PAS RACCORDER LA PINCE AU CARBURATEUR, AUX CANALISATIONS
D’ESSENCE NI AUX PIÈCES DE LA CARROSSERIE EN TÔLE. RACCORDER À UNE PIÈCE DU CADRE OU DU MOTEUR EN TÔLE DE
FORTE ÉPAISSEUR ;
(vi) SI LA BORNE POSITIVE EST MISE À LA MASSE, RACCORDER LA PINCE NÉGATIVE (NOIRE) DU CHARGEUR À LA BORNE
NÉGATIVE (NÉG, N, –) NON MISE À LA MASSE DE LA BATTERIE. RACCORDER LA PINCE POSITIVE (ROUGE) AU CHÂSSIS DU
VÉHICULE OU AU MOTEUR, LOIN DE LA BATTERIE. NE PAS RACCORDER LA PINCE AU CARBURATEUR, AUX CANALISATIONS
D’ESSENCE NI AUX PIÈCES DE LA CARROSSERIE EN TÔLE. RACCORDER À UNE PIÈCE DU CADRE OU DU MOTEUR EN TÔLE DE
FORTE ÉPAISSEUR ;
(vii) BRANCHER LE CORDON D’ALIMENTATION C.A. DU CHARGEUR ;
(viii) POUR INTERROMPRE L’ALIMENTATION DU CHARGEUR, METTRE LES INTERRUPTEURS HORS CIRCUIT, RETIRER LE
CORDON C.A. DE LA PRISE, ENLEVER LA PINCE RACCORDÉE AU CHÂSSIS ET EN DERNIER LIEU CELLE RACCORDÉE À LA
BATTERIE.
n) SUIVRE LES ÉTAPES SUIVANTES LORSQUE LA BATTERIE EST À L’EXTÉRIEUR DU VÉHICULE.
UNE ÉTINCELLE PRÈS DE LA BATTERIE POURRAIT PROVOQUER L’EXPLOSION DE CETTE DERNIÈRE. POUR RÉDUIRE LE RISQUE D’ÉTINCELLE
À PROXIMITÉ DE LA BATTERIE :
(i) VÉRIFIER LA POLARITÉ DES BORNES DE LA BATTERIE. LE DIAMÈTRE DE LA BORNE POSITIVE (POS, P, +) EST
GÉNÉRALEMENT SUPÉRIEUR À CELUI DE LA BORNE NÉGATIVE (NÉG, N, –) ;
(ii) RACCORDER UN CÂBLE DE BATTERIE ISOLÉ No 6 AWG MESURANT AU MOINS 60 CM DE LONGUEUR À LA BORNE
NÉGATIVE (NÉG, N, –) ;
(iii) RACCORDER LA PINCE POSITIVE (ROUGE) À LA BORNE POSITIVE (POS, P, +) DE LA BATTERIE ;
(iv) SE PLACER ET TENIR L’EXTRÉMITÉ LIBRE DU CÂBLE AUSSI LOIN QUE POSSIBLE DE LA BATTERIE, PUIS RACCORDER LA
PINCE NÉGATIVE (NOIRE) DU CHARGEUR À L’EXTRÉMITÉ LIBRE DU CÂBLE ;
(v) NE PAS SE PLACER FACE À LA BATTERIE POUR EFFECTUER LE DERNIER RACCORDEMENT ;
(vi) RACCORDER LE CORDON D’ALIMENTATION C.A. DU CHARGEUR À LA PRISE ;
(vii) POUR INTERROMPRE L’ALIMENTATION DU CHARGEUR, METTRE LES INTERRUPTEURS HORS CIRCUIT, RETIRER LE
CORDON C.A. DE LA PRISE, ENLEVER LA PINCE RACCORDÉE AU CHÂSSIS ET EN DERNIER LIEU CELLE RACCORDÉE À LA
BATTERIE. SE PLACER AUSSI LOIN QUE POSSIBLE DE LA BATTERIE POUR DÉFAIRE LA PREMIÈRE CONNEXION.
SÉCURITÉ US & CAN
Page 10

SÉCURITÉ
CHARGEUR À DIAGNOSTIC AUTOMATIQUE POUR BATTERIES LiFePO4
(LITHIUM FER PHOSPHATE) 12,8V. BATTERIES DE 2,5AH À 30 AH:
Entrée : 100-240V maximum 0,23A. Le courant de sortie maxi est 0,8A.
AVERTISSEMENT DE SÉCURITÉ ET REMARQUES : SI VOUS NE L'AVEZ PAS
DÉJÀ FAIT, LISEZ LES PAGES QUI PRÉCÈDENT INTITULÉES «INSTRUCTIONS
DE SÉCURITÉ IMPORTANTES» AVANT D'UTILISER CE CHARGEUR.
Cet appareil n'est pas destiné à être utilisé par des personnes (y compris des enfants) possédant
des capacités physiques, sensorielles ou mentales réduites, ou manquant d'expérience et de
connaissance, sauf si elles bénéficient d'une surveillance ou ont reçu des instructions concernant
l'utilisation de l'appareil d'une personne responsable de leur sécurité. Les enfants doivent faire
l'objet d'une surveillance pour s'assurer qu'ils ne jouent pas avec l'appareil.
UTILISATION D’OPTIMATE LITHIUM 0,8A
UTILISATION CORRECTE : utilisez le chargeur uniquement si les broches de raccordement et les connecteurs d'entrée et de sortie
sont en parfait état. Si le câble d'entrée est endommagé, il est essentiel que vous le fassiez remplacer au plus vite par le fabricant, son
technicien agréé ou un atelier qualifié, pour éviter tout danger. Protégez votre chargeur de l'humidité, qu'il soit en fonctionnement ou rangé.
La garantie ne couvre pas les dommages résultant de la corrosion, de l'oxydation ou d'un court-circuit électrique interne.
Éloignez le chargeur de la batterie pendant la charge pour éviter toute contamination par ou toute exposition à des acides ou des vapeurs
acides. Si vous l'utilisez en position horizontale, placez le chargeur sur une surface plane et dure, mais PAS sur du plastique, du textile ou
du cuir. Utilisez les trous de fixation situés dans la base du boîtier pour fixer le chargeur à toute surface verticale solide et pratique.
EXPOSITION À DES LIQUIDES: ce chargeur est conçu pour résister à une exposition à des liquides ayant éclaboussé ou ayant été
accidentellement renversés sur le boîtier par le dessus, ou à une pluie légère. Une exposition prolongée à une pluie forte est déconseillée
afin de prolonger la durée de vie de l'équipement. Une panne du chargeur due à une oxydation résultant de l'éventuelle pénétration d'un
liquide corrosif dans les composants électroniques, les connecteurs ou les prises ne sera pas couverte par la garantie
BATTERIES DÉGRADÉES TRÈS FAIBLES : soyez particulièrement vigilant : Une batterie LiFePO4 laissée complètement
déchargée pendant une période prolongée risque de développer des dommages permanents dans une ou plusieurs cellule(s). Ces batteries
peuvent atteindre une température excessivement élevée au cours de la charge. En mode save, le programme limite le courant de charge
si la tension est inférieure à 12,8 v et le programme est conçu pour détecter un éventuel endommagement évident de cellule et suspendre
automatiquement la charge le cas échéant, mais plus il y a de cellules en parallèle, plus il est difficile de détecter une mauvaise cellule. En
effet, une batterie de 5 ah présente ainsi par défaut 4 rangées connectées en séries de 2 cellules parallèles (configuration 4s2p - 8 cellules
au total), une batterie de 10 ah présente 4 rangées connectées en séries de 4 cellules parallèles (configuration 4s4p - 16 cellules au total).
Surveillez EN PERMANENCE la température de la batterie au cours de la première heure, puis une fois par heure. Si vous constatez à tout
moment que la batterie devient chaude au point de ne plus pouvoir la toucher à main nue ou si vous remarquez des signes inhabituels,
DÉBRANCHEZ LE CHARGEUR IMMÉDIATEMENT.
TEMPS DE CHARGE
Temps de charge pour une batterie déchargée mais en parfait état:
Pour les batteries d'une tension nominale comprise entre 2,5Ah et 5Ah : de 180 à 360 minutes pour effectuer le test de rétention de voltage.
Pour les batteries d'une tension nominale supérieure à 5Ah : 125% de la tension de la batterie; il faut donc au maximum environ 38
heures à une batterie de 30Ah pour effectuer le test de rétention de voltage.
Des batteries complètement déchargées peuvent nécessiter beaucoup plus de temps. Il est possible que la limite de charge de sécurité de 24
heures ne suffise pas pour une charge complète. Dans ce cas, suivez la procédure de réinitialisation ci-dessous.
RÉINITIALISATION DU CYCLE DE CHARGE ET TEST
Déconnectez la prise secteur CA. Attendez que la LED POWER ON #1 s'éteigne. Dès que le branchement se fait sur le CA, toutes les LED #3,
4, 5 et 6 clignotent deux fois pour confirmer le bon état du microprocesseur, indépendamment du fait que le chargeur soit resté connecté à
une batterie ou pas.
10
Page 11
MODE ÉCONOMIE D’ÉNERGIE LORSQUE LE CHARGEUR EST CONNECTÉ À L’ALIMENTATION SECTEUR :
Le convertisseur d'énergie passe en mode ECO lorsque le chargeur n'est pas branché sur une batterie, ce qui conduit à une très faible
puissance, inférieure à 0.5W, l'équivalent d'une consommation d'énergie de 0,012 kWh par jour. Lorsqu'une batterie est branchée sur le
chargeur, la consommation d'énergie dépend de la demande en courant de la batterie et du véhicule/des circuits électroniques raccordés.
Une fois que la batterie est chargée et que le programme de charge est en mode de charge de maintenance à long terme (pour garder la
batterie chargée à 100 %), la consommation d'énergie totale est estimée à 0,024 kWh ou moins par jour.
CHARGE
Les témoins à LED sont placés dans l'ordre chronologique de déroulement du programme.
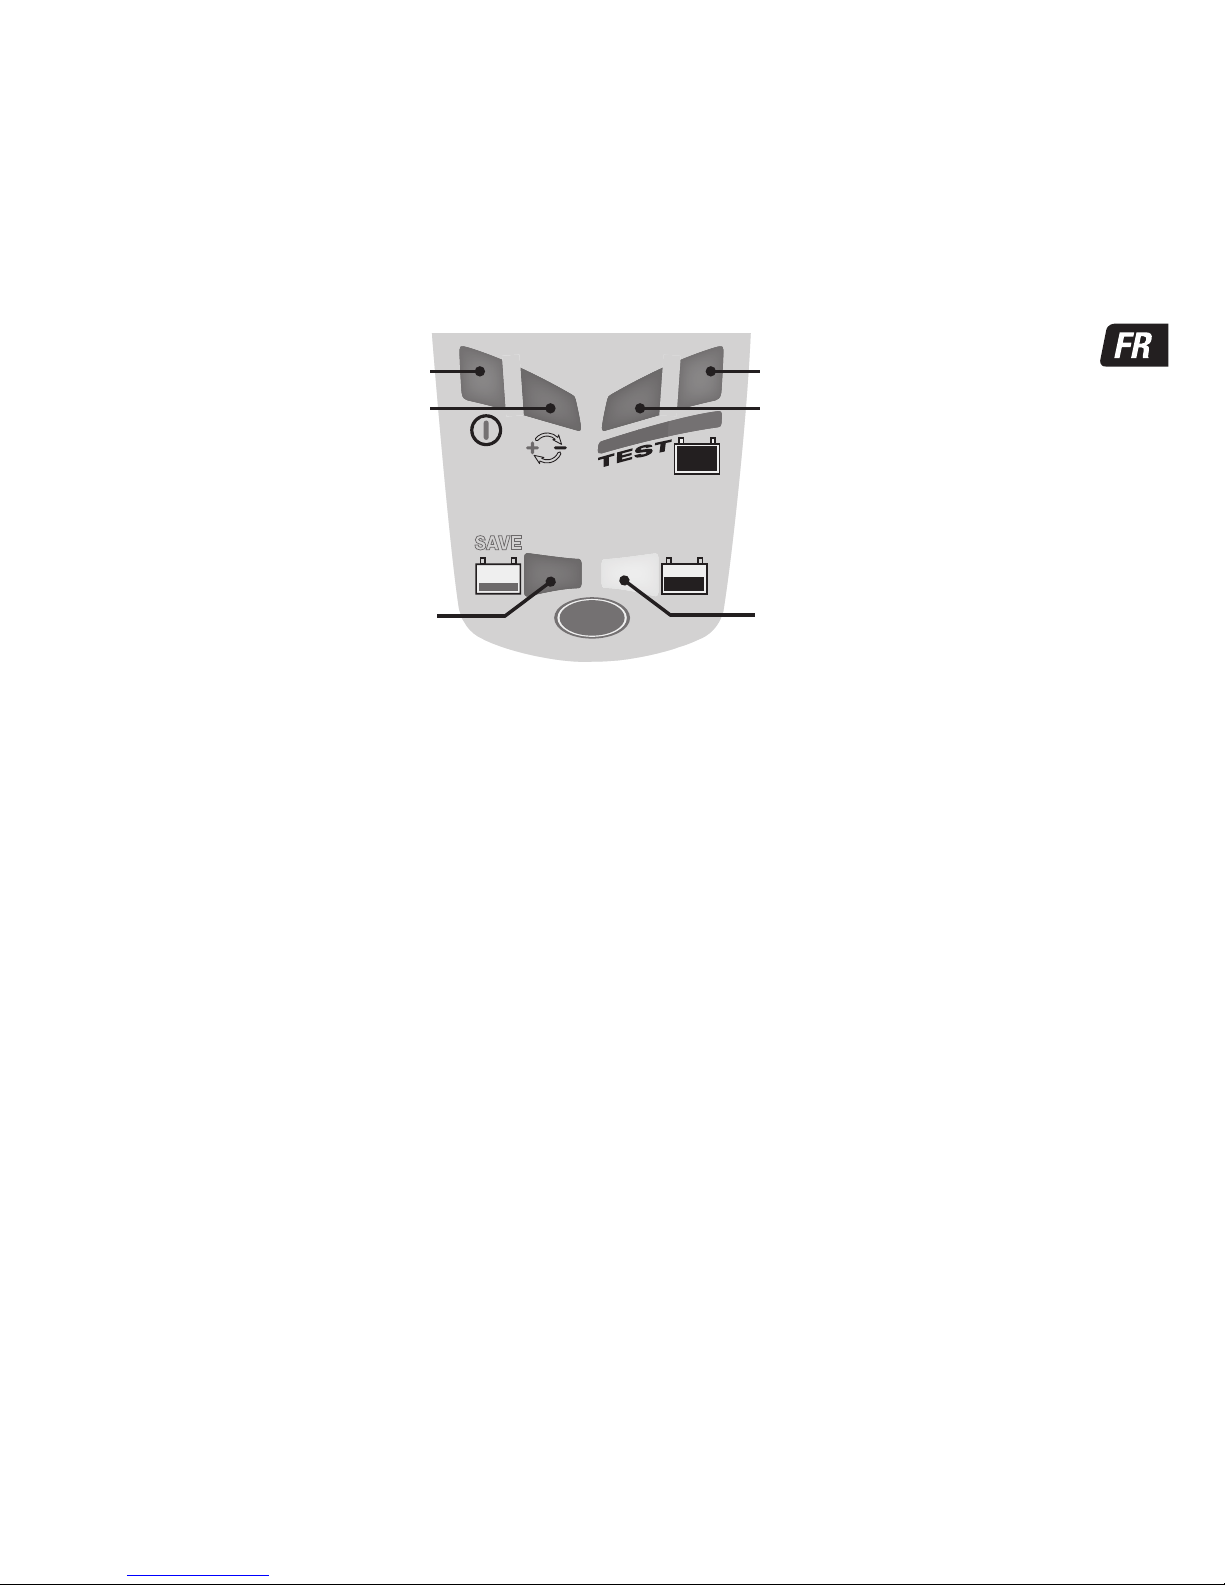
POWER ON: LED #1 - Confirme l'alimentation
Indication d'intensité HAUTE et BASSE : la LED #1 «POWER ON» va indiquer en s'allumant que le courant passe dans la batterie.
L'intensité de la LED #1 «POWER ON» va diminuer pour indiquer le mode de consommation «ECO». Cela se produit si
aucune batterie n'est branchée ou lorsqu'une batterie est branchée et que le programme se trouve en mode Test de
rétention de voltage ou en période «repos» du mode Charge de maintenance.
PROTECTION POLARITÉ INVERSE : LED #2 - s'allume lorsque les branchements de la batterie sont incorrects. Le chargeur est
protégé électroniquement et aucun dommage ne peut donc survenir, la sortie de courant restera inactive tant que les
connections n'auront pas été correctement restaurées.
LED #3 RÉCUPÉRATION s’allume si la batterie est extrêmement faible (c.-à-d. profondément déchargée ou sulfatée).
IMPORTANT: si ce mode se déclenche, lisez la section BATTERIES DÉGRADÉES TRÈS FAIBLES.
Ce mode se déclenche si la batterie était déchargée à plus de 90% ou si la tension est inférieure à 12,8V. Le courant de charge est
automatiquement ajusté en fonction de la tension et de la température ambiante mesurée lors du test de pré-qualification.
RÉCUPÉRATION À TRÈS FAIBLE VOLTAGE pour des batteries entre 0,6V et 8,8V: le courant commence à 200mA et augmente jusqu'à 325mA,
en fonction de l'évolution de la charge. Si la tension n'a pas dépassé 8,8V après 2 heures, la charge s'interrompt et la LED TEST #6 (rouge)
clignote pour indiquer qu'il est possible que la batterie ait subi des dommages irréversibles ou que l'expertise d'un professionnel est nécessaire.
RÉCUPÉRATION À TRÈS FAIBLE VOLTAGE pour des batteries entre 8,9V et 12,8V: le courant maximal est fixé à 0,8A. La capacité de
charge de la batterie est surveillée dans l'éventualité d'un comportement inhabituel. Une batterie LiFePO4 en bon état passe en mode
CHARGE en moins de 4 heures; dans le cas contraire, la charge s'interrompt et la LED TEST #6 (rouge) clignote pour indiquer qu'il est
possible que la batterie ait subi des dommages irréversibles ou que l'expertise d'un professionnel est nécessaire.
LED #4 Charge et vérification de charge
CHARGE : Etape de CHARGE principale (LED #3) : un courant constant de 1,0A maximum est délivré dans la batterie, jusqu'à une tension de
14,2 à 14,4V
VÉRIFICATION : Le circuit vérifie le niveau de charge de la batterie. Si la batterie requiert plus de charge, le programme repasse en mode CHARGE
PRINCIPALE pour de brèves périodes, fournissant une impulsion électrique variable à la batterie. Ces réversions auront lieu autant de fois que
nécessaire afin de réduire la demande de courant émanant de la batterie à moins de 200mA à 13,6V (valeurs typiques pour une batterie qui a
accepté autant de charge que son état initial le permettait). (voir temps de charge prévu)
REMARQUE : pour des raisons de sécurité, il y a une limite de charge absolue de 48 heures.
TEST DE RÉTENTION DE VOLTAGE : LED #5 clignotante
L'arrivée du courant dans la batterie est interrompue pendant 12 heures* pour permettre au programme de déterminer la capacité de la
batterie à retenir la charge. Pour des batteries en bon état, LED #5 (verte) devrait continuer à clignoter pendant toute la période des
12heures*. Lisez le chapitre REMARQUES SUR LES RÉSULTATS DES TESTS concernant les raisons des mauvais tests ou comment tester
une batterie qui renvoie un bon résultat au test, mais qui ne peut fournir assez de puissance lors de sa remise en service.
CHARGE
SAVESAVE
0.8
BATTERY SAVING
CHARGER + TESTER
FOR/POUR/PARA/FÜR/PER LITHIUM LiFePO4
LFP
12 3412 34
.
READ INSTRUCTIONS & WARNING LABELS
LIRE LES INSTRUCTIONS ET ETIQUETTES
LEER LAS INSTRUCCIONES Y ETIQUETAS
LESEN SIE DIE ANWEISUNGEN UND ETIKETTEN
LEGGERE LE ISTRUZIONI E ETICHETTE
Model: TM470
INPUT/SECTEUR/RED/NETZ/ALIM
100-240V 50-60Hz
0.23A@100Vac / 0.15A@240Vac
OUTPUT/SORTIE/SALIDA/LEISTUNG/USCITA
12.8V 0.8A
LED #5 - GREEN: TEST & MAINTAIN
LED #6 - RED: TEST & MAINTAIN
LED #1 - AC POWER (100-240V)
LED #2 - Reverse polarity
LED #3 - SAVE
LED #4 - CHARGE
11
Page 12

12
CHARGE DE MAINTENANCE : LED #5 / 6 fixes
Pendant 30 minutes, le circuit donne du courant à la batterie avec une limite raisonnable de 13,6 V alors que le résultat du test de rétention
de voltage est affiché. Si la LED #6 (rouge) l'indique, le TEST DE RÉTENTION DE VOLTAGE sera répété. Si la LED #5 (verte) s'allume en
permanence, elle indique l'alternance des périodes de maintenance de la charge tampon de 30 minutes et des périodes de REPOS (pas de
charge) de 30 minutes jusqu'à ce que la batterie soit déconnectée.
REMARQUES SUR LES RÉSULTATS DU TEST :
1. our tout résultat de test autre que vert #5, débranchez la batterie du système électrique qui l'alimente, et reconnectez l'OptiMate. Si un
meilleur résultat est obtenu, cela suppose que les pertes de courant sont en partie dues à un problème du système électrique et non à la
batterie elle-même. Si les mauvais résultats persistent, nous vous recommandons de confier la batterie à un atelier d'entretien professionnel
disposant d'équipements professionnels pour un contrôle plus approfondi.
2. Si la LED #6 rouge seule, ou à la fois la LED #5 verte et la LED #6 rouge, clignote(nt), cela révèle un problème important. Les LED vertes
+ rouges indiquent qu'après la charge, la tension de la batterie n'est pas maintenue ou que la batterie n'a pas pu être récupérée malgré les
tentatives de récupération. Cela peut être dû à un défaut de la batterie elle-même, par exemple une cellule en court-circuit ou une
sulfatation complète, ou, dans le cas où la batterie est toujours branchée sur le système électrique qu'elle alimente, il est possible que la
LED #6 rouge indique une perte de courant liée à un câblage endommagé, à un interrupteur ou à un contact dégradé ou à des accessoires
consommateurs de courant dans le circuit. L'allumage soudain d'une charge importante alors que le chargeur est branché peut également
causer une baisse significative de la tension de la batterie.
3. BONS RÉSULTATS DE TEST, mais la batterie ne délivre pas une puissance suffisante: il est possible que des dommages irréversibles de
la batterie causent une décharge spontanée excessive non détectée pendant la période de test de 12 heures. Déconnectez la batterie de
l'OptiMate.
MAINTENANCE AUTOMATIQUE DE LA BATTERIE : le CYCLE DE CHARGE DE MAINTENANCE est constitué de
périodes de charge de 30 minutes en alternance avec des périodes de «repos» de 30 minutes pendant lesquelles il n'y a pas de courant de
charge. Le circuit fournit du courant à la batterie dans la limite de sécurité de 13,6V («charge tampon») lui permettant de tirer le moindre
courant nécessaire pour l'alimenter à charge pleine et de compenser toute légère charge électrique imposée par le circuit relié ou par une
décharge spontanée progressive de la batterie elle-même.
Le CYCLE DE RAFRAÎCHISSEMENT DE LA BATTERIE est effectué si le chargeur détecte que la batterie a perdu de la charge. Le programme
retourne en mode OPTIMIZE (LED #4) puis effectue le test de rétention de voltage et le cycle de charge de maintenance.
GARANTIE LIMITÉE
TecMate International SA, Sint-Truidensesteenweg 252, B-3300 Tienen, Belgique, consent la présente garantie au premier client utilisateur
de ce produit, sans possibilité de transfert. TecMate (International) garantit ce chargeur pendant trois ans à compter de la date d’achat au
détail contre les défauts de composants ou d’assemblage. Le cas échéant, le chargeur sera réparé ou remplacé à la discrétion du fabricant.
L’acheteur doit expédier, à ses frais, l’appareil ainsi qu’une preuve d’achat (voir "NOTE") au fabricant ou à son représentant agréé. Cette
garantie limitée devient nulle si l’appareil est utilisé ou manipulé de façon inadéquate ou s’il a été réparé par toute personne physique ou
morale autre que le fabricant ou un représentant agréé. Le fabricant n’offre aucune autre garantie que la présente, et exclut expressément
toute garantie contre les dommages conséquentiels.
CECI EST LA SEULE GARANTIE EXPRESSÉMENT CONSENTIE PAR LE FABRICANT. CELUI-CI N’ASSUME ET N’AUTORISE QUICONQUE A
ASSUMER OU ETABLIR TOUTE AUTRE OBLIGATION LIÉE À CE PRODUIT, AUTRE QUE CETTE GARANTIE LIMITÉE EXPRESSÉMENT CONSENTIE.
VOS DROITES STATUTAIRES NE SONT PAS AFFECTÉES.
NOTE : Voir www.tecmate.com/warranty ou contactez warranty@tecmate.com
copyright © 2014 TecMate International
OptiMate, OptiMate Lithium et les noms des autresappareilsmentionnés dans ce texte tels queBatteryMate, TestMate et TestMate mini,
sont des marques déposées de TecMate International SA.
On peut trouver plus d'information surles produits deTecMate chez www.tecmate.com.
Page 13

13
SEGURIDAD
CARGADOR CON DIAGNÓSTICO AUTOMÁTICO PARA BATERÍAS LiFePO4
(FOSFATO DE LITIO-HIERRO) DE 12,8V, BATERÍAS DE 2,5 A 50AH:
Entrada: 100-240V máximo 0,23A. La corriente máxima de salida está 0,8A.
ADVERTENCIAS SOBRE SEGURIDAD Y NOTAS: SI AÚN NO LO HA HECHO,
LEA LAS PÁGINAS ANTERIORES CON LA INDICACIÓN «INSTRUCCIONES
DE SEGURIDAD IMPORTANTES» ANTES DE UTILIZAR EL CARGADOR.
Este aparato no puede ser utilizado por que lo utilicen personas (incluidos niños) con capacidades
físicas, sensoriales o mentales disminuidas, o bien con falta de experiencia y conocimientos, a menos
que una persona responsable de su seguridad las supervise o les dé instrucciones sobre el uso del
aparato. Es necesario supervisar a los niños para asegurarse de que no juegan con el aparato.
USO DE OPTIMATE LITHIUM 0,8 A
USO CORRECTO: utilice el cargador únicamente si las tomas de conexión de entrada y salida y los conectores se encuentran en perfecto
estado. Si el cable de entrada presenta daños, es de suma importancia que el fabricante, un agente de mantenimiento autorizado o un
distribuidor cualificado lo reemplace inmediatamente. Proteja su cargador de la humedad, tanto durante el uso, como en el almacenamiento.
Los daños derivados de la corrosión, oxidación o cortocircuitos eléctricos internos no están cubiertos por la garantía. El cargador debe estar
a cierta distancia de la batería durante el proceso de carga con el fin de evitar una posible contaminación por o exposición a ácidos y vapores
ácidos. Si se está utilizando en posición horizontal, coloque el cargador en una superficie plana y resistente, pero NO sobre plásticos, textiles o
cuero. Utilice los orificios de fijación incluidos en la base de la carcasa para acoplar el cargador a una superficie vertical adecuada.
EXPOSICIÓN A LÍQUIDOS: este cargador está diseñado para soportar la exposición accidental a líquidos derramados o salpicados
accidentalmente en la carcasa, procedentes de la parte superior o de llovizna. Se desaconseja una exposición prolongada a la lluvia, ya
que se reducirá la vida útil. Si se produjeran errores en el cargador debido a la oxidación derivada de la posible entrada de líquidos en los
componentes electrónicos, los conectores o tomas, estos no estarán cubiertos por la garantía.
BATERÍAS DESCUIDADAS MUY DESCARGADAS: Preste especial atención a lo siguiente: Una batería LiFePO4 que
quede muy descargada durante un periodo prolongado puede registrar daños permanentes en una o más células. Dichas baterías pueden
calentarse en exceso durante la carga. Durante el modo save (recuperación), el programa limita la corriente de carga si la tensión es inferior
a 12,8 v y el programa debería detectar los daños notables de las células y suspender automáticamente la carga. Sin embargo, cuanto
mayor es el número de células en paralelo, mayor es la dificultad de detectar una en mal estado; por ejemplo, una batería de 5 ah cuenta
normalmente con 4 series conectadas de 2 células en paralelo (configuración 4s2p, 8 células en total), una batería de 10 ah cuenta con 4
series conectadas de 4 células en paralelo (configuración 4s4p, 16 células en total). Supervise SIEMPRE la temperatura de la batería durante
la primera hora y, después, tras cada hora. Si en algún momento la batería se encuentra demasiado caliente para tocarla o si detecta algún
signo anómalo, DESCONECTE INMEDIATAMENTE EL CARGADOR.
TIEMPO DE CARGA
Tiempo de carga de una batería descuidada sin otros daños:
Baterías clasificadas entre 2,5Ah y 5Ah: 180 a 360minutos para llevar a cabo la prueba de retención de tensión.
Baterías con una clasificación superior a 5Ah: 125% de la clasificación Ah de la batería; por lo que una batería de 30Ah no debería
requerir más de 38horas para efectuar la prueba de retención de tensión.
En caso de baterías muy descargadas puede tardar mucho más. Puede que no se alcance una carga plena en las 24horas del límite de
seguridad de la carga. En este caso, efectúe el siguiente procedimiento de reinicio.
REINICIO DE LA CARGA Y CICLO DE PRUEBA
Desconecte de la red de CA. Espere hasta que el LED #1 DE POTENCIA ACTIVADA se apague. Tras la reconexión a la toma de CA, los LED #3, 4, 5 y
6 parpadearán dos veces para confirmar el estado del microprocesador, independientemente de si el cargador sigue conectado a la batería o no.
Page 14
14
MODO DE AHORRO DE ENERGÍA “ECO” CUANDO EL CARGADOR ESTÁ CONECTADO A LA RED CA:
El convertidor de energía pasa al modo ECO cuando el cargador no está conectado a la batería, por lo que la entrada de corriente es inferior
a 0,5W, lo que equivale a un consumo de energía de 0,012kW/h al día. Cuando la batería está conectada al cargador, el consumo de
energía varía en función de la cantidad de corriente que necesiten la batería y los circuitos del vehículo/electrónicos conectados a la
misma. Una vez que se ha cargado la batería y el cargador está en el modo de carga de mantenimiento prolongado (para mantener la
batería a plena carga), el consumo total de energía estimado es de 0,024kW/h o menos por día.
PROCEDIMIENTO DE CARGA
Las indicaciones LED evocadas a continuación y los textos relacionados aparecen según el orden de secuencia lógico del
programa.
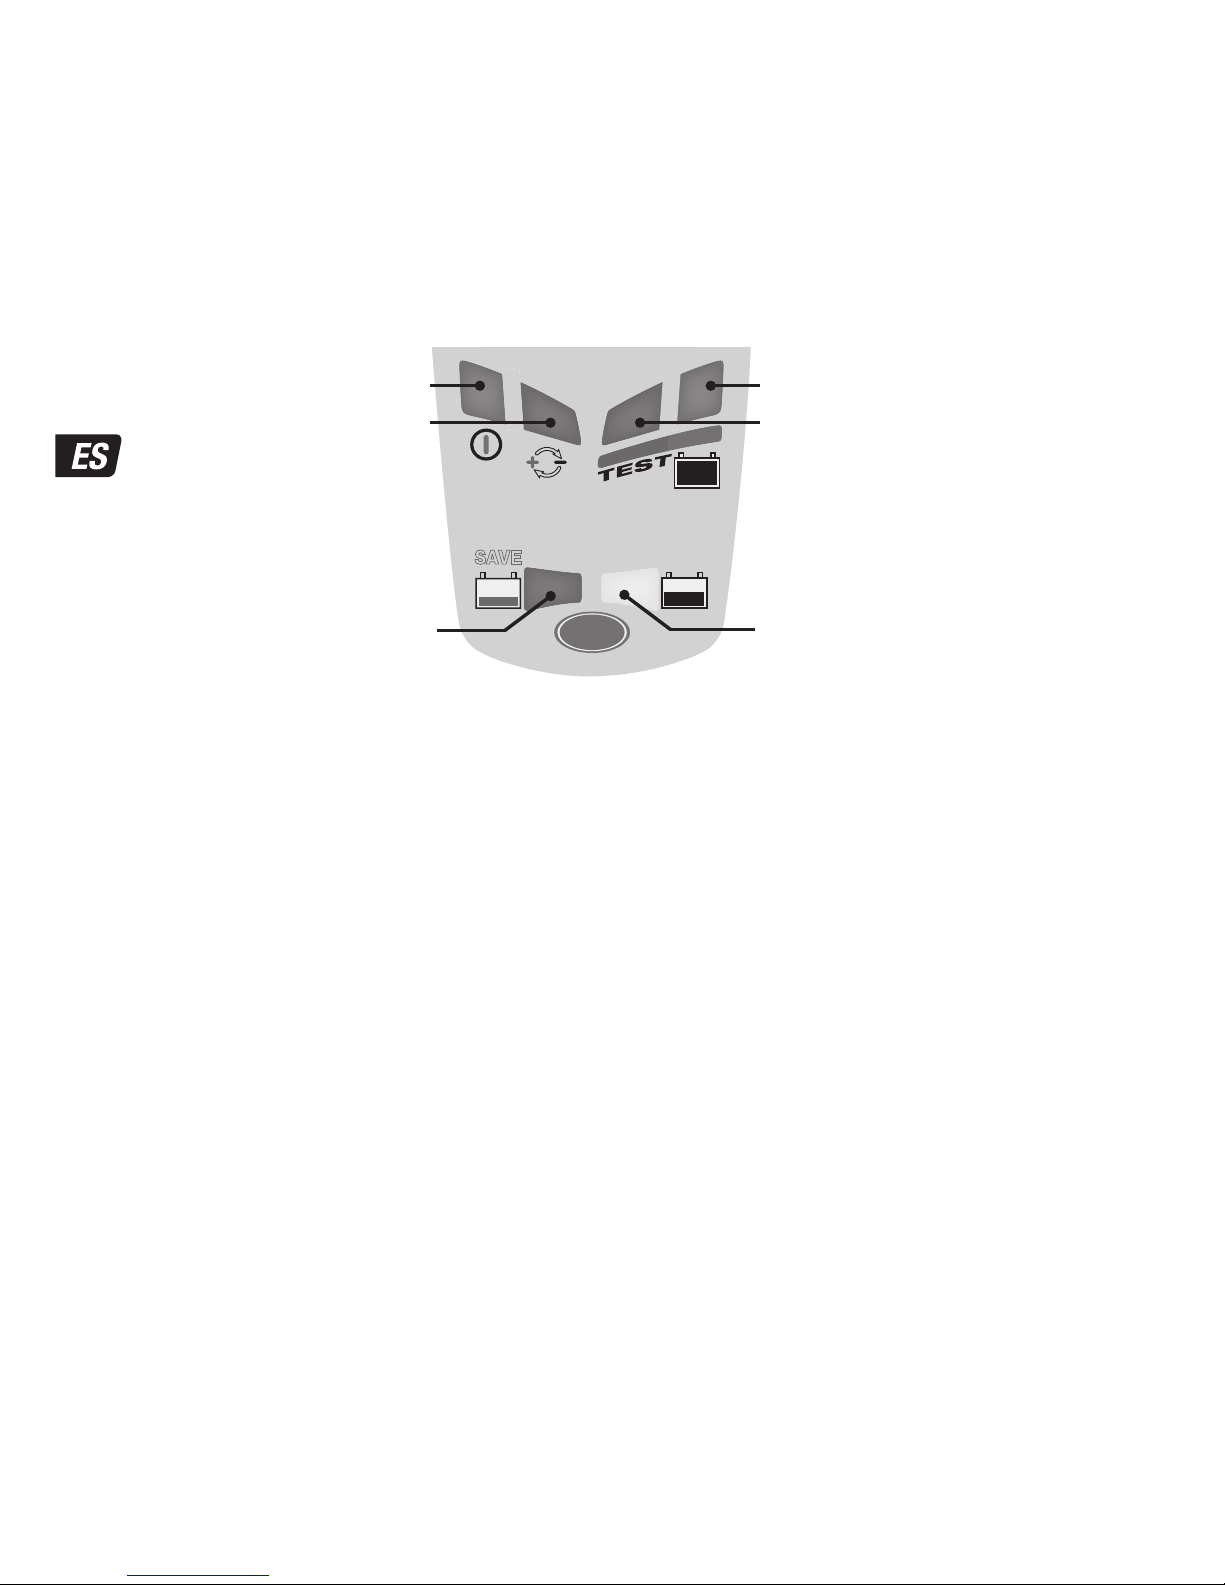
ALIMENTACIÓN ACTIVADA: LED #1: confirma la alimentación CA al cargador.
Indicación de intensidad ALTA y BAJA: El LED #1 «ALIMENTACIÓN ACTIVADA» se iluminará intensamente cuando se suministre corriente a la batería.
El LED #1 « ALIMENTACIÓN ACTIVADA» reducirá su intensidad a un nivel bajo durante el modo «ECO». Esto ocurrirá si no hay ninguna
batería conectada o, si hay una batería conectada, en modo de prueba de retención de tensión, o en modo de carga de mantenimiento.
PROTECCIÓN CONTRA POLARIDAD INVERTIDA: LED #2: se enciende cuando las conexiones de la batería son incorrectas. El cargador está
protegido electrónicamente, con lo que no se producirá ningún daño y la salida permanecerá desactivada hasta que se corrijan las conexiones.
El LED n.º 3 de RECUPERACIÓN se enciende si la batería está muy descargada (descargada o sulfatada),
IMPORTANTE: si se activa este modo, consulte el apartado BATERÍAS DESCUIDADAS MUY DESCARGADAS.
Si este modo se activa, la batería presentaba una descarga superior al 90%/tensión inferior a 12,8V: la corriente de carga se ajusta
automáticamente en función de la tensión y temperatura ambiente registradas durante la prueba de precualificación.
RECUPERACIÓN EN CASO DE MUY BAJA TENSIÓN para baterías entre 0,6V y 8,8V: la corriente se inicia a 200mA y se incrementa hasta
325mA en función del proceso de carga. Si la tensión no supera 8,8V en 2horas, la carga se suspenderá y el LED DE PRUEBA #6 (rojo)
parpadeará para indicar que la batería puede haber sufrido daños permanentes o que se requiere una valoración profesional.
RECUPERACIÓN EN CASO DE BAJA TENSIÓN para baterías entre 8,9V y 12,8V: la corriente máxima está fijada a 0,8A. Se controla la
asimilación de la carga de la batería para detectar algún comportamiento anómalo. Una batería LiFePO4 en buen estado pasará al modo
CARGA en 4horas; de lo contrario, la carga se suspenderá y el LED DE PRUEBA #6 (rojo) parpadeará para indicar que la batería puede haber
sufrido daños permanentes o que se requiere una valoración profesional.
LED #4 Carga y verificación de carga
CARGA: Etapa de CARGA principal : una corriente constante de máximo 0,8A se suministra, hasta una tensión de 14,2-14,4 V.
VERIFICACIÓN: Mientras el circuito verifica el nivel de carga de la batería.
Si la batería necesita más carga, el programa vuelve en modo de CARGA PRINCIPAL durante períodos cortos, suministrando así un impulso
de corriente variable a la batería. Estas reversiones ocurrirán tantas veces que se necesita, a fin de reducir la “petición” de corriente
emanando de la batería, hacia un nivel inferior a 200mA a 13,6V (valores típicos para una batería que aceptó una carga tal que su condición
de base lo permitió). (Consulte el apartado Tiempo de carga estimado.)
OBSERVACIÓN: por razones de seguridad hay un límite temporal de carga general de 48 horas.
PRUEBA DE RETENCIÓN DE TENSIÓN: LED #5 parpadea
El suministro de corriente a la batería se interrumpe durante 12 horas* para permitir que el programa determine la capacidad de la batería de
retener la carga. Para las baterías en buen estado, el LED #5 (verde) debería seguir parpadeando durante el período completo de 12 horas*.
Lea el apartado OBSERVACIONES SOBRE LOS RESULTADOS DE LA PRUEBA para averiguar las razones de resultados de pruebas deficientes o
cómo probar una batería que ofrece un buen resultado, pero no puede suministrar suficiente potencia una vez que está de nuevo operativa.
CHARGE
SAVESAVE
0.8
BATTERY SAVING
CHARGER + TESTER
FOR/POUR/PARA/FÜR/PER LITHIUM LiFePO4
LFP
12 3412 34
.
READ INSTRUCTIONS & WARNING LABELS
LIRE LES INSTRUCTIONS ET ETIQUETTES
LEER LAS INSTRUCCIONES Y ETIQUETAS
LESEN SIE DIE ANWEISUNGEN UND ETIKETTEN
LEGGERE LE ISTRUZIONI E ETICHETTE
Model: TM470
INPUT/SECTEUR/RED/NETZ/ALIM
100-240V 50-60Hz
0.23A@100Vac / 0.15A@240Vac
OUTPUT/SORTIE/SALIDA/LEISTUNG/USCITA
12.8V 0.8A
LED #5 - GREEN: TEST & MAINTAIN
LED #6 - RED: TEST & MAINTAIN
LED #1 - AC POWER (100-240V)
LED #2 - Reverse polarity
LED #3 - SAVE
LED #4 - CHARGE
Page 15

15
CARGA DE MANTENIMIENTO: LED #5, 6 fijos
Durante 30 minutos, el circuito suministra corriente a la batería dentro de un límite de tensión seguro de 13,6V, mientras se muestra el
resultado de la prueba de retención de tensión.
Si el LED n.º 6 (rojo) se enciende, se repetirá la PRUEBA DE RETENCIÓN DE TENSIÓN. El LED n.º 5 (verde) fijo indica los periodos de
mantenimiento de carga flotante de 30 minutos, que siguen y se alternan con los periodos de 30 minutos de DESCANSO (sin carga)hasta
que se desconecte la batería.
OBSERVACIONES SOBRE LOS RESULTADOS DE LA PRUEBA:
1. Si el resultado no es verde #5, desconecte la batería del sistema eléctrico y vuelva a conectar el OptiMate. Si en ese momento se obtiene
un mejor resultado en la prueba, es probable que las pérdidas de potencia se deban a un problema del sistema eléctrico y no a la propia
batería. Si persisten los resultados insatisfactorios, se recomienda que un profesional de mantenimiento examine la batería para llevar a
cabo una investigación más exhaustiva.
2. Si se ilumina únicamente el LED n.º 6 rojo, o bien el LED n.º 5 verde y el LED n.º 6 rojo al mismo tiempo, esto indica que existe un
problema importante. Los LED verde + rojo señalan que tras haber realizado la carga, la tensión de la batería no se está manteniendo o que,
a pesar de los intentos de recuperación, la batería no es recuperable. Esto puede deberse a un defecto en la propia batería, como una célula
cortocircuitada o una sulfatación total o, en el caso de una batería que aún está conectada al sistema eléctrico al que suministra energía, el
LED #6 rojo puede estar indicando una pérdida de corriente a través de un cableado deteriorado o un contacto o interruptor degradado, así
como a través de accesorios que consumen corriente dentro del circuito. Un consumo repentino activado mientras el cargador está
conectado también puede provocar que la tensión de la batería se reduzca drásticamente.
3. RESULTADO DE LA PRUEBA SATISFACTORIO, pero la batería no puede suministrar una potencia suficiente: un daño permanente de la
batería puede estar causando una autodescarga excesiva que no se ha detectado durante el periodo de prueba de 12horas de duración.
MANTENIMIENTO AUTOMÁTICO DE LA BATERÍA: El CICLO DE CARGA DE MANTENIMIENTO consiste en periodos de carga
de 30minutos seguidos y alternados con periodos de «descanso» de 30minutos, durante los que no hay corriente de carga. El circuito
suministra corriente a la batería dentro de un límite de tensión seguro de 13,6V («carga flotante»), lo que le permite tomar la corriente
necesaria para mantenerla a plena carga y compensar los pequeños consumos eléctricos impuestos por el circuito conectado o la
autodescarga gradual normal de la propia batería. El CICLO DE REFRESCO DE LA BATERÍA se efectúa si el cargador detecta que la batería ha
perdido carga. El programa vuelve al modo de OPTIMIZACIÓN (LED #4) y, a continuación, realiza la prueba de retención de tensión y el ciclo
de carga de mantenimiento.
GARANTÍA LIMITADA
TecMate (International) SA, Sint-Truidensesteenweg 252, B-3300 Tienen, Bélgica, establece esta garantía limitada en favor del primer
propietario que utilice este aparato. Esta garantía limitada no es transferible. TecMate (International) garantiza este aparato durante los tres
años siguientes a la fecha de compra por su primer usuario contra las fallos de materiales y de montaje. En este caso y a discreción del
fabricante el aparato podrá ser reparado ó reemplazado. La gestión y los costes relativos al transporte del aparato acompañado por una
prueba de compra (véase "NOTA") al fabricante ó a uno de sus representantes autorizados serán por cuenta del cliente. Esta garantía
limitada se anula en caso de uso ó tratamiento inadecuado, ó de reparación hecha por toda persona o organización otra diferente al
fabricante ó uno de sus representantes autorizados. El fabricante no cumple con otra garantía que esta garantía limitada y expresamente
excluye toda forma de garantía contra otros daños que los que sufra el aparato por sí mismo.
ESTO CONSTITUYE LA UNICA GARANTÍA LIMITADA VALIDA. El FABRICANTE NO RECONOCE A QUIENQUIERA EL DERECHO DE EJERCER Ó DE
TRANSMITIR NINGUN DERECHO RELATIVO AL PRODUCTO VENDIDO QUE SEA OTRO QUE EL QUE SE DERIVA DE ESTA GARANTÍA LIMITADA
EXPRESA. LAS SUS DERECHAS ESTATUTARIAS NO SON AFECTADAS.
NOTA: Véase www.tecmate.com/warranty ó contacte warranty@tecmate.com
copyright © 2014 TecMate International
OptiMate, OptiMate Lithium y los nombres de los otros aparatos mencionados en este texto como BatteryMate, TestMate y TestMate mini,
son marcas registradas de TecMate International SA.
Se puede encontrar más información sobre los productos de TecMate en www.tecmate.com.
Page 16

16
SEGURANÇA
CARREGADOR DE DIAGNÓSTICO AUTOMÁTICO PARA BATERIAS LiFePO4
(FOSFATO DE FERRO DE LÍTIO) DE 12,8V. BATERIAS DE 2,5AH A 30AH:
Entrada: 100-240V máximo 0,23A. A corrente máxima de saída é 0,8A.
NOTAS E AVISOS DE SEGURANÇA: CASO AINDA NÃO O TENHA FEITO,
LEIA AS PÁGINAS ANTERIORES COM A INDICAÇÃO "INSTRUÇÕES DE
SEGURANÇA IMPORTANTES" ANTES DE UTILIZAR ESTE CARREGADOR.
Este dispositivo não se destina a ser utilizado por pessoas (incluindo crianças) com capacidades
mentais, sensoriais ou físicas diminuídas, nem por pessoas com falta de experiência ou
conhecimentos, a não ser que recebam supervisão ou instruções adequadas, dadas por uma
pessoa responsável pela sua segurança, no que respeita ao seu uso. As crianças devem ser
supervisionadas de modo a assegurar que não brinquem com o dispositivo.
UTILIZAR O OPTIMATE LITHIUM 0,8A
UTILIZAÇÃO CORRECTA: Utilize o carregador apenas se os condutores de entrada e saída e os conectores estiverem em boas
condições e intactos. Se o cabo de entrada estiver danificado, é essencial que seja substituído imediatamente pelo fabricante, o agente
de assistência autorizado ou uma oficina qualificada, para evitar o perigo. Proteja o carregador da humidade tanto durante o uso como no
armazenamento. Os danos resultantes de corrosão, oxidação ou de curto-circuitos eléctricos internos não são cobertos pela garantia. Afaste
o carregador da bateria durante o carregamento para evitar a contaminação por ácido ou a exposição ao ácido ou a vapores ácidos. Se
utilizar o carregador na posição horizontal, coloque-o sobre uma superfície plana e dura, mas NÃO sobre uma superfície de plástico, tecido
ou couro. Utilize os orifícios de fixação existentes na base de caixa para prender o carregador a qualquer superfície vertical resistente e
adequada.
EXPOSIÇÃO A LÍQUIDOS: Este carregador foi concebido para resistir à exposição a líquidos acidentalmente derramados ou
salpicados sobre a caixa a partir de cima, ou a chuvas leves. A exposição prolongada à chuva não é aconselhável e se for minimizada é
possível obter uma vida útil mais longa. As falhas do carregador devido à oxidação resultante de uma eventual penetração de líquidos nos
componentes electrónicos, conectores ou fichas, não são cobertas pela garantia.
BATERIAS NEGLIGENCIADAS MUITO DESCARREGADAS: Preste especial atenção ao seguinte: Uma bateria LiFePO4
que esteja muito descarregada durante um período prolongado poderá desenvolver danos permanentes numa ou em várias células.
Essas baterias poderão aquecer excessivamente durante o carregamento. Durante o modo de recuperação (save), o programa limita a
corrente de carga se a tensão for inferior a 12,8 v e o programa deverá detetar danos óbvios nas células, suspendendo automaticamente
o carregamento. No entanto, quanto maior for o número de células em paralelo, mais difícil será a deteção de uma célula danificada. Por
exemplo, uma bateria de 5 ah normalmente tem 4 conjuntos ligados em série de 2 células paralelas (configuração 4s2p - total de 8 células)
e uma bateria de 10 ah tem 4 conjuntos ligados em série de 4 células paralelas (configuração 4s4p - total de 16 células).
Controle SEMPRE a temperatura da bateria durante a primeira hora e, posteriormente, todas as horas. Se a qualquer momento a bateria
estiver desconfortavelmente quente ao toque ou se detectar quaisquer sinais invulgares, DESLIGUE IMEDIATAMENTE O CARREGADOR.
TEMPO DE CARREGAMENTO
Tempo de uma bateria descarregada, mas intacta:
Para baterias de 2,5Ah a 5Ah: 180 a 360 minutos para avançar para o teste de retenção de tensão.
Para baterias com mais de 5Ah: 125% do valor de Ah da bateria, portanto, uma bateria de 30Ah não deverá demorar mais de 38 horas
para avançar para o teste de retenção de tensão.
As baterias muito descarregadas poderão demorar bastante mais tempo. É possível que não seja atingida a carga total dentro do limite de
segurança de carregamento de 24 horas. Neste caso, siga o procedimento de reposição abaixo.
REINICIAR O CICLO DE CARREGAMENTO E DE TESTE
Desligue da alimentação de CA. Espere até que o LED #1 «LIGADO» se apague. Depois de voltar a ligar o equipamento à energia eléctrica de
CA, os LEDs #3, 4, 5 e 6 piscam duas vezes para confirmar que o microprocessador se encontra em funcionamento, independentemente de
o carregador permanecer ligado a uma bateria ou não.
Page 17

17
MODO ECO DE POUPANÇA ENERGÉTICA QUANDO O CARREGADOR ESTÁ LIGADO À ALIMENTAÇÃO
DE CORRENTE CA:
O conversor de corrente muda para o modo ECO quando o carregador não está ligado a uma bateria, resultando num consumo de energia
muito reduzido, inferior a 0,5W, equivalente ao consumo de 0,012 kWh por dia. Quando uma bateria é ligada ao carregador, o consumo de
energia depende da necessidade de corrente da bateria e do veículo/circuito electrónico ligado. Depois de a bateria ter sido carregada e o
carregador se encontrar no modo de carregamento de manutenção de longo prazo (para manter a bateria a 100% de carga) o consumo total
de energia é estimado em 0,024 kWh por dia ou menos.
PROCEDER AO CARREGAMENTO
Os indicadores de LED em baixo encontram-se em sequência tal como podem aparecer durante o programa.
LIGADO: LED #1 - Confirma o fornecimento de energia CA ao carregador.
Indicação de intensidade ALTA e BAIXA: O LED #1 «LIGADO» fica com uma luminosidade mais intensa quando é fornecida corrente à bateria.
O LED #1 «LIGADO» reduz a intensidade para um nível baixo para indicar o modo "ECO" de baixo consumo de energia. Isto acontece quando
não há uma bateria ligada ou quando a bateria está ligada e o programa se encontra no modo de teste de retenção de tensão ou nos
períodos de "descanso" do modo de Carregamento de manutenção.
PROTECÇÃO DE POLARIDADE INVERTIDA: LED #2 - Acende-se quando as ligações da bateria estão incorrectas.
O carregador é protegido electronicamente para que não ocorram danos e a saída permanece desactivada até que as ligações sejam
corrigidas.
LED #3 RECUPERAR ilumina-se quando a bateria está fortemente descarregada (muito descarregada ou dessulfatada),
IMPORTANTE: Se o aparelho entrar neste modo, leia a secção BATERIAS NEGLIGENCIADAS MUITO DESCARREGADAS.
O aparelho entra neste modo se a bateria estiver mais de 90% descarregada/a tensão for inferior a 12,8V. A corrente de carga é ajustada
automaticamente de acordo com a tensão e temperatura ambiente medida durante o teste de pré-qualificação.
RECUPERAÇÃO COM TENSÃO MUITO BAIXA para baterias entre 0,6V e 8,8V: A corrente começa com 200mA e aumenta até 325mA dependendo
do avanço do carregamento. Se a tensão não subir acima de 8,8V dentro de 2 horas, o carregamento é suspenso e o LED DE TESTE #6 (vermelho)
fica intermitente, indicando que a bateria poderá ter sofrido danos permanentes ou que é necessária uma avaliação profissional.
RECUPERAÇÃO COM TENSÃO BAIXA para baterias entre 8,9V e 12.8V: A corrente máxima é definida para 0,8A. Este modo controla se
existem comportamentos invulgares para determinar a aceitação de carga da bateria. Uma bateria LiFePO4 saudável avança para o modo
de CARREGAMENTO (CHARGE) no espaço de 4 horas, caso contrário, o carregamento é suspenso e o LED DE TESTE #6 (vermelho) fica
intermitente, indicando que a bateria poderá ter sofrido danos permanentes ou que é necessária uma avaliação profissional.
LED #4 Carga e verificação de carga
CARGA: Etapa de CARGA principal: uma corrente constante de 0,8Amps, no máximo, é aplicada na bateria, até uma tensão de 14,2 - 14,4 V.
O circuito verifica o nível de carregamento da bateria. Se a bateria necessita mais carga, o programa reverte para CARREGAMENTO durante
breves intervalos, originando impulsos de corrente variável para a bateria. Estas reversões irão reproduzir-se tantas vezes quanto necessário,
afim de reduzir o pedido de corrente proveniente da bateria a menos de 200mA a 13,6V (valores típicos para uma bateria que tanta carga que
o seu estado inicial permitia). (ver Tempo de Carregamento)
OBSERVACIÓN: por razones de seguridad hay un límite temporal de carga general de 48 horas.
PRUEBA DE RETENCIÓN DE TENSIÓN: LED #5 parpadea
El suministro de corriente a la batería se interrumpe durante 12 horas* para permitir que el programa determine la capacidad de la batería de
retener la carga. Para las baterías en buen estado, el LED #5 (verde) debería seguir parpadeando durante el período completo de 12 horas*.
Lea el apartado OBSERVACIONES SOBRE LOS RESULTADOS DE LA PRUEBA para averiguar las razones de resultados de pruebas deficientes o
cómo probar una batería que ofrece un buen resultado, pero no puede suministrar suficiente potencia una vez que está de nuevo operativa.
CHARGE
SAVESAVE
0.8
BATTERY SAVING
CHARGER + TESTER
FOR/POUR/PARA/FÜR/PER LITHIUM LiFePO4
LFP
12 3412 34
.
READ INSTRUCTIONS & WARNING LABELS
LIRE LES INSTRUCTIONS ET ETIQUETTES
LEER LAS INSTRUCCIONES Y ETIQUETAS
LESEN SIE DIE ANWEISUNGEN UND ETIKETTEN
LEGGERE LE ISTRUZIONI E ETICHETTE
Model: TM470
INPUT/SECTEUR/RED/NETZ/ALIM
100-240V 50-60Hz
0.23A@100Vac / 0.15A@240Vac
OUTPUT/SORTIE/SALIDA/LEISTUNG/USCITA
12.8V 0.8A
LED #5 - GREEN: TEST & MAINTAIN
LED #6 - RED: TEST & MAINTAIN
LED #1 - AC POWER (100-240V)
LED #2 - Reverse polarity
LED #3 - SAVE
LED #4 - CHARGE
Page 18

18
CARGA DE MANTENIMIENTO: LED #5, 6 fijos
Durante 30 minutos, el circuito suministra corriente a la batería dentro de un límite de tensión seguro de 13,6V, mientras se muestra el
resultado de la prueba de retención de tensión. Se o LED #6 (vermelho) se iluminar, o TESTE DE RETENÇÃO DE TENSÃO será repetido. O
LED #5 (verde) aceso em contínuo indica períodos de 30 minutos de carregamento flutuante de manutenção seguidos e alternados com um
período de 30 minutos de REPOUSO (sem carregamento) até que a bateria seja desligada.
NOTAS SOBRE RESULTADOS DE TESTE:
1. Para qualquer resultado de teste que não seja #5 verde, desligue a bateria do sistema eléctrico que esta suporta, e volte a ligar o
OptiMate. Se, em seguida, for obtido um resultado de teste melhor, significa que as perdas de energia se devem em parte a um problema
eléctrico no sistema eléctrico e não à própria bateria. Se o mau resultado persistir, aconselha-se que leve a bateria a uma oficina de serviço
profissional, que disponha de equipamento profissional para uma investigação mais completa.
2.Se o LED #6 vermelho acender sozinho ou se acenderem simultaneamente o LED #5 VERDE e o LED #6 vermelho, existe um problema
significativo. Os LEDs verde + vermelho significam que, após o carregamento, a tensão da bateria não é mantida ou que, apesar das
tentativas de recuperação, não foi possível recuperar a bateria. Isto pode ser devido a um defeito na bateria em si, como por exemplo uma
célula em curto-circuito ou sulfatação total, ou, no caso de uma bateria ainda ligada ao sistema eléctrico que suporta, o LED #6 vermelho
poderá indicar uma perda de corrente através do circuito eléctrico deteriorado ou um interruptor ou um contacto degradado, ou acessórios
que consomem corrente em circuito. A ligação de uma carga súbita enquanto o carregador está ligado também pode provocar a uma
descida significativa da tensão da bateria.
3. BOM RESULTADO DE TESTE, mas a bateria não consegue fornecer energia eléctrica suficiente: Um dano permanente na bateria poderá
estar a causar demasiado auto-descarregamento que não é detectado no período de teste de 12 horas.
MANUTENÇÃO AUTOMÁTICA DA BATERIA: O CICLO DE CARREGAMENTO DE MANUTENÇÃO consiste em períodos de
carregamento de 30 minutos seguidos alternadamente por períodos de "descanso" de 30 minutos, durante os quais não há corrente de
carga. O circuito fornece corrente à bateria dentro de um limite de tensão seguro de 13,6V ("carga flutuante"), permitindo-lhe obter
qualquer pequena corrente necessária para manter a carga total e compensar quaisquer pequenas cargas eléctricas impostas pelo circuito
ligado ou o auto-descarregamento gradual natural da própria bateria. O CICLO DE RENOVAÇÃO DA BATERIA é realizado se o carregador
detectar que a bateria perdeu a carga. O programa volta ao modo OPTIMIZAÇÃO (OPTIMIZE) (LED #4) e, em seguida, avança para o teste de
retenção de tensão e o ciclo de carregamento de manutenção.
GARANTIA LIMITADA
TecMate (International) NV, Sint-Truidensesteenweg 252, B-3300, Belgium, consente a presente garantia ao primeiro utilizador deste
produto, sem possibilidade de transferibilidade. TecMate (International) NV garante este carregador durante três anos a partir da data de
compra ao retalhista, contra os defeitos dos componentes ou de montagem. Se for o caso, o carregador será reparado ou substituído à
discrição do fabricante. O comprador deve enviar por sua própria conta, o aparelho assim como uma prova de compra (veja "NOTA"), ao
fabricante ou ao seu representante. Esta garantia limitada, torna-se nula se o aparelho for utilizado ou manipulado de forma inadequada ou
se tiver sido reparado por toda outra pessoa física ou moral que o fabricante ou o seu representante. O fabricante não oferece nenhuma
outra garantia que a presente, e excluí expressamente toda garantia conta danos consequenciais.
ESTA É A ÚNICA GARANTIA EXPRESSAMENTE CONSENTIDA PELO FABRICANTE. ESTE NÃO ASSUME E NÃO AUTORIZA QUEM QUER QUE SEJA
A ASSUMIR OU ESTABELECER TODA OUTRA OBRIGAÇÃO LIGADA A ESTE PRODUTO, OUTRA QUE ESTA GARANTIA LIMITADA
EXPRESSAMENTE CONSENTIDA. SUAS DIREITAS ESTATUTÁRIAS NÃO SÃO AFETADAS.
NOTA: Veja www.tecmate.com/warranty o contatem warranty@tecmate.com
copyright © 2014 TecMate International
OptiMate, OptiMate Lithium e osnomes dos outros aparelhos mencionados neste texto como BatteryMate, TestMate e TestMate mini, são
marcas registadas de TecMate International SA.
Pode-se encontrar mais informação sobre os produtos de TecMate em www.tecmate.com.
Page 19
19
SICHERHEIT
AUTOMATISCHES DIAGNOSE-LADEGERÄT FÜR 12,8-V-LiFePO4BATTERIEN (LITHIUM-EISENPHOSPHAT) VON 2,5AH BIS 30AH:
Eingang : 100-240V maximal 0,23A. Der maximale Ausgangsstrom ist 0,8A.
SICHERHEITSWARNUNG UND -HINWEISE: SPÄTESTENS JETZT DIE
„WICHTIGEN SICHERHEITSHINWEISE“ AUF DEN VORAUSGEHENDEN
SEITEN LESEN, EHE DAS LADEGERÄT IN BETRIEB GENOMMEN WIRD.
Dieses Gerät ist nicht dafür vorgesehen, von Personen (einschließlich Kindern) verwendet zu werden,
die über beschränkte körperliche, sensorische und mentale Fähigkeiten oder mangelnder Erfahrung
bzw. unzureichendem Wissen verfügen, sofern diese nicht durch eine für die Sicherheit
verantwortliche Person zur korrekten Verwendung des Geräts eingewiesen wurden oder das Gerät
ohne Aufsicht bedienen. Kinder, die sich in der Nähe des Geräts befinden, sollten beaufsichtigt
werden, um sicherzustellen, dass diese nicht mit dem Gerät spielen.
VERWENDUNG DES OPTIMATE LITHIUM 0,8A
KORREKTER GEBRAUCH: Das Ladegerät darf nur verwendet werden, wenn sich die Eingangs- und Ausgangsleitungen in einem guten,
unbeschädigten Zustand befinden. Wenn das Eingangskabel beschädigt ist, muss es zur Vermeidung jeglicher Gefahr unverzüglich durch den
Hersteller, seinen autorisierten Wartungsdienstleister oder eine qualifizierte Werkstatt ausgetauscht werden. Das Ladegerät muss sowohl
während des Betriebs als auch während der Lagerung vor Dunst und Feuchtigkeit geschützt werden. Schäden durch Korrosion, Oxidation oder
internen Kurzschluss sind nicht durch die Garantie abgedeckt. Das Ladegerät während des Ladevorgangs in einem gewissen Abstand zur
Batterie aufstellen, um eine Verunreinigung durch Säure oder säurehaltige Dämpfe zu vermeiden. Wenn das Ladegerät horizontal aufgestellt
wird, muss es auf einer harten flache Fläche platziert werden, die NICHT aus Kunststoff, Stoff oder Leder bestehen darf. Zur Befestigung des
Ladegeräts an einer passenden und geeigneten vertikalen Oberfläche die Befestigungsbohrungen unten am Gehäuse verwenden.
EINWIRKUNG VON FLÜSSIGKEITEN: Dieses Ladegerät hält versehentlich von oben auf das Gehäuse verschütteten oder
verspritzten Flüssigkeiten sowie leichtem Regen stand. Von einem längeren Aufenthalt im Regen ist abzuraten. Je weniger das Gerät Regen und
sonstigen Flüssigkeiten ausgesetzt ist, desto länger wird seine Betriebsdauer. Ein Ausfall des Ladegeräts durch Oxidation aufgrund des
Eindringens von Flüssigkeiten in die elektronischen Bauteile, Stecker oder Anschlüsse ist nicht durch die Garantie abgedeckt.
SEHR STARK ENTLADENE, VERNACHLÄSSIGTE BATTERIEN: Beachten Sie die folgenden Punkte besonders genau: Bei
einer LiFePO4 Batterie, die sich über einen längeren Zeitraum im tiefentladenen Zustand befand, können eine oder mehrere Zellen
permanent beschädigt sein. Solche Batterien können sich beim Laden übermäßig erwärmen. Im SAVE-Modus begrenzt das Programm den
Ladestrom, wenn die Spannung unter 12,8V liegt und das Programm sollte offensichtliche Schäden an Zellen erkennen, je höher jedoch die
Anzahl parallel geschalteter Zellen, desto schwieriger ist die Erkennung einer defekten Zelle. Beispiel: eine 5Ah Batterie hat in der Regel 4 in
Reihe geschaltete Gruppen à 2 parallel geschaltete Zellen (4S2P Konfiguration - insgesamt 8 Zellen), eine 10Ah Batterie hat 4 in Reihe
geschaltete Gruppen à 4 parallel geschaltete Zellen (4S4P Konfiguration - insgesamt 16 Zellen).
Während der ersten Stunde IMMER die Batterietemperatur überwachen, danach einmal pro Stunde. Wenn die Batterie zu irgendeinem
Zeitpunkt so heiß wird, dass sie nicht mehr problemlos berührt werden kann, oder sonstige ungewöhnliche Zeichen erkennbar sind, DAS
LADEGERÄT SOFORT TRENNEN.
LADEDAUER
Ladedauer bei einer entladenen, aber ansonsten unbeschädigten Batterie:
Für Batterien mit einer Nennladung zwischen 2,5 und 5Ah: 180 bis 360 Minuten bist zum Spannungserhaltungstest.
Für Batterien mit einer Nennladung über 5Ah: 125% der Nennladung der Batterie, also benötigt eine 30-Ah-Batterie nicht mehr als 38
Stunden bis zum Spannungserhaltungstest.
Bei tiefentladenen Batterien kann die Ladedauer erheblich länger sein, Eine vollständige Aufladung wird möglicherweise innerhalb der
24-Stunden-Grenze für sichere Aufladung nicht erreicht. In diesem Fall muss der unten erläuterte Rücksetzvorgang befolgt werden.
RÜCKSETZEN DES AUFLADUNGS- UND TESTZYKLUS
Die Netzspannungsversorgung unterbrechen. Warten, bis die NETZ-LED #1 erlischt. Beim erneuten Anschluss an die Netzspannung blinken
alle LEDs bis auf # 3, 4, 5 und 6 zweimal, um die Funktion des Mikroprozessors zu bestätigen, auch wenn das Ladegerät nicht mit einer
Batterie verbunden ist.
Page 20
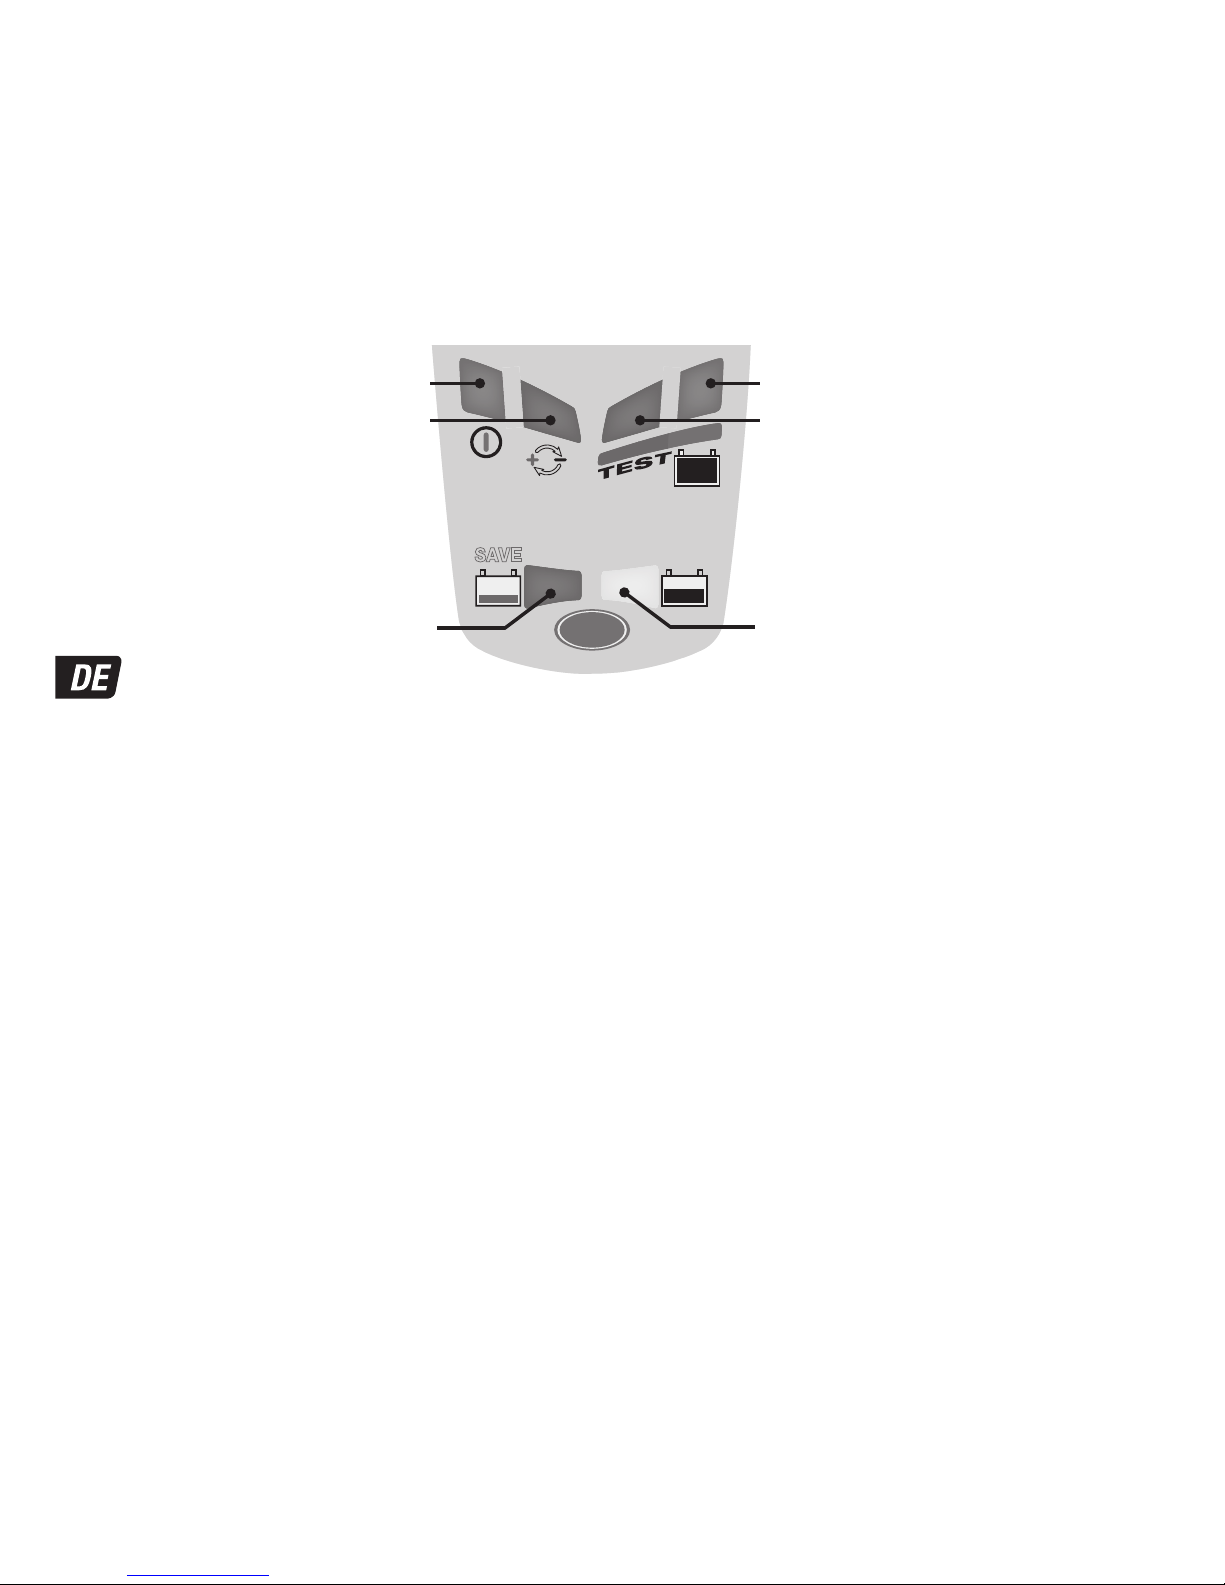
20
SPARMODUS, WENN DAS LADEGERÄT AN DIE NETZSPANNUNGSVERSORGUNG ANGESCHLOSSEN IST:
Der Stromrichter aktiviert den Sparmodus, wenn das Ladegerät nicht an eine Batterie angeschlossen ist, sodass ein niedriger
Stromverbrauch von weniger als 0,5W bzw. eine Leistungsaufnahme von 0,012 kWh pro Tag vorliegt. Wenn eine Batterie an das Ladegerät
angeschlossen wird, wird die Leistungsaufnahme vom Verbrauch der Batterie, und des angeschlossenen Fahrzeugs bzw. der elektronischen
Verbraucher bestimmt. Wenn die Batterie aufgeladen ist und sich das Ladegerät im langfristigen Wartungsladungsmodus befindet (um die
vollständige Ladung aufrechtzuerhalten), beträgt die gesamte Leistungsaufnahme voraussichtlich höchstens 0,024kWh pro Tag.
LADUNGSPROZEDUR
Die LED-Dioden, die sich unten beziehen, und die Klauseln die sie beschäftigen, erscheinen der Programmreihefolge nach.
NETZ: LED #1 – bestätigt die Netzspannungsversorgung des Ladegeräts.
Intensitätsanzeige HIGH und LOW: Die NETZ-LED 1 leuchtet hell auf, wenn die Batterie mit Strom versorgt wird.
Die NETZ-LED 1 verringert die Intensität, um den Sparmodus anzuzeigen. Dies ist der Fall, wenn keine Batterie angeschlossen ist, oder die
Batterie angeschlossen ist und das Programm im Spannungserhaltungstestmodus läuft oder der Wartungsladungsmodus „Pause“ macht.
VERPOLUNGSSCHUTZ: LED #2 – leuchtet auf, wenn die Batterie falsch angeschlossen ist. Das Ladegerät ist elektronisch gegen
Beschädigung geschützt. Der Ausgang bleibt deaktiviert, bis wieder die passenden Bedingungen vorliegen.
LED #3 (RETTEN) leuchtet, wenn die Batterie extrem entladen (tiefentladen oder sulfatiert) ist.
WICHTIG: Wenn dieser Modus vorliegt, bitte Abschnitt TIEFENTLADENE BATTERIEN. Dieser Modus liegt vor, wenn die Batterie zu über 90%
entladen ist / die Spannung unter 12,8V liegt. Der Ladestrom wird automatisch je nach Spannung angepasst, und die
Umgebungstemperatur wird während des Vorqualifikationstests gemessen.
SPARMODUS MIT SEHR NIEDRIGER SPANNUNG für Batterien zwischen 0,6 und 8,8V: Der Strom beginnt mit 200mA und steigt je nach
Ladevorgang auf 325mA an. Wenn die Spannung innerhalb von 2 Stunden nicht über 8,8V gestiegen ist, wird der Ladevorgang
unterbrochen und die TEST-LED #6 (rot) blinkt. Dadurch wird angezeigt, dass die Batterie möglicherweise dauerhaft beschädigt wurde oder
eine Überprüfung durch einen Fachmann erforderlich ist.
SPARMODUS MIT NIEDRIGER SPANNUNG für Batterien zwischen 8,9 und 12,8V: Der maximale Strom beträgt 0,8A. Die
Ladungsaufnahme der Batterie wird auf Abweichungen hin überwacht. Eine korrekt funktionierende LiFePO4-Batterie wechselt innerhalb
von 4 Stunden in den Lademodus, andernfalls wird der Ladevorgang unterbrochen und die TEST-LED #6 (rot) blinkt. Dadurch wird
angezeigt, dass die Batterie möglicherweise dauerhaft beschädigt wurde oder eine Überprüfung durch einen Fachmann erforderlich ist.
LED #4 Laden und überprüfen der Ladung.
LADEN: Die GRUNDLADEPHASE versorgt die Batterie mit einem Konstantstrom von rund max. 0,8 Ampere, bis zu einer Spannung von 14,2 - 14,4V.
ÜBERPRÜFUNG: Der Batterieladestand wird über den Schaltkreis geprüft. Wenn die Batterie weiter geladen werden muss, wechselt das
Programm wieder auf laden und liefert einen Stromimpuls an die Batterie. Diese Programmwechsel können so häufig auftreten, wie
erforderlich, um den Strombedarf der Batterie auf unter 200mA bei 13,6V zu reduzieren (was einer Batterie entspricht, die so viel Ladung
aufgenommen hat, wie ihr Grundzustand zulässt). (siehe voraussichtliche Ladezeit )
HINWEIS: Aus Sicherheitsgründen ist die Ladezeit auf 48 Stunden begrenzt.
SPANNUNGSERHALTTEST: LED 5 blinkt
Die Stromabgabe an die Batterie wird für 12 Stunden* unterbrochen, damit das Programm die Fähigkeit der Batterie zum Spannungserhalt
prüfen kann. Bei Batterien in gutem Zustand blinkt die LED 5 während der gesamten 12 Stunden*. Lesen Sie den Abschnitt mit HINWEISEN
ZU TESTERGEBNISSEN, wenn Sie Informationen zu schlechten Testergebnissen oder zu Test benötigen, die zwar ein gutes Ergebnis
hervorbringen, ohne dass die Batterie jedoch ausreichend Energie abgibt.
CHARGE
SAVESAVE
0.8
BATTERY SAVING
CHARGER + TESTER
FOR/POUR/PARA/FÜR/PER LITHIUM LiFePO4
LFP
12 3412 34
.
READ INSTRUCTIONS & WARNING LABELS
LIRE LES INSTRUCTIONS ET ETIQUETTES
LEER LAS INSTRUCCIONES Y ETIQUETAS
LESEN SIE DIE ANWEISUNGEN UND ETIKETTEN
LEGGERE LE ISTRUZIONI E ETICHETTE
Model: TM470
INPUT/SECTEUR/RED/NETZ/ALIM
100-240V 50-60Hz
0.23A@100Vac / 0.15A@240Vac
OUTPUT/SORTIE/SALIDA/LEISTUNG/USCITA
12.8V 0.8A
LED #5 - GREEN: TEST & MAINTAIN
LED #6 - RED: TEST & MAINTAIN
LED #1 - AC POWER (100-240V)
LED #2 - Reverse polarity
LED #3 - SAVE
LED #4 - CHARGE
Page 21

21
WARTUNGSLADUNG: LED 5/6 leuchtet
Der Schaltkreis gibt für 30 Minuten sichere 13,6 V an die Batterie ab, während das Ergebnis des Spannungserhalttests angezeigt wird.
Wenn LED #6 (rot) aufleuchtet, wird der SPANNUNGSHALTETEST wiederholt. Ein permanent leuchtende LED #5 (grün) zeigt an, dass die
30-minütige Erhaltungsladungsperiode folgt und mit der 30-minütigen Ruhephase (keine Ladung) abwechselt, bis die Batterie vom
Ladegerät entfernt wird.
HINWEISE ZU DEN TESTERGEBNISSEN:
1. Bei Testergebnissen, aufgrund derer LED #5 nicht grün leuchtet, die Batterie vom Verbraucher abklemmen und OptiMate wieder
anschließen. Wenn nun ein besseres Testergebnis erzielt wird, kann das ein Hinweis darauf sein, dass nicht die Batterie das Problem ist,
sondern der elektrische Verbraucher möglicherweise defekt ist. Wenn das Ergebnis weiterhin schlecht ist, sollte die Batterie von einer
professionellen Service-Werkstatt mit professioneller Ausrüstung überprüft werden.
2.Wenn die rote LED Nr. 6 alleine oder die GRÜNE LED Nr. 5 und die rote LED Nr. 6 zusammen aufleuchten, liegt ein signifikantes Problem
vor. Grüne + rote LED bedeutet, dass nach dem Laden die Batteriespannung nicht erhalten bleibt oder dass trotz Rettungsversuchen die
Batterie irreparabel war. Der Grund kann ein Defekt in der Batterie selbst sein, wie z.B. ein Kurzschluss in einer Zelle oder eine vollständige
Sulfatierung. Falls die Batterie noch an einen Verbraucher angeschlossen ist, kann die rote LED #6 auch auf einen Stromverlust durch ein
beschädigtes Kabel oder eine Beschädigung eines Schalters, eines Kontakts oder eines Zubehörteils im Stromkreis hinweisen. Auch durch
das plötzliche Einschalten einer Last bei angeschlossenem Ladegerät kann zu einem erheblichen Spannungsverlust der Batterie führen.
3. GUTES TESTERGEBNIS, aber die Batterie liefert nicht genug Energie: Eine dauerhafte Beschädigung der Batterie kann zu übermäßiger
Selbstentladung führen, die innerhalb der Testdauer von 12Stunden nicht erkannt wird.
AUTOMATISCHE BATTERIEWARTUNG: Der WARTUNGSLADUNGSZYKLUS besteht aus 30-minütigen
Ladezyklen, die sich mit 30-minütigen „Pausen“ abwechseln, in denen kein Ladestrom fließt. Der Schaltkreis gibt im sicheren
Spannungsbereich bis 13,6V Strom an die Batterie ab („Erhaltungsladen“), sodass diese den zur Aufrechterhaltung der vollständigen
Ladung notwendigen Strom entnehmen und kleine elektrische Lasten durch angeschlossene Verbraucher oder die natürliche allmähliche
Selbstentladung der Batterie selbst ausgleichen kann. Der BATTERIEERHALTUNGSZYKLUS wird ausgeführt, wenn das Ladegerät einen
Ladungsverlust der Batterie erkennt. Das Programm kehrt zurück zum Optimierungsmodus (LED #4) und fährt dann mit dem
Spannungserhaltungstest und dem Wartungsladungszyklus fort.
BEGRENZTE GARANTIE
TecMate (International) N.V., Sint-Truidensesteenweg 252, B-3300 Tienen, Belgien, gewährt dem ursprünglichen Käufer beim Kauf dieses
Produktes diese begrenzte Garantie. Diese begrenzte Garantie ist nicht übertragbar. TecMate (International) übernimmt für drei Jahre ab
Verkaufsdatum die Garantie für dieses Batterieladegerät hinsichtlich Material- oder Verarbeitungsfehlern. Sollten solche Fehler auftreten,
wird das Gerät nach Ermeßen des Herstellers repariert oder ersetzt. Es ist Sache des Käufers, das Gerät zusammen mit dem Kaufnachweis
(siehe "BEACHTUNG) "an den Hersteller oder seinen ermächtigten Vertreter einzuschicken, wobei der Käufer die Transport- oder Portokosten
trägt. Diese begrenzte Garantie ist nichtig, wenn das Produkt mißbräuchlich verwendet, unsachgemäß behandelt oder nicht vom Werk oder
einem ermächtigten Vertreter repariert wurde.
EINWIRKUNG VON FLÜSSIGKEITEN: Die Garantie gilt nicht für Schäden am Gerät bzw. den elektronischen Komponenten, Steckverbindern
oder Steckern, die durch eindringende korrosive Flüssigkeiten verursacht wurden.
Der Hersteller gewährt außer dieser begrenzten Garantie keinerlei Garantie und schließt ausdrücklich jede implizite Gewährleistung,
einschließlich jeglicher Garantie gegen Folgeschäden aus.
DIES IST DIE EINZIGE AUSDRÜCKLICHE BEGRENZTE GARANTIE, UND DER HERSTELLER ÜBERNIMMT KEINERLEI VERPFLICHTUNG
GEGENÜBER DEM PRODUKT. IHRE GESETZLICHEN RECHTE SIND NICHT BETROFFEN.
BEACHTUNG: Siehe www.tecmate.com/warranty oder kontaktieren Sie warranty@tecmate.com
copyright © 2014 TecMate International
OptiMate, OptiMate Lithium und die Namen anderer Produkte wie BatteryMate, TestMate und TestMate mini, die in diesen Anweisungen
erwähnt werden,sind geschützte Warenzeichen von TecMate International NV.
Mehr Informationen über TecMate Produkten können bei www.tecmate.com gefunden werden.
Page 22

22
VEILIGHEID
LADER MET AUTOMATISCHE DIAGNOSE VOOR 12,8 V LiFePO4
(LITHIUM-IJZERFOSFAAT-) ACCU’S. ACCU’S VAN 2,5 AH TOT 30 AH:
Ingang: 100-240V maximum 0,23A. De maximale uitgangsstroom is 0,8A.
VEILIGHEIDSWAARSCHUWING EN OPMERKINGEN: ALS U DE
'BELANGRIJKE VEILIGHEIDSINSTRUCTIES' OP DE VORIGE PAGINA'S NOG
NIET HEBT GELEZEN, LEES ZE DAN EERST VOOR U DE LADER GEBRUIKT.
Dit toestel is niet bedoeld voor gebruik door personen (inclusief kinderen) met beperkte fysieke,
motorische of mentale mogelijkheden, of mensen met een gebrek aan ervaring of kennis, tenzij zij voor
hun eigen veiligheid begeleid worden door een verantwoordelijke gedurende het gebruik van het
apparaat. Kinderen moeten onder toezicht staan om te voorkomen dat ze met het toestel zouden spelen.
DE OPTIMATE LITHIUM 0,8A GEBRUIKEN
CORRECT GEBRUIK:
gebruik de lader alleen als de ingangs- en uitgangsdraden en aansluitingen onbeschadigd en in goede staat zijn. Laat
een beschadigde ingangskabel meteen vervangen door de fabrikant of een erkende reparateur, met het oog op uw veiligheid. Bescherm de lader
tegen damp en vochtigheid, zowel tijdens het gebruik als bij de opslag. Schade als gevolg van corrosie, oxidatie of interne elektrische kortstuiting
valt niet onder de garantie. Zorg tijdens het opladen voor voldoende afstand tussen de lader en de accu, om contact met of blootstelling aan zuur of
zure dampen te voorkomen. Gebruikt u de lader horizontaal, plaats hem dan op een harde, vlakke ondergrond maar NIET op plastic, textiel of leer.
Onderaan in de voetplaat zijn gaten om de lader eventueel te bevestigen op een geschikt verticaal oppervlak in goede staat.
BLOOTSTELLING AAN VLOEISTOFFEN: de lader is ontworpen om per ongeluk gemorste of spatten van vloeistoffen van
bovenaf op de behuizing, of lichte regenval te weerstaan. Het is niet aangeraden om de lader lang aan regen bloot te stellen, met het oog
op een langere levensduur. Defecten aan de lader door oxidatie die het gevolg is van eventuele insijpeling van vloeistoffen in de elektrische
onderdelen, aansluitingen of stekkers, vallen niet onder de garantie.
ZEER LEGE, VERWAARLOOSDE ACCU'S: besteed bijzondere aandacht aan het volgende: Een LiFePO4-accu die voor lange
tijd diep ontladen is geweest, kan blijvende schade vertonen aan een of meer cellen. Dit soort accu's kan tijdens het opladen uitzonderlijk
warm worden. In de modus SPAREN beperkt het programma de laadstroom wanneer de spanning lager is dan 12,8 V. Het detecteert
zichtbare schade aan de cellen en onderbreekt het laden automatisch, maar hoe hoger het aantal cellen in parallel, hoe moeilijker om een
slechte cel op te sporen. Zo heeft een accu van 5 Ah 4 series verbonden paren van 2 cellen in parallel (4S2P-configuratie – totaal 8 cellen)
en heeft een accu van 10 Ah 4 series verbonden paren van 4 cellen in parallel (4S4P-configuratie – totaal 16 cellen).
Controleer ALTIJD de temperatuur van de accu tijdens het eerste uur, daarna om het uur. Wanneer de accu op een bepaald moment zo
warm wordt dat je hem niet meer kunt aanraken of er zijn ongewone tekenen, KOPPEL DE LADER DAN METEEN LOS.
OPLAADTIJD
Oplaadtijd voor een platte maar onbeschadigde accu:
Voor accu's van 2,5 Ah tot 5 Ah: 180 tot 360 minuten om naar de spanningsbehoudtest te gaan.
Voor accu's van meer dan 5 Ah: 125% van de capaciteit in Ah. Zo zou het voor een accu van 30 Ah maximaal 38 uur mogen duren om tot
de spanningsbehoudtest te komen.
Voor diep ontladen accu's is de oplaadtijd aanzienlijk langer. Soms kan de accu niet volledig worden opgeladen binnen de 24 uur veilige
oplaadtijd. Volg in dit geval de onderstaande resetprocedure.
DE LAAD- EN TESTCYCLUS RESETTEN
Koppel de lader los van de AC-netvoeding. Wacht tot VOEDING AAN-LED #1 uitgaat. Wanneer de lader opnieuw wordt aangesloten op de
netstroom zullen LED #3, 4, 5 en 6 twee keer knipperen om de goede conditie van de microprocessor te bevestigen, ongeacht of de lader
wel of niet op een accu is aangesloten.
ECO-STROOMBESPARINGSMODUS WANNEER DE LADER OP HET ELEKTRICITEITSNET IS AANGESLOTEN:
De vermogensomzetter gaat in ECO-modus wanneer de lader niet aangesloten is op een accu. Dit resulteert in een stroomopname van
minder dan 0,5 W, wat overeenkomt met een stroomverbruik van 0,012 kWh per dag. Als er een accu is aangesloten op de lader is het
stroomverbruik afhankelijk van de stroombehoefte van de accu en het aangesloten voertuig / de elektronische circuits.Wanneer de accu is
opgeladen en het laadprogramma in de langetermijnonderhoudslaadmodus staat (om de accu 100% vol te houden) wordt het totale
stroomverbruik geraamd op 0,024 kWh per dag of minder.
Page 23

23
BEGINNEN MET LADEN
De LEDs hieronder en de desbetreffende paragrafen zijn in de volgorde van het laadprogramma genummerd.
VOEDING AAN: LED #1 - Bevestigt de AC-voeding naar de lader.
HOGE en LAGE intensiteitsweergave: "VOEDING AAN" LED #1 zal fel branden wanneer stroom wordt geleverd aan de accu.
De "VOEDING AAN" LED #1 brandt minder fel in de energiezuinige 'ECO'-modus. Dit gebeurt als er geen accu aangesloten is of als er een
accu aangesloten is en het programma zich in de spanningsbehoudtest of de 'rustperiodes' van de onderhoudslaadmodus bevindt.
BESCHERMING OMGEKEERDE POLARITEIT: LED #2 - brandt wanneer de accu verkeerd is aangesloten. De lader is elektronisch beveiligd,
zodat er niets wordt beschadigd. De uitgang zal uitgeschakeld blijven tot de aansluitingen correct zijn.
LED #3 "SPAARSTAND" licht op als de accu volledig leeg is (diep ontladen of gesulfateerd),
BELANGRIJK: als deze modus wordt ingeschakeld, raadpleeg het hoofdstuk ZEER PLATTE VERWAARLOOSDE ACCU'S.
Deze modus wordt ingeschakeld wanneer de accu meer dan 90% ontladen is / de spanning minder dan 12,8 V bedraagt. De laadstroom
wordt automatisch aangepast volgens de spanning en de omgevingstemperatuur die werden gemeten tijdens de prekwalificatietest.
SPAARMODUS ZEER LAGE SPANNING voor accu's tussen 0,6 V en 8,8 V: de stroom start bij 200 mA en loopt op tot 325 mA, afhankelijk
van de voortgang van het laadproces. Wanneer na 2 uur de spanning niet boven 8,8 V komt, wordt het laadproces onderbroken en brandt de
TESTLED #6 (rood). Dat betekent dat de accu mogelijk blijvende schade heeft opgelopen of dat een professionele beoordeling vereist is
SPAARMODUS LAGE SPANNING voor accu's tussen 8,9 V en 12,8 V: de maximale stroom is ingesteld op 0,8 A. De stroomopname van de
accu wordt gecontroleerd op abnormaal gedrag. Een LiFePO4-accu in goede staat gaat in modus LADEN na 4 uur. Is dat niet het geval, dan
wordt het laadproces onderbroken en knippert de TESTLED #6 (rood). Dat betekent dat de accu mogelijk blijvende schade heeft opgelopen
of dat een professionele beoordeling vereist is
LED #4 Laden en ladingcontrole
LADEN: De BULK-LAADfase levert een constante stroom van ongeveer 1,0Ampère max. aan de accu, met een spanning tot 14,2 - 14,4V.
CONTROLE: Het circuit controleert het laadniveau van de accu. Indien de accu verder moet geladen worden, keert het programma voor korte
periodes terug naar BULK laden om een variabele stroompuls te geven. Deze herhaling gebeurt zo vaak als nodig, tot de stroomtoevoer lager
is dan 200mA bij 13,6V (dit toont aan dat de accu zoveel lading heeft aanvaard, als haar grondtoestand toelaat). (zie verwachte laadtijd)
Nota Om veiligheidsredenen is de totale laadtijd beperkt tot 48 uur.
SPANNINGSBEHOUDTEST: LED #5 knippert
De levering van stroom aan de accu wordt gedurende 12 uur* onderbroken, zodat het programma kan bepalen of de accu in staat is om de
lading vast te houden. Voor accu's in een gezonde conditie zou LED #5 (groen) tij dens deze 12 uur* continu moeten blijven knipperen. Lees
de paragraaf OPMERKINGEN OVER DE TESTRESULTATEN over de redenen voor slechte resultaten of over het testen van een accu die een
goed resultaat laat zien, maar niet voldoende vermogen kan leveren wanneer hij weer in gebruik wordt genomen.
ONDERHOUDSLADEN: LED #5, 6 branden constant
Het laadcircuit levert gedurende 30 minuten stroom aan de accu binnen een veilige begrenzing van 13,6 V, terwij l het resultaat van de
spanningsbehoudtest wordt weergegeven. Als #6 led (rood) oplicht, wordt de SPANNINGSBEHOUDTEST herhaald. Een ononderbroken #5 led
(groen) signaleert de 30 minuten durende druppellaadperiode die wordt afgewisseld met de 30 minuten durende RUSTperiode (waarbij de
accu niet wordt opgeladen), totdat de accu wordt losgekoppeld.
OPMERKINGEN OVER DE TESTRESULTATEN:
1. Voor een ander testresultaat dan groen #5, koppel de accu los van het elektrische systeem dat hij ondersteunt en sluit de OptiMate
opnieuw aan. Indien het testresultaat nu beter is, is het stroomverlies gedeeltelijk te wijten aan een elektrisch probleem in het elektrische
systeem en niet aan de accu zelf. Als het resultaat nog niet beter is, brengt u de accu beter naar een professionele werkplaats waar
professioneel materiaal voorhanden is en het probleem grondig kan worden onderzocht.
CHARGE
SAVESAVE
0.8
BATTERY SAVING
CHARGER + TESTER
FOR/POUR/PARA/FÜR/PER LITHIUM LiFePO4
LFP
12 3412 34
.
READ INSTRUCTIONS & WARNING LABELS
LIRE LES INSTRUCTIONS ET ETIQUETTES
LEER LAS INSTRUCCIONES Y ETIQUETAS
LESEN SIE DIE ANWEISUNGEN UND ETIKETTEN
LEGGERE LE ISTRUZIONI E ETICHETTE
Model: TM470
INPUT/SECTEUR/RED/NETZ/ALIM
100-240V 50-60Hz
0.23A@100Vac / 0.15A@240Vac
OUTPUT/SORTIE/SALIDA/LEISTUNG/USCITA
12.8V 0.8A
LED #5 - GREEN: TEST & MAINTAIN
LED #6 - RED: TEST & MAINTAIN
LED #1 - AC POWER (100-240V)
LED #2 - Reverse polarity
LED #3 - SAVE
LED #4 - CHARGE
Page 24

24
2. Wanneer enkel led #6 (rood) brandt of wanneer led #5 (groen) en led #6 (rood) beide branden, is er sprake van een ernstig probleem. Als
de groene en rode leds branden, betekent dit dat de accuspanning na het laden niet wordt vastgehouden of dat ondanks verschillende
pogingen de accu niet kon worden hersteld. De oorzaak kan te vinden zijn in de accu zelf, bijvoorbeeld een kortgesloten cel of volledige
sulfatie of corrosie. Wanneer de accu nog op het elektrische systeem dat ze ondersteunt, is aangesloten kan de rode LED #6 ook een
stroomverlies betekenen dat te wijten is aan versleten bedrading of een defecte schakelaar of contact, of aan stroomverbruikende
toebehoren op hetzelfde circuit. Een plotse belasting die wordt ingeschakeld terwijl de lader is aangesloten, kan ook leiden tot een
aanzienlijk spanningsverlies van de accu.
3. GOED TESTRESULTAAT, maar de accu kan niet voldoende vermogen leveren: Blijvende schade in de accu kan een overmatige
zelfontlading veroorzaken die niet kan worden opgespoord tijdens de testperiode van 12 uur.
AUTOMATISCH ACCUONDERHOUD: De ONDERHOUDSLAADCYCLUS bestaat uit laadperiodes van 30 minuten gevolgd door
telkens een rustperiode van 30 minuten. Tijdens de rustperiodes is er geen laadstroom. Het circuit biedt de accu stroom aan, bij een veilige
spanningsgrens van 13,6 V ('zwevende lading'). De accu kan nu een kleine hoeveelheid stroom opnemen die noodzakelijk is om de volle
lading te behouden en als compensatie voor kleine aangesloten belastingen, veroorzaakt door het aangesloten circuit, of voor natuurlijke
zelfontlading van de accu zelf. De ACCU-AANVULCYCLUS treedt in werking wanneer de lader detecteert dat de accu haar lading verloren
heeft. Het programma keert terug in de modus OPTIMALISEREN (LED #4) en voert vervolgens de spanningsbehoudtest en de
onderhoudslaadcyclus uit.
BEPERKTE GARANTIE
TecMate (International) SA, Sint-Truidensesteenweg 252, B-3300 Tienen, België, staat deze beperkte garantie toe aan elke eerste koper van
dit toestel. Deze beperkte garantie gaat in op de dag van aankoop en is niet overdraagbaar. De drie jaar geldige garantie aangeboden door
TecMate (International) dekt alle erkende gebreken en arbeidskosten. Indien de lader defect blijkt te zijn tengevolge van een constructiefout,
zal de klant het toestel altijd vooraf en op eigen kosten terugsturen naar de fabrikant of naar de nationale officiële verdeler, samen met een
kopij van de aankoopfactuur (zie "NOTITIE"). In zulke gevallen, zal de eenheid ter keuze van de fabrikant worden hersteld of worden
vervangen.Onkosten tengevolge van een ongeval, slordigheid, kwaadwilligheid, misbruik, niet conform gebruik volgens de aanwijzingen van
de fabrikant, of herstellingen gedaan door door TecMate niet-erkende verdelers, zijn niet gedekt door de garantie.
DE BEPERKTE GARANTIE SLUIT UITDRUKKELIJK ALLE VERDERE VERANTWOORDELIJKHEID UIT MET BETREKKING TOT EVENTUELE
SCHADEVERGOEDINGEN VAN WELKE AARD DAN OOK. UW STATUTAIRE RECHTEN WORDEN NIET BEÏNVLOED.
NOTITIE: Zie www.tecmate.com/warranty of contacteer warranty@tecmate.com.
copyright © 2014 TecMate International
OptiMate, OptiMate Lithium en de namen van andere producten zoals BatteryMate, TestMate en TestMate mini, die in deze instructies
worden vermeld, zijn gedeponeerd handelsmerken van TecMate International NV.
Meer informatie overTecMate productenkanop www.tecmate.com worden gevonden.
Page 25

25
SICUREZZA
CARICABATTERIE DIAGNOSTICO AUTOMATICO PER BATTERIE LiFePO4
(LITIO FERRO-FOSFATO) DA 12,8 V. BATTERIE DA 2,5 AH A 30 AH:
Input: 100-240V massimo 0,23A. La tensione massima è 0,8A.
AVVERTENZA DI SICUREZZA E NOTE: SE NON LO SI È ANCORA FATTO,
LEGGERE LE PAGINE PRECEDENTI CONTRASSEGNATE COME "ISTRUZIONI
DI SICUREZZA IMPORTANTI" PRIMA DI AZIONARE IL CARICABATTERIE.
Questo dispositivo non è destinato all'uso da parte di persone (tra cui i bambini) con ridotte capacità
mentali, sensoriali o fisiche oppure con una carenza in esperienza e conoscenza, salvo supervisione o
istruzioni relative all'uso del dispositivo da parte di una persona responsabile della loro sicurezza. I
bambini devono essere sorvegliati per evitare che giochino con il dispositivo.
USO DI OPTIMATE LITHIUM 0,8A
UTILIZZO CORRETTO: Utilizzare il caricabatterie soltanto se i poli e i connettori di ingresso e di uscita sono in buone condizioni, non
danneggiati. Se il cavo di ingresso è danneggiato, è essenziale farlo sostituire immediatamente dal produttore, dal riparatore autorizzato o
da un'officina qualificata, per evitare pericoli. Proteggere il caricabatterie dall'umidità sia durante l'uso che nell'immagazzinamento. I danni
derivanti da corrosione, ossidazione o cortocircuiti elettrici interni non sono coperti dalla garanzia. Distanziare il caricabatterie dalla batteria
durante la carica per evitare la contaminazione o l'esposizione all'acido o ai vapori acidi. Se lo si utilizza nell'orientamento orizzontale,
collocare il caricabatterie su una superficie dura e piana, ma NON su plastica, tessuto o cuoio. Utilizzare i fori di fissaggio forniti nella base
dell'involucro per collegare il caricabatterie a qualunque superficie verticale pratica e comoda.
ESPOSIZIONE AI LIQUIDI: Questo caricabatterie è destinato a sopportare l'esposizione ai liquidi rovesciati o spruzzati
accidentalmente sull'involucro dall'alto, o a una leggera pioggia.
L'esposizione prolungata alla pioggia è sconsigliata e si otterrà una maggiore durata riducendo al minimo tale esposizione. Un guasto del
caricabatterie dovuto all'ossidazione derivante dalla penetrazione eventuale di liquido nei componenti elettronici, nei connettori o nelle spine,
non è coperto da garanzia.
BATTERIE COMPLETAMENTE SCARICHE: Prestare particolare attenzione a quanto di seguito riportato:
Se lasciata scarica per un periodo di tempo prolungato, una batteria LiFePO4 può sviluppare danni permanenti a una o più celle. Questo
tipo di batteria può riscaldarsi eccessivamente durante la carica. Durante la modalità di ricupero, il programma limita la corrente di carica
se la tensione è inferiore a 12,8 v e dovrebbe rilevare danni evidenti alle celle e sospendere automaticamente la carica. Tuttavia, maggiore
è il numero delle celle in parallelo, più è difficile rilevare una cella difettosa. Ad es. una batteria da 5 ah ha generalmente 4 gruppi collegati
in serie, ciascuno da 2 celle collegate in parallelo (configurazione 4s2p - totale 8 celle), una batteria da 10 ah ha 4 gruppi collegati in serie,
ciascuno da 4 celle collegate in parallelo (configurazione 4s4p - totale 16 celle).
Controllare SEMPRE la temperatura della batteria durante la prima ora e successivamente ogni ora. Se in qualunque momento la batteria è
troppo calda per toccarla o si osservano segni insoliti, STACCARE IMMEDIATAMENTE IL CARICABATTERIE.
TEMPO DI CARICA
Tempo di carica su una batteria scarica ma senza danni:
Per le batterie con valore nominale da 2,5 Ah a 5 Ah: da 180 a 360 minuti per passare al test di mantenimento della carica.
Per le batterie con capacità superiore a 5 Ah: 125% del valore nominale Ah della batteria, pertanto per una batteria da 30 Ah non
dovrebbero essere necessarie più di 38 ore per passare al test di mantenimento della carica.
Per le batterie molto scariche potrebbe essere necessario molto più tempo. Non può essere raggiunta una carica completa entro il limite di
sicurezza della carica di 24 ore. In questo caso seguire la procedura di ripristino riportata di seguito.
RIPRISTINO DELLA CARICA E CICLO DI TEST
Scollegare dall'alimentazione di rete CA. Attendere che il LED 1 DI ACCENSIONE si spenga. Quando ci si ricollega all'alimentazione di rete
CA, i LED 3, 4, 5 e 6 lampeggiano due volte per confermare l'integrità del microprocessore, indipendentemente dal fatto che il caricabatterie
rimanga collegato o meno alla batteria.
Page 26

26
MODALITÀ ECOLOGICA DI RISPARMIO ENERGETICO QUANDO IL CARICABATTERIE È COLLEGATO
ALL’ALIMENTAZIONE CA:
Il convertitore di alimentazione passa in modalità ECO quando il caricabatterie non è collegato ad alcuna batteria e consente un
assorbimento di alimentazione molto limitato, inferiore a 0,5 W, pari a un consumo energetico di 0,012 kWh al giorno. Quando una batteria
viene collegata al caricabatterie, il consumo energetico dipende dalla domanda di corrente elettrica della batteria e della circuiteria
elettronica/del veicolo connessa. Dopo aver caricato la batteria e una volta portato il programma di carica in modalità di carica di
mantenimento a lungo termine (per mantenere la batteria carica al 100%), si stima che il consumo energetico totale sarà pari o inferiore a
0,024 kWh al giorno.
ESECUZIONE DELLA CARICA
Gli indicatori LED riportati di seguito sono disposti in sequenza nel modo in cui potrebbero accendersi nel corso del
programma.
CCENSIONE: LED #1 - Conferma l'alimentazione CA al caricabatterie.
Indicazione di ALTA e BASSA intensità: Il LED #1 DI ACCENSIONE è alla normale intensità quando una corrente si consegna alla batteria.
L'intensità del LED #1 DI ACCENSIONE si affievolisce fino a un livello minimo per indicare la modalità "ECO" a bassa potenza. Ciò avviene
quando non vi è alcuna batteria collegata, o quando una batteria è collegata e il programma si trova nella modalità di test o di
mantenimento.
PROTEZIONE DA INVERSIONE DI POLARITÀ: LED #2 - si accende quando i collegamenti della batteria non sono stati effettuati
correttamente. Il caricabatterie è dotato di protezione elettronica, pertanto non può subire danni. L'uscita resta disabilitata fino alla
correzione dell'errore di collegamento.
Il LED #3 RECUPERO si illumina se la batteria è estremamente scarica (completamente scarica o solfatata),
IMPORTANTE: Se si attiva questa modalità leggere la sezione BATTERIE COMPLETAMENTE SCARICHE.
Questa modalità si attiva se la batteria è stata scaricata più del 90% / la tensione è inferiore a 12,8 V. La corrente di carica viene regolata
automaticamente in base alla tensione e alla temperatura ambiente misurate durante il test di prequalificazione.
RICUPERO A BASSISSIMA TENSIONE per batterie tra 0,6 V e 8,8 V: la corrente inizia a 200 mA e aumenta a 325 mA a seconda del
progresso della carica. Se la tensione non aumenta oltre gli 8,8 V entro 2 ore, la carica viene sospesa e il LED DI TEST #6 (rosso) lampeggia,
a indicare che la batteria potrebbe aver subito un danno permanente o che è necessaria una valutazione professionale.
RICUPERO A BASSA TENSIONE per le batterie tra 8,9 V e 12,8 V: la corrente massima è impostata su 0,8 A. L'assorbimento della carica
della batteria viene controllato per il comportamento anomalo. Una batteria LiFePO4 in buone condizioni passa alla modalità di CARICA entro
4 ore, altrimenti la carica viene sospesa e il LED DI TEST #6 (rosso) lampeggia, a indicare che la batteria può aver subito un danno
permanente o che è necessaria una valutazione professionale.
LED #4 Carica e verifica della carica
CARICA: La fase di CARICA PRINCIPALE eroga una corrente costante di circa 0,8Ampère max. nella batteria, fino a una tensione di 14,2 – 14,4 V.
VERIFICA: Il circuito verifica il livello di carica della batteria. Se la batteria richiede più corrente, il programma ritorna alla fase di CARICA
PRINCIPALE (LED #3) durante brevi periodi per trasferire una carica ad impulsi variabili alla batteria. Questo processo puo’ accadere tante
volte quante ne sono necessarie per ridurre la richiesta di corrente della batteria al di sotto dei 200mA a 13,6V (questa richiesta è costante
in una batteria che abbia assorbito tanta carica quanta il proprio stato ne consenta). (Consultare i tempi di caricamento previsti.)
NOTA: per motivi di sicurezza, il limite di tempo di carica totale è di 48 ore.
CHARGE
SAVESAVE
0.8
BATTERY SAVING
CHARGER + TESTER
FOR/POUR/PARA/FÜR/PER LITHIUM LiFePO4
LFP
12 3412 34
.
READ INSTRUCTIONS & WARNING LABELS
LIRE LES INSTRUCTIONS ET ETIQUETTES
LEER LAS INSTRUCCIONES Y ETIQUETAS
LESEN SIE DIE ANWEISUNGEN UND ETIKETTEN
LEGGERE LE ISTRUZIONI E ETICHETTE
Model: TM470
INPUT/SECTEUR/RED/NETZ/ALIM
100-240V 50-60Hz
0.23A@100Vac / 0.15A@240Vac
OUTPUT/SORTIE/SALIDA/LEISTUNG/USCITA
12.8V 0.8A
LED #5 - GREEN: TEST & MAINTAIN
LED #6 - RED: TEST & MAINTAIN
LED #1 - AC POWER (100-240V)
LED #2 - Reverse polarity
LED #3 - SAVE
LED #4 - CHARGE
Page 27

27
TEST DI MANTENIMENTO DELLA TENSIONE: LED 5 lampeggiante
La consegna di corrente alla batteria viene interrotta per 12 ore* per consentire al programma di determinare la capacità della batteria di
mantenere la carica. Se le batterie si trovano in buono stato, il LED 5 (verde) dovrebbe continuare a lampeggiare per tutto il periodo di
12ore*. Leggere la sezione NOTE SUI RISULTATI DEI TEST per comprendere le ragioni che hanno determinato risultati scarsi o per sapere
come testare una batteria che produce un risultato corretto ma che non è in grado di consegnare sufficiente energia una volta riutilizzata.
CARICA DI MANTENIMENTO: LED 5 / 6 luce fissa
Il circuito consegna corrente alla batteria per 30 minuti entro un limite di tensione sicuro di 13,6 V mentre viene visualizzato il risultato del
test di mantenimento della tensione. Se il LED #6 (rosso) si illumina, il TEST DI MANTENIMENTO DELLA TENSIONE verrà ripetuto. Il LED #5
(verde) fisso indica che i periodi di mantenimento della carica fluttuante di 30 minuti seguono e si alternano con i periodi di PAUSA (non
carica) di 30 minuti fino allo scollegamento della batteria.
NOTE SUI RISULTATI DEL TEST:
1. Per risultati di test diversi dal LED verde #5, scollegare la batteria dal sistema elettrico e ricollegare OptiMate. Se questa volta si ottiene
un risultato di test migliore, ciò suggerisce che le perdite di potenza siano parzialmente dovute a un problema elettrico nel sistema elettrico
e non nella batteria. Se il risultato scarso persiste, si consiglia di portare la batteria a un'officina di assistenza dotata di apparecchiature
professionali per un'indagine più approfondita.
2. Se il LED #6 rosso si accende da solo o se il LED #5 VERDE e il LED #6 rosso si accendono simultaneamente, si è in presenza di un
problema grave. I LED verde + rosso indicano che dopo la carica la tensione della batteria non viene mantenuta o che, malgrado i tentativi di
recupero, la batteria era irrecuperabile. Ciò può essere dovuto a un difetto della batteria, come una cella cortocircuitata o la solfatazione
totale, o, nel caso di una batteria ancora collegata al sistema elettrico, il LED rosso #6 potrebbe segnalare una perdita di corrente tramite
collegamenti deteriorati o un interruttore o un contatto deteriorati, o ancora accessori in circuito che consumano corrente. Anche un
consumo improvviso che viene acceso mentre il caricabatterie è collegato può far scendere notevolmente la tensione della batteria.
3. BUONI RISULTATI DI TEST, ma la batteria non può erogare potenza sufficiente: danni permanenti all'interno della batteria possono
provocare uno scaricamento automatico eccessivo che non viene rilevato entro il periodo di test di 12 ore.
MANTENIMENTO AUTOMATICO DELLA BATTERIA: Il CICLO DI CARICA DI MANTENIMENTO consiste in periodi di carica di
30 minuti seguiti da e alternanti con periodi di "riposo" di 30 minuti, durante i quali non vi è corrente di carica. Il circuito eroga corrente alla
batteria entro un limite di tensione sicuro di 13,6 V (“carica fluttuante"), consentendole di utilizzare ogni piccola corrente necessaria per
mantenerla alla carica completa e compensare gli eventuali piccoli consumi elettrici imposti da circuiti collegati, o lo scaricamento graduale
naturale della batteria. Il CICLO DI RIPRISTINO DELLA BATTERIA viene eseguito se il caricabatterie rileva che la batteria ha perso la carica. Il
programma torna alla modalità OTTIMIZZAZIONE (LED #4), quindi passa al test di mantenimento della carica e al ciclo di carica di
mantenimento.
GARANZIA LIMITATA
TecMate (International) S.A., Sint-Truidensesteenweg 252, B-3300 Tienen, Belgio riconosce questa garanzia limitata agli acquirenti originali
al dettaglio di questo strumento. Questa garanzia limitata non e’ trasferibile. TecMate (International) garantische il carica per tre anni dalla
data di acquisto al dettaglio contro difetti di materiale o di manodopera. Se tali difetti fossero riscontrati lo strumento verra’ riparato o
sostituito a discrezione dell’Azienda. Sara’ obbligo dell’acquirente rispedire lo strumento, a proprie spese e cura, con il tagliando di acquisto
(vede "NOTA"), al produttore o al distributore autorizzato. Questa garanzia limitata e’ nulla se il prodotto e’ maltrattato o usate male,
soggetto ad incuria nel maneggiamento, o riparato da chiunque esclusi il produttore o il distributore autorizzato. Il produttore non riconosse
altre garanzie se non questa limitata garanzia ed esclude espressamente ogni implicata garanzia che includa garanzie per conseguenti
danneggiamenti.
QUESTA È LA SOLA ED ESPRESSAMENTE LIMITATA GARANZIA E L'AZIENDA PRODUTTRICE NE ASSUME NE AUTORIZZA ALCUNO AD
ASSUMERE O FARE ALTRE CONCESSIONI CHE RIGUARDINO IL PRODUTTORE, DIVERSAMENTE DA QUESTA. I VOSTRI DIRITTI STATUTARI NON
SONO COMMOVENTI.
NOTA: Vede www.tecmate.com/warranty o contattate warranty@tecmate.com
copyright © 2014 TecMate International
OptiMate, OptiMate Lithium ed i nomi degli altriapparecchi citati in questo testo come BatteryMate, TestMate e TestMate mini, sono marchi
registratii di TecMate International SA.
Si può trovare più informazione sui prodotti di TecMate da www.tecmate.com.
Page 28

28
SÄKERHET
AUTOMATISK DIAGNOSTISK LADDARE FÖR 12,8 V LiFePO4-BATTERIER
(LITIUMJÄRNFOSFAT-BATTERIER). BATTERIER FRÅN 2,5 AH TILL 30 AH:
Försörjning: 100-240 V max 0,23 A. Högsta utmatningsström: 0,8A.
SÄKERHETSVARNING OCH SÄKERHETSINFORMATION: OM DU INTE
REDAN HAR LÄST IGENOM FÖREGÅENDE SIDOR, MÄRKTA MED ”VIKTIGA
SÄKERHETSANVISNINGAR”, MÅSTE DU GÖRA DET INNAN DU ANVÄNDER
LADDAREN
Den här apparaten ska inte användas av personer (inklusive barn) med nedsatt fysisk, sensorisk eller
mental förmåga, eller personer som saknar erfarenhet och kunskap, såvida de inte hålls under uppsikt
eller instrueras om hur apparaten används av en person som ansvarar för deras säkerhet. Håll barn
under uppsikt för att se till att de inte leker med apparaten.
SÅ HÄR ANVÄNDER DU OPTIMATE LITHIUM 0,8A
KORREKT ANVÄNDNING: Använd endast laddaren om in- och utkablarna och kontaktdonen är oskadda och i gott skick. Om
inkabeln är skadad är det mycket viktigt att den genast byts ut av tillverkaren, tillverkarens auktoriserade serviceombud eller en kvalificerad
verkstad, så att fara inte uppstår. Skydda laddaren mot fukt, både vid användning och förvaring. Skador till följd av korrosion, oxidering eller
invändig elektrisk kortslutning täcks inte av garantin. Håll laddaren på avstånd från batteriet under laddning för att undvika kontaminering
genom eller exponering för syra eller sura ångor. Om du använder laddaren i horisontellt läge måste du placera den på en hård, plan yta och
INTE på plast, tyg eller läder. Använd fixeringshålen i höljets botten för att fästa laddaren på en lämplig och stabil lodrät yta.
VÄTSKEEXPONERING: Laddaren är konstruerad för att stå emot lätt regn och vätskor som av misstag spills eller skvimpas ut på
höljet ovanifrån. Längre exponering för regn är dock inte att rekommendera, och servicelivslängden ökar om laddaren inte utsätts för
sådant. Fel på laddaren, som ett resultat av oxidering orsakad av att vätska trängt in i de elektroniska komponenterna, kontaktdonen eller
stickpropparna, täcks inte av garantin.
URLADDADE OCH SKADADE BATTERIER: Observera särskilt följande:
I A LiFePO4 -batterier som får stå nästan helt urladdade en längre tid kan det uppstå bestående skador i en eller flera celler. Sådana
batterier kan bli oerhört varma vid laddning. I save-läge begränsar programmet laddningsströmmen och avbryter laddningen automatiskt om
spänningen är under 12,8 v och programmet upptäcker tydliga cellskador, men ju fler parallellkopplade celler batteriet innehåller, desto
svårare är det att upptäcka om någon är skadad. Exempelvis har ett 5 ah-batteri vanligen 4 seriekopplade uppsättningar med 2
parallellkopplade celler vardera (4s2p-konfiguration – totalt 8 celler), och ett 10 ah-batteri har 4 seriekopplade uppsättningar med 4
parallellkopplade celler vardera (4s4p-konfiguration – totalt 16 celler).
Övervaka ALLTID batteriets temperatur hela den första timmen, och kontrollera det sedan en gång i timmen. Om batteriet någon gång blir så
varmt att det är obehagligt att röra vid det, eller om du lägger märke till något annat ovanligt, ska du OMEDELBART KOPPLA BORT
LADDAREN.
LADDNINGSTID
Laddningstid för ett urladdat men i övrigt oskadat batteri:
För batterier med en märkkapacitet på 2,5 Ah till 5 Ah: 180 till 360 minuter för att nå spänningsgradstestläget.
För batterier med en märkkapacitet på över 5 Ah: 125 % av batteriets Ah-kapacitet, vilket innebär att det inte bör ta mer än 38 timmar
för ett 30 Ah-batteri att nå spänningsgradstestläget.
För nästan helt urladdade batterier kan laddningen ta betydligt längre tid. Det kan hända att de inte ens hinner bli fulladdade på de 24
timmar som utgör säkerhetsgränsen för laddning. Följ i sådana fall återställningsproceduren nedan.
ÅTERSTÄLLNING AV LADDNINGS- OCH TESTCYKELN
Koppla från strömförsörjningen. Vänta tills LED #1 (STRÖM PÅ) slocknar. När strömmen kopplas på igen blinkar LED-lamporna #3, 4, 5 och
6 två gånger för att bekräfta att mikroprocessorn fungerar, oavsett om laddaren är ansluten till ett batteri eller inte.
Page 29

29
STRÖMSPARLÄGE NÄR LADDAREN ÄR ANSLUTEN TILL VÄXELSTRÖMSFÖRSÖRJNINGEN:
Strömomvandlaren går över till strömsparläge när laddaren inte är ansluten till något batteri. Det gör att den drar mycket lite ström: mindre än 0,5
W, vilket motsvarar en energiförbrukning på 0,012 kWh per dag. När ett batteri är anslutet till laddaren beror energiförbrukningen på den ström
som batteriet och det anslutna fordonet/de elektroniska kretsarna kräver. När batteriet har laddats och laddaren har övergått till läget långvarig
underhållsladdning (vilket håller batteriet fulladdat) uppgår den totala energiförbrukningen till ungefär 0,024 kWh, eller ännu mindre, per dag.
ÖVERGÅNG TILL LADDNING
LED-lamporna nedan presenteras i samma ordning som de kan tändas under programmets gång.
STRÖM PÅ: LED #1 - Bekräftar att laddaren försörjs med växelström.
Indikering av HÖG och LÅG intensitet: LED #1 (STRÖM PÅ-lampan) lyser starkt när batteriet matas med ström.
LED #1 (STRÖM PÅ-lampan) minskar klart i intensitet när laddaren övergår till strömsparläge. Det inträffar om inget batteri är anslutet, eller
om ett batteri är anslutet och programmet befinner sig i spänningsgradstestläget eller i en viloperiod i underhållsladdningsläget.
SKYDD MOT OMKASTAD POLARITET: LED #2 - Lyser när batterianslutningarna är felaktigt gjorda. Laddaren är elektroniskt skyddad så att
det inte uppstår några skador, och utgången förblir inaktiv tills anslutningarna har korrigerats.
LYSDIOD #3 SAVE lyser om batteriets laddningsnivå är mycket låg (djupurladdat eller sulfaterat),
VIKTIGT! Läs igenom avsnittet ”URLADDADE OCH SKADADE BATTERIER” om detta läge aktiveras.
Detta läge aktiveras om batteriet är urladdat till mer än 90 %, eller om spänningen understiger 12,8 V. Laddnings-strömmen justeras
automatiskt efter den spänning och omgivningstemperatur som mättes upp under förbedömningstestet.
SKYDD VID MYCKET LÅG SPÄNNING för batterier mellan 0,6 V och 8,8 V: Laddningsströmmen är till att börja med 200 mA och ökar sedan
till 325mA, beroende på hur laddningen fortskrider. Om spänningen inte överstiger 8,8 V inom 2 timmar avbryts laddningen och TEST-LED
#6 (röd) börjar blinka, vilket indikerar att batteriet kan ha drabbats av bestående skador eller att det måste utvärderas av en sakkunnig.
SKYDD VID LÅG SPÄNNING för batterier mellan 8,9 V och 12,8 V: MMaxströmmen är satt till 0,8 A. Batteriets laddningsbenägenhet
övervakas för att det ska gå att upptäcka avvikande beteenden. Ett oskadat LiFePO
4
-batteri övergår till LADDNINGS-läge inom 4 timmar,
annars avbryts laddningen och TEST-LED #6 (röd) börjar blinka, vilket indikerar att batteriet kan ha drabbats av bestående skador eller att
det måste utvärderas av en sakkunnig
LYSDIOD #4 Laddning och laddningsbekräftelse
LADDNING: Steget BULKLADDNING levererar en konstant ström på ungefär 0,8A maximum till batteriet, upp till en spänning på 14,2 - 14,4 V.
VERIFIERING: När kretsen verifierar batteriladdningsnivån. Om batteriet kräver ytterligare laddning återgår programmet till BULKLADDNING
(lysdiod # 3) under korta perioder och ger en variabel strömpuls till batteriet. Dessa återgångar kan förekomma så många gånger som krävs
för att reducera batteriets strömbehov till under 200 mA vid 13,6 V (vilket är konsekvent med ett batteri som har accepterat lika mycket
laddning som dess grundläggande tillstånd tillåter). (se förväntad laddningstid)
OBS 2:
Av säkerhetsskäl finns det en övre laddningsgräns på 48 timmar.
TEST AV LADDNINGSGRAD: LED #5 blinkar
Leverans av strömmen till batteriet avbryts i 12 timmar* för att programmet ska kunna avgöra batteriets förmåga att behålla laddning. För
batterier i gott skick ska LED #5 (grön) blinka hela perioden på 12 timmar*. Läs i avsnittet TESTRESULTAT om du fått dåliga testresultat
eller om hur du testar ett batteri som får ett godkänt testresultat men inte kan leverera tillräckligt med ström.
UNDERHÅLLSLADDNING: LED #5, 6 lyser
I 30 minuter kan kretsen ge ström till batteriet inom en säker spänningsgräns på 13,6 V samtidigt som resultatet från test av laddningsgrad
visas. Lysdiod #6 (röd) indikerar att laddningsgradstestet kommer att upprepas. En fast sken från lysdiod #5 (grön) indikerar att
underhållsladdningen under 30 minuter alterneras med vila (ingen laddning) i 30 minuter tills batteriet kopplas från.
CHARGE
SAVESAVE
0.8
BATTERY SAVING
CHARGER + TESTER
FOR/POUR/PARA/FÜR/PER LITHIUM LiFePO4
LFP
12 3412 34
.
READ INSTRUCTIONS & WARNING LABELS
LIRE LES INSTRUCTIONS ET ETIQUETTES
LEER LAS INSTRUCCIONES Y ETIQUETAS
LESEN SIE DIE ANWEISUNGEN UND ETIKETTEN
LEGGERE LE ISTRUZIONI E ETICHETTE
Model: TM470
INPUT/SECTEUR/RED/NETZ/ALIM
100-240V 50-60Hz
0.23A@100Vac / 0.15A@240Vac
OUTPUT/SORTIE/SALIDA/LEISTUNG/USCITA
12.8V 0.8A
LED #5 - GREEN: TEST & MAINTAIN
LED #6 - RED: TEST & MAINTAIN
LED #1 - AC POWER (100-240V)
LED #2 - Reverse polarity
LED #3 - SAVE
LED #4 - CHARGE
Page 30

30
INFORMATION OM TESTRESULTAT:
1. Om du får ett annat testresultat än grön LED #5 bör du koppla bort batteriet från det elsystem som det stöder och sedan ansluta
OptiMate-laddaren igen. Blir testresultat bättre nu antyder det att effektförlusterna delvis beror på ett elektriskt problem i elsystemet, och
inte i själva batteriet. Består det dåliga resultatet rekommenderar vi att du lämnar in batteriet för närmare granskning på en serviceverkstad
som har tillgång till professionell utrustning.
2. Om den röda LED #6 lyser, eller om den gröna LED #5 och röda LED #6 lyser samtidigt, innebär det att det finns ett allvarligt fel. Den
gröna + röda LED-lampan indikerar att batteriet inte kan hålla spänningen efter att det laddats, eller att det inte gick att återställa batteriet
trots flera försök. Detta kan bero på ett fel i själva batteriet, till exempel en kortsluten cell eller total sulfatering. Om batteriet fortfarande är
anslutet till det elsystem som det stödjer kan den röda LED-lampan #6 också indikera strömförluster till följd av dåliga kablar,
strömslukande tillbehör eller angripna strömbrytare eller kontakter. En plötslig belastning medan laddaren är ansluten kan också leda till att
batterispänningen minskar betydligt.
3. GODA TESTRESULTAT, men batteriet kan inte leverera tillräckligt med ström: Permanenta skador inuti batteriet kan orsaka en omfattande
självurladdning som inte upptäcks inom testperioden på 12 timmar.
AUTOMATISKT BATTERIUNDERHÅLL: UNDERHÅLLSLADDNINGSCYKELN utgörs av laddningsperioder om 30 minuter som
omväxlande följs av viloperioder om 30 minuter. Under viloperioderna tillförs ingen laddningsström. Kretsen kan ge ström till batteriet inom
en säker spänningsgräns på 13,6 V (”flytande laddning”). Det innebär att batteriet kan dra den lilla ström som behövs för att det ska hålla
sig fulladdat, och att det också kan kompensera för alla små elektriska belastningar som den anslutna kretsen lägger på batteriet samt för
den naturliga självurladdning av batteriet som sker gradvis. BATTERIPÅBÄTTRINGSCYKELN aktiveras om laddaren upptäcker att batteriet
har tappat laddning. Programmet återgår då till OPTIMERINGS-läget (LED #4) och går sedan vidare till spänningsgradstestet och
underhållsladdningscykeln.
INSKRÄNKT GARANTI
TecMate (International) NV, Sint-Truidensesteenweg 252, B-3300 Tienen, Belgien, utfärdar denna garanti till den ursprungliga köparen av
produkten. Garantin kan inte överlåtas. Denna batteriladdare har av TecMate (International) försetts med en garanti som gäller i tre år från
och med det datum den köpts hos en återförsäljare. Garantin omfattar materialfel och tillverkningsfel. Om något av nämnda fel upptäcks
kommer enheten att repareras eller bytas ut enligt tillverkarens önskemål. Köparen måste överlämna enheten tillsammans med ett
köpebevis (se "NOTERA") och förbetalda transport- eller portokostnader till tillverkaren eller en auktoriserad återförsäljare. Garantin gäller
inte om produkten används felaktigt eller vårdslöst. Den gäller heller inte om produkten reparerats av någon annan än tillverkaren eller en
auktoriserad återförsäljare. Denna garanti är den enda giltiga och den omfattar inga implicerade garantikrav, inklusive garantikrav för
följdskador.
DETTA ÄR DEN ENDA GÄLLANDE GARANTIN OCH TILLVERKAREN VARKEN ÅTAR SIG ELLER AUKTORISERAR NÅGON ANNAN ATT ÅTA SIG
ELLER UPPRÄTTA NÅGRA SKYLDIGHETER GENTEMOT PRODUKTEN FÖRUTOM DENNA GARANTI. DINA LAGLIGA RÄTTIGHETER PÅVERKAS INTE.
NOTERA: Se www.tecmate.com/warranty eller kontakta warranty@tecmate.com
copyright © 2014 TecMate International
OptiMate, OptiMate Lithium och namnger av andra produkter som nämns i dessa anvisningar liksom BatteryMate, TestMate och
TestMatemini, är registreringsvarumärken av TecMate International NV.
Mer information på TecMate produkter kan finnas på www.tecmate.com.
Page 31

4x
4.5mm (1/6")
L +20mm (+4/5")
2m (6ft) max.
2m (6ft) + 3 (1,8m (5ft)) = 3,8m (12ft) max.
+ 13 / 23 (4,6m (15ft) = 6,6m(21ft) max.
3 / 13 / 23
6ft
max.
MOUNTING NOTICE
NOTICE DE MONTAGE
NOTA PARA EL MONTAJE
NOTA DA MONTAGEM
WANDMONTIERUNG
MUURBEVESTIGING
NOTA DEL MONTAGGIO
VÄGGMONTERING
Page 32

copyright © 2014 TecMate International – TM470-IN1-140211
Discover our full range of accessories at
optimate1.com
Entdecken Sie unser komplettes
Zubehörsortiment auf optimate1.com
Découvrez notre gamme complète
d’accessoires sur optimate1.com
Ontdek ons volledig gamma toebehoren op
optimate1.com
Descubra nuestra gama completa de
accesorios en optimate1.com
Descubra toda a nossa gama de acessórios
em optimate1.com
Scoprite la nostra gamma completa di
accessori su optimate1.com
Se vårt kompletta sortiment av tillbehör på
optimate1.com
C
H
A
R
G
E
C
O
N
N
E
C
T
O
R
C
O
N
N
E
C
T
O
R
P
O
W
E
R
P
O
W
E
R
 Loading...