

Page 1
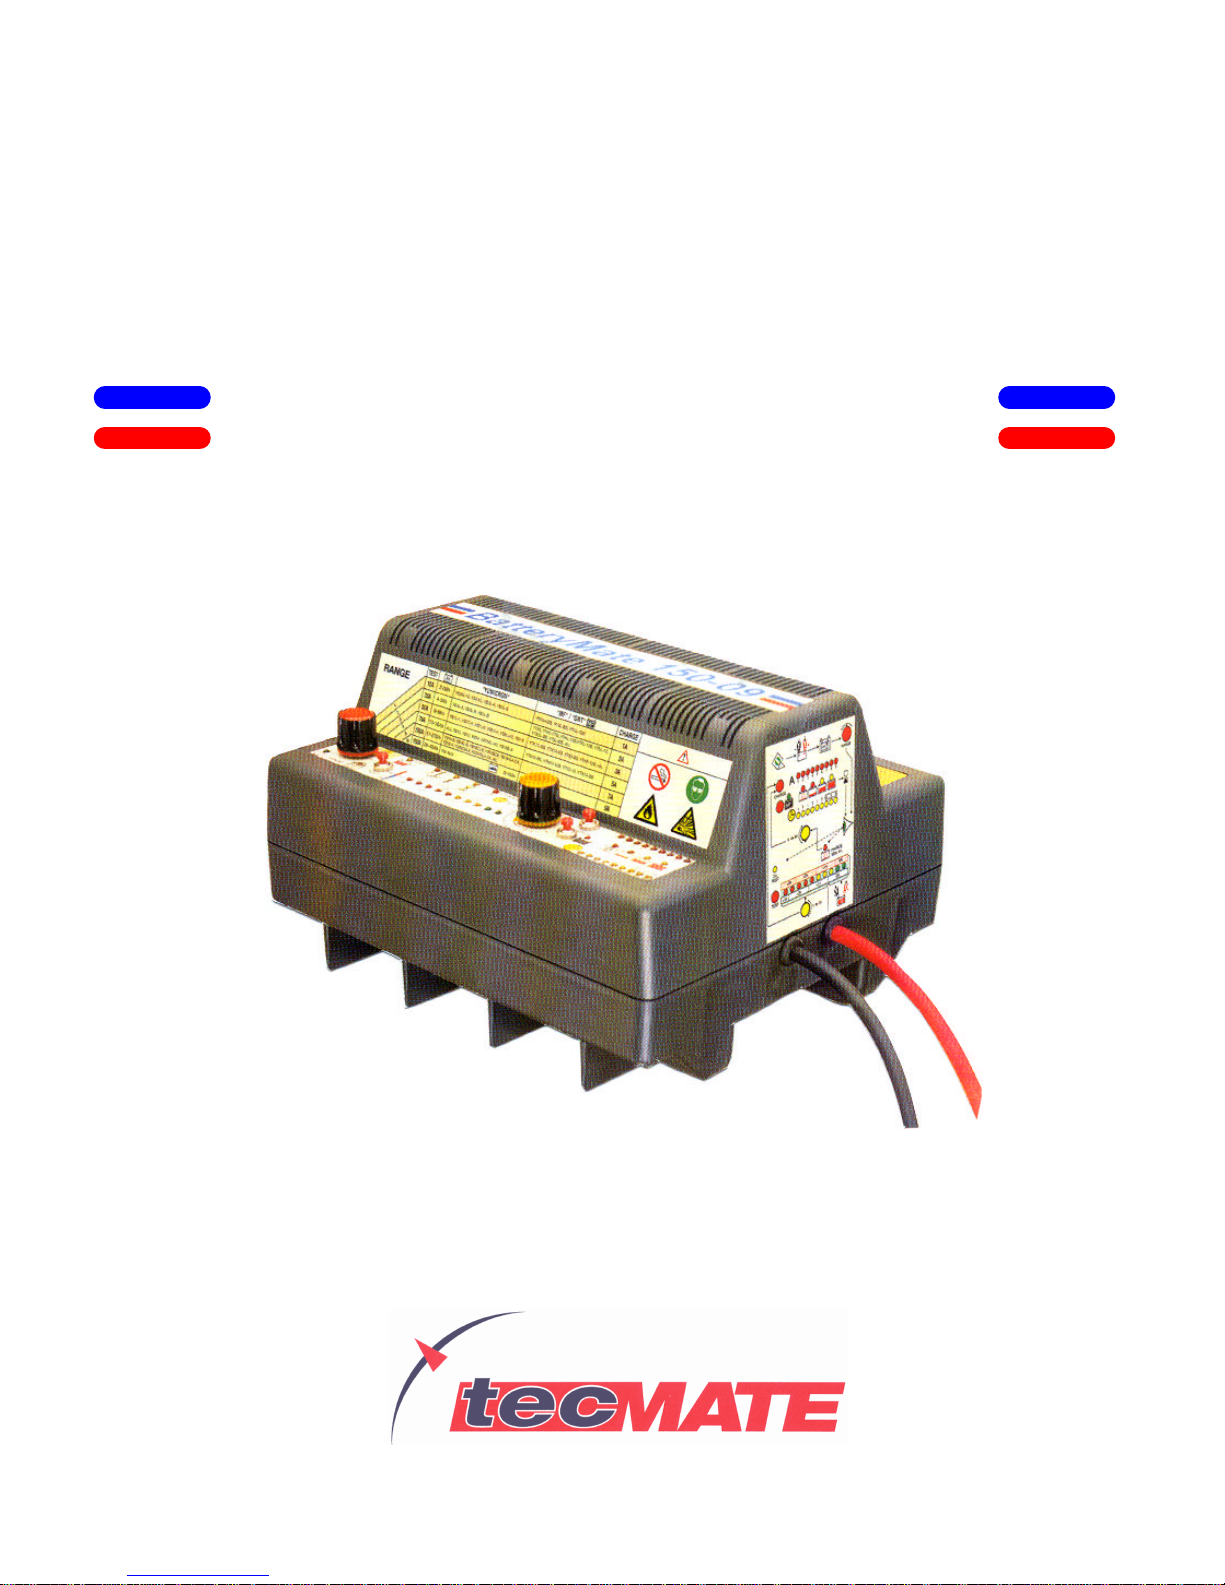
BatteryMate 150-9
Page 2

BatteryMate
Save these instructions: this manual contains important safety & operating
instructions
WARNING:
Working in the vicinity of lead-acid batteries is dangerous. Batteries generate explosive gases
during normal battery operation. It is therefore of the utmost importance that each time you
are preparing to use the BatteryMate you first read & follow exactly the instructions provided.
To reduce the risk of explosion, follow these instructions & those marked on the battery.
Never smoke or allow an open spark or flame near the battery or the vehicle's engine.
Charge only 12 Volt lead-acid batteries. Do not use to supply power to an extra low-voltage
electrical system nor to charge dry- cell batteries. Charging dry-cell batteries may cause them
to burst resulting in injury to persons & damage to property. Never charge a frozen battery.
PREPARING TO CHARGE
WARNING:
When charging watercraft batteries, always remove battery onto shore for charging. If it is
necessary to remove battery from vehicle to charge, always remove GROUNDED terminal
from battery first. Make sure all accessories in the vehicle are off, so as not to cause an arc.
Be sure area around battery is well ventilated while being charged. Forcefully blow away
any fumes that have or may accumulate. Clean battery terminals. Study all battery
manufacturers specific precautions such as removing or not removing cell caps while
charging and recommended rates of charge. Add distilled water in each cell until battery
acid reaches level specified by battery manufacturer. Do not overfill. For a battery without
cell caps, carefully follow manufacturer’s recharging instructions. Determine the nominal
voltage of the battery by referring to information printed on the battery, or by examining
owner’s manual of vehicle/equipment in which battery is or is to be installed.
WARNING: DO NOT attempt to charge a battery of which the nominal voltage differs
from the battery voltage for which the charger is intended; see data on label attached
to charger.
CHARGER LOCATION:
Position the battery charger on a sturdy, flat surface. DO NOT place charger directly above
or below battery being charged. The gases from the battery are corrosive and will damage
the charger. DO NOT allow battery acid to drip onto charger during filling or checking
gravity. Acid contamination will destroy charger or cause it to operate incorrectly. DO NOT
place battery or any object on top of charger. Place the battery as far away from the charger
as the cord permits during charging. DO NOT place charger in a small, fully enclosed space.
Ensure adequate ventilation. DO NOT expose charger to water, rain or snow.
CONNECTING TO BATTERY AND AC MAINS POWER:
Connect the battery charger to the battery before connecting to AC mains power socket.
First connect to UNGROUNDED post of the battery, then GROUNDED post. The BLACK
clip on the battery charger output lead must be connected to NEGATIVE (NEG, N, -) post
and the RED clip to POSITIVE (POS, P, +) post of the battery. When connecting the fina l
clip, position yourself as far away from the battery as practically possible - then connect to
post while facing away from the battery.
Page 3

NOTE:
The battery charger has an automatic safety feature that will prevent it from
operating if the battery has been inversely connected and will indicate the inverse
connection by illuminating the "INVERSE POLARITY" LED (light emitting diode), situated on
the lower left-hand side of the LED indicator information panel. If this LED is indicating,
disconnect the battery clips in reverse order to the connecting instructions above, then
reconnect correctly. When connections to the battery have been made, connect to AC
mains power conforming the input voltage given on the label attached to the charger.
Always disconnect following the reverse sequence of the connection procedure, breaking
the first connection while facing away & at arm's length from the battery. NOTE: Do not
allow battery clips to touch one another.
CAUTION:
When charging a battery which is installed in a vehicle; take special care in positioning AC
and DC cords away from the hood, doors or moving engine parts that can pinch or damage
the cords. Before connecting battery charger to battery, establish if the POSITIVE (POS, P,
RED,+) terminal, normally the larger post on the battery, is grounded or if the NEGATIVE
(NEG, N, -) terminal is grounded to the vehicle chassis. (in most vehicles the NEGATIVE
terminal is grounded). It is advisable to remove the grounded terminal from battery before
charging.
DO NOT connect battery charger clips to any part of the vehicle other than to the
battery posts or terminals. NEVER connect a battery clip to a carburettor fuel line or
sheet- metal body parts.
Make sure all accessories in the vehicle are off, so as not to cause an arc. SPARKS NEAR
BATTERY CREATE RISK OF EXPLOSION . DO NOT operate vehicle whilst connecting or
disconnecting battery charger or battery, or during charging.
Page 4

1
BATTERYMATE 150-9
Instructions for use:
IMPORTANT: Read the whole of this text before using the
BatteryMate.
MOUNTING BRACKET
A mounting bracket is included for fixing against a vertical surface so as to allow the
BatteryMate to be positioned off the workbench. Ensure that the bracket is firmly fixed so
that the surface of the long arm projects horizontally and safely supports a downward
force of 10 kg applied at the projecting end. Screws supplied with brackets should be
used for securely attaching the charger to the bracket through the smaller of the holes in
the longer bracket arm, when the charger is correctly located on the bracket. NOTE:
Mount the bracket in a position that allows batteries to he charged to be distanced
as far as possible from the BatteryMate & NOT directly above or below it.
CAUTION
This device is provided with an input voltage selector in the fuse drawer at the appliance
power cord inlet receptacle. The voltage for which the selector is set is displayed in an
aperture on the fuse drawer, which is located just above the power cord inlet receptacle.
Rated mains input voltages of 230, 115 or 100 Volts can be selected. Normally the
voltage for which the BatteryMate is set up should conform with the national standard
mains voltage of the country of purchase.
IT IS ESSENTIAL TO VERIFY THAT THE VOLTAGE DISPLAYED IN THE FUSE
DRAWER APERTURE CORRESPONDS WITH THE ACTUAL SUPPLY VOLTAGE. IF
NOT, THEN PROCEED AS FOLLOWS:
Disconnect the power cord and remove from the device. With a miniature screwdriver or
similar tool, prise open the fuse drawer. Then remove the pale coloured insert on which
the voltage selections are printed, rotate and replace it so that the correct input voltage
is visible through the aperture. Replace the fuse drawer. Make sure it is closed. If a fuse
blows, replace only with the same fuse type and rating as the original fuse.
WARNING!
Batteries emit EXPLOSIVE GASES – prevent flames or sparks near batteries.
DO NOT PLACE BATTERIES UNDER CHARGE DIRECTLY ABOVE OR BELOW THE
BatteryMate. Distance the battery from the BatteryMate as far as practicable. PROTECT
THE BatteryMate FROM DAMP & HUMIDITY & FROM ACID CONTAMINATION BOTH
DURING USE & DURING STORAGE.
NOTE : Disconnect AC power supply before making or breaking battery connections.
Battery acid is highly corrosive. Wear protective clothing and avoid contact. In case of
accidental contact wash immediately with soap and water. Check that the battery posts
are not loose. If they are, have the battery professionally assessed. If the battery posts
are corroded clean with a copper wire brush; if greasy or dirty, clean with a rag damped
in detergent. Only use the BatteryMate if the input & output leads and clamps are in
good, undamaged condition. Failure to observe the above warnings voids all
warranty.
Page 5

2
WHAT IS BATTERYMATE?
BatteryMate combines in one single tool a LOAD TESTER for 12 V lead-acid batteries to
accurately assess their state of charge and their underlying condition; a precisely
controlled, state - of-the-art constant current CHARGER for the quickest technically
achievable recharging of all 12 V lead -acid batteries regardless of type or condition; and
the automatic assessment & RECOVERY of deep -discharged & even of many sulphated
batteries. This is achieved by dual-stage constant current, then constant voltage
charging during which the voltage and current are precisely monitored. The precise
voltage-sensing monitor averages repetitive voltage samplings to erase false peaks, so
as to accurately control the termination of the rapid constant current charging phase as
also the automatic recovery action for batteries reluctant to accept a charge.
PRINCIPLE OF APPLICATION OF THE BATTERYMATE
Always TEST the battery FIRST, before charging, unless the battery is already too
severely discharged to sustain a load test (see below). It is a waste of time to charge a
battery which is internally damaged and therefore unable to adequately deliver the
required starting current for long enough to start. A battery may be fully charged and yet
unable to start the vehicle. On the other hand, a battery which has been unused for
some time or which has been subjected to a continuous discharge for too long may have
become deep-discharged or even sulphated, although it's basic status prior to this was
good. By load testing such batteries, once they have been sufficiently recharged to
sustain a test, one can establish whether complete re-charging will result in a usable
battery in practice. If the battery is too severely discharged to sustain the indicated load
test, then some recharging will be required before testing.
Always TEST the battery AGAIN after charging it, to confirm that the battery will be
capable of starting. A "fully charged" battery is not necessarily GOOD.
BatteryMate's two separate functions: the TESTER & the CHARGER are further
explained below.
SAFETY FEATURES & THEIR LED INDICATIONS
BatteryMate is very well protected against errors of operation and it is nearly impossible
to damage it by operator error. Similarly, the operator uses BatteryMate with the
absolute minimum of risk. However, please observe the cautions and warnings
contained in these instructions.
1) Incorrect AC mains input, for example an input of 230 V to a BatteryMate intended for
115 VAC input, will cause the fuse contained in the input power receptacle to blow, refer
above.
2) In case of incorrect (inverse polarity) battery connections, the Tester & Charger are both
disabled and an audible and visible warning LED will be activated. The warning LED is
just below the range selector knob (red cap). Correct the connections & proceed.
3) In case of accidental short-circuiting of the clamps, the BatteryMate will be disabled, no
fuses will blow, and sparks are automatically suppressed. Correct the short-circuit
condition as soon as possible and proceed.
Page 6

3
4) In case of overheating, for example through heavy repetitive use of the load tester, the
tester will be disabled. The action will be restored automatically after the BatteryMate
has had time to cool down again. Duri ng the period of disablement this is indicated by
the red LED on the control panel above the "egg-timer" symbol. The LED may continue
to indicate temporary disablement for up to 20 minutes in case of severe heating.
5) In the period immediately following e very load test carried out, the tester is disabled for
up to 60 seconds (see below) to allow tester and battery to cool. Again the "egg-timer"
LED will indicate the disablement and any subsequent test can be conducted only when
it extinguishes.
6) Should for any reason the red LED above the load resistor symbol light when a load test
(of 3s or 15s as selected) is NOT actually in progress, disconnect the battery
immediately and send the BatteryMate to the distributor for checking. This may be a sign
that the contacts of one of the relays controlling the test current selection are sticking
during operation.
7) If all else fails, the BatteryMate is further protected by internal fuses which should only
be replaced by qualified personnel.
TESTER OPERATION
1) The battery to be tested must be removed from the vehicle and from all electrical
connections. For batteries with filler caps check that these are correctly in place. Check
that the battery posts are clean, free of oxidation build-up & not loose.
2) Establish the Ampère-hour capacity (normally the " 10 hour" or "20 hour" rating) of the
battery and select the appropriate range according to the selection table on the decal
above the control panel. If you do not know the Ah rating of the battery but do know the
rated "Cold Cranking Ampère" rating (at 0°F or –18°C), select the range whereby the
test current indicated for that range is roughly half the "CCA" current of the battery to be
tested. If neither the Ah rating nor the "CCA" rating are known, consult the battery
supplier or distributors. If all else fails, look for another starter battery of similar type or
dimensions whose ratings are marked on the casing to obtain a rough idea of the rating
of the battery to be tested. Select the range accordingly. The rotary range selector is the
knob with the red cap on the left side of the control panel.
3) Connect the red battery clamp to the positive (+) or red battery post, the black clamp to
the negative (-) or black post.
4) Connect the BatteryMate to an AC input of the correct rated voltage, switch ON the main
switch next to the input connection cable.
5) The yellow LED marked "3s" (next to the range selector knob) should light.
6) Start the test by depressing and releasing the TEST push- button beneath the "3s" LED.
The red LED above the load resistor symbol will light for 3s during the test. A load test of
Page 7

4
15 second test duration may be initiated by depressing the TEST button for a good three
seconds, until the yellow " 15s" LED lights, then releasing it. The red LED above the load
resistor symbol should light for 15s during the 15s test.
7) Immediately the red LED above the load resistor symbol indicates a test has begun, look
at the LEDs on the TEST Voltmeter LED panel to the right of the TEST start button to
see how many have come on.
8) If all ten LEDS (or at least nine) light and remain on during the test, the battery is
sufficiently charged and able to sustain starting load for at least the duration of the test.
This indicates a GOOD battery.
9) If 7 to 10 LEDS indicate momentarily just as the test begins, but the LEDs then
progressively and rapidly extinguish, the battery is significantly discharged.
10) During the test, the approximate charging time required to restore the battery to a
starting condition can be read off the two time scales above (ambient temperatures
exceeding 15°C/60°F) and below (colder ambients) the Test Voltmeter LEDS. The
approximate required charging time is that indicated above (or below if colder than
15°C/60°F) the highest LED which lights (the furthest to the right).
11) If the battery is severely discharged, it is possible that it lacks sufficient power to register
on the test scale. If after depressing & releasing the TEST button the red LED "Charge
min 4h" lights, it is necessary to first charge the battery for at least 4 hours, at the charge
current indicated for that battery on the range selection table on the decal above the
control panel. (See step 2 above). A TEST should then be conducted.
12) Testing involves the withdrawal of significant energy from the battery which must then be
dissipated in the form of heat. Following each test the tester wilI be disabled for a period
to allow the tester and the battery to cool, thus avoiding potential damage to either by
immediate and repetitive re-testing. The periods of disablement are 20 seconds following
a 3s test and 60 seconds following a 15s test. Disabled periods are indicated by the red
LED above the egg-timer symbol.
13) After charging a battery for the indicated charge time it is ESSENTIAL to re-TEST the
battery to determine if it has achieved a starting capability. During this re-TEST:
a) if at least nine LEDs light at the beginning of the test and remain on until the end of the
test, the battery should be capable of sustaining the starting load for at least the
duration of the test, indicating a GOOD serviceable battery.
b) if the number of LEDs which light immediately the TEST begins decrease by more than
two LEDs during a 3s test or by more than four LEDs during a 15s test, the battery may
well have a degree of internal damage. Set the timer to at least the charging time
indicated by the highest LED on at the end of the TEST, and charge the battery again.
Then TEST again. If the TEST result is again similar to that described above, the
battery is unserviceable.
Page 8

5
14) If during a TEST following recharging the LEDs which light initially then extinguish
rapidly, the battery is clearly unserviceable.
If for any reason you observe overheating and perhaps even smoke coming out of the
top having initiated a load test, switch off the power & disconnect the battery
immediately, as this is symptomatic of a mechanically stuck relay. Send the
BatteryMate in for checking.
THE ROTARY CHARGE TIME SELECTOR AND THE CHARGING STATUS LED PANEL.
1) The charge time selector is the knob with the yellow cap. Around it are marked the
possible charge time selections, from 30 minutes (new battery) by half-hour to three
hours, then by hour to 6 hours.
2) Select the charging time indicated during the test if you only wish to restore the battery
to a state of charge normally sufficient to start the engine.
3) If you wish to charge the battery more thoroughly, and have sufficient time, set the timer
to 6 hours.
4) Should the battery come to full charge before the selected time has elapsed, the voltage
sensing circuitry will limit the charging voltage so as to just maintain the battery at full
charge until the timer switches off the charger. There is absolutely no danger of
overcharging the battery.
5) The elapsed charging time will be indicated progressively on the elapsed time (yellow)
LED panel to the right of the time selection knob. When the timer switches off the
charger, the duration of charging will continue to be displayed on this LED panel until the
battery is disconnected or re-tested or re-charged, or until the AC electrical input is
disconnected. Either of these actions will re-set the time elapsed LED panel to "zero".
6) The 4 LEDs just above the time elapsed LED panel indicate the status of the battery
under charge. See clause 6 of "Charger Operation" below. These status indicator LEDs
also continue to display the state of charge achieved until the battery is disconnected or
re-tested, or until the AC input is disconnected.
7) Important! The 4- LED panel is only a convenient indication of charging progress
status. It should not be relied on as a diagnosis of battery condition, for which a final load
test is essential. Batteries with certain types of defects may cause misleading indications
on this 4-LED panel. In doubtful or confusing cases, do one or more 15 second load
tests on the battery to check for "suspect" condition. If necessary, charge again & re test.
8) Do not alter the timer setting during charging, as the charger will automatically be
disabled. In such cases, re-test the battery and re-commence charging accordingly.
Page 9

6
ABOUT SEALED “MF” (Maintenance - Free) MOTORCYCLE / PWC BATTERIES
1) Maintenance-free "MF" motor-cycle batteries, also referred to as “AGM” (Absorbent Glass
Mat) batteries) or as “GRT” (Gas Recombination Technology) batteries, are valveregulated and are constructed with glass -mat separators (to effectively absorb and retain
the acid electrolyte). They have important differences from "flooded" (with filler caps) &
other types of lead -acid batteries. These differences significantly affect the correct method
of charging "MF" motorcycle batteries. Automobile starter batteries marketed as
"Maintenance-Free" are not usually constructed with glass-mat separators, & should not
be charged on the BatteryMate’s “MF” charging selection.
2) The internal glass fibre separators leave less space for the battery acid than in
"conventional" batteries without these separators. The electrochemical nature of "MF"
batteries, is rather different from "other" lead-acid batteries as a result of these factors,
and they are not only more powerful than other batteries of similar dimensions, but also
retain starting power at very low temperatures far better than other batteries.
3) The dilute sulphuric acid electrolyte in motorcycle “MF” batteries is often more
concentrated (denser) than the battery acid sold at auto chains & service shops. For this
reason the acid for dry- charged “MF” batteries is delivered in a separate special pack with
the battery. “Wet” “MF” batteries are filled with special acid and charged at the factory.
4) To prepare dry-charged “MF” batteries, the acid must be allowed to trickle into the battery
at its own speed and the battery must then be allowed to stand for at least 20 minutes to
allow acid absorption & reaction before being sealed with the sealing cap strip provided.
Before being sealed any trapped air bubbles must be released by tapping the battery a
few times. The battery has now achieved about 70% of it’s full electrical capacity. Before a
new battery in this state is installed in the vehicle it should be brought to full charge on the
BatteryMate using the 'new’ battery setting (30 minutes). Such batteries have a kind of
memory effect in that if subjected to the full charge current from the vehicles’ charging
system before being given this pre-charge, the batteries tend to get “blocked” at about
75% of potential capacity thereafter. These “dry-charged” MF motorcycle batteries are
generally type-designated “YTX” or “YTL” or “YTH” if from Yuasa, with the “Y” replaced by
another letter if from another manufacturer.
5) “WET” valve- regulated MF motorcycle batteries are filled with acid and pre-charged by the
battery manufacturer. This has the advantage that the battery vendor or retailer does not
have to perform this task so the customer does not have to wait as is the case when drycharged batteries have to be prepared. Wet “MF” batteries have the disadvantage that the
self-discharge period is always greatly extended due to the transport distribution &
warehousing before the retailer gets to sell the battery to the user. It is therefore essential
for the vendor or retailer to re- charge these batteries before delivery to the user. In spite of
great recent improvement in the ability of batteries to retain their charge over time , due to
the prolonged interval between factory-commissioning of the battery & it’s sale to the user,
it is possible that the battery has already self -discharged significantly.
6) Fully charged “Dry- charged” MF batteries such as the YTX types should measure 13,15 V
across the terminals at 25°C. “WET” types of MF batteries typically have charged terminal
voltages around 12,85 V & flooded batteries around 12,65 V. Logically, the charging
voltage of dry-charged MF batteries therefore needs to be higher. The app ropriate voltage
is not achievable with "conventional" vehicle battery chargers.
Page 10

7
7) Properly commissioned "MF" batteries retain their charge during storage better than
conventional batteries. This is especially the case with most of the recent new “WET” MF
batteries. However, if left for excessive time without being re -charged, they tend to go into
deep-discharge from which they are often very difficult to recover unless subjected to
relatively high voltages. This level of applied voltage is only achievable by chargers such
as BatteryMate which use the principle of "constant current". This means that the voltage
is controlled and varied according to the reluctance or otherwise of the battery to accept a
charge, so in "difficult" cases, the charger simply increases, (up to a specific & safe limit)
the applied voltage until the reluctance of the battery is eventually overcome and the
charge can be made to enter the battery, thus recovering it.
8) The “MF” push-button selector beside the symbol of the black battery inscribed "MF",
increases the voltage level at which the constant current charging stage is terminated from
14,5 V for most other batteries to 16,9 V for dry-charged MF batteries, see table below.
9) Push the “MF” button after pushing the charge button onl y when charging dry-charged MF
motorcycle batteries (those delivered with separate special acid packs, typically typelabelled "YTX-", "YTL-", “YTH-” for Yuasa, or with the Y substituted by “C” or “G” for
example, for some other manufacturers. For WET “MF” batteries & all other batteries, or if
in doubt, do NOT push the MF button.
When & when NOT to push BatteryMate’s ‘MF’ button when charging :!! If you are not sure, do not push the MF button !!
Battery Type Push ‘MF’ button?
YTR-4 -series YES
YTH-series YES
YTX-series (except for YTX20-BS) YES
YIZ30 & YIZ50 (Yuasa Inc USA) Not tested yet = NO provisionally
YTX20-BS (after -market, DRY) NO
YTZ-series (new Yuasa -Honda WET) NO
FTZ- series (new Furukawa-Honda WET) NO
Harley- YTX20-BS (1998/99 models, WET) NO
Harley #65989-97A (Y2K models, WET) NO
Harley #65991-90B (Y2K models, WET) NO
Harley #66010-97A (Y2K models, WET) NO
Hawker Genesis G13EP/G16ET/G26EP (WET) NO
YT7B-4 (Yuasa, WET) NO
GT12B-4 & GT14B-4 (GS Battery Co-Yamaha WET) NO
CHARGER OPERATION
1) Before starting, it is important to establish whether or not the battery you are about to
charge is an "MF" battery of the type described above, or another type of 12 V lead -acid
battery. Do not attempt to charge any battery other tha n a 12 V lead -acid battery. Refer
to the previous section. If in doubt, do NOT push the MF button.
2) Make sure the range selector setting (knob with the red cap on the left of the control
panel) is correct for the battery to be charged, according to the selection table. Sealed
deep cycle or trolling type batteries, often called "SLA", require a lower charge current
than those indicated on the range selection table for the relevant Amp-hour battery
Page 11

8
capacity. The selections given on the range selection table are appropriate for starter
type batteries. A charge current of about half the charge current indicated for that Amp hour capacity should be OK for sealed deep cycle or trolling batteries.
3) Depress and release the "CHARGE" push - button.
4) If, and only if, charging an "MF" battery of one of the appropriate types described above,
depress and release the push-button next to the "MF" black battery symbol below the
"CHARGE" button. When the charger stops for whatever reason, the "MF" mode
selection wilI automatic ally re - set to "Non-MF" mode. This is for safety reasons. Thus it
is necessary to re-select the "MF" charge mode each time one starts to charge an "MF"
battery.
5) The charging current entering the battery can be read off the charging current LED panel
to the right of the "Charge" button, one Ampère per illuminated LED.
6) The 4 charging status LEDs below the charge current LED panel indicate how well
charged the battery is at any moment. This is not simply a question of the battery
voltage. The first "low battery" symbol indicates a battery with excessive resistance,
possibly deep-discharged or even sulphated, with the automatic high-voltage recovery
action engaged. The second symbol indicates a battery under constant current "rapid"
charge. The third symbol indicates that the voltage of the battery under charge has risen
to the control point appropriate for that type of battery ("MF" or other) according to the
selection of the "MF" charge button or not. At this point, the battery is about 75 %
saturated & should normally be able to start the engine. However this MUST be
confirmed by conducting a load test. If you have time and wish to charge the battery
more thoroughly, the battery may be left connected for the remainder of the unelapsed
time. The charging mode will from now on be at a voltage limit of 13,8 Volts. Should the
current fall of it's own accord to 10 % or less of the selected charge current during the
remaining charge time, this is an indication that the battery is more than 90 % saturated,
and the fourth LED above the ‘MF’ battery" symbol will light.
7) ALWAYS RE -TEST THE BATTERY AFTER CHARGING TO CONFIRM IT IS IN GOOD
SHAPE. Remember that a "fully charged" battery is not necessarily able to start the
vehicle if internally damaged.
8) The LEDs indicating charge time elapsed and charge status achieved and "MF" charge
mode will continue to indicate until the battery or the AC input are disconnected or until
the battery is re-tested or re-charged so as to allow the operator to observe these
parameters even though absent at the time the charging terminated.
9) Switch off the AC mains switch before disconnecting the battery clamps.
RECOVERY OF DEEP- DISCHARGED OR SULPHATED BATTERIES
If the indicated actual charge current is less than the charge current sele cted according
to the range selection table, this is because the battery under charge has excessive
resistance to accepting the charge, probably due to deep- discharge or possible
sulphation. In such cases the BatteryMate will itself detect this and react automatically
by increasing the applied voltage as required to enter at least some current into the
battery initially. The maximum voltage is limited to 24 V. After a while the LED- ammeter
should gradually start to indicate an increasing current as the resistance is overcome,
until the indicated current and selected charge current correspond. Should the selected
Page 12

9
time elapse before this occurs, re- commence charging with the timer set on maximum, 6
hours.
NOTE : The special desulphating action described cannot engage for safety reasons,
UNLESS you have FIRST TESTED the battery.
If after this the selected charge current is still not entering the battery, the latter can be
scrapped. Never dispose of scrapped batteries into the environment or rubbish. The
contents are poisonous and dangerous. Scrapped batteries should be sent to a
specialised recycler without delay.
LIMITED WARRANTY
TecMate (International) SA, Sint-Truidensesteenweg 252, B -3300 Tienen, Belgium, makes
this limited warranty to the original purchaser at retail of this product. This limited
warranty is not transferable.
TecMate (International) warrants this battery charger for one year from date of purchase at retail
against defective material or workmanship. If such should occur the unit will be repaired or
replaced at the option of the manufacturer. It is the obligation of the purchaser to forward the
unit together with proof of purchase, transportation or mailing costs prepaid, to the manufacturer
or its authorised representative. This limited warranty is void if the product is misused, subjected
to careless handling, or repaired by anyone other than the manufacturers or their authorised
representative. The manufacturer makes no warranty other than this limited warranty and
expressly excludes any implied warranty including any warranty for consequential damages.
THIS IS THE ONLY EXPRESS LIMITED WARRANTY AND THE MANUFACTURER NEITHER
ASSUMES NOR AUTHORISES ANYONE TO ASSUME OR MAKE ANY OTHER OBLIGATION
TOWARDS THE PRODUCT OTHER THAN THIS EXPRESS LIMITED WARRANTY.
FAILURE TO OBSERVE ALL WARNINGS & CAUTIONS IN THE INSTRUCTIONS VOIDS
ALL WARRANTY.
Sint-Truidensesteenweg 252
B-3300 Tienen
(++32(16)805440
Ê++32(16)805441
: www.tecmate-int.com
Ísales: tecmate@skynet.be
Ítechnical: repairs.europe@ tecmate-int.com
 Loading...