

The User’s Manual
Please read this User’s Manual
Carefully before installing this Satellite set–top Box
Premium Satellite Set-top Box
(Twin Tuner PVR)

2
Not to be copied, used or translated in part or whole Manufacturer's prior consent in writing except
approval of ownership of copyright and copyright law.
This warranty does not cover parts which may become defective due to misused of the information
contained in this manual.
• Please read the following recommended instructions carefully to avoid the risk of your physical injury
before the product is operated.
• Do not cover the receiver and keep clear space around the receiver for sufficient.
• Check the receiver's operation 90-250V, 50Hz-60Hz. Keep liquid away from the receiver.
• The receiver shall not be exposed to dripping or splashing and that no objects filled with liquids, such
as vases, shall be placed on the receiver.
• Unplug the receiver from the wall outlet before cleaning.
• Use a soft cloth and a mild solution of washing-up liquid to clean the casing.
• Do not block the receiver’s ventilation slots which are provided for ventilation and protection from
overheating.
• Please maintain the receiver in a free airflow.
• Do not allow the receiver to be exposed to hot, cold or humid condition.
• Do not use any cable and attachment that are not recommended as these may damage your
equipment.
• Please unplug the receiver from the wall outlet and disconnect the cable between the receiver and the
antenna when you will not use it for long time.
• Do not remove the cover to reduce the risk of electric shock.
• Do not attempt to service the receiver yourself.
• Refer all serving to qualified service personnel.
• Manual may be updated as new features.
I. Notice
II. Warranty
III. Warning

3
1. Before you begin ---------------------------------------------------------------------------------------------------------- 5
1.1. General Features ----------------------------------------------------------------------------------------------------- 5
1.2. Unpacking ---------------------------------------------------------------------------------------------------------------- 6
2. Controls and functions ------------------------------------------------------------------------------------------------ 7
2.1. Front Panel --------------------------------------------------------------------------------------------------------------- 7
2.2. Rear Panel --------------------------------------------------------------------------------------------------------------- 8
2.3. Remote Control Unit (RCU) ------------------------------------------------------------------------------------------ 9
2.3.1. Key and Functions ------------------------------------------------------------------------------------------------- 9
2.3.2. Setting-up the RCU for your TV ------------------------------------------------------------------------------- 10
3. Connections TV, Audio, and Antenna --------------------------------------------------------------------------- 11
3.1. Connecting your TV to the receiver ------------------------------------------------------------------------------ 11
3.2. Connecting your hi-fi audio to the receiver (optional) -------------------------------------------------------- 12
3.3. Connecting your dish antenna to the receiver ----------------------------------------------------------------- 12
4. Basic Operations -------------------------------------------------------------------------------------------------------- 13
4.1. Switching Channel ---------------------------------------------------------------------------------------------------- 13
4.2. Volume Control ------------------------------------------------------------------------------------------------------ 13
4.3. Information Banner --------------------------------------------------------------------------------------------------- 13
4.4. Audio Track -------------------------------------------------------------------------------------------------------------14
4.5. Teletext ------------------------------------------------------------------------------------------------------------------ 14
4.6. Channel Browser ------------------------------------------------------------------------------------------------------ 14
4.7. PVR (Personal Video Recorder) ---------------------------------------------------------------------------------- 15
4.8. EPG (Electronic Program Guide) --------------------------------------------------------------------------------- 15
4.9. Schedule ---------------------------------------------------------------------------------------------------------------- 16
4.10. UPnP (Universal Plug and Play) -------------------------------------------------------------------------------- 16
5. Initial / Easy Installation ----------------------------------------------------------------------------------------------- 17
5.1. Step-1 Language ------------------------------------------------------------------------------------------------------ 17
5.2. Step-2 Time ------------------------------------------------------------------------------------------------------------ 18
5.3. Step-3 Audio, Video -------------------------------------------------------------------------------------------------- 18
5.4. Step-4 Antenna Connection ---------------------------------------------------------------------------------------- 19
5.5. Step-5 Satellite Selection ------------------------------------------------------------------------------------------- 20
5.6. Step-6 Antenna Setup ----------------------------------------------------------------------------------------------- 20
5.7. Step-7 Satellite Scan ------------------------------------------------------------------------------------------------- 21
5.8. Step-8 Scanning Channels ----------------------------------------------------------------------------------------- 22

4
6. Menus ----------------------------------------------------------------------------------------------------------------------- 22
6.1. Menus Map ------------------------------------------------------------------------------------------------------------- 23
6.2. Multimedia -------------------------------------------------------------------------------------------------------------- 24
6.2.1. Internal Disk -------------------------------------------------------------------------------------------------------- 24
6.2.2. USB1, USB2, USB3 ---------------------------------------------------------------------------------------------- 24
6.2.3. Ethernet ------------------------------------------------------------------------------------------------------------- 24
6.3. Accessory --------------------------------------------------------------------------------------------------------------- 25
6.3.1. Games --------------------------------------------------------------------------------------------------------------- 25
6.4. Preference -------------------------------------------------------------------------------------------------------------- 25
6.4.1. Language ----------------------------------------------------------------------------------------------------------- 25
6.4.2. Schedule ------------------------------------------------------------------------------------------------------------ 25
6.4.3. Time ------------------------------------------------------------------------------------------------------------------ 26
6.4.4. Audio, Video -------------------------------------------------------------------------------------------------------- 26
6.4.5. OSD, Display ------------------------------------------------------------------------------------------------------- 26
6.4.6. Network -------------------------------------------------------------------------------------------------------------- 27
6.4.7. PVR, Power-Save ------------------------------------------------------------------------------------------------ 27
6.4.8. Parental Control --------------------------------------------------------------------------------------------------- 28
6.4.9. Conditional Access ----------------------------------------------------------------------------------------------- 28
6.4.10. System Information --------------------------------------------------------------------------------------------- 29
6.5. Channel Manager ----------------------------------------------------------------------------------------------------- 29
6.5.1. TV, Radio Channels ---------------------------------------------------------------------------------------------- 29
6.5.2. Favorite TV / Radio ----------------------------------------------------------------------------------------------- 29
6.5.3. Backup Channel Data to Disk --------------------------------------------------------------------------------- 30
6.5.4. Restore Channel Data from Disk ----------------------------------------------------------------------------- 30
6.5.5. Delete All Channels ---------------------------------------------------------------------------------------------- 30
6.6. Installation -------------------------------------------------------------------------------------------------------------- 30
6.6.1. Satellite Scan ------------------------------------------------------------------------------------------------------ 30
6.6.2. Antenna Setup ----------------------------------------------------------------------------------------------------- 30
6.6.3. Motor Antenna ----------------------------------------------------------------------------------------------------- 31
6.6.4. Satellite Selection ------------------------------------------------------------------------------------------------- 31
6.6.5. Antenna Connection --------------------------------------------------------------------------------------------- 31
6.6.6. System Service ---------------------------------------------------------------------------------------------------- 31
6.6.7. Easy Installation --------------------------------------------------------------------------------------------------- 33
7. Appendix ------------------------------------------------------------------------------------------------------------------- 34
7.1. Specifications ---------------------------------------------------------------------------------------------------------- 34
7.2. Trouble Shooting ------------------------------------------------------------------------------------------------------ 37
7.3 Brand Codes for Universal RCU ----------------------------------------------------------------------------------- 38

5
1.1. General Features
• HD DVB-S/DVB-S2 Satellite Twin Tuner.
• Supporting MPEG-4, H.264, DivX, Xvid & VC-1 media file playback.
• Dual threading core (405MHz, 1,100 DMIPS).
• 2Gbit NAND Flash & 3Gbit DDR Ram
• Full-HD, true color graphic application software based on Linux.
• Full HD display support : Up-scaling to 1080P.
• High performance HD PVR : internal SATA2 disk interface, and three USB2.0/1.1 disks support.
• NTFS, FAT32 and Linux file systems support.
• 2 HD channel recording and 1 HD channel time shifting simultaneously.
• Fastest PVR trick play mode. (2×, 5×, 10×, …, 120×)
• Time shifting function.
• HDMI, Component (Y, Pb, Pr) and Euro SCART(RGB, YC, CVBS) outputs.
• 12 character VFD display with scrolling for local time or channel name.
• Multi-language support.
• Ethernet Communication Port
• Dolby Digital Plus Optical S/PDIF
1. Before You Begin

6
1.2. Unpacking
Please ensure that the following items are included with the receiver in our packing.
• User’s Manual
• Power cord
• Remote Control
• 2 AAA batteries for Remote Control
• HDMI cable
• Guarantee Coupon
7
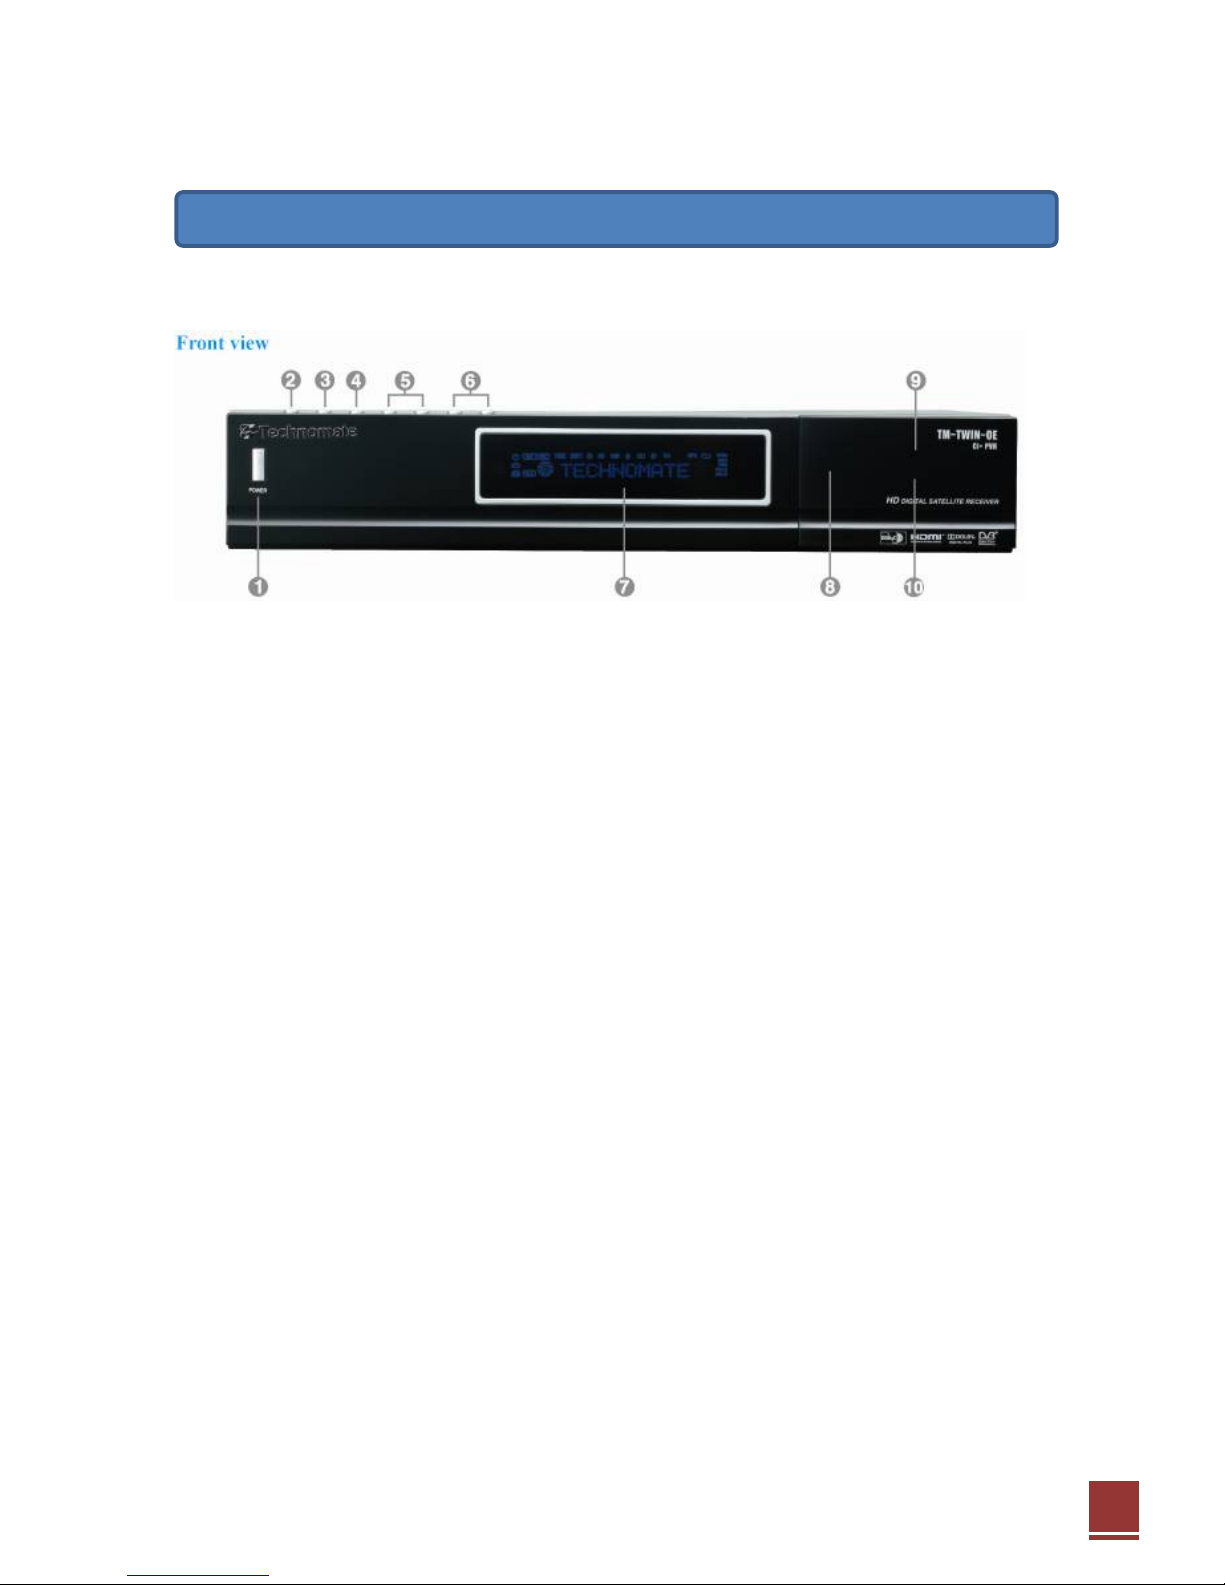
2.1. Front Panel
1. Power
: Switch between operation and standby modes.
2. Menu
: Open main menu & select sub menu using by navigation buttons.
3. OK
: Open service list in viewing mode and you can enter a selected menu or function in Menu mode.
4. Exit
: Close and return to the previous menu and screen.
5. Channel Up/Down
: Change channel or moves the cursor up/down on the menu.
6. Volume Up/Down Button
: Adjust the volume control.
7. Display (VFD)
: Display the current menu information.
8. USB
: Connect to the External HDD or USB storage with USB cable. (Max. 500mA)
9. Smart card reader
: Insert smartcard.
10. Common Interface Slot
: A slot for two CA modules with a Smartcard.
2. Controls and Functions
8
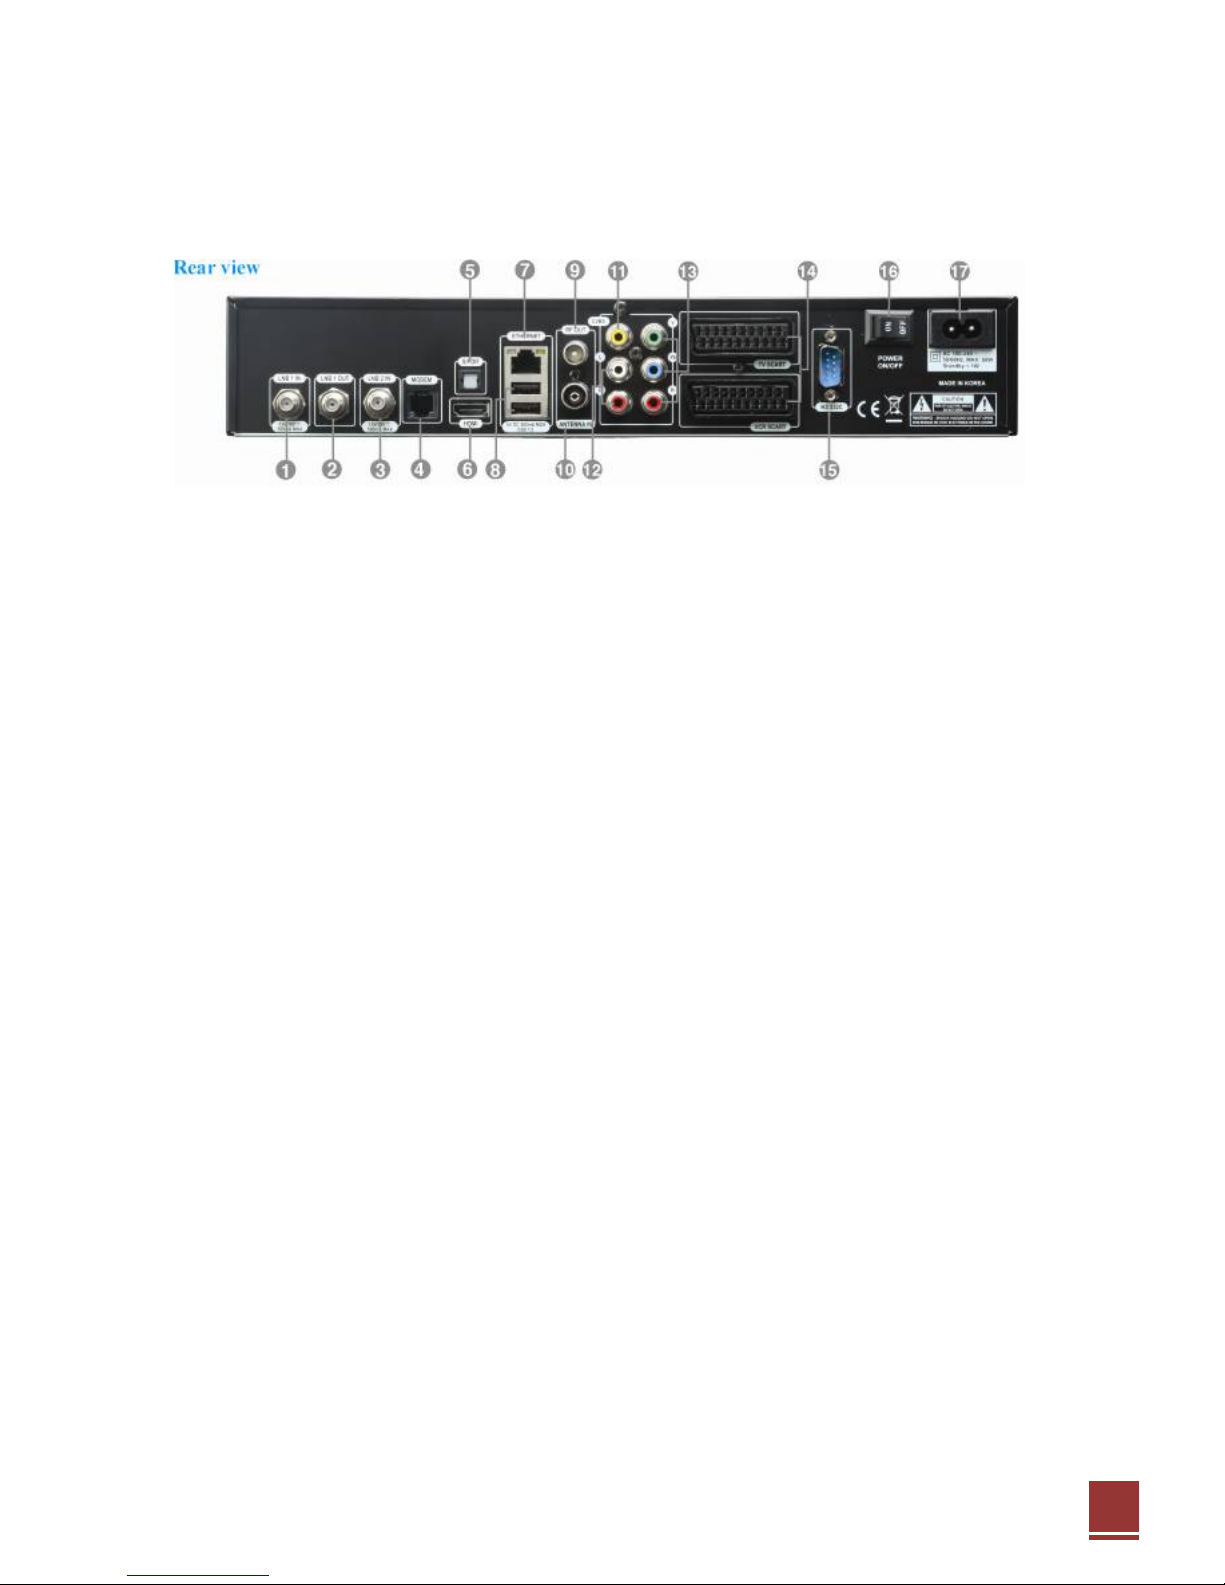
2.2. Rear Panel
1. LNB 1 IN : 1st satellite tuner input from the LNB on a dish antenna. Turn the receiver OFF first before
connecting.
2. Loop 1 OUT : Loop - through output of LNB1 IN for another satellite receiver. turn OFF the receiver to
watch an analogue program.
3. LNB 2 IN : 2nd satellite tuner input from the LNB on a dish antenna. Turn the receiver OFF first before
connecting.
4. Modem : Connect to a telephone line.
5. S/PDIF : Connect with an appropriate optical cable to your HiFi system.
6. HDMI : Connect to TV using a HDMI cable for both audio and video signals.
7. Ethernet : Communication port via HTTP, FTP, NFS, Telnet and Samba to access your Hard Drive or
to upload channel lists. This is also used to update TM-Twin-OE's software.
8. 2x USB : Connect to the External HDD or USB storage with USB cable (Max. 500mA).
9. RF OUT : Connect to TV or VCR.
10. Antenna IN : TV Antenna connection
11. Video Output : Connect to TV using RCA cable.
12. Audio Output : Connect to TV using RCA cable.
13. Component (YPbPr) : Connect to TV using Component cable.
14. Scart (TV/VCR) : Scart Cable to TV/VCR(AUX) connection (RGB,CVBS, YPbPr).
15. RS232 : RS232 data port is provided.
16. Power Switch : Turn AC Power On/Off.
17. Power Inlet : Connect the detachable power cord.
9
2.3. Remote Control Unit (RCU)
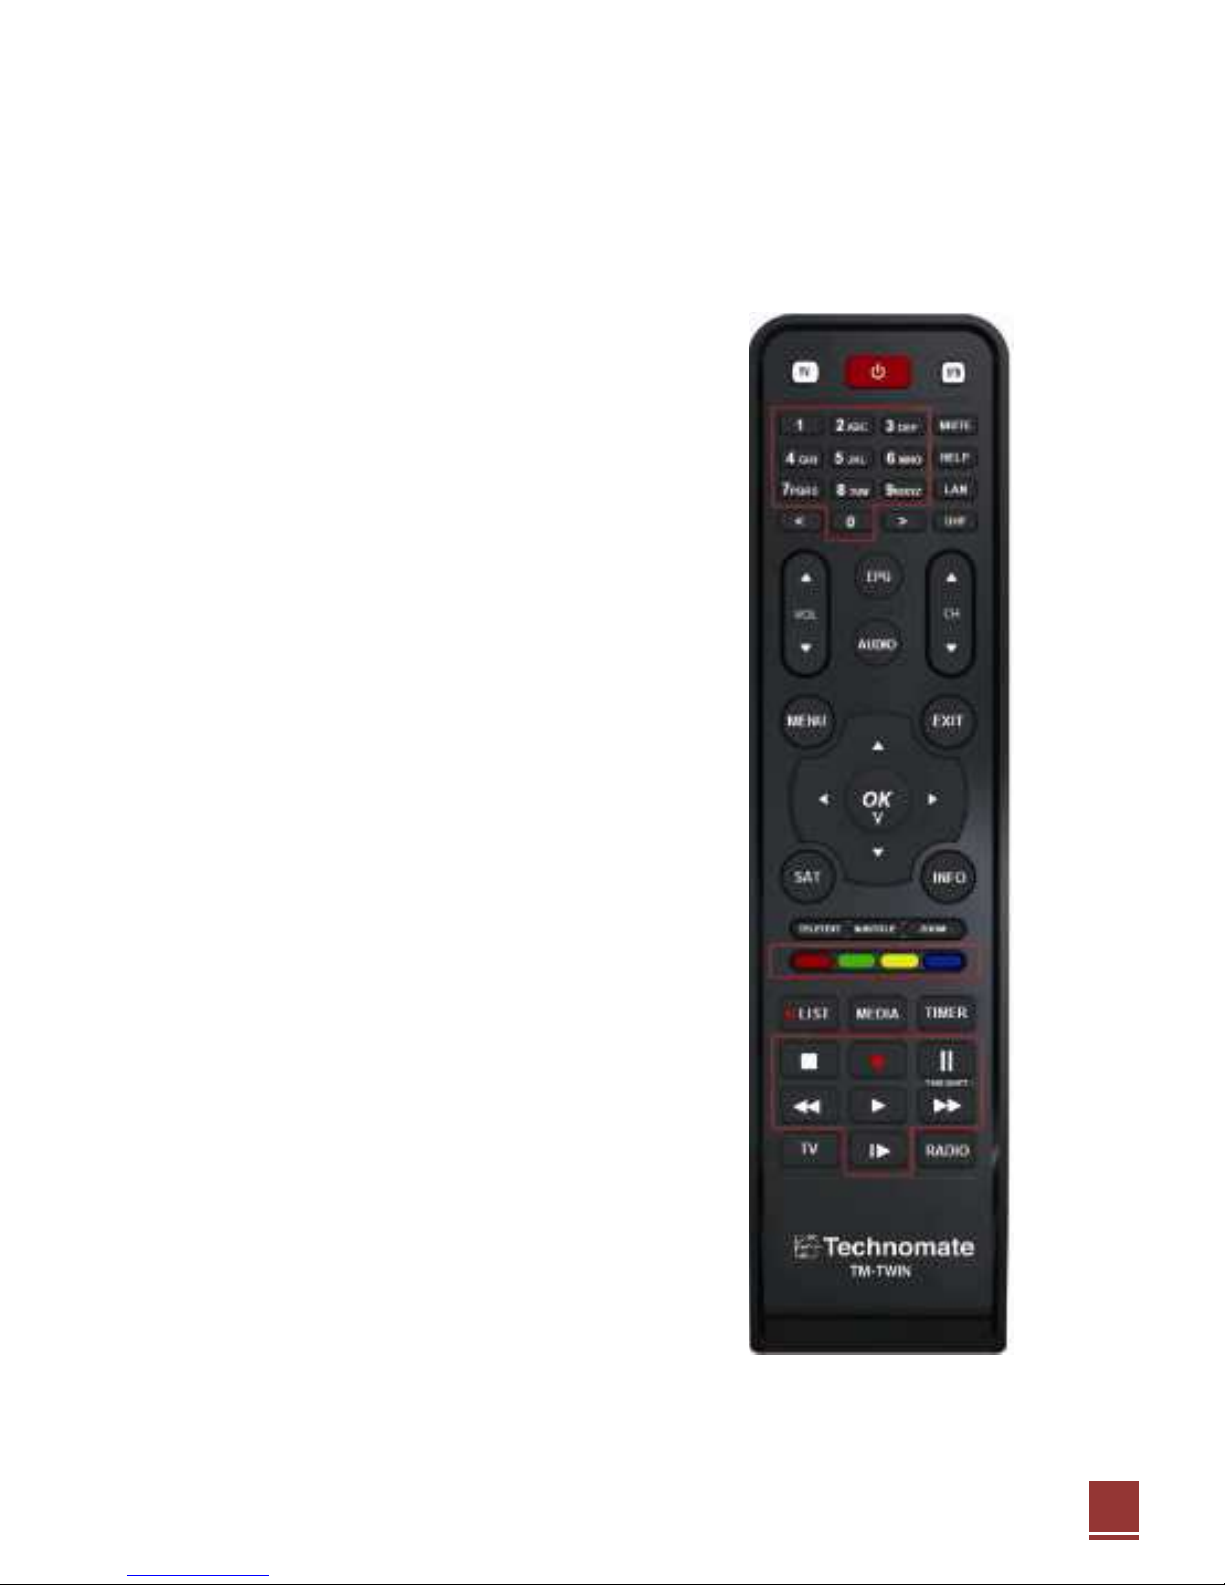
2.3.1. Keys and Functions
1. POWER : Switches between operation and standby.
2. TV : TV Mode.
3. STB : STB Mode.
4. NUMERIC KEY (0~9) : Control the numerical operation and
change the Channel/Service number directly.
5. PREV (<) : Return to the previous channel/service or move to
the end of the Service List or the Play List.
6. NEXT (>) : Go to the next channel/service or move to the
beginning of the Service List or the Play List.
7. MUTE : Mutes or unmutes the audio temporarily.
8. HELP : Displays major important operation methods of TM-
TWIN. This provides users with a quick guide of using TM-TWIN.
9. LAN : Open network configuration menu.
10. UHF : Open UHF modulator setup menu.
11. VOL. +/- : Increase/Decrease the volume (Volume up/down).
12. CH. +/- : Move in menus. In viewing mode, you can operate
CH+/- by pressing UP/DOWN button.
13. EPG : Displays the Electronic Program Guide (EPG)
information if provided.
14. AUDIO : select an audio track and a sound mode.
15. MENU : Open main menu & select sub menu using by
navigation buttons.
16. EXIT : Close and return to the previous menu and screen.
17. Navigation Keys : Navigates up/down and left/right on the
menu options. Up/down keys are used to call up the channel list.
18. OK : Select a menu, or confirms the selected operation. Also
displays the channel list while watching a programe.
19. SAT : Open channel list according to satellite.
20. INFO : Shows current program's stream information.
21. TELETEXT : Switch between the teletext and TV modes.
22. SUBTITLE : Display the subtitle language list.

10
23. Zoom : To zoom In/Out.
24. COLOR BUTTONS : Activates certain menu functions. Usage instructions are shown in each OSD
menu.
25. LIST : Open recording file menu.
26. MEDIA : Open media file list.
27. TIMER : Start timer function.
28. PVR FUNCTIONS :Control the PVR functions in PVR Mode.
29. TV : Switch between TV mode.
30. RADIO : Switch between Radio mode.
2.3.2. Setting-up the RCU for your TV
The RCU is a universal remote control, i.e. it can control your TV. You should setup the RCU for them to
use. If you want to control TV, please do the following steps with TV key instead.
1. At first, turn on the TV
2. Find the brand code for your TV in Brand Codes for Universal RCU at the Appendix. You can see
one or more 4 digit numbers.
3. Press the OK and Power keys on the RCU at the same time for more than 3 seconds until the back
light of the TV key twinkles 3 times shortly.
4. Please do just one of the following two methods.
A. Set the brand code manually – may be fast but a bit of complex
Press the 4 digit brand code in sequence found in the step 2.
If the back light of the TV key turns on during about two seconds,
- it means the code is wrong for the RCU,
- you can retry this step with the next code found in the step 2 within 20 seconds.
If the back light of the TV key twinkles 2 times shortly,
- it means the code was accepted to the RCU and the RCU transmits the ultra red light for the POWER
key.
- if the TV turns off, go to the step 5.
- if the TV does not respond, you can retry this step with the next code found in the step 2 within 20
seconds.
B. Set the brand code by scrolling – may take long time but easy
Press the UP / Down key until the TV turns off.
- if the TV turns off, go to the step 5.
- if the TV does not respond, continue this step B within 20 seconds.
5. Press the OK key then the back light of the TV key will twinkle 3 times again. Please turn on the TV by
pressing the POWER key on the RCU then check whether other keys such a VOL / , CH / , etc are
working correctly. Even though the POWER key works but other keys may not work under the brand
code. Please try again from the step 1 to find out the correct brand code for your TV.

11
3.1. Connecting your TV to the receiver
● There are various types of connections of the digital receiver, but please consider to follow the order
below if available for the best possible picture quality.
1. HDMI connector
2. Component(Y, Pb, Pr) connectors
3. SCART connector (RGB, YC, CVBS)
Please select RGB for the SCART TV item in the Audio, Video menu, if your TV supports this mode
because it is more clear than YC or CVBS.
● Using A HDMI Cable : If you have a HD television set, you should use a HDMI cable for the best
results. Plug receiver’s HDMI cable to the terminal marked “HDMI” on the rear panel of your receiver and
its other end to the TV HDMI input. In this case, you do not have to make audio connection because the
HDMI connector can output stereo audio or Dolby Digital audio.
● Using Component video cable : Plug the component video cable (RCA video cable) into the
appropriate RCA jacks on your receiver : Y (green), Pb (blue), Pr (red) according to the color of both sets.
3. Connecting TV, Audio, and Antenna

12
● Using A SCART Cable : Plug the SCART Cable into the TV SCART outlet on your receiver : then
connect end to your TV.
3.2. Connecting your Hi-Fi audio to the receiver (optional)
● Connect RCA audio cable to the appropriate RCA input terminal of your external audio system and
connect the other end to the RCA audio port on your receiver.
● If you have digital audio equipment, you can connect it to Receiver using S/PDIF.
- Plug in the appropriate cable to the S/PDIF port on your Receiver, then connect the other end to your
digital audio equipment.
3.3. Connecting your dish antenna to the receiver
● This receiver has two tuners inside and there are two LNB inputs and one loop-through output of the
LNB1 IN.
● Please connect the appropriate satellite input to the LNB1 IN and/or LNB2 IN. The connection should
be matched in the Antenna Connection menu later.
● Please ensure that there is a connection to both the LNB1 IN and LNB2 IN connectors on your receiver,
so that both tuners work properly. You don’t need to use a loop cable from the LNB1 OUT to the LNB2 IN
connector because it will be connected internally according to the mode in the Antenna Connection menu.
● If you want to use another satellite receiver, please connect the LNB input of the receiver to the LNB1
OUT connector of this receiver.
13
4.1. Switching Channel
● To display all channels list, press the OK key on the remote control.
● Use the ▲▼ keys to search the required channel one by one, and the ◄►keys for each page and
press the OK key to watch the selected channel.
(Note : An Euro dollar sign may be on some entries, indicating Pay-TV service using CAS system . To
watch the Pay-TV services, you may need the CAM and smartcard with entitlement)
4.2. Volume Control
● Press the VOL+ or VOL- key to control audio volume.
● Press the MUTE key to turn the sound on and off.
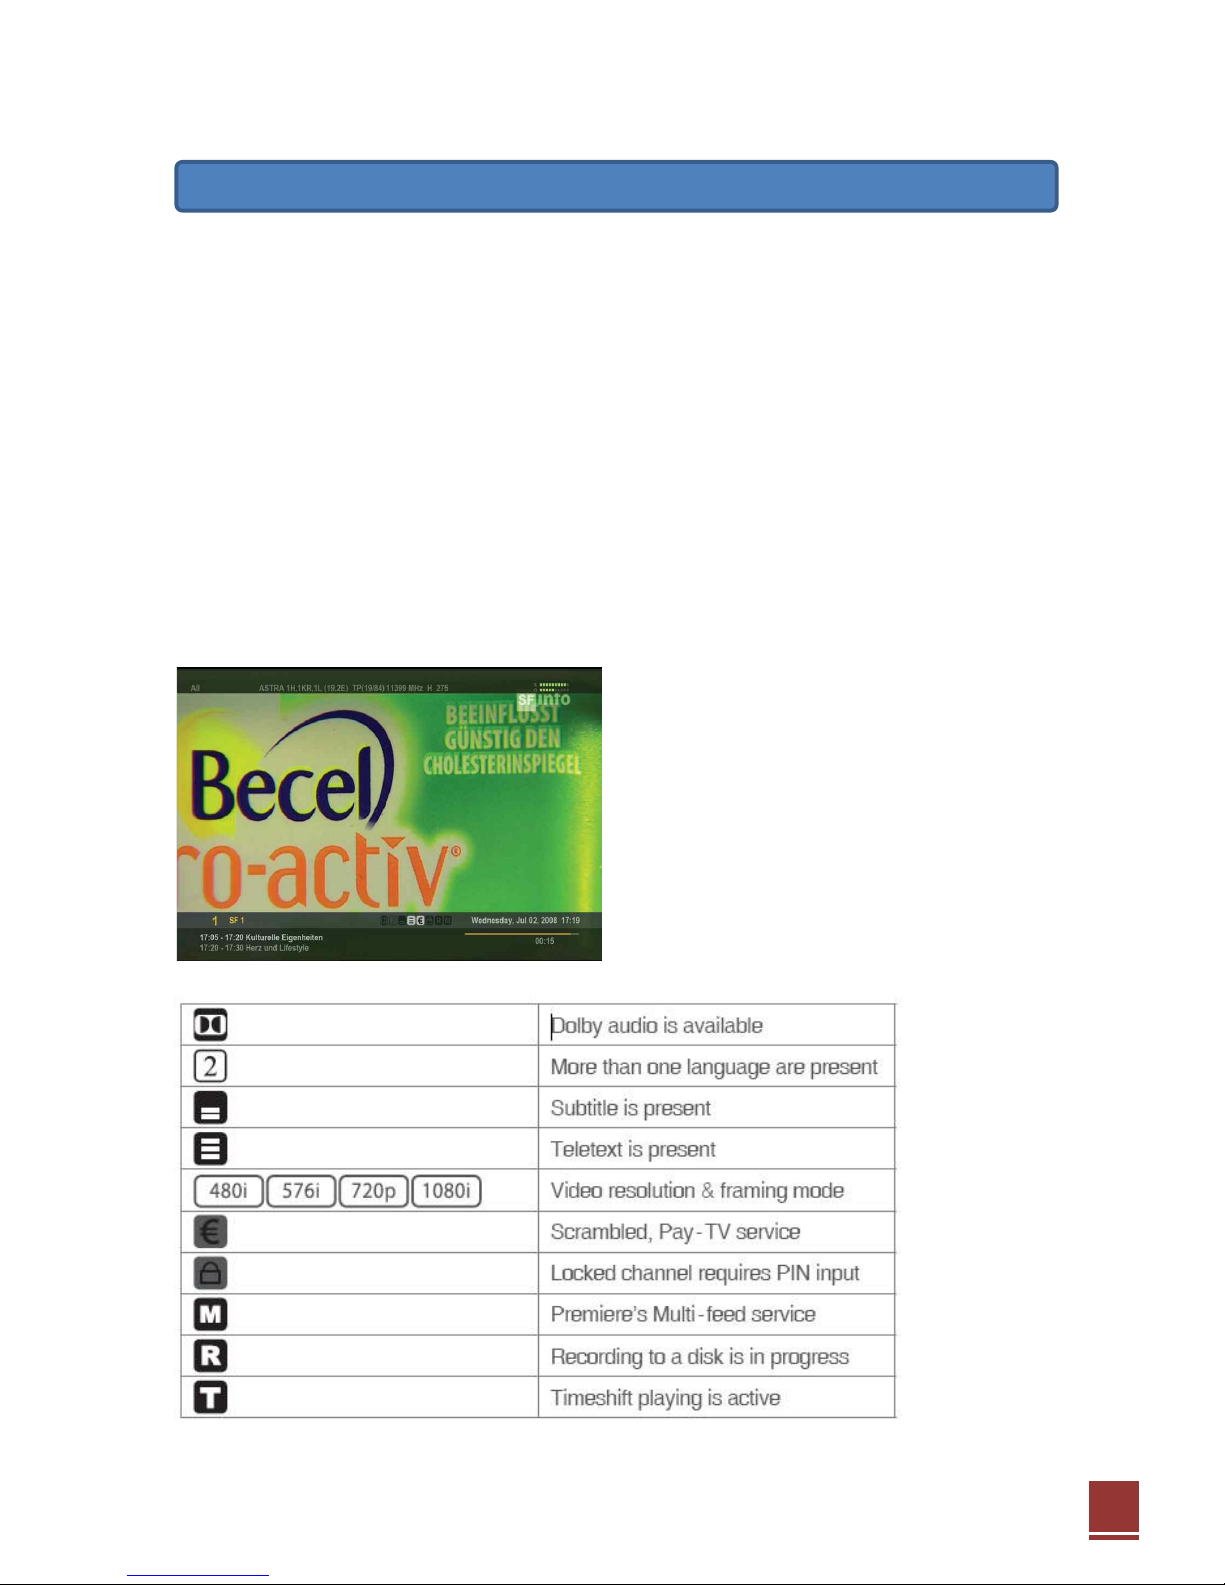
4.3. Information Banner
● Press the INFO key to see general information of
the current channel or file.
● Info. included with channel name, current time,
signal level/quality, displaying the stream
information.
● There are small icons to show the program specific information.
4. Basic Operation

14
● If you press the INFO key again, it raises the Mini
EPG window which shows more detailed
information of the selected program.
● ◄,►key moves the current program to the you
can reserve the service for watching pressing the
key named Reservation.
4.4. Audio Track
● Press the AUDIO key and ◄,►,▲,▼ keys on the remote control to select the audio track and audio
mode (mono right/left, stereo).
4.5. Teletext
● You can raise the teletext window while you are
watching/listening a TV/Radio program which has
the teletext service by pressing the TELETEXT
key on the remote control.
● You can adjust following features on the teletext
window.
■ Transparency : changes the mixing level between
background of teletext and the live video by
pressing the REW(◀◀) and FF(▶▶) keys.
■Language : changes the language by pressing the
OK key.
■ Zoom : enlarges the teletext window by pressing the ZOOM key and back to the normal size by the
same key.
4.6. Channel Browser
● While you are watching / listening a TV/ radio program, you can raise the Channel Browser by pressing
the OK key and find the desired channel quickly.
● Press the Up / Down keys to move the key focus, Left / Right keys to move the prior or next page of
the channel list.
● Press the Red key to find channels or files by
specifying particular characters contained in them.
● Press the Green key to sort the channel list by

15
- None : Scanned Order
- A-Z : Ascending Order
- Z-A : Descending Order
- FTA-CAS : FTA (Free To Air) channels first
- CAS-FTA : CAS(pay-TV) channels first
● Press the Yellow key to pick up a group of channel or device list. You can select one of, for example,
All SAT, Internal Disk, ‘Astra 19.2E’, USB1, etc.
4.7. PVR (Personal Video Recorder)
● Press the Record key to start recording while watching/ listening a TV/radio program.
● You may stop recording by pressing the Stop key manually, or the recording will stop automatically
after the Recording Duration or the time specified by EPG information, depending on which you select
when the recording starts. You can set the Recording Duration at the PVR, Power-Save menu in the
Preference menu.
● If you wish to play the files recorded, raise the File Browser by pressing the MEDIA key.
4.8. EPG (Electronic Program Guide)
● We support 3 presentations of EPG : Mini-, One Channel-, Multi Channel EPG.
● Press the EPG key to display the EPG window. You can see the Multi Channel EPG window, press the
same key again to show the One Channel EPG.
● Information in the channel and make an instant timer recoding or create reminders to tune to TV
programs.
- Timer(Red) List : You can see the reserved programs
- Timer(Yellow) : You can create Task function with prefered time frame
- Turn-in(Blue) : Press button for Recording / Watching
● You can make reservation with the Blue key and the reservation type will be cycled.
- W : Reserved for Watching
- R : Reserved for Recording
- WR : Reserved for Watching and Recording

16
● The One Channel EPG shows the program information only for the selected channel.
4.9. Schedule
● When you want to reserve the record or set the
TV on–time/off-time, select the Green key for below
options.
● To save the data, press the Blue key. Otherwise,
not to save the data, press the Yellow key.
4.10. UPnP (Universal Plug and Play)
※UPnP (Universal Plug and Play) : a set of networking protocols promulgated by the UPnP Forum.
The goals of UPnP are to allow devices to connect seamlessly and to simplify the implementation of
networks in the home (data sharing, communications, and entertainment) and in corporate environments
for simplified installation of computer components. UPnP achieves this by defining and publishing UPnP
device control protocols (DCP) built upon open, Internet-based communication standard
● The UPnP client function is always activated, and
therefore, it is constantly searching for servers on
the network.
● In order to use the UPnP file sharing functionality,
you must have at least one UPnP server on the
network such as ×-Box360, PS/3, and a PC
running a UPnP server software like TVersity ,
which is widely used in a PC environment.
● You can download and install the software from
www.tversity.com on the PC. After installation, add
desired folder to share as instructed by its operation guide and start the server function.
● The number of servers found in the Multimedia menu.
● If you select one of the servers and press the OK key, it will show the files contained in the selected
server.
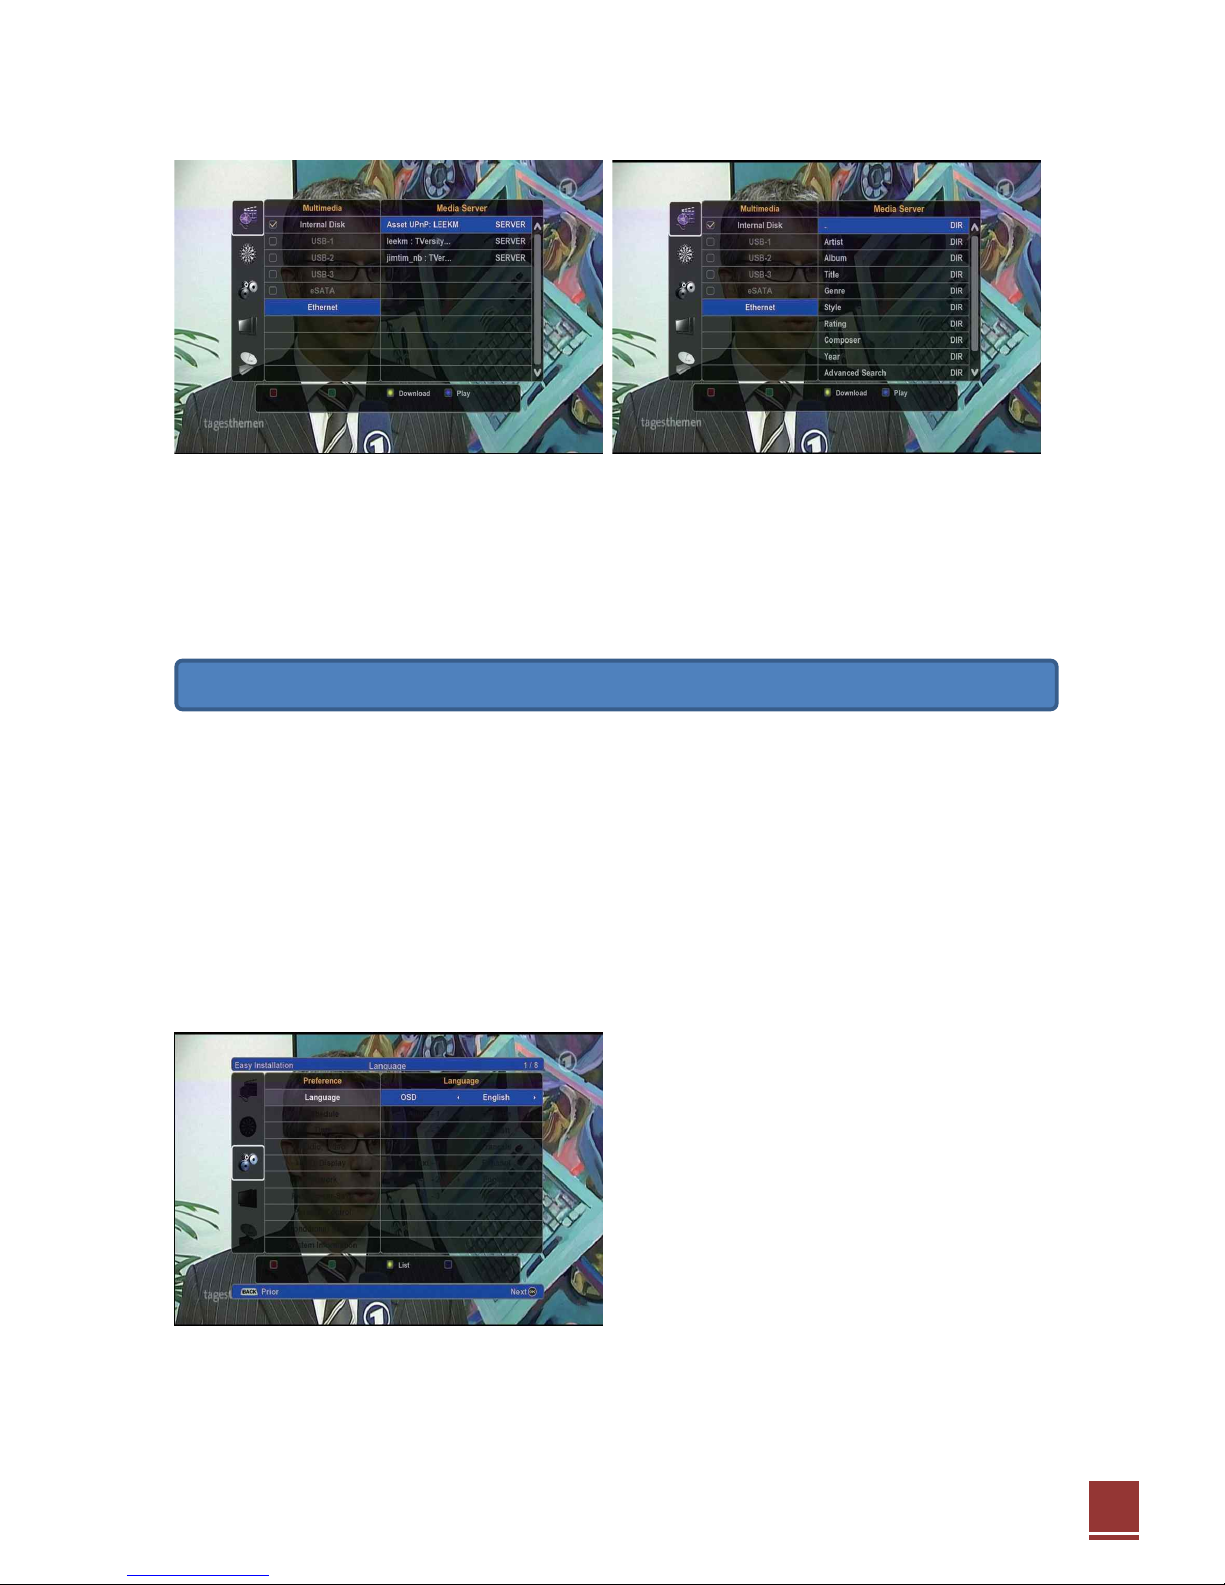
17
● Select the file and press the OK key then the file will be downloaded into the upnp folder in the Internal
Disk or external USB disk.
Depending on the file types, you may be able to play the file while downloading
(e.g .MKV format) or after downloading (e,g .AVI format).
The Easy Installation function was designed to do the first installation with ease but some steps require
the technical knowledge about the satellite broadcasting system. Please see the detailed description in
the 6. Menus chapter about the following steps.
5.1. Step-1 Language
There are three kinds of languages : OSD (On - Screen Display, e.g. Menu), multilingual audio (e.g.
audio track), and multilingual text (e.g. teletext and EPG).
You can select three levels of priority for audio and text languages.
● OSD – Selects the language for On-Screen
Display like menus.
● Audio 1, 2, 3 : Selects the preferred audio
language with priority.
● Text 1, 2, 3 : Selects the preferred teletext and
EPG language with priority.
☞ If a program has an audio/text language that
is matched to the 1st Audio / Text language when
you’re watching the program, it will be output.
● If the 1st Audio / Text language does not
matched, receiver will do above step with the 2nd one and then 3rd one if then 2nd one also fails.
5. Initial / Easy Installation

18
5.2. Step-2 Time
You should select the time zone where you are in and summer time correctly.
You don’t need to adjust the time and date manually because the time and date will be synchronized
with one in the broadcasting signal when you watch any program after finishing these installation phase
successfully (in case of Sync with TDT is Any TP or “reference” TP).
● Receiver should have exact time for correct
operation.
● Otherwise, the program time provided by the
EPG and user’s reservations of programs may be
distrustful.
● Receiver can take time from broadcasting signal
or set by user.
● You should specify your time zone and summer
time correctly.
■ Time Zone : Select your area (ex : Berlin,
Germany and you can see the current date DD/MM/YY and current time of the selected area) Press the
Yellow key to show the time offset table (example : GMT+1:00, Berlin using / key)
■ Summer Time (Yes, No) : If set “Yes”, you can also select the start /end period.
- Start : Start date of daylight saving time
■ Format (DD/MM/YYYY, YYYY/MM/DD) : Display format
■ Sync with TDT (Any TP, Below CH, No) : if select “Below CH” , time zone will be set automatically
with broadcaster information
- TDT (Time Date Table) : Receive the time from broadcaster
5.3. Step-3 Audio, Video
Select your TV aspect ratio and the best resolution, etc.
● Video Resolution (576i 50Hz ,720p 50Hz,1080i
50Hz,1080p 24/25/30 Hz) : Selects the video
resolution with framing rate. Please select the
possible highest resolution to fit your TV.
● Video Format (YCbCr/CVBS, RGB/CVBS,
YCbCr/YC, RGB/RGB) : Selects the video signal
type for your TV. If you have a legacy TV which has
only SCART connector, Select 576i mode resolution,
then you can also select one of RGB, YC, and
CVBS signal type. RGB is clear than YC and CVBS
but your TV may not handle it.
● Aspect Ratio (4:3, 16:9): Specifies the screen aspect ratio of your TV correctly. It will affect the

19
stretching of the video.
● Convert 4:3 to (Pillar-Box, Mixed, Zoom, Full) : Selects the way to show 4:3 video on 16:9 TV screen.
● TV Standard : Set the standard in your country: PAL for many European countries and China, NTSC
for USA, Japan, and Korea.
● SPDIF Output (Decoded, Bit Stream) : Selects the optical output type of audio.
- Decoded – Output the PCM type down mixed audio output.
- Bit Stream – Bypass the audio stream to the optical output untouched.
● SPDIF Delay (0ms,10ms, 20ms, ........, ~ 500ms): When using S/PDIF (Sony/Philips Digital Interface)
for digital audio, you can select the option for Sync delay.
5.4. Step-4 Antenna Connection
Specify your antenna connection.
● If you have only one antenna cable for one dish
antenna.
Select “Direct” mode and connect it to LNB A1.
Our receiver has two tuners and it supports
“Internal Loop-through”. So you can connect two
separate antennas to each tuners or connect one
antenna to LNB A1 tuner and internally loop-through
to LNB A2 tuner. So you don’t have to externally
connect loop-through. In this mode, two tuners
should have the same control signal such as
polarization and 22KHz tone.
● Select "Direct" mode of LNB A1 & LNB A2 both if you have two dish antennas separately.
● If you have one antenna cable for two or more dish antennas with DiSEqC switch, Select “DiSEqC”
mode and connect the antenna cable to LNB A1 connector.
※ Note : LNB (Low Noise Block amplifier) is located at the satellite dish antenna.

20
5.5. Step-5 Satellite Selection
Specifies the satellite(s) to receive signals from your dish antenna(s).
● Select the satellite(s) that you have installed for
tuner 1 and 2 correctly. Selected state will be
changed whenever you click OK key on the remote
control.
5.6. Step-6 Antenna Setup
You may need to change some parameters for your antenna and LNB to receive signals from the
satellite. You can find the signal with the signal meter display on the screen : it shows green blocks if the
signals found, or grayed if not found.
Please go to the next step if you found a few good signals.
For setup of a satellite, you can configure Antenna System, LNB Type, DiSEqC switches and Motor
Antenna if you have installed one.
● A1 “Astra 19.2E” shows the satellite selected
currently with the longitude and which tuner is
connected for the satellite.
● Antenna System : *DiSEqC, OneCable.
● LNB Type : *Universal, C-Band 1/2/3, Ku-Band
1/2/3, User Define.
● LNB Frequency : Specifies the frequency of LO
(local oscillator) in the LNB. You should select the
correct one installed.
● LNB Power : *Auto, Off, 13V, 18V - Supplies
electric power to the antenna system.
● LNB 22KHz : *Auto, Off, On
● 1st DiSEqC 1.0/1.1 : *None, 1/4 ~4/4, Tone A, Tone B, 1/16 ~16/16
● 2nd DiSEqC 1.0/1.1 : *None, 1/4 ~4/4, Tone A, Tone B, 1/16 ~16/16
● OneCable Status : Select the Red key to install.
● User Band : 1, 2, 3, 4
● UB Frequency : 1400, 1516, 1632, 1748 MHz
● MDU : *No, Yes - Select YES if you installed the Multiple Dwelling Unit system, “No” for Single

21
Dwelling Unit.
● MDU PIN : Enter PIN code for the MDU.
● Motor Antenna : *None, DiSEqC1.2, USALS - Set the type of positioner /motorized antenna if you
have installed the one.
☞ DiSEqC1.2(Digital Satellite Equipment Control Level 1.2) or USALS(Universal Satellites Automatic
Location System). If there is no motor antenna in your system, please just remain None as default.
5.7. Step-7 Satellite Scan
Now you are ready to start to scanning channels if you have passed the above steps correctly.
● To enjoy programs, you should take the channels contained in the broadcasting signal from satellite
antenna(s); normally it calls ‘Channel Scan’ or ‘Channel Searching’.
● There are several kind of channel scan modes according to target range to search.
- All SAT : searches all satellites you have selected
at the Satellite – Select menu.
- SAT : searches all transponders in the specified
satellite in the menu.
- TP : searches specified transponder in the menu.
- Service ID : searches the channel specified by its
service ID in the menu.
- PID : adds the channel specified by its audio,
video and PCR PID(Packet IDentifier) in the menu.
- Blind : it takes long time because many tuning
parameters are applied without specifying correct ones. You’d be better to use the All SAT or SAT mode.
● Transponder parameters
- Frequency : Current frequency displaying in MHz of selected TP
- Symbol Rate : Current symbol rate displaying in kSym/sec of selected TP
- Polarization (H,V) : Select Horizontal or Vertical polarization of electrical wave
- Code Rate (*Auto, 1/2, 2/3, ... 9/10)
- Modulation : Auto, QPSK/DVB-S, QPSK/DVB-S2, 8PSK/DVB-S2
- Find (*All, FTA only) : Select “All” for scanning all channels including the scrambled ones. It will scan
without CAS channels if you select “FTA only”.
- Network Scan (*No, Yes); You can search channels for another TP using NIT(Network Information
Table) which has the streaming to get other information of another TPs. It expects to take more time
depending on your network situation.
5.8. Step-8 Scanning Channels
It searches channels and shows them with the progress meter on the screen. It may take a few minutes
or more depending on the total number of transponders in all satellites to scan.

22
● If you press the key named Scan under the
Scan *** menu, then it will search
and show TV and radio channels found with
progress meter; it takes from a
few seconds to a few minutes depending on the
Scan Mode.
While you are watching/listening a TV/radio program or a media file, you can raise the Main Menu by
pressing the MENU key. You can select the sub – menu using the ▲►▼◄ keys. The selected sub-
menu becomes highlighted color.
When you wish to return to the previous menu, press the BACK key.
When you wish to return to the live screen, press the MENU key again.
※ Password Protection
Some important menus like the Installation menu are protected by the password, sometimes called
PIN(Personal Identification Number), to avoid modifying by accident. The password is 0000 by default
and you need to change it as your secret numbers at the Change Password menu in the Parental Control
menu and must remember that!
Warning : If you forgot the password you can’t access the protected data or services and may lose all of
your data in the receiver, or you can reset the password at the service center.
6. Menus

23
6.1. Menu Map

24
6.2. Multimedia
Multimedia menu is used for enjoying multimedia contents which are stored in a disk or available on the
network. Recorded contents by PVR function or movie files downloaded from internet can be played.
Photos or music files can be enjoyed also and all the files are treated just like PC.
6.2.1. Internal Disk - can be selected if it is present.
6.2.2. USB1, USB2, USB3 - There are 3 USB 2.0 ports in the receiver (two are at the rear panel and one
is at the front panel). If one or more disks are connected at those USB ports, the USB menu are
activated and can be selected just like internal disk.
- Among 3 USB devices, You can navigate from USB 1 to USB 3 and share the data, files and paste
them as you do in PC. Also. Play the movies/Musics You recorded.
6.2.3. Ethernet – If the receiver is connected to Local Area Network, the menu will be activated and
available number of servers will be displayed.

25
6.3. Accessory
This accessory section is for various applications like small utilities, games.
6.3.1. Games – it may have one or more games to enjoy.
6.4. Preference
6.4.1. Language
☞ Please see the 5.1.Step-1 Language
6.4.2. Schedule
● Number : Task quantity.
● Task - “power” for on/off time of TV.
- “Watch” for watching the selected TV channel.
- “Record” for recording the required TV Program.
- “Watch+Record” for watching & recording TV channel and program.
● Power-on time : After select the task “Power”,
you should select the required power-on time.
● Start time : After select the task “Watch” or
“Record” or “Wat + Rec”, you should select the
required start time.
● Weekdays : Also you can select the required
time period as Once, Everyday, Mon~Fri, and
Sat~Sun.
● CH Type : You can select the TV, Radio and the
last TV with using Yellow button showing all TV /
Radio Channels and the last channel.

26
6.4.3. Time
☞ Please see the 5.2.Step-2 Time
6.4.4. Audio, Video
☞ Please see the 5.3.Step-3 Audio, Video
6.4.5. OSD, Display
● OSD Transparency (0~100%) : OSD menu
transparency value.
● Text Transparency (0~100%) : Text menu
transparency value.
● OSD Font : Selects the font to be used for the
menu. 9 more fonts are copied to the system and
selected in addition to the default fonts.
Windows compatible “True Type Font” can be
used and the fonts can be copied to the receiver
from a USB disk using the Download color key.
● Banner Duration (No, 1, 3, 5, ..., 60 sec) : The information banner will be disappeared after this period
of time.
● Screen Saver (No, 5, 10 min.) : Screen saver will be activated if no video state such a ‘bad signal’,

27
listening a radio channel continues during this period of time to protect your TV screen.
● VFD Luminance (Dark, Normal, Bright) : Luminance of the front VFD display.
6.4.6. Network
● DHCP (Yes, No) : Selects whether automatic IP
configuration(DHCP) is enabled. If your network
(Ethernet, LAN) supports DHCP service or server
like a router or a hub, you can select Yes. If Yes is
selected, the following menu items are disabled and
the values are assigned automatically when you
press the key named Apply.
If No selected, you should set below values
correctly or you may need a help from a person
who knows this kind of networking.
● IP Address
● Subnet Mask
● Gateway
● DNS1, DNS2
● UPnP Server (*Off, On) : Select On if you want to share the contents in a disk on the receiver with the
UPnP clients outside with UPnP (Universal Plug and Play) protocol.
※ Note : It has been set the UPnP server Off as factory default.
● You can set the folder to share by pressing the Blue (UPnP DIR) button.
6.4.7. PVR, Power-Save
● Timeshift : *Manual, Always – Timeshift function
is enabled manually by default. If you set to Always,
it consumes processing power, lifetime of disk, and
electric energy, so we do not recommend this full -
time timeshift by Always mode.
Instant timeshift by the Pause key will enable the
timeshift function, but will be disabled after channel
change or stop key.
● Timeshift Duration : 1, *2, ... 8 hours - When you
select the timeshift duration time (2 hours ; default),
timeshift function automatically starts whenever you change the channel.
● Record Duration : 1, *2, 3, 24 hours as default recording time.
● CAS Recording : Encryted, Decrypted - When recording a scrambled program, you can select to
descramble to play back in the future. "Decrypted" records contents for decrambling by CAS. "Encrypted"
records contents untouched(scrambled), so it will be descrambled by CAS when plays back.

28
● Standby Mode : Sleep,*Shutdown - Default mode is Shutdown to save energy. Please set to
Shutdown mode to minimize the power consumption but it takes more than (10~30 secs) to power on.
● Auto Standby : *No , After 2 STD, After 3 STD - It will go back to Standby Mode if there is No key
operation during the selected time period.
6.4.8. Parental Control
● Lock - Content : controls the maturity rating of
content ( a / v channel or media file). If the content
rating is over or equal to this condition, it will be
blocked and prompt you to enter the password to
enjoy the program.
- Free : All contents can be viewed without the
password protection.
- +7 years : Contents which have more than 6
years of rating are blocked.
- +12 years : Contents which have more than 11 years of rating are blocked.
- +15 years : Contents which have more than 14 years of rating are blocked.
- +18 years : Contents which have more than 17 years of rating are blocked.
● Lock - Pay - TV : No or Locked
● Lock - Multimedia : No or Locked
● Lock - Game : No or Locked
● Lock - CH Manager : No or Locked
● Lock - Installation : No or Locked
● Lock - System : You should enter the password when you turn on the receiver if this lock is Locked.
● Change Password : You can change the current password with new one with this menu.
6.4.9. Conditional Access
For watching / listening the scrambled services,
you may need the proper smartcard with or without
the CAM(Conditional Access Module) which
depends on the service.
Following menu shows the name of each card or
CAM when it was recognized and the sub menu
items are defined by that card or module.
● CI1
● CI2
● Smartcard

29
6.4.10. System Information
You can find the system information like below.
- Brand – TM-TWIN
- Model – TM-TWIN
- Hardware ID : variable
- Software version : variable
- Data Version : variable
- API Version : variable
- OS Version : variable
6.5. Channel Manager
To edit the TV services list, first select the OK key and then pop-up window will be displayed to ask the
password and enter the 4 digit password and the OK key again then the TV services list is displayed and
related menus become enabled.
6.5.1. TV, Radio Channels
In order to delete the selected TV channel(s), select
the Red (Delete) key on the display and then pop-up
window below will be shown asking you to confirm it
and you can delete the channel(s) you want by
pressing the OK key.
Also you can change the name of channel by using
the Green (Rename) key and if you want to protect
the channel(s) by using the Yellow (Lock) key , the
channel will be secured by adding mark on the
channel list.
Also you can remove the channel you selected to
the other display of list by using the Blue (Move) key
on the display.
6.5.2. Favorite TV / Radio
You can also edit and save your favorite TV channels. There are 9 favorite channel groups (Kids,

30
Education, Sports, Drama, Movie and Shopping)
and also select the favorite Radio channels using
radio key on the remote controller (see remotes
map). There are 6 groups (Classic, Pop, Jazz, Hip
Hop, Rock, and Wrap).
6.5.3. Backup Channel Data
☞ Please see the 6.6.7 System Service.
- You can also move / copy / paste all channel data into internal Disk and USB devices
6.5.4. Restore Channel Data
☞ Please see the 6.6.7 System Service.
6.5.5. Delete All Channels
☞ Please see the 6.6.7 System Service.
6.6. Installation
6.6.1. Satellite Scan
☞ Please see the 5.7.Step-7 Satellite Scan.
6.6.2. Antenna Setup
☞ Please see the 5.6 Step-6 Antenna Setup

31
6.6.3. Motor Antenna
If there are two Motor Antenna mode DiSEqC1.2 or USALS in your system above, Select below.
● Positioner Name(DiSEqC motor setup).
● TP name.
● My Longitude.
● My Latitude.
● DiSEqC 1,2 : Save Position, Recalculate Position.
● USALS : Goto X, Goto Reference.
● Cancel Limit.
● East - Limit – West
● East – Move –West
6.6.4. Satellite Selection
☞ Please see the 5.5 Step-5 Satellite Selection
6.6.5. Antenna Connection
☞Please see the 5.4 Step-4 Antenna Connection
※ LNB(Low Noise Block) is usually located at the
Satellite dish antenna. If you are unsure, do NOT
change the default settings).
6.6.6. System Service
☞ The system has following software components in the flash memory and you can update with new
one selectively from an USB disk. They can be backuped to/restored from an USB disk.

32
- Main Firmware is the core GUI program you are
enjoying.
- Channel Data includes information of satellites,
transponders and channels.
● Update Firmware from Disk : You can click the selected USB disk which includes new firmware and
then, please follow up the direction on the screen.
● Update Firmware from Network (Auto, Manual) : When you click OK button, it will connect the file
server connected to the internet and show the pop up the list of the firmware files and you can select the
latest firmware for updating or any version of firmware in the list.
Pop-up window will be displayed when you select the firmware in the list and the downloading firmware
will be started by select the Red (Apply) button.
While updating, also the display indicates the sign with " Firmware update is in progress"
Finally, Your confirmation is needed whether you want to get update or not.

33
● Backup Channel Data from Disk
: Same as the method of update firmware from Disk above.
● Restore Channel Data from Disk
● Format Internal Disk : It will initiate the format
when you install new HDD or when you try to re-
format with the existing internal disk in the STB.
※ Warning : It may be causing to lose all or
some data while doing this .
● Delete All Channels : deletes all channels.
※ Warning : if you do this, you should rescan
channels to enjoy in the Satellite Scan menu but it
may be difficult to you if you are not familiar with.
● Factory Reset : erase all data changed by users and resets to the factory default settings.
※ Warning : if you do this, you should reinstall many things to enjoy in the Installation menu but it may
be difficult to you if you are not familiar with. You may do that using the Easy Installation menu.
6.6.7. Easy Installation
Please see the 5. Initial / Easy Installation

34
7.1. Specifications
Satellite Front-End
Input Connector
F-Type, IEC 169-24, Female x 2
Loop-through Connector
F-Type, IEC 169-24, Female
Frequency Range
950MHz to 2150MHz
RF Input Level
-25dBm to -75dBm
LNB Power & Polarization
Vertical: +13V (+14V at high voltage)
Horizontal: +18V (+19V at high voltage)
Current: Max. 500mA (Overload protection)
22KHz Tone
Frequency : 22KHz, +/- 4KHz
Amplitude: 0.7V, +/- 0.2V
DiSEqC Control
Version 1.0, 1.2, USALS compatible
Demodulation
QPSK, 8PSK
Input Symbol Rate
DVB-S : 1-45 MBaud
DVB-S2 : 5-30 MBaud (QPSK), 2-30 MBaud (8PSK)
FEC Mode
DVB-S : 1/2, 3/5, 2/3, 3/4, 4/5, 5/6, 7/8, 8/9, 9/10
DVB-S2 : 3/5, 2/3, 3/4, 4/5, 5/6, 8/9, 9/10
RF Modulator
RF-Connector
75ohm IEC169-2, Male / Female
Frequency
470MHz to 860MHz
Output Channel
CH 21~CH 69 for the Demodulator
TV Standard
PAL B/G/I/D/K Selectable by Menu Setting
Audio Output
Mono with Volume Control
Preset Channel
CH 40, Software changeable by Menu screen
7. Appendix

35
System Resource
Main Processor
Broadcom BCM7335 HD PVR Satellite SystemOn-Chip
Flash Memory
8MByte (NOR)
2Gbit (NAND)
DDR2 RAM
3Gbit
Storage Interface
SATA
For Internal HDD, SATA-2 ( 3.0 Gb/s)
USB
3 Port (5V/1500mA Max), Front ×1, Rear ×2
Host USB 2.0 compliant
Data In / Out
RS-232
D-SUB 9-Pin, Male Type
Ethernet
RJ-45, 10/100 BASE-T
Modem
RJ-11, Soft Modem (Optional)
Video In / Out
SCART
TV SCART (CVBS, S-Video, RGB)
VCR SCART (CVBS, S-Video)
Composite Video Out
CVBS (RCA Type)
Component Video Out
YPbPr (RCA Type)
HDMI
HDCP 1.2
Audio Out
SCART
TV / VCR SCART
RCA Type
Left / Right
SPDIF
Optical (Shutter Type)
RF Modulator

36
Conditional Access System
Common Interface Slots
x2
Smart Card Reader
x1
Front Panel
Display
5×7 Dot, 12 Digit, VFD
Buttons
POWER , MENU , OK , BACK, CH-,CH+,VOL+, VOL-
IR Receiver
x1
Power Supply
Input Voltage
AC 90-250V (Free voltage), SMPS
Power Consumption
Operation - 60W Max.
Standby - 1W Max.
Operating Temperature
0 to+45 Degrees
Physical Specification
Size (Width×Height ×Depth)
340 × 68 × 270 mm
Weight(Net)
2.8 Kg
Accessory
Remote Control Unit
x1
User’s Manual
x1
Guarantee Coupon
x1
HDMI Cable
x1
Power Code
x1
Batteries
AAA Size × 2

37
7.2. Trouble Shooting
Problem
Solution
No Display on the front panel or
No power supply
Check the power cable is plugged into the power socket
No Picture
Check the dish and adjust it.
Check the cable connection and correct it.
Push the TVOUT button repeatedly on
remote controller for proper TV resolution
Poor picture quality
Check the signal level
No Sound
Check the volume level of the TV and receiver
Check the mute status of TV and receiver
Check the cable connection and correct
Remote Control unit does not work
Replace the batteries
Aim the remote control unit directly to the receiver
Checking that nothing blocks the front panel
Service is not running or scrambled
Check the Conditional Access Module and
smartcard are appropriate for the selected service
Check the Conditional Access Module and
smartcard are correctly inserted
No signal on the screen
Check the signal strength and the signal quality
in the menu
Check the LNB and replace the LNB if necessary
Check the LNB cable
Check the Dish and adjust it
Tuner Defective Check
Go to the Optional and select system information
You have forgotten your secret PIN
code
Contact your service provider
38
7.3. Brand Codes for Universal RCU
Brand Name
Code
Brand Name
Code
A.R.SYSTEMS
8644
7213
6896
5090
ALBA
8644
3840
6896
8060
7014
7647
5553
7287
4530
ACCENT
7647
8644
6896
3637
5355
7384
4016
4469
ACER
3857
5531
5605
6230
6812
ACTION
4523
5510
3637
4648
7733
5119
4925
3637
ADCOM
4884
4648
ADL
7855
ALFA
4648
ADMIRAL
3193
2438
5553
5605
ALKOS
6482
3488
3637
4648
ALLSTAR
8644
6896
4648
ADVENTURA
5874
ALL-TEL
4677
ADVENTURI
5874
AMERICAN HIGH
5510
ADYSON
4469
4523
4648
AMERICANA
5510
AEA
8644
6896
AMPLIVISION
7287
AEG
5952
6305
5319
AMSTRAD
7647
8568
3488
4530
AGASHI
4469
3488
4016
8644
6896
5739
AGB
8568
6764
8377
3840
3451
AIKO
7647
8644
6896
4469
7066
3637
4530
4530
6482
5739
ANAM
8644
6896
7647
4526
3350
3518
3488
3637
ANAMNATIONAL
8644
6896
4526
AIM
8644
6764
6896
3036
ANDERSSON
5319
7660
7910
8435
8484
ANGLO
7647
3488
3637
AIWA
5448
7733
6736
ANITECH
7647
3488
8644
6896
AKAI
3350
7910
4530
3011
5896
4523
3637
4648
8644
5739
6669
3518
ANSONIC
7287
8644
6896
7647
6482
7647
3036
4016
5355
5090
5605
2620
2429
8060
5605
8568
5531
4917
3637
6381
2810
6896
4783
AOC
4523
4648
8020
8394
4469
3488
APOLLO
4659
5393
2796
6305
3840
ARCAM
4469
7733
4659
3451
5905
ARCENCIEL
7430
4925
4523
3802
3637
ARDEM
2590
8060
8644
5613
5874
4648
6896
AKASHI
7314
7647
ARISTONA
6896
8644
4648
AKIBA
4016
5896
7014
8644
ART TECH
4648
6896
ARTHURMARTIN
5605
AKIRA
5553
ASA
4819
6092
4265
AKITO
8644
6896
ASBERG
8644
6896
4648
AKURA
8644
6896
5355
6764
ASORA
7647
3637
7647
4016
5896
3488
ASTRA
8644
6896
3637
8060
7066
3637
4648
ASUKA
4016
4469
3488
5896
ALARON
4469
ATD
2924

39
Brand Name
Code
Brand Name
Code
ATLANTIC
8644
6896
4469
4648
BEON
8644
6896
5553
4648
ATORI
7647
3637
BERTHEN
5355
ATORO
3637
BEST
7287
AUCHAN
5605
BESTAR
8644
6896
7287
5090
AUDIOSONIC
7647
8644
5090
8033
4648
6896
7430
8060
6381
BESTAR-DAEWOO
5090
7287
3488
4016
2590
BIGSTON
3637
3637
4648
BLACKDIAMOND
5319
8033
3840
6896
AUDIOTON
2590
7287
3488
3637
7837
3036
AUDIOVOX
4648
BLACKSTAR
5531
AUDIOWORLD
2924
BLACKSTRIP
6482
3802
5510
AUTOVOX
5531
BLACKWAY
5896
4016
AVP
7733
BLAUPUNKT
3518
6640
5265
6538
AWA
7507
6812
7647
5090
7839
5186
7014
4849
6764
8644
6896
4469
6812
6305
5620
3488
4698
BLUESKY
8644
8060
3840
6230
3637
5355
6381
2499
6896
AXXENT
7647
4016
5896
7014
7733
AXXON
8060
4156
7361
6685
4648
B&D
7855
BLUESTAR
5896
BAIRD
7430
6127
6982
5301
BONDSTEC
5531
7910
3453
BOOTS
7647
BARCO
5605
BOSCH
7839
BASIC LINE
3637
4648
5090
8644
BPL
8644
6896
5896
5605
5355
6896
7647
BRANDT
4884
7430
4422
3270
4016
5896
7014
6559
6982
3847
3840
BRANDT_ELECTRONIQUE
4422
3270
BAUER
8484
7647
BRENDSTAR
3637
BAUR
7647
6640
5265
3835
BRINKMANN
8644
6896
5355
7350
8644
6896
3518
3350
5553
2590
6736
3637
5874
4648
BRIONVEGA
8644
6896
8377
4648
BEAUMARK
5393
BRIORRYEGA
4648
BEC
4648
BRITANNIA
4469
BECRESE
4523
3802
5874
4648
BROCKWOOD
4523
3802
5874
BEKO
8060
6482
2590
7287
BROKSONIC
4523
3802
5874
8644
5553
3840
6896
BROTHER
3488
6305
6381
7361
4648
BRUNS
2590
BELL & HOWELL
4648
BSR
5605
3350
BELSON
4156
4706
BTC
4016
BENCHMARK-BEAUMA
4523
5510
3637
4648
BUSH
5355
4016
5605
7647
BENNETT
6896
8644
6812
8644
4530
5896
BENQ
8016
7384
2438
5090
7350

40
Brand Name
Code
Brand Name
Code
BUSH
3488
3350
3840
6230
COLORTYME
5510
4648
7910
5952
5905
2924
COMBITECH
7733
6896
8060
5832
7733
COMPUTRON
3637
5453
3802
4648
CONCORDE
7647
3637
CAMPLE
4523
3802
5874
CONDOR
8644
6896
7287
4469
CANDLE
4523
7647
5896
5531
5553
CANTON
4016
2620
5605
3488
3637
CAPEHART
4523
3802
4648
4648
CAPSONIC
3488
CONIA
3491
7837
4706
8033
CARAD
2696
8644
6896
5355
CONIC
4523
3802
4648
3840
CONRAC
7361
CARENA
7014
8644
6896
CONRAD
8644
6896
CARREFOUR
6812
4265
8644
6896
CONTEC
4469
7647
7507
6812
4648
3488
8644
6896
3802
CARVER
4849
4648
3637
CASCADE
7647
8644
6896
CONTINENTALEDISON
7430
4422
6230
CASIO
8644
6896
5605
4648
CORONADO
4523
CATHAY
8644
6896
COSMEL
7647
8644
6896
3637
CCE
8644
6896
CRAIG
4648
CELESTIAL
6498
8033
7837
CROSLEY
5531
4752
6634
5605
CENTREX
7046
5397
3802
5874
4648
CENTRUM
3840
CROWN
7647
5716
7287
2590
CENTURION
8644
6896
4648
8644
6896
6230
8060
CENTURY
5531
6305
6381
5553
7910
CGE
4752
6634
5553
5531
4638
6559
3840
4523
7287
5605
3637
3637
4648
CGM
3637
CRYSTAL
4648
CIE
3637
CSELECTRONICS
4469
4016
5531
CIHAN
4648
CTC
5531
CIMLINE
7647
4016
3637
CTX
8016
CINEX
3451
5952
CURTIS MATHES
4523
3802
5510
4648
CIRCUIT CITY
4523
3802
5874
3193
CITIZEN
4523
5510
4648
CYBERTRON
4016
3802
CITY
7647
3637
CYTRONIX
3191
CLARIVOX
5553
8644
6896
4265
DAEWOO
5295
5090
2499
4874
CLATRONIC
8644
7287
4530
8060
3876
8644
6896
7647
4016
3488
6896
5531
4469
4016
6286
7733
7647
3451
6305
5319
3118
2016
3620
4677
3637
4523
3637
4648
CLAYTON
3840
DAICHI
3637
CMS
4469
DAINICHI
4016
4469
COBOLT
5397
DAITSU
4201

41
Brand Name
Code
Brand Name
Code
DANSAI
8644
6896
3488
6482
DREAMVISION
8561
4469
7647
6812
7910
DSE
6641
5952
8033
4523
DTS
7647
3637
DANSETTE
6764
DUAL
6982
7350
8644
6896
DANTAX
7287
2590
8060
6305
7213
3158
5605
6286
6381
7733
8394
7660
3840
4648
DATSURA
7910
3637
DAWA
7647
8644
6896
4648
DUMONT
4265
4523
3802
5874
DAYTEK
2924
4979
8435
4698
DUNAI
5605
DAYTON
4979
DURABRAND
8644
4917
6896
DAYTRON
7647
5090
8644
6896
DUX
8644
6896
4523
3637
D-VISION
8644
7066
6896
DEC
4167
7314
5397
DVX
5397
DECCA
8568
8644
6896
6286
DYNAMIC
3637
7733
4648
DYNATECH
4523
3802
5874
DEGRAAF
7910
5605
4783
2438
DYNATRON
8644
6896
DEITRON
8644
6896
5090
4016
EASYLIVING
4596
5905
DENKO
3488
EATON
5510
DENVER
8644
6896
6305
4485
ECCO
2335
8435
8299
3637
ECR
3802
DER
6127
EDISON-MINERVA
6230
DESMET
8644
6896
7647
3637
ELBE
3444
8377
7287
5605
4648
8644
6896
4016
3518
DIAMANT
8644
6896
2620
2696
8568
3350
DIAMOND
3488
2924
7647
4777
ELBE-SHARP
8568
4469
4530
7314
8033
ELBIT
4648
3637
ELCIT
5531
8568
5605
DIGATRON
8644
6896
ELECS
4648
DIGIHOME
7660
ELECTRATUNE
4523
DIGILINE
8644
6896
4819
5355
ELECTRO TECH
3637
DIGILOGIC
8644
6896
ELECTROBRAND
5874
DIGITEX
8033
ELECTROHOME
4523
3802
5874
DIGITOR
8644
6896
6641
ELECTRONIKA
4648
DIGIVISION
3350
ELEKTA
7647
8644
6896
3488
DIGIX
3118
5896
3637
DIK
8644
6896
ELFUNK
3573
3840
DIXI
7647
8644
6896
5531
ELG
8644
6896
3637
4648
ELIN
4469
8644
6896
4819
DL
5397
7046
8644
8299
4783
3350
5605
7647
4677
3637
4648
DOMEOS
5355
ELITE
4016
8644
6896
4523
DOMLAND
3158
3802
5510
4648

42
Brand Name
Code
Brand Name
Code
ELTA
7647
3488
4469
3637
ELITE
4016
8644
6896
4523
EMCO
5531
3802
5510
4648
EMERSON
8060
5393
5531
8644
EMCO
5531
6896
4530
4265
5896
EMERSON
8060
5393
5531
8644
3350
2499
2590
7287
6896
4530
4265
5896
5605
5355
4523
3802
3350
2499
2590
7287
5874
5605
5355
4523
3802
EMPEROR
5896
5874
ENZER
3036
EMPEROR
5896
EON
3802
5510
ENZER
3036
ERRES
8644
6896
4648
EON
3802
5510
ESC
8644
6896
ERRES
8644
6896
4648
EST?LE
5605
ESC
8644
6896
ETRON
4709
8644
6896
7647
EST?LE
5605
5605
8033
3637
ETRON
4709
8644
6896
7647
EUROFEEL
3488
5605
8033
3637
DYNATECH
4523
3802
5874
EUROFEEL
3488
DYNATRON
8644
6896
EUROLINE
8644
EASYLIVING
4596
5905
EUROMAN
4469
3488
8644
6896
EATON
5510
7287
ECCO
2335
8435
EUROMANN
4648
ECR
3802
EUROPA
8644
6896
EDISON-MINERVA
6230
EUROPHON
8644
8568
5605
6896
ELBE
3444
8377
7287
5605
5531
4469
4648
8644
6896
4016
3518
EVESHAM
4596
2620
2696
8568
3350
EXCEL
8644
6896
ELBE-SHARP
8568
EXPERT
5605
ELBIT
4648
EXQUISIT
8644
6896
5531
ELCIT
5531
8568
5605
FAGOR
8644
6896
ELECS
4648
FAIRTEC
4156
ELECTRATUNE
4523
FAMILYLIFE
8644
6896
ELECTRO TECH
3637
FAST
3634
ELECTROBRAND
5874
FENNER
5090
7647
3637
ELECTROHOME
4523
3802
5874
FERGUSON
5301
4884
4422
3270
ELECTRONIKA
4648
6127
7430
3847
8644
ELEKTA
7647
8644
6896
3488
6896
6482
6982
4638
5896
3637
5620
3350
4783
5119
ELFUNK
3573
3840
3840
4648
ELG
8644
6896
FIDELIS
3637
ELIN
4469
8644
6896
4819
FIDELITY
5605
3835
2438
8644
4783
3350
5605
7647
6896
4530
6764
6127
3637
4648
4469
3488
7733
3350
ELTA
7647
3488
4469
3637
FILSAL
3637

43
Brand Name
Code
Brand Name
Code
FINLANDIA
7910
6092
4783
3350
GE
6982
5393
5896
3847
5605
2438
4422
6982
4422
7430
3270
4884
FINLUX
4819
8644
6896
8060
GEANTCASINO
5605
6092
5605
8568
6381
GEC
5605
3350
8644
8568
4265
2620
8394
6753
6896
8020
5952
4659
5553
GELOSO
5531
7647
2438
5605
6305
7361
3637
4648
5090
3637
FIRSTLINE
8644
6896
5090
5355
8060
5605
7647
4469
GEMSOUND
3637
5531
2499
2620
7910
GENERAL
7430
4422
3637
3350
3840
4156
7361
GENERAL TECHNIC
3637
7647
6685
5319
3637
4648
GENERALELECTRIC
6982
4422
FISHER
6812
7910
7287
3350
GENESIS
7647
8644
6896
5605
3802
GENEXXA
4016
8644
6896
6764
FLINT
8644
6896
2696
4016
5605
7647
4648
7014
3488
4648
GERICOM
4677
3191
7855
3118
FORCE
7660
GITEM
4648
FORGESTONE
6127
GM
3637
FORMENTI
5605
8644
6896
2590
GMG
3637
4469
4648
GOLDFUNK
5355
FORMENTI-PHOENIX
4469
GOLDHAND
4469
3637
FORTRESS
3193
4523
3802
GOLDSTAR
8644
7647
7287
4709
FRABA
8644
6896
7287
2796
5393
5531
4469
FRIAC
7647
8644
6896
7287
6896
5605
3350
7430
4874
2696
2438
6305
8060
6381
FRONTECH
5531
3488
2438
7647
7014
4523
5510
4648
5605
3637
GOODING
6230
FUJIMARO
4677
GOODMANS
5295
5905
3840
8644
FUJITSU
5605
7647
7213
8644
4874
6896
8060
5355
6896
3350
8360
4523
2499
5090
6812
3488
3802
5874
8568
7647
6230
4530
FUJITSUGENERAL
7647
5605
6982
6482
8020
3847
FUJITSUSIEMENS
3191
5905
5319
3270
4016
7733
3876
FUNAI
5355
3488
6764
4523
5832
3118
6948
8299
3802
5874
4698
3637
4648
FURICHI
7314
GORENJE
7287
FUTRONIC
3488
4167
7314
GPM
4016
3637
FUTURE
8644
6896
GRADIENTE
4638
4849
8644
6896
GALAXI
8644
6896
3350
5605
GRADIN
3637
4648
GALAXIS
7287
5553
8644
6896
GRAETZ
8060
3350
4530
5605
GALERIA
7647
3637
8644
6559
6896
5319
GBC
5605
7647
5090
4016
GRANPRIX
3451
2438
3637
GRENADIER
3637

44
Brand Name
Code
Brand Name
Code
GRANADA
8644
6896
3001
5620
HCM
7647
6764
8644
6896
4659
3270
3847
5605
4016
5553
5896
3488
7910
6812
6559
8568
3637
2438
3952
6982
4783
HEMA
7647
4648
HICON
2519
GRANDIN
8644
6896
7647
5605
HIFIVOX
7430
5090
5896
4016
7014
HIGASHI
4469
2696
8060
6381
5355
HIGHLINE
3488
8644
6896
3840
4677
4156
3118
HIKONA
4016
GRONIC
5605
HILINE
3637
GRUNDIG
5265
4679
6640
3518
HINARI
7910
8644
6896
7647
8435
6896
8299
7647
4016
6812
5605
7384
4265
6230
8644
5119
5119
6230
3488
7733
6812
7287
4925
7733
3802
3637
4648
6948
5393
4698
6982
HISAWA
5896
4016
7014
2696
GRUNKEL
5319
7733
8060
GTT
3637
HISENSE
6685
7910
H&B
7361
HITACHI
3952
6069
4889
6812
HAAZ
8435
6896
7430
2438
4783
HAIER
2924
3488
5620
4659
5605
6982
HALIFAX
3488
4469
6619
5295
7040
5393
HALLMARK
4523
3802
5874
8568
6972
4874
8644
HAMMERSTEIN
3488
6286
4819
6753
4737
HAMPTON
4469
3350
3835
8020
3840
HANIMEX
4016
7733
8374
7660
3802
5874
HANSEATIC
8644
6896
4874
7350
4648
5605
3350
5896
3158
HITACHIFUJIAN
5620
3952
5295
7287
3876
7647
HITSU
7647
2696
7014
4016
7361
2590
3637
4648
HMV
6127
2796
8060
HOHER
8060
5952
4677
HANTAREX
7647
8644
6896
8568
HOMEELECTRONICS
6305
3637
4648
HORIZONT
4648
HANTOR
8644
6896
HORNYPHON
8644
6896
4648
HARLEY
DAVIDSON
4523
3802
5510
5874
HOSHAI
4016
7014
5896
HARRAD
4523
3802
5874
HUANYU
5090
4469
HARSPER
4677
HUGOSON
3094
7855
HARVARD
4523
3802
5874
HYGASHI
4469
HARWA
2335
3453
7789
HYPER
7647
4469
5531
3637
HARWOOD
7647
6764
8644
6896
4648
6230
HYPERSONIC
3350
HAUPPAUGE
8644
6896
HYUNDAI
8644
4677
6896
8435
HEATHKIT
5874
4648
7314
3036
3620
5952
HEDZON
6896
8644
IBERIA
8644
6896

45
Brand Name
Code
Brand Name
Code
HYPSON
8644
6896
8060
6381
IRRADIO
7647
8644
6896
4016
3488
5896
7014
7733
5531
4530
3637
4648
3840
5355
2590
3637
IST
4648
4648
ISUKAI
4016
8644
6896
5896
ICE
3488
8644
4530
7647
7014
4648
6896
4016
4469
3637
ITL
3637
4648
ITS
8644
4530
4016
5896
ICES
4016
4469
3488
4469
7647
6896
ICT
8644
6286
6896
3637
IISONIC
4698
ITT
5605
8020
3350
4659
IIYAMA
7855
3094
4783
6127
6092
6559
IMA
4523
3802
5874
7910
2696
IMPERIAL
8644
5605
7287
4752
ITTNOKIA
3350
4783
5605
4659
6634
6896
2620
3350
6305
2696
8394
2438
5553
5531
4648
8020
6092
7910
6559
INDIANA
8644
6896
4648
ITV
3488
8644
6896
5531
INFINITY
4648
5090
INFOCUS
3251
JBL
4648
INGELEN
6230
2696
8060
5605
JCB
5874
3350
JDV
7066
INGERSOLL
7647
3637
JEAN
6812
INNOHIT
7647
8644
6896
4016
JEC
6482
3637
4648
5896
5319
JETPOINT
5510
4648
8568
5531
JMB
8644
4874
5295
5090
INNOVATION
7350
8644
6896
6896
5119
7733
INNOWERT
4677
3191
JOCEL
5716
INOTECH
2335
8033
JUBILEE
6896
INTERACTIVE
8644
6896
3835
7839
JUMBOTROIC
4648
5605
3350
7287
7430
JVC
4638
6812
6127
4530
2620
4016
6305
5553
3193
INTERBUY
7647
8644
3488
5531
4526
3802
4648
3835
6896
3637
KAISER
4648
INTERDISCOUNT
4648
KAISUI
4016
5896
8644
6896
INTERFUNK
8644
6896
3835
7839
4469
7014
7647
3637
5605
3350
7287
7430
4648
5531
6538
4648
KAMBROOK
2796
INTERNAL
8644
6896
4874
5090
KAMP
4469
2499
KAPSCH
5605
3350
INTERNATIONAL
4469
KARCHER
8644
6896
7287
2696
INTERVISION
5896
7014
8644
4530
5605
5896
3488
5453
2796
7350
2590
7287
8060
5952
6305
3637
3488
5531
7647
6896
4648
3158
6230
4016
5605
KATHREIN
6896
8644

46
Brand Name
Code
Brand Name
Code
KAWA
4530
LEADER
7647
3637
KAWASHO
4469
LECSON
8644
6896
KBARISTOCRAT
5605
LEGEND
7647
3637
KENDO
2696
8644
6896
5605
LEMAIR
2620
7350
3835
7287
2796
LENCO
8644
7647
5605
5090
2438
2620
5531
8377
6896
8299
3840
3637
3451
3840
4917
2590
4648
3637
4648
LENOIR
3637
7647
KENDWOOD
4523
LESA
5531
KENNEDY
5605
3444
LEVISAUSTRIA
8644
6896
KENNEX
3840
LEXSOR
3453
KENWOOD
4819
LEYCO
3488
8644
6896
4648
KINGSLEY
4469
LG
8644
5393
7287
7647
KIOTA
4709
3637
7430
2924
6381
8265
KITON
6896
8644
5355
2796
5447
4709
6896
KLH
4523
3802
5874
4156
6944
4312
5531
KLOSS
5510
8060
4469
5605
6305
KNEISSEL
8644
7287
2696
2620
5090
4874
6896
3444
LIESENKOTTER
7839
8644
6896
4648
8377
7733
8644
7839
5186
6896
KOBIC
3637
LIFE
3637
KOBRA
2519
LIFETEC
8644
7647
7350
5090
KOLSTER
8644
6896
5531
4016
5355
3835
3840
6286
4648
6896
4016
3488
4596
KONICHI
7647
3637
8060
KONKA
8644
6896
4530
8060
LIFETEC
3637
4648
5553
4016
8485
8299
LINITRON
4523
3802
3491
4706
LLOYD
4523
3802
3637
5874
KONTAKT
6230
LLOYD'S
4709
7647
KORPEL
8644
6896
4648
LODOS
3840
7660
KORTING
7287
LOEWE
3835
5613
7337
8644
KOSMOS
8644
6896
6896
7287
8377
8568
KOTRON
6764
3488
4648
KOYODA
7647
LOGIK
7507
2924
2335
7647
KTV
4523
3802
5874
6127
3488
4530
4709
KUASHO
4523
4648
3118
7855
3840
KUBA
5605
LOGIX
5355
7350
KUBAELECTRONIC
5605
LUKER
7066
KYOSHU
6764
5553
3488
LUMA
8644
2438
5605
2620
KYOTO
5605
4469
6896
5090
7647
8377
L&SELECTRONIC
4677
8060
3637
4648
LASAT
2590
7287
LUMATRON
2438
8644
6896
8377
LAVIS
3840
8644
5605
5605
3350
3488
5301

47
Brand Name
Code
Brand Name
Code
LUX MAY
4648
8644
7647
6896
MAXIM
7066
5952
LUXOR
5319
2438
8020
6753
MCE
7647
3637
6092
4659
3840
8394
MEDIATOR
8644
6896
4648
3350
7910
4783
5605
MEDION
8644
8060
7361
7350
LXI
5393
4648
2924
7733
3840
4917
M ELECTRONICS
3637
4648
5355
6896
3835
6286
MACYS
4523
3802
5832
4596
3118
3730
MADISON
8644
6896
MEGAS
2696
MAGNADYNE
5531
8568
5605
3637
MEGATRON
5393
4648
MEI
3840
8644
6896
MAGNAFON
4648
8568
4469
5301
MELECTRONIC
6092
8644
3835
7430
MAGNASONIC
4523
3637
4648
2620
5605
4422
6896
MAGNAVOX
8644
6896
6812
7046
6982
5531
4819
5090
3802
4648
5295
3350
3518
5265
MAGNUM
3451
8060
8644
6896
7647
8020
6753
4469
6381
3730
3876
8060
MANDOR
3488
MEMOREX
7647
5393
4526
3637
MANESTH
8644
6896
3488
6482
MEMPHIS
3637
7647
5605
2438
4648
MERCURY
4709
8644
7647
6896
MANHATTAN
8644
6896
5355
3840
3637
4201
5605
5453
MERRITT
4783
3350
5605
MARANTZ
8644
6896
6764
4648
METZ
2769
6975
5313
2410
MARCYS
3802
8644
6896
8299
5355
MARK
8644
6896
4469
5090
5319
5265
6640
3518
7647
8060
6381
4648
3840
7324
MASTER'S
4874
8644
MGA
5393
8644
6896
4016
MASUDA
4016
4530
7647
3488
MICROMAXX
8644
6896
5355
3840
8644
6896
7361
MATSUI
8644
6896
6230
7647
MICROSTAR
7361
5605
8568
6482
7910
MICROTEK
8033
MARK
7507
7384
6812
4530
MIDLAND
4523
5265
3518
3270
8060
MIKOMI
7660
5739
5119
2438
7014
MINATO
8644
6896
7733
3840
3637
4648
MINERVA
6230
6640
5265
4265
MATSUSHITA
4526
3518
8568
5620
MATSUVIAMA
8299
MINOKA
6764
8644
6896
4648
MAVA
4523
MIRROR
5832
MAX_MULTI
4648
MISTRALELECTRONICS
6127
MAX_TIP1
3637
MITSUBISHI
5620
3193
3835
8644
MAX_TIP4
4648
5393
6812
6127
6640
MAXAM
3488
3637
6896
7910
3840
3802
MAXDORF
2335
3637
4648
MAXELL
3637
MITSURIGENERAL
5605

48
Brand Name
Code
Brand Name
Code
MIVAR
7287
4469
4318
8568
NEUFUNK
8644
7647
6896
2696
MONACO
7647
4016
5896
8060
8644
MONITOR
5510
7647
6896
6982
3637
MORGAN'S
8644
6896
4648
MOTOROLA
3193
4648
NICAMAGIC
4469
MTC
7287
3835
5605
4469
NIKKAI
4016
8644
6896
3488
3350
4523
5510
6482
4469
7647
6812
MTLOGIC
8060
6948
4523
4648
MULTIBROADCAST
6127
NIKKEI
8060
MULTITEC
8644
6896
2590
5355
NIKKO
5393
3840
5952
NISSAN
5510
MULTITECH
7647
2438
2590
8644
NOBLEX
3637
7287
6896
4469
5531
NOBLIKO
4265
4469
3488
4523
3802
3637
NOGAMATIC
7430
5874
4648
NOKIA
3350
5605
8020
4783
MURPHY
4469
5605
5090
8394
6305
6092
MUSIKLAND
8644
4016
5531
6896
6753
4659
6559
7910
MYCOM
4698
5393
2696
7430
5510
3637
MYRYAD
6896
8644
4648
NAD
5393
3350
5605
3802
NONAME
4648
NAIKO
8644
7066
6305
6896
NORDMENDE
7430
8060
5397
4422
NAKIMURA
5090
8644
6896
6896
3270
5605
5905
NAMSUNC
3637
3847
6982
5265
8644
NAONIS
2438
5605
4648
NAP
4648
NORFOLK
5605
NARITA
7066
NORMEREL
8644
6896
NAT
3001
NOVABEAM
4648
NATIONAL
3001
4648
NOVAK
8644
6896
NEC
4849
8299
7976
3726
NOVATRONIC
8644
4819
5090
6896
8644
6896
7507
8561
3637
4648
6812
7014
7647
5090
NURNBERG
5605
3350
4874
4638
3876
3637
NU-TEC
7014
2924
3802
5510
O GENTERAL
3637
NECKERMANN
8644
3518
7287
6736
OCEANIC
5605
3350
7910
4659
5553
5531
2620
2438
4783
8020
6538
6896
5605
7839
ODEON
3488
3835
3637
5874
4648
OKANO
7287
8644
6896
3488
NEI
8644
6896
4530
5605
7647
3637
4648
OLIDATA
4698
NEOVIA
4677
4698
OLYMPIC
3637
NESCO
5531
7733
OMEGA
3488
NETSAT
8644
6896
OMNI
7046
5397
2924
NEWWORLD
4016
ONCEAS
3637

49
Brand Name
Code
Brand Name
Code
ONWA
4530
2810
4016
5739
PANASONIC
4526
5620
3001
3350
OPERA
8644
6896
4648
5605
4783
7605
4709
OPTIMUS
4526
2410
8568
8644
6896
OPTONICA
3193
8360
5393
4648
ORAVA
4648
PANAVISION
8644
2620
6896
ORBIT
8644
6896
4648
PANAVOX
3637
ORCOM
4262
PANORMA
3637
ORIENT
3637
PAPOUW
8644
6896
ORION
8644
5119
7384
6896
PATHECINEMA
5605
4469
7287
6764
8568
7733
3118
PATHEMARCONI
7430
8060
7507
7647
3488
PAUSA
7647
3637
3453
3637
5874
4648
PCE/PEC
4523
3802
5510
4523
3802
PENNEY
4523
5510
ORLINE
8644
4016
6896
PERDIO
5605
8644
4469
5896
ORMOND
5355
3840
8644
6896
6896
ORSOWE
8568
PERFEKT
8644
6896
4648
OSAKI
4016
3488
8644
6764
PERFORMANCE
3802
5874
5090
7384
6896
PHILCO
6634
4752
5553
5531
OSIO
8644
6896
5605
7287
8644
6896
OSO
4016
3802
3637
4648
7350
OSUME
6812
4016
8644
6896
PHILEX
6127
5605
OTF
3637
PHILIPS
6896
8644
3518
6127
OTTO VERSAND
3802
3637
5874
7350
6538
8016
3802
5874
3518
3350
7430
3001
6982
5090
3350
7647
6736
6812
3193
3835
4648
5531
7647
5896
6982
PHOCUS
3730
6948
8060
8644
6896
6640
5265
PHOENIX
8644
6896
7287
2590
5605
4469
4648
OVP
4648
PHONOLA
8644
6896
6127
4469
PACE
7733
4648
PACIFIC
8644
6896
6286
8060
PILOT
6896
8644
5716
8435
3840
5119
5510
PAEL
4469
PIONEER
4174
7507
8644
4849
PALLADIUM
7287
8644
2620
8060
3350
7430
5605
4422
5553
6896
5531
7839
6896
8209
7287
6982
6286
3518
6736
6538
2590
3835
4648
7287
5605
7350
2438
4648
2590
PALSONIC
3488
6764
8644
2796
PLANTRON
8644
6896
3488
7647
4709
5553
5453
3453
3637
4648
4016
2924
6896
2335
PLAYSONIC
8060
8644
6559
6381
PANAMA
7647
3488
4469
8644
POLICOM
7430
3350
5605
4265
6896
5531
3637
4752
6634
6640
PANASHIBA
4709
3637
POLYTRON
5896

50
Brand Name
Code
Brand Name
Code
POPPY
7647
3637
QUELLE
6812
5531
4752
7839
PORTLAND
5090
2499
4523
5874
4523
3802
3637
5874
4648
4648
POWERPOINT
6230
8644
6896
2924
QUESTA
6812
3802
PRANDONI-PRINCE
5531
8568
3350
2438
R LINE
4648
PREMIER
7647
3488
RADIALVA
7430
4016
5605
8644
PRESIDENT
7314
6896
4422
PRIMA
7647
3488
6764
7789
RADIO SHACK
4523
4523
3802
5510
3637
RADIOLA
8644
6896
4648
4648
RADIOMARELLI
8568
5531
8644
6896
PRINCESS
2924
3637
RADIOSHACK
8644
6896
5393
PRINSTON
3840
RADIOTONE
7647
8644
6896
7287
PRINZ
3350
3488
3840
3637
4648
PROELCO
4648
5553
6764
3451
5355
PROFEX
7647
5605
3350
2438
RANK
4265
3637
RANKARENA
6812
2810
3036
PROFI
7647
RBM
4265
PROFITRONIC
8644
6896
4648
RCA
4884
3193
3847
3270
PROLINE
8644
6896
4884
5295
6982
3036
5510
2620
4698
REALISTIC
5393
PROSCAN
5510
RECOR
8644
5553
6896
4648
PROSONIC
8644
6896
7287
5090
RECORD
4648
4530
5355
8060
4469
RECTILIGNE
8644
6896
PROTEC
3637
4648
REDIFFUSION
3350
4783
6812
6092
PROTECH
8644
6896
7647
5531
REDSTAR
8644
6896
3488
5553
5355
5896
REFLEX
8644
6896
3840
5355
5605
2590
3840
REGENTE
3637
PROTON
5393
4523
3637
RELISYS
4677
2108
4979
3191
PROVISION
4874
8644
6896
3840
REOC
8060
5295
2499
8060
REVOX
8644
6896
7287
4648
PULSER
4523
5510
3637
4648
REVOX/STUDER
4648
4156
REX
2438
2620
5531
5605
PYE
8644
6896
5090
6764
3488
4648
RFT
7287
3488
8644
6896
PYMI
7647
3637
2590
QTY1
4648
RHAPSODY
4469
QUADRAL
4016
RICE CLUB
5510
QUASAR
5531
4526
4677
7647
RICOH
8644
6896
6634
5186
4265
4819
RINEX
2335
5553
QUELLE
8644
6736
7507
7430
R-LINE
8644
6896
5605
5355
6896
5265
6538
RMB
4523
3835
6640
3518
3350
RODEX
8644
6896
3488
3840
6092
7647
ROSITA
3637

51
Brand Name
Code
Brand Name
Code
ROADSTAR
3840
7647
5553
8644
SANTON
7647
3488
5896
4485
5832
SANYO
7910
3573
6812
7507
6896
8060
5355
4016
5605
8644
5620
6896
3637
7287
6559
4469
7647
ROVER
6812
2108
2590
4849
3802
3637
ROWA
3488
2924
5716
7647
SAVE
8644
6896
4469
8299
8644
6896
SAVILLE
7733
3637
SBR
8644
6896
6127
4648
ROYAL
3637
SCHAUBLORENZ
4783
8060
3350
6305
ROYALLUX
7287
6764
3270
2590
5090
4156
RUKOPIR
6896
8644
SCHNEIDER
6286
8644
6896
7350
RUNCO
5510
3840
5605
3451
8060
SABA
4884
7430
3847
6982
3158
7213
6982
5531
2104
3270
4783
4526
2499
7733
7066
4265
4422
5605
8568
3350
4530
3350
4016
5355
8060
3637
4648
SAGEM
2696
7014
5896
2820
SCOTLAND
5605
2517
SCOTT
4485
5393
4523
3802
SAISHO
8568
7647
7507
5605
5874
3488
4648
SEARS
5393
SAIVOD
8644
7066
6896
5319
SEAWAY
5295
5355
5716
3840
SEELVER
6896
3840
8644
SAKA?
5605
SEG
8644
6896
3840
4917
SAKIO
3637
8377
4469
5319
4016
SAKURA
3637
5355
6230
7647
5605
SAKYNO
7014
2499
3634
8060
3637
SALORA
5605
3350
8568
2438
3488
5295
6812
5531
4783
6559
7910
8020
4523
3802
SALSA
3270
SEI
6736
5605
8568
8644
SAMBERS
8568
6896
SAMPO
4523
SEI-SINUDYNE
8568
6736
8644
6896
SAMSUNG
2517
8299
8644
5393
5874
4648
7910
7350
5605
4884
SEITECH
7855
6896
7736
3193
4495
SELECO
2438
8377
5605
2620
4523
5510
3637
4648
3444
3488
6092
6812
7647
7287
3488
4469
4530
SAMSUX
4523
SEMUA
4523
SANDRA
4469
SENCORA
7647
3637
SANKY
4523
SENTRA
6482
4016
7647
SANSUI
8644
2429
6896
8435
SERINO
2696
7014
4469
3193
4530
2810
7014
6641
SHARP
3193
7138
6812
4638
3036
4523
5510
3637
6127
8568
6538
4174
4648
7409
5319
4523
3802

52
Brand Name
Code
Brand Name
Code
SHINTOM
5874
SONNECLAIR
8644
6896
SHINTOSHI
8644
6896
SONOKO
8644
6896
7647
3488
SHIVAKI
8644
6896
5119
5090
3637
5896
4648
5393
SONOLOR
7910
5605
6736
4783
SHOW
5553
7647
3637
3350
5896
SIAREM
5605
8568
SONTEC
8644
6896
7287
7647
SIEMENS
3518
6640
6538
5265
4648
7839
5186
8644
6896
SONY
6736
2762
7507
6219
3350
3193
4849
4752
5874
SIEMES
4523
4648
3078
6812
8644
6896
SIERA
8644
6896
8299
3802
SIERRA
4648
SOUND&VISION
4016
5090
8644
6896
SIESTA
7287
SOUNDESIGH
4523
3802
5510
5874
SIGMAX
5510
5393
SIGNATURE
5874
SOUNDMASTER
3637
SILMA
4648
SOUNDWAVE
8644
6896
5553
6381
SILVA
8644
6896
4469
3350
SOYEA
2335
3451
3637
SPECRICIAN
4523
4648
SILVASCHNEIDER
5952
SPECTRA
7647
SILVER
6812
8644
7014
3350
SSANGYONG
7647
6896
6381
5605
3802
STAKSONIC
7647
SILVERCREST
3840
8644
6896
STANDARD
8644
6896
3840
4016
SINGER
7647
3011
8644
6896
7647
5090
3637
5531
3444
3270
5605
STARLITE
7647
5605
8644
6896
3637
4648
3488
6764
3637
SINOTEC
2335
STARLUX
3637
SINUDYNE
5605
3350
8568
6736
STENWAY
5896
4016
8644
6896
7733
STERN
5605
2438
3488
2620
SKY
8644
5896
3118
5393
3444
6896
4262
STEVISON
7066
5952
SKYMASTER
4819
STRATO
8644
6896
3488
7647
SKYSONIC
3036
STRONG
5319
7660
3840
8644
SLIDING
4677
3118
6896
SLX
5355
SUNICLINE
8644
6896
SMARAGD
6230
SUNKAI
7384
7014
4016
2696
SNYDER
4648
8644
6896
6230
4677
SOEMTRON
4677
3191
SUNSTAR
4530
8644
6896
7647
SOLAVOX
3350
5605
4783
8644
3488
3637
6896
SUNWATT
7014
SONAWA
4016
SUNWOOD
8644
6896
7647
3637
SONIKO
8644
6896
4648
SONIQ
2519
SUPERLA
8568
4469
SONITRON
7910
7287
6559
SUPERTEC
3637
4648

53
Brand Name
Code
Brand Name
Code
SUPERSONIC
7910
6896
2924
3488
TECHNICS
4526
4648
8484
7014
TECHNILAND
4648
SUPERTECH
7647
8644
6896
4469
TECHNISAT
8644
6896
5605
4201
4016
3637
TECHNISSON
8060
3730
SUPRA
5393
5090
7647
3637
TECHNOSONIC
8644
6896
SUPREMACY
4523
3802
TECHWOOD
5319
5510
5874
SUPREME
5874
TECNIMAGEN
6896
SUSUMU
3270
4016
4422
TECNISON
3637
SUTRON
7647
3637
TEDELEX
5553
6305
3011
7647
SVASA
8484
8435
7910
2924
8299
SWISSLINE
5531
5397
8644
6896
3637
SWISSTEC
4262
3118
TEHNOL
3637
SYC LINE
3637
TEIRON
7647
SYDNEY
4469
TEKNANT
3637
4648
SYLVANIA
4648
TEKNIKA
4523
5510
SYMPHONIC
4523
3802
5874
TEKON
5510
3637
SYSLINE
8644
6896
TELEAVIA
7430
4422
6982
SYTONG
4469
TELECOR
8644
6896
5605
4016
T+A
6975
3158
TANDBERG
2410
2620
7430
8377
TELEFAC
3637
3350
5605
TELEFUNKEN
4884
3847
4752
8299
TANDY
4016
5531
3193
5605
4262
4422
6634
3270
TASHIKO
6812
4849
4469
5605
7430
2924
6982
5716
2438
3802
5301
8644
6896
2590
TATUNG
5952
8644
6896
8568
2104
8033
2707
3491
7507
7733
8016
5905
8060
5952
6092
7837
4156
4648
TELEFUSION
8644
6896
TCM
8060
3730
7361
TELEGAZI
8644
5605
4016
3488
TEAC
2924
3835
8644
4917
6896
5393
7647
6764
5896
TELEMEISTER
8644
6896
3840
6896
5716
5355
TELEOPTA
3637
5553
4849
8060
7660
TELESONIC
8644
6896
7014
8435
3488
2499
TELESTAR
7647
8644
6896
6764
5991
3637
TEAK
3637
TELETECH
8644
6896
5355
7647
TEC
7647
5531
3270
8644
5531
3840
3637
6896
3350
5605
TELETON
5605
6812
2438
3637
3637
TELEVIDEON
5605
4469
TECHICA
4016
TELEVIEW
8644
6896
TECHLINE
8644
6896
5355
4917
TEMPEST
7647
8644
6896
3488
5319
3637
TECHLUX
4485
TENNESSEE
8644
6896
TECHNICA
7066
TENSON
3637
7647

54
Brand Name
Code
Brand Name
Code
TENSAI
4016
8644
6896
7647
TOYODA
7647
4530
3488
4819
5090
4530
2796
TRAKTON
7647
3488
5531
6381
5605
3840
TRANSCONTINENS
5355
3840
8644
6896
3637
4648
2590
TESLA
8644
4648
TRANSCONTINENTS
4677
TESLA ORAVA
4648
TRANSONIC
8644
6896
7014
8299
TEVION
7350
4706
5905
3191
3835
3488
2924
5716
3451
5355
6286
8060
5553
7647
8644
5952
6896
7361
TRANSTEC
4469
3840
4596
3730
TRC
3637
TEXET
5090
7647
4469
4016
TREVI
3637
THOMAS
4523
5510
3637
5874
TRIAD
8644
6896
4016
4648
4648
TRIDENT
8568
THOMSON
4884
3847
6982
4422
TRILUX
4648
7430
3270
8644
6896
TRISTAR
3488
4016
6127
4469
TRIUMPH
8568
6092
6896
8644
THORN
5620
6127
7430
5301
TRIVISION
3637
8644
6896
7507
3270
TSOSCHI
5896
3952
6982
3350
6736
TVTEXT95
6896
3835
6812
5090
6482
UHER
8644
6896
5090
5553
4752
6634
4874
6640
2590
7287
8020
4648
4265
3802
ULTRAVOX
5090
5531
4469
5605
THORNFERGUSON
5620
7430
6127
3350
8644
6896
3270
4874
5301
6482
UMA
4648
TINY
3453
7789
5393
5510
UNICLINE
8644
6896
4659
7014
TOBISHI
4016
UNIMOR
4648
TOBO
3637
UNITED
8060
8644
6381
6896
TOKAI
8644
6896
5355
5605
7733
3840
8299
7066
5090
7647
3840
4648
UNIVERSAL
8644
6896
TOKAIDO
3840
UNIVERSUM
6092
4819
5265
4659
TOKYO
4469
6482
5510
2620
4752
7839
5186
TOMASHI
5896
4016
6640
3350
5531
6753
TONGTEL
7046
8299
6736
5355
7430
8377
TOPLINE
3840
5355
8020
7287
6538
5553
TOSHIBA
4679
4081
6482
3730
8394
7647
6634
3634
7733
7647
2924
8644
7507
8644
3835
6812
6812
4265
8060
7430
3840
4917
4849
5319
3251
5319
4925
5952
4265
5605
3488
6896
4940
5265
3518
2517
7660
2517
3637
4648
5447
4526
8561
3802
UNIVOX
8644
6896
5605
5510
URANYA
3637
TOSONIC
4523
5510
UTAX
5605
TOTEVISION
4523
VANGUARD
3637

55
Brand Name
Code
Brand Name
Code
V7VIDEOSEVEN
5991
5393
3118
4698
WEGAVOX
7647
8644
6896
3637
7855
4648
VECO
3637
WELLTECH
8060
VESTEL
8644
5605
6896
5355
WELTBLICK
8644
6896
4648
3840
5319
4648
WESTON
8644
6896
VEXA
7647
8644
6896
3637
WHARFEDALE
8644
6641
7350
2707
4648
6896
5952
VICTOR
4638
WHITE
WESTINGHOUSE
4648
4469
8644
6896
VIDEO SYSTEM
4648
2499
VIDEOLOGIC
4016
4469
WINDSOR
5355
3840
VIDEOLOGIQUE
4469
4016
WINDSTAR
5896
VIDEOSAT
5531
WINDYSAM
6896
VIDEOSYSTEM
8644
6896
WINSTON
3637
4648
VIDEOTECHNIC
4469
5090
WINTEL
8060
VIDEOTON
5605
WINTERNITZ
3637
VIDION
3637
WORLD-OF-VISION
3118
3094
4677
3730
VIDTECH
6812
5393
3191
2108
7855
VIEWSONIC
5991
WORLDVIEW
7014
3637
4648
VISIOLA
4469
XENIUS
5295
VISION
8644
3488
6896
3637
XLOGIC
2924
7314
VISON
4648
XORO
3453
7855
VISTAR
3350
XRYPTON
8644
6896
VOCSON
4648
X-VIEW
4156
VORTEC
8644
6896
YAMAHA
4526
8374
VOTREC
4648
YAMISHI
5896
7014
4016
8644
VOXSON
8644
6896
2438
5553
6896
5605
5393
YOKAN
8644
6896
WALTHAM
5553
4422
8644
6896
YOKO
8644
6896
4016
3488
5355
7430
3840
5605
7647
7287
6559
4469
5119
5531
3637
4648
WARDS
4648
YORK
4648
WATSON
3840
4596
8644
6896
YORX
4016
5605
7647
5355
4016
ZANUSSI
2438
4698
7839
3637
4648
ZENITH
2499
5874
4648
7350
3158
7733
4917
ZENOR
6559
WATTRADIO
5605
4469
ZX
7733
WEGA
8644
6896
6812
3802
 Loading...