


USER’S MANUAL
Manuel D’utilisation
High Definition Digital Satellite
Television Receiver and Recorder
Démodulateur & Enregistreur
de Télévision Numérique
de Haute Définition
TM-F3/5
Your Digital Partner for Life

2
Contents
Easy Installation guide --------------------------------------------- 3
1. Introduction ------------------------------------------------------- 6
1.1 Overview -------------------------------------------------------- 6
1.2 Main Features --------------------------------------------------- 6
2. Safety Precautions ----------------------------------------------- 7
2.1 safety ------------------------------------------------------------ 7
2.2 Precautions ------------------- ---------------------------------- 8
3. Points to Check before Use -------------------------------------- 9
3.1 Accessories ------------------------------------------------------ 9
4. Controls/Functions ----------------------------------------------- 10
4.1 Front Panel ------------------------------------------------------ 10
4.2 Rear Panel ------------------------------------------------------ 11
4.3 Remote Controller ---------------------------------------------- 12
5. How to Connect -------------------------------------------------- 14
6. Operation --------------------------------------------------------- 15
6.1 Getting Started ------------------------------------------------- 15
6.2 System Setting ------------------------------------------------- 26
6.3 Channels ------------------------------------------------------- 35
6.4 Electronic Program Guide -------------------------------------- 42
6.5 Entertainment --------------------------------------------------- 45
6.6 USB/External Device -------------------------------------------- 48
6.7 System Information --------------------------------------------- 54
6.8 Conditional Access System ------------------------------------- 55
6.9 DVR ------------------------------------------------------------ 57
7. Troubleshooting --------------------------------------------------- 64
8. Specifications ----------------------------------------------------- 65
3
English
Easy Installation Guide
4
Easy Installation Guide
5
English
Easy Installation Guide

6
1. Introduction
1.1 Overview
This satellite receiver is designed for the reception of free-to-air and encrypted channels.
Depending on your location, enjoy the rich choice of up to 10,000 different channels
broadcasting a large range of programs: culture, sports, cinema, news, events, etc.
This receiver is assembled with highly qualified electronic parts.
1.2 Main Features
▪ Video Resolution : 1080p / 1080i / 720p / 576p / 576i
▪ DVR Ready via USB External Mass Data Storage Device
▪ Time Shift, Record & Playback
▪ USB 2.0 Host for MP3 Playback, JPEG Viewing & Firmware Update
▪ 10,000 Programmable Channels
▪ DVB-S, DVB-S2 Compliant
▪ HDMI Output
▪ On-screen display with true color full resolution
▪ Advanced Blind Scan
▪ Auto & Manual Channel Search
▪ Dolby Digital Output
▪ Channel Sorting by Alphabet, Transponder or CAS
▪ 16 Favorite Channel Groups
▪ OSD in 16 Languages
▪ Multi Picture Display and Zoom
▪ 16:9 Full Screen, 4:3 Letterbox & Full Screen
▪ DiSEqC 1.2 and USALS Compatible
▪ Data Transfer Between Units
▪ Extended Electronic Program Guide (EPG) and program reservation through EPG
▪ Teletext by OSD/VBI (Vertical Blanking Interval)
▪ Auto Voltage (AC 100 - 250V) SMPS
▪ High speed software upgrade via USB 2.0
▪ Parental Lock/ Installation Lock / Receiver Lock / Channel Lock / Lock Channel Confirm
▪ Video color adjustment function.
▪ Manufactured under license from Dolby Laboratories.
“Dolby” and the double-D Symbol are trademarks of Dolby Laboratories.
✽ DiSEqC is a trademark of EUTELSAT
7
English
2. Safety Precautions
2.1 Safet y
l Be sure to read this user’s manual before
starting the operation of the unit.
l Do not touch the power cord with wet hands
as it may cause electric shock.
l Never open the cover. It is very dangerous
to touch the inside of the unit due to possible
electric shock.
l Place the unit in a well ventilated and
no-heat environment.
l When you do not use this unit for a long
time, make sure that power cord is pulled out
from the outlet. Also do not use a damaged
power cord as it may cause fire or electric shock.
l A professional installation is required.
If reception is interrupted, contact
your local service centre.
8
2. Safety Precautions
2.2 Precautions
l Install the unit horizontally. An uneven
installation may cause the unit to be damaged.
l Do not put heavy items such as a TV set on
the unit. That may damage the unit.
l Do not leave the unit where the water drops
or splashes.
l Do not put water holding items such as vases
on the unit.
l Do not install the unit:
▪ Where it is subject to vibrations
▪ Where it is exposed to direct sunlight
▪ Where there is humidity
▪ Where the temperature is too high or too low
▪ Where there is no ventilation
l Moving the unit to a hot area from a cold
one will cause condensation. Do not operate
the unit for one or two hours or until it has
dried completely.
When installing the unit
9
English
✽ This unit supports DiSEqC 1.2 and can work with a compatible antenna positioner.
Ask your dealer for information.
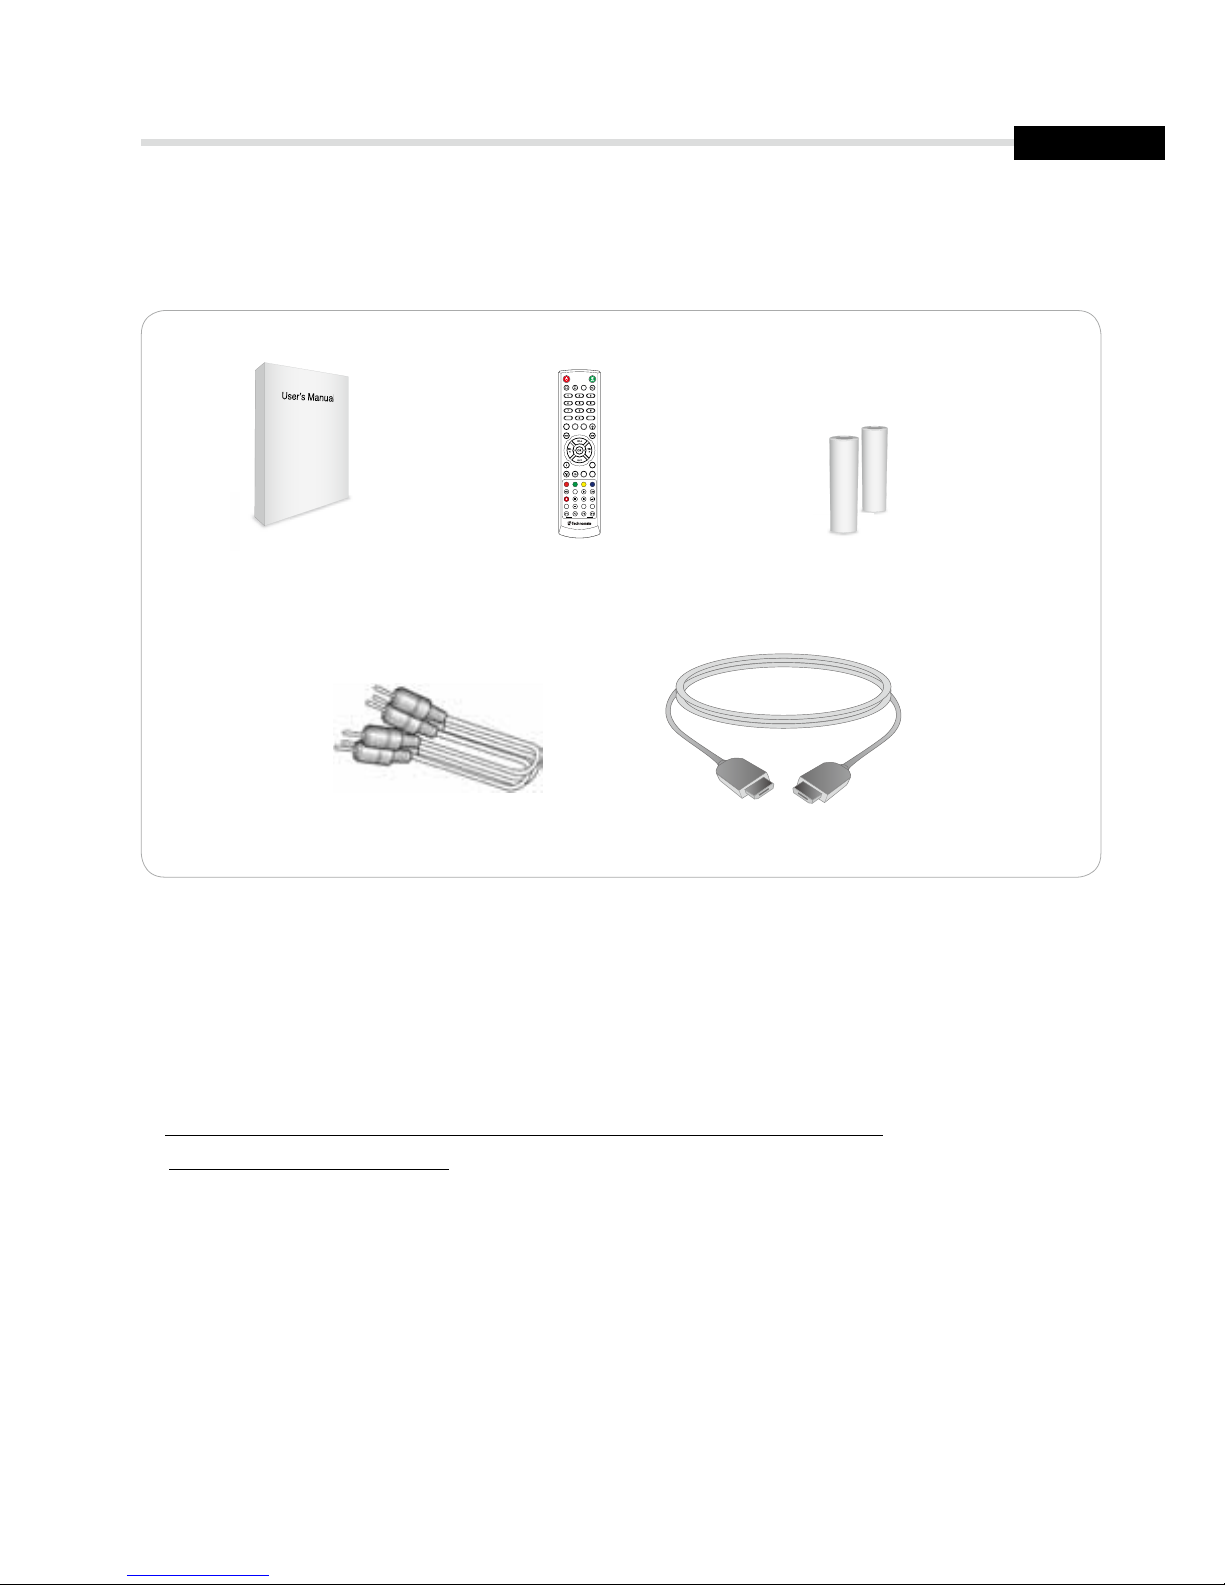
3. Points to Check before Use
The accessories below are included with this receiver:
Your dish should be properly installed and azimuth and elevation must be precisely set up
3.1 Accessories
3.2
The Satellite dish
Remote controlUser’s manual Batteries(AAA type) 2EA
BATTERY
BATTERY
BATTERY
BATTERY
HDMI Cable
HDMI
HDMI
RCA Cable
UHF FREEZE
SLEEP
TV/SAT
USB
SAT
EPG
REC STOP SLOWADVANCE
FAV
TEXT
A-Z
AUDIO
SUBTITLE
POS
BOOK MARK
V.FORMATWIDE
IP
MEDIA MOSAIC
CUSTOMIZABLE KEYS
ZOOM
INFO
REW TIME SHIFT PLAY FWD
FILE LIST
RECALL
TV/RAD
>><<

10
4. Controls/Functions
4.1 Front Panel
❶ Standby/Power on Indications Lamp: Flashes red light in ‘Standby’ mode and
shows no light in ‘Power ON’ mode.
❷ Power: Switches the receiver between ‘Standby’ and ‘Power ON’ modes.
❸ - ❹ CH. (▲/▼): To switch channels or change the cursor position on the
application screen.
❺ USB: To connect USB devices such as Memory stick or external Hard Disk Drive.
❻ Smart Card Reader: Insert smart card for encrypted channel access.
❶❸ ❹ ❻❷ ❺

11
English
11
4. Controls/Functions
4.2 Rear Panel
NO Name Connector Function
❶
LNB INPUT IEC 169-24 FEMALE IF input from LNB to digital tuner
❷
LOOP OUT IEC 169-24 FEMALE IF loop-through output from digital tuner
❸
VIDEO RCA cinch Composite video output
❹
AUDIO L RCA cinch Left audio output
❺
AUDIO R RCA cinch Right audio output
❻
S/PDIF RCA cinch Digital audio output
❼
LAN RJ-45 10/100Mbps Ethernet
❽
HDMI HDMI Digital Video/Audio Output
❾
RS-232 DB-9 Low speed serial port
❿
RF OUT UHF 21-69 IEC 169-2 MALE Output to TV
⓫
TV ANT IN IEC 169-2 FEMALE Input from terrestrial antenna
❶ ❷ ❽ ❾❸
⓫
❹ ❺ ❻
❿
❼
12 12
English
4. Controls/Functions
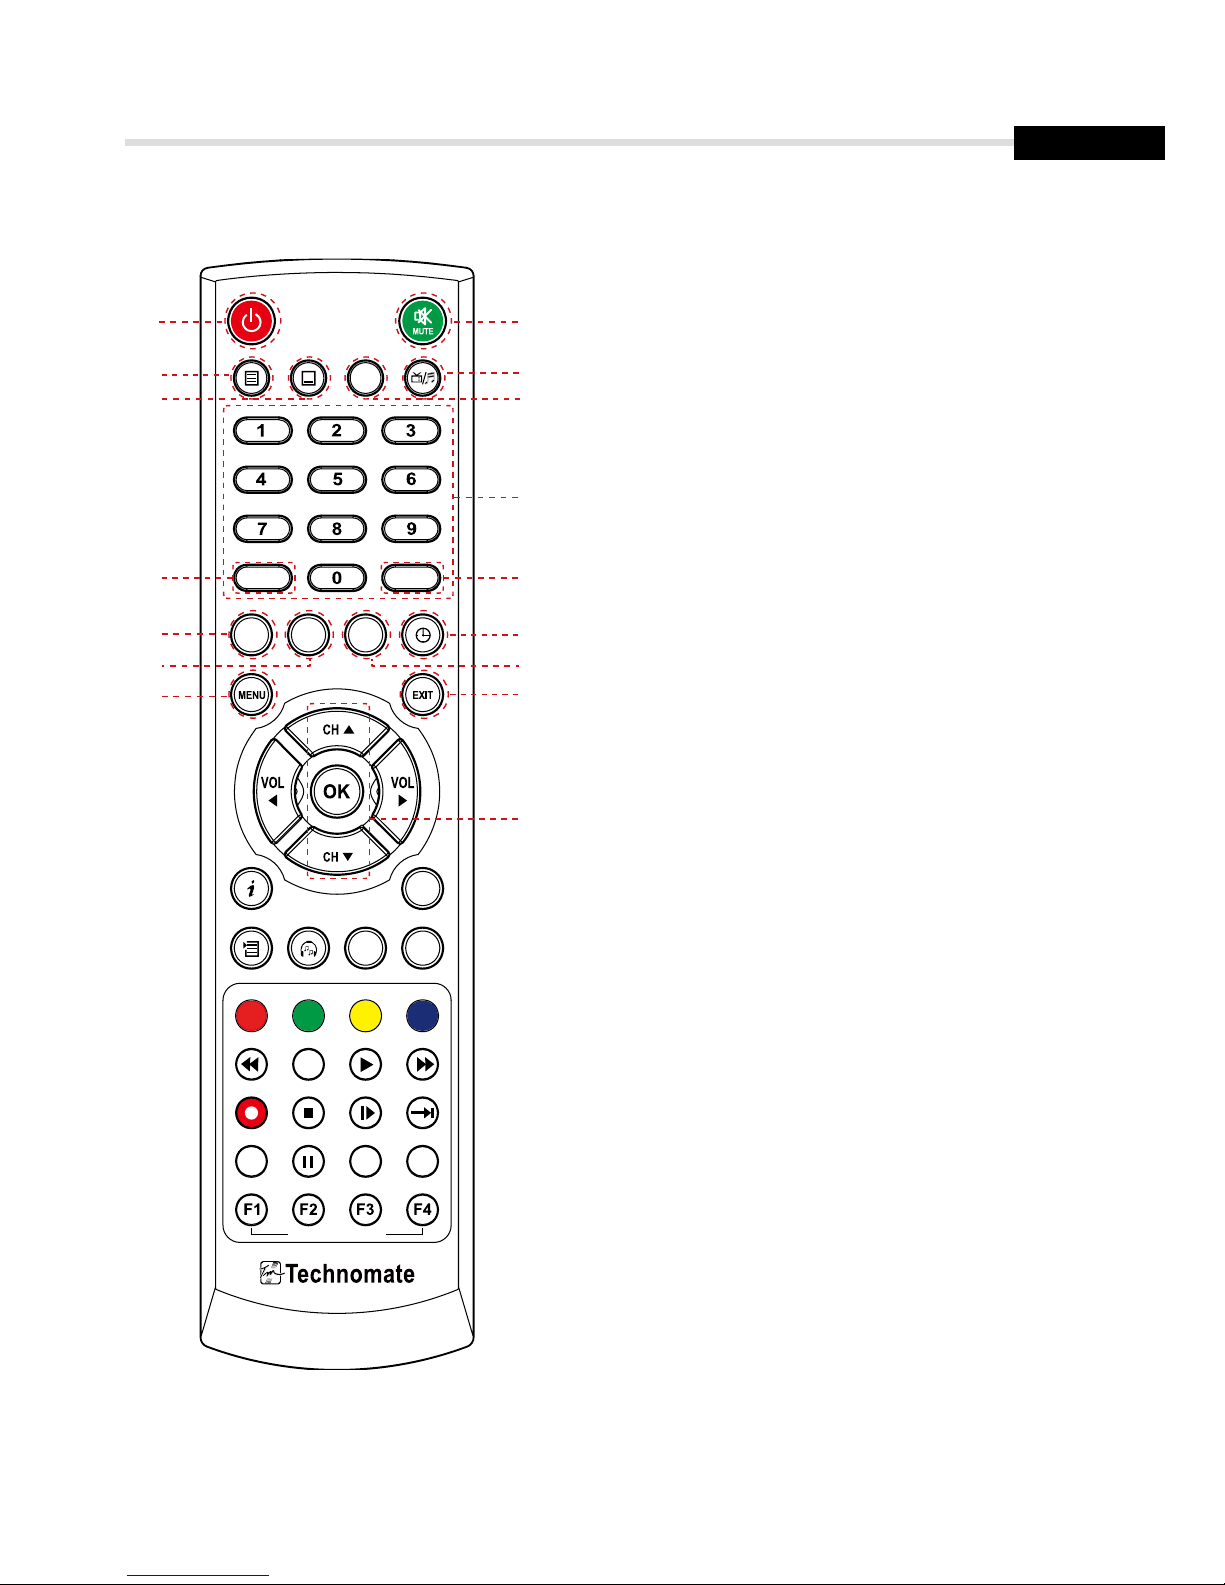
4.3 Remote Controller
UHF FREEZE
SLEEP
TV/SAT
USB
SAT
EPG
REC STOP SLOWADVANCE
FAV
TEXT
A-Z
AUDIO
SUBTITLE
POS
BOOK MARK
V.FORMATWIDE
IP
MEDIA MOSAIC
CUSTOMIZABLE KEYS
ZOOM
INFO
REW TIME SHIFT PLAY FWD
FILE LIST
RECALL
TV/RAD
>><<
❶ POWER: To turn the receiver On/Off
❷ STAND BY: Just turn the receiver off
❸ TEXT: To show the teletext contents if
teletext is transmitted
❹ SUBTITLE: To turn closed captions on or off
❺ TV/SAT: To switch between the satellite input
and UHF/VHF antenna input
❻ TV/RADIO: To switch between TV and Radio
❼ Numeric Keys (0-9): To enter numerical
settings (such as channel numbers) directly
❽ USB: To show the usb menu
❾ RECALL: To move to the previous channel
Used for special functions in menu mode
❿ IP: To go to Set IP menu
⓫ POS: To show the DisEqC motor view control
⓬ A-Z: To sort channel list
⓭ SLEEP: To set the STB off after minutes
⓮ MENU: To enter or exit the main menu
⓯ EXIT: To exit from the present menu and
move to the previous menu
⓰ Up & Down: To switch channels in
non-menu mode and move the cursor
up/down in menu mode
❶
❸
❹
❼
❿
⓭
❺
❷
❻
❽
❾
⓫ ⓬
⓮ ⓯
⓰
13
English
4. Controls/Functions
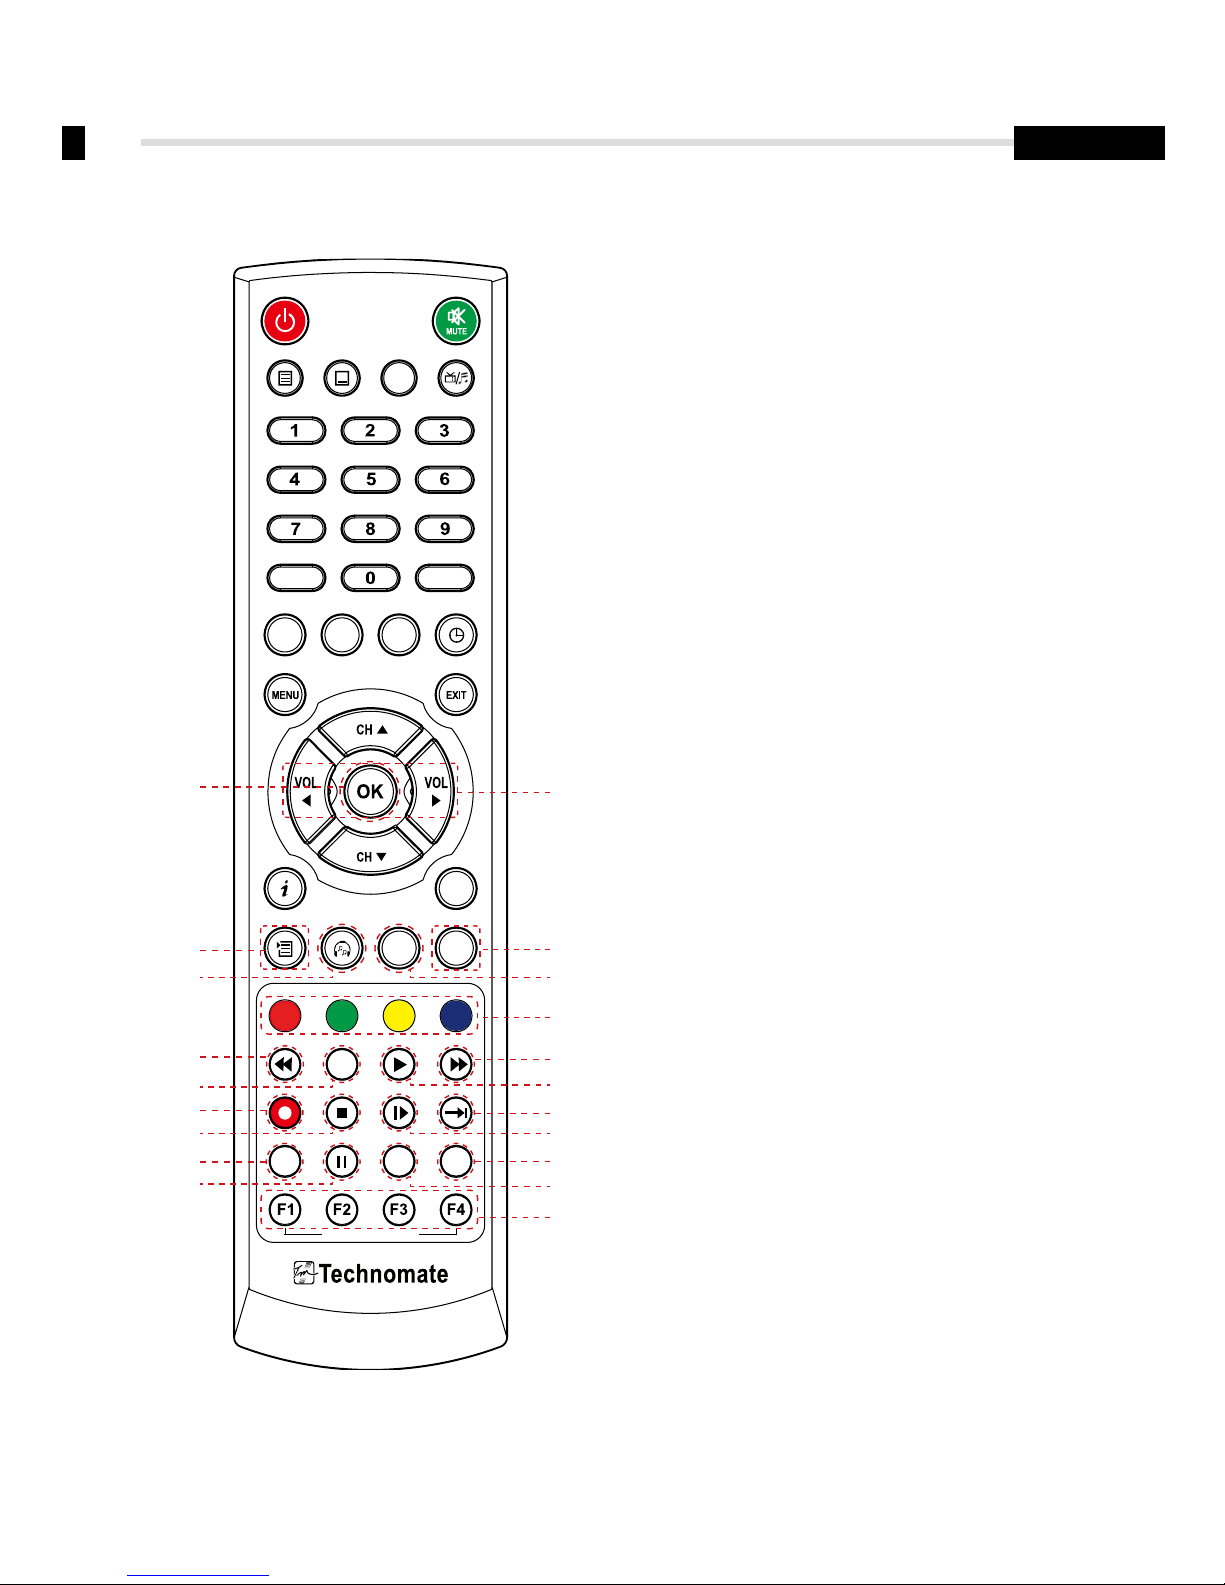
4.3 Remote Controller
UHF FREEZE
SLEEP
TV/SAT
USB
SAT
EPG
REC STOP SLOWADVANCE
FAV
TEXT
A-Z
AUDIO
SUBTITLE
POS
BOOK MARK
V.FORMATWIDE
IP
MEDIA MOSAIC
CUSTOMIZABLE KEYS
ZOOM
INFO
REW TIME SHIFT PLAY FWD
FILE LIST
RECALL
TV/RAD
>><<
❶ Vol Up & Down: To change the volume level
in non-menu mode
❷ OK: To show the Channel List in nonmenu
mode and select an item or confirm in menu mode
❸ FILELIST: To display the filelist
❹ FAV: To show favorite list in the favorite group or
to move to the next page
❺ AUDIO: To show the Multi-language
audio track, the stereo-mono mode and
subtitle information
❻ EPG: To show the TV/Radio program guide
❼ Color Key: Select the option such as View List,
Select Disk, Rename
❽ REW: Playback in rewind mode
❾ Time Shift: Play Content
❿ PLAY: Play Content
⓫ FWD: Playback in forward mode
⓬ REC: Start recording
⓭ STOP: Stop Playback
⓮ SLOW: Playback in slow mode
⓯ ADVANCE: Go to live channel
⓰ UHF: To adjust UHF chance
⓱ FREEZE: To pause the video.
Press again to resume the video
⓲ WIDE: To select a TV aspect ratio with Pan Scan
or Letter-Box(4:3)
(Full screen or Pillar box(16:9)
⓳ V.FORMAT: To switch the resolution of
video output
⓴ F1~F4: Reserved button for new function
❶
❸ ❹
❼
❿
⓯
⓰
⓱
⓭
❺
❷
❻
❽
❾
⓫
⓬
⓮
⓳
⓲
⓴
14
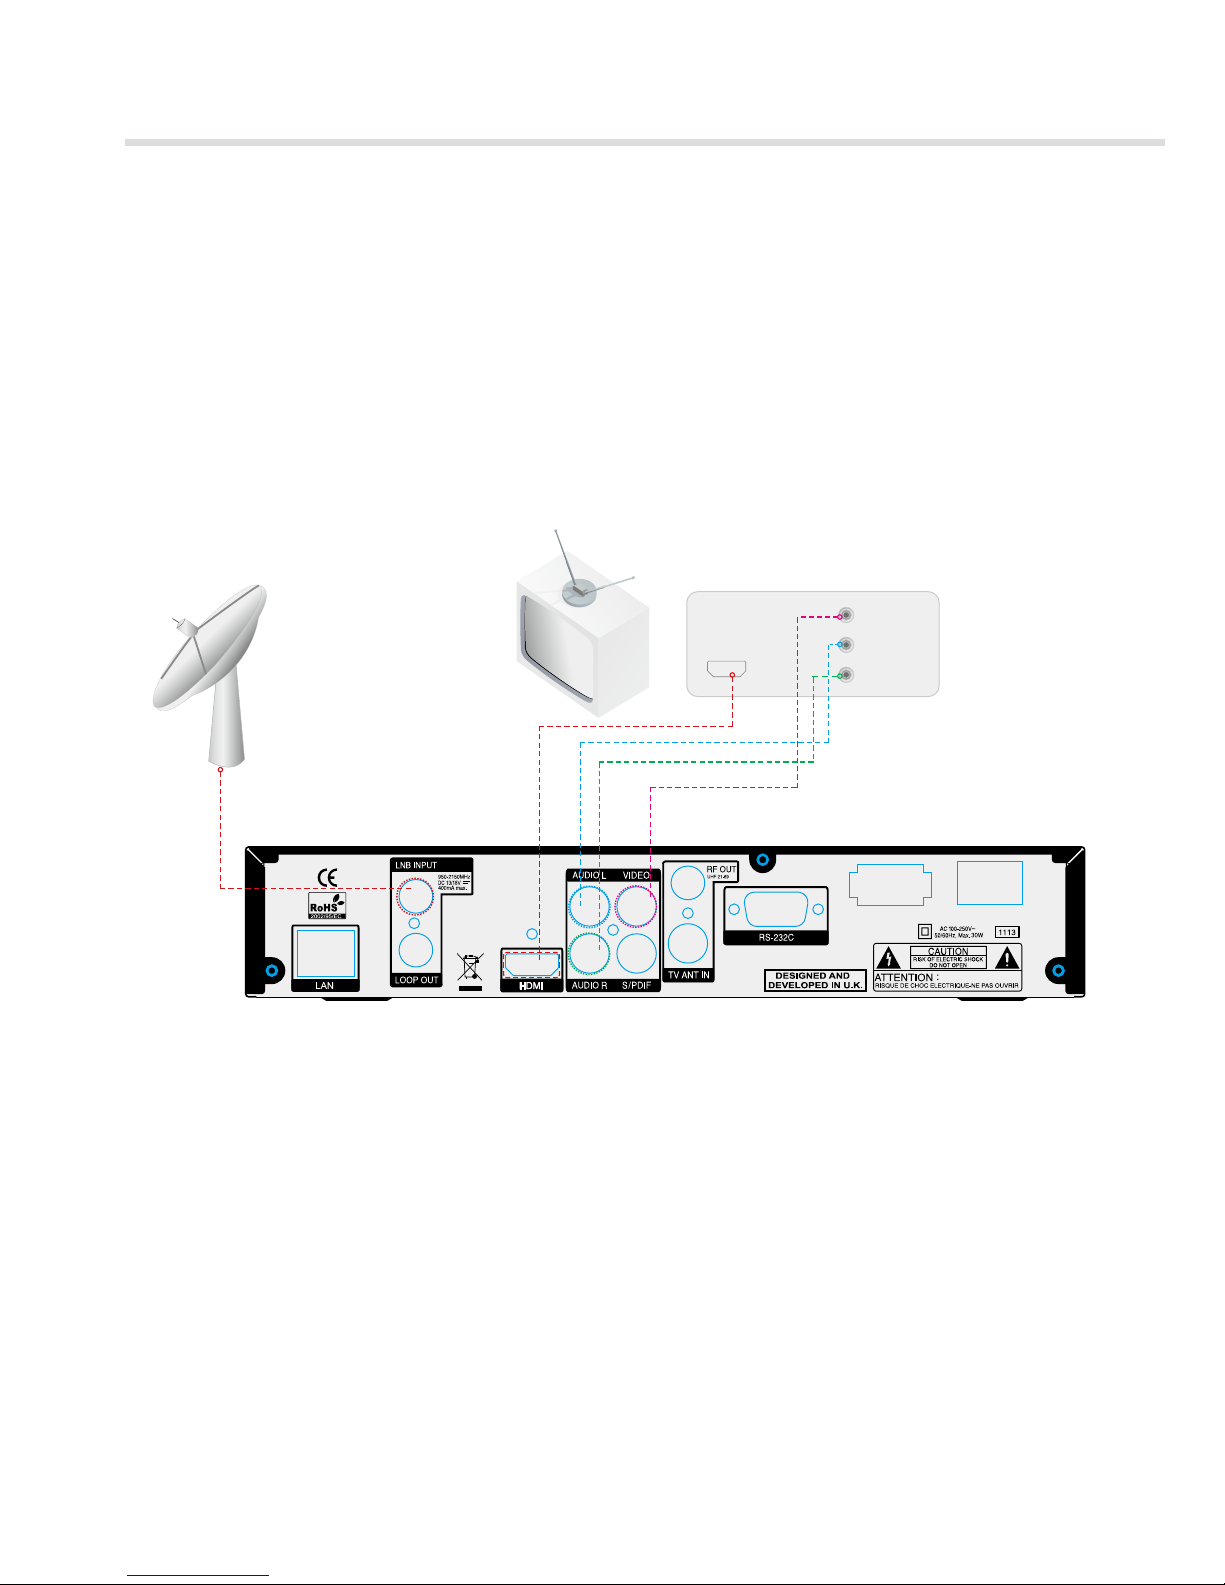
5. How to Connect
When Connecting the Receiver to a TV
1. Connect the TV antenna to TV ANT IN
2. Connect the Video and Audio of the TV to Video and Audio: connect the red and white
connectors to Audio R and Audio L, and the yellow connector to Video
3. Connect your satellite dish
Video
Audio
HDMI
TV
Satellite Dish
L
R

15
English
6. Operation
6.1
Getting Started
After your receiver is powered on, proceed with installation as follows :
➊
Menu Language Setting
1. Turn on your TV and receiver.
2. The wizard menu for language selection will appear.<Figure 6.1.1>
Select one language and press Recall (>>) to proceed.
Fi gure 6.1.1
➋
Antenna Setup
1. Press the MENU button to display the main menu.
2. Use and to move in the menu.
3. Press OK on ‘Satellite Setup’. The following window will appear. <Figure 6.1.2>
If you have a motorized dish, press OK on ‘Motorized Setting’. < Figure 6.1.3>
✽ Note: Enter a 4-Digit password if need arise. The default password is ‘0000’.

16
6. Operation
6.1
Getting Started
4. Select the item that you want to edit, and set its parameters as desired. <Satellite Setup>
▪ LNB Power: Select among ON/OFF/13V/18V.
▪ LNB Type : Select among Single/Universal/OCS/SaTCR.
▪ LNB Freq: Set the frequency of the LNB oscillator.
▪ 22KHz: When not AUTO, set the signal path from LNB or switch by selecting a control signal
among 0/22KHz.
▪ DiSEqC 1.0: Select DiSEqC 1.0 Port
▪ DiSEqC 1.1: Select DiSEqC 1.1 Port
▪ Rename: Press RED button on the remote to rename the selected satellite.
▪ Auto Navigation: Press RED button on the remote to begin auto navigation.
▪ Scan: Press Green button on the remote to begin satellite search.
▪ Save: Press Yellow button on the remote to save the selected satellite.
▪ Delete: Press Blue button on the remote to delete the selected satellite channels.
5. Select the item that you want to edit and set its parameters as desired. <Motorized Setting>
▪ Frequency: If the default TP frequency is not appropriate, you can select another
TP frequency at which to check for signal.
▪ DiSEqC Motor: Select DiSEqC protocol among OFF/1.2/USALS as appropriate for your Motor.
▪ Rename: Press RED button on the remote to rename the selected satellite.
▪ Scan: Press Green button on the remote to begin satellite search.
Fi gure 6.1.2 Figure 6.1.3

17
English
6. Operation
6.1
Getting Started
Figure 6.1.4
Fi gure 6.1.5
(When the DiSEqC Motor parameter is set as 1.2 <Figure 6.1.4>)
▪ Satellite: Select any satellite by pressing buttons.
▪ Frequency: Displays the current TP value of the selected satellite.
▪ Move: Move the dish position to west/east by pressing buttons.
▪ Move Fine: Move the dish position 1 step at a time to west/east by pressing buttons.
▪ Motor Control: Control motor by press OK button on the remote.
▫ Recalcuate: Recalculate the position of all other saved satellites relative to the known position.
▫ Reset System: Reset the position of all saved satellites.
▫ Goto Reference: Move the dish to the 0 position.
▫ Disable Limit: Disable east and west limit.
▫ Enable Limit: Enable the saved east and west limit.
▫ Set East Limit: Edit & Save east limit by pressing or OK buttons.
▫ Set West Limit: Edit & Save limit by pressing or OK buttons.
▪ Go To : Go to the position of the saved satellite.
▪ Save: Save the current setting of DiSEqC 1.2 system.

18
6. Operation
6.1
Getting Started
(When the DiSEqC Motor parameter is set as USALS <Figure 6.1.6>)
▪ Sat Degree: Satellite location.
▪ Position Setting: Press OK.
▪ Goto Reference: Move the dish to the reference 0 position.
▪ Antenna Longitude: Your longitude at present.
▪ Antenna Latitude: Your latitude at present.
✽ Note: You need to know what LNB you are using to correctly set the L.O.
(local oscillator) frequency.
✽ Note: You need to understand how your receiver is connected to properly set the
22KHz and DiSEqC.
Figure 6.1.6 Figure 6 .1.7
6. When you are done, press the EXIT button.

19
English
6. Operation
6.1
Getting Started
Fi gure 6.1.8 Fi gure 6.1.9
➌
Satellite Scan
Through this function, the receiver searches for all the available channels and saves them in
memory.
▣ Auto Navigation <Figure 6.1.8>
1. Select the satellites you want to search by pressing the OK button on the remote.
You can select more satellites by pressing the button and OK button on the remote.
▪ Search Type: Select the type of channel search you want by presssing buttons on the remote.
▫ All: To search all the Free To Air and scrambled channels, TV & Radio channels.
▫ Free: To search Free To Air channels only.
▫ TV: To search TV channels only.
▪ Network Search: Select Network Search ON/OFF to find more transponders through NIT Search.
▪ Scan: Begin channel search of the selected satellite.
▪ Auto Navigation: Press RED button on the remote.
▪ Auto Navigation Blind Search: Press Green button on the remote to begin channel
search of all of the satellite in the satellite list.
2. Press OK under ‘SCAN’ to scan the selected satellites. <Figure 6.1.9>

20
6. Operation
6.1
Getting Started
▣ Blind Scan <Figure 6.1.10>
1. Select the satellites you want to search by pressing the OK button on the remote.
2. Press , to set the “Polarization” and “Scan Mode” options.
▪ TP: Select TP Frequency
▪ Polarization: Select among All / Vertical / Horizontal
▪ Mode: Select among All / Free / TV
▪ SCAN: Begin channel search of the selected satellites.
▪ Auto Navigation: Press RED button on the remote.
Fi gure 6.1.10
▣ Advance Search <Figure 6.1.11>
1. Select a transponder.
2. To change a transponder’s information (Frequency, Symbol Rate), use the NUMERIC buttons.
3. To add a new transponder, press the GREEN button.
4. To delete a transponder, press the YELLOW button with the cursor next to the Frequency
parameter.
5. To search a transponder, set its different parameters and press OK button.

21
English
▣ Package Identifier (PID) Search <Figure 6.1.12>
1. Select a transponder.
2. To change a transponder’s information (Frequency, Symbol Rate), use the NUMERIC buttons.
3. To add a new transponder, press the GREEN button.
4. To delete a transponder, press the YELLOW button with the cursor next to the Frequency parameter.
5. To search a transponder, set its different parameters and press
You can search a specific channel of the transponder by setting its PID data (Video, Audio and PCR).
6. Operation
6.1
Getting Started
Fi gure 6.1.11 Fi gure 6.1.12
✽ Note: If you cannot access programs after correctly completing a scan procedure,
please contact your seller or your installer.

22
6. Operation
6.1
Getting Started
➍
Channel Selection
You can use / to navigate between channels until you find the channel you want.
▣ If you know the channel number, you can enter it with the NUMERIC buttons and wait
2 seconds until the channel is changed.
▣ If you know the channel name or transponder or CAS, you can press OK to display the
channel list <Figure 6.1.13>
Fi gure 6.1.13
1. In the left side of screen, detailed information about the selected channel will be displayed.
(Satellite Name, Frequency(Polar) and Channel Name)
2. You can use the following buttons to navigate between channels:
▪ : Moves one channel up/ down.
▪ : Moves one page up / one page down.
▪ RED: Shows all channels in the current group.
▪ GREEN: Shows all channels sorted alphabetically.
▪ YELLOW: Shows all channels sorted by Transponder.
▪ BLUE: Shows all channels sorted by CAS system.
3. Press OK when the selection bar is positioned on the desired channel.

23
English
➎
Other Functions of the Remote Control
▣ Volume Control
1. While watching a program, press or to control the volume.
2. You can press the MUTE button to remove the sound of the program: the mute icon will be
displayed. Press the MUTE button again to turn the sound back on.
▣ Channel Information
1. You can press the INFO button to display the information banner for a few seconds.
2. If you then press the INFO button again, a detailed banner will be displayed.
▣ TV/ RADIO switching
You can press this key to change from a TV channel to a Radio channel or vice versa.
▣ RECALL
Press to return to the previous channel.
▣ Audio
Press to adjust the subtitle and/or audio status of the current channel:
▪ Audio Mode: Select between, Stereo -> Mono-Left -> Mono-Right
▪ Audio Track: Select between tracks available in this program
▪ Audio Level: Select between, High -> Medium -> Low
✽ Note: These subtitle and audio parameters are workable only when the desired channel
supports these functions.
▣ TEXT
The Teletext service is a text data service sometimes available from the Service Provider.
▪ SAT: Press SAT button on the remote and select a satellite in the Satelliet List.
▪ FAV: Press FAV button on the remote to display a favorite channel list in the favorite group.
6. Operation
6.1
Getting Started

24
6. Operation
6.1
Getting Started
▣ Multi Picture Display <Figure 6.1.14>
You can press MOSAIC to display multiple pictures;
you can choose the number of pictures such as 1X2, 2X2, 2X3 or 3X3.
Fi gure 6.1.14
Fi gure 6.1.15 Fi gure 6.1.16
▣ ZOOM
You can press ZOOM to zoom in the video.
1. Press the FREEZE button and press ZOOM.
You can zoom in sections of Freezed Video <Figure 6.1.15>
2. While watching a program, press ZOOM.
You can zoom in sections of playing video. <Figure 6.1.16>
3. To cancel the freeze status, please release the zoom status.

25
English
▣ SUBTI TLE <Figure 6.1.17>
You can press to select the subtitle language of current channel.
▣ SLEE P <Figure 6 .1.18 >
You can set the your receiver to turn off after a few minutes. Press to set the sleep timer.
▪ To cancel the sleep timer, please press until you set time as “0 min”.
(Disable, 10, 20, 30, 60, 100, 120 Minutes)
6. Operation
6.1
Getting Started
Fi gure 6.1.17
Fi gure 6.1.19
Fi gure 6.1.18
Fi gure 6.1.20
▣ V. FORMAT < Fi gure 6.1.19 >
You can press to change the video resoultion Select between, 1080p->1080i->720p-> 576p->576i
▣ WIDE <Figure 6.1.20>
You can press ASPECT to change the TV aspect ratio.
▪ 4:3: Pan-Scan or Letter-Box
▪ 16:9: Full-Screen or Pillar-Box

26
6. Operation
6.2 System Setting
➊
Time Settings
This submenu allows you to set your local time, wake up time, wake up channel and sleep time.
<Figure 6.2.1>
▪ GMT Usage: Set this ON for the local time to be determined by adjusting the time
difference with the GMT (Greenwich Meantime) according to your location.
▪ Current Date: If GMT Usage is OFF, you can modify the date by pressing OK.
▪ Current Time: If GMT Usage is OFF, you can modify the time using the NUMERIC buttons.
▪ Summer Time: Select the period during which Summer Time is in force.
▪ Local Offset: If GMT Usage is ON, Local time is GMT time + Local Offset.
▪ Wake Up Mode: Select the wake up frequency. (Off/Once/Daily/Mon~Fri)
▪ Wake Up Time: Set the wake up time using the NUMERIC buttons.
▪ Wake Up Channel: Press OK to set the wake up channel.
▪ Sleep Mode: Select the Sleep frequency. (Off/Once/Daily/Mon~Fri)
▪ Sleep Time: Set the sleep time using the NUMERIC buttons.
▪ Timer Lead Time: Press OK to set the Timer Lead In And Lead Out Time.
Fi gure 6.2.1

27
English
➋
A/V Output Settings
This submenu allows you to specify the audio/video output. <Figure 6.2.2>
▪ Audio Language: Set the default audio language when selecting a channel.
▪ Subtitle Language: Set the default subtitle language.
▪ Screen Format: Select the screen format. (16:9 / 4:3)
▪ Display Format: Select the TV aspect ratio(Full Screen/Pillar-Box)
▪ Video Format: Select the Video format.(1080p, 1080i, 720p, 576p, 576i)
▪ Digital Audio: Select the Audio output type.(DOLBY SPDIF/PCM/DOLBY HDMI)
6. Operation
6.2 System Setting
Figure 6.2.2

28
6. Operation
6.2 System Setting
➌
OSD Settings
This submenu allows you to set the menu language, OSD transparency and Information
and Volume timeouts. <Figure 6.2.3>
▪ Menu Language: Select the desired language for the menu.
▪ Information Timeout: Select the display duration of the information banner.
(1, 2, 3, 5 or 10 seconds)
▪ Volume Timeout: Select the display duration of the volume box. (1, 2, 3, 5 or 10 seconds)
▪ Recall List: Set ON to display previous channel list.
▪ Changing Backgrounds: Select the background Style 1 or Style 2.
▪ Weather Widget: Set the Weather Widget function (ON/OFF).
▪ Widget repeat time: Set the Widget repeat time(1 Hour/2 Hour/6 Hour/12 Hour).
▪ Weather Widget City: Set the Weather Widget City.
Figure 6.2.3

29
English
➍
Password Settings
This submenu allows you to set password options and to lock or unlock access to menus
(✽ Note: PIN code and password are the same). <Figure 6.2.4>
▪ Receiver Lock: Set ON to require entering a PIN code at powering on.
▪ Install Lock: Set ON to require entering a PIN code to access the installation menu.
▪ Channel Lock: Set ON to require entering a PIN code to access the channels menu.
▪ Lock Channel Confirm: Set ON to require entering a PIN code to access a locked channel.
▪ Age Limit: Set to prevent children or unauthorized people from watching programs.
Select among (Free / 8 above / 12 above / 15 above / 18 above). When program information
(age limit) is available from broadcaster and this age limit exceeds the selection, a PIN code is
required to access the channel/program.
▪ Current Password: To change your password, first enter your current password.
▪ New Password: Enter the new password that you want to set.
▪ Verify Password: Enter the new password again for confirmation.
✽ Note: The default password is ‘0000’.
6. Operation
6.2 System Setting
Figure 6.2.4

30
6. Operation
6.2 System Setting
➎
Factory Reset
This submenu allows you to restore the factory set values
(useful when encountering problems after changing settings). <Figure 6.2.5>
▪ Delete Radio Channels: Erase all radio channels in the database.
▪ Delete Scramble Channels: Erase all scramble channels in the database.
▪ Delete All Channels: Erase all channels.
▪ Save As Default Channels: Change the factory channels.
▪ Restore Default Channels: Restores 64 satellites and apporx 10,000 channels pre-tuned.
▪ Factory Set: Erase all channels and restore the factory default settings.
Figure 6.2.5

31
English
➏
IP Setting
If the Network supports DHCP, IP settings can be allocated automatiocally. If the Network
does not support DHCP, the Addresses must enter manually(Static IP). <Figure 6.2.6>
▪ Connection Type : Ethernet/Wi-Fi to select
▪ DHCP Usage: On/Off to receive IP settings automatically.
▪ IP Address: Enter the IP address.
▪ Subnet Mask: Enter Subnet Mask Number from your Network.
▪ Gateway: Enter IP address of Gateway (e.g.router).
▪ DNS: Enter IP address of main DNS server.
▪ MAC Address: MAC address display.
6. Operation
6.2 System Setting
Figure 6.2.8
▪ Firmware update: Support download from a LAN.
1. Press BLUE button.
Figure 6.2.6 Figure 6.2.7

32
6. Operation
6.2 System Setting
Figure 6.2.9
Fi gure 6.2.10
▪ Wi-Fi Wizard: Scan Wi-Fi list.
1. Press Green button.
▪ Wi-Fi Setting
1. Press Yellow button.
✽ Note: To use Wi-Fi, Please use External USB Wi-Fi Adaptor.
✽ Compatible Wi-Fi chipset List: Ralink RT5370.

33
English
6. Operation
6.2 System Setting
➐
Front Display Setting
This submenu allows you to set the Standby
Mode. <Figure 6.2.11>
▪ Standby Mode: Select the Standby Mode.
▪ RCU: You can choose the RCU Type.
➑
Key Setting
This submenu allows you to set the Function
Key (Auto Scan / Lock Channel / Timer
Manager / Dvix List /...)
➒
Connecting your receiver to a PC via your Network
1. Follow these instructions prior to connecting your receiver to your PC:
a) Run the PC Tool program (STB Daemon) before connecting to your PC.
b) Click Browser and select a sharing folder on your PC.
Fig ure 6.2.11
Fi gure 6.2.12

34
c) Press 'OK' then select STB Daemon and
the window will be hidden. You can see
the icon on bottom right of the window
screen.
2. Connect an Ethernet cable from your
TM-F3/5 to your PC.
3. Press menu, Select System Settings, Select
IP Settings: DHCP Usage 'ON' and pressing the
RED Key
6. Operation
6.2 System Setting
b) If your Network does not support DHCP,
the IP Address must be entered manually
(Static IP)
c) Click the network icon on bottom of
your PC's Windows
a) If your Network supports DHCP, IP settings
can be allocated automatically by turning
DHCP Usage 'ON' and pressing the RED Key
d) Now select the Support Tap, you can
allocate your iP address.
4. Go to File Manager on your STB and
press the YELLOW Key to type the IP
address of PC which is running STB
Daemon.

35
English
6. Operation
6.3 Channels
➊
Set Favorites
This submenu allows you to set up favorite groups of channels. You can select TV or Radio
channels in an alternative way by pressing the TV/RADIO button.
The receiver supports 16 favorite groups.
1. Press on OK ‘Set Favorites’. The list of groups will be displayed. <Figure 6.3.1>
2. Press and OK to choose a group. The following menu will be displayed.
<Figure 6.3.2> If you want to change the name of a favorite group, press the RED button.
3. Press to OK add (or remove if previously added) the selected channel to/from the favorite
channel group.
4. Press the EXIT button to return to the previous menu.
Figure 6.3.1 Figure 6.3.2

36
➋
Rename CH/Edit Pids
This submenu allows you to rename channels and input user PID. You can select TV or Radio
channels in an alternative way by pressing the TV/RADIO button. You can choose a channel list
group by pressing the FAV/SAT button.
1. Press OK on ‘Edit Channels’. The following menu will be displayed. <Figure 6.3.3>
2. Press OK on the channel that you want to edit.
3. Press OK on ‘Edit Name’ to rename the channel; the keypad will be displayed.
4. Similarly, you can edit the PID data using the NUMERIC keys.
✽ Note: The VIDEO PID, AUDIO PID and PCR PID are very important for optimal satellite signal
reception. We recommend you get professional advice where available.
6. Operation
6.3 Channels
Figure 6.3.3

37
English
6. Operation
6.3 Channels
➌
Move Channels
This submenu allows you to move channels.
You can select TV or Radio channels in an alternative way by pressing the TV/RADIO button.
You can choose a channel list group by pressing the FAV/SAT button.
1. Press OK on ‘Move Channels’. The following menu will be displayed.<Figure 6.3.4>
2. Press OK on the channel that you want to move; a ‘move’ icon will be displayed.
3. After press , use the , , , , NUMERIC buttons to move the selected channel.
4. Press OK again to place the channel.
5. Press the EXIT button to return to the previous menu.
Figure 6.3.4

38
6. Operation
6.3 Channels
➍
Lock Channels
This submenu allows you to lock channels to control access to them. Once a channel is locked,
you will be asked to enter a password whenever you try to watch it.
You can select TV or Radio channels in an alternative way by pressing the TV/RADIO button.
You can choose a channel list group by pressing the FAV/SAT button.
✽ If you set ‘Lock Channel Confirm’ (refer to <6.2>security setting) to OFF, you will not be
asked to enter a password even if the channel is locked.
1. Press OK on ‘Lock Channels’. The following menu will be displayed. <Figure 6.3.5>
2. Press OK on the channel that you want to lock/unlock; the lock icon will be displayed/removed.
3. Press the EXIT button to return to the previous menu.
Figure 6.3.5

39
English
➎
Skip Channels
This submenu allows you to skip channels. Once a channel is set to be skipped, it will be
whenever you navigate channels using in non-menu mode.
You can select TV or Radio channels in an alternative way by pressing the TV/RADIO button.
You can choose a channel list group by pressing the FAV/SAT button.
✽ Note: You can still access a ‘skipped’ channel if you enter its number using the NUMERIC
buttons in non-menu mode.
1. Press OK on ‘Skip Channels’. The following menu will be displayed.<Figure 6.3.6>
2. Press OK on the channel that you want to skip/un-skip; the skip icon will be displayed / removed.
3. Press the EXIT button to return to the previous menu.
6. Operation
6.3 Channels
Figure 6.3.6

40
6. Operation
6.3 Channels
➏
Delete Channels
This submenu allows you to delete channels. You can select TV or Radio channels in an alternative way by pressing the TV/RADIO button. You can choose a channel list group by pressing
the FAV/SAT button.
✽ Note: Be careful! If you delete a channel, you will not be able to access it again until you rescan.
1. Press OK on ‘Delete Channels’. The following menu will be displayed. <Figure 6.3.7>
2. Press OK on the channel that you want to set/unset for deletion; the delete icon will be
displayed/removed.
3. Press the INFO button to delete all channels in the current list; you will be asked to enter your
password.
4. Press the EXIT button to return to the previous menu and confirm deletion.
Figure 6.3.7

41
English
➐
Add Channels
This submenu allows you to add channels.
1. Press on ‘Add Channels’. The following menu will be displayed. <Figure 6.3.8>
2. Press to change the parameter.
▪ Frequency: Select TP Frequency
▪ Channel Name: Press to display Keypad pop-up; Edit a channel’s name
▪ Channel Type: Select among TV / RADIO
▪ You can add specific channel of the transponder by setting its PID data
(Video, Audio and PCR).
▪ Video Type: Select the video type (MPEG1/2, H.26 4)
▪ Audio Type: Select the video type
(MPEG1/2, HE-AAC, Dolby Digital(AC3), MPEG4, AAC, Dolby Digital+(DD+))
6. Operation
6.3 Channels
Figure 6.3.8

42
6. Operation
6.4 Electronic Program Guide
➊
EPG
This submenu allows you to access the electronic program guide when available.
1. Press the EPG button to display the guide menu. <Figure 6.4.1>
2. Press to see the previous/next guide.
3. Press , , , to select another channel. <Figure 6.4.1>
4. Press OK to watch the selected channel and access its EPG data.
If you press OK in the right side of the screen (Event display list).
▪ If the current time EPG is selected, you will return to the previous menu and get signal from
the selected channel.
▪ If a future time (next) EPG is selected, the selected program will be reserved and the event
color will change.
5. You can select TV or Radio channels by pressing the TV/RADIO button
6. You can choose a satellite list by pressing the SAT button.
7. You can choose a favorite channel list by pressing the FAV button.
8. You can access the timer menu by pressing the RED button. <Figure 6.4.2>
9. You can choose a EPG mode by INFO button

43
English
6. Operation
6.4 Electronic Program Guide
➋
Timer
This sub menu allows you to set the on/off time of your receiver.
1. This submenu allows you to set on/off times of your receiver. To display the timer menu,
press the RED button while in the guide menu. <Figure 6.4.2>
2. Press OK to select a timer’s parameter.
3. Press to change the parameter.
▪ Timer No: Select the timer that you want to modify. (1- 32 )
▪ State: Select the timer frequency. (off/once/daily/Mon~Fri/weekly)
▪ Date: Press OK to display a Calendar pop-up; Select a date
▪ Start Time: Input the time for your receiver power-on; use the NUMERIC buttons
▪ End Time: Input the time for your receiver power-off; use the NUMERIC buttons
▪ Channel: Press OK to display a Channel list pop-up; Select a channel
▪ File Name: Press OK and enter file name using keypad.
▪ Record: Set the record mode (ON/OFF)by using the left and right arrow button.
▪ Power Off: Select Power Off should you wish the receiver to turn to standby
after recording has finished.

44
6. Operation
6.4 Electronic Program Guide
Figure 6.4.1 Figure 6.4.2
Figure 6.4.4Figure 6.4.3
▪ If you want to record a program in the right side of the screen, you can select a program by
using OK. The selected program will be reserved and the evnet color text will change to red.
<Figure 6.4.3>.
▪ You can also see change the timer menu.<Figure 6.4.4>

45
English
6. Operation
6.5 Entertainment
Figure 6.5.1
Figure 6.5.3
Figure 6.5.2
➊
YOUTUBE
1. : To select Youtube movie.
2. OK: To play movie.
▪ Option: To search by Category. Viewed,
Time, Location.
▪ Search: To serch by key word.
▪ Next: To move Next page.
▪ Previous: To move previous page.
▪ REPL AY: To replay the current movie.
▪ PAUSE : To pause the movie.
▪ STOP: To stop the movie.
▪ Fullview: To view the movie in full size.
➋
Internet Radio
▪ Search: To search by key word.
▪ Genres: To search by genre.
▪ Favorites: To set favorite channels.
▪ Record: To record Radio.
1. Search Radio channel by Key word or Genre.
2. Select a channel by <Figure 6.5.2>
3. Press OK to play Radio.
✽ Note: To record Radio, please install USB
storage.

46
6.5 Entertainment
6. Operation
Figure 6.5.4
Figure 6.5.5
➌
Weather
Searching the Weather for City, Country.
1. Press Blue button.
2. Enter the City or Country name.
3. Press EXIT to save and exit the window.
▪ View List: To view the saved list.
▪ Fahrenheit/Celsuis: To display the
temperature.
▪ Add City: To add City on list.
▪ Rename: To modify the City name.
▪ Save Info: To save the added City name.
➍
MAP
Searching the MAP for City, Country.
1. Press Blue button.
2. Enter the City or Country name.
3. Press Exit to save and exit the window.
▪ View List: To view the saved list.
▪ Move:
▪ Zoom In: To enlarge MAP.
▪ Zoom Out: To reduce MAP.
▪ Add City: To add City on list.
▪ Rename: To modify the City name.
▪ Save Info: To save the added City name.

47
English
6. Operation
6.5 Entertainment
➎
Calculator
This feature allows you to use a calculator <Figure 6.5.6>
▪ Use the Numerical and the arrow buttons on the remote control.
➎
Calendar
Figure 6.5.6
Figure 6.5.7

48
6.6 USB/External Device
6. Operation
➊
Disk Manager
Use the cursor keys to activate the desired functions from this menu.
▪ Default Disk: If you have additional Storage devices connected to your receiver
(i.e. USB HDD)
you can select which storage device is to be the default drive for playback and recording.
▪ Disk Information: Select the Hard disk volume, USB device.
Information of the storage devices will be displayed (i.e. used size, total size, free size)
▪ Format Disk: Format disk enables you to delete all information stored on the selected
storage device
✽ Warning: If you select Format Disk all data on the storage device will be deleted.
▪ Testing USB Speed: Press to test USB speed for DVR.
▪ Timeshift Rec Time: Set the preferred Timeshift Recording Time.
(10Min/30Min/60Min/90min/120min)
▪ Auto Timeshift: Set Auto Timeshift to On or Off. When set to on unit will automatically
begin Timeshift for pre determined time set in the Timeshift Rec Time menu.
▪ Skip Time: Set the preferred amount of Skip Forward and Back time during playback
(30sec/1Min/2Min/3Min/5Min/10Min20Min/30Min)
Figure 6.6.1

49
English
6.6 USB/External Device
6. Operation
➋
File Manager/Download/Upload
[Display]
1. BLUE KEY: To preview files.
2. SAT KEY: To filter files.
Figure 6.6.2 Figure 6.6.3
Figure 6.6.5Figure 6.6.4
[File Management (Copy, Move, NewFolder, Delete, Rename)]
1. RED KEY: To select files.
2. MENU KEY: To select a function.
3. Copy (or Move): To copy(or Move) files.
4. Paste: To paste the copied files to a folder.

50
6.6 USB/External Device
6. Operation
Figure 6.6.6
[MP3 Play]
1. Select the MP3 file you want to play using the , OK in the file list. <Figure 6.6.6>
2. Adjust the volume using RED / GREEN
3. Press the button to display the MP3 file list.
4. Press the button to display information about the selected MP3 file.
▪ LIST: Displays / hides the file list.
▪ INFO: Shows information about the selected file.
▪ YELLOW: Selects the hard disk or usb device.

51
English
6.6 USB/External Device
6. Operation
Figure 6.6.9
Figure 6.6.8
[JPG View]
1. Press to select a picture then press OK button to display the selected picture. <Figure 6.6.8>
2. Press the EXIT button to hide the file list. Select and option using , OK. <Figure 6.6.9>
3. Press the button to display the JPG file list.
4. Press the button to display information about the selected MP3 file.
▪ HIDE infobar: Hide all infos.
▪ LIST: Shows / Hides the JPEG file list.
▪ INFO: Shows information about the selected file.
▪ YELLOW: Selects the hard disk or usb device.

52
6.6 USB/External Device
6. Operation
Figure 6.6.11
Figure 6.6.10
Figure 6.6.12
[VIDEO Play]
1. Select the video file you want to play using the , OK in the file list.<Figure 6.6.10>
[Update (Firmware, Channel)]
1. Select the software you want to download by using in the menu.
2. Press the OK button to start the download. <Figure 6.6.12>
✽ Warning: do not switch off your receiver before the download is complete.

53
English
6.6 USB/External Device
6. Operation
➌
Timer Manager
(Manage Existing or Add Manual Timers for Reserving or Recording of Programs)
1. Press the OK button on the desired timer number to access and modify the timers’ parameters
2. Press the and arrow buttons to select timer parameters
3. Press the arrow buttons to change parameters
▪ Timer No: choose the desired timer using and Arrows buttons (1-32)
▪ State: Select timer frequency (off/daily/Mon-Fri/Weekly)
▪ Date: Press the OK button to display the calendar and select the desired date
▪ Start Time: Using the NUMERIC buttons input the required start time
▪ End Time: Using the Numeric buttons input the required end time
▪ Channel: Press the OK button to display the channel list and select a channel
▪ File Name: Press the OK button and enter File Name using keypad.
▪ Record: Set the record mode (ON/OFF) by using the left and right arrow button
▪ Power Off: Select Power Off should you wish the receiver to turn to standby after recording
has finished <Figure 6.6.13>
Figure 6.6.13

54
6.7 System Information
6. Operation
Figur e 6.7.1
Your receiver displays current information <Figure 6.7.1> regarding model name, software
version and date of manufacture. This info is useful when downloading new software.
Please note if you have performed a software update you must also perform a factory reset of
the receiver. Please see Database Reset section in the Systems settings menu for instruction on
page 23.

55
English
6. Operation
6.8 Conditional Access System
Fi gure 6.8 .1
➊
Card Initializing
To Enjoy Crypton scrambled channels, you will need a Smart Card from the service provider
(program distributor). If you are subscribing to services from more than one service provider,
you will need a Smart Card from each one. Since a Smart Card is connected to a single service
provider, a limited range of channels will be available via it.
✽ Note: Without the Smart Card, you can watch only Free-To-Air programs.
1. Insert the Smart Card into the receiver’s slot designed for it.
2. The message ‘Smart Card Initializing’ will appear on the screen. <Figure 6.8.1>
3. After the message ‘Smart Card Initializing’ has disappeared,
you will be able to watch the channels offered by the service provider.

56
6.8 Conditional Access System
6. Operation
Figure 6.8.2
➋
The Status of the Smart Card
1. You can access detailed information about the Smart Card using the / keys in the Main Menu
to select ‘CA’ and pressing OK. <Figure 6.8.2>
2. Proceed with further instructions displayed on the screen to check more detailed information
depending on the Smart Card in use.
✽ Note: Further detailed information is not mentioned in this

57
English
6. Operation
6.9 DVR
Figure 6.9.1
Figure 6.9.2
➊
File List
▣
File Playback
1. Press to show the file list. Select the file you want to play back by using , OK.
2. Press . In the left side of screen, detailed information about the selected file will be
displayed. (Recorded Date/Time, Used size, Total Size) <Figure 6.9.1>
▪ To see a full screen, press OK. And then the following time-bar will apprear.<Figure 6.9.2>

58
6.9 DVR
6. Operation
Figure 6.9.3
▣ Edit Menu
You will be asked to enter a password whenever you try to enter it. Press Menu.
The popup menu for selection will appear<Figure 6.9.3>. Select the item that you want to edit,
and set its parameters as desired
1. Normal Mode: Press OK on the file that you can see the preview of a selected file.
2. Lock Mode: Press OK on the file that you want to lock/unlock.
3. Delete Mode: Press OK on the file that you want to delete.
▪ SAT: Select between, File Mode Dir Mode
▪ ADVANCE: Shows all sorted files. Select between, Sort by name Sort by time.
✽ If you set ‘Channel Lock’ (refer to <Figure 6.2.4>security setting) to OFF, you will not be asked
to enter a password even if the channel is locked.
4. Rename Mode: Press OK on the file tha you want to rename.

59
English
6. Operation
6.9 DVR
➋
Trick Mode
You can operate the trick mode while you are playing the recorded files.
These functions are available in playback mode or time-shift mode powerfully.
▣ PLAY
This button will display a time- banner.
If you want to show the play list while playing the file by using .
▣ PAUSE
This button will pause the playing file until you play again with or . <Figure6.9.4>
▣ ADVANCE
▪ If the time-shift mode is enabled, You can press to jump the live program.
▪ If the playback mode is enabled, You can press to stop the current playing file and
then jumping the live program.
▣ FF(Fast Forward)
▪ When playing the file, you can press to adjusting the playing speed.<Figure 6.9.5>
▪ The speed will change to x2, x4, x8, x16 and x32.
Figure 6.9.5Figure 6.9.4

60
6.9 DVR
6. Operation
▣ RWD(Rewind)
When playing the file, you can press to adjusting the playing speed. <Figure 6.9.6>
The speed will change to x2, x4, x8, x16 and x32.
▣ Jump
▪ You can locate the control position to the desired position by using the .
▪ If you press this key continuosly, You can locate the control position to the desired
position very quickly.
▣ Skip
▪ You can skips and forward in 15 seconds using the USB(<<)
▪ You can skips and backward in 15 seconds using the RECALL(>>)
✽ Note: Jump & Skip used only playing at the time-bar.
Figure 6.9.6

61
English
6. Operation
6.9 DVR
▣ Bookmark
To mark a specific place in a file for later retrieval. <Figure 6.9.7>
▪ RED: Press this button and red small triangle cursor will be placed at that position.
If you want to delete the bookmarked position, press a this button once more when
red small triangle cursor appear.
▪ GREEN: Press this button and the current position will jump to the next bookmarked
position and playback starts from this point.
▪ YELLOW: Press this button and the current position will jump to the pre-bookmarked
position and playback starts from this point.
✽ Note: The maximum number of the bookmark is 20 in a file.
Figure 6.9.7

62
6.9 DVR
6. Operation
➌
Instant Recording
1. You can record a current channel by using .
If you then press , a time-banner will be displayed. <Figure 6.9.9>
2. Press once more. The following picture shows that you can select item when you
record a current channel. <Figure 6.9.10>
▪ Channel: It shows a current channel.
▪ Name: It shows a current recording name.
▪ Duration: You can change the duration of recording time by using the .
And current recorded time appear.
✽ Note: 1. Do not remove the USB device while recording a program.
Figure 6.9.10Figure 6.9.9
➍
EPG (Electronic Program Guide) Recording
This method can be used if the program you wish to record is on within the next 7 days.
▪ Press the EPG button on your remote.
▪ Use the or buttons to highlight the channel for the program you wish to record. Press OK.
▪ Use the button to highlight the program name section of the EPG menu.
▪ Use the or buttons to highlight the program you wish to record.
▪ Press the button while this program is highlighted.
The selected program will then appear in red.
▪ Press the EXIT key to return to normal viewing.

63
English
6. Operation
6.9 DVR
➎
Timer Recording
This function is availabe when usb device is connected. You can choose a channel to record the
Program Guide menu by using . (Refer to 6.4 Electric Program Guide, 2)Timer)
✽ Timer Lead In and Lead Out Times
▪ Lead In and Lead Out Times can be set on your DVR to apply to all Timer recordings. Lead
In and Lead Out times add specified amounts of time to the beginning and the end of Timer
recordings so you don't miss the beginning or end of recorded programs.
▪ To set Lead In & Out times press MENU and select System Settings, then select Time Settings.
Then highlight Timer Lead Time and press OK the button. This will allow you to set the Lead In &
Out times to either 5,10 or 15minutes
➏
Time Shift
1. If you want to pause and resume live TV channel, press TIMESHIFT button.
The default time of Time-Shift is 60 min in your STB.<Fig 6.10.11>
2. If you want to resume live TV channel, press PL AY button. <Figure 6.9.12>
3. The trick-mode operations are provided. If you want to jump to live channel, please press
Figure 6.9.12Figure 6.9.11

64
7. Troubleshooting
Problem Possible causes Remedy
The LED light on the
front panel does not light
The AC power cord is
disconnected.
Connect the power cord properly
into the power socket.
No Picture or sound Wrong connection of the
video/audio output to the
TV input terminal.
Wrong connection of the
satellite antenna cable.
Wrong direction of the
satellite antenna.
No signal or weak signal.
Wrong setting of channel
information in the MENU
screen.
Connect the two terminals
correctly with RCA or HDMI cable(s).
Connect the antenna cable
correctly.
Adjust the direction of the
antenna.
Check the cable connections,
the LNB and other equipment
connected between the LNB and
the receiver, or adjust the antenna.
Type the setting values correctly.
Black-and-white
screen or V-Hold
Your TV mode (PAL/NTSC)
is different from the satellite
broadcasting mode.
Use a TV of the same mode.
Connect a NTSC/PAL converter
between the receiver and the TV.
The remote controller
is not working
Batteries are exhausted.
Fluorescent light is interfering
with the remote controller.
Remote controller is
incorrectly aimed.
Change the batteries.
Switch off the light.
Aim the remote control at the
receiver.

65
English
8. Specifications
System capabilities Fully DVB compliant
satellite Connector IEC 169-24, female
LNB/Tuner input Frequency range
Signal level
LNB supply
LNB switch control
DiSEqC
950MHz ~ 2150MHz
-65dBm ~ -25dBm
DC 13/18V, max 400mA
22KHz
Ver 1.0 /1.1/1.2/USALS Compatible
Demodulator Front end DVB-S/S2 QPSK, 8PSK, 16APSK, 32APSK
Symbol rate DVB-S : 2~45Msps
DVB-S2 : 10~30Msps(QPSK) 10~30Msps(8PSK)
36Msps(16APSK), 27Msps(32APSK)
SCPC and MCPC Capable
Spectral inversion Auto conversion
System resource Processor 32bit processor (550MHz, 850DMIPS)
DDR3 128Mbyte
FLASH 8Mbyte
Video decoder MPEG 2 MPEG-2, MPEG-4, H.264
Data Rate up to 15M bits/s
Resolution 1920 X 1080P/i, 1280 X 720P, 720 X 576P/i
Video format PAL
Aspec Ratio 4 :3,16:9
Tel et ex t DVB compliant
MPEG Audio MPEG 1 layer I/ II,
MPEG 2 layer II,
AC3 Dolby Digital
Type Mono, Stereo, Joint Stereo
Sampling rates 32, 44.1 and 48 KHz
Serial data interface Connector 9pin D-sub male, Max 115K bps
Remote control Code N E C- I R
Operating condition up to 7 Meter
USB USB Supply DC 5V Max 500mA

66
8. Specifications
Disposal of Old Electrical & Electronic Equipment(Applicable in the European Union and
other European Countries with separate collection systems)
This symbol on the product or on its packaging indicates that this product shall not be treated
as household waste. Instead it shall be handed over to the applicable collection point for the
recycling of electrical and electronic equipnent.
By ensuring this product is disposed of correctly, you will help prevent potential negative
consequences for the environment and human health, which could otherwise be caused by
inappropirate waste handling of this product. The recycling of materials will help to conserve
natural resources.
For more detailed information about recycling of this product, please contact your local city
office, your household waste disposal service or the shop where you purchased the product.
Conditional Access
Interface
Smart Card Reader 1 Slot
Power supply Power consumption max 25W
Supply voltage AC 100V ~ 250V
Supply frequency 50Hz ~ 60Hz
Rear Panel
connectors
Video 1 X RCA cinch
Audio L/R 2 X RCA cinch
S/PDIF 1 X RCA cinch(Coaxial)
HDMI Digital Video/Audio Output
LAN RJ-45
Digital tuner input IEC 169 - 24
Loop-through Digital tuner IEC 169 - 24
Serial Data 9pin D-sub
RF modulator output IEC 169 - 2
RF modulator
PAL G/I/K TV Type
Connector IEC 169-2, female/male
Frequency 470 ~ 860MHz
Output channel number 21 ~ 69
Power supply Size (W x H x D) 250 x 45 x 195 (mm)
Weight 1.6 Kg

1
Française
Sommaire
1. Introduction ---------------------------------------------------------------------- 2
1.1 Aperçu ------------------------------------------------------------------------ 2
1.2 Caractéristiques Principales ------------------------------------------------- 2
2. Sûreté/Précautions -------------------------------------------------------------
3
2.1 Sûreté ------------------------------------------------------------------------- 3
2.2 Précautions ------------------- ----------------------------------------------- 4
3. Points à Vérifier avant l’Utilisation -----------------------------------------
5
3.1 Accessoires -------------------------------------------------------------------- 5
4. Contrôle/Fonctions ------------------------------------------------------------
6
4.1 Panneau de Commande Avant ---------------------------------------------- 6
4.2 Panneau de Commande Arrière -------------------------------------------- 7
4.3 Télécommande --------------------------------------------------------------- 8
5. Comment Connecter ----------------------------------------------------------
10
6. Opérer ---------------------------------------------------------------------------- 11
6.1 Préparatifs ------------------------------------------------------------------- 11
6.2 Configuration du Système ------------------------------------------------- 22
6.3 Chaînes ---------------------------------------------------------------------- 31
6.4 Guide Electronique du Programme (EPG) -------------------------------- 38
6.5 Divertissement ------------------------------------------------------------- 40
6.6 Manager Média ------------------------------------------------------------- 43
6.7 Informations sur le Système ----------------------------------------------- 49
6.8 Appareil Externe ------------------------------------------------------------ 50
6.9 DVR -------------------------------------------------------------------------- 52
7. Résolution de Pannes ---------------------------------------------------------
59
8. Caractéristiques ---------------------------------------------------------------- 60

2
1. Introduction
1.1 Aperçu
Ce récepteur satellite reçoit les chaînes d’accès libre (FTA) et chaînes cryptées. Dépendamment
de votre location, vous pouvez jouir d’un choix vaste de 10 000 chaînes différentes couvrant une
gamme de programmes variés : culture, sport, cinéma, nouvelles, événements… Ce récepteur
contient des composantes électroniques de haute qualité.
1.2 Caractéristiques Principales
▪ Résolution Vidéo : 1080p / 1080i / 720p / 576p / 576i
▪ Prêt à l’enregistrement numérique DVR Ready via Disque Dur Externe à Stockage de Masse
▪ Décalage de Temps, Enregistrement et Lecture
▪ Hôte USB pour Lecture MP3, JPEG et Mise à Jour du Micrologiciel
▪ 10,000 Chaînes Programmables
▪ Compatible avec DVB-S, DVB-S2
▪ Sortie HDMI
▪ Affichage sur écran avec résolution complète en vraies couleurs
▪ Blind Scan Avancé
▪ Recherche de Chaînes Automatique et Manuel
▪ Sortie Dolby Digital
▪ Classification de Chaînes par Ordre Alphabétique, Transpondeur ou CAC
▪ 16 Groupes de Chaînes Favorites
▪ Affichage sur Ecran en 12 Langues
▪ Affichage de Plusieurs Images et Zoom
▪ Affichage 16:9 Plein Ecran, 4:3 Boîte à Lettres et Plein Ecran
▪ Compatible avec DiSEqC 1.2 et Système Universel de Repérage Satellite Automatique
▪ Transfer de Données entre Unités
▪ Guide Electronique des Programmes (EPG) et Réservation de Programmes par EPG
▪ Télétexte par by Affichage Sur Ecran/VBI (Intervalle de Suppression Verticale)
▪ Auto Voltage (AC 100 - 250V) SMPS
▪ Mise à Jour Rapide du Logiciel par USB 2.0
▪ Verrouillage Parental/ Verrouillage d’Installation/ Verrouillage du Récepteur/ Verrouillage de
Chaînes/ Confirmation du Verrouillage de Chaînes
▪ Fonction d’Ajustement des Couleurs Vidéo
▪ Fabriqué sous la license des Laboratoires Dolby.
“Dolby” et le Symbole des doubles-D sont une marque déposée des
Laboratoires Dolby.
✽ DiSEqC est une marque déposée d’EUTELSAT

3
Française
2. Sûreté/Précautions
2.1 Sûreté
l Bien lire ce manuel d’utilisation avant de
mettre l’unité en service.
l Ne pas toucher le câble d’alimentation avec
des mains mouillées pour éviter l’électrocution.
l Ne jamais ouvrir la couverture. Il est
extrêmement dangereux de toucher l’intérieur
de l’unité vu le risque d’électrocution.
l Placer l’unité dans un endroit frais et aéré.
l S’assurer que le câble d’alimentation est
débranché de la sortie en cas de longue
période de non-utilisation de l’unité. Ne jamais
utiliser un câble endommagé pour éviter les
risques d’incendie ou d’électrocution
l Une installation professionnelle est requise.
Contacter votre centre de service local si la
réception est interrompue.

4
2. Sûreté/Précautions
2.2 Précautions
l Installer l’unité horizontalement. Une
installation inégale pourrait endommager l’unité.
l Ne pas placer des objets lourds, tel un poste
de télévision, sur l’unité car cela pourrait
l’endommager.
l Ne pas placer l’unité près de l’eau.
l Ne pas placer des objets contenant de l’eau,
tel un vase, sur l’unité.
l Ne pas installer l’unité:
▪ Où elle est sujette aux vibrations
▪ Où elle est exposée directement à la
lumière du soleil
▪ Où l’humidité est élevée
▪ Où la température est trop élevée ou
trop basse
▪ Où il n’y a pas d’aération
l Le déplacement de l’unité d’un endroit
chaud à un endroit froid causera de la
condensation. Ne pas opérer l’unité pour
une ou deux heures ou attendre qu’elle soit
complètement sèche.
When installing the unit

5
Française
3. Points to Check before Use
Les accessoires ci-dessous sont inclus avec ce récepteur:
Votre antenne parabolique devrait être bien installée et l’azimut et l’élévation devraient être mis
en place avec précision.
3.1 Accessories
3.2 L’Antenne Parabolique
Télécommande Manuel de l’utilisateur Batteries (type AAA) 2EA
BATTERY
BATTERY
BATTERY
BATTERY
Câble HDMI
HDMI
HDMI
Câble RCA
✽ Cette unité supporte le DiSEqC 1.2 et peut fonctionner avec un positionneur d’antenne compatible. Pour
plus d’informations, contacter votre revendeur.
UHF FREEZE
SLEEP
TV/SAT
USB
SAT
EPG
REC STOP SLOWADVANCE
FAV
TEXT
A-Z
AUDIO
SUBTITLE
POS
BOOK MARK
V.FORMATWIDE
IP
MEDIA MOSAIC
CUSTOMIZABLE KEYS
ZOOM
INFO
REW TIME SHIFT PLAY FWD
FILE LIST
RECALL
TV/RAD
>><<

6
4. Contrôle/Fonctions
4.1 Panneau Avant
❶ Lampe d’indication de mode En Veille ou ON: allume en rouge en mode En Veille et
n’allume pas en mode ON
❷ Alimentation: Fait passer le récepteur entre les modes 'En Veille' et 'ON'
❸ - ❹ CH (▲/▼): Pour changer de chaîne ou la position du curseur sur l’écran d’application.
❺ USB: Pour connecter des appareils à clé USB tel un disque dur externe ou un Stick Mémoire.
❻ Lecteur Carte à Puce: insérer une carte à puce pour accéder aux chaînes cryptées.
❶ ❸ ❹ ❻❷ ❺

7
Française
4. Contrôle/Fonctions
4.2 Panneau Arrière
NO Name Connector Function
❶
LNB ENTREE IEC 169-24 PRISE D’ENTRÉE FEMELLE entrée de LNB vers un tuner digital
❷
LOOP OUT IEC 169-24 PRISE D’ENTRÉE FEMELLE sortie en boucle du tuner digital
❸
VIDEO PRISE RCA Composée sortie vidéo
❹
AUDIO L PRISE RCA Sortie audio gauche
❺
AUDIO R PRISE RCA Sortie audio droite
❻
S/PDIF PRISE RCA Sortie audio digitale
❼
LAN RJ-45 10/100Mbps Ethernet
❽
HDMI HDMI Sortie Vidéo/Audio Digitale
❾
RS-232 DB-9 Port série à vitesse faible
❿
RF OUT UHF 21-69 IEC 169-2 MALE Output to TV
⓫
TV ANT IN IEC 169-2 FEMALE Input from terrestrial antenna
❶ ❷ ❽ ❾❸
⓫
❹ ❺ ❻
❿
❼

8
4. Contrôle/Fonctions
4.3 Télécommande
❶ Alimentation: Passer du mode ON au mode OFF
❷ Standby: Eteindre le récepteur
❸ Texte: Afficher le contenu télétexte s’il est transmis
❹ Sous-Titres: Activer ou désactiver les sous-titres
❺ TV / SAT: Pour basculer entre l'entrée satellite et
une entrée antenne UHF / VHF
❻ TV/Radio: Passer entre TV et Radio
❼ Touches Numériques (0-9): Introduire les
paramètres numériques (comme le numéro de la
chaîne) directement
❽ USB: Pour afficher le menu USB
❾ Rappel: Revenir à la chaîne précédente. Utilisé
pour des fonctions spéciales en mode MENU.
❿ IP: Pour aller au menu SET IP
⓫ POS: Pour afficher le contrôle View Motor DisEqC
⓬ A-Z: Pour trier la liste des chaînes
⓭ Veilleuse: Régler le STB selon les minutes
⓮ Menu: Pour sortir ou entrer au menu principal
⓯ Sortie: Sortir du menu actuel et passer au menu
précédent.
⓰ Haut & bas: Pour changer de chaîne en mode
non menu et de déplacer le curseur haut / bas en
mode menu
UHF FREEZE
SLEEP
TV/SAT
USB
SAT
EPG
REC STOP SLOWADVANCE
FAV
TEXT
A-Z
AUDIO
SUBTITLE
POS
BOOK MARK
V.FORMATWIDE
IP
MEDIA MOSAIC
CUSTOMIZABLE KEYS
ZOOM
INFO
REW TIME SHIFT PLAY FWD
FILE LIST
RECALL
TV/RAD
>><<
❶
❸
❹
❼
❿
⓭
❺
❷
❻
❽
❾
⓫ ⓬
⓮ ⓯
⓰

9
Française
4. Contrôle/Fonctions
4.3 Télécommande
❶ Volume Haut + Bas: Ajuster le volume hors du
mode Menu
❷ Ok: Afficher la liste des chaînes hors du mode
Menu et sélectionner ou confirmer un choix en
mode Menu
❸ Liste des Dossier: Afficher la liste des dossiers
❹ FAV: Pour afficher la liste des favoris dans le
groupe préféré ou pour passer à la page suivante
❺ Audio: Afficher les langues disponibles, le mode
stéréo-mono et les informations sur les sous-titres
❻ EPG: Pour afficher le guide des programmes
TV / Radio
❼ Touches couleurs: Sélectionner les options
Afficher la Liste, Sélectionner le Disque, Renommer…
❽ REW: Rembobiner
❾ Décalage Temporaire: Afficher le contenu
❿ PLAY: Visionner le contenu
⓫ FWD: Visionner en mode rapide
⓬ REC: Commencer à enregistrer
⓭ STOP: Arrêter le visionnement
⓮ SLOW: Visionner au ralenti
⓯ ADVANCE: Passer à la chaîne en direct
⓰ UHF: Pour régler UHF hasard
⓱ FREEZE: Geler l’image. Appuyer de nouveau pour
le reprendre
⓲ Aspect: Sélectionner un aspect ratio TV Pan Scan
ou Letterbox (4 :3) ou Full Screen ou Pillar Box (16 :9).
⓳ V-Format: Changer la résolution de la sortie vidéo
⓴ F1-F4: Touche réservée pour une nouvelle fonction
UHF FREEZE
SLEEP
TV/SAT
USB
SAT
EPG
REC STOP SLOWADVANCE
FAV
TEXT
A-Z
AUDIO
SUBTITLE
POS
BOOK MARK
V.FORMATWIDE
IP
MEDIA MOSAIC
CUSTOMIZABLE KEYS
ZOOM
INFO
REW TIME SHIFT PLAY FWD
FILE LIST
RECALL
TV/RAD
>><<
❶
❸ ❹
❼
❿
⓯
⓰
⓱
⓭
❺
❷
❻
❽
❾
⓫
⓬
⓮
⓳
⓲
⓴

10
5. Comment Connecter
Pour connecter le récepteur à une télévision
1. Connecter l’antenne télé au TV ANT IN
2. Connecter les fonctions Vidéo et Audio de la télévision aux fonctions correspondates:
connecter les connecteurs rouge et blanc à Audio D (R) et Audio (L) et le connecteur jaune à Video
3. Connecter l’antenne parabolique
Video
Audio
HDMI
TV
Satellite Dish
L
R

11
Française
6. Opération
6.1 Préparation
Allumer le récepteur puis installer comme suit:
➊
Configuration de la langue du menu
1. Allumer la télévision et le récepteur
2. Le menu Wizard pour le choix de la langue apparaîtra <image 6.1.1>
Sélectionner une langue et appuyer sur la touche pour continuer
Fi gure 6.1.1

12
6. Opération
6.1 Préparation
➋
Configuration de l’Antenne
1. Appuyer sur la touche MENU pour afficher le menu principal
2. Utiliser les touches et pour mouvoir le curseur dans le menu
3. Appuyer sur OK sur « Configuration de l’Antenne Parabolique ». La fenêtre suivante apparaîtra
<image 6.1.2>
Si vous avez une antenne parabolique motorisée, appuyez sur OK sur « Configuration
Motorisée » <image 6.1.3>
✽ Note: Tapez un mot de passe de 4 chiffres en cas échéant. Le mot de passe par défaut est
‘0000’ <image 6.1.2, image 6.1.3>
4. Selectionner ce que vous voulez changer et conimager les paramètres <Configuration Antenne
Parabolique>
▪ Alimentation LNB: Sélectionner ON/OFF/13V/18V
▪ Type LNB : Sélectionner Singulier/Universel/OCS (Solution à Câble Unique)/ SaTCR
▪ Fréquence LNB: Ajuster la fréquence de l’oscillateur LNB.
▪ 22KHz: En dehors du mode AUTO, ajuster le trajet du signal du LNB ou le changer en
sélectionnant un signal de contrôle entre 0/22KHz
▪ DiSEqC 1.0: Sélectionner le port DiSEqC 1.0
▪ DiSEqC 1.1: Sélectionner le port DiSEqC 1.1
Fi gure 6.1.2 Figure 6.1.3
5. Sélectionner l’article que vous voulez modifier et en conimage les parameters
<Configuration Motorisée>

13
Française
6. Opération
6.1 Préparation
Figure 6.1.4
Fi gure 6.1.5
▪ Fréquence: Si la fréquence du transpondeur n’est pas appropriée, il est possible d’en
sélectionner une autre pour chercher un signal.
▪ Moteur DiSEqC: Sélectionner le protocole DiSEqC entre OFF/1.2/USALS (Système Universel
de Repérage Satellite Automatique) qui est approprié à votre moteur.
(Quand le paramètre du moteur DiSEqC est fixé à 1.2 <image 6.1.4>)
▪ Satellite: Sélectionner n’importe quel satellite en appuyant sur les touches
▪ Fréquence: Afficher la valeur actuelle du transpondeur du satellite sélectionné.
▪ Mouvement: Changer la position de l’antenne parabolique vers l’Est ou l’Ouest en
appuyant sur les touches
▪ Mouvement Léger: Changer la position de l’antenne parabolique un pas à la fois vers
l’Est ou l’Ouest en appuyant sur les touches
▪ Contrôle du Moteur: Contrôler le moteur en appuyant sur la touche de la télécommande
▫ Recalculer: Recalculer la position de toutes les antennes paraboliques relatives à la position
connue.
▫ Réinitialiser le Système: Repositionner toutes les antennes paraboliques sauvegardées.
▫ Fonction Référence: Remettre l’antenne parabolique à la position 0.
▫ Désactiver les Limites: Désactiver les limites Est et Ouest.
▫ Activer les Limites: Activer les limites Est et Ouest sauvegardées.
▫ Déterminer la limite Est: Modifier et sauvegarder la limite Est en appuyant les
touches ou OK.
▫ Déterminer la limite Ouest: Modifier et sauvegarder la limite Ouest en appuyant
les touches ou OK.
▪ Aller à: Aller aux positions des satellites sauvegardés.
▪ Sauvegarder: Sauvegarder la configuration actuelle du système DiSEqC 1.2.

14
6. Opération
6.1 Préparation
(Quand les paramètres du moteur DiSEqC sont fixés à USALS <image 6.1.6>)
▪ Degré du Satellite: position du satellite.
▪ Position de l’antenne: Presser OK
▪ Fonction Référence: Bouger l’antenne parabolique à la position 0 de référence.
▪ Longitude de l’Antenne: La longitude actuelle.
▪ Latitude de l’Antenne: La latitude actuelle.
✽ Note: Il est nécessaire de savoir quel LNB vous utilisez pour determiner la fréquence de
l’oscillateur local correctement.
✽ Note: Il est nécessaire de comprendre comment le récepteur est connecté pour déterminer les
22KHz et le DiSEqC correctement.
Figure 6.1.6 Figure 6 .1.7
6. Appuyer sur la touche QUITTER quand tout est fini.

15
Française
6. Opération
6.1 Préparation
Fi gure 6.1.8 Fi gure 6.1.9
➌
Scan du Satellite
A travers cette fonction, le récepteur cherche toutes les chaînes disponibles et les sauvegarde
dans sa mémoire.
▣ Scan Automatique <image 6.1.8>
1. Sélectionner les satellites que vous voulez activer en appuyant la touche sur la télécommande.
Vous pouvez sélectionner plus de satellites en appuyant les touches et sur la télécommande.
▪ Type de recherche: Sélectionner le type de chaîne que vous voulez en appuyant la
touché sur la télécommande .
▫ Toutes les Chaînes: Pour rechercher toutes les chaînes à accès libre et chaînes cryptées
de radio et télévision.
▫ Accès Libre: Pour rechercher les chaînes à accès libre seulement .
▫ TV: Pour rechercher les chaînes de télévision seulement.
▪ Recherche sur le réseau: Sélectionner ON/OFF de la recherche sur le réseau pour trouver
plus de transpondeurs à travers la recherche NIT
▪ Scan: Commencer la recherche de chaîne avec le satellite sélectionné.
2. Appuyer sur sous ‘SCAN’ pour scanner les satellites sélectionnés <image 6.1.9>

16
6. Opération
6.1 Préparation
▣ Blind Scan <image 6.1.10>
1. Sélectionner les satellites que vous voulez rechercher en appuyant sur la touche de la
télécommande
2. Appuyer sur , pour sélectionner les options “Polarisation” et “Mode Scan”
▪ TP: Sélectionner la fréquence du transpondeur
▪ Polarisation: Choisir parmi Tous/ Vertical / Horizontal
▪ Mode: Choisir parmi Tous/ Accès Libre/ TV
▪ SCAN: Commencer la recherche de chaînes des satellites sélectionnés.
Fi gure 6.1.10
▣ Scan Manuel <image 6.1.11>
1. Sélectionner un transpondeur.
2. Pour changer les informations d’un transpondeur (fréquence, débit de symboles), utiliser les
touches NUMERIQUES.
3. Pour ajouter un nouveau transpondeur, appuyer sur la touche VERTE.
4. Pour éliminer un transpondeur, appuyer sur la touche JAUNE avec le curseur près du
Paramètre de Fréquence.
5. Pour fouiller un transpondeur, determiner ses différents paramètres et appuyer sur la touche ROUGE

17
Française
▣ Scan d’identification du package (PID) <image 6.1.12>.
1. Sélectionner un transpondeur. .
2. Pour changer les informations d’un transpondeur (fréquence, débit de symboles), utiliser les
touches NUMERIQUES.
3. Pour ajouter un nouveau transpondeur, appuyer sur la touche VERTE.
4. Pour éliminer un transpondeur, appuyer sur la touche JAUNE avec le curseur près du
Paramètre de Fréquence.
5. Pour fouiller un transpondeur, déterminer ses différents paramètres et appuyer sur
6. Opération
6.1 Préparation
▣ Menu OTA
1. Mode de Scan
▪ Par défaut: Service OTA selon les paramètres originaux
▪ Selon l’utilisateur: Service OTA selon les préférences de l’utilisateur
2. Sélectionner un satellite pour le les services OTA (disponible uniquement quand le mode Scan
est programmé en tant que mode de l’utilisateur).
3. Introduire les informations du transpondeur (fréquence, débit de symbole) avec les touches
0~9 (disponible uniquement quand le mode Scan est programmé en tant que mode de l’utilisateur).
4. Appuyer sur la touche ROUGE pour commencer le processus de Scan
5. Si les informations du transpondeur sont correctes, une fenêtre contextuelle affichera
la mise à jour du logiciel.
Fi gure 6.1.11 Fi gure 6.1.12
✽ Note: Au cas où vous ne pouvez pas accéder à des programmes après avoir complété
l’opération de scan, prière de contacter votre vendeur ou installeur.

18
6. Opération
6.1 Préparation
➍
Sélection de Chaînes
Utiliser les touches / pour passer de chaîne en chaîne pour sélectionner les chaînes que vous
désirez.
▣ Si vous connaissez le numéro de la chaîne vous pouvez l’introduire en utilisant les touches
NUMERIQUES et attendre 2 secondes pour que le changement se produise.
▣ Si vous connaissez le nom de la chaîne ou du transpondeur ou CAS, appuyez sur la touche OK
pour afficher la liste de chaînes <image 6.1.13>
Fi gure 6.1.13
1. A gauche de l’écran, des informations détaillées sur les chaînes sélectionnées apparaîtront
(Nom du satellite, fréquence et nom de chaîne).
2. Utiliser les touches suivantes pour passer de chaîne en chaîne
▪ : Monter ou descendre de chaîne
▪ : Monter ou descendre de page
▪ ROUGE: Montre toutes les chaînes du groupe actuel
▪ VERT: Montre toutes les chaînes en ordre alphabétique
▪ JAUNE: Montre toutes les chaînes par transpondeur
▪ BLEU: Montre toutes les chaînes par CAC.
3. Appuyer sur OK quand la barre de selection est sur la chaîne désirée

19
Française
➎
Autres fonctions de la télécommande
▣ Contrôle du Volume
1. Appuyer sur pour ajuster le volume en regardant un programme
2. Appuyer sur la touche silence ôtera le son et l’icône silence apparaîtra.
Appuyer sur la touche silence de nouveau ramènera le son.
▣ Informations sur les Chaînes
1. Appuyer sur cette touche fera apparaître les informations sur la chaîne momentanément.
2. Appuyer sur cette touche une seconde fois fera apparaître un programme d’informations plus
détaillé.
▣ Passer de la Télévision à la Radio
Appuyer sur cette touche pour passer de la télévision à une station radio.
Appuyer sur cette touche de nouveau pour revenir à la télévision.
▣ RAPPEL
Appuyer sur cette touche ramène l’unité à la chaîne visionnée précédemment.
▣ Audio
Appuyer sur cette touché pour ajuster les sous-titres ou le statut audio de la chaîne en
visionnement
▪ Mode Audio: Sélectionner du menu -> Stéréo -> Mono Gauche -> Mono Droite.
▪ Morceau Audio: Sélectionner parmi les morceaux disponible de ce programme
▪ Niveau Audio: Sélectionner Haut -> Moyen -> Bas
✽ Note: Les sous-titres et configuration audio ne sont disponible que pour les chaînes qui
offrent ces fonctions.
▣ Texte
Le service télétexte est parfois fourni par le Fournisseur de Service
▣ GEL D’IMAGE
Appuyer sur cette touche pour geler l’image. Appuyer dessus de nouveau pour revenir à l’mage normale.
▣ GROUPE
Utiliser cette touche pour voir la liste des groupes de chaînes et/ou de satellites favoris.
Seuls les groupes enregistrés apparaissent.
6. Opération
6.1 Préparation

20
6. Opération
6.1 Préparation
▣ Affichage de Plusieurs Images<image 6.1.14>
Appuyer sur la touche
Pour afficher plusieurs images.
Vous pouvez choisir le nombre d’images (1x2, 2x2, 2x3, 3x3)
Fi gure 6.1.14
Fi gure 6.1.15 Fi gure 6.1.16
▣ ZOOM
En appuyant sur la touche
1. vous pourrez faire zoom avant sur la vidéo. En appuyant sur la touche GEL D’IMAGE et
vous pourrez faire zoom avant sur des sections de vidéo gelées. <image 6.1.15> .
2. En regardant un programme, appuyer sur la touche
pour faire zoom avant sur une section de la vidéo <image 6.1.16>
3. Pour annuler le gel d’image, appuyer sur la touche qui libère le zoom.

21
Française
▣ SOUS -TIT R ES < image 6.1.17>
En appuyant sur la touche
vous pouvez sélectionner la langue des sous-titres de la chaîne en visionnement
▣ VEILLEUSE <image 6.1.18>
Vous pouvez conimager votre récepteur pour qu’il s’éteigne après un laps de temps. Les choix
disponibles sont de 10, 20, 30, 60, 100 et 120 minutes. Pour activer cette option, appuyer sur et
déterminer la durée voulue.
▪ Pour annuler cette fonction, appuyer sur la touche jusqu'à ce que les minutes reviennent à zéro.
6. Opération
6.1 Préparation
Fi gure 6.1.19 Fi gure 6.1.20
▣ FORMAT V <image 6.1.19>
Sélectionner la résolution vidéo en appuyant sur 1080p -> 1080i -> 720p -> 576p -> 576i
▣ ASPECT <image 6.1.20>
Appuyer sur la touche ASPECT change les proportions de l’image. Les choix disponibles sont.
▪ 4.3: Pan-Scan ou Boîtes aux Lettres
▪ 16.9: Plein Ecran ou Pillar-Box
Fi gure 6.1.17 Fi gure 6.1.18

22
6. Opération
6.2 Configuration du Système
➊
Configuration de l’Heure
Ce sous-menu vous permet de spécifier l’heure locale, l’heure du réveil matin, la chaîne du réveil
matin et l’heure de la mise en veille. <image 6.2.1>
▪ Utilisation GMT: Sélectionner cela pour que l’heure locale soit déterminée selon le décalage
horaire avec la zone GMT
▪ Date: Si la fonction GMT n’est pas utilisée, changer la date en appuyant sur
▪ Heure: Si la fonction GMT n’est pas utilisée, changer l’heure en utilisant les touches
NUMERIQUES
▪ Heure d’été : Sélectionner la date d’application de l’heure d’été
▪ Offset Local: Si la fonction GMT est utilisée, l’heure locale = GMT + Offset Local
▪ Mode Réveil: Sélectionner la fréquence du réveil matin (OFF/Une fois/Quotidiennement/
Lundi-Vendredi)
▪ Heure du réveil: Sélectionner l’heure du réveil en utilisant les touches NUMERIQUES
▪ Chaîne du Réveil: Appuyer sur pour sélectionner la chaîne du réveil
▪ Mode En Veille: Selectionner la fréquence du mode En Veille
(OFF/Une fois/Quotidiennement/Lundi-Vendredi)
▪ Heure de Veille: Sélectionner l’heure de Veille en utilisant les touches NUMERIQUES
▪ Laps de temps du compte-minute: Appuyer sur. Ceci vous permettra de sélectionner 5, 10
ou 15 minutes entre chaque fonction du compte-minute.
Fi gure 6.2.1

23
Française
6.2 Configuration du Système
➋
Configuration de la sortie A/V
Ce menu vous permet de déterminer les sorties vidéo et audio de votre récepteur <image 6.2.2>
▪ Langue Audio: sélectionner la langue audio
▪ Langue Sous-titres: Sélectionner la langue des sous-titres
▪ Format de l’Ecran: Sélectionner le format de l’écran (16.9/ 4.3)
▪ Format d’affichage: Sélectionner l’aspect ratio (Full screen/ Pillar Box)
▪ Format Vidéo: Sélectionner le format vidéo parmi 1080p, 1080i, 720p, 576p, 576i
▪ Audio Digital: Sélectionner le type de sortie audio (DOLBY SPDIF/PCM/DOLBY HDMI)
6. Opération
Figure 6.2.2

24
6. Opération
6.2 Configuration du Système
➌
Affichage de la Configuration sur l’écran
Sur ce menu, vous pouvez sélectionner la langue du menu, utiliser la liste de rappel et la durée
d’affichage des barres de volume sur l’écran <image 6.2.3>
▪ Langue du Menu: sélectionner la langue désirée pour le menu
▪ Durée d’affichage des informations: sélectionner la durée d’affichage de la barre
d’informations (1, 2, 3, 5 ou 10 secondes)
▪ Liste de rappel: sélectionner ON pour afficher la liste des chaînes précédentes.
Figure 6.2.3

25
Française
6.2 Configuration du Système
➍
Configuration de Sécurité
Ce menu vous permet de configurer le mot de passe et de verrouiller ou déverrouiller l’accès à
certains menus.
✽ NOTE: Le PIN par défaut est 0000, le même que le mot de passe. <image 6.2.4>
▪ Verrouillage du Récepteur: sélectionner ON pour que le PIN soit nécessaire dès le
démarrage de l’installation.
▪ Verrouillage de l’Installation: sélectionner ON pour que le PIN soit nécessaire pour l’accès
au menu d’installation.
▪ Verrouillage des Chaînes: sélectionner ON pour que le PIN soit nécessaire pour l’accès au
menu de chaînes.
▪ Confirmation du Verrouillage des Chaînes: Sélectionner ON pour que le PIN soit
nécessaire pour accéder aux chaînes verrouillées.
▪ Limite d’Age: Empêcher les enfants ou personnes non-autorisées de regarder un
programme. Sélectionner parmi Accès Libre, 8 et +, 12 et +, 15 et +, 18 et +. Quand les
informations sur le programme sont disponibles et ne correspondent pas à la limite que vous
désirez, un code PIN est nécessaire pour accéder au programme ou à la chaîne.
▪ Mot de passe actuel: Pour le changer, introduire votre mot de passe actuel.
▪ Nouveau mot de passe: Introduire le mot de passe que vous désirez.
▪ Vérification du mot de passe: réintroduire le nouveau mot de passe pour le confirmer.
6. Opération
Figure 6.2.4

26
6. Opération
6.2 Configuration du Système
➎
Réinitialisation de la Base de Données
Cette section vous permet de ré-adopter la configuration de l’usine, utile quand vous rencontrez
des problèmes après un changement de paramètres.
▪ Suppression de Chaînes Radio: Effacer toutes les chaînes radio de la base de données.
▪ Suppression de Chaînes Brouillées: Effacer toutes les chaînes brouillées de la base de
données.
▪ Suppression de toutes les Chaînes: Effacer toutes les chaînes.
▪ Configuration de l’Usine: Effacer toutes les chaînes et revenir à la configuration originale
par défaut .
Figure 6.2.5

27
Française
6.2 Configuration du Système
➏
Configuration IP
Si le réseau adopte le protocol DHCP, la configuration IP pourra être determine automatiquement.
Sinon, les adresses devront être introduites manuellement (IP Statique). <image 6.2.6>
▪ Type de connexion: Ethernet / Wi-Fi
▪ Utilisation DHCP: ON/OFF pour recevoir la configuration IP automatiquement
▪ Adresse IP: Introduire l’adresse IP
▪ Masque Subnet: Introduire le numéro du Masque Subnet de votre réseau
▪ Portail: Introduire l’adresse IP de votre portail (ex: routeur)
▪ DNS: Introduire l’adresse IP du serveur DNS principal
▪ Adresse Mac: Affichage de l’adresse Mac
6. Opération
Figure 6.2.8
▪ Mise à jour du firmware: Télécharger avec support LAN
1. Appuyer sur la Bouton Bleu
Figure 6.2.6 Figure 6.2.7

28
6. Opération
6.2 Configuration du Système
Figure 6.2.9
Fi gure 6.2.10
▪ étapes de la mise Wi-Fi: balayage liste de Wi-Fi.
1. Appuyez sur le bouton vert.
▪ Configuration Wi-Fi
1. Appuyez sur le bouton jaune.
✽ Remarque: Pour utiliser le Wi-Fi, S'il vous plaît utilisez Adaptateur USB Wi-Fi externe.
✽ Liste compatible de puce Wi-Fi: Ralink RT5370.

29
Française
6. Opération
6.2 Configuration du Système
➐
Configuration Affichage Avant
Ce menu vous permet de configurer le mode
En Veille <image 6.2.11>
▪ Mode EN VEILLE: Sélectionner mode
Standby
➑
Touche de réglage
Ce sous-menu vous permet de définir la
touche de fonction (scan automatique /
bloquer Chaînes / manager minuteur / Liste
Divx / ...)
➒
Connecting your receiver to a PC via your Network
1. Suivre ces instructions avant de connecter votre récepteur à votre PC.
a) Démarrer le programme Outil PC (Décodeur Daemon) avant de vous connecter à votre PC ;
vous pouvez le télécharger sur www.technomate.com
b) Cliquer sur Surfer et sélectionner un partage de fichiers sur votre PC
Fig ure 6.2.11
Fi gure 6.2.12

30
6.2 Configuration du Système
c) Appuyer sur «OK» puis sélectionner
le décodeur Daemon et la fenêtre sera
cachée. Vous pourrez toujours voir l’icône
sur le bas de votre écran, à droite.
2. Connecter un cable Ethernet de votre
TM-F3/5 à votre port réseau.
3. Cliquer sur menu, sélectionner
Configuration du Système, sélectionner
Configuration IP :
6. Opération
b) Si votre réseau n’est pas compatible avec
le DHCP, il faudra introduire l’adresse IP
manuellement (IP Statique).
c) Cliquer sur l’icône au bas de votre
fenêtre PC
a) Si votre réseau accepte le DHCP, la
configuration IP peut devenir automatique
en activant l’utilisation du DHCP et en
appuyant sur la touche ROUGE.
d) Sélectionner Support Tap pour introduire
votre adresse IP.
4. Aller à File Manager sur votre
et appuyer sur la touche JAUNE pour
introduire l’adresse IP du PC auquel est
relié le STB Dameon.

31
Française
6. Opération
6.3 Chaînes
➊
Configuration de Chaînes Favorites
Cette section vous permet de configurer les groupes de chaînes TV ou radio favorites –vous
pouvez passer d’un genre à l’autre en appuyant sur la touche TV/RADIO.
Le récepteur supporte jusqu’à 16 groupes de favoris.
1. Cliquer sur OK sur “Déterminer les Chaînes Favorites” et les listes apparaîtront <image 6.3.1>
2. Appuyer sur le bouton et OK pour choisir un groupe. Ce menu apparaîtra <image 6.3.2> Pour
changer le nom du groupe, appuyer sur la touche ROUGE.
3. Appuyer sur OK pour ajouter ou supprimer une chaîne de la liste.
4. Appuyer sur EXIT pour revenir au menu précédent.
Figure 6.3.1 Figure 6.3.2

32
6. Opération
6.3 Chaînes
Figure 6.3.3
➋
Modifier les Chaînes
Cette section vous permet de renommer et modifier les chaines et introduire des informations
PID. Sélectionner les chaines Radio ou TV en appuyant sur la touche TV/RADIO ou un groupe
de chaîne avec la touche GROUP.
1. Appuyer sur la touche OK sur “Modifier les Chaînes” et un nouveau menu apparaîtra <image 6.3.3>
2. Appuyer OK sur la chaîne désirée .
3. Appuyer OK sur “Modifier le Nom” pour renommer la chaîne en utilisant le clavier affiché
4. Vous pouvez de la même manière modifier les informations PID en utilisant les touches
Numériques.
✽ NOTE: Les informations PID Vidéo, Audio et PCR sont extrêmement importantes pour
une réception de signal satellite optimale. Nous vous conseillons de demander une
aide professionnelle si possible.

33
Française
➌
Bouger les Chaînes
En parcourant cette section, vous pouvez changer l’ordre des chaînes.
Sélectionner la liste des chaînes TV ou Radio en appuyant sur la touche TV/RADIO Sélectionner
un groupe de chaînes en appuyant sur la touche GROUP
1. Appuyer sur OK sur Bouger les Chaînes. Le menu suivant apparaîtra <image 6.3.4>
2. Appuyer sur OK sur la chaîne que vous voulez bouger. Un icône « bouger » apparaîtra.
3. Après avoir appuyé sur utilisez les touches , , , et les touches Numériques
pour bouger la chaîne sélectionnée.
4. Appuyer sur OK de nouveau pour placer la chaîne
5. Appuyer sur la touche EXIT pour revenir au menu précédent.
6. Opération
6.3 Chaînes
Figure 6.3.4

34
6. Opération
6.3 Chaînes
➍
Verrouillage des Chaînes
Cette caractéristique vous permet de verrouiller une chaîne spécifique. Un mot de passe est
requis pour y accéder.
Sélectionner la liste des chaînes TV ou Radio en appuyant sur la touche TV/RADIO
Sélectionner un groupe de chaînes en appuyant sur la touche GROUP
✽Si vous sélectionnez OFF sur la confirmation du verrouillage de chaîne (Configuration de
Sécurité 6.2) le mot de passe ne sera pas requis même si la chaîne est verrouillée.
1. Appuyer sur OK sur Verrouillage de Chaîne. Le menu suivant apparaîtra <image 6.3.5>
2. Appuyer sur OK sur la chaîne à verrouiller ou déverrouiller. L’icône verrou sera affiché ou ôté.
3. Appuyer sur EXIT pour revenir au menu précédent.
Figure 6.3.5
 Loading...