

Page 1
ACTIVE
Wellness TV
12” Display
Machine configuration
Page 2

Page 3

Contents
1. MACHINE CONFIGURATION...............................................................................................1
1.1. User menu configuration....................................................................................................................................1
1.1.1. SN.............................................................................................................................................................. 2
1.1.2. Language...................................................................................................................................................2
1.1.3. Measure.....................................................................................................................................................2
1.1.4. Priority ......................................................................................................................................................2
1.1.5. Maximum excercise time ...........................................................................................................................3
1.1.6. Enable TGS ............................................................................................................................................... 3
1.1.7. Keys...........................................................................................................................................................3
1.1.8. Pause time .................................................................................................................................................3
1.1.9. Top exercise programs for you shortcut.................................................................................................... 4
1.1.10. Modifiable target heart rate...................................................................................................................... 4
1.1.11. Standby......................................................................................................................................................4
1.1.12. Language................................................................................................................................................... 5
1.1.13. Lubricated (only on Step)..........................................................................................................................5
1.1.14. Default config............................................................................................................................................5
1.1.15. Format P&P..............................................................................................................................................5
1.1.16. Screen saver minutes.................................................................................................................................6
1.1.17. Display in the workout ..............................................................................................................................6
1.1.18. iPod connection option.............................................................................................................................. 6
1.1.19. Standby channel ........................................................................................................................................7
1.1.20. Other language..........................................................................................................................................7
1.2. Service menu configuration...............................................................................................................................8
1.2.1. Low kit parameter ..................................................................................................................................... 9
1.2.2. Operating data ........................................................................................................................................10
1.2.3. Errors log................................................................................................................................................ 11
1.2.4. TV Standard.............................................................................................................................................12
1.2.5. SW version devices.................................................................................................................................. 12
1.2.6. LUB. DFloors (only on Step)...................................................................................................................13
1.2.7. Last Lubr. (only on Step).........................................................................................................................13
1.2.8. N.Lubrif (only on Step)............................................................................................................................13
1.2.9. Standard settings .....................................................................................................................................13
1.3. TV menu configuration for 700i E models.....................................................................................................14
1.3.1. Tuning TV channels.................................................................................................................................14
1.3.2. Wellness TV adjustments......................................................................................................................... 16
1.4. Radio menu configuration for 700i E models.................................................................................................17
1.4.1. Tuning radio channels.............................................................................................................................17
1.5. Transferring the tuning data...........................................................................................................................20
1.5.1. Using the TGS .........................................................................................................................................20
1.5.2. Using the connecting cable .....................................................................................................................20
1.6. Touch screen calibration..................................................................................................................................21
1.7. Troubleshooting service menu for 700 and 900 models.................................................................................23
1.7.1. I2C Device Test .......................................................................................................................................24
1.7.2. CSafe COM test.......................................................................................................................................24
1.7.3. Low Kit COM Test................................................................................................................................... 24
1.7.4. TGS COM Test ........................................................................................................................................24
1.2.1.1. Read from low kit............................................................................................................................................................. 9
1.2.1.2. Write to low kit ................................................................................................................................................................ 9
1.2.1.3. Default Setting.................................................................................................................................................................. 9
1.2.1.4. Table of configuration parameters...................................................................................................................................9
1.2.2.1. Read from low kit........................................................................................................................................................... 10
1.2.2.2. Write to low kit .............................................................................................................................................................. 10
1.2.3.1. Read from low kit........................................................................................................................................................... 11
1.2.3.2. Reset Errors.................................................................................................................................................................... 11
1.2.3.3. COM.Fault...................................................................................................................................................................... 11
1.4.1.1. Automatic radio channel tuning procedure.................................................................................................................... 18
1.4.1.2. Procedure for manually entering radio channel frequencies ......................................................................................... 19
Page 4

Page intentionally left blank
Page 5
ACTIVE WTV: Machine configuration
1. MACHINE CONFIGURATION
1.1. USER MENU CONFIGURATION
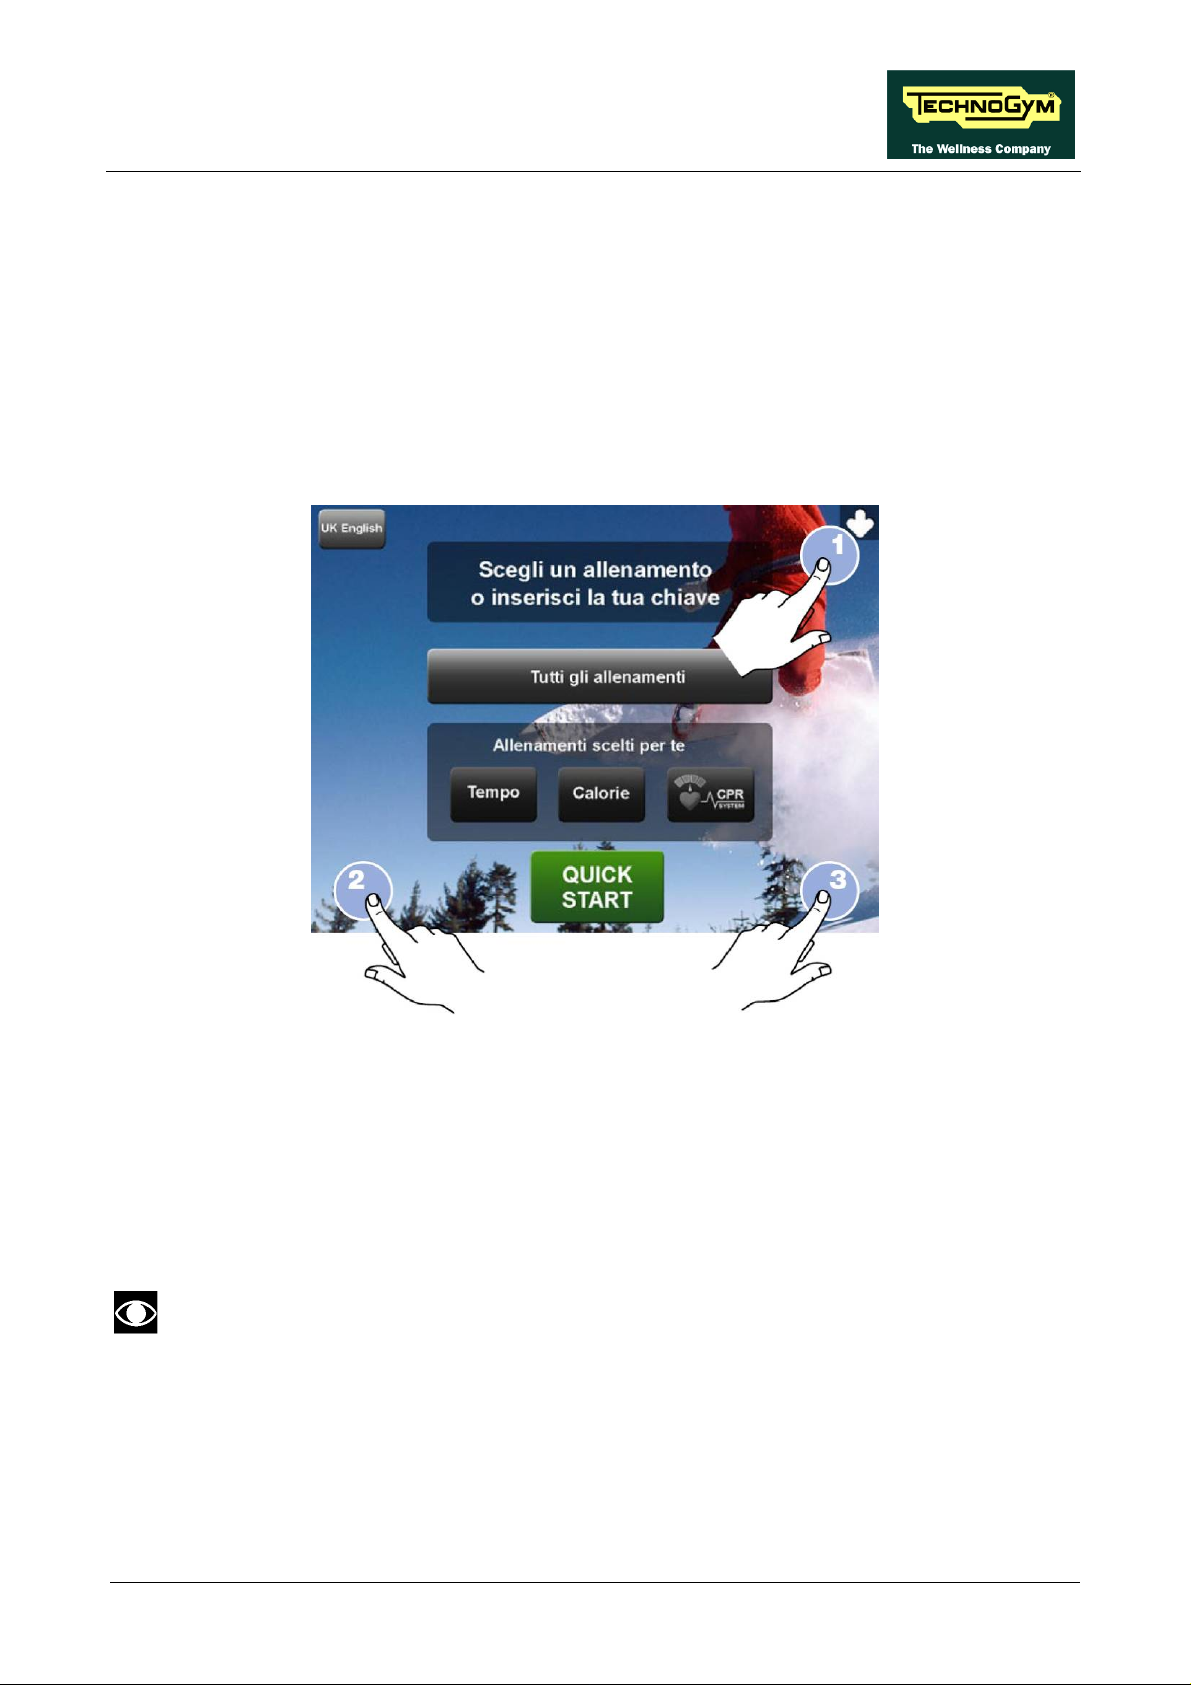
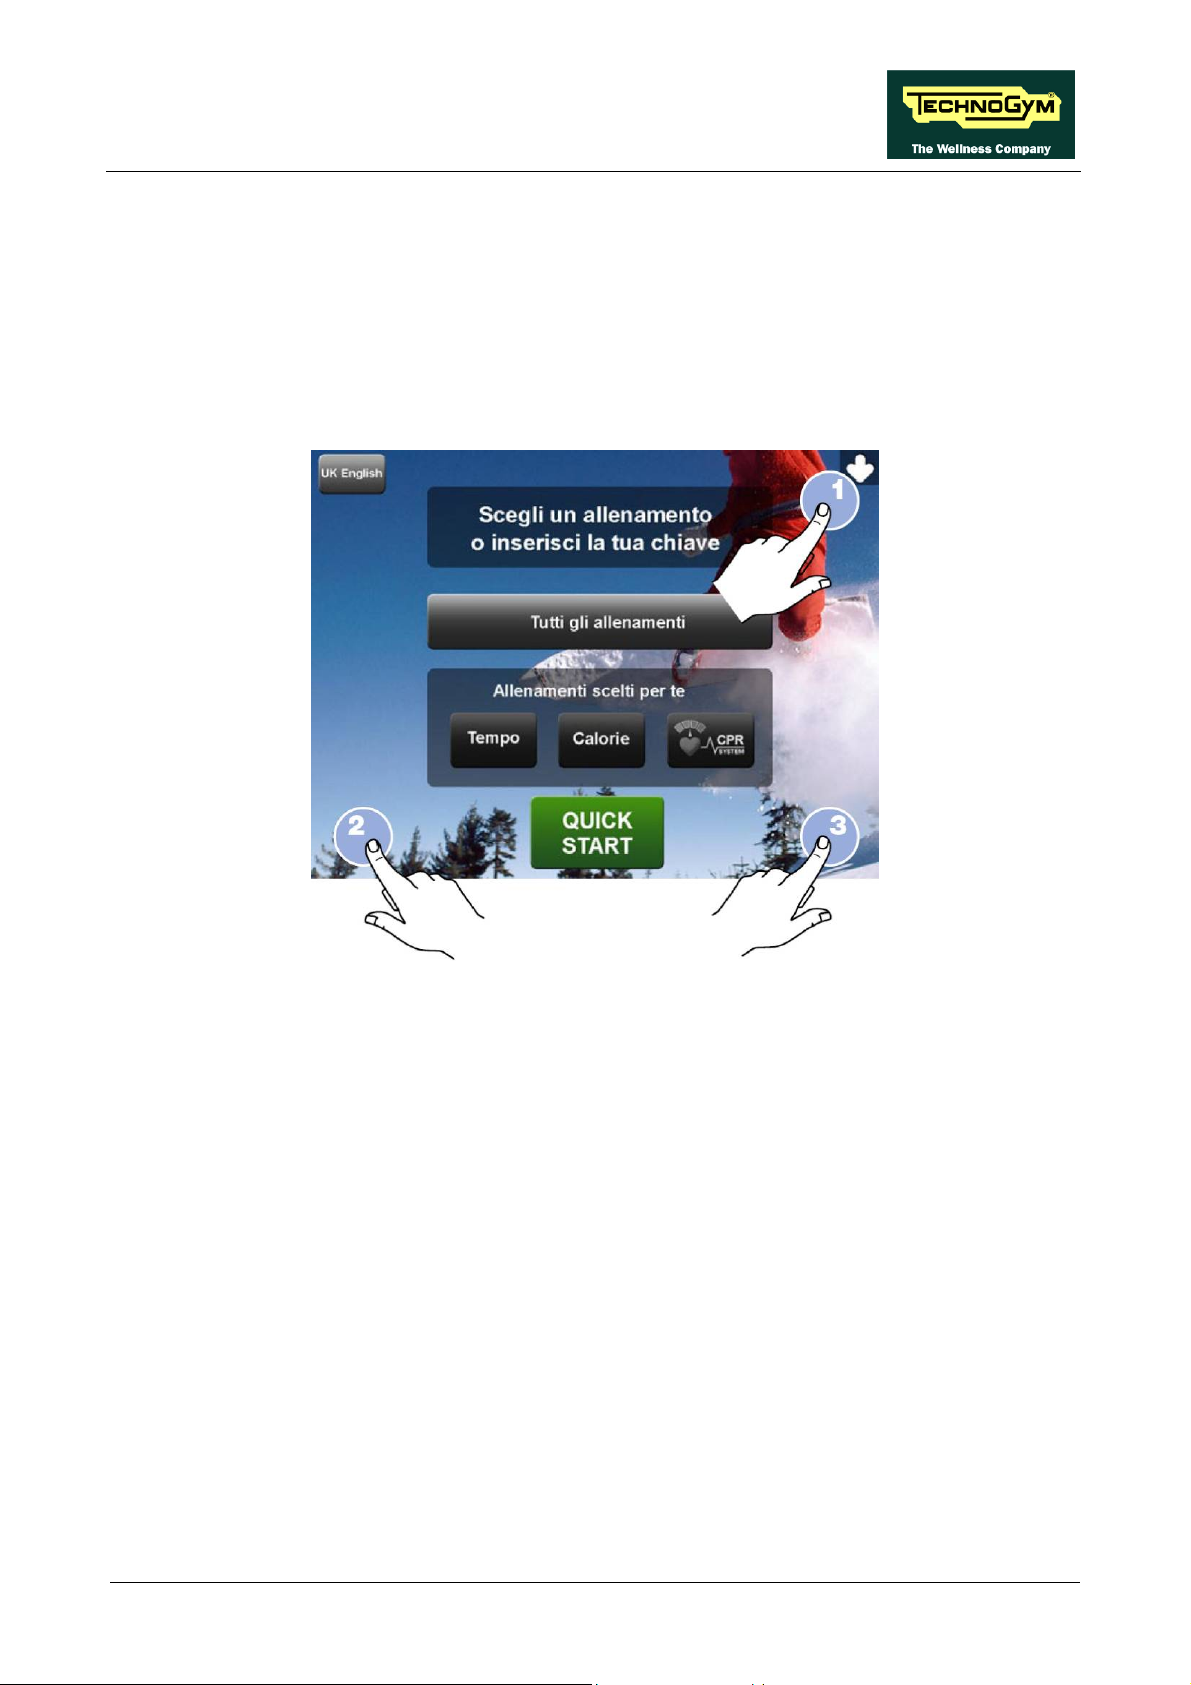
The machine configuration procedure is invoked, when the machine is in standby mode, by pressing
the top right hand, the bottom left hand and the bottom right hand corner in sequence, as shown in
the picture below.
The machine display will shows a window from where you can access the different configuration
menus, using the proper password.
To access the menu, type in the password 2406 and press ENTER key to confirm or BACK key to
back forward.
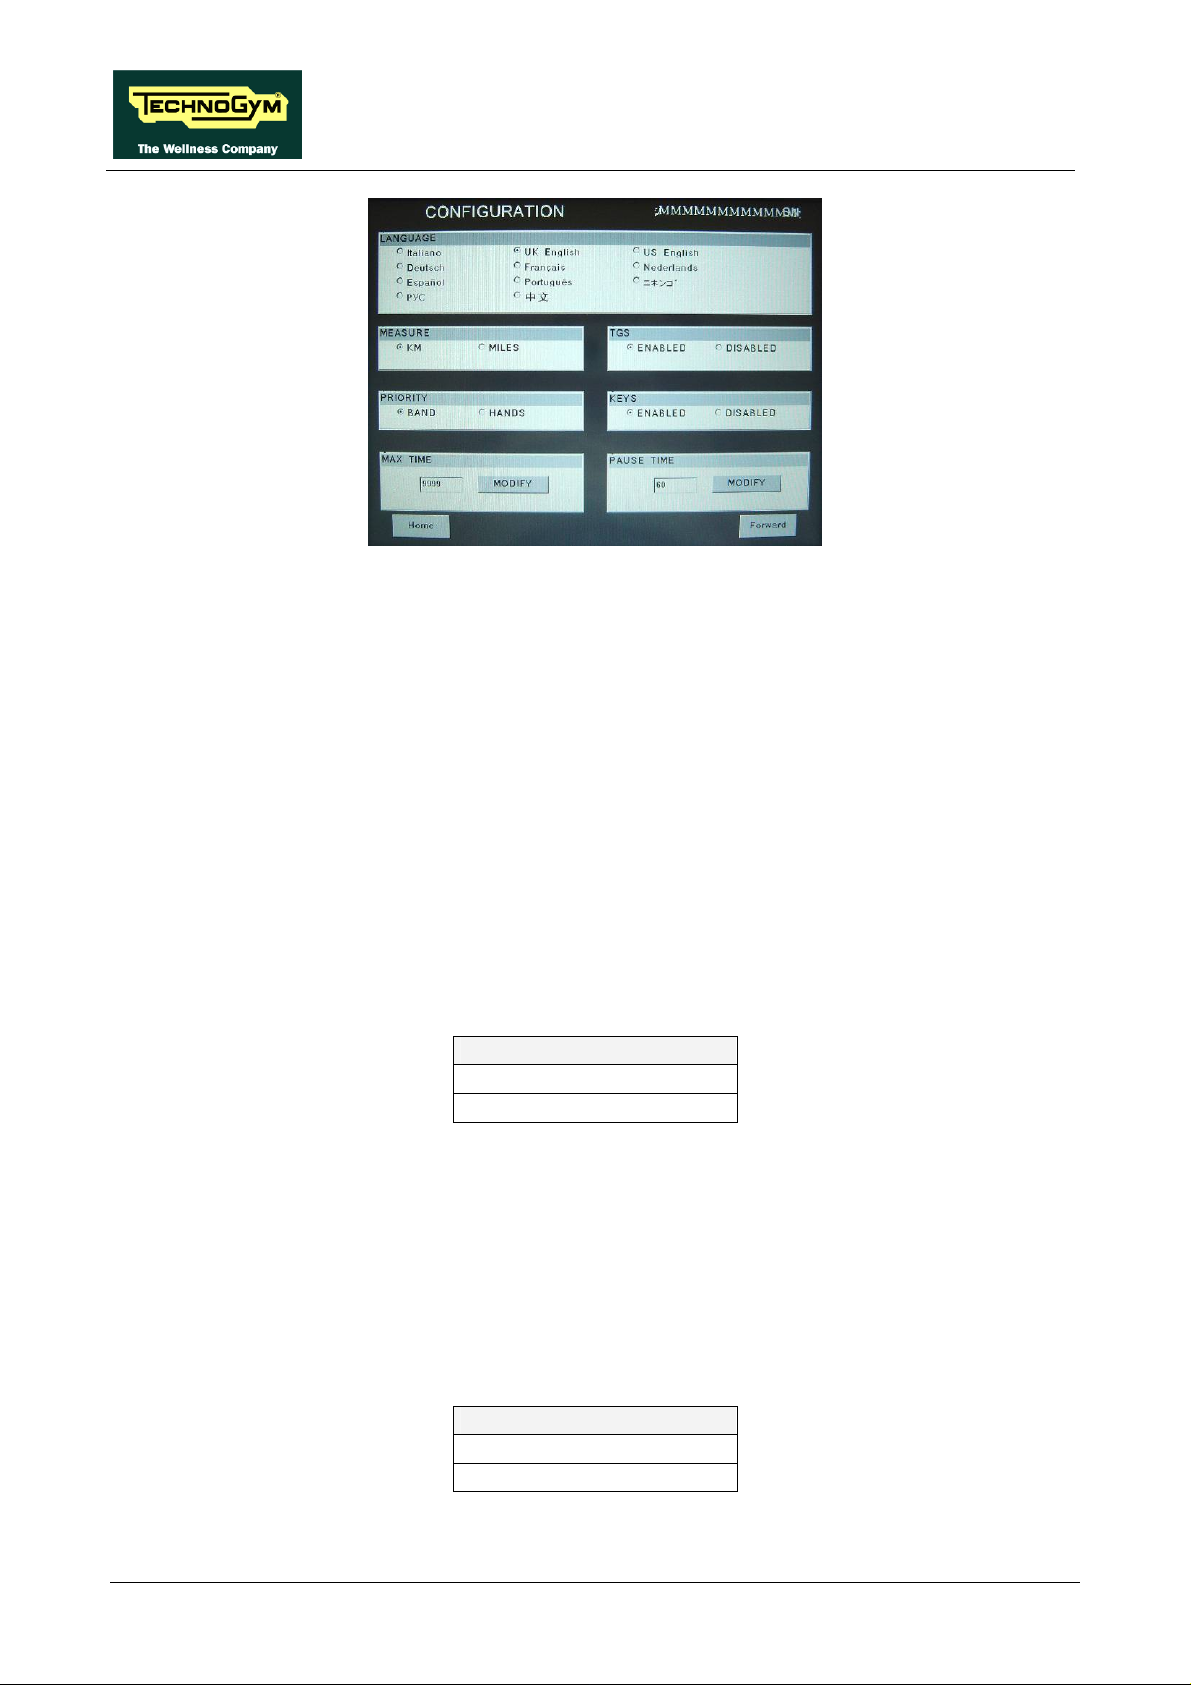
At this point the machine display will shows the different parameters of the menu, collected in
different pages, which can be scrolled with the FORWARD and BACK keys.
To exit the configuration press HOME key.
Pressing “HOME” in any page, all changes made up to that moment are saved; you
cannot exit without saving. In case of errors the initial Technogym settings can be
restored using the “DEFAULT CONFIG.” parameter.
Here below have been detailed all the parameters of the menu.
Page 1
Page 6
ACTIVE WTV: Machine configuration
1.1.1. SN
In the top right hand corner of the windows it is displayed the SN of the machine, loaded at the end
of the production line.
1.1.2. LANGUAGE
After selecting a language from the list of those available, all messages subsequently displayed by
the machine will be in the chosen language. To change the selection, select the desired option
among the ones in the list, directly touching on the Touch Screen.
Press HOME to confirm and save, FORWARD or BACK to scroll the pages.
1.1.3. MEASURE
It is possible to choose between EUROPEAN units (kg and km) or IMPERIAL units (pounds and
miles). To change the selection, select the desired option among the ones in the list, directly
touching on the Touch Screen.
MEASURE
KM <default>
MILES
Press HOME to confirm and save, FORWARD or BACK to scroll the pages.
1.1.4. PRIORITY
If signals are available from both the chest band and hand sensors, this parameter determines which
is the preferential source for displaying the heart rate value. Obviously, if only one of these two
signals is available, it will be used even if not configured as the preferential heart rate source. To
change the selection, select the desired option among the ones in the list, directly touching on the
Touch Screen.
PRIORITY
BAND <default>
HANDS
Press HOME to confirm and save, FORWARD or BACK to scroll the pages.
Page 2
Page 7

ACTIVE WTV: Machine configuration
1.1.5. MAXIMUM EXCERCISE TIME
It is possible to set a maximum duration for the exercise in minutes, with a value ranging from 1 to
9999. To change the setting, press the MODIFY key and insert the value using the numeric
keyboard. Press ENTER key to confirm or BACK key to back forward.
The default value of this parameter is 9999.
Press HOME to confirm and save, FORWARD or BACK to scroll the pages.
1.1.6. ENABLE TGS
It is possible to enable or disable the use of the TGS reader. To change the selection, select the
desired option among the ones in the list, directly touching on the Touch Screen.
TGS
ENABLED <default>
DISABLED
Press HOME to confirm and save, FORWARD or BACK to scroll the pages.
1.1.7. KEYS
It is possible to disable the keyboard so that the machine can only be used with the TGS. To change
the selection, select the desired option among the ones in the list, directly touching on the Touch
Screen.
KEYS
ENABLED <default>
DISABLED
Press HOME to confirm and save, FORWARD or BACK to scroll the pages.
1.1.8. PAUSE TIME
It is possible to set a maximum pause time for each exercise in seconds, with values ranging from
10 to 999. To change the setting, press the MODIFY key and insert the value using the numeric
keyboard. Press ENTER key to confirm or BACK key to back forward.
The default value of this parameter is 60.
Press HOME to confirm and save, FORWARD or BACK to scroll the pages.
Page 3
Page 8
ACTIVE WTV: Machine configuration
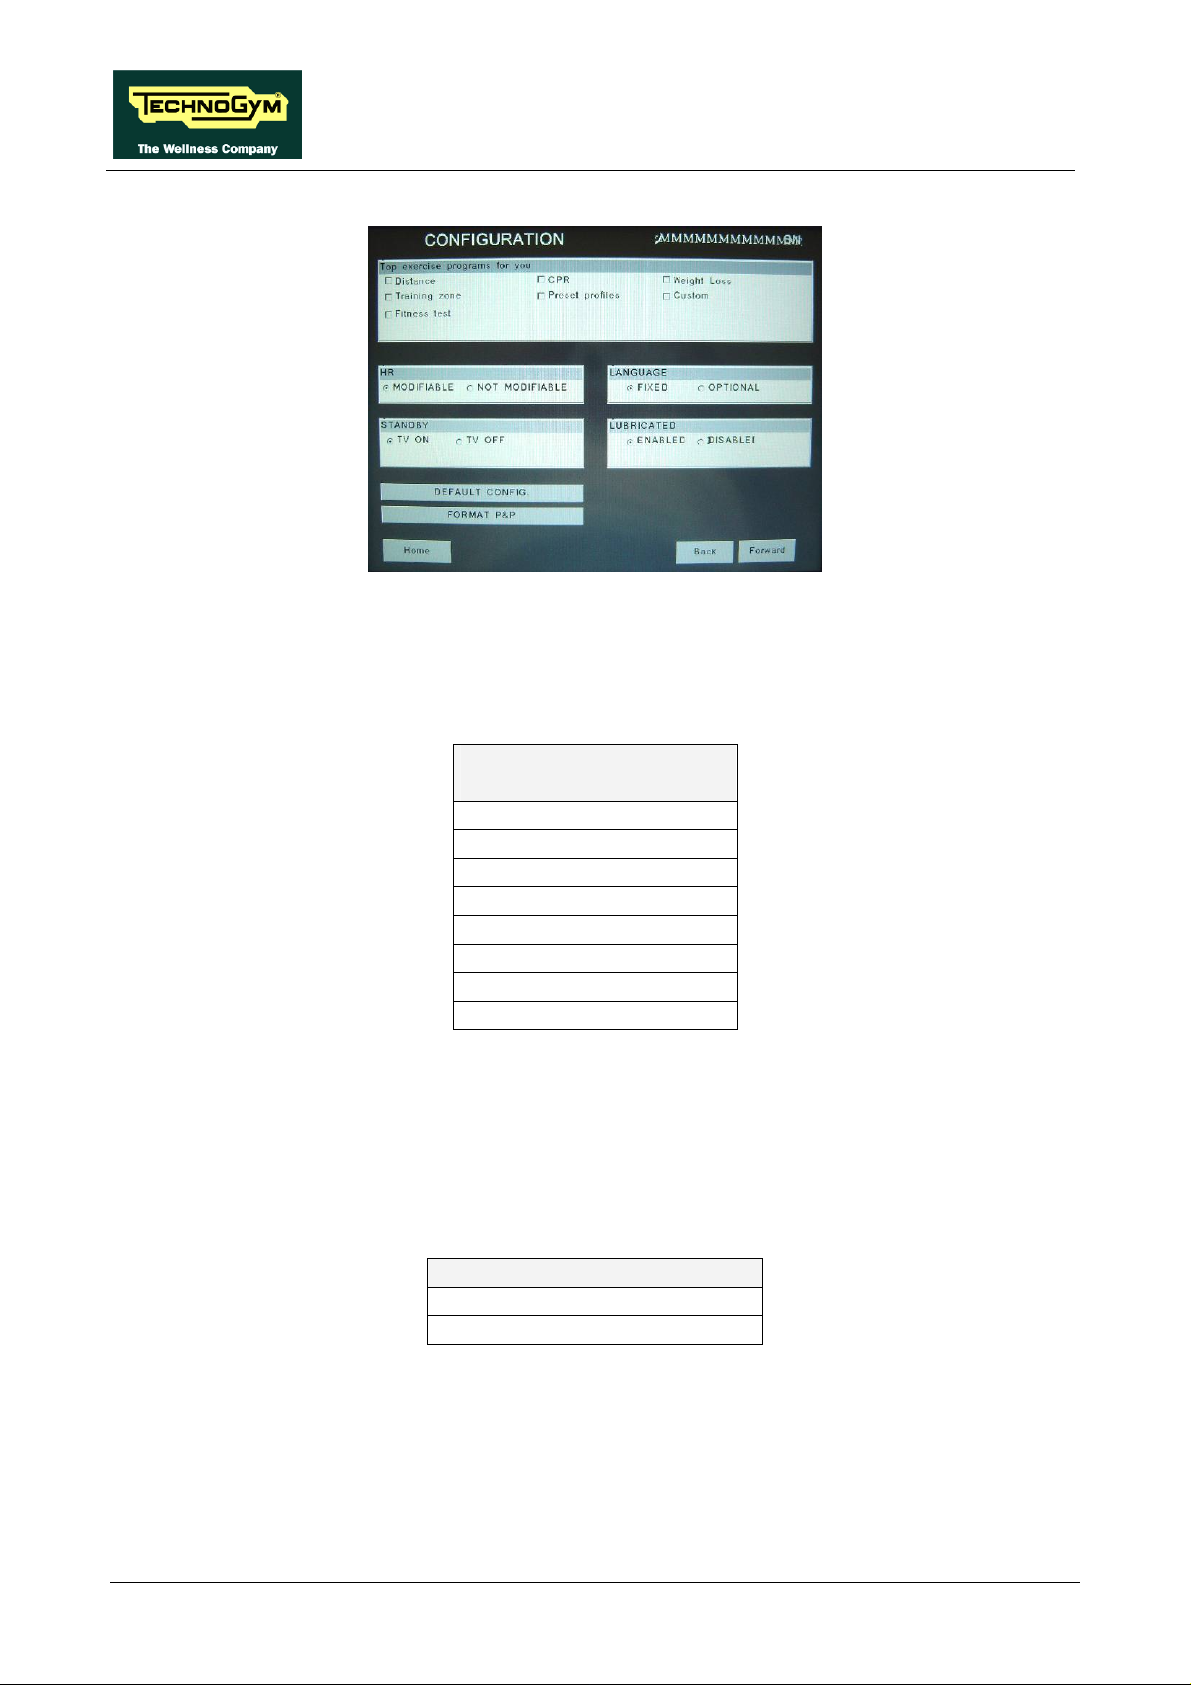
1.1.9. TOP EXERCISE PROGRAMS FOR YOU SHORTCUT
It is possible to choose 2 extra training programs, from the list of those available, which will be
displayed in the main page with the fixed ones “TIME” and “CALORIES”. To change the selection,
select the desired option among the ones in the list, directly touching on the Touch Screen.
TOP EXERCISE PROGRAMS
FOR YOU SHORTCUT
DISTANCE
TRAINING ZONE
CUSTOM OPACE
CPR
PRESET PROFILES
FITNESS TEST
WEIGHT LOSS
CUSTOM SPEED
Press HOME to confirm and save, FORWARD or BACK to scroll the pages.
1.1.10. MODIFIABLE TARGET HEART RATE
It is possible to enable or disable modification of the target heart rate during a constant heart rate
exercise. To change the selection, select the desired option among the ones in the list, directly
touching on the Touch Screen.
HR
MODIFIABLE <default>
NOT MODIFIABLE
Press HOME to confirm and save, FORWARD or BACK to scroll the pages.
1.1.11. STANDBY
It is possible to enable or disable the TV screen during the standby mode. To change the selection,
select the desired option among the ones in the list, directly touching on the Touch Screen.
Page 4
Page 9

ACTIVE WTV: Machine configuration
STANDBY
TV ON <default>
TV OFF
Press HOME to confirm and save, FORWARD or BACK to scroll the pages.
1.1.12. LANGUAGE
The machine can be configured to allow selection of the language at each session. To change the
selection, select the desired option among the ones in the list, directly touching on the Touch
Screen.
LANGUAGE
FIXED <default>
OPTIONAL
Press HOME to confirm and save, FORWARD or BACK to scroll the pages.
1.1.13. LUBRICATED (ONLY ON STEP)
This parameter tracks the lubrication status of the pedal chains. The default value is “YES”.
Whenever a certain number of floors have been climbed, the machine switches to “awaiting
lubrication” mode, signalled on the display by the message “LUBRICATE THE CHAINS, THEN
PRESS A KEY”, and the parameter value changes to “NO”.
When the parameter change to “NO”, select “YES” and carry on the “Lubrication chain” procedure
detailed on the “Service & maintenance manual”.
To change the selection, select the desired option among the ones in the list, directly touching on
the Touch Screen.
UP-DOWN
ENABLED <default>
DISABLED
Press HOME to confirm and save, FORWARD or BACK to scroll the pages.
1.1.14. DEFAULT CONFIG
It is possible to reset the user menu parameters to their default values. To select the function, press on “DEFAULT CONFIG” key.
Press HOME to confirm and save, FORWARD or BACK to scroll the pages.
1.1.15. FORMAT P&P
This function formats a TGS key for Plug&Play mode operation. To select the function, press “FORMAT P&P” key.
Press HOME to confirm and save, FORWARD or BACK to scroll the pages.
Page 5
Page 10
ACTIVE WTV: Machine configuration
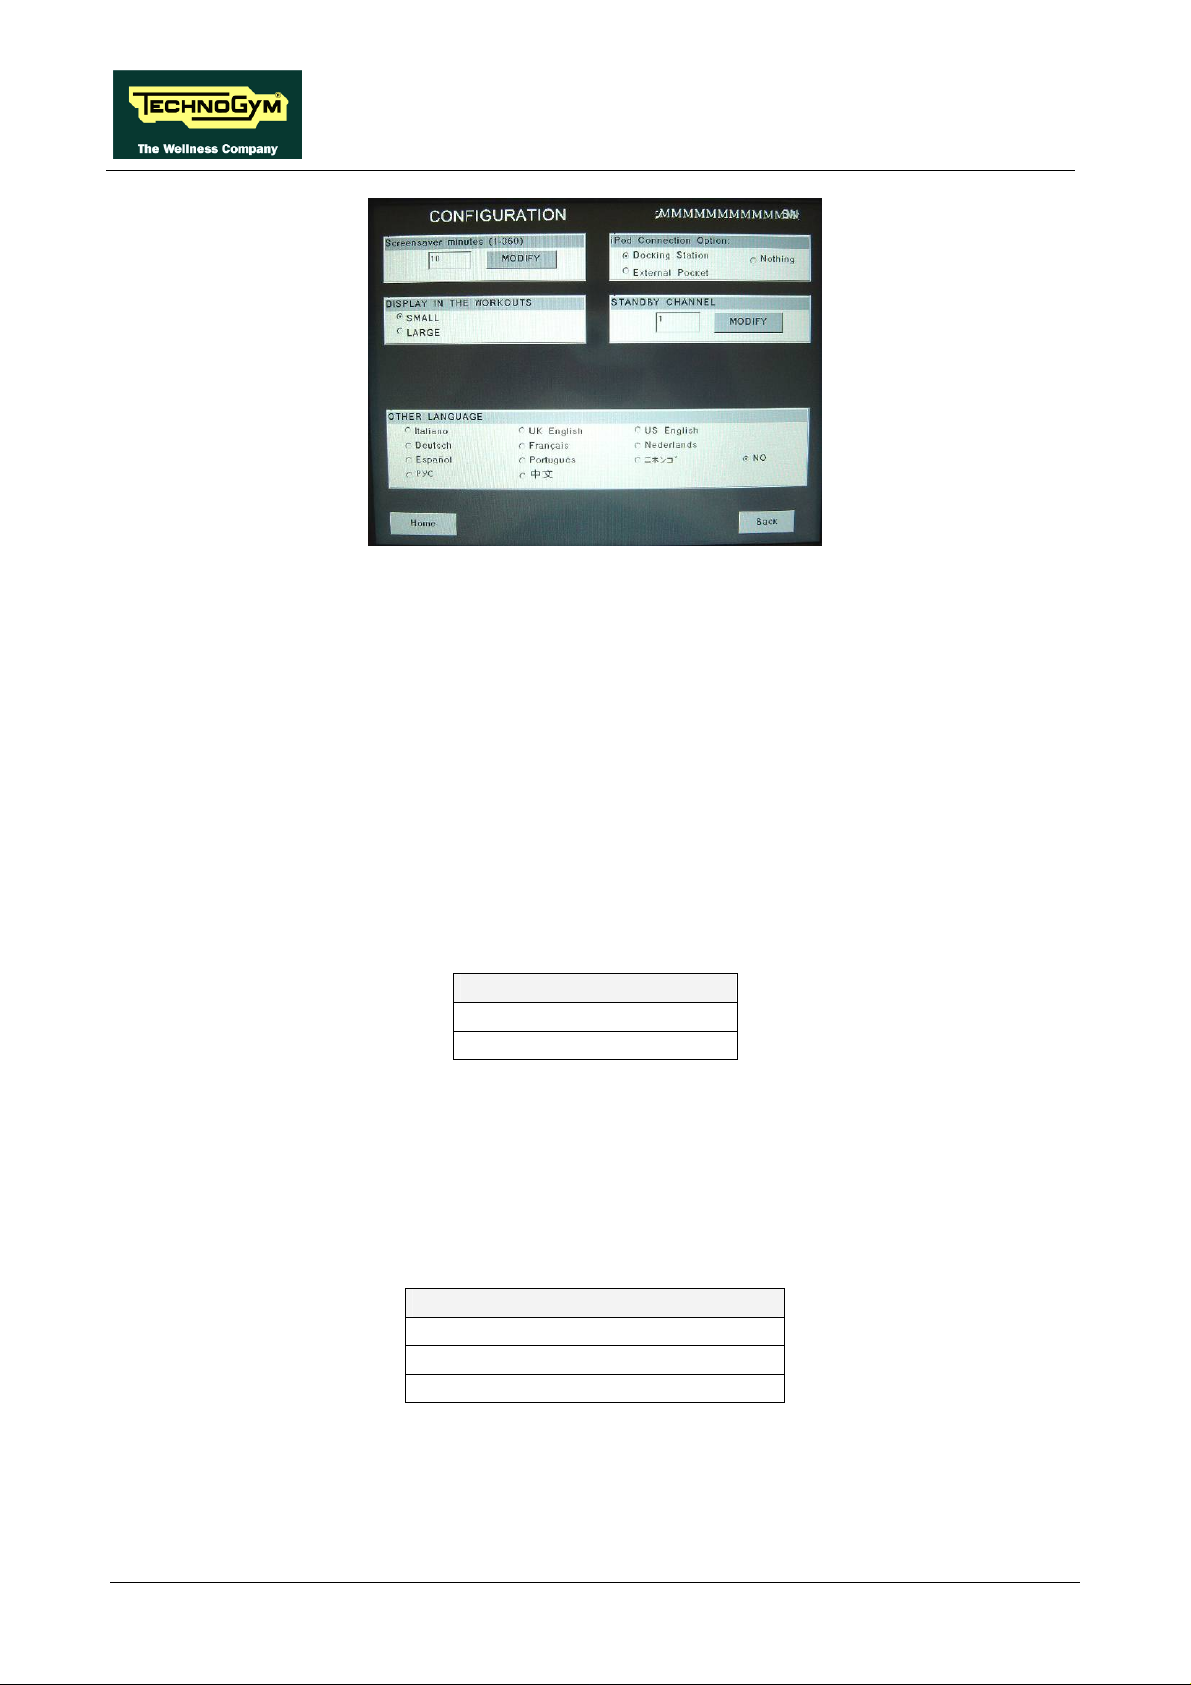
1.1.16. SCREEN SAVER MINUTES
It is possible to configure the amount of time, in minutes, the machine will wait before activating
the screen saver, with values ranging from 10 to 360.
To change the setting, press the MODIFY key and insert the value using the numeric keyboard.
Press ENTER key to confirm or BACK key to back forward.
The default value of this parameter is 10.
Press HOME to confirm and save, FORWARD or BACK to scroll the pages.
1.1.17. DISPLAY IN THE WORKOUT
It is possible to configure the size of the exercise data during the workout. To change the selection,
select the desired option among the ones in the list, directly touching on the Touch Screen.
DISPLAY IN THE WORKOUT
SMALL <default>
LARGE
Press HOME to confirm and save, FORWARD or BACK to scroll the pages.
1.1.18. IPOD CONNECTION OPTION
It is possible to set the machine for controlling the iPod through the display. To change the
selection, select the desired option among the ones in the list, directly touching on the Touch
Screen.
IPOD CONNECTION OPTION
DOCKING STATION <default>
NOTHING
External Pocket -not used-
Press HOME to confirm and save, FORWARD or BACK to scroll the pages.
Page 6
Page 11

ACTIVE WTV: Machine configuration
1.1.19. STANDBY CHANNEL
It is possible to set the channel which is displayed on the TV, when the TV is in standby. To change
the setting, press the MODIFY key and insert the value using the numeric keyboard. Press ENTER
key to confirm or BACK key to back forward.
Press HOME to confirm and save, FORWARD or BACK to scroll the pages.
1.1.20. OTHER LANGUAGE
It is possible to set a shortcut for a second language different from the one set at “LANGUAGE”
parameter, displayed in the top left hand corner of the main page.
To change the selection, select the desired option among the ones in the list, directly touching on
the Touch Screen.
Press HOME to confirm and save, FORWARD or BACK to scroll the pages.
Page 7
Page 12
ACTIVE WTV: Machine configuration
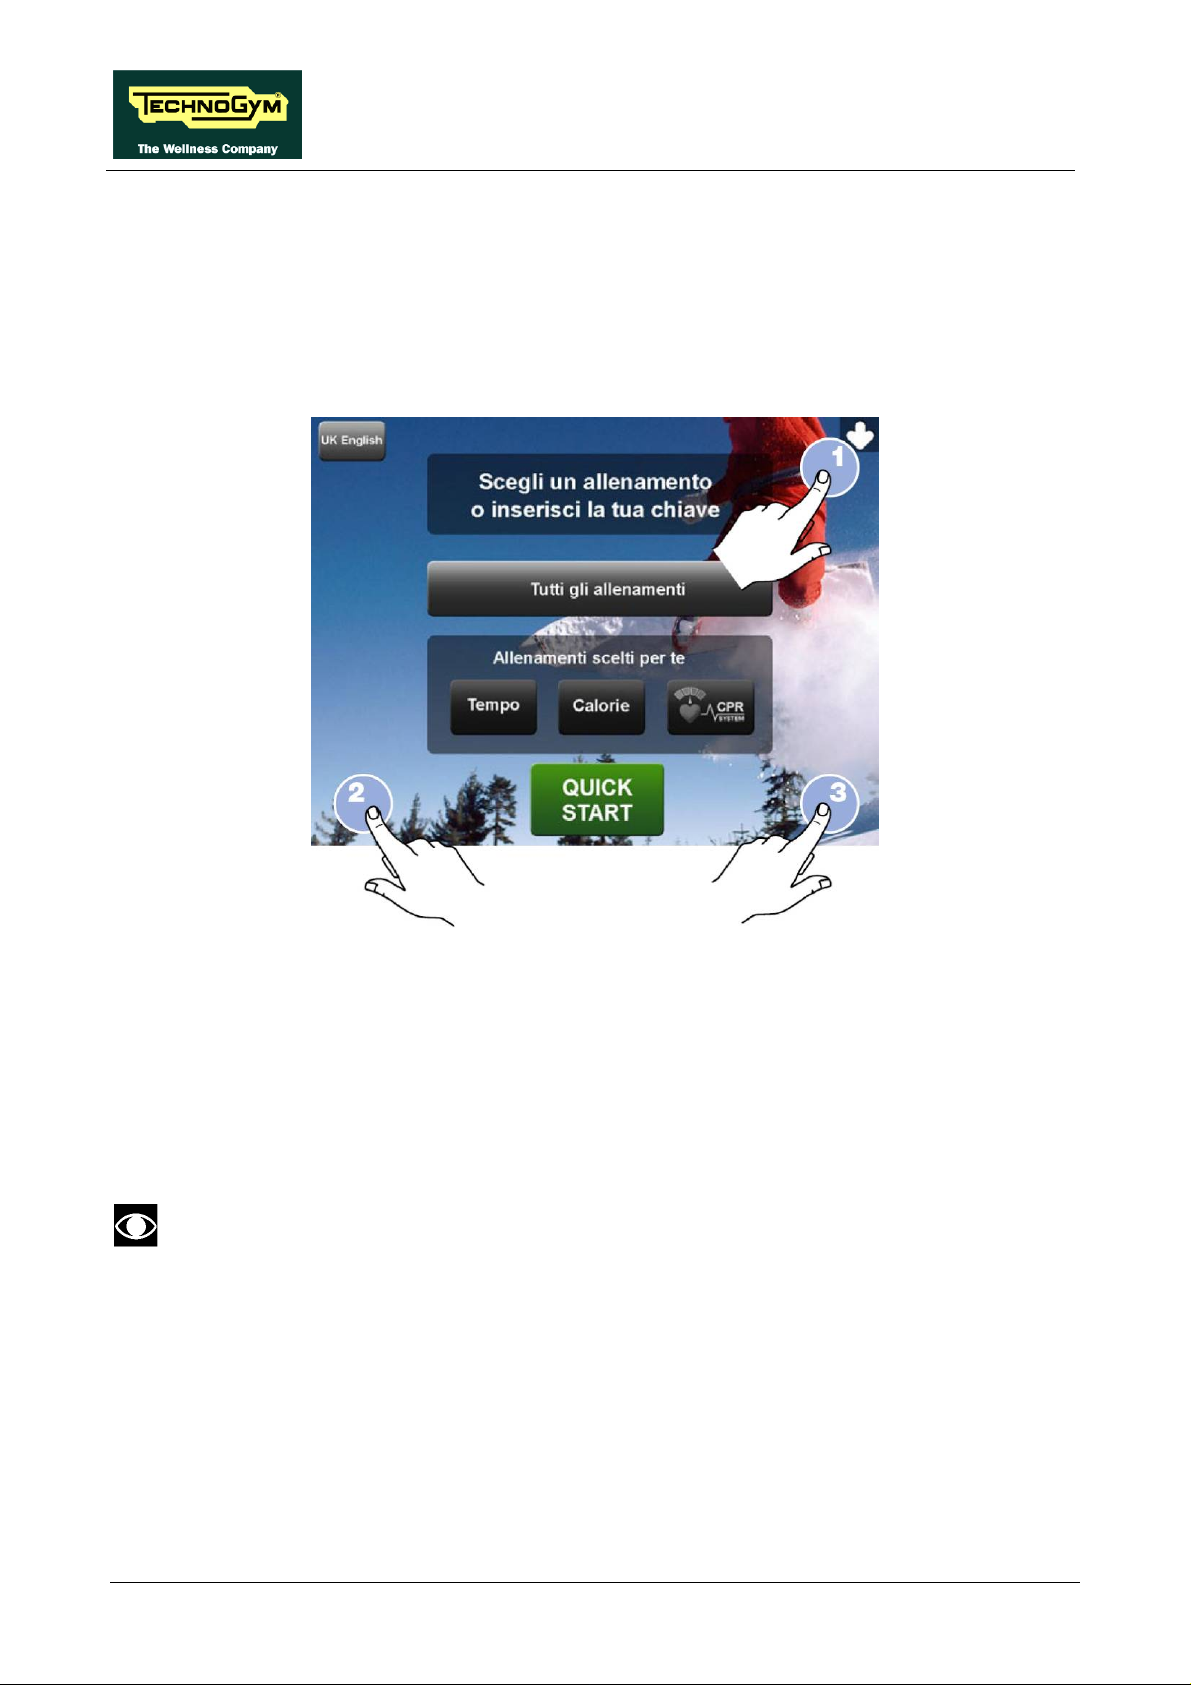
1.2. SERVICE MENU CONFIGURATION
The machine configuration procedure is invoked, when the machine is in standby mode, by pressing
the top right hand, the bottom left hand and the bottom right hand corner in sequence, as shown in
the picture below.
The machine display will shows a window from where you can access the different configuration
menus, using the proper password.
To access the menu, type in the password 2501 and press ENTER key to confirm or BACK key to
back forward.
At this point the machine display will shows the different parameters of the menu, collected in
different pages, which can be scrolled with the FORWARD and BACK keys.
To exit the configuration press HOME key.
Pressing “HOME” in any page, all changes made up to that moment are saved; you
cannot exit without saving. In case of errors the initial Technogym settings can be
restored using the “STANDARD SETTINGS.” parameter.
Here below have been detailed all the parameters of the menu.
Page 8
Page 13
ACTIVE WTV: Machine configuration
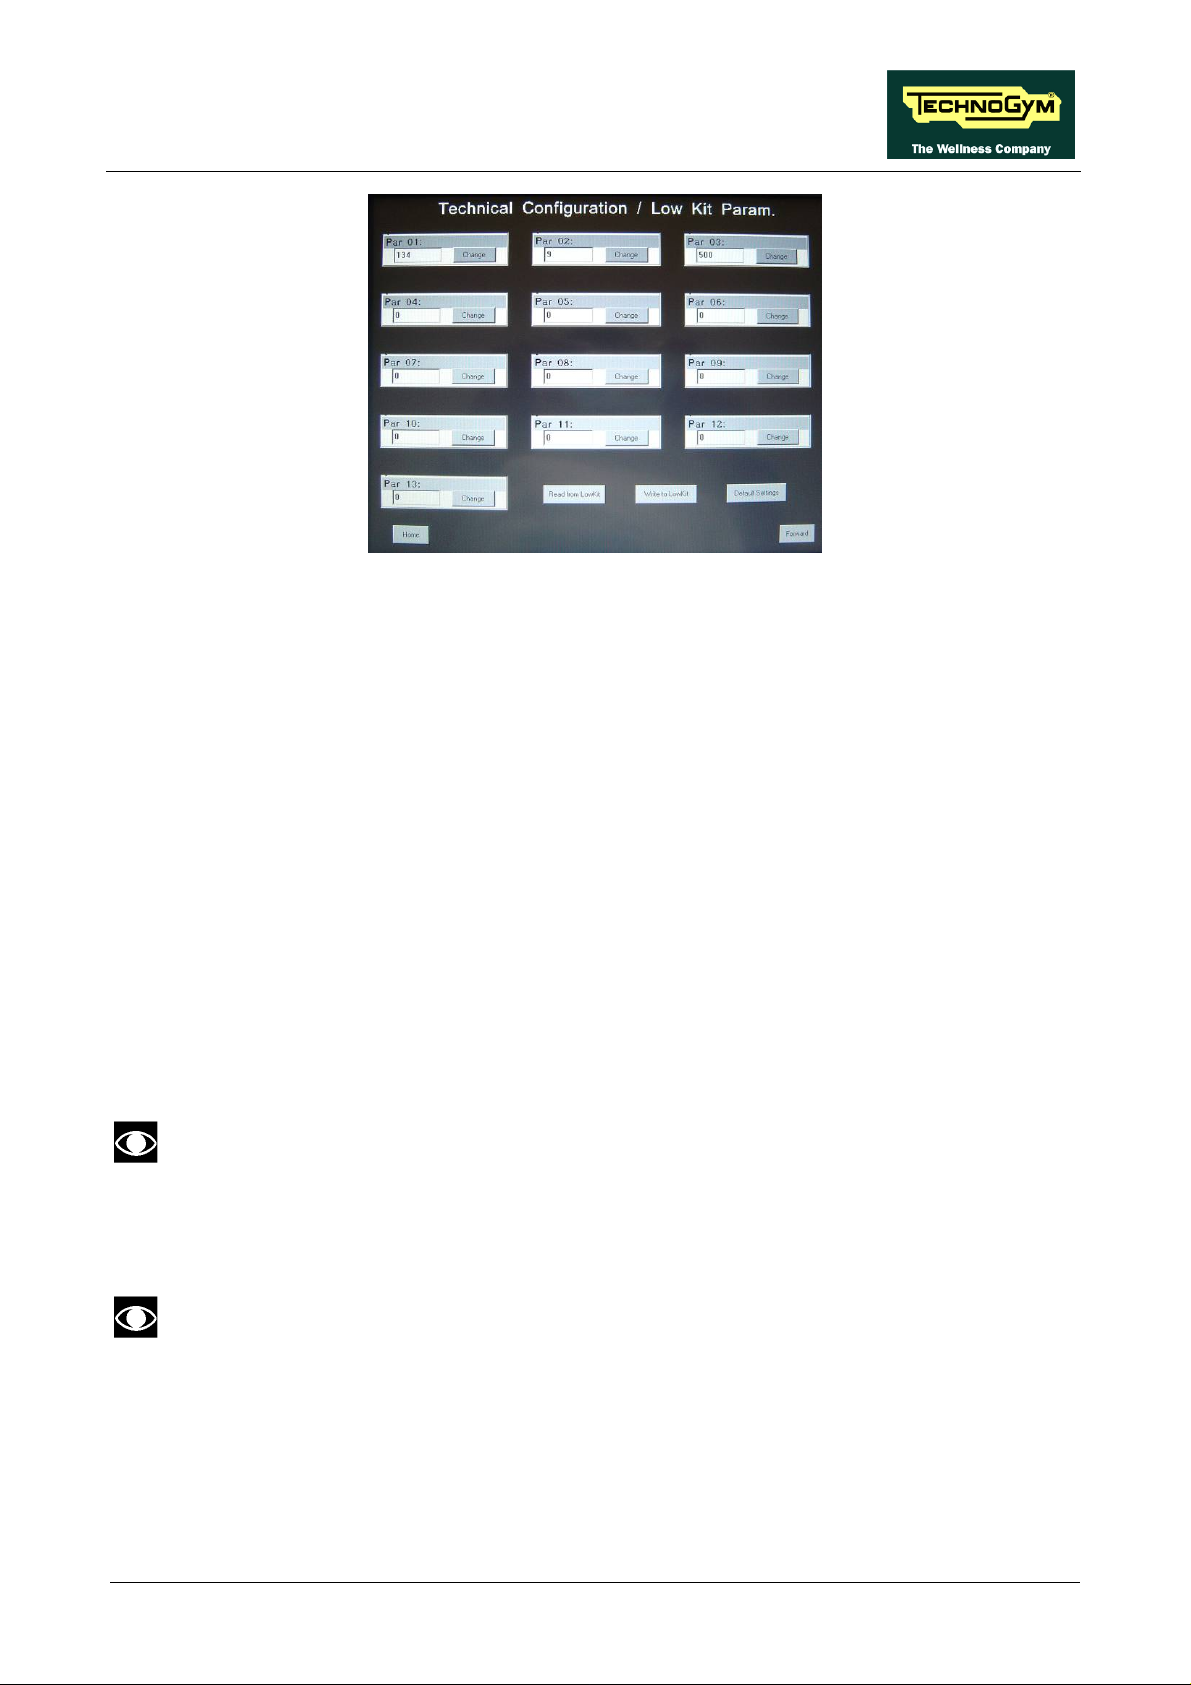
1.2.1. LOW KIT PARAMETER
This function provides access to parameters used for modifying certain settings of the lower
assembly. To access this menu, when the display shows:
In addition to the 13 configuration parameters, this function also includes the 3 sub-functions
described below:
1.2.1.1. Read from low kit To read the parameter values from the low kit memory and view them on the display, press READ
FROM LOW KIT key.
1.2.1.2. Write to low kit To write the values of the currently displayed parameters to the low kit, press WRITE TO LOW
KIT key.
1.2.1.3. Default Setting To load the default parameter values, press DEFAULT SETTING key.
1.2.1.4. Table of configuration parameters
To correctly display the parameter values, you need to load them from the low kit, using
the “Read from low kit” function.
To change the setting, press the CHANGE key and insert the value using the numeric keyboard.
Press ENTER key to confirm or BACK key to back forward.
After any changes to the parameter values, you need to load them in the low kit using
the “Write to low kit” function.
Press HOME to confirm and save, FORWARD or BACK to scroll the pages.
Page 9
Page 14
ACTIVE WTV: Machine configuration
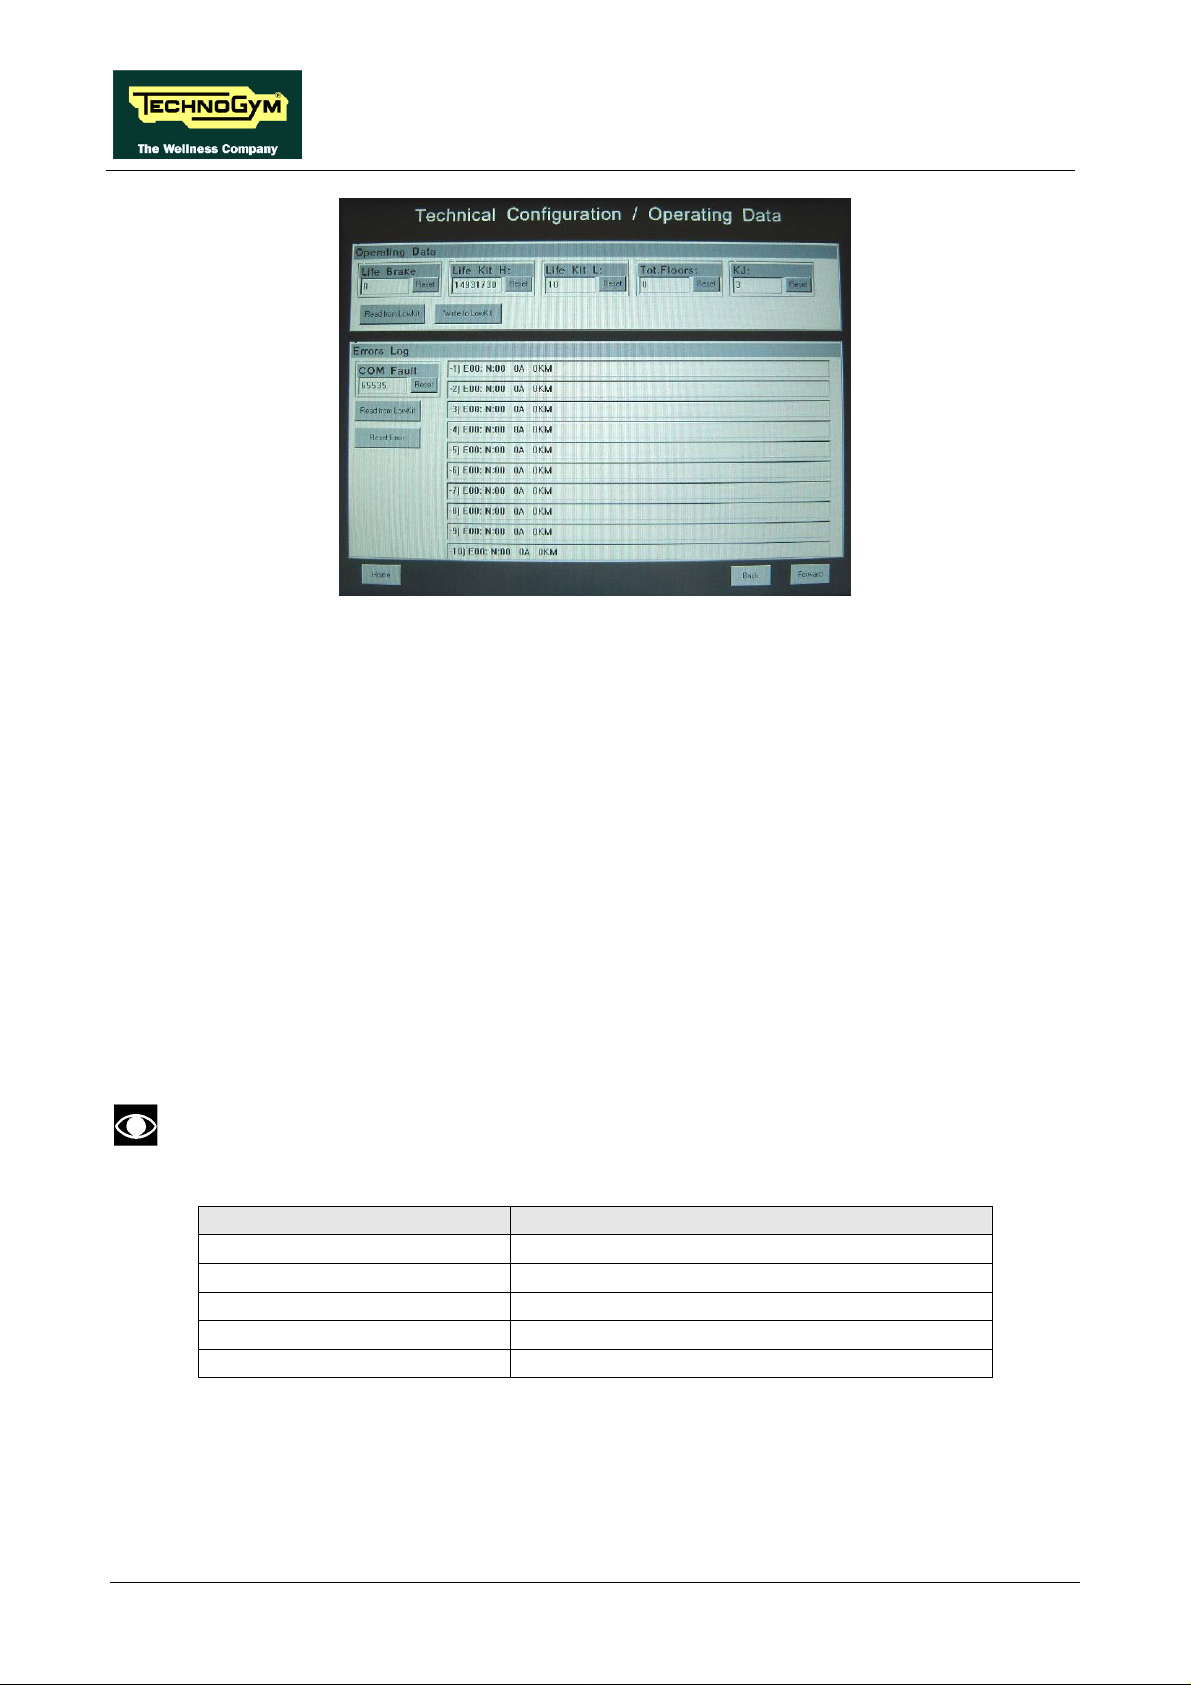
1.2.2. OPERATING DATA
This function makes it possible to access the machine usage data stored in the low kit.
In addition to the machine usage data, this function also includes the 2 sub-functions described
below:
1.2.2.1. Read from low kit
To read the parameter values from the low kit memory and view them on the display, press READ
FROM LOW KIT key.
1.2.2.2. Write to low kit
To write the values of the currently displayed parameters to the low kit, press WRITE TO LOW
KIT key.
The machine usage data on the display is updated every 10 minutes. This means that, whenever the
machine is switched off, any data modified after the last memory update will be lost.
To correctly display the parameter values, you need to load them from the low kit, using
the “Read from low kit” function.
MESSAGE ON DISPLAY DESCRIPTION
Life Brake: Minutes x 10 of operation of the brake
Life Kit H: Minutes x 10 of operation of the upper assembly
Life Kit L: Minutes x 10 of operation of the lower assembly
Tot. Km: Total km traveled
KJ Total KJ during exercise
By pressing the RESET key on the side of the value, it is possible to reset the value of the selected
item.
Press HOME to confirm and save, FORWARD or BACK to scroll the pages.
Page 10
Page 15
ACTIVE WTV: Machine configuration
1.2.3. ERRORS LOG
This function accesses the machine’s error history log.
In addition to the error history log, this function also includes the 3 sub-functions described below:
1.2.3.1. Read from low kit
To read the parameter values from the low kit memory and view them on the display, press READ
FROM LOW KIT key.
1.2.3.2. Reset Errors
To clear the error history in both the low and high kit memory, press RESET ERRORS key.
1.2.3.3. COM.Fault
This is a counter that display the number of errors in serial communication between the upper and
the lower kit. This counter increase each time a communication fault is detected.
To reset this counter, press RESET key on the side of the value.
To correctly display the parameter values, you need to load them from the low kit, using
the “Read from low kit” function.
For every error generated by the machine, the error history log records the information in the table
below:
• Counter
• Error code
• Current when the error occurred
• Distance in km when the error occurred
The correspondence between error codes and descriptions is given in the “Service & maintenance
manual”.
Press HOME to confirm and save, FORWARD or BACK to scroll the pages.
Page 11
Page 16
ACTIVE WTV: Machine configuration
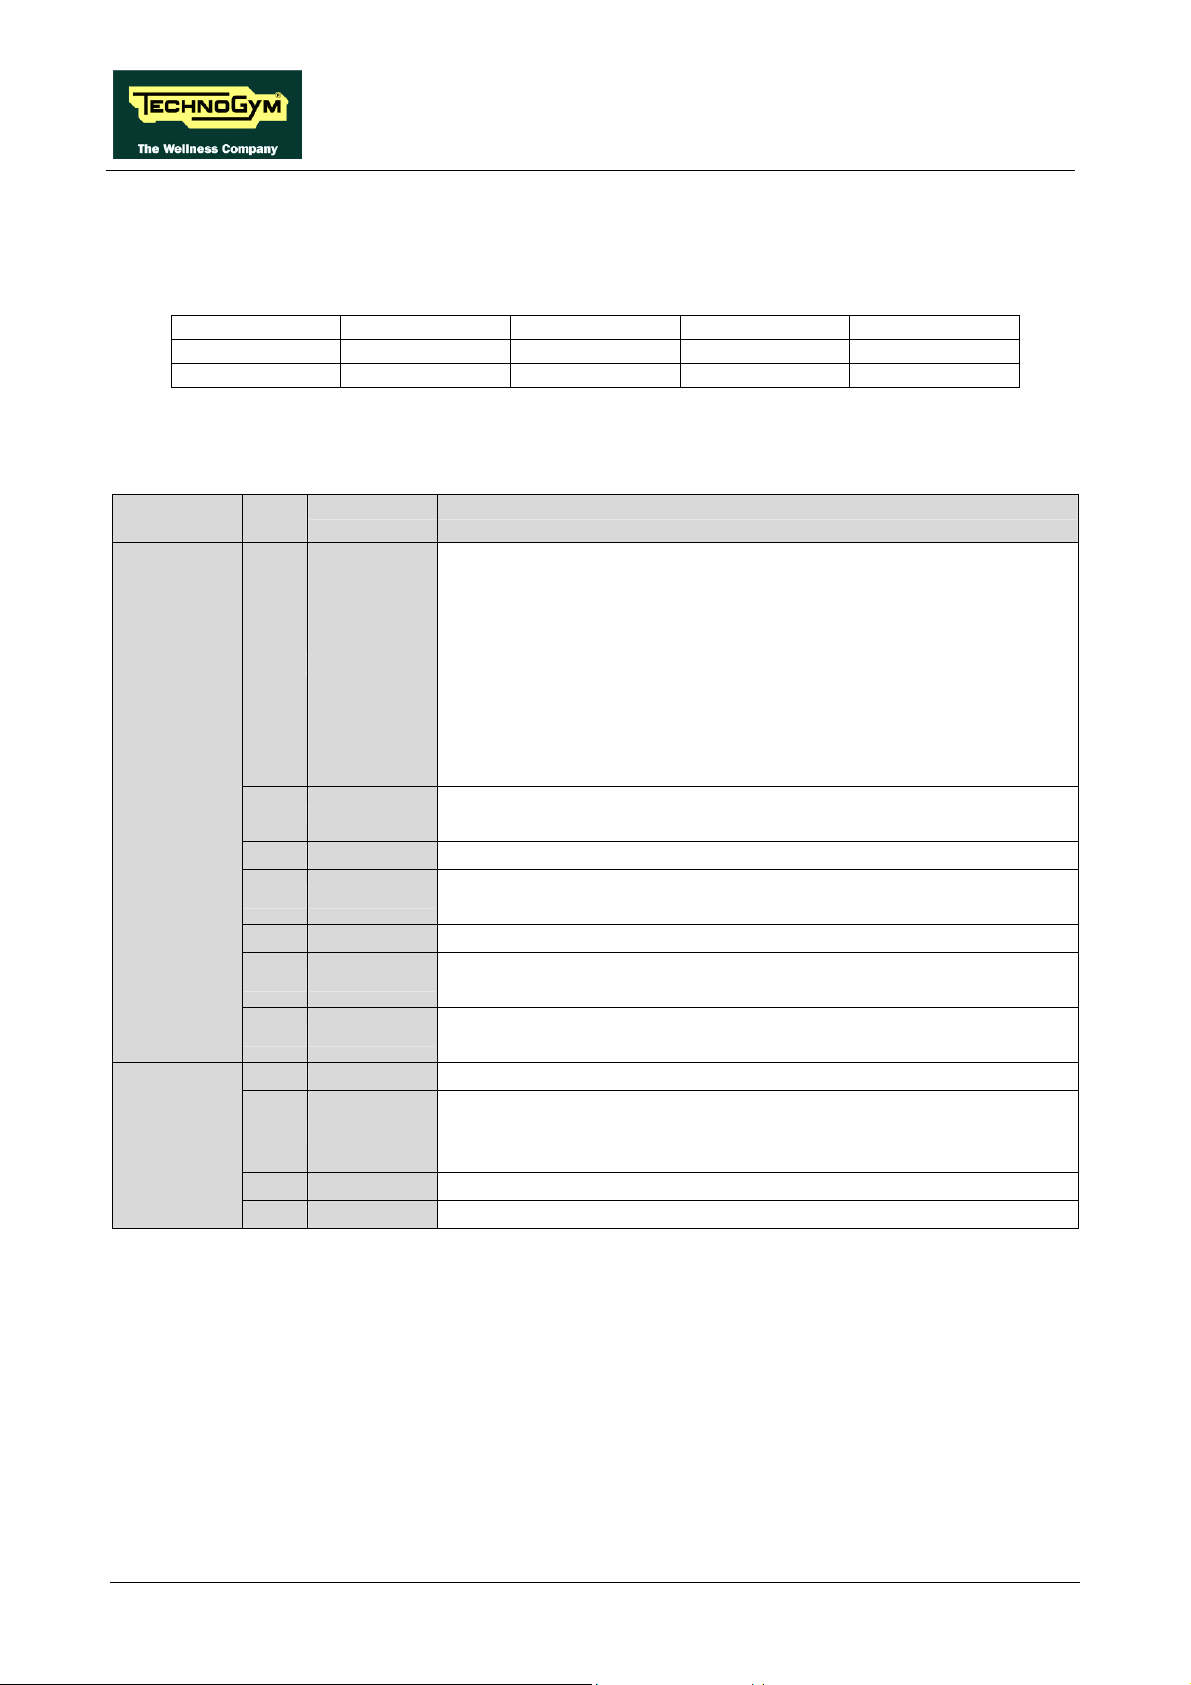
1.2.4. TV STANDARD
This function allows to display/configure the TV Standard on the machine. To change the selection,
select the desired option among the ones in the list, directly touching on the Touch Screen.
NTSC M NTSC44 M PAL B/G PAL I PAL D/K
SECAM D/K SECAM L SECAM L1 PAL B/H PAL M
SECAM H SECAM B/G PAL N
Selected as a function of the country where the machine is installed according to the following
table:
Multistandard
code
E
U
Press HOME to confirm and save, FORWARD or BACK to scroll the pages.
TG
TV Standard Countries
code
1 PAL B/G
2 PAL I
5 SECAM E/L
6 SECAM D/K
8 PAL D/K
9 SECAM B/G
A SECAM K1
3 PAL N
4 NTSC
7 NTSC M44
B PAL M
Albania Australia Austria Baharain Belgium
Cameroon Croatia Cyprus Czech Rep Denmark
Finland Germany Ghana Greece Hungary
India Israel Italy Jordan Kenya
Luxembourg Malaysia Malta Netherlands New Zealand
Nigeria Norway Pakistan Poland Portugal
Romania Singapore Slovakia Slovenia Spain
Sri Lanka Sweden Switzerland Thailand Turkey
United Arab E Zambia Zimbabwe
Botswana Hong Kong Ireland South Africa Seychelles
UK
France
Bulgaria Estonia Ex URSS Latvia Lithuania
Poland Russia Ukraina
Czech Rep China Poland
Saudi Arabia Iran Iraq Morocco Tunisia
Syria
French Guyana Guadeloupe Madagascar Martinique New Caledonia
Senegal Togo Zaire
Argentina Paraguay Uruguay
Bahamas Bermuda Canada Chile Costa Rica
Guatemala Japan Korea Peru Philippines
Taiwan Trinidad USA Venezuela
Mexico
Brazil
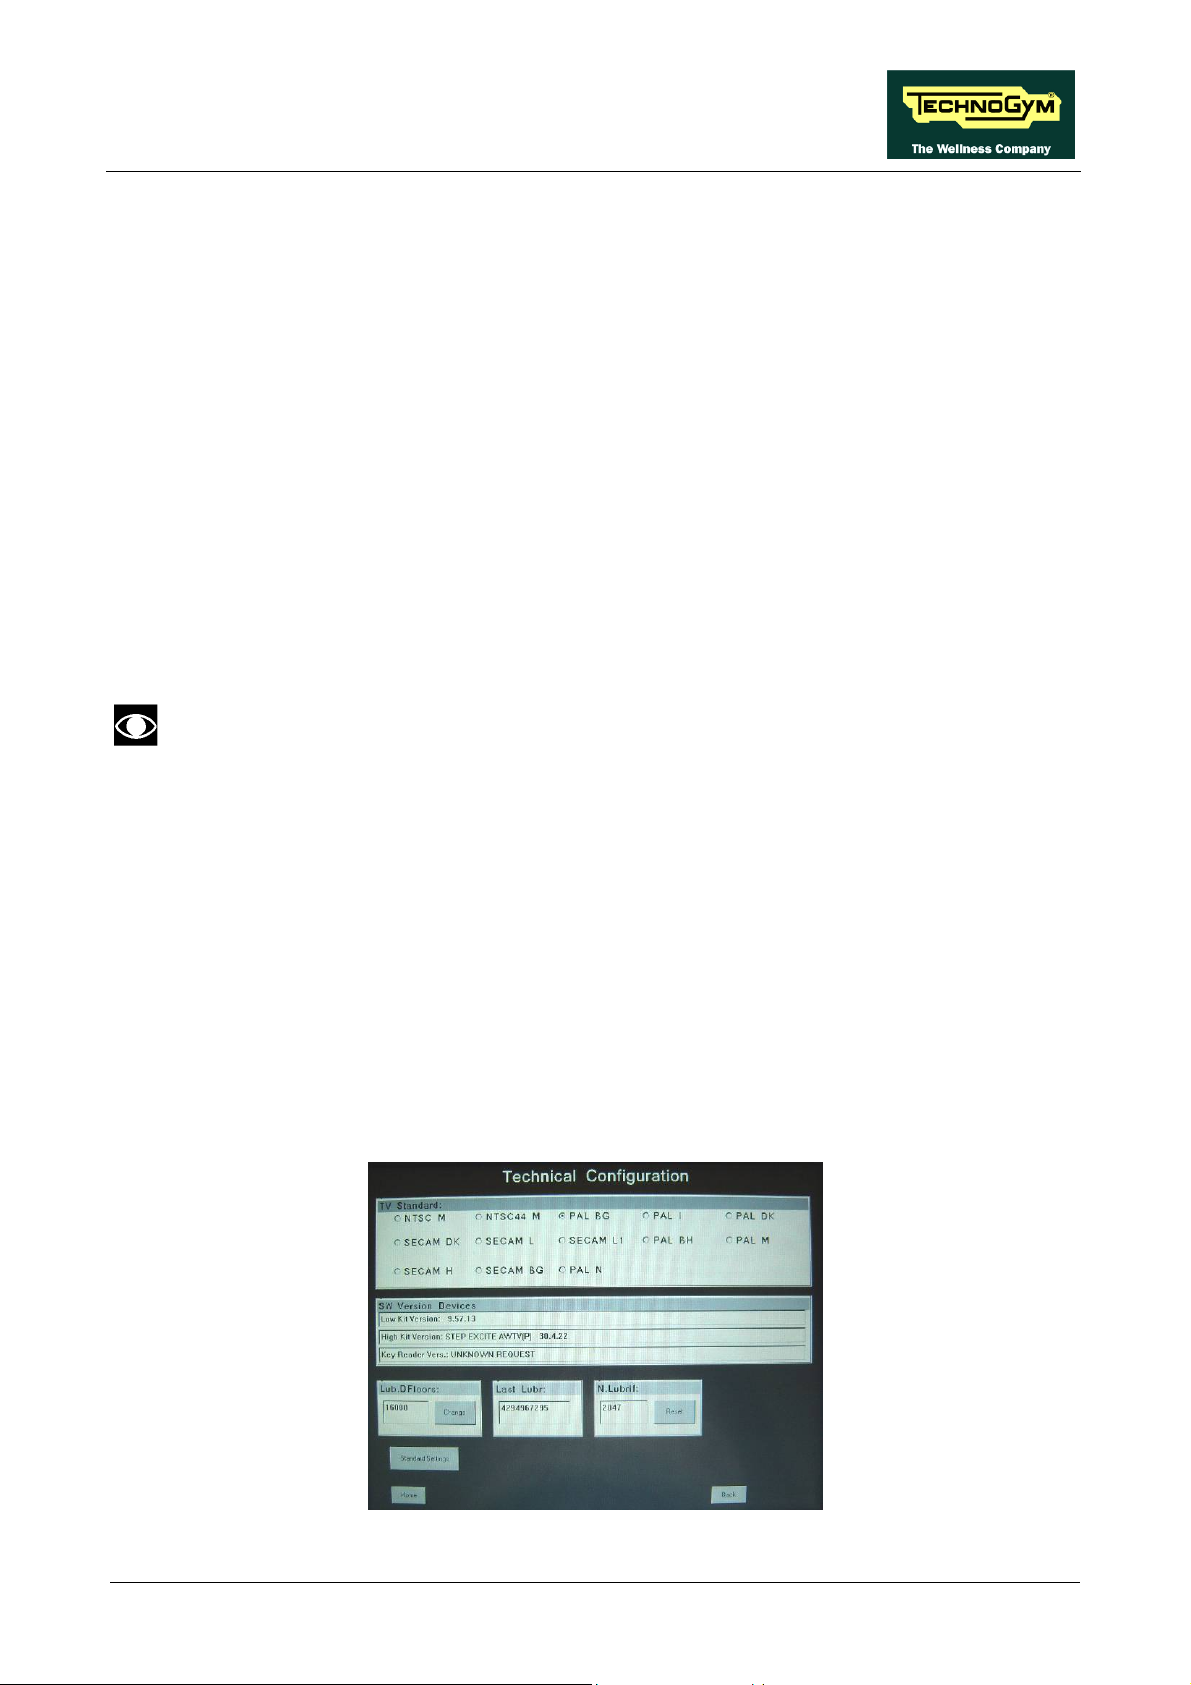
1.2.5. SW VERSION DEVICES
This function allows to display:
• the display SW version;
• the low kit SW version (H:x L:x B:x);
• the key reader SW version.
Press HOME to confirm and save, FORWARD or BACK to scroll the pages.
Page 12
Page 17

ACTIVE WTV: Machine configuration
1.2.6. LUB. DFLOORS (ONLY ON STEP)
This parameter defines the number of floors climbed, to be multiplied by ten, before the chains need
to be lubricated again.
To change the setting, press the CHANGE key and insert the value using the numeric keyboard.
Press ENTER key to confirm or BACK key to back forward.
Press HOME to confirm and save, FORWARD or BACK to scroll the pages.
The default value of this parameter is 16000.
1.2.7. LAST LUBR. (ONLY ON STEP)
This parameter displays the number of floors climbed since the chain was last lubricated.
Press HOME to confirm and save, FORWARD or BACK to scroll the pages.
1.2.8. N.LUBRIF (ONLY ON STEP)
This parameter displays the number of lubrication operations performed.
To reset the parameter, press RESET key.
Press HOME to confirm and save, FORWARD or BACK to scroll the pages.
1.2.9. STANDARD SETTINGS
This function clears the operating data of the machine and simultaneously resets the User menu, low
kit, UpDown table parameters to their default values. To launch the values restore press
STANDARD SETTINGS key
This function does not alter the language and the TV standard setting.
Page 13
Page 18
ACTIVE WTV: Machine configuration
1.3. TV MENU CONFIGURATION FOR 700I E MODELS
1.3.1. TUNING TV CHANNELS
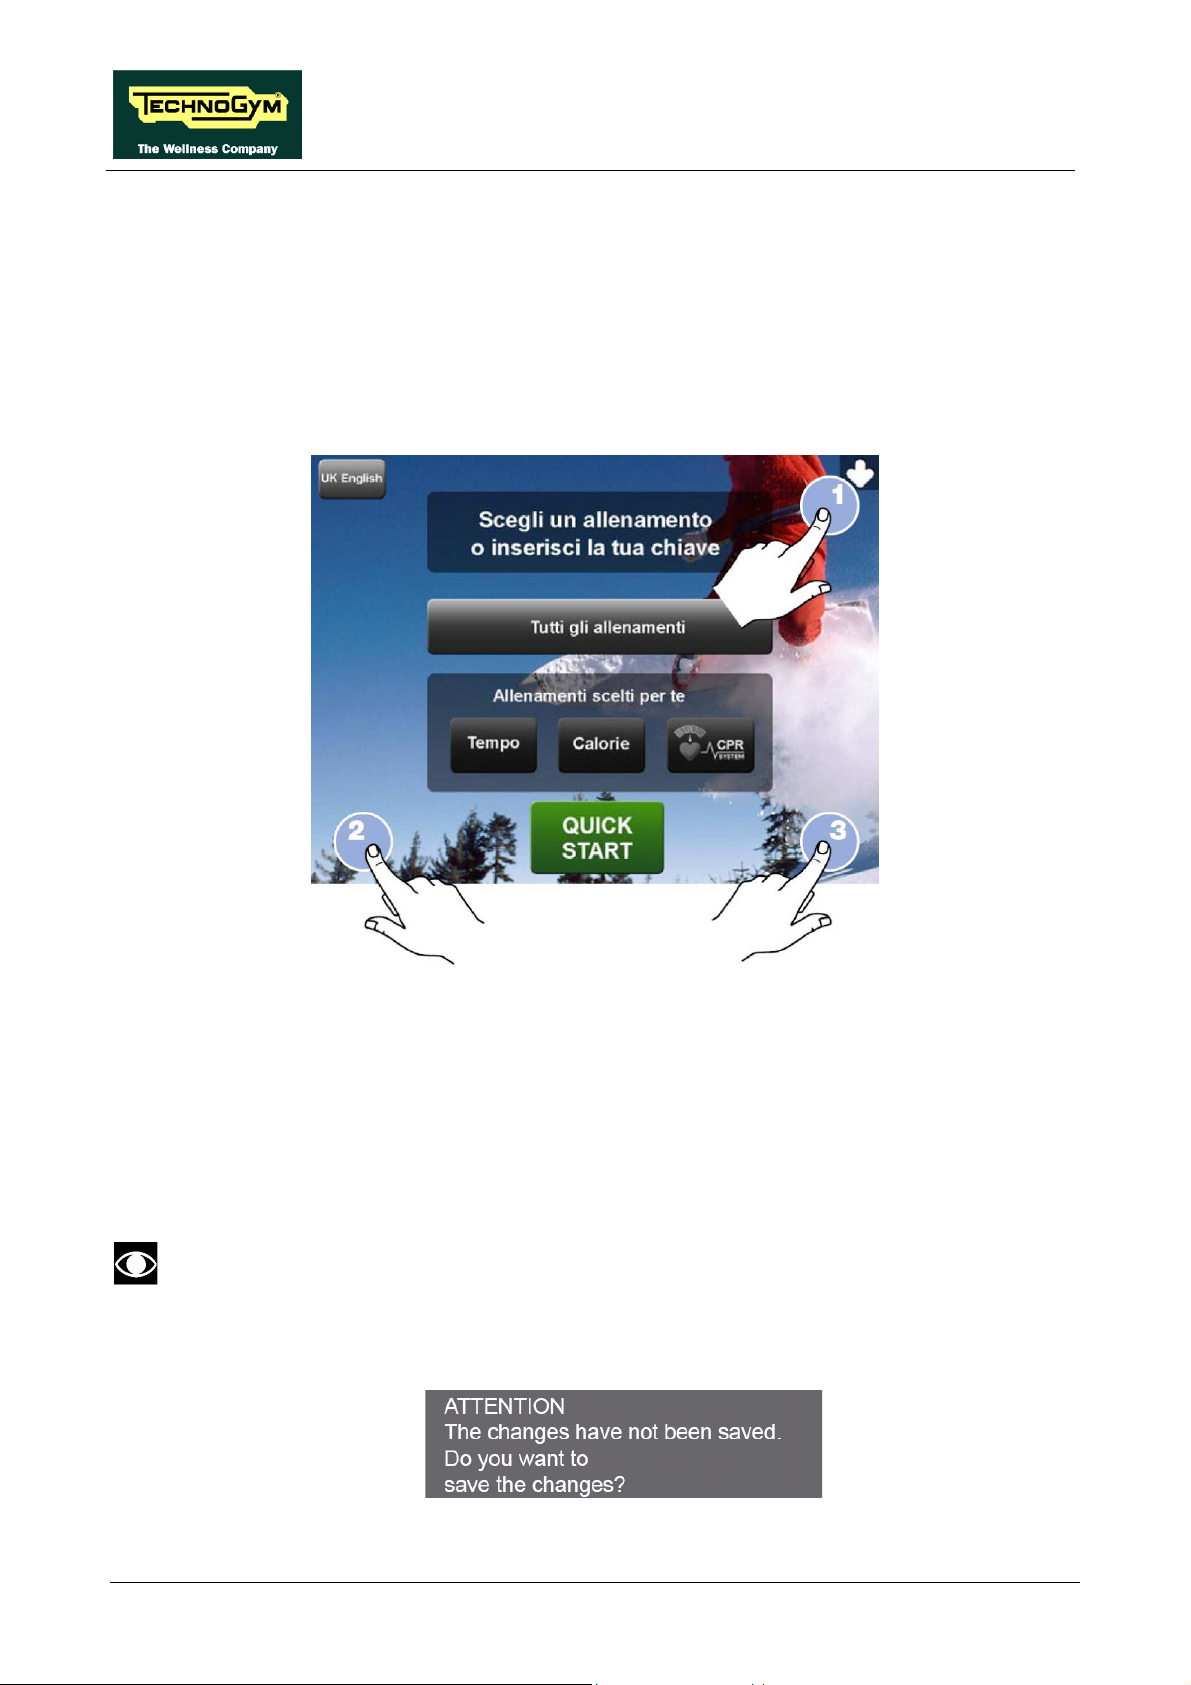
The machine configuration procedure is invoked, when the machine is in standby mode, by pressing
the top right hand, the bottom left hand and the bottom right hand corner in sequence, as shown in
the picture below.
The machine display will shows a window from where you can access the different configuration
menus, using the proper password.
To access the menu, type in the password 2407 and press ENTER key to confirm or BACK key to
back forward.
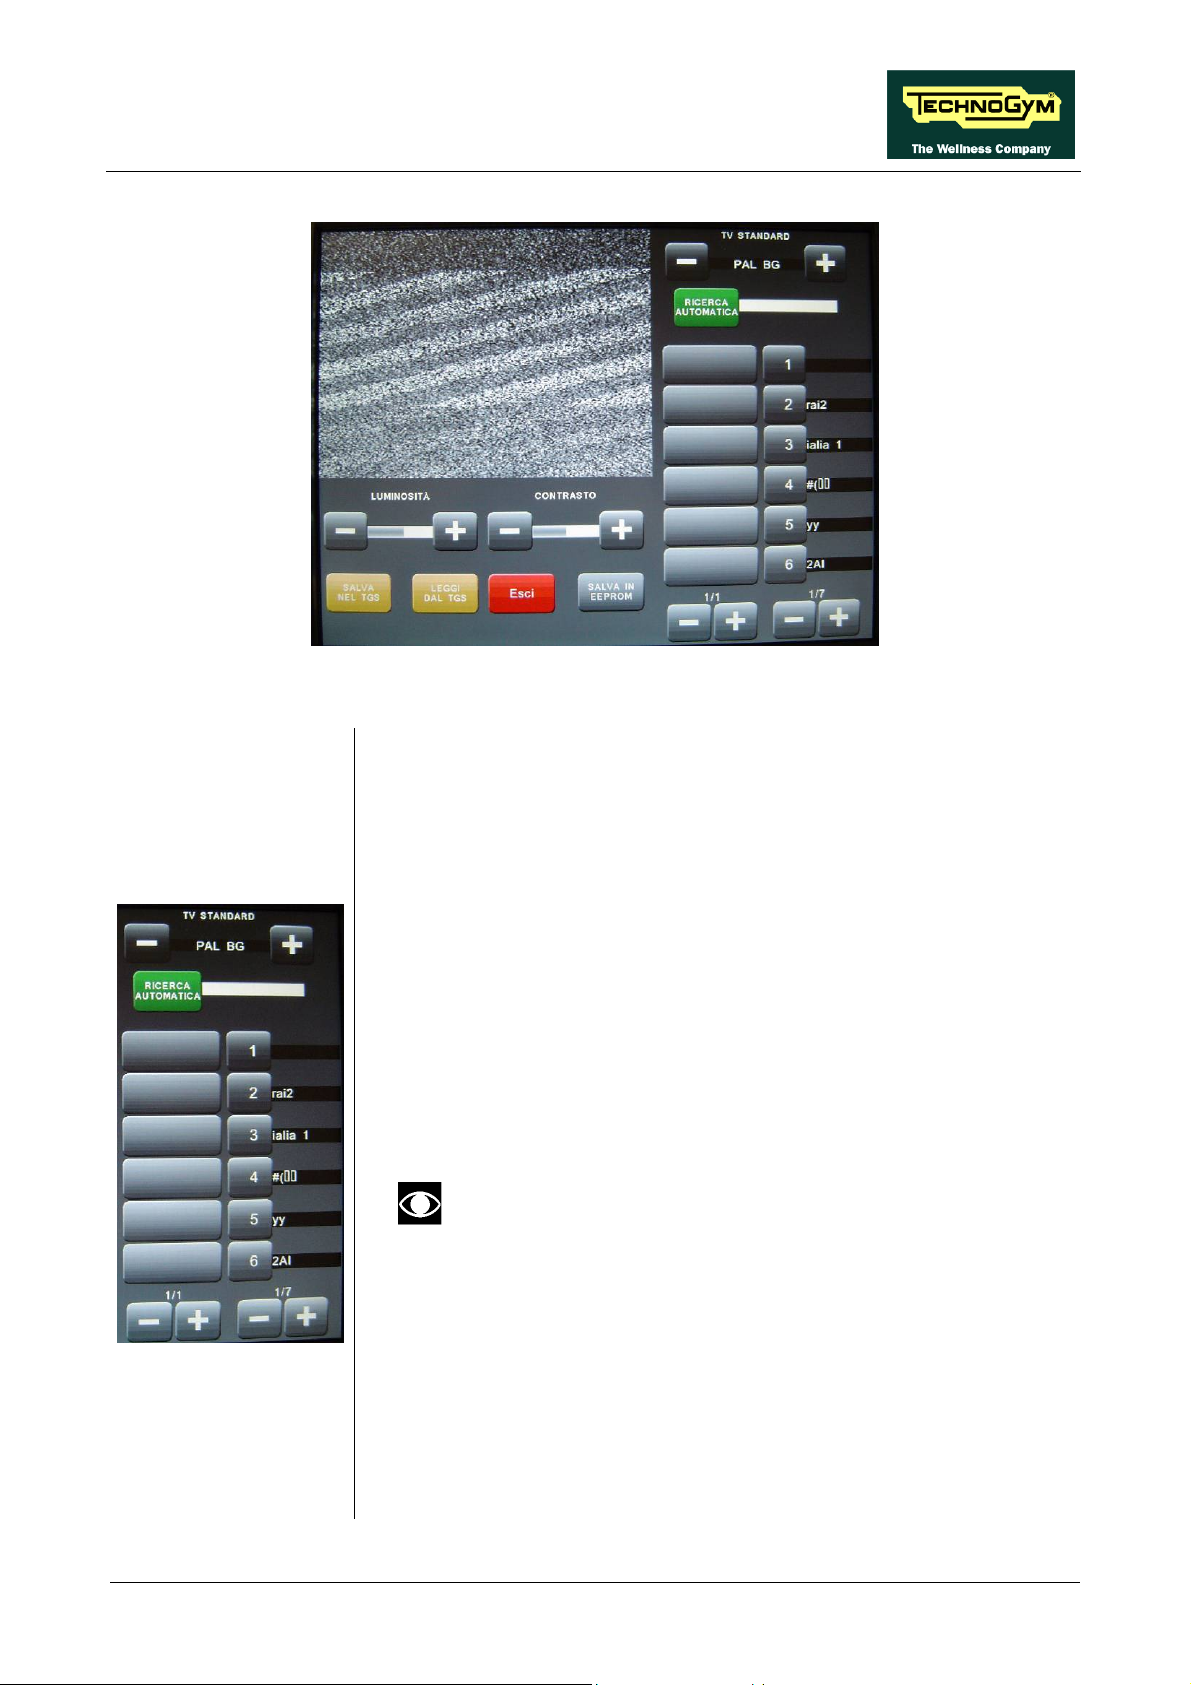
At this point the partial screen TV is displayed on the machine display, as shown in the picture
below.
To permanently save the changes which are going to be made in this page, press “SAVE
IN EEPROM” key. To go back to the home page press “HOME” key and the
configuration will be available until the machine is restarted. This is why the following
confirmation message is displayed:
Press “YES” to save the changes permanently or “NO” to continue.
Page 14
Page 19
ACTIVE WTV: Machine configuration
To tune and memorise a channel, proceed as follow:
1.
Select the correct television standard for the country of installation,
choosing between
all the available options, using the + and – keys in
the proper menu.
2.
Press the AUTOMATIC SEARCH button to start automatic
scanning of the video bands. During this stage, the channels found
will be collected in a temporary listing and visualized in the f
column on the left side of the one with the channel numbers.
3. search to finish, or interrupt it by pressing the
Wait for the automatic
STOP SEARCH key.
4.
Using the + and – buttons below the frequency column, it is possible
to scroll the frequency pages and using the + and – buttons below the
channel numbers column, it is poss
channels which can be memorised.
5.
Once you have found a channel to memorise, select it in the first
column, then press
the second column.
the number that you want to associate it with, in
irst
ible to scroll the pages of the 39
If a channel has already been memorised under that
numb
6. to associate a name to the
7. d will disappear and the name
one.
An alphanumeric keypad is displayed,
memorised channel (12 characters max).
Press the ENTER (↵) key: the keypa
er, the old channel will be overwritten with the new
will be displayed next to the numbere.
8. Repeat the above steps for each desired channel.
9. VE IN EEPROM” key to permanently save the
Press the “SA
configuration.
10. Exit with the “HOME” key.
Page 15
Page 20

1.3.2. WELLNESS TV ADJUSTMENTS
The keys in the figure at left can perform certain adjustments on the
Wellness TV. In particular, it is possible to:
1. Increase or reduce the brightness of the LCD.
2. Increase or reduce the contrast of the LCD.
3. Press the “SAVE IN EEPROM” key to permanently save the
configuration.
4. Exit with the “HOME” key.
ACTIVE WTV: Machine configuration
Page 16
Page 21
ACTIVE WTV: Machine configuration
1.4. RADIO MENU CONFIGURATION FOR 700I E MODELS
1.4.1. TUNING RADIO CHANNELS
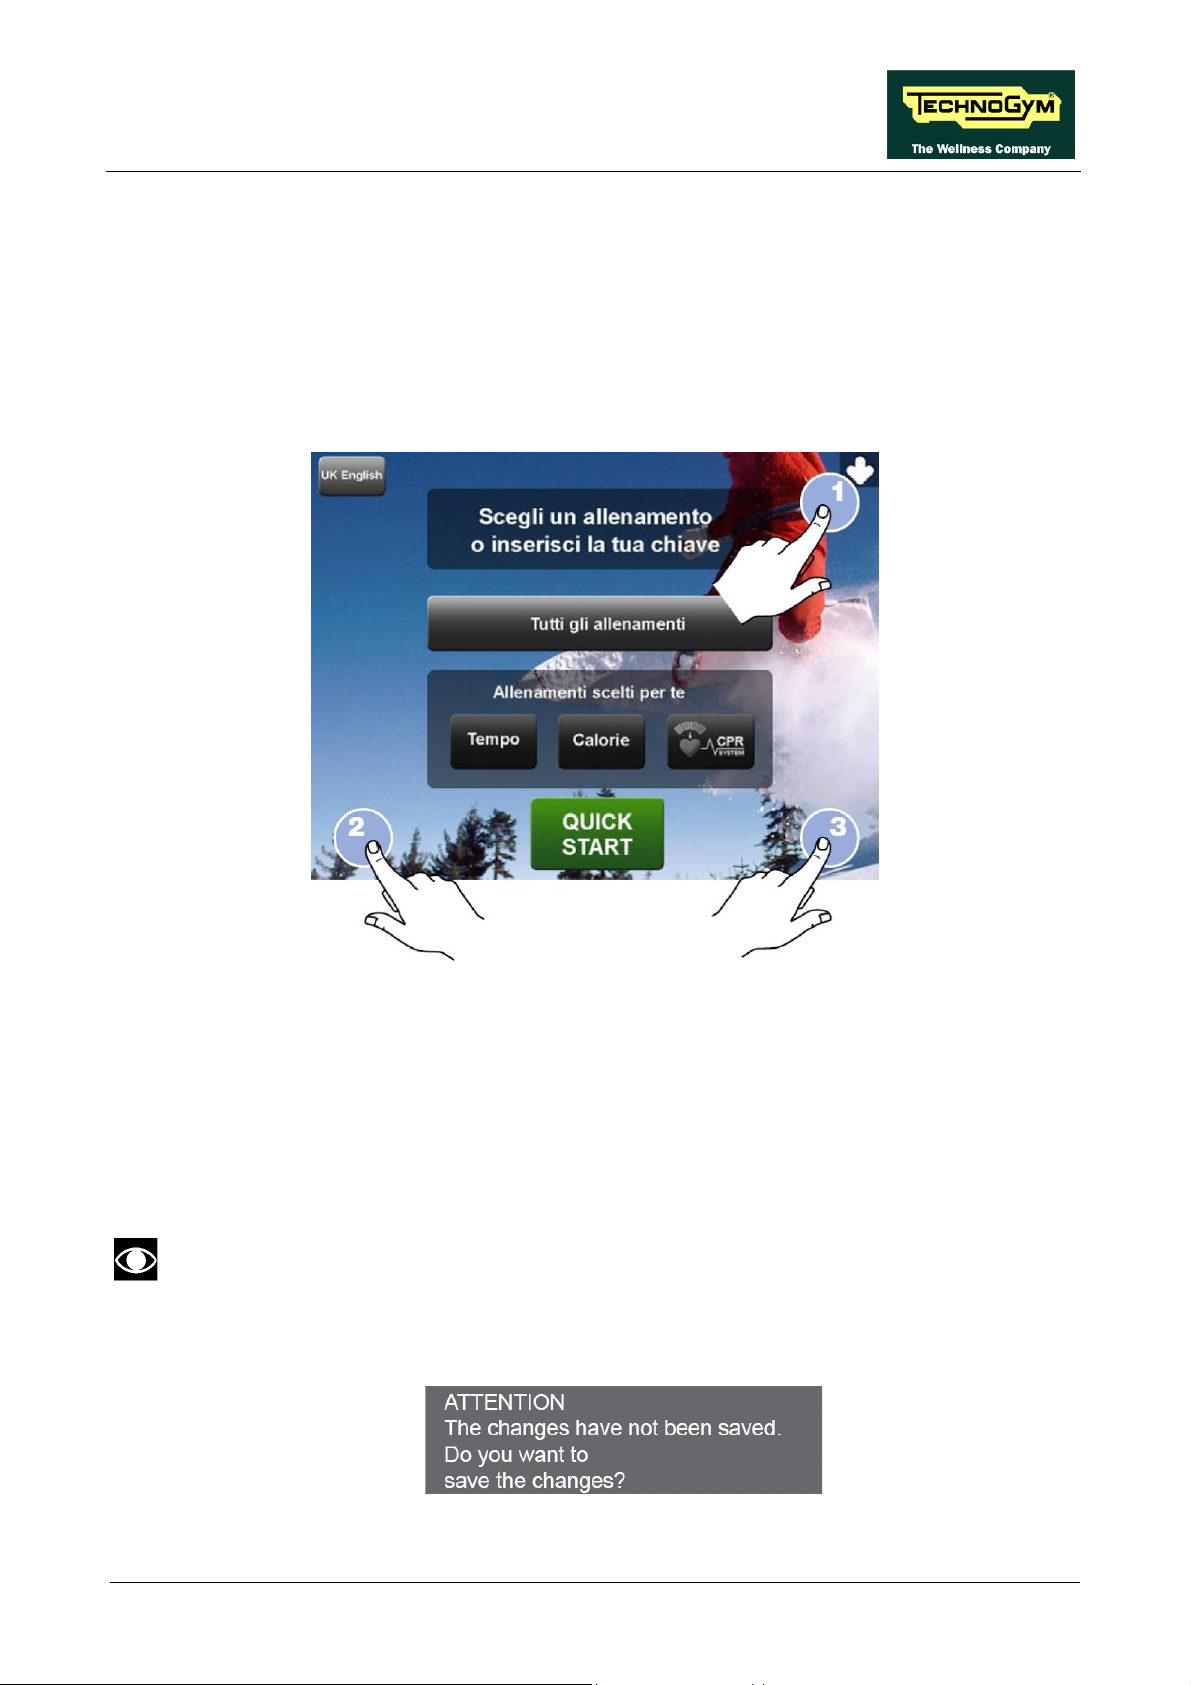
The machine configuration procedure is invoked, when the machine is in standby mode, by pressing
the top right hand, the bottom left hand and the bottom right hand corner in sequence, as shown in
the picture below.
The machine display will shows a window from where you can access the different configuration
menus, using the proper password.
To access the menu, type in the password 2408 and press ENTER key to confirm or BACK key to
back forward.
At this point the partial screen TV is displayed on the machine display, as shown in the picture
below.
To permanently save the changes which are going to be made in this page, press “SAVE
IN EEPROM” key. To go back to the home page press “HOME” key and the
configuration will be available until the machine is restarted. This is why the following
confirmation message is displayed:
Press “YES” to save the changes permanently or “NO” to continue.
Page 17
Page 22
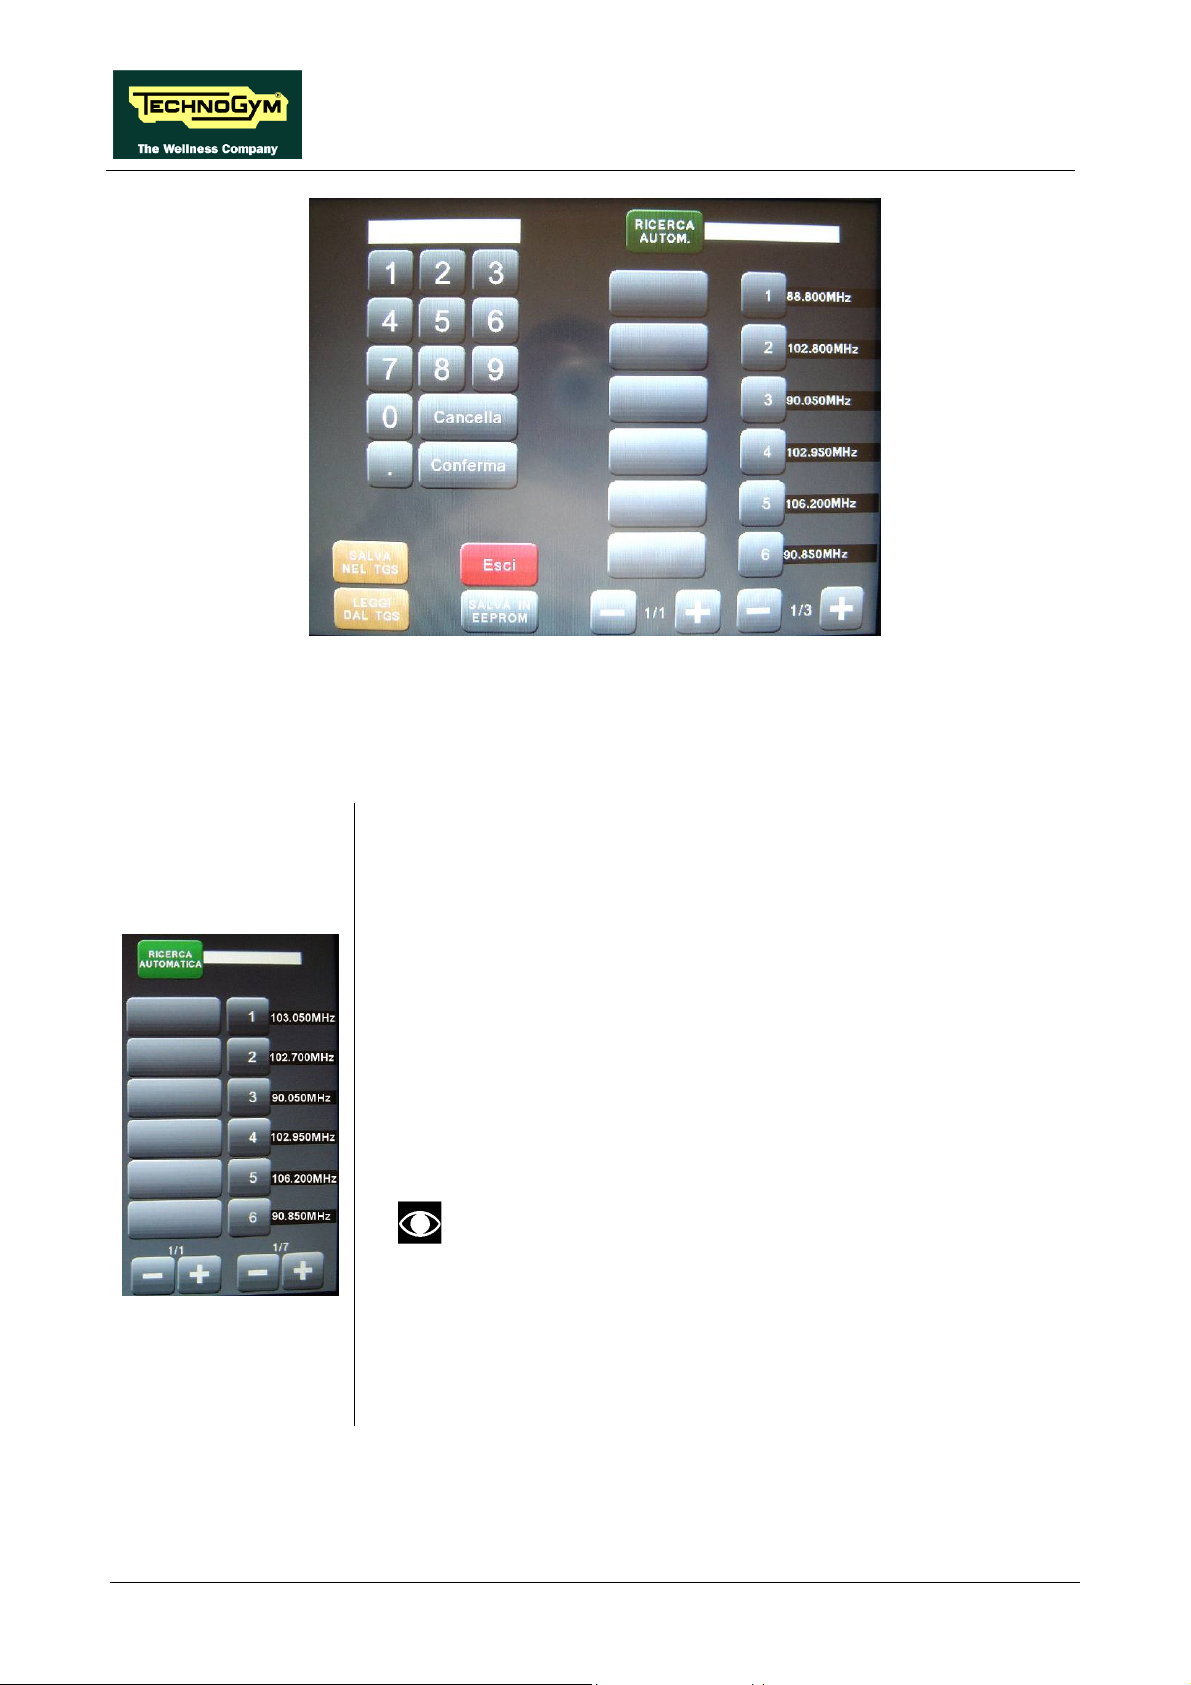
To tune and memorise a channel, proceed as follow:
ACTIVE WTV: Machine configuration
1.4.1.1. Automatic radio channel tuning procedure
1. Press the AUTOMATIC SEARCH button to start automatic
scanning of the FM radio band (88 – 108 MHz). During this stage, the
channels found will be collected in a temporary listing and visualized
in the first column on the left side of the one with the channel
numbers.
2. Wait for the automatic search to finish, or interrupt it by pressing the
STOP SEARCH key.
3. Using the + and – buttons below the frequency column, it is possible
to scroll the frequency pages and using the + and – buttons below the
channel numbers column, it is possible to scroll the pages of the 16
channels which can be memorised.
4. Once you have found a channel to memorise, select it in the first
column, then press the number that you want to associate it with, in
the second column.
If a channel has already been memorised under that
number, the old channel will be overwritten with the new
one.
5. Repeat the above steps for each desired channel.
6. Press the “SAVE IN EEPROM” key to permanently save the
configuration.
7. Exit with the “HOME” key.
Page 18
Page 23

ACTIVE WTV: Machine configuration
1.4.1.2. Procedure for manually entering radio channel frequencies
1. Digit the frequency using the keypad.
2. Press ENTER to confirm or DELETE to cancel.
3. Press the number that you want to associate the frequency.
If a channel has already been memorised under that
number, the old channel will be overwritten with the new
one.
4. Repeat the above steps for each desired channel.
5. Press the “SAVE IN EEPROM” key to permanently save the
configuration.
6. Exit with the “HOME” key.
Page 19
Page 24
ACTIVE WTV: Machine configuration
1.5. TRANSFERRING THE TUNING DATA
The TV and radio channel tuning data can be transferred from one machine to the other in 2 ways,
using a TGS key or connecting two machines using a CSafe connection.
NOTE: it is possible to use the above function only if the configuration has been
permanently saved in EEPROM.
1.5.1. USING THE TGS
On the already tuned machine:
1. Enter the configuration menu of the channels that are to be transferred.
2. Insert the TGS key into the reader on the machine;
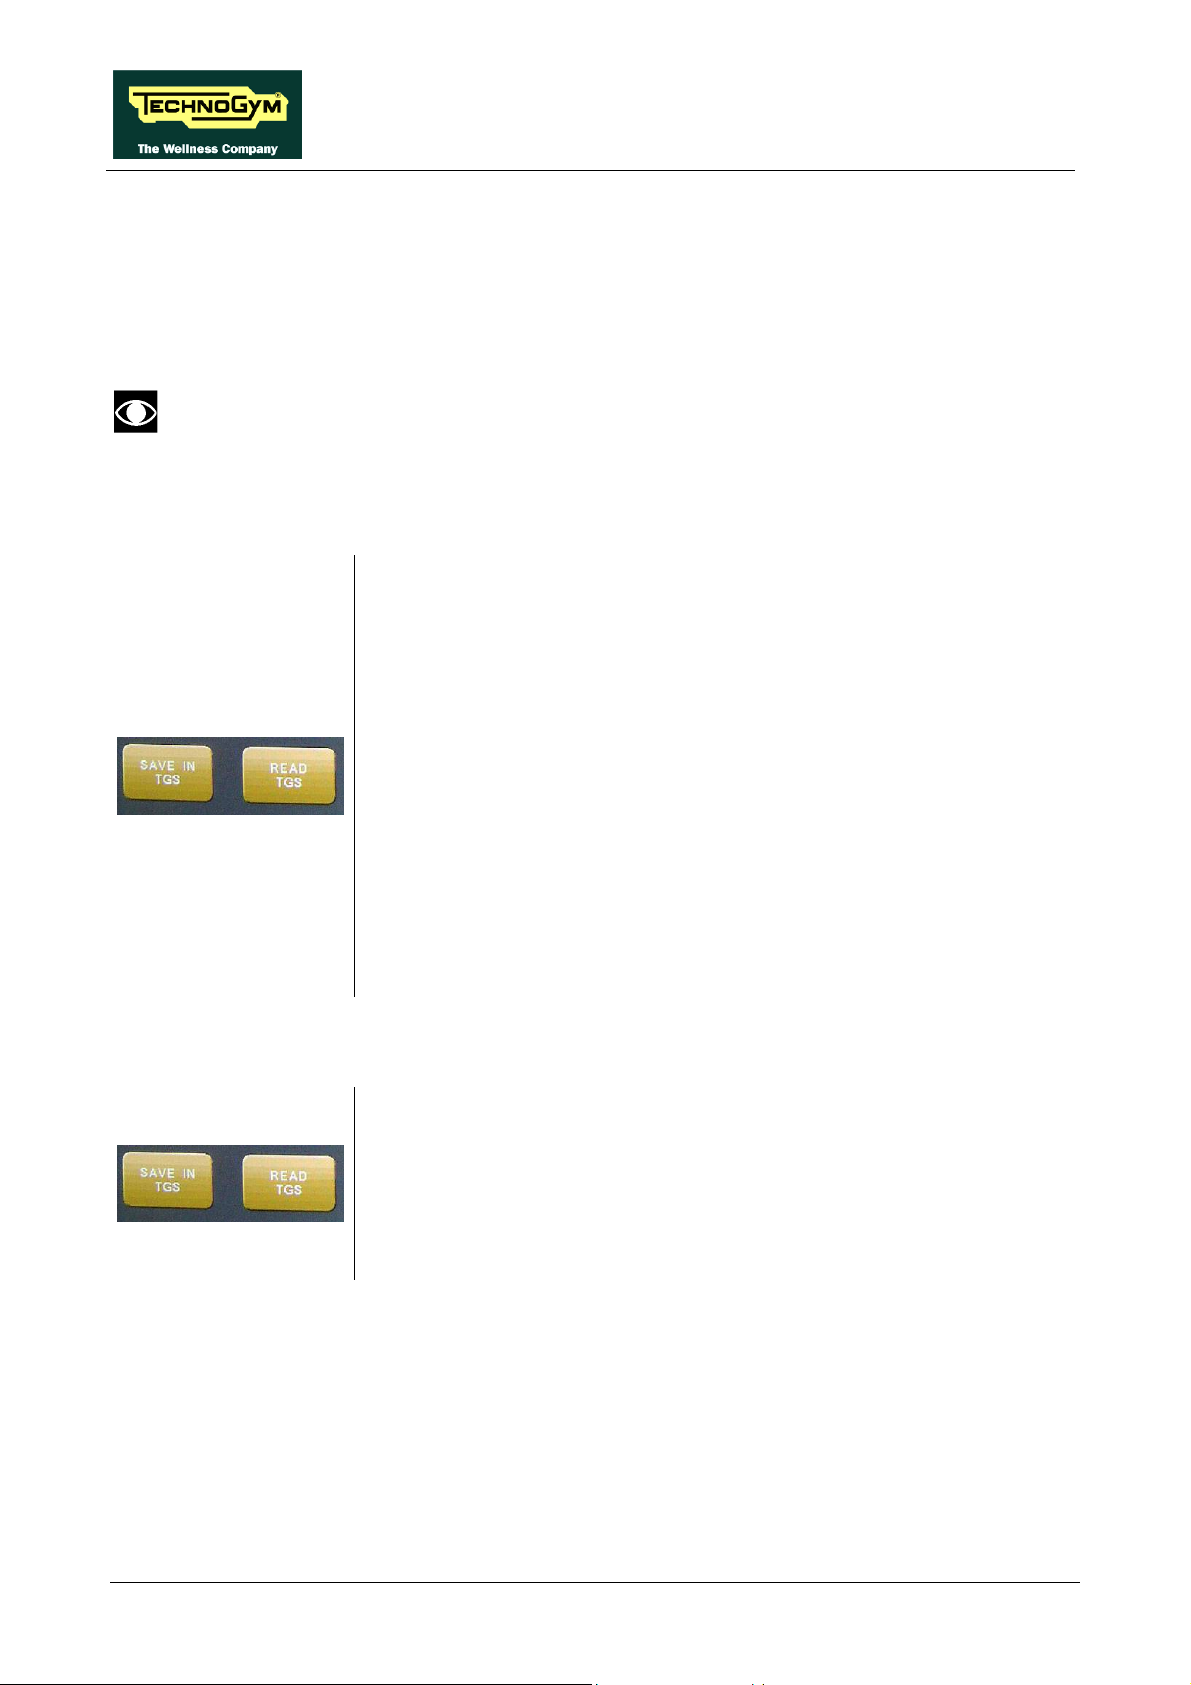
3. Press the “SAVE IN TGS” button, this will cause all the channel
configuration data to be saved to the key.
4. Exit the menu by pressing the “HOME” key.
On the machine to be tuned:
1. Enter the configuration menu of the channels that need to be tuned.
2. Insert the TGS key to which the tuning data was saved.
3. Press the “READ TGS” button.
4. Save the data uploaded to the machine by pressing “SAVE IN
EEPROM”.
5. Exit the menu by pressing the “HOME” key.
1.5.2. USING THE CONNECTING CABLE
1. Connect the two machines together using the proper cable.
2. On both machines, enter the configuration menu of the channels that
need to be tuned.
3. Press the “SAVE IN TGS” button on the already tuned machine.
4. Store the data transferred on the machine being tuned by pressing
“SAVE IN EEPROM”.
5. Exit the menu on both machines by pressing “HOME”.
Page 20
Page 25
ACTIVE WTV: Machine configuration
1.6. TOUCH SCREEN CALIBRATION
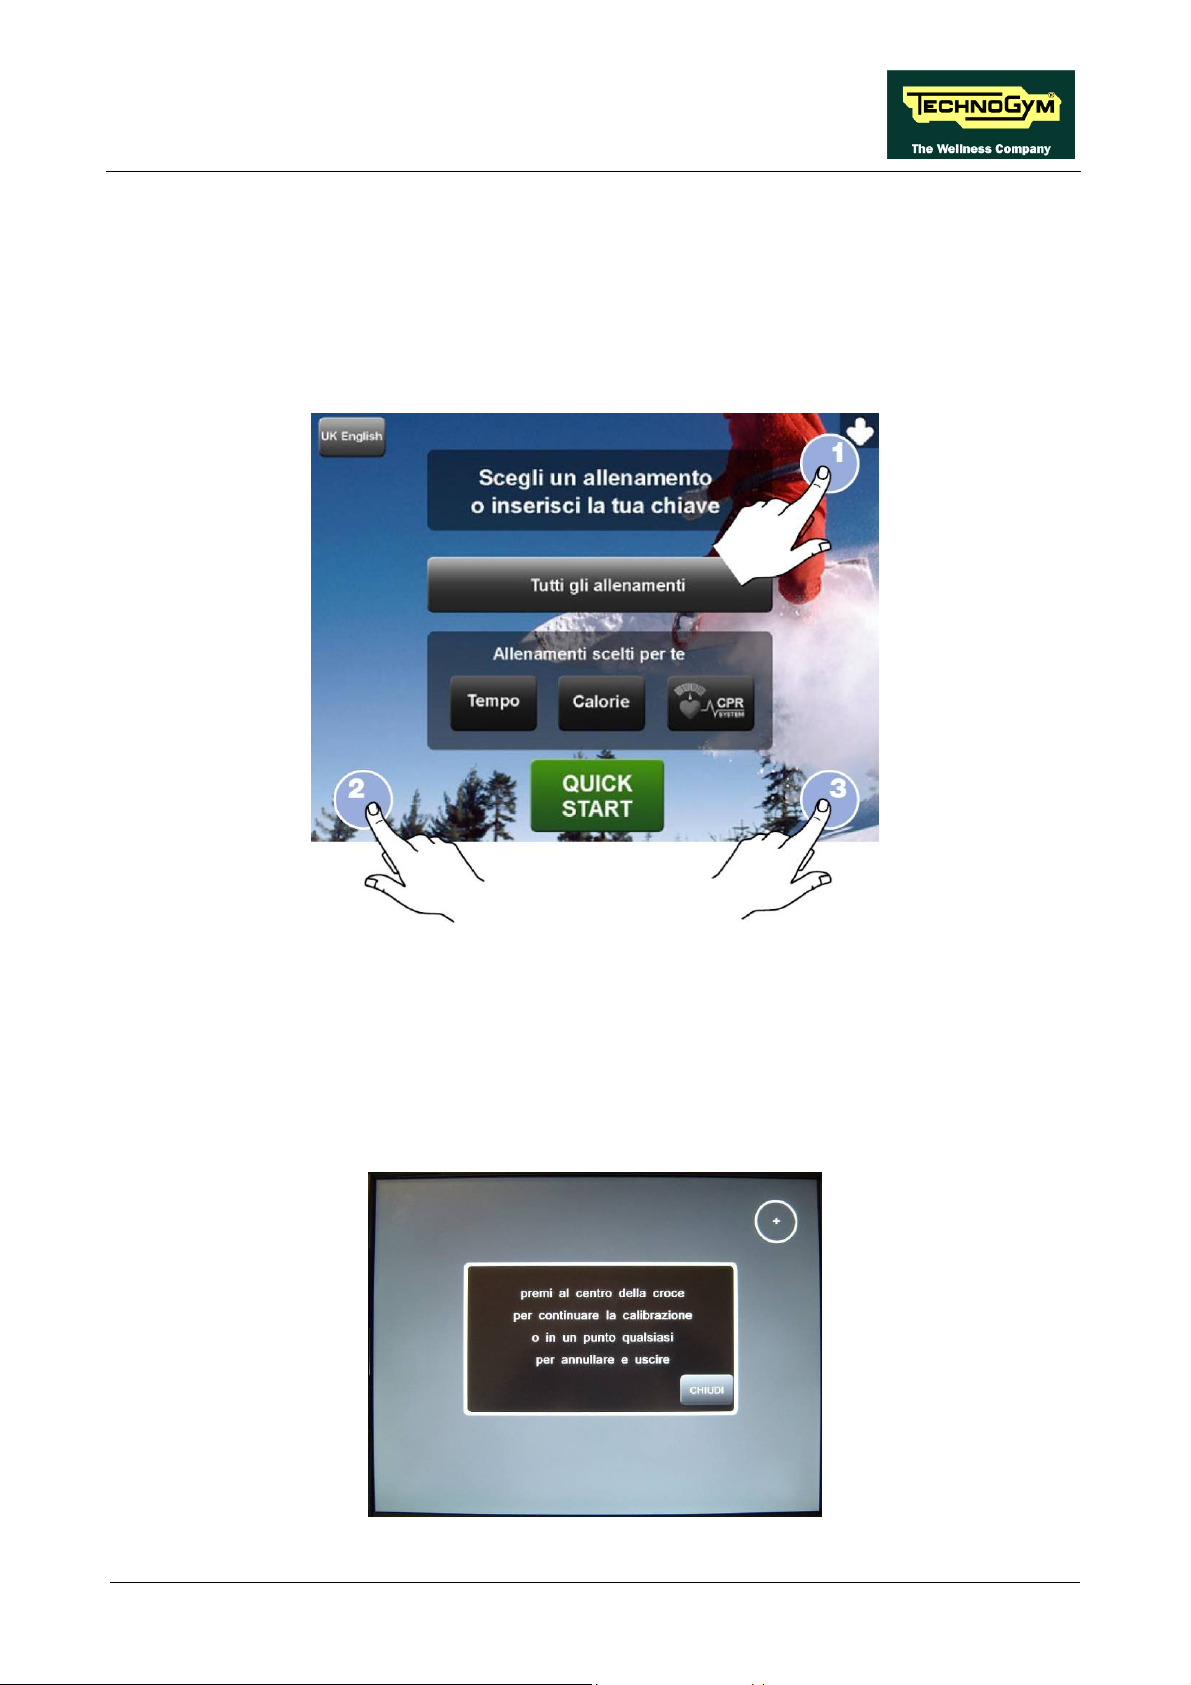
The machine configuration procedure is invoked, when the machine is in standby mode, by pressing
the top right hand, the bottom left hand and the bottom right hand corner in sequence, as shown in
the picture below.
The machine display will shows a window from where you can access the different configuration
menus, using the proper password.
To access the menu, type in the password 2409 and press ENTER key to confirm or BACK key to
back forward.
At this point the following screenshot appears on the display:
Page 21
Page 26

ACTIVE WTV: Machine configuration
Tap the centre of the + which appears on the screen, using an object that is pointed but not sharp.
The procedure must be repeated three times, with the + appearing in three diff erent positions.
At the end, the message “Calibration successful” will appear if the procedure was correctly carried
out, or “Calibration incomplete” if the procedure was not completed properly, after which the
machine reverts to standby mode.
During the machine power-up sequence, while the message showing the installed
software version is scrolling, pressing any point on the touch-screen for more than 6
seconds will automatically invoke the calibration procedure as soon as the software
version display finishes. Upon exiting the calibration procedure (successfully or
unsuccessfully), the machine automatically reverts to the standby state.
Page 22
Page 27
ACTIVE WTV: Machine configuration
1.7. TROUBLESHOOTING SERVICE MENU FOR 700 AND 900
MODELS
The machine configuration procedure is invoked, when the machine is in standby mode, by pressing
the top right hand, the bottom left hand and the bottom right hand corner in sequence, as shown in
the picture below.
The machine display will shows a window from where you can access the different configuration
menus, using the proper password.
To access the menu, type in the password 2411 and press ENTER key to confirm or BACK key to
back forward.
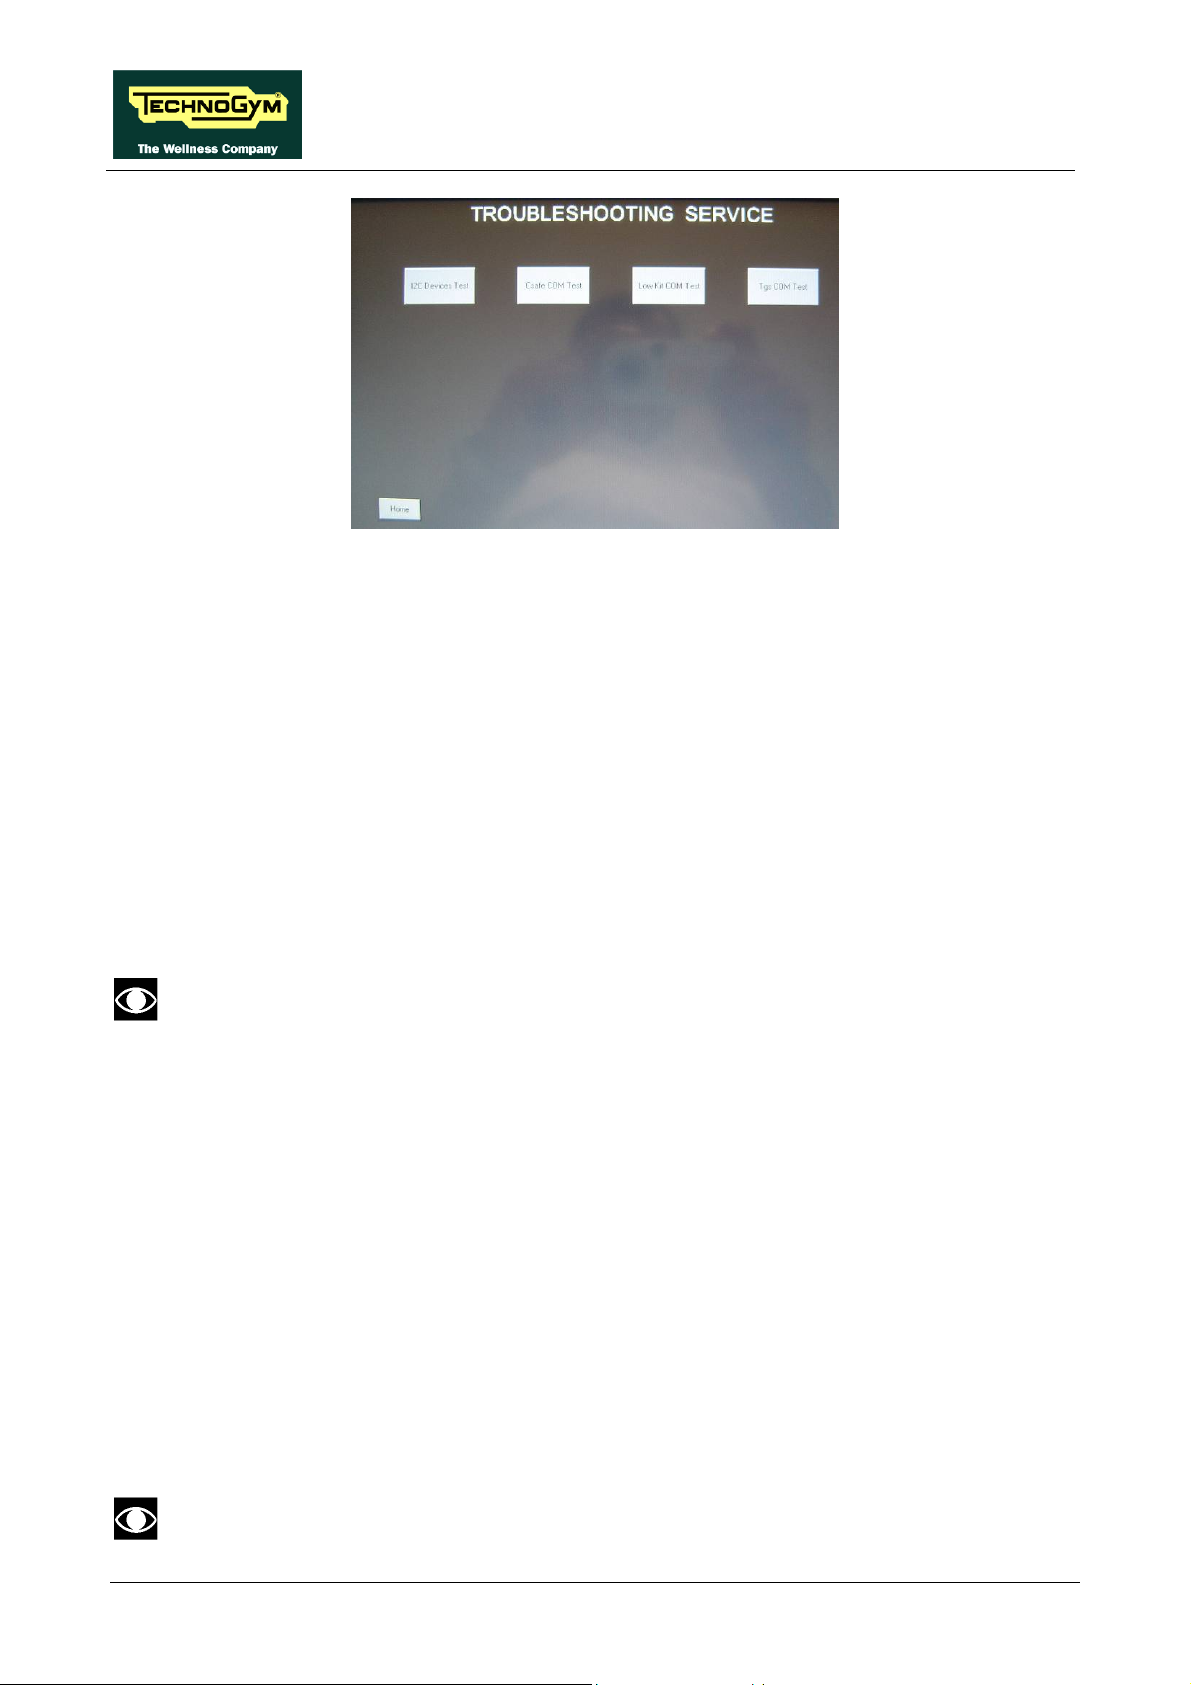
At this point the machine display will shows the different parameters of the menu. To exit the
TROUBLESHOOTING menu press HOME key.
Here below have been detailed all the parameters of the menu.
Page 23
Page 28
ACTIVE WTV: Machine configuration
1.7.1. I2C DEVICE TEST
The I2C Device test checks the communication following the 32K and 256K memories. The test
can have two outcomes:
• “Test Successful”: Signifies that data packets were successfully transmitted and received
toward the display board.
• “EEPROM Error”: Signifies that the display board has communication problems with the memories.
1.7.2. CSAFE COM TEST
The test checks the communication on CSafe ports. The test can have two outcomes:
• “Test Successful”: This means that the test was completed successfully, i.e. that serial
communications on the selected port are correct.
• “Error COM1”: This means that the outcome of the test was negative.
The “CSafe COM test” done on a machine which CSafe port is not plugged with the
monitor plug described at chapter 4 of the Service & Maintenance manual.
1.7.3. LOW KIT COM TEST
The test checks the communication with the Low kit. The test can have two outcomes:
• “Test Successful”: This means that the test was completed successfully, i.e. that serial
communications on the selected port are correct.
• “Error COM2”: This means that the outcome of the test was negative.
1.7.4. TGS COM TEST
The test checks the communication with the TGS reader. The test can have two outcomes:
• “Test Successful”: This means that the test was completed successfully, i.e. that serial
communications on the selected port are correct.
• “Error COM3”: This means that the outcome of the test was negative.
The “TGS COM test” done on machine not provided with the key reader gives a fail outcome.
Page 24
Page 29

Page 30

TECHNOGYM S.p.A.
Via G. Perticari, 20
47035 Gambettola (FC)
ITALIA
Tel.: +39-0547-650638
Fax: +39-0547-650150
e-mail:
 Loading...