

Page 1
Short instructions
TechniSat
DigiCorder DVB-C-Receiver
Your unit carries the CE symbol and complies with all relevant EU standards. Subject to change and printing errors. Correct as of 05/08
TechniSat and DigiCorder HD K2X are registered tradehighlights of TechniSat Digital GmbH Postfach 560 545 41 Daun www.technisat.de
Page 2
2
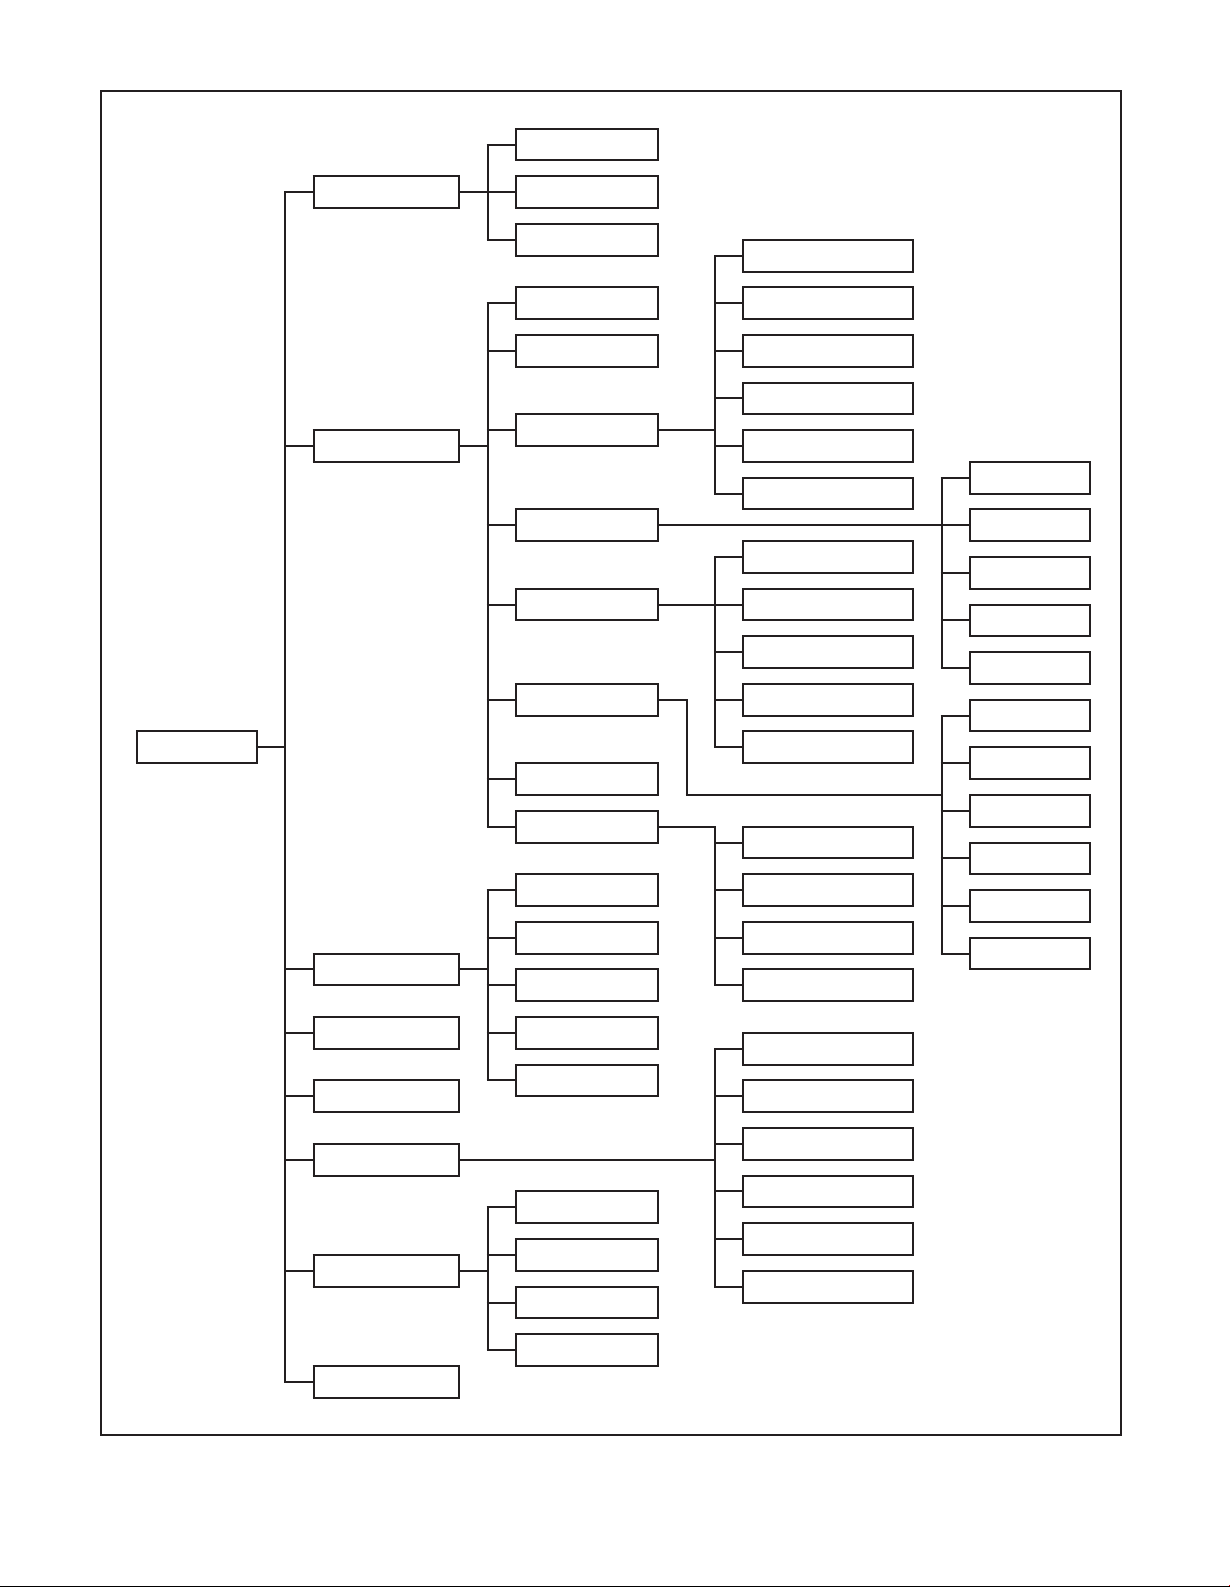
Automatic Search
Channel searching Extended Search
Manual Search
Country
Protection of minors Time zone
Program journal Date/Time
Standby clock
Basic set tings
Settings IRC code
Screen format
Quickstart
Picture settings HDMI resolution
Audio language
HDMI colour
space
Sound set tings Subtitle language
TV SCART mode
Dolby Digital
Zoom
Special functions AV synchronism
OSD
Main Menu HDMI audio format
PVR
System conguration
Media Player
Service settings
Restore factory settings
Network
Timer over view Delete all programs
Remote access
Hard disk timer Soft ware update:
Miscellaneous
Timer organising
Video rec. timer Copy settings
TV-Lists organising
Channel change
timer
Record organizing
Timer set tings
Radio lists organising Music copying
Picture c opying
Hard disk organising
Record c opying
CI Slot 1
Hard disk information
CI Slot 2
Conditional access
Hard disk maintenance
Smartcard 1
Smartcard 2
Menu language
Page 3
3
Disposal advice
The packaging for your unit consists entirely of recyclable material. Please sort the items appropriately, for
disposal via your local waste disposal system. Please note that spent batteries (from the remote control)
as well as electronic components should not be disposed of in your household refuse, but only in accordance with your local regulations (special waste, handing back to the outlet where purchased).
Safety advice
Contents
Disposal advice .............................................................................................................................................3
Safety advice .................................................................................................................................................3
When not in operation ...................................................................................................................................4
Connecting the DVB receiver ........................................................................................................................5
Help ...............................................................................................................................................................5
Initial installation ............................................................................................................................................5
Switching on and off ......................................................................................................................................6
Channel selection ..........................................................................................................................................6
Optional Features ..........................................................................................................................................6
Additional channel information ......................................................................................................................7
Volume control...............................................................................................................................................7
TV/Radio switching ........................................................................................................................................7
Access Electronic Channel Guide (EPG): .....................................................................................................7
Hard disk operation .......................................................................................................................................7
Recording ..................................................................................................................................................7
Automatically end recording ..........................................................................................................................9
Playback .................................................................................................................................................. 11
Play back hard disk recordings ...............................................................................................................12
Fast Forward and Rewind .......................................................................................................................12
Slow motion .............................................................................................................................................13
MP3 playback ..........................................................................................................................................13
Playback/reproduction of pictures ...........................................................................................................14
Manage hard disk ....................................................................................................................................15
Sort Channels / Congure Favourites List ..................................................................................................19
Exit menus ...................................................................................................................................................20
Page 4
4
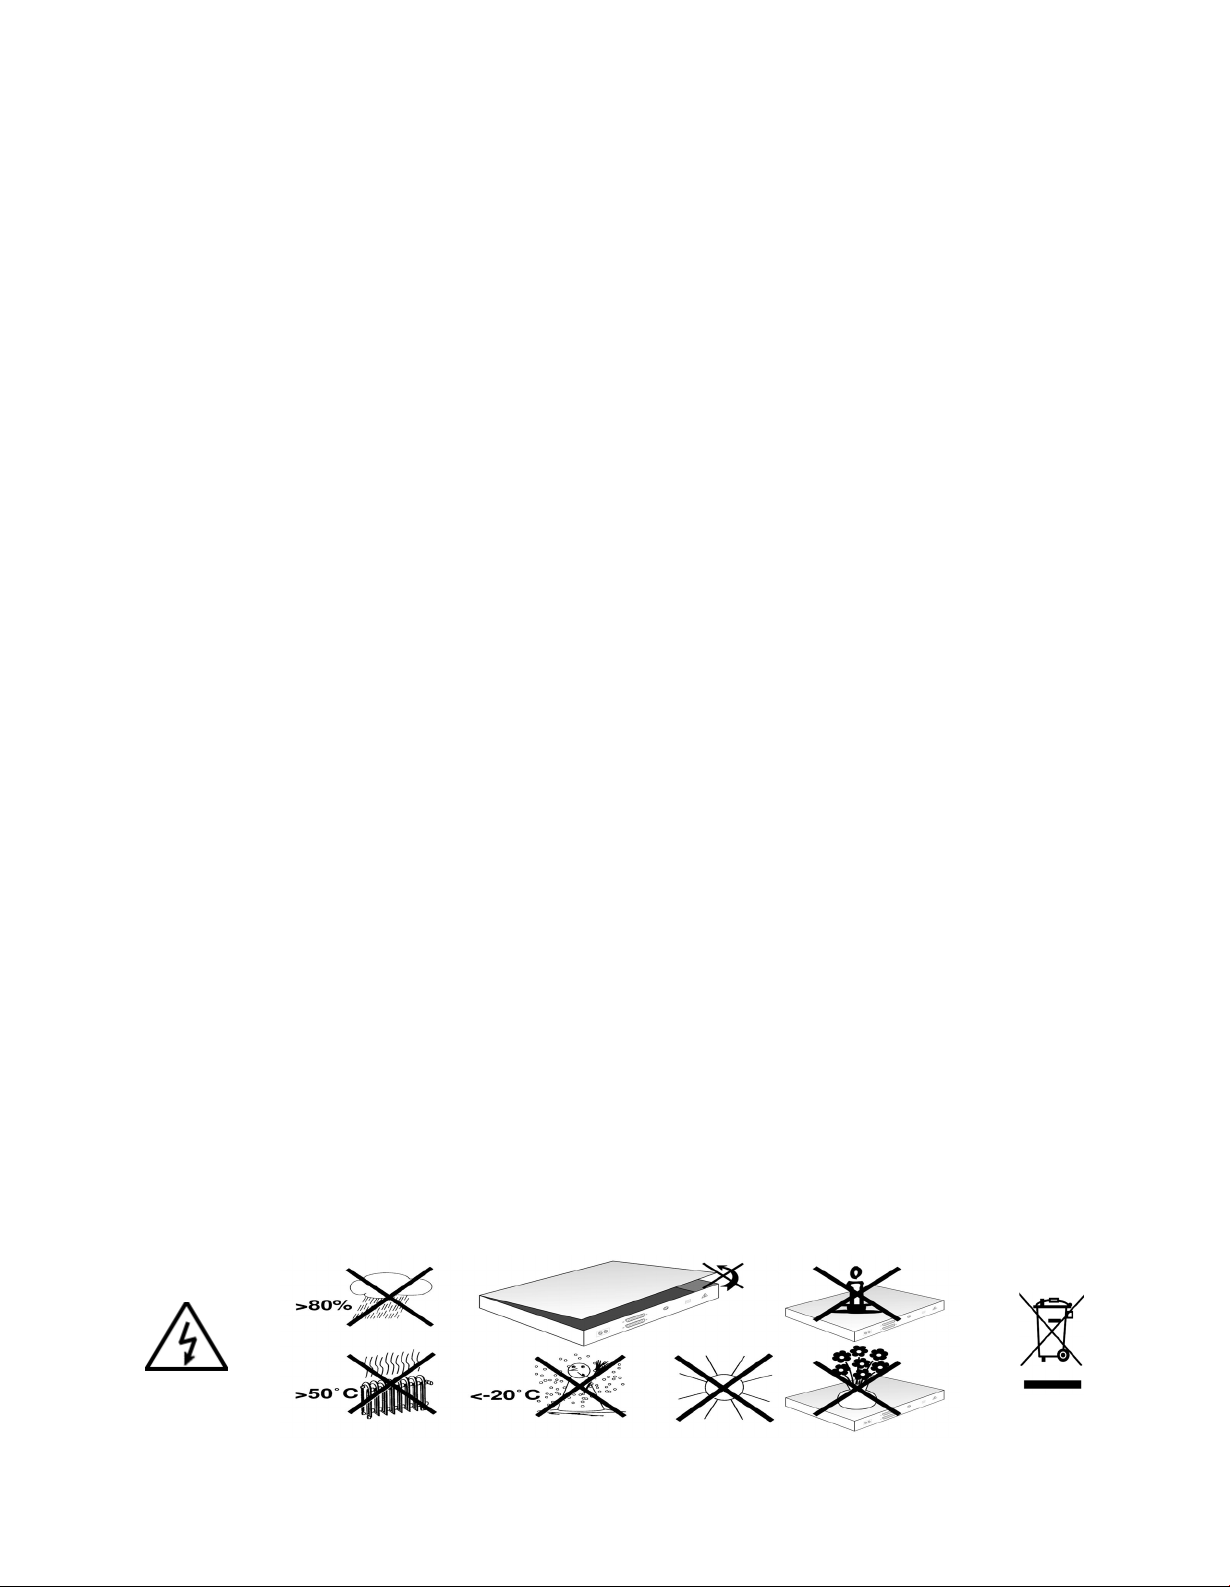
For your own protection, please read the safety instructions carefully before commencing operation of
your new unit.
The manufacturer accepts no responsibility for any damage caused by inappropriate operation, or by noncompliance with safety precautions.
> To ensure adequate ventilation, place the unit on a smooth horizontal surface, and do not place any
objects on the upper surface of the unit. This surface has ventilation slots that ensure heat can escape
from the interior.
> Do not place any burning objects, such as burning candles, on top of the unit.
> Do not subject the unit to water spray or droplets, and do not place any objects lled with liquid, e.g.
vases, on top of the unit.
> The unit may only be operated in a temperate climate.
> Never open the unit housing! You are in danger of receiving an electric shock. Any necessary repairs
should be carried out only by qualied service personnel.
In the following cases, you should disconnect the unit from the mains power supply, and consult a qualied
technician:
> the mains cable or the mains plug is damaged
> the unit was exposed to liquid, or liquid has run into the unit
> in case of signicant malfunction
> in case of severe external damage
When not in operation
During an electrical storm, or when the unit will not be used for a lengthy period of time (e.g. while you are
on holiday), disconnect the unit from the mains power supply.
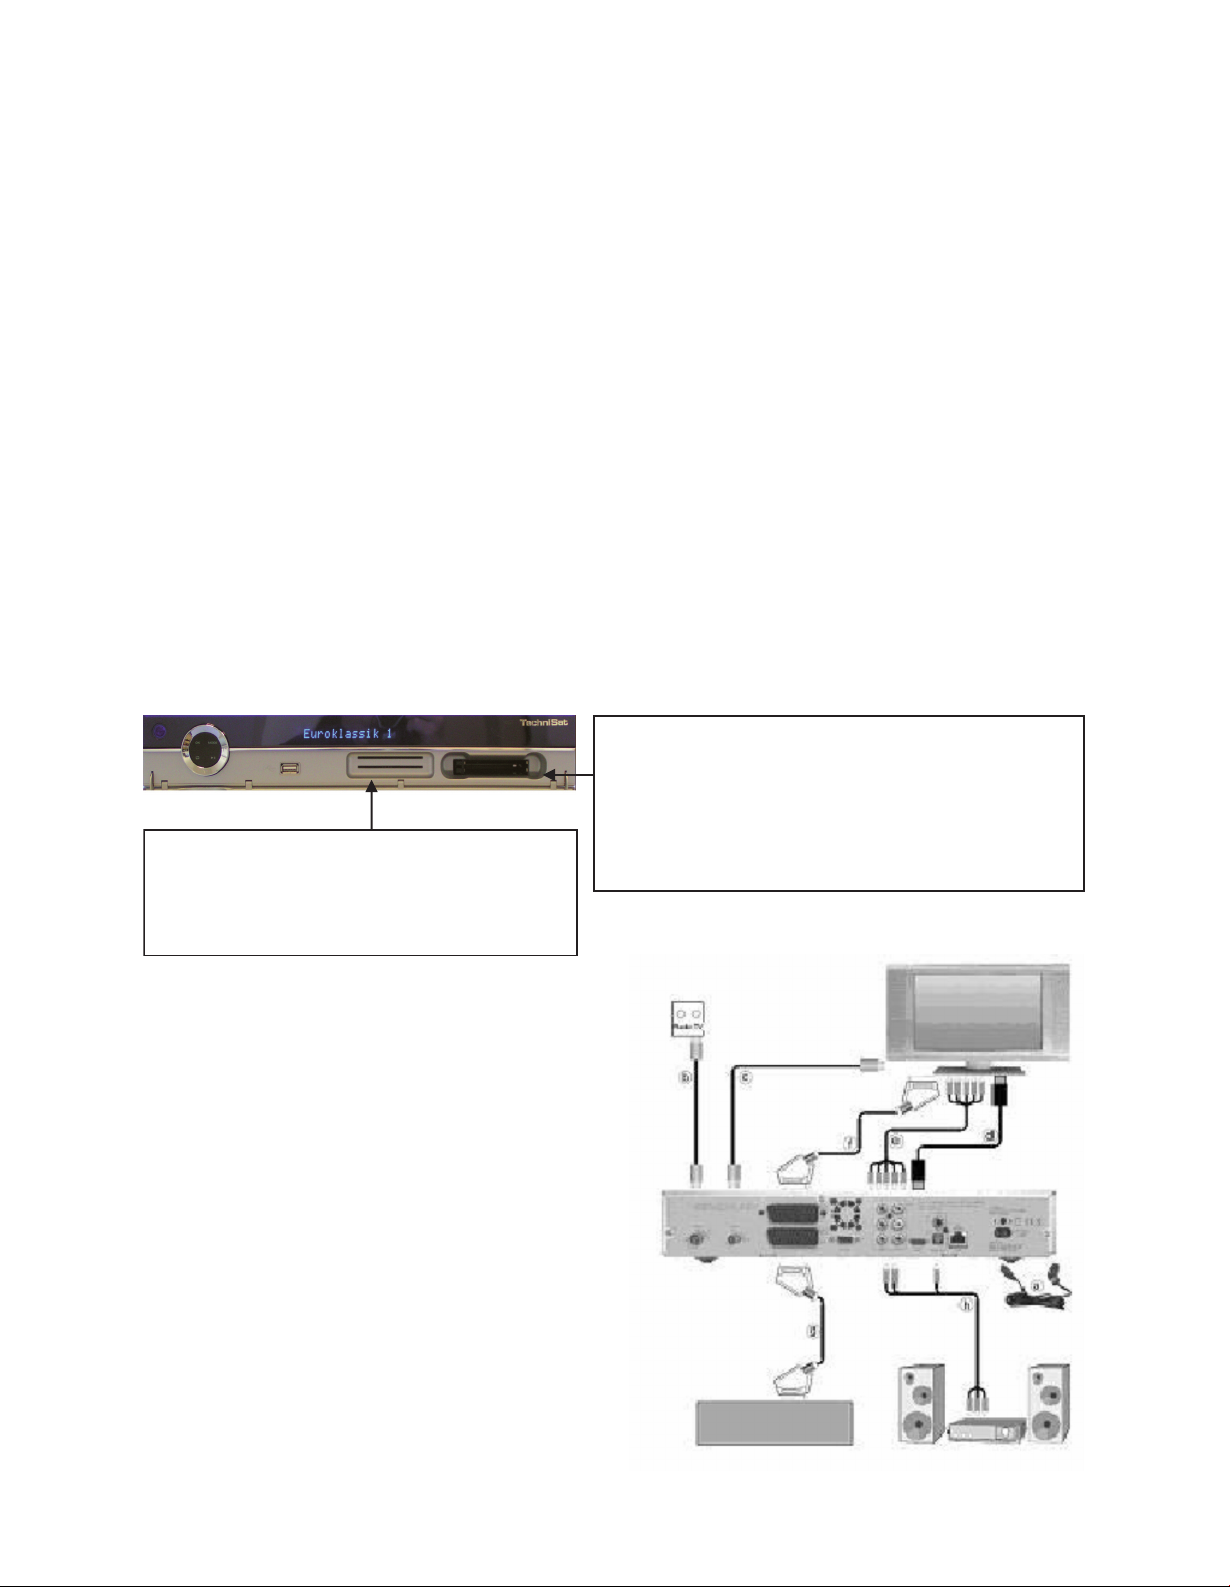
Card reader for the smartcard:
> Slide the smartcard (with the gold chip fac-
ing down and in the intended direction of
insertion) carefully until it is tted into the
card reader.
Inserting the CI module:
> Follow the instructions of the manufacturer of the
CI module and card.
> Slide the desired smart card into the relevant
CI module.
> Now carefully slide the CI module into the appro-
priate slot.
Connecting the DVB receiver
a. Mains connection
b. Connecting the cable connection box with the
antenna input of the DVB receiver.
c. Connecting the antenna output of the DVB
receiver with the antenna input of the TV set
(optional for reception of available analogue
channels).
d. Scart connection between the DVB receiver
and the television set.
e. Connecting from the component socket of the
DVB Receiver to the component socket of the
TV.
f. Scart connection between the DVB receiver
and the television set.
g. Scart connection from a video player to the
VCR Scart socket of the DVB receiver.
h. Connecting the Audio outputs with a HiFi-/Sur-
round system.
Video recorder
Page 5
5
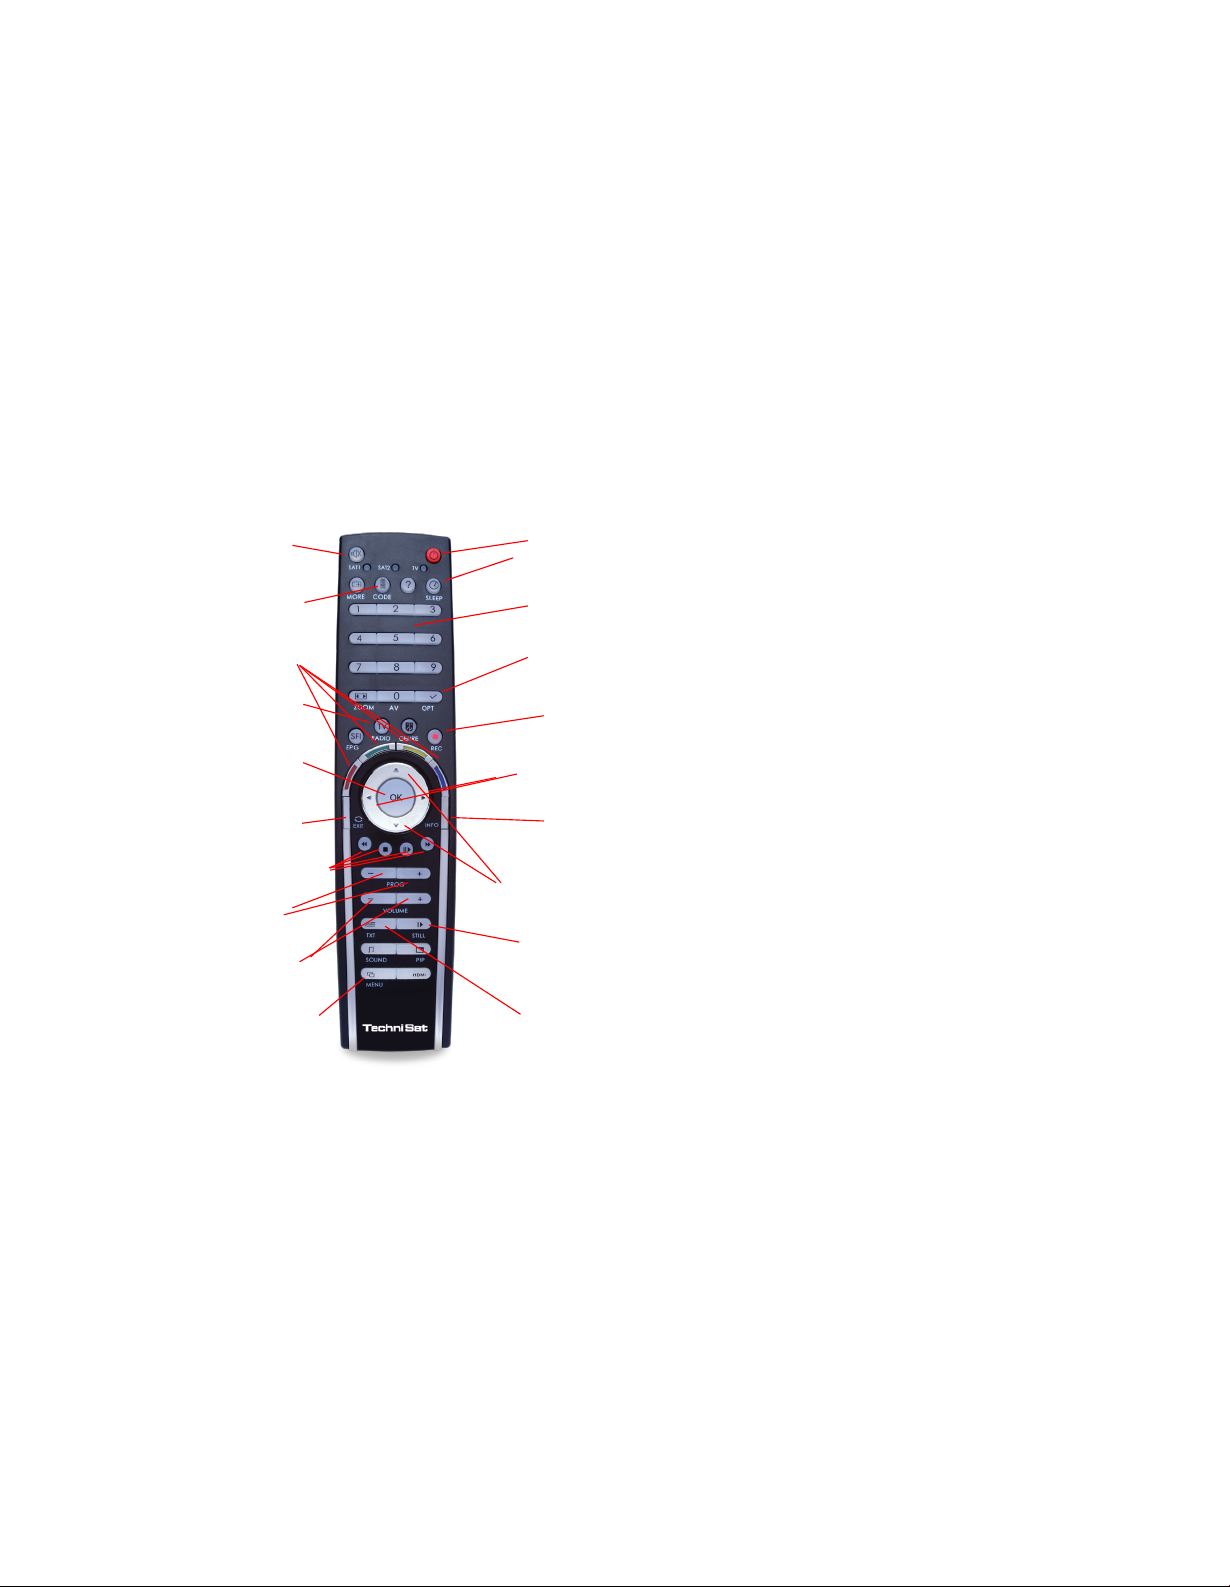
Mute
On/Standby
Sleep timer
Remote control option
(Code+OK
at the same time)
Numeric keys
Multifunctional keys
TV/Radio
Recording
OK/
Channel list
On/Off
Arrow keys left/right
Volume+ Volume–
Back
Info
Playback functions
Arrow down/Arrow up
Channel + /Channel –
Channel +/-
Stop/Freeze frame
Volume +/-
Menu On/Off
Video text
On/Mix/Off
Option button
Cable connection
Connecting the DVB receiver
b Connect the antenna input of the digital receiver via a suitable coaxial cable with the cable connection
box.
Connection to a television set
d Connect the receiver (HDMI output) and TV (HDMI input) via an HDMI cable. If your TV is suitably
equipped, it will automatically switch to the HDMI input when the digital receiver is switched on.
Or: e Connect the receiver (component output) and TV (component input) via a component cable.
Alternatively: f Use a SCART cable to connect the receiver (SCART socket TV) with the television set
(SCART socket). If your television set is appropriately equipped, it will automatically switch to AV, and thus
to receiver operation, when the digital receiver is switched on. Where applicable, it may be necessary to
adapt the type of signal for your television set.
Important operating instructions
The operation of the digital receiver is
simplied by the use of the “On Screen
Display”, which also serves to reduce the
number of keys required on the remote
control unit. All functions are displayed
on the screen, and can be operated
with a few keys. Related functions are
combined in a “MENU”. The function
selected is highlighted in colour. The
“Function keys” red, yellow, green and
blue are indicated by colour bars in the
bottom line. These colour bars represent
different functions in the various menus,
which will be activated by pressing the
appropriate coloured key (“Multifunction
key”) on the remote control. The “Func-
tion keys” are only active when a brief
description is displayed in the appropri-
ate eld.
Help:
Where available in the menus, pressing the blue function key will cause a help text to be displayed, pressing again will remove the text from the screen.
Initial installation
When switching on the unit for the rst time, a start window will be displayed, with the installation assistant AutoInstall. Please follow the instructions displayed on screen. If you do not implement the initial
installation, or if it is not completed, the receiver will commence operation with a standard pre-channeld
conguration.
You can abort the initial installation at any time simply by pressing the red function key. Press the green
function key to go back to the previous step in the installation procedure. Thus any entries made in error can be quickly corrected. If you do not implement the initial installation, or if it is not completed, the
receiver will commence operation with a standard pre-channeld conguration.
Page 6

6
For daily use
Switching on and off
>
Press the On/Standby key either on the digital receiver or on the remote control to switch the receiver on.
> Press the same key again to switch the receiver off again.
Channel selection
Using the channel up/down keys
> Use the channel up/down keys on the remote control or on the receiver to move up or down the list, one
channel slot at a time.
Using the numeric keys
> You may use the numeric keys to enter the desired channel number. For example: 1 for channel 1
1, then 4 for channel 14
2, then 3, then 4 for channel 234
When entering a channel number consisting of several digits, you have approx. 3 seconds after pressing
each number to complete the entry. If you wish to enter a number consisting of only one or two digit/s, you
can speed up the switching procedure by holding the key down on the last digit.
Using the channel list:
> Press the OK key.
> Now use the arrow keys up/down to highlight the desired channel.
> Press the OK key to display the highlighted channel.
> Use the arrow keys up/down to move the highlighter in the list by one line at a time.
> Use the arrow keys left/right to move back and forth in the list one page at a time.
Return to the last channel selected
> Pressing the Back key on the remote control will take you back to the last channel selected.
> Press the key again to return to the channel previously selected.
Optional Features
Certain channels offer the possibility of optional features. This function makes it possible for you, e.g.
during a sports broadcast, to freely select from various camera perspectives (Form 1) or to select from a
range of different sporting broadcasts (Bundesliga football).
If a programme includes optional channels, this will be indicated.
> To select one of the possible options, press the option button. A selection window showing the available
options will be displayed.
> Use the arrow keys up/down to highlight the desired option, and conrm by pressing OK.
Select start time
On certain channels, you can select individual lms with different start times. These lms are available
on a round the clock basis at different start times. If a channel features selectable start times, this will be
indicated by a notication.
> To select one of the possible start times, press the option button. A selection window showing the start
times offered will be displayed.
> Use the arrow keys up/down to select the desired start time.
> Conrm by pressing OK. Provided the broadcast for the selected start time is available, you can view
this at the desired time.
Page 7

7
Additional channel information
Each time you change channels, an information box will be displayed briey, showing the channel and the
channel name of the channel selected. In addition, other channel properties will be indicated, such as for
Video text, for widescreen broadcasts and for encrypted channels. If a TV broadcast is available in multiple languages or with multiple audio channels, or if multiple radio channels are available on a single radio
station this will be displayed on screen. You may then proceed as follows to select a different language or
a different audio channel:
> Press the Option key. A list will now be displayed on screen, indicating the languages currently avail-
able.
> Use the arrow keys up/down to highlight the desired language or the desired radio station and conrm
by pressing OK.
You may now listen to the channel in the language selected. Your digital receiver is also equipped to
receive monaural channels.
> Use the arrow keys left/right to choose between Mono channel 1, Mono channel 2 and Stereo.
Volume control
> Adjust the volume of your digital receiver using the Volume + key to increase the volume, and Volume –
to decrease the volume.
> Press the mute on/off key to switch the sound on or off.
TV/Radio switching
> By pressing the TV/Radio button, you can switch between TV and Radio operations.
Access Electronic Channel Guide (EPG):
> Press the SFI/EPG key on the remote control of the digital receiver.
The Electronic Channel Guide then appears on the screen. The channels you have selected, or those
of the factory default settings, will be shown with their current channels. You can now also use the EPG
function to obtain information on the contents of various channels. In addition, you may use the EPG functions to select a desired channel, to pre-select a channel, or to set a timer for a channel.
Exit EPG
> Press either the Menu or the TV/Radio key to return to normal operation.
Hard disk operation
Recording
Please note!!! Simultaneous reception of two encrypted channels
With your receiver, it is also possible, with just one CI module and one valid Smartcard, to receive two en-
crypted channels at the same time. However, this is only possible if you use a CI module with the “Dual-
Decrypt” function (see details of the CI module manufacturer), both the desired channels are located at
the samesatellite frequency and the CI dual decryption function has been correctly selected.
Please ensure that the receiver has acquired the time. During operation, this is displayed in the Infobox
and during standby operation on the display. If this is not the case, leave the receiver switched on to a selected channel for approximately 30 seconds, so that the receiver can acquire the current time.
Page 8

8
1. Immediate recording
Select this recording type, to record the broadcast currently showing immediately with the touch of a button.
2. Time-controlled recording
This function can be used to switch your digital receiver on and off for the selected broadcast, in order to
record onto the hard disk when you are away. The time can be channeld either manually or automatically
via the EPG function.
3. Timeshift recording
The timeshift recording function makes delayed TV viewing possible. With this function, even while the
recording continues, you can use a time-delayed playback.
Please note!
For technical reasons, it is not possible to receive two broadcasts, which are both transmitted in HD format, at the same time. The following combinations of recording and playback are possible:
- Record one broadcast and, at the same time, play back another broadcast of the same channel
(1 broadcast in HD format and 1 broadcast in SD format or 2 broadcasts in SD format) or a hard disk
recording.
- Record two broadcasts (1 broadcast in HD format and 1 broadcast in SD format or 2 broadcasts in SD
format) at the same time.
- Record two different broadcasts (1 broadcast in HD format and 1 broadcast in SD format or 2 broad-
casts in SD format) and play back a prerecorded broadcast.
Immediate recording
Manually start recording
Option 1
> Switch to the channel, which is showing the broadcast which you would like to record.
> Press the Record button to record the current broadcast. While the recording continues, the broadcast
is still displayed on the screen.
> To stop the playback of the current broadcast at a specic point, press the yellow function key Play/
Pause. While the recording continues in the background, a still picture appears on the screen.
> To continue the playback of this broadcast from this point, press the yellow function key Play/Pause
again. You will now view the broadcast with a time delay relative to the live transmission (Timeshift),
while the current broadcast is continually recorded in the background.
Option 2
> If you have to interrupt the viewing of a broadcast e.g. due to a telephone call etc., you can halt the play-
back of this broadcast by pressing the yellow function key Play/Pause and start recording the current
broadcast at the same time. While the recording starts in the background, a still picture appears on the
screen.
> To start the playback of the broadcast from this point, press the yellow function key Play/Pause again.
You will now view the broadcast with a time delay relative to the live transmission (Timeshift), while the
current broadcast is continually recorded in the background.
Manually end recording
> First press the OK button to end the recording.
> Press the green function key to access the PVR navigator. Use the arrow keys up/down to highlight the
current recording and conrm by pressing OK.
> Press the green function key Stop and a selection window appears.
> Use the arrow keys up/down to select Save, to save the recording onto the hard disk, or Cancel, to can-
cel saving of the broadcast and conrm by pressing OK.
Page 9

9
Automatically end recording
Option 1
> Press the On/Standby key. Now a selection window appears, which should show the details of the cur-
rent recording.
> Use the arrow keys up/down to highlight the line with the desired action.
> Conrm by pressing OK. The receiver completes recording of the broadcast and subsequently reverts
to standby mode.
> When you switch on the receiver before recording is over, a selection window appears, select whether
you wish to view the current broadcast from the start, revert to live mode or switch to the current chan-
nel.
> Use the arrow keys up/down to highlight the desired line and conrm by pressing OK. When Start is
selected, the recording will continue in Timeshift operation.
Option 2
> By pressing the Record button, a window opens with various functions.
> Use the arrow keys up/down to highlight the line with the desired action, e.g. +1 hour, and conrm by
pressing OK. The receiver will now record the channel(s) being broadcast on the channel selected for
the time period selected, and will then automatically stop recording
Timer recordings
With the help of the hard disk timer, you can record broadcasts on the integrated hard disk, even when
you are away. Your receiver is also equipped with video recorder timers as well as with channel switching
timers. In terms of their programming, these timers differ only in that the relevant type of timer is speci-
ed. In Standby operation, the hard disk and video recorder timers are shown by a clock symbol on the
display. As described in this chapter, you can either program the timer manually or with the help of the
EPG function.
1. Hard disk timer
This function can be used to switch your digital receiver on and off for the selected broadcast, in order to
record onto the hard disk when you are away. If the receiver was switched on by means of the hard disk
timer, this will be indicated by the message “_ PVR Timer” shown in the display. Some functions of the
remote control (e.g. Accessing the main menu) are not operational.
2. Video recorder timer
When you use a video recorder timer, your digital receiver will be switched on and off for the channel selected, so that it may be recorded, e.g. on a video recorder, in your absence. If the receiver was switched
on by means of the video recorder timer, this will be indicated by the message “_ VCR Timer” shown in
the display. Some functions of the remote control are not operational.
Be careful to note that the relevant recorder must also be channeld.
3. Channel change timer
If your receiver is in normal operating mode, it will switch to the channeld channel slot at the time selected. In contrast to the setting for a hard disk or video recorder timer, the controls remain fully functional,
and the receiver will not be switched off at the end of the channel.
Manual timer programming
> Press the Menu key to display the Main menu.
> Use the arrow keys up/down to highlight the line Manage timer.
> Conrm with the OK button, to access the Manage timer Menu
> Use the arrow keys up/down to select the desired type of timer.
> Press the OK key to go to the entry window in order to channel a new timer event.
Page 10

10
Channel
> Use the arrow keys to highlight the upper line of the menu.
> Press the OK key.
> In the selection window that will now be displayed, use the arrow keys up/down to select the desired
source (TV or Radio) and conrm with OK. Depending on the previous setting, either the TV or the
radio channel list will now be displayed.
> Now highlight the desired channel with the help of the numeric keys (channel slot input) and/or with the
help of the arrow keys. Use the arrow keys up/down to move the highlighter around the list one line at a
time and the arrow keys left/right to move the highlighter forwards or backwards one page at a time.
> Press the OK key to accept a channel into the timer memory.
Date
> Use the arrow keys to highlight the column Date.
> Use the numeric keys to enter the date (in 4-digit format) on which the timer event is to take place.
Start
> Use the arrow keys to highlight the column Start.
> In this line, use the numeric keys to enter the starting time for the timer.
Stop
> Repeat the steps as for “Start” in order to enter the ending time (except in the case of channel change
timers).
Repeat
> Use the arrow keys to highlight the column Rep.
> Press the OK key.
A selection window will be displayed, presenting various repeat options:
1x Timer once
T Daily repeat
1 W Repeat once per week
1-5 Repeat only on weekdays
6-7 Repeat only on weekends
> Use the arrow keys up/down to select the desired function.
> Press OK to accept the setting.
Accepting data into memory
> When you have completed the programming, press the green function key Accept, to transfer the data
to memory. After the data have been saved into memory, the timer overview appears.
Timer overview
The timer overview function gives you an overview of all timer events already channeld.
> To access the timer overview, rst call up the main menu by pressing the Menu button.
> Use the arrow keys up/down to select the entry Manage timer and conrm by pressing OK. The sub-
menu Manage timer will be displayed.
> Use the arrow keys up/down to highlight the line Set highlighter, conrm by pressing OK.
If, when programming, multiple timer events clash, meaning the timer cannot be correctly set,
these overlaps are highlighted in red.
Change timer programming
> To change an existing timer setting, access the timer overview function.
> Subsequently, use the arrow keys up/down to highlight the timer event you wish to change.
> Press the green function key Change to go to the settings of the selected timer. Make the changes as
described.
> Use the arrow keys up/down to highlight the additional eld type appearing, before saving the timer.
> By pressing the OK key a window with the available timer types will open.
> Now use the arrow keys up/down to select the desired timer type.
> To accept the timer type, conrm by pressing OK.
> Press the green function key Save, to save the data in storage.
Page 11

11
Delete timer programming
> To delete an existing timer setting, access the timer overview function.
> Subsequently, use the arrow keys up/down to select the timer to be deleted.
> Press the yellow function key Delete.
A message will be displayed: “Do you really want to delete this timer?”
> Use the arrow keys left/right to select Yes.
> To delete the timer, conrm by pressing OK.
Channel new timer event
> To channel a new timer event, use the arrow keys up/down to highlight a blank line in the menu Timer
overview.
> Press the green function key New to call up the input window to programme a new timer event.
> Now use the arrow keys up/down to highlight the additional Type eld displayed.
> By pressing the OK key a window with the available timer types will open.
> Now use the arrow keys up/down to select the desired timer type.
> To accept the timer type, conrm by pressing OK.
> When you have completed the programming, press the green function key Accept, to transfer the data
Timer settings (Preliminary or Follow-up time)
During the EPG timer programming, the receiver receives the data of the selected broadcast automatically from the EPG data. This allows the start and end time of the broadcast being recorded to be saved
precise to the minute. However, there are often cases where the selected broadcast starts somewhat
earlier or later than is specied. In this case, the recorded broadcast will miss out either the start or the
end. To solve this problem, you can set preliminary or follow-up time in one minute steps. The timer now
starts earlier at the specied preliminary time and ends at the set follow-up time later than specied in the
EPG data.
> Press the red function key Timer to open a selection window.
> Use the arrow keys up/down to highlight the line Timer settings.
> Conrm by pressing OK. A menu appears for adjusting the preliminary or follow-up time.
> Use the arrow keys up/down to highlight the line Timer preliminary time or Timer follow-up time.
> Use the numeric keys to enter the desired preliminary or follow-up time in minutes.
> Press the green function key Save, to save the setting and to return to the timer overview.
Timeshift function
The timeshift function allows you the possibility to activate both playback and recording at the same time.
This allows time-delayed TV viewing. This allows you to view the start of the recording and thus jump
through sections that have already been recorded. At the same time, the recording of the live signal of the
broadcast continues.
> To access a specic portion of a current recording, the functions Play and Pause are available, as well
as Fast Forward and the jog shuttle.
> Pressing the Info button causes the Infobox to appear with a status bar displayed, which shows the
playback and recording duration.
Setting highlights while recording
> Press the Record key to open a window showing the functions available.
> Use the arrow keys up/down to highlight the line Set highlight, conrm by pressing OK. A highlighter
will now be set at the current position. Continue in thiis manner to set highlighters at all desired places.
highlighters can also be placed even during a recording and in the Manage hard disk menu.
Playback
You can access hard disk recordings via the hard disk (PVR-) navigator. These can be accessed in several ways. Depending on whether you are operating the TV or radio, a list appears with all the TV or radio
recordings contained on the hard disk. After access via the navigator, the playback of the highlighted
recording already starts.
Page 12

12
Accessing the PVR navigator:
The PVR navigator can be accessed in the following ways:
During normal operation
> Press the OK key to open the channel list navigator.
> Press the green function key PVR to switch to the PVR navigator.
or
> Press the green function key directly to open the PVR navigator.
During recording/playback of a recording
> During a recording/playback of a hard disk recording, you can access the PVR navigator by pressing
the OK button.
Play back hard disk recordings
> First access the PVR navigator.
> Use the arrow keys up/down to select the recording you wish to play back. Completed as well as current
recordings can be selected.
> To start the playback, conrm by pressing OK. The indication “Playback _” will be displayed.
Recording information
> First access the PVR navigator.
> Use the arrow keys to highlight the recording for which you would like to see further information.
> Pressing the yellow function key Status allows information on the highlighted recording to be displayed.
> Press the Back button to return to the PVR navigator.
Pause/Still picture
> To halt the playback of a recording (still picture), press the yellow function key or the still picture button
during the recording. The symbol “Pause _II” will be displayed.
> Press the relevant key again to restart the playback from the same position.
Fast Forward and Rewind
To access a specic section of a recording, your PVR includes variable speed Fast Forward and Rewind
functions.
> During playback, press the blue function key for Fast Forward or the red function key for Rewind. The
display indicates “Fast Forward _ _ _” or “Rewind _ _ _”. The recording will now be run at 4x normal
speed in the selected direction.
> Press the blue or red function key again and the speed increases to 16x. The display indicates “Fast
Forward _ _ _” or “Rewind _ _ _”.
> Press the blue or red function key again and the speed increases to 64x. The display indicates “Fast
Forward _ _ _” or “Rewind _ _ _”.
> By pressing the blue or red function key again, you can jump forward or backward in 10 minute seg-
ments.
> Once the desired section of the recording has been reached, you can access normal playback by
pressing the yellow function key.
Jogshuttle function
In addition, your receiver features a jog-shuttle function, which allows you to go to a specic place in your
recording very quickly and precisely. This can be used as follows:
> While in playback mode, press the key Jogshuttle on/off (Freeze frame), to go to the jog-shuttle mode.
The playback of the recording will be stopped (freeze frame/pause). The symbol “_II” will be displayed.
Fast Forward and Rewind
> By pressing the arrow keys right/left, you can adjust both the speed and direction of playback. In the
process, the respective playback mode will be displayed.
> While this is displayed, press the arrow keys ____ or ____, right or left, to jump forward or backward in
10 minute steps.
Page 13

13
Slow motion
> By pressing the right arrow key once, the recording is played back at slow motion speed and the indica-
tion “I_” appears on the display.
Single frame progress
> Press the arrow key up to display the next frame in the forward direction and press down to display the
previous frame in the backward/reverse direction.
Create image
> By pressing the Record button, an individual image is transferred onto the hard disk. In this way, you
can access and manage created images.
Setting highlighters
> As described before, go to the place in your recording at which you wish to insert a highlighter.
> Press the Record button to set a highlighter at the actual position. Continue in this manner to set high-
lighters at all desired places. Highlighters can also be set during Record mode as well as in the menu
Manage hard disk.
Jump to highlighters
During the playback, it is possible to jump to specic sections of the recording, where you have positioned
highlighters, directly.
> Pressing the key Option will open a window with the existing highlighters. In addition, the indication
“Current” appears. This highlights the actual playback position on the recording.
> As soon you use the arrow keys arrow keys up/down to highlight a highlighter, the playback begins at
this point.
> By pressing the OK button, the window is closed and you switch to normal playback.
End playback
> To exit playback, press the green function key. The playback will be ended and your receiver will revert
to normal operation. In the process, the receiver logs the position on the recording at which playback
was ended. When you restart playback of this recording, it will automatically revert to the point at which
you previously stopped it.
MP3 playback
You can use your receiver to display created images, as well as les, which are saved in MP3 format on
the hard disk or on a device connected via the USB socket. The USB device should be formatted using
the le system FAT 32.
> During normal operation, open the PVR navigator with the green function key.
> Press the blue function key NAV Menu.
> Use the arrow keys up/down to highlight the line Music.
> By pressing OK, the selection of the source medium is now displayed.
> Use the arrow keys up/down to select the source from which you wish to play back the MP3 les.
> By pressing OK, a list now appears with the MP3 les contained on the hard disk or on the USB device.
> Where appropriate, rst use the arrow keys to select the folder containing the desired MP3 le, and con-
rm by pressing OK.
> Use the arrow keys to select from the list the MP3 le you wish to play rst, and conrm by pressing
OK. The le selected will now be played. Thereafter the other les located on the same source medium,
will be played automatically.
Skipping titles/tracks
> By pressing the arrow keys up/down, you can jump forward or backward one track.
Pause
> Press the yellow function key to stop the playback operation (Pause).
> Press the key again to resume playing the le from this position.
Page 14

14
Fast Forward and Rewind
> During playback, press the blue function key Fast Forward or the red function key Rewind, several times
if applicable, to advance or rewind the track at 4x, 16x or 64x normal speed.
> During the 64x speed, press the blue or red function button to go forward or backward in 10 minute
steps.
> Once the desired section has been reached, you can access normal playback by pressing the yellow
function key.
Stop/End playback
> To stop playback and revert to normal operation, press the TV/Radio button.
Display control
To avoid the need to switch on the television set when navigating the MP3 playback, the latter can be
controlled via the display. An MP3 le is shown on the display with its respective lename. A folder will be
indicated by a display of square brackets, e.g. [Popmusic]. The hard drive will be displayed as hard drive
and a USB device will be indicated as USB-device1, USB-device2 etc.
> While the receiver is in stand-by mode, press the Language select key. The receiver will now switch
itself on, and will automatically call up the navigator in the Music category.
> Use the arrow keys up/down to select the source from which you wish to play back the MP3 les, and
conrm by pressing OK. If no USB device is connected to the system, only the internal hard drive of the
receiver will be available as a source.
> Now, rst use the arrow keys up/down to select the folder containing the desired MP3 le, and conrm
by pressing OK.
> Use the arrow keys up/down to select from the list the MP3 le you wish to play rst, and conrm by
pressing OK. The le selected will now be played. Thereafter the other les located on the same source
medium will be played automatically.
Playback/reproduction of pictures
You can use your receiver to display created images, as well as les, which are saved in JPG format on
the hard disk or on a device connected via the USB socket. The USB device should be formatted using
the le system FAT 32.
> During normal operation, press the green function key to open the PVR navigator.
> Press the red function key Category to open an additional window.
> Use the arrow keys up/down to highlight the line Pictures and conrm by pressing OK.
> Use the arrow keys up/down to select the source from which you wish to view the picture les, and con-
rm by pressing OK. A list showing the picture les available on the hard drive or the USB device will be
displayed.
> Use the arrow keys up/down to highlight the folder containing the desired picture le, and conrm by
pressing OK.
> Use the arrow keys up/down to select from the list the JPG le you wish to view, and conrm by press-
ing OK. The picture selected will now be displayed in large format.
Show next/previous picture
> Press the arrow keys up/down to skip to the next or previous picture.
Rotate image
> By pressing the blue or red function key, the image can be rotated in a clockwise or anticlockwise direc-
tion.
Page 15

15
Manage hard disk
> Call the Main menu by pressing the key Menu.
> Use the arrow keys up/down to highlight the line Timer settings.
> Conrm by pressing OK. The menu Manage hard disk will be displayed.
> Use the arrow keys up/down to move the highlighter within the menu, and to change the individual items
as indicated.
Manage recordings
This menu allows you to manage your recordings.
> Press the OK button, to access the recording submenu.
A list appears of the recordings contained on the hard disk.
> Use the up/down arrow keys to select the desired recording.
Delete
> To delete the highlighted recording, press the red function key Delete.
> To actually delete the recording, use the arrow keys left/right to highlight the eld OK and conrm by
pressing OK.
Parental control
Recordings, which are unsuitable for children and young people, can be locked. These recordings can
then only be played back when a 4 digit PIN is entered. To ensure the parental control function is active,
this option (found under menu/settings/child safety) must be activated.
> To lock the highlighted recording, press the green function key. The selected recording will now be high-
lighted with the child safety symbol to show it is locked.
Editing
> By pressing the yellow function key Edit, you can access the menu for editing the highlighted hard disk
recording. The hard disk recording will be played back in a preview window. In addition, the highlight-
ers made on this recording are shown. The default highlighters are those at the start and end of the
recording. In addition, a yellow status bar is shown, which indicates the actual playback position and the
overall duration of the recording.
> To jump to a section of the recording indicated by a highlighter, highlight the desired highlighter using
the arrow keys up/down and conrm with OK.
Functions
> By pressing the green function key Menu, a window opens with the available functions for editing the
recordings.
> Use the arrow keys up/down to highlight the desired function, and conrm by pressing OK.
> Use the arrow keys to highlight the eld OK and accept the name.
Delete portion
Your PVR also allows you to delete selected sections (e.g. unwanted sections of commercials) from an
existing recording.
Page 16

16
Please note:
The deleted sections will be irretrievably removed from the hard disk.
To delete a specic section, proceed as follows: The beginning and end of the section that is to be extracted must be indicated by two highlighters.
> Here, highlight both the beginning and end of the portion to be deleted with one highlighter respectively.
> Now use the arrow keys up/down to set the highlighter indicating the beginning of the section to be
deleted. The section to be deleted will now be indicated in red on the progress indicator as well as in the
overview of existing highlighters.
> Now press the green function key Menu and use the arrow keys up/down to highlight the line delete sec-
tion.
> Press OK to display a selection window.
> To actually delete the section, use the arrow keys right/left to highlight the eld OK and conrm by
pressing OK.
Extracting a section
This function allows you to copy a section of a recording. A new recording is generated, consisting only of
this section. The recording from which this section is copied remains in memory unchanged. To extract a
section, proceed as follows: The beginning and end of the section that is to be copied must be indicated
by two markers.
> Mark both the beginning and end of the portion to be extracted with one highlighter respectively.
> Now use the arrow keys up/down to set the highlighter indicating the beginning of the section to be
copied. The section to be copied will now be indicated in red on the progress indicator as well as in the
overview of existing highlighters.
> Now press the green function key Menu and use the arrow keys up/down to highlight the line extract
section.
> Press OK to display a selection window.
> To actually copy the section, use the arrow keys right/left to highlight the eld OK and conrm by press-
ing OK. The highlighted section will now be copied to a new recording. Depending on the size of the
section, this may take several minutes.
Splitting a recording
This function allows you where, for instance, two successive channels were recorded as a single recording, to split these into two individual recordings. Each recording will be split at the point indicated by the
relevant highlighters. Recordings can be split as follows:
> Here, place a highlighter at the beginning of the portion to be extracted.
> Now use the arrow keys up/down to highlight the highlighter from which the total recording is to be split.
> Now press the green function key Menu and use the arrow keys up/down to highlight the line split re-
cording.
> Press OK to display a selection window. This will show information relating to the two recordings to be
created by the split.
> To actually split the recording, use the arrow keys left/right to highlight the eld OK and conrm by
pressing OK.
Rename recordings
Your PVR extracts information from the transmitted data stream concerning the names of the broadcast
channels. If a single recording contains multiple broadcasts, all the names of the recorded broadcasts are
compiled and saved internally. To rename a recording, proceed as follows:
> Press the green function key Menu and use the arrow keys up/down to highlight the line Rename.
> Conrm by pressing OK. A list of the possible titles will be displayed.
> Use the arrow keys up/down to select the title for which you wish to change the name and conrm by
pressing OK.
> In the selection window, use the arrow keys right/left to highlight the eld OK and conrm by pressing
OK.
> If you want to assign a specic name to the recording, use the arrow keys up/down to highlight the line
New.
> By pressing the OK button, a virtual keyboard is displayed, with which you can input the new name.
Page 17

17
Enlarge video
To facilitate the viewing of a desired section, you can enlarge the video image of the recording.
> Press the green function key Menu to do so and use the arrow keys up/down to highlight the line En-
large video.
> By conrming with OK, the video image is displayed in enlarged form.
> To reduce the size of the video image again, proceed likewise, highlighting the line Shrink video.
Managing music/pictures
You can use your receiver to play back musical tracks in MP3 format and images in JPG format. To copy
the relevant data onto the hard disk, connect a USB device, on which MP3s or JPGs are contained, to the
USB socket of the receiver.
Please be careful to note, that only MP3 les can be copied from the Music menu, and only JPG les
from the Images menu.
> Access the menu Manage hard disk.
> Use the arrow keys up/down to highlight the line Copy music or Copy images, in order to manage the
relevant les.
> Conrm by pressing OK.
In the subdivided menu, the left half (set-top box) shows the les and folders present on the hard disk.
The right side (USB device) shows the les and folders, which are contained on the connected USB de-
vice.
> Use the green function key to switch from one USB device to another or the red function key set-top box
to do the same for the hard disk. The rst le or the rst folder of the list is highlighted.
Copy
The Copy function allows you to make a copy of the highlighted le or highlighted folder onto the hard disk
or the USB device. The original le or folder also remains in place.
> With the help of the arrow keys up/down, highlight the le or folder, which you would like to copy.
> Press the blue function key Functions to open a window showing the functions available.
> Use the arrow keys up/down to highlight the line Copy and conrm by pressing OK.
> To copy the highlighted le or folder, now press the yellow function key Copy. The highlighted le or
folder is now copied and subsequently also appears in the left or right half of the menu.
Highlighting blocks of channels
To highlight several les simultaneously, proceed as follows:
> Press the OK key to go to the selection mode. The highlighted le will be indicated with a cross on the
left side.
> You may now use the arrow keys up/down to highlight the previous or following les as well.
> After you have highlighted the desired les in this way, press the yellow function key Copy, to copy
these les.
Please be careful to note, that collective copying of folders is not possible!
Page 18

18
Move
The Move function allows you to move the highlighted le or folder from the source medium (e.g. a USB
device) to the target medium (e.g. the hard disk). The moved le or folder will subsequently only be found
on the target medium.
> Use the red function key set-top box or the green function key USB device to select the source, in which
the le or folder to be moved is contained.
> With the help of the arrow keys up/down, highlight the le or folder that you wish to move.
> By pressing the blue function key Functions, the function window opens.
> Use the arrow keys up/down to highlight the line Move and conrm by pressing OK.
> To move the highlighted le or folder, now press the yellow function key Move.
> To move multiple les at the same time, highlight them and then press the yellow function key Move.
Delete
To delete les or folders, proceed as follows:
> Use the red function key set-top box or the green function key USB device to select the source, in which
the le or folder to be deleted is contained.
> With the help of the arrow keys up/down, highlight the le or folder that you wish to delete.
> Press the blue function key Functions to open a window showing the functions available.
> Use the arrow keys up/down to highlight the line Delete and conrm by pressing OK.
> To delete the highlighted le or folder, now press the yellow function key Delete. An selection window
appears, to conrm whether you really wish to delete the selected les.
> Use the arrow keys left/right to highlight the eld Yes and conrm by pressing OK. Highlight No and
conrm by pressing OK in order to abort the procedure. The les will now be deleted.
Hard disk information
> By pressing the OK button, information concerning the integrated hard disk is displayed.
Hard disk properties
> Press the OK button, to get an overview of the lled capacity of the hard disk and a list of the record-
ings contained on the dsik.
Checking hard disk
> To carry out a check of the hard disk, use the arrow keys right/left to highlight the eld Check.
> Press the OK button and conrm by using the arrow keys right/left to highlight the eld OK and conrm-
ing with OK, to start the checking process. The hard disk will now be checked. The result will subse-
quently be displayed.
Formatting the hard disk
By formatting the hard disk, the le system is renewed. This may be necessary when checks of the hard
disk reveal any errors.
Note!
Formatting will completely erase the hard disk. This means that all the recordings and multimedia les
there (e.g. MP3s) will be permanently deleted.
> To format the hard disk, use the arrow keys right/left to highlight the eld Format.
> Press the OK button and conrm by using the arrow keys right/left to highlight the eld OK and conrm-
ing with OK, to start the formatting.
Please note!
The device may only be operated with the originally integrated hard disk. Otherwise, this could lead to
damage to the device. Never open the device and attempt to exchange the hard disk, since this will render all warranties null and void.
Page 19

19
Sort Channels / Congure Favourites List
This chapter describes how you can change the pre-programming of your digital receiver as well as the
Favourites channel list in accordance with your own preferences. This function is also required to sort
new found channels into the channel list after a channel scan has been performed. In this regard you
should know the following: your receiver is equipped with two channel lists, the Favourites list and the
Total list. The Favourites channel list includes all the channels you have accepted into the list according to
the procedure described below. The Total list includes all channels.
Calling up channel list management
To customise the Favourites list, proceed as follows:
> Press the Menu key to display the Main menu.
> Use the arrow keys up/down to highlight the line Manage TV lists, in order to work on the TV list, or
Manage Radio lists, in order to work on the radio list.
> Conrm by pressing OK. The channel list management required to work on the respective Favourites
list will be displayed (TV or Radio list). The Favourites list will be displayed on the right half of the
screen. This is now active, with the currently selected channel being highlighted. The alphabetically
sorted Total list will be displayed on the left half of the screen. The Total list includes all available chan-
nels.
> Press the red function key to move the highlighter to the Total list. This is now active.
> Press the red function key again to open a selection window. Here you have the option of sorting the
Total list according to various selection criteria (e.g. all channels, all free-to-air, all new channels, all
channels found, all English channels, etc.) or sorted by Provider.
> Use the arrow keys up/down to select the desired channel list (e.g. Total list).
> Conrm by pressing OK. An additional selection window will now be displayed.
> Now use the arrow keys up/down to specify the criterion according to which the Total list is to be sorted.
Select e.g. All broadcasters, to display all available channels in the overall list or All new, to display
only newly found channels since the last search was carried out or All English, to display only English
language channels.
> Conrm by pressing OK. Now, depending on your selection, a channel list containing e.g. all channels,
all new or all English-language channels will be displayed. Channels already included in the Favourites
list are indicated by a check-highlight.
> Press the red function key Channels resp. the green function key TV List and you can switch back and
forth between the Favourites list and the Total list. The currently active list will be indicated by a blue
highlighter.
Adding channels to the Favourites list
To accept channels from the Total list into the Favourites list, call up the channel list manager as described above and go to the Total list.
> Press the blue function key Functions. A selection window showing the available functions will be dis-
played.
> Use the arrow keys up/down to highlight the item Add.
> Conrm by pressing OK.
> Use the arrow keys up/down to highlight a channel you wish to accept into the Favourites list.
> Press the yellow function key Add to accept the highlighted channel into the Favourites list.
Highlighting blocks of channels
To highlight several channels simultaneously, proceed as follows:
> Press the OK key to go to the selection mode. The highlighted channel will be indicated by a cross on
the left of the channel.
> You may now use the arrow keys up/down to highlight the previous or following channels as well.
> When you have completed highlighting the desired channels in this manner, press the yellow function
key Add to add the highlighted channels to the Favourites list.
Page 20

20
Deleting channels
To delete channels from the favourites list, access the channel list management. The Favourites list will
be displayed and active.
> Press the blue function key Functions. A selection window showing the available functions will be dis-
played.
> Use the arrow keys up/down to highlight the line Remove.
> Conrm by pressing OK.
> Use the arrow keys up/down to highlight a channel you wish to delete from the list.
> Press the yellow function key Delete. The message will be displayed: “Do you really want to delete the
channel(s) from the list?”.
> Use the arrow keys left/right to highlight Yes or No.
> Conrm by pressing OK.
The channels deleted in this manner will, however, remain in the Total list, and can be added to the Favourites list again at any time.
Deleting from the Total list
To remove channels from the Total list, proceed as described above. However, after calling up the chan-
nel list management, press the red function key Channels to rst switch to the Total list, then select the
function Delete.
Sorting channels
To sort the order of channels in the Favourites list according to your preferences, call up the channel list
manager. The Favourites list will be displayed and active.
> Press the blue function key Functions. A window showing the available functions will be displayed.
> Use the arrow keys up/down to highlight the line Sort.
> Conrm by pressing OK.
> Now use the arrow keys up/down to highlight the channel you wish to place in a different position in the
list.
> Now press the yellow function key Sort. A double arrow will appear next to the channel selected.
> Now use either the arrow keys up/down or the numeric keys to place the channel in the desired position
in the channel list.
> Press the yellow function key Sort to enter the new position of the channel into memory.
Exit menus
Press the TV/Radio key to return to normal operation.
Further Information in more detail can be found on the Internet at the site www.technisat.com
2233560000500
 Loading...