

Page 1
User Guide
Page 2

Page 3

INTRODUCTION
HDMI................................................................................................................................................5
SAFETY IS IMPORTANT.................................................................................................................5
IN THE BOX.....................................................................................................................................5
SAFETY INFORMATION
KEEP THIS INSTRUCTION.............................................................................................................6
IMPORTANT.....................................................................................................................................6
ELECTRICAL INFORMATION.........................................................................................................7
TV FUNCTIONS / TV CONNECTORS
TV FRONT CABINET FUNCTIONS.................................................................................................8
TV CONNECTIONS.........................................................................................................................9
CONNECTING THE TV ANTENNA...............................................................................................10
CONNECTING EXTERNAL DEVICES..........................................................................................10
CONNECTING DIAGRAM..............................................................................................................11
COMMON INTERFACE SLOT
COMMON INTERFACE.................................................................................................................12
WALL MOUNTING
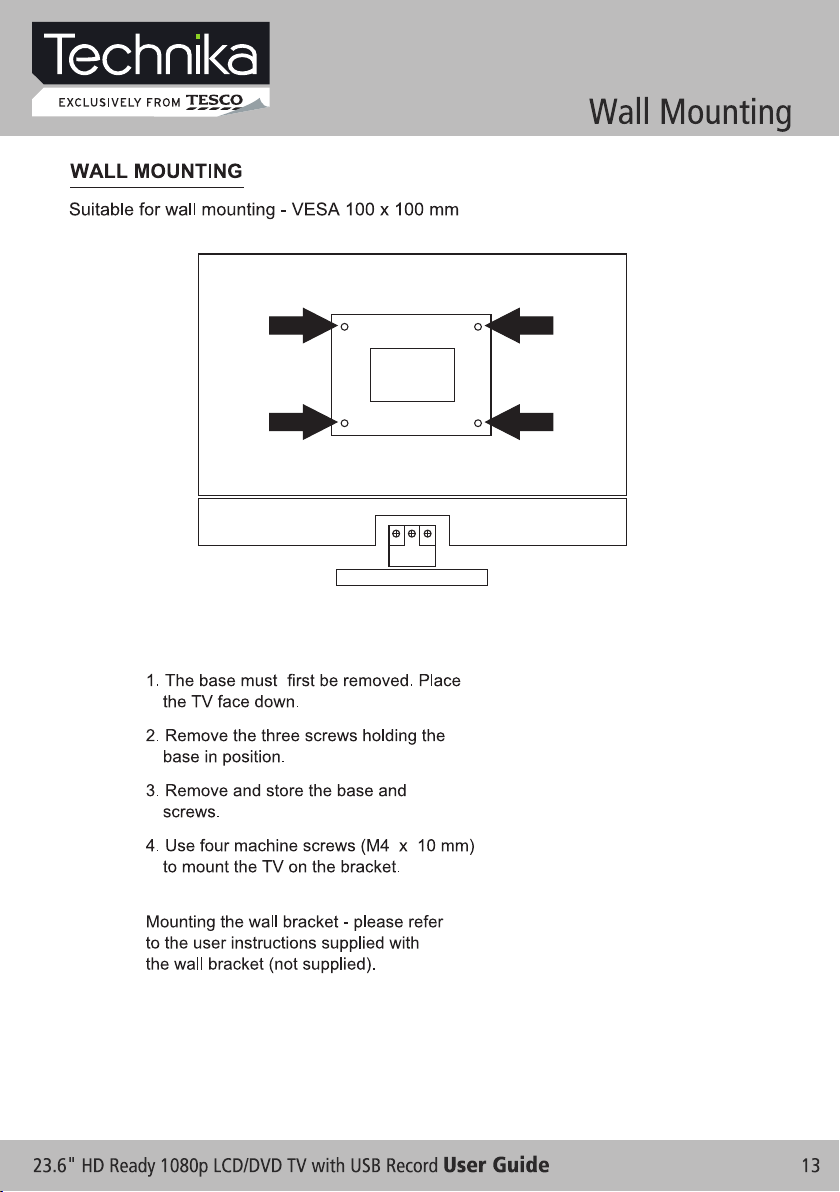
WALL MOUNTING.........................................................................................................................13
REMOTE CONTROL
REMOTE CONTROL.....................................................................................................................14
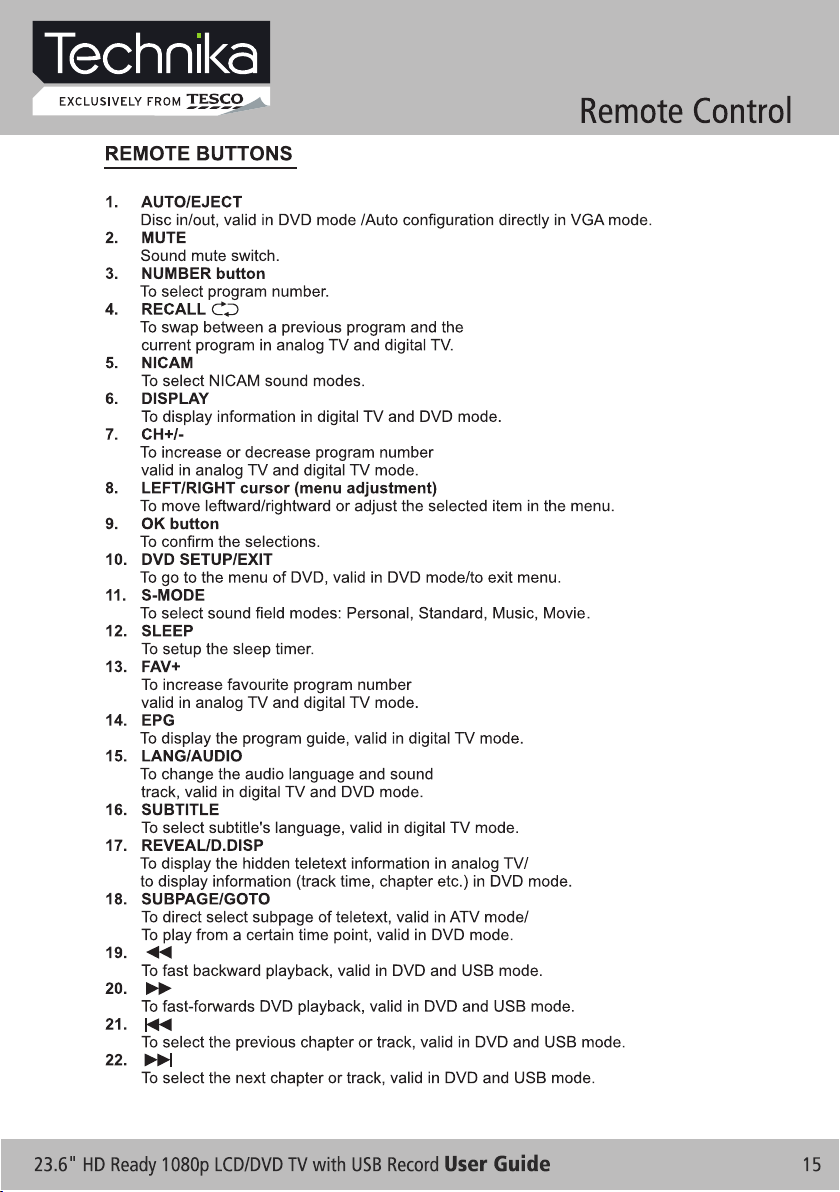
REMOTE BUTTONS.....................................................................................................................15
BATTERY INSTALLATION............................................................................................................17
LET’S START
SWITCHING ON............................................................................................................................18
SELECTING SOURCE OPERATION............................................................................................18
FIRST TIME INSTALLATION.........................................................................................................19
CHANNEL LIST.............................................................................................................................19
ANALOGUE TV GUIDE
TV INFORMATION........................................................................................................................21
PICTURE.......................................................................................................................................21
SOUND..........................................................................................................................................22
SETTING.......................................................................................................................................23
FUNCTION....................................................................................................................................23
CHANNEL.....................................................................................................................................25
TELETEXT FUNCTION
TELETEXT FUNCTION.................................................................................................................27
DIGITAL TV GUIDE
CHANNEL......................................................................................................................................29
MANUAL PROGRAM.....................................................................................................................29
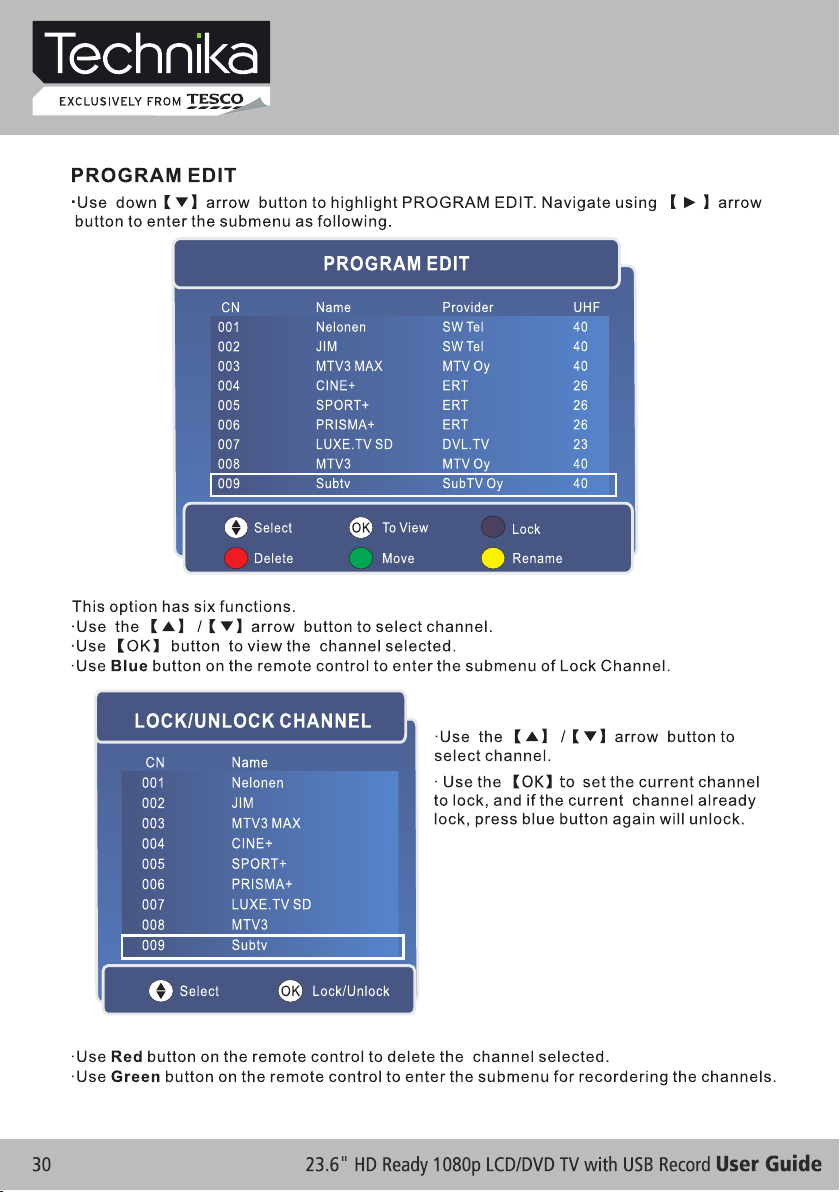
PROGRAM EDIT...........................................................................................................................30
CI MENU........................................................................................................................................32
TIMER............................................................................................................................................33
EPG...............................................................................................................................................34
SUBTITLE......................................................................................................................................34
FAV.................................................................................................................................................35
Page 4

VGA & PC SETUP
PC SETUP.....................................................................................................................................36
PICTURE.......................................................................................................................................37
MULTIMEDIA & USB PVR FUNCTIONS
MULTIMEDIA.................................................................................................................................38
MY ALBUM....................................................................................................................................38
MY MUSIC.....................................................................................................................................39
MY MOVIE.....................................................................................................................................40
MY RECORDER............................................................................................................................40
USB PVR RECORDING & PLAYBACK FUNCTION.....................................................................42
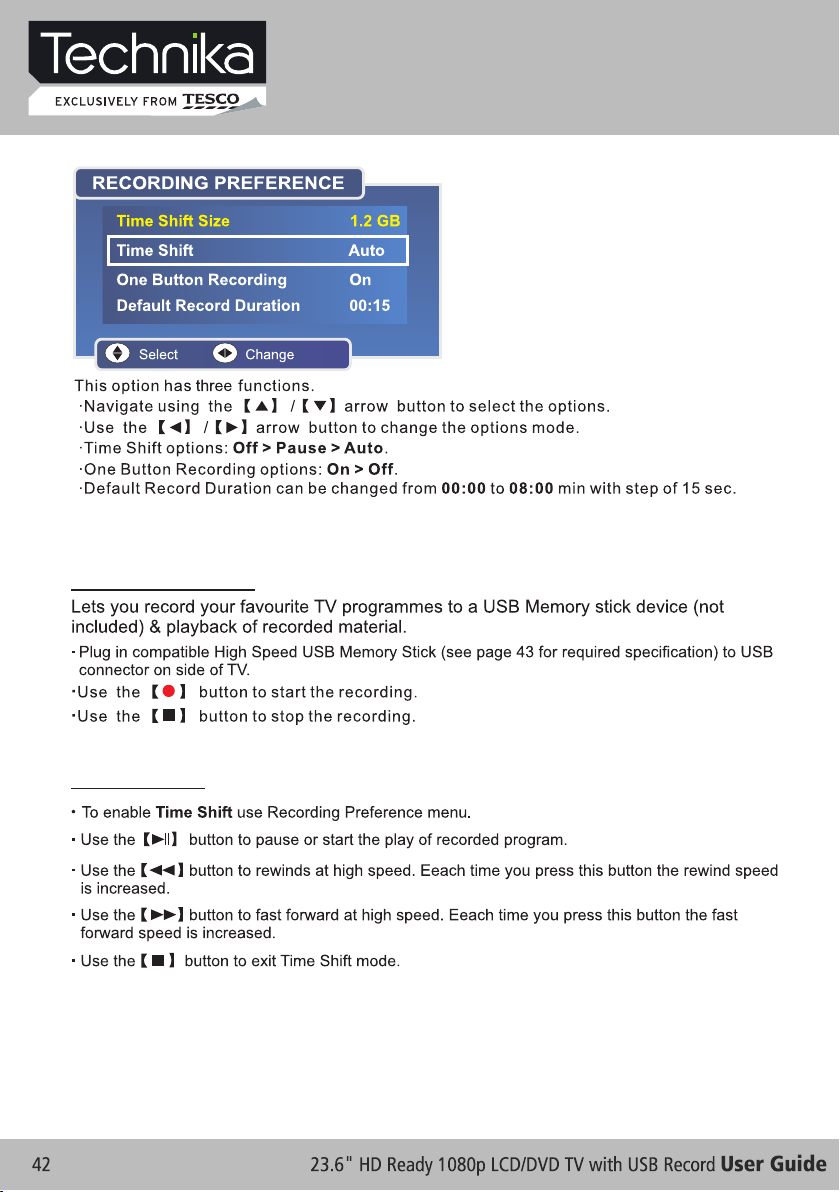
PVR TIME SHIFT...........................................................................................................................42
USB PVR FUNCTION ATTENTIONS............................................................................................43
DVD OPERATION
BASIC OPERATION......................................................................................................................44
SUPPORTING DVD FORMAT.......................................................................................................45
DVD FUNCTIONS OPERATING INSTRUCTIONS.......................................................................46
MP3 / JPEG PLAYBACK...............................................................................................................48
FUNCTION SETTINGS.................................................................................................................49
DVD FUNCTION GENERAL SETUP.............................................................................................49
SYSTEM SETUP...........................................................................................................................49
LANGUAGE SETUP......................................................................................................................52
AUDIO SETUP...............................................................................................................................53
DOLBY DIGITAL SETUP................................................................................................................54
CARE AND MAINTENANCE.........................................................................................................55
TROUBLESHOOTING
DISPLAY TROUBLESHOOTING...................................................................................................56
SOUND AND TV TROUBLESHOOTING.......................................................................................56
DVD TROUBLESHOOTING..........................................................................................................57
SPECIFICATIONS
SPECIFICATIONS.........................................................................................................................58
DISPLAY MODE
ANALOGIC RGB FORMAT TABLE...............................................................................................59
YPBPR FORMAT TABLE...............................................................................................................59
ADDITIONAL INFORMATION
DISPOSAL....................................................................................................................................60
WARRANTY...................................................................................................................................60
Page 5
HD Ready 1080p LCD/DVD TV
User Guide
Power Cable
Remote Control
2 x AAA Batteries
Page 6

Page 7

Page 8

TV Function / TV Connectors
TV FRONT CABINET FUNCTIONS
3. Mains Power Switch - Completely turns ON or OFF the power to the TV set to save on electricity.
Sencor Touch Keyboard (controlled by a soft finger touch)
LABEL SIDE
Page 9

TV CONNECTIONS
5 8
6 9
7 10
12
13
TV Function / TV Connectors
1
2
3
1. 12V DC power input
(intended for feeding to the TV
4
11
14
15
using a car battery power or
external 12V DC power
supply adapter)
2. HDMI input
3. PC VGA input
4. PC audio input
5. AV Video input
6. AV Right audio input
7. AV Left audio input
8. Y input
9. Pb input
10. Pr input
11. USB connector
12. SCART connecting terminal
13. SPDIF output
14. CI connector
15. TV signal input (TV Aerial input)
16. Audio Earphone output
16
Page 10

TV Function / TV Connectors
(CVBS / YPbPr cables)
You can connect this TV to a compatible
device using CVBS and YPbPr cables.
Connect the red, white and yellow (CVBS)
or the red, green and blue (YPbPr) outputs
to the matching coloured inputs on the
compatible device. An additional audio
input is required.
Page 11

TV Function / TV Connectors
Page 12

Page 13
Page 14

1
25
26
27
28
29
30
31
32
33
34
35
36
37
38
39
40
41
42
43
2
3
4
5
6
7
8
9
10
11
12
13
14
15
16
17
18
19
20
21
22
23
24
Page 15
Page 16

Page 17

Page 18

SOURCE
ATV
DTV
HDMI
SCART
YPBPR
AV
VGA
DVD
INPUT
Page 19

FIRST TIME INSTALLATION
ENGLISH
UK
CHANNEL LIST
Page 20

Analogue (ATV) Setup
Between now and the end of 2012 the UK will be turning
off all old “analogue” TV transmitters and switching your
TV signal to “digital”. Digital TV offers new ways to enjoy
your TV. You will have a greater choice of TV channels
as well as access to additional features and services
which will enhance your TV-watching experience. This
LCD TV features a built-in Freeview Digital Tuner please refer to the DTV section of this instruction on
page 28.
Page 21

TV Information
PICTURE
Analogue (ATV) Setup
PICTU RE
PICTU RE MODE
CONTR AST
BRIGH TNESS
COLOR
TINT
SHARP NESS
COLOR T EMP.
NOISE R EDUCT ION
MOVE EXIT
STAN DARD
50
50
50
50
6
NORMA L
ON
SELEC T
MEN U
Page 22

Analogue (ATV) Setup
SOUND
SOUND M ODE
BASS
TREBL E
BALAN CE
AVL
MOVE EXIT
STAN DARD
50
50
50
SELEC T
ON
MEN U
Page 23

SE T TI N G
LANGU AGE
OSD TIM ER
TRANS PARE NCE
OVERS CAN
RESET
SETTI NG
ENGLI SH
15 SEC
80
ON
Analogue (ATV) Setup
FUNCTION
MOVE EXIT
SELEC T
MEN U
SLEEP TIME R
ASPEC T
TT LA NG UAG E
BLUE SC REEN
SYSTE M LOCK
MOVE EXIT
FUNCT IO N
OFF
FULL
WEST
ON
SELEC T
MEN U
Page 24

FUNCT IO N
SYSTE M LOCK
CHILD L OCK
KEY LOC K
PARE NTAL
CHANG E CODE
MOVE EXIT
ON
ON
ON
ON
SELEC T
Analogue (ATV) Setup
ENTER PASSWORD
*
MEN U
Page 25

CH A NN E L
CHANN EL
COUNT RY
AUTO SE ARC H
MANUA L PRO GRA M
PROGR AM EDIT
Analogue (ATV) Setup
UK
MOVE EXIT
SELEC T
CHANN EL
PROGR AM
COLOR . SYS
SOUND . SYS
MANUA L SEA RCH
AFT
FINE
SKIP
MOVE EXIT
1
AUTO
AUTO
192.2 5 MHz
ON
OFF
SELEC T
MEN U
MEN U
Page 26

PROG RAM EDIT
Analogue (ATV) Setup
01
02
03
04
05
06
07
08
09
10
NAM E
INS ERT
11
12
13
14
15
16
17
18
19
20
MOVE EXIT
MEN U
LOC K
FAV
21
22
23
24
25
26
27
28
29
30
Page 27

TELETEXT FUNCTION
Page 28

Digital TV Setup
If the TV finds some, but not all, of the Digital channels, the TV
is functioning correctly but the signal being received is not
strong enough. (The signal strength needs to be above 85% you can see the signal strength the TV is receiving when you
search channels/ programmes) you will need to increase the
signal reception in order to receive all of the channels available.
The most economical way to do this is by purchasing and
connecting a 'signal booster' in between the TV and the TV
aerial socket. If this does not solve the problem, you will need to
upgrade the TV aerial to a digital hi-gain compatible aerial.
Page 29

CH A NN E L
CHANN EL
COUNT RY
LCN
AUTO SE ARC H
MANUA L PRO GRA M
PROGR AM EDIT
CI MENU
TIMER
MOVE EXIT
UK
SELEC T
Digital TV Setup
MEN U
CHANN EL
PROGR AM
STAR T SEA RCH
CHANN EL FO UND
SIG. QU ALITY
SIG. ST RENGT H
FREQU ENCY
MOVE EXIT
22
BEGIN
0
0
0
474.0 0
SELEC T
MEN U
Page 30
Digital TV Setup
Page 31

Digital TV Setup
Page 32

Digital TV Setup
Page 33

Digital TV Setup
Page 34

Digital TV Setup
Page 35

Digital TV Setup
Page 36

PC SETUP
PC SETU P
H-POS ITION
V-POSI TION
CLOCK
PHASE
AUTO ADJ UST
MOVE EXIT
50
100
97
SELEC T
VGA & PC Setup
100
MEN U
Page 37

PIC TURE
PICTU RE MODE
CONTR AST
BRIGH TNESS
COLOR TEMP.
PICTU RE
STAN DARD
50
50
50
VGA & PC Setup
MOVE EXIT
SELEC T
MEN U
Page 38

Multimedia & USB PVR Function
Page 39

Multimedia & USB PVR Function
Page 40

Multimedia & USB PVR Function
Page 41

Multimedia & USB PVR Function
Page 42
Multimedia & USB PVR Function
USB PVR RECORDING & PLAYBACK FUNCTION
USB PVR Recording
PVR Time Shift
Page 43

Multimedia & USB PVR Function
PVR Recording
USB PVR Function
Important Information About USB PVR Function
You can purchase high speed memory sticks from most Electrical or PC stores.
Before making your purchase please confirm the memory stick meets the
minimum specifications as below:
Read Speed 20MB/s (Mega Byte Per Second)
Write Speed 6 MB/s (Mega Byte Per Second)
Page 44
BASIC OPERATION
1. Turn ON a nd O FF the DV D funct ion
- Turn on th e LC D TV an d then pr es s INPUT r epeat edly to s el ect DVD m ode.
2. Inse rt D isc to DV D
- Inser t th e Disc to t he Disc s lot (mi rr or (rec ord) si de of the d is c has to fa ce towa rds fro nt o f the uni t),
the pla ye r will lo ad the di sc auto ma tical ly.T he re will h ave an on s creen i nd icati on “ ” then
“LOAD IN G”. Af ter loa di ng the di sc cont ent, it w il l switc h to play m ode aut om atica lly. If the dis c is
alrea dy p laced i nside , the dis c wi ll be rea d autom atica ll y.
NOTE: - F or s ome dis cs, aft er load in g the con tent of t he disc , ne ed to pre ss or sel ect fro m th e disc
menu to s tart.
- Pleas e ma ke su re w hen ins ertin g th e Disc, t he mirr or (rec or d) side o f the dis c shoul d be
facin g yo u.
When in se rti ng t he Disc i ncorr ec tly, you may da mage th e DV D mecha nism.
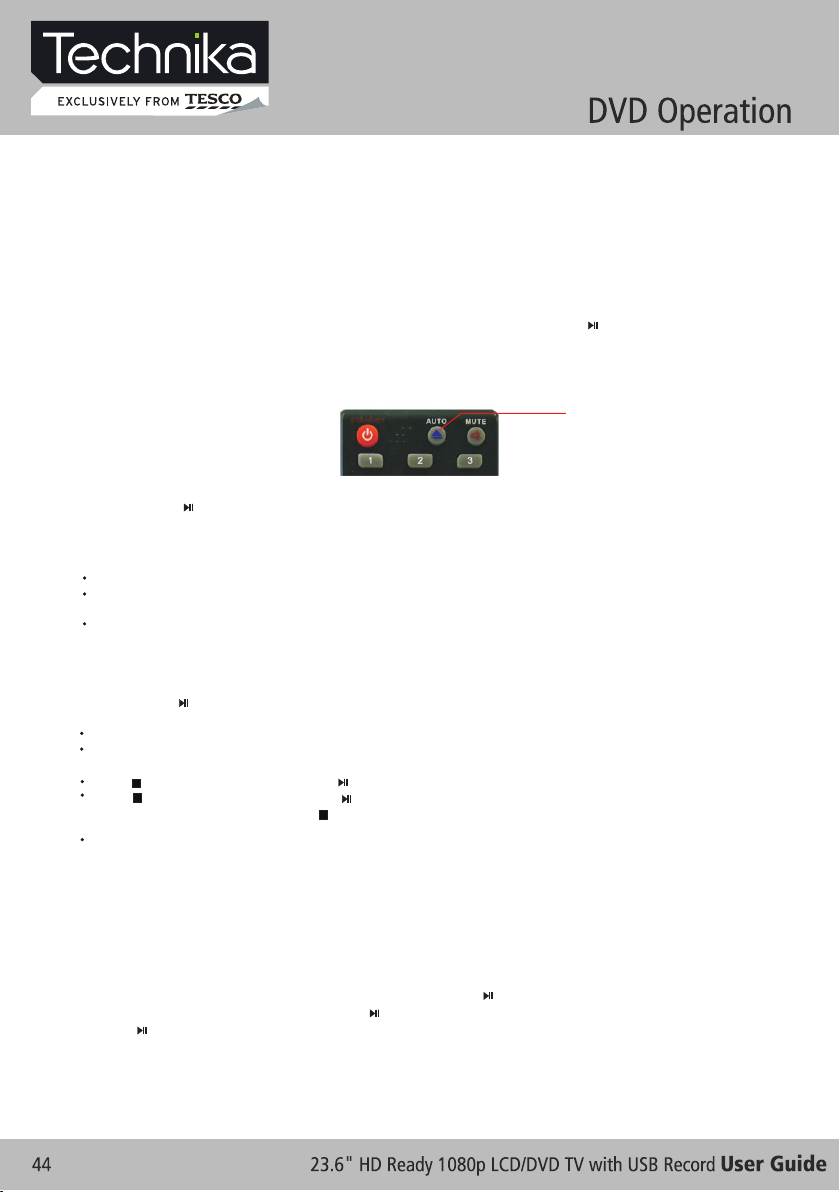
To ejec t th e DVD Dis c press :
DVD EJECT
(Valid in DVD mode)
3. Play t he D VD
- Accord in g to the di sc cont ent, th e di sc menu w ill dis play fo r yo ur sele ction . When pl ay ing the d isc,
you may u se b utton t o toggl e betwe en P lay and P ause mo de. Thi s produ ct also s up ports M enu,
Tit le, Seq uenti al a nd Prog ram pla yback .
4. Menu p la yback ( for DVD / super V CD a nd VCD 2. 0 discs )
- Press D .M ENU but ton
For DVD d is cs, the s creen w ill dis pl ay the DV D Disc Me nu (Roo t Me nu)
For Sup er V CD & VCD2 .0 disc s, the sc re en will d ispla y the Sup er V CD, VCD 2.0 Dis c Menu (P BC :
[OFF] )
(Pres s th e D.MEN U butto n to disp la y the PBC s tatus ).
Playb ac k the Sup er VCD & VC D2.0 di sc s, the de fault P BC stat us i s ON.
- For DVD d is cs, use t he navi gatio n bu ttons t o selec t and Pla y th e highl ighte d conte nt s; For Su per
VCD & VCD 2. 0 discs , use the n umeri c bu ttons t o play yo ur favo ri te cont ent dir ectly.
NOTE: P BC s hould b e OFF.
- Press O K or b utton t o start f rom the h ig hligh ted con tent.
- Retur n to t he Root M enu whe n playi ng t he disc
For DVD d is cs, pre ss D.ME NU to dis pl ay the Di sc Menu .
For Sup er V CD & VCD2 .0 disc s, when P BC i s ON, pre ss D.ME NU to dis pl ay the Di sc Menu .
- STO P
Press b ut ton onc e to stop . Press b ut ton t o re sume fr om wher e yo u stopp ed.
Press b ut ton Twice to st op. Pre ss b utton t o start f rom beg in ning.
In orde r to p rotec t the dis c, pres s bu tton th en pres s EJECT b ut ton to ta ke the di sc out. W he n the
disc is e je cted, h old the d isc edg e sl ightl y and tak e it from t he e ject di recti on to pre ve nt scra tches .
When no t us ing the D VD func tion (i n st and-b y mode or u sing ot he rs mode s for a lon g time) , pl ease
take ou t th e disc to p rotec t the DVD l oa der and t he disc .
5. Title p la yback ( for DVD d isc onl y)
- Press T IT LE butt on, the re will h av e an on scr een ind icati on “ Tit le Menu ”.
- Press t he d irect ion or nu meric b ut tons to s elect y our fav or ite tit le.
- The n wi ll play f rom the f ir st ch ap ter of th e selec te d tit le .
6. Sequ en tial pl aybac k (for DV D/ S uper VC D/ VCD/ C D/ CD-G /H D-CD an d Mp3/ JP EG disc s
- For Sup er V CD & VCD di scs, if P BC is “ON ” st atus, p ress bu tton wi ll e nter th e disc me nu. Pre ss
D.MEN U bu tton to t urn PBC O FF. Press b ut ton t o st art in se quent . Fo r oth er s, whil e it stop pe d,
press b ut ton to st art in se quent .
7. Prog ra m playb ack (fo r DVD/ Su pe r VCD/ VC D/ CD/ CD -G/HD -C D and Mp3 / JPEG di scs
- Using P ro gram pl aybac k, you ca n se lect ma x. 16 tra cks fro m th e disc to p layba ck in pro gr ammed
order.
- OSD for p ro gram pl aybac k as belo w.
CLOSE
Page 45

[--]
[--]
[--]
[--]
discs
[--]
12
[--]
14
[--]
15
[--]
16
VCD/ VC D/ CD /CD -G/ D-C D
DVD / MP3 / J PE G discs
PRO G
T C T C T C T C
1 : 5 : 9 :
2 : 6 :
3 : 7 :
4 : 8 :
PLAY C LEA R
- If it is in P BC O N statu s, usin g progr am p layba ck will t urn to PB C OF F autom atica lly.
- Accord in g to the hi ghlig ht area i np ut the ti tle and c hapte r nu mber by n umeri c butto ns , press b utton
to star t; o r move to t he <PLAY> by na vigat ion but to ns, pre ss OK but ton to st ar t.
- While p la ying th e progr am, you m ay p ress PR OGRAM b utton t o di splay t he prog ram men u fo r edit. To
clear t he p rogra m by movi ng to <CL EA R> and pr ess OK bu tton. O r pr ess but ton to en d the
progr am . When pr ess but ton aga in , the dis c will pl ay by seq ue nt.
- While p la ying th e progr am, the re w ill hav e an on scr een ind ic ation “ PRG PLAY ” and the c urren t title a nd
chapt er n umber .
10 :
11 :
12 :
13 :
14 :
15 :
16 :
Super
PRO G
[--] [--]
1
2 6
[--]
3
[--]
4 8 13
5 9
[--][--]
[--]
7
[--]
PLAY C LEA R
10
11
SUPPORTING DVD FORMAT
This pr od ucts ca n play th e follo wi ng form at of DVD d isc.
Disc Typ e
Sup er VCD
VCD
CD
HD- CD
MP3 /JPEG
NOTE: Al so s uppor t DVD-R , CD-R, C D- RW pl aybac k.
Disc Si ze (D iamet er) Reco rded Tim e Recor de d Conte nt Rema rks
DVD 12c m
12c m
12c m
12c m
12c m
12c m
Sin gle sid e:120 mins. Ap prox
Dou ble sid e:240 mins. Ap prox
45m ins. App rox
74m ins. App rox
74m ins. App rox CD- DA: Dig ital au dio
74m ins. App rox
600 mins. Ap prox
DVD f ormat :
Com press ed digi tal
aud io and vi deo
MPE G2
Com press ed digi tal
aud io and vi deo
MPE G1
Com press ed digi tal
aud io and vi deo
HD- DA: Dig ital au dio
Dig ital au dio
Inc lude SV CD
Inc lude:
VCD 2.0/ VC D1.1
VCD 1.0/ DV CD
WAR NI NG! DO NOT IN SERT OR PLAY 8C M DISC, THE Y WILL GET STU CK .
Regio n Co de
As it is us ua l for DVD m ovies t o be rele as ed at differ en t times i n diffe ren t re gions o f the wor ld , all pla yers
have re gi on code s and dis cs can ha ve a n optio nal reg ion cod e. I f you loa d a disc of a d iffer ent reg ion
code in to y our pla yer you w ill see t he r egion c ode not ice on th e sc reen. The di sc w ill not p layba ck and
shoul d be u nload ed.
2ALL 21
241
3
Page 46

DVD FUNCTIONS OPERATING INSTRUCTIONS
1. Play ( fo r DVD/ Su per VCD / VCD/ CD / CD -G/HD -CD and M p3/ JPE G di scs)
- For DVD d is c, pres s butto n from ro ot o r title m enu; wh ile pla yi ng the DV D, you ma y play yo ur f avori te
title d ir ectly w ith tit le sele ct ion by pr essin g the TIT LE butt on.
- For Sup er V CD & VCD di scs, wh ile pla yi ng the di sc, you m ay play y ou r favor ite tra cks by nu me ric but tons.
(NOTE : Wh en usin g the Pro gram pl ay back or w hen it is P BC ON sta tu s, you ca n only us e or butt on s
to chan ge t he trac k)
- For CD, C D- G & HD-CD d iscs, w hile pl ay ing the d isc, yo u may pla y yo ur favo rite tr acks by n um eric bu ttons .
- For MP3 / J PE G disc, y ou may pl ay your f av orite t racks b y numer ic b utton s from th e conte nt m enu.
- If inpu t tr ack num ber is no t valid , it w ill not f uncti on.
NOTE: F ro m track 1 -10, us e numer ic b utton s direc tly; Fo r tr acks ov er 10,
press - / - - bu tton fi rst(E .g. Trac k 15 , press - / - - then 5)
2. Prev io us/Ne xt (for D VD/ Sup er V CD/ VCD / CD/ CD- G/HD- CD a nd Mp3/ J PEG dis cs)
- While p la ying th e disc;
Press b ut ton to pl ay to the l ast Titl e / Ch apter / t rack.
Press b ut ton to pl ay to the n ext Titl e / Ch apter / t rack
- For sup er V CD & VCD di scs, in P BC OFF st at us;
If the cu rr ent tra ck is the f irst on e, p ress bu tton wi ll stop t he p layba ck.
If the cu rr ent tra ck is the l ast one , pr ess but ton wil l stop th e pl aybac k.
- For DVD d is cs, the a bove fu nctio ns m ay vary d ue to dif feren t DVD dis c's str uc ture.
3. Forw ar d/ Back ward (f or DVD/ S up er VC D/ V CD/ CD/ C D-G/H D-CD an d Mp 3/ JPEG d iscs)
- While p la ying th e disc, y ou may us e fo rward o r backw ard fun ct ion.
- There a re 5 s peeds f or forw ard . Press / b utton t o to ggle be tween d iffer ent spe eds in
seque nt . (FFx2 / FFx4 / FF x8 / FFx1 6 / FF x32 / P la y, or FR x2 /FRx 4 / FR x8 / FRx1 6 / FRx32 / P lay).
While i n backw ar d, you ma y press t o resum e no rmal sp eed.
forwa rd o r
For CD, H D- CD, Mp3 , forwa rd or bac kw ard als o has aud io outp ut .
For DVD d is cs, if ba ckwar d to firs t ti tle / cha pter, it w ill sta rt f rom the b eginn ing.
For Sup er V CD & VCD di scs, in P BC ON sta tu s, if bac kward t o the fir st t rack, i t will st art fro m th e begin ning.
NOTE: D ur ing For ward or B ackwa rd , the sou nd will b e off.
4. Slow m ot ion(f or DVD/ S uper VC D/ V CDdis cs)
- While p la ying th e disc, y ou may us e sl ow moti on func tion.
There a re 5 s peeds f or slow m otion . Pr ess but ton to to ggle be tw een differ en t speed s in sequ ent.
(SF1/ 2, S F1/4, S F1/8, S F1/16 , SF 1/3 2, P lay).
While i n sl ow moti on, you m ay pres s to r esume n ormal s peed.
NOTE: D ur ing Slo w motio n, the so un d will be o ff.
5. Paus e (f or DVD/ S uper VC D/ VCD/ C D/ C D-G/H D-CD an d Mp3/ JP EG d iscs)
- FOR CD, C D- G, HD-C D & MP3/J PEG dis cs , press b utton t o pause ; pr ess but ton to re sume.
- FOR DVD , Su per VCD , VCD dis cs, pre ss b utton t o pause ; press b ut ton to pl aybac k frame b y
frame ; pr ess but ton to re sume.
6. Repe at ( for DVD / Super V CD/ VCD / CD / CD-G/ HD-CD a nd Mp3/ J PE G discs )
- Press R EP EAT bu tton on ce to dis pl ay the cu rrent r ep eat mod e.
For Sup er V CD, VCD , CD, CD- G, HD-C D, d iscs, w hile pl aying i n se quent , you may u se the re pe at
playb ac k.The re are 2 re peat mo de s, pres s REPEAT to tog gle bet ween di ffere nt mode s in s equen t.
(REPE AT (OF F)/ REP EAT (1 )/REP EAT (A LL )).
For DVD d is cs, you m ay setu p the rep ea t playb ack mod e. Ther e are 2 rep eat mod es , press R EPEAT
to togg le b etwee n diffe rent mo des in se quent . (R EP: (OF F) / REP: ( CHAPT ER ) / REP: (T ITLE) / R EP:
(ALL) ). For MP3 / J PEG dis cs, whi le p layin g the dis c, you ma y us e the rep eat pla yback . There a re 3
repea t mo des, pr ess REP EAT to t og gle bet ween di ffere nt mode s in sequ en t. (REP EAT (O FF) /
REPEAT (1) / RE PEAT (DIR) / RE PE AT (ALL)) .
or back wa rd
use num er ic butt ons dir ectly o r
Page 47

7. Disp la y (for DV D/ Supe r VCD/ VC D/ C D/ CD-G /HD-C D and Mp3 / JP EG disc s)
- Press D .D ISP but ton to ac tivat e th e on scre en roll -down m en u for the c urren t Title, C ha pter, ti me and
other i nf ormat ion.
For DVD d is cs, (2 pa ges) Pr ess D.D IS P butto n once to d ispla y fi rst pag e as show n below :
Disc Type Chapt er -/-(C urr ent/F ull ) Elaps ed disc tim e
5
:4
0:05
ed 0
laps
DVD TT
0/3 C
C 1 / 2
itle E
T
Press but ton aga in to dis play se co nd page s shown b elow:D.DIS P
Langu age Audio Audio Typ e Ang le ON/OF F
Til tle - /- (Cur ren t/ Fu ll)
:Eng lish 1/1 :Oth ers1/2 AC3 2CH :OFF
Subti tle - /-( Cu rre nt/ Full) or OF F -/- (Cu rre nt/ F ull) or O FF
For Sup er V CD disc s, (2 pag es),P re ss but ton onc e to disp lay fir st p age: Di sc type , Track -/ (Curr en t / Full) , Mute st atus, P BC stat us , Repea t mode st atus, C ur rent tr ack tim e. Pres s D. DISP
butto n ag ain to di splay s econd p ag e: Audio -/--( Curre nt /Full ) or OFF, Audi o type, L an guage , Subti tle
-/-(C ur rent/ Full) o r OFF. Pres s D. DIS P bu tton ag ain to tu rn off th e on scre en disp la y.
For CD, C D- G, HD-C D, MP3 / JP EG disc s, P ress butt on once t o di splay f irst pa ge: Dis c ty pe,
Tra ck -/- (C urren t / Fu ll), Mu te stat us, Rep ea t mode st atus, C urren t tr ack tim e.
- Press butto n ag ain to tu rn off th e on scre en disp lay.D.DIS P
8. Goto ( fo r DVD/ Su per VCD / VCD/ CD / CD -G/HD -CD and M p3/ JPE G di scs)
- Thi s fu nctio n allow s yo u to play y our fav orite Ti tl e / Chapt er / trac k. Pres s GO TO bu tton to a ctiva te t he
on scre en s croll -down m enu for e di t. Accor ding to t he high li ghted a rea, in put you r fa vorit e Title /
chapt er / Tr ack num ber by nu meric b ut tons or i nput th e playb ac k time. Af ter edi ting, p re ss OK to
start . If t he in pu t is inva lid, it w il l not fun ction .
NOTE: W hi le edit ing, th e GOTO bu tton is n ot func ti on.
- If it is in P BC O N statu s, this f uncti on w ill swi tch it to O FF.
- For Mp3 /J PEG dis cs, use n umeri c bu ttons d irect ly to sel ec t your fa vorit e songs o r pi cture s.
9. AU DIO (fo r DVD/ Su pe r VCD/ VC D/ CD/ CD -G/HD -C D and Mp3 / JPEG di scs)
- Press A UD IO butt on once t o displ ay c urren t audio m ode.
- Press a ga in to tog gle bet ween di ffere nt audi o mo des in se quent .
For CD, CD- G, H D-CD, M P3 disc s: (L/L , R/R , ST EREO, M IX M ONO)Super V CD & V CD,
NOTE: S wi tchin g to Auto L / R audio c hanne l may be va ri ed due to d iff er ent dis cs cont ents. B il ingua l
VCD dis cs c an use AU DIO but ton to sw it ch betw een dif fer en t langu ages.
10. Lan gu age and (for DV D Super V CD d iscs)
- Press A UD IO butt on once t o displ ay c urren t langu age.
- Press a ga in to tog gle bet ween di ffere nt lang ua ges mod e in sequ ent.
NOTE: F or M ulti- langu ages DV D & Su per VCD d iscs, p ress AU DI O butto n to sele ct your f av orite l angua ge.
11. Subt it le a nd ( for DVD S uper VC D di scs)
- Press S UB TITLE b utton o nce to di sp lay cur rent su b-tit le .
- Press a ga in to tog gle bet ween di ffere nt subt it le mode s in sequ ent.
NOTE: F or M ulti- langu ages su bt itle DV D & Super V CD disc s, p ress SU BTITL E butto n to s elect y our
favor it e sub ti tle lan guage .
12. Angle (for DV D di sc)
- Press AN GL E butto n once to d ispla y cu rrent p layba ck angl e.
- Press a ga in to tog gle bet ween di ffere nt play ba ck angl e codes i n seque nt . (E.g. An gle -/- ( Curre nt /Full )
or OFF)
NOTE: O nl y for DVD w ith mul ti-an gl e, pres s ANGLE bu tton to s el ect you r favor ite pla yb ack ang le.
Selec ta ble p la yback a ngle de pe nds on th e avail abili ty o f the DVD c onten ts.
D.DIS P
D.DIS P
Page 48

13. Mut e (f or DVD/ S uper VC D/ VCD/ C D/ C D-G/H D-CD an d Mp3/ JP EG d iscs)
- Press M UT E butto n to mute t he audi o ou tput. Ther e wi ll have a n on scre en symb ol i ndica te “MUT E”.
- Press a ga in to can cel, or P ress VO L + to ca ncel an d ad just th e volum e.
- In case t he re is no au dio out put, tr y to p ress MU TE butt on to can ce l mute.
14. ZOO M / and (for DV D/ S uper VC D/ VCD Mp 3 JPEG di scs)
- Press Z OO M butto n to zoom i n the pic tu re.
- The re a re 3 zoom m odes, p re ss ZO OM b utton t o toggl e be tween d iff erent z oo m modes i n seque nt .
(Zoom O FF, Zo omx2 , Zo omx4)
- In Zoom x2 a nd Zoom x4, you m ay use th e na vigat ion but tons to p an t he pict ure for y our fav or ite por tion.
15. A- B (for DV D/ Supe r VC D/ VCD/ C D/ CD-G /HD-C D an d Mp3/ JP EG disc s)
- In norm al P layba ck, fas t forwa rd o r fast re verse , press A- B bu tton at w here yo u want to s ta rt the
repea t po rtion . The re w ill h av e an on scr een ind ic ation “ REPEAT A “.
- In norm al P layba ck, fas t forwa rd o r fast re verse , press A- B bu tton ag ain at wh ere you w an t to stop
the rep ea t porti on. The re wi ll h ave an on s creen i nd icati on “REP EAT A B“.
- The r ep eat fun ction s ta rte d to p layba ck the po rt ion fro m A to B auto ma tical ly.
- Press A- B bu tton ag ain to ca ncel. T here wi ll have a n on s creen i ndica tion “R EP EAT OFF”.
For Sup er V CD, VCD & C D discs , repea t A-B i s only fu nctio n withi n th e same tr ack. Wh en play in g
the oth er s, repe at A-B wil l cance l au tomat icall y.
For Sup er D VD disc s, repe at A-B is on ly f uncti on with in the sa me Ti tle /Ch apter. W hen pla yi ng the
other s, r epeat A- B will ca ncel au to matic ally.
16. Volu me (for D VD/ Sup er VCD/ V CD / CD/ CD- G/HD- CD and Mp 3/ J PEG dis cs)
- Press - V OL / VO L + but tons to a djust t he o utput v olume .
NOTE: P la yback D VD disc s in orig in al code , is not ad justa bl e
17. INT RO ( for Sup er VCD/ V CD/ CD/ C D- G/ HD-C D)
- 9 pict ure dis pl ays.Intro /S can/
MP3/JPEG PLAYBACK
After l oa ding th e MP3 / JPE G disc, i t wi ll star t to scan f or the st or ed MP3 /J PEG fol ders. T hen wil l
first ly d ispla y the MP3 c onten ts a utoma tical ly. Sc re en as fol low:
Dis play cu rrent
MP3 p layba ck
fun ction
Dis play th e selec ted
fil e’s con ten t.
File Nu mbe r: 1/ 16
Dis c Dis c
01 MP 3
01
02
03
04
05
06
07
08
09
10
Hig hligh t file fo r
cur rent pl aybac k.
Dis play cu rrent
JPE G playb ack
fun ction
File Nu mbe r: 1/ 16
01 PI CTURE
01
02
03
04
05
06
07
08
09
10
Scr oll bar t o view
nex t page.
Page 49

- Using t he n aviga tion bu ttons t o ch eck you f avori te fold er a nd play back th e first f il e or move t o the
your fa vo rite fi le.
NOTE:
- Press / b utton s to m ove the h ighli gh t to fo ld ers, do cumen ts o r mode se lecti on.
- Press n um eric bu ttons t o selec t th e conte nts dir ectly. F or numb er over 1 0, u se nume ric but tons
direc tl y or pres s - / -- butt on firs t( E.g . Tra ck 15, pr ess - / -- th en 5 )
- When pl ay back MP 3 files , there i s no p ictur e displ ay, only a udio ou tput.
- Playi ng t he JPEG d iscs, p ress PR OG RAM but ton to se lect sl id e eff ects. T here ar e 10 slid e mo des ,
press P RO GRAM bu tton to t oggle b et ween di ffe re nt mode s in sequ ent. (S ta rt from t op, Sta rt from
botto m, S tart fr om left , Start f rom rig ht , Start f rom upp er l eft c or ner, Sta rt from f ou r cor ne rs, etc )
- When pl ay o r pause w ith pic ture pl ay back, y ou may us e navig at ion but oons to f lip / rot at e the pic ture.
butto n to f lip hor izont ally.
butto n to f lip ver tical ly.
butto n to r otate l eft 90° .
butto n to r otate r ight 90 °.
- When pl ay o r pause w ith pic ture pl ay back, P ress / bu tton to s el ect nex t / previ ous pag e or p ress
numer ic b utton s to view t he corr es pondi ng pict ures.
FUNCTION SETTINGS
DVD Function General setup
SYS TEM SET UP
SOU RCE
TV SY STEM
TV TY PE
PASS W ORD
RATI NG
DEFA ULT
EXI T SE TUP
- Press D VD S ETUP butto n to a cti va te the DV D playe r
OSD men u;
- Press / b ut ton t o mo ve and hi ghlig ht b etwee n
diffe rent su b-men u. P res s / OK b utton t o
enter t he h ighli ghted s ub-me nu .
- Press D VD S ETUP butto n to e xit t he O SD menu , or
move th e hi ghlig ht to EXI T SET UP then p ress OK
butto n to e xit.
NOTE: I n Se tup m od e, the fo llowi ng f uncti ons wil l be canc el o r pause :
TIT LE , SUBTI TLE, DI SPLAY, PLAY, SET UP, STO P, SLOW / S TEP, AUD IO, F.FWD , F.REV, PREV,
NEXT, GOT O, ZOOM , ANGLE, P ROGRA M, P REVIE W, REPEAT, A-B.
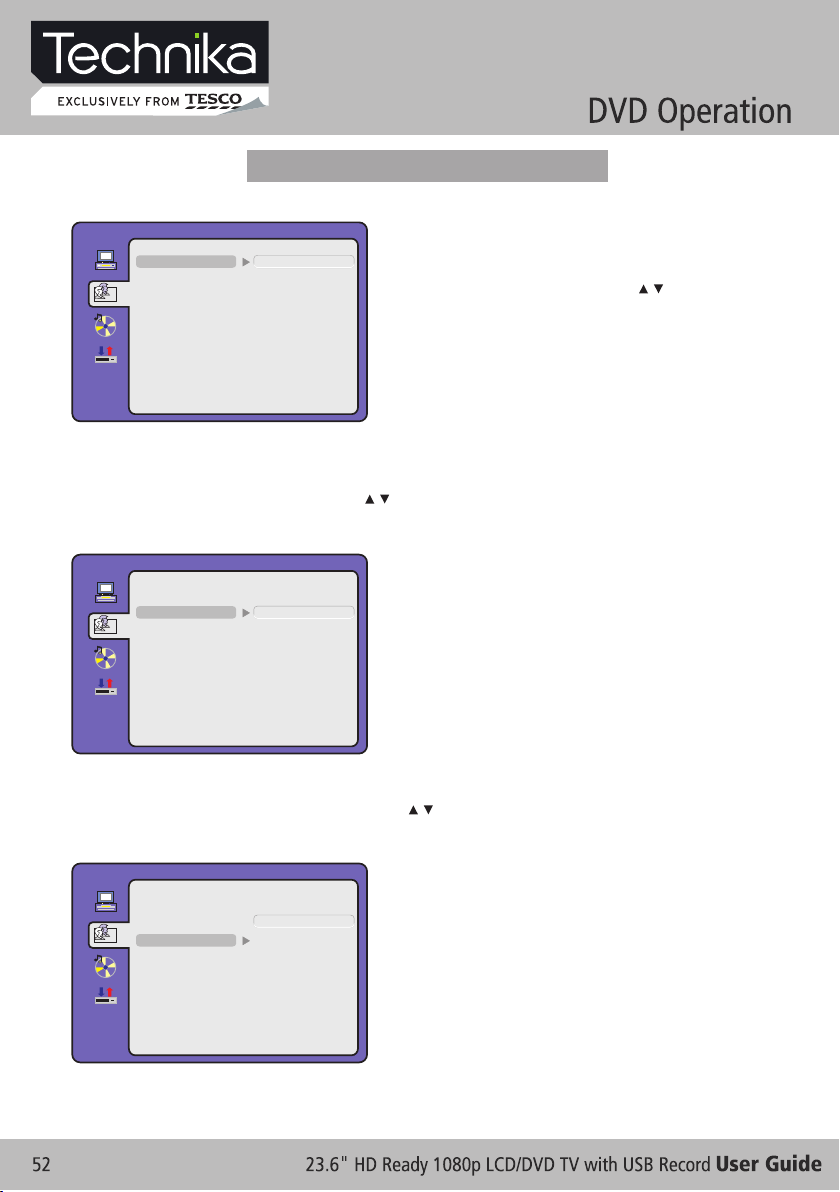
System Setup
SOURCE
Selec t ac cordi ng to wha t type of m ed ia you wa nt to pla yback :
(DISC , US B, CARD )
Defau lt s ettin g is AUTO.
CARD an d US B optio ns is una vaila bl e.
Page 50

SYS TEM SET UP
SOU RCE
TV SY STEM
TV TY PE
PASS W ORD
RATI NG
DEFA ULT
EXI T SE TUP
AUT O
DIS C
USB
CAR D
TV SYSTEM
This me nu e nable s you to se t the pic tu re form at for yo ur
TV/DV D.
NTSC
This fo rm at is use d by some o ther co un tries , e.g. US A
PAL
This is t he f ormat u sed in th e EUROP E an d the def ault se tting .
AUTO
This fo rm at can be u sed if yo ur TV /D VD is cap able of b ot h
PAL and NTS C fo rmats .
SYS TEM SET UP
SOU RCE
TV SY STEM
TV TY PE
PASS W ORD
RATI NG
DEFA ULT
EXI T SE TUP
NTS C
PAL
AUT O
NOTE: PA L for mat is ge neral ly used f or TVs in
the EUR OP E. Chec k your TV u ser g ui de for
suppo rt ed fo rm ats.I f NTSC is s el ect ed
with a no n- com pa tible t elevi si on you
may exp er ien ce i nterf erenc e or p ictur e
scrol li ng.
TV TYPE
DVDs ar e pr oduce d in a vari ety of sc re en aspe ct rati os. Thi s menu en ables y ou t o selec t one of th e three
aspec t ra tios:
SYS TEM SET UP
SOU RCE
TV SY STEM
TV TY PE
PASS W ORD
RATI NG
DEFA ULT
EXI T SE TUP
4:3 PS
4:3 LB
16: 9
4:3 PS
4:3 LB
16:9
- Selec t th e most ap propr iate as pe ct
ratio f or t he DVD be ing vie wed.
4:3PS
Pan and S ca n is used f or most n ormal t el evisi on broa dcast s an d it is the
defau lt s ettin g. It has a n aspec t ra tion of 4 :3. If yo u selec t th is sett ing
when vi ew ing a DVD t he pict ure wil l fi ll the sc reen bu t, you wi ll n ot see
the lef t an d right e dges of t he pict ur e.
4:3LB
Lette r Bo x will sh ow the DV D in its or ig inal as pect ra tio so de pe nding
on the si ze o f your te levis ion scr ee n, you ma y see bla ck bord er s above
and bel ow t he pict ure.
Page 51

16:9
Choos e th is sett ing if yo u have a wi de scree n telev ision .
NOTE:
- Playb ac k scree n size ma y vary ac co rding t o the dis cs cont en ts.
- For dis cs w ith 4:3 c onten ts, usi ng a ny mode w ould on ly disp la y a 4:3 scr een
- Scree n ra tio sel ectio n shoul d be a ccord ing to th e conne ct ed TV / D ispla y
aspec t ra tio.
PASSWORD
- The d ef ault se tting i s lo cke d. N o Ratin g selec ti on or cha nge pas sword c ou ld be don e. To edi t th e Ratin g
setti ng , pleas e enter d efaul t pa sswor d “8888 ” by nume ri c butto ns, the n press O K bu tton to c onfir m.
SOU RCE
TV SY STEM
TV TY PE
PASS WOR D
RATI NG
DEFA ULT
EXI T SE TUP
SYS TEM SET UP
- To chan ge p asswo rd, inp ut a ny 4 digi t numbe r when
the loc k is u nlock ed. Onc e the 4 dig it n umber i s enter ed,
that wi ll b e your ne w passw ord.
RATING
- Playb ac k for som e discs w ith rat in g, you ca n selec t the
ratin g se tting a ccord ing to yo ur p refer ence. R ating
restr ic tion di vided i n eight d iffer ent cat eg ory fro m KID
SAFE to AD ULT.This o ption i s va lid whe n you pre ss stop
butto n tw ice to pl aybac a nd then e nt er setu p menu.
NOTE: O nl y edita ble whe n passw or d is unlo cked. An d only
can fun ct ion w he n passw ord is lo ck ed. It do es not,
howev er, r eset ei ther th e Passw or d or the Ra ting
setti ng .
DEFAULT S ETTIN G
- Press O K bu tton to r estor e facto ry d efaul t.
SYS TEM SET UP
SOU RCE
TV SY STEM
TV TY PE
PASS WOR D
RATI NG
DEFA ULT RES TORE
EXI T SE TUP
SOU RCE
TV SY STEM
TV TY PE
PASS WOR D
RATI NG
DEFA ULT
EXI T SE TUP
SYS TEM SET UP
1 KID S AFE
2 G
3 PG
4 PG1 3
5 PG- R
6 R
7 NG. 17
8 ADULT
Page 52
Language Setup
Press SET UP butt on t o enter t he D VD OSD me nu .
LAN GUAGE S ETUP
OSD L ANGUA GE
AUD IO LANG
SUB TITLE L ANG
MEN U LANG
EXI T SE TUP
ENG LISH
GER MAN
SPAN ISH
FRE NCH
POR TUG UES E
ITAL IAN
- Aud io L anguage
Use nav ig ation b utton s to sele ct t he AUDIO L ANG set up icon , pr ess OK bu tton to c onfir m. Ther e
are 6 lan gu ages fo r you sel ectio n, p ress / bu ttons t o toggl e be tween d iff er ent lan guage s.
(ENGL IS H / GERMA N / SPAN ISH / FRE NC H / PORTUGUE SE / I TALI AN ).
Press O K bu tton to c onfir m.
LAN GUAGE S ETUP
OSD L ANGUA GE
AUD IO LANG
SUB TITLE L ANG
MEN U LANG
EXI T SE TUP
ENG LISH
GER MAN
SPAN ISH
FRE NCH
POR TUG UES E
ITAL IAN
- OSD Language
Use nav ig ation b utton s to sele ct t he OSD LA NGUAG E
setup i co n, pres s OK butt on to con fi rm. There ar e fe w
langu ag es for yo ur sele ction , pr ess / but tons to
toggl e be tween d iff er ent lan guage s.
NOTE: I f th e selec ted lan guage i s no t inclu ded in yo u
DVD dis c co nte nt , it will s elect t he d efaul t
langu ag e of th e di sc auto matic al ly. The def au lt
langu ag e setti ng is Eng lish.
NOTE: - If t he sele cted la nguag e is n ot incl uded in y our DVD
disc co nt ent, it w ill sel ect the d ef ault la nguag e of the
disc au to mat ic ally. The def ault la nguag e se tting
is Engl is h.
-Only v al id wh en y ou pres s stop bu tt on twic e to
playb ac k and the n enter s etup me nu .
- Subtitle Lang ua ge
Use nav ig ation b utton s to sele ct t he SUBT ITLE LA NG setu p ic on, pre ss OK but ton to co nf irm.
The re a re 6 lang uages f or y ou se le ction , press / b ut ton s to t oggle b etwee n di ffe rent la nguag es .
(ENGL IS H / GERMA N / SPAN ISH / FRE NC H / PORTUGUE SE / I TALI AN / OFF) P re ss OK b ut ton
to conf ir m.
NOTE: I f th e selec ted lan guage i s no t inclu ded in yo u DVD dis c co ntent , it will s elect t he d efaul t langu age
of the di sc a uto ma tical ly. Th e defau lt lang ua ge sett ing is EN GLISH .O nly val id when y ou p res s
stop bu tt on tw ic e to play back an d th en ente r setup m enu..
LAN GUAGE S ETUP
OSD L ANGUA GE
AUD IO LANG
SUB TITLE L ANG
MEN U LANG
EXI T SE TUP
ENG LISH
GER MAN
SPAN ISH
FRE NCH
POR TUG UES E
ITAL IAN
OFF
Page 53

MENU Language
LAN GUAGE S ETUP
OSD L ANGUA GE
AUD IO LANG
SUB TITLE L ANG
MEN U LANG
EXI T SE TUP
ENG LISH
GER MAN
SPAN ISH
FRE NCH
POR TUG UES E
ITAL IAN
- Use nav ig ation b utton s to sele ct t he MENU L ANG set up
icon, p re ss OK but ton to co nfirm . There a re 6
langu ag es for yo u selec tion, p re ss / butt ons to
toggl e be tween d iff er ent lan guage s. (ENG LI SH /
GERMA N / SPANIS H / FRENC H / PORTU GUESE /
ITAL IA N ) Press O K butto n to conf ir m.
- Only va li d when yo u press s top but to n to play back an d
then en te r setup m enu.
Audio Setup
Audio Output
AUD IO SETU P
AUD IO OUT
TON E
EXI T SE TUP
- SPDIF / O FF : Coa xi al outp ut off.
- SPDIF / R AW: W hen con necte d the coa xi al outp ut to you r audio a mp lifie r, playi ng back t he d iscs wi th
Dolby, M PEG con tents , the coa xi al outp uts the o ri ginal s ignal t o your am pl ifier. You r Amplif ier mus t
have th e co rresp ondin g decod in g funct ion.
- SPDIF / P CM : When co nnect ed with 2 c ha nnels d igita l stere o am plifi er, play ing bac k th e discs w ith
Dolby, M PEG con tents t he coax ia l outpu ts with 2 c ha nnel to y our amp lifie r.
SPD IF/OF F
SPD IF/RA W
SPD IF/PC M
- Use nav ig ation b utton s to sele ct t he AUDI O OUT set up
icon, p re ss OK but ton to co nfirm .
- The re a re 3 mode s for you r se lecti on; use n aviga ti on
butto ns t o selec t diffe ren t mo des, pr ess OK bu tt on
to conf ir m.
(SPDI F / OF F SPD IF / R AW SP DIF / PCM ).
Tone
- Use / but to ns to a dj ust the Tone set ti ng.
AUD IO SETU P
AUD IO OUT
TON E
EXI T SE TUP
#
+4
+2
+0
-2
-4
b
Page 54

Dolby Digital Setup
Dynamic Range
DIG ITAL SET UP
DYN AMIC RA NGE
DUA L MON O
EXI T SE TUP
FUL L
6 / 8
4 / 8
2 / 8
OFF
- When sw it ch the co mpres s mode to “ Au dio out put”,
adjus t th e compr ess rat io for di ffere nt effe ct. Whe n
selec te d FULL, t he peak s ignal v al ue is sma llest .
When se le cted OF F, the peak s ignal v al ue is big gest.
Dual Mono
DIG ITAL SET UP
DYN AMIC RA NGE
DUA L MON O
EXI T SE TUP
MOD E LEFT SP EAK ER RI GHT SP EAKER
STE REO STE REO-L S TERE O-R
L-M ONO L-M ONO L-M ONO
R-M ONO R-M ONO R-M ONO
MIX -MONO L -MONO +R-MO NO L-MO NO+ R-M ONO
STE REO
MON O L
MON O R
MIX M ONO
- You can sel ec t four di ffe re nt audi o outpu t, STER EO ,
MONO L, M ON O R, MIX MO NO. The audi o ou t
descr ip tion of t hese Se lecti on s is show n in the ta ble
below.
Page 55

CARE AND MAINTENANCE
Early m al funct ions ca n be prev en ted. Ca reful a nd regu la r clean ing can e xtend t he a mount o f time yo u
will ha ve y our new TV. Be sure to t urn the p ow er off and unp lu g the pow er cord b efore y ou b egin an y
clean in g.
Clean in g the s cr een
1. Here ’ s a gre at way to k ee p the dus t off y ou r scree n for a whi le. Wet a s oft clo th in a mix tu re of
lukew ar m water a nd a litt le fabr ic s often er or dis h washi ng d eterg ent. Wr ing the c loth un til it’ s almos t
dry, and t hen use d it to wip e the scr ee n.
2. Make s ur e the exc ess wat er is off t he scre en, and t he n let it ai r-dry b efore y ou t urn on yo ur TV.
Clean in g the c ab inet
To remove d ir t or dust , wipe th e cabin et w ith a sof t, dry, li nt-fr ee clot h. Plea se b e sure no t to use a we t
cloth .
Exten de d Absenc e
If you ex pe ct to lea ve your T V dor ma nt for a lo ng time (s uch as a va catio n), it’ s a good id ea to
Teletext operation
unplu g th e power c ord to pr otect a ga inst po ssibl e damag e fr om ligh tning o r power s ur ges.
If you ex pe ct to lea ve your T V dor ma nt for a lo ng time ( su ch as a vac ation ), it’s a g ood ide a to
unplu g th e power c ord to pr otect a ga inst po ssibl e damag e fr om ligh tning o r power s ur ges.
Handi ng D iscs
1. To rem ov e a disc fr om its st or age c as e, pres s on the ce nt re of the c ase and t ake the d is c out.
2. Hold t he d isc by th e edges , to avoi d to uchin g the Rec orded s id e of the di sc.
Clean in g dis cs
1. Fing er print s and dus t shoul d be c arefu lly wip ed from t he d isc's s urfac e with a so ft C loth.
Audio di sc s and DVD d iscs ha ve no gro ov es to col lect du st and mi cr oscop ic debr is so gen tl y
wipin g wi th a soft c loth sh ould re mo ve most p artic les. Wi pe i n a strai ght lin e from th e in side
to the ou ts ide of th e disc. S mall du st p artic les and l ight st ai ns shou ld have n o effec t on
repro du ction q ualit y.
2. Neve r us e chemi cals su ch as rec or d spray s, anti stati c sp rays, B enzin e, or thi nn ers to cl ean
the dis cs . The se chem ic als c an i rrepa rably d am age the d isc's s urfac e.
3. Disc s sh ould be r eturn ed to the ir c ases af ter use . This av oids se rious s cr atche s that co uld
cause t he l aser pi ckup to s kip.
4. Do not e xp ose dis cs to dir ect sun li ght, hi gh humi dity, or h igh tem perat ur e for ext ended p eriod s.
Expos ur e to high t emper ature s ca n warp th e disc.
5. Do not s ti ck pape r or writ e anyth in g with a ba ll poin t pen on th e la bel sid e of the di sc.
Page 56

Page 57

Page 58

23.6" : 60cm
23.6" : 1920 x 1080
Video format
CVBS / RGB / YPbPr / VGA
Page 59

Page 60
Page 61

Page 62

Page 63

Page 64

 Loading...