

Page 1

Full HD LCD TV with Freeview & DVD
User Guide
Model No
LCD23-230
Page 2
IDTV
2
Page 3

User Guide
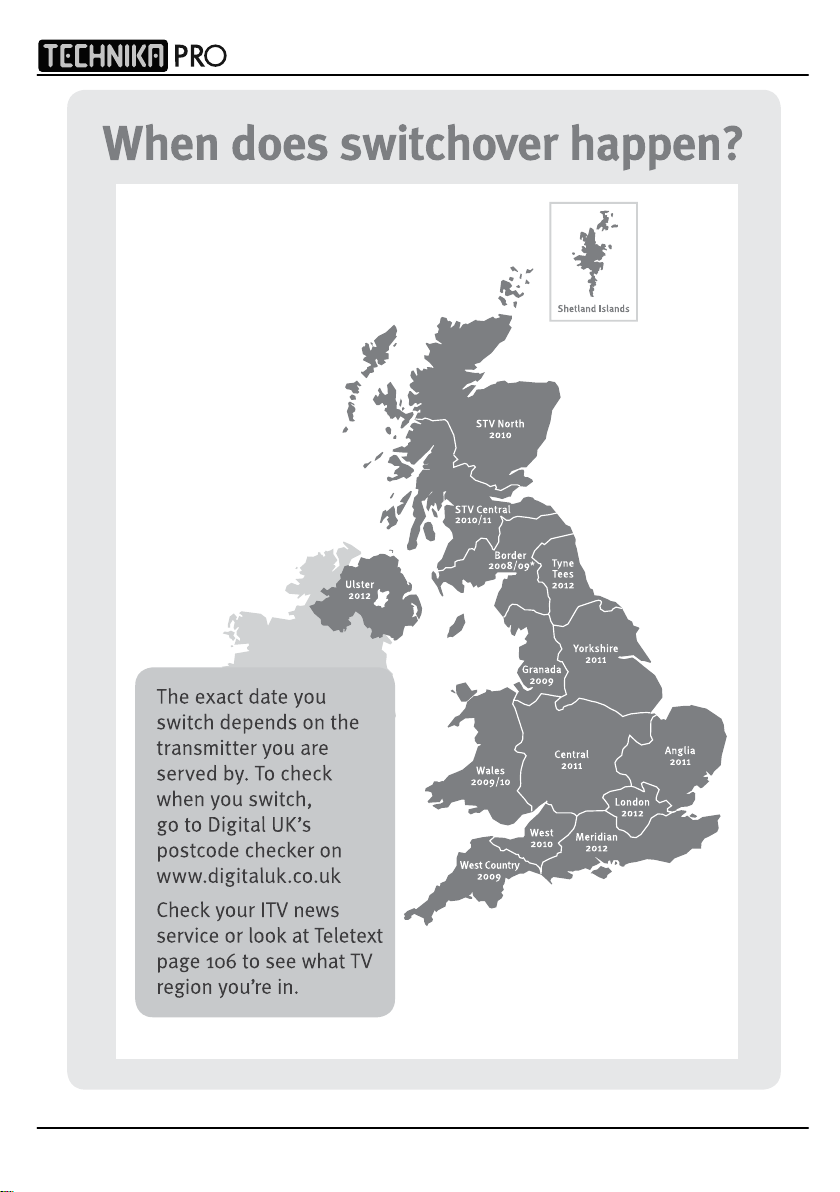
Important information regarding the digital TV switchover
Television in the UK is going digital, bringing us all more choice and new services. Starting late
2007 and ending in 2012, television services in the UK will go completely digital, TV region by TV region.
How the switchover affects your TV equipment.
Your new TV has a digital tuner built in, which means it is ready to receive the Freeview signal by simply
connecting it into your aerial socket (you can check if you can get digital TV through your aerial now or
whether you will have to wait until the switchover at www.digitaluk.co.u
When the TV switchover happens in your area, there are at least two occasions when you will need to re-tune
your TV in order to continue receiving your existing TV channels and also to pick up new ones. Digital UK, the
body leading the digital switchover, will advise you when you need to retune during the switchover.
How to retune.
Retuning your TV is a very quick and simple process. We recommend that you retune
every few months to ensure you are receiving the very latest TV and radio channels
that are broadcast.
• In digital/freeview mode, on the remote control press ‘menu’ quickly followed by 8-8-8-8 (so
press the number 8 four times)
• You will now enter the ‘First time installation’ mode. (if you do not, please refer to the section
called ‘getting started’ later in this user guide)
First Time Installation
Country
Language
Please ensure that the aerial is connected to the connector
labelled ‘ RF In ’ on the rear of the TV .Ensure that OK is
highlighted in yellow and press ‘OK’ on your remote .If after
this scan ,not all digital channels are found ,your aerial ma y
require a signal booster .alternatively ,upgrade your aerial
to a high gain digital version .
OK Cancel
English
UK
k)
• Simply press ‘OK’ or ‘Enter’ on the remote control and your TV will retune.
If you do not retune your TV when advised to do so by Digital UK, you may lose some or all of your channels
until you do re-tune.
If you are missing any channels, it may be that they are not available in your area, or that your TV aerial
needs upgrading.
For help and support regarding the digital switchover
Telephone: 08456 50 50 50
(calls charged at local call rate, approx 3p per minute daytime or 1p per minute evenings from a BT landline)
, please contact Digital UK:
Digital UK website: www.digitaluk.co.uk
If you require technical or warranty support on this television, please contact the manufacturer helpline, do
not contact Digital UK unless your query is regarding the digital switchover.
3
Page 4

WARNINGS
Cautio n
This t elevision con tains no user servi ceable part s. Please refe r t o t he manuf act urer
or a uthori sed repair agent in th e even t o f mal func tion. Do no t remove the back cover
from t he television.
Warning
To r educe th e r is k o f f ire , electri c s hoc k o r dam age t o t he tele vis ion, do no t e xpo se
it t o d ust , r ain or moi stu re , o r pla ce any obje cts f illed w ith liquids on o r nea r t he telev is ion.
Do not place th e televi sion in a confined space, ensure that not hing c an obstruct
the ventilation openings at the rear of th e t elevision.
Do not place naked f lames o n o r near the television.
Dispose of t his t elevision and any components including batteries i n a n env ironmentally
friendly manner. If in doubt, please contact your loc al authorit y f or details of recycling.
Your LCD TV should be cleaned using a dry o r slightly damp cloth . Y ou should not use
an alc ohol based c leaner
Safety
For your saf ety, this appliance is fi tted with a fused moulded 3 pin mains plug. Should
the fus e need to be replac ed, ensure that any replacement i s of the same amperage
and appr ove d w ith th e BSI m ark. ( )
IDTV
Neve r try and replace t
legally authorised to do so . I n t he event t hat a replacement Mains cable is required,
contac t the manufac turer fo r a s uitable replacement.
Never us e t he televis ion i f it is damaged i n any way.
Always place the t elevision on a fl at le ve l s ur fac e avoiding anywhe re whic h may
be subjec t t o s trong vibration. Ensure th e t elevision is not plac ed on to p o f the power
cable as th e weight of t he television may damage t he cable and cause a safet y hazard.
Never place mobile phones, speakers or any ot her devic e whic h may cause magnetic
or r adio i nterf ere nce w ith the telev ision . If int erf erenc e i s appa re nt, mo ve th e d evice
causing th e int erference away from th e t elevision.
Packaging
Please sav e t he packaging fo r t he telev ision as you will need this in t he event
of warrant y/service repair or support. We are unable t o carry out warranty/service
if you are unable t o package it correctl y. The safest way to package your it em in th e
event of warranty/service repair is i n i ts original box/ packaging
he m ains plug unless you hav e adequate qualif ic ation s and a re
4
Page 5
User Guide
5
Page 6

IDTV
6
Page 7

CONTENTS
User Guide
SETTING UP YOU R T V
- Digital Switchover Re-Tune 2
- What is included in the box 8
Attaching/Detaching the
-
Stand & Wall mounting
- Tuning in TV 10
- Remote control buttons and their
functions 11
- TV buttons and their functions 12
- Inputs and Connections 13
TV MENU OPERATION
- Picture Settings Menu 14 - 15
- Sound Setttings Menu 16
- Tuning Settings Menu 17
- Common Inferface Slot 18
- Timer Settings Menu 18
- Sleep Timer 18
- On Screen Display Timer 18
- General Settings Menu 19
- On Screen Menu Language 19
- Adjusting Picture Format 19
- Blue Screen 19
- System Lock 19
- First Time Installation 20
- Reset Television to Factory Settings 20
9
CHANNEL SERVICES
- Using Electronic Program Guide 20
- Using Digital TV teletext 21
- Using Analogue TV teletext 21
PC OPERATION
- Using with a PC or Laptop 22 - 23
DVD MENU OPERATION
- System Setup 24
- Changing Regions 25
- Audio Setup 25
- Digital Setup 25
GENERAL INFORMATION
- Using with Sky Digital/Virgin Media 26
- Connecting a Games Console 27
- Frequently Asked Questions 28
- Technical Specifications 29
- Index 30
If you experience any problems with this Television,
Please contact the helpline.
Customer Support/Technical Helpline
Sky Media UK LTD
Telephone UK ROI: 01443 3940: 0871 2000 463
Email: service@skymediauk.co.uk
7
Page 8
IDTV
Model No. 23-230
User Guide
IDTV
Quick Start Guide – Model 23-230
Onlinesupport:www.skymediauk.co.uk email: service@skymediauk.co.uk
y@ypp
4
RF cable supplied, connect the TV to the TV Aerial
wall socket (Fig A) then connect the Power cable
to your TV and Electrical outlet (Fig B)
6
Insertthebatteries supplied into the Remote control and press
thePower/Standbybutton to power on the TV
FigB
4
6
FigA
FigB
4
IMPORTANT:-If yourTV signal is inadequate to receive a
goodDigitalsignal, you will need to connect a 'Signal
booster' betweenyourTV and TV Aerial Socket. See section
6.
6
7
You willnowbe welcomed with the initial set-up screen. Press
OK ontheremote control and tuning will start. If after tuning
somechannelsare missing, please refer to section 6.
Remotecontrol
n
FigA
FigB
4
5
Switchonthe television using the power on/off switch
locatedonthe side or underside of the TV.
6
Connecta'Si
g
nal booster'asshown below.
7
Remotecontrol
buttons
FigA
FigB
4
5
6
8
7
Remotecontrol
buttons
FigA
FigB
On/OffSwitch
4
5
6
Oncethe'Signal booster' is connected, retune the TV in order to
receiveallof the channels.
8
7
Remotecontrol
buttons
FigA
FigB
On/OffSwitch
4
5
6
8
7
Remotecontrol
buttons
FigA
FigB
On/OffSwitch
2
3
4
6
5
Remotecontrol
buttons
FigA
FigB
On/OffSwitch
X23/MAN/0009
Fault Cause Solution
LED/Power on indicator light on TV not working No power being received to TV Ensure power outlet is switched on, check Power on/off switch on TV is switched on
No channels found or screen displays ‘no signal’ TV not receiving any signal Connect to loft/external aerial and retune TV
Some channels missing or picture appears ‘blocky’ Signal too weak If signal reception is below 85%, connect a signal booster (15-20Db) and retune (see
section 6). If signal reception below is 70%, an aerial upgrade may be necessary
If after checking the above you are unable to solve the problem, in the first instance contact the helpline as most problems
can be solved by the technical support team
TROUBLE SHOOTER:
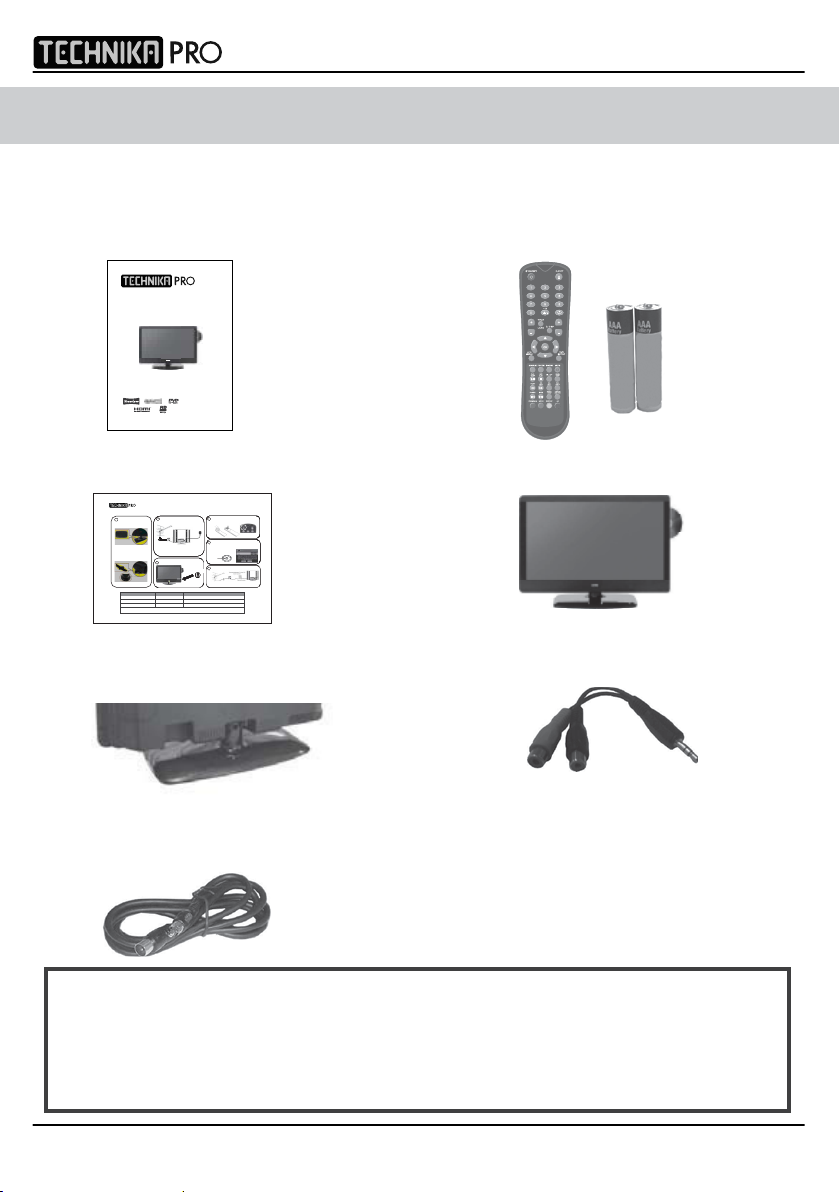
WHAT IS INCLUDED IN THE BOX
Accessories
Included with this TV are the following accessories:
1x - User Guide Book 1x - Remote control + AAA batteries
INFO
CH
VOL
GUIDE
PICTURE
FORMAT
1x - Quick Start Guide 1x - TV
UKTECHNICALSUPPORTHELPLINE
087
12000463 (Open Monday - Friday 8.30am - 6pm, Saturday 9am - 5pm)
ROI
1
Base of stand
A
Insert the TV into the stand
B
Twist the TV into the CLOSE position
until it clicks into place at 45 degrees
01443 3940
1x - Stand 1x - 3.5mm jack to phono cable
1x - RF lead
Please save your packaging as you will need this in the event
of warranty/service repair or support. We are unable to carry out
warranty/service if you are unable to package it correctly. The safest way
8
to package your item in the event of warranty/service repair
is in it’s original box/packaging.
Page 9

Attaching/Detaching the Stand & Wall mounting
User Guide
Attachin g t he St and
Base of stand
Insert the TV into the stand
1)
2)
Twist the TV into the CLOSE position
until it clicks into place at 45 degrees
IMPORT ANT— BEFO RE DRILLI NG
ANY HOLES IN THE W ALL ENSUR E
YOU ARE NOT DRI LLING WHE RE
THERE COULD BE ANY ELECTRI C
WIRES, W ATER OR G AS PIPES
THIS TV RE QU IRES A VE SA
100 WALL MOU NT, O R E QUIVA LEN T
100
To r emo ve th e sta nd
1) Remove base as shown opposite
2) R e
move th e fo ur sc rews highligh ted
below
3) Remove the two screws in
the neck of the stand.
4) T he st and will no w com e o ff
Wall Mo un ting the T V.
1) Remo ve the f our scre ws highlighted
below .
2) T he wa ll mount c an now b e e as ily at ta che d
to th e mou nting hole s on
These hole s a re indi cat ed in th e pic ture
the rear of the
TV.
Important – If wallmounting this TV, only use the screws already
provided in the wallmounting holes. Using other screws which are
longer could cause irreparable damage to internal parts.
9
Page 10
GETTING STARTED - INITIAL SET UP
IDTV
IMPORTANT - AFTER TUNING DO NOT PRESS ANY BUTTONS FOR 20 SECONDS SO THE CHANNEL
INFORMATION CAN BE STORED.
TUNING IN
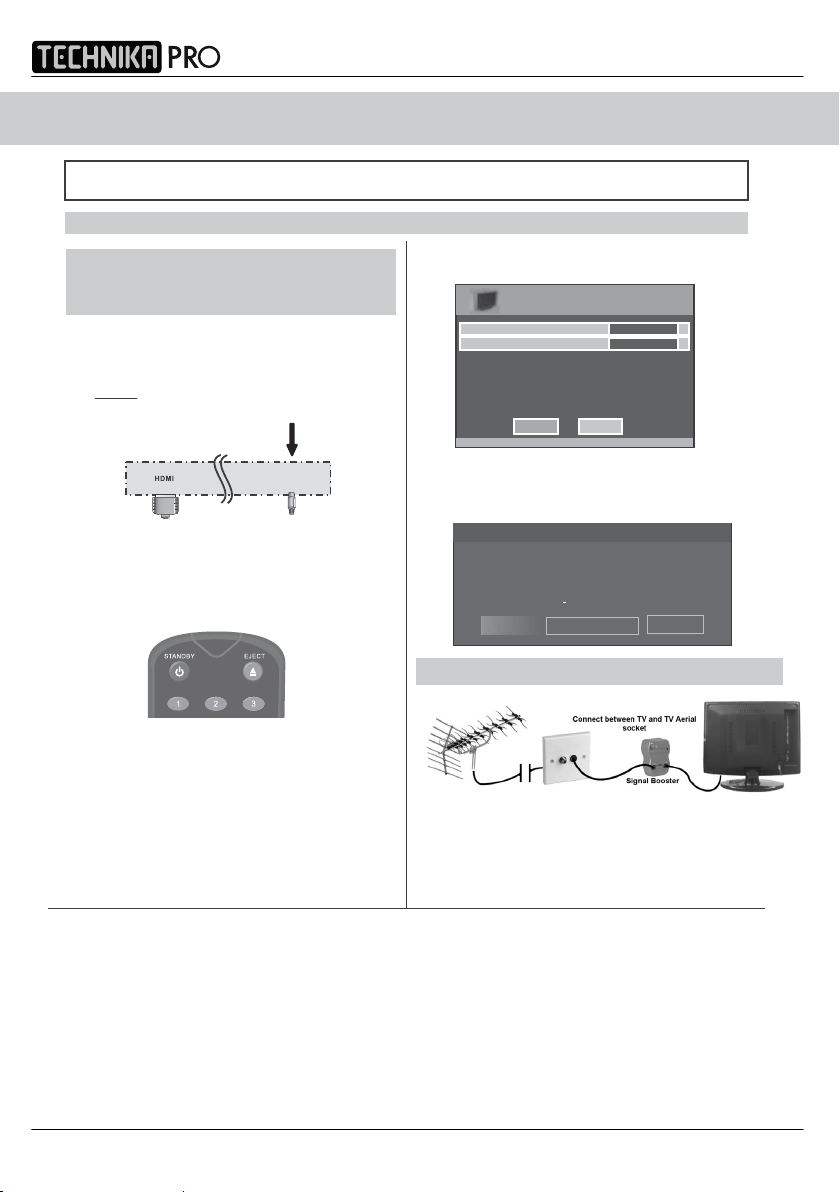
IMPORTANT — Please ensure the TV has
reached room temperature before
connecting the power for the first time
1) Connect the mains lead to your electrical outlet
2) Connect the RF cable supplied to the
'RF IN' on the rear of the TV and connect
the other end of the cable to your TV Aerial outlet
5) Press [OK] on the remote control whilst ‘OK’
is highlighted on screen.
First Time Installation
Country
Language
Please ensure that the aerial is connected to the connector
labelled ‘ RF In ’ on the rear of the TV .Ensu re that OK is
highlighted in yellow and press ‘OK’ on your remote .If after
this scan ,not all digital channels are found ,your aerial may
require a signal booster .alternatively ,upgrade your aerial
to a high gain digital version .
OK Cancel
English
UK
Tuning will now take place.
RF IN
3) Switch on the television using the rocker switch
located on the side of the TV
4) Install batteries in the remote control and press
the [STANDBY] button to turn on the TV.
INFO
The ‘First Time Installation’ menu should
now appear. If it does not, please press
[LCD-MENU] then 8-8-8-8 and the menu will
If no channels are found the following screen will appear,
please refer to additional information below.
Fir st Time Inst allat ion
Unf ortunat el y the TV did no t find an y c hannels
Pleas e c heck you r aerial connec tion
and re fe r to the use r manual
Do you wi sh to re tune yo ur TV
Yes D o i t ne xt t ime
No
TYPICAL SET-UP
appear.
Once you have connected a 'Signal booster' you will need
to retune the TV in order to receive all of the channels.
If the TV finds some, but not all, of the Digital channels, the TV is
functioning correctly but the signal being received is not strong enough.
(The signal strength needs to be above 85% - you can see the signal strength
the TV is receiving when you change channels/ programmes) you will
need to increase the signal reception in order to recieve all of the channels
available. The most economical way to do this is by purchasing
and connecting a 'signal booster' in between the TV and the TV
aerial socket.
If this does not solve the problem, you will need to upgrade the TV
aerial to a digital hi-gain compatible aerial
10
Page 11
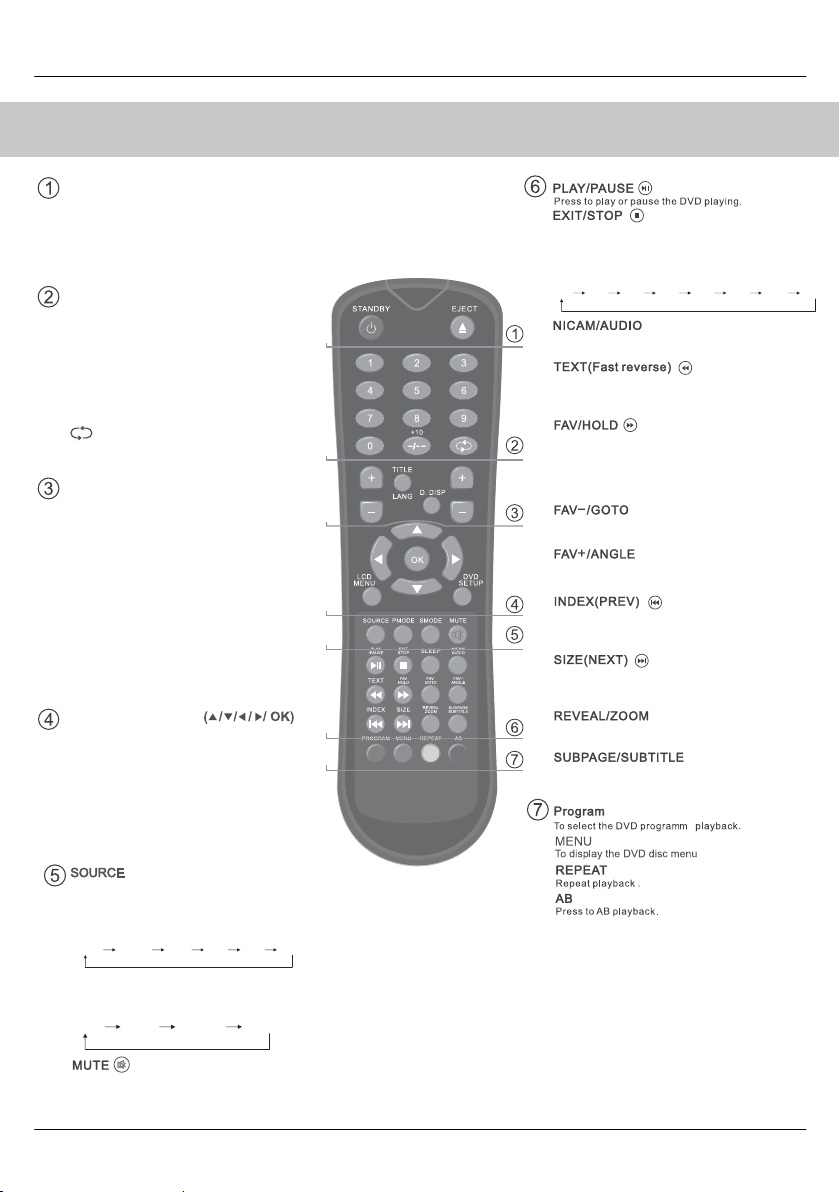
REMOTE CONTROL BUTTONS
STANDBY
Switch on TV when in standby or vice versa
EJECT / INFO
DVD mode: To eject disc
Digital/analogue mode: To display channel
information
NUMBER BUTTONS
Digital/analogue mode: 0 – 9 to select a
TV channel directly.
The channel will change after 2 seconds.
Teletext mode: To enter a page number
-/--
Analogue mode: To enter a channel of 2 digits
i.e. channel 15
Digital/analogue mode: To return to the previous
channel viewed
VOL+/-
To increase / decrease the sound level
TITLE/LANG
DVD mode: To display the DVD title menu
Digital mode: To change the audio language
(if available)
D.DISP/GUIDE
DVD mode: To display the current disc
information
Digital mode : To open the TV Guide menu
CH +/-
To increase or decrease the channel being
watched
NAVIGATION BUTTONS
Allows you to navigate the on-screen menus
and adjust the system settings to your preference
LCD MEN
U
To display OSD menu
DVD SETUP/PICTURE FORMAT
DVD mode: To display the DVD setup menu
All other modes: to switch the screen between
the different picture formats
- TV/AV
Press to display the source menu
PMODE
Press repeatedly to cycle through the available
picture modes
Standard MoviePersonal
MildSport
Game
VOL
TV/AV
GUIDE
PICT URE
FORM AT
INFO
CH
User Guide
Digital mode: Exit the Digital menu.
DVD mode: Stop the DVD playing.
SLEEP
Press repeatedly to cycle through the sleep options
15min 45min30min
Digital mode: press to select NICAM.
DVD mode: press to select DVD audio channels.
Teletext mode: press to enter the teletext mode.
DVD mode: press to play a DVD programme
rewind mode.
Digital mode: press to display FAV menu.
Teletext mode: press hold on or off
display.
DVD mode: press to play a DVD programme in fast
forward mode
Digital mode: decrease fav channel.
DVD mode: press to go to DVD.
Digital mode: increase fav channel.
DVD mode: select different angle of DVD
Teletext mode: request the index page.
DVD mode: press to replay the current programme from
the previous chapter.
Teletext mode: change the display size.
DVD mode: press to advance forward to the next
chapter.
Teletext mode: To reveal or hide the hidden words.
DVD mode: select the zoom to change picture size.
Teletext mode: Sub coded page acceses.
Digital mode: To switch the dialogue at the bottom
off the screen
75min60min
90min 105min 120min
for current page
fast
in
SMODE
Press repeatedly to cycle through the available
sound modes
Voice
Press to mute the sound and press again to
restore
Music
Theatre
Personal
11
Page 12

TV BUTTONS & THEIR FUNCTIONS
SIDE PANEL BUTTONS
IDTV
1
1
DVD - Eject
2
DVD – Play/Pause
3
Volume up and menu right
4
Volume down and menu left
5
Programme/Channel up and menu up
6
Programme/Channel down and menu down
7
Displays Menu/OSD
8
Select the input source
9
Standby Power On/Off
Choosing Mode/Source
To switch between the different connections is very easy.
Using the buttons on the remote control:
1) Press [SOURCE] - The following will appear
2) Press [\/] or [/\] to select the input you require.
3) Press [OK]
Using the buttons on the Television:
1) Press [SOURCE]
2) Scroll up / down using CH+/ CH- buttons to the
input/source you require
3) Press Vol+ to change input/source to the one selected.
VOL +
VOL -
CH+
CH-
MEN U
SOU RCE
STAND BY
2
3
4
5
6
7
8
9
12
Page 13

User Guide
INPUTS & CONNECTIONS
REAR CONNECTION S
CI Port
A B C D E F
A
B
C
D
E
F
G
H
I
HDMI
VGA (PC)
SCART
S-VIDEO
YPbPr
CI CARD IN
VGA(PC) AUDIO IN
Component/
S-Video Audio In
RF IN
CONNECTING A DVD RECORDER OR VIDEO RECORDER
HDMI input
VGA-PC input
SCART input
S-Video input
Component input
CI Port input
3.5mm PC Audio input
3.5mm Component/S-Video Audio input
RF input
G H I
Source should be set to SCART
CONNECTING A HIGH DEFINITION DEVICE
OPTION A – HDMI OPTION B – COMPONENT & AUDIO CABLES
Audio
Note – you will need the Phono
to 3.5mm Audio cable included
to connect into the 3.5mm Audio
3.5mm
YPbPr/S-Video
Source should be set to HDMI Source should be set to YPbPr/COMPONENT
CONNECTING A CAMERA OR CAMCORDER
Source should be set to SCART
SCART Adaptor
Note - SCART to AV Adaptor
– often included with some devices,
alternatively, these can be purchased
from the helpline/website
Input on the TV
13
Page 14

TV MENU OPERATION
IDTV
To access th e OSD menu, press
‘LCD-Menu’ on th e remo te contro l.
Use th e scr oll up/down/righ t/ left to
navi gat e thr ough the me nu s.
PICTURE
FORMAT
PICTURE SETTING S ME NU
Lets y ou adjust picture mode, cont rast,
brightness, colour, tint and sharpness
to enhan ce th e v iewing e xperien ce.
PLEASE NOTE – YOU C AN ONLY MA KE
ADJU STMENTS TO CO NT RAST,
BRIG HTNESS & C OL OUR W HEN
PICTURE MOD E IS SET T O ‘PERSON AL’ .
Selecting Pictur e Mode Preset
Switch bet ween different prese t picture
options
Standard Def ault settings
Personal Let s you manually alter all the s ettings
Movie Set to enhanc e when watching a mov ie
Sport Se t to enhance when watching a sport
Mild Set to be lighter in colou r and l ess b right
Game Set to enhanc e when play ing a games c onsole
1) P ress [LCD-MENU] t o ent er menu
2) P ress [\/] to highlight Picture Mod
3) P ress [>] to navigate through
the va rious o ption s
e
Adjust ing Co ntrast (O nly a vailable when
Picture Mode is se t to Personal )
Switch t he balance between black
and white
1) P ress [LCD-MENU] t o ent er menu
2) P ress [\/] t o highlight Cont rast
3) P ress [>] t o increas e t he cont rast
or [<] to de crease th e con tras t
4) P ress [EXIT] t o exit
Adjust ing Br ightn ess (Only a vailable
when Pi cture Mode i s set t o Personal)
Increa se or decrea se the bright nes s
of t he pict ur e
1) P ress [LCD-MENU] t o ent er menu
2) P ress [\/] t o highlight B rightnes s
3) P ress [>] t o increas e t he brightnes s
or [< ] t o decrease th e brigh tnes s
[EX IT] to ex it
4) P ress
Adjust ing Colour (Only a vailable when
Picture Mode is se t to Personal )
Increase t he colour f rom black and whit e
to v ivid
1) P ress [LCD-MENU] t o ent er menu
2) P ress [\/] t o highlight Colou r
3) P ress [>] t o increas e t he colour
or [< ] t o decrease th e c olour
4) P ress [EXIT] to exit
14
4) P re ss [EXIT] to ex it
Page 15

TV MENU OPERATION
User Guide
PICTURE SETTINGS MENU
Adjusting Tint (only available on some
sources)
Lets you increase or decrease the level
of tint within the picture
1) Press [LCD-MENU] to enter menu
2) Press [\/] to highlight Tint
3) Press [>] to increase the tint
or [<] to decrease the tint
4) Press [EXIT] to exit
Adjusting Sharpness
You can change the sharpness between
the different preset options
Normal For standard use
Sharp F or pict ures wit h little movement
Sharpest For pictures with nearly no movement
Soft For pictures with large amount o f movement
Softest For pictur es wit h lots of m ov em ent
Adjusting Colour Temperature (only available
on some sources)
There are 3 presets for colour temperature
Normal Standard setting
Warm Increased red within the picture
Cold Increased blue within the picture
1) Press [LCD-MENU] to enter menu
2) Pre ss [\/] t o highlight Colour Tem peratur e
3) Press [>] to navigate through the
various options
4) Press [EXIT] to exit
Dynamic Noise Reduction
Reduces the int erfe rence in t he picture.
1) Press [LCD-MENU] to enter menu
2) Press [\/] to highlight DNR
3) Press [>] to switch between OFF, LOW,
MID & HIGH
1) Press [LCD-MENU] to enter menu
2) Pre ss [\/] t o highlight Shar pness
3) Press [>] to navigate through
the various opt ions
4) Press [EXIT] to exit
4) Press [EXIT] to exit
15
Page 16

TV MENU OPERATIO N
IDTV
SOUND SETTINGS MENU
Adjusting Volume
Lets you adjust the volume
of t he televisi on
1) Press [LCD-ME NU] to en ter menu
2) Press [> ] t o move to Sound Se ttings
Menu
3) Press [\/] to highlight V olume
4) P ress [>] to increase th e volume
o r [<] to decrease th e v olume
5) Press [EXIT] to exit
Sele cting Sound Mod e P reset
Switch between different preset sound
options
Voice E mphasises v oice over o ther sound s
Music Emphasises music over voice s
Theatre Pr ov ides l iv er and f ull sound f or movies
Per sonal Selects your p er sonal s ound se tt ings
1) Press [LCD-ME NU] to en ter menu
2) Press [> ] t o move to Sound Se ttings
Menu
3) P ress [\/] to highlight Sound Mode
4) P ress [>] t o navigat e through
t he var ious opt ions
Adjust ing Bass
To adju st th e a mount o f b as s w ithin t he soun d
1) P ress [LCD-MENU] t o ent er menu
2) P ress [>] t o move t o S ound S ettings Menu
3) P res s [\/] t o highligh t B as s
4) P ress [>] t o increase the bass or [<]
t o decrease t he bass
5) P res s [EXIT] t o exi t
Adjusting T reble
To adju st th e a mount o f t reble wi thin th e s ound
1) P ress [LCD-MENU] t o ent er menu
2) P ress [>] t o move t o S ound S ettings Menu
3) P ress [\/] t o highlight T reble
4) P res s [>] t o i nc rease th e treble or [<]
t o decrease t he treble
5) P ress [EXIT] t o exit
sting Ba lance
Adju
To s witch t he sound between t he left
and right speakers
1) P ress [LCD-MENU] t o ent er menu
2) P ress [>] t o move t o S ound S ettings Menu
3) P ress [\/] t o highlight B alance
4) P ress [>] t o increase the balance or [<]
t o dec rea se th e balan ce
16
5) P ress [EXIT] t
o exit
5) P ress [EXIT] t o exi t
Page 17

TV MENU OPERATION
TUNING SETTINGS M ENU
(Only Freeview & A nalogu e T V m ode s)
Adjusting Country
If you are moving country you may wish
to change the Country Settings
1) Press [LCD-MENU] to enter menu
2) Press [>] to move to Tuning Settings Menu
3) Press [\/] to highlight Country
4) Press [>] to alter the chosen country
5) Press [EXIT] to exit
Auto Tuning
Scan for all channels based on the current settings
1) Press [LCD-MENU] to enter menu
2) Press [>] to move to Tuning Settings Menu
3) Press [\/] to highlight Auto Tuning
User Guide
6) Press [>] to start
7) Press [EXIT] to exit
Programme Edit / Changing Channel Position
(Only Freeview & Analague TV modes)
You can change the analogue channel
position to suit your requirements.
1) Press [LCD-MENU] to enter menu
2) Press [>] to move to Tuning Settings Menu
3) Press [\/] to highlight Programme Edit
4) Press [>] to enter Auto tuning
5) Press [OK] to start the tuning
6) Press [EXIT] to exit
Manual Tuning
You may wish to manual search if
certain channel or if you wish to connect to a
Satellite/Cable box via RF/Aerial connector
1) Press [LCD-MENU] to enter menu
2) Press [>] to move to Tuning Settings Menu
3) Press [\/] to highlight Manual Tuning
4) Press [>] to enter manual tuning
5) Press [>] to highlight Start Screen
you can’t find a
4) Press [>] to enter the program edit menu
5a) Freeview mode – Press the [Green] button to add the
selected channel to your favorite, press it a second
time to remove. Press the [Yellow] to delete the channel
from the list. WARNING – this will remove the channel
complete from the TV. Press [Blue] to lock a channel (
do this the Child Lock function must be set “ON”)
5b) Analogue TV mode – Press the [>] to select the change
you wish to move. Move to the new location and press
[OK]
715.Magic
716.Q
718.SMOOTH RADIO
722.Kerrang!
723.talkSPORT
725. Premier Radio
727.Absolute Radio
728.Heart
To swap channe l press on remote
move to th e desired locatio n and press
1.
2.
3.
4.
5.
6.
7.
8.
6) Press [EXIT] to exit
17
to
Page 18

TV MENU OPERATION
Common Interface Slot
(Only in Freeview Mode)
Pay per view services require a “smartcard” to
be inserted into the TV. If you subscribe to a
pay per view service the provider will issue you
with a ‘CAM’ and a “smartcard”. The CAM can
then be inserted into the COMMON
INTERFACE PORT. To access the card follow
the steps below.
CAM and smartcard
1) Press [LCD-MENU] to enter menu
2) Press [>] to move to Tuning Settings Menu
3) Press [\/] to highlight Common Interface
4) Press [>] to enter the menu
IDTV
TIMER SETTINGS MENU
Lets you adjust th e O SD ti ming and
the sleep timer
Sleep Time r
Lets y ou set t he sleep timer so
the television automatically switches of f
after a certain amount of time.
1) Press [ LCD-MENU] to enter menu
2) Press [>] to move to Timer Settings
Men u
3) Press [\/] to highlight Sleep Timer
4) Press [>] t o increas e t he time
to t he required amoun t
5) Press [EXIT] to exit
18
5) Press [EXIT] to ex it
On S creen Dis pla y T ime r
Lets you adjust the amount of time the On
Screen Menu st ays on th e s creen before
disappea ring.
1) Press [ LCD-MENU] to enter me
2) Press [>] to move to Timer Settings Menu
3) Press [\/] to highlight OSD Ti mer
4) Press [>] to increase the time and [<] t o
reduce t he time
5) Press [EXIT] to ex it
nu
Page 19

TV MENU OPERATION
User Guide
GENERAL SETTINGS MENU
Lets y ou adjust t he language, pic ture size,
blue sc reen, add child lock, comple te firs t
time installat ion and reset t he televis ion.
On S creen Menu La nguage
Lets y ou c hange t he o n screen menu language.
1) P ress [LCD-MENU] t o ent er menu
2) P ress [>] t o move t o General Se ttings
Men u
3) P re ss [\/] to highlight Languag e
4) P ress [>] to change th e language
GENERAL SETTINGS MENU
English
Auto
Off
5) P ress [EXIT] t o exit
Pictur e Fo rmat
Lets y ou adjust t he picture format
1) P ress [LCD-MENU] t o ent er menu
2) P ress [>] t o move t o General Se ttings Men u
3) P ress [\/] t o highlight P icture Format
4) P ress [>]
format
to change th e picture
GENERAL SETTINGS MENU
English
Auto
Off
5) P ress [EXIT] t o exit
Blue S creen
Changes th e background when t here i s
no inpu t be tween clear and a blue background
1) P ress [LCD-MENU] t o ent er menu
2) P ress [>] t o move t o General Se ttings Men u
3) P ress [\/] t o highlight Blue Screen
4) P ress [>] t o switc h between on and of f
GENERAL SETTINGS MENU
English
Auto
Off
5) P ress [EXIT] t o exit
System Loc k
This menu allows you to lock certain feat ures of th e
television s o t hat they can not be used or viewed. For
example if you don’t want cert ain channels viewed b y
children or i f t he television i s to be used in a hote l and
you want t o limi t the v
You ca n loc k an y o f th e f ollowing - T V bu tto ns ,
TV source, set default s tart up source and limit the
maximum v olume.
1) P ress [LCD-MENU] t o ent er menu
2) P ress [>] t o move t o General Se ttings Men u
3) P ress [\/] t o highlight S yste m Loc k
olume.
GENERAL SETTINGS MENU
English
Auto
Off
4) P ress [>] t o enter S yste m Lock men u
System Lock
Key Lock
Source Lock
Default Source
Max Volume
Change PIN Code
5) T o enter t his menu you will be asked fo r your pin cod e
(De faul t is blank so y ou ju st need to pres s [OK]).
6) T o set l ock s yo u f ir st need to sw it ch Sy ste m Lock to
ON, t his will u n grey t he options .
You ca n now select th e following:
Key Lock
television working .
Source Lock – Press [>] to ent er then apply On t o lock
the source so it can’t be used
Defaul t Sourc e – You c an se t th e d ef ault st ar t up so ur ce,
so when t he television is t urned o n it goes to this source .
Maximum V olume – You c an limit t he m aximum v olume
Change Pi n Code – P ress [>] to enter, f irst ent er t he
current code (default is blank so just press OK) , t hen
enter your new code .
7) O nce you happy wit h t he settings press [EXIT] to exi t
menu .
Channel Lock – please refe r t o Programme
select th e channels t hat you require t o lock . Once locke d
you can temporarily unlock a channel by e ntering t he pin
code, th e lock will be re -applied by s wi tching o ff the TV
to s tandby and then back on .
– Off/O n – T his stops t he bu tt ons on th e
SYSTEM LOCK
Off
On
ATV
99
Edit section to
19
Page 20

TV MENU OPERATION & 7 DAY TV GUIDE
IDTV
Firs t Tim e Insta ll ati on
Allows y ou to reset the televis ion f or first t ime
tuning.
1) P re ss [LCD-M ENU] to
2) P ress [> ] to move t o G eneral Set tings Menu
3) P ress [\/] to highlight F irst Time Inst allat ion
4) P ress [>] and First t ime install screen will
appear
ent er menu
GENERAL SETTINGS MENU
Welsh
Auto
Off
5) P ress [OK] and tuning will commer ce.
First Time Installation
Country
Language
Please ensure that the aerial is connected to the connector
labelled ‘ RF In ’ on the rear of the TV .Ensure that OK is
highlighted in yellow and press ‘OK’ on your remote .If after
this scan ,not all digital channels are found ,your aerial may
require a signal booster .alternatively ,upgrade your aerial
to a high gain digital version .
OK Cancel
Reset televi sion to facto ry settings
You may
settings e. g. if you have f orgotten a changed
password
1) P ress [LCD-ME NU ] to en ter men u
2) P ress [>] to move t o General Se ttings Men u
3) P ress [\/] to highlight Rese t
4) P ress [OK] to reset th e televisi on
wish to reset th e menus t o factory
GENERAL SETTINGS MENU
Welsh
Auto
Off
English
UK
7 DAY TV GU IDE
TV Guide is available in Digit al TV mode .
It provide s in formation abou t forthco mi ng
programmes (where supported by the
broadcasted channel).
You can view th e star t an d end time of all
programs an d on all channels for the nex t
7 days.
It is ver y simple to operate.
1) Press [GUIDE]. The following now and next menu
will appear.
TV Guide
(News/CA) Nick Knowles presents dramatic
events from the day-to-day work of the
emergency services, The series is out on call
with the dedicated crews, answering 999
calls as they protect the public. [S]
Channels
1. BBC ONE Real Rescues Put your Money Where Y...
2. BBC TWO
3. ITV 1
4. Channel 4
Current Event Next Event
Balamory
The Jeremy Kyle Show
Impressionism: Revenge...
Navigate
7 Day Guide
EXIT OK
Tues 14/10 09:42
00:01-51:90seucseRlaeR
Little Red Tractor
This Morning
Freshly Squeezed Shorts
Quit Watch Help
INFO
2) Navigate through the now and next menu using
the [>], [<], [V] and [/\] buttons
3) Press the [BLUE] button to enter the 7 day menu.
Reminders can now be added by pressing [OK].
7 Day TV Guide
Essential Electricals
vacuum cleaners, irons, home telephones and many other essential
electricals.
Thur 31/5 14:00 14:45 15:30
23. bid tv Essential Electric
24. price-drop tv
26. UKTV Style
33. Eurosport UK
34. Setanta SP...
Handbag Heaven
Extreme Makeover: Home Edition
Closedown
Top 14: SPL Sna NRL on Fox
Navigate
Quit Change Day Reminder
Tues 31/5 14:29
14:00-14:30
Quality Products
Quality Products Quality Products a
Extreme Makeove
KOEXIT
4) Press [EXIT] to exit the 7 day TV Guide.
5) P re ss [EXIT] to ex it
Please note – If y ou have applied th e
lock t o res et the tele vis ion yo u mus t press
[LCD-MEN U] then 8 -8 -8- 8, t o s ta rt th e first
time installat ion sequence.
20
syste m
Page 21

DIGITAL TELETEXT & ANALOGUE TELETEXT
User Guide
Digital TV Teletext
With Digital TV (Freeview) there is also
teletext available on some channels.
digital
Simply follow the on screen commands. Here is
an example of the BBC digital teletext service.
1) To start digital teletext press the RED button
(BBC channels) or the TEXT buttons (Other
channels)
B B C i
Tuesday 18 Dec
Press SELECT for
Live Crecket
Eng v SL
Radio Concert
News Multiscreen 1001
Sport 300
Weather 400
BBCi INDEX 199
Did Bee Movie Leave you
buzzing? BBC Movies - 540
To exit, press TEXT
100
2) To select the information you require you
can scroll using [\/] or [/\] and press [OK]
alternatively you can key the page number
for example [3][0][0] followed by [OK]
B B C
SPORT
BBC ONE
To exit, press TEXT
For full screen TV, press 0
HOME SHORTCUTS BACK INDEX
B B C i
Sport
Sport in Video
Main Headlines
Football
Cricket
Rugby Union
Rugby League
Tennis
Golf
more...
11:15 18 Dec
300
You can then navigate using the colours
buttons (Red, Green, Yellow, Blue), the [/\] [\/]
buttons and numbers.
If you wish to exit at anytime press [EXIT]
Teletext is a service offered by some
broadcasters.
Teletext Operation
1) Press [TEXT], a fter a few seconds
teletext page 100 should appear.
Here is an example of BBC1
2) You can now navigat e t o t he page
you require in a number o f ways:
a) Press the page you require using
the number buttons i.e. page 302,
by pressing [3 ][0][2]
b) Press the colour buttons, these will
take you to the page indicated
on screen for each colour
3) To exit Teletext press [TEXT] twice
at any time
Other buttons
[SIZE] this increases or decreases the
size of the text on screen
[INDEX] some pages are more than one
page long this button displays
the number of pages
[REVEAL] if there is an ans wer or
something hidden this will display it
[SUBPAGE] displays the sub page
if it exists
[HOLD] This stops the pages changing
when there ar e m ultiple pages
21
Page 22

USING THE TELEVISION AS A COMPUTER M ONITOR
IDTV
IMPORT ANT – Befor e c onnecting t he
computer to th e tel evision yo u m ust
ensu re the computer settings are
correct for th e tel evision. You MUST do
this using your old monitor.
WINDOWS XP, WINDOWS VISTA
1) S witch on your computer
2) W hen f inishing booting up right clic k
your mouse anywhere on th e scree n
XP Screen VISTA Screen
3) Lef t click your mouse on
Properties/Personalis e
5) Left click your mouse on Advance/Advance
Settings and left click on Monitor
XP Screen VISTA Screen
6) Left click on the drop down for Screen refresh rate
and select 60 Hertz.
7) Click on Apply, then click Yes and the settings will
be saved.
8) Now switch off your computer and connect the
television (as shown below)
9) Re-start your computer and switch the source
to VGA
CONNECTING A LAPTOP
XP Screen VISTA Screen
4) Lef t click your mouse on Setting/ Display
Settings. Ensure the screen res olutio n
is set to what is shown i n t he technical
specific ations section toward the rear of
this us er guide. To co rre ct the
resolu
the slider.
22
tion to that of th e t elevision move
XP Screen VISTA Screen
In addition to the above if you are connecting a laptop
to the television you will also need to activate the VGA
connection on the laptop.
This can vary based on the brand of laptop you have.
1) Connect the laptop to the television
2) On the Laptop push buttons
Fn F5
+
The screen will now switch to the television.
Page 23

PC MENU OPERATION (VGA)
User Guide
VGA MENU
Auto Conf iguration o f Screen
Lets you automatically configure the
television to be used as a computer monitor
1) Press [LCD-MENU] to enter menu
2) Press [>] to select PC settings
3) Press [\/] to select Auto Sync
4) Then pres s [>] for the TV to
automa tic ally configur e i tself
5) Press [EXIT] to exit
Phase
To adjust delay time of phase in order to
reduce the noise of picture
1) Press [LCD-MENU] to enter menu
2) Press [>] to select PC settings
3) Press [\/] t o select Phase
4) Then press [>] or [<] to increase or
decrease the phase
Hori zontal Po sit ion
Changes the horizontal position of the picture
1) Press [LCD-MENU] to enter menu
2) Press [>] to select PC settings
3) Press [\/] to select H-Position
4) Then press [>] or [<] to move the
picture to left or right
5) Press [EXIT] to exit
Vertical P osi tion
Changes the vert ical position of the
picture
1) Press [LCD-MENU] to enter menu
2) Press [>] to select PC settings
3) Press [\/] to select V-Position
4) Then press [>] or [<] to move the
picture up or down
5) Press [EXIT] to exit
Clock
Alter this in order to reduce the noise
within the picture
1) Press [LCD-MENU] to enter menu
2) Press [>] to select PC settings
3) Press [\/] to select Clock
4) Then press [>] or [<] to increase or
decrease the clock
5) Press [EXIT] to exit
5) Press [EXIT] to exit
Position Reset
To position of the picture to the factory settings
1) Press [LCD-MENU] to enter menu
2) Press [>] to select PC settings
3) Press [\/] to select Position Reset
4) Then press [>] or [<] to move the
picture up or down
5) Press [EXIT] to exit
23
Page 24

DVD MENU OPERATION
IDTV
HOW TO PLAY DVD’S
The DVD player has an automatic DVD feature
which means when you insert a disc it will
automatically switch source and start to play.
If you disc does not play please refer to
frequently asked questions section of the user
guide.
SYSTEM SET UP
Adjusting TV System
Lets you adjust between NTSC, PAL,
AUTO (PAL is default for the UK)
1) Press [DVD-SETUP] to enter menu
2) Press [>] to select TV System
3) Press [>] to enter menu
4) Press [\/] or [/\] to highlight NTSC, PAL
or AUTO
5) Press [OK] to confirm
6) Press [DVD-SETUP] to exit
Adjusting Picture Format
This lets you select the format of the picture
that is being shown between 16:9, 4:3
LetterBox and 4:3.
1) Press [DVD-SETUP] to enter menu
2) Press [>] to select TV System
3) Press [\/] to select TV Type
4) Press [>] to enter menu
5) Press [\/] or [/\] to highlight 4:3PS,
4:3LB or 16:9
6) Press [OK] to confirm
7) Press [DVD-SETUP] to exit
Returning to Default
This lets you switch the DVD menus show above
back to Default settings
1) Press [DVD-SETUP] to enter menu
2) Press [>] to select TV System
3) Press [\/] to select Default
4) Press [>] to enter menu
5) Press [>] to highlight Yes
6) Press [OK] to confirm
24
7) Press [DVD-SETUP] t
o exit
Page 25

DVD MENU OPERATION
[ ]
User Guide
AUDIO SET UP
Adjusting Tone
Lets you increase or decrease the Tone
of the sound
1) Press [DVD-SETUP] to enter menu
2) Press [\/] to select Audio Set Up
3) Press [>] to enter menu
4) Press [\/] to select Tone
5) Press [>] to enter menu
6) Press [\/] or [/\] to increase or decrease
the tone
7) Press [OK] to confirm
8) Press [DVD-SETUP] to exit
DIGITAL SET UP
Adjusting Dynamic Range
This is the difference between the quietest and
loudest sounds. This setting works only with
DVD discs recorded in Dolby digital.
FULL: Set this to listen with the range recorded
on the disc.
4/8: Set this to listen with a range equivalent
to a normal television.
2/8: Set this to listen with a smaller difference
between the maximum and minimum volume.
1) Press [DVD-SETUP] to enter menu
2) Press [\/] twice to select Digital Set Up
3) Press [>] to select Dynamic Range
4) Press [>] to enter menu
5) Press [\/] or [/\] to increase or decrease
the Dynamic range
6) Press [OK] to confirm
Adjusting the Sound
Lets you change the sound between Stereo,
Mono Left, Mono Right and Mixed Mono.
1) Press [DVD-SETUP] to enter menu
2) Press [\/] twice to select Digital Set Up
3) Press [>] to enter menu
4) Press [\/] to select Dual Mono
5) Press [>] to enter menu
6) Press [\/] or [/\] to switch between Stereo,
Mono L, Mono R and Mix Mono
7) Press [OK] to confirm
8) Press [DVD-SETUP] to exit
Changing Regions
This TV/DVD player is pre-set to play Region 2 DVDs.
In the event you wish to use the TV/DVD in another
country that uses different region discs, please visit
www.skymediauk.co.uk. Select ‘product support’,
‘Changing Region’
7) Press [DVD-SETUP] to exit
25
Page 26

USING WITH SKY D IGITAL / VIRGIN ME DIA
IDTV
You may wish to use your TV with Sky
Digital , V irgin Media o r ano ther cable
or S atellite box
There are a number o f connection opt ions,
the best being connect ing via SCAR T
cable.
Connecting vi a SCART
1) Connect th e S CA RT cable f rom t he
Cable/Satellit e B ox to SCART of th e TV
2) P ress [SOURCE ]
3) P res s [\/] o r [/\] to sele ct SC ART
4) P res s [OK ]
The channel your Cable/Satellit e box is
displaying will now be shown on t he TV .
You may wis h to share your Sk y Digital
signal around th e home by using an RF
connection.
ting v ia RF
Connec
1) Connect th e R F cable f rom t he RF
output socket of t he sky/cable box t o
the ‘RF IN’ of t he TV.
2) S witch the TV to analogue T V mode
3) P ress [ LCD-MENU] to ente r men u
4) P ress [>] twice to select Tuning
Settings Menu
5) P ress [\/] to select Manual Tuning
USING WITH SKY DIGITAL REMOTE CONTROL
(BSKYB) OR UNIVERSAL REMOTE CONTROL
You may wish to use your Sky Digital or a universal
remote control to operate some of the functions of this
TV. For this you require a ‘code’ that needs to be
programmed into your Sky Digital or universal remote
control.
For codes for universal remote controls, please visit
our website where you will find the very latest
information and codes.
For codes for Sky/Sky+Sky HD, please note that at the
point of manufacture, BSkyB have not launched the
code required for this model of TV. They are due to
launch a new remote control which should include the
necessary code to operate the functions of the TV
during 2010 (called revision 9).
Please check our website for updates, alternatively,
see some alternative options of remote controls
that are available.
6) P ress [>] to ent er Auto tuning
7) P ress [OK] to s tart tuning
Once t uning i s complet e the first channel
will appear . P ress [CH +] to mo ve through
the channel unti l y ou find th e Sky c hannel.
The channel can t hen be mov ed if you
wish , pleas e ref er to th e T uning S
menu – Pr og ram E dit s ect ion of the m anual.
26
etti ng
One for All Sky Originals
The One for All remote controls shown will operate
all of the functions of the Sky box in the same way the
original remote control will, in addition, they will also
operate the functions of this model of TV. The One for All
versions are available to
helpline/website. The original Sky remote controls are
shown for comparison purposes
If you require any further information, you can contact us:
purchase from the
www.skymediauk.co.uk
email - service@skymediauk.co.uk
Tel
UK
ROI
-- 0871
2000 463
01443 3940
Page 27

CONNECTING A GAMES CONSOLE
User Guide
Connecting a games cons ole ca n
sometimes seem very difficult. We have
simplified i t t o t hree options depending
on the c ables t hat y ou have .
Option 1 – C onnecting vi a S cart
to AV adapter
If you are supplied with a cable from the
console which has YELLOW,
RED & W HITE connectors you must
connect via a SCART to AV adapte r
(Some consoles include this)
TV source should be set to SC ART .
Option 2 – C onnecting vi a HDMI cable
If you are supplied with a HDMI cable is
the easiest option. A HDMI cable can
output both video and audio and enables
you to enjoy digital-quality video and
audio with minimal loss of picture quality.
Option 3 – Connecting v ia Com ponent
cable
If you are supplied with a cable from the
console which has RED, GREEN, BLUE,
RED & WHITE connectors you must
connect via Component (f or picture)
and by 3.5mm to phono cable (for sound).
TV Source should be set to Component.
3.5mm jack
to phono
cable adaptor
TV Source should be set to HDMI.
27
Page 28

FREQUENTLY ASKED QUESTIONS
Question :
I have tune d in Digita l TV but
I am not rec eiving any or al l of th e
channels and/or the channels I receiv e
are breaking up
The sound quality is high pit ched?
Solution:
1) Check y ou are in an area tha t ca n
receive Freeview. Visi t
www .f reeview.c o.u k or call
0870 1 11 1 270.
2) Check you are using an aerial that is
able t o r ec eiv e a good digit al signal . I n
most cas es, you will need an outdoor
digital hi-gain/wideband aerial. In areas
that have excellent Freev iew c overage,
you may be able to use a loft type aerial
but it i s highl y lik ely t hat y ou will als o
need t o c onnect a boos te r b etween t he
back of th e T V and t he TV aerial wall
socket . Unfortunat ely, t o receive a good
enough digit al signal, it is not
use a portable/indoor type aerial.
This may change once th e analogue
signal i s swit ched off in 2012 and th e
Digital signal st rength is increased.
Go in to the sound set tings menu as
shown earlier in th e manua l and increase
the level of th e bass and decrease
the treble
IDTV
possible to
I have ins erte d a disc but i t is not playin g
I have connect ed th e T V to my VCR vi a
SCAR T but it i s not r ecordin g
I have connected my PS3 to the TV via HDMI,
but I am not receiving any pictures or sound
on my Console
I have connected my Xbox 360 to the TV via
Component Cables (Red, Green & Blue) but I
am not receiving any sound
Why are some options in the menu
unavailable and greyed out
28
1) En sure you have insert ed pu t th e disc
in facin g t he correct wa y
2) En sure the
scratched
3) Some copied discs will not play.
4) Check the DVD is a region 2 disc – to change
the region of the DVD player, refer to section
‘Changing Regions’.
In addit ion to connecting via SCA RT, you
should connect the aerial cable fro m
wall socket t o VC R and another aerial
cable f rom t he VCR to th e TV
disc is clean and is no t
the
1) Ensure the TVs source is on HDMI
2) Check your settings on your PS3 are as
per the PS3 instruction manual
Component cables only provide HD Pictures. For
the sound you will need to connect the Red &
White audio cables on the Xbox to the 3.5mm
YPbPR/S-video Audio in on the TV. Please refer
to the ‘Connecting a games console’ page.
Some options are only available in certain
sources, i.e. HDMI, PC/VGA. They are
unavailable in the other sources where they have
no affect.
Page 29

g
User Guide
TECHNICAL SPECIFICATION
LCD23-230
Panel
)sehcnI(eziS
noituloseR
oitaRtsartnoC
htness cd/m
Bri
2
BGRCP
7
1 x SCART, 1 x S-Video, 1 x Component
(YPbPr - 1080p)
Input Signal
FR
Video
1 x 3.5mm jack for PC audio input, 1 x 3.5mm
Sound
jack, shared for S-Video & YPbPr
(component) audio input
IMDH
tuOrekaepS
reyalpDVD
DVD
)SMR(sttaWtup
Power Voltage 110-240v 50/60Hz 1.5A 90W (standby <1W)
Dimensions Inc Stand 561W x 402H x 178D
Weight
)sgK(teN
)sgK(ssorG
3”2
0801x0291
1:0001
300
seY
MACES-LAP/annetnAmho5
)80p01otpu(1
3x2
seY
3,6
7,7
29
Page 30

INDEX
IDTV
Analogue TV teletext 21
Attaching/Detaching the
Stand & Wall mounting 9
Auto Tuning 17
Balance 16
Bass 16
Blue Screen 19
Brightness 14
Changing DVD Regions 25
Colour 14
Colour Temperature 15
Common Inferface Slot 18
Connecting to a PC 22
Connecting a Games Console 27
Contrast 14
Country Settings 17
Digital Switchover Re-Tune 2-3
Digital TV teletext 21
Dynamic Noise Reduction 15
Dynamic Range 25
First Time Installation 20
Frequently Asked Questions 28
Horizontal Position (PC) 23
Inputs and Connections 13
Manual Tuning 17
On Screen Display Timer 18
On Screen Menu Language 19
Phase (PC) 23
Picture Format 19
Picture Format - (DVD) 24
Picture Mode Preset 14
Position Reset (PC) 23
Program Edit / Changing Channel
Position 17
Remote control buttons and their
functions 11
Reset Television 20
Returning to Default (DVD) 24
Sharpness 15
Sleep Timer 18
Sound Mode Preset 16
System Lock 19
Technical Specifications 29
Tint 15
Tone (DVD) 25
Treble 16
Tuning in TV 10
TV buttons and
their functions 12
TV Guide 20
TV System (DVD) 24
Using with Sky Digital / Virgin Media 26
Vertical Position (PC) 23
Volume 16
What is included in the box 8
OPTIONAL ACCESSORIES AND REPLACEMENT PARTS
If you need to order replacement parts for your TV, please visit our web site or call the helpline.
If you wish to wall mount your TV, we have a range of fully tested and compatible wall mounts available
to order from the helpline or via our web site.
If you wish to purchase a Sky
your Sky Box as well as this TV, these are available to order from the helpline or web site. Our Sky
remote controls operate your Sky or Sky+ box in exactly the same way your current Sky / Sky+ remote does
and our versions also look very similar to the Sky equivalent models, albeit slightly smaller in size, they will
also operate many of your TV’s functions including Power on/off, channel up/down, volume up/down as well
as many other functions.
or Sky+ remote control that includes the latest software/codes to operate both
/ Sky+
30
INFO
CH
VOL
GUIDE
PICTURE
FORMAT
Replacement
remote control
stnuoM llaW slortnoc etomeR +ykS/ykS ruO
Page 31

Page 32

Page 33

Page 34

X23/MAN/0008TESCO Stores Ltd, Cheshunt, EN8 9SL, UK.
 Loading...