


LCD19ID-107/207
TECHNIKA
19 LCD TV
For Assistance Please Call Our Tesco Electrical
Helpline On 0845 456 6767
LCD19ID-107/207
19 LCD TV

Contents
1 Safety and warnings.......................................................................2-5
2 Introduction.................................................................................6-7
3 Installation...................................................................................8-13
4 Remote controler.........................................................................14-16
5 Operation...................................................................................17-19
6 DVB MENU................................................................................20- 24
7 Trouble Shooting.............................................................................25
-1-

IMPORTANT SAFETY INSTRUCTIONS
IMPORTANT SAFETY INSTRUCTION
1.Read these safety instructions.
2.Keep these safety instructions.
3.Heed all warnings.
4.Follow all safety instructions.
5.Do not use this apparatus near water.
6.Clean only with a dry cloth.
7.Do not block any ventilation openings. Install in accordance with the manufacturers
instructions.
8.Do not install near any heat sources such as radiators,,stoves, or other apparatus
(including
9.Protect the power cord from being walked on or pinched particularly at power outlets,
and the point where they exit from the apparatus.
10.Only use attachments/accessories specified by the manufacturer.
11.Unplug this apparatus during lightning storms or when unused for long periods of time.
12.Refer all servicing to qualified service personnel. Servicing is required when the
apparatus has been damaged in any way, such as power-supply cord or plug is damaged,
liquid has been spilled or objects have fallen into apparatus, the apparatus has been
exposed to rain or moisture , does not operate n
13.Apparatus must not be exposed to dripping or splashing and no objects filled with
liquids, such as vases, should
amplifiers)that produce heat.
ormally, or has been dropped.
be placed on the apparatus.
-2-
IMPORTANT SAFETY INSTRUCTION
CAUTION
RISK OF ELECTRIC SHOCK
DO NOT OPEN!
CAUTION
TO REDUCE THE RISK OF ELECTRIC SHOCK, DO NOT
REMOVE COVER (OR BACK).NO USER SERVICEABLE
PARTS INSIDE. REFER SERVICING TO QUALIFIED
SERVICE PERSONNEL.
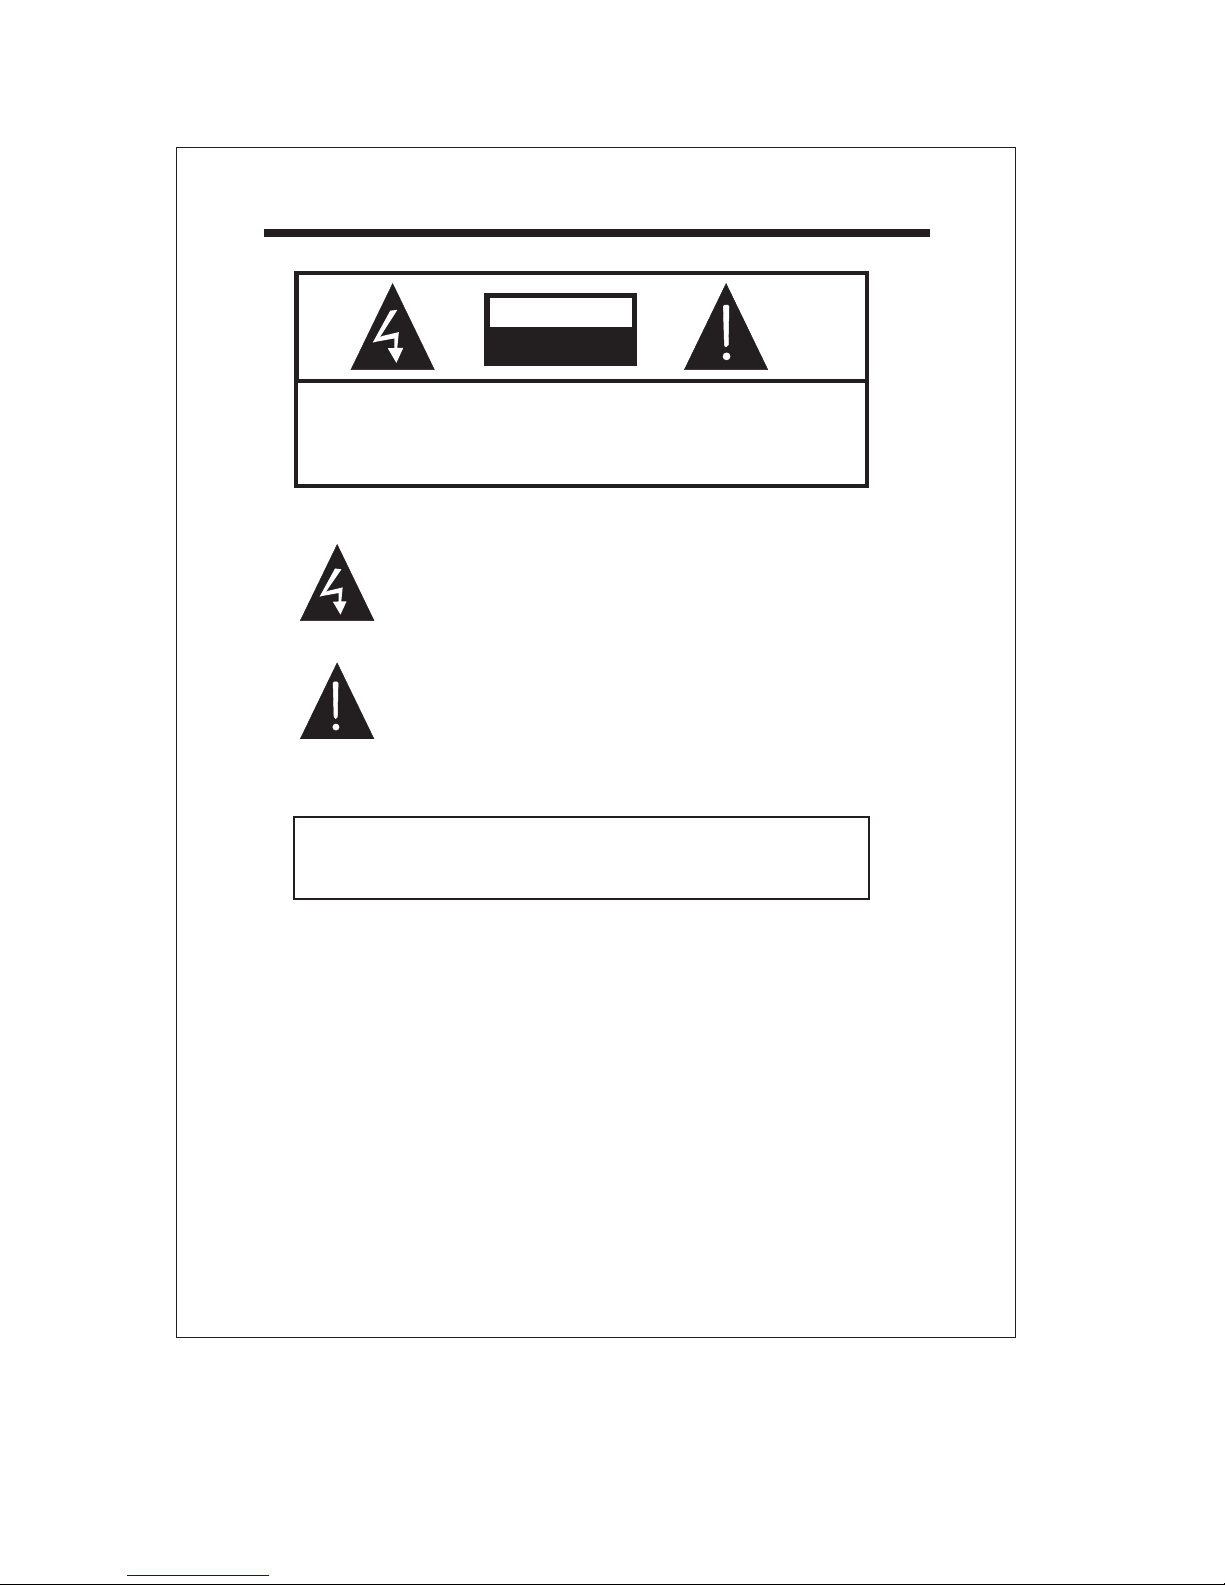
The symbol indicates that dangerous voltage
constituting a risk of electric shock is present within
this unit.
The symbol indicates that there are important
operating and maintenance instructions in the
literature accompanying this unit.
WARNING:
TO PREVENT FIRE OR SHOCK HAZARD, DO NOT EXPOSE
THIS APPLIANCE TO RAIN OR MOISTURE.
-3-
WARNINGS AND CAUTIONS
Warning
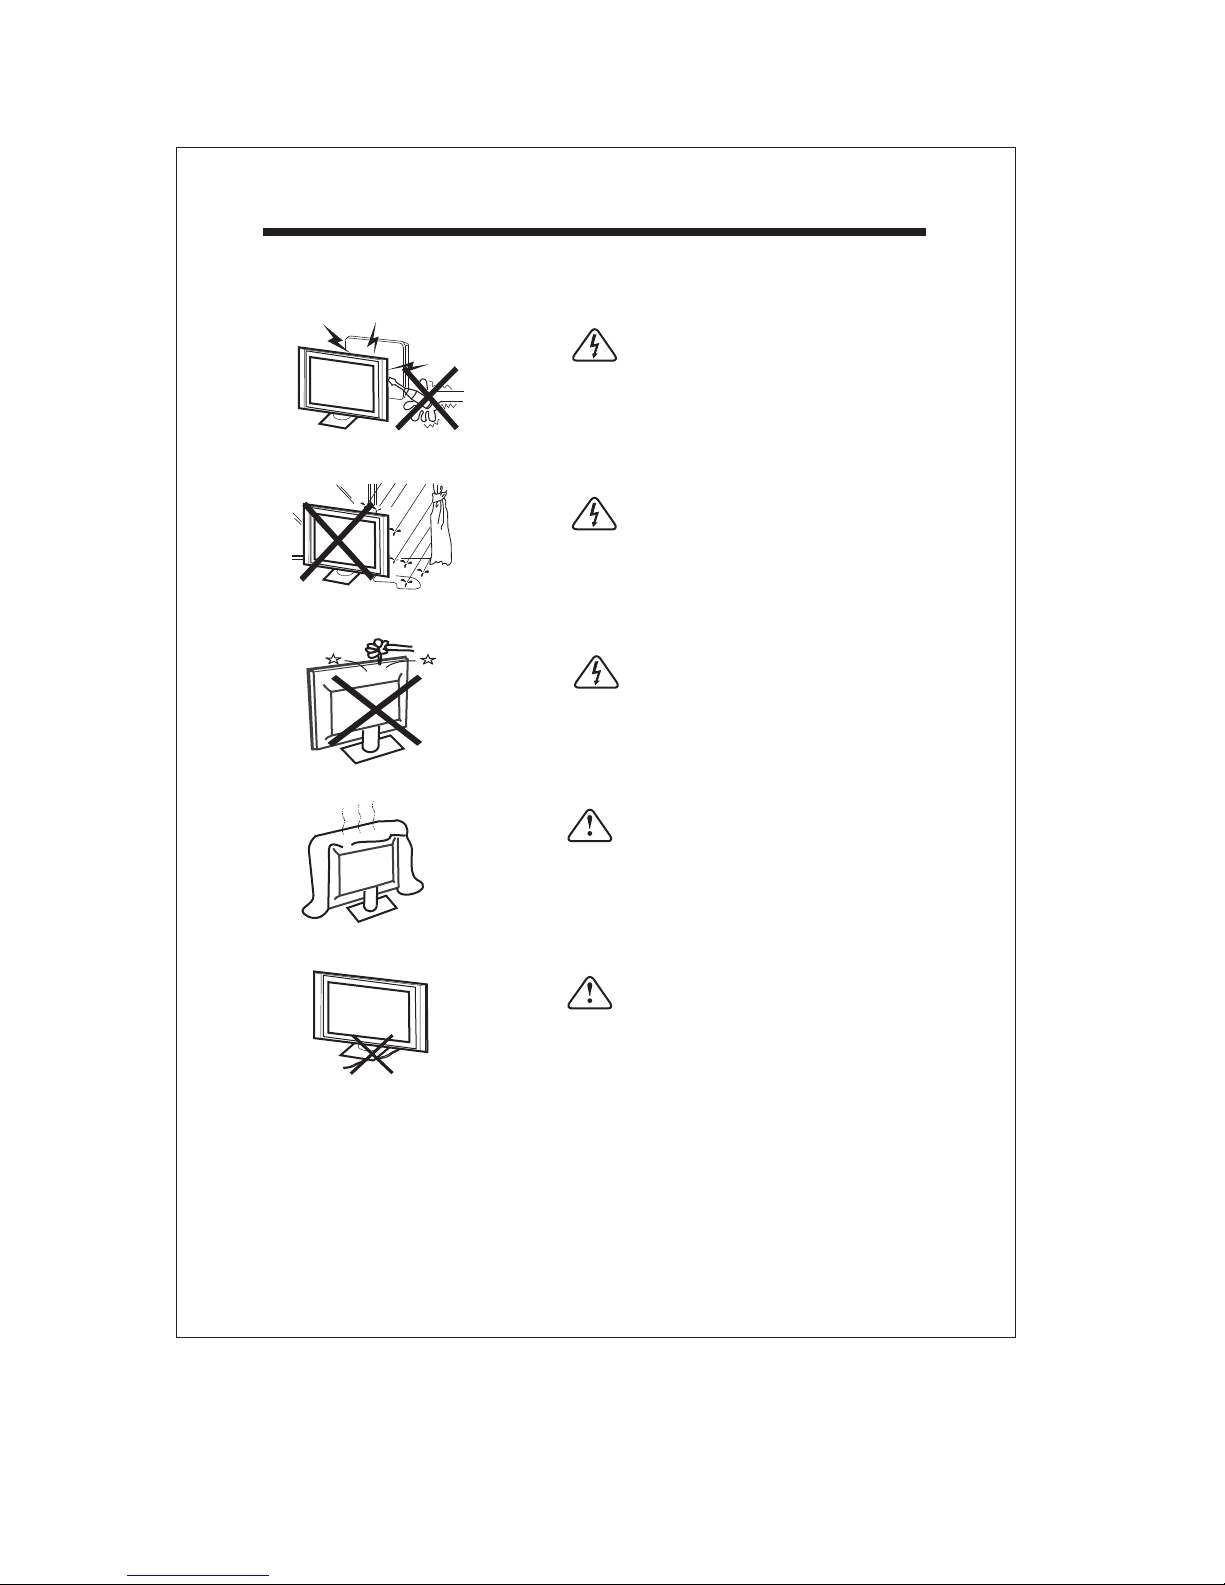
High voltages are used in the operation of this television
receiver.
Do not remove the cabinet back from your set Refer
servicing to qualified service personnel.
Warning
To prevent fire or electrical shock hazard, do not expose
the television receiver to rain or moisture.
Warning
Do not drop or push objects into the television cabinet
slots or openings. Never spill any kind of liquid on the
television receiver.
Caution
Do not block the ventilation holes in the back cover.
Adequate ventilation is essential to prevent failure of
electrical components.
Caution
Do not power supply cord under the television
trap
receiver.
-4-

WARNINGS AND CAUTIONS
Caution
Never stand on, lean on, or suddenly push the television or its
stand. You should pay special attention to children. Serious
injury may result if it should fall.
Caution
Do not place your television on an unstable cart, stand, shelf or
table.
Serious injury to an individual , and damage to the television,
may result if it should fall.
Caution
When the television receiver is not used for an extended
period of time, it is advisable to disconnect the AC power cord
from the AC outlet.
Dim:515*320mm(
Caution
Avoid exposing the television receiver to direct sunlight and
other sources of heat. Do not stand the television receiver
directly on other product which give off heat. e.g. video
cassette players and audio amplifiers. Do not place naked
flame sources, such as lighted candles on the television.
Caution
If the television is to be built into a compartment or similar
enclosed, the minimum distances must be maintained. Heat
build-up can reduce the service life of your television, and can
also be dangerous.
-5-

INTRODUCTION
Thank you very much for purchasing this TV. To enjoy from the very beginning, read
this manual carefully and keepit handy for easy reference.
INSTALLATION
Locate the TV in the roomwhere light does not strike the screen .
directly
Total darkness or a reflection on the picture screen can cause eyestrain. Soft and
indirect lighting is recommendedforcomfortable viewing.
Allow enough space betweentheTVand the wall to permit ventilation.
Avoid excessively warm locations to prevent possible damage to the cabinet or
premature component failure.
This TV can be connected to AC 100-240 Volts. 50/60 Hz. Never connect to a DC
supply or any other powersupply.
Do not cover the ventilationopenings when using theTV.
CAUTION
Never tamper withany components inside the TV, or any other adjustment controls not
mentioned in this manual.All LCD-TVs are high voltage instruments. When you clean
up dust or water drops on the LCD PANEL or CABINET, the power cord should be
pulled out from the receptacle, then wipe the TV with a dry soft cloth. During thunder
and lighting, unplug the power cord and antenna cord to prevent damage to your TV.
All repairs to this TV shouldonly be performed by the TV service personnel.
-6-
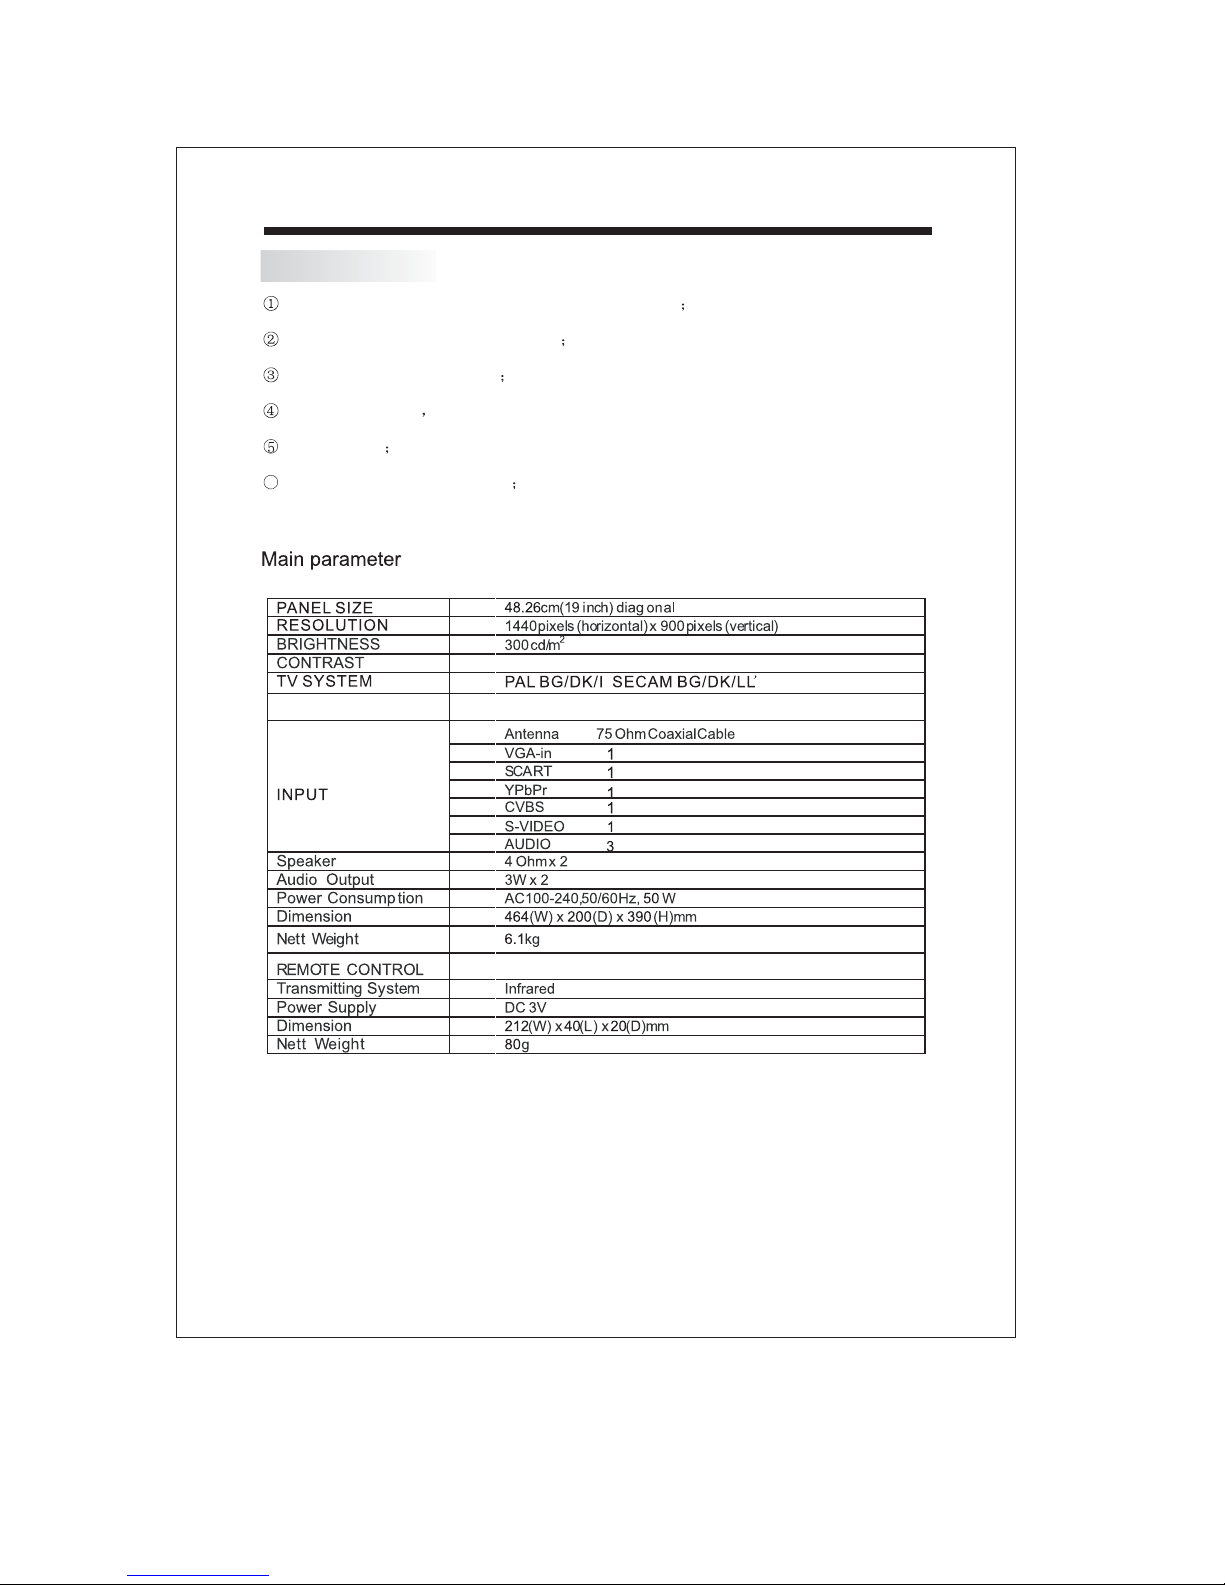
Main features
Used as a Television display terminal or PC display
High luminance,wide viewing angle
Can store 180 TV programs
Translucent OSD
Auto-search
Full function Remote Control
6
850:1
DVB-T DVB-T
INTRODUCTION
2x1.5V AAA Battery
-7-
Accessories
INSTALLATION
AC Power Cord.........................
Infrared Remote Controller......
User s Manual ........................
Battery(AAA)............................2
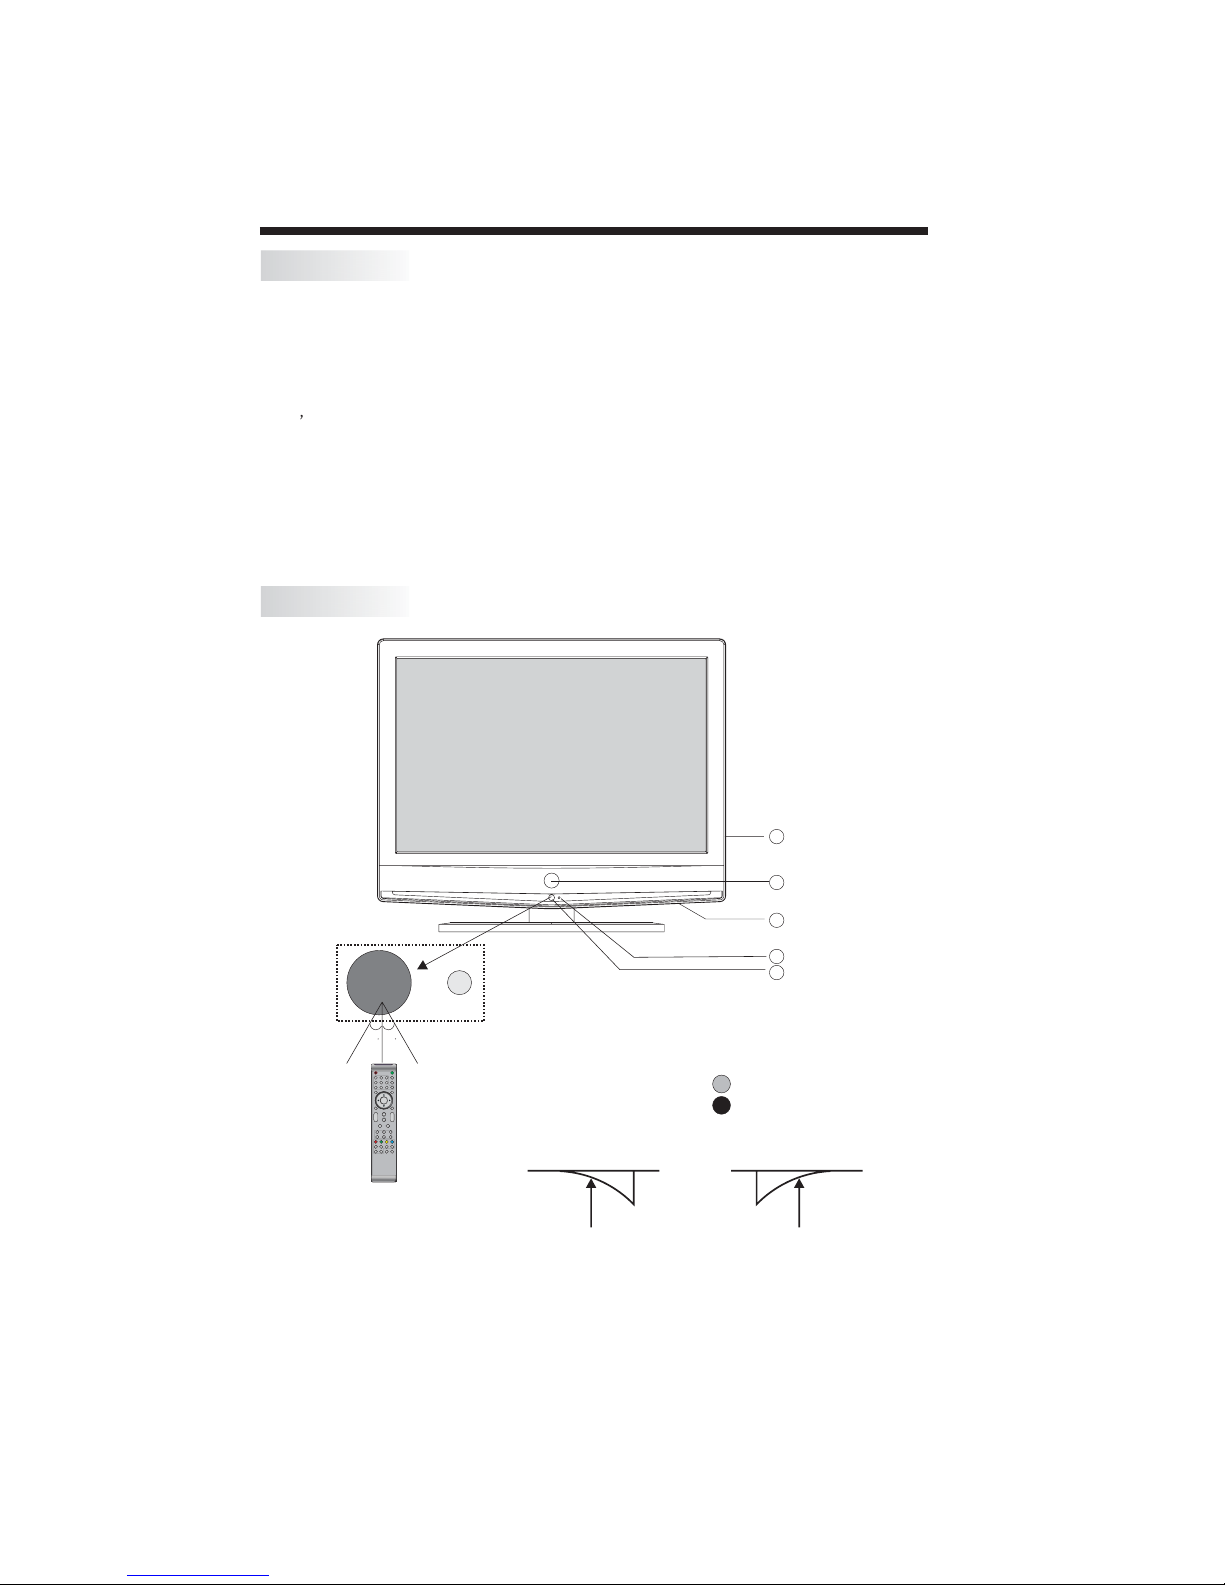
Front panel
1
1
1
4
1
30 30
POWER
1
4 5 6
7 8 9 0
TVMENU INPUT
DVBMENU
+
VOL
_
SLEEP ASPECT
INFO FAV EPG
REVEAL
HOLD
SUBPAGE SIZE AUDIO SUBTITLE
5
3
2
1: STANDBY BUTTON: Turn ON/OFF the TV set.
2: Remote control sensor.
MUTE
SWAP
2 3
RECALL
ENTER
SOUND
3: Indicator LED: GREEN POWER ON.
EXIT
+
CH
PIC
_
TEXTDISPLAYSOURCE
4: Key board(see next page).
INDEX
LIST
5: AC power switch.
RED STAND BY.
ON: OFF:
-8-

KEYBOARD
SCART
ANTENNA
AV
S-VIDEO
L
R
AUDIO
INPUT
YPbPr
INPUT
YPbPr
AUDIO
VGAINPUT
VGAINPUT
100-240V~ 50/60Hz
AC-INPUT
USB
SOURCE
MENU
CH+
CH-
VOL+
USB
1 SOURCE
Display the input source menu.
2 MENU
To display TV MENU.
3 CH+/CH-
In TV mode press CH+ or CH- to change the channel up and down.
In DTV mode,it can not change the channel.
In AV,S-VIDEO,YPbPr and SCART mode,it can switch to TV directly.
In MENU,press
CH+ or CH- to select items in MENU.
Press CH+ or CH- to return the previous mode under Standby status.
4 VOL+/VOL-
Adjust sound level.
In MENU,adjust the item that you selected.
VOL-
USB
INSTALLATION
5USB
REAR PANEL CONNECTIONS
100-240V~ 50/60Hz
AC-INPUT
VGAINPUT
AUDIO
VGAINPUT
S-VIDEO
AV
L
YPbPr
AUDIO
INPUT
R
YPbPr
INPUT
All the terminals are(from left to right):
AC POWER SOCKET,VGA,PCAUDIO,AV,S-VIDEO,YPbPr,SCART,ANTENNA
Note: AV,S-VIDEO and YPbPr share one audio channel.
-9-
SCART
ANTENNA
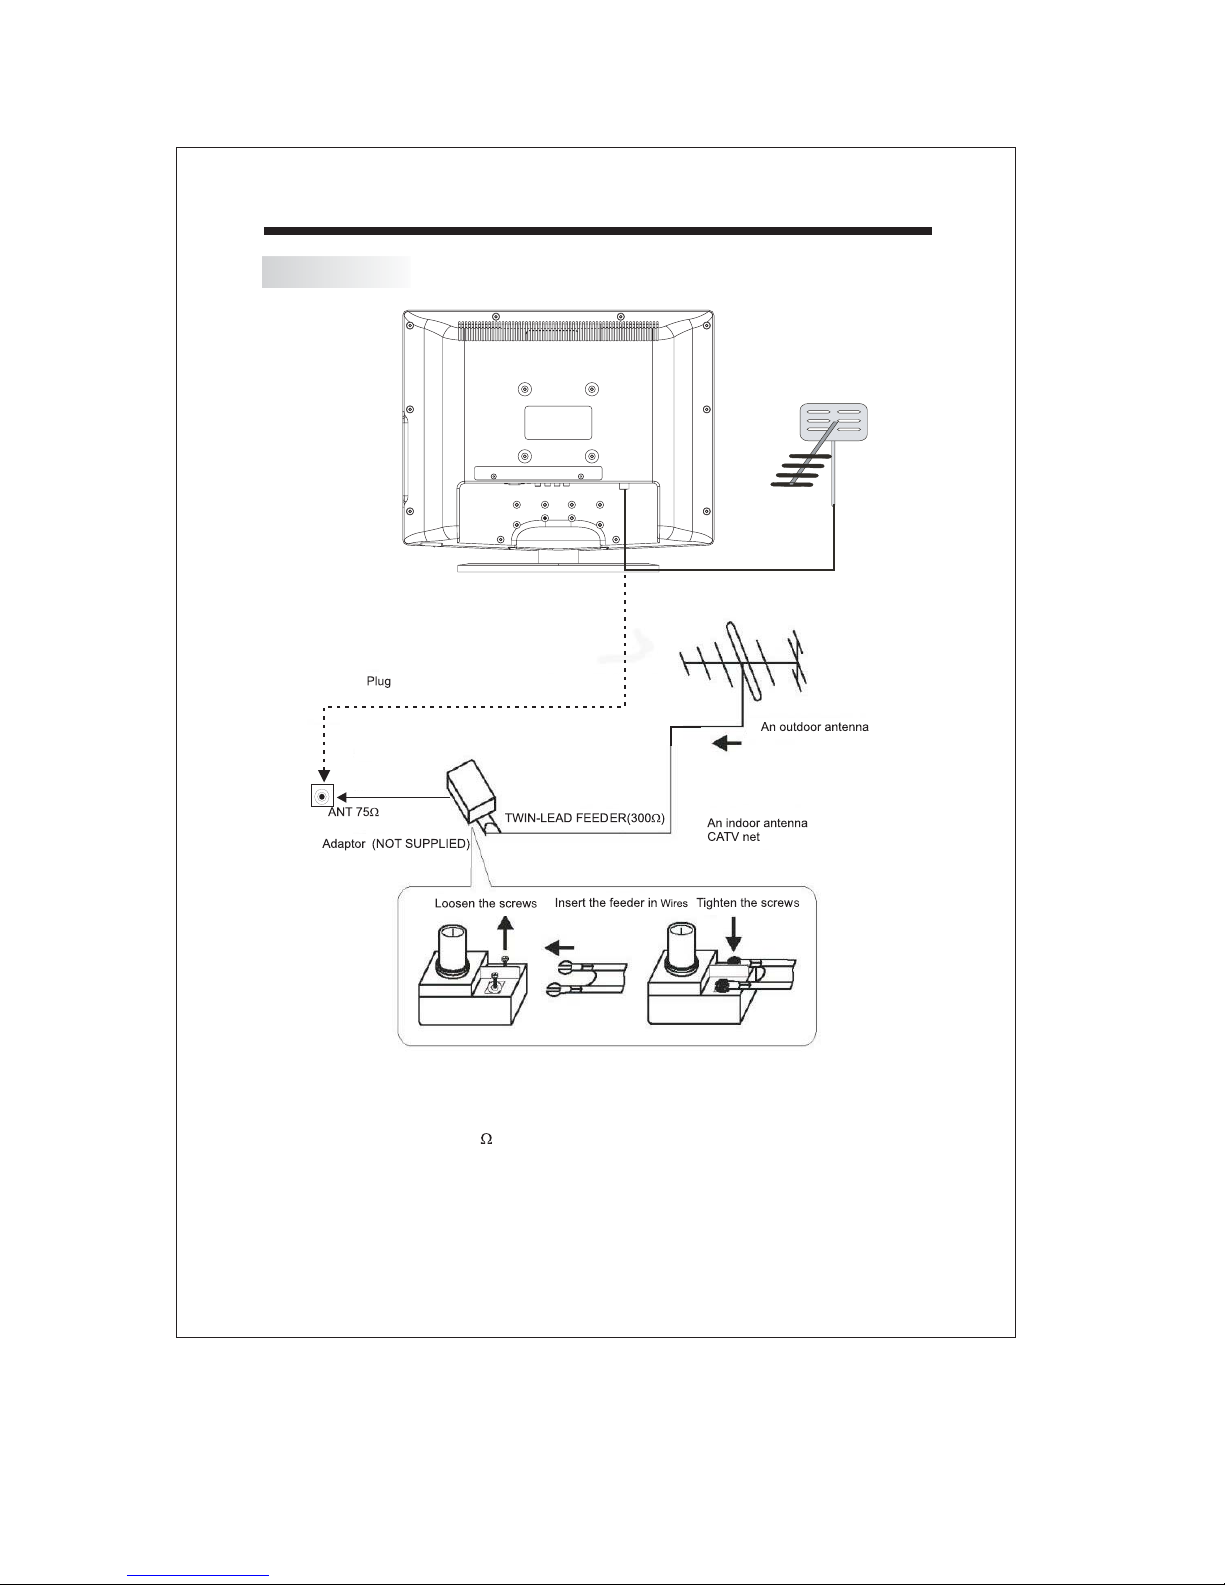
ANTENNA
INSTALLATION
DVB-T antenna
Note:
Aerial connections:IEC(female).
Input impendance:75 unbalanced.
-10-

SCART
ANTENNA
AV
S-VIDEO
L
R
AUDIO
INPUT
YPbPr
INPUT
YPbPr
AUDIO
VGAINPUT
VGAINPUT
100-240V~50/60Hz
AC-INPUT
PC
STEPS:
Be sure both the TV and computer are Power off.
1.Connect VGA and audio cable
2.Connect power cord
3.Power on the TV, switch input to PC mode
4.Power on the PC
This sequence is very important.
INSTALLATION
8
100-240V~50/60Hz
VGAINPUT
AV
L
AUDIO
VGAINPUT
AUDIO
AC-INPUT
INPUT
R
S-VIDEO
YPbPr
SCART
YPbPr
INPUT
ANTENNA
-11-

INSTALLATION
PC
PRESET MODE(recommended resolution is 1440*900@60Hz)
10
11
12
RESOLUTION
1
2
3
4
5
6
7
8
9
720*400
640*480
640*480
640*480
800*600
800*600
800*600
800*600
1024*768
1024*768
1024*768
1280*1024
V.Freq.(Hz) H.Freq.(KHz)
70
60
72
75
56
60
75
72
60
70
75
60
31.47
31.47
37.86
37.50
35.156
37.88
46.88
48.08
48.36
56.48
60.02
63.98
13
14
15
1280*1024
1440*900
1440*900
-12-
75
59.88
74.98
80.00
55.93
70.63

INSTALLATION
SCART
ANTENNA
AV
S-VIDEO
L
R
AUDIO
INPUT
YPbPr
INPUT
YPbPr
AUDIO
VGAINPUT
VGAINPUT
100-240V~ 50/60Hz
AC-INPUT
AV EQUIPMENT
This TV provides one group of AV ,one S-Video,one group (YPbPr) and one SCART socket for
convenient connection to VCR,DVD or other video equipment. Please refer to the owner s
manual of the equipment to be connected as well.
You can use the input terminals on rear of the TV as follows.
’
VIDEO EQUIPMENT with YPbPr
G
R
B
YPbPr
YPbPr
INPUT
G
R
B
SCART
ANTENNA
SCART
terminal
VIDEO EQUIPMENT
Y
Yellow (video)
W
White(audio L)
R
Red(audio R or Pr)
B
Blue(Pb)
G
Green(Y)
100-240V~ 50/60Hz
AC-INPUT
with S-video
terminal
VIDEO EQUIPMENT
W R
R
W
Y
To S-VIDEO
output
VGAINPUT
To audio
outputswith
To video
output
AUDIO
VGAINPUT
Y W R
AV
L
AUDIO
INPUT
R
S-VIDEO
W R
To audio outputs
It can be connected to the following appliances: VCR, multi disc player, DVD, camcorder,
video game or stereo system, etc.....
YPbPr can support these video fomats:480i,576i,480p,576p,720p,1080i.
*Please keep AC cord unplugged when connecting TV system.
-13-
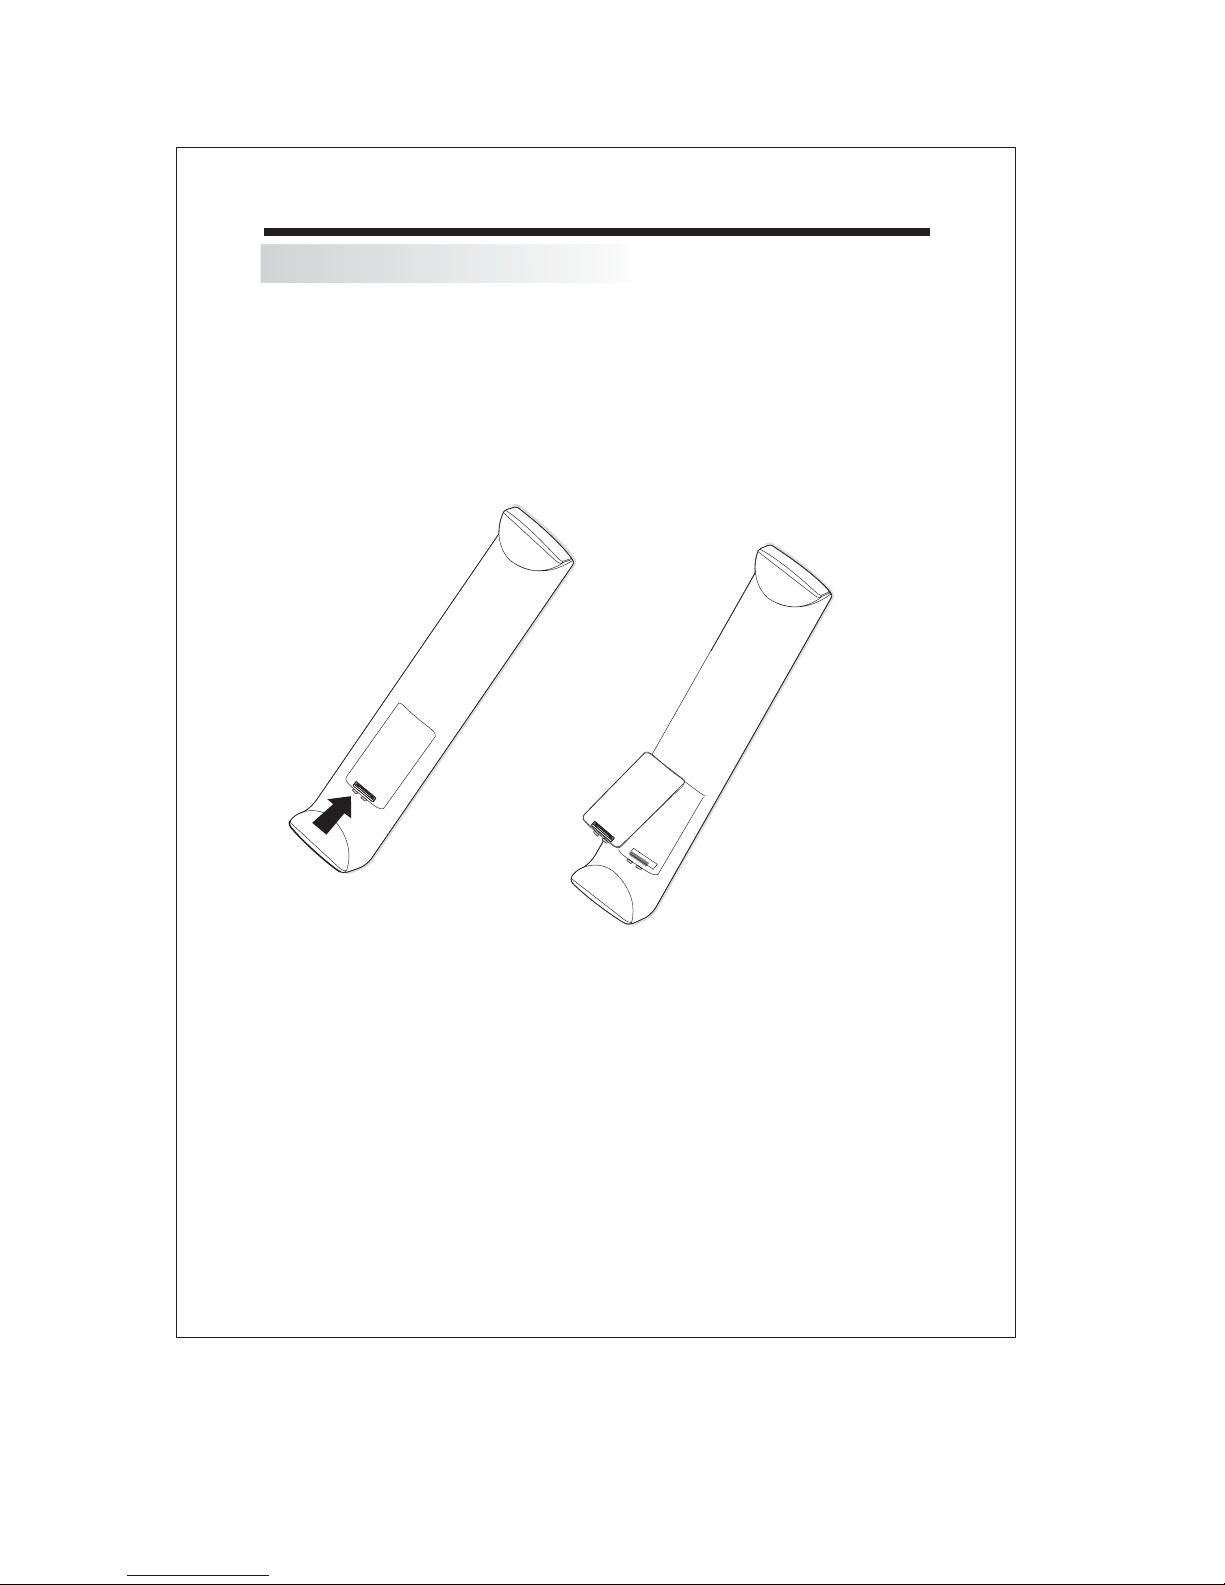
BATTERY INSTALLATION
Insert Batteries Into the Remote Control
1. Remove the battery cover.
2. Insert the 2 AAA 1.5V batteries making sure the polarity (+ or -) of the batteries matches the
polarity marks Inside the unit.
3. Mount the battery cover.
Replace with new batteries when the TV set begins to show the following symptoms:
Operation is unsteady or erratic. Sometimes the TV set does not function with Remote Control
Unit.
Remark:
1) Alkaline Battery Recommended.
2) Remove batteries when they are exhausted or if the remote control is not to be used for a
long time.
-14-
REMOTE CONTROLLER
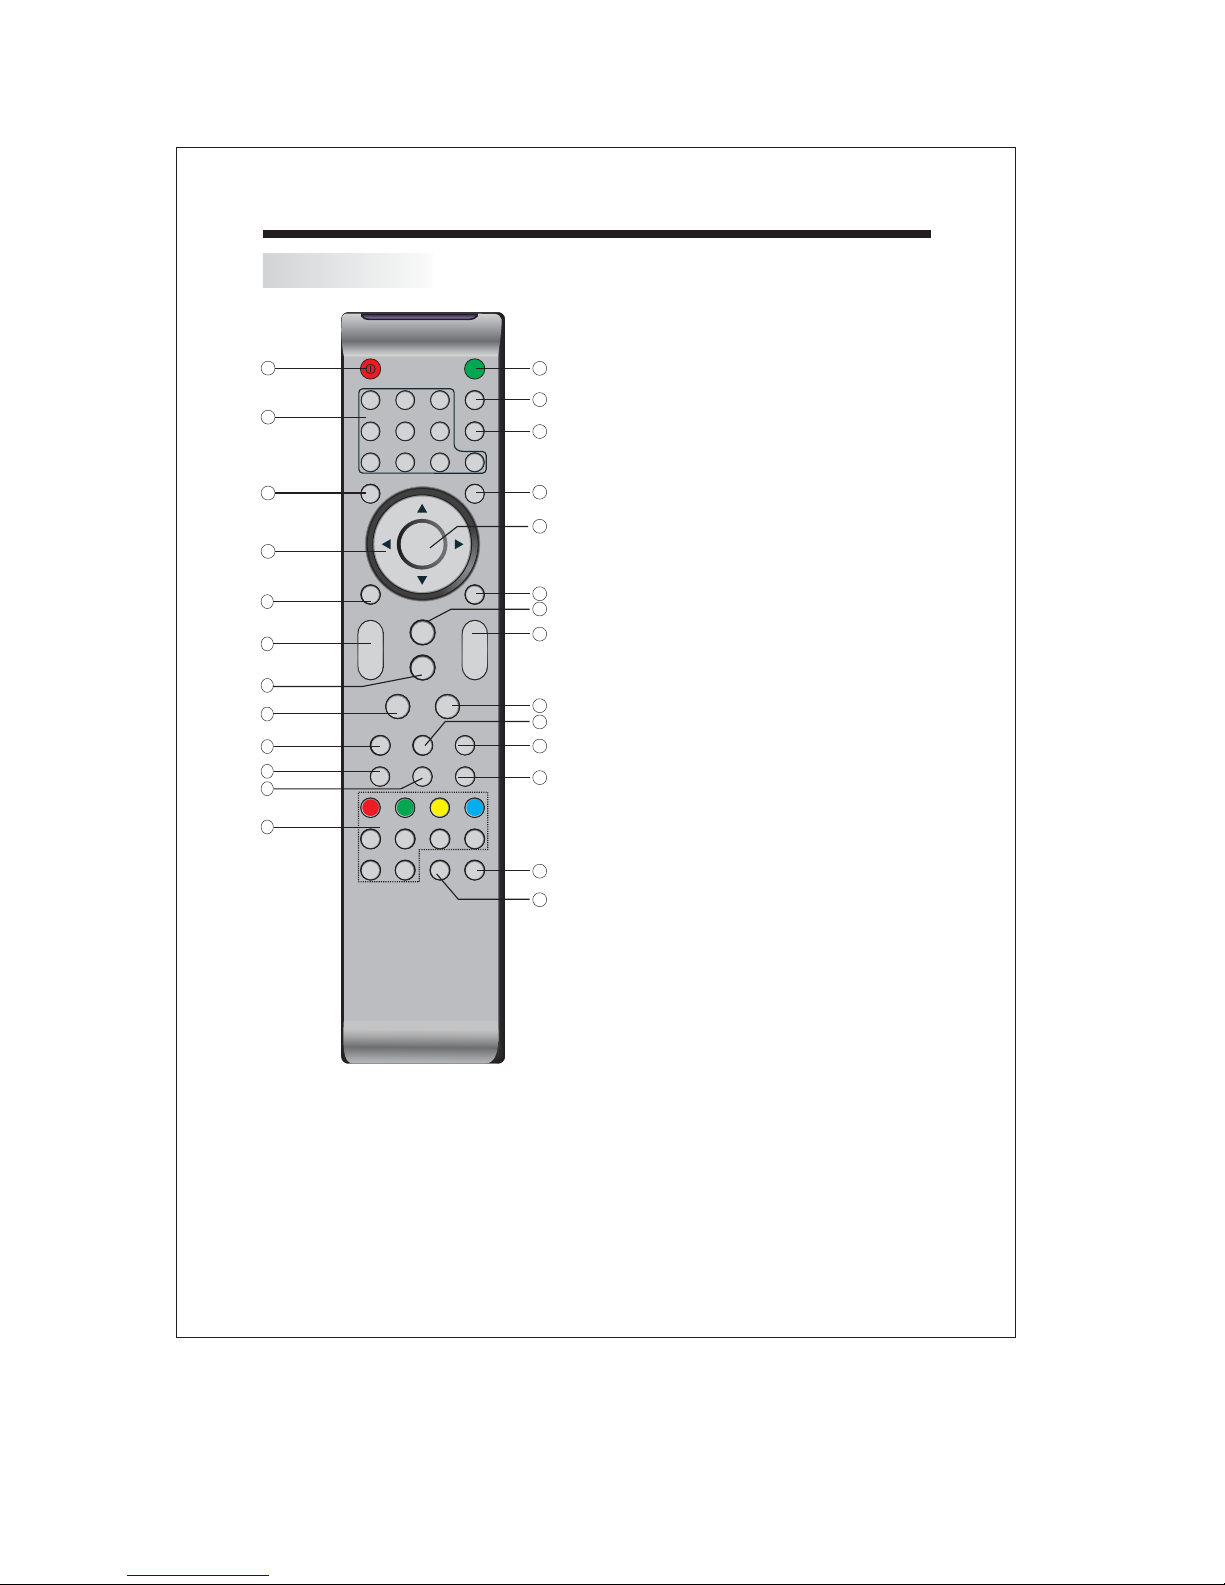
REMOTE CONTROLLER
1:POWER:To set the TV to standby or on.
POWER
1
1
2
3
4
2 3
4 5 6
7 8 9 0
TV MENU SOURCE
MUTE
NICAM
RECALL
ENTER
2:NUMBER KEY:
programmes. For a 2 (3) digit programme
13
number,The second (third) digit must be
entered before the dash disappears. The
14
number, the name (and the sound mode, in
analogue mode) are displayed . For a few
15
Seconds.
3:TV MENU:To display TV menu.
4: CURSOR:To move within the menu.
16
5: DVB MENU:To display DVB menu.
6: VOL+/- :To adjust sound level.
17
7: PIC:To switch picture mode.
8: SLEEP:S
9: AUTO:
10:INFO:
5
6
7
8
9
10
11
12
DVB MENU
+
VOL
_
SLEEP ASPECT
INFO FAV EPG
REVEAL
HOLD
SUBPAGE SIZE AUDIO SUBTITLE
SOUND
PIC
EXIT
+
CH
_
TEXTDISPLAYAUTO
INDEX
LIST
18
19
20
channel being viewed or further information
about the program when in small EPG
screen.
11: FAV:
Used to access your favourite channels.
12:TELETEXT KEYS(see next page )
13:MUTE:To disable or enable the sound.
21
14: NICAM:
22
23
24
available In tv program with nicam Mode.
15: RECALL: To access the previously viewed
programme.
16: SOURCE:Select EXT sources.
17: ENTER:Confirms selection.
18: EXIT:
Used to return to the previous screen
or menu.
19: SOUND:To switch sound mode.
25
20: CH+/CH-:To access the next or previous
26
Programmes.
21: ASPECT: To change picture aspect.
22:DISPALY:
For direct access to
et time to turn off the TV.
Auto adjust in PC mode.
Used to display information about the
To swich nicam mode.only be
Displays/removes the programme
Information.
23: TEXT:To enter or exit TELETEXT.
24: EPG:
Used to display information about the
program being viewed and what's on next.
25:SUBTITLE:
Used to switch between different
subtitles that are broadcasted.
26:AUDIO:
Used to set the sound output, the
Available
settings are STEREO, LEFT, RIGHT, MONO.
-15-
TELETEXT
REMOTE CONTROLLER
Press :
TEXT
Selecting a pag e
Direct access
to the items
INDEX
SUB PAGE
HOLD
REVEAL
SIZE
LIST
You will obtain :
E
This is used to call or exit teletext mode.The summary appears
with a list of items that can be accessed. Each item has a
corresponding 3 digit page number.If the channel selected
does not broadcast teletext, the indication 100 will be
displayed and the screen will remain blank (in this case, exit
teletext and select another channel).
Enter the number of the page required using the 0 to 9
up/down. Example: page 120, enter 120. The number is
displayed top left, the counter turns and then the page is
displayed. Repeat this operation to view another page. If the
counter continues to search, this means that the page is not
transmitted. Select another number.
Coloured buttons are as are displayed at the bottom of the
screen.The 4 coloured keys on the remote control are used to
access the items corresponding to the coloured buttons at the
bottom of the screen. The coloured areas flash when the item
or the page is not yet available.
This returns to the contents page (usually page 100).
Certain pages contain sub-pages which are automatically
displayed successively.This key is used to stop or resumesubpage acquisition.The indication appears top left.
To freeze the page.
To display or hide the concealed information (games solutions).
This allows you to display the top or bottom part of the page and
then return to normal size.
The user can set four favourite pages to be directly linked to
the four colour keys. While the list mode is activated, it is not
possible to use TOP or BOTTOM navigation with the colour
keys. The favourite page numbers are stored and restored
to/from non volatile memory for each channel by the system
software.
-16-
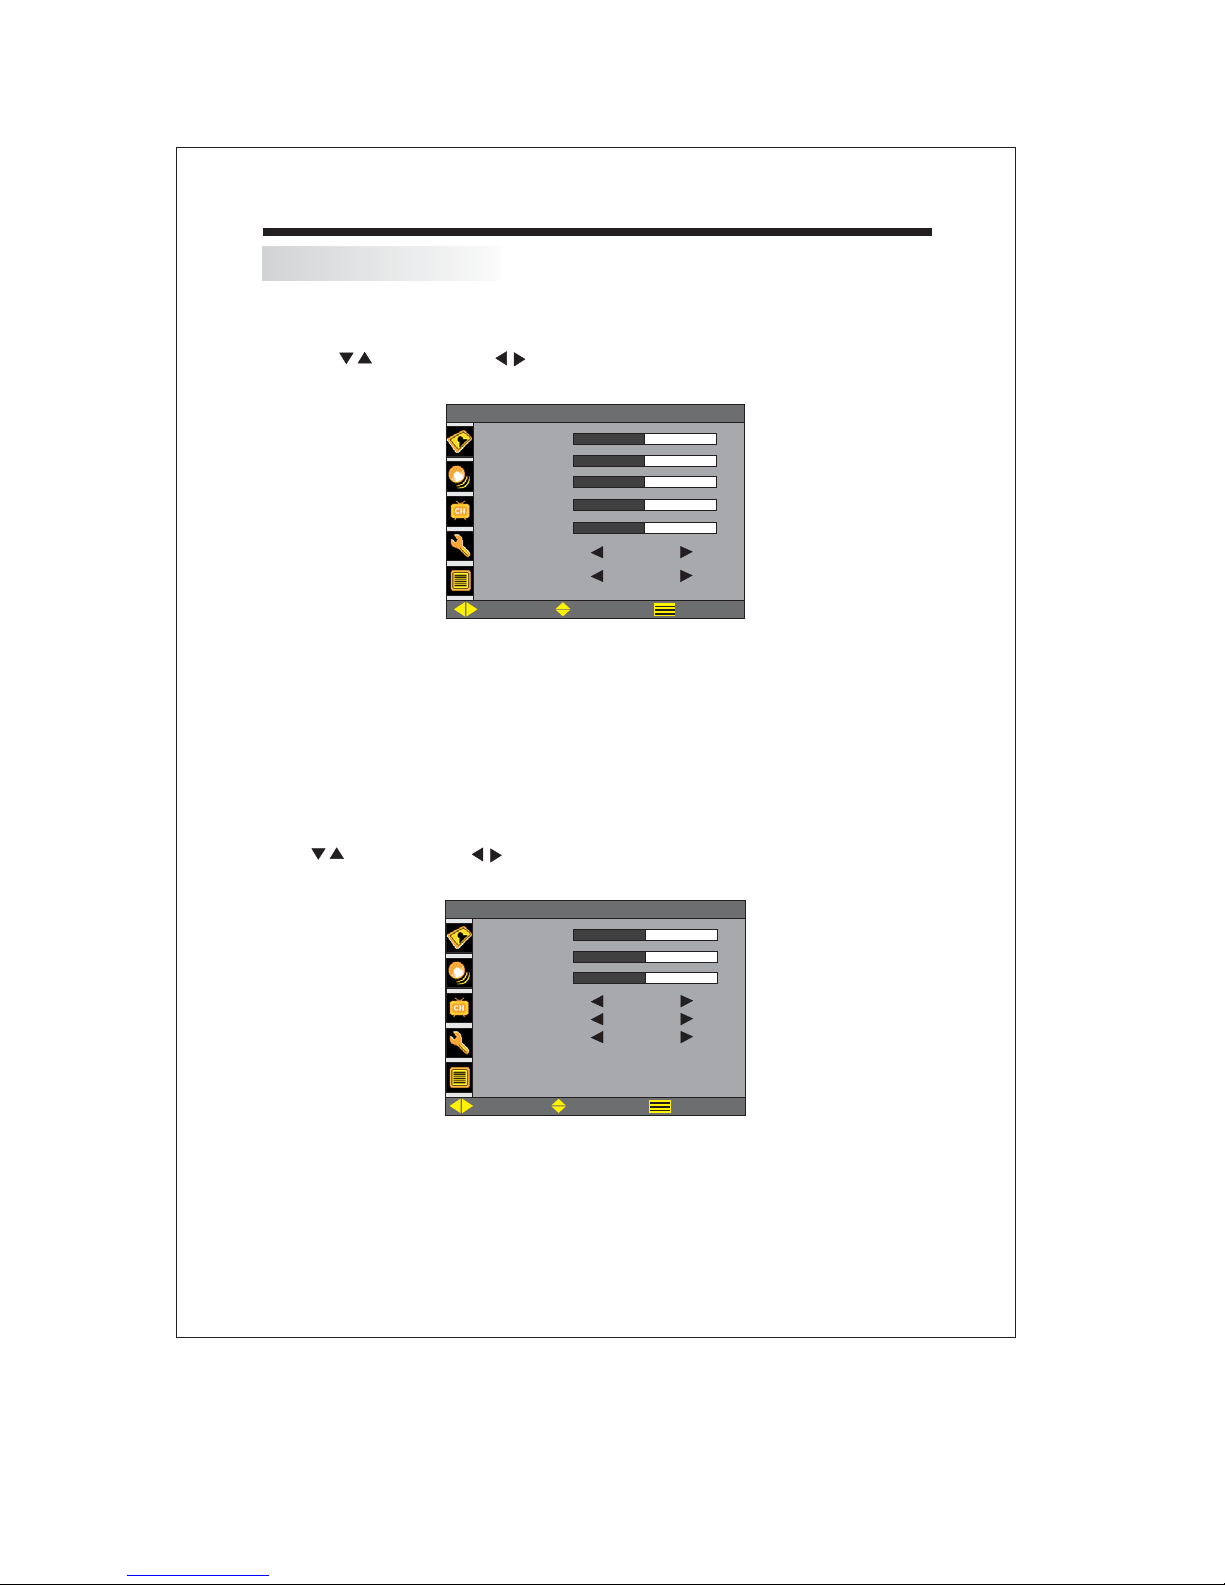
OPERATION-ANALOG TV
1. PICTURE MENU
The first item of the MENU is picture menu.
You can adjust picture here,such as contrast,brightness,etc.
Press to move,press to adjust.
PICTURE
CONTRAST
BRIGHTNESS
HUE
SATURATION
SHARPNESS
COLOR TEMP.
PICTURE MODE
PICTURE MODE
ADJUST SELECT EXIT
NORMAL
USER
50
50
50
50
50
Note:
1.HUE only available when receiving an NTSC signal.
2. Four picture modes: BRIGHT, SOFT, STANDARD and USER.
3. Three colour temperatures: NORMAL,WARM,COOL.
2.SOUND MENU
The second item of the MENU is SOUND MENU.
You can adjust the sound here.
Press to move,press to adjust.
OPERATION
SOUND
BASS
TREBLE
BALANCE
SOUND MODE
SOUND MODE USER
NICAM
AVL
ADJUST SELECT EXIT
FM-MONO
OFF
50
50
50
Note:
1.There are 5 sound modes: USER, MUSIC, SPEECH, MOVIE and STANDARD.
-17-

OPERATION
OPERATION-ANALOG TV
3.CHANNEL MENU
The third item of the MENU is channel menu(only in TV mode).
You can complete channel search and setting here.
1.COLOUR SYS:AUTO,PAL,SECAM. AUTO is recommended.
2.SOUND SYS:DK,BG,I.
You should set this system according to the local TV broadcast beforeAUTO SCAN.
If the setting is wrong, the sound and colour maybe abnormal.
3.SKIP
To skip the current channel yes or no.
4. AUTO SCAN
Search all the channels automatically.
5. MANUAL
Search the channels manually.
6. FINE
Fine tuning the channel.
CHANNEL
CHANNEL
COLOR.SYS
SOUND.SYS
SKIP
AUTO SCAN
AUTO SCAN
MANUAL
FINE
ADJUST SELECT EXIT
3
AUTO
D/K
OFF
168.20M Hz168.20M Hz
168.20M Hz168.20M Hz
4.FUNCTION MENU
The fourth item of the MENU is the function menu.
You can adjust settings below.
RESET: Reset all the settings to default value.
BLUE SCREEN: Switch on/off blue screen when no signal.
AUTO: Auto adjust in PC mode only.
BACK LIGHT:Adjust BACK LIGHT in PC mode only.
FUNCTION
RESET
BLUE SCREEN
BLUE SCREEN
TXT LANGUAGE
AUTO
BACKLIGHT
ADJUST SELECT EXIT
ON
WEST
-18-
100

OPERATION-ANALOGUE TV
5.OSD MENU
The fifth item of the MENU is OSD menu.
You can adjust OSD here.
There are 1 OSD languages: ENGLISH.
OSD
LANGUAGE
H-POSITION
V-POSITION
DUR ATION
HAL FTONE
ADJUST SELECT EXIT
OPERATION
ENGLISH
50
50
50
50
-19-
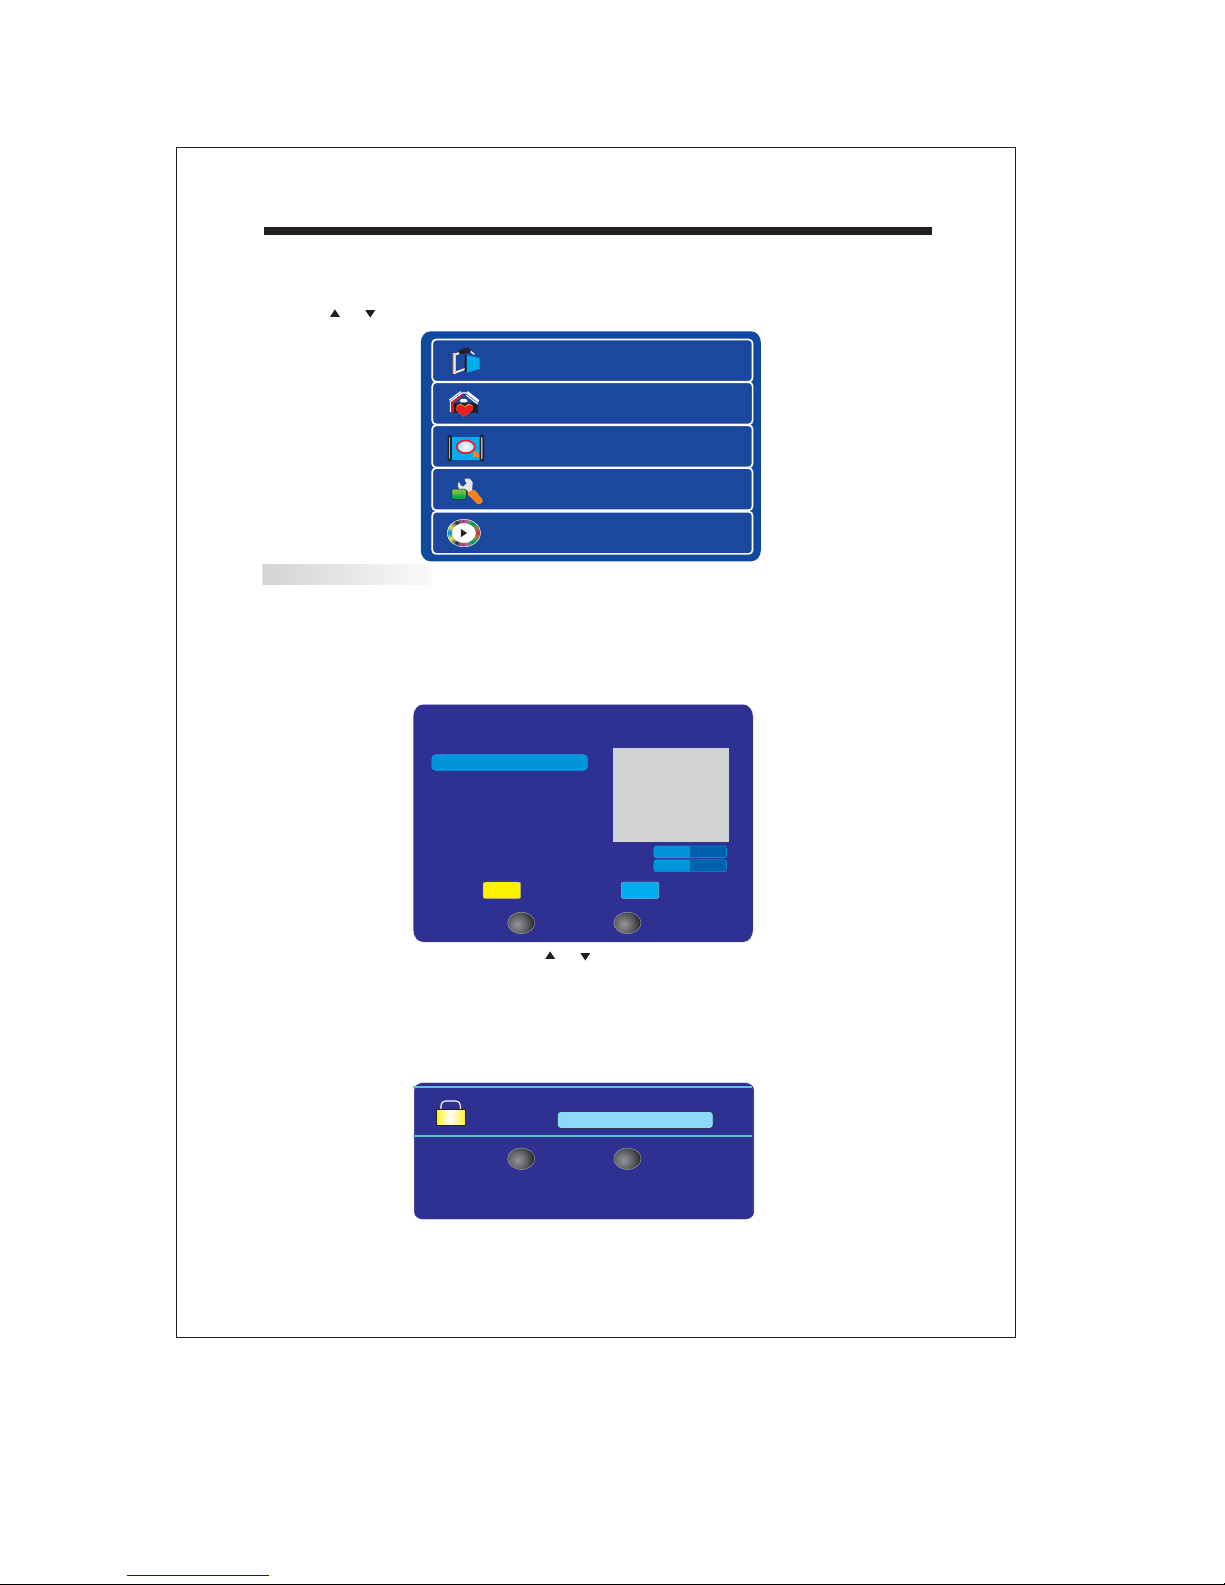
OPERATION
Sw tch the source to DTV.i
1. Press the INPUT button to display the source select menu.
2. Press or to select DTV and press ENTER to confirm.
Channel List
Favourite List
Channel Search
System Setting
Media Player
Channel List
The channel list is used to view all TV or Radio channels stored in the unit.
To access the channel list only without editing, press the ENTER button directly in
the non-menu state.
To edit the channel list, press the DVB MENU button and select Channel List using
the arrow buttons, press the ENTER for confirmation.
Channel List
ENTER
A/V Setting
Delete
Confirm
Quality
Strength
EXIT
Exit
Lock
50%
50%
then press the ENTER button
No Items
1.To view a different channel, Press or button , the
channel selected will be displayed in the window.
2.Lock / Unlock a Channel
Press the BLUE button to lock the viewed channel, enter your Pin Code to lock the
Channel. The factory default pin code is 888888.
Pin Code
ENTER EXIT
Confirm
-20-
Exit

OPERATION
3.Delete a channel
Under Channel List menu, press the button to delete the viewed channel.YELLOW
Favourite List
The favourite list is to store your frequently watched channels .
To edit the favourite list, press the DVB MENU button and select Favourite List using
the arrow buttons press the ENTER button when it's highlighted.
Favourite List
List 1
List 2
List 3
List 4
List 5
No Items
A/V Setting
Favourite
ENTER EXIT
REMOVE
Exit
Add a Favourite Channel
You can save up to 5 favourite lists.
1.Enter
2.Press the RED button to select a f to select a channel then press
Favourite list interface.
avourite list, press or
ENTER to add it to the selected favourite list.
Favourite List
List 1
List 2
List 3
List 4
List 5
Favourite
No Items
A/V Setting
ENTER EXIT
Add
Exit
Delete a Favourite Channel
1. Enter
2. Press the RED button to select a f to select a channel then
Favourite list interface.
avourite list, press or
press ENTER to delete the corresponding .
favourite channel
-21-

Channel Search
Getting Started
Channel Search
Search Type
ENTER EXIT
Auto Scan
Start Search
Exit
1. Press or to select Auto Scan or Manual Scan.
2. Auto Scan
Select Auto Scan and press ENTER to start Auto Scan. All channels searched will be
stored in the unit.
Channel Search
Search Type
Manual Scan
Channel No 42
Quality: 52% Strength: 100%
ENTER EXIT
Start Search
Exit
3.Manual Scan
Select Manual Scan and press or to select Channel No bar. Press or to increase or
decrease the channel number. You can also input the channel number by pressing the
digit buttons directly, the percentage indicator of quality and strength will be displayed
accordingly, the manual scan will start after pressing the ENTER button.
-22-

Getting Started
System Setting
From here you can set the First Time Installation, display system info, change the pin
code or update software.
First Time Installation
System Info
Change Pin Code
Software Update
First Time Installation
Select First Time I
Press or to select Confirm/Exit and press ENTER for confirmation.
System Info
The System Info menu displays the software and hardware version.
Change Pin Code
The Change Pin Code menu allows you to change the password, which is currently
set to 888888.
1. Enter your original and new PIN Code using the numerical buttons on the remote
control.
2. Press the or button, and enter the new PIN code again.
3. Press the ENTER button to confirm the new PIN code.
nstallation and press ENTER, the following screen will pop up.
Are you sure you want to delete
all channels and setting for first
time installation?
Confirm
Exit
Software Update
The displays the software update mode, you can selected Auto
Software Update
Mode or Manual Mode if there is update software being broadcasted over the air.
.
-23-

USB Operations
This DTV have a USB1.1 jack, you can playback Audio file /JPEG files or upgrade the
software version via this USB port.
When you insert a USB disc with /JPEG files, you can press the DVB MENU
button to enter main menu, using the cursor button to highlight the MediaPlayer item,
press ENTER to select the USB playback interface.
The function icons listed at the bottom of the menu are described as below:
u
1. Ret rn to home page: Press ENTER button to return to DTV mode when it highlighted.
2. Play: Press ENTER button to playback the above selected file.
3. Add to play list: Press ENTER button to add the selected file to the relevant play list,
for example, Audio file to Audio List, JPG file to Image List.
4. Play list: 3 options included:Audio List, Image List, File List, you can enter to the
selected play list if required.
5. Select filter content: You can select the filter as Audio, Image or All Types to obtain
different play list.
6. Play mode: You can select Play one, Play all, Shuffle, Repeat one, Repeat all, Repeat
shuffle .
Audio file
7. Slide show with background music: You can select Play without music, Play from
current folder, Play from play lists to start playback JPG file with or without play audio
file in the background.
NOTE:The USB Port on this device is only compatible with USB Memory Sticks(Discs)
or USB Mp3 Players.
You cannot connect other types of device via a USB cable as thesewill not function.
-24-

Trouble shooting
Problem
Picture Audio
Snow Noise
Ghost
Interference
Normal Picture
No picture Mute
No colour Normal audio
Static
Noise
Mute
Suggestion
antenna position, direction
or connection.
antenna position, direction
or connection.
electronic equipment, car/
motorcycle, fluorescent light.
Volume(check whether the
mute function is on or the sound
system is not set correctly).
power cord is not connected.
power switch is not turned on..
Press standby key on the remote
control.
check colour control.
Scramble
No colour
Normal audio
or weak
Noise
-25-
Search the channel again.
Audio system.
WARRANTY
Your Tesco appliance is covered by a warranty for 12 months from the date of
purchase. If a fault develops during this period, please contact the TESCO electrical
help line on 0845 456 6767. Please have your original purchase receipt with you when
you call. This warranty in no way affects your consumer rights.
Tesco Stores Ltd, Delamare Road, Cheshunt, Herts, EN8 9SL

 Loading...