

Page 1

7” Portable DVD Player
DPDVD7
Owner’s
Handbook
Page 2
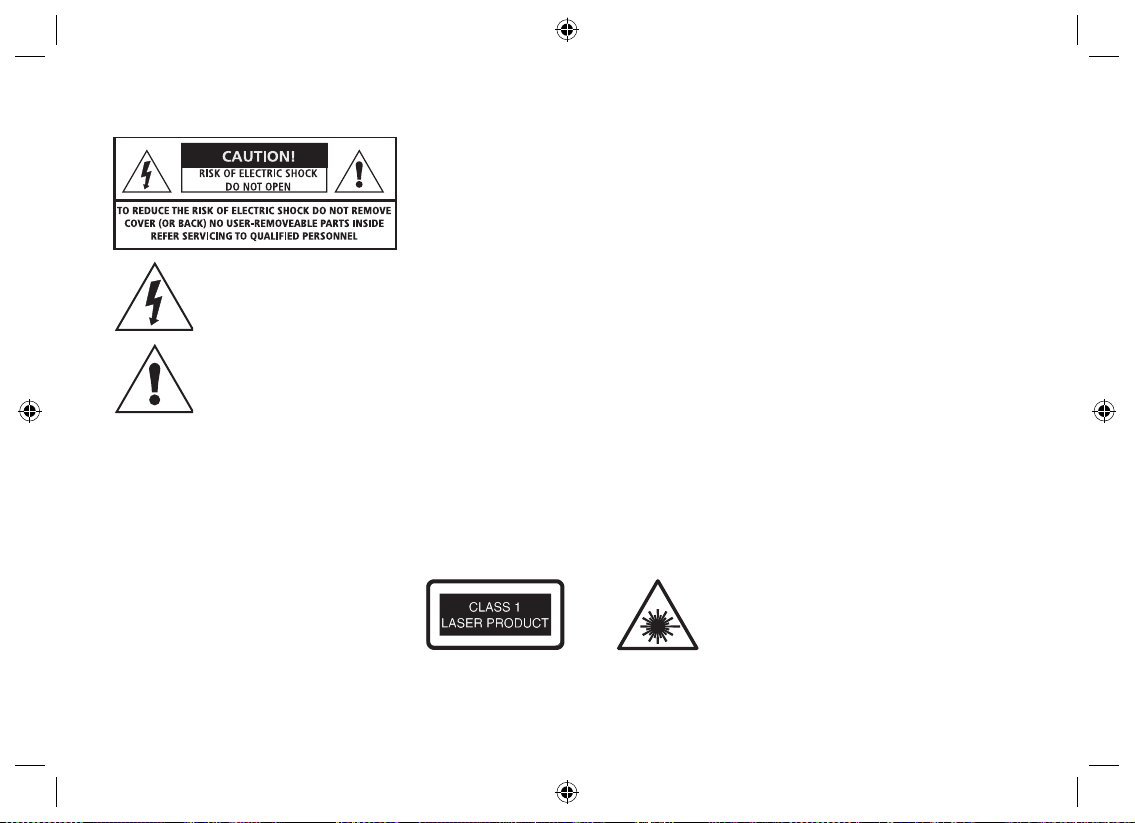
IMPORTANT SAFETY INFORMATION
This symbol indicates that dangerous
voltage constituting a risk of electric
shock is present within this unit.
This symbol indicates that there are
important operating and maintenance
instructions in the literature accompanying this unit.
Read these instructions.
Keep these instructions.
Heed all warnings.
Follow all instructions.
Do not use this apparatus near water.
Clean only with a slightly damp cloth.
Do not block any ventilation openings.
Install in accordance with the manufacturer’s instructions.
Do not install or operate near any heat sources such as
radiators, stoves, or other apparatus that produce heat.
Unplug this apparatus during lightning storms or when
unused for long periods of time.
Refer all servicing to qualied ser vice personnel. Ser vicing is required when the apparatus has been damaged
in any way, such as the power-supply cord or plug is
damaged, liquid has been spilled or objects have fallen
into the apparatus, the apparatus has been exposed to
rain or moisture, does not operate normally, or has been
dropped.
Warning: To reduce the risk of re or electrical shock, do
not expose this product to rain or moisture. The product
must not be exposed to dripping and splashing and no
object lled with liquids such as a vase of owers should
be placed on the product.
No naked ame sources such as candles should be
placed on the product.
Caution: Changes or modications not expressly approved by the manufacturer could void the user’s authority to operate this device.
Caution: Usage of controls or adjustments or per formance of procedures other than those specied herein
may result in hazardous exposure.
These labels tell you that the unit contains a Laser component. Do not stare at the laser lens.
When the disc tray is open a safety interlock disconnects
power to the laser. Do not defeat this safety interlock
IMPORTANT
This equipment generates, uses and can radiate radio
frequency energy and, if not installed and used in accordance with the instructions, may cause harmful interference to radio communication. However,this is no
guarantee that interference will not occur in a particular
installation. If this equipment does cause harmful interference to radio or television reception, hich can be determined by turning the equipment o and on,the user
is encouraged to try to correct the interference by one of
the following measures:
- Reorient or relocate the receiving antenna.
- Increase the separation between the equipment and
receiver.
- Connect the equipment into an outlet on a circuit different from that to which the receiver is connected.
- Consult the dealer or an experienced radio/TV technician for help.
BATTERY WARNINGS: The DVD player and the handset
use batteries. There is a risk of re and burns if batteries are
handled improperly. Do not disassemble, crush, puncture,
short external contacts, or dispose of in re or water.
Do not service the internal player battery. Have it examined
(and replaced if needed) by a competent service centre.
Replace the handset battery only with a battery of the
same voltage and type.
Discard used batteries in accordance with recycling regulations in force in your
area.
Page 3

CONTENTS
SAFETY INFORMATION .............................................................. Inside Front Cover
INTRODUCTION ................................................................................................... 1
PLAYER FEATURES .............................................................................................. 2
CONTROLS AND FUNCTIONS ................................................................................ 3
EXTERNAL AUDIO AND VIDEO CONNECTIONS ....................................................... 4
REMOTE HANDSET .............................................................................................. 5
POSITIONING THE PLAYER ................................................................................... 6
HANDSET TOPICS ................................................................................................ 6
CONNECTING THE DC POWER ADAPTER ............................................................... 6
PORTABLE OPERATION ........................................................................................ 6
GETTING STARTED ............................................................................................... 7
PLAYING A DVD .................................................................................................. 7
PLAYING AN AUDIO CD ...................................................................................... 10
PLAYING A JPG DISC .......................................................................................... 11
PLAYING AN XvID DISC ...................................................................................... 13
CUSTOMISING PLAYER SETTINGS ...................................................................... 14
THE RATINGS PAGE (PARENTAL SETTINGS) ....................................................... 16
CHANGING THE PASSWORD .............................................................................. 17
TROUBLESHOOTING .......................................................................................... 19
CARE AND CLEANING ........................................................................................ 19
SPECIFICATIONS & WARRANTY ......................................................................... 20
INTRODUCTION
Read this manual before using your player.
The Player is set to play Region 2 discs.
The player will accept the following formats (among others): DVD, DVD+R,
DVD+RW, CD-DA, CD, CD-R, CD-RW, Picture CD,
The following formats are not acceptable:
DVD discs with other region codes.
Improperly formatted CD-Rs or CD-RWs. This may include discs which are not
nalised.
The player has built in copyright protection technology. If a video recorder is connected to the player, the video output image may be distorted during recording.
UNPACKING
The carton should contain:
• Portable DVD Player
• Remote Control
• External Power Adapter
• Operating Manual
If any items are missing or damaged, contact your nearest TESCO store for a
replacement. Have your receipt ready when you call. Retain the packaging. If you
dispose of it, do so having regard to any recycling regulations in your area.
Before using the player open it and carefully remove any protective lm
covering the screen. Take care not to press on the screen while doing this.
Page 1
Page 4
PLAYER FEATURES
DVD, CD, CD-R, CD-RW DVD+R, DVD+RW capable
TV format: NTSC (Player): PAL (Video Out)
Screen format: Selectable Normal/Widescreen
Video output: Composite Video output
Audio output: Stereo analogue output
DVD features:
Multi Subtitle select
Multi Language select
Multi Angle select
Other features:
On screen display menu
Multi-level zooming
Parental control
JPG picture view
DVD REGION CODES
DVD discs and players are covered by a worldwide
agreement which limits playback of DVD discs to
specic regions as determined by the software
manufacturer. Most DVDs come marked with a
region coding. A disc specied as playable in one
region may not play on a player designed for a different region. A disc specied as universal or with no
region coding (Code 0)may be played in any region.
The regions are:
Region 1: Canada, USA
Region 2: Europe, Japan, Mid. East, South Africa
Region 3: South-East Asia
Region 4: Australia, Caribbean, Central & South
America, New Zealand
Region 5: Africa, Former Soviet Union, India,
North Korea, Pakistan
Region 6: China
THIS PLAYER PLAYS REGION 2 AND REGION FREE ,
UNIVERSAL (0) DISCS.
IMPORTANT NOTE
DVD discs contain various features. Many features are
determined by the program or software content on
the DVD disc itself. Some procedures in this manual
cannot be performed if the disc does not support the
feature. Also, some discs may need special settings
which are unsupported by the player.
GENERAL CAUTIONS
CAUTION: during playback, the disc spins at high
speed, do not lift or move the player, doing so may
damage the disc.
CAUTION: when the player is stopped the disc is still
rotating at a very high speed. Leave the disc to come
to a rest before removing it. Stopping a disc manually
could damage both the disc and the player.
Never press down on the disc compartment lid
especially when a disc is playing.
The player has built in copyright protection technology
that prevents copying from a DVD disc to any media.
If a video recorder is connected to the player, the video
output image will be distorted.
NOTICES
This product incorporates copyright protection technology that is protected by U.S. patents and other intellectual property rights. Use of this copyright protection
technology must be authorized by Rovi Corporation, and
is intended for home and other limited viewing uses
only unless otherwise authorized by Rovi Corporation.
Reverse engineering or disassembly is prohibited.
Manufactured under license from Dolby Laboratories.
Dolby and the double-D symbol are trade marks of Dolby
Laboratories.
Page 2
Page 5
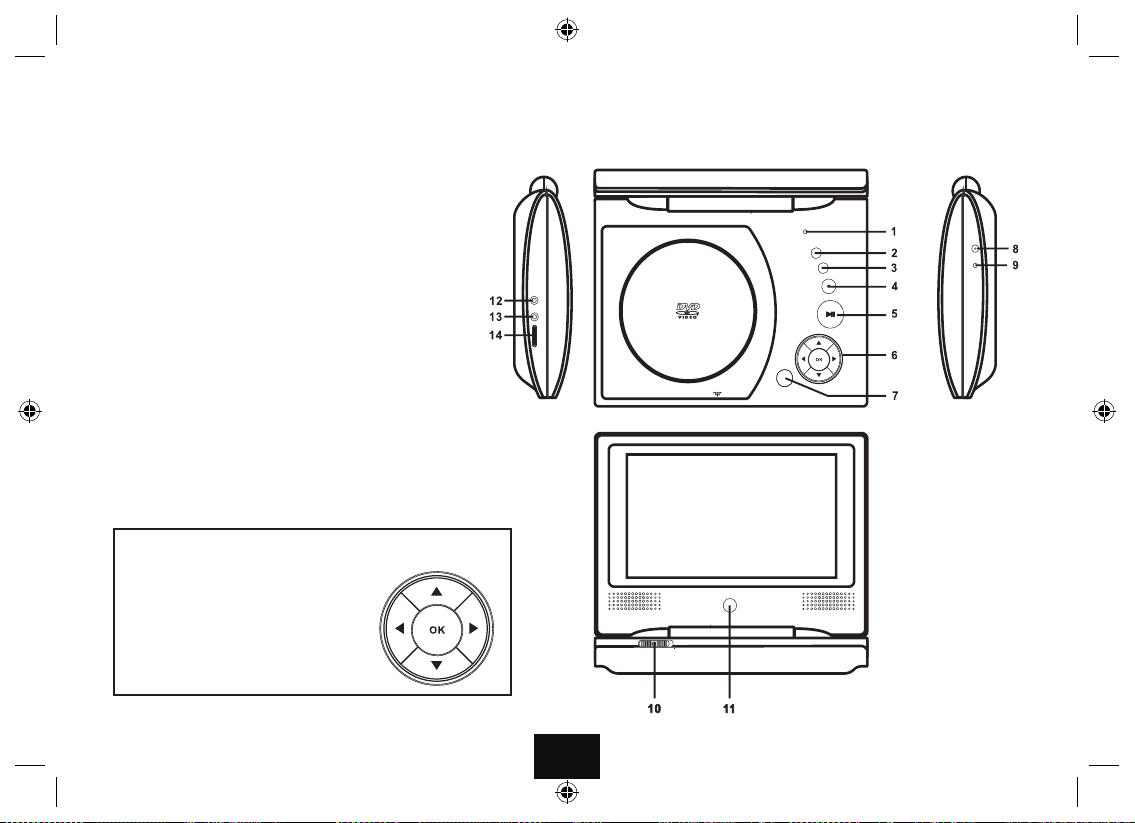
CONTROLS AND FUNCTIONS
1) LCD On/O switch: Press to blank out the screen.
2) MENU Button: Press to access the menu of a DVD
3) SETUP button: Press to enter the player’s Setup menu
4) . (Stop) button: Press to stop a disc (See Page 8)
5) uII (Play/Pause) button: Press to Play/Pause a Disc.
6) Navigation Keys*: (See below)
7) OPEN button: Press to open the Disc Compartment
8) 9 V DC jack: Insert the Mains Adaptor jack here.
9) Battery charge indicator:
The indicator glows red when the battery is charging.
When the battery is fully charged the indicator goes out.
10) Power On/O switch (with integral power indicator):
Switch the Player ON/OFF. When the player is on the indicator is lit.
11) Infrared sensor: Point the Handset here to operate the player.
12) AV OUT jack: Connect to external AV equipment
13) Headphone Jack: Connect to headphones (disables the internal speakers)
14) Volume Control: Alters the volume of the player.
L.H. VIEW TOP VIEW
R.H. VIEW
NAVIGATION KEYS
p Move Up a Menu/Menu Choice
q Move Down a Menu/Menu Choice
u Move along a Menu/Menu Choice
t Move Back in a Menu/Menu Choice
OK Conrm an Action
FRONT VIEW
Page 3
Page 6

EXTERNAL AUDIO/VIDEO CONNECTIONS
WHEN CONNECTING EQUIPMENT, ENSURE THE PLAYER AND ALL ANCILLARY
EQUIPMENT IS SWITCHED OFF AND UNPLUGGED AT THE MAINS.
TV (AUDIO/VISUAL) CONNECTION
You will need to purchase an interconnect with a three pole jack on one
end and three RCA phono plugs on the other. This interconnect is often
used for connecting Camcorders and games consoles.
Connect the jack plug to the Player AV OUT socket Connect the YELLOW
plug to the Composite Video input of the TV. Connect the WHITE and
RED plugs to the Audio inputs of the TV.
You can now view and listen to the DVD player on the TV.
AUDIO CONNECTION
You will need the interconnect as described above. Connect the jack
plug to the Player AV OUT socket Connect the WHITE and RED plugs to
a LINE input of your hi- system. Do NOT connect the YELLOW plug.
HEADPHONE CONNECTION
Connect a pair of headphones as shown. This connection disconnects
the internal speakers of the DVD player.
WARNING: Listening at loud volumes can damage your hearing!
WHITE (left)
RED (Right)
YELLOW (Video)
When the player is connected to an external screen, the internal player
screen is blanked out. This normal and NOT a fault.
WHITE (left)
RED (Right)
Page 4
Page 7

REMOTE HANDSET KEY OPERATIONS
1 SETUP: Enter/Exit the player Setup menu
2 AUDIO: Select audio language during DVD/CD play
3 SUB: Select a subtitle during play
4 REPEAT: Repeat a track/title/chapter/disc
5 A-B: Select and repeat a chosen passage
6 { Go to the Previous chapter/track
7 [ Fast Reverse Search & Navigation Key*
8 . Press Once to stop playback temporarily
Press Twice to stop playback completely
9 q Navigation Key*
10 NUM: Press to toggle Number Mode ON/OFF (See Below)
11 ] Fast Forward Search & Navigation Key*
12 uII Play/Pause a Disc : Conrm a Menu Choice*
13 } Go to the Next chapter/track
14 p Navigation Key*
15 ZOOM: Enlarge Image on Screen
16 MENU: Enter/Leave a DVD root menu
17 ANGLE: Change the viewing angle/ Select a transition eect
18 DISPLAY: Display/Hide On Screen Display
NUMBER AND FUNCTION MODES
Some function buttons are used to input numbers. Press the NUM button to activate the number functions.
In “Number mode” these function buttons are locked and the “NUM” icon appears and stays on the screen as a reminder.
To use the function buttons, press the NUM button again -the “NUM” icon disappears and normal functions are restored.
To enter a number from 1 to 9 (say 7): Enter 07. If you enter the number as ‘7’ the player will wait for a second digit. If
none is entered, after a period the player will play the chosen number. To enter numbers above 9: Enter the number.
*NAVIGATION KEYS
MENU MODE
p Move Up a Menu/Menu Choice
q Move Down a Menu/Menu Choice
u Move along a Menu/Menu Choice
t Move Back in a Menu/Menu Choice
ENTER Conrm an Action
PLAY MODE
{ Previous Track/Chapter
} Next Track/Chapter
] Fast Forward Search
[ Fast Reverse Search
Page 5
Page 8

POSITIONING THE PLAYER
USING THE HANDSET
PORTABLE OPERATION
Place the player on a rm level surface where it is unlikely to be knocked over or fall.
Do NOT operate the player on your knee or on the rear
seat of a travelling vehicle as erratic movement will
cause the player to skip tracks and may damage the
disc and the player.
HANDSET PREPARATION
Remove the safety strip from the battery compartment. The handset is now ready for use.
BATTERY REPLACEMENT
If the handset behaves erratically or fails to operate
the battery should be replaced.
1: Press the catch at the side of the battery compartment. Slide out the battery cage
2: Remove the old battery. Place the new battery in
the cage with the polarity as shown. Close the cage.
Observe all battery cautions on the Inside Front Cover.
Point the handset directly at
the infrared receiving window of the player. The handset must be no more than 3
metres from the player and
at an angle of no more than
30º for reliable operation.
Note: If handset operation is erratic in bright sunlight,
relocate the player to a shady location.
CONNECTING THE DC ADAPTOR
Connect the DC plug of the supplied adaptor into the
Player. Plug the Adaptor into the mains point and switch
on at the mains. The player is now ready for use.
I
f the player is not going to be used for a while, discon-
nect the adaptor from the player and the mains supply.
CAUTION: The means of disconnection from the mains
supply is the adaptor. This must at all times be accessible and capable of being unplugged from the mains.
If you want to use the player without mains power you
will need to charge the battery. The battery should be
be charged only when the player is switched o.
The amount of time taken to charge the battery depends on the amount of residual charge remaining
but it could take up to eight hours.
When the battery is charging the light at the side of
the player will glow RED. When the battery is fully
charged the light will go out. You may now disconnect the mains adaptor.
DURING BATTERY OPERATION:
If there is no display when the player is turned on:
This is not a fault condition- but due to a at battery.
• Switch the player o, connect the charger as described above and charge the battery for six hours.
When the battery is running out:
• After a short period the player will shut down.
• You must charge the battery as soon as possible.
To conserve power:
• Always switch the player o when it is not connected to the adaptor or you will drain the battery.
Follow all the care advice to keep your battery in
•
good condition.
Page 6
Page 9

GETTING STARTED
PLAYING A DVD - BASIC OPERATION
• Connect the supplied power adapter to the player. Plug the mains plug into
the mains outlet and switch on the power.
• Hold the player with one hand. Hold the tab at the front of the player lid with
the other hand and open the lid. The maximum angle you can open the player is
120º. Do not try to open it any further.
• Push the catch at the front of the player to open the disc lid.
• Switch the Player ON
• Load a disc into the tray, label side up. Align the centre of the disc with the
centre of the disc guide. Press gently on the disc to snap it into place.
• Close the disc cover. The disc will now load. Some formats take more time to
load than others as the player has to download the Table of Contents (TOC).
DVD discs will display the ROOT or TITLE menu. In exceptional cases where there is
one title and nothing else the disc may play.
The ROOT menu is the basic menu of a DVD disc and contains all the information
relating to the DVD disc This menu loads when you rst insert a disc. To access this
menu at other times, press the MENU key. The TITLE shows the titles available on
the DVD disc. On many DVDs the ROOT and TITLE menus are the same. Each TITLE
is divided into CHAPTERS. So you can play all, or any part of the disc as you choose.
If you give the player an invalid command it will be
ignored and a sign will ash on screen.
NOTE: These operation instructions refer to handset operation. Basic functions are also available on the main player and can be executed by pressing
the appropriate buttons. Refer to Page 4 for details.
1) To play a DVD disc from the beginning
Press PLAY
uII on the handset.
2) To change tracks when a DVD disc is playing
Press NEXT
Press PREV
} to go forward one track at a time
{ to go back one track at a time
When you reach the nal track you cannot go to the rst track using NEXT .
(Some DVDs will return you to the Title screen).
Press PREV
3) Fast Forward Playback
Press
The speed cycles 2X
PLAY
4) Fast Reverse Playback
Press
The speed cycles 2X
Press PLAY
{ to go back through the tracks.
] repeatedly
4X 8X 16X Normal
uII (or OK) or cycle to Normal Speed to resume normal play
[ repeatedly
4X 8X 16X Normal
uII (or OK) or cycle to Normal Speed to resume normal play
X2
X2
5) To Pause a disc during Play:
Press PLAY
To resume: Press OK or PLAY uII
uII (or OK)
II Pause
Page 7
Page 10

6) Zoom:
1
Press ZOOM repeatedly
The picture size changes
1 2 3 OFF
OFF
When Zoom is greater than 1: use the p q [] keys to move the image around.
7) To alter the volume
Use the volume control on the player or remote monitor to alter the volume.
8) Stopping the Disc
. button has two modes.
The STOP
When a disc is paused the disc may be stopped but the laser is active. If the disc
is paused for too long the surface may burn. A special stop mode is available
which stops the laser and the disc but memorises the position. When PLAY is next
pressed the disc picks up where it left o.
Press STOP
Press PLAY
. on the handset or the player.
uII to play from the point at which
STOP was pressed.
Press STOP
Press PLAY
. twice. The disc is now stopped.
uII (or OK) to play the disc.
Stop
Resume
Stop
NOTE: If there is no activity i.e the disc is stopped or no disc is loaded, after a few
minutes the screen saver will appear.
When you have nished: remove the disc from the player before switching o.
If you are using the mains adaptor, unplug the adaptor from the player and then
disconnect the adaptor from the mains or the vehicle power supply as appropriate.
PLAYING A DVD - ADVANCED OPERATION
ROOT AND TITLE MENUS:
1: Load a DVD disc.
2: To display the ROOT menu: Press MENU on the handset or the player.
The Root Menu displays the hierarchical structure of the DVD disc. If a disc is
playing it will stop.
CHECKING THE OPERATIONAL STATUS
An On Screen Display (OSD) status indicator will be displayed at the top of the TV
screen when certain functions are executed, or when the DISPLAY button on the
handset is pressed. When dierent discs are loaded the indicators may change
The On Screen Display can be congured to show the current title playing, the
chapter being played and various time modes.
Press the DISPLAY key continuously to cycle the Display Modes:
Total Time Remaining on Disc
Time Played On Disc
Current Title/Total Titles
Current Chapter /Total Chapters
Languages and Channel Formats
DVD Video
Time 00:14:34/01:39:45
Title 3/3
Chapter 4/20
Audio 1/3 D 6 Ch Eng
Subtitle O
Angle 1/3
Bitrate 3.92Mbps
(OSD O)
Page 8
Page 11

Using the Number Keys
• To enter a number from 1 to 9, (say 7): Press NUM; Press 07
• To enter 10 to 99, (say 77): Press 77 and so on.
• Press NUM to leave Number Mode when you are nished.
THE SEARCH FUNCTION
During Play: You can select a title, chapter, or time on the disc with a combination
of the number and navigation keys.
• Press the NUM key
• Enter a number at random (say 7):
The Search screen deploys
• To select Title/Chapter/Time: Use the the
p q keys.
Search
Title
Chapter
Time
7
4
00 : 30 : 40
The highlight moves to indicate the current selection.
• To enter the wanted Title or Chapter number: Use the
][ keys
• To directly enter the disc time:
Use the the
Use the
p q keys to select Time
][ keys to highlight Hr: Min: Sec.
Use the number keys to enter the tiime values.
• Press PLAY
uII (or OK) to conrm. The player will jump to the selection.
• Press the NUM key to leave number mode when you have nished
Direct Selection From the ROOT Menu:
• Press MENU. The disc stops and displays the DVD menu. Enter a number.
The player will usually go to the start of the chapter indicated by the number you
enter. If there is more than one title on the disc, entering a number may take you to
the title. Play begins immediately from the start of the selection.
‘ON THE FLY’ ADJUSTMENTS
The player’s Setup menu contains system setups for Angle, Subtitle and Audio
soundtrack but you may change them when a DVD disc is playing if the disc supports these features. The player returns to the system settings when you switch o
the player or replace a disc.
CHANGING THE AUDIO SETTINGS OF A DVD
You can select a language and audio format from those included on the DVD disc.
• Press AUDIO repeatedly.
The choices will cycle:
First the Audio Formats
Then the Languages
Total Audio
Channels
1/4 D 6 Ch Eng
2/4 D 2 Ch Eng
3/4 D 6 Ch Deu
2/4 D 2 Ch Deu
Audio Format and
Language
After you have entered the selection, the program will play with the new settings.
SELECTING SUBTITLES
Repeatedly press SUB to choose a supported
language
1/2 Eng
2/2 Deu
O
CHANGING THE CAMERA ANGLE
During playback of a DVD disc:
2/3
Press ANGLE repeatedly to select the camera angle.
A disc may contain 9 angles.
Page 9
Page 12

Track01
Track02
Track03
Track04
Track05
Track06
Track07
Track08
Music Playing
00:04:07
2 / 20
Track02:CDA
REPEAT PLAY
Pressing REPEAT will:
A: Repeat a Chapter continuously
B: Repeat a Title continuously
C: Repeat thr Disc continuously
D: Cancel REPEAT
Repeat Chapter
Repeat Title
Repeat Disc
Repeat O
REPEATING A CHOSEN PASSAGE (A-B Repeat)
• Press A-B at the start of the selection (point A)
• Press A-B at the end of the selection (point B)
Rep A–
Rep A– B
The disc will repeat the passage continuously
• Press A-B to return to normal play
Rep AB O
LAST MEMORY
To enable Last Memory:
• At the desired place, press STOP
.
Do not press STOP a second time, or switch the player o or load a dierent disc
otherwise the player will lose its settings!
• Open the player disc compartment. Remove the disc.
• Re-load the disc.
Last Memory
The disc will load and play from the point where you stopped. The words “Last
Memory” will briey appear on the screen.
To use this facility “Last Memory” must be enabled in the System Settings
Menu - see Page17
Stop
PLAYING AN AUDIO CD
Load an Audio CD into the player. The player reads the disc. Most CDs will start
automatically - a very few won’t.
Time played on track
CD Display
Current Track /
Total Tracks
1) To play an entire disc from the beginning when it is stopped:
• Press PLAY
uII (or OK)
2) To change tracks when a disc is playing
}{to go forward/back one track at a time
• Press
When you reach the nal track you cannot go to the rst track using
• Press
{ to go back through the tracks.
3) Forward and Reverse Search
[] repeatedly: The speed cycles 2X 4X 8X 16X Normal
• Press
• Press PLAY
uII (or OK) or cycle to Normal Speed to resume normal play.
4) Pausing a disc
II or uII on the player.
• Press
• Press PLAY
Page 10
uII (or OK) to resume normal play.
}.
Page 13

JPEG Preview
1 / 20 James
Sammy
James
Freda
Andy
Jack
Will
Mum
Dad
5) Stopping and re-starting a disc
• Press
..
• Press PLAY
• To completely stop a disc: Press
6) Selecting and playing a track
• Press
select a track. The highlight will move to a new track
with each press. The currently playing track will be
‘greyed out’
• Press PLAY
• Inputting the wanted track via the number keys
will also start play from the selected track.
uII (or OK) to resume play from where the disc was stopped.
. twice.
▲▼
to move up/down the track list and
uII (or OK) to play from the track.
Track01
Track02
Track03
Track04
Track05
Track06
Track07
Track08
(Remember to enable the number keypad before entering a number and return to
normal handset mode after you have nished)
7)
Repeat
• Press REPEAT once to repeat the track.
• Press REPEAT again to repeat all tracks.
• Press REPEAT again to cancel repeat.
8)
A-B Repeat
• Press A-B at the start of the selection (point A)
• Press A-B at the end of the selection (point B)
• Press A-B to return to normal play
Repeat Single
Repeat Folder
Repeat O
Rep A–
Rep A– B
Rep AB O
PLAYING A JPG DISC
Load a JPG disc
A JPG disc may contain pictures only or may have one or more folders with
pictures within the folders.
VIEWING JPGS
• Press
p or q to highlight a picture .
• Press PLAY
uII (or OK) or enter a number via the number keypad.
All the pictures not in folders will play as a slide show from that point forward.
• Press PLAY
• Press
uII (or OK) to pause and re-start the slide show.
[{/]
}to move to the previous/next image.
Rotating A Picture: (When a picture is rotated the slide show is paused).
• Press
q to continuously rotate a picture 90° to the right.
• To resume normal play, press PLAY
uII twice or cycle to normal orientation
Zoom: (When a picture is zoomed the slide show is paused).
Press ZOOM repeatedly: The picture size changes
1 2 3 OFF
When Zoom is greater than 1: use the p q [] keys to move the picture around.
• To resume normal play, press PLAY uII twice or cycle to Zoom o.
Page 11
Page 14

THUMBNAIL VIEW
JPEG Preview
1 / 20 James
Sammy
James
Freda
Andy
Jack
Will
Mum
Dad
JPEG Preview
1 / 20
ZOO
Sammy
Andy
Jack
Will
ZOO
LONDON
Mum
Dad
1 / 20
ZOO/ Img 001
Img 002
Img 003
Img 004
Img 001
- -
Img 005
Press MENU at any time. The images display in THUMB-
NAILS of 9 images per screen.
p or q to up or down a row
• Press
• Press
[] to move along a row
• Press PLAY uII (or OK) to start the slideshow from the selected picture.
ALTERING SLIDE SHOW TRANSITION EFFECTS
During a Slide Show (in play or pause mode):
Press ANGLE repeatedly to
choose one of 20 available transition eects (or no eect). This setting alters the way
one picture ows into the next during a slide show.
PLAYING FOLDERS
Load a JPG disc into the player. The main screen will appear
pq to select a folder
• Press
Folders
REPEAT MODE
You can select Repeat Single, Folder Repeat or Repeat OFF
Repeat Single- Repeat one le continuously
Repeat Folder- Repeat the contents of a folder continuously.
If you have a combination of les, some in folders and some on the main
disc drive (Root) you can repeat les in individual folders or les on the disc
drive proper but NOT the entire disc.
To return to the main screen:
• Press
. in slide show, or thumbnail mode:
The current folder displays. If there are no
folders the pictures on the disc will display.
• Select a picture. Press PLAY
uII (or OK) to
star t a new slide show
• Press PLAY
• Select a picture and press PLAY
uII (or OK). The pictures in the folder will display
uII (or OK) to start the slide show
• Proceed as before to view and manipulate your pictures
Page 12
Page 15

1 / 20
ZOO/ Img 001
Img 002
Img 003
Img 001
- -
1 / 20
ZOO/ --
Img 002
Img 003
Img 004
Img 001
1 / 20
ZOO
Sammy
Andy
Jack
ZOO
LONDON
Video 1
Video 2
Video 3
Video 4
Video 5
Video 6
Video 7
JPEG Preview
00:04:07
1/ 20
/Video 1.AVI
When the last picture has displayed the slide show will stop and the Folder
Menu will display
• At any time, pressing the
. key also returns you to the Folder Menu
To select another folder
• Press
p to highlight the top line
• Press PLAY
uII (or OK)
The main menu will display
To exit:
• Press the Open button to open the disc compartment.
Allow the disc to stop spinning before removing it.
PLAYING XvID VIDEO DISCS
XvID is an open source compressed video format.
Most XvID les will play; other video les may be
recognised by the player but will not play.
Load a disc: The main menu will display,
▲▼
• Press the
keys to highlight an XvID track,
or select a track with the number keys.
• Press PLAY
uII (or OK).
The disc will play from the selected track. If an unplayable track is in the list the
player will move to the next playable track. When all the tracks have played the
disc stops. (This depends on the repeat mode - modes are the same as JPEG play).
During play:
Zoom, next/previous track, direct track select and forward/reverse search operate.
Subtitles are selectable if the le supports them.
Press the DISPLAY key
continuously to cycle
the Display Modes:
XvID
Time 00:14:34/01:39:45
Track 3/3
Audio 1/1 MP3 2CH
Subtitle O
Note: Although XviD les use the MP3 format for audio, regular MP3 les cannot be
played on this player.
To stop play: Press
• Press PLAY
• Press
. once. The menu screen will deploy.
uII (or OK) to resume play (see Last Memory)
. twice to fully stop play.
To exit: Press the Open button. Allow the disc to stop before removing it.
Page 13
Page 16

Subtitle : Off
Audio : English
Language : English
DVD menu : English
Language
Video
Rating
Misc
Subtitle : English
Audio : English
Language : English
DVD menu : English
Language
Video
Rating
Misc
: English
: English
: English
: English
English
Český
Slovenčina
Polski
Magyar
Language
Subtitle : Off
Audio : English
Language : English
Language
Video
CUSTOMISING PLAYER SETTINGS
Always access the SETUP menu when the player is FULLY stopped or when
there is no disc in the drawer.
• Press SETUP to enter the Setup menu. The setup menu has 4 categories:
Language: Video: Rating: and Misc.
▲
• Press
or ▼ to move up and down a
menu list
• Press
] or [ to take you to the next/
previous menu list
• Press
uII to conrm your selection.
• Press SETUP at any time to leave the Setup menu. If you are in the middle
of a procedure any change will be discarded.
LANGUAGE SETUP: This is the language used in on screen displays.
• Press SETUP to enter Setup. The Setup Menu deploys.
• Press ] to highlight “Language”’.
uII to conrm.The current selection is highlighted.
Press
• Press
▲
or ▼ to move up and down the list. The highlight will move but
the tick imark indicating the current selected value will stay in place.
• Press
uII to conrm. The screen will change to the new language.
Use the same procedure to change the other parameters.
SUBTITLE: Default is OFF (no subtitles). You can select English or if there is a non
English speaker in your house you may want to select another language.
AUDIO: The language you want the lm to be in. Default is English.
DVD MENU: The language in which lm menus display. Default is English.
When you have made the changes:
• Press
[ to return to the Setup Menu
• Press
▲
or ▼ to select Rating or Misc. OR
• Press SETUP to leave the Setup menu.
Page 14
Page 17

VIDEO SETUP
:
16:9
:Auto Fit
:Standard
Aspect Ratio
View Mode
Smart Picture
Video
Rating
Misc
Language
: 16:9
:Auto Fit
:Multi
Aspect Ratio
View Mode
4:3
16:9
Smart Picture
Video
Rating
Misc
Language
Video
Rating
Misc
Language
Aspect Ratio
: 16:9
:Auto Fit
Smart Picture
: Standard
Fill
Original
Height Fit
Width Fit
Auto Fit
ModeiewV
:
16:9
:Auto Fit
:Standard
Aspect Ratio
View Mode
Smart Picture
Video
Rating
Misc
Language
• Press SETUP to enter Setup. Press or
• Press
] to highlight “Aspect Ratio”
▼
to move to the VIDEO page
VIEW MODE: This determines to what extent the DVD picture ts the Screen
• Press
▲
or ▼ to select View Mode: Press uII.
• Press
uII to conrm your selection.
ASPECT RATIO: This is the relationship between the player and the TV.
The default is 16:9 (Widescreen). The alternative is 4:3 S(tandard ).
Note: A picture recorded in standard 4:3 format always displays in 4:3 aspect ratio.
A DVD recorded in 16:9 wide format will be compressed if the (external) TV is a
standard 4:3 screen A DVD recorded in a special format will apply that format.•
Press
▲
or ▼ to select the parameter
• Press
uII to conrm and return to the Video Menu..
Fill: The picture lls the screen. This may result in “picture cropping” on 4:3 screens
Original: Choose this mode and the picture will appear in its original size.
Height t : Fit the picture height to the screen. The sides of the picture may be
cropped
Width t : Fit the picture width to the screen. The top and bottom of the picture
may be cropped
Auto Fit: (Default Option) In this mode the picture displayed on screen will t the
screen. This may result in “picture cropping” on 4:3 screens.
• Press
▲
or ▼ to select the parameter
uII to conrm and return to the Video Menu.
• Press
Page 15
Page 18

Video
Rating
Misc
Language
Aspect Ratio
: 16:9
:Auto Fit
Bright
Soft
Dynamic
ModeiewV
Smart Picture
Standard
Video
Rating
Language
Parental
Last Memory
control
: 8.Adult
: On
SetPassword
Language
Parental control
: 8.Adult
SetPassword
Video
Language
Parental control
: 8.Adult
SetPassword
Enter PasswordEnter PasswordEnter Password
Language
Parental control
: 8.Adult
SetPassword
Video
Rating
Misc
Language
Parental control
: 8.Adult
SetPassword
Parental control
8.Adult
7.NC-17
6.R
SMART PICTURE
• Press
▲
or ▼ to select TV System: Press uII
Smart Picture enables you to provide personalised image settings.
Standard: This is the default setting.
Oter settings can be chosen to enhance the program experience, e.g Dynamic for
sport and action movies and so on.
• Press
▲
or ▼ to select the parameter
• Press uII to conrm and return to the Video Menu.
• Press
[ to return to the main menu or SETUP to exit completely.
THE RATINGS PAGE
This menu enables you to set age restrictions on certain DVD discs (see Page 2).
▼
• Press SETUP to enter Setup. Press
to move to the RATING page.
• Press ► to highlight “Parental Control” Press uII
You will be prompted to enter the password. The default password is 9653. ONLY
If the password is accepted will the rating will be changed.
• Enter 9653
• Press
uII
The message “Correct Password” appears briey and the screen reverts to:
• Press
uII
• Press ▲ or ▼ to select a rating following the guide on Page XX
• Press uII to conrm.
Page 16
Page 19

Language
Parental control
: 8.Adult
SetPassword
Video
Rating
Misc
Language
Parental control
: 8.Adult
SetPassword
Last Memory
: On
Video
Rating
Misc
Language
Parental control
: 8.Adult
SetPassword
Last Memory
Off
On
Language
Parental control
: 8.Adult
SetPassword
Video
Language
Parental control
: 8.Adult
SetPassword
Enter PasswordEnter PasswordEnter Password
Video
Language
Parental control
: 8.Adult
SetPassword
Enter PasswordEnter PasswordNew Password
Language
Parental control
: 8.Adult
SetPassword
CHANGING THE PASSWORD
• Press
▲
or ▼ to highlight ‘SET PASSWORD’ : Press uII to conrm.
You will be prompted to enter the password. The default password is 9653
• Enter 9653
• Press ENTER
The message “Correct Password” appears briey and the screen changes to
• Press
uII
• Enter the new 4 digit password. Press uII
• Conrm the new password : Press uII
The message “Set Password Successful” appears briey and the screen reverts to:
• Press
◄
to return to the main menu or SETUP to exit completely.
Note: The default password 9653 is operative even after you change the password.
LAST MEMORY
• Press
▲
or ▼ to highlight ‘LAST MEMORY’ :
• Press
uII to conrm.
• Press
▲
or ▼ to highlight ‘O or On: Press uII to conrm.
Setting ON enables the LAST MEMORY functionality. Refer to Page 10.
When you have made the changes:
• Press
◄
to return to the Setup Menu
• Press
▲
or ▼ to select Language: Video: Rating: or Misc. OR
• Press SETUP to leave the Setup menu.
Page 17
Page 20

MISCELLANEOUS SETUP ITEMS
Video
Rating
Misc
Language
Use Default Settings
Off
On
Screen Saver
Video
Rating
Misc
Language
Use Default Settings
Screen Saver
: On
g
Do you want to use default setting?
Yes No
Us eDefault Settings
Video
Rating
Misc
Language
Use Default Settings
Screen Saver
: On
• Press SETUP to enter Setup. Press
• Press
►
to highlight “Use Default Settings”
uII
• Press
▼
to move to the Misc page
• Press ◄ or ► to select Yes/No.
• Press
uII to conrm
If you select “YES”: The screen will go blank and reset to system defaults. The
system will then re-boot .
A user-set password and any ratings settings will NOT be changed.
If you select “NO”:
The screen will revert to the Misc page.
SCREEN SAVER
Even if you are using a TFT screen we advise you to use the screen saver.
▲
• Press
• Press
or ▼ to highlight ‘Screen Saver’ :
uII
• Press ▲ or ▼ to highlight ‘O or On:
• Press
uII to conrm
• Press
▲
or ▼ to select Language: Video: Rating: or Misc. OR
• Press SETUP to leave the Setup menu.
Page 18
Page 21

TROUBLESHOOTING
If your DVD player is not working properly use this guide before contacting
Tesco. Before investigating a problem, always switch o the player and any
connected units.
SYMPTOM CORRECTIVE ACTION
No power Check if the power adapter is connected securely.
No Sound/ Distorted
sound
No sound or picture (In battery operation) - at battery. Connect AC adapter
Interference or
scrolling
Disc will not play
Disc skips
Disc Distorts
No forward or reverse
scan
Handset erratic/
inoperative
Is the volume control turned up?
In battery operation, battery running down.
Due to the eect of copy protection on the disc
Avoid connecting to a recorder or TV/VCR combination.
The DVD+-RW you played should be nalized.
Ensure the disc is correctly inserted.
Make sure the disc is free from scratches & marks.
Insert a playable disc. (Check disc type and system).
Is the disc Region 2?
Clean the disc.
Cancel or change the parental lock level
Some discs prohibit rapid scanning or title and chapter skip.
You can’t advance through the opening credits and warning
information at the beginning of movies.
Point the handset at the player not the screen!
Flat battery, distance too far from player or
Handset too far from player or obstructed.
AFTER USING YOUR PLAYER
• Remove the disc from the tray
• Close the player lid securely
• Unplug the adapter and coil the cables
• Store the player and accessories securely, away from sources of heat and damp
and out of the reach of children and pets.
NEVER store the player with the lid open!
CARE AND CLEANING
Occasionally wipe the player with a lint free duster. Never clean the player with
liquids or solvents.
Do NOT clean the inside of the player tray with a cloth. Lightly blow out any dust. If
your discs skip or don’t play properly, this is more likely to be caused by damage or
dirt on the disc rather than any fault of the unit.
Clean the screen from time to time with a approved anti-static cleaner. NEVER
wipe the screen with a tissue. Use a Calotherm cloth available from opticians.
CARE OF DISCS
DVD discs are fragile. Treat them with care. Always store them upright in their
packing; away from direct sunlight, heat and damp.
When handling discs, hold the disc’s outer edge and/or the centre spindle hole. Do
not touch the disc surface. Never bend or ex a disc.
Clean the disc surface with a soft, dry cloth. Wipe the disc surface gently, radially,
from centre toward the outer edge. Never apply solvents to the surface of a disc.
Page 19
Page 22

SPECIFICATIONS
WARRANTY
Compatible discs: DVD/CD
Signal system: Player NTSC; Video Out PAL
Panel size: 7 inch
Frequency response: 20 Hz to 20 kHz
Video output: 1 Vp-p/75 Ohm, unbalanced
Audio output: 1.4Vrms/10kOhm
Audio S/N: Better than 50 dB
Dynamic range: Better than 80 dB
Laser: Semiconductor, Wavelength: 650 nm/795 nm
Power source: DC 9 V (via AC/DC adapter)
Power consumption: <10 W
Operating temp: 5~40°C
Weight: 0.698 kg
Dimensions 203 x 157 x 43 mm (W x D x H)
Battery Type: Li Polymer
Your Technika appliance is covered by a warranty for 12 months from the date of
purchase. If a fault develops during this period, please contact the TESCO electrical
help line on 0845 456 6767. Please have your original purchase receipt with you
when you call. This warranty in no way aects your consumer rights,
UK: Waste electrical products should not be disposed of with household waste. Separate disposal facilities exist, for your nearest facilities.
See www.recycle-more.co.uk or in-store for details.
ROI: Produced after 13th August 2005. Waste electrical products
should not be disposed of with household waste. Please recycle where
facilities exist. Check with your Local Authority or retailer for recycling
advice.
Page 20
Page 23

Page 24

Te sco Stores Ltd,
Delamare Road, Cheshunt, Herts, EN8 9SL
Technika Helpline: 0845 456 6767 (Calls cost up to 4p per minute from a BT landline, other providers may vary)
 Loading...