

Page 1

DAB1101ST
Owner’s
Handbook
DAB stereo Digital Radio with alarm
Page 2

1
Read these instructions.
Keep these instructions.
Heed all warnings.
Follow all instruc tions.
Do not use this ap paratus near water.
Clean only with a s lightly damp cloth.
Do not block any ventilation openings.
Install in accordance with the manufact urer’s instruc tions.
Do not install o r operate near any heat sources such as
radiators, s toves, or other apparatus that produce heat.
Unplug this apparatus durin g lightning storms or when
unused for lo ng periods of time.
Refer all servicing to qualied service personnel.
Servic ing is required when the apparatus has bee n
damaged in any way, such as the power-supply cor d
or plug is damaged, liquid has been s pilled or objects
have fallen into the a pparatus, the apparatus ha s been
exposed to rain or moist ure, does not operate normall y,
or has been dropped.
Warning: To reduce the risk of re or elec trical shock,
do not expos e this product to rain or moi sture. The
product m ust not be exposed to dri pping and splashing
and no objec t lled with liquids such as a vas e of
owers should b e placed on the product.
No naked ame sour ces such as candles should be
placed on the product.
Caution: Changes or modications not expressly
approved by the ma nufacturer could void t he user’s
authorit y to operate this device.
Caution: Usage of controls or adjustme nts or
perfor mance of procedures other t han those specied
herein may result in hazardou s exposure.
IMPORTANT
This equipment generates, u ses and can radiate radio
frequenc y energy and, if not installed and used in
accordance wit h the instructions, may c ause harmful
interference to radio communication. However, this
is no guarantee that interf erence will not occur in a
particular installat ion. If this equipment does c ause
harmful interference to radio or television reception,
which can be de termined by turning the eq uipment
o and on, the user i s encouraged to try to correct the
interference by one of the f ollowing measures:
- Reorient or relocate the re ceiving antenna.
- Increase the s eparation between t he equipment
and receiver.
- Connect th e equipment into an outlet on a
circuit di erent from that to which the r eceiver is
connected.
- Consult the deale r or an experienced radio/ TV
technician for help.
ELECTRICAL INFORMATION
Mains Supply: The mains operating voltage of this unit
is marked on a rati ng plate on the back of the unit.
The means of disconnecti ng this appliance from
the mains suppl y is the mains plug. This should be
unobstru cted and readily operab le at all times.
CAUTION!
RISK OF ELECTRIC SHOCK
DO NOT OPEN
TO REDUCE THE RISK OF ELECTRIC SHOCK
DO NOT REMOVE COVER (OR BACK)
This symbol indicates th at there are
important operating and maintenance
instructions in the literature accompanying
this unit.
This symbol indicates that dangerous
voltage cons tituting a risk of elec tric shock
is present within this unit.
IMPORTANT SAFETY INFORMATION
Page 3

2
INDEX INTRODUCTION PRELIMINARIES
Import ant safety i nformation...............................................1
Introduc tion..........................................................................2
Unpackin g.............................................................................2
Contents................................................................................2
Controls an d connectors.......................................................3
AC mains opera tion...............................................................4
Batter y ope ration ..................................................................4
Batter y disposal....................................................................4
Getti ng sta rte d......................................................................4
DAB operatio n.......................................................................5
FM operatio n.........................................................................6
Time and date f unctions.......................................................7
Alarm func tions....................................................................8
General op eration.................................................................8
Headphone s..........................................................................8
Care and main tenance..........................................................8
Specic ations........................................................................9
Warranty...............................................................................9
Introduction
DAB (Digital Audio Br oadcasting) technology allows many
more radio st ations compared to FM. DAB transmis sions do
away with probl ems of hiss and fade that plague AM and
FM broadcas ts and are less likely to be aec ted by adverse
weather condit ions or other sources of inter ference.
In addition to sp eech and music DAB transmissions c arry
high levels of data - f ar greater than the limited RDS
information available on FM stations.
Unlike FM, DAB is broadcast on many fre quencies.
Many countrie s in Europe, including the UK use Band III
(174-240 MHz); others, France fo r example, use the L-Band
(1452-1492 MHz). Germany uses both ban ds.
Your radio can tune Ba nd III. Countries in Europe that u se
Band III include: Belgium, Denmar k, Holland, Italy, Norway,
Portugal, Spain, Sweden, Switzer land. Your radi o will tune
stations in a ll these countries.
Your radio cannot receive French or Ger man stations
broadcas ting in the L-Band though FM ser vices are
available all over Euro pe.
Being digital, DAB transmissions c an have a wider
frequency range and greater dy namics than that available
with FM technol ogy.
FM reception is avai lable on the DAB1101ST for use in those
locations w here there is no usable DAB ser vice.
Check how many stations you can get in your area by
texting DAB and your postcod e to 88600# or nd out whic h
stations on t he website at: getdigitalradio.com
A headphone ou tput is provided for per sonal listening.
UNPAC KING
Carefull y unpack the unit. If it is damage d, please return it
to your neares t Tesco store f or replacement. Remember to
take your purcha se receipt with you.
Retain the Use r Handbook. If you pass the uni t on to a third
part y make sure you pass on the handbook .
We suggest you retain the pack aging. If you dispose of it,
do so having regard to any recyc ling regulations in your
area.
CONTENTS
The carton should contain:
• The DAB1101ST digital ra dio
• Power adaptor
• Operating Manual
If any items are missing or damaged, contact your n earest
TESCO store fo r a replacement. Have your receipt rea dy
when you call. Retain the pack aging. If you dispose of it, do
so having regar d to any recycling regulatio ns in your area.
LOC ATION
Place the unit on a dr y stable surface aw ay from h eat and
damp and where it i s unlikely to fall or be knocked over.
Page 4
3
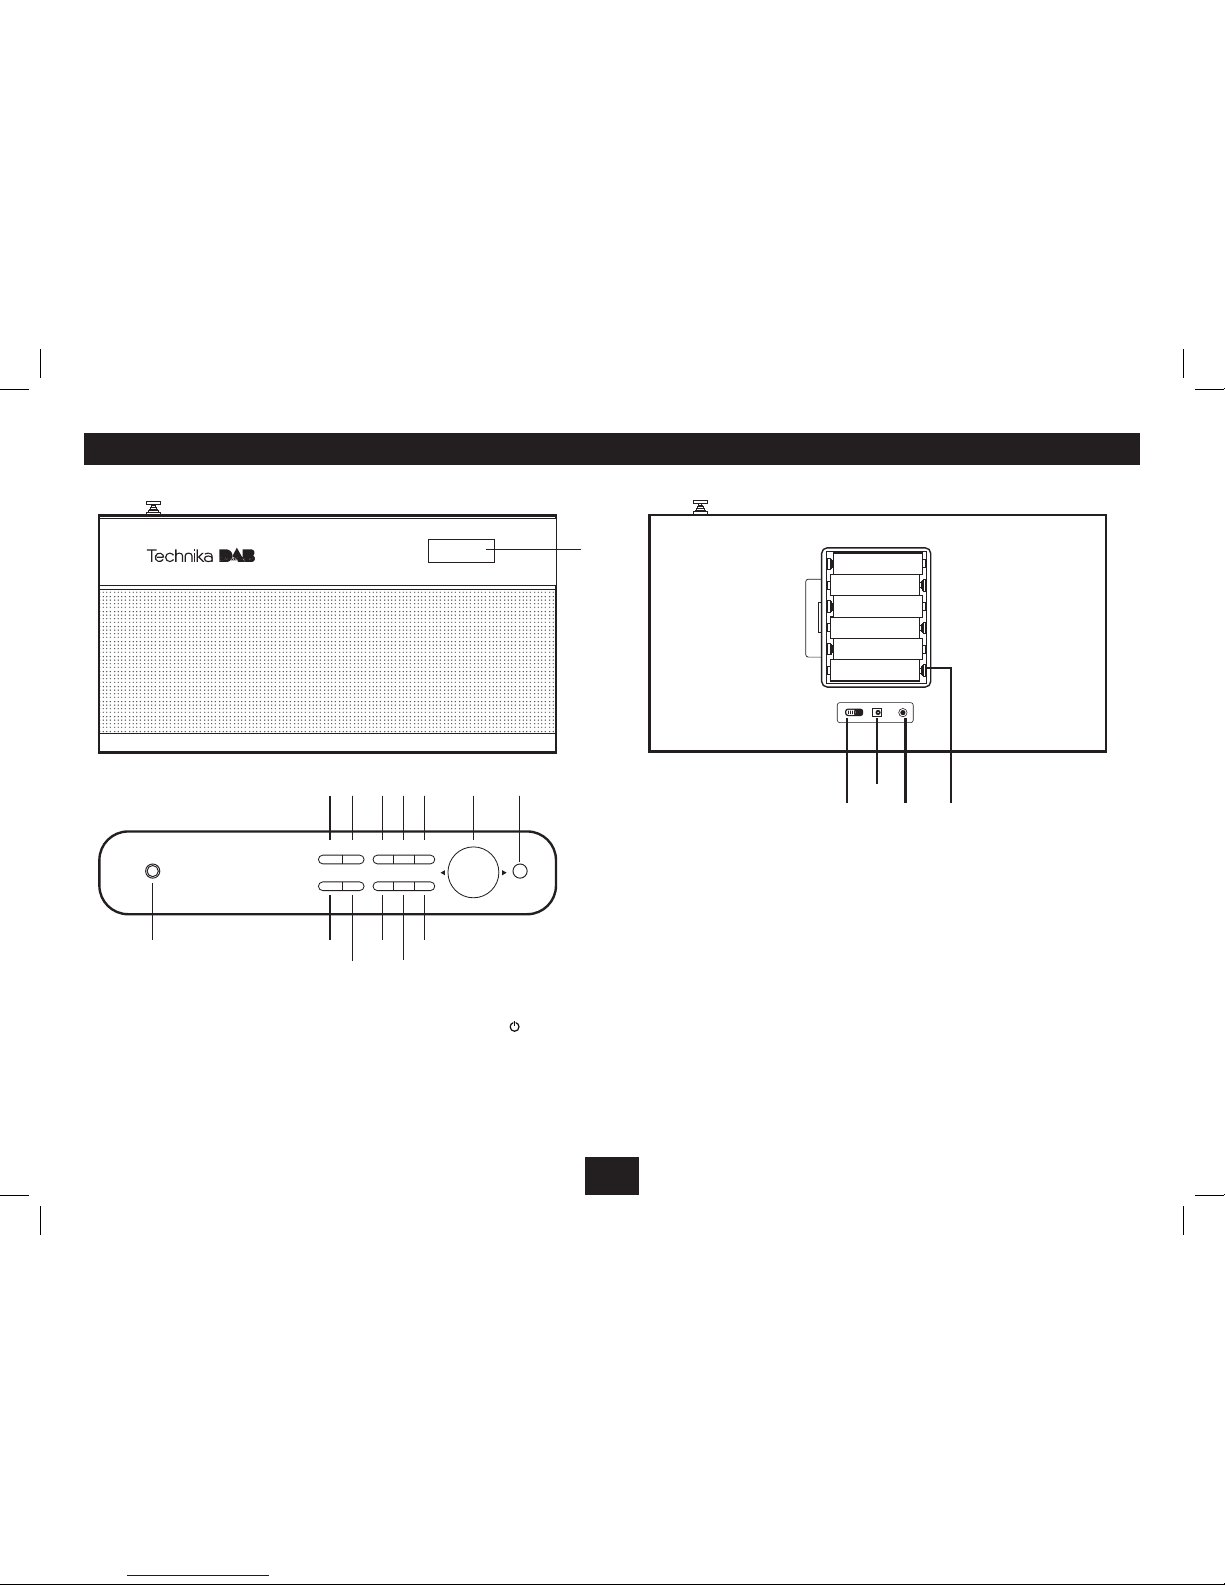
CONTROLS AND CONNECTORS
1
FRONT
TOP
2
DAB/FMBACK/
SCAN
1/6 2/7 3/8
4/9 5/10 PRESETINFO/
MENU
ENTER
VOL-
SLEEP
VOL+
3 4 5 6
10
11
121314
9
7 8
1
FRONT
TOP
BACK
2
151617 18
DAB/FMBACK/
SCAN
1/6 2/7 3/8
4/9 5/10 PRESETINFO/
MENU
ENTER
VOL-
SLEEP
VOL+
3 4 5 6
10
11
121314
9
7 8
1. LCD display
2. DAB/FM button
3. BACK/ SCAN
4. 1-6 preset bu tton
5. 2-7 preset button
6. 3-8 preset b utton
7. VOLUME +/- controls
8. SLEEP /
button
9. Telescopic aerial
10. INFO/MENU button
11. ENTER button
12. 4-9 preset but ton
13. 5-10 preset b utton
14. PRESET button
15. POWER switch
16. DC power input
17. EARPHONE out put
18. Battery compartment
Page 5

4
CONNECTING POWER
• Ensure that the mains wall socket i s switched o and
connect t he mains power adaptor.
• Insert th e DC power jack into the input on the r ear of
the unit (16).
BAT T E RY O PER ATION
Remove the bat tery compartment c over, by pressing t he
plastic tab inwards.
Referrin g to the diagram below, t 6 x AA batter ies into the
battery compartment. Alkaline bat teries are recommended
for best pe rformance.
NOTE: Make sure you ma tch the + / - polarities of the A A
batteries with the markings inside the compartment.
Dispose of us ed batteries with re gard to the recycling
regulations i n your area. Do NOT short circu it batteries or
throw them into water, the general rub bish or in a re.
Weak batteries can leak and damage the radio.
Replace them in good time!
GETTING STARTED
Switching o n your radio for the rst time
1 Ensure the m ains power is connec ted
Check the conn ection of the mains adapto r to the DC
power socket on t he rear of the radio (16).
2 Extend t he telescopic aerial as far as i t can go.
3 Slide the Power ON/OFF switch to ON to turn on the
radio.
The radio will au tomatically tune and opera te the quick
scan.
During scan mode, the LCD will disp lay a slide bar that
indicates th e progress of the scan, and t he amount of
radio stations that have been f ound so far. Once the scan
has nished, the r adio will select the r st alphanumeric
station.
NOTE: The name of t he found group of DAB radio stat ions
will be displayed o n the bottom half of the display.
Memory
When you power up th e radio again, the radio plays the
same mode (DAB or FM) as the last oper ation.
If you hear no soun d, then press the “VOL +” control unt il
you reach a desir ed level.
If the volume is too high, then pres s the “VOL -” control to
decrease t he volume level.
To listen the statio ns that have been stored pres s either
/
buttons to c ycle through.
Each time you p ress the forward and ba ckward buttons you
will skip to the ne xt or previous store d station. The radio
will then display t he station name.
Standby
To turn the radio o press and hold the SLEEP/
button
for 2 seconds.
Welcome to
Digital Radio
AC MAINS OPERATION BATTERY DISPOSAL GETTING STARTED
AA
AA
AA
AA
AA
AA
Page 6

5
Storing stations
It is possible to s tore up to 10 of your favourite stat ions
to the preset keys. This will ena ble you to access your
favourite stations quic kly & easily.
To store a preset, yo u must rst be listening to t he station
that you would like to s ave, press & hold the PRESET
button fo r 2 seconds. The LCD will then show the f ollowing:
Use the
/ buttons to c hoose the preset numbe r from
1-10 you wish to us e. Then press the ENTER button to
store.
Recalling a stored station
Once you have saved a station to one of t he preset buttons,
you can recal l that station by pressing th e PRESET button.
Then use the
/ buttons to c hoose the desired pres et
station. Once on the desire d station press the ENTER
button to ac tivate. If you choose a pre set that hasn’t
been allocated a station, then “Preset Empt y” will be
displayed. Alter natively you can use the pres et buttons,
press one of th e buttons to use the rs t digit preset ie:- 1-6
will be 1. To use the preset 6 press and hold the 1-6 butto n.
DAB OPERATION DAB OPERATION DAB OPERATION
Preset Store
< 1: (Empty) >
Preset 1
Stored
Display modes
Every time yo u press the “INFO/MENU” button, the display
will cycle through the fo llowing display modes: The
information is displayed on the l ower segment of the LCD
display.
DLS (Dynamic Label Segment)
Dynamic label s egment is a scrolling message that the
broadcaster may include with their transmissions. This
message usu ally includes informatio n, such as program
detail etc.
Signal strength
Denotes the qua lity of the current signa l.
Program type
This descr ibes the “Style” or “genre” of music th at is
being broadc ast e.g. “Rock “or “ Classical”.
Ensemble/Multiplex (Group name)
A multiplex /ensemble is a collec tion of radio stations that
are bundled and transmit ted on one frequency. There are
national and local multiplexes. Local ones contain stations
that are speci c to that area e.g. MXR West.
NOTE: DAB – unlike norma l radio, groups together sever al
radio stations and transm its them on one frequenc y.
Channel frequency
Shows the current channels f requency.
Signal error
Shows any reception errors.
Bitrate
Shows the current statio ns data bit rate.
Time / Date
Displays the tim e / date being broadcast.
Scan modes
There are two t ypes of scan, one is Quick scan and the
other is Full scan.
Quick sc an: searches the UK DAB band III
Full scan: searches all DAB channels.
1. To activate the quick sc an press and hold the
BACK/SCAN button.
2. To perform a FULL SC AN, press and hold the INFO/MENU
button for 3 seconds.
3. When the <Autosc an> option appears pre ss the ENTER
button.
Signal Error
Programme Type
DLS (scrolling text)
Bitrate
Time
Date
Signal Strength
Ensemble Name
Channel Frequency
Page 7

6
Switching f rom DAB to FM
Press the DAB /FM button once to sw itch. The display will
show FM Mod e.
Once activated the radio will automatic ally tune to the
nearest available station.
Storing stations
The operation for FM is the sam e as DAB. See Page 5.
Recalling a stored station
The operation for FM is the sam e as DAB. See Page 5.
Display modes
Every time yo u press the “INFO/MENU” button, the
display will cyc le through the following display modes:
The information is displayed on the l ower segment of the LCD
display.
Program type
This descr ibes the “Style” or “genre” of music th at is
being broadc ast e.g. “Rock “or “ Classical”.
Programme Name
Station name ( if broadcast ). Freq uency of the station if n o
name is broadcast.
Manual Tuning
As well as an auto tune funct ion, you can manually tune
the receiver. This ca n help you when aligning your aerial o r
when adding s tations that were missed while auto tuning.
1. Press and hold the INFO/MENU button for 3 seconds.
2. When <Autoscan> appears pres s the
button to select
<Manual Tune>, press t he ENTER button.
3. Use the
/ buttons to c ycle through the DAB
channels, whic h are numbered from 5A to 13F.
4. Now press the ENTER button to ente r the current
ensemble/multiplex, the top line will now display the
rst station in the ensemble/multiplex.
5. To see what stations ar e present in the found ense mble/
multiplex , just press either
or buttons . When you’ve
located a st ation that you would like to listen to, jus t
press the ENTER but ton
6. Once you have reache d the last station in the fo und
ensemble, it will revert bac k to the rst station agai n. If
you wish to exit t he manual tuning mode, just pre ss the
ENTER button.
Pruning
When the radio ha s performed a Scan i n several locations
you may nd there are s tored stations that you c an no
longer receive. T his function automatic ally removes them
from the st ored station list.
1. Press and hold the INFO/MENU button for 3 seconds.
2. When the <Autosc an> option appears press ei ther
or and nd <Prune>, press the ENTER button.
3. Use the
or buttons to select YES or NO and press
ENTER to select.
DRC ( Dynami c Range Control )
This causes t he radio to reduce the dynamic r ange of
the audio signal. T he purpose of this is to adapt th e
dynamic range o f the audio signal to listening in a no isy
environment.
NOTE: The Dyn amic Range Control option is not av ailable
on many DAB stations .
1. Press and hold the INFO/MENU button for 3 seconds.
2. When the <Autosc an> option appears press ei ther
or and nd <DRC>, press the ENTER button.
3. Choose bet ween DRC o, DRC Low and DRC High.
4. Press ENTER to save the s etting.
DAB OPERATION DAB OPERATION FM OPERATION
Radio text
Date
Time
Audio Mode (Stereo/Mono)
<Programme Type>
<Programme Name>
Page 8

7
Audio Mode (Stereo/Mono)
Denotes if the b roadcast is in Stereo or Mono.
To specify that a station c an be only played in mono or that
stereo is allowed:
1. Press and hold the INFO/MENU button for 3 seconds.
2. When the <Scan s etting> option appear s press either
or and nd <Audio Se tting>, press the ENTER
button.
3. Use the
or buttons to cycle thro ugh the 2 options
<Forced Mono> or <Stereo Allowe d>. Press ENTER to
select.
Stereo allowed: Means any station broadc ast in stereo
with a stro ng enough signal will be played in st ereo.
Mono only: Plays ALL stations in mo no regardless of the
availabilit y of a stereo signal.
Time
Displays the current time. Plea se see Page 7 for settin g.
Date
Displays the current date. Pleas e see Page 7 for setting.
Ra dio Te xt
Displays scro lling text broadcas t by the station ( only if
broadcast ).
Scan Modes
Auto Scan
The Auto scan se tting will scan up or dow n depending on
where the st arting frequenc y is. Once it nds a station it
will stop.
There are 2 opti ons to use when using this func tion.
NOTE: Ensure you are in the FM mode be fore following the
below steps.
1. Press and hold the INFO/MENU button for 3 seconds.
2. When the <Scan s etting> option appear s press the
ENTER button.
3. You will have the choice of either <Strong Stations
Only> or <All Statio ns> using the
or buttons.
Strong stations only, will only sto p at stations with a
strong signal. All station s will stop at any station foun d
with a stro ng or weak signal.
4. Make your choice by pr essing the ENTER button to
activate the setting.
Now when you press and hold the BAC K/SCAN but ton the
auto scan sear ches depending on what set ting you chose.
The time & date can be set automat ically from the DAB
broadcast or set manually.
1. Press and hold the INFO/MENU button for 3 seconds.
2. When the <Scan s etting> option appear s press either
or and nd <System>.
3. Press the ENTER but ton, use the
/ buttons to nd
<Time> and press ENTER.
Inside the <Time> menu there are several options. <Set
12/24 Hour>, <Set Ti me/Date> & <Auto Update>
<Set 12/24 Hour> Use the
/ buttons to s elect 12 or
24 hour and then press t he ENTER button to activate.
<Set Time/Date> When activated the Hour digit ashes,
use the
/ buttons to s et the digit to the correc t hour
then press ENTER, r epeat for the minutes again pressing
ENTER when set.
The process f or setting the date is exactly the s ame as the
above. Press ENTER to nali se the setting once comp lete.
<Auto Update> Use the
/ buttons to c ycle through
the various op tions for auto setting the time & date. The se
range from. <Update from any>, < Update from DAB>, <
Update from FM> and <No Upda te>.
NOTE: When the p ower is switched OFF ( not standby ) the
settings will be lost.
FM OPERATION TIME AND DATE FUNCTIONSFM OPERATION
Page 9

8
NOTE: when powered with bat teries the display will dim
after 40 seconds of ina ctivity, to activate a gain press any
button. Th is does not occur when using mains power.
ALARM FUNCTIONS
1. Press and hold the INFO/MENU button for 3 seconds.
2. When the <Scan s etting> option appear s press either
or and nd <System>.
3. Press the ENTER but ton, use the
/ buttons to nd
<Alarm> and press ENTER .
Alarm Setup
Press the ENTER button to init iate the setup process.
1. Use the
/ buttons to s elect Alarm ON or OFF then
press ENTER to activate.
2. Use the
/ buttons to s et the Alarm ON hour digits.
Press ENTER to set.
3. Set the Minute digits the sa me way and press ENTER
once set.
4. Choose the so urce of the alarm between BUZ ZER, DAB &
FM using the
/ buttons.
If you choose DAB or FM the next step is to choose the
station you want to play when the alarm so unds.
There is a choice of Last station listened to, or a preset
( if any stored ).
5. There is the option to only have the alar m activate on
WEEKDAYS, DAILY, ONCE and WEEKENDS. Choos e which
you require usi ng the
/ buttons. The ENTER button
stores the s etting.
6. The next s tep is to set the volume level you require. use
the
/ buttons to s et and press ENTER to activate t he
alarm.
7. To disable th e alarm return to the <Alarm> screen and
use the
/ buttons to c hoose OFF and press ENTER
to save.
8. To silence the alarm when s ounding press the ENTER
button.
NOTE: In stan dby the alarm icon
will display when
activated.
Snooze Mode
When the alarm sounds ( if in BUZZER mode ) you can press
the SLEEP /
button to ac tivate the SNOOZE mode and
delay the alarm fo r 5 minutes.
GENERAL OPERATION
Factory Reset
To reset the radio to the factor y settings follow t he below
steps. NOTE All pres et settings will be los t.
1. Press and hold the INFO/MENU button for 3 seconds.
TIME AND DATE FUNCTIONS ALARM FUNCTIONS
2. When the <Scan s etting> option appear s press either
or and nd <System>, press the ENTER button.
3. Use the
or buttons to nd the <Factor y Reset>
option and press ENTER.
4. Choose <Yes> and press the ENTER button.
HEADPHONES
There is a headph one output socket on the back panel of
the radio. If head phones are connected to t his socket for
private listening, the speakers will cut ou t automatically.
Always keep the volume within rea sonable limits to avoid
damaging your hearing. WARNING! Excessive s ound
pressure c an cause hearing loss. With continued use at
high volume, your ear s may become accustomed to t he
sound level, whic h may result in permanent damage to
your hearing.
CARE AND MAINTENANCE
AFTER USING YOUR RADIO
• Set to Standby.
• Switch the unit o at the mains and unplug it if you are
leaving it unat tended for a long period (ho lidays etc).
• Avoid leaving bat teries tted if you leave the radio
unattende d for long periods. They may leak and damage
the radio.
GENERAL OPERATION
or retailer f or recycling advice.
Page 10

9
CARE AND CLEANING
All care and clea ning operations should be c arried out with
the unit unplug ged from the mains power.
Occasionally w ipe the cabinet with a lint f ree duster. Never
clean the unit w ith liquids or solvents.
SPECIFICATIONS
SPECIFICATIONS
Adaptor Inpu t:...............................100-240V~ 50/60Hz 0.2A
Adaptor Out put:..............................................8V 750mA
Main Unit:....................................................... 8V 750m A
Batter y:....................................................... 9V (AA/UM3 x 6)
Speaker Power:................................................................. 2W
DAB:.....................................................174.928 - 239.200MHz
FM:..................................................................87.5 – 108MHz
Net weight:....................................................................0. 8kg
CARE AND MAINTENANCE WARRANTY
Your Tesco appliance is covered by a war ranty for 12
months from the date of purchase. If a fault deve lops
during this pe riod, please contact the TESCO elec trical help
line on 08 45 456 6767. Please have your original purc hase
receipt with you when you call. T his warranty in no way
aects your consumer rights.
UK: Waste elec trical product s should
not be dispose d of with household waste.
Separate disp osal facilities exis t, for your
nearest fa cilities. See www.recycle- more.co.uk
or in-store for details.
ROI: Produced af ter 13th August 2005. Waste
electrical product s should not be disposed of
with household waste. Please recycle where
facilitie s exist. Check with your Local Authority
or retailer f or recycling advice.
Page 11

Tesco Stores Ltd,
Delamare Road, Cheshunt, Herts, EN8 9SL
Technika Helpline: 0845 456 6767 (
Calls cost up to 4p per minute from a BT landline, other providers may vary)
DAB1101ST V0.1
Page 12

Tesco Stores Ltd,
Delamare Road, Cheshunt, Herts, EN8 9SL
Technika Helpline: 0845 456 6767 (
Calls cost up to 4p per minute from a BT landline, other providers may vary)
DAB1101ST V0.222222222222
2
 Loading...