

Page 1

Instructions for Use and Installation
Ceramic Electric Hotplates
2R-2
CFM31
CFM640
CFM641
CFE641
CFM742
CFE742
CSM842
CFE942
Page 2

Contents
2
For Your Safety . . . . . . . . . . . . . . . . . . . . . . . . . . . . . . . . . . . . . 3
Use and Care
Description of hobs . . . . . . . . . . . . . . . . . . . . . . . . . . . . . . . . . . 6
How to use your hob . . . . . . . . . . . . . . . . . . . . . . . . . . . . . . . . . 7
Hobs with control knobs . . . . . . . . . . . . . . . . . . . . . . . . . . . . . . 8
Hobs with touch controls . . . . . . . . . . . . . . . . . . . . . . . . . . . . . 10
Practical cooking advice . . . . . . . . . . . . . . . . . . . . . . . . . . . . . 13
Cleaning & manintenance . . . . . . . . . . . . . . . . . . . . . . . . . . . . 13
Troubleshooting . . . . . . . . . . . . . . . . . . . . . . . . . . . . . . . . . . . . 14
Disposal. . . . . . . . . . . . . . . . . . . . . . . . . . . . . . . . . . . . . . . . . . 14
Installation
Building into benches . . . . . . . . . . . . . . . . . . . . . . . . . . . . . . . 15
Insertion & fixing . . . . . . . . . . . . . . . . . . . . . . . . . . . . . . . . . . . 16
Electrical connection . . . . . . . . . . . . . . . . . . . . . . . . . . . . . . . . 17
Technical Data. . . . . . . . . . . . . . . . . . . . . . . . . . . . . . . . . . . . . 18
Data label . . . . . . . . . . . . . . . . . . . . . . . . . . . . . . . . . . . . . . . . 18
Page 3

For Your Safety
We recommend that you read the instructions in this owner's
manual carefully before use for the best performance and to extend
the life of your appliance. It will provide you with all the information
you need to ensure its safe installation, use and maintenance.
Retain this owner's manual for future reference.
To maintain the efficiency and safety of this appliance, we
recommend that you do the following:
· Always call the Technika service department if there are any
faults with your appliance.
· Always use original spare parts available from Technika.
· This appliance is designed for non-commercial, household use
and it must not be altered in any way.
· This appliance can only be used safely when it is correctly
connected to an efficient earthing system in compliance
with current electrical safety standards.
· If the supply cord is damaged, it must be replaced by the
manufacturer or its service agent or a similarly qualified
person in order to avoid a hazard.
· During use, the appliance becomes very hot. Take care not
to touch the surface of the hob. To avoid burns and scalds,
children should be kept away.
· The use of suitable heat proof gloves should be worn when
handling hot utensils and pans.
· This appliance is not intended for use by persons (including
children) with reduced physical, sensory or mental
capabilities, or lack of experience and knowledge, unless
they have been given supervision or instruction concerning
use of the appliance by a person responsible for their
safety.
· Young children should be supervised to ensure that they do
not play with the appliance.
· DO NOT use a steam cleaner to clean the appliance.
Packaging items such as plastic bags, polystyrene, nails, etc. are
potentially dangerous, and therefore appropriate measures must
be taken to prevent children and the disabled from coming into
contact with them.
3
Page 4

For Your Safety
Avoid the following:
· Touching the appliance with wet parts of the body.
· Using the appliance while barefoot.
· Improper or dangerous operation.
· Allowing power supply cables of other appliances to come into
contact with hot parts of the hob.
· Exposing the appliance to atmospheric agents such as rain, or
direct sunlight.
· Using flammable liquids near the appliance.
· Take care not to spill sugar or sweet mixtures on to the ceramic
glass surface when hot. Never place materials or substances on
the ceramic glass which may melt (plastic or aluminium foil). In
the event of this happening, promptly switch off and remove the
molten material while the cooking zone is still warm, to prevent it
from being damaged. Failure to instantly clean the ceramic glass
could lead to incrustations, which are impossible to remove once
the hob has cooled down.
Authorised personnel must be contracted to...
· Install the appliance according to these installation instructions
and any local requirements.
Technika Service Department must be contacted...
· If in doubt about the operation of the appliance.
· If in doubt about the soundness of the appliance after removing
it from its packaging.
· If the power supply cable has been damaged or needs to be
replaced.
· If the appliance requires a service.
· If you need spare parts.
4
Page 5

For Your Safety
WARNINGS:
· DO NOT steam clean the appliance.
· Only use the appliance to cook food and nothing else.
· If the surface is cracked, switch off the appliance to avoid
the possibility of electric shock.
· Check that the appliance has not been damaged
immediately after it has been unpacked.
· Disconnect the appliance from the electrical mains if it is
not functioning properly and before cleaning or performing
maintenance.
· Make sure the controls are switched OFF when the
appliance is not in use.
· Technika will not accept any liability as a result of any
damage due to incorrect installation or improper use.
5
Page 6
6
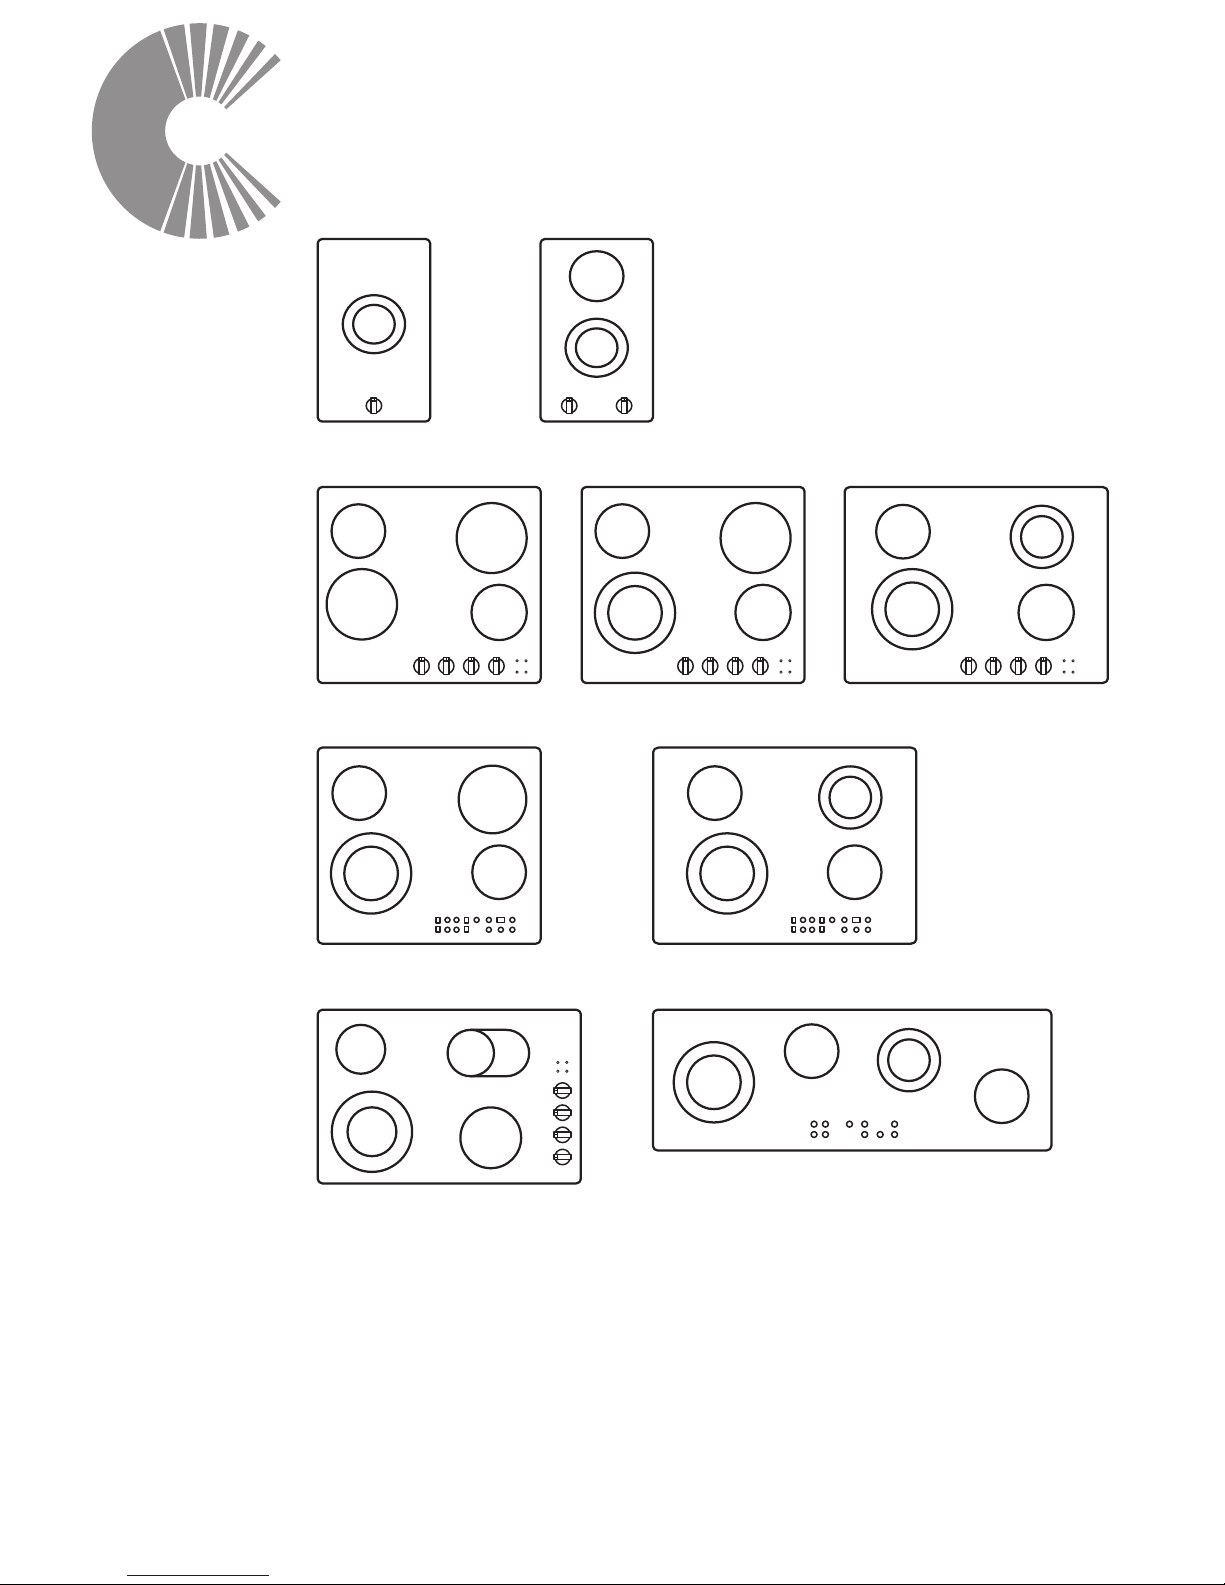
Description of the hobs
Use and Care
A. Single cooking zone 1200W
B. Single cooking zone 1800W
C. Dual cooking zone 1700/700W
D. Dual cooking zone 2200/1000W
E. Dual cooking zone 2000/1100W
1. Control knobs
2. Power & residual heat warning lights
3. Sensor touch controls
A
D
B
E
2
1
D
A
A
C
A
B
A
1 2
B
3
A
B
A
3
A
A
1 2
D
A
D
A
3
C
1
A
D
C
1
C
C
B
A
1 2
A
D
2R-2
CFE942
CFM31
CFM640
CFE641
CFM742CFM641
CFE742
CSM842
Page 7

Use and Care
7
HOW TO USE YOUR HOB
Before first Use
Before cooking for the first time the ceramic glass has to be
cleaned. Remove any removable labels and protective sheeting.
Place a saucepan of water on each of the front hotplates and
switch them on high for at least 30 minutes. After 30 minutes switch
the front hotplates off, place a saucepan of water on each of the
rear hotplates and the central hotplate (if present). Switch them on
high for at least 30 minutes. This procedure is necessary in order to
evaporate any protective oils and humidity that may have collected
during the manufacturing process and will enable the electronic
control circuits to operate properly.
Pot sizes
The pot sizes stated in the table below are suitable for your electric
hob. Solid pots and pans with flat bottoms are recommended for
efficient cooking.
Pot diameter
Hotplate diameter
140mm 160mm 200mm 240mm
120mm 140mm 180mm 220mm
Page 8

8
Use and Care
HOBS WITH CONTROL KNOBS
Description of symbols
Single cooking zones
Turn the control knob to the desired position (low to high).
Adjustment is continuous so the cooking zone will operate at any
intermediate knob setting between low & high. Once the cooking
zone is hot, the LED corresponding to the zone illuminates.
You can switch off the cooking zone by turning the knob, in either
direction, to the off position. The residual heat warning light
remains illuminated when the temperature of the ceramic glass
surface is hot and it will switch off once the surface temperature
has cooled.
Dual cooking zones
Turn the control knob clockwise to the desired position between low
and halfway as shown on the diagram on page 9. The inner cooking
zone will heat and the outer cooking zone is off. Adjustment is
continuous so the cooking zone will operate at any intermediate
knob setting between low & halfway. Once the inner cooking zone
is hot, the lamp corresponding to the zone illuminates.
To operate the outer cooking zone, turn the knob past the half way
setting. Both inner and outer cooking zones will operate.
Adjustment is continuous so the both zones will operate at any
intermediate knob setting between halfway & max. For highest
setting with both zones operating, turn the knob past max, to the
detent position (between max & ). To reduce heat setting, but
continue to operate both zones, turn the knob anywhere between
maximum and halfway setting.
To return to operating the inner cooking zone only, turn the knob
anticlockwise to between halfway and low.
Front
Left
Rear
Left
Rear
Right
Front
Right
Off
Page 9

9
Note: You can turn the knob in either direction from any position to
the setting you select.
The residual heat warning lamp remains illuminated when the
temperature of the ceramic glass surface is hot and it will switch off
once the surface temperature has cooled.
Use and Care
MAX
LOW
HALFWAY
e
n
o
Z
e
l
g
n
i
S
D
u
a
l
Z
o
n
e
Lowest Heat
(Single Zone)
Highest Heat
(Single Zone)
Highest Heat
(Dual Zone)
Lowest Heat
(Dual Zone)
Page 10

10
Use and Care
HOBS WITH TOUCH CONTROLS
When first connected to power or when power is restored after a
power outage, an operating check will be carried out automatically
and all the indicator lights will illuminate for a few seconds.
Description of symbols
Switching the hob on/off
Hold down switch icon for 2 seconds to switch the appliance on.
Displays will illuminate to confirm that the hob is switched on. If no
functions are used within 10 seconds of switching the appliance on,
it will automatically switch off.
When not in use, the hob should be switched off by pressing the
switch icon.
Single cooking zones
To operate the touch controls, lightly press the icon printed on the
ceramic glass surface, which corresponds to the cooking zone you
want to switch on. Pressing an icon is confirmed by a beep.
The display will indicate ‘0’). Press the or icons to activate
the cooking zone and adjust the power at which it should operate.
The power settings range from a minimum of 1 to a maximum of 9.
You must adjust the power within 10 seconds from when the icon is
pressed, otherwise it will automatically switch off.
On/Off
Lock
Increase
Setting
Decrease
Setting
Timer
Dual
Zone
Rear
Right
Front
Right
Rear
Left
Front
Left
Rear
Centre
Front
Centre
Page 11

11
Use and Care
Dual Cooking Zones
To activate heating of a dual cooking zone, once the zone has
been selected and set, press the dual zone icon . An indicator
will illuminate to show that dual cooking zone has been selected.
Press the or icons to adjust the power of the dual cooking
zone to the desired setting.
Cooking zone lock-out
The cooking zone lock-out function is a safety function. It locks out
the hob controls to prevent the cooking zones being switched on
accidentally, while the appliance is switched on.
Hold down lock key for 1 second to lock out the controls. The
conttrols can be reactivated by holding down lock key again for 1
second.
Timer (on some models only)
Some models are equipped with a 1 to 99 minute cooking timer.
To use timed cooking, first set the power level of the selected
cooking zone by following the instructions given in the sections
titled “Single cooking zones” or “Dual cooking zones”.
Press timer icon then press or icons to set the number
of minutes that you want the cooking zone to operate. The
operating time of the cooking zone can be increased or decreased
at any time by using the or icons.
The timer is set for the first selected cooking zone, to set the timer
for another cooking zone, select the cooking zone, then press the
timer icon and set the timer. You can use the timer for all
cooking zones. To check the time remaining, press the cooking
zone.
After 5 seconds have elapsed since the last button is pressed, the
timer will start and the cooking zone will operate until the display
time reaches ‘0’. At this point the cooking zone will automatically
switch off.
Page 12

12
Use and Care
Residual Heat
Each cooking zone is equipped with a residual heat warning device.
After any zone is switched off, a ‘ ’ will appear on the display. This
warns that the cooking zone is still very hot. Cooking can be
restarted while the ‘ ’ is illuminated.
Control Circuit Board Thermal Protection
If the cooking zones cause overheating of the internal electronic
circuit board, the heat will be switched off automatically. This
switches off power to the front zones, and the letters ‘ ’ and ‘ ’
flash alternately. If the circuit board does not cool down, power to all
the cooking zones is switched off, and is displayed.
Cooking can be resumed once the temperature has dropped below
the safety threshold.
Operator Error
If you make a mistake when using the push-buttons, an appears
on the display; it will remain there as long as you continue to press
the wrong button.
Switching off the cooking zones
The cooking zones are switched off when the display indicates ‘0’.
The zone wiIl automatically switch off approximately 5 seconds after
the display shows ‘0’.
If the cooking zones are hot, the blinking residual heat ‘ ’ will
appear after they are switched off.
Switching off the hob
To switch the appliance off, hold down switch icon for 1 second.
This will switch all cooking zones off, even if they are in use or the
lock-out function is active. The hob will switch off completely.
If the cooking zones have just been used, ‘ ’ will be displayed
after the hob is turned off to warn that they are still hot.
Page 13

13
Use and Care
PRACTICAL COOKING ADVICE
For best results and energy saving, only use pans suitable for
electric cooking:
· The bottom of the pan must be very thick and perfectly flat;
before placing on the hotplate, make sure that the pan, as well
as the hotplate itself, is perfectly clean and dry.
· To avoid scratching of the ceramic glass surface,never use cast-
iron pans or pans with a rough bottom.
· To avoid wasting energy, make sure that the diameter of the pan
bottom is 20mm bigger than the circle marked on the hotplate.
CLEANING AND MAINTENANCE
Switch off your appliance before cleaning.
The ceramic glass should be regularly cleaned, preferably
immediately after each use, once the residual heat warnings have
switched off.
Smudges from pans with an aluminum bottom can be easily
cleaned off with a cloth dampened in vinegar.
Remove any burnt residues immediately after cooking, rinse with
water and wipe dry with a clean cloth.
Never use abrasive or corrosive detergents, cleaning powders,
oven sprays, spot-removers, steel wool or scourers.
DO NOT use a steam cleaner to clean the appliance.
Page 14

14
Use and Care
Troubleshooting
The hob is not wired in
or switched on at the wall.
The cooking zones do
not come on during
timed cooking.
Check that the main switch/circuit
breaker/safety switch is turned on.
Check the Timer instructions.
The Hob doesn’t work.
There is a power failure.
Check power supply.
The results of cooking
are unsatisfactory.
Temperature is too high
or too low.
Consult Practical Cooking Advice.
The hob smokes.
The hob is dirty.
Wrong type of pot/pan.
Cooking time is incorrect.
Food has spilled over.
Clean the hob once cooking is finished.
Let it cool first.
Clean, then use a larger pan.
Timed cooking
programming - error
Disposal
By ensuring this product is disposed of correctly, you will help
prevent potential negative consequences for the environment and
human health, which could otherwise be caused by inappropriate
waste handling of this product.
The symbol on the product indicates that this product may not be
treated as household waste. Instead it shall be handed over to the
applicable collection point for the recycling of electrical and
electronic equipment.
Disposal must be carried out in accordance with local environmental
regulations for waste disposal.
For more detailed information about treatment, recovery and
recycling of this product, please contact your local city council office.
Page 15

15
Installation
IMPORTANT: Installation, assembly and electrical
connections must be carried out by authorised personnel.
Building into kitchen benches
The following operation requires building and/or carpentry work,
which must be carried out by a competent tradesman.
Installation can be carried out on various materials such as
masonry, metal, solid wood or plastic laminated wood as long as
they are heat resistant to a temperature of 90°C.
Create an opening with the dimensions shown in the diagrams
below in the top surface of the bench, keeping a minimum
distance of 50 mm from the rear edge and 150mm from the side.
Make sure there is a minimum of 650 mm between the hob and
any shelf, Rangehood or exhaust fan that may be installed directly
above the hob.
The diagrams above illustrate the cut-out sizes, clearances to rear
wall, side walls and overhead combustible surfaces. If you decide
to install the hob flush with the bench surface, then it is essential
to refer to your actual appliance before making any cuts.
20 40-
50
1
2
7
3
4
9
3
0
mn
5
i
.
650
300mm Hob
20
-40
50
1
750
490
50
min.
650
800mm Hob
2 0
0-4
50
1
88
5
3
3
5
50 min
.
650
900mm Hob
20-40
50
1
560
49
0
50
m
in
.
650
600mm Hob
700mm Hob
Page 16

16
Installation
Insertion and fixing
Warning: This appliance must not be fitted above a
dishwasher. If fitting above an underbench oven, check with
the oven manufacturer’s recommendations re installation of
hobs above the oven.
Pass the power supply cable through the back of the unit, taking
care that it does not touch the bottom casing of the appliance or
the oven, if one is installed underneath it.
IMPORTANT: when installing the
appliance above a cupboard, a
dividing shelf, as shown right,
must be installed to prevent
accidental contact with the hot
base panel.
Before inserting the hob in the
installation opening, place the
gasket provided around the
bottom edge of the hob. It is
important to fix this gasket evenly,
without gaps or overlapping, to
prevent liquid from seeping
underneath the hob.
Place the hob in the installation
opening and push it down so that
the hob is resting firmly on the benchtop. Fit the supplied brackets
and screws as shown in the illustration below. Tighten the screws to
secure the hob to the benchtop.
Page 17

17
Installation
Electrical Connection
Fit a plug that is appropriately rated for the load indicated on the
data plate to the cable supplied with the appliance. The plug must
be compatible with the socket outlet fitted to the final sub-circuit in
the fixed wiring that is intended to supply this appliance.
If connecting the cable directly to the mains, install a suitable
isolating switch with a minimum contact opening of 3mm between
the appliance and the mains. The isolating switch should be sized
according to the load on the data label and should comply with
current regulations (the earth wire should not be interrupted by the
circuit breaker).
Connection to the electricity supply must be made by an authorised
person in accordance with the Wiring Rules AS/NZS3000. Ensure
the supply cable cannot contact any hot surfaces.
Immediately after installation carry out an inspection test of the
appliance. If the appliance fails to operate correctly, after checking
that you have followed the user instructions correctly, disconnect
the appliance from the electrical mains and contact your nearest
service centre. Never attempt to repair the appliance.
Warning: Close the cable clamp after making the electrical
connection. Close the terminal board cover by twisting it down.
Page 18

Technical Data
Installation
Data label
Make sure that the voltage and capacity of the power supply are in
accordance with the data label located on the underside of the
appliance. Do not remove the data label for any reason.
Model
Voltage (V)
Frequency (Hz)
Overall Size* (mm)
Cutout Size (mm)
50-60
220-240
580 x 510 770 x 510 900 x 350
560 x 490 750 x 490 885 x 335
600mm 800mm 900mm
* Overall depth is 55mm which excludes electric terminal box (approximately 20mm).
18
680 x 510
560 x 490
700mm
290 x 510
273 x 493
300mm
Page 19

Page 20

TECHNIKA PTY LTD ACN 069 686 326
91-115 LINK DRIVE CAMPBELLFIELD VIC 3061
General : 1800 649 969 - Service : 1800 333 244
TOMORROWS TECHNOLOGY TODAY
Technika After Sales Service - P.O. Box 543 SOMERTON VIC 3061
Version 3 Revision 20090820
 Loading...