

Page 1
Model No
Smart TV
User Guide
22-212s
User Guide - Technika 22-212S.indd 1
User Guide - Technika 22-212S.indd 1
01-Oct-12 4:45:52 PM
01-Oct-12 4:45:52 PM
Page 2
2
User Guide - Technika 22-212S.indd Sec1:2
User Guide - Technika 22-212S.indd Sec1:2
01-Oct-12 4:45:56 PM
01-Oct-12 4:45:56 PM
Page 3
3
3
Manufacturers Guarantee
Congratulations on purchasing this television. We hope you have many years of trouble free
enjoyment from your purchase.
Your product is covered under the manufacturers guarantee for 12 months from date of
purchase.
In the event of a fault being diagnosed, please refer to the frequently asked questions/
troubleshooting section at the rear of this user guide.
If you are still unable to remedy the fault, try resetting the TV to factory settings, (details in this
user guide) or contact the helpline.
In the event that a fault is diagnosed, the helpline will arrange to collect the TV from your home
or work address, return it to our service centre, repair the item and then return it to you.
If we believe we cannot offer a permanent repair, we will replace the item.
Sky Media UK LTD – Helpline Information
Telephone UK 0871 2000 463, ROI 01443 3940
Web support: www.skymediauk.co.uk
The telephone opening hours are Monday to Friday 8.30am to 6pm, Saturday 9am – 5pm.
You must retain all packaging materials, in addition to your proof of purchase/receipt, as you will need
these in the event of warranty/service support.
This guarantee is in addition to and does not affect your statutory rights.
If you need to call the helpline, you will need the following information.
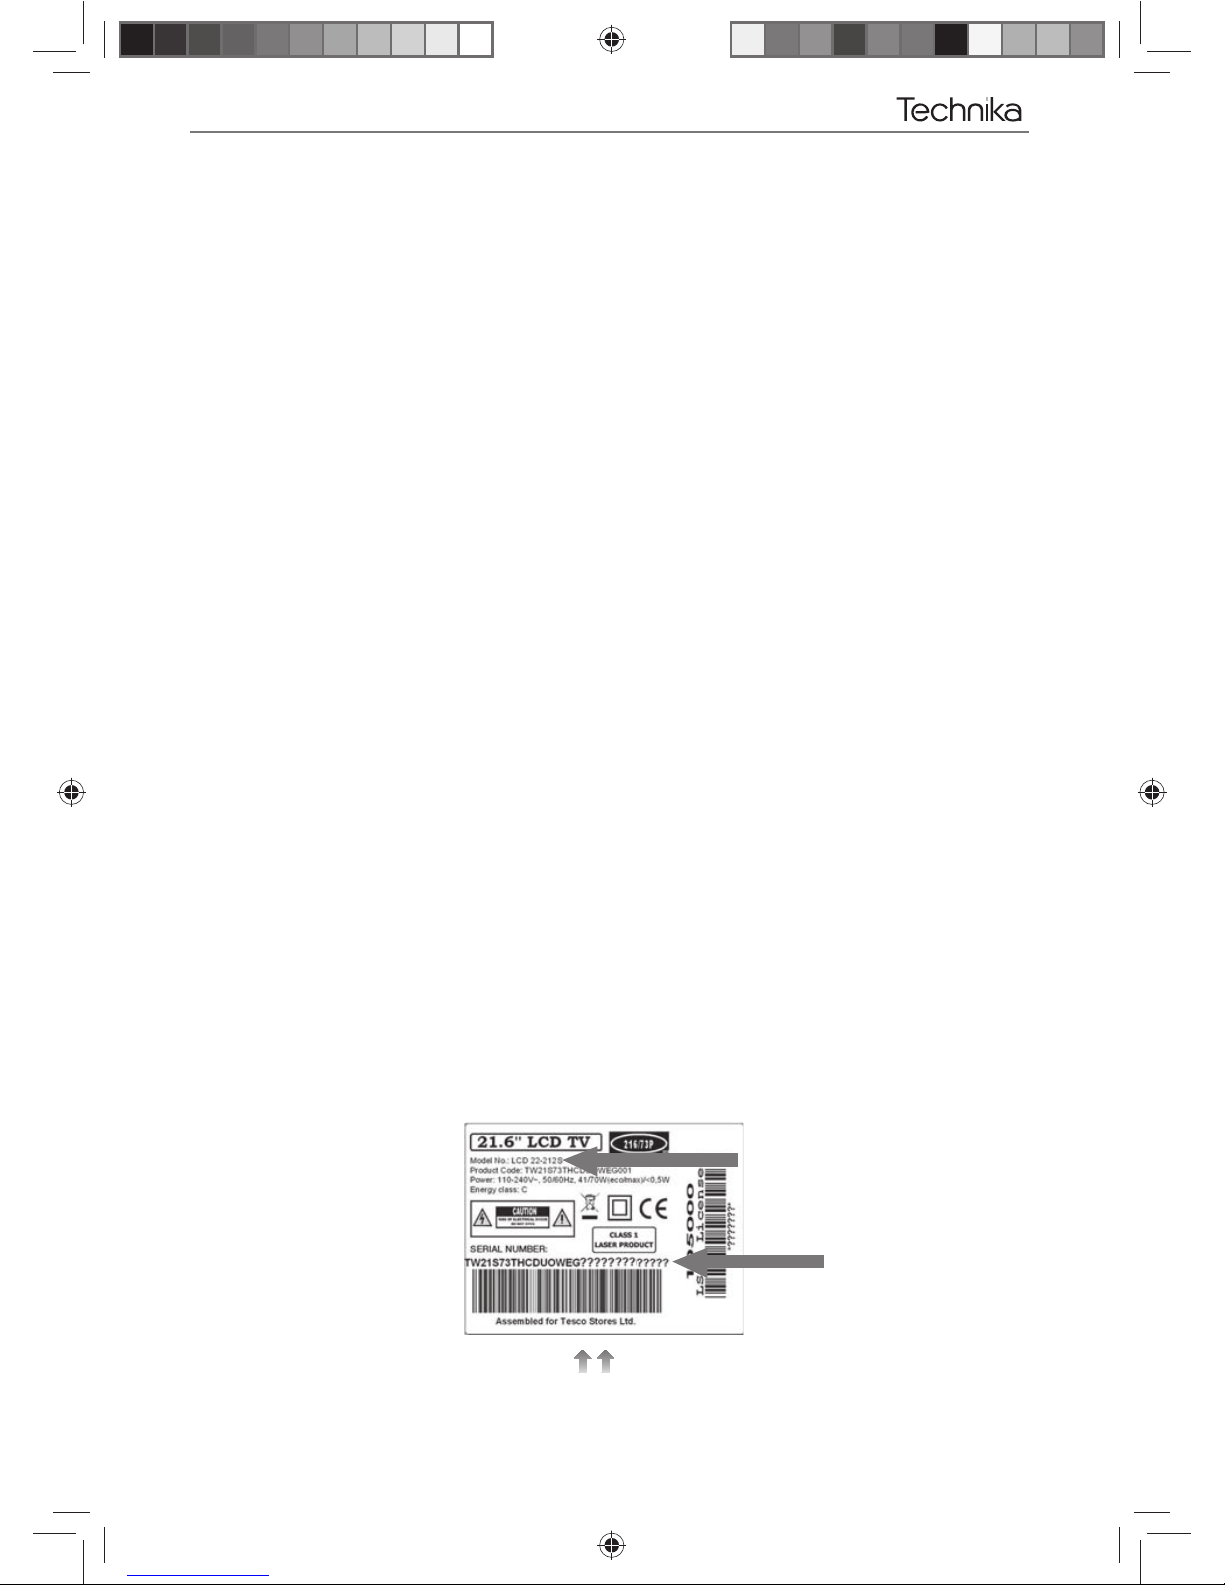
1) Model Ref LCD 22-212s
2) Date of purchase ______________________________________ (You can fi nd this on your sales receipt)
3) Serial Number ______________________________________ (You can fi nd this on the rear of the TV)
Model Ref
Serial No.
IMPORTANT GUARANTEE INFORMATION
EXAMPLE OF LABEL ON REAR OF TV
User Guide - Technika 22-212S.indd Sec1:3
User Guide - Technika 22-212S.indd Sec1:3
01-Oct-12 4:45:56 PM
01-Oct-12 4:45:56 PM
Page 4
4
IMPORTANT SAFETY INSTRUCTIONS
Please read these instructions. All the safety and operating instructions should be read before the
appliance is operated.
Warnings
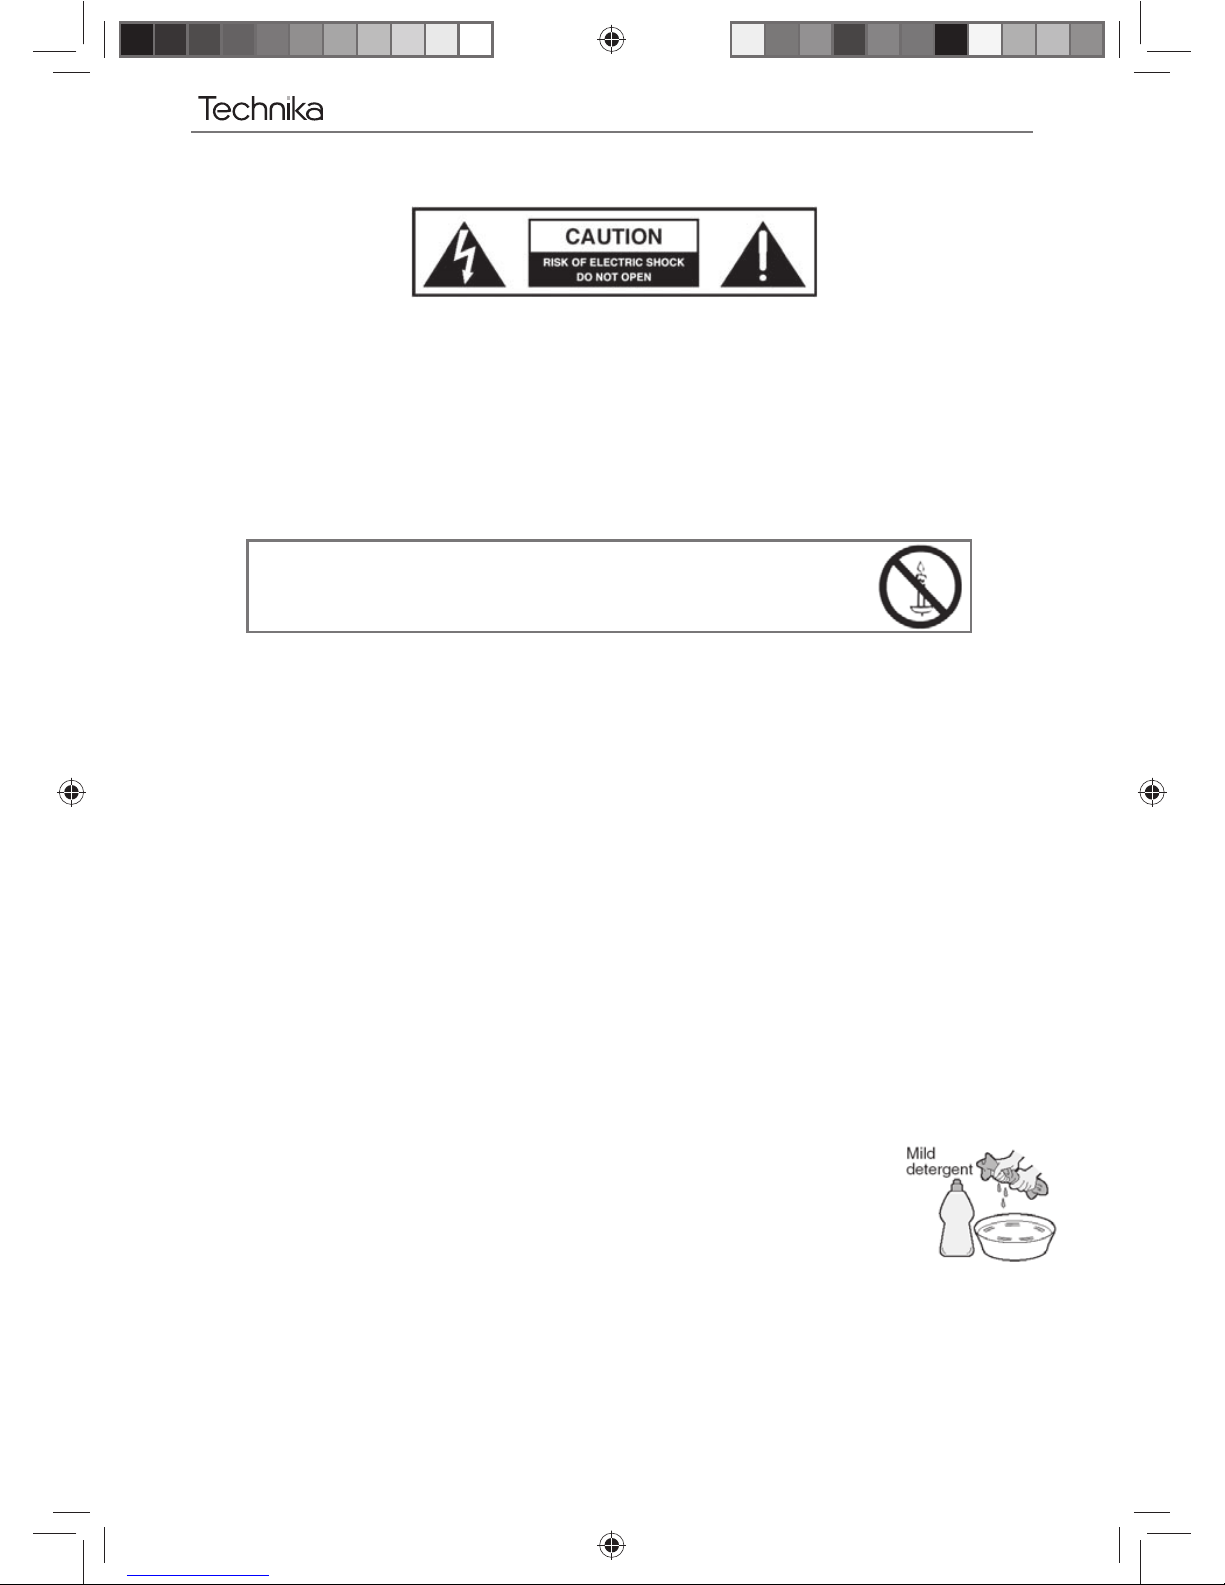
• To reduce the risk of fi re, electric shock or damage to the television, do not expose it to
dust, rain or moisture, or place any objects fi lled with liquids on or near the television.
• Do not place the television in a confi ned space, ensure that nothing can obstruct the
ventilation openings at the rear of the television.
• Dispose of this television and any components including batteries in an environmentally
friendly manner. If in doubt, please contact your local authority for details of recycling.
Safety
• For your safety, this appliance is fi tted with a fused moulded 3 pin mains plug. Should
the fuse need to be replaced, ensure that any replacement is of the same amperage and
approved with the BSI mark.
• Never try and replace the mains plug unless you have adequate qualifi cations and are
legally authorised to do so. In the event that a replacement Mains cable is required,
contact the manufacturer for a suitable replacement.
• Never use the television if it is damaged in any way.
• Always place the television on a fl at level surface avoiding anywhere which may be subject
to strong vibration.
• Ensure the television is not placed on top of the power cable as the weight of the
television may damage the cable and cause a safety hazard.
• Never place mobile phones, speakers or any other device which may cause magnetic or
radio interference with the television. If interference is apparent, move the device causing
the interference away from the television.
• To disconnect the apparatus from the mains, please use the all pole mains switch located on the side,
underside or rear of the TV. The switch shall remain readily operable.
• Install the product keeping the specifi ed distance from the wall.
• Batteries (battery pack or batteries installed) shall not be exposed to excessive heat such as sunshine,
fi re or the like.
• Install the product keeping the specifi ed distance (more than 5 cm) from the wall
Maintenance
• To clean this unit, wipe with a soft, dry cloth. If the surfaces are extremely dirty, use a
soft cloth dipped in a soap and water solution or a weak detergent solution.
• Use eyeglass cleaner to remove stubborn dirt from the LCD/LED Screen.
• Never use alcohol, paint thinner or benzene to clean this unit.
• Before using a chemically treated cloth, read the instructions that came with the cloth
carefully.
CAUTION: If water or other liquid enters the television through the display panel surface, a malfunction
may occur.
Packaging
• The safest way to transport your item is in the original box/packaging - please save your
packaging for this.
• You will need original box/packaging in the event of warranty/service repair or support. We are unable
to carry out warranty/service if you are unable to package it correctly.
To prevent spread of fi re, keep candles or
other open fl ames away from this product at all times
User Guide - Technika 22-212S.indd Sec1:4
User Guide - Technika 22-212S.indd Sec1:4
01-Oct-12 4:45:57 PM
01-Oct-12 4:45:57 PM
Page 5

5
5
IMPORTANT SAFETY INSTRUCTIONS
Please read these instructions. All the safety and operating instructions should be read before the
appliance is operated.
Important Information Regarding Use of Video Games, Computers,
Captions or Other Fixed Image Displays
The extended use of fi xed image program material can cause a permanent “shadow image” on the LCD
panel.
This background image is viewable on normal programs in the form of a stationary fi xed image. This type
of irreversible LCD/LED panel deterioration can be limited by observing the following steps:
1. Reduce the brightness/contrast setting to a minimum viewing level.
2. Do not display the fi xed image for extended periods of time.
3. Turn the power off when not in actual use.
Examples of images that you need to watch out for are as follows (this is not an exhaustive list):
• TV Channel Logos: e.g. Shopping channel logos and pricing displays-especially if they are
bright and stationary. Moving or low-contrast graphics are less likely to cause ageing of the screen.
• Time Displays
• Teletext: Do not view a stationary page for long period of time
• TV/DVD Menus: e.g. Listings of DVD disk content
• Pause Mode: Do not leave the TV in pause mode for long periods of time, e.g. When watching DVDs or
videos.
Important - Once ‘shadow image/screen burn’ occurs, it will never disappear and is not repairable under
warranty.
How do I dispose of this product?
UK: Waste electrical products should not be disposed of with household waste. Separate
disposal facilities exist. For your nearest facilities, please see www.recycle-more.co.uk or in
store for details.
ROI: Waste electrical products should not be disposed of with household waste. Separate
disposal facilities exist. Check with your Local Authority or retailer for recycling advice.
Batteries
• Do not expose batteries to high temperatures, excessive heat, prolonged sunshine, fi re
etc as may casue leakage, explosion or ignition.
• Observe the correct polarity when inserting batteries.
• Do not use different types of batteries together or mix old and new batteries.
• Dispose of batteries in an environmentally friendly way.
• Certain regions may regulate the disposal of batteries.
Please consult your local authority.
Cd
CAUTION:
THIS UNIT IS A CLASS 1 LASER PRODUCT. HOWEVER THIS UNIT USES A VISIBLE LASER BEAM WHICH COULD CAUSE
HAZARDOUS RADIATION EXPOSURE IF DIRECTED. BE SURE TO OPERATE THE PLAYER CORRECTLY AS INSTRUCTED.
WHEN THIS UNIT IS PLUGGED INTO THE WALL OUTLET, DO NOT PLACE YOUR EYES CLOSE TO THE OPENINGS TO LOOK
INTO THE INSIDE OF THIS UNIT.
USE OF CONTROLS OR ADJUSTMENTS OR PERFORMANCE OF PROCEDURES OTHER THAN THOSE SPECIFIED HEREIN MAY
RESULT IN HAZARDOUS RADIATION EXPOSURE.
DO NOT OPEN COVERS AND DO NOT REPAIR YOURSELF. REFER SERVICING TO QUALIFIED PERSONNEL.
CLASS 1
LASER PRODUCT
This caution label is located on the rear panel of the unit
User Guide - Technika 22-212S.indd Sec1:5
User Guide - Technika 22-212S.indd Sec1:5
01-Oct-12 4:45:57 PM
01-Oct-12 4:45:57 PM
Page 6

6
User Guide - Technika 22-212S.indd Sec1:6
User Guide - Technika 22-212S.indd Sec1:6
01-Oct-12 4:45:57 PM
01-Oct-12 4:45:57 PM
Page 7
7
7
CONTENTS
Manufacturers Guarantee Information . . . . . . . . . . . . . . . . . . . . . . . . . . . . . . . . . . . . . . 3
Important Safety Instructions . . . . . . . . . . . . . . . . . . . . . . . . . . . . . . . . . . . . . . . . . . . . . . 4-5
What is included in the box . . . . . . . . . . . . . . . . . . . . . . . . . . . . . . . . . . . . . . . . . . . . . . . 8
Attaching/Detaching the stand and wall mounting . . . . . . . . . . . . . . . . . . . . . . . . . . . . 9-10
Getting Started - Initial Set Up . . . . . . . . . . . . . . . . . . . . . . . . . . . . . . . . . . . . . . . . . . . . . 11-12
TV Buttons and Input Source Menu . . . . . . . . . . . . . . . . . . . . . . . . . . . . . . . . . . . . . . . . . 13
Remote Control . . . . . . . . . . . . . . . . . . . . . . . . . . . . . . . . . . . . . . . . . . . . . . . . . . . . . . . . . 14
Connections . . . . . . . . . . . . . . . . . . . . . . . . . . . . . . . . . . . . . . . . . . . . . . . . . . . . . . . . . . . . 15-16
TV Menu Operation . . . . . . . . . . . . . . . . . . . . . . . . . . . . . . . . . . . . . . . . . . . . . . . . . . . . . 17-22
Channel Menu . . . . . . . . . . . . . . . . . . . . . . . . . . . . . . . . . . . . . . . . . . . . . . . . 17
Picture Menu . . . . . . . . . . . . . . . . . . . . . . . . . . . . . . . . . . . . . . . . . . . . . . . . . 18
Sound Menu . . . . . . . . . . . . . . . . . . . . . . . . . . . . . . . . . . . . . . . . . . . . . . . . . . 19
Time Menu . . . . . . . . . . . . . . . . . . . . . . . . . . . . . . . . . . . . . . . . . . . . . . . . . . . 20
Option Menu . . . . . . . . . . . . . . . . . . . . . . . . . . . . . . . . . . . . . . . . . . . . . . . . . 21
Network Setup . . . . . . . . . . . . . . . . . . . . . . . . . . . . . . . . . . . . . . . . . . . . . . . 22
Lock Menu . . . . . . . . . . . . . . . . . . . . . . . . . . . . . . . . . . . . . . . . . . . . . . . . . . . 23
DVD Menu . . . . . . . . . . . . . . . . . . . . . . . . . . . . . . . . . . . . . . . . . . . . . . . . . . . . . . . . . . . . . 24
7 Day TV Guide . . . . . . . . . . . . . . . . . . . . . . . . . . . . . . . . . . . . . . . . . . . . . . . . . . . . . . . . . 25
USB Mode / Media Player . . . . . . . . . . . . . . . . . . . . . . . . . . . . . . . . . . . . . . . . . . . . . . . . . 26
Smart Functions . . . . . . . . . . . . . . . . . . . . . . . . . . . . . . . . . . . . . . . . . . . . . . . . . . . . . . . . 27-28
General Information . . . . . . . . . . . . . . . . . . . . . . . . . . . . . . . . . . . . . . . . . . . . . . . . . . . . . 29-32
Using with a Sky/Sky HD digibox . . . . . . . . . . . . . . . . . . . . . . . . . . . . . . . . . . 29
Frequently Asked Questions . . . . . . . . . . . . . . . . . . . . . . . . . . . . . . . . . . . . . 30
Technical Specifi cations . . . . . . . . . . . . . . . . . . . . . . . . . . . . . . . . . . . . . . . . . 31
Index . . . . . . . . . . . . . . . . . . . . . . . . . . . . . . . . . . . . . . . . . . . . . . . . . . . . . . . . 32
User Guide - Technika 22-212S.indd Sec1:7
User Guide - Technika 22-212S.indd Sec1:7
01-Oct-12 4:45:57 PM
01-Oct-12 4:45:57 PM
Page 8
8
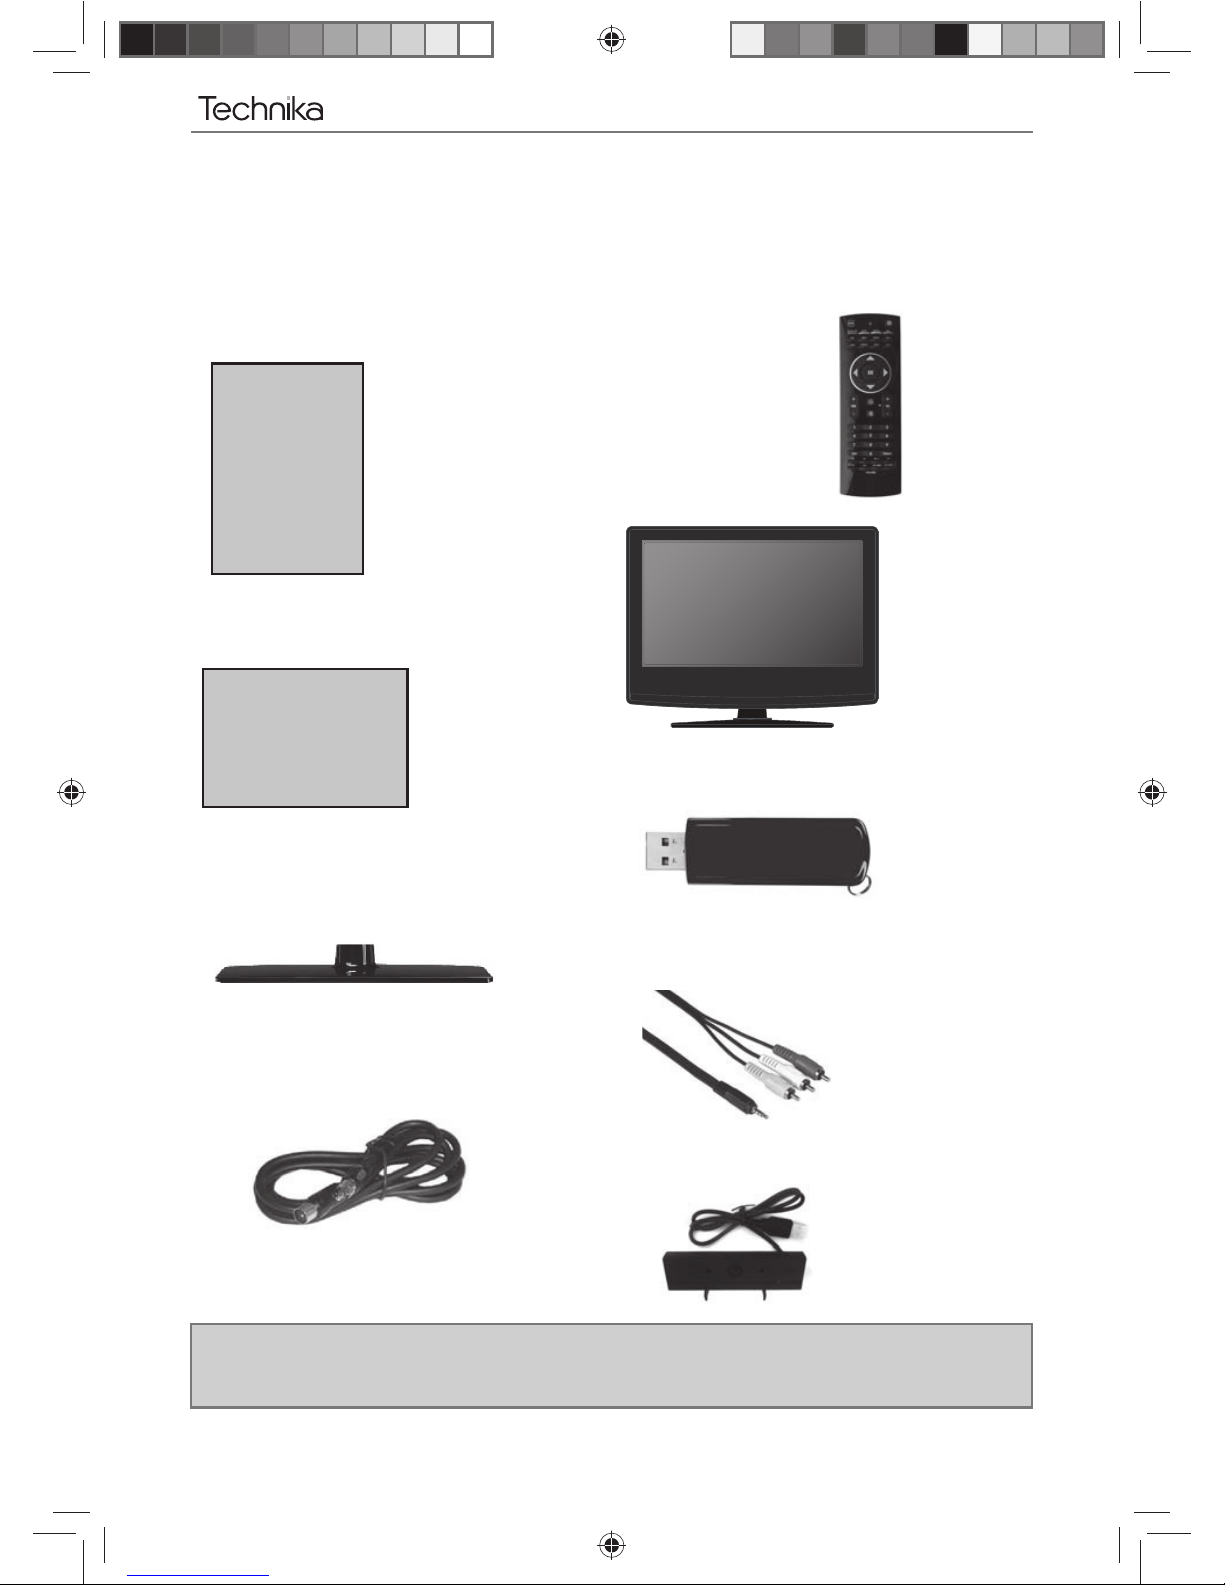
What is included in the box
Please save your packaging as you will need this in the event of warranty/service repair or support. We
are unable to carry out warranty/service if you are unable to package it correctly. The safest way to
package your item in the event of warranty/service repair is in it’s original box/packaging.
WHAT IS INCLUDED IN THE BOX
Accessories
Included with this TV are the following accessories:
1 x User Guide
1 x Quick Start Guide
1 x TV
1 x USB wireless key
1 x Stand
1 x RF Cable
1 x 3.5mm AV cable
1 x Webcam
1 x Remote Control
User Guide
Quick Start
Guide
User Guide - Technika 22-212S.indd Sec1:8
User Guide - Technika 22-212S.indd Sec1:8
01-Oct-12 4:45:57 PM
01-Oct-12 4:45:57 PM
Page 9
9
9
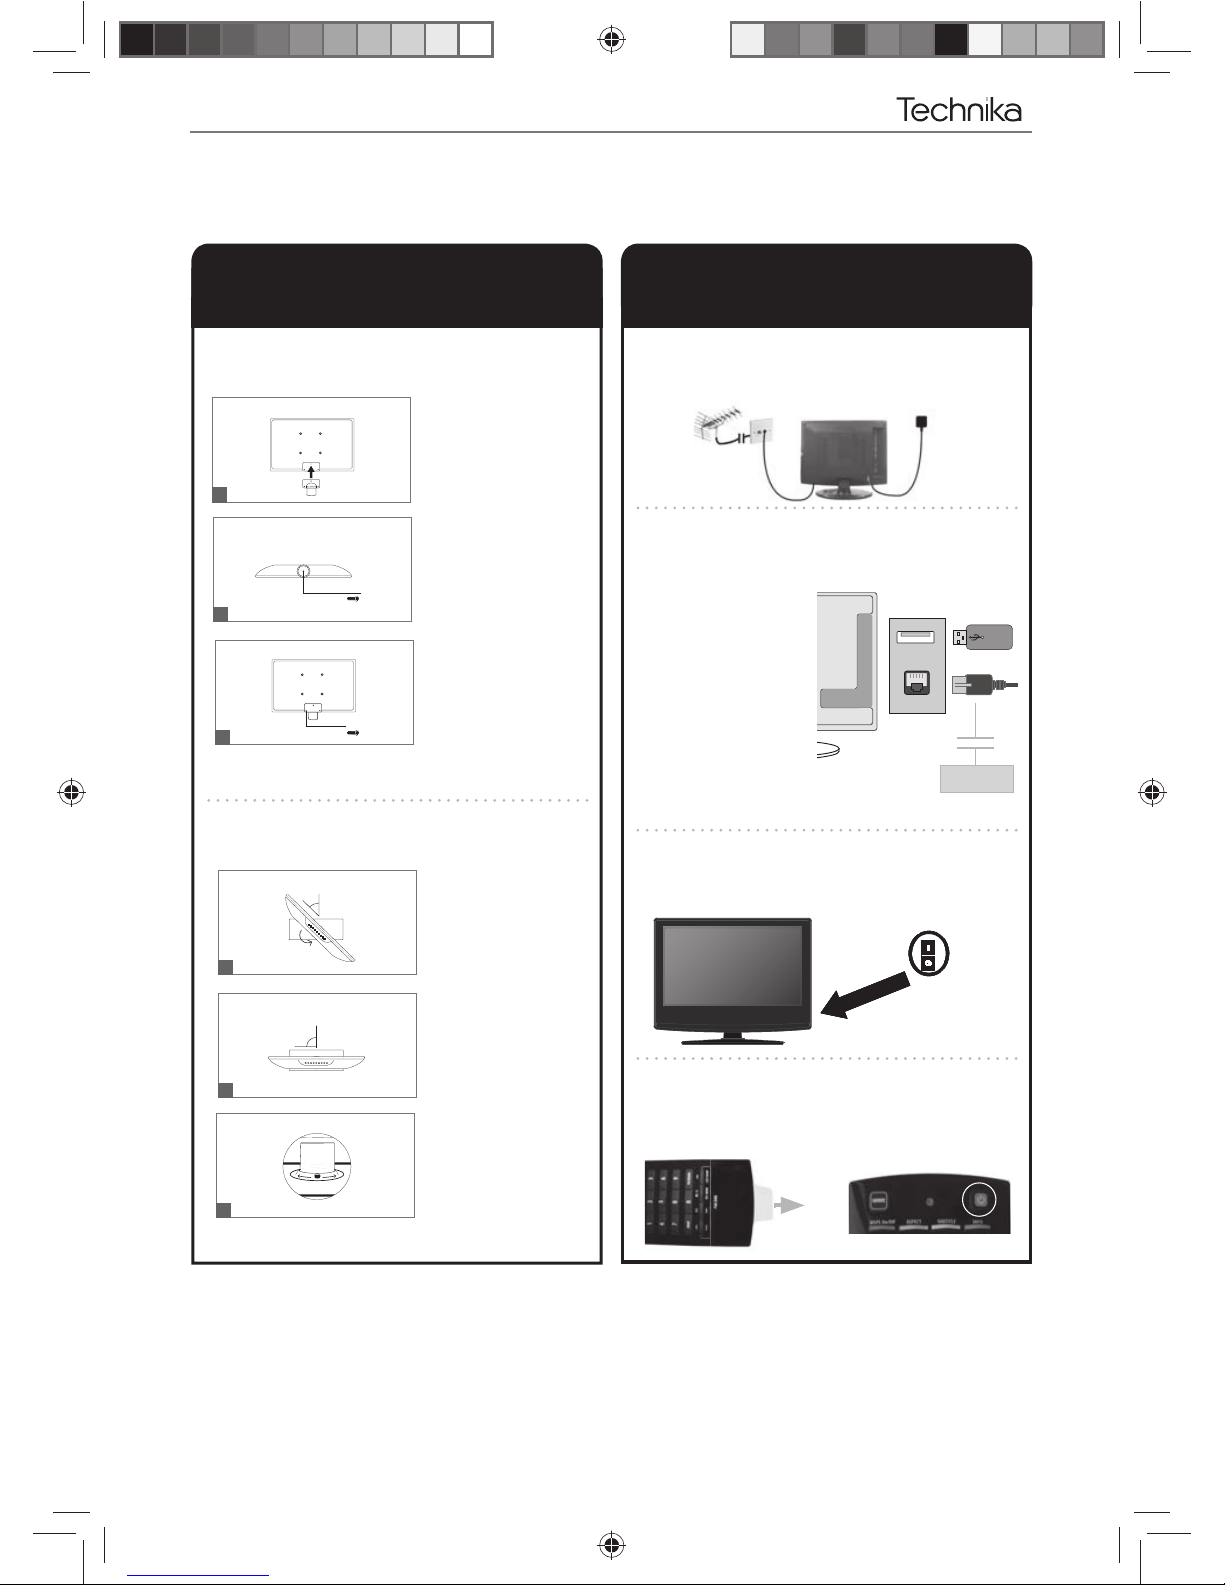
Attaching / Detaching the stand and wall mounting
ATTACHING/DETACHING THE STAND
Attaching the Stand
Please lay the TV down on a fl at and clean surface.
1
3x M4x10
3
45°
45°
4
90°
5
PUSH
O
p
e
n
C
l
o
s
e
6
1x M4x10
2
Fig 1) Attach the stand neck to the rear of the TV
set.
Fig 2) Secure the neck underneath with 1 x (M4x10)
screw provided.
Fig 5) Gently twist the base to lock the neck and
base together.
Fig 6) Once the base and neck are locked a small
button will click that is located on the stand neck.
Fig3) Secure the neck to the rear of the TV set with
the 3 x (M4x10) screws provided.
v Fig 4) Once the neck has been connected attach
the base to the neck as a 45 degree angle.
User Guide - Technika 22-212S.indd Sec1:9
User Guide - Technika 22-212S.indd Sec1:9
01-Oct-12 4:46:09 PM
01-Oct-12 4:46:09 PM
Page 10
10
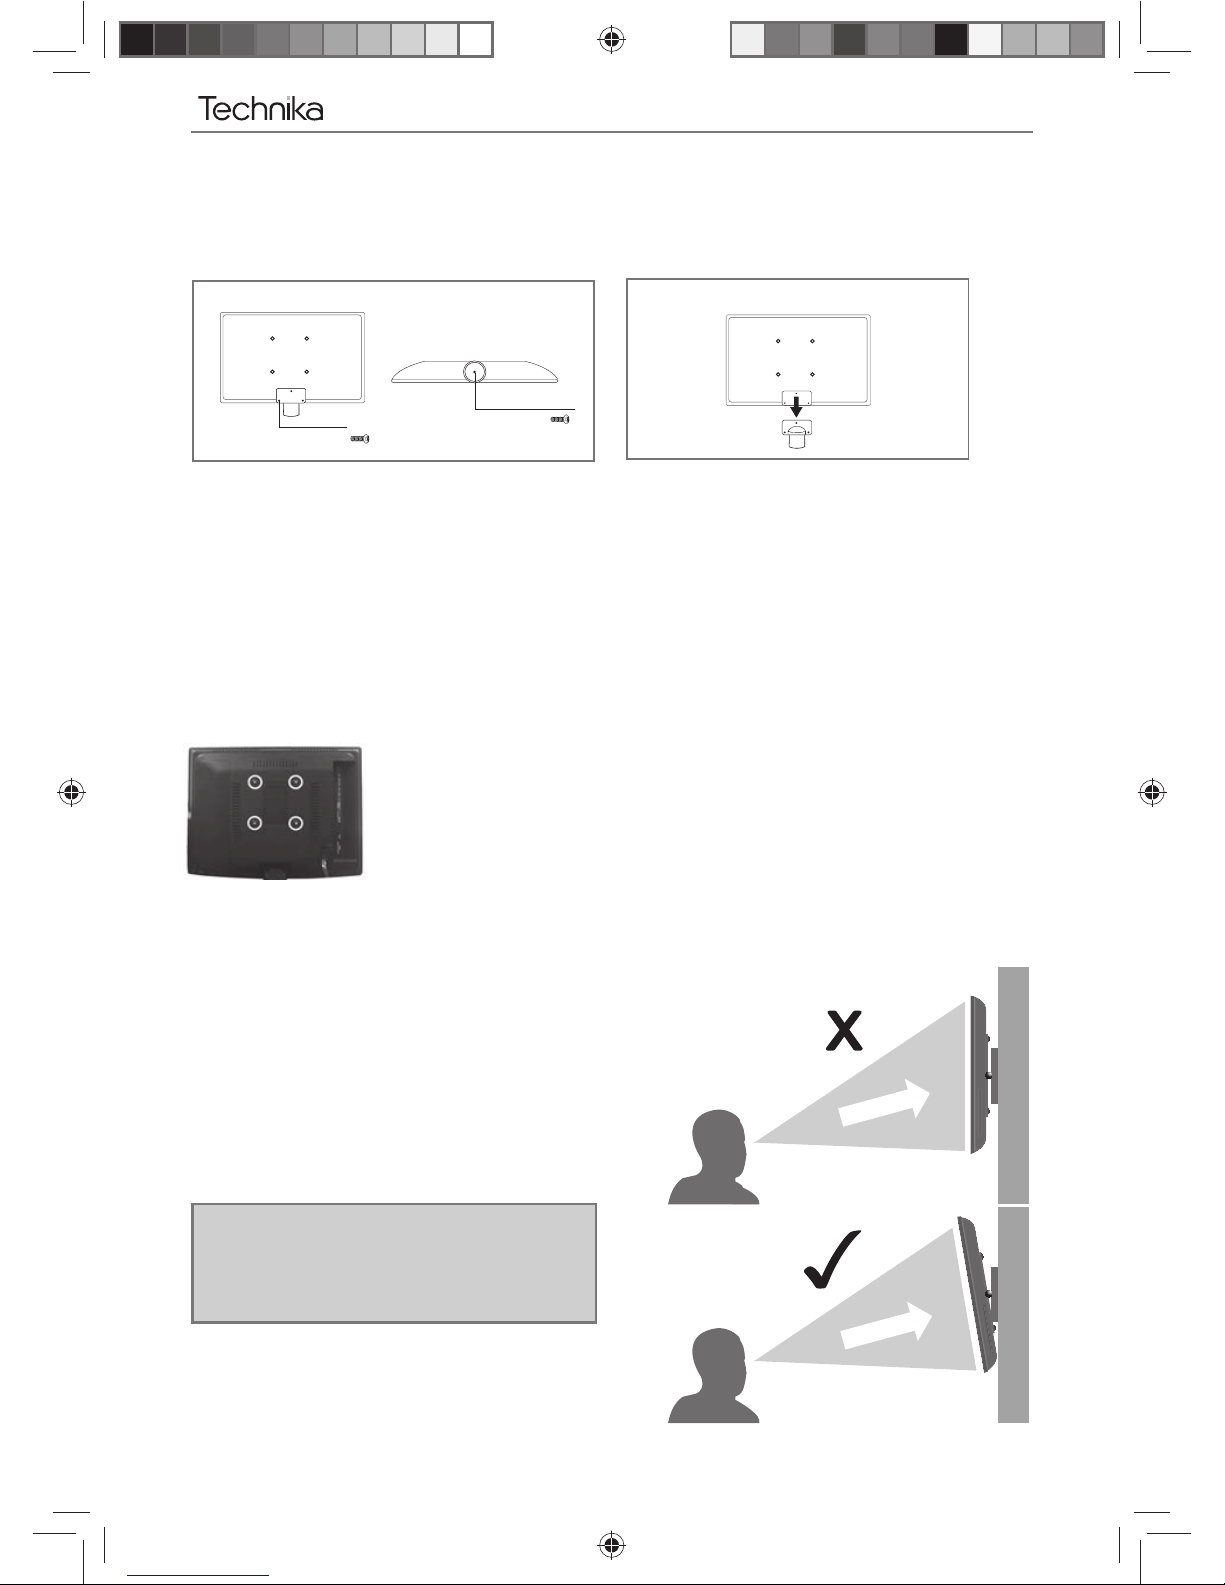
fi g 1
fi g 2
For optimum viewing, if wall mounting the TV
higher than eye level, the TV should be tilted
downwards so that the TV’s screen is ‘face on’.
See fi g 1 and 2
Wall mounting the TV
IMPORTANT - Before drilling any holes in the wall ensure you are not drilling
where there could be any electric wires, water or gas pipes. If in doubt please
contact a qualifi ed tradesman.
1) Remove the four screws highlighted left.
2) The wall mount can now be easily attached to the mounting holes on the
rear of the TV.
Important – If wall mounting this TV, only
use the screws already provided in the wall
mounting holes. Using other screws which
are longer could cause irreparable damage to
internal parts.
TV
TV
Viewing angle
Viewing angle
INCORRECT
CORRECT
1
3x M4x10
1x M4x10
Detaching the Stand
ATTACHING/DETACHING THE STAND
Fui Fig 1) To detach the stand please remove the four screws highlighted.
Attaching / Detaching the stand and wall mounting
User Guide - Technika 22-212S.indd Sec1:10
User Guide - Technika 22-212S.indd Sec1:10
01-Oct-12 4:46:10 PM
01-Oct-12 4:46:10 PM
Page 11
111111
11
GETTING STARTED INITIAL SET UP
Getting Started - Initial Set Up
USB
LAN
Remove the plastic tab to activate the remote control and press
the Standby button to power on the TV
Switch on the television using the power on/off switch.
On/Off Sw
Using the RF cable supplied, connect the TV to the TV Aerial wall socket
(Fig A) then connect the Power cable to the Electrical outlet (Fig B)
Fig B
Fig A
STEP 1 - Connecting the stand STEP 2 - Connecting the TV
2A
2B
2C
2D
If you do not wish to connect
the TV to the internet now,
skip to 2C
You can connect the TV to the
internet using either Wifi or
Wired connection depending
on your home set up.
Wifi connection. Connect the
USB Wifi adaptor (included) to
one of the USB ports on the TV.
Wired connection. Connect
a Cat 5/Ethernet cable (not
included) from the TV to your
broadband modem/router.
a)
b)
Connecting to the Internet. (Optional)
Your broadband
router
1B
1A
Fig 1) Attach the stand neck
to the rear of the TV set.
Fig 2) Secure the neck
underneath with 1 x (M4x10)
screw provided.
1
1x M4x10
2
3x M4x10
3
Fig3) Secure the neck to the
rear of the TV set with the 3
x (M4x10) screws provided.
90°
5
45°
45°
4
PUSH
O
p
e
n
C
l
o
s
e
6
Fig 5) Gently twist the base
to lock the neck and base
together.
Fig 6) Once the base and
neck are locked a small
button will click that is
located on the stand neck.
v Fig 4) Once the neck has
been connected attach the
base to the neck as a 45
degree angle.
User Guide - Technika 22-212S.indd Sec1:11
User Guide - Technika 22-212S.indd Sec1:11
01-Oct-12 4:46:11 PM
01-Oct-12 4:46:11 PM
Page 12

12
GETTING STARTED INITIAL SET UP
As part of our ongoing development to reduce power consumption, we have added an extra function to this Television
called ‘Ecohome’ (you will see this during the fi rst time installation set up). Power consumption using the Ecohome function
is approximately 15% lower than some other modes. The picture brightness is reduced using the Ecohome function. If this
function is not suitable for your viewing environment, you can select other modes as necessary. (Please note, ‘Demo’ mode is
for optimum default picture settings, however, power consumption is approximately 15% higher than ‘Ecohome’ mode)
Please refer to the user guide section ‘Picture settings’ in order to change the mode to one that maybe more suitable for
your environment.
Wired network connection.
If you selected ‘Wifi ’ in step 3A,
skip to 3C. If you selected ‘Skip’ in
3A, skip to 3E
Ensure you have connected the Cat 5/
Ethernet cable to the TV and your
Broadband router as per step 2B
Press OK on the remote control and the
TV will connect to the network
Wifi network connection.
Ensure you have connect the USB Wifi
dongle as per 2B
Press OK on the remote control and the TV
will search for available wireless networks.
If your Wifi connection has security
enabled, you will need to obtain and enter
the password/key in step 3D.
If you do not know the password, you
should refer to the user documentation that came
with your router from your Internet providor.
Enter your password/WEP key using
either:-
Onscreen keyboard and the arrow
direction and ‘OK’ keys on the
remote control.
Qwerty keyboard on the reverse
of the remote control. (you need
to ‘unlock’ the keyboard using the
bottom/left key with a picture of
a padlock on it) to enter numbers,
press the ALT button to activate the
number keys.
Once you have entered your passwork/
key, Press the blue/info button on the
front of the remote control to connect.
After connecting to internet or if
you chose to skip this, the TV will
start to tune in the TV channels
and the following screen will
appear.
Once tuning is complete you
need to confi rm the Country,
primary and secondary region by
pushing OK.
If after tuning some channels are
missing, please refer to section 11.
If the TV fi nds some, but not all, of the channels you would expect
to receive, this is because the signal being received by the TV is
inadequate. In most circumstances, this can be corrected with the
simple addition of a Signal Booster between the TV and the TV aerial
wall socket as shown. Once the signal booster is connected, retune the
TV in order to receive all of the channels
You will be welcomed with the fi rst time installation screen.
OSD Language - The only option is English
Country - The only option is UK. (This TV will only operate in UK)
Tune Type - Select from Freeview, Analogue or Skip
Environment - Default is Ecohome (uses less power)
Network Setup - Select from Wired (CAT 5), Wifi (USB Wifi Dongle) or
Skip (if you do not wish to set up a network now).
If you select to Skip network set up, go to 3E.
When you are happy with your selections, press ‘OK’
STEP 3 - Initial TV set up
3B
3D
3E
3F
3C
3A
Connecting to the Internet - for further information on using the built
in internet applications, please refer to the user guide section ‘Smart
Functions’
Getting Started - Initial Set Up
User Guide - Technika 22-212S.indd Sec1:12
User Guide - Technika 22-212S.indd Sec1:12
01-Oct-12 4:46:22 PM
01-Oct-12 4:46:22 PM
Page 13

131313
13
TV BUTTONS & SOURCE MENU
TV Buttons and Source Menu
VOL +
VOL -
CH+
MEN U
SOU RCE
STAN DBY
CH-
Choosing Mode Input/Source
To switch between the different input/
connections.
A) Using the buttons on the remote control:
1) Press [SOURCE] - The source menu will
appear
2) Press [\/] or [/\] to select the input you
require.
3) Press [OK]
B) Using the buttons on the Television:
1) Press [SOURCE]
2) Scroll up / down using CH+/ CH- buttons to
the input/source you require
3) Press Vol+ to change input/source to the
one selected.
1
2
3
4
5
6
7
8
9
Eject Disc
Play/Pause Disc
Volume up and menu right
Volume down and menu left
Programme/Channel up and menu up
Programme/Channel down and menu down
Displays Menu/OSD
Displays the input source menu
Standby Power On/Off
1
2
3
4
5
6
7
8
9
User Guide - Technika 22-212S.indd Sec1:13
User Guide - Technika 22-212S.indd Sec1:13
01-Oct-12 4:46:23 PM
01-Oct-12 4:46:23 PM
Page 14

14
REMOTE CONTROL
Remote Control
[POWER] - Turn the TV on and off.
[SOURCE] - To display the input/source menu
[DISPL On/Off] - Turn the screen on and off (hold for 3 secs)
[ASPECT] - To switch the screen between the different formats
[SUBTITLE] - To switch the dialogue at the bottom of the screen
(on/off)
[INFO] - Press once for now/next channel information
Press twice for programme information about current
programme
[Colour Buttons] - Most of these have other special functions
(look for the prompt when browsing the Menus).
[TEXT] - To enter Teletext
[D.MENU/INDEX] DVD mode - To display the DVD disc menu
Teletext mode - To display the index page
[TITLE/REVEAL] DVD mode - To display the DVD title menu
Teletext mode - To reveal or hide the hidden words.
[HOLD] - Teletext mode - Hold current page which is displayed
[MENU] - To display OSD menu
[Favourite] - To open the Favourite list or to set favourite channel
in program edit menu.
[GUIDE] - Opens the 7 Day TV Guide (Freeview mode)
[EXIT] - Press this button to quit present menu.
- Allows you to navigate the on-screen menus
VOL - To increase / decrease the sound level
Displays the Apps Menu
Mutes the sound on the TV
CH To increase or decrease the channel being watched
NUMBER BUTTONS - 0 – 9 to select a TV channel directly.
[SWAP] - To return to the previous channel viewed
[TV/RADIO] - Switch to Freeview and switch between TV and radio
in Freeview mode
- To restart the current chapter
- To advance forward to the next chapter
- To stop the playback / eject (hold for 3 seconds)
- To play in fast rewind mode
- To play in fast forward mode
- To play/pause
[REC/MENU] - Display DVD menu.
[LIST/SETUP] - Display DVD setup menu.
On the rear of the remote is a QWERTY keyboard.
Press the lock button to activate. Press [ALT] and then your required
button to use the yellow characters
1
1
2
3
2
3
LOCK ALT
[ (u
User Guide - Technika 22-212S.indd Sec1:14
User Guide - Technika 22-212S.indd Sec1:14
01-Oct-12 4:46:29 PM
01-Oct-12 4:46:29 PM
Page 15

151515
15
RF INEARPHONE AV IN COAX OUT
SCART
CI IN
HDMI 2 HDMI 1
USB 3 USB 2
USB 1
LAN
CONNECTIONS
Connections
A
BCD E F
G
H
HEADPHONES 3.5mm Headphone output
RF IN RF / TV Aerial Input
AV IN 3.5mm (Use cable provided)
COAX Audio Out Digital Coax output
SCART SCART input
CI CARD IN Common Interface Card Input
2 x HDMI HDMI input
3 x USB USB port
LAN Network connection
A
B
C
D
E
F
G
H
I
I
User Guide - Technika 22-212S.indd Sec1:15
User Guide - Technika 22-212S.indd Sec1:15
01-Oct-12 4:46:29 PM
01-Oct-12 4:46:29 PM
Page 16

16
Connections
CONNECTIONS
Connecting a Camcorder, Camera or Games Console
Source should be set to Video
Connecting a High Defi nition (HD) Device
HDMI to HDMI cable
A HDMI cable can output both video and audio and enables you to enjoy digital-quality video and audio
with minimal loss of quality.
TVs Input/Source should be set to HDMI.
Ca mer a o r
Camcor der
Y ellow
White
Red
Audio
In L / R
Video
Connecting a DVD Player/Recorder, Video Recorder or
Cable/Satellite Box
TVs Input/Source should be set to SCART
RF I N
SCART
TV Aerial
Wall Socket
SCART
OUT
RF
IN
RF
OUT
DV D o r VCR
HDMI OUT
HDMI
User Guide - Technika 22-212S.indd Sec1:16
User Guide - Technika 22-212S.indd Sec1:16
01-Oct-12 4:46:29 PM
01-Oct-12 4:46:29 PM
Page 17

171717
17
TV Menu Operation
CHANNEL MENU
Auto Tuning - Allows you to retune the television for all digital channels, digital radio stations and
analogue channels.
Freeview Manual Tuning- Allows you to manually tune your digital signal
Analogue Manual Tuning - Allows you to manually tune your analogue signal
Programme Edit - Allows you to delete, skip and add favourite channels.
Signal Information - Provides technical information on the signal
CI Information - Pay per view services require a “smartcard” to be inserted into the TV.
If you subscribe to a pay per view service the provider will issue you with a ‘CAM’ and a “smartcard”. The
CAM can then be inserted into the COMMON INTERFACE PORT (CI Card In).
Software Update (OAD) - Switch on/off OAD updates
OAD SCAN - Allows you to scan for OAD (over air download) updates
To access this menu, press [MENU] button on the remote control.
If you wish to make changes to any of the default settings, use the
buttons to highlight.
Press [OK] to access and
to make any changes
To exit this menu at anytime, press [EXIT] button or [MENU] to go back to the previous screen.
User Guide - Technika 22-212S.indd Sec1:17
User Guide - Technika 22-212S.indd Sec1:17
01-Oct-12 4:46:30 PM
01-Oct-12 4:46:30 PM
Page 18

18
PICTURE MENU
To access this menu, press [MENU] button on the remote control.
If you wish to make changes to any of the default settings, use the
buttons to highlight.
Press [OK] to access and
to make any changes
To exit this menu at anytime, press [EXIT] button or [MENU] to go back to the previous screen.
TV Menu Operation
Picture Mode - Choose from the following presets
Ecohome 15% less power consumption
Dynamic Recommended settings for fast moving pictures
Standard Default settings
Movie Set to be lighter in colour and less bright
User Lets you manually alter all the settings
In ‘User’ mode, you can adjust the following settings.
Contrast - Changes the balance between black and white
Brightness - Increase or decrease the brightness of the picture
Colour - Increases the colour from black and white
Sharpness - Increase or decrease the sharpness of the picture
Colour Temperature - Choose from the following presets
Cool Increases blue within the picture
Nature Default settings
Warm Increases red within the picture
User User defi ned settings
Noise Reduction - Choose from the following presets
Off Turns noise reduction off
Low Minor system adjustment
Middle Medium system adjustments
High Maximum system adjustments
Auto Default settings
Auto
Automatically displays the best picture
format. So the picture is in the correct
position. May have black lines
At the top/bottom and/or sides.
Aspect Ratio - Within the UK the
picture format varies depending on the
channel/broadcast. There are a number of
different options to best meet your needs
4:3
Displays the 4:3
picture in its
original size. Side
bars are shown to
fi ll the full screen
16:9
Top and bottom
bars are shown
to fi ll the 16:9
screen. 4:3
pictures will be
stretched
Zoom 1/2
The picture
is the correct
proportion but
zoomed in to
fi ll the screen
User Guide - Technika 22-212S.indd Sec1:18
User Guide - Technika 22-212S.indd Sec1:18
01-Oct-12 4:46:31 PM
01-Oct-12 4:46:31 PM
Page 19

191919
19
TV Menu Operation
SOUND MENU
Balance - To switch the sound between the left and right speakers
Auto Volume - When ‘on’ is selected, the volume will stay at a constant level regardless of input/source
Surround Sound - Allows you to turn the function On or Off
Narration - Available in freeview, when broadcast. This function handles the audio stream for the AD
(Audio Description) which is sent along the main audio from the channel.
Press [OK] button to turn on or off.
SPDIF - Provides digital sound. Press [OK] button to set PCM or Auto or OFF
Connecting speakers
1) Connect a COAX cable* from the TV’s COAX output to your amplifi er/surround systems COAX input
2) Connect a 3.5mm jack to L/R phono cable* from the TV’s headphone socket (where fi tted) to your
amplifi er/surround sound L/R input. Please note sound to the TV’s speakers will be disabled.
Please note due to copyright laws it is not possible to output video/sound from the TV on certain sources,
i.e. HDMi, DVD etc.
*cables and switches mentioned are available to purchase separately from your retailer.
Sound Mode - Choose from the following presets
Standard Default settings
Music Emphasises music over voices
Movie Provides live and full sound for movies
User Selects your personal sound settings
Sports Emphasises sound for sports
To access this menu, press [MENU] button on the remote control.
If you wish to make changes to any of the default settings, use the
buttons to highlight.
Press [OK] to access and
to make any changes
To exit this menu at anytime, press [EXIT] button or [MENU] to go back to the previous screen.
User Guide - Technika 22-212S.indd Sec1:19
User Guide - Technika 22-212S.indd Sec1:19
01-Oct-12 4:46:33 PM
01-Oct-12 4:46:33 PM
Page 20

20
TIME MENU
To access this menu, press [MENU] button on the remote control.
If you wish to make changes to any of the default settings, use the
buttons to highlight.
Press [OK] to access and
to make any changes
To exit this menu at anytime, press [EXIT] button or [MENU] to go back to the previous screen.
TV Menu Operation
Clock - Shows the current time, lets you edit the time in the case you have not tuned in the channels.
Off Time - Auto power off setting. Press [OK] button to display Off Time.
Press [LEFT]/[RIGHT] to select the mode.( Available mode: Off-Once-Everyday-
Mon~Fri - Mon~Sat - Sat~Sun - Sunday).Then set the hour and minute according to the prompt.
On Time - Auto power on setting. Press [OK] button to display On Time.
Press [LEFT]/[RIGHT] to select the mode.( Available mode: Off-Once-Everyday-
Mon~Fri - Mon~Sat - Sat~Sun -Sunday). Then set the hour, minute, source, channel,and
volume according to the prompt.
Sleep Timer - Lets you set the sleep timer so the television automatically switches off after a set amount of
time. Off -> 10min -> 20min -> 30min -> 60min -> 90min -> 120min -> 180min -> 240min
Auto sleep - Toggle the Function on and off
Time Zone - Change your current time zone
User Guide - Technika 22-212S.indd Sec1:20
User Guide - Technika 22-212S.indd Sec1:20
01-Oct-12 4:46:34 PM
01-Oct-12 4:46:34 PM
Page 21

212121
21
TV Menu Operation
OPTION MENU
To access this menu, press [MENU] button on the remote control.
If you wish to make changes to any of the default settings, use the
buttons to highlight.
Press [OK] to access and
to make any changes
To exit this menu at anytime, press [EXIT] button or [MENU] to go back to the previous screen.
Audio Language - You can press [LEFT]/[RIGHT] button to set primary or secondary. Then select language
you want to set.
Subtitle Language - You can press [LEFT]/[RIGHT] button to set primary or secondary. Then select language
you want to set.
Hearing Impaired - It will show the subtitles only if the programme you are watching supports the
hearing impaired function.
Press [OK] button to turn on or off.
Restore Factory Default - Reset TV to its default settings
Network Setup - Allows you to begin connecting your TV to your preferred network (please see the
following page for instructions on how to do so).
Software Update (USB) - Update your TVs software via USB
Software Update (Network) - Update your TVs software via your network connection
The TV will scan for an available software update on each power-up, if a new software version (including all
the preinstalled applications, such as Skype®, Youtube etc) is detected you will be informed via a notifi cation
window, you will then have the option to accept or decline the update.
User Guide - Technika 22-212S.indd Sec1:21
User Guide - Technika 22-212S.indd Sec1:21
01-Oct-12 4:46:36 PM
01-Oct-12 4:46:36 PM
Page 22

22
NETWORK SETUP
TV Menu Operation
WIRED
SIMPLE MODE
A screen will prompt you to connect your LAN
cable, once this is done you may press start.
A screen will then be displayed telling you the TV
is connecting to the network.
If the TV connected
successfully to the network
you should see this screen.
You will then see your
network information. Press
OK and set up is complete
NETWORK SET UP
Firstly you must choose the set up type. Simple mode should be chosen in all cases except for advanced
users (who can set static IPs, confi gure hidden networks etc)
Then select network type - Wired or WIFI
WIFI
SIMPLE MODE
A screen will prompt you to connect your wireless
USB key, once this is done you may press start.
The TV will then scan for
available wireless networks.
Scroll down to your preferred
network and press OK.
You will now be asked to
enter your security key so
you can connect to your
wireless network. This can
be done via on screen,
number keys or QWERTY
keyboard
After pressing OK the TV will begin to connect to
the network, if confi gured correctly you will see a
fi nal screen informing you that the network has
been set up.
User Guide - Technika 22-212S.indd Sec1:22
User Guide - Technika 22-212S.indd Sec1:22
01-Oct-12 4:46:37 PM
01-Oct-12 4:46:37 PM
Page 23

232323
23
TV Menu Operation
LOCK MENU
To access this menu, press [MENU] button on the remote control.
If you wish to make changes to any of the default settings, use the
buttons to highlight.
Press [OK] to access and
to make any changes
To exit this menu at anytime, press [EXIT] button or [MENU] to go back to the previous screen.
Lock system - Allows you to lock or unlock the menu. You will be asked to enter a 4 digit password use the
button to quit the password input. Use the button to clear. Default password is 0000
Set Password - Allows you to sets the password for system lock
Block Programme - Allows you to block certain programs from being viewed.
If you forget the password you have chosen, the master password is 4711
User Guide - Technika 22-212S.indd Sec1:23
User Guide - Technika 22-212S.indd Sec1:23
01-Oct-12 4:46:40 PM
01-Oct-12 4:46:40 PM
Page 24

24
AV
DVD MENU
To access this menu, press [MENU] button on the remote control.
If you wish to make changes to any of the default settings, use the
buttons to highlight.
Press [OK] to access and make any chnages
To exit this menu at anytime, press [EXIT] button or [MENU] to go back to the previous screen.
TV System - Choose from the following options
NTSC Normally used for discs from North America, Japan etc
PAL The standard for discs from UK/Europe, most of Asia, Australia etc
Auto For both NTSC and PAL
TV Type - Choose from the following options
4:3PS
Traditional picture format, often used on old fi lm
4:3 LB
Traditional picture which has been adapted for widescreen
16:9 Widescreen picture format
Default - This option allows you reset all DVD settings.
Tone - Choose from the following options
+ Increases the treble (high frequency sound)
- Increases the bass (low frequency sound)
Dynamic Range - This is the difference between the quietest and loudest sounds. This setting works only
with DVD discs recorded in Dolby digital.
Full Set this to listen with the range recorded on the disc
4/8 Set this to listen with a range equivalent to a normal television
2/8 Set this to listen with a smaller difference between the maximum and minimum volume
Dual Mono
Stereo Outputs 2 channels of sound both left and right
Mono L Outputs left side sound
Mono R Outputs right side sound
Mix Mono Outputs a single channel of sound but mix between right and left
DVD Menu Operation
User Guide - Technika 22-212S.indd Sec1:24
User Guide - Technika 22-212S.indd Sec1:24
01-Oct-12 4:46:42 PM
01-Oct-12 4:46:42 PM
Page 25

252525
25
7 DAY TV GUIDE
TV Guide is available in Digital TV mode. It provides information about forthcoming programmes (where
supported by the freeview channel). You can view the start and end time of all programmes and on all
channels for the next 7 days and set reminders.
Press [GUIDE]. The following 7 Day TV Guide will appear. This will show what programmes are currently
playing on all channels.
Navigate through the menu using
press [LEFT]/[RIGHT] to switch between Time mode and
Channel mode
Info:
Press [INFO] button to get more information of the selected programme.
Schedule:
Press [YELLOW] button to the Schedule List.
Remind:
Press [BLUE] to the Reminder setting.
1) To navigate through future programmes press [INDEX]
2) Press [LEFT] or [RIGHT] to search by TIME or CHANNEL
3) Then move down and scroll [LEFT]/[RIGHT] to change channel or time
4) Scroll down the page to view future time or extra channels
To go back at any point press [INDEX]
7 Day TV Guide
User Guide - Technika 22-212S.indd Sec1:25
User Guide - Technika 22-212S.indd Sec1:25
01-Oct-12 4:46:42 PM
01-Oct-12 4:46:42 PM
Page 26

26
USB Mode / Media Player
USB MODE / MEDIA PLAYER
1) You can navigate through the menus using the
scroll
buttons. To confi rm the item you
wish to play/view press [OK] button.
2) Select the drive you require. (If your drive only
has 1 partition you will only see 1 item).
3) You can now scroll to preview the item, press
OK to select it and then press to play/view. See
technical specifi cation page for fi le types which
can be played.
Please note if you wish to view all items in a folder, do not select any list but instead press
Refer to page 30 for compatible fi le types.
4) While viewing you control the item using
the buttons below or by pressing ( i ) and using
and (OK)
USB mode offers playback of various different types of content that you have saved on your USB Memory
Stick.
On switching to USB source the above menu screen will appear. The content will be divided into Photo,
Music, Movie and Text based on fi le type.
User Guide - Technika 22-212S.indd Sec1:26
User Guide - Technika 22-212S.indd Sec1:26
01-Oct-12 4:46:42 PM
01-Oct-12 4:46:42 PM
Page 27

272727
27
SMART FUNCTIONS
With this TV you have access to several apps allowing you to watch fi lms, catch up on the latest
programmes and check your Social media networks.
To access these features you need to press the
button.
Once this has been pressed you will be greeted with the home screen. To navigate use
and
press [OK] to select.
On screen instructions should guide you through the rest of the applications.
To exit the applications press the [EXIT] button and you will return to the previous source
Smart functions
For the latest Internet Applications (like Facebook and Twitter) you can visit our webpage for more info
www.skymediauk.co.uk
IMPORTANT: In order for the Youtube app to work in the UK, it requires date and time information. The time
and date is normally set by freeview when the TV is tuned in with a digital signal , however in case you do not
tune in the Freeview you will need to set the time and date manually.
To do this please refer to the Time Menu on page 19.
User Guide - Technika 22-212S.indd Sec1:27
User Guide - Technika 22-212S.indd Sec1:27
01-Oct-12 4:46:47 PM
01-Oct-12 4:46:47 PM
Page 28

28
Once you have selected the Skype logo the app
will open and you will be greeted with this login
screen. To proceed you must enter your Skype
login details.
Once you have entered your details select the
‘login’ button.
A successful login will open the Skype application
as shown.
Once an available contact has been selected you
can then choose to either video or voice call to
enter a conversation.
During a skype call you have access to numerous
options highlight and press enter to use them.
Smart functions
PLEASE NOTE: The suggested viewing distance
when using the Skype app is <0.7m
Skype is a trade mark of Skype Limited or its related companies. This product/application has not been
approved or endorsed by Skype Limited, Skype Communications S.A.R.L. or any of their related companies.
SMART FUNCTIONS: SKYPETM
User Guide - Technika 22-212S.indd Sec1:28
User Guide - Technika 22-212S.indd Sec1:28
01-Oct-12 4:46:47 PM
01-Oct-12 4:46:47 PM
Page 29

292929
29
General Information
USING YOUR TV WITH A SKY DIGITAL SET TOP BOX
Option 1) Connecting your TV to your Sky box (when both the TV and Sky Box are located
in the same room)
Depending on your Sky Box and TV model, connect either by SCART (or if no SCART
connector is included with your TV, connect via a SCART to AV cable) or via an HDMI cable
(SCART to AV and HDMI cables are available separately)
If connecting by SCART cable to both the Sky Box and TV, select the ‘input source’ as
SCART.
If connecting by SCART to AV cable (SCART on one end connected to your Sky box and
a Red/White and Yellow connector on the other end that connects to the TV) select the
‘input source’ as AV.
If connecting by HDMI, select the ‘Input source’ on the TV as HDMI (if the TV has more
than 1 HDMI port, ensure you select the input source to match the HDMI numbered port
on the rear of the TV)
If you wish to use your Sky remote to operate the TV’s functions, you will need a Sky remote control (Revision 9 or
later) and you will need to programme a 4 digit code into it. See bottom of this page.
Option 2) Connecting your TV
to your Sky box (when your
Sky box is located in a different
room to the TV)
Please note, if you are adding a ‘Magic
Eye/TV Link’ to your system so that
you can use your Sky remote control
to change the Sky channel in the room
where the 2nd TV is located, please
refer to the instructions included
with the TV link/magic eye in order to
ensure the RF or RF2 output on your
Sky box is powered on. (The red LED
light on the TV link/magic eye will light
up if the RF / RF2 output is correctly set up) If you do not have the instructions that came with the TV link/magic
eye, instructions on how to do it can be found on our web site.
1) To tune the TV to the Sky box, on the 2nd TV, select the ‘Analogue’ input source.
2) Select the channel that you wish to store the Sky box/channel on. (If you do not use channels 1-5 because you
no longer have analogue terrestrial channels after digital switchover, you may choose to select channel 1 to store
the Sky box/channel, if you still have and use analogue channels 1-5, you may for example decide that channel 6 is
the best option for you)
3) Press the corresponding number on the remote control to select the desired analogue channel chosen as per
point 2 above.
4) On the TV remote control, press Menu. Now navigate through the menus to select Manual Tuning or Analogue
Manual tuning (refer to the Tuning/Channel menu section of this user guide if necessary)
5) Manually tune in the channel (usually, the Sky box is at a frequency between 800Mhz and 850Mhz) once the
Sky box/channel is found, press ‘OK’ to store it.
If you wish to use your Sky remote to operate the TV’s functions, you will need a Sky remote control (Revision 9 or
later) and you will need to programme a 4 digit code into it. See below.
Sky Box
SCART
or HDMI
cable
RF/COAX cable from
Sky Box to 2nd TV
Connect to RF
or RF2 output
on the Sky box
Connect to the
Aerial/RF input
on the 2nd TV
TV Link/Magic Eye
(optional)
2nd TV in
another room
Sky Box
SCART
or HDMI
cable
Using a Sky Remote or a Universal Remote to operate your TV
Sky Remote Control, If you wish to use your Sky remote to operate the basic functions of your TV, you need to
programme a 4 digit code into it. Please note. you will need the latest Sky Revision 9 remote control as this is
the only version that includes the latest software/fi rmware necessary to operate this model of TV. All codes can
be found on our website. If you wish to upgrade/replace your existing Sky remote control to the latest version,
you can do so on our web site.
Universal Remote Control, If you wish to use a Universal remote control to operate your TV, please refer to the
web site for a full list of codes. (Please note we only have codes for One for All branded remote controls, if you
have an alternative brand of Universal remote, please refer to the manufacturer for the code.)
User Guide - Technika 22-212S.indd Sec1:29
User Guide - Technika 22-212S.indd Sec1:29
01-Oct-12 4:46:55 PM
01-Oct-12 4:46:55 PM
Page 30

30
FREQUENTLY ASKED QUESTIONS
General Information
General I would like to have louder
sound by connecting
additional speakers
Subject to the TV model and connections, it is possible to connect the TV
to an external amplifi er or surround sound (subject to connections/inputs
on the device) as follows:-
1) Connect a COAX cable* from the TV’s COAX output to your amplifi er/
surround systems COAX input
2) Connect a 3.5mm jack to L/R phono cable* from the TV’s headphone
socket (where fi tted) to your amplifi er/surround sound L/R input. Please
note sound to the TV’s speakers will be disabled.
General Why are some options in
the menu unavailable and
greyed out
Some options are only available in certain sources, i.e. HDMI, They are
unavailable in the other sources where they have no affect.
General Can I stop my TV turning off
after 4hrs?
Yes
1) In the picture settings menu, de-select Eco-home
2) In the time settings menu, scroll down to Auto standby and select OFF
TV I have tuned in Digital TV
but I am not receiving any
or all of the channels and/
or the channels I receive are
breaking up
1) Check you are in an area that can receive Freeview.
Visit www.freeview.co.uk
2) Check you are using an aerial that is able to receive a good digital
signal. In most cases, you will need an outdoor digital hi-gain/wideband
aerial. In areas that have excellent Freeview coverage, you may be able
to use a loft type aerial but it is highly likely that you will also need to
connect a booster between the back of the TV and the TV aerial wall
socket. Unfortunately, to receive a good enough digital signal, it is not
possible to use a portable/indoor type aerial. This may change once the
analogue signal is switched off in 2012 and the Digital signal strength is
increased.
TV I have re-tuned my television
but when I switch it off it is
not storing the channels
Complete a fi rst time installation, please refer to the set-up menu section
of the manual of how to do this
VCR/DVD
Recorder
I have connected the TV to
my VCR or DVD Recorder
via SCART/AV but it is not
recording
In addition to connecting via SCART or AV input, you should connect the
aerial cable from the wall socket to your VCR/DVD Recorder and another
aerial cable from the VCR/DVD Recorder to the TV
DVD I have inserted a disc but it is
not playing
1) Ensure you have inserted put the disc in facing the correct way forward
2) Ensure the disc is clean and is not scratched
3) Some copied discs will not play.
4) Check the DVD is a region 2 disc – to change the region of the DVD
player, refer to section ‘Changing Regions’.
Game Consoles I have connected my PS3 to
the TV via HDMI, but I am
not receiving any pictures or
sound on my Television
1) Ensure the TVs source is on HDMI
2) Check your settings on your PS3 are as per the PS3 instruction manual
USB Mode I have inserted a USB
Memory Key, but the TV
does not recognise it
Ensure the USB Memory Key is formatted to type FAT32.
USB Mode Using a USB portable hard
drive
If you wish to use a portable hard drive larger than 32GB, please note
that it must be formatted to the FAT32 fi le system in order to operate on
this TV. Windows XP/Vista computers are only capable of formatting up
to 32GB, therefore, you will need a software programme/utility to format
larger hard drives. Please refer to the web site for more information.
System Lock I have changed the password
on the television and now
forgotten it
There is a master password of 4711, to gain access to the TV menu and
reset the normal password
Note: Supplier may change Software Version and On Screen Graphics without warning.
User Guide - Technika 22-212S.indd Sec1:30
User Guide - Technika 22-212S.indd Sec1:30
01-Oct-12 4:46:55 PM
01-Oct-12 4:46:55 PM
Page 31

313131
31
TECHNICAL SPECIFICATION
Model 22-212s
Screen size (diagonal) 21.6"/55cm
Resolution 1366 x 768
Contrast Ratio 1000:1
Brightness cd/m2 350
RF 75 ohm Antenna / PAL-SECAM
Video and sound Inputs 1 x SCART, 1 x 3.5mm AV/CVBS (includes RCA adapter)
2 x HDMI (upto 1080p), 3 x USB, 1 x LAN (RJ45)
Sound Outputs 1 x Coax Audio output, 1 x Headphone output
Sound power,
watts (RMS)
2 x 3
Voltage and power
consumption
110-240V 50/60Hz 41W/70W (eco/Max)
(standby less than 0.5w)
Dimensions including stand (mm)
535W x392H x170D
Net weight (Kgs) 4.9
Media File Ext. Codec
Video Audio
Movie .mpg Mpeg-1, Mpeg-2
MP3, WMA
Max Resolution: 1920x1080
Max Data rate: 40Mbps
.avi Xvid, MJPEG,
MPEG-4 SP/ASP
.ts Mpeg-2 Max Resolution: 1920x1080
Max Data rate: 40Mbps
.mov Mpeg-4 SP/ASP
.mkv
.dat Mpeg-1
.mp4 Mpeg-1, Mpeg-2 Max Resolution: 1024x768
Max Data rate: 40Mbps
Music .vob Mpeg-2
.mp3 - MP3 Sample Rate 16K-48KHz
Bit rate: 32K - 442Kbps
.wma - WMA
Picture .jpg Progressive JPEG Max Resolution: 1024x768
.jpeg Baseline JPEG Max Resolution: 8192x8192
.bmp BMP Max Resolution: 6500x6500
Compatible fi les in USB Mode
User Guide - Technika 22-212S.indd Sec1:31
User Guide - Technika 22-212S.indd Sec1:31
01-Oct-12 4:46:55 PM
01-Oct-12 4:46:55 PM
Page 32

32
7 day TV guide ................................................................ 25
Aspect ratio .................................................................... 18
Attaching the stand ....................................................... 9-10
Auto language ............................................................... 21
Auto sleep ....................................................................... 20
Auto volume ................................................................... 19
Balance ............................................................................ 19
Block programme ........................................................... 23
Clock ................................................................................ 20
Colour temperature ....................................................... 18
Connections .................................................................... 15-16
Detaching the stand ....................................................... 10
DVD menu ...................................................................... 24
Frequently asked questions ........................................... 30
Getting started ............................................................... 11-12
Hearing Impaired ........................................................... 21
Lock system ..................................................................... 23
Narration ........................................................................ 19
Network setup ................................................................ 22
Noise reduction .............................................................. 18
Off time .......................................................................... 20
On time ........................................................................... 20
Picture mode .................................................................. 18
Remote control ............................................................... 14
Restore factory default .................................................. 21
Set password ................................................................... 23
Sleep timer ...................................................................... 20
Smart functions .............................................................. 27-28
Software update (USB) .................................................. 20
Sound mode ................................................................... 19
Source menu ................................................................... 13
SPDIF ............................................................................... 19
Subtitle language ........................................................... 21
Surround sound .............................................................. 19
Technical specifi cations .................................................. 31
Time zone ....................................................................... 20
TV buttons ...................................................................... 13
USB mode / Media player .............................................. 26
Using you TV with a Sky Digital set top box ................ 29
What is included in the box ........................................... 8
INDEX
General Information
User Guide - Technika 22-212S.indd Sec1:32
User Guide - Technika 22-212S.indd Sec1:32
01-Oct-12 4:46:55 PM
01-Oct-12 4:46:55 PM
Page 33

33
33
User Guide - Technika 22-212S.indd Sec1:33
User Guide - Technika 22-212S.indd Sec1:33
01-Oct-12 4:46:55 PM
01-Oct-12 4:46:55 PM
Page 34

34
User Guide - Technika 22-212S.indd Sec1:34
User Guide - Technika 22-212S.indd Sec1:34
01-Oct-12 4:46:56 PM
01-Oct-12 4:46:56 PM
Page 35

35
35
User Guide - Technika 22-212S.indd Sec1:35
User Guide - Technika 22-212S.indd Sec1:35
01-Oct-12 4:46:56 PM
01-Oct-12 4:46:56 PM
Page 36

TEC/MAN/0043
User Guide - Technika 22-212S.indd Sec1:36
User Guide - Technika 22-212S.indd Sec1:36
01-Oct-12 4:46:56 PM
01-Oct-12 4:46:56 PM
 Loading...